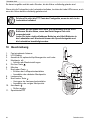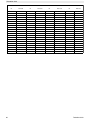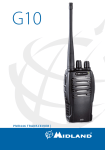
1
TWINTALKER 9310 LONG RANGE
User manual
Handleiding
Manuel d’utilisateur
Bedienungsanleitung
Manual do utilizador
V1.1 - 03/12
This product is in compliance with the essential requirements and other
relevant provisions of the R&TTE directive 1999/5/EC and the Erp directive 2009/125/EC
and carries the CE mark accordingly.
UK
NL
FR
DE
PT
The features described in this manual are published with reservation to
modifications.
De in deze handleiding beschreven mogelijkheden worden gepubliceerd onder
voorbehoud van wijzigingen.
Les possibilités décrites dans ce manuel sont publiées sous réserve de
modifications.
Die in dieser Bedienungsanleitung umschriebenen Möglichkeiten, werden
vorbehaltlich Änderungen publiziert.
As características descritas neste manual são publicadas sob reserva de
modificação.
Twintalker 9310
1
Introduction
2
ENGLISH
Thank you for purchasing the Twintalker 9310. It’s a long range, low powered radio
communication device with a range of maximum 10 Km. It has no running costs other than
the minimal cost of re-charging the batteries.
The Twintalker operates on 8 channels.
Intended purpose
It can be used for recreational purposes. For example: to keep in contact during travelling
with 2 or more cars, biking, skiing. It can be used to keep in contact with your children when
they are playing outside, etc...
3
CE Mark
The CE symbol on the unit, user guide and giftbox indicates that the unit complies with the
essential requirements of the R&TTE directive 1999/5/EC.
4
Safety instructions
4.1
General
Please read carefully through the following information concerning safety and proper use.
Make yourself familiar with all functions of the device. Keep this manual in a safe place for
future use.
4.2
Burning injuries
•
•
4.3
If the cover of the antenna is damaged, do not touch because when an antenna
comes in contact with the skin, a minor burn may result when transmitting.
Batteries can cause property damage such as burns if conductive material such as
jewellery, keys or beaded chains touches exposed terminals.The material may
complete an electrical circuit (short circuit) and become quite hot. Exercise care in
handling any charged battery, particularly when placing it inside a pocket, purse or
other container with metal objects.
Injuries
•
•
•
Do not place your device in the area over an air bag or in the air bag deployment
area. Air bags inflate with great force. If a PMR is placed in the bag deployment
area and the air bag inflates, the communicator may be propelled with great force
and cause serious injury to the occupants of the vehicle.
Keep the PMR at least 15 centimetres away from a pacemaker.
Turn your PMR OFF as soon as interference is taking place with medical
equipment.
Twintalker 9310
3
Twintalker 9310
4.4
Danger of explosion
•
•
•
Do not replace batteries in a potentially explosive atmosphere. Contact sparking
may occur while installing or removing batteries and cause an explosion.
Turn your PMR off when in any area with a potentially explosive atmosphere.
Sparks in such areas could cause an explosion or fire resulting in bodily injury or
even death.
Never throw batteries in fire as they may explode.
Areas with potentially explosive atmospheres are often, but not always,
clearly marked. They include fuelling areas such as below deck on
boats, fuel or chemical transfer or storage facilities; areas where the air
contains chemicals or particles, such as grain, dust or metal powders;
and any other area where you would normally be advised to turn off
your vehicle engine.
4.5
Poisoning danger
•
4.6
Legal
•
•
•
•
4.7
In some countries it is prohibited to use your PMR while driving a vehicle. In this
case leave the road before using the device.
Turn your PMR OFF when on board an aircraft when instructed to do so. Any use of
the PMR must be in accordance with airline regulations or crew instructions.
Turn your PMR OFF in any facilities where posted notices instruct you to do so.
Hospitals or health care facilities may be using equipment that is sensitive to
external RF energy.
Replacing or modifying the antenna may affect the PMR radio specifications and
violate the CE regulations. Unauthorised antennas could also damage the radio.
Notes
•
•
5
Do not touch the antenna while transmitting, it could affect the range.
Remove the batteries if the device is not going to be used for a long period.
Cleaning and maintenance
•
•
•
4
Keep batteries away from small children.
To clean the unit, wipe with a soft cloth dampened with water. Don’t use a cleaner
or solvents on the unit; they can damage the case and leak inside, causing
permanent damage.
Battery contacts may be wiped with a dry lint-free cloth.
If the unit gets wet, turn it off and remove the batteries immediately. Dry the battery
compartment with a soft cloth to minimize potential water damage. Leave the cover
off the battery compartment overnight or until completely dry. Do not use the unit
until completely dry.
Twintalker 9310
Twintalker 9310
Disposal of the device (environment)
At the end of the product lifecycle, you should not throw this product into the
normal household garbage but bring the product to a collection point for the
recycling of electrical and electronic equipments. The symbol on the product,
user guide and/or box indicate this.
Some of the product materials can be re-used if you bring them to a recycling
point. By re-using some parts or raw materials from used products you make an important
contribution to the protection of the environment. Please contact your local authorities in case
you need more information on the collection points in your area.
7
Using a PMR device
To communicate between PMR devices they need to be set all on the same channel and
CTCSS/DCS code (see chapter “12.7 CTCSS (Continuous Tone Coded Squelch System) /
DCS (Digital Coded Squelch)”) and within receiving range (up to max. 10 km in open field).
Since these devices use free frequency bands (channels), all devices in operation share
these channels(total 8 channels). Therefore, privacy is not garanteed. Anybody with a PMR
set to your channel can overhear the conversation. If you want to communicate
(transmitting a voice signal) you need to press the PTT-button.
Once this button pressed, the device will go into transmit mode and you can speak into the
microphone. All other PMR devices in range , on the same channel and in standby mode (not
transmitting) will hear your message. You need to wait until the other party stops transmitting
before you can reply to the message. At the end of each transmission the unit will send a
beep if the Roger Beep is enable (see chapter “12.12 Roger Beep On/Off”). To reply, just
press the PTT-button and speak into the microphone.
If 2 or more users press the PTT- button at the same time the receiver will
receive only the stongest signal and the other signal(s) will be
supressed. Therefore you should only transmit a signal (press PTTbutton) when the channel is free.
The range of radio waves is strongly affected by obstacles such as
buildings, concrete/metal structures, the unevenness of the landscape,
woodland, plants, … This implies that the range between two or more
PMR's may in some extreme cases be restricted to a maximum of a few
tens of meters. You will soon notice that PMR works best when there is
a minimum of obstacles between users.
Twintalker 9310
5
ENGLISH
6
Twintalker 9310
8
8.1
1.
2.
Getting started
A
Installing/Removing the Belt Clip
To remove the belt clip from the unit, push the
belt clip (B) towards the antenna, while pulling
the clip tab (A).
When re-installing the belt clip, a click
indicates the belt clip is locked into position.
B
C
8.2
Battery Installation
D
1.
2.
3.
4.
5.
6
Remove the belt clip (See chapter “8.1 Installing/Removing the Belt Clip”).
Open the locking latch (C) and slide off the battery cover.
Install the rechargeable battery pack following the polarity as shown. Ensure that the
metal contacts on the side (D) are facing outwards so they will make contact to the
battery door.
Close the battery door.
Re-install the belt clip.
Twintalker 9310
Twintalker 9310
9
Charging the batteries
1.
2.
3.
4.
ENGLISH
When the batteries are installed, the
desktop charger provides drop-in
charging conveniency.
Put the desktop charger on a flat
surface.
Plug one end of the supplied
adapter into an easy accessible
electric socket and the other end
into the connector on the
backside of the desktop charger.
Put the radio in the charger as
indicated.
The charging LED will turn on if
it’s properly inserted and
charging.
It will take about 8 to 10 hours to fully charge the batteries.
When the PMR’s are in the desktop charger, the charging LED’s will always be ON, even
when the batteries are fully charged.
Do not press the PTT-button of the PMR’s while they are placed in the
charger !
Do not short-circuit the batteries or dispose in fire. Remove the
batteries if this device is not going to be used for a long period.
Do not charge non rechargeable batteries like Alkaline batteries in the
charger. This might damage the PMR’s and charger unit.
Twintalker 9310
7
Twintalker 9310
10 Description
1.
2.
3.
4.
5.
6.
7.
8.
9.
10.
11.
Fixed antenna
LCD display
Connection for optional headset and charger
Menu button
– Enter the menu settings
On-off button
Microphone
UP button
– Increase the speaker volume
– Select the next value in the menu
Speaker
Down button
– Decrease the speaker volume
– Select the previous value in the menu
Call button
– Transmit a call tone
Push to talk button PTT
1
2
3
4
5
6
7
11
10
9
8
11 LCD display information
TX icon - Displayed when transmitting a signal
RX icon - Displayed when receiving a signal
Speaker volume indicator
Lock icon - Displayed when the keypad is locked.
Battery charge level indicator
VOX icon - Displayed in Voice controlled (Vox) mode
Scan icon - Displayed when scan mode is active
Dual Scan icon - Displayed when dual scan mode is
active
12 Using the Twintalker 9310
The display illustrations in next pages only show the icons or display
informations of the functions that are explained in the text.
8
Twintalker 9310
Twintalker 9310
12.1 Turning the Unit ON/OFF
ENGLISH
To turn ON:
•
Press and hold the
- button for 2 seconds. The unit will
“beep” and the LCD display will display the current channel.
To switch OFF:
•
Press and hold the
- button for 2 seconds. The unit will
“beep” and the LCD display will turn blank.
12.2 Battery Charge Level/Low Battery Indication
The battery charge level is indicated by the number of squares present inside the battery icon
on the LCD Screen.
Battery Full
Battery 2/3 charged
Battery 1/3 charged
Battery empty
When the battery charge level is low, the battery icon will flash and a beep will be heard to
indicate that the batteries need to be replaced or recharged.
Never recharge non-rechargable batteries like for exemple Alkaline
batteries.
12.3 Adjusting Speaker Volume
•
•
Press the
- button in stand-by-mode to increase the
speaker volume. The volume level is displayed.
Press the
- button to decrease the speaker volume.
12.4 Receiving a Signal
The unit is continuously in the receive mode when the unit is switched ON and not
transmitting.
In order for other people to receive your transmission, they must also be
on the same channel and have set the same CTCSS code or DCS code.
(See chapter “12.6 Changing Channels” and “12.7 CTCSS (Continuous
Tone Coded Squelch System) / DCS (Digital Coded Squelch)”)
Either CTCSS or DCS can be used but never both at the same time.
Twintalker 9310
9
Twintalker 9310
12.5 Transmitting a Signal
•
•
•
Press and hold the PTT - button to transmit. The TX symbol
is displayed.
Hold the unit in a vertical position with the microphone 10cm
from the mouth and speak into the microphone.
Release the PTT - button when you want to stop
transmitting.
To check the channel activity use the monitor function (See chapter
“12.8 Monitor”).
12.6 Changing Channels
•
•
•
Press the
- button once, the current channel number
flashes on the display.
Press the
- button or the
- button to change the
channel.
Press the PTT - button to confirm and return to stand-by
mode.
If no button is pressed within 5 seconds during setting, the unit will return
to standby.
12.7 CTCSS (Continuous Tone Coded Squelch System) /
DCS (Digital Coded Squelch)
License free PMR radio's operating on the 446 MHz frequency band, like the Twintalker 9310
PMR, have 8 available radio channels. If there are many PMR users in your neighborhood,
there is a chance that some of these users are operating on the same radio channel.
To prevent that you receive signals from other users, sub-channels have been integrated.
Two PMR radio's will only be able to communicate with each other when they are operating
on the same radio channel and when they have selected exactly the same sub-channel.
There are two kind of sub-channels :
•
Continuous Tone Coded Squelch System (CTCSS)
•
Digital Coded Squelch (DCS)
When using CTCSS, a low frequency tone (between 67 and 250 Hz) will be transmitted along
with the voice signal. There are 38 available tones to choose from. You are free to choose
one of these 38 available tones. Due to filtering, these tones will generally not be audible so
they will not disturb the communication.
DCS is similar to CTCSS, but instead of sending a continuous tone of a selected frequency,
a digital data transmission is added to the radio signal. This Digital Code is transmitted at a
10
Twintalker 9310
really low rate, around 134 bits per second (the code is 23 bits long). Only the PMR's of the
latest generation will support DCS. There are 83 available DCS codes that can be used.
Since earlier models will only support CTCSS it will be better to use DCS to prevent that other
users will be audible during your PMR conversations.
12.7.1 CTCSS
•
•
•
Press the
-button twice: "CTCSS" and the current
CTCSS code flashes on the display.
Press the
-button or the -button to change to another
code.
Press the PTT-button to confirm and return to stand-by
mode.
12.7.2 DCS
•
•
•
Press the
-button three times: "DCS" and the current
DCS code flashes on the display.
Press the
-button or the -button to change to
another code.
Press the PTT-button to confirm and return to stand-by
mode.
To disable CTCSS or DCS, select code "00" for CTCSS or for DCS in the
menu. When the entry is confirmed, "OF" will be displayed.
12.8 Monitor
You can use the monitor feature to check for weaker signals in the current channel.
•
•
Press the
Press the
-button and -button simultaneously to activate channel monitoring.
-button to stop channel monitoring.
During channel monitoring the receiver circuit in the PMR will not listen to
CTCSS or DCS codes.
Twintalker 9310
11
ENGLISH
Twintalker 9310
Twintalker 9310
12.9 VOX Selection
The PMR is capable of voice activated (VOX) transmission. In VOX mode, the radio will
transmit a signal when it is activated by your voice or other sound around you. VOX operation
is not recommended if you plan to use your radio in a noisy or windy environment.
VOX mode will be overrided when you press the PTT - button .
•
•
•
•
Press the
- button four times, the current VOX setting
flashes on the display and the VOX icon is displayed.
Press the -button to set the VOX sensitivity level
between 1 and 3 (level 3 is the most sensitive level).
Press the
button until ‘OF’ appears on the display, to
turn VOX OFF.
Press the PTT - button to confirm and return to stand-by
mode.
12.10 Channel Scan
Channel scan performs searches for active signals in an endless loop from channel 1 to 8.
Once an active channel is found you have the option to search for the CTCSS code or the
DCS code that is set by the user who is broadcasting on the channel.
12.10.1 Scanning for an active radio channel
•
•
Press the
-button five times: "SC" and the current
channel flashes on the display.
Press the
-button or the -button to start the channel
scan.
Once an active channel is found, the scanning will stop and you can listen to the
transmission.
When the transmission on the found channel stops, the scanning will resume automatically.
If you press the PTT button while listening to a found channel, the PMR
will go back in stand-by mode on the found channel.
12.10.2 Scanning for a CTCSS code
When an active channel is found press the PTT button to select the found active channel.
Now you have to option to search for the CTCSS/DCS code that is used by the found user.
12
Twintalker 9310
•
•
Press the
-button six times: "SC" and "CTCSS 00"
flashes on the display for the selected radio channel.
Press the
-button or the
-button to start the CTCSS
scan.
Once there is a transmission on the channel, the CTCSS code (if used) will be detected and
displayed.
•
•
If you press the PTT button while listening to a found CTCSS
code, the PMR will go back in stand-by mode on the channel with
the CTCSS code.
If no CTCSS code is detected there is a chance that DCS is
selected by the user. In this case you can scan for the DCS code.
(section 12.10.3)
12.10.3 Scanning for a DCS code
•
•
Press the
-button seven times: "SC" and "DCS 00"
flashes on the display for the selected radio channel.
Press the
-button or the -button to start the DCS scan.
Once there is a transmission on the channel, the DCS code (if used) will be detected and
displayed.
If you press the PTT button while listening to a found DCS code, the PMR
will go back in stand-by mode on the channel with the DCS code.
12.11 Call Tones
A call tone alerts others that you want to start talking.
12.11.1 Setting the Call Tone
The Twintalker 9310 has 10 call tones.
•
•
•
Twintalker 9310
Press the
- button eight times, “CA” is displayed and
the current call tone is flashing.
- button to change to another
Press the
- button or the
Call Tone.
Press the PTT - button to confirm and return to stand-by
mode.
13
ENGLISH
Twintalker 9310
Twintalker 9310
12.11.2 Sending a call Tone
Press the
button briefly. The call tone will be transmitted on the set channel.
12.12 Roger Beep On/Off
After the PTT -button is released, the unit will send out a roger beep to confirm that you have
stopped talking.
To set the Roger Beep.
• Press the
- button nine times. ‘rO’ will be displayed.
• Press
to enable (ON) or
to disable the Roger-Beep (OF).
• Press the PTT - button to confirm your selection and return to the
standby mode.
12.13 Key-Tone On/Off
When a button is pressed, the unit will beep briefly.
To set the key-tone.
• Press
ten times. ‘tO’ will be displayed.
• Press
to enable (ON) or
disable the Key Tones (OF).
• Press the PTT - button to confirm your selection and return to the.
standby mode.
12.14 Dual Channel Monitor function
In stand-by, the PMR is set on one channel with CTCSS/DCS code. The PMR will only
receive signals transmitted on that channel with the CTCSS/DCS code.
Dual Channel Monitor (DCM) allows you to monitor a second channel with CTCSS/DCS
code.
•
•
•
•
•
•
Press the
-button eleven times,” DCM OF" will flash on
the display.
Press the
-button or the -button to change the
channel.
Press the
-button to confirm the channel selection and
go to CTCSS selection. (Press the
-button again to go to
DCS selection)
Press the
-button or the -button to change the CTCSS
code or DCS code.
Press the PTT-button to confirm and return to stand-by
mode.
To disable the function select "OF" when selecting the DCM
channel.
When the Dual Channel Monitor function is activated, the PMR will switch sequentially
between the standby channel + CTCSS/DCS code and the Dual Channel + CTCSS/DCS
code.
14
Twintalker 9310
Twintalker 9310
12.15 Button Lock
•
Press and hold the
-button for three seconds to activate
the Button lock mode. The button lock icon is displayed on
the LCD Screen.
Press and hold the
-button again for three seconds
deactivate button lock
The PTT-button, the
-button and the
when the Button Lock is activated.
ENGLISH
•
-button will still be functional
12.16 Stopwatch function
The Twintalker 9310 has a stopwatch that will count to 59'59''99.
•
•
•
•
•
Press the
-button and hold for two seconds, the
stopwatch display will appear.
Press the
-button to start the stopwatch.
Press the
-button to stop the stopwatch.
Press the -button to reset the stopwatch to zero.
Press the -button and hold for two seconds to deactivate
the stopwatch.
12.17 Display back light
To activate the backlight of the LCD display, press any button except the PTT- button or the
button.
The LCD backlight will light up for 6 seconds.
12.18 FM radio
The Twintalker 9310 has an integrated FM radio.
•
•
•
•
Twintalker 9310
Press the -button briefly to turn on the FM radio.
Press the
-button or the -button to tune up or down
the frequency.
Press and hold the
-button or the -button for two
seconds to scan for a radio station.
Press the
-button briefly to turn on the FM radio off.
15
Twintalker 9310
While listening to a radio station, the PMR will still be operational in the
background. The FM radio will switch off when a signal is received and
will resume when there is no more PMR signal.
While the radio is on, you can still broadcast a signal when pressing the
PTT button or the -button.
13 Technical specifications
Channels
Sub-code
Frequency
Range
Batteries
Transmission Power
Modulation Type
Channel spacing
FM radio
Power adapter
Channel Frequency Chart:
Channel
1
2
3
4
5
6
7
8
16
Frequency (MHz)
446,00625
446,01875
446,03125
446,04375
446,05625
446,06875
446,08125
446,09375
8
CTCSS: 38 / DCS: 83
446.00625 MHz - 446.09375 MHz
Up to 10 Km (Open field)
4 x AAA Alkaline or NiMH rechargeable battery pack
=< 500mW ERP
FM - F3E
12,5 kHz
87.5 MHz - 108 MHz
Input: 230V AC / 50Hz - Output: 9V DC / 300mA
CTCSS Code Chart
Code
0
1
2
3
4
5
6
7
8
9
Frequency (Hz)
Disabled
67,0
71,9
74,4
77,0
79,7
82,5
85,4
88,5
91,5
Code
10
11
12
13
14
15
16
17
18
19
Freq. (Hz)
94,8
97,4
100,0
103,5
107,2
110,9
114,8
118,8
123,0
127,3
Code
20
21
22
23
24
25
26
27
28
29
Freq. (Hz)
131,8
136,5
141,3
146,2
151,4
156,7
162,2
167,9
173,8
179,9
Code
30
31
32
33
34
35
36
37
38
Freq. (Hz)
186,2
192,8
203,5
210,7
218,1
225,7
233,6
241,8
250,3
Twintalker 9310
Twintalker 9310
No
DCS code
No
DCS code
No
DCS code
No
DCS code
0
Disabled
21
134
42
311
63
516
1
2
23
25
22
23
143
152
43
44
315
331
64
65
532
546
3
4
26
31
24
25
155
156
45
46
343
346
66
67
565
606
5
6
32
43
26
27
162
165
47
48
351
364
68
69
612
624
7
47
28
172
49
365
70
627
8
9
10
51
54
65
29
30
31
174
205
223
50
51
52
371
411
412
71
72
73
631
632
654
11
71
32
226
53
413
74
662
12
13
72
73
33
34
243
244
54
55
423
431
75
76
664
703
14
74
35
245
56
432
77
712
15
16
17
114
115
116
36
37
38
251
261
263
57
58
59
445
464
465
78
79
80
723
731
732
18
125
39
265
60
466
81
734
19
20
131
132
40
41
271
306
61
62
503
506
82
83
743
754
Twintalker 9310
ENGLISH
DCS Code Chart
17
Twintalker 9310
14 Warranty
14.1 Warranty period
The devices have a 36-month warranty period. The warranty period starts on the day the new
unit is purchased. There is no warranty on standard or rechargeable batteries (AA/AAA type).
Consumables or defects causing a negligible effect on operation or value of the equipment
are not covered. The warranty has to be proven by presentation of the original or copy of the
purchase receipt, on which the date of purchase and the unit-model are indicated.
14.2 Warranty exclusions
Damage or defects caused by incorrect treatment or operation and damage resulting from
use of non-original parts or accessories are not covered by the warranty.
The warranty does not cover damage caused by outside factors, such as lightning, water and
fire, nor any damage caused during transportation. No warranty can be claimed if the serial
number on the units has been changed, removed or rendered illegible. Any warranty claims
will be invalid if the unit has been repaired, altered or modified by the buyer.
18
Twintalker 9310
Twintalker 9310
1
Inleiding
Hartelijk dank voor de aankoop van de Twintalker 9310. Dit is een radiocommunicatieapparaat met een groot bereik van maximaal 10 km en een laag vermogen. Er zijn geen
gebruikskosten, op de minimale kosten na van het opladen van de batterijen.
De Twintalker werkt met 8 kanalen.
2
Gebruiksdoel
3
NEDERLANDS
Dit toestel kan voor verschillende recreatiedoeleinden worden gebruikt. Bijvoorbeeld om
contact te houden wanneer u op reis bent in 2 of meer voertuigen of tijdens het fietsen of
skiën. Ook kunt u hiermee contact houden met uw kinderen, bijvoorbeeld wanneer zij
buiten spelen.
CE-markering
De CE-markering op het toestel, de handleiding en de verpakking geven aan dat het toestel
voldoet aan de basiseisen van de R&TTE-richtlijn 1999/5/EG.
4
Veiligheidsinstructies
4.1
Algemeen
Lees de onderstaande informatie over veiligheid en een correct gebruik zorgvuldig door. Leer
alle functies van het toestel goed kennen. Bewaar deze handleiding op een veilige plaats
voor later gebruik.
4.2
Brandwonden
•
•
4.3
Raak de antenne niet aan als de afdekking van de antenne is beschadigd, want
als een antenne bij het zenden in contact komt met de huid, kan dit leiden tot
kleine brandwonden.
Batterijen kunnen schade aan materiaal veroorzaken, bijvoorbeeld brandplekken,
als geleidend materiaal (zoals sieraden, sleutels of kralenkettingen) in aanraking
komt met de blootliggende contacten. Het materiaal kan een elektrisch circuit
sluiten (kortsluiting) en erg heet worden. Hanteer opgeladen batterijen met zorg,
vooral als u deze in een zak, tas of andere houder met metalen voorwerpen plaatst.
Letsels
•
•
•
Plaats het toestel niet boven een airbag of in de buurt van de plaats waar de airbag
zich opblaast. Airbags worden met veel kracht opgeblazen. Als een PMR zich in de
radius van de airbag bevindt op het moment dat deze wordt geactiveerd, kan het
toestel met grote kracht worden weggeslingerd, waardoor de inzittenden van het
voertuig ernstig gewond kunnen raken.
Houd de PMR ten minste 15 centimeter verwijderd van een pacemaker.
Schakel uw PMR onmiddellijk UIT in geval van interferentie met
medische apparatuur.
Twintalker 9310
19
Twintalker 9310
4.4
Explosiegevaar
•
•
•
Vervang de batterijen niet in een omgeving waar explosiegevaar bestaat.
Bij het plaatsen of verwijderen van de batterijen kunnen contactvonken ontstaan,
die een explosie kunnen veroorzaken.
Schakel uw PMR uit wanneer u zich bevindt in een omgeving waar explosiegevaar
bestaat. Vonken kunnen in een dergelijke omgeving brand of een explosie
veroorzaken, met lichamelijk letsel of zelfs de dood tot gevolg.
Gooi batterijen nooit in vuur, aangezien ze dan kunnen ontploffen.
Omgevingen waar explosiegevaar bestaat, worden vaak, maar niet
altijd, duidelijk aangegeven. Hieronder vallen brandstoftankruimtes,
zoals onderdeks op schepen, overslag- of opslagplaatsen voor
brandstof of chemicaliën, omgevingen waar de lucht chemicaliën of
deeltjes bevat, zoals graan-, stof- of metaaldeeltjes, en elke andere
omgeving waar u gewoonlijk wordt geadviseerd de motor van uw
voertuig uit te schakelen.
4.5
Vergiftigingsgevaar
•
4.6
Regelgeving
•
•
•
•
4.7
In bepaalde landen is het verboden om onder het rijden uw PMR te gebruiken.
Ga in dit geval aan de kant staan voordat u het toestel gebruikt.
Schakel uw PMR UIT aan boord van een vliegtuig wanneer u hierom wordt
verzocht. Gebruik van de PMR dient in overeenstemming te zijn met de
voorschriften van de luchtvaartmaatschappij of de instructies van de bemanning.
Schakel uw PMR UIT op plaatsen waar waarschuwingsbordjes u vragen dit te
doen. Ziekenhuizen of gezondheidscentra kunnen apparaten gebruiken die
gevoelig zijn voor radiofrequentiesignalen van buitenaf.
Het vervangen of aanpassen van de antenne kan de PMR-radiospecificaties
beïnvloeden en inbreuk maken op de CE-voorschriften. Niet-goedgekeurde
antennes kunnen de radio ook beschadigen.
Opmerkingen
•
•
5
Raak de antenne niet aan tijdens het zenden; dit kan het bereik beïnvloeden.
Verwijder de batterijen als u het toestel langere tijd niet gebruikt.
Reiniging en onderhoud
•
•
•
20
Houd de batterijen uit de buurt van kinderen.
Reinig het toestel met een vochtige doek. Gebruik hiervoor alleen water. Gebruik
geen reinigings- of oplosmiddelen op het toestel; deze kunnen de behuizing
beschadigen en naar binnen lekken, wat kan leiden tot blijvende beschadigingen.
Gebruik een droge, pluisvrije doek om de batterijcontacten te reinigen.
Wanneer het toestel nat is geworden, moet u het meteen uitschakelen en de
batterijen verwijderen. Droog het batterijvak met een zachte doek om mogelijke
waterschade tot een minimum te beperken. Laat het batterijvak een nacht lang
open of totdat het volledig droog is. Gebruik het toestel niet voordat het weer
volledig droog is.
Twintalker 9310
Twintalker 9310
Afvoeren van het toestel (milieu)
Op het einde van de levenscyclus van het product mag u dit product niet met het
normale huishoudelijke afval weggooien, maar moet u het naar een inzamelpunt
brengen voor de recyclage van elektrische en elektronische apparatuur.
Dit wordt aangeduid door het symbool op het product, in de gebruiksaanwijzing
en/of op de verpakking.
Sommige materialen waaruit het product is vervaardigd, kunnen worden hergebruikt als u ze
naar een inzamelpunt brengt. Door onderdelen of grondstoffen van gebruikte producten te
hergebruiken, levert u een belangrijke bijdrage aan de bescherming van het milieu. Wend u
tot uw plaatselijke overheid voor meer informatie over de inzamelpunten in uw buurt.
7
Een PMR-toestel gebruiken
Om met andere PMR-toestellen te kunnen communiceren, dienen deze allemaal op
hetzelfde kanaal en dezelfde CTCSS-/DCS-code (zie hoofdstuk “12.7 CTCSS (Continuous
Tone Coded Squelch System) / DCS (Digital Coded Squelch)”) te zijn afgestemd en zich
binnen het ontvangstbereik te bevinden (tot max. 10 km in open veld). Aangezien deze
toestellen vrij toegankelijke frequentiebanden gebruiken (kanalen), delen alle werkende
toestellen dezelfde kanalen (8 kanalen in totaal). Privacy is daarom niet gegarandeerd.
Iedereen met een PMR die op uw kanaal is afgestemd, kan het gesprek afluisteren.
Als u wilt communiceren (een spraaksignaal uitzenden), drukt u op de PTT-toets.
Zodra deze toets wordt ingedrukt, wordt de zendmodus van het toestel ingeschakeld en kunt
u in de microfoon spreken. Alle andere PMR-toestellen binnen het uitzendbereik, die op
hetzelfde kanaal staan afgestemd en in de stand-bymodus (niet zenden) staan, kunnen uw
bericht horen. U moet wachten totdat uw gesprekspartner stopt met zenden voordat u kunt
antwoorden. Na het zenden laat het toestel een geluidssignaal horen als het Roger-signaal
is ingeschakeld (zie hoofdstuk “12.12 Roger-pieptoon in-/uitschakelen”). U hoeft alleen de
PTT-toets in te drukken en in de microfoon te spreken om te antwoorden.
Als 2 of meer gebruikers de PTT-toets tegelijkertijd indrukken, ontvangt
de ontvanger enkel het sterkste signaal, waarbij alle andere signalen
worden geblokkeerd. Zend daarom alleen uit (door op de PTT-toets te
drukken) als het kanaal vrij is.
Het bereik van de radiogolven wordt sterk beïnvloed door obstakels als
gebouwen, betonnen/metalen constructies, de onregelmatigheid van het
landschap, bossen, planten ... Dat houdt in dat het bereik tussen twee of
meerdere PMR's in sommige extreme gevallen tot een maximum van
enkele tientallen meters kan worden beperkt. U zult gauw merken dat de
PMR het beste werkt wanneer er een minimum aan obstakels tussen de
gebruikers is.
Twintalker 9310
21
NEDERLANDS
6
Twintalker 9310
8
8.1
1.
2.
Van start gaan
A
De riemclip verwijderen/installeren
Druk de riemclip (B) in de richting van de
antenne terwijl u het lipje van de clip (A) naar
buiten trekt, om de riemclip van het toestel te
verwijderen.
Bij het weer aanbrengen van de riemclip geeft
een hoorbare klik aan dat de riemclip op zijn
plaats is vergrendeld.
B
C
8.2
Batterijen plaatsen
D
1.
2.
3.
4.
5.
De riemclip verwijderen (zie hoofdstuk “8.1 De riemclip verwijderen/installeren”).
Open de vergrendeling (C) en schuif het batterijafdekplaatje eraf.
Plaats de oplaadbare batterijset met de aangegeven polariteit. Controleer of de
metalen contacten aan de zijkant (D) van de radio naar buiten wijzen, zodat ze contact
maken met het batterijafdekplaatje.
Sluit het batterijvak.
Installeer de riemclip opnieuw.
22
Twintalker 9310
Twintalker 9310
9
De batterijen opladen
Als de batterijen zijn geïnstalleerd, kunt
u het toestel gemakkelijk opladen door
het in de bureaulader te plaatsen.
2.
3.
4.
Plaats de bureaulader op een
vlak oppervlak.
Steek het ene uiteinde van de
meegeleverde adapter in een
goed toegankelijk stopcontact en
het andere uiteinde in de
aansluiting aan de achterkant
van de bureaulader.
Plaats de radio in de lader
zoals aangegeven.
De laad-LED gaat branden als het
toestel juist is geplaatst en aan
het laden is.
NEDERLANDS
1.
Het volledig laden van de batterijen duurt ongeveer 8 tot 10 uur.
Wanneer de PMR's in de bureaulader zitten, brandt de laad-LED steeds, zelfs als de
batterijen volledig geladen zijn.
Druk niet op de PTT-toets van de PMR wanneer deze in de batterijlader
is geplaatst!
Zorg dat er zich geen kortsluiting in de batterijen kan voordoen en gooi
ze nooit in vuur. Verwijder de batterijen wanneer u het toestel langere
tijd niet gebruikt.
Laad niet-oplaadbare batterijen zoals alkalinebatterijen nooit in de lader
op. Dat kan de PMR's en lader schade toebrengen.
Twintalker 9310
23
Twintalker 9310
10 Beschrijving
1.
2.
3.
4.
5.
6.
7.
8.
9.
10.
11.
Vaste antenne
Lcd-display
Aansluiting voor optionele koptelefoon en lader
Menutoets
– Selecteer de menu-instellingen
AAN/UIT-toets
Microfoon
OMHOOG-toets
– Verhoog het luidsprekervolume
– Selecteer het volgende menuonderdeel
Luidspreker
OMLAAG-toets
– Verlaag het luidsprekervolume
– Selecteer het vorige menuonderdeel
Oproeptoets
– Zendt een oproeptoon uit
PTT-toets (push to talk)
1
2
3
4
5
6
7
11
10
9
8
11 Informatie lcd-display
TX-pictogram - Wordt getoond bij het zenden van
een signaal
RX-pictogram - Wordt getoond bij het ontvangen van
een signaal
Indicator luidsprekervolume
Vergrendelpictogram -Wordt getoond als het toetsenbord
is vergrendeld
Indicator laadniveau batterijen
VOX-pictogram - Wordt getoond tijdens de
spraakgestuurde (Vox) modus
Scan-pictogram - Wordt getoond als de scan-modus is
ingeschakeld
Dual Scan-pictogram - Wordt getoond als de dual
scanmodus is ingeschakeld
12 De Twintalker 9310 gebruiken
De displayafbeeldingen op de volgende bladzijden tonen enkel de
pictogrammen of informatie van de functies die in de tekst worden
uitgelegd.
24
Twintalker 9310
Twintalker 9310
12.1 Het toestel in- en uitschakelen (AAN/UIT)
NEDERLANDS
Inschakelen:
•
Houd de
-toets 2 seconden ingedrukt. Het toestel gaat
“piepen” en de lcd-display geeft het huidige kanaal weer.
Uitschakelen:
•
Houd de
-toets 2 seconden ingedrukt. Het toestel gaat
“piepen” en de lcd-display wordt zwart.
12.2 Laadniveau batterijen/Indicatie batterij bijna leeg
Het laadniveau van de batterijen wordt aangegeven door het aantal vierkantjes in het
batterijpictogram op het lcd-scherm.
Batterij vol
Batterij 2/3 geladen
Batterij 1/3 geladen
Batterij leeg
Als het laadniveau van de batterij laag is, gaat het batterijpictogram knipperen en zal het
toestel piepen om aan te geven dat de batterijset moet worden opgeladen of vervangen.
Laad niet-oplaadbare batterijen zoals alkalinebatterijen nooit op.
12.3 Luidsprekervolume instellen
•
•
Druk op de -toets in de stand-bymodus om het
luidsprekervolume te verhogen. Het volumeniveau
wordt weergegeven.
Druk op de -toets om het luidsprekervolume te verlagen.
12.4 Een signaal ontvangen
Het toestel is voortdurend in de ontvangstmodus wanneer het AAN staat en niet aan het
zenden is.
Andere mensen die uw signaal willen ontvangen, moeten op hetzelfde
kanaal zitten en dezelfde CTCSS-code of DCS-code hebben ingesteld
als u. (Zie hoofdstuk “12.6 Van kanaal veranderen” en “12.7 CTCSS
(Continuous Tone Coded Squelch System) / DCS (Digital Coded
Squelch)”)
CTCSS en DCS kunnen enkel afzonderlijk en nooit samen
Twintalker 9310
25
Twintalker 9310
12.5 Een signaal zenden
•
•
•
Houd de PTT-toets ingedrukt om te zenden.
Het TX-symbool wordt weergegeven.
Houd het toestel verticaal met de microfoon op 10 cm
afstand van uw mond en spreek in de microfoon.
Laat de PTT-toets los als u stopt met zenden.
Gebruik de monitorfunctie om de kanaalactiviteit te controleren
(zie hoofdstuk “12.8 Monitor”).
12.6 Van kanaal veranderen
•
•
•
Druk eenmaal op de
-toets, het huidige kanaalnummer
knippert op de display.
Druk op de -toets of op de -toets om van kanaal
te veranderen.
Druk op de PTT-toets om te bevestigen en terug te keren
naar de stand-bymodus.
Als er binnen 5 seconden geen toets wordt ingedrukt, keert het toestel
terug naar de stand-bymodus.
12.7 CTCSS (Continuous Tone Coded Squelch System) /
DCS (Digital Coded Squelch)
Licentievrije PMR-radio's die op de frequentieband 446 MHz werken, zoals de
Twintalker 9310 PMR, hebben 8 beschikbare radiokanalen. Als er in uw buurt veel
PMR-gebruikers zijn, bestaat de kans dat sommige van die gebruikers op hetzelfde
radiokanaal zitten. Om te voorkomen dat u signalen van andere gebruikers ontvangt,
werden er subkanalen voorzien. Twee PMR-radio's kunnen enkel met elkaar communiceren
wanneer ze op hetzelfde radiokanaal zitten en wanneer ze precies hetzelfde subkanaal
hebben geselecteerd.
Er zijn twee soorten subkanalen:
•
Continuous Tone Coded Squelch System (CTCSS)
•
Digital Coded Squelch (DCS)
Wanneer CTCSS wordt gebruikt, wordt er samen met het spraaksignaal een toon met een
lage frequentie (tussen 67 en 250 Hz) uitgezonden. Er kan uit 38 beschikbare tonen worden
gekozen. U bent vrij om een van die 38 beschikbare tonen te kiezen. Door filtratie zijn die
tonen over het algemeen niet hoorbaar, zodat ze de communicatie niet verstoren.
DCS is vergelijkbaar met CTCSS, maar in plaats van een continue toon van een
geselecteerde frequentie te verzenden, wordt er aan het radiosignaal een digitale
26
Twintalker 9310
Twintalker 9310
datatransmissie toegevoegd. Deze digitale code wordt met een erg lage snelheid, ongeveer
134 bits per seconde, verzonden (de code is 23 bits lang). Alleen de laatste nieuwe PMR's
ondersteunen DCS. Er zijn 83 beschikbare DCS-codes die kunnen worden gebruikt.
Aangezien eerdere modellen alleen CTCSS ondersteunen, kunt u beter DCS gebruiken
om te voorkomen dat u tijdens uw PMR-gesprekken andere gebruikers hoort.
12.7.1 CTCSS
•
•
Druk tweemaal op de
-toets: “CTCSS” en de huidige
CTCSS-code knipperen op de display.
Druk op de
-toets of de -toets om van code te
veranderen.
Druk op de PTT-toets om te bevestigen en terug te keren
naar de stand-bymodus.
NEDERLANDS
•
12.7.2 DCS
•
•
•
Druk drie keer op de
-toets: “DCS” en de huidige
DCS-code knipperen op de display.
Druk op de
-toets of de -toets om van code
te veranderen.
Druk op de PTT-toets om te bevestigen en terug te keren
naar de stand-bymodus.
Om CTCSS of DCS uit te schakelen, kiest u code “00” voor CTCSS of voor
DCS in het menu. Wanneer de invoer bevestigd is, verschijnt er “OF”.
12.8 Monitor
U kunt de monitorfunctie gebruiken om op het huidige kanaal te zoeken naar
zwakkere signalen.
•
•
Druk tegelijkertijd op de
-toets en -toets om de monitorfunctie in
te schakelen.
Druk de
-toets in om de monitorfunctie uit te schakelen.
In de monitorfunctie luistert het ontvangstcircuit in de PMR niet naar
CTCSS- of DCS-codes.
Twintalker 9310
27
Twintalker 9310
12.9 VOX-selectie
De PMR is in staat spraakgestuurd (VOX) te zenden. In de VOX-modus zendt de radio
een signaal uit als hij wordt geactiveerd door uw stem of een ander geluid in de omgeving.
De VOX-modus wordt niet aangeraden als u van plan bent de radio in een lawaaierige of
winderige omgeving te gebruiken.
De VOX-modus zal worden opgeheven als u op de PTT-toets drukt.
•
•
•
•
Druk viermaal op de
-toets, de huidige VOX-instellingen
knipperen op de display en het VOX-pictogram
wordt weergegeven.
Druk op de -toets om het VOX-gevoeligheidsniveau
in te stellen tussen 1 en 3 (niveau 3 is het meest
gevoelige niveau).
Druk op de -toets totdat ‘OF’ op de display verschijnt
om VOX uit te schakelen.
Druk op de PTT-toets om te bevestigen en terug te keren
naar de stand-bymodus.
12.10 Kanaalscan
De functie kanaalscan zoekt in een eindeloze lus naar actieve signalen op kanaal 1 tot 8.
Zodra een actief kanaal wordt gevonden, kunt u de CTCSS-code of de DCS-code zoeken
die werd ingesteld door de gebruiker die op het kanaal uitzendt.
12.10.1 Scannen naar een actief radiokanaal
•
•
Druk vijfmaal op de
-toets: “SC” en het huidige kanaal
knipperen op de display.
Druk op de
-toets of de -toets om de kanaalscan te
starten.
Zodra een actief kanaal wordt gevonden, wordt de scan stopgezet en kunt u naar de
transmissie luisteren.
Wanneer de transmissie op het gevonden kanaal stopt, wordt de scan automatisch hervat.
Als u op de PTT-toets drukt terwijl u naar een gevonden kanaal luistert,
gaat de PMR terug naar de stand-bymodus op het gevonden kanaal.
12.10.2 Scannen naar een CTCSS-code
Wanneer er een actief kanaal wordt gevonden, drukt u op de PTT-toets om het gevonden
actieve kanaal te selecteren. Nu hebt u de mogelijkheid om de CTCSS-/DCS-code te zoeken
die door de gevonden gebruiker wordt gebruikt.
28
Twintalker 9310
Twintalker 9310
•
Druk zesmaal op de
-toets: “SC” en “CTCSS 00”
knipperen op de display voor het geselecteerde
radiokanaal.
Druk op de
-toets of de -toets om de CTCSS-scan te
starten.
Zodra er op het kanaal transmissie is, wordt de CTCSS-code (indien gebruikt) gedetecteerd
en weergegeven.
•
•
Als u op de PTT-toets drukt terwijl u naar een gevonden CTCSScode luistert, gaat de PMR terug naar de stand-bymodus op het
kanaal met de CTCSS-code.
Als er geen CTCSS-code wordt gedetecteerd, is het mogelijk dat
DCS door de gebruiker werd geselecteerd. In dat geval kunt u
naar de DCS-code scannen. (zie 12.10.3)
12.10.3 Scannen naar een DCS-code
•
•
Druk zevenmaal op de
-toets: “SC” en “DCS 00”
knipperen op de display voor het geselecteerde
radiokanaal.
Druk op de
-toets of de -toets om de DCS-scan
te starten.
Zodra er op het kanaal transmissie is, wordt de DCS-code (indien gebruikt) gedetecteerd
en weergegeven.
Als u op de PTT-toets drukt terwijl u naar een gevonden DCS-code
luistert, gaat de PMR terug naar de stand-bymodus op het kanaal
met de DCS-code.
12.11 Oproeptonen
Met een oproeptoon laat u anderen weten dat u wilt praten.
12.11.1 De oproeptoon instellen
De Twintalker 9310 is voorzien van 10 oproeptonen.
•
•
•
Twintalker 9310
Druk achtmaal op de
-toets , “CA” wordt weergegeven
en de huidige oproeptoon weerklinkt.
Druk op de -toets of op de -toets om van oproeptoon
te veranderen.
Druk op de PTT-toets om te bevestigen en terug te keren
naar de stand-bymodus.
29
NEDERLANDS
•
Twintalker 9310
12.11.2 Een oproeptoon zenden
Druk kort op de
-toets. De oproeptoon wordt op het ingestelde kanaal uitgezonden.
12.12 Roger-pieptoon in-/uitschakelen
Nadat u de PTT -toets hebt losgelaten, zendt het toestel een Roger-pieptoon uit om te
bevestigen dat u klaar bent met praten.
De Roger-pieptoon instellen.
• Druk negenmaal op de
-toets. ‘rO’ verschijnt op de display.
• Druk op
om de Roger-pieptoon in te schakelen (ON) of op
om
de Roger-pieptoon uit te schakelen (OF).
• Druk op de PTT-toets om te bevestigen en terug te keren naar de
stand-bymodus.
12.13 Toetstoon in-/uitschakelen
U hoort een korte pieptoon bij het indrukken van een toets.
Toetstoon instellen.
• Druk tienmaal op
. ‘tO’ verschijnt op de display.
• Druk op
om de toetstonen in te schakelen (ON) of op
om ze
uit te schakelen (OF).
• Druk op de PTT-toets om te bevestigen en terug te keren naar de
stand-bymodus.
12.14 Functie Dual Channel Monitor
In stand-by is de PMR ingesteld op één kanaal met een CTCSS-/DCS-code. De PMR
ontvangt enkel signalen die op hetzelfde kanaal en met dezelfde CTCSS-/DCS-code
worden verzonden.
De functie Dual Channel Monitor (DCM) stelt u in staat een tweede kanaal met
CTCSS-/DCS-code te monitoren.
•
•
•
•
•
•
Druk elfmaal op de
-toets, “DCM OF” knippert op de
display.
Druk op de
-toets of op de -toets om van kanaal te
veranderen.
Druk op de
-toets om de kanaalkeuze te bevestigen en
naar CTCSS-selectie te gaan. (Druk nogmaals op de
toets om naar DCS-selectie te gaan)
Druk op de
-toets of op de -toets om de CTCSS-code
of DCS-code te veranderen.
Druk op de PTT-toets om te bevestigen en terug te keren
naar de stand-bymodus.
Selecteer “OF” bij het instellen van het DCM-kanaal om de
functie uit te schakelen.
Als de functie Dual Channel Monitor is ingeschakeld, schakelt de PMR opeenvolgend tussen
het stand-bykanaal + CTCSS-/DCS-code en het Dual Channel + CTCSS-/DCS-code.
30
Twintalker 9310
Twintalker 9310
12.15 Toetsvergrendeling
•
Houd de
-toets gedurende drie seconden ingedrukt om
de toetsvergrendelingsmodus in te schakelen. Het
pictogram toetsvergrendeling verschijnt op het lcd-scherm.
Druk opnieuw op de
-toets en houd deze gedurende
drie seconden ingedrukt om de toetsvergrendeling uit
te schakelen.
NEDERLANDS
•
De PTT-toets, de
-toets en de
-toets blijven werken wanneer de
toetsvergrendeling is ingeschakeld.
12.16 Stopwatch-functie
De Twintalker 9310 beschikt over een stopwatch die tot 59'59''99 telt.
•
•
•
•
•
Houd de
-toets drie seconden ingedrukt; de
stopwatchdisplay verschijnt.
Druk op de
-toets om de stopwatch te starten.
Druk op de
-toets om de stopwatch te stoppen.
Druk op de -toets om de stopwatch weer op nul te zetten.
Houd de -toets gedurende twee seconden ingedrukt om
de stopwatch uit te schakelen.
12.17 Achtergrondverlichting display
Om de achtergrondverlichting van de lcd-display te activeren, drukt u op een willekeurige
toets, behalve op de PTT-toets of de
-toets.
De lcd-achtergrondverlichting gaat 6 seconden branden.
12.18 FM-radio
De Twintalker 9310 heeft een ingebouwde FM-radio.
•
•
•
•
Twintalker 9310
Druk kort op de -toets om de FM-radio in te schakelen.
Druk op de
-toets of de -toets om een frequentie
hoger of lager te gaan.
Houd de
-toets of de -toets gedurende twee
seconden ingedrukt om een radiostation te zoeken.
Druk kort op de
-toets om de FM-radio uit te schakelen.
31
Twintalker 9310
Wanneer u naar een radiostation luistert, is de MPR steeds op de
achtergrond actief. De FM-radio zal uitschakelen wanneer er een signaal
wordt ontvangen en zal herstarten zodra het PMR-signaal wegvalt.
Terwijl de radio ingeschakeld is, kunt u nog steeds een signaal zenden
door op de PTT-toets of de -toets te drukken.
13 Technische specificaties
Kanalen
Subcode
Frequentie
Bereik
Batterijen
Zendvermogen
Modulatietype
Kanaalinterval
FM-radio
Stroomadapter
Channel Frequency Chart:
Channel
1
2
3
4
5
6
7
8
32
Frequency (MHz)
446,00625
446,01875
446,03125
446,04375
446,05625
446,06875
446,08125
446,09375
8
CTCSS: 38 / DCS: 83
446,00625 MHz – 446,09375 MHz
Tot 10 km (open veld)
4 x AAA Alkaline of NiMh oplaadbare batterijset
=< 500 mW ERP
FM - F3E
12,5 kHz
87,5 MHz – 108 MHz
Ingang: 230 V AC / 50 Hz - Uitgang: 9 V DC / 300 mA
CTCSS Code Chart
Code
0
1
2
3
4
5
6
7
8
9
Frequency (Hz)
Disabled
67,0
71,9
74,4
77,0
79,7
82,5
85,4
88,5
91,5
Code
10
11
12
13
14
15
16
17
18
19
Freq. (Hz)
94,8
97,4
100,0
103,5
107,2
110,9
114,8
118,8
123,0
127,3
Code
20
21
22
23
24
25
26
27
28
29
Freq. (Hz)
131,8
136,5
141,3
146,2
151,4
156,7
162,2
167,9
173,8
179,9
Code
30
31
32
33
34
35
36
37
38
Freq. (Hz)
186,2
192,8
203,5
210,7
218,1
225,7
233,6
241,8
250,3
Twintalker 9310
Twintalker 9310
No
DCS code
No
DCS code
No
DCS code
No
DCS code
0
Disabled
21
134
42
311
63
516
1
2
23
25
22
23
143
152
43
44
315
331
64
65
532
546
3
4
26
31
24
25
155
156
45
46
343
346
66
67
565
606
5
6
32
43
26
27
162
165
47
48
351
364
68
69
612
624
7
47
28
172
49
365
70
627
8
9
10
51
54
65
29
30
31
174
205
223
50
51
52
371
411
412
71
72
73
631
632
654
11
71
32
226
53
413
74
662
12
13
72
73
33
34
243
244
54
55
423
431
75
76
664
703
14
74
35
245
56
432
77
712
15
16
17
114
115
116
36
37
38
251
261
263
57
58
59
445
464
465
78
79
80
723
731
732
18
125
39
265
60
466
81
734
19
20
131
132
40
41
271
306
61
62
503
506
82
83
743
754
Twintalker 9310
NEDERLANDS
DCS Code Chart
33
Twintalker 9310
14 Garantie
14.1 Garantieperiode
Op het product wordt een garantie van 36 maanden verleend. De garantieperiode gaat in
op de dag waarop het nieuwe product werd gekocht. Er is geen garantie op standaard- of
oplaadbare batterijen (type AA/AAA).
Kleine onderdelen of defecten die een verwaarloosbaar effect hebben op de werking of
waarde van het product, worden niet door de garantie gedekt. De garantie moet worden
aangetoond door overlegging van het originele aankoopbewijs of een kopie waarop de
aankoopdatum en het toestelmodel staan vermeld.
14.2 Garantiebeperkingen
Schade of defecten die te wijten zijn aan onjuist gebruik of bediening en schade die te wijten
is aan het gebruik van niet-originele onderdelen of accessoires worden niet door de
garantie gedekt.
De garantie dekt geen schade die te wijten is aan externe factoren, zoals bliksem, water en
brand of transportschade. Er kan geen aanspraak worden gemaakt op de garantie als het
serienummer op het product gewijzigd, verwijderd of onleesbaar gemaakt is. Garantieclaims
zijn ongeldig wanneer het product door de koper werd gerepareerd, gewijzigd of aangepast.
34
Twintalker 9310
Twintalker 9310
1
Introduction
Nous vous remercions d'avoir acheté le Twintalker 9310. Il s'agit d'un appareil de
communication radio de faible puissance avec une portée maximale de 10 km.
Son coût de fonctionnement se limite au rechargement des piles.
Le Twintalker fonctionne sur 8 canaux.
2
Usage
Cet appareil peut être utilisé dans le cadre privé, par exemple, pour maintenir le contact lors
d'un voyage à plusieurs voitures, au cours de randonnées en deux-roues ou à ski. Vous
pouvez également l'utiliser pour communiquer avec vos enfants lorsqu'ils jouent dehors, etc.
Marque CE
Le symbole CE qui figure sur le produit, sur le mode d'emploi et sur la boîte indique que
l'appareil est conforme aux recommandations essentielles de la directive R&TTE 1999/5/CE.
4
Instructions de sécurité
4.1
Généralités
Veuillez lire attentivement les instructions suivantes relatives à la sécurité et à l'utilisation
correcte du produit. Familiarisez-vous avec toutes les fonctions de l'appareil. Conservez
ce manuel en lieu sûr pour pouvoir le consulter ultérieurement.
4.2
Risques de brûlure
•
•
4.3
Ne touchez pas l'antenne si son couvercle est endommagé, car un contact avec la
peau risque de provoquer des brûlures bénignes lors de la transmission.
Les piles peuvent causer des dommages matériels tels que des brûlures si des
matériaux conducteurs (bijoux, clés ou chaînettes) entrent en contact avec les
bornes dénudées. Le matériau peut constituer un circuit électrique (court-circuit) et
devenir très chaud. Les piles chargées doivent être manipulées avec précaution,
particulièrement lorsque vous les mettez dans une poche, un sac ou un autre
récipient contenant des objets métalliques.
Blessures
•
•
•
Ne placez pas votre appareil dans la zone située au dessus d'un airbag ni dans la
zone de déploiement de ce dernier. Les airbags se gonflant avec une très grande
force, si un talkie-walkie est placé dans leur zone de déploiement, ce dernier peut
être violemment propulsé et blesser gravement les occupants du véhicule.
Gardez une distance minimum de 15 centimètres entre le talkie-walkie et un
stimulateur cardiaque.
Désactivez votre talkie-walkie dès qu'une interférence se produit avec l'appareil
médical.
Twintalker 9310
35
FRANÇAIS
3
Twintalker 9310
4.4
Risque d'explosion
•
•
•
Ne remplacez pas les piles dans une atmosphère présentant des risques de
déflagration. L'installation et le retrait des piles peuvent provoquer des étincelles de
contact susceptibles d'entraîner une explosion.
Désactivez votre talkie-walkie lorsque vous vous trouvez dans une atmosphère
présentant des risques de déflagration. Si des étincelles se produisent, cela peut
provoquer une explosion ou un incendie entraînant des blessures corporelles, voire
la mort.
Ne jetez jamais les piles au feu car elles risquent d'exploser.
Les zones qui présentent des risques de déflagration sont
généralement signalées, mais ce n'est pas toujours le cas. Il s'agit des
zones d'alimentation en carburant telles que le premier pont d'un
bateau, des installations de transfert ou de stockage de carburant ou de
produits chimiques, des zones dont l'air contient des produits
chimiques ou des particules comme des grains, de la poussière ou du
métal pulvérisé, et de toute autre zone dans laquelle il vous est
demandé de couper le moteur de votre véhicule.
4.5
Risques d'empoisonnement
•
4.6
Mentions légales
•
•
•
•
4.7
Dans certains pays, il vous est interdit d'utiliser un talkie-walkie au volant d'un
véhicule. Dans ce cas, arrêtez-vous avant d'utiliser l'appareil.
À bord d'un avion, désactivez votre appareil dès que le personnel vous le
demande. L'utilisation du talkie-walkie doit se faire conformément aux
réglementations de la compagnie aérienne ou aux instructions de l'équipage.
Désactivez votre talkie-walkie dans tous les lieux où des affiches interdisent son
utilisation. Les hôpitaux et les établissements de soins peuvent utiliser des
équipements sensibles à l'énergie radioélectrique extérieure.
Le remplacement ou la modification de l'antenne peut affecter les caractéristiques
radio du talkie-walkie et enfreindre les réglementations CE. Les antennes non
autorisées peuvent également endommager l'équipement radio.
Remarques
•
•
5
Ne touchez pas l'antenne lors de la transmission, car cela peut avoir une incidence
sur la portée.
Retirez les piles si vous n'utilisez pas l'appareil pendant un long moment.
Nettoyage et maintenance
•
•
36
Gardez les piles hors de portée des enfants.
Pour nettoyer l'appareil, utilisez un chiffon doux humidifié avec de l'eau. N'utilisez
ni produit nettoyant, ni solvant. Ils risqueraient, en effet, d'endommager le boîtier,
de pénétrer à l'intérieur de l'appareil et de provoquer des dégâts irréversibles.
Pour nettoyer le contact des piles, utilisez un tissu sec non pelucheux.
Twintalker 9310
Twintalker 9310
6
Si l'appareil entre en contact avec de l'eau, éteignez-le immédiatement et retirez
les piles. Séchez le compartiment à piles à l'aide d'un chiffon doux pour réduire les
risques de dégradation. Laissez le couvercle du compartiment ouvert toute la nuit
ou jusqu'à ce que l'appareil soit totalement sec. Attendez que l'appareil soit
entièrement sec avant de le réutiliser.
Mise au rebut de l'appareil (environnement)
Au terme du cycle de vie de ce produit, ne le jetez pas avec les déchets
ménagers ordinaires mais déposez-le dans un point de collecte pour le
recyclage des équipements électriques et électroniques. Le symbole indiqué sur
le produit, sur le mode d'emploi et/ou sur la boîte est là pour vous le rappeler.
Certains matériaux qui composent le produit peuvent être réutilisés s'ils sont
déposés dans un point de recyclage. Le recyclage de certaines pièces ou matières
premières de produits usagés contribue fortement à la protection de l'environnement.
Pour toute information supplémentaire sur les points de collecte dans votre région,
veuillez contacter les autorités locales.
7
Utilisation d'un talkie-walkie
Pour que des talkies-walkies puissent communiquer entre eux, ils doivent utiliser le même
canal et le même code CTCSS/DCS (voir le chapitre « 12.7 CTCSS (Continuous Tone
Coded Squelch System, ou système de squelch à tonalités codées)/ DCS (Digital Coded
Squelch ou système de squelch numérique codé) ») et la portée de réception doit être
respectée (maximum de 10 km en terrain dégagé). Ces appareils utilisant des bandes de
fréquences libres (canaux), tous les appareils en fonctionnement partagent ces canaux (8 au
total). La confidentialité n'est donc pas assurée. Toute personne qui dispose d'un talkiewalkie utilisant votre canal est susceptible d'écouter votre conversation. Pour communiquer
(transmettre un signal vocal), appuyez sur la touche PTT.
L'appareil passe alors en mode de transmission et vous pouvez parler dans le micro. Les
personnes qui utilisent d'autres talkies-walkies couverts par la portée, utilisant le même canal
et se trouvant en mode veille (pas en cours de transmission) entendent votre message. Pour
que vous puissiez répondre au message, vous devez attendre que votre interlocuteur arrête
de transmettre. À la fin de chaque transmission, l'appareil émet un bip si le Roger Beep est
activé (voir chapitre « 12.12 Activation/Désactivation du Roger Beep »). Pour répondre, il
vous suffit d'appuyer sur la touche PTT et de parler dans le micro.
Si plusieurs utilisateurs appuient simultanément sur la touche PTT,
c'est le signal le plus puissant qui est détecté par le récepteur et les
autres signaux sont supprimés. C'est pourquoi vous ne devez
transmettre de signal (touche PTT) que lorsque le canal est libre.
La gamme des ondes radio est fortement affectée par des obstacles, tels
que bâtiments, structures en béton/métal, paysages accidentés, zones
boisées, plantes, etc. Cela implique que la portée entre plusieurs talkieswalkies peut, dans certains cas extrêmes, être réduite à un maximum de
quelques dizaines de mètres. Vous constaterez rapidement que les
talkies-walkies fonctionnent mieux lorsque peu d'obstacles se trouvent
entre les utilisateurs.
Twintalker 9310
37
FRANÇAIS
•
Twintalker 9310
8
8.1
1.
2.
Pour commencer
Installation/Retrait du clip de ceinture
A
Pour retirer le clip de ceinture (B) de l'appareil,
poussez celui-ci vers l'antenne tout en tirant
sur l'agrafe du clip (A).
Lorsque vous réinstallez le clip de ceinture, un
déclic indique qu'il est correctement verrouillé.
B
C
8.2
Installation des piles
D
1.
2.
4.
5.
Retirez le clip de ceinture (voir chapitre « 8.1 Installation/Retrait du clip de ceinture »).
Ouvrez le loquet de verrouillage (C) et faites glisser le couvercle du compartiment
à piles.
Installez les piles rechargeables en respectant la polarité indiquée. Assurez-vous que
les contacts métalliques latéraux (D) sont bien placés vers l'extérieur pour qu'ils
touchent la porte du compartiment à piles.
Refermez le compartiment à piles.
Replacez le clip de ceinture.
38
Twintalker 9310
3.
Twintalker 9310
9
Chargement des piles
Une fois les piles installées, il est
possible d'utiliser un chargeur de
bureau pour les recharger facilement.
2.
3.
4.
Placez le chargeur de bureau sur
une surface plane.
Branchez une extrémité de
l'adaptateur fourni dans une prise
de courant facile d'accès et l'autre
extrémité dans le connecteur
situé à l'arrière du chargeur
de bureau.
Placez l'équipement radio sur
le chargeur, tel qu'illustré.
Le voyant de chargement
s'allume si l'appareil est
correctement inséré et qu'il se charge.
FRANÇAIS
1.
Le chargement total des piles dure entre 8 et 10 heures.
Lorsque le talkie-walkie est raccordé au chargeur de bureau, les LED de chargement restent
allumées, même lorsque les piles sont entièrement rechargées.
N'appuyez pas sur la touche PTT d'un talkie-walkie lorsque ce dernier
se trouve dans le chargeur.
Ne court-circuitez pas les piles et ne les jetez pas au feu. Retirez-les
lorsque vous n'utilisez pas l'appareil pendant une durée prolongée.
Ne rechargez pas des piles non rechargeables, telles que des piles
alcalines, avec le chargeur. Vous risqueriez d'endommager les
talkies-walkies et le chargeur.
Twintalker 9310
39
Twintalker 9310
10 Description
1.
2.
3.
4.
5.
6.
7.
8.
9.
10.
11.
Antenne fixe
Écran LCD
Connexion pour le casque et le chargeur disponibles
en option
Touche Menu
– Permet de passer en mode de réglage
Touche Marche/Arrêt
Micro
Touche Haut
– Permet d'augmenter le volume du haut-parleur
– Permet de sélectionner l'option de menu suivante
Haut-parleur
Touche Bas
– Permet de diminuer le volume du haut-parleur.
– Permet de sélectionner l'option de menu
précédente.
Touche Appel
– Permet de transmettre une tonalité d'appel
Touche Parole PTT
1
2
3
4
5
6
7
11
10
9
8
11 Informations apparaissant sur l'écran LCD
Icône TX - s'affiche lors de la transmission d'un signal
Icône RX - s'affiche lors de la réception d'un signal
Indicateur du volume du haut-parleur
Icône de verrouillage - s'affiche lorsque le clavier
est verrouillé
Indicateur du niveau de charge des piles
Icône VOX - s'affiche en mode contrôle vocal (Vox)
Icône de balayage - s'affiche lorsque le mode de
balayage est activé
Icône de double balayage - s'affiche lorsque le mode de
double balayage est activé
12 Utilisation du Twintalker 9310
Les illustrations de l'écran présentées aux pages suivantes ne montrent
que les icônes ou informations apparaissant sur l'écran relatives aux
fonctions expliquées dans le texte.
40
Twintalker 9310
Twintalker 9310
12.1 Activation et désactivation de l'appareil
Pour activer :
•
Appuyez sur la touche
et maintenez-la enfoncée
pendant 2 secondes. L'appareil émettra un « bip » et
l'écran LCD affichera le canal actuel.
Pour désactiver :
•
Appuyez sur la touche
et maintenez-la enfoncée
pendant 2 secondes. L'appareil émettra un « bip » et
l'écran LCD s'éteindra.
12.2 Indication de niveau de charge des piles/de piles faibles
FRANÇAIS
Le niveau de charge des piles est représenté par le nombre de barres que contient
l'icône de la pile sur l'écran LCD.
Piles chargées à 100 %
Piles chargées aux 2/3
Piles chargées à 1/3
Piles déchargées
Lorsque le niveau de charge des piles est faible, l'icône de la pile clignote et un bip retentit
pour signaler qu'il faut procéder au remplacement ou au rechargement de celles-ci.
Ne rechargez pas des piles non rechargeables (piles alcalines, par ex.).
12.3 Réglage du volume du haut-parleur
•
•
Appuyez sur la touche
en mode de veille pour
augmenter le volume du haut-parleur. Le niveau
de volume s'affiche.
Appuyez sur la touche
pour diminuer le volume
du haut-parleur.
12.4 Réception d'un signal
Lorsque l'appareil est activé et qu'il n'est pas en mode de transmission, il est en permanence
en mode de réception.
Pour que d'autres personnes reçoivent votre transmission, elles doivent
également utiliser le même canal et le même code CTCSS ou DCS. (voir les
chapitres « 12.6 Changement de canal » et « 12.7 CTCSS (Continuous
Tone Coded Squelch System, ou système de squelch à tonalités codées)/
DCS (Digital Coded Squelch ou système de squelch numérique codé) »)
Les codes CTCSS et DCS peuvent être utilisés, mais jamais
simultanément.
Twintalker 9310
41
Twintalker 9310
12.5 Transmission d'un signal
•
•
•
Appuyez sur la touche PTT et maintenez-la enfoncée
pour transmettre un signal. Le symbole TX s'affiche.
Tenez l'appareil à la verticale, placez le micro à 10 cm
de votre bouche et parlez.
Relâchez la touche PTT lorsque vous voulez arrêter
la transmission.
Pour vérifier l'activité du canal, utilisez la fonction de surveillance
(voir chapitre « 12.8 Surveillance »).
12.6 Changement de canal
•
•
•
Appuyez une fois sur la touche
; le numéro du canal
actuel clignote sur l'écran.
Appuyez sur la touche
ou
pour changer de canal.
Appuyez sur la touche PTT pour confirmer votre sélection et
revenir en mode de veille.
Si vous n'appuyez sur aucune touche pendant 5 secondes lors
du réglage, l'appareil revient en mode de veille.
12.7 CTCSS (Continuous Tone Coded Squelch System,
ou système de squelch à tonalités codées)/
DCS (Digital Coded Squelch ou système de squelch numérique codé)
Les talkies-walkies sans licence fonctionnant sur la bande de fréquences de 446 MHz, tels
que le Twintalker 9310, disposent de 8 canaux radio. S'il y a de nombreux utilisateurs de
talkies-walkies dans votre entourage, il se peut que certains utilisent le même canal radio.
Pour éviter de recevoir les signaux d'autres utilisateurs, l'appareil dispose de sous-canaux.
Deux talkies-walkies ne peuvent communiquer l'un avec l'autre que lorsqu'ils fonctionnent
sur le même canal radio et exactement le même sous-canal.
Il existe deux types de sous-canaux :
•
CTCSS (Continuous Tone Coded Squelch System ou système de squelch
à tonalités codées)
•
DCS (Digital Coded Squelch ou système de squelch numérique codé)
Avec le CTCSS, une tonalité de faible fréquence (entre 67 et 250 Hz) est transmise avec
le signal vocal. Vous avez le choix entre 38 tonalités différentes. Vous pouvez sélectionner
l'une de ces 38 tonalités. Grâce au filtrage, ces tonalités ne sont généralement pas audibles
afin de ne pas gêner la communication.
42
Twintalker 9310
Twintalker 9310
Le code DCS est similaire au CTCSS mais, au lieu d'envoyer une tonalité continue d'une
fréquence sélectionnée, une transmission numérique de données s'ajoute au signal radio.
Ce code numérique est transmis selon un débit très faible, environ 134 bits par seconde (le
code fait 23 bits). Seuls les talkies-walkies de dernière génération prennent en charge le
code DCS. 83 codes DCS peuvent être utilisés. Étant donné que les modèles précédents ne
prennent en charge que le CTCSS, mieux vaut utiliser le DCS afin d'éviter d'entendre
d'autres utilisateurs pendant vos conversations.
12.7.1 CTCSS
•
•
Appuyez deux fois sur la touche
: « CTCSS », le code
CTCSS actuel clignote sur l'écran.
Appuyez sur la touche
ou
pour changer de code.
Appuyez sur la touche PTT pour confirmer votre sélection et
revenir en mode de veille.
FRANÇAIS
•
12.7.2 DCS
•
•
•
Appuyez trois fois sur la touche
: « DCS », le code DCS
actuel clignote sur l'écran.
Appuyez sur la touche
ou
pour changer de code.
Appuyez sur la touche PTT pour confirmer votre sélection et
revenir en mode de veille.
Pour désactiver le code CTCSS ou DCS, sélectionnez « 00 » pour
CTCSS ou pour DCS dans le menu. Lorsque l'entrée est confirmée,
« OF » s'affiche.
12.8 Surveillance
La fonction de surveillance permet de détecter les signaux faibles du canal actuel.
•
•
Appuyez simultanément sur les touches
et
pour activer la surveillance des
canaux.
Appuyez sur la touche
pour arrêter la surveillance.
Lors de la surveillance des canaux, le circuit récepteur du talkie-walkie
ne tient pas compte du code CTCSS ou DCS.
Twintalker 9310
43
Twintalker 9310
12.9 Sélection du mode VOX
Le talkie-walkie est capable de transmettre en mode de commande vocale (VOX). Dans ce
mode, l'appareil transmet un signal lorsqu'il est activé par votre voix ou par un son proche de
vous. Le fonctionnement en mode VOX n'est pas recommandé si vous envisagez d'utiliser
l'appareil dans un environnement bruyant ou venteux.
Le mode VOX est annulé lorsque vous appuyez sur la touche PTT.
•
•
•
•
Appuyez quatre fois sur la touche
, le réglage VOX
actuel clignote sur l'écran et l'icône VOX s'affiche.
Appuyez sur la touche
pour régler le niveau de
sensibilité VOX entre 1 et 3 (le niveau 3 étant le niveau
le plus sensible).
Pour désactiver le mode VOX, appuyez sur la touche
jusqu'à ce que « OF » s'affiche à l'écran.
Appuyez sur la touche PTT pour confirmer votre sélection
et revenir en mode de veille.
12.10 Balayage des canaux
Le balayage des canaux recherche les signaux actifs dans une boucle sans fin sur les
canaux 1 à 8.
Lorsqu'un canal actif est trouvé, vous pouvez rechercher le code CTCSS ou le code DCS
réglé par l'utilisateur émettant sur ce canal.
12.10.1 Recherche d'un canal radio actif
•
•
Appuyez cinq fois sur la touche
: « SC », le canal actuel
clignote à l'écran.
Appuyez sur la touche
ou
pour démarrer le balayage
des canaux.
Lorsqu'un canal actif est trouvé, le balayage s'arrête et vous pouvez écouter la transmission.
Lorsque la transmission sur le canal trouvé s'arrête, le balayage reprend automatiquement.
Si vous appuyez sur la touche PTT pendant que vous écoutez un canal
trouvé, le talkie-walkie revient en mode de veille sur le canal trouvé.
12.10.2 Recherche d'un code CTCSS
Lorsqu'un canal actif est trouvé, appuyez sur la touche PTT pour sélectionner le canal actif
trouvé. Vous pouvez alors rechercher le code CTCSS/DCS utilisé par l'utilisateur trouvé.
44
Twintalker 9310
Twintalker 9310
•
•
Appuyez six fois sur la touche
: « SC » et « CTCSS 00 »
clignotent à l'écran pour le canal radio sélectionné.
Appuyez sur la touche
ou
pour démarrer le
balayage CTCSS.
Lorsqu'une transmission s'effectue sur le canal, le code CTCSS (s'il est utilisé) est détecté
et affiché.
•
Si vous appuyez sur la touche PTT pendant que vous écoutez un
code CTCSS trouvé, le talkie-walkie revient en mode de veille sur
le canal avec le code CTCSS.
Si aucun code CTCSS n'est détecté, il se peut que l'utilisateur
ait sélectionné un DCS. Dans ce cas, vous pouvez rechercher
un code DCS. (section 12.10.3)
FRANÇAIS
•
12.10.3 Recherche d'un code DCS
•
•
Appuyez sept fois sur la touche
: « SC » et « DCS 00 »
clignotent à l'écran pour le canal radio sélectionné.
Appuyez sur la touche
ou
pour démarrer le balayage
DCS.
Lorsqu'une transmission s'effectue sur le canal, le code DCS (s'il est utilisé) est détecté
et affiché.
Si vous appuyez sur la touche PTT pendant que vous écoutez un code
DCS trouvé, le talkie-walkie revient en mode de veille sur le canal avec le
code DCS.
12.11 Tonalités d'appel
Une tonalité d'appel signale aux autres personnes que vous voulez parler.
12.11.1 Réglage de la tonalité d'appel
Le Twintalker 9310 dispose de 10 tonalités d'appel.
•
•
•
Twintalker 9310
, « CA » s'affiche et la
Appuyez huit fois sur la touche
tonalité d'appel actuelle clignote.
ou
pour changer de
Appuyez sur la touche
tonalité d'appel.
Appuyez sur la touche PTT pour confirmer votre sélection
et revenir en mode de veille.
45
Twintalker 9310
12.11.2 Envoi d'une tonalité d'appel
Appuyez brièvement sur la touche
et. La tonalité d'appel est transmise sur le
canal sélectionné.
12.12 Activation/Désactivation du Roger Beep
Lorsque vous avez relâché la touche PTT , l'appareil envoie un Roger Beep pour confirmer
que vous avez cessé de parler.
Pour activer le Roger Beep.
• Appuyez neuf fois sur la touche
. « rO » s'affiche.
• Appuyez sur
pour activer (ON) ou sur
pour désactiver (OF)
le Roger Beep.
• Appuyez sur la touche PTT pour confirmer votre sélection et revenir
en mode de veille.
12.13 Activation/Désactivation de la tonalité des touches
Lorsque vous appuyez sur une touche, l'appareil émet un bip court.
Pour régler la tonalité des touches.
• Appuyez dix fois sur
. « tO » s'affiche.
• Appuyez sur
pour activer (ON) ou sur
pour désactiver (OF)
la tonalité des touches.
• Appuyez sur la touche PTT pour confirmer votre sélection et revenir
en mode de veille.
12.14 Fonction de surveillance double canal
En mode veille, le talkie-walkie est réglé sur un canal avec code CTCSS/DCS.
Il ne reçoit que les signaux transmis sur ce canal avec ce code CTCSS/DCS.
La surveillance double canal (DCM) permet de contrôler un second canal avec code
CTCSS/DCS.
•
•
•
•
•
•
46
Appuyez onze fois sur la touche
, « DCM OF » clignote
à l'écran.
Appuyez sur la touche
ou
pour changer de
canal mémorisé.
Appuyez sur la touche
pour confirmer la sélection
du canal et passer à la sélection du CTCSS. (Appuyez
une nouvelle fois sur la touche
pour passer à la
sélection du DCS.)
Appuyez sur la touche
ou
pour changer le code
CTCSS ou DCS.
Appuyez sur la touche PTT pour confirmer votre sélection
et revenir en mode de veille.
Pour désactiver la fonction, sélectionnez « OF » lorsque
vous sélectionnez le canal DCM.
Twintalker 9310
Twintalker 9310
Lorsque la fonction de surveillance double canal est activée, le talkie-walkie passe de
manière séquentielle du canal de veille + CTCSS/DCS au double canal + CTCSS/DCS
et vice-versa.
12.15 Verrouillage des touches
•
Appuyez sur la touche
et maintenez-la enfoncée
pendant trois secondes pour activer le mode de verrouillage
des touches. L'icône de verrouillage des touches apparaît
à l'écran LCD.
Appuyez à nouveau sur la touche
et maintenez-la
enfoncée pendant trois secondes pour désactiver
le verrouillage des touches.
Les touches PTT,
et
des touches est activé.
FRANÇAIS
•
restent fonctionnelles lorsque le verrouillage
12.16 Fonction chronomètre
Le Twintalker 9310 dispose d'un chronomètre d'une durée maximale de 59'59''99
•
•
•
•
•
Appuyez sur la touche
et maintenez-la enfoncée
pendant deux secondes, l'écran du chronomètre apparaît.
Appuyez sur la touche
pour lancer le chronomètre.
Appuyez sur la touche
pour arrêter le chronomètre.
Appuyez sur la touche
pour remettre le chronomètre
à zéro.
Appuyez sur la touche
et maintenez-la enfoncée
pendant deux secondes pour désactiver le chronomètre.
12.17 Écran rétroéclairé
Pour activer le rétroéclairage sur l'écran LCD, appuyez sur n'importe qu'elle touche, excepté
les touches PTT ou
.
L'écran rétroéclairé s'allume pendant 6 secondes.
12.18 Radio FM
Le Twintalker 9310 est équipé d'une radio FM intégrée.
Twintalker 9310
47
Twintalker 9310
•
•
•
•
Appuyez brièvement sur la touche
pour allumer la
radio FM.
Appuyez brièvement sur la touche
ou
pour passer
à la fréquence suivante ou précédente.
Appuyez sur la touche
ou
et maintenez-la enfoncée
pendant 2 secondes pour rechercher une station de radio.
Appuyez brièvement sur la touche
radio FM.
pour éteindre la
Lorsque vous écoutez une station de radio, le talkie-walkie reste
opérationnel en arrière-plan. La radio FM s'éteint dès que le
talkie-walkie reçoit un signal, puis se rallume lorsque le signal
du talkie-walkie disparaît.
Lorsque la radio est allumée, vous pouvez émettre un signal en
appuyant sur la touche PTT ou .
13 Caractéristiques techniques
Canaux
Sous-code
Fréquence
Portée
Piles
Puissance de transmission
Type de modulation
Espacement des canaux
Radio FM
Adaptateur secteur
Channel Frequency Chart:
Channel
1
2
3
4
5
6
7
8
48
Frequency (MHz)
446,00625
446,01875
446,03125
446,04375
446,05625
446,06875
446,08125
446,09375
8
CTCSS : 38/DCS : 83
446,00625 MHz - 446,09375 MHz
Jusqu'à 10 km (en terrain dégagé)
4 piles alcalines AAA ou bloc-piles NiMH rechargeable
=< 500 mW ERP
FM - F3E
12,5 kHz
87,5 MHz – 108 MHz
Entrée : 230 V CA/50 Hz - Sortie : 9 V CC/300 mA
CTCSS Code Chart
Code
0
1
2
3
4
5
6
7
8
9
Frequency (Hz)
Disabled
67,0
71,9
74,4
77,0
79,7
82,5
85,4
88,5
91,5
Code
10
11
12
13
14
15
16
17
18
19
Freq. (Hz)
94,8
97,4
100,0
103,5
107,2
110,9
114,8
118,8
123,0
127,3
Code
20
21
22
23
24
25
26
27
28
29
Freq. (Hz)
131,8
136,5
141,3
146,2
151,4
156,7
162,2
167,9
173,8
179,9
Code
30
31
32
33
34
35
36
37
38
Freq. (Hz)
186,2
192,8
203,5
210,7
218,1
225,7
233,6
241,8
250,3
Twintalker 9310
Twintalker 9310
No
DCS code
No
DCS code
No
DCS code
No
DCS code
0
Disabled
21
134
42
311
63
516
1
2
23
25
22
23
143
152
43
44
315
331
64
65
532
546
3
4
26
31
24
25
155
156
45
46
343
346
66
67
565
606
5
6
32
43
26
27
162
165
47
48
351
364
68
69
612
624
7
47
28
172
49
365
70
627
8
9
10
51
54
65
29
30
31
174
205
223
50
51
52
371
411
412
71
72
73
631
632
654
11
71
32
226
53
413
74
662
12
13
72
73
33
34
243
244
54
55
423
431
75
76
664
703
14
74
35
245
56
432
77
712
15
16
17
114
115
116
36
37
38
251
261
263
57
58
59
445
464
465
78
79
80
723
731
732
18
125
39
265
60
466
81
734
19
20
131
132
40
41
271
306
61
62
503
506
82
83
743
754
Twintalker 9310
FRANÇAIS
DCS Code Chart
49
Twintalker 9310
14 Garantie
14.1 Période de garantie
Les appareils bénéficient d'une période de garantie de 36 mois. Celle-ci prend effet le jour
de l'achat du nouvel appareil. Il n'y a aucune garantie sur les piles standard ou rechargeables
(de type AA/AAA).
Les accessoires et les défauts ayant un effet négligeable sur le fonctionnement ou la valeur
de l'appareil ne sont pas couverts. La garantie s'applique uniquement sur présentation de
l'original ou d'une copie de la facture sur laquelle figurent la date de l'achat et le modèle
de l'appareil.
14.2 Exclusions de garantie
Les dommages et pannes causés par un mauvais traitement ou une utilisation incorrecte
ou résultant de l'utilisation de pièces et d'accessoires non originaux ne sont pas couverts
par la garantie.
La garantie ne couvre pas les dégâts causés par des éléments extérieurs, tels que la foudre,
l'eau et le feu, ni les dégâts produits pendant le transport. Aucune garantie ne pourra être
invoquée si le numéro de série indiqué sur l'appareil a été modifié, supprimé ou rendu
illisible. De même, aucune garantie ne pourra être sollicitée si l'appareil a été réparé
ou modifié par l'acheteur.
50
Twintalker 9310
Twintalker 9310
1
Einführung
Herzlichen Glückwunsch zum Kauf des Twintalker 9310. Es ist ein Sprechfunkgerät für
große Entfernungen mit einer Reichweite bis zu 10 km. Es verursacht keine laufenden
Betriebskosten, außer den geringfügigen Kosten für das Aufladen der Akkus.
Der Twintalker verwendet 8 Kanäle.
2
Verwendungszweck
Das Gerät kann für Freizeitzwecke verwendet werden, zum Beispiel: Um bei einem Ausflug
in einer Gruppe mit 2 oder mehreren Fahrzeugen, Radfahrern oder Skiläufern miteinander
in Verbindung zu bleiben. Es kann auch eingesetzt werden, um mit Ihren Kindern in Kontakt
zu bleiben, wenn sie draußen spielen usw.
3
CE-Kennzeichnung
Das CE-Zeichen auf dem Gerät, der Bedienungsanleitung und der Verpackung zeigt an,
dass das Gerät die grundlegenden Anforderungen der R&TTE-Richtlinie 1999/5/EG erfüllt.
Sicherheitshinweise
4.1
DEUTSCH
4
Allgemeines
Bitte lesen Sie die folgenden Informationen für den sicheren und ordnungsgemäßen
Gebrauch aufmerksam durch. Machen Sie sich mit allen Funktionen des Geräts vertraut.
Bewahren Sie diese Bedienungsanleitung zur späteren Verwendung sicher auf.
4.2
Verbrennungsgefahr
•
•
4.3
Berühren Sie die Antenne nicht, wenn der Antennenschutz beschädigt ist.
Eine Berührung der Antenne mit der Haut kann bei einer Übertragung zu
einer geringfügigen Verbrennung führen.
Batterien können Sachschäden und Verbrennungen verursachen, wenn leitende
Materialien wie Schmuck, Schlüssel oder Perlenketten freiliegende Anschlüsse
berühren. Das Material schließt unter Umständen einen elektrischen Stromkreis
(Kurzschluss) und wird dadurch entsprechend heiß. Seien Sie achtsam im Umgang
mit Akkus und Batterien, insbesondere wenn Sie diese in einer Tasche, einem
Geldbeutel oder einem anderen Behälter mit metallenen Objekten aufbewahren.
Verletzungsgefahr
•
•
•
Legen Sie Ihr Gerät nicht in den Bereich über einem Airbag oder in den
Airbagauslösebereich. Airbags blasen sich mit großer Wucht auf. Wenn sich das
Funkgerät im Airbagauslösebereich befindet und der Airbag auslöst, kann es sein,
dass das Funkgerät mit großer Wucht durch die Luft geschleudert wird und dabei
Insassen des Fahrzeugs verletzt.
Halten Sie mit dem Sprechfunkgerät einen Abstand von mindestens 15 cm zu
einem Herzschrittmacher ein.
Schalten Sie Ihr Sprechfunkgerät sofort aus, sobald eine Interferenz mit
medizinischen Geräten auftritt.
Twintalker 9310
51
Twintalker 9310
4.4
Explosionsgefahr
•
•
•
Tauschen Sie die Batterien/Akkus niemals in potenziell explosionsgefährdeten
Bereichen aus. Während des Einsetzens oder Entfernens der Batterien/Akkus
kann es zu einem Funkenschlag kommen, der eine Explosion auslöst.
Schalten Sie Ihr Sprechfunkgerät aus, wenn Sie sich in einem
explosionsgefährdeten Bereich befinden. Ein Funkenschlag in solchen Bereichen
kann eine Explosion oder einen Brand verursachen, was zu Verletzungen und
sogar zum Tod führen kann.
Werfen Sie Batterien/Akkus niemals ins Feuer, da sie explodieren könnten.
Explosionsgefährdete Bereiche sind oft, aber nicht immer eindeutig
ausgewiesen. Dazu zählen Tankbereiche, wie z. B. unter Deck auf
Schiffen, Kraftstoff- oder Chemikalienüberführungen oder
Aufbewahrungsbereiche; Bereiche, in denen die Luft Chemikalien oder
Teilchen enthält, wie z. B. Getreide, Staub oder Metallpulver, sowie alle
anderen Bereiche, in denen Sie normalerweise angewiesen werden,
Ihren Kraftfahrzeugmotor abzuschalten.
4.5
Vergiftungsgefahr
•
4.6
Vorschriften
•
•
•
•
4.7
In einigen Ländern ist es verboten, Ihr Sprechfunkgerät während des Steuerns
eines Fahrzeugs zu benutzen. Halten Sie Ihr Fahrzeug in diesen Fällen neben
der Straße an, bevor Sie das Sprechfunkgerät benutzen.
Schalten Sie Ihr Sprechfunkgerät aus, wenn Sie sich an Bord eines Flugzeugs
befinden und entsprechende Anweisungen erhalten. Die Benutzung des Geräts
muss entsprechend den Bestimmungen der Fluglinie und den Anweisungen der
Besatzung erfolgen.
Schalten Sie Ihr Gerät überall dort aus, wo Aushänge es von Ihnen verlangen.
Krankenhäuser und Gesundheitseinrichtungen verwenden möglicherweise Geräte,
die empfindlich auf externe Radiofrequenzen reagieren.
Das Ersetzen oder Verändern der Antenne kann die Gerätespezifizierung
verändern und die CE-Bestimmungen verletzen. Nicht genehmigte Antennen
können außerdem das Funkgerät beschädigen.
Hinweise
•
•
52
Bewahren Sie Batterien/Akkus außer Reichweite von kleinen Kindern auf.
Berühren Sie die Antenne während einer Übertragung nicht, da dadurch
die Reichweite beeinflusst werden kann.
Entfernen Sie die Batterien/Akkus, wenn Sie das Gerät längere Zeit
nicht verwenden.
Twintalker 9310
Twintalker 9310
Reinigung und Wartung
•
•
•
6
Reinigen Sie das Gerät, indem Sie es mit einem weichen, feuchten Tuch
abwischen. Verwenden Sie keine Reinigungs- oder Lösungsmittel für das Gerät.
Diese können das Gehäuse beschädigen und ins Innere gelangen, was zu
dauerhaften Schäden führen kann.
Die Batteriekontakte können mit einem trockenen, flusenfreien Tuch
abgewischt werden.
Sollte das Gerät einmal nass werden, schalten Sie es aus, und entfernen Sie sofort
die Batterien/Akkus. Trocknen Sie das Batteriefach mit einem weichen Tuch,
um den potenziellen Wasserschaden zu minimieren. Lassen Sie das
Batterie-/Akkufach über Nacht geöffnet, oder bis es vollständig getrocknet ist.
Benutzen Sie das Gerät erst, wenn es vollständig getrocknet ist.
Entsorgung des Geräts (Umweltschutz)
Am Ende der Nutzungsdauer des Produkts darf das Gerät nicht im normalen
Hausmüll entsorgt werden. Bringen Sie es zu einer Sammelstelle zur
Aufbereitung elektrischer und elektronischer Geräte. Das Symbol am Gerät,
in der Bedienungsanleitung und/oder auf der Verpackung weist darauf hin.
Einige der Materialien des Geräts können wiederverwendet werden, wenn sie
an einer Recyclingstelle abgegeben werden. Mit der Verwertung einiger Teile oder Rohstoffe
aus gebrauchten Produkten leisten Sie einen wichtigen Beitrag zum Umweltschutz. Wenden
Sie sich bitte an Ihre örtlichen Behörden, wenn Sie weitere Informationen über die
Sammelstellen in Ihrer Umgebung benötigen.
7
Betrieb eines Sprechfunkgeräts
Zur Verständigung über Sprechfunkgeräte müssen diese auf denselben Kanal und CTCSS/
DCS-Code eingestellt sein (siehe Kapitel “12.7 CTCSS (Continuous Tone Coded Squelch
System)/ DCS (Digital Coded Squelch)”). Sie müssen sich auch innerhalb der
Empfangsreichweite befinden (bis zu max. 10 km in offenem Gelände). Da diese Geräte freie
Kanäle verwenden, teilen sich alle in Betrieb befindlichen Geräte diese Kanäle (insgesamt
8 Kanäle). Daher ist eine Privatsphäre nicht garantiert. Jede Person mit einem
Sprechfunkgerät, das auf Ihren Kanal eingestellt ist, kann Ihr Gespräch mithören. Möchten
Sie kommunizieren (eine Sprechverbindung erzeugen), drücken Sie die PTT-Taste.
Twintalker 9310
53
DEUTSCH
5
Twintalker 9310
Sobald diese Taste gedrückt ist, schaltet sich das Gerät in den Sendemodus, und Sie
können in das Mikrofon sprechen. Alle Sprechfunkgeräte innerhalb der Reichweite, die
auf denselben Kanal eingestellt sind und sich im Standby-Modus befinden (nicht im
Sendemodus), empfangen Ihre Nachricht. Zum Antworten müssen Sie abwarten, bis die
andere Seite mit dem Sprechen fertig ist. Wenn der Quittungston aktiviert ist (siehe Kapitel
“12.12 Ein-/Ausschalten des Quittungstons (Roger Beep)”), sendet das Gerät am Ende jeder
Übertragung einen Ton. Zum Antworten drücken Sie einfach die PTT-Taste und sprechen in
das Mikrofon.
Drücken zwei oder mehr Benutzer die PTT-Taste gleichzeitig, so wird
der Empfänger nur das stärkste Signal empfangen. Alle anderen Signale
werden unterdrückt. Daher sollten Sie nur ein Signal übertragen
(die PTT-Taste drücken), wenn der Kanal frei ist.
Die Reichweite der Funkwellen wird stark durch Hindernisse wie
beispielsweise Gebäude, Beton- und Metallstrukturen, Unebenheiten
in der Landschaft, Bewaldungen, Bepflanzungen usw. beeinflusst.
Das bedeutet, dass die Reichweite zwischen zwei oder mehreren
Sprechfunkgeräten in einigen extremen Fällen auf einige Dutzend
Meter beschränkt sein kann. Sie werden schnell feststellen, dass ein
Sprechfunkgerät am besten funktioniert, wenn zwischen den Benutzern
nur wenige Hindernisse vorhanden sind.
8
8.1
1.
2.
Erste Schritte
Anbringen/Entfernen des Gürtelhalters
Um den Gürtelhalter vom Gerät zu entfernen,
drücken Sie den Gürtelhalter (B) in Richtung
Antenne, während Sie an der Lasche des Halters
(A) ziehen.
Wenn Sie den Gürtelhalter wieder montieren,
zeigt ein Klicken an, dass der Gürtelhalter
eingerastet ist.
A
B
C
54
Twintalker 9310
Twintalker 9310
8.2
Einlegen der Batterien/Akkus
1.
4.
5.
Entfernen Sie den Gürtelhalter (siehe Kapitel “8.1 Anbringen/Entfernen des
Gürtelhalters”).
Öffnen Sie die Schließlasche (C) und schieben Sie die Batterieabdeckung ab.
Legen Sie den wiederaufladbaren Akkupack ein. Achten Sie dabei auf die
angegebene Polarität. Stellen Sie sicher, dass die Metallkontakte an der Seite
(D) nach außen zeigen, um einen Kontakt zur Batterieabdeckung herzustellen.
Schließen Sie das Batteriefach.
Montieren Sie den Gürtelhalter wieder.
9
Laden der Akkus
2.
3.
DEUTSCH
D
Wenn die Akkus eingelegt sind,
können Sie sie mit der Ladestation
einfach aufladen.
1.
2.
3.
4.
Stellen Sie die Ladestation
auf eine ebene Oberfläche.
Stecken Sie ein Ende des
mitgelieferten Netzadapters
in eine leicht erreichbare
Steckdose und das andere
Ende in den Anschluss auf
der Rückseite der Ladestation.
Stellen Sie das Funkgerät wie
dargestellt in die Ladestation.
Die Lade-LED leuchtet auf, wenn
das Gerät richtig eingelegt ist und
aufgeladen wird.
Twintalker 9310
55
Twintalker 9310
Es dauert ungefähr acht bis zehn Stunden, bis die Akkus vollständig geladen sind.
Wenn sich die Funkgeräte in der Ladestation befinden, leuchten die Lade-LEDs immer, auch
wenn die Akkus bereits vollständig geladen sind.
Drücken Sie nicht die PTT-Taste der Funkgeräte, wenn sie sich in der
Ladestation befinden!
Schließen Sie die Akkus nicht kurz, und verbrennen Sie sie nicht.
Entfernen Sie die Akkus, wenn das Gerät längere Zeit nicht
verwendet wird.
Laden Sie keine nicht aufladbaren Batterien wie Alkali-Batterien in
der Ladestation auf. Hierdurch können die Sprechfunkgeräte und
die Ladestation beschädigt werden.
10 Beschreibung
1.
2.
3.
4.
5.
6.
7.
8.
9.
10.
11.
56
Fest eingebaute Antenne
LCD-Display
Anschluss für optionale Kopfhörergarnitur und Lader
Menütaste
– Aufrufen der Menüeinstellungen
Ein-Aus-Taste
Mikrofon
Nach-oben-Taste
– Erhöhen der Lautsprecherlautstärke
– Auswählen des nächsten Menüpunkts
Lautsprecher
Nach-unten-Taste
– Verringern der Lautsprecherlautstärke
– Auswählen des vorigen Menüpunkts
Anruftaste
– Rufton senden
Sprechtaste PTT
1
11
10
9
2
3
4
5
6
7
8
Twintalker 9310
Twintalker 9310
11 Informationen zum LCD-Display
DEUTSCH
TX-Symbol - Wird angezeigt, wenn ein Signal
gesendet wird
RX-Symbol - Wird angezeigt, wenn ein Signal
empfangen wird
Lautstärke des Lautsprechers
Lock-Symbol - Wird angezeigt, wenn die
Tastatursperre aktiv ist
Batteriestandsanzeige
VOX-Symbol - Wird im sprachgesteuerten (Vox)
Modus angezeigt
Scan-Symbol - Wird angezeigt, wenn der
Scan-Modus aktiv ist
Dual-Scan-Symbol - Wird angezeigt, wenn
der Dual-Scan-Modus aktiv ist
12 Betrieb des Twintalker 9310
Die Display-Abbildungen auf den nächsten Seiten zeigen nur die
Symbole oder Anzeigeinformationen, die im Text erklärt werden.
12.1 Ein-/Ausschalten des Geräts
Zum Einschalten:
•
Halten Sie die
-Taste zwei Sekunden lang gedrückt.
Sie hören einen Signalton und im LCD-Display erscheint
der aktuelle Kanal.
Zum Ausschalten:
•
Halten Sie die
-Taste zwei Sekunden lang gedrückt.
Sie hören einen Signalton und das LCD-Display zeigt
nichts mehr an.
12.2 Batterieladezustandsanzeige/Anzeige schwache Batterie
Der Batterieladezustand wird durch die Anzahl der Quadrate im Batteriesymbol
im LCD-Display angezeigt.
Batterie/Akku voll
Batterie/Akku 2/3 voll
Batterie/Akku 1/3 voll
Batterie/Akku leer
Twintalker 9310
57
Twintalker 9310
Wenn der Batterieladezustand niedrig ist, blinkt das Batteriesymbol und ein Signalton ertönt,
um anzuzeigen, dass die Batterien/Akkus ausgetauscht oder aufgeladen werden müssen.
Laden Sie niemals nicht aufladbare Batterien wie beispielsweise AlkaliBatterien in der Ladestation auf.
12.3 Einstellen der Lautsprecherlautstärke
•
•
Drücken Sie die -Taste im Standby-Modus, um
die Lautsprecherlautstärke zu erhöhen. Das
Lautstärke-Level wird angezeigt.
Drücken Sie die -Taste, um die Lautstärke zu verringern.
12.4 Empfangen eines Signals
Das Gerät befindet sich immer im Empfangsmodus, wenn es eingeschaltet ist und nicht
sendet.
Damit andere Personen Ihre Übertragung empfangen können, müssen
sie denselben Kanal und CTCSS-Code oder DCS-Code eingestellt haben.
(Siehe Kapitel “12.6 Wechseln des Kanals” und “12.7 CTCSS (Continuous
Tone Coded Squelch System)/ DCS (Digital Coded Squelch)”)
Sie können entweder CTCSS oder DCS verwenden, aber nicht
beide gleichzeitig.
12.5 Senden eines Signals
•
•
•
Halten Sie zum Senden die PTT-Taste gedrückt. Das
TX-Symbol erscheint im Display.
Halten Sie das Gerät in einer senkrechten Position mit
dem Mikrofon 10 cm vor dem Mund. Sprechen Sie in
das Mikrofon.
Lassen Sie die PTT-Taste los, wenn Sie die Durchsage
beenden möchten.
Zum Kontrollieren der Kanäle verwenden Sie die
Kanalüberwachungsfunktion (siehe Kapitel “12.8 Kanalüberwachung”).
58
Twintalker 9310
Twintalker 9310
12.6 Wechseln des Kanals
•
•
•
Drücken Sie einmal die
-Taste. Die aktuelle
Kanalnummer blinkt in der Anzeige.
Drücken Sie die -Taste oder die -Taste, um den
Kanal zu wechseln.
Drücken Sie die PTT-Taste, um die Einstellung zu
bestätigen und in den Standby-Modus zurückzukehren.
Wenn beim Einstellen fünf Sekunden lang keine Taste betätigt wird,
kehrt das Gerät in den Standby-Modus zurück.
12.7 CTCSS (Continuous Tone Coded Squelch System)/
DCS (Digital Coded Squelch)
DEUTSCH
Lizenzfreien Sprechfunkgeräten, die wie der Twintalker 9310 auf dem Frequenzband 446
MHz senden, stehen 8 Funkkanäle zur Verfügung. Falls in Ihrer Nachbarschaft viele
Sprechfunkgeräte im Einsatz sind, besteht die Möglichkeit, dass einige der Benutzer
denselben Funkkanal verwenden.
Um zu vermeiden, dass Sie Signale von anderen Benutzern empfangen, wurden
Subkanäle integriert.
Zwei Sprechfunkgeräte können nur miteinander kommunizieren, wenn sie auf demselben
Funkkanal senden und genau denselben Subkanal ausgewählt haben.
Es gibt zwei Arten von Subkanälen:
•
Continuous Tone Coded Squelch System (CTCSS)
•
Digital Coded Squelch (DCS)
Bei Verwendung von CTCSS wird ein Ton mit niedriger Frequenz (zwischen 67 und 250 Hz)
zusammen mit dem Sprachsignal übertragen. Es stehen 38 verfügbare Töne zur Auswahl.
Sie können aus den 38 zur Verfügung stehenden Tönen einen beliebigen auswählen.
Aufgrund der Filterung sind diese Töne im Allgemeinen nicht zu hören, sodass sie die
Kommunikation nicht stören.
DCS funktioniert ähnlich wie CTCSS, aber anstatt einen kontinuierlichen Ton einer
ausgewählten Frequenz zu senden, wird dem Funksignal eine digitale Datenübertragung
hinzugefügt. Dieser digitale Code wird mit einer sehr niedrigen Rate von etwa 134 Bit pro
Sekunde übertragen (der Code ist 23 Bit lang). Nur Sprechfunkgeräte der jüngsten
Generation unterstützen DCS. Es können 83 verfügbare DCS-Codes verwendet werden. Da
ältere Modelle nur CTCSS unterstützen, empfiehlt sich die Verwendung von DCS, um zu
verhindern, dass andere Benutzer bei Ihren Gesprächen mit dem Funkgerät zu hören sind.
12.7.1 CTCSS
•
•
•
Twintalker 9310
Drücken Sie die
-Taste zweimal: “CTCSS” und der
aktuelle CTCSS-Code blinken im Display.
Drücken Sie die
-Taste oder die -Taste, um zu einem
anderen Code zu wechseln.
Drücken Sie die PTT-Taste, um die Einstellung zu
bestätigen und in den Standby-Modus zurückzukehren.
59
Twintalker 9310
12.7.2 DCS
•
•
•
Drücken Sie die
-Taste dreimal: “DCS” und der aktuelle
DCS-Code blinken im Display.
Drücken Sie die
-Taste oder die -Taste, um zu einem
anderen Code zu wechseln.
Drücken Sie die PTT-Taste, um die Einstellung zu
bestätigen und in den Standby-Modus zurückzukehren.
Zum Deaktivieren von CTCSS oder DCS wählen Sie im Menü für CTCSS
oder für DCS den Code “00” aus. Wenn die Eingabe bestätigt wird,
erscheint “OF” in der Anzeige.
12.8 Kanalüberwachung
Mit der Überwachungsfunktion können Sie schwächere Signale im aktuellen Kanal suchen.
•
•
Drücken Sie die
-Taste und die -Taste gleichzeitig, um die
Kanalüberwachung zu aktivieren.
Drücken Sie die
-Taste, um die Überwachung zu beenden.
Während der Kanalüberwachung hört die Empfängerschaltung
im Sprechfunkgerät keine CTCSS- oder DCS-Codes.
12.9 VOX-Auswahl
Das Sprechfunkgerät eignet sich für sprachaktivierte (VOX) Übertragung. Im VOX-Modus
sendet das Sprechfunkgerät ein Signal, wenn es von Ihrer Stimme oder einem anderen
Geräusch in Ihrer Umgebung aktiviert wird. Der VOX-Betrieb ist nicht empfehlenswert, wenn
Sie Ihr Funkgerät in einer lauten oder windigen Umgebung benutzen möchten.
Der VOX-Modus wird deaktiviert, wenn Sie die PTT-Taste drücken.
•
•
•
•
60
Drücken Sie die
-Taste viermal. Die aktuelle
VOX-Einstellung blinkt im Display und das
VOX-Symbol wird angezeigt.
Drücken Sie die -Taste, um die VOX-Empfindlichkeit
zwischen 1 und 3 einzustellen (3 ist die empfindlichste
Stufe).
Drücken Sie die -Taste, bis im Display “OF” erscheint,
um VOX auszuschalten.
Drücken Sie die PTT-Taste, um die Einstellung zu
bestätigen und in den Standby-Modus zurückzukehren.
Twintalker 9310
Twintalker 9310
12.10 Kanalsuchlauf
Der Kanalsuchlauf sucht in einer Endlosschleife in den Kanälen 1 bis 8 nach aktiven
Signalen.
Sobald ein aktiver Kanal gefunden wird, haben Sie die Möglichkeit, den CTCSS-Code oder
den DCS-Code zu suchen, den der Benutzer, der auf dem Kanal sendet, eingestellt hat.
12.10.1 Suchen nach einem aktiven Funkkanal
•
•
Drücken Sie die
-Taste fünfmal: “SC” und der aktuelle
Kanal blinken im Display.
Drücken Sie die
-Taste oder die -Taste, um den
Kanalsuchlauf zu starten.
DEUTSCH
Sobald ein aktiver Kanal gefunden wird, hört der Suchlauf auf und Sie können die
Übertragung hören.
Wenn die Übertragung auf dem gefundenen Kanal beendet wird, wird der Suchlauf
automatisch fortgesetzt.
Wenn Sie die PTT-Taste drücken, während Sie einen gefundenen Kanal
abhören, kehrt das Sprechfunkgerät auf dem gefundenen Kanal in den
Standby-Modus zurück.
12.10.2 Suchen nach einem CTCSS-Code
Wenn ein aktiver Kanal gefunden wird, drücken Sie die PTT-Taste, um den gefundenen
aktiven Kanal auszuwählen. Nun haben Sie die Möglichkeit, nach dem vom gefundenen
Benutzer verwendeten CTCSS/DCS-Code zu suchen.
•
•
Drücken Sie die
-Taste sechsmal: “SC” und “CTCSS 00”
blinken im Display für den ausgewählten Funkkanal.
Drücken Sie die
-Taste oder die -Taste, um den
CTCSS-Suchlauf zu starten.
Sobald eine Übertragung auf dem Kanal stattfindet, wird der CTCSS-Code (falls verwendet)
erkannt und angezeigt.
•
•
Twintalker 9310
Wenn Sie die PTT-Taste drücken, während Sie einen gefundenen
CTCSS-Code abhören, kehrt das Sprechfunkgerät auf dem Kanal
mit dem CTCSS-Code in den Standby-Modus zurück.
Wenn kein CTCSS-Code erkannt wird, besteht die Möglichkeit,
dass der Benutzer DCS gewählt hat. In diesem Fall können
Sie nach dem DCS-Code suchen (Abschnitt 12.10.3).
61
Twintalker 9310
12.10.3 Suchen nach einem DCS-Code
•
•
Drücken Sie die
-Taste siebenmal: “SC” und “DCS 00”
blinken im Display für den ausgewählten Funkkanal.
Drücken Sie die
-Taste oder die -Taste, um den
DCS-Suchlauf zu starten.
Sobald eine Übertragung auf dem Kanal stattfindet, wird der DCS-Code (falls verwendet)
erkannt und angezeigt.
Wenn Sie die PTT-Taste drücken, während Sie einen gefundenen
DCS-Code abhören, kehrt das Sprechfunkgerät auf dem Kanal mit
dem DCS-Code in den Standby-Modus zurück.
12.11 Ruftöne
Ein Rufton weist andere darauf hin, dass Sie eine Durchsage beginnen möchten.
12.11.1 Einstellen des Ruftons
Der Twintalker 9310 verfügt über 10 Ruftöne.
•
•
•
Drücken Sie die
-Taste achtmal. “CA” wird angezeigt
und der aktuelle Rufton blinkt.
Drücken Sie die -Taste oder die -Taste, um einen
anderen Rufton auszuwählen.
Drücken Sie die PTT-Taste, um die Einstellung zu
bestätigen und in den Standby-Modus zurückzukehren.
12.11.2 Senden eines Ruftons
Drücken Sie kurz auf die
-Taste. Der Rufton wird über den eingestellten Kanal gesendet.
12.12 Ein-/Ausschalten des Quittungstons (Roger Beep)
Nach dem Loslassen der PTT -Taste sendet das Gerät einen Quittungston, um das
Übertragungsende zu bestätigen.
Einstellen des Quittungstons:
• Drücken Sie die
-Taste neunmal. “rO” wird angezeigt.
• Drücken Sie
zum Aktivieren (ON) oder
zum Deaktivieren (OF)
des Quittungstons.
• Drücken Sie die PTT-Taste, um die Auswahl zu bestätigen und in den
Standby-Modus zurückzukehren.
62
Twintalker 9310
Twintalker 9310
12.13 Ein-/Ausschalten des Tastentons
Wenn eine Taste gedrückt wird, hören Sie einen kurzen Ton.
Einstellen des Tastentons.
• Drücken Sie
zehnmal. “tO” wird angezeigt.
• Drücken Sie
zum Aktivieren (ON) oder
zum Deaktivieren (OF)
des Tastentons.
• Drücken Sie die PTT-Taste, um die Auswahl zu bestätigen und in
den Standby-Modus zurückzukehren.
12.14 Zweikanalsuchlauf (DCM)
Im Standby-Modus ist das Sprechfunkgerät auf einen Kanal mit CTCSS/DCS-Code
eingestellt. Das Sprechfunkgerät empfängt nur Signale, die auf diesem Kanal und mit
diesem CTCSS/DCS-Code übertragen werden.
Mit dem Zweikanalsuchlauf (DCM) können Sie einen zweiten Kanal mit
CTCSS/DCS-Code überwachen.
•
•
•
•
•
Drücken Sie die
-Taste elfmal. “DCM OF” blinkt
im Display.
Drücken Sie die
-Taste oder die -Taste, um
den Kanal zu wechseln.
Drücken Sie die
-Taste, um die Kanalauswahl zu
bestätigen und zur CTCSS-Auswahl zu gelangen.
(Drücken Sie die
-Taste erneut, um zur DCS-Auswahl zu
gelangen.)
Drücken Sie die
-Taste oder die -Taste, um den
CTCSS-Code oder den DCS-Code zu wechseln.
Drücken Sie die PTT-Taste, um die Einstellung zu
bestätigen und in den Standby-Modus zurückzukehren.
Zum Deaktivieren der Funktion wählen Sie “OF”, wenn
Sie den DCM-Kanal auswählen.
DEUTSCH
•
Bei aktivierter Zweikanalabfrage wechselt das Sprechfunkgerät abwechselnd zwischen
dem Standby-Kanal + CTCSS/DCS-Code und dem Zweikanal + CTCSS/DCS hin und her.
12.15 Tastensperre
•
•
Halten Sie die
-Taste drei Sekunden lang gedrückt, um
die Tastensperre zu aktivieren. Das Tastensperre-Symbol
wird im LCD-Display angezeigt.
Halten Sie die
-Taste erneut für drei Sekunden gedrückt,
um die Tastensperre zu deaktivieren.
Die PTT-Taste, die
-Taste und die
aktivierter Tastensperre.
Twintalker 9310
-Taste funktionieren auch bei
63
Twintalker 9310
12.16 Stoppuhrfunktion
Der Twintalker 9310 verfügt über eine Stoppuhr, die bis 59'59''99 zählt.
•
•
•
•
•
Halten Sie die
-Taste zwei Sekunden lang gedrückt.
Die Stoppuhranzeige erscheint im Display.
Drücken Sie die
-Taste, um die Stoppuhr zu starten.
Drücken Sie die
-Taste, um die Stoppuhr zu stoppen.
Drücken Sie die -Taste, um die Stoppuhr auf null
zurückzusetzen.
Halten Sie die -Taste zwei Sekunden lang gedrückt,
um die Stoppuhr zu deaktivieren.
12.17 Display-Hintergrundbeleuchtung
Drücken Sie zum Aktivieren der Hintergrundbeleuchtung des LCD-Displays eine
beliebige Taste außer der PTT-Taste oder der
-Taste.
Die Displaybeleuchtung leuchtet sechs Sekunden.
12.18 UKW-Radio
Der Twintalker 9310 verfügt über ein integriertes UKW-Radio.
•
•
•
•
Drücken Sie kurz die -Taste, um das UKW-Radio
einzuschalten.
Drücken Sie die
-Taste oder die -Taste, um die
Frequenz auszuwählen.
Halten Sie die
-Taste oder die -Taste zwei Sekunden
lang gedrückt, um nach einem Radiosender zu suchen.
Drücken Sie kurz die
auszuschalten.
-Taste, um das UKW-Radio
Während Sie einen Radiosender hören, ist das Funkgerät weiterhin
betriebsbereit. Das UKW-Radio wird ausgeschaltet, sobald ein Signal
empfangen wird. Hört das Signal auf, wird das Radio wieder
eingeschaltet.
Während das Radio eingeschaltet ist, können Sie weiterhin Signale
senden, indem Sie die PTT-Taste oder die -Taste drücken.
64
Twintalker 9310
Twintalker 9310
13 Technische Daten
Kanäle
Subcode
Frequenz
Reichweite
Batterien
Sendeleistung
Modulationstyp
Kanalabstand
UKW-Radio
Netzteil
Channel
1
2
3
4
5
6
7
8
Frequency (MHz)
446,00625
446,01875
446,03125
446,04375
446,05625
446,06875
446,08125
446,09375
Twintalker 9310
CTCSS Code Chart
Code
0
1
2
3
4
5
6
7
8
9
Frequency (Hz)
Disabled
67,0
71,9
74,4
77,0
79,7
82,5
85,4
88,5
91,5
Code
10
11
12
13
14
15
16
17
18
19
Freq. (Hz)
94,8
97,4
100,0
103,5
107,2
110,9
114,8
118,8
123,0
127,3
Code
20
21
22
23
24
25
26
27
28
29
Freq. (Hz)
131,8
136,5
141,3
146,2
151,4
156,7
162,2
167,9
173,8
179,9
Code
30
31
32
33
34
35
36
37
38
Freq. (Hz)
186,2
192,8
203,5
210,7
218,1
225,7
233,6
241,8
250,3
65
DEUTSCH
Channel Frequency Chart:
8
CTCSS: 38/DCS: 83
446,00625 MHz - 446,09375 MHz
Bis zu 10 km (im Freien)
4 x AAA Alkali oder NiMh wiederaufladbarer Akkupack
=< 500 mW ERP
FM - F3E
12,5 kHz
87,5 MHz - 108 MHz
Eingang: 230 V AC/50 Hz - Ausgang: 9 V DC/300 mA
Twintalker 9310
DCS Code Chart
66
No
DCS code
No
DCS code
No
DCS code
No
DCS code
0
Disabled
21
134
42
311
63
516
1
2
23
25
22
23
143
152
43
44
315
331
64
65
532
546
3
4
26
31
24
25
155
156
45
46
343
346
66
67
565
606
5
6
32
43
26
27
162
165
47
48
351
364
68
69
612
624
7
47
28
172
49
365
70
627
8
9
10
51
54
65
29
30
31
174
205
223
50
51
52
371
411
412
71
72
73
631
632
654
11
71
32
226
53
413
74
662
12
13
72
73
33
34
243
244
54
55
423
431
75
76
664
703
14
74
35
245
56
432
77
712
15
16
17
114
115
116
36
37
38
251
261
263
57
58
59
445
464
465
78
79
80
723
731
732
18
125
39
265
60
466
81
734
19
20
131
132
40
41
271
306
61
62
503
506
82
83
743
754
Twintalker 9310
Twintalker 9310
14 Garantie
14.1 Garantiezeit
Die Geräte haben eine 36-monatige Garantiezeit. Die Garantiezeit beginnt an dem
Tag, an dem das neue Gerät gekauft wird. Die Garantie gilt nicht für Batterien oder
Akkus (Typ AA/AAA).
Verbrauchsmaterialien und Schäden, die unbedeutende Auswirkungen auf den Betrieb
oder den Wert des Geräts haben, sind nicht abgedeckt. Der Garantieanspruch muss
durch Vorlage des Originalkaufbelegs oder einer Kopie des Kaufbelegs nachgewiesen
werden, aus dem das Kaufdatum und das Gerätemodell ersichtlich sind.
14.2 Garantieausschlüsse
Twintalker 9310
DEUTSCH
Schäden oder Defekte, die durch unsachgemäße Handhabung oder unsachgemäßen
Betrieb verursacht werden, sowie Defekte, die durch die Verwendung von NichtOriginalteilen oder -zubehör entstehen, fallen nicht unter die Garantie.
Die Garantie deckt keine Schäden ab, die durch äußere Einflüsse entstanden sind,
wie z. B. Blitzeinschlag, Wasser, Brände oder auch jegliche Transportschäden. Wenn
die Seriennummer des Geräts verändert, entfernt oder unleserlich gemacht wurde, kann
kein Garantieanspruch geltend gemacht werden. Alle Garantieansprüche erlöschen,
wenn das Gerät vom Käufer repariert, verändert oder umgebaut wurde.
67
Twintalker 9310
1
Introdução
Agradecemos a sua aquisição do Twintalker 9310. Trata-se de um dispositivo de
comunicação rádio de longo alcance e baixo consumo, que permite a comunicação até à
distância máxima de 10 Km. O seu único custo é limitado ao recarregamento das pilhas.
O TwinTalker funciona em 8 canais.
2
Utilização prevista
Pode ser utilizado para fins recreativos. Por exemplo: para manter em contacto 2 ou mais
carros, ciclistas ou esquiadores durante uma viagem ou percurso. Pode ser utilizado para
se manter em contacto com as crianças enquanto elas brincam no exterior, etc...
3
Marca CE
O símbolo CE na unidade, no guia do utilizador e na caixa de oferta indica que a unidade se
encontra em conformidade com os requisitos essenciais da diretiva R&TTE 1999/5/CE.
4
Instruções de segurança
4.1
Geral
Leia atentamente as seguintes informações acerca da segurança e da utilização correta do
dispositivo. Familiarize-se com todas as funções do dispositivo. Conserve este manual em
lugar seguro para utilização futura.
4.2
Queimaduras
•
•
4.3
Lesões
•
•
•
68
Se a cobertura da antena estiver danificada, não lhe toque, pois se a antena
entrar em contacto com a pele durante a transmissão pode causar uma
queimadura ligeira.
As pilhas podem provocar danos materiais, como queimaduras, caso algum
material condutor, como joias, chaves ou colares, toque nos polos expostos.
O material pode fechar um circuito elétrico (curto circuito) e ficar bastante quente.
Tome cuidado ao manusear qualquer pilha carregada, em particular ao colocá-la
num bolso, bolsa ou noutro recipiente que contenha objetos metálicos.
Não coloque o dispositivo na zona por cima de um airbag nem na área de ação do
airbag. Os airbags são insuflados com muita força. Se um PMR for colocado na
área de ação do airbag e este for insuflado, o comunicador pode ser projetado com
muita força e causar lesões graves nos ocupantes do veículo.
Mantenha o PMR a pelo menos 15 centímetros de um pacemaker.
Desligue o PMR imediatamente se este causar interferência em
qualquer equipamento médico.
Twintalker 9310
Twintalker 9310
4.4
Perigo de explosão
•
•
•
Não substitua as pilhas na presença de qualquer atmosfera potencialmente
explosiva. Pode libertar-se uma faísca do contacto ao colocar ou ao retirar as
pilhas e provocar uma explosão.
Desligue o PMR quando se encontrar em áreas com uma atmosfera
potencialmente explosiva. Faíscas nestas áreas podem provocar uma explosão
ou um incêndio, resultando em lesões físicas ou mesmo na morte.
Nunca coloque pilhas no fogo, pois podem explodir.
Áreas com atmosferas potencialmente explosivas estão frequentemente
marcadas de forma clara, mas nem sempre. Estas incluem áreas de
armazenamento de combustível como o porão de embarcações,
instalações de armazenamento ou transferência de combustível ou
de produtos químicos; áreas onde o ar contém substâncias químicas
ou partículas, como poeiras de cereais, pó ou metais; e quaisquer outras
áreas em que normalmente seria recomendável desligar o motor do
seu veículo.
4.5
Perigo de envenenamento
•
Restrições legais
•
•
•
•
4.7
Nalguns países é proibido utilizar o PMR durante a condução de um veículo.
Neste caso, é aconselhável sair da estrada antes de utilizar o dispositivo.
Desligue o PMR a bordo de aviões quando for instruído a fazê-lo. Qualquer
utilização da unidade deve estar em conformidade com os regulamentos da linha
aérea e as instruções da tripulação.
Desligue o PMR em quaisquer instalações onde existam avisos de que deve
fazê-lo. Os hospitais e unidades de saúde poderão conter equipamento sensível
a energia RF externa.
A substituição ou a modificação da antena poderá afetar as especificações de
PMR e violar os regulamentos CE. Antenas não autorizadas poderão igualmente
danificar o rádio.
Notas
•
•
5
Não toque na antena enquanto o dispositivo estiver em transmissão, pois poderá
afetar o alcance.
Remova as pilhas se o dispositivo não for utilizado durante um período de tempo
prolongado.
Limpeza e manutenção
•
•
Para limpar a unidade, passe um pano macio humedecido com água. Não utilize
agentes de limpeza ou solventes na unidade, pois podem danificar a caixa
e penetrar no interior do dispositivo, causando danos permanentes.
Os contactos das pilhas podem ser limpos com um pano seco que não
liberte partículas.
Twintalker 9310
69
PORTUGUÊS
4.6
Mantenha as pilhas afastadas de crianças pequenas.
Twintalker 9310
•
6
Caso a unidade se molhe, desligue-a e retire imediatamente as pilhas. Seque
o compartimento das pilhas com um pano macio de modo a minimizar os danos
potenciais causados pela água. Deixe o compartimento das pilhas aberto durante
a noite ou até estar completamente seco. Não utilize a unidade até estar
completamente seca.
Eliminação do dispositivo (ambiente)
Quando o ciclo de vida do produto chega ao fim, não deve eliminar este produto
juntamente com os resíduos domésticos. Deve levá-lo a um ponto de recolha
de equipamentos elétricos e eletrónicos. O símbolo presente no produto, no
manual do utilizador e/ou na caixa dá essa indicação.
Alguns dos materiais do produto podem ser reutilizados se os colocar num
ponto de reciclagem. Ao reutilizar algumas das partes ou das matérias-primas dos produtos
utilizados, contribui de forma importante para a proteção do meio ambiente. Contacte as
autoridades locais se necessitar de mais informações sobre os pontos de recolha existentes
na sua área.
7
Utilizar um dispositivo PMR
Para que seja possível estabelecer comunicação entre dispositivos PMR, estes têm de
estar definidos para o mesmo canal e código CTCSS/DCS (ver capítulo “12.7 CTCSS
(Continuous Tone Coded Squelch System - sistema silenciador controlado por tonalidades)
/ DCS (Digital Coded Squelch - sistema celular digital)”) e encontrar-se dentro do alcance de
receção (até a um máx. de 10 km em campo aberto). Dado que estes dispositivos utilizam
bandas de frequência livre (canais), todos os dispositivos ligados partilham estes canais
(total de 8 canais). Assim, a privacidade não é garantida. Qualquer pessoa que disponha de
um conjunto PMR definido para o mesmo canal poderá ouvir a conversa. Quando quiser
comunicar (transmitir um sinal de voz) deve premir o botão PTT.
Uma vez premido este botão, o dispositivo entra em modo de transmissão e pode falar para
o microfone. Todos os outros dispositivos PMR na área de alcance, definidos no mesmo
canal e em modo de espera (que não estejam em modo de transmissão), ouvirão a sua
mensagem. É necessário esperar até que um outro dispositivo acabe a transmissão para
poder responder à mensagem. No final de cada transmissão, a unidade enviará um sinal
sonoro “bip” se a função Roger Beep estiver ativada (ver capítulo “12.12 Ligar/Desligar sinal
de fim de comunicação (Roger)”). Para responder, simplesmente prima o botão PTT e fale
para o microfone.
Caso 2 ou mais utilizadores primam o botão PTT ao mesmo tempo, o
recetor receberá apenas o sinal mais forte e os restantes sinais serão
suprimidos. Assim, deve transmitir um sinal (premir o botão PTT) apenas
quando o canal está desimpedido.
O alcance das ondas de rádio é fortemente afetado por obstáculos, tais
como edifícios, estruturas de metal/betão, os acidentes da paisagem,
bosques, plantas, ... Isto quer dizer que, nalguns casos, o alcance entre
dois ou mais PMR pode ser reduzido a um máximo de algumas dezenas
de metros. Rapidamente verificará que os PMR funcionam melhor
quando existe um número mínimo de obstáculos entre os utilizadores.
70
Twintalker 9310
Twintalker 9310
8
8.1
1.
2.
Introdução
A
Colocar/retirar o clipe de cinto
Para retirar o clipe de cinto da unidade,
empurre o clipe de cinto (B) na direção
da antena ao mesmo tempo que puxa
pela patilha (A).
Ao recolocar o clipe de cinto, um clique
indica que o clipe está preso em posição.
B
C
Instalação das Pilhas
PORTUGUÊS
8.2
D
1.
2.
3.
4.
5.
Retire o clipe de cinto (ver capítulo “8.1 Colocar/retirar o clipe de cinto”).
Abra o fecho do compartimento das pilhas (C) e retire a tampa.
Instale o conjunto de pilhas recarregáveis respeitando a polaridade tal como indicado.
Assegure-se de que os contactos metálicos no lado (D) se encontram voltados para
fora, de modo a estabelecerem ligação com a tampa do compartimento das pilhas.
Feche com a tampa do compartimento das pilhas.
Reponha o clipe de cinto.
Twintalker 9310
71
Twintalker 9310
9
Carregar as pilhas
Quando as pilhas estão instaladas,
o carregador de secretária proporciona
a possibilidade de carregamento.
1.
2.
3.
4.
Coloque o carregador de mesa
sobre uma superfície plana.
Ligue uma extremidade do
transformador fornecido a uma
tomada elétrica facilmente
acessível e a outra extremidade
ao conector existente na parte de
trás do carregador de secretária.
Coloque o rádio no carregador
da forma indicada.
O LED indicador de carregamento
acende-se quando o dispositivo
está inserido da forma correta e em carregamento.
Levará cerca de 8 a 10 horas até que as pilhas estejam totalmente carregadas.
Quando o PMR se encontra no carregador de secretária, o LED permanece ACESO,
mesmo quando as pilhas estão totalmente carregadas.
Não prima o botão PTT do PMR enquanto se encontra colocado no
carregador!
Não provoque curto-circuitos nem elimine as pilhas queimando-as.
Retire as pilhas se o dispositivo não for utilizado durante um período de
tempo prolongado.
Não carregue pilhas não recarregáveis, tais como pilhas alcalinas, no
carregador. Isto poderá causar danos nos PMR e no carregador.
72
Twintalker 9310
Twintalker 9310
10 Descrição
1.
2.
3.
4.
5.
6.
7.
8.
9.
10.
11.
Antena fixa
Visor LCD
Ligação para auricular opcional e carregador
Botão de Menu
– Entra no menu de configuração
Botão Ligar/Desligar
Microfone
Botão Para Cima
– Aumenta o volume do som
– Seleciona o valor seguinte no menu
Altifalante
Botão Para Baixo
– Reduz o volume do som
– Seleciona o valor anterior no menu
Botão de Chamada
– Transmite um tom de chamada
Botão premir para falar PTT
1
11
10
9
2
3
4
5
6
7
8
Ícone TX - Apresentado durante a transmissão de
um sinal
Ícone RX - Apresentado durante a receção de um sinal
Indicador do volume do som
Ícone Bloqueado - Apresentado quando o teclado se
encontra bloqueado.
Indicador do estado de carregamento das pilhas
Ícone VOX - Apresentado no modo de controlo por voz
(Modo VOX)
Ícone Scan - Apresentado quando o Modo SCAN se
encontra ativado
Ícone Dual Scan - Apresentado quando o Modo DUAL
SCAN se encontra ativado
12 Utilizar o Twintalker 9310
As ilustrações do visor nas páginas que se seguem apenas mostram
os ícones ou as informações no visor das funções que são explicadas
no texto.
Twintalker 9310
73
PORTUGUÊS
11 Informação apresentada no visor LCD
Twintalker 9310
12.1 Ligar e desligar a unidade
Ligar:
•
Prima e mantenha premido o botão
durante 2
segundos. A unidade emitirá um sinal sonoro (bip)
e o visor LCD apresentará o canal ativo.
Desligar:
•
Prima e mantenha premido o botão
durante 2
segundos. A unidade emitirá um sinal sonoro (bip)
e o visor LCD ficará vazio.
12.2 Nível de Carga das Pilhas/Indicador de Pilhas Fracas
O nível de carga das pilhas é indicado pelo número de quadrados presentes no interior
do ícone de pilhas no visor LCD.
Pilhas carregadas
Pilhas a 2/3 da carga
Pilhas a 1/3 da carga
Pilhas descarregadas
Quando o nível de carga das pilhas é fraco, o ícone de nível de carregamento das pilhas
começará a piscar e ouve-se um sinal sonoro de modo a indicar que é necessário substituir
ou recarregar as pilhas.
Nunca recarregue pilhas não recarregáveis, como por exemplo pilhas
alcalinas.
12.3 Ajustar o Volume do Altifalante
•
•
Prima o botão
em modo de espera para aumentar
o volume do som. É mostrado o nível de volume.
Prima o botão
para baixar o volume do som.
12.4 Receber um Sinal
A unidade encontra-se continuamente em modo de receção enquanto está ligada e não está
a transmitir.
Para que os outros recebam a sua transmissão, têm de estar no mesmo
canal e ter definido o mesmo código CTCSS ou código DCS. (Ver capítulo
“12.6 Mudar de Canal” e “12.7 CTCSS (Continuous Tone Coded Squelch
System - sistema silenciador controlado por tonalidades) / DCS (Digital
Coded Squelch - sistema celular digital)”)
74
Twintalker 9310
Twintalker 9310
12.5 Transmitir um sinal
•
•
•
Prima e mantenha premido o botão PTT para transmitir.
É mostrado o símbolo TX.
Mantenha a unidade numa posição vertical, com
o microfone a 10 cm da boca, e fale diretamente para
o microfone.
Solte o botão PTT para parar de transmitir.
Para verificar a atividade do canal, utilize a função de monitorização
(ver capítulo “12.8 Monitorização”).
12.6 Mudar de Canal
•
•
•
Prima uma vez o botão
; o número do canal atual
aparece intermitente no visor.
Prima o botão
ou o botão
para mudar o canal.
Prima o botão PTT para confirmar e regressar ao modo
de espera.
12.7 CTCSS (Continuous Tone Coded Squelch System sistema silenciador controlado por tonalidades) /
DCS (Digital Coded Squelch - sistema celular digital)
Os rádios PMR sem licença que operam na banda de frequências de 446 MHz, como o PMR
Twintalker 9310, dispõem de 8 canais de rádio disponíveis. Caso existam muitos utilizadores
de PMR na sua região, existe a possibilidade de alguns destes utilizadores operarem no
mesmo canal de rádio.
Para evitar receber sinais de outros utilizadores, foram integrados subcanais.
Dois rádios PMR apenas poderão comunicar entre si quando operam no mesmo canal de
rádio e quando tiverem selecionado exatamente o mesmo subcanal.
Existem dois tipos de subcanais:
•
CTCSS (Continuous Tone Coded Squelch System - sistema silenciador
controlado por tonalidades )
•
DCS (Digital Coded Squelch - sistema celular digital)
Ao utilizar o CTCSS, é transmitido um tom de baixa frequência (entre 67 e 250 Hz) em
conjunto com o sinal de voz. Pode selecionar entre 38 tons disponíveis. Escolha livremente
entre um dos 38 tons disponíveis. Devido à filtração, estes tons em geral não são audíveis,
de modo a não prejudicarem a comunicação.
Twintalker 9310
75
PORTUGUÊS
Se nenhum botão for premido no espaço de 5 segundos durante
a configuração, a unidade regressa ao modo de espera.
Twintalker 9310
O DCS é semelhante ao CTCSS, mas em vez de ser enviado um tom contínuo de uma
frequência selecionada, é adicionada uma transmissão de sinais digitais ao sinal de rádio.
Este Código Digital é transmitido a uma frequência muito baixa, à volta de 134 bits por
segundo (o código tem um tamanho de 23 bits). Apenas os PMR de última geração suportam
DCS. Existem 83 códigos DCS disponíveis que podem ser utilizados. Dado que os modelos
mais antigos apenas suportam CTCSS, o melhor é utilizar DCS para evitar que outros
utilizadores sejam audíveis durante as suas conversas com o PMR.
12.7.1 CTCSS
•
•
•
Prima duas vezes o botão
: “CTCSS” e o código
CTCSS atual piscam no visor.
Prima o botão
ou o botão
para mudar para
outro código.
Prima o botão PTT para confirmar e regressar ao modo
de espera.
12.7.2 DCS
•
•
•
Prima três vezes o botão
: “DCS” e o código DCS
atual piscam no visor.
Prima o botão
ou o botão
para mudar para
outro código.
Prima o botão PTT para confirmar e regressar ao modo
de espera.
Para desativar CTCSS ou DCS, selecione o código “00” para CTCSS
ou para DCS no menu. Quando a sua seleção for confirmada, “OF”
será apresentado.
12.8 Monitorização
Pode utilizar a função de monitorização para procurar sinais mais fracos no canal ativo.
•
•
Prima simultaneamente o botão
e o botão
para ativar a monitorização
de canais.
Prima o botão
para parar a monitorização de canais.
Durante a monitorização de canais, o circuito de receção do PMR
não escuta os códigos CTCSS ou DCS.
76
Twintalker 9310
Twintalker 9310
12.9 Seleção de VOX
A transmissão do PMR pode ser ativada por voz (VOX). No modo VOX, o rádio transmitirá
um sinal sempre que seja ativado pela sua voz ou por qualquer som. A operação em modo
VOX não é recomendada se o rádio for utilizado em locais ruidosos ou ventosos.
O modo VOX será desativado quando premir o botão PTT.
•
•
•
•
Prima quatro vezes o botão
: a configuração corrente
de VOX fica intermitente no visor e o ícone VOX
é apresentado.
Prima o botão
para selecionar o nível de sensibilidade
VOX de 1 a 3 (o nível 3 é o mais sensível).
Prima o botão
até que ‘OF’ seja apresentado no visor,
para desativar o modo VOX.
Prima o botão PTT para confirmar e regressar ao modo
de espera.
12.10 Procura de canais
PORTUGUÊS
A procura de canais procura sinais ativos em contínuo, do canal 1 ao 8.
Quando um canal ativo é encontrado, tem a opção de procurar o código CTCSS
ou o código DCS definido pelo utilizador que está a emitir nesse canal.
12.10.1 Procura de um canal de rádio ativo
•
•
Prima o botão
piscam no visor.
Prima o botão
de canais.
cinco vezes: “SC” e o código atual
ou o botão
para iniciar a procura
Quando um canal ativo é encontrado, a procura pára e pode ouvir a transmissão.
Quando a transmissão do canal encontrado pára, a procura de canais é retomada
automaticamente.
Se premir o botão PTT enquanto ouve um canal encontrado,
o PMR regressa ao modo de espera no canal encontrado.
12.10.2 Procura de um código CTCSS
Quando um canal ativo é encontrado, prima o botão PTT para selecionar o canal
ativo encontrado. Tem agora a opção de procurar o código CTCSS/DCS utilizado
pelo utilizador encontrado.
Twintalker 9310
77
Twintalker 9310
•
•
Prima o botão
seis vezes: “SC” e “CTCSS 00” piscam
no visor para o canal de rádio selecionado.
Prima o botão
ou o botão
para iniciar a procura
de canais CTCSS.
Quando existir uma transmissão no canal, o código CTCSS (se utilizado) será detetado
e apresentado.
•
•
Se premir o botão PTT enquanto ouve um canal encontrado,
o PMR regressa ao modo de espera no canal com o
código CTCSS.
Caso não seja detetado nenhum código CTCSS, há a
possibilidade de estar a ser utilizado um código DCS
selecionado pelo utilizador. Neste caso, procure o código DCS.
(secção 12.10.3)
12.10.3 Procura de um código DCS
•
•
Prima o botão
sete vezes: “SC” e “DCS 00” piscam
no visor para o canal de rádio selecionado.
Prima o botão
ou o botão
para iniciar a procura
do DCS.
Quando existir uma transmissão no canal, o código DCS (se utilizado) será detetado
e apresentado.
Se premir o botão PTT enquanto ouve o código DCS encontrado,
o PMR regressa ao modo de espera no canal com o código DCS.
12.11 Tons de chamada
Um tom de chamada alerta os outros utilizadores de que pretende começar a falar.
12.11.1 Definir o sinal de chamada
O Twintalker 9310 tem disponíveis 10 tons de chamada.
•
•
•
78
Prima o botão
oito vezes: “CA” é apresentado e o tom
de chamada atual fica intermitente.
Prima o botão
ou o botão
para mudar para outro Tom
de chamada.
Prima o botão PTT para confirmar e regressar ao modo
de espera.
Twintalker 9310
Twintalker 9310
12.11.2 Enviar um sinal de chamada
Prima brevemente o botão
. O sinal de chamada é transmitido no canal definido.
12.12 Ligar/Desligar sinal de fim de comunicação (Roger)
Depois de soltar o botão PTT , a unidade envia um sinal de fim de comunicação (Roger)
de modo a confirmar que parou de falar.
Para definir o sinal de fim de comunicação (Roger).
• Prima nove vezes o botão
. ‘rO’ é apresentado.
• Prima
para ativar (ON) ou
desativar o sinal de fim de
comunicação (Roger) (OF).
• Prima o botão PTT para confirmar a seleção e regressar ao
modo de espera.
12.13 Ligar/Desligar tons de teclado
Quando um botão é premido, a unidade emite um ligeiro sinal sonoro.
Para definir os tons do teclado.
• Prima dez vezes
. ‘tO’ é apresentado.
• Prima
para ativar (ON) ou
para desativar os tons de teclado
(OF).
• Prima o botão PTT para confirmar a sua seleção e regressar ao
modo de espera.
PORTUGUÊS
12.14 Função de monitorização de bicanal 'Dual Channel'
No modo de espera, o PMR é definido para um canal com um código CTCSS/DCS.
O PMR apenas recebe sinais transmitidos nesse canal com o código CTCSS/DCS.
O monitor de bicanal 'Dual Channel Monitor' (DCS) permite-lhe monitorizar um segundo
canal com código CTCSS/DCS.
•
•
•
•
•
•
Prima onze vezes o botão
, “DCM OF” pisca no visor.
Prima o botão
ou o botão
para mudar de canal.
Prima o botão
para confirmar a seleção de canal e ir
para a seleção de CTCSS. (Prima novamente o botão
para ir para a seleção DCS)
Prima o botão
ou o botão
para mudar o código
CTCSS ou o código DCS.
Prima o botão PTT para confirmar e regressar ao modo
de espera.
Para desativar a função selecione “OF” quando estiver
a selecionar o canal DCM.
Quando a função de monitorização de bicanal está ativada, o PMR comuta sequencialmente
entre o canal de espera + código CTCSS/DCS e o outro canal selecionado + código
CTCSS/DCS.
Twintalker 9310
79
Twintalker 9310
12.15 Bloqueio do teclado
•
•
Prima e mantenha premido o botão
durante três
segundos para ativar o modo de bloqueio de teclado.
O ícone de bloqueio de teclado é mostrado no visor LCD.
Prima novamente e mantenha premido o botão
,
durante três segundos, para desativar o bloqueio
de teclado.
O botão PTT, o botão
e o botão
continuam funcionais mesmo
quando o bloqueio de teclado está ativado.
12.16 Função de cronómetro
O Twintalker 9310 tem um cronómetro que marca o tempo até 59'59''99.
•
•
•
•
•
Prima e mantenha premido o botão
durante dois
segundos e o cronómetro é apresentado.
Prima o botão
para iniciar o cronómetro.
Prima o botão
para parar o cronómetro.
Prima o botão
para repor o cronómetro a zeros.
Prima e mantenha premido o botão
durante dois
segundos para desativar o cronómetro.
12.17 Luz de fundo do visor
Para ativar a luz de fundo do visor LCD, prima qualquer botão exceto o botão PTT ou
o botão
.
A luz de fundo do visor LCD acende-se durante 6 segundos.
12.18 Rádio FM
O Twintalker 9310 possui um rádio FM integrado.
•
•
•
•
80
Prima brevemente o botão
para ligar o rádio FM.
Prima o botão
ou o botão
para sintonizar
a frequência.
Prima e mantenha premido o botão
ou o botão
durante dois segundos para procurar uma estação de rádio.
Prima brevemente o botão
para desligar o rádio FM.
Twintalker 9310
Twintalker 9310
Enquanto ouve a estação de rádio sintonizada, o PMR continuará
operacional em fundo. O rádio FM desliga-se quando é recebido um sinal
e retoma a transmissão quando o PMR deixar de receber um sinal.
Enquanto o rádio estiver ligado, poderá continuar a emitir sinais
premindo o botão PTT ou o botão .
13 Especificações técnicas
Poder de Transmissão
Tipo de Modulação
Espaçamento de canais
Rádio FM
Transformador de corrente
Channel Frequency Chart:
Channel
1
2
3
4
5
6
7
8
Frequency (MHz)
446,00625
446,01875
446,03125
446,04375
446,05625
446,06875
446,08125
446,09375
Twintalker 9310
8
CTCSS 38 / DCS: 83
446.00625 MHz - 446.09375 MHz
Até 10 km (campo aberto)
4 x pilhas alcalinas AAA ou conjunto de pilhas
recarregáveis de NiMh
=< 500mW ERP
FM - F3E
12,5 kHz
87,5 MHz - 108 MHz
Entrada: 230V AC / 50Hz - Saída: 9V DC / 300mA
PORTUGUÊS
Canais
Subcódigo
Frequência
Alcance
Pilhas
CTCSS Code Chart
Code
0
1
2
3
4
5
6
7
8
9
Frequency (Hz)
Disabled
67,0
71,9
74,4
77,0
79,7
82,5
85,4
88,5
91,5
Code
10
11
12
13
14
15
16
17
18
19
Freq. (Hz)
94,8
97,4
100,0
103,5
107,2
110,9
114,8
118,8
123,0
127,3
Code
20
21
22
23
24
25
26
27
28
29
Freq. (Hz)
131,8
136,5
141,3
146,2
151,4
156,7
162,2
167,9
173,8
179,9
Code
30
31
32
33
34
35
36
37
38
Freq. (Hz)
186,2
192,8
203,5
210,7
218,1
225,7
233,6
241,8
250,3
81
Twintalker 9310
DCS Code Chart
82
No
DCS code
No
DCS code
No
DCS code
No
DCS code
0
Disabled
21
134
42
311
63
516
1
2
23
25
22
23
143
152
43
44
315
331
64
65
532
546
3
4
26
31
24
25
155
156
45
46
343
346
66
67
565
606
5
6
32
43
26
27
162
165
47
48
351
364
68
69
612
624
7
47
28
172
49
365
70
627
8
9
10
51
54
65
29
30
31
174
205
223
50
51
52
371
411
412
71
72
73
631
632
654
11
71
32
226
53
413
74
662
12
13
72
73
33
34
243
244
54
55
423
431
75
76
664
703
14
74
35
245
56
432
77
712
15
16
17
114
115
116
36
37
38
251
261
263
57
58
59
445
464
465
78
79
80
723
731
732
18
125
39
265
60
466
81
734
19
20
131
132
40
41
271
306
61
62
503
506
82
83
743
754
Twintalker 9310
Twintalker 9310
14 Garantia
14.1 Período de garantia
As unidades têm um período de garantia de 36 meses. O período de garantia entra em
efeito a partir da data de compra da unidade. Não há qualquer garantia em pilhas padrão
ou recarregáveis (tipo AA/AAA).
Consumíveis e defeitos que causem um efeito negligenciável sobre o funcionamento ou
o valor do equipamento não se encontram cobertos por esta garantia. A prova de garantia
terá de ser dada com a apresentação da respetiva confirmação de compra, ou uma cópia
da mesma, na qual apareçam indicados a data de compra e o modelo da unidade.
14.2 Exclusões de garantia
PORTUGUÊS
Danos ou defeitos causados pelo tratamento ou operação incorretos e danos resultantes
da utilização de peças ou acessórios não originais não são abrangidos pela garantia.
A garantia não cobre danos causados por fatores externos, como relâmpagos, água e fogo,
nem quaisquer danos causados durante o transporte. Não se poderá reclamar os direitos de
garantia se o número de série que se encontra na unidade tiver sido alterado, retirado ou
tornado ilegível. Qualquer reclamação de garantia não será válida se a unidade tiver sido
reparada, alterada ou modificada pelo comprador.
Twintalker 9310
83
TWINTALKER 9310 LONG RANGE
MD3900424 - V1.1