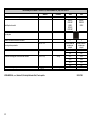
1
GB INSTRUCTIONS FOR OPERATION AND MAINTENANCE Dear customer, You have purchased a product of our new series of built-in electric appliances. We hope that our product will serve you well and for long time. We recommend you to study these instructions and to operate this product according to them. IMPORTANT INFORMATION, INSTRUCTIONS AND RECOMMENDATIONS DE AT BEDIENUNGS- UND WARTUNGSEINLEITUNG Sehr geehrter Kunde, Sie haben ein Produkt aus der unserer neuen Serie der eingebauten Elektrogeräte gekauft. Unser Wunsch ist, dass das Produkt Ihnen gut dient. Wir empfehlen Ihnen diese Anweisung zu lernen and das Produkt gemäß in der Anweisung erhaltenen Informationen zu bedienen. WICHTIGE INFORMATIONEN, ANWEISUNGEN UND EMPFEHLUNGEN PT INSTRUÇÕES DE FUNCIONAMENTO E MANUTENÇÃO Caro Cliente, Adquiriu um produto da nova geração de placas de encastre. Esperamos que o mesmo o satisfaça. Recomendamos que leia atentamente estas instruções e opere este aparelho de acordo com as mesmas INFORMAÇÕES IMPORTANTES, NORMAS E RECOMENDAÇÕES Safety measures Sicherheitsmaßnahmen Medidas de seugurança This appliance can be used by Dieses Gerät dürfen Kinder, älter Recomenda-se veemente aos children aged from 8 years and als 8 Jahre, wie auch Personen menores a partir de 8 anos e às above and persons with reduced mit verminderten körperlichen, pessoas com capacidades physical, sensory or mental sensorischen und geistigen físicas, motoras ou mentais capabilities or lack of experience Fähigkeiten oder mangelhaften reduzida ou aos adultos sem and knowledge if they have been Erfahrungen und Wissen exeperiência ou sem given supervision or instruction bedienen, jedoch nur, wenn Sie conhecimentos suficientes, de concerning use of the appliance das Gerät unter entsprechender ser auxiliadas por alguém com in a safe way and understand the Aufsicht bedienen oder competência para utilizar o hazards involved. Children shall entsprechende Hinweise über aparelho. Ou, se utilizar o 1 2 not play with the appliance. Cleaning and user maintenance shall not be made by children without supervision. WARNING: Danger of fire: do not lay down objects on the cooking surfaces. WARNING: The cooking without supervision with fat or oil on the cooking surface could be dangerous and could cause the ignition of fire. NEVER extinguish the fire here with water, but switch out the appliance first and then cover the flames for instance with pot lid or with a wet cloth. NOTICE: The cooking process should be provided under supervision. Also a short time cooking should be provided under constant supervision. Switch out the cooking element after use with the corresponding control device, do not rely on the pot detector. Do not lay down any metal objects on the induction cooking den sicheren Gebrauch des Geräts erhalten haben und wenn Sie über die mit dem Gebrauch des Geräts verbundenen Gefahren belehrt wurden. Kinder sollten mit dem Gerät nicht spielen. Kinder sollen das Gerät nicht reinigen und keine Instandhaltungsarbeiten am Gerät ohne die entsprechende Aufsicht von Erwachsenen ausführen. WARNUNG: Feuergefahr: legen sie keine Gegenstände auf die Kochoberflächen ab. WARNUNG: Das Kochen mit Fett oder Öl auf der Kochplatte ohne Aufsicht kann gefährlich sein und kann ein Feuer verursachen. NIEMALS löschen das Feuer mit Wasser, sondern schalten sie das Gerät aus und dann decken sie die Flammen zum Beispiel mit einem Topfdeckel oder feuchtem Tuch zu. HINWEIS: Das Kochen muss unter Aufsicht erfolgen. Auch kurzzeitiges Kochen muss unter aparelho sem vigilância de uma pessoa competente, recomendase de serem instruídas sobre o uso do aparelho, tendo consciência do risco possível. Não deixe as crianças brincar com o aparelho. Limpeza e manutenção do aparelho não pôde ser feita por crianças com menos que 8 anos, ou criança sem vigilância. Atenção: Perigo de incêndio: Não coloque objectos sobre as superfícies para cozinhar. Atenção: Cozinhar na placa cerámica ou placa de indução com banha ou óleo pode ser perigoso e pode causar incêndio. Nunca apague o fogo com água, desligue primeiro o aparelho e em seguida abafe as chamas com uma tampa ou um pano molhado. Aviso: Ao cozinhar deve estar sempre em alerta. Deve prestar sempre a maxima atenção quando estiver a cozinhar rápido ou com pressa. surface, as forks, spoons and lids, as they could be heated up. WARNING: If the hotplate surface shows cracks, switch out the appliance and the circuit breaker for to prevent the electric shock. Never use steam or pressure cleaners for cleaning of the appliance. A danger of electric shock is threatening here. The appliance is not adapted for control with help of external timers or other special control devices. WARNING: Use the protection of cooking panel designed with the producer of cooking appliance or marked with the appliance producer as suitable in the user's manual only, or protection devices directly built in in the appliance. The use of incorrect protection devices could cause accident. Caution Only authorized service worker or similar authorized person can 3 Aufsicht erfolgen. Schalten sie die Kochplatte nach der Benutzung mit der entsprechenden Steuereinrichtung aus und verlassen sie sich auf den Topfdetektor nicht. Legen sie auf die Kochplatte keine Metallgegenstände wie Messer, Gabel, Löffel oder Topfdecke ab, weil sie sich aufwärmen können. WARNUNG: Falls die Oberfläche der Kochplatte oder des Kochelements gekracht ist, schalten sie das Gerät und den Schutzschalter aus, damit sie die Möglichkeit eines Elektrounfalls verhindern können. Verwenden sie nie Dampfreiniger oder Druckluftreiniger für Reinigung des Geräts. Es droht ein Elektrounfall. Das Gerät ist für Steuerung mit externem Wecker oder anderen speziellen Steuersystemen nicht geeignet. WARNUNG: Verwenden sie nur Após o uso do aparelho, desligue-o completamente e não espere que o dispositivo de controle ou detector de alerta do recipiente se active. Não coloque sobre a placa de indução ou placa cerámica quaisquer objetos metálicos, tais como facas, garfos, colheres e tampas, porque eles podem se aquecer e causar danos. ATENÇÃO: Se a superfície da placa para cozinhar ou de uma das bocas do fogao estiver rachada, desligue o aparelho e o disjuntor, para evitar a possibilidade de choque elétrico. Para limpar o aparelho nunca utilize produtos de limpeza a vapor ou a pressão. Corre o risco de apanhar um choque elétrico. O aparelho não está preparado para operar com control remoto, temporizadores externos e outros sistemas especiais de controle a distância. ATENÇÃO: Utilize apenas as barreiras ou mateial de proteção 4 connect the appliance to the die Barriere der Kochplatte, do painel de cozinha concebidos electric mains. welche mit dem Erzeuger des pelo fabricante ou indicados pelo Manipulation with the appliance Kochgeräts konstruiert wurde fabricante nas instruções de uso or unprofessional service could oder mit dem Erzeuger des como acessíveis. O uso de lead to risk of serious injury or to Kochgeräts in der Anleitung als barreiras ou material de proteção damaging of appliance, geeignet bestimmt wurde, oder impróprio pode causar acidentes. eventually. The installation, the die Barriere der Kochplatte, die Chamada de atenção all repairs, modifications or direkt in dem Gerät eingebaut ist. O aparelho deve ser ligado à interventions into the appliance Die Verwendung von corrente eléctrica por um técnico should be provided with the ungeeigneten Barrieren kann ou uma pessoa competente. authorized serviceman or Unfälle verursachen. O manuseamento do aparelho ou Warnung similarly authorized person only. serviço não profissional pode ser A device for disconnecting of all Das Gerät kann zu dem um risco de ferimentos graves ou poles of the appliance from the Stromnetz nur mit dem danos ao produto. A instalação, mains Into the electric wall circuit Inbetriebsetzer oder mit einer reparos, modificações e before the appliance should be ähnlich fachlich befähigten intervenções no aparelho deve inserted, where the contacts Person zugeschaltet werden. ser sempre feita por um técnico distance in disconnected state is Eine Manipulation mit dem Gerät ou uma pessoa competente. 3 mm as minimum (thereafter oder ein unsachgemäßer Eingriff Durante a instalação eléctrica do called in the text as mains kann zu Risiko einer schweren aparelho deve-se sempre instalar switch). Verletzung oder zu Beschädigung entre a caixa fixa de derivação e The hotplate must be connected des Produktes zu führen. Die o aparelho um disjuntor, para a to power net with corresponding Inbetriebsetzung, alle desconexão dos pólos do voltage, which is noticed on the Reparaturen, Änderungen und dispositivo de rede. Os contactos rating plate, and with line Eingriffe in das Gerät müssen nur em posição desativada devem ter connector corresponding to the mit dem Inbetriebsetzer oder mit uma distância de 3 mm. power capacity of the hotplate einer ähnlich befähigten Person (doravante designado como (see the art. "Connection of durchgeführt werden. interruptor principal). 5 appliance to the power net"). Please let confirm the date of provided installing in the Guarantee sheet. The product is designed exclusively for cooking. Do not use for other purposes, for instance for room heating. Do not put empty pots on the cooking zones. The electric feeding cables of the appliance or other appliances should not come in contact with the cooking plate. Switch off the mains switch before providing cleaning or repairs. Do not use the glass-ceramic surface as a shelf. Cracks or other damaging of surface can be caused so. Do not heat up food covered with aluminum foil, plastic pots or similar materials. The danger of melting, fire or the damaging of hotplate threatens in such cases. If the hotplate is not in service, ensure that all of its control Am Anfang des festen Stromkreises vor dem Gerät muss ein Schalter für Abschaltung aller Polen des Geräts von dem Stromnetz, bei welchem die Entfernung der abgeschalteten Kontakte mindestens 3 mm ist (weiter im Text nur als Hauptschalter genannt) gebaut werden. Die Kochplatte muss zu einem Stromnetz mit vorgeschriebener, aus dem Typenschild angegebener Spannung zugekoppelt werden, und mit einer Stromschnur, welche der Leistung der Kochplatte entspricht (sehe „Kopplung des Geräts zu dem Stromnetz“). Lassen Sie sich das Datum der Montage in die Garantieschein bestätigen. Das Erzeugnis ist ausschließlich für das Kochen bestimmt. Verwenden sie das Gerät für andere Zwecke, wie zum Beispiel für Heizung des Raums, nicht. Legen sie die leeren Töpfe auf A vitrocerâmica deve estar ligada devidamente à rede elétrica de tensão prescrita, indicada na placa de identificação, em conformidade com a potência instalada da vitrocerâmica (veja „Instruções para ligar aparelho à rede elétrica“) . A data da instalação deve ser confirmada no documento de garantia. O produto é determinado exclusivamente para cozinhar. Não utilizar para outros fins, por exemplo como um aquecidor. Não coloque louça ou recipientes vazios sobre a placa de cozinhar. O cabo de alimentação do aparelho ou de outros aparelhos não devem estar em contato com o cooktop. Para a limpeza e manuteção do aparelho desligue primeiro o interruptor principal da fonte de alimentação. Não use a placa de vidrocerâmica como área de armazenamento, prateleira, ou elements are off. The main power switch should be always switched off in case of changed surrounding conditions in the room with the installed appliance (painting, gluing works, etc.). Switch off the main switch before the line connector at manipulation with the appliance or at longer time without use. We recommend you to call once in two years the service company for checking of the hotplate functions. You can prevent this way the faults and prolong the lifetime of hotplate. 6 die Kochzonen nicht. Versichern Sie sich, dass die Netzanschlussschnurren des Geräts oder der anderen Geräte sind nicht im Kontakt mit der Kochplatte. Der Hauptschalter der Stromzufuhr muss bei Reinigung und Reparatur ausgeschaltet werden. Verwenden sie die glaskeramische Platte als eine Ablagefläche nicht. Es droht die Entstehung der Kratzen oder anderer Beschädigung. Wärmen sie die Speise in Alufolie oder in Plastik- und ähnlichen Behältern nicht auf. Besteht hier die Gefahr der Verschmelzung, des Feuers, oder der Beschädigung der Kochplatte. Wenn das Gerät nicht im Betrieb ist, überzeugen Sie sich, dass alle Bedienelemente ausgeschaltet sind. Wenn die Umgebung des Geräts geändert werden sollte (Arbeiten mit Strichmaterialien, lugar para colocar objectos. Pode riscar, causar ranhuras ou outros danos a placa. Não aqueça alimentos em folhas de alumínio, recipientes de plástico e outros objectos semelhantes. O uso dos mesmos corre o risco de derretimento, incêndio ou danos a placa do fogão. Quando não está utilizando a placa de cozedura, verifique que todos os elementos de comando foram desligados. Antes de proceder a intervenção no espaço onde fica instalada a placa da cozedura (usando materiais tipo tinta, cola, etc.) corte a alimentação elétrica do aparelho. Em caso que qualquer manipulação com o aparelho, ou se pretender deixar o aparelho fora de uso durante um tempo prolongado, a corte a alimentação elétrica principal do aparelho por meio do interruptor principal. É recomendável a cada dois 7 Klebestoffen u. ä.), muss immer vorher von der Stromversorgung entkoppelt werden. Bei Manipulation mit dem Gerät, oder bei längerer Nichtbenützung, schalten Sie bitte den Hauptschalter der Energiezufuhr vor dem Gerät aus. Wir empfehlen Ihnen einmal in zwei Jahren sich auf eine Reparaturstelle zu wenden mit Bitte die Funktionen der Platte zu überprüfen. Sie vermeiden damit die eventuellen Störungen und Sie verlängern damit die Lebensdauer der Kochplatte. anos contatar uma empresa de serviço e manutenção pós venda para que verificasse o bom funcionamento da placa de cozedura. É uma forma de precaução contra os eventuais defeitos que prolonga a vida útil do aparelho. The symbol on the product or on its packaging determines, that this appliance should not be given into the domestic waste. It should be delivered to collection spot for recycling of electric and electronic devices. With correct liquidation of this product you can help at prevention of negative consequences for the environment and for the human health, which could be else caused with improper liquidation of this product. More detailed information on recycling of this product you can receive at competent local authority, service for liquidation of domestic waste or in the shop, where you had bought the product. 8 Das Symbol auf dem Erzeugnis oder auf die Verpackung bestimmt, dass dieses Erzeugnis gehört nicht in den Hausmüll. Er muss in die Sammelstelle für die Wiederverwendung der elektrischen und elektronischen Einrichtungen geliefert werden. Mit der Ausführung einer richtigen Liquidation dieses Erzeugnisses sie elfen bei der Vermeidung der negativen Einflüsse für die Umwelt und der menschlichen Gesundheit, welche bei einer unrichtigen Liquidation dieses Erzeugnisses entstehen könnten. Sie können mehr ausführliche Information über Wiederverwendung dieses Erzeugnisses bei der zuständigen Ortsbehörde, bei einer Stelle für Liquidation des Hausmülls oder im Geschäft, wo sie das Erzeugnis gekauft haben. O símbolo ou etiqueta no produto ou colado na sua embalagem, indica que este produto não pode ser tratado como lixo ou resíduo doméstico. Deve ser levado para um sítio de recolha de lixo especialmente para a reciclagem de equipamentos eléctricos e eletrônicos. Ao garantir o descarte correto deste produto ajuda a proteger potenciais consequências negativas para o meio ambiente e saúde humana, que poderiam resultar do tratamento incorrecto do produto. Para informações mais detalhadas sobre a reciclagem deste produto, entre em contato com a câmara municipal local,ou com o serviço de recolha de lixo doméstico, ou ainda com a loja onde adquiriu o produto. The purpose of the appliance The appliance is designed for usual preparation of food in households and it should not be used for other purposes. The individual possibilities of its use are fully described in this manual. ATTENTION! When using induction build-in hobs, do not insert any additional equippment (for instance so called reduction rings or induction base, which make cookware with nonmagnetic base possible to use) between base of cookware and surface of glass ceramic hob. Aplication of such a equippment can cause damage of appliance and there is high risk of burning. ATTENTION! Switch of the appliance from the power net when detecting any cracks on the hotplate surface. 9 Der Zweck des Geräts Das Gerät ist für normale Vorbereitung der Nahrung in den Haushalten bestimmt und es sollte nicht für andere Zwecke benützt werden. Die einzelnen Möglichkeiten der Verwendung sind ausführlich in diesem Handbuch beschrieben. VORSICHT! Bei der Verwendung von KeramikKochfeld dürfen sich keine zusätzliche Geräte (wie die sogenannte Reduktion Ringe oder induktiven Pad, mit dem Sie Kochgeschirr mit einem nichtmagnetischen Basis verwenden können) zwischen dem Boden des Behälters und der Oberfläche der Keramik-Platte. Mit solchen Geräten kann das Gerät beschädigen und kann mit einem hohen Risiko von Verbrennungen auftreten. VORSICHT! Bei Entdeckung auch kleine Rissen auf der Oberfläche der Kochfläche schalten Sie das Gerät sofort von dem Netz ab. Finalidade ou propósito do eletrodoméstico O aparelho é concebido para confeiçoar alimentos e não deve ser utilizada para outros fins. As opções individuais de utilização deste aparelho estão detalhadamente descritas neste manual. ATENÇÃO! NÃO COLOQUE nenhuns objetos adicionais (como, por exemplo, placas de redução ou de indução, que possibilitem uso de recipientes sem fundo magnêtico) entre a base do recipiente e a superfície da placa vitrocerâmica. Esses objetos podem causar danos ao aparelho e aumentar risco de queimaduras. ATENÇÃO! Se detectar alguma falha na superfície, desligue o aparelho. DESCRIPTION AND OPERATION OD APPLIANCE BESCHREIBUNG UND WARTUNG DES GERÄTS IS656SC, IS656USC, IS656X, IS756SC, IS756USC IS655SC, IS655USC, IS655X 10 FUNCIONAMENTO 1. Cooking zones 2. Control panel - TOUCH CONTROL The appliance is intended for building in a cutout in working table of kitchen furniture. The sealing rubber glued on the border of hotplate prevents the in-leak of liquids under the hotplate. The basic part of appliance is the glass ceramics hotplate, to which the all other supporting, covering and electric parts are connected. The surfaces of hot plates are derived from usual dimensions of pots. The cooking zone diameters are derived from usual cooking pot sizes. We do not recommend the use of pots exceeding the marking of cooking zone. The overheating of induction electronics is prevented with a temperature limiter. An increased temperature of hotplate surface after switching off is signalized with light indicator of residual heat. The energy of hot place can be used yet. The light indicator switches off after cooling down to a temperature without danger of burning. USUAL NOISE DURING OPERATION OF AN APPLIANCE WITH INDUCTION WARMING The appliance can emit noises as buzzing, whistling or cracking at switching on to maximum capacity or at certain utensils. These noises vanish after switching to lower capacity level. Also the quantity of cooked food and the method of cooking can affect the noise intensity. The appliance is provided with a cooling ventilator, which is switched on at detected higher temperature. If the temperature is always high then the ventilator could remain running also after switching off of cooking zones. The mentioned noises are usual manifestation of 11 1. Kochzonen 2. Bedienpult – KONTAKTBEDIENUNG (TOUCH CONTROL) Das Gerät ist für Einbau in einer Ausschnitt in dem Arbeitsbrett des Kuchenmöbels bestimmt. Die auf die Ränder der Kochplatte geklebte Gummidichtung verhindert die Eindringung der Flüssigkeit unter der Kochplatte. Der Hauptteil des Geräts ist die glas-keramische Kochplatte, auf welche die anderen tragenden, deckenden und elektrischen Teile des Geräts gekoppelt sind. Die Flächen der Kochzonen sind aus den üblichen Dimensionen der Kochgefäße abgeleitet. Die Durchmesser der Kochzonen sind von üblichen Massen des Kochgeschirrs abgeleitet. Wir empfehlen nicht die Benützung von Geschirr mit die Kochzone markierenden Markierung übersteigender Größe. Die Überheizung der Kochzone unter der glaskeramischen Platte ist mit Temperatursbegrenzer verhindert. Die leuchtenden Signalleuchten der Restwärme eine erhöhte Temperatur der Kochzonenoberfläche nach Ausschaltung signalisieren. Die Energie der heißen Kochplatte kann noch benützt werden. Die Signalleuchte erlischt erst nach solcher Abkühlung der Kochplatte, wenn schon keine Gefahr einer Verbrennung droht. 1. Bocas de cozedura 2. Painel de comando – CONTROLO TÁCTIL (TOUCH CONTROL) O aparelho destina-se a ser encastrado em móvel de cozinha. O vedante colado na parte de baixo da placa destina-se a impedir a penetração de líquidos. O material base da placa é vitrocerâmica, todas as outras partes, tampo ou partes eléctricas estão ligadas ao material base. As dimensões das bocas de cozedura foram deduzidas das dimensões dos recipeintes de cozinha comuns. As áreas de aquecimento estão desenhadas na superfície vitrocerâmica. Estas áreas são para recipientes normais e apenas para cozinhar. A restante superfície permanece relativamente fria. O limitador de temperatura impede o sobreaquecimento das áreas de cozedura Os sinalizadores de calor residual detectam a temperatura elevada na superfície, após desligar as áreas de cozedura. Os sinalizadores de calor residual apagam-se quando a temperatura da superfície está baixa, não havendo risco de queimadura. ÜBLICHER BETRIEBSALARM ZUGESCHALTETES GERÄTS INDUKTIONSERWÄRMUNG EINES MIT RUÍDO NORMAL DURANTE O SERVIÇO DO ELETRODOMÉSTICO COM AQUECIMENTO POR INDUÇÃO Das Gerät kann bei Einschaltung der Erwärmung auf maximale Leistung, in Abhängigkeit von dem gewählten Typ der Behälter, verschiedene Geräusche, wie z.B. Getöse, Pfeifen oder Krachen ausgeben. Die Geräusche verschwinden mit Wählen einer niedrigeren Leistungsstufe der Erwärmung. Auch die Menge des gekochten Gerichts und die Methode des Kochvorgangs können die Intensität der Geräusche beeinflussen. Das Gerät ist mit einem Kühlventilator, welcher bei erhöhter Temperatur eingeschaltet wird, ausgestattet. Ligando o aquecimento à potência máxima ou em dependência do tipo selecionado de recipientes, o eletrodoméstico pode fazer sons tais como, por exemplo, zumbidos, assobios ou estalos. Os sons desaparecem com a redução do nível de aquecimento. A quantidade de comida cozida e o método de cozedura podem ter influência sobre a intensidade de sons. O eletrodoméstico está equipado com o ventilador de refrigeração que se liga no caso da indicação duma temperatura mais elevada. O ventilador pode estar em induction heating and they do not indicate a defect. Der Ventilator kann auch nach Ausschalten der Kochzonen in Betrieb bleiben, falls die Temperatur noch zu hoch geblieben ist. Diese Geräusche sind normale Erscheinungen der Induktionserwärmung und sie signalisieren keine Störung. funcionamento igualmente após o desligamento das zonas de cozedura, desde que persistir a temperatura elevada. Os sons mencionados são uma manifestação normal do aquecimento por indução e não indicam qualquer defeito. THE PRINCIPLE OF INDUCTION PRINZIP DER INDUKTION SISTEMA DE INDUÇÃO The system of induction heating is based of physical phenomenon of magnetic induction. The basic property of this system is the direct energy transfer from the generator directly to the bottom of cooking spot. Das System der Induktionsheizung ist auf der physikalischen Erscheinung der magnetischen Induktion gegründet. Die Grundeigenschaft dieses Systems ist die direkte Energieübertragung aus einem Generator in den Boden des Kochgeschirrs. O sistema de aquecimento por indução é um método baseado na indução magnética. A principal caraterística do sistema consiste em transmissão direta da energia do seu gerador à base do recipiente. ADVANTAGES OF INDUCTION HEATING VORTEILE DER INDUKTIONSHEIZUNG VANTAGENS DO SISTEMA DE INDUÇÃO More safe – low glass surface temperature More quickly – shot heating up time More accurate – it reacts immediately to adjusting of heating level More effective – 90% of adsorbed energy is changed to heat Sie ist mehr gefahrlos – niedrige Temperatur auf der Glasoberfläche Sie ist schneller – kurze Erwärmungszeit Sie ist mehr genau – sie reagiert sofort auf Änderung des Sollwertes der Heizung Sie ist wirksamer – 90 % der absorbierten Energie ändert sich in Wärme Segurança - a superfície do vidro não aquece muito Rapidez – tempo de aquecimento reduzido Exatidão – reage imediatamente a cada regulação da temperatura desejada Eficiência – 90% da energia absorvida será transformado em calor COOKERS FOR INDUCTION COOKING ZONE The magnetism is used for heat generation at induction cooking. Therefore the cookers have to contain iron. Check it please with a piece of magnet, if the cooker is 12 GESCHIRR FÜR KOCHEN MIT INDUKTIONSHEIZUNG Das Induktionskochen benützt den Magnetismus für Wärmegenerierung. Das Geschirr muss dafür Eisen RECIPIENTES RECOMENDADOS PARA O USO NAS BOCAS DE COZEDURA INDUTIVAS O sistema de indução aproveita o magnetismo para magnetic The bottom of a pot used for induction cooking zones can have a smaller or the same diameter as the surface of marked cooking zone, within the range of: 140 up to 200 mm – for individual zones, 200 up to 200 x 400 mm – for flexi zones. The other requirements for pots - see „The principles of using of glass ceramics plate". enthalten. Überprüfen Sie bitte mit Hilfe eines Magnets, ob das Geschirr magnetisch ist Der Gefäßboden benützt für die Induktionskochzonen kann einen kleineren oder gleichen Diameter wie die markierte Fläche der Kochzone haben, und zwar: 140 bis 200 mm - für die einzelnen Zonen, 200 bis 200 x 400 mm - für die Flexi-Zonen. Die anderen Anforderungen für das Geschirr - sehe „Grundsätze der Benützung einer glaskeramischen Platte". BEDIENUNG DES GERÄTS OPERATION OF APPLIANCE gerar calor. Por isso, os recipientes devem conter ferro. Para testar os recipeintes, coloque um íman na base, e se ficar colado, significa que o recipiente suporta um campo magnético. O diâmetro da base do recipiente pode ser inferior ao da boca de cozedura indicada, ou corresponder com ela, obedecendo os parâmetros na tabela seguinte: de Ø140 a Ø 200 mm – em caso de bocas individuais, Ø200 až 200 x 400 mm - em caso de bocas flexi. Para mais requerimentos aplicados sobre os recipientes de cozinhar veja „Regras de utilização de placa vitrocerâmica“. OPERAÇÃO DO APARELHO WARNING HINWEIS CUIDADO! Solely adults can operate this appliance and according to this manual. It is not allowed to leave children unattended at the appliance in operation. The electric hotplate is an appliance requesting attendance. Persons with pacemaker or insulin pump can operate the appliance, provided that their implants are in conformity with to 89/336/CEE directive. Nur Erwachsene können das Gerät und gemäß der Bedienungsanweisung zu bedienen. Es ist nicht erlaubt, wenn das Gerät im Betrieb ist, Kinder ohne Aufsicht neben dem Gerät zu lassen. Der Betrieb einer elektrischen Kochplatte erfordert ständige Aufsicht. Personen mit Herzstimulator (Pacemaker) oder mit Insulinpumpe können das Gerät mit Induktionskochzonen nur dann bedienen, wenn die Implantate die Anforderungen der Regelung 89/336/CEE erfüllen. O aparelho não é um brinquedo e só pode ser utilizado por um adulto, de acordo com estas instruções. Não deixe crianças sem supervisão perto da placa. A placa eléctrica é um aparelho que necessita supervisão durante o seu funcionamento. Pessoas com um estimulador cardíaco ou uma bomba de insulina podem utilizar a placa com bocas de cozedura indutivas só se os implantados correspondam com a norma 89/336/CEE. CONTROL PANEL BEDIENPULT PAINEL DE COMANDOS IS656SC, IS656USC, IS656X, IS756SC, IS756USC A - power switch sensor B - sensor for performance control C - sensor of a cooking zone D - sensor of a flexi zone E - timer 13 A - Fühler des Netzschalters B - Sensor für Einstellung der Leistung C - Fühler der Kochzone D - Fühler der Flexi-Zone E - Wecker (Timer) IS655SC, IS655USC, IS655X A - tecla sensível de ligar/desligar da rede B - tecla sensível de comando da potência C - tecla sensívěl de seleção das bocas de cozedura D - tecla sensível de seleção da boca flexi E - temporizador F - heat keeping G - POWER BOOST H - lock F - Warmhalten der Speise G - POWER BOOST H - Verriegelung F - tecla de manter temperatura G - POWER BOOST H - bloqueio ATTENTION! VORSICHT! AVISO! The sensor type "Touch control" is activated by touching a finger to appropriate symbol on glass ceramic hob. Therefore keep the control panel clean and dry. Do not lay down objects on the control panel of hotplate. Avoid children using or cleaning the hob surface. Prevent all unwished switching on appliance, for instance with pets! The set up parameters will be deleted after disconnection of hotplate form the power net. Never lay down food packaged into aluminum foil, knives and forks, pot lids or other metal objects on the induction cooking zones. These objects could be heated up very quickly and cause burning or damages at unwished or unintentional switching on of appliance. After removing the pot from cooking zones, hob will be switched off in 60 seconds automatically Switch off the induction zone with the corresponding switch after using it; do not rely up to automatic switching off (pot recognition). Die Sensorbedienung ist mit Anlegen des Fingers auf das entsprechende Symbol auf der glas keramischer Platte aktiviert. Dafür halten Sie das Bedienpult rein und trocken. Legen Sie keine Gegenstände auf das Bedienpult der Kochplatte. Verhindern Sie den Kindern, die Kochfläche der Platte zu benützen oder reinigen. VORSICHT auf unerwünschte Einschaltung des Geräts, z.B. durch Haustiere! Bei Abschaltung des Geräts von dem Stromnetz werden die eingestellten Parameter gelöscht. Auf die Induktionskochzonen legen Sie keine in Alufolien gepackte Nahrung, Gedecke, Topfdeckel oder andere Metallgegenstände. Bei unerwünschter oder zufälliger Zuschaltung können diese Gegenstände sich schnell aufheizen und Verbrennung oder Beschädigung verursachen. Nach Entfernen des Kochtopfes aus der Induktionszone wird die Kochplatte nach 60 Sekunden abgeschaltet. Nach Beendigung der Benützung schalten Sie das Gerät mit dem Schalter ab, verlassen Sie nicht auf die automatische Abschaltung (Erkennung des Geschirrs). Die Leistungen der Kochzonen sind in 9 Stufen mit Hilfe des "B" Sensors auf Steuerpult reguliert. As teclas são ativadas por dedos, tocando o respetivo símbolo na placa vitrocerâmica. Mantenha o painel de comando limpo e seco. Não coloque objetos no painel de comando da vitrocerâmica. Evite que a vitrocerâmica seja utilizada ou limpa por crianças. EVITE uma ativação inadvertida do aparelho, por exemplo pelos animais de estimação! Ao desligar a placa de cozedura da rede elétrica, anulam-se os parâmetros preajustados Nunca ponha alimentos em folhas de alumínio, talheres, tapas de recipientes e outros objetos metálicos nas bocas de cozedura indutivas. Na eventualidade da ativação errônea ou inadvertida do aparelho, o sobreaquecimento rápido desse objetos poderia causar queimaduras ou danificar o aparelho A placa de cozedura desliga dentro de 60 segundos depois de retirar o recipiente da boca indutiva. Depois de terminar a cozedura, desligue as bocas indutivas do aparelho através do comando, não confie. SWITCHING ON THE HOB ZUSCHALTUNG DER KOCHPLATTE LIGAR A PLACA DE COZEDURA Press the A sensor (line switch). Symbols of control displays C, D and E will light up. If you don’t select any function during in next 60 second, the hob will be switched off automatically. Drücken sie den Fühler A (Netzschalter). Die Symbole der Bedienanzeigen „C“, „D“ a „E“ werden leuchten.Falls wir keine andere Wahl bis 60 Sekunden machen, wird die Kochplatte automatisch abgeschaltet. Toque a tecla A (ligar/desligar geral). Acendem-se os símbolos de „C“, „D“, „E“ no painel de comando. A partir deste momento tem 60 segundos para tocar outra tecla, caso contrário a placa de cozedura desliga automaticamente. SWITCHING ON OF COOKING ZONE ZUSCHALTEN DER KOCHZONE LIGAR BOCA DE COZEDURA Choose the appropriate cooking zone or flexi zone by pushing the C or D sensor. Set the required performance level (1-9) within 5 Mit Drücken des Sensors „C“ oder „D“ wir können die entsprechende Kochzone oder Flexi-Zone auswählen. Bis 5 Sekunden nach Zuschalten der Kochplatte stellen Tocando a tecla de „C“ ou „D“ você seleciona a respetiva boca de cozedura ou a boca flexi. A partir deste momento tem 5 segundos para proceder The input power of cooking zones is regulated within the range of 9 degrees which are infinitely selectable by means of the “B” sensor on the control panel. 14 Aquecimento das bocas de cozedura tem 9 níveis e pode ser regulado gradualmente por meio da tecla „B“ do painel de comando. seconds after switching on the hotplate. Sie mit Hilfe des Sensors „B“ die angeforderte Leistungsstufe (1 – 9) ein. ao ajuste da potência da boca selecionada, do 1 a 9, pela tecla „B“ POT DETECTION FUNCTION TOPFERKENNUNG BEI DER INDUKTIONSKOCHZONE DETEÇÃO DA PRESENÇA DO RECIPIENTE NA BOCA DE COZEDURA INDUTIVA Falls die Kochzone eingeschaltet und kein oder ein zu kleiner Topf auf sie gestellt ist, dann wird keine Energieübertragung stattfinden. Das ist mit blinkendem Symbol „ “ signalisiert. Wenn auf die Kochzone ein geeigneter Topf gestellt ist, dann die eingestellte Leistungsstufe schaltet sich ein und die entsprechende Nummer der Leistung auf der Anzeige ständig leuchten wird. Falls der Topf abgestellt ist, dann die Energiezufuhr unterbrochen ist. Auf der Anzeige der Leistungsstufe wird erneut das blinkende Symbol „ “ gezeigt. Falls auf die Kochzone ein kleiner Kochtopf, aber noch mit einem größeren als der minimale, für Inbetriebnahme der Kochzone notwendige Diameter aufgestellt ist, dann nur eine dem Diameter des Topfes entsprechende Energie wird übertragen. Símbolo „ “ pisca avisando que não se realiza transmissão da energía porque na zona de cozedura ligada não há recipiente nenhum, ou o recipiente é pequeno demais. Com um recipiente de diâmetro correspondente, a potência ajustada fica ligada e na placa acende-se um número que indica o nível da potência. Depois de retirar o recipiente da zona, a transmisão do calor (da energie) será interrompida. No indicador do nível de potência volta a piscar o símbolo „ “ Se colocar um recipiente de diâmetro inferior ao da boca, mas aínda suficiente para manté-la ativada, a energia transmitida (a potência) corresponde com o diâmetro do recipiente. BRIDGE MODE (FLEXI ZONE) BRÜCKEN-MODE (DIE FLEXI-ZONE) REGIME DE INTERLIGAÇÃO (ZONA FLEXI) The cooking zones on the left as well as right side can be used as separate cooking zones (front and back ones) or united into the bridge mode of 200x400 mm. The cooking zones on the left side for the types IS655SC, IS655USC and IS655X can be used independently (the front or the rear) or united in to the s.c. "bridge mode"; the cooking zones on the right side can be used separately only. To activate the bridge mode, push the D sensor. Now you can move the pot (200) from the front to back cooking zone (or vice versa), the bridge mode detects automatically its position and sets performance for the appropriate zone. To transfer the performance correctly, the pot (200) has to be placed in the front or back part of zone when using the bridge mode. It is also possible to use an oval pot up to the size of 200x400 mm. The oval pot can be placed anywhere on the entire zone surface when using the bridge mode. Die Kochzonen auf der linken und auch in der rechten Seite können als selbständige Kochzonen (vordere und hintere) oder vereinigt in eine BrückenMode 200x400 mm benützt werden. Bei den Typen IS655SC, IS655USC und IS655X können die Kochzonen auf der linken Seite einzeln benützt werden (die vordere und die hintere) oder vereinigt in das "Brücken-Regime"; die Kochzonen auf der rechten Seite können nur einzeln benützt werden. Für Aktivierung der Brücken-Mode drücken Sie den Sensor „D“ Ein Topf (200) kann jetzt von der vorderen auf die hintere Kochzone (oder umgekehrt) geschoben werden, die Brücken-Mode detektiert automatisch die Lage und stellt die Leistung für die entsprechende Zone ein. Für die richtige Leistungsübertragung muss der Topf (200) bei Benutzung der Brücken-Mode in dem vorderen oder hinteren Teil der Zone gelegt werden. Auch ein lang gestreckter Topf bis die Größe 200x400 mm kann benützt werden. As boca do lado esquerdo ou as do lado direito podem ser utilizadas separadamente (dianteiras ou traseira), ou podem estar unidas sob o regime de interligação (200x400mm). Para os tipos IS655SC, IS655USC e IS655X é possível utilizar as zonas de cozedura no lado esquerdo em separado (a dianteira e a traseira) ou unidas no modo de ponte, as zonas no lado direito podem ser utilizadas apenas em separado. Toque a tecla „D“ para ativar o regime de interligação. A partir de agora poderá mover o recipiente (200) de trás para frente (ou ao contrário), o regime de interligação faz deteção automática da posição do recipiente, e ativa bocas correspondentes. No regime de interligação é necessário colocar o recipiente (200) na parte dianteira ou traseira da zona ativada para garantir a transmissão correta do calor. Também pode utilizar um recipiente de forma oblonga. Esse tipo de recipiente pode ser posto em qualquer If the cooking zone is switched on but there is no pot or the pot is not suitable for induction cooking, no heat is transferred. Symbol „ “ is flashing. If there is a suitable pot on the cooking zone, set power level is switched on and number of power level is displayed. Heat transfer is interrupted when pot is removed. Symbol „ “ is flashing. When small pot is placed on cooking zone only appropriate amount of heat is transferred depending on pot dimensions 15 Ein lang gestreckter Topf kann bei der BrückenMode auf einer beliebigen Stelle der gesamten Zone gelegt werden. local da superfície da zona LATENT HEAT ENERGY INDICATOR INDIKATOR DER RESTWÄRME INDICADOR DO CALOR RESIDUAL Right after switching off the cooking zone display shows “H” that means cooking zone temperature is above 60°C. After cooling down “H” will disappear. This signalization prevents you from burns. Latent heat energy can be used. Falls nach Abschaltung der Kochzone diese eine Temperatur über 60° C hat, dann auf der Anzeige das Symbol „H“, welches die erhöhte Temperatur der Kochzonenoberfläche signalisiert, leuchten wird. Diese Signalisierung die Möglichkeit der Verbrennung bei abgeschalteter Kochzone reduziert. Die Wärme der heißen Kochzone kann benützt werden. No indicador da boca de cozedura desligada e de temperatura não superior aos 60°C aparece „H“ para sinalizar uma temperatura elevada da superfície da boca. O signal serve de proteção contra queimaduras causadas pela boca desligada. A temperatura residual da boca ainda pode ser aproveitada para aquecer alimentos. CHILD LOCK KINDERSICHERUNG The child lock prevents making changes of the setting during cooking or using the appliance. Die Kindersicherung dient für Vermeidung der Änderungen in der Einstellung während des Kochen oder für allgemeine Vermeidung der Benutzung des Geräts. BLOQUEIO SEGURANÇA CONTRA CRIANÇAS METHOD METHODE PROCEDIMENTO Switch on the hotplate with pressing of sensor „A“. The child lock will be activated when pushing the H sensor. “Lo” appears on the display above the E sensor. You can activate the child lock also if any hot plate is active. Schalten sie die Platte mit Drücken des Fühlers „A“ ein. Die Kindersicherung wird mit Drücken des Sensors „H“ aktiviert. Auf der Anzeige über dem Sensor "E" erscheinen die Buchstaben „Lo“ Diese Aktivierung kann bei aktivem Zustand einer Kochzone ausgeführt werden. Tocar a tecla „A“ para ligar a placa de cozedura Tocar a tecla „H“ para ativar o bloqueio segurança contra crianças No indicador em cima da tecla „E“ virão visíveis as letras „Lo“ O bloqueio pode ser ativado também quando tem uma das boca de cozedura ligadas. DEACTIVATION DEAKTIVIERUNG DESATIVAR Push and keep pushing the H sensor for c. 3 seconds. “Lo” letters disappear and the hot plate is ready for use. Drücken und drückenhalten Sie den Sensor „H“ für eine Zeit von ca. 3 Sekunden. Die Buchstaben „Lo“ erlöschen, die Kochplatte ist Betriebsbereit. Tocar a tecla „H“ durante uns 3 segundos. As letras „Lo“ desaparecem e a placa está pronta para ser utilizada SWITCHING OFF THE HOB ABSCHALTUNG DER KOCHPLATTE DESLIGAR A PLACA DE COZEDURA Switching off the hob function can be done regardless the working state of the hob by touching “A” symbol. If the hob is switched off sound beeps and all the symbols are switched off (only “H” and alarm symbols could remain on. Die Funktion der allgemeinen Abschaltung kann ohne Rücksicht auf das Arbeitsregime der Kochplatte durchgeführt werden, und zwar mit Drücken des Tasters „Zugeschaltet / Abgeschaltet“(symbol A). Bei der Abschaltung der Kochplatte ertönt ein Tonsignal (Piepen) und alle Symbole erlischen (mit Ausnahme eventueller Signalisierung der Restwärme des einen Alarms auf einigen Anzeigen). Em qualquer um dos regimes de funcionamento da placa da cozedura é possível utilizar a função de desligar a placa. Para desligà-la, toque a tecla „LIGAR/DESLIGAR“ (símbolo A). O desligamento da placa da cozedura será indicado por um sinal sonoro (um bip), e todos os símbolos apagam (exceto o símbolo do calor residual ou do alarme). 16 Este bloqueio segurança serve para evitar alterações indesejáveis durante o processo de cozedura, ou uma utilização proíbida do aparelho em geral. INCREASED POWER LEVEL FUNCTION „POWER BOOST“ FUNKTION DER ERHÖHTEN LEISTUNG „POWER BOOST“ FUNÇÃO DE INTENSIDADE AUMENTADA DO AQUECIMENTO „POWER BOOST“ „POWER BOOST“ function is for quick and maximum heat transfer through cooking zone Cooking zone operates in thin mode for 5 minutes maximum. After timeout it switches to power level 9 automatically. When at using of „POWER BOOST“ function also the second induction zone on the same side of the hot plate is switched on, then the capacity level of this zone will be decreased to the level „2“. Die Funktion „POWER BOOST“ dient für schnelle Zufuhr der maximalen Leistung der entsprechenden Kochzone. Die Betriebsdauer der Kochzone in diesem Regime kann maximal 5 Minuten sein. Nach Ablauf dieser Periode wird die Leistung automatisch auf die Stufe 9 rückgesetzt. Wenn bei Benutzung der „POWER - BOOST“ – Funktion auch die andere Induktionskochzone auf der gleichen Seite eingeschaltet ist, dann die Leistung dieser Kochzone automatisch auf Stufe „2“ rückgesetzt wird. A função de „POWERBOOST“ serve para acelerar a intensidade do aquecimento por meio da potência máxima na boca selecionada. O prazo máximo de powerbooster ativo é de 5 minutos. Quando a funçáo booster chega ao termo, a boca passa automaticamento ao nível 9. Se no momento de ativação da função „POWER BOOST“ haja ligada a segunda boca indutiva do mesmo lado da placa de cozedura, sua potência passa automaticamente para baixo até o nível „2“. NOTE All cooking zones are provided with the „POWER BOOST“ function. ACTIVATION OF THE “POWER BOOST” FUNCTION BEMERKUNG NOTA Alle Kochzonen sind mit der Funktion „POWER BOOST“ ausgestattet. Todas as bocas de cozedura têm a funcão de „POWER BOOST“ AKTIVIERUNG DER FUNKTION „POWER BOOST“ PARA ATIVAR A FUNÇÃO DE „POWER BOOST“ Set any performance level for the cooking zone. Push the G sensor to activate the “POWER BOOST” function. The “b” letter will be displayed on the display of appropriate zone during activation of this function. Stellen Sie eine beliebige Leistungsstufe auf der Kochzone ein. Für Aktivierung der Funktion "POWER BOOST" drücken Sie den Sensor „G“. Während der Aktivierung dieser Funktion wird auf der entsprechenden Anzeige der Kochzone die Buchstabe „b“ leuchten. Ajuste a desejada intesidade de aquecimento da boca de cozedura Toque a tecla „G“ para ativar a função de „POWER BOOST“ Com a função ativada, no mostrador da respetiva boca de cozedura pisca a letra „b“. DEACTIVATION OF THE “POWER BOOST” FUNCTION DEAKTIVIERUNG DER FUNKTION „POWER BOOST“ PARA DESATIVAR A FUNÇÃO DE „POWER BOOST“ The “POWER BOOST” function will be deactivated when choosing any level on the B sensor. Mit Wählen einer beliebigen Leistungsstufe auf dem Sensor „B“ wird die Funktion „POWER BOOST“ deaktiviert. Se modificar a intensidade de aquecimento na tecla „B“ enquanto a função „POWER BOOST“ estiver ativa, esta desativa-se imediatamente. KEEPING FOOD HOT FUNCTION FUNKTION DER WARMHALTUNG DER NAHRUNG FUNÇÃO DE MANTER OS ALIMENTOS QUENTES Die Nahrung wird mit niedrigerer Leistung warm gehalten. Diese Funktion kann bei jeden Kochzonen benützt werden. Mantém os preparos quentes por meio de uma potência reduzida A função existe em todas as bocas de cozedura ACTIVATION OF THE FUNCTION “KEEPING FOOD HOT” AKTIVIERUNG DER FUNKTION DER WARMHALTUNG DER NAHRUNG PARA ATIVAR A FUNÇÃO DE MANTER OS ALIMENTOS QUENTES Turn on the hot plate by pushing the A sensor. Choose the appropriate cooking zone or flexi zone Schalten sie die Kochplatte mit Drücken des Fühlers „A“ ein. Para ligar a placa de cozedura toque a tecla „A“ Selecione a boca desejada tocando a tecla „C“ ou Low performance keeps food hot. This function can be used for all cooking zones. 17 by pushing the C or D sensor. Activate the function of keeping food hot by pushing the F sensor. „‘ “ symbol appears on the display of a hot plate. Mit Drücken des Sensors „C“ oder „D“ wir können die entsprechende Kochzone oder Flexi-Zone auswählen. Mit Drücken des Sensors „F“ wir aktivieren die Funktion für Warmhaltung der Nahrung. Auf der Anzeige der Kochzone wird das Symbol „‘ “ dargestellt. „D“ Para ativar a função de manter os preparos quentes toque a tecla „F“. O símbolo „‘ “ acende-se no mostrador da boca selecionada. DEACTIVATION OF THE FUNCTION “KEEPING FOOD HOT” DEAKTIVIERUNG DER FUNKTION DER WARMHALTUNG DER NAHRUNG DESATIVAR A A FUNÇÃO DE MANTER OS ALIMENTOS QUENTES Choose the appropriate cooking zone or flexi zone, where this function is activated, by pushing the C or D sensor. The deactivation of the function can be done with setting of capacity with the „B“ sensor. Mit Drücken des Sensors „C“ oder „D“ wir wählen der entsprechenden Kochzone oder Flexi-Zone, bei welcher die Funktion für Warmhaltung der Nahrung aktiviert ist, aus. Die Funktion wird mit der Einstellung der Leistung mit dem Sensor „B“ deaktiviert. Selecione a boca desejada com a função de manter os alimentos quentes ativa, tocando a tecla „C“ ou „D“ A desativação da função realiza-se mediante o ajuste da potência pelo sensor „B“. IS656SC, IS656USC, IS656X, IS756SC, IS756USC IS655SC, IS655USC, IS655X TIMER ZEITGEBER (TIMER) TEMPORIZADOR (TIMER) Cooking hob is equipped with timer switch which can operate in two modes: a) minute reminder b) setting operating time of the cooking zone Die Kochplatte ist mit einem Zeitschalter ausgestattet, welcher in zwei Regime arbeiten kann: a) Wecker b) Zeitsteuerung der Kochzone (Einstellen der Betriebsdauer der Kochzone) A placa de cozedura dispõe de um temporizador que pode funcionar em dois regimes diferentes: a) de função alarme b) de função corta-corrente (para programar a duração de funcionamento de uma boca selecionada) MINUTE REMINDER MODE WECKER TEMPORIZADOR EM REGIME DE ALARME After timeout alarm sounds. Function can be activated only when the hob is switched on. Zeitschalter - das Regime eines Weckers. Nach Ablauf der eingestellten Zeitperiode wird ein Tonsignal ausgegeben. Die Wecker-Funktion kann nur bei zugeschaltetem Zustand der eingebauten Kochplatte aktiviert werden. O temporizador avisa por um sinal sonoro que o tempo ajustado decorreu. Esta função do temporizador pode ser ativada só se a placa de cozedura estiver ligada. METHOD METHODE PROCEDIMENTO Turn on the built-in plate by pushing the A sensor. Push the E timer sensor. Figure 10 appears on the display above the sensor. Schalten sie die eingebaute Platte mit Drücken des Fühlers „A“ ein. Drücken Sie den „E“ Sensor des Weckers. Toque a tecla „A“ para ligar a placa de cozedura. Toque a tecla „E“ do temporizador. Número 10 aparece no mostrador em cima da tecla. 18 Set the required number of minutes using the B sensor. You can set time for tens of minutes when pushing repeatedly the E timer sensor and using the B sensor. After the set time ends, the display shows the value of “00” and the audio signal sounds for 30 seconds. Auf der Anzeige über dem Sensor wird die Zahl 10 dargestellt. Stellen Sie die geforderte Anzahl der Minuten mit Hilfe des Sensors „B“ ein. Mit wiederholtem Drücken des Timer-Sensors „E“ und mit Hilfe des Sensors „B“ Sie können eine Zeit in mehreren Duzend von Minuten einstellen. Nach Ablauf der eingestellten Zeit die Anzeige wird den Wert „00“ darstellen und ein Tonsignal wird für 30 Sekunden lauten. Ao tocar a tecla „B“ ajuste o número dos minutos desejado. Se voltar a tocar a tecla „E“ poderá, por meio da tecla „B“ ajustar o tempo na ordem das dezenas de minutos. Depois de ter decorrido o tempo ajustado, o valor de „00“ pisca no mostrador e ouve-se um sinal sonoro durante 30 segundos. TIMING OF COOKING ZONE MODE ZEITSTEUERUNG DER KOCHZONE Timing of cooking zone mode is for switching off the zone automatically after predefined time. After timeout alarm sounds. This function can be activated only when the hob and cooking zone are switched on (power level 1-9). Das Regime der Zeitsteuerung der Kochzone dient für Beendigung des Betriebs der Kochzone nach Ablauf der eingestellten Zeit. Nach Beendigung des Betriebs wird ein Tonsignal ausgegeben. Die Funktion der Zeitsteuerung der Kochzone kann nur bei zugeschaltetem Zustand der eingebauten Kochplatte und bei aktivierter Kochzone (Leistungsstufe 1 – 9) aktiviert werden. CONTAGEM DESCRESCENTE COM PARAGEM DAS BOCAS PROCEDURE METHODE PROCEDIMENTO Turn on the built-in plate by pushing the A sensor. Choose the appropriate cooking zone by pushing the C or D sensor. Set the required performance level (1 – 9) by pushing the B sensor. Push the E timer sensor within 5 seconds and set the required time by pushing the B sensor. After this time the hot plate will turn off. After the set time ends, an audio signal appears and hot plate turns off. Schalten sie die eingebaute Platte mit Drücken des Fühlers „A“ ein. Mit Drücken des Sensors „C“ oder „D“ wir können die entsprechende Kochzone auswählen. Stellen Sie mit Hilfe des Sensors „B“ die eingeforderte Leistungsstufe (1 – 9) ein. Bis 5 Sekunden drücken Sie den Sensor „E“ des Timers und mit Hilfe des Sensors „B“ stellen Sie die angeforderte Zeit, nach Ablauf von welcher die Kochplatte soll ausgeschaltet werden, ein. Nach Ablauf der eingestellten Periode wird ein Tonsignal ausgegeben und die Kochzone schaltet sich ab. Toque a tecla „A“ para ligar a placa de cozedura Toque a tecla „C“ ou „D“ para selecionar a boca. Toque a tecla „B“ para ajustar a intensidade do aquecimento da boca (1-9). Dentro de 5 segundos toque a tecla „E“ do temporizador e através da tecla „B“ ajuste a duração da cozedura. Ao decorrer o tempo ajustado, a boca de cozedura desliga. NOTE BEMERKUNG NOTA Timing of a hot plate can be used for all cooking zones at the same time. You can set off-time for other cooking zone when turning on another cooking zone by pushing the C or D sensor and by consecutive pushing of the E timer sensor. Time remaining till turning-off a cooking zone is Die Funktion der Zeitsteuerung der Kochzone kann gleichzeitig bei allen Kochzonen benützt werden. Sie können mit Einschaltung einer weiteren Kochzone mit Drücken des Sensors „C“ oder „D“ und nachfolgendem Drücken des Sensors „E“ des Timers die Ausschaltungszeit der weiteren Kochzonen einstellen. A função de corta-corrente pode ser utilizada simultaneamente em todas a as bocas de cozedura Depois de tocar a tecla „C“ ou „D“, toque a tecla „E“ e use o temporizador para ajustar a duracão da cozedura de mais bocas No mostrador aparece o tempo de cozedura restante para a boca de cozedura. O tempo corresponde com 19 A função de corta-corrente possibilita programar a duração de funcionamento e paragem de uma boca selecionada de cozedura. No fim da cozedura ouve-se um sinal sonoro. A função de corta-corrente com paragem da boca pode ser ativada só com a placa ligada e a boca de cozedura ativa (intensidade de aquecimento entre 1 e 9). displayed on the display. The displayed time belongs to the cooking zone which has a flashing decimal point next to the displayed performance level. Luminous decimal points at other figures of performance levels symbolize the set off-time for a concrete zone. To clear the set timing of a cooking zone push the E sensor and then keep pushing it for c. 2 seconds. Auf der Anzeige wird die verbleibende Zeit bis Ausschaltung der Kochzone gezeigt. Die gezeigte Zeit gehört zu der Kochzone, bei welcher neben der gezeigten Leistungsstufe ein Dezimalpunkt blinkt. Die leuchtenden Dezimalpunkte bei anderen Zahlen der Leistungsstufen darstellen die eingestellte Zeit für Ausschaltung der gegebenen Zone. Für Nullstellen der eingestellten Zeit der Kochzone drücken Sie den Sensor „E“ und nachfolgend halten ihn gedrückt für ca. 2 Sekunden. a boca com um ponto decimal piscante ao lado do indicador digital do nível de intensidade de aquecimento. Os pontos decimais iluminados dos outros digitos que indicam a intensidade de aquecimento das respetivas bocas sinalizam a duracão de cozedura ajustada para cada das bocas. Se tocar levemente a tecla „E“ durante uns 2 segundos, a duração da cozedura preajustada será anulada. Examples of activities at setting on of capacity levels Beispiele der Tätigkeit bei der Einstellung der Leistungsstufen Exemplos de funcionamento com várias intensidades de aquecimento ajustadas Level 0 Switched off Level 1 - 3 for holding of liquids in light boiling, for light and slow heating up without danger of burning, for solution of butter, chocolate, for de-freezing, for boiling of small quantity of liquid. Level 4 - 6 for intensive boiling, for keeping in boiling of greater volume of liquid, for stewing. Nível 0 Stufe 0 Abgeschaltet OFF Stufe 1 - 3 für Haltung der Flüssigkeiten in leichtem Sieden, für leichte und langsame Wärmung ohne Gefahr des Anbrennens, für Auflösung von Butter, Schokolade, für Abtauen, Nível 1 - 3 Manter pequenas quantidades de água a ferver Aquecimento de comida confeccionada. Derreter manteiga, chocolate, etc. Descongelação . für Kochen von kleinen Mengen von Flüssigkeiten. Stufe 4 - 6 für intensives Kochen, für Erhaltung des Siedens von größeren Mengen von Flüssigkeiten, für Dünstung. Stufe 7 – 9 für Vorbereitung von Gerichten, welche schnelles Aufwärmen und hohe Temperaturen brauchen (Beefsteaks, Schnitzel, Backen von Kartoffelchips, und ähnliche), für Aufwärmen der Gerichte vor Umschaltung auf niedrigere Stufe. Nível 4 - 6 Aquecimento de alimentos líquidos ou sólidos Manter a água a ferver Guisar, estufar carne, peixe, vegetais e frutos LIMITATION OF COOKING ZONE OPERATION TIME BEGRENZUNG DER BETRIEBSZEIT DER KOCHZONE LIMITAÇÃO DO PRAZO DE FUNCIONAMENTO DA BOCA The cooking zones have an automatic operation time limitation. The continuous use of each cooking zone depends on the selected heating level (see the table). The condition is here, that no modification in cooking zone setting was realized during the use. At the moment of activation of operation limitation the Die Kochzonen haben eine automatische Begrenzung der Betriebszeit. Die pausenlose Benützung jeder Kochzone ist von der gewählten Stufe der Erwärmung abhängig (sehe Tabelle). Vorausgesetzt, dass während der Benützung es sind keine Änderungen in der Einstellung der Kochzone As bocas de cozedura dispõem de um limitador automático do funcionamento. Um funcionamento contínuo da boca depende do nível do aquecimento (veja o quadro). Para manter a limitação automática ativa, supõe-se que não tenham sido feitas nenhumas alterações do Level 7 - 9 for preparation of food, requiring fast heating und high temperature (beefsteaks, slices, chipped potatoes, etc.), for warming up of food before switching over to lower capacity level. 20 Nível 7 – 9 para os preparos que necessitam aquecimento rápido e temperatura alta (bife, costeletas, batatas fritas, etc.) para aquecer os preparos, antes de mudar a intensidade para um nível mais baixo cooking zone is switched off, a short sound signal sounds and the display shows the sign „H“. The switching off automatics has priority before the limitation of operation time; that means that the cooking zone switches off after expiration of the time of automatics only (e.g. there is the switching off automatics with 99 minutes and with capacity level 9 possible). Capacity level gemacht. Bei Aktivierung der Begrenzung der Betriebszeit wird die Kochzone abgeschaltet, ertönt ein kurzes Tonsignal und auf der Anzeige wird ein „H“ dargestellt. Die Ausschaltautomatik hat Vorrang vor der Begrenzung der Betriebszeit, was bedeutet, dass die Kochzone schaltet nur dann aus, wenn die Zeit der Automatik ausläuft (z.B. es ist möglich eine Ausschaltautomatik mit eingestellten 99 Minuten und mit Leistungsstufe 9). Maximale Zeit (Stunden) 8 8 8 4 4 4 2 2 2 5 (Minuten) Nível de potência Maximal time period (hours) 1 8 2 8 3 8 4 4 5 4 6 4 7 2 8 2 9 2 P 5 (minutes) P - function of increased capacity "BOOSTER" P - Funktion der erhöhten Leistung = „BOOSTER“ ERROR CODES FEHLERMELDUNGEN SINALIZAÇÃO DOS ERROS (E and error code are flashing) (das Symbol E und die Fehlernummer blinken) (E e o número do erro piscante) E1/E2 – UNSUITABLE SUPPLY VOLTAGE E1/E2 – UNGEEIGNETE STROMSPANNUNG E1/E2 – UMA TENSÃO NÃO CORRESPONDE The connection of a hot plate and supply voltage must be double-checked. Die Anschaltung der Kochplatte und die Spannung des Stromkreises müssen kontrolliert werden. É necessário verificar a tensão indicada na placa de identificação do aparelho e a tensão do circuito da fonte de alimentação. E3/E4/E5 - COOKING ZONE OVERHEAT E3/E4/E5 – ÜBERHITZUNG DER KOCHZONE Empty pot could cause the cooking zone to overheat when operating. In this case let the hob cool down. Die Kochzone kann zum Beispiel bei Verlassen eines leeren Topfes auf zugeschalteter Kochzone, beim Auskochen und ähnlichem überhitzt werden). Lassen sie in diesem Falle das Gerät Abkühlen. E3/E4/E5 – SOBREAQUECIMENTO DA BOCA DE COZEDURA In case of any other error code authorized service is needed. Im Falle der Darstellung eines anderen Fehlerkodes wenden sie sich auf autorisierte Kundendienststelle. 21 Leistungsstufe 1 2 3 4 5 6 7 8 9 P¨ ajustamento original da boca. Ao ativar a limitação de funcionamento da boca, a boca desliga, ouve-se um curto sinal sonoro e aparece a letra „H“ no mostrador. A limitação automática tem preferência sobre a função de corta-corrente, ou seja, a boca desliga sómente após ter decorrido o tempo controlado pela automática (por exemplo: um ajuste automático de prazo de 99 minutos e o nível de aquecimento de 9) Tempo de funcionamento na potência máxima (horas) 1 8 2 8 3 8 4 4 5 4 6 4 7 2 8 2 9 2 P 5(min.) P – intensidade aumentada de „BOOSTER“ As bocas podem aquecer excessivamente quando postas em função com um recipienet vazio, um recipiente do qual o líquido tinah evaporado etc.) Deixe o aparelho arrefecer. Se aparecer um símbolo diferente dos mencionados acima, contate um serviço pós venda autorizado. PRINCIPLES OF USE OF GLASS CERAMICS PLATE GRUNDSÄTZE DER BENÜTZUNG DER GLASKERAMISCHEN PLATTE REGRAS DA UTILIZAÇÃO DAS PLACAS VITROCERÂMICAS The glass ceramics plate fulfils at corresponding use according to these instructions the all requirements to similar home appliances. Switch off the main switch before the first use and clean the appliance orderly (for cleaning agents see the chapter “Cleaning and maintenance”). The appliance may be operated only by adult persons and in accordance with these instructions. Do not leave small children without supervision near appliance in operation. The electric hotplate is an appliance whose operation requires supervision. Prevent the use of empty enameled pots; their bottoms could be so damaged and at scratch the surface at moving on the cooking plate. Pots with grooving or burrs on the bottom are not suitable. The bottom of metal pots should be for achieving the best results (at cooking on induction cooking zone) 2 - 3 mm thick, at pots from stainless steel witch sandwich bottom 4 - 6 mm thick. The bottom should be at room temperature slightly bulged out, as after hot extension only will lay on the cooking zone surface evenly. The minimal thermal losses are so eliminated with contact of surfaces. You can prevent the scratching of glass ceramics with use of pots with clean and smooth bottom. Use pots with a diameter corresponding in size to the diameter of selected cooking zone. The heat created on the pot bottom depends from the pot diameter. At smaller pot also the capacity is lower. There is no exceeding consumption of energy, when the cooking zone is not fully covered by the pot. Nevertheless put the pot in the middle of cooking zone. Use higher capacity levels for bringing food to boiling. After achieving of boiling switch over to lower capacity level of cooking zone. Never use trays from aluminum foil nor made from aluminum containing materials. Die glaskeramische Platte erfüllt bei angemessener Handhabung gemäß diesen Anweisungen alle Anforderungen auf solche Geräte im Haushalt. Vor erster Benützung muss zuerst der Hauptschalter abgeschaltet werden und das Gerät muss gründlich gereinigt werden (Reinigungsmittel: sehe Kapitel “Reinigung und Wartung”). Nur Erwachsene können das Gerät und gemäß der Bedienungsanweisung zu bedienen. Es ist nicht erlaubt, wenn das Gerät im Betrieb ist, Kinder ohne Aufsicht neben dem Gerät zu lassen. Der Betrieb einer elektrischen Kochplatte erfordert ständige Aufsicht. Vermeiden Sie die Erwärmung des leeren Emaillegeschirrs, der Boden des Geschirrs konnte damit beschädigt werden oder bei Verschiebung die Oberfläche der Kochplatte bekratzen. Das Geschirr mit Rillen oder mit scharfen Graten auf der Kochfläche ist nicht geeignet. Der Boden von Metallgeschirr sollte für Erzielung von besseren Ergebnissen 2-3 mm Dick zu sein (beim Kochen auf der Induktionskochzone), der Boden bei Geschirr aus rostfreiem Stahl sollte einen 4 bis 6 mm dicken mehrschichtigen (Sandwich) Boden zu haben. Der Boden sollte bei Raumtemperatur eine leichte Einbeulung zu haben, weil durch Hitze er dehnt und erst nach Ausdehnung wird eben auf der Oberfläche der Kochzone zu setzen. Damit wird der minimale Wärmeverlust aus Kontakt der Oberflächen gewährleistet. Mit Einsatz des Geschirrs mit reinem und glattem Boden Sie können das Kratzen der Glaskeramik vermeiden. Versuchen Sie immer die Durchmesser der gewählten Kochzone und des Geschirrsbodens gegenseitig anzupassen. Die auf dem Boden gebildete Wärme hängt vom Durchmesser des Geschirrs ab. Je kleineres Geschirr, desto kleinere Leistung. Sie wüsten keine Energie, wenn die Kochzone nicht voll mit dem Se utilizada conforme as instruções do manual, a placa vitrocerâmica cumpre todos os requisitos para os aparelhos de uso doméstico. Antes de proceder a primeira utilização do aparelho, desligue a aparelho por meio do interruptor principal ou retire o cabo de alimentação da tomada e limpe bem o aparelho (para detergentes recomendados veja em „Limpenza e manutenção“) O aparelho não é um brinquedo e só pode ser utilizado por um adulto, de acordo com estas instruções. Não deixe crianças sem supervisão perto da placa. A placa eléctrica é um aparelho que necessita supervisão durante o seu funcionamento Evite o uso dos recipientes de superfície esmaltada vazios, porque poderia danificar os fundos deste, e consequentemente riscar a superfície vitrocerâmica. Não utilize recipientes com fundos riscados ou com pontos agudos. Os melhores resultados (quando cozinhar na boca indutiva) podem ser atingidos com os recipientes de base de uns 2-3mm de espessura, ou de 4-6mm em caso dos recipientes de aço inoxidável cuja base consta de mais câmadas (tipo sandwich) Numa temperatura ambiente, a base do recipiente, que dilata com calor aumentado, deveria estar levemente côncava, para ajustar bem com a superfície da placa, para garantir o mínimo escape termico entre as duas superfícíes em contato. Utiliza apenas recipientes com a base limpa e lisa para evitar rachadura na superfícíes da vitrocerâmica. Procure utilizar os recipientes com a base de diâmetro semelhante com o da boca de cozedura selecionada. O calor induzido depende do diâmetro da base do recipiente. Com os diâmetros mais pequenos diminui a potência. Com um recipiente de diâmetro da base que não cobre a zona da cozedura inteira, gasta se menor energia. Sempre coloque o recipiente no meio da boca de cozedura. 22 Do not place things from plastics on hot cooking zones (spoons, trays, strainers, etc.), such materials can easily melt and burn up. Overheated fats and oils can easily inflame so be careful, when preparing meals on fats and oils (fritting, etc.). Geschirr bedeckt ist. Stellen Sie das Geschirr aber immer in die Mitte der Kochzone auf. Für die Nahrung in Siedepunkt zu bringen benützen Sie höhere Leistungsstufe. Nach Erreichung des Siedens dann schalten Sie auf niedrigere Leistungsstufe der Kochzone um. Benützen Sie weder Schalen aus Alu-Folien noch aus Aluminium erhaltenden Materialien. Auf heize Kochzonen legen Sie keine Gegenstände aus Plastik (Löffel, Schale, Seihe u.ä.), diese Materialien verschmelzen und aufkleben sich. Überhitzte Fette und Öle können sich entzünden, dafür arbeiten Sie bitte mit Aufmerksamkeit bei Nahrungsvorbereitung mit Fetten und Ölen (Frittung, u.ä.). Ajuste o aquecimento da boca para o nível mais alto para fazer os alimentos a ferver. Depois de atingir o ponto de ebulição, reduza o nível. Não utilize recipientes em folha de alumínio ou feitos de ligas metálicas com alumínio. Não pouse nem objetos de plástico (colheres, copos, passadores) na superfície em vitrocerâmica, eles se pegam. Durante a cozedura, óleos e gorduras muito quentes podem inflamar-se facilmenet, é portanto necessário vigiar permanentemente os alimentos (fritos, etc.) CLEANING AND MAINTENANCE REINIGUNG UND WARTUNG LIMPEZA E MANUTENÇÃO Your glass ceramic hotplate is nice looking and easy to operate. Following hints and recommendations can help you keep it as it is for a long time. Ihre glaskeramische Platte sieht schön aus und es ist bedienungsfreundlich. Die folgenden Räte und Vorschläge können Ihnen helfen, die Platte in einen Zustand für wirklich lange Benützung zu halten. A placa vitrocerâmica é bonita e fácil de utilizar. Seguir as recomendações pode ajudá-lo a manter a sua placa por muito tempo. RECOMMENDATIONS VORSCHLÄGE RECOMENDAÇÕES Do nut use steam cleaner for cleaning of appliance! Clean your glass ceramic plate regularly, after each use as the best. Remove from the glass ceramic plate first all dried on food and liquid rests with help of scraper Für Reinigung des Geräts benützen Sie keinen Dampfreiniger! Reinigen Sie Ihre glaskeramische Platte regelmäßig, am bestens nach jeder Benützung. Entfernen Sie zuerst aus der glaskeramischen Platte Para limpar a placa não utilize vapor! Limpe regularmente a placa, de preferência após cada utilização. Primeiro remova todas as impurezas secas com a ajuda da espátula incluída 23 (enclosed in accessory). As soon as the plate is cold, apply a few drops of suitable detergent and clean the surface with paper towel or clean, soft towel. Wash and dry up the surface after cleaning by another paper towel or soft cloth. Never use steel wool, washing sponge or other cleaning matters with rough surface. We do not recommend also the agents supporting corrosion, as for instance sprays for cleaning of roasters and for removing of stains. When by mistake an object from plastic, kitchen foil, sugar of food containing sugar was melted on the hot surface of your glass ceramic plate, remove it immediately from the hot surface by the scraper, and this not only from the hotplate but also from the pot surface, when applicable. You prevent with it the damaging of cooking plate surface. Before preparing meals with high content of sugar (for instance jam), coat the plate with suitable protective agent for to protect it against damaging it with sugar in case of running over of food or at pouring on the plate surface. Shiny metal stains appear from scratching of aluminum pot bottom on the plate surface or with using of unsuitable cleaning agent. Removing such stains is possible by hard repeated cleaning. Colored changes on the hotplate surface are usually caused by not removed burnt on rests. They have no influence on the function of the glass ceramic plate, this is not a change in material composition. 24 alle vertrockneten Reste der Nahrung und Flüssigkeiten mit Hilfe eines Spachtels (aus Zubehör des Geräts). Sobald die Platte gekühlt ist, tragen Sie ein Paar Tropfen von geeignetem Reinigungsmittel auf und reinigen Sie die Oberfläche mit einem Papiertuch oder mit einem reinen, weichen Wisch. Dann reinigen Sie die Oberfläche mit einem weiteren Papiertuch oder weichem Wisch. Benützen Sie keinen Drahtschwamm, Badeschwamm oder andere Reinigungsmittel mit rauer Oberfläche. Wir empfehlen auch nicht die Benützung von der Korrosion fördernden Zubereitungen, wie zum Beispiel Sprays für Herde oder für Fleckenentfernung. Wenn zufällig ein Gegenstand aus Plastik oder aus Kochfolie, Zucker oder Zucker beinhaltende Nahrung auf der heißen Oberfläche der glaskeramischen Platte einschmelzt, entfernen Sie ihn sofort mit Hilfe des Reinigungsspachtels bereits noch bei heißer Platte, und zwar nicht nur aus der Platte, sondern auch aus von der eventuell verschmutzten Oberfläche des Geschirrs. Sie vermeiden damit die Beschädigung der Kochplattenoberfläche. Vor Kochen einer mehr Zucker enthaltenden Nahrung (z.B. Konfitüre), streichen Sie auf die Platte ein geeignetes Schutzmittel ein, für die Oberfläche gegen Beschädigung mit Zucker im Falle eines Überlaufens oder Verschüttung auf der Plattenoberfläche zu schützen. Die glänzenden Flecken entstehen aus Aufscheuerung des Bodens eines Alu-Geschirrs oder aus Benützung von ungeeignetem Reinigungsmittel. Diese Flecken können sich nur mühsam mit wiederholter Reinigung entfernet werden. Logo que a placa arrefeça aplique algumas gotas de detergente apropriado para superfícies vitrocerâmicas e limpe com toalha de papel ou pano macio. Após limpar seque a superfície com outra toalha de papel ou pano macio. Nunca use materiais abrasivos sobre a superfície. Não use detergentes agressivos que possam causar corrosão, como os que são utilizados para limpeza de fornos ou remoção de nódoas. Se houver contacto com plástico, papel de alumínio, açúcar ou preparados à base de açúcar, limpe imediatamente com a espátula enquanto a placa está quente. Se o recipiente estiver sujo, limpe também. Noutros casos traços permanentes podem aparecer. Depois de arrefecer limpe da forma usual. Antes de preparar alimentos com açúcar, proteja a placa com o detergente apropriado. Manchas provocadas por salpicos de água podem ser removidas com vinagre ou limão. Die Verfärbungen auf der Kochplatte sind meist nicht behebbaren angebrannten Resten verursacht. haben aber keinen Einfluss auf die Funktion glaskeramischen Platte, es handelt sich nicht Änderung in dem Material. Manchas coloridas são normalmente causadas pela não remoção de impurezas na superfície vitrocerâmica. Estas manchas não influenciam o funcinamento da placa. mit Sie der um Manchas brilhantes podem aparecer quando usar utensílios de alumínio ou detergentes inadequados. A remoção destas manchas é possível com a repetição da limpeza. You can cause the grinding down of decor with abrasive cleaning agents or with scratching of pot bottom on the hotplate surface for longer time. A dark stain can be created on the hotplate. Einen Abrieb des Dekors kann mit Benützung von abrasiven Reinigungsmitteln verursacht werden, oder mit Reibung des Geschirrsbodens auf der Kochplattenoberfläche während längerer Zeit. Ein dunkeler Fleck kann dann auf der Kochplatte entstehen. Partes baças na superfície podem ser causadas por detergentes abrasivos ou devido à permanência de recipientes em cima da placa, durante muito tempo. CLAIMS REKLAMATION RECLAMAÇÃO If there is any defect on the appliance within the guarantee period, do not repair it self. Apply a claim in the shop in which you bought the appliance or at service representatives, mentioned in the Guarantee conditions. At applying of claim observe the text of Guarantee sheet and Guarantee conditions. The claim is valid with submitted dully filled up Guarantee sheet only. Falls ein Mangel entsteht auf dem Gerät währen der Garantieperiode, reparieren ihn nie selbst. Die Reklamation erheben Sie in der Verkaufsstelle, wo Sie haben das Gerät gekauft, bei Markenservicestelle, oder bei in der Garantiebedingungen bestimmten Vertragsservicestellen. Bei diesem Verfahren der Text des Garantiescheines und der Garantiebedingungen wird maßgeblich. Die Reklamation ist ohne Vorlegung ordentlich ausgefüllten Garantiescheines ungültig. Se aparecer durante o tempo de garantia alguma avaria no aparelho não repare por sim mesmo. Faça a reclamação na loja onde comprou o aparelho, no serviço do fabricante ou nos serviços de gestão indicados nas Condições de garantia. Ao apresentar uma reclamação proceda segundo a Folha de garantia e as Condições de garantia. Sem apresentar a Folha de garantia preenchida correctamente a reclamação não é válida. METHODS OF REUSE AND LIQUIDATION OF WASTE DIE METHODEN DER WIEDERVERWENDUNG UND ENTSORGUNG DER PACKUNG MÉTODOS DE UTILIZAÇÃO E DESTRUIÇÃO DE EMBALAGENS Grooved cardboard, packaging paper - sale to waste collecting company - to collecting vessels for used paper - other reuse Packaging foil and PE backs - to collecting vessels for plastic Wellpappe, Verpackungspapier - Verkauf in Entsorgungsfirmen - Hinterlegung in Containers für Altpapier - andere Benützung Verpackungsfolien und PE – Säcke - Hinterlegung in Containers für Plastik Se colocar as embalagens num Ecoponto garante a sua reciclagem Cartão, papel - Ecoponto; - Caixotes para papéis; Esferovite - Ecoponto Plástico, sacos e tampas de polietileno - Ecoponto LIQUIDATION OF APPLIANCE AFTER FINISHED USE ENTSORGUNG DES GERÄTS NACH BEENDIGUNG DER BENÜTZUNG DESTRUIÇÃO DO APARELHO EM FIM DE VIDA This appliance is marked in accordance with Directive 2012/19/EU on manipulation with waste from electric and electronic equipment - WEEE. This directive determines the unified European (EU) frame for collection and recycling of used equipment. Dieses Gerät ist im Einklang der EU-Regelung 2012/19/EU über Behandlung mit benützten elektrischen und elektronischen Einrichtungen (waste electrical and electronic equipment - WEEE) markiert. Die Regelung bestimmt einen einheitlichen EURahmen für Rückabnahme und Wiederverwendung der benützten Einrichtungen. Este aparelho está marcado de acordo com a Directiva 2012/19/EU de REEE. Após expirar o prazo de vida útil do aparelho, entregueo no local próprio de recolha de aparelhos electrónicos usados. 25 The appliance contains valuable materials which should be reused. Please give your used appliance to waste processing company or to by your community determined waste collection point. Das Gerät enthält wertvolle Materialien, die wieder verwendet werden sollten. Liefern Sie das Gerät in eine mit der Gemeinde bestimmte Abfallsammelstelle. O aparelho contém materiais preciosos que possam ser reusados depois do fim da vida do aparelho. O aparelho que está no fim da sua vida deve ser entregue ao centro da recolha selectiva para reciclagem. INSTRUCTIONS FOR INSTALLATION MONTAGEAN-WEISUNGEN REGRAS PARA INSTALAÇÃO Solely company authorized to provide such activities may perform the installation of this hotplate and it should be installed in compliance with local standards and regulations. At installation of appliance the following steps should be provided from point of view of appliance: checking of correct connection to electric power net, function check of heating, control and regulation elements, demonstration of appliance all functions, operation and maintenance to the customer. Die Montage kann nur eine Firma mit entsprechender Befugnis zu machen und die Montage muss im Einklang mit den lokalen Normen und Regelungen ausgeführt werden. Bei Montage des Geräts ist es notwendig, von Gesichtspunkt des Geräts, nämlich die folgenden Schritte zu machen: Kontrolle der Richtigkeit der Kopplung zu dem Stromzufuhr, Funktionskontrolle der Heiz-, Bedienund Steuerelemente, Vorführung aller Funktionen des Geräts dem Kunden und Bekanntmachung mit der Bedienung und Wartung Estas instruções são dirigidas especialmente aos técnicos que procedem a intervenções nos aparelhos. Mas recomendamos que também as leia, pois são do seu interesse. O aparelho deve ser instalado de acordo com as normas em vigor no país. Após a instalação o técnico deve proceder da seguinte forma: verificar as ligações à corrente eléctrica verificar se as áreas de cozedura, os controlos e os elementos de regulação funcionam em perfeitas condições demonstrar todas as funções do aparelho ao cliente, instruir o cliente sobre a operação e manutenção do aparelho. IMPORTANT NOTE! WICHTIGE HINWEIS! NOTA IMPORTANTE! At any manipulation with the appliance, except of normal use, it is necessary to disconnect the power, e.g. with pulling out of the plug from the socket or with switching off the main switch before the appliance. Bei jeder Handlung mit dem Gerät, außer üblicher Benützung, es ist notwendig die Abschaltung von dem Stromnetz und zwar mit Ausziehung der Netzschnur aus der Steckdose zu gewährleisten. Em todas as operações de montagem ou desmontagem deve desligar-se o aparelho da rede eléctrica. ATTENTION HINWEIS ADVERTÊNCIA This appliance is not designed to work with remote timer or remote control system. Das Gerät ist nicht für Betrieb mit Hilfe externes Zeitschalters oder einer externen Fernsteuerung bestimmt. O aparelho não deve ser posto em funcionamento por meio de um comando externo ou um sistema de telecomando separado. 26 LOCATION OF HOTPLATE STANDORT DES GERÄTS LOCALIZAÇÃO DA PLACA INSTALLATION DIMENSIONS EINBAUMAßE DIMENSÕES PARA A INSTALAÇÃO IS656USC, IS656X, IS655USC, IS655X, IS756USC, S756SC, IS656SC, IS655SC IS756SC 27 IS656SC, IS655SC Se a placa é maior que o armário e a bancada de uma espessura inferior a 49mm, corte de ambos os lados o armário de modo a que o aparelho fique separado do armário. Installation dimensions inside the cabinet X < 49 mm: y = 49 mm – x X > = 49 mm: y = 0 Wenn das Kochfeld breiter ist als das Küchenelement und die Arbeitsplatte dünner ist als 49 mm, sägen Sie eine Öffnung in beide Seitenwände des Küchenelements, das Gerät darf das Element nicht berühren. Maße für den Einbau in das Küchenelement X < 49 mm: y = 49 mm – x X > = 49 mm: y = 0 Additional requirements for the integration (flush installation) of the hob Zusätzliche Anforderungen für die Aufstellung der Kochfelder – mit der Arbeitsplatte bündig Os adicionais para a integração da placa na bancada. 1. Tape 2. Kit 1. Band 2. Dichtungsmasse 1. Fita 2. Kit de vedação If the hob is wider than the cupboard, with a worktop less than 49 mm thick, saw a cut-out in both sides of the cupboard, so the appliance is detached from the cupboard. 28 Dimensões para a instalação no interior do armário. X < 49 mm: y = 49 mm – x X > = 49 mm: y = 0 The hob can only be integrated above a single cupboard at least 650 mm wide (IS656SC, IS655SC) / 800 mm wide (IS756SC) (see illustration). Once it has been integrated, the hob must remain accessible from underneath for service purposes. If a drawer or oven is built in under the hob it must be easily removable. These hobs are particularly suitable for integration in stone or tiled worktops. When integrating the hob it should only be kitted along the side of the glass top and not at the bottom. This is to ensure that the glass top itself remains accessible should it need to be replaced. To do this, apply a layer of tape, such as masking tape, to the inlay surface. Report any transit damage before sealing the hob. Any damages reported afterwards will be deemed a result of it being built in. The guarantee does not cover damages resulting from the hob being built in. The guarantee does not cover water damage or any other damage to the worktop the hob is built into. Prior to any service call, all interior parts of the cupboard the hob is built into, such as drawer constructions, shelves, racks and runners, are to be removed. The service department is responsible for the repair and service of the hob only. You should contact your kitchen specialist about the re-integration (flush installation) of the hob. The kit used to seal the edges of the glass top must be resistant to temperatures of at least 160 °C. To prevent discolouration of the natural stone, use a specially developed sealant between the glass and natural stone. 29 Sie können das Kochfeld in ein Küchenelement einbauen, das mindestens 650 (IS656SC, IS655SC) und 800 mm breit ist (IS756SC) (siehe Abb.). Nach dem Einbau des Kochfeldes, muss der untere Teil des Geräts für Serviceeingriffe zugänglich sein. Wenn unter dem Kochfeld ein Backofen oder ein Fach montiert ist, muss dieser(s) einfach zu entfernen sein. Diese Kochfelder lassen sind besonders zum Einbau in Arbeitsplatten aus Stein oder Keramik einbauen (mit Fliesen bedeckte Arbeitsfläche). Beim Einbau des Kochfeldes den Kitt nur an den Seiten der Glaskeramikoberfläche auftragen und nicht unter die Glaskeramikplatte. Dadurch wird gewährleistet, dass die Glaskeramikplatte nach Bedarf ausgetauscht werden kann. Dazu können Sie auf die Innenseite ein Papierband aufkleben. Bevor Sie das Kochfeld abdichten, prüfen Sie, ob es beschädigt ist und melden Sie dem Händler eventuelle Beschädigungen. Im Fall einer Reklamation wegen einer Beschädigung des Kochfeldes, das bereits eingebaut wurde, gilt, dass die Beschädigung beim Einbau geschehen ist. Die Garantie deckt keine Schäden, die Folge von Einbau sind bzw. die beim Einbau entstehen. Die Garantie deckt auch keine Schäden, die wegen des Kontakts mit Wasser entstehen sowie andere Beschädigungen der Arbeitsfläche, in die das Kochfeld eingebaut ist. Bevor Sie den Kundendienst anrufen, entfernen Sie alle Teile aus dem Inneren des Küchenelements (z.B. Schublade, Ablagen, Träger, Führungen), in welches das Kochfeld eingebaut ist. Der Kundendienst ist nur für Reparaturen und Instandhaltungsarbeiten am Kochfeld verantwortlich. Informieren Sie sich über den Wiedereinbau des Kochfeldes (bündig zur Arbeitsfläche) bei Ihrem Küchenfachgeschäft. Die DIchtungsmasse, mit der Sie eventuelle Spalten an den Rändern der Glaskeramikfläche abdichten, muss temperaturbeständig sein (mindestens 160°C). Verwenden Sie eine spezielle Dichtmasse zum O aparelho só pode ser integrado em cima de um armário com uma largura no mínimo de 650 (IS656SC, IS655SC) ou 800 mm (IS756SC) (ver imagem) Depois de integrada, a placa deve ficar acessível pela parte inferior para qualquer serviço de reparação. Se por baixo da placa houver uma gaveta ou um forno, ambos têm de ser fácilmente removíveis. Estas placas são particularmente adequadas para serem integradas em bancadas de pedra ou de azulejos. Ao instalar a placa, esta só deve ser fixada ao longo da parte inferior da parte lateral da placa cerâmica. Isto garante que a placa cerâmica fique acessível caso precise de ser substituída. Para esta fixação utilize a fita adesiva para selar a superfície. A reclamação por qualquer dano causado pelo transporte deve ser apresentada antes da instalação do aparelho, caso contrário os danos serão considerados como resultantes de uma incorrecta instalação. A garantia não cobre danos devidos a uma instalação incorrecta. A garantia não cobre danos causados por água ou por danos no aparelho durante a instalação. Antes de qualquer serviço de reparação, arranje espaço à volta do aparelho ( retire gavetas, prateleiras etc.). O assistente de serviço é responsável pela reparação e manutenção do aparelho. Para a reinstalação do aparelho na bancada contacte o seu especialista de cozinha. O kit utilizado para vedar as bordas da placa vitrocerâmica deve ser resistente no mínimo a uma temperatura de 160°C. Para evitar manchas na pedra natural, faça a vedação entre o vidro e a pedra natural com a pasta especialmente desenvolvida para o efeito. The minimal distance 30 mm of kitchen unit content (the content of drawer) from the plate cover should be observed. Ensure the sufficient venting - see the picture. Abdichten des Spaltes zwischen der Glaskeramikfläche und dem Naturstein, um die Verfärbung der Natursteinplatte zu verhindern. Die minimale Entfernung von 30 mm des KüchenblockInhaltes (Schubladeninhaltes) von der Plattendecke muß beachtet werden. Besorgen Sie bitte die ausreichende Lüftung - sehe Abbildung. Se a espessura do plano de trabalho no qual a placa será embutida for superior aos 30 mm, serão necessárias adaptações no local da saída do ar de arrefecimento do aparelho (veja a figura). Solely company authorized to provide such activities may perform the installation and it should be installed in compliance with local standards and regulations. The electric hot plate is designed, from external influence point of view, for normal indoor conditions. The hot plate is designed for building in to cut out in the working sink of minimal thickness of 30 mm, which is covered with heat resistant material. The sink has to be installed in horizontal position and has to be sealed against leaking in of liquids on the wall side. The dimensions of cut out for the hotplate and its position are shown on the picture of installation. The safe distances of walls and furniture from the hotplate are given on the picture. We recommend to cover the in the cut out created cut surfaces with appropriate varnish (for instance silicon varnish) or Al-foil, respectively, which decrease the intrusion of humidity into the sink plate. It is not allowed - without special measures – to install oven under the hot plate, where the burnt gases from the oven could stream upwards under the hotplate. Also the rear wall of kitchen unit has to be from heat resistant material (120° C). The smallest distance of hotplate rear edge from the rear wall is 50 mm. Die Montage kann nur eine Firma mit entsprechender Befugnis zu machen und die Montage muss im Einklang mit den lokalen Normen und Regelungen ausgeführt werden. Die elektrische Kochplatte ist aus der Sicht der Einwirkung äußerer Kräfte für normale Umgebung bestimmt. Die Kochplatte ist für Einbau in einen Ausschnitt in einem min. 30mm Dicken, mit wärmebeständigem Material bedeckten Arbeitsbrett des Kuchenmöbels, bestimmt. Das Arbeitsbrett muss waagerecht eingebaut und auf der Wandseite gegen Einfließung von Flüssigkeiten gedichtet werden. Die Dimensionen des Ausschnittes für die Kochplatte und ihre Lage Sie finden auf der Darstellung für die Montage. Sie finden die sichere Entfernungen der Wänden und Möbel von der Kochplatte, die einzuhalten sind, auf dem Bild. Wir empfehlen die mit dem Ausschnitt entstandenen Flächen mit geeignetem Lack (z.B. Silikonlack), oder mit Alufolie, welche die Eindringung der Feuchtigkeit in das Brett vermindern, zu decken. Es ist nicht erlaubt ohne besonderer Maßnahme unter die Kochplatte Ofenröhre, die Abgase von welchen aufwärts unter die Kochplatte strömen A instalação, colocação em serviço e manutenção devem ser feitas por um técnico especializado. O aparelho deve ser instalado num plano aberto de pelo menos 30 mm de espessura, e cuja superfície seja resistente ao calor. Para a dividir do armário inferior deve ser colocada uma divisória. O plano de trabalho deve ser horizontal e a parte do lado da parede deve ser isolada contra a penetração de líquidos. As dimensões do nicho de encastre estão na Fig. Espaço de segurança entre a placa e a parede bem como de outros móveis, estão mencionados na Fig. Após cortar o nicho de encastre este deve ser isolado com silicone, para proteger da humidade. Se houver um forno sob a placa, não é necessário colocar a divisória. Fornos cujos produtos da combustão circulem . A parede por trás da placa deve ser resistente ao calor até 120ºC. A distância mínima entre o rebordo posterior da placa e a parede é de 50 mm. A placa não pode ser instalada junto a um móvel de cozinha de material inflamável. É recomendado que em cima da placa de cozedura embutida seja colocado só um exaustor. Só em cima dele poderá ser colocado um imóvel de cozinha. }ão é recomendável instala um imóvel sem exaustor em cima da placa de cozedura embutida. A 30 The hotplate should not be installed in close neighborhood of kitchen cabinet made from flammable material, which extends over the surface of sink. We recommend the installation over the hotplate a vapor absorber exclusively (digestor); over this absorber a kitchen cabinet can be installed. We do not recommend the installation of independent cabinet without vapor absorber directly over the hotplate. The minimal distance of hotplate from the vapor absorber is 760 mm; you should observe the recommendations of absorber producers here. 31 können, zu installieren. Auch die Hinterwand des Küchenblocks hinter der Kochplatte muss aus wärmebeständigem Material sein (120°C). Die kleinste Entfernung der Kochplattenhinterkante ab der Hinterwand ist 50 mm. Die Kochplatte darf nicht in unmittelbarer Nähe eines Küchenschrankes aus brennbarem Material, welcher der Oberfläche der Arbeitsplatte übersteigt, montiert werden. Über der Kochplatte wir empfehlen nur einen Abzugsschrank zu montieren, über dem Abzugsschrank kann eventuell ein Küchenschrank montiert werden. Wir empfehlen nicht einen getrennten Küchenschrank ohne Dampfabsauger über der Kochplatte zu montieren. Die minimale Entfernung zwischen der Kochplatte und dem Absauger ist 760 mm, oder nach Bestimmungen der Absaugerproduzenten. distância mínima entre a placa e o exaustor deve ser 760 mm, obedecendo as recomendações do frabricante do exaustor. LÜFTUNG VENTILATION VENTILAÇÃO IMPORTANT! WICHTIG! IMPORTANTE! Observe the following instructions for installation of appliance. The insufficient access of cooling air could cause the limitation of appliance or its damaging, eventually. If the hob is built in furniture above case, there cant be small pieces or sheets paper, because ventilation inlets could be stocked. Beachten Sie die folgenden Hinweise für Einbau des Geräts. Die ungenügende Zufuhr der Kühlluft kann die Funktion des Geräts begrenzen oder eben zu Beschädigung des Geräts zu führen. Falls die Induktionsplatte über einer Schublade angebracht ist, dann in ihr keine kleine Gegenstände oder Papierstücke geladen werden können, welche die Saugöffnungen der Ventilatoren verstopfen und die Kühlung der Induktionsplatte verhindern könnten. Ao instalar o aparelho, obedeçam instruções seguintes: Uma ventilação insuficiente pode reduzir um bom funcionamento do aparelho, ou causar danos neste aparelho. Se a placa de cozedura for situada em cima de um móvel com gavetas, é proibído guardar no móvel objetos pequenos e papéis que possam vedar os ventiladores e obstruir a ventilação da placa de indução. Die Hinterwand des unteren Schrankes muss in dem Bereich des Ausschnitts des Arbeitbrettes offen gehalten, für den Luftaustausch zu ermöglichen. Die vorderen Streben des Möbels müssen entfernt werden, um eine Öffnung für Luftzufuhr, mindestens 5 mm unter dem Arbeitsbrettes entlang der ganzen Breite des Geräts, zu schaffen. Die eventuellen Streben unter dem Arbeitsbrett müssen, wenigstens im Bereich des Arbeitsbrettes, entfernt werden. Die Entfernung zwischen der Induktionskochplatte und der Küchenmöbel, eventuell anderen eingebauten Geräten, muss so gewählt werden, O imóvel debaixo da placa de cozedura deve ter um espaço aberto no local da corte da placa de trabalho, para garantir uma passagem livre do ar. É necessário realizar um corte de 5 mm ou mais na parte dianteira do móvel por onde ar possa sair debaixo da placa de trabalho ao longo do aparelho embutido. Os possíveis apoios da placa de trabalho devem ser removidos pelo menos na área de baixo do aparelho. A distância entre a placa de cozedura indutiva e o móvel de cozinha ou outros aparelhos embutidos deve possibilitar um arrefecimento e ventilação A (mm) B (mm) C (mm) 50 20 5 The rear wall of lower cabinet in the area of cut out has to be open, for to ensure the air exchange. The front reinforcement of furniture should be removed, for to enable of creation of opening for passage of air, at least in a height of 5 mm under the sink over the whole length of appliance. The eventual reinforcements under the sink should be removed at least in the area of sink. The distance between the induction cooking plate and kitchen furniture, or other built in appliances, eventually, should be chosen so, that the sufficient ventilation of induction cooking zones would be provided. When the working table is sicker as 50 32 mm, then its shape in the place of cooling air output from the appliance should be modified (see the picture). The excessive heating up from below – for instance from the built in stove without cooling ventilator should be prevented. When at eventually built in stove (roaster) – located under the built in cooking plate – a pyrolysis process (high frequency cleaning) is in operation, than the induction cooking plate should not be used. dass eine genügende Lüftung der Induktionskochzonen gewährleistet wird. Falls das Arbeitsbrett dicker als 50 mm ist, dann die Form des Brettes neben des Kühlluft- Auslasses aus dem Gerät muß geändert werden (sehe Abbildung). Die übermäßige Erwärmung von der unteren Seite, z.B. von eingebautem Ofenrohr ohne Kühlungsventilator, muss verhindert werden. Wenn bei dem unter die eingebaute Kochplatte eingebauten Rohofen ein Prozess der Pyrolyse (Hochtemperaturreinigung) geführt ist, dann die Induktionskochplatte darf nicht benützt werden. suficientes das bocas de cozedura indutivas. A distância mínima entre os objetos dentro do móvel de cozinha (das gavetas) e a cobertura da placa é de 50 mm. É necessário assegurar uma ventilação suficiente para evitar um sobreaquecimento da parte de baixo do aparelho pelo ar quente saído de um forno ou outro aparelho situado em baixo da placa – veja a figura. É proíbido por a placa indutiva em funcionamento no momento quando o forno embutido, situado em baixo da placa de cozedura está sendo limpado por processo pirolítico. CONNECTION OF APPLIANCE TO POWER NET ANSCHLUSS DES GERÄTS ZU DEM STROMNETZ LIGAÇAO ELÉCTRICA DA PLACA The appliance must be connected to power net with authorized body only. A switch with minimal distance of disconnected all poles contacts of 3 mm has to be connected into the circuit before the appliance for disconnecting of appliance from the power net. This obligation is not necessary, when the supply cord is provided with a plug and this plug can be easily and without obstruction pulled out from the socket. To connect a hot plate, use a 3 wire cable with 4mm cross-section, e.g. H05VV-F 3G4, or a 4 wire cable with 2,5mm cross-section, e.g. H05VV-F 4G2,5. Adjust the endings according to the picture. The cable ends should be fastened against fraying with pressed on cable ends. Put the cable into the terminal box and secure against pulling up with clip after fastening of core ends under the screw heads of terminals. Close the terminal box cover at the end. For connecting turn the appliance into working position, insert it to the cut out and check the position of connection cable. Remove the top foil from the sealing on the lower plate edging, insert the plate into the opening of your kitchen unit and press the edgings gently as not to damage the appliance. Die Montage kann nur eine Firma mit entsprechender Befugnis zu machen. Am Anfang des Stromkreises vor dem Gerät muss ein Schalter für Abschaltung des Geräts von dem Stromnetz, bei welchem die Entfernung der abgeschalteten Kontakte mindestens 3 mm ist, gebaut werden. Benützen Sie für die Anschaltung der Kochplatte ein Dreiadriges Kabel mit 4mm Durchschnitt, z.B. ein Typ H05VV-F 3G4, oder ein Vieradriges Kabel mit 2,5mm Durchschnitt, z.B. von Typ H05VV-F 4G2,5, die Enden sollen gemäß der Abbildung vorbereitet werden. Die Kabelenden müssen gegen Zerfasern mit angepressten Endstücken befestigt werden. Für Kopplung der Kabelenden unter den Schraubenköpfen im Klemmbrett legen Sie das Kabel in das Klemmbrett ein und sichern gegen Auslösung. Dann schließen Sie den Deckel des Klemmbrettes. Nach Zukopplung drehen Sie das Gerät in Arbeitslage, legen Sie das Gerät in den Ausschnitt ein und überprüfen Sie die Lage des Anschlusskabels. Entfernen Sie die Deckfolie aus der Dichtung auf der unteren Kante der Platte, legen Sie die Platte in die Öffnung in der Küchenzeile und drücken Sie die Platte mit leichter Stärke ohne Beschädigung des Geräts ein. A conexão do aparelho à rede eléctrica deve ser feita somente pelas firmas especializadas e autorizadas. Na distribuição antes do aparelho deve haver um interruptor para desligar o aparelho da rede eléctrica no qual a distancia dos contactos separados de todos os pólos de 3 mm como mínimo. Para ligar a placa de cozedura utilize um cabo de três veias com perfil de 4mm, por exemplo H05VV-F 3G4, ou um cabo de 4 veias com perfil de 2,5mm, por exemplo H05VV-F 4G2.5 e adapte suas extremidades conforme instruído na figura. Os extremos dos condutores devem ser fixados contra o desfiado das terminações prensadas. Depois de ter fixado as terminações dos condutores por abaixo das cabeças dos parafusos na placa de bornes ponha o cabo na placa de bornes e assegure contra o arrancamento com a fivela. Finalmente feche a tampa da placa de bornes. Para conectar o aparelho gire na posição de trabalho, introduza no recorte e controle a posição do cabo de alimentação. A alimentação de rede deve ser levada de maneira que não seja danada. Retire a banda adesiva que protege a junta em baixo da placa de cozedura, coloque a placa no recorte do plano de trabalho e pressione levemente nas partes laterais, não cause danos ao aparelho. 33 SINGLE-PHASE CONNECTION ANSCHLUSS 1 PHASE LIGAÇÃO MONOFÁSICA 1. clip against cord tearing 2. conductor ends braced with pressed terminal 1. klemmschuh gegen ablösung der schur 2. die kabelenden sind mit aufgepressten endstück ausgestattet 1. parafuso que impede o cabo de ser arrancado 2. extremidade dos condutores com terminais NOTICE: HINWEIS: AVISO: The producer reserves the right for small modifications of manual, following from the technical or technological changes of product, which have no influence to the function of product. Der Produzent vorbehaltet sich das Recht auf kleine Änderungen dieser Anweisungen, die aus Erneuerung oder aus technologischen Änderungen des Produktes, ohne die Funktion des Geräts zu beeinflussen, sich ergeben. O fabricante se reserva o direito de as direcções pequenas alterações, resultando em produtos inovadores ou mudanças tecnológicas que não afetam a função do produto. ACCESSORIES Cleaning scrape 34 ZUBEHÖR Spachtel für Reinigung ACESSÓRIOS Raspadeira 1 TECHNICAL DATA TECHNISCHE DATEN Electric induction built in cooking plate Glaskeramik-EinbauInduktionskochfeld Dimensions Dimensionen Total dimensions - W x D x H (H = built in depth) Dimensions of cut out in the working sink Width x Depth x Thickness of sink Gesamtdimensionen – B x T x H (V = Einbautiefe) Dimensionen des Ausschnitts im Arbeitsbrett Breite xTiefe x Dicke des Arbeitbrettes Cooking zones Kochzonen Left front Left rear Right rear Right front Left and right flexi zone Links vorne Links hinten Rechts vorne Rechts hinten Linke und rechte FlexiZone Elektrische Spannung Gesamtleistung Electric voltage Total electric input 35 IS656SC IS656USC IS656X IS756SC IS756USC 595 / 510 / 60 mm 600 / 510 / 60 mm 600 / 515 / 62 mm 750 / 510 / 60 mm 750 / 510 / 60 mm 560 x 490 x (30 - 50) mm 200x200 mm 200x200 mm 200x200 mm 200x200 mm 400x200 mm 1800/3000 kW 1800/3000 kW 1800/3000 kW 1800/3000 kW 3000/4000 kW 220-240 V/400 V ~; 50/60 Hz 7,2 kW DADOS TÉCNICOS Placa de cozedura indutiva embutível IS656SC IS656USC 595 / 510 / 60 mm 600 / 510 / 60 mm IS656X IS756SC IS756USC 600 / 515 / 62 mm 750 / 510 / 60 mm 750 / 510 / 60 mm Dimensões: largura/ altura/ profundidade Nicho de encastre – L x F x espessura da bancada Potência eléctrica cozedura das Dianteira esquerda Traseira esquerda Dianteira direita Traseira direita Boca flexi esquerda e direita Voltagem Potência total 36 áreas 560 x 490 x (30 - 50) mm de 200x200 mm 1800/3000 kW 200x200 mm 1800/3000 kW 200x200 mm 1800/3000 kW 200x200 mm 1800/3000 kW 400x200 mm 3000/4000 kW 220-240 V/400 V ~; 50/60 Hz 7,2 kW TECHNICAL DATA TECHNISCHE DATEN Electric induction built in cooking plate Glaskeramik-EinbauInduktionskochfeld Dimensions Dimensionen Total dimensions - W x D x H (H = built in depth) Dimensions of cut out in the working sink Width x Depth x Thickness of sink Gesamtdimensionen – B x T x H (V = Einbautiefe) Dimensionen des Ausschnitts im Arbeitsbrett Breite xTiefe x Dicke des Arbeitbrettes Cooking zones Kochzonen Left front Left rear Right rear Right front Left flexi zone Electric voltage Total electric input Links vorne Links hinten Rechts vorne Rechts hinten Linke Flexi-Zone Elektrische Spannung Gesamtleistung IS655SC IS655USC IS655X 595 / 510 / 60 mm 600 / 510 / 60 mm 600 / 515 / 62 mm 560 x 490 x (30 - 50) mm 200x200 mm 1800/3000 kW 200x200 mm 1800/3000 kW 200x200 mm 1800/3000 kW 200x200 mm 1800/3000 kW 400x200 mm 3000/4000 kW 220-240 V/400 V ~; 50/60 Hz 7,2 kW DADOS TÉCNICOS Placa de cozedura indutiva embutível IS655SC IS655USC IS655X 595 / 510 / 60 mm 600 / 510 / 60 mm 560 x 490 x (30 - 50) mm 600 / 515 / 62 mm Dimensões: largura/ altura/ profundidade Nicho de encastre – L x F x espessura da bancada Potência eléctrica das áreas de cozedura Dianteira esquerda Traseira esquerda Dianteira direita Traseira direita Boca flexi esquerda Voltagem Total electric input 37 200x200 mm 1800/3000 kW 200x200 mm 1800/3000 kW 200x200 mm 1800/3000 kW 200x200 mm 1800/3000 kW 400x200 mm 3000/4000 kW 220-240 V/400 V ~; 50/60 Hz 7,2 kW PRODUCT INFORMATION REGULATION (EU) NO 66/2014 Symbol Unit Supplier’s name or trade mark Model identification Value Value GORENJE IS656SC IS656USC IS656X IS756SC IS756USC GORENJE IS655SC IS655USC IS655X 4 induction cooking zones and cooking areas 20,0 20,0 200,7 202,6 181,9 198,7 196,0 4 induction cooking zones and cooking areas 20,0 20,0 203,6 200.8 181,3 182,1 192,0 en Type of hob Number of cooking zones and/or areas EE electric burner Heating technology Dimensions of cooking zones and / or areas L W Energy consumption per cooking zone or area ECelectric cooking Wh/kg Energy consumption for the hob EE electric hob Wh/kg 38 cm PRODUKTINFORMATIONEN VERORDNUNG (EU) NR. 66/2014 Symbol Einheit Name oder Warenzeichen des Lieferanten Modellkennung Wert Wert GORENJE IS656SC IS656USC IS656X IS756SC IS756USC GORENJE IS655SC IS655USC IS655X 4 Induktionskochzonen und –kochflächen 20,0 20,0 200,7 202,6 181,9 198,7 196,0 4 Induktionskochzonen und –kochflächen 20,0 20,0 203,6 200.8 181,3 182,1 192,0 de Art der Kochmulde Anzahl der Kochzonen und/oder Kochflächen Heiztechnik EE electric burner Die Durchmesser der Kochzonen und / oder Bereiche L W Energieverbrauch je Kochzone oder -fläche ECelectric cooking Wh/kg Energieverbrauch der Kochmulde EE electric hob Wh/kg 39 cm INFORMAÇÄO SOBRE O PRODUTO, REGULAMENTO (UE) N.O 66/2014 Símbolo Unidade Nombre o marca comercial del proveedor Identificação do modelo Valor Valor GORENJE IS656SC IS656USC IS656X IS756SC IS756USC GORENJE IS655SC IS655USC IS655X 4 zonas e áreas de cozedura por indução 20,0 20,0 200,7 202,6 181,9 198,7 196,0 4 zonas e áreas de cozedura por indução 20,0 20,0 203,6 200.8 181,3 182,1 192,0 pt Tipo de placa Número de zonas e/ou áreas de cozedura EE electric burner Tecnologia de aquecimento Dimensões da zona de cozinhar e / ou áreas L W Consumo de energia por zona ou área de cozedura ECelectric cooking Wh/kg Consumo de energia da placa EE electric hob Wh/kg MORA MORAVIA, s.r.o., Nádražní 50, Hlubočky-Mariánské Údolí, Czech republic 40 cm SAP 473802