1
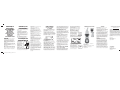
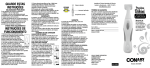
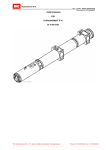
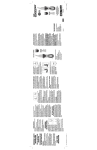
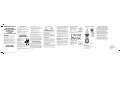
IMPORTANT SAFETY
INSTRUCTIONS
READ ALL INSTRUCTIONS
BEFORE USING
FOR HOUSEHOLD
USE ONLY
KEEP AWAY FROM WATER
WARNING
1. Use close supervision when the appliance is
used by, on, or near children or individuals with
certain disabilities.
2. Use appliance only for its intended use as
described in this manual. Only use attachments
recommended by the manufacturer.
3. Never operate the appliance if it is not working
properly, has been dropped or damaged, or
dropped into water. Return the appliance to a
Conair service center for examination and repair.
4. Do not use the appliance with teeth missing
from the blades, as injury may result. Before each
use, make certain the blades are aligned properly
and oiled.
SAVE THESE
INSTRUCTIONS
ne43br_13ip142622_ib_final.indd 1
TROUBLESHOOTING
There are several things to look for if your trimmer
fails to operate:
1. Be sure the trimmer is turned ( | ).
2. Make sure that the battery is properly placed
in the battery compartment. Test the battery to be
sure it is working.
3. Check the blades to see if they are clogged
with hair clippings; if so, use a cleaning brush to
remove hair.
4. If the trimmer still fails to operate,
take or send it to a Conair Service Center
(see warranty procedure and addresses).
OPERATING
INSTRUCTIONS
1. To insert battery,
Fig. 1
remove compartment
cover at the back of the
unit by pulling straight
down (Fig.1). Insert one
AA alkaline battery,
negative end up. (Alkaline
batteries will ensure
the best performance
and longest life for your
appliance.) If you are not
going to use the unit for
a long period of time, or
if the battery is dead, remove the battery from the
unit. Remove used batteries promptly. This will
increase the life of your trimmer.
2. After inserting the battery, replace the
battery compartment.
3. Now your unit is ready to be used. *Do not use
in the shower. To clean simply rinse trimmer blade
under faucet.
4. To use your trimmer, push On/Off switch
upwards to “|” position.
5. After you finish using your trimmer, push down
on the On/Off switch to turn the trimmer "O".
6. Always purchase the correct size and grade of
battery most suitable for the intended use.
7. Replace all batteries of a set at the
same time.
8. Clean the battery contacts and also those
of the devise prior to battery installation.
9. Ensure the batteries are installed correctly with
regard to polarity (+ and -).
10. Remove batteries from equipment, which is not
to be used for an extended period of time.
11. Remove used batteries promptly.
12. Store unused batteries in their original
packaging, away from metal objects that could
short-circuit them. Never short-circuit batteries.
13. Never dispose of batteries in fire, except under
conditions of controlled incineration. Failure to
observe this precaution may result in an explosion.
Never attempt to recharge primary batteries as
this may cause leakage, fire, or explosion.
GETTING STARTED
TO SWITCH TRIMMER HEADS
Hold the handle of the trimmer while turning the
trimmer head counterclockwise until the "I" mark
is aligned properly with the "arrow" mark (Fig.
2). At this point you should be able to easily lift
the trimmer head from the handle. To use a new
trimmer head on the unit, properly install the head
into position making sure the "I" mark is aligned
with the "arrow" mark, turn clockwise until the "I"
and "circle" marks are aligned (Fig. 3) and lock
into position.
Fig. 2
Fig. 3
TO TRIM NECKLINE & SIDEBURNS
Attach the all-purpose 20mm trimmer attachment
to the trimmer handle. Hold the trimmer blade
against the skin at the length desired and move
the trimmer downward.
TO TRIM NOSE HAIR
Attach the angled detail trimmer head to the
trimmer handle. Turn unit on. Gently insert trimmer
head into nostril. Gently move trimmer in and
out of the nostril to remove unwanted hair. Avoid
inserting the trimmer more than 1/4 in. to ensure
safe trimming.
TO TRIM EAR HAIR
Attach the angled detail trimmer head to the
trimmer handle. Turn unit on. Gently insert trimmer
head no more than 1/4 in. into outer ear canal.
Gently move trimmer around the outer ear to
remove unwanted hair extending beyond the outer
ear. Guide the trimmer around the outer surface of
ear to trim protruding hairs. Never insert trimmer
more than 1/4 in. into ear canal.
TO TRIM EYEBROWS
Attach the angled detail trimmer to the trimmer
handle. Turn unit on. To shape and define, move
the trimmer without the eyebrow comb attachment
slowly so as not to cut any hair you do not intend
to trim. Once shaped and defined, you may thin
out the hair using the eyebrow comb attachment.
USING THE 5-POSITION TRIMMING COMB
CLEANING YOUR TRIMMER
1. To use the 5-position comb, attach the comb
to the 20mm trimmer head by sliding the unit
over the trimmer blades and snapping it down
into position.
2. At first, until you become familiar with the
adjustments, use the longest setting. (You can
always go back and trim hair shorter.)
3. Using smooth, even strokes gently move the
comb through the hair in the direction of growth.
(Never attempt to trim against the natural growth
of your hair because it will be cut too short.)
4. If you decide to make your hair shorter, you
can now adjust the 5-position comb attachment
to a shorter setting until the desired length of hair
is achieved.
5. When you have finished, run a comb or brush
(not included) through the hair to remove any
loose hairs.
Make sure trimmer is off.
1. To remove the trimmer head
for cleaning, turn the head
counter-clockwise until the "I"
mark aligns with the "arrow"
mark, then lift the head gently
Fig. 4
(Fig. 4).
2. Only rinse the head under water (Fig. 5). For
proper functioning of the unit, the handle can not
touch or be immersed in water.
TAKING CARE OF YOUR TRIMMER
BLADE CARE
Because the trimmer blades are precision made
for a very special use, they should always be
handled with care. Each time you finish using
the trimmer, brush away any loose hair that has
collected in the blades, then rinse blades under
water only and store the trimmer in its storage
stand until the next use.
To promote the long life of the appliance, use
your trimmer only for the purpose intended by
the manufacturer.
NE43BR DETAIL TRIMMER
1.
2.
4.
5.
Fig. 5
3. After cleaning, make sure to shake dry the head
before replacing it to the body.
4. To reassemble the head onto
the body, align the "I" mark
on the head with the "arrow"
mark on the body and then turn
clockwise until the "I" mark
aligns with the "circle" mark on
the body (Fig. 6).
Fig. 6
WARRANTY CERTIFICATE
THE
The product identified in this manual, duly sealed,
is guaranteed by the manufacturer and/or importer,
for the period of 90 days, counting from the date
of its acquisition by the first consumer in abidance
with the conditions and special recommendations
listed herein. Contractual warranty is given to
the identified product, exclusively for possible
design, manufacturing, assembly defects, or
any other quality vices that make it improper or
inadequate for regular use. As proof of this period,
the consumer should present this Warranty Term
duly filled in, and the original copy of the purchase
invoice, or other equivalent document as long as
it identifies the product and the purchase date,
legibly, without erasures or alterations.
Warranty is understood as the substitution free
of charge of components that present production
defects or deformity in the material. In the case
of irreparable defect or repeated faults of the
same origin, the Retailer/Importer can opt for the
substitution of the device. The warranty of the new
device will be to the end of the initial contract.
CHOPPER
Trimmer Multiuso
PODEROSAS
lâminas de aço
inoxidável
3.
1. Angled head with powerful, stainless
steel blades
2. No-slip grip handle
3. Cordless/battery operated
(requires AA battery; not included)
4. 5-position trimming comb
5. 20mm trimmer head
©2013 CONAIR
COMERCIALIZACAO
DO BRASIL LTDA.
CNPJ 08.794.720/0001-88
Made in China
13IP142622
IB-12225
Modelo NE43BR
5/16/13 2:09 PM
IMPORTANTE
INSTRUÇÕES
DE SEGURANÇA
LEIA TODAS AS
INSTRUÇÕES
ANTESDE USAR
APENAS PARA USO
DOMÉSTICO
MANTENHA
AFASTADODA ÁGUA
ATENÇÃO
1. Tenha muita atenção quando este aparelho
for usado por crianças, nelas ou perto delas,
ou perto de pessoas com certas deficiências.
2. Utilize este aparelho apenas para suas
finalidades, como estão descritas neste manual.
Não utilize acessórios não recomendados
pelo fabricante.
3. Nunca utilize este aparelho se ele não estiver
funcionando de forma apropriada, tenha sofrido
queda ou dano, ou caído dentro da água. Leve-o a
um serviço autorizado Conair
para verificação.
4. Não use o aparelho se faltar algum dente nas
lâminas, pois pode causar ferimentos. Antes de
cada uso, certifique-se de que as lâminas estão
alinhadas e lubrificadas de forma apropriada.
ne43br_13ip142622_ib_final.indd 2
GUARDE ESTAS
INSTRUÇÕES
SOLUCIONANDO PROBLEMAS
Há várias coisas para verificar se seu trimmer
deixar de funcionar:
1. Certifique-se de que ele está LIGADO.
2. Certifique-se de que a bateria está bem
colocada no seu compartimento. Teste-a para
certificar-se de que está funcionando.
3. Verifique as lâminas para ver se não estão
obstruídas por restos de pêlos; se estiverem,
use uma escova de limpeza para remover
os cabelos.
4. Se o aparador ainda não funcionar, leve-o
a um centro de serviço da Conair (Veja
o procedimento de garantia e endereços).
INSTRUÇÕES DE
FUNCIONAMENTO
1. Para inserir a bateria,
Fig. 1
remova a tampa do
compartimento na parte
de trás do aparelho,
puxando-a para baixo
(Fig. 1). Insira uma bateria
alcalina AA, com o pólo
negativo para cima
(As baterias alcalinas
garantirão um melhor
desempenho e uma vida
útil mais longa a seu
aparelho). Se o aparelho
não for ser usado por um período de tempo
mais longo ou se as pilhas estiverem esgotadas,
remova-as do aparelho. Remova as baterias
usadas imediatamente. Isso aumentará a vida
de seu trimmer.
2. Depois de inserir as pilhas, feche
seu compartimento.
3. Agora, seu aparelho está pronto para
ser usado. *Não utilize o aparelho durante o
banho ou mergulhe-o na água. Para limpá-lo,
simplesmente enxágüe a lâmina sob
uma torneira.
4. Para usar seu trimmer, empurre o interruptor
de liga/desliga (On/Off) para cima, para
a posição “|”.
5. Quando acabar de usar o aparelho, empurre
o interruptor para baixo, para desligá-lo.
6. Sempre compre a bateria de dimensões
e capacidade corretas mais adequadas para
o uso pretendido.
7. Substitua todas as baterias de um conjunto
ao mesmo tempo.
8. Limpe os contatos da bateria e também
os do dispositivo antes da instalação da bateria.
9. Certifique-se de que as baterias estão
instaladas corretamente em relação
à polaridade (+ e -).
10. Remova as baterias do equipamento
que não for ser usado por um longo período
de tempo.
11. Remova imediatamente as baterias usadas.
12. Guarde as baterias não utilizadas em sua
embalagem original, afastadas de objetos
metálicos, que podem provocar um curto-circuito
entre elas. Nunca deixe isso acontecer.
13. Nunca coloque as baterias no fogo, exceto
sob condições de incineração controlada. A não
observância desta precaução poderá resultar
em uma explosão.
Nunca tente recarregar pilhas primárias,
pois isso pode causar vazamento, incêndio
ou explosão.
COMO COMEÇAR
TROCAR AS CABEÇAS
DO TRIMMER
Segure o cabo do trimmer, enquanto gira sua
cabeça no sentido anti-horário até que a marca
“I” esteja alinhada corretamente com a marca
da “seta” (Fig. 2).
Nesse ponto, você pode facilmente retirar
a cabeça do cabo. Para usar uma nova cabeça
no aparelho, instale-a corretamente na posição,
certificando-se de que a marca “I” esteja alinhada
com a marca da “seta”; gire no sentido horário até
que as marcas “I” e “círculo” estejam alinhadas
(Fig. 3) e trave-a na posição.
Fig. 2
Fig. 3
PARA APARAR A NUCA E
AS COSTELETAS
Fixe o acessório para aparar de uso geral de
20mm ao cabo do aparelho. Segure a lâmina do
trimmer contra a pele no comprimento desejado e
desloque o aparelho para baixo.
PARA APARAR OS PELOS DO NARIZ
Fixe a cabeça angulada no cabo. Ligue
o aparelho. Delicadamente, insira o trimmer
na narina. Mova suavemente o trimmer para
dentro e para fora da narina para remover os
pêlos. Evite inserir o trimmer mais do que 0,5 cm
para ter segurança no corte.
PARA CORTAR OS PELOS DAS ORELHAS
Fixe a cabeça angulada no cabo. Ligue o aparelho.
Delicadamente, insira a cabeça do trimmer não
mais do que 0,5cm na parte externa do canal
auditivo. Mova suavemente o trimmer em torno da
parte externa do canal auditivo para remover os
pêlos. Passe o trimmer em torno da parte externa
da superfície das orelhas para cortar os pelos
salientes. Nunca insira o trimmer mais do que
0,5cm no canal auditivo.
PARA APARAR SOBRANCELHAS
Fixe a cabeça angulada no cabo. Ligue o aparelho.
Para dar forma e definir, mova o aparador sem o
pente de sobrancelha lentamente para não cortar
qualquer cabelo que você não queira. Uma vez em
forma e definida, você pode diminuir os pêlos com
o pente de sobrancelha.
PARA USAR O PENTE DE 5 POSIÇÕES
1. Para utilizar o pente de 5 posições, coloque
o pente na cabeça de corte de 20mm,
deslizando-o sobre as lâminas e encaixando-o
na posição.
2. No início, até você se familiarizar com os
ajustes, use o ajuste mais longo. (Você sempre
pode VOLTAR e aparar mais curto.)
3. Com passadas suaves e uniformes, movimente
o pente pelos pêlos na direção de seu crescimento
(Nunca tente aparar contra o crescimento natural
dos pêlos, porque o corte será muito curto).
4. Se decidir cortar mais curto, você pode ajustar
o pente de 5 posições para uma definição mais
curta até o comprimento desejado dos pêlos
ser alcançado.
5. Quando tiver terminado, passe um pente
ou escova (não incluídos) através dos pêlos para
remover os soltos.
PARA CUIDAR DE SEU TRIMMER
CUIDADO COM AS LÂMINAS
As lâminas do trimmer são lâminas de precisão
para um uso muito especial, sempre devem ser
manuseados com cuidado. Cada vez que você
terminar de usar o aparador, escove os pêlos
soltos que permaneceram nas lâminas;
lave-as, então, somente com água e guarde
o aparelho o aparador em sua embalagem
até a próxima utilização.
Para obter uma longa vida útil do aparelho,
utilize-o apenas para os fins destinados
pelo fabricante.
TRIMMER MULTIUSO NE43BR
1.
4.
PARA LIMPAR SEU TRIMMER
Certifique-se de que ele está desligado.
1. Para remover a cabeça do
trimmer para limpá-la, gire-a no
sentido anti-horário até que a
marca “I” tenha se alinhado
com a “seta”; retire-a, então,
delicadamente (Fig. 4).
Fig. 4
2. Apenas enxágüe a cabeça, embaixo da água
(Fig. 5). Para o bom funcionamento do aparelho,
o cabo não deve tocar ou ser imerso na água.
2.
5.
GARANTIA
A garantia não abrangerá, sendo, pois, ônus
do consumidor:
Os danos sofridos pelo produto, ou seus
acessórios, em conseqüência de acidente, maus
tratos, manuseio, uso incorreto, uso inadequado,
imperícia, e transporte não efetuado pelo
Revendedor/Importador.
Os danos sofridos pelo produto, em conseqüência
de sua utilização para finalidades diversas das
especificadas pelo fabricante e/ou importador,
ou incompatíveis com a destinação do mesmo.
São também excluídas da garantia, as
intervenções inerentes à instalação e alimentação
do aparelho, uso de voltagem indevida, assim
como as operações de manutenção enunciadas
no manual de instruções. A garantia não cobre
o desgaste proveniente da utilização normal
do aparelho.
LOCAL ONDE A GARANTIA DEVERÁ
SER EXERCIDA
3.
Fig. 5
3. Depois da limpeza, seque a cabeça, agitando-a,
antes de recolocá-la no corpo do aparelho.
4. Para montar de novo a cabeça
no corpo do aparelho, alinhe a
marca “I” na cabeça com a
“seta” no corpo e, então, gire no
sentido horário até que a marca
“I” esteja alinhada com a marca
Fig. 6
do “círculo” no corpo (Fig. 6).
1. Cabeça angulada com potentes lâminas
de aço inoxidável.
2. Cabo antiderrapante
3. Sem fio/a bateria (necessita de bateria AA,
não incluída)
4. Pente para aparar de 5 posições
5. Cabeça de 20mm
Os consertos em garantia somente deverão
ser efetuados por uma Assistência Autorizada,
devidamente nomeada pelo fabricante e/ou
importador, que, para tanto, se utilizará de
técnicos especializados e de peças originais.
Durante os (12) doze meses de garantia, caso
o aparelho seja reparado num Centro de
Assistência Técnica indicado pelo Revendedor/
Importador, o risco do transporte será coberto
pelo cliente, caso faça o envio diretamente, ou
pelo Centro de Assistência Técnica, caso este
efetue transporte. Os técnicos autorizados, que
operam na região, intervirão a pedido do cliente,
nos limites de tempo às exigências operacionais.
Assistência Técnica Autorizada: NS Service
Central de Atendimento – 0800 770 8575
www.NSservice.com.br
THE
CHOPPER
Detail Trimmer
TÉRMINO DA GARANTIA
Não confie o conserto do produto abaixo
identificado a curiosos, pessoas ou oficinas
não autorizadas e não credenciadas pelo seu
fabricante e/ou importador. Se isto vier a ocorrer,
com a conseqüente violação do lacre do produto,
a garantia cessará, de imediato. O produto abaixo
identificado foi projetado para funcionamento
em uso doméstico, única e exclusivamente. A sua
utilização, para uso não doméstico, industrial
ou comercial, acarretará a cessação imediata
da garantia.
POWERFUL
STAINLESS
STEEL BLADES
No. de Série:
Data da Compra:
Nome e Carimbo da Loja:
Modelo NE43BR
©2013 CONAIR
COMERCIALIZACAO
DO BRASIL LTDA.
CNPJ 08.794.720/0001-88
Fabricado na China
13IP142622
IB-12225
Model NE43BR
5/16/13 2:09 PM