1
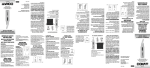
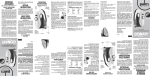
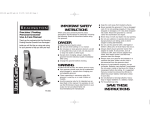
ne43_12pg137971_ib_final.indd 1
SAVE THESE
INSTRUCTIONS
1. Use close supervision when the appliance is
used by, on, or near children or individuals with
certain disabilities.
2. Use appliance only for its intended use as
described in this manual. Only use attachments
recommended by the manufacturer.
3. Never operate the appliance if it is not working properly, has been dropped or damaged,
or dropped into water. Return the appliance to
a Conair service center for examination and
repair.
4. Do not use the appliance with teeth missing
from the blades, as injury may result. Before
each use, make certain the blades are aligned
properly and oiled.
READ ALL INSTRUCTIONS
BEFORE USING
FOR HOUSEHOLD USE ONLY
KEEP AWAY FROM WATER
WARNING–
IMPORTANT SAFETY
INSTRUCTIONS
TROUBLESHOOTING
1. To insert battery, remove
compartment cover at the Fig. 1
back of the unit by pulling straight down (Fig.1).
Insert one AA alkaline
battery, negative end up.
(Alkaline batteries will
ensure the best performance and longest life for
your appliance.) If you are
not going to use the unit
for a long period of time,
or if the battery is dead, remove the battery from
the unit. Remove used batteries promptly. This will
increase the life of your trimmer.
2. After inserting the battery, replace the battery
compartment.
3. Now your unit is ready to be used. *Do not use
in the shower. To clean simply rinse trimmer blade
under faucet.
OPERATING
INSTRUCTIONS
There are several things to look for if your trimmer
fails to operate:
1. Be sure the trimmer is turned ON.
2. Make sure that the battery is properly placed
in the battery compartment. Test the battery to be
sure it is working.
3. Check the blades to see if they are clogged
with hair clippings; if so, use a cleaning brush to
remove hair.
4. If the trimmer still fails to operate, take or
send it to a Conair Service Center (see warranty
procedure and addresses).
Hold the handle of the trimmer while turning the
trimmer head counterclockwise until the "I" mark
is aligned properly with the "arrow" mark (Fig. 2).
At this point you should be able to easily lift the
trimmer head from the handle. To use a new trimmer head on the unit, properly install the head into
position making sure the "I" mark is aligned with
the "arrow" mark, turn clockwise until the "I" and
"circle" marks are aligned (Fig. 3) and lock into
position.
TO SWITCH TRIMMER HEADS
GETTING STARTED
4. To use your trimmer, push On/Off switch
upwards to “On” position.
5. After you finish using your trimmer, push down
on the On/Off switch to turn the trimmer off.
6. Always purchase the correct size and grade of
battery most suitable for the intended use.
7. Replace all batteries of a set at the same time.
8. Clean the battery contacts and also those of the
devise prior to battery installation.
9. Ensure the batteries are installed correctly with
regard to polarity (+ and -).
10. Remove batteries from equipment, which is
not to be used for an extended period of time.
11. Remove used batteries promptly.
12. Store unused batteries in their original
packaging, away from metal objects that could
short-circuit them. Never short-circuit batteries.
13. Never dispose of batteries in fire, except under
conditions of controlled incineration. Failure to
observe this precaution may result in an explosion.
Never attempt to recharge primary batteries as
this may cause leakage, fire, or explosion.
Fig. 3
Attach the angled detail trimmer to the trimmer
handle. Turn unit on. To shape and define, move
the trimmer without the eyebrow comb attachment
slowly so as not to cut any hair you do not intend
to trim. Once shaped and defined, you may thin out
the hair using the eyebrow comb attachment.
TO TRIM EYEBROWS
Attach the angled detail trimmer head to the trimmer handle. Turn unit on. Gently insert trimmer
head no more than ¼" into outer ear canal. Gently
move trimmer around the outer ear to remove
unwanted hair extending beyond the outer ear.
Guide the trimmer around the outer surface of ear
to trim protruding hairs. Never insert trimmer more
than ¼" into ear canal.
TO TRIM EAR HAIR
Attach the angled detail trimmer head to the trimmer handle. Turn unit on. Gently insert trimmer
head into nostril. Gently move trimmer in and
out of the nostril to remove unwanted hair. Avoid
inserting the trimmer more than ¼" to ensure safe
trimming.
TO TRIM NOSE HAIR
Attach the all-purpose 20mm trimmer attachment to
the trimmer handle. Hold the trimmer blade against
the skin at the length desired and move the trimmer
downward.
TO TRIM NECKLINE & SIDEBURNS
Fig. 2
To promote the long life of the appliance, use
your trimmer only for the purpose intended by
the manufacturer.
Because the trimmer blades are precision made
for a very special use, they should always be
handled with care. Each time you finish using the
trimmer, brush away any loose hair that has collected in the blades, then rinse blades under water
only and store the trimmer in its storage stand
until the next use.
BLADE CARE
TAKING CARE OF YOUR TRIMMER
1. To use the 5-position comb, attach the comb to
the 20mm trimmer head by sliding the unit over the
trimmer blades and snapping it down into position.
2. At first, until you become familiar with the adjustments, use the longest setting. (You can always go
back and trim hair shorter.)
3. Using smooth, even strokes gently move the
comb through the hair in the direction of growth.
(Never attempt to trim against the natural growth of
your hair because it will be cut too short.)
4. If you decide to make your hair shorter, you can
now adjust the 5-position comb attachment to a
shorter setting until the desired length of hair is
achieved.
5. When you have finished, run a comb or brush
(not included) through the hair to remove any loose
hairs.
USING THE 5-POSITION TRIMMING COMB
4. To reassemble the head onto
the body, align the "I" mark on
the head with the "arrow" mark
on the body and then turn clockwise until the "I" mark aligns
with the "circle" mark on the
body (Fig. 6).
Fig. 6
3. After cleaning, make sure to shake dry the head
before replacing it to the body.
Fig. 5
2. Only rinse the head under water (Fig. 5). For
proper functioning of the unit, the handle can not
touch or be immersed in water.
Make sure trimmer is off.
1. To remove the trimmer head
for cleaning, turn the head
counter-clockwise until the "I"
Fig. 4
mark aligns with the "arrow"
mark, then lift the head gently (Fig. 4).
CLEANING YOUR TRIMMER
1. Angled head with powerful, stainless
steel blades
2. No-slip grip™ handle
3. Cordless/battery operated
(requires AA battery; not included)
4. 5-position trimming comb
5. 20mm trimmer head
3.
2.
1.
NE43 DETAIL TRIMMER
5.
4.
LIMITED TWO YEAR WARRANTY
This warranty gives you specific legal rights, and
you may also have other rights, which vary from
state to state.
IN NO EVENT SHALL CONAIR BE LIABLE FOR
ANY SPECIAL, INCIDENTAL, OR CONSEQUENTIAL
DAMAGES FOR BREACH OF THIS OR ANY
OTHER WARRANTY, EXPRESS OR IMPLIED,
WHATSOEVER. Some states do not allow the
exclusion or limitation of special, incidental, or
consequential damages, so the above limitation
may not apply to you.
ANY IMPLIED WARRANTIES, OBLIGATIONS, OR
LIABILITIES, INCLUDING BUT NOT LIMITED TO
THE IMPLIED WARRANTY OF MERCHANTABILITY
AND FITNESS FOR A PARTICULAR PURPOSE,
SHALL BE LIMITED IN DURATION TO THE 24
MONTH DURATION OF THIS WRITTEN, LIMITED
WARRANTY. Some states do not allow limitations
on how long an implied warranty lasts, so the
above limitations may not apply to you.
To obtain service under this warranty, return the
defective product to the service center listed below
that is listed on back, together with your purchase
receipt and $5.00 for postage and handling.
California residents need only provide proof of
purchase and should call 1-800-366-0937 for
shipping instructions. In the absence of a purchase
receipt, the warranty period shall be 24 months
from the date of manufacture.
Conair will repair or replace (at our option) your
unit free of charge for 24 months from the date
of purchase if the appliance is defective in workmanship or materials.
12PG137971
Service Center
Conair Corporation
Service Department
7475 North Glen Harbor Blvd.
Glendale, AZ 85307
©2012 CONAIR CORPORATION
Please register this product at:
www.conair.com/registration
IB-11920
THE
®
11/20/12 2:19 PM
Model NE43
Conair wants
ants to thank you
yo
for choosing our personal grooming kit.
We know it will provide you with
years of reliable service.
STEEL BLADES
POWERFUL
STAINLESS
Detail Trimmer
CHOPPER
ne43_12pg137971_ib_final.indd 2
1. Supervise el uso de este aparato cuidadosamente cuando esté usado por, sobre o cerca de
niños o personas con alguna discapacidad.
2. Utilice este aparato únicamente con el propósito para el cual fue diseñado y solamente
según las instrucciones. Sólo use accesorios
recomendados por el fabricante.
3. No utilice este aparato si no funcionase
correctamente, si estuviese dañado o después
de que se hubiese caído o caído al agua.
Regrese el aparato a un centro de servicio autorizado para su revisión y reparación.
4. No utilice este aparato con guías o cuchillas
rotas o dañadas. Esto podría provocar una
herida. Asegúrese de que las cuchillas estén
debidamente alineadas y lubricadas antes de
cada uso.
LEA TODAS LAS
INSTRUCCIONES ANTES
DE USARLO
PARA USO DOMÉSTICO
SOLAMENTE
MANTÉNGALO ALEJADO
DEL AGUA
ADVERTENCIA–
MEDIDAS DE
SEGURIDAD
IMPORTANTES
1. Para instalar la pila, abra Fig. 1
el compartimiento de la
pila ubicado en la parte
trasera del aparato (Fig. 1).
Instale una pila alcalina
AA, el polo positivo primero. Pilas alcalinas garantizarán un rendimiento
óptimo y mayor vida útil.
Retire la(s) pila(s) al final
de su vida útil o si no va
a usar el aparato durante
un largo período de tiempo. Retire las pilas usadas
sin demora. Esto prolongará la vida de su aparato.
2. Cierre el compartimiento de la pila.
3. Su aparato está listo. * No lo use en la ducha.
Para limpiarlo, simplemente enjuague la cuchilla
INSTRUCCIONES
DE OPERACIÓN
Si su aparato no funcionase correctamente:
1. Asegúrese de que el aparato esté encendido.
2. Asegúrese de que la pila esté debidamente
instalada. Cerciórese de que la pila no está
agotada.
3. Revise las cuchillas y límpielas si fuera
necesario, usando el cepillo de limpieza provisto.
4. Si esto no soluciona el problema, regrese el
aparato a un centro de servicio autorizado (véase
la información de garantía).
RESOLUCIÓN DE PROBLEMAS
GUARDE ESTAS
INSTRUCCIONES
Sostenga el aparato firmemente y gire el cabezal
en sentido antihorario, hasta que la marca "I" en
el cabezal coincida con la flecha en el cuerpo del
aparato (Fig. 2). Retire el cabezal. Instale el cabezal deseado, haciendo coincidir la marca "I" con
la flecha. Para sujetar el cabezal, gírelo en sentido
horario hasta que la marca "I" coincida con el
círculo (Fig. 3).
CÓMO CAMBIAR EL CABEZAL
FUNCIONAMIENTO BÁSICO
en agua corriente.
4. Para encender el aparato, deslice el interruptor
hacia arriba (ON).
5. Para apagar el aparato, deslice el interruptor
hacia abajo (OFF).
6. No utilice pilas que no sean del tamaño o de la
potencia indicada para uso con este aparato.
7. Cambie todas las pilas al mismo tiempo.
8. Limpie los contactos del aparato y los de la(s)
pila(s) antes de instalar ésta(s).
9. Siempre respete los signos de polaridad (+/-) al
instalar la(s) pila(s).
10. Retire las pilas si no va a usar el aparato
durante un largo período de tiempo.
11. Retire las pilas usadas sin demora.
12. Guarde las pilas nuevas en su paquete
original, lejos de los objetos de metal, los
cuales podrían provocar un cortocircuito. Nunca
cortocircuite las pilas.
13. Nunca tire las pilas al fuego, excepto mediante
incineración controlada. Esto podría causar una
explosión. Nunca intente cargar una pila no
recargable. Esto podría presentar un riesgo de
pérdida de electrolito, incendio o explosión.
Fig. 3
Instale el cabezal sesgado. Encienda el aparato.
Dé forma y defina las cejas, moviendo la cortadora lentamente, para no cortar demasiado pelo.
Después de darle forma, puede clarearlas con la
guía para cejas.
CÓMO CORTAR LAS CEJAS
Instale el cabezal sesgado. Encienda el aparato.
Introduzca delicadamente la punta del cabezal en
la oreja, no más de ¼ pulgada (5 mm) en el canal
del oído. Mueva suavemente el aparato alrededor
del canal del oído. Guíe el aparato alrededor de
la superficie externa de la oreja para cortar pelos
que sobresalen. Nunca inserte el cabezal más de
¼ pulgada (5 mm) adentro de la oreja.
CÓMO CORTAR EL PELO EN LAS OREJAS
Instale el cabezal sesgado. Encienda el aparato.
Introduzca delicadamente la punta del cabezal
en la nariz. Mueva suavemente el aparato hacia
dentro y fuera de la nariz. Nunca inserte el cabezal
más de ¼ pulgada (5 mm) adentro de la nariz.
CÓMO CORTAR EL PELO EN LA NARIZ
Instale el cabezal multiuso con cuchillas de 20 mm.
Sostenga la cortadora recta, colóquela contra la piel
al nivel deseado y deslícela hacia abajo.
CÓMO RECORTAR LAS PATILLAS Y
EL CABELLO EN LA NUCA
Fig. 2
Para seguir disfrutando de su aparato durante
mucho tiempo, utilícelo únicamente con el propósito para el cual fue diseñado.
Las cuchillas de su aparato fueron diseñadas con
precisión para un uso específico, y deben recibir
un cuidado muy especial. Limpie las cuchillas
después de cada uso con el cepillo de limpieza
provisto, y luego enjuáguelas en agua corriente.
Guarde el aparato en la bolsa de almacenaje.
LIMPIEZA DE LAS CUCHILLAS
MANTENIMIENTO DE LAS CUCHILLAS
1. Instale la guía sobre las cuchillas de 20 mm,
deslizándola por encima del cabezal y presionando
para sujetarla.
2. Le recomendamos que utilice el ajuste más
largo para empezar Siempre podrá volver a acortar el cabello.
3. Corte el cabello en dirección del crecimiento
del pelo, con pasadas suaves y uniformes. Nunca
corte en dirección contraria al crecimiento natural
del pelo. El corte resultaría demasiado corto.
4. Si desea conseguir un corte aún más corto,elija
un ajuste más corto y siga acortando el cabello
hasta conseguir la longitud deseada.
5. Después de terminar, peine el cabello con un
peine o un cepillo (no incluido) para eliminar los
pelos sueltos.
CÓMO USAR LA GUÍA CON 5 POSICIONES
4. Vuelva a instalar el cabezal,
haciendo coincidir la marca
"I" con la flecha. Para sujetar
el cabezal, gírelo en sentido
horario hasta que la marca "I"
coincida con el círculo (Fig. 6).
Fig. 6
3. Después de limpiar el cabezal, sacúdalo para
secarlo.
Fig. 5
2. Enjuague el cabezal en agua corriente (Fig. 5).
No permita que el cuerpo del aparato tenga contacto con agua.
Asegúrese de que el aparato
esté apagado.
1. Para remover el cabezal, gíreFig. 4
lo en sentido antihorario hasta
que la marca "I" coincida con la
flecha (Fig. 4) y jale suavemente el cabezal.
LIMPIEZA DE LA
RECORTADORA
5.
4.
1. Cabezal sesgado con potentes
cuchillas de aceite inoxidable
2. Mango antideslizante No-slip grip™
3. Funcionamiento inalámbrico/con pila
(requiere una pila AA, no incluida)
4. Guía ajustable con 5 posiciones
5. Cabezal de corte con cuchilla de 20 mm
3.
2.
1.
RECORTADORA MULTIUSO NE43
GARANTÍA LIMITADA DE DOS AÑOS
CONAIR NO SERÁ RESPONSABLE, EN
NINGÚN CASO, POR NINGÚN DAÑO ESPECIAL,
INCIDENTAL O CONSECUENTE DEBIDO AL
INCUMPLIMIENTO DE ESTA O CUALQUIER OTRA
GARANTÍA, EXPRESA O IMPLÍCITA. Algunos
Estados no permiten la exclusión o limitación de
daños especiales, incidentales o consecuentes, de
modo que las limitaciones mencionadas pueden
no regir para usted.
CUALQUIER GARANTÍA, OBLIGACIÓN O
RESPONSABILIDAD IMPLÍCITAS, INCLUYENDO
PERO NO LIMITADAS A LA GARANTÍA IMPLÍCITA
DE COMERCIABILIDAD Y APTITUD PARA UN
PROPÓSITO ESPECÍFICO, ESTARÁN LIMITADAS
POR LOS 24 MESES DE LA PRESENTE
GARANTÍA ESCRITA. Algunos Estados no
permiten limitaciones sobre la duración de una
garantía implícita, de modo que las limitaciones
mencionadas pueden no regir para usted.
Para obtener servicio técnico bajo esta garantía,
regrese su aparato al Centro de Servicio indicado
a continuación, junto con su recibo de compra y
un cheque o giro postal de US$5.00 por gastos de
manejo y envío. Los residentes de California sólo
necesitan dar una prueba de compra y deben
llamar al 1-800-366-0937 para recibir
instrucciones de envío. En ausencia del recibo de
compra, el período de garantía será de 24 meses
a partir de la fecha de fabricación.
Conair reparará o remplazará (a su opción) su
aparato sin cargo por un período de 24 meses
a partir de la fecha de compra si presentara
defectos de materiales o fabricación.
12PG137971
Centro de servicio
Conair Corporation
Service Department
7475 North Glen Harbor Blvd.
Glendale, AZ 85307
©2012 CONAIR CORPORATION
IB-11920
Para registrar su producto, visítenos en:
www.conair.com/registration
Esta garantía le otorga derechos legales
específicos y usted puede tener otros derechos
que varían de un Estado a otro.
THE
®
11/20/12 2:19 PM
Modelo NE43
Gracias por comprar
la cortadora multiuso de Conair.
Le proporcionará años de
servicio confiable.
DE ACERO
INOXIDABLE
POTENTES
CUCHILLAS
CHOPPER
Recortadora multiuso