1
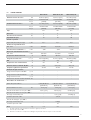
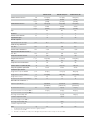
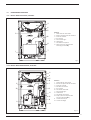
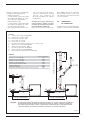
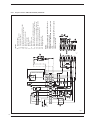
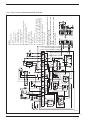
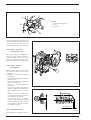
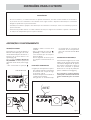
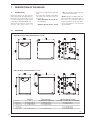
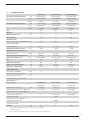
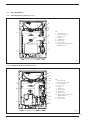
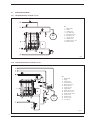
SOLO - DUETTO
PORTUGUÊS
INSTRUÇÕES PARA O INSTALADOR
INDICE
1
DESCRIÇÃO DO APARELHO . . . . . . . . . . . . . . . . . . . . . . . . . . . . . . . . . . . . . . . . . . . . . . . . . . . . . . . . . . . . . . . . . . . . . . . . . . . pag. 46
2
INSTALAÇÃO . . . . . . . . . . . . . . . . . . . . . . . . . . . . . . . . . . . . . . . . . . . . . . . . . . . . . . . . . . . . . . . . . . . . . . . . . . . . . . . . . . . . . . . . . pag.
3
CARACTERISTICA . . . . . . . . . . . . . . . . . . . . . . . . . . . . . . . . . . . . . . . . . . . . . . . . . . . . . . . . . . . . . . . . . . . . . . . . . . . . . . . . . . . . pag. 59
4
USO E MANUTENÇÃO . . . . . . . . . . . . . . . . . . . . . . . . . . . . . . . . . . . . . . . . . . . . . . . . . . . . . . . . . . . . . . . . . . . . . . . . . . . . . . . . pag. 59
51
IMPORTANTE
No momento em que o aparelho for aceso pela primeira vez, è boa norma proceder aos seguintes controles:
– Controlar que não esistam liquidos ou materiais inflamáveis, prossimos a caldeira.
– Acertar-se que a ligação elétrica seja feita in modo correto e que o fio terra seja ligado a uma boa ligação de terra.
– Verificar que o tubo de evacuação dos produtos de combustão sejam livres.
– Verificar que as eventuais portas de ferro sejam abertas.
– Certificar-se que a instalaçào seja cheia de água e resulte esbaforida.
– Verificar que o circulador não resulte blocado.
45
1
DESCRIÇÕES DO APARELHO
1.1
INTRODUÇÃO
O grupo térmico construído em ferro
fundido com queimador pressurizado
integrado destaca-se pela sua qualidade,
fiabilidade e baixo ruído, sendo projectado de acordo com a Directiva de
Rendimento CEE 92/42. A combustão
perfeitamente equilibrada e os elevados
1.2
rendimentos permitem obter grande
economia na sua utilização.
Neste manual encontram-se as
instruções relativas aos seguintes
modelos:
– “SOLO 20-30-40 OF/30-40 BF”
para Aquecimento Central.
– “DUETTO 20-30-40 OFi/30-40
BFi” para Aquecimento Central e
produção de água quente sanitária
através de permutador instantâneo.
As versões “BF-BFi” são caldeiras
com queimador a combustão estanque. As instruções constantes neste
manual, devem ser seguidas, para
uma instalação correcta e um perfeito funcionamento do aparelho.
DIMENÇÕES
Modelo “SOLO 20-30-40 OF/DUETTO 20-30-40 OFi”
Modelo “SOLO 30-40 BF/DUETTO 30-40 BFi”
P
M
R
C1
E
U
S
Profondidade
Passada ao circuito
Retorno do circuito
Carregamento da instalação
Entrada dos sanitários
Saida dos sanitários
Escoamento da caldeira
SOLO 20 OF
650
G 1” (UNI ISO 228/1)
G 1” (UNI ISO 228/1)
G 1/2” (UNI ISO 228/1)
–
–
G 1/2” (UNI ISO 228/1)
SOLO 30-40 OF/BF
750 (30 OF/BF) - 850 (40 OF/BF)
G 1” (UNI ISO 228/1)
G 1” (UNI ISO 228/1)
G 1/2” (UNI ISO 228/1)
–
–
G 1/2” (UNI ISO 228/1)
DUETTO 20-30-40 OFi/30-40 BFi
650 (20 OFi) - 750 (30 OFi/BFi) - 850 (40 OFi/BFi)
G 1” (UNI ISO 228/1)
G 1” (UNI ISO 228/1)
–
G 1/2” (UNI ISO 228/1)
G 1/2” (UNI ISO 228/1)
G 1/2” (UNI ISO 228/1)
Fig. 1
46
1.3
DADOS TECNICOS
SOLO 20 OF
SOLO 30 OF/BF
SOLO 40 OF/BF
kW
18,9-23,5 (20,7)
24,5-31,3 (27,5)
32,5-40,0 (35,2)
kcal/h
16.300-20.200
21.100-26.900
28.000-34.400
kcal/h
(17.800)
(23.700)
(30.300)
kW
21,1-26,2 (23,0)
27,2-34,8 (30,6)
36,0-44,3 (39,0)
kcal/h
18.100-22.500
23.400-29.900
31.000-38.100
kcal/h
(19.800)
(26.300)
(33.500)
B23
B23
B23
n°
3
4
5
bar
4
4
4
l
18
22
26
l/bar
10/1
10/1
10/1
Min. - Max.
mbar
0,05-0,11
0,12-0,16
0,15-0,21
Pressão câmera combustão **
mbar
– 0,02
– 0,02
– 0,05
mbar
0,07-0,13
0,14-0,18
0,17-0,23
°C
160-185
160-185
160-185
24,0-31,6 (26,4)
32,4-41,4 (35,9)
42,9-52,8 (46,3)
Potência termica min.-max.*
Caudal termico min.-max.*
Tipo
Elementos
Pressão max. de exercicio
Capacidade de água
Vaso de espansão
Capacidade/Pressão pre-carga
Perdas de cargo lado do fumo
Depressão aconselhada da chaminé **
Min. - Max.
Temperatura do fumo min.-max.
Carga de fumo min.-max.*
m3n/h
CO2
%
12,5
12,5
12,5
Temperatura max. funcionamento
°C
95
95
95
Potência elétrica assorbida “OF/BF”
W
220
200/230
180/210
Campo de regolazione aquecimento
°C
45÷85
45÷85
45÷85
l/min
–
–
–
l/h
–
–
–
l/min
–
–
–
Pressão max. de exercicio dos fervidores bar
–
–
–
0,50-0,60 60°W
0,60-0,75 60°W
0,75-0,85 60°W
(0,50 60°W)
(0,65 60°W)
(0,85 60°W)
12-12 (14)
14-14 (14)
14-14 (12)
3,2-3,7 (3,4)
3,0-5,2 (4,1)
5,0-6,2 (5,3)
descarga coaxial ø 80/125
–
1,7-4,1 (4,0)
1,8-3,6 (2,4)
condutas separadas ø 80
–
1,0-2,0
descarga coaxial ø 80/125
–
D-G (D)
condutas separadas ø 80
–
M
112
137
Produção de água sanitaria
Carga sanitario especifico EN 625
Carga sanitario continuo ∆t 30°C *
Carga sanitario minimo
Queimadores de combustivel ***
Injetor dos queimadores*
Pressão bomba min.-max.*
bar
Posiçào fechamento min.-max. para “OF” *
Posiçào fechamento min.-max. para “BF” *:
–
Posição do diafragma para “BF” *:
Peso
kg
–
162
*
Os dados indicados entre parêntises referemse à regulação de fábrica
** Somente para versión “OF”
*** Quando se modificam as condições de calibragem do queimador verificar sempre os valores de CO2.
47
DUETTO 20 OFi
DUETTO 30 OFi/BFi
DUETTO 40 OFi/BFi
23,5 (20,7)
31,3 (27,5)
40,0 (35,2)
kcal/h
20.200
26.900
34.400
kcal/h
(17.800)
(23.700)
(30.300)
26,2 (23,0)
34,8 (30,6)
44,3 (39,0)
kcal/h
22.500
29.900
38.100
kcal/h
(19.800)
(26.300)
(33.500)
B23
B23
B23
n°
3
4
5
bar
4
4
4
l
18
22
26
l/bar
10/1
10/1
10/1
Min. - Max.
mbar
0,11
0,16
0,21
Pressão câmera combustão **
mbar
– 0,02
– 0,02
– 0,05
mbar
0,13
0,18
0,23
°C
185
185
185
31,6 (26,4)
41,4 (35,9)
52,8 (46,3)
Potência termica min.-max.*
Caudal termico min.-max.*
kW
kW
Tipo
Elementos
Pressão max. de exercicio
Capacidade de água
Vaso de espansão
Capacidade/Pressão pre-carga
Perdas de cargo lado do fumo
Depressão aconselhada da chaminé **
Min. - Max.
Temperatura do fumo min.-max.
Carga de fumo min.-max.*
m3n/h
CO2
%
12,5
12,5
12,5
Temperatura max. funcionamento
°C
95
95
95
Potência elétrica assorbida “OFi/BFi”
W
215
200/230
180/210
Campo de regolazione aquecimento
°C
45÷85
45÷85
45÷85
l/min
9,7 (8,7)
12,5 (11,0)
16,0 (14,2)
670 (590)
890 (780)
1.140 (1.000)
2,5
2,5
2,5
6
6
6
0,60 60°W
0,75 60°W
0,85 60°W
(0,50 60°W)
(0,65 60°W)
(0,85 60°W)
12 (14)
14 (14)
14 (12)
3,7 (3,4)
5,2 (4,1)
6,2 (5,3)
descarga coaxial ø 80/125
–
4,1 (4,0)
3,6 (2,4)
condutas separadas ø 80
–
1,0-2,0
–
descarga coaxial ø 80/125
–
G (D)
–
condutas separadas ø 80
–
M
–
151
176
201
Produção de água sanitaria
Carga sanitario especifico EN 625
Carga sanitario continuo ∆t 30°C *
Carga sanitario minimo
Pressão max. de exercicio dos fervidores
l/h
l/min
bar
Queimadores de combustivel ***
Injetor dos queimadores*
Pressão bomba min.-max.*
bar
Posiçào fechamento min.-max. para “OFi” *
Posiçào fechamento min.-max. para “BFi” *:
Posição do diafragma para “BFi” *:
Peso
*
**
***
48
kg
Os dados indicados entre parêntises referemse à regulação de fábrica
Somente para versión “OFi”
Quando se modificam as condições de calibragem do queimador verificar sempre os valores de CO2.
1.4
COMPONENTES PRINCIPAIS
1.4.1
Modelo “SOLO 20-30-40 OF/30-40 BF”
3
4
5
LEGENDA
1 Queimador de combustivel
2 Bainha de alojamento dos sensores
3 Painel de controle
4 Enchimento
5 Pressostato água
6 Hidrometro
7 Circolador do implanto
8 Aspiração do ar do queimador
estanque (versão “BF”)
2
8
6
7
1
Fig. 2
1.4.2 Modelo “DUETTO 20-30-40 OFi/30-40 BFi”
3
4
5
8
2
7
10
6
11
12
9
LEGENDA
1 Queimador de combustivel
2 Bainha de alojamento dos sensores
3 Painel de controle
4 Fervidor instantâneo
5 Enchimento
6 Circolador do fervidor
7 Pressostato água
8 Hidrometro
9 Circolador do implanto
10 Aspiração do ar do queimador
estanque (versão “BFi”)
11 Valvula de retenção
12 Valvula de esfogo
1
11
Fig. 2/a
49
1.5
ESQUEMA FUNCIONAL
1.5.1
Modelo “SOLO 20-30-40 OF/30-40 BF”
LEGENDA
1 Corpo da caldeira
2 Enchimento
3 Valvula de segurança da caldeira
4 Valvula de esfogo automatico
5 Vaso espansão
6 Queimador de combustivel
7 Circulador do implanto
8 Hidrometro
9 Torneira de descarga da caldeira
10 Pressòstato água
Fig. 3
1.5.2 Modelo “DUETTO 20-30-40 OFi/30-40 BFi”
LEGENDA
1 Corpo da caldeira
2 Enchimento
3 Valvula de segurança da caldeira
4 Valvula de esfogo automatica
5 Vaso espansão
6 Queimador de combustivel
7 Circulador do implanto
8 Hidrometro
9 Torneira de descarga da caldeira
10 Pressòstato água do implanto
11 Pressòstato água sanitaria
12 Acumulador instantaneo
13 Valvula de retençáo
14 Valvula de esfogo
15 Circulador de fervidor
Fig. 3/a
50
2
INSTALAÇÀO
2.1
LOCALIZAÇÃO DA CALDEIRA
As caldeiras com potências superiores
a 35 kW, devem dispor de uma zona
técnica com características e requisitos em conformidade com normas e
regulamentos actualmente em vigor.
Entre as paredes internas do local e a
caldeira, deve ser deixado um espaço
de, pelo menos, 0,60 m, enquanto que
entre a parte superior da caldeira e o
tecto deve existir uma distância de,
pelo menos, 1,0 m, que pode ser diminuída a 0,50 m para as caldeiras com
acumuladores integrados (todavia a
altura min. do compartimento caldeira
não pode ser inferior a 2,5 m). As caldeiras com potências inferiores a 35
kW, devem ser instaladas e funcionar
somente em lugares constantemente
ventilados. É, então necessário, para a
circulação de ar no local, prever nas
paredes externas, aberturas que correspondam aos seguintes requisitos:
– Devem ter uma secção livre total de
pelo menos 6 cm2, por cada kW de
capacidade térmica, com um mínimo de 100 cm2.
– Estar situadas o mais perto possível
do pavimento, não obstruídas e protegidas com uma grelha que não diminua a secção útil de passagem do ar.
2.2
INSTALAÇÃO E ARRANQUE
DA CALDEIRA
Antes de proceder ao acendimento da
caldeira é bom deixar circular água nos
tubos para eliminar os eventuais corpos estranhos que poderiam comprometer o bom funcionamento do aparelho. Ao efectuar a ligação hidráulica
certifique-se que as dimensões da figura 1 são respeitadas. É aconselhável
que esta ligação seja facilmente
desmontável.
O tubo de descarga da válvula de segurança deve ser ligado a um sistema adequado de
drenagem.
que bolhas de ar possam sair através
dos purgadores de ar.
Para facilitar esta operação, posicionar
horizontalmente o entalhe do parafuso
de desbloqueio das válvulas de
retenção. Terminada a fase de enchimento recolocar o parafuso na posição
inicial. No fim da operação controlar
que a torneira seja fechada (figura 4).
ABRE
Fig. 4
Para evitar a formação de incrustações de calcário e de danos no permutador de água quente, a água de alimentação não deve ter uma dureza
superior aos 20°F. De qualquer modo
é necessário verificar as características da água utilizada e instalar dispositivos adequados para o tratamento.
Para evitar incrustações ou depósitos
no permutador primário, também a
água de alimentação do circuito de
aquecimento deve ser tratada em
conformidade com a norma UNI-CTI
8065. É absolutamente indispensável
tratar a água nos seguintes casos:
– Instalação muito extensa (com elevado conteúdo de água ).
– Frequente adição de água à instalação.
– No caso em que seja necessário o
esvaziamento parcial ou total da
instalação.
2.3
2.2.2 Produção de água sanitária
“DUETTO OFi/BFi”
Para regular o caudal de água sanitária actuar no regulador de caudal do
pressóstato da água (fig. 5):
- Girando no sentido dos ponteiros do
relógio o regulador reduz o caudal
de admissão de água sanitária
aumentando consequentemente a
sua temperatura.
- Girando no sentido inverso o regulador aumenta o caudal de admissão
de água sanitária diminuindo consequentemente a sua temperatura.
REGULADOR
REGOLATORE
DEPORTATA
CAUDAL
DI
2.2.1 Enchimento da instalação
O enchimento da caldeira e da respectiva instalação efectua-se através de
válvulas de enchimento torneiras,
devendo a pressão de carga, com o
equipamento frio, estar compreendida
entre 1 e 1,2 bar.
Durante a fase de enchimento da
instalação é aconselhável manter o
interruptor geral desligado. O enchimento deve ser feito lentamente para
2.2.3 Características
da água de alimentação
Fig. 5
EVACUAÇÃO DOS FUMOS
2.3.1 Ligação da chaminé
A chaminé tem uma importância fundamental para o funcionamento do
equipamento. Tanto é que se não for
correctamente dimensionada podem
suceder disfunções no queimador,
ampliação dos ruídos, formação de fuligem, condensação e encrostação.
Uma chaminé deve, então responder
aos seguintes requisitos:
– Deve ser de material impermeável e
resistente à temperatura do fumo e
relativas condensações;
– Deve ser de suficiente resistência
mecânica e de pouca conductividade
térmica;
– Deve ser perfeitamente isolada,
para evitar o seu arrefecimento;
– Deve ter um desenvolvimento o mais
vertical possível e na parte final deve
haver um terminal que assegure
uma eficiente e constante evacuação dos produtos da combustão.
– Com intenção de evitar que o vento
possa criar retorno à chaminé e zonas
de pressão, tais que impeçam a exaustão dos gases de combustão, é
necessário que a descarga da chaminé esteja, pelo menos, 0,4 m acima
qualquer estrutura adjacente a própria
chaminé (incluindo o ponto mais alto
do telhado ) distantes menos de 8 m;
– A chaminé deve ter um diâmetro
não inferior ao de união da caldeira
com a chaminé: para chaminés com
51
secção quadrada ou rectangular , a
secção interna deve ser aumentada
10% relativamente à secção da
união da caldeira com a chaminé;
– A secção útil da chaminé pode ser calculada do seguinte modo:
P
S
= K
S
K
P
H
Secção resultante em cm2
Coeficiente em redução: 0,024
Potência da caldeira em kcal/h
Altura da chaminé, em m, medida do eixo da chama à descarga
da chaminé na atmosfera.
No dimensionamento da chaminé deve-se ter em atenção a
altura efectiva da chaminé em
m, medida do eixo da chama ao
ponto mais alto em cima, diminuída de:
√H
– 0,50 m por cada mudança de
direcção do tubo de chaminé;
– 1,00 m por cada m percorrido horizontalmente.
As nossas caldeiras são de tipo B23 e
não precisam de particulares ligações,
senão a ligação à chaminé como é
especificado em cima.
2.3.2
O comprimento máximo da conduta
não dever á ser super ior a 7,0
metros equivalentes.
As perdas de carga em metros por
cada acessório a utilizar na configuração de evacuação estão indicadas na Tabela A.
Utilizar exclusivamente acessórios de
origem SIME e cer tificar-se que a
ligação seja efectuada correctamente,
como indicado nas instruções fornecidas com os acessórios.
Evacuação dos fumos com
conduta coaxial ø 80/125
2.3.3
As caldeiras da versão “BF - BFi”
estão preparadas para a ligação a
condutas coaxiais de evacuação em
aço inox ø80/125 que se podem
orientar na direcção mais adequada
às exigências do local (fig. 6).
Saída de fumos com
condutas separadas ø 80
As caldeiras versão “SOLO 30 BF DUETTO 30 BFi” estão predispostas
para a ligação a condutas separadas
em aço inox ø 80 que se podem
min. 715
LEGENDA
1
Tubo coaxial em aço inox L. 886 cód. 8096220
2 a Extensão em aço inox L. 1000 cód. 8096121
2 b Extensão em aço inox L. 500 cód. 8096120
3 a Curva a 90° em aço inox cód. 8095820
3 b Curva a 45° em aço inox cód. 8095920
4
Recuperação da condensação vertical em aço inox L. 135 cód. 8092820
5
Telha com articulação cód. 8091300
6
Terminal de saida telhado L. 1063 cód. 8091203
7
Kit cód. 8098810
6
TABELA A
Perda de carga (m)
Curva em aço inox a 90° MF
1,80
Curva em aço inox a 45° MF
0,90
Extensão em aço inox L. 1000
1,00
Extensão em aço inox L. 500
0,50
Terminal de saida telhado L. 1063
1,00
Tubo coaxial em aço inox L. 886
0,70
Recuperação da condensação vertical em aço inox L. 135
0,70
1
5
3
2
2
4
7
3
3
7
ø 80/125
ATENÇÃO: O comprimento máximo da conduta não deverá ser superior a 7,0 metros equivalentes.
Nas saídas com evacuação vertical, utilizar sempre a recuperação da condensação (4).
Fig. 6
52
orientar na direcção mais adequada
às exigências do local (fig. 6/a):
- Conduta aspiração:
o comprimento máximo permitido
da conduta não deverá ser superior a 16 metros equivalentes.
- Conduta de descarga:
o comprimento máximo permitido
da conduta não deverá ser superior a 6 metros equivalentes.
Nas saídas pelo tecto utilizar sem-
pre a recuperação da condensação e o comprimento máximo
ver tical, sem mudanças de
direcção, não deverá ser superior
a 7,6 metros.
As fugas de carga em metros para
cada acessório a utilizar nas configurações de aspiração e de descarga está indicada na Tabela B.
Utilizar exclusivamente acessórios ori-
ginais SIME e verificar se a ligação é
feita de modo correcto, assim como
indicado pelas instruções fornecidas
com os acessórios.
2.4
ALIMENTAÇÃO
DE COMBUSTÍVEL
O grupo térmico está preparado para
receber a alimentação do combustível
min. 700
LEGENDA
1
Terminal de descarga cód. 8089501
2 a Extensão em aço inox L. 1000
2 b Extensão em aço inox L. 500
3 a Curva a 90° em aço inox
3 b Curva a 45° em aço inox
4
Recuperação da condensação vertical em aço inox L. 148
5
Telha com articulação cód. 8091300
6
Terminal de saida telhado L. 1063
7
Kit de descarga L. 224 cód. 8098811
8
Terminal de aspiração cód. 8089500
9
Kit braçadeiras interior-exterior cód. 8091500
TABELA B
1
Perda de carga (m)
1,00
0,60
1,00
0,50
1,00
0,40
0,10
1,50
2
2
5
2
2
4
7
3
9
2
8
2
max
max16
16mmequivalentes
equivalenti
ATENÇÃO::
3/10
3
9
8
2
6
max
7,67,6
mm
verticais
max
verticali
Curva em aço inox a 90° MF
Curva em aço inox a 45° MF
Extensão em aço inox L. 1000
Extensão em aço inox L. 500
Terminal de saida telhado L. 1063
Terminal de descarga
Terminal de aspiração
Recuperação da condensação vertical em aço inox L. 148
3
9
2
7
2
max
1616mmequivalentes
max
equivalenti
O comprimento máximo da conduta de aspiração não deverá ser superior a 16 metros equivalentes.
O comprimento máximo da conduta de descarga não deverá ser superior a 6 metros equivalentes.
Nas saídas pelo tecto utilizar sempre a recuperação da condensação (4) e o comprimento máximo
vertical da conduta, sem mudanças de direcção, não deverá ser superior a 7,6 metros.
Fig. 6/a
53
TABELA 1
H
metri
H max 4 m
H
lateralmente, os tubos devem passar
através de aberturas predispostas
nos lados direito e esquerdo da envolvente para poderem ser ligados à
bomba (fig. 7 - 7/a).
0
0,5
1
1,5
2
3
3,5
Advertência importante
H
– Certifique-se, antes de acender o
queimador, que o tubo de retorno
não esteja obstruído. Uma excessiva
contra pressão pode provocar a
deterioração de componentes da
bomba.
L (metri)
øi tubo
øi tubo
8 mm
10 mm
35
100
30
100
25
100
20
90
15
70
8
30
6
20
H = Desnivel
L = Maxima comprimento
do tubo de aspiração
– Certifique-se que os tubos são resistentes.
– Não se deve superar a depressão
máxima de 0,4 bar (300 mmHg)
(Tabela 1).
Acima de tal valor dá-se a cavitação
que pode gerar deterioração da
bomba.
– Nas ligações em depressão é aconselhável fazer chegar o tubo de
retorno à mesma altura do tubo de
aspiração. Neste caso não é necessária a válvula de fundo. Se o tubo de
retorno chega depois do nível de
combustível a válvula de fundo é indispensável.
Fig. 7
LIGAÇÕES
1 Ligação vacuometro
2 Regularizador de pressão
3 Tomada manômetro
4 Parafusos de bay-pass
5 Retorno flexivel (fornido)
6 Aspiração flexivel (fornido)
7 Tomada de pressão auxiliar
8 Valvula
9 Ligação 3/8" (fornido)
10 Filtro da linha de alimentação
combustivel (fornido)
8
1
2
3
7
Funcionamento bomba
9
Para ligar a bomba, basta acender o
queimador e verificar o acendimento
da chama. Se o queimador entra em
bloqueio, antes de chegar o combustível, esperar no min. 20 segundos, e
depois apertar o botão de desbloqueio
do queimador - RESET e esperar que
seja feito de novo toda a fase de acendimento até o acendimento da chama.
2.5
REGULAÇÃO DO QUEIMADOR
Cada aparelho é fornecido com uma
unidade de combustão completa préafinada em fabrica; todavia é melhor
verificar os parâmetros reportados ao
ponto 1.3, que são referidos à pressão
atmosférica ao nível do mar.
No caso que o equipamento necessite
de regulação diferente daquela de
fabrica, estas podem ser feitas somente pelo pessoal autorizado, seguindo as
instruções acima dispostas: para chegar aos órgãos de regulação da unidade de combustível, remover a porta da
caldeira.
54
10
9
4
6
5
ATENÇÃO:
- Afroxar as junta ligadas a bomba (5-6) antes de orientar os flexiveis
para tirar-los fora da abertura pre-disposta nos lados dir/esq da
capa. Uma volta efetuada a operação fechar a junta da bomba.
- A bomba è pre-disposta para o funcionamento bi-cano, para o funcionamento monocano, é necessário tirar o parafuso de bay-pass (4).
Fig. 7/a
2.5.1 Regulação de ar
do queimador
2.5.2 Regulação
da pressão da bomba
Para efectuar a regulação de ar do queimador, actuar nos parafusos (1 fig. 8) e
ter em atenção a escala graduada (2
fig. 8) que indica a posição da porta.
Os valores de regulação para cada equipamento estão indicados no ponto 1.3.
Para efectuar a regulação da pressão
do combustível actuar nos parafusos
(3 fig. 8/a) e verificar através de um
manómetro ligado à tomada, (2 fig.
8/a) que a pressão esteja conforme
os valores indicados no ponto 1.3.
RESET
TWICE
ONLY
5
6
2
7
1
Fig. 8
12
bar
3
2
LEGENDA
1 Bomba de combustivel
2 Tomada do manômetro
3 Parafuso de regulação da pressão
1
Fig. 8/a
2.6
PRÉ-AQUECIMENTO
Nas versões “SOLO 20-30 OF/BF” o
pré-aquecimento entra em funcionamento sempre que é necessário o funcionamento do queimador, retardando
o seu arranque por um tempo máximo
de 90 seg. necessários a elevar a temperatura do combustível, a 65ºC, na
zona do injector .Uma vez atingida a
temperatura o termostato colocado
sobre o pré-aquecedor dá ordem para
o acendimento do queimador (1 fig.
15/b). O pré-aquecimento continua
em funcionamento durante todo o
período de funcionamento do queimador, desactivando-se quando o mesmo
se desliga.
A versão “DUETTO 20-30 OFi/30
BFi” dispõe de um pré-aquecedor de
potência mais baixa, que no período de
inverno, está sempre activo, desde o
momento em que se acende o interruptor geral do quadro de comando.
Aquando do primeiro arranque no
período de Inverno, pode suceder que
o queimador tenha dificuldade para
acender-se, existindo a possibilidade
de bloqueio, porque o ciclo de acendimento se inicia antes que o combustível chegue a temperatura correcta. Na
altura em que o queimador arranca de
novo, terá passado tempo suficiente (
2 ou 3 min.), para que o combustível
atinja a temperatura correcta para o
acendimento do queimador.
O pré-aquecimento não é montado
nas versões “SOLO 40 OF/BF - DUETTO 40 OFi/BFi” porque não é necessário.
mentação eléctrica e deverá ser alimentada, com tensão monofásica
230V/50Hz, através de um interruptor geral, protegido por fusível.
O cabo do termostato ambiente, cuja
instalação é aconselhável para obter
um melhor controle da temperatura
ambiente, deverá ser ligado como
mostra a figura 9 - 9/a.
2.7
Antes de efectuar qualquer operação
no quadro eléctrico, desligue a alimentação eléctrica.
LIGAÇÕES ELÉCTRICAS
A caldeira é fornecida com cabo de ali-
NOTA:
O aparelho deve ser conectado a uma eficaz ligação à
terra.
A SIME não se responsabiliza por
danos causados a pessoas derivados
da falta da ligação à terra.
55
56
NOTAS:
Ligando o termóstato de ambiente (TA) retirar a
ponte entre os bornes 4-5.
Ligando a central RVA 43.222 retirar as pontes 4-5
e 4-6.
Ligando o relógio programador (OP) retirar a ponte
entre os bornes 5-8.
LEGENDA
IG Interruptor geral
TS Termostato de segurança
TC Termostato da caldeira
SPA Luz de intervenção do pressóstato da água
SA Luz de presença de corrente eléctrica
SB Botão de bloco do queimador
PA Pressostato água
P Bomba instalação
B Queimador
TA Crono-termostato
C Conectores da central RVA 43.222 (opcional)
SS Sonda de imersão no fervedor QAZ21 (opcional)
SC Sonda de imersão na caldeira QAZ21 (opcional)
SE Sonda da temperatura externa QAC31 (opcional)
UA Unidade ambiente QAA70 (opcional)
PB Bomba do fervedor
OP Relógio programador
2.7.1
Esquema elètrico “SOLO 20-30-40 OF/30-40 BF”
Fig. 7
ROSSO - RED
MARRONE - BROWN
NERO - BLACK
NOTAS: Ligando o termóstato ambiente (TA) retirar a
ponte entre os bornes 17-18.
Ligando a central RVA 43.222 retirar as pontes 13-14
e 17-18.
Ligando o relógio programador (OP) retirar a ponte
entre os bornes 15-16.
LEGENDA
IG Interruptore geral
R Relé
TM Termostato de minima
TL Termostato limite
VP Válvula pressóstato
TS Termostato de segurança
E/I Interruptor verão/inverno
TC Termostato caldeira
SPA Luz de intervenção do pressóstato da água
SA Luz de presença de corrente eléctrica
SB Tomada de bloco do queimador
PA Pressostato água
PI Bomba de instalação
PB Bomba de acumulador
B Queimador
TA Crono-termostato
C Conectores da central RVA 43.222 (opcional)
SS Sonda de imersão no fervedor QAZ21 (opcional)
SC Sonda de imersão na caldeira QAZ21 (opcional)
SE Sonda da temperatura externa QAC31 (opcional)
UA Unidade ambiente QAA70 (opcional)
OP Relógio programador
2.7.2 Esquema elétrico “DUETTO 20-30-40 OFi/30-40 BFi”
Fig. 7/a
57
2.7.3 Diagrama de funcionamento “SOLO 20-30 OF/BF - DUETTO 20-30 OFi/30 BFi”
Normal
Bloco por não ascenção
Consentimento de ascenção
Termostato do aquecedor
Aquecedor
Motor
Transformador de ascenção
Valvula de combustivel
Chama
Lampada de blocagem
0÷150 s ~ 12 s
0÷150 s ~ 12 s
~5 s
NOTA: Na versão DUETTO 30 OFi/BFi sem o termostato, o aquecedor de Inverno e sempre ativo.
2.7.4 Diagrama de Funcionamento “SOLO 40 OF/BF - DUETTO 40 OFi/BFi”
Normal
Bloco por não ascenção
Consentimento de ascenção
Motor
Transformador de ascenção
Valvula de combustivel
Chama
Lampada de blocagem
~ 12 s
58
~ 12 s
~5 s
3
CARACTERISTICAS
3.1
DIMENSÃO DA CÂMARA
DE COMBUSTÃO
3.2
PREVALÊNCIA DISPONÍVEL
AO APARELHO
A prevalência resídua para o equipamento de aquecimento, é representada, em função do caudal, pelo gráfico
da fig. 11.
L
270
Fig. 10
500
SOLO - DUETTO OF/BF
Volume
dm3
17,5
24,0
30,5
17,5
24,0
30,5
PREVALÊNCIA RESIDUA
RESÍDUA (mbar)
PREVALENZA
SOLO 20 OF
SOLO 30 OF/BF
SOLO 40 OF/BF
DUETTO 20 OFi
DUETTO 30 OFi/BFi
DUETTO 40 OFi/BFi
L
mm
305
405
505
305
405
505
280
A câmara de combustão é do tipo passagem directa, e é conforme a norma
EN 303-3 anexo E. As dimensões são
indicadas na figura 10. Um painel especifico de protecção é aplicado na parede interna do cabeçote posterior de
todos os modelos.
400
300
200
100
0
200
400
600
800 1000 1200 1400 1600 1800 2000
CAUDAL (l/h)
(l/h)
PORTATA
SOLO OF/BF
DUETTO OF/BF - OFi/BFi
Fig. 11
4
USO E MANUTENÇÃO
4.1
CENTRAL RVA 43.222
(opcional)
O painel de controle permite a utilização de uma central RVA 43.222
(cód. 8096303) fornecido sob encomenda, junto com um manual de
instruções para a montagem (figura
12). Efectuar a ligação eléctrica como
é indicado no parágrafo 2.7.
4.4
DESMONTAGEM DA
ENVOLVENTE
Para uma fácil manutenção da caldeira, é possível desmontar completamente a envolvente, seguindo a ordem
da figura 14.
4.5
DESMONTAGEM
DO VASO DE EXPANSÃO
Para a desmontagem do vaso de
expansão de aquecimento proceder no
TIRAR
Fig. 12
59
seguinte modo:
– Certifique-se que a caldeira tenha
sido esvaziada de água.
– Desparafusar a ligação que une o
vaso de expansão.
– Retirar o vaso expansão.
Antes de proceder ao enchimento do
equipamento certifique-se, que o vaso
de expansão esteja com uma précarga de 0,8÷1 bar.
2
6
4.6
MANUTENÇÃO
DO QUEIMADOR
3
1
Para desmontar o queimador do corpo
da caldeira tirar a porca (fig. 15).
– Para chegar a zona interna do queimador retire o sistema de regulação do ar, fixo através de dois parafusos laterais e remova a tampa
direita, fixa com quatro parafusos,
tendo em atenção para não danificar as juntas de vedação OR.
– Para desmontar o porta-injector e o
grupo de pré-aquecimento agir no
seguinte modo:
– Abrir a tampa do aparelho, fixa com
um parafuso, desligue os cabos do
pré-aquecimento (1 figura 15/a)
protegidos por uma bainha termoresistente que devem passar através
do buraco, depois de ter tirado o
respectivo passacabos.
– Retirar os dois cabos dos eléctrodos
de ignição fixos com faston.
– Afrouxar a ligação (2 figura 15/a) e
tirar os quatro parafusos que fixam a
coleira (3 figura 15/a) ao queimador.
– Para a desmontagem do pré-aquecedor ou do termostato ver figura
15/b.
4.7
4
5
Fig. 14
LIMPEZA E MANUTENÇÃO
DA CALDEIRA
Fig. 15
A manutenção preventiva, de controle
1
2
3
LEGENDA
1 Cabos dos aparelhos
2 Ligação
3 Coleira
Fig. 15/a
60
1
LEGENDA
1 Termostato do aquecedor
2 Tampa
3 Aquecedor
2
3
Fig. 15/b
de funcionamento dos aparelhos e do
sistema de segurança, deverá ser feito
no final de cada estação, exclusivamente do pessoal técnico e autorizado.
4.7.1
Limpeza da zona de
passagem dos fumos
RONDO' 3/4 OF
ESTELLE 3/4 OF
Para limpar a zona de passagem dos
fumos, no corpo caldeira, utilizar um
escovilhão especifico. Uma vez terminada a manutenção, posicionar os turbuladores na posição inicial (figura 16).
RONDO' 5/6 OF
ESTELLE 5/6 OF
4.7.2 Limpeza da cabeça
de combustão
Fig. 16
A
4 ± 0,3 mm
Para efectuar a limpeza da cabeça de
combustão proceder como se indica
na figura 17:
– Desligar os cabos de alta tensão dos
eléctrodos.
– Desparafusar o suporte do distribuidor e removê-lo.
– Limpar delicadamente o distribuidor
(disco de turbulência).
– Limpar com cuidado os eléctrodos
de ignição.
– Limpar com cuidado a fotocélula de
eventuais depósitos de sujidade que
podem depositar-se na sua superfície.
– Limpar os restantes componentes
da cabeça de combustão com eventuais depósitos de sujidade.
– Uma vez terminada a limpeza,
remontar tudo, com o procedimento
inverso daquele descrito anteriormente, tendo cuidado para manter
as medidas indicadas.
2 - 2,5 mm
4.7.3 Substituição Injector
Fig. 17
É aconselhável a substituição do injec61
tor no inicio de cada estação de aquecimento para garantir o correcto caudal de combustível e uma pulverização
eficiente.
Para substituir injector proceder no
seguinte modo:
– Desligar os cabos de alta tensão dos
eléctrodos
– Afrouxar o parafuso de fixação (a
figura 15) do suporte eléctrodo e
remove-lo.
– Fixar o porta injector utilizando uma
chave n°19 e desaparafusar o injector com uma chave n°16 (fig. 18).
Uma anomalia no funcionamento, na
maior parte dos casos, causa o acendimento do sinal de bloqueio no painel
de controlo. Quando se acende este
sinal, o queimador poderá funcionar de
novo somente depois de ter pressionado o botão de desbloqueio; Uma vez
realizada esta operação e a ignição
ocorrer normalmente, a anomalia
pode ser considerada transitória e não
perigosa. Se, pelo contrário, o bloqueio
continua , a causa da anomalia e a sua
solução devem ser procurados na lista
seguinte:
O queimador não se acende
– Verificar as ligações eléctricas.
– Verificar o regular fluxo do combustível, a limpeza dos filtros, limpeza
do injector e a eliminação de ar dos
tubos.
– Verificar o regular funcionamento do
arco eléctrico de ignição e o funcionamento correcto do queimador.
Fig. 18
4.8
ANOMALIAS
DE FUNCIONAMENTO
São indicadas algumas causas e os
possíveis soluções de algumas anomalias que poderão acontecer e levar ao
não funcionamento do aparelho.
62
Queimador faz a ignição correctamente, mas se desliga-se subitamente.
– Verificar a fotocélula de detecção de
chama, a regulação do ar e o funcionamento do aparelho.
Dificuldade de regulação do queimador e/ou falta de rendimento
– Verificar: o regular fluxo de combustível, a limpeza da caldeira, a não
obstrução da conduta de descarga
dos fumos, a real potência fornecida pelo queimador e a sua limpeza
(poeira).
A caldeira suja-se facilmente
– Verificar a regulação do queimador
(análise dos gases de combustão), a
qualidade do combustível, a não
obstrução da chaminé e a limpeza
da admissão do ar do queimador
(poeira).
A caldeira não chega a temperatura
– Verificar a limpeza do corpo da caldeira, a combinação, a regulação, as
prestações do queimador, a temperatura pré-regulada, o funcionamento correcto e posicionamento do termostato de regulação.
– Assegurar-se que a caldeira tem
potência suficiente para a aplicação.
Cheiro a combustível ,não queimado
– Verificar a limpeza do corpo da caldeira e da descarga dos fumos, a
estanquidade da caldeira, dos tubos
de descarga (Porta da câmara de
combustão, câmara de combustão,
zonas de passagem de fumos, chaminé, juntas.)
– Controlar a qualidade da combustão.
Intervenção frequente da válvula de
segurança da caldeira
– Controlar a presença de ar na instalação, e o funcionamento dos circuladores.
– Verificar a pressão de carga da instalação, a eficiência do vaso de expansão e a taragem da própria válvula.
INSTRUÕES PARA O UTENTE
ADVERTÊNCIAS
– Em caso de defeito e/ou malfuncionamento do aparelho desactivar-lo, sem fazer nenhum tentativo de riconcertar-lo.
Se, se averte odore de combustivel ou de combustão arear o lugar e fechar o dispositvo de intercetação do combustivel.
Rivolger-se rapidamente ao pessoal autorizado.
– A instalação da caldeira e qualquer outra intervenção de assistência e manutenção devem ser efetuadas por pessoal
tecnico autorizado.
– É severamente proibido obstruir ou reduzir a abertura de ariação do lugar aonde é instalado o aparelho. As aberturas
de ariação são indispensáveis para uma justa combustão.
ASCENÇÃO E FUNCIONAMENTO
ASCENÇÃO CALDEIRA
Para efetuar uma ascenção apertar o
botão do interruptore geral. O acendimento do led verde permite verificar a
presença de corrente eléctrica no
aparelho (fig. 19).
Nas versões “DUETTO 20-30-40
OFi/30-40 BFi” escolher a posição no
desviador Staet Verão/Inverno (fig.
20):
– Com o desviador em posição
Led verde aceso
Fig. 19
Fig. 20
( STATE) a caldeira funciona como
sanitàrio.
– Com o desviador em posição
(INVERNO) a caldeira funciona sia
como sanitàrio que como aquecedor de ambiente.
Será o regulador climatico a parar
em tempo o funcionamento da caldeira.
REGULAÇÃO TEMPERATURA
A regulação da temperatura aquecedor se obtem agindo na manivela do
termostato com campo de regulação da 45° a 85°C.
O valor da temperatura escolhida se
controla no termômetro.
Para garantir um rendimento opti-
mal do gerador se aconselha de
não descer de uma temperatura
minima de funcionamento de 60°C
(fig. 21).
TERMOSTATO DE SEGURANÇA
O termostato de segurança em modalidade manual, intervem provocando o
instantâneo desligamento do queimador quando a temperatura supera os
120°. Para reacender o aparelho
desenrroscar a tampa de proteção e
apertar o botão em baixo (fig. 22).
Se a anomalia se verifica frequentemente pedir a intervençào do serviso
tecnico autorizado, para um controle.
60°C
Fig. 21
63
DESBLOCAGEM DO QUEIMADOR
No caso em que se verificasse anomalias de acendimento ou de funcionamento o grupo termico efetuará
uma parada de bloco e se acenderá
uma espia vermelha no painel de controle. Apertar o interruptor de desblocagem do queimador “RESET” para
haver as condiçes de aviamento fino
ao acendimento da chama (fig. 23).
Esta operação pode ser repetida duas
ou três vezes, no maximo e em caso
de insucesso chamar o serviso tecnico autorizado.
Fig. 22
ATENÇÀO: Verificar que esista combustivel no tanque e
que as torneiras sejam abertas. Depois de cada enchimento do
tanque, se aconselha uma parada de
cerca 1 hora.
INTERRUPTORDE
DESBLOCAGEM
DESLIGAMENTO DA CALDEIRA
Para desligar-la é suficiente apertar o
botão interruptor geral (fig. 19).
Fechar as torneiras do combustivel e
d'agua da instalação termica se o
gerador continuará inutilizado por um
lungo periodo.
RESET
TWICE
ONLY
LUZ VERMELHA DE
SINALIZAÇÃO ACESA
Fig. 23
ENCHIMENTO DA INSTALAÇÃO
Verificar periodicamente que o hidrometro indique valores de pressão
para a instalação fria compresos
entre 1 e 1,2 bar. No caso em que se
acenda a luz laranja pela intervenção
do pressóstato da água, interrompendo o funcionamento do queimador,
restabelecer o funcionamento girando
a torneira de enchimento no sentido
inverso aos ponteiros do relógio.
Depois da operaçào controlar que a
torneira seja corretamente fechada
(fig. 24). Se a pressão aumentasse
mais do limite previsto descarregar a
pressão ecedente agindo na valvola de
escapamento de um radiador.
Led laranja aceso
ABRE
2
bar
1
0
3
4
LIMPEZA E MANUTENÇÀO
E obr igat ór io efe tuar, no f im da
estaçào de inverno, um controle da
instalação e a eventual limpeza.
A manutenção preventiva e o
controle de funcionabilidade
da instalaão e dos sistemas
de segurança deverá ser efetuada
esclusivamente por pessoal tecnico
autorizado.
64
Fig. 24
SOLO - DUETTO
ENGLISH
INSTALLER INSTRUCTIONS
CONTENTS
1
DESCRIPTION OF THE BOILER . . . . . . . . . . . . . . . . . . . . . . . . . . . . . . . . . . . . . . . . . . . . . . . . . . . . . . . . . . . . . . . . . . . . . . . . . . . .
66
2
INSTALLATION . . . . . . . . . . . . . . . . . . . . . . . . . . . . . . . . . . . . . . . . . . . . . . . . . . . . . . . . . . . . . . . . . . . . . . . . . . . . . . . . . . . . . . . . . .
71
3
CHARACTERISTICS . . . . . . . . . . . . . . . . . . . . . . . . . . . . . . . . . . . . . . . . . . . . . . . . . . . . . . . . . . . . . . . . . . . . . . . . . . . . . . . . . . . . . .
79
4
USE AND MAINTENANCE . . . . . . . . . . . . . . . . . . . . . . . . . . . . . . . . . . . . . . . . . . . . . . . . . . . . . . . . . . . . . . . . . . . . . . . . . . . . . . .
79
IMPORTANT
When carrying out commissioning of the boiler, you are highly recommended to perform the following checks:
– Make sure that there are no liquids or inflammable materials in the immediate vicinity of the boiler.
– Make sure that the electrical connections have been made correctly and that the earth wire is connected to a good
earthing system.
– Check that the flue pipe for the outlet of the products of the combustion is unobstructed.
– Make sure that any shutoff valves are open.
– Make sure that the system is charged with water and is thoroughly vented.
– Check that the circulator is not blocked.
65
1
DESCRIPTION OF THE BOILER
1.1
INTRODUCTION
One of the features of the cast iron
thermal group with the integrated gasoil burner is its functional silence and it
has been designed in accordance with
the european directives CEE 92/42.
The perfectly balanced combustion
and t he high yield allow s it t o
1.2
economise considerably the operating
costs.
The instructions relative to the following models are indicated in the present manual:
– “SOLO 20-30-40 OF/30-40 BF”
for heating only
– “DUETTO 20-30-40 OFi/30-40
BFi” for heating and hot water production with instant tank
“BF-BFi” versions are boilers with airtight burners. The instructions given in
this manual are provided to ensure
proper installation and perfect operation of the appliance and should be
strictly followed.
DIMENSIONS
“SOLO 20-30-40 OF/DUETTO 20-30-40 OFi” version
“SOLO 30-40 BF/DUETTO 30-40 BFi” version
P
M
R
C1
E
U
S
Depth
C.H. flow
C.H. return
System load
D.H.W. inlet
D.H.W. outlet
Boiler drain
SOLO 20 OF
650
G 1” (UNI ISO 228/1)
G 1” (UNI ISO 228/1)
G 1/2” (UNI ISO 228/1)
–
–
G 1/2” (UNI ISO 228/1)
SOLO 30-40 OF/BF
750 (30 OF/BF) - 850 (40 OF/BF)
G 1” (UNI ISO 228/1)
G 1” (UNI ISO 228/1)
G 1/2” (UNI ISO 228/1)
–
–
G 1/2” (UNI ISO 228/1)
DUETTO 20-30-40 OFi/30-40 BFi
650 (20 OFi) - 750 (30 OFi/BFi) - 850 (40 OFi/BFi)
G 1” (UNI ISO 228/1)
G 1” (UNI ISO 228/1)
–
G 1/2” (UNI ISO 228/1)
G 1/2” (UNI ISO 228/1)
G 1/2” (UNI ISO 228/1)
Fig. 1
66
1.3
TECHNICAL FEATURES
Heat output minimum-maximum*
Heat input minimum-maximum*
SOLO 20 OF
SOLO 30 OF/BF
SOLO 40 OF/BF
kW
18.9-23.5 (20.7)
24.5-31.3 (27.5)
32.5-40.0 (35.2)
kcal/h
16,300-20,200
21,100-26,900
28,000-34,400
kcal/h
(17,800)
(23,700)
(30,300)
kW
21.1-26.2 (23.0)
27.2-34.8 (30.6)
36.0-44.3 (39.0)
kcal/h
18,100-22,500
23,400-29,900
31,000-38,100
kcal/h
(19,800)
(26,300)
(33,500)
B23
B23
B23
n°
3
4
5
bar
4
4
4
l
18
22
26
10/1
10/1
10/1
Type
Elements
Maximum water head
Water content
Expansion vessel
Water content/Preloading pressure l/bar
Loss of head smoke
Minimum-Maximum
mbar
0.05-0.11
0.12-0.16
0.15-0.21
Combustion chamber pressure **
mbar
– 0.02
– 0.02
– 0.05
mbar
0.07-0.13
0.14-0.18
0.17-0.23
°C
160-185
160-185
160-185
24.0-31.6 (26.4)
32.4-41.4 (35.9)
42.9-52.8 (46.3)
Suggested chimney depression **
Minimum-Maximum
Smoke temperature minimum-max.
Smoke flow minimum-max.*
m3n/h
CO2
%
12.5
12.5
12.5
Maximum temperature
°C
95
95
95
Power consumption “OF/BF”
W
220
200/230
180/210
Adjustment range heating
°C
45÷85
45÷85
45÷85
l/min
–
–
–
l/h
–
–
–
l/min
–
–
–
bar
–
–
–
0.50-0.60 60°W
0.60-0.75 60°W
0.75-0.85 60°W
(0,50 60°W)
(0.65 60°W)
(0.85 60°W)
12-12 (14)
14-14 (14)
14-14 (12)
3.2-3.7 (3.4)
3.0-5.2 (4.1)
5.0-6.2 (5.3)
coaxial exhaust ø 80/125
–
1.7-4.1 (4.0)
1.8-3.6 (2.4)
separate flues ø 80
–
1,0-2,0
–
coaxial exhaust ø 80/125
–
D-G (D)
–
separate flues ø 80
–
M
–
112
137
162
D.H.W. production
D.H.W. flow rate EN 625
Contin. D.H.W. flow rate ∆t 30°C
Minimum D.H.W. flow rate
D.H.W. tank maximum water head
Gas-oil burner ***
Burner nozzle *
Pump pressure min.-max. *
bar
Shutter position min.-max. for “OF” vers.*
Shutter position min.-max. for “BF” vers.*:
Diaphragm position for “BF” vers.*:
Weight
kg
*
The date shown between the brackets refer to the factory settings
** For “OF” versions only
*** After changing the calibration values of the burner, always check the C02 values.
67
Heat output minimum-maximum *
Heat input minimum-maximum*
DUETTO 20 OFi
DUETTO 30 OFi/BFi
DUETTO 40 OFi/BFi
23.5 (20.7)
31.3 (27.5)
40.0 (35.2)
kcal/h
20,200
26,900
34,400
kcal/h
(17,800)
(23,700)
(30,300)
26.2 (23.0)
34.8 (30.6)
44.3 (39.0)
kcal/h
22,500
29,900
38,100
kcal/h
(19,800)
(26,300)
(33,500)
B23
B23
B23
n°
3
4
5
bar
4
4
4
l
18
22
26
10/1
10/1
10/1
kW
kW
Type
Elements
Maximum water head
Water content
Expansion vessel
Water content/Preloading pressure l/bar
Loss of head smoke
Minimum-Maximum
mbar
0.11
0.16
0.21
Combustion chamber pressure **
mbar
– 0.02
– 0.02
– 0.05
mbar
0.13
0.18
0.23
°C
185
185
185
31.6 (26.4)
41.4 (35.9)
52.8 (46.3)
Suggested chimney depression **
Minimum-Maximum
Smoke temperature minimum-max.
Smoke flow minimum-max. *
m3n/h
CO2
%
12.5
12.5
12.5
Maximum temperature
°C
95
95
95
Power consumption “OFi/BFi)
W
215
200/230
180/210
Adjustment range heating
°C
45÷85
45÷85
45÷85
9.7 (8.7)
12.5 (11.0)
16.0 (14.2)
670 (590)
890 (780)
1,140 (1,000)
2.5
2.5
2.5
6
6
6
0.60 60°W
0.75 60°W
0.85 60°W
(0.50 60°W)
(0.65 60°W)
(0.85 60°W)
12 (14)
14 (14)
14 (12)
3.7 (3.4)
5.2 (4.1)
6.2 (5.3)
coaxial exhaust ø 80/125
–
4.1 (4.0)
3.6 (2.4)
separate flues ø 80
–
1,0-2,0
–
coaxial exhaust ø 80/125
–
G (D)
–
separate flues ø 80
–
M
–
151
176
201
D.H.W. production
D.H.W. flow rate EN 625
Contin. D.H.W. flow rate ∆t 30°C
Minimum D.H.W. flow rate
D.H.W. tank maximum water head
l/min
l/h
l/min
bar
Gas-oil burner ***
Burner nozzle *
Pump pressure min.-max. *
bar
Shutter position min.-max. for “OFi” vers. *
Shutter position min.-max. for “BFi” vers. *:
Diaphragm position for “BFi” vers. *:
Weight
kg
*
The date shown between the brackets refer to the factory settings
** For “OFi” versions only
*** After changing the calibration values of the burner, always check the C02 values.
68
1.4
MAIN COMPONENTS
1.4.1
“SOLO 20-30-40 OF/30-40 BF” version
3
4
5
KEY
1
2
3
4
5
6
7
8
2
8
6
1
Gas-oil burner
Bulb housing sheath
Control panel
Filling
Water switch
Hydrometer
System pump
Air intake for airtight burner
(“BF” versions)
7
Fig. 2
1.4.2 “DUETTO 20-30-40 OFi/30-40 BFi” version
3
4
5
8
2
7
10
6
11
12
9
KEY
1
2
3
4
5
6
7
8
9
10
Gas-oil burner
Bulb housing sheath
Control panel
Instant tank
Filling
Tank pump
Water switch
Hydrometer
System pump
Air intake for airtight burner
(“BFi” versions)
11 Control valve
12 Air vent valve
1
11
Fig. 2/a
69
1.5
FUNCTIONAL DIAGRAM
1.5.1
“SOLO 20-30-40 OF/30-40 BF” version
KEY
1
2
3
4
5
6
7
8
9
10
Boiler body
Filling
Safety valve
Air relief valve
Expansion vessel
Gas-oil burner
System pump
Hydrometer
Boiler drainer cock
Water switch
Fig. 3
1.5.2 “DUETTO 20-30-40 OFi/30-40 BFi” version
KEY
1
2
3
4
5
6
7
8
9
10
11
12
13
14
15
Boiler body
Filling
Safety valve
Air relief valve
Expansion vessel
Gas-oil burner
System pump
Hydrometer
Boiler drainer cock
C.H. water switch
D.H.W. water switch
Instant tank
Control valve
Air vent valve
Tank pump
Fig. 3/a
70
2
INSTALLATION
2.1
BOILER ROOM
The boilers with a rating of more than
35 kW must be equipped with a technical room whose dimensions and
requirements correspond to the current standards and regulations.
The minimum distance between the
walls of the room and the boiler must
not be less than 0.60 m., while the minimum height between the top of the
boiler and the ceiling must be at least 1
m. which can be reduced to 0.50 m.
for boilers with incorporated heaters
(however the minimum height of the
boiler room must not be less than 2,5
m). The boilers with a rating of less
than 35 kW can be installed only in
perfectly air-vented rooms. To circulate
air in the room, air vents must be
made on the outside walls which satisfy
the following requirements:
– Have a total surface area of at least
6 cm2 for each installed Kw of thermal capacity and however not less
than 100 cm2.
– To be situated as close as possible
to the floor, unobstructable and protected by a grate which does not
reduce the air passage area.
2.2
CONNECTING UP SYSTEM
Before proceeding to connect up the
boiler, you are recommended to make
the water circulate in the piping in
order to eliminate any foreign bodies
that might be detrimental to the operating efficiency of the appliance. For
connecting up the pipes, make sure to
follow the indications illustrated in fig.
1. The connections should be easy to
disconnect using pipe unions with orientable connections.
The shutoff valve must be
connected to a suitable flow
system and return pipes
screw back to its original position. At
the end of the operation make sure
that the tap is closed (fig. 4).
OPEN
Fig. 4
2.3
SMOKE EXHAUST
2.3.1 Connecting up flue
2.2.2 D.H.W. production on
“DUETTO OFi/BFi”
version
To adjust water flow use the water
pressure gauge flow regulator (fig. 5):
- Turn clockwise and the regulator
reduces water supply consequently
increasing the relevant temperature.
- Turn counter-clockwise and the
regulator increases water supply
consequently reducing the relevant
temperature.
FLOW
REGOLATORE
REGULATOR
DI
PORTATA
2.2.1 System filling
The boiler and the relative system
must be filled operating on the bearing
tap and the pressure of cold charging
the system must be included between
1 - 1.2 bar. During filling the main
switch should be left open.
Filling must be done slowly so as to
allow any air bubbles to be bled off
through the provided air vents. This
operation can be made easy by positioning horizontally the incision of the
block screw of the shutoff valve.
Upon completing the filling, put the
In all cases the water used should be
tested and adequate treatment devices should be installed.
To prevent lime scale or deposits on
the primary exchanger, the water used
to supply the heating circuit should
must be treated in accordance with
UNI-CTI 8065 standards. It is absolutely essential that the water is to be
treated in the following cases:
– Very extensive systems (with high
contents of feedwater).
– Frequent addition of makeup water
into the system.
– In case it is necessary to empty the
system either partially or totally.
Fig. 5
2.2.3 Characteristics of feedwater
To prevent lime scale and damage to
the tap water exchanger, the water
supplied should have a hardness of no
more than 20°F.
The flue is of fundamental importance
for the proper operation of the boiler;
if not installed in compliance with the
standards, starting the boiler will be
difficult and there will be a consequent
formation of soot, condensation and
encrustation.
A flue therefore must satisfy the following requirements:
– be constructed with waterproof
materials and resistant to smoke
temperature and condensate;
– be of adequate mechanical resilience
and of low heat conductivity;
– be perfectly sealed to prevent cooling of the flue itself:
– be as vertical as possible; the terminal section of the flue must be fitted
with a static exhaust device that
ensures cons t ant and ef ficient
extraction of products generated by
combustion;
– to prevent the wind from creating
pressure zones around the chimney top greater than the uplif t
force of combustion gases, the
exhaust outlet should be at least
0.4 m higher than structures adjacent to the stack (including the roof
top) within 8 m;
– have a diameter that is not inferior
to that of the boiler union: square or
rectangular-section flues should
have an int er nal section 10%
greater than that of the boiler union;
– the useful section of the flue must
conform to the following formula:
P
S
= K
S
resulting section in cm2
√H
71
K reduction coefficient for liquid
fuels: 0.024
P boiler input in Kcal/h
H height of the flue in meters measured from the flame axis to the
flue outlet into the atmosphere.
When dimensioning the flue, the
ef fective height of the flue in
meters must be considered,
measured from the flame axis to
the top of the flue, reduced by:
– 0.50 m for each change of
direction of the connection
union between boiler and flue;
– 1.00 f or each hor izont al
metre of the union itself.
valent meters.
Load losses in meters for each single accessory to be used in the
exhaust configuration are indicated
in Table A.
2.3.2
Only use original SIME accessories
and make sure that connections are
correct as indicated in the instructions supplied with the accessories.
Smoke exhaust with
ø 80/125 coaxial flue
“BF-BFi” version boilers are set to be
connected to ø 80/125 stainless
steel coaxial flues that can be adjusted to the most suitable direction
for room requirements (fig. 6).
The maximum acceptable length of
the flue must not be over 7.0 equi-
2.3.3
Exhaust with separate
flues (ø 80)
“SOLO 30 BF -DUETTO 30 BFi” boi-
Stainless steel coaxial flue L. 886 code 8096220
Stainless steel extension L. 1000 code 8096121
Stainless steel extension L. 500 code 8096120
90° stainless steel curve code 8095820
45° stainless steel curve code 8095920
Stainless steel vertical condensation recovery L. 135 code 8092820
Tile with hinge code 8091300
Roof outlet terminal L. 1063 code 8091203
Kit code 8098810
min. 715
KEY
1
2a
2b
3a
3b
4
5
6
7
Our boilers are the B23 type and do
not need any particular connections
other than the one to the flue as
described above.
6
TABLE A
90° stainless steel curve
45° stainless steel curve
Stainless steel extension L. 1000
Stainless steel extension L. 500
Roof outlet terminal L. 1063
Stainless steel coaxial flue L. 886
Stainless steel vertical condensation recovery L. 135
1
Load loss (mt)
1,80
0,90
1,00
0,50
1,00
0,70
0,70
5
3
2
2
4
7
3
3
7
ø 80/125
WARNING:
The maximum acceptable length of the flue must not be over 7.0 equivalent meters.
Always use the condensation recovery (4) in outlets with vertical exhaust.
Fig. 6
72
lers are designed to be connected to
separate ø 80 flues in stainless
steel, which can be oriented in the
position that best suits the requirements of the room (figure 6/a):
- Suction flue:
the maximum permitted length of
the flue should not exceed 16 equivalent meters.
- Exhaust flue:
the maximum permitted length of
gurations are indicated in Table B.
Use original SIME accessories only
and make sure that the connection is
performed correctly, as specified in
the instructions supplied with the
accessories.
2.4
The load losses for each accessory
used in suction and exhaust confi-
The fuel can be fed into the thermal
Exhaust terminal code 8089501
Stainless steel extension L. 1000
Stainless steel extension L. 500
90° stainless steel curve
45° stainless steel curve
Stainless steel vertical condensation recovery L. 148
Tile with hinge code. 8091300
Roof outlet terminal L. 1063
Exhaust kit L. 224 code 8098811
Suction terminal code 8089500
Internal-external ring nut kit code 8091500
TABLE B
1
Load loss (mt)
1,00
0,60
1,00
0,50
1,00
0,40
0,10
1,50
max.max
7.67,6
m vertical
length
m verticali
90° stainless steel curve
45° stainless steel curve
Stainless steel extension L. 1000
Stainless steel extension L. 500
Roof outlet terminal L. 1063
Exhaust terminal
Suction terminal
Stainless steel vertical condensation recovery L. 148
2
3/10
2
5
2
2
4
7
3
9
2
8
2
max.
1616
m equivalent
length
max
m equivalenti
WARNING:
2
6
3
9
8
FUEL ADDUCTION
min. 700
KEY
1
2a
2b
3a
3b
4
5
6
7
8
9
the flue should not exceed 6 equivalent meters.
For roof-mounted outputs: always
use the condensation recovery and
verify that the maximum vertical
length does not exceed 7.6 meters
and that there are no direction
changes.
3
9
2
7
2
max.
16 16
m equivalent
length
max
m equivalenti
The maximum length of the suction flue should not exceed 16 equivalent meters.
The maximum length of the exhaust flue should not exceed 6 equivalent meters.
For roof-mounted outputs, always use the condensation recovery (4) and verify that the maximum
vertical length of the flue does not exceed 7.6 meters without changes in direction.
Fig. 6/a
73
group sideways, the ducts must be
passed through the aperture on the
right or left hand side of the shell for
connection to the pump (fig. 7 - 7/a).
H
meters
H max 4 m
H
Important
TABLE 1
0
0,5
1
1,5
2
3
3,5
H
– Make sure, before turning on the
boiler, that the return tube is free.
An excessive counter -pressure
would break the pump seal.
– Make sur e t hat t he tubes ar e
sealed.
– The maximum depression of 0.4 bar
(300 mmHg) (see Table 1) must not
be exceeded. Gas is freed from the
fuel above that value and can cause
cavitation of the pump.
– It’s advisable to bring the return
tube in the depression systems up
to the same height of the intake
tube. In this case the foot valve is
unnecessary.
If instead the return tube arrives
above the fuel level, the foot valve is
indispensable.
L (meters)
øi tube
øi tube
8 mm
10 mm
35
100
30
100
25
100
20
90
15
70
8
30
6
20
H = Difference in level
L = Maximum length
of the intake tube
Fig. 7
8
1
Starting the pump
Turn on the burner to start the pump
and check the flame ignition.
If a “lock out” occur s befor e fuel
arrival, wait for at least 20 seconds
then press the burner release button
“RESET” and wait for the whole startup operation to repeat until the flame
lights up.
2.5
2
3
7
9
10
9
4
6
5
BURNER ADJUSTMENTS
Each unit is shipped with a burner unit
equipped with a nozzle and calibrated
at the factory; it is recommended,
however, that the settings listed under
point 1.3 be checked, with reference
to atmospheric pressure at sea level.
If it is necessary to adjust the burner
differently from the factory settings,
this should be done by authorised personnel following the instructions provided below.
Remove the shell door to access the
burner unit’s controls.
CONNECTIONS
1 Vacuometer attachment
2 Pressure regulator
3 Manometer attachment
4 By-pass screw
5 Back-flow flexible pipe
(included in supply)
6
Suction flexible pipe
(included in supply)
7 Auxiliary pressure intake
8 Valve
9 Racor 3/8” (included in supply)
10 Fuel feed line filter
(included in supply)
ATTENTION:
- loosen the pump joints (5-6) before pointing the flexible pipes for
bringing them out from the prefixed opening on the right/left hand
side of the shell. Afterwards tighten the joints to the pump.
- The pump is prearranged for the double-tube function. Remove the
by-pass screw (4) for single tube function.
Fig. 7/a
2.5.1 Air lock adjustment
To adjust the air lock, loosen the screw
(1 fig. 8) and slide the graduated scale
(2 fig. 8) indicating the position air lock
position.
The values for adjustment of each unit
are given in point 1.3.
74
2.5.2 Pump pressure
adjustment
To adjust gas-oil pressure, turn the
screw (3 fig. 8/a) and check pressure
with a pressure gauche connected to
the intake (2 fig. 8/a), making sure
pressure corresponds to the value
given under point 1.3.
RESET
TWICE
ONLY
5
6
2
7
1
Fig. 8
12
bar
3
2
KEY
1 Gas-oil pump
2 Pressure gauche intake
3 Pressure adjustment screw
1
Fig. 8/a
2.6
HEATER UNIT
In “SOLO 20-30 OF/BF” models, the
heater unit comes on with the consensus of the burner, after a delay of a
maximum of 90 seconds required to
bring fuel in the nozzle holder area up
to a temperature of 65°C. Once this
temperature has been reached, the
thermostat, which is located above
the preheater (1 fig. 15/b), will give
consensus for the burner to start.
The heater will remain on for as long
as the burner stays on and go off
when the burne goes off.
The “DUETTO 20-30 OFi/30 BFi”
model has a lower power heater which
remains on all the time after the main
switch is turned on in the control panel
in winter only. The first time it is turned
on at the beginning of the season, it
may be difficult for the burner to come
on, and the boiler may stop working if
the operating cycle is begun before te
correct fuel temperature has been
reached.
When it is started again, enough time
will have passed (2 - 3 minutes) for the
fuel to have reached the correct temperature for start-up.
“SOLO 40 OF/BF - DUETTO 40
OFi/BFi” model have no heater unit,
as it is not required.
2.7
ELECTRICAL CONNECTION
The boiler is supplied with an electric
cable and the electric power supply to
the boiler must be 230V-50Hz singlephase through a fused main switch.
The stat cable, whose installation is
compulsory for obtaining a better
adjustment of the room temperature,
must be connected as shown in fig. 9 9/a.
NOTE:
Device must be connected
to an efficient earthing system. SIME declines all responsibility for injury or damage to persons
resulting from the failure to provide for proper earthing of the
appliance.
Always turn off the power supply
before doing any work on the electrical panel.
75
76
Main switch
Safety stat
Boiler stat
Water pressure gauge triggered light
Power on light
Burner “lock out” warning light
Water switch
Pump system
Burner
Room stat
RVA 43.222 unit connectors (optional)
Boiler immersion probe QA721 (optional)
Heater immersion probe QA721 (optional)
External temperature probe QAC31 (optional)
Room unit QAA70 (optional)
Boiler pump
Time programmer
NOTE:
When connecting the room stat (TA) remove the bridge
between terminals 4-5.
When connecting the RVA 43.222 unit remove the bridge between terminals 4-5 and 4-6.
When connecting the time programmer (OP) remove
the bridge between terminals 5-8.
KEY
IG
TS
TC
SPA
SA
SB
PA
P
B
TA
C
SS
SC
SE
UA
PB
OP
2.7.1
“SOLO 20-30-40 OF/30-40 BF” wiring diagram
Fig. 9
ROSSO - RED
MARRONE - BROWN
NERO - BLACK
Main switch
Relay
Minimum tem. stat
Limit stat
Pressure stat valve
Safety stat
Summer/Winter switch
Boiler stat
Water pressure gauge triggered light
Power on light
Burner “lock out” warning light
Water switch
C.H. pump
D.H.W. pump
Burner
Room stat
RVA 43.222 unit connectors (optional)
Boiler immersion probe QA721 (optional)
Heater immersion probe QA721 (optional)
External temperature probe QAC31 (optional)
Room unit QAA70 (optional)
Time programmer
NOTE: When connecting the room stat (TA)
remove the bridge between terminals 17-18.
When connecting the RVA 43.222 unit remove
the bridge between terminals 13-14 and 17-18.
When connecting the time programmer (OP)
remove the bridge between terminals 15-16.
KEY
IG
R
TM
TL
VP
TS
E/I
TC
SPA
SA
SB
PA
PI
PB
B
TA
C
SS
SC
SE
UA
OP
2.7.2 “DUETTO 20-30-40 OFi/30-40 BFi” wiring diagram
Fig. 9/a
77
2.7.3 “SOLO 20-30 OF/30 BF - DUETTO 20-30 OFi/30 BFi” functional diagram
Normal
Stopped due to failure to ignite
Consensus for start-up
Heater stat
Heater
Motor
Ignition transform.
Gas-oil valve
Flame
Stop light
0÷150 s ~ 12 s
0÷150 s ~ 12 s
~5 s
NOTE: On “DUETTO 30 OFi/BFi” without stat, the heater is always fed in winter position.
2.7.4 “SOLO 40 OF/BF - DUETTO 40 OFi/BFi” functional diagram
Normal
Stopped due to failure to ignite
Consensus for start-up
Motor
Ignition transform.
Gas-oil valve
Flame
Stop light
~ 12 s
78
~ 12 s
~5 s
3
CHARACTERISTICS
3.1
COMBUSTION CHAMBER
DIMENSIONS
3.2
SYSTEM AVAILABLE HEAD
The head available for the heating
plant is shown as a function of the
flow in graph in fig. 11.
L
270
500
Fig. 10
SOLO - DUETTO OF/BF
Volume
dm3
17,5
24,0
30,5
17,5
24,0
30,5
RESIDUAL
HEAD (mbar)
PREVALENZA
RESIDUA
(mbar)
SOLO 20 OF
SOLO 30 OF/BF
SOLO 40 OF/BF
DUETTO 20 OFi
DUETTO 30 OFi/BFi
DUETTO 40 OFi/BFi
L
mm
305
405
505
305
405
505
280
The combustion chamber is a direct
passage type and is conform to the EN
303-3 standard annex E.
The dimensions are shown in fig. 10.
An adequat e pr o t ection panel is
mounted on the inside wall of the rear
head of all the models.
400
300
200
100
0
200
400
600
800 1000 1200 1400 1600 1800 2000
PORTATA
FLOW
RATE (l/h)
(l/h)
SOLO OF/BF
DUETTO OF/BF - OFi/BFi
Fig. 11
4
USE AND MAINTENANCE
4.1
RVA 43.222 UNIT
(optional)
The control panel allows the use of a
RVA 43.222 unit (cod. 8096303) supplied in kit form upon request, complete with mounting instructions (fig.
12).
Make t he electr ic connection as
shown in point 2.7.
4.4
DISASSEMBLY
OF OUTER CASING
The shell can be completely disassembled for an easy maintenance of the
boiler by following the numeric steps
shown in fig. 14.
REMOVE
4.5
DISASSEMBLY
OF EXPANSION VESSEL
Fig. 12
The heating expansion tank is disas79
sembled in the following manner:
– Make sure that the boiler has been
emptied of water.
– Unscrew the union which connects
the expansion tank.
– Remove the expansion tank.
Before filling up the system make sure
that the expansion tank is reloaded at
the pressure of 0.8 ÷ 1 bar.
2
4.6
6
BURNER MAINTENANCE
3
To dismantle the burner from the boiler
door, remove the nut (fig. 15).
– To access the internal part of the
burner, remove the air lock unit
held in place by two screws to the
sides and remove the right hand
shell, which is held in place by four
screws, taking care not to damage
the O-ring seal. OR.
– To dismantle the nozzle holder and
heater unit, proceed as follows:
– open the cover, which is held in
place by a screw, and remove the
heater cables (1 fig. 15/a) protected by a heat resistant sheath;
remove the fairlead and pass the
cables through the hole.
– remove the two cables from the
ignition electrodes fastened in
place with a faston.
– loosen the union (2 fig. 15/a) and
remove the four screws which fasten the collar (3 fig. 15/a) to the
burner.
– To dismantle the eater or thermostat, refer to figure 15/b.
4.7
4
5
Fig. 14
CLEANING
AND MAINTENANCE
Preventive maintenance and checking
of the efficient operation of the equipment and safety devices must be carried out at the end of each heating
season exclusively by the authorised
technical staff.
4.7.1
1
Fig. 15
1
2
3
Cleaning smoke ducts
Use an adequate swab for cleaning
the smoke ducts of the boiler. After
cleaning, position the circulators in
their original position (fig. 16).
KEY
1 Control bow cables
2 Connection
3 Collar
4.7.2 Cleaning combustion head
The combustion head is cleaned in the
following manner (fig. 17):
80
Fig. 15/a
1
KEY
1 Heater stat
2 Cap
3 Heater
2
3
Fig. 15/b
– Disconnect the high tension cables
from the electrodes.
– Unscrew the fixture screws of the
circulator support and remove it.
– Brush the propeller delicately (turbulence disc).
– Carefully clean the photo-resistance
of eventual deposits of dirt deposited on its surface.
– Clean the remaining components of
the combustion head of eventual
deposits.
– Upon completion re-assemble the
unit in t he opposit e way as
described above taking care to
respect the indicated measurements.
RONDO' 3/4 OF
ESTELLE 3/4 OF
RONDO' 5/6 OF
ESTELLE 5/6 OF
4.7.3 Substitution of nozzle
The nozzle should be substituted at
the beginning of every heating system
for guaranteeing the correct fuel flow
and a good spray efficiency.
The nozzle is substituted in the following manner:
– Disconnect the high tension cables
Fig. 16
4 ± 0,3 mm
A
2 - 2,5 mm
Fig. 17
81
from the electrodes.
– Loosen the fixture screw (A fig. 17)
of t he electr odes suppor t and
remove it.
– Block the spray door using a n°19
spanner and unscrew the nozzle
with a n°16 spanner (fig. 18).
function again after the reset button
has been pressed; once this has been
done and a regular ignition occurs, the
failure can be defined momentary and
not dangerous.
On the contrary, if the “lock out” persists, then the cause of the fault as
well as the remedy must be looked for
in the following faults:
The burner does not ignite
– Check the electric connections.
– Check the regular fuel flow, the
cleanness of the filters, of the nozzle
and air vent from the tube.
– Check the regular spark ignition and
the proper function of the burner.
Fig. 18
4.8
FAULT FINDING
There follow a list of some reasons
and the possible remedies for a series
of faults which could happen causing a
failure or an irregular function of the
appliance. A function fault, in most
cases, causes the “lock out” signal on
the control panel to turn on. When
this light turns on, the burner can only
82
The burner ignites regularly but the
flame goes out immediately
– Check the flame detection, the air
calibration and the function of the
appliance.
Difficulty in regulating the burner
and/or lack of yield
– Check: the regular flow of fuel, the
cleanness of the boiler, the non
obstruction of the smoke duct, the
real input supplied by the burner
and its cleanness (dust).
The boiler gets dirty easily
– Check the burner regulator (smoke
analysis), the fuel quantity, the flue
obstruction and the cleanness of
the air duct of the burner (dust).
The boiler does not heat up
– Control the cleanness of the shell,
the matching, the adjustment, the
burner per formances, the preadjusted temperature, the correct
function and position of the regulation stat.
– Make sure that the boiler is sufficiently powerful for the appliance.
Smell of unburnt products
– Control the cleanness of the boiler
shell and the flue, the airtightness of
the boiler and of the flue ducts (door,
combustion chamber, smoke ducts,
flue, washers).
– Control the quality of the fuel.
Frequent intervention of the boiler
shutoff valve
– Control the presence of air in the
system, the function of the circulation pumps.
– Check the load pressure of the appliance, the efficiency of the expansion
tanks and the valve calibration.
USER INSTRUCTIONS
WARNINGS
– In case of fault and/or incorrect operation, deactivate it without making any repairs or taking any direct action. If fuel or
combustion is smelt, air the room and close the fuel interception device. Contact the authorised technical staff.
– The installation of the boiler and any servicing or maintenance job must be carried out by qualified personnel.
– It is absolutely prohibited to block the intake grilles and the aeration opening of the room where the equipment is
installed. The intake grilles are indispensable for a correct combustion.
IGNITION AND OPERATION
BOILER IGNITION
Press the main switch for lighting the
boiler. The green light turns on to indicate that the appliance is powered (fig.
19). In the “DUETTO 20-30-40
OFi/30-40 BFi” version choose the
position Summer/Winter on the
switch (fig. 20):
– The boiler oper at es in tr eat ed
phase wit h t he switch in t he
position
(SUMMER)
GREEN LIGHT ON
– The boiler operates both in treated
phase as well as for heating with
the switch in the position (WINTER). The room stat or the chronostat will stop the operation of the
boiler.
To ensure optimal boiler efficiency at
all times, we recommend not to drop
below a minimum working temperature of 60°C (fig. 21).
SAFETY STAT
TEMPERATURE ADJUSTMENT
The heating temperature can be
adjusted by turning the knob of the
thermostat which has a range of
between 45 and 85°C.
The t emper atur e se tting can be
checked on the thermometer.
The safety stat is of the manually
resetting type and opens, causing the
main burner to turn off immediately,
whenever the temperature of 110°C is
exceeded in the boiler. To restore boiler operation, unscrew the black cap
and reset the button (fig. 21).
Should the appliance “lock out” again,
60°C
Fig. 19
Fig. 20
Fig. 21
83
please approach the authorised technical staff.
BURNER RESTART
In case that ignition or operation faults
occur, the main burner “locks out” and
the red lamp lights up on the control
panel. Press the “RESET” button to
restart the ignition conditions until the
flame lights up (fig. 23). This operation
can be repeated 2-3 times at maximum and in case of failure contact the
authorised technical staff.
Fig. 22
ATTENTION: Make sure that
there is fuel in the tank and
that the taps are open. After
each fill up of the tank it is advisable
to interrupt the operation of the
burner for about one hour.
RESET
BUTTON
TURNING OFF BOILER
It is sufficient to press the main switch
to turn off the boiler (fig. 19).
Close both the gas-feed pipe tap and
the water tap if the boiler remains
inoperative for a long period.
RESET
TWICE
ONLY
RED WARNING LIGHT ON
SYSTEM FILLING
Check periodically that the hydrometer
has pressure values at a switched-off
system of 1 - 1.2 bar.
If the orange water pressure gauge
light turns on inhibiting boiler operations, restore operations by turning
the supply tap counter-clockwise.
After the operation check that the tap
is properly closed (fig. 24).
Should the pressure exceed the foreseen limit, discharge the superfluous
amount by operating on the vent knob
of any radiator.
CLEANING AND MAINTENANCE
At the end of each heating season, it is
essential to have the boiler thoroughly
checked and cleaned out.
Preventive maintenance and
checking of the efficient operation of the equipment and
safety devices must be carried out
exclusively by the authorised technical
staff.
84
Fig. 23
ORANGE LIGHT ON
OPEN
2
bar
1
0
3
4
Fig. 24
DICHIARAZIONE DI CONFORMITA’
CALDAIE A COMBUSTIBILE LIQUIDO
La FONDERIE SIME SpA, con riferimento all’ar t. 5 DPR n°447 del 6/12/1991
“Regolamento di attuazione della legge 5 marzo 1990 n°46”, dichiara che le proprie caldaie a combustibile liquido serie:
AR
SOLO
RONDO’ B
ARB
DUETTO
ESTELLE B
1R OF
AQUA
ESTELLE
2R OF/OF S/GT OF
RONDO’
sono complete di tutti gli organi di sicurezza e di controllo previsti dalle norme vigenti in materia e rispondono, per caratteristiche tecniche e funzionali, alle prescrizioni delle norme:
UNI 7936 (dicembre 1979), FA130-84, FA168-87
EN 303-1994.
Le caldaie a gasolio sono inoltre conformi alla DIRETTIVA RENDIMENTI 92/42 CEE.
La ghisa grigia utilizzata è del tipo EN-GJL 150 secondo la norma europea UNI EN 1561.
Il sistema qualità aziendale è certificato secondo la norma UNI EN ISO 9001: 2000.
Legnago, 5 settembre 2006
Il Direttore Generale
ing. Aldo Gava
Fonderie Sime S.p.A. - Via Garbo, 27 - 37045 Legnago (Vr) - Tel. 0442 631111 - Fax Servizio Tecnico 0442 631292 - www.sime.it
86
Cod. 6276014A - 03/09 - Documentation Dpt.
Fonderie Sime S.p.A
Via Garbo, 27 - 37045 Legnago (Vr)
Tel. + 39 0442 631111 - Fax +39 0442 631292
www.sime.it