1
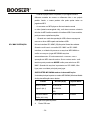
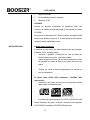
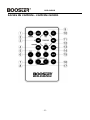
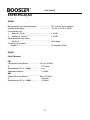
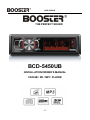
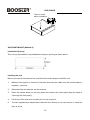
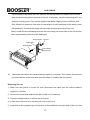
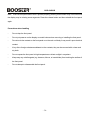
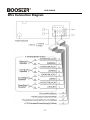
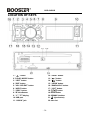
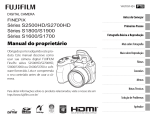
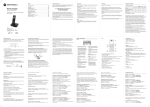
BCD-5450UB THE PERFECT SOUND BCD-5450UB INSTALAÇÃO / MANUAL DO PROPRIETÁRIO CD / USB / SD / MP3 PLAYER -1- BCD-5450UB Índice analítico Frente DIN/ TraseiraMontagem .................................................................................. 3 Montagem DIN frontal (Método A) .............................................................................. 4 Instalação da unidade .................................................................................................. 4 Remoção da unidade ................................................................................................... 6 Montagem DIN posterior (Método B) .......................................................................... 7 Com o painel frontal destacável .................................................................................. 8 Conexão fiação ............................................................................................................. 11 Local das teclas ............................................................................................................ 12 Ligar / desligar o aparelho ........................................................................................... 13 Liberação Faceplate .................................................................................................... 13 Ajuste de som .............................................................................................................. 13 Exibir informações ....................................................................................................... 13 Função ESP .................................................................................................................... 14 Restabelecer .............................................................................................................. 14 Operação de rádio ....................................................................................................... 14 CD operação ................................................................................................................ 15 MP3 operação ............................................................................................................. 16 Seleção de faixas por AS / PS / botão......................................................................... 17 Exibir informações........................................................................................................ 18 WMA operação ............................................................................................................. 19 USB operação jogo ...................................................................................................... 19 SD / MMC operação ..................................................................................................... 20 Disco notas ................................................................................................................... 21 Controle remoto ........................................................................................................... 23 Especificações ............................................................................................................. 25 Resolução de problemas ............................................................................................ 26 -2- BCD-5450UB INSTALAÇÃO Notas: Escolher o local de montagem em que a unidade não irá interferir com a função normal de condução do condutor. - Antes de instalar o aparelho, conecte os fios temporariamente e verifique se tudo estáconectado corretamente e se o aparelho e que o sistema funcione corretamente. - Utilize somente as peças incluídas com a unidade para garantir a instalação adequada. O uso de peças não autorizadas pode causar avarias. Consulte o seu revendedor mais próximo se a instalação requer a perfuração de furos ou outras modificações no veí culo. Instale a unidade onde ele não fique no caminho do motorista e não pode ferir o passageiro no caso de uma parada brusca, como uma parada de emergência. Se anjo de instalação exceder 30 ° da horizontal, a unidade não pode dar seu melhor desempenho. Evite instalar a unidade onde ele estaria sujeito a altas temperaturas, como da luz solar direta, ou de ar quente, a partir do aquecedor, ou onde seria sujeito a vibração poeira, sujeira ou excessiva. DIN FRONT / REAR-MOUNT Esta unidade pode ser instalada apropriada "Front" (Convencional Montagem DIN frontal) ou "Rear" (DIN instalação posterior de montagem, utilizando os orifí cios para parafusos nas laterais do chassis da unidade). Para detalhes, consulte o seguido ilustrado métodos de instalação. RETIRAR PARAFUSO ANTES DA INSTALAÇÃO Antes de instalar a unidade, remova os dois parafusos. -3- BCD-5450UB Montagem DIN frontal (Método A) Abertura de instalação Esta unidade pode ser instalada em qualquer painel que tem uma abertura, como mostrado abaixo: Instalação da unidade Certifique-se de testar todas as conexões primeiro, e depois siga estes passos para instalar a unidade. 1. Certifique-se de que a ignição é desligada e desconecte o cabo da bateria do veículo de negativo (-) ao terminal. 2. Desconecte o chicote de fios ea antena. 3. Pressione o botão de liberação no painel frontal e remova o painel de controle (consulte os passos de "remover o painel frontal"). 4. Levante a parte superior do anel externo guarnição então puxe-a para removê-lo. 5. As duas chaves fornecidas liberar as guias dentro da manga da unidade para que você possa removê-lo. Inserir as chaves, tanto quanto -4- BCD-5450UB Eles vão (com os entalhes virados para cima) nas aberturas apropriadas nos lados esquerdo e direito do meio da unidade. Em seguida, deslizar a manga de fora da parte traseira da unidade. 6. Montar a manga através da inserção da manga para dentro da abertura do painel e dobram as abas abertas situadas em torno da manga, com uma chave de fenda. Nem todas as guias serão capazes de fazer contato, então examinar quais serão os mais eficazes. Dobrando aberto as guias apropriadas por trás do painel de instrumentos para garantir a manga no lugar. 7. Volte a ligar o chicote de fios ea antena e ter cuidado para não prender os fios ou cabos. 8. Deslize a unidade na manga até que ele trave no lugar. 9. Para proteger ainda mais a unidade, utilizar o metálico fornecido cinta para fixar a parte de trás da unidade no lugar. Usar o hardware fornecido (Nut Hex (M5mm) e a arruela de mola) para prender uma extremidade da cinta para o parafuso de fixação na parte de trás da -5- BCD-5450UB unidade. Se necessário, dobre a tira de metal para atender área de montagem do seu veículo. Em seguida, use o hardware fornecido (roscante (5x25mm) e arruela) para prender a outra extremidade da alça de metal para uma peça de metal sólido do veículo sob o painel. Esta tira também ajuda a assegurar a ligação à terra eléctrica apropriada da unidade. Nota para instalar o terminal de curto rosca do parafuso de montagem para a parte de trás do aparelho e o outro terminal longa rosqueamento para o painel. 10. Volte a ligar o cabo à bateria do veículo de negativo (-) ao terminal. Em seguida, substitua o anel externo da guarnição e instalar o painel frontal da unidade (veja os passos de "instalar o painel frontal"). Remoção da unidade 1. Certifique-se de que a ignição é desligada, desconecte o cabo da bateria do veículo de negativo (-) ao terminal. 2. Remover a tira de metal ligada à parte de trás da unidade (se montado). 3. Pressione o botão de liberação para remover o painel frontal. 4. Levante a parte superior do anel externo guarnição então puxe-a para removê-lo. 5. Insira ambas as chaves fornecidas nas aberturas dos lados médio esquerdo e direito da unidade, em seguida, puxe a unidade para fora do painel. -6- BCD-5450UB Montagem DIN posterior (Método B) Se o seu veículo é uma continuação Nissan, Toyota, estas instruções de montagem. Use os furos marcados T (Toyota), N (Nissan) localizadas em ambos os lados da unidade para a unidade Asten aos suportes de montagem da fábrica de rádio fornecido com o veículo. -7- BCD-5450UB UTILIZAÇÃO DO PAINEL FRONTAL DESTACÁVELEL Para retirar o painel frontal 1. Pressione o release ( )botão, em seguida, o painel frontal serádobrada para baixo. OPEN 2. Para remover o painel frontal, levante-o em um ângulo pouco de posição horizontal, em seguida, retire primeiro o lado direito e depois puxe o lado esquerdo. 3. Por precaução, guarde o painel frontal no caso de proteção fornecido imediatamente após ser removido. -8- BCD-5450UB Para instalar o painel frontal 1. Instalação do painel frontal, insira primeiro o lado direito em posição adequada em seguida, insira o lado esquerdo no lugar. 2. Quando o dois lados fixados no lugar, empurre o painel frontal na unidade principal. -9- BCD-5450UB Nota: que, se o painel frontal não bloquear na posição correcta, primaing botão de controle pode não funcionar e o exibição pode estar faltando alguns segmentos. Pressione o liberar botão e depois reinstalar o painel frontal novamente. Precauções ao manusear - Não derrube o painel frontal. - Não coloque pressão sobre os botões de exibição ou controle quando remover ou instalar o painel frontal. - Não toque os contatos no painel frontal ou no corpo da unidade principal. Isso pode resultar em contato elétrico pobres. - Se qualquer sujidade ou substâncias estranhas aderido sobre os contactos, que podem ser removidos com um pano limpo e seco. - Não exponha o painel frontal a altas temperaturas ou luz solar direta em qualquer lugar. - Manter afastado quaisquer agentes voláteis (por exemplo, benzeno, diluente, ou inseticidas) de tocar a superfí cie do painel frontal - Não tente desmontar o painel frontal. - 10 - BCD-5450UB Diagrama de conexão de fio - 11 - BCD-5450UB LOCALIZAÇÃO DE TECLAS 1. " "Botão 2. "LIGAR / MODO" botão 3. "3 RPT"botão. 4. "DSP"Botão. 5. "VOL / SEL / ENT" botão. 6. "AS / PS"botão. 7. "5 DIR-"Botão. 8. "IR" Sensor Infra. 9. "3" TFT. 10. Porta USB. 11. "AUX IN " 12. "6 DIR +"Botão. 13. " "Button 14. " "Botão. 15. "4 RDM"Botão. 16. "BANDA / LOU"Botão. 17. "2 INT"Botão. 18. " "Botão. 19. Botão de reset 20.SD / MMC Interface 21. (Botão de ejeção) 22.slot de disco - 12 - BCD-5450UB LIGAR / DESLIGAR A UNIDADE LIBERAÇÃO FACEPLATE Ajuste de som Press PWR botão (2) Para ligar em a unidade. Quando o aparelho está ligado. Pressione e segure por 2 segundos para desligar o aparelho. Imprensa liberar botão painel frontal. (1) A separar o removível Imprensa SEL botão (5) Brevemente para selecionar o modo de ajuste desejado. O ajustamento MODE ser mudard na seguinte ordem: BAS: baixo TRE: agudos BAL: equilíbrio FAD: fader BEEP: Sinal sonoro EQ: Equalização LOUD:LOUD ON / OFF LOC:local ST: estéreo VOL: volume Ao girar o botão de áudio (5) No sentido horário ou anti-horário, É possível ajustar a qualidade de som desejada. CRISTAL LÍQUIDO EXIBIÇÃO Apresentam freqüência da corrente e funções ativadas no visor A unidade pode ser à prova de choque entre dez segundos e FUNÇÃO ESP 20 segundo - 13 - BCD-5450UB REAJUSTE FUNÇÃO REAJUSTE botão (19) deve ser ativado com uma caneta esferográfica ou objeto de metal fino. O REAJUSTE botão é para ser ativado pelas seguintes razões: - Instalação inicial do aparelho quando todas as wEuring é concluída. - Todos os botões de função não funcionam. - Símbolo de erro no visor. Nota: se pressionar REAJUSTE botão (19), A unidade não pode trabalhar ainda, por favor use um cotonete embebido em álcool isopropílico para limpar o soquete no painel frontal. FUNCIONAMENTO DO RÁDIO Alternar para o modo RADIO Imprensa MODE botão (2) Para selecionar o modo de rádio, o modo de rádio aparece no visor, juntamente com a banda de memória e frequência. SELEÇÃO A banda de frequência Em rádio modo, pressione BAND botão (16) brevemente para selecionar a banda de recepção desejada band.The mudarána seguinte ordem: → → FM1 FM2 FM3 → → → AM1 AM2 → SELEÇÃO DA ESTAÇÃO Imprensa botão (13) Ou botão (14) pouco para ativar a função de busca automática. Pressione por alguns segundos até que "MANUAL"Aparecems no visor, o modo de sintonização manual é selecionado. Se ambos os botões não têm sido pressionado por alguns segundos, eles vão Return a procurar modo de sintonia e "AUTO"Aparecems no visor. MEMÓRIA armazenamento automático e programa de digitalização Armazenamento automático de memória Imprensa AS / PS botão (6) por alguns segundos, a busca de rádioes da freqüência da corrente e verifica a intensidade do sinal até uma pesquisa ciclo está terminado. E então, seis emissoras mais fortes são armazenadas no botão número programado. - 14 - BCD-5450UB Programa de digitalização Imprensa AS / PS botão (6) em breve para analisar estação programada. Tele está segurando a rádio numero programado para vários segundos, com versão sem som, procura de novo. ESTAÇÃO DE ARMAZENAMENTO Toreceber uma estação, pressione uma do botão de programação (1 ~ 6) para 2 segundo. O estação actual é armazenado no número bUtton. CD OPERAÇÃO Mudar para modo CD Se não houver um CD inserido no condutor: Insira cuidadosamente o CD com o impresso lado superior no compartimento de CD até sentir alguma resistência. O CD é puxado para o driver automaticamente. CD começa a reprodução. Se um CD já está inserido no driver: Continue pressionando o botão MODE (2) Pouco até que o visor do modo de CD aparece. Seleção de faixas Imprensa botão (14) Ou botão (13) Para ir para a faixa anterior ou a faixa seguinte. Número da faixa mostra em exibição. Segurar botão (14) ou botão (13) Para recuar ou avançar rapidamente. A reprodução começa a partir de quando você solta o botão. PAUSA JOGANDO Imprensa botão (18) Para CD player pausa. Pressione-o novamente para retomar a reprodução. Visualização de todas as faixas Imprensa INT botão (17) Para jogar primeiros segundos de cada faixa do disco atual. Pressione novamente para introdução parar e ouvir a acompanhar. - 15 - BCD-5450UB REPETINDO A mesma faixa Pressione RPT botão (3), Para repetir o mesmo caminho. Pressione-o novamente para repetir todas as faixas. Reprodução de todas as faixas em RANDOM Pressione RDM botão (15) Para reproduzir todas as faixas do CD em ordem aleatória. Pressione novamente para cancelar a função. Ejectar um disco Imprensa botão (21) Para parar a reprodução do CD e ejetar o disco da ranhura do disco (22). MP3 OPERAÇÃO Alternar para o modo MP3 Se não houver um disco MP3 inserido no driver: Insira com cuidado o disco de MP3 com o lado impresso para cima no slot de disco (22) Até sentir alguma resistência. O disco MP3 é arrastado para o driver automaticamente. A reprodução de MP3 começa. Se um disco de MP3 já está inserido no driver: Continue pressionando o botão MODE (2) pouco até que o visor do modo de MP3 aparece. Ejectar um disco Imprensa botão (21) Para parar MP3 jogar e ejetar o disco da ranhura do disco (22). Seleção de faixas NA ETAPA ÚNICA Imprensa botão (14) Ou botão (13) Para ir para a faixa anterior ou a faixa seguinte. Número da faixa mostra em exibição. SELEÇÃO DIRETÓRIO UP / DOWN Imprensa DIR-botão (7) ou DIR + botão (12) Para selecionar um diretório para baixo ou para cima. Se o disco MP3 não contêm qualquer diretório, não há nenhuma função de 16 - botão (7) Ou DIR + botão (12). pressionar-DIR- BCD-5450UB PAUSA JOGANDO Imprensa botão (18) Para o jogador pausa MP3. Pressione-o novamente para retomar a reprodução. Visualização de todas as faixas Imprensa INT botão (17) Para jogar primeiros segundos de cada faixa do disco atual. Pressione novamente para parar e ouvir a introdução acompanhar. REPETINDO A mesma faixa Imprensa RPT botão (3), Para repetir o mesmo caminho. Pressione-o novamente para repetir todas as faixas. Reprodução de todas as faixas em RANDOM Imprensa RDM botão (15) Para reproduzir todas as faixas do CD em ordem aleatória. Pressione novamente tocancelar a função Seleção de faixas POR AS / PS BOTÃO AS / PS botão (6) É atribuído como botão de seleção de áudio Modo Digital em operação MP3. Quando pressionado, ele é ativado como a seleção de cada modo de Áudio Digital. "Procurando faixa directamente" => "Procurando Diretório ou File Name "=>" Navegação "da pasta por TUNE / SEEK / TRACK UP / DOWN ou VOL + / -. Pesquisando faixa directamente Pressione AS / PS botão por um tempo. Entra em "pista Pesquisando diretamente" no disco MP3/WMA. A unidade de pesquisa a faixa selecionada, seguindo direto botões numéricos: M1-M6, MOD, TUNE / SEEK / TRACK DOWN, TUNE / SEEK / TRACK UP, DISP. Se selecionado três dígitos, o aparelho procura o trato de uma só vez. Se for selecionado um ou dois dígitos, a unidade - 17 - esperar por botão SEL por alguns segundos. A unidade de pesquisa a pista depois de poucos segundos, mesmo se o botão enter não é pressionado BCD-5450UB Pesquisando nome de diretório ou arquivo Pressione AS / botão PS por duas vezes. Ele entra em "Nome do diretório ou arquivo Procurando" em CD de Áudio Digital. A unidade de busca de arquivos e pastas que têm o mesmo carácter que é introduzido pelo utilizador pressionando os botões correspondentes listados na Tabela 1 abaixo. Explicar como se segue: - Use os botões correspondentes para selecionar os caracteres de A a Z, em branco, 0 a 9, _, -, +. - Pressione SEL para iniciar a busca do título. Pesquisando a partir do diretório raiz Pressione AS / PS botão por três vezes. A unidade de pesquisa de arquivo a pasta TUNE / SEEK / TRACK UP / DOWN ou girando o botão VOL. Tela irá listar todos os diretórios disponíveis e canções. Selecione o diretório desejado / músicas usando TUNE / SEEK / TRACK UP / DOWN botões e SEL para confirmar. Se o título escolhido é uma música, ela começa a tocar. Se o título escolhido é um nome de pasta. Em seguida, use o TUNE / SEEK / TRACK UP / DOWN botão ou girar o botão VOL para listar todas as músicas nessa pasta e selecione o título. - Imprensa SEL botão para confirmar e iniciar o jogo. - Repita os passos acima, se o título recém-selecionado é novamente um diretório. Exibição de informações Imprensa DSP botão (4) Para mostrar as seguintes informações, tais como o relógio, ID3 TAG (se disponível: título da música, nome do diretório, nome do artista, outros conteúdos ...) (PARA VERSÃO COM MP3 FUNÇÃO ID3 ONLY) e outras informações. Tecla atribuída na busca de modo (Tabela 1) - 18 - BCD-5450UB AS / PS Modo de Seleção SEL ENTER M1 A, B, C, 1 M2 D, E, F, 2 M3 G, H, I, 3 M4 J, K, L, 4 M5 M, N, O, 5/Directory BAIXO M6 P, Q, R, 6/Directory UP MOD S, T, U, 7 TUNE / SEEK / TRACK V, W, X, 8 DOWN TUNE / SEEK / TRACK UP Y, Z, SPACE, 9 DSP _, -, +, 0 BOTÃO AUDIO Seleção de personagens todas as caracterí sticas acima BOTÃO AUDIO & TUNE / SEEK / TRACK UP / DOWN: Busca de arquivos e diretórios durante a navegação. WMA OPERAÇÃO A unidade que pode reproduzir o disco e WMA a operação éa mesma operação com MP3 descrito acima. USB JOGO OPERAÇÃO No painel frontal da unidade, existe uma interface USB (10). Você pode conectar um driver USB através desta interface (10). Quando você conectar um controlador USB através da interface, a unidade irá procurar os arquivos MP3 / WMA no driver USB e começar a reproduzir arquivos MP3/WMA automaticamente. Em caso de outro modo, você pode também pressionar MODE botão para selecionar o modo USB. Ao reproduzir os arquivos MP3/WMA em o dispositivo, a operação é a mesma, com a operação de MP3 descrito acima. Nota: - A unidade principal pode suportar apenas o disco de memória USB padrão que éaprovado pela Microsoft. - 19 - BCD-5450UB - USB MP3 player não éum padrão, o que significa marca diferente modelos de nomes ou diferentes têm o seu próprio padrão. Assim, o nosso produto não pode apoiar todos os jogadores MP3. - Ao conectar um MP3 player e não tem bateria normal no leitor (bateria recarregável não), você deve remover a bateria do leitor de MP3 então conectá-lo àinterface USB. Caso contrário, pode provocar explosões da pilha. - Quando em modo de reprodução USB, não se esqueça de remover o driver USB a partir da interface USB. SD / MMC OPERAÇÃO Háuma interface SD / MMC (20) No painel frontal da unidade. Quando você inserir um cartão SD / MMC na SD / MMC interface, a unidade irá procurar os arquivos MP3/WMA no cartão e começar a jogar MP3/WMA arquivos automaticamente. O funcionamento é o mesmo, com a operação de MP3 descrito acima. Se em outros modo. você também pode pressionar MODE botão para selecionar SD / MMC. Quando há arquivos importantes no SD / MMC, Não ligue para a unidade principal para jogar. SUPPORTED MP3/WMA modos de descodificação A unidade principal suporta os modos MP3/WMA (Windows Media Audio) decodificação como abaixo. Padrão Bit Rate (kbps) MPEG1 Audio 32,48,64,96, Layer 3 (44,1) 128192256, Suporta Modo Estéreo 320 Windows Media 64,96,128,192 Audio (44,1 kHz) A solução USB pode suportar: 4. Pasta: 500 max. - 20 - Estéreo BCD-5450UB 1. Arquivo: 999 máx. 2. Profundidade da pasta: 8 camadas 3. Tamanho: 2 GB CUIDADO Quando há arquivos importantes no dispositivo USB, não conecte-o à unidade principal para jogar. E não reproduzir o disco CD-R/RW tem arquivos importantes nele. Porque qualquer operação errada pode causar perda de arquivos. E a nossa empresa não assume nenhuma responsabilidade por este NOTAS DE DISCO A.Notas sobre os discos: A tentativa de usar forma não padronizada discos (por exemplo, quadrado, iní cio, coração) podem danificar o aparelho. Certifique-se de usar os discos de CD-redondas forma única para esta unidade. Não cole papel ou fita, etc, para o lado da etiqueta ou o lado da gravação de todos os discos, pois pode provocar uma avaria. - Sujeira, pó, riscos e discos empenamento vai causar um mau funcionamento. B. Notas sobre CD-Rs (CDs graváveis) / CD-RWs (CDs regraváveis): Certifique-se de utilizar os discos com as seguintes marcas apenas para a unidade de jogar: ReWrit able - A unidade não pode reproduzir um CD-R e CD-RW que não estiver finalizado. (Por favor, consulte o manual de seu gravador CD-R/CD-RW ou software CD-R/CD-RW para mais - 21 - BCD-5450UB NOTAS DE DISCO informações sobre o processo de finalização). - Dependendo do estado de gravação, do estado do disco e os equipamento utilizado para a gravação, alguns CD-Rs/CD-RWs não podem ser reproduzidos nesta unidade. (Ver * 1) * 1: Para ter de volta o jogo mais confiável, consulte seguintes recomendações: R: Use CD-RW com velocidade de 1x a 4x e escrever com velocidade de 1x para 2x. b. Use CD-R com velocidade de 1x a 8x e escrever com velocidade de 1x para 2x. c. Não reproduzir um CD-RW que foi escrito por mais de 5 vezes. C. Notas sobre arquivos MP3 (versão MP3 apenas): - O disco deve estar na ISO9660 nível 1 ou 2, formato ou Joliet ou Romeo no formato de expansão. - Ao nomear um arquivo MP3, certifique-se a extensão do nome do arquivo é". MP3". - Para um arquivo não-MP3, mesmo que a extensão do nome do arquivo é". MP3", a unidade não pode reconhecê-lo. - 22 - BCD-5450UB Locais de controle - controle remoto BCD-5450UB - 23 - BCD-5450UB 1. LIGAR 2. 7/MODE 3. TUNE / SKIP (8) 4. BND (LOU / ENT) 5. SCN 6. PAU 7. SHF 8.DISC /DIR ▼ 9. VOL ▲ 10. SEL 11.TUNE / SKIP (9) 12. VOL ▼ 13. DISP (0) 14. RPT 15.AS / PS (D-AUD) 16. LOC 17.DISC /DIR ▲ Ligarr ON / OFF Modo de Botton Sintonize / SKIP Botão para baixo Botão banda Select (Quando pressionado em breve) Botão de sonoridade (Quando pressionado longo) Digitalização Botão Botão de pausa Botão shuffle DISC / DIR ▼ Botão Volume Botão + Modo de som botão Selecionar Sintonize / SKIP Botão para cima Botão Volume Mostrar botão Repita Botão Memória armazenamento automático e botão de digitalização Programa (Botão Select Mode Para operação MP3/WMA) Local / Distante botão Selecionar DISC /DIR botão ▲ - 24 - BCD-5450UB ESPECIFICAÇÃO GERAL Requisitos da fonte de alimentação ............................. DC 12 Volts, terra negativo Chassis Dimensões ............................................................ 178 (W) x 97 (D) x 50 (H) Controles de tom 1. Bass (a 100 Hz) ......................................................... ±10 dB .............................. ..................... ±10 dB 2. Agudos (a 10 kHz)......... Máxima potência de saída Versão V …………………………………………… 4x40 watts Consumo de corrente Versão V................................................................... 15 ampères (máx.) RÁDIO Para 2 Bandas FM ............................. 87,5 a 108 MHz. Cobertura de freqüência IF 10.7 MHz ............................. Sensibilidade (S / N = 30dB) 4μV Separação estéreo ............................. > 25dB AM ............................. 520-1710 KHz Cobertura de freqüência IF 450 kHz ............................. Sensibilidade (S / N = 20dB) 36 dBuV - 25 - BCD-5450UB RESOLUÇÃO DE PROBLEMAS Antes de verificar a lista, verifique a conexão de fiação. Se algum dos problemas persistirem após a lista foi feita, consulte o seu fornecedor de serviço mais próximo Sintoma Causa Solução O interruptor de ignição Se a fonte de alimentação do carro não está estáligada aos circuitos de ligado. acessório do carro, mas o motor não estáse Sem energia. movendo, mude a chave de ignição para "ACC". O fusível está queimado. Volume estáem mí nimo Não hásom. Fiação não está Substitua o fusível. Ajustar o volume a um ní vel desejado. Verifique a conexão de fiação. conectado corretamente. As teclas de O microcomputador operação não incorporado não está funcionam. funcionando Pressione o botão de reset. corretamente devido ao ruí do. O rádio não O cabo da antena não funciona. A seleção estáligado. automática de estação de rádio não Os sinais são muito fracos. funciona. - 26 - Insira o cabo de antena com firmeza. Selecione uma estação manualmente. BCD-5450UB THE PERFECT SOUND BCD-5450UB INSTALLATION/OWNER’S MANUAL CD/USB / SD / MP3 PLAYER - 27 - BCD-5450UB Table of Contents DIN Front/Rear-Mount …….………………………………………………………………… 29 DIN Front-Mount (Method A)………………………………………………………………… 20 Installing the unit…………………………………………………………………….……..... .. 30 Removing the unit…………………………………………………………………………….. 32 DIN Rear-Mount (Method B)…………………………………………………………………. 33 Using the detachable front panel…………………………………………………………….. 34 Wiring Connection…………………………………………………………………………….. 37 Location of keys ………………………………………………………………………………. 38 Switching on/off the unit……………………………………………………………………… 39 Faceplate release…………………………………………………………………………….. 39 Sound adjustment…………………………………………………………………………….. 39 Liquid crystal display………………………………………………………………………….. 39 ESP Function…………………………………………………………………………………….. 39 Reset function…………………………………………………………………………………. 40 Radio operation……………………………………………………………………………..… 40 CD operation………………………………………………………………………………..… 41 MP3 operation ……………………………………………………………………………..… 42 Selecting tracks by As/ps / button……………………………………………………..……… 43 Display information…………………………………………………………………………... 44 WMA operation ……………………………………………………………………………..… 45 USB play operation…………………………………………………………………………... 45 SD/MMC operation…………………………………………………………………………… 46 Disc ontes….………………………………………………………………………………..… 47 Remote control………………………………………………………………………………... 50 Specification…………………………………………………………………………………… 51 Trouble shooting………………………………………………………………………………. 52 - 28 - BCD-5450UB INSTALLATION Notes: Choose the mounting location where the unit will not interfere with the normal driving function of the driver. - Before finally installing the unit, connect the wiring temporarily and make sure it is all connected up properly and the unit and the system work properly. - Use only the parts included with the unit to ensure proper installation. The use of unauthorized parts can cause malfunctions. Consult with your nearest dealer if installation requires the drilling of holes or other modifications of the vehicle. Install the unit where it does not get in the driver’s way and cannot injure the passenger if there is a sudden stop, like an emergency stop. If installation angel exceeds 30°from horizontal, the unit might not give its optimum performance. Avoid installing the unit where it would be subject to high temperature, such as from direct sunlight, or from hot air, from the heater, or where it would be subject to dust, dirt or excessive vibration. DIN FRONT/REAR-MOUNT This unit can be properly installed either from “Front” (conventional DIN Front-mount) or “Rear” (DIN Rear-mount installation, utilizing threaded screw holes at the sides of the unit chassis). For details, refer to the following illustrated installation methods. TAKE OUT SCREW BEFORE INSTALLATION Before install the unit, please remove the two screws. - 29 - BCD-5450UB Take out screw before installation. DIN FRONT-MOUNT (Method A) Installation Opening This unit can be installed in any dashboard having an opening as shown below: Installing the unit Be sure you test all connections first, and then follow these steps to install the unit. 1. Make sure the ignition is turned off, and then disconnect the cable from the vehicle battery’s negative (-) terminal. 2. Disconnect the wire harness and the antenna. 3. Press the release button on the front panel and remove the control panel (see the steps of “removing the front panel”). 4. Lift the top of the outer trim ring then pull it out to remove it. 5. The two supplied keys release tabs inside the unit’s sleeve so you can remove it. Insert the keys as far as - 30 - BCD-5450UB they will go (with the notches facing up) into the appropriate slots at the middle left and right sides of the unit. Then slide the sleeve off the back of the unit. Sleeve L Key Outer Trim Ring Front Panel R Key 6. Mount the sleeve by inserting the sleeve into the opening of the dashboard and bend open the tabs located around the sleeve with a screwdriver. Not all tabs will be able to make contact, so examine which ones will be most effective. Bending open the appropriate tabs behind the dashboard to secure the sleeve in place. Dashboard Tabs Screwdriver Sleeve 7. Reconnect the wire harness and the antenna and be careful not to pinch any wires or cables. 8. Slide the unit into the sleeve until it locks into place. 9. To further secure the unit, use the supplied metal strap to secure the back of the unit in place. - 31 - BCD-5450UB Use the supplied hardware (Hex Nut (M5mm) and Spring Washer) to attach one end of the strap to the mounting bolt on the back of the unit. If necessary, bend the metal strap to fit your vehicle’s mounting area. Then use the supplied hardware (Tapping Screw (5x25mm) and Plain Washer) to attach the other end of metal strap to a solid metal part of the vehicle under the dashboard. This strap also helps ensure proper electrical grounding of the unit. Note to install the short threading terminal of the mounting bolt to the back of the unit and the other long threading terminal to the dashboard. Spring Washer Hex Nut Metal Strap Mounting Bolt Plain Washer Tapping Screw 10. Reconnect the cable to the vehicle battery’s negative (-) terminal. Then replace the outer trim ring and install the unit’s front panel (see the steps of “installing the front panel”). Removing the unit 1. Make sure the ignition is turned off, then disconnect the cable from the vehicle battery’s negative (-) terminal. 2. Remove the metal strap attached the back of the unit (if attached). 3. Press the release button to remove the front panel. 4. Lift the top of the outer trim ring then pull it out to remove it. 5. Insert both of the supplied keys into the slots at the middle left and right sides of the unit, then - 32 - BCD-5450UB pull the unit out of the dashboard. DIN REAR-MOUNT (Method B) If your vehicle is a Nissan, Toyota, follow these mounting instructions. Use the screw holes marked T (Toyota), N (Nissan) located on both sides of the unit to asten the unit to the factory radio mounting brackets supplied with your vehicle. Side View showing Screw Holes marked T, N Screw Factory Radio Mounting Bracket Screw Dashboard or Console - 33 - BCD-5450UB USING THE DETACHABLE FRONT PANEL To Detach the Front Panel 1. Press the release ( ) button, then the front panel will be folded down. OPEN 2. To remove the front panel, lift it up at a little angle from horizontal position, then first pull out the right side and then pull out the left side. The right side Front Panel 3. For safekeeping, store the front panel in the supplied protective case immediately after being removed. - 34 - BCD-5450UB To Install the Front Panel 3. T o install the front panel, first insert the right side into proper position then insert the left side into place. 4. When the two sides fixed into place, push the front panel into main unit. - 35 - BCD-5450UB Note: that if the front panel fails to lock in position properly, pressing control button may not function and the display may be missing some segments. Press the release button and then reinstall the front panel again. Precautions when handling - Do not drop the front panel. - Do not put pressure on the display or control buttons when removing or installing the front panel. - Do not touch the contacts on the front panel or on the main unit body. It may result in poor electrical contact. - If any dirt or foreign substances adhered on the contacts, they can be removed with a clean and dry cloth. - Do not expose the front panel to high temperatures or direct sunlight in anywhere. - Keep away any volatile agents (e.g. benzene, thinner, or insecticides) from touching the surface of the front panel - Do not attempt to disassemble the front panel. - 36 - BCD-5450UB Wire Connection Diagram - 37 - BCD-5450UB LOCATION OF KEYS 1. “ ” button 2. "LIGAR / MODO" button 3. “3 RPT” button. 4. “DSP” button. 5. “VOL / SEL/ENT” button. 6. “AS/PS” button. 7. “5 DIR-” button. 8. “IR”Infra Sensor. 9. “ 3" ” TFT display. 10. USB port. 11. “AUX IN” jack 12. “6 DIR+” button. 13. “ ” button 14. “ ” button. 15. “4 RDM” button. 16. “BANDA/LOU” button. 17. “2 INT” button. 18. “ ” button. 19. Reset button 20. SD/MMC interface 21. (eject button) 22. disc slot - 38 - BCD-5450UB SWITCHING ON/OFF THE UNIT Press PWR button (2) to turn on the unit. When the unit is on. Press and hold for 2 seconds to turn off the unit. FACEPLATE RELEASE Press release button faceplate. SOUND ADJUSTMENT Press SEL button (5) shortly to select the desired adjustment mode. The adjustment mode will be changed in the following order: (1) to detach the removable BAS: bass TRE: treble BAL: balance FAD: fader BEEP: Beep sound EQ:Equalization LOUD:LOUD ON/OFF LOC: local ST: stereo VOL: volume By rotating the audio knob (5) clockwise or counter-clockwise, it is possible to adjust the desired sound quality. LIQUID CRYSTAL DISPLAY Exhibit current frequency and activated functions on the display ESP FUNCTION The unit can be shockproof between ten seconds and twenty seconds - 39 - BCD-5450UB RESET button (19) must be activated with either a ballpoint pen RESET FUNCTION or thin metal object. The RESET button is to be activated for the following reasons: - Initial installation of the unit when all wiring is completed. - All the function buttons do not operate. - Error symbol on the display. Note: if press RESET button (19), the unit can’t work yet, please use a cotton swab soaked in isopropyl alcohol to clean the socket on the front panel. RADIO OPERATION SWITCHING TO RADIO MODE Press MODE button (2) to select radio mode, the radio mode appears in the display together with the memory band and frequency. SELECTING THE FREQUENCY BAND At radio mode, press BAND button (16) shortly to select the desired band.The reception band will change in the following order: →FM1→ FM2→ FM3 → AM1→AM2→ SELECTING STATION Press button (13) or button (14) shortly to activate automatic seek function. Press for several seconds until “MANUAL” appears on the display, the manual tuning mode is selected. If both buttons have not been pressed for several seconds, they will return to seek tuning mode and “AUTO” appears on the display. AUTOMATIC MEMORY STORING & PROGRAM SCANNING Automatic memory storing Press AS/PS button (6) for several seconds, the radio searches from the current frequency and checks the signal strength until one cycle search is finished. And then 6 strongest stations are stored into the corresponding preset number button. - 40 - BCD-5450UB - Program scanning Press AS/PS button (6) shortly to scan preset station. The radio is holding at that preset number for several seconds with release mute, then searches again. STATION STORING To receive a station, Press one of the preset button(1~6) for 2 seconds. The current station is stored into the number button. CD OPERATION SWITCHING TO CD MODE If there is no CD inserted in the driver: Gently insert the CD with the printed side uppermost into the CD compartment until you feel some resistance. The CD is drawn into the driver automatically. CD playback begins. If a CD is already inserted in the driver: Keep pressing MODE button (2) shortly until the CD mode display appears. SELECTING TRACKS Press button (14) or button (13)to move to the previous track or the following track. Track number shows on display. Hold button (14) or button (13) to fast reverse or fast forward. CD play starts from when you release the button. PAUSING PLAYING Press button (18) to pause CD player. Press it again to resume play. PREVIEWING ALL TRACKS Press INT button (17) to play first several seconds of each track on the current disc. Press again to stop intro and listen to track. - 41 - BCD-5450UB REPEATING THE SAME TRACK Press RPT button (3) to continuously repeat the same track. Press it again to Repeat all the tracks. PLAYING ALL TRACKS IN RANDOM Press RDM button (15) to play all tracks on CD in random order. Press again to cancel the function. EJECTING A DISC Press button (21) to stop CD playing and eject the disc from the disc slot (22). MP3 OPERATION SWITCHING TO MP3 MODE If there is no MP3 disc inserted in the driver: Gently insert the MP3 disc with the printed side uppermost into the disc slot (22) until you feel some resistance. The MP3 disc is drawn into the driver automatically. The MP3 playback begins. If a MP3 disc is already inserted in the driver: Keep pressing MODE button (2) shortly until the MP3 mode display appears. EJECTING A DISC Press button (21) to stop MP3 playing and eject the disc from the disc slot (22). SELECTING TRACKS IN SINGLE STEP Press button (14) or button (13) to move to the previous track or the following track. Track number shows on display. SELECTING DIRECTORY UP/DOWN Press DIR-button (7) or DIR + button (12) to select directory downward or upward. If the MP3 disc does not contain any directory, there is no function of pressing DIR- button (7) or DIR + button (12). - 42 - BCD-5450UB PAUSING PLAYING Press button (18) to pause MP3 player. Press it again to resume play. PREVIEWING ALL TRACKS Press INT button (17) to play first several seconds of each track on the current disc. Press again to stop intro and listen to track. REPEATING THE SAME TRACK Press RPT button (3) to continuously repeat the same track. Press it again to repeat all the tracks. PLAYING ALL TRACKS IN RANDOM Press RDM button (15) to play all tracks on CD in random order. Press again to cancel the function SELECTING TRACKS BY AS/PS BUTTON AS/PS button (6) is assigned as Digital Audio Mode selection button in MP3 operation. When pressed, it is activated as selecting each mode of Digital Audio. “Searching track directly” => “Searching Directory or File Name”=> “Navigation” from folder by TUNE/SEEK/TRACK UP/DOWN buttons or VOL +/-. Searching Track Directly Press AS/PS button for one time. It enters into “Searching track directly” in MP3/WMA disc. The unit searches the track selected by following direct numeric buttons: M1-M6, MOD, TUNE/SEEK/TRACK DOWN, TUNE/SEEK/TRACK UP, DISP. If selected three digits, the unit searches the tract at once. If selected one or two digits, the unit wait for SEL button for seconds. The unit searches the track after few seconds, even if the enter button is not pressed - 43 - BCD-5450UB Searching Directory or File Name Press AS/PS button for two times. It enters into “Searching Directory or File Name” in Digital Audio CD. The unit searches files and directories that have the same character which is inputted by the user pressing the corresponding buttons listed on the Table 1 below. Explain as follows: - Use the corresponding buttons to select the characters A to Z, blank, 0 to 9, _, -, +. - Press SEL button to start the title search. Searching From Root Directory Press AS/PS button for three times. The unit searches file from the folder by TUNE/SEEK/TRACK UP/DOWN buttons or rotating the VOL knob. Display will list all available directories and songs. Select the desired directory/songs by using TUNE/SEEK/TRACK UP/DOWN buttons and SEL button to confirm. If the selected title is a song, it starts to play. If the selected title is a folder name. then Use the TUNE/SEEK/TRACK UP/DOWN button or rotating the VOL knob to list all songs under this folder and select the title. - Press SEL button to confirm and start the play. - Repeat the above steps if the newly selected title is again a directory. DISPLAY INFORMATION Press DSP button (4) to show the following information, such as the clock, ID3 TAG (if available: song title, directory name, artist name, other contents…) (FOR WITH MP3 ID3 FUNCTION VERSION ONLY) and other information. KEY Assigned IN Searching mode (Table 1) - 44 - BCD-5450UB AS/PS Mode Select SEL ENTER M1 A, B, C, 1 M2 D, E, F, 2 M3 G, H, I, 3 M4 J, K, L, 4 M5 M, N, O, 5/Directory DOWN M6 P, Q, R, 6/Directory UP MOD S, T, U, 7 TUNE/SEEK/TRACK V, W, X, 8 DOWN TUNE/SEEK/TRACK UP Y, Z, SPACE, 9 DSP _,-,+,0 AUDIO KNOB CHARACTER SELECT All the CHARACTER above AUDIO KNOB & TUNE /SEEK/TRACK UP/DOWN buttons: Searching file and directory during Navigation. WMA OPERATION The unit that can play the WMA disc and the operation is the same with MP3 operation described above. USB PLAY OPERATION In the front panel of the unit, there is an USB interface (10). You can connect an USB driver through this interface (10). When you connect an USB driver through the interface, the unit will search the MP3/ WMA files in the USB driver and start to play MP3/WMA files automatically. If in other mode, you can also press MODE button to select USB mode. When playing the MP3/WMA files in the device, the operation is the same with the MP3 operation described above. Note: - The main unit can only support the standard USB-memory disc which is approved by Microsoft. - 45 - BCD-5450UB - USB MP3 player is not a standard which means different brand name or different models have their own standard. So our product cannot support every MP3 player. - When connecting an MP3 player and there has normal battery in the player (non rechargeable battery), you should remove the battery from the MP3 player then connect it to the USB interface. Otherwise, it may cause battery burst. - When in USB play mode, be sure not to remove the USB driver from the USB interface. SD/MMC OPERATION There is a SD/MMC interface (20) on the front panel of the unit. When you insert a SD/MMC card in the SD/MMC interface, the unit will search the MP3/WMA files in the card and start to play MP3/WMA files automatically. The operation is the same with the MP3 operation described above. If in other mode. you can also press MODE button to select SD/MMC mode. When there are important files in the SD/MMC card, do not connect it to the main unit to play. SUPPORTED MP3/WMA DECODING MODES The main unit supports MP3/WMA (Windows Media Audio) decoding modes as below. Supports Standard Bit Rate (kbps) Mode MPEG1 Audio 32,48,64,96, Layer 3 (44.1kHz) 128,192,256, Stereo 320 Windows Media 64,96,128,192 Audio (44.1kHz) The USB solution can support: 5. Folder: 500 max. - 46 - Stereo BCD-5450UB 6. File: 999 max. 7. Depth of folder: 8 layers 8. Size: 2 GB CAUTION When there are important files in the USB device, do not connect it to the main unit to play. And don’t play the CD-R/RW disc that has important files in it. Because any wrong operation may cause files loss. And our company assumes no responsibility for this DISC ONTES A.Notes on discs: Attempting to use non-standard shape discs (e.g. square, start, heart) may - damage the unit. Be sure to use round shape CD discs only for this unit. - Do not stick paper or tape, etc, onto the label side or the recording side of any discs, as it may cause a malfunction. - Dirt, dust, scratches and warping discs will cause misoperation. B. Notes on CD-Rs (recordable CDs)/CD-RWs (rewritable CDs): - Be sure to use discs with following marks only for the unit to play: ReWrit able - The unit cannot play a CD-R and CD-RW that is not finalized. (Please refer to the manual of your CD-R/CD-RW recorder or CD-R/CD-RW software for more - 47 - BCD-5450UB DISC ONTES information on finalization process). - Depending on the recording status, conditions of the disc and the equipment used for the recording, some CD-Rs/CD-RWs may not be played on this unit. (see *1) *1: To have more reliable play back, please see following recommendations: a: Use CD-RWs with speed 1x to 4x and write with speed 1x to 2x. b. Use CD-Rs with speed 1x to 8x and write with speed 1x to 2x. c. Do not play a CD-RW which has been written for more than 5 times. C. Notes on MP3 files (MP3 Version Only): - The disc must be in the ISO9660 level 1 or level 2 format, or Joliet or Romeo in the expansion format. - When naming a MP3 file, be sure the file name extension is “.MP3”. - For a non-MP3 file, even though the file name extension is “.MP3”, the unit cannot recognize it. - 48 - BCD-5450UB Control Locations – Remote Handset BCD-5450UB - 49 - BCD-5450UB 1. POWER 2. 7/MODE 3. TUNE/SKIP (8) 4.BND(LOU/ENT) 5.SCN 6.PAU 7.SHF 8.DISC/DIR▼ 9.VOL▲ 10.SEL 11.TUNE/SKIP (9) 12.VOL ▼ 13.DISP(0) 14.RPT 15.AS/PS(D-AUD) 16.LOC 17.DISC/DIR▲ Power ON/OFF Button Mode Botton Tune/SKIP Down Button Band Select Button(When pressed shortly) Loudness Button (When pressed long) Scanning Button Pause Button Shuffle Button DISC/ DIR▼ Button Volume Up Button Sound Mode Select Button Tune/SKIP Up Button Volume Down Button Display Button Repeat Button Automatic Memory Storing & Program Scanning Button (Mode Select Button For MP3/WMA Operation) Local/Distant Select Button DISC/DIR▲ Button - 50 - BCD-5450UB SPECIFICATION GENERAL Power Supply Requirements.......................DC 12 Volts, Negative Ground . . . . . . . . . . . . . . . . . . . . . . . . . . . . . 178 (W) x 97 (D) x 50 (H) Chassis Dimensions........ Tone Controls 3. Bass (at 100 Hz) ............................. ±10 dB 4. Treble (at 10 kHz) ........................... ±10 dB Maximum Output Power... Version V .................................. 4x40 watts Current Drain Version V ...................................... 15Ampere (max.) RADIO For 2 Bands FM Frequency Coverage ............................ IF ............................................. Sensitivity (S/N=30dB)............................. . . . . . . . . . . . . . . . . . . . . . . . . . . . . . Stereo Separation AM Frequency Coverage ............................. . . . . . . . . . . . . . . . . . . . . . . . . . . . . . . . . . . . . . . . . . . . . . . IF Sensitivity (S/N=20dB) ............................. - 51 - 87.5 to 108 MHz. 10.7 MHz 4μV >25dB 520 to 1710 KHz 450 kHz 36 dBuV BCD-5450UB TROUBLE SHOOTING Before going through the checklist, check wiring connection. If any of the problems persist after checklist has been made, consult your nearest service dealer Symptom Cause Solution The car ignition switch If the power supply is is not on. connected to the car accessory circuits, but the No power. engine is not moving, switch the ignition key to “ACC”. The fuse is blown. Replace the fuse. Volume is in minimum No sound. Wiring is not properly Adjust volume to a desired level. Check wiring connection. connected. The operation keys The built-in Press the reset button. do not work. microcomputer is not operating properly due to noise. The radio does not The antenna cable is not Work. The radio connected. station automatic selection does not The signals are too Insert the antenna cable firmly. Select a station manually. weak. work. - 52 -