1
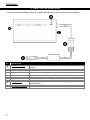
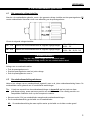
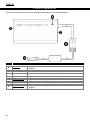
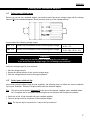
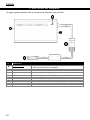
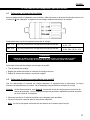
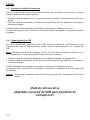
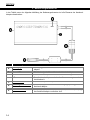
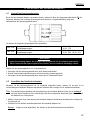
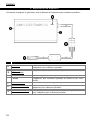
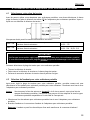
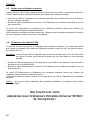
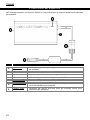
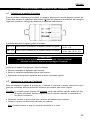
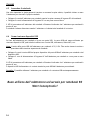
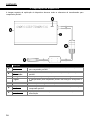
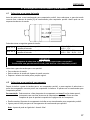
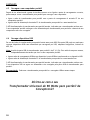
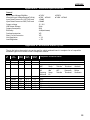
NEDERLANDS Conceptronic CNB90 Gebruiksaanwijzing Gefeliciteerd met uw nieuwe Conceptronic 90 Watt universele notebooklader. In deze gebruiksaanwijzing vindt u stap-voor-stap instructies voor installatie en gebruik van de Conceptronic 90 Watt universele notebooklader. Als u meer informatie of ondersteuning voor uw product nodig heeft, kunt u het beste naar onze Service & Support website op www.conceptronic.net gaan en een van de volgende mogelijkheden kiezen: FAQ Downloads Contact : Database met veel gestelde vragen : Gebruiksaanwijzingen, stuurprogramma's, firmware en overige downloads : Contact opnemen met Conceptronic Support Voor algemene informatie over Conceptronic producten gaat u naar de Conceptronic website op www.conceptronic.net. 1. Inhoud verpakking U vindt de volgende items in de verpakking van de Conceptronic 90 Watt universele notebooklader: Conceptronic 90 Watt universele notebooklader (CNB90) Netsnoer 10 verschillende notebookconnectors (zie Appendix B aan het einde van deze gebruiksaanwijzing) Deze meertalige gebruiksaanwijzing Garantiekaart en boekje CE-verklaring 2. Product eigenschappen Netlader voor uw notebook of USB-apparaat Instelbare uitgangsspanning Universeel, geschikt voor alle notebooks tot 90 Watt Ingebouwde beveiliging tegen overbelasting, kortsluiting en oververhitting 1 NEDERLANDS 3. Plaats van de onderdelen In de onderstaande afbeelding worden de verschillende onderdelen van de notebooklader aangegeven: Nr. Beschrijving A. AC lichtnetingang: Lichtnetaansluiting om het netsnoer op de notebooklader aan te sluiten. B. Aan/uit lampje: Uit Aan Geeft de status van de notebooklader aan. De notebooklader krijgt geen stroom. De notebooklader staat aan en is klaar voor gebruik. C. USB-aansluiting: USB-aansluiting om uw USB-apparaten op te laden. D. Voltagekeuze: Met deze selectieknop kiest u de gewenste uitgangsspanning van uw notebooklader. E. Notebookaansluiting: Aansluiting voor de meegeleverde notebookaansluitingen. 2 NEDERLANDS 4. Uw notebooklader gebruiken 4.1 Het gewenste voltage instellen Voordat u de notebooklader gebruikt, moet u het gewenste voltage instellen met de spanningselector [D] van de notebooklader. Hieronder vindt u een afbeelding van de spanningselector: U kunt de volgende voltages instellen: 15V – 17V Geschikt voor alle notebooks met de volgende ingangsvoltages: 18V – 21V Geschikt voor alle notebooks met de volgende ingangsvoltages: 15V - 15,5V - 16V – 16,5V – 17V 18V - 18,5V - 19V – 19,5V - 20V - 20,5V - 21V ! WAARSCHUWING ! Zorg dat u het juiste voltage voor uw notebook instelt! Als u een verkeerd voltage instelt, kan uw notebook defect raken! Voltage voor uw notebook instellen: Trek de spanningselector uit. Draai de spanningselector naar het juiste voltage. Druk de spanningselector weer in. 4.2 Uw notebookaansluiting selecteren Nadat u het voltage voor uw notebook heeft ingesteld, moet u de juiste notebookaansluiting kiezen. De notebooklader wordt geleverd met 10 verschillende aansluitingen. Tip: U vindt een overzicht van de notebookaansluitingen in Appendix B aan het einde van deze gebruiksaanwijzing, samen met een overzicht van notebookmerken. Een volledig overzicht van compatibele notebooks vindt u op de Conceptronic website. Kies een van de 10 bij uw notebooklader meegeleverde notebookaansluitingen. Zet de notebookaansluiting op de kabel van de notebooklader. NB: De notebookaansluiting kan maar op één manier op de kabel van de lader worden gezet! 3 NEDERLANDS 4.3 Uw notebook van stroom voorzien Nadat u het juiste voltage heeft ingesteld en de juiste notebookaansluiting heeft geplaatst, kunt u gebruik maken van de notebooklader om uw notebook op te laden. Sluit de kabel van de notebooklader via de geplaatste notebookaansluiting aan op de DC gelijkstroomingang van uw notebook. Sluit het netsnoer aan op de AC-ingang van de netlader en op een stopcontact. Het aan/uit-lampje van de notebooklader gaat aan om aan te geven dat de notebooklader in gebruik is. Uw notebook krijgt nu stroom van de notebooklader en de batterij van uw notebook wordt opgeladen. 4.4 USB-apparaten opladen Aan de linkerzijkant van de notebooklader zit een USB-poort. U kunt deze USB-poort gebruiken om uw USB-apparaten op te laden, zoals hiervoor geschikte mobieltjes, camera's, MP3-spelers etc. NB: De elektrische waarden van de USB-poort van de notebooklader zijn 5V en 0,5A. Deze zijn altijd gelijk en hangen niet af van het voltage dat u heeft ingesteld voor uw notebook. Doe de USB-oplaadkabel van uw apparaat in de USB-poort van uw notebooklader en in uw USB-apparaat. Sluit het netsnoer aan op de AC-ingang van de netlader en op een stopcontact. Het aan/uit-lampje van de notebooklader gaat aan om aan te geven dat de notebooklader in gebruik is. Uw USB-apparaat wordt nu van stroom voorzien en/of opgeladen via de USB-poort van uw notebooklader. Tip: U kunt de notebooklader en de USB-lader tegelijk gebruiken. Veel plezier met uw Conceptronic 90 Watt universele notebooklader! 4 ENGLISH Conceptronic CNB90 User Manual Congratulations on the purchase of your Conceptronic 90 Watt Universal Notebook Adapter. This User Manual gives you a step-by-step explanation how to install and use the Conceptronic 90 Watt Universal Notebook Adapter. When you need more information or support for your product, we advise you to visit our Service & Support website at www.conceptronic.net/support and select one of the following options: FAQ Downloads Contact : Frequently Asked Questions database : Manuals, Drivers, Firmware and more downloads : Contact Conceptronic Support For general information about Conceptronic products visit the Conceptronic website at www.conceptronic.net. 1. Package contents The following items are present in the package of the Conceptronic 90 Watt Universal Notebook Adapter: Conceptronic 90 Watt Universal Notebook Adapter (CNB90) Power cable 10 different notebook charging tips (see Appendix B at the end of this manual) This Multilanguage user manual Warranty card & CE declaration booklet 2. Product features Charge your notebook and/or USB device Switchable output voltage Universal, can be used for all notebooks up to 90W Built-in protection against overload, short circuiting and overheating 5 ENGLISH 3. Device explanation The device explanation picture below describes all elements of the notebook adapter: 6 Nr Description A. AC input: AC input connection to connect the power cable to the notebook adapter. B. Power LED: Off On Show the power state of the notebook adapter. The notebook adapter is not powered. The notebook adapter is powered and ready to use. C. USB connector: USB connector to charge your USB devices. D. Voltage selector: Selector to set the output voltage for your notebook adapter. E. Tip connector: Connector for one of the notebook tips included with the notebook adapter. ENGLISH 4.Using your notebook adapter 4.1 Select your voltage range Before you can use your notebook adapter, you need to select the correct voltage range with the voltage selector [D] of the notebook adapter. Below you see a close-up of the voltage selector: You can select the following voltage ranges: 15V – 17V Suitable for all notebooks with the following input voltages: 18V – 21V Suitable for all notebooks with the following input voltages: 15V - 15.5V - 16V – 16.5V - 17V 18V - 18.5V - 19V – 19.5V - 20V - 20.5V - 21V ! WARNING ! Make sure you set the correct voltage range for your notebook! If you select the wrong voltage range, you can damage your notebook! Select the voltage range for your notebook: Pull the voltage selector. Rotate the voltage selector to the correct voltage range. Push the voltage selector back to the original position. 4.2 Select your notebook tip After setting up the voltage range for your notebook, the following step is to select the correct notebook tip for your notebook. There are 10 tips included with the notebook adapter. Tip: The tip list can be found in Appendix B at the end of this manual, together with a notebook brand list. A complete list of compatible notebook types can be found on the Conceptronic website. Select one of the 10 tips included with your notebook adapter. Connect the tip to the tip connector of the notebook adapter. Note: The tip can only be connected in 1 way to the tip connector! 7 ENGLISH 4.3 Power your notebook When you have set the correct voltage range and connected the correct tip, you can start using the notebook adapter to charge your notebook. Connect the notebook adapter cable with the connected tip to the DC input of your notebook. Connect the power cable to the AC input of the notebook adapter and to a free wall outlet. The power LED on the notebook adapter will turn on, indicating that the notebook adapter is in use. Your notebook is now powered by the notebook adapter and your notebook battery is being charged. 4.4 Charging USB devices On the side of the notebook adapter, there is an USB port. This USB port can be used to charge your USB devices, like USB charged mobile phones, cameras, MP3 players, etc. Note: The output of the USB port of the notebook adapter is 5V, 0.5A. This output is always the same, no matter which voltage you have set for your notebook. Connect the USB charging cable of your device to the USB port of your notebook adapter and to your USB device. Connect the power cable to the AC input of the notebook adapter and to a free wall outlet. The power LED on the notebook adapter will turn on, indicating that the notebook adapter is in use. Your USB device will now be powered and/or charged by the USB port of the notebook adapter. Tip: You can use the notebook adapter and USB charger at the same time. Enjoy the use of your Conceptronic 90 Watt Universal Notebook Adapter! 8 ESPAÑOL CNB90 de Conceptronic Manual de usuario Felicidades por la compra de su adaptador universal de 90W para portátiles de Conceptronic. Este manual de usuario le ofrece una descripción paso a paso acerca de cómo instalar y utilizar el adaptador universal de 90W para portátiles de Conceptronic. Si necesita más información o soporte técnico acerca de su producto, le recomendamos que visite nuestra página web de Servicio y Soporte www.conceptronic.net/support y seleccione una de las siguientes opciones: FAQ Descargas Contacto : Base de datos con las preguntas más frecuentes (FAQ) : Manuales, drivers, firmware y otras descargas : Contactar con el servicio técnico de Conceptronic Para información general sobre los productos de Conceptronic, visite la página web de Conceptronic www.conceptronic.net. 1. Contenido del paquete El paquete del adaptador universal de 90W para portátiles de Conceptronic contiene los elementos siguientes: Adaptador universal de 90W para portátiles de Conceptronic (CNB90). Cable de alimentación 10 clavijas eléctricas diferentes para carga de portátil (vea el Anexo B al final de este manual). Este manual del usuario en varios idiomas. Tarjeta de garantía y folleto de declaración de conformidad de la CE. 2. Características del producto Cargue su portátil y/o sus dispositivos USB. Voltaje de salida seleccionable. Universal, puede utilizarse para todos los portátiles de hasta 90W. Incorpora protección contra sobrecarga, cortocircuito y sobrecalentamiento. 9 ESPAÑOL 3. Descripción del adaptador La imagen siguiente describe todos los elementos del adaptador para portátiles: Nº Descripción A. Entrada de AC: Conexión de entrada de corriente alterna (AC) para conectar el cable de alimentación al adaptador. B. LED alimentación: OFF ON Muestra el estado de la alimentación del adaptador. El adaptador no está enchufado a la corriente. El adaptador está enchufado y listo para ser utilizado. C. Conector USB: Conector USB para cargar sus dispositivos USB. D. Selector de voltaje: Selector para seleccionar el voltaje de salida del adaptador. E. Conector para clavija: Conector para una de las clavijas incluidas con el adaptador. 10 ESPAÑOL 4. Utilización del adaptador para portátiles 4.1 Seleccionar un intervalo de voltajes Antes de poder utilizar el adaptador para portátiles, debe seleccionar el intervalo de voltajes correcto con el selector [D] del adaptador. La siguiente es una imagen ampliada del selector de voltajes: Puede seleccionar uno de los siguientes intervalos de voltaje: 15V – 17V Para los portátiles con los siguientes voltajes de entrada: 18V – 21V Para los portátiles con los siguientes voltajes de entrada: 15V - 15,5V - 16V 16,5V - 17V 18V - 18,5V - 19V 19,5V - 20V - 20,5V - 21V ! Atención! ¡Asegúrese de haber seleccionado el intervalo de voltajes correcto para su portátil! Si selecciona el intervalo de voltajes incorrecto, su portátil podría sufrir daños. Seleccione el intervalo de voltajes correcto para su portátil: Tire del selector de voltajes. Hágalo girar hasta seleccionar el intervalo de voltajes correcto. Empuje el selector de voltajes a su posición original. 4.2 Seleccione la clavija correspondiente a su portátil Una vez seleccionado el intervalo de voltajes adecuado, el siguiente paso es seleccionar la clavija eléctrica correspondiente a su portátil. Con el adaptador para portátiles se incluyen 10 clavijas. Consejo: Al final de este manual, en el Anexo B, encontrará la lista de clavijas junto con una lista de marcas de portátiles. La lista completa de tipos de portátiles compatibles la puede encontrar en el sitio web de Conceptronic. Seleccione una de las 10 clavijas incluidas con el adaptador para portátiles. Conecte la clavija al conector para las clavijas del adaptador. Nota: ¡La clavija sólo puede conectarse de una manera en el conector para clavijas! 11 ESPAÑOL 4.3 Enchufar el portátil a la corriente Una vez ha seleccionado el intervalo de voltajes correcto y ha conectado la clavija correcta, ya puede utilizar el adaptador para cargar su portátil. Conecte el cable del adaptador, con la clavija conectada, a la entrada de corriente continua (DC) de su portátil. Conecte el cable de alimentación a la entrada de corriente alterna (AC) del adaptador y a una toma de corriente de la pared. El LED de alimentación del adaptador se encenderá, indicando que el adaptador está en uso. Su portátil se encontrará ahora conectado a la corriente mediante el adaptador y la batería del portátil cargándose. 4.4 Cargar dispositivos USB En un lado del adaptador encontrará un puerto USB. Este puerto USB puede ser utilizado para cargar dispositivos USB, como por ejemplo teléfonos móviles, cámaras, reproductores MP3, etc., cargados por USB. Nota: La salida del puerto USB del adaptador es de 5V, 0,5A. Esta salida es siempre la misma, no se ve afectada por el voltaje que haya seleccionado para cargar su portátil. Conecte el cable de carga USB del dispositivo al puerto USB del adaptador y al dispositivo USB. Conecte el cable de alimentación a la entrada de corriente alterna (AC) del adaptador y a una toma de corriente de la pared. El LED de alimentación del adaptador se encenderá, indicando que el adaptador está en uso. Su dispositivo USB se encontrará ahora conectado a la corriente y/o cargándose a través del puerto USB del adaptador. Consejo: Puede utilizar el adaptador para enchufar y/o cargar su portátil y un dispositivo USB al mismo tiempo. ¡Disfrute del uso de su adaptador universal de 90W para portátiles de Conceptronic! 12 DEUTSCH Conceptronic CNB90 Benutzerhandbuch Wir gratulieren Ihnen zum Kauf Ihres Conceptronic 90 Watt-Universal-Notebook-Adapters. In dieser Bedienungsanleitung wird Ihnen Schritt für Schritt gezeigt, wie der Conceptronic 90 WattUniversal-Notebook-Adapter installiert und verwendet wird. Wenn Sie weitere Informationen oder Support für Ihr Produkt benötigen, besuchen Sie unsere Service & Support-Webseite www.conceptronic.net/support und wählen Sie eine der folgenden Optionen: FAQ Downloads Kontakt : Datenbank mit den häufig gestellten Fragen : Handbücher, Treiber, Firmware und weitere Downloads : Kontakt für den Conceptronic-Support Allgemeine Informationen über Conceptronic-Produkte finden Sie auf der Conceptronic-Webseite unter www.conceptronic.net. 1. Packungsinhalt In der Verpackung des Conceptronic 90 Watt-Universal-Notebook-Adapters ist Folgendes enthalten: Conceptronic 90 Watt-Universal-Notebook-Adapter (CNB90) Stromkabel 10 verschiedene Notebook-Ladeaufsätze (siehe Anhang B am Ende dieses Handbuchs) Dieses mehrsprachige Benutzerhandbuch Garantiekarte und Broschüre mit CE-Erklärung 2. Produkteigenschaften Für das Aufladen von Notebooks und/oder USB-Geräten Umschaltbare Ausgangsspannung Universalladegerät, kann für alle Notebooks bis zu 90 Watt verwendet werden Integrierter Überlast-, Kurzschluss- und Überhitzungsschutz 13 DEUTSCH 3. Bedienungselemente In der Tabelle unter der folgenden Abbildung der Bedienungselemente sind alle Elemente des NotebookAdapters beschrieben: Nr. Beschreibung A. AC-Eingang: AC-Eingang für den Anschluss des Stromkabels an den NotebookAdapter. B. Power LED: Aus Ein Für die Anzeige des Power-Status des Notebook-Adapters. Der Notebook-Adapter wird nicht mit Strom versorgt. Der Notebook-Adapter wird mit Strom versorgt und betriebsbereit. C. USB-Anschluss: USB-Anschluss für das Aufladen von USB-Geräten. D. Spannungswahlschalter: Wahlschalter für das Einstellen der Ausgangsspannung für den Notebook-Adapter. E. Aufsatzanschluss: Anschluss für einen der Notebook-Aufsätze, die im Lieferumfang des Notebook-Adapters enthalten sind. 14 ist DEUTSCH 4. Verwenden des Notebook-Adapters 4.1 Auswahl des Spannungsbereichs Bevor Sie den Notebook-Adapter verwenden können, müssen Sie über den Spannungswahlschalter [D] des Notebook-Adapters den korrekten Spannungsbereich einstellen. Folgende Abbildung zeigt eine Nahaufnahme des Spannungswahlschalters: Sie können die folgenden Spannungsbereiche auswählen: 15V – 17V 18V – 21V Geeignet für alle Notebooks mit den folgenden Eingangsspannungen: Geeignet für alle Notebooks mit den folgenden Eingangsspannungen: 15V – 15,5V - 16V – 16,5V - 17V 18V – 18,5V - 19V – 19,5V - 20V – 20,5V - 21V ! ACHTUNG ! Achten Sie unbedingt darauf, den richtigen Spannungsbereich für Ihr Notebook einzustellen ! Wenn Sie den falschen Spannungsbereich einstellen, kann Ihr Notebook beschädigt werden! Wählen Sie den Spannungsbereich für Ihr Notebook aus: Entriegeln Sie den Spannungswahlschalter durch Auseinanderziehen. Drehen Sie den Spannungswahlschalter auf den korrekten Spannungsbereich. Verriegeln Sie den Spannungswahlschalter wieder durch Zusammenschieben. 4.2 Auswählen des Notebook-Aufsatzes Nachdem Sie den Spannungsbereich für Ihr Notebook eingestellt haben, müssen Sie aus den 10 im Lieferumfang des Notebook-Adapters enthaltenen Aufsätzen den richtigen für Ihr Notebook auswählen. Tipp: Eine Aufstellung der Aufsätze und eine Aufstellung der Notebook-Marken finden sich im Anhang B am Ende dieses Handbuchs. Eine vollständige Liste aller kompatiblen Notebook-Typen finden Sie auf der Webseite von Conceptronic. Wählen Sie aus den 10 im Lieferumfang des Notebook-Adapters enthaltenen Aufsätzen den richtigen für Ihr Notebook aus. Schließen Sie den Aufsatz am Aufsatzanschluss des Notebook-Adapters an. Hinweis: Es gibt nur eine Möglichkeit, den Aufsatz an den Aufsatzanschluss anzuschließen! 15 DEUTSCH 4.3 Aufladen von Notebooks Nachdem Sie den korrekten Spannungsbereich eingestellt und den richtigen Aufsatz angeschlossen haben, können Sie den Notebook-Adapter für das Aufladen Ihres Notebooks verwenden. Schließen Sie das Kabel des Notebook-Adapters mit dem angeschlossenen Aufsatz am DC-Eingang Ihres Notebooks an. Schließen Sie das Stromkabel am AC-Eingang des Notebook-Adapters und an einer Steckdose an. Daraufhin schaltet die Power-LED des Notebook-Adapters ein, um anzuzeigen, dass der Notebook-Adapter in Betrieb ist. Jetzt wird Ihr Notebook über den Notebook-Adapter mit Strom versorgt und der Akku des Notebooks wird aufgeladen. 4.4 Aufladen von USB-Geräten Seitlich am Notebook-Adapter befindet sich ein USB-Port. Dieser USB-Port kann für das Aufladen von USBGeräten wie über USB mit Strom versorgten Mobiltelefonen, Kameras, MP3-Playern usw. verwendet werden. Hinweis: Die Leistung des USB-Ports des Notebook-Adapters ist 5V, 0,5A. Diese Leistung ist immer gleich, unabhängig davon, welche Spannung Sie für Ihr Notebook eingestellt haben. Schließen Sie das USB-Ladekabel des aufzuladenden Geräts an den USB-Port des Notebook-Adapters und an das USB-Gerät an. Schließen Sie das Stromkabel am AC-Eingang des Notebook-Adapters und an einer Steckdose an. Daraufhin schaltet die Power-LED des Notebook-Adapters ein, um anzuzeigen, dass der Notebook-Adapter in Betrieb ist. Jetzt wird das USB-Gerät über den USB-Port des Notebook-Adapters mit Strom versorgt und/oder aufgeladen. Tipp: Sie können den Notebook-Adapter und das USB-Ladegerät gleichzeitig verwenden. Viel Spaß mit Ihrem Conceptronic 90 Watt-Universal-Notebook-Adapter! 16 FRANÇAIS CNB90 de Conceptronic Manuel d’Utilisateur Nous vous félicitons d'avoir acheté votre Adaptateur pour Ordinateurs Portables Universel 90 Watt de Conceptronic. Vous trouverez dans ce Manuel d'Utilisateur une explication détaillée de l'installation de l'Adaptateur pour Ordinateurs Portables Universel 90 Watt de Conceptronic. Pour plus d'informations ou pour obtenir de l'aide concernant votre produit, nous vous conseillons de visiter notre site web de Service & Support sur www.conceptronic.net/support et de sélectionner l'une des options suivantes : Foire aux Questions : Base de Données de Questions les plus Fréquemment Posées Téléchargements : Manuels, Drivers, Microprogramme et plus de téléchargements Contact : Pour contacter le Service support de Conceptronic Pour plus d'informations générales concernant les produits Conceptronic, visitez le site web de Conceptronic sur www.conceptronic.net. 1. Contenu du Coffret Les éléments suivants sont fournis dans le paquet avec l'Adaptateur pour Ordinateurs Portables Universel 90 Watt de Conceptronic : Adaptateur pour Ordinateurs Portables Universel 90 Watt de Conceptronic (CNB90) Câble d'alimentation 10 embouts de chargement pour ordinateurs portables différents (voyez l'Annexe B à la fin de ce manuel) Ce Manuel d'utilisateur en plusieurs langues Carte de garantie et brochure de déclaration CE 2. Caractéristiques du produit Chargez votre ordinateur portable et/ou votre dispositif USB Tension de sortie réglable Universel, il peut être utilisé sur tous les ordinateurs portables, jusqu'à 90 W Protection intégrée contre la surcharge, les courts-circuits et la surchauffe. 17 FRANÇAIS 3. Explication du dispositif L'illustration du dispositif ci-après décrit tous les éléments de l'adaptateur pour ordinateurs portables : Nº Description A. B. Entrée CA : Connexion d'entrée CA pour brancher le câble d'alimentation sur l'adaptateur pour ordinateurs portables. Voyant LED d’Alimentation : Indique si l'adaptateur pour ordinateurs portables est allumé ou pas. Éteint Allumé L'adaptateur pour ordinateurs portables n'est pas allumé. L'adaptateur pour ordinateurs portables est allumé et prêt à être utilisé. C. Connecteur USB : Connecteur USB pour recharger vos dispositifs USB. D. Sélecteur de tension : Sélecteur permettant de régler la tension de sortie pour votre adaptateur pour ordinateurs portables. E. Connecteur d'embout : Connecteur pour l'un des embouts pour ordinateurs portables fournis avec l'adaptateur pour ordinateurs portables. 18 FRANÇAIS 4. Utilisation de votre adaptateur pour ordinateurs portables 4.1 Sélectionnez votre plage de tension Avant de pouvoir utiliser votre adaptateur pour ordinateurs portables, vous devez sélectionner la bonne plage de tension à l'aide du sélecteur de tension [D] de l'adaptateur pour ordinateurs portables. Voyez ciaprès une vue détaillée du sélecteur de tension : Vous pouvez choisir parmi les tensions d'alimentation suivantes : 15V – 17V 18V – 21V Convient à tous les ordinateurs portables avec les tensions d'entrée suivantes : Convient à tous les ordinateurs portables avec les tensions d'entrée suivantes : 15V - 15,5V - 16V – 16,5V – 17V 18V - 18,5V - 19V – 19,5V - 20V - 20,5V - 21V ! ATTENTION ! Vérifiez que vous avez bien réglé la plage de tension correcte pour votre ordinateur portable ! Si vous sélectionnez la mauvaise plage de tension vous pourriez endommager votre ordinateur portable ! Comment sélectionner la plage de tension pour votre ordinateur portable : Tirez sur le sélecteur de tension. Faites tourner le sélecteur de tension sur la bonne plage de tension. Enfoncez à nouveau le sélecteur de tension dans sa position d'origine. 4.2 Sélection de l'embout pour votre ordinateur portable Après avoir réglé la plage de tensions pour votre ordinateur portable, procédez comme suit pour sélectionner le bon embout pour ordinateur portable pour votre ordinateur. 10 embouts sont fournis avec l'adaptateur pour ordinateurs portables. Astuce: Vous trouverez la liste des astuces en Annexe B à la fin de ce manuel, ainsi qu'une liste de marques d'ordinateurs portables. Vous pouvez vous procurer la liste complète de tous les types d'ordinateurs portables compatibles sur le site Web de Conceptronic. Sélectionnez l'un des embouts pour ordinateurs portables fournis avec l'adaptateur pour ordinateurs portables. Branchez l'embout sur le connecteur d'embout de l'adaptateur pour ordinateurs portables. Remarque: L'embout ne peut être branché que d'une seule manière sur le connecteur d'embout ! 19 FRANÇAIS 4.3 Mettez votre ordinateur en marche Lorsque vous avez réglé la bonne plage de tensions et branché le bon embout, vous pouvez commencer à utiliser l'adaptateur pour ordinateurs portables pour charger votre ordinateur portable. Connectez le câble de l'adaptateur pour ordinateurs portables avec l'embout connecté sur l'entrée CC de votre ordinateur portable. Branchez le câble d'alimentation sur l'entrée CC de l'adaptateur pour ordinateurs portables et sur une prise murale libre. Le voyant LED d'alimentation de l'adaptateur pour ordinateurs portables s'allume pour indiquer que l'adaptateur pour ordinateurs portables fonctionne. Votre ordinateur portable est à présent alimenté par l'adaptateur pour ordinateurs portables et la batterie de votre ordinateur portable est en cours de chargement. 4.4 Chargement des dispositifs USB Un port USB est prévu sur un côté de l'adaptateur pour ordinateurs portables. Ce port peut être utilisé pour charger vos appareils USB comme des téléphones portables chargés sur USB, des appareils photos, des lecteurs MP3, etc. Remarque: La sortie du port USB de l'adaptateur pour ordinateurs portables est de 5V, 0,5A. Cette sortie est toujours la même, quelle que soit la tension que vous avez réglée sur votre ordinateur portable. Branchez le câble de chargement de votre appareil sur le port USB de votre adaptateur pour ordinateurs portables et sur votre dispositif USB. Branchez le câble d'alimentation sur l'entrée CC de l'adaptateur pour ordinateurs portables et sur une prise murale libre. Le voyant LED d'alimentation de l'adaptateur pour ordinateurs portables s'allume pour indiquer que l'adaptateur pour ordinateurs portables fonctionne. Votre appareil USB est à présent alimenté et/ou chargé par le port USB de l'adaptateur pour ordinateurs portables. Astuce : Vous pouvez utiliser l'adaptateur pour ordinateurs portables et le chargeur USB en même temps. Bon travail avec votre Adaptateur pour Ordinateurs Portables Universel 90 Watt de Conceptronic ! 20 ITALIANO Conceptronic CNB90 Manuale d’uso Complimenti per aver acquistato l’adattatore universale per notebook 90 Watt Conceptronic. Il presente manuale d’uso illustra passo dopo passo come installare e usare l’adattatore universale per notebook 90 Watt Conceptronic. Per ulteriori informazioni o assistenza relativamente al prodotto, consultare il sito Service & Support all’indirizzo www.conceptronic.net/support, selezionando una delle seguenti opzioni: FAQ Download Contact : Archivio delle risposte alle domande più frequenti : Manuali, driver, firmware e altri prodotti scaricabili : Contatta il servizio di assistenza Conceptronic Per informazioni generali riguardo ai prodotti Conceptronic visitare il sito Web di Conceptronic all’indirizzo: www.conceptronic.net. 1. Contenuto della confezione La confezione dell’adattatore universale per notebook 90 Watt Conceptronic contiene le seguenti unità: Adattatore universale per notebook 90 Watt Conceptronic (CNB90) Cavo elettrico 10 diverse spine di ricarica per notebook (vedere Appendice B alla fine del presente manuale) Il presente manuale d’uso multilingue Certificato di garanzia e libretto dichiarazione di conformità CE 2. Caratteristiche del prodotto Consente di ricaricare notebook e/o dispositivi USB Tensione di uscita commutabile Universale, può essere impiegato per tutti i notebook fino a 90 W Protezione integrata contro il sovraccarico, il cortocircuito e il surriscaldamento. 21 ITALIANO 3. Descrizione del dispositivo Nell’immagine seguente, che illustra il dispositivo, sono indicati tutti gli elementi presenti nell’adattatore per notebook: N Descrizione A. Ingresso AC: Connessione ingresso AC per collegare il cavo elettrico all’adattatore per notebook. B. LED accensione: Off On Mostra lo stato di funzionamento dell’adattatore per notebook. L’adattatore per notebook non è collegato. L’adattatore per notebook è collegato e pronto all’uso. C. Connettore USB: Connettore USB per la ricarica di dispositivi USB. D. Regolaz. Tensio.: Manopola di regolazione della tensione per impostare la tensione di uscita dell’adattatore per notebook. E. Connett. spina: Connettore per inserire una delle spine per notebook incluse nella confezione dell’adattatore. 22 ITALIANO 4.Come utilizzare l’adattatore per notebook 4.1 Selezionare la gamma di tensione Prima di utilizzare l’adattatore per notebook, è necessario selezionare la corretta gamma di tensione per mezzo della manopola di regolazione della tensione [D] posta sull’adattatore per notebook. Nell’immagine seguente è riprodotto il dettaglio del dispositivo di regolazione della tensione: É possibile selezionare le seguenti gamme di tensione: 15V – 17V Adatto a tutti i notebook con le seguenti tensioni di ingresso: 18V – 21V Adatto a tutti i notebook con le seguenti tensioni di ingresso: 15V - 15.5V - 16V – 16.5V - 17V 18V - 18.5V - 19V – 19.5V - 20V - 20.5V - 21V ! AVVERTENZA ! Accertarsi di aver impostato la corretta tensione per il proprio notebook! Impostare una tensione sbagliata può danneggiare il notebook! Selezionare la gamma di tensione per il proprio notebook: Estrarre la manopola di regolazione della tensione. Ruotare la manopola impostandola sulla corretta tensione. Riposizionare la manopola di regolazione della tensione in posizione originale. 4.2 Selezionare la spina per il notebook Dopo aver impostato la gamma di tensione per il notebook, è necessario in seguito selezionare la spina giusta per il notebook. Nella confezione dell’adattatore per notebook sono incluse 10 spine. Consiglio: La lista delle spine è riportata nell’allegato B alla fine del presente manuale, assieme alla lista dei marchi di notebook. Una lista completa di tipi di notebook compatibili è consultabile nel sito Web di Conceptronic. Selezionare una delle 10 spine incluse nella confezione dell’adattatore per notebook. Collegare la spina al connettore dell’adattatore per notebook. Nota: È possibile inserire la spina nel connettore solamente in un verso! 23 ITALIANO 4.3 Accendere il notebook Una volta impostata la giusta gamma di tensione e connessa la spina adatta, è possibile iniziare a usare l’adattatore per ricaricare il proprio notebook. Collegare il cavo dell’adattatore per notebook tramite la spina connessa all’ingresso DC del notebook. Collegare il cavo di alimentazione all’ingresso DC e a una presa a muro libera. Il LED di accensione sull’adattatore del notebook s’illuminerà indicando che l’adattatore per notebook è pronto all’uso. Il notebook è adesso alimentato tramite l’adattatore e la batteria del notebook è in ricarica. 4.4 Come ricaricare dispositivi USB Sul lato dell’adattatore per notebook si trova una porta USB. La porta USB può essere utilizzata per ricaricare dispositivi USB, quali telefoni cellulari con ricarica USB, telecamere, lettori MP3, ecc. Nota: L’uscita della porta USB dell’adattatore per notebook è 5V, 0.5A. Tale uscita rimane invariata a prescindere dalla tensione impostata sul notebook. Collegare il cavo di ricarica USB del proprio dispositivo alla porta USB dell’adattatore per notebook e del dispositivo USB. Collegare il cavo di alimentazione all’ingresso AC dell’adattatore per notebook e a una presa a muro libera. Il LED di accensione sull’adattatore per notebook s’illuminerà indicando che l’adattatore per notebook è pronto all’uso. Il dispositivo USB è alimentato e/o caricato tramite la porta USB dell’adattatore per notebook. Consiglio: È possibile utilizzare l’adattatore per notebook e il caricatore USB contemporaneamente. Buon utilizzo dell’adattatore universale per notebook 90 Watt Conceptronic! 24 PORTUGUÊS Conceptronic CNB90 Manual do utilizador Parabéns pela compra do seu Transformador Universal de 90 Watts para portátil da Conceptronic. Este manual de utilizador fornece-lhe uma explicação passo-a-passo sobre como instalar e usar o Transformador Universal de 90 Watts para portátil da Conceptronic. Se precisar de mais informação ou suporte para o seu produto, aconselhamo-lo a visitar a nossa página Web Service & Support em www.conceptronic.net/support e a seleccionar uma das seguintes opções: FAQ Downloads Contact : Base de dados das Perguntas Mais Frequentes : Manuais, controladores, firmware e mais transferências : Contacte o suporte da Conceptronic Para informações gerais sobre os produtos da Conceptronic visite a página Web da Conceptronic em www.conceptronic.net. 1. Conteúdo da embalagem Existem os seguintes elementos na embalagem do Transformador Universal de 90 Watts para portátil da Conceptronic: Transformador Universal de 90 Watts para portátil (CNB90) da Conceptronic Cabo de alimentação 10 pontas de carregamento diferentes para computadores portáteis (ver o Anexo B no fim deste manual) Este manual de utilizador multilingue Garantia e Declaração de conformidade CE 2. Características do produto Carrega o seu computador portátil e/ou dispositivo USB Tensão de saída variável Universal, pode ser usado em todos os portáteis até 90 Watts Protecção contra sobrecargas, curto-circuitos e sobreaquecimento 25 PORTUGUÊS 3. Explicação do dispositivo A imagem seguinte de explicação do dispositivo descreve todos os elementos do transformador para computador portátil: Nº Descrição A. Entrada CA: Ficha de entrada CA para ligar o cabo de alimentação ao transformador para computador portátil. B. Luz de Alimentação: Desligado Ligado Mostra o estado da alimentação do transformador para computador portátil. O transformador para computador portátil não tem energia. O transformador para computador portátil tem energia e está pronto a usar. C. Ficha USB: Ficha USB para carregar os seus dispositivos USB. D. Selector de tensão: Selector para escolher a tensão de saída do transformador para computador portátil. E. Ficha para as pontas: Ficha para usar uma das pontas incluídas com o transformador de alimentação. 26 PORTUGUÊS 4. Utilização do transformador para portátil 4.1 Seleccione a sua gama de tensão Antes de poder usar o seu transformador para computador portátil, deve seleccionar a gama de tensão correcta com o selector de tensão [D] do transformador para computador portátil. Abaixo pode ver um esquema do selector de tensão: Pode seleccionar as seguintes gamas de tensão: 15 V – 17 V 18 V – 21 V Adequada para todos os portáteis com as seguintes tensões de entrada: Adequada para todos os portáteis com as seguintes tensões de entrada: 15 V 16,5 18 V 19,5 – 15,5 V – 16 V – V – 17 V – 18,5 V – 19 V – V – 20 V – 20,5 V – 21 V ! ATENÇÃO! Assegure-se de seleccionar a gama de tensões correcta para o seu portátil! Se seleccionar uma gama de tensões errada, pode danificar o seu computador portátil! Seleccione a gama de tensões para o seu portátil: Puxe o selector de tensão. Rode o selector de tensão até à gama de tensão correcta. Empurre o selector de tensão para a posição original. 4.2 Seleccione a sua ponta de carregamento Depois de definir a gama de tensões para o seu computador portátil, o passo seguinte é seleccionar a ponta de carregamento correcta para o seu computador. Incluem-se 10 pontas com o transformador para computador portátil. Recomendação: Pode encontrar a lista das pontas de carregamento no Anexo B no fim deste manual, juntamente com uma lista de marcas de computadores portáteis. Existe uma lista completa de tipos de portáteis compatíveis na página web da Conceptronic. Escolha uma das 10 pontas de carregamento incluídas no seu transformador para computador portátil. Ligue a ponta à ficha para ponta de carregamento do transformador para portátil. Nota: A ponta só pode ser ligada de 1 forma à ficha! 27 PORTUGUÊS 4.3 Carregue o seu computador portátil Depois de ter seleccionado a gama de tensões correcta e ter ligado a ponta de carregamento correcta, pode começar a usar o transformador para portátil para carregar o seu computador. Ligue o cabo do transformador para portátil com a ponta de carregamento à entrada CC do seu computador portátil. Ligue o cabo de alimentação à entrada CC do transformador para portátil e a uma tomada livre. O LED de alimentação do transformador para portátil acende, indicando que o transformador está em uso. O seu computador portátil está agora a ser alimentado pelo transformador para portátil e a bateria do seu computador está a ser carregada. 4.4 Carregar dispositivos USB De um dos lados do transformador para portátil existe uma porta USB. Esta porta USB pode ser usada para carregar dispositivos USB como telemóveis que carreguem por USB, máquinas fotográficas, leitores de MP3, etc. Nota: A saída da porta USB do transformador para portátil é de 5 V, 0,5 A. Esta saída é sempre a mesma, independentemente da tensão que tiver no seu computador portátil. Ligue o cabo de carregamento USB do seu dispositivo à porta USB do transformador e ao dispositivo USB. Ligue o cabo de alimentação à entrada CC do transformador para portátil e a uma tomada livre. O LED de alimentação do transformador para portátil acende, indicando que o transformador está em uso. O seu dispositivo USB vai agora ser alimentado e/ou carregado pela porta USB do transformador para portátil. Recomendação: Pode usar o transformador para portátil e o carregador USB ao mesmo tempo. Divirta-se com o seu Transformador Universal de 90 Watts para portátil da Conceptronic! 28 APPENDIX Appendix A. Technical specifications General Rated Input Voltage(50-60Hz) Vibration Input Voltage Range(47-63Hz) Input Rated Current at 115V, Full Load Input Rated Current at 230V, Full Load Output voltage USB Output Voltage Output power(max) Efficiency AC115V AC90V ~ AC264V 1.5AMP 0.8AMP 15 ~21V 5Volt 90W >84%(minimum) Overload protection Short Circuit Protection Line Regulation Load Regulation YES YES +/-1% +/-5% AC230V AC180V ~AC264V Appendix B. Notebook brand tip list The tip list below shows which tip can be used for which notebook brand. A complete list of compatible notebook types can be found on the Conceptronic website. Tip Nr. Tip Color Outer (mm) Inner (mm) Length (mm) A B C Yellow Orange Blue 4.75 5.5 5.5 1.7 1.7 2.1 9.5 12 12 D White 5.5 2.5 12 E F G H I J Green Yellow Black Black Red Black 6.3 6.5 7.4 7.9 7.4 4.75 3.0 4.3 5.0 5.6 5.0 1.7 12 9.5 12 12 12 9.5 Compatible notebook brands Acer Acer Acer NEC Acer HP Samsung Winbook Acer Sony Dell IBM HP HP Asus Compaq HP LG Compaq Sharp Compaq IBM Sharp LG Asus Gateway Toshiba Fujitsu NEC Toshiba Hitachi Twinhead Gateway Panasonic Twinhead IBM Winbook Hitachi Philips Viewsonic Compaq HP Lenovo Compaq 29