1
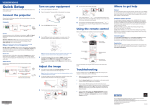
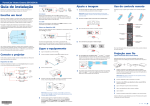
PowerLite® Presenter i/Presenter i+
Reproduza do seu iPod, iPhone ou iPad
4 Play from your iPod, iPhone, or iPad
Este menu aparece quando você conecta o seu dispositivo.
Observação: Quando o seu iPod estiver conectado ao projetor, ele carregará sempre que o projetor estiver ligado, mesmo que o projetor esteja em
modo de espera.
Guia de instalação • Quick Setup
This menu appears when you connect your device.
Note: When your iPod is connected to the projector, it charges whenever the projector is on, including when the projector is in standby mode.
Antes de usar o projetor, certifique-se de ler as instruções de segurança no Manual do usuário eletrônico.
Before using the projector, make sure you read the safety instructions in the on-screen User’s Guide.
Observaçao: Estas ilustrações mostram o projetor Presenter i+, mas as instruções são as mesmas para o projetor Presenter i, a não ser que seja
indicado o contrário.
Note: These illustrations show the Presenter i+, but the instructions are the same for the Presenter i unless otherwise noted.
*412286800*
*412286800*
Reproduza vídeos ou música • Play videos or music
1
1 Instale o projetor • Set up the projector
1
Press
or
then press
Coloque o projetor em uma superfície estável e plana, a até 2 metros de uma tomada de parede aterrada. Consulte o Manual do
usuário eletrônico para determinar a qual distância da tela colocar o projetor, dependendo do tamanho da imagem projetada.
2
Place the projector on a sturdy, level surface within 6 feet (2 m) of a grounded electrical outlet. See the on-screen User’s Guide to
determine how far to place the projector from the screen based on the size of the projected image.
2
Coloque duas pilhas AAA conforme mostrado.
Insert two AAA batteries as shown.
Scroll up
on the remote control to select Videos or Music,
.
Navegue os menus na tela até que o título de um vídeo ou música
que deseja tocar seja destacado, depois aperte
para tocar o
título selecionado.
Menu anterior
Selecionar/Próximo
Previous menu
Select/Next
Navigate the on-screen menus until the title of a video or song
you want to play is highlighted, then press
to start your
selected title.
Observação: Quando usar o controle remoto, aponte-o para um
dos receptores do controle remoto no projetor, dentro das diretrizes
mostradas a baixo, ou para a tela de projeção.
Note: When using the remote control, aim it at either of the
projector’s remote control receivers within the guidelines shown
below, or at the projector screen.
Para cima
Pressione
ou
no controle remoto para selecionar Vídeos ou
Música, depois aperte
.
3
Para baixo
Scroll down
Selecionar/Cancelar shuffle
Use o controle remoto para selecionar outras opções mostradas
à direita.
Select/Cancel shuffle
Observação: O menu Vídeos só exibirá vídeos do seu aparelho que
tenham sido importados para o iTunes. Para reproduzir outros vídeos,
você precisa usar os controles no seu aparelho. Veja a seção “Resolução
de Problemas” para instruções.
20 ft (6 m)
Use the remote control to select other options shown at right.
Note: The Videos menu will only play videos from your device that have
20 ft (6 m)
Menu anterior
Iniciar reprodução
Previous menu
Start playback
Selecionar/Cancelar
repetição
been imported into iTunes. To play other videos, you need to use the
controls on your device. See “Troubleshooting” for instructions.
Select/Cancel repeat
Pausar/Retomar
Pause/Resume
Próximo/Avançar
Anterior/Voltar
Next/Fast-forward
Back/Rewind
Ajustar volume
2 Ligue o projetor • Turn on the projector
Adjust volume
Inicie um show de slides • Start a slideshow
1
2
3
1
Aperte o botão
Press the
2
no controle remoto para passar o controle para o seu aparelho. A tela projetada fica escura.
button on the remote control to switch control to your device. The projected screen turns black.
Use os controles no seu aparelho para encontrar fotos que deseja projetar e inicie um
show de slides.
Use the controls on your device to find the photos you wish to project and start a
slideshow.
Veja o Manual do usuário eletrônico para detalhes adicionais.
See the on-screen User’s Guide for additional details.
4
O idioma padrão do sistema de menus é o Inglês. Para selecionar outro idioma, pressione o botão Menu no controle remoto.
Selecione Extended > Language, depois selecione o seu idioma e aperte o botão enter. Aperte o botão Menu para sair do
sistema de menus.
Observação: Para desligar o projetor, aperte o botão
de energia e aguarde até que ele emita dois bipes. Quando a luz
de piscar, você pode desconectar o projetor da tomada.
de energia parar
The default language of the menu system is English. To select another language, press the Menu button on the remote control.
Select Extended > Language, then select your language and press the enter button. Press the Menu button to exit the menu
system.
Note: To shut down the projector, press the
unplug the projector.
power button and wait for it to beep twice. Once the
power light stops flashing, you can
5 Ajuste a imagem • Adjust the image
1
Para levantar a imagem, pressione a alavanca de liberação do pé e levante a
frente do projetor. Solte o botão para travar o pé na posição desejada.
To raise the image, press the foot release button and lift the front of the
projector. Release the button to lock the foot in position.
Conecte o seu iPod, iPhone ou iPad
3 Connect your iPod, iPhone, or iPad
Observação: O termo “iPod” é usado para descrever um iPod, iPhone ou iPad, a não ser que seja indicado do contrário.
2
Note: The term “iPod” is used to describe an iPod, iPhone, or iPad unless otherwise noted.
iPad somente: Comece com o passo 1. Se não estiver usando um iPad, vá para o passo 4.
Para ajustar uma inclinação horizontal, estenda ou retraia o pé
traseiro ajustável.
To adjust horizontal tilt, extend or retract the rear adjustable feet.
iPad only: Start with step 1. If you are not using an iPad, skip to step 4.
1
Limpe o projetor para
remover poeira.
Clean the projector to
remove any dust.
2
Remova a parte traseira do suporte
do iPad para expor o adesivo.
Remove the backing from the iPad
bracket to expose the adhesive.
3
Prenda o suporte do iPad conforme mostrado.
Observação: Não remova o suporte depois que
estiver instalado.
Attach the iPad bracket, as shown.
Note: Do not remove the bracket once it has been
installed.
4
Aperte o Dock para ejetá-lo,
depois o solte.
Eject the dock by pressing it
until it clicks, then release it.
5
Remova qualquer cobertura de proteção do seu aparelho, depois faça a conexão
conforme mostrado.
3
Gire o anel de foco para ajustar a nitidez da imagem.
Turn the focus ring to sharpen the image.
4
Presenter i+: Gire o anel de zoom para reduzir ou amentar o tamanho
da imagem.
Presenter i+: Turn the zoom ring to reduce or enlarge the image.
Remove any protective case from your device, then connect it as shown.
Presenter i: Para ajustar o zoom, aperte o botão Menu no controle
remoto e use os botões , ,
ou
para navegar pelo ajuste
Definição. Aperte o botão enter e selecione Zoom.
Presenter i: To ajust the zoom, press the Menu button on the remote
control and use the , , , or
buttons to navigate to Settings.
Press the enter button and selct Zoom.
5
Cuidado: Para evitar danos, não faça muita pressão quando conectar o seu aparelho.
Observação: Se o iPod não for reconhecido pelo projetor, remova-o do Dock e depois encaixe-o novamente. Certifique-se de que a luz do Dock
está acesa.
Caution: To avoid damage, do not apply too much pressure when connecting your device.
Se a sua imagem tiver uma aparência assim
ou assim
,o
projetor foi colocado para o lado da tela, em ângulo. Use o controle
deslizante de correção de efeito trapézio horizontal no projetor para
corrigi-la ou coloque o projetor no centro e diretamente de frente
para a tela.
If the image looks like
or
, you’ve placed the projector off to
one side of the screen at an angle. Use the horizontal keystone slider
on the projector to correct it, or place the projector directly in front
of the center of the screen, facing the screen squarely.
Note: If the iPod is not recognized by the projector, remove it from the dock and reseat it. Make sure the Dock light is on.
4122868
1-F
Rev.0
C
4122868
1-F
Rev.0
M
4122868
1-F
Rev.0
Y
4122868
1-F
Rev.0
K
? Resolução de problemas • Troubleshooting
Conexão de outros dispositivos • Connecting other devices
As portas estão localizadas nas partes traseira e lateral do
projetor. Você pode acessá-las se remover as tampas do
painel.
Se vir uma tela em branco ou a mensagem Sem sinal após conectar o seu iPod ou ligar o computador ou dispositivo de vídeo,
verifique o seguinte:
Ports are located on the back and side of the projector. You
can access them by removing the panel covers.
• Aperte o botão Source no projetor ou no controle remoto para mudar para a fonte de imagem correta, se necessário.
•
Dispositivo de vídeo • Video device
Saída componente/
Component output
Cabo de vídeo componente/
Component video cable
Saída de vídeo/
Video output
Cabo de vídeo RCA/
RCA video cable
HDMI
Cabo HDMI/
HDMI cable
Saída de áudio/
Audio out
Cabo de áudio/
Audio cable
Computador • Computer
Porta USB
Conecte a extremidade quadrada de um cabo USB à porta USB
TypeB (quadrada) do projetor. Conecte a extremidade
plana do cabo a qualquer porta USB do computador.
Windows® 2000 (SP4) ou posterior: Depois de ligar o
projetor, siga as instruções na tela para instalar o software
EPSON® USB Display (EMP_UDSE.EXE; você só precisa
instalar o software a primeira vez que conectar o projetor ao
computador).
de energia está acesa, mas não piscando, e de que a tampa da lente está aberta.
•
Se conectou um iPod, certifique-se de que luz Dock está acesa. Se ela estiver piscando, desconecte o iPod e tente reconectá-lo
ao Dock.
•
Se estiver usando um laptop com Windows, pressione a tecla de função no teclado que permite a exibição em um monitor externo.
Ela pode se chamar CRT/LCD ou ter um ícone como
. Se estiver usando um laptop Mac, abra Preferências do Sistema
e selecione Monitores. Selecione a opção Monitor VGA ou LCD, se necessário, depois clique na guia Arranjar ou Arranjo e
selecione a caixa Espelhar imagem.
Se não conseguir encontrar vídeos feitos com o seu iPod, iPhone ou iPad, aperte
no controle remoto para passar o controle para
o aparelho. Use a tela sensível ao toque ou os controles do aparelho para navegar até o ícone de fotos. Selecione o vídeo que deseja
projetar e aperte play.
Conecte até 3 dispositivos de vídeo e use o controle
remoto para navegar entre eles.
Connect up to 3 video devices and use the remote control
to switch between them.
Certifique-se de que a luz
USB (Type A)
Cabo USB/
USB cable
Saída de PC/
PC output
Cabo VGA/
VGA cable
HDMI
Cabo HDMI/
HDMI cable
Observação: Se a tela do software não aparecer automaticamente,
abra Meu Computador ou Computador e clique duas vezes em
EPSON_PJ_UD.
Se estiver projetando uma imagem ou vídeo de um iPod em alta resolução e a imagem não estiver nítida, cheque as especificações do
seu iPod. Nem todos os aparelhos são compatíveis com mídia HD (alta definição).
If you see a blank screen or the No signal message after connecting your iPod or turning on your computer or video device, check the
following:
•
Make sure the
power light is on and not flashing and that the lens cover is open.
•
Press the Source button on the projector or the remote control to switch to the correct image source, if necessary.
•
If you connect an iPod, be sure the Dock light is on. If it is flashing, disconnect the iPod and try reconnecting it to the dock.
•
If you’re using a Windows laptop, press the function key on your keyboard that lets you display on an external monitor. It may be
labeled CRT/LCD or have an icon such as
. If you’re using a Mac laptop, open System Preferences and select Displays.
Select the VGA Display or Color LCD option, if necessary, then click the Arrange or Arrangement tab, and select the Mirror
Displays check box.
If you cannot find videos that were taken with your iPod, iPhone, or iPad, press
on the remote control to switch control to the device.
Use the touch screen or controls on the device to navigate to the Photos icon on your device. Select the video you wish to project and
press play.
If you are projecting an image or video from an iPod at a high resolution and the image is not clear, check your iPod specifications. Not
all devices support HD media.
Onde obter ajuda • Where to get help
Manual
Saída de áudio de PC/
Cabo de áudio/
Mac OS® X 10.5.1 ou superior: Depois de ligar o projetor,
Audio out from PC
Audio cable
a pasta de configuração do USB Display aparece no Finder.
Clique duas vezes em USB Display Installer e siga as
instruções na tela para instalar o EPSON USB Display (você só precisa instalar o software a primeira vez que conectar o projetor
ao computador).
Porta PC
Conecte uma extremidade do cabo VGA à porta PC do projetor e a outra extremidade à porta do monitor do computador.
Se estiver usando um laptop, mude para exibição externa (veja a seção “Resolução de problemas”). Você também pode conectar
um cabo de áudio.
Porta HDMI
Conecte uma extremidade do cabo HDMI à porta HDMI do projetor e a outra extremidade à porta HDMI do computador.
Para mais informação sobre o uso do projetor, clique no ícone na sua área de trabalho para acessar o Manual do usuário. Caso não veja o
ícone do Manual do usuário, você pode instalá-lo a partir do CD do projetor ou visitar o site da Epson, conforme descrito a seguir.
Serviços de suporte por telefone
Brasil 0800-880-0094
Suporte pela Internet
Visite o site global.latin.epson.com/Suporte para obter soluções para problemas comuns. Você pode baixar utilitários e
documentação, acessar as perguntas mais frequentes, obter ajuda com a resolução de problemas ou enviar emails para a Epson.
Acessórios opcionais
Para uma lista de acessórios opcionais, consulte o Manual do usuário eletrônico.
Você pode comprar telas ou outros acessórios de um revendedor autorizado de produtos EPSON. Para achar o revendedor mais
próximo, entre em contato com a Epson como descrito acima.
USB Port
Connect the square end of a USB cable to the projector’s USB
TypeB (square) port. Connect the flat end of the cable to any
USB port on your computer.
Windows® 2000 (SP4) or later: After turning on the projector, follow the on-screen instructions to install the EPSON® USB Display
software (EMP_UDSE.EXE; only on first connection).
Manual
Note: If the software screen does not display automatically, open My Computer or Computer, then double-click EPSON_PJ_UD.
Brasil 0800-880-0094
Mac OS® X 10.5.1 or higher: After turning on the projector, the setup folder for USB Display appears in the Finder. Double-click
USB Display Installer and follow the on-screen instructions to install the EPSON USB Display software (only on first connection).
Internet support
PC Port
Connect one end of a VGA cable to the projector’s PC port, and the other end to your computer’s monitor port. If you are using a
laptop, switch it to external display (see “Troubleshooting”). You can also connect an audio cable.
Optional accessories
HDMI port
Connect one end of an HDMI cable to the projector’s HDMI port and the other end to an HDMI port on your computer.
For more information about using the projector, click the icon on your desktop to access the on-screen User’s Guide. If you don’t have a
User’s Guide icon, you can install it from the projector CD or go to the Epson website, as described below.
Telephone support services
Visit global.latin.epson.com/Suporte for solutions to common problems. You can download utilities and documentation, get FAQs
and troubleshooting advice, or e-mail Epson. (Website available only in Portuguese.)
For a list of optional accessories, see the on-screen User’s Guide.
You can purchase screens or other accessories from an EPSON authorized reseller. To find the nearest reseller, contact Epson as
described above.
Dispositivo de armazentamento USB ou câmera digital (Presenter i+)
USB storage device or digital camera (Presenter i+)
Você pode projetar imagens de um dispositivo de armazenamento USB se conectá-lo à
porta USB
TypeA do projetor.
Para conectar uma câmera digital ou disco rígido, use o cabo USB incluído com o seu aparelho.
You can project images from a USB storage device by connecting it to the projector’s USB
To connect a digital camera or hard drive, use the USB cable that comes with your device.
TypeA port.
Microfone • Microphone
Pode-se reproduzir áudio de um microfone através dos alto-falantes do
projetor. Para usar um microfone, conecte-o à porta Mic na lateral do
projetor.
Audio from a microphone can be output from the projector’s speakers.
To use a microphone, plug it into the Mic port on the side of the
projector.
Uso do controle remoto • Using the remote control
Botão de energia
Liga e desliga o projetor
Power button
Turns projector on or off
Botão Source
Troca entre os equipamentos
conectados ao projetor
Source button
Switches between equipment
connected to the projector
Botão Menu
Exibe o menu do projetor
Menu button
Displays the projector’s menu
Botão User
Atalho para itens de menu
selecionados
User button
Shortcut to selected menu items
Transfere o controle para o iPod
quando conectado
Transfers control to the iPod when
connected
EPSON e PowerLite são marcas registradas e EPSON Exceed Your Vision é uma logomarca registrada da Seiko Epson Corporation.
Silenciar A/V
Liga e desliga temporariamente
imagens e áudio projetados
Botão Iluminação
Ilumina os botões de reprodução
e volume do controle remoto
para fácil visualização
Illumination button
Lights the remote control
playback and volume buttons
for easy viewing
A/V Mute
Temporarily turns projected
images and audio off and on
Aviso geral: Outros nomes de produtos são aqui usados apenas com intuito de identificação e podem ser marcas comerciais dos seus respectivos donos. A Epson nega todo
e qualquer direito sobre tais marcas.
Esta informação está sujeita a mudanças sem aviso prévio.
EPSON and PowerLite are registered trademarks, and EPSON Exceed Your Vision is a registered logomark of Seiko Epson Corporation.
General Notice: Other product names used herein are for identification purposes only and may be trademarks of their respective owners. Epson disclaims any and all rights
in those marks.
This information is subject to change without notice.
© 2012 Epson America, Inc. 2/12
País de impressão: XXXXXX
Printed in XXXXXX
4122868
1-B
Rev.0
C
CPD-35192R1
4122868
1-B
Rev.0
M
4122868
1-B
Rev.0
Y
4122868
1-B
Rev.0
K