1
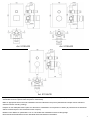
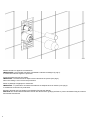
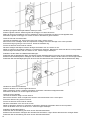
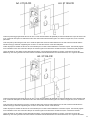
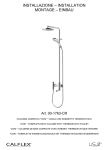
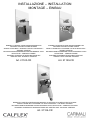
INSTALLAZIONE – INSTALLATION
MONTAGE – EINBAU
RUBINETTO MISCELATORE MONOCOMANDO AD
INCASSO CON DEVIATORE QUADRO
SINGLE LEVER BUILT-IN MIXER TAP WITH DIVERTER –
SQUARE VERSION
MITIGEUR MONOCOMMANDE D’ENCASTREMENT AVEC
DEVIATEUR – VERSION CARRÉE
EINHEBEL EINGEBAUTE-MISCHBATTERIE MIT
UMSTELLUNG- QUADRAT VERSION
RUBINETTO MISCELATORE MONOCOMANDO AD
INCASSO CON DEVIATORE TONDO
SINGLE LEVER BUILT-IN MIXER TAP WITH DIVERTER –
ROUND VERSION
MITIGEUR MONOCOMMANDE D’ENCASTREMENT AVEC
DEVIATEUR – VERSION RONDE
EINHEBEL EINGEBAUTE-MISCHBATTERIE MIT
UMSTELLUNG- ROUNDE VERSION
Art. 21120-CR
Art. 21129-CR
RUBINETTO MISCELATORE MONOCOMANDO AD INCASSO CON DEVIATORE COLONIAL
SINGLE LEVER BUILT-IN MIXER TAP WITH DIVERTER – COLONIAL VERSION
MITIGEUR MONOCOMMANDE D’ENCASTREMENT AVEC DEVIATEUR – VERSION COLONIAL
EINHEBEL EINGEBAUTE-MISCHBATTERIE MIT UMSTELLUNG- COLONIAL VERSION
Art. 21124-CR
(I)
INFORMAZIONI PRELIMINARI
I miscelatori della linea CARIMALI sono idonei al funzionamento con acqua calda fornita da accumulatori in pressione. Per il
funzionamento con scalda acqua istantanei elettrici o a gas verificare che questi abbiano una potenza non inferiore a 18 KW o 250
Kcal/min. ; per il tipo a gas è consigliato l’utilizzo di apparecchi con regolazione automatica della fiamma in funzione del volume di acqua
prelevato.
ATTENZIONE: con i miscelatori CARIMALI non si possono utilizzare accumulatori di acqua calda senza pressione.
ATTENZIONE: in caso di pericolo di gelo svuotare l’impianto domestico e smontare le valvole di non ritorno (vedere paragrafo
USO E MANUTENZIONE: Smontaggio valvole di non ritorno) per consentire il completo svuotamento
del miscelatore.
DATI TECNICI
Pressione dinamica minima………………………………………..1 bar
Pressione max di esercizio (statica)....……………………………6 bar
Pressione di esercizio raccomandata (statica)………………..…2-5 bar
Temperatura acqua calda massima……………………………….65°C
Ingresso acqua calda……………………………………………….G1/2” a sinistra
Ingresso acqua fredda…………………………………………...…G1/2” a destra
(UK)
PREVIOUS INFORMATION
The mixers of the CARIMALI line are suitable to operate with hot water supplied by accumulators in pressure.
For use with instantaneous electric or gas water heaters make sure they have a minimum output of 18 kW or 250 Kcal / min.;
for the gas type it is recommended the use of devices with automatic adjustment of the flame according to the volume of the taken water.
WARNING: CARIMALI mixers cannot be used with hot water storage without pressure.
WARNING: in case of danger of frost drain the home system and remove the Non-return valves (see section USE AND
MAINTENANCE: Non-return valves disassembly) to allow the complete emptying of the mixer.
TECHNICAL DATA:
Minimum dynamic pressure………………………………………..1 bar
Maximum working pressure (static)......……………………………6 bar
Recommended operating pressure (static)……..……………..…2-5 bar
Maximum hot water temperature….……………………………….65°C
Hot water inlet……………………………………………………….G1/2” on the left
- Cold water inlet…………………………………………………...…G1/2” on the right
(F)
INFORMATIONS PRELIMINAIRES
Les mixers de la ligne CARIMALI adaptés à fonctionner avec l’eau chaude fournie par accumulateurs en pression.
Pour le fonctionnement avec chauffe-eau instantanés électriques ou à gaz, vérifier que ceux-ci aient une puissance non inférieure à 18
KW ou 250 Kcal/min. ; pour le type à gaz il est recommandé l’usage d’appareillage avec réglage de la flamme en fonction du volume
d’eau prélevé.
ATTENTION: On ne peut pas utiliser les accumulateurs d’eau chaude sans pression avec les mixers de la ligne CARIMALI.
ATTENTION: En cas de danger de glace vider l’implantation domestique et démonter les clapets anti-retour (voir
paragraphe UTILISATION ET ENTRETIEN : démontage des clapets anti-retour) pour consentir le vidage complet
du mixer.
DONNEES TECHNIQUES
Pression dynamique minime………………………………..……….1 bar
Pression max de fonctionnement (statique)......……………….…6 bar
Pression de fonctionnement recommandée (statique)……….…2-5 bar
Température eau chaude maximum ……………………………….65°C
Arrivée eau chaude ….…………………………………………..….G1/2” à gauche
- Arrivée eau froide……………………………………………........…G1/2” à droite
(D)
VORINFORMATION
Die thermostatische Mischbatterie der CARIMALI Linie sind für den Lauf mit warmem Wasser geeignet, das aus Druck- Akkumulatoren
ausgestattet wird. Um den Lauf mit Elektrisch/Gas- Durchlauferhitzer prüfen Sie, dass die Geräte eine Minimum Leistung von 18 KW oder
250 Kcal/Min. haben; für das Gas-Gerät riet man, ein mit automatische Regelung der Flamme zu benutzen, die in Funktion des Volume
des entnommenen Wasser ist.
ACHTUNG: Mit CARIMALI Mischer darf man nicht die “Ohne-Druck” warmes Wasser Akkumulatoren benutzen.
ACHTUNG: Im Frost-Notfall leeren die ganze Haus-Anlage und zerlegen die nicht-Rücklauf Ventil, um die ganze Leerung der
Mischer zu erlauben.(Sehen Abschnitt VERWENDUNG UND WARTUNG – Ausbau nicht-Rücklauf Ventil).
TECHNISCHE DATEN
Minimaler dynamischer Druck ……...……….……………………..1 bar
Maximaler Dienst-Druck (statisch)...…………….…………………6 bar
Empfohlen Dienst-Druck(statisch)..…………..…….…….……..…2-5 bar
Max Temperatur warmes Wasser…....…………………………….65°C
- Eintritt warmes Wasser.………………………………………….….G1/2” nach Linke
- Eintritt kaltes Wasser….…………………………………….…....…G1/2” nach Rechte
2
Art. 21120-CR
Art. 21129-CR
Art. 21124-CR
Preparare un foro adeguato nella parete: le quote di installazione sono riportate nella figura (la profondità di incasso
ammissibile è intesa a parete finita compreso il rivestimento).
Make an appropriate hole in the wall: installation rates are indicated in the picture (allowed built-in depth means at finished
wall level surface including coating).
Préparer un trou adéquate dans la paroi: les dimensions d’installation sont reportées en dessin (la profondeur d’encastrement
admise s’entend à paroi finie revêtement mural compris).
Bereiten in der Mauer ein passendes Loch vor. Die Anteile der Installation werden im Bild gezeigt.
Die annehmbare Einbautiefe ist an der beendete Wand mit Mantel einverstanden.
3
Inserire nel foro sulla parete il gruppo incasso con le protezioni montate, collegare le mandate delle acque (acqua fredda a
destra, acqua calda a sinistra) ed eseguire l’impianto idraulico.
Attenzione: tubi mandate delle acque e tubo dell’utenza 2 da 1/2”G, tubo dell’utenza 1 da 3/4"G.
Attenzione: collegare l’utenza principale al tubo 1.
Insert the built-in group provided with the protections into the hole in the wall, connect it to the water inlets (cold water on the
right, hot water on the left) and perform plumbing.
Warning: water inlet tubes and outlet 2 tubes have a 1/2”G connection, outlet 1 tube has a 3/4”G connection.
Warning: connect the main outlet to tube 1.
Introduire le group encastré dans le trou de la paroi avec les protections montées, connecter les arrivées d’eau (froide à
droite, chaude a gauche) et faire l’implant hydraulique.
Attention: les tubes des arrivées d’eau et le tube de sortie 2 ont un raccord 1/ 2”G, le tube de sortie 1 a un raccord 3/4”G.
Attention : connecter la sortie principale au tube 1.
Legen der einbau-Gruppe in das Loch an der Wand mit Schutzvorrichtungen an ihrem Platz ein, verbinden die Wasser
Sendungen (Kaltwasser auf der rechten Seite, Warmwasser auf der linken Seite) und führen die Wasserversorgungsanlage
aus.
Achtung: Wassereintrittsrohre und Auslaufrohre 2 haben 1/2 "G-Anschluss, Auslaufrohre 1 hat eine 3/4" G Anschluss.
Achtung: Schließen Sie den Haupt Steckdose, um ein Rohr.
Achtung: verbinden Sie den Hauptabsatz mit Rohr 1.
4
Dopo avere effettuato tutti i collegamenti mettere in bolla il gruppo incasso.
Collaudare l’impianto (pressione massima di prova 16 bar).
After operating all connections, put the built-in group in the correct bubble position with a level.
Test the system (16 bar maximum test pressure).
Après avoir fait tous les raccords mettre le groupe encastré à niveau à l’aide d’un niveau à bulle.
Essayer l’implantation (pression max d’essai 16 bar).
Setzen der eingebauten Gruppe in der richtigen blasen Lage.
Die Anlage zu testen (Test Max-Druck 16 Bar).
5
Rifinire l’intonaco e applicare il rivestimento.
IMPORTANTE: La profondità di incasso ammissibile è indicata sul disegno (a pag.3).
A rivestimento ultimato togliere le protezioni.
Finish the plaster and put the coating.
IMPORTANT: The allowed built-in depth is also indicated in the picture (see pag.3).
When the coating is over remove the protections.
Refinir le plâtrage et appliquer le revêtement.
IMPORTANT : La profondeur d’encastrement admise est indiquée aussi en dessin (voire pag.3).
A revêtement fini enlever les protections.
Beenden Sie bitte den Putz wieder und befestigen Sie bitte den Mantel.
WICHTIG: Die annehmbare Einbautiefe ist auch auf das Zeichnen gezeigt (auf Seite 3). Wenn der Mantel fertig ist, nehmen
Sie bitte die Schutzes ab.
6
Art. 21120-CR
Art. 21129-CR
Inserire la piastra aggiungendo del silicone sul retro in modo da farla aderire alle piastrelle per evitare infiltrazioni di acqua all’ interno del
muro. Inserire la manopola con l’indicatore rivolto verso l’alto e bloccarla serrando il grano con chiave a brugola da 2,5 mm. Inserire la
placchetta.
Insert the plate by siliconizing the back of it to make the plate stick and avoid water infiltrations in the wall. Insert the handle with the
indicator facing up and block it tightening the nut with a 2.5 mm Allen wrench. Insert the small plate.
Insérer la plaque en mettant du silicone sur la face arrière pour la coller et éviter infiltrations d’eau dans la paroi. Introduire la poignée
avec l’indicateur tourné vers le haut et la bloquer en vissant le grain avec l’aide d’une clé Allen de 2,5mm. Introduire la petit plaquette.
Legen die Platte ein, der Silikon auf der Rückseite hinzufügen, um Eindringen des Wasser zu meiden. Legen den Knopf mit der
Markierung nach oben gewandt und sichern die durch Anziehen der Madenschraube mit Inbusschlüssel 2,5 mm. Legen Sie die Platte.
Art. 21124-CR
Inserire la piastra aggiungendo del silicone sul retro in modo da farla aderire alle piastrelle per evitare infiltrazioni di acqua all’interno del
muro. Inserire la manopola con l’indicatore rivolto verso l’alto e bloccarla serrando il grano con chiave a brugola da 2,5 mm. Avvitare la
leva.
Insert the plate by siliconizing the back of it to make the plate stick and avoid water infiltrations in the wall. Insert the handle with the
indicator facing up and block it tightening the nut with a 2.5 mm Allen wrench. Screw the lever.
Insérer la plaque en mettant du silicone sur la face arrière pour la coller et éviter infiltrations d’eau dans la paroi. Introduire la poignée
avec l’indicateur tourné vers le haut et la bloquer en vissant le grain avec l’aide d’une clé Allen de 2,5mm. Introduire la manette.
Legen die Platte ein, der Silikon auf der Rückseite hinzufügen, um Eindringen des Wasser zu meiden. Legen den Knopf mit der
Markierung nach oben gewandt und sichern die durch Anziehen der Madenschraube mit Inbusschlüssel 2,5 mm. Schrauben Sie den
Hebel.
7
USO E MANUTENZIONE: Funzionamento
USE AND MAINTENANCE: Functioning
UTILISATION ET ENTRETIEN: Fonctionnement
VERWENDUNG UND WARTUNG: Lauf
Sollevando la manopola si apre l’acqua e se ne regola la
portata.
La manopola regola la temperatura dell’acqua miscelata
(senso orario = fredda / senso anti orario = calda).
Turn on the water and regulate the water flow by lifting up
the handle.
The handle regulates the temperature of the mixed water
(clockwise = cold / counter clockwise = hot).
Ouvrez l’eau et en régulez le débit en élevant la poignée.
La poignée régule la température de l'eau mélangée
(dans le sens horaire = froid / dans le sens antihoraire =
chaud).
Den Griff zu heben, um das Wasser zu offen und die
Wassermenge zu regeln.
Der Griff regelt die Temperatur des gemischten Wassers
(im Uhrzeigersinn = kalt / gegen den Uhrzeigersinn =
heiß).
In posizione di riposo (con il deviatore tirato) l’acqua è
deviata all’uscita 1 (utenza principale).
Premendo il deviatore si devia l’acqua all’uscita 2.
In resting position (with pulled diverter) water is diverted
to outlet 1 (main outlet).
Water is diverted to outlet 2 by pushing the diverter.
En position de repos (avec déviateur tiré), l’eau est
détournée à la sortie 1 (sortie principale).
En poussant le déviateur, l’eau est détournée à la sortie
2.
In Ruhestellung (mit Weiche gezogen) Wasser wird
umgeleitet, um 1 (Hauptausgang ) anschließen.
Wasser wird umgeleitet, um durch Drücken der
Umstellung Steckdose 2.
8
USO E MANUTENZIONE: Smontaggio cartuccia miscelatrice e/o deviatore per pulizia o
sostituzione
USE AND MAINTENANCE: Removal of the mixer cartridge and/or deviator for cleaning or
replacement
UTILISATION ET ENTRETIEN: Démontage de la cartouche de mélange et/ou déviateur pour le
nettoyage ou le remplacement
VERWENDUNG UND WARTUNG: Ausbau Mischer-Kartusche und/oder Umsteller zum Reinigen
oder Austauschen
Art. 21120-CR
Art. 21129-CR
Rimuovere la placchetta. Svitare il grano con chiave a brugola da 2,5 mm e sfilare la manopola. Sfilare la piastra.
Remove the small plate. Unscrew the nut using a 2,5 mm Allen wrench and take the handle off. Extract the plate.
Enlever la petite plaquette. Dévisser le grain avec l’aide d’une clé Allen de 2,5 mm et défiler la poignée. Enlever la plaque.
Entfernen Sie die Platte. Die Schraube mit einem 2,5-mm-Inbusschlüssel lösen und die Knöpfe entfernen. Entfernen Sie die
Platte.
Art. 21124-CR
Svitare la leva. Svitare il grano con chiave a brugola da 2,5
mm e sfilare la manopola. Sfilare la piastra.
Remove the lever. Unscrew the nut using a 2,5 mm Allen
wrench and take the handle off. Extract the plate.
Enlever la manette. Dévisser le grain avec l’aide d’une clé
Allen de 2,5 mm et défiler la poignée. Enlever la plaque.
Nehmen Sie den Hebel. Die Schraube mit einem 2,5-mmInbusschlüssel lösen und die Knöpfe entfernen. Entfernen
Sie die Platte.
9
Chiudere gli ingressi dell’acqua fredda e dell’acqua calda.
Svitare la ghiera estetica. Svitare la ghiera di serraggio con chiave da 27mm.
Sfilare la cartuccia miscelatrice. Pulire o sostituire la cartuccia. Reinserire la cartuccia nell’apposita sede.
Riavvitare la ghiera di serraggio con chiave da 27mm. Riavvitare la ghiera estetica.
Close the hot and cold water inlets.
Unscrew the aesthetic ring. Unscrew the fixing ring using a 27mm wrench.
Remove the mixer cartridge. Clean and replace the cartridge. Insert the cartridge in the correct position.
Screw the fixing ring using a 27mm wrench. Screw the aesthetic ring.
Fermer les arrivées d’eau froide et chaude.
Dévisser la bague esthétique. Dévisser la bague de fixation avec une clé de 27 mm.
Défiler la cartouche de mélange. Nettoyer ou remplacer la cartouche. Réinsérer la cartouche dans la correct position.
Visser la bague de fixation avec une clé de 27 mm. Visser la bague esthétique.
Schließen Sie die Warm-und Kaltwasserzuleitungen.
Schrauben Sie die ästhetischen Ring. Schrauben Sie den Befestigungsring mit einem 27mm Schraubenschlüssel.
Entfernen Sie die Mischpatrone. Reinigen und die Patrone zu ersetzen. Setzen Sie die Patrone in die richtige Position.
Schrauben Sie den Befestigungsring mit einem 27mm Schraubenschlüssel. Schrauben Sie die ästhetischen Ring.
Chiudere la cartuccia miscelatrice.
Svitare il deviatore con chiave inglese da 22 mm.
Sfilare il deviatore. Pulire o sostituire il deviatore. Reinserire il deviatore nell’apposita sede.
Riavvitare il deviatore con chiave inglese da 22 mm.
Close the mixer cartridge.
Unscrew the diverter using a 22 mm wrench.
Remove the diverter. Clean or replace the diverter. Insert the diverter in the correct place.
Screw the diverter using a 22 mm wrench.
Fermer les arrivées d’eau froide et chaude.
Dévisser le déviateur avec une clé de 22 mm.
Défiler le déviateur. Nettoyer ou remplacer le déviateur. Réinsérer le déviateur dans la correct position.
Visser le déviateur avec une clé de 27 mm. Visser la bague esthétique.
Schließen Sie die Mischpatrone.
Schrauben Sie die Umstellung mit einem 22 mm Schraubenschlüssel.
Entfernen Sie die Weiche. Reinigen oder ersetzen Sie die Weiche. Legen Sie die Weiche an der richtigen Stelle.
Schrauben Sie die Umstellung mit einem 22 mm Schraubenschlüssel.
10
Art. 21120-CR
Art. 21129-CR
Inserire la piastra aggiungendo del silicone sul retro in modo da farla aderire alle piastrelle per evitare infiltrazioni di acqua all’ interno del
muro. Inserire la manopola con l’indicatore rivolto verso l’alto e bloccarla serrando il grano con chiave a brugola da 2,5 mm. Inserire la
placchetta.
Insert the plate by siliconizing the back of it to make the plate stick and avoid water infiltrations in the wall. Insert the handle with the
indicator facing up and block it tightening the nut with a 2.5 mm Allen wrench. Insert the small plate.
Insérer la plaque en mettant du silicone sur la face arrière pour la coller et éviter infiltrations d’eau dans la paroi. Introduire la poignée
avec l’indicateur tourné vers le haut et la bloquer en vissant le grain avec l’aide d’une clé Allen de 2,5mm. Introduire la petit plaquette.
Legen die Platte ein, der Silikon auf der Rückseite hinzufügen, um Eindringen des Wasser zu meiden. Legen den Knopf mit der
Markierung nach oben gewandt und sichern die durch Anziehen der Madenschraube mit Inbusschlüssel 2,5 mm. Legen Sie die Platte.
Art. 21124-CR
Inserire la piastra aggiungendo del silicone sul retro in modo da farla aderire alle piastrelle per evitare infiltrazioni di acqua all’interno del
muro. Inserire la manopola con l’indicatore rivolto verso l’alto e bloccarla serrando il grano con chiave a brugola da 2,5 mm. Avvitare la
leva.
Insert the plate by siliconizing the back of it to make the plate stick and avoid water infiltrations in the wall. Insert the handle with the
indicator facing up and block it tightening the nut with a 2.5 mm Allen wrench. Insert the lever.
Insérer la plaque en mettant du silicone sur la face arrière pour la coller et éviter infiltrations d’eau dans la paroi. Introduire la poignée
avec l’indicateur tourné vers le haut et la bloquer en vissant le grain avec l’aide d’une clé Allen de 2,5mm. Introduire la manette.
Legen die Platte ein, der Silikon auf der Rückseite hinzufügen, um Eindringen des Wasser zu meiden. Legen den Knopf mit der
Markierung nach oben gewandt und sichern die durch Anziehen der Madenschraube mit Inbusschlüssel 2,5 mm. Legen Sie die Platte.
11
Per una politica di continuo miglioramento, CALFLEX S.r.l. si riserva la
possibilità di applicare modifiche tecniche sui suoi articoli senza nessun
preavviso.
For a continuous improvement policy, CALFLEX S.r.l. reserves the right to
modify the technical features of its articles at any time without notice.
Pour une politique d'amélioration continue, CALFLEX S.r.l. se réserve le droit
d'effectuer des modifications techniques de ses articles sans préavis.
Um einen kontinuierlichen Verbesserungsprozess zu verbürgen, CALFLEX
S.r.l. behält sich das Recht vor, die geltende technische Zeichnungen zu
ändern, ohne vorherige Ankündigung zu geben.
12