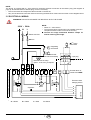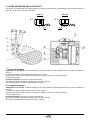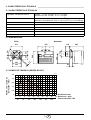
1
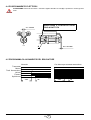
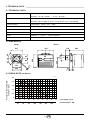
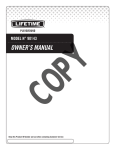
Istruzioni per installazione, uso e manutenzione
Installation, use and maintenance instructions
Instrucciones de instalación, uso y mantenimiento
I
GB
E
Bruciatore a gasolio/kerosene
Light oil/Kerosene
Quemador de gasóleo/queroseno
Funzionamento bistadio
Two stage operation
Funcionamiento de dos llamas
CODICE
CODE - CÓDIGO
MODELLO
MODEL - MODELO
TIPO - TYPE
3748418
G20D
484T1
2903397 (2) - 06/2008
INDICE
1.
1.1
DESCRIZIONE DEL BRUCIATORE . . . . . . . . . . . . . . . . . . . . . . . . . . . . . . . . . . . . . . . . . . . . . . . 2
Materiale a corredo . . . . . . . . . . . . . . . . . . . . . . . . . . . . . . . . . . . . . . . . . . . . . . . . . . . . . . . . . . . . . . . . . 2
2.
2.1
2.2
2.3
CARATTERISTICHE TECNICHE . . . . . . . . . . . . . . . . . . . . . . . . . . . . . . . . . . . . . . . . . . . . . . . . . .
Caratteristiche tecniche . . . . . . . . . . . . . . . . . . . . . . . . . . . . . . . . . . . . . . . . . . . . . . . . . . . . . . . . . . . . . .
Dimensioni. . . . . . . . . . . . . . . . . . . . . . . . . . . . . . . . . . . . . . . . . . . . . . . . . . . . . . . . . . . . . . . . . . . . . . . .
Campo di lavoro (secondo EN 267) . . . . . . . . . . . . . . . . . . . . . . . . . . . . . . . . . . . . . . . . . . . . . . . . . . . .
3
3
3
3
3.
3.1
3.2
3.3
3.4
3.5
INSTALLAZIONE . . . . . . . . . . . . . . . . . . . . . . . . . . . . . . . . . . . . . . . . . . . . . . . . . . . . . . . . . . . . .
Fissaggio alla caldaia . . . . . . . . . . . . . . . . . . . . . . . . . . . . . . . . . . . . . . . . . . . . . . . . . . . . . . . . . . . . . . .
Posizione di manutenzione . . . . . . . . . . . . . . . . . . . . . . . . . . . . . . . . . . . . . . . . . . . . . . . . . . . . . . . . . . .
Impianti idraulici. . . . . . . . . . . . . . . . . . . . . . . . . . . . . . . . . . . . . . . . . . . . . . . . . . . . . . . . . . . . . . . . . . . .
Collegamenti elettrici . . . . . . . . . . . . . . . . . . . . . . . . . . . . . . . . . . . . . . . . . . . . . . . . . . . . . . . . . . . . . . . .
Collegamenti elettrici . . . . . . . . . . . . . . . . . . . . . . . . . . . . . . . . . . . . . . . . . . . . . . . . . . . . . . . . . . . . . . . .
4
4
4
5
6
7
4.
4.1
4.2
4.3
4.4
4.5
4.6
FUNZIONAMENTO . . . . . . . . . . . . . . . . . . . . . . . . . . . . . . . . . . . . . . . . . . . . . . . . . . . . . . . . . . . . 9
Regolazione combustione . . . . . . . . . . . . . . . . . . . . . . . . . . . . . . . . . . . . . . . . . . . . . . . . . . . . . . . . . . . . 9
Ugelli consigliati. . . . . . . . . . . . . . . . . . . . . . . . . . . . . . . . . . . . . . . . . . . . . . . . . . . . . . . . . . . . . . . . . . . . 9
Pressione pompa e portata aria . . . . . . . . . . . . . . . . . . . . . . . . . . . . . . . . . . . . . . . . . . . . . . . . . . . . . . 11
Posizionamento elettrodi . . . . . . . . . . . . . . . . . . . . . . . . . . . . . . . . . . . . . . . . . . . . . . . . . . . . . . . . . . . . 12
Programma di avviamento del bruciatore . . . . . . . . . . . . . . . . . . . . . . . . . . . . . . . . . . . . . . . . . . . . . . . 12
Electronic start delaying device . . . . . . . . . . . . . . . . . . . . . . . . . . . . . . . . . . . . . . . . . . . . . . . . . . . . . . . 13
3397
1
I
1. DESCRIZIONE DEL BRUCIATORE
³ Bruciatore in conformità alle Direttive CEE: CEM 89/336/CEE - 2004/108/CEE, Bassa Tensione 73/23/CEE 2006/95/CEE, Macchine 98/37/CEE e Rendimento 92/42/CEE.
³ Il bruciatore risponde al grado di protezione IP 40 secondo EN 60529.
Fig. 1
D8078
1–
2–
3–
4–
5–
6–
7–
8–
9–
10 –
11 –
Ritorno
Aspirazione
Attacco manometro
Regolatore pressione, 2° stadio
Attacco vacuometro
Martinetto serranda aria
1.1 MATERIALE A CORREDO
Quantità
2
1
4
1
1
1
Descrizione
Tubi flessibili con nipples
Flangia con schermo isolante
Viti e dadi per flangia
Gruppo manutenzione
Vite con due dadi per flangia
Passacavo
3397
2
I
Vite di regolazione testa
Pulsante di sblocco con segnalazione di blocco
Flangia con schermo isolante
Regolatore pressione, 1° stadio
Ritardatore elettronico
2. CARATTERISTICHE TECNICHE
2.1 CARATTERISTICHE TECNICHE
71 / 89 ÷ 231 kW – 6 / 7,5 ÷ 19,5 kg/h
72 / 86 ÷ 219 kW – 6 / 7,2 ÷ 18,3 kg/h
Potenza termica - Portata
Gasolio:
Kerosene:
Combustibile
Gasolio, viscosità max. a 20 °C: 4 ÷ 6 mm2/s (Hi = 11.86 kWh/kg)
Kerosene, viscosità max. a 20 °C: 1,6 ÷ 6 mm2/s (Hi = 11.97 kWh/kg)
Alimentazione elettrica
Monofase,
Motore
1,4A assorbiti – 2800 g/min – 293 rad/s
Condensatore
5 µF
Trasformatore d’accensione
Secondario 8 kV – 16 mA
Pompa
Pressione: 7 ÷ 11 bar – 101,5 ÷ 159,5 psi
Potenza elettrica assorbita
0,33 kW
230V ± 10% ~ 50Hz
2.2 DIMENSIONI
Flangia
213
Bruciatore
350
118
=
ø 125
11
230
45°
99
298
99
45°
=
160
295
190
41
2.3 CAMPO DI LAVORO (SECONDO EN 267)
D8161
Pressione in camera di
combustione – mbar
4.0
3.2
2.4
1.6
0.8
0
Portata di Kerosene - kg/h
4
6
60
8
90
10
120
12
150
14
16
180
18
20
210
240
3397
3
I
22
Potenza termica - kW
D5283
3. INSTALLAZIONE
3.1 FISSAGGIO ALLA CALDAIA
³ Inserire sulla flangia (1) la vite e i due dadi (vedi fig. 2).
³ Allargare, se necessario, i fori dello schermo isolante (5), (vedi fig. 3).
³ Fissare alla portina della caldaia (4) la flangia (1) mediante le viti (2) e (se necessario) i dadi (3) interponendo lo
schermo isolante (5), (vedi fig. 4).
3.2 POSIZIONE DI MANUTENZIONE
Accessibilità alla testa di combustione, al gruppo elica - elettrodi e all’ugello, (vedi fig. 5).
³ Estrarre il bruciatore dalla caldaia dopo avere tolto il dado di fissaggio alla flangia.
³ Agganciare il bruciatore alla flangia (1), togliere la testa di combustione (6) dopo aver allentato le viti (7).
³ Estrarre dal portaugello (8) il gruppo supporto elica (9) dopo aver allentato la vite.
³ Avvitare l’ugello (10).
4
5
Fig. 4
Fig. 2
Fig. 3
2
5
1
D5012
E9022
1
2
D8058
9
1
6
10
8
Fig. 5
7
D8056
D8057
Verificare che il bruciatore una volta installato sia leggermente inclinato verso il basso. (Vedi fig. 6).
Fig. 6
Il bruciatore è predisposto per ricevere i tubi di alimentazione del
combustibile da entrambi i lati.
D5572
3397
4
I
3
3.3 IMPIANTI IDRAULICI
ATTENZIONE: Accertarsi, prima di mettere in funzionamento il bruciatore, che il tubo di ritorno non abbia
occlusioni. Un eventuale impedimento provocherebbe la rottura dell’organo di tenuta della pompa.
ATTENZIONE
La pompa è predisposta per funzionamento bitubo.
Per il funzionamento monotubo è necessario togliere la vite di by-pass (A). (Vedi figura).
L metri
H
metri
H
max. 4 m
D5219
min. 0.1 m
IMPIANTO
NON AMMESSO
IN GERMANIA
0.5
1
1.5
2
I. D.
8 mm
I.D.
10 mm
10
20
40
60
20
40
80
100
A
D5809
INNESCO POMPA
Allentare il tappo dell’attacco vacuometro (5, fig. 1) ed attendere la fuoriuscita del combustibile.
0
0.5
1
1.5
2
3
3.5
L metri
I. D.
8 mm
I.D.
10 mm
35
30
25
20
15
8
6
100
100
100
90
70
30
20
Non si deve superare la depressione max. di
0,4 bar (30 cm Hg). Oltre tale valore si ha
liberazione di gas dal combustibile.
Si raccomanda che le tubazioni siano a
perfetta tenuta.
Negli impianti in depressione si consiglia
di far arrivare la tubazione di ritorno alla
stessa altezza della tubazione di aspirazione. In questo caso non è necessaria la
valvola di fondo.
Se invece la tubazione di ritorno arriva sopra
il livello del combustibile la valvola di fondo è
indispensabile.
Questa soluzione è meno sicura della precedente per la possibile mancanza di tenuta
della valvola.
INNESCO POMPA
Avviare il bruciatore ed attendere l’innesco.
Se avviene il blocco prima dell’arrivo del combustibile, attendere 20 secondi almeno, poi
ripetere l’operazione.
ATTENZIONE:
Q Verificare periodicamente le condizioni dei
tubi flessibili. Usando il kerosene come combustibile i tubi devono essere sostituiti almeno
ogni due anni.
H
D5220
H
metri
max. 4 m
H
H = dislivello.
L = max. lunghezza del
tubo di aspirazione.
ø i = diametro interno del
tubo.
È necessario installare un filtro sulla linea
di alimentazione del combustibile.
3397
5
I
3.4 COLLEGAMENTI ELETTRICI
ATTENZIONE: NON SCAMBIARE IL NEUTRO CON LA FASE
ATTENZIONE
230V ~ 50Hz
L
NOTE:
– Sezione dei conduttori 1 mm2.
– I collegamenti elettrici eseguiti dall’installatore devono rispettare le norme vigenti nel paese.
O In caso di collegamento a caldaia senza spina a 7 poli, vedi
pagina 7.
N
Interruttore con
fusibile
6A max.
Collegare il termostato 2° stadio ai morsetti T6 - T8
Neutro
togliendo il ponte.
h Contaore
T Termostato di regolazione
T Termostato di massima
a riarmo manuale
Caldaie con
spine a 7 poli
1
Segnalazione di blocco esterna
(230V - 0,5A max), a richiesta
N T1 T2 S3 B4
Termostato 2°
stadio
T
Bruciatore
presa a 7 poli
B5 T6 T7 T8
Giallo/
Verde
C
D
N
2
3
Presa 4 poli
E
L
4
5
6
7
8
9
12
11
Morsettiera
apparecchiatura
530SE
C
D
M
A
~
Motore
Condensatore
C
D
Ritardatore
elettronico
4
5
6
3
2
1
2061425
(50V)
B
C
AD
Valvola 2° stadio
*
Valvola 1° stadio
ESEGUITO IN FABBRICA
1
A
Spina 4 poli
D5822
A = Marrone
B = Bianco
C = Blu
D = Nero
3397
6
I
E = Grigio
NOTE:
Il bruciatore è provvisto di presa a 7 poli per la connessione alla spina della caldaia (vedi schema di pagina 6). Se
nella caldaia non è presente suddetta spina è necessario:
– Rimuovere la presa e rispettivo cablaggio montati sul bruciatore;
– Eseguire la connessione elettrica diretta alla morsettiera bruciatore seguendo lo schema successivo.
3.5 COLLEGAMENTI ELETTRICI
ATTENZIONE: NON SCAMBIARE IL NEUTRO CON LA FASE
ATTENZIONE
230V ~ 50Hz
N
NOTE:
– Sezione dei conduttori 1 mm2.
– I collegamenti elettrici eseguiti dall’installatore devono
rispettare le norme vigenti nel paese.
L
Collegare il termostato 2° stadio ai morsetti T6 -
Interruttore con
fusibile
T8 togliendo il ponte.
6A max.
Neutro
T
T
Termostato di
regolazione
Termostato di
massima
a riarmo
manuale
2
3
B5 T6 T7 T8
Spina 4 poli
L
4
5
7
6
8
9
12
11
Morsettiera
apparecchiatura
530SE
C
D
AD
B
M
A
~
Motore
Condensatore
C
Ritardatore
elettronico
D
4
5
6
3
2
1
2061425
C
Valvola 2° stadio
(50V)
*
Valvola 1° stadio
ESEGUITO IN FABBRICA
1
Termostato 2°
stadio
Presa 4 poli
Segnalazione di blocco esterna
(230V - 0,5A max), a richiesta
N
T
D5823
A = Marrone
B = Bianco
C = Blu
D = Nero
3397
7
I
Per togliere l’apparecchiatura dal bruciatore allentare la vite (A) (vedi figura successiva) e tirare nel senso della
freccia.
S7348
PERCORSO DEI CAVI ELETTRICI
1 – Passacavo
2 – Fissacavo
3 – Morsettiera
4 – Morsetti per termostato 2° stadio
5 – Presa 4 poli per termostato 2° stadio
6 – Presa 7 poli per bruciatore
N Trasformatore
d’accensione L
S7057
Fotoresistenza
Neutro
-
Segnalazione di blocco
-
Fase
-
Terra bruciatore
La fotoresistenza è montata direttamente nell’apparecchiatura (sotto il trasformatore di accensione) su un supporto
ad innesto rapido.
COLLAUDO
Verificare l’arresto del bruciatore aprendo i termostati.
3397
8
I
4. FUNZIONAMENTO
4.1 REGOLAZIONE COMBUSTIONE
In conformità con la Direttiva Rendimento 92/42/CEE, l’applicazione del bruciatore alla caldaia, la regolazione e il collaudo, devono essere eseguiti nell’osservanza del manuale d’istruzione della caldaia stessa,
compreso il controllo della concentrazione di CO e CO2 nei fumi, della loro temperatura e di quella media
dell’acqua della caldaia.
A seconda della portata richiesta dalla caldaia vanno definiti: l’ugello, la pressione della pompa, la regolazione
della testa di combustione, la regolazione della serranda, secondo la tabella seguente.
Gasolio
Kerosene
Ugello
Pressione
pompa
Portata
bruciatore
bar
GPH
2.00
2.25
2.50
2.75
3.00
3.50
4.00
4.50
Angolo
60°
60°
60°
60°
60°
60°
60°
60°
1°
7*
7*
7*
7*
7*
7*
7*
7*
2°
11
11
11
11
11
11
11
11
kg/h ± 4%
1°
2°
5.90
7.27
6.37
8.02
6.90
8.62
7.50
9.56
8.56
10.64
9.35
12.0
10.50
13.15
12.24
15.32
5.00
5.50
60°
60°
7*
7*
11
10
14.35
15.27
1.75
2.00
2.25
2.50
3.00
3.50
4.00
4.50
60°
60°
60°
60°
60°
60°
60°/45°
60°/45°
9
9
9
9
9
9
9
9
14
14
14
14
14
14
14
14
6.1
7.0
7.8
8.7
10.4
12.2
13.9
15.6
Regolazione testa di
combustione
Regolazione serranda aria
Tacca
0 (min)
1
1.5
2
2.5
3
3.5
4
1° stadio
Tacca
1.9
2
2.1
2.3
2.4
2.5
2.7
2.9
2° stadio
Tacca
2.3
2.5
2.6
2.9
3.1
3.3
3.8
4
17.95
18.30
5
6 (max)
4.1
4.5
8 (max)
8 (max)
7.6
8.7
9.8
10.8
13.0
15.2
17.3
19.5
1
1.5
2
2.5
3.5
4
5
6
2.3
2.5
2.7
2.9
3.2
3.5
4.5
5
2.6
3.0
3.5
3.8
4.3
5.0
6.5
8.0
*Con Kerosene il valore della pressione non deve essere superiore a 7 bar.
4.2 UGELLI CONSIGLIATI
Monarch type R - PLP
Delavan type B - W
Steinen type S - SS
Danfoss type S
Gasolio
Kerosene
–
–
Angolo
60° : Nella generalità dei casi. Particolarmente adatto per
evitare lo stacco di fiamma all’accensione.
–
: Non previsto
: Applicabile
REGOLAZIONE TESTA:
Va fatta all’atto del montaggio dell’ugello, con boccaglio smontato. Dipende dalla portata
del bruciatore e si esegue ruotando l’asta di regolazione fino a che il piano terminale del
boccaglio collima con la tacca indicata in tabella.
Nello schizzo a lato, la testa è regolata per una porPiano terminale boccaglio
tata di 3,5 GPH a 7/11 bar.
La tacca 3 dell’indicatore coincide con il piano terminale del boccaglio come indicato in tabella.
2
5 3 1
Asta di regolazione
Indicatore
D5284
Boccaglio
3397
9
I
Le regolazioni della testa indicate in tabella vanno bene nella generalità dei casi. L’adattamento della portata del ventilatore all’impianto va fatta normalmente solo con la serranda dell’aria.
Se eventualmente si vuole ritoccare successivamente, con bruciatore funzionante, anche la regolazione della testa,
agire sull’asta (1) con chiave fissa (2) come segue:
RUOTARE VERSO DESTRA: (segno +)
Per aumentare la quantità di aria immessa in camera di combustione e diminuire la sua pressione.
La CO2 diminuisce e l’aggancio fiamma al disco di turbolenza
migliora. (Regolazione indicata per accensioni a basse temperature).
RUOTARE VERSO SINISTRA: (segno –)
Per diminuire la quantità di aria immessa in camera di combustione ed aumentare la sua pressione.
La CO2 migliora e l’aggancio fiamma si riduce. (Regolazione
sconsigliata per accensioni a basse temperature).
Non spostare, in ogni caso, la regolazione della testa oltre una
tacca dal valore indicato in tabella. Una tacca corrisponde a tre
giri dell’asta.
Un foro (3) alla sua estremità facilita il conto dei giri.
2
3
1
6
D8068
REGOLAZIONE SERRANDA ARIA:
Le regolazioni riportate in tabella si riferiscono al bruciatore con cofano montato e camera di combustione con
depressione zero.
Tali regolazioni sono puramente indicative.
Ogni impianto ha condizioni di funzionamento sue proprie, non prevedibili: portata effettiva dell’ugello, pressione o
depressione in camera di combustione, eccesso d’aria necessario; ecc.
Tutte queste condizioni possono richiedere una diversa regolazione della serranda.
È importante tenere conto che la portata d’aria del ventilatore è differente a seconda che il bruciatore abbia il
cofano smontato o montato.
Pertanto è opportuno procedere come segue:
PANNELLO
³ regolare la serranda come indicato in tabella (vedi pag. 9);
³ montare il cofano avvitando per semplicità solo la vite superiore;
³ controllare il bacharach;
³ se occorre variare la portata d’aria, allentare la vite del cofano,
toglierlo, agire sulla serranda, rimontare il cofano e quindi
ricontrollare il bacharach.
NOTE:
Quando il bruciatore lavora ad un ritmo superiore ai 18 kg/h rimuovere il
pannello fissato all’interno della copertura metallica. (vedi figura)
S7352
3397
10
I
4.3 PRESSIONE POMPA E PORTATA ARIA
Il bruciatore è dotato di un dispositivo idraulico, comandato dal ritardatore elettronico che riduce la portata del combustibile e dell’aria al 70% circa della portata massima.
Item A
II - I
Item B
I
II
II - I
9
I
9
II
S7353
S7354
REGOLAZIONE 1° STADIO
Regolazione serranda: inserire lo spinotto (9) del ritardatore (10) nella posizione I (Item A).
Allentare il dado (2) agire sulla vite (3) fino a portare la serranda (1) sulla posizione desiderata. Quindi bloccare il
dado (2).
Regolazione pressione: Viene tarata in fabbrica a 7 bar. Se è necessario ritarare tale pressione, o se si preferisce
cambiarla, basta agire sulla vite (4).
Il manometro per il controllo della pressione va montato al posto del tappo (5).
REGOLAZIONE 2° STADIO
Regolazione serranda: inserire lo spinotto (9) del ritardatore (10) nella posizione II (Item B).
Allentare il dado (6), agire sulla vite (7) fino a portare la serranda (1), sulla posizione desiderata. Quindi bloccare il
dado (6).
Regolazione pressione: Viene tarata in fabbrica a 10 bar. Se è necessario ritarare tale pressione, o se si preferisce
cambiarla, basta agire sulla vite (8). Il manometro per il controllo della pressione va montato al posto del tappo (5).
3397
11
I
4.4 POSIZIONAMENTO ELETTRODI
ATTENZIONE: Prima di smontare o montare l’ugello allentare la vite (A) e spostare in avanti gli elettrodi.
ATTENZIONE
ARRETRARE IL PORTAELETTRODI
FINO A BATTUTA
4 ± 0.3 mm
D5288
A
6.5 ± 0.5 mm
4.5 PROGRAMMA DI AVVIAMENTO DEL BRUCIATORE
Normale
Con blocco per mancata accensione
Termostato
Motore
Trasf. d’accensione
Valvola
Fiamma
Spia blocco
~12s
D5810
~5s
3397
12
I
~12s
~5s
4.6 RITARDATORE ELETTRONICO
Il ritardatore elettronico indicato in figura può essere collegato ad un
termostato di 2° stadio.
Quando è collegato al termostato 2° stadio svolge due funzioni:
1. Ritarda di 5 ÷ 6 secondi l’intervento della valvola del 2° stadio
rispetto alla valvola del 1° stadio.
2. Seleziona il tipo di funzionamento desiderato a seconda del
posizionamento dello spinotto A:
S7355
A
II - I
I
Posizione I - II
= Funzionamento del bruciatore in 1° o 2° stadio su comando del termostato 2° stadio.
I
Posizione II
= Funzionamento solo in 2° stadio, obbligatoriamente.
I
Posizione I
= Funzionamento solo in 1° stadio, obbligatoriamente.
II
II - I
II
II - I
II
3397
13
I
INDEX
1.
1.1
BURNER DESCRIPTION . . . . . . . . . . . . . . . . . . . . . . . . . . . . . . . . . . . . . . . . . . . . . . . . . . . . . . . . 2
Equipment . . . . . . . . . . . . . . . . . . . . . . . . . . . . . . . . . . . . . . . . . . . . . . . . . . . . . . . . . . . . . . . . . . . 2
2.
2.1
2.2
2.3
TECHNICAL DATA . . .
Technical data . . . . . . .
Dimensions . . . . . . . . .
Firing rate (as EN 267)
.
.
.
.
.
.
.
.
.
.
.
.
.
.
.
.
.
.
.
.
.
.
.
.
.
.
.
.
.
.
.
.
.
.
.
.
.
.
.
.
..
..
..
..
....
....
....
....
...
...
...
...
....
....
....
....
...
...
...
...
....
....
....
....
...
...
...
...
....
....
....
....
...
...
...
...
....
....
....
....
.....
.....
.....
.....
.
.
.
.
.
.
.
.
.
.
.
.
.
.
.
.
.
.
.
.
.
.
.
.
.
.
.
.
.
.
.
.
3
3
3
3
3.
3.1
3.2
3.3
3.4
3.5
INSTALLATION . . . . .
Boiler fixing . . . . . . . .
Maintenance position .
Fuel lines . . . . . . . . . .
Electrical wiring . . . . .
Electrical wiring . . . . .
.
.
.
.
.
.
.
.
.
.
.
.
.
.
.
.
.
.
.
.
.
.
.
.
.
.
.
.
.
.
.
.
.
.
.
.
.
.
.
.
.
.
.
.
.
.
.
.
.
.
.
.
.
.
.
.
.
.
.
.
.
.
.
.
.
.
.
.
.
.
.
.
.
.
.
.
.
.
.
.
.
.
.
.
.
.
.
.
.
.
.
.
.
.
.
.
.
.
.
.
.
.
.
.
.
.
.
.
.
.
.
.
.
.
.
.
.
.
.
.
.
.
.
.
.
.
.
.
.
.
.
.
.
.
.
.
.
.
.
.
.
.
.
.
.
.
.
.
.
.
.
.
.
.
.
.
.
.
.
.
.
.
.
.
.
.
.
.
.
.
.
.
.
.
.
.
.
.
.
.
.
.
.
.
.
.
.
.
.
.
.
.
.
.
.
.
.
.
.
.
.
.
.
.
.
.
.
.
.
.
.
.
.
.
.
.
.
.
.
.
.
.
.
.
.
.
.
.
.
.
.
.
.
.
.
.
.
.
.
.
.
.
.
.
.
.
.
.
.
.
.
.
.
.
.
.
.
.
..
..
..
..
..
..
.
.
.
.
.
.
.
.
.
.
.
.
.
.
.
.
.
.
.
.
.
.
.
.
.
.
.
.
.
.
.
.
.
.
.
.
4
4
4
5
6
7
4.
4.1
4.2
4.3
4.4
4.5
4.6
WORKING . . . . . . . . . . . . . . . .
Combustion adjustment . . . . . .
Nozzles recommended. . . . . . .
Pump pressure and air output .
Electrode setting . . . . . . . . . . .
Burner start-up cycle . . . . . . . .
Electronic start delaying device
.
.
.
.
.
.
.
.
.
.
.
.
.
.
.
.
.
.
.
.
.
.
.
.
.
.
.
.
.
.
.
.
.
.
.
.
.
.
.
.
.
.
.
.
.
.
.
.
.
.
.
.
.
.
.
.
.
.
.
.
.
.
.
.
.
.
.
.
.
.
.
.
.
.
.
.
.
.
.
.
.
.
.
.
.
.
.
.
.
.
.
.
.
.
.
.
.
.
.
.
.
.
.
.
.
.
.
.
.
.
.
.
.
.
.
.
.
.
.
.
.
.
.
.
.
.
.
.
.
.
.
.
.
.
.
.
.
.
.
.
.
.
.
.
.
.
.
.
.
.
.
.
.
.
.
.
.
.
.
.
.
.
.
.
.
.
.
.
.
.
.
.
.
.
.
.
.
.
.
.
.
.
.
.
.
.
.
.
.
.
.
.
.
.
.
.
.
.
.
.
.
.
.
..
..
..
..
..
..
..
.
.
.
.
.
.
.
.
.
.
.
.
.
.
.
.
.
.
.
.
.
.
.
.
.
.
.
.
...
...
...
...
...
...
...
.
.
.
.
.
.
.
...
...
...
...
...
...
...
.
.
.
.
.
.
.
.
.
.
.
.
.
.
. 9
. 9
. 9
11
12
12
13
.
.
.
.
.
.
3397
1
GB
.
.
.
.
.
.
.
.
.
.
.
.
...
...
...
...
...
...
.
.
.
.
.
.
.....
.....
.....
.....
.....
.....
.....
.
.
.
.
.
.
.
1. BURNER DESCRIPTION
³ Burner in conformity with EEC directives: EMC 89/336/EEC - 2004/108/EEC, Low Voltage 73/23/EEC - 2006/95/
EEC, Machines 98/37/EEC and Efficiency 92/42/EEC.
³ The burner meets protection level of IP X0D (IP 40), EN 60529.
Fig. 1
D8078
1–
2–
3–
4–
5–
6–
7–
8–
9–
10 –
11 –
Return line
Suction line
Gauge connection
Pressure regulator, 2nd stage
Vacuum gauge connection
Hydraulic jacks with air-damper
Combustion head adjustment screw
Lock-out lamp and reset button
Flange with insulating gasket
Regulation pressure, 1st stage
Electronic start delaying device
1.1 EQUIPMENT
QUANTITY
2
1
4
1
1
1
DESCRIPTION
Flexible pipes with nipples
Flange with insulating gasket
Screws and nuts for flange
Maintenance assembly
Screw with two nuts for flange
4 pin plug
3397
2
GB
2. TECHNICAL DATA
2.1 TECHNICAL DATA
Thermal power – output
Light oil:
71 / 89 - 231 kW – 6 / 7.5 - 19.5 kg/h
Kerosene: 72 / 86 - 219 kW – 6 / 7.2 - 18.3 kg/h
Light oil, max. viscosity at 20 °C: 4 ÷ 6 mm2/s (Hi = 11.86 kWh/kg)
Fuel
Kerosene, max. viscosity at 20 °C: 1.6 ÷ 6 mm2/s (Hi = 11.97 kWh/kg)
Electrical supply
Single phase, 230V ± 10% ~ 50Hz
Motor
Run current 1.4A – 2800 rpm – 293 rad/s
Capacitor
5 µF
Ignition transformer
Secondary 8 kV - 16 mA
Pump
Pressure: 7 - 11 bar – 101.5 ÷159.5 psi
Absorbed electrical power
0.33 kW
2.2 DIMENSIONS
Flange
Burner
350
213
ø 125
11
230
298
99
99
45°
160
190
41
2.3 FIRING RATE (AS EN 267)
D8161
Pressure in the combustion
chamber – mbar
4.0
3.2
2.4
1.6
0.8
0
4
6
60
295
=
=
45°
118
8
90
10
120
12
150
14
16
180
18
210
240
3397
3
20
GB
22
Fuel output - kg/h
Thermal power - kW
D5283
3. INSTALLATION
3.1 BOILER FIXING
³ Put on the flange (1) the screw and two nuts, (see fig. 2).
³ Widen, if necessary, the insulating gasket holes (5), (see fig. 3).
³ Fix the flange (1) to the boiler door (4) using screws (2) and (if necessary) the nuts (3) interposing the insulating
gasket (5), (see fig. 4).
3.2 MAINTENANCE POSITION
Access to the combustion head, diffuser disc / electrodes unit and nozzle, (see fig. 5).
³ Remove the burner out of the boiler, after loosing the fixing nut to the flange.
³ Hook the burner to the flange (1), by removing the combustion head (6) after loosing the fixing screws (7).
³ Remove the diffuser disc-holder assembly (9) from the nozzle-holder (8) after loosing its fixing screw.
³ Screw the nozzle (10).
4
5
Fig. 4
Fig. 2
Fig. 3
2
5
1
D5012
E9022
1
2
D8058
9
1
6
10
8
Fig. 5
7
D8056
D8057
Verify that the installed burner is lightly leaned towards the button.
(See figure 6).
Fig. 6
The burner is designed to allow entry of the flexible oil-lines on either
side of the burner.
D5572
3397
4
GB
3
3.3 FUEL LINES
WARNING: before starting the burner make sure that the return pipe-line is not clogged: any obstruction
would cause the pump seals to break.
WARNING
The pump is supplied for use with a two pipe system.
For use on a one pipe system, it is necessary to remove the by-pass screw (A), (see figure).
H
meters
H
max. 4 m
D5219
min. 0.1 m
SYSTEM
NOT PERMITTED
IN GERMANY
0.5
1
1.5
2
L meters
I. D.
8 mm
I.D.
10 mm
10
20
40
60
20
40
80
100
A
D5809
PRIMING THE PUMP
Loosen the plug of the vacuum gauge (5, fig. 1) and wait until the fuel flows out.
= Difference of level.
= Max. length of the
suction line.
I.D. = Internal diameter of the
fuel pipes.
D5220
H
meters
0
0.5
1
1.5
2
3
3.5
L meters
I. D.
8 mm
I.D.
10 mm
35
30
25
20
15
8
6
100
100
100
90
70
30
20
The pump vacuum should not exceed a maximum of 0.4 bar (30 cm Hg).
Beyond this limit gas is released from the fuel.
Fuel lines must be completely airtight.
The return line should terminate in the fuel
tank at the same level as the suction line;
in this case a non-return valve is not required.
When the return line arrives over the fuel
level, a non-return valve must be used.
This solution however is less safe than previous one, due to the possibility of leakage of
the valve.
PRIMING THE PUMP
Start the burner and wait for the priming.
Should lock-out occur prior to the arrival of
the fuel, await at least 20 seconds before
repeating the operation.
max. 4 m
H
H
L
WARNING:
Q Check periodically the flexible pipes condi-
tions. Using kerosene, they have to be
replaced at least every 2 years.
H
A filter must be installed on the suction
fuel line.
3397
5
GB
3.4 ELECTRICAL WIRING
WARNING: DO NOT EXCHANGE THE NEUTRAL WITH THE PHASE
WARNING
230V ~ 50Hz
L
NOTE:
– Wires of 1 mm2 section.
– The electrical wiring carried out by the installer must be in
compliance with the rules in force in the Country.
O For connection to boilers without a 7 pin plug, see page 7.
Connect 2nd stage thermostat between clamps T6 and T8
removing the bridge.
N
Switch with fuse
Neutral
6A max.
h Hour counter
T Regulating thermostat
Limit thermostat
T with manual resetting
Boilers’s
7 pin plug
1
N T1 T2 S3 B4
2nd stage
thermostat
T
Remote lock-out lamp
(230V - 0.5A max.), if required
Burners’s
7 pole socket
B5 T6 T7 T8
Yellow/
green
D
3
L
4
5
6
8
9
C
D
M
~
12
11
B
C
AD
7
C
2nd Valve
2
4 pole socket
E
(50V)
1
1st Valve
CARRIED-OUT IN THE FACTORY
N
A
A
Motor
Capacitor
D
Terminal block of
control-box 530SE
Electronic start
delaying device
4
5
6
3
2
1
2061425
C
4 pin plug
D5822
A = Brown
B = White
C = Blue
D = Black
3397
6
GB
E = Grey
*
NOTE:
The burner is provided with a 7 pole socket for the direct electrical connection to the boiler’s plug (see diagram at
page 6). Should the boiler be without plug, it is then necessary:
– remove the socket and respective cable mounted on the burner;
– carry out the electrical connection direct to the wiring terminal block of the burner as shown on the diagram below.
3.5 ELECTRICAL WIRING
WARNING: DO NOT EXCHANGE THE NEUTRAL WITH THE PHASE
WARNING
230V ~ 50Hz
N
NOTE:
– Wires of 1 mm2 section.
– The electrical wiring carried out by the installer must be in
compliance with the rules in force in the Country.
Connect 2nd stage thermostat between clamps T6
and T8 removing the bridge.
L
Switch with fuse
6A max.
T
2nd stage
thermostat
T Regulating
Neutral
thermostat
T
Limit thermostat
with manual resetting
B5 T6 T7 T8
4 pole socket
Remote lock-out lamp
(230V - 0.5A max.),if required
4
5
7
6
C
C
D
AD
8
9
B
M
~
A
Motor
Capacitor
12
11
C
D
Terminal block of
control-box 530SE*
Electronic start
delaying device
4
5
6
3
2
1
2061425
3
2nd Valve
2
L
(50V)
1
1st Valve
CARRIED-OUT IN THE FACTORY
N
4 pin plug
D5823
A = Brown
B = White
C = Blue
D = Black
3397
7
GB
To remove the control-box from the burner, loosen screw (A) (see figure below) and pull towards the arrow.
S7348
RUN OF THE ELECTRICAL CABLES
1 – Cable gland
2 – Cable-clamp
3 – Terminal block
4 – Clamps for 2nd stage thermostat
5 – 4 pole socket for 2nd stage thermostat
6 – 7 pole socket for burner
N
Ignition
transformer
S7057
Photoresistance
L
-
Neutral
-
Lock-out lamp
-
Phase
-
Burner-earth
The photoresistance is fitted directly into the control-box
(underneath the ignition-transformer) on a plug-in support.
TESTING
Check the shut-down of the burner by opening the thermostats.
3397
8
GB
4. WORKING
4.1 COMBUSTION ADJUSTMENT
In conformity with Efficiency Directive 92/42/EEC the application of the burner on the boiler, adjustment and testing
must be carried out observing the instruction manual of the boiler, including verification of the CO and CO2 concentration in the flue gases, their temperatures and the average temperature of the water in the boiler.
To suit the required appliance output, fit the nozzle, the settings of the combustion head and the air damper opening
in accordance with the following schedule.
Light oil
Kerosene
Nozzle
GPH
2.00
2.25
2.50
2.75
3.00
3.50
4.00
4.50
5.00
5.50
Angle
60°
60°
60°
60°
60°
60°
60°
60°
60°
60°
1.75
2.00
2.25
2.50
3.00
3.50
4.00
4.50
60°
60°
60°
60°
60°
60°
60°/45°
60°/45°
Pump
pressure
bar
1st
2nd
7*
11
7*
11
7*
11
7*
11
7*
11
7*
11
7*
11
7*
11
7*
11
7*
10
9
9
9
9
9
9
9
9
14
14
14
14
14
14
14
14
Burner
output
kg/h ± 4%
1st
2nd
5.90
7.27
6.37
8.02
6.90
8.62
7.50
9.56
8.56
10.64
9.35
12.0
10.50
13.15
12.24
15.32
14.35
17.95
15.27
18.30
6.1
7.0
7.8
8.7
10.4
12.2
13.9
15.6
Combustion head
adjustment
7.6
8.7
9.8
10.8
13.0
15.2
17.3
19.5
Air damper adjustment
Set-point
0 (min)
1
1.5
2
2.5
3
3.5
4
5
6 (max)
1st stage
Set-point
1.9
2
2.1
2.3
2.4
2.5
2.7
2.9
4.1
4.5
2nd stage
Set-point
2.3
2.5
2.6
2.9
3.1
3.3
3.8
4
8 (max)
8 (max)
1
1.5
2
2.5
3.5
4
5
6
2.3
2.5
2.7
2.9
3.2
3.5
4.5
5
2.6
3.0
3.5
3.8
4.3
5.0
6.5
8.0
*With Kerosene, the pressure value in the 1st stage must be no greater than 7 bar.
4.2 NOZZLES RECOMMENDED
Monarch type R - PLP
Delavan type B - W
Steinen type S - SS
Danfoss type S
Light oil
Kerosene
–
–
Angle
60° : in most cases. Particularly suited to avoid flamedetachment during ignition.
–
: Not foreseen
: Applicable
COMBUSTION HEAD SETTING: This is done when fitting the nozzle, with the blast tube removed. It depends on
the output of the burner and is carried out by rotating the regulating rod, till the terminal plane of the blast tube is level with the set-point, as indicated in the schedule.
In the sketch on the left, the combustion head is set for an
Terminal plane of the blast tube
output of 3.5 GPH at 7/11 bar, while the shutter is level
with set-point 3, as required by the above schedule.
2
5 3 1
Regulating rod
Shutter
D5284
Blast tube
3397
9
GB
Combustion head settings indicated in the schedule are valid for most cases.
The setting of the fan output according to the installation should normally be done only through the air damper.
Should one subsequently want to retouch also the setting of the combustion head, with the burner running, operate
on the rod (1) with a 6 mm spanner (2) as follows:
Turn to the right: (sign +), in order to increase the volume of
air entering the combustion chamber and thus diminishing its
pressure.
There is a reduction of CO2 and the adhesion of the flame to the
air diffuser disc improves. (Setting advisable for ignitions at low
temperatures).
Turn to the left: (sign –), in order to reduce the volume of air
entering the combustion chamber and thus increasing its pressure. The CO2 improves and the adhesion of the flame to the diffuser tends to reduce. (This setting is not advisable for ignitions
at low temperatures).
In any case do not bring the combustion head setting more than
one point away from that indicated in the schedule. One setpoint corresponds to 3 turns of the rod; a hole (3) at its end facilitates counting the number of turns.
2
3
1
6
D8068
AIR DAMPER ADJUSTMENT:
The settings indicated in the schedule refer to the burner with its metal cover fitted and the combustion chamber with
“zero” depression. These regulations are purely indicative.
Each installation however, has its own unpredictable working conditions: actual nozzle output; positive or negative
pressure in the combustion-chamber, the need of excess air, etc. All these conditions may require a different airdamper setting.
It is important to take account of the fact that the air output of the fan differs according to whether the burner
has its metal cover fitted or not.
Therefore we recommended to proceed as follows:
PANEL
³ adjust the air damper as indicated in the schedule (see page 9);
³ mount the cover, simply by means of the upper screw;
³ check smoke number;
³ should it become necessary to modify the air output, remove the
cover by loosening the screw, adjust the air damper, remount the
cover and finally recheck the smoke number.
NOTE:
When the burner works at a firing rate higher than 18 kg/h
remove the panel fitted inside the metal cover. (See figure).
S7352
3397
10 GB
4.3 PUMP PRESSURE AND AIR OUTPUT
The burner is provided with an hydraulic device controlled by the electronic start delaying device which reduces to
approx. 70% the max. output of fuel and air.
Item A
II - I
Item B
I
II
9
II - I
I
9
II
S7353
S7354
1st STAGE ADJUSTMENT
Adjustment of air shutter: place the small plug (9) of the electronic start delaying device (10) into the position I
(Item A).
In this way the burner will remain permanently in the 1st stage.
Unloosen the nut (2), turn the screw (3) until the air shutter (1) reaches the position desired.
Then lock the nut (2).
Pressure regulation: this is set at 7 bar at the factory.
Should such pressure be reset or changed, just turn the screw (4).
The pressure gauge must be mounted in place of cap (5).
2nd STAGE ADJUSTMENT
Adjustment of air shutter: place the small plug (9) of the electronic start delaying device (10) into the position II
(Item B).
In this way the burner remains permanently in the 2nd stage.
Unloosen the nut (6), turn the screw (7) until the air shutter (1) reaches the position desired.
Then lock the nut (6).
Pressure regulation: this is set at 10 bar at the factory.
Should such pressure be reset or changed, just turn the screw (8).
The pressure gauge must be mounted in place of cap (5).
3397
11 GB
4.4 ELECTRODE SETTING
WARNING: Before assembling or removing the nozzle, loosen the screw (A) and move the electrodes ahead.
WARNING
MOVE THE ELECTRODE HOLDER
BACKWARDS TO THE END
4 ± 0.3 mm
D5288
A
6.5 ± 0.5 mm
4.5 BURNER START-UP CYCLE
Normal
Lock-out, due to light-failure
Thermostat
Motor
Ignition transformer
1st stage valve
2nd stage valve
Lock-out lamp
~12s
~5s
D5810
3397
12 GB
~12s
~5s
4.6 ELECTRONIC START DELAYING DEVICE
This electronic start delaying device showed in fig. on the right
can be wired to a 2nd stage thermostat; in this case it performs
two functions:
1. Delay of 5 - 6 seconds in the intervention of the 2nd stage valve
against 1st stage valve.
2. In relation of the position of the plug A, it determines the type of
required operation:
S7355
A
II - I
I
Position I - II
= Burner operation in 1 st or 2nd stage on request
of the 2nd stage thermostat.
I
Position II
= Burner operation only in 2nd stage - compulsorily.
I
Position I
= Burner operation only in 1st stage - compulsorily.
II
II - I
II
II - I
II
3397
13 GB
ÍNDICE
1.
1.1
DESCRICIÓN QUEMADOR . . . . . . . . . . . . . . . . . . . . . . . . . . . . . . . . . . . . . . . . . . . . . . . . . . . . . . 2
Equipamiento . . . . . . . . . . . . . . . . . . . . . . . . . . . . . . . . . . . . . . . . . . . . . . . . . . . . . . . . . . . . . . . . . 2
2.
2.1
2.2
2.3
CARACTERÍSTICAS TÉCNICAS .
Características técnicas . . . . . . . . .
Dimensiones . . . . . . . . . . . . . . . . .
Campo de trabajo (según EN 267) .
.
.
.
.
.
.
.
.
.
.
.
.
.
.
.
.
.
.
.
.
.
.
.
.
.
.
.
.
.
.
.
.
.
.
.
.
.
.
.
.
.
.
.
.
.
.
.
.
.
.
.
.
.
.
.
.
.
.
.
.
.
.
.
.
.
.
.
.
.
.
.
.
.
.
.
.
.
.
.
.
.
.
.
.
.
.
.
.
.
.
.
.
.
.
.
.
.
.
.
.
.
.
.
.
.
.
.
.
.
.
.
.
.
.
.
.
.
.
.
.
.
.
.
.
.
.
.
.
.
.
.
.
.
.
.
.
.
.
.
.
.
.
.
.
.
.
.
.
.
.
.
.
.
.
.
.
.
.
.
.
.
.
.
.
.
.
.
.
.
.
.
.
.
.
.
.
.
.
.
.
.
.
.
.
.
.
.
.
.
.
.
.
3
3
3
3
3.
3.1
3.2
3.3
3.4
3.5
INSTALACIÓN. . . . . . . . . .
Fijación a la caldera . . . . . .
Posición de mantenimiento
Instalación hidráulica . . . . .
Cableado eléctrico . . . . . . .
Conexión eléctrica . . . . . . .
.
.
.
.
.
.
.
.
.
.
.
.
.
.
.
.
.
.
.
.
.
.
.
.
.
.
.
.
.
.
.
.
.
.
.
.
.
.
.
.
.
.
.
.
.
.
.
.
.
.
.
.
.
.
.
.
.
.
.
.
.
.
.
.
.
.
.
.
.
.
.
.
.
.
.
.
.
.
.
.
.
.
.
.
.
.
.
.
.
.
.
.
.
.
.
.
.
.
.
.
.
.
.
.
.
.
.
.
.
.
.
.
.
.
.
.
.
.
.
.
.
.
.
.
.
.
.
.
.
.
.
.
.
.
.
.
.
.
.
.
.
.
.
.
.
.
.
.
.
.
.
.
.
.
.
.
.
.
.
.
.
.
.
.
.
.
.
.
.
.
.
.
.
.
.
.
.
.
.
.
.
.
.
.
.
.
.
.
.
.
.
.
.
.
.
.
.
.
.
.
.
.
.
.
.
.
.
.
.
.
.
.
.
.
.
.
.
.
.
.
.
.
.
.
.
.
.
.
.
.
.
.
.
.
.
.
.
.
.
.
.
.
.
.
.
.
.
.
.
.
.
.
.
.
.
.
.
.
.
.
.
.
.
.
.
.
.
.
.
.
.
.
.
.
.
.
.
.
.
.
.
.
.
.
.
.
.
.
4
4
4
5
6
7
4.
4.1
4.2
4.3
4.4
4.5
4.6
FUNCIONAMIENTO . . . . . . . . . . . . .
Regulación de la combustión . . . . . . .
Boquillas recomendadas . . . . . . . . . .
Presión de la bomba y caudal de aire
Regulación electrodos . . . . . . . . . . . .
Programa de puesta en marcha . . . . .
Retardador electrónico . . . . . . . . . . . .
.
.
.
.
.
.
.
.
.
.
.
.
.
.
.
.
.
.
.
.
.
.
.
.
.
.
.
.
.
.
.
.
.
.
.
.
.
.
.
.
.
.
.
.
.
.
.
.
.
.
.
.
.
.
.
.
.
.
.
.
.
.
.
.
.
.
.
.
.
.
.
.
.
.
.
.
.
.
.
.
.
.
.
.
.
.
.
.
.
.
.
.
.
.
.
.
.
.
.
.
.
.
.
.
.
.
.
.
.
.
.
.
.
.
.
.
.
.
.
.
.
.
.
.
.
.
.
.
.
.
.
.
.
.
.
.
.
.
.
.
.
.
.
.
.
.
.
.
.
.
.
.
.
.
.
.
.
.
.
.
.
...
...
...
...
...
...
...
.
.
.
.
.
.
.
.
.
.
.
.
.
.
.
.
.
.
.
.
.
....
....
....
....
....
....
....
....
....
....
....
....
....
....
.
.
.
.
.
.
.
. 9
. 9
. 9
11
12
12
13
.
.
.
.
.
.
.
.
.
.
.
.
.
.
.
.
.
.
.
.
.
.
.
.
.
.
.
.
.
.
.
.
.
.
.
.
3397
1
E
.......
.......
.......
.......
.......
.......
.......
1. DESCRICIÓN QUEMADOR
³ Quemador conforme a las Directivas CEE: EMC 89/336/CEE - 2004/108/CEE, 73/23/CEE - 2006/95/CEE de Bajo
Voltaje, 98/37/CEE de Máquinas y 92/42/CEE de Rendimientos.
³ El quemador tiene un nivel de protección IP X0D (IP 40), según EN 60529.
Fig. 1
D8078
1–
2–
3–
4–
5–
6–
7–
8–
9–
10 –
11 –
Tubo de retorno
Tubo de aspiración
Racor del manómetro
Regulador de presión, 2ª llama
Racor del vacuómetro
Tomas hidráulicas con registro del aire
1.1 EQUIPAMIENTO
CANTIDAD
DESCRIPCIÓN
2
1
4
1
1
1
Tubos flexibles con racores
Brida con junta aislante
Tornillos y tuercas para la brida
Conjunto mantenimiento
Tornillo con dos tuercas para la brida
Conector macho de 4 contactos
3397
2
E
Tornillo de regulación del cabezal de combustión
Indicador de bloqueo y botón de reset
Brida con junta aislante
Presión de regulación, 1ª llama
Retardador electrónico
2. CARACTERÍSTICAS TÉCNICAS
2.1 CARACTERÍSTICAS TÉCNICAS
Capacidad - Rendimiento térmico
Gasóleo: 71 / 89 - 231 kW – 6 / 7.5 - 19.5 kg/h
Queroseno:72 / 86 - 219 kW – 6 / 7.2 - 18.3 kg/h
Combustible
Gasóleo, viscosidad máx. a 20 °C: 4 ÷ 6 mm2/s (Hi = 11.86 kWh/kg)
Queroseno, viscosidad máx. a 20 °C: 1.6 ÷ 6 mm2/s (Hi = 11.97 kWh/kg)
Alimentación eléctrica
Monofásica,
Motor
Corriente absorbida 1.4A – 2800 rpm – 293 rad/s
Capacitor
5 µF
Transformador de encendido
Secundario 8 kV – 16 mA
Presión
de la bomba: 7 - 11 bar – 101.5 ÷159.5 psi
Potencia eléctrica absorbida
0.33 kW
230V ± 10% ~ 50Hz
2.2 DIMENSIONES
Brida
Quemador
350
213
118
ø 125
=
11
160
230
45°
99
298
99
45°
=
190
41
2.3 CAMPO DE TRABAJO (SEGÚN EN 267)
D8161
Presión en la cámara de
combustión - mbar
4.0
3.2
2.4
1.6
0.8
0
4
6
60
295
8
90
10
120
12
150
14
16
180
18
20
210
240
3397
3
E
22
Rendimiento del
Queroseno - kg/h
Potencia térmica - kW
D5283
3. INSTALACIÓN
3.1 FIJACIÓN A LA CALDERA
³ Introduzca en la brida (1) el tornillo y las dos tuercas, (ver fig. 2).
³ Ensanche, si es necesario, los agujeros de la protección aislante (5), (ver fig. 3).
³ Fije a la portezuela de la caldera (4) la brida (1) mediante los tornillos (2) y (si es necesario) las tuercas (3)
interponiendo la protección aislante (5), (ver Fig. 4).
3.2 POSICIÓN DE MANTENIMIENTO
Accesibilidad al cabezal de combustión, al grupo disco estabilizador - electrodos y a la boquilla, (ver Fig. 5).
³ Retirar el quemador de la caldera luego de haber quitado la tuerca de fijación a la brida.
³ Enganchar el quemador a la brida (1), sacar el cabezal de combustión (6) luego de haber aflojado los tornillos (7).
³ Extraer del portaboquilla (8) el grupo soporte del disco estabilizador (9) luego de haber aflojado el tornillo.
³ Enroscar la boquilla (10).
4
5
Fig. 4
Fig. 2
Fig. 3
2
5
1
D5012
E9022
1
2
D8058
9
1
6
10
8
Fig. 5
7
D8056
D8057
Compruebe que una vez instalado el quemador quede ligeramente
inclinado hacia abajo. (Ver fig. 6).
Fig. 6
Es posible conectar los tubos de alimentación del gasóleo a ambos
lados del quemador.
D5572
3397
4
E
3
3.3 INSTALACIÓN HIDRÁULICA
ATENCIÓN: antes de poner en marcha el quemador asegúrese que el tubo de retorno no esté obstruido: las obstrucciones pudieran causar la rotura de los órganos de estanqueidad de la bomba.
ATENCIÓN
La bomba está prevista para trabajar en bitubo.
Para el funcionamiento en monotubo, se debequitar el tornillo de by-pass (A), (ver la figura).
H
metros
H
max. 4 m
D5219
min. 0.1 m
SISTEMA
NO PERMITIDO
EN ALEMANIA
0.5
1
1.5
2
L metros
I. D.
8 mm
I.D.
10 mm
10
20
40
60
20
40
80
100
A
D5809
CEBADO DE LA BOMBA
Aflojar el racor del vacuómetro (5, fig. 1, página 1) y hasta que salga combustible.
= Diferencia de nivel.
= Máx. longitud del tubo de
H
L
D5220
max. 4 m
H
aspiración.
I.D. = Diámetro interno del
tubo de alimentación de
combustible.
H
metros
0
0.5
1
1.5
2
3
3.5
L metros
I. D.
8 mm
I.D.
10 mm
35
30
25
20
15
8
6
100
100
100
90
70
30
20
No hay que sobrepasar la depresión máxima
de 0.4 bar (30 cm Hg). Si se supera dicho
límite, el gasóleo libera humos.
Por encima de este valor se produce la
gasificación del combustible.
La tubería de retorno debe llegar a la
misma altura de la de aspiración; en este
caso no se necesita una válvula antirretorno.
Cuando la tubería de retorno llega por arriba
del nivel de combustible, se debe utilizar una
válvula antirretorno.
Sin embargo, esta solución es menos segura
que la anterior, debido a la eventual falta de
estanqueidad de la válvula.
CEBADO DE LA BOMBA
Arrancar el quemador y esperar el cebado. Si
el bloqueo del quemador se produce antes de
la llegada del combustible, esperar como
mínimo 20 segundos e iniciar de nuevo esta
operación.
H
ATENCIÓN:
Q Verificar periódicamente las condiciones
de los tubos flexibles.
Usando el queroseno, tienen que ser substituidos por lo menos cada dos anos.
Se debe instalar un filtro en el tubo de
aspiración de combustible.
3397
5
E
3.4 CABLEADO ELÉCTRICO
ATENCIÓN: NO INVERTIR EL NEUTRO CON LA FASE
ATENCIÓN
230V ~ 50Hz
L
NOTAS:
– Cables de 1 mm2 de sección.
– Las conexiones eléctricas efectuadas por el instalador deben
cumplir la normativa vigente en el país.
O Para la conexión a las calderas sin un conector macho de
7 contactos, ver la página 5.
Conectar el termostato de 2ª llama entre las abrazaderas
T6 y T8, eliminando el puente.
N
Interruptor con
fusible
Neutro
6A máx.
h Cuentahoras
T Regulación del termostato
T Termostato de regulación
con reinicio manual
1
Indicador de bloqueo remoto
(230V - 0.5A máx.), si se requiere
N T1 T2 S3 B4
2ª llama
termostato
T
Conector
hembra de
7 contactos
B5 T6 T7 T8
Amarillo/
verde
C
D
N
3
L
4
5
6
8
9
C
2ª Válvula
M
~
12
11
B
C
D
AD
7
(50V)
2
Conector hembra
de 4 contactos
E
C
1ª Válvula
SE REALIZA EN LA FÁBRICA
1
A
Conector macho
de 4 contactos
A
Motor
Capacitor
D
Bloque de terminales de la caja de
control 530SE*
Retardador
electrónico
4
5
6
3
2
1
2061425
Conector
macho de
7 contactos
D5822
A = Marrón
B = Blanco
C = Azul
D = Negro
3397
6
E
E = Gris
NOTAS:
El quemador se suministra con un conector hembra de 7 contactos para la conexión eléctrica directa con el conector
macho de la caldera (ver el diagrama en la página 4). Si la caldera no tiene un conector macho, es necesario:
– quitar el conector hembra y el cable montado en el quemador;
– realizar la conexión eléctrica directa al bloque de terminales de cableado del quemador como se muestra en el
diagrama de abajo.
3.5 CONEXIÓN ELÉCTRICA
ATENCIÓN: NO INVERTIR EL NEUTRO CON LA FASE
ATENCIÓN
230V ~ 50Hz
N
NOTAS:
– Cables de 1 mm2 de sección.
– Las conexiones eléctricas efectuadas por el instalador
deben cumplir la normativa vigente en el país.
Conectar el termostato de 2ª llama entre las abrazaderas T6 y T8, eliminando el puente.
L
Interruptor con
fusible
6A máx.
2ª llama
termostato
T
Regulación del
T termostato
Neutro
Termostato
T de regulación
con reinicio
manual
B5 T6 T7 T8
Conector hembra
de 4 contactos
Indicador de bloqueo remoto
(230V - 0.5A máx.), si se
requiere
4
5
C
C
D
AD
7
6
8
9
B
M
~
A
Motor
Capacitor
12
11
C
D
Bloque de terminales de la caja de
control 530SE*
Retardador
electrónico
4
5
6
3
2
1
2061425
3
2ª Válvula
2
L
(50V)
1
1ª Válvula
SE REALIZA EN LA FÁBRICA
N
Conector macho
de 4 contactos
D5823
A = Marrón
B = Blanco
C = Azul
D = Negro
3397
7
E
Para quitar la caja de control del quemador, destornillar el tornillo (A) (ver la figura de abajo) y extraer la flecha.
S7348
DISPOSICIÓN DE LOS CABLES ELÉCTRICOS
1 – Prensacables
2 – Abrazadera de cables
3 – Bloque de terminales
4 – Abrazaderas para termostato de 2ªllama
5 – Conector hembra de 4 contactos para termostato de
2ª llama termostato
6 – Conector hembra de 7 contactos para quemador
N
Transformador
de encendido
- Neutro
- Indicador de bloqueo
L
- Fase
- Quemador-tierra
S7057
Fotorresistencia
La fotorresistencia se instala directamente en la caja de
control (debajo del transformador de encendido) en el
soporte de enchufe.
PRUEBA
Compruebe el apagado del quemador abriendo los termostatos.
3397
8
E
4. FUNCIONAMIENTO
4.1 REGULACIÓN DE LA COMBUSTIÓN
Conforme a la Directiva de Rendimiento 92/42/CEE, seguir las indicaciones del manual de la caldera para montar el
quemador, efectuar la regulación y probar verificando la concentración de CO y CO2, en los humos, su temperatura y
la media del agua de la caldera.
Según el caudal de combustible exigido por la caldera se debe determinar la boquilla, la presión de la bomba, la
regulación del cabezal de combustión y la regulación del registro del aire, ver las tablas que siguen.
Gasóleo
Queroseno
Boquilla
GPH
2.00
2.25
2.50
2.75
3.00
3.50
4.00
4.50
5.00
5.50
Angle
60°
60°
60°
60°
60°
60°
60°
60°
60°
60°
1.75
2.00
2.25
2.50
3.00
3.50
4.00
4.50
60°
60°
60°
60°
60°
60°
60°/45°
60°/45°
Presión
de la bomba
bar
1a
2a
7*
11
7*
11
7*
11
7*
11
7*
11
7*
11
7*
11
7*
11
7*
11
7*
10
9
9
9
9
9
9
9
9
14
14
14
14
14
14
14
14
Caudal del
quemador
kg/h ± 4%
1a
2a
5.90
7.27
6.37
8.02
6.90
8.62
7.50
9.56
8.56
10.64
9.35
12.0
10.50
13.15
12.24
15.32
14.35
17.95
15.27
18.30
6.1
7.0
7.8
8.7
10.4
12.2
13.9
15.6
Regulación
del cabezal de
combustión
Regulación del registro del aire
Punto de ajuste
0 (mín)
1
1.5
2
2.5
3
3.5
4
5
6 (máx)
1a llama
Punto de ajuste
1.9
2
2.1
2.3
2.4
2.5
2.7
2.9
4.1
4.5
2a llama
Punto de ajuste
2.3
2.5
2.6
2.9
3.1
3.3
3.8
4
8 (máx)
8 (máx)
1
1.5
2
2.5
3.5
4
5
6
2.3
2.5
2.7
2.9
3.2
3.5
4.5
5
2.6
3.0
3.5
3.8
4.3
5.0
6.5
8.0
7.6
8.7
9.8
10.8
13.0
15.2
17.3
19.5
* Con funcionamiento a queroseno, el valor de la presión en 1a llama no debe superar los 7 bar.
4.2 BOQUILLAS RECOMENDADAS
Monarch type R - PLP
Delavan type B - W
Steinen type S - SS
Danfoss type S
Gasóleo
Queroseno
–
–
Ángulo
60° : en la mayoría de los casos. Se usa preferentemente
para evitar que falle la llama durante el encendido.
–
: No previsto
: Aplicable
REGULACIÓN DEL CABEZAL DE COMBUSTIÓN: Se realiza cuando se coloca la boquilla, con el tubo de ventilación quitado. Depende de la capacidad del quemador y se lleva a cabo girando la varilla de regulación hasta que el
plano terminal del tubo de ventilación esté a nivel con el punto de ajuste, como se indica en la tabla.
En el diagrama de la izquierda, el cabezal de comPlano terminal del tubo de ventilación
bustión se regula para un caudal de 3.5 GPH a 7/11
bar, y el obturador está a nivel con el punto de
ajuste 3, como se indica en la tabla de arriba.
2
5 3 1
Varilla de regulación
Obturador
D5284
Tubo de ventilación
3397
9
E
Los ajustes del cabezal de combustión de la tabla son válidos en la mayoría de los casos.
El ajuste de la salida del ventilador de acuerdo con la instalación se debe realizar normalmente a través del registro
de aire. Si se desea volver a ajustar posteriormente esta versión de combustión con el quemador trabajando, accionar la varilla (1) con una llave de 6 mm (2) como sigue:
GIRO HACIA LA DERECHA: (signo +)
Para aumentar el volumen de aire que entra en la cámara de
combustión y así disminuir la presión.
Hay una reducción de CO2 y la adherencia de la llama al disco
de difusión de aire aumenta. (Este ajuste se recomienda para
los encendidos a bajas temperaturas).
GIRO HACIA LA IZQUIERDA: (signo -)
Para reducir el volumen de aire que entra en la cámara de combustión y así aumentar su presión. El CO2 aumenta y la adherencia de la llama al difusor tiende a reducirse. (Este ajuste no
se recomienda para los encendidos a bajas temperaturas).
En cualquier caso, no mueva el ajuste del cabezal de combustión más allá del punto indicado en la tabla. Un punto de ajuste
corresponde a 3 giros de la varilla; un hueco (3) al final facilita el
conteo del número de giros.
2
3
1
6
D8068
REGULACIÓN DEL REGISTRO DEL AIRE:
El ajuste indicado en la tabla se refiere al quemador con su tapa de metal puesta y la cámara de combustión con
depresión "cero". Estas regulaciones son solamente indicativas.
Sin embargo, cada instalación tiene condiciones de trabajo impredecibles: caudal real de las boquillas; presión positiva o negativa en la cámara de combustión, necesidad de exceso de aire, etc. Todas estas condiciones pudieran
requerir un ajuste diferente del registro de aire.
Es importante tener en cuenta que la salida de aire del ventilador varía si el quemador tiene la tapa de metal
puesta o no.
Por lo tanto recomendamos proceder como sigue:
PANEL
³ ajustar el registro del aire como se indica en la tabla (Ver pág. 9);
³ montar la tapa, simplemente colocando los tornillos de arriba;
³ comprobar el número de humos;
³ si fuera necesario modificar el caudal de aire, quitar la tapa
aflojando los tornillos, ajustar el registro de aire, volver a montar la
tapa y volver a comprobar el número de humos.
NOTAS:
Cuando el quemador trabaja a un régimen de encendido superior a 18
kg/h quitar el panel colocado dentro de la tapa de metal. (Ver la figura).
S7352
3397
10
E
4.3 PRESIÓN DE LA BOMBA Y CAUDAL DE AIRE
El quemador se suministra con un dispositivo hidráulico controlado por un retardador electrónico que reduce a
aproximadamente 70% el caudal máximo de gasóleo y aire.
Elemento A
II - I
Elemento B
I
II
II - I
9
I
9
II
S7353
S7354
1ª LLAMA - REGULACIÓN
Regulación del obturador de aire: coloque la clavija pequeña (9) del retardador electrónico (10) en la posición
(Elemento A). Así el quemador permanecerá permanentemente en la 1ª llama.
Apretar la tuerca (2), gire el tornillo (3) hasta que el obturador de aire (1) llegue a la posición deseada.
Luego, bloquee la tuerca (2).
I
Regulación de presión: se realiza a 8 bar en la fábrica.
Si la presión se debe reiniciar o cambiar, girar el tornillo (4). El manómetro se debe montar en lugar de la tapa (5).
2ª LLAMA - REGULACIÓN
Regulación del obturador de aire: coloque la clavija pequeña (9) del retardador electrónico (10) en la posición II
(Elemento B). Así el quemador permanecerá permanentemente en la 2ª llama.
Apretar la tuerca (6), gire el tornillo (7) hasta que el obturador de aire (1) llegue a la posición deseada. Luego, bloquee la tuerca (6).
Regulación de presión: se realiza a 14 bar en la fábrica.
Si la presión se debe reiniciar o cambiar, girar el tornillo (8). El manómetro se debe montar en lugar de la tapa (5).
3397
11
E
4.4 REGULACIÓN ELECTRODOS
ATENCIÓN: Antes de ensamblar o quitar la boquilla, aflojar el tornillo (A) y mover hacia adelante los
electrodos.
ATENCIÓN
MOVER EL PORTAELECTRODO
HACIA ATRÁS HASTA EL FINAL
4 ± 0.3 mm
D5288
A
6.5 ± 0.5 mm
4.5 PROGRAMA DE PUESTA EN MARCHA
Bloqueo, debido a un pequeño fallo
Normal
Termostato
Motor
Transf. de encendido
1 válvula de 1ª llama
2 válvula de 2ª llama
Indicador de bloqueo
~12s
D5810
~5s
3397
12
E
~12s
~5s
4.6 RETARDADOR ELECTRÓNICO
El retardador electrónico mostrado en la figura de la derecha se
puede conectar al termostato de 2ª llama.
El economizador, conectado al termostato de 2ª llama realiza
dos funciones:
1. Retardo de 5 - 6 segundos en la activación de la válvula de
2ª llama en relación con la válvula de 1ª llama.
2. En relación con la posición de la clavija A, determina el tipo de
operación requerida:
S7355
A
II - I
I
Posición
I - II = Operación del quemador en 1ª o 2ª llama solicitada por la
2ª llama del termostato.
II
II - I
I
Posición
II
= Operación del quemador solamente en 2ª llama obligatoriamente.
I
Posición
I
= Operación del quemador solamente en 1ª llama obligatoriamente.
II
II - I
II
3397
13
E
RIELLO S.p.A.
I-37045 Legnago (VR)
Tel.: +39.0442.630111
http:// www.riello.it
http:// www.rielloburners.com
Con riserva di modifiche - Subject to modifications - Con la posibilidad de modificaciones