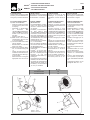
1
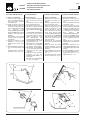
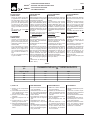
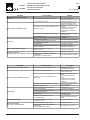
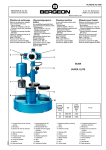
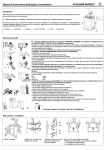
2
MAINTENANCE
PICJET®
GUNJET
•
HAMMER BLASTS & AIR BLASTERS
INSTALLATION, OPERATION AND MAINTENANCE
•
LUFTSTOSSAUSTRAGHILFEN
EINBAU-, BETRIEBS-, UND WARTUNGSANLEITUNG
•
SYSTEMES DE DEVOUTAGE A PERCUSSION
INSTALLATION, UTILISATION ET ENTRETIEN
•
SISTEMI DI DISCESA A PERCUSSIONE
All rights reserved © WAMGROUP
INSTALLAZIONE, USO E MANUTENZIONE
CATALOGUE No.
OL.3001-3002 M.
ISSUE
CIRCULATION
A
100
DATE OF LATEST UPDATE
CREATION DATE
06 - 2004
06.04
- INDEX
PICJET® - INHALTSVERZEICHNIS
GUNJET
- INDEX
- INDICE
2 MAINTENANCE CATALOGUE
OL.3001-3002 INDEX
WARTUNGS-KATALOG
OPERATION AND MAINTENANCE.............................................. BETRIEBS- UND WARTUNGSANLEITUNG............................. M.3 →.11
2 CATALOGUE D’ENTRETIEN
CATALOGO DI MANUTENZIONE
UTILISATION ET ENTRETIEN...................................................... USO E MANUTENZIONE.......................................................... M.3 →.11
3 SPARE PARTS CATALOGUE
ERSATZTEILKATALOG
SPARE PARTS......................................................................... ERSATZTEILE........................................................................... R.14 →.17
3 CATALOGUE PIECES DE RECHANGE
CATALOGO RICAMBI
PIECES DE RECHANGE............................................................ PEZZI DI RICAMBIO................................................................... R.14→.17
06.04
- OPERATION AND MAINTENANCE
PICJET® GUNJET
BETRIEBS- UND WARTUNGSANLEITUNG
2
- UTILISATION ET ENTRETIEN
- USO E MANUTENZIONE
OL.3001-3002 M. 3
A) ADDRESS OF LOCAL DEAL- A) ADRESSE DES HÄNDLERS A) ADRESSE DU REVENDEUR OU A) INDIRIZZO RIVENDITORE O
ER OR LOCAL SERVICE POINT ODER DES KUNDENDIENSTES DU SERVICE APRES-VENTE LO- PUNTO DI ASSISTENZA LOCAVOR ORT
LE
CAL
B) IDENTIFICATION OF THE B) INTERPRETATION DES TY- B) INTERPRETATION DE LA B) INTERPRETAZIONE DELLA
EQUIPMENT
PENSCHILDES
PLAQUE
TARGHETTA
For a correct identification of the
equipment please refer to the
code number shown on the acknowledgement of order, on the
invoice and on the equipment itself.
_ _
Zur eindeutigen Identifikation des
Geräts auf die Seriennummer
Bezug nehmen. Diese befindet
sich in der Auftragsbestätigung,
in der Rechnung und auf dem
Typenschild.
_ _ _
_
Pour l’identification correcte de
la machine il faut se référer au
numéro de matricule qui se trouve sur la confirmation de commande, sur la facture et sur la
plaque de la machine-même.
Per una corretta identificazione
della macchina, bisogna fare riferimento al numero di matricola
che si trova sulla conferma d'ordine, sulla fattura e sulla targhetta posta sulla macchina stessa.
_
Version of striker (where present)
Version der Schlagvorrichtung (falls vorgesehen)
Version enclume (où prévue)
A
Versione incudine (dove prevista)
B
Control - Antrieb
Commande - Comando
E = Electrical - Elektrisch - Electrique - Elettrico
P = Pneumatic* - Pneumatisch*
Pneumatique* - Pneumatico*
032
Size - Baugröße
Taille - Grandezza
040
063
080
Model (type) - Modell (Typ)
Modèle (type) - Modello (tipo)
PJ = PICJET®
Combined percussion gun - Kombiklopfer
Percuteur combiné - Percussore combinato
PG = GUNJET
Air Cannon - Luftkanone
Désagrégateur - Disgregatore
* Not yet in production - Zur Zeit nicht lieferbar
Pas in production - Non ancora in produzione
06.04
- OPERATION AND MAINTENANCE
PICJET®
GUNJET
- BETRIEBS- UND WARTUNGSANLEITUNG
2
- UTILISATION ET ENTRETIEN
- USO E MANUTENZIONE
C) CONTRA-INDICATIONS
C) GEGENANZEIGEN
With the exception of hazardous
environments, there are no contraindications if normal precautions prescribed for this equipment and the instructions given
in this manual are followed.
As regards PICJET ® Hammer
Blasts, if the product in contact
with the membrane is acidic or
has too high or too low a temperature, please contact the Manufacturer.
Mit Ausnahme der explosionsgefährdeten Bereiche gibt es keine
Gegenanzeigen zur Verwendung, wenn die normalen Vorsichtsmaßnahmen für Geräte
dieses Typs zusammen mit den
Angaben dieses Handbuchs beachtet werden.
Falls das Produkt, das mit der
Membran in Berührung kommt, im
Fall des PICJET® Kombiklopfers
zu sauer ist oder eine zu hohe
oder zu niedrige Temperatur
aufweist, wenden Sie sich direkt
an den Hersteller.
OL.3001-3002 M. 4
C) CONTRE-INDICATIONS A
L’UTILISATION
A l’exclusion des environnements
explosibles, il n’y a aucune contre indications à l’utilisation si on
respecte les précautions normales pour les machines de ce type
et les indications de ce manuel.
Dans le cas du percuteur PICJET®
si le produit en contact avec la
membrane est acide ou sa température est trop élevée ou trop
basse, contacter directement le
constructeur.
C) CONTROINDICAZIONI ALL’USO
Ad esclusione degli ambienti deflagranti, non vi è nessuna controindicazione all’uso se vengono osservate le normali precauzioni per macchine di questo tipo
unitamente alle indicazioni riportate su questo manuale.
Per il percussore PICJET®, nel
caso in cui il prodotto a contatto
con la membrana sia acido o a
temperatura troppo elevata o
troppo bassa, rivolgersi direttail
costruttore.
This equipment is NOT suitable Das Gerät eignet sich nicht für Ces machines NE sont PAS indi- Queste macchine NON sono cofor use with food-grade materi- Anwendungen mit Nahrungsmit- quées pour les applications avec munque idonee per applicazioni
als.
teln.
des produits alimentaires.
per prodotti alimentari.
D) TRANSPORT - WEIGHTS OF D) TRANSPORT - GEWICHT D) TRANSPORT - POIDS UNI- D) TRASPORTO - PESI DEI PEZDER EINZELNEN TEILE
INDIVIDUAL COMPONENTS
TAIRE DES PIECES
ZI SEPARATI
On delivery, check that the nature and quantity of the goods
comply with the acknowledgement of order.
Bei Erhalt der Ware sicherstellen, dass Typ und Menge den
Daten der Auftragsbestätigung
entsprechen.
If any parts have been damaged
during transport, immediately
state your claim in writing in the
space provided on the consignment note (way bill). The driver
is obliged to accept such a claim
and to leave you a copy. If you
received the goods free destination send your claim directly
to the Manufacturer or to your
shipping agent. If you fail to state
your claim immediately on receipt
of the goods, acceptance may
be denied.
Etwaige Schäden müssen sofort
auf dem Schriftweg in dem dafür
vorgesehenen Raum auf dem
Frachtbrief bekannt gegeben
werden. Der Fahrer ist verpflichtet, eine solche Reklamation
entgegen zu nehmen und dem
Empfänger eine Kopie auszuhändigen. Wenn die Lieferung
frei Haus erfolgt, senden Sie Ihre
Reklamation an den Hersteller,
ansonsten direkt an den Frachtführer. Die Entschädigung kann
nur vorgenommen werden,
wenn der Schaden beim Wareneingang erklärt wird.
Les dommages éventuels doivent être signalés immédiatement
par écrit dans l’espace réservé
à cet effet sur la lettre de voiture. Le conducteur a l’obligation
d’accepter cette déclaration et
vous en remettre une copie. Si
la fourniture est franco destination, envoyer votre réclamation
au constructeur, sinon directement au transporteur. Le dédommagement n’est possible que si
vous avez signalé les dégâts au
moment de la réception.
Avoid damaging the parts during Vorsichtig mit der Ware umgethe unloading and handling op- hen, um jede Art der Beschädigung beim Abladen und dem
erations.
Handling zu vermeiden.
Manutentionner avec soin afin
d’éviter tout type de dommage
pendant le déchargement et les
déplacements.
Movimentare con cura onde evitare ogni tipo di danneggiamento
durante lo scarico e le movimentazioni.
POIDS
PESI
WEIGHTS
GEWICHTE
A la réception de la marchandise
contrôler que la typologie et la
quantité correspond à ce qui est
indiqué sur la confirmation de
commande.
Al ricevimento della merce controllare se la tipologia e la quantità corrispondono con i dati della
conferma d’ordine.
Eventuali danni devono essere
fatti presenti immediatamente per
iscritto nell’apposito spazio della
lettera di vettura. L’autista è obbligato ad accettare un tale reclamo e lasciarne una copia a
Voi. Se la fornitura è franco destino, inviate il Vs. reclamo al
costruttore, altrimenti direttamente allo spedizioniere. Il risarcimento avviene soltanto se avete fatto presente il danno all’atto del
ricevimento.
Type
Tipo
Weight including packing - Gewicht inkl. Verpackung
Poids emballage inclus - Peso compreso imballo
(kg)
PICJET® 032
7.9
®
10
®
PICJET 040
PICJET 063
193
PICJET® 080
40
GUNJET 032
5.6
GUNJET 040
7.5
GUNJET 063
13.6
GUNJET 080
26
06.04
- OPERATION AND MAINTENANCE
PICJET® GUNJET
BETRIEBS- UND WARTUNGSANLEITUNG
2
- UTILISATION ET ENTRETIEN
- USO E MANUTENZIONE
OL.3001-3002 M. 5
E) INSTALLATION
Unpack PICJET ® Hammer Blast
and carry out the installation following the procedure described.
E) INSTALLATION
Den Klopfer aus der Verpackung
herausnehmen und den Einbau
wie beschrieben vornehmen.
E) INSTALLATION
Enlever le percuteur de son
emballage et procéder à
l’installation comme décrit de
suite.
E) INSTALLAZIONE
Togliere il percussore dall’imballo ed eseguire l’installazione
come descritto in seguito.
E1) PICJET® INSTALLATION
A) Area of installation
- Clean the surface to be welded removing any paint or other impurity
- Weld plate “1” with Rutil Basic
electrode
DIN
1913E5153B(R10)AVSE7016,
taking care NOT to ground the
welder to the stud bolts of
the plate.
- Weld the chain bolt “5”
B) Make a bore in the container
corresponding with the bore
in the annular plate.
C) Line the contact surface with
silicone sealant
- Mount PICJET® “2” on the stud
bolts of the plate
D) Attach using vibration dampers “3” and self-locking nuts
“4”
- Tighten the self-locking nuts
so that the dimension M corresponds with the values given in the table.
- Attach the chain “9” using the
appropriate nuts “8” and “10”
E1) PICJET® EINBAU
A) Einbaubereich
- Die Schweißfläche reinigen,
indem man Anstriche oder
Schmutz unterschiedlicher
Art entfernt.
- Die Platte „1" mit der Elektrode Rutil Basico DIN
1913E5153B(R10)AVSE7016
schweißen: Darauf achten,
dass das Massekabel des
Schweißgeräts NICHT an
die Stiftschrauben der Platte
angeschlossen wird.
- Die Verankerung für die Kette „5" anschweißen.
B) Ein Loch im Blech des Behälters auf der Höhe des Lochs
der Ringplatte bohren.
C) Die Kontaktfläche mit Silikon
bestreichen.
- PICJET ® „2" auf die Stiftschrauben der Platte setzen.
D) Mit den stoßdämpfenden
Buchsen „3" und den
selbstsichernden Muttern „4"
befestigen.
- Die selbstsichernden Muttern
anziehen, bis der Wert M auf
die Werte der nachfolgenden
Tabelle gebracht worden ist.
- Die Kette „9" mit den Muttern
„8" und „10" einhaken.
E1) INSTALLATION PICJET®
A) Zone d’installation
- Nettoyer la surface à souder
en enlevant les peintures ou les
impuretés.
- Souder l’enclume “1” avec
l’électrode Rutil Basico DIN
1913E5153B (R10) AVSE7016,
en prenant soin de NE PAS relier les fils de masse de la machine à souder aux goujons de
la plaque.
- Souder l’ancrage pour chaîne
“5”.
B) Percer un trou dans la tôle du
récipient à la hauteur de l’orifice de la plaque annulaire.
- Installer PICJET® “2” sur les goujons de la plaque.
D) Fixer avec des bagues
d’amortissement “3” et de sûreté “4”;.
- Serrer les écrous de sûreté jusqu’à placer la cote M aux valeurs du tableau ci-dessous.
- Accrocher la chaîne “9” avec
les écrous prévus “8” et “10”.
E1) INSTALLAZIONE PICJET®
A) Zona d’installazione
- Pulire la superficie da saldare asportando vernici o impurità varie.
- Saldare la piastra “1” con elettrodo Rutil Basico DIN
1913E5153B(R10)AVSE7016,
avendo cura di NON collegare il filo di massa della saldatrice ai prigionieri della piastra.
- Saldare ancoraggio per catena “5”.
B) Ricavare un foro nella lamiera del contenitore in corrispondenza del foro della piastra anulare.
C) Siliconare la superficie di contatto;
- installare PICJET® “2” sui prigionieri della piastra.
D) Fissare con boccole ammortizzatrici “3” e autobloccanti
“4” ;
- serrare i dadi autobloccanti
fino a portare la quota M ai
valori della tabella sottostante.
- Agganciare la catena “9” con
gli appositi dadi “8” e “10”.
Type
M (mm)
PICJET® 032-040
16
PICJET® 063-080
25
Silicone - Silikon
Silicone - Siliconare
- OPERATION AND MAINTENANCE
PICJET®
GUNJET
- BETRIEBS- UND WARTUNGSANLEITUNG
- UTILISATION ET ENTRETIEN
- USO E MANUTENZIONE
06.04
2
OL.3001-3002 M. 6
E3) GUNJET INSTALLATION
E3) GUNJET EINBAU
E3) INSTALLATION GUNJET
E3) INSTALLAZIONE GUNJET
A) Area of installation
- Provide a bore of approx. 75
mm in the indicated position.
- Thoroughly clean the area
around the hole
B) Insert the spout in the bore
made and weld the plate connected to it to the wall of the
silo or hopper with a Rutil Basic
electrode
DIN
1913E5153B(R10)AVSE7016,
taking care NOT to ground the
welder to the stud bolts of
the plate.
- Weld the bolt “7” in a position
near the plate as shown in
the diagram.
C) Mount the gasket “2” and
GUNJET “3” on the corresponding stud bolts of the
plate.
D) Fasten GUNJET using washers “4” and self-locking nuts
“5”
- Attach the chain “9” with appropriate nuts “8” and “10”.
A) Einbaubereich
- An der empfohlenen Stelle ein
Loch von circa 75 mm bohren.
- Den Bereich rings um das
Loch sorgfältig reinigen.
B) Die Düse in das vorher gebohrte Loch stecken und die
daran angeschlossene Platte mit der Elektrode Rutil Basico
DIN
1913E5153B(R10)AVSE7016
an der Silo- oder Trichterwand anschweißen, wobei
darauf zu achten ist, dass
das
Massekabel
des
Schweißgeräts NICHT an
die Stiftschrauben der Platte
angeschlossen wird.
- Die Schraube „7" in der Nähe
der Platte in der angegebenen Position anschweißen.
C) Die Dichtung „2" und GUNJET
„3" auf die entsprechenden
Stiftschrauben der Platte
montieren.
D) GUNJET mit den Unterlegscheiben „4" und den
selbstsichernden Muttern „5"
befestigen.
- Die Kette „9" mit den Muttern
„8" und „10" einhaken.
A) Zone d’installation
- Réaliser un trou d’environ 75
mm dans la position conseillée.
- Nettoyer soigneusement la
zone qui entoure le trou.
B) Insérer la buse dans l’orifice
réalisé précédemment, et
souder la plaque qui lui est
relié sur la partoi du silo ou
de la trémie avec une électrode Rutil Basico DIN
1913E5153B(R10)AVSE7016
en prenant soin de NE PAS
relier les fils de masse de la
machine à souder aux goujons de la plaque.
- Souder la vis “7” à proximité
de la plaque, dans la position
indiquée.
C) Monter le joint “2” et le désagrégateur GUNJET “3” sur les
goujons correspondants de
la plaque.
D) Fixer GUNJET avec les rondelles “4” et les écrous de sûreté “5”.
- Accrocher la chaîne “9” avec
les écrous prévus “8” et “10”.
A) Zona d’installazione
- Realizzare nella posizione
consigliata un foro di circa 75
mm
- Pulire accuratamente la zona
circostante il foro.
B) Inserire l’ugello entro il foro
precedentemente realizzato
e saldare la piastra ad esso
collegata sulla parete del silo
o tramoggia con elettrodo
Rutil
Basico
DIN
1913E5153B(R10)AVSE7016,
avendo cura di NON collegare il filo di massa della saldatrice ai prigionieri della piastra.
- Saldare la vite “7” nei pressi
della piastra, nella posizione
indicata.
C) Montare la guarnizione “2” e
il disgregatore GUNJET “3” sui
corrispondenti prigionieri della
piastra.
D) Fissare il GUNJET con rondelle “4” e dadi autobloccanti “5”.
- Agganciare catena “9” con
appositi dadi “8” e “10”
06.04
- OPERATION AND MAINTENANCE
PICJET® GUNJET
BETRIEBS- UND WARTUNGSANLEITUNG
2
- UTILISATION ET ENTRETIEN
- USO E MANUTENZIONE
OL.3001-3002 M. 7
E4) ELECTRICAL
CONNECTIONS
- During this phase follow safety regulations ref. CEI 68-8/4
- The percussion guns are supplied with Ø10 2-way stem
(pos. 24 in the spare parts list)
on which a coil with characteristics suitable for the power
supply circuit has to be mounted.
- The coil has to be of the rapid
excitation type.
E4) ELEKTRISCHER
ANSCHLUSS
- Während dieser Phase sind die
Sicherheitsbestimmungen Bez.
CEI 68-8/4 zu beachten.
- Die Klopfer werden mit Rohr
(Bez. 24 Ersatzteilliste) Durchmesser 10, 2-wegig mit Öffnerkontakt geliefert, auf dem die
Spule mit den Eigenschaften
installiert werden kann, die zur
elektrischen Versorgungsanlage passt.
- Die Spule muss eine vom Typ
mit Schnellerregung sein.
E4) RACCORDEMENT
ELECTRIQUE
- Pendant cette phase respecter
les normes de sécurité réf. CEI
68-8/4.
- Les percuteurs sont fournis
avec un fourreau (réf. 24 liste
pièces détachées) diam. 10-2
voies N.F. sur laquelle doit être
installée la bobine ayant des
caractéristiques adaptées à
l’installation électrique d’alimentation.
- La bobine doit être à excitation rapide.
E4) COLLEGAMENTO
ELETTRICO
- Durante questa fase attenersi
alle norme di sicurezza rif. CEI
68-8/4.
- I percussori vengono forniti con
canotto (rif. 24 lista ricambi)
diam. 10-2 vie N.C. sul quale
deve essere installata la bobina con caratteristiche adeguate all’impianto elettrico di alimentazione.
- La bobina deve essere ad eccitazione rapida.
E5) PNEUMATIC
CONNECTIONS
- Connect the compressed air
supply tube to the inlet tube
(pos. 23 in the spare parts list).
- Operating pressure must not
exceed 6 bar!
- The compressed air supply
system has to be able to fill the
reservoir (ref. C1 pages 8, 10,
12) of the percussion gun during the interval between firings.
- The air consumption per firing
is given in Table 2.
E5) PNEUMATISCHER
ANSCHLUSS
- Die Druckluftleitung am Anschluss (Bez. 23 Ersatzteilliste) anschließen.
- Der Betriebsruck darf nie über
6 bar liegen!
- Der Anschluss an die pneumatische Versorgungsleitung
muss so ausgelegt werden,
dass die Füllung des Behälters
(Bez. C1 Seite 8 - 10 - 12) des
Klopfers innerhalb einer Zeitspanne gewährleistet wird, die
unter dem Abstand zwischen
zwei Abreinigungsvorgängen
liegt.
- Luftverbrauch für Abreinigung
(siehe Tab. 2).
E5) RACCORDEMENT
PNEUMATIQUE
- Brancher le tuyau de l’air comprimé au raccord (réf. 23 liste
pièces détachées).
- La pression de service ne doit
jamais dépasser 6 bars !
- Le raccordement de l’alimentation pneumatique doit être dimensionné pour garantir le
remplissage du réservoir (réf.
C1 page 8 - 10 - 12) du percuteur dans un temps inférieur à
l’intervalle d’impulsion.
- Consommation d’air par impulsion (voir Tab. 2).
E5) COLLEGAMENTO
PNEUMATICO
- Collegare al raccordo (rif. 23
lista ricambi) il tubo dell’aria
compressa.
- La pressione di esercizio non
deve mai superare 6 bar !
- Il collegamento alimentazione
pneumatica deve essere dimensionato per garantire il riempimento del serbatoio (rif. C1
pag. 8 - 10 - 12) del percussore in un tempo inferiore all’intervallo di sparo.
- Consumo d’aria per sparo (vedi
Tab.2).
Table 2
Type
Tipo
AIR CONSUMPTION PER CYCLE - LUFTVERBRAUCH PRO ZYKLUS
CONSOMMATION D’AIR PAR CYCLE - CONSUMO ARIA PER CICLO
(NI)
Picjet® - Gunjet
3 bar
6 bar
032
0.3
0.7
040
0.6
1.3
063
1.1
2.3
080
2.3
4.8
F) START-UP
F) INBETRIEBNAHME
F) MISE EN MARCHE
F) AVVIAMENTO
1) Switch on the compressed
air supply.
2) Check that minimum and maximum pressures are within
the allowable range.
3) Switch on the power supply
adjusting:
a) duration of impulse max. 30
ms
b) impulse interval >= 30" depending on requirements
4) Adjust the operating pressure
to obtain the desired percussion, fluidisation or combined
effect.
1) Die pneumatische Versorgung einschalten.
2) Sicherstellen dass die oberen und unteren Grenzwerte
der zulässigen Drücke eingehalten werden.
3) Die elektrische Versorgung
aktivieren und wie folgt regeln:
a) Impulsdauer max. 300 ms
b) Impulsintervall > = 30" je nach
Bedarf
4) Den Betriebsdruck so einstellen, dass die gewünschte
Klopf- und Auflockerungswirkung erzielt wird.
1) Mettre en marche l’alimentation pneumatique.
2) Vérifier que les valeurs minimales et maximales de pression admissibles sont respectées.
3) Activer l’alimentation électrique, en réglant :
a) durée d’impulsion maxi. 300
ms
b) Intervalle impulsions > = 30"
en fonctions des exigences
4) Régler la pression de service pour obtenir l’effet voulu
de percussion, de fluidification ou combiné.
1) Attivare alimentazione pneumatica.
2) Verificare che siano rispettati i valori minimi e massimi di
pressione ammessi
3) Attivare alimentazione elettrica regolando:
a) durata impulso max 300 ms
b) intervallo impulsi >= 30" in funzione delle esigenze
4) Regolare la pressione di esercizio per ottenere l’effetto
voluto di percussione, di fluidificazione o combinato.
06.04
- OPERATION AND MAINTENANCE
PICJET®
GUNJET
G) OPERATION
- Operation is governed by an electrical control panel and the pressurisation of the reservoir inside the
percussion gun is achieved by
means of a compressed air supply
system.
When the electrical control panel
sends an electrical signal to a solenoid valve the following occurs:
1)With MARTSHOCK, a mass is projected against the wall of the silo/
hopper causing vibrations (see Tab.
3)
2)With PICJET®, a mass is projected
against the wall of the silo/hopper
causing vibrations (see Tab. 3) with
simultaneous discharge of compressed air into the silo/hopper to
fluidise the material.
3)With GUNJET, rapid discharge of
the compressed air in the reservoir
of the percussion gun creating a
pneumatic shock wave that
disperses the material inside the
silo/hopper.
- BETRIEBS- UND WARTUNGSANLEITUNG
2
- UTILISATION ET ENTRETIEN
- USO E MANUTENZIONE
OL.3001-3002 M. 8
G) BETRIEB
- Der Betrieb wird über eine Schalttafel überwacht, während eine pneumatische Versorgungsleitung für die
Druckbeaufschlagung des Raums/
Behälters innerhalb des Klopfers
sorgt.
Wenn die elektrische Schalttafel
einem Magnetventil, das auf dem
Klopfer montiert ist, ein Signal sendet,
kommt es:
1)bei MARTSHOCK zum Ausstoß
einer Masse gegen die Silo-/Trichterwand, was zu Vibrationen führt
(siehe Tab. 3).
2)bei PICJET ® zum Ausstoß einer
Masse gegen die Silo-/Trichterwand,
was zu Vibrationen führt (siehe Tab.
3) und gleichzeitig zum Austragen
von Druckluft in das Innere des Silos bzw. Trichters, um das Material
aufzulockern.
3)bei GUNJET zum schnellen Ausstoß der im Behälter des Klopfers
enthaltenen Druckluft, wobei eine
pneumatische Stoßwelle entsteht,
die zum Auflockern des im Silo/
Trichter befindlichen Materials führt.
G) FONCTIONNEMENT
- Le fonctionnement est contrôlé par
un tableau électrique et une ligne
d’alimentation pneumatique garantit le remplissage sous pression du
compartiment/réservoir à l’intérieur
du percuteur.
L’impulsion transmise par le tableau
électrique à une électrovanne montée sur le percuteur produit l’effet
suivant :
1)Dans le MARTSHOCK le lancement
d’une masse contre la paroi du silo/
trémie en provoquant une vibration
(Voir tab. 3).
2)Dans le PICJET ® le lancement
d’une masse contre la paroi du silo/
trémie en provoquant une vibration
(Voir tab. 3) et simultanément le
déchargement de l’air sous pression à l’intérieur du silo/trémie pour
fluidifier le produit.
3) Dans le GUNJET le déchargement
rapide de l’air sous pression contenu
dans le réservoir du percuteur en
créant une onde de choc pneumatique qui désagrège le produit à l’intérieur du silo/trémie.
G) FUNZIONAMENTO
- Il funzionamento è controllato da
un quadro elettrico mentre da una
linea di alimentazione pneumatica
viene assicurato il riempimento in
pressione del vano/serbatoio all’interno del percussore .
A seguito di un impulso trasmesso
dal quadro elettrico ad una elettrovalvola montata sul percussore si ha:
1) Nel MARTSHOCK il lancio di una
massa contro la parete del silo/tramoggia provocando una vibrazione
(vedi tab. 3).
2) Nel PICJET® il lancio di una massa
contro la parete del silo/tramoggia
provocando una vibrazione (vedi
tab. 3) e contemporaneamente lo
scarico dell’aria in pressione all’interno del silo/tramoggia per fluidificare il materiale.
3) Nel GUNJET lo scarico rapido dell’aria in pressione contenuta nel serbatoio del percussore creando
un’onda d’urto pneumatica tale da
disgregare il materiale all’interno del
silo/tramoggia.
Table 3
ENERGY - ENERGIE - ENERGIE - ENERGIA
(J)
Type
Tipo
GUNJET
3 bar
6 bar
032
4.2
7.1
040
8.4
18.1
063
28.8
62
080
59.2
153
H) NOISE
The operating noise levels of the
MARTSHOCK- PICJET® - GUNJET
percussion guns depend on a
number of factors amongst
which the more important are:
1) thickness and size of the
metal panels
2) filling coefficient
3) type of material
4) operating pressure
LÄRM
Der Lärmpegel der Modelle
MARTSHOCK- PICJET® - GUNJET
hängt von unterschiedlichen
Faktoren ab, von denen die folgenden einen großen Einfluss
haben:
1) Stärke und Größe des Blechs
2) Füllgrad
3) Beschaffenheit des Materials
4) Betriebsdruck
BRUIT
Le niveau sonore des modèles
MARTSHOCK- PICJET® - GUNJET
dépend de plusieurs facteurs
dont les suivants sont considérés particulièrement importants :
1) épaisseur et dimension de la
tôle
2) coefficient de remplissage
3) nature du produit
4) pression de service
H) RUMORE
Il livello di rumorosità dei modelli
MARTSHOCK- PICJET® - GUNJET
dipende da diversi fattori tra i quali
rivestono particolare importanza:
1) spessore e dimensione della
lamiera
2) coefficiente di riempimento
3) natura del materiale
4) pressione di esercizio
- The values given in Table 4 are - Die Tabelle 4 ist daher nur als - Le tableau 4 n’a qu’une valeur - La tabella 4 ha pertanto un vaonly indicative.
lore indicativo.
richtungsgebend zu verstehen. indicative.
- Measurements were taken at - Die in der Tabelle stehenden - Les valeurs indiquées ont été - I valori riportati sono stati mia distance of 1 m with the per- Werte wurden im Abstand von mesurées à la distance de 1 m surati alla distanza di 1m con il
cussion gun installed on a full 1 Meter mit auf dem gefüllten avec le percuteur monté sur percussore installato su trahopper at a height of 1,6 m from Trichter installierten Klopfer in une trémie pleine de produit à moggia piena di materiale a 1,6
the ground.
m da terra.
1,6 m Höhe über dem Boden 1,6 m du sol.
gemessen.
Table 4
Type
Tipo
Open surroundings - Offene Umgebung
Milieu ouvert - Ambiente aperto
Closed surroundings - Geschlossene Umgebung
Milieu fermé - Ambiente chiuso
3 bar
6 bar
3 bar
6 bar
PICJET® 032
47 dB (A)
62 dB (A)
63 dB (A)
77 dB (A)
PICJET® 040
62 dB (A)
83 dB (A)
72 dB (A)
91 dB (A)
PICJET® 063
73 dB (A)
93 dB (A)
82 dB (A)
105 dB (A)
PICJET® 080
82 dB (A)
102 dB (A)
91 dB (A)
121 dB (A)
GUNJET 032
<= 70 dB (A)
<= 70 dB (A)
<= 70 dB (A)
<= 70 dB (A)
GUNJET 040
<= 70 dB (A)
<= 70 dB (A)
<= 70 dB (A)
<= 70 dB (A)
GUNJET 063
<= 70 dB (A)
<= 70 dB (A)
<= 70 dB (A)
<= 70 dB (A)
GUNJET 080
<= 70 dB (A)
<= 70 dB (A)
<= 70 dB (A)
<= 70 dB (A)
06.04
- OPERATION AND MAINTENANCE
PICJET® GUNJET
BETRIEBS- UND WARTUNGSANLEITUNG
2
- UTILISATION ET ENTRETIEN
- USO E MANUTENZIONE
I) MAINTENANCE
If the instructions given in points
C, D, E, F, G are followed, then
no maintenance will be required.
OL.3001-3002 M. 9
I) WARTUNG
Wenn die Angaben beachtet
werden, die unter den Punkten
C-D-E-F-G beschrieben wurden,
ist keine Wartung vorgesehen.
L) POSSIBLE MALFUNCTIONS L) MÖGLICHE STÖRUNGEN
PROBLEM
Ruptured membrane (Pos. 25 spare parts).
A
Limited percussion of fluidisation effect.
B
I) MAINTENANCE
Si les indications décrites aux
points C-D-E-F-G sont respectées aucune intervention de maintenance n’est prévue.
I) MANUTENZIONE
Se vengono rispettate le indicazioni descritte ai punti C-D-E-FG non è previsto alcun intervento di manutenzione
L) INCONVÉNIENTS
PROBABLES
L) POSSIBILI INCONVENIENTI
POSSIBLE CAUSE
SOLUTION
1) Operating and supply pressure > 6 bar.r.
1) Replace the membrane..
2) Adjust the pressure setting.
1) Operating pressure too low.
1) Adjust to > 2 bar until desired
effect is obtained
2) The reservoir does not recharge completely between
firings.
2a) Increase interval between firings.
2b) Increase air supply rate.
2c) Check that there are no restrictions
in the supply tube.
3) Another pneumatic appliance connected in parallel
3) Install a check valve at the inlet of
the percussion gun
4) Failure of return spring.
4) Replace spring.
1) Ruptured membrane (Pos. 25 spare parts).
1) See point "A".
2) Percussion mass blocked.
2) Replace mass.
3) Solenoid does not receive electrical signal.
No effect.
C
4) No compressed air supply.
Damaged seals.
D
Damaged membrane..
(only PICJET® - pos. 30 in spare parts list)
E
5) Faulty solenoid.
5) Replace solenoid.
6) Pilot blocked inside stem
(pos. 24 in spare parts list)
6a) Replace stem..
6b) Remove any dirt that may have
accumulated.
1) Ambient temperature not within allowable range
(standard -10 +50° C)
1) Replace seals.
1) Material temperature too high (> 80° C)
1) Replace membrane
2) Material with incompatible characteristics:
- high acidity
- highly adhesive
2) Contact our Tech Off.
PROBLEM
(A) Membran gerissen (Pos. 25 Ersatzteilliste)
(B) Reduzierte Schlag- und
Luftauflockerungswirkung.
MÖGLICHE URSACHE
1) Betriebs- und Leitungsdruck hoch > 6 bar.
1) Membran ersetzen.
1) Betriebsdruck zu niedrig.
2) Eichdruck einstellen.
2) Der Behälter kann sich zwischen einem Impuls und
dem nächsten nicht ganz laden.
1) Anlage > 2 bar eichen, bis die
gewünschte Wirkung erhalten wird.
3) Vorhandensein eines anderen parallel
angeschlossenen Verbrauchers.
2a) Abstand zwischen Impulsen
vergrößern.
4) Rückholfeder gebrochen.
2b) Luftzufuhr verstärken.
1) Membran gerissen (Pos. 25 Ersatzteilliste)
2c) Sicherstellen, dass in
pneumatischem Anschluss keine
engen Stellen vorhanden sind.
2) Klopfmasse blockiert.
3) Im Eingang zum Klopfer ein
Rückschlagventil montieren.
3) Spule erhält keinen elektrischen Impuls.
1) Siehe Punkt „A”.
(C) Keine Wirkung
(D) Dichtringe beschädigt.
(E) Membran beschädigt (nur PICJET® - Bez. 30
Eratzteilliste)
LÖSUNG
4) Es kommt keine Druckluft an.
2) Klopfmasse ersetzen.
5) Spule defekt.
5) Spule ersetzen.
6) Vorsteuerung innerhalb des Rohrs blockiert (Pos. 24
Ersatzteilliste).
6a) Rohr ersetzen.
1) Raumtemperatur unzulässig (Standardwerte -20° /
+80°C)
6b) Etwaigen Schmutz entfernen.
1) Produkttemperatur sehr hoch (> 80°C)
1) Dichtungssatz ersetzen.
2) Produkt mit unverträglichen Eigenschaften:
- hoher Säuregrad
- hohe Klebrigkeit
1) Membran ersetzen.
06.04
- OPERATION AND MAINTENANCE
PICJET®
GUNJET
- BETRIEBS- UND WARTUNGSANLEITUNG
2
- UTILISATION ET ENTRETIEN
- USO E MANUTENZIONE
PROBLEME
Rupture membrane (Pos. 25 liste pièces
détachées)
A
OL.3001-3002 M. 10
CAUSE PROBABLE
1) Pression de service et de ligne élevée > 6 bars.
1) Pression de service trop bas.
Effet percussion et fluidification réduite
B
2) Le réservoir ne se charge pas complètement entre
une impulsion et l’autre.
3) Présence d’une autre utilisation reliée en parallèle.
REMÈDE
1) Remplacer la membrane.
2) Régler l’étalonnage de la pression.
1) Etalonnage l’installation > 2 bars
jusqu’à obtenir l’efficacité voulue.
2a) Augmenter l’intervalle entre les
impulsions.
2b) Augmenter l’alimentation de l’air.
2c) Vérifier qu’il n’y ait pas de
bridages le long de la connexion
pneumatique.
3) Monter la vanne unidirectionnelle en
entrée du percuteur.
4) Rupteur ressort de retour.
4) Remplacer le ressort
1) Rupture membrane (Pos. 25 liste pièces détachées)
1) Voir point “A”.
2) Blocage masse percutante.
2) Remplacer la masse percutante.
3) L’impulsion électrique n’arrive pas à la bobine.
Aucun effet
C
4) L’air comprimé n’arrive pas.
Anneaux d’étanchéité endommagés.
D
5) Bobine épuisée.
5) Remplacer les bobines.
6) Blocage du pilote à l’intérieur du fourreau (Pos. 24
liste pièces détachées).
6a) Remplacer le fourreau.
6b) Nettoyer de toute impureté.
1) Température ambiante non autorisée (
Standar -20 +80°C)
1) Remplacer le kit des joints.
1) Température produit élevée (> 80°C)
Membrane endommagée
(seulemen PICJET® - réf. 30 liste pièces détachées) 2) Produit avec caractéristiques incompatibles:
- acidité élevée
E
- caractéristiques d’adhérence élevées
PROBLEMA
Rottura membrana (Pos. 25 lista ricambi).
A
Effetto percussione e fluidificazione ridotto.
B
POSSIBILE MOTIVO
1) Remplacer la membrane.
2) Consulter notre Bureau Technique.
SOLUZIONE
1) Pressione esercizio e di linea elevata > 6 bar.
1) Sostituire la membrana.
2) Regolare taratura pressione.
1) Pressione esercizio troppo bassa.
1) Tarare impianto > 2 bar fino ad
ottenere l'efficacia voluta.
2) Il serbatoio non si carica completamente fra un
impulso e l'altro.
2a) Aumentare l'intervallo fra gli
impulsi.
2b) Potenziare l'alimentazione
dell'aria.
2c) Verificare che non ci siano
strozzature lungo il collegamento
pneumatico.
3) Presenza di un'altro utilizzo collegato in parallelo.
3) Montare valvola unidirezionale in
ingresso al percussore.
4) Rottura molla di ritorno.
4) Sostituire molla
1) Rottura membrana (Pos. 25 lista ricambi).
1) Vedi punto "A".
2) Blocco massa battente.
2) Sostituire massa battente.
3) Non arriva l'impulso elettrico alla bobina.
Nessun effetto.
C
Anelli di tenuta danneggiati.
D
Membrana danneggiata.
(solo PICJET® - rif. 30 lista ricambi)
E
4) Non arriva aria compressa.
5) Bobina esausta.
5) Sostituire bobina.
6) Blocco del pilota all'interno del canotto
(Pos. 24 lista ricambi).
6a) Sostituire canotto.
6b) Pulire da eventuale presenza di
impurità.
1) Temperatura ambiente non consentita
(standard -10 +50° C)
1) Sostituire kit guarnizioni.
1) Temperatura prodotto elevata (> 80° C)
1) Sostituire membrana
2) Prodotto con caratteristiche incompatibili:
- elevata acidità
- elevate caratteristiche di adesione
2) Consultare il ns. Uff. Tecnico
- OPERATION AND MAINTENANCE
PICJET® GUNJET
BETRIEBS- UND WARTUNGSANLEITUNG
- UTILISATION ET ENTRETIEN
- USO E MANUTENZIONE
06.04
2
OL.3001-3002 M. 11
M) DISMANTLING
AND DISPOSAL
M) VERSCHROTTUNG UND M) DEMANTELEMENT ET ELI- M) IMMAGAZZINAGGIO E
ENTSORGUNG
MINATION
ROTTAMAZIONE
1) STORAGE OF THE EQUIPMENT FOR LONGER PERIODS
- Clean the equipment thoroughly
especially inside.
- Provide it into a box.
1) LAGERUNG DER GERÄTE
ÜBER LÄNGERE ZEITRÄUME
- Das Gerät gründlich reinigen,
insbesondere innen.
- Das Gerät in einen Karton
packen.
1) ENTREPOSAGE DE LA MACHINE POUR UNE PERIODE
D’INACTIVITÉ PROLONGÉE
- Nettoyer soigneusement la machine surtout à l’intérieur.
- L’entreposer dans une caisse.
2) DEMOLITION OF THE EQUIPMENT
- Recover plastic materials (e.g.,
coatings, linings, etc.) and
deliver them to special collection centres.
- Deliver all remaining parts,
which are made from steel and
cast iron, to specific scrap
yards.
2) VERSCHROTTUNG DER
GERÄTE
- Kunststoffteile (z.B. Verkleidungen etc.) ausbauen und bei
speziellen Sammelstellen abgeben.
- Alle restlichen Teile aus Stahl
und Guss beim Schrotthändler
abgeben.
2) DEMANTELEMENT DE LA 2)ROTTAMAZIONE DELLA
MACHINE
MACCHINA
- Récupérer le matériel en plasti- - In caso di rottamazione o deque (par. ex. revêtements, molizione a fine vita del comjoints, vis sans fin etc.) et les ponente, avere cura di smonmettre à la décharge dans les tare le parti in materiale plasticentres spécialisés.
co (guarnizioni e componenti)
- Mettre à la décharge toute les e destinarle agli appositi centri
parties restantes en fer et en di raccolta.
métal dans une décharge spé- - Le restanti parti sono da desticialisée.
nare al recupero dei materiali
ferrosi.
1)IMMAGAZZINAGGIO DELLA
MACCHINA PER PERIODI PROLUNGATI
- Pulire accuratamente la macchina soprattutto all’interno
- Riporla dentro una cassa.
N.B.: Rights reserved to modify technical specifications
N.B.: Angaben ohne Gewähr. Änderungen können ohne Vorankündigung vorgenommen werden.
N.B.: Toutes données portées dans le présent catalogue n’engagent pas le fabricant. Elles peuvent être modifiéès à tout moment.
N.B.: Tutti i dati riportati nel presente catalogo non sono impegnativi e possono subire variazioni in qualsiasi momento.
O.L.I. S.r.l.
Via Canalazzo, 35 - Rovereto s/S
I - 41036 Medolla - (MO)
ITALY
+39 / 0535 / 46 400
fax +39 / 0535 / 46 350
e-mail [email protected]
internet www.olivibra.it