1
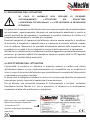
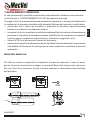
Aziona
Azionamento
ziionamento
nto p
per
er a
attuatore
ttuator
tuatore llineare
ineare
singolo
con
Motore
24V
sin
ngolo c
on M
otore 2
4V
Driver
riv
ver for
ffo
or 1 Linear
L
Lin
inear Actuator
Ac
ctua
tuator
with 24Vdc
cM
otor
Motor
Attuatore Elettromeccanico
Electromechanical Actuator
ALI1
PF0025
ALI1-P
Manuale di Uso e Manutenzione
Use and maintenance handbook
ALI1-F
ALI1-P
ALI1-PF
ALI1-R
ALI1-PR
ITALIANO
ALI1
2
mod.ALI1
manuale uso e manutenzione (rev.01)
10 NOTE
...............................................................................................................22
mod.ALI1
manuale uso e manutenzione (rev.01)
3
ITALIANO
1 NORME ED AVVERTENZE GENERALI .................................................................4
1.1
Premessa .................................................................................................4
1.2
Riferimenti normativi ................................................................................4
1.3
Marcatura CE ...........................................................................................4
2 DESCRIZIONE DELLA MACCHINA E CARATTERISTICHE TECNICHE ..............5
2.1
Configurazioni dei modelli ALI1................................................................6
2.2
Descrizione dei componenti e degli accessori .........................................6
2.2.1 Motorizzazioni ..........................................................................................7
2.2.2 Riduttori....................................................................................................7
2.2.3 Steli filettati...............................................................................................7
2.2.4 Controllo della corsa dell’attuatore...........................................................7
2.2.5 Attacchi e dispositivi di fissaggio..............................................................8
2.2.6 Dispositivo di antirotazione ......................................................................8
2.2.7 Lubrificanti................................................................................................8
3 TRASPORTO E SMALTIMENTO............................................................................9
3.1
Smaltimento .............................................................................................9
4 INSTALLAZIONE ..................................................................................................10
4.1
Piazzamento e operazioni di installazione .............................................10
4.2
Regolazione sistemi controllo corsa ......................................................12
4.3
Collegamenti ..........................................................................................13
4.3.1 Collegamento elettrico. ..........................................................................13
4.4
Predisposizioni a carico del cliente ........................................................13
5 FUNZIONAMENTO ED USO .................................................................................14
5.1
Funzionamento ......................................................................................14
5.2
Uso previsto e condizioni di utilizzo .......................................................14
5.3
Preparazione del ciclo di lavoro e di carico............................................17
5.4
Rischi residui..........................................................................................17
6 MANUTENZIONE DELL’ATTUATORE ..................................................................18
6.1
Precauzioni e indicazioni comportamentali generali ..............................18
6.2
Operazioni di manutenzione dell’attuatore.............................................19
6.3
Riparazione dell’attuatore ......................................................................20
6.4
Sostituzione dell’attuatore ......................................................................20
7 AZIONAMENTO MANUALE .................................................................................21
8 INTERFACCIA CON L’OPERATORE ...................................................................22
9 CONDIZIONI GENERALI DI GARANZIA ..............................................................22
1 NORME ED AVVERTENZE GENERALI
ITALIANO
1.1 PREMESSA
Il presente manuale è proprietà della MecVel s.r.l.
Tutti i diritti sono riservati, viene pertanto vietata la riproduzione o la cessione a terzi
dei contenuti del presente documento.
La MecVel s.r.l. si riserva il diritto di apportare modifiche al presente manuale senza
alcun specifico preavviso.
Prima di procedere all’utilizzo dell’attuatore si raccomanda di leggere attentamente
questo documento.
L’attuatore non è e non deve essere considerato come un dispositivo di sicurezza.
L’utente finale o il costruttore della macchina o impianto all’interno del quale l’attuatore
è utilizzato come componente è responsabile della sicurezza della macchina o
dell’impianto e quindi è tenuto ad installare l’attuatore stesso solo conformemente alle
norme di sicurezza applicabili vigenti nel paese di installazione ed utilizzo.
Il presente manuale è relativo all’attuatore ALI 1 descritto nelle successive sezioni.
1.2 RIFERIMENTI NORMATIVI
Le norme di sicurezza applicate dal fabbricante per la progettazione e realizzazione
dell’apparato in conformità alla marcatura CE sono riportate all’interno del fascicolo
tecnico, Sezione 3 di proprietà della MecVel s.r.l.
NOTA: Per eventuali dettagli e precisazioni contattare la MecVel s.r.l.
1.3 MARCATURA CE
Ogni attuatore è provvisto di una targa dati riportante le seguenti informazioni:
• dati del costruttore
• modello
• anno di costruzione.
Si riporta a titolo di esempio una della targhe dati apposte dalla MecVel s.r.l.
4
mod.ALI1
manuale uso e manutenzione (rev.01)
2 DESCRIZIONE DELL’ATTUATORE,CARATTERISTICHE TECNICHE
CARATTERISTICHE/VALORE
Motorizzazione CC
12 / 24 / 36 Volt
Meccanismo di riduzione
Vite senza fine - ruota elicoidale
Meccanismo di traslazione
Stelo trapezoidale filettato e madrevite
Asta traslante
Alluminio (inox a richiesta)
Attacchi, ancoraggi, snodi
Posteriori
ITALIANO
COMPONENTE/ACCESSORIO
Anteriori
Dispositivi di controllo corsa
Encoder
Meccanico a microswitch
Lubrificazione
Permanente a grasso
Grado di protezione
Variabile a seconda della richiesta
del cliente (MAX IP65)
Peso
Variabile a seconda della configurazione
(Esempio 1 Kg per 100 mm di corsa)
Le configurazioni previste per l’attuatore sono riportate sotto con le rispettive sigle:
MOD. ALI 1
MOD. ALI1-F
MOD. ALI1-R
MOD. ALI1-P
MOD. ALI1-PF
MOD. ALI1-PR
NOTA:Eventuali configurazioni personalizzate sono realizzabili. Per la rispondenza del presente
manuale all’utilizzo di tali configurazioni contattare il costruttore.
2.1 CONFIGURAZIONI DEI MODELLI ALI1
Per la descrizione delle caratteristiche tecniche dei componenti e dispositivi delle
configurazioni di seguito riportate si rimanda alla sezione 2 CARATTERISTICHE
TECNICHE del presente manuale.
MODELLO MOTORE* RIDUTTORE STELO
ASTA TRASLANTE
FINECORSA
ALI1
AoB
VR
TR
ALLUMINIO (standard) / INOX (a richiesta)
-
ALI1-F
AoB
VR
TR
ALLUMINIO (standard) / INOX (a richiesta)
F
ALI1-R
AoB
VR
-
-
-
ALI1-P
B
2 VR
TR
ALLUMINIO (standard) / INOX (a richiesta)
-
ALI1-PF
B
2 VR
TR
ALLUMINIO (standard) / INOX (a richiesta)
F
ALI1-PR
B
2 VR
-
-
-
mod.ALI1
manuale uso e manutenzione (rev.01)
5
* vedi tabella sottostante
LEGENDA:
NON PRESENTE
VR
VITE SENZA FINE RUOTA ELICOIDALE
2 VR
VITE SENZA FINE RUOTA ELICOIDALE A DUE STADI DI RIDUZIONE
TR
FILETTATURA TRAPEZOIDALE
F
FINECORSA MECCANICO A MICROSWITCH
ITALIANO
TIPO MOTORE
TAGLIA MOTORE
A
B
40S (24V)
40L (12, 24, 36 V)
2.2 DESCRIZIONE DEI COMPONENTI E DEGLI ACCESSORI
Per quanto riguarda le caratteristiche tecniche e prestazionali fare riferimento al
catalogo del prodotto.
Dal disegno sotto riportato si identificano le parti che costituiscono l’attuatore.
accesso al
comando manuale
flangia
riduttore
albero
corpo
motore
accesso al
comando manuale
canotto esterno
attacco posteriore
riduttore
asta traslante
attacco anteriore
corpo motore
6
mod.ALI1
manuale uso e manutenzione (rev.01)
2.2.2 Riduttori
Riduttore a vite senza fine in acciaio e ruota elicoidale in resina acetalica o in diversi tipi
di bronzo per privilegiare le esigenze applicative, come silenziosità, durata, assenza
di giochi, etc.
2.2.3 Steli filettati
Gli steli sono usualmente a filettatura trapezoidale in acciaio C20 o superiore e ottenute
con processo di rullatura, accoppiati a madreviti in bronzo o in materiale plastico
termofuso per assicurare un’alta resistenza ai carichi.
2.2.4 Controllo della corsa dell’attuatore
Agli attuatori si possono applicare diversi sistemi di controllo della corsa: dai semplici
microinterruttori, meccanici o magnetici, che generano un segnale che gestisce
l’alimentazione del motore (funzionamento ON/OFF), fino a dispositivi elettronici per
realizzare servomeccanismi.
Le diverse tipologie di dispositivi disponibili sono:
Finecorsa meccanici a microswitch
Sono microswitch ad un contatto in scambio integrati dentro involucri fissati sul cannotto
e sull’asta traslante. Sono azionati da una asta che trasla in modo solidale con l’asta
traslante dell’attuatore. È possibile la regolazione del dispositivo.
Encoder incrementale (opzionale)
L’encoder è un trasduttore incrementale rotativo che trasforma un movimento
angolare in una serie di impulsi elettrici digitali. Può essere installato sull’attuatore in
corrispondenza della prolunga dell’albero veloce dal lato opposto al motore, oppure
integrato direttamente nei motori. Genera in uscita un segnale digitale che origina un
riferimento relativo, al quale deve essere data la posizione di zero ad ogni ripristino
della macchina.
mod.ALI1
manuale uso e manutenzione (rev.01)
7
ITALIANO
2.2.1 Motorizzazioni
La motorizzazione è in CC a magneti permanenti.
Le tensioni disponibili sono 12, 24 e 36 V.
Per la scelta delle motorizzazioni si consiglia la consultazione del catalogo del
prodotto.
2.2.5 Attacchi e dispositivi di fissaggio
Sono previsti attacchi standard e attacchi a disegno. Devono essere scelti in relazione
all’installazione dell’attuatore al fine di annullare l’eccentricità del carico. Si sottolinea
che sull’attacco si scarica la coppia di reazione che agisce sulla madrevite in seguito
all’applicazione del carico perciò nel caso di attacchi a forcella o a snodo sferico si deve
prevedere il dispositivo antirotazione.
ITALIANO
2.2.6 Dispositivo di antirotazione
Il dispositivo di antirotazione è necessario quando l’applicazione non consente di
vincolare l’asta traslante alle rotazioni attorno al proprio asse (obbligatorio con attacco
anteriore a snodo sferico e forcella). Può essere realizzato tramite una linguetta in
acciaio, fissata internamente lungo il cannotto, che si impegna in una sede ricavata
nella madrevite, oppure tramite una chiocciola sagomata che si impegna in una sede
di scorrimento ricavata nell’alloggiamento dell’asta traslante.
2.2.7 Lubrificanti
Le caratteristiche tecniche dei lubrificanti standard sono riportate nelle tabelle
sottostanti, per usi particolari sono disponibili grassi speciali, in questo caso contattare
l’Ufficio Tecnico della MecVel s.r.l.
GRASSO STANDARD
Marca
Tipo
T min
T max
T goccia
Olio base
Vanguard
G.S.
-45 °C
+150 °C
+180 °C
Sintetico
Friction 2
Addensante Classe NLGI
Idrossistearato
2
di litio
GRASSI EQUIVALENTI
Marca
Tipo
T min
T max
T goccia
Olio base
Addensante Classe NLGI
Klueber
Isoflex LDS 18
Special A
-50 °C
+120 °C
-
Sintetico
complessi di
litio
Saponi
2
Dow
Corning
Molykote
BG20
-45 °C
+180 °C
+290 °C
Estere
sintetico
Saponi
complessi di litio
2
Per le caratteristiche tecniche e prestazionali si rimanda al Catalogo fornito dal
fabbricante.
8
mod.ALI1
manuale uso e manutenzione (rev.01)
Il prodotto viene consegnato in imballi (scatole cartone, casse, etc.) a seconda degli
accordi con il cliente e in base alle dimensioni del prodotto. Si raccomanda di movimentare
i prodotti dopo aver aperto l’imballo, utilizzando idonei sistemi di movimentazione (quali
carrelli elevatori, transpallet, cinghie di sicurezza).
Si richiama l’attenzione al rispetto delle condizioni di sicurezza per il trasporto del
prodotto da parte dell’operatore. In particolare si ricorda di indossare opportuni
dispositivi di protezione individuali quali scarpe con rinforzo e guanti al fine di evitare
danni o lesioni provocate da una eventuale caduta accidentale del prodotto.
Il peso dell’ attuatore è riportato nella tabella della sezione 2 DESCRIZIONE DELL’
ATTUATORE. CARATTERISTICHE TECNICHE.Gli attuatori con peso inferiore ai 10Kg
possono essere movimentati senza l’ausilio di particolari strumenti, si raccomanda
tuttavia di considerare che gli attuatori con corse superiori a 500 mm presentando
il baricentro spostato verso il lato motore, possono causare difficoltà nel trasporto e
richiedere l’ausilio di un secondo operatore e/o strumenti opportuni.
Si prega di porre la massima attenzione nella movimentazione della scatola contenente
il prodotto per evitare che eventuali urti danneggino l’attuatore.
3.1 SMALTIMENTO
Di seguito sono riportati i prodotti correlati all’attuatore che devono essere smaltiti
secondo quanto previsto dalle normative vigenti nel Paese di uso e installazione del
prodotto:
• Imballaggio in fase di installazione;
• Componenti dell’attuatore in fase di sostituzione o riparazione;
• Lubrificante in fase di pulizia e manutenzione;
• Attuatore in fase di sostituzione o riparazione.
È vietato disperdere nell’ambiente i rifiuti derivanti dalle operazioni sopra indicate..
mod.ALI1
manuale uso e manutenzione (rev.01)
9
ITALIANO
3 TRASPORTO E SMALTIMENTO
4 INSTALLAZIONE
ITALIANO
4.1 PIAZZAMENTO
L’attuatore deve essere installato in modo che i carichi ad esso applicati risultino agire
nella sola direzione assiale.
In fase di montaggio è necessario curare l’allineamento dei punti di fissaggio
dell’attuatore. A tal fine è opportuno indicare, in sede di scelta dell’attuatore, i fissaggi
anteriori e posteriori adeguati alla situazione di carico cui sarà sottoposto l’attuatore,
così da evitare disallineamenti che causerebbero funzionamento irregolare e possibile
fuoriuscita di lubrificante.
Si raccomanda un’installazione robusta e sicura che garantisca la stabilità dell’attuatore
durante il funzionamento secondo le indicazioni di seguito riportate:
1. disporre il foro dell’attacco posteriore dell’attuatore in posizione coassiale al foro del
supporto esterno;
2. posizionare il tirante di fissaggio nella sede sopra realizzata e serrare in modo da
rendere stabile l’attuatore al supporto esterno;
3. collegare il carico all’attacco anteriore dell’attuatore utilizzando gli opportuni
dispositivi di fissaggio (tiranti, viti, spine etc.);
4. eseguire il collegamento elettrico.
L’ECCENTRICITÀ DEL CARICO DOVUTA AD UNA SCELTA ERRATA DEI
FISSAGGI E/O DA UNO SCORRETTO MONTAGGIO CON CONSEGUENTE
DISALLINEAMENTO DEI PUNTI DI FISSAGGIO PUÒ DARE ORIGINE A
CARICHI RADIALI CON USURA DEI COMPONENTI INTERNI, FUORIUSCITE
ANOMALE DI LUBRIFICANTE E IRREGOLARITÀ NEL FUNZIONAMENTO.
È necessario che l’attuatore lavori nell’ambito della sua corsa utile stabilita evitando
l’arresto a finecorsa meccanico. L’eventuale arresto a finecorsa meccanico dovuto ad
un utilizzo dell’attuatore oltre i limiti della sua corsa utile può causare il danneggiamento
dei componenti interni. In fase di messa in servizio devono essere effettuate e verificate
le seguenti operazioni:
• In presenza di dispositivi di controlli di corsa elettrici, prima di azionare il motore
elettrico, collegare il dispositivo di controllo e verificarne il suo funzionamento per
evitare arresti a finecorsa meccanici;
• Verificare, azionando il motore con brevi impulsi, il corretto senso di avanzamento
dell’asta traslante e della posizione degli eventuali dispositivi di fine corsa;
10
mod.ALI1
manuale uso e manutenzione (rev.01)
•
La prima volta che si accende l’attuatore è consigliabile partire da una posizione
intermedia per evitare di andare a fine corsa meccanico perche si è partiti nel senso
sbagliato.
Verificare l’assenza di eventuali interferenze tra l’asta traslante e altre parti della
macchina, impianto o sistema in cui l’attuatore viene integrato o/e utilizzato.
NOTA: Per la definizione della corsa utile dell’attuatore si rimanda al catalogo (contattare la
MecVel s.r.l.).
NEL CASO IN CUI IL DISPOSITIVO DI FINECORSA SIA FORNITO GIÀ
TARATO DAL FABBRICANTE LA ROTAZIONE MANUALE DELL’ASTA
TRASLANTE PROVOCA LA PERDITA DELLE POSIZIONI REGOLATE
ALL’ORIGINE.
Al momento dell’installazione, per evitare un sovraccarico accidentale sull’attuatore,
si consiglia di installare un limitatore di corrente amperometrico nel quadro elettrico di
alimentazione.
La funzione di tale dispositivo è quella di limitare ad un valore di soglia regolabile
la corrente assorbita dal motore elettrico, essendo infatti la corrente proporzionale al
carico si riesce ad evitare il sovraccarico accidentale dell’attuatore.
NOTA: Il limitatore non interviene sulla corrente di spunto motore necessaria durante
l’avviamento.
SI RICORDA DI NON METTERE MAI IN FUNZIONE L’ATTUATORE
SENZA PRIMA AVER ESEGUITO CORRETTAMENTE LE OPERAZIONI DI
POSIZIONAMENTO SOPRA ELENCATE.
mod.ALI1
manuale uso e manutenzione (rev.01)
11
ITALIANO
•
4.2 REGOLAZIONE SISTEMI CONTROLLO CORSA
TARATURA GRUPPO FINE CORSA
Corsa minima controllabile
min. 35
Versione 2FC - 2FC Version
ITALIANO
Versione 3FC - 3FC Version
A-F
min. 25
P-B
P-B
min. 35
A-F
I
I
INTERRUTTORI DI FINECORSA
Sono montati due microinterruttori di finecorsa ad un contatto in scambio. È disponibile la versione con terzo microinterruttore in posizione centrale. La posizione di
arresto, individuata dal micro centrale, è diversa nei due versi di traslazione dell’asta.
La regolazione della posizione dei microinterruttori avviene agendo sulle viti presenti
sulla testata dell’attuatore. Ad ogni giro di vite in senso orario il micro avanza verso
la testata di 0.7 mm. Il senso delle frecce sul disegno seguente esplica quanto sopra
riportato; le diciture hanno il seguente significato:
A-F= Anteriore
I= Intermedio
P-B= Posteriore
ENCODER
•
•
•
•
Alimentazione Encoder 3,8 V - 24 Vdc
PUSH-PULL
2 canali - 4 impulsi/giro
Corrente massima d’uscita: 100 mA
12
OUT 1
OUT 2
MARRONE BROWN
BIANCO WHITE
VERDE
GREEN
GIALLO
YELLOW
mod.ALI1
manuale uso e manutenzione (rev.01)
4.3 COLLEGAMENTI
4.3.1 Collegamento Elettrico
TALI OPERAZIONI DEVONO ESSERE EFFETTUATE DA PERSONALE
Una volta posizionato secondo le operazioni sopra descritte l’attuatore e gli
eventuali dispositivi di controllo corsa devono essere alimentati collegando i cavi
dell’alimentazione elettrica direttamente alla morsettiera posta all’interno del quadro
elettrico di alimentazione.
Le operazioni di allacciamento devono essere svolte in condizione di massima sicurezza
ponendo l’attenzione sulla necessità di utilizzo di dispositivi di protezione individuali
(guanti, occhiali, etc.).
Schemi di riferimento per il collegamento elettrico sono presenti sul catalogo del
prodotto (contattare la MecVel s.r.l.).
NOTA: Se il motore è di tipo autofrenante ed è pilotato tramite un inverter si deve prevedere
l’alimentazione separata dal freno.
4.4 PREDISPOSIZIONI A CARICO DEL CLIENTE
L’utilizzatore dovrà installare la macchina in ambienti di lavoro adeguati, dotati di
impianto elettrico e di illuminazione rispondente alla normativa vigente.
Si raccomanda inoltre l’installazione delle linee elettriche in ambienti asciutti e illuminati
in conformità alla legislazione vigente, aventi caratteristiche ambientali di temperatura,
umidità, ecc., conformi ai limiti imposti dalle norme applicabili.
In particolare deve essere cura dell’utilizzatore installare a bordo della macchina o
assemblato all’interno del quale sarà inserito l’attuatore i seguenti dispositivi:
• Dispositivo di interruzione automatica di corrente (interruttore magnetotermico) a
guardia dei contatti diretti e indiretti oltre che per proteggere i dispositivi elettrici da
sovratensioni e sovracorrenti;
• Un sezionatore lucchettato, per le operazioni di manutenzione, dimensionato
adeguatamente a cui converga l’intera alimentazione elettrica di tutto l’attuatore
prima di giungere alle diverse apparecchiature;
• Realizzazione della messa a terra a guardia dei contatti indiretti e delle scariche
atmosferiche.
mod.ALI1
manuale uso e manutenzione (rev.01)
13
ITALIANO
QUALIFICATO ED AUTORIZZATO DAL DATORE DI LAVORO.
ITALIANO
Fare riferimento alle caratteristiche elettriche riportate nei maculai di uso e
manutenzione.
Il tutto va inserito in un quadro elettrico di comando di grado IP adeguato all’applicazione.
Nel caso in cui vengano inseriti dispositivi accessori di fine corsa, è obbligo dell’installatore
che gli stessi siano alimentati sotto trasformatore.
Il costruttore non può essere ritenuto responsabile per malfunzionamenti che possono
causare perdita delle prestazioni e/o danni a persone cose o animali qualora le
condizioni di installazione differiscano da quelle raccomandate.
Si raccomanda di contattare il costruttore per verificare la compatibilità dell’ambiente di
lavoro e di installazione dell’attuatore stesso.
NOTA: Con legislazione/normativa vigente si intende il quadro legislativo in vigore nel paese di
utilizzazione.
5 FUNZIONAMENTO ED USO
5.1 FUNZIONAMENTO
La macchina è destinata alla movimentazione di carichi. Si compone di un motore
elettrico che direttamente o tramite l’interposizione di un riduttore meccanico, mette in
movimento uno stelo filettato sul quale scorre una madrevite; la madrevite, vincolata
alla rotazione, realizza lo spostamento lineare dell’asta ad essa collegata.
Il funzionamento è di tipo intermittente.
Si può prevedere per l’attuatore un funzionamento reversibile o irreversibile.
Comunque la transizione fra reversibilità e irreversibilità è influenzata da diversi fattori
quali lo stato di usura dei ruotismi dell’attuatore (rodaggio), dal carico, dalla presenza
di vibrazioni. Nei casi dubbi, per valutare con certezza l’irreversibilità del sistema si
devono eseguire test sull’applicazione e contattare il costruttore.
NOTA: Si sottolinea che la reversibilità dell’attuatore ne limita la precisione e la ripetibilità di
posizionamento. Contattare la MecVel s.r.l. in caso di dubbi.
5.2 USO PREVISTO E CONDIZIONI DI UTILIZZO
L’attuatore è progettato per un utilizzo conforme alle condizioni specificate dal
fabbricante e riportate nel catalogo del prodotto.
L’alimentazione è in CC ma si può prevedere anche un azionamento manuale nei soli
casi di manovre di emergenza. Tramite la doppia sporgenza d’albero sul motore o tramite
prolunghe sull’albero veloce del riduttore o ancora tramite l’utilizzo dei volantini.
14
mod.ALI1
manuale uso e manutenzione (rev.01)
Il fattore di servizio standard cui sono riferite le prestazioni degli attuatori è S3
30% ad una temperatura ambiente di riferimento di -10°C/+60°C ed una campo di
pressione di 0,8-1,1 bar.
A seconda della configurazione e dell’utilizzo dell’attuatore il fattore di servizio può
variare. In ogni caso il fattore di servizio relativo al prodotto fornito è indicato sulla targa
dati apposta sul prodotto. In caso di dubbi contattare l’Ufficio Tecnico della MecVel
s.r.l.
Indicativamente per l’uso previsto dell’attuatore, la corsa di funzionamento deve essere
scelta nel rispetto dei limiti in tabella sotto riportata, legati alla velocità di rotazione dello
stelo e del peso proprio del medesimo, (nel caso di montaggio ad asse orizzontale).
Inoltre occorre rispettare i limiti legati all’instabilità al carico di punta (vedere diagramma
riportato a lato).
È necessario che l’attuatore lavori nell’ambito della corsa stabilita: in fase di progetto
dell’applicazione si deve prevedere sempre un’extracorsa di almeno 10 mm in chiusura
ed in apertura, riducendo così il rischio di arresti a finecorsa meccanico dell’attuatore.
NOTA: Arresti a finecorsa meccanico dell’attuatore ne danneggiano i componenti interni! Per
corse superiori a 20 volte il diametro dello stelo filettato si deve prevedere, ad asta
traslante fuori, un’extra corsa di circa 150 mm in luogo di 10 mm per evitare disallineamenti
fra asta e cannotto.
NOTA: I disallineamenti danno luogo a carichi radiali, usure anomale con fuoriuscita di
lubrificante e irregolarità di funzionamento.
mod.ALI1
manuale uso e manutenzione (rev.01)
15
ITALIANO
Nel caso si verificasse questa eventualità è necessario scollegare preventivamente
l’alimentazione elettrica dell’attuatore.
Per l’uso si richiama l’attenzione al fattore di servizio dell’attuatore e alle condizioni
ambientali.
Il fattore di servizio e le condizioni ambientali sono parametri che si influenzano a
vicenda. Il fattore di servizio è definito come il rapporto percentuale fra il tempo di
lavoro e il tempo di sosta nel ciclo, calcolato su una base di tempo max. di 5 min.
Le condizioni ambientali sono caratterizzate dalla temperatura e dagli elementi che ne
definiscono l’aggressività (umidità, salinità, polverosità, etc.). Per l’utilizzo dell’attuatore
in ambienti aggressivi oppure nei settori alimentare o farmaceutico è possibile montare
un dispositivo a soffietto di protezione sull’asta traslante, in ogni caso per l’installazione
dell’attuatore in tale ambienti contattare preventivamente il costruttore.
Al fine di determinare il valore limite del carico si fa riferimento al diagramma che dà il
valore del carico limite in funzione della lunghezza dello stelo e delle sue condizioni di
vincolo. In linea generale, si operano le seguenti scelte:
Serie attuatore
Scala
Attuatore con corsa inferiore a 15-20 volte il diametro dello stelo filettato
C
Attuatore con corsa superiore a 15-20 volte il diametro dello stelo filettato
B
ITALIANO
IL GENERICO MODELLO DI ATTUATORE NON È UTILIZZABILE IN
ATMOSFERA ESPLOSIVA.PER INFORMAZIONI IN MERITO ALL’USO DEL
PRODOTTO IN TALI CONDIZIONI CONTATTARE LA MECVEL S.R.L.
16
mod.ALI1
manuale uso e manutenzione (rev.01)
RISCHIO
RESIDUO
APPARATO
MISURE
Parti in
tensione
Motore e
Apparecchi
elettrici
Prima di eseguire qualsiasi operazione
da parte dell’operatore sulla macchina va
esclusa l’alimentazione elettrica
Parti
scaldanti
Motore,
Apparecchi
elettrici,
Asta traslante,
Gruppo
riduttore
Indossare i DPI prescritti.
Prima di eseguire qualsiasi operazione da
parte dell’operatore sulla macchina bisogna
attendere il raffreddamento dei componenti.
Parti in
movimento
scoperte
Asta
traslante
CARTELLI
Prima di eseguire qualsiasi operazione
da parte dell’operatore sulla macchina va
esclusa l’alimentazione elettrica
Indossare indumenti che non possano
generare il rischio di trascinamento.
mod.ALI1
manuale uso e manutenzione (rev.01)
17
ITALIANO
5.3 PREPARAZIONE DEL CICLO DI LAVORO E DI CARICO
Prima di potere iniziare il ciclo di lavoro deve essere verificato:
• la corretta installazione dell’attuatore;
• la corretta taratura degli eventuali dispositivi di controllo della corsa;
• la corretta applicazione del carico di lavoro in relazione alle istruzioni riportate
È necessario tenere presente la velocità di traslazione in relazione al ciclo di carico a
cui è sottoposto l’attuatore onde evitare fenomeni dinamici dovuti all’inerzia del carico
o vibrazioni. Nel caso in cui si prevede la possibilità di una tale situazione contattare
l’Ufficio Tecnico della MecVel s.r.l. per verificare la corretta scelta dell’attuatore in
relazione al suo dimensionamento.
5.4 RISCHI RESIDUI
L’analisi e valutazione dei rischi ha messo in evidenza come nonostante si siano adottate
tutte le misure disponibili per evitare la presenza di pericoli nell’utilizzo dell’attuatore, a
causa della sua natura esistono dei rischi residui.Si da evidenza delle disposizioni che
l’operatore dovrà adottare e dei pittogrammi adottati per segnalare i rischi residui.
6 MANUTENZIONE DELL’ATTUATORE
DURANTE LE OPERAZIONI DI MANUTENZIONE È NECESSARIO
PRENDERE TUTTE LE PRECAUZIONI DEL CASO PER EVITARE
SITUAZIONI DI PERICOLO A CARICO DELL’OPERATORE. SI CONSIGLIA
PERTANTO DI LEGGERE ATTENTAMENTE LA PRESENTE SEZIONE DEL
MANUALE DI ISTRUZIONE USO E MANUTENZIONE.
ITALIANO
6.1 PRECAUZIONI E INDICAZIONI COMPORTAMENTALI GENERALI
Le operazioni di manutenzione dell’attuatore devono essere eseguite da personale
addetto autorizzato, opportunamente informato ed eventualmente addestrato in merito
ai pericoli derivanti da tali operazioni. Vanno inoltre considerate le possibili condizioni
di utilizzo e di integrazione dell’attuatore in contesti più complessi.
Nel caso in cui l’attuatore si trovi ad operare in ambienti aggressivi e quindi
potenzialmente pericolosi, gli operatori addetti alla manutenzione dovranno essere
adottate i DPI specifici per particolari caratteristiche ambientali (es. mascherine di
protezione, occhiali, etc.).
Dette operazioni devono essere eseguite in condizioni di sicurezza, a macchina o
impianto fermo e in assenza di corrente elettrica, avendo cura di verificare l’assenza di
un possibile azionamento esterno della macchina o del complesso in cui essa si trova
integrata al momento delle operazioni di manutenzione.
Prima di eseguire qualsiasi tipo di operazione indicata nel presente paragrafo è
obbligo da parte dell’operatore indossare i dispositivi di protezione individuali di seguito
elencati:
GUANTI
18
TUTA DI
LAVORO
SCARPE
RINFORZATE
CASCO
mod.ALI1
manuale uso e manutenzione (rev.01)
6.2 OPERAZIONI DI MANUTENZIONE DELL’ATTUATORE
PRIMA DI QUALSIASI INTERVENTO SULLA MACCHINA VERIFICARE CHE LA
TEMPERATURA DELLE SUPERFICI NON SIA TALE DA PROVOCARE DANNI,
LESIONI E USTIONI PER L’OPERATORE. NEL CASO IN CUI LA SUPERFICIE
SIA CALDA, ATTENDERE CHE LA TEMPERATURA DELLA STESSA ABBIA
L’attuatore richiede solo limitati interventi di manutenzione ordinaria: pulizia ed
eventualmente rabbocco di lubrificante (grasso, da inserire, se necessario e secondo
le istruzioni del costruttore mediante gli appositi ingrassatori).
NOTA: I lubrificanti utilizzabili sono riportati nella sezione 2 CARATTERISTICHE TECNICHE
del presente manuale.
Si raccomanda tuttavia di controllare lo stato dell’attuatore/martinetto per evidenziare
eventuali anomalie di funzionamento in relazione alla regolarità di movimento e alla
presenza anomala di rumorosità: in caso di dubbi contattare l’assistenza tecnica della
MecVel s.r.l.
È opportuno verificare periodicamente l’usura della madrevite a filettatura trapezoidale.
Per tale verifica occorre eseguire le seguenti operazioni:
1. scollegare l’attuatore dal carico;
2. applicare all’asta traslante un carico adeguato alla dimensione dell’attuatore (il
valore del carico varia da 1 volta a 0,1 volte il carico nominale a seconda della taglia
dell’attuatore);
3. applicando il carico in trazione e in compressione e facendo uso di un comparatore,
verificare che il gioco assiale sia sempre inferiore a 0,3 volte il passo della vite.
Quando a seguito delle operazioni sopra descritte si osserva un gioco assiale maggiore
di tale valore limite è necessaria la sostituzione completa dell’attuatore.
È necessario verificare periodicamente:
• lo stato di isolamento e di conservazione dei cavi
• le entrate di cavo
• lo stato di conservazione delle superfici esterne con particolare riferimento alle
superfici degli organi mobili e delle loro eventuali protezioni.
mod.ALI1
manuale uso e manutenzione (rev.01)
19
ITALIANO
RAGGIUNTO UN VALORE ADEGUATO.
6.3 RIPARAZIONE DELL’ATTUATORE
IN
CASO
DI
AUTONOMAMENTE
ANOMALIE
NON
L’ATTUATORE
CERCARE
MA
DI
RIPARARE
CONTATTARE
L’ASSISTENZA TECNICA MecVel s.r.l PER RICEVERE LE NECESSARIE
ISTRUZIONI.
ITALIANO
Le operazioni di riparazione dell’attuatore devono essere eseguite da personale addetto
ed autorizzato, opportunamente informato ed eventualmente addestrato in merito ai
pericoli derivanti da tali operazioni, considerate le possibili condizioni di utilizzo e di
integrazione dell’attuatore in contesti più complessi.
Eventuali operazioni di riparazioni dell’attuatore devono essere eseguite in condizioni
di sicurezza, a macchina o impianto fermo e in assenza di corrente elettrica, avendo
cura di verificare l’assenza di un possibile azionamento esterno della macchina o del
complesso in cui essa si trova integrata al momento delle operazioni di riparazione.
Nel caso in cui l’attuatore si trovi ad operare in ambienti aggressivi e quindi potenzialmente
pericolosi, gli operatori addetti alla riparazione dovranno essere dotati di DPI specifici
per particolari caratteristiche ambientali.
6.4 SOSTITUZIONE DELL’ATTUATORE
L’eventualità di sostituire un attuatore si presenta quando si verifica una rottura
dell’attuatore stesso, un suo malfunzionamento non compatibile con le condizioni di
uso e in caso di rimozione dell’attuatore per smantellamento completo dell’attrezzatura
o macchinario sul quale è montato.
In questi casi è obbligatorio adottare le misure di sicurezza già descritte nel presente
manuale per quanto riguarda le operazione di manutenzione.
Per gli attuatori che presentino anomalie di funzionamento o controllo, contattare
l’assistenza tecnica MecVel s.r.l. per le procedure, le istruzioni e le autorizzazioni
necessarie relative alla sostituzione o riparazione.
Nota: nel caso si contatti l’assistenza
MecVel fare sempre riferimento
al numero di O.P.
riportato sulla targa dell’attuatore
(vedi foto).
20
mod.ALI1
manuale uso e manutenzione (rev.01)
In casi eccezionali è possibile movimentare manualmente l’attuatore come descritto
nella Sezione 5, FUNZIONAMENTO E USO del presente manuale.
Si prega di fare la massima attenzione durante tali operazioni e di seguire strettamente
le indicazioni di sicurezza riportate nella presente Sezione del manuale in particolare:
• assicurarsi che il carico sia vincolato in posizione di sicurezza, opportunamente
frenato e/o sostenuto da dispositivi esterni;
• accertarsi che non sussistano condizioni ambientali tali da rendere intrinsecamente
pericoloso l’intervento di emergenza stesso (insufficiente illuminazione, presenza di
fumi e/o gas e/o nebbie e/o vapori tossici o ustionanti o aggressivi, etc.);
• dotarsi di DPI e di attrezzature idonee all’intervento;
• assicurarsi il supporto di altro personale per facilitare l’allontanamento e l’evacuazione
dell’addetto all’intervento di emergenza nel caso subentrino condizioni di pericolo
impreviste.
MANOVRA MANUALE
Per tutte le versioni è disponibile il dispositivo di manovra manuale: in caso di emergenza, tramite la rimozione di un tappo, si accede all’albero del motore che è manovrabile con l’uso di un cacciavite. Si può così fare avanzare o retrocedere l’asta traslante
dell’attuatore.
Bologna
Bologna
MM
MM
MM
mod.ALI1
manuale uso e manutenzione (rev.01)
21
ITALIANO
7 AZIONAMENTO MANUALE
8 INTERFACCIA CON L’OPERATORE
ITALIANO
Questa sezione del manuale non è applicabile poiché l’attuatore non ha nessuna
interfaccia diretta con l’operatore. L’intervento esterno è previsto solo nel caso di
operazioni di manutenzione, riparazione o per arresti dovuti a manovre di emergenza.
Nei suddetti casi è necessario scollegare preventivamente l’alimentazione elettrica
dell’attuatore ed accertarsi che le superfici scaldanti si siano raffreddate e che i
dispositivi meccanici in movimento si siano arrestati.
Si fa riferimento alla Sezione 6, MANUTENZIONE DELL’ATTUATORE per tutte le
indicazioni necessarie ad eseguire in sicurezza le operazioni sopra indicate.
9 CONDIZIONI DI GARANZIA
Per le condizioni generali di vendita consultare il CATALOGO o il sito internet www.
mecvel.com.
10 NOTE
Note particolari per l’uso e manutenzione di configurazioni personalizzate dell’attuatore
(disponibili solo in caso di configurazioni particolari).
22
mod.ALI1
manuale uso e manutenzione (rev.01)
ITALIANO
mod.ALI1
manuale uso e manutenzione (rev.01)
23
ITALIANO
24
mod.ALI1
manuale uso e manutenzione (rev.01)
mod. ALI1
use and maintenance handbook (rev.01)
25
ENGLISH
1 GENERAL RULES AND REMARKS .....................................................................26
1.1
Introduction ............................................................................................26
1.2
Law references ......................................................................................26
1.3
CE marking ............................................................................................26
2 DESCRIPTION OF THE MACHINE AND TECHNICAL FEATURES ....................27
2.1
Configurations of ALI1 models ..............................................................27
2.2
Description of the components and options ...........................................28
2.2.1 Motorizations..........................................................................................29
2.2.2 Gear boxes ...........................................................................................29
2.2.3 Lead screws ...........................................................................................29
2.2.4 Actuator stroke control ..........................................................................29
2.2.5 Ends and fastening devices ..................................................................29
2.2.6 Antirotation device .................................................................................30
2.2.7 Lubricants ..............................................................................................30
3 TRANSPORT AND DISPOSAL .............................................................................30
3.1
Disposal ................................................................................................31
4 INSTALLATION ......................................................................................................32
4.1
Installation instructions ..........................................................................32
4.2
Stroke control system setting .................................................................34
4.3
Connections ..........................................................................................35
4.3.1 Electric connection ................................................................................35
4.4
Duties of the end user ...........................................................................35
5 WORKING AND USE .............................................................................................36
5.1
Working ..................................................................................................36
5.2
Use and usage conditions .....................................................................36
5.3
Preparation of working and duty cycles ................................................38
5.4
Residual risks.........................................................................................39
6 ACTUATOR MAINTENANCE ...............................................................................39
6.1
General cautions and hints ....................................................................40
6.2
Actuator service operations ..................................................................40
6.3
Actuator repair .......................................................................................41
6.4
Actuator replacement ............................................................................41
7 MANUAL DRIVE ..................................................................................................42
8 INTERACTION WITH THE OPERATOR .............................................................43
9 GENERAL WARRANTY CONDITIONS ...............................................................43
10 REMARKS ...........................................................................................................43
1 GENERAL RULES AND REMARKS
ENGLISH
1.1 INTRODUCTION
This handbook is property of MecVel s.r.l. All rights are reserved, hence it is forbidden
to copy and transfer to others this document contents.
MecVel s.r.l. has the right to modify this handbook, without any need for preliminary
information.
Before using this product( o actuator), we strongly recommend to read this document
carefully.
The actuator is not and must not be considered as a safety device. The final
user, or the manufacturer of the machine or system, in which the actuator is installed,
has the responsibility for the safety of the machine or system itself and he must install
the actuator only in accordance to the current rules for safety of the land where the
machine is used.
This handbook is about the range of ALI1 actuators, described in the next chapters.
1.2 LAW REFERENCES
The safety rules applied by the manufacturer for the design and the production of this
apparatus, in accordance with “CE” marking are described in the technical brochure,
section nr. 3, property of MecVel s.r.l.
REMARK: For further explanations and details, please contact MecVel s.r.l.
1.3 CE MARKING
Each actuator is provided with a label, containing the following details:
• manufacturer’s name
• model
• year of production
As an example, here below you can find one of the labels applied by MecVel s.r.l.
26
mod. ALI1
use and maintenance handbook (rev.01)
2 DESCRIPTION OF THE MACHINE AND TECHNICAL FEATURES
COMPONENT/OPTION
FEATURES/VALUE
DC Motor
12 / 24 / 36 Volt
Gearing
Worm screw - Worm wheel
Mechanism
Cold-rolled profile ACME + Nut
Push rod
Aluminium (stainless steel upon request)
Ends, joints, fastening devices
Rear
Front
Stroke control devices
Encoder
Lubrication
Permanent with grease
Protection level
Depending on customer’s demand
ENGLISH
Mechanical, by microswitch
(MAX IP65)
Weight
Depending on the configuration
(For ex: 1 Kg for 100 mm stroke)
Possibile actuator configurations are listed below, with the following codes:
MOD. ALI1
MOD. ALI1-P
MOD. ALI1-F
MOD. ALI1-PF
MOD. ALI1-R
MOD. ALI1-PR
REMARK: Customized configurations can be carried out . To check if these configurations
comply with this handbook, please contact the manufacturer.
2.1 CONFIGURATIONS OF ALI1 MODELS
For the technical features description of the following configurations components and
devices, please see section 2 TECHNICAL FEATURES of this handbook.
MODEL
MOTOR*
GEARS
LEAD SCREW
ALI1
A or B
VR
TR
END
SWITCHES
AL. (standard) / STAINLESS STEEL (on request)
-
ALI1-F
A or B
VR
TR
AL. (standard) / STAINLESS STEEL (on request)
F
ALI1-R
A or B
VR
-
-
-
ALI1-P
B
2 VR
TR
AL. (standard) / STAINLESS STEEL (on request)
-
ALI1-PF
B
2 VR
TR
AL. (standard) / STAINLESS STEEL (on request)
F
ALI1-PR
B
2 VR
-
-
-
mod. ALI1
use and maintenance handbook (rev.01)
PUSH ROD
27
* see below table.
LEGEND:
NOT AVAILABLE
VR
WORM SCREW - WORM WHEEL
2 VR
TR
F
DOUBLE REDUCTION WORM GEAR-BOX
COLD - ROLLED ACME PROFILE
MECHANICAL STROKE LIMIT DEVICE WITH MICROSWITCH
MOTOR TYPE
A
B
MOTOR SIZE
40S (24V)
40L (12, 24, 36 V)
ENGLISH
2.2 DESCRIPTION OF THE COMPONENTS AND OPTIONS
Concerning technical features and performances, please refer to the catalogue of the
product.From the below drawing, you can identify the main components of the differt
models of this actuator.
Access to
Manual Control
Fastening Flange
Gearbox
Shaft
Motor
Access to
Manual Control
Actuator body
containing limit switches
Rear end
Gearbox
28
Motor
Push rod
Front end
mod. ALI1
use and maintenance handbook (rev.01)
2.2.1 Motorizations
Available only with permanent magnets DC motors.
Possible voltages are 12, 24 and 36 V.
To choose the right motorization, we suggest to read the catalogue.
2.2.3 Lead screws
Basically made of C-20 steel and featuring cold-rolled profile; it is coupled with bronze
or polymer nuts in order to grant safety against loads and low noise.
2.2.4 Actuator stroke control
Different types of stroke control devices can be applied to actuators: from simple
microswitches, mechanical or magnetic, providing a signal to control motor supply (ON/
OFF), up to electronic devices to obtain servo-mechanisms.
The types of devices available on ALI1 are:
Mechanical stroke control with microswitches
There are 2 or more changeover single - contact cam operated microswitches, integrated
into the actuator protective tube. They are switched by a rod tied to the push rod. This
device is adjustable.
Encoder
It is an incremental rotative transducer, that turns spinning movements into digital
pulses. It can be installed on actuators by using a longer wormscrew coming out the
gear-box on the opposite side of the motor, or directly on board on the back of the motor
itself. Its digital output allows for a feedback on actuator position, yet, every time there
is a machiner reset, encoder shall be given the zero position.
2.2.5 Ends and fastening devices
Both standard and dedicated ends (according to customer’s drawing) are available.
Ends shall be carefully chosen, in order to avoid radial loads on actuator. Please note
that front end receives reaction spinning torque when load is acting on actuator, so
when yoke or balljoint ends are used, antirotation key is advisable.
It is important to keep the front and back fixing. Ends with parallal axis when mounting
mod. ALI1
use and maintenance handbook (rev.01)
29
ENGLISH
2.2.2 Gearbox
Steel wormscrew and wormwheel made of special plastic or bronze materials, to meet
different needs in terms of performances low noise, lifetime, backlash, etc.
the actuator, in order to avoid having an iperstatic system, which would damage the
actuator.
ENGLISH
2.2.6 Antirotation device
Antirotation device is needed when the application does not allow preventing from
rotating: in other words if the load is not guided. This device is realized by a long key
fixed inside of the outer tube and a keyway cut into the nut, or by a safety nut with
special slide running along a slide installed into the outer tube.
2.2.7 Lubricants
The technical features of the standard lubricants are shown on the below tables. For
specific uses special lubricants are available: in this case, please contact the MecVel
Technical Dept.
STANDARD LUBRICANTS
Brand
Vanguard
Product Min. T
G.S.
-45 °C
Max. T
Drop T
Base oil
Thickener
NLGI Class
+150 °C
+180 °C
Synthetic
Lithium
2
Friction 2
hydroxide
EQUIVALENT LUBRICANTS
Brand
Klueber
Product
Min. T
Max. T
Drop T
Base oil
Thickener
NLGI Class
Isoflex LDS 18 -50 °C
+120 °C
-
Synthetic
Lithium
2
Special A
Dow
Corning
Molykote
complex
-45 °C
+180 °C
+290 °C
BG20
Synthetic
Lithium
ester
complex
2
For deeper technical features and performances, please see the manufacturer’s
catalogue.
3 TRANSPORT AND DISPOSAL
The product is supplied in carton or wooden boxes with or without pallets, depending on
the agreements takenwith the customer and on the dimensions/weight of the product
itself. After unpacking, we recomend to move the products using adeguate systems
(such as fork lifts, transpallets, safety belts).
30
mod. ALI1
use and maintenance handbook (rev.01)
3.1 DISPOSAL
Hereafter is the list of the products connected with the actuator, that have to be disposed,
in accordance with the current rules with the Country in which the product is installed
and used:
• Package, during the installation;
• Actuator components, if replaced or repaired;
• Lubricants, after the clenaing or service of the actuator;
• Actuator itself, if replaced or repaired.
Please dispose of all waste carefully.
mod. ALI1
use and maintenance handbook (rev.01)
31
ENGLISH
It is important that the operator pay attention to the safety conditions fcr the product
transport. In particular, please remember to wear appropriate safety clothes, such as
safety shoes and gloves, to avoid damages or injuries caused by an accidental fall of
the product.
The weight of an actuator is reported in the table of section 2. Up to a weight of 10
Kg the actuator can be moved without using any particolar tools, but please consider
that for actuators with strokes longer than 500 mm, the barycenter shifted towards the
motor can cause difficulties during the transport and it can be necessary the help of a
second operator or of suitable tools. We strongly recommend to move the actuator box
with the maximum care, to avoid that accidental collisions damage the actuator.
4 INSTALLATION
ENGLISH
4.1 INSTALLATION INSTRUCTIONS
The actuator shall be installed paying attention to have only axial forces applied to it.
It is important to get the mounting points perfectly alligned. They have to be chosen,
taking into consideration the loads with which the actuator has to work, in order to avoid
misalignements that would cause grease loss and non-regular working.
To guarantee stability of the actuator, a safe and stable installation, according to the
following instructions, is recommended:
1. Front and rear connection points must have parallel axis;
2. Fix the rear connection point so that the actuator is strongly fastened to the
structure;
3. connect the load to the front end of the actuator, using suitable fastening devices
(tie - rods, screws, pins, etc.);
4. proceed with the electric connection.
OFF - SET LOADS, DUE TO WRONG SELECTION OF ACTUATOR’S FIXINGENDS OR INSTALLATION MISTAKES, WITH NON ALIGNED ENDS, LEAD
TO SIDEFORCES ON ACTUATOR PUSH ROD CAUSING UNEXPECTED
WEAR, LUBRICANT LOSS AND NON REGULAR WORKING.
Actuator shall work within its nominal stroke, avoiding mechanical end stops.
Running againstmechanical stops cause serious damage of internal actuator parts.
Before starting the actuator, following check-ups shall be performed:
• If actuator is equipped with electric limit switches, before starting the motor, be sure
they have been connected and ensure they work properly, in order to avoid any
mechanical end - stop.
• Make sure that push rod is regularly travelling and limit switches are correctly
adjusted. Drive the actuator “step-by-step” to check all this.
• The first time you switch on the actuator it is advisable to start from the middle of the
stroke to avoid damages due to startingthe motor in the wrong direction and hitting
the stroke end.
• Make sure that there are no interferences between the push rod and other parts of
the machine or system on which the actuator is installed.
REMARK: check catalogue for more explanations about actuator stroke (contact MecVel s.r.l.).
32
mod. ALI1
use and maintenance handbook (rev.01)
IN CASE LIMIT SWITCHES ARE ALREADY ADJUSTED BY THE
MANUFACTURER, MANUAL ROTATION OF THE PUSH - ROD WILL
CAUSE ADJUSTMENT LOSS!
REMARK: Current threshold shall be adjusted not to react towards current spikes on motor
startups.
PLEASE NEVER SWITCH ON THE ACTUATOR, BEFORE HAVING
CORRECTLY COMPLETED ALL THE POSITIONING OPERATIONS.
mod. ALI1
use and maintenance handbook (rev.01)
33
ENGLISH
When installing the actuator, to avoid accidental overloads, we suggest to install a
current overload relay on general control panel. Its function is to cut off the power
supply when actuator current cunsumption is overriding a chosen limit. In fact, being
current proportional to load, this device avoids actuator to be accidentally overloaded.
4.2 STROKE CONTROL SYSTEM SETTING
SETTING LIMIT SWITCHES
Minimum stroke setting
min. 35
Versione 2FC - 2FC Version
Versione 3FC - 3FC Version
ENGLISH
A-F
P-B
min. 25
P-B
min. 35
A-F
I
I
LIMIT SWITCHES
This model is equipped with two limit switches (featuring one contact each). A version
with a third limit switch, central positioning, is available.
Intermediate position changes according to push-rod moving direction.Tuning is adjusted by turning screws on actuator header. Each clock wise turn of the screw allows
the micro switch to go 0.7 mm. forth, towards the header itself.
Look at the drawing to see how it works; letters have following meaning:
A-F= Front
I= Intermediate
P-B= Back
ENCODER
Encoder opposite side of motor available only on ALI4 and ALI4-F
•
•
•
•
Encoder Power Supply 3,8 V - 24 Vdc
PUSH-PULL
2 CH - 4 ppr
Maximum output current: 100 mA
34
OUT 1
OUT 2
MARRONE BROWN
BIANCO WHITE
VERDE
GREEN
GIALLO
YELLOW
mod. ALI1
use and maintenance handbook (rev.01)
4.3 CONNECTIONS
4.3.1 Electric connection
THESE OPERATIONS MUST BE DONE BY QUALIFIED AND AUTHORIZED
Once installation is completed, following the above described instuctions, the stroke
control devices (if present) can be activated, by connection of the supply cable to the
general control panel.
Connection operations must be done with the maximum attention to safety, using the
proper safety tools (such as gloves, glasses, etc.).
Reference drawings for the electric connection are available on the catalogue of the
product (contact MecVel s.r.l.)
REMARK: If a brakemotor is driven by a frequency converter, brake shall get a separate power
supply.
4.4 DUTIES OF THE END USER
The end user must install the machine in suitable places, equipped with electrical
system and lighting, according to the rules in force.
We recommend, moreover, the installation of the electricity in dry and lighted places,
with temperature, humidity, etc., comply with the limits indicated by the laws in force.
In particular, the end user shall install on board of the machine the following devices:
• Device for the automatic interruption of the current (magnetothermic switch),
controlling the functions of direct and indirect electrical connections, as well as
protecting the electrical devices from overloads;
• A locked disconnector, for mainteinance operations, of the suitable size, that gathers
all the current supply of the actuator, before it reaches all the different tools;
• Earthing to control indirect contacts and air discharges.
Remember to use disconnectors of the right dimension for the number and type of
actuators that they have to disconnect. Please refer to the electric features described
on the use and maintenance handbooks.
All these devices shall be installed in a general control panel, adequate to the
application.
mod. ALI1
use and maintenance handbook (rev.01)
35
ENGLISH
PERSONNEL.
In case of additional end stroke devices, it is up to the installator to supply them by a
current transformer.
The manufacturer cannot be considered as liable in case of loss of performance and/
or damages to people or animals, if the installation instructions are not fulfilled as here
recommended.
Please contact the manufacturer to verify the compatibility of the work place with the
actuator itself.
REMARK: By laws/rules in force, it is meant the legislation of the Country in which the actuator
is used.
ENGLISH
5 WORKING AND USE
5.1 WORKING
This machine is used for loads movement. It is made up by an electrical motor, driving
a lead screw directly or with a gearbox. A nut is then allowed to move along lead screw,
and its movement drives push rod connected the nut itself.
Load shall be axial only, but it can be tensile or pushing, no matter what push rod
direction is. The actuator can be selflocking or non-selflocking. Anyway, there is not
a sharp threshold between selflocking and non-selfleocking, because this feature is
affected by gears wear, load, vibrations. In case of doubt about actuator behaviour, it is
necessary to do some tests and to contact the manufacturer.
REMARK: We would like to stress that the selflocking of the actuator limits its accuracy and the
repeat of the positioning. In case of doubts, please contact MecVel s.r.l.
5.2 USE AND USAGE CONDITIONS
The actuator is designed for the use conditions specified by the manufacturer and
explained on the catalogue of the product.
The supply is in AC or DC, but it is also possibile to drive it manually, in case of
emergency, through second shafts or streched wormscrews acting as second shafts.
Before starting with manual operation, it is important to disconnect the power supply of
the actuator.
About use, it is important to define the actuator duty cycle and the environment.
These parameters need to be analyzed as linked together. Duty cycle is percentage
rate between on-time and idle-time, on a timeframe of 5 mins.
36
mod. ALI1
use and maintenance handbook (rev.01)
REMARK: Running on block cause serious damage of actuator! For strokes 20 times larger than
lead screw diameter, it is important to consider 150 mm of extra stroke, instead of 10
mm to avoid off set loads and compensate buckling effect.
REMARK: Off set load lead to side-forces on actuator axis, unexpected wear, lubricant loss and
non regular workout.
The diagram shows how to see what is max load admitted by a lead screw, basing upon
its lenght and upon how actuator will be fixed on frame. As a general rule, choice is:
Actuator series
Diagram
Actuator with stroke 15 - 20 time lower than lead screw diameter
C
Actuator with stroke 15 - 20 time larger than lead screw diameter
B
THE STANDARD MODEL OF ACTUATOR CANNOT BE USED IN EXPLOSIVE
OR POTENTIALLY EXPLOSIVE ENVIRONMENT.
FOR FURTHER INFORMATION REGARDING THE USE OF THE PRODUCT
IN THESE CONDITIONS, PLEASE CONTACT MECVEL S.R.L.
mod. ALI1
use and maintenance handbook (rev.01)
37
ENGLISH
Environment is mainly due to temperature and related elements, which can sometimes
create an aggressive environment (humidity, dust...). A bellow protecting push rod is
available: pharmaceptical and food industry or aggressive environment are typical
examples of applications where this item can be requested; in any case, under such
circumstances, please contact the manufacturer.
Standard duty cycle for our actuators is rated in S3-30% and the temperature gap
is -10°C/+60°C, the pressure range is 0,8-1,1 bar.
Duty cycle can vary depending on the configuration and on the usage of the actuator.
In any case, it is indicated on the label on the product. In case of doubt, please contact
the Technical Dept. of MecVel s.r.l.
The below table shows how to determine the actuator actual stroke. It depends on the
speed and the weight of the lead screw (in case of assemblying on the horizontal axis.
Actuator shall work within stroke settled. During the project of the application, some
10 mm extra stroke (in both directions) are to be considered: lower possibilities of
mechanical end - stops will then be involved.
ENGLISH
5.3 PREPARATION OF WORKING AND DUTY CYCLES
Before starting the duty cycle, following checks have to be carried out:
• correct installation of the actuator;
• correct setting of the stroke control devices, if present;
• correct application of the load, with reference to the guidelines of this handbook.
It is necessary to consider the linear speed along stroke together with the load dynamics,
in order to avoid inertias or vibrations. In case this situation might happen, we suggest
to contact the Technical Department of MecVel s.r.l. to check the correct choice of the
actuator, comparing with its dimensions.
38
mod. ALI1
use and maintenance handbook (rev.01)
5.4 RESIDUAL RISKS
The risks analysis and evaluation has shown that, even though all the possibile measures
to avoid dangers from the actuator use have been adopted, still some residual risks
exist. In this section, we will explain all the cares that the operator shall adopt to avoid
this residual risks. We will also show the signs used to indicated these risks on the
machine.
PROCEDURE
Parts in
tension
Motor and
electric parts
Before proceeding with any
operation on the actuator, the
operator must switch power off.
Hot parts
Motor,
electric parts,
push rod,
reduction unit
Wear the necessary clothes.
Before proceeding with any
operation, the operator must wait
until all the hot parts are cooled.
Push rod
Before proceeding with any
operation, switch power off. Do not
wear clothes that can be dragged in
the machine.
External parts
in movement
SIGN
ENGLISH
RESIDUAL
COMPONENT
RISK
6 ACTUATOR MAINTENANCE
DURING MAINTENANCE OPERATIONS, PLEASE TAKE ALL THE
NECESSARY CARES, TO AVOID ANY DANGER FOR THE OPERATOR.
WE RECOMMEND TO CAREFULLY READ THIS CHAPTER OF THE
HANDBOOK FOR USE AND MAINTENANCE.
mod. ALI1
use and maintenance handbook (rev.01)
39
ENGLISH
6.1 GENERAL CAUTIONS AND HINTS
All the maintenance operations must be done by qualified and authorized technicians,
adequately informed and trained about the dangers, arising from them.
Moreover, it is important to consider the integration and usage of the actuator into more
complicated systems.
If the actuator is installed in dangerous environment, the operators must behave
accordingly, for example, wearing protecting masks, glasses, etc.
All the operations must be fulfilled in safety conditions, with power supply switched off,
and after checking the non - possibility of an external switch on of the machine or of the
system in which it is integrated, during these operations.
Before starting any operation, operator must wear the following safety clothes:
GLOVES
SUIT
SAFETY
SHOES
HELMET
6.2 ACTUATOR SERVICE OPERATIONS
BEFORE STARTING WITH ANY SERVICE OPERATION, CHECK
THAT THE TEMPERATURE OF THE PARTS IS NOT SO HOT TO
CAUSE DAMAGES, INJURIES OR BURNS TO THE OPERATOR. IN
THIS CASE, WAIT UNTIL THE PARTS ARE COOLER.
Actuator needs only few service operations: cleaning and eventually greasing (if
necessary, lubricant has to be added by the appropriate lubricator).
REMARK: Lubricants that can be used are listed in chapter 2 TECHNICAL FEATURES of this
handbook.
Anyway, MecVel s.r.l. recommends a scheduled inspection on actuator or screwjacks
to detect any problem, especially about movements and in case of noises.
The schedule of the checks should vary according to the application and the use: in
case of continuative use or for any doubts, please contact the Technical Department
of MecVel s.r.l.
40
mod. ALI1
use and maintenance handbook (rev.01)
6.3 ACTUATOR REPAIR
IF SOMETHING WRONG IS DETECTED, DO NOT TRY TO REPAIR IT
BY YOUR OWN, BUT CONTACT AFTER-SALES DEPT. OF MECVEL TO
GET THE NECESSARY INSTRUCTIONS.
All the repairs must be done by qualified technicians, adequately informed and trained
about the dangers, arising from them. Moreover, it is important to consider the integration
and usage of the actuator into more complicated systems.
Every repair must be fulfilled in safety conditions, with power supply switched off, and
after checking the non - possibility of an external switch on of the machine or of the
system in which it is integrated.
If the actuator is installed in dangerous environment, the operator must behave
accordingly, for example, wearing protecting clothes and tools.
6.4 ACTUATOR REPLACEMENT
It is necessary to replace the actuator, in the following cases: if it breaks, if it is not
working correctly for its use and if the whole system or application on which it is
installed is dismantled.In these cases, the operator must take care to follow the safety
instructions about actuator service, explained in this handbook.
mod. ALI1
use and maintenance handbook (rev.01)
41
ENGLISH
It is necessary to frequently check the nut wear.
To do this, follow this procedure:
1. disconnect load from actuator;
2. put load on push rod, according to model rating (from nominal load till 0.1 times
nominal load, lowering this parameter the more actuator size is high);
3. with a dial - gauge, putting both compressing and tensile load, check that axial
backlash is always lower than 0,3 times the screwpitch.
In case backlash is higher, then actuator needs to be replaced.
It is necessary to periodically check:
• the isolation and preservation of the cables;
• the cable inlets;
• the preservation of the external surfaces, with particolar attention to the parts in
movement and their shelters.
If the actuator has problem of functioning or control, please get in touch with the
Technical Service of MecVel s.r.l. for the instructions and the authorizations about
replacement or repair.
REMARK:For the Technical Service
MecVel is important the O.P. number
writed on the label on the motor.
ENGLISH
7 MANUAL DRIVE
In case of emergency, it is possibile to move the actuator manually, as described in
section 5, WORKING AND USE of this handbook.
Please take the greatest care during these operations and follow carefully the guidelines
of this hanbook, in particolar:
• be sure that load is safely held, braked and/or supported by external tools;
• be sure that the environment is not intrinsecally dangerous during the emergency
operation (bad lighting, smoke or gases or toxic and burning vapours, etc.);
• use safety tools and wear safety clothes;
• do not proceed with emergency operation without some personnel that can help the
operator in case of unexpected danger.
MANUAL DRIVING
A manual driving system is available, for emergency situations.
By removing the cap support, movement can be controlled using a screwdriver.
Bologna
Bologna
MM
42
mod. ALI1
use and maintenance handbook (rev.01)
MM
ENGLISH
MM
8 INTERACTION WITH THE OPERATOR
This section cannot be applied, because the actuator has no interaction with the
operator. External drive is possibile only in case of service, repair or emergency. In
these cases, remember to switch off power supply of the actuator and be sure that hot
surfaces are cool and parts in movement are still.
Please refer to chapter 6, ACTUATOR MAINTENANCE for all the necessary hints to
safely fulfill these operations.
9 GENERAL WARRANTY CONDITIONS
For general sales conditions consult the catalog or website www.mecvel.com.
10 REMARKS
Particolar guidelines for the use and maintenance of customized actuators are available
only in case of special configurations.
mod. ALI1
use and maintenance handbook (rev.01)
43
ENGLISH
44
mod. ALI1
use and maintenance handbook (rev.01)
45
rev. 01 del 01/2009
MecVel S.r.l. - Via Due Portoni, 23 - 40132 Bologna - ITALIA - Tel. +39 051
4143711 - Fax +39 051 404567
www.mecvel.com