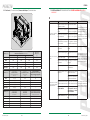
1
Modello/Model:
KOALA
I TRINCIAERBA
GB FLAIL
MOWER
F BROYEUR
A HERBE
D SCHLEGELMÄHER
KOALA 1000
Manuale/Manual:
Idraulico/Hydraulic:
Cod. 05063000
Cod. 05064000
KOALA 1200
Manuale/Manual:
Idraulico/Hydraulic:
Professional:
Cod. 05024000
Cod. 05018000
Cod. 05092000
KOALA 1600
Manuale/Manual:
Idraulico/Hydraulic:
Professional:
Cod. 05023000
Cod. 05022000
Cod. 05093000
Peruzzo srl
Via Valsugana, 30 Curtarolo (PD)
Tel . 049.9620477
Fax 049.9620435
P.iva 00712120286
[email protected]
www.peruzzo.it
Cod. 29050015 Rev.3 Edit: 09/2009
KOALA PROFESSIONAL
I MANUALE
GB USE
KOALA
D’USO E MANUTENZIONE
AND MAINTENANCE MANUL
F NOTICE
D’INSTRUCTIONS
D HANDBUCH
ZUM BETRIEB UND ZUR WARTUNG
KOALA
INTRODUZIONE / FOREWORD /INTRODUCTION / EINFÜRUNG
I
B
Vi ringraziamo per aver acquistato una attrezzatura PERUZZO.
B1
C
C1
9
Questo manuale descrive le norme d’uso, di manutenzione e le parti di ricambio relative.
Dal corretto uso e dall’adeguata manutenzione dipende il regolare funzionamento dell’attrezzatura.
È altresì importante attenersi a quanto descritto in questo manuale in quanto la ditta costruttrice
declina ogni e qualsiasi responsabilità per incidenti e/o danni dovuti alla negligenza e/o alla
mancata osservanza delle norme riportate.
1
GB 2
3
4
8
We thank you to have bought a PERUZZO’s equipment.
This handbook shows either the operation and maintenance instructions and the spare parts of
your machine.
The right running of your equipment depends on a right operation and maintenance.
Therefore, we recommend you to follow strictly what herein enclosed, in order to prevent all
troubles which could hinder a good running.
7
It is furthermore important to follow these instruction, since the manufacturer refuses all responsibilities due to negligence and non fulfilment of such rules.
5
6
F
Ce livret décrit normes d’emploi, opérations d’entretien et pièces de rechange de votre
tondeuse.
Le fonctionnement régulier de l’équipement dépend de son correct emploi et d’un entretien
approprié.
N.
Code
1
Il est conseillé de suivre scrupuleusement ce qui est indiqué dans cette notice. Le constructeur
décline toute responsabilité en cas d’accident et/ou dommages dûs à la négligence et au
manque de consultations des règles reportées dans cette notice.
D
Dieses Handbuch beschreibt die Vorschriften für den Gebrauch, die Wartung und die dazugehörigen Ersatzteile.
Von der korrekten Anwendung und der entsprechenden Wartung hängt der einwandfreie Betrieb
der Maschine ab.
Es ist außerdem wichtig, sich an die Beschreibung in diesem Handbuch zu halten, da die Herstellerfirma jede Haftung ablehnt, die auf einen Unfall bzw. Schäden zurückzuführen sind, die durch
Fahrlässigkeit bzw. Nichteinhalten der angeführten Normen zurückzuführen ist.
Articolo
Article
Article
Artikel
07020183
Coltello “B”
Flail “B”
Couteau “B”
Messer “B”
2
05030030
Coltello “B1”
Flail “B1”
Couteau “B1”
Messer “B1”
3
05010075
Coltello “C”
Flail “C”
Couteau “C”
Messer “C”
4
05010060
Coltello con
saldatura “C1”
Flail “C1”
Couteau “C1”
Messer “C1”
5
05010070
Vite con dado
Bolt with Nut
Boulon avec ecrou
Schraube mit mutter
6
36030317
Cinghie mod. XPA
1107
Belts mod. XPA 1107
Courroie mod. XPA
1107
Keilriemen mod. XPA
1107
7
04010166
Ruota
Wheel
Roue
Rad
8
05018503
Forcella
Front wheel fork
Fourche
Rad Gabel
9
05018126
Distanziali
Spacer
Bague
Distanzstück
67
Release 00_09/09
11.LISTA PARTI DI RICAMBIO / SPARE PARTS LIST / LISTE DE PIECE DETACHEES /
ERSATZTEILELISTE
I
La sostituzione di parti di ricambio va effettuata da personale specializzato.
Per ordinare qualsiasi pezzo di ricambio, fare riferimento ai dati riportati nella targhetta di
identificazione della macchina acquistata.
La garanzia decade qualora non siano usati pezzi di ricambio originali.
GB
The replacement of spare parts must be effected by specialized staff.
To order any spare part, mention all the data indicated in the identification plate of the
machine.
The warranty expire when non original spare parts are used.
F
Le remplacement des pièces détachées doit être effectué par du personnel spécialisé.
Pour toute commande de pièce de rechange, indiquer toutes les données mentionnées
sur la plaquette d’identification de la machine.
La garantie échoue dans le cas d’utilisation de pièces qui ne sont pas d’origine.
Peruzzo srl
Via Valsugana, 30 Curtarolo (PD)
Tel . 049.9620477
Fax 049.9620435
P. iva 00712120286
I
DICHIARAZIONE DI CONFORMITÀ
GB DECLARATION OF CONFORMITY
F
DECLARATION DE CONFORMITE
D
KONFORMITÄTSERKLÄRUNG
La ditta ___________________________________________________________________________________
(denominazione del fornitore)
___________________________________________________________________________________________
(indirizzo)
dichiara sotto la propria esclusiva responsabilità che la macchina:
D
Der Eersatzteilaustausch muss von Fachleuten vorgenommen werden.
Jede Ersatzteilbestellung soll die auf den Identifizierungschildchen der Maschine enthaltenen
Angaben enthalten.
Die Garantie wird ungültig, wenn keine Originalersatzteile beutzt werden.
___________________________________________________________________________________________
(nome, tipo, modello, lotto, gruppo o numero di serie, anno di costruzione, possibilmente la sua origine ed il numero)
___________________________________________________________________________________________
alla quale questa dichiarazione si riferisce, risponde ai requisiti essenziali di sicurezza previsti dalla
direttiva europea:
I
Direttiva Europea Macchine 98/37/CE
Ed è conforme alle seguenti norme armonizzate:
UNI EN 12100-1 (2005)
UNI EN 12100-2 (2005)
Curtarolo,
_____________________________
(luogo e data)
Il legale rappresentante
Release 00_09/09
66
_____________________________________
(nome e firma o timbratura equivalente della persona autorizzata)
KOALA
10.GARANZIA / WARRANTY / GARANTIE / GARANTIE
La garanzia decade qualora si faccia un uso diverso da quello prescritto.
Controllare la macchina al momento della consegna per verificare eventuali danni da trasporto.
Eventuali reclami devono essere inviati alla “ PERUZZO s.r.l.” per iscritto entro 8 (otto) giorni dalla
ricezione. La garanzia prevede la sola sostituzione, o riparazione delle parti riconosciute difettose,
dopo attento esame da parte della PERUZZO Srl.
La garanzia è valida per 12 mesi dalla data di acquisto.
La garanzia decade se non si rispettano le istruzioni del seguente libretto, decade inoltre se vengono operati dei cambiamenti o vengono montati pezzi di ricambio non originali.
Foro competente di Padova.
I
The guarantee decay when the machine is used differently as explained in this manual.
Check the machine when delivered to inspect eventual transport damages.
Eventual complaints must be forwarded to “Peruzzo s.r.l.” in writing within 8 (eight) days from the
receipt. The guarantee can be applied with the replacement or repairing only for the defective
part, after a careful checking from Peruzzo Srl company.
The guarantee is 12 months valid from purchasing date.
The guarantee decay in case the information of the present manual are not respected, moreover
decay in case of modification by the owner or fitted not original spare parts.
Court to be due of Padova.
GB
La garantie échoue en cas d’usage différent de celui prescrit.
Contrôler la machine au moment de la livraison afin de vérifier s’il y a eu des dommages durant
le transport.
Pour toute réclamation, s’adresser directement à la société “Peruzzo s.r.l.” par écrit, maximum 8
jours dès la machine. La garantie a une validité de 12 mois à partir de la date d’achat.
La garantie ne prévoit que le remplacement ou la réparation des pièces qui ont été reconnues
défectueuses, à la suite d’un contrôle par la sté. Peruzzo Srl.
La garantie n’est plus valable si les instructions reportées dans cette notice n’ont pas été scrupuleusement observées, dans le cas de changements apportées à la machine et dans le cas de
montage de pièces détachées non originales.
Tribunal de compétence de Padova.
F
Die Garantie wird hinfällig, wenn die Maschine zum nicht vorgeschribenen Zweck verwendet
wird.
Bei der Anlieferung muss die Maschine auf eventuelle Transportschäden untersucht verden.
Eventulle Reklamierungen müssen innerhalb 8 (acht) tagen nach Erhalt schriftlich bei der “PERUZZO
s.r.l.” geltend gemarcht werden.
Die Garantie hat eine Gültigkeit von 12 Monaten nach der Lieferung.
Die Garantie wird ungültig, wenn die Betriebs und Wartungsanweisungen dieses Handbuchs nicht
befolgt werdenm ausserdem wenn Aenderungen an der Maschine vorgenommen oder keine
Originalersatzteile verwendet werden.
Gerichtstand Padua.
D
65
Release 00_09/09
KOALA
ben.
I
- Eine gründliche Schmierung und Oelung vornehmen, um alle Teile zu schützen.
- Maschine, nach Unterstellung in geschüzter Umgebung, abdecken und auf dem Boden festsetzen, um Fortbewegung durch zufälliges Anstossen zu vermeiden.
Wenn die Masachine abei Wiederaufnahme des Betriebs in perfektem Zustand vorgefunden wird,
bedeutet das nur Vorteile für den Benutzer.
1.
INDICE /
GB
INDEX /
F
INDEX /
D
INHALT
PREFAZIONE/USE OF EQUIPMENT/PREFACE/VORWORT........................................... 7
1.1 Guida alla consultazione / Reference guide / Guide a la consultation / Anleitung zur
benutzung des handbuches................................................................................................... 8
2.
CARATTERISTICHE TECNICHE / TECHNICAL CHARACTERISTICS / CARACTERISTIQUES TECHNIQUES / MERKMAL TECHNISCHE............................................................ 9
2.1 Note identificative / Identification note / Notes d'identification / Herstellerkennzeichen.9
9. Smaltimento della macchina / Getting rid of the machine /
Elimination de la machine / Entsorgung der ausgemusterten
maschine
Alla fine della vita della macchina, prima di portarla da un apposito demolitore, assicurarsi
che non vi sia olio nel moltiplicatore o nel sistema idraulico della macchina.
2.2 Dati tecnici / Technical data / Donnees techniques / Technishe daten............................. 10
2.3 Prestazioni / Performance / Prestations / Leistungen........................................................ 11
2.4 Adesivi segnaletici e di pericolo / Adesivi segnaletici e di pericolo / Adesivi segnaletici
e di pericolo / Adesivi segnaletici e di pericolo.................................................................. 11
I
3.
NORME ANTINFORTUNISTICHE / SAFETY REGULATIONS / REGLES DE SECURITE /
SICHERHEITSVORSCHRIFTEN...................................................................................... 15
4.
DESCRIZIONE DELLA MACCHINA/ MACHINE DESCRIPTION / DESCRIPTION DE LA
MACHINE / MASCHINENBESCHREIBUNG.................................................................... 20
5.
NORME D'USO / OPERATION RULES / MODE D’EMPLOI / GEBRAUCHSANWEISUNGEN................................................................................................................................... 23
Evitare dispersioni nell’ambiente che possono creare danni ecologici.
At the end of machine working life and before to be scraped by a special company, ensure
that there in no oil into the grar box and in the in the hydraulic system of the machine.
GB
5.1 Trasporto della macchina / Transport of the machine / Transport de la machine / Transport der maschine................................................................................................................ 25
Avoid environment loss that cause environment damages.
5.2 Controlli e consigli prima della messa in moto / Checking and suggestions before operating / Controles et conseils avant son utilisation / Kontrollen und Hinweise vor der
Inbetriebsetzung der Maschine............................................................................................ 27
A la fin de l’utilisation de la machine etravat et avant d’être conduite à un centre de démolition, il faut s’assurer qu’il n’y ait pas d’huile dans le renvoi d’angle.
F
5.3 Applicazione al trattore / Fitting to the tractor / Application au tracteur / Ankuppelung
an den traktor......................................................................................................................... 32
Éviter la dispersion et causer des dommages au niveau écologique.
5.4 Regolazione dell'altezza di taglio / Adjusting cutting height / Reglage de la hauteur de
coupe / Schnitthöeheeinstellung......................................................................................... 37
Alla fine della vita della macchina, prima di portarla da un apposito demolitore, assicurarsi
che non vi sia olio nel moltiplicatore o nel sistema idraulico della macchina.
D
Evitare dispersioni nell’ambiente che possono creare danni ecologici.
5.5 Distacco della trattrice / Tractor disengagement / Distacco della trattrice / Distacco della trattrice............................................................................................................................... 39
6.
MANUTENZIONE / MAINTENANCE / MAINTENANCE / WARTUNG............................. 41
6.1 Regolazione tensione cinghie di trasmissione / Stretching adjustement of the driving
belts / Reglage et tension des courroies de transmission / Spannungseinstellung der
keilriemen............................................................................................................................... 46
6.2 Sostituzione cinghie / Belts replacement / Remplacement des courroies / Keilriemenaustausch................................................................................................................................... 48
6.3 Bloccaggio delle pulegge / Pulleys Locking / Bloquage des poulies/ Fixieren der keilriemenscheiben.......................................................................................................................... 49
6.6 Sostituzione dei coltelli / Replacement of flails / Replacement des cateaux / Austausch
von Messern........................................................................................................................... 51
6.7 Il taglio verticale / Vertical cutting / La coupe verticale / Den vertikalen Schnitt............. 54
7.
Release 00_09/09
64
Ricerca anomalie / TROUBLESHOOTING / Ricerca anomalie / Ricerca
5
Release 00_09/09
KOALA
8. Messa a riposo / Winter storage / Mise a repos /
Ausserbetriebstellung der maschine
anomalie........................................................................................................................ 59
8.
Messa a riposo / Winter storage / Mise a repos / Ausserbetriebstellung der maschine.................................................................................................... 63
I
9.
Smaltimento della macchina / Getting rid of the machine / Elimination de la machine
/ Entsorgung der ausgemusterten maschine................................................................ 64
10. GARANZIA / WARRANTY / GARANTIE / GARANTIE..................................................... 65
11. LISTA PARTI DI RICAMBIO / SPARE PARTS LIST / LISTE DE PIECE DETACHEES /
ERSATZTEILELISTE........................................................................................................ 66
A fine stagione, o nel caso di lunghi periodi di fermo, è necessario:
- Lavare accuratamente la macchina ed eventualmente sostituire le parti danneggiate od
usurate.
- Controllare la macchina e sostituire le parti danneggiate.
- Serrare tutti i bulloni avendo cura soprattutto di verificare lo stato delle viti e dei coltelli.
- Effettuare un accurato ingrassaggio al fine di proteggere tutte le parti.
- Coprire la macchina, dopo averla collocata in ambiente protetto e bloccarla onde evitare
spostamenti dovuti da urti accidentali.
Trovarla in perfette condizioni alla ripresa del lavoro sarà beneficio solo dell’utilizzatore.
GB At the end of the season or when the machine is laid up for long period of time, it is necessary
to:
- Wash the machine carefully and wipe it.
- Check the machine carefully and replace possible broken or worn parts
- Tight all bolts and check the wear of the bolts, hooks, flails and its screws.
- Make the proper greasing in order to protect all the parts.
- Cover the machine, when properly parked and fixed in order to avoid any movement due to
possible impacts.
To find the equipment in perfect conditions when restarting, is an advantage of the user.
F
A la fin de la saison, ou dans le cas de longues périodes d’inactivité il est nécessaire de:
- Laver soigneusement la machine et l’essuyer.
- La contrôler soigneusement et remplacer éventuellement les pièces endommagées ou
usées
- Fixer tous les boulons en vérifiant aussi l’etat des vis et des couteaux.
- Effectuer un bon graissage pour protéger toutes les parties.
- Couvrir la machine, après l’avoir stationnée et bloquée et afin d’éviter des déplacements à
la suite de coups accidentels.
Trouver la machine en excellent état à la reprise du travail est un bénéfice de l’utilisateur.
Am Ende der Jahreszeit für den Betrieb, und wenn eine längere Ausserbetriebstellung anfällt,
sind forlgende Arbeiten notwendig:
D
- Maschine gründlich waschen und trocknen.
- Alle Maschinenteile aufmerksam prüfen und beschädigte Teile oder Teile mit Verschleiss gegebenfalls ersetzen.
- Alle Muttern anziehenm mit besonderer Aufmerksamkeit auf den Zustand der MesserschrauRelease 00_09/09
6
63
Release 00_09/09
KOALA
D
1. PREFAZIONE/USE OF EQUIPMENT/PREFACE/VORWORT
STOERUNG
Zu starke Vibration
USRSACHE
BEHEBUNG
GEFAEHRLICHKEIT
Messerbruch
Austausch der Messer
Rotorlagerbruch
Zum Messeraustausch sieAustausch durch ein Origihe Wartungsabschnitt.
nalrotorlager
In den anderen Fällen
Bruch eines Betriebwellen- Austausch durch ein Origimuss der Austausch von
lagers
nalgetriebewellenlager
Spezialisten vorgenommen werden.
Schlimmstenfalls Rotorver- Austausch durch einen
formung durch Stösse
Originalrotor
Messerbruch
Messeraustausch
Il presente manuale è parte integrante della macchina e contiene le informazioni
necessarie al funzionamento ed alla manutenzione della stessa.
È necessario leggerlo attentamente e seguire le istruzioni.
Il libretto, o copia dello stesso deve essere sempre a portata di mano per la consultazione
da parte dell’operatore.
Consigliamo inoltre di contattare la Casa Costruttrice per ogni necessità di informazione,
ricambi, accessori.
I
The present manual is integrate part of the machine and cover its necessary
information for operation and maintenance.
It is necessary read it carefully and follow the instructions.
The manual, or copy of it, must be within reach always for any reference by the
operator.
Moreover we advise to contact the manufacturer for any necessity information, spare
parts or fittings.
GB
Schlüpfung eines Antrie- Einstellung der Riemenbriemens
spannung
Zum Austausch von Messern, zum regulieren der
Zeressen. Eines Antriebrie- Antriebsriemenaustausch
Riemenspannungm zum
mens
Austausch der Riemen, zur
Das Gras wird nicht
Fixierung der Scheibenkeile
gemäht
verrutschen der Keilrie- Fixierung der Scheibenentsprechende Abschnitte
mentscheiben auf der keile
der Wartungsvorschriften
Achse
konsultieren.
Uebersetzungsgetriebe- Reparatur oder Austausch
bruch
des Uebersetzungsgetriebs
Die im Traktor vorhandere Ol in hydraulischen Umlauf
Olmenge ist nicht ausrei- des Traktors nachfülen
chend
Trattore con capienza insufficiente olio idraulico
Cette notice d’instruction fait partie de la machine et contient les informations
nécessaires pour son fonctionnement et son entretien.
Il est important de le lire scrupuleusement et suivre les instructions reportées.
Le notice, ou une copie, doit toujours être à la portée de la main de l’opérateur pour
le consulter en cas de nécessité.
Nous conseillons en outre de contacter le Constructeur pour toute nécessité
d’informations, de pièces détachées ou accessoires.
F
Dieses Handbuch ist ein integraler Bestandteil der Maschine und enthält die zu ihrem
Betrieb und zu ihrer Wartung notwendigen Informationen.
Es muss aufmerksam gelesen werden. Die Anweisungen müssen befolgt werden.
Das Handbuch oder eine Kopie davon muss stet greifbar sein, damit es von jedem der
die Maschine bedientem konsultiert werden kann.
Wir empfehlen ausserdemm sich für jedweden Informationsbedarf für Ersatzteile oder
Zubehör an den Hersteller zu wenden.
D
Luftrückstande im hydrau- A b l a s s e n d e r L u f t i m
Ein anheben, Offnen lischen Umlauf
hydraulischen Umlauf der
oder Schliessen des
Maschine
Behälters ist nicht möglich
Das Hydrualiksystem des Überprüfen Sie den HydrauSchleppers ist drucklos
likdruck am Schlepper
oder den Ölstand
Die Hydraulkzylinder sind Lassen Sie die Hydrauliblockiert
kzylinder bei Peruzzo oder
einer geeigneten Werkstatt
überprüfen
Bezüglich des Ablassens
der Luftrückstände im
hydraulischen Umlauf der
Maschine, slehe Kapitel
Wartung.
Peruzzo srl
Via Valsugana, 30
Curtarolo (PD)
Tel . 049.9620477 - Fax 049.9620435
[email protected] - www.peruzzo.it
Release 00_09/09
62
7
Release 00_09/09
KOALA
1.1 Guida alla consultazione / Reference guide / Guide a la consultation / Anleitung
zur benutzung des handbuches
F
INCONVENIENT
CAUSE
Cassure de couteaux
PERICOLO: Richiama l’attenzione a situazioni o problemi che possono pregiudicare
la sicurezza delle persone per infortuni o rischio di morte.
GB DANGER: This is used to call the attention to the problems that may endanger the
safety of people as these imply the risk of injury and death.
F DANGER: Rappelle l’attention à des situations ou problèmes qui peuvent compromettre
la sécurité des personnes pour accidents ou danger de mort.
D GEFAHR: Auf dieses Zeichen achten ; es verweist auf Gefahr bei der Bedienung oder
auf gefährliche Situationen.
I
ATTENZIONE: Richiama l’attenzione a situazioni o problemi connessi con l’efficienza
della macchina che non pregiudicano la sicurezza delle persone.
GB CAUTION: This is used to call the attention to situations and problems related to the
machine’s efficiency that do not pose a risk to the people’s safety.
F ATTENTION: Rappelle l’attention à des situations ou problèmes liés à l’efficacité t de
l’équipement qui ne compromettent pas la sécurité des personnes.
D ACHTUNG: Dieses Zeichen verweist auf eine Anmerkung oder auf eine sehr wichtige
Empfehlung.
I
Tutte le norme di sicurezza sono importanti e come tali devono essere rigorosamente
osservate / All safety norms are important and as such must be strictly observed /
Toutes les règles de sécurité sont importantes et doivent donc être scrupuleusement
observées / Alle Sicherheitsvoerschriten sind wichtig und müssen als solche streng
befolgt werden
SOLUTION
NIVEAU DE RISQUE
Remplacer les couteaux
cassés
Pour le remplacement des
Cassure d’un support du Remplacer le support du
couteaux, voir le paragrarotor
rotor aver un autre origiphe relatif à la maintenal
nance.
Vibration eccessive de
la machine
Cassure d’un support de Remplacer le support de
Dans les autres cas, le
l’arbre de transmission
l’arbre avec un autre d’oriremplacement doit être
gine
effectué par le personnel
spécialisé.
Dan le pire des cas, dé- Remplacer le rotor avec
formation du rotor du aux un autre d’origine
chocs
Rottura od eccessiva usura Remplacer les couteaux
dei coltelli
Slittamento delle cinghie
Réglage de la tension des Pour le remplacement des
courroies
couteaux, des courroies, le
réglage de la tension des
L’herbe n’est pas
Rupture des courroies
Remplacer les courroies
courroies, et le bloquage
coupée
des pièces de calage, voir
Glissement des poulies sur Fixer les piéces de calage les paragraphes relatifs à
la maintenance.
les arbres
des poulies
Rupture du renvoi d’an- Réparation ou remplacegle
ment du renvoi d’angle
L’huile du tracteur est in- Ajouter de l’huile au le
suffisante
circuit hydraulique du tracteur
Le tracteur a une capacité
insuffisante d’huile hydraulique
Pour la vidange de l’air
Le bac de ramassage
Présence d’air dans le Vidanger l’air présent dans contenue dans le circuit
ne monte pas, ne s’oucircuit hydraulique de la le circuit hydraulique de la hydraulique de la machine
vre pas, ne se ferme
voir le paragraphe relatif à
machine
machine
pas complètement
la maintenance.
Mancanza di pressione nel V e r i f i c a r e p r e s s i o n e
circuito idraulico
dell’impianto idraulico
della trattrice e/o livello
dell’olio idraulico
Cilindri idraulici bloccati
Release 00_09/09
8
Revisionare i cilindri idraulici
61
Release 00_09/09
KOALA
2. CARATTERISTICHE TECNICHE / TECHNICAL CHARACTERISTICS / CARACTERISTIQUES
TECHNIQUES / MERKMAL TECHNISCHE
GB
FAILURE
CAUSE
Breakage of flails
SOLUTION
LEVEL OF DANGER
For flails replacement paBreakage of rotor support Replace rotor support with
ragraph relating mainteoriginal one
nance.
Excessive vibration of
the machine
Breakage of driving sup- Replace shaft support with
In the other cases, replaport shaft
original one
cement must be done by
specialised staff.
The worst : deformation of Replace rotor with original
the rotor due to impacts one
The grass is not cut
2.1 N o t e i d e n t i f i c a t i v e / I d e n t i f i c a t i o n n o t e / N o t e s d ' i d e n t i f i c a t i o n /
Herstellerkennzeichen
Replace broken flails
Breakage of flails
Replacement of flails
Belt slipping
Adjustment
stretching
Breakage of belts
Replacement belts
Pulleys slipping on shafts
Fixing pulley lock joints
belt
La targhetta di identificazione riporta le caratteristiche della macchina ed è applicata in una
posizione facilmente individuabile (fig. 01). Essa non dovrà essere rimossa per nessun motivo.
I
GB The
Peruzzo metal lable idicating the machine details and features is fixed on an easy to find
place.(fig.01) This lable must not be remuved for any reason.
La targhetta di identificazione riporta le caratteristiche della macchina ed è applicata in una
posizione facilmente individuabile (fig. 01). Essa non dovrà essere rimossa per nessun motivo.
F
For replacement of flails,
adjustment or replacement belts
and fixing lock joints, see
paragraph relating maintenance
La targhetta di identificazione riporta le caratteristiche della macchina ed è applicata in una
posizione facilmente individuabile (fig. 01). Essa non dovrà essere rimossa per nessun motivo.
D
Breakage of the gear box Repairing or replacement
of gear box
There isn’t enough oil in the Add oil at the hydraulic
tractor
tractor system
Tractor with insufficient oil
capacity
s.r.l.
CURTAROLO - PADOVA . ITALY
TEL. +39-049-9620477 FAX +39-049-9620435
Presence or air inside the
The collector does not
hydraulic jacks
lift, open or close completely
Tractor hydraulic system
loss of pressure
Hydraulic rams blocked
Drainage in the machine
For the drainage hydraulic
hydraulic jacks
jacks, see paragraph relating maintenance
Check the tractor hydraulic pressure system or the
oil level on its tank
COD.
ANNO
TYPE
kW
SERIE
kg
MANIFACTURED BY
+
39
CUR
TAR
OLO
04
9
- PAD
20
96
47
7
X
FA
+
OVAs.r.l.
. ITAL
Y
-
9
20
96
43
5
kg
04
ANN
O
kW
BY
39
COD
TYPE .
SER
IE
MAN
IFAC
TUR
ED
L.
TE
Hydraulic rams service to
Peruzzo or suitable company
Fig. 01
Release 00_09/09
60
9
Release 00_09/09
KOALA
2.2 Dati tecnici / Technical data / Donnees techniques / Technishe daten
7. Ricerca anomalie / TROUBLESHOOTING / Ricerca anomalie / Ricerca
anomalie
I
INCONVENIENTE
CAUSA
RIMEDIO
PERICOLOSITÀ
Rottura od eccessiva usura Sostituzione del coltello
di qualche coltello
C
Per la sostituzione dei colRottura di un supporto Sostituzione del supporto telli vedere paragrafo relarotore
rotore con uno originale tivo la manutenzione.
.
Eccessiva vibrazione
della macchina
Rottura di un supporto al- Sostituzione del supporto Negli altri due casi le sobero trasmissione
albero con uno originale stituzioni devono essere
eseguite da personale
Nel peggiore dei casi, Sostituzione del rotore con specializzato.
deformazione del rotore uno originale, o ripristino
dovuta ad urti
mediante manutenzione
7
VA 049
39
DO
O
PA FAX
047
LO
962
-
RO
049
-
RTA
39
CU
s.r.l.
+
-
LY
5
kg
043
kW
ITA 962
ANN
-
.
BY
.
ED
COD E
TUR
TYP IE
IFAC
SER MAN
TEL
+
A
B
Rottura od eccessiva usura Sostituzione o affilatura dei
dei coltelli
coltelli
Dimensioni di ingombro / Overall dimensions
Dimensions d’encombrement / Aussenmass
A (mm)
B (mm)
C (mm)
Peso / Weight
Poids / Masse
(kg)
1000
1300
1500
1100
240
1200
1460
1500
1100
260
1600
1760
1500
1100
310
1200 prof.
1460
1500
1380
360
1600 prof.
1760
1500
1380
400
Modello / Model
Potenza assorbita
Power required
Puissance nécessaire
Zeistungsaufnahme kit rad
kW (HP)
Presa di forza trattore
Tractor PTO
Prise de force du tracteur
Traktorzapfwelle
(rpm)
Capacità olio moltiplicatore
Gear box oil quantity
Quantité d’huile du renvoi d’angle
Ölmenge für Übersetzungsgetriebe
(Lt.)
1000
11 (15)
540
0,4
1200
15 (20)
540
0,7
1600
19 (25)
540
1
1200 prof.
15 (20)
540
0,7
1600 prof.
19 (25)
540
1
Numero coltelli
Number of flails
Nombre de fleaux
Messeranzahl
Olio consigliato
Oil suggested
Huile conseillé
Empfohlenes Öl
Grasso consigliato: Grease Rulten
Grease seggested: Grease Rulten
Graisse conseillé: Grease Rulten
Empfohlenes Schmierfett
1000
32
EP 220
LITEX EP/2
1200
40
EP 220
LITEX EP/2
1600
50
EP 220
LITEX EP/2
1200 prof.
40
EP 220
LITEX EP/2
1600 prof.
50
EP 220
LITEX EP/2
Modello / Model
Modello / Model
Release 00_09/09
10
Slittamento delle cinghie
Registrazione tensione cinPer la sostituzione dei colghie
telli, registrazione tensione
L’erba non viene tacinghie, sostituzione delle
Rottura delle cinghie
Sostituzione delle cinghie
gliata
cinghie, bloccaggio calettatori, vedere paragrafi
Slittamento delle pulegge Bloccaggio calettatori
relativi la manutenzione.
sugli alberi
pulegge
Rottura moltiplicatore
Riparazione o sostituzione
moltiplicatore
L’olio del trattore non è Aggiungere olio al circuito
sufficiente
idraulico del trattore
Trattore con capienza insufficiente olio idraulico
Presenza di aria nel circuito
Il cassone non si alza
idraulico della macchina
o non si apre o chiude
completamente
Mancanza di pressione nel
circuito idraulico
Cilindri idraulici bloccati
Spurgo aria nel circuito Per lo spurgo aria nel ciridraulico della macchina cuito idraulico della macchina, vedere paragrafo
V e r i f i c a r e p r e s s i o n e relativo la manutenzione.
dell’impianto idraulico
della trattrice e/o livello
dell’olio idraulico
Revisionare i cilindri idraulici
59
Release 00_09/09
KOALA
2.3 Prestazioni / Performance / Prestations / Leistungen
Calendario degli interventi colturali - Calendar of the cutting and scarifying interventions
Calendrier les opérations de tonte et defeûtrage - Kalender für Behauungsarbeiten
Periodo - Period
Période - Jahreszeit
Frequenza
Performances
Fréquence - Frequenz
Tipo di lavoro
Type of work
Opération
Arbeitsgang
Rasatura
Cutting
Tonte
Kurzschnitt
Taglio verticale e del
feltro (anni)
Vertical cutting and
scarifying (years)
Défeutrage (années)
Vertikaler
(u.Mattenschnitt)
Mesi
Moths
Mois
Monaten
Gennaio
January
Janvier
Januar
Settimane 1
Weeks
Semaine
Woche
2
3
4
Febbraio
February
Février
Februar
5
6
7
8
9
Marzo
March
Mars
März
10
11
12
Aprile
April
Avril
April
13
14
15
16
Maggio
May
Mai
Mai
17
18
19
20
21
Giugnio
June
Juin
Juni
22
23
24
25
26
Frequenza
Performances
Fréquence - Frequenz
Tipo di lavoro
Type of work
Opération
Arbeitsgang
Rasatura
Cutting
Tonte
Kurzschnitt
Taglio verticale e del
feltro (anni)
Vertical cutting and
scarifying (years)
Défeutrage (années)
Vertikaler
(u.Mattenschnitt)
Altezza di taglio
Height of grass cut
Hauteur de coupe de l'herbe
Höhe des Grassschnitts
(cm)
Altezza scarico
Discharge height
Altezza scarico
Altezza scarico
(mm)
Capacità raccoglitore
Collector Capacity
Capacité ramasseur
Fassungsvermögen des Behalters
(Lt.)
1000
1000
3-8
-
600
1200
1180
3-8
-
700
1600
1480
3-8
-
900
1200 prof.
1180
3-8
1830
700
1600 prof.
1480
3-8
1830
900
Modello / Model
27
10 - 40
1-4
Calendario degli interventi colturali - Calendar of the cutting and scarifying interventions
Calendrier les opérations de tonte et defeûtrage - Kalender für Behauungsarbeiten
Periodo - Period
Période - Jahreszeit
Larghezza di taglio
Working width
Largeur de coupe
Schnittbreite
(mm)
Mesi
Moths
Mois
Monaten
Luglio
July
Julliet
Juli
Settimane 28
Weeks
Semaine
Woche
29
30
Agosto
August
Août
August
31
32
33
34
Settembre
September
Septembre
September
35
36
37
38
39
Ottobre
October
Octobre
Oktober
40
41
42
43
Novembre
November
Novembre
November
44
45
46
47
48
Dicembre
December
Décembre
Dezember
49
50
51
2.4 Adesivi segnaletici e di pericolo / Signaling and hazard stickers. / Adesivi segnaletici
e di pericolo / Adesivi segnaletici e di pericolo
52
ATTENTION
10 - 40
DO NOT INSERT HANDS INSIDE
NITHER OPEN THE GATE OR HOPPER
WHILE THE MACHINE IS WORKING
1-4
s.r.l.
CURTAROLO - PADOVA . ITALY
TEL. +39-049-9620477 FAX +39-049-9620435
+
CURT
-
049
-
AROL
VA
s.r.l.
+
39
049
-
. ITALY
5
043
962
-
TE
L.
39
04
CUR
TAR
OLO
9
20
96
- PAD
47
7
FA
X
+
OVAs.r.l.
. ITAL
-
39
04
Y
-
9
20
96
ANN
O
kW
BY
43
5
kg
SERIE
- PADO
ANNO
kW
BY
kg
+
O
FAX
ED
COD
TYPE .
SER
IE
MAN
IFAC
TUR
ED
7
MANIF
ACTUR
047
962
COD.
TYPE
SERIE
39
kW
.
ANNO
TYPE
TEL
COD.
MAX PTO
540
r.p.m
kg
.
MANIFACTURED BY
PTO
MAX 540 r.p.m.
Tenere sempre
le cinghie
ben tese!
Keep the belts
always well
stretched!
Vérifier que les
courroies soient
bien tendues!
Keilriemen immer
auf guter
Spannung halten!
Release 00_09/09
58
11
Release 00_09/09
KOALA
s.r.l.
CURTAROLO - PADOVA . ITALY
TEL.
+39-049-9620477
FAX
+39-049-9620435
COD.
ANNO
TYPE
kW
SERIE
kg
I In ogni macchina della Peruzzo s.r.l. viene applicata una tar-
ghetta che riporta i dati identificativi del prodotto e della ditta costruttrice.
GB Every Peruzzo machine comes with a metal label fixed on the
main frame that shows all machine and company details.
F In ogni macchina della Peruzzo s.r.l. viene applicata una tar-
ghetta che riporta i dati identificativi del prodotto e della ditta costruttrice.
MANIFACTURED BY
D In ogni macchina della Peruzzo s.r.l. viene applicata una tar-
ghetta che riporta i dati identificativi del prodotto e della ditta costruttrice.
I Leggere il manuale dell’operatore prima di avviare la macchina.
GB Read the use and maintenance manual before operating with the machine.
F Lire la notice d’instructions avant de mettre en marche la machine.
D Handbuch für den Benutzer lesen, bevor die Maschine in Bewegung gesetzt wird.
I Fare attenzione ai piedi zona di pericolo.
GB Keep your feet away. Cutting hazard.
• Une double fonction de tonte et défeûtrage simultanées;
• Grande vitesse de travail;
• Simultanea rullatura del manto erboso.
Toute modification arbitraire effectuée sur la machine libère le constructeur de toute responsabilité des dommages éventuels qui pourraient en dériver.
MATTE
Bezeichnet die organische Schichtm die sich aus toten und lebendigen Gras-Laub-und Wurzeltein
zwischen dem Boden und der aktiven Vegetaion heranbildet.
D
USRSACHE DER MATTENBILDUNG
Verschiedene Arten von schnellwachsenden Graminaceaem erhöhte Stickstoffdüngung, auf der
Rasenfläche zurückgelassene Schnittreste, Trockenheit des Bodens.
NACHTEILE
Wenn die Mattenschicht stark ist (über 5-6 mm), beeinflusst sie die Qualität der Rasenfläche negativ
und schafft Probleme, die zusammen mit Pilzkrankheiten und der Blattchlorose die Widerstandkraft
gegen Hitze, Kälte und Trockenheit vermindern.
LOESUNG DES PROBLEMS
Durch Einbau der Spezialaufreissmesser C an den Grasschneider PERUZZO. Mit ersteren erhält man
Schnitte in der Länge oder Mikrofurchen von variierbarer Tiefe von 0 bis 5-6 mm, die zur Entfernung
der Matte dienen ; dabei werden auch die anfallenden Pflanzenrückstände aufgesammelt. Arbeitsleistung : 5000-6000 m2/g.
Technische vorteile
F Eloigner les pieds: Danger de coupure.
Der doppelte Arbeitsgang des Schneidens und der Entfernung der Matte fördert:
D Fuß hazard.
• den Gasaustausch mit der Atmosphäre zur Freisetzung von CO2;
• die für Keimung und Wachstum unentbehrliche Sauerstoffaufnahme;
• Vermindet Bewässerungsmenge und -Häufigkeit;
I Mantenere una distanza di sicurezza dalla macchina: pericolo di eiezione di parti.
GB Keep a safety distance from the machine: Danger of throwing objects.Keep you hands
away. Cutting hazard.
F Garder une distance de sécurité de la machine: risque de lancement (éjection).
D Mantenere una distanza di sicurezza dalla macchina: pericolo di eiezione di parti.
• Fördert das Eindringen in die Tiefe der weniger löslicehn Nährstoffe;
• verbessert das Einwurzeln;
• beschleunigt die Dekomposition der Matte und die Bildung von neuen Ausläufern und Wurzelstöcken;
Wird dieser arbeitsgang eine Woche vord dem Säen durchgeführt, fördert er einen guten Kontakt
des Samens mit dem Boden, indem das Angriffspotential (Krankenheiten) der zu starken Mattenkonsistenz reduziert wird.
Wirtschaftliche vorteiledurch die benutzung des grasschneiders PERUZZO
I Mantenere una distanza di sicurezza dalla macchina: pericolo apertura cassone idrau-
• Ein einziges Gerät sowohl zum Schneiden als auch zum Aufreissen;
lico.
• Doppelte Wirkung in Durchlüftung und - Aufnahme des anfallenden Materials;
GB Keep a safety distance from the machine: Danger of falling objects.
• Erhöhte Arbeitsgeschwindigkeit;
F Mantenere una distanza di sicurezza dalla macchina: pericolo apertura cassone idrau-
• Gleichzeitiges Walzen des Grassmantels.
D Sicherheitsabstand zur Maschine einhalten : Auswurfgefahr.
Jede nach eigenem Gutdünken vorgenommene Aenderung an der Maschine enthebt den Hersteller jeder Haftung für eventuelle daraus resultierende Schäden.
lico.
Release 00_09/09
12
57
Release 00_09/09
KOALA
• Improve the roots deepening;
I Velocità di rotazione della presa di forza.
• Speed up the moss and catch decomposition and new stolons and rhizomes formation;
This operation, performed one week before sowing, aid a perfect contact between seed and
ground, highly reducing the possibilities of diseases due to excessive moss and thatch level.
GB Tractor PTO allowed speed.
PTO
MAX 540 r.p.m.
F Vitesse de rotation de la prise de force.
D Drehgeschwindigkeit der Zapfwelle.
Economic advantages with PERUZZO's flail mowers use
• Special equipment for cutting and scarifying in one operation only;
I Punti di ingrassaggio.
• Double cutting and scarifying function in one operation only;
GB Greasing points.
• High working speed;
F Points de graissage.
• Simultaneous lawn rolling.
D Schmierpunkte..
Any arbitrary modification caused on the machine and its wrong use relieves the manufacturer
from any responsibility for eventual derived damages.
I Tenere lontane le mani: pericolo di taglio.
GB Keep your hands away. Cutting hazard.
FEUTRE
Accumulation da matières cellulosiques telles que herbe, feuilles et racines en cours de décomposition qui se forme entre la surface du sol et la végétation active.
F
F Eloigner les mains: Danger de coupure.
D Hand hazard.
LA CAUSE DE LA FORMATION DE FEUTRE
Variété d’espèces de graminées à croissance rapide, sur fertilisation d’azote, résidus de tonte
laissés sur la pelouse, sol acide.
I Punto di attacco per il sollevamento.
INCONVENIENTS
Une accumulation de feutre excessive (plus de 5-6 mm) combinée aux maladies dûes aux
champignons pathogènes, aux insectes, réduit la résistance du gazon à la chaleur, au froid et
à la sécheresse.
COMMENT RESOUDRE LE PROBLEME
En appliquant les couteaux spéciaux pour la coupe verticale C interchangeables avec les couteaux pour la tonte (type A) sur les tondeuses à fléaux PERUZZO. Les couteaux C effectuent des
microsillages dans le sol à une profondeur réglable de 0 à 5-6 mm, qui permettent un défeûtrage
efficace du gazon.
Advantages techniques
L’opération de tonte/défeûtrage permet:
GB Linking points for machine lifting operations.
F Point de fixation pour le soulèvement.
D Angriffpunkt für das Heben.
Tenere sempre
le cinghie
ben tese!
Keep the belts
always well
stretched!
I Controllare periodicamente la tensione delle cinghie di trasmissione.
GB Often check the belts tihtening.
F Controllare periodicamente la tensione delle cinghie di trasmissione.
D Controllare periodicamente la tensione delle cinghie di trasmissione.
Vérifier que les
courroies soient
bien tendues!
• Une meilleure aération libération de CO2;
• L’absorption d’oxygène qui est indispensable à la germination et à la croisance du gazon;
• Réduit la fréquence de l’irrigation et l’apport d’eau;
Keilriemen immer
auf guter
Spannung halten!
• Permet una pénétration plus profonde des engrais peu solubles;
• Améliore l’enracinement;
I Pericolo di taglio. Non introdurre le mani.
• Accélère la décomposition du feûtre et la formation de stolons et de rhizomes;
Si la verticoupe s’effectue une semaine avant l’engazonnement, elle favorit un excellent contact
entre les semis et le sol, un réduisant les possibilités de contaminations (maladies) dûes à une
accumulation eccessive de feûtre.
Vantaggi economici per chi utilizza il trinciaerba PERUZZO
• Un seul équipement pour la tonte et le défeûtrage;
Release 00_09/09
56
GB Cutting hazard. Do not insert the hands.
F Pericolo di taglio. Non introdurre le mani.
ATTENTION
D Pericolo di taglio. Non introdurre le mani.
DO NOT INSERT HANDS INSIDE
NITHER OPEN THE GATE OR HOPPER
WHILE THE MACHINE IS WORKING
13
Release 00_09/09
KOALA
I Leggere gli adesivi di IMPORTANTE prima di iniziare a lavorare
Vantaggi tecnici
con la macchina.
La duplice operazione di taglio ed asportazione del feltro favorisce:
GB Read the CAUTION lables before operating with the machine.
• Lo scarico gassoso con l’atmosfera per la liberazione di CO2;
F Lire les étiquettes indicant attention avant la mise en fonction
de la machine.
D Leggere gli adesivi di IMPORTANTE prima di iniziare a lavorare
con la macchina.
• L’assorbimento dell’ossigeno, indispensabile per la germinazione e per la crescita;
• Riduce la frequenza e la quantità d’acqua d’irrigazione;
• Favorisce la penetrazione in profondità degli elementi nutritivi poco solubili;
• Migliora l'attecchimento radicale;
• Accelera la decomposizione del feltro e la formazione di nuovi stoloni e rizomi;
Questa operazione, eseguita una settimana prima della risemina, favorisce un ottimo contatto
tra seme e suolo, riducendo il potenziale di aggressione (malattie) dovute ad un eccessivo livello
di feltro.
Vantaggi economici per chi utilizza il trinciaerba PERUZZO
I Indossare SEMPRE i Dispositivi di Protezione Individuale.
GB Wear protecting items alway.
• Unica attrezzatura sia per il taglio che per la scarifica;
• Duplice funzione di arieggiatura e carico del prodotto di risulta;
F Indossare SEMPRE i Dispositivi di Protezione Individuale.
• Elevata velocità di lavoro;
D Indossare SEMPRE i Dispositivi di Protezione Individuale.
• Simultanea rullatura del manto erboso.
Ogni modifica arbitraria apportata alla macchina o suo uso improprio solleva il produttore da
ogni responsabilità per eventuali danni derivanti.
GB MOSS
Si raccomanda che sia la targhetta che i simboli di pericolo siano sempre puliti e in buono
stato; eventualmente vanno sostituiti con altri originali richiedendoli alla casa costruttrice.
I nuovi simboli vanno applicati nella posizione di quelli sostituiti.
GB It is suggested the plates and hazard symbols to be always cleaned and in well conditions;
eventually have to be replaced with original ones requiring them from the manufacturer.
I
The new symbols must be positioned on the same place as the damaged or ones.
Il est conseillé de garder les plaquettes et les symboles de danger toujours propres et en bon
état. Ils doivent être éventuellement remplacés en demandant les originaux au Constructeur.
F
I nuovi simboli vanno applicati nella posizione di quelli sostituiti.
Es wird darauf hingewiesen, dass die Kennzeichen und Schilder stets sauber und in gutem
Zustand sein müssen; bei Bedarf werden sie durch neue vom Hersteller anzufordernde ersetzt.
D
Die neuen Warnaufkleber müssen an gleicher Stelle wie die beschädigten überklebt werden.
AND THATCH
It is the organic ground surface compound by dead and dry grass parts, leaves and roots from
the active vegetation.
CAUSE OF MOSS AND THATCH FORMATION
Variety of Gramineae with fast growing high azotes manuring, dried grass left on the ground after
various cutting without collecting it and ground acidity.
INCONVENIENTS
In case of thick moss and thatch (over 5 or 6 mm) it can influence negatively on the quality of
the lawn, producing damages related to mould diseases, insects and green sickness (chlorosis),
reducing the endurance to hot, cold and dry weather.
HOW THE PROBLEM CAN BE SOLVED
Mounting the right flails type : C for the scarifying system on the flail mower “PERUZZO” changeable
from the only cutting ones (types A), can be effected longitudinal or micro furrows in the ground
at a maximum depth of 5-6 mm. Special scarifying flails useful for removing moss and thatch all
the waste vegetation.
Technical advantages
The double operation of cutting and scarifying at the same time moss and thatch aid:
• The gaseous exchange with the atmosphere for the release of CO2;
• The oxygen absorption, essential for the germination and growth;
• Reduce the quantity and times of irrigation water;
• Help the penetration in depth of nourishing elements not much soluble;
Release 00_09/09
14
55
Release 00_09/09
KOALA
6.7 Il taglio verticale / Vertical cutting / La coupe verticale / Den vertikalen Schnitt
I
3. NORME ANTINFORTUNISTICHE / SAFETY REGULATIONS / REGLES DE SECURITE /
SICHERHEITSVORSCHRIFTEN
FELTRO
È lo strato organico composto da parti vive e morte di erbe, foglie e radici che viene a formarsi
tra la superficie del suolo e la vegetazione attiva.
Al fine di evitare infortuni è necessario fare attenzione alle indicazioni riportate nelle etichette
di sicurezza applicate sulla macchina.
I
CAUSA DELLA FORMAZIONE DEL FELTRO
Varietà di specie di graminacee a crescita rapida, elevata concimazione azotata, residui di
taglio lasciati in campo, acidità del terreno.
INCONVENIENTI
Se lo strato del feltro è elevato (oltre i 5-6 mm) influisce negativamente sulla qualità del tappeto,
creando problemi che, connessi con le malattie fungine, gli insetti e la clorosi fogliare, ne riduce
la resistenza agli stress da caldo, freddo e siccità.
Fare sempre attenzione che durante il lavoro non ci siano persone nel raggio di azione,
soprattutto bambini.
Tenere sempre questo libretto a portata di mano dell’operatore.
Quando la macchina non lavora, spegnere il motore del trattore, sostare su di un terreno in piano
con il freno di stazionamento innestato, con la marcia innestata, la presa di forza disinserita e con
l’attrezzatura appoggiata al terreno.
Le gomme di protezione anteriori devono essere sempre i buone condizioni onde evitare
un lancio di sassi o altro materiale.
COME RISOLVERE IL PROBLEMA
Applicando gli appositi coltelli tipo C per la scarica, alle trinciaerba PERUZZO, intercambiabili con
quelli per il solo taglio dell’erba (tipo A), si effettuano tagli longitudinali o microsolchi nel suolo
da una profondità variabile da 0 a 5-6 mm, utili per la rimozione e l’asportazione del feltro, dei
residui vegetali di risulta.
Non eseguire nessun lavoro di pulizia o manutenzione con il motore in moto, né con la
presa di forza inserita.
Prima di inserire la presa di forza accertarsi che il numero di giri sia quello prestabilito
(540).
Per la circolazione su strada è necessario attenersi alle norme del codice stradale.
In lavorazione l’operatore deve usare occhiali di protezione e mascherina antipovere,
qualora il trattore non sia cabinato.
Non è consentito sostare nell’area di apertura scarico del cassone idraulico.
È bene ricordare che un operatore prudente è la migliore sicurezza contro qualsiasi infortunio.
Release 00_09/09
54
• La macchina è stata progettata per essere utilizzata da un solo operatore che deve aver letto e
assimilato il contenuto di questo manuale.
• Se venisse smarrito il libretto o danneggiato richiedere una copia sostitutiva alla ditta costruttrice.
• Prima di utilizzare la macchina assicurarsi che tutti i dispositivi di sicurezza siano collocati correttamente al loro posto ed in buono stato; qualora si verificassero guasti o danneggiamenti alle
protezioni sostituirle immediatamente.
• È obbligatorio usare un abbigliamento idoneo come previsto nel presente manuale e dalle leggi
vigenti nel Paese di utilizzo dell’attrezzatura; vanno in ogni modo evitati abiti larghi e svolazzanti,
cinture, anelli e catenine.
• Non lasciare mai incustodita la macchina quando è in moto.
• Prima di scendere dalla trattrice e prima di ogni operazione di pulizia, manutenzione, regolazione azionare il freno di stazionamento, spegnere il motore, togliere la chiave di accensione dal
cruscotto, inserire la marcia e disinserire la p.d.f.
• Gli interventi all’impianto idraulico devono essere eseguiti solo dopo aver scaricato la pressione.
• Verificare lo stato di usura dei tubi idraulici; in caso di deterioramento provvedere alla loro sostituzione.
• Ispezionare il terreno prima di utilizzare la macchina allo scopo di individuare e rimuovere eventuali
ostacoli (pietre, fili di ferro, tombini sporgenti, ecc..)
• Accertarsi delle condizioni del suolo tenendo presente che con erba troppo bagnata non è
possibile operare.
• Evitare di affrontare curva ad alta velocità; sollevare la barra alle testate degli appezzamenti se
15
Release 00_09/09
KOALA
si opera in pendenza
• Nei terreni declivi è preferibile operare nel senso della massima pendenza (40°) per evitare il
ribaltamento.
• Scegliere una velocità di avanzamento compatibile con le condizioni del terreno su cui si opera.
• Durante il lavoro soprattutto con colture molto alte fare attenzione all’eventuale presenza di
persone o animali.
• Durante la circolazione su strada è necessario attenersi alle norme del codice stradale vigenti nel
paese di utilizzo.
• Nel caso si accertano vibrazioni o rumori durante la lavorazione, spegnere immediatamente il
motore della trattrice e verificarne le cause.
• Durante l’uso la macchina può dare luogo a emissioni di polveri. Si consiglia di verificare periodicamente i filtri sul sistema di ventilazione della cabina della trattrice oppure di utilizzare idonei
sistemi di protezione delle vie respiratorie quali maschere antipolvere o maschere con filtro.
• Prima di immettersi nella circolazione stradale verificare che gli stabilizzatori siano bloccati nella
posizione di trasporto.
F
Per la sostituzione dei coltelli procedere come di seguito indicato:
Cette opération doit être effectuée avec le moteur arrêté et la prise de force dégagée.
Utiliser des gants de protection afin d’éviter des accidents dûs aux arrêtes tranchantes des
couteaux.
Avec la machine attelée au tracteur:
- Sollevare il cassone della macchina tramite il distributore idraulico.
- Pour le remplacement des fléaux se mettre dans la position indiquée par la flèche (C) (Voir fig.
16).
- Svitare tutti i dadi ad aletta (D) se trouvant sur la porte (E).
- Ouvir complètement la porte, jusquà avoir une vision parfaite du rotor (Voir fig. 17).
- Enfiler à la main, la goupille (G) qui bloque le boulon (H).
GB In
order to avoid accidents is necessary pay attention at the indications mentioned on the
safety labels placed on the machine.
Pay always attention that during the work no people and moreover children must be on
the range of action.
- Verificare le condizioni dei coltelli e sostituire quelli rotti o usurati con altrettanti originali (Voir
fig. 17).
Il est conseillé de remplacer les couteaux par paires diamétralement opposées, afin d’éviter que
le rotor ne soit déséquilibré et produise des vibrations.
Il est important de vérifier, durant le remplacement des couteaux, l’état d’usure des vis et
éventuellement les remplacer avec des piéces d’origine.
Keep this manual within reach always of the user.
When the machine doesn’t operate, stop the tractor engine and park on a flat ground with hand
break engaged, with speed engaged and P.T.O. disconnected and the equipment laid on the
ground.
The front safety plates gate must be in good conditions always in order to avoid a dangerous throwing of stones or others materials.
Don’t carry out any cleaning work or maintenance while engine is working nor with connected P.T.O.
Before connecting the P.T.O. verify that the rpm must be the one prearranged.
For traffic on the street is necessary to observe the highway code norms.
While working the user must ware protection glasses and in case the tractor is not supplied
with its cab the user must ware the mask against dust.
It is not allowed the presence of people underneath the area of complete collector opening.
A careful user is the best safety against any kind of accident.
• The machine is manufactured to be used by one user only that must have read and assimilated
all manual details.
• • In case of manual loss or damage, it must be requested to PERUZZO manufacturing company.
• Before using the machine the operator must be sure that all safety devices must be in proper position and in good been; in case of failures or damages to the safety protections must be promptly
changed.
• Is compulsory use suitable clothes as informed on the present manual and as per safety norms on
the country where the machine is operated; however must not wear large or loose clothes, belts,
Release 00_09/09
16
- Après le remplacement des fléaux, refermer la porte.
D
Per la sostituzione dei coltelli procedere come di seguito indicato:
Dieser Vorgang muss bei abgestelltem Motor und abgezogenem Kraftstecker erfolgen.
Sicherheitshandschuhe benutzen um Unfälle durch schneidende Messerkanten zu vermeiden.
Con la macchina collegata al trattore:
- Sollevare il cassone della macchina tramite il distributore idraulico.
- Sich zum Austausch der Messer in Richtung des Pfeils (C) stellen (siehe abb. 16).
- Svitare tutti i dadi ad aletta (D) presenti sulla porta (E).
- Die Tür komplett, bis zur vollständigen Sicht der Messerwelle öffnen (siehe abb. 17).
- Mit Hande den Splint (G), welcher den Bolzen (H) blockiert einschalten.
- Verificare le condizioni dei coltelli e sostituire quelli rotti o usurati con altrettanti originali (siehe
abb. 17).
Man empfiehlt die Messer in diametral entgegengesetzten Paaren auszutauschen, um so Unausgeglichenheiten und Vibrationen des Rotors zu vermeiden.
Bei Austausch der Messer ist es wichtig, den Abnützungsgrad der Schrauben zu ermitteln
und diese eventuell mit originalen auszutauschen.
- Nach erfolgtem Austausch die Tür schliessen.
53
Release 00_09/09
KOALA
rings or loose necklace.
• Never leave the machine when it is operating or with engine switched on.
• Before getting off the tractor and before any cleaning maintenance or adjustment, activate the
tractor brake, turn tractor engine off, disconnect the key from dashboard, insert the gear and
disconnect the PTO.
• Hydraulic system operations or maintenance must be done after discharging oil pressure by acting
to the tractor levers.
• Verify the hydraulic tubes wear; In case of wearing, provide new hydraulic tubes change from
PERUZZO.
• Carefully check on the field surface where you intend to operate with the machine that must be
free from stones, metal parts, ropes or similar items.
• Before beginning the cutting operation check the grass humidity that must not exceed over
50%.
• Avoid any bending with mowers fixed on 3 points linkage, on steep grounds or at any end of
cutting field where the mower must be lifted to cut on opposite side. In case you want bending
without lifting the mower it must be fitted with proper trailing draw bar.
• On hilly grounds the machine must not lean over 30 degree in order to prevent overturning or
damages to machine and ground surface.
• Choose a working speed suitable with ground and grass conditions, however not more than 7
Km/hour.
• In case of high grass cut check that must not people, animal or parts near by the cutting area.
• On road transport operations is necessary to check the street laws on the country where the machine is used.
• In case of rising machine vibrations or strange noise during operation, immediately stop working
and check the causes. In case of continuous vibrations do not keep working with the machine.
• During machine use it may cause powder emissions. It is advised to check the tractor cabin filters
that must be cleaned always or use proper safety powder masks.
• Before driving on roads check that tractor 3 points linkage must be fixed with its chains to prevent
machine swinging and use lights bar in case the machine cover the tractor lights.
G
B
B1
C
H
G
Fig. 17
Afin d’éviter tout accident il est nécessaire d’observer scrupuleusement les symboles et les
étiquettes de sécurité appliqués sur la machine.
F
GB For
flails replacement proceed as follows:
This operation must be effected with power-off engine and P.T.O. disconnected.
Use protecting gloves in order to avoid accidents due to cutting edges of the flails of machine parts.
With the machine linked to the tractor:
- Lift the collector by acting on the hydraulic distributor.
- For replacing flails move on the direction shown from the harrow (C) (See fig. 16).
S’assurer toujours que personne, surtout des enfants, ne se trouve dans la zone de travail
de la machine.
Cette notice d’instruction doit toujours être à la portée de l’opérateur.
Si la machine n’est pas en phase de travail, arrêter le moteur du tracteur et s’arrêter sur un terrain
plat, ayant le frein de stationnement et une vitesse inséré. La prise de force doit être dégagée
du cardan et la machine doit être posée par terre.
- Unsrew all wing nuts (D) on door (E).
Les protections antérieures doivent toujours être en bon état afin d’éviter.
- Open completely the door until the complete flails shaft view (See fig. 17).
Ne jamais effectuer aucune opération de nettoyage ou de maintenance avec le moteur
en marche ni la prise de forze insérée.
- With hands turn the spring (G) into the bolt hole (H).
- Check the flails conditions and change those broken or worn ones with new original ones (See
fig. 17).
It is suggested to replace the knives diametrically opposite in order to avoid lack of balance and
flails shaft vibration.
When replacing the flails, carefully check also the wear of the screw, pins etc. and if necessary replace them with new original ones.
Avant d’insérer la prise de force, s’assurer que le nombre de tours soit celui indiqué.
Pour la circulation sur route, suivre les règles de circulation routière.
Durant le travail, l’opérateur doit être muni de lunettes de protection et de masque à
poussière, si le tracteur est dépourvu de cabine.
Il est interdit de s’approcher de la zone de bennage du bac de ramassage.
Un opérateur prudent est la meilleure sécurité contre tout accident.
- At the end of replacement close and restore all items.
Release 00_09/09
52
17
Release 00_09/09
KOALA
• La machine a été conçue pour etre utilisée par un seul opérateur qui doit avoir lu et compris le
contenu de ce manuel.
• Dans le cas de perte ou endommagement de ce manuel, demander un copie du meme au
constructeur.
• Avant d’utiliser la machine, s’assurer que tous les dispositifs de sécurité soient installés correctement
et en bon état; dans le cas qu’ils soient de dégat ou endommagement des dispositifs, veiller à les
remplacer immédiatement.
• Il est obbligatoire de porter des habits adéquats comme prévu dans ce manuel et par les lois en
vigueur dans le pays d’utilisation de la machine, Il faut tout de meme éviter vetements larges et
souples, ceintures, bagues et colliers.
• Ne jamais abbandonner la machine quand elle est en marche.
• Avant de descendre du tracteur et avant toute opération de nettoyage, maintenance ou réglage, actionner le frein de stationnement, arreter le moteur, enlever la clé de contact du tableau
de bord, mettre un vitesse et désengager la prise de force.
• Les services à la partie hydraulique doivent etre effectués seulement après avoir vider la pression.
• Vérifier l’état d’usure des tuyaux hydrauliques; dans le cas d’udure, veiller à les remplacer.
• Controler le terrain avant d’uttiliser la machine pour repérer et enlever les obstacles éventuels
(pierres, fils de fer, égouts )
• S’assurer des conditions du terrain et considérere qu’en présence d’herbe trop mouillée il est
impossible de travaillier.
• Eviter d’effectuer les virages à grande vitesse; soulever la machine à la fin de chaque terrain de
travail en pente.
• Sur les terrains en pente, il est préférable de travailler dans le sens de la pente maximum (40°) pour
éviter de se renverser.
• Choisir un vitesse de travail compatible aux conditions du terrain sur lequel on traille .
• Durant le travail sur terrain avec végétation haute, faire très attention à la présence éventuelle de
personnes ou animaux. soprattutto con colture molto alte fare attenzione all’eventuale presenza
di persone o animali.
• Pendant la circulation sur route,s’attenir aux normes du code routier en vigueur dans le pays
d’utilisation.
• Dans le cas de vibrations ou bruit durant le travail, arreter immédiatement le moteur du tracteur
et en vérifier les causes.
• Durant l’utilisation de la machine, il pourrait y avoir une émissin de poussière. Il est conseillé de
vérifier périodiquement les filtres du sistème de ventilation de la cabine du tracteur ou utiliser des
systèmes de protection adécats des voies respiratoires comme masques à poussière ou masques
avec filtre.
• Avant de se mettre sur route vérifier que les stabiliseurs soient blloqués dans la position de transport.
6.6 Sostituzione dei coltelli / Replacement of flails / Replacement des cateaux /
Austausch von Messern
I
Per la sostituzione dei coltelli procedere come di seguito indicato:
Questa operazione va eseguita con motore spento e presa di forza disinserita.
Usare guanti di protezione onde evitare infortuni dovuti agli spigoli taglienti dei coltelli.
Con la macchina collegata al trattore:
- Sollevare il cassone della macchina tramite il distributore idraulico.
- Per il cambio dei coltelli, collocarsi nella posizione indicata dalla freccia (C) (Vedi fig. 16).
- Svitare tutti i dadi ad aletta (D) presenti sulla porta (E).
- Aprire completamente la porta fino alla completa visione dell’albero coltelli (Vedi fig. 17).
- Servendosi di una chiave appropriata, svitare i dadi (G) che bloccano le viti (H).
- Verificare le condizioni dei coltelli e sostituire quelli rotti o usurati con altrettanti originali (Vedi
fig. 17).
È consigliabile sostituire i coltelli in coppie diametralmente opposte, onde evitare squilibri e vibrazioni del rotore.
È importante, quando si procede alla sostituzione dei coltelli, verificare lo stato di usura
delle viti, ed eventualmente sostituirle con pezzi originali.
- A cambio coltelli avvenuto richiudere la porta.
C
Um Unfälle zu vermeiden ist es unbedingt erforderlichm die Hinweise auf den Sicherheitschildchenm die an der Maschine angebracht sind, zu beacten.
D
D
Stets darauf achtenm dass sich beim Arbeiten mit der Maschine niemand besonders kein
Kindm im Arbeitsbereich aufhält.
Dieser Handbuch muss stets für jeden, der mit der Maschine arbeitet, greifbar sein.
Wenn die Maschine stillsteht, muss der Motor des Traktorsss ausgeschaltet sein, der Traktor muss auf
ebenem Boden mit angezogener Haltebremse abgestellt sein ; ebenso muss ein Gang eingelegt
sein und die Zapfwelle muss abagekuppelt mit der Halterung auf dem Boden abgesetzt sein.
Der Front-Gummischutz muss immer in gutem Zustand seinm damit keine geräharlichen
Materiallen wie Steine herausgeschleudet werden können.
E
Fig. 16
Keine Sauberungs oder Wartungsarbeiten bei laufendem Motor oder bei laufender ZapfRelease 00_09/09
18
51
Release 00_09/09
KOALA
F
welle ausführen.
Per il bloccaggio delle pulegge procedere come di seguito indicato:
Cette opération doit être effectuée avec le moteur arrêté et la prise de force dégagée.
- Enlever le carter de protection des courroies. Réduire la tension des courroies (voir paragrafo
6.2 "Replacement des courroies").
Bevor dir Zapfwelle eingeschaltet wird, muss darauf geachtet werden, dass die vorgeschriebene Drehzahl erreicht ist.
Für den Strassenverkehr sind die Vorschrifren des Strassenverkehrs einzuhalten.
Bei der Arbeit mit der Maschine muss der Benutzer Schutzbrille und Staubmaske tragen, falls
der Traktor kein Führerhaus hat.
- Bloquer les pièces de calage (Voir fig. 15).
Es ist verboten, sich sowohl im Offnungs als auch Entladebereich des hydraulischen Behälters
aufzuhalten.
- Vérifier à l’aide d’une barre que les poulies soient alignées afin d’éviter un surchauffement des
courroies ou leur usure (Voir fig. 14d).
Der beste Unfallschutz ist ein vorsichtiger Benutzer der Maschine.
- Régler à nouveau la tension des courroies.
Controllare l’esatto allineamento tra le due pulegge. Remonter le carter de protection.
D
Per il bloccaggio delle pulegge procedere come di seguito indicato:
Diese Arbeit darf nur bei stillstehendem Motor und abgekuppelter Zapfwelle vorgenommen
werden.
- chutzgehäuse abnehmen Keilriemenspannung beseitigen (siehe paragrafo 6.2 "Keilriemenaustausch").
- Keile blosckieren (siehe abb. 15).
- Prüfen Sie mit Hilfe einer Stange, dass Scheiben und Keilriement nach oben ausgerichtet sind,
um Überhitzung (siehe abb. 14d).
- Reissen der Keilriement zu vermeiden.
Keilriemen neu einstellen. Schutzgehäuse sorgfältig wieder anbringen.
Release 00_09/09
50
• Die Maschine ist zum Gebrauch durch einen Anwender bestimmt, der mit den Vorgaben und
Bestimmungen dieser Anleitung bestens vertraut ist.
• Im Falle des Verlusts oder der Beschädigung dieser Anleitung, muss diese ersetzt werden, und kann
direkt bei Peruzzo nachgefragt werden.
• Vor dem Einsatz der Maschine, hat sich der Anwender davon zu überzeugen, dass sich alle Sicherheitselemente an Ihrem vorgesehenen Platz befinden und einsatzfähig sind. Im Falle von
Beschädigungen an den Sicherheitselementen sind diese umgehend auszutauschen.
• Is ist erforderlich die nötige Schutzkleidung entsprechend dieser Anleitung und den im jeweiligen
Land gültigen Sicherheitsbestimmungen zu tragen. Ebenso sollten keine übergroße, loose Kleidung,
sowie Gürtel, Ringe oder loose Umhänge getragen werden.
• Die Maschine niemals während des Betriebs oder bei laufendem Motor verlassen.
• Vor jeglicher Reinigung, Wartung oder Einstellungsarbeit an der Maschine ist am Traktor die Bremse
zu ziehen, der Motor abzustellen, der Zündschlüssel zu entfernen, ein Gang einzulegen und die
Gelenkwelle zu trennen.
• Maßnahmen am Hydrauliksystem sind nur durchzuführen, wenn der Öldruck über die entsprechende Steuerung am Schlepper abgestellt ist.
• Prüfen Sie stets den Zustand der Hydraulikschläuche. Im Falle von Verschleiß können neue Hydraulikschläuche von Peruzzo bezogen werden.
• Vergewissern Sie sich, dass die zu bearbeitende Fläche frei von Steinen, Metallteilen, Seilen und
ähnlichem Unrat ist.
• Vor Beginn der Mäharbeiten sollte darauf geachtet werden, dass die Grasfeuchte 50% nicht
übersteigt.
• Vermeiden Sie jegliches Lenken beim Einsatz von Mähern in der Heck-3-Pkt., auch beim Wenden
bevor das Gerät angehoben wurde. Sollten Sie diese Einsatzmöglichkeit wünschen, muss das
Gerät mit einer entsprechenden Anhängevorrichtung (Zugdeichsel) ausgestattet werden.
• Auf hügeligen Flächen sollte die Neigung nie mehr als 30° betragen, um Unfälle oder Beschädigungen an Maschine und Untergrund zu vermeiden.
• Arbeiten Sie mit einer an den Untergrund und die Grashöhe angepassten Einsatzgeschwindigkeit
von nicht mehr als 7 km/h.
• Vergewissern Sie sich beim Einsatz in hohem Grass, dass sich keine Personen, Tiere oder Gefahrteile
im Umfeld aufhalten.
• Für den Straßentransport sind die jeweiligen Ländervorschriften zubeachten.
• Im Falle von Vibrationen oder ungewöhnlicher Lärmentwicklung stoppen Sie sofort jegliche Arbeit
mit dem Gerät. Bei anhaltenden Vibrationen auf keinen Fall weiterarbeiten!
• Beim Einsatz der Maschine kann es zu Staubausstössen kommen. Es sollten regelmäßig die Luftfilter der Fahrerkabine gereinigt werden, oder entsprechende Atemschutzmasken verwendet
werden.
• Vor dem Straßentransport ist die Heck-3-Pkt. des Schleppers mit den vorgesehenen Ketten zu sichern, um ungewolltes Schwingen der Maschine zu vermeiden. Sollte die Maschine die Rücklichter
des Schleppers verdecken, ist ein Entsprechender Rücklicht-Kit zu verwenden.
19
Release 00_09/09
KOALA
6.3 Bloccaggio delle pulegge / Pulleys Locking / Bloquage des poulies/ Fixieren der
keilriemenscheiben
4. DESCRIZIONE DELLA MACCHINA/ MACHINE DESCRIPTION / DESCRIPTION DE LA
MACHINE / MASCHINENBESCHREIBUNG
Questo trinciaerba è adatto al taglio e raccolta per aspirazione di erba, foglie e feltro su prati,
parchi, giardini e aree pubbliche in genere, campi sportivi, campi da golf etc.
I
Data la sua robustezza e le sue caratteristiche tecniche, consente un’alta velocità di avanzamento (2÷5 km/h max) abbinata ad una ottima redditività oraria.
La macchina è applicabile a qualsiasi tipo di trattore di adeguata potenza :
Mod. 1000: kW 11 (15 HP)
Mod. 1200 - 1200 professional: kW 15 (20 HP)
Mod. 1600 - 1600 professional: kW 19 (25 HP)
è inoltre munito di attacco universale a tre punti.
Questa macchina può montare tre tipi di coltelli (Vedi fig. 02):
Coltello B/B1 per il taglio e raccolta erba.
Coltello C
per la scarifica e la raccolta del feltro e/o muschio.
I
Per il bloccaggio delle pulegge procedere come di seguito indicato:
Questa operazione va eseguita con motore spento e presa di forza disinserita.
- Togliere il carter di protezione. Allentare la tensione delle cinghie (vedi paragrafo 6.2 "Sostituzione cinghie").
- Bloccare i calettatori (Vedi fig. 15).
- Controllare mediante una sbarra che le pulegge siano allineate onde evitare surriscaldamento
delle cinghie (Vedi fig. 14d).
- Regolare nuovamente la tensione delle cinghie.
Controllare l’esatto allineamento tra le due pulegge. Rimontare accuratamente il carter
di protezione.
Il coltello B/B1 deve lavorare in assenza di sassi o arbusti e il coltello C deve solo scalfire la superficie del terreno (Vedi fig. 02) abbinato al coltello B.
Non si deve usare la macchina in prati o giardini dove sia presente ghiaia, in questo caso si verificherebbe un lancio di sassi molto pericoloso, sia per l’operatore, sia per eventuali persone che
si trovassero nei paraggi. Mantenere quindi la distanza di sicurezza indicata in fig. 03.
È proibito l’uso per il taglio di arbusti.
N.B.: Quando si monta il coltello di scarifica tipo C, verificare che non interferisca con nessuna
parte interna della macchina prima della messa in moto.
Ogni modifica arbitraria apportata alla macchina solleva il produttore da ogni responsabilità per eventuali danni derivanti.
Fig. 15
GB For
B
locking of the pulleys proceed as follows:
This operation must be effected with power-off engine and P.T.O. disconnected.
B1
- Take the belts protecting guard off. Reduce belts stretching (see paragraph 6.2 " Belts replacement").
- Lock the joints (see fig. 15).
- Check with the help of a bar that pulleys and belts must be lined up in order to prevent belts
overheating and its wear (see fig. 14d).
- Adjust belts stretching again.
Fig. 02
Release 00_09/09
C
Check the pulleys alignment. Replace belts protecting guard in the proper way.
20
49
Release 00_09/09
KOALA
6.2 Sostituzione cinghie / Belts replacement / Remplacement des courroies /
Keilriemenaustausch
I
Per la sostituzione delle cinghie di trasmissione procedere come di seguito indicato:
Questa operazione va eseguita con motore spento e presa di forza disinserita.
Togliere il carter di protezione cinghie (fig. 14a).
Scaricare la tensione delle cinghie come descritto al paragrafo 6.1.
Sostituire le cinghie e regolare la tensione come descritto al paragrafo 6.1.
Rimontare accuratamente il carter di protezione.
GB For
Belts drive replacement proceed as following steps:
This operation must be effected with power-off engine and P.T.O. disconnected.
Take the belts protecting guard off (fig. 14a).
Fig. 03
Unload the belts tightening as shown on paragraph 6.1.
Change and adjust the belt as shown on paragraph 6.1.
Replace belts protecting guard in the proper way.
F
Per la sostituzione delle cinghie di trasmissione procedere come di seguito indicato:
Cette opération doit être effectuée avec le moteur arrêté et la prise de force d’égagée.
Enlever le carter de protection des courroies (fig. 14a).
Scaricare la tensione delle cinghie come descritto al paragrafo 6.1.
Sostituire le cinghie e regolare la tensione come descritto al paragrafo 6.1.
Remonter le carter de protection.
D
GB This
flail mower is suitable for the cutting and collection by vacuuming of grass, leaves, moss
and thatch on parks, gardens, sport grounds golf courses, public authorities etc.
Its strength and technical features, allow fast cutting and collection performances with grate
hourly profits (2÷5 km/h max).
The machine can be fitted on any kind of tractor of suitable power:
Mod. 1000: kW 11 (15 HP)
Mod. 1200 - 1200 professional: kW 15 (20 HP)
Mod. 1600 - 1600 professional: kW 19 (25 HP)
and supplied with universal 3 point hitch.
This flail mower can be fitted with three kind of flails (See fig. 02):
Per la sostituzione delle cinghie di trasmissione procedere come di seguito indicato:
Nur bei ausgeschaltetem Motor und abgekuppelter Zapfwelle vornehmen.
Schutzgehäuse abnehmen (abb. 14a).
Scaricare la tensione delle cinghie come descritto al paragrafo 6.1.
Sostituire le cinghie e regolare la tensione come descritto al paragrafo 6.1.
Schutzgehäuse sorgfältig wieder anbringen.
Flail type B/B1 for grass cutting and collecting.
Flail type C for verticut operation
Flail type B/B1/C must be used on lawns with no stones or bushes and the type C ( vertical blade
) must just touch the ground surface. (See fig. 02) Jointed with flail type B.
Do not use the machine on grass fields where is present gravel, in this case it would cause a
dangerous stones (gravel) throwing for the operator and possible nearby people. Keep a safety
distance as shown on figure 03.
It is forbidden its use for bunches cutting.
N.B.: When fitted the verticut blade type (C) check that must not interfere with any frame mower
parts before starting the PTO shaft rotation.
Any arbitrary modification caused on the machine relieves the manufacturer from any
responsibility for eventual derived damages.
Release 00_09/09
48
21
Release 00_09/09
KOALA
Ce rotobroyeur permet la coupe et le ramassage par aspiration de l’herbe et des feuilles sur
pré, parcs, jardins, camps sportifs et espaces verts publics.
F
Grâce à sa construction robuste et à ses caractéristiques techniques, il permet une vitesse de
travail élevée et une excellente capacité horaire.
La machine s’applique à tout tracteur de puissance proportionnée:
Mod. 1000: kW 11 (15 HP)
Mod. 1200 - 1200 professional: kW 15 (20 HP)
Mod. 1600 - 1600 professional: kW 19 (25 HP)
et muni d’attelage aux 3 points universel.
Ce rotobroyeur peut monter 3 types de couteaux différents (Voir fig. 02):
Couteau B/B1 pour la coupe et le ramassage de l’erbe.
Couteau C pour le défeutrâge.
Le couteau B/B1/C doit travailler en abscence de cailloux et d’arbustes et sa partie centrale
(lame verticale) doit seulement rayer la pelouse (Voir fig. 02) abbinato al coltello B.
Ne jamais utiliser la machine sur des surfaces ayant du gravier pour en éviter la projection qui
pourrait se révéler dangereuse soit pour l’utilisateur que pour tout autre éventuelle persone qui
pourrait se trouver près de la zone de travail. Mantenere quindi la distanza di sicurezza indicata
in fig. 03.
Il est interdit d’utiliser la machine pour le broyage d’arbustes.
N.B.: Quando si monta il coltello di scarifica tipo C, verificare che non interferisca con nessuna
parte interna della macchina prima della messa in moto.
Toute modification arbitraire effectuée sur la machine libère le constructeur de toute responsabilité des dommages éventuels qui porraient en dériver.
Questo trinciaerba è adatto al taglio e raccolta per aspirazione di erba, foglie e feltro su prati,
parchi, giardini e aree pubbliche in genere, campi sportivi, campi da golf etc.
D
Data la sua robustezza e le sue caratteristiche tecniche, consente un’alta velocità di avanzamento abbinata ad una ottima redditività oraria.
Die Maschine kann an jede Art von Traktor mit geeigneter Leistung angekuppelt werden:
Mod. 1000: kW 11 (15 HP)
Mod. 1200 - 1200 professional: kW 15 (20 HP)
Mod. 1600 - 1600 professional: kW 19 (25 HP)
è inoltre munito di attacco universale a tre punti.
Es ist weiters verboten diese zum schneiden von Büschen einzusetzen (Siehe Abb. 02):
Coltello B/B1 per il taglio e raccolta erba.
Coltello C
per la scarifica e la raccolta del feltro e/o muschio.
Il coltello B/B1 deve lavorare in assenza di sassi o arbusti e il coltello C deve solo scalfire la superficie del terreno (Vedi fig. 02) abbinato al coltello B.
Non si deve usare la macchina in prati o giardini dove sia presente ghiaia, in questo caso si verificherebbe un lancio di sassi molto pericoloso, sia per l’operatore, sia per eventuali persone che
si trovassero nei paraggi. Mantenere quindi la distanza di sicurezza indicata in fig. 03.
È proibito l’uso per il taglio di arbusti.
N.B.: Quando si monta il coltello di scarifica tipo C, verificare che non interferisca con nessuna
parte interna della macchina prima della messa in moto.
GB For
belts adjustment act as per following instructions :
This operation must be effected with power-off engine and P.T.O. disconnected.
Take the belt guard off (fig. 14a).
1- Unload the screws locking the gear box (A) (fig. 14b).
2- Move the tie-rod by acting on the nut (B) (fig. 14c), up to reaching the correct belts tightening.
3- Line up the gear box by checking with a metal bar that two driving pulley as aligned (See fig.
14d).
4- Tighten the gear box bolts and carefully assemble back the belts guard.
A well tightened belt must flex 6 mm by pressing it with a 2kg weight.
F
Per la registrazione delle cinghie di trasmissione procedere come di seguito indicato:
Cette opération doit être effectuée avec le moteur arrêté et la prise de force d’égagée.
Enlever le carter de protection des courroies (fig. 14a).
1- Allentare le viti che bloccano la scatola moltiplicatore (A) (fig. 14b).
2- Spostare il tirante agendo sul dado (B) (fig. 14c), fino ad ottenere una corretta tensione delle
cinghie.
3- Allineare la scatola moltiplicatore verificando, mediante una barra, che le pulegge siano allineate onde evitare surriscaldamento delle cinghie (Vedi fig. 14d).
4- Bloccare le viti della scatola moltiplicatore e rimontare accuratamente il carter di protezione.
La cinghia correttamente tesa deve flettere di circa 6mm applicando una forza di 2 kg.
D
Per la registrazione delle cinghie di trasmissione procedere come di seguito indicato:
Diese Einstellung wird bei abgestelltem Motor und abgekuppelter Zapwelle vorgehommen.
Schutzgehäuse abnehmen (abb. 14a).
1- Allentare le viti che bloccano la scatola moltiplicatore (A) (fig. 14b).
2- Spostare il tirante agendo sul dado (B) (fig. 14c), fino ad ottenere una corretta tensione delle
cinghie.
3- Allineare la scatola moltiplicatore verificando, mediante una barra, che le pulegge siano allineate onde evitare surriscaldamento delle cinghie (Vedi fig. 14d).
4- Bloccare le viti della scatola moltiplicatore e rimontare accuratamente il carter di protezione.
La cinghia correttamente tesa deve flettere di circa 6mm applicando una forza di 2 kg.
Jede nach eigenem Gutdünken vorgenemmene Aenderung an der Maschine enthebt der
Hersteller jeder Haftung für eventuelle daraus resultierende Schäden.
Release 00_09/09
22
47
Release 00_09/09
KOALA
6.1 Regolazione tensione cinghie di trasmissione / Stretching adjustement of the driving
belts / Reglage et tension des courroies de transmission / Spannungseinstellung
der keilriemen
I
5. NORME D'USO / OPERATION RULES / MODE D’EMPLOI / GEBRAUCHSANWEISUNGEN
I Per un corretto utilizzo della macchina osservare le seguenti precauzioni:
Non è consentito salire sulla macchina in lavoro, né farsi trasportare.
Per la registrazione delle cinghie di trasmissione procedere come di seguito indicato:
Non è consentito sostare nell’area di apertura e scarico del cassone idraulico.
Questa regolazione va eseguita con motore spento e presa di forza disinserita.
Togliere il carter di protezione cinghie (fig. 14a).
1- Allentare le viti che bloccano la scatola moltiplicatore (A) (fig. 14b).
2- Spostare il tirante agendo sul dado (B) (fig. 14c), fino ad ottenere una corretta tensione delle
cinghie.
3- Allineare la scatola moltiplicatore verificando, mediante una barra, che le pulegge siano allineate onde evitare surriscaldamento delle cinghie (Vedi fig. 14d).
4- Bloccare le viti della scatola moltiplicatore e rimontare accuratamente il carter di protezione.
La cinghia correttamente tesa deve flettere di circa 6mm applicando una forza di 2 kg.
Ogni impiego della macchina diverso da quelli sopra indicati è da considerarsi non autorizzato
e pericoloso.
Prima di utilizzare la macchina accertarsi che non vi sia nessuno nel raggio d’azione della
macchina ed a una distanza non inferiore a quella di sicurezza (Vedi fig. 03).
Deve essere azionata solo da personale che è a conoscenza delle sue particolari caratteristiche
e che è al corrente delle principali procedure di sicurezza e dotato degli opportuni dispositivi
di protezione personale e che abbia effettuato un corso di addestramento sul suo utilizzo.
Non si deve utilizzare la macchina se si è stanchi, ammalati, o sotto l’effetto di alcool, farmaci
o droghe.
Il livello di pressione acustica della macchina in condizioni di massimo carico di funzionamento
è di: 70 dB (A) - 80 dB (A) pertanto è obbligatorio l'uso di cuffie di protezione.
La velocità di avanzamento deve variare masssimo di 2-3 Km/orari per erba alta e fitta, e su
terreni sconnessi, e durante l'operazione di Verticult. Velocità di 4-5 Km/orari per erba bassa e
su terreni pianeggianti.
A
Quando si solleva il cassone (Koala Professional) la macchina deve essere sempre agganciata
al 3° punto del trattore e posizionata su un terreno piano per evitare ribaltamenti.
GB Check the following instruction to operate the right machine use:
It is consented its use from adult people only. It is not allowed to get people on the machine
while working neither be carried.
It is not allowed the presence of people underneath the area of complete collector opening.
Fig. 14a
Fig. 14b
2 kg
The maximum working operation speed the noise pressure is 70 dB (A) - 80 dB (A) than it is necessary the ears protections.
The working speed during operation must be within the range of: 2-3 Km/hour for high and thick
grass, on uneven grounds and during verticut operations. Maximum 4-5 Km/hour for short, thin
on flat grounds.
B
During collector lifting (Koala Professional) the mower must be linked to tractro 3 point linkage
always and positioned on plain ground to prevent overturning.
Fig. 14c
Release 00_09/09
Each machine use that differ from above mentioned is considered not allowed and dangerous. Before using the mower check that must not people nearby the operating area and at a
distance lower than safety distance (see fig. 03).
Must be operated by instructed staff that knows its features and safety procedures and equipped with proper safety clothes and items and must have made a machine training for its right
use.
The machine must not be used if tired, sick or under alcoholic effect, medicine or drugs.
Fig. 14d
46
23
Release 00_09/09
KOALA
F Per un corretto utilizzo della macchina osservare le seguenti precauzioni:
Il est interdit de monter sur la machine au travail, ni de se faire transporter.
Il est interdit de s’approcher de la zone de bennage du bac de ramassage.
Ogni impiego della macchina diverso da quelli sopra indicati è da considerarsi non autorizzato
e pericoloso.
Prima di utilizzare la macchina accertarsi che non vi sia nessuno nel raggio d’azione della
macchina ed a una distanza non inferiore a quella di sicurezza (Vedi fig. 03).
Deve essere azionata solo da personale che è a conoscenza delle sue particolari caratteristiche
e che è al corrente delle principali procedure di sicurezza e dotato degli opportuni dispositivi
di protezione personale e che abbia effettuato un corso di addestramento sul suo utilizzo.
Non si deve utilizzare la macchina se si è stanchi, ammalati, o sotto l’effetto di alcool, farmaci
o droghe.
Il livello di pressione acustica della macchina in condizioni di massimo carico di funzionamento
è di: 70 dB (A) - 80 dB (A) pertanto è obbligatorio l'uso di cuffie di protezione.
La vitesse de travail doit varier de la façon suivante: Max. 2-3 km/h dans l’herbe haute et drue,
sur les terrains irréguliers et accidentés et durant les opérations de verticoupe. Max 4-5 km/h
dans l’herbe basse et claire et sur les terrains plats.
Quando si solleva il cassone (Koala Professional) la macchina deve essere sempre agganciata
al 3° punto del trattore e posizionata su un terreno piano per evitare ribaltamenti.
D Per un corretto utilizzo della macchina osservare le seguenti precauzioni:
Es ist nicht gestattet, auf die fahrende Maschine aufzuspringen, noch sich von ihr transportieren
zu lassen.
Es ist verboten, sich sowohl im Offnungs als auch Entladebereich des hydraulischen Behalters
aufzuhalten.
Jegliche Verwendung der Maschine in Anwendungsgebieten außerhalb denen, von Peruzzo
vorgegebenen, ist untersagt und gefährlich für Menschen und Gegenstände in unmittelbarer
Umgebung. Vor Benutzung der Maschine muss der Anwender sicherstellen, dass sich keine anderen Personen im Gefahrenbereich aufhalten, und sich keine Gegenstände im unmittelbaren
Umfeld (siehe Seite 3) befinden. Benutzung nur von authorisierten Personen, die auch mit dem
Inhalt dieser vorliegenden Bedienungsnaleitung, sowie mit den entsprechenden Körperschutzmaßnahmen und Sicherheitsregulierungen vertraut sind. Eine exakte Einweisung und Einarbeitung
in die Bedienung der Maschine ist ebenso erforderlich.
Mit der Maschine darf nicht gearbeitet werden, wenn der Anwender übermüdet, krank, betrunken ist, oder unter dem Einfluss von Medikamenten oder Drogen steht.
Der Lärmpegel der Maschine unter vollem Einsatz liegt bei ca. 70 dB (A) - 80 dB (A). Das Tragen
von Lärm- oder Ohrenschützern wird empfholen.
Die Arbeits-Geschwindigkeit während des Einsatzes sollte 2-3 km/h für hohen und dicken Grasbewuchs sein, sowie bei unebenen Böden und Vertikutier-Einsatz. Beim Einsatz auf IntensivFlächen sollte 4-5 Km/h gefahren werden.
Quando si solleva il cassone (Koala Professional) la macchina deve essere sempre agganciata
al 3° punto del trattore e posizionata su un terreno piano per evitare ribaltamenti.
Release 00_09/09
24
Alle Wartungsarbeiten müssen fachmännisch und unter Beachtung der Vorschriften dieses
Handbuches ausgeführt werden.
D
Bei jeder Wartungsarbeit muss der Motor des Traktors abgestellt und die Gelenkwwelle
abgekuppelt sein.
Vor jeder Ueberprüfung oder Wartungsarbeit muss der Maschinenbereichm an dem gearbeitet wird, gereinigt werden. Es müssen immer fachgerechte Werkzeuge bnutzt werden,
die sich in gutem Zustand befinden.
WARTUNG IN VORGEGEBENEN ZEITABSTAENDEN
NACH BEENDIGUNG EINES JEDEN ARBEITSZEICHTRAUMS:
• Es wird empfohlen, die Maschine innen zu waschen.
ALLE 10 BETRIEBSSTUNDEN:
• Das Gelenkkreuz schmieren.
• Rotorlager schmieren e del rullo. Siehe Abb. 11
• Keilriemenspannung kontrollieren.
• Sitz der Schrauben kontrollieren.
• Messerverschleiss kontrollieren.
ALLE 50 BETRIEBSSTUNDEN:
• Ingrassare le barre di rotazione. Vedi fig. 12.
• Oelstand des Uebersetzungsgetriebes mittels des dazu bestimmten Pfropfens kontrollieren.
Siehe Abb. 12.
• Prüfen Sie die hydr. Schläuche auf mögliche Schäden.
ALLE 200 BETRIEBSSTUNDEN:
• Oelwechsel im Uebersetzungsgetriebe.
Diesel Altöl muss jedesmal bei den Entsorgungszentren abgeliefert werden.
Bringen Sie an der Maschine ein Hinweisschild an, dass den momentanen Wartungszustand beschreibt:
"Maschine steht unter Wartungsarbeiten: Es ist Unbefugten verboten, sich der Maschine zu nähern,
oder diese zu benutzen!".
Bevor jegliche Einstellungen vorgenommen werden, muss der Motor abgestellt werden,
die Bremse gezogen, der Zündschlüssel abgezogen, ein Gang eingelegt und die Zapfwelle
abgeschaltet werden.
Vor Arbeiten an der Hydraulik muss der Druck aus dem System genommen werden.
Verwenden Sie Schutzkleidung (Handschuhe, Brillen, etc.) und passendes Werkezeug in
guter Kondition. Vorsicht vor Schnittverletzungen!
Ogni volta che si cambia l'olio del moltiplicatore, questo deve essere raccolto e portato
agli appositi centri di smaltimento.
45
Release 00_09/09
KOALA
5.1 Trasporto della macchina / Transport of the machine / Transport de la machine /
Transport der maschine
Toute maintenance doit être effectuée par du personnel compétent en observant scrupuleusement ce qui est indiqué dans cette notice.
F
A chaque opération de maintenance, arrêter le moteur du tracteur et dégager la prise de
force.
In caso di trasporto della macchina, sia per manutenzione che per spostamento su automezzo, è necessario sollevarla facendo passare le funi nei tre punti indicati in figura 04.
Avant toute maintenance ou contrôle, nettoyer toujours la zone de travail, utiliser toujours
des outils corrects et en bon état.
Assicurarsi che il mezzo di sollevamento e le funi di ancoraggio siano idonee al peso da
sollevare.
MAINTENANCE PERIODIQUE
APRES CHAQUE UTILISATION:
• Il est conseillé de laver soigneusement l’intérieur de la machine.
TOUTES LES 10 HEURES DE TRAVAIL:
• Graisser les joints du cardan.
• Graisser les supports du rotor et du rouleau. Voir fig. 11.
I
Accertarsi che una volta caricata sul mezzo, la macchina sia fissata con corde adeguate, sempre sui punti di sollevamento.
Per il trasporto su strada la ditta PERUZZO fornisce su richiesta un kit luci da applicare posteriormente (Vedi fig. 05). Assicurarsi inoltre che il trinciaerba sia sufficientemente sollevato da terra.
Porre la massima attenzione alla sicurezza durante le operazioni di carico e scarico, che
dovranno essere effettuate da personale qualificato.
• Contrôler la tension des courroies.
• Contrôler le bloquage des vis.
• Vérifier l’etat d’usure des couteaux.
TOUTES LES 50 HEURES DE TRAVAIL:
• Ingrassare le barre di rotazione. Vedi fig. 12.
• Vérifier le niveau de l’huile de renvoi d’angle à travers le bouchon. Voir fig. 12.
• Contrôler les pertes éventuelles des tubes hydrauliques.
TOUTES LES 200 HEURES DE TRAVAIL:
• Remplacer l’huile du renvoi d’angle.
L’huile remplacée du renvoi d’angle doit être recueillie et livrée aux centre de recyclage.
Applicare alla macchina un cartello che ne indichi la particolare situazione:
"Macchina fuori uso per manutenzione: al personale non autorizzato è vietato avvicinarsi ed
avviarla".
Fig. 04
Prima di effettuare qualsiasi operazione di manutenzione assicurarsi che la macchina sia
appoggiata a terra, spegnere il motore della trattrice, estrarre la chiave di accensione,
azionare il freno di stazionamento, innestare la marcia e disinserire la p.d.f.
Prima di effettuare qualsiasi operazione di manutenzione all’impianto idraulico scaricare
la pressione del circuito.
Usare i dispositivi di protezione individuali (guanti da lavoro) e utensili idonei e in buono
stato, pericolo di taglio.
Ogni volta che si cambia l'olio del moltiplicatore, questo deve essere raccolto e portato
agli appositi centri di smaltimento.
Fig. 05
Release 00_09/09
44
25
Release 00_09/09
KOALA
GB In
case of machine transport for maintenance or to place on trucks, it is necessary to lift it by
inserting the suitable ropes as shown on figure 04.
Check that the lifter and the cables are suitable for the weight to carry.
When loaded on the vehicle the machine must be fixed with proper ropes, always on the hanging points.
For road transport Peruzzo supply on request a light kit to fit on rear machine side (see fig 05).
Ensure that the mower must be at a sufficient distance from the ground.
Keep a careful attention always during loading and unloading operations, that must be
done by qualified staff trained for this sp cial purpose.
In caso di trasporto della macchina, sia per manutenzione che per spostamento su automezzo, è necessario sollevarla facendo passare le funi nei tre punti indicati in figura 04.
F
S’assurer que le moyen de soulèvement et les cordes utilisés, soient appropriés au poids à
soulever.
GB Every
maintenance must be effected by specialized staff and carefully conforming to what
indicated in the present handbook.
Any maintenance must be effected with power-off engine and P.T.O. disconnected.
Before any maintenance or control operation, clean the working zone, use proper tools
always and in good condition.
PERIODICAL MAINTENANCE
EVERY END OF WORKING:
• It is advisable wash the inside part of the inside part of the machine.
EVERY 10 WORKING HOURS:
• Grease the PTO shaft cross.
• Grease the rotor supports and of the roller. See fig. 11.
• Check the belts stretching.
• Check the tight of the screws.
• Check the wear of the flails.
Une fois que la machine à été chargée sur le véhicule, il faut la fixer à l’aide de cordes appropriées en la bloquant toujours sur les points de prise.
EVERY 50 WORKING HOURS:
• Grease the spin bars. See fig. 12.
Per il trasporto su strada la ditta PERUZZO fornisce su richiesta un kit luci da applicare posteriormente (Vedi fig. 05). Assicurarsi inoltre che il trinciaerba sia sufficientemente sollevato da terra.
• Check the oil l evel in the gear box through the proper cap. See fig. 12.
Porre la massima attenzione alla sicurezza durante le operazioni di carico e scarico, che
dovranno essere effettuate da personale qualificato.
• Check the possible leak of hydraulic tubes.
EVERY 200 WORKING HOURS:
• Replace oil in the gear box.
Any time the gear box oil must be changed collect it and bring it to special recycling centres.
In caso di trasporto della macchina, sia per manutenzione che per spostamento su automezzo, è necessario sollevarla facendo passare le funi nei tre punti indicati in figura 04.
D
Assicurarsi che il mezzo di sollevamento e le funi di ancoraggio siano idonee al peso da
sollevare.
Accertarsi che una volta caricata sul mezzo, la macchina sia fissata con corde adeguate, sempre sui punti di sollevamento.
Per il trasporto su strada la ditta PERUZZO fornisce su richiesta un kit luci da applicare posteriormente (Vedi fig. 05). Assicurarsi inoltre che il trinciaerba sia sufficientemente sollevato da terra.
Be- und Entladevorgänge sind stets unter absoluter Vorsicht durchzuführen und dürfen nur
von dafür qualifizierten Arbeitern vorgenommen werden.
Put on the machine a placard informing its maintenance situation:
"Machine broke down under service : Is forbidden to get close or operate from not authorised
staff".
Before operating any adjustment the user must, turn off the tractor engine, activate the
tractor brake, turn tractor engine off, disconnect the key from dashboard, insert the gear
and disconnect the PTO.
Before any hydraulic system maintenance unload the oil pressure from tractor or machine
levers (distributor levers if available).
Use safety protections (gloves, glasses etc.) and suitable tools in good conditions. Cutting
hazards.
Every time the gear box oil change, this must be taken to proper disposal location.
Release 00_09/09
26
43
Release 00_09/09
KOALA
5.2 Controlli e consigli prima della messa in moto / Checking and suggestions before
operating / Controles et conseils avant son utilisation / Kontrollen und Hinweise
vor der Inbetriebsetzung der Maschine
Questi controlli vanno eseguiti a trattore spento e presa di forza disinserita. Controllare che i
tubi del circuito idraulico siano in perfette condizioni.
I
Controllare l’usura dei coltelli.
Bloccare sempre i perni con le apposite copiglie di sicurezza a scatto.
Innestare l’albero cardanico assicurandosi che sia scattato il fermo di sicurezza.
Assicurarsi che il cardano in posizione di massima chiusura resti aperto non meno di 4 cm,
in caso di massima apertura i due pezzi devono essere sovrapposti non meno di 15 cm (fig.
06).
Evitare nel modo più assoluto di scavalcare il cardano sia esso in movimento o fermo.
Prima di mettere in moto la macchina assicurarsi del parallelismo di questa con il terreno, il rullo
posteriore di contatto deve poggiare a terra.
Controllare ed assicurare il cardano come da istruzione della casa costruttrice e agli apparati di sicurezza della trinciaerba stessa.
Fig. 11
IMPORTANTE: Nel caso si noti una vibrazione, fermare il trattore immediatamente, controllare subito nella trincia se mancano o sono danneggiati delle mazze o coltelli. Nel caso
manchi o sia rotto un solo coltello procedere subito alla sostituzione con mazze o coltelli
originali PERUZZO.
IMPORTANTE: Lo scarico del cassone deve essere eseguito sempre in terreni piani, mai
inclinati, per evitare ribaltamenti. Procedere lentamente in modo da acquisire consapevolezza sull'operatività della macchina.
Ma
x
Min. 4 cm.
Min
Max
Fig. 12
Release 00_09/09
Max
Fig. 06
42
Min. 15 cm.
27
Release 00_09/09
KOALA
6. MANUTENZIONE / MAINTENANCE / MAINTENANCE / WARTUNG
Tali operazioni devono essere svolte dal conduttore del mezzo.
Questi controlli vanno eseguiti a trattore spento, con freno di stazionamento inserito, con
marcia inserita e presa di forza disinserita.
Ogni manutenzione deve essere effettuata da personale competente in stretta osservanza
a quanto prescritto nel presente libretto.
Verificare l'integrità della macchina, il corretto posizionamento e funzionamento dei dispositivi di sicurezza.
Ogni qualvolta si debba effettuare una manutenzione, spegnere il motore del trattore e
disinserire la presa di forza.
Verificare il corretto collegamento dei tubi idraulici alla trattrice.
Prima di eseguire qualsiasi manutenzione o controllo, pulire sempre la zona di lavoro, usare
utensili idonei ed in buono stato.
Imparare perfettamente il significato e l'uso dei comandi per il funzionamento.
Ispezionare il terreno allo scopo di individuare e rimuovere eventuali ostacoli (pietre, fili di
ferro, tombini sporgenti, ecc..).
I
MANUTENZIONE PERIODICA
OGNI FINE LAVORO:
• È consigliabile lavare all’interno la macchina.
Verificare che l’albero cardanico sia dotato di marcatura CE e sia in buono stato, e che
la protezione in plastica non sia danneggiata.
OGNI 10 ORE DI LAVORO:
• Ingrassare le crociere del cardano.
Verificare la lunghezza dell’albero (fig. 06).
• Ingrassare i supporti del rotore e del rullo. Vedi fig. 11.
Innestare l’albero cardanico alla p.d.f. della trattrice e poi alla macchina rispettando il
verso di rotazione ed il verso di montaggio evidenziato sul cardano, assicurandosi che sia
scattato il fermo di sicurezza.
Agganciare agli appositi punti i dispositivi di trattenuta (catenelle).
• Controllare la tensione cinghie.
• Controllare il bloccaggio viti.
• Controllare l’usura dei coltelli.
OGNI 50 ORE DI LAVORO:
• Ingrassare le barre di rotazione. Vedi fig. 12.
• Controllare il livello olio del moltiplicatore per mezzo dell’apposito tappo. Vedi fig. 12.
GB These
checking must be executed with tractor poweroff engine and P.T.O. disconnected.
Check that the hydraulic plugs of the tubes are cleaned and in perfect conditions.
Check the wear of flails.
Lock always the point hitch pins with the suitable safety split-pins.
Fit the cardan shaft and make sure that the safety lock is been released.
Ensure that PTO shaft on its maximum closing position must beopened not less than 4 cm /
1,57 inch.
In case of maximum opening the two pieces must be superimposed not less than 15 cm /
5,90 inch (fig. 06).
It is absolutely forbidden to step or jump over the PTO shaft while it is stopped or turning
operation.
• Controllare perdite tubi idraulici.
OGNI 200 ORE DI LAVORO:
• Sostituire olio moltiplicatore.
Ogni volta che si cambia l’olio del moltiplicatore, questo deve essere raccolto e portato
agli appositi centri di smaltimento.
Applicare alla macchina un cartello che ne indichi la particolare situazione:
"Macchina fuori uso per manutenzione: al personale non autorizzato è vietato avvicinarsi ed
avviarla".
Prima di effettuare qualsiasi operazione di manutenzione assicurarsi che la macchina sia
appoggiata a terra, spegnere il motore della trattrice, estrarre la chiave di accensione,
azionare il freno di stazionamento, innestare la marcia e disinserire la p.d.f.
Before working with the machine make sure its parallelism on the ground, the rear roller must be
laid on the ground as well as the two front castor wheels.
Prima di effettuare qualsiasi operazione di manutenzione all’impianto idraulico scaricare
la pressione del circuito.
Check and assure the P.T.O. shaft as per instructions supplied from its manufacturing company and on machine safety devices.
Usare i dispositivi di protezione individuali (guanti da lavoro) e utensili idonei e in buono
stato, pericolo di taglio.
IMPORTANT: In case of mower vibration, stop right away the tractor engine and PTO, check
immediately if there are missing flails or broken ones. In case of missing of broken, (even
Ogni volta che si cambia l'olio del moltiplicatore, questo deve essere raccolto e portato
agli appositi centri di smaltimento.
Release 00_09/09
28
41
Release 00_09/09
KOALA
1 flail), dispose at once the change of the flail with original one from PERUZZO.
Operating as per following points:
- Slowly lower the tractor linkage in order to place the machine on the ground surface without
hitting it.
IMPORTANT: The collector discharge must be operated on flat grounds, never on sloping
grounds in order to prevent overturning. Operate it slowly in order to achieve a good awareness.
- Release the hydraulic tubes from tractor plugs, checking that no oil drops must touch the
ground surface.
These duties must be executed by the machine user and after manual knowledge.
- Release the PTO shaft from tractor PTO.
- Release the tractor 3 pints linkage from machine housings by unlocking.
These checking must be done after, activating the tractor brake, turning tractor engine off,
disconnecting the key from dashboard, inserting the gear and disconnecting the PTO.
- taking out its hair pin cotters and pins.
- After checking that are no more parts linked to the tractor, turn on the tractor engine and
move it slowly away from the machine.
Check the machine integrity, the correct position and safety devices operation.
Check the right hydraulic tubes fitting to the tractor plugs.
F
Learn completely the use and meaning of every tractor and machine use and features.
Check the working field must be free from obstacles (stones, metal ropes, holes or parts
that could obstruct the machine).
Il distacco della macchina deve essere effettuato appoggiando la stessa su un terreno
in piano e compatto, con motore della trattrice spento, chiave di accensione disinserita,
freno di stazionamento innestato, marcia inserita e p.d.f. disinserita.
Check that PTO shaft must have “CE” marks and must be in good conditions as well as
plastic covering all along its width.
Procedere rispettando i seguenti punti:
- abbassare gradualmente il sollevamento della trattrice fino ad appoggiare la macchina sul
terreno.
Check the right working PTO shaft length (fig. 06).
- scollegare i tubi idraulici dagli innesti della trattrice.
Fit the PTO shaft to tractor PTO and than to machine PTO checking the machine gear
box r.p.m. the rotation direction (Clockwise or Anticlockwise) and the fitting way printed
on PTO shaft manual, ensure the safety PTO shaft devices as given from its manufacturing
company.
- disinserire l’albero cardanico dalla trattrice.
- staccare il terzo punto.
- staccare i perni di collegamento alle barre di sollevamento.
Lock the PTO shaft with its safety chains to proper points on tractor and machine sides.
- avviare il motore del trattore ed allontanarsi lentamente.
Les contrôles doivent être effectués en ayant le moteur du tracteur arrêté et la prise de force
dégagée. Contrôler que les prises hydrauliques soient propres et en parfaites conditions.
F
D
Das abkoppeln der Maschine vom Schlepper muss auf einer ebenen Fläche vorgenommen
werden, bei ausgeschaltetem Motor, angezogener Bremse, abgezogenem Zündschlüssel,
eingelegtem Gang und abgeschalteter Zapfwelle.
Gehen Sie wie folgt vor:
- Lösen Sie langsam die Aufnahmen am Schlepper, so dass sich die Maschine langsam absenkt
und nicht hart aufschlägt.
- Trennen Sie die Hydraulikschläuche vom Schlepper ab und achten Sie darauf, dass keine Öltropfen den Boden berühren.
- Trennen Sie die Gelenkwelle vom Schlepper ab.
- staccare il terzo punto.
- staccare i perni di collegamento alle barre di sollevamento.
- avviare il motore del trattore ed allontanarsi lentamente.
Release 00_09/09
40
Contrôler l’état d’usure des couteaux.
Fixer toujour les pivots de l’attelage points à l’aide des groupilles de sûreté.
Fixer le cardan en s’assurant qu’il soit bien bloqué sur la prise de force en faisant déclencher
le dispositif de sûreté.
S’assurer que le cardan soit ouvert d’au moins 4 cm en position de fermeture max. et que
les deux parties se superposent d’au moins 15 cm dans la position d’allongement max. (fig.
06).
Evitare nel modo più assoluto di scavalcare il cardano sia esso in movimento o fermo.
Avant de mettre la machine en fonction, veiller à ce qu’elle soit parallèle au terrain et que le
rouleau arrière et les roues avant touchent le sol.
Vérifier et fixer le cardan selon les instructions du constructeur du cardan (dans la notice
livrée avec le cardan) et l’assurer au tracteur et à la tondeuse au moyen des chaînettes
de fixation.
29
Release 00_09/09
KOALA
IMPORTANT: Si l’on perçoit des vibrations, arreter le tracteur immédiatment, et vérifier de
suite sur le broyeur s’il manque des fléaux ou s’ils sont endommagés. Dans le cas ou l’on
remarque 1 seul fléau cassé ou manquant, procéder à son remplacement par une pièce
originale PERUZZO.
(A) verändert werden (siehe fig. 10).
Bevor der Anwender jegliche Einstellungsarbeiten vornimmt ist der Motor abzustellen, die
Bremse zu ziehen, der Zündschlüssel abzuziehen, ein Gang einzulegen und die Zapfwelle
abzuschalten.
IMPORTANTE: Lo scarico del cassone deve essere eseguito sempre in terreni piani, mai
inclinati, per evitare ribaltamenti. Procedere lentamente in modo da acquisire consapevolezza sull'operatività della macchina.
Quando viene alzata la macchina con l’uso dei tre punti del trattore per regolare l’altezza
di taglio, puntellare la macchina a terra ambo i lati con opportuni tappi.
Quando si procede alla regolazione del rullo posteriore si deve sollevare la macchina,
ricordarsi di puntellare la macchina a terra ambo i lati con opportuni tappi.
Tali operazioni devono essere svolte dal conduttore del mezzo.
Questi controlli vanno eseguiti a trattore spento, con freno di stazionamento inserito, con
marcia inserita e presa di forza disinserita.
Arbeiten Sie nicht mit einer zu tiefen Einstellung, damit die Werkzeuge nicht in den Boden
schlagen. Geschleuderte Steine und Erdmaterial schaden der Maschine und gefährden zu
nahe stehende Menschen oder Gegenstände.
Verificare l'integrità della macchina, il corretto posizionamento e funzionamento dei dispositivi di sicurezza.
Quando si monta il coltello di scarifica tipo C (vedi Cap. 4) verificare che non interferisca
con nessuna parte interna della macchina prima della messa in moto.
Verificare il corretto collegamento dei tubi idraulici alla trattrice.
Machen Sie diese Änderungen mit Hilfe einer zweiten Person und achten Sie vor Inbetriebnahme
darauf, daß notwendige Werkzeuge, Handschuhe, Kleider entfernt sind.
Imparare perfettamente il significato e l'uso dei comandi per il funzionamento.
Ispezionare il terreno allo scopo di individuare e rimuovere eventuali ostacoli (pietre, fili di
ferro, tombini sporgenti, ecc..).
Verificare che l’albero cardanico sia dotato di marcatura CE e sia in buono stato, e che
la protezione in plastica non sia danneggiata.
5.5 Distacco della trattrice / Tractor disengagement / Distacco della trattrice / Distacco
della trattrice
I
Verificare la lunghezza dell’albero (fig. 06).
Innestare l’albero cardanico alla p.d.f. della trattrice e poi alla macchina rispettando il
verso di rotazione ed il verso di montaggio evidenziato sul cardano, assicurandosi che sia
scattato il fermo di sicurezza.
Agganciare agli appositi punti i dispositivi di trattenuta (catenelle).
Il distacco della macchina deve essere effettuato appoggiando la stessa su un terreno
in piano e compatto, con motore della trattrice spento, chiave di accensione disinserita,
freno di stazionamento innestato, marcia inserita e p.d.f. disinserita.
Procedere rispettando i seguenti punti:
- abbassare gradualmente il sollevamento della trattrice fino ad appoggiare la macchina sul
terreno.
- scollegare i tubi idraulici dagli innesti della trattrice.
Folgende Kontrolle sind bei asugeschaltetem Traktor und abgekuppelter Zapfzelle vorzunehmen Prüfen, ob die Hydraulikleitungen in perfektem Zustand sind.
D
- disinserire l’albero cardanico dalla trattrice.
- staccare il terzo punto.
- staccare i perni di collegamento alle barre di sollevamento.
Verschleiss der Messer prüfen.
Die Gelenkzapfen der Punkte stets mit den vorgesehenen Sicherheitsspringfedersplinten blockieren.
- avviare il motore del trattore ed allontanarsi lentamente.
Die Gelenkwelle so einkuppelnm dass die Sicherheitsfestsellvorrichtung einrastet.
Sich vergewissern, dass das kardangelenk bei maximaler Schlusstellung nicht unter 4 cm
offen bleibtm bei maximaler Oeffnung dürfen die beiden Enden nicht weniger als 15 cm
übereinanderliegen (abb. 05).
Evitare nel modo più assoluto di scavalcare il cardano sia esso in movimento o fermo.
Release 00_09/09
30
GB The machine release fro the tractor must be done placing it on perfect flat surface, with
tractor engine turned off , tractor brake activated, disconnect the key from dashboard,
insert the gear and disconnect the PTO.
39
Release 00_09/09
KOALA
GB To
adjust height of cut, act on front castor wheels by moving the spacers (See fig. 10).
It is possible to adjust the cutting height on rear roller, by acting on the bolt (A) (See fig. 10).
Before operating any adjustment the user must, turn off the tractor engine, activate the
tractor brake, turn tractor engine off, disconnect the key from dashboard, insert the gear
and disconnect the PTO.
These operations must be effected with tractor power-off engine and P.T.O. disconnected.
When lifting the machine with tractor lifter to adjust the height of cut, prop it on both sides.
In order to adjust the rear roller, lift the machine and remember toprop it on both sides.
Do not work with machine adjusted on lower position as the flails may touch the ground,
throwing objects with a consequent damage for machine and to nearby people or
things.
During fitting the blades type “C” (see Sect. 4) check that must not interfere with any inside
parts of the mower before start cutting.
Make the adjustment with the help of a second person and make sure to have necessary tools,
gloves and clodes available before beginning the operation.
Le réglage de la hauteur de coupe se fait en agissant sur les roues avant, en augmentant ou
en diminuant le nombre de bagues (Voir fig. 10).
F
On peut agir sur le boulon (A) du rouleau arrière (Voir fig. 10).
Toutes ces opérations doivent être effectuées en ayant le moteur arrêté et la prise de force
dégagée.
Quand la machine est soulevée à l’aide du relevage hydraulique du tracteur , afin de
régler la hauteur de coupe, étayer la machine sur les deux côtés.
Quand on procède au réglage du rouleau arrière il faut soulever la machine et se rappeler
d’étayer la machine sur les deux côtés.
Ne jamais travailler avec la machine réglée sur sa position plus basse car les fléaux pourraient toucher le sol et par conséquent endommager la machine et nuire aux personnes ou
choses qui se trouvent dans le voisinage.
Quando si monta il coltello di scarifica tipo C (vedi Cap. 4) verificare che non interferisca
con nessuna parte interna della macchina prima della messa in moto.
Effectuer le réglage avec l’aide d’une deuxième personne ayant les outils nécessaires à disposition avant de commencer le travail.
Bevor die Maschine in Betrieb gesetzt wird, ihre Parallestellung zum Boden prüfen, die hintere
Kontrastrole sowie die beiden vorderen Räder müssen kauf dem Boden aufliegen.
Prüfen und sichern Sie die Gelenkwelle mit den vorgesehennen Keiten und beachten Sie
die Anweisungen des Herstellers.
ACHTUNG: Bei Auftreten von Vibrationen an der Maschine stellen Sie SOFORT den Traktor
bzw. die Zapfwelle ab, und prüfen Sie das Gerät auf beschädigte oder fehlende Werkzeuge
an der Rotorwelle. Im Fall von fehlenden oder beschädigten Werkzeugen (selbst schon bei
nur 1 Messer) sind diese umgehend durch Original-Werkzeuge von Peruzzo.
IMPORTANTE: Lo scarico del cassone deve essere eseguito sempre in terreni piani, mai
inclinati, per evitare ribaltamenti. Procedere lentamente in modo da acquisire consapevolezza sull'operatività della macchina.
Diese Vorgänge sind vom Anwender erst nach durchlesen der Bedienungsnaleitung durchzuführen.
Diese Prüfungen dürfen erst durchgeführt werden, nachdem die Bremse gezogen, der
Motor abgestellt, der Zündschlüssel abgezogen, ein Gang eingelegt und die Gelenkwelle
abgenommen ist.
Prüfen Sie die Maschinenstruktur, die korrekte Position hinter dem Schlepper und die Funktion
der Sicherheitselemente.
Prüfen Sie den korrekten Anschluß der Hydraulikleitungen an den Schlepper.
Studieren Sie gewissenhaft die Bedienung jedes Schleppers und der Anbaugeräte.
Die zu bearbeitende Fläche muss frei von Hindernissen sein (Steine, Metallseile, Löcher oder
Teile die die Maschine beschädigen könnten).
Prüfen Sie, dass die Gelenkwelle ein CEZeichen trägt und sich in gutem Zustand befindet,
wie ebenso der diese umgebende Plastikschutz auf der gesamten Länge.
Prüfen Sie die Gelenkwelle auf korrekte Länge (abb. 05).
Schließen Sie die Gelenkwelle zuerst Traktorseitig, danach an die Maschine an, und prüfen
Sie dabei die Umdrehungszahl des Getriebes, sowie die korrekte Drehrichtung (im oder
gegen den Uhrzeigersinn) und beachten Sie die Richtlinien zum Anschluss der Gelenkwelle
sowie die Sicherheitsbestimmungen wie in der Anleitung des Gelenkwellenherstellers vorgegeben.
Sichern Sie die Gelenkwelle mit den Sicherungsketten an entsprechenden Fixpunkten am
chlepper, sowie an der Maschine.
Zum Einstellen der gewünschten Schnitthöhe verändern Sie die Distanzringe an den Fronträdern
(siehe fig. 10).
D
Zusätzlich kann die Schnitthöhe über die Heck-Stützrolle durch Positions-Änderung der Schrauben
Release 00_09/09
38
31
Release 00_09/09
KOALA
5.3 Applicazione al trattore / Fitting to the tractor / Application au tracteur / Ankuppelung
an den traktor
I
L'intera operazione di attacco al trattore deve avvenire su terreno piano.
L'applicazione della macchina al trattore è una fase molto pericolosa: fare molta attenzione
ed eseguire l'operazione seguendo le istruzioni di seguito indicate.
- Accostare le barre del sollevatore del trattore, ponendole all'esterno delle piastre della macchina (vedi fig. 07).
- Spegnere il motore della trattrice, estrarre la chiave di accensione, azionare il freno di stazionamento ed inserire la marcia, quindi scendere dal mezzo (Verificare che la p.d.f. sia disinserita).
- Inserire il perno e bloccarlo con le copiglie di sicurezza a scatto.
- Innestare il giunto cardanico e assicurarsi che sia bloccato sulla presa di forza.
5.4 Regolazione dell'altezza di taglio / Adjusting cutting height / Reglage de la hauteur
de coupe / Schnitthöeheeinstellung
Per regolare l’altezza di taglio si deve agire anteriormente sulle ruote pivottanti, spostare gli
appositi spessori (Vedi fig. 10).
I
Si può agire posteriormente sul bullone (A) del rullo (Vedi fig. 10).
Prima di effettuare qualsiasi regolazione è obbligatorio spegnere il motore della trattrice,
estrarre la chiave di accensione, azionare il freno di stazionamento, innestare la marcia e
verificare che la p.d.f. sia disinserita.
Quando viene alzata la macchina con l’uso dei tre punti del trattore per regolare l’altezza
di taglio, puntellare la macchina a terra ambo i lati con opportuni tappi.
Quando si procede alla regolazione del rullo posteriore si deve sollevare la macchina,
ricordarsi di puntellare la macchina a terra ambo i lati con opportuni tappi.
Non lavorare con la macchina regolata nella sua posizione minima poichè i coltelli possono toccare il terreno e quindi danneggiare la macchina stessa più persone o cose nelle
vicinanze.
Quando si monta il coltello di scarifica tipo C (vedi Cap. 4) verificare che non interferisca
con nessuna parte interna della macchina prima della messa in moto.
Eseguire la regolazione con l’ausilio di una seconda persona prima di iniziare il lavoro avendo a
disposizione gli attrezzi necessari.
MIN.
Fig. 07
Collegare il terzo punto, avendo cura che l’asse della presa di forza risulti parallelo al piano
di terra, far si che il terzo punto lavori a macchina orizzontale ed appoggiata a terra, in
centro della feritoia, onde evitare in caso di irregolarità del terreno, tiri od impuntamenti
del terzo punto stesso (vedi fig. 08).
- Collegare i tubi idraulici all’apposito distributore del trattore facendo attenzione al corretto
collegamento.
- Azionare lentamente la leva della valvola per controllare l’apertura e chiusura del cassone.
MAX.
A
Pressione massima di esercizio consentita: 150 bar.
• L’aggancio della macchina alla trattrice è considerata un’operazione pericolosa: attenersi
alle istruzioni riportate e tenersi a distanza di sicurezza dall’area di manovra.
Fig. 10
• Posizionare la trattrice e la macchina su un terreno compatto e in piano.
Release 00_09/09
32
37
Release 00_09/09
KOALA
D
L'intera operazione di attacco al trattore deve avvenire su terreno piano.
L'applicazione della macchina al trattore è una fase molto pericolosa: fare molta attenzione
ed eseguire l'operazione seguendo le istruzioni di seguito indicate.
- Accostare le barre del sollevatore del trattore, ponendole all’interno delle piastre della macchina (Siehe abb. 07).
- Ziehen Sie die Bremse an, stellen Sie den Motor ab, ziehen Sie den Zündschlüssel ab, legen Sie
einen Gang ein und schalten Sie die Zapfwelle aus. Erst jetzt den Schlepper verlassen. (Beachten
Sie, dass die Zapfwelle des Schleppers langsam ausläuft).
- Inserire il perno e bloccarlo con le copiglie di sicurezza a scatto.
- Innestare il giunto cardanico e assicurarsi che sia bloccato sulla presa di forza.
Den dritten Punkt ankuppeln, wobei darauf zu acten ist, dass die Zapfwellenachse parallel
zur Bodenfläche verläuft, dafür sorgen, dass der dritte Punkt bei horizontalerm, auf dem
Boden stehender Maschine arbeitet. (Siehe abb. 08).
- Hydraulikleitungen an den vorgesehenen Verteiler des Traktors sorgfältig und genau anschliessen.
- Ventilhebel langsam betätigen, um das Oeffnen und-Schliessen des hinteren Grassbehälters
zu prüfen.
Fig. 08
Nelle macchine applicate all'attacco posteriore del trattore, a causa della massa della macchina,
il complesso trattrice-operatrice può risultare instabile, causando difficoltà di guida e sbandamenti in curva, è quindi opportuno verificare se occorra o meno zavorrare la parte anteriore del
trattore, da effettuare tuttavia, nei limiti e nelle modalità prescritte dal costruttore.
Pertanto è necessario che vengano soddisfatte le seguenti condizioni (vedi fig. 09):
M x (s1 + s2) ≤ 0,2 x T x i + Z x (d + i)
M ≤ 0,3 T
Erlauber Maximaldruck 150 Bar.
• Der Anbau der Maschine an den Schlepper kann gefährlich sein: behalten Sie einen Sicherheitsabstand bei, und denken Sie an die in dieser Anleitung beschriebenen Sicherheitshinweise.
• Platzieren Sie den Schlepper und die Maschine auf einer ebenen Fläche.
Nelle macchine applicate all'attacco posteriore del trattore, a causa della massa della macchina,
il complesso trattrice-operatrice può risultare instabile, causando difficoltà di guida e sbandamenti in curva, è quindi opportuno verificare se occorra o meno zavorrare la parte anteriore del
trattore, da effettuare tuttavia, nei limiti e nelle modalità prescritte dal costruttore.
Pertanto è necessario che vengano soddisfatte le seguenti condizioni (vedi fig. 09):
M x (s1 + s2) ≤ 0,2 x T x i + Z x (d + i)
M ≤ 0,3 T
dove: i = interasse ruote trattrice;
d = distanza dell'asse anteriore della zavorra;
s1 = distanza delle ruote dei bracci inferiori di sollevamento dall'asse posteriore della
trattrice;
s2 = distanza degli attacchi inferiori dal baricentro della macchina;
T = massa della trattrice con operatore;
Z = massa della zavorra;
M = massa del Trinciaerba;
Per quanto riguarda la stabilità laterale, non essendo disponibile un documento normativo che
tratti lo specifico pericolo, si rimanda ad una guida attenta ad evitare di inoltrarsi su terreni cedevoli o pendenti. In questo caso, occorre ricordare di tenere sempre l'attrezzo "a monte" rispetto
alla trattrice.
Release 00_09/09
36
dove: i = interasse ruote trattrice;
d = distanza dell'asse anteriore della zavorra;
s1 = distanza delle ruote dei bracci inferiori di sollevamento dall'asse posteriore della
trattrice;
s2 = distanza degli attacchi inferiori dal baricentro della macchina;
T = massa della trattrice con operatore;
Z = massa della zavorra;
M = massa del Trinciaerba;
Z
0,2 T
d
T
M
i
s1
Per quanto riguarda la stabilità laterale, non essendo
disponibile un documento
normativo che tratti lo specifico pericolo, si rimanda ad
una guida attenta ad evitare
di inoltrarsi su terreni cedevoli
o pendenti. In questo caso,
occorre ricordare di tenere
sempre l'attrezzo "a monte"
rispetto alla trattrice.
s2
Fig. 09
33
Release 00_09/09
KOALA
GB The
entire mower fitting to 3 points tractor linkage must be executed on flat ground.
The mower linkage to the tractor is very dangerous operation: Pay careful attention to follow
the down mentioned instructions.
- Put the tractor lifting arms inside the fixing supports of the machine 3-point hitch (see fig. 07).
- Activate the tractor brake, turn tractor engine off, disconnect the key from dashboard, insert
the gear and disconnect the PTO., than get off from the tractor (Check that tractor PTO must
be carefully disengaged or disconnected acting on its lever or switch button).
- Insert the pin locking it with proper safety pin.
- Insert the PTO shaft ensuring it proper locking to the PTO.
Connect the third point checking that the P.T.O. axis must be parallel to the ground. When
the machine is in horizontal position and touching the ground, the third point must be in
the central position of the 3-point split, to avoid wrenches or impacts due to unevenness
of the ground (see fig. 08).
- Fit the hydraulic plugs to the proper distributor of the tractor, connecting them in the right
way.
- Move the valve level slowly to check the opening and closing of the rear grass collector.
F
L'intera operazione di attacco al trattore deve avvenire su terreno piano.
L'applicazione della macchina al trattore è una fase molto pericolosa: fare molta attenzione
ed eseguire l'operazione seguendo le istruzioni di seguito indicate.
- Approcer les barres du relevage hydraulique à l’attelage 3 points de la machine, en les faisant
glisser à l’intérieur des supports de fixage. (voir fig. 07).
- Spegnere il motore della trattrice, estrarre la chiave di accensione, azionare il freno di stazionamento ed inserire la marcia, quindi scendere dal mezzo (Verificare che la p.d.f. sia disinserita).
- Enfiler le pivot et le bloquer à l’aide des goupilles.
- Placer le cardan en s’assurant qu’il soit bien bloqué sur la prise de force.
Fixer le troisième point en veillant à ce que l’axe de la prise de force soit parallèle au sol. Le
troisième point doit travailler, ayant la machine en position horizontale et touchant le sol, au
centre de la glissière de l’attelage 3 points, afin d’éviter des coups brusques ou saccades
au troisième point en cas de terrain irrégulier (voir fig. 08).
- Fixer les prises hydrauliques au distributeur du tracteur en faisant attention à les branches de
façon correcte.
Max working pressure allowed: 150 bar.
- Actioner la manette du distributeur hydraulique, lentement pour vérifier l’ouverture et la fermeture du bac de ramassage postérieur.
• The machine linkage to the tractor is considered a dangerous operation: keep a safety distance
from the machine and bear in mind the instructions given in the present manual.
Pression du circuit hydraulique max. 150 bar.
• Place tractor and machine on complete flat ground.
On machines fitted on rear tractor side, due to frame load , the tractor and mower can be unstable, causing driving difficulties and banking during turnings, it is than necessary to check if
necessary to ballast om front tractor side to operate as per tractor manufacturer advise.
In order to check the right weight to fit on front tractor side must be fulfilled the following condition (see figure 09):
M x (s1 + s2) ≤ 0,2 x T x i + Z x (d + i)
M ≤ 0,3 T
Where:i = is the tractor wheel;
d = Front wheels axels distance from ballast;
s1 = Rear wheel axels to lower linkage lifting arms distance;
s2 = Lower linkange distance to the machine barycentre;
T = Tractor with drive weight;
Z = Ballast weight;
M = Machine weight;
For side stability, as it is not present a safety norm for such hazard we inform a guide to prevent
damages and harmful on soft grounds or slopes. In case of slopes it is advises to keep the machine
on high level than the tractor in order to cause overturning.
Release 00_09/09
34
• L’aggancio della macchina alla trattrice è considerata un’operazione pericolosa: attenersi
alle istruzioni riportate e tenersi a distanza di sicurezza dall’area di manovra.
• Posizionare la trattrice e la macchina su un terreno compatto e in piano.
Nelle macchine applicate all'attacco posteriore del trattore, a causa della massa della macchina,
il complesso trattrice-operatrice può risultare instabile, causando difficoltà di guida e sbandamenti in curva, è quindi opportuno verificare se occorra o meno zavorrare la parte anteriore del
trattore, da effettuare tuttavia, nei limiti e nelle modalità prescritte dal costruttore.
Pertanto è necessario che vengano soddisfatte le seguenti condizioni (vedi fig. 09):
M x (s1 + s2) ≤ 0,2 x T x i + Z x (d + i)
M ≤ 0,3 T
dove: i = interasse ruote trattrice;
d = distanza dell'asse anteriore della zavorra;
s1 = distanza delle ruote dei bracci inferiori di sollevamento dall'asse posteriore della
trattrice;
s2 = distanza degli attacchi inferiori dal baricentro della macchina;
T = massa della trattrice con operatore;
Z = massa della zavorra;
M = massa del Trinciaerba;
Per quanto riguarda la stabilità laterale, non essendo disponibile un documento normativo che
tratti lo specifico pericolo, si rimanda ad una guida attenta ad evitare di inoltrarsi su terreni cedevoli o pendenti. In questo caso, occorre ricordare di tenere sempre l'attrezzo "a monte" rispetto
alla trattrice.
35
Release 00_09/09