1
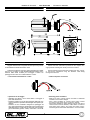
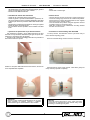
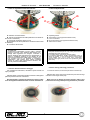
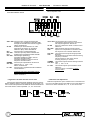
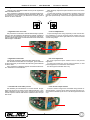
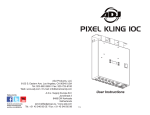
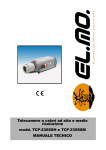
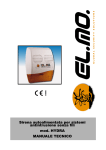
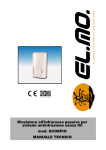
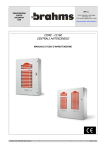
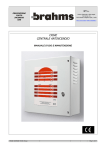
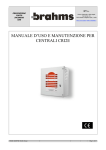
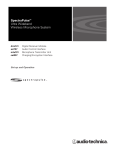
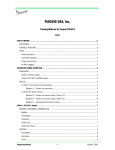
MANUALE TECNICO
TECHNICAL MANUAL
Telecamera Day&Night ad Alta Velocità
High Resolution Day&Night Camera
mod. GPC E7344 DN
MANUALE TECNICO - GPC E7344 DN - TECHNICAL MANUAL
AVVERTENZE - FOREWORD
PER L’INSTALLATORE: Attenersi scrupolosamente alle normative vigenti sulla realizzazione di impianti elettrici e sistemi di sicurezza, oltre che alle
prescrizioni del costruttore riportate nella manualistica a corredo dei prodotti.
Fornire all’utilizzatore tutte le indicazioni sull’uso e sulle limitazioni del sistema installato, specificando che esistono norme specifiche e diversi livelli di
prestazioni di sicurezza che devono essere commisurati alle esigenze dell’utilizzatore.
Far prendere visione all’utilizzatore delle avvertenze riportate in questo documento.
PER L’UTILIZZATORE: Verificare periodicamente e scrupolosamente la funzionalità dell’impianto accertandosi della correttezza dell’esecuzione delle
manovre di inserimento e disinserimento. Curare la manutenzione periodica dell’impianto affidandola a personale specializzato in possesso dei requisiti
prescritti dalle norme vigenti. Provvedere a richiedere al proprio installatore la verifica dell’adeguatezza dell’impianto al mutare delle condizioni operative (es.
variazioni delle aree da proteggere per estensione, cambiamento delle metodiche di accesso ecc...)
Questo dispositivo è stato progettato, costruito e collaudato con la massima cura, adottando procedure di controllo in conformità alle normative vigenti. La
piena rispondenza delle caratteristiche funzionali è conseguita solo nel caso di un suo utilizzo esclusivamente limitato alla funzione per la quale è stato
realizzato, e cioè:
Telecamera Day&Night ad Alta Velocità
Qualunque utilizzo al di fuori di questo ambito non è previsto e quindi non è possibile garantire la sua corretta operatività.
I processi produttivi sono sorvegliati attentamente per prevenire difettosità e malfunzionamenti; purtuttavia la componentistica adottata è soggetta a guasti in
percentuali estremamente modeste, come d’altra parte avviene per ogni manufatto elettronico o meccanico. Vista la destinazione di questo articolo
(protezione di beni e persone) invitiamo l’utilizzatore a commisurare il livello di protezione offerto dal sistema all’effettiva situazione di rischio (valutando la
possibilità che detto sistema si trovi ad operare in modalità degradata a causa di situazioni di guasti od altro), ricordando che esistono norme precise per la
progettazione e la realizzazione degli impianti destinati a questo tipo di applicazioni.
Richiamiamo l’attenzione dell’utilizzatore (conduttore dell’impianto) sulla necessità di provvedere regolarmente ad una manutenzione periodica
del sistema almeno secondo quanto previsto dalle norme in vigore oltre che ad effettuare, con frequenza adeguata alla condizione di rischio,
verifiche sulla corretta funzionalità del sistema stesso segnatamente alla centrale, sensori, avvisatori acustici, combinatore/i telefonico/i ed ogni
altro dispositivo collegato. Al termine del periodico controllo l’utilizzatore deve informare tempestivamente l’installatore sulla funzionalità
riscontrata.
La progettazione, l’installazione e la manutenzione di sistemi incorporanti questo prodotto sono riservate a personale in possesso dei requisiti e delle
conoscenze necessarie ad operare in condizioni sicure ai fini della prevenzione infortunistica. E’ indispensabile che la loro installazione sia effettuata in
ottemperanza alle norme vigenti. Le parti interne di alcune apparecchiature sono collegate alla rete elettrica e quindi sussiste il rischio di folgorazione nel caso
in cui si effettuino operazioni di manutenzione al loro interno prima di aver disconnesso l’alimentazione primaria e di emergenza. Alcuni prodotti incorporano
batterie ricaricabili o meno per l’alimentazione di emergenza. Errori nel loro collegamento possono causare danni al prodotto, danni a cose e pericolo per
l’incolumità dell’operatore (scoppio ed incendio).
FOR THE INSTALLER:
Please follow carefully the specifications relative to electric and security systems realization further to the manufacturer’s prescriptions indicated in the manual
provided.
Provide the user the necessary indication for use and system’s limitations, specifying that there exist precise specifications and different safety performances
levels that should be proportioned to the user needs. Have the user view the directions indicated in this document.
FOR THE USER:
Periodically check carefully the system functionality making sure all enabling and disabling operations were made correctly.
Have skilled personnel make the periodic system’s maintenance. Contact the installer to verify correct system operation in case its conditions have changed
(e.g.: variations in the areas to protect due to extension, change of the access modes, etc…)
This device has been projected, assembled and tested with the maximum care, adopting control procedures in accordance with the laws in force. The full correspondence to the functional characteristics is given exclusively when it is used for the purpose it was projected for, which is as follows:
High Resolution Day&Night Camera
Any use other than the one mentioned above has not been forecasted and therefore it is not possible to guarantee its correct operativeness.
The manufacturing process is carefully controlled in order to prevent defaults and bad functioning. Nevertheless, an extremely low percentage of the components used is subjected to faults just as any other electronic or mechanic product. As this item is meant to protect both property and people, we invite the user
to proportion the level of protection that the system offers to the actual risk (also taking into account the possibility that the system was operated in a degraded
manner because of faults and the like), as well reminding that there are precise laws for the design and assemblage of the systems destinated to these kind of
applications.
The system’s operator is hereby advised to see regularly to the periodic maintenance of the system, at least in accordance with the provisions of
current legislation, as well as to carry out checks on the correct running of said system on as regular a basis as the risk involved requires, with
particular reference to the control unit, sensors, sounders, dialler(s) and any other device connected. The user must let the installer know how well
the system seems to be operating, based on the results of periodic checks, without delay.
Design, installation and servicing of systems which include this product, should be made by skilled staff with the necessary knowledge to operate in safe conditions in order to prevent accidents. These systems’ installation must be made in accordance with the laws in force. Some equipment’s inner parts are connected to electric main and therefore electrocution may occur if servicing was made before switching off the main and emergency power. Some products
incorporate rechargeable or non rechargeable batteries as emergency power supply. Their wrong connection may damage the product, properties and the operator’s safety (burst and fire).
Timbro della ditta installatrice - Your dealer/installer:
2
MANUALE TECNICO - GPC E7344 DN - TECHNICAL MANUAL
1. GENERALITA’
1. GENERALS
La Telecamera Day&Night ad alta velocità GPC E7344 DN
utilizza un sensore 1/3" CCD ExView HAD SONY altamente performante.
È dotata di 42 LED e di un obiettivo varifocal con iride automatica e funzione Day&Night per immagini nitide ed illuminate indipendentemente dalle condizioni ambientali.
Gli elementi principali di questa telecamera sono:
- Evoluto circuito DSP.
- Sensore 1/3" CCD ExView HAD SONY
- Risoluzione orizzontale pari a 480 linee TV
- Obiettivo varifocal con iride automatica e funzione
Day&Night
- Programmazione del funzionamento tramite dipswitch:
AGC/EE, AI/BLC/FLK/GAMMA/Int-LL.
- Regolazione della messa a fuoco
- Regolazione luminosità, fase verticale, sensibilità CDS e
tempo di commutazione ICR
- 54 LED IR incorporati con dispositivo CDS.
- Alimentazione 12Vcc/24Vca (senza polarità).
- Tettuccio protettivo ventilato e staffa di montaggio a sbalzo
- Grado di protezione IP68.
GPC E7344 DN Day&Night High Resolution camera employs a
high-performance Sony 1/3" ExView HAD CCD sensor.
The camera features 42 LEDs and Day&Night, varifocal, autoiris lens for clearer images regardless of lightning conditions.
Il design della telecamera mod. GPC E7344 DN consente
un’agile operatività ed una facile installazione grazie alla particolare staffa di montaggio snodata con passaggio cavi incorporato.
Il design della telecamera è di tipo bullet ed è caratterizzato
da una robusta custodia in alluminio verniciato, resistente alle intemperie e agli urti. Inoltre, le viti di sicurezza, unitamente al meccanismo interno di passaggio dei cavi assicurano tenuta
antivandalo e antimanomissione.
L’alta risoluzione della qualità delle immagini rende questa telecamera particolarmente adatta a impieghi in installazioni di sorveglianza, sia da interno che da esterno.
The unique design of GNV-E7344WS camera provides comfortable operation and easy installation through the standard rack
mounting bracket and cable.
The bullet-style, rack-mount design incorporates a weatherproof, heavy duty, high-impact aluminium housing. Security locking screws and concealed wiring ensure they are tamper-, and
vandal-resistant.
High-resolution image quality makes this camera particularly
suitable security systems with indoor/outdoor video surveillance
installations.
The main features of this camera are as follows:
- DSP Circuit
- Sony 1/3" ExView HAD CCD sensor
- 480 TV Line horizontal resolution
- Built-in, Day&Night, varifocal, autoiris lens
- AGC/EE, AI/BLC/FLK/GAMMA/Int-LL selectable via dipswitch.
- DC Level, V-Phase, CDS sensitivity and ICR dwell time
adjustment.
- Focus compensation
- Built-in 42 IR LEDs with CDS device
- 12VDC/24VAC dual power (non polarity)
- Sunshield cover and rack mounting bracket
- IP68 Rating
2. CARATTERISTICHE
2. SPECIFICATIONS
• Caratteristiche tecniche:
Modello:
Sensore:
Elementi sensibili:
Bilanciamento del
bianco:
Sist. di scansione:
Sistema di
sincronizzazione:
Frequenza di
scansione:
Risoluzione
orizzontale:
Rapporto S/N:
Correzione Gamma:
Uscita video:
Minima illumin.:
Caratteristiche
integrate:
Otturatore
elettronico:
• Technical features:
Telecamera Day&Night ad Alta
Velocità
mod. GPC E7344 DN
CCD 1/3" ExView HAD SONY
CDS per 24h clear image
470K
GPC E7344 DN
High Resolution Day&Night
Camera
SONY CCD 1/3" ExView HAD
Image sensor:
CDS circuit for 24h clear
image
Picture elements:
470K
White balance:
Automatic (AWB)
Scanning system:
Interlaced 2:1, 625 TV line
Internal (12VDC) / LL
Sync.System:
External
Scanning frequency:
H 15.625 Hz, V 50Hz.
H. Resolution:
480 TV line
S/N ratio:
48dB
Gamma control:
0.45 /1 selectable
Video output:
1.0Vpp composite, VBS
Minimum illumination:
0lux
AGC/EE, AI / BLC / FLK /
GAMMA / Int.LL / DC Level
Adjustment /
Built-in features:
V-Phase Up/Down / ICR
Dwell Time Adjustment / CDS
Sensitivity Adjustment
Electronic Shutter:
1/50 - 1/10.000s max.
standard 9-22mm varifocal,
Lens type:
autoiris, day&night lens
Model:
Automatico (AWB).
2:1 interlacciati, 625 linee TV.
Interna (12Vcc) / LL Line Lock
(24Vca).
H 15.625 Hz, V 50Hz.
480 linee TV
48dB
0.45 /1 selezionabile
1.0Vpp composito, VBS
0lux
AGC/EE, AI / BLC / FLK /
GAMMA / Int.LL
Regolazione luminosità, fase
verticale, sensibilità CDS e
tempo di commutazione ICR
1/50 - 1/10.000s max
3
MANUALE TECNICO - GPC E7344 DN - TECHNICAL MANUAL
9-22mm varifocal, day&night,
autoiris
Illuminatore:
42 IR LEDs, 850nm
Sensibilità IR:
800 - 1000 nm (IR ON)
Tempo di ritardo impostabile per
Tempo di
la commutazione da B/N a
commutazione ICR:
colore e viceversa
12Vcc
(11-16Vcc) / 24Vca (17Alimentazione:
32Vca)
Assorbimento:
IR LED OFF
IR LED ON
12VDC
300mA
800m
24VAC
140mA
8W
Temp. di
Da -25°C a +50°C / -30°C a
funzionamento/
+60°C, <85% U.R.
conservazione:
12VDC (11-16VDC) / 24VAC
(17-32VAC)
IR illuminator:
42 IR LEDs, 850nm
IR Sensitivity:
800 - 1000 nm (IR ON)
Standard VR to adjust Dwell
Dwell time for ICR:
time colour / B/W and B/W /
colour
Power consumption:
IR LED OFF
IR LED ON
12VDC
300mA
800m
24VAC
140mA
8W
Operating/storage
From -25°C to +50°C, -30°C a
temperature:
+60°C, rh <85%
Ivory
polished
aluminium with
Housing:
sunshield
Bracket:
Rack-mounting type
Cable:
BNC / Shield
Dimensions:
L 210 x H 74
Weight:
660g
Technical manual, mounting
bracket with cable, socket
Parts supplied:
head screws + wrench, plastic
DC level adjustment driver.
Obiettivo:
Custodia:
Staffa:
Connessione:
Dimensioni:
Peso:
Dotazione:
Input Voltage:
Alluminio verniciato color avorio
con tettuccio protettivo.
Per montaggio a sbalzo.
Cavo schermato preintestato
con BNC e piattina rosso/nera di
alimentazione.
L 210 x H 74 mm
660 g
Manuale tecnico, staffa di
montaggio con cavo, viti +
chiave a brugola, cacciavite in
plastica per regolazione
luminosità.
3. PRECAUZIONI
3. WARNINGS
- Non tentate di smontare la telecamera. Per prevenire
scosse elettriche evitate di rimuovere viti o coperchi. Non
ci sono parti che possano servire all'utente all'interno
dell'apparecchio.
- Per l'esecuzione di lavori di manutenzione rivolgetevi a personale specializzato o all'assistenza tecnica.
- Maneggiate la telecamera con attenzione e non abusatene.
Evitate urti o scosse.
- La telecamera si potrebbe danneggiare se maneggiata o
conservata impropriamente.
- Non rivolgete mai la telecamera verso il sole, sia accesa
che spenta.
- Fate attenzione quando operate con la telecamera vicino a
riflettori o altre luci ad intensa luminosità ed oggetti che
riflettano la luce.
- Non accendete la telecamera in caso siano superati i valori
massimi di temperatura, umidità o di alimentazione previsti
per il suo impiego. Non utilizzate la telecamera in condizioni
ambientali estreme dove vi siano alte temperature o umidità.
- Utilizzate la telecamera in condizioni in cui la temperatura
sia compresa fra -10°C e +50°C e l'umidità relativa sia inferiore al 90%.
- L’installazione della telecamera potrebbe generare disturbi
radioelettrici in alcune installazioni residenziali (prodotto di
classe B) da risolvere a cura dell’installatore caso per caso,
ad esempio il riposizionamento del prodotto.
- Per l’assistenza, rivolgetevi a personale qualificato.
- Do not remove any part from cameras. To prevent the risk
of injury or death by electric shock do not remove screws or
covers. There are no usable parts inside cameras.
- Installation and maintenance work have to be carried out by
suitable qualified and experienced personnel ONLY.
- Handle cameras with care. Avoid collisions and shakes.
- These cameras are intended for indoor use. For outdoor
use, an appropriate protective housing must be used.
- Cameras could be damaged by inappropriate handling or
storing.
- Do not expose cameras to direct sunlight, neither powered
ON, nor switched OFF.
- Pay attention when operating cameras near reflectors or
high-luminance lights and light-reflecting objects.
- Do not operate cameras when temperature, humidity, or
power supply values are not within ranges specified for
their appropriate and safe usage. Do not operate cameras
in hostile environment where temperature and humidity values are considerably high.
- Only operate your cameras within -10ºC +50ºC temperature range, and relative humidity is 90% max.
- Camera installation could cause radioelectric interference
within some domestic systems (class B product). This problems have to be fixed by installers according to the problems specific causes (e.g. moving installation place, and so
on).
Assistance shall be carried out by qualified personnel ONLY.
4
MANUALE TECNICO - GPC E7344 DN - TECHNICAL MANUAL
4. VISTA DELLA TELECAMERA
4. CAMERA OVERVIEW
5. INSTALLAZIONE
5. INSTALLATION
Leggere attentamente le seguenti istruzioni prima di procedere all’installazione della telecamera dome.
Please read the instructions provided in this chapter thoroughly before installing the vandal proof dome camera.
La telecamera GPC E7344 DN è stata progettata per installazioni a muro, a soffitto e a palo facilitate dalla particolare conformazione della staffa snodata per montaggio a sbalzo con
passaggio interno del cavo di alimentazione e video.
GPC E7344 DN Camera has been designed for wall-, ceilingor pole-mount installations using the standard cable fitting
through back bracket.
• Connessione alimentazione e video
• Video and power connection
• Operazioni di montaggio
• Mounting plate installation
- Verificare che parete o muro siano adatti a sorreggere il
peso della telecamera.
- Praticare i quattro fori per le viti di fissaggio della base secondo le indicazioni riportate nell’immagine del capitolo precedente.
- Praticare un foro di diametro adeguato al passaggio dei
cavi, approssimativamente del diametro interno della base
della telecamera e posizionato al centro del punto di fissaggio la telecamera (parete, soffitto). Collocare i cavi di ali-
- Make sure wall or ceiling support are made of materials
suitable to hold camera weight.
- Drill 4 holes suitable for camera base’s fixing screws
according to the image shown in previous chapter.
- Drill a hole suitable for cable passage, approx the size of
camera base’s internal diameter, at the centre of camera’s
fixing place (wall, ceiling). Run power and video connections through the wall to their destinations. To ensure water-
5
MANUALE TECNICO - GPC E7344 DN - TECHNICAL MANUAL
mentazione e video per tutta la lunghezza necessaria fino
alla destinazione. Per assicurare la tenuta stagna, girare la
placca di montaggio del cavo verso il basso.
- Fissare la base della telecamera.
proof protection, turn mounting plate cable notch face
down.
- Screw base’s screws tight.
• Orientamento iniziale della telecamera
• Camera mount
- Svitare le viti di sicurezza lungo le due ghiere.
- Svitare le ghiere e portare la telecamera in posizione, finché non inquadra il campo di visuale desiderato. Riavvitare
le ghiere per fissare la posizione della staffa della telecamera.
- Fissare bene la telecamera avvitando le viti lungo le ghiere
tramite la chiave a brugola fornita.
- Far scivolare il tettuccio protettivo verso la staffa e avvitare
le viti.
- Unscrew security screws on the lower / upper locking rings.
- Loose the locking rings and move the camera into position.
Swivel camera to capture the desired field of view. Tighten
the locking rings to set the position.
- Lock the camera into position using the supplied L-wrench
to tighten screws on the locking rings.
- Slide the sunshield cover towards the mounting bracket
and then lock the screws.
• Operazioni di apertura del corpo della telecamera
• Procedure for disassembling GPC E7344 DN
Per effettuare la messa a punto della telecamera si deve
smontare il corpo cilindrico della stessa per agire sui punti di regolazione, le operazioni sono le seguenti
Svitare la vite superiore di fissaggio del tettuccio protettivo e
rimuovere il tettuccio e riporlo.
To setup camera, disassemble camera cylindrical body to
reach relevant adjusting points.
Unscrew sunshield fixing screw and remove sunshield.
Svitare le due parti della telecamera modo deciso, finché non
sono completamente separate.
Separate the two parts of tha camera: rotate them gently but
firmly until they separate completely.
Attenzione
Riporre il corpo cilindrico della telecamera in un posto
sicuro evitando di rompere, sporcare o strisciare
esternamente oppure internamente il vetro frontale.
Warning
Keep the camera front part in a dry, clean, and safe
place while is separated from the camera body; avoid
breaking or scratching front glass.
6
MANUALE TECNICO - GPC E7344 DN - TECHNICAL MANUAL
• Punti di regolazione della telecamera:
• Camera adjustments:
D
B
A
C
E
A. Selettore di funzionamento.
B. Trimmer di regolazione del CDS (utilizzare il cacciavite isolato fornito in dotazione).
C. Pulsanti di regolazione del Line Lock
D. Regolazione DC level (utilizzare il cacciavite isolato fornito
in dotazione).
E. Connettore di test video.
A. Operating switch.
B. CDS trimmer (use supplied insulated screw).
C. Line Lock buttons.
D. DC level trimmer (use supplied insulated screw).
E. Video test connector.
ATTENZIONE:
Conservare la telecamera in luogo pulito e asciutto
mentre è priva del corpo cilindrico della stessa. Per i
dettagli sulle regolazioni da eseguire consultare il
capitolo Settaggi della telecamera Per applicazioni in
esterni è consigliato l’impiego di una bustina di sali
essiccanti da posizionare subito dietro il circuito con i
Led, avendo cura di non spostare le regolazioni
dell’obiettivo. Tale bustina deve essere sostituita
quando si notano degli appannamenti all’interno del
vetro di protezione dell’obiettivo.
WARNING:
Keep the camera front part in a dry, clean place while is
separated from the camera body.
For camera setup, see below ’Camera setup’.
For outdoor application, El.Mo. recommends using a
Silica gel packet to be placed behind camera LED
circuit. Make sure not to touch lens commands.
Replace Silica gel packet if the lens protection glass
gets misty.
• Camera closing and fixing procedures
• Chiusura della telecamera e fissaggio
To close the camera, screw front part back on main body.
Per richiudere la telecamera, riavvitare la parte frontale sul
corpo principale.
IMPORTANTE: Posizionare l’obiettivo all’interno delle ghiere
(esterne) indicate nella foto sottostante.
IMPORTANT: place camera lens inside front part external rings
indicated in the image below (left).
Non danneggiare i gommini di protezione (interni) indicati nell’immagine sottostante durante la fase di installazione
Make sure not to damage internal protection rubber rings
(indicated in the image below) during installation procedure.
7
MANUALE TECNICO - GPC E7344 DN - TECHNICAL MANUAL
6. SETTAGGI
6. CAMERA SETUP
Vista del selettore interno
Internal dipswitch view
AGC / OFF The Automatic Gain Control function
automatically adjusts pictures in accordance
with subject brightness. Deafult ON.
AI / EE
Auto Iris or Electronic shutter control function.
Default AI.
BLC ON / When enabled (ON) this function adjusts
OFF
exposure to compensate for situations where
the subject is lit from behind. Default OFF.
FLK ON / The Flicker function adjusts image possible
OFF
flickering.
Set this function to ON when vertical scanning
frequency is at 50Hz.
Set this function to OFF when vertical
scanning frequency is at 60Hz.
GAMMA
This function adjusts Gamma settings. Default
ON / OFF OFF.
ON = 1; OFF = 0.45.
LL / INT
This function adjusts synchronization mode.
Default LL.
Line Lock option is available for 24Vac
cameras ONLY.
AGC / OFF Funzione per il controllo automatico del
guadagno con regolazione automatica delle
immagini in base alla luminosità del soggetto.
Valore di default ON.
AI / EE
Selezione per funzionamento con iride
automatica (AI) oppure con otturatore
elettronico (E.E). Valore di default AI.
BLC
Funzione per la compensazione del
ON / OFF controluce (se ON). Valore di default OFF.
FLK
Selettore per la regolazione dello sfarfallio
ON / OFF dell’immagine (Flickering).
Impostare il selettore su ON in caso di
frequenza verticale a 50Hz.
Impostare il selettore su OFF in caso di
frequenza verticale a 60Hz.
GAMMA
Funzione per l’impostazione del valore di
ON / OFF gamma. ON = 1; OFF = 0.45.
Valore di default OFF.
LL / INT
Funzione per la regolazione della modalità di
sincronizzazione.
L’opzione Line Lock è disponibile solo per
alimentazione della telecamera a 24Vca.
Valore di default LL.
• CDS Dwell Time Adjustment
• Regolazione del dwell time del circuito CDS
’Dwell time adjustment’ option enables users to set dwell time
from colour to B/W mode and from B/W to colour mode thanks to
CDS circuit. Values available are 1, 10, 15, and 20 seconds.
Funzione per l’impostazione del dwell time (tempo di commutazione da B/N a colore e viceversa) grazie al circuito CDS. Il circuito consente l’impostazione del ritardo di attivazione del filtro IR
CUT e dei LED IR. Valori impostabili: 1, 5, 10 e 15 secondi.
8
MANUALE TECNICO - GPC E7344 DN - TECHNICAL MANUAL
• Regolazione della sensibilità del circuito CDS
• CDS Sensitivity Adjustment
Trimmer a lato del selettore delle funzioni per la regolazione
della sensibilità del CDS.
Per le regolazioni, utilizzare l’apposito cacciavite isolato fornito in dotazione con la telecamera. Per aumentarne il valore, girare il trimmer in senso orario, per diminuirne il valore, girare il
trimmer in senso antiorario
CDS Sensitivity adjustment option enables users to set sensitivity range.
To raise CDS sensitivity, turn the button clockwise (see picture
beside). To diminish CDS sensitivity, turn the button anticlockwise (see picture below). Please use the supplied insulated driver.
• Regolazione fase Line Lock
• Line Lock Adjustment
Per prevenire lo scorrimento verticale delle immagini, specialmente in caso di installazioni di telecamere multiple, regolare la
modalità di sincronizzazione Line Lock premendo opportunamente i pulsanti della speci-fica telecamera finché lo scorrimento
dell’immagine si stabilizza.
To prevent images from rolling, especially in case of multi-camera installations, it may be necessary adjust camera Line Lock
mode by pushing down left or right switch on one camera until the
vertical rolling stops.
• Regolazione luminosità
• DC Level Adjustment
Funzione di regolazione della luminosità dell’immagine.
Per diminuire la luminosità di un immagine, girare il trimmer
in senso antiorario, per aumentare la luminosità, girare il trimmer
in senso orario.
Per le regolazioni, utilizzare l’apposito cacciavite isolato fornito in dotazione con la telecamera.
DC Level adjustment option enables users to set pictures
brightness.
To raise picture darkness, turn the button clockwise, to raise
picture brightness, turn the button anticlockwise.
Use the supplied insulated driver only.
• Connettore di uscita video per test
• Test monitor output terminal
Per utilizzare più comodamente un monitor durante le regolazioni sul campo per la messa a punto della telecamera, è possibile collegarlo al cavo di test il cui connettore deve essere
inserito nel punto indicato dalla freccia. Utilizzare solo il cavo per
test fornito.
To make a monitor usage more confortable during camera onsite adjustment, connect it to the cable test.Insert test cable connector where indicated by the arrow. Use the supplied test cable
only.
9
MANUALE TECNICO - GPC E7344 DN - TECHNICAL MANUAL
• Regolazione fuoco
• Focus adjustment
La regolazione del fuoco deve essere eseguita con telecamera aperta, se necessario separare il corpo cilindrico dalla base
seguendo le indicazioni contenute nel capitolo di installazione.
Per regolare la lunghezza focale, allentare il pomello superiore e quindi muoverlo per ottenere la lunghezza focale desiderata
(Near / Far).
Per regolare il fuoco, allentare il pomello inferiore quindi
muoverlo per regolare la messa a fuoco dell’immagine (Wide /
Tele)
For camera focus adjustment, remove front cover from camera
body. If necessary, separate camera body from its base following
instructions at installation section.
To adjust focal length, loose the top locking screw on the side
of the lens then slide the screw to set focal length (marked as
Near / Far).
To adjust focus, loose the locking bottom screw on the side of
the lens then slide the screw to set focus (marked as Wide / Tele).
Una volta completate le regolazioni, riavvitare entrambi i pomelli di regolazione per il bloccaggio definitivo e reinserire la telecamera nel corpo cilindrico seguendo le indicazioni contenute
nel capitolo di installazione.
Once adjustment is finished, tighten both locking screws and
place camera body back inside front part. For further details,
please see installation section.
NOTA: Non toccare la sezione dell’obiettivo sopra i led IR
durante le operazioni di regolazione.
NOTE: Do not touch lens area above IR LEDs while adjusting camera angle.
IMPORTANTE:
Se la telecamera non produce alcuna immagine, controllare:
- la corretta alimentazione della telecamera.
- la corretta realizzazione del cavo video.
- che il bocchettone BNC del cavo video sia correttamente innestato nel BNC della telecamera.
- che la regolazione del "Level" della telecamera non sia troppo bassa per la ripresa da effettuare.
IMPORTANT:
If the camera does not transmit images, please check:
- correct power supply;
- video cable;
- the connection of cable BNC connector to camera BNC connector;
- camera DC level is set properly, e.g. not too low for the
shooting to be made.
10
MANUALE TECNICO - GPC E7344 DN - TECHNICAL MANUAL
7. AVVERTENZE PER LO SMALTIMENTO
7. DISPOSAL INSTRUCTIONS
La Telecamera Day&Night ad Alta Velocità mod. GPC
E7344 DN deve essere smaltita in accordo con le vigenti disposizioni comunali e conferita in una discarica autorizzata per lo
smaltimento di prodotti elettronici; in caso di necessità è necessario chiedere informazioni al proprio ufficio comunale per la N.U.
Il materiale utilizzato è altamente nocivo ed inquinante se disperso nell’ambiente.
Dispose of High Resolution Day&Night Camera GPC
E7344 DN in compliance with current city regulations and by
leaving the device in a dumping ground that is authorized for the
disposal of electronic products. If required, please contact the appropriate city office for additional information.
The materials used for this product are very harmful and polluting if dispersed in the environment.
11
8. INDICE
1. GENERALITA’ . . . . . . . . . . . . . . . . . . . . . . . . . . . . .3
2. CARATTERISTICHE . . . . . . . . . . . . . . . . . . . . . . . .3
3. PRECAUZIONI . . . . . . . . . . . . . . . . . . . . . . . . . . . .4
4. VISTA DELLA TELECAMERA . . . . . . . . . . . . . . . .5
5. INSTALLAZIONE . . . . . . . . . . . . . . . . . . . . . . . . . .5
6. SETTAGGI . . . . . . . . . . . . . . . . . . . . . . . . . . . . . . . .8
7. AVVERTENZE PER LO SMALTIMENTO . . . . . . . 11
8. INDICE . . . . . . . . . . . . . . . . . . . . . . . . . . . . . . . . . . 12
8. CONTENTS
1. GENERALS . . . . . . . . . . . . . . . . . . . . . . . . . . . . . . . .3
2. SPECIFICATIONS . . . . . . . . . . . . . . . . . . . . . . . . . .3
3. WARNINGS . . . . . . . . . . . . . . . . . . . . . . . . . . . . . . . .4
4. CAMERA OVERVIEW . . . . . . . . . . . . . . . . . . . . . . .5
5. INSTALLATION . . . . . . . . . . . . . . . . . . . . . . . . . . . .5
6. CAMERA SETUP . . . . . . . . . . . . . . . . . . . . . . . . . . .8
7. DISPOSAL INSTRUCTIONS . . . . . . . . . . . . . . . . . 11
8. CONTENTS . . . . . . . . . . . . . . . . . . . . . . . . . . . . . . . 12
Telecamera Day&Night ad Alta Velocità - MANUALE TECNICO - GPC E7344 DN
High Resolution Day&Night Camera - TECHNICAL MANUAL - GPC E7344 DN
Edizione Dicembre 2010 - Dicember 2010 Edition
Le informazioni e le caratteristiche di prodotto non sono impegnative e potranno essere modificate senza preavviso.
Product specifications as described above do not bind the manufacturer and may be altered without prior notice.
090000540