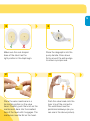
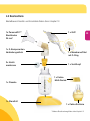
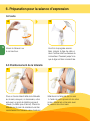
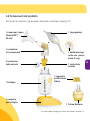
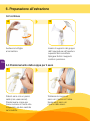
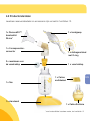
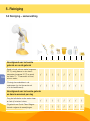
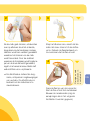
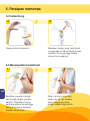
1
Harmony ® EN Instructions for use | DE Gebrauchsanweisung FR Mode d’emploi | IT Istruzioni per l’uso NL Gebruiksaanwijzing | ID Petunjuk penggunaan Thank you for choosing the Harmony breastpump. Breastmilk is the natural choice for your baby, but there are reasons and situations where breastfeeding is not possible. For over 50 years, it has been Medela’s conviction that these mothers and babies can be supported. In close cooperation with breastfeeding experts, Medela, one of the market leaders, has researched and developed breastpumps that perfectly meet the needs of breastfeeding mothers. For mothers who insist on the best for their babies and themselves. Because you care. Herzlichen Dank, dass Sie sich für die Milchpumpe Harmony entschieden haben. Muttermilch ist an sich das Beste für Ihr Baby, doch es gibt Gründe und Situationen, die das Stillen nicht ermöglichen. Als einer der Marktführer setzt sich Medela seit über 50 Jahren mit Überzeugung für das Wohl von Babys und Müttern ein. In Zusammenarbeit mit Stillexperten und führenden Forschern hat Medela Milchpumpen entwickelt, die optimal auf die Bedürfnisse stillender Frauen abgestimmt sind. Für Mütter, die nur das Beste für sich und ihr Baby wollen. „Because you care.” Medela vous remercie d‘avoir acheté un tire-lait Harmony. Le lait maternel est ce qu‘il y a de plus naturel pour votre enfant, mais dans certaines situations l‘allaitement au sein n‘est pas toujours possible. Depuis plus de 50 ans, Medela s‘est donné comme mission de supporter ces mamans et bébés en difficultés. C‘est en travaillant en étroite collaboration avec des experts en matière d‘allaitement maternel, que Medela , un des leaders du marché, a pu développer d‘après des preuves scientifiques, des tire-laits répondant parfaitement aux besoins des mamans allaitantes. Pour les mamans qui ne veulent que le meilleur pour elles et leurs bébés. « Parce que votre bien-être est important pour nous. » Grazie per aver scelto il tiralatte Harmony. Il latte materno è la scelta naturale per il tuo bambino, ma in alcuni casi non è possibile allattare al seno. Da oltre 50 anni Medela è impegnata ad aiutare madri e bambini che si trovano in questa situazione. In stretta cooperazione con gli esperti di allattamento al seno, Medela, uno dei leader del mercato, ha condotto ricerche volte a sviluppare tiralatte che soddisfino pienamente le esigenze delle mamme che allattano. Per madri che vogliono il meglio per i loro bambini e per loro stesse. „Because you care“. Hartelijk dank dat u voor de Harmony borstkolf hebt gekozen. Moedermelk is een natuurlijke keuze voor uw baby, maar er zijn redenen en omstandigheden waarin het niet mogelijk is om borstvoeding te geven. Medela is er al meer dan 50 jaar van overtuigd dat deze moeders en baby’s met speciale oplossingen ondersteund kunnen worden. In nauwe samenwerking met borstvoedingsdeskundigen heeft Medela, als een van de marktleiders, na uitvoerig onderzoek borstkolven ontwikkeld, die perfect aansluiten op de behoeften van moeders die borstvoeding geven. Voor moeders die het beste willen voor hun baby en voor zichzelf. Uit liefde. Terima kasih telah memilih pompa ASI Harmony. ASI adalah pilihan alami bagi bayi Anda, tetapi situasi dan kondisi kadang membuat menyusui tidak mungkin. Selama lebih dari 50 tahun, Medela yakin ada yang dapat dilakukan untuk membantu ibu-ibu dan bayi-bayi ini. Medela, salah satu pemimpin pasar, bekerja sama dengan pakar perASI-an, berhasil meneliti dan mengembangkan pompa ASI yang benar-benar memenuhi kebutuhan ibu menyusui. Untuk para ibu yang menginginkan yang terbaik bagi bayi mereka juga mereka sendiri. Karena Anda peduli. EN 4–31 DE 32–59 FR 60–87 IT 88–115 NL 116–143 ID 144–170 Table of Contents 4 1. 2. 3. 4. Intended Use / Population – Contraindication Meaning of symbols Important safety information Product description 5 6 8 10 4.1 Harmony - light, convenient, clever 10 4.2 Product parts 5. Cleaning 11 12 5.1 Before using for the first time and after every use 12 5.2 Before using for the first time and once a day 14 5.3 Cleaning - summary 16 6. Preparing for pumping 18 6.1 Assembling the handle 18 6.2 Assembling the pump set 18 6.3 Placing the breastshield 7. Expression 8. Storing and thawing breastmilk 8.1 Storage 24 8.2 Freezing 24 8.3 Thawing 9. 10. 11. 12. 13. 20 22 24 Feeding breastmilk Troubleshooting Disposal Complete care during breastfeeding time Technical specifications 24 25 26 27 28 171 1. Intended use / Population – Contraindication 5 The intended use and indications of breastpumps Breastpumps are intended to be used by lactating women in the hospital or home environment for expressing breastmilk. Breastpumps are indicated to alleviate the symptoms of engorgement by expressing milk. In case of mastitis, breastpumps support the healing process by removing breastmilk from the affected breast. Breastpumps are indicated to relieve sore and cracked nipples and to bring out flat or inverted nipples. Also breastpumps enable mothers to provide breastmilk for babies who cannot feed directly at the breast for a variety of reasons such as latch-on problems, cleft palate or premature babies. Intended patient population / user Adolescent paediatric or adult lactating women. Many women find it convenient, or even necessary, to use a breastpump to express and store their breastmilk once they have returned to work, are travelling or are otherwise separated from their baby. Women are often delighted to learn that a breastpump can be used as a supplement to breastfeeding and that some pumps are designed to mimic the sucking of a nursing baby. Contraindications There are no known contraindications for the Harmony breastpump. 2. Meaning of symbols The warning symbol identifies all instructions that are important for safety. Failure to follow these instructions can lead to injury or damage to the Harmony breastpump! There are several warning symbols. Each symbol is used together with a specific word. The warning symbol/word combinations stand for: Caution Failure to follow instructions of this type can lead to (minor) injury or contamination/growth of bacteria. i 6 Note i Info Failure to follow instructions of this type can lead to material damage. Useful or important information that is not related to safety. Symbols on the packaging This symbol indicates that the material is part of a recovery/recycling process. This symbol indicates a carton package. This symbol indicates to keep the device away from sunlight. This symbol indicates to handle the fragile device with care. °C This symbol indicates the temperature limitation for operation, transport and storage. This symbol indicates the humidity limitation for operation, transport and storage. This symbol indicates the atmospheric pressure limitation for operation, transport and storage. This symbol indicates to keep the device dry. This symbol indicates that the packaging contains products intended to come in contact with food according to regulation 1935/2004. This symbol indicates the unique GSI Global Trade Item Numbers (GTIN). This symbol indicates to follow the instructions for use. This symbol indicates the manufacturer. This CE symbol indicates the compliance of the Harmony breastpump with the essential requirements of the Council Directive 93/42/EEC of 14 June 1993 concerning medical devices. Symbols on the device 05 PP 7 PP This symbol indicates the recycling code (here 05 for material made of polypropylene PP). This symbol indicates the recycling code (here 7 for all material that is not specified by the other recycling codes). This code indicates the use of polypropylene. This CE symbol indicates the compliance of the Harmony breastpump with the essential requirements of the Council Directive 93/42/EEC of 14 June 1993 concerning medical devices. 7 3. Important safety information 8 For your child’s safety and health WARNING! Failure to follow the safety information on these pages can lead to danger. Device The Harmony breastpump is not heat-resistant: keep away from radiators and open flames. Do not expose the Harmony breastpump to direct sunlight. Check the breastpump’s components for wear or damage. Never use a defective device. Throw a part away at first signs of damage or weakness. Important: I Plastic bottles and component parts become brittle when frozen and may break when dropped. I A lso, bottles and component parts may become damaged if mishandled, e.g. dropped, over-tightened or knocked over. I Take appropriate care in handling bottles and components. l Do not use the breastmilk if bottles or components become damaged. Use 9 Use the Harmony breastpump only for its intended use as described in this manual. Supervision is necessary when you use the Harmony breastpump in the vicinity of children. Keep all parts that are not in use out of children’s reach. Contact your lactation consultant or physician if you experience problems or pain. This is a single user product. Use by more than one person may present a health risk. 4. Product description 10 4.1 Harmony – light, convenient, clever By buying the Harmony breastpump, you have chosen well: Harmony is the first manual breastpump based on 2-Phase Expression Technology. This technology mimics your baby’s natural sucking rhythm. The pump’s ergonomic handle allows you to alternate between short movements to stimulate and longer ones, to express the milk. Just like your baby sucks when it is being fed on your breast. As a result, you can express more milk in less time. The Harmony breastpump is ideal for occasional usage. For example, if you need to leave your baby alone for short periods, e.g. to do sports or have an evening out. Or if you want to involve your partner in breastfeeding. You can also use Harmony in addition to a rental pump. Harmony can also help to overcome health problems, such as sore, flat or inverted nipples. The main features of your Harmony breastpump are: I Silent and discreet pumping; I Easy to use, clean and assemble; I Light to transport, suitable for use at home or on the go. 4.2 Product parts 11 You can find spare parts and accessories available for order in chapter 12. 1 x PersonalFit™ Breastshield 24 mm* 1 x handle 1 x 2-component connector 1 x diaphragm/stem with O-ring 2 x valve membrane 1 x bottle 1 x valve head 1 x Calma multi-lid 1 x bottle stand 1 x Calma Solitaire * for other breastshield sizes, see chapter 12 5. Cleaning Caution 12 lT ake apart and wash all parts that come in contact with the breast and breastmilk immediately after use, to avoid the drying up of milk residues and to prevent growth of bacteria. l O nly use drinking-quality water for cleaning. To avoid contamination, do not touch the inside of the parts after cleaning. I Do not clean the pump set with a sharp object (such as a toothpick). l Take care not to damage parts of the pump set during cleaning. I Some parts of the Harmony pump set are very small (e.g. the O-ring or the valve membrane). Check that no parts are missing when you reassemble the pump set after cleaning. 5.1 B efore using for the first time and after every use 1 Disassemble the pump set into its individual parts. 4 Note i lT he pump set requires no maintenance. l If you clean the individual parts of the pump set in a dishwasher, parts may change in colour. This has no impact on the function. I D o not leave (parts of) the pump set in direct sunlight or heat. I Do not use chemical sterilisers. Rinse all parts with cold, clear water (approx. 20 ° C) for 10 – 15 seconds. 13 2 3 Clean all parts with plenty of warm soapy water (approx. 30 ° C). Rinse all parts with cold, clear water (approx. 20 ° C). Check the parts for damage and throw away at first signs of damage or weakness. or 6 As an alternative to steps 2, 3 and 4. 5 Dry with a clean cloth or leave to dry on a clean cloth. If you clean the individual parts of the pump set in the dishwasher, place them on the top rack or in the cutlery section. 5. Cleaning Caution 14 I D o not drop the parts of the pump set into boiling water. I To avoid contamination, do not touch the inside of the parts after sterilisation. l Take apart and wash all parts that come in contact with the breast and breastmilk imme diately after use to avoid drying up of milk residues and to prevent growth of bacteria. l O nly use drinking-quality water for cleaning. 5.2 Before using for the first time and once a day 1 Disassemble the pump set into its individual parts. Note i lW hen you boil the parts of the pump set, you could add a teaspoon of citric acid to avoid a build-up of limescale. When you use citric acid, minor traces might remain on the pump parts. Use drinking-quality water to wash them off. Dry the parts as shown in figure 3 to the right. 3 Dry with a clean cloth or leave to dry on a clean cloth. Store the clean parts in an air-permeable, clean bag/container, or in an air-permeable, clean paper/cloth until next use. 15 2a Cover all parts with water and boil for five minutes. or 2b Use a Quick Clean Microwave Bag* in accordance with the instructions. * More information at www.medela.com 5. Cleaning 16 5.3 C leaning – summary Before using for the first time and after every use Rinse with cold, clear water ( approx. 20 ° C ), then clean with plenty of warm soapy water ( approx. 30 ° C ) and finally rinse with cold, clear water for 10 – 15 seconds; √ √ √ √ √ √ √ √ Or wash in the dishwasher ( on the top rack or in the cutlery section ). √ √ √ √ √ √ √ √ Cover with water and boil for five minutes; √ √ √ √ √ √ √ √ Or use a Quick Clean Microwave bag in accordance with the instructions. √ -- √ √ √ √ √ √ Before using for the first time and once a day 17 6. Preparing for pumping 6.1 A ssembling the handle Caution 18 lW ash your hands thoroughly (for approx. one minute) with soap and water before you touch your breast and the pump parts. 1 Note i lO nly use Medela original accessories. I C heck that the (white) O-ring is still placed around the stem: O-ring Stem T he O-ring makes a sealed connection between the handle and the 2-component connector possible. This is necessary to build up a vacuum. i Insert the stem (with the O-ring) into the hole on the upper side of the diaphragm. The stem and diaphragm are parts of the pump’s handle. 6.2 A ssembling the pump set 1 Info l C arry out all steps with care and assemble the pump set correctly for optimum performance. Carefully insert the breastshield into the top opening of the connector. 19 3 2 √ X Make sure the oval shaped base of the stem has the right position in the diap hragm. 2 Place the valve membrane in a horizontal position on the valve head. Carefully push the knob on the membrane‘s back into the smallest hole of the head until it engages. The membrane must lie flat on the head. Place the diagraphm into the pump handle. Press down firmly around the entire edge to ensure a proper seal. 3 Push the valve head onto the inner ring of the connector. The valve head must be positioned sideways (as you can see in the above picture). 6. Preparing for pumping 20 6.2 continued 4 Screw the bottle onto the connector. 5 Insert the stem of the handle assembly into the opening on top of the connector. Push until the stem locks into place. 6.3 Placing the breastshield 1 Wipe your breast with a warm cloth (do not use alcohol). Place the breastshield on your breast so that your nipple is properly centred in the tunnel. 2 Hold the breastshield onto your breast with your thumb and index finger. Support your breast with the palm of your hand. Does your breastshield fit? A √ 21 C B X X It is important that the breastshield fits correctly. A properly fitting breastshield ensures comfort and efficient milk expression. Figure A above shows a breastshield that is the correct size. The breastshield in figure B is too small, the one in figure C too large. Answer the following questions to find out whether your breastshield fits correctly: l Is your nipple moving freely in the tunnel of the shield? l Is no or a minimal part of your areola being pulled into the tunnel of the breastshield? l D o you see a gentle, rhythmic motion in the breast with each cycle of the pump? l After pumping, does your breast feel much less full, with no areas of hardness? l Is your nipple pain-free? If the answer to all of these questions is “Yes”, then your breastshield fits correctly. If the answer to any of these questions is “No”, or if you experience problems or pain during expression, your breastshield may not be the right size. Medela offers five different sizes of the PersonalFit™ breastshield. Consult your breastfeeding and lactation consultant or midwife for advice. 7. Expression Caution 22 1 lW ash your hands thoroughly (for approx. one minute) with soap and water before you touch your breast and the pump parts. l Contact your midwife or breastfeeding and lactation consultant if you can express only minimal or no milk or if expression is painful. Start pumping with stimulation: press down the smaller part of the handle. This is the part with the milk drops on top. Press and release quickly, again and again, until your milk starts to flow. Note i I D o not hold the pump set by the bottle. This can lead to engorgement and blockage of the milk ducts. I O nly fill the bottle to the 150 ml mark. T he Stimulation mode mimics your baby’s initial rapid sucking. It is designed to stimulate the milk flow. Once your milk starts to flow, switch to expression: press down the lower, longer part of the handle. By doing so, you build up a vacuum that facilitates the milk flow. You control the level of the vacuum with the speed of the handle stroke and the compression that is created. Decide yourself which pumping rhythm is the best for you. T he Expression mode mimics your baby’s slower, more relaxed sucking. It is designed to maximise the milk flow. 3 23 Stop pumping when you feel that the milk does not flow anymore or when the bottle is full. Use the stand to prevent the bottle from tipping over. 4 Clean as described in chapter 5 2 Unscrew the bottle from the connector. Close the bottle with the multi lid. Store the breastmilk (follow the instructions in the next chapter, chapter 8). 8. Storing and thawing breastmilk 24 8.1 Storage Storage guidelines for freshly expressed breastmilk ( For healthy term babies ) Room temperature Refrigerator Freezer Thawed breastmilk 4 − 6 hours at 19 to 26 ° C ( 6 6 to 78 ° F ) 3 − 8 days at 4 ° C ( 3 9 ° F ) or lower 6 − 12 months –18 to – 20 °C ( 0 to 4 ° F ) In refrigerator for 10 h max. Do not refreeze! l D o not store breastmilk in the door of the refrigerator. Instead choose the coldest part of the refrigerator (this is at the back of the glass shelf above the vegetable compartment). 8.2 Freezing l You can freeze expressed breastmilk in milk bottles or “Pump & Save”* bags. Do not fill the bottles or bags more than ¾ full to allow space for possible expansion. l Label the bottles or “Pump & Save” bags with the date of expression. 8.3 Thawing Caution Do not thaw frozen breastmilk or do not warm breastmilk in a microwave or a pan of boiling water to avoid loss of vitamins, minerals and other important ingredients and to prevent burns. l In order to preserve the components of the breastmilk, thaw the milk in the refriger ator overnight. Alternatively, you can hold the bottle or “Pump & Save” bag under warm water (max. 37 ° C). l Gently swirl the bottle or “Pump & Save” bag to mix any fat that has separated. Avoid shaking or stirring the milk. * More information at www.medela.com 9. Feeding breastmilk i Info 25 Medela recommends Calma for feeding breastmilk. With Calma l your baby can feed, pause and breathe regularly. l m ilk will flow when a vacuum is created. l your baby’s natural feeding behaviour will be maintained, supporting easy transition back to the breast. Calma – unique feeding solution for breastmilk. N MULATIO TI PU NG Invented by Medela D G LM A SUCKL I More milk in less time SION E FEE IN ILK FLOW E X PR ES 2-PHAS RESEARCH BASED SUPPORT FOR BREASTFEEDING MOTHERS NG M M PI Supporting babies feeding behavior CA As a result of its comprehensive research work, Medela is one of the first companies in the world to incorporate babies’ breastfeeding behaviour into its 2-Phase Expression and Calma innovations. 2-Phase Expression mimics the baby’s natural sucking rhythm to express more milk in less time. Short, stimulating patterns are followed by longer ones, providing optimal milk flow. The uniq ue Calma breastmilk feeding device allows the baby to pause and breathe during feeding whilst maintaining the suckling behaviour learned at the breast. Develop ed for a great breast feeding experience. S You can find detailed information about Calma on the Medela website (www.medela.com). 10. Troubleshooting 26 Problem Solution If there is low or no suction IM ake sure the yellow valve head and the white membrane are clean and not damaged. I Make sure the membrane lies flat on the valve head. I Make sure the valve head is positioned sideways on the connector. I Make sure the components of the handle are assembled correctly. I Check all connections. I Make sure the breastshield forms a complete seal around the breast. If there is no milk flow IE nsure your breastpump is assembled correctly and there is suction. I Relax and take a 10-15 minute break if expression is not achieved after two consecutive pumping sessions. I Consult your breastfeeding and lactation consultant or midwife if expression still does not occur. In the case of a product failure, please contact your local subsidiary. You can find the addresses on the reverse of this instruction manual. 11. Disposal The Harmony breastpump is made of plastics. You must dispose it in accordance with local regulations. 27 12. Complete care during breastfeeding time The following product variants, spare parts, consumables and accessories for the 28 Harmony breastpump are available from Medela distribution partners. You can order a product by specifying the product name or the corresponding product (article) number. Product variants Article number Product 005.2039 Harmony™ EN/NL/FR Spare parts Article number Product 099.0259 099.0260 Harmony Handle Harmony Membrane complete Consumables Article number Product 800.0727 Valves & Membranes Consists of two valve heads and six membranes Accessories 29 Article number Product 008.0337 008.0338 008.0339 008.0340 008.0341 PersonalFit™ PersonalFit™ PersonalFit™ PersonalFit™ PersonalFit™ 800.0796 200.1659 008.0315 Breastmilk Bottles 150 ml – 3 pcs. Breastmilk Bottles 250 ml – 2 pcs. Pump & Save™ Breastmilk Bags 008.0139 Calma Solitaire Breastshield Breastshield Breastshield Breastshield Breastshield Other Medela products are available at www.medela.com S ( 21 mm ) M ( 24 mm ) L ( 27 mm ) XL ( 30 mm ) XXL ( 36 mm ) 5 BREAST SHIELD SIZES 30 31 Inhaltsverzeichnis 1. 2. 3. 4. 32 Verwendungszweck/Zielgruppe - Kontraindikationen Bedeutung der Symbole Wichtige Sicherheitshinweise Produktbeschreibung 33 34 36 38 4.1 Harmony – leicht, praktisch, clever 38 4.2 Bestandteile 5. Reinigung 5.1 Vor Erstgebrauch und nach jedem Gebrauch 40 5.2 Vor Erstgebrauch und einmal täglich 42 5.3 Reinigung – Zusammenfassung 6. Vorbereitung des Abpumpens 44 46 6.1 Den Griff zusammensetzen 46 6.2 Zusammensetzen des Pumpsets 46 6.3 Die Brusthaube anlegen 7. Abpumpen 8. Aufbewahren und Auftauen der Muttermilch 48 50 52 8.1 Lagerung 52 8.2 Einfrieren 52 8.3 Auftauen 9. 10. 11. 12. 13. 39 40 Füttern von Muttermilch Fehlerbehebung Entsorgung Rundum versorgt in der Stillzeit Technische Daten 52 53 54 55 56 171 1. Verwendungszweck/Zielgruppe - Kontraindikationen 33 Verwendungszweck und Indikationen für Milchpumpen Milchpumpen dienen dazu, dass stillende Frauen im Krankenhaus oder zu Hause Muttermilch abpumpen können. Milchpumpen dienen dazu, die Symptome von Milchstau durch Abpumpen der Milch zu lindern. Im Fall einer Brustdrüsenentzündung (Mastitis) unterstützen Milchpumpen den Heilungsprozess durch Entleerung der betroffenen Brust. Milchpumpen sind dazu geeignet, bei wunden oder rissigen Brustwarzen Linderung zu verschaffen sowie Flach- oder Hohlwarzen hervorzuholen. Überdies bieten Milchpumpen Müttern die Möglichkeit, Babys mit Muttermilch zu füttern, die wegen verschiedener Probleme, wie Saugposition, Gaumenspalten oder Frühgeburt, nicht direkt an der Brust trinken können. Patientinnenzielgruppe / Benutzerinnen Jugendliche oder erwachsene stillende Frauen. Viele Frauen finden es praktisch, oft sogar unerlässlich, eine Milchpumpe zum Abpumpen und Aufbewahren der Muttermilch zu verwenden, wenn sie wieder zu arbeiten beginnen, auf Reisen oder aus anderen Gründen von ihrem Baby getrennt sind. Sie sind häufig erfreut, wenn sie erfahren, dass Milchpumpen als Ergänzung zum Stillen an der Brust eingesetzt werden können und dass die Funktionsweise gewisser Pumpen das natürliche Saugen des Babys imitiert. Kontraindikationen Für die Milchpumpe Harmony gibt es keine bekannten Kontraindikationen. 2. Bedeutung der Symbole Das Warnsymbol kennzeichnet alle für die Sicherheit wichtigen Anweisungen. Missachtung kann zu Verletzungen oder Schäden an der Milchpumpe Harmony führen! Es gibt verschiedene Warnsymbole, wobei jedes Symbol zusammen mit einem spezifischen Wort verwendet wird. Die Kombinationen aus Symbol und Wort bedeuten: 34 Vorsicht Missachtung von Anweisungen dieser Art kann zu (geringfügigen) Verletzungen oder Verunreinigungen/Entwicklung von Bakterien führen. i Hinweis i Info Missachtung von Anweisungen dieser Art kann zu Sachschäden führen. Nützliche und wichtige Informationen, die nicht sicherheitsrelevant sind. Symbole auf der Verpackung Dieses Symbol zeigt an, dass das Material Teil eines Recycling-Prozesses ist. Dieses Symbol zeigt eine Kartonverpackung an. Dieses Symbol zeigt an, dass das Produkt vor Sonnenlicht zu schützen ist. Dieses Symbol zeigt an, dass das zerbrechliche Produkt mit Vorsicht zu behandeln ist. °C Dieses Symbol zeigt die Temperaturbeschränkung für Betrieb, Transport und Lagerung an. Dieses Symbol zeigt die Luftfeuchtigkeitsbeschränkung für Betrieb, Transport und Lagerung an. Dieses Symbol zeigt die Luftdruckbeschränkung für Betrieb, Transport und Lagerung an. Dieses Symbol zeigt an, dass das Produkt trocken zu lagern ist. Die Verpackung enthält Produkte, die dazu bestimmt sind, mit Lebens mitteln in Berührung zu kommen gemäss Verordnung 1935/2004. Dieses Symbol zeigt die GTIN (GS1 Global Trade Item Number), eine weltweit eindeutige Identifikationsnummer, an. Dieses Symbol zeigt an, dass die Gebrauchsanweisung zu befolgen ist. Dieses Symbol weist auf den Hersteller hin. Dieses CE-Symbol zeigt an, dass die Milchpumpe Harmony der Richtlinie 93/42/EWG des Rates vom 14. Juni 1993 über Medizinprodukte entspricht. Symbole auf dem Gerät 05 PP 7 PP Dieses Symbol zeigt den Recyclingcode an (hier 05 für Material aus Polypropylen, PP). Dieses Symbol zeigt den Recyclingcode an (hier 7 für sämtliche Materialien, die nicht von anderen Recyclingcodes erfasst werden). Dieses Symbol zeigt die Verwendung von Polypropylen an. Dieses CE-Symbol zeigt an, dass die Milchpumpe Harmony der Richtlinie 93/42/EWG des Rates vom 14. Juni 1993 über Medizinprodukte entspricht. 35 3. Wichtige Sicherheitshinweise Für die Sicherheit und Gesundheit Ihres Kindes ACHTUNG! Bei Missachtung der Sicherheitshinweise können Gefährdungen durch das Gerät entstehen. Gerät 36 Die Milchpumpe Harmony ist nicht hitzebeständig: Halten Sie das Gerät von Heizkörpern und offenem Feuer fern. Die Milchpumpe Harmony nicht direktem Sonnenlicht aussetzen. Die Teile der Milchpumpe auf Abnutzung oder Beschädigung überprüfen. Nie ein beschädigtes Produkt verwenden. Teile bei ersten Anzeichen von Schäden oder Schwachstellen sofort entsorgen. Wichtig: I Plastikflaschen und andere Bestandteile können durch Einfrieren brüchig werden und beim Herunterfallen zerbrechen. I Zudem können Flaschen und andere Bestandteile durch unsachgemäßen Gebrauch beschädigt werden, z. B. wenn sie fallen gelassen, zu fest zugeschraubt oder umgestoßen werden. I Gehen Sie mit den Flaschen und Bestandteilen entsprechend vorsichtig um. l Verwenden Sie die Muttermilch nicht, wenn die Flasche oder Bestandteile beschädigt wurden. Verwendung Die Milchpumpe Harmony ausschließlich für den in dieser Gebrauchsanweisung beschriebenen Verwendungszweck benutzen. Bei Verwendung der Milchpumpe Harmony in der Nähe von Kindern ist eine entsprechende Beaufsichtigung notwendig. Einzelteile, die nicht unmittelbar verwendet werden, dürfen nicht in die Hände von Kindern gelangen. Bitte wenden Sie sich bei Problemen oder Schmerzen an Ihre Hebamme, Stillberaterin oder Ihren Arzt. Dieses Produkt ist nur für eine Benutzerin bestimmt. Die Benutzung durch verschiedene Personen kann ein Gesundheitsrisiko darstellen. 37 4. Produktbeschreibung 4.1 Harmony – leicht, praktisch, clever 38 Mit dem Kauf der Milchpumpe Harmony haben Sie eine gute Wahl getroffen: Harmony ist die erste Hand-Milchpumpe mit der 2-Phase Expression Technologie, die den natürlichen Saugrhythmus des Babys nachahmt. Der ergonomische Griff der Pumpe ermöglicht Ihnen, zwischen kurzen Bewegungen zur Stimulation und längeren zum Abpumpen zu wechseln. Genau so, wie Ihr Baby saugt, wenn Sie es an der Brust stillen. So können Sie mehr Milch in kürzerer Zeit abpumpen. Die Milchpumpe Harmony ist ideal für gelegentliches Abpumpen, wenn Sie ohne ihr Baby unterwegs sind, weil Sie z.B. ausgehen oder Sport treiben wollen oder wenn Sie Ihren Partner ins Stillen einbeziehen möchten. Sie können Harmony auch ergänzend zu einer elektrischen Mietpumpe verwenden. Harmony kann zudem dazu beitragen, Stillschwierigkeiten wie wunde oder rissige Brustwarzen zu überwinden, sowie Flach- oder Hohlwarzen hervorzuholen. Die wichtigsten Eigenschaften der Milchpumpe Harmony sind: I Geräuschloses, diskretes Abpumpen I Einfach zu verwenden, zu reinigen und zusammenzusetzen I Leicht zu transportieren, geeignet für zu Hause und unterwegs 4.2 Bestandteile Bestellbares Zubehör und Ersatzteile finden Sie in Kapitel 12. 1x PersonalFit™ Brusthaube 24 mm* 1 x Griff 1 x 2-KomponentenVerbindungsstück 1 x Membrane/Stiel mit O-Ring 2 x Ventilmembrane 1 x Flasche 39 1 x Ventilkopf 1 x Calma Multi-Deckel 1 x Standfuß 1 x Calma Solitaire * Weitere Brusthaubengrößen siehe Kapitel 12 5. Reinigung Vorsicht l Alle Teile, die mit Brust und Milch in Berührung kommen, sofort nach Gebrauch auseinandernehmen und reinigen, um Eintrock40 nen von Milch und Wachstum von Bakterien zu verhindern. IV erwenden Sie für die Reinigung nur Wasser in Trinkwasserqualität. Berühren Sie die Innenseite der Teile nach dem Reinigen nicht, um Verunreinigung zu vermeiden. IR einigen Sie die Pumpe nicht mit scharfen Gegenständen (wie Zahnstochern). IT eile des Pumpsets bei Reinigung nicht beschädigen. IE inige Teile des Harmony Pumpsets sind sehr klein (z. B. der O-Ring oder die Ventilmembrane). Überprüfen Sie, dass kein Teil fehlt, wenn Sie das Pumpset nach der Reinigung wieder zusammensetzen. 5.1 Vor Erstgebrauch und nach jedem Gebrauch 1 Pumpset in seine Einzelteile zerlegen. 4 Hinweis i ID as Pumpset muss nicht gewartet werden. I Einzelteile der Pumpe, die in einer Geschirrspülmaschine gewaschen werden, können sich verfärben. Dies hat keinen Einfluss auf die Funktion. IS etzen Sie das Pumpset (oder Teile davon) nicht direktem Sonnenlicht oder Hitze aus. IV erwenden Sie keine chemischen Sterilisierungsprodukte. Alle Teile mit kaltem, sauberem Wasser (circa 20° C) 10 –15 Sekunden nachspülen. 2 3 41 Alle Teile mit viel warmem Seifenwasser (circa 30 °C) reinigen. Alle Teile mit kaltem, sauberem Wasser (circa 20 °C) abspülen. Die Teile auf Schäden prüfen und bei ersten Anzeichen von Schäden oder Schwachstellen umgehend entsorgen. oder 6 Alternative zu Schritt 2, 3 und 4. 5 Mit einem sauberen Tuch abtrocknen oder auf einem sauberen Tuch trocknen lassen. Einzelteile im oberen Gitter oder im Besteckfach des Geschirrspülers reinigen. 5. Reinigung Vorsicht I Lassen Sie die Teile des Pumpsets nicht in kochendes Wasser fallen, Spritzgefahr! IB erühren Sie die Innenseite der Teile 42 nach dem Sterilisieren nicht, um Verunreinigung zu vermeiden. l Alle Teile, die mit Brust und Milch in Berührung kommen, sofort nach Gebrauch auseinandernehmen und waschen, um Eintrocknen von Milch und Wachstum von Bakterien zu verhindern. I Verwenden Sie für die Reinigung nur Wasser in Trinkwasserqualität. 5.2 Vor Erstgebrauch und einmal täglich 1 Zerlegen Sie das Pumpset in seine Einzelteile. Hinweis i I Beim Auskochen der Teile können Sie dem Wasser einen Teelöffel Zitronensäure hinzufügen, um Kalkablagerungen zu verhindern. Bei der Verwendung von Zitronensäure können geringfügige Spuren auf den Teilen zurückbleiben. Verwenden Sie Wasser in Trinkwasserqualität, um diese abzuwaschen. Trocknen Sie die Teile, wie rechts im Bild dargestellt (siehe Abbildung 3). 3 Mit einem sauberen Tuch abtrocknen oder auf einem sauberen Tuch trocknen lassen. Bewahren Sie die sauberen Teile bis zum nächsten Gebrauch in einem luftdurchlässigen, sauberen Beutel/Behälter oder eingehüllt in ein luftdurchlässiges, sauberes Papier/Tuch auf. 2a oder 2b 43 Alle Teile mit Wasser bedeckt fünf Minuten lang auskochen. Verwenden Sie den Quick Clean-Mikrowellenbeutel* gemäß Gebrauchsanweisung. * Weitere Informationen finden Sie unter www.medela.de 5. Reinigung 5.3 R einigung – Zusammenfassung 44 Vor Erstgebrauch und nach jedem Gebrauch Mit kaltem, sauberem Wasser (circa 20 °C) abspülen, dann mit viel warmem Seifenwasser (circa 30 °C) reinigen und mit kaltem, sauberem Wasser 10 –15 Sekunden nachspülen. √ √ √ √ √ √ √ √ Oder im Geschirrspüler reinigen (im oberen Gitter oder im Besteckfach). √ √ √ √ √ √ √ √ Alle Teile mit Wasser bedeckt fünf Minuten lang auskochen. √ √ √ √ √ √ √ √ Oder den Quick Clean-Mikrowellenbeutel gemäß Gebrauchsanweisung verwenden. √ -- √ √ √ √ √ √ Vor Erstgebrauch und einmal täglich 45 6. Vorbereitung des Abpumpens 6.1 Den Griff zusammensetzen Vorsicht i 46 I Waschen Sie die Hände gründlich (ca. eine Minute) mit Seife und Wasser, bevor Sie Ihre Brust und die Pumpenteile berühren. 1 Hinweis I Nur Originalzubehör von Medela verwenden. I Überprüfen Sie, dass sich der (weiße) O-Ring noch auf dem Stiel befindet: O-Ring Stiel Der O-Ring stellt die dichte Verbindung zwischen Griff und dem 2-Komponenten-Verbindungsstück sicher. Für den Aufbau des Vakuums ist dies unerlässlich. i Stecken Sie den Stiel (mit dem O-Ring) in das Loch auf der Oberseite der Membrane. Stiel und Membrane sind Teil des Pumpengriffs. 6.2 Zusammensetzen des Pumpsets 1 Info IF ühren Sie alle Schritte sorgfältig aus und setzen Sie das Pumpset korrekt zusammen, um eine optimale Funktionsweise sicherzustellen. Stecken Sie die Brusthaube in die obere Öffnung des Verbindungsstückes. 3 2 47 √ X Stellen Sie sicher, dass die ovale Basis des Stiels richtig in die Membrane eingesetzt ist. 2 Legen Sie die Ventilmembrane horizontal auf den Ventilkopf. Drücken Sie vorsichtig die Noppe auf der Rückseite der Membrane in das kleinste Loch auf dem Ventilkopf, bis sie einrastet. Die Membrane muss flach auf dem Ventilkopf aufliegen. Setzen Sie die Membrane in den Pumpengriff ein. Drücken Sie den Rand rundum fest nach unten, um ein vollständiges Abdichten zu gewährleisten. 3 Drücken Sie den Ventilkopf auf den inneren Ring des Verbindungsstücks. Der Ventilkopf muss seitlich positioniert sein (siehe Bild oben). 6. Vorbereitung des Abpumpens 6.2 Fortsetzung 4 5 48 Flasche auf das Verbindungsstück schrauben. Führen Sie den Stiel des Handgriffs in die Öffnung auf der Oberseite des Verbindungsstücks ein. Drücken Sie, bis der Stiel einrastet. 6.3 Die Brusthaube anlegen 1 Wischen Sie Ihre Brust mit einem warmen Tuch ab (verwenden Sie keinen Alkohol). Brusthaube auf die Brust aufsetzen, sodass die Brustwarze gut zentriert im Tunnel liegt. 2 Brusthaube mit Daumen und Zeigefinger an Brust halten. Die Brust mit der Handfläche stützen. Sitzt Ihre Brusthaube korrekt? A C B √ X X Es ist wichtig, dass Ihre Brusthaube korrekt sitzt. Mit einer korrekt sitzenden Brusthaube können Sie angenehm und effizient abpumpen. Abbildung A (siehe oben) zeigt eine korrekt sitzende Brusthaube. In Abbildung B ist die Brusthaube zu klein, in Abbildung C zu groß. Beantworten Sie die folgenden Fragen, um festzustellen, ob Ihre Brusthaubengröße passt: I Bewegt sich die Brustwarze frei im Tunnel? I W ird kein oder nur wenig Gewebe des Brustwarzenhofs in den Tunnel der Brusthaube gezogen? I Erkennen Sie sanfte, rhythmische Bewegungen der Brust bei jedem Pumpzyklus? I Spüren Sie, wie sich die Brust vollkommen entleert? I Ist Ihre Brustwarze schmerzfrei? Wenn Sie alle diese Fragen mit „Ja“ beantworten haben, hat Ihre Brusthaube die richtige Größe. Wenn Sie eine dieser Fragen mit „Nein“ beantworten mussten oder wenn das Abpumpen Probleme oder Schmerzen bereitet, hat Ihre Brusthaube möglicherweise nicht die richtige Größe. Medela bietet fünf unterschiedliche PersonalFit™-Brusthaubengrößen an. Erkundigen Sie sich bei Ihrer Still- und Laktationsberaterin oder Hebamme. 49 7. Abpumpen Vorsicht I Waschen Sie die Hände gründlich (ca. eine Minute) mit Seife und Wasser, bevor Sie Ihre Brust und die Pumpenteile berühren. 50 I Kontaktieren Sie Ihre Still- und Laktationsberaterin oder Hebamme, wenn Sie keine oder nur wenig Milch abpumpen können oder das Abpumpen schmerzhaft ist. Hinweis i I Pumpset nicht an der Flasche halten. Dies kann zu Milchstau und zum Abdrücken der Milchkanäle führen. I Flasche nur bis zur 150 ml Markierung füllen. 1 Beginnen Sie das Abpumpen mit der Stimulation: Drücken Sie den kürzeren Teil des Griffs. Dies ist der Teil mit dem abbgebildeten Milchtropfen. In rascher, kurzer Abfolge drücken und loslassen, bis die Milch zu fließen beginnt. D ie Stimulation ahmt das anfängliche rasche Saugen Ihres Babys nach und dient dazu, den Milchspendereflex auszulösen. 2 3 51 D er Abpumpmodus ahmt das langsamere, entspannte Saugen Ihres Babys nach und dient dazu, den Milchfluss zu steigern. Beenden Sie das Abpumpen, wenn Sie spüren, dass keine Milch mehr fließt, oder wenn die Flasche voll ist. Verwenden Sie den Standfuß, um ein Kippen der Flasche zu vermeiden. 4 Reinigen Sie wie in Kapitel 5 beschrieben Sobald die Milch zu fließen beginnt, wechseln Sie zum Abpumpen: Drücken Sie nun den unteren, längeren Teil des Griffs. Dadurch bauen Sie ein Vakuum auf, das den Milchfluss fördert. Die Stärke des Vakuums wird durch die Intensität und Geschwindigkeit des Drückens gesteuert. Bestimmen Sie selbst, welcher Pumprhythmus für Sie am besten ist. Schrauben Sie die Flasche vom Verbindungsstück ab. Verschließen Sie die Flasche mit dem Multi-Deckel. Lagern Sie die Muttermilch (entsprechend der Anweisungen in Kapitel 8). 8. Aufbewahren und Auftauen der Muttermilch 8.1 Lagerung Regeln für das Aufbewahren frisch abgepumpter Muttermilch (für gesunde, termingeborene Babys) 52 Raumtemperatur Kühlschrank Tiefkühltruhe Aufgetaute Muttermilch 4 – 6 Stunden bei 19 bis 26 ° C (66 bis 78 ° F) 3 – 8 Tage bei 4 ° C (39 ° F) oder weniger 6 – 12 Monate bei −18 bis −20 ° C (0 bis 4 ° F) Im Kühlschrank max. 10 Stunden. Nicht wieder einfrieren! IM uttermilch nicht in der Kühlschranktür, sondern am kältesten Ort im Kühlschrank (hinten auf der Glasplatte über dem Gemüsefach) aufbewahren. 8.2 Einfrieren ID ie abgepumpte Muttermilch kann in Milchflaschen oder „Pump & Save“* Beuteln eingefroren werden. Füllen Sie Flaschen oder Beutel nur drei viertel voll, um Raum für Ausdehnung zu lassen. I Die Milchflaschen oder „Pump & Save” Milchbeutel mit Abpumpdatum versehen. 8.3 Auftauen Vorsicht Verwenden Sie keine Mikrowelle oder kochendes Wasser zum Auftauen oder Erwärmen von Muttermilch, damit Vitamine, Mineralien und andere wertvolle Inhaltsstoffe erhalten bleiben und Verbrühungen vermieden werden. IM ilchflasche oder „Pump & Save“ Milchbeutel zum Auftauen über Nacht in den Kühlschrank stellen oder unter warmes Wasser halten (max. 37 ° C). I Schwenken Sie die Milchflasche oder den „Pump & Save“ Beutel sanft, um abgesetztes Fett mit der Milch zu vermischen. Schütteln oder rühren Sie die Milch nicht. * Weitere Informationen finden Sie unter www.medela.de 9. Füttern von Muttermilch i Info Medela empfiehlt Calma für das Füttern von Muttermilch. Mit Calma I kann Ihr Baby regelmäßig trinken, pausieren und atmen. I fließt die Milch erst, wenn ein Vakuum erzeugt wird. I kann das Baby sein natürliches Saugverhalten beibehalten, was einen leichten Übergang vom Stillen an der Brust zu Calma und zurück an die Brust unterstützt. Calma – die einzigartige Fütterungslösung für Muttermilch. Detaillierte Informationen über Calma finden Sie auf der Medela Website (www.medela.de). IMULATI PU N LM SAUGE N M SION E N CA Mehr Milch in kürzerer Zeit E X PR ES 2-PHAS ER FORSCHUNGSGESTÜTZTE LÖSUNGEN FÜR STILLENDE MÜTTER F ÜT Von Medela T entwickelt A M PE Unterstützt das Saugverhalten des Babys HFLU S ILC ON ST S Dank umfassender Forschungsarbeit hat Medela als weltweit eines der ersten Unternehmen das Trinkverhalten von Babys an der Mutterbrust in die Innovationen 2-Phase Expression und Calma einfließen lassen. Die 2-Phase Expression Technologie ahmt den natürlichen Saugrhythmus des Babys nach, sodass in kürzerer Zeit mehr Milch abgepumpt werden kann. Auf kurze, stimulierende Saugbewegungen folgen längere, die für einen optimalen Milchfluss sorgen. Beim einzigartigen Muttermilchsauger Calma kann das Baby während des Trinkens pausieren, ruhig atmen und das an der Brust erlernte Saugverhalten beibehalten. Speziell entwickelt für eine glückliche Stillzeit. 53 10. Fehlerbehebung 54 Problem Lösung Die Pumpe saugt zu schwach oder gar nicht IS tellen Sie sicher, dass der gelbe Ventilkopf und die weiße Membrane sauber und unbeschädigt sind. I Stellen Sie sicher, dass die Membrane flach auf dem Ventilkopf liegt. I Stellen Sie sicher, dass der Ventilkopf seitwärts auf dem Verbindungsstück positioniert ist. I Stellen Sie sicher, dass alle Bestandteile des Griffs richtig zusammengesetzt sind. I Prüfen Sie alle Verbindungen. I Stellen Sie sicher, dass die Brusthaube die Brust rundum gut abdichtet. Es fließt keine Milch IS tellen Sie sicher, dass die Milchpumpe richtig zusammengesetzt ist und ein Sog entsteht. I Entspannen Sie sich und machen Sie eine Pause von 10 - 15 Minuten, wenn nach zwei Abpumpvorgängen keine Milch entleert werden konnte. I Kontaktieren Sie Ihre Still- und Laktationsberaterin oder Hebamme, wenn weiterhin keine Milch abgepumpt werden kann. Sollte das Produkt nicht funktionieren, kontaktieren Sie bitte Ihre örtliche Niederlassung. Sie finden die Adressen auf der Rückseite der Gebrauchsanweisung. 11. Entsorgung Die Milchpumpe Harmony besteht aus Kunststoff. Entsorgen Sie sie gemäß den örtlichen Vorschriften. 55 12. Rundum versorgt in der Stillzeit Die folgenden Produktvarianten, Ersatzteile, Verbrauchsartikel und Zubehörteile können über Medela Verkaufsstellen bezogen werden. Bei der Bestellung eines Produkts geben Sie bitte den Namen oder die Artikelnummer des Produkts an. 56 Produktvarianten Artikelnummer Produkt 005.2035 Harmony™ DE/FR/IT Ersatzteile Artikelnummer Produkt 099.0259 099.0260 Harmony Griff Harmony vollständige Membrane Verbrauchsartikel Artikelnummer Produkt 800.0727 Ventile und Membranen. Umfasst zwei Ventilköpfe und sechs Membranen. Zubehör Artikelnummer Produkt 008.0327 008.0328 008.0329 008.0330 008.0331 PersonalFit™ PersonalFit™ PersonalFit™ PersonalFit™ PersonalFit™ 800.0796 200.1659 008.0315 Muttermilchflaschen 150 ml – 3 Stk. Muttermilchflaschen 250 ml – 2 Stk. Pump & Save™ Muttermilchbeutel 008.0138 Calma Solitaire Brusthaube Brusthaube Brusthaube Brusthaube Brusthaube Weitere Medela Produkte finden Sie unter www.medela.de. S ( 21 mm ) M ( 24 mm ) L ( 27 mm ) XL ( 30 mm ) XXL ( 36 mm ) 5 BREAST SHIELD SIZES 57 58 Pflege & Schutz der Brust Abpumpen Evidenzbasierte Forschung Fortbildung Erfahrung Service Füttern Innovation Fachpersonal Transportieren & Reinigen Auffangen & Aufbewahren 59 Table des matières 1. 2. 3. 4. Utilisation/Public cible – Contre-indications Signification des symboles Informations de sécurité importantes Description du produit 61 62 64 66 4.1 Harmony – Léger, pratique, astucieux. 66 4.2 Pièces du produit 5. Nettoyage 60 5.1 Avant la première utilisation et après chaque utilisation 68 5.2 Avant la première utilisation et une fois par jour 70 5.3 Nettoyage – résumé 6. Préparation pour la séance d’expression 72 74 6.1 Assemblage de la poignée 74 6.2 Assemblage du tire-lait 74 6.3 Positionnement de la téterelle 7. Expression 8. Conservation et décongélation du lait maternel 76 78 80 8.1 Conservation 80 8.2 Congélation 80 8.3 Décongélation 9. 10. 11. 12. 13. 67 68 Alimentation au lait maternel Résolution des problèmes Mise au rebut Une gamme complète pour l’allaitement maternel Caractéristiques techniques 80 81 82 83 84 171 1. Utilisation/Public cible – Contre-indications 61 Utilisation du tire-lait et indications Les tire-laits sont conçus pour être utilisés par des femmes allaitantes, à l’hôpital ou à domicile, en vue d’exprimer le lait maternel. Ils aident à atténuer les symptômes d’engorgement grâce à l’expression du lait maternel. En cas de mastite, les tire-laits servent à extraire le lait maternel du sein infecté, ce qui facilite le processus de guérison. Les tire-laits servent à soulager les mamelons douloureux et crevassés, ainsi qu’à faire ressortir des mamelons plats ou ombiliqués. Ils permettent également aux mères de donner du lait maternel aux bébés qui ne peuvent pas être nourris directement au sein pour des raisons diverses (par exemple en cas de difficultés à téter, de fente palatine ou de bébés prématurés). Public cible Les femmes allaitantes, qu’elles soient adolescentes ou adultes. De nombreuses femmes trouvent pratique, voire nécessaire, d’utiliser un tire-lait pour exprimer et conserver leur lait une fois qu’elles ont repris le travail, qu’elles sont en voyage ou séparées de quelque façon que ce soit de leur bébé. Elles sont souvent ravies d’apprendre qu’un tire-lait peut être utilisé en tant que complément à l’allaitement maternel et que certains sont même conçus pour imiter la succion d’un bébé au sein. Contre-indications Il n’y a aucune contre-indication connue au tire-lait Harmony. 2. Signification des symboles Les symboles d’avertissement réfèrent aux instructions importantes pour la sécurité. Le non-respect de ces instructions peut provoquer des blessures ou endommager le tire-lait ! Il existe plusieurs symboles d’avertissement. Chacun d’entre-eux est associé à un terme spécifique. Voici l’explication des symboles : Avertissement Le non-respect des instructions de cette catégorie peut entraîner des blessures (mineures) ou une contamination/prolifération bactérienne. i 62 Remarque i Info Le non-respect des instructions de cette catégorie peut causer des dommages matériels. Informations utiles ou importantes non relatives à la sécurité. Symboles présents sur l’emballage Ce symbole indique que le matériau peut être recyclé selon la règlementation en vigueur. Ce symbole indique un emballage en carton. Ce symbole indique que le produit doit être conservé à l’abri de la lumière directe du soleil. Ce symbole indique que le produit est fragile et doit être manipulé avec précaution. °C Ce symbole indique la limite de température à ne pas dépasser en cas de fonctionnement, de transport et de stockage. Ce symbole indique le taux d’humidité maximal à respecter pour l’utilisation, le transport et le stockage. Ce symbole indique la limite de pression atmosphérique à ne pas dépasser en cas de fonctionnement, de transport et de stockage. Ce symbole indique que le produit doit être maintenu au sec. L’emballage contient des produits destinés à entrer en contact avec des denrées alimentaires conformément au règlement N° 1935/2004. Ce symbole fait référence à la codification unique du produit selon la norme du code article international (GTIN) GSI. Ce symbole indique qu’il est impératif de respecter les instructions d’utilisation. Ce symbole fait référence au fabricant. Ce symbole CE indique la conformité du tire-lait Harmony aux exigences essentielles de la directive du Conseil 93/42/CEE du 14 juin 1993 relative aux dispositifs médicaux. Symboles présents sur l’appareil 05 PP 7 PP Ce symbole fait référence au code de recyclage (ici 05 pour un matériau constitué de polypropylène PP) Ce symbole indique que le code de recyclage (ici 07 pour tous les matériaux non spécifiés par d’autres codes de recyclage). Ce code indique l’utilisation du polypropylène. Ce symbole CE indique la conformité du tire-lait Harmony aux exigences essentielles de la directive du Conseil 93/42/CEE du 14 juin 1993 relative aux dispositifs médicaux. 63 3. Informations de sécurité importantes Pour la sécurité et la santé de votre bébé AVERTISSEMENT Le non-respect des informations de sécurité mentionnées sur ces pages peut engendrer un danger. Appareil Le tire-lait Harmony n’est pas thermorésistant : le tenir éloigné des radiateurs et des flammes. 64 Ne pas exposer le tire-lait Harmony à la lumière directe du soleil. Contrôler les différentes parties du tire-lait et vérifier qu’il ne présente pas de signes d’usure ou de dommages. Ne jamais utiliser un produit défectueux. Remplacer une pièce du produit aux premiers signes de dégradation ou de dysfonctionnement de celle-ci. Important : I Les contenants en plastique ainsi que les différentes pièces peuvent être fragilisés par la congélation et risquent de casser en cas de chute. I De même, le contenant et les différentes pièces peuvent être endommagés à la suite d’une mauvaise manipulation, par exemple en cas de chute, de vissage excessif ou de choc. I Manipulez avec soin le contenant et les différentes pièces. l Ne donnez pas le lait maternel si vous constatez que le produit est endommagé. Utilisation N’utilisez le tire-lait Harmony que pour l’usage auquel il est destiné, tel que décrit dans ce manuel. Une surveillance est nécessaire lorsque vous utilisez le tire-lait Harmony à proximité d’enfants. Conservez toutes les pièces inutilisées hors de portée des enfants. En cas de problèmes ou de douleur, contacter un professionnel de santé (consultante en lactation, médecin, etc.). Ce produit est exclusivement réservé à un usage personnel. L’utilisation du même appareil par plusieurs personnes peut présenter un risque sanitaire. 65 4. Description du produit 4.1 Harmony – Léger, pratique, astucieux. Vous avez fait le bon choix en achetant le tire-lait Harmony : L’Harmony est le premier tire-lait manuel équipé de la technologie d’expression à 2 phases. Cette technologie reproduit le rythme naturel de succion du nourrisson. La poignée ergonomique du tire-lait vous permet d’alterner des mouvements courts pour stimuler le réflexe d’éjection du lait et des mouvements longs pour exprimer le lait. Exactement comme lorsque votre bébé tète quand vous le nourrissez au sein. Vous pouvez ainsi exprimer davantage de lait en moins de temps. 66 Le tire-lait Harmony est idéal pour une utilisation occasionnelle. Par exemple, si vous devez vous séparer de votre bébé pendant de courtes périodes (pratique d’un sport, sortie, etc.). Ou si vous souhaitez impliquer votre partenaire dans l’allaitement. Vous pouvez également utiliser l’Harmony en complément d’un tire-lait en location. L’Harmony peut aussi vous aider à surmonter des problèmes de santé, tels que des mamelons douloureux, plats ou ombiliqués. Les principales caractéristiques de votre tire-lait Harmony sont : I Expression silencieuse et discrète ; I Facile à utiliser, nettoyer et assembler ; I Léger à transporter, adapté à une utilisation à la maison ou en déplacement. 4.2 Pièces du produit Vous trouverez les pièces détachées et les accessoires disponibles à la vente au chapitre 12. 1 x Embout téterelle PersonalFit™ 24 mm* 1 x poignée 67 1 x connecteur de 2 composants 1 x diaphragme / tige avec joint torique 2x membranes 1x biberon 1x support de biberon 1x valve 1x couvercle multifonction Calma 1 x Calma seule * pour d’autres tailles de téterelle, reportez-vous au chapitre 12 5. Nettoyage Avertissement l Démontez et nettoyez toutes les pièces entrant en contact avec la poitrine et le lait maternel immédiatement après utilisation afin d’éviter le dépôt de résidus de lait et la prolifération de bactéries. l N’utilisez que de l’eau potable pour le nettoyage. Afin d’éviter toute contamination, ne touchez pas l’intérieur des pièces après le nettoyage. 68 I Ne nettoyez pas les pièces du tire-lait à l’aide d’un objet pointu (par ex. un cure-dent). l Veillez à ne pas endommager les pièces du tire-lait lors du nettoyage. IC ertaines pièces du tire-lait Harmony sont très petites (par ex. la membrane ou le joint torique). Vérifiez qu’aucune pièce ne manque lorsque vous assemblez le tire-lait après nettoyage. 5.1 Avant la première utilisation et après chaque utilisation 1 Démontez chaque pièce du tire-lait. 4 Remarque i lL e tire-lait ne nécessite aucun entretien. l Si vous nettoyez les pièces du tire-lait au lave-vaisselle, celles-ci peuvent changer de couleur. Ce phénomène n’a aucune conséquence sur le fonctionnement de l’appareil. IA ucune pièce du tire-lait ne doit être exposée à la lumière directe du soleil ou à une source de chaleur. I N’utilisez pas d’agents stérilisants chimiques. Rincez toutes les pièces à l’eau claire et froide (plus ou moins 20 °C) pendant 10 à 15 secondes. 2 3 69 Nettoyez toutes les pièces à l’eau savonneuse et chaude (environ 30 °C). Rincez toutes les pièces à l’eau claire et froide (plus ou moins 20 °C). Vérifiez que les pièces ne présentent pas de dégradation ou de dysfonctionnement, remplacez-les aux premiers signes. ou 6 Alternative aux étapes 2, 3 et 4. 5 Essuyez les pièces avec un chiffon propre ou laissez-les sécher sur un chiffon propre. Si vous nettoyez les différentes pièces du tire-lait au lave-vaisselle, placez-les sur le panier supérieur ou dans le bac à couverts. 5. Nettoyage Avertissement I Ne plongez pas les pièces du tire-lait dans l’eau bouillante. I Pour éviter toute contamination, ne touchez pas l’intérieur des pièces après stérilisation. l Démontez et nettoyez toutes les pièces entrant en contact avec la poitrine et le lait maternel immédiatement après utilisation afin 70 d’éviter le dépôt de résidus de lait et la prolifération de bactéries. l N’utilisez que de l’eau potable pour le nettoyage. 5.2 Avant la première utilisation et une fois par jour 1 Démontez chaque pièce du tire-lait. Remarque i l Lorsque vous faites bouillir les pièces du tire-lait, vous pouvez ajouter une cuillère à café d’acide citrique pour éviter la formation de calcaire. L’acide citrique peut laisser de légères traces sur les pièces du tire-lait. Rincez-les uniquement à l‘eau potable. Séchez les pièces telles que sur la figure 3 ci-contre. 3 Essuyez les pièces avec un chiffon propre ou laissez-les sécher sur un chiffon propre. Rangez les pièces nettoyées dans un sachet/contenant propre , un linge propre/feuilles d’essuie-tout, perméable à l’air , jusqu’à leur prochaine utilisation. 2a ou 2b 71 Recouvrez toutes les pièces d’eau et portez à ébullition pendant 5 minutes. Utilisez un sachet pour micro-ondes Quick Clean* conformément aux instructions. * Pour plus d’informations, consultez le site www.medela.com 5. Nettoyage 5.3 N ettoyage – résumé 72 Avant la première utilisation et après chaque utilisation Rincer à l’eau claire et froide (environ 20 °C), puis nettoyer abondamment à l’eau chaude et savonneuse (environ 30 °C). Enfin, rincer à l’eau claire et froide pendant 10 à 15 secondes ; √ √ √ √ √ √ √ √ Ou laver au lave-vaisselle (sur le panier supérieur ou dans le bac à couverts). √ √ √ √ √ √ √ √ Recouvrir d’eau et porter à ébullition pendant 5 minutes ; √ √ √ √ √ √ √ √ Ou utiliser un sachet pour micro-ondes Quick Clean conformément aux instructions. √ -- √ √ √ √ √ √ Avant la première utilisation et une fois par jour 73 6. Préparation pour la séance d’expression Avertissement lL avez-vous soigneusement les mains (pendant environ une minute) avec de l’eau et du savon avant de toucher votre sein et les pièces du tire-lait. i 74 6.1 Assemblage de la poignée 1 Remarque lN ’utilisez que des accessoires Medela d’origine. IV érifiez que le joint torique (blanc) est toujours placé autour de la tige : Joint torique Tige Le joint torique permet d’établir une connexion étanche entre la poignée et le connecteur à 2 composants. Cela est nécessaire pour créer un vide. i Insérez la tige (avec le joint torique) dans l’orifice situé sur la face supérieure du diaphragme. La tige et le diaphragme sont des pièces de la poignée du tire-lait. 6.2 Assemblage du tire-lait 1 Info l Exécutez soigneusement toutes les étapes et veillez à assembler correctement le tire-lait pour une utilisation efficace. Insérez doucement l’embout téterelle dans l’ouverture supérieure du connecteur. 3 2 √ X Assurez-vous que la base ovale de la tige est correctement positionnée dans le diaphragme. 2 Placez la membrane à l’horizontal sur la valve. Appuyez fermement sur la partie saillante de la membrane afin de l’enclencher dans le plus petit orifice de la valve. La membrane doit être positionnée bien à plat sur la valve. 75 Positionner le diaphragme sur la poignée du tire-lait. Appuyez fermement sur les bords pour assurer une bonne étanchéité. 3 Insérer la valve munie de la membrane sur la partie inférieure du connecteur. La valve doit être positionnée latéralement (comme sur l’illustration ci-dessus). 6. Préparation pour la séance d’expression 6.2 suite 4 76 Vissez le biberon sur le connecteur. 5 Une fois la poignée assemblée, insérez la tige de celle-ci dans l’orifice situé au dessus du connecteur. Poussez jusqu’à ce que la tige soit bien enclenchée. 6.3 Positionnement de la téterelle 1 Pour un bonne étanchéité de la téterelle sur le sein, essuyez, si nécessaire, votre sein avec un gant de toilette propre et chaud (n’utilisez pas d’alcool). Placez la téterelle sur le sein de manière à centrer correctement le mamelon dans l’embout. 2 Maintenez la téterelle sur le sein à l’aide de votre pouce et de votre index. Soutenez votre sein avec la paume de votre main. La téterelle est-elle adaptée ? A C B √ X X Il est important que la téterelle soit bien positionnée. Une téterelle bien positionnée permet une expression du lait confortable et efficace. La figure A ci-dessous montre une téterelle à la bonne taille. La téterelle de la figure B est trop petite et celle de la figure C est trop large. Répondez au questionnaire suivant pour vérifier que la téterelle est adaptée : l Le mamelon bouge-t-il librement dans l’embout de la téterelle ? l Une petite partie de l’aréole seulement (voire aucune) s’étire dans l’embout de la téterelle ? l Observez-vous un mouvement doux et rythmé du sein à chaque cycle d’aspiration ? l Après l’expression, votre sein semble-t-il moins rempli, sans zone dure ? l Vos mamelons sont-ils indolores ? Si vous pouvez répondre par « Oui » aux questions suivantes, votre téterelle est bien adaptée. Si la réponse à l’une de ces questions est « Non », si vous rencontrez des problèmes ou ressentez une douleur pendant l’expression, votre téterelle n’est peut-être pas à la bonne taille. Medela propose des téterelles PersonalFit™ en 5 tailles différentes. Contactez votre professionnel de l’allaitement (consultant(e) en lactation, sage-femme) pour plus de conseils. 77 7. Expression Avertissement lL avez-vous soigneusement les mains (pendant environ une minute) avec de l’eau et du savon avant de toucher votre sein et les pièces du tire-lait. l Contactez un professionnel des l’allaitement, par exemple une sage-femme ou un(e) consultant(e) en lactation, si vous n’exprimez 78 que très peu de lait ou pas du tout ou si l’expression s’avère douloureuse. Remarque i I Ne tenez pas le tire-lait par le biberon. Cela peut provoquer un engorgement et le blocage des canaux galactophores. I Ne remplissez le biberon que jusqu’au marquage 150 ml. 1 Démarrez l’expression par la phase de stimulation : Appuyez sur la petite partie de la poignée. Des gouttes de lait sont gravées sur le dessus. Appuyez et r elâchez rapidement plusieurs fois jusqu’à ce que le lait commence à s’écouler. La phase de stimulation reproduit la succion initiale rapide de votre bébé. Elle vise à stimuler l’écoulement de lait. Lorsque le lait commence à s’écouler, passez en phase d’expression : appuyez sur la partie inférieure et longue de la poignée. Vous créez ainsi un vide facilitant l’écoulement de lait. Vous contrôlez le niveau de vide par la vitesse des mouvements sur la poignée et la compression créée. Décidez vous-même du meilleur rythme d’aspiration. L a phase d’expression reproduit la succion plus lente et détendue de votre bébé. Elle vise à maximiser l’écoulement de lait. 3 Arrêtez l’expression lorsque vous sentez que le lait ne s’écoule plus ou lorsque le biberon est plein. Utilisez le support de biberon pour éviter que celui-ci ne se renverse. 4 Nettoyez en suivant les instructions du chapitre 5 2 Dévissez le biberon du connecteur. Fermez le biberon avec le couvercle multifonction. Conservez le lait maternel (respectez les instructions figurant au chapitre suivant, chapitre 8). 79 8. Conservation et décongélation du lait maternel 8.1 Conservation Règles de conservation pour le lait maternel fraîchement exprimé (Pour les bébés en bonne santé et nés à terme) Température ambiante Réfrigérateur Congélateur Lait maternel décongelé 4 − 6 heures de 19 à 26 °C (66 à 78 °F) 3− 8 jours à 4 °C (39 °F) ou moins 6 − 12 mois de –18 à – 20 °C (0 à 4 °F) Au réfrigérateur pendant au max. 10 h. Ne pas recongeler ! 80 l Ne conservez pas le lait maternel dans la porte du réfrigérateur. Choisissez plutôt la partie la plus froide du réfrigérateur (à l’arrière de la clayette en verre au-dessus du bac à légumes). 8.2 Congélation l Vous pouvez congeler le lait maternel exprimé dans des biberons ou des sachets « Pump & Save »*. Ne remplissez pas les biberons ou sachets à plus de ¾ afin de laisser de l’espace pour la solidification du lait. l Indiquez la date d’expression sur les biberons ou sachets « Pump & Save ». 8.3 Décongélation Avertissement Ne décongelez pas et ne réchauffez pas le lait maternel au four à micro-ondes ni dans une casserole d’eau bouillante afin d’éviter toute perte de vitamines, de minéraux et d’autres ingrédients essentiels, ainsi que tout risque de brûlure. lP our préserver les composants du lait maternel, décongelez le lait dans le réfrigérateur la veille de son utilisation. Vous pouvez également tenir le biberon ou le sachet « Pump & Save » sous l’eau chaude (max. 37 °C). l Secouez délicatement le biberon ou le sachet « Pump & Save » afin d’homogénéiser les corps gras. Évitez de d’agiter brutalement le lait. * Pour plus d’informations, consultez le site www.medela.com 9. Alimentation au lait maternel i Info Medela recommande Calma pour une alimentation au lait maternel. Avec Calma l votre bébé peut se nourrir, marquer des pauses et respirer régulièrement. l le lait s’écoule lorsqu’un vide est créé. l le comportement naturel d’alimentation de votre bébé est maintenu, ce qui permet un retour aisé à l’allaitement au sein. Calma – une solution d’alimentation unique conçue pour le lait maternel 81 E XP ION SION OULEM ÉC E X PR ES E NT CA LM Plus de lait en moins de temps A RE SS 2-PHAS SUPPORT BASÉ SUR LA RECHERCHE POUR LES MÈRES ALLAITANTES ALLA Invention de IT Medela E EM T DU LA I EN N MULATIO TI Prise en considération du mécanisme d'alimentation acquis par bébé T CC SU ION BÉBÉ DU Grâce à ses travaux de recherche, Medela est devenue l’une des premières entreprises au monde à intégrer le mécanisme d’allaitement des bébés dans ses innovations : la technologie d’expression à 2 phases et Calma. La technologie d’expression à 2 phases reproduit le rythme naturel de succion du bébé, afin d’exprimer davantage de lait en moins de temps. Les mouvements brefs de stimulation sont suivis de mouvements plus longs, générant un écoulement de lait optimal. Calma, l’unique solution d’alimentation conçue pour le lait maternel, permet à votre enfant de marquer des pauses et de reprendre son souffle pendant l’allaitement, tout en conservant le comportement de succion qu’il a appris naturellement en tétant le sein. Conçue pour une belle expérience d’allaitement. S Vous trouverez des informations détaillées sur Calma sur le site Internet Medela (www.medela.com). 10. Résolution des problèmes 82 Problème Solution S’il n’y a pas ou peu d’aspiration IA ssurez-vous que la valve jaune et la membrane blanche soient propres et ne soient pas endommagées. I Vérifiez que la membrane soit positionnée à plat sur la valve. I Assurez-vous que la valve soit positionnée latéralement sur le connecteur. I Vérifiez que les pièces de la poignée soient assemblées correctement. I Vérifiez toutes les connexions. I Assurez-vous que la téterelle soit placée de manière hermétique sur le sein. Si le lait ne s’écoule pas IA ssurez-vous que le tire-lait soit correctement assemblé et que vous constatiez un vide. I Détendez-vous et faites 10-15 minutes de pause si l’expression n’est pas terminée après deux séances consécutives. I Contactez un professionnel de l’allaitement, par exemple un(e) consultant(e) en lactation ou une sage-femme, si vous n’arrivez pas à exprimer votre lait. En cas de défaillance du produit, veuillez contacter votre filiale locale. Vous trouverez les adresses correspondantes au dos de ce manuel d’instruction. 11. Mise au rebut Le tire-lait Harmony est composé de matériaux plastiques. Vous devez le jeter conformément aux réglementations locales. 83 12. Une gamme complète pour l’allaitement maternel Les variantes de produit, les pièces de rechange, les consommables et les accessoires indiqués ci-dessous et destinés au tire-lait Harmony sont disponibles chez les distributeurs Medela. Vous pouvez commander un produit en précisant son nom ou le numéro de produit (d’article) correspondant. Variantes du produit 84 Référence de l’article Produit 005.2035 005.2039 Harmony™ DE/FR/IT Harmony™ EN/NL/FR Pièces détachées Référence de l’article Produit 099.0259 099.0260 Poignée Harmony Diaphragme complet Harmony Consommables Référence de l’article Produit 800.0727 Valves & Membranes. Se compose de deux valves et six membranes Accessoires Référence de l’article Produit 008.0327 008.0328 008.0329 008.0330 008.0331 Téterelle Téterelle Téterelle Téterelle Téterelle 800.0796 200.1659 008.0315 Biberon pour lait maternel 150 ml (3 pc). Biberon pour lait maternel 250 ml (2 pc). Sachets pour lait maternel Pump & Save™ 008.0138 008.0139 008.0140 Calma Seule DE/FR Calma Seule EN/FR Calma Seule NL/FR PersonalFit™ PersonalFit™ PersonalFit™ PersonalFit™ PersonalFit™ S (21 mm) M (24 mm) L (27 mm) XL (30 mm) XXL (36 mm) Les autres produits Medela sont disponibles sur www.medela.com. 5 BREAST SHIELD SIZES 85 Exprimer le lait Soigner les mamelons 86 Recherche factuelle Formation Expertise Service Nourrir bébé Innovation Professionnels Transporter et nettoyer Reccueillir le lait 87 Indice 1. 2. 3. 4. Uso previsto/Popolazione - Controindicazioni Significato dei simboli Importanti informazioni di sicurezza Descrizione del prodotto 89 90 92 94 4.1 Harmony: leggero, pratico, intelligente 94 4.2 Componenti del prodotto 5. Pulizia 5.1 Prima del primo impiego e dopo ciascun utilizzo 5.2 Prima del primo impiego e una volta al giorno 5.3 Pulizia - riepilogo 6. Preparazione all’estrazione 98 100 102 102 6.2 Montaggio del set di pompaggio 102 7. Estrazione 8. Conservazione e scongelamento del latte materno 9. 10. 11. 12. 13. 96 6.1 Montaggio dell’impugnatura 6.3 Posizionamento della coppa per il seno 88 95 96 104 106 108 8.1 Conservazione 108 8.2 Congelamento 108 8.3 Scongelamento 108 Alimentazione con latte materno Risoluzione dei problemi Smaltimento Cura completa durante l’allattamento al seno Specifiche tecniche 109 110 111 112 171 1. Uso previsto/Popolazione - Controindicazioni Uso previsto e indicazioni dei tiralatte I tiralatte sono destinati alle donne che allattano in ospedale o a casa estraendo dal seno il latte materno. I tiralatte sono indicati per alleviare i sintomi di ingorgo durante l’estrazione del latte materno. In caso di mastite, i tiralatte contribuiscono al processo di guarigione estraendo il latte materno dal seno interessato. I tiralatte sono indicati per dare sollievo ai capezzoli screpolati e doloranti e per portare nella posizione corretta i capezzoli appiattiti o rientrati. Inoltre, essi aiutano le madri a fornire latte materno ai neonati che non possono essere allattati direttamente al seno a causa di vari motivi, come problemi di attaccamento, palatoschisi o perché prematuri. Utenti destinatari Donne che allattano, giovani adolescenti o adulte. Molte donne trovano comodo, o addirittura necessario, l’uso del tiralatte per estrarre e conservare il latte materno, dopo essere tornate all’attività lavorativa, durante i viaggi o quando si trovano lontane dal bambino per altri motivi. Le madri sono spesso liete di sapere che il tiralatte può essere usato come integrazione all’allattamento al seno e che alcuni modelli sono studiati per imitare la suzione del bambino. Controindicazioni Non ci sono controindicazioni note per il tiralatte Harmony. 89 2. Significato dei simboli Il simbolo di avvertenza identifica tutte le istruzioni importanti per la sicurezza. La mancata osservanza di tali istruzioni può comportare lesioni alle persone o danni al tiralatte Harmony! Sono presenti diversi simboli di avvertenza. Ogni simbolo viene utilizzato insieme a uno specifico termine. Le combinazioni di simbolo di avvertenza/termine indicano: Attenzione La mancata osservanza di tali istruzioni può provocare lesioni (lievi) o contaminazione/formazione di batteri. i Nota i Informazioni La mancata osservanza di tali istruzioni può comportare danni materiali. Informazioni utili o importanti non correlate alla sicurezza. 90 Simboli sulla confezione Questo simbolo indica che il materiale è oggetto di un processo di recupero/riciclo. Questo simbolo indica una confezione in cartone. Questo simbolo indica che il dispositivo non deve essere esposto alla luce solare. Questo simbolo indica che il dispositivo è fragile e deve essere maneggiato con attenzione. °C Questo simbolo indica i limiti di temperatura per funzionamento, trasporto e conservazione. Questo simbolo indica i limiti di umidità per funzionamento, trasporto e conservazione. Questo simbolo indica i limiti di pressione atmosferica per funzionamento, trasporto e conservazione. Questo simbolo indica di mantenere il dispositivo asciutto. La confezione contiene prodotti destinati a venire a contatto con alimenti secondo il regolamento 1935/2004. Questo simbolo indica il codice univoco GSI Global Trade Item Number (GTIN). Questo simbolo indica di seguire le istruzioni per l’uso. Questo simbolo indica il produttore. Questo simbolo CE indica la conformità del tiralatte Harmony ai requisiti fondamentali della Direttiva del Consiglio 93/42/CEE del 14 giugno 1993 relativa ai dispositivi medici. Simboli sul dispositivo 05 Questo simbolo indica il codice di riciclaggio (qui 05 per materiale in polipropilene PP). PP 7 PP Questo simbolo indica il codice di riciclaggio (qui 7 per tutto il materiale che non è contrassegnato dagli altri codici di riciclaggio). Questo codice indica l’utilizzo del polipropilene. Questo simbolo CE indica la conformità del tiralatte Harmony ai requisiti fondamentali della Direttiva del Consiglio 93/42/CEE del 14 giugno 1993 relativa ai dispositivi medici. 91 3. Importanti informazioni di sicurezza Per la sicurezza e la salute del vostro bambino ATTENZIONE! La mancata osservanza delle informazioni di sicurezza presenti in queste pagine può comportare situazioni di pericolo. Dispositivo Il tiralatte Harmony non è resistente al calore: tenere lontano da radiatori e fiamme libere. Non esporre il tiralatte Harmony alla luce diretta del sole. Controllare l’eventuale usura o danneggiamento dei componenti del tiralatte. Non utilizzare mai un dispositivo difettoso. Gettare al primo segnale di danneggiamento o usura. 92 Importante I Le bottiglie e i componenti in plastica diventano fragili se congelati e potrebbero rompersi cadendo. I Inoltre, le bottiglie e i componenti potrebbero danneggiarsi se non maneggiati correttamente, ad esempio se vengono fatti cadere, se serrati eccessivamente o rovesciati. I Prestare attenzione quando si maneggiano le bottiglie e i componenti. l Non utilizzare il latte materno se le bottiglie o i componenti sono danneggiati. Uso Usare il tiralatte Harmony solo per l’uso previsto, come descritto nel presente manuale. Prestare particolare attenzione quando si utilizza il tiralatte Harmony in prossimità di bambini. Mantenere tutti i componenti non utilizzati fuori dalla portata dei bambini. In caso di problemi o se si avverte dolore, consultare il proprio consulente per l’allattamento o il medico. Il prodotto deve essere utilizzato da un singolo utente. L’uso da parte di più persone può esporre a rischi per la salute. 93 4. Descrizione del prodotto 4.1 Harmony: leggero, pratico, intelligente Complimenti per l’acquisto del tiralatte Harmony, un’ottima scelta: Harmony è il primo tiralatte manuale dotato di tecnologia 2-Phase Expression, che imita il ritmo di suzione naturale del bambino. L’impugnatura ergonomica della pompa consente di alternare movimenti brevi con funzione di stimolo e movimenti più lunghi per l’estrazione del latte. Proprio come la suzione del bambino quando è alimentato al seno. È quindi possibile estrarre più latte in meno tempo. Il tiralatte Harmony è perfetto per l’uso occasionale. Ad esempio, se si presenta l’esigenza di lasciare da solo il bambino per brevi periodi, per fare sport o per concedersi un’uscita serale. O se si desidera coinvolgere il partner nell’allattamento. Harmony è utilizzabile anche in aggiunta a un tiralatte a noleggio. L’utilizzo di Harmony è indicato in caso di problemi di salute, come capezzoli screpolati, appiattiti o rientrati. 94 Le caratteristiche principali del tiralatte Harmony sono: I estrazione silenziosa e discreta; I facile da utilizzare, pulire e montare; I leggero da trasportare, adatto per l’utilizzo a casa o in viaggio. 4.2 Componenti del prodotto Per le parti di ricambio e gli accessori disponibili consultare il capitolo 12. 1 coppa per il seno PersonalFit™ 24 mm* 1 impugnatura 1 connettore a 2 componenti 1 diaframma/supporto con guarnizione O-ring 2 membrane della valvola 1 bottiglia 1 supporto per bottiglia 1 testa della valvola 1 coperchio multifunzione Calma 1 Calma Solitaire * per altre taglie di coppe per il seno consultare il capitolo 12 95 5. Pulizia Attenzione l Separare e lavare tutti i componenti che entrano in contatto con il seno o con il latte materno subito dopo l’uso per evitare l’essiccazione dei residui di latte e prevenire la formazione di batteri. l Per la pulizia, usare esclusivamente acqua potabile. Per evitare contaminazioni, non toccare la parte interna dei componenti dopo la pulizia. I Non pulire il set di pompaggio con oggetti affilati (come ad esempio stuzzicadenti). l Prestare attenzione a non danneggiare i componenti del set di pompaggio durante la pulizia. I Alcuni componenti del set di pompaggio 96 Harmony sono di dimensioni molto piccole (ad esempio la guarnizione O-ring o la membrana della valvola). Verificare che non manchi alcun componente durante il montaggio del set di pompaggio dopo la pulizia. 5.1 Prima del primo impiego e dopo ciascun utilizzo 1 Smontare il set di pompaggio nei singoli componenti. 4 Nota i l Il set di pompaggio non necessita di manutenzione. l In caso di lavaggio in lavastoviglie dei singoli componenti del set di pompaggio, è possibile che alcuni subiscano un cambiamento di colore. Ciò non comporta effetti sul funzionamento. I Non esporre il set di pompaggio o parti di esso alla luce diretta del sole o a fonti di calore. I Non utilizzare sterilizzatori chimici. Risciacquare tutti i componenti con acqua pulita e fredda (20 °C circa) per 10-15 secondi. 2 3 Risciacquare tutti i componenti con acqua pulita e fredda (20 °C circa). Verificare la presenza di eventuali danni ai singoli componenti e gettare ai primi segni di danneggiamento o di usura. oppure 97 6 In alternativa alle operazioni 2, 3 e 4. 5 Pulire tutti i componenti con abbondante acqua saponata tiepida (30 °C circa). Asciugare con un panno pulito o lasciare asciugare su un panno pulito. Se i singoli componenti del set di pompaggio sono lavati in lavastoviglie, posizionarli nel cestello superiore o nello scomparto per le posate. 5. Pulizia Attenzione I Non immergere in acqua bollente i componenti del set di pompaggio. I Per evitare contaminazioni, non toccare la parte interna dei componenti dopo la sterilizzazione. l Separare e lavare tutti i componenti che entrano in contatto con il seno o con il latte materno subito dopo l’uso per evitare l’essiccazione dei residui di latte e prevenire la formazione di batteri. l Per la pulizia, usare esclusivamente acqua potabile. i 98 5.2 Prima del primo impiego e una volta al giorno 1 Smontare il set di pompaggio nei singoli componenti. Nota lD urante la bollitura dei componenti del set di pompaggio, l’aggiunta di un cucchiaino di acido citrico consente di evitare la formazione di depositi calcarei. Grazie all’uso dell’acido citrico, sui componenti rimangono meno tracce di calcare. Per il risciacquo, utilizzare acqua potabile. Asciugare i componenti come illustrato in figura 3 a destra. 3 Asciugare con un panno pulito o lasciare asciugare su un panno pulito. Conservare i componenti puliti in una sacca o in un contenitore puliti e traspiranti, oppure in un panno o in carta puliti e traspiranti fino all’utilizzo successivo. 2a Coprire tutti i componenti con acqua e lasciare bollire per cinque minuti. oppure 2b Utilizzare una sacca per microonde Quick Clean* secondo le istruzioni. 99 * Per ulteriori informazioni visitare il sito www.medela.com 5. Pulizia 5.3 P ulizia - riepilogo 100 Prima del primo impiego e dopo ciascun utilizzo Risciacquare con acqua pulita e fredda (20 °C circa), poi pulire con abbondante acqua saponata tiepida (30 °C circa) e infine risciacquare con acqua pulita e fredda per 10-15 secondi; √ √ √ √ √ √ √ √ oppure lavare in lavastoviglie (nel cestello superiore o nello scomparto per le posate). √ √ √ √ √ √ √ √ Coprire con acqua e lasciare bollire per cinque minuti; √ √ √ √ √ √ √ √ oppure utilizzare una sacca per microonde Quick Clean secondo le istruzioni. √ -- √ √ √ √ √ √ Prima del primo impiego e una volta al giorno 101 6. Preparazione all’estrazione 6.1 Montaggio dell’impugnatura Attenzione lL avarsi accuratamente le mani (per circa un minuto) con acqua e sapone prima di toccare il seno e i componenti del tiralatte. 1 Nota i lU tilizzare esclusivamente accessori originali Medela. I Verificare che la guarnizione O-ring (bianca) si trovi posizionata sul supporto: O-ring 102 Supporto L’O-ring favorisce la tenuta del collegamento tra l’impugnatura e il connettore a 2 componenti, necessaria per creare il vuoto. i Inserire il supporto (con la guarnizione O-ring) nel foro sul lato superiore del diaframma. Il supporto e il diaframma sono componenti dell’impugnatura del tiralatte. 6.2 Montaggio del set di pompaggio 1 Informazioni lE seguire tutte le operazioni con attenzione e montare correttamente il set di pompaggio per un funzionamento ottimale. Inserire con cautela la coppa per il seno nell’apertura superiore del connettore. 3 2 √ X Assicurarsi che la base a forma ovale del supporto sia correttamente posizionata nel diaframma. 2 Posizionare la membrana della valvola in posizione orizzontale sulla testa della valvola. Spingere delicatamente la manopola sul retro della membrana nel foro più piccolo della testa fino a farla scattare in sede. La membrana deve aderire alla testa della valvola. Posizionare il diaframma nell’impugnatura del tiralatte. Esercitare una ferma pressione lungo tutto il bordo per garantire una tenuta adeguata. 3 Spingere la testa della valvola sull’anello interno del connettore. La testa della valvola deve essere posizionata lateralmente (come illustrato nell’immagine sopra). 103 6. Preparazione all’estrazione 6.2 continua 4 Avvitare la bottiglia al connettore. 104 5 Inserire il supporto del gruppo dell’impugnatura nell’apertura superiore del connettore. Spingere finché il supporto scatta in posizione. 6.3 Posizionamento della coppa per il seno 1 Pulire il seno con un panno caldo (non usare alcool). Posizionare la coppa per il seno sul seno in modo che il capezzolo sia ben centrato nel condotto. 2 Trattenere la coppa sul seno con il pollice e l’indice. Sostenere il seno con il palmo della mano. La coppa per il seno è quella giusta? A C B √ X X È importante che la coppa per il seno aderisca in modo corretto. La giusta coppa per il seno assicura comfort ed efficienza nell’estrazione del latte. La figura A sopra illustra la coppa per il seno della misura corretta. La coppa per il seno in figura B è troppo piccola, quella in figura C troppo grande. Rispondere alle seguenti domande per sapere se la misura della coppa per il seno è corretta. l Il capezzolo si muove liberamente nel condotto del paracapezzolo? l L’areola è in minima parte o per nulla attirata nel condotto della coppa? l Si nota un movimento delicato e ritmico del seno a ogni ciclo della pompa? l Dopo l’estrazione, si avverte una minor pienezza del seno, senza aree di durezza? l Non si avverte alcun dolore al capezzolo? Se la risposta a tutte le domande è „Sì“ la coppa per il seno è della misura corretta. Se la risposta a una qualunque di tali domande è „No“ o in caso di problemi o di sensazioni di dolore durante l’estrazione, la misura della coppa per il seno potrebbe non essere quella corretta. Medela offre coppe per il seno PersonalFit™ di cinque taglie diverse. Chiedere consiglio al consulente per l’allattamento o a un’ostetrica di fiducia. 105 7. Estrazione Attenzione lL avarsi accuratamente le mani (per circa un minuto) con acqua e sapone prima di toccare il seno e i componenti del tiralatte. l Consultare il proprio consulente per l’allattamento o l’ostetrica se la quantità di latte estratta è minima o nulla oppure se l’estrazione risulta dolorosa. i 106 Nota I Non tenere il set di pompaggio tramite la bottiglia. Potrebbero verificarsi il blocco o l’ingorgo dei dotti lattiferi. I Riempire la bottiglia solo fino al segno di 150 ml. 1 Iniziare l’estrazione con la stimolazione: premere verso il basso la parte più piccola dell’impugnatura. È il componente con sopra le gocce di latte. Premere e rilasciare velocemente e ripetere ulteriormente l’operazione finché il latte inizia a fluire. L a modalità Stimolazione imita la suzione iniziale veloce del bambino ed è studiata per stimolare il flusso del latte. Una volta che il latte inizia a fluire, passare su estrazione: premere verso il basso la parte più bassa e lunga dell’impugnatura. Per effetto di tale pressione si crea un vuoto che facilita il flusso del latte. Il livello di vuoto è controllabile mediante la velocità del movimento dell’impugnatura e la compressione creata. Stabilire liberamente il ritmo di aspirazione migliore. L a modalità Estrazione imita la suzione più lenta e rilassata del bambino. È pensata per ottenere il massimo flusso di latte. 3 Arrestare l’estrazione quando non esce più latte o al riempimento della bottiglia. Usare il supporto della bottiglia per evitare ribaltamenti. 4 107 Pulire come descritto al capitolo 5 2 Svitare la bottiglia dal connettore. Chiudere la bottiglia con il coperchio multifunzione. Conservare il latte materno (seguire le istruzioni riportate nel prossimo capitolo, il capitolo 8). 8. Conservazione e scongelamento del latte materno 8.1 Conservazione Linee guida per la conservazione del latte materno appena estratto (Per bambini sani, nati a termine) Temperatura ambiente Congelatore Latte materno scongelato 6-12 mesi a una temperatura compresa tra 18 e 20 °C ( tra 0 e 4 ° F ) In frigorifero per un massimo di 10 ore. Non ricongelare! Frigorifero 4-6 ore a una tempera3-8 giorni a una tura compresa tra 19 e temperatura di 4 °C 26 °C (tra 66 e 78 °F) (39 °F) o inferiore l Non conservare il latte materno nella porta del frigorifero. Scegliere invece la parte più fredda del frigorifero (la parte posteriore del ripiano in vetro sopra lo scomparto delle verdure). 8.2 Congelamento possibile congelare il latte materno appena estratto in bottiglie per latte o in sacche 108 l È „Pump & Save“*. Non riempire le bottiglie o le sacche per più di ¾, in modo da lasciare lo spazio per l’eventuale dilatazione. l Etichettare le bottiglie o le sacche „Pump & Save“ con la data di estrazione. 8.3 Scongelamento Attenzione Non scongelare il latte materno e non scaldarlo in un forno a microonde o in una pentola di acqua bollente per evitare la perdita di vitamine, sali minerali e altre importanti sostanze e per evitare ustioni. lA l fine di preservare i componenti del latte materno, scongelare il latte nel frigorifero durante la notte. In alternativa, è possibile tenere la bottiglia o la sacca „Pump & Save“ sotto l’acqua calda (max. 37 °C). l Far roteare delicatamente la bottiglia o la sacca „Pump & Save“ per miscelare il grasso eventualmente separato. Evitare di scuotere o mescolare il latte. * Per ulteriori informazioni visitare il sito www.medela.com 9. Alimentazione con latte materno i Informazioni Medela consiglia Calma per l’alimentazione con latte materno. Con Calma l il vostro bambino può alimentarsi, fare una pausa e respirare regolarmente; l il latte defluisce quando si crea un vuoto; l il comportamento di alimentazione naturale del bambino viene mantenuto, consentendo un ritorno semplice all’allattamento al seno. Calma: la soluzione perfetta per l’alimentazione con latte materno. Sul sito di Medela (www.medela.com) sono disponibili informazioni dettagliate su Calma. NE S 109 MOLAZIO TI EST ON E FLUSSO ION E CA LM Più latte in minor tempo A SION E LATTE SUPPORTO BASATO SULLA RICERCA PER MADRI CHE ALLATTANO AL SENO Inventato da Medela A L I ME NT E X PR ES 2-PHAS L DE RA ZI A supporto del comportamento di alimentazione dei neonati AZ SUZION A seguito dell’esaustivo lavoro di ricerca svolto, Medela è una delle prime aziende al mondo a tenere conto del comportamento dei neonati durante l’allattamento al seno nelle proprie innovazioni 2-Phase Expression e Calma. 2-Phase Expression imita il ritmo naturale di suzione del bambino per estrarre più latte in meno tempo. Movimenti brevi atti alla stimolazione sono seguiti da altri più lunghi, il che garantisce un flusso ottimale del latte. L’innovativo strumento di alimentazione per il latte materno Calma consente al neonato di fermarsi e respirare durante l’alimentazione, mantenendo al contempo il comportamento di suzione appreso al seno. Sviluppato per favorire un’ottimale esperienza di allattamento al seno. E 10. Risoluzione dei problemi Problema Soluzione Se la suzione è scarsa o inesistente IA ssicurarsi che la testa gialla della valvola e la membrana bianca siano pulite e non danneggiate. I Assicurarsi che la membrana aderisca alla testa della valvola. I Assicurarsi che la testa della valvola sia posizionata lateralmente sul connettore. I Assicurarsi che i componenti dell’impugnatura siano montati correttamente. I Verificare tutti i collegamenti. I Assicurarsi che la coppa per il seno aderisca completamente al seno. In caso di flusso del latte assente IA ssicurarsi che il tiralatte sia montato correttamente e che vi sia suzione. I Rilassarsi e prendersi una pausa di 10-15 minuti, se l’estrazione non viene raggiunta dopo due sessioni consecutive di estrazione. I Consultare il proprio consulente per l’allattamento o l’ostetrica se l’estrazione continua a non verificarsi. 110 In caso di guasto del prodotto, contattare la filiale locale. L’indirizzo è indicato sul retro del presente manuale di istruzioni. 11. Smaltimento Il tiralatte Harmony è realizzato in plastica. Smaltire secondo le normative locali. 111 12. Cura completa durante l’allattamento al seno Sono disponibili presso i distributori Medela le seguenti varianti del prodotto, parti di ricambio, materiali di consumo e accessori del tiralatte Harmony. Per ordinare un prodotto specificare il nome del prodotto o il numero di prodotto (articolo) corrispondente. Varianti del prodotto Codice articolo Prodotto 005.2035 Harmony™ DE/FR/IT Parti di ricambio 112 Codice articolo Prodotto 099.0259 099.0260 Impugnatura Harmony Membrana Harmony completa Materiali di consumo Codice articolo Prodotto 800.0727 Valvole e membrane. Consistono di due teste delle valvole e sei membrane. Accessori Codice articolo Prodotto 008.0327 008.0328 008.0329 008.0330 008.0331 Coppa Coppa Coppa Coppa Coppa 800.0796 200.1659 008.0315 Bottiglie per latte materno 150 ml – 3 unità Bottiglie per latte materno 250 ml - 2 unità Sacche per latte materno Pump & Save™ 008.0142 Calma Solitaire per per per per per il il il il il seno seno seno seno seno PersonalFit™ PersonalFit™ PersonalFit™ PersonalFit™ PersonalFit™ taglia taglia taglia taglia taglia S ( 21 mm ) M ( 24 mm ) L ( 27 mm ) XL ( 30 mm ) XXL ( 36 mm ) 5 BREAST SHIELD SIZES Altri prodotti Medela sono disponibili su www.medela.com. 113 Estrazione del latte materno Cura del seno Ricerca basata sull’evidenza Competenza Educazione 114 Assistenza Somministrazione del latte materno Innovazione Mondo professionale Gestione del latte materno Raccolta e conservazione 115 Inhoudsopgave 1. 2. 3. 4. Beoogd gebruik/populatie – contra-indicatie Betekenis van de symbolen Belangrijke veiligheidsinformatie Productomschrijving 117 118 120 122 4.1 Harmony – licht, handig, slim 122 4.2 Productonderdelen 5. Reiniging 5.1 Voorafgaand aan het eerste gebruik en na elk gebruik 124 5.2 Voorafgaand aan het eerste gebruik en daarna eenmaal per dag 126 5.3 Reiniging – samenvatting 6. Voorbereidingen voor het afkolven 130 6.2 De afkolfset in elkaar zetten 130 7. Afkolven 8. Moedermelk bewaren en ontdooien 9. 10. 11. 12. 13. 128 130 6.1 De handgreep in elkaar zetten 6.3 Het borstschild plaatsen 116 123 124 132 134 136 8.1 Bewaren 136 8.2 Invriezen 136 8.3 Ontdooien 136 Moedermelk voeden Problemen oplossen Afvalverwijdering Volledige verzorging tijdens de borstvoedingsperiode Technische specificaties 137 138 139 140 171 1. Beoogd gebruik/populatie – contra-indicatie Het beoogde gebruik en indicaties van borstkolven Borstkolven zijn bedoeld voor gebruik door lacterende moeders, thuis of in het ziekenhuis. Borstkolven worden geïndiceerd om de symptomen van stuwing middels het afkolven van moedermelk te verzachten. In geval van mastitis ondersteunen borstkolven het genezingsproces door moedermelk uit de aangedane borst te kolven. Door het afkolven worden tepels met wondjes en kloven minder belast, en kunnen vlakke of ingetrokken tepels naar buiten worden gebracht. Borstkolven zijn ook bedoeld om moedermelk te geven aan baby’s die om diverse redenen niet rechtstreeks aan de borst kunnen drinken, bijvoorbeeld wegens problemen met aanleggen, gespleten gehemelte of in geval van premature baby’s. Beoogde patiëntenpopulatie / gebruikers Adolescente pediatrische of volwassen lacterende moeders. Veel vrouwen vinden het gemakkelijk, en soms ook noodzakelijk, om nadat ze weer aan het werk zijn gegaan, op reis zijn, of om andere redenen van hun baby zijn gescheiden, met behulp van een borstkolf de moedermelk af te kolven en te bewaren. Vrouwen zijn vaak blij te horen dat een borstkolf gebruikt kan worden als ondersteuning bij het geven van borstvoeding en dat sommige kolven zo zijn ontworpen dat ze het zuigen van een baby imiteren. Contra-indicaties Er zijn geen contra-indicaties bekend voor de Harmony borstkolf. 117 2. Betekenis van de symbolen Het waarschuwingssymbool geeft belangrijke veiligheidsinstructies aan. Als deze instructies niet worden gevolgd, kan dit letsel of schade aan de Harmony borstkolf veroorzaken! Er zijn verschillende waarschuwingssymbolen. Elk symbool wordt in combinatie met een specifiek woord gebruikt. De symbool-woordcombinaties staan voor: Waarschuwing Het niet in acht nemen van dit type aanwijzing kan (licht) letsel of besmetting/groei van bacteriën als gevolg hebben. i i Opmerking Het niet in acht nemen van dit type aanwijzing kan materiële schade als gevolg hebben. Info Nuttige of belangrijke informatie die niet gerelateerd is aan de veiligheid. Symbolen op de verpakking Dit symbool geeft aan dat het materiaal deel uitmaakt van een terugwinnings-/recyclingproces. 118 Dit symbool geeft een kartonnen verpakking aan. Dit symbool geeft aan dat het apparaat niet in zonlicht geplaatst mag worden. Dit symbool geeft aan dat het apparaat voorzichtig behandeld moet worden. °C Dit symbool geeft de temperatuurbeperkingen aan bij gebruik, transport en opslag. Dit symbool geeft de vochtigheidsbeperkingen aan bij gebruik, vervoer en opslag. Dit symbool geeft de luchtdrukbeperkingen aan bij bediening, transport en opslag. Dit symbool geeft aan dat het apparaat droog gehouden moet worden. De verpakking bevat producten die zijn goedgekeurd om in contact te komen met levensmiddelen conform EG-verordening 1935/2004. Dit symbool geeft de unieke GSI-identificatie van handelseenheden (GTIN) aan. Dit symbool wil zeggen dat de gebruiksaanwijzing gevolgd moet worden. Dit symbool duidt de fabrikant aan. Dit CE-symbool geeft aan dat de Harmony borstkolf voldoet aan de essentiële eisen van de Richtlijn 93/42/EEC van de Raad van 14 juni 1993 betreffende medische hulpmiddelen. Symbolen op het apparaat 05 Dit symbool geeft de recyclingcode aan (in dit geval 05 voor materiaal vervaardigd van polypropyleen PP). PP 7 PP Dit symbool geeft de recyclingcode aan (in dit geval 7 voor alle materialen die niet worden aangeduid door de andere recyclingcodes). Deze code geeft aan dat bij de fabricage van het product polypropyleen is gebruikt. Dit CE-symbool geeft aan dat de Harmony borstkolf voldoet aan de essentiële eisen van de Richtlijn 93/42/EEC van de Raad van 14 juni 1993 betreffende medische hulpmiddelen. 119 3. Belangrijke veiligheidsinformatie Voor de veiligheid en de gezondheid van uw kind WAARSCHUWING! Als de op deze pagina’s vermelde veiligheidsinformatie niet wordt opgevolgd, kan dit gevaar opleveren. Apparaat De Harmony borstkolf is niet hittebestendig: weghouden van radiatoren en open vuur. Plaats de Harmony borstkolf niet in direct zonlicht. Controleer de componenten van de borstkolf op slijtage en beschadiging. Gebruik nooit een defect apparaat. Gooi onderdelen weg bij de eerste tekenen van beschadiging of verzwakking. Belangrijk: 120 I Door invriezen worden de plastic flessen en onderdelen broos en is er een verhoogde kans op breken als ze vallen. I Ook kunnen flessen en onderdelen beschadigd raken bij verkeerde hantering, bv. als ze vallen, te vast worden dichtgedraaid of worden omgestoten. I Ga voorzichtig om met flessen en onderdelen. l Gebruik de moedermelk niet als de flessen of onderdelen beschadigd zijn. Gebruik Gebruik de Harmony borstkolf alleen voor het doel waarvoor deze bestemd is, zoals beschreven in deze gebruiksaanwijzing. Er is toezicht vereist als u de Harmony borstkolf in de buurt van kinderen gebruikt. Houd alle delen die niet worden gebruikt buiten het bereik van kinderen. Consulteer uw lactatiekundige of arts in geval van problemen of pijn. Dit product is bestemd voor gebruik door één persoon. Gebruik door meer dan één persoon kan gezondheidsrisico’s met zich meebrengen. 121 4. Productomschrijving 4.1 Harmony – licht, handig, slim Uw aankoop van de Harmony borstkolf was een juiste keuze: Harmony is de eerste handkolf die is gebaseerd op de 2-Phase Expressiontechnologie. Deze technologie bootst het natuurlijke zuigritme van uw baby na. Door de ergonomische hangreep is het mogelijk te schakelen tussen korte bewegingen die stimuleren en langere bewegingen om de melk af te kolven. Precies zoals uw baby zuigt als u borstvoeding geeft. Daardoor kunt u in minder tijd meer melk afkolven. De Harmony borstkolf is ideaal voor incidenteel gebruik. Bijvoorbeeld als u korte tijd niet bij uw baby kunt zijn, bv. om te gaan sporten of bij een avondje uit. Of als u uw partner bij de borstvoeding wilt betrekken. U kunt de Harmony ook gebruiken naast een gehuurde borstkolf. De Harmony kan ook helpen bij gezondheidsproblemen zoals pijnlijke, vlakke of ingetrokken tepels. De belangrijkste kenmerken van uw Harmony borstkolf: I Zacht en discreet afkolven; I Gemakkelijk te gebruiken, te reinigen en in elkaar te zetten; I Gemakkelijk mee te nemen, geschikt voor thuisgebruik of onderweg. 122 4.2 Productonderdelen Leverbare reserveonderdelen en accessoires zijn vermeld in hoofdstuk 12. 1 x PersonalFit™ borstschild 24 mm* 1 x handgreep 1 x 2-componentenconnector 1 x diafragma/steel met O-ring 2 x membraan voor de vacuümklep 1 x fles 1 x vacuümklep 123 1 x Calma multideksel 1 x standaard 1 x Calma Solitaire * voor borstschilden in andere maten, zie hoofdstuk 12 5. Reiniging Waarschuwing l Haal de borstkolf uit elkaar en maak alle onderdelen die in aanraking komen met de borst en moedermelk onmiddellijk na het gebruik schoon, om te voorkomen dat melkresten opdrogen en om de vorming van bacteriën tegen te gaan. l Gebruik voor het reinigen alleen water van drinkkwaliteit. Raak de binnenkant van de onderdelen na reiniging niet meer aan om verontreiniging te voorkomen. IR einig de afkolfset niet met een scherp voorwerp (zoals een tandenstoker). l Pas op dat u tijdens het reinigen geen onderdelen van de afkolfset beschadigt. IS ommige delen van de Harmony afkolfset zijn erg klein (bv. de O-ring of het membraan van de vacuümklep). Controleer dat er geen onderdelen ontbreken als u de afkolfset na het reinigen 124 in elkaar zet. 5.1 Voorafgaand aan het eerste gebruik en na elk gebruik 1 Haal de afkolfset tot losse onderdelen uit elkaar. 4 Opmerking i l De afkolfset vergt geen onderhoud. l De onderdelen van de afkolfset kunnen verkleuren als ze in de vaatwasser worden gereinigd. Dit is niet van invloed op de functie. I Stel (delen van) de afkolfset niet bloot aan direct zonlicht of hitte. I Gebruik geen chemische sterilisatiemiddelen. Spoel alle onderdelen 10 - 15 seconden in koud, schoon water van circa 20 °C. 2 3 Maak alle delen schoon in ruim warm zeepwater (circa 30 °C). Spoel alle onderdelen in koud, schoon water van circa 20 °C Controleer de onderdelen en gooi ze weg bij de eerste tekenen van beschadiging of verzwakking. of 6 Als alternatief voor de stappen 2, 3 en 4. 5 Droog ze af met een schone doek of leg ze op een schone doek om te drogen. Als u de afzonderlijke onderdelen van de afkolfset in de vaatwasser reinigt, leg ze dan in het bovenste rek of in de bestekmand. 125 5. Reiniging Waarschuwing lD e delen van de afkolfset mogen niet in kokend water worden gehouden of gelegd. l Om verontreiniging te voorkomen, na sterilisatie niet de binnenkant van de onderdelen aanraken. l Haal de borstkolf uit elkaar en maak alle onderdelen die in aanraking komen met de borst en moedermelk onmiddellijk na gebruik schoon, om te voorkomen dat melkresten opdrogen en om de vorming van bacteriën tegen te gaan. l Gebruik voor het reinigen alleen water van drinkkwaliteit. 5.2 Voorafgaand aan het eerste gebruik en daarna eenmaal per dag 1 1 Haal de afkolfset tot losse onderdelen uit elkaar. 3 Opmerking i 126 l Als u de onderdelen van de afkolfset in kokend water reinigt, kunt u een theelepel citroenzuur toevoegen om kalkaanslag te voorkomen. Bij het gebruik van citroenzuur kunnen er minieme sporen op de onderdelen van de afkolfset achterblijven. Gebruik drinkwater om deze sporen af te spoelen. Droog de onderdelen zoals getoond in figuur 3 rechts. Droog ze af met een schone doek of leg ze op een schone doek om te drogen. Bewaar de schone onderdelen tot het volgende gebruik in een luchtdoorlatende, schone tas/ verpakking of in een luchtdoorlatende, schone papieren zak/doek. 2a Zorg dat alle delen onder water staan en laat vijf minuten koken. of 2b Gebruik een Quick Clean Magnetronzak* volgens de aanwijzingen. 127 * Meer informatie vindt u op www.medela.nl of www.medela.be 5. Reiniging 5.3 R einiging – samenvatting Voorafgaand aan het eerste gebruik en na elk gebruik 128 Spoel in koud, schoon water (ongeveer 20 °C), reinig daarna in ruim warm zeepwater (ongeveer 30 °C) en spoel ten slotte 10 - 15 seconden in koud, schoon water; √ √ √ √ √ √ √ √ Of reinig de onderdelen in de vaatwasser (op het bovenste rek of in de bestekmand). √ √ √ √ √ √ √ √ Voorafgaand aan het eerste gebruik en daarna eenmaal per dag Zorg dat alle delen onder water staan en laat vijf minuten koken; √ √ √ √ √ √ √ √ Of gebruik een Quick Clean Magnetronzak volgens de aanwijzingen. √ -- √ √ √ √ √ √ 129 6. Voorbereidingen voor het afkolven Waarschuwing l Was uw handen grondig (gedurende ca. een minuut) met zeep en water, voordat u uw borst en delen van de afkolfset aanraakt. 6.1 De handgreep in elkaar zetten 1 Opmerking i lG ebruik alleen originele accessoires van Medela. I Controleer of de (witte) O-ring zich nog om de steel bevindt: O-ring Steel 130 D e O-ring zorgt voor een verzegelde afsluiting tussen de handgreep en de 2-componentenconnector. Dit is nodig om een vacuüm te vormen. i Breng de steel (met de O-ring) in de opening aan de bovenkant van het diafragma. De steel en het diafragma zijn onderdelen van de handgreep van de kolf. 6.2 De afkolfset in elkaar zetten 1 Info lV oer alle stappen zorgvuldig uit en zet de afkolfset op de juiste wijze in elkaar zodat hij optimaal functioneert. Plaats het borstschild voorzichtig in de opening aan de bovenkant van de connector. 3 2 √ X Zorg ervoor dat de ovaalvormige basis van de steel zich in de juiste positie in het diafragma bevindt. 2 Plaats het membraan van de vacuümklep horizontaal op de vacuümklep. Druk de knop aan de achterkant van het membraan voorzichtig in de kleinste opening van de vacuümklep tot deze vastklikt. Het membraan moet plat op de vacuümklep liggen. Plaats het diafragma in de handgreep van de kolf Druk rondom de rand stevig aan om een juiste afsluiting te bewerkstelligen. 3 Druk de vacuümklep op de binnenring van de connector. De vacuümklep moet zijdelings gepositioneerd zijn (zoals u kunt zien op de afbeelding hierboven). 131 6. Voorbereidingen voor het afkolven 6.2 vervolg 4 Schroef de fles op de connector. 5 Plaats de steel van de handgreepset in de opening aan de bovenkant van de connector. Druk aan tot de steel vastklikt. 6.3 Het borstschild plaatsen 1 2 132 Veeg uw borst af met een warme doek (gebruik geen alcohol). Plaats het borstschild op uw borst met de tepel in het midden van de schacht. Houd het borstschild met uw duim en wijsvinger op de borst. Ondersteun uw borst met de palm van uw hand. Past het borstschild? A C B √ X X Het is belangrijk dat het borstschild goed aansluit. Een goed passend borstschild zorgt voor comfortabel en efficiënt afkolven. In figuur A hierboven ziet u een borstschild met de juiste maat. Het borstschild in figuur B is te klein, dat in figuur C te groot. Beantwoord de volgende vragen om te bepalen of uw borstschild goed aansluit: l Kan de tepel vrij binnen de schacht van het schild bewegen? l Wordt er geen of slechts een minimaal deel van uw tepelhof in de schacht van het borstschild getrokken? l Ziet u bij elke cyclus van de kolf een rustige, ritmische beweging in uw borst? l Voelt uw borst na het afkolven veel minder vol, zonder harde plekken? l Is uw tepel pijnvrij? Als u al deze vragen met „Ja“ kunt beantwoorden, heeft uw borstschild de juiste maat. Als uw antwoord op een van deze vragen „Nee“ is, of als u tijdens het afkolven problemen of pijn ondervindt, heeft het borstschild mogelijk niet de juiste maat. Medela biedt PersonalFit™-borstschilden aan in vijf verschillende maten. Vraag uw borstvoedingsdeskundige/lactatiekundige of verloskundige om advies. 133 7. Afkolven Waarschuwing lW as uw handen grondig (gedurende ca. een minuut) met zeep en water, voordat u uw borst en delen van de afkolfset aanraakt. l Raadpleeg uw verloskundige of borstvoedingsdeskundige/lactatiekundige als u slechts een minimale hoeveelheid of geen melk kunt afkolven of als het afkolven pijnlijk is. Opmerking i I Pak de afkolfset niet vast aan de fles. Dit kan leiden tot stuwing en verstopping van de melkkanalen. I Vul de fles niet verder dan tot aan 134 de 150 ml-markering 1 Start het afkolven met stimuleren: druk het kleinste deel van de handgreep naar beneden. Dit is het onderdeel waarop melkdruppels zijn afgebeeld. Druk en laat snel weer los, herhalen tot de melkstroom op gang komt. D e stimulatiemodus imiteert de eerste snelle zuigbewegingen van uw baby. Deze snelle zuigbewegingen stimuleren de melkstroom. Als de melk gaat stromen, schakel dan over op afkolven: druk het onderste, lange deel van de handgreep omlaag. Hierdoor wordt een vacuüm gecreëerd waardoor het stromen van de melk wordt bevorderd. Door de snelheid waarmee de handgreep wordt ingeknepen en de druk die wordt gecreëerd, regelt u het vacuümniveau. Beslis zelf welk kolfritme voor u optimaal is. D e afkolfmodus imiteert de langzame, ontspannen zuigbewegingen van uw baby. De afkolfmodus is bedoeld om de melkstroom te maximaliseren. 3 Stop het afkolven als u merkt dat de melk niet meer stroomt of als de fles vol is. Gebruik de flesstandaard om te voorkomen dat de fles omvalt. 4 Reinigen zoals beschreven in hoofdstuk 5 2 Draai de fles los van de connector. Sluit de fles af met het multideksel. Bewaar de moedermelk (volg de aanwijzingen die in het volgende hoofdstuk 8 worden gegeven). 135 8. Moedermelk bewaren en ontdooien 8.1 Bewaren Richtlijnen voor het bewaren van vers afgekolfde moedermelk (Voor gezonde, voldragen baby’s) Kamertemperatuur Koelkast Diepvriezer Ontdooide moedermelk 4 - 6 uur bij 19 tot 26 °C (66 tot 78 °F) 3 - 8 dagen bij 4 °C (39 °F) of lager 6 - 12 maanden -18 tot -20 °C ( 0 tot 4 ° F ) In de koelkast max. 10 u. Niet opnieuw invriezen! l Bewaar moedermelk niet in de deurvakken van de koelkast. Kies in plaats daarvan de koelste plaats in de koelkast (dat is achterin op de glazen plaat boven het groentecompartiment). 8.2 Invriezen l Vers afgekolfde moedermelk kan worden ingevroren in melkflesjes of in „Pump & Save“* moedermelkbewaarzakjes. De flesjes of de Pump & Save moedermelkbewaarzakjes niet verder dan voor ¾ vullen, zodat er ruimte overblijft voor mogelijk uitzetten bij invriezen. l Plak een etiket met daarop de afkolfdatum op de flessen of op de „Pump & Save“ moedermelkbewaarzakjes. 136 8.3 Ontdooien Waarschuwing Ingevroren moedermelk niet in een magnetron of in een pan met kokend water ontdooien, om verlies van vitaminen, mineralen, andere belangrijke ingrediënten en eventuele brandwonden te voorkomen. lO ntdooi de melk door deze gedurende een nacht in de koelkast te plaatsen. Zo blijven de ingrediënten van de moedermelk goed beschermd. Een andere mogelijkheid is om het flesje of de „Pump & Save“-zak in warm water (max. 37 °C) te plaatsen. l Het flesje of de „Pump & Save“-zak behoedzaam schudden om eventueel gescheiden vet door de melk te mengen. Vermijd hard schudden en roeren van de melk. * Meer informatie vindt u op www.medela.nl of www.medela.be 9. Moedermelk voeden i Info Medela adviseert om voor het voeden Calma te gebruiken. Met Calma l kan uw baby in zijn eigen ritme drinken, pauzeren en ademen; l stroomt de melk als er een vacuüm is gecreëerd; l blijft uw baby’s natuurlijke drinktechniek behouden, waardoor hij gemakkelijk weer kan overschakelen op de borst. Calma – uniek borstvoedingssysteem voor moedermelk. MULATIE TI AFK N ME L N LM Meer melk in minder tijd A AF K O EN LV 2 - FA S E OP ONDERZOEK GEBASEERDE ONDERSTEUNING VOOR MOEDERS DIE BORSTVOEDING VO GEVEN E Een uitvinding van Medela DE TROOM KS O E LV Ondersteuning van het drinkgedrag van baby's CA ZUIGEN Op basis van uitgebreid wetenschappelijk onderzoek heeft Medela als een van de eerste bedrijven ter wereld de borstvoedingstechniek van baby’s geïntegreerd in de innovatieve 2-Phase Expression en de Calma. 2-Phase Expression imiteert het natuurlijke zuigritme van baby’s, zodat er meer melk in minder tijd wordt afgekolfd. Korte, stimulerende kolfpatronen worden gevolgd door langere, voor een optimale melkstroom. Met Calma, het unieke voedingssysteem voor moedermelk, kunnen baby’s tijdens het drinken pauzeren en ademhalen, en behouden ze het aan de borst geleerde zuiggedrag. Ontwikkeld voor een fijne voedingservaring voor moeder en baby. S Gedetailleerde informatie over Calma vindt u op de website van Medela (www.medela.nl of www.medela.be). 137 10. Problemen oplossen Probleem Oplossing Er is weinig of geen zuigkracht IC ontroleer of de gele vacuümklep en het witte membraan schoon en onbeschadigd zijn. I Controleer of het membraan van de vacuümklep plat op de vacuümklep ligt. I Controleer of de vacuümklep zijdelings op de connector is gepositioneerd. I Controleer of de onderdelen van de handgreep correct in elkaar zijn gezet. I Controleer alle aansluitingen. I Zorg ervoor dat het borstschild de borst rondom luchtdicht afsluit. Er komt geen melkstroom op gang IC ontroleer of de borstkolf correct in elkaar is gezet en er zuigkracht is. I Ontspan en neem 10-15 minuten pauze als het afkolven na twee opeenvolgende stimulatiesessies niet op gang komt. I Raadpleeg uw borstvoedingsdeskundige/lactatiekundige of verloskundige als de melkstroom ook dan niet op gang komt. Functioneert het product niet naar behoren, neem dan contact op met de dichtstbijzijnde Medela-vestiging. U vindt de adressen aan de achterkant van deze handleiding. 138 11. Afvalverwijdering De Harmony is vervaardigd van kunststof. Afvalverwijdering moet plaatsvinden in overeenstemming met de plaatselijke voorschriften. 139 12. Volledige verzorging tijdens de borstvoedingsperiode De volgende productvarianten, vervangingsonderdelen, verbruiksartikelen en accessoires voor de Harmony borstkolf zijn verkrijgbaar via de distributiepartners van Medela. U kunt een product bestellen door de productnaam of het desbetreffende product-/artikelnummer op te geven. Productvarianten Artikelnummer Product 005.2039 Harmony™ EN/NL/FR Reserveonderdelen Artikelnummer Product 099.0259 099.0260 Harmony handgreep Harmony membraan compleet Verbruiksartikelen 140 Artikelnummer Product 800.0727 Vacuümkleppen en membranen. Bestaat uit twee vacuümkleppen en zes membranen Accessoires Artikelnummer Product 008.0337 008.0338 008.0339 008.0340 008.0341 PersonalFit™ PersonalFit™ PersonalFit™ PersonalFit™ PersonalFit™ 800.0796 200.1659 008.0315 Moedermelkflesjes 150 ml – 3 stuks Moedermelkflesjes 250 ml – 2 stuks Pump & Save™ moedermelkbewaarzakjes 008.0140 Calma Solitaire borstschild borstschild borstschild borstschild borstschild S ( 21 mm ) M (24 mm) L (27 mm) XL ( 30 mm ) XXL ( 36 mm ) 5 BREAST SHIELD SIZES Andere producten van Medela vindt u op www.medela.com. 141 Kolven Borstverzorging Research Based onderzoek Voorlichting Expertise Service Voeden Innovatie Deskundigen 142 Omgaan met moedermelk Opvangen 143 Daftar Isi 1. 2. 3. 4. Peruntukan/Populasi - Kontraindikasi Arti simbol Petunjuk keselamatan penting Uraian produk 145 146 148 150 4.1 Harmony - ringan, nyaman, pintar 150 4.2 Bagian produk 151 5. Membersihkan 152 5.1 Sebelum menggunakannya untuk kali pertama dan selanjutnya 152 5.2 Sebelum menggunakannya untuk kali pertama dan sekali setiap hari 154 5.3 Pembersihan - ringkasan 6. Persiapan memompa 6.1 Memasang pegangan 158 6.2 Merakit set memompa 158 6.3 Menempatkan breastshield 7. Ekspresi 8. Menyimpan dan mencairkan ASI 9. 10. 11. 144 12. 13. 156 158 160 162 164 8.1 Menyimpan 164 8.2 Membekukan 164 8.3 Mencairkan 164 Memberikan ASI Jika ada masalah Pembuangan Perawatan lengkap selama periode menyusui Spesifikasi teknis 165 166 167 168 171 1. Peruntukan/Populasi - Kontraindikasi Peruntukan dan indikasi pompa ASI ini Pompa ASI ini ditujukan untuk membantu ibu-ibu menyusui di rumah sakit atau di rumah untuk memerah ASI. Indikasi pompa ASI adalah meringankan gejala pembengkakan dengan memerah ASI. Untuk kasus mastitis, pompa ASI mendukung proses penyembuhan dengan membuang ASI dari payudara yang sakit. Pompa ASI ini ditujukan untuk meringankan puting luka dan retak dan mengembalikan posisi puting yang terbenam atau datar. Pompa ASI ini juga memudahkan para ibu memberikan ASI pada bayi yang tidak dapat menyusu secara langsung akibat gangguan menghisap, bibir sumbing, atau lahir prematur. Populasi pasien/pengguna yang dituju Perempuan menjelang dewasa atau ibu menyusui Banyak perempuan merasa nyaman, atau bahkan perlu, menggunakan pompa ASI untuk mengeluarkan dan menyimpan ASI saat kembali bekerja, atau selama melakukan perjalanan atau saat sedang jauh dari 145 bayi mereka. Wanita senang mengetahui bahwa pompa ASI dapat digunakan untuk menyempurnakan pemberian ASI dan bahwa beberapa jenis pompa dirancang meniru isapan bayi yang sedang menyusu. Kontraindikasi Tidak ada kontraindikasi untuk pompa ASI Harmony. 2. Arti simbol Simbol peringatan berisi semua petunjuk penting bagi keselamatan. Patuhi petunjuk-petunjuk tersebut untuk menghindari cedera atau kerusakan pada pompa ASI Harmony! Terdapat beberapa simbol peringatan. Setiap simbol digunakan secara bersamaan dengan kata yang spesifik. Kombinasi simbol / kata peringatan merupakan: Awas Kegagalan untuk mengikuti instruksi dari jenis ini dapat menyebabkan (minor) cedera atau kontaminasi / pertumbuhan bakteri. i i Catatan Kegagalan untuk mengikuti instruksi dari jenis ini dapat menyebabkan material menjadi rusak. Info Informasi berguna atau penting yang tidak berhubungan dengan keselamatan. Simbol pada kemasan Simbol ini berarti produk menggunakan bahan hasil daur ulang. Simbol ini berarti kemasan karton. Simbol ini berarti jauhkan perangkat dari sinar matahari. Simbol ini berarti barang mudah pecah tangani dengan hati-hati. 146 °C Simbol menunjukkan batasan suhu pengoperasian, pengangkutan, dan penyimpanan. Simbol ini menunjukkan batasan kelembaban pengoperasian, pengangkutan, dan penyimpanan. Simbol ini menunjukkan batasan tekanan atmosfer untuk pengoperasian, pengangkutan, dan penyimpanan. Simbol ini artinya jaga perangkat tetap kering. Paket berisi produk yang ditujukan berhubungan dengan makanan sesuai dengan peraturan 1935/2004. Simbol ini menunjukkan Nomor Item Perdagangan Global GSI (GTIN) unik. Simbol ini artinya patuhi petunjuk penggunaan. Simbol ini menunjukkan produsen alat. Simbol CE ini menunjukkan kepatuhan Pompa ASI Harmony dengan persyaratan penting dari Council Directive 93/42/EEC 14 Juni 1993 tentang peralatan medis. Simbol pada perangkat 05 PP 7 PP Simbol ini menunjukkan kode daur ulang (di sini 05 untuk bahan terbuat dari polypropylene PP). Simbol ini menunjukkan kode daur ulang (di sini 7 untuk semua bahan yang tidak ditentukan oleh kode daur ulang lainnya). Kode ini menunjukkan penggunaan polypropylene. Simbol CE ini menunjukkan kepatuhan Pompa ASI Harmony dengan persyaratan penting dari Council Directive 93/42/EEC 14 Juni 1993 tentang peralatan medis. 147 3. Petunjuk keselamatan penting Untuk keselamatan dan kesehatan anak Anda PERINGATAN! Kegagalan untuk mengikuti informasi keselamatan pada halaman ini dapat menyebabkan bahaya. Produk Pompa ASI Harmony tidak tahan panas: jauhkan dari radiator dan api terbuka. Hindarkan pompa ASI Harmony dari sinar matahari langsung. Periksa komponen ASI untuk pemakaian atau kerusakan. Jangan menggunakan produk rusak. Buang pada saat ditemukan tanda tanda kerusakan atau kecacatan. Penting: I Botol dan bagian komponen dari plastik menjadi rapuh jika beku dan dapat pecah jika jatuh. I Selain itu, botol dan bagian-bagian komponen dapat rusak jika tidak ditangani dengan benar, misalnya, terjatuh, terlalu kencang, atau terbentur. I Hati-hati saat menangani botol dan komponen. I Jangan gunakan ASI jika botol atau komponen rusak. 148 Penggunaan Gunakan pompa ASI Harmony sesuai peruntukannya seperti diuraikan di dalam buku petunjuk ini. Hati-hati saat menggunakan pompa ASI Harmony ini di sekitar anak-anak. Jauhkan semua bagian yang tidak sedang digunakan dari jangkauan anak-anak. Jika muncul gangguan atau rasa sakit, hubungi konsultan laktasi atau dokter Anda. Satu produk satu pengguna saja. Menggunakannya secara bergantian berbahaya bagi kesehatan. 149 4. Uraian produk 4.1 Harmony - ringan, nyaman, pintar Dengan membeli pompa ASI Harmony, Anda telah memilih dengan baik: Harmony merupakan pompa ASI manual pertama yang berdasarkan Teknologi Ekspresi 2-Fase. Teknologi ini meniru irama mengisap alami bayi Anda. Pegangan pompa yang ergonomis memungkinkan Anda untuk bergantian antara gerakan pendek untuk merangsang dan yang lebih panjang, untuk mengekspresikan ASI. Sama seperti bayi Anda menghisap ketika sedang menyusu di payudara Anda. Sebagai hasilnya, Anda dapat mengekspresikan lebih banyak ASI dalam waktu yang lebih sedikit. Pompa ASI Harmony sangat ideal untuk penggunaan sesekali. Misalnya, apabila Anda perlu untuk meninggalkan bayi Anda untuk jangka pendek, misalnya melakukan olahraga atau keluar malam. Atau apabila Anda ingin melibatkan pasangan Anda dalam menyusui. Anda juga dapat menggunakan Harmony di samping pompa yang disewakan. Harmony juga dapat membantu mengatasi masalah kesehatan, seperti puting lecet, datar atau terbenam. Fitur utama dari pompa ASI Harmony: I Tidak Bersuara dan tidak kentara dalam memompa; I Mudah digunakan, dibersihkan dan dipasang; I Ringan dibawa, sesuai untuk penggunaan rumah atau bepergian. 150 4.2 Bagian produk Anda dapat menemukan suku cadang dan aksesoris tersedia untuk pemesanan di chapter 12. 1 x PersonalFit ™ Breastshield 24 mm * 1 x pegangan 1x2-konektor komponen 1 x diafragma/ tangkai dengan O-ring 2x membran katup 1x ujung katup 1x Calma multi-lid 1x botol 151 1x kaki botol 1 x Calma Solitaire * untuk ukuran corong lain, baca chapter 12 5. Membersihkan Awas l Lepas dan cuci semua komponen yang berkontak dengan payudara dan ASI segera setelah digunakan untuk menghindari sisa ASI yang mengering dan mencegah pertumbuhan bakteri. l Hanya gunakan air yang benar-benar bersih untuk membersihkan produk. Untuk menghindari kontaminasi, jangan menyentuh bagian dalam bagianbagian setelah dibersihkan. I Jangan membersihkan set memompa dengan benda tajam (seperti tusuk gigi). l Hati-hati jangan sampai merusak set memompa saat dibersihkan. I Beberapa bagian dari set memompa Harmony sangat kecil (misalnya O-ring atau katup membran). Periksa apakah ada bagian yang hilang ketika Anda memasang set memompa setelah dibersihkan. 5.1 Sebelum menggunakannya untuk kali pertama dan selanjutnya 1 Melepas set memompa menjadi bagian-bagian tersendiri. 4 Catatan i lS et memompa tidak memerlukan perawatan khusus. 152 l Apabila Anda membersihkan bagian dari set memompa kedalam mesin cuci piring, bagian-bagian tersebut dapat berubah warna. Perubahan warna ini tidak mengurangi fungsi produk. I Jangan biarkan (bagian dari) set memompa di bawah sinar matahari langsung atau panas. I Tidak menggunakan sterilliser kimia. Bilas semua bagian dengan air bersih dingin (suhu kira-kira 20 °C) selama 10 - 15 detik. 2 3 Bilas semua bagian dengan air bersih dingin (suhu kira-kira 20 °C). Periksa bagian-bagian dari kerusakan dan buang pada saat ditemukan tanda-tandar kerusakan atau kecacatan. atau 6 Sebagai alternatif untuk langkah 2, 3 dan 4. 5 Bersihkan semua bagian dengan air sabun hangat yang banyak (suhu kira-kira 30 °C). Keringkan dengan kain bersih atau biarkan mengering di atas kain bersih. Taruh set memompa di rak atas atau rak pisau jika Anda membersihkannya di pencuci perabot. 153 5. Membersihkan Awas I J angan menjatuhkan bagian dari set memompa ke dalam air mendidih. I Untuk menghindari kontaminasi, tidak menyentuh bagian dalam dari komponen-komponen setelah sterilisasi. l Lepas dan cuci semua bagian yang berkontak dengan payudara dan ASI segera setelah digunakan untuk menghindari sisa ASI yang mengering dan mencegah pertumbuhan bakteri. l Hanya gunakan air yang benar-benar bersih untuk membersihkan produk. 5.2 Sebelum menggunakannya untuk kali pertama dan sekali setiap hari 1 Urai set memompa per komponennya. Catatan i l Bila Anda merebus bagian dari set memompa, Anda bisa menambahkan satu sendok teh asam sitrat untuk menghindari penumpukan limescale. Bila Anda menggunakan asam sitrat, mungkin masih tersisa pada bagian-bagian 154 pompa. Gunakan air minum berkualitas untuk membersihkannya. Keringkan bagian seperti yang ditunjukkan pada gambar 3 ke kanan. 3 Keringkan dengan kain bersih atau biarkan mengering di atas kain bersih. Simpan bagian-bagian bersih di wadah / kantung yang berpori, bersih, atau di kain / kertas yang berpori, bersih hingga pemakaian berikutnya. 2a Rendam semua bagian dalam air dan rebus selama lima menit. atau 2b Gunakan Kantung Microwave Quick Clean* sesuai petunjuk. 155 * Informasi lebih lanjut ada di www.medela.com 5. Membersihkan 5.3 P embersihan - ringkasan Sebelum menggunakannya untuk kali pertama dan selanjutnya 156 Bilas dengan air dingin, jernih (sekitar 20 ° C), kemudian bersihkan dengan air sabun hangat (sekitar 30 ° C) dan akhirnya bilas dengan air dingin, jernih selama 10 - 15 detik; √ √ √ √ √ √ √ √ Atau cuci di mesin cuci piring (di rak atas atau di bagian sendok garpu). √ √ √ √ √ √ √ √ Rendam dengan air dan didihkan selama lima menit; √ √ √ √ √ √ √ √ Atau gunakan kantung Microwave Quick Clean sesuai petunjuk. √ -- √ √ √ √ √ √ Sebelum menggunakannya untuk kali pertama dan sekali setiap hari 157 6. Persiapan memompa 6.1 Memasang pegangan Awas l Cuci tangan Anda secara menyeluruh (untuk kira-kira satu menit) dengan sabun dan air sebelum menyentuh payudara Anda dan bagian-bagian pompa. 1 Catatan i l Gunakan aksesori asli Medela saja. I Periksa apakah O-ring (putih) masih berada di sekitar tangkai: O-ring Masukkan tangkai (dengan O-ring) ke dalam lubang di bagian atas diafragma. Tangkai dan diafragma adalah bagian pegangan pompa. Tangkai O-ring membuat koneksi tersegel antara pegangan dan 2-konektor komponen dimungkinkan. Hal ini diperlukan untuk membangun vakum. 158 i 6.2 Merakit set memompa 1 Info l Laksanakan semua langkah di atas dengan hati-hati dan rangkai set memompa dengan benar. Dengan hati-hati masukkan corong ke pembukaan atas konektor. 3 2 √ X Pastikan alas tangkai berbentuk oval memiliki posisi yang tepat dalam diafragma. 2 Tempatkan diafragma ke pegangan pompa. Tekan dengan kuat di sekitar seluruh tepi untuk memastikan segel yang tepat. 3 159 Tempatkan katup membran dalam posisi horisontal pada kepala katup. Dengan hati-hati dorong knop di bagian belakang membran ke dalam lubang terkecil dari kepala sampai menyatu. Membran harus menempel di bagian atas. Dorong kepala katup ke cincin bagian dalam konektor. Kepala katup harus diposisikan ke samping (seperti yang Anda lihat pada gambar di atas). 6. Persiapan memompa 6.2 bersambung 4 Pasang botol ke konektor. 5 Masukkan tangkai yang telah dirakit di pegangan ke dalam lubang di atas konektor. Dorong hingga tangkai terkunci ke tempatnya. 6.3 Menempatkan breastshield 1 2 160 Bersihkan payudara dengan kain hangat (jangan gunakan alkohol). Tempatkan corong pada payudara Anda sehingga puting Anda benar berpusat di dalam terowongan. Tahan corong ke payudara dengan ibu jari dan telunjuk Anda. Sangga payudara dengan telapak tangan Anda. Apakah corong Anda sesuai? A C B √ X X Penting bahwa corong sesuai secara benar. Corong yang sesuai secara benar memastikan kenyamanan dan ekspresi ASI secara efisien. Gambar A di atas menunjukkan corong dengan ukuran yang benar. Corong pada gambar B terlalu kecil, yang di gambar C terlalu besar. Jawablah pertanyaan-pertanyaan berikut untuk mengetahui apakah corong Anda sesuai secara benar: l Apakah puting Anda bergerak bebas di dalam terowongan? l Apakah sebagian jaringan di sekitar puting sedikit tertarik ke terowongan corong atau tidak sama sekali? l Apakah Anda melihat gerakan lembut dan ritmis pada payudara selama siklus pemompaan? l Setelah memompa, apakah payudara Anda terasa lebih ringan, dengan tidak ada daerah yang keras? l Apakah puting Anda tidak terasa nyeri? Jika jawaban untuk semua pertanyaan ini adalah „Ya“, maka corong Anda telah sesuai dengan benar. Jika jawaban untuk semua pertanyaan ini adalah „Tidak“, atau jika Anda mengalami masalah atau sakit saat ekspresi, corong Anda mungkin bukan ukuran yang tepat. Medela menawarkan lima ukuran yang berbeda dari corong PersonalFit™. Konsultasikan ke konsultan laktasi dan menyusui atau bidan untuk meminta saran. 161 7. Ekspresi Awas lC uci tangan Anda secara menyeluruh (untuk kira-kira satu menit) dengan sabun dan air sebelum menyentuh payudara Anda dan bagian-bagian pompa. l Hubungi bidan atau konsultan laktasi dan menyusui apabila ASI yang dihasilkan terlalu sedikit atau tidak keluar sama sekali atau Anda merasa nyeri selama fase ekspresi. Catatan i I Jangan menggunakan botol untuk menahan set memompa. Hal ini dapat menyebabkan pembengkakan dan penyumbatan saluran susu. I Isi botol tidak lebih dari tanda 150 ml. 162 1 Mulai memompa dengan stimulasi: tekan bagian kecil dari pegangan. Ini adalah bagian dengan gambar ASI menetes di bagian atas. Tekan dan lepas dengan cepat berulang kali sampai ASI mulai mengalir. M ode Stimulasi meniru hisapan awal yang cepat dari bayi Anda. Hal ini dirancang untuk merangsang aliran susu. Setelah susu mulai mengalir, beralih ke ekspresi: tekan ke bawah bagian pegangan yang lebih panjang, lebih rendah. Dengan demikian, Anda membangun vakum yang memfasilitasi aliran susu. Anda mengontrol tingkat vakum dengan kecepatan kayuhan pegangan dan tekanan yang dibuat. Putuskan sendiri irama memompa mana yang terbaik untuk Anda. M ode Expresi meniru pengisapan bayi yang lebih lambat, lebih santai. Hal ini dirancang untuk memaksimalkan aliran susu. 3 Berhenti memompa pada saat Anda merasa bahwa susu tidak mengalir lagi atau ketika botol penuh. Gunakan kaki botol untuk mencegahnya terbalik. 4 Bersihkan seperti yang dijelaskan di chapter 5 2 Lepaskan botol dari konektor. Tutup botol dengan multi tutupnya. Simpan ASI (ikuti instruksi dalam bab berikutnya, chapter 8). 163 8. Menyimpan dan mencairkan ASI 8.1 Menyimpan Pedoman untuk penyimpanan baru ASI (Untuk bayi yang lahir dan normal) Suhu ruangan Kulkas Lemari beku Pencairan ASI 4 - 6 jam pada 19 sampai 26°C (66 sampai 78°F) 3 - 8 hari pada 4°C (39°F) atau lebih rendah 6 − 12 bulan –18 to – 20 °C ( 0 to 4 ° F ) Di dalam lemari es untuk maksimum 10 j. Jangan dibekukan kembali! lT idak menyimpan ASI pada pintu kulkas. Sebaliknya pilih bagian yang terdingin dari lemari es (terletak di belakang rak kaca diatas rak sayuran). 8.2 Membekukan l I Anda dapat membekukan ASI di dalam botol susu atau kantung “Pump & Save”*. Jangan mengisi botol atau kantung lebih dari ¾ penuh untuk memberikan ruang untuk kemungkinan pengembangan. l Cantumkan tanggal ekspresi pada botol atau kantung „Pump & Save“. 8.3 Mencairkan Awas 164 Jangan mencairkan ASI atau jangan menghangatka ASI di dalam microwave atau merebus dengan air mendidih di dalam panci untuk menghindari hilangnya vitamin, mineral dan protein-protein penting lainnya dan untuk mencegah terbakar. l I Untuk mempertahankan komponen-komponen ASI , cairkan didalam lemari es semalam. Cara lain, Anda dapat memegang botol atau kantung „Pump & Save“ di bawah air hangat (maks. 37 °C). l Secara lembut putar botol atau kantung „Pump & Save“ untuk mencampur lemak yang terpisah. Hindari mengocok atau mengaduk susu. * Informasi lebih lanjut ada di www.medela.com 9. Memberikan ASI i Info Medela merekomendasikan Calma untuk memberikan ASI. Dengan Calma l bayi Anda dapat minum, beristirahat sejenak dan bernafas secara teratur. l susu akan mengalir ketika kondisi vakum tercapai. l perilaku menyusu alami bayi Anda dipertahankan sehingga transisi kembali ke payudara dapat dilakukan dengan mudah. S Anda dapat menemukan informasi lebih rinci tentang Calma di situs Medela (www.medela.com). MULASI TI ME M A MP O Mendukung perilaku makan bayi LM MENGI Lebih banyak ASI lebih sedikit waktu S AP AL SI CA A E K SP RE 2 - FA S A DUKUNGAN BERBASIS PENELITIAN BAGI IBU MENYUSUI MA K Diciptakan oleh Medela AN AN SUS IR U Berkat penelitian yang komprehensif, Medela menjadi salah satu perusahaan pertama di dunia yang berhasil merefleksikan perilaku menyusu bayi lewat inovasinya yaitu 2 Phase Expression dan Calma. 2-Phase Expression meniru ritme alami bayi mengisap untuk memerah ASI lebih banyak dalam waktu yang lebih singkat. Pola stimulasi pendek diikuti pola stimulasi yang lebih panjang, sehingga menghasilkan aliran susu yang optimal. Berkat perangkat Calma yang unik ini, bayi dapat beristirahat dan bernafas selama menyusu sekaligus mempertahankan perilaku menyusu yang mereka pelajari secara alami. Dikembangkan untuk pengalaman menyusui yang baik. Calma - solusi unik untuk memberikan ASI. 165 10. Jika ada masalah Gangguan Tindakan Isapan lemah atau tidak ada sama sekali I I I I I I Jika tidak ada aliran ASI IP astikan ASI Anda telah terpasang dengan benar dan ada hisap. I Santai dan istirahat 10-15 menit jika ekspresi tidak tercapai setelah dua sesi memompa berturut-turut. I Konsultasikan dengan konsultan laktasi dan menyusui Anda atau bidan jika expresi masih tidak terjadi. astikan kepala katup kuning dan membran putih, bersih dan tidak rusak. P Pastikan membran terletak datar di kepala katup. Pastikan kepala katup diposisikan menyamping pada konektor. Pastikan komponen pegangan dirakit dengan benar. Periksa semua sambungan. Pastikan corong menutup payudara dengan sempurna. Dalam kasus kegagalan produk, silakan hubungi cabang perusahaan lokal Anda. Anda dapat menemukan alamat di balik instruksi manual ini. 166 11. Pembuangan Pompa ASI Harmony terbuat dari plastik. Anda harus membuangnya sesuai dengan peraturan lokal. 167 12. Perawatan lengkap selama periode menyusui Varian produk, suku cadang, dan aksesoris untuk Pompa ASI Harmony berikut tersedia dari mitra distributor Medela. Anda dapat memesan produk dengan menyebutkan nama produk atau nomor (artikel) produk yang sesuai. Varian produk Nomor artikel Produk 005.2039 Harmony™ Suku cadang Nomor artikel Produk 099.0259 099.0260 Pegangan Harmony Membran Harmony komplit Habis pakai 168 Nomor artikel Produk 800.0727 Katup & Membran. Terdiri dari dua kepala katup dan enam membran Aksesoris Nomor artikel Produk 008.0337 008.0338 008.0339 008.0340 008.0341 PersonalFit™ PersonalFit™ PersonalFit™ PersonalFit™ PersonalFit™ 800.0796 200.1659 008.0315 Botol ASI 150 ml - 3 pcs. Botol ASI 250 ml - 2 pcs. Kantung ASI Pump & Save™ 008.0139 Calma Solitaire Breastshield Breastshield Breastshield Breastshield Breastshield S ( 21 mm ) M ( 24 mm ) L ( 27 mm ) XL ( 30 mm ) XXL ( 36 mm ) 5 BREAST SHIELD SIZES Produk lain dari Medela dapat dilihat di situs web www.medela.com. 169 Memompa Perawatan Riset Berbasis Bukti Pendidikan Kepakaran Layanan Menyusui Inovasi Profesional 170 Mengelola susu ibu Mengumpulkan 13. Technical specifications Vacuum Vakuum Vide Vuoto Vacuüm Vakum Stimulation phase Stimulationsphase Phase de stimulation Fase di stimolazione Stimulatiefase Fase stimulasi 0...–150 mmHg 0...–20 kPa +40 +5 °C +50 -20 °C 80 20 95 20 106 70 kPa Expression phase Abpumpphase Phase d‘expression Fase di estrazione Afkolffase Fase ekspresi 0...–230 mmHg 0...–31 kPa Operation Betrieb Utilisation Funzionamento Bediening Pengoperasian Transport / Storage Transport / Lagerung Transport/stockage Trasporto/Conservazione Vervoer/opslag Pengangkutan/Penyimpanan Operation Betrieb Utilisation Funzionamento Bediening Pengoperasian Transport / Storage Transport / Lagerung Transport/stockage Trasporto/Conservazione Vervoer/opslag Pengangkutan/Penyimpanan Transport / Storage / Operation Transport / Lagerung / Betrieb Transport/stockage/utilisation Trasporto/Conservazione/Funzionamento Vervoer/opslag/bediening Pangangkutan/Penyimpanan/Pengoperasian 171 ref. master doc. 200.7050/B International Sales Medela AG Lättichstrasse 4b 6341 Baar Switzerland Phone +41 (0)41 769 51 51 Fax +41 (0)41 769 51 00 [email protected] www.medela.com Germany & Austria Medela Medizintechnik GmbH & Co. Handels KG Postfach 1148 85378 Eching Germany Phone +49 (0)89 31 97 59-0 Fax +49 (0)89 31 97 59 99 [email protected] www.medela.de France Medela France Sarl 14, rue de la Butte Cordière 91154 Etampes Cedex France Phone +33 (0)1 69 16 10 30 Fax +33 (0)1 69 16 10 32 [email protected] www.medela.fr Italy Medela Italia Srl Via Turrini, 13-15 - Loc. Bargellino 40012 Calderara di Reno (BO) Italy Phone + 39 051 72 76 88 Fax + 39 051 72 76 89 [email protected] www.medela.it Australia Medela Australia Pty Ltd, Medical Technology 3 Arco Lane, Heatherton, Vic 3202 Australia Phone +61 (0) 3 9552 8600 Fax +61 (0) 3 9552 8699 [email protected] www.medela.com.au Netherlands & Belgium Medela Benelux BV Uilenwaard 31 5236 WB ‚s-Hertogenbosch Netherlands Phone +31 73 690 40 40 Fax +31 73 690 40 44 [email protected] [email protected] www.medela.nl www.medela.be Switzerland Medela AG Lättichstrasse 4b 6341 Baar Switzerland Phone +41 (0)848 633 352 Fax +41 (0)41 769 51 00 [email protected] www.medela.ch United Kingdom Medela UK Ltd. Huntsman Drive Northbank Industrial Park Irlam, Manchester M44 5EG United Kingdom Phone +44 (0)161 776 0400 Fax +44 (0)161 776 0444 [email protected] www.medela.co.uk © Medela AG/200.7169/2014-03/A Medela AG Lättichstrasse 4b 6341 Baar, Switzerland www.medela.com