1
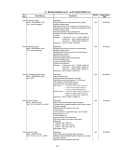
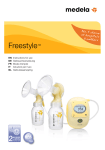
Freestyle™
EN Instructions for use | DE Gebrauchsanweisung | FR Mode d'emploi
IT Istruzioni per l’uso | NL Gebruiksaanwijzing | ID Petunjuk penggunaan
BPA Bisphenol-A free
EFFICIENCY
Thank you for choosing the Freestyle Breastpump. Breastmilk is the natural choice for your baby,
but there are reasons and situations where breastfeeding is not possible. For over 50 years, it has
been Medela’s conviction that these mothers and babies can be supported. In close co-operation
with breastfeeding experts, Medela, one of the market leaders, has researched and developed
breastpumps that perfectly meet breastfeeding mothers needs. For mothers who insist on the
best for their babies and themselves. Because you care.
Herzlichen Dank, dass Sie sich für die Freestyle Milchpumpe entschieden haben. Muttermilch ist
an sich das Beste für Ihr Baby, doch es gibt viele Gründe, weshalb Stillen nicht immer möglich ist.
Als einer der Marktführer setzt sich Medela seit über 50 Jahren mit Überzeugung für das Wohl
von Babys und Müttern ein. In Zusammenarbeit mit Stillexperten und mit führenden Forschern hat
Medela Milchpumpen entwickelt, die optimal auf die Bedürfnisse stillender Frauen abgestimmt
sind. Für Mütter, die das Beste für ihr Baby und sich wollen. «Because you care».
Medela vous remercie d'avoir acheté un tire-lait Freestyle. Le lait maternel est le meilleur aliment
pour votre enfant, mais il n'est pas toujours possible de l'allaiter partout ou au bon moment.
Depuis plus de 50 ans, l'objectif de Medela, l'un des leaders sur le marché des tire-laits et
accessoires d'allaitement, est de soutenir le bien-être des mamans et de leurs bébés. Medela
a développé des tire-laits qui répondent de façon optimale aux besoins des mamans allaitantes,
en collaboration avec des experts de l’allaitement et des chercheurs avant-gardistes. Pour les
mamans qui ne veulent que le meilleur pour elles et leurs bébés. «Because you care.»
Grazie per aver scelto il tiralatte Freestyle. Il latte materno è la scelta naturale per il tuo bambino,
ma in alcuni casi non è possibile allattare al seno. Da oltre 50 anni Medela è impegnata ad aiutare
madri e bambini che si trovano in questa situazione. In stretta cooperazione con gli esperti di
allattamento al seno, Medela, uno dei leader del mercato, ha condotto ricerche volte a sviluppare
tiralatte che soddisfino pienamente le esigenze delle mamme che allattano. Per madri che
vogliono il meglio per i loro bambini e per loro stesse. „Because you care“.
Hartelijk dank dat je voor de Freestyle borstkolf hebt gekozen. Moedermelk is de natuurlijke keuze
voor je baby, maar er zijn redenen en omstandigheden waarin het niet mogelijk is om borstvoeding te geven. Medela is er al meer dan 50 jaar van overtuigd dat deze moeders en baby's ondersteund kunnen worden. In nauwe samenwerking met borstvoedingsdeskundigen heeft Medela,
een van de marktleiders, na uitvoerig onderzoek borstkolven ontwikkeld die perfect tegemoetkomen aan de behoeften van moeders die borstvoeding geven. Voor moeders die het beste willen
voor hun baby en voor zichzelf. Uit liefde.
Terima kasih telah memilih Pompa ASI Freestyle. ASI adalah pilihan alami bagi bayi Anda, tetapi
situasi dan kondisi kadang membuat menyusui tidak mungkin. Selama lebih dari 50 tahun,
Medela yakin ada yang dapat dilakukan untuk membantu ibu-ibu dan bayi-bayi ini. Medela, salah
satu pemimpin pasar, bekerja sama dengan pakar per-ASI-an, berhasil meneliti dan
mengembangkan pompa ASI yang benar-benar memenuhi kebutuhan ibu menyusui. Untuk para
ibu yang menginginkan yang terbaik bagi bayi mereka juga mereka sendiri. Karena Anda peduli.
EN
4–33
DE
34–63
FR
64–93
IT
94–123
NL
124–153
ID
154–183
Table of Contents
4
1. Intended use / Population – Contraindication
5
2. Meaning of symbols
6
3. Important safety information
8
4. Product description
10
4.1 Freestyle – all-in-one, innovative, time-saving
10
4.2 Product parts
10
5. Cleaning
5.1 Before using for the first time and after every use
12
12
5.2 Before using for the first time and once a day
14
5.3 Cleaning the motor unit
15
5.4 Cleaning – summary
16
6. Preparing for pumping
18
6.1 Mains operation
18
6.2 Battery operation
19
6.3 Assembling the pump set
20
7. Expression
22
7.1 P
reparing for single pumping
22
7.2 Pumping
22
7.3 Preparing for hands-free expression with Easy Expression Bustier
26
7.4 P
reparing for double pumping
26
8. Storing and thawing breastmilk
28
8.1 Storage
28
8.2 Freezing
28
8.3 Thawing
28
9. Feeding breastmilk
29
10. Troubleshooting
30
11. Warranty / disposal
31
12. Complete care during breastfeeding time
32
13. EMC / Technical description
184
14. Technical specifications
191
1. Intended use / Population – Contraindication
5
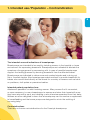
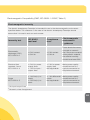
The intended use and indications of breastpumps
Breastpumps are intended to be used by lactating women in the hospital or home
environment for expressing breastmilk. Breastpumps are indicated to alleviate the
symptoms of engorgement by expressing milk. In case of mastitis breastpumps
support the healing process by removing breastmilk from the affected breast.
Breastpumps are indicated to relieve sore and cracked nipples and to bring out
flat or inverted nipples. Also breastpumps enable mothers to provide breastmilk for
babies who cannot feed directly at the breast for a variety of reasons such as latchon problems, cleft palate or premature babies.
Intended patient population/user
Adolescent paediatric or adult lactating women. Many women find it convenient,
or even necessary, to use a breastpump to express and store their breastmilk once
they have returned to work, are travelling or are otherwise separated from their baby.
Women are often delighted to learn that a breastpump can be used as a supplement
to breastfeeding and that some pumps are designed to mimic the suckling of
a nursing baby.
Contraindications
There are no known contraindications for the Freestyle breastpump.
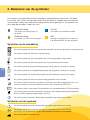
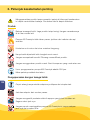
2. Meaning of symbols
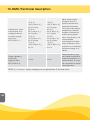
The warning symbol identifies all instructions that are important for safety. Failure to
observe these instructions can lead to injury or damage to the breastpump!
When used in conjunction with the following words, the warning symbol stands for:
Warning
Can lead to serious injury or death.
Caution
Can lead to minor injury.
i
6
Note
i
Info
Can lead to material damage.
Useful or important information that is
not related to safety.
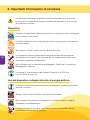
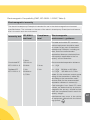
Symbols on the packaging
This symbol indicates that the material is part of a recovery/recycling process.
This symbol indicates a carton package.
This symbol indicates to keep the device away from sunlight.
This symbol indicates to handle the fragile device with care.
This symbol indicates the temperature limitation for operation, transport and storage.
°C
This symbol indicates the humidity limitation for operation, transport and storage.
This symbol indicates the atmospheric pressure limitation for operation,
transport and storage.
This symbol indicates to keep the device dry.
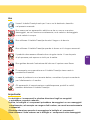
This symbol indicates that the packaging contains products intended to come in
contact with food according to regulation 1935/2004.
This symbol indicates unique GSI Global Trade Item Numbers (GTIN).
This symbol indicates do not dispose the device together with unsorted municipal
waste (for EU only).
This symbol indicates to follow instructions for use.
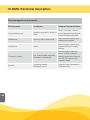
Symbols on the device
This symbol indicates to follow instructions for use.
0123
This symbol indicates the compliance with the essential requirements of the Council
Directive 93/42/EEC of 14 June 1993 concerning medical devices.
This symbol indicates the manufacturer.
This symbol indicates where to open the battery cover.
This symbol indicates where to plug in the mains adapter.
This symbol indicates do not dispose the device together with unsorted municipal
waste (for EU only).
This symbol indicates the compliance with additional USA and Canada safety
requirements for medical electrical equipment.
This symbol indicates a type BF applied part.
REF
This symbol indicates manufacturer's catalogue number of the battery.
SN
This symbol indicates manufacturer's serial number of the device.
IP22
This symbol indicates the protection against ingress of solid foreign objects and
against harmful effects due to the ingress of water.
This symbol indicates the date of manufacture (four digits for the year and
two digits for the month).
Symbols on the mains adapter
This symbol indicates that the mains adapter is a class II device.
This symbol indicates the compliance with China Compulsory Certification.
This symbol indicates that the mains adapter is safety tested.
This symbol indicates that the mains adapter is for indoor use only.
This symbol indicates the compliance with USA and Canada safety requirements.
This symbol indicates the compliance with Federal Communications Commission
requirements.
This symbol indicates polarity of d.c. power connector.
N136
This symbol indicates the compliance with AUS/NZ regulatory requirements
(Regulatory compliance mark).
This CE-mark indicates the compliance with the low voltage and electromagnetic
compatibility directive.
This symbol indicates to not dispose the device together with unsorted municipal
waste (for EU only). The solid bar symbol indicates that mains adapter is put on the
market after 13 August 2005.
This symbol indicates the compliance with Japanese safety requirements.
This symbol indicates the compliance with energy efficiency requirements.
This symbol indicates alternating current.
9 VDC
This symbol indicates direct current.
7
3. Important safety information
Failure to follow these instructions/safety information can lead to danger
from the device. Subject to technical changes.
8
Device
Danger of electrocution! Keep the device dry! Never immerse in water or
other liquids!
The Freestyle breastpump is not heat-resistant: keep away from radiators
and open flames.
Do not expose the motor unit to direct sunlight.
Repairs must be performed only by an authorised service agency.
Do not repair yourself! No modifications to the device are permitted.
Never use a damaged device. Replace damaged or worn parts.
MAX.
250 h
The operating life of the Freestyle breastpump is 250 hours.
The service life is two years.
Electrical use
Separation from the mains is only assured through the disconnection of
the mains adapter from the wall socket outlet.
Keep the mains adapter away from heated surfaces.
Do not reach for any electrical device if it has fallen into water.
Unplug immediately.
The Freestyle breastpump should never be left unattended when plugged
into a power source.
Use
9
Use the Freestyle breastpump only for its intended use as described
in this manual.
Never operate an electrical device if it has a damaged cord or plug, if it is
not working properly, if it has been dropped or damaged, or dropped into
water.
Do not use the Freestyle breastpump while bathing or showering.
Do not use the Freestyle breastpump while sleeping or overly drowsy.
This is a single user product. Use by more than one person may
present a health risk.
Do not drive whilst hands-free pumping.
Supervision is necessary when the Freestyle breastpump is used
in the vicinity of children.
Contact your lactation consultant or physician if you experience
problems or pain.
Portable and mobile radio frequency communications equipment
can affect the Freestyle breastpump.
Important:
lP
lastic bottles and component parts become brittle when frozen and may
break when dropped.
I A lso, bottles and component parts may become damaged if mishandled,
e.g. dropped, over-tightened, or knocked over.
l Take appropriate care in handling bottles and components.
l Do not use the breastmilk if bottles or components become damaged.
4. Product description
10
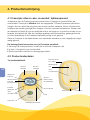
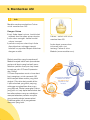
4.1 Freestyle - all-in-one, innovative, time-saving
By buying Freestyle, you have made the right choice. Freestyle is both efficient and
comfortable. Freestyle is efficient because it uses 2-Phase Expression pumping
technology, which mimics the baby’s natural sucking rhythm. Short, stimulating
patterns are followed by longer ones, ensuring an optimal flow of milk. Combined
with double pumping, this helps to increase and maintain milk production and saves
precious time. Freestyle is comfortable thanks to its adjustable vacuum settings,
memory function and information display, which are very convenient.
All this makes Freestyle ideal for working mums and for daily and regular use.
The main features of your Freestyle breastpump are:
I Helps to maintain and increase milk production and saves time;
I Is small, lightweight and comfortable;
I Offers maximum mobility and freedom of movement.
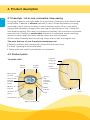
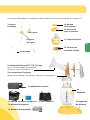
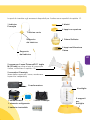
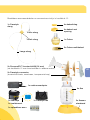
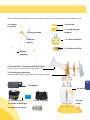
4.2 Product parts
1x motor unit:
Freestyle
tubing port
Fixing clip
Reduce
vacuum
Increase
vacuum
Mains power
indicator
Battery
compartment
Vacuum
level
indicator
(expression
phase)
Vacuum level
indicator
(stimulation
phase)
Memory “on”
indicator
Battery
indicator
Let-down
button
Timer
On/Off button
Memory function key
Power socket
Pushbutton
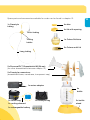
Spare parts and accessories available for order can be found in chapter 12.
1x Freestyle
tubing
11
4x disc
4x lid with opening
Short tubing
1x Calma Solitaire
Tubing
holder
2x Calma multi lid
Long tubing
2x PersonalFit™ Breastshield M (24 mm)
(for other breastshield sizes see chapter 12)
2x Freestyle connectors
(breastshield base, membrane, transparent cap)
1x mains adapter
4x
bottle
1x cooler bag
1x cooling element
1x rechargeable battery
1x Freestyle bag
2x bottle
stand
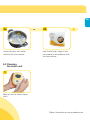
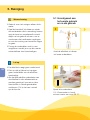
5. Cleaning
Caution
12
l O nly use drinking-quality water
for cleaning.
l Take apart and wash all parts that
come in contact with the breast and
breastmilk immediately after use to
avoid dry up of milk residues and to
prevent growth of bacteria.
l N ever dry parts in a microwave,
as this may destroy them.
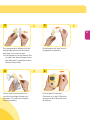
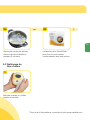
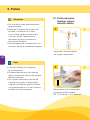
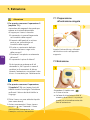
5.1 B
efore using for the first
time and after every use
1
Disassemble the pump set
into individual parts.
Note
i
l T he pump set requires no maintenance.
l Take care not to damage parts
of the pump set during cleaning.
l If the individual components of the
pump set are cleaned in a dish
washer parts may be discoloured by
food pigments. This has no impact
on the function.
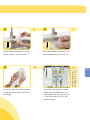
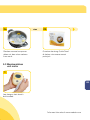
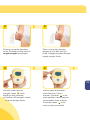
4
Rinse all parts with cold,
clear water (approx. 20 °C)
for 10 – 15 seconds.
13
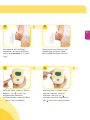
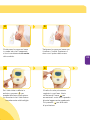
3
2
Clean all parts with plenty
of warm soapy water (approx.
30 °C).
Rinse all parts with cold,
clear water (approx. 20 °C).
or
As an alternative to
steps 2, 3, 4 and 5.
5
Dry with a clean cloth or leave
to dry on a clean cloth.
If you clean the individual parts
of the pump set in the dishwasher, place them on the top
rack or in the cutlery section.
5. Cleaning
Caution
14
lO
nly use drinking-quality water
for cleaning.
l Take apart and wash all parts that
come in contact with the breast and
breastmilk immediately after use to
avoid dry up of milk residues and to
prevent growth of bacteria.
l N ever dry parts in a microwave,
as this may destroy them.
5.2 Before using for
the first time and
once a day
1
Disassemble the pump set
into individual parts.
Note
i
l W hen boiling, a tea spoon of citric
acid may be added to avoid a buildup of limescale.
l S tore the pump set in a clean bag/
container until next use. Or store it in
clean paper or a cloth.
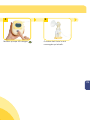
3
Dry with a clean cloth or leave
to dry on a clean cloth.
15
2a
Cover all parts with water
and boil for five minutes.
or
2b
Use QuickClean* bags in the
microwave in accordance with
the instructions.
5.3 Cleaning
the motor unit
1
Wipe off with a clean, damp
cloth.
*More information at www.medela.com
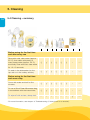
5. Cleaning
16
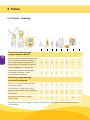
5.4 Cleaning – summary
Before using for the first time
and after every use
Rinse with cold, clear water ( approx.
20 ° C ), then clean with plenty of
warm soapy water ( approx. 30 ° C )
and finally rinse with cold, clear water
for 10 – 15 seconds;
√
√
√
√
√
√
--
--*
Or wash in the dishwasher ( on the
top rack or in the cutlery section ).
√
√
√
√
√
√
--
--*
Cover with water and boil for five
minutes;
√
√
√
√
√
√
--
--*
Or use a Quick Clean Microwave bag
in accordance with the instructions;
√
√
√
√
√
√
--
--*
Or wipe off with a clean, damp cloth.
--
--
--
--
--
--
√
--*
Before using for the first time
and once a day
*For more information, see chapter 10 Troubleshooting ("If there is low or no suction")
17
6. Preparing for pumping
Warning
18
re 6.1 Mains operation:
I Follow the exact order of the steps.
l O nly use the mains adapter that
comes with Freestyle.
l M ake sure the voltage of the mains
adapter is compatible with the
power source.
1
Note
i
lD
o not use force to push the battery
into the battery compartment.
ID
o not insert the battery while the
pump is on mains.
i
6.1 Mains operation
To operate the pump via mains
power, uncover the power
socket on the bottom of the
motor unit. Insert the power
adapter (the small round plug)
into the socket.
Info
IY
ou can operate the Freestyle
breastpump via battery or mains.
If you want to use the battery, you
must charge it before first use.
re 6.2 Battery operation:
l The battery starts charging as soon
as you connect the pump to a power
source.
l You can use the pump during
charging.
lD
o not disconnect the mains adapter
until charging is completed.
I If possible, do not remove the
battery from the motor unit.
Removing the battery requires a
recharging time of up to 24 hours.
ID
o you plan to store the pump for
an extended period of time? Then it
is better to remove the battery from
the unit.
l If Freestyle has been inactive for
30 minutes, it automatically switches
off.
2
Insert the battery into the
battery compartment with
the “This Side Down” arrows
pointing towards the compartment. The gold contacts on
the battery must touch the
contacts in the compartment.
Finally, put the battery cover
back on.
6.2 Battery operation
1
For information on
assembling the pump
set, see chapter 6.3.
2
Slide the country-specific plug
onto the larger adapter unit
(if this is not already done so).
Plug the plug into the mains
socket on the wall. The motor
unit is now ready for operation.
To operate the pump via
battery, open the battery
c ompartment by pressing the
push-button on the battery
cover (on the back of the motor
unit) and sliding the cover in
the direction of the arrow.
3
More information on
mains operation in
chapter 6.1.
Mains adapter
connected to socket
Charge the battery by connecting the motor unit to the
mains. “bAtt” will appear on
the display on the motor unit's
front. Charge the battery until
the battery indicator on the display stops flashing and “bAtt”
disappears. The battery is now
fully charged. Disconnect the
mains adapter. The pump is
ready for operation via battery.
flashing
Battery charge status
Battery fully charged, approx.
3 hours‘ expression
flashing
20 min. expression time remaining.
flashing
Battery flat
“bAtt”
Initial charge and charging after
removing the battery
(up to 24 hours charging time)
The above table shows the different
operation statuses. These symbols appear
on the display on the front of the motor unit.
19
6. Preparing for pumping
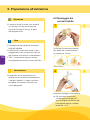
Caution
20
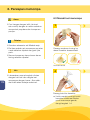
l Wash hands thoroughly (at least one
minute) with soap and water before
touching the breast and pump parts.
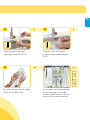
6.3 Assembling
the pump set
1
Note
i
lU
se only original Medela
accessories.
lC
heck pump set components for
wear or damage before use and
replace if necessary.
lA
ll components must be completely
dry before use.
Put the yellow membrane onto
the base of the breastshield
connector:
✔
✗
View from below
i
Info
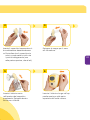
4
lC
arry out all the steps with care and
assemble the pump set correctly.
Otherwise a good vacuum may not
be achieved.
Screw the bottle onto the connector.
To assemble the second
breastshield/bottle/connector combination for double
pumping, repeat steps 1-4.
21
2
Click the transparent cap onto
the base/membrane combination.
C heck that the cap is firmly
connected to all three connection points (one at the
top, two at the sides).
5
Insert the short tubing into
the opening in the transparent
cap. Push it inside as far as it
will go.
3
Push the breastshield onto the
connector.
6
Insert the long tubing into the
tubing port at the top of the
motor unit.
7. Expression
Caution
22
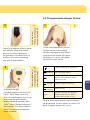
l r e step 2 (chapter 7.1):
Answer the following questions
to find out whether the available
breastshield size will fit:
l Is your nipple moving freely in
the tunnel?
l Is minimal or no areolar tissue
being pulled into the tunnel of
the breastshield?
l D o you see a gentle, rhythmical
motion in the breast with each
cycle of the pump?
l D o you feel the breast emptying
all over?
l Is your nipple pain-free?
If the answer to any of these questions is “No” or if you experience
problems or pain during expression,
consult your breastfeeding and
lactation consultant or midwife.
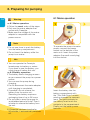
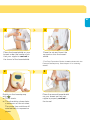
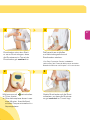
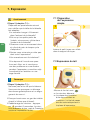
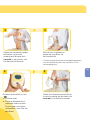
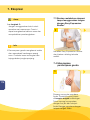
7.1 Preparing for
single pumping
1
Insert the unused short tubing
into the tubing holder.
7.2 Pumping
1
Note
i
l r e step 3 (chapter 7.1):
Do not hold the pump set by the
bottle. This can lead to blockage of
the milk ducts and engorgement.
lW
ipe the breast with a warm
washcloth (do not use alcohol).
l Restart timer: press
for
3 seconds. Timer is restarted but
Freestyle continues to pump.
Switch on the breastpump with
.
T imer starts.
The stimulation phase lasts a
maximum of two minutes. The
pump then switches off automatically in expression phase.
23
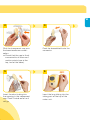
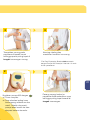
2
1
Place the breastshield on
your breast so that your
nipple is properly centred
in the tunnel.
2
1
If your milk starts to flow
earlier, press
to change to
the expression phase.
M
ake sure that the milk
is flowing into the bottle
properly.
3
Hold the breastshield onto
your breast with your thumb
and index finger.
Support your breast with the
palm of your hand.
3
The vacuum can be adjusted
in every phase. Comfort
vacuum: Use
to increase
the vacuum until it is slightly
unpleasant. Then press
to
dial it back minimally.
7. Expression
Caution
24
4
l C ontact your midwife or lactation
consultant if you can express only
minimal or no milk or if expression is
painful.
Note
i
Info
l Freestyle switches off automatically
if it has been running for 30 minutes
with no manipulations.
l D o not kink the tubing during
expression.
l r e step 4:
Memory function key
To activate your personal setting,
start the pump and press
.
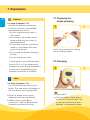
7
1
Clean in accordance
with chapter 5.
i
l A lways disconnect Freestyle from the
mains after expression (except if the
battery is charging).
l O nly fill the bottle to the 150 ml mark.
Press
for three seconds during
the expression phase to save the
individual pumping programme.
The indicator on the display
flashes and the pump emits
three beeps.
Finish expression as usual.
Close the bottle with a lid.
Follow the instructions in
Chapter 8 “Storing and thawing
breastmilk”.
5
Switch off the breastpump
with
.
6
1
Use the stand to prevent the bottle
from tipping over.
25
7. Expression
Caution
26
l r e step 2:
Do not hold the pump set by the
bottle. This can lead to blockage of
the milk ducts and engorgement.
i
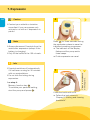
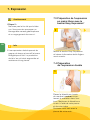
7.3 Preparing for hands-free
expression with the
Easy Expression Bustier*
1
Info
lD
ouble pumping saves time and
increases the energy content of the
milk. Milk production is increased
and maintained long-term.
Put on the Easy Expression
Bustier and leave the zip open
slightly.
7.4 P
reparing for double
pumping
1
Place the breastshield on your
breast so that your nipple is
properly centred in the tunnel.
Hold the breastshield onto
your breast with your thumb
and index finger.
Support your breast with the
palm of your hand.
27
2
3
Place the breastshield on your
breast under the bustier such
that your nipple is centred in
the tunnel of the breastshield.
Close the zip and insert the
connector onto the breastshield.
*The Easy Expression Bustier is not included with the
Freestyle breastpump. See chapter 12 for ordering
details.
2
1
Switch on the breastpump
with
.
T
imer starts.
T
he stimulation phase lasts
a maximum of two minutes.
The pump then switches off
automatically in expression
phase.
3
Place the second breastshield
on your breast so that your
nipple is properly centred in
the tunnel.
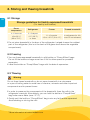
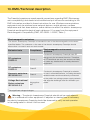
8. Storing and thawing breastmilk
28
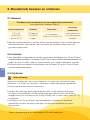
8.1 Storage
Storage guidelines for freshly expressed breastmilk
( For healthy term babies )
Room
temperature
Refrigerator
Freezer
Thawed breastmilk
4 − 6 hours at
19 to 26 ° C
( 6 6 to 78 ° F )
3 − 8 days at
4 ° C ( 39 ° F )
or lower
6 − 12 months
–18 to – 20 °C ( 0 to 4 ° F )
In refrigerator for 10 h
max. Do not refreeze !
lD
o not store breastmilk in the door of the refrigerator. lnstead choose the coldest
part of the refrigerator (this is at the back of the glass shelf above the vegetable
compartment).
8.2 Freezing
lY
ou can freeze expressed breastmilk in milk bottles or “Pump & Save” bags.
Do not fill the bottles or bags more than ¾ full to allow space for possible
expansion.
I Label the bottles or “Pump & Save” bags with the date of expression.
8.3 Thawing
Warning
Do not thaw frozen breastmilk or do not warm breastmilk in a microwave
or a pan of boiling water to avoid loss of vitamins, minerals and other important
components and to prevent bums.
I ln order to preserve the components of the breastmilk, thaw the milk in the
refrigerator overnight. Alternatively, you can hold the bottle or “Pump & Save”
bag under warm water (max. 37 °C).
I G ently swirl the bottle or “Pump & Save” bag to mix any fat that has separated.
Avoid shaking or stirring the milk.
* More information at www.medela.com
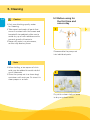
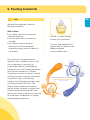
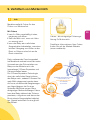
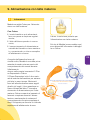
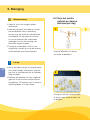
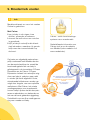
9. Feeding breastmilk
i
Info
29
Medela recommends Calma for
feeding breastmilk.
With Calma
l your baby can feed, pause and
breathe regularly.
l milk will flow when a vacuum is
created.
l your baby’s natural feeding
behaviour will be maintained,
supporting easy transition back to
the breast.
MULATIO
TI
N
S
You can find detailed information about Calma on the
Medela website
(www.medela.com).
PU
NG
G
LM
A
SUCKL
I
More
milk in
less time
SION
E
Invented by Medela
D
IN
NG
M
FEE
E X PR
ES
2-PHAS
RESEARCH BASED SUPPORT FOR
BREASTFEEDING MOTHERS
ILK FLOW
M
PI
Supporting
babies feeding
behavior
CA
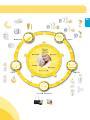
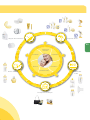
As a result of its comprehensive
research work, Medela is one of the
first companies in the world to
incorporate babies’ breastfeeding
behaviour into its 2-Phase Expression
and Calma innovations. 2-Phase
Expression mimics the baby’s natural
sucking rhythm to express more milk
in less time. Short, stimulating
patterns are followed by longer ones,
providing optimal milk flow. The
uniq ue Calma breastmilk feeding
device allows the baby to pause and
breathe during feeding whilst maintaining the suckling behaviour learned
at the breast. Develop ed for a great
breastfeeding experience.
Calma – unique feeding
solution for breastmilk.
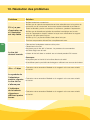
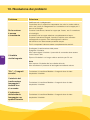
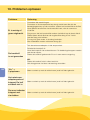
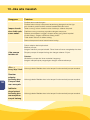
10. Troubleshooting
30
Problem
Solution
If there is low
or no suction
Check all connections.
Check that the transparent cap is firmly connected to all three connection points on the connector between breastshield and bottle.
Hold the breastshield, not the connector or bottle, while expressing.
Ensure the breastshield forms a complete seal around the breast.
During single pumping, insert the unused tubing into the tubing
holder. Do not kink the tubing.
There should be no water in the tubing.
All components must be completely dry.
The pump
becomes wet
Unplug the mains adapter from the socket.
Switch off the pump.
Do not place the pump upside down. Control panel must point
u pwards.
Store the pump in a dry, warm place for 24 hours.
Note:
Do not expose the pump to direct sunlight.
Do not accelerate the drying process by use of heat.
“Err” + 3 beeps
Contact your Medela dealer or the store where you bought
the pump.
The mains
adapter symbol
flashes
The pump does
not switch on
Contact your Medela dealer or the store where you bought
the pump.
The battery
indicator flashes
with four bars
Contact your Medela dealer or the store where you bought
the pump.
11. Warranty / disposal
Warranty
The “International Warranty” brochure contains detailed warranty information.
Disposal
The unit is made of various metal and plastics. Before disposal, the device is to
be rendered unusable and it must not be disposed of as unsorted municipal waste
in accordance with local regulations. Use your local return and collection system
for waste electrical and electronic equipment (incl. batteries). Improper disposal
may have harmful effects on the environment and on public health.
31
12. Complete care during breastfeeding time
32
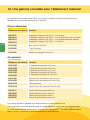
The following accessories for the Freestyle are available from Medela distribution
partners by specifying the product number.
Spare parts
Article number
Product
099.0271
099.0272
099.0273
099.0274
Freestyle Adapter (100-240V; 12V) Euro
Freestyle Adapter (100-240V; 12V) UK and US / JP
Freestyle Adapter (100-240V; 12V) AUS / NZ
Freestyle Adapter (100-240V; 12V) CN
200.1690
Freestyle Motor Unit
200.1692
Freestyle Tubing
200.1691
Freestyle Rechargeable Battery
Accessories
Article number
Product
008.0337*
008.0338*
008.0339*
008.0340*
008.0341*
PersonalFit
PersonalFit
PersonalFit
PersonalFit
PersonalFit
800.0796
200.1659
Breastmilk Bottle 150 ml (3 pcs)
Breastmilk Bottle 250 ml (2 pcs)
008.0139
Calma Solitaire
008.0315
Pump & Save Breastmilk Bags
008.0217
008.0220
008.0224
008.0225
Easy
Easy
Easy
Easy
2
2
2
2
2
Breastshields
Breastshields
Breastshields
Breastshields
Breastshields
Expression
Expression
Expression
Expression
Bustier
Bustier
Bustier
Bustier
S (21 mm)
M (24 mm)
L (27 mm)
XL (30 mm)
XXL (36 mm)
white
white
white
white
S
M
L
XL
Other Medela products are available at www.medela.com
* If the result of expression is unsatisfactory or expression is painful, contact your
midwife or lactation consultant. A different size of PersonalFitTM Breastshield may
help make expression more comfortable and successful.
33
Inhaltsverzeichnis
34
34
1. Verwendungszweck/Zielgruppe – Kontraindikationen
35
2. Symbolbedeutung
36
3. Wichtige Sicherheitshinweise
38
4. Produktbeschreibung
40
4.1 Freestyle - universell, innovativ, zeitsparend
40
4.2 Bestandteile
40
5. Reinigung
42
5.1 Vor Erstgebrauch und nach jedem Gebrauch
42
5.2 Vor Erstgebrauch und einmal täglich
44
5.3 Reinigung der Motoreinheit
45
5.4 Reinigung – Zusammenfassung
46
6. Vorbereitung des Abpumpens
48
6.1 Netzbetrieb 48
6.2 Akkubetrieb
49
6.3 Zusammensetzen des Pumpsets
50
7. Abpumpen
52
7.1 V
orbereitung einseitiges Abpumpen
52
7.2 Abpumpen
52
7.3 Vorbereitung freihändiges Abpumpen mit Easy Expression-Bustier
56
7.4 V
orbereitung beidseitiges Abpumpen
56
8. Aufbewahren und Auftauen der Muttermilch 58
8.1 Aufbewahren
58
8.2 Einfrieren
58
8.3 Auftauen
58
9. Verfüttern von Muttermilch
59
10. Fehlerbehebung
60
11. Garantie / Entsorgung
61
12. Rundum versorgt in der Stillzeit
62
13. EMV / Technische Beschreibung
184
14. Technische Spezifikationen
191
1. Verwendungszweck/Zielgruppe – Kontraindikationen
35
35
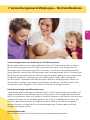
Verwendungszweck und Indikationen für Milchpumpen
Milchpumpen dienen dazu, dass stillende Frauen im Krankenhaus oder zu Hause
Muttermilch abpumpen können. Milchpumpen dienen dazu, die Symptome von
Milchstau durch Abpumpen der Milch zu lindern. Im Fall einer Brustdrüsenentzündung (Mastitis) unterstützen Milchpumpen den Heilungsprozess durch Entnahme der
Milch aus der betroffenen Brust. Milchpumpen sind dazu geeignet, bei wunden oder
rissigen Brustwarzen Linderung zu verschaffen sowie Flach- oder Hohlwarzen
hervorzuholen. Überdies bieten Milchpumpen Müttern die Möglichkeit, Babys mit
Muttermilch zu füttern, die wegen verschiedener Probleme, wie Stillposition, Gaumenspalten oder Frühgeburt, nicht direkt an der Brust saugen können.
Patientinnenzielgruppe/Benutzerinnen
Jugendliche oder erwachsene stillende Frauen. Viele Frauen finden es praktisch, oft
sogar unerlässlich, eine Milchpumpe zum Abpumpen und Aufbewahren der Muttermilch zu verwenden, wenn sie wieder zu arbeiten beginnen, auf Reisen sind oder aus
anderen Gründen von ihrem Baby getrennt sind. Sie sind häufig erfreut, wenn sie
erfahren, dass Milchpumpen als Ergänzung zum Stillen an der Brust eingesetzt
werden können und dass die Funktionsweise gewisser Pumpen das natürliche
Saugen des Babys imitiert.
Kontraindikationen
Für die Milchpumpe Freestyle sind keine Kontraindikationen bekannt.
2. Symbolbedeutung
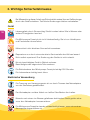
Das Warnsymbol kennzeichnet alle für die Sicherheit wichtigen Anweisungen.
Nichtbeachtung kann zur Beschädigung oder Zerstörung der Milchpumpe führen!
In Verbindung mit den folgenden Signalwörtern steht das Warnsymbol für:
Kann zu schweren Verletzungen
oder zum Tod führen.
36
36
Vorsicht
Kann zu leichten Verletzungen führen.
i
Achtung
Hinweis
i
Info
Kann zu Materialschaden führen.
Nicht sicherheitsrelevante, aber
nützliche oder wichtige Informationen.
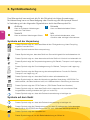
Symbole auf der Verpackung
Dieses Symbol zeigt an, dass das Material der Rückgewinnung /dem Recycling
zugeführt werden kann.
Dieses Symbol bedeutet Kartonverpackung.
Dieses Symbol zeigt an, dass das Gerät vor Sonnenlicht geschützt aufzubewahren ist.
Dieses Symbol zeigt an, dass das zerbrechliche Gerät mit Vorsicht zu behandeln ist.
Dieses Symbol zeigt die Temperaturbegrenzung für Betrieb, Transport und Lagerung
an.
°C
Dieses Symbol zeigt die Feuchtebegrenzung für Betrieb, Transport und Lagerung
an.
Dieses Symbol zeigt die Begrenzung des atmosphärischen Drucks für Betrieb,
Transport und Lagerung an.
Dieses Symbol zeigt an, dass das Gerät trocken aufzubewahren ist.
Dieses Symbol zeigt an, dass die Verpackung gemäss Verordnung 1935/2004 Produkte enthält, die dazu bestimmt sind, mit Lebensmitteln in Berührung zu kommen.
Dieses Symbol zeigt den GTIN Code an. (GSI Global Trade Item Number).
Dieses Symbol zeigt an, dass das Gerät nicht zusammen mit unsortierten Siedlungsabfällen entsorgt werden darf (gilt nur in der EU).
Dieses Symbol zeigt an, dass die Gebrauchsanweisung zu befolgen ist.
Symbole auf dem Gerät
Dieses Symbol zeigt an, dass die Gebrauchsanweisung zu befolgen ist.
0123
Dieses Symbol zeigt die Übereinstimmung mit den Grundlegenden Anforderungen
der Richtlinie 93/42/EWG des Rates vom 14. Juni 1993 über Medizinprodukte an.
Dieses Symbol zeigt den Hersteller an.
Dieses Symbol zeigt an, wo die Batterieabdeckung zu öffnen ist.
Dieses Symbol zeigt an, wo der Netzadapter anzuschließen ist.
Dieses Symbol zeigt an, dass das Gerät nicht zusammen mit unsortierten Siedlungsabfällen entsorgt werden darf (gilt nur in der EU).
Dieses Symbol zeigt die Übereinstimmung mit zusätzlichen US-amerikanischen und
kanadischen Sicherheitsvorschriften für medizinische elektrische Geräte an.
Dieses Symbol zeigt einen Anwendungsteil vom Typ BF an.
REF
Dieses Symbol zeigt die korrekte Position der Batterie an.
SN
Dieses Symbol zeigt die Seriennummer des Gerätes an
IP22
Dieses Symbol zeigt den Schutz gegen das Eindringen von Fremdkörpern und
gegen schädliche Auswirkungen infolge des Eindringens von Wasser an.
Dieses Symbol zeigt das Herstellungsdatum (vier Ziffern für das Jahr und zwei
Ziffern für den Monat) an.
Symbole auf dem Netzteil
Dieses Symbol zeigt, dass das Netzteil ein Gerät der Klasse 2 ist.
Dieses Symbol bedeutet die Zertifizierung in China. (China Compulsory Certification)
Dieses Symbol bedeutet, dass das Netzteil sicherheitsgeprüft ist.
Dieses Symbol bedeutet, dass man das Netzteil nicht im Freien verwenden soll.
Dieses Symbol zeigt an, dass die Sicherheitsanforderungen in den USA und
Kanada erfüllt sind.
Dieses Symbol zeigt an das die Anforderungen der Federal Communications
Commission erfüllt werden.
Dieses Symbol zeigt die Polarität des Gleichstromsteckers an.
N136
Dieses Symbol bedeutet, dass das die Vorschriften in Australien und Neuseeland
erfüllt sind.
Dieses Symbol zeigt die Übereinstimmung mit der Niederspannung- und elektromagnetischen Verträglichkeit-Richtlinie an.
Dieses Symbol zeigt an, dass dieses Gerät nicht im Hausmüll entsorgt werden soll.
(gilt nur in der EU) Der dicke Balken zeigt an, dass das Netzteil nach dem
13. August 2005 in den Handel gekommen ist.
Dieses Symbol zeigt an, dass das Gerät den japanischen Sicherheitsanforderungen entspricht.
Dieses Symbol zeigt, dass die Anforderungen an die Energieeffizienz erfüllt werden.
Dieses Symbol bedeutet Wechselstrom.
9 VDC
Dieses Symbol bedeutet Gleichstrom.
37
37
3. Wichtige Sicherheitshinweise
Bei Missachtung dieser Anleitung/Sicherheitshinweise können Gefährdungen
durch das Gerät entstehen. Technische Änderungen bleiben vorbehalten.
Gerät
Lebensgefahr durch Stromschlag! Gerät trocken halten! Nie in Wasser oder
andere Flüssigkeiten tauchen!
38
38
Die Milchpumpe Freestyle ist nicht hitzebeständig: Sie ist von Heizkörpern
und Feuerstellen fernzuhalten.
Motoreinheit nicht direktem Sonnenlicht aussetzen.
Reparaturen nur durch eine autorisierte Servicestelle durchführen lassen!
Nicht selbst reparieren! Eine Änderung des Geräts ist nicht erlaubt.
Nie ein beschädigtes Gerät in Betrieb nehmen.
Beschädigte oder abgenutzte Teile ersetzen.
MAX.
250 h
Die Betriebsdauer der Milchpumpe Freestyle beträgt 250 Stunden.
Die Lebensdauer beträgt zwei Jahre.
Elektrische Verwendung
Die Trennung vom Versorgungsnetz ist nur durch Trennen des Netzadapters
von der Steckdose gewährleistet.
Den Netzadapter und das Kabel von heißen Oberflächen fern halten.
Niemals nach einem ins Wasser gefallenen elektrischen Gerät greifen ohne
zuvor den Netzadapter herauszuziehen.
Die Milchpumpe Freestyle niemals unbeaufsichtigt lassen, wenn sie an einer
Stromquelle angeschlossen ist.
Verwendung
Die Milchpumpe Freestyle ausschließlich für den in dieser Gebrauchsanweisung beschriebenen Verwendungszweck benutzen.
Ein elektrisches Gerät nie in Betrieb nehmen, wenn der Netzadapter oder
das Kabel beschädigt ist, wenn es nicht korrekt funktioniert, wenn es
heruntergefallen, beschädigt oder ins Wasser gefallen ist.
Die Milchpumpe Freestyle nicht beim Baden oder Duschen verwenden.
Die Milchpumpe Freestyle nicht verwenden, wenn Sie schlafen oder
übermäßig müde sind.
Dieses Produkt ist für nur eine Benutzerin bestimmt. Die Benutzung durch
verschiedene Personen kann ein Gesundheitsrisiko darstellen.
Während des freihändigen Abpumpens nicht Auto fahren.
Bei Verwendung der Milchpumpe Freestyle in der Nähe von Kindern ist
eine entsprechende Beaufsichtigung notwendig.
Bei Problemen oder Schmerzen, Stillberaterin oder Arzt kontaktieren.
Tragbare und mobile Radiofrequenz-Kommunikationsgeräte können
die Milchpumpe Freestyle beeinflussen.
Wichtig:
IP
lastikflaschen und andere Bestandteile können durch Einfrieren brüchig
werden und beim Fallenlassen zerbrechen.
IA
uch bei unsachgemäßem Gebrauch können Flaschen und andere Bestandteile beschädigt werden, z. B. wenn sie fallen gelassen, zu fest zusammen
geschraubt oder umgestoßen werden.
I Gehen Sie mit den Flaschen und Bestandteilen entsprechend vorsichtig um.
I Verwenden Sie die Muttermilch nicht, wenn die Flasche oder Bestandteile
beschädigt wurden.
39
39
4. Produktbeschreibung
4.1 Freestyle - universell, innovativ, zeitsparend
40
40
Mit Freestyle haben Sie die richtige Wahl getroffen. Freestyle ist sowohl effizient
als auch komfortabel. Diese Effizienz verdankt Freestyle der 2-Phase Expression
Pumptechnologie, die den natürlichen Saugrhythmus des Babys nachahmt. Auf kurze,
stimulierende Saugbewegungen folgen längere, die für einen optimalen Milchfluss
sorgen. In Kombination mit dem beidseitigen Abpumpen trägt dies dazu bei, die Milchproduktion zu erhöhen, zu erhalten und wertvolle Zeit zu sparen. Dank der individuell
regulierbaren Vakuumeinstellungen, der Memory-Funktion und dem Informationsdisplay, die eine praktische Bedienung gewährleisten, ist Freestyle so komfortabel.
Damit ist Freestyle ideal für berufstätige Mütter und eignet sich perfekt für den täglichen
und regelmäßigen Einsatz.
Die wichtigsten Eigenschaften Ihrer Freestyle Milchpumpe sind:
I Hilft bei der Aufrechterhaltung und Steigerung der Milchproduktion und spart Zeit;
I Ist klein, leicht und komfortabel;
I Bietet maximale Mobilität und Bewegungsfreiheit.
4.2 Bestandteile
1x Motoreinheit:
Eingang für FreestyleSchlauch
Vakuum
reduzieren
Befestigungsclip
Vakuum
erhöhen
Netzstromanzeige
Akkufach
VakuumlevelAnzeige
(Abpumpphase)
VakuumlevelAnzeige
(Stimulationsphase)
Anzeige
Memory „on“
Akkuanzeige
Stromanschluss
Let-down-Taste
Timer
Ein-/Aus-Taste
Memory-Funktionstaste
Druckknopf
Bestellbares Zubehör und Ersatzteile finden Sie in Kapitel 12.
4x Deckeleinlage
1x FreestyleSchlauch
4x Deckel mit Öffnung
41
41
Kurzes
Schlauchstück
Schlauchhalterung
Langes
Schlauchstück
1x Calma Solitaire
2x Calma
Multi-Deckel
2x PersonalFit™ Brusthaube M (24 mm)
(weitere Brusthaubengrößen siehe Kapitel 12)
2x Freestyle Verbindungsstück
(Brusthaubenkörper, Membrane, durchsichtige Kappe)
1x Netzadapter
4x
Flasche
1x Kühltasche
1x Kühlelement
1x Freestyle
Aufbewahrungstasche
1x Wiederaufladbarer Akku
2x
Standfuß
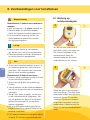
5. Reinigung
VORSICHT
1
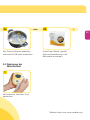
Pumpset in Einzelteile zerlegen.
i
42
42
I Für Reinigung nur Trinkwasserqualität verwenden.
I A lle Teile, die mit Brust und Milch
in Berührung kommen, sofort nach
Gebrauch auseinandernehmen und
waschen, um Eintrocknen von Milch
und Wachstum von Bakterien zu
verhindern.
I Einzelteile niemals in der Mikrowelle
trocknen, da dies zu einer Beschädigung führen kann.
5.1 V
or Erstgebrauch und
nach jedem Gebrauch
HINWEIS
I D as Pumpset muss nicht gewartet
werden.
I Teile des Pumpsets bei Reinigung
nicht beschädigen.
I B ei Reinigung im Geschirrspüler
können Farbstoffe von Lebensmitteln Teile verfärben. Dies hat keinen
Einfluss auf die Funktion.
4
Alle Teile mit kaltem, klarem
Wasser (circa 20° C) für
10 – 15 Sekunden nachspülen.
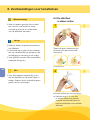
3
2
43
43
Alle Teile mit viel warmem
Seifenwasser (circa 30° C)
reinigen.
Alle Teile mit kaltem, klarem
Wasser (circa 20° C) abspülen.
oder
Alternative zu
Schritt 2, 3 und 4.
5
Mit sauberem Tuch abtrocknen oder auf sauberem Tuch
trocknen lassen.
Einzelteile im oberen Gitter
oder im Besteckfach des
Geschirrspülers reinigen.
5. Reinigung
VORSICHT
1
Pumpset in Einzelteile zerlegen.
i
44
44
I Für Reinigung nur Trinkwasserqualität verwenden.
I A lle Teile, die mit Brust und Milch
in Berührung kommen, sofort nach
Gebrauch auseinandernehmen und
waschen, um Eintrocknen von Milch
und Wachstum von Bakterien zu
verhindern.
I Einzelteile niemals in der Mikrowelle
trocknen, da dies zu einer Beschädigung führen kann.
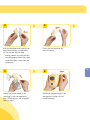
5.2 Vor Erstgebrauch und
einmal täglich
HINWEIS
I B eim Auskochen kann dem Wasser
ein Teelöffel Zitronensäure hinzugefügt werden, um Kalkablagerungen
zu verhindern.
I B is zum nächsten Gebrauch Pumpset in einem sauberen Beutel/Behälter aufbewahren. Oder in einem
sauberen Papier aufbewahren oder
in Stofftuch einschlagen.
3
Mit sauberem Tuch abtrocknen
oder auf sauberem Tuch trocknen
lassen.
2a
oder
2b
45
45
Alle Teile mit Wasser bedecken,
während fünf Minuten auskochen.
QuickClean-Beutel* gemäß
Gebrauchsanweisung in der
Mikrowelle verwenden.
5.3 Reinigung der
Motoreinheit
1
Mit sauberem, feuchtem Tuch
abwischen.
*Weitere Infos unter www.medela.com
5. Reinigung
5.4 Reinigung – Zusammenfassung
46
46
Vor Erstgebrauch und nach
jedem Gebrauch
Mit kaltem, sauberem Wasser (circa
20 °C) abspülen, dann mit viel warmem
Seifenwasser (circa 30 °C) reinigen und
abschließend mit kaltem, sauberem
Wasser 10 –15 Sekunden nachspülen;
√
√
√
√
√
√
--
--*
Oder im Geschirrspüler reinigen
(im oberen Gitter oder im Besteckfach).
√
√
√
√
√
√
--
--*
Mit Wasser bedeckt fünf Minuten
lang auskochen;
√
√
√
√
√
√
--
--*
Oder den Quick Clean-Mikrowellenbeutel gemäß Gebrauchsanweisung
verwenden;
√
√
√
√
√
√
--
--*
Oder mit sauberem, feuchtem Tuch
abwischen.
--
--
--
--
--
--
√
--*
Vor Erstgebrauch und
einmal täglich
*Weitere Informationen finden Sie in Kapitel 10 Fehlerbehebung („Die Pumpe saugt schwach oder gar nicht“)
47
47
6. Vorbereitung des Abpumpens
WARNUNG
i
48
48
z u 6.1 Netzbetrieb:
I Reihenfolge der Schritte unbedingt
einhalten.
I Ausschließlich den mit der Freestyle
gelieferten Netzadapter verwenden.
I Sicherstellen, dass die Spannung des
Netzadapters mit der Stromquelle
kompatibel ist.
1
HINWEIS
IA
kku nicht gewaltsam in das Akkufach
drücken.
IB
atterien dürfen nicht eingesetzt
werden, wenn der Netzadapter in der
Netzsteckdose ist.
i
6.1 Netzbetrieb
INFO
ID
ie Freestyle Milchpumpe kann über den
Akku oder Netzstrom betrieben werden.
Wenn Sie sich für den Akkubetrieb entscheiden, muss der Akku vor dem ersten
Gebrauch aufgeladen werden.
zu 6.2 Akkubetrieb:
ID
er Akku beginnt sich aufzuladen,
sobald die Pumpe mit der Stromquelle
verbunden ist.
ID
ie Pumpe kann während des Aufladevorgangs benutzt werden.
I Netzadapter erst herausziehen, wenn
der Aufladevorgang beendet ist.
I Wenn möglich, den Akku nicht mehr
aus der Motoreinheit entnehmen. Eine
Entnahme des Akkus erfordert eine
Ladezeit von bis zu 24 Stunden.
I Planen Sie die Pumpe für längere Zeit
zu lagern? Dann ist es besser, den Akku
aus der Einheit zu entnehmen.
I Ist die Freestyle 30 Minuten lang nicht
aktiv, schaltet sie sich automatisch ab.
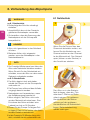
Wenn Sie die Pumpe über das
Stromnetz betreiben wollen, entfernen Sie die Abdeckung vom
Stromanschluss an der Unterseite der Motoreinheit. Den Netzadapter (kleiner runder Stecker) in
den Anschluss stecken.
2
Den Akku so in das Batteriefach einlegen, dass die „This
side down“-Pfeile zum Batteriefach zeigen. Die goldenen
Kontaktflächen des Akkus
müssen auf den goldenen
Kontaktflächen im Batteriefach
liegen. Batterieabdeckung
wieder anbringen.
2
Wie Sie das Pumpenset
zusammensetzen,
erfahren Sie in Kapitel 6.3.
6.2 Akkubetrieb
Länderspezifischen Stecker
auf die größere Adaptereinheit
schieben (sofern nicht bereits
erfolgt). Stecker an der Netz-/
Steckdose anschließen. Die Motoreinheit ist nun betriebsbereit.
1
49
49
Wenn Sie die Pumpe über den
Akku betreiben wollen, öffnen
Sie das Batteriefach, indem Sie
auf den Druckknopf der Batterieabdeckung drücken (Rückseite der Motoreinheit) und
anschließend die Abdeckung
in Pfeilrichtung schieben.
Netzadapter in
Steckdose eingesteckt
Weitere Informationen
zum Netzbetrieb finden
Sie in Kapitel 6.1.
3
Die Batterie durch Verbinden der
Motoreinheit mit dem Netzstrom
laden. „bAtt“ erscheint auf dem
vorderen Display der Motoreinheit.
Akku laden, bis die Batterieanzeige
auf dem Display aufhört zu blinken
und „bAtt“ verschwindet. Der Akku
ist nun vollständig geladen. Den
Netzadapter herausziehen. Die
Pumpe ist für den Akkubetrieb bereit.
blinkt
Ladezustand des Akkus
Akku voll, ca 3h Pumpdauer
blinkt
20 min. Restdauer zum Abpumpen.
blinkt
Akku leer
„bAtt“
Erstes Aufladen und Aufladen
nach Entnahme des Akkus
(bis 24h Ladezeit)
Die oben aufgeführte Tabelle zeigt die
verschiedenen Betriebszustände. Diese
Symbole erscheinen auf dem Display
der Vorderseite der Motoreinheit.
6. Vorbereitung des Abpumpens
VORSICHT
i
50
50
IH
ände gründlich (mind. eine Minute)
mit Wasser und Seife waschen,
bevor Brust und gereinigte Pumpenteile angefasst werden.
6.3 Zusammensetzen des
Pumpsets
1
HINWEIS
IN
ur Originalzubehör von Medela
verwenden.
IT
eile des Pumpsets vor Gebrauch
auf Abnutzung/Beschädigung
prüfen, gegebenenfalls ersetzen.
IA
lle Teile müssen vor Gebrauch
komplett trocken sein.
Die gelbe Membran auf den
Sockel des BrusthaubenVerbindungsstücks setzen:
✔
✗
Ansicht von unten
i
INFO
4
IA
lle Schritte sorgfältig ausführen
und Pumpset korrekt zusammenstellen. Ansonsten kann es zu einem
geringeren Vakuum führen.
Flasche auf das Verbindungsstück schrauben.
Für die Zusammensetzung
der zweiten Kombination
aus Brusthaube, Flasche
und Verbindungsstück für
doppelseitiges Abpumpen
Schritte 1-4 wiederholen.
2
3
51
51
Die transparente Kappe auf die
Sockel/Membran-Kombination
drücken, bis sie einrastet.
Die Kappe auf einen festen Sitz
an allen drei Anschlusspunkten
(ein Mal oben, zwei Mal an den
Seiten) überprüfen.
5
Das kurze Schlauchstück in
die durchsichtige Kappe einstecken. So weit wie möglich
hineinschieben.
Brusthaube auf das Verbindungsstück stecken.
6
Das andere Ende des
Schlauchs in den Schlauchanschluss der Motoreinheit
einführen.
7. Abpumpen
VORSICHT
Wenn Sie eine dieser Fragen mit
„Nein“ beantworten müssen, oder
wenn das Abpumpen Probleme
oder Schmerzen bereitet, kontaktieren Sie bitte Ihre Still- und Laktationsberaterin oder Hebamme.
i
52
52
I z u Schritt 2 (Kapitel 7.1):
Beantworten Sie die folgenden Fragen, um festzustellen, ob die vorhandene Brusthaubengröße passt:
I Bewegt sich die Brustwarze frei im
Tunnel?
I W ird kein oder nur wenig Gewebe
des Brustwarzenhofs in den Tunnel
der Brusthaube gezogen?
I Sind sanfte, rhythmische Bewegungen der Brust bei jedem Pumpzyklus zu sehen?
IS
püren Sie, wie sich die Brust
überall entleert?
I Ist Ihre Brustwarze schmerzfrei?
7.1 Vorbereitung einseitiges
Abpumpen
1
Das nicht benutzte kurze
Schlauchstück in die Schlauchhalterung einstecken.
7.2 Abpumpen
1
HINWEIS
I z u Schritt 3 (Kapitel 7.1):
Pumpset nicht an der Flasche halten.
Dies kann zum Abklemmen der Milchkanäle und zu Milchstau führen.
I Brust
mit warmem Waschlappen abwaschen (keinen Alkohol verwenden).
IN
eustart des Timers:
für 3 Sekunden drücken. Timer wird neu gestartet, Freestyle pumpt jedoch weiter.
Milchpumpe mit
einschalten.
T imer startet.
Stimulationsphase dauert max.
zwei Minuten. Anschließend
automatischer Wechsel in
Abpumpphase.
2
1
3
53
53
Brusthaube auf die Brust
aufsetzen, so dass die Brustwarze gut zentriert im Tunnel
liegt.
2
1
Falls die Milch früher zu fließen
beginnt, mit
in den Abpumpmodus wechseln.
S
icherstellen, dass die Milch
gut in Flasche abfließt.
Brusthaube mit Daumen und
Zeigefinger an Brust halten.
Mit Handfläche Brust stützen.
3
Vakuum kann in jeder Phase
reguliert werden. Komfort
Vakuum: Vakuum mit
erhöhen bis leicht ungenehm.
Mit
minimal zurückschalten.
7. Abpumpen
VORSICHT
I Wenn keine oder nur wenig Milch
abgepumpt werden kann oder das
Abpumpen schmerzhaft ist, Hebamme oder Stillberaterin kontaktieren.
HINWEIS
I Freestyle nach dem Abpumpen immer
vom Netz trennen (ausser beim Ladevorgang des Akkus).
I Flasche nur bis zur 150 ml-Markierung
füllen.
i
Zum Abspeichern des individuellen
Pumpprogramms
während der
Abpumpphase für drei Sekunden
drücken.
A nzeige auf Display blinkt und
Pumpe gibt drei Signaltöne ab.
A bpumpen wie gewohnt beenden.
INFO
I Freestyle schaltet sich nach
30 Minuten Bedienungspause automatisch ab.
I Schlauch während des Abpumpens
nicht knicken.
I Zu Schritt 4:
Memory-Funktionstaste
Zum Aktivieren der persönlichen
Einstellung Pumpe starten und
drücken.
7
1
Reinigung gemäß
Kapitel 5
i
54
54
4
Flasche mit Deckel verschließen.
G emäß Kapitel 8 „Aufbewahren
und Auftauen der Muttermilch“
vorgehen.
5
6
1
55
55
Milchpumpe mit
ausschalten.
Standfuß verwenden, um Umkippen der Flasche zu vermeiden.
7. Abpumpen
VORSICHT
56
56
I zu Schritt 2:
Pumpset nicht an der Flasche halten.
Dies kann zum Abklemmen der
Milchkanäle und zu Milchstau führen.
i
7.3 Vorbereitung freihändiges
Abpumpen mit
Easy Expression-Bustier*
1
INFO
IB
eidseitiges Abpumpen verringert
den Zeitaufwand und erhöht den
Energiegehalt der Milch. Die Milchproduktion wird erhöht und langfristig aufrecht erhalten.
Easy Expression-Bustier anziehen
und Reißverschluss ein wenig
geöffnet lassen.
7.4 V
orbereitung beidseitiges
Abpumpen
1
Brusthaube auf die Brust
aufsetzen, so dass die Brustwarze gut zentriert im Tunnel
liegt. Brusthaube mit Daumen
und Zeigefinger an Brust
halten. Mit Handfläche Brust
stützen.
2
3
Brusthaube unter dem Bustier so an Brust anlegen, dass
die Brustwarze im Tunnel der
Brusthaube gut zentriert ist.
Reißverschluss schließen
und Verbindungsstücke auf
Brusthauben stecken.
*Das Easy Expression Bustier ist nicht im
Lieferumfang der Freestyle Milchpumpe enthalten.
Bestellinformationen sind Kapitel 12 zu entnehmen.
2
1
Milchpumpe mit
einschalten.
T
imer startet.
S
timulationsphase dauert max.
zwei Minuten. Anschließend
schaltet Pumpe automatisch in
Abpumpphase.
3
Zweite Brusthaube auf die Brust
aufsetzen, so dass die Brustwarze gut zentriert im Tunnel liegt.
57
57
8. Aufbewahren und Auftauen der Muttermilch
8.1 Lagerung
Regeln für das Aufbewahren frisch abgepumpter Muttermilch
(für gesunde, termingeborene Babys)
58
58
Raumtemperatur
Kühlschrank
Tiefkühltruhe
Aufgetaute
Muttermilch
4 – 6 Stunden bei 19
bis 26 ° C
(66 bis 78 ° F)
3 – 8 Tage bei 4 ° C
(39 ° F)
oder weniger
6 – 12 Monate bei −18 bis
−20 ° C (0 bis 4 ° F)
Im Kühlschrank max.
10 Stunden. Nicht
wieder einfrieren!
IM
uttermilch nicht in der Kühlschranktür, sondern am kältesten Ort im Kühlschrank
(hinten auf der Glasplatte über dem Gemüsefach) aufbewahren.
8.2 Einfrieren
ID
ie abgepumpte Muttermilch kann in Milchflaschen oder „Pump & Save“* Beuteln
eingefroren werden. Füllen Sie Flaschen oder Beutel nur drei viertel voll, um Raum
für Ausdehnung zu lassen.
I Die Milchflaschen oder „Pump & Save” Milchbeutel mit Abpumpdatum versehen.
8.3 Auftauen
Warnung
Verwenden Sie keine Mikrowelle oder kochendes Wasser zum Auftauen oder Erwärmen von Muttermilch, damit Vitamine, Mineralien und andere wertvolle Inhaltsstoffe
erhalten bleiben und Verbrühungen vermieden werden.
IM
ilchflasche oder „Pump & Save“ Milchbeutel zum Auftauen über Nacht in den
Kühlschrank stellen oder unter warmes Wasser halten (max. 37 ° C).
I Schwenken Sie die Milchflasche oder den „Pump & Save“ Beutel sanft, um abgesetztes Fett mit der Milch zu vermischen. Schütteln oder rühren Sie die Milch nicht.
* Weitere Informationen finden Sie unter www.medela.de
9. Verfüttern von Muttermilch
i
Info
Medela empfiehlt Calma für das
Füttern von Muttermilch.
Mit Calma
I k ann Ihr Baby regelmäßig trinken,
pausieren und atmen.
I fl ießt die Milch erst, wenn ein Vakuum erzeugt wird.
I kann das Baby sein natürliches
Saugverhalten beibehalten, was einen
leichten Übergang vom Stillen an der
Brust zu Calma und zurück an die
Brust unterstützt.
Detaillierte Informationen über Calma
finden Sie auf der Medela Website
(www.medela.de).
IMULATI
PU
N
SION
E
N
CA
LM
Mehr Milch in
kürzerer Zeit
E X PR
ES
2-PHAS
FORSCHUNGSGESTÜTZTE
LÖSUNGEN FÜR
STILLENDE MÜTTER
F ÜT
Von Medela
T
entwickelt
A
M
PE
Unterstützt das
Saugverhalten
des Babys
HFLU
S
ILC
ON
ST
ER
SAUGE
N
M
Calma – die einzigartige Fütterungslösung für Muttermilch.
S
Dank umfassender Forschungsarbeit
hat Medela als weltweit eines der ersten
Unternehmen das Trinkverhalten von
Babys an der Mutterbrust in die
Innovationen 2-Phase Expression und
Calma einfließen lassen.
Die 2-Phase Expression Technologie
ahmt den natürlichen Saugrhythmus
des Babys nach, sodass in kürzerer Zeit
mehr Milch abgepumpt werden kann.
Auf kurze, stimulierende Saugbewegungen folgen längere, die für einen
optimalen Milchfluss sorgen. Beim
einzigartigen Muttermilchsauger Calma
kann das Baby während des Trinkens
pausieren, ruhig atmen und das an der
Brust erlernte Saugverhalten beibehalten. Speziell entwickelt für eine glückliche Stillzeit.
59
59
10. Fehlerbehebung
60
60
PROBLEM
LÖSUNG
Die Pumpe saugt
zu schwach oder
gar nicht
Alle Verbindungen prüfen.
Überprüfen, ob die durchsichtige Kappe fest mit allen drei
Anschlusspunkten am Verbindungsstück zwischen Brusthaube
und Flasche verbunden ist.
Während des Abpumpens Brusthaube und nicht Verbindungsstück
oder Flasche halten.
Brusthaube korrekt zusammensetzen und gut anliegend an die
Brust nehmen.
Beim einseitigen Abpumpen unbenutzten Schlauch in die
Schlauchhalterung stecken. Schlauch nicht knicken.
Es sollte kein Wasser im Schlauch sein.
Alle Teile müssen komplett trocken sein.
Die Pumpe
wird nass
Netzadapter aus der Steckdose ziehen.
Pumpe ausschalten.
Pumpe nicht auf den Kopf stellen. Display muss nach oben zeigen.
Pumpe 24 Stunden lang an einem trockenen und warmen Ort
aufbewahren.
Hinweis:
Pumpe nicht direktem Sonnenlicht aussetzen.
Trockenvorgang nicht durch Anwendung von Wärme beschleunigen.
„Err“ + 3 Signaltöne
Kontaktieren Sie die Medela-Vertretung oder die Verkaufsstelle.
Das NetzadapterSymbol blinkt
Kontaktieren Sie die Medela-Vertretung oder die Verkaufsstelle.
Die Pumpe schaltet sich nicht ein
Die Akkuanzeige
blinkt mit vier
Balken
Kontaktieren Sie die Medela-Vertretung oder die Verkaufsstelle.
11. Garantie/Entsorgung
Garantie
In der Broschüre „Internationale Gewährleistung“ finden Sie detaillierte Informationen
zur Garantie.
Entsorgung
Das Gerät besteht aus verschiedenen Metall- und Kunststoffelementen. Es ist vor
der Entsorgung unbrauchbar zu machen und darf nicht als Hausmüll, sondern muss
gemäß lokalen Vorschriften entsorgt werden. Nutzen Sie daher die an Ihrem Wohnort
eingerichteten Rückgabe- und Sammelsysteme für die Entsorgung von elektrischen
und elektronischen Altgeräten (inkl. Akku). Die unsachgemäße Entsorgung kann
schädliche Auswirkungen auf die Umwelt und die Gesundheit haben.
61
61
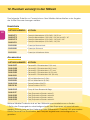
12. Rundum versorgt in der Stillzeit
Das folgende Zubehör zur Freestyle kann über Medela-Verkaufstellen unter Angabe
der Artikel-Nummer bezogen werden.
Ersatzteile
62
62
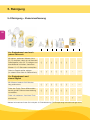
ARTIKELNUMMER
ARTIKEL
099.0271
099.0272
099.0273
099.0274
Freestyle Netzadapter (100-240V; 12V) Euro
Freestyle Netzadapter (100-240V; 12V) UK and US / JP
Freestyle Netzadapter (100-240V; 12V) AUS / NZ
Freestyle Netzadapter (100-240V; 12V) CN
200.1690
Freestyle Motoreinheit
200.1692
Freestyle-Schlauch
200.1691
Freestyle Aufladbarer Akku
Accessoires
ARTIKELNUMMER
ARTIKEL
008.0327
008.0328
008.0329
008.0330
008.0331
PersonalFit
PersonalFit
PersonalFit
PersonalFit
PersonalFit
800.0796
200.1659
150 ml Milchflasche (3 Stk.)
250 ml Milchflasche (2 Stk.)
008.0139
008.0138
Calma Solitaire EN/FR
Calma Solitaire DE/FR
008.0315
Pump & Save Breastmilk Bags
008.0217
008.0220
008.0224
008.0225
Easy
Easy
Easy
Easy
2
2
2
2
2
Brusthauben
Brusthauben
Brusthauben
Brusthauben
Brusthauben
Expression
Expression
Expression
Expression
Bustier
Bustier
Bustier
Bustier
S (21 mm)
M (21 mm)
L (27 mm)
XL (30 mm)
XXL (36 mm)
weiss
weiss
weiss
weiss
S
M
L
XL
Weitere Medela-Produkte sind auf der Webseite www.medela.com zu finden.
* Sollte das Pumpergebnis unbefriedigend oder das Abpumpen schmerzhaft sein,
wenden Sie sich bitte an Ihre Hebamme oder Stillberaterin. Eventuell hilft eine andere
Größe PersonalFitTM Brusthaube, das Pumpen angenehmer und erfolgreicher zu
gestalten.
63
63
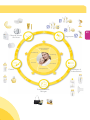
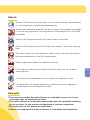
Pflege & Schutz
der Brust
Abpumpen
Evidenzbasierte
Forschung
Fortbildung
Erfahrung
Service
Füttern
Innovation
Fachpersonal
Transportieren &
Reinigen
Auffangen &
Aufbewahren
Table des matières
1. Utilisation/Public cible – Contre-indications
65
2. Signification des symboles
66
3. Informations de sécurité importantes
68
4. Description du produit
70
4.1 Freestyle - tout-en-un, innovateur, rapide
70
4.2 Pièces du produit
70
5. Nettoyage
64
72
5.1 Avant la première utilisation et après chaque utilisation
72
5.2 A
vant la première utilisation et une fois par jour
74
5.3 Nettoyage
du bloc-moteur
75
5.4 Nettoyage – résumé
76
6. Préparation de l’expression
78
6.1 Fonctionnement sur secteur
78
6.2 Fonctionnement sur piles
79
6.3 Assemblage du set pour tire–lait
80
7. Expression
82
7.1 Préparation de l’expression simple
82
7.2 Expression du lait
82
7.3 P
réparation de l’expression en mains libres avec
le bustier Easy Expression
7.4 P
réparation de l’expression double
8. Conservation et décongélation du lait maternel
86
86
88
8.1 Conservation
88
8.2 Congélation
88
8.3 Décongélation
9. Alimentation au lait maternel
88
89
10. Résolution des problèmes
90
11. Garantie/recyclage
91
12. Une gamme complète pour l’allaitement maternel
92
13. Compatibilité électromagnétique/Description technique
184
14. Caractéristiques techniques
191
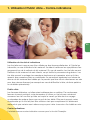
1. Utilisation / Public cible – Contre-indications
65
Utilisation du tire-lait et indications
Les tire-laits sont conçus pour être utilisés par des femmes allaitantes, à l'hôpital ou
à domicile, en vue d'extraire le lait maternel. Ils aident à atténuer les symptômes d'engorgement lors de la collecte du lait maternel. En cas de mastite, les tire-laits servent
à extraire le lait maternel du sein infecté, ce qui facilite le processus de guérison. Les
tire-laits servent à soulager les mamelons douloureux et crevassés, ainsi qu'à faire
ressortir des mamelons plats ou ombiliqués. Ils permettent également aux mères de
donner du lait maternel aux bébés qui ne peuvent pas être nourris directement au sein
pour des raisons diverses (par exemple en cas de difficultés à téter, de fente palatine
ou de bébés prématurés).
Public cible
Les femmes allaitantes, qu'elles soient adolescentes ou adultes. De nombreuses
femmes trouvent pratique, voire nécessaire, d'utiliser un tire-lait pour extraire et
conserver leur lait une fois qu'elles ont repris le travail, qu'elles sont en voyage
ou séparées de quelque façon que ce soit de leur bébé. Elles sont souvent ravies
d'apprendre qu'un tire-lait peut être utilisé en tant que complément à l'allaitement
maternel et que certains sont même conçus pour imiter la succion d'un bébé au sein.
Contre-indications
Il n'existe aucune contre-indication connue pour le tire-lait Freestyle.
2. Signification des symboles
Le symbole d'avertissement indique toutes les instructions importantes pour la sécurité.
Le non-respect de ces instructions peut provoquer blessures ou endommagements du
tire-lait! Utilisé conjointement avec les mots suivants, le symbole d'avertissement signifie :
Peut engendrer des blessures
graves ou la mort.
Avertissement
Peut provoquer des blessures
légères.
66
i
Attention
Remarque
i
Info
Peut causer un endommagement
du matériel.
Informations utiles ou importantes
non relatives à la sécurité.
Symboles présents sur le conditionnement
Ce symbole indique que le matériau fait partie d’un procédé de récupération/recyclage.
Ce symbole indique un emballage en carton.
Ce symbole indique que l’appareil doit être tenu éloigné de la lumière du soleil.
Ce symbole indique que l’appareil est fragile et doit être manipulé avec soin.
Ce symbole indique la limite de température à ne pas dépasser en cas de fonctionnement, de transport et de stockage.
°C
Ce symbole indique la limite d’humidité à ne pas dépasser en cas de fonctionnement,
de transport et de stockage.
Ce symbole indique la limite de pression atmosphérique à ne pas dépasser en cas de
fonctionnement, de transport et de stockage.
Ce symbole indique que l’appareil doit être conservé au sec.
Ce symbole indique que l'emballage contient des produits destinés à entrer en
c ontact avec des denrées alimentaires conformément au règlement N° 1935/2004.
Ce symbole indique les codes articles internationaux (GTIN) GSI uniques.
Ce symbole indique que l’appareil ne peut être éliminé avec les déchets ménagers
non triés (en UE exclusivement).
Ce symbole indique qu’il est impératif de respecter les instructions d’utilisation.
Symboles présents sur l’appareil
Ce symbole indique qu’il est impératif de respecter les instructions d’utilisation.
0123
Ce symbole indique la conformité aux exigences essentielles de la Directive du
Conseil 93/42/CEE du 14 juin 1993 relative aux dispositifs médicaux.
Ce symbole indique le fabricant.
Ce symbole indique où ouvrir le couvercle de batterie.
Ce symbole indique où connecter l'adaptateur secteur.
Ce symbole indique que l’appareil ne peut être éliminé avec les déchets ménagers
non triés (en UE exclusivement).
Ce symbole indique la conformité aux exigences de sécurité supplémentaires
des É.-U. et du Canada en ce qui concerne les dispositifs médicaux électriques.
Ce symbole indique l’application d’une pièce de type BF.
RÉF.
Ce symbole indique le numéro de référence assigné par le fabricant à la batterie.
SN
Ce symbole indique le numéro de série assigné par le fabricant à l’appareil.
IP22
Ce symbole indique la protection contre l’introduction de corps étrangers solides
et les effets nocifs de l’infiltration d’eau.
Ce symbole indique la date de fabrication (quatre chiffres pour l’année et deux chiffres
pour le mois).
Symboles présents sur l’adaptateur secteur
Ce symbole indique que l’adaptateur secteur est un appareil de classe II.
Ce symbole indique la conformité à la certification chinoise obligatoire.
Ce symbole indique que l’adaptateur secteur a été testé quant à sa sécurité.
Ce symbole indique que l’adaptateur secteur est uniquement destiné à
un usage intérieur.
Ce symbole indique la conformité aux exigences de sécurité des É.-U. et du Canada.
Ce symbole indique la conformité aux exigences de la commission fédérale des
communications américaine (FCC).
Ce symbole indique la polarité du connecteur d’alimentation CC.
N136
Ce symbole indique la conformité aux exigences réglementaires
d’Australie/Nouvelle Zélande (marquage de conformité réglementaire).
Ce marquage CE indique la conformité aux directives sur la basse tension
et la compatibilité électromagnétique.
Ce symbole indique que l’appareil ne peut être éliminé avec les déchets ménagers
non triés (en UE exclusivement). Le symbole de la barre pleine indique que l’adaptateur
secteur a été mis sur le marché après le 13 août 2005.
Ce symbole indique la conformité aux exigences de sécurité japonaises.
Ce symbole indique la conformité aux exigences d’efficacité énergétique.
Ce symbole représente le courant alternatif.
9 VDC
Ce symbole représente le courant direct.
67
3. Informations de sécurité importantes
Le non-respect de ces instructions/informations de sécurité peut engendrer
un danger de l'appareil. Susceptible de subir des modifications techniques.
Logo
Risque d'électrocution! Conservez l'appareil au sec! N'immergez jamais
l'appareil dans l'eau ou dans d'autres liquides!
Le tire-lait Freestyle n'est pas thermorésistant : éloignez-le des radiateurs
et des flammes nues.
68
N'exposez pas le bloc-moteur à la lumière directe du soleil.
Toute réparation doit exclusivement être réalisée par un service technique
agréé. Ne réparez pas l'appareil vous-même! Aucune modification
de l'appareil n'est autorisée.
N'utilisez jamais un appareil endommagé. Remplacez les pièces
endommagées ou usées.
MAX.
250 h
La durée de vie en fonctionnement du tire-lait Freestyle est de 250 heures.
Sa durée de vie utile est de deux ans.
Utilisation de l'électricité
La déconnexion du secteur n'est assurée que par le débranchement
de l'adaptateur secteur de la prise électrique murale.
Conservez l'adaptateur secteur éloigné de toute surface chaude.
Ne saisissez jamais un appareil électrique tombé dans l'eau.
Débranchez-le immédiatement.
Ne laissez jamais le tire-lait Freestyle sans surveillance lorsqu'il est branché à
une source d'alimentation.
Utilisation
N'utilisez le tire-lait Freestyle que pour l'usage auquel il est destiné,
tel que décrit dans ce manuel.
Ne faites jamais fonctionner un appareil électrique dont la fiche ou
le cordon est endommagé, s'il ne fonctionne pas correctement, est tombé,
est endommagé ou est tombé dans l'eau.
N'utilisez pas le tire-lait Freestyle lors du bain ou de la douche.
69
N'utilisez pas le tire-lait Freestyle pendant le sommeil ou en cas de
grosse somnolence.
Ce produit est exclusivement réservé à un usage personnel. L'utilisation du
même appareil par plusieurs personnes peut présenter un risque sanitaire.
Ne conduisez pas pendant l'expression en mains libres.
Une surveillance est nécessaire lorsque le tire-lait Freestyle est employé
à proximité d'enfants.
Consultez un(e) consultant(e) en lactation ou un médecin en cas
de problèmes ou de douleur.
Les appareils de communication portables et mobiles peuvent influencer
le fonctionnement du tire-lait Freestyle.
Important :
lL
es biberons et composants en plastique sont fragilisés par le gel et
risquent de se briser en cas de chute.
l De même, les biberons et composants peuvent être endommagés
à la suite d'une mauvaise manipulation, par exemple en cas de chute,
de serrage excessif ou de renversement.
l Manipuler avec prudence les biberons et composants.
l Ne pas utiliser le lait maternel si les biberons ou composants présentent
des dommages.
4. Description du produit
4.1 Freestyle - tout-en-un, innovateur, rapide
En achetant Freestyle, vous avez fait le bon choix. Freestyle est aussi efficace que confortable. Freestyle est efficace grâce à sa technologie 2-Phase Expression qui imite
le rythme naturel de succion du nourrisson. Les mouvements rapides de stimulation
sont suivis de mouvements plus longs, assurant l'écoulement optimal du lait. Associé
au double pompage, il vous aide à augmenter et à maintenir la production de lait et à
gagner un temps précieux. Freestyle est confortable grâce à ses paramètres de vide
réglables, sa fonction de mémoire et son écran informatif très pratiques.
Par conséquence, Freestyle est idéal pour les femmes qui travaillent et pour une
utilisation quotidienne et régulière.
70
Les principales caractéristiques de votre tire-lait Freestyle sont :
I Aide à maintenir et à augmenter la production de lait et fait gagner du temps ;
I Est petit, léger et confortable ;
I Offre une mobilité et une liberté de mouvement optimales.
4.2 Pièces du produit
Freestyle
encoche
du tuyau
1x bloc-moteur:
Diminution
de la force
d’aspiration
Augmentation
de la force
d’aspiration
Attache
ade fixation
Compartiment
des piles
Indicateur
d’alimentation
secteur
Indicateur
du niveau de
vide (phase
stimulation)
Indicateur de
mémoire «on»
Bouton
d’écoulement
Indicateur
du niveau de
vide (phase
d’expression)
Indicateur de
batterie
Minuterie
Bouton de fonction de mémoire
Prise électrique
Bouton
Les pièces détachées et accessoires disponibles à la vente sont indiqués au chapitre 12.
1x tuyau
Freestyle
4x disque
de transport
4x couvercle
avec ouverture
Petit tuyau
1x Calma Solitaire
Support
de tuyau
71
2x couvercles
multiples Calma
Long tuyau
2x téterelles PersonalFit™ M (24 mm)
(pour d’autres tailles de téterelles,
reportez-vous au chapitre 12)
2x connecteurs Freestyle
(base de la téterelle, membrane, capuchon transparent)
1x adaptateur secteur
4x
biberons
1x sac de transport réfrigérant
1x élément réfrigérant
1x batterie rechargeable
1x sac Freestyle
2x supports
de biberon
5. Nettoyage
Avertissement
1
Démontez chaque élément
du tire-lait.
i
72
lN
’utilisez que de l’eau potable pour le
nettoyage de l’appareil.
l Démontez et nettoyez toutes les pièces
entrant en contact avec la poitrine et
le lait maternel immédiatement après
utilisation afin d’éviter l’assèchement
de résidus de lait et la prolifération de
bactéries.
l Ne jamais sécher les pièces au microonde de crainte de les détruire.
5.1 Avant la première
utilisation et après
chaque utilisation
Remarque
l Le tire-lait ne nécessite aucun entretien.
l Veillez à ne pas endommager les pièces
du tire-lait lors du nettoyage.
l Si les composants du set pour tirelait sont nettoyés au lave-vaisselle, ils
peuvent décolorer sous l'action de pigments alimentaires. Ce phénomène n'a
aucune conséquence sur le fonctionnement de l'appareil.
4
Rincez toutes les pièces
à l'eau claire et froide (plus
ou moins 20 °C) pendant
10 à 15 secondes.
3
2
73
Nettoyez toutes les pièces à
l'eau savonneuse et chaude
(plus ou moins 30 °C).
Rincez toutes les pièces à
l'eau claire et froide (plus ou
moins 20 °C).
ou
Alternative aux
étapes 2, 3 et 4.
5
Séchez l'appareil avec un chiffon propre ou laissez-le sécher
sur un chiffon propre.
Si vous nettoyez les composants du set pour tire-lait au
lave-vaisselle, placez-les sur
le panier supérieur ou dans
le bac à couverts.
5. Nettoyage
Avertissement
1
Démontez chaque élément
du tire-lait.
i
74
lN
’utilisez que de l’eau potable pour le
nettoyage de l’appareil.
l Démontez et nettoyez toutes les pièces
entrant en contact avec la poitrine et
le lait maternel immédiatement après
utilisation afin d’éviter l’assèchement
de résidus de lait et la prolifération
de bactéries.
l Ne jamais sécher les pièces au
micro-onde de crainte de les détruire.
5.2 Avant la première
utilisation et
une fois par jour
Remarque
lL
ors de l'ébullition, vous pouvez ajouter une cuillère à thé d'acide citrique
pour éviter la formation de calcaire.
l Rangez le tire-lait dans un sac/conteneur propre jusqu'à sa prochaine utilisation. Ou emballez-le dans un papier
ou chiffon propre.
3
Séchez l'appareil avec un chiffon propre ou laissez-le sécher
sur un chiffon propre.
2a
ou
2b
75
Recouvrez toutes les pièces
d'eau et portez à ébullition
pendant 5 minutes.
Utilisez les sacs QuickClean*
pour four à micro-ondes
conformément aux instructions.
5.3 Nettoyage du
bloc-moteur
1
Essuyez-le avec un chiffon
propre et humide.
*Pour plus d'informations, consultez le site www.medela.com
5. Nettoyage
5.4 Nettoyage – résumé
76
Avant la première utilisation et
après chaque utilisation
Rincer à l'eau claire et froide (environ
20 °C), puis nettoyer abondamment
à l'eau chaude et savonneuse
(environ 30 °C). Enfin, rincer
à l'eau claire et froide pendant
10 à 15 secondes (sauf tuyau) ;
√
√
√
√
√
√
--
--*
Ou laver au lave-vaisselle (sur le
panier supérieur ou dans le bac à
couverts, sauf tuyau).
√
√
√
√
√
√
--
--*
Recouvrir d'eau et porter à ébullition
pendant 5 minutes ;
√
√
√
√
√
√
--
--*
Ou utiliser un sachet pour microondes Quick Clean conformément
aux instructions (sauf tuyau) ;
√
√
√
√
√
√
--
--*
Ou essuyez-le avec un chiffon propre
et humide.
--
--
--
--
--
--
√
--*
Avant la première utilisation
et une fois par jour
*Pour plus d'informations, reportez-vous au chapitre 10 portant sur la résolution de problèmes
(« si la succion est faible ou inexistante »).
77
6. Préparation de l'expression
Attention
6.1 Fonctionnement sur secteur :
l Respectez l'ordre exact des étapes
indiquées.
l N’utilisez que l’adaptateur secteur
fourni avec le tire–lait Freestyle.
l Veillez à ce que la tension de
l’adaptateur secteur corresponde
à celle de la source d’alimentation.
i
78
1
Remarque
lN
e forcez pas pour insérer la batterie
dans le compartiment.
I N’insérez pas la pile lorsque le tire-lait
est branché sur l’alimentation secteur.
i
6.1 Fonctionnement
sur secteur
Pour utiliser le tire-lait sur
secteur, localisez la prise sur la
face inférieure du bloc-moteur.
Insérez l'adaptateur (la petite
fiche ronde).
Info
l Vous pouvez faire fonctionner le tire-lait
Freestyle sur batterie ou sur secteur. Si
vous souhaitez utiliser la batterie, vous
devez la charger avant votre première
utilisation.
re 6.2 Fonctionnement sur batterie :
l La batterie commence à se charger dès
que vous connectez le tire-lait à une
source d'alimentation.
l Vous pouvez utiliser le tire-lait pendant le
chargement.
l Ne débranchez pas l'adaptateur secteur
avant la fin du chargement.
l Si possible, n'enlevez pas la batterie du
bloc-moteur. Si vous retirez la batterie,
elle devra être rechargée pendant une
durée maximum de 24 heures.
l Avez-vous l'intention de stocker le tire-lait
pendant une période prolongée ? Il est
recommandé de retirer la batterie.
l Freestyle s'éteint automatiquement s'il
est inactif pendant plus de 30 minutes.
2
Insérez la batterie dans le compartiment prévu à cet effet en
orientant les flèches « vers le bas »
vers le compartiment. Les pôles
positifs de la batterie doivent
toucher les contacts du compartiment. Enfin, refermez le compartiment à l'aide de son couvercle.
2
Pour plus d'informations
sur l'assemblage du set
pour tire-lait, reportez-vous
à la section 6.3.
6.2 Fonctionnement
sur piles
3
Pour plus d'informations
sur l'utilisation sur
secteur, voir la section 6.1.
Insérez la fiche spécifique au
pays dans la plus grande unité
d'adaptateur (si cela n'est pas
déjà fait). Branchez la fiche dans
la prise électrique du mur. Le
bloc-moteur est désormais prêt
à être utilisé.
Chargez la batterie en branchant le
bloc-moteur sur secteur. « bAtt » apparaîtra sur l'écran de la face supérieure
du bloc-moteur. Chargez la batterie
jusqu'à ce que l'indicateur de batterie cesse de clignoter et que «bAtt»
disparaisse. La batterie est désormais
complètement chargée. Débranchez
l'adaptateur secteur. Le tire-lait est prêt
à être utilisé sur batterie.
1
79
Pour utiliser le tire-lait sur
batterie, ouvrez le compartiment à batterie en appuyant
sur le bouton du couvercle (au
dos du bloc-moteur) et faites
glisser le couvercle dans la
direction indiquée par la flèche.
Adaptateur secteur branché sur la prise
clignote
État de charge de la batterie
Batterie complètement chargée, env.
3 heures d’expression
clignote
20 min. de durée d’expression restante.
clignote
Batterie déchargée
«bAtt»
Chargement initial et rechargement
après la réinstallation de la batterie (durée de chargement de max. 24 heures)
Le tableau ci-dessus présente les différents
statuts d'utilisation. Ces symboles apparaissent sur l'écran à l'avant du bloc-moteur.
6. Préparation de l'expression
Avertissement
lL
avez-vous soigneusement les mains
(au moins pendant une minute) avec
de l'eau et du savon avant de toucher
le sein et les pièces du tire-lait.
i
80
6.3 Assemblage
du tire–lait
1
Remarque
lN
'utilisez que des accessoires Medela
originaux.
l Avant utilisation, vérifiez que les
composants du tire-lait ne présentent
aucun signe d'usure ou d'endommagement et remplacez-les si nécessaire.
l Tous les composants doivent être
complètement secs avant utilisation.
Placez la membrane jaune sur
la base du connecteur de la
téterelle :
✔
Vue de dessous
i
Info
4
lE
xécutez soigneusement toutes les
étapes de la procédure et montez le
tire-lait correctement. Sans quoi, vous
n'obtiendrez pas une bonne force
d'aspiration.
Vissez le biberon sur
le connecteur.
Pour assembler l'autre
combinaison téterelle/
biberon/connecteur pour
un double pompage,
répétez les étapes 1 à 4.
✗
2
3
81
Enfoncez la capsule transparente sur la combinaison base/
membrane.
Vérifiez que la capsule soit
bien attachée aux trois points
de connexion (un au-dessus,
deux sur les côtés).
5
Insérez la tubulure dans
l'ouverture de la capsule transparente. Poussez-la aussi loin
que possible.
Poussez la téterelle sur
le connecteur.
6
Insérez la longue tubulure dans
l'orifice pour tuyau sur la face
supérieure du bloc-moteur.
7. Expression
Avertissement
Si la réponse à l'une de ces questions est «Non» ou si vous éprouvez des problèmes ou une douleur
pendant l'expression, consultez un(e)
consultant(e) en lactation ou une
sage-femme.
i
82
lÉ
tape 2 (chapitre 7.1) :
Répondez au questionnaire suivant
pour vérifier que la taille de la téterelle
est adaptée :
lL
e mamelon bouge-t-il librement
dans l’embout de la téterelle?
lE
st-ce qu’une petite partie de
l’aréole, voire aucune, s’étire dans
l’embout de la téterelle?
lO
bservez-vous un mouvement doux
et rythmé du sein à chaque cycle
d’aspiration?
lS
entez-vous votre sein se vider pendant toute l’expression?
lV
os mamelons sont-ils indolores?
7.1 Préparation
de l'expression
simple
1
Insérez le petit tuyau non utilisé
dans le support de tuyau.
7.2 Expression du lait
1
Remarque
lÉ
tape 3 (chapitre 7.1) :
Ne tenez pas le tire-lait par le biberon.
Vous pourriez provoquer un blocage
des canaux galactophores et un engorgement de ceux-ci.
lE
ssuyez le sein avec un gant de toilette
chaud (n'utilisez pas d'alcool).
l Redémarrage du minuteur : appuyez
sur
pendant 3 secondes. Le minuteur redémarre à zéro, mais le Freestyle
continue l'expression du lait.
Allumez le tire-lait avec
.
Le minuteur démarre.
La phase de stimulation
dure deux minutes au
maximum. Le tire-lait passe
ensuite automatiquement à
la phase d'expression.
2
1
3
83
Placez la téterelle sur le sein
de manière à centrer correctement le mamelon dans
l'embout.
2
1
Si le lait commence à s'écouler plus rapidement, appuyez
sur
pour passer en phase
d'expression.
Veillez à ce que le lait
s'écoule correctement dans
le biberon.
Maintenez la téterelle sur le sein
à l'aide de votre pouce et de
votre index. Soutenez votre sein
avec la paume de votre main.
3
La force d'aspiration peut être
adaptée à chaque phase. Force
d'aspiration de confort :
Utilisez
pour augmenter la
force d'aspiration jusqu'à ce
qu'elle devienne légèrement
désagréable. Appuyez ensuite
sur
pour la réduire de
manière minime.
7. Expression
Avertissement
4
lC
ontactez une sage-femme ou un(e)
consultant(e) en lactation si vous
n'exprimez que très peu de lait ou
pas du tout ou si l'expression s'avère
douloureuse.
Remarque
lD
ébranchez toujours le Freestyle de
l'alimentation secteur après l'expression (sauf si la batterie est en train
de recharger).
l Ne remplissez le biberon que jusqu'au
marquage 150 ml.
i
Appuyez sur
pendant trois
secondes durant la phase d'expression afin de sauvegarder
votre programme d'expression
personnalisé.
L
'indicateur sur l'écran clignote
et le tire-lait émet trois bips.
T
erminez l'expression comme
d'habitude.
Info
lL
e Freestyle se désactive automatiquement après avoir fonctionné pendant
30 minutes sans manipulation.
l Ne pliez pas le tuyau pendant
l'expression.
lÉ
tape 4 :
Bouton de fonction de mémoire
Pour activer vos réglages personnels,
démarrez le tire-lait et appuyez sur
.
7
1
Nettoyez-le en respectant
les instructions
contenues au chapitre 5.
i
84
Fermez le biberon avec
un couvercle.
Respectez les instructions
contenues au chapitre 8
«Conservation et décongélation
du lait maternel».
5
Éteindre le tire-lait en
appuyant sur
.
6
1
Utilisez le support pour éviter
que le biberon ne se renverse.
85
7. Expression
Avertissement
lÉ
tape 2 :
Ne tenez pas le tire-lait par le biberon. Vous pourriez provoquer un
blocage des canaux galactophores
et un engorgement de ceux-ci.
86
i
7.3 Préparation de l'expression
en mains libres avec le
bustier Easy Expression*
1
Info
lU
ne expression double permet de
gagner du temps et accroît la teneur
énergétique du lait. La production
de lait s'en voit ainsi augmentée et
maintenue à long terme.
Mettez le bustier Easy Expression
et laissez la fermeture-éclair légèrement ouverte.
7.4 Préparation
de l'expression double
1
Placez la téterelle sur le sein
de manière à centrer correctement le mamelon dans l'embout. Maintenez la téterelle sur
le sein à l'aide de votre pouce
et de votre index.
Soutenez votre sein avec la
paume de votre main.
2
3
87
Placez la téterelle sur votre sein
sous le bustier de manière à
centrer votre mamelon dans
l'embout de la téterelle.
2
1
Allumez le tire-lait avec
.
Le minuteur démarre.
La phase de stimulation
dure deux minutes au
maximum. Le tire-lait passe
ensuite automatiquement
à la phase d'expression.
Refermez la fermeture-éclair
et insérez le connecteur sur
la téterelle.
*Le bustier Easy Expression n'est pas inclus avec
le tire-lait Freestyle. Reportez-vous au chapitre 12
pour apprendre comment le commander.
3
Placez l'autre téterelle sur le sein
de manière à centrer correctement le mamelon dans l'embout.
8. Conservation et décongélation du lait maternel
8.1 Conservation
Règles de conservation pour le lait maternel fraîchement exprimé
(pour les bébés en bonne santé nés à terme)
88
Température a mbiante
Réfrigérateur
Congélateur
Lait maternel d écongelé
4 – 6 heures de
19 à 26 °C (66 à 78 °F)
3 – 8 jours à 4 °C
(39 °F) ou moins
6 – 12 mois
–18 à –20 °C
(0 à 4 °F)
Au réfrigérateur p endant
au max. 10h. Ne pas
recongeler !
lN
e conservez pas le lait maternel dans la porte du réfrigérateur. Choisissez plutôt
la partie la plus froide du réfrigérateur (à l'arrière de la clayette au-dessus du bac
à légumes).
8.2 Congélation
lV
ous pouvez congeler le lait maternel exprimé dans des biberons ou des sachets
« Pump & Save »*. Ne remplissez pas les biberons ou sachets à plus de 3/4 afin de
laisser de l'espace pour la solidification du ilait.
l Indiquez la date d'expression sur les biberons ou sachets « Pump & Save ».
8.3 Décongélation
Attention
Ne décongelez pas et ne réchauffez pas le lait maternel au four à micro-ondes
ni dans une casserole d'eau bouillante afin d'éviter toute perte de vitamines, de
minéraux et d'autres nutriments essentiels, ainsi que tout risque de brûlure.
lP
our préserver les composants du lait maternel, décongelez le lait dans le
réfrigérateur la veille de son utilisation. Vous pouvez également tenir le biberon
ou le sachet « Pump & Save » sous l'eau chaude (max. 37 °C).
lS
ecouez délicatement le biberon ou le sachet « Pump & Save » afin d'homogénéiser les corps gras. Évitez de secouer vigoureusement ou d'agiter le lait.
* Pour plus d’informations, consultez le site www.medela.com
9. Alimentation au lait maternel
i
Info
Medela recommande Calma pour une
alimentation au lait maternel.
Avec Calma
l votre bébé peut se nourrir, marquer
des pauses et respirer régulièrement.
l le lait s’écoule lorsqu’un vide est créé.
l le comportement naturel
d’alimentation de votre bébé est
maintenu, ce qui permet un retour
aisé à l’allaitement au sein.
MULATIO
TI
E XP
ION
OULEM
ÉC
SION
E
NT
CA
LM
Plus de lait en
moins de temps
E X PR
ES
2-PHAS
E
EM
SUPPORT BASÉ SUR
LA RECHERCHE POUR LES
MÈRES ALLAITANTES
ALLA
Invention de
IT
Medela
A
RE
SS
Prise en
considération
du mécanisme
d'alimentation
acquis par
bébé
T DU LA
I
EN
89
N
S
Vous trouverez des informations
détaillées sur Calma sur le site
Internet Medela (www.medela.com).
T
CC
SU ION
BÉBÉ
DU
Grâce à ses travaux de recherche,
Medela est devenue l’une des premières entreprises au monde à intégrer
le mécanisme d’allaitement des bébés
dans ses innovations : la technologie
d’expression à 2 phases et Calma.
La technologie d’expression à 2 phases
reproduit le rythme naturel de succion
du bébé, afin d’exprimer davantage
de lait en moins de temps. Les mouvements brefs de stimulation sont suivis
de mouvements plus longs, générant
un écoulement de lait optimal. Calma,
l’unique solution d’alimentation conçue
pour le lait maternel, permet à votre
enfant de marquer des pauses et de
reprendre son souffle pendant l’allaitement, tout en conservant le comportement de succion qu’il a appris naturellement en tétant le sein. Conçue pour
une belle expérience d’allaitement.
Calma – une solution d’alimentation
unique conçue pour le lait maternel.
10. Résolution des problèmes
Problème
Solution
S’il n’y a pas
d’aspiration ou
si l’aspiration
est trop faible
Vérifiez toutes les connexions.
Vérifiez que la capsule transparente est bien attachée aux trois points de
connexion sur le connecteur se trouvant entre la téterelle et le biberon.
Tenez la téterelle, pas le connecteur ni le biberon, pendant l'expression.
Vérifiez que la téterelle est placée de manière hermétique sur le sein.
Lors de l'expression simple, insérez le tuyau non utilisé dans le support
de tuyau. Ne pliez pas le tuyau.
Vérifiez qu'il n'y a pas de résidu d'eau dans le tuyau.
Tous les composants doivent être complètement secs.
90
Le tire-lait
devient humide
Débranchez l'adaptateur secteur de la prise.
Désactivez le tire-lait.
Ne placez pas le tire-lait à l'envers. Le panneau de commandes
doit être dirigé vers le haut.
Laissez le tire-lait dans un endroit sec et chaud pendant 24 heures.
Remarque :
N'exposez pas le tire-lait à la lumière directe du soleil.
N'accélérez pas le procédé de séchage en utilisant une source de chaleur.
«Err» + 3 bips
Contactez votre revendeur Medela ou le magasin où vous avez acheté
le tire-lait.
Le symbole de
l'adaptateur
secteur clignote
Le tire-lait ne
s'allume pas
Contactez votre revendeur Medela ou le magasin où vous avez acheté
le tire-lait.
L'indicateur
de la batterie
clignote en
affichant quatre
barres
Contactez votre revendeur Medela ou le magasin où vous avez acheté
le tire-lait.
11. Garantie/recyclage
Garantie
La brochure «Garantie internationale» contient des informations détaillées relatives
à la garantie.
Recyclage
91
Cet appareil est composé de différents métaux et plastiques. Avant élimination,
l'appareil doit être rendu inutilisable. En fonction de la réglementation locale, il ne
peut être jeté avec les déchets ménagers non triés. Utilisez votre système local de
collecte de rebuts d'équipements électriques et électroniques (y compris les piles).
Une élimination non conforme peut avoir des effets néfastes sur l'environnement
et la santé publique.
12. Une gamme complète pour l'allaitement maternel
En spécifiant le numéro de produit, vous pouvez obtenir auprès des distributeurs
Medela les accessoires suivants du Freestyle.
Pièces détachées
Référence de l'article Produit
92
099.0271
099.0272
099.0273
099.0274
Adaptateur Freestyle (100–240 V ; 12 V) Europe
Adaptateur Freestyle (100–240 V ; 12 V) Royaume Uni et É.-U./Japon
Adaptateur Freestyle (100–240 V ; 12 V) Australie/Nouvelle Zélande
Adaptateur Freestyle (100–240 V ; 12 V) Chine
200.1690
Bloc-moteur Freestyle
200.1692
Tuyau Freestyle
200.1691
Batterie rechargeable Freestyle
Accessoires
Référence de l'article
Produit
008.0327
008.0328
008.0329
008.0330
008.0331
2
2
2
2
2
800.0796
200.1659
Biberon pour lait maternel 150 ml (3 pc)
Biberon pour lait maternel 250 ml (2 pc)
008.0139
Calma Solitaire
008.0315
Sachets pour lait maternel Pump & Save
008.0217
008.0220
008.0224
008.0225
Bustier
Bustier
Bustier
Bustier
Téterelles
Téterelles
Téterelles
Téterelles
Téterelles
PersonalFit
PersonalFit
PersonalFit
PersonalFit
PersonalFit
Easy
Easy
Easy
Easy
S (21 mm)
M (24 mm)
L (27 mm)
XL (30 mm)
XXL (36 mm)
Expression
Expression
Expression
Expression
blanc
blanc
blanc
blanc
S
M
L
XL
Les autres produits Medela sont disponibles sur www.medela.com.
* Si l'expression s'avère douloureuse ou insatisfaisante, contactez une sage-femme
ou un(e) consultant(e) en lactation. Une téterelle PersonalFitTM de taille différente peut
aider à rendre l'expression plus confortable et plus efficace.
Exprimer le lait
Soigner les mamelons
93
Recherche
factuelle
Formation
Expertise
Service
Nourrir bébé
Innovation
Professionnels
Transporter et nettoyer
Reccueillir
le lait
Indice
1. Uso previsto/Popolazione – Controindicazioni
95
2. Significato dei simboli
96
3. Importanti informazioni di sicurezza
98
4. Descrizione del prodotto
4.1 Freestyle – tutto in uno, innovativo, salvatempo
100
4.2 C
omponenti del prodotto
100
5. Pulizia
94
100
102
5.1 Prima del primo impiego e dopo ciascun utilizzo
102
5.2 P
rima del primo impiego e una volta al giorno
104
5.3 Pulizia
dell'unità motore
105
5.4 Pulizia
– riepilogo
106
6. Preparazione all'estrazione
108
6.1 Funzionamento a corrente
108
6.2 Funzionamento a batteria
109
6.3 Montaggio del set del tiralatte
110
7. Estrazione
112
7.1 Preparazione all'estrazione singola
112
7.2 Estrazione
112
7.3 Preparazione all'estrazione a mani libere con il bustino Easy Expression
116
7.4 Preparazione all'estrazione doppia
116
8. Conservazione e scongelamento del latte materno
118
8.1 Conservazione
118
8.2 Congelamento
118
8.3 Scongelamento
118
9. Alimentazione con latte materno
119
10. Risoluzione dei problemi
120
11. Garanzia/smaltimento
121
12. Cura completa durante l'allattamento al seno
122
13. EMC/Descrizione tecnica
184
14. Specifiche tecniche
191
1. Uso previsto/Popolazione – Controindicazioni
95
Uso previsto e indicazioni dei tiralatte
I tiralatte sono destinati alle donne che allattano in ospedale o a casa estraendo
dal seno il latte materno. I tiralatte sono indicati per alleviare i sintomi di congestione
mammaria durante l'estrazione del latte materno. In caso di mastite, i tiralatte contribuiscono al processo di guarigione estraendo il latte materno dal seno interessato.
I tiralatte sono indicati per dare sollievo ai capezzoli screpolati e doloranti e per portare
nella posizione corretta i capezzoli appiattiti o rientrati. Inoltre, essi aiutano le madri a
fornire latte materno ai neonati che non possono essere allattati direttamente al seno a
causa di vari motivi, come problemi di attaccamento, palatoschisi o perché prematuri.
Popolazione di pazienti/utenti destinatari
Donne che allattano, giovani adolescenti o adulte. Molte donne trovano comodo,
o addirittura necessario, l'uso del tiralatte per estrarre e conservare il latte materno,
dopo essere tornate all'attività lavorativa, durante i viaggi o quando si trovano lontane
dal bambino per altri motivi. Le madri sono spesso liete di sapere che il tiralatte può
essere usato come integrazione all'allattamento al seno e che alcuni modelli sono
studiati per imitare la suzione del bambino.
Controindicazioni
Non sussistono controindicazioni note per l'uso del tiralatte Freestyle.
2. Significato dei simboli
Il simbolo di avvertenza identifica tutte le istruzioni importanti per la sicurezza. La mancata
osservanza di tali istruzioni può comportare lesioni alle persone o danni al tiralatte! Abbinato ai seguenti termini, il simbolo di avvertenza assume i significati descritti di seguito.
Può comportare lesioni gravi o la morte.
Attenzione
Può comportare lesioni non gravi.
i
Avvertenza
Nota
i
Informazione
Può comportare danni alle cose.
Informazioni utili o importanti non correlate
alla sicurezza.
Simboli sulla confezione
Questo simbolo indica che il materiale è oggetto di un processo di recupero/riciclaggio.
Questo simbolo indica una confezione in cartone.
Questo simbolo indica che il dispositivo non deve essere esposto alla luce solare.
96
Questo simbolo indica che il dispositivo è fragile e deve essere maneggiato con attenzione.
Questo simbolo indica i limiti di temperatura per funzionamento, trasporto e conservazione.
°C
Questo simbolo indica i limiti di umidità per funzionamento, trasporto e conservazione.
Questo simbolo indica i limiti di pressione atmosferica per funzionamento, trasporto
e conservazione.
Questo simbolo indica di mantenere il dispositivo asciutto.
Questo simbolo indica che la confezione contiene prodotti destinati a venire a contatto
con alimenti secondo il regolamento 1935/2004.
Questo simbolo indica il codice univoco GSI Global Trade Item Number (GTIN).
Questo simbolo indica di non smaltire il dispositivo nei rifiuti urbani indifferenziati
(solo per UE).
Questo simbolo indica di seguire le istruzioni per l'uso.
Simboli sul dispositivo
Questo simbolo indica di seguire le istruzioni per l'uso.
0123
Questo simbolo indica la conformità ai requisiti fondamentali della
Direttiva del Consiglio 93/42/CEE del 14 giugno 1993 relativa ai dispositivi medici.
Questo simbolo indica il produttore.
Questo simbolo indica dove aprire il coperchio della batteria.
Questo simbolo indica dove inserire la spina del trasformatore.
Questo simbolo indica di non smaltire il dispositivo nei rifiuti urbani indifferenziati
(solo per UE).
Questo simbolo indica la conformità ai requisiti di sicurezza supplementari di USA
e Canada per le apparecchiature elettromedicali.
Questo simbolo indica un componente da applicare di tipo BF.
REF
Questo simbolo indica il codice di catalogo della batteria assegnato dal produttore.
SN
Questo simbolo indica il numero di serie del dispositivo assegnato dal produttore.
IP22
Questo simbolo indica la protezione contro l'ingresso di oggetti estranei solidi
e contro gli effetti nocivi dovuti all'ingresso di acqua.
Questo simbolo indica la data di produzione (quattro cifre per l'anno e due cifre
per il mese).
Simboli sul trasformatore
Questo simbolo indica che il trasformatore è un dispositivo di classe II.
Questo simbolo indica la conformità alla Certificazione obbligatoria cinese (CCC).
Questo simbolo indica che il trasformatore è stato sottoposto a test di sicurezza.
Questo simbolo indica che il trasformatore è destinato esclusivamente all'uso
in interni.
Questo simbolo indica la conformità ai requisiti di sicurezza di USA e Canada.
Questo simbolo indica la conformità ai requisiti della Commissione federale
per le comunicazioni.
Questo simbolo indica la polarità del connettore di alimentazione a c.c.
N136
Questo simbolo indica la conformità ai requisiti regolamentari di Australia e Nuova Zelanda
(Marchio di conformità regolamentare).
Il marchio CE indica la conformità alla direttiva relativa a bassa tensione e
compatibilità elettromagnetica.
Questo simbolo indica di non smaltire il dispositivo nei rifiuti urbani indifferenziati
(solo per UE). Il simbolo della barra indica che il trasformatore è stato introdotto
sul mercato dopo il 13 agosto 2005.
Questo simbolo indica la conformità ai requisiti di sicurezza giapponesi.
Questo simbolo indica la conformità ai requisiti di efficienza energetica.
Questo simbolo indica la corrente alternata.
9 VDC
Questo simbolo indica la corrente continua.
97
3. Importanti informazioni di sicurezza
La mancata osservanza di queste istruzioni/informazioni di sicurezza
può portare a situazioni di pericolo causate dal dispositivo. Con riserva
di modifiche tecniche.
Dispositivo
Pericolo di folgorazione! Mantenere asciutto il dispositivo! Non immergere
mai in acqua o altri liquidi!
Il tiralatte Freestyle non è resistente al calore: tenere lontano da radiatori
e fiamme libere.
Non esporre l'unità motore alla luce diretta del sole.
Le riparazioni devono essere effettuate esclusivamente da operatori
di assistenza autorizzati. Non riparare da soli l'apparecchio. Non sono
consentite modifiche al dispositivo.
98
Non utilizzare mai un dispositivo danneggiato. Sostituire i componenti
danneggiati o logorati.
MAX.
250 h
La durata di funzionamento del tiralatte Freestyle è di 250 ore.
La vita utile è di due anni.
Uso del dispositivo collegato alla rete di energia elettrica
Il distacco dalla rete è assicurato solo scollegando il trasformatore dalla
presa di corrente.
Tenere il trasformatore lontano da superfici riscaldate.
Non cercare di recuperare un apparecchio elettrico caduto in acqua.
Scollegarlo immediatamente.
Il tiralatte Freestyle non deve mai essere lasciato incustodito mentre
è collegato a una presa di corrente.
Uso
Usare il tiralatte Freestyle solo per l'uso a cui è destinato, descritto
nel presente manuale.
Non usare mai un apparecchio elettrico se ha un cavo o una spina
danneggiati, se non funziona correttamente, se è caduto o danneggiato
o se è caduto in acqua.
Non utilizzare il tiralatte Freestyle durante il bagno o la doccia.
Non utilizzare il tiralatte Freestyle quando si dorme o si è troppo assonnati.
Il prodotto deve essere utilizzato da un singolo utente. L'uso da parte
di più persone può esporre a rischi per la salute.
Non guidare durante l'estrazione del latte con l'opzione mani libere.
È necessaria una supervisione se il tiralatte Freestyle viene usato in
prossimità di bambini.
In caso di problemi o se si avverte dolore, consultare il proprio consulente
per l’allattamento o il medico.
Gli apparecchi di comunicazione a radiofrequenza, portatili o mobili,
possono disturbare il tiralatte Freestyle.
Importante:
lL
e bottiglie e i componenti in plastica diventano fragili se congelati
e potrebbero rompersi cadendo.
l Inoltre, le bottiglie e i componenti potrebbero danneggiarsi se non maneggiati
correttamente, ad esempio se vengono fatti cadere, se serrati eccessivamente
o rovesciati.
l Prestare attenzione quando si maneggiano le bottiglie e i componenti.
l Non utilizzare il latte materno se le bottiglie o i componenti sono danneggiati.
99
4. Descrizione del prodotto
4.1 Freestyle – tutto in uno, innovativo, salvatempo
Acquistando Freestyle hai fatto la scelta giusta. Freestyle è allo stesso tempo efficiente
e comodo. Freestyle è efficiente perché utilizza la tecnologia di estrazione 2-Phase
Expression, che imita il ritmo di suzione naturale del bambino: movimenti brevi atti alla
stimolazione sono seguiti da altri più lunghi, assicurando un flusso ottimale del latte. La
tecnologia 2-Phase Expression combinata all'estrazione doppia, aiuta ad aumentare e
a mantenere la produzione di latte e a risparmiare tempo prezioso. Freestyle è anche
comodo, grazie alle impostazioni del vuoto regolabili, alla funzione di memoria e al
display informativo, che risultano molto utili. Tutto questo rende Freestyle ideale per le
mamme che lavorano e per un uso quotidiano e regolare.
Le caratteristiche principali del tiralatte Freestyle sono:
I aiuta a mantenere e ad aumentare la produzione di latte e a risparmiare tempo;
I è piccolo, leggero e comodo;
I offre la massima mobilità e libertà di movimento.
100
4.2 Componenti del prodotto
Porta per il tubicino
Freestyle
1 unità motore:
Diminuzione
del vuoto
Gancio di
fissaggio
Aumento
del vuoto
Indicatore
alimentazione
di rete
Vano batterie
Indicatore
del livello
di vuoto
(fase di
estrazione)
Indicatore
del livello di
vuoto (fase
di stimolazione)
Indicatore
memoria „on“
Indicatore
batteria
Tasto
discesa latte
Timer
Tasto On/Off
Tasto funzione
di memoria
Presa di alimentazione
Pulsante
Le parti di ricambio e gli accessori disponibili per l'ordine sono reperibili al capitolo 12.
1 tubicino
Freestyle
4 dischi
4 tappi con apertura
Tubicino corto
Supporto
del tubicino
1 Calma Solitaire
2 tappi multifunzione
Calma
Supporto
del tubicino
101
2 coppe per il seno PersonalFit™ taglia
M (24 mm)(per altre misure di coppe per
il seno, consultare il capitolo 12)
2 connettori Freestyle
(base della coppa per il seno, membrana,
coperchio trasparente)
1 trasformatore
4 bottiglie
1 borsa termica
1 elemento refrigerante
1 batteria ricaricabile
1 borsa Freestyle
2 supporti
per
bottiglia
5. Pulizia
Attenzione
lP
er la pulizia, usare esclusivamente
acqua potabile.
l Separare e lavare tutte le parti che
entrano in contatto con il seno
o con il latte materno subito dopo
l'uso per evitare l'essiccazione
dei residui di latte e prevenire la
formazione di batteri.
l Non asciugare mai i componenti in microonde, poiché si potrebbero rompere.
5.1 Prima del primo
impiego e dopo
ciascun utilizzo
1
Smontare il set del tiralatte
nei singoli componenti.
102
Nota
i
l Il set del tiralatte non necessita
di manutenzione.
l Prestare attenzione a non danneggiare i componenti del set del tiralatte
durante la pulizia.
l Se i singoli componenti del set del
tiralatte sono lavati in lavastoviglie,
i pigmenti alimentari possono causarne la decolorazione. Ciò non comporta effetti sul funzionamento.
4
Risciacquare tutti i componenti
con acqua pulita e fredda
(20 °C circa) per 10–15 secondi.
3
2
Pulire tutti i componenti con
abbondante acqua saponata
tiepida (30 °C circa).
Risciacquare tutti i componenti
con acqua pulita e fredda
(20 °C circa).
oppure
In alternativa alle
operazioni 2, 3 e 4.
5
103
Asciugare con un panno
pulito o lasciare asciugare
su un panno pulito.
Se i singoli componenti del
set del tiralatte sono lavati
in lavastoviglie, posizionarli
nel cestello superiore o nello
scomparto per le posate.
5. Pulizia
Attenzione
lP
er la pulizia, usare esclusivamente
acqua potabile.
l Separare e lavare tutte le parti
che entrano in contatto con il seno
o con il latte materno subito dopo
l'uso per evitare l'essiccazione
dei residui di latte e prevenire la
formazione di batteri.
l Non asciugare mai i componenti in
microonde, poiché si potrebbero
rompere.
5.2 Prima del primo
impiego e una
volta al giorno
1
Smontare il set del tiralatte
nei singoli componenti.
104
Nota
i
lD
urante la bollitura, si può aggiungere un cucchiaino di acido citrico
per evitare la formazione di depositi
calcarei.
l Conservare il set del tiralatte in
una sacca o in un contenitore puliti
fino all'utilizzo successivo. Oppure
conservarlo avvolto in carta pulita
o in un panno.
3
Asciugare con un panno
pulito o lasciare asciugare
su un panno pulito.
2a
Coprire tutte le parti con
acqua e lasciare bollire
per cinque minuti.
oppure
2b
Usare le sacche QuickClean*
nel forno a microonde secondo
le istruzioni.
5.3 Pulizia dell'unità
motore
1
Pulire con un panno umido
pulito.
*Ulteriori informazioni sul sito www.medela.com
105
5. Pulizia
5.4 Pulizia – riepilogo
Prima del primo impiego
e dopo ciascun utilizzo
106
Risciacquare con acqua pulita e fredda
(20 °C circa), poi pulire con abbondante acqua saponata tiepida (30 °C
circa) e infine risciacquare con acqua
pulita e fredda per 10-15 secondi.
√
√
√
√
√
√
--
--*
In alternativa, lavare in lavastoviglie
(nel cestello superiore o nello
scomparto per le posate).
√
√
√
√
√
√
--
--*
Coprire con acqua e lasciare bollire
per cinque minuti.
√
√
√
√
√
√
--
--*
In alternativa, utilizzare una sacca
per microonde Quick Clean secondo
le istruzioni.
√
√
√
√
√
√
--
--*
Altrimenti, pulire con un panno
umido pulito.
--
--
--
--
--
--
√
--*
Prima del primo impiego
e una volta al giorno
*Per ulteriori informazioni, vedere il capitolo 10 "Risoluzione dei problemi" ("Se la suzione è scarsa
o inesistente")
107
6. Preparazione all'estrazione
Avvertenza
Per quanto concerne la sezione
6.1 Funzionamento a corrente:
l Osservare la sequenza esatta delle operazioni.
l Usare soltanto il trasformatore fornito con
il tiralatte Freestyle.
l Assicurarsi che la tensione del trasformatore sia compatibile con l'alimentazione
elettrica.
i
108
Nota
l Non forzare per inserire la batteria
nell'apposito vano.
IN
on inserire la batteria quando il tiralatte
è collegato alla rete elettrica.
i
6.1 Funzionamento
a corrente
1
Per far funzionare il tiralatte a
corrente, scoprire la presa di
alimentazione nella parte inferiore dell'unità motore. Inserire
il trasformatore (la piccola spina
rotonda) nella presa.
Informazione
l È possibile far funzionare il tiralatte Freestyle a batteria o a corrente. La batteria
va caricata prima dell'utilizzo.
Per quanto concerne il "Funzionamento
a batteria" (sezione 6.2):
l La batteria inizia a ricaricarsi non appena
il tiralatte viene collegato a una fonte di
alimentazione.
l È possibile utilizzare il tiralatte durante la
ricarica.
l Non scollegare il trasformatore finché la
ricarica non è completa.
l Se possibile, non rimuovere la batteria
dall'unità motore. La rimozione della
batteria richiede un tempo di ricarica
massimo di 24 ore.
l Il tiralatte verrà riposto per un periodo di
tempo prolungato? In tal caso è meglio
rimuovere la batteria dall'unità.
l Se Freestyle rimane inattivo per 30 minuti,
si spegne automaticamente.
2
Inserire la batteria nell'apposito
scomparto, con le frecce "This
side down" rivolte verso lo scomparto stesso. I contatti dorati
della batteria devono essere in
contatto con quelli nello scomparto. Al termine, riposizionare
il coperchio della batteria.
2
Per informazioni sul montaggio del set per tiralatte, vedere il capitolo 6.3.
6.2 Funzionamento
a batteria
Se ancora non è stato fatto, montare la
spina specifica del paese in cui ci si trova sul
gruppo trasformatore più grande. Inserire la
spina nella presa di corrente nel muro. Ora
l'unità motore è pronta per il funzionamento.
1
Per far funzionare il tiralatte a
batteria, aprire lo scomparto della
batteria premendo il pulsante sul
coperchio della batteria (nella parte posteriore dell'unità motore) e
facendo scorrere il coperchio nella
direzione della freccia.
3
Ulteriori informazioni sul
funzionamento a
corrente al capitolo 6.1.
Trasformatore collegato alla presa
Caricare la batteria collegando l'unità
motore alla rete elettrica. Sul display nella
parte anteriore dell'unità motore apparirà
la scritta "bAtt". Caricare la batteria finché
il relativo indicatore non smette di
lampeggiare e la scritta "bAtt" scompare.
Ora la batteria è completamente carica.
Scollegare il trasformatore. Il tiralatte
è pronto per funzionare a batteria.
lampeggiante
Stato di carica della batteria
Batteria completamente carica,
circa 3 ore di estrazione
lampeggiante
20 minuti di tempo di estrazione
rimanenti.
lampeggiante
Batteria completamente scarica
„bAtt“
Carica iniziale e ricarica dopo
la rimozione della batteria (fino
a 24 ore di tempo di ricarica)
La tabella sopra riportata mostra i diversi stati
di funzionamento. Questi simboli appaiono sul
display nella parte anteriore dell'unità motore.
109
6. Preparazione all'estrazione
Attenzione
lL
avare a fondo le mani (per almeno
un minuto) con acqua e sapone
prima di toccare il seno e le parti
dell'apparecchio.
i
110
6.3 Montaggio del
set del tiralatte
1
Nota
lU
tilizzare esclusivamente accessori
originali Medela.
l Controllare l'eventuale usura o danneggiamento dei componenti del set
del tiralatte e sostituirli se necessario.
l Tutti i componenti devono essere
completamente asciutti prima dell'uso.
Collocare la membrana gialla
alla base del connettore per
la coppa per il seno:
✔
✗
Vista inferiore
i
Informazione
4
lE
seguire tutte le operazioni con
attenzione e montare correttamente
il set del tiralatte. In caso contrario,
potrebbe non essere ottenuto un
vuoto adeguato.
Avvitare la bottiglia al connettore.
Per montare la seconda
combinazione coppa per il
seno/bottiglia/connettore per
l'estrazione doppia, ripetere
le fasi da 1 a 4.
2
Inserire il coperchio trasparente sulla combinazione base/membrana.
Controllare che il coperchio sia
unito in modo saldo a tutti e tre
i punti di collegamento (uno
nella parte superiore, due ai lati).
5
Inserire il tubicino corto
nell'apertura del coperchio
trasparente. Spingerlo dentro
finché non si ferma.
3
Spingere la coppa per il seno
sul connettore.
111
6
Inserire il tubicino lungo nell'apposita apertura nella parte
superiore dell'unità motore.
7. Estrazione
Attenzione
Se la risposta a qualunque di tali
domande è „No“ oppure in caso di
problemi o di sensazioni di dolore
durante l'estrazione, consultare l'ostetrica o il consulente per l'allattamento.
i
112
l Per quanto concerne l'operazione 2
(capitolo 7.1):
rispondere alle seguenti domande per
sapere se la misura disponibile
di coppa per il seno è corretta.
l Il capezzolo si muove liberamente
nel condotto della coppa?
l Il tessuto dell’areola è in minima
parte o per nulla attirato nel
condotto della coppa?
l Si nota un movimento delicato
e ritmico del seno a ogni ciclo
della pompa?
l Si avverte il completo svuotamento
del seno?
l Il capezzolo è privo di dolore?
7.1 Preparazione
all'estrazione singola
1
Inserire l'estremità non utilizzata
del tubicino corto nell'apposito
supporto.
7.2 Estrazione
1
Nota
l Per quanto concerne l'operazione
3 (capitolo 7.1): non tenere il set del
tiralatte tramite la bottiglia. Potrebbero
verificarsi il blocco dei dotti lattiferi e
l'ingorgo.
l Pulire il seno con una salvietta tiepida
(non usare alcool).
l Avviare nuovamente il timer: tenere
premuto
per 3 secondi. Il timer
viene avviato nuovamente, ma
Freestyle continua l'estrazione.
Accendere il tiralatte con
.
Il timer si avvia.
La fase di stimolazione dura al
massimo due minuti. La pompa
passa poi automaticamente alla
fase di estrazione.
2
1
Posizionare la coppa sul seno
in modo tale che il capezzolo
si trovi correttamente al centro
del condotto.
2
1
Se il latte inizia a defluire in
anticipo, premere
per
passare alla fase di estrazione.
Accertarsi che il latte fluisca
correttamente nella bottiglia.
3
Trattenere la coppa sul seno con
il pollice e l'indice. Sostenere il
seno con il palmo della mano.
113
3
Il livello di vuoto può essere
regolato in ogni fase. Vuoto
confortevole: usare
per
aumentare il vuoto fino a quando
diventa leggermente sgradevole.
Poi premere
per diminuirlo
di pochissimo.
7. Estrazione
Attenzione
4
lC
ontattare l'ostetrica o il consulente
per l'allattamento se la quantità di
latte estratta è minima o nulla oppure
se l'estrazione è dolorosa.
lS
collegare sempre Freestyle
dall'alimentazione di rete dopo
l'estrazione (a eccezione di
quando la batteria è in carica).
lR
iempire la bottiglia solo fino
al segno di 150 ml.
i
Informazione
lD
opo 30 minuti di funzionamento
senza alcuna manipolazione, Freestyle
si spegne automaticamente.
lN
on attorcigliare il tubicino durante
l'estrazione.
lP
er quanto concerne l'operazione 4:
tasto funzione di memoria
Per attivare l'impostazione
personalizzata, avviare il tiralatte
e premere
.
Tenere premuto
per tre secondi
durante la fase di estrazione per
memorizzare il programma di
estrazione personalizzato.
L'indicatore sul display lampeggia e il tiralatte emette tre
segnali acustici.
Terminare l'estrazione come
di consueto.
7
1
Pulire secondo
quanto indicato
al capitolo 5.
i
114
Nota
Chiudere la bottiglia con
un coperchio.
Seguire le istruzioni del
capitolo 8 „Conservazione
e scongelamento del latte
materno“.
5
Spegnere il tiralatte con
6
.
1
Usare il supporto della bottiglia
per evitare ribaltamenti.
115
7. Estrazione
Attenzione
lP
er quanto concerne l'operazione 2:
non tenere il set del tiralatte tramite
la bottiglia. Potrebbero verificarsi il
blocco dei dotti lattiferi e l'ingorgo.
i
116
7.3 Preparazione
all'estrazione a mani
libere con il bustino
Easy Expression*
1
Informazione
lL
'estrazione doppia permette di
risparmiare tempo e aumenta il
contenuto energetico del latte.
La produzione di latte aumenta
e si mantiene a lungo.
Indossare il bustino Easy
Expression lasciando la zip
leggermente aperta.
7.4 Preparazione
all'estrazione doppia
1
Posizionare la coppa sul seno
in modo tale che il capezzolo
si trovi correttamente al centro
del condotto. Trattenere la
coppa sul seno con il pollice
e l'indice.
Sostenere il seno con il palmo
della mano.
2
3
Posizionare la coppa sul
seno sotto il bustino, in
modo che il capezzolo risulti
centrato nel condotto della
coppa per il seno.
2
1
Accendere il tiralatte con
.
Il timer si avvia.
La fase di stimolazione dura
al massimo due minuti. La
pompa passa poi automaticamente alla fase di
estrazione del latte.
Chiudere la zip e inserire il
connettore sulla coppa
per il seno.
*Il bustino Easy Expression non è fornito insieme
al tiralatte Freestyle. I dettagli per l'ordine sono
indicati al capitolo 12.
3
Posizionare la seconda coppa
sul seno in modo che il
capezzolo sia correttamente
centrato nel condotto.
117
8. Conservazione e scongelamento del latte materno
8.1 Conservazione
Linee guida per la conservazione del latte materno appena estratto
(Per bambini sani, nati a termine)
Temperatura
ambiente
4-6 ore a una
temperatura compresa tra 19 e 26 °C
(tra 66 e 78 °F)
Frigorifero
Congelatore
6-12 mesi a una
3-8 giorni a una
temperatura compresa tra
temperatura di 4 °C
18 e 20 °C
(39 °F) o inferiore
( tra 0 e 4 ° F )
Latte materno
scongelato
In frigorifero per un
massimo di 10 ore.
Non ricongelare!
lN
on conservare il latte materno nella porta del frigorifero. Scegliere invece la parte
più fredda del frigorifero (la parte posteriore del ripiano in vetro sopra lo scomparto
delle verdure).
8.2 Congelamento
118
lÈ
possibile congelare il latte materno appena estratto in bottiglie per latte o in sacche
„Pump & Save“*. Non riempire le bottiglie o le sacche per più di ¾, in modo da
lasciare lo spazio per l’eventuale dilatazione.
l Etichettare le bottiglie o le sacche „Pump & Save“ con la data di estrazione.
8.3 Scongelamento
Avvertenza
Non scongelare il latte materno e non scaldarlo in un forno a microonde o in una
pentola di acqua bollente per evitare la perdita di vitamine, sali minerali e altre
importanti sostanze e per evitare ustioni.
lA
l fine di preservare i componenti del latte materno, scongelare il latte nel frigorifero durante la notte. In alternativa, è possibile tenere la bottiglia o la sacca „Pump &
Save“ sotto l’acqua calda (max. 37 °C).
l Far roteare delicatamente la bottiglia o la sacca „Pump & Save“ per miscelare il
grasso eventualmente separato. Evitare di scuotere o mescolare il latte.
* Per ulteriori informazioni visitare il sito www.medela.com
9. Alimentazione con latte materno
i
Informazioni
Medela consiglia Calma per l’alimentazione con latte materno.
Con Calma
l il vostro bambino può alimentarsi,
fare una pausa e respirare regolarmente;
l il latte defluisce quando si crea un
vuoto;
l il comportamento di alimentazione
naturale del bambino viene mantenuto, consentendo un ritorno semplice
all’allattamento al seno.
Sul sito di Medela (www.medela.com)
sono disponibili informazioni dettagliate su Calma.
MOLAZIO
TI
NE
S
119
EST
ON
di alimentazione
dei neonati
E
FLUSSO
ION
E
CA
LM
Più latte in
minor tempo
A
SION
E
LATTE
SUPPORTO BASATO SULLA RICERCA PER
MADRI CHE ALLATTANO AL SENO
Inventato da Medela
A L I ME
NT
E X PR
ES
2-PHAS
L
DE
RA
ZI
A supporto
del comportamento
AZ
SUZION
A seguito dell’esaustivo lavoro di
ricerca svolto, Medela è una delle prime
aziende al mondo a tenere conto del
comportamento dei neonati durante
l’allattamento
al seno nelle proprie innovazioni 2-Phase Expression e Calma.
2-Phase Expression imita il ritmo naturale di suzione del bambino per estrarre
più latte in meno tempo. Movimenti
brevi atti alla stimolazione sono seguiti
da altri più lunghi, il che garantisce un
flusso ottimale del latte. L’innovativo
strumento di alimentazione per il latte
materno Calma consente al neonato di
fermarsi e respirare durante l’alimentazione, mantenendo al contempo il
comportamento di suzione appreso al
seno. Sviluppato per favorire un’ottimale
esperienza di allattamento al seno.
Calma: la soluzione perfetta per
l’alimentazione con latte materno.
E
10. Risoluzione dei problemi
120
Problema
Soluzione
Se la suzione
è scarsa
o inesistente
Verificare tutti i collegamenti.
Controllare che il coperchio trasparente sia unito in modo saldo a
tutti e tre i punti di collegamento sul connettore tra la coppa per il
seno e la bottiglia.
Durante l'estrazione, tenere la coppa per il seno, non il connettore
o la bottiglia.
Accertarsi che la coppa aderisca completamente al seno.
Durante l'estrazione singola, inserire il tubicino non utilizzato
nell'apposito supporto. Non attorcigliare il tubicino.
Nel tubicino non deve essere presente acqua.
Tutti i componenti devono essere completamente asciutti.
Il tiralatte
risulta bagnato
Scollegare il trasformatore dalla presa.
Spegnere il tiralatte.
Non capovolgere il tiralatte. Il pannello di comando deve essere
rivolto verso l'alto.
Riporre il tiralatte in un luogo caldo e asciutto per 24 ore.
Nota
Non esporre il tiralatte alla luce diretta del sole.
Non accelerare il processo di asciugatura mediante calore.
"Err" + 3 segnali
acustici
Contattare il rivenditore Medela o il negozio dove è stato
acquistato il tiralatte.
Il simbolo del
trasformatore
lampeggia Il
tiralatte non
si accende
Contattare il rivenditore Medela o il negozio dove è stato
acquistato il tiralatte.
L'indicatore
della batteria
lampeggia con
quattro barrette
Contattare il rivenditore Medela o il negozio dove è stato
acquistato il tiralatte.
11. Garanzia/smaltimento
Garanzia
La brochure „Garanzia internazionale“ contiene informazioni dettagliate
in merito alla garanzia.
Smaltimento
Questo prodotto è conforme alla Direttiva EU 2002/96/EC.
Il simbolo del cestino barrato riportato sull'apparecchio indica che il prodotto, alla
fine della propria vita utile, dovendo essere trattato separatamente dai rifiuti domestici, deve essere conferito in un centro di raccolta differenziata per apparecchiature
elettriche ed elettroniche oppure riconsegnato al rivenditore al momento dell'acquisto
di una nuova apparecchiatura equivalente. L'utente è responsabile del conferimento
dell'apparecchio a fine vita alle appropriate strutture di raccolta. L'adeguata raccolta differenziata per l'avvio successivo dell'apparecchio dismesso al riciclaggio, al
trattamento e allo smaltimento ambientalmente compatibile contribuisce ad evitare
possibili effetti negativi sull'ambiente e sulla salute favorisce il riciclo dei materiali di cui
è composto il prodotto.
Lo smaltimento abusivo del prodotto da parte dell'utente comporta delle sanzioni
amministrative di cui al D.lgs. n. 22/1997 (art.50 e seguenti del D.lgs. 22/97). Per
informazioni più dettagliate inerenti i sistemi di raccolta disponibili, rivolgersi al servizio
locale di smaltimento rifiuti, o al negozio in cui è stato effettuato l'acquisto.
121
12. Cura completa durante l'allattamento al seno
I seguenti accessori per Freestyle sono disponibili presso i distributori Medela,
specificando il codice del prodotto.
Parti di ricambio
122
Codice articolo
Prodotto
099.0271
099.0272
099.0273
099.0274
Trasformatore
Trasformatore
Trasformatore
Trasformatore
200.1690
Unità motore Freestyle
200.1692
Tubicino Freestyle
200.1691
Batteria ricaricabile Freestyle
Freestyle
Freestyle
Freestyle
Freestyle
(100-240
(100-240
(100-240
(100-240
V;
V;
V;
V;
12
12
12
12
V)
V)
V)
V)
Euro
UK e USA/JP
AUS/NZ
CN
Accessori
Codice articolo
Prodotto
008.0327
008.0328
008.0329
008.0330
008.0331
2
2
2
2
2
800.0796
200.1659
Bottiglia per latte materno da 150 ml (3 pz.)
Bottiglia per latte materno da 250 ml (2 pz.)
008.0139
Calma Solitaire
008.0315
Sacche per latte Pump & Save
008.0217
008.0220
008.0224
008.0225
Bustino
Bustino
Bustino
Bustino
Coppe
Coppe
Coppe
Coppe
Coppe
per
per
per
per
per
Easy
Easy
Easy
Easy
il
il
il
il
il
seno
seno
seno
seno
seno
PersonalFit
PersonalFit
PersonalFit
PersonalFit
PersonalFit
Expression
Expression
Expression
Expression
taglia
taglia
taglia
taglia
taglia
bianco,
bianco,
bianco,
bianco,
S (21 mm)
M (24 mm)
L (27 mm)
XL (30 mm)
XXL (36 mm)
taglia
taglia
taglia
taglia
S
M
L
XL
Altri prodotti Medela sono disponibili su www.medela.com.
* Se il risultato dell'estrazione non è soddisfacente o se l'estrazione è dolorosa,
contattare l'ostetrica o il consulente per l'allattamento. Una diversa taglia di coppa
per il seno PersonalFitTM può aiutare a rendere l'estrazione più confortevole
e a ottenere risultati soddisfacenti.
Estrazione del latte materno
Cura del seno
Ricerca basata
sull’evidenza
Competenza
Educazione
123
Assistenza
Somministrazione
del latte materno
Innovazione
Mondo
professionale
Gestione del latte materno
Raccolta e conservazione
Inhoudsopgave
1. Beoogd gebruik/populatie – contra-indicatie
125
2. Betekenis van de symbolen
126
3. Belangrijke veiligheidsinformatie
128
4. Productomschrijving
130
4.1 Freestyle: alles-in-één, innovatief, tijdsbesparend
130
4.2 Productonderdelen
130
5. Reiniging
5.1 Voorafgaand aan het eerste gebruik en na elk gebruik
132
5.2 V
oor het eerste gebruik en daarna eenmaal per dag
134
5.3 Het
reinigen van de motor
135
5.4 Reiniging
– samenvatting
136
6. Voorbereidingen voor het afkolven
138
6.1 Werking op netstroomadapter
138
6.2 Gebruik met oplaadbare accu
139
6.3 De afkolfset in elkaar zetten
140
7. Afkolven
124
132
142
7.1 Voorbereiding enkel afkolven
142
7.2 Kolven
142
7.3 Voorbereiding voor handsfree afkolven met de Easy Expression Bustier
146
7.4 Voorbereiding voor dubbel afkolven
146
8. Moedermelk bewaren en ontdooien
148
8.1 Bewaren
148
8.2 Invriezen
148
8.3 Ontdooien
148
9. Moedermelk voeden
149
10. Problemen oplossen
150
11. Garantie / afvoeren
151
12. Volledige verzorging tijdens de borstvoedingsperiode
152
13. EMC / Technische omschrijving
184
14. Technische specificaties
191
1. Beoogd gebruik/populatie – contra-indicatie
Het beoogde gebruik en indicaties van borstkolven
Borstkolven zijn bedoeld voor gebruik door lacterende moeders, thuis of in het ziekenhuis. Door het afkolven van moedermelk verzachten borstkolven de symptomen van
stuwing. In geval van mastitis ondersteunen borstkolven het genezingsproces door
moedermelk uit de aangedane borst te kolven. Door het afkolven worden tepels met
wondjes en kloven minder belast, en kunnen vlakke of ingetrokken tepels naar buiten
worden gebracht. Borstkolven zijn ook bedoeld om moedermelk te geven aan baby's
die om diverse redenen niet rechtstreeks aan de borst kunnen drinken, bijvoorbeeld wegens problemen met aanleggen, gespleten gehemelte of in geval van premature baby's.
Beoogde patiëntenpopulatie/gebruikers
Adolescente pediatrische of volwassen lacterende moeders. Veel vrouwen vinden het
gemakkelijk, en soms ook noodzakelijk, om nadat ze weer aan het werk zijn gegaan,
op reis zijn, of om andere redenen van hun baby zijn gescheiden, met behulp van een
borstkolf de moedermelk af te kolven en te bewaren. Vrouwen zijn vaak blij te horen
dat een borstkolf gebruikt kan worden als ondersteuning bij het geven van borstvoeding
en dat sommige kolven zo zijn ontworpen dat ze het zuigen van een baby imiteren.
Contra-indicaties
Er zijn geen contra-indicaties voor de Freestyle borstkolf bekend.
125
2. Betekenis van de symbolen
Het waarschuwingssymbool geeft belangrijke veiligheidsinstructies aan. Als deze
instructies niet in acht worden genomen, kan dit letsel of schade aan de borstkolf
veroorzaken! Indien het waarschuwingssymbool wordt gebruikt in combinatie met
de volgende woorden, staat het voor:
Kan leiden tot ernstig letsel of
de dood.
Waarschuwing
Kan leiden tot lichte verwondingen.
i
Waarschuwing
Let op
i
Info
Kan leiden tot materiële schade.
Nuttige of belangrijke informatie die
niet gerelateerd is aan de veiligheid.
Symbolen op de verpakking
Dit symbool geeft aan dat het materiaal deel uitmaakt van een terugwinnings-/recyclingproces.
Dit symbool duidt een kartonnen verpakking aan.
Dit symbool geeft aan dat het apparaat niet in zonlicht geplaatst mag worden.
Dit symbool geeft aan dat het apparaat met zorg behandeld moet worden.
Dit symbool geeft de temperatuurbeperkingen aan bij gebruik, transport en opslag.
°C
126
Dit symbool geeft de vochtigheidsbeperkingen aan bij gebruik, transport en opslag.
Dit symbool geeft de luchtdrukbeperkingen aan bij bediening, transport en opslag.
Dit symbool geeft aan dat het apparaat droog gehouden moet worden.
Dit symbool geeft aan dat de verpakking producten bevat die goedgekeurd zijn om in
contact te komen met levensmiddelen conform EG-verordening 1935/2004.
Dit symbool duidt op de unieke GSI identificatie van handelseenheden (GTIN) (barcodes).
Dit symbool geeft aan dat het apparaat niet samen met ongesorteerd gemeentelijk afval
dient te worden afgevoerd (geldt alleen in de EU).
Dit symbool geeft te kennen dat de gebruiksaanwijzing gevolgd moet worden.
Symbolen op het apparaat
Dit symbool geeft te kennen dat de gebruiksaanwijzing gevolgd moet worden.
0123
Dit symbool geeft de conformiteit aan met de essentiële eisen van de Richtlijn
93/42/EEC van de Raad van 14 juni 1993 betreffende medische hulpmiddelen.
Dit symbool geeft de fabrikant aan.
Dit symbool geeft aan waar het klepje van het accucompartiment moet worden geopend.
Dit symbool geeft aan waar de netstroomadapter moet worden ingestoken.
Dit symbool geeft aan dat het apparaat niet samen met ongesorteerd gemeentelijk
afval dient te worden afgevoerd (geldt alleen in de EU).
Dit symbool geeft de conformiteit aan met aanvullende Amerikaanse en Canadese
veiligheidseisen voor elektrische medische hulpmiddelen.
Dit symbool duidt op een type BF toegepast onderdeel.
REF
Dit symbool geeft het fabrikantcatalogusnummer van de accu aan.
SN
Dit symbool geeft het serienummer van de fabrikant aan.
IP22
Dit symbool wijst op de bescherming tegen indringing van vaste vreemde voorwerpen
en schadelijke effecten door indringing van water.
Dit symbool geeft de fabricagedatum aan (vier cijfers voor het jaar en twee cijfers
voor de maand).
Symbolen op de netstroomadapter
Dit symbool geeft aan dat de netstroomadapter een klasse II-apparaat is.
Dit symbool duidt op de conformiteit met de in China verplichte CCC-certificering
(China Compulsory Certification).
Dit symbool geeft aan dat de netstroomadapter op veiligheid is getest.
Dit symbool geeft aan dat de netstroomadapter alleen is bedoeld voor gebruik binnenshuis.
Dit symbool duidt op de conformiteit met Amerikaanse en Canadese veiligheidseisen.
Dit symbool duidt op de conformiteit met de eisen van de Federale Communicatiecommissie.
Dit symbool geeft de polariteit van de gelijkstroomconnector aan.
N136
Dit symbool duidt op de conformiteit met de regelgeving in Australië/Nieuw-Zeeland.
Dit CE-keurmerk geeft de conformiteit aan met de richtlijn betreffende lage voltage
en elektromagnetische compatibiliteit.
Dit symbool geeft aan dat het apparaat niet samen met ongesorteerd gemeentelijk afval
dient te worden afgevoerd (geldt alleen in de EU). Het symbool met de gesloten balk
geeft aan dat de netstroomadapter na 13 augustus 2005 op de markt is gebracht.
Dit symbool wijst op de conformiteit met Japanse veiligheidseisen.
Dit symbool duidt op de conformiteit met de eisen betreffende energie-efficiëntie.
Dit symbool betekent wisselstroom.
9 VDC
Dit symbool betekent gelijkstroom.
127
3. Belangrijke veiligheidsinformatie
Als deze aanwijzingen / veiligheidsinformatie niet wordt opgevolgd,
kan een veilig gebruik van het apparaat niet worden gegarandeerd.
Technische wijzigingen voorbehouden.
Apparaat
Gevaar voor elektrocutie! Apparaat droog houden! Nooit in water
of in andere vloeistoffen dompelen!
De Freestyle borstkolf is niet hittebestendig: niet bij radiatoren en open
vuur plaatsen.
Stel de motoreenheid niet bloot aan direct zonlicht.
Reparatiewerkzaamheden mogen alleen door een bevoegde servicedienst
worden uitgevoerd.
Repareer het apparaat niet zelf. Aan het apparaat mogen geen wijzigingen
worden aangebracht.
Gebruik nooit een beschadigd apparaat. Vervang beschadigde of versleten
onderdelen.
128
MAX.
250 h
De bedrijfsduur van de Freestyle borstkolf bedraagt 250 uur.
De levensduur die onder fabrieksgarantie valt, bedraagt twee jaar.
Omgaan met elektriciteit
De stroomtoevoer is pas gegarandeerd afgesloten als de stekker
van de netstroomadapter uit het stopcontact verwijderd is.
Houd de netstroomadapter uit de buurt van verwarmde oppervlakken.
Pak een elektrisch apparaat dat in het water is gevallen niet vast.
Trek onmiddellijk de stekker uit het stopcontact.
Laat de Freestyle borstkolf niet onbeheerd achter met de stekker
in het stopcontact.
Gebruik
Gebruik de Freestyle borstkolf alleen voor het doel waarvoor deze bestemd
is, zoals beschreven in deze gebruiksaanwijzing.
Gebruik een elektrisch apparaat niet als het snoer of de stekker beschadigd
is, als het niet goed werkt, als het gevallen of beschadigd is of in het water
is gevallen.
Gebruik de Freestyle borstkolf niet tijdens baden of douchen.
Gebruik de Freestyle borstkolf niet tijdens het slapen of als je zeer slaperig
bent.
Dit is een product voor één gebruiker. Gebruik door meer dan één persoon
kan gezondheidsrisico's met zich meebrengen.
Bestuur geen auto tijdens het handsfree afkolven.
Er is toezicht vereist als de Freestyle borstkolf in de buurt van kinderen
wordt gebruikt.
Consulteer je lactatiekundige of arts in geval van problemen of pijn.
De frequenties van mobiele telefoons en radio’s kunnen een negatieve
invloed hebben op de Freestyle borstkolf.
Belangrijk:
lD
oor invriezen worden de plastic flessen en onderdelen broos en is er een
verhoogde kans op breken als ze vallen.
l Ook kunnen flessen en onderdelen beschadigd raken bij verkeerde hantering,
bv. als ze vallen, te vast worden dichtgedraaid of worden omgestoten.
l Ga voorzichtig om met flessen en onderdelen.
l Gebruik de moedermelk niet als de flessen of onderdelen beschadigd zijn.
129
4. Productomschrijving
4.1 Freestyle: alles-in-één, innovatief, tijdsbesparend
Je aankoop van de Freestyle was een juiste keuze. Freestyle is zowel efficiënt als
comfortabel. Freestyle is efficiënt door de toegepaste 2-Phase Expression-afkolftechnologie, die het natuurlijke zuigritme van je baby perfect nabootst. Korte, stimulerende
kolfpatronen worden gevolgd door langere, voor een optimale melkstroom. Samen met
de dubbele kolf helpt dit om de melkproductie te verhogen en in stand te houden en zo
bespaar je kostbare tijd. Met zijn handige regelbare vacuüminstelling, geheugenfunctie
en informatiedisplay is de Freestyle bijzonder prettig in het gebruik.
Kortom, Freestyle is de ideale keuze voor werkende moeders en voor dagelijks en regelmatig gebruik.
De belangrijkste kenmerken van je Freestyle borstkolf:
I Verhoogt de melkproductie, houdt die in stand en bespaart tijd.
I Is klein, lichtgewicht en comfortabel.
I Biedt maximale mobiliteit en bewegingsvrijheid.
4.2 Productonderdelen
1x motoreenheid:
Freestyle poort
voor slang
Vacuüm
verlagen
130
Bevestigingsclip
Vacuüm
verhogen
Netstroomindicator
Accucompartiment
Vacuümniveau-indicator (afkolffase)
Vacuümniveauindicator
(stimulatiefase)
Indicator
geheugen
„aan“
Accu-indicator
„Druppel“ toets
Timer
Stroomcontact
Knop aan / uit
Geheugenfunctietoets
Drukknop
Bestelbare reserveonderdelen en accessoires vind je in hoofdstuk 12.
1x Freestyle
slang
4x dekselinleg
Korte slang
Y-stuk slang
4x deksel met
opening
1x Calma
2x Calma multideksel
Lange slang
2x PersonalFit™ borstschild M (24 mm)
(zie hoofdstuk 12 voor borstschilden in andere maten)
131
2x Freestyle connector
(borstschild-basis, membraan, transparante kap)
1x netstroomadapter
4x fles
1x koeltasje
1x koelelement
1x oplaadbare accu
1x Freestyle tas
2x flessenstandaard
5. Reiniging
Waarschuwing
lG
ebruik voor het reinigen alleen drinkwater.
l Haal de borstkolf uit elkaar en maak
alle onderdelen die in aanraking komen
met de borst en moedermelk onmiddellijk na het gebruik schoon, om te
voorkomen dat melkresten opdrogen
en om de vorming van bacteriën tegen
te gaan.
l Droog de onderdelen nooit in een
magnetron omdat je ze op die manier
onherstelbaar kunt beschadigen.
i
132
5.1 Voorafgaand aan
het eerste gebruik
en na elk gebruik
1
Haal de afkolfset uit elkaar
tot losse onderdelen.
Let op
lD
e afkolfset vraagt geen onderhoud.
l Pas op dat je tijdens het reinigen
geen onderdelen van de afkolfset
beschadigt.
l Als de afzonderlijke onderdelen van
de afkolfset in een afwasmachine
worden gereinigd, kunnen ze door
kleurstoffen in voedingsmiddelen
verkleuren. Dit is niet van invloed
op de functie.
4
Spoel alle onderdelen
10–15 seconden in koud,
schoon water van circa 20 °C.
3
2
Maak alle delen schoon in ruim
warm zeepwater (circa 30 °C).
Spoel alle onderdelen in koud,
schoon water van circa 20 °C.
of
Als alternatief voor
de stappen 2, 3 en 4.
5
Droog af met een schone doek
of leg op een schone doek om
te drogen.
Als je de afzonderlijke onderdelen van de afkolfset in de
vaatwasser reinigt, leg ze dan
in het bovenste rek of in de
bestekmand.
133
5. Reiniging
Waarschuwing
lG
ebruik voor het reinigen alleen
drinkwater.
l Haal de borstkolf uit elkaar en maak
alle onderdelen die in aanraking
komen met de borst en moedermelk
onmiddellijk na het gebruik schoon,
om te voorkomen dat melkresten
opdrogen en om de vorming van
bacteriën tegen te gaan.
l Droog de onderdelen nooit in een
magnetron omdat je ze op die manier
onherstelbaar kunt beschadigen.
i
134
5.2 Voor het eerste
gebruik en daarna
eenmaal per dag
1
Haal de afkolfset uit elkaar
tot losse onderdelen.
Let op
lA
ls je de delen reinigt in kokend water,
kun je een beetje citroenzuur toevoegen om te verhinderen dat er kalkaanslag ontstaat.
l Bewaar de afkolfset tot het volgende
gebruik in een schoon zakje/schone
verpakking. Of bewaar hem in schoon
(keuken)papier of in een doek.
3
Droog af met een schone doek
of leg op een schone doek om
te drogen.
2a
Zorg dat alle delen onder
water staan en laat
vijf minuten koken.
of
2b
Maak voor reiniging in de magnetron gebruik van QuickClean*
Magnetronzakken en volg de daarop
aangegeven instructies.
5.3 Het reinigen
van de motor
135
1
Afvegen met een schone,
vochtige doek.
*Meer informatie vind je op www.medela.com
5. Reiniging
5.4 Reiniging – samenvatting
Voorafgaand aan het eerste
gebruik en na elk gebruik
136
Spoel in koud, schoon water (ongeveer 20 °C), reinig daarna in ruim
warm zeepwater (ongeveer 30 °C) en
spoel ten slotte 10 – 15 seconden in
koud, schoon water.
√
√
√
√
√
√
--
--*
Of reinig de onderdelen in de
vaatwasser (op het bovenste rek
of in de bestekmand).
√
√
√
√
√
√
--
--*
Zorg dat alle onderdelen onder water
staan en laat vijf minuten koken.
√
√
√
√
√
√
--
--*
Of gebruik een Quick Clean Magnetronzak volgens de aanwijzingen.
√
√
√
√
√
√
--
--*
Of veeg de onderdelen af met
een schone, vochtige doek.
--
--
--
--
--
--
√
--*
Voorafgaand aan het eerste
gebruik en daarna eenmaal
per dag
*Meer informatie vind je in hoofdstuk 10 Problemen oplossen ('Als er weinig of geen zuigkracht is').
137
6. Voorbereidingen voor het afkolven
Waarschuwing
Betreffende 6.1 Gebruik met netstroomadapter:
l Voer de stappen in de juiste volgorde uit.
l Gebruik alleen de netstroomadapter
die bij de Freestyle borstkolf geleverd is.
l Let erop dat de spanning van de netstroomadapter overeenkomt met die
van de spanningsbron.
i
138
1
Let op
l Gebruik geen kracht bij het plaatsen
van de accu's in het accucompartiment.
I Plaats de batterij niet terwijl de borstkolf
op het stroomnet is aangesloten.
i
6.1 Werking op
netstroomadapter
Info
I J e kunt de Freestyle borstkolf op accu of
op netstroom gebruiken. Wil je de accu
gebruiken, dan moet die voor het eerste
gebruik eerst worden opgeladen.
Betreffende 6.2 Gebruik met accu:
ID
e accu wordt opgeladen zodra je de kolf
op een stroombron aansluit.
I J e kunt de kolf tijdens het opladen gebruiken.
IT
rek de stekker van de netstroomadapter
pas uit het stopcontact als het laadproces
voltooid is.
IV
ermijd het, indien mogelijk, om de accu
uit de motoreenheid te verwijderen. Na
het verwijderen van de accu moet deze
gedurende maximaal 24 uur opnieuw
worden opgeladen.
IW
il je de kolf gedurende langere tijd opbergen? Dan kun je de accu beter uit de
eenheid verwijderen.
ID
e Freestyle schakelt zichzelf automatisch
uit als hij 30 minuten niet wordt gebruikt.
Om de kolf met netstroom te
gebruiken, haal je het klepje van
het contact onderaan op de
motoreenheid. Steek de
netstroomadapter (de kleine
ronde stekker) in het contact.
2
Plaats de accu in het compartiment met de pijl 'This side down'
(deze zijde onder) naar het compartiment gericht. De gouden
contacten op de accu moeten
de gouden contacten in het apparaat raken. Plaats tot slot het
klepje van het accucompartiment
terug.
informatie over het in
Zie hoofdstuk 6.3 voor
2
elkaar zetten van de afkolfset.
6.2 Gebruik met
oplaadbare accu
1
Om de kolf op de accu te gebruiken, open je het accucompartiment door de drukknop op
het accuklepje (aan de achterzijde van de motoreenheid) in
te drukken en het klepje naar
de pijl toe te schuiven.
Schuif de landspecifieke stekker
op de grotere adaptereenheid
(als deze nog niet is aangebracht).
Steek dan de stekker in de wandcontactdoos. De motoreenheid is
nu klaar voor gebruik.
Accu opladen door de motoreenheid op de netstroom aan te sluiten. Op het display aan de voorzijde van de motoreenheid verschijnt
nu 'bAtt'. Laad de accu volledig
op totdat de indicator ophoudt
te knipperen en 'bAtt' verdwijnt.
De accu is nu volledig opgeladen.
Haal de netstroomadapter uit het
stopcontact. De kolf is klaar voor
gebruik op de accu.
de werking op netstroom.
meer informatie over
In hoofdstuk 6.1 vind je
3
Netstroomadapter aangesloten
op stopcontact
knippert
Oplaadstatus accu
Accu volledig opgeladen, ca. 3 uur
afkolftijd
knippert
Resterende afkolftijd 20 min.
knippert
Accu leeg
“bAtt”
Eerste keer opladen en opladen
na verwijderen van accu (maximaal
24 uur oplaadtijd)
In de bovenstaande tabel staan de verschillende werkingsmodi. Deze symbolen
worden op het display aan de voorzijde van
de motoreenheid weergegeven.
139
6. Voorbereidingen voor het afkolven
Waarschuwing
lW
as je handen grondig (ten minste
een minuut) met water en zeep
voordat je je borst en onderdelen
van de afkolfset aanraakt.
6.3 De afkolfset
in elkaar zetten
1
Let op
i
lG
ebruik alleen originele accessoires
van Medela.
l Controleer voor gebruik de onderdelen van de afkolfset op slijtage en beschadiging en vervang ze zo nodig.
l Voor gebruik moeten alle onderdelen
helemaal droog zijn.
Plaats de gele membraan op
de basis van de borstschildconnector:
✔
✗
Onderaanzicht
140
i
Info
4
lV
oer alle stappen zorgvuldig uit en
zet de afkolfset op de juiste wijze in
elkaar. Anders wordt misschien geen
goed vacuüm verkregen.
Schroef de fles op de connector.
H
erhaal stap 1-4 voor het
in elkaar zetten van het/de
tweede borstschild/fles/connectorcombinatie voor dubbel
afkolven.
2
Klik de transparante kap op de
basis/membraan-combinatie.
Controleer dat de kap
stevig vastzit op alle drie de
bevestigingspunten (één aan
de bovenzijde, twee aan de
zijkanten).
5
Steek de korte slang in de
opening in de transparante
kap. Steek die zo ver mogelijk
naar binnen.
3
Druk het borstschild op
de connector.
6
Steek de lange slang in de
slangpoort boven op de
motoreenheid.
141
7. Afkolven
Waarschuwing
l Betreffende stap 2 (hoofdstuk 7.1):
Beantwoord de volgende vragen om
de juiste maat van het borstschild te
bepalen:
l Kan de tepel vrij binnen de schacht
bewegen?
l Wordt er geen of weinig weefsel van je
tepelhof in de tunnel van het borstschild getrokken?
l Zie je bij elke cyclus van de kolf een
rustige, ritmische beweging in je borst?
l Voel je de borst helemaal leeg worden?
l Is je tepel pijnloos?
Als je antwoord op een van deze
vragen „nee“ is, of als je tijdens het
afkolven problemen of pijn ondervindt,
raadpleeg dan je borstvoedingsdeskundige/lactatiekundige of je vroedvrouw.
142
7.1 Voorbereiding
enkel afkolven
1
Steek de ongebruikte korte
slang in het Y-stuk.
7.2 Kolven
1
Let op
i
l Betreffende stap 3 (hoofdstuk 7.1):
Pak de afkolfset niet vast aan de fles.
Dit kan leiden tot een blokkade van de
melkkanalen en tot stuwing.
l Neem de borst af met een warm washandje (geen alcohol gebruiken).
l Herstart de timer: druk gedurende
3 seconden op
. De timer wordt
herstart, maar Freestyle blijft afkolven.
Schakel de borstkolf in met
.
De timer start.
De stimulatiefase duurt maximaal twee minuten. De kolf gaat
vervolgens automatisch over
naar de afkolffase.
2
1
Plaats het borstschild op
je borst met de tepel in het
midden van de schacht.
2
1
Als de melk eerder begint te
stromen, druk op
om over
te schakelen naar de afkolffase.
Z
org ervoor dat de melk
op de juiste manier de fles
in stroomt.
3
Houd het borstschild met je
duim en wijsvinger op de borst.
Ondersteun je borst met de
palm van je hand.
3
Het vacuümniveau kan in elke
fase worden aangepast.
Comfortabel vacuüm: druk op
om het vacuüm te verhogen
totdat het enigszins onprettig
aanvoelt. Druk dan op
om
het minimaal terug te stellen.
143
7. Afkolven
Waarschuwing
4
lR
aadpleeg je vroedvrouw of lactatiekundige als je slechts een minimale
hoeveelheid of geen melk kunt
afkolven of als het afkolven pijnlijk is.
Let op
i
144
Info
lD
e Freestyle schakelt zich automatisch uit als deze 30 minuten heeft
aangestaan zonder enige aanpassing
aan de instellingen.
lZ
org ervoor dat de slang tijdens het
afkolven niet knikt.
lB
etreft stap 4:
Geheugenfunctietoets
Om uw persoonlijke instelling te
activeren start je de kolf en druk
je op
.
7
1
Reinigen
zoals vermeld
in hoofdstuk 5.
i
lH
aal na het afkolven altijd de stekker
van de Freestyle uit het stopcontact
(tenzij de accu aan het opladen is).
lV
ul de fles niet verder dan tot aan de
150 ml-markering
Druk tijdens de afkolffase gedurende 3 seconden op
om
het individuele afkolfprogramma
op te slaan.
De indicator op het scherm
knippert en de kolf laat drie
pieptonen horen.
Voltooi het afkolven zoals
gewoonlijk.
Sluit de fles met een deksel.
Volg de aanwijzingen in
hoofdstuk 8 „Moedermelk
bewaren en ontdooien“.
5
Schakel de borstkolf uit met
.
6
1
Gebruik de flesstandaard om te
voorkomen dat de fles omvalt.
145
7. Afkolven
Waarschuwing
lB
etreft stap 2:
Pak de afkolfset niet vast aan de fles.
Dit kan leiden tot een blokkade van
de melkkanalen en tot stuwing.
i
7.3 Voorbereidingen voor
handsfree afkolven met de
Easy Expression Bustier*
1
Info
lD
ubbel afkolven bespaart tijd en
verhoogt de voedingswaarde van
de melk. Op de langere termijn
neemt de melkproductie toe.
Doe de Easy Expression Bustier
aan en laat de rits een stukje open.
7.4 Voorbereiding voor
dubbel afkolven
146
1
Plaats het borstschild op je
borst met de tepel in het
midden van de schacht.
Houd het borstschild met je
duim en wijsvinger op de borst.
Ondersteun je borst met de
palm van je hand.
2
3
Plaats het borstschild onder
de bustier op je borst,
zodanig dat de tepel zich
centraal in de schacht van
het borstschild bevindt.
2
1
Schakel de borstkolf in met
.
D
e timer start.
D
e stimulatiefase duurt
maximaal twee minuten.
De kolf gaat vervolgens
automatisch over naar de
afkolffase.
Sluit de rits nu geheel en
plaats de connector op
het borstschild.
*De Easy Expression Bustier wordt niet meegeleverd
met de Freestyle borstkolf. Zie hoofdstuk 12 voor
de bestelgegevens.
3
Plaats het tweede borstschild op
je borst zodanig dat de tepel zich
centraal in de schacht bevindt.
147
8. Moedermelk bewaren en ontdooien
8.1 Bewaren
Richtlijnen voor het bewaren van vers afgekolfde moedermelk
(Voor gezonde, voldragen baby’s)
Kamertemperatuur
Koelkast
Diepvriezer
Ontdooide
moedermelk
4–6 uur bij
19 tot 26 °C
(66 tot 78 °F)
3–8 dagen bij
4 °C (39 °F)
of lager
6–12 maanden
-18 tot -20 °C ( 0 tot 4 ° F )
In de koelkast max.
10 u. Niet opnieuw
invriezen!
lB
ewaar moedermelk niet in de deurvakken van de koelkast. Kies in plaats daarvan
de koelste plaats in de koelkast (dat is achterin op de glazen plaat boven het
groentecompartiment).
8.2 Invriezen
lV
ers afgekolfde moedermelk kan worden ingevroren in melkflesjes of in „Pump & Save“*
moedermelkbewaarzakjes. De flesjes of de Pump & Save moedermelkbewaarzakjes niet
verder dan voor ¾ vullen, zodat er ruimte overblijft voor mogelijk uitzetten bij invriezen.
l Plak een etiket met daarop de afkolfdatum op de flessen of op de „Pump & Save“
moedermelkbewaarzakjes.
148
8.3 Ontdooien
Waarschuwing
Ingevroren moedermelk niet in een magnetron of in een pan met kokend water
ontdooien, om verlies van vitaminen, mineralen, andere belangrijke ingrediënten
en eventuele brandwonden te voorkomen.
lO
ntdooi de melk door deze gedurende een nacht in de koelkast te plaatsen.
Zo blijven de ingrediënten van de moedermelk goed beschermd. Een andere
mogelijkheid is om het flesje of de „Pump & Save“-zak in warm water (max. 37 °C)
te plaatsen.
l Het flesje of de „Pump & Save“-zak behoedzaam schudden om eventueel
gescheiden vet door de melk te mengen. Vermijd hard schudden en roeren
van de melk.
* Meer informatie vind je op www.medela.nl of www.medela.be
9. Moedermelk voeden
i
Info
Medela adviseert om voor het voeden
Calma te gebruiken.
Met Calma
l kan je baby in zijn eigen ritme
drinken, pauzeren en ademen;
l s troomt de melk als er een vacuüm
is gecreëerd;
l blijft je baby’s natuurlijke drinktechniek behouden, waardoor hij gemakkelijk weer kan overschakelen op
de borst.
S
Gedetailleerde informatie over
Calma vind je op de website
van Medela (www.medela.nl of
www.medela.be).
MULATIE
TI
AFK
N
ME
L
N
LM
Meer melk in
minder tijd
A
AF K O
EN
LV
2 - FA S E
OP ONDERZOEK GEBASEERDE
ONDERSTEUNING VOOR
MOEDERS DIE BORSTVOEDING
VO
GEVEN
E
Een uitvinding
van Medela
DE
TROOM
KS
O
E
LV
Ondersteuning
van het
drinkgedrag
van baby's
CA
ZUIGEN
Op basis van uitgebreid wetenschappelijk onderzoek heeft Medela als een
van de eerste bedrijven ter wereld de
borstvoedingstechniek van baby’s
geïntegreerd in de innovatieve 2-Phase
Expression en de Calma. 2-Phase
Expression imiteert het natuurlijke zuigritme van baby’s, zodat er meer melk
in minder tijd wordt afgekolfd. Korte,
stimulerende kolfpatronen worden gevolgd door langere, voor een optimale
melkstroom. Met Calma, het unieke
voedingssysteem voor moedermelk,
kunnen baby’s tijdens het drinken pauzeren en ademhalen, en behouden ze
het aan de borst geleerde zuiggedrag.
Ontwikkeld voor een fijne voedingservaring voor moeder en baby.
Calma – uniek borstvoedingssysteem voor moedermelk.
149
10. Problemen oplossen
Probleem
Oplossing
Er is weinig of
geen zuigkracht
Controleer alle aansluitingen.
Controleer of de transparante kap stevig vastzit aan alle drie de
bevestigingspunten op de connector tussen het borstschild en de fles.
Houd tijdens het afkolven het borstschild vast, niet de connector
of de fles.
Zorg ervoor dat het borstschild rondom luchtdicht op de borst afsluit.
Plaats tijdens enkel afkolven de ongebruikte slang in het Y-stuk.
Laat de slang niet knikken.
Er mag zich geen water in de slang bevinden.
Alle onderdelen moeten volkomen droog zijn.
De borstkolf
is nat geworden
Trek de netstroomadapter uit het stopcontact.
Schakel de borstkolf uit.
Houd de borstkolf niet ondersteboven. De bedieningsknoppen moeten
naar boven wijzen.
Plaats de borstkolf gedurende 24 uur in een warme omgeving.
NB:
Plaats de borstkolf niet in direct zonlicht.
Het droogproces niet door verwarming versnellen.
150
“Err” +
3 pieptonen
Neem contact op met de winkel waar je de kolf hebt gekocht.
Het netstroomadaptersymbool
knippert De kolf
schakelt niet in
Neem contact op met de winkel waar je de kolf hebt gekocht.
De accu-indicator
knippert met
vier balken
Neem contact op met de winkel waar je de kolf hebt gekocht.
11. Garantie / afvoeren
Garantie
De „International Warranty“-brochure bevat gedetailleerde informatie over de garantie.
Weggooien
Het apparaat bestaat uit verschillende metalen en kunststoffen. Alvorens het apparaat
als afval af te voeren, moet het onbruikbaar worden gemaakt. Niet afvoeren als ongesorteerd gemeentelijk afval, maar behandelen in overeenstemming met de plaatselijke
regelgeving. Gebruik de plaatselijke voorzieningen voor teruggave en inzamelen van
oude elektrische en elektronische apparatuur (incl. accu's). Als het apparaat niet
correct wordt vernietigd, kan dit schadelijke gevolgen hebben voor het milieu en de
volksgezondheid.
151
12. Volledige verzorging tijdens de borstvoedingsperiode
De volgende accessoires voor de Freestyle kunnen, onder vermelding van het
productnummer, via de verkooppunten van Medela worden aangeschaft.
Reserveonderdelen
Artikelnummer
Product
099.0271
099.0272
099.0273
099.0274
Freestyle
Freestyle
Freestyle
Freestyle
200.1690
Freestyle motoreenheid
200.1692
Freestyle slang
200.1691
Freestyle oplaadbare accu
adapter
adapter
adapter
adapter
(100-240
(100-240
(100-240
(100-240
V;
V;
V;
V;
12
12
12
12
V)
V)
V)
V)
Europa
VK en VS / JP
AUS / NZ
CN
Accessoires
152
Artikelnummer
Product
008.0337
008.0338
008.0339
008.0340
008.0341
PersonalFit
PersonalFit
PersonalFit
PersonalFit
PersonalFit
800.0796
200.1659
Moedermelkflesje, 150 ml (3 stuks)
Moedermelkflesje, 250 ml (2 stuks)
008.0139
Calma
008.0315
Pump & Save moedermelkzakjes
008.0217
008.0220
008.0224
008.0225
Easy
Easy
Easy
Easy
2
2
2
2
2
borstschilden
borstschilden
borstschilden
borstschilden
borstschilden
Expression
Expression
Expression
Expression
Bustier
Bustier
Bustier
Bustier
wit
wit
wit
wit
S (21 mm)
M (24 mm)
L (27 mm)
XL (30 mm)
XXL (36 mm)
S
M
L
XL
Andere producten van Medela vind je op www.medela.com.
* Als het resultaat van het afkolven onbevredigend is of als het afkolven pijnlijk is,
raadpleeg dan je vroedvrouw of lactatiekundige. Wellicht kan een andere maat
PersonalFitTM borstschild het comfort en succes van het afkolven helpen vergroten.
Kolven
Borstverzorging
Research Based
onderzoek
Voorlichting
Expertise
Service
Voeden
Innovatie
Deskundigen
Omgaan met moedermelk
Opvangen
153
Daftar Isi
1. Peruntukan/Populasi – Kontraindikasi
155
2. Arti simbol
156
3. Petunjuk keselamatan penting
158
4. Uraian produk
160
4.1 Freestyle - all-in-one, inovatif, hemat waktu
160
4.2 Bagian produk
160
5. Membersihkan
162
5.1 Sebelum menggunakannya untuk kali pertama dan selanjutnya
162
5.2 S
ebelum menggunakannya untuk kali pertama dan sekali setiap hari
164
5.3 Membersihkan
unit motor
165
5.4 Membersihkan - ringkasan
166
6. Persiapan memompa
168
6.1 Pengoperasian dengan listrik
168
6.2 Pengoperasian dengan baterai
169
6.3 Merakit set memompa
170
7. Ekspresi
172
7.1 Menyiapkan pemompaan tunggal
172
7.2 Memompa
172
7.3 Mempersiapkan ekspresi tanpa menggunakan tangan dengan
Easy Expression Bustier
154
7.4 Menyiapkan pemompaan ganda
8. Menyimpan dan mencairkan ASI
176
176
178
8.1 Menyimpan
178
8.2 Membekukan
178
8.3 Mencairkan
178
9. Memberikan ASI
179
10. Jika ada masalah
180
11. Garansi / pembuangan
181
12. Perawatan lengkap selama periode menyusui
182
13. EMC / Uraian Teknis
184
14. Spesifikasi teknis
191
1. Peruntukan/Populasi – Kontraindikasi
Peruntukan dan indikasi pompa ASI ini
Pompa ASI ini ditujukan untuk membantu ibu-ibu menyusui di rumah sakit atau
di rumah untuk memerah ASI. Indikasi pompa ASI adalah meringankan gejala
pembengkakan dengan memerah ASI. Untuk kasus mastitis, pompa ASI mendukung
proses penyembuhan dengan membuang ASI dari payudara yang sakit. Pompa ASI ini
ditujukan untuk meringankan puting luka dan retak dan mengembalikan posisi puting
yang terbenam atau datar. Pompa ASI ini juga memudahkan para ibu memberikan ASI
pada bayi yang tidak dapat menyusu secara langsung akibat gangguan menghisap,
bibir sumbing, atau lahir prematur.
Populasi pasien/pengguna yang dituju
Perempuan menjelang dewasa atau ibu menyusui. Banyak ibu merasa nyaman,
atau bahkan perlu, menggunakan pompa ASI untuk mengeluarkan dan menyimpan
ASI sepulang kerja, atau selama melakukan perjalanan atau saat sedang jauh dari
bayi mereka. Wanita senang mengetahui bahwa pompa ASI dapat digunakan untuk
menyempurnakan pemberian ASI dan bahwa beberapa jenis pompa dirancang meniru
isapan bayi yang sedang menyusu.
Kontraindikasi
Tidak ada kontraindikasi yang diketahui untuk pompa ASI Freestyle.
155
2. Arti simbol
Simbol peringatan berisi semua petunjuk penting bagi keselamatan. Patuhi petunjukpetunjuk tersebut untuk menghindari cedera atau kerusakan pada pompa ASI.
Jika digunakan bersama kata-kata berikut, simbol peringatan tersebut artinya:
Peringatan
Dapat menyebabkan cedera
serius atau kematian.
i
Awas
i
Dapat menyebabkan cedera ringan.
Catatan
Dapat menimbulkan kerusakan
pada harta benda.
Info
Informasi berguna atau penting yang
tidak berhubungan dengan keselamatan.
Simbol pada kemasan
Simbol ini berarti produk menggunakan bahan hasil daur ulang.
Simbol ini berarti kemasan karton.
Simbol ini berarti jauhkan perangkat dari sinar matahari.
Simbol ini berarti barang mudah pecah tangani dengan hati-hati.
Simbol menunjukkan batasan suhu pengoperasian, pengangkutan, dan penyimpanan.
°C
Simbol ini menunjukkan batasan kelembaban pengoperasian, pengangkutan,
dan penyimpanan.
Simbol ini menunjukkan batasan tekanan atmosfer untuk pengoperasian, pengangkutan,
dan penyimpanan.
Simbol ini artinya jaga perangkat tetap kering.
Simbol ini menunjukkan bahwa kemasan berisi produk yang ditujukan berhubungan
dengan makanan sesuai dengan peraturan 1935/2004
156
Simbol ini menunjukkan Nomor Item Perdagangan Global GSI (GTIN) unik.
Simbol ini artinya jangan buang produk bersama limbah rumah tangga lain yang
tidak disortir (khusus UE).
Simbol ini artinya patuhi petunjuk penggunaan.
Simbol pada perangkat
Simbol ini artinya patuhi petunjuk penggunaan.
0123
Simbol ini artinya produk memenuhi ketentuan Council Directive 93/42/EEC
tanggal 14 Juni 1993 untuk peralatan medis.
Simbol ini menunjukkan produsen alat.
Simbol ini menunjukkan di mana membuka penutup baterai.
Simbol ini menunjukkan di mana mencolok adaptor utama.
Simbol ini artinya jangan buang produk bersama limbah rumah tangga lain yang tidak
disortir (khusus UE).
Simbol ini berarti produk memenuhi ketentuan keselamatan tambahan AS dan Kanada
untuk peralatan medis elektrik.
Simbol ini menunjukkan komponen terapan tipe BF.
REF
Simbol ini menunjukkan nomor katalog yang ditetapkan produsen untuk baterai tersebut.
SN
Simbol ini menunjukkan nomor seri yang ditetapkan produsen untuk perangkat tersebut.
IP22
Simbol ini menunjukkan perlindungan terhadap masuknya objek asing padat dan
pengaruh negatif masuknya air.
Simbol ini menunjukkan tanggal produksi (empat digit untuk tahun dan dua digit
untuk bulan).
Simbol pada adaptor
Simbol ini berarti adaptor ini termasuk perangkat kelas II.
Simbol ini artinya adaptor memenuhi Ketentuan Sertifikasi Wajib di Cina.
Simbol ini artinya adaptor sudah menjalani uji keamanan.
Simbol ini artinya adaptor hanya boleh digunakan di dalam ruang.
Simbol ini artinya produk memenuhi ketentuan keselamatan yang berlaku di A.S
dan Kanada.
Simbol ini berarti produk memenuhi ketentuan Federal Commission.
Simbol ini menunjukkan polaritas konektor d.c.
N136
Simbol ini artinya produk memenuhi ketentuan peraturan AUZ/NZ (tanda memenuhi
Peraturan).
Tanda CE artinya produk memenuhi ketentuan kompatibilitas tegangan rendah dan
elektromagnetik.
Simbol ini artinya jangan membuang produk bersama limbah kota yang tidak disortir
(khusus UE). Simbol batang solid artinya adaptor dipasarkan setelah tanggal
13 Agustus 2005.
Simbol ini artinya produk memenuhi ketentuan keselamatan yang berlaku di Jepang.
Simbol ini artinya produk memenuhi ketentuan tentang efisiensi energi.
Simbol ini artinya arus bolak-balik.
9 VDC
Simbol ini artinya arus searah.
157
3. Petunjuk keselamatan penting
Mengoperasikan produk tanpa mematuhi petunjuk/informasi keselamatan
ini dapat menimbulkan bahaya. Perubahan teknis dapat dilakukan.
Produk
Bahaya tersengat listrik! Jaga produk tetap kering! Jangan merendamnya
di air atau cairan lain!
Pompa ASI Freestyle tidak tahan panas: jauhkan dari radiator dan api
terbuka.
Hindarkan unit motor dari sinar matahari langsung.
Hanya boleh diperbaiki oleh bengkel servis resmi.
Jangan memperbaiki sendiri! Dilarang memodifikasi produk.
Jangan menggunakan produk rusak. Ganti komponen yang rusak atau aus.
MAX.
250 h
Umur pengoperasian pompa ASI Freestyle adalah 250 jam.
Masa pakainya adalah dua tahun.
Pengoperasian dengan tenaga listrik
158
Copot selang hanya setelah adaptornya dilepas dari stopkontak.
Jauhkan adaptor dari sumber panas.
Jangan mengambil peralatan elektrik apapun yang jatuh ke dalam air.
Segera cabut jack-nya.
Jangan pernah meninggalkan pompa ASI Freestyle ini tanpa melepas
jack-nya dari sumber arus.
Penggunaan
Gunakan pompa ASI Freestyle sesuai peruntukannya seperti diuraikan
di dalam buku petunjuk ini.
Jangan menggunakan peralatan elektrik yang kabel atau jack-nya rusak,
tidak berfungsi dengan benar, pernah jatuh atau rusak, atau jatuh ke air.
Jangan gunakan pompa ASI Freestyle sambil mandi atau di bawah pancuran.
Jangan gunakan pompa ASI Freestyle sambil tidur atau saat terlalu ngantuk.
Satu produk satu pengguna saja. Menggunakannya secara bergantian
berbahaya bagi kesehatan.
Jangan gunakan produk ini saat mengemudi.
Hati-hati saat menggunakan pompa ASI Freestyle ini di sekitar anak-anak.
Jika muncul gangguan atau rasa sakit, hubungi konsultan menyusui atau
dokter Anda.
Peralatan komunikasi frekuensi radio portabel dan bergerak dapat
mengganggu fungsi Pompa ASI Freestyle.
Penting:
lB
otol dan bagian komponen dari plastik menjadi rapuh jika beku dan dapat
pecah jika jatuh.
lS
elain itu, botol dan bagian-bagian komponen dapat rusak jika tidak ditangani
dengan benar, misalnya, terjatuh, terlalu kencang, atau terbentur.
I Hati-hati saat menangani botol dan komponen.
I Jangan gunakan ASI jika botol atau komponen rusak.
159
4. Uraian produk
4.1 Freestyle - all-in-one, inovatif, hemat waktu
Dengan melakukan pembelian Freestyle, Anda telah membuat pilihan yang tepat.
Freestyle efisien dan nyaman. Freestyle sangat efisien karena menggunakan
teknologi memompa 2-Phase Expression, yang meniru irama mengisap alami bayi.
Pola stimulasi pendek diikuti pola stimulasi yang lebih panjang, sehingga memastikan aliran ASI yang optimal. Dikombinasikan dengan memompa ganda, hal ini
membantu untuk meningkatkan dan mempertahankan produksi ASI dan menghemat
waktu yang berharga. Freestyle sangat nyaman, berkat pengaturan vakum yang
dapat disesuaikan, fungsi memori dan tampilan informasi, yang mudah didapat.
Semuanya ini membuat Freestyle ideal untuk ibu yang bekerja dan untuk penggunaan sehari-hari dan rutin.
Fitur utama dari pompa ASI Freestyle:
l M embantu untuk mempertahankan dan meningkatkan produksi ASI dan
menghemat waktu;
l Kecil, ringan dan nyaman;
l M enawarkan mobilitas maksimum dan kebebasan bergerak.
4.2 Bagian produk
Lubang
selang
Freestyle
1x unit motor:
Pengurang
vakum
160
Klip penahan
Penambah
vakum
Indikator
daya listrik
Ruang
baterai
Indikator
tingkat vakum
(fase ekspresi)
Indikator
tingkat vakum
(fase stimulasi)
Indikator
memori on
Indikator
baterai
Tombol cucuran
Timer
Tombol On/Off
Tombol fungsi memori
Soket listrik
TombolTekan
Suku cadang dan aksesoris yang tersedia untuk dipesan dapat ditemukan pada bab 12.
4x cakram
1x selang
Freestyle
Selang pendek
Penahan
selang
4x tutup dengan
bukaan
1x Calma Solitaire
2x Calma multi lid
Selang
panjang
2x PersonalFit™ Breastshield M (24 mm)
(untuk ukuran corong lain, baca bab 12)
2x Freestyle connectors
(breastshield base, membrane, transparent cap)
161
1x adaptor
4x botol
1x tas pendingin
1x elemen pendingin
1x baterai isi ulang
1x tas Freestyle
2x kaki
botol
5. Membersihkan
Awas
lH
anya gunakan air yang benar-benar
bersih untuk membersihkan produk.
l Lepas dan cuci semua komponen
yang berkontak dengan payudara dan
ASI segera setelah digunakan untuk
menghindari sisa ASI yang mengering
dan mencegah pertumbuhan bakteri.
l Jangan pernah mengeringkan bagianbagiannya di microwave, karena dapat
merusak alat.
5.1 Sebelum menggunakannya
untuk kali pertama dan
selanjutnya
1
Urai set memompa per
komponennya.
i
162
Catatan
lS
et memompa tidak perlu dirawat
secara khusus
l Hati-hati jangan sampai merusak set
memompa saat dibersihkan.
l Pigmen makanan dapat memudarkan
warna set memompa yang dibersihkan
di dalam pencuci perabotan.
Perubahan warna ini tidak mengurangi
fungsi produk.
4
Bilas semua komponen dengan
air bersih dingin (suhu kira-kira
20 °C) selama 10–15 detik.
3
2
Bersihkan semua komponen
dengan air sabun yang banyak
(suhu kira-kira 30 °C).
Bilas semua komponen
dengan air bersih dingin
(suhu kira-kira 20 °C).
atau
Sebagai alternatif
untuk langkah 2, 3
dan 4.
5
Keringkan dengan kain bersih
atau biarkan mengering di atas
kain bersih.
Taruh set memompa di rak
atas atau rak pisau jika Anda
membersihkannya di pencuci
perabot.
163
5. Membersihkan
Awas
lH
anya gunakan air yang benar-benar
bersih untuk membersihkan produk.
l Lepas dan cuci semua komponen
yang berkontak dengan payudara dan
ASI segera setelah digunakan untuk
menghindari sisa ASI yang mengering
dan mencegah pertumbuhan bakteri.
l Jangan pernah mengeringkan bagianbagiannya di microwave, karena dapat
merusak alat.
5.2 Sebelum
menggunakannya
untuk kali pertama
dan sekali setiap hari
1
Urai set memompa per
komponennya.
i
164
Catatan
lS
elama perebusan, tambahkan
satu sendok teh asam sitrat untuk
mencegah timbulnya karat.
l Simpan set memompa di dalam
kantong/wadah yang bersih untuk
pemakaian selanjutnya. Atau simpan
di dalam kertas atau kain bersih.
3
Keringkan dengan kain bersih
atau biarkan mengering di atas
kain bersih.
2a
Rendam semua komponen
dalam air dan rebus selama
lima menit.
atau
2b
Gunakan kantong QuickClean*
di dalam microwave sesuai
petunjuk.
5.3 Membersihkan
unit motor
1
165
Lap dengan kain bersih
dan lembab.
*Informasi lain ada di www.medela.com
5. Membersihkan
5.4 Membersihkan - ringkasan
Sebelum menggunakannya untuk
kali pertama dan selanjutnya
Bilas dengan air dingin, jernih (sekitar
20 ° C), kemudian bersihkan dengan
air sabun hangat (sekitar 30 ° C) dan
akhirnya bilas dengan air dingin,
jernih selama 10 - 15 detik;
√
√
√
√
√
√
--
--*
Atau cuci di mesin cuci piring (di rak
atas atau di bagian sendok garpu).
√
√
√
√
√
√
--
--*
Rendam dengan air dan didihkan
selama lima menit;
√
√
√
√
√
√
--
--*
Atau gunakan kantung Microwave
Quick Clean sesuai petunjuk;
√
√
√
√
√
√
--
--*
Atau lap dengan kain bersih dan
lembab.
--
--
--
--
--
--
√
--*
Sebelum menggunakannya untuk
kali pertama dan sekali setiap hari
166
* Untuk informasi lebih lanjut, lihat bab 10 Pemecahan Masalah ("Jika vakum rendah atau tidak ada hisapan")
167
6. Persiapan memompa
Peringatan
re 6.1 Pengoperasian dengan listrik:
l Ikuti urutan langkah-langkahnya.
l Gunakan adaptor yang disertakan
bersama Pompa ASI Freestyle saja.
l Pastikan tegangan adaptor sesuai
dengan sumber arus.
i
168
1
Catatan
l J angan memasukkan baterai ke
wadah baterai dengan menekannya
terlalu kuat.
I J angan memasukkan baterai saat
pompa menggunakan tenaga listrik.
i
6.1 Pengoperasian
dengan listrik
Info
lA
nda dapat mengoperasikan Pompa
ASI Freestyle melalui baterai atau listrik.
Jika Anda ingin menggunakan baterai,
Anda harus mengisi sebelum digunakan
pertama kali.
re 6.2 Pengoperasian dengan baterai:
l Baterai memulai pengisian setelah Anda
menghubungkan pompa ke sumber listrik.
l Anda tetap dapat menggunakan pompa
selama pengisian.
l Jangan mencabut kabel adaptor sampai
pengisian selesai.
l Jika memungkinkan, jangan melepas
baterai dari unit motor. Melepas baterai
membutuhkan waktu pengisian ulang
kembali hingga 24 jam.
l Apakah Anda berencana untuk
menyimpan pompa untuk jangka waktu
yang lama? Lebih baik lepaskan baterai
dari unit tersebut.
l J ika Freestyle tidak aktif selama 30 menit,
maka secara otomatis akan mati.
Untuk mengoperasikan pompa
melalui daya listrik, buka soket
listrik di bagian bawah unit
motor. Masukkan adaptor listrik
(plug bulat kecil) ke soket.
2
Masukkan baterai ke dalam
kompartemen baterai dengan
panah "Bagian ini Di Bawah"
menunjuk ke arah kompartemen.
Kontak emas pada baterai
harus menyentuh kontak di
kompartemen. Akhirnya, pasang
penutup baterai kembali.
6.2 Pengoperasian dengan baterai
1
Untuk informasi
tentang perakitan set
pompa, lihat bab 6.3.
2
3
Informasi lebih lanjut
tentang pengoperasian
utama dalam bab 6.1.
Geser plug negara-tertentu pada
unit adaptor yang lebih besar
(jika hal ini belum dilakukan).
Plug konektor ke soket listrik di
dinding. Unit motor sekarang
siap untuk dioperasikan.
Isi baterai dengan
menghubungkan unit motor ke
listrik. "Batt" akan muncul di
layar di bagian depan unit motor.
Isi baterai sampai indikator
baterai berhenti berkedip dan
"bAtt" hilang. Baterai sekarang
terisi penuh. Putuskan adaptor
listrik. Pompa siap beroperasi
melalui baterai.
Untuk mengoperasikan pompa
melalui baterai, buka baterai
dengan menekan tombol tekan
pada penutup baterai (di bagian
belakang unit motor) dan geser
penutup ke arah panah.
Adaptor terhubung ke stopkontak
berkedip
Status pengisian baterai
Dengan baterai terisi penuh,
ekspresi dapat dilakukan selama
maksimum 3 jam
berkedip
Ekspresi tinggal 20 menit lagi.
berkedip
Baterai kosong
“bAtt”
Pengisian pertama dan pengisian
kembali setelah baterai dilepas
(makan waktu sampai 24 jam)
Tabel di atas menunjukkan status operasi
yang berbeda. Simbol-simbol ini muncul di
layar di bagian depan unit motor.
169
6. Persiapan memompa
Awas
lC
uci tangan dengan teliti (minimal
satu menit) dengan air sabun sebelum
menyentuh payudara dan komponen
pompa.
6.3 Merakit set memompa
1
Catatan
i
lG
unakan aksesoris asli Medela saja.
l Periksa apakah set memompa aus atau
rusak sebelum dipakai dan ganti jika
perlu.
l Semua komponen harus benar-benar
kering sebelum dipakai.
Pasang membran kuning ke
dasar konektor breastshield:
✔
✗
Lihat dari bawah
i
170
Info
4
lL
aksanakan semua langkah di atas
dengan hati-hati dan rangkai set
memompa dengan benar. Jika salah,
alat tidak akan bekerja maksimal.
Pasang botol ke konektor.
U
ntuk merakit corong/ botol/
konektor kombinasi kedua
untuk memompa ganda,
ulangi langkah 1-4.
2
Klik tutup transparan ke
kombinasi dasar / membran.
Periksa bahwa tutup
tersambung ke tiga poin
koneksi (satu di atas, dua
di sisi).
5
3
Tekan corong ke konektor.
6
171
Masukkan selang pendek
ke tutup transparan.
Dorong sedalam mungkin.
Masukkan tabung panjang ke
port pipa di bagian atas unit
motor.
7. Ekspresi
Awas
l r e langkah 2 (bab 7.1):
Jawab pertanyaan-pertanyaan berikut
untuk mengetahui kecocokan ukuran
corong yang tersedia:
lA
pakah puting Anda bergerak bebas
di dalam terowongan?
lA
pakah jaringan di sekitar puting
sedikit tertarik ke terowongan corong
atau tidak sama sekali?
lA
pakah Anda melihat gerakan lembut
dan ritmis pada payudara selama
siklus pemompaan?
lA
pakah Anda merasa payudara
kosong dengan cepat?
lA
pakah puting Anda tidak terasa
nyeri?
Jika jawaban Anda untuk salah satu
pertanyaan tersebut adalah „Tidak“
atau Anda mengalami gangguan
atau nyeri selama ekspresi, hubungi
konsultan ASI atau bidan terdekat.
i
172
7.1 Menyiapkan
pemompaan tunggal
1
Masukkan selang yang tidak
dipakai ke penahan selang.
7.2 Memompa
1
Catatan
l r e langkah 3 (bab 7.1):
Jangan menggunakan botol untuk
menahan set memompa. Cara ini
dapat menghambat saluran susu dan
menyebabkan pembengkakan.
lL
ap payudara dengan seka hangat
(jangan gunakan alkohol).
lT
imer restart: tekan
selama 3 detik.
Timer akan direstart, tetapi Freestyle
akan tetap memompa.
Nyalakan pompa ASI dengan
.
T imer menyala.
Fase stimulasi paling lama
berlangsung selama 2 menit.
Pompa akan beralih ke fase
ekspresi secara otomatis.
2
1
Pasang corong ke payudara
Anda. Posisikan puting tepat di
tengah-tengah terowongan.
2
1
3
Tahan corong ke payudara
dengan ibu jari dan telunjuk
Anda. Sangga payudara dengan
telapak tangan Anda.
3
173
Jika ASI sudah terlanjur
mengalir, tekan
untuk
beralih ke fase ekspresi.
P
astikan ASI mengalir masuk
ke botol dengan benar.
Vakum dapat disesuaikan
pada tiap fase. Vakum
nyaman: Gunakan untuk
meningkatkan vakum sampai
terasa sedikit tidak nyaman.
Kemudian tekan untuk
menurunkannya kembali.
7. Ekspresi
4
Awas
lH
ubungi bidan atau konsultan ASI jika
ASI yang dihasilkan terlalu sedikit atau
tidak keluar sama sekali atau Anda
merasa nyeri selama fase ekspresi.
Catatan
Tekan
selama tiga detik
selama fase ekspresi untuk
menyimpan program pemompaan
pribadi.
Indikator pada layar berkedip
dan pompa berbunyi bip tiga
kali.
Akhiri ekspresi seperti biasa.
i
Info
lF
reestyle akan mati secara otomatis,
jika pompa menyala selama 30 menit
tanpa manipulasi.
l Jangan membuat selang kusut selama
ekspresi.
174
l r e langkah 4:
Tombol fungsi memori
Untuk mengaktifkan pengaturan
pribadi, nyalakan pompa lalu tekan
7
1
Bersihkan sesuai
petunjuk di Bab 5.
i
l J angan lupa untuk memutus Freestyle
dari sumber arus setelah ekspresi
(kecuali selama pengisian baterai).
l Isi botol tidak lebih dari tanda 150 ml.
.
Tutup botol.
Ikuti petunjuk pada Bab 8
„Menyimpan dan mencairkan
ASI.“
5
Matikan pompa ASI dengan
6
.
1
Gunakan kaki botol untuk
mencegahnya terbalik.
175
7. Ekspresi
Awas
l r e langkah 2:
Jangan menggunakan botol untuk
menahan set memompa. Cara ini
dapat menghambat saluran susu dan
menyebabkan pembengkakan.
i
7.3 Bersiap melakukan ekspresi
tanpa menggunakan tangan
dengan Easy Expression
Bustier*
1
Info
lP
emompaan ganda menghemat waktu
dan menambah kandungan energi
susu. Produksi susu meningkat dan
terjaga dalam jangka panjang.
Kenakan Easy Expression Bustier
dan biarkan risleting terbuka
sedikit.
7.4 Menyiapkan
pemompaan ganda
1
176
Pasang corong ke payudara
Anda. Posisikan puting tepat
di tengah-tengah terowongan.
Tahan corong ke payudara
dengan ibu jari dan telunjuk
Anda.Sangga payudara dengan
telapak tangan Anda.
2
3
Kancing risleting dan
masukkan konektor ke corong.
Tempatkan corong pada
payudara di bawah korset
sehingga posisi puting tepat di
tengah terowongan corong.
*The Easy Expression Bustier tidak termasuk
dengan Pompa ASI Freestyle. Lihat bab 12 untuk
rincian pemesanan.
2
3
1
177
Nyalakan pompa ASI dengan
T imer menyala.
F
asa stimulasi paling lama
berlangsung maksimum dua
menit. Setelah dua menit,
pompa akan beralih ke fase
ekspresi secara otomatis.
.
Pasang corong kedua ke
payudara Anda sedemikian rupa
sehingga puting tepat berada di
tengah terowongan.
8. Menyimpan dan mencairkan ASI
8.1 Menyimpan
Pedoman untuk penyimpanan baru ASI
(Untuk bayi yang lahir dan normal)
Suhu ruangan
Kulkas
Lemari beku
Pencairan ASI
4–6 jam pada 19
sampai 26°C (66
sampai 78°F)
3–8 hari pada 4°C
(39°F) atau lebih
rendah
6−12 bulan
–18 to – 20 °C ( 0 to 4 ° F )
Di dalam lemari es
untuk maksimum
10 j. Jangan
dibekukan kembali!
lT
idak menyimpan ASI pada pintu kulkas. Sebaliknya pilih bagian yang terdingin dari
lemari es (terletak di belakang rak kaca diatas rak sayuran).
8.2 Membekukan
l I Anda dapat membekukan ASI di dalam botol susu atau kantung “Pump & Save”*.
Jangan mengisi botol atau kantung lebih dari ¾ penuh untuk memberikan ruang
untuk kemungkinan pengembangan.
l Cantumkan tanggal ekspresi pada botol atau kantung „Pump & Save“.
8.3 Mencairkan
Peringatan
178
Jangan mencairkan ASI atau jangan menghangatka ASI di dalam microwave atau
merebus dengan air mendidih di dalam panci untuk menghindari hilangnya vitamin,
mineral dan protein-protein penting lainnya dan untuk mencegah terbakar.
l I Untuk mempertahankan komponen-komponen ASI , cairkan didalam lemari es
semalam. Cara lain, Anda dapat memegang botol atau kantung „Pump & Save“
di bawah air hangat (maks. 37 °C).
l Secara lembut putar botol atau kantung „Pump & Save“ untuk mencampur lemak
yang terpisah. Hindari mengocok atau mengaduk susu.
* Informasi lebih lanjut ada di www.medela.com
9. Memberikan ASI
i
Info
Medela merekomendasikan Calma
untuk memberikan ASI.
Dengan Calma
l bayi Anda dapat minum, beristirahat
sejenak dan bernafas secara teratur.
l susu akan mengalir ketika kondisi
vakum tercapai.
lp
erilaku menyusu alami bayi Anda
dipertahankan sehingga transisi
kembali ke payudara dapat dilakukan
dengan mudah.
S
MULASI
TI
ME
M
A
MP
O
Mendukung
perilaku
makan bayi
LM
MENGI
S
Lebih banyak
ASI lebih
sedikit waktu
SI
CA
A
E K SP
RE
2 - FA S A
AN SUS
IR
DUKUNGAN BERBASIS
PENELITIAN BAGI
IBU MENYUSUI
MA
K Diciptakan oleh
Medela
AN
AP
AL
Anda dapat menemukan
informasi lebih rinci
tentang Calma di situs
Medela (www.medela.com).
U
Berkat penelitian yang komprehensif,
Medela menjadi salah satu perusahaan
pertama di dunia yang berhasil merefleksikan perilaku menyusu bayi lewat
inovasinya yaitu 2 Phase Expression
dan Calma.
2-Phase Expression meniru ritme alami
bayi mengisap untuk memerah ASI
lebih banyak dalam waktu yang lebih
singkat. Pola stimulasi pendek diikuti pola stimulasi yang lebih panjang,
sehingga menghasilkan aliran susu
yang optimal. Berkat perangkat Calma
yang unik ini, bayi dapat beristirahat dan
bernafas selama menyusu sekaligus
mempertahankan perilaku menyusu
yang mereka pelajari secara alami.
Dikembangkan untuk pengalaman
menyusui yang baik.
Calma – solusi unik untuk
memberikan ASI.
179
10. Jika ada masalah
Gangguan
Tindakan
Isapan lemah
atau tidak ada
sama sekali
Periksa semua sambungan.
Periksa bahwa tutup transparan tersambung dengan kuat ke tiga
poin koneksi pada konektor antara breastshield dan botol.
Tahan corong, bukan konektor atau botolnya, selama ekspresi.
Pastikan corong menutup payudara dengan sempurna.
Selama pemompaan tunggal, simpan selang yang tidak terpakai
di dok selang. Jangan membuat selang kusut.
Tidak boleh ada air di dalam selang.
Semua komponen harus benar-benar kering.
Jika pompa
terkena air
Cabut adaptor dari stopkontak.
Matikan pompa.
Jangan menaruh pompa terbalik. Panel kontrol harus menghadap ke atas.
Simpan pompa di tempat kering dan hangat selama 24 jam.
Catatan:
Hindarkan pompa dari sinar matahari langsung.
Jangan mempercepat pengeringan dengan memanaskannya.
180
«Err» +
bunyi bip 3 kali
Hubungi dealer Medela atau toko tempat Anda membeli pompa tersebut.
Gambar
adaptor
berkedip dan
Pompa tidak
mau menyala
Hubungi dealer Medela atau toko tempat Anda membeli pompa tersebut.
Indikator
daya baterai
berkedip dan
menampilkan
empat batang
Hubungi dealer Medela atau toko tempat Anda membeli pompa tersebut.
11. Garansi / pembuangan
Garansi
Brosur „Garansi Internasional“ berisi informasi rinci tentang garansi.
Pembuangan
Alat ini terbuat dari berbagai jenis logam dan plastik. Sebelum membuangnya,
pastikan alat ini sudah tidak berfungsi dan jangan membuang tanpa memilahnya
terlebih dahulu sesuai ketentuan setempat. Patuhi ketentuan tentang pengembalian
dan pengumpulan limbah elektrik dan elektronik (termasuk baterai) yang berlaku di
tempat Anda. Membuangnya sembarangan dapat membahayakan lingkungan dan
kesehatan masyarakat.
181
12. Perawatan lengkap selama periode menyusui
Sebutkan nomor produk saat memesan aksesoris berikut untuk Freestyle dari mitra
distributor Medela.
Suku cadang
Nomor artikel
Produk
099.0271
099.0272
099.0273
099.0274
Adaptor
Adaptor
Adaptor
Adaptor
200.1690
Unit Motor Freestyle
200.1692
Selang Freestyle
200.1691
Baterai Isi Ulang Freestyle
Freestyle
Freestyle
Freestyle
Freestyle
(100-240V;
(100-240V;
(100-240V;
(100-240V;
12V)
12V)
12V)
12V)
Eropa
Inggris dan AS / JP
AUS / NZ
CN
Aksesoris
182
Nomor artikel
Produk
008.0337
008.0338
008.0339
008.0340
008.0341
PersonalFit
PersonalFit
PersonalFit
PersonalFit
PersonalFit
800.0796
200.1659
Botol ASI 150 ml (3 buah)
Botol ASI 250 ml (2 buah)
008.0139
Calma Solitaire
008.0315
Pump & Save Breastmilk Bags
008.0217
008.0220
008.0224
008.0225
Easy
Easy
Easy
Easy
2
2
2
2
2
Breastshields
Breastshields
Breastshields
Breastshields
Breastshields
Expression
Expression
Expression
Expression
Bustier
Bustier
Bustier
Bustier
S (21 mm)
M (24 mm)
L (27 mm)
XL (30 mm)
XXL (36 mm)
putih
putih
putih
putih
S
M
L
XL
Produk lain dari Medela dapat dilihat di situs web www.medela.com.
* Jika hasil ekspresi tidak memuaskan atau ekspresi terasa sakit, hubungi bidan atau
konsultan laktasi Anda. Corong PersonalFitTM ukuran lain mungkn dapat membuat
ekspresi terasa lebih nyaman dan berhasil.
Memompa
Perawatan
Riset
Berbasis
Bukti
Pendidikan
Kepakaran
Layanan
Menyusui
Inovasi
Profesional
Mengumpulkan
183
Mengelola susu ibu
13. EMC / Technical description
The Freestyle breastpump needs special precautions regarding EMC (Electromagnetic compatibility) and needs to be installed and put into service according to the
EMC information provided in these instructions for use. Wireless communications
equipment such as wireless home network devices, mobile phones, cordless
telephones and their base stations, walkie-talkies can affect the electric breastpump
Freestyle and should be kept at least a distance 1.0 m away from the equipment.
Electromagnetic Compatibility (EMC, IEC 60601-1-2:2007, Table 1)
Electromagnetic emissions
The electric breastpump Freestyle is intended for use in the electromagnetic environment
specified below. The customer or the user of the electric breastpump Freestyle should
a ssure that it is used in such an environment.
Compliance
Electromagnetic environment –
g uidance
RF emissions
CISPR 11
Group 1
The electric breastpump Freestyle uses RF
energy only for its internal function. Therefore,
its RF emissions are very low and are not likely
to cause any interference in nearby electronic
equipment.
RF emissions
CISPR 11
Class B
Harmonic emissions
IEC 61000-3-2
Class A
Voltage fluctuations /
flicker emissions
IEC 61000-3-3
Not applicable a
Emission tests
a
184
184
The electric breastpump Freestyle is suitable
for use in all establishments, including domestic
establishments and those directly connected
to the public low-voltage power supply network
that supplies buildings used for domestic purposes.
No significant voltage changes
Warning – The electric breastpump Freestyle should not be used adjacent
to or stacked with other equipment. If adjacent or stacked use is necessary,
the electric breastpump Freestyle should be observed to verify normal operation
in the configuration in which it will be used.
Electromagnetic Compatibility (EMC, IEC 60601-1-2:2007, Table 2)
Electromagnetic immunity
The electric breastpump Freestyle is intended for use in the electromagnetic environment
specified below. The customer or the user of the electric breastpump Freestyle should
assure that it is used in such an environment.
Immunity test
Electrostatic
discharge ( ESD )
IEC 61000-4-2
Electrical fast
transient / burst
IEC 61000-4-4
Surge
IEC 61000-4-5
a
b
Compliance
level
Electromagnetic
environment
– guidance
± 6 kV contact
± 8 kV air
± 6 kV contact
± 8 kV air
Floors should be wood,
concrete or ceramic
tile. If floors are covered
with synthetic material,
the relative humidity
should be at least 30%.
± 2 kV for power
supply lines
± 1 kV for input /
output lines
± 2 kV for power
supply lines
Not applicable a
Mains power quality
should be that of a
typical commercial or
hospital environment.
± 1 kV line( s ) to
line(s)
± 2 kV line( s ) to
earth
± 1 kV differential
mode
Not applicable b
Mains power quality
should be that of a
typical commercial or
hospital environment.
IEC 60601
test level
No input/output lines
No earth, class II equipment
185
185
13. EMC / Technical description
Voltage dips, short
interruptions and
voltage variations
on power supply
input lines
IEC 61000-4-11
Power frequency
(50/60 Hz)
magnetic field
IEC 61000-4-8
<5 % U T
(>95 % dip in U T )
for 0,5 cycle
40 % U T
(60 % dip in U T )
for 5 cycles
70 % U T
(30 % dip in U T )
for 25 cycles
<5 % U T
(>95 % dip in U T )
for 5 s
3 A/m
<5 % U T
(>95 % dip in U T )
for 0,5 cycle
40 % U T
(60 % dip in U T )
for 5 cycles
70 % U T
(30 % dip in U T )
for 25 cycles
<5 % U T
(>95 % dip in U T )
for 5 s
Mains power quality
should be that of a
typical commercial or
hospital environment.
If the user of the electric
breastpump Freestyle
requires continued operation during power
mains interruptions, it is
recommended
that the electric breastpump Freestyle is powered from an uninterruptible power supply or a
battery.
3 A/m
Power frequency magnetic fields should be at
levels characteristic of a
typical location in a typical commercial or hospital environment.
NOTE U T is the a.c. mains voltage prior to application of the test level.
186
186
Electromagnetic Compatibility (EMC, IEC 60601-1-2:2007, Table 4)
Electromagnetic immunity
The electric breastpump Freestyle is intended for use in the electromagnetic environment
specified below. The customer or the user of the electric breastpump Freestyle should assure
that it is used in such an environment.
Immunity test
IEC 60601
test level
Compliance
level
Electromagnetic
environment – guidance
Portable and mobile RF communications equipment should be used
no closer to any part of the electric
breastpump Freestyle, including cables, than the recommended
separation distance calculated from
the equation applicable to the frequency of the transmitter.
Conducted RF
IEC 61000-4-6
Radiated RF
IEC 61000-4-3
3 Vrms
150 kHz to
80 MHz
3 V/m
80 MHz to
2,5 GHz
3 Vrms
3 V/m
Recommended separation distance
d = 1,2√P
d = 1,2√P 80 MHz to 800 MHz
d = 2,3√P
800 MHz to 2,5 GHz
where P is the maximum output power
rating of the transmitter in watts (W)
according to the transmitter manufacturer and d is the recommended
separation distance in metres (m).
Field strengths from fixed RF transmitters, as determined by an electromagnetic site survey,a should be less
than the compliance level in each frequency range.b
Interference may occur in the vicinity
of equipment marked with the following symbol:
187
187
13. EMC / Technical description
Note 1 At 80 MHz and 800 MHz, the higher frequency range applies.
Note 2 T hese guidelines may not apply in all situations. Electromagnetic propagation is
affected by absorption and reflection from structures, objects and people.
Field strengths from fixed transmitters, such as base stations for radio (cellular/cordless) telephones and land mobile radios, amateur radio, AM and FM radio broadcast and TV broadcast
cannot be predicted theoretically with accuracy. To assess the electromagnetic environment
due to fixed RF transmitters, an electromagnetic site survey should be considered. If the measured field strength in the location in which the electric breastpump Freestyle is used exceeds
the applicable RF compliance level above, the electric breastpump Freestyle should be observed to verify normal operation. If abnormal performance is observed, additional measures
may be necessary, such as re-orienting or relocating the electric breastpump Freestyle.
b
Over the frequency range 150 kHz to 80 MHz, field strengths should be less than 3 V/m.
a
188
188
Electromagnetic Compatibility (EMC, IEC 60601-1-2:2007, Table 6)
Recommended separation distances between portable and mobile RF
communications equipment and the electric breastpump Freestyle
The electric breastpump Freestyle is intended for use in an electromagnetic environment
in which radiated RF disturbances are controlled. The customer or the user of the electric
breastpump Freestyle can help prevent electromagnetic interference by maintaining a minimum distance between portable and mobile RF communications equipment (transmitters)
and the electric breastpump Freestyle as recommended below, according to the maximum
output power of the communications equipment.
Rated maximum
output power of
transmitter W
Separation distance according to frequency of
t ransmitter M
150 kHz to 80 MHz
d = 1,2√P
80 MHz to
800 MHz
d = 1,2√P
800 MHz to 2,5 GHz
d = 2,3√P
0,01
0,12
0,12
0,23
0,1
0,37
0,37
0,74
1
1,2
1,2
2,3
10
3,7
3,7
7,4
100
12
12
23
For transmitters rated at a maximum output power not listed above, the recommended separation distance d in metres (m) can be estimated using the equation applicable to the frequency of the transmitter, where P is the maximum output power
rating of the transmitter in watts (W) according to the transmitter manufacturer.
Note 1 At 80 MHz and 800 MHz, the separation distance for the higher frequency range
a pplies.
Note 2 These guidelines may not apply in all situations. Electromagnetic propagation is
affected by absorption and reflection from structures, objects and people.
189
189
13. EMC / Technical description
Electromagnetic environments
190
190
Environment
Locations
General characteristics
Typical health care
Hospital, large clinic, d
octor’s
office
Partly controlled, covered
by the general requirements
of this collateral standard
Residential
Doctor’s office, small clinic
Not controlled, health care
professional present
Residential
Home
Not controlled, health care
professional not normally
present
Transport, mobile
Car, aircraft (fixed-wing and
helicopter), ambulance
Not controlled, wide variations, critical receivers
nearby, harsh environments
for ESD, RF, electric and
magnetic fields
Special
Operating theatre,
emergency room
Case-by-case examination
of environment
14. Technical specifications
Intermittent
93
vacuum (approx.)
-20....-270 mmHg
-3....-35 kPa
45 … 120 cpm
15
Operation
93
In
Out
100-240V~ 50/60 Hz
12 V
1 A / 1.5 A
15
Transport / Storage
106
7.2 V, 2250mAh
Li-Ion
70
kPa
Operation/ Transport / Storage
122 x 90 x 58 mm
370 g
kg
270 g
+40
+5
°C
Operation
+60
-20
°C
Transport / Storage
191
191
ref. master doc. 200.7493/D
International Sales
Medela AG
Lättichstrasse 4b
6341 Baar
Switzerland
Phone +41 41 562 51 51
Fax +41 41 562 51 00
[email protected]
www.medela.com
Australia
Medela Pty Ltd, Medical Technology
3 Arco Lane, Heatherton
Vic 3202
Australia
Phone +61 3 9552 8600
Fax
+61 3 9552 8699
[email protected]
www.medela.com.au
France
Medela France Sarl
14, rue de la Butte Cordière
91154 Etampes cedex
France
Phone +33 1 69 16 10 30
Fax +33 1 69 16 10 32
[email protected]
www.medela.fr
Germany & Austria
Medela Medizintechnik
GmbH & Co. Handels KG
Postfach 1148
85378 Eching
Germany
Phone +49 89 31 97 59-0
Fax +49 89 31 97 59 99
[email protected]
www.medela.de
Italy
Medela Italia Srl
Via Turrini, 19 - Loc. Bargellino
40012 Calderara di Reno (BO)
Italy
Phone + 39 051 72 76 88
Fax
+ 39 051 72 76 89
[email protected]
www.medela.it
Switzerland
Medela AG
Lättichstrasse 4b
6341 Baar
Switzerland
Phone +41 848 633 352
Fax +41 41 562 51 00
[email protected]
www.medela.ch
United Kingdom
Medela UK Ltd.
Huntsman Drive
Northbank Industrial Park
Irlam, Manchester M44 5EG
United Kingdom
Phone +44 161 776 0400
Fax +44 161 776 0444
[email protected]
www.medela.co.uk
Netherlands & Belgium
Medela Benelux BV
Uilenwaard 31
5236 WB ’s-Hertogenbosch
The Netherlands
Phone +31 73 690 40 40
Fax +31 73 690 40 44
[email protected]
[email protected]
www.medela.nl
www.medela.be
©Medela AG/200.4122/2015-02/H
Medela AG
Lättichstrasse 4b
6341 Baar, Switzerland
www.medela.com