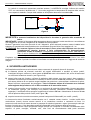
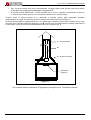
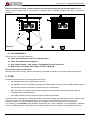
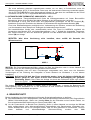
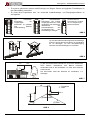
1
Termocucina / Thermocooker / Heizungsherd – TERMOSUPREMA Compact
ISTRUZIONI PER L’INSTALLAZIONE, L’USO E LA MANUTENZIONE – IT
INSTRUCTIONS FOR INSTALLATION, USE AND MAINTENANCE - EN
ANWEISUNGEN FÜR DIE AUFSTELLUNG, DEN GEBRAUCH UND DIE WARTUNG - DE
TERMOCUCINA / THERMOCOOKER / HEIZUNGSHERD
TERMOSUPREMA Compact
Testata secondo / Tested according to / Geprüft nach EN 12815
|
Complimenti per aver acquistato una termocucina a legna LA NORDICA!
Congratulations on your purchase of a LA NORDICA wood-powered thermocooker!
Wir gratulieren Ihnen zum Kauf eines LA NORDICA Holzgerät!
•
Sentirsi bene e allo stesso tempo risparmiare energia con i prodotti LA NORDICA diventa possibile!
With LA NORDICA products, feeling good and saving energy at the same time becomes possible!
Sich wohl fühlen und gleichzeitig Energie sparen: Mit den Produkten der Marke LA NORDICA wird es
möglich!
NORME DI SICUREZZA SUGLI APPARECCHI
SAFETY PRESCRIPTIONS ON EQUIPMENT
GERÄTE-SICHERHEITSVORSCHRIFTEN
Secondo le norme di sicurezza sugli apparecchi l’acquirente e l’esercente sono obbligati ad
informarsi sul corretto funzionamento in base alle istruzioni per l’uso.
According to the safety prescriptions on equipment, the purchaser and the operator are obliged to
get informed about the correct operation according to the instructions for use.
Laut der Geräte-Sicherheitsvorschriften sind Käufer und Betreiber verpflichtet, sich über
den funktionsgerechten Betrieb auf Grundlage der Gebrauchanweisung zu informieren.
Istruzioni / Instructions / Anweisungen IT – EN – DE – Rev.07
1
Termocucina / Thermocooker / Heizungsherd – TERMOSUPREMA Compact
DICHIARAZIONE DI CONFORMITA’ DEL COSTRUTTORE
Oggetto: assenza di amianto e cadmio
Si dichiara che tutti i nostri apparecchi vengono assemblati con materiali che non presentano parti di
amianto o suoi derivati e che nel materiale d’apporto utilizzato per le saldature non è presente/utilizzato in
nessuna forma il cadmio, come previsto dalla norma di riferimento.
Oggetto: Regolamento CE n. 1935/2004
Si dichiara che in tutti gli apparecchi da noi prodotti, i materiali destinati a venire a contatto con i cibi sono
adatti all’uso alimentari, in conformità al Regolamento CE in oggetto.
MANUFACTURER’S DECLARATION OF CONFORMITY
Object: absence of asbestos and cadmium
We declare that all our appliances are assembled with materials which do not have parts made of asbestos
or its derivatives and that in the weld metal used for welding, cadmium is not present, nor is it used in any
form, as required by the reference regulation.
Object: EC REGULATION no. 1935/2004
We declare that in all the appliances which we produce, the materials which are intended to come into
contact with food are suitable for use with food products, in conformity with the EC Regulation in
question.
KONFORMITÄTSERKLÄRUNG DES HERSTELLERS
Betreff: Fehlen von Asbest und Kadmium
Wir bestätigen, dass die verwendeten Materialen oder Teilen für die Herstellung der La Nordica Geräte
ohne Asbest und Derivat sind und auch das Lot für das Schweißen immer ohne Kadmium ist.
Betreff: Ordnung CE n. 1935/2004. Wir erklären in alleiniger Verantwortung, dass die Materialien der
Teile, die für den Kontakt mit Lebensmitteln vorgesehen sind, für die Nahrungsbenutzung geeignet sind
und der Richtlinien CE n. 1935/2004 erfüllen.
2
Istruzioni / Instructions / Anweisungen IT – EN – DE – Rev.07
Termocucina / Thermocooker / Heizungsherd – TERMOSUPREMA Compact
INDICE
1.
2.
3.
4.
IT
DATI TECNICI ................................................................................................................................................... 5
DESCRIZIONE TECNICA .................................................................................................................................. 6
NORME PER L’INSTALLAZIONE ...................................................................................................................... 7
SICUREZZA ANTINCENDIO ............................................................................................................................. 9
4.1.
5.
PRONTO INTERVENTO .......................................................................................................................................... 10
CANNA FUMARIA ........................................................................................................................................... 10
5.1.
6.
7.
8.
9.
10.
11.
12.
13.
14.
POSIZIONE DEL COMIGNOLO................................................................................................................................ 11
COLLEGAMENTO AL CAMINO ....................................................................................................................... 13
AFFLUSSO D’ARIA NEL LUOGO D’INSTALLAZIONE DURANTE LA COMBUSTIONE ................................... 13
COMBUSTIBILI AMMESSI / NON AMMESSI ................................................................................................... 13
ACCENSIONE ................................................................................................................................................. 14
FUNZIONAMENTO NORMALE.................................................................................................................... 15
USO DEL FORNO ....................................................................................................................................... 16
UTILIZZO CORRETTO PER IL RISCALDAMENTO CENTRALIZZATO. ....................................................... 16
MANCANZA DI ENERGIA ELETTRICA........................................................................................................ 17
FUNZIONAMENTO NEI PERIODI DI TRANSIZIONE ................................................................................... 17
14.1.
15.
UTILIZZO COME NORMALE CUCINA...................................................................................................................... 18
MANUTENZIONE E CURA .......................................................................................................................... 18
15.1.
15.2.
15.3.
15.4.
PULIZIA CANNA FUMARIA...................................................................................................................................... 18
PULIZIA VETRO ...................................................................................................................................................... 18
PULIZIA CASSETTO CENERE................................................................................................................................. 19
MANUTENZIONE DELL’IMPIANTO IDRAULICO ...................................................................................................... 19
16.
FERMO ESTIVO .......................................................................................................................................... 19
17.
COLLEGAMENTO ALLA CANNA FUMARIA DI UN CAMINETTO O FOCOLARE APERTO ......................... 19
18.
MONTAGGIO CORRIMANO LATERALI / SIDE HANDRAIL ASSEMBLY / MONTAGE SEITLICHE
HANDLÄUFE........................................................................................................................................................... 54
19.
SCHEDA TECNICA / TECHNICAL DATA SHEET / TECHNISCHES DATENBLATT..................................... 54
20.
SCHEMA DI INSTALLAZIONE / INSTALLATION LAY-OUT / ALLGEMEINES INSTALLATIONSSCHEMA
THERMOKÜCHE..................................................................................................................................................... 55
CONTENTS
1.
2.
3.
4.
EN
TECHNICAL DATA .......................................................................................................................................... 21
TECHNICAL DESCRIPTION............................................................................................................................ 22
INSTALLATION REGULATIONS ..................................................................................................................... 23
FIRE PREVENTION SAFETY .......................................................................................................................... 25
4.1.
5.
IN A EMERGENCY .................................................................................................................................................. 26
FLUE ............................................................................................................................................................... 26
5.1.
6.
7.
8.
9.
10.
11.
12.
13.
14.
POSITION OF THE CHIMNEY POT.......................................................................................................................... 27
CONNECTION TO THE CHIMNEY .................................................................................................................. 28
AIR FLOW IN THE PLACE OF INSTALLATION DURING COMBUSTION ........................................................ 29
PERMITTED/FORBIDDEN FUELS .................................................................................................................. 29
IGNITION......................................................................................................................................................... 30
NORMAL OPERATION................................................................................................................................ 31
OVEN USE .................................................................................................................................................. 32
CORRECT USE FOR CENTRAL HEATING. ................................................................................................ 32
ELECTRICAL POWER SUPPLY FAILURE .................................................................................................. 33
OPERATION IN TRANSITION PERIODS..................................................................................................... 33
14.1.
15.
15.1.
15.2.
15.3.
15.4.
NORMAL COOKER USE.......................................................................................................................................... 33
MAINTENANCE AND CARE ........................................................................................................................ 33
FLUE CLEANING..................................................................................................................................................... 34
GLASS CLEANING .................................................................................................................................................. 34
ASH DRAWER CLEANING ...................................................................................................................................... 34
MAINTENANCE ON THE WATER SYSTEM ............................................................................................................. 34
16.
SUMMER SET ASIDE.................................................................................................................................. 35
17.
CONNECTING A FIREPLACE OR OPEN HEARTH TO THE FLUE.............................................................. 35
18.
MONTAGGIO CORRIMANO LATERALI / SIDE HANDRAIL ASSEMBLY / MONTAGE SEITLICHE
HANDLÄUFE........................................................................................................................................................... 54
19.
SCHEDA TECNICA / TECHNICAL DATA SHEET / TECHNISCHES DATENBLATT..................................... 54
20.
SCHEMA DI INSTALLAZIONE / INSTALLATION LAY-OUT / ALLGEMEINES INSTALLATIONSSCHEMA
THERMOKÜCHE..................................................................................................................................................... 55
Istruzioni / Instructions / Anweisungen IT – EN – DE – Rev.07
3
Termocucina / Thermocooker / Heizungsherd – TERMOSUPREMA Compact
INHALTSVERZEICHNIS
1.
2.
3.
4.
DE
TECHNISCHE DATEN..................................................................................................................................... 37
TECHNISCHE BESCHREIBUNG..................................................................................................................... 38
INSTALLATIONSVORSCHRIFTEN.................................................................................................................. 39
BRANDSCHUTZ.............................................................................................................................................. 41
4.1.
5.
SOFORTIGES EINSCHREITEN ............................................................................................................................... 42
RAUCHABZUG................................................................................................................................................ 43
5.1.
6.
7.
8.
9.
10.
11.
12.
13.
14.
SCHORNSTEINPOSITION....................................................................................................................................... 43
ANSCHLUSS AN DEN SCHORNSTEIN........................................................................................................... 45
LUFTZUSTROM AM INSTALLATIONSORT WÄHREND DER VERBRENNUNG.............................................. 45
ZULÄSSIGE / UNZULÄSSIGE BRENNSTOFFE .............................................................................................. 46
ANZÜNDEN..................................................................................................................................................... 47
NORMALER BETRIEB................................................................................................................................. 48
BENUTZUNG DES BACKOFENS ................................................................................................................ 49
RICHTIGER GEBRAUCH ZUR ZENTRALHEIZUNG .................................................................................... 49
STROMAUSFALL ........................................................................................................................................ 50
BETRIEB IN DER ÜBERGANGSZEIT .......................................................................................................... 50
14.1.
15.
15.1.
15.2.
15.3.
15.4.
VERWENDUNG ALS NORMALER HERD................................................................................................................. 50
INSTANDHALTUNG UND PFLEGE ............................................................................................................. 50
REINIGUNG DES RAUCHABZUGS.......................................................................................................................... 51
REINIGUNG DER GLASSCHEIBE ........................................................................................................................... 51
REINIGUNG DES ASCHEKASTENS ........................................................................................................................ 51
WARTUNG DER HYDRAULIKANLAGE.................................................................................................................... 51
16.
STILLSTAND IM SOMMER.......................................................................................................................... 52
17.
ANSCHLUSS AN DEN RAUCHABZUG EINES OFFENEN KAMINS ............................................................ 52
18.
MONTAGGIO CORRIMANO LATERALI / SIDE HANDRAIL ASSEMBLY / MONTAGE SEITLICHE
HANDLÄUFE........................................................................................................................................................... 54
19.
SCHEDA TECNICA / TECHNICAL DATA SHEET / TECHNISCHES DATENBLATT..................................... 54
20.
SCHEMA DI INSTALLAZIONE / INSTALLATION LAY-OUT / ALLGEMEINES INSTALLATIONSSCHEMA
THERMOKÜCHE..................................................................................................................................................... 55
4
Istruzioni / Instructions / Anweisungen IT – EN – DE – Rev.07
Termocucina – TERMOSUPREMA Compact
Definizione: termocucina secondo EN 12815
1. DATI TECNICI
TERMOSUPREMA COMPACT
Potenza termica globale in kW
24.1
Potenza termica utile in kW
18.5
Potenza resa al liquido (H2O) in kW
12
Potenza resa all’ambiente in kW
6.5
Consumo orario legna in kg / h (legna con 20% umidità)
5.2
Rendimento
77.5
CO misurato al 13% di ossigeno in %
0.280
Diametro tubo uscita fumi in mm
Diametro canna fumaria in mm
160 S/P
5m – 220x220 Ø220 ∗
Contenuto di acqua nella caldaia in lt
25
Depressione al camino in mm H2O
1,7
Diametro raccordi mandata e ritorno in pollici gas
1¼”F gas
Sezione presa aria esterna Ø in mm
200
Emissione gas di scarico in g/s – legna
26.84
Temperatura gas di scarico nel mezzo in °C - legna
Temperatura ottimale di esercizio in °C
186
70 ÷ 75
Pressione max d’esercizio in bar
Dimensioni apertura focolare mm (L x H)
1.5
233 x 193
Dimensioni corpo focolare / testata focolare in mm (L x H x P)
257 x 395 x 407
Dimensioni forno in mm (L x H x P)
307 x 418 x 430
Tipo di griglia
Movibile - piana
Altezza termocucina in mm
881
Larghezza termocucina in mm
982
Profondità termocucina (con maniglie) in mm
682
Peso in Kg
280
Distanze di sicurezza antincendio
Capitolo 4
∗ Diametro 200 mm utilizzabile con canna fumaria non inferiore a 6 m
Il volume di riscaldamento delle cucine secondo EN 12815, per edifici il cui isolamento termico non
corrisponde alle disposizioni sulla protezione del calore, è:
(30 Kcal/h x m3) - tipo di costruzione favorevole:
(40 Kcal/h x m3) - tipo di costruzione meno favorevole:
(50 Kcal/h x m3) - tipo di costruzione sfavorevole:
530 m³
400 m³
320 m³
Con un isolamento termico secondo le norme sul risparmio energetico il volume riscaldato è maggiore.
Con un riscaldamento temporaneo, in caso di interruzioni superiori a 8h, la capacità di riscaldamento
diminuisce del 25% circa.
IMPORTANTE: La potenza dell’impianto termico collegato deve essere commisurata alla potenza
ceduta all’acqua dalla termocucina; un carico troppo ridotto non consente un
regolare funzionamento del forno, mentre un carico troppo elevato impedisce un
adeguato riscaldamento dei radiatori.
Istruzioni per l’installazione, l’uso e la manutenzione – IT – Rev.07
5
Termocucina – TERMOSUPREMA Compact
2. DESCRIZIONE TECNICA
Le termocucine La Nordica si addicono a riscaldare spazi abitativi dotati di un impianto di riscaldamento
centralizzato costituito da radiatori o da termoconvettori sostituendo del tutto o in parte la tradizionale
caldaia a gas o gasolio. Esse sono ideali per appartamenti di vacanza e case del fine settimana oppure
come riscaldamento ausiliario durante tutto l’anno.
Come combustibili vengono utilizzati ceppi di legna.
La termocucina è costituita di lastre in lamiera d’acciaio zincata, ghisa smaltata e ceramica termo-radiante.
Il focolare si trova all’interno della caldaia costruita con acciaio di 4 mm di spessore e rinforzata con chiodi
saldati. Nella caldaia circola l’acqua dell’impianto di riscaldamento la quale assorbe il calore prodotto nel
focolare. All’interno del focolare si trova una griglia piana regolabile in altezza.
Il focolare è dotato di una porta panoramica con vetro ceramico (resistente fino a 700°C). Questo cons ente
un’affascinante vista sulle fiamme ardenti. Inoltre viene così impedita ogni possibile fuoriuscita di scintille e
fumo.
Il riscaldamento dell’ambiente avviene:
a) per irraggiamento: attraverso il vetro panoramico e le superfici esterne calde della stufa viene
irraggiato calore nell’ambiente.
b) mediante i radiatori o termoconvettori dell’impianto centralizzato alimentati dall’acqua calda
prodotta dalla Termocucina stessa.
La termocucina è fornita di registri per l’aria primaria e secondaria e di un termostato, con i quali viene
regolata l’aria di combustione.
E
E
D
D
B
Temperatura
forno
A
-
+
Temperatura
H2O
C
Figura 1
Registro Aria PRIMARIA (pomello inferiore della porta focolare Figura 1 pos. A).
Con il registro inferiore viene regolato il passaggio dell’aria primaria nella parte bassa della cucina
attraverso il cassetto cenere e la griglia in direzione del combustibile. L’aria primaria è necessaria per il
processo di combustione. Il cassetto cenere deve essere svuotato regolarmente, in modo che la cenere
non possa ostacolare l’entrata dell’aria primaria per la combustione. Attraverso l’aria primaria viene anche
mantenuto vivo il fuoco.
Il registro dell’aria primaria deve essere aperto appena un po’ durante la combustione della legna, poiché
altrimenti questa arde troppo velocemente e la termocucina si può surriscaldare.
Registro Aria SECONDARIA (pomello superiore della porta focolare Figura 1 pos. B).
Questo pomello deve essere aperto (quindi totalmente spostato verso destra) in particolare per la
combustione di legna (vedi paragrafo 10). L’aria secondaria, passando tra il doppio vetro della porta fuoco,
si riscalda ed innesca la doppia combustione mantenendo nello stesso tempo il vetro pulito (registro
aperto).
6
Istruzioni per l’installazione, l’uso e la manutenzione – IT – Rev.07
Termocucina – TERMOSUPREMA Compact
TERMOSTATO automatico (posto sulla parte superiore destra della schiena Figura 1 pos. C)
Il termostato ha la funzione di aumentare o diminuire automaticamente la combustione.
A seconda della posizione scelta, il termostato agirà sulla valvola che regola l’immissione dell’aria nel
focolare, posta sulla schiena della cucina. Ruotare in senso orario dallo 0 al 5 per ravvivare il fuoco e dal 5
allo 0 in senso antiorario per ridurre la combustione. Trattandosi di un dispositivo di elevata precisione si
raccomanda di ruotare con cura e di non forzare mai la manopola.
Registro FUMI (Figura 1 Pos.D)
(Conversione dalla funzione di cucina - USO PIASTRA - USO FORNO a quella di cucina uso RISCALDAMENTO)
Nella parte centrale del cruscotto si trova il registro-fumi, riconoscibile da un pomello smaltato e
contrassegnato.
Quando si posiziona il registro a SX (sul simbolo pentola), i gas di combustione fluiscono sopra ed attorno
al forno (funzione cucina - USO PIASTRA – USO FORNO); quando invece si posiziona a DX (sul simbolo
dell’acqua), i gas fluiscono vicino alla caldaia aumentando uniformemente la temperatura favorendo il
riscaldamento dell’acqua al suo interno (funzione cucina USO RISCALDAMENTO).
Registro ACCENSIONE (Figura 1 pos. E).
Sulla facciata della cucina, tra il corrimano di protezione e il registro fumi, si trova la leva di comando del
registro di accensione, riconoscibile da un pomolo cromato.
Questo registro va utilizzato solo per facilitare l’accensione del combustibile nella caldaia, tirare la leva
verso l’esterno della cucina (registro aperto).
IMPORTANTE : durante il normale funzionamento della cucina, la leva del registro deve rimanere tutta
inserita (spinta verso l’interno della cucina) in questo modo si evita un consumo eccessivo
del combustibile ed una scarsa resa della termocucina (registro chiuso).
3. NORME PER L’INSTALLAZIONE
L’installazione della termocucina e degli equipaggiamenti ausiliari, relativi all’impianto di riscaldamento,
deve essere conforme e tutte le Norme e Regolamentazioni attuali ed a quanto previsto dalla Legge.
L’installazione, i relativi collegamenti dell’impianto, la messa in servizio e la verifica del corretto
funzionamento devono essere eseguiti a regola d’arte da personale professionalmente autorizzato nel
pieno rispetto delle norme vigenti, sia nazionali, regionali, provinciali e comunali presenti nel paese in cui è
stato installato l’apparecchio, nonché delle presenti istruzioni.
L’installazione deve essere eseguita da personale autorizzato, che dovrà rilasciare all’acquirente una
dichiarazione di conformità dell’impianto, il quale si assumerà l’intera responsabilità dell’installazione
definitiva e del conseguente buon funzionamento del prodotto installato.
Non vi sarà responsabilità da parte di La NORDICA S.p.A. in caso di mancato rispetto di tali precauzioni.
Prima dell’installazione, si consiglia di effettuare un lavaggio accurato di tutte le tubazioni dell’impianto
onde rimuovere eventuali residui che potrebbero compromettere il buon funzionamento dell’apparecchio.
IMPORTANTE:
a) In caso di fuoriuscite d’acqua chiudere l’alimentazione idrica ed avvisare con sollecitudine il servizio
tecnico di assistenza;
b) La pressione di esercizio dell’impianto deve essere periodicamente controllata.
c) In caso di non utilizzo della caldaia per un lungo periodo è consigliabile l’intervento del servizio
tecnico di assistenza per effettuare almeno le seguenti operazioni:
- chiudere i rubinetti dell’acqua sia dell’impianto termico sia del sanitario;
- svuotare l’impianto termico e sanitario se c’è rischio di gelo.
La Nordica S.p.a. declina ogni responsabilità per danni a cose e/o persone provocati dall’impianto.
Inoltre non è responsabile del prodotto modificato senza autorizzazione e tanto meno per l’uso di
ricambi non originali.
Il Vostro abituale spazzacamino di zona deve essere informato sull’installazione della termocucina,
affinché possa verificarne il regolare collegamento alla canna fumaria ed il grado di efficienza di
quest’ultima.
NON SI POSSONO EFFETTUARE MODIFICHE ALL’APPARECCHIO.
Prima dell’installazione, verificate se il Vostro pavimento può sopportare il peso della Termocucina.
ATTENZIONE: assicurarsi che l’apparecchio sia posto perfettamente in piano e che il diametro del
tubo di scarico dei fumi sia quello richiesto.
Istruzioni per l’installazione, l’uso e la manutenzione – IT – Rev.07
7
Termocucina – TERMOSUPREMA Compact
Non è concesso il collegamento di più stufe allo stesso camino.
Vi consigliamo di far verificare dal Vostro abituale spazzacamino di zona sia il collegamento al camino sia il
sufficiente afflusso d’aria per la combustione nel luogo d’installazione.
Il diametro dell’apertura per il collegamento al camino deve corrispondere per lo meno al diametro del tubo
fumo. L’apertura dovrebbe essere dotata di una connessione a muro per l’inserimento del tubo di scarico e
di un rosone.
Il foro di scarico fumi non utilizzato deve essere ricoperto con il relativo tappo.
Le termocucina modello TERMOSUPREMA COMPACT va OBBLIGATORIAMENTE installata in un
impianto a VASO DI ESPANSIONE APERTO.
L’impianto con vaso di espansione aperto, deve essere obbligatoriamente provvisto di:
1.
VASO DI ESPANSIONE APERTO: avente una capacità pari al 10 % del contenuto d’acqua totale
della termocucina e dell’impianto. Questa va posizionata nel punto più alto dell’impianto almeno 2m
sopra il radiatore posto al livello più alto.
2.
TUBO DI SICUREZZA : che collega per la via più breve, senza tratti discendenti o sifonanti la
mandata della termocucina con la parte superiore della vaschetta descritta al punto 1.
Il tubo di sicurezza deve avere la sezione minima di 1’’.
3.
TUBO DI CARICO : che collega il fondo della vaschetta del punto 1 con il tubo di ritorno dell’impianto.
La sezione minima deve essere di ¾’’.
Tutti questi elementi non devono per nessuna ragione avere organi di intercettazione interposti che
possano accidentalmente escluderli e devono essere posizionati in ambienti non esposti al gelo
poiché, se dovessero gelare, si potrebbe verificare la rottura o addirittura l’esplosione del corpo
caldaia.
In caso di esposizione al gelo sarà opportuno aggiungere all’acqua dell’impianto una adeguata
percentuale di liquido antigelo che consentirà di eliminare completamente il problema.
In nessun modo dovrà esserci circolazione d’acqua nella vaschetta fra il tubo di sicurezza ed il tubo di
carico poiché questa provoca l’ossigenazione dell’acqua stessa e la conseguente corrosione del corpo
della termocucina e dell’impianto in tempi molto brevi.
4.
VALVOLA DI SCARICO TERMICO: costituisce una ulteriore sicurezza positiva in grado di prevenire
l’ebollizione anche in assenza di energia elettrica.
E’ costituita da un corpo valvola simile ad una valvola di sicurezza a pressione che, a differenza di
questa, si apre al raggiungimento di una temperatura pretarata (di solito 94 – 95° C) scaricando dalla
mandata dell’impianto acqua calda che verrà sostituita con altrettanta acqua fredda proveniente
attraverso il tubo di carico dalla vaschetta del vaso aperto smaltendo in questo modo il calore
eccessivo.
5.
VALVOLA DI SICUREZZA da 1,5bar: la massima pressione di esercizio ammessa per l’impianto è di
1,5bar (pari a 15m di colonna d’acqua), pressioni superiori possono provocare deformazioni e rotture
del corpo caldaia.
6.
ALTRI DISPOSITIVI di sicurezza previsti dalla Normativa vigente in materia.
7.
POMPA DI CIRCOLAZIONE : dovrebbe preferibilmente essere montata sul ritorno per evitare che
possa disinnescarsi a temperature dell’acqua molto elevate accertandosi però che non faccia circolare
l’acqua nella vaschetta del vaso aperto altrimenti provocherebbe una continua ossigenazione
dell’acqua con conseguente, rapida, corrosione del corpo caldaia.
Deve inoltre essere collegata elettricamente in modo da funzionare solamente quando la temperatura
dell’acqua supera i 65-70° C ; per ottenere questo si potrà usare la centralina elettronica fornibile come
OPTIONAL assieme alla termocucina, oppure utilizzando un termostato a bracciale montato
immediatamente sulla mandata e tarato appunto a 65-70° C.
8. VALVOLA MISCELATRICE TERMOSTATICA AUTOMATICA - Figura 2
La valvola miscelatrice termostatica automatica trova applicazione nei termoprodotti a combustibile
solido in quanto previene il ritorno di acqua fredda nello scambiatore.
Le tratte 1 e 3 sono sempre aperte e, assieme alla pompa installata sul ritorno (R), garantiscono la
circolazione dell’acqua all’interno dello scambiatore della caldaia a biomassa (CB).
Una elevata temperatura di ritorno permette di migliorare l’efficienza, riduce la formazione di condensa
dei fumi e allunga la vita della caldaia.
8
Istruzioni per l’installazione, l’uso e la manutenzione – IT – Rev.07
Termocucina – TERMOSUPREMA Compact
Le valvole in commercio presentano svariate tarature, La NORDICA consiglia l’utilizzo del modello
55°C con connessioni idrauliche da 1”. Una volta ra ggiunta la temperatura di taratura della valvola,
viene aperta la tratta 2 e l’acqua della caldaia va all’impianto attraverso la mandata (M).
M
CB
3
55°
R
1
2
TERMOPRODOTTO
Figura 2
IMPORTATE la mancata installazione del dispositivo fa decadere la garanzia dello scambiare di
calore.
IMPORTANTE: i sensori di sicurezza della temperatura devono essere a bordo macchina o a una distanza
non maggiore di 30 cm dal collegamento di mandata del termoprodotto.
Qualora i generatori non siano provvisti di tutti i dispostivi, quelli mancanti possono essere installati sulla
tubazione di mandata del termoprodotto entro una distanza da quest’ultimo non maggiore di 1 m.
ATTENZIONE: Per nessuna ragione si dovrà accendere il fuoco prima che l’impianto non sia stato
completamente riempito d’acqua; il farlo comporterebbe un danneggiamento
gravissimo a tutta la struttura. Il riempimento dell’impianto deve essere fatto tramite il
tubo di carico direttamente dalla vaschetta del vaso aperto in modo da evitare che una
eccessiva pressione della rete idrica deformi il corpo della termocucina.
L’impianto va tenuto costantemente pieno d’acqua anche nei periodi in cui non è richiesto l’uso della
termocucina. Durante il periodo invernale un’eventuale non attività va affrontata con l’aggiunta di sostanze
antigelo.
4. SICUREZZA ANTINCENDIO
Nell’installazione della termocucina devono essere osservate le seguenti misure di sicurezza:
a) la distanza minima da elementi costruttivi ed oggetti infiammabili e sensibili al calore (mobili,
rivestimenti di legno, stoffe ecc.) deve essere di 20 cm dal retro e da entrambi i lati; al fine di assicurare
un sufficiente isolamento termico (vedi Figura 3 A).
b) davanti alla porta del focolare, nell’area di radiazione della stessa, non deve esserci alcun oggetto o
materiale di costruzione infiammabile e sensibile al calore a meno di 100 cm di distanza. Tale distanza
può essere ridotta a 40 cm qualora venga installata una protezione, retroventilata e resistente al calore,
davanti all’intero componente da proteggere. Tutte le distanze minime di sicurezza sono indicate
sulla targhetta del prodotto e non si deve scendere al di sotto delle stesse.
c) qualora la termocucina venga installata su un pavimento di materiale infiammabile, bisogna prevedere
un sottofondo ignifugo, per esempio una pedana d'acciaio (dimensioni secondo l’ordinamento
regionale). Il sottofondo deve sporgere frontalmente di almeno 50 cm e lateralmente di almeno 30 cm
oltre all’apertura della porta di carico (vedi Figura 3 B).
d) sopra la termocucina non devono essere presenti componenti infiammabili (es. mobili - pensili).
La termocucina deve funzionare esclusivamente con il cassetto cenere inserito. I residui solidi della
combustione (ceneri) devono essere raccolti in un contenitore ermetico e resistente al fuoco. La
termocucina non deve mai essere accesa in presenza di emissioni gassose o vapori (per esempio colla per
linoleum, benzina ecc.). Non depositate materiali infiammabili nelle vicinanze della termocucina.
Durante la combustione viene sprigionata energia termica che comporta un marcato riscaldamento delle
superfici, di porte, maniglie, comandi, vetri, tubo fumi ed eventualmente della parte anteriore
Istruzioni per l’installazione, l’uso e la manutenzione – IT – Rev.07
9
Termocucina – TERMOSUPREMA Compact
dell’apparecchio. Evitate il contatto con tali elementi senza un corrispondente abbigliamento protettivo o
senza utensili accessori (guanti resistenti al calore, dispositivi di comando).
Fate in modo che i bambini siano consapevoli di questi pericoli e teneteli lontani dal focolare
durante il suo funzionamento.
Quando si utilizza un combustibile errato o troppo umido, a causa di depositi presenti nella canna fumaria
si potrebbe avere un incendio della stessa.
A
Figura 3
4.1.
B
PRONTO INTERVENTO
Se si manifesta un incendio nel collegamento o nella canna fumaria :
a) Chiudere la porta di caricamento e del cassetto cenere.
b) Chiudere i registri dell’aria comburente
c) Spegnere tramite l’uso di estintori ad anidride carbonica ( CO2 a polveri )
d) Richiedere l’immediato intervento dei Vigili del Fuoco
Non spegnere il fuoco con l’uso di getti d’acqua.
Quando la canna fumaria smette di bruciare farla verificare da uno specialista per individuare eventuali
crepe o punti permeabili.
5. CANNA FUMARIA
Requisiti fondamentali per un corretto funzionamento dell’apparecchio:
• la sezione interna deve essere preferibilmente circolare;
• essere termicamente isolata ed impermeabile e costruita con materiali idonei a resistere al calore,
ai prodotti della combustione ed alle eventuali condense;
• essere priva di strozzature ed avere andamento verticale con deviazioni non superiori a 45°;
• se già usata deve essere pulita;
• rispettare i dati tecnici del manuale di istruzioni;
Qualora le canne fumarie fossero a sezione quadrata o rettangolare gli spigoli interni devono essere
arrotondati con raggio non inferiore a 20 mm. Per la sezione rettangolare il rapporto massimo tra i lati deve
essere ≤ 1,5.
Una sezione troppo piccola provoca una diminuzione del tiraggio. Si consiglia un’altezza minima di 4 m.
Sono vietate e pertanto pregiudicano il buon funzionamento dell’apparecchio: fibrocemento, acciaio
zincato, superfici interne ruvide e porose. In Figura 4 sono riportati alcuni esempi di soluzione.
La sezione minima deve essere di 4 dm2 (per esempio 20x20cm) per gli apparecchi il cui diametro
di condotto è inferiore a 200mm, o 6,25dm2 (per esempio 25x25cm) per gli apparecchi con diametro
superiore a 200mm.
10
Istruzioni per l’installazione, l’uso e la manutenzione – IT – Rev.07
Termocucina – TERMOSUPREMA Compact
Il tiraggio creato dalla vostra canna fumaria deve essere
sufficiente ma non eccessivo.
Una sezione della canna fumaria troppo importante può
presentare un volume troppo grande da riscaldare e
dunque provocare delle difficoltà di funzionamento
dell’apparecchio; per evitare ciò provvedete ad intubare la
stessa per tutta la sua altezza. Una sezione troppo piccola
provoca una diminuzione del tiraggio.
La canna fumaria deve essere adeguatamente
distanziata da materiali infiammabili o combustibili
mediante un opportuno isolamento o un’intercapedine
d’aria.
E’ vietato far transitare all’interno della stessa tubazioni di
impianti o canali di adduzione d’aria. E’ proibito inoltre
praticare aperture mobili o fisse, sulla stessa, per il
collegamento di ulteriori apparecchi diversi (Vedi capitolo
.17 ).
(1)
(2)
(3)
(4)
Max. A+1/2A
A+1/2A
A
(1) Canna fumaria in acciaio AISI 316 con doppia
camera isolata con materiale resistente a
400°C. Efficienza 100% ottima.
(2) Canna fumaria in refrattario con doppia
camera isolata e rivestimento esterno in
calcestruzzo alleggerito. Efficienza 100%
ottima.
(3) Canna fumaria tradizionale in argilla sezione
quadrata con intercapedini. Efficienza 80%
ottima.
(4) Evitare canne fumarie con sezione
rettangolare interna il cui rapporto sia diverso
dal disegno.
Efficienza 40% mediocre.
5.1.
POSIZIONE DEL COMIGNOLO
Il tiraggio della canna fumaria dipende anche
dall’idoneità del comignolo.
È pertanto indispensabile che, se costruito artigianalmente,
la sezione di uscita sia più di due volte la sezione interna
della canna fumaria.
Dovendo sempre superare il colmo del tetto, il comignolo
dovrà assicurare lo scarico anche in presenza di vento
(Figura 5).
Il comignolo deve rispondere ai seguenti requisiti:
• avere sezione interna equivalente a quella del
Figura 4
camino.
• avere sezione utile d’uscita doppia di quella interna della canna fumaria.
• essere costruito in modo da impedire la penetrazione nella canna fumaria di pioggia, neve e di
qualsiasi corpo estraneo.
• essere facilmente ispezionabile, per eventuali operazioni di manutenzione e pulizia.
(1) Comignolo industriale
ad elementi prefabbricati,
consente
un
ottimo
smaltimento dei fumi.
(2) Comignolo artigianale.
La giusta sezione di uscita
deve essere minimo 2 volte
la sezione interna della
canna fumaria, ideale 2,5
volte.
(3) Comignolo per canna
fumaria in acciaio con
cono interno deflettore
dei fumi.
Figura 5
50 cm
(1) In caso di canne fumarie affiancate un
comignolo dovrà sovrastare l’altro d’almeno 50 cm
al fine d’evitare trasferimenti di pressione tra le
canne stesse.
Figura 6
Istruzioni per l’installazione, l’uso e la manutenzione – IT – Rev.07
11
Termocucina – TERMOSUPREMA Compact
2m
10 m
(1) Il comignolo non deve avere ostacoli entro i 10 m da muri,
falde ed alberi. In caso contrario innalzare lo stesso d’almeno
1 m sopra l’ostacolo.
Il comignolo deve oltrepassare il colmo del tetto d’almeno 1 m.
1
m
Figura 7
>A
>
_A
0,5 m
H min.
(1)Asse colmo
α
(2)Tetto
Figura 8
COMIGNOLI DISTANZE E POSIZIONAMENTO UNI 10683/98
Inclinazione del tetto
Distanza tra il colmo e il camino
Altezza minima del camino (misurata dallo
sbocco)
α
A (m)
H (m)
< 1,85 m
0,50 m oltre il colmo
> 1,85 m
1,00 m dal tetto
< 1,50 m
0,50 m oltre il colmo
> 1,50 m
1,30 m dal tetto
< 1,30 m
0,50 m oltre il colmo
> 1,30 m
2,00 m dal tetto
< 1,20 m
0,50 m oltre il colmo
> 1,20 m
2,60 m dal tetto
15°
30°
45°
60°
12
Istruzioni per l’installazione, l’uso e la manutenzione – IT – Rev.07
Termocucina – TERMOSUPREMA Compact
6. COLLEGAMENTO AL CAMINO
Le cucine con chiusura automatica della porta (tipo 1) devono obbligatoriamente funzionare, per motivi di
sicurezza, con la porta del focolare chiusa (fatta eccezione per la fase di carico del combustibile o
l’eventuale rimozione della cenere).
Le cucine con le porte non a chiusura automatica (tipo 2) devono essere collegate ad una propria canna
fumaria . Il funzionamento con porta aperta è consentito soltanto previa sorveglianza.
ATTENZIONE: qualora il collegamento attraversi particolari composti da materiali infiammabili, nel raggio
di 20cm attorno al tubo tutti i materiali infiammabili devono essere sostituiti da materiali
ignifughi e resistenti al calore.
Per un buon funzionamento dell’apparecchio è essenziale che nel luogo d’installazione venga immessa
sufficiente aria per la combustione (vedi paragrafo 7).
Il tubo di collegamento alla canna fumaria deve essere più corto possibile, rettilineo ed a tenuta stagna.
Il collegamento deve essere eseguito con tubi stabili e robusti (Vi consigliamo uno spessore di 2 mm) ed
essere fissato ermeticamente alla canna fumaria. Il diametro interno del tubo di collegamento deve
corrispondere al diametro esterno del tronchetto di scarico fumi della cucina (DIN 1298).
La depressione al camino (TIRAGGIO) deve essere di almeno 17 Pascal (=1.7 mm di colonna d’acqua).
La misurazione deve essere fatta sempre ad apparecchio caldo (resa calorifica nominale). Quando la
depressione supera i 20 Pascal (2 mm di colonna d’acqua) è necessario ridurre la stessa con
l’installazione di un regolatore di tiraggio supplementare (valvola a farfalla) sul tubo di scarico o nel camino.
7. AFFLUSSO D’ARIA NEL LUOGO D’INSTALLAZIONE DURANTE LA
COMBUSTIONE
Poiché le termocucine ricavano la loro aria di combustione dal locale di installazione, è essenziale che nel
luogo stesso venga immessa una sufficiente quantità d’aria. In caso di finestre e porte a tenuta stagna (es.
case costruite con il criterio di risparmio energetico) è possibile che l’ingresso di aria fresca non venga più
garantito e questo compromette il tiraggio dell’apparecchio, il vostro benessere e la vostra sicurezza.
Bisogna pertanto garantire una alimentazione aggiuntiva di aria fresca mediante una presa d’aria esterna
posta nelle vicinanze dell’apparecchio oppure tramite la posa di una conduttura per l’aria di combustione
che porti verso l’esterno od in un vicino locale areato, ad eccezione del locale caldaia o garage
(VIETATO).
Il tubo di collegamento deve essere liscio con un diametro minimo di 120 mm, deve avere una lunghezza
massima di 4 m e presentare non più di tre curve. Qualora questo sia collegato direttamente con l’esterno
deve essere dotato di un apposito frangivento.
L’entrata dell’aria per la combustione nel luogo d’installazione non deve essere ostruita durante il
funzionamento della termocucina. E’ assolutamente necessario che negli ambienti, in cui vengono fatte
funzionare termocucine con un tiraggio naturale del camino, venga immessa tanta aria quanta ne è
necessaria per la combustione, ossia fino a 25 m³/ora. Il naturale ricircolo dell’aria deve essere garantito da
alcune aperture fisse verso l’esterno, la loro grandezza è stabilita da relative normative in materia.
Chiedete informazioni al Vostro spazzacamino di fiducia. Le aperture devono essere protette con delle
griglie e non devono mai essere otturate. Una cappa di estrazione (aspirante) installata nella stessa stanza
od in una confinante provoca una depressione nell’ambiente. Questo provoca la fuoriuscita di gas combusti
(fumo denso, odore); é dunque necessario assicurare un maggiore afflusso di aria fresca.
La depressione di una cappa aspirante può, nella peggiore delle ipotesi, trasformare la canna
fumaria della termocucina in presa d’aria esterna risucchiando i fumi nell’ambiente con
conseguenze gravissime per le persone.
8. COMBUSTIBILI AMMESSI / NON AMMESSI
I combustibili ammessi sono ceppi di legna. Si devono utilizzare esclusivamente ceppi di legna secca
(contenuto d’acqua max 20%). I pezzi di legna dovrebbero avere una lunghezza di circa 30 cm ed una
circonferenza di 15 - 18 cm max.
Istruzioni per l’installazione, l’uso e la manutenzione – IT – Rev.07
13
Termocucina – TERMOSUPREMA Compact
Kg/mc
KWh/kg
Umidità 20%
Faggio
750
4,0
Cerro
900
4,2
Olmo
640
4,1
Pioppo
470
4,1
Larice*
660
4,4
Abete rosso*
450
4,5
Pino silvestre*
550
4,4
Specie
* LEGNI RESINOSI POCO ADATTI PER LA TERMOCUCINA
La legna usata come combustibile deve avere un contenuto d’umidità inferiore al 20% e la si ottiene con un
tempo di essiccazione di almeno un anno (legno tenero) o di due anni (legno duro) collocandola in un
luogo asciutto e ventilato (per esempio sotto una tettoia). La legna umida rende l’accensione più difficile,
poiché è necessaria una maggiore quantità d’energia per far evaporare l’acqua presente. Il contenuto
umido ha inoltre lo svantaggio, con l’abbassarsi della temperatura, di far condensare l’acqua prima nel
focolare e quindi nel camino. La legna fresca contiene circa il 60% di H2O, perciò non è adatta ad essere
bruciata.
Tra gli altri non possono essere bruciati: resti di carbone, ritagli, cascami di corteccia e pannelli,
legna umida o trattata con vernici, materiali di plastica; in tal caso decade la garanzia
sull’apparecchio.
Carta e cartone devono essere utilizzati solo per l’accensione. La combustione di rifiuti è vietata e
danneggerebbe inoltre la termocucina e la canna fumaria, provocando inoltre danni alla salute ed in virtù
del disturbo olfattivo a reclami da parte del vicinato.
La legna non è un combustibile a lunga durata e pertanto non è possibile un riscaldamento continuo della
termocucina durante la notte.
ATTENZIONE: L'uso continuo e prolungato di legna particolarmente ricca di oli aromatici (p.e.
Eucalipto, Mirto, etc.) provoca il deterioramento (sfaldamento) repentino dei
componenti in ghisa presenti nel prodotto.
9. ACCENSIONE
ATTENZIONE : Per nessuna ragione si dovrà accendere il fuoco prima che l’impianto non sia stato
completamente riempito d’acqua; il farlo comporterebbe un danneggiamento
gravissimo a tutta la struttura.
IMPORTANTE: alla prima accensione è inevitabile che venga prodotto un odore sgradevole (dovuto
all’essiccamento dei collanti nella cordicella di guarnizione o delle vernici protettive), che
sparisce dopo un breve utilizzo. Deve comunque essere assicurata una buona
ventilazione dell’ambiente. Alla prima accensione Vi consigliamo di caricare una quantità
ridotta di combustibile e di aumentare lentamente la resa calorifica dell’apparecchio.
Per effettuare una corretta prima accensione dei prodotti trattati con vernici per alte temperature, occorre
sapere quanto segue:
• i materiali di costruzione dei prodotti in questione non sono omogenei, infatti coesistono parti in ghisa e
in acciaio.
• la temperatura alla quale il corpo del prodotto è sottoposto non è omogenea: da zona a zona si
registrano temperature variabili dai 300 °C ai 500 °C;
• durante la sua vita, il prodotto è sottoposto a cicli alternati di accensioni e di spegnimento durante la
stessa giornata e a cicli di intenso utilizzo o di assoluto riposo al variare delle stagioni;
14
Istruzioni per l’installazione, l’uso e la manutenzione – IT – Rev.07
Termocucina – TERMOSUPREMA Compact
•
•
la termocucina nuova, prima di potersi definire rodata, dovrà essere sottoposta a diversi cicli di
avviamento per poter consentire a tutti i materiali ed alla vernice di completare le varie sollecitazioni
elastiche;
in particolare inizialmente si potrà notare l’emissione di odori tipici dei metalli sottoposti a grande
sollecitazione termica e di vernice ancora fresca. Tale vernice, sebbene in fase di costruzione venga
cotta a 250°C per qualche ora, dovrà superare più v olte e per una certa durata la temperatura di
350°C, prima di incorporarsi perfettamente con le s uperfici metalliche
Diventa quindi importante seguire questi piccoli accorgimenti in fase di accensione:
1. Assicuratevi che sia garantito un forte ricambio d'aria nel luogo dove è installato l'apparecchio.
2. Nelle prime accensioni, non caricare eccessivamente la camera di combustione (circa metà della
quantità indicata nel manuale d'istruzioni) e tenere il prodotto acceso per almeno 6-10 ore di continuo,
con i registri meno aperti di quanto indicato nel manuale d'istruzioni.
3. Ripetere questa operazione per almeno 4-5 o più volte, secondo la Vostra disponibilità.
4. Successivamente caricare sempre più (seguendo comunque quanto descritto sul libretto di istruzione
relativamente al massimo carico) e tenere possibilmente lunghi i periodi di accensione evitando,
almeno in questa fase iniziale, cicli di accensione-spegnimento di breve durata.
5. Durante le prime accessioni nessun oggetto dovrebbe essere appoggiato sulla termocucina ed in
particolare sulle superfici laccate. Le superfici laccate non devono essere toccate durante il
riscaldamento.
6. Una volta superato il “rodaggio” si potrà utilizzare il Vostro prodotto come il motore di un’auto,
evitando bruschi riscaldamenti con eccessivi carichi.
Per accendere il fuoco consigliamo di usare piccoli listelli di legno con carta oppure altri mezzi di
accensione in commercio, escluse tutte le sostanze liquide come per es. alcool, benzina, petrolio e simili.
Seguire quindi quanto segue:
•
Aprire il registro accensione per agevolare lo scarico dei fumi, posizionare il registro come indicato
al capitolo 2 pos.E (si deve aprire anche l’eventuale valvola a farfalla posta sul tubo di scarico fumi).
•
Posizionare la manopola del termostato sulla posizione 5 (massima apertura).
•
Aprire il registro dell’aria primaria (posto sulla porta cenere).
•
Dopo aver innescato il fuoco con piccoli pezzi di legna e aspettato che sia ben acceso, regolare il
termostato sulla pozione corrispondente al calore desiderato.
•
Portare il registro fumi nella posizione forno, tirando la leva.
Quando la legna comincia ad ardere si può caricare altro combustibile, chiudere il registro dell’aria primaria
e controllare la combustione mediante l’aria secondaria secondo le indicazioni del paragrafo 10. Durante
questa fase non lasciare mai la cucina senza supervisione.
ATTENZIONE: durante le prime accensioni potrà avvenire una consistente condensazione dei fumi
con una piccola fuoriuscita d’acqua dalla termocucina ; questo è un fenomeno
destinato a sparire in brevissimo tempo, se invece dovesse risultare persistente
sarà necessario far controllare il tiraggio della canna fumaria.
Non si deve mai sovraccaricare la termocucina. Troppo combustibile e troppa aria per la
combustione possono causare surriscaldamento e quindi danneggiare la termocucina. I danni
causati da surriscaldamento non sono coperti da garanzia.
10.
FUNZIONAMENTO NORMALE
ATTENZIONE: Per nessuna ragione si dovrà accendere il fuoco prima che l’impianto non sia stato
completamente riempito d’acqua; il farlo comporterebbe un danneggiamento
gravissimo a tutta la struttura.
Gli apparecchi con chiusura automatica della porta (tipo 1) devono obbligatoriamente funzionare, per
motivi di sicurezza, con la porta del focolare chiusa (fatta eccezione per la fase di carico del combustibile o
l’eventuale rimozione della cenere ).
Gli apparecchi con le porte non a chiusura automatica (tipo 2) devono essere collegati ad una propria
canna fumaria. Il funzionamento con porta aperta è consentito soltanto previa sorveglianza.
Istruzioni per l’installazione, l’uso e la manutenzione – IT – Rev.07
15
Termocucina – TERMOSUPREMA Compact
IMPORTANTE: Per motivi di sicurezza la porta del focolare deve essere aperta solamente durante la
fase di accensione e per fare le ricariche di legna mentre durante il funzionamento e
durante i periodi di non utilizzo deve rimanere chiusa.
Il potere calorifico nominale della termocucina viene raggiunto con un tiraggio (depressione) minimo di
17Pa ( =1.7 mm di colonna d’acqua ).
Bisogna pertanto usare la termocucina sempre con porta chiusa per evitare l’effetto forgia.
Non si deve mai sovraccaricare la termocucina. Troppo combustibile e troppa aria per la
combustione possono causare surriscaldamento e quindi danneggiare la termocucina. I danni
causati da surriscaldamento non sono coperti da garanzia.
Con i registri posti sulla facciata della termocucina viene regolata l’emissione di calore del focolare. Essi
devono essere aperti secondo il bisogno calorifico. La migliore combustione (emissioni minime) viene
raggiunta quando, caricando legna, la maggior parte dell’aria per la combustione passa attraverso il
registro dell’aria secondaria.
IMPORTANTE: durante il normale funzionamento della cucina, la leva del registro Figura 1 pos. E deve
rimanere tutta inserita (spinta verso l’interno della cucina) in questo modo si evita un
consumo eccessivo del combustibile (registro chiuso).
La regolazione dei registri necessaria per l’ottenimento della resa calorifica nominale è la seguente:
Combustibile
Aria primaria
Aria secondaria
LEGNA
CHIUSO
APERTO completamente
L’intensità della combustione e quindi la resa calorifica della Vostra termocucina è influenzata dal camino.
Un buon tiraggio del camino richiede una regolazione minore quantità d’aria per la combustione, mentre
uno scarso tiraggio necessita di una maggiore quantità.
IMPORTANTE: per verificare la buona combustione della termocucina verificate che il fumo che esce dal
camino sia trasparente. Se è bianco significa che la termocucina non è regolata
correttamente o la legna è troppo bagnata; se invece il fumo è grigio o nero è segno che la
combustione non è completa(è necessario una maggiore quantità di aria secondaria).
11.
USO DEL FORNO
Dopo aver pulito la griglia del focolare caricate del combustibile. Grazie all’apporto d’aria per la
combustione la temperatura del forno può essere sensibilmente influenzata. Un sufficiente tiraggio al
camino e dei canali ben puliti per il flusso dei fumi roventi attorno al forno sono fondamentali per un buon
risultato di cottura. Il registro dei fumi deve essere tirato completamente verso la facciata della
termocucina.
La padella forno può essere collocata su diversi piani. Torte spesse e arrosti grandi sono da inserire al
livello più basso. Torte piatte e biscotti vanno al livello medio. Il livello superiore può essere utilizzato per
riscaldare o rosolare.
La termocucina è dotata di una griglia focolare in ghisa sollevabile tramite un’apposita manovella. La
posizione superiore ottimizza l’uso della piastra mentre quella inferiore ottimizza il riscaldamento dell’acqua
e del forno.
12.
UTILIZZO CORRETTO PER IL RISCALDAMENTO CENTRALIZZATO.
Per poter ottenere i migliori risultati nell’utilizzo come riscaldamento centralizzato è necessario avere ben
chiari alcuni concetti base.
L’impianto funzionerà molto bene solo quando sarà arrivato a regime ed avrà la pompa sempre in
movimento; solo in questa condizione infatti l’acqua proveniente dall’impianto sarà sufficientemente calda
da impedire fenomeni di condensazione all’interno del corpo caldaia; se al contrario l’impianto verrà gestito
ad una potenza troppo ridotta, l’impianto tenderà a funzionare in modo intermittente.
16
Istruzioni per l’installazione, l’uso e la manutenzione – IT – Rev.07
Termocucina – TERMOSUPREMA Compact
In pratica avverrà che la pompa funzionerà solamente per brevi periodi e solamente quando l’acqua supera
i 70°C ma, ogni volta che l’acqua fredda che ritorn a dall’impianto avrà fatto scendere la temperatura al di
sotto di questo limite, questa si fermerà in attesa che ritorni appunto a 70° C.
Durante questi periodi di pausa l’acqua dei radiatori tenderà a raffreddarsi tornando a sua volta fredda in
caldaia quando la pompa sarà nuovamente in grado di ripartire.
Con questa modalità di funzionamento i radiatori saranno sempre freddi nella parte più bassa e così pure
anche la parte inferiore del corpo caldaia rimarrà sempre quasi fredda consentendo la condensazione dei
fumi e dei vapori acidi che, a lungo andare ne potranno provocare la corrosione.
Per evitare questo grave inconveniente sarà necessario regolare l’aria di combustione in modo che il
calore generato sia in grado di mantenere costantemente la pompa in funzione; solo così infatti sarà
possibile riscaldare in modo uniforme i radiatori causando un ritorno di acqua calda in caldaia tale da
impedire la condensazione dei fumi e la conseguente corrosione.
Per ottenere questo risultato bisognerà regolare la serranda dell’aria primaria (Figura 1 pos.A) a 1/3 di
apertura, L’aria secondaria (Figura 1 pos.B) tutta aperta, mentre la manopola della serranda termostatica
(Termostato automatico Figura 1 pos.C) andrà regolata in modo che la temperatura dell’acqua in caldaia si
stabilizzi fra i 70 – 80 ° C operando nel seguente modo.
Se regolando la serranda in posizione 3 dopo un paio di ore di funzionamento la temperatura dell’acqua
non si sarà ancora stabilizzata consentendo un funzionamento continuo della pompa, sarà necessario
aumentare l’apertura provando ad impostarla sulla posizione 5.
Se in posizione 5 la temperatura, dopo un po’ di tempo arriverà a 80 – 85°C sarà opportuno portare la
regolazione sulla posizione 4 perché sarebbe eccessiva, se invece si stabilizzerà fra i 70 – 80°C andr à
bene e potrà sempre essere lasciata in quella posizione.
13.
MANCANZA DI ENERGIA ELETTRICA
Nell’eventualità di un’improvvisa interruzione di erogazione dell’energia elettrica durante il normale
funzionamento dell’impianto, sarà necessario compiere queste semplici manovre per evitare che la caldaia
possa andare in ebollizione in seguito al mancato funzionamento della pompa.
1
Alzare al massimo la griglia mobile del focolare per ridurre la superficie di scambio esposta al calore
della fiamma.
2
Chiudere i registri dell’aria primaria e secondaria nonché portare in posizione 0 la manopola del
termostato modulante fissata sulla parte destra del dorso della termocucina in modo da bloccare
completamente l’entrata dell’aria comburente.
3
Aprire la porta del forno in modo da favorire lo smaltimento del calore interno.
4
Aprire il registro fumi spingendo il pomello posto sul lato destro del telaio; in questo modo si devierà
verso il camino il calore residuo ancora prodotto.
14.
FUNZIONAMENTO NEI PERIODI DI TRANSIZIONE
ATTENZIONE: Per nessuna ragione si dovrà accendere il fuoco prima che l’impianto non sia stato
completamente riempito d’acqua; il farlo comporterebbe un danneggiamento
gravissimo a tutta la struttura. L’impianto va tenuto costantemente pieno d’acqua anche
nei periodi in cui non è richiesto l’uso della termocucina. Durante il periodo invernale
un’eventuale non attività va affrontata con l’aggiunta di sostanze antigelo.
Durante il periodo di transizione, ovvero quando le temperature esterne sono più elevate ,in caso di
improvviso aumento della temperatura si possono avere dei disturbi alla canna fumaria che fanno si che i
gas combusti non vengono aspirati completamente. I gas di scarico non fuoriescono più completamente
(odore intenso di gas).
In tal caso scuotete più frequentemente la griglia e aumentate l’aria per la combustione. Caricate in seguito
una quantità ridotta di combustibile facendo sì che questo bruci più rapidamente ( con sviluppo di fiamme )
e si stabilizzi così il tiraggio della canna fumaria. Controllate quindi che tutte le aperture per la pulizia e i
collegamenti al camino siano ermetici.
Istruzioni per l’installazione, l’uso e la manutenzione – IT – Rev.07
17
Termocucina – TERMOSUPREMA Compact
14.1.
UTILIZZO COME NORMALE CUCINA.
ATTENZIONE: Per nessuna ragione si deve accendere il fuoco se prima l’impianto non sia stato
completamente riempito d’acqua; il farlo comporterebbe un danneggiamento
gravissimo di tutta la struttura.
Volendo utilizzare la termocucina solamente per la cottura dei cibi ad esempio durante il periodo estivo
bisognerà alzare al massimo la griglia mobile in modo da escludere il più possibile le superfici di scambio
in grado di cedere calore all’acqua ;il registro fumi andrà tenuto aperto in modo da favorire la fuoriuscita dei
fumi caldi dopo aver scaldato la piastra in ghisa.
Onde evitare l’ebollizione dell’acqua nella caldaia, quando la termocucina è in funzione, la pompa di
circolazione dovrà essere in funzione per poter smaltire sui radiatori il calore ceduto all’acqua dalla caldaia.
15.
MANUTENZIONE E CURA
Fate controllare dal Vostro spazzacamino responsabile di zona la regolare installazione della termocucina,
il collegamento al camino e l’aerazione.
Per la pulizia delle parti smaltate usare acqua saponata o detergenti non abrasivi o chimicamente
aggressivi.
Qualora i componenti cromati dovessero diventare azzurrognoli a causa di un surriscaldamento, ciò può
essere risolto con un adeguato prodotto per la pulizia.
IMPORTANTE: si possono usare esclusivamente parti di ricambio espressamente autorizzate ed offerte da
La Nordica. In caso di bisogno Vi preghiamo di rivolgerVi al Vs rivenditore specializzato.
L’ APPARECCHIO NON PUÒ ESSERE MODIFICATO!
15.1.
PULIZIA CANNA FUMARIA
La corretta procedura di accensione, l’utilizzo di quantità e tipi di combustibili idonei, il corretto
posizionamento del registro dell’aria secondaria, il sufficiente tiraggio del camino e la presenza d’aria
comburente sono indispensabili per il funzionamento ottimale dell’apparecchio. Almeno una volta l’anno è
consigliabile eseguire una pulizia completa, o qualora sia necessario (problemi di malfunzionamento con
scarsa resa). Questa operazione, fatta esclusivamente a
cucina fredda, dovrebbe essere svolta da uno
spazzacamino che contemporaneamente può effettuare
un’ispezione.
Il vano di raccolta dei fumi può essere pulito attraverso lo
sportello posto sotto il forno (dopo aver tolto le due viti che
fissano lo stesso alla facciata della cucina Figura 9), oppure
dall’alto.
A tale scopo rimuovete i cerchi della piastra di cottura e
smontate il tubo-fumi dal tronchetto di scarico. La pulizia può
essere effettuata con l’aiuto di una spazzola e di un aspiratore.
Fate attenzione che dopo la pulizia tutte le parti smontate
vengano reinstallate in modo ermetico.
15.2.
Figura 9
PULIZIA VETRO
Tramite uno specifico ingresso dell’aria secondaria la formazione di deposito di sporco, sul vetro della
porta, viene efficacemente rallentata. Non può comunque mai essere evitata con l’utilizzo dei combustibili
solidi (es. legna umida ) e questo non è da considerarsi come un difetto dell’apparecchio .
IMPORTANTE: la pulizia del vetro panoramico deve essere eseguita solo ed esclusivamente a
termocucina fredda per evitarne l’esplosione. Non usare comunque panni, prodotti
abrasivi o chimicamente aggressivi.
ROTTURA DEI VETRI: i vetri essendo in vetroceramica resistenti fino ad uno sbalzo termico di
750°C, non sono soggetti a shock termici. La loro r ottura può essere causata solo da shock
meccanici (urti o chiusura violenta della porta ecc.). Pertanto la sostituzione non è in garanzia .
18
Istruzioni per l’installazione, l’uso e la manutenzione – IT – Rev.07
Termocucina – TERMOSUPREMA Compact
15.3.
PULIZIA CASSETTO CENERE
Tutte le termocucine LA NORDICA hanno una griglia focolare ed un
cassetto per la raccolta della ceneri. Vi consigliamo di svuotare
periodicamente il cassetto dalla cenere e di evitarne il riempimento
totale, per non surriscaldare la griglia. Inoltre Vi consigliamo di lasciare
sempre 3-4 cm di cenere nel focolare.
ATTENZIONE: le ceneri tolte dal focolare vanno riposte in un
recipiente di materiale ignifugo dotato di un coperchio
stagno. Il recipiente va posto su di un pavimento
ignifugo, lontano da materiali infiammabili fino allo
spegnimento e raffreddamento completo delle ceneri.
IMPORTANTE: se per un qualsiasi motivo viene tolta la griglia dal
focolare, nel riporla è IMPORTANTE che la parte piana con i passaggi
della cenere più stretti sia rivolta verso l’alto, al contrario risulta
difficoltoso rimuovere le ceneri dalla griglia.
(vedi Figura 10).
15.4.
Figura 10
MANUTENZIONE DELL’IMPIANTO IDRAULICO
Ad impianto spento, una volta all’anno, eseguire le seguenti verifiche:
•
•
•
16.
controllare la funzionalità e l’efficienza delle valvole di scarico termico e di sicurezza. Qualora
queste fossero difettose contattare l’installatore autorizzato. E’ TASSATIVAMENTE VIETATO LA
RIMOZIONE O MANOMISSIONE DI TALI SICUREZZE.
Verificare l’isolamento termico del tubo di riempimento e del tubo di sicurezza.
Accertarsi che l’impianto sia carico ed in pressione, controllare il livello dell’acqua all’interno del
vaso di espansione, e verificarne la funzionalità assicurandosi anche dell’efficienza del tubo di
sicurezza.
FERMO ESTIVO
ATTENZIONE : L’impianto va tenuto costantemente pieno d’acqua anche nei periodi in cui non è richiesto
l’uso della termocucina. Durante il periodo invernale un’eventuale non attività va affrontata
con l’aggiunta di sostanze antigelo.
Dopo aver effettuato la pulizia del focolare, del camino e della canna fumaria, provvedendo all’eliminazione
totale della cenere ed altri eventuali residui, chiudere tutte le porte del focolare ed i relativi registri e
sconnettere l’apparecchio dal camino.
Consigliamo di effettuare l’operazione di pulizia della canna fumaria almeno una volta all’anno; verificare
nel frattempo l’effettivo stato delle guarnizioni che, se non perfettamente integre, non garantiscono il buon
funzionamento dell’apparecchio! In tal caso è necessaria la sostituzione delle stesse.
Proteggere le parti in ghisa, se si vuole mantenere inalterato nel tempo l’aspetto estetico, con della
vaselina neutra.
17. COLLEGAMENTO ALLA CANNA FUMARIA DI UN CAMINETTO O
FOCOLARE APERTO
Il canale fumi è il tratto di tubo che collega il termoprodotto alla canna fumaria, nel collegamento devono
essere rispettati questi semplici ma importantissimi principi:
•
•
•
per nessuna ragione si dovrà usare il canale fumo avente un diametro inferiore a quello del
collarino di uscita di cui è dotato il termoprodotto;
ogni metro di percorso orizzontale del canale fumo provoca una sensibile perdita di carico che
dovrà eventualmente essere compensata con un innalzamento della canna fumaria;
il tratto orizzontale non dovrà comunque mai superare i 2m (UNI 10683-2005);
Istruzioni per l’installazione, l’uso e la manutenzione – IT – Rev.07
19
Termocucina – TERMOSUPREMA Compact
•
•
ogni curva del canale fumi riduce sensibilmente il tiraggio della canna fumaria che dovrà essere
eventualmente compensata innalzandola adeguatamente;
la Normativa UNI 10683-2005 – ITALIA prevede che le curve o variazioni di direzione non devono
in nessun caso essere superiori a 2 compresa l’immissione in canna fumaria.
Volendo usare la canna fumaria di un caminetto o focolare aperto, sarà necessario chiudere
ermeticamente la cappa al di sotto del punto di imbocco del canale fumo pos.A Figura 11.
Se poi la canna fumaria è troppo grande (p.e. cm 30x40 oppure 40x50) è necessario intubarla con un tubo
di acciaio inox di almeno 200mm di diametro, pos.B, avendo cura di chiudere bene lo spazio rimanente fra
il tubo stesso e la canna fumaria immediatamente sotto al comignolo pos. C.
C - Tamponamento
B
A - Chiusura ermetica
Sportello di
ispezione
Figura 11
Per qualsiasi ulteriore chiarimento Vi preghiamo di rivolgerVi al Vs. rivenditore di fiducia!
20
Istruzioni per l’installazione, l’uso e la manutenzione – IT – Rev.07
Thermocooker – TERMOSUPREMA Compact
Definition: thermocooker in accordance with EN 12815
1. TECHNICAL DATA
TERMOSUPREMA COMPACT
Overall thermal power in kW
24.1
Useful thermal power in kW
18.5
Output power to liquid (H2O) in kW
12
Output power to room in kW
6.5
Hourly wood consumption in kg / h (wood with 20% humidity)
5.2
Yield
77.5
CO measured at 13% oxygen in %
0.280
Flue gas exhaust pipe diameter in mm
160 S/P
5m – 220x220 Ø220 ∗
Flue diameter in mm
Water contained in the boiler in litres
25
Chimney pressure in mm H2O
1,7
Delivery and return connector diameter (nominal bore)
1¼”F
External air intake section Ø in mm
200
Exhaust gas emission in g/s – wood
26.84
Exhaust gas temperature in °C - wood
Optimum working temperature in °C
186
70 ÷ 75
Max. operating pressure in bar
Furnace opening dimensions mm (L x H)
1.5
233 x 193
Furnace body / furnace headpiece dimensions in mm (L x H x D)
257 x 395 x 407
Oven dimensions in mm (L x H x D)
307 x 418 x 430
Type of grill
Movable - flat
Thermocooker height in mm
881
Thermocooker width in mm
982
Thermocooker depth (with handles) in mm
682
Weight in Kg
280
Fire prevention safety distances
Chapter 4
∗ 200 mm diameter can be used with flue of no less than 6 m
The heating volume of the cookers in accordance with EN 12815, for buildings whose thermal insulation
does not correspond to the provisions regarding heat protection, is:
(30 Kcal/h x m3) - favourable type of building:
(40 Kcal/h x m3) -less favourable type of building:
(50 Kcal/h x m3) - unfavourable type of building:
530 m³
400 m³
320 m³
With thermal insulation in accordance with the regulations regarding energy saving, the heated volume is
greater. With temporary heating, in the event of interruptions which last more than 8 hours, the heating
capacity is reduced by about 25%.
IMPORTANT: The power of the connected heating system must be proportional to the power
transferred to the water by the thermocooker; a charge which is too low does not
allow regular oven operation, while a charge which is too high prevents adequate
radiator heating.
Instructions for installation, use and maintenance – EN – Rev.07
21
Thermocooker – TERMOSUPREMA Compact
2. TECHNICAL DESCRIPTION
La Nordica thermocookers are suitable for heating living spaces equipped with a central heating system
made up of radiators or convectors completely or partially replacing the traditional gas or diesel boiler.
These are ideal for holiday flats and weekend houses or as auxiliary heating all year round.
Wooden logs are used as fuel.
The thermocooker is composed of galvanised steel sheet plates, enamelled cast iron and thermoradiant
ceramic. The furnace is found inside the boiler made with 4 mm thick steel and reinforced with welded
nails. The water from the heating system, which absorbs the heat produced in the furnace, circulates in the
boiler. Inside the furnace, there is a height-adjustable flat grill.
The furnace is equipped with a panoramic door with ceramic glass (resistant up to 700°C). This allows a
fascinating view of the burning flames. In addition, in this way there is no possibility of sparks or smoke
escaping.
The heating of the room takes place:
a) by means of radiation: through the panoramic glass and the hot external surfaces of the stove, heat
is radiated into the room.
b) through radiators or convectors in the central heating system fed by the hot water produced by the
Thermocooker itself.
The thermocooker is supplied with registers for primary and secondary air and a thermostat with which the
combustion air is regulated.
E
E
D
D
B
Oven
Temperature
A
-
+
H2O
Temperature
C
Picture 1
PRIMARY Air Register (lower knob on the furnace door Picture 1 pos. A).
With the lower register, the passage of primary air in the lower part of the cooker is regulated through the
ash drawer and the grill in the direction of the fuel. The primary air is necessary for the combustion
process. The ash drawer must be emptied regularly, so that the ash cannot block the primary air intake for
combustion. The primary air also keeps the flame alive.
The primary air register must be open a little during wood combustion, as otherwise the wood burns too
quickly and the thermocooker may overheat.
SECONDARY Air Register (upper knob on the furnace door Picture 1 pos. B).
This knob must be open (i.e. turned completely to the right), in particular for the combustion of wood (see
paragraph 10). The secondary air, passing between the double glass of the fire door, heats up and triggers
the dual combustion, keeping the glass clean at the same time (register open).
22
Instructions for installation, use and maintenance – EN – Rev.07
Thermocooker – TERMOSUPREMA Compact
AUTOMATIC Thermostat (placed in the upper right-hand part of the back Picture 1 pos. C)
The thermostat has the task of automatically increasing or decreasing combustion.
Dependent on the position chosen, the thermostat will act on the valve which regulates the intake of air into
the furnace, placed on the back of the cooker. Turn it in a clockwise direction from 0 to 5 to make up the
fire and in an anti-clockwise direction to reduce combustion. As this is an extremely precise device, it is
advisable to turn it carefully and never force the knob.
FLUE GAS Register (Picture 1 Pos.D)
(Conversion from the cooker HOTPLATE USE – OVEN USE function to the cooker HEATING function)
In the central part of the instrument panel, there is the flue gas register, which can be recognised from its
enamelled, labelled knob.
When the register is positioned to the LEFT (on the pan symbol), the combustion gases flow above and
around the oven (oven function – HOTPLATE USE – OVEN USE); when positioned to the RIGHT (on the
water symbol), the gases flow near the boiler, increasing the temperature evenly, favouring water heating
inside it (cooker function HEATING USE).
IGNITION Register (Picture 1 pos. E).
On the front of the cooker, between the protective handrail and the flue gas register, there is the ignition
register control lever, which can be recognised by a chrome-plated knob.
This register must only be used to facilitate the ignition of fuel in the cooker. Pull the lever outwards from
the cooker (register open).
IMPORTANT : during normal cooker operation, the register lever must remain completely inserted (pushed
inwards on the cooker). In this way avoiding excessive fuel consumption and poor
thermocooker output (register closed).
3. INSTALLATION REGULATIONS
Installation of the thermo stove and auxiliary equipment in relation to the heating system must comply with
all current Standards and Regulations and to those envisioned by the law.
Installation relating to the connections of the system, commissioning and the check of the correct
functioning must be carried out in compliance with the regulations in force by authorised professional
personnel with the requisites required by the law, being national, regional, provincial or town council
present in the country within which the appliance is installed, besides these present instructions.
Installation must be carried out by authorised personnel who must provide the buyer with a system
declaration of conformity certificate and will assume full responsibility for final installation and as a
consequence the correct functioning of the installed product.
NORDICA S.p.A. cannot be held responsible for lack of respect for such precautions.
Before installation, accurately wash the pipes of the system in order to remove any residuals that could
compromise the correct functioning of the appliance.
IMPORTANT:
a) In case of water leaking, close the water supply and promptly warn the after sales technical service;
b) The system working pressure must periodically be checked.
c) If not using the boiler for a long period of time, it is recommended that the after sales technical
service is contacted to carry out at least the following operations:
- close the water taps of both the thermal system and the domestic hot water system;
- empty the thermal system and the domestic hot water system if there is risk of freezing.
La Nordica S.p.a. declines all responsibility for damage to things and/or persons caused by the
system. In addition, it is not responsible for any product modified without authorisation and even
less for the use of non original spare parts.
Your local chimneysweep must be informed of the installation of the thermocooker, so that he can check its
correct connection to the flue and the level of efficiency of the flue itself.
NO MODIFICATIONS CAN BE CARRIED OUT TO THE APPLIANCE.
Before installation, check whether your floor can support the weight of the Thermocooker.
WARNING ensure the device is placed perfectly level and that the diameter of the smoke exhaust
pipe is that required.
Instructions for installation, use and maintenance – EN – Rev.07
23
Thermocooker – TERMOSUPREMA Compact
Connection of more that one stove to the same chimney is not allowed.
It is advisable to have your local chimneysweep check both the connection to the chimney and the
sufficient flow of air for combustion in the place of installation.
The diameter of the opening for connection to the chimney must at least correspond to the diameter of the
flue gas pipe. The opening must be equipped with a wall connection for the insertion of the exhaust pipe
and a rosette.
The unused flue gas exhaust stub pipe must be covered with its respective cap.
It is COMPULSORY that the thermo stove model TERMOSUPREMA COMPACT is installed in an OPEN
expansion VESSEL system.
It is COMPULSORY that the OPEN expansion VESSEL system is provided with:
1. OPEN EXPANSION VESSEL: with a capacity of 10% of the total water content of the thermocooker
and the system. This must be positioned at the highest point of the system, at least 2m above the
radiator placed at the highest level.
2. SAFETY PIPE : that connects by means of the shortest path without descending routes or siphoning
the flow of the thermo stove with the top part of the tank described in point 1. The safety pipe must
have the minimum gas section of 1’’.
3. LOAD PIPE : that connects the bottom of the tank of point1 with the system's return pipe.
It must have a minimum gas section of ¾’’.
All these elements must not, for any reason, have intercepting objects inserted, as these could
accidentally exclude them, and they must be placed in an area not subject to freezing, seeing that, if
they should freeze, the boiler frame could break or even explode.
In case of exposure to ice, it is opportune to add a sufficient quantity of anti-freeze to the water in the
system, enough to completely eliminate the problem.
In no way should water circulate in the small tank in-between the safety pipe and load pipe, seeing as
this oxidises of the water and consequently this quickly corrodes the thermo stove and system body.
4. HEAT DISCHARGE VALVE: permits an extra positive safety, capable of preventing boiling, even if
there is no electric power.
It consists of a valve, similar to a pressure safety valve, but differs, seeing that it opens once the precalibrated temperature (normally 94-95°C) is reache d. It discharges hot water from the system flow
pipe, and the water is replaced with the same quantity of cold water, supplied from the tank vessel
load pipe, this way reducing the excessive heat.
5. SAFETY VALVE FROM 1,5bar: maximum operation pressure allowed for the system is 1,5 bar
(equal to 15m of the water column). Higher pressures can cause deformation and breakage of the
boiler body.
6. SAFETY DEVICES envisioned by Regulations in vigour.
7. CIRCULATION PUMP : preferably fitted on the return pipes to avoid diffusion of extremely high
temperature water, however ensure that it does not make water circulate in the open vessel tank as
this would cause continuous oxidation of water which would quickly corrode the boiler body.
It must also be connected electronically so that it will only work when the water temperature reaches
65-70°C. To achieve this one can use the electronic control unit, available as an OPTIONAL with the
thermo stove, or by using a sleeve thermo switch fitted directly on the flow pipe and calibrated at 6570° C.
8. AUTOMATIC THERMOSTATIC MIXING VALVE - Picture 2
The automatic thermostatic mixer valve finds applications in solid fuel heat generators as it prevents
cold water return in the exchanger.
Routes 1 and 3 are always open and, along with the pump installed on the return (R), the guarantee
water circulation inside the biomass boiler exchanger (CB).
24
Instructions for installation, use and maintenance – EN – Rev.07
Thermocooker – TERMOSUPREMA Compact
An elevated return temperature, allows efficiency improvement, reduces formation of smoke
condensation and prolongs the boiler life span.
Valves on the market have different calibrations. NORDICA advises use of model 55°c with 1"
hydraulic connections. Once the valve calibration temperature is reached, route 2 is opened and the
boiler water is goes to the system via the flow (M).
M
CB
3
55°
R
1
2
TERMOPRODOTTO
Picture 2
IMPORTANT lack of installation of the device voids the heat exchanger warranty.
IMPORTANT: temperature safety sensors must be in place on the machine at a distance no greater than
30 cm from the flow connection of the thermo-product.
Whenever the thermo products lack a device, those missing can be installed on the thermo product flow
pipe, within a distance no greater than 1m from the thermo product.
ATTENTION: For no reason should the fire be lit if the plant has not previously been completely
filled with water. Doing so would seriously damage the entire structure. Filling the
plant must be done via the load pipe direct to the open vessel tank, in a manner that avoids
an excessive pressure of the water network deforming the thermo stove boiler body. .
The plant must always be full of water even during periods when the thermo stove is not used. During
winter, an eventual period of rest must be met with the addition of antifreeze.
4. FIRE PREVENTION SAFETY
When installing the thermocooker, the following safety measures must be observed:
a) the minimum distance from structural elements and flammable and heat-sensitive objects (furniture,
wood coverings, fabrics etc.) must be 20 cm from the back and from both sides, in order to ensure
sufficient heat insulation (see Picture 3 A).
b) in front of the furnace door, in the radiation area, there must be no flammable or heat-sensitive
objects or material at a distance of less than 100 cm. This distance can be reduced to 40 cm where
a rear-ventilated, heat-resistant protection device is installed in front of the whole component to
protect. All the minimum safety distances are shown on the product data plate and lower
values must not be used.
c) if the thermocooker is installed on flooring made of flammable material, it is necessary to provide a
fireproof base, for example a steel platform (dimensions in accordance with regional regulations).
The base must extend at least 50 cm at the front and at least 30 cm at the sides, in addition to the
opening of the loading door (see Picture 3 B).
d) no flammable components (e.g. wall units) must be present above the thermocooker.
The thermocooker must always operate exclusively with the ash drawer inserted. The solid combustion
residues (ash) must be collected in a sealed, fire resistant container. The thermocooker must never be on
in the presence of gaseous emissions or vapours (for example glue for linoleum, petrol etc.). Never deposit
flammable materials near the thermocooker.
During combustion, thermal energy is released which leads to considerable heating of the surfaces, doors,
handles, controls, glass parts, the flue gas pipe and possibly the front part of the appliance. Avoid contact
with these elements unless using suitable protective clothing or accessories (heat resistant gloves, control
devices).
Instructions for installation, use and maintenance – EN – Rev.07
25
Thermocooker – TERMOSUPREMA Compact
Ensure children are aware of these dangers and keep them away from the furnace when it is on.
When using the wrong fuel or one which is too damp, due to deposits present in the flue, a flue fire is
possible.
Picture 3
A
B
4.1. IN A EMERGENCY
If there is a fire in the flue connection :
a) Close the loading door and the ash drawer door
b) Close the comburent air registers
c) Use carbon dioxide ( CO2 powder ) extinguishers to put out the fire
d) Request the immediate intervention of the Fire Brigade
Do not put out the fire with water.
When the flue stops burning, have it checked by a specialist to identify any cracks or permeable points.
5. FLUE
Essential requirements for correct appliance operation:
• the internal section must preferably be circular;
•
the appliance must be thermally insulated and impermeable and built with suitable materials which
are resistant to heat, combustion products and any condensation;
•
there must be no narrowing and vertical passages with deviations must not be greater than 45°;
•
if already used, it must be clean;
•
the technical data from the instruction manual must be respected;
If the flues are of a square or rectangular section, the internal edges must be rounded with a radius of not
less than 20 mm. For the rectangular section, the maximum ratio between the sides must be ≤ 1.5.
A section which is too small causes a reduction in draught. A minimum height of 4 m is advisable.
The following are forbidden and therefore jeopardise the correct operation of the appliance: asbestos
cement, galvanised steel, rough and porous internal surfaces. Picture 4 shows some example solutions.
26
Instructions for installation, use and maintenance – EN – Rev.07
Thermocooker – TERMOSUPREMA Compact
The minimum section must be 4 dm2 (for example
20x20cm) for appliances whose pipe dimensions are
less than 200mm, or 6.25dm2 (for example 25x25cm)
for appliances with a diameter of more than 200mm.
The draught created by your flue must be sufficient but
not excessive.
A section of the flue which is too large can present a
volume which is too large to heat and therefore cause
operating difficulties for the appliance; to avoid this, it is
necessary to intubate the appliance for its entire height. A
section which is too small causes a reduction in draught.
The flue must be suitably distanced from flammable
or combustible material using suitable insulation or
an air space.
It is forbidden to pass system piping or air ducts inside
the flue. It is also forbidden to create moveable or fixed
openings on the flue itself, for the connection of further
different appliances.
IMPORTANT: refer to chapter 17 CONNECTING A
FIREPLACE OR OPEN HEARTH TO
THE FLUE.
5.1. POSITION OF THE CHIMNEY POT
(1)
(2)
(3)
(4)
Max. A+1/2A
A+1/2A
A
(1) AISI 316 stainless steel flue with double
chamber insulated with material resistant at
400°C. 100% efficiency - excellent.
(2) Fireproof flue with double insulated chamber
and external covering in lightweight concrete.
100% efficiency - excellent.
(3) Traditional clay flue with square section and
air spaces. 80% efficiency - excellent.
(4) Avoid flues with an internal rectangular
section whose ratio is different from the
design.
Efficiency 40% - mediocre.
The flue draught depends on the suitability of the
chimney pot.
Picture 4
It is therefore essential that, if built in a handcrafted way,
the exit section is more than twice the internal section of
the flue.
As it must always go past the ridge of the roof, the chimney pot must ensure exhaust even in the presence
of wind. (Picture 5).
The chimney pot must meet the following requirements:
• have an internal section equivalent to that of the chimney.
• have a useful exit section of double the internal section of the flue.
• be built so as to prevent rain, snow or any foreign body entering the flue.
• be easy to inspect, for any maintenance and cleaning operations.
(1) Industrial chimney pot
with
prefabricated
components,
allowing
excellent
flue
gas
disposal.
(2) Handcrafted chimney
pot. The correct exit section
must be at least twice the
internal section of the flue,
ideally 2.5 times.
(3) Chimney pot for
steel flue with internal
flue gas deflector cone.
Picture 5
50 cm
(1) If there are flues which are side by side, one
chimney pot must surpass the other by at least 50
cm in order to avoid pressure transfers between the
flues themselves.
Picture 6
Instructions for installation, use and maintenance – EN – Rev.07
27
Thermocooker – TERMOSUPREMA Compact
2m
10 m
(1) The chimney pot must not have obstacles within 10 m such
as walls, slopes or trees. If this is not the case, raise the pot by
at least 1 m above the obstacle.
The chimney pot must surpass the roof ridge by at least 1 m.
1
m
Picture 7
>A
>
_A
0.5 m
min. H
(1)Ridge axis
α
(2)Roof
Picture 8
CHIMNEY POT DISTANCES AND POSITIONING: UNI 10683/98
Roof slope
Distance between ridge and
chimney
Minimum chimney height (measured from the
outlet)
α
A (m)
H (m)
< 1.85 m
0.50 m beyond the ridge
> 1.85 m
1.00 m from the roof
< 1.50 m
0.50 m beyond the ridge
> 1.50 m
1.30 m from the roof
< 1.30 m
0.50 m beyond the ridge
> 1.30 m
2.00 m from the roof
< 1.20 m
0.50 m beyond the ridge
> 1.20 m
2.60 m from the roof
15°
30°
45°
60°
6. CONNECTION TO THE CHIMNEY
Cookers with automatic door closing (type 1) must operate, for safety reasons, with the furnace door closed
(except during the fuel loading or ash removal phases).
Cookers with non-automatic door closing (type 2) must be connected to their own flue.
Operation with doors open is only allowed when supervised.
The connection pipe to the flue must be as short as possible, straight and watertight.
28
Instructions for installation, use and maintenance – EN – Rev.07
Thermocooker – TERMOSUPREMA Compact
Connection must be carried out with stable and robust pipes (we recommend a thickness of 2 mm) and be
hermetically secured to the flue. The internal diameter of the connection pipe must correspond to the
external diameter of the cooker flue gas exhaust stub pipe (DIN 1298).
CAUTION: if the connection passes particular compounds of flammable material, in the radius of 20cm
around the pipe, all flammable material must be replaced by fireproof, heat resistant materials.
For correct appliance operation, it is essential that sufficient air for combustion is introduced into the place
of installation (see paragraph 7).
IMPORTANT: the unused flue gas exhaust hole must be covered with its respective cap (See
chapter 19).
The chimney pressure (DRAUGHT) must be at least 17 Pascal (=1.7 mm water). The measurement must
always be carried out when the appliance is hot (nominal calorific power). When the pressure exceeds 20
Pascal (2 mm water), it is necessary to reduce it through the installation of an additional draught regulator
(butterfly valve) on the exhaust pipe or in the chimney.
7. AIR FLOW IN THE PLACE OF INSTALLATION DURING COMBUSTION
As the thermocookers draw their combustion air from the place of installation, it is essential that in the
place itself, a sufficient quantity of air is introduced. If windows and doors are airtight (e.g. built according to
energy saving criteria), it is possible that the fresh air intake is no longer guaranteed and this jeopardises
the draught of the appliance and your health and safety. It is therefore necessary to guarantee a supply of
fresh air through an external air inlet placed near the appliance or by placing piping for combustion air
which leads outside or to a nearby airy place, with the exception of the boiler room or garage
(FORBIDDEN).
The connection pipe must be smooth with a minimum diameter of 120 mm. It must have a minimum length
of 4 m and have no more than three bends. If it is directly connected to the outside, it must be equipped
with a suitable windbreak.
The intake of air for combustion in the place of installation must not be obstructed during operation by the
thermocooker. It is absolutely essential that in environments in which thermocookers are operated with a
natural chimney draught, as much air as is necessary for combustion is introduced, i.e. up to 25 m³/hour.
The natural recirculation of air must be guaranteed by some fixed openings to the outside. Their size is
established by regulations regarding the subject. Ask for information from a chimneysweep. The openings
must be protected with grills and must never be blocked up. An extractor hood (suction) installed in the
same room or in a neighbouring one causes a depression in the environment. This causes the leakage of
burnt gas (dense smoke, smell); it is therefore necessary to ensure a greater flow of fresh air.
The depression of an extractor hood can, in the worst case scenario, transform the flue of the
thermocooker into an external air inlet, resucking the flue gases into the environment with very
serious consequences for persons.
8. PERMITTED/FORBIDDEN FUELS
The permitted fuels are wooden logs. Only dry wooden logs must be used (water content max 20%). The
pieces of wood should have a length of about 30 cm and circumference of 15 - 18 cm max.
The wood used as fuel must have a humidity content lower than 20% which is obtained with a drying time
of at least one year (soft wood) or two years (hard wood) placing it in a dry, airy place (for example under
roofing). Damp wood makes lighting more difficult, as a greater quantity of energy is necessary to make the
water present evaporate. The humidity content also has the disadvantage, as the temperature goes down,
of causing the water to condense first in the furnace and then in the chimney. Fresh wood contains about
60% H2O, therefore it is not suitable for burning.
Among other things which cannot be burned: carbon residues, cuttings, bark waste and panels,
wood which is damp or treated with varnishes, plastic materials; in this case, the appliance
warranty is forfeited.
Instructions for installation, use and maintenance – EN – Rev.07
29
Thermocooker – TERMOSUPREMA Compact
Paper and cardboard must only be used for lighting. The combustion of rubbish is forbidden and would
also damage the thermocooker and the flue, causing damage to health and, due to the bad smell, causing
complaints from the neighbouring area.
Wood is not a long-lasting fuel and therefore it is not possible to use the thermocooker for continuous
heating during the night.
CAUTION: The continuous and prolonged used of wood which is particularly rich in aromatic oils
(e.g. Eucalyptus, Myrtle etc.) causes the sudden deterioration (flaking) of the cast iron
components present in the product.
Kg/m3
KWh/kg
20% humidity
Beech
750
40
Turkey oak
900
4.2
Elm
640
4.1
Poplar
470
4.1
Larch*
660
4.4
Norway spruce*
450
4.5
Scotch pine*
550
4.4
Type
* RESINOUS WOOD UNSUITABLE FOR THE THERMOCOOKER
9. IGNITION
WARNING: For no reason turn on the fire before the system has been completely filled with water;
doing so could cause serious damage to the entire structure.
IMPORTANT: during the first ignition, it is inevitable that an unpleasant smell is produced (due to the
drying of the adhesives in the sealing cord or the protective varnishes), which disappears
after a short use. The environment must nevertheless be well ventilated. On first ignition,
we recommend loading a reduced quantity of fuel and increasing the calorific power of the
appliance.
To carry out a correct first ignition of the products treated with varnishes for high temperatures, it is
necessary to know the following information:
•
•
•
•
•
the construction materials of the products in question are not homogeneous; in fact cast iron and steel
parts exist side by side.
the temperature to which the body of the product is subjected is not homogeneous: from zone to zone,
the temperatures recorded vary from 300 °C to 500 ° C;
during its life, the product is subjected to alternate cycles of ignition and switch-off during the same day
and to cycles of intense usage and complete rest as the seasons change;
the new thermocooker, before it can be defined as “tested”, must be subjected to various start up
cycles in order to allow all the materials and the varnish to complete the various elastic stresses;
in particular at the beginning, it is possible to notice the emission of smells which are typical of metals
subjected to great thermal stress and varnish which is still fresh. This varnish, despite being baked at
250°C for a few hours in the manufacturing process, must exceed the temperature of 350°C several
times and for a certain duration, before incorporating itself perfectly with the metal surfaces
It therefore becomes important to follow these small precautions in the ignition phase:
1. Make sure that there is significant air turnover in the place where the appliance is installed.
2. When lighting for the first few times, do not load the combustion chamber excessively (about half of
the quantity shown in the instruction manual) and keep the product lit for at least 6-10 hours
continuously, with the registers open less than shown in the instruction manual.
3. Repeat this operation at least 4-5 times, according to your availability.
30
Instructions for installation, use and maintenance – EN – Rev.07
Thermocooker – TERMOSUPREMA Compact
4. Subsequently load more (nevertheless following the descriptions in the instruction booklet regarding
the maximum load) and if possible, keep ignition periods long, at least in this initial phase, avoiding
short on-off cycles.
5. When lighting for the first few times, no object must be resting on the thermocooker and in particular
on enamelled surfaces. Enamelled surfaces must not be touched during heating.
6. Once the “testing” phase has passed, it is possible to use your product like you would a car engine,
avoiding abrupt heating with excessive loads.
To ignite the flame, it is advisable to use small panels of wood with paper or other means of ignition on the
market, excluding all liquid substances such as alcohol, petrol, oil etc.
Follow the instructions below:
• Open the ignition register to aid flue gas exhaust. Position the register as shown in chapter 2 pos.E
(any butterfly valve placed on the flue gas exhaust pipe must also be opened).
• Position the thermostat knob on position 5 (maximum opening).
• Open the primary air register (placed on the ash tray).
• After having started the fire with small pieces of wood and waited until it is well lit, adjust the
thermostat to the positions corresponding to the desired heat.
• Bring the flue gas register to the oven position, pulling the lever.
When the wood starts to burn, it is possible to load other fuel, close the primary air register and check
combustion using secondary air following the instructions in paragraph 10. During this phase, never leave
the cooker unsupervised.
CAUTION: when lighting for the first few times, it is possible to find consistent flue gas
condensation with slight leakage of water from the thermocooker; this is a
phenomenon which should disappear in a very short time. If it results as persistent, it
will be necessary to have the flue draught checked.
Never overload the thermocooker. Too much fuel and too much air for combustion can cause
overheating and therefore damage the thermocooker. The damage caused by overheating is not
covered by the warranty.
10. NORMAL OPERATION
WARNING: For no reason turn on the fire before the system has been completely filled with water;
doing so could cause serious damage to the entire structure.
The appliances with automatic door closing (type 1), must operate, for safety reasons, with the furnace
door closed (with the exception of the fuel loading phase or any ash removal).
Appliances with non-automatic door closing (type 2), must be connected to their own flue. Operation with
the door open is only allowed under supervision.
IMPORTANT: For safety reasons, the furnace door must only be open during the ignition phase and
for loading wood whilst during operation and periods of non-use it must remain
closed.
The nominal calorific power of the thermocooker is reached with a minimum draught (depression) of 17Pa
(=1.7 mm water).
It is therefore necessary to always use the thermocooker with the door closed to prevent the “forge” effect.
The thermocooker must never be overloaded. Too much fuel and too much air for combustion can
cause overheating and therefore damage the thermocooker. The damage caused by overheating is
not covered by the warranty.
The emission of heat from the furnace is adjusted with the registers placed on the front of the
thermocooker. These must be open according to calorific need. The best combustion (minimum emissions)
is reached when, loading wood, most air for combustion passes through the secondary air register.
IMPORTANT: during normal cooker operation, the register lever, Picture 1 pos. E must remain completely
inserted (pushed inwards on the cooker). In this way, excessive fuel consumption is avoided
(register closed).
Instructions for installation, use and maintenance – EN – Rev.07
31
Thermocooker – TERMOSUPREMA Compact
The register regulation necessary in order to obtain nominal calorific output is the following:
Fuel
Primary air
Secondary air
WOOD
CLOSED
Completely OPEN
The intensity of combustion and therefore the calorific output of your thermocooker are influenced by the
chimney. Good chimney draught requires less regulation of the quantity of combustion air, while insufficient
draught requires a larger quantity.
IMPORTANT: to check that combustion is taking place correctly, verify that the smoke which comes out of
the chimney is transparent. If it is white, it means that the thermocooker is not regulated
correctly or the wood is too wet; if, on the other hand, the smoke is grey or black, this means
that combustion is not complete (a greater quantity of secondary air is necessary).
11. OVEN USE
After having cleaned the furnace grill, load the fuel. Thanks to the supply of air for combustion, the oven
temperature can be influenced slightly. Sufficient chimney draught and very clean channels for the flow of
scorching flue gas around the oven are essential for a good cooking result. The flue gas register must be
completely drawn towards the front of the thermocooker.
The oven pan can be placed on various levels. Thick cakes and large roasts should be inserted at the
lowest level. Thin cakes and biscuits go on a medium level. The highest level can be used for heating or
browning.
The thermocooker is equipped with a cast iron furnace grill which can be removed using a specific handle.
The upper position optimises the use of the hotplate while the lower one optimises water and oven heating.
12. CORRECT USE FOR CENTRAL HEATING.
To get the best results when using the appliance for central heating, it is necessary to clarify some basic
concepts.
The system will only work very well when it arrives at full speed and the pump is always moving; only in
this condition, in fact, will the water coming from the system be hot enough to prevent condensation
phenomena inside the boiler body. If, on the other hand, the system is managed at a power which is too
low, the system will tend to operate in an intermittent way.
In practice, the pump will only operate for brief periods and only when the water exceeds 70°C but, ea ch
time the cold water which returns to the system brings the temperature under this limit, the pump stops,
waiting for it to return to 70° C.
During these pauses, the water in the radiators tends to cool down, in turn becoming cold in the boiler
when the pump is able to start again.
With this operating mode, the radiators will always be cold at the bottom and the lower part of the boiler
body will also remain almost cold, allowing the condensation of flue gases and acidic vapours which, in the
long term could cause corrosion.
To avoid this serious inconvenience, it will be necessary to regulate the combustion air so that the heat
generated is capable of keeping the pump operating constantly; only in this way will it be possible to heat
the radiators evenly, causing a return of hot water to the boiler which is enough to prevent condensation of
flue gases and consequent corrosion.
To obtain this result, it is necessary to regulate the primary air damper (Picture 1 pos.A) to 1/3 opening,
The secondary air (Picture 1 pos.B) completely open, while the thermostatic damper handle (Automatic
thermostat Picture 1 pos.C) must be regulated so that the temperature of the water in the boiler stabilises
at between 70 – 80 ° C operating as follows.
If, regulating the damper to position 3, the water temperature has still not stabilised allowing continuous
pump operation after a couple of hours operating, it is necessary to increase the opening, attempting to set
it to position 5.
32
Instructions for installation, use and maintenance – EN – Rev.07
Thermocooker – TERMOSUPREMA Compact
If, after a short while in position 5, the temperature reaches 80 – 85°C, it is advisable to regulate it to
position 4 as that would be excessive. If, on the other hand, it stabilises at between 70 – 80°C, this is the
correct position and should be left as such.
13. ELECTRICAL POWER SUPPLY FAILURE
In the event of an unexpected electrical power supply failure during normal system operation, it will be
necessary to carry out these simple manoeuvres to prevent the water in the boiler starting to boil as a
consequence of the lack of pump operation.
1
Raise the moveable furnace grill to the highest level in order to reduce the exchange surface exposed
to the heat of the flame.
2
Close the primary and secondary air registers in addition to turning the thermostat knob placed on the
right hand side at the back of the thermocooker to 0, in order to block the intake of comburent air
completely.
3
Open the oven door in order to favour the elimination of the internal heat.
4
Open the flue gas register by pushing the knob placed on the right hand side of the frame; in this way,
it will deviate the residual heat still produced towards the chimney.
14. OPERATION IN TRANSITION PERIODS
WARNING: For no reason turn on the fire before the system has been completely filled with water;
doing so could cause serious damage to the entire structure. The system should be kept
constantly full of water even in periods in which the use of the wood burning stove/cooker is
not required. During winter any non activity should involve the addition of anti- freeze.
During transition periods when the external temperatures are higher, if there is a sudden increase of
temperature it can happen that the combustion gases inside the flue cannot be completely sucked up.
The exhaust gases do not come out completely (intense smell of gas). In this case, shake the grating more
frequently and increase the air for the combustion. Then, load a reduced quantity of fuel in order to permit a
rapid burning (growing up of the flames) and the stabilization of the draught.
Then, check that all openings for the cleaning and the connections to the stack are air-tight.
14.1.NORMAL COOKER USE.
WARNING: For no reason turn on the fire before the system has been completely filled with water;
doing so could cause serious damage to the entire structure.
If the thermocooker is only to be used for cooking foods, for example during the summer period, it is
necessary to raise the moveable grill to the highest level in order to exclude as much as possible the
exchange surface capable of passing heat to the water; the flue gas register (Picture 1 pos.D) must be
completely positioned to the RIGHT in order to favour the exhaust of hot flue gases after having heated the
cast iron hotplate.
In order to prevent water boiling in the boiler, when the thermoheating stove is in function, the circulation
pump must be in function in order to dispose of the heat given to the boiler water on the radiators.
The system must be kept constantly full of water even in period when use of the thermoheating stove is not
requested. During the winter, inactivity must be faced with the addition of antifreeze.
15. MAINTENANCE AND CARE
Have a chimneysweep check the correct installation, connection to the chimney and aeration of
thermocooker.
When cleaning enamelled parts, use soapy water or detergents which are not abrasive or chemically
aggressive.
Should the chrome-plated components become bluish due to overheating, this can be resolved with a
suitable cleaning product.
IMPORTANT: only spare parts which have been expressly authorised and offered by La Nordica can be
used. If parts are required, please contact your specialised dealer.
THE APPLIANCE CANNOT BE MODIFIED!
Instructions for installation, use and maintenance – EN – Rev.07
33
Thermocooker – TERMOSUPREMA Compact
15.1.FLUE CLEANING
The correct ignition procedure, the use of suitable quantities and types of fuel, the correct positioning of the
secondary air register, sufficient chimney draught and the presence of comburent air are essential for
optimum appliance operation. At least once a year, or whenever it becomes necessary (malfunctioning
problems with insufficient output) it is advisable to carry out complete cleaning. This operation, carried
out exclusively when the cooker is cold, should be carried out by a chimneysweep who can carry
out an inspection at the same time.
During cleaning, it is necessary to remove the flue gas exhaust
stub pipe and the flue gas pipe.
The flue gas collection tank can be cleaned from the oven
(after having removed the two screws which secure the
extractable oven plate Picture 9), or from above.
For this purpose, remove the cooking plate rings and
disassemble the flue gas pipe from the exhaust stub pipe.
Cleaning can be carried out with the aid of a brush and a
vacuum cleaner.
Take care that, after cleaning, all the disassembled parts are
reinstalled in a hermetic way.
Picture 9
15.2.GLASS CLEANING
Through a specific secondary air inlet, the formation of deposits
of dirt, on the door glass, is effectively slowed down. It cannot, though, ever be avoided with the use of
solid fuels (e.g. damp wood) and this should not be considered a defect of the appliance.
IMPORTANT: the cleaning of the panoramic glass must only be carried out when the thermocooker
is cold, in order to prevent it exploding. Do not use cloths or products which are abrasive
or chemically aggressive.
GLASS BREAKAGE: as the glass parts are in ceramic glass, resistant up to a sudden thermal
change of 750°C, they are not subject to thermal sh ocks. Their breakage can only be caused by
mechanical shocks (knocks or violent door closing etc.). Therefore replacement is not covered by
the warranty.
15.3.ASH DRAWER CLEANING
All LA NORDICA thermocookers have a furnace grill and a drawer
for ash collection. It is advisable to empty the ash drawer
periodically and prevent it filling up completely, so as not to
overheat the grill. In addition, it is advisable to always leave 3-4 cm
of ash in the furnace.
CAUTION: the ash removed from the furnace must be replaced in
a recipient for fireproof material equipped with an
airtight cover. The recipient must be placed on
fireproof flooring, away from flammable materials
until the ash is completely out and cool.
IMPORTANT: if for whatever reason the grill is removed from the
furnace, take care to reassemble it with the wider
part of the slit facing downwards. This is to aid
furnace cleaning (Picture 10).
Picture 10
15.4.MAINTENANCE ON THE WATER SYSTEM
With the system switched off, once a year carry out the following checks:
• Check the operation and efficiency of the blowdown and safety valves. If they are defective, contact
your authorised installer. IT IS STRICTLY FORBIDDEN TO REMOVE OR TAMPER WITH THE
SAFETY DEVICES.
• Check the thermal insulation of the filling pipe and the safety pipe.
• Make sure that the system is filled and under pressure, checking the water level in the expansion
tank; also check that it is working properly and check the efficiency of the safety pipe.
34
Instructions for installation, use and maintenance – EN – Rev.07
Thermocooker – TERMOSUPREMA Compact
16. SUMMER SET ASIDE
WARNING: The system should be kept constantly full of water even in periods in which the use of the
wood burning stove/cooker is not required. During the winter, inactivity must be faced with the
addition of antifreeze.
After having cleaned the furnace, the chimney and the flue, ensuring total elimination of the ash and other
residues, close all the furnace doors and respective registers and disconnect the appliance from the
chimney.
It is advisable to carry out the flue cleaning operation at least once a year; in the meantime, check that the
seals are in good condition as, if not perfectly intact, they do not guarantee good appliance operation! In
this case, it is necessary to replace them.
If appearance is to be maintained over time, protect the cast iron parts with neutral Vaseline.
17. CONNECTING A FIREPLACE OR OPEN HEARTH TO THE FLUE
The flue gas channel is the stretch of piping which connects the thermoproduct to the flue. In the
connection, these simple but extremely important principles must be respected:
• under no circumstances use a flue gas channel with a diameter less that that of the exhaust clamp
with which the thermoproduct is equipped;
• each metre of the horizontal stretch of the flue gas channel causes a slight loss of head which must
be compensated if necessary by elevating the flue;
• the horizontal stretch must never exceed 2 m (UNI 10683-2005);
• each bend of the flue gas channel slightly reduces the flue draught which must be compensated if
necessary by elevating it suitably;
• The UNI 10683-2005 – ITALY regulation requires that under no circumstances must there be more
than 2 bends or variations in direction including the intake into the flue.
C - Plugging
B
A – Hermetic closure
Inspection
hatch
Picture 11
Instructions for installation, use and maintenance – EN – Rev.07
35
Thermocooker – TERMOSUPREMA Compact
If the user wishes to use the flue as a fireplace or open hearth, it is necessary to seal the hood below the
entrance point of the flue gas channel pos.A Picture 11.
If the flue is then too big (e.g. 30x40cm or 40x50cm), it is necessary to intubate it with a stainless steel tube
with a diameter of at least 200mm, pos.B, taking care to close the remaining spaces between the pipe itself
and the flue immediately under the chimney pot pos. C.
For any further clarifications, please contact your local dealer!
36
Instructions for installation, use and maintenance – EN – Rev.07
Heizungsherd – TERMOSUPREMA Compact
Definition: Heizungsherd gemäß EN 12815
1. TECHNISCHE DATEN
TERMOSUPREMA COMPACT
Gesamtwärmeleistung in kW
24.1
Nutzwärmeleistung in kW
18.5
Dem Wasser gelieferte Leistung in kW
12
Der Umgebung gelieferte Leistung in kW
6.5
Stündlicher Holzverbrauch in kg / h (Holz mit 20% Feuchtigkeit)
5.2
Wirkungsgrad in %
77.5
CO gemessen an 13% Sauerstoff in %
0.280
Durchmesser Rauchabzugsrohr in mm
160 S/P
5m – 220x220 Ø220 ∗
Durchmesser Rauchabzug in mm
Wasserinhalt im Kessel in l
25
Saugdruck am Schornstein in mm H2O
1,7
Durchmesser Zufuhr- und Rückführungsverbindungen in Zoll
1¼”F gas
Außenlufteintritt Ø in mm
200
Abgasemission in g/s – Holz
26.84
Abgastemperatur im Medium in °C - Holz
186
Optimale Betriebstemperatur in °C
70 ÷ 75
Arbeitstdruck in bar
1.5
Ausmaße Feuerraumöffnung in mm (LxH)
233 x 193
Ausmaße Feuerraumkörper / Feuerraumfront in mm (LxHxP)
257 x 395 x 407
Ausmaße Backofen in mm (L x H x T)
307 x 418 x 430
Rosttyp
beweglich - flach
Höhe Heizungsherd in mm
881
Breite Heizungsherd in mm
982
Tiefe Heizungsherd (mit Handgriffen) in mm
682
Gewicht in Kg
280
Sicherheitsabstände zur Brandverhütung
Kapitel 4
* Durchmesser 200 mm nutzbar mit Rauchabzug nicht unter 6 m
Das Heizvolumen der Herde gemäß EN 12815
Wärmeschutzbedingungen nicht entspricht, beträgt:
für
(30 Kcal/h x m3) - vorteilhafter Bautyp:
(40 Kcal/h x m3) - weniger vorteilhafter Bautyp:
(50 Kcal/h x m3) - unvorteilhafter Bautyp:
Gebäude,
deren Wärmeisolierung
den
530 m³
400 m³
320 m³
Bei einer Wärmeisolierung, die den Normen zur Energieersparnis entspricht, ist das Heizvolumen höher.
Bei zeitweiliger Heizung, im Falle von Unterbrechungen von mehr als 8 Stunden, verringert sich die
Heizkapazität um ca. 25%.
WICHTIG: Die Leistung der angeschlossenen Heizungsanlage muss der vom Heizungsherd an das
Wasser abgegebenen Leistung angepasst sein. Eine zu geringe Beschickung verhindert
den ordnungsgemäßen Betrieb des Ofens, während eine zu hohe Beschickung die
angemessene Erwärmung der Heizkörper verhindert.
Anleitung zur Installation, Benutzung und Wartung – DE – Rev.07
37
Heizungsherd – TERMOSUPREMA Compact
2. TECHNISCHE BESCHREIBUNG
Die Thermoküchen La Nordica sind besonders geeignet, Wohnbereiche mit zentralem Heizsystem zu
heizen, das aus Radiotoren oder Thermokonvektoren besteht, wodurch zur Gänze oder teilweise ein
herkömmlicher Gas- oder Heizölkessel ersetzt werden kann. Sie bieten sich für Ferienwohnungen und
Wochenendhäuser oder als Hilfsheizung das ganze Jahr hindurch an.
Als Brennstoff wird Stückholz verwendet.
Die Thermoküche besteht aus verzinkten Stahl-, emaillierten Gusseisen- und Keramikheizplatten. Der
Feuerraum befindet sich im Heizkessel, der aus 4 mm dickem Stahl gefertigt und mit Schweißnägeln
verstärkt ist. Im Heizkessel zirkuliert das Wasser der Heizanlage, das die vom Feuerraum produzierte
Wärme aufnimmt. Im Feuerraum befindet sich ein flaches, höhenverstellbares Gitter.
Der Feuerraum ist mit einer Sichttür mit Keramikglas (bis 700°C widerstandsfähig) versehen, durch die die
lodernden Flammen beobachtet werden können und wodurch jeglicher Austritt von Funken oder Rauch
verhindert wird.
Die Umgebungsheizung erfolgt:
a) Durch Strahlung: Über das Sichtfenster und die heißen Außenflächen des Ofens wird Wärme in die
Umgebung gestrahlt.
b) Über die Radiatoren oder Thermokonvektoren der Zentralanlage, die vom Warmwasser gespeist
werden, das wiederum von der Thermoküche selbst erzeugt wird.
Die Thermoküche ist mit Reglern für die Primär- und Sekundärluft und einem Thermostat ausgestattet, mit
denen die Verbrennungsluft reguliert wird.
E
E
D
D
B
Ofentemperatur
A
-
+
H2O
Temperatur
C
ABB. 1
Regler PRMÄRluft (unterer Knopf an der Feuerraumstür ABB. 1 Pos. A).
Mit dem unteren Regler wird der Durchfluss der Primärluft im Unterteil der Thermoküche über den
Aschenkasten und das Gitter zum Brennstoff geregelt. Die Primärluft dient dem Verbrennungsprozess. Der
Aschenkasten muss regelmäßig geleert werden, damit die Asche den Einlauf der Primärluft für die
Verbrennung nicht behindern kann. Dank der Primärluft wird auch das Feuer bewahrt.
Der Regler der Primärluft muss während der Holzverbrennung auf ganz niedrig geschaltet sein, da das
Holz sonst zu rasch verbrennt und die Thermoküche überhitzt werden kann.
Für die Kohlenverbrennung ist der Zulauf von Primärluft unerlässlich (siehe Paragraf 10).
Regler SEKUNDÄRluft (oberer Knopf an der Feuerraumstür ABB. 1 Pos. B).
Dieser Regler muss vor allem bei Holzverbrennung offen (also komplett nach rechts gedreht) sein (siehe
Paragraf 10). Die Sekundärluft erwärmt sich beim Durchgang durch das doppelte Glas der Feuerraumtür
und zündet die Doppelverbrennung, wodurch auch das Glas sauber gehalten wird (Regler offen).
38
Anleitung zur Installation, Benutzung und Wartung – DE – Rev.07
Heizungsherd – TERMOSUPREMA Compact
Automatischer THERMOSTAT (rechts oben an der Rückseite ABB. 1 Pos. C)
Der Thermostat hat die Funktion, automatisch die Verbrennung zu steigern oder zu verringern.
Je nach gewählter Position wirkt der Thermostat auf das Ventil an der Rückseite der Thermoküche, das
die Luftzufuhr in den Feuerraum reguliert. Im Uhrzeigersinn von 0 auf 5 drehen, um das Feuer zu schüren
und von 5 auf 0 gegen den Uhrzeigersinn drehen, um die Verbrennung zu reduzieren. Da es sich dabei um
ein hoch präzises Gerät handelt, wird empfohlen, den Knopf vorsichtig und niemals mit Gewalt drehen.
RAUCHregler (ABB. 1 Pos. D)
(Umwandlung von der Küchenfunktion -KOCHPLATTENVERWENDUNG - OFENVERWENDUNG zur
Küchenfunktion mit HEIZUNGsverwendung)
In der Mitte des Schaltbretts befindet sich der Rauchregler, der durch einen lackierten Kugelknopf
erkennbar und gekennzeichnet ist.
Wird der Regler nach LINKS (auf das Pfannensymbol) gestellt , fließen die Verbrennungsgase über und
um den Ofen (Küchenfunktion - KOCHPLATTENVERWENDUNG – OFENVERWENDUNG); wird hingegen
der Regler nach RECHTS (auf das Wassersymbol) gestellt, fließen die Gase zum Heizkessel und die
Temperatur wird gleichmäßig erhöht, wodurch das Wasser darin erwärmt wird (Küchenfunktion
HEIZUNGSVERWENDUNG).
ZÜNDUNGSregler (ABB. 1 Pos. E).
An der Vorderfront der Thermoküche zwischen dem Schutzhandlauf und dem Rauchregler befindet sich
der Steuerhebel des Zündungsreglers, der durch einen verchromten Kugelknopf erkennbar ist.
Dieser Regler darf nur verwendet werden, um die Zündung des Brennstoffs im Heizkessel zu fördern; den
Hebel nach außen ziehen (Regler offen).
WICHTIG : Bei Normalbetrieb der Küche muss der Reglerhebel ganz eingelegt (nach innen gedrückt)
sein, so werden ein übermäßiger Brennstoffverbrauch und eine reduzierte Leistung der
Thermoküche verhindert (Regler geschlossen).
3. INSTALLATIONSVORSCHRIFTEN
Die Installation des Ofens und der zur Heizungsherde gehörigen Zusatzausstattung muss sämtlichen
geltenden und vom Gesetz vorgesehenen Normen und Vorschriften entsprechen.
Die Installation, die entsprechenden Anschlüsse der Anlage, die Inbetriebnahme und die Überprüfung der
korrekten Funktion müssen von entsprechend geschultem, autorisierten Fachpersonal fachgerecht und
unter Einhaltung der national, regional und lokal geltenden Bestimmungen des Landes ausgeführt werden,
in welchem das Gerät zum Einsatz kommt. Ferner sind diese Anleitungen einzuhalten.
Die Installation muss von einem autorisierten Fachmann ausgeführt werden, der dem Käufer eine
Konformitätsbescheinigung der Anlage ausstellen muss und die komplette Verantwortung für die definitive
Installation und die daraus folgende reibungslose Funktion des installierten Produktes übernimmt.
Sollten diese Vorkehrungen nicht eingehalten werden, übernimmt die Gesellschaft La NORDICA S.p.A.
keinerlei Haftung.
Vor der Installation wird eine gründliche Reinigung sämtlicher Leitungen der Anlage empfohlen, um
eventuelle Rückstände zu entfernen, welche die Funktion des Gerätes beeinträchtigen könnten.
WICHTIG:
a) Im Fall eines Wasseraustritts die Wasserzufuhr sperren und umgehend den technischen
Kundendienst verständigen;
b) Der Betriebsdruck der Anlage muss regelmäßig kontrolliert werden.
c) Wird der Kessel für längere Zeit nicht verwendet, wird der Eingriff des technischen Kundendienstes
empfohlen, der zumindest folgende Tätigkeiten ausführen soll:
- die Wasserhähne sowohl an der Heizanlage als auch im Bereich der Wasserinstallation schließen;
- die Heizanlage und die Wasseranlage entleeren, wenn Frostgefahr besteht.
- .
La Nordica S.p.A. haftet nicht für Produkte, die ohne Genehmigung geändert wurden, und ebenso
wenig, wenn keine Originalersatzteile verwendet wurden.
Ihr gewohnter Bezirksschornsteinfeger ist von der Installation des Heizungsherds zu unterrichten, damit er
seinen ordnungsgemäßen Anschluss an den Rauchabzug und dessen Leistungsvermögen überprüfen
kann.
Anleitung zur Installation, Benutzung und Wartung – DE – Rev.07
39
Heizungsherd – TERMOSUPREMA Compact
DAS GERÄT DARF NICHT ABGEÄNDERT WERDEN!
Kontrollieren Sie bitte vor der Installation, ob Ihr Fußboden das Gewicht des Thermoofens
aushalten kann.
ACHTUNG: Vergewissern Sie sich danach, dass das Gerät völlig eben steht und den
Rauchrohrdurchmesser korrekt ist.
Der Anschluss mehrerer Öfen an denselben Schornstein ist nicht zulässig.
Wir raten Ihnen, von Ihrem gewohnten Bezirksschornsteinfeger sowohl den Anschluss an den Schornstein
als auch die ausreichende Verbrennungsluftzufuhr am Installationsort kontrollieren zu lassen.
Der Durchmesser der Öffnung für den Schornsteinanschluss muss mindestens dem Durchmesser des
Rauchrohrs entsprechen. Die Öffnung sollte mit einem Wandanschluss zum Einsetzen des Abzugsrohrs
und einer Scheibe ausgestattet sein.
Das nicht benutzte Rauchabzugsloch muss mit dem entsprechenden Verschluss abgedeckt werden.
Der Herd TERMOSUPREMA COMPACT muss VERPFLICHTEND in einer Anlage mit OFFENEM
Ausdehnungsgefäß installiert werden.
Die Anlage mit OFFENEM Ausdehnungsgefäß muss VERPFLICHTEND mit folgenden Elementen
ausgestattet sein:
1. OFFENES AUSDEHNUNGSGEFÄSS: Es hat ein Fassungsvermögen von 10 % des gesamten
Wasserinhalts des Heizungsherds und der Anlage. Es ist am höchsten Punkt der Anlage mindestens
2m über dem Heizkörper, der sich an der höchsten Stelle befindet, anzubringen.
2.
SICHERHEITSROHR : Es verbindet auf dem kürzesten Weg, ohne abfallende oder sifonierte
Abschnitte die Zufuhr des Heizungsherds mit dem oberen Teil des unter Punkt 1 beschriebenen
Gefäßes.
Das Sicherheitsrohr muss einen Querschnitt von mindestens 1’’ besitzen.
3.
ZUFUHRROHR : Es verbindet den Boden des unter Punkt 1 beschriebenen Gefäßes mit dem
Rückführungsrohr der Anlage. Der Querschnitt muss mindestens ¾’’ betragen.
Alle diese Elemente dürfen auf keinen Fall dazwischen liegende Auffangorgane aufweisen, die sie
versehentlich ausschließen können, und sind deshalb in frostgeschützten Räumen anzubringen. Falls
sie gefrieren sollten, könnte nämlich ein Bruch oder sogar die Explosion des Kesselkörpers eintreten.
Sollten sie Frost ausgesetzt sein, sollte dem Wasser der Anlage eine geeignete Menge
Froschutzmittel zugegeben werden, das es ermöglicht, das Problem vollständig zu beseitigen.
In keinem Fall darf Wasserumlauf in dem Gefäß zwischen dem Sicherheitsrohr und dem Zufuhrrohr
vorhanden sein, da dieser in sehr kurzer Zeit eine Sauerstoffanreicherung des Wassers und folglich
eine Korrosion des Körpers des Heizungsherds und der Anlage verursacht.
4.
WÄRMEABLASSVENTIL: Es stellt eine weitere positive Sicherheitsvorrichtung dar, um dem Sieden
auch bei Fehlen von elektrischer Energie vorzubeugen.
Es besteht aus einem Ventilkörper, der einem Drucksicherheitsventil gleicht, sich jedoch im
Unterschied zu diesem bei Erreichen einer voreingestellten Temperatur (gewöhnlich 94 – 95° C) öffnet
und von der Zufuhr der Anlage Wasser ablässt, das durch ebenso viel kaltes Wasser ersetzt wird.
Dieses kommt vom offenen Expansionsgefäß durch das Zufuhrrohr und beseitigt auf diese Weise die
übermäßige Wärme.
5.
SICHERHEITSVENTIL von 1.5 bar: Der zulässige maximale Betriebsdruck beträgt 1,5 bar gleich 15m
Wassersäule. Ein höherer Druck kann Deformierungen oder den Bruch des Kesselkörpers
verursachen.
6.
ANDERE SICHERHEITSVORRICHTUNGEN der gültigen Normen gemäß.
7. UMLAUFPUMPE : Sie sollte am besten an der Rückführung montiert sein, um zu vermeiden, dass sie
sich bei sehr hoher Wassertemperatur abschalten kann. Dabei ist jedoch sicherzustellen, dass sie das
Wasser nicht im offenen Expansionsgefäß umlaufen lässt, sonst würde dies eine ständige
Sauerstoffanreicherung des Wassers und folglich eine schnelle Korrosion des Kesselkörpers
verursachen.
40
Anleitung zur Installation, Benutzung und Wartung – DE – Rev.07
Heizungsherd – TERMOSUPREMA Compact
Sie muss außerdem elektrisch angeschlossen werden, um nur dann zu funktionieren, wenn die
Wassertemperatur 65-70° C überschreitet. Dazu kann die elektronische Steuerung verwendet werden,
die als EXTRAZUBEHÖR mit dem Heizungsherd lieferbar ist, oder aber ein unmittelbar an der Zufuhr
montierter und auf 65-70° C eingestellter Manschett enthermostat.
8. AUTOMATISCHES THERMOSTAT- MISCHVENTIL - ABB. 2
Das automatische Thermostat-Mischventil findet bei Wärmegeneratoren mit festen Brennstoffen
Anwendung, da es einen Rücklauf des kalten Wassers in den Wärmetauscher verhindert.
Die Abschnitte 1 und 3 sind immer offen und gewährleisten gemeinsam mit der am Rücklauf (R),
installierten Pumpe die Zirkulation des Wassers im Wärmetauscher des Biomasse-Kessels (CB).
Eine hohe Rücklauftemperatur ermöglicht einer Verbesserung der Effizienz, reduziert die Entstehung
von Kondensation durch Dampf und verlängert die Lebensdauer des Kessels.
Die handelsüblichen Ventile sind unterschiedlich tariert. Die Firma La NORDICA empfiehlt die
Verwendung des Modells 55°C mit Hydraulikanschlüsse n von 1”. Sobald die eingestellte Temperatur
des Ventils erreicht ist, wird der Abschnitt 2 geöffnet und das Wasser des Kessels führt über den
Vorlauf (M) zur Anlage.
WICHTIG: Wird diese
Wärmetauschers.
Vorrichtung nicht
installiert,
dann verfällt die
Garantie des
M
CB
3
55°
R
1
2
TERMOPRODOTTO
ABB. 2
WICHTIG: Die Sicherheitstemperaturfühler müssen an Bord der Maschine oder in einem Abstand von
höchstens 30 cm von der Zuleitung des Heizgerätes montiert werden.
Sollten die Heizgeräte nicht mit allen Vorrichtungen ausgestattet sein, kann man die fehlenden
Vorrichtungen an der Zuleitung der Heizgeräte in einem Abstand von höchstens 1 m von diesem
installieren.
ACHTUNG: Auf keinen Fall darf das Feuer angezündet werden, bevor die Anlage vollständig mit
Wasser gefüllt ist; dies würde zu einer sehr schweren Beschädigung der gesamten
Einrichtung führen. Das Füllen der Anlage ist durch das Zufuhrrohr direkt vom offenen
Expansionsgefäß vorzunehmen, um zu vermeiden, dass ein übermäßiger Druck des
Wassernetzes den Körper des Heizungsherds deformiert.
Die Anlage ist ständig voll Wasser zu halten, auch in den Zeiträumen, in denen die Benutzung des
Heizungsherds nicht erforderlich ist. In der Winterzeit ist eine eventuelle Außerbetriebsetzung durch
Hinfügen von Frostschutzmitteln anzugehen.
4. BRANDSCHUTZ
Bei der Installation des Heizungsherds sind folgende Sicherheitsmaßnahmen zu befolgen:
a) Der Mindestabstand von entflammbaren und wärmeempfindlichen Bauelementen und Gegenständen
(Möbel, Holzverkleidungen, Stoffe usw.) beträgt 20cm an der Rückseite und auf beiden Seiten, um
eine ausreichende Wärmeisolierung zu sichern (siehe ABB. 3 A).
b) Vor der Feuerraumtür, im Bereich ihrer Strahlung, dürfen in einem Abstand von weniger als 100 cm
keine entflammbaren oder wärmeempfindlichen Gegenstände oder Bauelemente vorhanden sein.
Dieser Abstand kann auf 40 cm verringert werden, falls vor dem gesamten zu schützenden Teil eine
Alle
hinten
belüftete
und
wärmebeständige
Schutzvorrichtung
montiert
wird.
Anleitung zur Installation, Benutzung und Wartung – DE – Rev.07
41
Heizungsherd – TERMOSUPREMA Compact
Mindestsicherheitsabstände sind auf dem Typenschild des Produkts angegeben und dürfen
nicht unterschritten werden.
c) Falls der Heizungsherd auf einem aus entflammbarem Material bestehenden Fußboden installiert wird,
ist ein feuerfester Unterbau vorzusehen, z.B. ein Stahlpodest (Ausmaße nach den regionalen
Bestimmungen). Der Unterbau muss vorn mindestens 50 cm und seitlich 30 cm über die Öffnung der
Einfülltür vorspringen (siehe ABB. 3 B).
d) Über dem Heizungsherd dürfen sich keine entflammbaren Teile (z.B. Hängeschränke) befinden.
Der Heizungsherd darf ausschließlich mit eingesetztem Aschekasten betrieben werden. Die festen
Verbrennungsrückstände (Asche) müssen in einem hermetischen und feuerfesten Behälter gesammelt
werden. Der Heizungsherd darf niemals bei Vorhandensein von Gas- oder Dampfemissionen (z.B.
Linoleumkleber, Benzin usw.) angezündet werden. Stellen Sie keine entflammbaren Materialien in die
Nähe des Heizungsherds.
Bei der Verbrennung wird Wärmeenergie freigesetzt, die eine erhebliche Erwärmung der Oberflächen,
Türen, Griffe, Bedienelemente und Glasscheiben, des Rauchrohrs und eventuell der Vorderseite des
Geräts mit sich bringt. Berühren Sie diese Elemente nicht ohne entsprechende Schutzkleidung oder
zusätzliche Utensilien (hitzefeste Handschuhe, Bedienungsgeräte).
A
ABB. 3
B
Machen Sie den Kindern diese Gefahren bewusst und halten Sie sie während des Betriebs vom
Herd fern.
Wenn falscher oder zu feuchter Brennstoff verwendet wird, könnte aufgrund von Ablagerungen im
Rauchabzug ein Kaminbrand entstehen.
4.1.
SOFORTIGES EINSCHREITEN
Wenn ein Brand im Anschluss oder im Rauchabzug eintritt:
a) Die Einfülltür und die Tür des Aschenkastens schließen.
b) Die Verbrennungsluftregler schließen.
c) Unter Verwendung von Kohlensäurelöschern (pulverförmiges CO2) den Brand löschen.
d) Sofort die Feuerwehr rufen.
Das Feuer nicht mit Wasserstrahl löschen.
Wenn der Rauchabzug aufhört zu brennen, diesen von einem Fachmann kontrollieren lassen, um
eventuelle Risse oder durchlässige Stellen festzustellen.
42
Anleitung zur Installation, Benutzung und Wartung – DE – Rev.07
Heizungsherd – TERMOSUPREMA Compact
5. RAUCHABZUG
Grundlegende Anforderungen für einen einwandfreien
Betrieb des Geräts:
• Der innere Querschnitt sollte vorzugsweise
kreisförmig sein.
• Er muss wärmeisoliert und wasserundurchlässig
und mit Materialien gebaut sein, die der Hitze, den
Verbrennungsprodukten
und
eventuellen
Kondensaten widerstehen.
• Er darf keine Verengungen aufweisen und muss
einen senkrechten Verlauf mit Abweichungen von
nicht mehr als 45° haben.
• Wenn er bereits benutzt wurde, muss er gereinigt
werden.
• Es
sind
die
technischen
Daten
der
Bedienungsanleitung zu beachten.
Sollten die Rauchabzüge einen quadratischen oder
rechteckigen Querschnitt besitzen, sind die Innenkanten mit
einem Radius von nicht weniger als 20 mm abzurunden.
Beim rechteckigen Querschnitt muss das maximale
Verhältnis zwischen den Seiten ≤ 1,5 betragen.
Ein zu kleiner Querschnitt führt zu einer Verringerung des
Zugs. Wir empfehlen eine Mindesthöhe von 4 m.
Verboten sind, da sie den ordnungsgemäßen Betrieb des
Geräts beieinträchtigen: Eternit, verzinkter Stahl, raue und
poröse
Innenflächen.
In
ABB.
4
sind
einige
Lösungsbeispiele wiedergegeben.
(1)
(2)
(3)
(4)
A+1/2A
Max.
A+1/2A
A
(1) Rauchabzug in Stahl AISI 316 mit zweifacher
Kammer, mit bis zu 400°C beständigem
Material isoliert. Wirkungsgrad 100% - sehr
gut.
(2) Rauchabzug in Schamottestein mit zweifacher
isolierter Kammer und Außenverkleidung in
Leichtbeton. Wirkungsgrad 100% - sehr gut.
(3) Traditioneller Rauchabzug in Ton mit
quadratischem Querschnitt mit Hohlräumen.
Wirkungsgrad 80% - sehr gut.
(4)
Vermeiden
Sie
Rauchabzüge
mit
rechteckigem Querschnitt, dessen Verhältnis
anders ist als in der Zeichnung.
Wirkungsgrad 40% - mittelmäßig.
Der Mindestquerschnitt muss 4 dm2 (z.B. 20x20cm) für
die Geräte mit einem Rohrleitungsdurchmesser von
weniger als 200mm, oder 6,25dm2 (z.B. 25x25cm) für
die Geräte mit einem Durchmesser von mehr als 200mm betragen.
ABB. 4
Der von Ihrem Rauchabzug geschaffene Zug muss ausreichend, darf aber nicht übermäßig sein.
Ein zu großer Querschnitt des Rauchabzugs kann ein zu großes Heizvolumen aufweisen und daher zu
Betriebsproblemen des Geräts führen: Um dies zu vermeiden, sollten Sie denselben über die gesamte
Höhe verrohren. Ein zu kleiner Querschnitt führt zu einer Verringerung des Zugs.
Der Rauchabzug muss durch geeignete Isolierung oder einen Luftzwischenraum von
entflammbaren oder brennbaren Materialien angemessen entfernt gehalten werden.
Es ist verboten, im Innern des Rauchabzugs Anlagenleitungsrohre oder Luftzufuhrkanäle durchgehen zu
lassen. Außerdem ist verboten, daran bewegliche oder feste Öffnungen zum Anschluss weiterer
verschiedener Geräte anzubringen (siehe Abschnitt 17).
5.1.
SCHORNSTEINPOSITION
Der Zug des Rauchabzugs hängt auch von der Eignung des Schornsteins ab.
Es ist unerlässlich, dass der Ausgangsquerschnitt eines handwerklich gebauten Schornsteins mehr als das
Zweifache des Innenquerschnitts des Rauchabzugs beträgt.
Der Schornstein muss immer den Dachfirst überragen und muss daher die Ableitung auch bei Wind
gewährleisten (ABB. 5).
Der Schornstein muss folgenden Anforderungen entsprechen:
• Der innere Querschnitt muss dem des Kamins entsprechen.
• Der Ausgangsnutzquerschnitt muss doppelt so groß wie der innere Querschnitt des Rauchabzugs
sein.
Anleitung zur Installation, Benutzung und Wartung – DE – Rev.07
43
Heizungsherd – TERMOSUPREMA Compact
•
•
Er muss so gebaut sein, dass er das Eindringen von Regen, Schnee und jeglichen Fremdkörpern in
den Rauchabzug verhindert.
Er muss leicht inspizierbar sein, um eventuelle Instandhaltungs- und Reinigungsverfahren zu
ermöglichen.
(2)
Handwerklicher
Schornstein. Der richtige
Ausgangsquerschnitt muss
mindestens das Zweifache,
idealerweise
das
Zweieinhalbfache
des
Innenquerschnitts
des
Rauchabzugs betragen.
(1)
Industrieller
Schornstein
mit
vorgefertigten
Elementen. Er gestattet
eine
optimale
Rauchableitung.
(3) Schornstein für
Schornsteinrohr aus Stahl
mit einer Kegelförmigen
Rauchumlenkplatte.
ABB. 5
(1) Im Falle nebeneinander liegender Rauchabzüge
muss ein Schornstein den anderen um mindestens
50 cm überragen, um eine Druckübertragung
zwischen den Rauchabzügen zu vermeiden.
50 cm
ABB. 6
2m
10 m
(1) Der Schornstein darf innerhalb von 10 m keine Hindernisse
durch Mauern, Dachflächen oder Bäume aufweisen.
Andernfalls muss er auf mindestens 1 m über dem Hindernis
erhöht werden.
Der Schornstein muss den Dachfirst um mindestens 1 m
überragen.
1
m
ABB. 7
>A
>
_A
1 - Firstachse
2 - Dach
0,5 m
H min.
(1)Asse colmo
α
(2)Tetto
ABB. 8
44
Anleitung zur Installation, Benutzung und Wartung – DE – Rev.07
Heizungsherd – TERMOSUPREMA Compact
SCHORNSTEINE - ABSTÄNDE UND POSITIONIERUNG UNI 10683/98
Dachschräge
Abstand zwischen First und
Schornstein
Mindesthöhe des Schornsteins (von der
Mündung aus gemessen)
α
A (m)
H (m)
< 1,85 m
0,50 m über dem First
> 1,85 m
1,00 m vom Dach
< 1,50 m
0,50 m über dem First
> 1,50 m
1,30 m vom Dach
< 1,30 m
0,50 m über dem First
> 1,30 m
2,00 m vom Dach
< 1,20 m
0,50 m über dem First
> 1,20 m
2,60 m vom Dach
15°
30°
45°
60°
6. ANSCHLUSS AN DEN SCHORNSTEIN
Bei Herden mit selbstschließenden Feuerraumtüren (Typ 1) ist ein Anschluss an einen bereits mit anderen
Öfen oder Feuerstätten belegten Schornstein möglich, sofern die Rauchfangbemessung gem. DIN 4705,
Teil 3, dem nicht widerspricht.
Aus Sicherheitsgründen müssen die Herde mit selbstschließender Tür - außer beim Nachfüllen von
Brennstoff und der eventuellen Entfernung der Asche - unbedingt mit geschlossenem Feuerraum betrieben
werden.
Die Geräte ohne automatische Türschließung (Typ 2) müssen an einen eigenen Rauchabzug
angeschlossen werden. Der Betrieb mit offener Tür ist nur unter Beaufsichtigung zulässig.
ACHTUNG: Falls die Verbindung an Einzelteilen vorbeigeht, die aus entflammbarem Material bestehen,
müssen im Umkreis von 20cm um die Rohre alle entflammbaren Materialen durch feuerfeste
und wärmebeständige Materialien ersetzt werden.
Für ein einwandfreies Funktionieren des Geräts ist es erforderlich, dass am Installationsort genügend
Verbrennungsluft zugeführt wird (siehe Abschnitt 7).
Der Heizungsherd ist mit einer oberen Rauchableitung ausgestattet. Das Verbindungsrohr zum Anschluss
an den Kamin muss so kurz wie möglich sein, und die Verbindungsstellen der einzelnen Rohre müssen
hermetisch sein. Der Anschluss an den Kamin muss mit stabilen und robusten Rohren (wir empfehlen eine
Stärke von 2 mm) erfolgen. Das Rauchabzugsrohr muss hermetisch am Kamin befestigt werden. Der
Innendurchmesser des Verbindungsrohrs muss dem Außendurchmesser des Rauchabzugsstutzens des
Heizungsherds entsprechen. Dies gewährleisten Rohre nach DIN 1298.
Der Unterdruck des Kamins (ZUG) muss mindestens 17 Pascal (=1,7 mm Wassersäule) betragen. Die
Messung muss immer bei warmem Gerät erfolgen (nominale Heizleistung). Wenn der Unterdruck 20
Pascal (2,0 mm Wassersäule) übersteigt, muss sie durch Installation eines zusätzlichen Zugreglers
(Drosselklappe) am Abzugsrohr oder im Kamin verringert werden.
7. LUFTZUSTROM
VERBRENNUNG
AM
INSTALLATIONSORT
WÄHREND
DER
Da die Heizungsherde ihre Verbrennungsluft aus dem Installationsraum erhalten, ist es notwendig, dass in
diesen Raum eine ausreichende Luftmenge zugeführt wird. Im Falle von hermetisch dichten Fenstern und
Türen (z.B. nach dem Kriterium der Energieersparnis gebaute Häuser) ist es möglich, dass der Eintritt von
Frischluft nicht mehr gesichert ist, was den Zug des Geräts, Ihr Wohlbefinden und Ihre Sicherheit
beeinträchtigt. Daher ist eine zusätzliche Frischluftzufuhr zu sichern, und zwar mithilfe eines
Anleitung zur Installation, Benutzung und Wartung – DE – Rev.07
45
Heizungsherd – TERMOSUPREMA Compact
Außenlufteintritts, der in der Nähe des Geräts anzubringen ist, oder durch eine Rohrleitung für die
Verbrennungsluft, die nach außen oder in einen nahen belüfteten Raum – mit Ausnahme eines
Kesselraums oder einer Garage (VERBOTEN) – führt.
Das Verbindungsrohr muss glatt sein und einen Mindestdurchmesser von 120 mm besitzen, es darf
höchstens 4 m lang sein und nicht mehr als drei Rohrbögen aufweisen. Falls es direkt nach außen führt,
muss es mit einem geeigneten Windbrecher ausgestattet sein.
Der Eintritt der Verbrennungsluft in den Installationsraum darf während des Betriebs des Heizungsherds
nicht verstopft sein. Es ist unbedingt notwendig, dass in die Räume, in denen Heizungsherde mit
natürlichem Kaminzug betrieben werden, so viel Luft zugeführt wird wie für die Verbrennung erforderlich
ist, d.h. bis zu 25 m³/h. Die natürliche Luftzirkulation muss durch einige feste Öffnungen nach außen
gesichert sein, deren Größe von den diesbezüglich geltenden Bestimmungen festgelegt wird. Bitten Sie
den Schornsteinfeger Ihres Vertrauens um Informationen. Die Öffnungen müssen durch Gitter geschützt
sein und dürfen niemals verstopft sein. Eine in demselben oder in einem angrenzenden Raum installierte
Abzugshaube verursacht einen Unterdruck im Raum. Dieser führt zum Austritt von Verbrennungsgasen
(dichter Rauch, Geruch), daher muss eine größere Frischluftzufuhr gesichert werden.
Der Unterdruck einer Abzugshaube kann im schlimmsten Fall den Rauchabzug des Heizungsherds
in einen Außenlufteintritt verwandeln und die Rauchgase in den Raum saugen, was schwerste
Folgen für die Personen haben kann.
8. ZULÄSSIGE / UNZULÄSSIGE BRENNSTOFFE
Als Brennstoff sind Holzscheite zulässig. Es dürfen ausschließlich trockene Holzscheite (Wassergehalt
max. 20%) verwendet werden. Die Holzscheite sollten eine Länge von ca. 30 cm und einen Umfang von
max. 15 - 18 cm haben.
Das als Brennstoff verwandte Holz muss einen Feuchtigkeitsgehalt von weniger als 20% haben, was mit
einer Trockenzeit von mindestens einem Jahr (Weichholz) oder von zwei Jahren (Hartholz) erzielt wird,
indem man es an einem trockenen und belüfteten Ort lagert (z.B. unter einem Schutzdach). Feuchtes Holz
macht das Anzünden schwieriger, da eine größere Energiemenge erforderlich ist, um das vorhandene
Wasser verdunsten zu lassen. Der Feuchtigkeitsgehalt hat außerdem den Nachteil, bei Absinken der
Temperatur das Wasser zuerst im Feuerraum und danach im Kamin kondensieren zu lassen. Frisches
Holz enthält ca. 60% H2O, daher ist es nicht zum Verbrennen geeignet.
Unter Anderem dürfen nicht verbrannt werden: Kohlenreste, Abschnitte, Rindenabfälle und Bretter,
feuchtes oder mit Lacken behandeltes Holz, Kunststoffmaterial. In diesem Fall verfällt die Garantie
auf das Gerät.
GEWÖHNLICHES BRENNHOLZ
Kg/m³
KWh/kg
Feuchtigkeit 20%
Buche
750
4,0
Zerreiche
900
4,2
Ulme
640
4,1
Pappel
470
4,1
Lärche*
660
4,4
Fichte*
Föhre*
450
550
4,5
4,4
Art
* HARZIGE HÖLZER, WENIG GEEIGNET FÜR DEN HEIZUNGSHERD
46
Anleitung zur Installation, Benutzung und Wartung – DE – Rev.07
Heizungsherd – TERMOSUPREMA Compact
Papier und Pappe dürfen nur zum Anzünden verwendet werden. Die Verbrennung von Abfällen ist
verboten. Sie würde außerdem den Heizungsherd und den Rauchabzug beschädigen sowie zu
Gesundheitsschäden und aufgrund der Geruchsbelästigung zu Beschwerden seitens der Nachbarschaft
führen.
Holz ist kein Brennstoff von langer Dauer, daher ist eine ständige Erwärmung des Heizungsherds in der
Nacht nicht möglich.
ACHTUNG: Die ständige lange Verwendung von Hölzern, die besonders reich an ätherischen Ölen
sind (z.B. Eukalyptus, Myrte usw.), führt zu einer plötzlichen Beschädigung (Abblättern)
der am Produkt vorhandenen Gusseisenteile.
9. ANZÜNDEN
ACHTUNG: Auf keinen Fall darf das Feuer angezündet werden, bevor die Anlage vollständig mit
Wasser gefüllt ist; dies würde zu einer sehr schweren Beschädigung der gesamten
Einrichtung führen.
WICHTIG: Beim ersten Anzünden ist es unvermeidlich, dass ein unangenehmer Geruch (durch das
Austrocknen der Kleber am Dichtungsring oder der Schutzlacke) erzeugt wird, der jedoch nach
kurzem Gebrauch verschwindet. In jedem Fall ist eine gute Belüftung des Raums zu
sichern. Beim ersten Anzünden raten wir Ihnen, eine geringe Brennstoffmenge einzufüllen und
die Heizleistung des Geräts langsam zu steigern.
Zur richtigen Durchführung des ersten Anzündens der Produkte, die mit für Hochtemperaturen geeigneten
Lacken behandelt sind, ist Folgendes wissenswert:
•
•
•
•
•
Die Baumaterialen der besagten Produkte sind nicht homogen, sondern bestehen in Teilen aus
Gusseisen und aus Stahl.
Die Temperatur, der der Körper des Produkts ausgesetzt ist, ist nicht gleichmäßig: Von Bereich zu
Bereich sind Temperaturen festzustellen, die von 300 °C bis zu 500 °C variieren.
In seinem Leben ist das Produkt abwechselnd Zyklen des Anzündens und des Ausgehens im Verlauf
eines Tags und Zyklen intensiven Gebrauchs oder absoluter Ruhe im Wechsel der Jahreszeiten
ausgesetzt.
Der neue Heizungsherd muss, bis er als eingelaufen gelten kann, diversen Inbetriebsetzungszyklen
unterzogen werden, damit alle Materialien und der Lack die verschiedenen elastischen Spannungen
vervollständigen können.
Insbesondere am Anfang kann eine Geruchsemission, die für großer thermischer Beanspruchung
ausgesetzte Metalle typisch ist, und der Geruch nach noch frischem Lack bemerkt werden. Obwohl
dieser Lack bei der Herstellung einige Stunden lang bei 250°C gebrannt wird, muss er mehrmals und
eine gewisse Zeit lang eine Temperatur von 350°C üb erschreiten, bis er von den metallenen
Oberflächen perfekt aufgenommen ist.
Beim Anzünden sind daher folgende Hinweise zu befolgen:
1. Vergewissern Sie sich, dass in dem Raum, in dem das Gerät installiert ist ein starker Luftwechsel
gesichert ist.
2. Bei den ersten Malen des Anzündens die Verbrennungskammer nicht übermäßig füllen (etwa die
Hälfte der in der Bedienungsanleitung angegebenen Menge), den Heizungsherd mindestens 6-10
Stunden ständig angezündet lassen und dabei die Regler weniger öffnen als in der
Bedienungsanleitung angegeben.
3. Dieses Verfahren je nach Ihren Möglichkeiten mindestens 4-5 oder mehr Mal wiederholen.
4. Danach immer mehr Brennstoff einfüllen (wobei in jedem Fall die Angaben der Bedienungsanleitung
hinsichtlich der Höchstladung zu beachten sind) und die Anzündzeiten möglichst lang halten.
Zumindest in dieser Anfangszeit sollten Sie vermeiden, den Herd mehrmals für kurze Zeit anzuzünden
und wieder ausgehen zu lassen.
5. Bei den ersten Malen des Anzündens sollte kein Gegenstand auf den Heizungsherd und insbesondere
auf die lackierten Oberflächen gestellt werden. Die lackierten Oberflächen dürfen während der
Heizphase nicht berührt werden.
6. Nach der „Einlaufzeit“ können Sie Ihren Heizungsherd wie einen Automotor benutzen, indem Sie
plötzliches starkes Erhitzen mit übermäßiger Beschickung vermeiden.
Anleitung zur Installation, Benutzung und Wartung – DE – Rev.07
47
Heizungsherd – TERMOSUPREMA Compact
Zum Anzünden des Feuers raten wir, kleine Holzleisten mit Papier oder andere handelsübliche Anzünder
zu benutzen, ausgeschlossen alle flüssigen Stoffe wie z.B. Alkohol, Benzin, Petroleum und Ähnliches.
Folgendes Verfahren befolgen:
• Die Rauchgasregler öffnen, um den Abzug zu erleichtern, den Regler für die Herdfunktion
regulieren, d.h. der Bedienungshebel muss gegen die Rückseite gedrückt werden (auch die
eventuelle Absperrklappe am Rauchableitungsrohr ist zu öffnen).
• Den Thermostatknopf auf Position 5 stellen (maximale Öffnung).
• Den Primärluftregler (an der Tür des Aschenfachs) öffnen.
• Nachdem Sie das Feuer mit kleinen Holzstücken angezündet und gewartet haben, bis es gut
brennt, stellen Sie den Thermostat auf die der gewünschten Wärme entsprechende Position ein.
• Den Rauchgasregler durch Ziehen des Hebels in die Backofen-Position bringen.
Wenn das Holz zu brennen beginnt, kann weiterer Brennstoff nachgefüllt werden. Den Primärluftregler
schließen und die Verbrennung mithilfe der Sekundärluft nach den Angaben in Abschnitt 10 kontrollieren.
In dieser Phase den Herd niemals unbeaufsichtigt lassen.
ACHTUNG: Bei den ersten Malen des Anzündens kann eine erhebliche Kondensation der
Rauchgase mit geringem Wasseraustritt aus dem Heizungsherd erfolgen. Diese
Erscheinung sollte in sehr kürzester Zeit verschwinden, sollte sie dagegen anhalten,
ist es erforderlich, den Zug des Rauchabzugs kontrollieren zu lassen.
Der Heizungsherd darf nie überladen werden. Zu viel Brennstoff und zu viel Verbrennungsluft
können zu einer Überhitzung führen und daher den Heizungsherd beschädigen. Die durch
Überhitzung verursachten Schäden sind nicht durch die Garantie gedeckt.
10.
NORMALER BETRIEB
ACHTUNG: Auf keinen Fall darf das Feuer angezündet werden, bevor die Anlage vollständig mit
Wasser gefüllt ist; dies würde zu einer sehr schweren Beschädigung der gesamten
Einrichtung führen.
Die Geräte mit automatischer Türschließung (Typ 1) müssen aus Sicherheitsgründen obligatorisch mit
geschlossener Feuerraumtür betrieben werden (ausgenommen die Phase des Einfüllens des Brennstoffs
oder der Beseitigung der Asche).
Die Geräte ohne automatische Türschließung (Typ 2) müssen an einen eigenen Rauchabzug
angeschlossen werden. Der Betrieb mit offener Tür ist nur unter Beaufsichtigung zulässig.
WICHTIG: Aus Sicherheitsgründen darf die Feuerraumtür nur in der Phase des Anzündens und um
Holz nachzulegen offen sein. Während des Betriebs und in den Zeiten der
Nichtbenutzung muss sie geschlossen bleiben.
Die nominale Heizleistung des Heizungsherds wird mit einem Zug (Unterdruck) von mindestens 17Pa
(=1,7 mm Wassersäule ) erreicht.
Daher ist der Heizungsherd immer mit geschlossener Tür zu benutzen, um den Schmiedeeffekt zu
vermeiden.
Der Heizungsherd darf nie überladen werden. Zu viel Brennstoff und zu viel Verbrennungsluft
können zu einer Überhitzung führen und daher den Heizungsherd beschädigen. Die durch
Überhitzung verursachten Schäden sind nicht durch die Garantie gedeckt.
Daher ist der Heizungsherd immer mit geschlossener Tür zu benutzen, um den Schmiedeeffekt zu
vermeiden.
Mit den Reglern an der Vorderseite des Heizungsherds wird die Wärmeemission des Feuerraums reguliert.
Sie sind je nach dem Heizbedürfnis zu öffnen. Die beste Verbrennung (minimale Emissionen) wird erzielt,
wenn beim Holznachlegen der Großteil der Verbrennungsluft durch die Sekundärluftregler strömt.
Folgende Regulierung der Regler ist zum Erreichen der nominalen Heizleistung erforderlich:
48
Brennstoff
PRIMÄRLUFT
SEKUNDÄRLUFT
HOLZ
GESCHLOSSEN
GANZ OFFEN
Anleitung zur Installation, Benutzung und Wartung – DE – Rev.07
Heizungsherd – TERMOSUPREMA Compact
Die Verbrennungsstärke und daher die Heizleistung Ihres Heizungsherds wird nicht nur von der
Regulierung der Verbrennungsluft, sondern auch vom Kamin beeinflusst. Ein guter Kaminzug erfordert
eine geringere Regulierung der Verbrennungsluft, während ein geringer Zug in höherem Maße eine
genaue Regulierung der Verbrennungsluft notwendig macht.
WICHTIG: Zur Überprüfung der guten Verbrennung des Heizungsherds sollten Sie kontrollieren, dass der
aus dem Schornstein austretende Rauch transparent ist. Wenn er weiß ist, bedeutet dies, dass
der Heizungsherd nicht richtig reguliert ist oder das Holz zu feucht ist. Grauer oder schwarzer
Rauch ist dagegen ein Zeichen dafür, dass die Verbrennung nicht vollständig ist (eine größere
Menge Sekundärluft ist erforderlich).
11.
BENUTZUNG DES BACKOFENS
Reinigen Sie den Rost des Feuerraums und füllen Sie danach Brennstoff ein. Durch die Zufuhr von
Verbrennungsluft kann die Backofentemperatur merklich beeinflusst werden. Ein ausreichender Kaminzug
und saubere Kanäle für den Fluss der heißen Rauchgase rings um den Backofen sind für ein gutes
Backergebnis wesentlich. Der Rauchgasregler muss vollständig gegen die Vorderseite des Heizungsherds
gezogen sein.
Der Backofenschieber kann auf verschiedenen Ebenen untergebracht werden. Hohe Kuchen und große
Braten sind auf der untersten Ebene einzuschieben. Flache Kuchen und Kekse werden auf der mittleren
Ebene gebacken. Die obere Ebene kann zum Erhitzen oder zum Anbraten benutzt werden.
Der Heizungsherd ist mit einem Feuerrost aus Gusseisen ausgestattet, der mithilfe einer speziellen Kurbel
angehoben werden kann. Die obere Position optimiert die Benutzung der Kochplatte, während die untere
die Erhitzung des Wassers und des Backofens optimiert.
12.
RICHTIGER GEBRAUCH ZUR ZENTRALHEIZUNG
Um optimale Ergebnisse beim Gebrauch als Zentralheizung zu erzielen, müssen einige Grundgedanken
klar sein.
Die Anlage funktioniert erst dann richtig gut, wenn sie auf vollen Touren läuft und die Pumpe immer in
Bewegung ist. Nur unter dieser Bedingung ist nämlich das von der Anlage kommende Wasser heiß genug,
um Kondensationserscheinungen um den Kesselkörper zu verhindern. Andernfalls, wenn die Anlage bei zu
geringer Leistung betrieben wird, neigt sie dazu, intermittierend zu funktionieren.
Praktisch heißt das, dass die Pumpe immer nur für kurze Zeit funktioniert und nur, wenn die
Wassertemperatur über 70°C liegt, aber jedes Mal, w enn das kalte Wasser, das von der Anlage
zurückläuft, die Temperatur unter diese Grenze senken lässt, hält sie an und wartet, dass sie wieder auf
70° C steigt.
Während dieser Pausen kühlt das Wasser in den Heizkörpern ab und wird seinerseits kalt in den Kessel
zurückgeführt, wenn die Pumpe erneut in der Lage ist, wieder anzulaufen.
Bei dieser Betriebsweise sind die Heizköper im unteren Teil immer kalt, und der untere Teil des
Kesselkörpers bleibt ebenfalls fast kalt und führt zur Kondensation der Rauchgase und der säurehaltigen
Dämpfe, die auf Dauer zur Korrosion des Kesselkörpers führen.
Zur Vermeidung dieser schweren Folge muss die Verbrennungsluft so reguliert werden, dass die erzeugt
Wärme in der Lage ist, die Pumpe ständig in Betrieb zu halten; nur so ist es möglich, die Heizkörper
gleichmäßig zu erwärmen und eine Rückführung von warmem Wasser zum Kessel zu gestatten, die die
Kondensation der Rauchgase und die drohende Korrosion vermeiden.
Um dieses Ergebnis zu erzielen, ist die Primärluftklappe (Aschenfachtür) um 1/3, die Sekundärluft (über
der Feuerraumtür) ganz zu öffnen, während der Knopf der Thermostatklappe unter der Backofentür so zu
regulieren ist, dass sich die Wassertemperatur im Kessel zwischen 70 – 80 ° C stabilisiert. Dabei ist
folgendermaßen vorzugehen.
Wenn die Klappe auf Position 3 reguliert ist und die Wassertemperatur sich nach zwei Betriebsstunden
noch nicht stabilisiert hat, um den ständigen Pumpenbetrieb zu ermöglichen, muss die Öffnung erhöht
werden, indem man versucht, sie auf Position 5 einzustellen.
Wenn die Temperatur in Position 5 nach einer Weile auf 80 –85°C steigt, sollte die Regulierung auf
Position 4 erfolgen, da sie zu hoch wäre, wenn sie sich dagegen zwischen 70–80°C stabilisiert, ist es in
Ordnung, und die Position kann beibehalten werden.
Anleitung zur Installation, Benutzung und Wartung – DE – Rev.07
49
Heizungsherd – TERMOSUPREMA Compact
13.
STROMAUSFALL
Im Falle eines plötzlichen Stromausfalls während des normalen Betriebs der Anlage sind die folgenden
einfachen Handgriffe vorzunehmen, um zu vermeiden, dass der Kessel infolge des fehlenden
Pumpenbetriebs zum Sieden kommt.
1 Den beweglichen Feuerrost auf die oberste Stufe heben, um die der Hitze der Flamme ausgesetzte
Austauschoberfläche zu verringern.
2 Die Primär- und Sekundärluftregler schließen und den Drehknopf des Steuerthermostats, der sich
rechts an der Rückseite des Heizungsherds befindet, auf 0 stellen, um die Verbrennungsluftzufuhr
völlig zu sperren.
3 Die Backofentür öffnen, um die Verteilung der Innenwärme zu fördern.
4 Den Rauchgasregler durch Drücken des Knaufs, der sich an der rechten Seite des Rahmens
befindet, öffnen. Auf diese Weise wird die noch erzeugte Restwärme zum Kamin abgeleitet.
14.
BETRIEB IN DER ÜBERGANGSZEIT
ACHTUNG: Auf keinen Fall darf das Feuer angezündet werden, bevor die Anlage vollständig mit
Wasser gefüllt ist; dies würde zu einer sehr schweren Beschädigung der gesamten
Einrichtung führen. Die Anlage ist ständig voll Wasser zu halten, auch in den Zeiträumen, in
denen die Benutzung des Heizungsherds nicht erforderlich ist. In der Winterzeit ist eine
eventuelle Außerbetriebsetzung durch Hinfügen von Frostschutzmitteln anzugehen.
Während der Übergangszeit, d. h. bei höheren Außentemperaturen, kann es bei plötzlichem
Temperaturanstieg zu Störungen des Schornsteineinzugs kommen, sodass die Abgase nicht vollständig
abgezogen werden. Die Abgase treten nicht mehr vollständig aus (intensiver Gasgeruch).
In diesem Fall sollten Sie den Rost häufiger rütteln und die Verbrennungsluft erhöhen. Legen Sie dann
eine geringere Brennstoffmenge nach und sorgen Sie dafür, dass diese schneller (mit Flammentwicklung)
abbrennt und dadurch der Schornsteinzug stabilisiert wird. Kontrollieren Sie schließlich, ob alle
Reinigungsöffnungen und die Kaminanschlüsse dicht sind.
14.1. VERWENDUNG ALS NORMALER HERD
ACHTUNG: Auf keinen Fall darf das Feuer angezündet werden, bevor die Anlage vollständig mit
Wasser gefüllt ist; dies würde zu einer sehr schweren Beschädigung der gesamten
Einrichtung führen
Wenn der Heizungsherd, z.B. im Sommer, zur zum Kochen verwendet werden soll, ist der bewegliche Grill
auf die oberste Stufe zu heben, um Austauschoberflächen, die Wärme an das Wasser abgeben können, so
weit wie möglich auszuschließen. Der Rauchgasregler ist offen zu halten, um nach Erhitzen der
Gusseisenplatte den Austritt der warmen Rauchgase zu fördern.
Die Umlaufpumpe muss in jedem Fall betriebsbereit sein, um an einigen Heizkörpern die ans Wasser
abgegebene Wärme ableiten zu können und damit das Sieden zu verhindern.
Die Anlage ist ständig voll Wasser zu halten, auch in den Zeiträumen, in denen die Benutzung des
Heizungsherds nicht erforderlich ist.
Sollte das Gerät Frost ausgesetzt sein, dann muss dem Wasser in der Anlage eine ausreichende Menge
an Frostschutzmittel beigefügt werden, wodurch das Problem gänzlich ausgeschaltet wird.
15.
INSTANDHALTUNG UND PFLEGE
Lassen Sie die ordnungsgemäße Installation der Heizungsherds, den Anschluss an den Schornstein und
die Belüftung von Ihrem Bezirksschornsteinfeger kontrollieren.
Zur Reinigung der lackierten Teile Seifenwasser oder andernfalls nicht abreibende oder chemisch
aggressive Reinigungsmittel verwenden.
Sollten die Messingteile aufgrund von Überhitzung bläulich werden, kann dem mit einem geeigneten
Reinigungsmittel abgeholfen werden.
WICHTIG: Es dürfen ausschließlich von La Nordica ausdrücklich genehmigte und angebotene Ersatzteile
verwendet werden. Wenden Sie sich im Bedarfsfall bitte an Ihren Fachhändler.
DAS GERÄT DARF NICHT ABGEÄNDERT WERDEN!
50
Anleitung zur Installation, Benutzung und Wartung – DE – Rev.07
Heizungsherd – TERMOSUPREMA Compact
15.1. REINIGUNG DES RAUCHABZUGS
Das richtige Anfeuern, die Verwendung der geeigneten Art und Menge von Brennstoff, die korrekte
Einstellung des Sekundärluftreglers, der ausreichende Kaminzug und das Vorhandensein von
Verbrennungsluft sind für eine optimale Funktionsweise des Geräts unerlässlich.
Der Kaminofen sollte mindestens einmal pro Jahr vollständig gereinigt werden (oder im Fall von
Betriebsproblemen). Die Reinigung darf nur bei kaltem Ofen
erfolgen. Diese Arbeit sollte von einem Schornsteinfeger
ausgeführt werden, der gleichzeitig eine Inspektion
vornehmen kann.
Während der Reinigung muss der Ofen mit dem
Rauchgaskasten und das Rauchgasrohr einbezogen werden
(ABB. 9). Der Rauchgaskasten kann vom Feuerraum aus und
nach Abbau des Rauchgasrohres vom Abgasstutzen mit Hilfe
einer Bürste und eines Saugers gereinigt werden.
Nach der Reinigung sollen alle Teilen wieder hermetisch
eingestellt werden.
ABB. 9
15.2. REINIGUNG DER GLASSCHEIBE
Durch einen besonderen Sekundärlufteintritt wird die Bildung von Schmutzablagerungen an der Türscheibe
wirksam verlangsamt. Bei Verwendung fester Brennstoffe (z.B. feuchtem Holz) kann dies jedoch niemals
ganz vermieden werden und ist nicht als Defekt des Geräts anzusehen.
WICHTIG: Die Reinigung der Panoramascheibe darf ausschließlich bei kaltem Heizungsherd
erfolgen, um eine Explosion zu vermeiden. Keinesfalls abreibende Tücher oder abreibende
oder chemisch aggressive Produkte verwenden.
BRUCH DER GLASSCHEIBEN: Die Scheiben aus Glaskeramik sind bis zu einer
Temperaturschwankung von 750°C beständig und damit keinen Thermoschocks ausgesetzt. Ihr
Bruch kann deshalb nur durch mechanische Schocks (Stöße oder heftiges Schließen der Tür usw.)
verursacht werden. Daher fällt die Auswechslung nicht unter die Garantie.
15.3. REINIGUNG DES ASCHEKASTENS
Alle Heizungsherde von LA NORDICA besitzen einen Feuerrost und einen Aschekasten zum Sammeln der
Asche. Wir empfehlen, den Aschekasten regelmäßig zu leeren, bevor er ganz voll ist, um den Rost nicht zu
überhitzen. Außerdem raten wir, immer 3-4 cm Asche im Feuerraum zu lassen.
ACHTUNG: Geben Sie die aus dem Feuerraum entfernte Asche in
einen Behälter aus feuerfestem Material mit dicht
schließendem Deckel. Stellen Sie den Behälter auf einen
feuerfesten Fußboden, fern von entflammbaren Materialien,
bis die Asche gelöscht und völlig abgekühlt ist.
WICHTIG: Nach einer eventuellen Demontierung des Rostes bitte
stellen Sie ihn wieder in der korrekten Stellung, d.h. soll die ebene
Flache mit den kleinen Spalten oben stehen.
Falls der Rost umgekehrt eingestellt wird, könnte es schwierig sein,
ABB. 10
die Asche zu entfernen. ABB. 10
15.4.
WARTUNG DER HYDRAULIKANLAGE
Bei ausgeschalteter Anlage müssen einmal im Jahr folgende Kontrollen durchgeführt werden:
• Kontrolle der Funktionstüchtigkeit und der Leistungsfähigkeit des thermischen Ablassventils und
des Sicherheitsventils. Sollte sich diese nicht in einem einwandfreien Zustand befinden, den
autorisierten Installateur kontaktieren. DAS ENTFERNEN ODER VERÄNDERUNGEN AN DIESEN
SICHERHEITSVORRICHTUNGEN, SIND STRENGSTENS VERBOTEN.
• Die Thermoisolierung der Füllrohre und des Sicherheitsrohrs überprüfen.
• Sicherstellen, dass die Anlage gefüllt ist und unter Druck steht, den Wasserstand im Inneren des
Expansionsgefäßes kontrollieren, ebenso wie dessen Funktionstüchtigkeit, auch die
Leistungsfähigkeit des Sicherheitsrohrs muss kontrolliert werden.
Anleitung zur Installation, Benutzung und Wartung – DE – Rev.07
51
Heizungsherd – TERMOSUPREMA Compact
16.
STILLSTAND IM SOMMER
ACHTUNG : Die Anlage ist ständig voll Wasser zu halten, auch in den Zeiträumen, in denen die Benutzung
des Heizungsherds nicht erforderlich ist.
Sollte das Gerät Frost ausgesetzt sein, dann muss dem Wasser in der Anlage eine ausreichende Menge
an Frostschutzmittel beigefügt werden, wodurch das Problem gänzlich ausgeschaltet wird.
Nach der Reinigung des Feuerraums, des Schornsteins und des Rauchabzugs und der vollständigen
Beseitigung der Asche und eventueller anderer Rückstände alle Türen des Herds und die entsprechenden
Regler schließen und das Gerät vom Schornstein trennen.
Wir raten, die Reinigung des Rauchabzugs mindestens einmal im Jahr vorzunehmen. In der Zwischenzeit
den tatsächlichen Zustand der Dichtungen überprüfen, die, wenn sie nicht völlig unversehrt sind, den
einwandfreien Betrieb des Geräts nicht gewährleisten! In diesem Fall ist ihre Auswechslung erforderlich.
Die Teile aus Gusseisen mit neutraler Vaseline schützen, wenn die ästhetische Erscheinung im Laufe der
Zeit unverändert erhalten bleiben soll.
17.
ANSCHLUSS AN DEN RAUCHABZUG EINES OFFENEN KAMINS
Der Rauchkanal ist der Rohrabschnitt, der das Heizungsprodukt mit dem Rauchabzug verbindet. Bei der
Verbindung sind diese einfachen, aber äußerst wichtigen Grundsätze zu beachten:
• Auf keinen Fall darf ein Rauchkanal benutzt werden, der einen geringeren Durchmesser als die
Ausgangsmanschette hat, mit dem das Heizungsprodukt ausgestattet ist.
• Jeder Meter eines horizontalen Verlaufs des Rauchkanals verursacht einen merklichen Lastverlust,
der gegebenenfalls durch eine Erhöhung des Rauchabzugs auszugleichen ist;
• Der horizontale Abschnitt darf in keinem Fall 2m überschreiten (UNI 10683-2005);
• Jeder Bogen des Rauchkanals verringert den Zug des Rauchabzugs erheblich, was gegebenenfalls
durch dessen angemessene Erhöhung des Rauchabzugs auszugleichen ist.
• Die Norm UNI 10683-2005 – ITALIA sieht vor, dass es in keinem Fall mehr als 2 Bögen oder
Richtungsänderungen – einschließlich der Mündung in den Rauchabzug – sein dürfen.
C - Abdichtung
B
A – Hermetischer
Verschluss
Inspektionsklappe
ABB. 11
52
Anleitung zur Installation, Benutzung und Wartung – DE – Rev.07
Heizungsherd – TERMOSUPREMA Compact
Wenn der Rauchabzug eines offenen Kamins benutzt werden soll, muss die Haube unter der Stelle der
Einmündung des Rauchkanals hermetisch verschlossen werden (Pos. A ABB. 11).
Wenn der Rauchabzug zu groß ist (z.B. 30x40 oder 40x50 cm), muss er mit einem Rohr aus rostfreiem
Stahl von mindestens 200mm Durchmesser verrohrt werden (Pos.B), wobei darauf zu achten ist, den
verbliebenen Raum zwischen dem Rohr und dem Rauchabzug unmittelbar unter dem Schornstein fest zu
schließen (Pos. C).
Für jede weitere Klärung wenden Sie sich bitten an Ihren Fachhändler!
Anleitung zur Installation, Benutzung und Wartung – DE – Rev.07
53
Termocucina / Thermocooker / Heizungsherd – TERMOSUPREMA Compact
18. MONTAGGIO CORRIMANO LATERALI / SIDE HANDRAIL ASSEMBLY /
MONTAGE SEITLICHE HANDLÄUFE
19. SCHEDA TECNICA / TECHNICAL DATA SHEET / TECHNISCHES
DATENBLATT
SONDA PER
CIRCOLATORE
PROBE FOR PUMP
ZIRKULATOR-SONDE
54
Istruzioni / Instructions / Anweisungen IT – EN – DE – Rev.07
Termocucina / Thermocooker / Heizungsherd – TERMOSUPREMA Compact
20. SCHEMA DI INSTALLAZIONE / INSTALLATION
ALLGEMEINES INSTALLATIONSSCHEMA THERMOKÜCHE
LAY-OUT
/
IT La nostra responsabilità è limitata alla fornitura dell’apparecchio. Il suo impianto va realizzato a regola d’arte
secondo le prescrizioni delle seguenti istruzioni e le regole della professione, da personale qualificato, che agisce a
nome di imprese adatte ad assumere l’intera responsabilità dell’impianto secondo quanto riportato al capitolo 3.
Gli schemi presenti sono puramente indicativi non hanno quindi valore di progetto.
A termini di legge la presente documentazione è strettamente confidenziale e riservata e ne è vietata la riproduzione,
l’utilizzazione e la comunicazione a terzi. La divulgazione non consentita da La NORDICA S.p.a. verrà sanzionata
secondo i termini di legge.
EN Our responsibility is limited to the supply of the appliance. Its system is realised precisely according to the
provisions of the following instructions and the regulations of the profession, by qualified staff, which acts in the name
of companies suitable to assume the entire responsibility of the system according to that stated in chapter 3.
The present planes are purely indicative, therefore they have not value as project.
According to the laws, the present documentation is closely confidential and reserved and it is forbidden the reproduction, the use
and the communication to a third party.
The diffusion not allowed from La Nordica S.p.a. will be sanctioned from the laws
DE Die Haftung der Fa. La NORDICA beschränkt sich auf die Gerätelieferung. Die Installation muss fachgerecht in
Übereinstimmung mit den Vorschriften der folgenden Anweisungen und den Berufsregeln von qualifiziertem Personal
vorgenommen werden, das im Namen von Unternehmen handelt, die die gesamte Haftung für die Installation wie in
Kapitel 3 beschrieben übernehmen kann.
Die gezeigten Pläne sind rein indikativ, und haben keinen Wert als Projekt.
Gesetzlich ist diese Dokumentation streng vertraulich und die Reproduktion, die Benutzung und der Vertrieb an Dritte ist verboten.
Eine nicht von La Nordica gestattete Verbreitung der selben, wird gesetzlich sanktioniert.
IT - LEGENDA
EN - KEY
DE - ZEICHENERKLÄRUNG
C
Circolatore
Circulator
Pumpe
F
Flussostato
Flow switch
Flussmesser
M
Manometro
Manometer
Manometer
P
Circolatore
Circulator
Pumpe
P1
Circolatore nr.1
Circulator n°.1
Pumpe Nr.1
P2
Circolatore nr.2
Circulator n°.2
Pumpe Nr. 2
T
Termometro
Thermometer
Thermometer
V
Valvola a sfera
Ball valve
Kugelventil
VA
Vaso d’espansione aperto
Open expansion chamber
Offenes Expansionsgefäß
VB
Valvola di bilanciamento
Balancing damper
Ausgleichventil
VDM
Valvola deviatrice motorizzata
Motorized deviator valve
Motorisiertes Ablenkventil
VEAC
Vaso espansione aperto caldaia
Central heating expansion tank
open
Offnes Ausgleichsbehälter Heizkessel
VEC
Vaso espansione chiuso
Close expansion vessel
Offnes Ausgleichsbehälter
VECTS
Vaso espansione chiuso sanitario
Sanitary expansion tank closed
Geschlossener
Warmerwasser
Ausgleichsbehälter
VMS
Valvola miscelatrice sanitario
Sanitary mixing valve
Warmwasser-Mischventil
VR
Valvola di non ritorno
Non return valve
Rückschlagventil
VSP
Valvola di sicurezza
Safety valve
Sicherheitsventil
VST
Valvola scarico termico
VTMA
Valvola
miscelatrice
automatica
Thermal drain valve
termostatica
Automatic
valve
Istruzioni / Instructions / Anweisungen IT – EN – DE – Rev.07
thermostatic
-
Wärmeableitventil
mixing
Mischventil
Thermostat
mit
automatischem
55
Termocucina / Thermocooker / Heizungsherd – TERMOSUPREMA Compact
9196629 - 17/09/2008
VISUALIZZAZIONE
FUSIBILE
Circolatore attivo
Regolazione valvola
20 - 80° C
OFF
Allarme sovratemperatura
Valvola a 3 vie
ON
ON OFF
allarme
acustico
VEAC
Alimentazione
230 Volt
50 Hz
Entrata acqua fredda
Cold water inlet
Eintritt kaltes Wasser
V
S
Entrata acqua fredda
Regolare a 50° C
Tubo di carico ø ¾””
Load pipe ø ¾””
Zufuhrrohr ø ¾”
Tubo di carico ø3/4"
VSP
V
Uscita
Uscita acqua
acqua calda sanitaria
T
(1,5 bar)
V
Collettore di ritorno
Collettore di mandata
Mandata impianto
Return Ritorno
manifold impianto
Delivery manifold
-Sammelkanal
riscaldamento
riscaldamento RÜCKLAUF
ZUFUHR-Sammelkanal
VECTS
VST
Alimentazione
230 Volt
50 Hz
VDM
Hot water outlet
Austritt warmes Wasser
S
Bollitore
VSP
TERMOCUCINA
TERMOSTUFA
Regolazione circolatore
20 - 80° C
(6 bar)
Tubo di sicurezza ø1"
Tubo di sicurezza ø 1”
Safety pipe ø 1”
Sicherheitsrohr ø 1”
1 2 3 4 5 6
CM
M
T M
CR
V
VB
Innesto Venturi
Sonda
C
Innesto venturi
Venturi coupling
Venturi-Verbindung
VMTA
9196619B - 09/07/2008
VISUALIZZAZIONE
FUSIBILE
Regolazione valvola
20 - 80° C
OFF
Circolatore attivo
Allarme sovratemperatura
Valvola a 3 vie
ON
ON OFF
allarme
acustico
Innesto venturi
Venturi coupling
Venturi-Verbindung
Innesto Venturi
TERMOCUCINA
TERMOSTUFA
Entrata acqua fredda
Cold water inlet
Eintritt kaltes Wasser
VEAC
V
S
Alimentazione
230 Volt
50 Hz
Regolazione circolatore
20 - 80° C
Entrata acqua fredda
Regolare a 50° C
(6 bar)
VSP
Tubo di carico ø ¾””
Load pipe ø ¾””
Zufuhrrohr ø ¾”
Tubo di carico ø3/4"
Tubo di sicurezza ø1"
Tubo di sicurezza ø 1”
Safety pipe ø 1”
Sicherheitsrohr ø 1”
1 2 3 4 5 6
V
T
(1,5 bar)
V
S
Bollitore
VSP
Uscita acqua calda
Hot water outlet
Austritt
warmes
Wasser
Uscita acqua
calda
Collettore di mandata
Mandata impianto
Delivery manifold
riscaldamento
ZUFUHR-Sammelkanal
Collettore
di ritorno
Ritorno
impianto
Return manifold
riscaldamento
RÜCKLAUF -Sammelkanal
VECTS
VST
CM
Alimentazione
230 Volt
50 Hz
CR
V
M
T M
VDM
VB
C
VMTA
56
Istruzioni / Instructions / Anweisungen IT – EN – DE – Rev.07
Termocucina / Thermocooker / Heizungsherd – TERMOSUPREMA Compact
9196616-B - 09/07/2008
SANITARIA DA BOILER
VISUALIZZAZIONE
FUSIBILE
Regolazione valvola
20 - 80° C
OFF
Circolatore attivo
Allarme sovratemperatura
Valvola a 3 vie
VEAC
ON
ON OFF
allarme
acustico
1 2 3 4 5 6
Entrata acqua fredda - Cold water inlet
Eintritt kaltes Wasser
Entrata acqua fredda
AcquaACQUA
sanitaria - Sanitary water
Sanitärwasser
SANITARIA
Regolazione circolatore
20 - 80°C
Alimentazione
230 Volt
50 Hz
Regolare a 50° C
Tubo di sicurezza ø 1”
Safety pipe ø 1”
Sicherheitsrohr
ø 1”ø1"
Tubo di sicurezza
VSP
6 bar
Tubo di carico ø ¾””
Load pipe ø ¾””
Zufuhrrohr
ø ¾” ø3/4"
Tubo di carico
Caldaia murale gas
WallCALDAIA
mounted gas boiler
GAS-W
andKESSEL
murale
VST
GAS
V
T
Alimentazione
230 Volt
50 Hz
Collettore di mandata
Mandata impianto
Delivery manifold
riscaldamento
ZUFUHR-Sammelkanal
BOILER
CM
VSP
1,5
bar
M
VDM
VSP
VECTS
V
3 bar
VR
T M
V C2 VR
V C1 V
TERMOSTUFA
TERMOCUCINA
CR
VETC
Collettore
di ritorno
Ritorno impianto
Return
manifold
riscaldamento
RÜCKLAUF Sammelkanal
V
Scambiatore
30 piastre30p
Scambiatore
30 plate exchanger
Austauscher mit 30 Platten
Visualizzazione
Display
ANZEIGE
Fusibile
Fuse
SCHMELZSICHERUNG
Regolazione valvola 20 – 80°C
Regulation valve 20 – 80°C
Ventileinstellung 20 – 80°C
Circolatore attivo
Circulator active
Aktive Pumpe
Allarme sovratemperatura
Excess temperature alarm
Übertemperatur-Alarm
Allarme acustico
Acoustic alarm
EIN/AUS Tonsignal
VISUALIZZAZIONE
FUSIBILE
Valvola a tre vie
Three way valve
Dreiwegventil
Circolatore attivo
Regolazione valvola
20 - 80° C
OFF
Allarme sovratemperatura
Alimentazione 230 volt
Power supply 230 volt
Stromversorgung 230 Volt
Valvola a 3 vie
ON
ON OFF
allarme
acustico
1 2 3 4 5 6
Regolazione circolatore
20 - 80° C
Alimentazione
230 Volt
50Hz
Regolare a 50° C
Regolazione circolatore 20 – 80°C
Regulation circulator 20 – 80°C
Pumpeneinstellung 20 – 80°C
Istruzioni / Instructions / Anweisungen IT – EN – DE – Rev.07
Regolare a 50°C
Set to 50°C
Auf 50°C einstellen
57
Termocucina / Thermocooker / Heizungsherd – TERMOSUPREMA Compact
DICHIARAZIONE
DI CONFORMITÀ
|
DECLARATION OF
CONFORMITY
KONFORMITÄTSERKLÄRUNG
In accordo con la Direttiva 89/106/CEE (Prodotti da Costruzione), il Regolamento CE n. 1935/2004 (Materiali e Oggetti
destinati a venire a contatto con prodotti alimentari)
According to the Directive 89/106/EEC (Construction Products ), the CE Regulation No. 1935/2004 (Materials and
Articles intended to come into contact with foodstuffs)
Im Einklang mit der Direktive 89/106/EEC (Bauprodukte) und der CE- Vorschrift Nr. 1935/2004 (Materialien und
Gegenstände, die für den Kontakt mit Lebensmitteln vorgesehen sind)
066
N° di identificazione - Identification No.- Identifikationsnummer:
La NORDICA S.p.A.
Via Summano,66/a-36030 Montecchio Precalcino (VICENZA)
+39 0445 804000 - Fax +39 0445 804040
Emesso da - Issued by - Ausgestellt von:
Tipo di apparecchio - Type of equipment – Gerätetyp:
Cucine a combustibile solido
Fire coocker by solid fuel
Herde für Festbrennstoffe
Marchio commerciale –Trademark – Handelsmarke:
La NORDICA
Modello o tipo – Model or type – Modell:
Uso – Use –
Verwendungszweck :
TERMOSUPREMA COMPACT
Riscaldamento e cottura uso domestico - Space heating and cooking
Erwärmung von Wohnräume und Kochen
La NORDICA S.p.A.
Via Summano,66/a-36030 Montecchio Precalcino (VICENZA)
0445-804000-Fax 0445-804040
Costruttore – Manufacturer – Herstelle :
Ente notificato - Notified body - Benanntes Labor :
in buildings -
NB 1881
IMQprimacontrol S.R.L.
I - 31020 Zoppè - San Vendemiano (TV)
Via dell'Industria, 55
Le norme armonizzate o le specifiche tecniche (designazioni) che sono state applicate in accordo con le regole della
buona arte in materia di sicurezza in vigore nella CEE sono :
The following harmonised standards or technical specifications (designations) which comply with good engineering
practice in safety matters in force within the EEC have been applied :
Die folgenden abgeglichenen Standards bzw. technischen Einzelheiten (Bestimmungen) - angewandt im Einklang mit
den Normen in Sicherheitsangelegenheiten – die in der CEE in Kraft sind, wurden angewandt :
Norme o altri riferimenti normative
Standards or other normative documents
Standards oder andere normensetzende Dokumente
Rapporto di Prova ITT
Initial Type Tests Report
Prüfbericht
EN 12815
CS-07-087
Condizioni particolari - Particular conditions –
Besondere Bedingungen :
-
Informazioni marcatura CE – CE Marking information –
vedi allegato / see enclosure / siehe Beilage
Auszeichnungsinformationen :
In qualità di costruttore e/o rappresentante autorizzato della società all’interno della CEE, si dichiara sotto la propria
responsabilità che gli apparecchi sono conformi alle esigenze essenziali previste dalle Direttive su menzionate.
As the manufacturer’s authorised representative established within EEC, we declare under out sole responsibility that the
equipment follows the provisions of the Directives stated above.
Als vom Hersteller bevollmächtigter und in der EEC etablierter Vertreter erklären wir, dass wir die volle Verantwortung dafür
übernehmen, dass die Geräte den Vorschriften entsprechen, die in den oben angegebenen Direktiven dargelegt werden.
15/06/2007 Montecchio Precalcino (VI)
…………………………………………
(data e luogo di emissione - place and date of issue Ort und Datum der Ausstellung)
58
(nome, posizione e firma - name, function and segnature Positionsbezeichnung)
Istruzioni / Instructions / Anweisungen IT – EN – DE – Rev.07
Termocucina / Thermocooker / Heizungsherd – TERMOSUPREMA Compact
INFORMAZIONI MARCATURA
CE
MARKING INFORMATION
AUSZEICHNUNGSINFORMATIONEN
|
LA NORDICA S.p.A.
07
EN 12815
TERMOSUPREMA COMPACT
Distanza minima da materiali infiammabili
Distance to adjacent combustible materials
Mindestabstand zu brennbaren Materialen
:
Emissione di CO (13 % O2 )
(13 % O2 )
Emission of CO
CO-Ausstoss bez.auf (13 % O2 )
: 0,28 %
Emissioni polveri (13 % O2 )
Dust emissions
(13 % O2 )
Staubemissionen (13 % O2 )
: - mg/m3
Massima pressione idrica di esercizio
ammessa Maximum operating pressure
Maximale Betriebsdruck
: 1,5 bar
Temperatura gas di scarico
Flue gas temperature
Abgastemperatur
: 186 °C
Potenza termica nominale
Thermal output
Nennheizleistung
: 18,5 kW
Laterale / lateral / seiten 20 cm
Posteriore / rear / hinten 20 cm
Rendimento / Energy efficiency / Wirkungsgrad : 77,5 %
Tipi di combustibile / Fuel types /
Brennstoffarten
: LEGNA – WOOD – HOLZ
VKF
Nr.
: -
SINTEF
Nr.
: -
15a B-VG
Nr.
: -
Istruzioni / Instructions / Anweisungen IT – EN – DE – Rev.07
59
Termocucina / Thermocooker / Heizungsherd – TERMOSUPREMA Compact
Dati e modelli non sono impegnativi:
la ditta si riserva di apportare
modifiche e migliorie senza alcun preavviso.
Data and models are not binding: the company reserves
the right to perform modifications and improvements
without notice.
Daten und Modelle sind nicht bindend. Die Firma behält
sich vor, ohne Vorankündigung Änderungen und
Verbesserungen vorzunehmen
La NORDICA S.p.A.
Via Summano, 66/A – 36030 Montecchio Precalcino – VICENZA – ITALIA
Tel: +39 0445 804000 – Fax: +39 0445 804040
email: [email protected] - www.lanordica-extraflame.com
60
7095810 Rev.07 – IT – EN – DE
Istruzioni / Instructions / Anweisungen IT – EN – DE – Rev.07