1
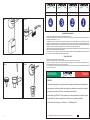
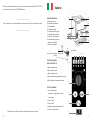
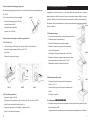
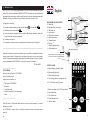
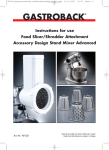
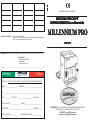
COGNOME E NOME:
COGNOME E NOME:
COGNOME E NOME:
N. TELEFONO:
N. TELEFONO:
N. TELEFONO:
N. TELEFONO:
DATA DI ACQUISTO:
DATA DI ACQUISTO:
DATA DI ACQUISTO:
DATA DI ACQUISTO:
N° DOCUMENTO FISCALE:
N° DOCUMENTO FISCALE:
N° DOCUMENTO FISCALE:
N° DOCUMENTO FISCALE:
RIVENDITORE:
RIVENDITORE:
RIVENDITORE:
RIVENDITORE:
TAGLIANDI DI GARANZIA:
COMPILARE E TRATTENERE
MOSTRARE AL CENTRO DI ASSISTENZA AUTORIZZATO INSIEME AL DOCUMENTO
FISCALE IN CASO DI INTERVENTO IN GARANZIA.
PU362
COGNOME E NOME:
STANDARD DI QUALITA' EUROPEA
MA
CCHIN
A PER CAFFE'
MACCHIN
CCHINA
SUPERA
UT
OMA
TICA con Montala
tte
SUPERAUT
UTOMA
OMATICA
Montalatte
MILLENNIUM PRO
AR
T. 877
ART
GARANZIA ITALIA: TAGLIARE E INVIARE IN BUSTA CHIUSA ENTRO 8 GIORNI DALLA DATA DI ACQUISTO A:
G3 FERRARI
SERVIZIO ASSISTENZA
VIA ROSSINI 8
41030 BASTIGLIA MO
-----------------------------------------------------------------------------------------------------------------------------------------------------R
GARANZIA
ITALY
ARTICOLO: 877 MILLENNIUM PRO
NOME:
_____________________
ITALIA
- MACCHINA PER CAFFE' SUPERAUTOMATICA
COGNOME: ________________________________
VIA: ______________________________________________________________________
CAP: ___________
LOCALITA': __________________________
DATA DI NASCITA: _________________
E-MAIL: _______________________________
RIVENDITORE: ___________________________________________
DATA DI ACQUISTO: _____________
PROVINCIA: ____
PROVINCIA: ____
N° DOCUMENTO FISCALE: __________________
G3 FERRARI S.r.l. - Via G. Rossini, 8 - 41030 BASTIGLIA (Modena) ITALY
Tel. 059.90.40.99 - Fax 059.90.42.24 - 059.81.50.99
INTERNET: www.G3Ferrari.com
e-mail: [email protected]
R
ITALY
877 MILLENNIUM PRO
FIG. 1
FIG. 2
R
R
ITALY
877 MILLENNIUM PRO
R
ITALY
877 MILLENNIUM PRO
ITALY
877 MILLENNIUM PRO
[ Z Y X
CONDIZIONI DI GARANZIA:
L'apparecchio è garantito per un periodo di due anni dalla data di acquisto.
La validità della GARANZIA deve essere sempre comprovata da un documento fiscale (Scontrino fiscale, bolla o fattura) e dal
TAGLIANDO DI GARANZIA (1 - 2 - 3 - 4).
La GARANZIA copre tutti i componenti che risultano difettosi all'origine per vizi di fabbricazione. Sono quindi escluse tutte le parti
soggette ad incrostazione da calcare, a rotture accidentali o ad usura , difetti derivati da un utilizzo non domestico dell'apparecchio,
negligenza nell'uso o nella manutenzione, danni da trasporto, pulizia e manutenzione e tutti quei danni non imputabili alla G3 FERRARI.
Il gruppo di infusione è un componente soggetto ad usura e dovrebbe essere sostituito ogni 5000 caffè.
L'apparecchio deve essere riparato esclusivamente da personale autorizzato da G3 FERRARI; l'eventuale manomissione da parte di
personale non autorizzato farà decadere la GARANZIA.
Il consumatore resta in ogni caso titolare dei diritti secondo la propria legislazione nazionale applicabile disciplinante la vendita dei
beni di consumo. Questa GARANZIA lascia impregiudicati tali diritti.
COSA DEVO FARE:
FIG. 3
FIG. 4
Compilare il retro di questa pagina in tutte le sue parti.
Inviare solo la GARANZIA ITALIA, conservare il libretto di istruzioni e il documento fiscale in originale.
Nel caso in cui l'apparecchio presenti una anomalia nel funzionamento rivolgersi ad un centro di assistenza autorizzato G3 Ferrari.
Tenere a disposizione il libretto di istruzioni e il documento fiscale.
In caso di assistenza in garanzia il centro chiederà di vedere il documento fiscale e ritirerà uno dei 4 TAGLIANDI DI GARANZIA
compilato in tutte le sue parti.
R
GARANZIA
ITALY
ITALIA
PRIVACY:
I dati personali riguardanti la Vostra persona saranno oggetto di trattamento per finalità gestionali
(per esempio per verificare la validità della Garanzia), per statistiche commerciali, di marketing,
per promozioni da parte di G3 Ferrari o da aziende di nostra fiducia.
Ai sensi della legge 675/96 G3 Ferrari garantisce la massima riservatezza dei dati da Lei forniti
e la possibilità di richiederne gratuitamente la rettifica o la cancellazione scivendo a
G3 Ferrari Servizio Assistenza - Via Rossini, 8 - 41030 Bastiglia MO.
Se non desiderasse ricevere ulteriori comunicazioni barri la casella a fianco.
2
Should you need further information, or have any doubt about how to operate MILLENNIUM,
Italiano
do not hesitate to contact your G3 FERRARI dealer.
_______________________
Visit our web site: http:/ / www.G3ferrari.com, where you can find our full range of products.
_______________________
LEGENDA MACCHINA
A - Serbatoio acqua
B - Sportello di protezione
C - Set Montalatte
D - Tastiera comandi
E - Contenitore caffè in grani
F - Vaschetta raccogli-fondi
G - Pulsante "vaporizzatore"
H - Vaschetta raccogli-gocce
I - Manopola regolazione macinatura caffè
L - Beccuccio erogatore caffè
C
E
A
B
I
L
D
F
G
H
Spillo di regolazione densità della
crema di latte
a
Vite e ghiera, stringendo la vite il latte sarà
più caldo
b
c
d
e
TASTIERA COMANDI
SPIE DI CONTROLLO (LED)
a- Spia controllo temperatura acqua (verde)
b- Spia controllo acqua (rossa)
c - Spia controllo quantità di caffè (rossa)
d- Spia vaschetta raccoglifondi piena (rossa)
e- Spia indicatore di accensione (verde)
4
TASTI DI COMANDO
1- Tasto multifunzione
accensione / spegnimento / vapore
2
3
/ reset allarmi
2- Tasto 1 caffè
1
3- Tasto 2 caffè
4- Manopola regolazione altezza caffè
Possible traces of coffee inside the coffee machine are due to our tests.
30
5- Pulsante "vaporizzatore"
5
3
PRESENTAZIONE
Questa macchina per caffè completamente automatica, tecnologicamente avanzata e dotata di grandi
prestazioni, permette di preparare un eccellente caffè espresso utilizzando caffè in grani.
E' possibile inoltre preparare comodamente cappuccino, the, latte caldo e qualsiasi tipo di infuso.
9. HOW TO DECALCIFY MILLENNIUM
At regular intervals, MILLENNIUM PRO must be decalcified.
a) Switch the unit off and unplug it.
1. NORME DI SICUREZZA - PRECAUZIONI D'USO GENERALI
1.
2.
3.
4.
5.
6.
7.
8.
9.
10.
11.
12.
13.
14.
15.
16.
17.
Leggere attentamente le avvertenze contenute nel presente libretto in quanto forniscono importanti indicazioni
concernenti la sicurezza di installazione, d'uso e di manutenzione. Facendo ciò eviterete contrattempi e
possibili incidenti che comprometterebbero la Vostra sicurezza.
Dopo aver tolto l'imballaggio assicurarsi dell'integrità dell'apparecchio, in particolare il cavo di alimentazione.
In caso di dubbio non utilizzare l'apparecchio e rivolgersi a personale professionalmente qualificato.
Prima di collegare il Vostro apparecchio accertarsi che i dati di targa siano rispondenti a quelli della
Vostra rete elettrica. In caso di incompatibilità tra la Vostra presa e la spina dell'apparecchio far sostituire la
presa con altra di tipo adatto da personale professionalmente qualificato. Quest'ultimo, in particolare, dovrà
anche accertare che la sezione dei cavi della presa sia idonea alla potenza assorbita dal Vostro apparecchio.
In generale è sconsigliabile l'uso di adattatori, prese multiple e/o prolunghe. Qualora il loro uso si rendesse
indispensabile è necessario utilizzare solamente adattatori semplici o multipli e prolunghe conformi alle vigenti
norme di sicurezza, facendo però attenzione a non superare il limite di portata in valore di corrente, marcato
sull'adattatore semplice e sulle prolunghe, e quello di massima potenza marcato sull'adattatore multiplo.
Non utilizzate l'apparecchio dopo un eventuale funzionamento anomalo. In tal caso spegnerlo, e non
manometterlo. Per l'eventuale riparazione rivolgersi solamente ad un centro di assistenza tecnica G3FERRARI
autorizzato e richiedere l'utilizzo di ricambi originali. Il mancato rispetto di quanto sopra citato può compromettere
la sicurezza del Vostro apparecchio.
Questo apparecchio dovrà essere destinato solo all'uso per il quale è stato espressamente concepito.
Ogni altro uso è da considerarsi improprio e quindi pericoloso. Il costruttore non può essere considerato
responsabile per eventuali danni derivanti da usi impropri, erronei ed irragionevoli.
Non usare l'apparecchio in vicinanza della vasca da bagno, doccia o lavabo, o dove la presenza di acqua
possa creare potenziale fonte di pericolo. Non immergere per nessun motivo l'apparecchio in acqua o altri
liquidi. Nel caso che l’apparecchio cada in acqua, disinserire la spina e toglierlo dall’acqua. Non mettere più
l’apparecchio in funzione prima di averlo fatto controllare da un centro di assistenza tecnica autorizzato.
Questa raccomandazione vale anche nel caso che il cavo di alimentazione o l’apparecchio siano danneggiati
o nel caso che l'apparecchio sia caduto in terra.
Non utilizzare l'apparecchio in presenza di esplosivi, sostanze infiammabili, gas o fiamme accese.
L'apparecchio deve essere sempre sorvegliato. Non permettere che l'apparecchio sia usato dai bambini
o da incapaci, senza adeguata sorveglianza.
Non impugnare l'apparecchio con mani o piedi bagnati.
Non utilizzare accessori non previsti da G3 FERRARI, potrebbero creare serio pericolo.
Non tirare mai il cavo, o l'apparecchio stesso, per staccare la spina dalla presa di rete.
Non lasciare il cavo pendente dal bordo del piano di lavoro o i prossimità di superfici calde.
Non lasciare l'apparecchio esposto ad agenti atmosferici quali pioggia, vento, neve, grandine ecc.
Disinserire la spina dalla presa di corrente quando l'apparecchio non è in uso o durante la pulizia dello stesso.
Allorché si decida di non utilizzare più un apparecchio di questo tipo, si raccomanda di renderlo inoperante
tagliandone il cavo di alimentazione (dopo aver staccato la spina dalla presa di corrente). Si raccomanda inoltre
di rendere innocue quelle parti suscettibili di costituire un potenziale pericolo, specialmente per i bambini, che
potrebbero servirsi dell'apparecchio fuori uso per i loro giochi.
Fate leggere queste istruzioni a tutti i potenziali utilizzatori del prodotto.
Conservare queste istruzioni.
b) Fill the water tank with a mixture of water and a liquid product suitable for decalcifying coffee
machines (for the right proportion see the product instructions).
c) Plug the unit in and switch it on.
d) Press the "steamer" button for at least 2 minutes for permitting the mixture to get into the
circuit.
e) Release the "steamer" button.
f) Switch the unit off.
g) Wait 20 minutes at least.
h) Switch the unit on an repeat operations d to g twice (place a container under the water /
steam nozzle).
i)
Rinse the water tank thoroughly and fill it with cold water.
l)
Press the "steamer" button in order to let the fresh water clean up the circuits. Let flow into
the circuit at least 2 lts of water. Empty the coffee grounds box at times.
WARNING! Use only products which are not toxic and are suitable for decalcifying coffee
machines. Rinse thoroughly.
Time needed to decalcify the unit can change according to the product used.
Read and follow the product instructions carefully.
G3 FERRARI disclaims responsability for damages due to the use of unsuitable products or
improper use.
10. ESPRESSO COFFEE MACHINE SETTING
MILLENNIUM PRO is programmed by G3 FERRARI with standard parameters and it is sold
it is ready for use. The special function "SETTING", anyway, permits you to improve the
performances of the coffee machine according to the type of coffee you're using. The setting
should be done the first time it is used and each time you change type of coffee.
a) Switch off the coffee machine (in case it is on).
ISTRUZIONI PARTICOLARI
1.
2.
3.
4.
Prima di collegare o di scollegare la macchina per caffè espresso, accertarsi che la macchina sia spenta.
Non fare funzionare la macchina per caffè espresso senza acqua nel serbatoio.
Procedere con precauzione durante la produzione di vapore in quanto raggiunge una temperatura molto
elevata.
Chiudere la manopola erogazione acqua/vapore quando non vengono utilizzati.
Riparare un apparecchio da sè può costituire un pericolo per l'utilizzatore. Non improvvisate
rimedi che potrebbero rivelarsi pericolosi, nel dubbio mettetevi in contatto con il nostro servizio
tecnico. Molti dubbi possono essere chiariti con una semplice telefonata! ✆ 059.904099
4
b) Press contemporary the switch on button
and the 2 cups coffee selection button
c) Keep on pressing the 2 cups coffee selection button
.
.
d) More pilot lights turn on and bigger is the quantity of coffee that will be grounded. Release the
2 cups coffee selection button
and the machine save the new setting.
e) Switch on the coffee machine.
f) Complete the setting by regulating also the coffee grinding (see chapter 6).
29
8.2 How to replace the brewing group gasket
2. INSTALLAZIONE E MESSA IN SERVIZIO
When the brewing group gasket wears out, it must be replaced with a new original gasket (our
Appoggiate la macchina per caffè su di un ripiano stabile ed orizzontale, mai su superfici
ref. GU043).
The unit must be switched off and unplugged.
-
bagnate, lontano da fonti di calore ed in luogo non accessibile a bambini, incapaci o animali
gasket
domestici. Sollevate il coperchio del serbatoio A, estraete dal serbatoio il tubo montalatte (C)
Remove the brewing group by following
ed inseritelo nel foro (contraddistinto da una clip verde) presente sotto lo sportello di protezione
the instructions in point 8.1
-
(B) della macchina.
Replace the old gasket with a
new one (our ref. GU043).
FIG. A
2.1 Riempimento acqua.
-
A macchina spenta, staccate la spina dalla presa di corrente.
-
Sollevate il coperchio del serbatoio A.
8.3.1 The drip Tray
-
Estraete il serbatoio tramite l'apposita maniglia.
-
Clean the drip-tray and the grid, when they are staibed or full of dirty water.
-
Riempite il serbatoio con acqua fresca o se preferite
-
Remove the drip-tray together with the grid ( FIG. Q ).
minerale (NON gassata).
-
Clean them.
NON riempite con acqua frizzante, latte o altri liquidi.
-
Reinsert the drip-tray and the grid.
8.3 How to clean the drip-tray and the coffee grounds box.
-
FIG. B
Riponete il serbatoio nella propria sede premendo a fondo
in modo da innestare la relativa valvola. ( FIG. B ).
-
Abbassate la maniglia e richiudete il coperchio.
2.2 Riempimento caffè in grani.
-
Sollevate il coperchio salva-aroma del contenitore dei
FIG. C
chicchi E ( FIG. C).
FIG. Q
FIG. R
FIG. S
-
Versate il caffè in grani fino a riempire il contenitore dei
chicchi.
8.3.2 The coffee grounds box.
-
Richiudete il coperchio.
-
Remove the drip tray (FIG. Q).
-
Release the coffee-grounds box with your fingers (FIG. R) and remove it (FIG.S).
2.3 Collegamento MILLENNIUM PRO.
-
Empty the box, then wash it carefully and dry it.
-
-
Reinsert the box and push it completely so that it is well set.
-
Wash, dry and reinsert the drip-tray.
28
Accertatevi che la tensione di rete corrisponda al valore riportato sulla targhetta dati tecnici
della macchina per caffè.
-
Collegate la macchina per caffè alla presa di corrente attraverso l'apposito cavo in dotazione.
5
2.4 ACCENSIONE DELLA MACCHINA PER CAFFE'
2.4.1 Premete il tasto multifunzione
-
anticlockwise with a coin so that the brewing chamber moves and you can wash the parts
e mantenetelo premuto per circa 3 secondi.
Inizialmente tutte le spie led si accenderanno in rapida sequenza, la spia-led
accenderà con una luce verde fissa e la spia
To wash the brewing group thoroughly, turn the screw located above the coffee spout
which were hidden.
si
lampeggerà durante il riscaldamento
WARNING: The movement of the brewing chamber is restricted by locks. DO NOT FORCE them.
dell'acqua in caldaia. Durante questo periodo non sarà possibile erogare caffè.
2.4.2 Scaricate l'aria presente nel circuito idraulico premendo il pulsante "vaporizzatore" per
circa un minuto. Al termine, svuotate la vaschetta raccogli fondi (F) dall'acqua che è
stata raccolta.
☞ Questa operazione è indispensabile la prima volta che si installa MILLENNIUM PRO,
ma è consigliabile ripeterla nel caso la macchina per caffè rimanga senz'acqua e/o dopo un
lungo periodo di inattività. Dopo un lungo periodo di inattività si consiglia inoltre di lavare
bene il serbatoio, riempirlo con acqua fresca e rinnovare l'acqua presente nella macchina
☞ We advise you not to wash the brewing group in the dishwasher (although this would be
possible) because the coffee grounds would stick on the dishes.
-
Clean MILLENNIUM PRO inside with a soft cloth.
-
Remove possible coffee grounds with a soft brush.
-
Reinsert the brewing group. With a coin turn the screw located above the coffee spout with
azionando il pulsante "vaporizzatore" per circa 2 minuti, svuotando al termine la vachetta
short anticlockwise movements while gently pushing the brewing group (FIG. N). In this
raccogli fondi (F).
way you will be able to push a little the brewing group. Then push it completely into the unit.
Una volta raggiunta la corretta temperatura di funzionamento la spia led
(As soon as MILLENNIUM PRO is switched on, it will automatically position the brewing
si spegnerà e
MILLENNIUM PRO sarà pronta per l'erogazione del caffè.
group correctly).
☞ Se non l'avete ancora fatto, procedete alla MESSA A PUNTO della macchina per caffè
seguendo le istruzioni come da CAPITOLO 10.
-
Tighten the brewing group set screw ( FIG. O ).
-
Reinsert the safety cover (first lower tongues, then upper tongue) and screw the knob
(FIG. P).
2.5 SPEGNIMENTO MACCHINA PER CAFFE'
-
Per spegnere la macchina, premete il tasto multifunzione
e mantenetelo premuto per
-
Close the brewing group housing door.
-
Reinsert the coffee grounds box and the drip tray.
circa 3 secondi finchè tutti i led si accendono brevemente e poi si spengono.
3. EROGAZIONE CAFFE'
3.1 Caffè per una persona
-
Posizionate una tazzina sotto il beccuccio erogatore L
( FIG. D ), regolate l'altezza del caffè (cap. 3.3) e premete
il tasto
(un segnale acustico).
MILLENNIUM PRO in automatico provvederà a macinare,
a comprimere e ad erogare la quantità di caffè regolata.
FIG. N
FIG. D
☞ E' possibile interrompere anzitempo l'erogazione del caffè premendo il tasto
6
.
FIG. O
FIG. P
☞ Lack of cleaning could cause an early wear of the brewing group gasket.
27
8. MAINTENANCE
3.2 Caffè per due persone
In order to make excellent coffee, MILLENNIUM PRO needs to be cleaned thoroughly at
-
Posizionate due tazzine sotto il beccuccio erogatore ( FIG. D ), regolate l'altezza del caffé
(due volte un segnale acustico). MILLENNIUM PRO
regular intervals. To remind you this, MILLENNIUM PRO is equipped with an alarm which
(cap. 3.3) e premete il tasto
stops the coffee delivery every 200 cups of coffee (You will notice that all the red lights will flash
in automatico provvederà a macinare, a comprimere e ad erogare la quantità di caffè
and beep). Switch the unit off and unplug it. Clean it thoroughly by following the instructions in
regolata.
point 8.1 and, if necessary, point 9.
☞ To use MILLENNIUM PRO again you must stop the alarm by switching off the unit.
☞ E' possibile interrompere anzitempo l'erogazione del caffè premendo il tasto
.
3.3 Regolazione altezza caffé
-
8.1 How to clean the brewing group
Ruotate la manopola regolazione altezza caffé (4 ) per regolare l'altezza del caffè secondo
il vostro gusto:
-
Switch the unit off and unplug it.
-
Let the unit cool down.
verso sinistra = caffè più basso
-
Remove the drip tray and the coffee grounds box.
verso destra = caffè più lungo
-
Open the brewing group housing door.
-
Screw out the knob and pull out the safety cover ( FIG. H ).
-
Remove the brewing group set screw. You can use a coin to unscrew it. ( FIG. I )
-
Take out the brewing group. Proceed as shown in FIG. L.
NOTA: La scala è regolata in centimetri cubici (cc). Effettuate alcune prove per determinare le
posizioni che realmente corrispondono ai vostri gusti e annotatele sul manuale di istruzioni.
4. EROGAZIONE ACQUA CALDA
Per ottenere acqua calda per preparare the o altri infusi è necessario attivare la funzione
"vapore".
-
A macchina accesa premete il tasto multifunzione
, la spia
lampeggerà
velocemente durante l'aumento della temperatura.
Quando la spia led
smette di lampeggiare e rimane accesa, il vaporizzatore ha raggiunto
la giusta temperatura e la macchina è pronta ad erogare vapore e quindi acqua calda.
Fino a quando il vaporizzatore non avrà raggiunto la temperatura ottimale, la spia led
FIG. H
FIG. I
FIG. L
- Wash the brewing group thoroughly under the
water tap and dry it well. (FIG. M)
continuerà a lampeggiare velocemente ed il pulsante "vaporizzatore" non sarà attivo.
-
Mettete in posizione il set montalatte C
-
Posizionate un contenitore pieno d'acqua sotto il set montalatte.
-
Immergete il tubo del set montalatte nel contenitore d'acqua.
-
Premete il pulsante"vaporizzatore" (5) fino a quando l'acqua contenuta nel contenitore,
circolando, diventa sempre più calda.
FIG. M
26
7
ATTENZIONE! Nella fase iniziale di erogazione del vapore, potrebbero prodursi degli spruzzi.
- Reinsert the box and push it completely so that it is well set.
Operate con la massima cautela. Il tubetto in metallo del set montalatte si scalda, evitate il
- Wash, dry and reinsert the drip-tray.
contatto diretto con la pelle. Operate con la massima cautela!
- Press the multifunction button
: the warning light will go off.
- When the coffee grounds warning light stops flashing the coffee
5. ATTIVAZIONE DEL MONTALATTE
buttons will transmit commands again.
5.1 Come montare il latte.
WARNING! When the coffee grounds warning light flashes, empty
the coffee grounds box although it is not completely full. If you don't
Per montare il latte e quindi ottenere cappuccini è necessario attivare la funzione "vapore".
-
A macchina accesa premete il tasto multifunzione
, la spia
empty the box the coffee grounds could block the machine.
lampeggerà
velocemente durante l'aumento della temperatura.
Quando la spia led
☞ To empty the coffee grounds box more easily, place a piece of
smette di lampeggiare e rimane accesa, il vaporizzatore ha raggiunto
absorbent paper on the bottom of the box.
la giusta temperatura e la macchina è pronta ad erogare vapore e quindi a montare il latte.
Fino a quando il vaporizzatore non avrà raggiunto la temperatura ottimale, la spia led
continuerà a lampeggiare velocemente ed il pulsante "vaporizzatore" non sarà attivo.
-
Mettete in posizione il set montalatte C
-
Posizionate il contenitore del latte a fianco della macchina ed immergete il tubo del
e) The on / off function pilot light comes on = the unit is switched on.
The on / off function pilot light comes off = the unit is switched off.
set montalatte dentro di esso(FIG.1 - PAG.2). Il latte può essere indifferentemente magro o
intero, a temperatura ambiente o freddo.
-
Posizionate una tazza sotto il montalatte.
-
Premete il pulsante "vaporizzatore" (5) per montare il latte. Durante l'erogazione la spia led
della temperatura potrà nuovamente lampeggiare, ma sarà comunque possibile continuare
l'erogazione.
-
-
All pilot lights flash simultaneously: there is a mechanical malfunctioning. C l e a n
MILLENNIUM thoroughly by following the instuctions at point 8.1 "How to clean the
Se il latte perde di densità potete regolare lo spillo di regolazione della densità (N)
brewing group" and point 9 "HOW TO DECALCIFY MILLENNIUM"
sollevandolo leggermente.
☞ If all lights stays on, contact an Authorized Service Cantre.
Se il latte montato non è sufficentemente caldo o è troppo caldo, potete regolarne l'afflusso
e quindi la temperatura stringendo la vite (il latte sarà più caldo) o allargando la vite (il latte
-
sarà meno caldo) posta sul tubo di pescaggio del set montalatte (C).
The three pilot lights in the middle, flash simultaneously and a signal warning
Durante l'erogazione del latte è inoltre possibile erogare contemporaneamente il caffè
tone is heard: Clean the brewing unit by followig the instructions at point 8.1.
ottenendo in meno di un minuto un delizioso cappuccino.
☞ If you are not going to use MILLENNIUM PRO for a long period of time,
5.1 Come pulire il set montalatte (FIG.4 - PAG.2).
switch it
off and unplug it.
Al termine di ogni uso con il latte è necessario pulire accuratamente il cappucinatore e tutte le
parti che sono venute in contatto con il latte in quanto a temperatura ambiente il latte diventa
☞ Switch MILLENNIUM PRO off only when the brewing cycle is over.
acido e sviluppa batteri.
8
25
Per pulire rapidamente ed efficacemente il cappuccinatore vi consigliamo di:
7. PILOT AND WARNINGS LIGHTS
a) The water heating up pilot light flashes: the right water temperature for coffee
(normal flash) or steam (rapid flash) has not yet been reached.
The water heating up pilot light comes on: the water has reached the right
temperature and MILLENNIUM PRO is ready to deliver steam (see point 5).
The water heating up pilot light is off while
is on: The Coffee Machine
is ready.
b) The water warning light flashes:
a) The water tank is empty and must be refilled (see chapter 2.1). Don't forget
to let air go off from circuits following the instructions of chapter 2.4.2.
b) The water tank has been introduced wrongly.
c) The coffee has been ground too finely and water can't pass through, select
a coarser coffee grinding. (see chapter 6).
-
Controllare che la funzione "vapore" sia attiva
-
Prendere un bicchiere d'acqua pulita.
-
Immergere il tubo del cappuccinatore del bicchiere d'acqua.
-
Premere il pulsante "vaporizzatore" per pulire il condotto con l'acqua.
-
Vuotare il bicchiere e riempirlo nuovamente con un piccolo quantitativo di acqua pulita.
-
Posizionate il bicchiere sotto l'uscita del "set montalatte" (C)
-
Immergere il tubo del cappuccinatore del bicchiere d'acqua.
-
Premere il pulsante "vaporizzatore" per attivare il ricircolo in modo da sterilizzare il condotto.
-
Con un panno morbido e inumidito in acqua calda, pulire il tubo di aspirazione.
Per una pulizia più accurata del cappuccinatore, periodicamente:
-
Sfilarlo dalla propria sede tirando verso l'esterno (FIG.2 - PAG.2)
-
togliere il coperchio (O), lo spillo (N) ed il tubo di aspirazione (M) (FIG.3 - PAG.2) e pulire
accuratamente.
Press the multifunction button
: the warning light will go off.
ATTENZIONE! Nella fase iniziale di erogazione del latte montato potrebbero prodursi degli
c) The coffee warning light flashes:
a) The coffee beans container is empty. Fill the cofee beans container
following instruction at point 2.2
b) The coffee as been ground too finely and the quantity of grounded coffee
introduced into the brewing unit results to be too small: select a coarser
grinding (see chapter 6) or increase the quantity of coffee to be grounded
(see chapter 10).
The coffee warning light is on: coffee has been grounded too coarsly
and the quantity of coffee introduced into the brewing unit is too thick: select
a finer grinding (see chapter 6) or decrease the quantity of coffee to be
grounded (see chapter 10).
spruzzi. Operate con la massima cautela. Il tubetto in metallo del set montalatte si scalda, evitate
il contatto diretto con la pelle.
6. COME REGOLARE LA MACINATURA
Una corretta regolazione della macinatura è indispensabile per un buon caffè espresso
all'italiana.
Una macinatura troppo fine provoca l'uscita del caffè in gocce, dando un gusto troppo acre e
senza formazione di crema. Una macinatura troppo grossa provoca la fuoriuscita del caffè in
modo veloce, dando come risultato una bevanda senza gusto e troppo leggera.
Un caffè con una tostatura chiara normalmente necessita di una macinatura più fine, un caffè
Press the multifunction button
: the warning light will go off.
con una tostatura scura normalemente necessita di una macinatura più grossa.
Una corretta regolazione della macinatura va effettuata solo mentre MILLENNIUM PRO sta
d) The coffee grounds warning light flashes = the coffee grounds box is
full. The coffee buttons will not transmit any command until you empty the
macinando. ATTENZIONE! Regolare la macinatura mentre MILLENNIUM PRO non sta
macinando potrebbe danneggiare il macinacaffè.
coffee grounds box.
-
Premete la manopola regolazione della macinatura (I) per
consentire la sua fuoriuscita (FIG. G1).
How to empty the coffee grounds box (Page 28 for pictues)
- Remove the drip tray (FIG. Q ).
-
- Release the coffee-grounds box with your fingers (FIG. R)
e premere un tasto caffè.
and remove it (FIG.S).
24
- Empty the box, then wash it carefully and dry it.
Posizionate una tazzina sotto il beccuccio di erogazione caffè
(Fine)
(Grosso)
9
-
Press the "steamer" button
-
water is adsorbed by the tube and let it circulate into the frother, in this way water cleans both
the tube and the frother
FIG. G1
After having cleaned roughly the circuit, take some more clean water and let it circulate some
time for sterilisation.
FIG. G2
-
At the end, clean the suction tube with a soft cloth dampened with hot water.
For a more thorough cleaning of the cappuccino maker, the following should be done pariodically:
-
-
La regolazione della macinatura deve essere eseguita con la macchina in azione, durante
la fase di macinatura.
Ruotate la manopola per la regolazione della macinatura di uno (360°) o due giri completi
per volta secondo il tipo di correzione che desiderate fare (FIG. G2), girando verso sinistra
per un caffè macinato più fine e girando verso destra per un caffè macinato più grosso.
Dopo aver individuato la macinatura di vostro gradimento premete la manopola per
riposizionarla a "scomparsa" ( FIG. G1 ).
CONSIGLIO! Per verificare la giusta macinatura, fate uscire un paio di caffè prima di fare altre
correzioni.
-
extract it by pulling it outwards (see FIG.2 - PAG.2)
-
take the lid off (O), remove the pin (N) and the suction tube (M) (FIG.3 - PAG.2);
-
wash everything under running wanter.
WARNING! At the beginning of the frothered milk delivery, there may be a spray of hot milk. Be
careful. The milk-frother set nozzle heats up. Do not touch it.
6. HOW TO ADJUST THE COFFEE GRINDING
Correct grinding is essential for a good Italian espresso.
7. FUNZIONAMENTO DELLE SPIE
If the coffee beans are ground too finely the coffee will drip, taste bitter and have no cream.
a) Se lampeggia costantemente: La macchina è in fase di riscaldamento
e la temperatura è ancora troppo bassa per potere erogare caffè (lampeggio
normale) o vapore (lampeggio rapido). Attendete qualche minuto.
Se è spenta e la spia
è accesa: La macchina è pronta ad erogare caffè.
Se è accesa: E' attivata la funzione vapore, consultate il capitolo 5.
b) Se la spia di controllo acqua lampeggia costantemente:
a) manca l'acqua nel serbatoio, occorre riempire il serbatoio dell'acqua, (vedi
capitolo 2.1). Ricordatevi di caricare i circuiti prima di fare il caffè (cap.2.4.2).
b) Il serbatoio è stato inserito male, controllate il serbatoio.
c) Il caffè è stato macinato troppo fine e l'acqua non riesce a passare,
regolate con una macinatura più grossa (vedi cap.6).
If the coffee beans are ground too coarsely, the water goes through the ground coffee too quickly.
The coffee will thus be watery and tasteless.
If the coffee beans are ligh roasted we suggest you a finer setting (turn anti-clockwise).
If the coffee beans are dark roasted we suggest you a coarser setting (turn clockwise).
A correct coffee grinding adjustment must be done while MILLENNIUM PRO is
grinding. Adjusting the coffee grinding while MILLENNIUM PRO is not grinding may
damage the coffee grinder.
-
Push the grinding regulation knob ( I ) to let it out ( FIG. G1 ).
-
Press one of the coffee button (after having placed a container under the coffee outlet spout).
-
While MILLENNIUM PRO is grinding, turn the grinding regulation knob ( I ) of one or two
complete rounds (360°) per time to adjust the coffee grinding according to your personal
taste (FIG. G2). After having adjusted it, push the button to its original position. Before making
c) Se la spia di controllo della quantità di caffè lampeggia costantemente:
a) manca il caffè, riempite il contenitore dei chicchi, (vedi cap.2.2).
b) Il caffè è stato macinato troppo fine e la pastiglia di caffè è troppo sottile,
regolate con una macinatura più grossa (vedi cap.6) oppure aumentate
la quantità di caffè da macinare (vedi cap.10).
Se è accesa: Il caffè è stato macinato troppo grosso e la pastiglia di caffè è
troppo spessa, regolate con una macinatura più fine (vedi cap.6) oppure
diminuite la quantità di caffè da macinare (vedi cap.10).
Premendo il tasto multifunzione
la spia si spegnerà.
10
new adjustments check if the coffee grinding is correct, by making a couple of coffees.
(Fine)
(Coarse)
FIG.G1
FIG.G2
23
5. FROTHERED-MILK DELIVERY
5.1 How to frother milk and make cappuccinos .
To frother milk and make cappuccinos it is necessary to activate the "Steam" function.
-
While the coffee machine is off is on press the multifunction button
up pilot light
, the water heating
will flash rapidly to indicate that the temperature is rising.
When the water heating up pilot light
stops flashing and stays on, the heater has reached
the right temperature and MILLENNIUM PRO is ready to deliver steam and froth milk.
The pilot light
will keep flashing rapidly (and the steam button won't be operating) until
the ideal temperature for the steamer has been reached.
-
Set the milk-frother in the correct position.
Place the milk box next to the coffee machine and introduce into it the milk-frother tube (FIG.1
- PAG.2). Any type of milk can be used indifferently.
-
Place a cup under the Milk-frother spout.
-
Press the "steamer" button, the tube adsorb milk and mix it with steam and air, then the milkfrother delivers from the main spout the frothered milk.
During this operation the water heating up pilot light
Quando la spia smette di lampeggiare i tasti caffè sono sbloccati e
MILLENNIUM PRO può erogare il caffè.
ATTENZIONE! Quando si accende la spia vuotate SEMPRE il contenitore
dei fondi di caffè, anche se non è pieno. Se non vuotate il contenitore i fondi
di caffè potrebbero far bloccare la macchina.
☞ Per facilitare lo svuotamento del contenitore dei fondi di caffè, suggeria
mo di stendere uno strato di carta a cucina nel contenitore, dopo averlo
pulito e asciugato.
e) Se è accesa: la macchina é in funzione.
might start flashing again, but it is
possible to go on just the same.
-
d) Se la spia di controllo fondi lampeggia costantemente:
il contenitore dei fondi caffè è pieno.
I tasti caffè sono bloccati in attesa che la vaschetta venga svuotata.
- Togliete la vaschetta raccogli gocce. (cap. 8.3.1 e 8.3.2)
- Con un dito sganciate il cassetto ed estraetelo completamente.
- Svuotatelo, lavatelo accuratamente e asciugatelo prima di rimontarlo.
- Introducete il cassetto e premete a fondo fino a battuta.
- Rimettete la vaschetta raccogli gocce dopo averla opportunamente
lavata ed asciugata.
Premete il tasto multifunzione
e la spia si spegnerà.
Se è spenta: la macchina é spenta ma ancora collegata alla corrente
elettrica, per scollegarla dovete staccare la spina dalla presa di corrente.
In case the result isn't the one desired, it can be improved pulling the regulationg cream pivot
(N)
-
In case the frothered milk isn't sufficiently hot, temperature can be increased turning the
screw of the gear that narrows the tube (C). Narrowing the tube the milk temperature
increases.
Se tutte le spie lampeggiano contemporaneamente: è avvenuto un blocco meccanico della
Thanks to the two separate heating systems, it is possible to obtain, contemporary, a creamy
coffee and the frothered milk. A very good cappuccino iin less then a minute.
5.2 Milk-frother maintenance (FIG.4 - PAG.2).
macchina. Procedete alla PULIZIA DEL GRUPPO DI INFUSIONE (cap. 8.1) e alla
DECALCIFICAZIONE DELLA MACCHINA (cap. 9)
☞ Se le spie continuano a lampeggiare anche dopo la pulizia del gruppo, contattate un Centro
di Assistenza autorizzato.
After having used the steamer for frothering milk, it is recommended to clean the frother carefully
since home temperature turns the milk sour and produces bacteria.
Se le tre spie centrali lampeggiano contemporaneamente ed avvisate un segnale acustico: Procedete alla PULIZIA DEL GRUPPO DI INFUSIONE (cap. 8.1)
For cleaning rapidly and thoroughly the milk-frother it is suggested to:
-
Turn on the the milk-frother function
-
sink the tube of the frother into a glass of water
22
11
CONSIGLIO! La macchina per caffè può rimanere accesa per tutta la giornata. Tuttavia se non
3.2 Two coffees
viene utilizzata per lungo tempo, è meglio spegnerla; una volta accesa la macchina sarà pronta
-
Place two cups under the coffee spout ( L ) ( FIG. D ). Choose the type of coffee (weak / strong)
in pochissimo tempo.
by turning the coffee regulation knob (see point 3.3).
☞ Spegnete la macchina soltanto quando si è concluso il ciclo automatico di preparazione
Press the coffee button
del caffè.
(= two beeps). MILLENNIUM PRO will automatically
make and deliver the two espresso coffees.
8. CURA E MANUTENZIONE
☞ You can stop the coffee delivery by pressing the multifunction button
Un' accurata pulizia periodica della macchina Vi garantirà un caffè di ottima qualità per un lungo
periodo di tempo, Vi consigliamo perciò di seguire con cura e attenzione le seguenti indicazioni:
.
3.3 How to weaken or strengthen the coffee
-
Per ricordarvi di effettuare queste operazioni la macchina è dotata di un allarme che si attiva ogni
According to your taste, you can weaken or strengthen the coffee by turning the coffee
regulation knob ( 4 ):
200 caffè che blocca la macchina (noterete che tutte le tre spie centrali rosse lampeggeranno
ed emetteranno un segnale acustico). Per riavviarla provvedete alla PULIZIA DEL GRUPPO DI
towards the left
= to have a stronger coffee
towards the right = to have a weaker coffee
INFUSIONE e alla DECALCIFICAZIONE DELLA MACCHINA.
☞ Durante la fase di allarme la macchina è bloccata e non potrà erogare caffè! Per sbloccarla
bisogna spegnere MILLENNIUM PRO mantenendo premendo il tasto multifunzione
Note: the scale is graduated in cubic centimeters (cc). Make some tests in order to define the
scale selection which allows to the preparation of the coffee in the concentration that you prefer.
.
4. HOT WATER DELIVERY
8.1 PULIZIA DEL GRUPPO DI INFUSIONE.
If you want hot water to make tea or other infusions, it is necessary to activate the "Steam"
-
Spegnete la macchina e scollegatela dall'impianto elettrico.
-
Se la macchina è stata utilizzata da poco tempo, attendete che si raffreddi.
-
Togliete la vaschetta raccogli gocce ed il cassetto raccogli fondi.
function.
-
-
Sollevate lo sportello frontale di protezione B di MILLENNIUM PRO.
-
Svitate il pomello di fissaggio, sollevate verso l'alto ed estraete il coperchio di protezione
While the coffee machine is off is on press the multifunction button
up pilot light
will flash rapidly to indicate that the temperature is rising.
When the water heating up pilot light
(FIG. H).
, the water heating
stops flashing and stays on, the heater has reached
-
Togliete la vite di fermo del gruppo infusione aiutandovi con una moneta se necessario
the right temperature and MILLENNIUM PRO is ready to deliver steam and hot water.
(FIG. I).
The pilot light
-
Estraete il gruppo d'infusione, avendo cura di agire come indicato in (FIG. L).
will keep flashing rapidly (and the steam button won't be operating) until
the ideal temperature for the steamer has been reached.
-
Set the milk-frother in the right position.
-
Place a cup of water under the Milk-frother set.
-
Sink the steamer tube into a cup of water:
-
Press the "steamer" button , water is adsorbed through the tube and heated by steam, then
it is delivered hot from the spout.
You can let the water re-circulate several times in order to get it as hot as you want.
FIG. H
12
FIG. I
FIG. L
WARNING! At the beginning of the hot water delivery, there may be a spray of hot water. Be
careful. The milk-frother set nozzle heats up. Do not touch it.
21
2.4 STARTING
-
2.4.1 Press the multifunction button
corrente ed asciugatelo bene. (FIG. M)
and hold it down for about 3 seconds. All the lights
will come on and go off in a rapid order, then the on / off function pilot light
on. The water heating up pilot light
Lavatelo accuratamente sotto il rubinetto dell'acqua
will come
will flash to indicate that the water in the boiler
is heating up. Delivering coffee is impossible while this operation is on.
FIG. M
2.4.2. Drain out the air present into the hydraulic circuit pressing the "steamer" button for about
☞ E' possibile lavare il gruppo infusione in lavastoviglie, noi però lo sconsigliamo in quanto i
residui di polvere di caffè che durante il lavaggio vengono estratti dal gruppo si possono
1 minute. Empty the coffee groungs box (F)of the water formed during this operation.
attaccare alle stoviglie.
☞ This operation is essential when you use your MILLENNIUM PRO for the first time, and
has to be repeated in case you run out of water or when you use your MILLENNIUM PRO
-
after a long period of inactivity. After a long period of inactivity clean the water tank thoroughly,
Per una pulizia più profonda, aiutandovi con una moneta fate scorre la camera di infusione
lungo la vite fino a raggiungere la massima apertura, senza mai forzare il blocco naturale.
fill it with cold water and let water out of the Milk-frother set by pressing the "steamer" button. This
-
Pulite l'interno della macchina per caffè con un panno mordido.
operation will take about 2 minutes. Empty the coffee groungs box (F)of the water formed during
-
Per eliminare eventuali residui di polvere di caffè aiutatevi con un pennello morbido da
this operation.
cucina.
Once the right water temperature has been reached, the water heating up pilot light
will go
-
off: your MILLENNIUM PRO is ready to make coffee.
e ruotatelo in senso antiorario con una moneta) ( FIG. N ). La macchina provvederà in
☞ Set up the Espresso Coffee Machine following the instructions of chapter 10 in case it hasn't
been done.
2.5 HOW TO SWITCH MILLENNIUM PRO OFF
-
Press the multifunction button
Reinserite il gruppo di infusione (nel caso fosse impossibile farlo, verificate il perno in acciaio
automatico al corretto posizionamento al momento della successiva accensione.
-
Rimettete la vite di bloccaggio in sede ( FIG. O ).
-
Rimontate il coperchio di protezione introducendo prima le linguette inferiori poi la linguetta
superiore, chiudete quindi ruotando il pomello. ( FIG. P )
and hold it down for about 3 seconds until all the lights
come on and then go off.
3. COFFEE BREWING
-
Reinserite il cassetto raccogli fondi e successivamente la vaschetta raccogli gocce.
-
Abbassate lo sportello di protezione B.
-
Collegate la macchina all'impianto elettrico e mettetela in funzione premendo il tasto
multifunzione
.
3.1 One coffee
-
Place a cup under the coffee spout ( L ) ( FIG. D ).
Choose the type of coffee (weak / strong) by turning
the coffee regulation knob (see point 3.3).
Press the coffee button
(you will hear a beep).
MILLENNIUM PRO will automatically make and deliver
the chosen espresso coffee.
FIG. D
☞ You can stop the coffee delivery by pressing the multifunction button
20
.
FIG. N
FIG. O
FIG. P
13
☞ La mancanza di pulizia del gruppo, potrebbe provocare un'usura precoce della guarnizione
2. HOW TO OPERATE MILLENNIUM PRO
del gruppo di infusione.
Put the unit on a flat and dry worktop, far from heat sources. Open the cover of the water tank
(pict. A) take out from the tank the milk-frothing tube and fit it into the hole (distinguished by a
8.2 SOSTITUZIONE DELLA GUARNIZIONE
A causa della normale usura, periodicamente è necessario provvedere alla sosituzione della
guarnizione che si trova nel gruppo di infusione.
-
Spegnete la macchina e staccate la spina dalla
2.1 Water filling.
guarnizione
-
The unit must be switched off and unplugged.
-
Lift the cover of the water tank ( A ).
-
Take out the tank by using the specially provided handle.
come già visto per la pulizia al par. 8.1
-
Fill the tank with cold water, or if you prefer with mineral water (WITHOUT gas).
Assicuratevi che la camera di infusione sia alla
-
Reinsert the tank and push it gently so that it is well set. (FIG. B)
massima apertura.
-
Lower the handle and close the tank with the cover.
presa di corrente.
-
green clip) situated under the cover (pict. B) of the machine.
Procedete allo smontaggio del gruppo di infusione,
Sostituite la guarnizione in gomma con una guarnizione nuova originale. (mod. GU043)
assicurandovi che sia correttamente posizionata nella scalanatura.
☞ Do not fill the water tank with mineral water with gas, milk or other liquid.
8.3 PULIZIA DELLE VASCHETTE RACCOGLI GOCCE E RACCOGLI FONDI
2.2 Coffee beans filling.
8.3.1 Vaschetta raccogli gocce
Qualora la vaschetta raccogli gocce fosse piena o la griglia appoggia tazze fosse sporca
provvedete alla loro pulizia.
-
Sollevate ed estraete la vaschetta raccogli gocce con la griglia appoggia tazze (FIG. Q).
-
Provvedete alla pulizia.
-
Riposizionate la vaschetta raccogli gocce e la griglia appoggia tazze.
-
Lift the cover of the coffee beans container (E FIG.C )
-
Put the coffee beans into the coffee beans container.
-
Close the container with the cover.
2.3 Connection.
-
Check that the rated voltage of the unit matches your local voltage.
-
Plug the unit in, by using the specially provided power cord.
FIG. A
FIG. Q
14
FIG. R
FIG. B
FIG. C
FIG. S
19
This sophisticated espresso coffee machine is fully authomatic and allows you to make an excellent
espresso coffee by using coffee beans. You can also make cappuccinos, hot milk, tea and any other
kind of infusion.
8.3.2 Vaschetta raccogli fondi
Per la pulizia della vaschetta raccogli fondi provvedete come segue:
-
Sollevate ed estraete la vaschetta raccogli gocce (FIG. Q)
1. WARNING
-
Con un dito sganciate il cassetto (FIG. R)
1.
-
Estraete la vaschetta completamente (FIG. S)
2.
3.
4.
5.
6.
7.
8.
9.
10.
11.
12.
13.
14.
15.
16.
17.
18.
19.
20.
21.
22.
23.
Read the following instructions carefully, since they give you useful safety information about installation,
use and maintenance and help you avoid mishaps and possible accidents.
Remove the packing and make sure that the appliance is intact, with special attention to the supply cable.
In case of doubt, do not use the appliance and turn to qualified personnel.
Before connecting the appliance make sure that the mains voltage corresponds to the data specified on
the label. The appliance can be damaged if the voltage is not correct.
If the plug does not suit the socket, let it be replaced with another suitable plug by qualified personnel
only, which shall also ensure that the section of the socket cables is suitable for your appliance power
absorption.
Generally, the use adaptors multiple plugs and/or extensions is not recommended; should they be
necessary, please use only simple or multiple adaptors and extensions in compliance with the safety
rules in force, making sure that the capacity absorption limit marked on the simple adaptors and the
extensions and the maximum power limit marked on the multiple adaptor are not exceeded.
Do not use the appliance if the cable or the plug shows any damages.
Do not use the appliance after a possible irregular working. In this case, switch it off and do not break
it open. Refer to an authorized G3 FERRARI after-sale service for repair and require original spare parts
only. Failing to follow these instructions may impair the safety of your appliance.
This appliance is to be destined to its special purpose only. Any other use is to be considered as improper
and thus dangerous. The manufacturer cannot be responsible for any damages deriving from
improper, wrong or incautious use. This appliance is for HOUSEHOLD USE ONLY.
To protect against electric shock, do not immerse cord, plug or any parts of the appliance into water or other
fluids.
Do not use the appliance near explosives, highly flammable materials, gases or burning flames.
Do not allow children or disabled people to use the appliance if they are not properly watched over. Close
supervision is necessary when any appliance used by or near children.
Do not hold the appliance with wet hands or feet.
Never use any accessories but those provided for by G3 FERRARI. The use of accessory attachments
not recommended by the appliance manufacturer may cause hazard or injury.
Do not use the appliance near the bath, the shower, the wash-basin or anywhere water can turn out to be a
source of danger.
Do not pull the mains cable or the appliance itself when disconnecting the plug from the socket.
Do not let cord hang over edge of table, or touch hot surface.
Do not expose the appliance to atmospheric agents such as rain, wind, snow, hail. Do not use outdoors.
Pull out the plug from the mains socket when the appliance is not used or when cleaning it.
Allow to cool before cleaning.
If you decide not to use the appliance any longer, make it unserviceable by simply cutting the supply cable after
disconnecting the plug from the socket. Also make any dangerous parts unserviceable, especially for children
who could play whit the appliance.
Unplug from outlet when not in use, before putting on or taking off parts, and before cleaning.
Let other potential users read these instructions.
Keep these instructions.
9. DECALCIFICAZIONE DELLA MACCHINA
Periodicamente ed in ogni caso quando si attiva l'apposito allarme, bisogna procedere alla
decalcificazione della macchina per caffè.
a) Spegnete la macchina e togliete la spina dalla presa elettrica.
b) Riempite il serbatoio con una miscela di acqua e prodotto decalcificante liquido per
macchine per caffè espresso nelle proporzioni indicate sul prodotto decalcificante.
c) Inserite la spina nella presa elettrica ed accendete l'apparecchio.
d) Attivate il pulsante "vaporizzatore" subito dopo l'accensione dell'apparecchio (senza
attivare la funzione vapore) per almeno 2 minuti per permettere alla miscela di entrare nei
circuiti.
e) Rilasciate il pulsante.
f) Spegnete la macchina.
g) Aspettate almeno 20 minuti.
h) Accendete la macchina e ripetete le operazioni dalla d) alla g) per almeno altre 2 volte.
i)
Sciacquate a fondo il serbatoio dell'acqua e riempitelo con acqua fresca.
l)
Attivate il pulsante "vaporizzatore" subito dopo l'accensione dell'apparecchio (senza
attivare la funzione vapore) per fare in modo che l'acqua fresca pulisca i circuiti. Fate scorrere
almeno due litri di acqua fresca vuotando di tanto in tanto la vaschetta dei fondi.
ATTENZIONE! Utilizzate solo prodotti specifici e non tossici per decalcificazione. Sciacquate
adeguatamente tutti i componenti venuti a contatto con il prodotto decalcificante prima di
riutilizzare. Dosi e tempi possono variare a secondo del prodotto decalcificante utilizzato.
Leggete ed attenetevi alle istruzioni del prodotto decalcificante. La G3 FERRARI non si ritiene
IMPORTANT
1.
2.
3.
4.
Switch the unit off before plugging or unplugging it.
Do not operate the unit without water in the water tank.
Be careful when steaming as steam can reach high temperatures.
Close the hot water / steam knob when you do not need them.
Repairing the unit yourself is hazardous. Have it always repaired by an Authorized Service
Centre.
18
responsabile per i danni provocati da un uso o da un prodotto non adeguato.
CONSIGLIO! Se pensate di non utilizzare la macchina per caffè per un lungo periodo di tempo
consigliamo di provvedere alla sua completa pulizia. Inoltre si suggerisce di svuotare dall'acqua
il serbatoio e la caldaia attraverso il pulsante "vaporizzatore". Questa operazione è inoltre
necessaria per proteggere la macchina dai danni provocati dal gelo durante il trasporto.
15
10. MESSA A PUNTO
MILLENNIUM PRO viene programmata da G3 Ferrari con valori standard ed è subito
pronta all'uso. L'esclusiva funzione di "MESSA A PUNTO" vi permette comunque di ottimizzare
le prestazioni della macchina per caffè in base al tipo di caffè che state utilizzando ed andrebbe
effettuata subito dopo l'acquisto ed ogni qualvolta si cambia tipo o marca di caffè.
a) Spegnete la macchina.
b) Premete contemporaneamente il tasto di accensione
c) Mantenete premuto il tasto caffè
ed il tasto caffè
.
.
d) Più led si illuminano e maggiore sarà la quantità di caffè macinato, rilasciate il tasto caffè,
la macchina salva la nuova impostazione.
e) Accendete la macchina.
f) Completate la messa a punto con la regolazione della macinatura (vedi capitolo 6).
____________________________________________________________________________________________
English
E
MILLENNIUM PRO DESCRIPTION
A - Water tank
B - Brewing group housing door
C - Milk-frother set
D - Control panel
E - Coffee beans container
F - Coffee grounds box
G - "Steamer" button
H - Drip tray
I - Grinding regulation knob
L - Coffee outlet spout
B
I
L
D
sorgano eventuali dubbi o chiarimenti che nelle presenti istruzioni non sono state spiegati
F
G
C
Le presenti istruzioni non possono contemplare ogni uso possibile ed immaginabile. Qualora
A
H
Milk cream regulator pin
Screw and gear. You can make your milk
more hot or less hot by turning the screw
secondo il Vostro parere abbastanza chiaramente, Vi preghiamo rivolgerVi al Vostro rivenditore
a
b
c
d
e
locale o direttamente alla G3 FERRARI. I nostri tecnici saranno lieti di aiutarVi.
✆
059.904099
_______________________
SITO INTERNET
CONTROL PANEL
a- Water heating up pilot light (green)
b- Water warning light (red)
All'indirizzo del sito Internet di G3 FERRARI
http:/ /www.G3ferrari.com
potete trovare informazioni su:
Tutti i prodotti G3 FERRARI
c - Coffee warning light (red)
d- Full coffee grounds box warning light (red)
e- On / Off function pilot light (green)
Rivenditori
4
Prodotti innovativi
1- Multifunction button (On / Off / Steam/ Reset)
Centri di Assistenza Tecnica Autorizzati
2 - One-coffee button
News
3 - Two-coffee button
_______________________
Eventuali tracce di caffè presenti nella macchina sono dovute alle operazioni di collaudo
effettuate con il caffè.
4 - Coffee regulation knob
2
3
5- "Steamer" button
1
La G3 FERRARI si riserva il diritto di modificare le presenti istruzioni senza dare nessun
preavviso.
16
17