1
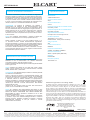
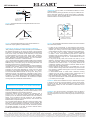
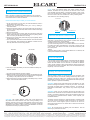
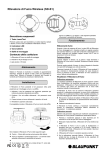
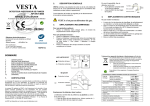
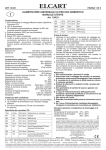
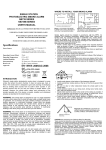
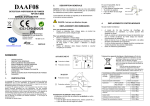
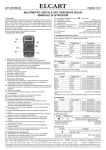
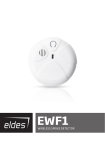
ART. 35/08410-00
ELCART
PAGINA 1 DI 8
Manuale di istruzioni/Scheda tecnica
Alcune informazioni utili:
• Installare
Rilevatore di fumo fotoelettrico
Manuale d’istruzioni
Ideale per l’installazione
in qualsiasi area
un rilevatore di fumo nel corridoio all’esterno di
ogni camera da letto separata, come indicato nella Figura 1.
In abitazioni con due camere da letto, saranno necessari due
rilevatori come indicato nella Figura 2.
• Nel caso di abitazioni a più piani, installare un rilevatore di fumo
per piano come mostrato nella Figura 3.
• Installare un minimo di due rilevatori in ogni abitazione.
• Installare un rilevatore di fumo all’interno di ogni camera da letto.
• Installare rilevatori di fumo alla fine del corridoio che porta alle
camere da letto se risulta più lungo di 12 mt.
• Installare il rilevatore di fumo all’interno della camera da letto
specialmente se si ha l’abitudine di dormire con la porta chiusa,
già che il fumo può rimanere bloccato dalla porta chiusa e l’allarme
posizionato all’entrata potrebbe non svegliarlo con la porta chiusa.
SALA DA PRANZO
CUCINA
CAMERA
DA LETTO
CAMERA
DA LETTO
ART. 35/08410-00
SMK-500 (Wireless)
SMK-500D (Indipendente)
Introduzione
Il nostro rilevatore di fumo fotoelettrico è progettato per rilevare
la presenza di fumo in un determinato ambiente. Non rileva gas, il
calore o fiamme. Questo rivelatore è stato progettato per segnalare
anticipatamente lo sviluppo di fiamme attraverso la segnalazione
acustica integrata nell’apparecchio.
ATTENZIONE: Questo rilevatore di fumo è progettato per il solo
utilizzo in una unità residenziale singola, ovvero deve essere utilizzato
all’interno di un’abitazione singola o di un’appartamento. Non è
destinato per un utilizzo in atri, corridoi, seminterrati, in appartamenti
in condomini, salvo se sono già installati in modo indipendente
altri rilevatori di fumo in ogni nucleo familiare esistente. I rilevatori
di fumo installati in locali ad uso comune esterni all’unità familiare,
come verande o corridoi, potrebbero non avvertire a tempo i residenti
dell’edificio. Nei edifici residenziali multifamiliari, ogni appartamento
individuale deve essere equipaggiato di rilevatori di fumo indipendenti.
ATTENZIONE: Questo rilevatore di fumo non è progettato per un
utilizzo in zone non residenziali, capannoni, edifici industriali o
commerciali. I luoghi a fini non residenziali devono avere rilevatori
di fuoco specializzati e sistemi di allarme. Questo rilevatore da solo
non risulta adatto alla completa sostituzione di un sistema antincendio
in locazioni dove lavorano molte persone come alberghi o motels,
dormitori, ospedali, case di cura e cosi via, anche se sono edifici
singoli. Si prega di riferirsi ai codici NFPA 101, NFPA71, 72A,72B,72C,
72D e 72E per le esigenze sui sensori di fumo per la protezione
antiincendio in stabilimenti non definiti come “abitazioni”.
Ubicazioni per l’installazione del rilevatore di fumo
I rilevatori di fumo devono essere installati in accordo con lo standard
NFPA 72 (Associazione nazionale protezione antiincendio).
Per una completa copertura in ambienti residenziali, i rilevatori di fumo
dovrebbero essere installati in tutte le stanze, corridoi, magazzini e
attici. La copertura minima è costituita da un rivelatore per ogni piano
e uno in ogni area da notte.
SOGGIORNO
CAMERA DA LETTO
Installazione a bassa sicurezza
Installazione ad elevata sicurezza
Figura 1: Dove posizionare rivelatori di fumo nel caso di residenze
con un’unica area da notte.
CUCINA
SALOTTO
CAMERA
DA LETTO
CAMERA
DA LETTO
SOGGIORNO
CAMERA
DA LETTO
Installazione a bassa sicurezza
Installazione ad elevata sicurezza
CAMERA
DA LETTO
Figura 2: Dove posizionare rivelatori di fumo nel caso di residenze
con più di un’area da notte.
CAMERA
DA LETTO
CAMERA
DA LETTO
PIANO
TERRA
CAMERA
DA LETTO
CUCINA
GARAGE
SEMINTERRATO
Installazione a bassa sicurezza
Figure 3: Posizionamento di rivelatori di fumo in residenze a più piani
• Installare i rilevatori di fumo in un semiinterrato in fondo alla
tromba delle scale.
• Installare i rilevatori di fumo al secondo piano in cima alla tromba
delle scale tra il primo ed il secondo piano.
• Assicurarsi che nessuna porta o altri ostacoli blocchino il percorso
del fumo verso il rilevatore.
• Installare rilevatori di fumo addizionali in sala da pranzo, salotto,
attico, camere di stoccaggio e ripostiglio.
• Installare i rilevatori di fumo il più vicino possibile al centro del
soffitto. Se non è possibile, installare il rilevatore sul soffitto,
assicurandosi che non sia più lontano di 10 cm da ogni muro o
angolo, come indicato nella figura 4.
• Se l’installazione sul soffitto non è possibile, installare il rilevatore
di fumo sul muro a 10÷15 cm dal soffitto, come indicato nella
figura 4.
• Se alcune stanze presentano un soffitto inclinato o non piano,
installare il rilevatore di fumo a 90 cm dal punto più alto del soffitto,
come indicato nella figura 5.
ELCART DISTRIBUTION SPA via Michelangelo Buonarroti, 46 - 20093 Cologno Monzese (Milano) ITALY
Tel. +39 02.25117310 Fax +39 02.25117610 sito internet: www.elcart.com
e-mail: [email protected]
La divulgazione dei dati contenuti in questa scheda è da ritenersi un servizio puramente informativo e non costituisce alcun vincolo da parte della Elcart in merito a prestazioni ed utilizzo del prodotto.
The divulgation of data contained on this technical sheet are exclusively for informational reasons and establish no link on behalf of Elcart regard to thr performances and the usa of the product.
La divulgacion de los datos contenidos en esta ficha son un servicio unicamente informativo y no constituyen ningun vinculo de parte de Elcart respecto a las prestaciones y uso del producto.
ELCART
ART. 35/08410-00
PAGINA 2 DI 8
Manuale di istruzioni/Scheda tecnica
SOFFITTO
CENTRO DEL
SOFFITTO
4 inch
(10cm)
MAI QUI
4 inch (10cm)
Minimo
6 inch (15cm)
Max
IMPORTANTE: Per qualsiasi motivo, non disabilitare l’unità per
evitare allarmi indesiderati.
In condotte di areazione della cucina. Il modo in cui un rilevatore di
fumo rivela le particelle di combustione in normali percorsi di corrente
d’aria è mostrato nella figura 6, indicando i luoghi corretti e non
corretti dove posizionare il rilevatore.
MIGLIOR POSIZIONE
POSIZIONE ACCETTABILE
Figura 4: Posizioni raccomandate per installare il rilevatore
CORRENTE D’ARIA
ENTRATA ARIA
CAMERA BAGNO
DA LETTO
FORNELLI
CUCINA
RILEVATORE
CAMERA
DA LETTO
9 FEET
(2,75 mt.)
DISTANZA ORIZZONTALE
DAL VERTICE
SOGGIORNO
UBICAZIONE CORRETTA
UBICAZIONE ERRATA
Figura 5: Modalità d’installazione con soffitto inclinato
Figura 6: Posizioni raccomandate dove installare il rilevatore per
evitare correnti di aria con particelle di combustione
ATTENZIONE:
“Un allarme precoce del rilevamento del fuoco si ottiene grazie
all’installazione di un sistema di rilevamento di fuoco in ogni camera
da letto e le varie zone della casa come segue: (1) Un rilevatore di
fuoco installato in ogni camera da letto separata (vicino, ma fuori
dalla stanza), e (2) un rilevatore installato nel salone, sala da pranzo,
cucina, corridoi, solai, gabinetti, ripostiglio e zone di stoccaggio, ed
i garage annessi”.
Per informazione, conforme allo standard NFPA 74, Sezione 2-4,
afferma: “2-4.1.1 I rivelatori di fumo e calore devono essere installati
al di fuori di ogni zona notte, nelle immediate vicinanze delle camere
da letto e in ogni area supplementare compresi scantinati.”
Le disposizioni del 2-4.1.1 rappresentano il numero minimo di
rilevatori richiesti dalla presente norma. Si raccomanda che il
padrone di casa prenda in considerazione l’uso di rivelatori aggiuntivi
per una maggiore protezione per le aree separate da una porta dalle
aree protette dal rivelatore. Le ulteriori aree consigliate sono
soggiorno, sala da pranzo, camera da letto (s), cucina, mansarda,
ripostiglio, cantina, garage integrato o collegato, e corridoi non
inclusi nel 2-4.1.1 sopra. Tuttavia, l’uso di rilevatori aggiuntivi non è
obbligatorio ed è una decisione del capo famiglia. “Raccomandiamo
una copertura completa e l’uso di rivelatori di fumo e calore
supplementari.”
• In presenza di bagnato o aree molto umide o vicino a bagni con
doccia. La condensa può entrare nella camera di rilevamento,
quindi creare gocce di raffreddamento capaci di causare falsi
allarmi. Installare il rilevatore al meno a 3 metri da bagni.
• In zone molto fredde o molto calde, inclusi edifici non riscaldati
o stanze esterne. Se la temperatura è maggiore o minore
dell’intervallo di rilevamento del rilevatore di fumo, questo non
funziona. Rispettare l’intervallo di rilevamento da 4°C÷38°C
(40°F÷100°F).
• In prossimità di condotti di ventilazione o zone con correnti d’aria
come condizionatori, radiatori o ventilatori. Questi condotti di
ventilazione e correnti d’aria potrebbero allontanare il fumo dai
rivelatori.
• In zone di aria morta. Sono spesso localizzate a livello del tetto o
negli angoli formati dal soffitto con il muro. L’aria stagnata potrebbe
impedire al fumo di arrivare al rilevatore. Riferirsi alle figure 4 e 5
per una corretta scelta del luogo di installazione.
• In zone infestate da insetti. Può accadere che questi insetti entrino
nella camera di rilevazione causando allarmi indesiderati. Quando
gli insetti possono essere un problema, disinfestare l’area prima di
installare i rivelatori.
• In prossimità di luci fluorescenti. Il rumore elettrico delle luci
fluorescenti può causare falsi allarmi. Installare i rivelatori di fumo
ad almeno 1,5 metri da queste luci.
Dove non installare i rilevatori di fumo
I falsi allarmi possono avvenire se i rivelatori vengono installati dove
non funzionerebbero correttamente. Per evitare i falsi allarmi, non
installare i rivelatori di fumo e di calore nelle seguenti situazioni:
• In prossimità di zone dove sono presenti particelle di combustione,
tali come cucine con poche finestre o poca ventilazione, garages
dove si possono trovare fumi di scarico provenienti da veicoli,
riscaldamento ad acqua calda, riscaldatori.
• Non installare i rilevatori di fumo a meno di 6 metri da luoghi
dove le particelle di combustione sono presenti (come cucine).
Se una possibile distanza non è ottenibile, provare ad installare
il rivelatore il più lontano possibile dalle particelle di combustione,
preferibilmente sul muro. Provvedere ad una adeguata
ventilazione.
ATTENZIONE: Non togliere mai la batteria del rilevatore per
fare cessare allarmi indesiderati. Aprireuna finestra o attivare un
ventilatore per fare partire via il fumo. Il rilevatore si disattiverà da
solo. Se l’allarme persiste, pulire il rilevatore come descritto in questo
manuale di istruzioni.
ATTENZIONE: Evitare di rimanere troppo a lungo vicino al rilevatore
quando è in allarme. Il rumore è potente, l’eccessiva esposizione
potrebbe danneggiare l’udito.
ELCART DISTRIBUTION SPA via Michelangelo Buonarroti, 46 - 20093 Cologno Monzese (Milano) ITALY
Tel. +39 02.25117310 Fax +39 02.25117610 sito internet: www.elcart.com
e-mail: [email protected]
La divulgazione dei dati contenuti in questa scheda è da ritenersi un servizio puramente informativo e non costituisce alcun vincolo da parte della Elcart in merito a prestazioni ed utilizzo del prodotto.
The divulgation of data contained on this technical sheet are exclusively for informational reasons and establish no link on behalf of Elcart regard to thr performances and the usa of the product.
La divulgacion de los datos contenidos en esta ficha son un servicio unicamente informativo y no constituyen ningun vinculo de parte de Elcart respecto a las prestaciones y uso del producto.
ELCART
ART. 35/08410-00
PAGINA 3 DI 8
Manuale di istruzioni/Scheda tecnica
Installazione del rilevatore di fumo
Il rilevatore di fumo è stato progettato per essere installato sul soffitto
o sul muro se necessario. Riferirsi prima ai due paragrafi precedenti
per decidere dove e come installarlo.
Seguire i passi seguenti per installare il rilevatore di fumo:
1.Scegliere il luogo di installazione e tracciare una linea orizzontale
lunga 15 cm.
2.Rimuovere la staffa dall’unità ruotandola in senso antiorario.
3.Fissare la piastra di base nella posizione di montaggio desiderata
e contrassegnare i due fori con una penna.
4.Rimuovere la staffa.
5.Praticare due fori con una punta da trapano di 5 mm ed inserire due
stopper nei fori. Tenere il rilevatore di fumo lontano da eventuale
polvere causata dal trapano.
6.Fissare la piastra inferiore con le viti e tasselli corrispondenti.
7.Allineare il rilevatore alla staffa, premerlo contro e ruotarlo in senso
orario per bloccarlo. Assicurarsi che l’installazione sia stabile.
STAFFA DI FISSAGGIO
RILEVATORE
VITI
NOTE: Quando la batteria è stata inserita, il rilevatore emetterà
un beep sonoro per confermare che la batteria è stata inserita
correttamente. Chiudere il coperchio e premere il tasto di test per
5 secondi fino a che non viene emesso un suono. Ciò significa che
l’apparecchio funziona correttamente.
ALTOPARLANTE
LED ROSSO
PULSANTE DI TEST
Abbinamento del rilevatore
con un pannello di controllo
Il rilevatore di fumo 35/08410-00 può essere utilizzato individualmente
o abbinato ad un pannello di controllo per integrare un sistema di
allarme via modulo wireless del rilevatore.
1.Assicurarsi che il pannello di controllo sia in modalità learning
(abbinamento).
2.Premere il tasto test del rilevatore per 3 secondi, due beep sonori
confermeranno l’abbinamento. Il pannello di controllo emetterà
anche lui un beep per indicare che l’operazione è stata effettuata
con successo.
Fase test:
Premere il tasto test per 3 secondi, il pannello di controllo si metterà
in allarme automaticamente.
Indicatore LED Rosso
VITI
Per aprire il coperchio della batteria ed installarla, procedere nel
modo seguente:
1.Per azionare il rilevatore di fumo si richiede una batteria.
2.Aprire il compartimento batteria ed installare la batteria all’interno,
assicurarsi che “+” e “-” siano allineati contemporaneamente.
3.Chiudere il vano batteria fermamente fino allo scatto in posizione.
Il rilevatore di fumo è equipaggiato di un indicatore LED rosso situato
presso il tasto Test. Quando l’indicatore LED rosso lampeggia una
volta ogni 32 secondi, significa che il rilevatore è in condizione di
funzionamento normale. Quando il LED rosso è acceso in modo
continuo e simultaneamente il cicaclino interno del rilevatore emette
un beep acustico, questo indica che il rilevatore sta rilevando una
condizione di allarme.
Test del rilevatore di fumo
Per assicurarsi che il rilevatore di fumo stia funzionamento
correttamente testare settimanalmente il sensore premendo il
tasto Test fino all’emissione del beep di conferma. Per ottenere il
beep sonoro ci vogliono circa 5 secondi. Questo è l’unico modo
per verificare se il rilevatore funziona correttamente. Se il rilevatore
non emette nessun suono acustico, significa che deve essere
immediatamente riparato o sostituito.
BATTERIA
ATTENZIONE: Il rilevatore è dotato di un meccanismo sul coperchio
in modo da evitare che si chiuda qualora la batteria non sia installata
correttamente. Il rilevatore non funzionerà fino a quando la batteria
non sarà posizionata correttamente.
ATTENZIONE: Evitare assolutamente di utilizzare una fiamma per
testare il rilevatore: è possibile danneggiare il prodotto e la sua
abitazione. Utilizzare unicamente il tasto test.
ATTENZIONE: Quando non si sta testando il rilevatore e l’apparecchio
emette un suono, significa che sono state rilevate delle particelle di
fumo. Assicurarsi della gravità della situazione rilevata.
L’allarme può essere causato da fumo proveniente dalla cucina.
Se succede, aprire una finestra e fare circolare l’aria in maniera da
rimuovere il fumo. Il rilevatore di fumo smetterà di suonare appena
l’aria sarà pulita.
NOTA: Non disconnettere l’alimentazione o estrarre la batteria dal
rilevatore. La sua abitazione non sarà più protetta dal fuoco.
ELCART DISTRIBUTION SPA via Michelangelo Buonarroti, 46 - 20093 Cologno Monzese (Milano) ITALY
Tel. +39 02.25117310 Fax +39 02.25117610 sito internet: www.elcart.com
e-mail: [email protected]
La divulgazione dei dati contenuti in questa scheda è da ritenersi un servizio puramente informativo e non costituisce alcun vincolo da parte della Elcart in merito a prestazioni ed utilizzo del prodotto.
The divulgation of data contained on this technical sheet are exclusively for informational reasons and establish no link on behalf of Elcart regard to thr performances and the usa of the product.
La divulgacion de los datos contenidos en esta ficha son un servicio unicamente informativo y no constituyen ningun vinculo de parte de Elcart respecto a las prestaciones y uso del producto.
ART. 35/08410-00
ELCART
Manuale di istruzioni/Scheda tecnica
Funzione di tacitazione dell’allarme
La funzione di tacitazione permette di silenziare la segnalazione
acustica a seguito di un allarme per un periodo di tempo di 8 minuti.
Per attivare questa funzione, premere il tasto Test. Durante il periodo
di tacitazione, la spia Led lampeggerà ogni 8 secondi (durante 8
minuti) per ricordare che la funzione è attivata. Passato il tempo di
8 minuti, la spia Led smetterà di lampeggiare per segnalare che il
rilevatore è di nuovo in modalità di funzionamento normale.
ATTENZIONE: La funzione di tacitazione non disattiva il
funzionamento del rilevatore. È solo temporaneamente meno
sensibile al fumo. Per ragioni di sicurezza, se l’apparecchio rileva
del fumo abbastanza denso da raggiungere la soglia di allarme, si
attiverà l’allarme. Se non si conosce l’origine del fumo, verificare
la situazione prima di pensare ad un falso allarme. I sistemi di
rilevazione fumo sono un’importante aiuto per ridurre danni, infortuni
e rischi di morte.
NOTA: Non scollegare l’alimentazione o estrarre la batteria dal
rilevatore. La sua abitazione non sarà più protetta dal fuoco.
Questo rilevatore è dotato di una spia “batteria scarica” e di
un avvisatore acustico. Emette simultaneamente segnalazioni
acustiche ad intervalli di 1 minuto e ha una durata residua di almeno
30 giorni prima che le batterie si scarichino completamente. Quando
si sente questo segnale di avvertimento, sostituire le batterie.
Se invece il rilevatore emette suoni acustici intermittenti e la spia
Led si accende ad intervalli di un minuto, significa che deve essere
immediatamente riparato o sostituito.
Manutenzione del rilevatore di fumo
Per mantenere il rivelatore in buone condizioni di funzionamento
effettuare un test di funzionamento con cadenza settimanale.
Consultare la sezione “Test del rilevatore di fumo”.
Sostituire la batteria del rilevatore appena emette il segnale di batteria
scarica ogni minuto.
PAGINA 4 DI 8
Specifiche tecniche
Alimentazione:
1 Batteria 6F22 9VCC
Consumo allarme disattivo:
≤5µA
Consumo allarme attivo:
≤15mA
Frequenza segnale LED in modalità normale:
Once every 32 sec.
Frequenza segnale LED in modalità allarme:
Once every 0.62 sec.
Segnalazione Batteria Scarica:
Un beep sonoro una volta ogni minuto
Condizioni Operative:
Temperatura: -10°C÷+55°C
Umidità relativa: ≤95% (senza condensa)
Area di copertura:
20m2
Livello di suono allarme:
85dB/3mt.
Frequenza di trasmissione:
315MHz, 433.92MHz or 868MHz
Distanza di trasmissione:
≤80mt. in spazio aperto (SMK-500)
Materiale:
Plastica ABS
Dimensioni (LxWxH):
102x102x31 mm
NOTA: Utilizzare solo batterie di tipo Gold Peak 1604P, 1604S,
1604G, 1604A; Eveready 522, 216; Duracell Mn1604; Premisafe
G6F22; Ultralife U9VL-J; EVE CR9V.
ATTENZIONE: Non utilizzare altri tipi di batterie. Il rilevatore potrebbe
non funzionare correttamente.
Aprire il coperchio ed aspirare la polvere/particelle presenti nella
camera di rilevazione almeno una volta al’ anno. Si può effettuare
la pulizia ogni volta che si sostituisce la batteria. Prima di pulire
il rilevatore, estrarre la batteria. Utilizzare un aspirapolvere a
spazzola, soprattutto in corrispondenza della aperture della camera
di rilevazione. Terminata la pulizia, rimettere la batteria e testare il
rilevatore per verificarne il corretto funzionamento. Mai utilizzare
agenti liquidi per pulire.
Verificare che non rimanga polvere sul tasto Test. Rimuovere la
polvere con uno stuzzicadenti con cautela.
NOTA: Se il rilevatore rileva frequentemente falsi allarmi, si deve
controllare se la posizione di installazione del rilevatore è appropriata.
Riferirsi alla sezione “UBICAZIONI PER L’INSTALLAZIONE DEL
RILEVATORE DI FUMO”. Spostare il rilevatore se non è stato
posizionato correttamente.
Pulire il rilevatore come indicato in precedenza. Non immergere
il prodotto in acqua. Non utilizzare detergenti abrasivi o a base di
sostanze chimiche. Sostituire la batteria e rimettere il coperchio
adeguatamente. Effettuare un test per verificare il corretto
funzionamento del rilevatore.
Informazione agli utenti ex art. 26 D.Lgs. 49/2014
Il simbolo riportato sull’apparecchiatura (Allegato IX D.Lgs. 49/2014)
indica che il rifiuto deve essere oggetto di “raccolta separata” e che è stato
immesso sul mercato, in Italia, dopo il 31/12/2010. Pertanto, l’utente
dovrà conferire (o far conferire) il rifiuto ai centri di raccolta differenziata
predisposti dalle amministrazioni locali, oppure consegnarlo al rivenditore
contro acquisto di una nuova apparecchiatura di tipo equivalente.
L’utente ha dunque un ruolo attivo: la raccolta differenziata del rifiuto e le
successive operazioni di trattamento, recupero e smaltimento favoriscono
la produzione di apparecchiature con materiali riciclati e limitano gli effetti
negativi sull’ambiente e sulla salute eventualmente causati da una gestione
impropria del rifiuto. Nel caso di RAEE di piccolissime dimensioni
(<25 cm), l’utente ha diritto al conferimento gratuito, senza obbligo di
contestuale acquisto, ai distributori al dettaglio la cui superficie di vendita
specializzata eccede i 400 mq.
IMPORTATO E DISTRIBUITO DA
ELCART DISTRIBUTION SPA
Via Michelangelo Buonarroti, 46
20093 COLOGNO MONZESE (MI)
ITALY
www.elcart.com - [email protected]
Made in China
ELCART DISTRIBUTION SPA via Michelangelo Buonarroti, 46 - 20093 Cologno Monzese (Milano) ITALY
Tel. +39 02.25117310 Fax +39 02.25117610 sito internet: www.elcart.com
e-mail: [email protected]
La divulgazione dei dati contenuti in questa scheda è da ritenersi un servizio puramente informativo e non costituisce alcun vincolo da parte della Elcart in merito a prestazioni ed utilizzo del prodotto.
The divulgation of data contained on this technical sheet are exclusively for informational reasons and establish no link on behalf of Elcart regard to thr performances and the usa of the product.
La divulgacion de los datos contenidos en esta ficha son un servicio unicamente informativo y no constituyen ningun vinculo de parte de Elcart respecto a las prestaciones y uso del producto.
ART. 35/08410-00
ELCART
PAGINA 5 DI 8
Manuale di istruzioni/Scheda tecnica
Here, we have useful tips for you:
• Install a smoke detector in the hallway outside every separate
Smoke Detector
User Manual
Ideal for All Areas
bedroom area, as shown in Figure 1. Two detectors are required
in homes with two bedroom areas, as shown in Figure 2.
• Install a smoke detector on every floor of a multi-floor home or
apartment, as shown in Figure 3.
• Install a minimum of two detectors in any household.
• Install a smoke detector inside every bedroom.
• Install smoke detectors at both ends of a bedroom hallway if the
hallway is more than 40 feet (12 meters) long.
• Install a smoke detector inside every room where one sleeps
with the door partly or completely closed, since smoke could be
blocked by the closed door and a hallway alarm may not wake
up the sleeper if the door is closed.
DINING ROOM
KITCHEN
BEDROOM
BEDROOM
ART. 35/08410-00
SMK-500 (Wireless)
SMK-500D (Independent)
LIVING ROOM
BEDROOM
SMOKE DETECTORS FOR MINIMUM SECURITY
SMOKE DETECTORS FOR MORE SECURITY
Figure 1: locations for placing smoke detectors for single residence
with only one sleeping area
Introduction
FAMILY ROOM
Our photoelectric smoke detector is designed to sense smoke that
comes into the detector chamber. It does not sense gas, heat, or
flame. This smoke detector is designed to give early warning of
developing fires by giving off the alarm sounds from its built-in alarm
horn. It can provide precious time for you and your family to escape
before fire spreads. However, the smoke detector makes such prewarning of fire accident possible, only if the detector is located,
installed, and maintained properly as described in this User’s Manual.
WARNING: This smoke detector is designed for use in a single
residential unit only, which means that it should be used inside a
single family home or apartment. It is not meant to be used in lobbies,
hallways, basements, or another apartment in multi-family buildings,
unless there are already working detectors in each family unit. Smoke
detectors, placed in common areas outside the individual living unit,
such as on porches or in hallways, may not provide early warning to
residents. In multi-family buildings, each family living unit should set
up its own detectors.
Locations to Install Your Smoke Detectors
Smoke detectors should be installed in accordance with the NFPA
Standard 74 (National Fire Protection Association, Battery march
Park, Quincy, MA 02169). For complete coverage in residential units,
smoke detectors should be installed in all rooms, halls, storage areas,
basements, and attics in each family living unit. Minimum coverage is
one detector on each floor and one in each sleeping area and attics in
each family living unit.
BEDROOM
LIVING ROOM
BEDROOM
SMOKE DETECTORS FOR MINIMUM SECURITY
SMOKE DETECTORS FOR MORE SECURITY
BEDROOM
Figure 2: locations for placing smoke detectors for single-floor residence
with more than one sleeping area
BEDROOM
BEDROOM
GROUND
FLOOR
WARNING: This detector is not meant to be used in non-residential
buildings, warehouses, industrial or commercial buildings, and special
purpose non-residential buildings require special fire detection and
alarm systems. This detector alone is not a suitable substitute for
complete fire detection systems for places where many people live
or work, such as hotels or motels. The same is true of dormitories,
hospitals, nursing homes or group homes of any kind, even if they
were once single family homes. Please refer NFPA 101, the Life
Safety Code, NFPA71, 72A, 72B, 72C, 72D, and 72E for smoke
detector requirements for fire protection in buildings not defined as
“households”.
KITCHEN BEDROOM
BEDROOM
KITCHEN
GARAGE
BASEMENT
SMOKE DETECTORS FOR MINIMUM SECURITY
Figure 3: locations for placing smoke detectors for a multi-floor
residence
• Install basement detectors at the bottom of the basement stairwell.
• Install second-floor detectors at the top of the first-to-second floor
stairwell.
• Be sure no door or other obstruction blocks the path of smoke to
the detector.
• Install additional detectors in your living room, dining room, family
room, attic, utility and storage rooms.
• Install smoke detectors as close to the center of the ceiling as
possible. If this is not practical, put the detector on the ceiling, no
closer than 4 inches (10 cm) from any wall or corner, as shown in
Figure 4.
• If ceiling mounting is not possible and wall mounting is permitted
by your local and state codes, put wall-mounted detectors between
4 and 6 inches (10÷15 cm) from the ceiling, also see Figure 4.
If some of your rooms have sloped, peaked, or gabled ceilings, try
to mount detectors 3 feet (0.9 meter) measured horizontally from the
highest point of the ceiling as shown in Figure 5.
ELCART DISTRIBUTION SPA via Michelangelo Buonarroti, 46 - 20093 Cologno Monzese (Milano) ITALY
Tel. +39 02.25117310 Fax +39 02.25117610 sito internet: www.elcart.com
e-mail: [email protected]
La divulgazione dei dati contenuti in questa scheda è da ritenersi un servizio puramente informativo e non costituisce alcun vincolo da parte della Elcart in merito a prestazioni ed utilizzo del prodotto.
The divulgation of data contained on this technical sheet are exclusively for informational reasons and establish no link on behalf of Elcart regard to thr performances and the usa of the product.
La divulgacion de los datos contenidos en esta ficha son un servicio unicamente informativo y no constituyen ningun vinculo de parte de Elcart respecto a las prestaciones y uso del producto.
ELCART
ART. 35/08410-00
PAGINA 6 DI 8
Manuale di istruzioni/Scheda tecnica
4in
(10cm)
CEILING
CENTER OF
CEILING
NEVER
HERE
4in (10cm)
Minimum
6in(15cm)
Maximum
IMPORTANT: For any reason, do not disable the detector to avoid
nuisance alarms.
When air streams passing by kitchens, the way how a detector can
sense combustion particles in normal air-flow paths is graphically
shown in Figure 6, which indicates the correct and incorrect smoke
detector locations concerning this problem.
BEST LOCATION
ACCEPTABLE
LOCATION
Figure 4: recommended best and acceptable locations to mount
smoke detectors
AIR ENTRY
BEDROOM BATH
STOVE
KITCHEN
DETECTOR
BEDROOM
9 FEET
HORIZONTAL DISTANCE
FROM PEAK
LIVING ROOM
CORRECT LOCATION
INCORRECT LOCATION
Figure 5: recommended locations to mount smoke detectors in
rooms with sloped, gabled, or peaked ceiling
Figure 6: recommended smoke detector locations to avoid air streams
with combustion particles
CAUTION (As required by the California State Fire Marshall)
“Early warning fire detection is best achieved by the installation of
fire detection equipment in all rooms and areas of the household
as follows: (1) A smoke detector installed in each separate sleeping
area (in the vicinity, but outside of the bedrooms), and (2) Heat
or smoke detectors in the living rooms, dining rooms, bedrooms,
kitchens, hallways, attics, furnace rooms, closets, utility and, storage
rooms, basements and attached garages.” For your information,
NFPA Standard 74, Section 2-4 reads as follows:
“2-4.1.1 Smoke detectors shall be installed outside of each separate
sleeping area in the immediate vicinity of the bedrooms and on each
additional story of the family living unit including basements and
excluding crawl spaces and unfinished attics.
The provisions of 2-4.1.1 represent the minimum number of detectors
required by this standard. It is recommended that the householder
considers the use of additional smoke detectors for increased
protection for those areas separated by a door from the areas
protected by the required smoke detectors under 2-4.1.1 above.
The recommended additional areas are living room, dining room,
bedroom(s), kitchen, attic (finished or unfinished), furnace rooms,
utility room, basement, integral or attached garage, and hallways not
included in 2-4.1.1 above. However, the use of additional detectors
remains the option of the householder.” We recommend complete
coverage and use of additional smoke detectors.
• In damp or very humid areas, or near bathrooms with showers.
Moisture in humid air can enter the sensing chamber, then turns into
droplets upon cooling, which can cause nuisance alarms. Install
smoke detectors at least 10 feet (3 meters) away from bathrooms.
• In very cold or very hot areas, including unheated buildings
or outdoor rooms. If the temperature goes above or below the
operating range of smoke detector, it will not work properly. The
operating temperature range for your smoke detector is 40°F to
100°F (4°C to 38°C).
• In very dusty or dirty areas, dirt and dust can build up on the
detector’s sensing chamber, to make it over sensitive. Additionally,
dust or dirt can block openings to the sensing chamber and keep
the detector near fresh air vents or very drafty areas like air
conditioners, heaters or fans, fresh air vents and drafts can drive
smoke away from smoke detectors.
• Dead air spaces are often at the top of a peaked roof, or in the
corners between ceilings and walls. Dead air may prevent smoke
from reaching a detector. See Figures 4 and 5 for recommended
mounting locations.
• In insect-infested areas. If insects enter a detector’s sensing
chamber, they may cause a nuisance alarm. Where bugs are a
problem, get rid of them before putting up a detector.
• Near fluorescent lights, electrical “noise” from fluorescent lights
may cause nuisance alarms. Install smoke detectors at least 5 feet
(1.5 meters) from such lights.
Locations not to Install Your Smoke Detectors
WARNING: Never remove batteries to stop a nuisance alarm. Open
a window or fan the air around the detector to get rid of the smoke.
The alarm will turn itself off when the smoke is gone. If nuisance
alarms persist, attempt to clean the detector as described in this
User’s Manual.
Nuisance alarms take place when smoke detectors are installed
where they will not work properly. To avoid nuisance alarms, do not
install smoke detectors in the following situations:
Combustion particles are the by-products of something that is
burning. Thus, in or near areas where combustion particles are
present you do not install the smoke detectors to avoid nuisance
alarms, such as kitchens with few windows or poor ventilation,
garages where there may be vehicle exhaust, near furnaces, hot
water heaters, and space heaters.
Do not install smoke detectors less than 20 feet (6 meters) away
from places where combustion particles are normally present, like
kitchens. If a 20-foot distance is not possible, e.g. in a mobile home,
try to install the detector as far away from the combustion particles
as possible, preferably on the wall. To prevent nuisance alarms,
provide good ventilation in such places.
WARNING: Do not stand close to the detector when the alarm is
sounding. The alarm is loud in order to wake you in an emergency.
Too much exposure to the horn at close range may be harmful to your
hearing.
ELCART DISTRIBUTION SPA via Michelangelo Buonarroti, 46 - 20093 Cologno Monzese (Milano) ITALY
Tel. +39 02.25117310 Fax +39 02.25117610 sito internet: www.elcart.com
e-mail: [email protected]
La divulgazione dei dati contenuti in questa scheda è da ritenersi un servizio puramente informativo e non costituisce alcun vincolo da parte della Elcart in merito a prestazioni ed utilizzo del prodotto.
The divulgation of data contained on this technical sheet are exclusively for informational reasons and establish no link on behalf of Elcart regard to thr performances and the usa of the product.
La divulgacion de los datos contenidos en esta ficha son un servicio unicamente informativo y no constituyen ningun vinculo de parte de Elcart respecto a las prestaciones y uso del producto.
ELCART
ART. 35/08410-00
PAGINA 7 DI 8
Manuale di istruzioni/Scheda tecnica
Installing Your Smoke Detectors
Read “Locations to Install Your Smoke Detectors” and “Locations
not to Install Your Smoke Detectors” section in the manual first, and
then decide where to install the detector.
NOTE: When the detector battery first makes contact with the
detector, the alarm horn may sound for one second. This is normal
and indicates that the battery is positioned properly. Close cover,
then press the test button, holding it down for about 5 seconds until
the horn sounds. The horn should sound a loud, pulsating alarm.
This means the unit is working properly.
LOUDSPEAKER
Please follow these steps to install your smoke detector:
1.At the place where you are going to install the detector, draw a
horizontal line six inches long.
2.Remove the mounting bracket from your unit by rotating it
counterclockwise.
3.Place the bracket so that the two longest hole slots are aligned on
the line. In each of keyhole slots, draw a mark to locate a mounting
plug and screw.
4.Remove the bracket.
5.Using a 3/16-inch (5mm) drill bit, drills two holes at the marks and
insert plastic wall plugs. Put the detector away from getting plaster
dust on it when you drill holes for mounting.
6.Using the two screws and plastic wall plugs (all supplied), attach
the bracket to the wall.
7.Line up the slot of the bracket and the detector. Push the clockwise
to fix it into place. Pull outward on the detector to make sure it is
securely attached to the mounting bracket.
BRACKET
DETECTOR
SCREWS
SCREWS
8.The steps to open the battery cover and to install the battery are
listed as follows:
RED LED
TESTING BUTTON
Connect with Alarm Control Panel
SMK-500 can not only work as a single station, but also can work
with alarm control panel to form an alarm system when wireless
module is added to the smoke detector.
1) Make sure the control panel is in learning state.
2) Press the testing button on the smoke detector for 3 seconds,
two beeps are heard. Simultaneously, one beep is heard from the
control panel. The detector has been connected successfully with
the control panel.
Testing:
Press the testing button on the smoke detector for 3 seconds, the
control panel will alarm immediately.
Red LED Indicator
The red LED, as the ALARM indicator, is featured with the detector.
It can be seen through the test button on the cover of the detector.
When red LED flashes once 32 seconds, it indicates the detector
under normal operation. When smoke detector senses smoke and
simultaneously sounds an audible alarm, the red LED will flash very
frequently, once 0.67 seconds.
Testing Your Smoke Detector
1.To power smoke detector requires a battery.
2.Match terminals on the end(s) of the battery with opposite terminal
connections on the detector. Be sure to insert the zinc-manganese
dry battery in the position shown on the detector.
3.When terminals are properly matched, push battery firmly in until it
snaps and cannot be shaken loose.
Test the detector weekly by pushing firmly on the test button with
your finger until the horn sounds. Testing method may take up to 5
seconds to sound the alarm horn. These are only ways to be sure
that detector is working correctly. If the detector fails to test properly,
have it repaired or replaced immediately.
WARNING: Never use an open flame to test your detector. You may
set fire to damage the detector, as well as your home. The built-in
test switch accurately tests all detector functions, as required by
Underwriters’ Laboratories. They are the only correct ways to test
the unit.
BATTERY
CAUTION: This smoke detector comes with cover latches that
will prevent the smoke detector cover from closing if battery is not
installed. This tells you that the smoke detector will not work until a
new battery is properly installed. The battery is purposely positioned
WRONGLY in the factory to keep it fresh until installation. It must be
re-positioned correctly to provide DC power.
WARNING: When you are not testing the unit and the alarm horn
sounds a loud continuous sound, this means the detector has sensed
smoke or combustion particles in the air. Be sure that the alarm horn
is a warning of a possible serious situation, which requires your
immediate attention.
The alarm could be caused by a nuisance situation. Cooking smoke
or a dusty furnace, sometimes called “friendly fires” can cause the
alarm to sound. If this happens, open a window or fan the air to
remove the smoke or dust. The alarm will turn off as soon as the air
is completely clear.
NOTE: Do not disconnect the battery from the detector. This will
remove your protection from fires.
ELCART DISTRIBUTION SPA via Michelangelo Buonarroti, 46 - 20093 Cologno Monzese (Milano) ITALY
Tel. +39 02.25117310 Fax +39 02.25117610 sito internet: www.elcart.com
e-mail: [email protected]
La divulgazione dei dati contenuti in questa scheda è da ritenersi un servizio puramente informativo e non costituisce alcun vincolo da parte della Elcart in merito a prestazioni ed utilizzo del prodotto.
The divulgation of data contained on this technical sheet are exclusively for informational reasons and establish no link on behalf of Elcart regard to thr performances and the usa of the product.
La divulgacion de los datos contenidos en esta ficha son un servicio unicamente informativo y no constituyen ningun vinculo de parte de Elcart respecto a las prestaciones y uso del producto.
ART. 35/08410-00
ELCART
Manuale di istruzioni/Scheda tecnica
Using The Silence Feature
The silence feature can temporarily quiet an unwanted alarm for
up to 8 minutes. To use the feature, press the”TEST” button. When
remain in silence, the LED will flash once every 8 seconds (for up to
8 minutes) to remind you the alarm has been stopped. The flashing
LED will stop when the unit returns to normal operation.
WARNING: The silence feature does not disable the unit. It is
temporarily less sensitive to smoke. For your safety, if smoke
around the unit is dense enough to suggest a potentially dangerous
situation, it will stay in alarm, or may re-alarm quickly. If you do not
know the source of the smoke, do not assume it is an unwanted
alarm. Not responding to an alarm can result in property loss, injury
or death.
NOTE: Do not disconnect the battery from the detector. This will
remove your protection from fires.
If a beep or chirp virtually simultaneously with an LED flash once
a minute, this means the detector’s battery is weak. Replace new
battery immediately.
If a beep or chirp occurring halfway an LED flash once a minute,
this signal means that the detector is faulting, it is must repaired or
replaced immediately.
Taking Care of Your Smoke Detector
To keep your detector in good working condition, you must test the
detector weekly, as referring to section “TESTING YOUR SMOKE
DETECTOR”.
Replace the detector battery when the low battery “beep” signal
sounds once a minute. The low battery “beep” should last at least
30 days.
PAGINA 8 DI 8
Technical Specifications
Power Supply:
DC 9V 6F22 battery x 1
Standby Current:
≤5µA
Alarm Current:
≤15mA
LED Frequency in Working State:
Once every 32 sec.
LED Frequency in Alarming State:
Once every 0.62 sec.
Low Battery State:
Beep once with a LED flash per 60s (last for 30 days)
Operation Condition
Temperature: -10°C÷+55°C
Relative humidity: ≤95% (no condensing)
Monitoring Area:
20m2
Alarm Decibel:
85dB/3m
Radio Frequency:
315MHz, 433.92MHz or 868MHz
Transmitting Distance:
≤80mt. in open area (SMK-500)
Housing Material:
ABS Plastic
Dimensions (LxWxH):
102x102x31 mm
NOTE: For replacement battery, use Gold Peak 1604P, 1604S,
1604G, 1604A; Eveready522, 216; Duracell Mn1604; Premisafe
G6F22; Ultralife U9VL-J; EVE CR9V.
WARNING: Do not use any other kind of battery. This detector may
not operate properly with other kind of battery.
Open the cover and vacuum the dust off the detector’s sensing
chamber at least once a year. This can be done when you open the
detector to change the battery. Remove battery before cleaning. To
clean detector, use soft brush attachment to your vacuum. Carefully
remove any dust on detector components, especially on the openings
of the sensing chamber. Replace battery after cleaning. Test detector
to make sure battery works correctly. Check to make sure there is
no obstruction inside the test button. If there is any dust in the test
button, insert a toothpick from the back to the front.
NOTE: If nuisance alarms keep coming from the detector, you should
check whether the detector’s location is adequate. Refer to section
“WHERE TO INSTALL SMOKE DETECTORS.” Move your detector if
it is not located properly.
Clean detector as described above.
Clean detector cover when it gets dirty. First open the cover and
remove battery. Hand-wash cover with cloth dampened with clean
water. Dry it with lint-free cloth. Do not get any water on the detector
components. Replace the battery, and close cover. Test detector to
make sure that battery works correctly.
User information ex art. 26 D. 49/2014
The symbol labelled on the appliance (Annex IX D. 49/2014) indicates that
the rubbish is subject to “separate collection” and it has been placed on the
Italian market after the December 31, 2010.
The user must therefore assign or (have collected) the rubbish to a
treatment facility according to indications by the local administration, or
hand it over to the reseller in exchange for an equivalent new product. The
separate collection of the rubbish and the subsequent treatment, recycling
and disposal operations encourage the production of appliances made
with recycled materials and reduce negative effects on health and the
environment caused by improper treatment of rubbish.
In the case of very small WEEE (no external dimension more than 25 cm),
the user is eligible to get free of charge assignation to retail shops with sales
areas relating to EEE of at least 400 m².
IMPORTED AND DISTRIBUTED BY:
ELCART DISTRIBUTION SPA
Via Michelangelo Buonarroti, 46
20093 COLOGNO MONZESE (MI)
ITALY
www.elcart.com - [email protected]
Made in China
ELCART DISTRIBUTION SPA via Michelangelo Buonarroti, 46 - 20093 Cologno Monzese (Milano) ITALY
Tel. +39 02.25117310 Fax +39 02.25117610 sito internet: www.elcart.com
e-mail: [email protected]
La divulgazione dei dati contenuti in questa scheda è da ritenersi un servizio puramente informativo e non costituisce alcun vincolo da parte della Elcart in merito a prestazioni ed utilizzo del prodotto.
The divulgation of data contained on this technical sheet are exclusively for informational reasons and establish no link on behalf of Elcart regard to thr performances and the usa of the product.
La divulgacion de los datos contenidos en esta ficha son un servicio unicamente informativo y no constituyen ningun vinculo de parte de Elcart respecto a las prestaciones y uso del producto.