1
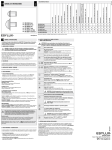
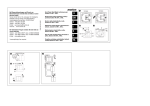
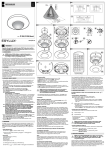
DE BEWEGUNGSMELDER GB MOTION DETECTOR ABB. • FIG. 1 ABB. • FIG. 3 1a ABB. • FIG. 4 MD 180i/R-CH 1b TECHNISCHE DATEN • TECHNICAL DATA 4.1 MA00530300 4.2 www.esylux.com 4.4 ABB. • FIG. 2 3d 3b 3a 3c ABB. • FIG. 7 ABB. • FIG. 5 ABB. • FIG. 6 7a 5a ABB. • FIG. 8 5b 2b 2d DE 1 • SICHERHEITSHINWEISE ACHTUNG: Arbeiten an elektrischen Systemen dürfen nur von autorisiertem Fachpersonal unter Berücksichtigung der landesüblichen Installationsvorschriften/-normen ausgeführt werden. Vor der Montage des Produktes ist die Netzspannung freizuschalten. =Kontaktöffnungsweite < 1,2 mm Das Gerät ist eingangsseitig mit einem 10 A Leitungsschutzschalter abzusichern (Abb. 4). Das Produkt ist nur für den sachgemäßen Gebrauch (wie in der Bedienungsanleitung beschrieben) bestimmt. Änderungen, Modifikationen dürfen nicht vorgenommen werden, da ansonsten jeglicher Gewährleistungsanspruch entfällt. Sofort nach dem Auspacken ist das Gerät auf Beschädigungen zu prüfen. Im Falle einer Beschädigung darf das Gerät keinesfalls in Betrieb genommen werden. Wenn anzunehmen ist, dass ein gefahrloser Betrieb des Gerätes nicht gewährleistet werden kann, so ist dieses unverzüglich außer Betrieb zu nehmen und gegen unbeabsichtigten Betrieb zu sichern. HINWEIS: Dieses Gerät darf nicht mit dem unsortierten Siedlungsabfall entsorgt werden. Besitzer von Altgeräten sind gesetzlich dazu verpflichtet, dieses Gerät fachgerecht zu entsorgen. Informationen erhalten Sie von Ihrer Stadt- bzw. Gemeindeverwaltung. 2 • BESCHREIBUNG Der ESYLUX MD 180i/R-CH ist ein Bewegungsmelder mit 180° Erfassungsbereich für die Wandmontage. Der Bewegungsmelder besitzt einen integrierten Akustiksensor für den optimalen Einsatz in unübersichtlichen, verwinkelten Räumen und Durchgangsbereichen. Programmierbar per Fernbedie-nung, somit schnelles und exaktes Einstellen diverser Parameter ganz ohne Werkzeug. 3 • INSTALLATION / MONTAGE / ANSCHLUSS •Die empfohlene Montagehöhe beträgt 1,10 - 2,20 m. Mit steigender Montagehöhe wird die Reichweite größer, die Empfindlichkeit wird jedoch kleiner. Die Bewegung quer zum Melder ist optimal für eine Auslösung. Bei einem direkten und frontalen Zugehen ist es für den Melder schwieriger eine Bewegung zu erkennen, somit ist die Reichweite deutlich geringer. •Die Platzierung des Melders sollte entsprechend den räumlichen Gegebenheiten und Anforderungen erfolgen (Abb. 1a Frontal zum Melder und Quer zum Melder). •Vor der Montage des Produktes ist die Netzspannung freizuschalten. Der Bewegungsmelder ist in der Standard-Ausführung für die Unterputzmontage ausgelegt (Abb. 2a/3a). Die Sensoreinsätze (Abb. 2b/3b) sind kombinierbar mit einer IP 20 (Abb. 2) oder einer IP 44 Abdeckung (Abb. 3). Sensoreinsätze (Abb. 2b/3b) gemäß Anschlussplan (Abb. 4 oder 5) anschließen und je nach verwendeter Abdeckung gemäß Abb. 2 oder 3 montieren. (4.1) Standardbetrieb (4.2) Standardbetrieb mit zusätzlicher Ansteuerung durch Schließtaster. Bei Bedarf kann das Licht durch Taster manuell ein- bzw. ausgeschaltet werden (4.3) Master-Slave-Schaltung: Das Mastergerät schaltet angeschlossenen Verbraucher je nach eingestellten Para- meter. Die Slavegeräte dienen nur der Präsenzerfas- sung und geben bei erkannter Bewegung einen Impuls an das Mastergerät. Achtung: Es können max. 10 Slave- geräte an ein Mastergerät angeschlossen werden (4.4) Parallelbetrieb von max. 5 Geräten bei MD 180i/R-CH HINWEIS: Die Klemme „S/P“ kann für den externen Taster- und den Slaveanschluss parallel genutzt werden. •Für die Aufputzmontage wird eine AP-Dose (Zubehör) benötigt (Abb. 2c/3c). •Die Bewegungsmelder verfügen über eine zusätzliche vertikale Erfassungsebene, diese kann mittels beiliegender Abdeckkappe (Abb. 2d/3d) ausgeblendet werden, um somit ungewolltes Schalten (z. B. durch Kleintiere) zu vermeiden (Abb. 1b). 4 • INBETRIEBNAHME Individuelle Einstellungen können einfach per Fernbedienung (Abb. 6) vorgenommen werden oder manuell über die Einstellelemente (Abb. 5a - 5d). • Netzspannung zuschalten Es beginnt eine Initialisierungsphase (warm-up) von ca. 60 Sek. Die rote LED signalisiert den Zustand des Kanals = Beleuchtung. Rote LED blinkt langsam (f = 1 Hz). Angeschlossene Beleuchtung ist eingeschaltet. • LED-Anzeige nach warm-up Das Umgebungslicht liegt unterhalb des voreingestellten danach ist die LED als Anzeige für die Lichtwertes Bewegungserfassung aktiv = 2 x kurzes Blitzen je erfasster Bewegung (rote LED). Angeschlossene Beleuchtung ist eingeschaltet. 5d 8a 2c HINWEIS: Die rote LED ist im Betriebsmodus nur dann aktiv, wenn sie zuvor nicht über die LED ON/OFF Funktion per IR-Fernbedienung deaktiviert wurde (siehe Kapitel 6). Die LED funktioniert dann nur noch in der warm-up-Phase und im geöffneten Programmiermodus der IR-Fernbedienung als Quittierungsanzeige. Das Umgebungslicht liegt über dem voreingestellten die rote LED ist AUS. Lichtwert Keine Anzeige der Bewegungserfassung. Angeschlossene Beleuchtung ist AUS. 4.1 Betrieb Die Beleuchtung wird automatisch eingeschaltet, wenn der Melder durch Bewegung ausgelöst wurde und das Umgebungslicht den voreingestellten Lichtwert unterschritten hat. Erst mit dem Einschalten der Beleuchtung wird die Akustikfunktion aktiviert. Das Licht wird automatisch ausgeschaltet bei Abwesenheit von Bewegungen und/oder Geräuschen und wenn die voreingestellte Nachlaufzeit abgelaufen ist. 4.2 Manuelle Beleuchtungssteuerung Die Beleuchtung kann zu jeder Zeit per IR-Fernbedienung Taste oder durch Betätigen des externen Tasters (Taster – Arbeitsstrom), welcher mit der„S/P“-Klemme des Melders (MD 180i/R-CH) verbunden ist, eingeschaltet werden (Abb. 4.2). Die Beleuchtung kann zu jeder Zeit per IR-Fernbedienung Taste ein- oder ausgeschaltet werden (Abb. 6). Die Beleuchtung bleibt so lange ausgeschaltet bzw. eingeschaltet wie der Melder noch eine Bewegung erfasst. Nach Erfassen der letzten Bewegung kehrt der Melder erst zum vorherigen Einstellmodus zurück nachdem die Nachlaufzeit abgelaufen ist. Taste • Schalter ON/OFF/AUTO (Abb. 5a) Die Beleuchtung kann über den Schiebeschalter wie folgt geschaltet werden: Position ON = Beleuchtung ist permanent EIN, der Bewegungsmelder ist nicht aktiv. Position OFF = Beleuchtung ist permanent AUS, der Bewegungsmelder ist nicht aktiv. Position AUTO= Automatik-Modus siehe Abschnitt 4.1 Betrieb. HINWEIS: Die Funktion der Fernbedienung ist nur im „AUTO“-Modus möglich. • Einsteller: Nachlaufzeit = Beleuchtung (Abb. 5b) Die Zeit kann zwischen 15 Sek. und 30 Min. gewählt werden. TEST: Steht der Pfeil auf „TEST“ ist der „Testmodus“ gewählt, d. h.: •Der Lichtwert ist deaktiviert. •Sobald der Melder durch Bewegung ausgelöst wurde, leuchtet die rote LED sowie die angeschlossene Beleuchtung wiederholt im Rhythmus 1 Sek. EIN, 2 Sek. AUS. : Steht der Pfeil auf , ist „Kurzimpuls“ gewählt, d. h.: •Der Melder reagiert auf Bewegungen sowie auf den voreingestellten Umgebungslichtwert. •Sobald der Melder durch Bewegung ausgelöst wurde, wird die rote LED und die Beleuchtung (Relais 1) wiederholt für 1 Sek. eingeschaltet und dann für 9 Sek. ausgeschaltet. : Lichtwert beträgt ca. 5 Lux : Tag-/Nachtbetrieb HINWEIS: Wird beim Drehen des LUX-Reglers (ausgehend vom Mond-Symbol) der aktuelle Umgebungslichtwert erreicht, wird dies durch das Aufleuchten der roten LED angezeigt (LED ist somit Einstellhilfe). Die LED erlischt nach 30 Sek. automatisch. • Einsteller: Akustiksensor (Abb. 5d) Der Akustiksensor muss manuell eingestellt werden. Schaltet der Melder die Beleuchtung nach Ablauf der Nachlaufzeit aus, kann danach sofort z. B. durch einen Zuruf (Geräusch) innerhalb von max. 8 Sek. die Beleuchtung wieder aktiviert werden. Ist das Gerät längere Zeit nicht schaltaktiv, muss zwingend zuerst eine Bewegung einen neuen Schaltvorgang auslösen. Diese Schaltkombination schützt vor unerwünschtem Einschalten durch Fremdgeräusche. Funktionsbeschreibung 7 • MARKEN-SCHALTER KOMPATIBEL Einlesen des aktuellen Umgebungslichtes als Ein-/ Ausschaltwert für die Beleuchtung Die ESYLUX Wand-Bewegungsmelder sind kombinierbar mit dem Schalterprogramm Feller EDIZIOdue*. Sie benötigen hierzu den Einzelrahmen (Abb. 7a) des Feller EDIZIOdue* Schalterprogrammes. Bei der Verwendung in einer Kombination (Mehrfachrahmen) ist die Einzelmetallplatte (Abb. 8a) zu entfernen. Der Melder (Abb. 8b) wird nun mittels der beiden Schrauben in der Befestigungsplatte/Feller EDIZIOdue* (Abb. 8c) der Kombination montiert. Abdeckrahmen/ Feller EDIZIOdue* (Abb. 8d) und innere Abdeckung/ ESYLUX (Abb. 8e) werden anschließend montiert. • Der Bereich des aktuellen Umgebungslichtwertes (zwischen 5 - 2000 Lux) kann als Schaltwert eingelesen werden. Merke: Drücken Sie im geöffneten Programmiermodus. Schnelles Blinken von der roten LED signalisiert, dass der aktuelle Umgebungslichtwert zu hell ist (> 2000 Lux) oder zu dunkel (< 5 Lux), d. h., der aktuelle Umgebungslichtwert kann nicht eingelesen werden. • Aktuelle Lichtverhältnisse einlesen als Einschaltwert (wenn die Beleuchtung ausgeschaltet ist) Methode des Einlesens: Wenn der gewünschte Umgebungslichtwert erreicht ist, drücken Sie im geöffneten Programmiermodus. Quittierung des empfangenen Signales: Angeschlossene Beleuchtung schaltet EIN für 2 Sek. und rote LED blinkt langsam. Ist der Einlesevorgang erfolgreich beendet, schaltet die Beleuchtung AUS und die rote LED leuchtet wieder permanent. Beim Betätigen der Tasten Lichtwerte (LUX) wird das Signal wie folgt quittiert: 1. Die angeschlossene Beleuchtung ist AUS. - Taste drücken, Beleuchtung schaltet EIN/AUS. Die rote LED blinkt für 2 Sek. 2. Die angeschlossene Beleuchtung ist EIN. - Taste drücken, Beleuchtung schaltet AUS/EIN. Die rote LED blinkt für 2 Sek. • Einsteller: Lichtwerte LUX = Beleuchtung (Abb. 5c) Die Lichtwerte können zwischen 5 Lux und 2000 Lux gewählt werden. Fester Einschaltwert (10 Lux - 2000 Lux) Tastenfeld c1 Beim Betätigen der Tasten Zeitwerte und Test für Kanal = Beleuchtung wird das Signal wie folgt quittiert: 1. Die angeschlossene Beleuchtung ist AUS. - Taste drücken, Beleuchtung schaltet EIN/AUS. Die rote LED blinkt für 2 Sek. 2. Die angeschlossene Beleuchtung ist EIN. - Taste drücken, Beleuchtung schaltet AUS/EIN. Die rote LED blinkt für 2 Sek. Kurzimpuls: Der Melder reagiert auf Bewegungen sowie auf den voreingestellten Umgebungslichtwert. Sobald der Melder durch Bewegung ausgelöst wurde, wird die rote LED und die Beleuchtung für 1 Sek. eingeschaltet und dann für 9 Sek. ausgeschaltet. • Linksanschlag = max. Empfindlichkeit • Rechtsanschlag= Akustiksensor deaktiviert Feste Nachlaufzeit (1 Min. - 15 Min.) Akustiksensor entsprechend den örtlichen Gegebenheiten einstellen. (Beachten Sie die Lautstärke von vorhandenen Hifi- oder TV-Geräten etc. – Vermeidung von ungewolltem Schalten.) Die rote LED dient hierbei als zusätzlicher Indikator für das Ansprechen des Akustiksensors. Testmodus: Der Lichtwert ist deaktiviert. Sobald der Melder durch Bewegung ausgelöst wurde, leuchtet die rote LED sowie die angeschlossene Beleuchtung 1 Sek. EIN, 2 Sek. AUS. 6 • EINSTELLUNG PER FERNBEDIENUNG Beleuchtung ON/OFF Durch Drücken von kann die Beleuchtung jederzeit eingeschaltet werden, falls die Beleuchtung AUS war. Wiederholen Sie diesen Vorgang, kann die Beleuchtung ausgeschaltet werden (siehe Absatz 4.2 Manuelle Beleuchtungssteuerung). HINWEIS: Die Funktion der Fernbedienung ist nur im „AUTO“-Modus möglich. Mit der Fernbedienung Mobil-PDi/MDi (Abb. 6) können Sie die Einstellungen bequem vom Boden ohne Leiter und Werkzeug vornehmen. Die Werte der Einstellelemente (Abb. 5) werden bei der Benutzung der Fernbedienung überschrieben. Sämtliche Eingaben per Fernbedienung werden dauerhaft gespeichert (EEPROM). Bei Stromaufall bleiben die Werte erhalten. Durch Drücken der RESET-Taste während die IR-Fernbedie nung nicht gesperrt ist, werden die Informationen im EEPROM gelöscht und der Melder arbeitet in Abhängigkeit der Einstellelemente (Abb. 5). HINWEIS: Die gespeicherten Fernbedienungseingaben werden auch gelöscht, wenn die Einstellelemente (Abb. 5) verändert werden, dann ist jeweils der Wert der Einsteller wieder aktiv. Für einen optimalen Empfang richten Sie die Fernbedienung bei der Programmierung auf den Bewegungsmelder. Bitte beachten Sie, dass bei direkter Sonneneinstrahlung die Standardreichweite von ca. 6 m bedingt durch den Infrarotanteil der Sonne stark reduziert werden kann. Taste Funktionsbeschreibung Signalempfang: das -Die rote LED blinkt für 2 Sek. Signal von der Fernbedienung wurde verstanden. das -Die rote LED blitzt 2 x kurz Signal von der Fernbedienung wurde nicht verstanden. Programmiermodus sperren Durch Drücken dieser Taste wird der Programmiermodus beendet. Melder reagiert nun automatisch entsprechend den eingestellten Werten. Hinweis: Im Modus „Programmiermodus gesperrt“ sind nur die Tasten LICHT ON/OFF , RESET und die Taste TEST bedienbar, alle anderen Tasten sind gesperrt. Programmiermodus öffnen Durch Drücken dieser Taste wird der Programmiermodus geöffnet. 1. Die angeschlossene Beleuchtung ist AUS. - Taste drücken, Beleuchtung schaltet EIN/AUS. Die rote LED leuchtet permanent solange sich der Melder im Programmiermodus befindet. 2. Die angeschlossene Beleuchtung ist EIN. - Taste drücken, Beleuchtung schaltet AUS. Die rote LED leuchtet permanent solange sich der Melder im Programmiermodus befindet. Hinweis: Wird der Programmiermodus nicht durch Drücken der Taste geschlossen, schließt der Melder automatisch den Programmiermodus 10 Min. nach dem letzten Betätigen einer Taste. Der Melder reagiert im Programmiermodus nicht auf Bewegungen. 180° horizontal, 60° vertikal 180° horizontal, 60° vertical REICHWEITE RANGE ca. 8 m, bei einer Montagehöhe von ca. 1,10 - 2,20 m approx. 8 m, at an installation height of 1,10 - 2,20 m EINSTELLUNGEN SETTINGS mechanisch über Einstellregler, elektronisch mit Infrarot-Fernbedienung (Zubehör) mechanically using setting controls, electronically using infrared remote control (accessory) 8c 8d MD 180i/R-CH: 230 V ~50 Hz, 2300 W, 10 A (cos ϕ = 1), 1150 VA, 5 A (cos ϕ = 0,5), EVG: 30 x (1 x 18 W), 20 x (2 x 18 W), 25 x (1 x 36 W), 15 x (2 x 36 W), 20 x (1 x 58 W), 10 x (2 x 58 W) max. Einschaltstrom 800 A/200 µs • max. inrush current 800 A/200 µs NACHLAUFZEIT FOLLOW-UP TIME Impuls/ca. 15 Sek. - 30 Min. impulse/approx. 15 seconds - 30 minutes LICHTWERT CA. LIGHT EXPOSURE RANGE 5 - 2000 Lux TASTEREINGANG KEY INPUT MD 180i/R-CH = ja MD 180i/R-CH = yes SLAVE-EINGANG SLAVE INPUT MD 180i/R-CH = ja MD 180i/R-CH = yes SCHUTZART PROTECTION TYPE IP 20, IP 44 je nach Abdeckung IP 20, IP 44 depending on cover SCHUTZKLASSE PROTECTION CLASS II BETRIEBSTEMPERATURBEREICH OPERATING TEMPERATURE RANGE 0 °C...+55 °C GEHÄUSE CASING UV-stabilisiertes Polycarbonat UV stabilised polycarbonate ABMESSUNGEN CA. APPROX. DIMENSIONS Breite 86 mm, Höhe 86 mm, Tiefe 63 mm width 86 mm, height 86 mm, depth 63 mm Technische und optische Änderungen vorbehalten. • Technical and design features may be subject to change. Mobil-PDi/MDi (EM10425509) GB 5 • EINSTELLUNG PER EINSTELLELEMENTE 8b 8e 2a BEWEGUNGSMELDER Wir gratulieren Ihnen zum Kauf dieses qualitativ hochwertigen ESYLUX Produktes. Um ein einwandfreies Funktionieren zu gewährleisten, lesen Sie bitte diese Montage-/Bedienungsanleitung sorgfältig durch und bewahren Sie sie auf, um gegebenenfalls zukünftig nachlesen zu können. 5c 230 V ~ 50 Hz ERFASSUNGSBEREICH FIELD OF DETECTION SCHALTLEISTUNG BREAKING CAPACITY 4.3 • • MD 180i/R-CH NETZSPANNUNG MAINS VOLTAGE Zurücksetzen • Durch Drücken von im geöffneten Programmiermodus werden die Informationen im EEPROM gelöscht und der Melder arbeitet in Abhängigkeit der Einstellelemente. • Durch Drücken von im gesperrten Programmiermodus schaltet sich die Beleuchtung aus und der Melder ist im voreingestellten Modus. LED ON/OFF Durch Betätigen der Taste im geöffneten Programmiermodus kann die rote LED deaktiviert bzw. aktiviert werden. Das Signal wird zusätzlich durch die Beleuchtung wie folgt quittiert: 1. Die angeschlossene Beleuchtung ist AUS. - Taste drücken, Beleuchtung schaltet EIN/AUS. 2. Die angeschlossene Beleuchtung ist EIN. - Taste drücken, Beleuchtung schaltet AUS/EIN. Funktion: LED deaktivieren: - Taste drücken. Die rote LED ist für 2 Sek. aus. Die LED ist nun deaktiviert und funktioniert nur noch in der warm-up-Phase und im geöffnenten Programmiermodus als Quittierungs anzeige. HINWEIS: Farbabweichungen sind möglich, da die NCS-Angaben mit dem Hinweis „ähnlich“ versehen sind und die Materialien und Oberflächen variieren. *Eingetragenes Markenzeichen der Firma Feller AG. 8 • PRAKTISCHE TIPPS Störung Ursache Beleuchtung schaltet nicht EIN bzw. Beleuchtung schaltet AUS bei Anwesenheit und Dunkelheit -Lichtwert zu tief eingestellt -Beleuchtung wurde manuell ausgeschaltet -Person nicht im Erfassungsbereich -Hindernis(se) stören Erfassung -Nachlaufzeit zu kurz eingestellt Beleuchtung ist EIN bei Anwesenheit trotz genügend Helligkeit -Lichtwert zu hoch eingestellt -Beleuchtung wurde vor kurzem manuell eingeschaltet -Melder im Testbetrieb Beleuchtung schaltet nicht AUS bzw. Beleuchtung schaltet spontan ein bei Abwesenheit -Nachlaufzeit abwarten -Thermische Störquellen im Erfassungsbereich: Heizlüfter, Glühlampe/ Halogenstrahler, sich bewegende Objekte (z. B. Vorhänge bei offenen Fenstern), Last (EVGs Relais) nicht entstört Licht schaltet in warm-up Phase ständig EIN und AUS -Zuviel Kunstlicht fällt auf den Melder -Lichtwert erhöhen oder Melder umplatzieren Gerät reagiert nicht -Netzspannung prüfen 9 • ESYLUX HERSTELLERGARANTIE ESYLUX Produkte sind nach geltenden Vorschriften geprüft und mit größter Sorgfalt hergestellt. Der Garantiegeber, die ESYLUX Deutschland GmbH, Postfach 1840, D-22908 Ahrensburg (für Deutschland) bzw. der entsprechende ESYLUX Distributor in Ihrem Land (eine vollständige Übersicht finden Sie unter www.esylux.com) übernimmt für die Dauer von drei Jahren ab Herstelldatum eine Garantie auf Herstellungs-/Materialfehler der ESYLUX Geräte. Diese Garantie besteht unabhängig von Ihren gesetzlichen Rechten gegenüber dem Verkäufer des Geräts. Die Garantie bezieht sich nicht auf die natürliche Abnutzung, Veränderung/Störung durch Umwelteinflüsse oder auf Transportschäden sowie nicht auf Schäden, die infolge Nichtbeachtung der Bedienungsanleitung, der Wartungsanweisung und/oder unsachgemäßer Installation entstanden sind. Mitgelieferte Batterien, Leuchtmittel und Akkus sind von der Garantie ausgeschlossen. Die Garantie kann nur gewährt werden, wenn das unveränderte Gerät unverzüglich nach Feststellung des Mangels mit Rechnung/Kassenbon sowie einer kurzen schriftlichen Fehlerbeschreibung, ausreichend frankiert und verpackt an den Garantiegeber eingesandt wird. Bei berechtigtem Garantieanspruch wird der Garantiegeber nach eigener Wahl das Gerät in angemessener Zeit ausbessern oder austauschen. Weitergehende Ansprüche umfasst die Garantie nicht, insbesondere haftet der Garantiegeber nicht für aus der Fehlerhaftigkeit des Geräts entstehende Schäden. Sollte der Garantieanspruch nicht gerechtfertigt sein (z.B. nach Ablauf der Garantiezeit oder bei Mängeln außerhalb des Garantieanspruchs), so kann der Garantiegeber versuchen, das Gerät kostengünstig gegen Berechnung für Sie zu reparieren. MOTION DETECTOR Congratulations on your purchase of this high-quality ESYLUX product. To ensure correct device operation, please read these installation/operating instructions carefully and keep them in a safe place for future reference. Position AUTO= Automatic mode, see section 4.1 Operation 1 • SAFETY INSTRUCTIONS •Adjuster: Follow-up time = lighting (fig. 5b) The time can be selected between 15 sec and 30 min. TEST: If the arrow is pointing to “TEST”, “test mode” is selected, i.e.: •The light value is deactivated. •When the detector is activated by motion, the red LED and the connected lighting repeatedly flash ON for 1 sec and OFF for 2 sec. WARNING! Work on electrical systems must be carried out by authorised personnel only, with due regard to the applicable installation regulations. Switch off the power supply before installing the system. =Contact gap < 1.2 mm On the input side, the device is to be protected against short circuits with a 10 A circuit breaker (fig. 4). Use this product only as intended (as described in the user instructions). Do not make any changes or alterations as this will render any warrantees null and void. You should check the device for damage immediately after unpacking it. If there is any damage, you should not install the device under any circumstances. If you suspect that safe operation of the device cannot be guaranteed, you should turn the device off immediately and make sure that it cannot be operated unintentionally. NOTE: This device must not be disposed of as unsorted household waste. Used devices must be disposed of correctly. Contact your local town council for more information. 2 • DESCRIPTION The ESYLUX MD 180i/R-CH is a motion detector with a 180° field of detection for wall mounting. The motion detector features an in-built acoustic sensor that makes it perfect for use in passageways and areas with a complex layout. Programmable by remote control, allowing fast and precise setting of various parameters with no need for tools. 3 • INSTALLATION / ASSEMBLY / CONNECTION •The recommended installation height is 1,10 - 2,20 m. The greater the installation height, the greater the range. The sensitivity is, however, reduced. The sensor is at its most sensitive if approached diagonally. If approached directly or frontally it is more difficult for the detector to detect motion and the range is thus considerably reduced. •The detector should be positioned as suits the local environment and conditions (fig. 1a frontal approach to detector and diagonal approach to detector). •Switch off the mains supply before installing the product. The motion detector is a standard recessed-mounted version (fig. 2a/3a). The sensor inserts (fig. 2b/3b) can be combined with an IP 20 (fig. 2) or an IP 44 cover (fig. 3). Connect sensor inserts (fig. 2b/3b) as shown in the circuit diagram (fig. 4 or 5) and install as shown in fig. 2 or 3 depending on which cover is used. (4.1) Standard operating mode (4.2) Standard operating mode with additional control using lock button. The light can be switched on and off manually as required using the button (4.3) Master-Slave switch: The master switch switches connected loads depending on the set parameters. The slave devices only serve to detect the presence of persons. They send an impulse to the master device if motion is detected. The light is therefore only measured in the master device. Please therefore ensure that the master device is positioned accordingly. Up to 10 Slave devices can be connected to the master device (4.4) Parallel operation of up to 5 devices with MD 180i/R-CH NOTE: The “S/P” terminal can be used both as the external button input and as the slave device input. •If surface mounting, a surface mounting box (accessory) is required (fig. 2c/3c). •The motion detectors also have a vertical field of detection; this can be deactivated using the cover plate supplied (fig. 2d/3d), thereby avoiding inadvertent activation (e.g. by small animals) (fig. 1b). 4 • STARTING UP Individual settings can be simply programmed using the remote control (fig. 6) or manually using the programming elements (fig. 5a - 5d). • Connecting mains voltage An initialisation phase (warm-up) starts. This lasts approximately 60 sec. The red LED signals the channel status = lighting. Red LED flashes slowly (f = 1 Hz). The connected lighting is switched on. • LED display after warm-up phase the LED The level of light is below the set light value is then activated as a display for the motion detector = 2 brief flashes each time motion is detected (red LED). The connected lighting is switched on. NOTE: In operating mode, the red LED will only light up if it has not been disabled via the LED ON/OFF feature on the infrared remote control (see point 6). When disabled, it will only light up during the warm-up phase and to acknowledge settings programmed with the infrared remote control. The level of light is above the set light value the red LED is switched OFF. No display to indicate that motion is detected. The connected lighting is switched OFF. Funktion: LED aktivieren: - Taste drücken. Die rote LED blinkt für 2 Sek. Die LED ist nun auch wieder im Betriebsmodus aktiv. 4.1 Operation The lighting is automatically switched on if the detector is triggered by motion and the lighting level is below the set value. The acoustic function is not activated until the lighting is switched on. Dauerlicht 4h ON/OFF für Kanal 1 = Beleuchtung Durch Drücken der Taste kann die Beleuchtung jederzeit für 4 Std. dauerhaft eingeschaltet werden, falls die Beleuchtung AUS war. Wiederholen Sie diesen Vorgang, kann die Beleuchtung für 4 Std. dauerhaft ausgeschaltet werden. Nach Ablauf der 4 Std. kehrt der Melder in den entsprechend eingestellten Betriebsmodus zurück. Abbrechen dieser Funktion 4h ON/OFF vor dem Ablauf der 4 Std. durch Drücken der Taste . The light automatically switches off if motion and/or sounds are no longer detected and when the set follow-up time has expired. Hinweis: Der Melder reagiert bei Akivierung der Funktion 4h ON/OFF nicht mehr auf Bewegungen und wird nicht durch den Lichtwert kontrolliert! 4.2 Manual lighting control The lighting can be switched on at any time with the key on the infrared remote control or by the external switch (switch - operating current), connected to the detector (MD 180i/R-CH) with the “S/P” clip (fig. 4.2). The lighting can be turned on or off at any time using the infrared remote control key (fig. 6). The lighting remains switched on/off for as long motion is detected. When no further motion is detected the detector does not return to the previous programming mode until the follow-up time has expired. 5 • SETTING BY PROGRAMMING ELEMENTS • Switch ON/OFF/AUTO (fig. 5a) The lighting can be controlled as follows using the sliding switch: Position ON = lighting is permanently ON, the motion detector is not active. Position OFF = lighting is permanently OFF, the motion detector is not active. : If the arrow is pointing towards , “short impulse” is selected, i.e.: •The detector reacts to motion and to the set value for the lighting level. •When the detector is activated by motion, the red LED and the lighting (relay 1) are repeatedly switched on for 1 sec and off for 9 sec. •Adjuster: Lighting values LUX = lighting (figure 5c) The lighting values can be selected from 5 Lux to 2000 Lux. : Lighting value is approx. 5 Lux : Day/night operating mode Key NB: The remote control can only be used in “AUTO” mode. Keypad c1 Function: Disable the LED: - Press the button. The red LED will go out for 2 sec. The LED is now disabled and will only light up during the warm up phase and to acknowledge settings in programming mode. To ensure the best reception, the remote control should be pointed towards the motion detector when programming. Please note that the standard range of approx. 6 m can be substantially affected by direct sunlight, on account of the infrared rays of the sun. Function: Enable the LED: - Press the button. The red LED will flash for 2 sec. The LED is now enabled again in operating mode. Function Signal reception: -The red LED flashes for 2 sec the signal from the remote control has been understood. -The red LED flashes briefly 2 x the signal from the remote control has not been understood. Maintained lighting 4h ON/OFF for channel 1 = lighting If the lighting is OFF, it can be switched on at any time for a duration of 4 hours by pressing the key. Press this key again to switch the 4 hour-lighting OFF. Once the 4 hours have expired, the detector will switch back to the corresponding setoperating mode. You can interrupt the 4h ON/OFF feature before the 4 hours have expired by pressing the key. Lock programming mode Press this key to exit programming mode. The detector only reacts automatically in accordance with the set values. Note: When programming mode is locked, only the LIGHT ON/OFF , RESET and TEST button can be used, all other button are locked. The range of the current lighting level (between 5 - 2000 Lux) can be read in as the activation/ deactivation value. Please note: Press in programming mode. Rapid flashing of the red LED shows that the current lighting level is too high (> 2000 Lux) or too low (< 5 Lux), i.e. the current lighting level cannot be programmed. • Programming the current lighting level as the activation value (when the lighting is switched off) Input method: When the required ambient light value is reached, press in programming mode. Confirmation of the signal received: the connected lighting switches ON for 2 seconds and the red LED flashes slowly. When this process has been successfully completed the lighting switches OFF and the red LED is continuously lit up. key The light acknowledges the signal as follows: 1. The connected light is OFF. - Press the key, the light switches ON/OFF. 2. The connected light is ON. - Press the key, the light switches OFF/ON. NB: The saved remote control entries are also lost if the programming elements (fig. 5) are changed: The value on the programmer is then active again. • -Check mains voltage LED ON/OFF In programming mode, press the to disable or enable the red LED. The values of the programming elements (fig. 5) are overwritten when the remote control is used. All entries made by remote control are saved (EEPROM). If there is a power cut the values are not lost. If you press the RESET key when the infrared remote control is not locked, the information is deleted in EEPROM and the sensor works according to the programming elements (fig. 5). Programming the current lighting level as the value to switch the lighting on/off. Device does not react When the keys “time value” and “test for channel” = lighting are operated, the signal is confirmed as follows: 1. The connected lighting is switched OFF. - Press the key; the lighting switches ON/OFF. The red LED flashes for 2 sec. 2. The connected lighting is switched ON. - Press the key; the lighting switches OFF/ON. The red LED flashes for 2 sec. Reset • Press in programming mode to clear the information stored in the EEPROM. The detector will then operate according to the settings programmed using the device. • When programming mode is locked, press to disable the light. The detector will switch to the default settings. The remote control Mobil-PDi/MDi (fig. 6) allows you to set the device conveniently from the ground, without the need for a ladder or tools. Programming mode open The programming mode is opened with this key. 1. The connected lighting is switched OFF. - Press the key; the lighting switches ON/OFF. The red LED is lit continuously, providing the detector is in programming mode. 2. The connected lighting is switched ON. - Press the key; the lighting switches OFF. The red LED is lit up continuously, providing the detector is in programming mode. Note: If programming mode is not locked by pressing the , the detector automatically closes programming mode if no key is pressed for 10 min. The detector does not react to motion when in programming mode. -Too much artificial light on the detector -Increase lighting value or reposition detector Lighting ON/OFF By pressing the key the lighting can be switched on at any time if it was previously switched OFF. If you repeat this process the lighting can be switched off (see section 4.2 Manual lighting control). NB: The remote control can only be used in “AUTO” mode. Light constantly switches ON and OFF in the warm-up phase Test mode: The light value is deactivated. When the detector is activated by motion, the red LED and the connected lighting switch ON for 1 sec and OFF for 2 sec. 6 • PROGRAMMING BY REMOTE CONTROL Key -Wait for follow-up time -Thermal disturbance in field of detection: Patio heaters, halogen flood light/light bulb, moving objects (e.g. curtains at an open window), load (series connection unit relay) not suppressed Set follow-up time (1 min - 15 min) Set the acoustic sensor to suit the local environment. (Please bear in mind the volume of any stereos or TVs, etc – this is to prevent inadvertent activation.) The red LED is an additional indicator to show if the acoustic sensor is activated. Cause Lighting does not switch OFF or lighting switches ON, even if there is no motion Short impulse: The detector reacts to motion and to the set value for the lighting level. When the detector is activated by motion, the red LED and the lighting are switched on for 1 sec and off for 9 sec. NB: When the current lighting level is reached by turning the LUX regulator (starting at the moon symbol), this is indicated by the red LED, which lights up (the LED thus acts as a programming aid). The LED automatically switches off after 30 sec. • Left position = max. sensitivity • Right position= acoustic sensor deactivated Fault Set activation value (10 Lux - 2000 Lux) • Adjuster: Acoustic sensor (fig. 5d) The acoustic sensor must be set manually. If the detector switches the lighting off once the follow-up time has expired, the light is activated again within max. 8 sec by a call (noise). If the device is not activated for longer periods, it needs to be activated again by motion rather than by noise. This ensures that external noises do not inadvertently switch on the light. Function When programming the keys to indicate the lighting level “LUX”, the signal is confirmed as follows: 1. The connected lighting is switched OFF. - Press the key; the lighting switches ON/OFF. The red LED flashes for 2 sec. 2. The connected lighting is switched ON. - Press the key; the lighting switches OFF/ON. The red LED flashes for 2 sec. Note: the detector no longer enables the 4h ON/OFF feature when movement is detected and is not controlled by the light intensity value. 7 • COMPATIBLE WITH STANDARD SWITCHES ESYLUX wall-mounted motion detectors are compatible with the Feller EDIZIOdue* switch range. The detector may be assembled using the single frame (fig. 7a) available in the Feller EDIZIOdue* range. If you wish to use a multi-frame, remove the metal plate (fig. 8a) and attach the detector (fig. 8b) to the Feller EDIZIOdue* mounting plate (fig. 8c) using the two screws. Fit the Feller EDIZIOdue* frame cover (fig. 8d) and the ESYLUX inner cover (fig. 8e). PLEASE NOTE: Differences in colour may occur as the standard colour information carries the notice “similar” and materials and surfaces may vary. *Registered trademark of Feller AG. 8 • PRACTICAL ADVICE Fault Cause Lighting does not switch ON or lighting switches despite motion and darkness -Lighting value is set too low -Lighting was switched off manually -Person is not in the field of detection -Obstacle(s) affect(ed) detection -Set follow-up time too short Lighting switches ON if motion is detected, even if the lighting level is sufficient -Lighting value is set too high -Lighting has been recently operated manually -Detector is in test mode 9 • ESYLUX MANUFACTURER’S GUARANTEE ESYLUX products are tested in accordance with applicable regulations and manufactured with the utmost care. The guarantor, ESYLUX Deutschland GmbH, Postfach 1840, D-22908 Ahrensburg, Germany (for Germany) or the relevant ESYLUX distributor in your country (visit www.esylux.com for a complete overview) provides a guarantee against manufacturing/material defects in ESYLUX devices for a period of three years from the date of manufacture. This guarantee is independent of your legal rights with respect to the seller of the device. The guarantee does not apply to natural wear and tear, changes/interference caused by environmental factors or damage in transit, nor to damage caused as a result of failure to follow the user or maintenance instructions and/ or as a result of improper installation. Any illuminants or batteries supplied with the device are not covered by the guarantee. The guarantee can only be honoured if the device is sent back with the invoice/receipt, unchanged, packed and with sufficient postage to the guarantor, along with a brief description of the fault, as soon as a defect has been identified. If the guarantee claim proves justified, the guarantor will, within a reasonable period, either repair the device or replace it. The guarantee does not cover further claims; in particular, the guarantor will not be liable for damages resulting from the device’s defectiveness. If the claim is unfounded (e.g. because the guarantee has expired or the fault is not covered by the guarantee), then the guarantor may attempt to repair the device for you for a fee, keeping costs to a minimum. DÉTECTEUR DE MOUVEMENT IT SENSORI DI MOVIMENTO ABB. • FIG. 1 ABB. • FIG. 3 1a ABB. • FIG. 4 MD 180i/R-CH 1b DONNÉES TECHNIQUES • DATI TECNICI 4.1 MA00530300 4.2 www.esylux.com 4.4 ABB. • FIG. 2 3d 3b 3a 3c ABB. • FIG. 7 ABB. • FIG. 5 ABB. • FIG. 6 7a 5a ABB. • FIG. 8 5b 2b 2d FR 1 • CONSIGNES DE SÉCURITÉ ATTENTION : seules des personnes autorisées et qualifiées pour effectuer une installation conforme aux normes et prescriptions en vigueur peuvent intervenir sur des réseaux électriques. Coupez le courant avant d’installer le produit. =Largeur d'intervalle de coupure < 1,2 mm L'appareil doit être protégé côté entrée à l'aide d'un disjoncteur 10 A (fig. 4). Ce produit ne doit être utilisé que dans les conditions prévues par le présent mode d’emploi. Tout changement ou modification entraîne l’annulation de la garantie. Une fois que vous avez déballé l’appareil, vérifiez qu’il ne présente aucun défaut. En cas d’anomalie, ne le mettez pas en marche. Si vous n’êtes pas certain que l’appareil peut être utilisé en toute sécurité, éteignez-le immédiatement et prenez vos dispositions pour empêcher toute utilisation involontaire. REMARQUE : cet appareil ne doit en aucun cas être jeté avec les déchets municipaux. Les propriétaires d'équipements électriques ou électroniques usagés ont en effet l'obligation légale de les déposer dans un centre de collecte sélective. Informez-vous auprès de votre municipalité sur les possibilités de recyclage. 2 • DESCRIPTION Le MD 180i/R-CH d‘ESYLUX est un détecteur de mouvement avec zone de détection de 180° pour montage mural. Le détecteur de mouvement possède un capteur sonore intégré pour une utilisation optimale dans les pièces sans visibilité et dont l‘agencement est complexe ainsi que dans les zones de passage. Programmable avec une télécommande, pour un réglage rapide et précis des paramètres sans outil. 3 • INSTALLATION / MONTAGE / RACCORDEMENT •La hauteur de montage recommandée est 1,10 - 2,20 m. Une hauteur de montage plus élevée augmente la portée, mais diminue la sensibilité. Pour un déclenchement optimal, le mouvement doit s’effectuer perpendiculairement au détecteur. En cas d’approche directe et frontale, la détection d’un mouvement sera plus difficile et la portée sera en conséquence nettement plus faible. •L’emplacement du détecteur devrait être choisi en fonction des conditions d’espace existantes (fig. 1a mouvement en face du détecteur et transversal par rapport au détecteur). •Avant le montage du produit, il convient de couper la tension du secteur. Le modèle standard de ce détecteur de mouvement est conçu pour un montage encastré (fig. 2a/3a). Les inserts-capteurs (fig. 2b/3b) peuvent être combinés avec un couvercle IP 20 (fig. 2) ou IP 44 (fig. 3). Raccorder les inserts-capteurs (fig. 2b/3b) conformément au plan de raccordement (fig. 4 ou 5) et les monter en fonction du couvercle utilisé conformément à la fig. 2 ou 3. (4.1) Branchement standard (4.2) Branchement standard avec activation supplémentaire par interrupteur poussoir à fermeture. Au besoin, l’éclairage peut être allumé ou éteint manuellement (4.3) Connexion Master-Slave : L’appareil Master enclenche les consommateurs raccordés en fonction des paramètres réglés. Les appareils Slave servent uniquement à la détection de présence et envoient une impulsion au Master dès qu’un mouvement est détecté. La mesure de lumière s’effectue donc uniquement dans l’appareil Master. Veillez en conséquence à un emplacement optimum de l’appareil Master. 10 appareils Slave peuvent être au maximum raccordés à un appareil Master. Le câble de raccordement ne doit pas dépasser 100 m de longueur (4.4) Avec MD 180i/R-CH : branchement simultané de 5 appareils max. REMARQUE : la borne « S/P » peut être utilisée à la fois comme entrée interrupteur et comme entrée pour l’appareil esclave. •Pour un montage sur crépi, un boîtier sur crépi (accessoire) est nécessaire (fig. 2c/3c). •Les détecteurs de mouvement disposent d’un niveau supplémentaire de détection verticale pouvant être masqué à l’aide du capot joint à l’appareil (fig. 2d/3d) pour éviter ainsi un allumage involontaire (p. ex. provoqué par de petits animaux) (fig. 1b). 4 • MISE EN SERVICE Les réglages individuels peuvent être aisément effectués par télécommande (fig. 6) ou manuellement à l’aide des organes de réglage (fig. 5a - 5d). • Enclencher la tension du secteur Une phase d’initialisation (warm-up) d’env. 60 s démarre. La LED rouge indique le statut du canal = éclairage. La LED rouge clignote lentement (f = 1 Hz). L‘éclairage raccordé est enclenché. • Indicateur LED après le réchauffement La luminosité ambiante se situe sous la valeur de ensuite la LED est active pour la luminosité réglée détection de mouvement = 2 x un court éclair par mouvement détecté (LED rouge). L‘éclairage raccordé est en marche. REMARQUE : lorsque l’appareil est en mode fonctionnement, la LED rouge ne s’allume que si elle n’a pas été préalablement désactivée via la fonction « ACTIVATION/DÉSACTIVATION DE LA LED » au moyen de la télécommande infrarouge (cf. point 6). Même désactivée, la LED continue de s’allumer lors de la mise en marche de l’appareil et pendant les opérations de programmation faisant appel à la télécommande, pour confirmer les réglages. 5d 8a 2a 2c La luminosité ambiante est supérieure à la valeur la LED rouge est ÉTEINTE. réglée Pas d‘indication de détection de mouvement. L‘éclairage raccordé est ÉTEINT. 4.1 Fonctionnement L‘éclairage est automatiquement allumé dès que le détecteur a été activé par un mouvement et que la luminosité ambiante est inférieure à la valeur de luminosité pré-réglée. La fonction sonore est active dès que l‘éclairage est allumé. L‘éclairage s‘éteint automatiquement dès l‘absence de mouvements et/ou de bruits et lorsque la durée résiduelle est écoulée. Touche • Commutateur ON/OFF/AUTO (fig. 5a) L’éclairage peut être allumé à l’aide du commutateur à coulisse comme suit : Position ON = Éclairage en permanence sur MARCHE, le détecteur est désactivé. Position OFF = Éclairage en permanence sur ARRÊT, le détecteur est désactivé. Position AUTO= Mode automatique – voir paragraphe 4.1 Mode de service. • Organe de réglage : Durée résiduelle = éclairage (fig. 5b) On peut sélectionner une durée entre 15 s et 30 min TEST : Si la flèche est positionnée sur « TEST », le « Mode test » est sélectionné. Ceci veut dire : •La valeur lumineuse est désactivée. •Dès que le détecteur a été déclenché par un mouvement, la LED rouge et l’éclairage raccordé s’allument et s’éteignent de façon répétée au rythme de 1 s MARCHE, 2 s ARRÊT : Si la flèche est positionnée sur , « Impulsion courte » est sélectionnée. Ceci veut dire : •Le détecteur réagit aux mouvements et à la valeur de luminosité ambiante pré-ajustée. •Dès que le détecteur a été déclenché par un mouvement, la LED rouge et l’éclairage (relais 1) s’allument de nouveau pour 1 s Et s’éteignent ensuite pour 9 s. • Organe de réglage : valeurs lumineuses LUX = éclairage (fig. 5c) On peut sélectionner des valeurs lumineuses entre 5 Lux et 2000 Lux. : la valeur lumineuse est d’env. 5 Lux : mode de service jour/nuit • Butée gauche= sensibilité maxi • Butée droite = capteur sonore désactivé. Régler le capteur sonore en fonction des conditions locales. (Attention à la puissance sonore des appareils Hifi ou TV etc. - Protection conte allumages involontai res). Pour le réglage, la LED rouge fait fonction d‘indicateur supplémentaire pour la réaction du capteur acoustique. 6 • RÉGLAGE À L’AIDE DE LA TÉLÉCOMMANDE REMARQUE : la fonction télécommande est uniquement possible en mode « AUTO ». La télécommande Mobil-PDi/MDi (fig. 6) vous permet de régler les paramètres confortablement à partir du sol sans avoir besoin d’échelle ou d’outils. L’utilisation de la télécommande effacera les valeurs des organes de réglage (fig. 5). Toutes les valeurs saisies à l’aide de la télécommande seront durablement mémorisées (EEPROM). En cas de panne de courant, les valeurs sont conservées. En appuyant sur la touche RESET pendant que la télécommande n’est pas bloquée, les données de l’EEPROM sont effacées et le détecteur travaille en fonction des organes de réglage (fig. 5). REMARQUE : les valeurs mémorisées saisies par télécommande seront également effacées si les positions des organes de réglage (fig. 5) sont modifiées ; la valeur respective des organes de réglage est alors de nouveau active. Pour une réception optimale, orienter la télécommande vers le détecteur de mouvement lors de la programmation. Veuillez noter qu’en cas d’exposition directe au soleil, la portée standard de 6 m peut être considérablement réduite du fait de la proportion des rayons infrarouges de la lumière solaire. Touche Description de la fonction Réception de signal : Le signal de - La LED rouge clignote 2 s la télécommande a été reçu. - La LED rouge jette 2 éclairs brefs. Le signal de la télécommande n‘a pas été compris. Blocage du mode de programmation En actionnant cette touche on arrête le mode de programmation. Le détecteur réagit maintenant automatiquement en fonction des paramètres réglés. Remarque : lorsque le mode de programmation est verrouillé, seules les touches ALLUMAGE/EXTINCTION DE L’ÉCLAIRAGE , RESET et TEST sont accessibles. Les autres sont verrouillées. • La plage de valeur de luminosité ambiante actuelle (entre 5 et 2000 Lux) peut être lue comme valeur de seuil de commutation. Remarque : appuyez sur en mode de programmation. Un clignotement rapide de la LED rouge signifie que la valeur de luminosité ambiante actuelle est trop élevée (> 2000 Lux) ou trop faible (< 5 Lux), c‘est-à-dire que la valeur de luminosité actuelle ne peut pas être lue. • Lecture du rapport de luminosité actuelle comme valeur de mise en marche (quand l‘éclairage est éteint). Méthode de saisie : lorsque la luminosité ambiante (valeur en lux) souhaitée est atteinte, passez en mode de programmation et appuyez sur . Confirmation du signal reçu : l‘éclairage raccordé se met en MARCHE 2 s et la LED rouge clignote lentement. Quand l‘opération de lecture se termine avec succès, l‘éclairage s‘ETEINT et la LED rouge est allumée en continu. Lors de la confirmation avec les touches Valeur de luminosité LUX le signal sera confirmé de la sorte : 1. L‘éclairage raccordé est arrêté. - Actionner la touche, l‘éclairage commute en MARCHE/ARRET. La LED rouge clignote 2 s. 2. L‘éclairage raccordé est en MARCHE. - Actionner la touche, l‘éclairage commute en ARRET/MARCHE. La LED rouge clignote 2 s. REMARQUE : si la valeur de luminosité ambiante est atteinte lorsque l’on tourne l’organe de réglage LUX (en partant du symbole lune), cela sera signalé par l’allumage de la LED rouge (la LED fait donc fonction d’aide au réglage). La LED s’éteint automatiquement au bout de 30 s. • Organe de réglage : capteur de son (fig. 5d) Le capteur de son doit être réglé manuellement. Si le détecteur éteint l‘éclairage après écoulement de la durée résiduelle, il est possible de le réactiver immédia- tement, p. ex. en émettant un appel (bruit) dans un délai maxi de 8 s. Si l‘appareil n‘a pas été enclenché pendant une période prolongée, il est absolument nécessaire d‘activer tout d‘abord un enclenchement par un mouvement. La combinaison d‘enclenchement évite un allumage inopiné provoqué par des bruits étrangers. Touche Seuil de mise en marche fixe (10 Lux - 2000 Lux) Champ de touches c1 Lors de la confirmation avec les touches valeur de délai et Test pour canal = éclairage, le signal sera confirmé de la sorte : 1. L‘éclairage raccordé est ARRÊTÉ. - Actionner la touche, l‘éclairage commute en MARCHE/ARRET. La LED rouge clignote 2 s. 2. L‘éclairage raccordé est en MARCHE. - Actionner la touche, l‘éclairage commute en ARRET/MARCHE. La LED rouge clignote 2 s. Impulsion brève : le détecteur réagit aux mouvements ainsi qu‘à la valeur de luminosité ambiante réglée. Dès que le détecteur à déclenché en raison d‘un mouvement, la LED rouge et l‘éclairage raccordé s‘allument pendant 1 s et s‘éteignent pendant 9 s. Délai de retard fixe (1 min. - 15 min.) Mode de Test : la valeur de luminosité est désactivée. Dès que le détecteur à déclenché en raison d‘un mouvement, la LED rouge et l‘éclairage raccordé clignotent en alternance 1 s sur MARCHE et 2 s sur ARRÊT. Éclairage ON/OFF Un appui sur permet d‘enclencher l‘éclairage à tout moment si ce dernier était ÉTEINT. Un nouvel appui permet d‘éteindre à nouveau l‘éclairage (voir paragraphe 4.2 Commande manuelle de l‘éclairage). Réinitialisation • En mode de programmation, un appui sur permet de supprimer les informations stockées dans la mémoire EEPROM. Le détecteur fonctionne alors conformément aux réglages effectués sur l’appareil. • Lorsque le mode de programmation est verrouillé, l’éclairage peut être éteint via la touche et le détecteur bascule vers le mode préalablement défini. ACTIVATION/DÉSACTIVATION DE LA LED En mode de programmation, un appui sur la touche permet d’activer et de désactiver la LED rouge. L’éclairage confirme la réception du signal de la façon suivante : 1. Le luminaire raccordé est ÉTEINT. - Appui sur la touche = allumage puis extinction de l’éclairage. 2. Le luminaire raccordé est ALLUMÉ. - Appui sur la touche = extinction puis allumage de l’éclairage. Désactiver la LED : - Appuyez sur la touche . La LED rouge s’éteint pendant 2 secondes. Elle est à présent désactivée et ne s’allume que lors de la mise en marche de l’appareil et en mode de pro grammation, pour confirmer les réglages. Activer la LED - Appuyez sur la touche . La LED rouge clignote pendant 2 secondes. Elle est de nouveau active en mode fonctionnement. Description de la fonction Activation/Désactivation permanente de l’éclairage pendant 4 heures sur le canal 1 = éclairage Lorsque l’éclairage est inactif, vous pouvez à tout moment appuyer sur la touche pour l’activer pendant 4 heures. Et si vous appuyez une seconde fois sur cette touche, vous désactiverez totalement l’éclairage pour une durée de 4 heures. Une fois les 4 heures écoulées, le détecteur retourne automatiquement au mode de fonctionnement précédemment sélectionné. L’activation/désactivation permanente de l’éclairage pendant 4 heures peut être interrompue avant son terme au moyen de la touche . Remarque : si le mode de programmation n‘est pas arrêté en actionnant la touche , le détecteur arrête automatiquement le mode de programmation 10 min après la dernière activation d‘une touche. En mode programmation le détecteur ne réagit pas aux mouvements. Lecture de la luminosité ambiante actuelle comme valeur de mise en arche/d‘arrêt de l‘éclairage. REMARQUE : la fonction télécommande est uniquement possible en mode « AUTO ». Description de la fonction Ouvrir le mode de programmation En actionnant cette touche on active le mode de programmation. 1. L‘éclairage raccordé est ÉTEINT. - Actionner la touche , l‘éclairage commute en MARCHE/ARRET. La LED rouge est allumée en permanence, tant que le détecteur se trouve en mode de programmation. 2. L‘éclairage raccordé est ALLUMÉ. - Actionner la touche , l‘éclairage commute à l‘ARRET. La LED rouge est allumée en permanence, tant que le détecteur se trouve en mode de programmation. 5 • RÉGLAGE À L’AIDE DES ORGANES DE RÉGLAGE 8c 8d Mobil-PDi/MDi (EM10425509) IT 4.2 Commande manuelle de l‘éclairage L‘éclairage peut à tout moment être allumé à l‘aide de la touche de la télécommande IR ou en actionnant la touche externe (touche – courant de travail), qui est reliée à la borne « S/P » du détecteur (MD 180i/R-CH) (fig. 4.2). L‘éclairage peut être allumé ou éteint à tout moment à l‘aide de la touche de la télécommande (fig. 6). L‘éclairage reste éteint ou allumé tant que le détecteur enregistre encore un mouvement. Après avoir enregistré le dernier mouvement, le détecteur reprend le mode de service précédemment réglé une fois que la durée résiduelle est écoulée. 8b 8e DÉTECTEUR DE MOUVEMENT Félicitations ! Avec ce produit ESYLUX, vous avez fait le choix de la qualité. Pour l‘utiliser dans les meilleures conditions, veuillez lire attentivement cette notice de montage et d‘utilisation et la conserver en vue d‘une éventuelle consultation future. 5c Remarque : lorsque cette fonction est activée, le détecteur ne réagit plus aux mouvements etne tient plus compte de la luminosité. REMARQUE : une même couleur peut varier légèrement en fonction des surfaces et matériaux utilisés. Les noms de couleur du nuancier NCS sont donc accompagnés de la mention « similaire à ». *Marque déposée de la société Feller AG. 8 • CONSEILS PRATIQUES Incident Cause L‘éclairage ne s‘ALLUME pas ou s‘ÉTEINT en cas d‘absence ou d‘obscurité -Valeur de luminosité réglée trop faible -Éclairage éteint en manuel -Personne dans la zone de détection -Un obstacle gêne la détection -Délai de retard réglé trop court L‘éclairage commute malgré suffisamment de luminosité en cas d‘absence L‘éclairage ne s‘ÉTEINT plus ou se met spontanément en MARCHE en cas d‘absence -Valeur de luminosité réglée trop élevée -Éclairage a été mis en marche auparavant en manuel -Détecteur en mode de test -Attendre le délai de retard -Source thermique parasite dans la zone de détection : Ventilateur thermique, ampoule/projecteur halogène, objets mobiles (par exemple rideaux à une fenêtre ouverte), tension (relais EVG) pas antiparasités Dans la phase de réchauffement la lampe s‘ALLUME et s‘ETEINT en permanence -Trop de lumière électrique désorganise le détecteur -Augmenter la valeur de luminosité ou déplacer le détecteur L‘appareil de réagit pas -Vérifier la tension secteur 9 • ESYLUX – GARANTIE DU CONSTRUCTEUR Les produits ESYLUX sont fabriqués avec le plus grand soin et testés selon les normes en vigueur. Le garant, ESYLUX Deutschland GmbH, Case postale 1840, D-22908 Ahrensburg (pour l’Allemagne) ou le distributeur de la marque dans votre pays (vous trouverez toutes les informations nécessaires à ce sujet sur le site www.esylux.com) garantit les appareils ESYLUX contre les défauts de fabrication et de matériaux pour une durée de 3 ans à partir de la date d’achat. Cette garantie est indépendante de vos droits légaux vis-à-vis du vendeur de l’appareil. L’usure naturelle, les modifications de l’appareil dues à son milieu d’installation et les dommages résultant de son transport n’entrent pas dans le cadre de la garantie. De même, ne sont pas couverts les défauts dus au non-respect des instructions de montage et d’entretien et/ou à une installation inappropriée. Sont également exclues de la garantie les batteries, sources lumineuses et piles fournies avec l’appareil. La procédure de garantie ne pourra être enclenchée que sur présentation d’un appareil non modifié après constatation du défaut, ainsi que d’un ticket de caisse valable, accompagnés d’une courte description de l’anomalie constatée et expédié au garant dans un emballage approprié et suffisamment affranchi. Si le recours en garantie s’avère justifié, le garant peut décider soit de réparer, soit de remplacer l’appareil dans les meilleurs délais. La garantie ne comprend aucun autre recours. Le garant n’est notamment pas responsable de tout dommage causé par un défaut de l’appareil. Si le recours de garantie s’avère injustifié (par exemple, si la garantie a expiré ou si le défaut constaté n’est pas couvert par celle-ci), le garant tentera de réparer l’appareil au meilleur coût. Congratulazioni per l‘acquisto di questo prodotto di elevata qualità ESYLUX. Per garantire un corretto funzionamento, si prega di leggere attentamente le presenti istruzioni di montaggio e d‘uso e di conservarle per una eventuale consultazione successiva. 1 • INDICAZIONI DI SICUREZZA ATTENZIONE: le operazioni sugli impianti elettrici devono essere eseguite solo da personale autorizzato nel rispetto delle disposizioni e delle norme di installazione locali. Prima dell‘installazione del prodotto interrompere l‘alimentazione. 5 • IMPOSTAZIONE TRAMITE REGOLATORI PORTÉE PORTATA env. 8 m, avec une hauteur de montage de 1,10 - 2,20 m circa 8 m, ad un‘altezza di montaggio di 1,10 - 2,20 m RÉGLAGES IMPOSTAZIONI mécanique par régleur, électronique par télécommande infrarouge (en option) meccanica tramite regolatore, elettronica con telecomando a infrarossi (accessorio) MD 180i/R-CH: 230 V ~50 Hz, 2300 W, 10 A (cos ϕ = 1), 1150 VA, 5 A (cos ϕ = 0,5), EVG: 30 x (1 x 18 W), 20 x (2 x 18 W), 25 x (1 x 36 W), 15 x (2 x 36 W), 20 x (1 x 58 W), 10 x (2 x 58 W) ballasts électroniques - courant d‘appel maximal 800 A/200 µs • corrente di ingresso massima 800 A/200 µs DELAI DE RETARD TEMPO TRASCORSO impulsion 15 s à 30 min a impulsi/circa 15 secondi - 30 minuti VALEUR DE LUMINOSITÉ VALORE DI LUMINOSITÀ 5 - 2000 Lux ENTREE INTERRUPTEUR INPUT DALLA TASTIERA MD 180i/R-CH = oui MD 180i/R-CH = sì ENTREE ESCLAVE INGRESSO SLAVE MD 180i/R-CH = oui MD 180i/R-CH = sì TYPE DE PROTECTION GRADO DI PROTEZIONE IP 20, IP 44 selon le couvercle utilisé IP 20, IP 44 a seconda della copertura CLASSE DE PROTECTION CLASSE DI PROTEZIONE II TEMPÉRATURES AUTORISÉES TEMPERATURA DI ESERCIZIO 0 °C...+55 °C BOITIER CORPO Polycarbonate stabilisé aux UV Policarbonato stabilizzato agli UV DIMENSIONS ENV. DIMENSIONI CIRCA largeur 86 mm, hauteur 86 mm, profondeur 63 mm larghezza 70 mm, altezza 70 mm, profondità 63 mm Sous réserve de modifications techniques et esthétiques. • L‘azienda si riserva il diritto di apportare modifiche tecniche ed estetiche. =Distanza tra contatti aperti < 1,2 mm È necessario proteggere il dispositivo tramite un interruttore magnetotermico da 10 A in ingresso (fig. 4). NOTA: il presente dispositivo non deve essere smaltito come rifiuto urbano indifferenziato. Chi possiede un vecchio dispositivo è vincolato per legge allo smaltimento conformemente alle normative in vigore. Per ulteriori informazioni rivolgersi all'amministrazione comunale. 2 • DESCRIZIONE Il dispositivo ESYLUX MD 180i/R-CH è un rilevatore di movimento con un angolo di copertura di 180° destinato al montaggio sulla parete. Il rilevatore di movimento è dotato di un sensore acustico integrato per impiego ottimale in locali con scarsa visibilità, spazi angusti e zone di passaggio. Programmabile tramite telecomando per consentire un’impostazione rapida ed esatta dei diversi parametri senza l’utilizzo di attrezzi. L‘illuminazione è sempre ACCESA, il sensore di movimento non è attivo. L‘illuminazione è sempre SPENTA, il sensore di movimento non è attivo. Modalità automatica, vedere la sezione 4.1 Funzionamento. SUGGERIMENTO: La funzione del telecomando è possibile solo in modalità “AUTO”. • Regolatore: Tempo trascorso = Illuminazione (fig. 5b) È possibile selezionare un tempo compreso fra 15 sec. e 30 min. TEST: Se la freccia si trova su “TEST”, è selezionata la “Modalità di test”, ovvero: •Il valore di luminosità è disattivato. •Appena il sensore viene azionato per via del movimento, il LED rosso si accende e l‘illuminazione collegata si ripete nella sequenza di 1 sec. di ACCENSIONE, 2 sec. di SPEGNIMENTO. : Se la freccia si trova su , è selezionato l‘“impulso breve”, ovvero: •Il sensore reagisce ai movimenti e al valore di luminosità ambientale preimpostato. •Appena il sensore viene azionato per via del movimento, il LED rosso e l‘illuminazione (relé 1) si accendono per 1 sec. e successivamente si spengono per 9 sec. : Il valore di luminosità è di circa 5 Lux 3 • INSTALLAZIONE / MONTAGGIO / COLLEGAMENTO : Funzionamento giornaliero/notturno •L‘altezza di montaggio consigliata è 1,10 - 2,20 m. Con una maggiore altezza di montaggio, la portata aumenta, tuttavia la sensibilità viene ridotta. Il movimento in direzione trasversale rispetto al sensore è ottimale per l‘intervento del sensore. In caso di avvicinamento diretto e frontale, è più difficile per il sensore rilevare un movimento, pertanto la portata si riduce notevolmente. •Il posizionamento del sensore deve essere eseguito in base alle condizioni ambientali e alle esigenze (fig. 1a frontalmente rispetto al sensore e perpendicolarmente rispetto al sensore). •Prima di eseguire il montaggio del prodotto è necessario togliere alimentazione. In versione standard, il rilevatore è destinato al montaggio incassato (fig. 2a/3a). I gruppi sensori (fig. 2b/3b) possono essere utilizzati insieme ad una copertura IP 20 (fig. 2) o IP 44 (fig. 3). Collegare i gruppi sensore (fig. 2b/3b) secondo lo schema dei collegamenti (fig. 4 o 5) e in base alla copertura utilizzata, montarli come indicato in fig. 2 o 3. (4.1) Funzionamento standard (4.2) Funzionamento standard con comando addizionale tramite tasto di chiusura All‘occorrenza è possibile accendere o spegnere la luce in modalità manuale tramite tasto (4.3) Commutazione master-slave: l‘apparecchio master commuta le utenze collegate a seconda dei parametri impostati. Le apparecchiature slave vengono utilizzate per il rilevamento delle presenze e forniscono un impulso all‘apparecchiatura master in caso di riconoscimento di un movimento. La misurazione della luce viene eseguita solo nel master. Pertanto, prestare attenzione al posizionamento ottimale dell‘apparecchiatura master. A un apparecchio master possono essere collegati un massimo di 10 apparecchi slave (4.4) Esercizio contemporaneo di massimo 5 dispositivi con MD 180i/R-CH NOTA: Il morsetto “S/P” può essere utilizzato contempora- neamente per la tastiera esterna e collegamento Slave. •Per il montaggio a parete è necessaria una presa esterna (accessorio) (fig. 2c/3c). •I sensori di movimento sono dotati di un‘ulteriore superficie di rilevamento verticale, la quale può essere oscurata con l‘ausilio della calotta fornita in dotazione (fig. 2d/3d), per evitare un‘accensione indesiderata (ad es., provocata da piccoli animali) (fig. 1b). 4 • MESSA IN FUNZIONE Le singole impostazioni possono essere eseguite semplicemente tramite telecomando (fig. 6) oppure manualmente tramite regolatori (fig. 5a - 5d). •Collegare l‘alimentazione Inizia una fase di inizializzazione (riscaldamento) di circa ca. 60 sec. Il LED rosso segnala la condizione del canale = illuminazione. Il LED rosso lampeggia lentamente (f = 1 Hz). L‘illuminazione collegata è inserita. • Visualizzazione tramite LED dopo il riscaldamento La luce ambientale si trova sotto il valore di luminosità successivamente il LED si accende per preimpostato indicare il rilevamento del movimento = 2 brevi lampeggi per ogni movimento rilevato (LED rosso). L‘illuminazione collegata è inserita. NOTA: Nella modalità di esercizio, il LED rosso è attivo solo quando non sia stato precedentemente disattivato con la funzione LED ON/OFF del telecomando IR (vedere il capitolo 6) Il LED funziona quindi solo ancora nella fase di accensione e nella modalità di programmazione aperta del telecomando IR come indicazione di conferma. La luce ambientale si trova sopra il valore di luminosità il LED rosso è SPENTO. preimpostato Nessuna visualizzazione del rilevamento di movimento. L‘illuminazione collegata è SPENTA. 4.1 Funzionamento L‘illuminazione viene inserita automaticamente quando il sensore è stato azionato dal movimento e la luce ambientale non ha raggiunto il valore di luminosità preimpostato. La funzione acustica viene attivata solo con l‘attivazione dell‘illuminazione. La luce viene disinserita automaticamente in assenza di movimenti e/o di rumori e se è trascorso il tempo preimpostato. 4.2 Comando di illuminazione manuale L‘illuminazione può essere inserita in qualunque momento tramite il telecomando a infrarossi con il tasto oppure premendo il tasto esterno (tasto – corrente attiva), collegato al morsetto “S/P” del sensore (fig. 4.2). L‘illuminazione può essere accesa o spenta in ogni momento tramite il tasto del telecomando a infrarossi (fig. 6). L‘illuminazione rimane accesa o spenta finché il sensore rileva un ulteriore movimento. Dopo aver rilevato l‘ultimo movimento, il sensore ritorna alla modalità di impostazione precedente dopo che è trascorso il tempo previsto. SUGGERIMENTO: Se, ruotando il regolatore LUX (partendo dal simbolo della luna) si raggiunge l‘attuale valore di luminosità ambientale, ciò viene indicato dall‘accensione del LED rosso (il LED è quindi un ausilio di regolazione). Il LED si spegne automaticamente dopo circa 30 sec. • Regolatore: Sensore acustico (fig. 5d) Il sensore acustico deve essere impostato manualmente. Se il sensore si disattiva trascorso il tempo previsto, è possibile riattivare l‘illuminazione, ad es., con un grido (rumore) al massimo entro 8 sec. Se l‘apparecchiatura non è attiva per un periodo di tempo più lungo, è indispensabile eseguire un movimento per innescare un nuovo processo di inserimento. Questa combinazione di attivazione evita un intervento indesiderato del sensore dovuto a rumori estranei. • Tutto a sinistra= Sensibilità max. • Tutto a destra = Sensore acustico disattivato Impostare il sensore acustico in base alle condizioni locali (fare attenzione al volume di apparecchi TV o impianti Hifi, ecc., per evitare un‘attivazione indesiderata). Il LED rosso in questo caso funge da ulteriore indicatore per l‘intervento del sensore acustico. 6 • IMPOSTAZIONE TRAMITE TELECOMANDO SUGGERIMENTO: La funzione del telecomando è possibile solo in modalità “AUTO”. Con il telecomando Mobil-PDi/MDi (fig. 6) è possibile eseguire impostazioni comodamente dal suolo senza alcuna scala o utensile. Utilizzando il telecomando, i valori dei regolatori (fig. 5) vengono sovrascritti. Tutte le immissioni effettuate con il telecomando vengono memorizzate in modo duraturo (EEPROM). In caso di caduta di tensione i valori vengono mantenuti. Premendo il tasto RESET mentre il telecomando a infrarossi non è bloccato, le informazioni contenute nella EEPROM vengono cancellate e il sensore funziona secondo le impostazioni dei regolatori (fig. 5). SUGGERIMENTO: Se si modificano i regolatori, (fig. 5) anche le immissioni del telecomando memorizzate vengono cancellate; poi il valore dei regolatori è di nuovo attivo. Per una ricezione ottimale, durante la programmazione orientare il telecomando verso il sensore di movimento. Tenere presente che in caso di irradiazione diretta del sole, la portata standard di circa 6 m potrà essere molto ridotta a causa della quota di infrarossi della luce solare. Tasto Descrizione della funzione Ricezione segnale: - Il LED rosso lampeggia per 2 sec il segnale è stato compreso dal telecomando. - Il LED rosso lampeggia brevemente per il segnale non è stato 2 volte compreso dal telecomando. Blocco della modalità di programmazione Blocco della modalità di programmazione Premendo questo tasto si termina la modalità di programmazione. Il sensore reagisce in modo automatico a seconda dei valori impostati. Nota: Nella modalità “Modalità programmazione bloccata” solo i tasti LUCE ON/OFF , RESET e il tasto TEST sono utilizzabili, tutti gli altri tasti sono bloccati. Blocco modalità di programmazione Premendo questo tasto, la modalità di programmazione viene attivata. 1. L‘illuminazione collegata è SPENTA. - Premere il tasto , l‘illuminazione si ACCENDE/SPEGNE. Il LED rosso si accende in modo permanente finché il sensore si trova in modalità di programmazione. 2. L‘illuminazione collegata è inserita. - Premere il tasto , l‘illuminazione si SPEGNE. Il LED rosso si accende in modo permanente, finché il sensore si trova in modalità di programmazione. Suggerimento: Se la modalità di programmazione non viene chiusa premendo il tasto , il sensore disattiva automaticamente la modalità di programmazione 10 min. dopo l‘ultima pressione del tasto. Il sensore non reagisce ai movimenti in modalità di programmazione. Descrizione della funzione 7 • COMPATIBILITÀ CON INTERRUTTORI DI ALTRE MARCHE Lettura dell‘attuale luce ambientale come valore di accensione/spegnimento per l‘illuminazione. I sensori di movimento da parete ESYLUX sono compatibili con la gamma di interruttori Feller EDIZIOdue*. È sufficiente utilizzare una cornice singola (fig. 7a) della gamma di interruttori Feller EDIZIOdue*. Se si desidera utilizzare una cornice multipla, rimuovere la piastra di metallo singola (fig. 8a) e fissare con due viti il rilevatore (fig. 8b) alla piastra Feller EDIZIOdue* (fig. 8c). Montare, infine, la maschera di protezione Feller EDIZIOdue* (fig. 8d) e la protezione interna ESYLUX (fig. 8e). • L‘ambito dell‘attuale valore di luminosità ambientale (fra 5 - 2000 Lux) può essere letto come valore di commutazione. Nota bene: Premere in modalità di programmazione aperta. Un lampeggio veloce del LED rosso indica che l‘attuale valore di luminosità ambientale è troppo alto (> 2000 Lux) o troppo basso (< 5 Lux), ovvero, non è possibile leggere l‘attuale valore di luminosità ambientale. • Le attuali condizioni di luce vengono rilevate come valore di attivazione (se l‘illuminazione è spenta) Metodo di lettura: Quando il valore di luce ambiente desiderato viene raggiunto, premere in modalità di programmazione aperta. Tacitazione del segnale ricevuto: l‘illuminazione collegata si ACCENDE per 2 sec. e il LED rosso lampeggia lentamente. Se il procedimento di lettura si conclude con successo, l‘illuminazione si SPEGNE e il LED rosso si riaccende in modo permanente. Premendo il tasto dei valori del tempo e il tasto di luminosità LUX, il segnale viene tacita to come segue: 1. L‘illuminazione collegata è SPENTA. - Premere il tasto, l‘illuminazione si ACCENDE/SPEGNE. Il LED rosso lampeggia per 2 sec. 2. L‘illuminazione collegata è ACCESA. - Premere il tasto, l‘illuminazione si SPEGNE/ACCENDE. Il LED rosso lampeggia per 2 sec. • Regolatore: Valori di luminosità LUX = Illuminazione (fig. 5c) È possibile selezionare i valori di luminosità fra 5 Lux e 2000 Lux. Tasto • Interruttore ON/OFF/AUTO (fig. 5a) L‘illuminazione può essere inserita tramite l‘interruttore a scorrimento nel seguente modo: Posizione ON = Posizione OFF = Posizione AUTO= Il prodotto è destinato solo a un utilizzo adeguato (come descritto nelle istruzioni per l‘uso). Non è consentito eseguire variazioni o modifiche, pena l’annullamento della garanzia. Dopo il disimballaggio verificare che il prodotto non sia danneggiato. In caso di danni, non utilizzare il dispositivo. Se si presume che il funzionamento sicuro del dispositivo non possa essere garantito, non utilizzare l‘apparecchio e impedirne l‘azionamento involontario. 180° à horizontale, 60° à la verticale 180° orizzontale, 60° verticale SENSORI DI MOVIMENTO 7 • COMPATIBILITÉ AVEC LES INTERRUPTEURS DE MARQUE Les détecteurs de mouvement muraux ESYLUX sont compatibles avec la gamme d’interrupteurs Feller EDIZIOdue*. Lors du montage, il suffit d’utiliser le cadre simple (fig. 7a) proposé par cette marque. Si vous souhaitez utiliser un cadre multiple, retirez la plaque métallique (fig. 8a) et montez le détecteur (fig. 8b) sur la plaque de fixation Feller EDIZIOdue* (fig. 8c) au moyen des deux vis. Enfin, fixez le cache de protection Feller EDIZIOdue* (fig. 8d) et la protection intérieure ESYLUX (fig. 8e). 230 V ~ 50 Hz RAYON DE DÉTECTION CAMPO DI RILEVAMENTO PUISSANCE DE COMMUTATION POTENZA DI COMMUTAZIONE 4.3 • • MD 180i/R-CH TENSION DE RÉSEAU ALIMENTAZIONE NOTA: Sono possibili differenze di colore, siccome la notazione colori NCS riporta l‘indicazione “simile” e i materiali e le superfici possono variare. *Marchio registrato dell‘azienda Feller AG. 8 • SUGGERIMENTI PRATICI Anomalia Causa L‘illuminazione non si ACCENDE oppure si SPEGNE anche in presenza di movimento e di buio -Impostazione troppo bassa del valore di luminosità -L‘illuminazione è stata spenta in modo manuale -Persona non presente nel campo di rilevamento -Uno o più ostacoli disturbano il rilevamento -Impostazione del tempo previsto troppo breve L‘illuminazione si ACCENDE anche in presenza di luminosità sufficiente -Impostazione troppo alta del valore di luminosità -L‘illuminazione è stata inserita brevemente in modo manuale -Sensore in funzionamento di test L‘illuminazione non si SPEGNE oppure si ACCENDE spontaneamente in assenza di movimento -Attendere il tempo previsto -Sorgenti termiche di disturbo nel campo di rilevamento: Ventilatori di calore, lampade a incandescenza/riflettori alogeni, oggetti in movimento (ad es., tende appese a finestre aperte), carico (relè di apparecchi elettronici di preinserimento) non eliminati La luce si ACCENDE e SI SPEGNE in modo continuo in fase di riscaldamento -Un‘eccessiva quantità di luce artificiale penetra nel sensore -Aumentare il valore di lumino- sità o spostare il sensore L‘apparecchiatura non reagisce -Verificare l‘alimentazione Valore di attivazione fisso (10 Lux - 2000 Lux) Area dei tasti c1 Premendo il tasto dei valori del tempo e il tasto Test per canale = illuminazione, il segnale viene tacitato come segue: 1. L‘illuminazione collegata è SPENTA. - Premere il tasto, l‘illuminazione si ACCENDE/SPEGNE. Il LED rosso lampeggia per 2 sec. 2. L‘illuminazione collegata è ACCESA. - Premere il tasto, l‘illuminazione si SPEGNE/ACCENDE. Il LED rosso lampeggia per 2 sec. Impulso breve: Il sensore reagisce ai movimenti e al valore di luminosità ambientale preimpostato. Appena il sensore viene azionato per via del movimento, il LED rosso e l‘illuminazione si accendono per 1 sec. e successivamente si spengono per 9 sec. Tempo trascorso fisso (1 min. - 15 min.) Modalità di test: Il valore di luminosità è disattivato. Appena il sensore viene azionato per via del movimento, il LED rosso e l‘illuminazione collegata lampeggiano per 1 sec. ACCESI e 2 sec. SPENTI. Illuminazione ON/OFF Premendo è possibile accendere l‘illuminazione in qualunque momento ammesso che fosse spenta. Ripetere questo procedimento per spegnere l‘illuminazione (vedere il paragrafo 4.2 Comando di illuminazione manuale). Reimpostazione • Con la pressione di nella modalità di programmazione aperta le informazioni nella EEPROM vengono cancellate e il segnalatore lavora in base agli elementi di impostazione. • Premendo nella modalità di programmazione bloccata l‘illuminazione si spegne e il segnalatore si trova nella modalità preimpostata. LED ON/OFF Il LED rosso può essere disattivato o attivato tramite l’azionamento del tasto nella modalità di programmazione aperta. Inoltre il segnale viene confermato tramite illuminazione come segue: 1. L’illuminazione collegata è SPENTA. - Premere il tasto , l’illuminazione si ACCENDE e SPEGNE. 2. L’illuminazione collegata è ACCESA. - Premere il tasto , l’illuminazione si SPEGNE e ACCENDE. 9 • GARANZIA DEL PRODUTTORE ESYLUX I prodotti ESYLUX sono omologati secondo le norme vigenti e realizzati con la massima cura. Il garante, ESYLUX Deutschland GmbH, casella postale 1840, D-22908 Ahrensburg (per Germania), oppure il distributore ESYLUX locale (per un elenco completo dei distributori, consultare il sito Web www.esylux.com), stipula un contratto di garanzia della durata di tre anni a partire dalla data di acquisto contro difetti di produzione o di materiale dei dispositivi ESYLUX. La presente garanzia sussiste indipendentemente dai diritti legali del cliente nei confronti del rivenditore del dispositivo. La garanzia non copre l’usura normale, variazioni o disturbi causati da interferenze ambientali o danni di trasporto, nonché danni dovuti alla mancata osservanza delle istruzioni d‘uso e manutenzione e/o a un‘installazione non appropriata. Le batterie, le lampadine e le batterie ricaricabili fornite sono escluse dalla garanzia. La garanzia è valida solo nel caso in cui il dispositivo, non modificato, venga immediatamente spedito al produttore, correttamente affrancato e imballato, accompagnato dalla fattura o dallo scontrino fiscale e da una breve descrizione del difetto. In caso di richiesta giustificata di intervento in garanzia, il produttore dovrà provvedere alla riparazione o alla sostituzione del dispositivo nei tempi previsti. La copertura non prevede altri tipi di garanzia o estensione dei diritti; in particolare il produttore non potrà essere ritenuto responsabile di danni derivanti da imperfezioni del dispositivo. Qualora la richiesta di intervento in garanzia non fosse giustificata (ad esempio dopo decorrenza del periodo di validità della garanzia o per danni non coperti da quest‘ultima), il produttore può provvedere alla riparazione del dispositivo a un prezzo conveniente con fatturazione a carico del cliente. Funzione: Disattivazione LED: - Premere il tasto . Il LED rosso si spegne per 2 sec. a questo punto il LED è disattivato e funziona solo ancora nella fase di accensione e nella modalità di programmazione aperta come indicatore di conferma del comando. Funzione: Attivazione LED: - Premere il tasto . Il LED rosso lampeggia per 2 sec. Il LED è ora nuovamente attivo nella modalità di esercizio. Luce continua 4h ON/OFF per il canale 1 = illuminazione Premendo il tasto , è possibile accendere in modo permanente l’illuminazione per 4 ore se era SPENTA. Ripetendo questo passaggio è possibile spegnere l’illuminazione in modo permanente per 4h. Al termine delle 4 ore il segnalatore ritorna nella modalità di esercizio impostata. Interrompere la funzione 4h = ON/OFF prima della scadenza delle 4 ore premendo il tasto . Nota: Il segnalatore attivando la funzione 4h ON/OFF non reagisce più ai movimenti e non viene controllato mediante l’indice di luminosità. MA00530300 FR ESYLUX GmbH An der Strusbek 40, 22926 Ahrensburg/Germany Internet: www.esylux.com e-mail: [email protected]