1
Libretto d'istruzione e uso - Notice d'instructions et mode d'emploi - Instruction manual
Bedienungsanleitung - Manual de uso y manutencion - Gebruiksaanwijzing
Livro de instrucçoes e modo de emprego - Instrukcja obslÀugi i konserwacji - Használati utasítás
Návod k pouívání - Brugsvejledning - Bruksanvisning - Bruks- og vedlikeholdsveiledning
Käyttöohjeet - Navodila za uporabo in vzdrz°evanje - Egceirivdio odhgiwvn crhvshς
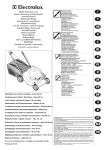
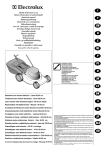
Rasaerba autoportante con motore a scoppio-Lama 62 cm
I
F
GB
Tondeuse autoportante avec moteur à explosion-Lame 62 cm.
Ride-on Lawnmower with Petrol engine-62 cm blade
Selbstfahrender Rasenmäher mit Berstmotor-Klinge 62 cm
D
Cortadora de hierba autosustentador con motor de explosión-Cuchilla 62 cm.
Zelfdragende grasmaaimachine met verbrandingsmotor-Mes 62 cm
Cortador de grama autoportante com motor de explosão-Faca 62 cm
E
Maszyna do cie%cia trawy samonos>na z silnikiem o zaplÀonie iskrowym-Ostrze 62 cm
Gèpesìtett fuìnyirò robbanò motorral-Kès 62 cm
Samohybná sekac°ka trávy s výbušným motore-sekací list 62 cm
NL
Selvkørende plæneklipper med benzinmotor-Klinge 62 cm
Självgående gräsklippare med explosionsmotor-Knivblad 62 cm
Selvførende gressklipper med eksplosjonsmotor-62 cm klinge
P
Itseliikkuva räjähdysmoottorilla varustettu ruohonleikkuri-Terä 62 cm
Samohodna motorna kosilnica-rezilo 62 cm
Clookoptikhv autometaferovmenh mhcanhv me kinhthvra eswterikhςς kauvsh-Macaivri 62 cm
Tall Console - Electric Start
Small Console - Electric Start
Small Console - Pull Start
PL
H
SK
CZ
DK
S
N
Il presente manuale rappresenta una parte integrante del prodotto. Vi preghiamo di conservarlo per ogni ulteriore utilizzo.
Le manuel présent fait partie intégrante du produit; nous vous prions en conséquence de le conserver pour toutes nécessités ultérieures.
The present manual constitutes an integral part of the product and it should be kept for all future reference.
Das vorliegende Handbuch gehört zu einem festen Bestandteile des Produktes und muss deshalb zur Einsichtnahme sorgfältig aufgehoben werden.
El presente manual representa una parte integrante del producto. Les rogamos que lo conserven para cualquier ulterior empleo.
Deze handleiding is een integrerend deel van het product. Wij verzoeken u hem te bewaren voor iedere mogelijke nadere raadpleging
Este manual representa uma parte integrante do produto. Recomendamos guardá-lo para outros usos.
Niniejsza instrukcja stanowi integralna% cze%s>c> produktu. Prosimy przechowywac> ja% do kazédego dalszego uzéytkowania.
A jelen szakkönyv a termék szerves részét képezi. Kérjük megörizni minden utólagos használatért.
Tato uz°ívatelská pr°íruc°ka je neopomenutelnou souc°astí výrobku. Uschovejte ji pro další pouz°ití.
Håndbogen er en integreret del af produktet. Den skal opbevares omhyggeligt for yderligere konsultation.
Denna manual utgör en integrerande del av produkten. Vi ber er spara den för senare bruk.
Dette håndboken representerer en fullende del av produkten. Det skal oppbevares for alle ytre anvendelser.
Tämä käyttöopas kuuluu olennaisena osana tuotteeseen. Säilytä se huolellisesti myöhempää käyttöä varten.
Navodila za uporabo in vzdrz°evanje so sestavni del izdelka, zato prosimo, da jih shranite in upoštevate za nadaljnjo uporabo.
To parovn egceirivdio apoteleiv ena oloklhrwtikov mevroς tou proiovntoς. Saς parakalouvme na to fulavxete me prosochv gia kavqe peraitevrw crhvsh.
SF
SLO
GR
I
La ringraziamo per la fiducia accordataci con l'acquisto del nostro rasaerba. Siamo certi che avrà modo di apprezzare nel tempo e con
soddisfazione la qualità del nostro prodotto. La preghiamo di leggere attentamente questo manuale predisposto appositamente per informarla
circa il suo uso corretto in conformità ai requisiti essenziali di sicurezza.
F
Nous vous remercions de la préférence que vous nous avez accordée en choisissant notre tondeuses. Nous sommes persuadés que
vous pourrez apprécier dans le temps la qualité de notre produit et que vous en serez entièrement satisfaits.Nous vous prions de lire
attentivement ce manuel, spécialement conçu pour illustrer l'utilisation correcte de cette machine, dans le respect des normes de sécurité
fondamentales.
GB
We wish to thank you for choosing our Ride-on lawnmower. We are confident that the high quality of our machine will meet with your
satisfaction and appreciation and that your lawn mower will give you long-lasting service.Before starting to use your machine, make sure
to read with care this manual, provided to you with all the necessary information for proper use, in compliance with basic safety
requirements.
D
Wir danken Ihnen für Ihr Vertrauen, das Sie uns durch den Kauf unseres Rasenmäher entgegengebracht haben und sind sicher, daß Sie mit der
Qualität unseres Produkte zufrieden sein werden.Wir bitten Sie, dieses Handbuch aufmerksam durchzulesen, das Sie über die richtige Verwendung
in Übereinstimmung mit den Sicherheitsvorschriften informiert.
E
Le damos las gracias por la confianza que nos ha demostrado al comprar nuestro cortacesped. Estamos seguros de que podrá apreciar con
el tiempo y con satisfacción la calidad de nuestro producto.Le rogamos lea atentamente este manual preparado expresamente para informarle
sobre el uso correcto con arreglo a los requisitos básicos de seguridad.
NL
Wij danken u voor het vertrouwen waarmee voor u onze maaimachine heeft gekozen. U zult langdurig plezier hebben van de kwaliteit van
dit produkt.Leest u aandachtig dit handboek, dat speciaal bedoeld is om u te informeren over het juiste gebruik ervan volgens de vereiste
veiligheidsvoorwaarden.
P
Agradecemos a preferência que nos deram, escolhendo a nossa cortadores de relva.Estamos seguros que, com o tempo, podereis
apreciar a qualidade dos nossos produtos e ficareis plenamente satisfeitos.Pedimos a leitura atenta deste manual, preparado especialmente
para informar da utilização correcta da máquina e das normas de segurança fundamentais.
PL
Gratulujemy Pan>stwu zakupu naszej kosiarka do trawy jestes>my pewni, zée be%dziecie Pan>stwo usatysfakcjonowani wysoka% jakos>cia%
naszego produktu.Prosimy o uwazéne przeczytanie calÀej instrukcji obslÀugi i szczególÀowe zapoznanie sie% ze wskazaniami dotycza%cymi
bezpíeczen>stwa uzéytkowania urza%dzenia.
H
Köszönjük Fu^nyírógép megvásárlása útján belénkhelyezett bizalmat. Biztosak vagyunk, hogy meg lesz elégedve gyártmanyunk
mino^ségével. Kérjük, olvassa el figyelemmel ezt az utasítást a helyes használati mod és a biztonsági eloirások betartása érdekében.
SK
Dìkujeme za Vai dùvìru, kterou jste projevili nákupem naí sekaèky na trávu. Jsme pøesvìdèeni, e vysoká kvalita naich výrobkù
splní Vae oèekávání a sekaèka Vám bude spolehlivì slouit po dlouhou dobu. Ne sekaèku nastartujete, pøeètìte si pozornì tento
návod k pouívání, který Vám poskytne vechny nezbytné informace týkající se pouití stroje v souladu se základními bezpeènostními
pøedpisy.
CZ
DK
Vi takker dig for at have valgt en af vores plæneklippere. Vi er overbeviste om, at maskinens høje kvalitet og præstationer vil tilfredsstille
dine forventninger og klippe din plæne lang tid fremover. Læs vejledningen grundigt igennem, da den indeholder vigtige råd til en korrekt
anvendelse i overensstemmelse med de vigtigste sikkerhedskrav.
S
Vi tackar er för det förtroende ni visat oss genom att köpa vår gräsklippare. Vi är övertygade om att ni med tillfredsställelse kommer att
uppskatta vår produkts kvalitet under en lång tid framöver. Vi ber er att noggrannt läsa denna bruksanvisning som har till uppgift att
informera er om hur man ska använda gräsklipparen på ett korrekt sätt i enlighet med nödvändiga säkerhetskrav.
N
Takk for tilliten du har vist ved å kjøpe vår gressklipper. Vi er sikker på at du i fremtiden vil sette pris på og ha glede av kvaliteten til vårt
produkt. Vi ber deg om å lese denne veiledningen for å få all informasjon om riktig bruk i overensstemmelse med de viktigste sikkerhetskravene.
SF
Kiitämme ruohonleikkurimme valinnasta. Olemme varmoja, että tuotteemme tarjoaa parhaan mahdollisen suorituskyvyn ja kestää käytössä
pitkään. Lue käyttöopas huolellisesti, sillä se antaa tärkeää laitteen oikeaan ja turvalliseen käyttöön liittyvää tietoa.
SLO
Spoštovani kupec, zahvaljujemo se Vam za nakup enega naših proizvodov in Vam z°elimo veliko zadovoljstva pri delu z novo kosilnico.Preden
pric°nete z uporabo kosilnice, pozorno preberite navodila, predstavljena v tem priroèniku, da bi spoznali in razumeli njegovo vsebino glede
pravilne uporabe kosilnice in temeljnih varnostnih ukrepov pri delu.
GR
Saς eucaristouvme gia thn protivmhsh pou maς deivxate agoravzontaς thn clookoptikhv maς mhcanhv. Eivmaste bevbaioi oti crhsimopoiwvntaς thn
qa mporevsete na ektimhvsete me eucarivsthsh thn poiovthta tou proiovntoς maς. Saς parakalouvme na diabavsete prosektikav to egceirivdio
autov pou suntavcqhke epivthdeς gia na Saς plhroforeiv katav swstov trovpo ovson aforav thn swsthv crhvsh thς mhcanhς suvmfwna me touς
basikouvς kanovneς asfaleivaς.
2
1
5
2
6
3
4
7
8
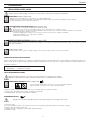
Attenzione! Leggere il manuale di istruzioni prima dell'uso
Attention! Lire le manuel d’instructions
avant utilisation.
Caution! Read the instruction manual
before use.
Achtung! Vor der Verwendung ist die
Bedienungsanleitung zu lesen.
Atención! Leer el manual de instrucciones
antes del uso.
Pas op! De gebruiksaanwijzing voor het
gebruik nauwkeurig doorlezen.
Atenção! Ler o manual de instruções
antes do uso.
Uwaga! Przed u¿yciem przeczytac >
instrukcjê obslÀugi.
Figyelem! Elolvasni az utasìtàsokat
a hasznàlat elott.
Upozornìní! Ne zaènete sekaèku
pouívat, pozornì si prostudujte návod
k pouívání.
Forsigtig! Læs vejledningen igennem
inden ibrugtagning.
Varning! Läs bruksanvisningen innan ni
använder gräsklipparen
Advarsel! Les bruksveiledningen før
bruk.
Huomio! Lue käyttöopas huolellisesti
ennen laitteen käyttöönottoa.
Pozor! Pozorno preberite navodila
preden pric°nete z uporabo kosilnice.
Prosochv! Diabavste prosektikav to
egceirivdio odhgiwvn privn apo thn crhvsh.
Tenere le persone estranee fuori dalla
zona di pericolo!
Eloigner toute personne etrangère de la
zone dangereuse!
Keep other people well away from the
danger area!
Unbefugte dürfen nicht in den
Gefahrenbereich gelangen!
Mantener al personal ajeno fuera de la zona
de peligro!
Zorg ervoor dat andere personen buiten
de gevarenzone blijven!
Manter pessoas estranhas fora da zona
de perigo
Osoby postronne nie powinny przebywac>
w zasie%gu pracy urza%dzenia.
A veszélyes területen ne tartózkodjanak
idegenek!
V nebezpeèné vzdálenosti se nesmí
zdrovat cizí osoby!
Hold uvedkommende personer på sikker
afstand af farezonen!
Håll alla obehöriga på avstånd från
riskområdet!
Hold uvedkommende utenfor
faresonen!
Älä anna asiattomien henkilöiden
oleskella vaara-alueella!
Oddaljite tuje osebe iz delovnega
obmoc°ja kosilnice!
Apomakruvnete ta avsceta provswpa apo
ton cwvro kinduvnou.
!
Attenzione:pericolo ferimento mani e
piedi.
Attention! Danger de blessures des mains
et des pieds.
Warning: Risk of hand and feet injury.
Achtung: Hand- und Fussverletzung
Atención: peligro heridas a manos y pies.
Let op, gevaar voor verwondingen aan handen
en voeten.
Atenção, perigo machucamento mãos e
pés.
Uwaga, wiruj¹cy nó¿
niebezpieczen>stwo zranienia ra%k i nóg.
Figyelem, veszèly: kezek ès làbak
megsebzèse.
Pozor, nebezpeèí poranìní rukou a
nohou.
Forsigtig: Fare for tilføjelse af sår på
hænder og fødder.
Varning: risk för skada på händer och
fötter.
Advarsel: Fare for å skade hender og
føtter.
Huomio: käsien ja jalkojen
loukkaantumisen vaara.
Pozor! Nevarnost poškodb rok in nog!
Prosochv! Kivndunoς traumatismouv
ceriwvn kai podiwvn.
"
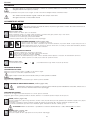
Pericolo di aspirazione di gas tossici!
Non utilizzare l'apparecchio in ambienti
chiusi o poco ventilati.
Danger d’inhalation de gaz toxiques! Ne
pas utiliser l’appareil dans des espaces
fermés ou peu ventilés.
Risk of breathing in toxic gases ! Do not
use the unit in closed or poorly ventilated
environments.
Gefahr des Einatmens giftiger Gase !
Das Gerät darf nicht in geschlossenen
oder schlecht belüfteten Räumen
verwendet werden.
Peligro de aspiración de gases tóxicos!
No utilizar el aparato en ambientes cerrados
o poco ventilados.
Gevaar voor inademing van giftige
gassen! Gebruik het apparaat niet in
gesloten of niet goed geventileerde
ruimtes.
Perigo de aspiração de gás tossicos! Não
utilizar o aparelho em lugares fechados
ou pouco ventilados.
Niebezpieczen>stwo wdychania gazów
truja%cych! Nie uz>ywac > urza%dzenia w
pomieszczeniach zamknie %tych lub o
slÀabym przewietrzeniu.
Mèrgezo gàzak belègzèse veszèly! Ne
hasznàlni a gèpet zàrt vagy kevèsbè
szelloztetett helysègekben.
Nebezpeèí vdechování toxických plynù!
Výrobek nesmí být pouíván
v uzavøených nebo nedostateènì
vìtraných prostorách.
Fare for indånding af giftige gasser!
Anvend andrig maskinen i lukkede eller
dårligt ventilerede rum.
Risk för inandning av giftiga gaser!
Använd inte apparaten i stängda eller
dåligt ventilerade lokaler.
Fare for å puste inn giftige gasser! Ikke
bruk apparatet i lukkede eller dårlig
ventilerte lokaler.
Myrkyllisten kaasujen hengittämisen
vaara! Älä käytä laitetta suljetuissa tai
riittämättömästi ilmastoiduissa tiloissa.
Nevarnost vdihavanja strupenih izpušnih
plinov! Nikoli ne uporabljajte kosilnice v
zaprtem ali slabo zrac°enem prostoru.
Kivndunoς eispnohvς toxikwvn aerivwn. Mh
crhsimopoieivte thn suskeuhv se kleistouς hv
livgo aerizovmenouV cwvrouς.
#
Pericolo di esplosione! Non effettuare
rabbocchi di carburante con motore in
moto.
Danger d’explosion ! Ne pas faire le plein
de carburant, moteur en marche.
Risk of explosion ! Do not fill the unit
with unleaded petrol gasoline while the
engine is running.
Explosionsgefahr ! Treibstoff darf nicht
bei laufendem Motor nachgefüllt werden.
Peligro de explosión! No rellenar con
carburante cuando el motor está
encendido
Gevaar voor explosie! Vul geen
brandstof met draaiende motor bij.
Perigo de explosão! Não juntar o
carburante com o motor em função
Niebezpieczen >s two wybuchu! Nie
przelewac> paliwa przy zapalonym silniku
Robbanàsveszèly! Ne hajtani vègre az
uzemanyag toltèst amikor a motor
mukodèsben van.
Nebezpeèí výbuchu! Pohonné hmoty je
zakázáno doplòovat pokud je motor v chodu.
Eksplosionsfare! Fyld aldrig brændstof
på med motoren tændt.
Risk för explosion! Utför inte
påfyllning av bränsle med motorn
igång.
Fare for eksplosjon! Ikke etterfyll
drivstoff med motoren i gang.
Räjähdyksen vaara! Älä suorita
polttoaineentäydennystä moottorin
käydessä.
Nevarnost eksplozije! Ne nalivajte
gorivo v kosilnico, ko motor deluje.
Kivndunoςς evkrhxhςς! Mh bavzete ta kauvsima
me ton kinhthvra upo kivnhsh.
$
Attenzione! Superficie calda.
Attention! Surface chaude
Caution! Hot surface
Achtung! Oberfläche ist heiß.
Atención! Superficie caliente
Pas op! Warm oppervlak
Atenção! Supercifie quente
Uwaga! Powierzchnia gora%ca
Figyelem! Meleg felulet.
Výstraha! Horký povrch.
Forsigtig! Varm overflade.
Varning! Mycket het yta.
Advarsel! Varm overflate
Huomio! Kuuma pinta.
Pozor! Vroc°a površina.
Prosochv! Epifavneia qermhv.
%
Effettuare lavori di manutenzione o riparazioni solo dopo aver letto il manuale
d’istruzione, aver tolto la chiave d’accensione e staccato la candela.
Efectuar trabajos de manutención o
reparaciones solamente después de
haber leído el manual de instrucciones y
de haber quitado la llave de encendido e
staccato la candela.
Executar a manutenção ou as reparações
so depois da leitura do manual das
instruções e de ter tirado a chave de ignição
e staccato la candela.
Wykonac> prace konserwacji lub reperacji
tylko po przeczytaniu podre %cznika
instrukcji i po wyje%ciu kluczyka zaplÀonu
e staccato la candela.
A karbantartàst ès a javìtàsokot
csak az ùtasìtàsok elolvasàsa ès
a gyùjtòkulcs eltàvolìtàsa utàn
csinàlni. e staccato la candela
Opravy a údrz °bár °ské práce
prováde °jte pouze po pr °ec °t ení
uz°ivatelské pr°íruc°ky a kdyz° jste pr°ed
tím vytáhli startovací klíc e staccato la
candela °.
Enhver form for vedligeholdelse eller
reparation må kun udføres efter en
grundig
gennemlæsning
af
vejledningen og med frakoblet
tændingsnøgle e staccato la candela.
Genomför ingrepp för underhåll eller
reparation enbart efter det att ni har
läst bruksanvisningen och dragit ut
startnyckeln e staccato la candela.
Vedlikehold eller reparere kun etter
man
leser
bruksandvisning
håndboken og etter at man tar av
startnøkkelen e staccato la candela.
Suorita
huoltotai
korjaustoimenpiteet ainoastaan sen
jälkeen,
kun
olet
lukenut
käyttöoppaan ja poistanut virtaavaimen e staccato la candela.
Preden priènete s katerimkoli
popravilom ali vzdrevalnim delom,
preberite navodila za uporabo in
iztaknite zagonski kljuè e staccato
la candela
Oi ergasiv e ς sunthv r hsh ς hv oi
epidiorqwv s ei ς prev p ei na giv n ontai
afouv prwvta diabavsete prosectikav to
egceirivdio crhvsh kai afouv bgavlete
to kleidiv evnaushς e staccato la candela .
Voorzichtig! Beschermen tegen regen
an vocht.
Atenção! Protegercontra a chuva e a
humidade.
UWAGA! Zabezpieczyæ przed deszczem
i wilgoci¹.
Figyelem! Óvni az esõtõl és a
nedvességtõl.
POZOR! Chraòte pøed detìm a vlhkem.
BEMÆRK!Skal beskyttes mod regn og
fugtighed
Varning! Skyddas från regn och fukt.
Pas på! Beskyttelse mot regn og
fuktighet.
Varoitus! Suojele sateelta ja
kosteudelta.
Pozor! Zaèitite pred dejem in
vlanostjo.
Effectuer les travaux d’entretien ou
es réparations après avoir pris
connaissance du mode d’emploi et
après avoir retiré la clé de contact e
staccato la candela.
Remove the ignition key and read
the instruction manual before
carrying out any service or
maintenance work on the ride-on
lawnmower and disconnect the spark
plug.
Instandsetzungs- oder Wartungsarbeiten
erst nachdem Bedienungsanleitung
gelesen und Zündschlüssel abgezogen
wurden, durchführen e staccato la candela.
&
Attenzione! Proteggere dalla pioggia.
Attention! Protéger de la pluie et de
l’humidité.
Caution! Shelter from rain.
Achtung! Vor Regen und Nässe
schützen.
Atención! Proteger de la lluvia de la
humedad.
Voer
de
onderhoudswerkzaamheden en de
reparaties pas uit na de handleiding
gelezen te hebben en de startsleutel
verwijderd te hebben e staccato la
candela.
Ðñïóï÷ç ! Ðñïóôáôåõåôå áðï ôçí âñï÷ç êáé ôçí
õãñáóéá
3
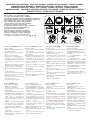
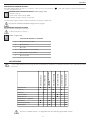
SIMBOLOGIA SULLA MACCHINA - SIGLES SUR LAPPAREIL - SYMBOLS ON THE MACHINE - SYMBOLE AM GERÄT SIMBOLOGÍA EN LA MÁQUINA - YMBOLEN OP DE MACHINE - SIMBOLOS SOBRE A MAQUINA SYMBOLE NA MASZYNIE - GEPEN LEVO JELZESEK - SYMBOLY NA STROJI - MASKINSYMBOLER MASKINSYMBOLER - SYMBOLER PÅ MASKINEN SIMBOLOGI PÅ MASKINEN - KONEESSAK KÄYTETYT SYMBOLIT OZNAKE NA STROJU - SUMBOLA EPI THS MHCANHS
Questi simboli sono usati sulla macchina:
Les sigles suivants figurent sur la tondeuse :
The following symbols are fixed on the Ride-on lawnmower:
Die folgenden Hinweise sind am Aufsitzmäher angebracht:
Estos símbolos son usados sobre la máquina:
Deze symbolen zijn op de machine gebruikt:
Sobre a máquina sao usados estes simbolos:
Symbole te sa% uz>ywane na maszynie:
A kovetkezo jelzèsek vannak a gèpen hasznàlva:
Na stroji jsou pou°ity následující symboly:
Anvendte symboler på maskinen:
Följande symboler används på maskinen:
Disse er symboler som finnes på maskinen:
Koneessa on käytetty seuraavia symboleita:
Na stroju so prikazane naslednje oznake:
Ta suvmbola autav crhsimopoiouvntai epi thςς mhcanhςς:
Etichetta "ATTENZIONE" generale.
Dall’alto a sinistra:
- Attenzione! Leggere il manuale istruzioni prima dell’uso
- Coltello girevole, pericolo ferimento
arti
- Pericolo di lancio oggetti
- Effettuare lavori di manutenzione o
riparazioni solo dopo aver letto il manuale d’istruzione, aver tolto la chiave d’accensione e staccato la candela.
- Mantenere la distanza di sicurezza
per le persone non addette al lavoro
quando il trattorino è in funzione
- Massima pendenza del prato durante
la lavorazione: 10°
- Indice di rumorosità a norme di legge
- Tenere le persono estranee fuori
dalla zona di pericolo
- Accertarsi che non ci siano minori
nella zona di lavoro.
- Non portare mai passeggeri.
Etiquette “ATTENTION” générale.
De haut à gauche:
- Attention! Lire le manuel d’instructions
avant utilisation.
- Lame tournante, risque de blessures
des membres.
- Danger : risque de projection d’objets
- Effectuer les travaux d’entretien ou
es réparations après avoir pris
connaissance du mode d’emploi et
après avoir retiré la clé de contact e
staccato la candela.
- Se tenir à une distance de sécurité
de
la tondeuse en marche (à l’exception
de l’opérateur).
- Déclivité maxi. de travail : 10%
- Puissance sonore aux termes de la
loi.
- Eloigner toute personne etrangère
de la zone dangereuse!
-
General label “ATTENTION”
From top to left:
- Caution! Read the instruction manual
before use.
- Rotating blade, risk of limb injury
- Danger of thrown objects
- Remove the ignition key and read
the instruction manual before
carrying out any service or
maintenance work on the ride-on
lawnmower and disconnect the spark
plug.
- Keep the safety distance from the
operating ride-on lawnmower (except
operator)
- Max. work slope: 10°
- Noise level in accordance with the
law
- Keep other people well away from
the danger area!
- Make sure there are no children within
the work area.
- Never carry any passenger.
Generelle Warnetikette
Von oben nach links:
- Achtung! Vor der Verwendung ist die
Bedienungsanleitung zu lesen.
- Drehendes Messer Gefahr für Arme
und Beine
Schleuder-Gefahr
von
Gegenständen
Instandsetzungsoder
Wartungsarbeiten erst nachdem
Bedienungsanleitung gelesen und
Zündschlüssel abgezogen wurden,
durchführen e staccato la candela.
- Sicherheitsabstand bei laufendem
Aufsitzmäher einhalten.
- Max. Hangneigung bei der Arbeit:
10°
- Geräuschpegel gemäss Gesetz.
- Unbefugte dürfen nicht in den
Gefahrenbereich gelangen!
-
Etiqueta “ATENCIÓN” general.
Algemeen “LET OP” etiket.
- Pas op! De gebruiksaanwijzing voor
het gebruik nauwkeurig doorlezen.
Etiqueta “ATENÇÃO” general.
Do alto à esquerda:
- Atenção! Ler o manual de instruções
antes do uso.
- Cortador rotante, perigo machucamento
dos artos
- Perigo lanço objetos
- Executar a manutenção ou as reparações
so depois da leitura do manual das
instruções e de ter tirado a chave de ignição
e staccato la candela.
- Os que não sao os operadores devem
manter uma distancia de segurança quando o mini trator está funcionando.
- Máxima pendencia do gramado : 10°
- Indice de rumorosidade em conformidade
com a lei.
Etykietka “UWAGA” ogólnie.
Z góry na lewo:
- Uwaga! Przed u¿yciem przeczytac>
instrukcjê obslÀugi
- Nóz> obrotowy, niebezpieczen> s two
zranienia ra%k i nóg
- Niebezpieczen>stwa wyrzutu przedmiotów
- Wykonac> prace konserwacji lub reperacji
tylko po przeczytaniu podre% cznika
instrukcji i po wyje%ciu kluczyka zaplÀonu
e staccato la candela.
- Utrzymywac> odleglÀos>c> bezpieczen>stwa
wzgle%dem osób nie upowaz>nionych do
pracy gdy traktorek jest w dzialÀaniu!
- Maksymalne pochylenie trawnika
podczas pracy: 10°
- Wskaz>nik halÀas>liwos>ci zgodnie z normami
prawa.
- Osoby postronne nie powinny przebywac>
w zasie%gu pracy urza%dzenia.
Desde arriba a la izquierda:
- Atención! Leer el manual de
instrucciones antes del uso.
- Cuchillo giratorio, peligro heridas
extremidades
- Peligro de lanzamiento de objetos
- Efectuar trabajos de manutención o
reparaciones solamente después de
haber leído el manual de
instrucciones y de haber quitado la
llave de encendido e staccato la
candela.
- Mantener la distancia de seguridad
para las personas no encargadas
del trabajo cuando el pequeño
tractor está en funcionamiento
- Máxima pendencia del prado durante el
trabajo: 10°
- Índice de ruido a normas de ley
- Mantener al personal ajeno fuera de la
zona de peligro!
-
- Lees de handleiding voor het gebruik
- Draaimes, gevaar voor verwondingen
aan de ledematen
- Gevaar voor wegspringende
voorwerpen
- Voer de onderhoudswerkzaamheden
en de reparaties pas uit na de
handleiding gelezen te hebben en
de startsleutel verwijderd te hebben
e staccato la candela.
- Houd u op een afstand van
onbevoegde personen wanneer de
tractor in bedrijf is
- Maximale helling van het grasveld
tijdens de bewerking: 10°
- Geluidsniveau overeenkomstig de
normen
- Zorg ervoor dat andere personen
buiten de gevarenzone blijven!
-
- Manter pessoas estranhas fora da
zona de perigo
-
4
-
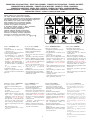
SIMBOLOGIA SULLA MACCHINA - SIGLES SUR LAPPAREIL - SYMBOLS ON THE MACHINE - SYMBOLE AM GERÄT SIMBOLOGÍA EN LA MÁQUINA - YMBOLEN OP DE MACHINE - SIMBOLOS SOBRE A MAQUINA SYMBOLE NA MASZYNIE - GEPEN LEVO JELZESEK - SYMBOLY NA STROJI - MASKINSYMBOLER MASKINSYMBOLER - SYMBOLER PÅ MASKINEN SIMBOLOGI PÅ MASKINEN - KONEESSAK KÄYTETYT SYMBOLIT OZNAKE NA STROJU - SUMBOLA EPI THS MHCANHS
Questi simboli sono usati sulla macchina:
Les sigles suivants figurent sur la tondeuse :
The following symbols are fixed on the Ride-on lawnmower:
Die folgenden Hinweise sind am Aufsitzmäher angebracht:
Estos símbolos son usados sobre la máquina:
Deze symbolen zijn op de machine gebruikt:
Sobre a máquina sao usados estes simbolos:
Symbole te sa% uz>ywane na maszynie:
A kovetkezo jelzèsek vannak a gèpen hasznàlva:
Na stroji jsou pou°ity následující symboly:
Anvendte symboler på maskinen:
Följande symboler används på maskinen:
Disse er symboler som finnes på maskinen:
Koneessa on käytetty seuraavia symboleita:
Na stroju so prikazane naslednje oznake:
Ta suvmbola autav crhsimopoiouvntai epi thςς mhcanhςς:
Altalànos “FIGYELEM” cìmke.
Fentrol balra:
- Figyelem! Elolvasni az utasìtàsokat
a hasznàlat elott.
- Forgò kès, veszèly: vègtagok megsebzèse
- Veszèly: tàrgyak kidobàsa
- A karbantartàst ès a javìtàsokot
csak az ùtasìtàsok elolvasàsa ès
a gyùjtòkulcs eltàvolìtàsa utàn
csinàlni. e staccato la candela
- Betartatni a biztonsàgitàvolsàgot a
szemèlyekkel akik nem dolgoznak a
kis traktorral amikor ez mukodèsben
van.
- A gyep maximàlis lejtèse a
megmunkàlàs alatt: 10°
- Zajszint a torvènyrendeletek szerint.
- A veszélyes területen ne tartózkodjanak
idegenek!
-
Všeobecná etiketa “POZOR”.
Od horní levé strany:
- Upozornìní! Ne zaènete sekaèku
pouívat, pozornì si prostudujte
návod k pouívání.
- Otoc° n ý nuñ z ° , nebezpec° í porane° n í
konc°etin
- Nebezpec°í odhozených pr°edme°tuñ
- Opravy a údrz°bár°ské práce prováde°jte
pouze po pr°ec°tení uz°ivatelské pr°íruc°ky
a kdyz° jste pr°ed tím vytáhli startovací
klíc e staccato la candela°.
- Pr°i provozu traktorku dbejte na to,
aby osoby, které se strojem
nepracují, byly
v bezpec° n é
vzdálenosti.
- Maximální svah louky pro sec°ení: 10°
- Ukazatel hluc°nosti podle pr°edpisuñ
- V nebezpeèné vzdálenosti se nesmí
zdrovat cizí osoby!
-
Allminnelige etikettet “FORSIKTIG”
Fra toppen i venstre siden:
Yleinen “VAROITUS” kyltti.
Ylhäältä vasemmalle:
- Advarsel! Les bruksveiledningen før
bruk.
- Huomio! Lue käyttöopas huolellisesti
ennen laitteen käyttöönottoa.
- Rullende knive, hender og føtter kan
bli skadet
- Farlig for stykker kan kastes
- Vedlikehold eller reparere kun etter
man
leser
bruksandvisning
håndboken og etter at man tar av
startnøkkelen e staccato la candela.
- Når apparatet er i gang alltid holde
personer som ikke er interesserte
med verken på sikringsavstanden.
- Høyeste engshellingen under verk:
10°
- Bråksnivået ifølge loven.
- Hold uvedkommende utenfor
faresonen!
-
- Sinkoavien kappaleiden vaara
- Suorita huolto- tai korjaustoimenpiteet
ainoastaan sen jälkeen, kun olet
lukenut käyttöoppaan ja poistanut
virta-avaimen e staccato la candela.
- Älä anna asiattomien henkilöiden
oleskella
puutarhatraktorin
toimintasäteellä
Nurmikon
maksimikaltevuus
työskentelyn aikana: 10°
- Melutaso säännösten mukaisesti
- Älä anna asiattomien henkilöiden
oleskella vaara-alueella!
-
5
Alment “ADVARSELSSKILT”.
Oppe fra og mod højre:
Etikett allmän “VARNING”.
Från längst upp till vänster:
- Forsigtig! Læs vejledningen igennem
inden ibrugtagning.
- Varning! Läs bruksanvisningen innan
ni använder gräsklipparen
- Drejelig kniv, fare for tilføjelse af sår
på kroppen
- Fare for flyvende genstande
- Enhver form for vedligeholdelse eller
reparation må kun udføres efter en
grundig
gennemlæsning
af
vejledningen og med frakoblet
tændingsnøgle e staccato la candela.
- Hold uvedkommende personer på
sikker afstand af traktoren, når den
er i brug
- Maks.hældning af plænen under
klipning: 10°
- Støjniveauet ligger inden for de
lovpligtige normer
- Hold uvedkommende personer på
sikker afstand af farezonen!
-
- Vridbar kniv, risk för skada på
extremiteterna.
- Risk för utslungning av föremål.
- Genomför ingrepp för underhåll eller
reparation enbart efter det att ni har
läst bruksanvisningen och dragit ut
startnyckeln e staccato la candela.
- Håll obehöriga personer på säkert
avstånd när traktorn är i funktion.
- Maximal lutning på gräsmattan under
arbetet: 10°.
- Bullernivån respekterar gällande
normer.
- Håll alla obehöriga på avstånd från
riskområdet!
-
Splona oznaka POZOR
Iz smeri zgornjega levega kota:
- Pozor! Pozorno preberite navodila
preden pric°nete z uporabo kosilnice.
Genikhv etikevta “PROSOCH”
Apo to avnw mevroς proς ta aristerav:
- Prosochv! Diabavste prosektikav to
egceirivdio odhgiwvn privn apo thn
crhvsh.
- Peristrofikov macaiv r i, kiv n dunoς
traumatismouv twn avkrwn.
- Kivnduno ektovxeushς antikeimevnwn.
- Oi ergasiv e ς sunthv r hshς hv oi
epidiorqwv s eiς prev p ei na giv n ontai
afouv prwvta diabavsete prosectikav to
egceirivdio crhvsh kai afouv bgavlete
to kleidiv evnaushς e staccato la candela.
- Diathreivte thn apovstash asfaleivaς
gia ta provswpa pou eivnai avsceta me
thn ergasiv a ov t an to trakterav k i
leitourgei.v
- Mevgisth klivsh tou edavfouς katav thn
ergasiva: 10°
- Deivkthς qorubhtikovthtaς suvmfwna me
ton novmo.
- Apomakruvnete ta avsceta provswpa apo
ton cwvro kinduvnou.
-
- Rotirajoèe rezilo, nevarnost pokodb
rok in nog
- Nevarnost: leteèi predmeti
- Preden priènete s katerimkoli
popravilom ali vzdrevalnim delom,
preberite navodila za uporabo in
iztaknite zagonski kljuè e staccato la
candela
- Med delovanjem motorja, oddaljite
vse nezaposlene osebe iz
delovnega obmoèja stroja
- Najveèji dovoljeni nagib terena med
delom: 10°
- Oznaka glasnosti v skladu s predpisi
- Oddaljite tuje osebe iz delovnega
obmoc°ja kosilnice!
-
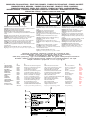
SIMBOLOGIA SULLA MACCHINA - SIGLES SUR LAPPAREIL - SYMBOLS ON THE MACHINE - SYMBOLE AM GERÄT SIMBOLOGÍA EN LA MÁQUINA - YMBOLEN OP DE MACHINE - SIMBOLOS SOBRE A MAQUINA SYMBOLE NA MASZYNIE - GEPEN LEVO JELZESEK - SYMBOLY NA STROJI - MASKINSYMBOLER MASKINSYMBOLER - SYMBOLER PÅ MASKINEN SIMBOLOGI PÅ MASKINEN - KONEESSAK KÄYTETYT SYMBOLIT OZNAKE NA STROJU - SUMBOLA EPI THS MHCANHS
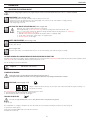
Attenzione: pericolo ferimento arti. Parti rotanti.
Attention ! Danger de blessures des membres. Parties tournantes.
Warning: risk of limb injury. Rotating parts.
Achtung: Gliederverletzung Drehende Teile
Atención: peligro heridas a extremidades. Piezas giratorias.
Let op, gevaar voor verwondingen aan de ledematen. Draaiende
delen.
Atenção, perigo machucamento artos. Partes rotantes.
Uwaga, niebezpieczen>stwo zranienie ra%k i nóg. Cze%s>ci obrotowe.
Figyelem, veszèly: vègtagok megsebzèse. Forgò rèszek.
Pozor, nebezpec°í zrane°ní konc°etin. Rotující c°ásti.
Advarsel: Fare for tilføjelse af sår på kroppen. Roterende dele.
Varning: risk för skada på extremiteterna. Roterande delar.
Forsiktig: hender og føtter kan bli skadet. Rullende deler.
Varoitus: käsiin ja jalkoihin kohdistuvien onnettomuuksien vaara.
Pyöriviä teriä.
Pozor: nevarnost pokodb rok in nog. Rotirajoèa orodja.
Prosochv: kivndunoς traumatismouv twn avkrwn. Peristrefovmena mevrh.
Attenzione:pericolo ferimento mani e piedi.
Attention! Danger de blessures des mains et des
pieds.
Warning: risk of hand and feet injury.
Achtung: Hand- und Fussverletzung
Atención: peligro heridas a manos y pies.
Let op, gevaar voor verwondingen aan handen en
voeten.
Atenção, perigo machucamento mãos e pés.
Uwaga, niebezpieczen>stwo zranienia ra%k i nóg.
Figyelem, veszèly: kezek ès làbak
megsebzèse.
Pozor, nebezpec°í porane°ní rukou a nohou.
Advarsel: Fare for tilføjelse af sår på hænder og
fødder
Varning: risk för skada på händer och fötter.
Forsiktig: hender og føtter kan bli skadet.
Varoitus: käsiin ja jalkoihin kohdistuvien
onnettomuuksien vaara.
Pozor: nevarnost pokodb rok in nog.
Prosochv: kivndunoς traumatismouv ceriwvn kai podiwvn.
Attenzione: pericolo di scottature. Parti calde.
Attention! Danger de brûlures. Parties chaudes.
Warning: risk of burns. Hot parts
Achtung: Heisse Teile - Verbrennungsgefahr.
Atención: peligro de quemaduras. Piezas
calientes.
Let op, gevaar voor brandwonden. Hete delen.
Atenção, perigo queimaduras. Partes quentes.
Uwaga, niebezpieczen>stwo poparzenia. Cze%s>ci
gora%ce.
Figyelem, veszèly: ègèsisebek. Meleg rèszek.
Pozor, nebezpec°í popálení. Horké c°ásti.
Advarsel: Fare for forbrænding. Varme dele.
Varning: risk för brännskada. Varma delar.
Forsiktig: brannsårfare. Varme deler.
Varoitus: palovammojen vaara. Kuumia osia.
Pozor: nevarnost opeklin. Stroj je vroè.
Prosochv: kivndunoς egkaumavtwn. Qermav mevrh.
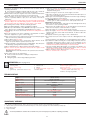
Etichetta di conformità CE - Etiquette de conformité CE - Conformity EC label CE-Konformitätsetikett - Etiqueta de conformidad CE - Etiket CE overeenstemming Etiqueta de conformidade CE - Etykietka zgodnos>ci CE Cìmke amely igazolja,hogy a gèp az EU rendelkezèsei szerint volt gyàrtva - Štítek potvrzující konformitu CE
EU-mærke – Etikett för överensstämmelse med CE – Etikettet for UE overenmsstemmelsen - CE – kyltti Nalepka o skladnosti s predpisi EZ - Etikevta sumfwnivaς CE
1
COSTRUTTORE
CONSTRUCTEUR
MANUFACTURER
BAUFIRMA
CONSTRUCTOR
FABRIKANT
FABRICANTE
PRODUCENT
EPITO
VÝROBCE
FABRIKANT
TILLVERKARE
KONSTRUKTØREN
VALMISTAJA
IZDELOVALEC
KATASKEUASTHS
2
3
4
5
6
Modello
Modèle
Model
Modell
Modelo
Model
Modelo
Model
Tipus
Model
Model
Modell
Modell
Malli
Modell
Montevlo
Numero di serie articolo-Progressivo
Numéro de série article-Progressif
Serial number - Progressive
Seriennummer-Progressiv
Número de serie artículo-Progresivo
Serienummer artikel – Oplopend
Numero de série artigo-Progressivo
Numer serii atykulÀu - Poste%puja%cy
Az àrù sorozatszàma-novekvo
Sériové c°íslo výrobku-Progresivní
Serienummer produkt-Fortløbende
Serienummer artikel-Progressivt
Godsserietallet-Progressiv
Tuotteen sarjanumero-Kasvava
Serijska tevilka izdelka-Zaporedna
Ariqmoς seirav eivdouς- Proodeutikoς
Giri del motore-Potenza in Kw
Vitesse du moteur-Puissance en Kw.
Engine revolutions-Power in kW
Motordrehzahl-Leistung in Kw
Revoluciones del motor-Potencia en Kw
Toerental van de motor-Vermogen in Kw
Voltas do motor-Potência em Kw
Obroty silnika-Moc w Kw
A motor fordulatszàma-teljesìtmèny KW
Otác°ky motoru-Výkon v Kw
Motoromdrejninger-Effekt i Kw
Motorvarv-Effekt i Kw
Motorsrundt-Kw kraft
Moottorin kierrokset-Teho Kw
Vrtljaji motorja-Moè v Kw
Strofeς tou kinhthvra-Iscuς seKw
Anno di costruzione
Année de construction
Year of construction
Baujahr
Año de construcción
Bouwjaar
Ano de fabricação
Rok produkcji
Epìtèsièv
Rok výroby
Fremstillingsår
Tillverkningsår
Konstruksionsår
Valmistusvuosi
Leto izdelave
Etoς kataskeuhς.
Peso
Masse
Weight
Gewicht
Masa
Massa
Massa
Cie%z>ar
Sùly
Hmotnost
Stel
Massa
Masse
Paino
Tez°a
Mavza
6
ITALIANO
NORME DI SICUREZZA
1) Tutte le persone che usano il trattorino devono essere a conoscenza
delle istruzioni d’uso.
l
Norma molto importante: i minori di 16 anni o le persone sotto
l’effetto di alcool o farmaci non possono usare la macchina.
2) Emissione di gas da parte di motori a benzina: queste emissioni contengono monossido di carbonio nocivo, non far funzionare mai la macchina
in ambienti chiusi.
3) Durante il funzionamento del trattorino, accertarsi che non vi sia alcuna
persona, soprattutto bambini, o animali domestici, nelle immediate vicinanze della macchina.
4) Accertarsi che durante il funzionamento della macchina non vi siano
corpi estranei nel prato. Un oggetto lasciato nel prato durante il funzionamento potrebbe essere lanciato in giro dalla macchina e provocare danni, gravi lesioni o persino essere letale.
5) Durante l’uso è vietato fumare nei pressi della macchina.
6) Tagliare solo durante il giorno o comunque in condizioni di buona illuminazione.
7) Tagliare solamente su e giù su un pendio, MAI ad angolo o trasversalmente rispetto al pendio stesso.
8) Dirigendosi verso la zona da tagliare, assicurarsi che il piatto di taglio
non sia innestato.
9) Non impiegare mai la macchina qualora presenti danni alla scocca o sia
priva degli organi di sicurezza (sacco raccoglierba, ecc.).
10) Il corretto posizionamento del blocco motore è stato appositamente
studiato in sede di progettazione e predisposto in fabbrica e non deve
essere modificato.
11) Non inclinare la macchina sui lati.
12) Questo trattorino è dotato di un dispositivo di sicurezza che provvede
a spegnere il motore ogniqualvolta l’operatore si alza dal sedile.
13) Tenere mani o piedi lontani dalle lame rotanti. Tenersi altresì lontani
dall’apertura di scarico dell’erba tagliata durante la rotazione delle lame.
14) Non spostare o sollevare manualmente la macchina con motore in
funzione.
15) In caso di manutenzione della macchina,spegnere sempre il motore e
scollegare la candela.
Importante: Togliere la chiave di accensione ogniqualvolta l’operatore
lascia incustodito il trattorino.
16) Il motore deve altresì essere spento:
lquando ci si allontana dalla macchina o durante il suo trasporto
lprima del rifornimento di carburante
ldurante le operazioni di svuotamento del cesto raccoglierba
A
17) Prestare la massima attenzione durante le operazioni di taglio dell’erba. Pericolo di infortuni! Tenere dita e arti lontani dalla zona del piatto di
taglio e della scocca. Indossare guanti.
18) Lasciar raffreddare il motore prima di riporre la macchina in un luogo
chiuso.
19) Per evitare pericoli d’incendio, mantenere sempre puliti il motore e lo
scarico da residui di erba, foglie e perdite di grasso.
20) Controllare regolarmente lo stato d’usura del sacco raccoglierba.
21) Non tagliare l’erba in retromarcia.
22) ATTENZIONE! Durante le operazioni di taglio o di trasferimento, e
soprattutto con la retromarcia innestata, accertarsi che non ci siamo
altre persone nella zona.
Manutenzione e deposito
1)Tenere tutti i dadi, bulloni e viti perfettamente serrati per lavorare in
condizioni di sicurezza.
2) Non lasciare mai la macchina con benzina nel serbatoio in un luogo
chiuso dove i vapori del carburante potrebbero raggiungere fiamme o
scintille.
3) Dare al motore il tempo di raffreddarsi prima di mettere l’apparecchio in
qualsiasi ambiente chiuso.
4)Tenere il motore, lo scarico, la marmitta, il vano batteria e il serbatoio
della benzina liberi da erba, foglie ed eccessivo lubrificante, onde ridurre
i pericoli di incendio.
5) Controllare frequentemente il raccoglierba per eventuale usura o deterioramento.
6) Per ragioni di sicurezza, sostituire tempestivamente le parti usurate o
danneggiate.
7) Qualora si effettuasse lo scarico del serbatoio, tale operazione va
effettuata all’aperto.
8) Montare le lame seguendo le rispettive istruzioni e usare solo lame
indicanti il nome o il marchio del costruttore o fornitore e contrassegnate
con il numero di riferimento. La sostituzione o la manutenzione delle lame
dovrebbe essere effettuata solamente da un rivenditore autorizzato.
9) Per la protezione delle mani durante lo smontaggio o il montaggio delle
lame , è assolutamente indispensabile utilizzare idonei guanti di protezione. La sostituzione o la manutenzione delle lame dovrebbe essere effettuata solamente da un rivenditore autorizzato.
10) Non lavare mai il trattorino con getti d’acqua. Utilizzare un panno umido
per pulire il trattorino al fine di evitare rischi di corrosione.
NOMENCLATURA (vedere a pagina 101)
1
2
3
4
5
Sedile
Volante
Cestello raccoglierba
Lama
Chiave di avviamento
(solo vers.avv.elettrico)
6
7
8
9
10
Cavo avviamento (solo vers.avv. a strappo) 11 Leva cambio marce
Leva comando gas
12 Leva regolazione altezza piano
Batteria
13 Tappo serbatoio benzina
Leva innesto lama piatto di taglio
14 Spia funzionamento motore e indicatore
Pedale freno
sacco erba pieno (solo vers.avv.elettrico)
15 Impugnatura sacco raccoglierba
CARATTERISTICHE TECNICHE
6,0 Hp ÷ 6,5 Hp
Motore
Metodo di avviamento
Elettrico/ A strappo
Marce
Cinque marce avanti e una retromarcia
Velocità massima
8,0 Km/h
Dimensioni con sacco raccoglierba
2000 mm x 630 mm x 1020 mm
Scocca
Polipropilene
Piatto di taglio
Acciaio
Larghezza di taglio
62 cm
Regolazione altezza di taglio
Regolazione a cinque altezze di taglio
Diametro di curvatura
1,5 m
Volume sacco raccoglierba
150 litri
Peso max.operatore consentito
120 Kg
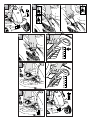
DISIMBALLAGGIO
Il trattorino è racchiuso in un cartone e pronto per l’uso, escluso sedile, volante, sacco raccoglierba e ruote anteriori (Alcuni modelli vengono forniti con le ruote
anteriori preassemblate). Al momento del disimballaggio rispettare la seguente sequenza:
1 - Disimballare tutti i pezzi compresi nella fornitura. Smaltire il cartone e il pallet in modo ecocompatibile.
2 - Controllare tutti i pezzi.
3 - Iniziare il montaggio.
E’ severamente proibito mettere in moto il trattorino (anche per prova) senza aver completamente terminato il montaggio .
7
ITALIANO
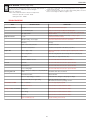
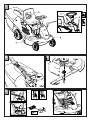
MONTAGGIO SACCO RACCOGLIERBA (vedere a pagina 101)
Il sacco raccoglierba è compreso in tutti i modelli come dotazione standard.
Per il montaggio sono necessari i seguenti particolari ed attrezzi:
Attrezzi necessari:
- Cacciavite a stella
- Chiave Ø 8
Particolari:
- 4 viti M5x30 UNI 7688
- 4 dadi autobloccanti M5
- Telaio anteriore sacco raccoglierba.
B
C
Montaggio:
Fissare il telaio anteriore del sacco raccoglierba al telaio sacco raccoglierba già pre-assemblato.
Fare attenzione che la parte anteriore del sacco raccoglierba sia nella posizione corretta per assicurare il buon funzionamento del sacco raccoglierba
e del trattorino stesso.
Inserire le 4 viti M5x30 negli appositi fori.
Avvitare e stringere bene con appositi attrezzi le viti e i dadi di nylon autobloccanti.
Finire di montare il sacco sul telaio agganciando i relativi ganci in gomma.
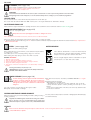
MONTAGGIO RUOTE (vedere a pagina 101)
(NOTA: Alcuni modelli sono forniti con le ruote preassemblate)
1) Montare le ruote anteriori sugli assali (16) inserendo una rondella (17), la ruota (18) ed una rondella (19).
2) Fissare con il l'anello di fermo (20).
Attrezzi necessari:
- Pinze
Particolari:
- 4 rondelle
- 2 fermi
Attenzione: Montare la ruota con la valvola verso l’esterno.
D1
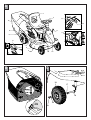
MONTAGGIO DEL VOLANTE (vedere a pagina 102)
Attrezzi necessari:
- Cacciavite a stella
- Chiave Ø 10 mm
Particolari:
- 1 Vite M6x45 UNI 7687
- Dado Flangiato M6.
Montaggio:
Inserire il volante sul tubo sterzo e facendo attenzione ad allineare il foro del volante con il foro del tubo sterzo.
Assicurarsi che il volante sia nella posizione corretta (Fig.D1).
- Inserire la vite , avvitare e stringere il dado con la vite usando gli appositi attrezzi.
NOTA: Il volante è dotato di regolazione a due altezze a seconda della preferenza dell’operatore –vedere D1.
D2
D3
ACCESSO AL VANO MOTORE (vedere a pagina 102)
Per rimuovere il coperchio di accesso al vano motore usare un cacciavite, infilandolo nelle apposite fessure del coperchio motore fino a sganciare i due
agganci anteriori e i due posteriori.
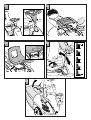
MONTAGGIO DEL SEDILE (vedere a pagina 102)
Attrezzi necessari:
- Chiave Ø 13 mm
Particolari:
- 4 viti M8x18
- 4 rondelle 9x24
- 4 rondelle di sicurezza Ø 8
1 - Fissare il sedile (1) alla piastra di supporto tramite le 4 viti M8x18 . Assemblare con 4 rondelle Ø 9x24 e 4 rondelle di sicurezza Ø 8 .
2 - Prima di serrare le viti, occorre regolare la posizione del sedile sulle asole della piastra, in base alle esigenze dell’utilizzatore.
Controllare regolarmente il fissaggio delle viti.
8
ITALIANO
FUNZIONAMENTO
REGOLAZIONE ALTEZZA TAGLIO
Prima di regolare l’altezza di taglio, il motore deve essere spento e le lame devono arrestarsi completamente.
E1
REGOLAZIONE (vedere a pagina 102)
E2
SVUOTAMENTO DEL CESTO DI RACCOLTA (vedere a pagina 102)
F1
PREDISPOSIZIONE PROTEZIONI (vedere a pagina 103)
F2
(vedere a pagina 103)
1- Spingere la leva di regolazione (12) verso l’esterno, per sganciarla dalla sede.
2- Posizionare la leva in corrispondenza della tacca prescelta per l’altezza di taglio (n.5 posizioni per altrettante posizioni di taglio).
3- Lasciare lentamente la leva fino all’incastro nella tacca.
Svuotare il sacco raccoglierba tempestivamente prima che travasi.
La spia rossa (solo versione con avviamento elettrico) sotto il volante indica che il contenitore è pieno.
Non riempire troppo il contenitore raccoglierba. Quando la spia rossa posta sotto il volante si accende, procedere allo svuotamento.
1- Disinserire la piastra. Spegnere il motore.
2- Afferrare l’impugnatura e sollevare il sacco. Scuoterlo un paio di volte fino al suo completo svuotamento.
3- Riportare lentamente il sacco nella posizione originale.
4- Riprendere il funzionamento.
Prima di iniziare il taglio, togliere tutti i corpi estranei che potrebbero essere lanciati in giro dalla macchina. Durante il taglio, fare attenzione a eventuali
corpi estranei dimenticati.
Non mettere mai le mani o i piedi sotto il piatto di taglio o nello scivolo di scarico posteriore con il motore in funzione.
PRIMA MESSA IN MARCIA DEL TRATTORINO
Mettere in marcia il trattorino quando il suo montaggio è completamente terminato. Prima della prima messa in marcia riempire il serbatoio della benzina senza
piombo e quello dell’olio. La prima messa in marcia dovrà essere effettuata da persone che hanno letto e compreso pienamente le presenti istruzioni d’uso.
Per l'utilizzo del trattore:
Benzina
Olio per motori
senza piombo (n° ottani minimo 92)
SAE 30 ("SE", "SF" O "SG")
MESSA IN FUNZIONE DEL MOTORE
Eseguire l’avviamento del motore solo dopo aver messo benzina e olio a sufficienza nei serbatoi.
Osservare scrupolosamente le norme contenute nel libretto di uso e manutenzione del costruttore.
G
RIFORNIMENTO DI BENZINA (vedere a pagina 103)
Pericolo di esplosione! Riempire il serbatoio solo in luogo aperto! Non effettuare
mai il rifornimento con motore acceso o molto caldo! Non fumare!
Il tappo del serbatoio della benzina senza piombo è posto nella parte posteriore sinistra del trattorino.
1- Svitare il tappo del serbatoio (33) e riempire con benzina senza piombo.
2- Richiudere il tappo del serbatoio al termine del rifornimento.
RIFORNIMENTO DI OLIO
Impiegare solo olio del tipo SAE 30 (“SE”,”SF” o “SG”). Fare attenzione a non spargere olio per terra.
1- Sollevare il sedile
Il vano per il rifornimento dell’olio si trova nel blocco motore ed è accessibile asportando la protezione come indicato in Fig. D2.
2- Svitare il tappo del serbatoio dell’olio (21)
3- Riempirlo di olio fino e raggiungere il livello “MAX” dell’astina indicatore.
4- Richiudere il tappo.
9
ITALIANO
AVVIAMENTO
Prima di procedere all’avviamento controllare i livelli di olio e benzina.
Non fumare durante le operazioni di rifornimento e controllo olio e benzina. Rabboccare con benzina o olio se necessario (secondo le
dettagliate indicazioni del capitolo precedente).
L’avviamento (avviamento motore) deve essere eseguito secondo la descrizione dettagliata intitolata “avviamento iniziale”.
Non cambiare mai marcia durante la guida, il trattorino deve sempre essere fermo.
Non tagliare mai l’erba con marcia indietro inserita
AVVIAMENTO DEL MOTORE
Gli scarichi contengono monossido di carbonio, un pericoloso gas mortale e inodore. Non avviare mai il motore in
ambienti chiusi o mal aerati.
H1
H2
(vedere a pagina 104)
Avviare il motore su un terreno piano con erba bassa.
Azionare l’avviamento elettrico solo stando seduti sul trattorino con frizione lama (9) in posizione stop e freno inserito.
1- Portare la leva innesto lama piatto taglio (9) in posizione STOP
2- Posizionare la leva comando gas (7) in posizione START.
3- Premere il pedale del freno (10) e portarlo in posizione di parcheggio.
AVVIAMENTO ELETTRICO (vedere a pagina 104)
4- Inserire la chiave di accensione nel relativo blocchetto (5)
5- Girare la chiave verso destra e rilasciarla, dopo l’avvenuto avviamento, in posizione “RUN”. La spia verde posta sotto il
comando volante rimane accesa. Se il motore non dovesse avviarsi entro 5 secondi, per evitare danni alla batteria, attendere
altri 10 secondi prima di tentare un altro avviamento.
AVVIAMENTO A STRAPPO
Posizionare il pedale freno in posizione di parcheggio.
Verificare che la leva innesto lama piatto taglio non sia innestata.
Portare la leva acceleratore in posizione di START.
Impugnare il cavo dell’avviamento (6) e tirarlo. Il motore dovrebbe avviarsi. Ripetere se necessario fino all’avviamento del motore.
Ad avviamento avvenuto, prendere posizione sul sedile per procedere alle operazioni di lavoro.
H3
(vedere a pagina 104)
7- Posizionare la leva (7) tra
e
, a seconda del numero di giri ritenuto necessario per lavorare.
SPEGNIMENTO DEL MOTORE
AVVIAMENTO ELETTRICO
Spegnere il motore portando la chiave su “STOP”. La spia verde si spegne.
Spegnere il motore solo a macchina completamente ferma.
Togliere sempre la chiave di accensione dal blocchetto per evitare partenze accidentali.
AVVIAMENTO A STRAPPO
Spegnere il motore spingendo la leva acceleratore (7) in avanti in posizione di STOP.
H4
AVANZAMENTO SENZA MARCIA INSERITA (vedere a pagina 104)
L’avanzamento senza marcia è possibile solo a motore spento. Prima di spostare manualmente la macchina, verificare che la
marcia sia in folle. Al termine inserire il freno di parcheggio.
ISTRUZIONI PER LA MARCIA
Accertarsi che nel raggio d’azione della macchina non si trovino persone ed animali.
Scegliere la giusta velocità e guidare prestando la massima attenzione. E’ severamente proibito il trasporto di altre persone.
I1
MARCIA (vedere a pagina 104)
1-Premere il pedale freno (10) che funge da frizione, azionare la leva (12) nella marcia prescelta, quindi rilasciare lentamente il pedale freno (10) fino
alla messa in moto.
Per innestare la retromarcia, fermarsi, premendo il pedale (10) innestare la retromarcia (R) e rilasciare lentamente il pedale freno (10).
2-La velocità di avanzamento può altresì essere modificata agendo manualmente sulla leva comando gas (7).
ATTENZIONE! Durante le fasi di lavoro o spostamento se si devono affrontare discese o salite, utilizzare solo la 1° marcia.
I2
FRENARE (vedere a pagina 104)
Premere il pedale del freno (10).
Per bloccare il pedale del freno (10) spostare la leva in posizione di parcheggio.
10
ITALIANO
ISTRUZIONI PER LAPPARATO DI TAGLIO
E’ possibile abilitare l’apparato di taglio solo se il motore è in moto, la leva (7) è posizionata su
e il sacco raccoglierba è inserito.
I3
(max. gas), l’operatore è seduto a bordo del trattorino
INSERIMENTO DELLAPPARATO DI TAGLIO (vedere a pagina 104)
1- Azionare il freno (9)
2- Portare la leva (10) in posizione START.
Ora l’apparato di taglio è innestato e la lama gira.
3- Si può iniziare il taglio procedendo a marcia in avanti dopo aver rilasciato il pedale freno.
Se l’operatore si alza dal sedile durante il taglio il motore si spegne.
ESCLUSIONE DELLAPPARATO DI TAGLIO
Rilasciare la leva innesto lama (9) fino a disinserirla.
La lama si ferma entro 5 secondi circa
DISPOSITIVI DI CONTROLLO E SICUREZZA
a
Micro posizionamento cestello
b
Micro pedale freno
c
Micro sedile
d
Spia funzionamento (vers.avv.elettrico)
e
Spia cesto pieno (vers.avv.elettrico)
f
Micro innesto lama
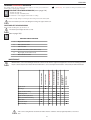
MANUTENZIONE
■
Cambio olio
■
PRIMA DEL RIMESSAGGIO
■
ALL'INIZIO DI STAGIONE
■
OGNI 50 ORE DI SERVIZIO
■
OGNI 25 ORE DIS ERVIZIO
FREQUENTEMENTE SECONDO
NECESSITA'
Controllo motore
DOPO LE PRIME 5 ORE
Tutti i lavori di manutenzione, di ispezione e di pulizia dovranno essere eseguiti solo se la macchina sarà ferma e fredda. I lavori seguenti potranno
essere eseguiti dall’utente stesso. Tutti gli altri lavori di manutenzione, di ispezione e di riparazione dovranno essere eseguiti da una officina
autorizzata.
DOPO OGNI UTILIZZO
L
(vedere a pagina 105)
■
■
Pulizia filtro
Controllo candela
■
Cambio filtro aria
■
■
■
Pulizia batteria e collegamenti
Controlli freni
■
Controllo di parti mobili
■
■
■
■
Pulizia trattorino
■
Con l’uso in condizioni estreme o con temperature molto alte, abbreviare gli intervalli di controllo!
11
ITALIANO
M
CAMBIO DELLOLIO (vedere a pagina 105)
Rimuovere il carter di accesso al vano motore, come indicato al punto D2.
Togliere il tappo dell’olio. Mediante la siringa in dotazione, aspirare l’olio.
Ripetere l’operazione fino al completo svuotamento del serbatoio.
ATTENZIONE !
L’olio esausto non deve essere gettato in scarichi fognari o canali idrici. Per evitare l’inquinamento delle falde acquifere.
Depositi per l’olio esausto sono ubicati presso la maggior parte delle stazioni di servizio, oppure si possono utilizzare le discariche autorizzate
secondo le normative delle autorità locali.
CONTROLLO LIVELLO OLIO
Il controllo del livello dell’olio nel motore può essere effettuato con l’ausilio dell’astina applicata al tappo del serbatoio introduzione olio.
Il livello dell’olio deve essere compreso tra le tacche “MAX” e “MIN”. (consultare il libretto manutenzione del costruttore del motore).
FILTRO ARIA E CANDELA
Si prega di consultare le istruzioni d’uso del costruttore del motore a corredo del trattorino e la tabella “Ricerca ed eliminazione guasti”.
N
SOSTITUZIONE DELLA LAMA (vedere a pagina 105)
Usare sempre e solo ricambi originali!
Scollegare sempre la candela prima della manutenzione sulla lama o sul piatto di taglio.
Se il piatto di taglio o la lama necessitano di manutenzione, portare la macchina in un Centro di Assistenza.
Indossare dei guanti di protezione per la sostituzione della lama e sfilare la chiave d’accensione dalla sede.
1- Liberare la lama dal mozzo, usando una chiave da 17 mm. Montare la nuova lama stringendo bene il mozzo con la chiave apposita. La coppia minima
richiesta per la lama è 55 Nm.
O
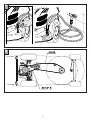
BATTERIA (vedere a pagina 105)
SMALTIMENTO BATTERIA
Durante il rimessaggio staccare la batteria!
E' opportuno prima di eseguire il primo avviamento tenere sotto carica la
batteria per 2-3 ore.
Se durante l'avviamento la batteria da segni di insufficienza, caricarla per 24
ore max.
Non insistere per ogni avviamento oltre i 5 secondi
Pb
Ricarica batteria
Pb
1- Rimuovere l’accesso frontale (22).
2- Estrarre il cavo con il cavo carica batteria.
3- Collegare il cavo batteria al cavo carica batteria.
4- Collegare il carica batteria alla presa a muro.
5- Scollegare i connettori e riposizionare il coperchio al termine della ricarica
della batteria.
Le batteria contrassegnate con il simbolo "container spazzatura
cancellato" e con l'indicazione del simbolo chimico Pb (=batteria
con piombo) non vanno gettate nei rifiuti casalinghi.
L'utente è obbligato dalla legge a consegnare batterie usate in
appositi punti di raccolta oppure ai rivenditori
Ricaricare la batteria solo in ambiente asciutto.
IMPORTANTE! Proteggere i contatti dalla sporcizia, e da ristagni di
umidità. NON SPRUZZARE CON ACQUA!
P
PULIZIA DEL TRATTORINO (vedere a pagina 106)
Per la pulizia della macchina, spegnere il motore e
attendere 15-20 minuti che si raffreddi completamente.
Non usare un getto d’acqua per pulire la macchina.
Ciò potrebbe provocare corrosione e danni.
Utilizzare stracci o spazzole per rimuovere lo sporco e
l’ erba.
Per pulire lo sporco e i residui d’erba usare stracci o spazzole.
l
l
Controllare di frequente la lama per accertare eventuali danni.
E' buona cosa ogni fine stagione far controllare il rasaerba da una stazione
di servizio.
l Pulizia sottoscocca
A macchina ferma e spenta.
- Collegare il raccordo (23) sulla scocca al rubinetto alimentazione acqua.
Aprire il rubinetto.
- Avviare il motore (lama in rotazione) lasciandola funzionare per alcuni minuti.
- A pulizia avvenuta: spegnere il motore. Chiudere il rubinetto, staccare il tubo
dal raccordo/scocca.
ULTERIORI INDICAZIONI PER LA MANUTENZIONE E LA RIPARAZIONE
Bisogna portare sempre dei guanti per proteggere le mani quando di maneggiano le
lame (lavori di controllo o di pulizia)!
Per ragioni di sicurezza bisogna far sostituire immediatamente (da un’officina di assistenza autorizzata) i pezzi logorati o danneggiati!
Controllare regolarmente l’integrità del dispositivo raccogli erba.
Per il pericolo d’incendio è indispensabile che il motore e lo scarico
siano tenuti liberi da erba, da foglie o da altro materiale incendiabile!
INDICAZIONI PER IL DEPOSITO
Non depositare mai la macchina in luoghi dove i vapori della
benzina potrebbero entrare in contatto con fiamme o scintille.
Prima di collocare il trattorino in un locale chiuso lasciarlo raffreddare adeguatamente!
12
ITALIANO
Q
MANUTENZIONE CINGHIE (vedere pag. 106)
La macchina utilizza le seguenti cinghie. Il mancato utilizzo delle diverse cinghie potrebbe causare un cattivo funzionamento e danni.
1-Qualora sia necessario riposizionare le cinchie di comando o del piatto di
taglio, fare riferimento allo schema per il riposizionamento corretto.
Usare sempre cinghie originali.
2-Prima di fare manutenzione alle cinghie spegnere il motore, inserire il freno di
parcheggio e abbassare il piatto alla minima altezza di taglio. Attendere che
il motore si raffreddi.
- Verificare i ricambi con un Servizio Assistenza Autorizzato:
Cinghia di comando – Stile AX 1/ 4" K – Kevlar
Cinghia piatto di taglio - 4H400
INCONVENIENTI - RISOLUZIONI
ANOMALIA
Il motore non parte
Il motore non parte
Motore non rende
Taglio non perfetto
Il cesto non si riempie
Non funziona la trasmissione
Frizione lama non funzionante
PROBABILE CAUSA
RIMEDIO
Manca la benzina
Riempire il serbatoio con benzina senza piombo.
Benzina scadente e sporca
Adoperare sempre benzina pulita e fresca. Utilizzare benzina senza piombo.
Filtro aria sporco
Pulire il filtro aria motore secondo le istruzioni e le indicazioni nel manuale del
costruttore del motore.
Manca la scintilla
Pulire la candela e se necessario sostituirla secondo il manuale di istruzioni del
costruttore del motore.
Difficoltà nell'accensione, motore ingolfato
Svitare la candela e asciugarla. Seguire le indicazioni e istruzioni nel manuale
del costruttore del motore. Lasciar riposare la macchina per alcuni minuti.
Batteria scarica
Ricaricare
Cavo avviamento non ben collegato
Verificare l'inserimento dello spinotto.
Intervento dei dispositivi di sicurezza
Verificare il funzionamento corretto dei dispositivi (vedere il punto L)
Erba troppo alta e umida
Alzare l'altezza di taglio al massimo. Rallentare la velocità sul terreno oppure
attendere che l'erba asciughi.
Piatto di taglio intasato
Pulire il piatto di taglio (Attenzione: prima di pulire estrarre il cavo della
candela)
Filtro aria sporco
Pulire filtro d'aria (vedi anche istr.motore)
Registrazione del carburatore non va bene
Rivolgersi al Centro Assistenza autorizzato
Lama non ben tagliente
Rivolgersi al Centro Assistenza autorizzato
Lama troppo usurata e non affilata
Rivolgersi al Centro Assistenza autorizzato
Altezza taglio errata
Rivolgersi al Centro Assistenza autorizzato
Erba troppo umida - troppo pesante per essere spinta
con l'aria
Attendere per il taglio finchè l'erba sia asciutta
Lama troppo usurata - senza taglio preciso
Rivolgersi al Centro Assistenza autorizzato
Erba troppo alta crea problemi di trasporto fino al cesto
Tagliare l'erba in 2 volte regolando l'altezza di taglio
Piatto di taglio sporco dei resti dell'ultimo taglio
Pulire il piatto di taglio (non utilizzare l'acqua)
Attenzione: asportare il cappuccio della candela
Cinghia comando staccato
Vedere schema manutenzione cinghie pag.106
Trasmissione difettosa
Rivolgersi al Centro Assistenza autorizzato
Trazione difettosa
Rivolgersi al Centro Assistenza autorizzato
Prolunga-cavo difettosa
Rivolgersi al Centro Assistenza autorizzato
Danni alla frizione
Rivolgersi al Centro Assistenza autorizzato
Cinghia difettosa
Rivolgersi al Centro Assistenza autorizzato
Il sacco non è installato correttamente
Installarlo correttamente e verificare il montaggio.
13
ENGLAND
SAFETY RULES
1)All persons operating the ride-on lawnmower must be familiar with the
operating instructions.
l Very important regulation: anybody under the age of 16 or under the
effects of alcohol or medicines cannot operate the machine.
2)Exhaust fumes from petrol engines: these fumes contain harmful carbon
monoxide, never operate the engine in closed environments.
3)When operating on the ride-on lawnmower make sure that no other
persons, especially children or pets, are in the vicinity of the ride-on
lawnmower.
4)Please ensure that no foreign objects are in the lawn while operating the
machine.- Object left on the lawn during operation could be thrown around
by the machine and cause damages, serious injury or even death.
5)No smoking in the vicinity of the mower during operation.
6)Only mow during daylight or under good lighting conditions.
7)Only Mow up or downwards a slope NEVER at an angle or across to the
slope. Special care is needed when changing direction on slopes.
8)When driving to the area to be mowed, ensure that the cutting deck is not
engaged.
9)Never use machine in the event of damage to the bodywork or without
protective equipment (i.e. grass collector bag, etc).
10)The correct position of the engine block has been specifically designed
and set at the factory and must not be altered
11)Do not tilt the unit on its sides.
12)This ride-on lawnmower has a safety device which switches off the
engine every time that the operator leaves his seat.
13)Keep your hands or feet away from the rotating blades. Stay away from
the discharge opening whilst the blade are rotating.
14)Do not manually move or lift the machine with engine running.
15)In the event of any unit maintenance always turn the engine off and
disconnect the spark plug.
Important: Remove start key whenever the operator leaves the tractor
unattended.
16)The engine must also be switched off:
l when you leave the machine or during its transportation
l before refuelling
l during the grass collection bag emptying operations.
A
17)Take the greatest care during the mowing operations. Risk of injury!!
Keep fingers and limbs away from the area of the cutting deck and
bodywork. Wear gloves.
18)Before storing in a closed room, let the engine cool down.
19)In order to avoid risk of fire, the engine and exhaust must be kept free of
grass, leaves and leaking grease.
20)The grass collection bag must regularly be checked for signs of damage
21) Do not cut grass in reverse motion.
22) CAUTION! During the mowing/transfer operations and above all with
reverse gear on, make sure there are no other people in the area.
Maintenance and storage
1)Make sure that all nuts, bolts, and screws are kept well tightened to keep
the mower in a safe operating condition.
2)Never leave the machine with petrol in the tank within an enclosed area
where the fuel vapours could reach flames or sparks.
3)Allow the engine to cool before storing in any enclosure.
4)Keep the engine, exhaust and muffler, battery compartment and petrol
tank free from grass, leaves and excess lubricant, in order to reduce the
danger of fire.
5)Frequently check the grass bag for wear or deterioration
6)For safety reasons, be sure to replace worn-out or damaged parts in due
time.
7)If the fuel tank has to be drained, it is essential that this be done outdoor.
8)Assemble the blades following the corresponding instructions and use
only blades bearing the maker's name or the trademark of the
manufacturer or supplier and marked with the reference number. Only a
certified service dealer should change or service the blade.
9)To protect hands during disassembly or assembly of the blades, it is
absolutely essential to wear suitable protective gloves. Only a certified
service dealer should change or service the blade.
10)Never wash the tractor with water jets. Use a wet cloth to clean the
tractor to avoid the risk of corrosion.
DESCRIPTION (starts at page 101)
1
2
3
4
5
Seat
Steering wheel
Grass collection bag
Blade
Ignition key (electric-start version only)
6
7
8
9
10
Pull start rope (pull start version only)
Throttle lever
Battery
Cutting deck blade engage lever
Brake pedal
11 Gear shift lever
12 Deck height regulation lever
13 Petrol tank cap
14 Pilot light for engine run and full grass bag
indicator (electric start version only)
15 Grass collecting bag handle
TECHNICAL DETAILS
6,0 Hp ÷ 6,5 Hp
Engine
Ignition method
Gears
Electric / Pull cable
Five forward gears and one reverse gear.
Maximum speed
Dimension with grass collection bag
8,0 Km/h
2000 mm x 630 mm x 1020 mm
Frame
Polypropylene
Cutting plate
Steel
Cutting width
62 cm
Cutting height regulation
Five cutting height regulation
Uncut turning circle
1,5 m
Grass collection bag volume
150 litre
Maximum operator weight allowed
120 Kg
UNPACKING/ ASSEMBLY
The ride-on lawnmower is packed in a carton and is ready assembled apart from the steering wheel, seat, grass collection bag and front wheels (Some models
come with pre-assembled wheels). Please observe the following sequence when unpacking the machine:
1 - Unpack all the parts that have been delivered. Dispose of the carton and pallet in an environmentally friendly way.
2 - Check all the parts
3 - Begin assembly.
It is strictly forbidden to start the ride-on lawnmower (even for trial purposes) without completing assembly.
14
ENGLAND
ASSEMBLY OF THE GRASS COLLECTION BAG (starts at page 101)
The grass collection bag is included with all model as a standard feature.
For the assembly the following parts and tools are required:
Tools required:
- Phillips head screwdriver
- Wrench Ø 8
Parts:
- 4 screws M5x30 UNI 7688
- 4 M5 self-locking nuts
- Front frame for grass collecting bag
B
C
Assembly:
Fix the front frame of the grass collecting bag to the pre-assembled grass collecting bag frame.
Make sure that the front section of the grass collecting bag is in the correct position to ensure the correct operation of the grass collecting bag and of
the tractor.
Insert the 4 M5x30 screws into the corrisponding holes.
Screw and properly tighten screws and self-locking nylon nuts with tools.
Complete the assembly of the bag on the frame by connecting the grassbag rubber snap on hooks.
FRONT WHEELS ASSEMBLY (starts at page 101)
(NOTE: Some models come with pre-assembled wheels)
1 - Mount the front wheels on the axials (16), positioning a washer (17), the wheel (18) and a washer (19).
2 - Secure with circlip (20).
Tools required:
- Pliers
Parts:
- 4 washer
- 2 circlip
Attention: Assemble the wheel with valve outwards.
D1
STEERING WHEEL ASSEMBLY (starts at page 102)
Tools required:
- Phillips head screwdriver
- Wrench Ø 10 mm
Parts:
- 1 screw M6x45 UNI 7687
- M6 Flanged Nut.
Assembly:
Insert the steering wheel on the steering tube and align the steering wheel hole with the steering tube hole.
Make sure that the steering wheel is in the correct position (Fig.D1).
- Insert the screw, screw and tighten the nut with the screw using the suitable tools.
NOTE: The steering wheel can be adjusted to two height based on operator preference see D1.
D2
D3
ACCESS TO THE ENGINE COMPARTMENT (starts at page 102)
To remove the access cover to the engine compartment use a screwdriver and insert it into the appropriate slots of the engine cover until the two front
connections and the two rear connections are released.
SEAT ASSEMBLY (starts at page 102)
Tools required:
- Wrench Ø 13 mm
Parts:
- 4 screw M8x18
- 4 washer 9x24
- 4 lock washer Ø 8
1- Fasten the seat (1) to the support plate through the 4 M8 x 18 screws. Assemble with 4 washers Ø 9 x 24 and 4 lock washer Ø 8.
2- Before tightening the screws, adjust the position of the seat on the holes of the plate to suit the user's needs.
Regularly check the screw fixing.
15
ENGLAND
OPERATION
ADJUSTING THE CUTTING HEIGHT
Before the cutting height is adjusted, the engine must be switched off and the blades must have come to a complete standstill.
E1
ADJUSTMENT (starts at page 102)
E2
EMPTYING THE GRASS COLLECTION BAG (starts at page 102)
F1
SAFETY PRECAUTIONS (starts at page 103)
F2
(starts at page 103)
1
2
3
4
- Push the adjustment lever (12) outwards in order to release it from its seat.
- Push the lever into the required notch for the cutting height (no.5 positions for the same number of cutting positions)
- Release the lever slowly till it sticks in the notch.
- The cutting height is now set.
Empty the grass collection bag in time before it overflows.
The red light situated (electric start version only) under the steering wheel shows that the bin is full.
Don’t over fill the grass collection bin. When the red light situated under the steering wheel is on, empty bag.
1 - Disengage plat. Switch off the engine
2 - Hold the handle and lift the bag. Shake the bag twice until it is completely empty.
3 - Let the grass collection bag return slowly to its original position.
4 - Resume operation on the engine.
Before mowing, remove all foreign objects from the lawn which may be thrown by the machine. While mowing, stay alert for any foreign objects which
may have been missed.
Never place your hands or feet underneath the deck or into the rear discharge chute while the engine is running.
PUTTING THE RIDE-ON LAWNMOWER INTO OPERATION FOR THE FIRST TIME
Start up the tractor when its assembly is entirely completed. Before the first start up fill the unleaded petrol tank and the oil tank. The first start up shall be carried
out by people who have read and fully understood these instructions for use.
Use the following in your ride-on lawnmower:
Petrol
engine oil
lead free (min. octane rating 92)
SAE 30 ("SE", "SF" O "SG")
STARTING THE ENGINE
Start up the engine only after filling the tanks with sufficient petrol and oil.
Carefully follow the instructions in the enclosed engine manufacturer’s operating and maintenance manual.
G
REFUELLING (starts at page 103)
Danger of explosion! Fill the tank only only in an open area! Never refuel while the engine is running or is
very hot! Do not smoke!
The unleaded petrol tank plug is situated in the left rear side of the tractor.
1 - Unscrew the tank cap (33) and fill up with lead-free petrol.
2 - After refuelling, the tank cap shall be closed again.
TOPPING UP WITH OIL
Use only oil of type SAE 30 (“SE”, “SF” or “SG”). Ensure that no oil is spilt onto the ground.
1- Lift the seat
The compartment for oil supply is situated in the motor block and can be accessed by removing the protection as shown in Fig. D2.
2- Unscrew the oil filler cap (21)
3- Fill up the oil until the “MAX.” mark on the dip stick is reached
4- Replace the oil filler cap.
16
ENGLAND
STARTING UP
Before starting up check the oil and petrol levels.
Do not smoke during the oil and petrol refuelling and checking operations. Top up with petrol or oil if necessary (as described in detail in
the previous chapter).
Starting up (engine start) must be carried out as described in detail under the heading “initial starting up”.
Never change gear while driving, the mower must always be at a standstill.
Never mow the grass with reverse gear engaged.
ENGINE START
The exhaust fumes contain carbon monoxide, an odourless and deadly gas. Never start the engine in closed or
badly ventilated rooms.
H1
(starts at page 104)
Look for a flat piece of ground with short grass for starting the engine.
Operate the electric start only when sitting on the tractor with the blade clutch (9) in stop position and with brake engaged.
1 - Set the clutch deck blade engage lever (9) to STOP position
2 - Set the throttle lever (7) to START position
3 - Press brake pedal (10) and put it into parking position.
ELECTRIC START (starts at page 104)
H2
4 - Insert the ignition key in the ignition block (5)
5 - Turn the key to the right and release it, after starting in “RUN” position. The green light positioned beneath the steering wheel
control remains on. Should the engine fail to start within 5 seconds, to avoid damaging the battery, wait a further 10 ten seconds
before trying again.
PULL START
Put brake pedal into parking position.
Make sure that the cutting deck blade engage lever is not engaged.
Put accelerator lever into START position.
Grab the pull start rope (6) and pull it. Engine should start. - Repeat if necessary until engine starts.
After start up, sit on the seat and proceed to the work operations.
H3
ENGINE SPEED ADJUSTMENT(starts at page 104)
7 - Set the lever (7) between
and
until you judge the revs to be correct for your work
SWITCHING OFF THE ENGINE
ELECTRIC START
Turn off the engine by turning key to Stop. The green light will switch off.
Only switch the engine off when the machine is at a complete standstill.
Always remove the ignition key to prevent accidental starting.
PULL START
Turn off the engine by pushing accelerator lever (7) forward to STOP position.
H4
MOVING WITHOUT POWER (starts at page 104)
Movement without power possible only with engine off. Before manually moving the unit, make sure the gear is in neutral.
Apply parking brake when finished.
DRIVING INSTRUCTIONS
Ensure that there are no persons or animals within the operating vicinity of the machine.
Select the required speed and drive carefully. Transportation of other persons is strictly forbidden.
I1
DRIVING (starts at page 104)
1 - Press the brake pedal (10) which acts as a clutch, activate the lever (12) according to chosen gear, then slowly release the brake pedal (10) until
unit starts moving. To engage reverse gear, stop, and engage the reverse and engage the gear into reverse (R) by pressing the brake pedal (10), then
slowly releasing the brake pedal (10) again.
2 - Advance speed may also be varied by manually operating the gas throttle lever (7).
CAUTION! During work or transfer phases, in case of upward/downward slopes, use 1st gear only.
I2
BRAKING (starts at page 104)
Press the brake pedal (10).
To lock brake pedal (10) move lever to parking position.
17
ENGLAND
OPERATING CUTTING DECK MECHANISM
The cutting system can be enabled only if the engine is on, lever (7) is positioned on
and the grass collecting bag is installed.
I3
(full throttle) , the operator is sitting on board the tractor
ENGAGING THE MOWER MECHANISM (starts at page 104)
1 - Engage the brake (9)
2 - Set the lever (10) on START position
The mower mechanism is now engaged and the blade is rotating.
3 - It is possible to begin cutting in forward gear after having released the brake pedal.
If the user stands up from the seat during the mowing, the engine switches off.
SWITCHING OFF THE MOWER GEAR
Release blade enabling lever (9) until this is off.
The blade stops turning in about 5 seconds.
CONTROL/SAFETY DEVICES
a
Bag position microswitch
b
Brake pedal microswitch
c
Seat microswitch
d
Operation microswitch (electric-starter version)
e
Bag full light (electric-starter version)
f
Blade enabled microswitch
MAINTENANCE
■
■
Oil change
■
PRIOR TO STORING
AT THE BEGINNING OF
EVERY SEASON
■
EVERY 50 OPERATING HOURS
■
EVERY 25 OPERATING HOURS
OFTEN, ON AS NEEDED BASIS
Engine check
AFTER FIRST 5 HOURS
All maintenance, service and cleaning work must be carried out only after the engine has stopped and cooled off. The following operations
may be carried out by the user himself. All other maintenance, service and repair works must be carried out by an authorized dealer.
AFTER USING EACH TIME
L
(starts at page 105)
■
■
Engine air filter cleaning
Spark plug check
■
Engine air filter replacement
■
■
■
Battery and terminal cleaning
Brake check
■
Loose part check
■
■
■
■
Mower cleaning
■
In the event of using this ride-on lawnmower under extreme conditions and very high temperatures, check more
often.
18
ENGLAND
M
OIL CHANGE (starts at page 105)
Remove engine compartment access case,as described in D2.
Remove oil cap. Using the syringe supplied, suck out the oil.
Repeat until the engine is empty of oil.
CAUTION!
Used oil must not be drained into the sewer system or waterworks. In order to prevent any pollution to the water-table.
Most garages have used oil deposits, or use the authorized deposits according to your local authority regulations.
OIL LEVEL CHECK
You can check the motor oil level with the dip stick placed in the oil filler tank cap.
The oil level must be between “MAX.” and “MIN.” notches (refer to the engine manufacturer's maintenance manual).
AIR FILTER AND SPARK PLUG
Please follow the engine manufacturer's operating instructions enclosed with this ride-on lawnmower and the trouble shooting guide.
N
BLADE REPLACEMENT (starts at page 105)
Always use only original spares!
Always disconnect the spark plug before blade or cutting deck service.
If the cutting deck or the blade need service, take the unit to an authorized dealer.
Remove the ignition key and always wear protective gloves when you replace the blade.
1 - Release the blade from the hub using a 17 mm wrench. Install the new blade and properly tighten the hub with the relevant wrench.Torque requirement for
blade is minimum 55 Nm.
O
BATTERY (starts at page 105)
BATTERY DISPOSAL
Remove the battery during storage!
Before starting the motor for the first time, you are advised to keep the battery
on charge for 2 to 3 hours.
If the battery proves to be low during starting, charge it for 24 hours.
When starting, don't keep trying to start for more than 5 seconds.
BATTERY RECHARGE
1 - Remove front access (22)
2 - Pull out cable with the battery charger connector
3 - Connect the battery charger to the battery charger connector
4 - Plug in the battery charger in wall outlet
5 - Disconnect connectors and replace the cover after battery recharge is
complete.
Pb
Those batteries marked with a “crossed out waste disposal
bin” and bearing the chemical symbol Pb (battery containing
lead) are not to be disposed in domestic waste bins.
The user is legally obliged to take the used batteries to special
collection points or to return them to the retailer.
Pb
Recharge the battery only in a dry room.
IMPORTANT! Protect the contacts from dirt, damp and moisture.
DO NOT SPRAY WITH WATER!
P
MOWER CLEANING (starts at page 106)
For unit cleaning, shut off engine and wait 15-20 minutes lThe lawn mower must be checked by a SERVICE DEALER on a regular
basis.
for unit to cool down completely. Do not use a water hose
or water jet to clean unit. This could cause corrosion and l Cleaning under the bodywork
With machine at a standstill and off.
damage the unit. Use cloths, or brushes to clean away dirt
- Attach fitting (23) on the deck to the water supply tap. Turn on the tap.
and grass.
- start up the motor (blade in rotation), allowing it to warm up for a few
minutes.
- at the end of cleaning switch off the motor, turn off the tap, detach the tube
from the deck connection
Use cloths or brushes to clean away any dirt of grass residue.
lFrequently check the blade for damage.
FURTHER MAINTENANCE AND REPAIR ADVICE
Always wear protective gloves when handling the blades (during checking or
cleaning operations).
For safety reasons always replace used and or damaged parts immediately (by
an authorized dealer).
Regularly check that the grass collection device is in good condition.
Due to the risk of fire it is essential that both the engine and
exhaust are kept free of grass, leaves or any combustible material!
STORAGE
Never store the unit where the petrol vapors could come into Before storing unit allow the unit to cool properly.
contact with flames or sparks.
19
ENGLAND
Q
BELTS ROUTING (starts at page 106)
The unit uses the following belts. Failure to use the different belts
could cause the unit to malfunction and be damaged.
Always use original belt.
- Check with an Authorized Service Dealer for Repair Parts.
1 - If the deck or drive belt come off the pulley, please see the diagram to
correctly reroute the belt.
2 - Before servicing the belts shut off engine, apply parking brake, and lower
deck to lowest height cut. Wait for engine to cool.
Drive belt - Style AX - 32 1/4"K - Kevlar
Cutting Deck Belt - 4H400
TROUBLESHOOTING
FAULT
Engine does not start
Engine does not start
Engine stalls
Poor cut
Grass bag fails to fill
The unit does not drive
POSSIBLE CAUSES
CORRECTION
No petrol
Fill the petrol tank with unleaded petrol
Poor contaminated petrol
Always use clean, fresh petrol. Only use unleaded petrol.
Dirty engine air filter
Clean the engine air filter according to engine manufacturer's guidelines and
intruction manual.
No spark
Clean the spark plug and replace if necessary, according to engine
manufacturer's intruction manual.
Difficulty in starting, flooded engine.
Unscrew the plug and dry it. Follow engine manufacturer's guidelines and
instruction in manual. Let the unit sit for a few minutes.
Flat battery
Recharge.
Starter cord incorrectly connected
Check the connection.
Intervention of safety devices
Check the correct operation of the devices (see point L)
Grass too high or damp.
Raise the cutting height to maximum height. Slow ground speed, or wait for
grass to dry.
Mower casing blocked
Clean the casing (Important: before cleaning extract the spark plug lead)
Dirty air filter
Clean air filter (see engine instructions also).
Carburetor calibration incorrect
Take unit to Authorized Service Dealer for Assistance.
Blunt blade
Take unit to Authorized Service Dealer to replace the blade.
Blade badly worn
Take unit to Authorized Service Dealer to replace the blade.
Incorrect cutting height
Take unit to Authorized Service Dealer to replace the blade.
Grass too heavy or too damp to be conveyed by the air
stream
Wait until the lawn surface has dried off.
Blade badly worn, blunt
Replace the blade.
Grass is too high causing poor collection.
Cut the lawn twice, altering the cutting height accordingly.
Casing blocked with previous grass cutting
Clean the casing (do not use water)
NB: remember to remove the spark plug connector.
Drive belt detached
See belt rouying diagram page 106
Defective transmission
Seek assistance from Authorized Service Dealer.
Cutting deck does not function Cabling defect
Seek assistance from Authorized Service Dealer.
Clutch damage
Seek assistance from Authorized Service Dealer.
Faulty belt
Seek assistance from Authorized Service Dealer.
Bag is not installed properly
Properly install bag and check fit up
20
21
A
1
2
11
15
13
3
9
14
5
6
7
8
4
B
10
12
C
18
17
16
19
20
22
D2
D1
M6 x 45
M6
D3
E1
12
E2
23
F1
F2
G
13
21
24
H1
H2
9
5
6
7
10
7
H4
H3
7
I1
12
10
I2
I3
10
10
25
L
N
M
O
22
BATT
ERY
BATT
ERY
max
24 h
26
P
23
Q
27