1
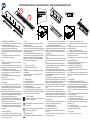
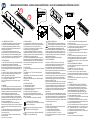
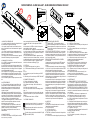
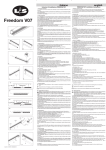
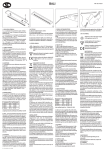
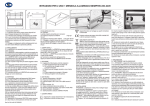
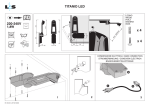
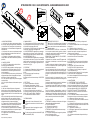
ISTRUZIONI PER L’USO • SLIDE SPORGENTE - SLIDE SEMINCASSO 230-240V
LE
HO LY
ON M
M
/
:%2 0
'!
&IG
&IG
&IG
&IG
&IG
1. INDICAZIONI GENERALI
1.1. Le istruzioni d’uso devono essere sempre disponibili nel luogo d’impiego dell’apparecchio d’illuminazione
1.2. Le istruzioni d’uso contengono le informazioni per
l’installazione e per il funzionamento dell’apparecchio
d’illuminazione.
1.3. Le istruzioni d’uso vanno scrupolosamente seguite
in fase d’installazione,di sostituzione del tubo fluorescente e in fase d’utilizzo.
1.4. Il fissaggio e il collegamento elettrico dell’apparecchio luminoso deve essere effettuato da personale
qualificato.
2. CAMPO D’IMPIEGO
2.1. La SLIDE è un apparecchio in alluminio fluorescente ad accensione automatica.
2.2. La SLIDE è stata progettata e costruita per garantire elevati standard di sicurezza rispetto al rischio di
scosse elettriche, la sicurezza è garantita anche dal
corretto montaggio.
2.3. La SLIDE NON E’ protetta contro gli effetti dannosi
sull’apparecchiatura dovuti alla penetrazione d’acqua
nell’involucro.(Grado di protezione IP20)
2.3.1. Non va posta in luoghi dove può essere soggetta
a cadute d’acqua
2.3.2. Per la pulizia utilizzare esclusivamente un panno
asciutto.
3. AVVERTENZE
3.1. Nel caso si debba effettuare un collegamento
elettrico diverso alla rete d’alimentazione, questo può
essere effettuato solo da personale abilitato alla realizzazione d’impianti elettrici civili in conformità alla norme
vigenti.
L&S non risponde degli eventuali danni alle persone,agli
animali domestici e alle cose causati da operazioni
effettuate in modo non conforme alla norme vigenti sul
collegamento elettrico da personale abilitato.
3.2. L’apparecchio d’illuminazione NON DEVE essere
manomesso in alcun modo, le uniche operazioni ammesse sono quelle indicate dall’istruzioni d’uso.
3.3. La sostituzione o riparazione del cavo di alimentazione deve essere effettuata solo da personale qualificato (costruttore, centro assistenza).
3.4. L’apparecchio non deve mai essere ricoperto da
materiale isolante.
Mac file: 026-INST07_81700590000
4. GAMMA MODELLI
4.1. Potenze lampada: La SLIDE può essere realizzata
con una lampada fluorescente lineare tipo T2 con attacco W4.3x8.5d nelle potenze 8W o 13W.
4.2. Interruttore: La SLIDE è dotata di un interruttore per
l’accensione o spegnimento dell’apparecchio.
4.3. SLIDE SPORGENTE: apparecchio per montaggio
sotto pensile, non ad incasso, con fila continua (max
250W), predisposta per utilizzare il sistema di connessione L&S PRATIKA V07 (Fig. 1).
4.4. SLIDE SEMINCASSO: apparecchio per montaggio
sotto pensile, a semi incasso, fornito con cavo flessibile
esterno montato con attacco tipo Z che non può essere
sostituito, se il cavo è danneggiato l’apparecchio deve
essere distrutto (Fig. 4).
5. DOTAZIONE
5.1. L’apparecchio d’illuminazione è fornito completo di:
N.1 Tubo fluorescente T2 attacco W4.3x8.5d
N.2 Viti
N. 1 Connettore ponte per fila continua per SLIDE SPORGENTE
N. 1 Tappo per fila continua montato per SLIDE SPORGENTE
6. DATI TECNICI
6.1. Tensione d’alimentazione : 230-240V
6.2. Frequenza d’alimentazione : 50/60 Hz
6.3. Potenza lampada : 8W o 13W secondo il modello
6.4. Attacco lampada : W4.3x8.5d
6.5. Classe di protezione dalla scossa elettrica : II
6.6. Grado di protezione da polvere, corpi solidi e umidità: IP20 (Rif. Norma EN 60529 - EN 60598-1)
6.7. Tubi fluorescenti da utilizzare: OSRAM
7. LEGENDA SIMBOLI
Apparecchio in classe d’isolamento II. Non è
necessaria la connessione al circuito di messa a
terra.
Apparecchio idoneo al montaggio su superfici
normalmente infiammabili
Prodotto conforme alle direttive 2006/95/CE (LVD)
e 2004/108/CE (EMC).
&IG
SMALTIMENTO DEI RIFIUTI
IMBALLI: Sono da considerarsi come rifiuti speciali
non tossici e non nocivi tutti i materiali relativi all’imballo e come tali devono essere smaltiti secondo la
normativa vigente.
DEFINIZIONE DI RIFIUTI SPECIALI : I residui derivanti da lavorazioni industriali, attività agricole, artigianali,
commerciali e servizi che, per qualità o quantità non siano dichiarati assimilabili ai rifiuti urbani.
DEMOLIZIONE E SMALTIMENTO DELL’APPARECCHIO DI ILLUMINZIONE
L’apparecchio va considerato come AEE (apparecchiatura elettrica ed elettronica) e come tale deve essere
smaltita.
Il simbolo sottoriportato indica che l’apparecchiatura a
fine vita è da considerarsi RAEE (rifiuto di apparecchiatura elettrica ed elettronica)
Come tale l’apparecchio non può essere smaltito come
rifiuto urbano misto ma deve essere conferito agli appositi centri di raccolta allestiti dalle amministrazioni o dai
produttori che provvederanno alla raccolta separata dei
RAEE.
Nel caso di acquisto di un apparecchio nuovo, un apparecchio da smaltire potrà anche essere consegnato al
distributore.
Contattare le amministrazioni competenti o il distributore/
produttore per ulteriori informazioni in merito.
La presenza del simbolo RAEE identifica che l’apparecchiatura è stata immessa sul mercato dopo il 13 agosto
2005
Percoli per l’ambiente: l’apparecchiatura contiene dei
materiali e dei componenti potenzialmente pericolosi per
l’ambiente e per la salute umana. Non disperdere i materiali nell’ambiente, l’inosservanza di tale regola può dare
adito a sanzioni da parte delle autorità competenti.
8. INSTALLAZIONE
ATTENZIONE: L’installazione va fatta prima di collegare
l’apparecchio alla rete di alimentazione.
8.1. SLIDE SPORGENTE:
8.1.1.Rimuovere lo schermo fig. 1.
8.1.2. Rimuovere il tubo T2 fig. 1.
ATTENZIONE: Il riflettore basculante deve essere perfettamente in piano fig. 2.
8.1.3. Tracciare sulla superficie di supporto la posizione
dei punti di fissaggio vedi fig. 1.
8.1.4. Forare la superficie di supporto.
8.1.5. Effettuare un foro di ø10mm per far passare il
cavo di alimentazione.
8.1.6. Fissare la lampada Slide con le viti di fissaggio in
dotazione fig. 1.
8.1.7. Rimontare il tubo e lo schermo fig. 1.
8.1.8. Nel caso di lampade in fila continua ripetere le
operazioni come sopra e collegare le lampade con il
connettore ponte in dotazione.
8.1.9. Inserire il tappo di copertura fig. 3 in corrispondenza dell’uscita del cavo di alimentazione.
SLIDE SEMINCASSO:
8.2. ATTENZIONE: Prima di procedere all’installazione
della lampada, eseguire una fresatura nella superficie
di supporto.
Per SLIDE 8W: 75x377mm profondità 12mm.
Per SLIDE 13W: 75x579 profondità 12mm.
8.2.1.Effettuare un foro di ø10mm per far passare il
cavo di alimentazione fig. 4.
8.2.2.Inserire il tappo di copertura fig.5 in corrispondenza dell’uscita del cavo di alimentazione.
8.2.3. Inserire la lampada SLIDE nella fresatura precedentemente eseguita fig. 4.
9. MANUTENZIONE
9.1. SOSTITUZIONE TUBO FLUORESCENTE
9.1.1. ATTENZIONE: L’apparecchio d’illuminazione è
dotato di una protezione elettronica di fine vita lampada
per questo la sostituzione del tubo fluorescente lineare
può essere effettuata SOLO CON L’APPARECCHIO
SCOLLEGATO DALLA RETE D’ALIMENTAZIONE,
altrimenti non si avrà l’accensione una volta messo il
tubo fluorescente nuovo.
9.1.2. ATTENZIONE: effettuare la sostituzione del tubo
fluorescente solo dopo aver tolto tensione all’impianto.
9.1.3. Rimuovere lo schermo come da fig. 6
9.1.4. Tirare il tubo fluorescente da sostituire ed estrarlo
dalla sua sede fig. 6.
9.1.5. Sostituire il tubo fluorescente con uno dalle analoghe caratteristiche, lampada fluorescente lineare 8-13W
ø7mm att.W4.3x8.5d fig. 6.
9.1.7. Ricollocare lo schermo fig. 6.
9.1.8. Ricollegare l’apparecchio alla rete di alimentazione (230-240V 50/60 Hz).
9.2. PULIZIA:
9.2.1. Utilizzare esclusivamente dei panni asciutti per
la polvere.
INSTRUCTIONS FOR USE – PROJECTING SLIDE – SEMI-RECESSED SLIDE 230-240V
LE
HO LY
ON M
M
/
:%2 0
'!
&IG
&IG
&IG
&IG
&IG
1. GENERAL RECOMMENDATIONS
1.1. The instructions for use must always be kept in the
place where the light fitting is used.
1.2. The instructions for use contain information for
installation and operation of the light fitting.
1.3. The instructions for use must be scrupulously complied with during installation, changing of the fluorescent
tube and use.
1.4. Qualified personnel must fix the light fitting and
carry out the electrical connections.
2. USE
2.1. SLIDE is a fluorescent light fitting in aluminium with
automatic switching on.
2.2. SLIDE has been designed and made to high safety
standards with regard to the risk of electric shock; safety
is also guaranteed by correct assembly.
2.3. SLIDE IS NOT protected against damaging effects
due to the penetration of water into the housing. (Protection rating IP20)
2.3.1. It must not be installed in places where water
could drip onto it.
2.3.2. Only use a dry cloth to clean.
3. WARNINGS
3.1. In the event of electrical connection other than
to the mains supply, it must only be carried out by an
electrician qualified to install civil electrical systems in
conformity with current regulations.
L&S is relieved from all liability for any injury to persons
and pets or damage to property caused by work that is
not carried out in conformity with current regulations on
electrical connection by qualified persons.
3.2. The light fitting MUST NOT be tampered with in any
way whatsoever. The only permissible operations are
those given in the instructions for use.
3.3. Only qualified persons (manufacturer, after-sales
service centre) must replace or repair the mains lead).
3.4. The light fitting must never be covered with insulating material.
4. RANGE OF MODELS
4.1. Bulb wattage: SLIDE may be fitted with a T2 linear
fluorescent tube with base W4.3x8.5d and wattage 8W
Mac file: 026-INST07_81700590000
or 13W.
4.2. Switch: SLIDE comes with a switch for switching
the appliance on or off.
4.3. PROJECTING SLIDE: light fitting for mounting
under a wall cabinet, not recessed; fittings can be linked
together up to max. 250 W using the L&S PRATIKA V07
connecting system (Fig. 1).
4.4. SEMI-RECESSED SLIDE: light fitting for semirecessed mounting under a wall cabinet; provided with
flexible external lead fitted with Z shaped connector,
which cannot be replaced. If the lead is damaged the
light fitting must be destroyed (Fig. 4).
5. KIT
5.1. The light fitting comprises:
1 T2 fluorescent tube base W4.3x8.5d
2 Screws
1 Bridging connector for PROJECTING SLIDE fittings
linked together
1 Endcap, already fitted, for PROJECTING SLIDE
fittings linked together
6. TECHNICAL DATA
6.1. Power supply: 230-240V
6.2. Frequency: 50/60 Hz
6.3. Bulb wattage: 8W or 13W depending on the model
6.4. Bulb base: W4.3x8.5d
6.5. Class of protection against electric shock: II
6.6. Protection rating against dust, solid objects and
humidity: IP20 (Ref. Standards EN 60529 - EN 60598-1)
6.7. Fluorescent tubes to be used: OSRAM
7. KEY TO SYMBOLS
Appliance in insulation class II. Connection to the
earth circuit is unnecessary.
Suitable appliance for mounting on normally flammable surfaces
Product in conformity with directives 2006/95/CE
(LVD) and 2004/108/CE (EMC).
WASTE DISPOSAL
PACKAGING: all the packaging materials are to
&IG
be considered as non-toxic and non-hazardous
special waste and must be disposed of as such in
accordance with current legislation.
DEFINITION OF SPECIAL WASTE: residues from industrial processes, agricultural, handicraft and commercial
activities as well as services that, due to quality and
quantity, have not been declared as disposable with
municipal waste.
DEMOLITION AND DISPOSAL OF THE LIGHT FITTING
The light fitting should be considered as EEE (electrical
and electronic equipment) and must be disposed of as
such.
The symbol shown below indicates that at the end of
its life the equipment is to be considered WEEE (waste
electrical and electronic equipment)
As such the light fitting may not be disposed of as
mixed municipal waste, but must be taken to the special
collection centres set up by the local authorities or by
the manufacturers, who will arrange for the separate
collection of WEEE.
When purchasing a new light fitting, an old fitting to be
disposed of may also be handed over to the distributor.
Contact the competent authorities or the distributor/manufacturer for further information on the matter.
The presence of the WEEE symbol shows that the light
fitting has been put onto the market after 13 August
2005
Environmental hazards: the equipment contains
materials and parts that are potentially hazardous for
the environment and for human health. Dispose of the
materials properly: failure to observe this rule may lead
to sanctions being applied by the competent authorities.
8. INSTALLATION
CAUTION: the light fitting must be installed before it is
connected to the mains electricity supply.
8.1. PROJECTING SLIDE:
8.1.1.Remove the screen, fig. 1.
8.1.2. Remove the tube T2, fig. 1.
CAUTION: the overhead reflector must be perfectly
level, fig. 2.
8.1.3. Mark the position for the fixing points on the supporting surface, see fig. 1.
8.1.4. Drill holes in the supporting surface.
8.1.5. Make a hole ø10mm for the mains lead to pass
through.
8.1.6. Fix the Slide fitting using the fastening screws
provided in the kit, fig. 1.
8.1.7. Refit the tube and the screen fig. 1.
8.1.8. In the case of fittings linked together, repeat the
above steps and connect the lamps with the bridging
connector provided in the kit.
8.1.9. Fit the endcap, fig. 3, where the mains lead exits.
SEMI-RECESSED SLIDE:
8.2. CAUTION: before installing the light fitting, cut out
the supporting surface appropriately.
For 8W SLIDE: 75x377mm depth 12mm.
For 13W SLIDE: 75x579 depth 12mm.
8.2.1. Make a hole ø10mm for the mains lead to pass
through, fig. 4.
8.2.2. Fit the endcap, fig.5 where the mains lead exits.
8.2.3. Insert the SLIDE fitting into the previously made
slot, fig. 4.
9. MAINTENANCE
9.1. CHANGING THE FLUORESCENT TUBE
9.1.1. CAUTION: the light fitting is fitted with an electronic lamp end-of-life protection and the linear fluorescent
tube may therefore ONLY be changed WHEN THE
LIGHT FITTING IS CUT OFF FROM THE ELECTRICITY SUPPLY, otherwise the new fluorescent tube will not
come on.
9.1.2. CAUTION: only change the bulb after having cut
off the electricity supply.
9.1.3. Remove the screen as shown in fig. 6
9.1.4. Take out the fluorescent tube, fig. 6.
9.1.5. Replace the linear fluorescent tube with one that
has similar characteristics, that is 8-13W ø7mm base
W4.3x8.5d fig. 6.
9.1.7. Refit the screen, fig. 6.
9.1.8. Connect the light fitting to the mains electricity
supply again (230-240V 50/60 Hz).
9.2. CLEANING:
9.2.1. Only use dry cloths for dusting.
GEBRAUCHSANLEITUNGEN - SLIDE IN ANBAUAUSFÜHRUNG - SLIDE IN HALBEINBAUAUSFÜHRUNG 230-240 V
LE
HO LY
ON M
M
/
:%2 0
'!
&IG
&IG
&IG
&IG
&IG
1. ALLGEMEINE ANLEITUNGEN
1.1. Die Bedienungsanleitungen müssen stets griffbereit
am Einsatzort des Beleuchtungskörpers aufliegen.
1.2. Die Bedienungsanleitungen enthalten alle für die
Installation und den Betrieb des Beleuchtungskörpers
erforderlichen Informationen.
1.3. Für das Montieren und das Auswechseln der
Leuchtstoffröhre sowie das Bedienen der Lampe halten
Sie sich unbedingt strikt an die Bedienungsanleitungen.
1.4. Der Leuchtkörper darf nur von qualifizierten Fachkräften befestigt und elektrisch angeschlossen werden.
2. EINSATZBEREICH
2.1. Bei SLIDE handelt es sich um eine Leuchtstoffleuchte
aus Aluminium mit automatischer Einschaltung.
2.2. Beim Auslegen und Bauen von SLIDE war man bestrebt, höchsten Sicherheitsanforderungen im Hinblick auf
die Stromschlaggefahr und die korrekte Montage gerecht
zu werden.
2.3. SLIDE IST NICHT gegen die schädlichen Auswirkungen auf das Gerät durch Eindringen von Wasser in das
Gehäuse geschützt (Schutzgrad IP20).
2.3.1. Sie darf keineswegs an Orten untergebracht werden, auf die Wasser herabfallen kann.
2.3.2. Für die Reinigung nur einen trockenen Lappen
verwenden.
3. HINWEISE
3.1. Wird die Lampe nicht an das Stromnetz sondern auf
andere Art und Weise angeschlossen, so darf dies nur von
eigens für die Realisierung von elektrischen Zivilanlagen
befähigten Fachkräften in Übereinstimmung mit den geltenden Bestimmungen durchgeführt werden.
Die Fa. L&S haftet keineswegs für eventuelle Sach-,
Personen- und Haustierschäden, die auf unsachgemäß
durchgeführte Arbeiten von befähigten Personen und das
Nichtbeachten der geltenden Bestimmungen für Stromanschlüsse zurückzuführen sind.
3.2. Am Beleuchtungskörper DÜRFEN KEINERLEI
Änderungen vorgenommen werden; die einzig zulässigen
Vorgänge sind die in der Bedienungsanleitung beschriebenen.
3.3. Das Speisekabel darf nur von qualifizierten Fachkräften (Hersteller, Kundendienstzentrum) ausgewechselt
oder repariert werden.
3.4. Das Gerät darf niemals mit isolierendem Material
abgedeckt werden.
Mac file: 026-INST07_81700590000
4. MODELLAUSWAHL
4.1. Lampenleistungen: SLIDE kann mit einer linearen
Leuchtstofflampe vom Typ T2 mit Sockel W4.3x8.5d und
den Leistungen 8 W oder 13 W realisiert werden.
4.2. Schalter: SLIDE ist mit einem Schalter für das Einund Ausschalten des Geräts ausgestattet.
4.3. SLIDE IN ANBAUAUSFÜHRUNG: Gerät für die
Lichtbandmontage unter der Konsole, nicht als Einbauausführung, (max. 250 W), für das Anschlusssystem von
L&S PRATIKA V07 vorgerüstet (Abb. 1).
4.4. SLIDE IN HALBEINBAUAUSFÜHRUNG: Gerät für
die Montage unter Konsole in Halbeinbauausführung mit
externem flexiblem Kabel und nicht auswechselbarem
Z-Anschluss. Bei beschädigtem Kabel muss das Gerät
zerstört werden (Abb. 4).
5. AUSSTATTUNG
5.1. Der Beleuchtungskörper wird komplett mit Folgendem
geliefert:
1 Leuchtstoffrohr vom Typ T2 mit Sockel W4.3x8.5d
2 Schrauben
1 Brückenstecker für Lichtbandmontage von SLIDE IN
ANBAUAUSFÜHRUNG
1 Stopfen für Lichtbandmontage von SLIDE IN ANBAUAUSFÜHRUNG
6. TECHNISCHE DATEN
6.1. Speisespannung: 230-240V
6.2. Speisefrequenz: 50/60 Hz
6.3. Lampenleistung: 8 W oder 13 W je nach Modell
6.4. Lampensockel: W4.3x8.5d
6.5. Schutzklasse gegen Stromschläge: II
6.6. Schutzgrad gegen das Eindringen von Staub,
Festkörpern und Feuchtigkeit: IP20 (Bezugsnormen EN
60529 - EN 60598-1)
6.7. Zu verwendende Leuchtstoffröhren: OSRAM
7. LEGENDE ZU DEN SYMBOLEN
Gerät in Isolierklasse II. Es bedarf keines Anschlusses an den Erdungskreis.
Das Gerät ist für die Anbringung auf normal entflammbaren Oberflächen geeignet.
Das Gerät entspricht den Richtlinien 2006/95/EG
(LVD) und 2004/108/EG (EMC).
&IG
ABFALLENTSORGUNG
VERPACKUNGEN: Die Verpackungsmaterialien
sind als ungiftiger und unschädlicher Sonderabfall
zu berücksichtigen und dementsprechend, gemäß
der jeweils geltenden Vorschrift zu entsorgen.
BEGRIFFSERKLÄRUNG ZU SONDERABFALL: Alle aus
Industrie-, Landwirtschafts-, Handwerks-, Handels- und
Dienstleistungsbetrieben stammenden Rückstände, die
aufgrund ihrer Menge oder Art nicht dem Haushaltsmüll
zugeordnet werden können.
DEMOLITION UND ENTSORGUNG DES BELEUCHTUNGSGERÄTS
Das Gerät ist als EEE (Electrical and electronic equipment, deutsch elektrische und elektronische Geräte)
anzusehen und dementsprechend zu entsorgen.
Das nachstehende Symbol deutet darauf hin, dass
das Gerät am Ende seines Lebens als WEEE (Waste
Electrical and Electronic Equipment, deutsch Elektro- und
Elektronikalt-/schrottgerät) anzusehen ist.
Als solches darf das Gerät nicht als normaler gemischter
Hausmüll entsorgt werden, sondern muss eigens den von
den Verwaltungen oder den Herstellern eingerichteten
Sammelzentren übergeben werden, die für die separate
Sammlung der WEEE sorgen.
Beim Kauf eines neuen Geräts kann das zu entsorgende
Gerät auch dem jeweiligen Händler übergeben werden.
Für mehr Informationen wenden Sie sich bitte an die zuständigen Verwaltungen oder Ihren Händler/Hersteller.
Die Präsenz des Symbols WEEE deutet darauf hin, dass
das Gerät nach dem 13. August 2005 auf den Markt
gekommen ist.
Umweltgefahren: Das Gerät enthält Materialien und Bauteile, die für die Umwelt und die menschliche Gesundheit
eine Gefährdung darstellen können. Die Materialien keinesfalls widerrechtlich ablagern. Das Nichtbeachten dieser
Vorschrift kann Grund zur Verhängung von Strafen seitens
der zuständigen Behörden sein.
8. INSTALLATION
ACHTUNG: Die Installation sieht zuerst den Anschluss
des Geräts an das Stromnetz vor.
8.1. SLIDE IN ANBAUAUSFÜHRUNG:
8.1.1. Entfernen Sie den Schirm von Abb. 1.
8.1.2. Entfernen Sie das Rohr T2 von Abb. 1.
ACHTUNG: Der Kippstreuer muss perfekt eben resultieren, siehe Abb. 2.
8.1.3. Auf dem Untergrund die Befestigungspunkte anzeichnen, siehe Abb. 1.
8.1.4. Führen Sie die Bohrungen auf dem Untergrund aus.
8.1.5. Machen Sie ein Loch mit 10 mm Durchmesser,
durch welches das Speisekabel geführt wird.
8.1.6. Befestigen Sie die Lampe Slide mit den mitgelieferten Befestigungsschrauben, Abb. 1.
8.1.7. Bringen Sie das Rohr und den Streuer wieder an,
siehe Abb. 1.
8.1.8. Bei Lichtbandmontage wiederholen Sie die oben
erklärten Vorgänge und schließen Sie die Lampen mit
dem mitgelieferten Brückenstecker untereinander an.
8.1.9. Setzen Sie den Stopfen von Abb. 3 beim Speisekabelaustritt ein.
SLIDE IN HALBEINBAUAUSFÜHRUNG:
8.2. ACHTUNG: Vor dem Montieren der Lampe den Untergrund wie folgt fräsen.
Für SLIDE 8 W: 75 x 377 mm, Tiefe 12 mm.
Für SLIDE 13 W: 75 x 579 mm, Tiefe 12 mm.
8.2.1. Machen Sie ein Loch mit 10 mm Durchmesser,
durch welches das Speisekabel geführt wird, siehe Abb. 4.
8.2.2. Setzen Sie den Stopfen von Abb. 5 beim Speisekabelaustritt ein.
8.2.3. Setzen Sie die Leuchte SLIDE in die vorab ausgeführte Fräsung ein, Abb. 4.
9. WARTUNG
9.1. AUSWECHSELN DER LEUCHTSTOFFRÖHRE
9.1.1. ACHTUNG: Der Beleuchtungskörper ist mit einer
elektronischen Schutzeinrichtung für die erschöpfte
Lampe ausgestattet. Aus diesem Grund darf die lineare
Leuchtstoffröhre NUR BEI VOM STROMNETZ ABGESTECKTEM GERÄT ausgewechselt werden, denn
ansonsten schaltet sich das Gerät auch nach Einsetzen
der neuen Leuchtstoffröhre nicht ein.
9.1.2. ACHTUNG: Die Leuchtstoffröhre erst nach Abschalten des Netzstroms auswechseln.
9.1.3. Entfernen Sie den Schirm wie in Abb. 6 zu sehen.
9.1.4. An der auszuwechselnden Leuchtstoffröhre ziehen
aus ihrem Sitz nehmen, siehe Abb. 6.
9.1.5. Die Leuchtstoffröhre durch eine andere Leuchtstoffröhre mit gleichen Merkmalen – d.h. lineare Röhre 8 - 13
W ø 7 mm Sockel W4.3 x 8.5 d - ersetzen, siehe Abb. 6.
9.1.7. Bringen Sie den Schirm wieder an, Abb. 6.
9.1.8. Schließen Sie das Gerät wieder an das Stromnetz
an (230 - 240 V 50/60 Hz).
9.2. REINIGUNG:
9.2.1. Nur mit trockenem Lappen abstauben.
MODE D’EMPLOI - SLIDE SAILLANT - SLIDE SEMI-ENCASTRABLE 230-240V
LE
HO LY
ON M
M
/
:%2 0
'!
&IG
&IG
&IG
&IG
&IG
1. INDICATIONS GENERALES
1.1 Le mode d’emploi doit toujours être disponible sur le
lieu d’utilisation de l’appareil d’éclairage.
1.2 Le mode d’emploi contient les informations nécessaires à l’installation et au fonctionnement de l’appareil
d’éclairage.
1.3 Le mode d’emploi doit être scrupuleusement suivi
pour ce qui concerne l’installation, l’utilisation et le remplacement du tube fluorescent.
1.4 Le fixage et le raccordement électrique de l’appareil
doivent être effectués par du personnel qualifié
2. DOMAINE D’UTILISATION
2.1 Le SLIDE est un appareil en aluminium fluorescent
à allumage automatique.
2.2 Le SLIDE a été conçu et réalisé pour garantir des
standards élevés de sécurité par rapport aux risques de
décharges électriques. Le montage correct de l’appareil
en garantit également la sécurité.
2.3 Le SLIDE N’EST PAS protégé contre les dommages
dus aux infiltrations d’eau (Degré de protection IP20)
2.3.1 Le SLIDE ne doit pas être utilisé dans un lieu où
un risque de chute d’eau existe.
2.3.2 Le SLIDE ne peut être nettoyé qu’avec un chiffon
sec.
3. AVERTISSEMENTS
3.1 Si une connexion électrique de type différent doit
être effectuée au réseau d’alimentation, elle ne peut
être faite que par du personnel apte à réaliser des
installations électriques civiles, conformément aux
normes en vigueur.
L&S dégage toute responsabilité dans le cas d’éventuels dommages aux personnes, animaux domestiques
ou choses dus à des opérations n’ayant pas été effectuées par du personnel certifié et conformément aux
normes en vigueur sur la connexion électrique.
3.2 L’appareil d’éclairage NE DOIT en aucun cas être
modifié. Les seules opérations admises sont celles
indiquées dans le mode d’emploi.
3.3 Le remplacement ou la réparation du câble d’alimentation ne doit être effectué que par du personnel
qualifié (constructeur, centre d’assistance).
3.4 L’appareil ne doit jamais être couvert avec du
matériel isolant.
4. GAMME MODELES
4.1 Puissance de la lampe. Le SLIDE peut être réalisé
Mac file: 026-INST07_81700590000
avec une lampe fluorescente linéaire de type T2 avec
une fixation W4. 3x8. 5d d’une puissance de 8W
ou13W.
4.2 Interrupteur. Le SLIDE est doté d’un interrupteur
pour allumer et éteindre l’appareil.
4.3 SLIDE SAILLANT : appareil non encastrable à monter en file continue (max. 250W) sous un élément mural,
conçu pour fonctionner avec le système de connexion
L&S PRATIKA V07 (Fig. 1).
4.4. SLIDE SEMI-ENCASTRABLE: appareil semi-encastrable à monter sous un élément mural, fourni avec
un câble flexible externe ne pouvant pas être remplacé,
doté d’un connecteur de type Z. L’appareil doit être
détruit si le câble est endommagé (Fig. 4).
5. DOTATION
5.1 L’appareil d’éclairage est fourni doté de :
N. 1 Tube fluorescent linéaire type T2 fixation W4. 3x8.
5d
N. 2 Vis
N. 1 Connecteur pont pour file continue pour SLIDE
SAILLANT
N.1 Bouchon pour file continue pour SLIDE SAILLANT
6. DONNEES TECHNIQUES
6.1 Tension d’alimentation : 230-240V
6.2 Fréquence d’alimentation : 50/60Hz
6.3 Puissance de la lampe : 8W ou 13W selon le
modèle
6.4 Fixation de la lampe W4. 3x8. 5d
6.5 Classe de protection contre les décharges électriques : II
6.6 Degré de protection contre la poussière, les corps
solides ou l’humidité IP 20 (Réf. Norme EN 60529-En
60598-1)
6.7 Tube fluorescent à utiliser : OSRAM
7. LEGENDE SYMBOLES
Appareil en classe d’isolation II. La connexion au
circuit de mise à la terre n’est pas nécessaire.
Appareil pouvant être installé sur des surfaces
normalement inflammables.
Produit conforme aux directives 2006/95/CE (LVD)
et 2004/108/CE (EMC).
&IG
ELIMINATION DES DECHETS
EMBALLAGES : Tous les matériaux faisant
partie de l’emballage doivent être considérés des
déchets spéciaux non toxiques et non nocifs et en
tant que tels doivent être éliminés selon la normative en vigueur.
DEFINITION DE DECHETS SPECIAUX : Les déchets
dérivant d’exécutions industrielles, activités agricoles,
artisanales, commerciales et services qui, en raison de
leur qualité ou quantité, ne sont pas déclarés assimilables à des résidus urbains.
DEMOLITION ET ELIMINATION DE L’APPAREIL
D’ECLAIRAGE
L’appareil entre dans la catégorie des EEE (appareil
électrique et électronique) et comme tel il doit être
éliminé.
Le symbole représenté ci-dessous indique que l’appareil, en fin de vie, doit être considéré comme un DEEE
(déchet d’appareil électrique et électronique).
En tant que tel, il ne peut pas être éliminé comme un
résidu urbain mixte mais doit être remis à un centre
spécial de collecte des déchets mis en place par les
administrations ou par les producteurs qui pourvoiront à
la collecte séparée des DEEE.
Au moment de l’achat d’un nouvel appareil, le vieil appareil pourra éventuellement être remis au distributeur.
Contacter les administrations compétentes ou le distributeur/producteur pour de plus amples informations à
ce sujet.
La présence du symbole DEEE indique que l’appareil a
été introduit sur le marché après le 13 Août 2005.
Dangers pour l’environnement: l’appareil contient des
matériaux et des composants potentiellement dangereux pour l’environnement et pour la santé de l’homme.
Eliminer ce produit dans un centre de collecte de déchets. Le non respect de cette règle peut entraîner des
sanctions de la part des autorités compétentes.
8. MONTAGE
ATTENTION:
L’installation doit être effectuée avant de connecter
l’appareil au réseau d’alimentation.
8.1. SLIDE SAILLANT:
8.1.1. Enlever l’écran fig. 1.
8.1.2. Enlever le tube T2 fig. 1.
ATTENTION: Le réflecteur basculant doit être parfaitement à plat fig. 2.
8.1.3. Tracer sur la surface d’appui la position des poin-
ts de fixage voir fig. 1.
8.1.4. Percer la surface d’appui.
8.1.5. Effectuer un trou de ø10mm pour faire passer le
câble d’alimentation.
8.1.6. Fixer la lampe Slide avec les vis de fixage en
dotation fig. 1.
8.1.7. Replacer le tube et l’écran fig. 1.
8.1.8. Dans le cas de lampes en file continue, répéter
les opérations indiquées ci-dessus avant de connecter
les lampes avec le connecteur pont en dotation.
8.1.9. Introduire le bouchon de couverture fig. 3 au
niveau de la sortie du câble d’alimentation.
SLIDE SEMI-ENCASTRABLE:
8.2. ATTENTION: Avant d’effectuer l’installation de la
lampe, effectuer un fraisage sur la surface d’appui.
Pour SLIDE 8W: 75x377mm profondeur 12mm.
Pour SLIDE 13W: 75x579 profondeur 12mm.
8.2.1. Effectuer un trou de ø10mm pour faire passer le
câble d’alimentation fig. 4.
8.2.2. Introduire le bouchon de couverture fig. 5 au
niveau de la sortie du câble d’alimentation.
8.2.3. Introduire la lampe SLIDE dans le fraisage effectué précédemment fig. 4.
9. MAINTENANCE
9.1 REMPLACEMENT DU TUBE FLUORESCENT
9.1.1 ATTENTION : L’appareil est doté d’une protection
électronique de fin de vie de la lampe. De ce fait, le
remplacement du tube fluorescent linéaire NE PEUT
ETRE EFFECTUE QUE SI L’APPAREIL EST DECONNECTE DU RESEAU D’ALIMENTATION. Dans le cas
contraire, le nouveau tube fluorescent ne s’allumera pas
une fois posé.
9.1.2 ATTENTION : N’effectuer le remplacement du
tube fluorescent qu’après avoir coupé le courant.
9.1.3 Enlever l’écran comme indiqué sur la fig. 6
9.1.4 Tirer le tube fluorescent à remplacer et l’extraire
de son siège fig. 6.
9.1.5 Remplacer le tube fluorescent par un autre possédant les mêmes caractéristiques que le précédent,
lampe fluorescente linéaire d’une puissance de 8W ou
13W Ø7mm, fixation W4. 3x8. 5d fig. 6
9.1.7 Replacer l’écran fig. 6
9.1.8 Connecter de nouveau l’appareil au réseau d’alimentation (230-240V 50/60 Hz).
9.2. NETTOYAGE
9.2.1 Pour éliminer la poussière, n’utiliser que des
chiffons secs.