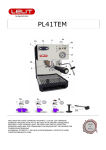
1
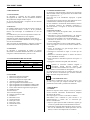
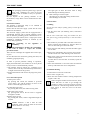
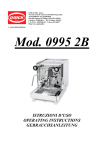
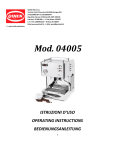
QUICK MILL S.R.L. Via Stati Uniti D’America 6/8-20030 Senago (MI) Tel.02/9986106- Fax.02/99010947 Reg.delle Imprese di Milano (MI-1999-193954) Cap.Soc.€ 52.000,00i.v. – R.E.A.Milano 1593567 C.F.-P.IVA 12859930153 – N.Mecc.MI 300877 Http:/www.quickmill.it – E-Mail: [email protected] Il gusto della perfezione Mod. 04003 / 04004 ISTRUZIONI D’USO OPERATING INSTRUCTIONS Mod. 04003 / 04004 Rev. 01 QUICK MILL vi ringrazia per aver scelto un nostro prodotto. Prima di mettere in funzione la macchina, vi consigliamo di leggere attentamente questo manuale per avere le necessarie informazioni per un corretto utilizzo ed una adeguata manutenzione del prodotto. Per eventuali altre domande, rivolgetevi al vostro rivenditore di fiducia o alla nostra sede. QUICK MILL thanks you for having purchased one of our products. Before using the machine we suggest you carefully read this manual to obtain the necessary information for correctly using and servicing the product. If you have any questions please contact your retailer or our offices. Mod. 11-A FIG. 1 1 5 2 6 3 7 10 4 18 12 13 8 17 16 15 14 19 FIG. 2 Mod. 11-B 1 2 3 5 6 7 4 1 1 Mod. 04003 / 04004 Schema d’identificazione dati di targa: 1 Costruttore 2 Modello 3 Tensione d’alimentazione 4 Frequenza elettrica 5 Numero di matricola 6 Anno di fabbricazione 7 Potenza totale della macchina 8 Marchi di conformità PREMESSA Conservare il libretto istruzioni in un luogo sicuro, per eventuali informazioni o problematiche trattate in modo non esaustivo rivolgersi al personale competente. 1. SIMBOLI Il triangolo d’avvertimento identifica tutte le spiegazioni di natura importante per la sicurezza della persona. Attenersi a tali indicazioni per evitare incidenti! 2 Il simbolo numerico numeri o lettere indica riferimenti ad illustrazioni e parti della macchina come tasti, spie luminose ecc. L’azienda costruttrice non si assume nessuna responsabilità per eventuali danni in caso di: • Impieghi non conformi agli scopi previsti; • Alterazione del cavo di alimentazione; • Alterazione di qualsiasi parte componente la macchina; • Utilizzo di componenti o accessori non originali; • Riparazioni non effettuate presso centri assistenza convenzionati; Questo prodotto risponde ai requisiti sull’etichettatura stabiliti nella Direttiva RAEE (2002/96/CE). Il simbolo apposto indica che non si deve gettare questo prodotto elettrico o elettronico in un contenitore per rifiuti domestici. CATEGORIA DEL PRODOTTO con riferimenti ai tipi di apparecchiature elencate nell’Allegato 1 della Direttiva RAEE, questo prodotto rientra nella categoria 2 “Piccoli elettrodomestici”. NON GETTARE IN UN CONTENITORE PER RIFIUTI DOMESTICI. La mancata osservazione dei punti sopra citati rendono la garanzia decaduta. Rev. 01 2. AVVERTENZE Gli elementi d’imballaggio (sacchetti di plastica, polistirolo espanso, chiodi, cartoni, ecc...) non devono essere lasciati alla portata di bambini in quanto potenziali fonti di pericolo. Prima di collegare la macchina accertarsi che i dati di targa siano rispondenti a quelli della rete di distribuzione elettrica. Il cavo di alimentazione deve essere ben steso (evitare arrotolamenti o sovrapposizioni) in posizione non esposta ad eventuali urti o manomissioni di minori, non deve essere in prossimità di liquidi o acqua e a fonti di calore, non deve essere danneggiato (eventualmente farlo sostituire da personale qualificato) E’ sconsigliato l’uso di adattatori, prese multiple e/o prolunghe. Qualora il loro uso si rendesse indispensabile è necessario utilizzare prodotti con marchio di certificazioni qualità (tipo IMQ, VDE, +s, ecc....) e controllare che il valore di potenza stampigliato sia comunque superiore all’assorbimento (A = ampére) degli apparecchi allacciati. In caso di dubbio o di incertezza far controllare da personale qualificato l’impianto di alimentazione elettrica che deve rispondere ai requisiti disposti dalle normative di sicurezza vigenti, fra i quali: - efficace messa a terra; - sezione dei conduttori sufficiente alla potenza di assorbimento; - dispositivo salvavita efficiente. Posizionare la macchina su un piano idrorepellente (laminato, acciaio, ceramica, ecc...) lontano da sorgenti di calore (forni, fornelli, camini, ecc...) e in ambienti dove la temperatura non scenda sotto i 5°C. Non esporre la macchina ad intemperie o installarla in ambienti ad elevata umidità come locali da bagno. In caso di sostituzione di pezzi, rivolgersi ad un concessionario o ad un Rivenditore Autorizzato ed utilizzare solo ricambi originali. La macchina imballata va immagazzinata in luogo riparato dalle intemperie, asciutto e privo di umidità. La temperatura deve essere non inferiore a +5°C. I colli si possono impilare per un massimo di quattro pezzi dello stesso tipo. Evitare di sovrapporre all’imballo colli pesanti di altro genere. In caso di danni a cose o persone causati da un errata installazione o utilizzo il costruttore non può considerarsi responsabile. 2 2 Mod. 04003 / 04004 3. DESCRIZIONE 3.1 Caratteristiche La macchina è costituita da una caldaia dedicata all’erogazione di caffè e da uno scambiatore dedicato alla produzione di acqua calda e vapore. La scocca della macchina è composta da una struttura portante in acciaio INOX. 3.2 Sicurezza La caldaia è dotata di una valvola meccanica a molla per le sovrapressioni tarata a 12 bar, e di un protettore termico che interrompe il riscaldamento in caso di guasto. Lo scambiatore è provvisto di un protettore termico che interrompe il riscaldamento in caso di guasto. Entrambe le pompe elettromagnetiche sono dotate di protettore termico a riarmo automatico che le protegge in caso di surriscaldamento. Tutti gli organi di riscaldamento e sottoposti a tensione elettrica sono interni alla pannellatura della macchina. 3.3 Vibrazioni La macchina è equipaggiata di piedini in gomma antivibranti. In normali condizioni di lavoro la macchina non genera vibrazioni dannose a persone o cose. 4. CARATTERISTICHE TECNICHE Dimensioni cm. L 25 x H 38 x P 28,5 Dati elettrici Tensione alimentazione Potenza Corrente 220-230 V / 50-60 Hz 2380 W 11 A Capacità serbatoio acqua 1,8 Lt. Temperatura ambiente di lavoro +5° +45° C 5. LEGENDA 1 Interruttore generale (ON/OFF) 2 Interruttore erogazione caffé 3 Interruttore erogazione acqua calda 4 Interruttore produzione vapore 5 Spia di segnalazione macchina accesa 6 Spia di segnalazione riscaldamento caldaia caffè 7 Spia di segnalazione riscaldamento scambiatore 8 Lancia antiscottatura erogazione acqua/vapore 10 Serbatoio acqua 11a Termometro 11b Termometro digitale 12 Gruppo erogazione caffé 13 Portafiltro 14 Bacinella scarico 15 Griglia posatazze 16 Filtro per 2 tazze 17 Filtro per 1 tazza 18 Dosatore/Pressino 19 Filtro Cieco Rev. 01 6. DESTINAZIONE D’USO La macchina è stata progettata, costruita per l’erogazione della bevanda caffé e la preparazione di bevande calde (the, cappuccino, ecc....) Ogni altro uso é da considerarsi improprio e quindi pericoloso. L’operatore deve sempre attenersi alle indicazioni di uso e manutenzione contenute nel presente libretto. In caso di dubbio o anomalia di funzionamento, fermare la macchina, astenersi da effettuare riparazioni o interventi diretti e rivolgersi al servizio di assistenza autorizzato. L’operatore non deve: toccare con le mani le superfici calde , ma utilizzare solo i comandi previsti; intervenire in opere di manutenzione o di trasporto macchina con la spina inserita e la macchina calda; staccare la spina tirando il cavo di alimentazione; utilizzare la macchina se il cavo di alimentazione risulta danneggiato; toccare la macchina con mani o piedi bagnati o umidi; non capovolgere o coricare su un fianco l’imballo e la macchina. lavare la macchina con getti d’acqua diretti o in pressione o con vapore; immergere la macchina in acqua o in altro tipo di liquido; utilizzare la macchina qualora vi fossero dei minori nelle immediate vicinanze; lasciar utilizzare la macchina a persone non capaci o a minori; appoggiare contenitori di liquidi sulla macchina. Qualora la macchina risultasse bagnata o fortemente umida, bisogna astenersi da procedere all’installazione e uso fino a quando non si abbia la certezza della sua asciugatura. E’ comunque necessario fare un controllo preventivo da parte del servizio di assistenza per accertare eventuali danni subiti dai componenti elettrici. Controindicazioni d’uso La macchina va utilizzato solo per l’uso previsto e non per altri scopi come per esempio macinare ed erogare prodotti diversi da caffè o prodotti non alimentari. 7. TRASPORTO 7.1. Imballo Durante il trasporto tenere sempre il collo in posizione corretta facendo riferimento all’indicazione stampata all’esterno del cartone. Non capovolgere o coricare su un fianco l’imballo. Nell’imballo sono contenute le parti staccate e la documentazione a corredo che va conservata per ulteriori consultazioni. Aprire la parte superiore della confezione, togliere gli accessori e quindi sfilare la macchina dall’involucro. Controllare l’integrità della macchina, degli accessori, del cavo di alimentazione e della spina ed in caso di danni, avvertire con tempestività il rivenditore. 3 3 Mod. 04003 / 04004 Rev. 01 Gli elementi d’imballaggio (sacchetti di plastica, polistirolo espanso, chiodi, cartoni, ecc..) non devono essere lasciati alla portata di bambini in quanto potenziali fonti di pericolo. Non disperdere nell’ambiente gli elementi d’imballaggio, ma smaltirli affidandoli agli organi preposti a tali attività. 6. Spia resistenza caldaia. Si accende quando è in attività la resistenza elettrica che riscalda l’acqua nella caldaia. 8. INSTALLAZIONE La macchina viene consegnata pronta per l’installazione secondo i dati di targa. Accertarsi che la linea elettrica abbia le stesse caratteristiche della macchina. 9. FUNZIONAMENTO L’impianto di alimentazione elettrica deve essere dotato di salvavita o di interruttore generale automatico con una efficiente presa a terra. Qualora non vi fosse alcuna sicurezza elettrica, fare installare da personale qualificato un interruttore bipolare magnetotermico differenziale come previsto dalle norme di sicurezza vigenti. Riempire il serbatoio di acqua (utilizzare acqua potabile possibilmente addolcita). E’ obbligatorio il collegamento a terra dell’apparecchio. Il costruttore declina ogni responsabilità qualora questa norma antinfortunistica non venga rispettata. 7. Spia resistenza scambiatore. Si accende quando è in attività la resistenza elettrica che riscalda lo scambiatore. 9.1 Riempimento Da effettuare la prima volta per il rabbocco (spegnere sempre la macchina): Da effettuare la prima volta o dopo lunghe soste della macchina e in caso di totale svuotamento del serbatoio: La macchina è dotata di due filtri anticalcare a resine, prima di accendere la macchina, lasciare i filtri a mollo in acqua per impregnare le resine. Inserire il serbatoio accertandosi che i tubi di gomma non siano piegati. Fare attenzione a non danneggiare il cavo di alimentazione con piegature, schiacciamenti o sollecitazioni. Sganciare il portafiltro, quindi premere l’interruttore generale 1 e contemporaneamente l’interruttore 2 erogazione caffè. Non scollegare l’alimentazione della macchina tirando il cavo, ma estrarre impugnando la spina. Quando fuoriesce acqua dalla doccetta del gruppo spegnere l’interruttore erogazione caffè. Se dopo 30s. non esce acqua, ripetere l’operazione. Si consiglia di evitare il collocamento della macchina in nicchie o similari onde evitare disagi operativi, di rifornimento e manutenzione. Il piano sul quale va installata la macchina deve essere ben livellato, asciutto, robusto e stabile ed essere ad una altezza dal pavimento di 80 cm.; Piazzare la macchina e inserire la spina nella presa di corrente. 8.1. Descrizione comandi 1. Interruttore generale. Azionando il tasto, si da alimentazione alla macchina, (spia verde 5 accesa), e si avvia il riscaldamento dell’acqua in caldaia, lampade 6 e 7 accese. 2. Interruttore erogazione caffé. Azionando il tasto, si effettua l’erogazione di caffé. Agganciare il portafiltro 13 con filtro inserito ed attendere che la macchina si riscaldi e raggiunga la temperatura di utilizzo. 9.2 Riscaldamento macchina Controllare il livello dell’acqua nel serbatoio. Premere l’interruttore 1 (spia 5 accesa) Attendere che la macchina raggiunga la temperatura di esercizio (spie 6 e 7 spente). Quando si utilizza la macchina per la prima volta, lasciare scorrere a macchina calda circa 0,5 litri di acqua per effettuare il risciacquo del gruppo premendo l’interruttore erogazione caffè e quello erogazione acqua calda per il risciacquare il circuito dello scambiatore. 3. Interruttore erogazione acqua calda. Azionando il tasto, si ottiene l’erogazione dell’acqua calda dalla lancia 8. 4. Interruttore erogazione vapore. Azionando il tasto, si ottiene l’erogazione di vapore dalla lancia 8. NB. I due interruttori 3 e 4 vanno usati separatamente (il prelievo dell’acqua non può essere fatto in contemporanea al prelievo di vapore o viceversa). 4 4 Mod. 04003 / 04004 9.3 Erogazione del caffé Sganciare il portafiltro dalla propria sede ruotandolo in senso orario Riempire il filtro con una o due dosi di caffé (a seconda del filtro inserito) usando l'apposito dosatore Premere il caffé con il pressino. Riagganciare e serrare il portafiltro nella propria sede ruotandolo in senso antiorario. Posizionare le tazze in corrispondenza dei fori di uscita posti sotto il portafiltro. Premere l’interruttore erogazione caffé 2; dopo alcuni secondi inizia l’erogazione. Raggiunta la dose voluta spegnere l’interruttore. Il livello dell’acqua del serbatoio 10 deve essere verificato spesso per evitare che in fase di erogazione del caffé la pompa aspiri aria, diventando improvvisamente rumorosa. In questo caso provvedere a spegnere immediatamente l’erogazione, ripristinare il livello dell’acqua nel serbatoio e ripetere le operazioni di messa in servizio. Si raccomanda di fare attenzione alle parti calde della macchina, in special modo al gruppo erogazione e al tubo vapore. Non mettere mai le mani sotto al tubo vapore e al gruppo quando si effettuano le relative operazioni. 9.4 Erogazione vapore Premere l’interruttore vapore 4 ed attendere qualche secondo la fuoriuscita di vapore dalla lancia 8. Immergere il tubetto vapore 8 nel liquido da riscaldare (acqua, punch, ecc.); il vapore uscendo scalda il liquido fino alla temperatura voluta. Terminato di riscaldare la bevanda interrompere l’erogazione di vapore spegnendo l’interruttore vapore 4. Accendere per qualche secondo il pulsante vapore 4 e pulire con un panno inumidito il tubetto vapore 8. 9.5 Cappuccio Per ottenere il cappuccio con schiuma cremosa, procedere come segue: Utilizzare un recipiente alto e stretto riempito a metà circa di latte. Immergere circa metà tubo 8 nel liquido, azionare l’erogazione di vapore tramite l’interruttore vapore 4 e portare il latte alla temperatura desiderata. Spegnere l’interruttore vapore, versare il latte montato e cremoso nella tazza di caffé precedentemente preparata. 9.6 Erogazione acqua calda Porre il recipiente atto a raccogliere l’acqua sotto il tubetto vapore 8. Premere l’interruttore erogazione acqua 3. Rev. 01 Raggiunta la quantità desiderata spegnere l’interruttore erogazione acqua calda 3. 9.9 Funzionamento Termopid Vedere punto 13 10. MANUTENZIONE Le operazioni di manutenzione vanno effettuate a macchina spenta e fredda e con la spina di alimentazione elettrica disinserita. Per la pulizia non utilizzare strumenti metallici o abrasivi tipo pagliette, spazzole metalliche, aghi, ecc..., e detergenti ma usare un panno o una spugna umidi. 10.1. Giornaliera Pulire la carrozzeria , il tubo vapore 8, la doccetta e la guarnizione sottocoppa del gruppo. Controllare ed eventualmente pulire il cassetto di scarico. Sciacquare i filtri e il portafiltro con acqua calda e un panno o spugna. 10.2. Periodica o dopo l’uso intenso della macchina Oltre alle operazioni giornaliere, effettuare le seguenti operazioni: Immergere i filtri 16/17 e il portafiltro 13 in acqua bollente per qualche minuto per favorire lo scioglimento dei grassi del caffé, quindi usare un panno o una spugna per rimuoverlo. 10.3 Manutenzione straordinaria In dotazione con la macchina, viene fornito un filtro cieco per poter effettuare la pulizia del gruppo e dell’elettrovalvola. Questa operazione deve essere eseguita almeno una volta a settimana in modo da rimuovere le incrostazioni di caffé da circuito. 1. Sganciare il portafiltro 13 dal gruppo 12. 2. Rimuovere il filtro dal portafiltro 13. 3. Inserire il filtro cieco nel portafiltro13. 4. Agganciare il portafiltro 13 al gruppo 12. 5. Avviare l’erogazione caffè col tasto 2 per 15 secondi circa quindi arrestare l’erogazione. 6. Ripetere per 10-15 volte consecutive le operazioni descritte al punto 6. 7. Sganciare il portafiltro e rimuovere il filtro cieco. Durante le operazioni di pulizia col filtro cieco viene scaricata acqua bollente nella vaschetta di scarico 14, prestare attenzione ad eventuali schizzi di acqua che potrebbero uscire dalla griglia posatazze. Le operazioni di pulizia del gruppo, possono essere effettuate con l’aiuto di prodotti sgrassanti specifici per macchine da caffé. 5 5 Mod. 04003 / 04004 Attenersi scrupolosamente alle istruzioni indicate sulle confezioni del decalcificante. Per informazioni sulla scelta dei prodotti decalcificanti rivolgersi a personale specializzato o al servizio assistenza. Pulire il serbatoio dell’acqua 10 avendo l’accortezza di riposizionare il tubo di gomma col filtro fino a che tocchi il fondo del serbatoio. 11. MESSA FUORI SERVIZIO 11.1. Temporanea Svuotare il serbatoio dell’acqua 10 e la vaschetta raccogligocce. Spegnere tutti gli interruttori e staccare la spina di alimentazione elettrica. Effettuare le operazioni di manutenzione Riporre la macchina in un ambiente asciutto, al riparo da intemperie e di esclusivo accesso (evitare di lasciarla alla portata di minori o incapaci). Rev. 01 C) Non eroga acqua calda o vapore: - Mancanza di acqua nel serbatoio; ripristinare il livello. - Pompa acqua calda/vapore surriscaldata, attendere ripristino termoprotettore. - Ugelli intasati; pulite gli ugelli della lancia vapore. E) Erogazione irregolare di caffé: - Pulire il filtro contenuto nel portafiltro. - Macinatura del caffé, troppo fine o troppo grossa. Per ogni altro tipo di anomalia o inconveniente non specificato, staccare la spina di alimentazione elettrica, astenersi da interventi diretti di riparazione o verifica e rivolgersi al servizio tecnico di assistenza qualificato. 11.2. Definitiva Oltre alle operazioni della messa fuori servizio temporanea, provvedere a : Tagliare il cavo di alimentazione, imballare la macchina con cartone o altro e consegnarla al personale preposto (smaltimento rifiuti autorizzato o ritiro usato). 12. INCONVENIENTI POSSIBILI In caso di danneggiamento del cavo di alimentazione, fare riferimento ad un centro di assistenza autorizzato per la sostituzione in quanto è necessario l’uso di un utensile speciale. I materiali di scarto usati per la lavorazione o manutenzione, se non biodegradabili o inquinanti, vanno riposti in separati contenitori e consegnati negli appositi centri di raccolta. Operazioni di controllo eseguibili dall’utilizzatore da effettuare dopo aver staccato l’alimentazione elettrica. A) Non si accende la macchina: - Controllare se è inserita la spina; - Controllare che ci sia corrente in rete e il salvavita o l’interruttore generale sia inserito; - Controllare le condizioni della spina e del cavo di alimentazione, se sono danneggiati farli sostituire da personale qualificato. - Controllare i fusibili nella presa della macchina. B) Non eroga caffé: - Mancanza di acqua nel serbatoio; ripristinare il livello. - Non è stata effettuata la funzione di riempimento caldaia. - Pompa caffè surriscaldata, attendere ripristino termoprotettore. 6 6 Mod. 04003 / 04004 Rev. 01 13. TERMOPID specifica tecnica funzionale 1.1 PROGRAMMAZIONE SET-POINT DI TEMPERATURA • Premere il tasto • Quando il display visualizza PrG premere il tasto • Quando il display visualizza il setpoint, impostare con i tasti minimo di 85C° ad un massimo di 105C°. e il valore di temperatura desiderato da un Dopo 3 secondi dalla pressione dell’ultimo tasto il dato è memorizzato ed il display visualizza la temperatura. 1.2 PROGRAMMAZIONE PARAMETRI DI REGOLAZIONE • Accendere la macchina tramite l’interruttore generale 1 tenendo premuti i tasti • Quando il display visualizza F.03 rilasciare i tasti Il tasto scorre i parametri Il tasto entra nel menù di programmazione e Nel menù programmazione i tasti e modificano il dato, dopo 3 secondi dalla pressione dell’ultimo tasto il dato viene memorizzato uscendo dal menù di programmazione. Elenco parametri. Parametro Display ºF ºC F.03 P. X.X I. X.XX d. XX.X F.04 X Descrizione Unita di misura gradi Fahrenheit Unita di misura gradi Centigradi Dove X.X indica il valore della costante Proporzionale del controllo PID. Dove X.X indica il valore della costante Integrativa del controllo PID. Dove X.X indica il valore della costante Derivativa del controllo PID. Dove X indica il fattore di correzione in negativo della temperatura (°C) Per uscire dalla programmazione parametri spegnere la macchina tramite l’interruttore generale 1. 1.3 PRESET PARAMETRI • • • Accendere la macchina tenendo premuto il tasto Quando il display visualizza PrS rilasciare il tasto Spegnere la macchina tramite l’interruttore generale 1 Parametro F.03 P. I. d. F.04 Valore ºC 3.0 0.05 2.0 10 (°C) 7 7 Mod. 04003 / 04004 1.4 Rev. 01 ALLARMI In caso di sonda guasta il display visualizza la scritta A1, l’uscita di regolazione e la programmazione sono disabilitati. In caso di sonda in corto circuito il display visualizza la scritta A2, l’uscita di regolazione e la programmazione sono disabilitati. 2.1 DISPOSITIVI DI TRASDUZIONE INGRESSI PER SONDE RISOLUZIONE DI LETTURA IN CICLO NTC 3K3 1 grado. 2.2 CARATTERISTICHE GENERALI DI SICUREZZA TIPO DI PROTEZIONE CONTRO LA SCOSSA ELETTRICA TIPO DI ISOLAMENTO DELLE PARTI IN TENSIONE CLASSE II DOPPIO ISOLAMENTO O ISOLAMENTO RINFORZATO 8 8 Mod. 04003 / 04004 Features on identification plate: 1 Manufacturer 2 Model 3 Voltage 4 Electrical frequency 5 identification number 6 Year of manufacture 7 Total machine power 8 Compliance marks PREMISE Keep this handbook in a safe place. For further information or problems, please address to competent personnel. 1. SYMBOLS The warning triangle identifies all the important explanations for personal safety. Pay attention to these warnings to prevent accidents! 2 The numeric symbols or letters indicate references to illustrations and parts of the machine like keys, warning lights, etc… The manufacturer shall not be held liable for any injury or damage caused by: • Uses not in compliance with foreseen purposes; • Alteration of the cord; • Alteration of any component of the machine; • The use of components or accessories which are not original; • Repairs not made by authorized service centers. This product complies with the WEEE Directive (2002/06/EC) marking requirements. The affixed label indicated that you must not discard this electrical / electronic product in domestic household waste. PRODUCT CATEGORY: with reference to the equipment types in the WEEE Directive Annex I, this product is classed as category 2 “Small electric household appliances” product. DO NOT DISPOSE IN DOMESTIC HOUSEHOLS WASTE. Rev. 01 2. WARNINGS Keep the packaging (plastic bags, injected foam, cartons, etc…) out of the reach of children, as they can be potentially dangerous. Before connecting the machine, make sure the features on the plate correspond to the electricity voltage. The cord should be well unwounded (avoid any wrap or overlap), not exposed to hitting or children tampering. It must be away from fluids, water or heating sources; it must not be damaged (in case, make it replace by qualified personnel). It is inadvisable to use adaptor, multiple plugs and / or extension cable. In case of necessity, use quality certified products (like IMQ, VDE, +s, etc....) and check that the voltage capacity limit indicated on the adapters exceeds the absorption capacity (A = ampere) of the equipment. When in doubt, request an accurate check of the connections by qualified personnel. The wiring system must comply with the following safety regulations: - Efficient grounding; - Section of conductors suitable for absorbtion capacity; - Efficient earth leakage protection circuit breaker. Place the machine on a water-repellent top (laminate, steel, ceramic, etc.) away from heat sources (oven, cooking stoves, fireplace, etc.) and in conditions in which the temperature may not go below 5°C. Do not leave the machine exposed to atmospheric agents (rain, sun, etc.) and do not install in damp rooms such as bathrooms. In the event of parts replacement, request original spare from an authorized retailer or dealer. Keep the packed machine in a dry place, not exposed to atmospheric agents and in conditions in which the temperature will fall below 5°C. Do not stack more than four items of the same kind. Do not place heavy items on the packaging. Erroneous installation may cause damage to people and things for which the manufacturer cannot be considered responsible. Failure to observe the above points shall result in forfeiture of the warranty. 9 9 Mod. 04003 / 04004 3. DESCRIPTION 3.1 Features The machine is composed of a boiler for the coffee brewing and of a heat-exchanger for the steam / hot water supply. The body is made up of a supporting structure in Stainless Steel. 3.2 Security The boiler is provided with a spring mechanical valve for over-pressures set to 12 bars, and with a thermal protection that stops the heating in case of failure. The heat-exchanger is provided with a thermal protection that stops the heating in case of failure. Both electro-magnetic pumps are provided with a thermal protection with automatic restart that protects in case of overheating. All the moving and heating parts are inside the machine. 3.3 Vibrations The machine is supplied with rubber vibrationsuppressing feet. In normal working conditions, the machine does not produce vibrations harmful to the operator and / or the environment. Rev. 01 6. INTENDED USE The machine has been designed and manufactured to obtain espresso and other hot beverages (tea, cappuccino, etc.) Any other use is to be considered unsuitable and therefore dangerous. The user must always follow the indications contained in this manual. In case of doubts or the machine is not working properly, switch it off and do not attempt any direct repair. For service, contact an authorized service center. The user must not: Touch the hot surfaced of the machine with his hands, but use only proper controls; Transport the machine or carry out maintenance operations with the plug connected and when the machine is warm; Disconnect the plug by pulling the cable; Use the machine if the supplied cable is damaged; Touch the machine with wet or damp hands or feet; Overturn or place the packaging on one side; Wash the machine with water or steam jets; Dip the machine in water or other liquid; Use the machine when there are children in close proximity; Allow the machine to be used by children or incapable persons; Place containers with liquids on the machine. 4. TECHNICAL DATA Dimensions cm. L 25 x H 38 x D 28,5 Electrical data Voltage Power Current 220-230 V / 50-60 Hz 2380 W 11 A Water tank capacity 1,8 Lt. Working place temperature +5° +45° C 5. KEY 1 Main power switch (ON/OFF) 2 Switch for coffee brewing 3 Switch for hot water supply 4 Switch for steam supply 5 Light for machine on 6 Light for coffee boiler heating 7 Light for heat-exchanger heating 8 Anti-burn wand for steam / hot water 10 Water tank 11a Thermometer 11b Digital thermometer 12 Brewing group 13 Filterholder 14 Discharge drawer 15 Drip tray 16 2 cup filter 17 1 cup filter 18 Measuring spoon / Tamper 19 Blind filter In case the machine is wet or damp, do not install or use it until it is completely dry. It is anyway necessary to request an accurate check by qualified personnel in order to find any possible damages to the electric components. Use contraindications This machine may be used only for the purposes for which it was designed. It cannot be used to dispense products other than coffee or any non food products. . 7. TRANSPORT 7.1. Packaging The machine must always be transported in the correct position following the instructions on the cardboard box. Do not turn over the machine or lay it down on its side. The box also contains separate accessories and technical documentation which must be saved for further consultation. Open the top part of the packaging, remove the accessories and then remove the machine from its packaging. Check if the machine, the accessories, the electric cable and the plug are in perfect condition. Should one of the parts be damaged, immediately contact the retailer. 10 10 Mod. 04003 / 04004 Rev. 01 The packaging elements (plastic bags, injected foam, nails, cardboard, etc.) must not be left within reach of children as they are potential sources of danger. Do not dispose of the packing elements in the environment; cosign them to firms authorized for their disposal. 8. INSTALLATION The machine is delivered ready to be installed in accordance to the label data. Ensure that the electrical supply system has the same features as the machine. The electrical supply system must be equipped with a ground-fault interrupt with a general automatic switch with an efficient grounding system. Should there be no electrical protection element, have a single-pole switch installed by qualified personnel, as outlined by the current safety regulations. The grounding mandatory. of the appliance is The manufacturer declines all responsibility in the event of failure to respect the accident prevention norms. Take care not to damage the supplied cable with wraps, or press. Do not disconnect the machine by pulling the cable, but instead by gripping the plug. In order to prevent problems relating to operation, supply and maintenance, the machine is not to be placed in any recesses or similar difficult positions. The machine must be placed on a completely level surface, that is both dry and sufficiently stable and at a height of 80 cm from the ground; Position the machine and connect the plug to the power outlet. 8.1. Control description 1. Main power switch. By pressing this switch, the machine is powered (green light 5 on) and the heating of water in the boiler is activated (light 6 and 7 on). 2. Coffee brewing switch. By pressing this switch, the coffee brewing starts. The light gets on when the boiler water is being heated through the heating element. 8. Heat-exchanger resistance light. The light gets on when the heating element in the heat-exchanger is activated. 9. FUNCTION 9.1 Filling For the first time and for refilling (always switch off the machine): Fill the water tank (use drinking water, softened if possible). Fill the water tank before using the machine the first time, after a long period of inactivity or when the tank is empty. The machine is provided with 2 lime filter with resins: before switching the machine on, keep the filters in water so that resins get socked with water. Insert the water tank making sure that the rubber pipes are not bent. Remove the Filterholder, then press the main switch 1 and the switch 2 for coffee brewing at the same time. When water comes out of the brew head, switch off the coffee brewing button. If water fails to come out after 30 seconds, repeat the operation. Insert the filterholder 13 and wait until the machine heats up and reaches the correct temperature. 9.2 Machine heating Control the level of water in the tank. Press switch 1 (light 5 on) Wait until the machine reaches working temperature (lights 6 and 7 off). When using the machine for the first time, allow about half liter of water to go through the machine in order to rinse the group by pressing the switch for coffee brewing and the one for hot water supply to rinse the circuit of the heatexchanger. 3. Hot water supply switch. By pressing this switch, the hot water is supplied through the wand 8. 4. Steam supply switch. By pressing this switch, steam is supplied through the wand 8. NOTE: Switches 3 and 4 must be used separately (water cannot be taken at the same time as steam or vice versa). 6. Boiler resistance light. 11 11 Mod. 04003 / 04004 Rev. 01 9.3 Coffee brewing 9.9 Termopid functioning Remove the Filterholder from its slot by turning it clockwise. See point 13 Using the measurement scoop supplied, fill the filter with either 1 or 2 measurements of coffee (according to the inserted filter). 10. MAINTENANCE Press the coffee using the tamper. Re-connect and tighten the Filterholder in its slot by turning it anticlockwise. Place your espresso cup(s) under the exit outlets of the Filterholder. Press the switch for coffee brewing 2; brewing will begin after a few seconds. On obtaining the required amount, turn off the switch. Check frequently the water tank 10 in order to avoid causing the pump to pull in air during coffee delivery (which is noisy). If this should happen, immediately switch off the coffee delivery switch, fill the water tank and repeat the “starting up” operations. It is recommended to pay attention to the hot parts of the machine, especially the delivery group and the steam outlet steam wand. Never put your hands under the group or under the steam outlet while the machine is working. 9.4 Steam supply Press the steam switch 4 and wait a few seconds for the steam supply through the steam wand 8. Immerse the steam wand 8 in the liquid to be heated (water, milk, etc.); the supply of water heats the liquid to the desired temperature. Once the heating of the liquid is complete, stop the steam supply by pressing the steam switch 4. Turn on the steam switch 4 for a few seconds and clean with a wet cloth the steam wand 8. 9.5 To steam milk In order to have a cappuccino with creamy foam, proceed as following: Use a high and narrow container filled half with milk. Immerse about half of the wand 8 in the liquid, press for steam supply through the steam switch 4 and steam milk to the desired temperature. Close the steam switch; pour the foamed milk in the coffee cup previously brewed. All maintenance operations must be carried out with the machine off and cold and with the power plug disconnected. Use a damp cloth or sponge for cleaning. Do not use any metallic or abrasive materials for cleaning (such as scourers, metal brushes, needles or detergents). 10.1. Daily Clean the body, the steam wand 8, the shower head and the gasket under the group. Check and eventually clean the discharge drawer. Rinse filters and Filterholder with hot water and a cloth or sponge. 10.2. Periodically or after a period of intensive machine use Do the following in addition to the “Daily” operations: Immerse filters 16/17 and the Filterholder 13 in boiling water for a few minutes to allow the coffee grease to dissolve, then remove using a sponge or a cloth. 10.3 Extraordinary maintenance Along with the machine a blind filter is supplied in order to clean the group and the solenoid valve. This operation should be done at least once a week in order to remove coffee deposits from the circuit. 1. Remove the Filterholder 13 from the group 12. 2. Remove the filter from the Filterholder 12. 3. Put the blind filter into the Filterholder 13. 4. Connect the Filterholder 13 to the group 12. 5. Press for coffee brewing through the switch 2 for about 15 seconds, then stop the brewing. 6. Repeat 10-15 times in a raw the operations described in point 5. 7. Remove the Filterholder and remove the blind filter. During cleaning operations with the blind filter hot water is drained to the drain drawer 14; pay attention to hot water splashes that may come out of the grill. Cleaning operations could be done also using degreasing products specific for coffee machines. 9.6 Hot water supply Place a container under the steam wand 8. Press the switch for hot water supply 3. Once the desired quantity is reached, switch off the switch for hot water supply 3. 12 12 Mod. 04003 / 04004 Carefully follow the instruction on the descaling products’ packaging. For information concerning the choice of the cleaning product, contact the retailer. Clean the water tank 10 making sure to place the rubber tube with the filter until it reaches the bottom of the tank. 11. PLACING OUT OF ACTION 11.1. Temporary Rev. 01 - Overheated hot water / steam pump: wait for the restart of the thermal protector. - Clogged nozzle: clean the steam delivery nozzle. E) Irregular coffee brewing: - Rinse the filterholder. - Check that the grind is neither too coarse nor too fine. In the event of all problems not specified always detach the power cable, avoid undertaking any further diagnostic operations or direct repair, and contact the retailer or a qualified service company. Empty the water tank 10 and the drip tray. Switch all the switches off and disconnect the cable from the plug. Carry out the necessary maintenance operations. Place the machine in a dry place, away from atmospheric agents and of exclusive access (avoid leaving it in the reach of children or untrained persons). 11.2. Definitive Do the following in addition to the “Temporarily placing out of service” actions: Cut the power cable; Wrap cardboard or other material around the machine and cosign to the authorized personnel (authorized refuse disposal center or used material collection center). 12. POSSIBLE PROBLEMS In the event of damage to the power supply cable, contact an authorized service company for replacement as a special tool is required. The scrap material used for processing or maintenance should be placed in containers and sent to special collection centers, unless they are biodegradable or nonpolluting. Operations to be carried out by the user after disconnecting the electrical supply. A) The machine fails to start: - Check whether the power plug is connected: - Check that the power is on and that the ground-fault interrupt or the main switch is engaged; - Check the conditions of the plug and the power cable, should they be damaged have them replaced by authorized personnel; - Check the fuses in the machine plug. B) Machine fails to deliver coffee: - Lack of water in the tank; fill it in. - The boiler has not been refilled. - Overheated coffee pump: wait for the restart of the thermal protector. C) Machine fails to deliver hot water or steam: - Lack of water in the tank; fill it in. 13 13 Mod. 04003 / 04004 Rev. 01 13. TERMOPID functional technical specification 1.1 PROGRAMMING SET-POINT OF TEMPERATURE • Press the button • When the display shows PrG, press the button • When the display shows the setpoint, set with the buttons minimum of 85C° to a maximum of 105C°. and the desired temperature value, from a After 3 seconds from the last button pressing, the data are saved and the display shows the temperature. 1.2 PROGRAMMING ADJUSTMENT PARAMETERS • Switch on the machine through the main switch 1 by pressing buttons • When the display shows F.03, release the buttons. Button slides the parameters. Button enters the programming menu. and at the same time. Inside the programming menu, the buttons and change the data; after 3 seconds from the last button pressing, the data are saved by quitting the programming menu. List of parameters Parameter Display ºF ºC F.03 P. X.X I. X.XX d. XX.X F.04 X Description Unit of measurement: degrees Fahrenheit Unit of measurement: degrees Celsius Where X.X stands for the value of the proportional constant of PID control Where X.X stands for the value of the integrative constant of PID control Where X.X stands for the value of the derivative constant of PID control Where X stands for the correction negative factor of temperature (°C) the the the the To quit programming parameter, switch off the machine through the main switch 1. 1.3 PRESET PARAMETERS • • • Switch on the machine keeping pressed button When the display shows PrS, release the button. Switch off the machine through the main switch 1. Parameter F.03 P. I. d. F.04 Value ºC 3.0 0.05 2.0 10 (°C) 14 14 Mod. 04003 / 04004 1.4 Rev. 01 ALLARMS In case of broken feeler, the display shows A1; the out-coming adjustment and the programming are disabled. In case of a feeler in short circuit, the display shows A2, the out-coming adjustment and the programming are disabled. 2.1 TRANSDUCTION DEVICES FEELERS’ INPUTS RECOGNITION RESOLUTION IN CYCLE NTC 3K3 1 grade. 2.2 GENERAL SECURITY FEATURES KIND OF PROTECTION AGAINST ELECTRO SHOCK KIND OF INSULATION OF PARTS UNDER VOLTAGE CLASS II DOUBLE INSULATION OR REINFORCED INSULATION 15 15