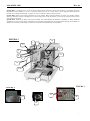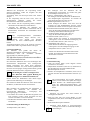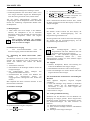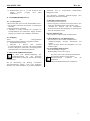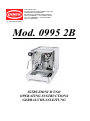
1
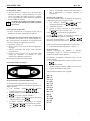
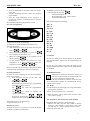
QUICK MILL S.R.L. Via Stati Uniti D’America 6/8-20030 Senago (MI) Tel.02/9986106- Fax.02/99010947 Reg.delle Imprese di Milano (MI-1999-193954) Cap.Soc.€ 52.000,00i.v. – R.E.A.Milano 1593567 C.F.-P.IVA 12859930153 – N.Mecc.MI 300877 Http:/www.quickmill.it Il gusto della perfezione Mod. 0995 2B ISTRUZIONI D’USO OPERATING INSTRUCTIONS GEBRAUCHSANLEITUNG Mod. 0995P LED Rev. 00 QUICK MILL vi ringrazia per aver scelto un nostro prodotto. Prima di mettere in funzione la macchina, vi consigliamo di leggere attentamente questo manuale per avere le necessarie informazioni per un corretto utilizzo ed una adeguata manutenzione del prodotto. Per eventuali altre domande, rivolgetevi al vostro rivenditore di fiducia o alla nostra sede. QUICK MILL thanks you for having purchased one of our products. Before using the machine we suggest you carefully read this manual to obtain the necessary information for correctly using and servicing the product. If you have any questions please contact your retailer or our offices. QUICK MILL dankt für die Wahl eines unserer Produkte. Vor Inbetriebnahme der Maschine, empfehlen wir dieses Handbuch aufmerksam zu lesen um alle nötigen Informationen zur korrekten Anwendung und der entsprechenden Wartung des Produktes zu erhalten. Für eventuelle weitern Fragen, wenden Sie sich an Ihren Fachhändler oder an unsere Büros. FIGURA 1 16 1 3 13 5 11 2 12 4 6 14 7 9-10 15 FIGURA 3 FIGURA 2 21 18 20 19 1 1 Mod. 0995P LED PREMESSA Conservare il libretto istruzioni in un luogo sicuro, per eventuali informazioni o problematiche trattate in modo non esaustivo rivolgersi al personale competente. 1. SIMBOLI Il triangolo d’avvertimento identifica tutte le spiegazioni di natura importante per la sicurezza della persona. Attenersi a tali indicazioni per evitare incidenti! 2 Il simbolo numerico numeri o lettere indica riferimenti ad illustrazioni e parti della macchina come tasti, spie luminose ecc. L’azienda costruttrice non si assume nessuna responsabilità per eventuali danni in caso di: • Impieghi non conformi agli scopi previsti; • Alterazione del cavo di alimentazione; • Alterazione di qualsiasi parte componente la macchina; • Utilizzo di componenti o accessori non originali; • Riparazioni non effettuate presso centri assistenza convenzionati; Questo prodotto risponde ai requisiti sull’etichettatura stabiliti nella Direttiva RAEE (2002/96/CE). Il simbolo apposto indica che non si deve gettare questo prodotto elettrico o elettronico in un contenitore per rifiuti domestici. CATEGORIA DEL PRODOTTO con riferimenti ai tipi di apparecchiature elencate nell’Allegato 1 della Direttiva RAEE, questo prodotto rientra nella categoria 2 “Piccoli elettrodomestici”. NON GETTARE IN UN CONTENITORE PER RIFIUTI DOMESTICI. La mancata osservazione dei punti sopra citati rendono la garanzia decaduta. Rev. 00 2. AVVERTENZE Gli elementi d’imballaggio (sacchetti di plastica, polistirolo espanso, chiodi, cartoni, ecc...) non devono essere lasciati alla portata di bambini in quanto potenziali fonti di pericolo. Prima di collegare la macchina accertarsi che i dati di targa siano rispondenti a quelli della rete di distribuzione elettrica. Il cavo di alimentazione deve essere ben steso (evitare arrotolamenti o sovrapposizioni) in posizione non esposta ad eventuali urti o manomissioni di minori, non deve essere in prossimità di liquidi o acqua e a fonti di calore, non deve essere danneggiato (eventualmente farlo sostituire da personale qualificato) E’ sconsigliato l’uso di adattatori, prese multiple e/o prolunghe. Qualora il loro uso si rendesse indispensabile è necessario utilizzare prodotti con marchio di certificazioni qualità (tipo IMQ, VDE, +s, ecc....) e controllare che il valore di potenza stampigliato sia comunque superiore all’assorbimento (A = ampére) degli apparecchi allacciati. In caso di dubbio o di incertezza far controllare da personale qualificato l’impianto di alimentazione elettrica che deve rispondere ai requisiti disposti dalle normative di sicurezza vigenti, fra i quali: - efficace messa a terra; - sezione dei conduttori sufficiente alla potenza di assorbimento; - dispositivo salvavita efficiente. Posizionare la macchina su un piano idrorepellente (laminato, acciaio, ceramica, ecc...) lontano da sorgenti di calore (forni, fornelli, camini, ecc...) e in ambienti dove la temperatura non scenda sotto i 5°C. Non esporre la macchina ad intemperie o installarla in ambienti ad elevata umidità come locali da bagno. In caso di sostituzione di pezzi, rivolgersi ad un concessionario o ad un Rivenditore Autorizzato ed utilizzare solo ricambi originali. La macchina imballata va immagazzinata in luogo riparato dalle intemperie, asciutto e privo di umidità. La temperatura deve essere non inferiore a +5°C. I colli si possono impilare per un massimo di quattro pezzi dello stesso tipo. Evitare di sovrapporre all’imballo colli pesanti di altro genere. In caso di danni a cose o persone causati da un errata installazione o utilizzo il costruttore non può considerarsi responsabile. 2 2 Mod. 0995P LED 3. DESCRIZIONE 3.1 Caratteristiche La macchina è costituita da una caldaia dedicata all’erogazione di caffè e da una caldaia dedicata alla produzione di acqua calda e vapore. La scocca della macchina è composta da una struttura portante in acciaio INOX. 3.2 Sicurezza La caldaia caffè è dotata di una valvola meccanica a molla per le sovrapressioni tarata a 12 bar, e di un protettore termico che interrompe il riscaldamento in caso di guasto. La caldaia vapore è dotata di una valvola di sicurezza tarata a 2,3 Bar ed un protettore termico che interrompe il riscaldamento in caso di guasto. La pompa è dotata di protettore termico a riarmo automatico che la protegge in caso di surriscaldamento. Tutti gli organi di riscaldamento e sottoposti a tensione elettrica sono interni alla pannellatura della macchina. 3.3 Vibrazioni La macchina è equipaggiata di piedini in gomma antivibranti. In normali condizioni di lavoro la macchina non genera vibrazioni dannose a persone o cose. 4. CARATTERISTICHE TECNICHE Dimensioni cm L 33 x H 40,5 x P 46,5 Peso Kg 28 Dati elettrici Tensione alimentazione Potenza 220/230 V - 50-60 Hz 2350 W 115V – 60 Hz 2050 W Capacità serbatoio acqua 3 Lt. Temperatura ambiente di lavoro +5° +45° C 5. LEGENDA (fig.1) 1 Interruttore generale (ON/OFF) 2 Interruttore caldaia acqua e vapore 3 Spia verde macchina accesa (ON) 4 Spia verde caldaia vapore accesa (ON) 5 Spia arancio resistenza caldaia caffè accesa (ON) 6 Spia arancio resistenza caldaia vapore accesa (ON) 7 Leva erogazione caffè 8 Portafiltro 9 Manometro pressione caldaia caffè 10 Manometro pressione caldaia vapore 11 Rubinetto acqua calda 12 Lancia acqua 13 Rubinetto vapore 14 Lancia vapore 15 Bacinella scarico 16 Termostato digitale 17 By pass regolazione pompa 18 Serbatoio acqua (fig. 2) Rev. 00 19 Interruttore selezione alimentazione idrica (rete/tanica) 20 interruttore accensione led (fig.3) 21 rubinetti di scarico (fig. 3) 6. DESTINAZIONE D’USO La macchina è stata progettata, costruita per l’erogazione della bevanda caffé e la preparazione di bevande calde (the, cappuccino, ecc....) Ogni altro uso é da considerarsi improprio e quindi pericoloso. L’operatore deve sempre attenersi alle indicazioni di uso e manutenzione contenute nel presente libretto. In caso di dubbio o anomalia di funzionamento, fermare la macchina, astenersi da effettuare riparazioni o interventi diretti e rivolgersi al servizio di assistenza autorizzato. L’operatore non deve: toccare con le mani le superfici calde , ma utilizzare solo i comandi previsti; intervenire in opere di manutenzione o di trasporto macchina con la spina inserita e la macchina calda; staccare la spina tirando il cavo di alimentazione; utilizzare la macchina se il cavo di alimentazione risulta danneggiato; toccare la macchina con mani o piedi bagnati o umidi; non capovolgere o coricare su un fianco l’imballo e la macchina. lavare la macchina con getti d’acqua diretti o in pressione o con vapore; immergere la macchina in acqua o in altro tipo di liquido; utilizzare la macchina qualora vi fossero dei minori nelle immediate vicinanze; lasciar utilizzare la macchina a persone non capaci o a minori; appoggiare contenitori di liquidi sulla macchina. Qualora la macchina risultasse bagnata o fortemente umida, bisogna astenersi da procedere all’installazione e uso fino a quando non si abbia la certezza della sua asciugatura. E’ comunque necessario fare un controllo preventivo da parte del servizio di assistenza per accertare eventuali danni subiti dai componenti elettrici. Controindicazioni d’uso La macchina va utilizzato solo per l’uso previsto e non per altri scopi come per esempio macinare ed erogare prodotti diversi da caffè o prodotti non alimentari. 7. TRASPORTO 7.1. Imballo Durante il trasporto tenere sempre il collo in posizione corretta facendo riferimento all’indicazione stampata all’esterno del cartone. Non capovolgere o coricare su un fianco l’imballo. Nell’imballo sono contenute le parti staccate e la documentazione a corredo che va conservata per ulteriori consultazioni. 3 3 Mod. 0995P LED Rev. 00 Aprire la parte superiore della confezione, togliere gli accessori e quindi sfilare la macchina dall’involucro. Controllare l’integrità della macchina, degli accessori, del cavo di alimentazione e della spina ed in caso di danni, avvertire con tempestività il rivenditore. Gli elementi d’imballaggio (sacchetti di plastica, polistirolo espanso, chiodi, cartoni, ecc..) non devono essere lasciati alla portata di bambini in quanto potenziali fonti di pericolo. Non disperdere nell’ambiente gli elementi d’imballaggio, ma smaltirli affidandoli agli organi preposti a tali attività. 8. INSTALLAZIONE La macchina viene consegnata pronta per l’installazione secondo i dati di targa. Accertarsi che la linea elettrica abbia le stesse caratteristiche della macchina. Azionando la leva verso l’alto si attiva l’erogazione dal gruppo caffè. Abbassando la leva l’erogazione si arresta. 4. Manometro pressione circuito caffè (fig.1 pos.9) Indica la pressione della caldaia caffè e la pressione della pompa durante l’erogazione caffè 5. Manometro pressione vapore (fig.1 pos.10) Indica la pressione della caldaia vapore. 6. Rubinetto acqua calda (fig.1 pos.11) Ruotando la manopola in senso antiorario si attiva l’erogazione di acqua calda dalla lancia acqua (fig.1 pos.12) 7. Rubinetto vapore (fig.1 pos.13) Ruotando la manopola in senso antiorario si attiva l’erogazione di vapore dalla lancia vapore (fig.1 pos.14). 8. Int. rete/tanica (Fig. 2 pos 19) permette di selezionare il tipo di aliment. Idrica. 9. FUNZIONAMENTO La macchina può essere alimentata a rete idrica o con la tanica L’impianto di alimentazione elettrica deve essere dotato di salvavita o di interruttore generale automatico con una efficiente presa a terra. Qualora non vi fosse alcuna sicurezza elettrica, fare installare da personale qualificato un interruttore bipolare magnetotermico differenziale come previsto dalle norme di sicurezza vigenti. 9.1 messa in funzione Riempire il serbatoio di acqua (utilizzare acqua potabile possibilmente addolcita). Accendere l’interruttore generale (fig.1 pos.1) ed attendere che la macchina ricarichi la caldaia e raggiunga la temperatura di esercizio. Accendere l’interruttore della caldaia vapore (fig.1 pos.2) ed attendere il raggiungimento della pressione di esercizio (1,2 Bar). E’ obbligatorio il collegamento a terra dell’apparecchio. Al primo utilizo lasciare scorrere a macchina calda circa 0,5 litri di acqua per effettuare il risciacquo del gruppo premendo l’interruttore erogazione caffè e quello erogazione acqua calda per il risciacquare il circuito dello scambiatore. Il costruttore declina ogni responsabilità qualora questa norma antinfortunistica non venga rispettata. Fare attenzione a non danneggiare il cavo alimentazione con piegature, schiacciamenti sollecitazioni. di o Non scollegare l’alimentazione della macchina tirando il cavo, ma estrarre impugnando la spina. 9.2 Erogazione del caffé Si consiglia di evitare il collocamento della macchina in nicchie o similari onde evitare disagi operativi, di rifornimento e manutenzione. Il piano sul quale va installata la macchina deve essere ben livellato, asciutto, robusto e stabile ed essere ad una altezza dal pavimento di 80 cm.; Posizionare la macchina e inserire la spina nella presa di corrente. Riempire il filtro con una o due dosi di caffé (a seconda del filtro inserito) usando l'apposito dosatore 8.1. Descrizione comandi Alzare la leva di erogazione caffé (fig.1 pos7) dopo alcuni secondi inizia l’erogazione. Raggiunta la dose voluta abbassare la leva. 1. Interruttore generale (fig.1 pos.1) Azionandolo si accende la macchina per l’erogazione caffè. Si accende la spia verde (fig.1 pos.3). 2. Interruttore acqua e vapore (fig.1 pos.2) Azionandolo si accende la macchina per l’erogazione di acqua calda e vapore. Si accende la spia verde (fig.1 pos.4). 3. Leva erogazione caffè (fig.1 pos.7) Sganciare il portafiltro dalla propria sede ruotandolo in senso orario Premere il caffé con il pressino. Riagganciare e serrare il portafiltro nella propria sede ruotandolo in senso antiorario. Posizionare le tazze in corrispondenza dei fori di uscita posti sotto il portafiltro. Si raccomanda di fare attenzione alle parti calde della macchina, in special modo al gruppo erogazione e al tubo vapore. Non mettere mai le mani sotto al tubo vapore e al gruppo quando si effettuano le relative operazioni. 4 4 Mod. 0995P LED Rev. 00 9.3 Erogazione vapore Aprire il rubinetto e scaricare un po’ di vapore nella bacinella di scarico, quindi immergere la lancia vapore nel liquido da scaldare ed aprire il rubinetto fino al raggiungimento della temperatura desiderata quindi chiudere il rubinetto Terminato di riscaldare la bevanda, scaricare un po di vapore dal tubo per pulire i fori dello spruzzatore Parametri di regolazione Per accedere al menù relativo ai parametri di regolazione è sufficiente agire come di seguito riportato: Con termopid disabilitato (spento) premere 9.4 Erogazione acqua calda Porre il recipiente atto a raccogliere l’acqua sotto al diffusore acqua calda, quindi aprire il rubinetto. 9.5 Regolazione valvola pressione caffè (fig.2 pos.17) La macchina viene fornita con la valvola regolata a 9 Bar. L’utente finale può effettuare la regolazione della valvola per aumentare o diminuire la pressione. Rimuovere il tappo 17. Inserire il filtro cieco nel porta filtro ed agganciarlo al gruppo. Attivare l’erogazione dal gruppo caffè azionando l’apposita leva. Ruotare in senso orario la vite di regolazione della pompa per aumentare la pressione (in senso antiorario per diminuire la pressione) Si consiglia di regolare la pressione 9 Bar. Dopo 3 secondi dalla pressione dell’ultimo tasto il dato è memorizzato e il display visualizza la temperatura. contemporaneamente i tasti e Alimentare la scheda Quando il display visualizza il primo parametro programmabile “f01” rilasciare i tasti. Il tasto scorre i parametri programmabili Il tasto consente di confermare l’entrata in programmazione del parametro visualizzato. Nel menù programmazione i tasti e modificano (incremento/decremento / selezione) il dato. Questo menù consente di programmare i seguenti tasti Unità di misura della temperatura °C oppure ° F Preset parametri Tramite l’operazione di PRESET è possibile riconfigurare l’unità di controllo Termo-pid con i parametri di default (dati di fabbrica) Per effettuare il PRESET è sufficiente agire come di seguito riportato: Con TermoPid disabilitato (spento) premere il tasto 9.6 Funzionamento Termopid Alimentare la scheda Quando il display visualizza “PrS” rilasciare il tasto Togliere alimentazione alla scheda I dati di fabbrica (default) sono i seguenti Programmazione set-point di temperatura Per accedere alla programmazione dei set point di regolazione della temperatura è sufficiente agire come di seguito riportato: Con termopid abilitato (acceso) premere contemporaneamente i tasti e Quando il display visualizza “t1” premere il tasto per scorrere i setpoint “t1 o t2” Quando il display visualizza il setpoint desiderato “t1 o t2” premere il tasto Il display visualizza la temperatura di setpoint impostata; è quindi possibile modificare tramite i tasti desiderato. e F01 - °C F02 - 6 P1 – 1,5 I1 – 0,0 D1 – 1,5 B1 – 10 P2 – 1,5 I2 – 0,0 D2 – 1,5 B2 – 6 T1 – 95 T2 – 124 E1 – 15 E2 – 0 il valore di temperatura 5 5 Mod. 0995P LED 9.8 Allarmi In caso di sonda guasta il display visualizza la scritta A1 o A3 l’uscita di regolazione e la programmazione sono disabilitati. Rev. 00 Quando la macchina si sarà raffreddata aprire i rubinetti e scaricare l’acqua dalle caldaie (fig. 3 pos 21) Chiudere i rubinetti di scarico e rimettere in funzione la macchina. 11. MESSA FUORI SERVIZIO In caso di sonda in corto circuito il display visualizza la scritta A2 o A4, l’uscita di regolazione e la programmazione sono disabilitati. 10. MANUTENZIONE Le operazioni di manutenzione vanno effettuate a macchina spenta e fredda e con la spina di alimentazione elettrica disinserita. Per la pulizia non utilizzare strumenti metallici o abrasivi tipo pagliette, spazzole metalliche, aghi, ecc..., e detergenti ma usare un panno o una spugna umidi. 11.1. Temporanea Svuotare il serbatoio dell’acqua (fig.2 pos.18) e la bacinella di scarico. Spegnere tutti gli interruttori e staccare la spina di alimentazione elettrica. Effettuare le operazioni di manutenzione Riporre la macchina in un ambiente asciutto, al riparo da intemperie e di esclusivo accesso (evitare di lasciarla alla portata di minori o incapaci). 10.1. Giornaliera Pulire la carrozzeria , il tubo vapore, la doccetta e la guarnizione sottocoppa del gruppo. Controllare ed eventualmente pulire il cassetto di scarico. Sciacquare i filtri e il portafiltro con acqua calda e un panno o spugna. 10.2. Periodica o dopo l’uso intenso della macchina Oltre alle operazioni giornaliere, effettuare le seguenti operazioni: Immergere i filtri e il porta filtro in acqua bollente per qualche minuto per favorire lo scioglimento dei grassi del caffé, quindi usare un panno o una spugna per rimuoverlo. Pulire il serbatoio dell’acqua 18. 10.3 Manutenzione straordinaria In dotazione con la macchina viene fornito un filtro cieco per poter effettuare la pulizia del gruppo. Questa operazione deve essere eseguita almeno una volta a settimana in modo da rimuovere le incrostazioni di caffè dal circuito. 1. Sganciare il porta filtro dal gruppo. 2. Rimuovere il filtro dal porta filtro ed inserire il filtro cieco. 3. Agganciare il porta filtro al gruppo. 4. Avviare l’erogazione di caffè per 15 secondi circa quindi arrestare l’erogazione. Ripetere l’operazione per 10-15 volte. 10.4 Decalcificazione: Inserire nella tanica dell’acqua il prodotto decalcificante quindi attivare l’erogazione dal gruppo caffè e dal rubinetto acqua. Lasciare la macchina accesa per circa 1 ora per fare agire il decalcificante quindi spegnere la macchina e introdurre acqua pulita nella tanica. Attivare l’erogazione dal gruppo e dal rubinetto acqua quindi spegnere la macchina e scaricare la pressione nelle due caldaie. 11.2. Definitiva Oltre alle operazioni della messa fuori servizio temporanea, provvedere a : Tagliare il cavo di alimentazione, imballare la macchina con cartone o altro e consegnarla al personale preposto (smaltimento rifiuti autorizzato o ritiro usato). 12. INCONVENIENTI POSSIBILI In caso di danneggiamento del cavo di alimentazione, fare riferimento ad un centro di assistenza autorizzato per la sostituzione in quanto è necessario l’uso di un utensile speciale. I materiali di scarto usati per la lavorazione o manutenzione, se non biodegradabili o inquinanti, vanno riposti in separati contenitori e consegnati negli appositi centri di raccolta. Operazioni di controllo eseguibili dall’utilizzatore da effettuare dopo aver staccato l’alimentazione elettrica. A) Non si accende la macchina: - Controllare se è inserita la spina; - Controllare che ci sia corrente in rete e il salvavita o l’interruttore generale sia inserito; - Controllare le condizioni della spina e del cavo di alimentazione, se sono danneggiati farli sostituire da personale qualificato. B) Non eroga caffé: - Mancanza di acqua nel serbatoio; ripristinare il livello. C) Non eroga acqua calda o vapore: - Mancanza di acqua nel serbatoio; ripristinare il livello. - diffusore acqua calda intasato, smontare e pulire. - Ugelli intasati; pulite gli ugelli della lancia vapore con uno spillo. E) Erogazione irregolare di caffé: - Pulire il filtro contenuto nel portafiltro. - Macinatura del caffé, troppo fine o troppo grossa. 6 6 Mod. 0995P LED Per ogni altro tipo di anomalia o inconveniente non specificato, staccare la spina di alimentazione elettrica, astenersi da interventi diretti di Rev. 00 riparazione o verifica e rivolgersi al servizio tecnico di assistenza qualificato. 7 7 Mod. 0995P LED INTRODUCTION Keep this instruction manual in a safe place; for any information or problems not comprehensively dealt with, contact qualified personnel. 1. SYMBOLS The warning triangle identifies all explanations of importance for human safety. Follow these indications to prevent accidents! 2 The numerical symbol, numbers or letters indicates references to illustrations and parts of the machine like keys, luminous indicators, etc. The manufacturer assumes no responsibility for possible damage/injury in case of: • Uses not in conformity with the intended purposes; • Alteration to the power cord; • Alteration to any machine part; • Use of non-original components or accessories; • Repairs made at unauthorised service centres; This product complies with the label requirements established in the WEEE Directive (2002/96/EC). The affixed symbol indicates that this electrical or electronic product should not be thrown in a container for household waste. PRODUCT CATEGORY with references to the types of appliances listed in Annex 1 of the WEEE Directive; this product falls into category 2 “Small household appliances”. DO NOT THROW INTO A CONTAINER FOR HOUSEHOLD WASTE. Lack of compliance with the above points render the warranty invalid. Rev. 00 2. WARNINGS Do not leave packaging items (plastic bags, expanded polystyrene, nails, cardboard boxes, etc.) within the reach of children as they are potentially hazardous. Before connecting the machine make sure that the rating plate data comply with those of the power distribution network. The power cord should be completely extended (do not roll up or overlap) and positioned where it is not exposed to bumps or minor tampering; do not place near water or other liquids or near heat sources; make sure it is not damaged (otherwise have it replaced by qualified personnel). The use of adapters, multiple outlets and/or extension cords is not recommended. If it should be necessary to use them, use products with quality certification marks (e.g. IMQ, VDE, +s, etc.) and make sure that the stamped power value is in any case higher than the absorption (A = ampere) of the connected appliances. In case of doubt or uncertainty, have the power supply system checked by qualified personnel; it must comply with the requirements set out by the current safety standards, including: - effective earthing; - cross section of conductors sufficient for the absorption power; - efficient cut-out device. Place the machine on a water-resistant surface (laminate, steel, ceramic, etc.) away from heat sources (ovens, burners, fireplaces or chimneys, etc.) and in locations where the temperature does not go below 5°C. Do not expose the machine to inclement weather or install it in rooms with high humidity like bathrooms. If you have to replace parts, contact a dealer or authorised reseller and only use original spare parts. Store the packed machine in a place sheltered from inclement weather that is dry and moisture free. The temperature should not be below +5°C. A maximum of four packages of the same type may be stacked. Do not set heavy packages of another type on top of the package. The manufacturer cannot be held responsible for any damage/injuries to objects or persons caused by incorrect installation or use. 8 8 Mod. 0995P LED 3. DESCRIPTION 3.1 Characteristics The machine comprises a boiler for dispensing coffee and a boiler for producing hot water and steam. The body of the machine is composed of a stainless steel load-bearing structure. 3.2 Safety The coffee boiler has a mechanical overpressure spring valve calibrated to 10 bar, as well as a thermal protector that shuts off the heat in case of failure. The steam boiler has a safety valve calibrated to 12 bar and a thermal protector that shuts off the heat in case of failure. The pump has a thermal protector with automatic reset that protects it in case of overheating. All heating components and those subjected to electric voltage are located inside the machine’s panels. 3.3 Vibrations The machine comes with rubber antivibration feet. Under normal operating conditions, the machine does not generate vibrations that are harmful to persons or objects. 4. TECHNICAL FEATURES Dimensions cm L 33 x H 40,5 x P 46,5 Weight Kg 28 Ratings Power supply voltage Power 220/230 V - 50-60 Hz 2350 W 115V – 60 Hz 2050 W Water tank capacity 3L Ambient operating temperature +5° +45° C 5. LEGEND (Fig. 1) 1 Main switch (ON/OFF) 2 Water and steam boiler switch 3 Machine ON green indicator light 4 Steam boiler ON green indicator light 5 Coffee boiler heating element ON orange indicator light 6 Steam boiler heating element ON orange indicator light 7 Coffee dispensing handle 8 Filter holder 9 Coffee boiler pressure gauge 10 Steam boiler pressure gauge 11 Hot water valve 12 Water nozzle 13 Steam valve 14 Steam nozzle 15 Drip tray 16 Digital thermostat 17 Pump adjuster 18 Water tank (Fig. 2) 19 Selector switch for direct water connection/tank 20 Switch to turn on the led Rev. 00 21 Drain taps 6. INTENDED USE This machine was designed and built to dispense coffee and prepare hot drinks (tea, cappuccino, etc.) Any other use should be considered inappropriate and thus dangerous. The operator should always follow the operating and maintenance instructions found in this instruction manual. In case of doubt or operating defect, stop the machine; do not carry out any repairs or direct interventions but contact an authorised service centre. The operator should never: touch the hot surfaces with his/her hands but only use the proper controls; carry out maintenance operations or transport the machine when plugged in and hot; unplug the machine by pulling on the power cord; use the machine if the power cord is damaged; touch the machine with wet or damp hands or feet; turn the package and the machine upside down or lay it on its side. wash the machine with direct or high-pressure water jets or with steam; immerse the machine in water or other liquids; use the machine when there are minors in the immediate vicinity; let incapacitated persons or minors use the machine; set containers holding liquids on the machine. If the machine is wet or very damp, do not proceed with installation and operation until you are sure that it has been dried completely. In any case it is necessary to have a precautionary check carried out by the service centre to determine if the electrical components have been damaged. Contraindications for use The machine should only be used as intended and not for other purposes, for example to grind and dispense products other than coffee or non-food items. 7. TRANSPORT 7.1. Packing During transport, always keep the package in the correct position as indicated on the outside of the carton. Do not turn the package upside down or lay it on its side. The package contains the detached parts and the accompanying documentation, which should be kept for future consultation. Open the upper part of the package, remove the accessories and then remove the machine from the wrapping. Make sure that the machine, the accessories, the power cord and the plug are in good condition; if you see any signs of damage, promptly notify the retailer. Do not leave packaging items (plastic bags, expanded polystyrene, nails, cardboard boxes, 9 9 Mod. 0995P LED etc.) within the reach of children as they are potentially hazardous. Do not disperse the packaging items in the environment but dispose of them properly. 8. INSTALLATION The machine is delivered ready for installation in accordance with the rating plate data. Make sure that the electric line has the same characteristics as the machine. The machine can work with direct water connection or with tank The power supply system must have a cut-out or automatic main switch with an efficient earthed outlet. If there is no electrical safety, have qualified personnel install a bipolar differential magnetothermic switch as required by the safety regulations in force. It is obligatory to earth the appliance. Rev. 00 9. OPERATION 9.1 Starting Fill the water tank (use drinking water, softened if possible) Turn on the main switch (Fig. 1, pos. 1) and wait for the machine to refill the boiler and reach the operating temperature. Turn on the steam boiler switch (Fig. 1, pos. 2) and wait until the operating pressure is reached (1.2 bar). The first time you use the machine, let approx. 0.5 litres of water flow, with the machine hot, in order to rinse the unit, pressing the coffee dispensing switch and the hot water dispensing switch to rinse the exchanger circuit. 9.2 Dispensing coffee The manufacturer declines all responsibility if this accident prevention rule is not complied with. Unhook the filter holder from its seat, turning it clockwise Be careful not to damage the power cord by bending, crushing or putting stress on it. Put one or two doses of coffee in the filter (depending on the inserted filter) using the special doser Do not unplug the machine by pulling on the cord but by gripping the plug. We recommend not placing the machine in niches/cubby-holes or similar to prevent operational, restocking and maintenance problems. Install the machine on a level, dry, sturdy and stable surface at a height of 80 cm from the floor; Position the machine and insert the plug in the power outlet. 8.1. Description of controls 1. Main switch (Fig. 1, pos. 1) Use it to turn the machine on to dispense coffee. The green indicator light comes on (Fig. 1, pos. 3). 2. Water and steam switch (Fig. 1, pos. 2) Use it to turn the machine on to dispense hot water and steam. The green indicator light comes on (Fig. 1, pos. 4). 3. Coffee dispensing handle (Fig. 1, pos. 7) Move the handle upward to dispense from the coffee unit. Move the handle downward to stop dispensing. 4. Coffee circuit pressure gauge (Fig. 1, pos. 9) Indicates the pressure of the coffee boiler and the pump pressure while coffee is being dispensed 5. Steam pressure gauge (Fig. 1, pos. 10) Indicates the pressure of the steam boiler. 6. Hot water valve (Fig. 1, pos. 11) Turn the knob counterclockwise to dispense hot water from the water nozzle (Fig. 1, pos. 12) 7. Steam valve (Fig.1 pos.13) Turn the knob counterclockwise to dispense steam from the steam nozzle (Fig. 1, pos. 14). 8. Switch direct main/tank (pic. 2 .pos. 19) It allows to choose the water supply. Press the coffee with the tamper. Rehook and tighten the filter holder in its seat, turning it counterclockwise. Line the cups up with the holes where the coffee comes out, located under the filter holder. Raise the coffee dispensing handle (Fig. 1, pos. 7) and begin dispensing after a few seconds. Lower the handle when the desired amount has been reached. Be careful of the hot parts of the machine, especially the dispensing unit and the steam pipe. Never put your hands under the steam pipe or unit when carrying out the relative operations. 9.3 Dispensing steam Open the valve and discharge a bit of steam into the drip tray, then immerse the steam nozzle in the liquid to be heated and open the valve until the desired temperature has been reached; then close the valve. After heating the beverage, discharge a bit of steam from the pipe to clean the nozzle holes 9.4 Dispensing hot water Place the container for collecting water under the hot water nozzle and open the valve. 9.5 Coffee pressure valve adjustment (Fig. 2, pos. 17) The machine comes with the valve set to 9 bar. The end user may adjust the valve to increase or decrease the pressure. Remove the cap. (17) 10 10 Mod. 0995P LED Rev. 00 Insert the blind filter in the filter holder and hook it to the unit. Activate dispensing from the coffee unit using the proper handle. Turn the pump adjustment screw clockwise to increase the pressure (counterclockwise to decrease the pressure) We recommend adjusting the pressure to 9 bar 9.6 Termopid operation Temperature set-point programming To adjust the set point of temperature please act as following described: With termopid on press at the same time the push buttons and When on the display appears t1, press the key to display the set-point t1 or t2 When the wished set-point t1 or t2appears on the To PRESET please act as follows: . with termopid off press key - Switch the machine on - When the display “PrS” release the key - Switch the machine off The production data are following: F01 - °C F02 - 6 P1 – 1,5 I1 – 0,0 D1 – 1,5 B1 – 10 P2 – 1,5 I2 – 0,0 D2 – 1,5 B2 – 6 T1 – 95 T2 – 124 E1 – 15 E2 – 0 9.7 Alarms display, push key On the display appears the selected set point temperature; it is then possible to modify the In case of a failed probe, A1 will appear on the display and the adjustment output and the programming are disabled. temperature with the In case of a probe short circuit, A2 will appear on the display and the adjustment output and the programming are disabled. and keys. Three (3) seconds after the last key is pressed, the datum is stored and the temperature is shown on the display. Set point parameters To enter the menu regarding the set point parameters, please act as follows: - With termopid off push at the same time - key and Switch the machine on When the display shows the first programmable parameter f1, release the keys - The parameters - The key allows to confirm the visualized parameter. - key slides the programmable In the set up menu the key and modify the value (increase/decrease/selection) This menu allows to set up following: . temperature unit °C or °F Parameters preset Through the preset it is possible to retrofit the default parameters (production parameters). 10. MAINTENANCE Maintenance operations should be carried out with the machine turned off and cold and with the power-supply plug disconnected. To clean do not use metal or abrasive tools like steel wool, metal brushes, needles, etc. and detergents, but use a damp cloth or sponge. 10.1. Daily Clean the body, the steam pipe, the spray head and the group gasket of the unit. Check and clean the drip tray, if necessary. Rinse the filters and the filter holder with hot water and a cloth or sponge. 10.2. Periodic or after intense use of the machine Besides the daily operations, do the following: Immerse the filters and the filter holder in boiling water for a few minutes to help dissolve the coffee fats and then use a cloth or sponge to remove them. Clean the water tank (18). 11 11 Mod. 0995P LED Rev. 00 11.2. Definitive 10.3 Special maintenance The machine comes with a blind filter for cleaning the unit. This operation must be done at least once a week to remove coffee encrustations from the circuit. 9. Unhook the filter holder from the unit. 10. Remove the filter from the filter holder and insert the blind filter. 11. Hook the filter holder to the unit. 12. Start dispensing coffee for around 15 seconds and then stop dispensing. Repeat the operation 10-15 times. 10.4 Descaling 1. Put the descaling product in the water tank (following the instruction of the supplier) 2. raise the coffee lever and open the water wand till the water tank is empty Close the water knob and pull down the coffee lever again. 3. Full and rinse the water tank with clean water 4. Let act the descaling product for ca. an hour Rinse 5. Raise the coffee lever again and open the water knob till the water tank is empty 6. Now switch the machine off and let the coffee lever up and the water knob open. 7. Once the machine is completely cold, open the taps and drain the water of the boilers (pic. 3, pos. 21) 8. Once the boilers are empty, close the drain taps and reassemble the lock plate again. 11. PUTTING OUT OF OPERATION 11.1. Temporary Empty the water tank (Fig. 2, pos. 18) and the drip tray. Turn off all switches and unplug the power-supply plug. Perform the maintenance operations Store the machine in a dry place, protected from inclement weather and where only qualified people have access (do not leave it within the reach of minors or incapacitated adults). Besides the temporary putting out of operation procedures, do the following: Cut the power cord, Pack the machine in a carton or other and deliver it to the personnel in charge (authorised waste disposal or used appliance pick up). 12. POSSIBLE PROBLEMS If the power cord is damaged, contact an authorised service centre to have it replaced since it requires the use of a special tool. Waste materials used for processing or maintenance, if they are not biodegradable or are polluting, should be put in separate containers and delivered to the appropriate collection centres. Checks that can be carried out by the user after having disconnected the electric power supply. A) The machine does not turn on: - Make sure that it is plugged in; - Make sure that the mains current is present and that the cut-out or main switch is connected; - Check the condition of the plug and of the power cord; have them replaced by qualified personnel if they are damaged. B) The machine does not dispense coffee: - No water in the tank; restore the water level. C) The machine does not dispense hot water or steam: - No water in the tank; restore the water level. - Hot water nozzle clogged; disassemble and clean. - Nozzles clogged; clean the steam wand nozzles with a pin. E) Irregular coffee dispensing: - Clean the filter found in the filter holder. - Coffee grinding too fine or too coarse. For all other types of unspecified defect or problem, unplug the power-supply plug, do not carry out repairs or checks on your own and contact a qualified technical service centre. 12 12 Mod. 0995P LED VORWORT Bewahren Sie das Gebrauchshandbuch an einem sicheren Ort auf, für eventuell nicht ausführlich behandelte Informationen oder Problematiken, wenden Sie sich an kompetentes Personal. 1. SYMBOLE Das Warndreieck gibt Hinweise zu wichtigen Erklärungen in Bezug auf persönliche Sicherheiten. Bitte berücksichtigen Sie diese Informationen zum Vermeiden von Unfällen! 2 Das Nummernsymbol mit Zahlen oder Buchstaben gibt Hinweise zu Abbildungen und Maschinenteilen, wie Tasten, Leuchtanzeigen usw. an. Die Herstellerfirma übernimmt keine Verantwortung für Schäden im Falle von: • nicht konformen Anwendungen gemäß vorgesehener Zwecke; • Änderung des Zufuhrkabels; • Änderung eines jeglichen Maschinenteils; • Anwendung von nicht originalen Zubehören oder Ersatzteilen; • Nicht bei vertragsgebundenen Kundendienststellen vorgenommenen Reparaturen; Dieses Produkt entspricht den auf der Etikette angegebenen und in der Richtlinie RAEE (2002/96/CE) festgelegten Eigenschaften. Das angebrachte Symbol weist darauf hin, dass dieses elektrische oder elektronische Produkt nicht im Haushaltsmüll entsorgt werden darf. PRODUKTKATEGORIE Mit Bezug auf in Anlage 1 der Richtlinie RAEE aufgelistete Gerätetypen, ist dieses Produkt Teil der Kategorie 2 “kleine Haushaltsgeräte”. NICHT IM HAUSHALTSMÜLL ENTSORGEN. Das Nichtberücksichtigen obiger Punkte habt den Garantierverfall zur Folge. Rev. 00 2. HINWEISE Die Verpackungselemente (Plastiktüten, Polystirolschaum, Nägel, Kartons, usw...) müssen fern dem Zugriff von Kindern aufbewahrt werden da diese potentielle Gefahrenquellen darstellen. Vor Anschluss der Maschine sicherstellen, dass die Angaben der Plakette jenen des elektrischen Stromnetzes entsprechen. Das Zufuhrkabel muss gut gespannt sein, (vermeiden Sie das Einrollen oder die Überlagerung), an nicht Stößen oder Eingriffen Seitens Kindern ausgesetzten Stellen positioniert werden, es darf sich nicht in der Nähe von Flüssigkeiten, Wasser oder Hitzequellen befinden, es darf nicht beschädigt werden (eventuell von qualifiziertem Personal austauschen lassen) Die Anwendung von Adaptern, Mehrfachsteckdosen und /oder Verlängerungen ist nicht ratsam. Sollte die Anwendung solcher Vorrichtungen jedoch unentbehrlich sein, müssen Produkte mit Qualitätskennzeichnung verwendet (z.B. IMQ, VDE, +s, usw....) und kontrolliert werden, dass der aufgedruckte Leistungswert in jedem Falle höher als die Aufnahme (A = Ampere) angeschlossener Geräte ist. Im Zweifelsfalle oder bei Unsicherheit, die elektrischen Leitungen, welche den Erfordernissen der geltenden Sicherheitsnormen entsprechen müssen, von qualifiziertem Personal kontrollieren lassen; worunter: - die wirksame Erdleitung; - der Aufnahmeleistung entsprechende Kabelstärken; - wirksame Sicherungen. Stellen Sie die Maschine auf eine Wasserabweisende Oberfläche (Laminat, Stahl, Keramik, usw...) fern von Hitzequellen (Bachöfen, Kochfelder, Kamine, usw...) und an Stellen, welche keinen Temperaturen unterhalb 5°C ausgesetzt sind. Setzten Sie die Maschine keinen Umwelteinflüssen aus und installieren Sie diese nicht in Räumen mit hoher Luftfeuchtigkeit wie Badezimmern. Im Falle des Austausches von Maschinenteilen, wenden Sie sich an einen autorisierten Fachhändler und verwenden Sie ausschließlich Originalersatzteile. Die verpackte Maschine muss an einem trockenen, vor Umwelteinflüssen und Feuchtigkeit geschützten Ort gelagert werden. Die Temperatur darf nicht unter +5°C sinken. Die Verpackungen können bis zu maximal vier Stück derselben Art gestapelt werden. Vermeiden Sie das darauf Abstellen schwererer Verpackungen anderer Art. Im Falle von Schäden an Personen oder Gegenständen in Folge einer falschen Installierung oder Anwendung, darf der Hersteller nicht haftbar gemacht werden. 13 13 Mod. 0995P LED 3. BESCHREIBUNG 3.1 Eigenschaften Die Maschine besteht aus einem Kaffeeausgabekessel und aus einem Kessel zur Heißwasser – und Dampfausgabe. Das Maschinengehäuse besteht aus einer tragenden Struktur aus EDELSTAHL. 3.2 Sicherheiten Der Kaffeekessel ist mit einem mechanischen zu 10 Bar eingestelltem Federventil gegen Überdruck und einem Wärmeschutz, welcher die Erhitzung im Schadensfall unterbricht, ausgestattet. Der Dampfkessel ist mit einem zu 2,3 Bar eingestelltem Sicherheitsventil und einem Wärmeschutz, welcher die Erhitzung im Schadensfalle unterbricht, ausgestattet. Die Pumpe ist mit einem automatisch aufrüstbaren Wärmeschutz ausgestattet, welcher diese vor Überhitzung schützt. Alle Maschinenteile, welche einer Erhitzung oder Stromzufuhr ausgesetzt sind, befinden sich im Inneren der Verkleidung der Maschine. 3.3 Vibrationen Die Maschine ist mit Vibrationsdämpfenden Gummifüßchen ausgestattet. Unter Normalen Betriebsbedingungen erzeugt die Maschine keine für Personen oder Gegenstände schädlichen Vibrationen. 4. TECHNISCHE EIGENSCHAFTEN Ausmaße cm L 33 x H 40,5 x P 46,5 Gewicht Kg 28 Elektrische Daten Zufuhrspannung Leistung 220/230 V - 50-60 Hz 2350 W 115V – 60 Hz 2050 W Kapazität Wassertank 3 Lt. Betriebstemperatur +5° +45° C 5. LEGENDE (Abb.1) 1 Hauptschalter (EIN/AUS) 2 Kesselschalter Wasser/Dampf 3 Grüne Kontrolllampe Maschine in Funktion (EIN) 4 Grüne Kontrolllampe Dampfkessel in Funktion (EIN) 5 Rote Kontrolllampe Widerstand Kaffeekessel in Funktion (EIN) 6 Rote Kontrolllampe Widerstand Dampfkessel in Funktion (EIN) 7 Hebel Kaffeeausgabe 8 Siebträger 9 Druckmanometer Kaffeekessel 10 Druckmanometer Dampfkessel 11 Heißwasserhahn 12 Wasserdüse Rev. 00 13 Dampfhahn 14 Dampflanze 15 Abtropfschale 16 Digitaler Thermostat 17 Pumpe Einstellung 18 Wassertank (Abb. 2) 19 Schalter zum Wahl Direktwasseranschluss/Wassertank 20 Schalter fuer die Led Einschaltung 21 Abflussventile 6. BESTIMMUNGSZWECK Die Maschine wurde zur Versorgung von Kaffee und warmen Getränken (Tee, Cappuccino usw…) entworfen und hergestellt. Jede andere Anwendung gilt als missbräuchlich und in Folge als gefährlich. Der Anwender muss die im Handbuch enthaltenen Gebrauchs – und Wartungshinweise immer befolgen. Im Zweifelsfalle oder Funktionsdefekt, Maschine abstellen, keine Reparaturen oder direkten Eingriffe vornehmen und die autorisierte Kundendienststelle kontaktieren. Der Anwender muss vermeiden: die heißen Oberflächen mit den Händen zu berühren, sondern ausschließlich vorgesehene Bedienungen verwenden; Wartungs- – oder Maschinentransporte bei angeschlossenem Stecker und warmer Maschine vorzunehmen; den Stecker durch Ziehen des Kabels zu entfernen; die Maschine bei beschädigtem Kabel zu bedienen; die Maschine mit nassen oder feuchten Händen oder Füssen zu berühren; die Verpackung und die Maschine auf den Kopf zu stellen oder seitlich abzulegen; die Maschine mit direkten Wasserstrahlen, Druck oder Dampf reinigen; die Maschine in Wasser oder andere Flüssigkeiten zu tauchen; die Maschine bei Anwesenheit von Kindern zu bedienen; die Maschine dem Gebrauch von Kindern oder unfähigen Personen zu überlassen; Flüssigkeitsbehälter auf der Maschine abzustellen. Sollte die Maschine nass oder sehr feucht sein, muss eine Installierung und der Gebrauch bis zu deren kompletter Trocknung vermieden werden. Seitens des Kundendienstes ist es jedenfalls nötig eine vorbeugende Kontrolle vorzunehmen, um eventuelle Schäden der elektrischen Zubehöre zu ermitteln. Unzweckmäßiger Gebrauch Die Maschine darf nur für vorgesehene Zwecke und keinesfalls für andere Zwecke wie das Mahlen oder die Ausgabe anderer Produkten als Kaffee oder nicht Lebensmitteln verwendet werden. 7. TRANSPORT 7.1. Verpackung 14 14 Mod. 0995P LED Während des Transportes die Verpackung immer aufrecht beibehalten, indem die Angaben auf dem Karton befolgt werden. Verpackung nicht auf den Kopf stellen oder seitlich ablegen. In der Verpackung sind die losen Teile, sowie die Dokumentation enthalten, welche für weitere Konsultationen aufbewahrt werden muss. Den oberen Teil der Verpackung öffnen, Zubehöre entnehmen und die Maschine herausnehmen. Integrität der Maschine, der Zubehöre, des Zufuhrkabels und des Steckers sicherstellen und im Schadensfalle, unmittelbar den Fachhändler davon unterrichten. Die Verpackungselemente (Plastiktüten, Polystirolschaum, Nägel, Kartons, usw..) entfernt vom Zugriff von Kindern aufbewahren, da diese Gefahrenquellen darstellen können. Verpackungselemente nicht in der Umwelt verstreuen, sondern durch dafür vorgesehene Stellen entsorgen. 8. INSTALLIERUNG Die Maschine wird gemäß den Daten der Identifizierungsplakette, gebrauchsfertig geliefert. Sicherstellen, dass die Stromlinie dieselben Eigenschaften der Maschine aufweist. Die Maschine kann mit Direktwasseranschluss oder Wassertank arbeiten. Die elektrische Zufuhrlinie muss mit Sicherungen oder automatischem Hauptschalter und wirkungsvoller Erdung ausgestattet sein. Sollte keine elektrische Sicherheit vorhanden sein, muss Seitens qualifizierten Personals ein zweipoliger Leitungsschutzschalter, gemäß geltenden Sicherheitsnormen, eingebaut werden. Die Erdung des Gerätes ist obligatorisch. Der Hersteller lehnt jegliche Haftung bei Nichtbeachtung dieser Unfallschutzrichtlinie, ab. Rev. 00 Bei betätigen wird die Maschine für die Kaffeeausgabe eingeschaltet. Es leuchtet die grüne Kontrolllampe auf (Abb.1 Pos.3). 2. Wasser - Dampfschalter (Abb.1 Pos.2) Bei betätigen wird die Maschine für die Heißwasser – und Dampfausgabe eingeschaltet. Es leuchtet die grüne Kontrolllampe auf (Abb.1 Pos.4). 3. Kaffeeausgabehebel (Abb.1 Pos.7) Durch betätigen des Hebels nach oben wird die Ausgabe aus dem Kaffeebehälter aktiviert. Durch Absenken des Hebels wird die Ausgabe unterbrochen. 4. Druckmanometer Kaffeekreislauf (Abb.1 Pos.9) Zeigt den Druck des Kaffeekessels und den Druck der Pumpe während der Kaffeeausgabe an 5. Druckmanometer Dampf (Abb.1 Pos.10) Zeigt den Druck des Dampfkessels an. 6. Heißwasserhahn (Abb.1 Pos.11) Durch Drehen des Knaufs in entgegengesetzten Uhrzeigersinn wird die Heißwasserversorgung aus der Wasserdüse aktiviert (Abb.1 Pos.12) 9. Dampfhahn (Abb.1 Pos.13) Durch Drehen des Knaufs in entgegengesetzten Uhrzeigersinn wird die Dampfversorgung aus der Dampflanze aktiviert (Abb.1 Pos.14). Schalter fuer Direktwasseranschluss/Wassertank. Erlaubt, den Gebrauch mit Direktanschluss oder Wassertank zu waehlen. 9. FUNKTION 9.1 Inbetriebsetzung Tank mit Wasser füllen (wenn möglich weiches Trinkwasser verwenden). Hauptschalter anschalten (Abb.1 Pos.1) und abwarten, dass die Maschine den Tank auffüllt und die Betriebstemperatur erreicht. Schalter des Dampfkessels anschalten (Abb.1 Pos.2) und das Erreichen des Betriebsdruckes abwarten (1,2 Bar). Darauf achten das Zufuhrkabel nicht durch biegen, quetschen oder Belastung zu beschädigen. Bei Erstanwendung und warmer Maschine, zirka 0,5 Liter Wasser zum Spülen der Gruppe, durch Drücken des Kaffeeausgabeschalters, sowie des Heißwasserausgabeschalters zum Spülen des Austauscherkreislaufs, durchlaufen lassen. Die elektrische Zufuhr der Maschine nicht durch ziehen des Kabels, sondern des Steckers unterbrechen. Man empfiehlt die Installierung der Maschinen in Nischen oder ähnlichem aus Gründen des beschwerlichen Bedienungs- – Versorgungs- und Wartungszugangs, zu vermeiden. Die Fläche auf welcher die Maschine abgestellt wird muss nivelliert, trocken, robust und stabil sein und sich auf einer Höhe von 80 cm befinden; Die Maschine abstellen und den Stecker am Stromnetz anschließen. 9.2 Kaffeeausgabe Siebträger aus seinem Sitz durch Drehen in Uhrzeigersinn entfernen Filter mit einer oder zwei Dosen Kaffee (je nach eingeführtem Filter) durch Anwendung des Dosierers, befüllen Kaffe mit Kaffeestopfen andrücken. 8.1. Beschreibung der Bedienungen 1. Hauptschalter (Abb.1 Pos.1) Siebträger durch Drehen in entgegengesetzten Uhrzeigersinn wieder in seinem Sitz anbringen und befestigen. 15 15 Mod. 0995P LED Rev. 00 Tassen unter die Öffnungen des Siebträgers stellen. Kaffeeausgabehebel nach oben führen (Abb.1 Pos7) nach einigen Sekunden beginnt die Kaffeeausgabe. Nach Erreichen gewünschter Dosis, Hebel senken. Bei Displayanzeige PrG, Taste drücken Bei Displayanzeige des Set Points, mit den Tasten und gewünschte Temperatur von minimal 85C° bis maximal 105C° eingeben. Auf die heißen Maschinenteile, besonders der Ausgabegruppe und der Dampflanze achten. Die Hände niemals bei Ausführung entsprechender Befehle unter die Dampflanze. Nach 3 Sekunden des Drückens letzterer Taste, werden die Daten gespeichert und auf dem Display erscheint die Temperaturangabe. 9.3 Dampfausgabe 9.7 Alarme Hahn öffnen und etwas Dampf in den Behälter ablassen, die Dampflanze in die zu erhitzende Flüssigkeit tauchen und den Hahn bis zum Erreichen gewünschter Temperatur öffnen und folglich schließen Nach erfolgter Erhitzung des Getränks, etwas Dampf aus dem Rohr ablassen um die Ösen der Lanze zu reinigen 9.4 Heißwasserversorgung Den Wassersammelbehälter unter Wasserversorgung stellen und den Hahn öffnen. Bei kurzgeschlossener Sonde erscheint auf dem Display die Angabe A2, der Einstellungsausgang und die Programmierung sind desaktiviert. 10. WARTUNG die 9.5 Einstellung des Kaffee Druckventils (Abb.2 Pos.17) Die Maschine wird mit zu 10 Bar eingestelltem Ventil geliefert. Der Endbenutzer kann die Einstellung des Ventils zum Erhöhen oder Senken des Drucks vornehmen. Tassenwärmer entfernen. Das Blindsieb in den Siebträger einführen und an die Gruppe befestigen. Die Kaffeeausgabe durch betätigen des entsprechenden Hebels aktivieren. Einstellschraube des Ventils zum Erhöhen des Drucks in Uhrzeigersinn drehen (in entgegengesetzten Uhrzeigersinn zum Senken des Drucks) Man empfiehlt den Druck zwischen maximal 12 und minimal 9 Bar einzustellen. 9.6 Funktion Termopid Bei defekter Sonde erscheint auf dem Display die Angabe A1, der Einstellungsausgang und die Programmierung sind desaktiviert. Die Wartungseingriffe müssen bei ausgeschalteter und kalter Maschine und vom Stromnetz entferntem Stecker erfolgen. Keine Metall – oder scheuernden Gegenstände wie Stahlwolle, Metallbürsten, Nadeln usw…., sowie Reinigungsmittel, sondern nur einen feuchten Lappen oder Schwamm verwenden. 10.1. Täglich Gehäuse, Dampflanze, Brause und Dichtung des Unterteils des Behälters der Gruppe reinigen. Ablassbehälter kontrollieren und eventuell reinigen. Filter und Siebträger mit warmen Wasser und einem Lappen oder Schwamm reinigen. 10.2. Periodisch oder nach intensiver Anwendung der Maschine Außer täglichen Eingriffen, folgende Eingriffe vornehmen: Filter und Siebträger einige Minuten in kochendes Wasser tauchen um die Kaffeefettlösung zu unterstützen, in Folge mit einem Lappen oder Schwamm entfernen. Wassertank 18 reinigen. 10.3 Außergewöhnliche Wartung Set point Programmierung der Temperatur Taste drücken Zusammen mit der Maschine wird ein Blindsieb zur Reinigung der Gruppe geliefert. Dieser Eingriff muss mindestens einmal wöchentlich vorgenommen werden, um Kaffeeverkrustungen aus dem Kreislauf zu entfernen. 13. Siebträger aus der Gruppe entfernen. 14. Filter aus dem Siebträger entfernen und Blindsieb einführen. 15. Siebträger an die Gruppe befestigen. 16 16 Mod. 0995P LED 16. Kaffeeausgabe über ca. 15 Sek. aktivieren und folglich stoppen. Vorgang 10-15 Male wiederholen. 11. AUSSERBETRIEBSETZUNG 11.1. Vorübergehend Wassertank (Abb.2 Pos.18) und Ablassbehälter leeren. Alle Schalter ausschalten und Stecker vom Stromnetz entfernen. Wartungsarbeiten vornehmen Maschine an einem trockenen Ort, geschützt vor Umwelteinflüssen und exklusivem Zugang abstellen (Zugang von Kindern oder Unfähigen verhindern). 11.2. Endgültig Außer den vorübergehenden Außerbetriebsetzungsvorgängen, folgendes beachten: Zufuhrkabel durchtrennen; Maschine in Kartons oder anderem Verpackungsmaterial verpacken und entsprechendem Personal übergeben (autorisierte Entsorgungsstellen oder Rücknahme von Gebrauchtprodukten). 12. MÖGLICHE FEHLFUNKTIONEN Im Falle einer Kabelbeschädigung, eine Kundendienststelle für den Austausch kontaktieren da dafür ein spezielles Werkzeug erforderlich ist. Rev. 00 gesammelt und an übergeben werden. entsprechende Sammelstellen Vom Benutzter ausführbare Kontrollvorgänge, nach Entnahme der elektrischen Zufuhr . A) Maschine schaltet nicht an: - Steckeranschluss kontrollieren; - Stromversorgung kontrollieren und sicherstellen, dass Sicherung und Hauptschalter angeschlossen sind; - Zustand des Steckers und des Zufuhrkabels kontrollieren und bei Beschädigung von qualifiziertem Personal austauschen lassen. B) Keine Kaffeeausgabe: - Wassertank leer; Wasserstand wiederherstellen. C) Keine Heißwasser oder Dampfausgabe: - Wassertank leer; Wasserstand wiederherstellen. - Heißwasserausgabe verstopft, demontieren und reinigen. - Düsen verstopft; Düsen der Dampflanze mit einer Nadel reinigen. E) Unregelmäßige Kaffeeausgabe: - Filter im Siebträger reinigen. - Kaffeemahlung zu fein oder zu grob. Für jede weitere nicht spezifizierte Fehlfunktion Stromstecker entfernen, keine direkten Reparatureingriffe vornehmen und die qualifizierte technische Kundendienststelle kontaktieren. Die zur Bearbeitung oder Wartung verwendeten Ausschussmateriale müssen, wenn nicht biologisch abbaubar oder umweltschädlich, in getrennten Behältern 17 17