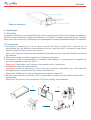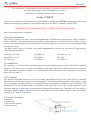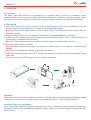
1
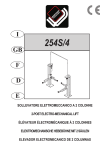
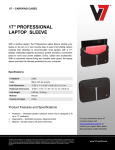
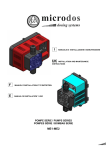
MA LTM 630 01 A
• LTM630
NEOPRO 10000
MANUALE D’ISTRUZIONE
NEOPRO 10000
INSTRUCTION MANUAL
Distribuito da/Distribuited by:
Moretti S.p.A.
Via Bruxelles 3 - Meleto
52022 Cavriglia (Arezzo)
Telefono +39 055 96 21 11
Fax +39 055 96 21 200
www.morettispa.com
[email protected]
Prodotto da/Produced by Apex Medical Corporation
Taipei Taiwan
Rappresentante in Europa/EU Representative:
APEX MEDICAL S.L.
Alameda de Reaclde 50 Despacho 304
48008 Bilbao Vizcaya - Spain
ITALIANO
I sistemi terapeutici della Serie Neo sono conformi
alla Direttiva 93/42/EEC e sono stati sottoposti alle procedure
della verifica conformità stabiliti dalla direttiva.
Codice LTM620
Grazie per aver acquistato il materasso antidecubito e pompa della linea LEVITAS by Moretti,
fabbricata secondo i più alti standard di qualità e sicurezza e conforme alla direttiva europea sui
dispositivi medici (93/42/CEE).
LEGGERE ATTENTAMENTE IL MANUALE PRIMA DELL’USO
Destinazione d’uso: prevenzione e trattamento delle piaghe da decubito.
1. Informazioni generali
I sistemi terapeutici della serie Neo sono prodotti usando le tecnologie e i materiali d’avanguardia
per garantire la migliore qualità, il massimo comfort e la minor rumorosità possibile. La maggior
parte dei sistemi terapeutici della serie Neo sono raccomandati per la prevenzione e il trattamento
delle piaghe da decubito incluse quelle di IV grado.
I sistemi terapeutici delle serie Neo sono stati collaudati da enti indipendenti risultando conformi
ai seguenti standard:
EN 60601-1/UL2601
IEC 801-2
IEC 801-5
EN 60601-1-2
IEC 801-3
EN 61000-3-2
EN 55011 Class B
IEC 801-4
EN 61000-3-3
1.2 Uso consigliato
NeoPro 10000 è un sistema terapeutico a bassa perdita d’aria. È destinato a prevenire la
formazione delle pieghe da decubito e ad ottimizzare il comfort del paziente. Consente di regolare
la pressione in funzione delle singole parti del corpo individuali ed è consigliato per la prevenzione
e la cura delle piaghe da decubito fino alla IV grado.
2. Il Prodotto
Il sistema terapeutico NeoPro 10000 è formata da una pompa a controllo digitale che permette di
regolare sia la pressione sia la durata del ciclo in modalità alternata. Il materasso che offre la
terapia a bassa uscita d’aria permette un riposo comodo, riducendo la pressione e regolandola
secondo le esigenze individuali.
Originale design – cella dentro cella – permette il gonfiaggio e lo sgonfiaggio delle celle d’aria più
velocemente e garantisce l’efficace dispersione della pressione. La cella interna garantisce anche
il supporto sufficiente del peso in caso dell’interruzione del flusso della corrente.
2.1 Pompa e materasso
1. Materasso
2. Pompa
3. Connettore del tubo d’aria
4.Pannello di controllo
ITALIANO
1
4
2
Pompa e materasso
3
3. Installazione
3.1. Disimballo
La pompa e il materasso sono imballati in due cartoni separati per assicurare il fissaggio dei contenuti.
Aprire i colli per rimuovere la pompa e il materasso. Controllare la pompa e il materasso per eventuali
danni causati dal trasporto. Se gli oggetti sono danneggiati, contattare immediatamente il rivenditore.
3.2. Installazione
1. Posizionare il materasso su di un piano ai piedi del letto in modo che i raccordi per la
connessione dei tubi dell’aria siano posizionati verso i piedi del letto. Il materasso può essere
legato ai piedi del letto con dei lacci elastici.
Attenzione! Coprire il materasso con lenzuola di cotone per evitare il contatto diretto con la pelle
del paziente.
2. Attaccare la pompa al letto e aggiustare la larghezza dei ganci.
3. Connettere il tubo di collegamento ai connettori della pompa. La connessione è completa ed
assicurata quando si sente un “click”.
Attenzione! Controllare che i tubi non siano piegati sotto il materasso.
4. Collegare la spina alla presa elettrica.
Attenzione! Prima di attaccare la spina alla presa elettrica controllare che i dati riportati
sull’apparecchio siano conformi alla vostra rete elettrica
Attenzione! Collegare la spina solo alla presa con messa a terra AC.
5. Portare l’interruttore in posizione “ON”. L’interruttore è situato sul lato destro del pannello
della pompa.
Attenzione! Assicurarsi che i connettori CPR siano sigillati accuratamente.
2
3
1
5
4
ITALIANO
4. Operazioni
4.1. Descrizione delle funzioni
Tasto
Funzione
Power
Premere per accendere il sistema. Per gonfiaggio completo del materasso sono necessari
circa 15 minuti. Le installazioni standard sono per il ciclo in modalità alternato di 5 minuti,
la pausa di rotazione 10 minuti.
Allarm/Mute
Attiva e disattiva l’allarme sonoro. Premere il tasto per disattivare l’allarme sonoro.
L’allarme suonerà di nuovo se dopo 3 minuti la pressione non è ancora tornata ai livelli normali.
Panel Lock
Fissa le impostazioni scelte e ne impedisce il cambiamento.
Per riattivare il pannello tenere il bottone premuto per 3 secondi.
Low Pressure Indicator
Indica il livello di pressione del materasso.
Spia spenta – condizione normale; il materasso può essere usato normalmente.
Spia gialla – la pressione non ha raggiunto il livello installato.
gialla lampeggiante – la pressione bassa.
Autofirm
Assicura il massimo gonfiaggio del materasso. Tutte le funzioni sono disattivate fino a che
questo bottone viene premuto di nuovo. Questo ciclo dura per 20 minuti dopo di che
torneranno automaticamente le impostazioni prestabilite.
Static
Interrompe il ciclo alternato di gonfiaggio del materasso trasformandolo in materasso
normale. Premere di nuovo per riavviare il ciclo alterno.
Seat Inflate (gonfiaggio posizione seduta)
La pressione aumenta nella zona d’appoggio del corpo per dare maggior comfort mentre il
paziente è seduto e per agevolare l’alzarsi dal letto. Disattivare questa funzione quando il
paziente si sdraia di nuovo per evitare che la pressione sia troppo alta nella zona del corpo.
Comfort Range (Gamma comfort)
Ci sono 6 livelli di comfort. Usare tasto UP/DOWN per scegliere il livello dal 1° – più morbido al
livello 6 – più duro.
Cycle Time (Ciclo alternato)
Ci sono 4 livelli del ciclo alternato. Usare tasto UP/DOWN per scegliere il livello della durata del
ciclo di 5, 10, 15 oppure 20 minuti.
ITALIANO
4.2. Istruzioni d’uso
1. Premere l’interruttore (POWER) nel display per avviare il sistema.
2. Per rendere il gonfiamento più veloce, attivare la funzione AUTOFIRM premendo il pulsante. Il
ciclo dura 20 minuti dopo che il ritorno alle installazioni iniziali è automatica.
3. Terminato il gonfiaggio l’operatore può cambiare le installazioni secondo raccomandazione medica.
4.3 CPR
Le valvole CPR vengono attivate per uno gonfiaggio immediato del materasso in caso di interventi di
rianimazione urgenti. Tali valvole sono situate sul lato destra della testa del materasso. I connettori dei
tubi d’aria possono essere disconnessi dal materasso per uno sgonfiamento ancora più veloce.
4.4. Ciclo alternato di gonfiaggio
Il livello di pressione del materasso può essere aggiustato secondo 6 livelli diversi premendo il
bottone sul pannello di controllo. Inoltre il sistema è dotato di cicli alternati di varia duratura (5, 10,
15 e 20 minuti). Per scegliere l’impostazione più adatta consultare il medico.
Il livello prestabilito del gonfiaggio è raggiunto quando si spenge l’indicatore della pressione di
gonfiamento basso (Low Pressure Indicatore). Ora può essere usato il materasso.
Attenzione! Per verificare che il livello di gonfiaggio adatto è stato ottenuto inserire il palmo della mano
tra un elemento gonfiato e il corpo del paziente. Il contatto con il paziente dovrebbe essere minimale.
4.5. Sgonfiaggio Emergenza
Per sgonfiare il materasso in caso di emergenza disconnettere semplicemente il connettore
posizionato nella sezione di testa del materasso per sgonfiare velocemente le prime 4 celle.
Il materasso rimane in funzione tranne la sezione sgonfia. Per gonfiare di nuovo le celle attaccare
il connettore ed aspettare alcuni minuti.
4.3
4.4
4.5
4.6. Gonfiaggio posizione seduta (Seat Inflate)
La pressione nella zona d’appoggio del corpo aumenta per dare il comfort mentre il paziente è
seduto e per agevolare l’alzarsi dal letto. Disattivare questa funzione quando il paziente si sdraia
di nuovo per evitare la pressione troppo alta nella zona del corpo.
4.7 Funzione Protezione dei talloni
Ultime celle del materasso sono costruite per proteggere i talloni del paziente riducendo la pressione.
4.8. Allarme pressione bassa (Low Pressure)
Quando si è verificato uno stato di pressione insolitamente bassa per un periodo prolungato, si accende
un allarme visivo LED giallo lampeggiante e sonoro. Controllare che tutte le connessioni siano sicure e
installate correttamente secondo le istruzioni d’uso. Se necessario sostituire gli elementi e i tubi
danneggiati e contattare il rivenditore locale autorizzato ad effettuare le riparazioni. Nel caso il panello
di controllo non sia completo di allarme sonoro, l’allarme visivo Low Pressure (pressione bassa)
lampeggerà finché la pressione non tornerà al livello prestabilito. Se il panello di controllo è completo
di allarme sonoro, il lampeggiare dell’allarme visivo viene accompagnato da quello sonoro.
ITALIANO
Per spegnere l’allarme sonoro, premere il bottone “ALLARM MUTE”. L’allarme sonoro di Low
Pressure continuerà a lampeggiare. L’allarme suonerà ogni 3 minuti finché il livello di pressione
non è tornato ai livelli prestabiliti.
5. Pulizia
Attenzione! Verificare che la pompa sia disconnessa dalla spina prima di iniziare le pulizie.
5.1. La pompa
Strofinare con panno umido e detergente neutro. Tenere lontano dalla polvere.
Se viene usato un detergente non neutro, verificare che il detergente scelto non abbia degli effetti
chimici con la superficie plastica della pompa. Lasciare asciugare completamente prima dell’uso.
Attenzione! Non immergere nell’acqua o bagnare la pompa.
5.2. Materasso
Lavare con acqua calda e detergente neutro. La coperta può essere lavata con sodio ipoclorite
diluito in acqua. Lasciare asciugare completamente all’aria aperta prima dell’uso.
Non usare prodotti a base di fenolo.
Attenzione! Se il livello di pressione è costantemente bassa, verificare che non ci siano delle
fessure negli elementi o nei tubi connettori.
Consultare il distributore per un detergente adatto in vendita nel paese d’acquisto.
Attenzione! Asciugare il materasso all’ombra.
6. Magazzinaggio e conservazione
1. Staccare le valvole CPR e sgonfiare il materasso affinché tutte le celle siano completamente sgonfie.
2. Stendere il materasso capovolto.
3. Proteggere l’accoppiatore dei tubi d’aria infilandoli dentro il materasso.
4.Arrotolare il materasso cominciando dalla testa.
5. Infilare le cinghie nei piedi del materasso intorno al materasso per fissarlo.
7. Manutenzione
7.1. Generale
• Controllare la spina e il filo per verificare che non siano eccessivamente consumati.
• Controllare che la coperta del materasso non presenti segni di usura o danneggiamenti.
• Verificare che i tubi siano staccati correttamente dal materasso.
• Controllare il connettore del tubo d’aria per eventuali danni.
• Informare il produttore o il distributore per qualsiasi danno rilevato.
7.2. Sostituzione del filtro d’aria
Il filtro d’aria dovrebbe essere controllato e spolverato periodicamente.
• Staccare la coperta plastica situata nel retro della pompa.
• Il filtro è riutilizzabile e può essere lavato con l’acqua e detergente neutro.
• Nel caso la pompa venga usata in un ambiente particolarmente polveroso,
è consigliabile cambiare il filtro d’aria regolarmente. Questo aiuta a
migliorare il flusso d’aria. I filtri di ricambio possono essere acquistati dai
distributori locali.
7.3 Sostituzione del fusibile
• Staccare la presa dalla spina prima di cambiare il fusibile.
• Staccare il coperchio del portafusibili con un cacciavite piccolo.
• Inserire il nuovo fusibile controllando che la classe del fusibile sia quella indicata nelle
descrizioni tecniche.
ITALIANO
8. Risoluzione dei problemi
Problema*
La pompa non si accende
Soluzione
• Verificare il corretto collegamento della spina alla presa elettrica.
• Verificare che non ci siano dei fusibili guasti.
Allarme visibile e sonoro è acceso
• Verificare che il collegamenti fra connettore del tubo d’aria e la pompa
siano corretti.
• Verificare che tutti i collegamenti fra i vari tubi del materasso siano solidi.
• Verificare che la valvola CPR sia chiusa.
• Verificare che non ci siano delle crepe negli elementi del materasso.
Il paziente si immerge nel materasso • Il livello di pressione prestabilito potrebbe essere insufficiente per
sopportare il peso del paziente. Aumentare il livello di pressione ed
attendere per un paio di minuti.
Il materasso indurito con un
livello di pressione troppo alto
• La funzione “Autofirm” è rimasta attiva per un periodo di tempo troppo
lungo. Disconnettere il connettore del tubo d’aria per rilasciare l’eccesso.
Cambiare le installazione prefissate.
Il materasso non è stabile
• Controllare che la base del materasso sia attaccata fermamente agli
elementi con i bottoni e le cinghie.
• Controllare che il materasso sia attaccato fermamente al letto.
Il connettore del tubo d’aria
attacca alla pompa
• Premere leggermente i manici del connettore prima di connetterlo non si
alla pompa.
• Assicurare di aver attaccato il connettore alla pompa fermamente.
Un “click” dovrebbe essere sentito per la verifica.
Non funziona l’alternanza
di gonfiaggio
• Aspettare l’inizio del ciclo di rotazione completo, visto che il materasso
potrebbe essere nella fase “Flat level” o nella pausa di rotazione.
* Se il problema incontrato con il prodotto non è stato elencato qui sopra, contattare il vostro rivenditore per
la risoluzione del problema.
9. Caratteristiche tecniche
Pompa
Alimentazione
Classe Fusibile
Dimensioni (Lunghezza x
Larghezza x Altezza)
Peso
Caratteristiche
AC100-120V, 50/60Hz AC220-240, 50/60Hz
1A, T1A
37 x 27 x 13 cm
Condizioni di funzionamento
• Temperatura
6,0 kg
• Umidità
• Atmosfera
Operatività: 10°C – 50°C
Magazzinaggio: -10°C – 70°C
Trasporto: -10°C - 70°C
Operatività: 30% - 75% non condensato
Magazzinaggio: 10% - 100% non condensato
700 hPa – 1060 hPa
Classificazione
Classe II tipo BF, IPX0
Non adatto ad essere usato nella presenza dei anestetici infiammabili
IPX0 Apparecchio chiuso non protetto contro l’entrata d’acqua
Operazione continua
Materasso
Modello
LTM630
Caratteristiche
Dimensioni sgonfio (LxWxH)
200 x 105 x 25.4
Peso
10 kg
* Il peso e le dimensioni del materasso sono state prese senza la gommapiuma.
Attenzione! Le specificazioni sono valide anche per le zone dove c’è lo stesso voltaggio.
ITALIANO
Simbolo “BF”, indica che il prodotto ha un livello della protezione contro scossa
elettrica per essere classificato un apparecchio di tipo BF.
Il simbolo dell’apparecchio di Classe II, 2 quadrati che indicano che l’apparecchio ha un
doppio isolamento.
Attenzione, leggere le istruzioni
IPX0
Apparecchio chiuso senza protezione contro l’entrata dell’acqua.
Il prodotto non deve essere smaltito insieme a rifiuti urbani. Può essere consegnato presso
gli appositi centri di raccolta differenziata predisposti dalle amministrazioni comunali.
Precauzione e avvertenze - Attenzione! Per ridurre il rischio di scossa elettrica
• Staccare sempre la spina immediatamente dopo l’uso.
• Non utilizzare l’apparecchio in bagno. Non far cadere l’apparecchio nell’acqua o in altri liquidi.
• Non cercare di recuperare il prodotto caduto in acqua e staccare immediatamente la spina.
Avvertenze! Per ridurre il rischio di ustioni, scosse elettriche, incendi o lesioni a persone:
• Sorvegliare con particolare attenzione l’uso del prodotto da, su o vicino a bambini ed invalidi.
• Usare il prodotto solo per l’uso indicato nel presente manuale.
• Non utilizzare accessori non raccomandati dal produttore.
• Non usare l’apparecchio nel caso in cui il filo o la presa siano danneggiati, non funzioni
correttamente, sia caduto, danneggiato o bagnato. Nei casi sopra citati si prega di rinviare il
prodotto al distributore per eventuali verifiche e/o riparazioni.
• Tenere il filo di alimentazione lontano da fonti di calore.
• Non bloccare le uscite d’aria dell’apparecchio e non posarlo su superficie morbide, quali letto,
divano, dove le uscite d’aria potrebbero essere bloccate. Tenere le uscite d’aria libere da polvere,
capelli e similari.
• Non inserire oggetti nelle aperture presenti sull’apparecchio.
• Collegare il prodotto ad una appropriata connessione elettrica.
ENGLISH
The Serie Neo is in conformity with the Medical Devices Directive (93/42/EEC)
and has been subjet to the conformity assurance
procedures laid down in the Council Directive.
Codes LTM630
Thank you for purchasing the mattress antidecubitus and pump LEVITAS by Moretti, which have
been manufactured according to the highest quality and safety standards (93/42/CEE).
MPORTANT SAFEGUARDS READ ALL INSTRUCTIONS BEFORE USING
Use: for antidecubitus treatment.
1.1 General Information
Neo-series systems use most advanced technologies and mattress materials to deliver the best
quality, comfort and whisper-quiet operations to you and your customers. Most systems in Neoseries are recommended for prevention and treatment of pressure ulcers up to and including stage
IV pressure ulcers.
The Neo-series range of systems have been independently tested and successfully approved to
the following standards:
EN 60601-1/ UL 2601
EN 60555-2 Class A
IEC 1000-4-4
EN 60601-1-2
EN 60555-3
IEC 1000-4-5
EN 55011 Class B
EN 50141
IEC 1000-4-2
1.2 Intended Use
This product is an advanced alternating pressure relief replacement system suitable for highrisk
patients. This low air-loss system is intended to help and reduce the incidence of pressure ulcers
while optimizing patient comfort. It is recommended for prevention and treatment of pressure
ulcers up to stage IV.
2. The Product
The digital controlled pump unit, which provides adjustable pressure and cycle time, is compact
and effective in pressure control and management. The replacement mattress, which offers a low
air loss therapy, provides patients a comfortable pressure support suiting for each individual. The
patented cell-in-cell design allows the inflation and deflation of air cells to be achieved in the
shortest amount of time while providing the good pressure dispersion. The inner cell also offers a
sufficient weight support during a power failure (the cell-in-cell bladder design is only available in
models of 10” and 8” mattress).
2.1 Product Description
1. Mattress
2. Pump unit
3. Air tube connector
4.Control panel
1
4
2
3
ENGLISH
3. Installation
3.1 Unpacking
The pump unit and mattress are packaged in a separate box to secure its contents inside.
Unpacking these boxes to remove the pump unit and mattress and check for any damage, which
may have occurred in shipping. If there are damages, please contact your dealer immediately.
3.2 Setting Up
1. Place the mattress on top of the bed frame. Please note for the foot end. Mattress can be
secured firmly by fixing the elastic straps at the bottom bed frame.
Warning! Please cover the mattress with a cotton sheet to avoid direct skin contact and for
patient’s comfort.
2. Hang the pump onto bed rail (foot-end), and adjust a suitable wideness of hangers.
3. Connect air tube connector from air mattress to the pump unit. When “click” is felt or heard, the
connection is completed and Secured.
Warning! Check and ensure the air tubes are not kinked or tucked under mattress.
4.Plug into mains electrical outlet.
Warning! Before inserting the plug into the mains, make sure it is suitable for the local main
voltage.
Warning! Put the plug into socket of grounded AC power.
5. Then turn the main power switch ON. The power switch is located on the right side panel of the
pump unit.
Warning! Ensure the CPR connectors are sealed completely.
2
3
1
5
4
Grounding
Before any connection to the output connectors is made, the unit shall be connected to grounding
conductor via the three-core main cable; the grounding is only a “functional grounding”.
Installation tips are listed below
After installation, the extra wire of the power cord, if any, should be neatly arranged to avoid any
tripping accidents. The equipment should be firmly placed at position where users/doctors can
easily access.
ENGLISH
4. Operation
4.1. Function Description
Control Button
Function Description
Power
To turn on control unit. It takes approximately 15-min to inflate the mattress. The default
settings are 5-min alternating cycle time, level 1 comfort level, 10-min flat level pause
interval, and 4-min turn level pause interval.
Allarm/Mute
Enable and disable the audible alarm feature. Press this button to silent the audible alarm.
The alarm buzzer will alert again after 3-min if the pressure has not yet returned to
normal condition.
Panel Lock
To lock the current setting and prevent other persons from changing them. To unlock the
panel, press this button and hold it for 3 seconds.
Low Pressure Indicator
3 Conditions:
1. No light - normal condition; mattress is operated accordingly.
2. Yellow light - pressure has not reached the preset setting.
3. Flashing yellow light - low pressure condition.
Autofirm
For maximum inflation of mattress. All other functions are disabled unless this button is
pressed again. This mode will last for 20-min and then it will return to default setting
automatically.
Static
For non-alternating mode of mattress. To go back to alternating mode, simply press this
button again (such as regular air mattress).
Seat Inflate
The Body zone’s pressure will be increased higher than the preset setting to give a proper
support for purposes of user’s sitting up and easiness of getting in and out of the mattress.
This function should be disable when user is in lying position to prevent too high pressure
support at body zone (only available in 10” and 8” mattress models).
Comfort Range
6 Comfort ranges of mattress. Use UP/DOWN button to adjust the comfort levels. 1 is the
softest & 6 is the firmest.
Cycle time
4 Alternating cycle time. Use UP/DOWN button to adjust the cycle time of 5, 10, 15, 20
minutes.
ENGLISH
4.2 Operating Instruction
1 Press the POWER button on the display panel to start the system.
2 For faster inflation, the AUTOFIRM function can be activated. This mode will last for 20 minutes
and then it will return to default setting automatically.
3 After the mattress is fully inflated, user can change the setting according to their preference
or recommended by physician.
4.3 CPR
When there is an emergency to perform CPR on the patient, quickly pull the CPR valves to release
air from mattress. The CPR valves are located at the head-end, right-hand-side of the mattress.
The air tube connector (located on the pump unit indicated with “PULL CPR” sign) can be
disconnected for even faster deflation.
4.4 Alternating Function Setup
User can adjust pressure of air mattress by adjusting the comfortable range from level 1 to 6. The
system also provides various alternating cycle time mode, 5, 10, 15, 20 minutes. Please consult
your physician for a suitable setting. When the Low Pressure indicator is off, it indicates the
mattress has reached to its preset softness. Patient can lie on the mattress.
Warning! Check to see if the suitable comfort range (or pressure setting) is selected by sliding one
hand between the deflated air cell and the patient to feel the patient buttock. Users should be able
to feel the minimal contact.
4.5 Intubation Function
To activate the emergency intubation, simply disconnect the connector located at the head
section to quickly deflate the first 4 air cells. The whole mattress will still function normally except
at this region. To make mattress back to normal, simply secure the connector and wait for a few
minutes for inflation. (only available in models of 10” and 8” mattress).
4.3
4.4
4.5
4.6 Seat Inflate Function
When it is necessary for patient to sit on the bed (or for easiness of getting in and out of mattress),
the seat inflate function provide extra pressure compensation in body region‘s cells for more
suitable surface support. (only available in models of 10” and 8“ mattress) This function should be
disable when user is in lying position to prevent too high pressure support at body zone.
4.7 Heel Protection Function
The last 5 air cells of mattress are interchangeable with a set of 5” and 18” air cells to provide a
proper heel protection. The 5” air cell provides the heel protection and 18” air cell provides the
foot stopper. These integrated air cells help patient to have proper position while reducing the
interface pressure at the heel region (only available in 10” mattress model).
4.8 Low Pressure and Alarm Function
When an abnormal low pressure is lasted for a long period, the Low Pressure Indicator (flashing
yellow LED) will light up with audible alarm. Check if all the connections are securely made and
that they are correctly installed as per installation instructions.
Warning! If the pressure level is consistently low, check for any leakage at air cells or connecting
ENGLISH
tubes. If necessary, replace any damaged cells or tubes or contact local qualified dealer for repair.
If the control unit is equipped without audible alarm feature, the Low Pressure Indicator will flash
until the low-pressure fault condition is solved. If the control unit is equipped with audible alarm
feature, the Low Pressure indicator will flash and the alarm will sound when air pressure is below
normal (preset pressure). To silent the alarm, simply press the alarm mute button, and it will be
silent for 3 minutes; however, the Low Pressure Indicator still remains flashing. After 3 minutes,
alarm buzzer will alert again if the pressure has not yet returned to normal.
5. Cleaning
Warning! Ensure the pump unit is disconnected from the mains before cleaning.
5.1 Pump Unit
Wipe with a damp cloth and a mild detergent and keep it away from dust. If other detergent is
used, choose one that will have no chemical effects on the surface of the plastic case of the pump
unit. All parts should be air dried thoroughly before use.
Warning! Do not immerse or soak pump unit.
5.2 Mattress
Wipe down with warm water containing a mild detergent. The cover may also be cleaned using
sodium hypochlorite diluted in water. All parts should be air dried thoroughly before use. Do not
use Phenolic based products for cleaning.
For suitable and locally available cleaner please ask your distributor.
Warning! Dry the mattress on SUNLESS capitalized area after cleaning.
6. Storage
• Pull the CPR tags and make sure all cells are deflated.
• Lay the mattress out flat and upsides down.
• Protect the air tube coupler by putting it in the inner side of mattress.
• Roll the mattress from the head end towards the foot end.
• Foot-end straps can then be stretched around the rolled mattress to prevent unrolling.
7. Maintenance
7.1 General
• Check main power cord and plug if there is abrasions or excessive wear.
• Check mattress’ cover for signs of wear or damage. Ensure mattress cover and tubes are stubbed
together correctly.
• Check the air tube connections for any damage.
• Report any problems or malfunctions to local distributors.
7.2 Air Filter Replacement
The air filter should be checked and dusted periodically.
• Snap out the plastic cover, located on the back of the pump unit.
• The filter is reusable and can be washed gently with a mild detergent
and water.
• Suggest to replace air filter regularly if the environment is dirty. This
will help to improve the airflow. Spare filters are available from the
local distributers.
7.3 Fuse Replacement
1. Disconnect the plug form mains power when a fuse is to be replaced.
2. Remove the cover of the fuse holder by means of a small screwdriver.
3. Insert a new fuse of the correct rating in, and replace the cover of the
fuse holder back. Check the technical specification for correct fuse rating.
ENGLISH
8. Troubleshooting
Problem*
Power is not ON
Solution
• Check if the plug is connected to mains.
• Check if there is any blown fuse.
Alarm is on (audible & visual)
• Check if the connection between air tube connector to pump unit is tightly secured.
• Check if all tubing connections along mattress are secured.
• Check if the CPR is sealed.
• Check if there are any leakage on air cells.
Patient is bottoming out
• Pressure setting might be inadequate for the patient, adjust comfort range 1 to 2 levels
higher and wait for a few minutes.
Mattress becomes too firm
• The AUTOFIRM is activated for too long, release some air by
and pressure can't be lower down
disconnecting the air tube connector and change to your preferred setting.
Mattress form is loose
• Check if all the snap buttons and straps of mattress on all air cells are all securely fastened.
• Check if the mattress is fixed to the bed frame by elastic straps.
Air tube connector can't fit
• Press handles on both sides of air tube connector
into the pump unit
slightly before push the connector into the pump unit.
• Make sure the connector is tightly secured by hearing "click" while pushing it into pump unit.
No air produced from some
• This is normal since there are alternating and rotating mode.
air outlets of the air tube connector
Air outlets take turn to produce air during their preset cycle time.
* If your questions can't be answered with above information, please contact your local agent directly.
They might require a technician to take care the problem.
9. Technical Description
Pump
Power supply
Fuse Rating
Dimension (LxWxH)
Weight
Environment
Specification
AC100-120V,50/60Hz AC220-240,50/60Hz
1A T1A
37 x 27x 13 (cm)or 14.4” x 10.5” x 5.0”
6.0 kg or13.2 lb
• Temperature Operation: 10¢~50¢
Storage:-10¢~70¢
Shipping: -10¢~70¢
• Humidity
Operation: 30%~ 75% non-condensing
Storage: 10%~100% non-condensing
• Atmosphere 700 hPa ~1060 hPa
Classification:
• Class II, Type BF Applied Parts Mattress
• Not suitable for use in the presence of a flammable anesthetic mixture
• IPX0 Enclosed equipment without protection against ingress of water
• Continuous operation
Mattress
Specification
• Dimension (inflated, LxWxH)*
200 x 90x 25.4(cm) 78.7” x 35.4”x 10”
• Weight*
10 kg or22 lb
* The weight and dimension of mattress is measured without foam.
Warning! The specifications, also apply tothose areas operatingwith the samepower supply.
“BF” symbol, indicatethis product isaccording to thedegree of protectingagainst electric shock fortype BF equipment.
The Symbol for class II equipment, 2 concentricsquare indicating doubleinsulation.
Attention, shouldread the instructions.
IPX0 Enclosed equipment withoutprotection against ingressof water.
Disposal of Electrical & Electronic Equipment (WEEE): This product should be handed over to an applicable collection
point for the recycling of electrical and electronic equipment. For more detailed information about the recycling of
this product, please contact your local city office, household waste disposal service or the retail store where you
purchased this product.
ENGLISH
Important safeguard
Warning! To reduce the risk of electrocution:
• Always unplug this product immediately after using.
• Do not use while bathing.
• Do not place or store product where it can fall or be pulled into a tub or sink.
• Do not place in or drop into water or other liquid.
• Do not reach for a product that has fallen into water. Unplug immediately.
Warning! To reduce the risk of burns, electrocution, fire, or injury to persons:
• This product should never be left unattended when plugged in.
• Close supervision is necessary when this product is used by, on, or near children or invalids.
• Use this product only for its intended use as described in this manual.
• Do not use attachments not recommended by the manufacturer.
• Never operate this product if it has a damaged cord or plug, if it is not working properly, if it has
been dropped or damaged, or dropped into water. Return the product to a service center for
examination and repair.
• Keep the cord away from heated surfaces.
• Never block the air openings of this product or place it on a soft surface, such as a bed or couch, where
their openings may be blocked. Keep the air opening free of lint, hair, and other similar particles.
• Never drop or insert any object into any opening or hose.
• Connect this product to a properly grounded outlet only.
•This device is Class II equipment with functional earth, no Protective Earth is provided.
GARANZIA
Tutti i kit materasso antidecubito a bolle e compressore Serie Neo sono protetti da una
garanzia di 24 mesi per ogni eventuale difetto di fabbricazione. La garanzia non copre
guasti, forature o malfunzionamenti derivanti da un cattivo uso od installazione del
prodotto e parti soggette ad usura e deterioramento. L’apparecchio verrà riparato o
sostituito gratuitamente a giudizio della Moretti S.p.A. purchè venga inviato tramite il
rivenditore fiduciario dove è stato effettuato l’acquisto, franco di porto e accompagnato dalla presente garanzia debitamente compilata.
WARRANTY
All kit mattress antidecubitus and pump Serie Neo sets are guarantied for 24 months
against any possible manufacturing fault. The warranty covers neither damages, perforations or bad functioning caused by mishandling or faulty installation nor parts subject to wear and tear. Postage must be paid and the appliance must be sent together
with the present guarantee coupon duly filled in.
Distribuito da/Distribuited by: Moretti S.p.A.
Via Bruxelles 3 - Meleto 52022 Cavriglia (Arezzo) Telefono/Telephone +39 055 96 21 11 - Fax +39 055 96 21 200
www.morettispa.com - [email protected]
CERTIFICATO DI GARANZIA - WARRANTY CERTIFICATE
Prodotto / Product
Acquistato in data / Purchasing date
Rivenditore / Authorized dealer
Via / Street
Località / Place
Venduto a / Purchased by
Via / Street
Località / Place