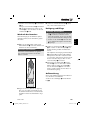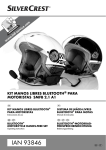
1
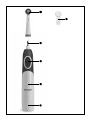
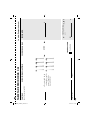
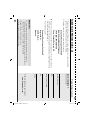
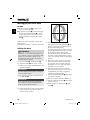
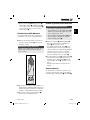
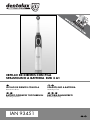
CEPILLO DE DIENTES CON PILA
SPAZZOLINO A BATTERIA DZB 3 A1
CEPILLO DE DIENTES CON PILA
SPAZZOLINO A BATTERIA
Instrucciones de uso
Istruzioni per l‘uso
BATTERY-OPERATED TOOTHBRUSH
BATTERIE-ZAHNBÜRSTE
Operating instructions
Bedienungsanleitung
IAN 93451
Antes de empezar a leer abra la página que contiene las imágenes y, en seguida, familiarícese con todas
las funciones del dispositivo.
Prima di leggere aprire la pagina con le immagini e prendere confidenza con le diverse funzioni
dell’apparecchio.
Before reading, unfold the page containing the illustrations and familiarise yourself with all functions of
the device.
Klappen Sie vor dem Lesen die Seite mit den Abbildungen aus und machen Sie sich anschließend mit allen
Funktionen des Gerätes vertraut.
ES
IT / MT
GB / MT
DE / AT / CH
Instrucciones de uso
Istruzioni per l‘uso
Operating instructions
Bedienungsanleitung
Página 1
Pagina 9
Page
17
Seite
23
Índice
ES
Introducción . . . . . . . . . . . . . . . . . . . . . . . . . . . . . . . . . . . . . . . . . . . . . . . . . . . . . . . . . . 2
Uso previsto . . . . . . . . . . . . . . . . . . . . . . . . . . . . . . . . . . . . . . . . . . . . . . . . . . . . . . . . . . 2
Volumen de suministro. . . . . . . . . . . . . . . . . . . . . . . . . . . . . . . . . . . . . . . . . . . . . . . . . . 2
Descripción del aparato . . . . . . . . . . . . . . . . . . . . . . . . . . . . . . . . . . . . . . . . . . . . . . . . . 2
Características técnicas . . . . . . . . . . . . . . . . . . . . . . . . . . . . . . . . . . . . . . . . . . . . . . . . . 2
Indicaciones de seguridad . . . . . . . . . . . . . . . . . . . . . . . . . . . . . . . . . . . . . . . . . . . . . . . 2
Primer uso . . . . . . . . . . . . . . . . . . . . . . . . . . . . . . . . . . . . . . . . . . . . . . . . . . . . . . . . . . . . 3
Montaje/desmontaje de la cabeza de cepillo . . . . . . . . . . . . . . . . . . . . . . . . . . . . . . . 4
Limpieza dental . . . . . . . . . . . . . . . . . . . . . . . . . . . . . . . . . . . . . . . . . . . . . . . . . . . . . . . 4
Cambio de las pilas . . . . . . . . . . . . . . . . . . . . . . . . . . . . . . . . . . . . . . . . . . . . . . . . . . . . 5
Limpieza y mantenimiento . . . . . . . . . . . . . . . . . . . . . . . . . . . . . . . . . . . . . . . . . . . . . . 5
Almacenamiento. . . . . . . . . . . . . . . . . . . . . . . . . . . . . . . . . . . . . . . . . . . . . . . . . . . . . . . 5
Desecho . . . . . . . . . . . . . . . . . . . . . . . . . . . . . . . . . . . . . . . . . . . . . . . . . . . . . . . . . . . . . . 6
Desecho del aparato . . . . . . . . . . . . . . . . . . . . . . . . . . . . . . . . . . . . . . . . . . . . . . . . . . . . . . . . . . . . . . . . 6
Desecho de las pilas/baterías . . . . . . . . . . . . . . . . . . . . . . . . . . . . . . . . . . . . . . . . . . . . . . . . . . . . . . . . . 6
Garantía y asistencia técnica . . . . . . . . . . . . . . . . . . . . . . . . . . . . . . . . . . . . . . . . . . . . . 6
Importador . . . . . . . . . . . . . . . . . . . . . . . . . . . . . . . . . . . . . . . . . . . . . . . . . . . . . . . . . . . 6
DZB 3 A1
IB_93451_DZB3A1_LB5.indb 1
1
06.09.13 13:47
ES
Introducción
Descripción del aparato
Felicidades por la compra de su aparato nuevo.
1 Cabeza de cepillo
Ha adquirido un producto de alta calidad. Las
instrucciones de uso forman parte del producto y
contienen indicaciones importantes acerca de la
seguridad, el uso y el desecho de este aparato.
Antes de usar el producto, familiarícese con todas
las indicaciones de manejo y de seguridad. Utilice
el producto únicamente como se describe y para
los ámbitos de aplicación indicados. Entregue todos
los documentos cuando transfiera el producto a
terceros.
2 Caperuza protectora
Tipo de pila:
1,5 V, Mignon, AA, LR6
Uso previsto
Clase de protección:
IPX4
Este aparato está destinado exclusivamente para
el uso dental personal. Este aparato está previsto
exclusivamente para el uso doméstico privado.
No está previsto para su uso comercial, industrial
ni en áreas médicas o veterinarias.
Volumen de suministro
3 Eje de accionamiento
4 Interruptor de encendido/apagado
5 Mango
6 Compartimento para pilas
Características técnicas
Alimentación de corriente: 2 pilas de 1,5 V
Indicaciones de seguridad
¡ADVERTENCIA!
¡PELIGRO DE LESIONES!
►
Mango
4 cabezas de cepillo
2 pilas
1 caperuza protectora
Instrucciones de uso
Compruebe la integridad del volumen de suministro
inmediatamente después de desembalar el producto.
Retire todo el material de embalaje y las láminas
del aparato.
►
►
►
2
IB_93451_DZB3A1_LB5.indb 2
Estos cepillos dentales pueden
ser utilizados por niños y por
personas con facultades físicas,
sensoriales o mentales reducidas,
así como con falta de conocimientos o de experiencia, siempre
que sean vigiladas o hayan sido
instruidas correctamente sobre
el uso seguro del aparato y que
hayan comprendido los peligros
que entraña.
Los niños no deben realizar la
limpieza ni el mantenimiento del
aparato a menos que se encuentren bajo supervisión.
Los niños no deben jugar con el
aparato.
No abra usted mismo el aparato
(excepto el compartimento para
pilas). ¡Existe riesgo de lesiones
debido a un ensamblaje incorrecto!
DZB 3 A1
06.09.13 13:47
¡ATENCIÓN! ¡PILAS!
Indicaciones de seguridad para la
manipulación de pilas:
► No arroje las pilas al fuego. No
vuelva a cargar las pilas. ¡Existe
riesgo de explosión y de lesiones!
► No abra, estañe ni suelde las
pilas. ¡Existe riesgo de explosión
y de lesiones!
► Compruebe las pilas de forma regular. Las pilas con fugas pueden
ocasionar daños al aparato.
► Si no pretende utilizar el aparato
durante un periodo de tiempo
prolongado, extraiga las pilas.
► Si las pilas tienen fugas, utilice
guantes de protección. Limpie
el compartimento para pilas y
los contactos de las pilas con un
paño seco.
► Los niños no deben tener acceso a
las pilas, ya que podrían metérselas en la boca y tragarlas. En
caso de ingestión de una pila,
busque inmediatamente asistencia
médica.
DZB 3 A1
IB_93451_DZB3A1_LB5.indb 3
¡ATENCIÓN!
¡PELIGRO DE DAÑOS MATERIALES!
►
►
►
►
ES
No permita que penetre agua en
el interior del aparato y no lo sumerja en agua para evitar daños.
Evite la penetración de impurezas.
No sumerja el mango en agua ni
en otros líquidos. ¡Esto provocaría
daños irreparables en el aparato!
El aparato no puede entrar en
contacto con superficies calientes.
Primer uso
Antes de poner el aparato en funcionamiento,
cerciórese de que se encuentre en perfecto estado.
En caso contrario, no deberá utilizarse.
1) Abra el compartimento para pilas deslizando
la tapa del compartimento para pilas hacia
abajo 6.
2) Coloque las pilas conforme a la polaridad
que se indica en el compartimento para pilas
(consulte el capítulo "Cambio de las pilas").
3) Coloque la tapa del compartimento para
pilas 6 de nuevo en el mango 5.
Asegúrese de que esté bien encajada.
4) Antes del primer uso, limpie la nueva cabeza
de cepillo 1 con agua limpia.
3
06.09.13 13:47
ES
Montaje/desmontaje de la
cabeza de cepillo
■ Para retirar la cabeza de cepillo 1, gírela en
sentido horario y extráigala tirando de ella
hacia arriba.
■ Para insertar la cabeza de cepillo 1 colóquela
ligeramente inclinada sobre el mango 5 y gírela
en sentido antihorario hasta que quede sobre el
interruptor de encendido/apagado 4.
Para evitar daños en el aparato, utilice únicamente
cabezas de cepillo originales.
(Podrá consultar las cabezas de cepillo de repuesto
en la tarjeta de pedido).
Limpieza dental
¡ADVERTENCIA!
Al principio, es posible que las encías sangren
un poco por no estar habituadas al efecto de
fricción, lo que es normal. Si esta situación se
prolonga durante más de dos semanas, deberá
consultar a su odontólogo.
1) Coloque la cabeza de cepillo 1 sobre el
mango 5.
2) Humedezca la cabeza de cepillo 1 con el
agua del grifo.
3) Aplique un poco de pasta de dientes sobre
el cepillo húmedo.
6) Comience con uno de los cuadrantes:
Coloque la cabeza de cepillo 1 sobre las encías y desplace el cepillo por toda la superficie
de los dientes desde arriba hacia abajo.
Proceda del mismo modo en el lado interior
y en el exterior del diente. Empiece a limpiar
cada diente desde las encías.
No se olvide del lado posterior de la muela
trasera.
Para limpiar la superficie masticatoria, pase el
cepillo giratorio por todos los dientes ejerciendo
una ligera presión.
7) Después de 30 segundos, el cepillo de dientes
interrumpe brevemente el funcionamiento
para indicarle que es momento de pasar a
limpiar el siguiente cuadrante. Limpie todos los
cuadrantes con la misma técnica.
Encienda el aparato cuando lo tenga dentro de
la boca para evitar salpicaduras.
8) Después de dos minutos, el cepillo de dientes
interrumpe brevemente 3 veces el funcionamiento. De esta manera, se le indica que ya
ha cumplido con los dos minutos de limpieza
recomendados por los odontólogos.
4) Pulse el interruptor de encendido/apagado 4
para activar el cepillo de dientes.
9) Pulse el interruptor de encendido/apagado 4
para detener el cepillo de dientes.
INDICACIÓN
INDICACIÓN
Este cepillo de dientes dispone de un temporizador con un intervalo de 30 segundos para
que pueda limpiar uniformemente los cuatro
cuadrantes maxilares.
10) Ahora podrá retirar el cepillo de dientes de la
boca.
11) Tras su uso, limpie la cabeza de cepillo 1
concienzudamente bajo el agua corriente.
12) Coloque la caperuza protectora 2 sobre la
cabeza de cepillo 1.
5) Subdivida sus maxilares en cuatro partes (cuadrantes): el superior izquierdo, el superior derecho, el inferior izquierdo y el inferior derecho.
4
IB_93451_DZB3A1_LB5.indb 4
DZB 3 A1
06.09.13 13:47
13) Retire la cabeza de cepillo 1 del mango 5.
Limpie el eje de accionamiento 3 del mango 5
bajo el agua corriente. Sujete el mango 5 de
forma que el agua solo caiga sobre el eje de
accionamiento 3.
Cambio de las pilas
Cuando aprecie que los movimientos del cepillo
de dientes se debiliten, es momento de cambiar
las pilas.
■ Abra el compartimento para pilas tirando de
la tapa del compartimento para pilas 6 hacia
abajo y extraiga las pilas vacías.
¡ATENCIÓN!
¡PELIGRO DE DAÑOS MATERIALES!
Utilice siempre pilas del mismo tipo y no mezcle
nunca pilas usadas y nuevas.
■ Vuelva a colocar la tapa del compartimento
para pilas 6 de forma que quede firmemente
cerrado.
ES
Limpieza y mantenimiento
¡ATENCIÓN!
¡PELIGRO DE DAÑOS MATERIALES!
► Para eliminar los restos de pasta dentífrica reseca en el mango 5, no use objetos puntiagudos, ya que, de lo contrario, podrá dañar
la junta y, por consiguiente, el aparato.
► ¡No sumerja el mango 5 bajo el agua! La
humedad no debe penetrar en el mango 5.
■ Retire la cabeza de cepillo 1 del mango 5.
Limpie las cabezas de cepillo 1 después de
cada uso concienzudamente bajo el agua
corriente.
Le recomendamos que limpie cada 2-4 semanas
las cabezas de cepillo 1 con un producto de
limpieza para prótesis dentales. Después de
unos 3 meses aprox., o como muy tarde cuando
las cerdas del cepillo se doblen hacia fuera,
deberá utilizar una nueva cabeza de cepillo 1.
■ Para limpiar el eje de accionamiento 3 y el
mango 5, deje que el agua caiga brevemente
sobre estos. Para ello, sujete el mango 5 de
forma que el eje de accionamiento 3 apunte
hacia abajo.
Procure que no penetre agua en el compartimento para pilas.
Almacenamiento
Si no pretende utilizar el cepillo de dientes durante
un tiempo prolongado, extraiga las pilas.
Coloque la caperuza protectora 2 sobre la cabeza de cepillo 1.
■ Inserte dos pilas nuevas del tipo AA/LR6 1,5 V.
Al introducirlas, observe la polaridad correcta.
Las polaridades de ambos contactos están
indicadas en el interior del compartimento para
pilas.
DZB 3 A1
IB_93451_DZB3A1_LB5.indb 5
5
06.09.13 13:47
Desecho
ES
Desecho del aparato
No deseche nunca el aparato
con la basura doméstica. Este
aparato está sujeto a la Directiva europea 2012/19/EU.
Deseche el aparato en un centro de residuos autorizado a través de las instalaciones de desecho de
residuos comunitarias. Observe las normas vigentes.
En caso de duda, póngase en contacto con las
instalaciones municipales de desecho de residuos.
Desecho de las pilas/baterías
Las pilas/baterías no deben
desecharse con la basura
doméstica.
Los consumidores están obligados legalmente a
entregar las pilas en un punto de recogida de residuos de su municipio/barrio o en un establecimiento.
Con esta obligación, se consigue que las pilas
se desechen de forma respetuosa con el medio
ambiente. Devuelva las pilas exclusivamente en
estado descargado.
El embalaje consta de materiales ecológicos que pueden desecharse a través
de los centros de reciclaje locales.
Garantía y asistencia técnica
Este producto ha sido diseñado exclusivamente
para el uso particular y no para el uso industrial.
En caso de manipulación indebida e incorrecta,
uso de la fuerza y apertura del aparato por personas ajenas a nuestros centros de asistencia técnica
autorizados, la garantía pierde su validez.
Sus derechos legales no se ven limitados por
esta garantía. La duración de la garantía no se
prolonga por hacer uso de ella. Este principio rige
también para las piezas sustituidas y reparadas.
Si después de la compra del aparato, se detecta
la existencia de daños o de defectos al desembalarlo, deben notificarse de inmediato o, como muy
tarde, dos días después de la fecha de compra.
Cualquier reparación que se realice una vez finalizado el plazo de garantía está sujeta a costes.
Servicio España
Tel.: 902 59 99 22
(0,08 EUR/Min. + 0,11 EUR/llamada
(tarifa normal))
(0,05 EUR/Min. + 0,11 EUR/llamada
(tarifa reducida))
E-Mail: [email protected]
IAN 93451
Disponibilidad de la línea de atención al
cliente:
de lunes a viernes de 8.00 a 20.00 h (CET)
Importador
KOMPERNASS HANDELS GMBH
Este aparato tiene 3 años de garantía desde la
fecha de compra. El aparato ha sido fabricado
cuidadosamente y examinado en profundidad
antes de su entrega.
BURGSTRASSE 21
Guarde el comprobante de caja como justificante
de compra. Si necesitara hacer uso de la garantía,
póngase en contacto por teléfono con su punto
de servicio habitual. Este es el único modo de
garantizar un envío gratuito.
www.kompernass.com
44867 BOCHUM
ALEMANIA
La garantía cubre los defectos de fabricación o
del material, pero no los daños de transporte, las
piezas de desgaste o los daños sufridos en las
piezas frágiles (p. ej., el interruptor o las pilas).
6
IB_93451_DZB3A1_LB5.indb 6
DZB 3 A1
06.09.13 13:47
IB_93451_DZB3A1_LB5.indb 7
06.09.13 13:47
PRECIO POR UNIDAD
(Lugar, fecha)
(Firma)
cabezales de cepillos
para el Cepillo de
diente DZB 3 A1
► Conjunto de 8 du. de
transferencia
FORMA DE PAGO
5,50 €
=
+
Suplemento costes de gestión,
correo, manipulación, embalaje
y envío
€
6,50 €
€
PRECIO NETO
DESCRIPCIÓN DEL ARTÍCULO
CANTIDAD
(max. 3 juegos por pedido)
www.kompernass.com
TARJETA DE PEDIDO DZB 3 A1
TARJETA DE PEDIDO DZB 3 A1
1) Escriba bajo “Remitente/Ordenante“ su nombre, tratamiento y su número de teléfono
(para posible información adicional) en letra de imprenta.
2) Transfiera el importe total a la cuenta bancaria siguiente
Kompernaß Handelsgesellschaft mbH
IBAN: DE03440100460799566462
SWIFT (BIC): PBNKDEFF 440
Banco: Postbank Dortmund AG
Kompernaß Handelsgesellschaft mbH
Burgstraße 21
44867 Bochum
Alemania
■ Indique como concepto de su transferencia el artículo así como su nombre y domicilio.
Envíe después en un sobre la hoja de pedido completamente cumplimentada a nuestra
dirección postal, indicada al lado.a
Nuestra dirección postal:
IMPORTANTE
► Si realiza el pago mediante transferencia bancaria, marque la casilla en el
formulario para transferencia bajo el punto gastos en el campo “shared” (gastos
compartidos). De lo contrario no podremos tramitir el pedido.
► Rogamos franquee suficientemente el envío.
► Escriba su nombre como remitente en el sobre.
www.kompernass.com
REMITE/COMPRADOR
(escribir en mayúsculas)
Apellido(s), Nombre
Calle
Código Postal, Localidad
País
Teléfono
Pida cómodamente por Internet
www.kompernass.com
06.09.13 13:47
IB_93451_DZB3A1_LB5.indb 8
Indice
Introduzione . . . . . . . . . . . . . . . . . . . . . . . . . . . . . . . . . . . . . . . . . . . . . . . . . . . . . . . . . 10
IT
MT
Uso conforme . . . . . . . . . . . . . . . . . . . . . . . . . . . . . . . . . . . . . . . . . . . . . . . . . . . . . . . . 10
Volume della fornitura . . . . . . . . . . . . . . . . . . . . . . . . . . . . . . . . . . . . . . . . . . . . . . . . . 10
Descrizione dell'apparecchio . . . . . . . . . . . . . . . . . . . . . . . . . . . . . . . . . . . . . . . . . . . . 10
Dati tecnici . . . . . . . . . . . . . . . . . . . . . . . . . . . . . . . . . . . . . . . . . . . . . . . . . . . . . . . . . . . 10
Indicazioni relative alla sicurezza . . . . . . . . . . . . . . . . . . . . . . . . . . . . . . . . . . . . . . . . 10
Primo impiego. . . . . . . . . . . . . . . . . . . . . . . . . . . . . . . . . . . . . . . . . . . . . . . . . . . . . . . . 11
Montaggio/rimozione della testina . . . . . . . . . . . . . . . . . . . . . . . . . . . . . . . . . . . . . . 12
Pulizia dei denti . . . . . . . . . . . . . . . . . . . . . . . . . . . . . . . . . . . . . . . . . . . . . . . . . . . . . . 12
Sostituzione delle batterie . . . . . . . . . . . . . . . . . . . . . . . . . . . . . . . . . . . . . . . . . . . . . . 13
Pulizia e piccola manutenzione . . . . . . . . . . . . . . . . . . . . . . . . . . . . . . . . . . . . . . . . . . 13
Conservazione . . . . . . . . . . . . . . . . . . . . . . . . . . . . . . . . . . . . . . . . . . . . . . . . . . . . . . . 13
Smaltimento . . . . . . . . . . . . . . . . . . . . . . . . . . . . . . . . . . . . . . . . . . . . . . . . . . . . . . . . . 14
Smaltimento dell'apparecchio . . . . . . . . . . . . . . . . . . . . . . . . . . . . . . . . . . . . . . . . . . . . . . . . . . . . . . . . 14
Smaltimento batterie/accumulatori . . . . . . . . . . . . . . . . . . . . . . . . . . . . . . . . . . . . . . . . . . . . . . . . . . . . 14
Garanzia e assistenza . . . . . . . . . . . . . . . . . . . . . . . . . . . . . . . . . . . . . . . . . . . . . . . . . 14
Importatore. . . . . . . . . . . . . . . . . . . . . . . . . . . . . . . . . . . . . . . . . . . . . . . . . . . . . . . . . . 14
DZB 3 A1
IB_93451_DZB3A1_LB5.indb 9
9
06.09.13 13:47
IT
MT
Introduzione
Descrizione dell'apparecchio
Congratulazioni per l'acquisto del nuovo apparecchio.
1 Testina
È stato acquistato un prodotto di alta qualità.
Il manuale di istruzioni è parte integrante del presente prodotto. Esso contiene importanti indicazioni per la sicurezza, l'uso e lo smaltimento. Prima
di utilizzare il prodotto, familiarizzarsi con tutte le
indicazioni relative ai comandi e alla sicurezza.
Utilizzare l'apparecchio solo come descritto e per
i campi d'impiego indicati. In caso di cessione del
prodotto a terzi, consegnare anche tutta la documentazione relativa.
3 Albero motore
2 Cappuccio di protezione
4 Interruttore ON/OFF
5 Impugnatura
6 Coperchio del vano batterie
Dati tecnici
Tensione di alimentazione: 2 x 1,5 V
Batterie di tipo:
1,5 V, Mignon, AA, LR6
Grado di protezione:
IPX4
Uso conforme
Questo apparecchio è previsto esclusivamente per
la cura personale dei denti. Questo apparecchio è
destinato esclusivamente all'uso in ambienti domestici. Non è destinato all'uso in settori commerciali,
industriali, medici o veterinari,
Indicazioni relative alla
sicurezza
AVVERTENZA! PERICOLO DI LESIONI!
►
Volume della fornitura
Impugnatura
4 testine
2 batterie
1 cappuccio di protezione
Istruzioni per l'uso
Subito dopo il disimballaggio, controllare l'integrità
della fornitura.
►
Rimuovere tutti i materiali di imballaggio e pellicole
dall'apparecchio.
►
►
10
IB_93451_DZB3A1_LB5.indb 10
Questi spazzolini possono venire
utilizzati da bambini e da persone
con capacità fisiche, sensoriali
o mentali ridotte o insufficiente
esperienza o conoscenza solo
se sorvegliati o istruiti sull'uso
sicuro dell'apparecchio e qualora
ne abbiano compreso i risultanti
pericoli.
La pulizia e la manutenzione a
carico dell'utente non devono essere eseguite dai bambini a meno
che essi non vengano sorvegliati.
I bambini non devono giocare
con l'apparecchio.
Non aprire di propria iniziativa
l'apparecchio (escluso il vano batterie). Il rimontaggio erroneo può
comportare il rischio di lesioni!
DZB 3 A1
06.09.13 13:47
ATTENZIONE! BATTERIE!
Avvertenze sulla sicurezza per il
trattamento delle batterie:
► Non gettare le batterie nel fuoco.
Non ricaricare le batterie. Pericolo
di esplosione e lesioni!
► Non aprire, saldare o fondere le
batterie. Pericolo di esplosione e
lesioni!
► Controllare regolarmente le batterie. Le batterie deteriorate possono
causare danni all'apparecchio.
► Se non si utilizza l'apparecchio
per lungo tempo, rimuovere le
batterie.
► In presenza di batterie deteriorate,
indossare guanti protettivi. Pulire
il vano batterie e i contatti delle
batterie con un panno asciutto.
► Impedire ai bambini di entrare in
possesso delle batterie. I bambini
potrebbero portarle alla bocca e
ingerirle. In caso di ingestione di
una batteria, consultare immediatamente un medico.
DZB 3 A1
IB_93451_DZB3A1_LB5.indb 11
ATTENZIONE! DANNI MATERIALI!
►
►
►
►
Impedire la penetrazione di liquidi
nell'apparecchio e non immergerlo
in acqua, per evitare danni.
Evitare la penetrazione di corpi
estranei.
Non immergere mai l'impugnatura
in acqua o altri liquidi. Ciò apporta
danni irreparabili all'apparecchio!
Non mettere l'apparecchio a contatto con superfici surriscaldate.
IT
MT
Primo impiego
Prima di mettere in funzione l'apparecchio, accertarsi
che sia in condizioni perfette. In caso contrario, non
utilizzarlo.
1) Aprire il vano batterie tirando verso il basso
il coperchio del vano batterie 6.
2) Inserire le batterie rispettando la polarità
riportata nel vano batterie (vedere Capitolo
"Sostituzione delle batterie“).
3) Reinserire il coperchio del vano batterie 6
sull'impugnatura 5. Verificarne il corretto
posizionamento.
4) Prima del primo impiego lavare la testina
nuova 1 con acqua pulita.
11
06.09.13 13:47
Montaggio/rimozione della
testina
IT
MT
■ Per rimuovere la testina 1, ruotarla in senso
orario ed estrarla verso l'alto.
■ Per applicare la testina 1, posizionarla leggermente spostata sull'impugnatura 5 e girarla
in senso antiorario fino a quando non viene a
trovarsi esattamente sopra l'interruttore ON/
OFF 4.
Utilizzare solo testine originali, per evitare danni
all'apparecchio.
(Per le testine di ricambio v. scheda di ordinazione)
Pulizia dei denti
AVVERTENZA!
Inizialmente, a causa della insolita stimolazione,
si può verificare un leggero sanguinamento delle
gengive, che è da ritenersi normale. Se tale
eventualità persistesse per oltre due settimane,
consultare il proprio dentista.
1) Inserire la testina 1 sull'impugnatura 5.
2) Inumidire la testina1 sotto acqua corrente.
3) Mettere una piccola quantità di dentifricio sullo
spazzolino inumidito.
6) Cominciare da uno dei quattro quadranti:
Appoggiare la testina dello spazzolino 1 sulle
gengive e far passare lo spazzolino lungo il
dente partendo dalla gengiva.
Procedere analogamente con l'interno e l'esterno
dei denti. Ripetere l'operazione per ogni singolo
dente, sempre partendo dalla gengiva.
Non dimenticare il retro dei molari posteriori.
Per pulire le superfici di masticazione, poggiare
su di esse lo spazzolino rotante con una leggera
pressione.
7) Dopo 30 secondi, lo spazzolino interrompe
brevemente il funzionamento per due volte,
per segnalare che è il momento di passare
al quadrante successivo. Pulire tutti i quattro
quadranti con la stessa tecnica.
Accendere l'apparecchio quando lo avete già in
bocca per evitare schizzi.
8) Dopo due minuti, lo spazzolino smette di
funzionare brevemente per 3 volte. Ciò indica
il completamento del tempo consigliato di
2 minuti per la pulizia dei denti.
4) Per spegnere lo spazzolino, premere l'interruttore ON/OFF 4.
9) Premere l'interruttore ON/OFF 4, dopodiché
lo spazzolino si fermerà.
AVVERTENZA
AVVERTENZA
Questo spazzolino ha un timer a intervalli di
30 secondi, per consentire la pulizia uniforme
di tutti i quattro quadranti mascellari.
10) Rimuovere quindi lo spazzolino dalla bocca.
11) Pulire accuratamente la testina 1 sotto l'acqua
corrente dopo l'uso.
12) Inserire il cappuccio di protezione 2 sulla
testina 1.
5) Dividere la mascella in quattro parti (quadranti):
in alto a sinistra, in alto a destra, in basso a
sinistra e in basso a destra.
12
IB_93451_DZB3A1_LB5.indb 12
DZB 3 A1
06.09.13 13:47
13) Rimuovere la testina 1 dall'impugnatura 5.
Pulire l'albero motore 3 sull'impugnatura 5
sotto acqua corrente. Tenere l'impugnatura 5
in modo tale che l'acqua scorra solo lungo
l'albero motore 3.
Sostituzione delle batterie
Se i movimenti dello spazzolino si indeboliscono
sensibilmente, è necessario sostituire le batterie.
■ Aprire il vano batterie tirando verso il basso il
coperchio del vano batterie 6 e rimuovendo
le batterie scariche.
ATTENZIONE! DANNI MATERIALI!
Utilizzare sempre batterie dello stesso tipo, e non
utilizzare mai contemporaneamente batterie
nuove e vecchie.
Pulizia e piccola manutenzione
ATTENZIONE! DANNI MATERIALI!
► Non utilizzare oggetti appuntiti per rimuovere i
resti di dentifricio essiccato sull'impugnatura 5,
altrimenti si rischia di danneggiare la guarnizione e l'apparecchio stesso.
► Non immergere mai l'impugnatura 5 nell'acqua! Provvedere a impedire che entri del
liquido nell'impugnatura 5.
IT
MT
■ Rimuovere la testina 1 dall'impugnatura 5.
Dopo l'uso pulire sempre accuratamente le
testine 1 sotto l'acqua corrente.
Consigliamo la pulizia delle testine 1 con il
liquido detergente per le protesi dentarie presente in commercio, con frequenza bisettimanale
o mensile. Dopo circa 3 mesi, e comunque
quando le setole si piegano verso l'esterno, è
necessario utilizzare una nuova testina 1.
■ Per pulire l'albero motore 3 e l'impugnatura 5,
far scorrere brevemente dell'acqua su di essi,
badando a tenere l'impugnatura 5 in modo
tale che l'albero motore 3 sia rivolto verso il
basso.
Impedire la penetrazione di acqua nel vano
batterie.
Conservazione
Se si prevede di non utilizzare lo spazzolino per
un lungo periodo di tempo, rimuovere le batterie.
Inserire il cappuccio di protezione 2 sulla testina 1.
■ Inserire due nuove batterie di tipo AA/LR6 1,5 V.
Nell'inserimento della batteria fare attenzione a
rispettare la polarità corretta. Essa è indicata su
entrambi i contatti all'interno del vano batterie.
■ Reinserire il coperchio del vano batterie 6 in
modo da che sia saldamente chiuso.
DZB 3 A1
IB_93451_DZB3A1_LB5.indb 13
13
06.09.13 13:47
Smaltimento
Smaltimento dell'apparecchio
Non smaltire mai l'apparecchio assieme ai normali
rifiuti domestici. Questo
prodotto è soggetto alla
Direttiva Europea 2012/19/
EU.
IT
MT
Smaltire l'apparecchio attraverso un'azienda di
smaltimento autorizzata o attraverso l'ente di smaltimento comunale. Rispettare le norme attualmente
in vigore. In caso di dubbi mettersi in contatto con
l'ente di smaltimento competente.
Smaltimento batterie/accumulatori
Batterie e/o accumulatori
non devono essere smaltiti
insieme ai rifiuti domestici.
Ogni utente è obbligato per legge a portare le
batterie/accumulatori presso un centro di raccolta
del proprio comune / quartiere o a restituirle al
rivenditore.
Questo obbligo è finalizzato allo smaltimento ecologico delle batterie e/o degli accumulatori. Restituire le batterie/gli accumulatori solo se scarichi.
L'imballaggio è composto di materiali
ecocompatibili, che possono essere
smaltiti tramite gli appositi centri di
raccolta e riciclaggio.
Garanzia e assistenza
Questo apparecchio è garantito per tre anni a
partire dalla data di acquisto. L'apparecchio è
stato prodotto con cura e debitamente collaudato
prima della consegna.
Conservare lo scontrino come prova d'acquisto.
Nei casi contemplati dalla garanzia, mettersi in
comunicazione telefonicamente con il centro di
assistenza più vicino. Solo in tal modo è possibile
garantire una spedizione gratuita della merce.
14
IB_93451_DZB3A1_LB5.indb 14
La garanzia copre solo i difetti del materiale o di
fabbricazione, non i danni da trasporto, ai pezzi
soggetti a usura o i danni a parti fragili, come ad
es. interruttori o accumulatori.
Il prodotto è destinato esclusivamente all'uso domestico e non a quello commerciale. La garanzia
decade in caso di impiego improprio o manomissione, uso della forza e interventi non eseguiti
dalla nostra filiale di assistenza autorizzata.
Questa garanzia non costituisce alcun limite ai diritti legali del consumatore. Il periodo di garanzia
non viene prolungato da interventi in garanzia.
Ciò vale anche per le parti sostituite e riparate.
I danni e difetti eventualmente presenti già all'atto
dell'acquisto devono essere comunicati immediatamente dopo il disimballaggio, e comunque entro
e non oltre due giorni dalla data di acquisto.
Le riparazioni eseguite dopo la scadenza del
periodo di garanzia sono a pagamento.
Assistenza Italia
Tel.: 02 36003201
E-Mail: [email protected]
IAN 93451
Assistenza Malta
Tel.: 80062230
E-Mail: [email protected]
IAN 93451
Raggiungibilità della hotline: dal lunedì al venerdì, dalle 8.00 alle 20.00 (CET)
Importatore
KOMPERNASS HANDELS GMBH
BURGSTRASSE 21
44867 BOCHUM
GERMANY
www.kompernass.com
DZB 3 A1
06.09.13 13:47
IB_93451_DZB3A1_LB5.indb 15
06.09.13 13:47
PREZZO SINGOLO
(luogo, data)
per spazzolino
DZB 3 A1
(firma)
► Set di otto testine
Bonifico
TIPO DI PAGAMENTO
5,50 €
=
+
Spese di spedizione
€
6,50 €
€
PREZZO COMPLESSIVO
DESCRIZIONE ARTICOLO
QUANTITÀ DA ORDINARE
(max. 3 set per ordinazione)
www.kompernass.com
SCHEDA D‘ORDINAZIONE DZB 3 A1
SCHEDA D‘ORDINAZIONE DZB 3 A1
1) Alla voce „Mittente/ordinante“, inserire nome, Cognome, indirizzo e numero telefonico
(per eventuali domande), scrivendo in stampatello.
2) Versare l‘importo totale in anticipo sul seguente conto
Kompernaß Handelsgesellschaft mbH
IBAN: DE03440100460799566462
SWIFT (BIC): PBNKDEFF 440
Banca: Postbank Dortmund AG
■ Se si paga tramite bonifico bancario, sul modulo per i bonifici alla voce Spese contrassegnare il campo „shared“ (spese condivise). In caso contrario, non potremo elaborare
l‘ordine.
Kompernaß Handelsgesellschaft mbH
Burgstraße 21
44867 Bochum
Germania
■ Indicare l‘articolo nella causale del bonifico, nonché nome, cognome e indirizzo.
Inviare quindi la cartolina di ordine interamente compilata, inserendola in una busta,
all‘indirizzo indicato qui accanto.
IMPORTANTE
► Affrancare correttamente la busta.
► Scrivere il proprio nome come mittente sulla busta.
MITTENTE
www.kompernass.com
(si prega di compilare il modulo in stampatello)
Cognome, Nome
Via
Cap, Città
Paese
Telefono
06.09.13 13:47
IB_93451_DZB3A1_LB5.indb 16
Contents
Introduction . . . . . . . . . . . . . . . . . . . . . . . . . . . . . . . . . . . . . . . . . . . . . . . . . . . . . . . . . . 18
Proper use . . . . . . . . . . . . . . . . . . . . . . . . . . . . . . . . . . . . . . . . . . . . . . . . . . . . . . . . . . . 18
Package contents . . . . . . . . . . . . . . . . . . . . . . . . . . . . . . . . . . . . . . . . . . . . . . . . . . . . . 18
Appliance description . . . . . . . . . . . . . . . . . . . . . . . . . . . . . . . . . . . . . . . . . . . . . . . . . . 18
GB
MT
Technical details . . . . . . . . . . . . . . . . . . . . . . . . . . . . . . . . . . . . . . . . . . . . . . . . . . . . . . 18
Safety instructions . . . . . . . . . . . . . . . . . . . . . . . . . . . . . . . . . . . . . . . . . . . . . . . . . . . . 18
Initial use . . . . . . . . . . . . . . . . . . . . . . . . . . . . . . . . . . . . . . . . . . . . . . . . . . . . . . . . . . . . 19
Fitting/removing the brush head . . . . . . . . . . . . . . . . . . . . . . . . . . . . . . . . . . . . . . . . 20
Brushing teeth . . . . . . . . . . . . . . . . . . . . . . . . . . . . . . . . . . . . . . . . . . . . . . . . . . . . . . . . 20
Changing the batteries . . . . . . . . . . . . . . . . . . . . . . . . . . . . . . . . . . . . . . . . . . . . . . . . . 21
Cleaning and care . . . . . . . . . . . . . . . . . . . . . . . . . . . . . . . . . . . . . . . . . . . . . . . . . . . . . 21
Storage . . . . . . . . . . . . . . . . . . . . . . . . . . . . . . . . . . . . . . . . . . . . . . . . . . . . . . . . . . . . . 21
Disposal . . . . . . . . . . . . . . . . . . . . . . . . . . . . . . . . . . . . . . . . . . . . . . . . . . . . . . . . . . . . . 22
Disposal of the appliance . . . . . . . . . . . . . . . . . . . . . . . . . . . . . . . . . . . . . . . . . . . . . . . . . . . . . . . . . . . 22
Disposal of batteries . . . . . . . . . . . . . . . . . . . . . . . . . . . . . . . . . . . . . . . . . . . . . . . . . . . . . . . . . . . . . . . 22
Warranty and Service . . . . . . . . . . . . . . . . . . . . . . . . . . . . . . . . . . . . . . . . . . . . . . . . . 22
Importer . . . . . . . . . . . . . . . . . . . . . . . . . . . . . . . . . . . . . . . . . . . . . . . . . . . . . . . . . . . . 22
DZB 3 A1
IB_93451_DZB3A1_LB5.indb 17
17
06.09.13 13:47
GB
MT
Introduction
Appliance description
Congratulations on the purchase of your new
appliance.
1 Brush head
You have selected a high-quality product.
The operating instructions are part of this product.
They contain important information on safety, use
and disposal. Before using the product, familiarise
yourself with all operating and safety instructions.
Use this product only as described and only for
the specified areas of application. Please also
pass these operating instructions on to any future
owner(s).
3 Drive shaft
Proper use
This appliance is intended exclusively for personal
dental care. This appliance is intended exclusively
for use in domestic households. The appliance is
not intended for use in commercial, industrial or
medical environments. It is not suitable for animal
care.
2 Protective cap
4 On/off switch
5 Handle
6 Battery compartment cover
Technical details
Power supply:
2 x 1.5 V
Battery type:
1.5 V, Mignon, AA, LR6
Protection class:
IPX4
Safety instructions
WARNING! RISK OF INJURY!
►
Package contents
Handle
4 brush heads
2 batteries
1 protective cap
Operating instructions
Check the delivery contents for completeness
immediately after unpacking.
►
Remove all packaging materials and plastic
film from the appliance.
►
►
18
IB_93451_DZB3A1_LB5.indb 18
Toothbrushes may be used by
children and by persons with reduced physical, sensory or mental
capabilities or lack of experience
and/or knowledge if they are
supervised or, with regard to safe
use of the appliance, have been
instructed in its use and have
understood the potential risks.
Cleaning and user maintenance
should not be performed by
children, unless they are being
supervised.
Children must not play with the
appliance.
Do not open the appliance (except
the battery compartment) yourself.
Risk of injury if appliance is not
properly assembled!
DZB 3 A1
06.09.13 13:47
CAUTION! BATTERIES!
Safety information for handling
batteries:
► Do not throw batteries into a fire.
Do not recharge batteries.
Risk of explosions and injuries!
► Never open batteries and never
solder or weld batteries.
Risk of explosions and injuries!
► Check the condition of the batteries
at regular intervals. Leaking batteries can cause damage to the
appliance.
► If you do not intend to use the appliance for an extended period,
remove the batteries.
► If the batteries have leaked, use
protective gloves. Clean the battery
compartment and the battery
contacts with a dry cloth.
► Keep batteries out of the reach of
children. Children might put bat-teries into their mouth and swallow
them. If a battery is swallowed,
medical assistance must be sought
immediately.
DZB 3 A1
IB_93451_DZB3A1_LB5.indb 19
ATTENTION! DAMAGE TO PROPERTY!
►
►
►
►
To avoid damage, do not permit
liquids of any kind to enter the
appliance and do not submerge
it in water.
Avoid penetration by foreign
objects.
Do not submerge the handle in
water or other liquids. This will
lead to irreparable damage to
the appliance!
The appliance must not come into
contact with hot surfaces.
GB
MT
Initial use
Before starting to use the appliance, check that it
is in fault-free condition. If it is not, it must not be
used.
1) Open the battery compartment by pulling off
the battery compartment cover 6 in a downwards direction.
2) Insert the batteries in accordance with the
polarity specified in the battery compartment
(see chapter entitled "Changing the batteries").
3) Re-attach the battery compartment cover 6
to the handle 5. Check that it is securely
attached.
4) Before initial use, clean the new brush heads 1
with fresh water.
19
06.09.13 13:47
Fitting/removing the brush
head
■ To remove the brush head 1, turn it clockwise
and then pull it upwards.
GB
MT
■ To fit the brush head 1, put it onto the handle 5
in a slightly offset position and then turn it anticlockwise until it is in a straight position above
the on/off switch 4.
To avoid damage to the appliance, always use
original brush heads.
(For replacement brush heads, see the order card)
Brushing teeth
WARNING!
Due to the unaccustomed effect of the toothbrush
there may be some initial gum bleeding, which is
normal. Should this continue for more than two
weeks, consult your dentist.
1) Fit the brush head 1 to the handle 5.
2) Moisten the brush head 1 under running
water.
3) Put a little toothpaste onto the wet brush.
NOTE
To avoid spray, do not switch on the appliance
until it is in your mouth
4) To start the toothbrush, press the on/off
switch 4.
6) Start in one quadrant:
Start with the brush head 1 on your gums,
and move the brush upwards/downwards from
the gums to the crown of the tooth.
Proceed in this manner on both the inside and
the outside of the tooth. Start again at the
gums for each individual tooth.
Do not forget to brush the back of the rear
molars.
To clean the chewing surfaces, guide the rotating
brush head over the chewing surfaces with a
little pressure.
7) After 30 seconds, the toothbrush stops briefly,
to signal that you should start cleaning the next
quadrant. Clean each jaw quadrant using the
same technique.
8) After two minutes, the toothbrush briefly stops
operating 3 times. This informs you that you
have complied with the dental recommendation of two minutes cleaning.
9) Press the on/off switch 4 to stop the toothbrush.
NOTE
10) Then take the toothbrush out of your mouth.
This toothbrush has a 30-second interval timer,
so that all four jaw quadrants can be cleaned
evenly.
11) After use, rinse the brush head 1 thoroughly
under running water.
12) Replace the protective cap 2 on the brush
head 1.
5) Divide your mouth into four parts (quadrants):
upper left, upper right, lower left and lower
right.
20
IB_93451_DZB3A1_LB5.indb 20
DZB 3 A1
06.09.13 13:47
13) Remove the brush head 1 from the handle 5.
Clean the drive shaft 3 on the handle 5 under
running water. Hold the handle 5 so that the
water only flows over the drive shaft 3.
Changing the batteries
When the toothbrush’s movements become noticeably weaker, the batteries must be replaced.
■ Open the battery compartment by pulling off the
battery compartment cover 6 in a downwards
direction and remove the old batteries.
ATTENTION! DAMAGE TO PROPERTY!
Always use batteries of the same type, and never
use a new battery and an old battery together.
Cleaning and care
ATTENTION! DAMAGE TO PROPERTY!
► Do not use sharp objects to remove dried-on
toothpaste from the handle 5, otherwise
the seal and thus the appliance may be
damaged.
► Do not immerse the handle 5 in water!
Liquid must not be allowed to penetrate the
handle 5.
GB
MT
■ Remove the brush head 1 from the handle 5.
After use, always clean the brush heads 1
thoroughly under running water.
We recommend cleaning the brush heads 1 in
a standard commercial denture cleaning fluid
every 2–4 weeks. A new brush head 1 should
be fitted after about 3 months, and the brush
head must always be replaced when the bristles
start to bend outwards.
■ To clean the drive shaft 3 and the handle 5,
allow a little water to flow over them. To do this,
hold the handle 5 so that the drive shaft 3 is
pointing downwards.
Make sure that no water gets into the battery
compartment.
Storage
Remove the batteries if you do not intend to use
the toothbrush for a long period.
Place the protective cap 2 on the brush head 1.
■ Insert two new batteries of type AA/LR6 1.5 V.
Ensure that the batteries are inserted with the
correct polarity. This is marked on both contacts
inside the battery compartment.
■ Replace the battery compartment cover 6 in
such a way that it is securely attached.
DZB 3 A1
IB_93451_DZB3A1_LB5.indb 21
21
06.09.13 13:47
Disposal
Disposal of the appliance
GB
MT
Under no circumstances should
the appliance be disposed of
in the normal domestic waste.
This product is subject to the
provisions of European Directive 2012/19/EU.
Dispose of the appliance via an approved disposal
company or your municipal waste facility. Please
observe the currently applicable regulations.
Please contact your waste disposal centre if you
are in any doubt.
Disposal of batteries
Used batteries may not be
disposed of in the household
waste.
All consumers are legally obliged to dispose of
batteries at a collection point provided by their
local community or at a retail store.
The purpose of this obligation is to ensure that
batteries are disposed of in an environmentally
friendly way. Only dispose of batteries when
they are fully discharged.
The packaging is made from environmentally friendly material and can be
disposed of at your local recycling plant.
This appliance is intended solely for private use
and not for commercial purposes. The warranty
is deemed void if this product has been subjected
to improper or inappropriate handling, abuse or
modifications that were not carried out by one of
our authorised service centres.
Your statutory rights are not restricted in any way
by this warranty. The warranty period is not prolonged by repairs made under the warranty. This
also applies to replaced and repaired parts.
Damage and defects present at the time of
purchase must be reported immediately after
unpacking, or no later than two days after the date
of purchase.
Repairs made after expiry of the warranty period
are chargeable.
Service Great Britain
Tel.: 0871 5000 720 (£ 0.10/Min.)
E-Mail: [email protected]
IAN 93451
Service Malta
Tel.: 80062230
E-Mail: [email protected]
IAN 93451
Hotline availability: Monday to Friday 08:00 20:00 (CET)
Importer
KOMPERNASS HANDELS GMBH
Warranty and Service
BURGSTRASSE 21
The warranty provided for this appliance is 3 years
from the date of purchase. This appliance has been
manufactured with care and inspected meticulously
prior to delivery.
44867 BOCHUM
GERMANY
www.kompernass.com
Please retain your receipt as proof of purchase.
In the event of a warranty claim, please contact
your Customer Service by telephone. This is the
only way to guarantee free return of your goods.
The warranty only covers claims for material and
manufacturing defects, not for transport damage,
worn parts or damage to fragile components such
as buttons or batteries.
22
IB_93451_DZB3A1_LB5.indb 22
DZB 3 A1
06.09.13 13:47
Inhaltsverzeichnis
Einleitung . . . . . . . . . . . . . . . . . . . . . . . . . . . . . . . . . . . . . . . . . . . . . . . . . . . . . . . . . . . . 24
Bestimmungsgemäßer Gebrauch . . . . . . . . . . . . . . . . . . . . . . . . . . . . . . . . . . . . . . . . 24
Lieferumfang. . . . . . . . . . . . . . . . . . . . . . . . . . . . . . . . . . . . . . . . . . . . . . . . . . . . . . . . . 24
Gerätebeschreibung. . . . . . . . . . . . . . . . . . . . . . . . . . . . . . . . . . . . . . . . . . . . . . . . . . . 24
Technische Daten . . . . . . . . . . . . . . . . . . . . . . . . . . . . . . . . . . . . . . . . . . . . . . . . . . . . . 24
Sicherheitshinweise . . . . . . . . . . . . . . . . . . . . . . . . . . . . . . . . . . . . . . . . . . . . . . . . . . . 24
Erste Verwendung . . . . . . . . . . . . . . . . . . . . . . . . . . . . . . . . . . . . . . . . . . . . . . . . . . . . 25
DE
AT
CH
Bürstenkopf aufsetzen / abnehmen . . . . . . . . . . . . . . . . . . . . . . . . . . . . . . . . . . . . . . 26
Zähne putzen . . . . . . . . . . . . . . . . . . . . . . . . . . . . . . . . . . . . . . . . . . . . . . . . . . . . . . . . 26
Wechseln der Batterien . . . . . . . . . . . . . . . . . . . . . . . . . . . . . . . . . . . . . . . . . . . . . . . . 27
Reinigung und Pflege . . . . . . . . . . . . . . . . . . . . . . . . . . . . . . . . . . . . . . . . . . . . . . . . . . 27
Aufbewahrung . . . . . . . . . . . . . . . . . . . . . . . . . . . . . . . . . . . . . . . . . . . . . . . . . . . . . . . 27
Entsorgung . . . . . . . . . . . . . . . . . . . . . . . . . . . . . . . . . . . . . . . . . . . . . . . . . . . . . . . . . . 28
Gerät entsorgen. . . . . . . . . . . . . . . . . . . . . . . . . . . . . . . . . . . . . . . . . . . . . . . . . . . . . . . . . . . . . . . . . . . 28
Batterien/Akkus entsorgen . . . . . . . . . . . . . . . . . . . . . . . . . . . . . . . . . . . . . . . . . . . . . . . . . . . . . . . . . . 28
Garantie und Service . . . . . . . . . . . . . . . . . . . . . . . . . . . . . . . . . . . . . . . . . . . . . . . . . . 28
Importeur . . . . . . . . . . . . . . . . . . . . . . . . . . . . . . . . . . . . . . . . . . . . . . . . . . . . . . . . . . . 28
DZB 3 A1
IB_93451_DZB3A1_LB5.indb 23
23
06.09.13 13:47
DE
AT
CH
Einleitung
Gerätebeschreibung
Herzlichen Glückwunsch zum Kauf Ihres neuen
Gerätes.
1 Bürstenkopf
Sie haben sich damit für ein hochwertiges Produkt
entschieden. Die Bedienungsanleitung ist Bestandteil dieses Produkts. Sie enthält wichtige Hinweise
für Sicherheit, Gebrauch und Entsorgung. Machen
Sie sich vor der Benutzung des Produkts mit allen
Bedien- und Sicherheitshinweisen vertraut. Benutzen Sie das Produkt nur wie beschrieben und für
die angegebenen Einsatzbereiche. Händigen Sie
alle Unterlagen bei Weitergabe des Produkts an
Dritte mit aus.
3 Antriebswelle
Bestimmungsgemäßer
Gebrauch
Dieses Gerät ist ausschließlich vorgesehen zur persönlichen Zahnpflege. Dieses Gerät ist ausschließlich für die Benutzung in privaten Haushalten
bestimmt. Es ist nicht vorgesehen zur Verwendung
in gewerblichen, industriellen oder medizinischen
Bereichen und nicht in der Tierpflege.
2 Schutzkappe
4 Ein-/Ausschalter
5 Handteil
6 Batteriefachdeckel
Technische Daten
Spannungsversorgung: 2 x 1,5 V
Batterietyp:
1,5 V, Mignon, AA, LR6
Schutzart:
IPX4
Sicherheitshinweise
WARNUNG! VERLETZUNGSGEFAHR!
►
Lieferumfang
Handteil
4 Bürstenköpfe
2 Batterien
1 Schutzkappe
Bedienungsanleitung
Kontrollieren Sie direkt nach dem Auspacken den
Lieferumfang auf Vollständigkeit.
►
Entfernen Sie alle Verpackungsmaterialien und
Folien vom Gerät.
►
►
24
IB_93451_DZB3A1_LB5.indb 24
Zahnbürsten können von Kindern
und von Personen mit reduzierten physischen, sensorischen
oder mentalen Fähigkeiten oder
Mangel an Erfahrung und / oder
Wissen benutzt werden, wenn sie
beaufsichtigt oder bezüglich des
sicheren Gebrauchs des Gerätes unterwiesen wurden und die
daraus resultierenden Gefahren
verstanden haben.
Reinigung und Benutzer-Wartung
dürfen nicht durch Kinder durchgeführt werden, es sei denn, sie
sind beaufsichtigt.
Kinder dürfen nicht mit dem Gerät
spielen.
Öffnen Sie das Gerät (außer
Batteriefach) nicht selber. Durch
unsachgemäßen Zusammenbau
besteht Verletzungsgefahr!
DZB 3 A1
06.09.13 13:47
ACHTUNG! BATTERIEN!
Sicherheitshinweise für den Umgang
mit Batterien:
► Werfen Sie keine Batterien ins
Feuer. Laden Sie Batterien nicht
wieder auf. Es besteht Explosionsund Verletzungsgefahr!
► Öffnen Sie die Batterien niemals,
löten oder schweißen Sie nie an
Batterien. Es besteht Explosionsund Verletzungsgefahr!
► Überprüfen Sie regelmäßig die
Batterien. Auslaufende Batterien
können Beschädigungen am Gerät verursachen.
► Wenn Sie ein Gerät längere Zeit
nicht benutzen, entnehmen Sie die
Batterien.
► Bei ausgelaufenen Batterien,
ziehen Sie Schutzhandschuhe an.
Reinigen Sie das Batteriefach und
die Batteriekontakte mit einem
trockenen Tuch.
► Batterien dürfen nicht in die Hände von Kindern gelangen. Kinder
könnten Batterien in den Mund
nehmen und verschlucken.
Sollte eine Batterie verschluckt
worden sein, muss sofort medizinische Hilfe in Anspruch genommen
werden.
DZB 3 A1
IB_93451_DZB3A1_LB5.indb 25
ACHTUNG! SACHSCHADEN!
►
►
►
►
Lassen Sie keine Flüssigkeiten in
das Gerät eindringen und tauchen Sie es nicht unter Wasser,
um Beschädigungen zu vermeiden.
Vermeiden Sie das Eindringen von
Fremdkörpern.
Tauchen Sie das Handteil nicht in
Wasser oder andere Flüssigkeiten.
Das führt zu irreparablen Schäden am Gerät!
Das Gerät darf nicht mit heißen
Oberflächen in Berührung kommen.
DE
AT
CH
Erste Verwendung
Bevor Sie das Gerät in Betrieb nehmen, überzeugen Sie sich davon, dass es in einwandfreiem
Zustand ist. Andernfalls darf es nicht verwendet
werden.
1) Öffnen Sie das Batteriefach, indem Sie den
Batteriefachdeckel 6 nach unten abziehen.
2) Legen Sie die Batterien gemäß der im Batteriefach angegebenen Polarität ein (siehe Kapitel
„Wechseln der Batterien“).
3) Stecken Sie den Batteriefachdeckel 6 wieder
auf das Handteil 5 auf. Achten Sie darauf,
dass er fest sitzt
4) Reinigen Sie vor der ersten Verwendung den
neuen Bürstenkopf 1 mit klarem Wasser.
25
06.09.13 13:47
Bürstenkopf aufsetzen /
abnehmen
■ Zum Abnehmen des Bürstenkopfes 1, drehen
Sie ihn im Uhrzeigersinn und ziehen Sie ihn
dann nach oben ab.
■ Zum Aufsetzen des Bürstenkopfes 1 setzen Sie
ihn leicht versetzt auf das Handteil 5 auf und
drehen Sie ihn gegen den Uhrzeigersinn, bis er
gerade über dem Ein-/Ausschalter 4 steht.
DE
AT
CH
Verwenden Sie nur Original-Bürstenköpfe, um
Schäden am Gerät zu vermeiden.
(Ersatzbürstenköpfe siehe Bestellkarte)
Zähne putzen
WARNUNG!
Anfänglich kann es durch die ungewohnte Reizung zu etwas Zahnfleischbluten kommen, das
ist normal. Hält dies länger als zwei Wochen an,
sollten Sie Ihren Zahnarzt befragen.
1) Stecken Sie den Bürstenkopf 1 auf das
Handteil 5.
2) Feuchten Sie den Bürstenkopf 1 unter fließendem Wasser an.
3) Tragen Sie etwas Zahnpasta auf die feuchte
Bürste auf.
HINWEIS
Schalten Sie das Gerät erst im Mund ein, um
Spritzer zu vermeiden.
4) Drücken Sie den Ein-/Ausschalter 4, um die
Zahnbürste zu starten.
HINWEIS
Diese Zahnbürste hat einen 30-Sekunden-Intervall-Timer, damit Sie alle vier Kieferquadranten
gleichmäßig reinigen können.
6) Beginnen Sie in einem Quadranten:
Setzen Sie den Bürstenkopf 1 auf das
Zahnfleisch auf und führen Sie die Bürste vom
Zahnfleisch ausgehend über den Zahn.
Verfahren Sie so mit der Innenseite sowie mit
der Außenseite des Zahnes. Setzen Sie für
jeden Zahn neu auf dem Zahnfleisch an.
Vergessen Sie die Rückseite des hinteren Backenzahnes nicht.
Um die Kauflächen zu reinigen, führen Sie die
rotierende Bürste mit leichtem Druck über die
Kauflächen.
7) Nach 30 Sekunden unterbricht die Zahnbürste
kurz den Betrieb, um Ihnen zu signalisieren,
dass Sie den nächsten Kieferquadranten reinigen sollen. Reinigen Sie alle Kieferquadranten
mit der gleichen Technik.
8) Nach zwei Minuten unterbricht die Zahnbürste den Betrieb 3 x kurz. Dann sind Sie der
zahnärztlichen Empfehlung von 2 Minuten
Zähneputzen gerecht geworden.
9) Drücken Sie den Ein-/Ausschalter 4, so dass
die Zahnbürste stoppt.
10) Nehmen Sie erst dann die Zahnbürste aus dem
Mund.
11) Säubern Sie den Bürstenkopf 1 nach Gebrauch gründlich unter fließendem Wasser.
12) Stecken Sie die Schutzkappe 2 auf den
Bürstenkopf 1.
5) Teilen Sie Ihren Kiefer in vier Teile (Quadranten): oben links, oben rechts, unten links und
unten rechts.
26
IB_93451_DZB3A1_LB5.indb 26
DZB 3 A1
06.09.13 13:47
13) Nehmen Sie den Bürstenkopf 1 vom Handteil
5 ab.
Reinigen Sie die Antriebswelle 3 am Handteil
5 unter fließendem Wasser. Halten Sie das
Handteil 5 so, dass das Wasser nur über die
Antriebswelle 3 fließt.
Wechseln der Batterien
Wenn die Bewegungen der Zahnbürste spürbar
schwächer werden, müssen die Batterien gewechselt werden.
■ Öffnen Sie das Batteriefach, indem Sie den
Batteriefachdeckel 6 nach unten abziehen und
entnehmen Sie die leeren Batterien.
ACHTUNG! SACHSCHADEN!
Verwenden Sie immer Batterien des gleichen
Typs und niemals eine frische und eine alte
Batterie zusammen.
■ Stecken Sie den Batteriefachdeckel 6 wieder
auf, so dass er fest verschlossen ist.
Reinigung und Pflege
ACHTUNG! SACHSCHADEN!
► Um eingetrocknete Zahnpastareste am Handteil 5 zu entfernen, verwenden Sie keine
spitzen Gegenstände, da ansonsten die Dichtung und somit das Gerät beschädigt werden.
► Tauchen Sie das Handteil 5 nicht unter Wasser! Es darf keine Flüssigkeit in das Handteil
5 gelangen.
DE
AT
CH
■ Nehmen Sie den Bürstenkopf 1 vom Handteil
5 ab. Säubern Sie die Bürstenköpfe 1 nach
Gebrauch immer gründlich unter fließendem
Wasser.
Wir empfehlen eine Reinigung der Bürstenköpfe
1 in handelsüblicher Reinigungsflüssigkeit für
Zahnprothesen etwa alle 2 - 4 Wochen. Nach
ca. 3 Monaten, spätestens jedoch wenn sich die
Borsten nach außen biegen, sollten Sie einen
neuen Bürstenkopf 1 verwenden.
■ Zum Reinigen der Antriebswelle 3 und des
Handteils 5, lassen Sie kurz Wasser darüber
fließen. Halten Sie dabei das Handteil 5 so,
dass die Antriebswelle 3 nach unten weist.
Achten Sie dabei darauf, dass kein Wasser in
das Batteriefach gelangt.
Aufbewahrung
Wenn Sie die Zahnbürste längere Zeit nicht benutzen, entnehmen Sie die Batterien.
Stecken Sie die Schutzkappe 2 auf den Bürstenkopf 1.
■ Legen Sie zwei neue Batterien des Typs AA/
LR6 1,5 V ein. Achten Sie beim Einlegen auf
die korrekte Polarität. Diese ist auf den beiden
Kontakten im Inneren des Batteriefaches angegeben.
DZB 3 A1
IB_93451_DZB3A1_LB5.indb 27
27
06.09.13 13:47
Entsorgung
Gerät entsorgen
Werfen Sie das Gerät keinesfalls in den normalen Hausmüll.
Dieses Produkt unterliegt
der europäischen Richtlinie
2012/19/EU.
DE
AT
CH
Entsorgen Sie das Gerät über einen zugelassenen
Entsorgungsbetrieb oder über Ihre kommunale
Entsorgungseinrichtung. Beachten Sie die aktuell
geltenden Vorschriften. Setzen Sie sich im Zweifelsfall mit Ihrer Entsorgungseinrichtung in Verbindung.
Batterien/Akkus entsorgen
Batterien/Akkus dürfen nicht
im Hausmüll entsorgt werden.
Jeder Verbraucher ist gesetzlich verpflichtet, Batterien /
Akkus bei einer Sammelstelle seiner Gemeinde /
seines Stadtteils oder im Handel abzugeben.
Diese Verpflichtung dient dazu, dass Batterien/Akkus einer umweltschonenden Entsorgung zugeführt
werden können. Geben Sie Batterien/Akkus nur im
entladenen Zustand zurück.
Die Verpackung besteht aus umweltfreundlichen Materialien, die Sie über
die örtlichen Recyclingstellen entsorgen
können.
Garantie und Service
Sie erhalten auf dieses Gerät 3 Jahre Garantie ab
Kaufdatum. Das Gerät wurde sorgfältig produziert
und vor Anlieferung gewissenhaft geprüft.
Das Produkt ist lediglich für den privaten und nicht
für den gewerblichen Gebrauch bestimmt. Bei
missbräuchlicher und unsachgemäßer Behandlung,
Gewaltanwendung und bei Eingriffen, die nicht von
unserer autorisierten Service-Niederlassung vorgenommen wurden, erlischt die Garantie.
Ihre gesetzlichen Rechte werden durch diese Garantie nicht eingeschränkt. Die Garantiezeit wird
durch die Gewährleistung nicht verlängert. Dies gilt
auch für ersetzte und reparierte Teile.
Eventuell schon beim Kauf vorhandene Schäden
und Mängel müssen sofort nach dem Auspacken
gemeldet werden, spätestens aber zwei Tage nach
Kaufdatum.
Nach Ablauf der Garantiezeit anfallende Reparaturen sind kostenpflichtig.
Service Deutschland
Tel.: 0800 5435 111
E-Mail: [email protected]
IAN 93451
Service Österreich
Tel.: 0820 201 222 (0,15 EUR/Min.)
E-Mail: [email protected]
IAN 93451
Service Schweiz
Tel.: 0842 665566 (0,08 CHF/Min.,
Mobilfunk max. 0,40 CHF/Min.)
E-Mail: [email protected]
IAN 93451
Erreichbarkeit Hotline: Montag bis Freitag von
8:00 Uhr – 20:00 Uhr (MEZ)
Importeur
Bitte bewahren Sie den Kassenbon als Nachweis
für den Kauf auf. Bitte setzen Sie sich im Garantiefall mit Ihrer Servicestelle telefonisch in Verbindung.
Nur so kann eine kostenlose Einsendung Ihrer
Ware gewährleistet werden.
KOMPERNASS HANDELS GMBH
Die Garantieleistung gilt nur für Material- oder
Fabrikationsfehler, nicht aber für Transportschäden,
Verschleißteile oder für Beschädigungen an zerbrechlichen Teilen, z. B. Schalter oder Akkus.
www.kompernass.com
28
IB_93451_DZB3A1_LB5.indb 28
BURGSTRASSE 21
44867 BOCHUM
GERMANY
DZB 3 A1
06.09.13 13:47
KOMPERNASS HANDELS GMBH
BURGSTRASSE 21
44867 BOCHUM
DEUTSCHLAND / GERMANY
www.kompernass.com
Estado de las informaciones · Versione delle informazioni
Last Information Update · Stand der Informationen:
08 / 2013 · Ident.-No.: DZB3A1-072013-2
IAN 93451
5