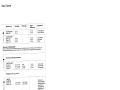
1
ejtun
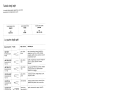
Bedlenungsanl
Instruction Boofr
Mode d’empioj
Libreo istruzionj
4
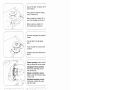
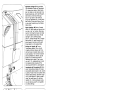
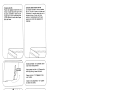
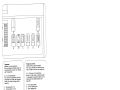
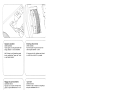
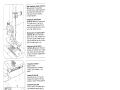
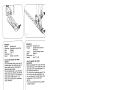
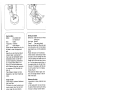
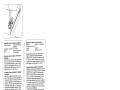
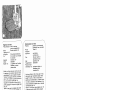
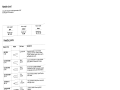
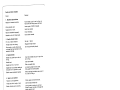
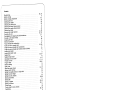
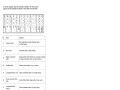
Teile der Nähmaschine
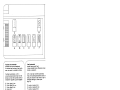
Parts of the sewing machine
101
102
103
104
105
106
107
108
101
102
103
104
105
106
107
108
109
110
111
112
113
114
115
116
117
118
119
120
121
122
123
124
125
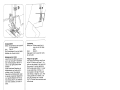
Fadenhebel
Spuler-Vorspannung
Tragegriff
Spuler
Handrad
Auslösescheibe
Stichlangen-Einsteller
Verwandlurigsnahflache
mit Zubehörfach
Stichplatte
NãhfuBhalter mit NãhfuB
Einfadelschlitze
Oberfadenspannung
Stoffdrückerhebel
Nadelhalter mit Halteschraube
Garnrollenstifte
Stichmustertabelle
Tipptasten
Grundplatte
Verschlul3klappe dahinter Greifer
Fadenfuhrung
Anschlag zum Stopfen
Zierstich-Einstellrad
Rückwärtstaste
Freiarm
Hauptschalter
109
110
111
112
113
114
115
116
117
118
119
120
121
122
123
124
125
Take-up lever
Bobbin winder tension
Carrying handle
Bobbin winder
Hand wheel
Stop motion knob
Stitch length key
Detachable work support with
accessory compartment
Needle plate
Sewing foot holder with sewing foot
Threading slots
Needle thread tension
Presser bar lifter
Needle holder with screw
Spool pins
Table of stitch patterns
Finger-tip controls
Bedplate
Free arm cover
(enclosing sewing hook)
Thread guide
Stop for darning operations
Fancy-stitch thumb wheel
Reverse-feed control
Free arm
Master switch
)
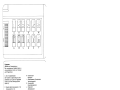
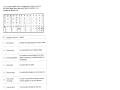
Pièces de Ia machine
101
102
103
104
105
106
107
108
109
110
111
112
113
114
115
116
117
118
119
120
121
122
123
124
125
Levier releveur de fil
Pretension du dévidoir
Poignee
Dévidoir
Volant
Disque de debrayage du volant
Regle-point
Plaque de rangement avec botte a
accessoires
Plaque a aiguille
Support avec pied presseur
Fentes denfilage
Tension dii fil d’aiguille
Levier presse-tissu
Pince-aiguille avec vis de fixation
Broches a bobines
Tableau de points
Touches de commando
Plaque de base
Compartiment du crochet
Guide-fil
Butee pour travaux de reprisage
Disque do reglage des points
d’ornementation
Touche marche arriére
Bras libre
Interrupteur general
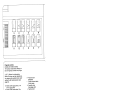
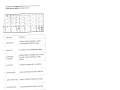
Parti della macchina per cucire
101
102
103
104
105
106
107
108
109
110
111
112
113
114
115
116
117
118
119
120
121
122
123
124
125
Leva tendifilo
Tensione dello spolatore
Maniglia
Spolatore
Volantino
Disco di disinnesto
Regolatore lunghezza punto
Piano variabile con scomparto per
accessori
Placca d’ago
Supporto del piedino con piedino
Fessura per infilatura
Tensione superiore
Leva alzapiedirio
Morsetto d’ago con vite
Perni portarocchetti
Tabella del punti
I tasti automatici
Base piana
Sportello, dietro crochet
Guidafili
Fermo per rammendo
Regolatore punto ornamentale
Tasto per cucire indietro
Braccio libero
Interruttore principale
______
__
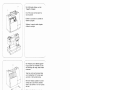
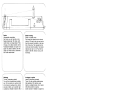
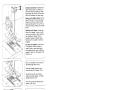
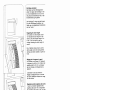
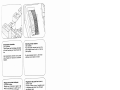
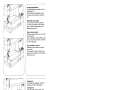
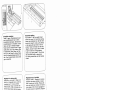
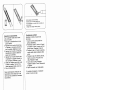
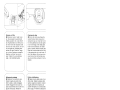
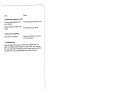
Die Kofferhaube abheben und den
Tragegriff umklappen.
Lift off the cover and fold down the
carrying handle.
Enlever Ic couvercle de a valisette et
rabattre a poignée.
Sollevare 1 coperchio della valigetta e
ribaltare a maniglia.
-
Den Anlasser und die Bedienungsanlei
tung aus dem Fach N nehmen, So wie
die Abbildung oben zeigt, beides wieder
einräumen.
Take foot control and Instruction Book
out of compartment N. Put back again
as shown in the illustration above.
Retirer le rheostat a pedale et a notice
d’emploi de Ia case N et es remettre
dans a case comme on voit sur Ia photo
du haut.
Togliere 1 pedale davviamento e le
istruzioni per l’uso dal contenitore N.
Come rappresentato nella figura supe
riore, riporre entrambi nd contenitore.
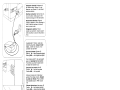
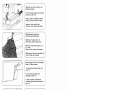
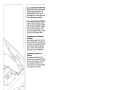
Elektrischer Anschlul3: Anlasser auf
den Boden stellen. Stecker N in die
Maschine, und Stecker 0 in die Wand
steckdose stecken.
Electrical connection: Set the foot con
trol on the floor. Insert plug N in the
machine and plug 0 in the wall socket.
Branchement electrique: Placer le
rheostat a pedale sur le sol. Brancher Ia
fiche N dans a machine et Ia fiche 0
dans Ia prise murale.
Collegamento elettrico: Porre il
reostato sul pavirnento. Inserire spina N
nella macchina. e spina 0 nella presa a
muro.
4
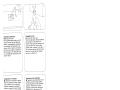
Hauptschalter P drücken, wobei das
Nählicht aufleuchtet. Anlasser nieder
treten. Je tiefer man drückt, urn so
schneller näht die Pfaff.
Electronic-Anlasser (Schalter 0)
= halbe Endgeschwindigkeit
Stellung
Stellung 41 = voIle Endgeschwindigkeit
Push master switch P; the sewing light
goes on. Operating the foot control:
The farther you press the pedal down
the faster the machine runs.
Electronic foot control (slide 0)
= half the top speed
Position
Position 44 = full top speed
Enfoncer le bouton de linterrupteur
general P; Ia lampe s’allume. Abaisser
Ia pédale du rheostat. Plus Ia pédale
sera abaissée, plus Ia Pfaff” coudra
vite.
Rheostat electronlque (interrupteur Q)
= derni-vitesse rnaximale
Position
Position 11 = vitesse maximale integrale
Prernendo l’interruttore principale P si
accende il ritlettore. Premere II
reostato: Piü a fondo si preme il pedale,
piU veloce cucirà Ia “Pfaff”.
Reostato elettronico (commutatore Q)
= velocitá finale dirnezzata
Posizione
Posizione 44 = velocità finale intera
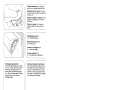
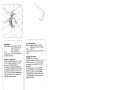
4Spulen vorbereiten:
Verwandlungsnahfläche etwas anheben
und herausnehmen.
Preparation for bobbin winding:
Lift detachable work support and remove it.
Preparation des canettes:
Lever quolque peu Ia boite de rangement
et Ia sortir.
Preparazione per avvolgere Ia spohna:
Sollevare eggermente II piano variabile e
toglierlo.
4
Verschlu3klappe 119 nach unten Offnen.
Open free arm cover 119.
Ouvrir le capot 119 vers le bas.
Aprire sportello 119 verso basso.
Hauptschalter 125 ausschalten.
Klappe N anheben und die Spulenkapsel
herausziehen.
Switch off master switch 125.
Raise latch N and pull out the bobbin case.
Tourner l’interrupteur general 125 sur
ArrêP’.
Lever le loquet N et retirer Ia boite a
canette.
• Disinserire I’interruttore principale 125.
Sollevare ii chiusion N e togliere Ia
\cpsula della spolina.
Kiappe N loslassen und die Spule her
ausnehmen.
Release latch N and take out the bobbin.
Lãcher le loquet N et retirer Ia canette.
Rilasciare chiusino N e togliere Ia
spolina.
4
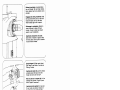
,4Spule aut den Spuler 104 stecken.
N
Stiff N
muB in Schlitz 0.
Place a bobbin on spindle 104, making
sure pin N enters slot 0.
•
Mettre a canette sur le dévidoir 104; le
tenon N doit s’engager dans Ia fente 0.
Mettere a spolina su spolatore 104.
Perno N deve entrare in fessura 0.
Spule nach rechts gegen den Anschlag P
drücken.
Push the bobbin to the right against
stop P.
Poussor Ia canette vers Ia droite centre
Ia butée P.
Spingere Ia spolina verso destra centre il
fermo P.
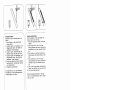
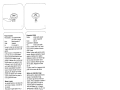
Nähwerk ausschalten: Handrad 105 fest
halten und Scheibe 106 nach vorn drehen.
Disengaging the sewing mechanism:
Hold the hand wheel steady and turn
knob 106 toward you.
Débrayer le mécanisme de couture:
Retenir le volant 105 et tourner le disque
106 vers lavant.
Disinnestare meccanismo del cucito:
Tenere fermo 1 volantino 105 e girare
disco 106 in avanti.
Garnrollenstifte 115 ganz hochziehen und
Garnrolle aufstecken.
Pull thread stand pins 115 up completely
and place thread reels on them.
Tirer les broches 115 a fond vers le haut
et mettre Ia bobine en place.
Estrarre completamente i perni porta
rocchetti 115 e sistemarci il rocchetto del
file.
(
S
4
pulen
Hauptschabter einschalten,
Den Faden von der Garnrolle in die
Spulervorspannung 102 ziehen, nach
rechts führen und einige Mate in Pfeil
richtung urn die Spule wickeln. Dann den
Ful3anlasser betatigen und spulen. 1st die
Spule volt, bloibt sie stehen. Die voile
Spule nach links drücken, abnehmen und
den Faden abschneiden.
N 4 Bobbin winding
Bobinage
Tourner l’interrupteur general.
Tirer le fil de Ia bobine dans Ia préten
sion 102 du dévidoir, le coucher a droite
et lenrouler de quelques tours, dans le
sens de Ia flèche, sur Ia canette. Agir sur
Ia pedale du rheostat et bobiner. Des que
Ia canette est pleine, le dévidoir s’arréte.
Pousser Ia canette vers Ia gauche, Ia reti
rer et couper le fib.
Switch on master switch.
Pull thread from thread reel into thread
retainer 102, lead to the right and wind a
few times around the bobbin in the direc
tion of the arrow. Then actuate the foot
control and wind the bobbin. The bobbin
stops as soon as it is full. Push the full
bobbin to the left, remove it and cut off
the thread.
Avvolgere Ia spolina
Inserire l’interruttore principale.
Tirare ii fib dat rocchetto nella tensione
deblo spolatore 102, riportarlo verso
destra e avvolgerlo alcune volte in senso
della freccia attorno Ia spolina.
Quindi azionare II reostato e avvolgere Ia
spolina. Quando Ia spolina è piena Si
ferma da sola, Premere a spolina piena
verso sinistra, toglierla e tagliare it fib.
_________________________________________________________________
_________
4
N4
U
—
Nähwerk elnschalten: Handrad festhal
ten und Scheibe 106 nach hinten drehen.
Dann Handrad nach vorne drehen, bis es
einrastet.
Engaging the sewing mechanism: Hold
the hand wheel firmly and turn disk 106
toward the back, then turn the hand
wheel forward again until it snaps in.
Embrayage du mécanisme: Retenir le
volant et tourner le disque 106 vers
i’arrière. Tourner le volant vers l’avant
jusqu’a ce qu’il senclenche.
lnserimento meccanismo di cucito:
tenere fermo il volantino e girare ii disco
106 verso dietro. Girare guindi II volantino
in avanti finché sinnesta.
—
1’
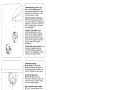
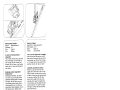
Spule einlegen N (Faden nach hinten).
Den Faden in den Schlitz 0 und bis zur
Offnung P ziehen.
Inserting the bobbin (N), with the thread
unreeling tod the back.
_
Mise en place de Ia canette (N), le fil so
déroulant vers larrière. Tirer le fil par Ia
fente 0 jusqu’à I’ouverture P.
Inserimento della spolina N (ii capo del
fib va rivolto verso dietro). Introdurre 1
fib nella fessura 0, quindi tirare fino
all’apertura P.
4
Unterfadenspannung prUfen: Kapsel
leicht ruckartig aufwartsbewegen. Sie
muB stufenweise niedersinken. (Einstell
schraube N nach links drehen = loser,
nach rechts drehen = fester).
Checking the bobbin thread tension:
With a brief, sharp upward movement of
your hand, the bobbin must gradually slip
downwards. (Turn screw N counter-clock
wise for a weaker tension, or clockwise
for a tighter tension.)
Tension du fil de canette: Laisser
pendre Ia canette garnie au fil de Ia
canette. Elle dolt descendre graduelle
ment quand on imprime a Ia main de
legeres saccades ascendantes. Rotation
de Ia vis N vers Ia gauche: reduction de
Ia tension; rotation vers Ia droite:
renforcement.
Controllo della tensione inferiore: Tirare
Ia capsula con leggeri colpetti verso
I’alto. Deve abbassarsi gradatamente
(girando Ia vite di regolaggio N a sinistra
si allenta, verso destra si rinforza).
Spulenkapsel einsetzen:
• Hauptschalter 125 ausschalten.
Klappe 0 anheben und die Kapsel bis
zum Anschlag auf Stift P schieben. Aus
schnitt Q mul3 dabei nach oben zeigen.
Inserting the bobbin case:
• Switch off master switch 125.
Raise latch 0 and push the bobbin case
onto stud P as far as it will go, making
sure cutout Q points upwards.
Mise en place de a boite a canette:
• Tourner I’interrupter general 125 sur
‘Arrêt’..
Relever le loquet 0 et glisser Ia boite a
canette, l’ouverture Q en haut, a fond
sur le tourillon P.
Come inserire Ia capsula della spolina:
• Disinserire l’interruttore principale 125.
Sollevare il chiusino 0 e inserire Ia cap
sula fino aIl’arresto sul perno P. L’aper
tura Q deve essere rivolta verso l’alto,
4 Obertaden einlegen: •
Hauptschalter
125 ausschalten. Nadel und Fadenhebel
101 müssen oben stehen. Nähfu8 anho
ben. Den Faden von der Garnrolle in die
Spulervorspannung, durch die Offnung N,
den Schlitz 0, hinter das Fuhrungs
stuck P, nach oben in den Schlitz 0,
durch den Fadenhebel 101, zurück durch
den Schlitz Q, hinter die Fuhrung A und
in die rechte Fadenfuhrung S am Nadel
halter ziehen.
Upper threading: • Switch off master
switch 125. Both needle and take-up lever
must be in the “up” position. Raise sew
ing foot. Pull thread from spool and draw
it into the bobbin tension stud, through
opening N, slot 0, behind guiding
piece P, upwards through slot 0. through
take-up lever 101. back through slot Q.
behind guide A and then into the right
thread guide S on the needle holder.
Enfilage de I’aiguille: • Tourner
l’interrupteur général 125 sur ‘Arrêt.
L’aiguille et le levier releveur de fil doi
vent so trouver en position haute. Lever
to pied presseur. Tirer le fit de Ia bobine
dans a pretension du dévidoir, par les
fentes N et 0, derriere le guide-fit P.
Remonter dans Ia fente Q, par le rele
veur de f ii 101, redescendre par a fente
0 et passer derriere le guide-fil A et
dans to guide-fil droit S du pince-aiguilte.
lnserimento del fib superiore: • Disiri
serire I’interruttore principale 125. Ago e
leva tendifilo devono essere in alto. Levare
1 piedino. Portare il fib dat rocchetto nella
tensione detlo spolatore, attraverso ‘aper
tura N, nella fessura 0, dietro Ia guida P,
verso l’atto nella fessura Q, nella leva
tendifilo 101, di ritorno attraverso Ia fes
sura Q, dietro Ia guida A e nel guidafilo
S a destra dell’ago.
4
Den Oberfaden von vorn nach hinten
durch das Nadelöhr fädeln.
Thread the needle from front to back.
Enfiler le fil d’aiguille do ‘avant en arriè
re par le chas d’aiguille.
lnfilare it fib superiore dat davanti verso
dietro attraverso Ia cruna dell’ago.
9
Untertaden herautholen: Obertaden fest
halten. Handrad nach vorn drehen und
einen Stich nähen bis Nadel und Faden
hebel wieder oben stehen. Mit dem Ober
faden den Uriterfaden nach oben ziehen.
Drawing up the bobbin thread: Hold the
needle thread taut. Turn the hand wheel
towards you and sew a stitch until both
needle and take-up lever are up. Pull out
the bobbin thread by means of the needle
thread.
Remontée du fil inférieur: Tendre lege
rement le fil daiguille. Tourner le volant
vers avant et coudre un point jusqu’à ce
que l’aiguille et le releveur do hi se
trouvent a nouveau en position haute.
Remonter le fil de canette a ‘aide du f ii
daiguille.
Far salire it fib inferiore: Tenere fermo
1 fib superiore. Girare ii volantino in
avanti e cucire un punto finché ago e
eva tendifilo siano di nuovo in posizione
re con lb fib superiore II fib
nut
und Unterfaden nach rechts unter
4 Oberden Nähful3 legen (etwa 10 cm).
Place both threads towards the right
under the sewing foot, (approx 10 cm).
Coucher les deux fibs vers b’arnere a
droite sous be pied presseur. Los laisser
dépasser d’environ 10cm.
Porre i fill superiore ed inferiore sotto II
piedino, (circa 10 cm).
4
Verschbub3klappe 119 schlieb3en.
Close free-arm cover 119.
Fermer be capot 119.
Chiudere be sportebbo 119.
4 Nàhfläche, wie der Pfeil zeigt, an die
Maschine schieben.
Push work support against the machine,
as shown by the arrow.
Placer a boite de rangement contre Ia
machine, comme le montre Ia flèche.
Applicare ii piano variabile alla
macchina, come indicato dalla freccia.
Hauptschalter ausschalten.
Stoff unter den NähfuB legen.
• Switch off master switch 125.
Place fabric under the sewing foot.
• Tourner I’interrupteur gOnéral 125
sur rArrêt’.
Placer du tissu sous le pied presseur.
• Disinserire I’interruttore principale 125.
\orre Ia stoffa sotto ii piedino.
4 Beim Einlegen extrem dicker Stofflagen
Hebel 113 häher anheben.
To insert extra-thick fabric plies raise
lever 113.
Pour les tissus très epais, lever
davantage le levier 113.
In caso di spessori di stoffa estre
mamente grossi aizare ulteriormente Ia
leva 113.
4 Hauptschalter einschalten.
Stoffdrückerhebel 113 senken.
Switch on master switch.
Lower presser bar lifter 113.
Tourner l’interrupteur general.
Descendre le levier 113.
Inserire l’interruttore principale.
Abbassare Ia leva premistoffa 113.
11
Anlasser niedertreten. Je tiefer man
drückt, urn so schneuer näht die Pfaff.
Operating the foot control: The more
you press down the pedal, the faster the
machine runs.
Abaisser Ia pedale du rheostat. Plus a
pédale sera abaissée, plus Ia Pfaff
coudra vite.
Premere ii reostato: Piü a fondo Si
preme ii pedale, piü veloce cucirà Ia
Pfaff”
/
Oberfadenspannung 112
N = Einstellmarkierung.
Needle thread tension 112
N = Setting mark.
Tension du fil d’alguille 112
N = repere de réglage.
Tensione superiore 112
N = marcatura per Ia regolazione.
Fadenspannung uberprUfen
Die normale Einstellung liegt im Bereich
von 3—5. Je höher die Zahl, je fester die
Spannung. Die Uberprufung wird mit
einem breiten Zickzackstich vorgenom
men. Eine kurze Naht nähen. Die Faden
verknotung soil in der Mitte der
Stofflagen liegen.
Checking the needle thread tension
The normal setting is between 3 and 5.
The higher the number, the tighter the
tension. To check the tension, set the
machine at a wide zigzag stitch. Sew a
short seam. The threads should interlock
in the middle of the material.
t
4
Tensions des Ills
Position de reglage normale entre 3 et 5.
Tension dautant plus forte que le chiffre
est grand. Contrôler a l’aide dun point
zigzag large. Coudre quelques points.
Les Ills doivent se nouer dans l’épais
seur des tissus.
Controuo della tensione del fib
La tensione normale si trova nel settore
da 3—5. Piü alto ii numero, piU forte sara
Ia tonsione. II controllo viene fatto con lo
zig-zag piU largo. Cucire una breve
cucitura. L’annodamento del f iii dove
avvenire al centro dello spessore del
materiale.
4Stotfdrückerhebel 113 hochstellen. Stoff
nach hinten herausnehmen.
1l
I
Raise presser bar lifter 113. Remove the
fabric by pulling it toward the back.
Relever le levier 113. Degager le tissu
vers l’arrière.
Alzare Ia leva alzapiedino 113. Togliere
Ia stoffa verso dietro.
4
Fadenabschneider N. Fâden einlegen
und nach unten ziehen.
Thread cutter N. Draw the threads into
the slot and pull them downwards.
Coupe-Ill N. Coucher los hIs dans a
fento at les tirer vers Ia bas.
Tagblafblo N. Inserire i fili e tirarli verso II
basso.
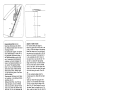
Stichlange einstellen
Die Zahien auf dem Stichlangen-Ein
steller 107 geben die Stichlänge in mm
an. Der Einstellbereich 1st 0 bis 6 mm.
Die gewunschte Stichlänge wird an die
Einstellmarkierung N gedreht.
Die Abbildung 0 unten zeigt die Einstel
lung des Stichlangen-Einstellers zum
Nähen der rot abgebildeten Stretchstiche
auf den Tasten.
I
Regulating the stitch length
The numbers on stitch length control
107 indicate the stitch length in milli
meters. The stitch length range is 0 to
6 mm. Turn the control to set the
number indicating the stitch length at
L.__—
.
-.
\\
\\
\\
\\ \
\\
:Obottom, shows how to set the
stitch length control for sewing stretch
stitches (red stitch symbols on push but
tons).
j
\\
\\\
\
Réglage de Ia longueur du point
Les chiffres sur le disque 107 indiquent
Ia longueur du point en mm. Celle-ci est
reglable entre 0 et 6 mm. La Iongueur
de point choisie est indiquée face au
repére N.
\
\ \
\\ \
\ \
ii
-
jJL..
\\ \
—
L
Z
_.zzEEEEEZEZZZZZ
\\\
I\
\\
EE___
\
\
\
L’illustration 0 (en bas) montre le
réglage du regle-point pour a couture
des points éiastiques marques en rouge
—
\_
\\
‘\\
\\
\\\
I
\\ \
\\\\ \\ \ \ \
\
\
\
\
\
\
_—
1\
Regolazione della lunghezza del punto
I numeri sul bottone regolatore della
lunghezza del punto 107 corrispondono
alla lunghezza del punto in mm. La rego
lazione si estende da 0 a 6 mm. La
Iunghezza del punto desiderata si regola
sulla marcatura N.
‘
La figura 0 sotto mostra Ia regolazione
del bottone regolatore per cucire i punti
flexi (stretch) raffigurati in rosso sui tasti.
RUckwärtsnähen
Die Taste 123 niederdrücken. Solange
die Taste gedrückt wird, näht die
Maschine rückwärts.
Reverse sewing
Press button 123. As long as you hold
this button the machine sews back
wards.
Couture en marche arrière
Abaisser Ia touche 123. La machine
coud en arrière aussi longtemps que a
touche est maintenue en bas.
La cucitura indietro
Premere ii tasto 123. Finchè II tasto
rimane premuto Ia macchina cuce
indietro.
J
15
4 Slcherheitshinweise
für Haushaltnähmaschinen
nach DIN 57700 Tell 28
bzw. lEG 335 Tell 28
a) Der Benutzer hat wegen der auf- und
abgehenden Nadel genugend Vor
sicht walton zu lassen und die Näh
stelle bei der Arbeit standig zu
beobachten.
b) Beim Verlassen der Maschine, bei
Wartungsarbeiten oder beim Wech
seln von mechanischen Teilen odor
Zubehör, ist die Maschine durch Her
ausziehen des Netzsteckers aus der
Steckdose vom Netz zu trennen.
c) Die maximal zulassige Leistung der
Lampe betragt 15 Watt.
4Mesures de sécurité
a) Toujours faire preuve do prudence et
continuellement surveiller 10 travail.
b) Toujours débrancher Ia machine du
secteur avant de quitter Ia machine,
avant les travaux d’entretien et en
cas de remplacement de pièces
mécaniques ou d’accessoires.
c) Puissance maximale admissible do
l’ampoule: 15 Watts.
4
Some safety rules
a) Take care to avoid injury to your
fingers by the needle during sewing.
b) Make sure you unplug the power
cord whenever you have to leave the
machine or want to clean it, oil it or
change mechanical and accessory
parts.
C) Be sure to use only a 15-watt light
bulb in the sewing lamp.
Safety rules for United Kingdom
see page 36.
Norme dl sicurezza per macchine per
cucire per uso famiglia secondo
DIN 57700 parte 28
o lEG 335 parte 28
a) In virtU del movimento alternativo
delI’ago, I’utonte deve prestare suffi
ciente attenziono e tenere constante
mente d’occhio il punto di lavoro.
b) Nel cambiare ago, piedino, spolina e
placca d’ago, nelle interruzioni non
custodite del lavoro e durante i lavor
di manutenzione si dove disinserire I
corrente della macchina togliendo Ia
spina dalla presa a muro.
c) La potenza massima consentita per
Ia lampadina è di 15 Watt.
4
4
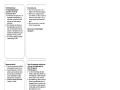
Tipptasten
(Modelle ohne Stretchstiche)
Die verschiedenen Modelle haben eine
unterschiedliche Anzahl von Tipptasten
und Programmen.
A, B, C Knopflochtasten
Die Taste B 1st gleichzeitig die Aus
schaittaste zum LOsen der getippten
Tasten und linke Stichlage (siehe
Seite 25).
D
E
F
G
M
Zickzackstich 2 mm
Zickzackstich 3,5 mm
Zickzackstich 5 mm
Geradstich
Elasticstich
In der Programmtabelle auf den Seiten
78—79 sind die Stiche und Stichkombina
tionen mit Hinweisen für ihre Verwen
dung angegeben.
Die Buchstaben der Tasten ihrer
Maschine bestimmen die Programme
und Kombinationen, welche genaht wer
den kännen.
Finger-tip controls
(models without stretch stitches)
The various models have differing num
bers of finger-tip controls and programs.
A, B, C; Buttons for buttonholing
Button B is also used as clearing button
for releasing the pushed buttons and for
setting the left needle position (see
page 25).
D
E
F
G
M
2-mm zigzag stitch
3.5-mm zigzag stitch
5-mm zigzag stitch
Straight stitch
Elastic stitch
All stitches and stitch combinations are
listed in the stitch program chart on
pages 80—81. This chart also contains
possible applications.
The letters of the buttons on your
machine determine the programs and
combinations that can be sewn.
1
4Touches de commande
Nt I tast automatici
(modéles sans points elastiques)
Le nombre des touches et des program
mes vane selon le modéle do machine.
(modelli senza punti flexi)
I diversi modelli hanno differente numerc
di tasti e programmi.
Touches boutonnières: A, B, C
La touche boutonniere B sert en méme
temps a annuler les touches activées et
a déporter l’aiguille a gauche (page 25).
A, B, C tasti per occhiello automatico
Tasto B è contemporaneamente anche il
tasto per annullare i tasti inseriti e per l
posizione deIl’ago a sinistra (vedi
pag. 25).
D
E
F
G
M
Point
Point
Point
Point
Point
zigzag
zigzag
zigzag
droit
zigzag
2 mm
3,5 mm
5 mm
piqué
Le tableau du programme des points
présente, sur les pages 82 a 83, les
points, los points combines et leurs prin
cipales utilisations.
Les lettres gravees sur les touches de
votre machine déterminent los program
mes simples et combines réalisables.
o
E
F
G
M
punto
punto
punto
punto
punto
a zig-zag 2 mm
a zig-zag 3,5 mm
a zig-zag 5 mm
diritto
elastico
Nella tabella dei programmi a pagine
84—85 sono descritti i punti e le possibili
combianazioni con accenni per Ia loro
utilizzazione.
Le lettere dei tasti della sua macchina
determinano I programmi e le combina
zioni che si possono cucire.
______
I
Tipptasten
(Modelle mit Stretchstichen)
Die verschiedenen Modelle haben eine
unterschiedliche Anzahl von Tipptasten
und Programmen.
A, B, C Knopflochtasten
Die Taste B st gleichzeitig die Aus
schaittaste zum Lösen der getippten
Tasten und linke Stichlage (siehe
Seite 25).
D Stretch-3fach-Zickzackstich 2 mm
Zickzackstich 2 mm
E Stretch-3fach-Zickzackstich 3,5 mm
Zickzackstich 3,5 mm
F Stretch-3fach-Zickzackstich 5 mm
Zickzackstich 5 mm
G Stretch-3fach-Geradstich
Geradstich
H Pulloverstich
Blindstich
I Geschlossener Overlockstich
Verbindungsstich
K Overlockstich
Muschelkantenstich
L Federstich
Zierelasticstich
M Wabenstich
Elasticstich
In der Programmtabelle auf den Seiten
78—79 sind die Stiche und Stichkombina
tionen mit Hinweisen für ihre Verwen
dung angegeben.
Die Buchstaben der Tasten ihrer
Maschine bestimmen die Programme
und Kombinationen, weiche genaht wer
den können.
U
HHH
llNP
G
H
I
K
L
M
A
B
C
D
E
F
4 Finger-tip controls
(models with stretch stitches)
The various models have differing num
bers of finger-tip controls and programs.
A, B, C; Buttons for buttonholing
Button B is also used as clearing button
for releasing the pushed buttons and for
setting the left needle position (see
page 25).
D Elastic triple zigzag stitch, 2 mm
2-mm zigzag stitch
E Elastic triple zigzag stitch, 3.5 mm
3.5-mm zigzag stitch
F Elastic triple zigzag stitch, 5 mm
5-mm zigzag stitch
G Elastic triple straight stitch
Straight stitch
H Pullover stitch
Blindstitch
I Closed overlock stitch
Joining stitch
K Overlock stitch
Shell-edge stitch
L Feather stitch
Elastic decorative stitch
M Honeycomb stitch
Elastic stitch
All stitches and stitch combinations are
listed in the stitch program chart on
pages 80—81. This chart also contains
possible applications.
The letters of the buttons on your
machine determine the programs and
combinations that can be sewn.
4Touches de commande
(modèles avec points elastiques)
Le nombre des touches et des program
mes vane sebon be modèle de machine.
Touches boutonnières: A, B, C
La touche boutonniere B sort en memo
temps a annulor les touches activées et
a déporter l’aiguille a gauche (page 25).
D Triple point zigzag elastique 2 mm
Point zigzag 2 mm
E Triple point zigzag élastique 3,5 mm
Point zigzag 3,5 mm
F Triple point zigzag elastique 5 mm
Point zigzag 5 mm
G Triple couture élastique
Point droit
H Point de tricot
Point invisible
I Point overlock fermé
Point d’assemblage
K Point overlock
Point bord coquille
L Point d’epis
Point elastique décoratif
M Point nid d’abeilbo
Point zigzag piqué
Le tableau du programme des points
présente, sur los pages 82 a 83, los
points, les points combines et leurs prin
cipals utilisations.
Les ettres gravées sur los touches de
vot machine déterminent los program
mes simples et combines réalisabbes.
I tasti automatici
(modelli con punti flexi)
I diversi modelli hanno differente numero
di tasti e programmi.
A, B, C tasti per occhiello automatico
Tasto B è contemporaneamente anche ii
tasto per annullare i tasti inseriti e per Ia
posizione dell’ago a sinistra (vedi
pag. 25).
D punto triplo flexi a zig-zag 2 mm
punto a zig-zag 2 mm
E punto triplo flexi a zig-zag 3,5 mm
punto a zig-zag 3,5 mm
F punto triplo flexi a zig-zag 5 mm
punto a zig-zag 5 mm
G punto diritto flexi triplo
punto diritto
H punto pullover
punto invisible
I punto overlock chiuso
punto giuntura
K punto overlock
orb a conchiglia
L punto piuma
punto elastico ornamentale
M punto a nido d’ape
punto elastico
Nella tabella dei programmi a pagine
84—85 sono descritti i punti e le possibili
combinazioni con accenni per Ia loro uti
lizzazione.
Le lettere dei tasti della sua macchina
determinano i programmi e to combina
zioni che si possono cucire.
2
\\\
\\ \\\
\\
\\\\
\\‘
11
4Nutzstiche einstellen
(weiBe Symbole)
Taste tippen und die gewunschte Stich
lange zwischen 1 und 6 einstellen.
22
4
Selecting utility stitches
(white symbols)
Push the button required and set the
stitch length between 1 and 6.
Alle Zickzack- und Nutzstiche werden
durch zusätzliches Tippen der Taste G
in der Breite halbiert.
All zigzag and utility stitches are halved
in width when button G is pressed.
Reglage des points utilitaires
(symboles blancs)
Appuyer sur Ia touche et regler a Ion
gueur de point désirée entre 1 et 6.
I punti utili
(simboli bianchi)
Premere ii tasto e regolare a lunghezza
del punto desiderata tra 1—6.
En appuyant également sur a touche G,
tous les points zigzag et utilitaires sont
réduits de moitlé,
Tutti i punti a zig-zag e punti utili
vengono dimezzati nella loro larghezza,
se si preme in aggiunta II tasto G.
4
Stretchstlche einstellen
(rote Symbole)
Taste tippen und Stichlangen-Einsteller
bis zum Anschlag auf rotes Symbol stel
ten.
Alto Stretchstiche werden durch zusâtzli
ches Tippen der Taste G in der Breite
halbiert.
Reglage des points elastlques
(symboles rouges)
Appuyer sur Ia touche et regler le regle
point de Ia longueur de points sur le
symbole rouge, jusqu’a Ia butée.
Tous les points elastiques sont réduits
do moitié en appuyant sur Ia touche C.
Selecting stretch stitches
(red symbols>
Push the button required and turn the
stitch length control as far as it will go
(red symbol>.
N
By also pressing button G, all stretch
stitches can be halved in width.
4 Regolazione del punti flexi (stretch)
(simboli rossi)
Premere ii tasto e girare II regolatore per
Ia lunghezza del punto fino allarresto
sul simbolo rosso.
Tutti i punti flexi si dimezzano in tar
ghezza, premendo in aggiunta 1 tasto C.
23
Nutz- und Stretchstich-Kombinationen
Bei Stichkombinationen werden mehrere
Tipptasten gleichzeitig gedruckt. Die
Stichkombinationen sind auf der Pro
grammtabelle und am Ende dieser Anlei
tung mit Nähhinweisen angegeben.
Utility- and stretch-stitch combinations
In case of stitch combinations, several
finger-tip controls are pressed simultane
ously. The stitch combinations, together
with some useful sewing tips, can be
found in the programme table as well as
at the end of this Instruction Book.
Combinalsons de points elastlques
et utilitaires
Pour combiner plusieurs types de point,
appuyer simultanément sur plusieurs de
ces touches. Les combinaisons possible
figurent dans le tableau des program
mes, y compris, en fin de notice, des
conseils de couture correspondants.
Combinazioni di punti utili e di
punti flexl
Per ottenere combinazioni di punti
diversi, si premono contemporaneament
piü tasti. Le combinazini di punti diversi
sono riportate nella tabella dei pro
grammi ed alla fine di queste istruzione
con indicazioni per le cuciture.
4
[1
H
I
N 4 Selecting the needle position for
4.
Stichiage einstellen bet Geradsttch:
.
Stichlage links: Taste B tippen
Stichlage Mitte: Taste G tippen
Stichlage rechts: Taste H und I tippen
straight stitching:
Left needle position: push button B
Central needle position: push button G
Right needle position: push buttons H
and I
4
Deport du point droit:
Deport a gauche: appuyer sur Ia
touche B
Deport au milieu: appuyer sur a
touche G
Deport a droite: appuyer sur es
touches H et I
Regolazione della posizione d’ago
nella cucitura diritta:
Posizione ago sinistra: premere tasto B
Posizione ago centro: premere tasto G
Posizione ago destra: premere tasti H el I
2
N
Einstellrad für Zierstiche
Jedem Zierstich ist em Buchstabe zuge
ordnet. Den Zierstich auf der Tabelle
auswãhlen. Mit dem Einstellrad N” den
entsprechenden Buchstaben unter die
Einstellmarkierung 0” drehen.
Zum Nàhen der Nutzstiche mul3 das Em
stellrad N” der Zierstiche ausgeschaltet
werden, Dazu den weil3en Punkt unter
die Einstellmarkierung ,,0” drehen.
4 Disque de reglage des points
d’ornementation
Chaque point d’ornementation est
désigné par une lettre-code, A laide du
disque ,N” placer Ia lettre-cade du motif
désiré sous le repére
Pour pouvoir coudre les points utilitaires,
debrayer le disque de reglage N’ des
points d’ornementation en plaçant le
point blanc de ce disque sous le repére
0.
4
Thumb wheel for fancy stitches
Every fancy stitch is provided with a
letter. Select the fancy stitch from the
table. Set the corresponding letter at
mark ‘0” by turning thumb wheel N.
For sewing utility stitches, thumb wheel
N for fancy stitches must be disengaged.
To do so, set the white dot at mark”0”.
Regolatore punti ornamentali
Ad ogni punto ornamentale corrisponde
una lettera. Scegliere 1 punto secondo Ia
riproduzione nella tabella. Col selettore
di registrazione “N” ruotare Ia lettera
desiderata sotto Ia marca di registrazio
ne ‘0”.
Per cucire con i punti comuni disinserire
ii regolatore “N” dei punti ornamentali.
Allo scopo ruotare II punto bianco sotto
a marca di registrazione “0”.
4
Zierstiche und Kombinationen
Musterkombinationen lassen sich durch
Drücken der Tasten in Verbindung mit
den Zierstichen herstellen. Die Tabelle
zeigt den Stich und darunter, welche
Tasten zu drücken sind. Beim Hinweis
,,stretch” Stichlängen-Einsteller auf
stretch drehen.
Points décoratifs et points combines
Les motifs combinôs sont obtenus par
pression des touches correspondantes.
Le tableau présente les points avec, en
dessous, es lettres-codes des touches
a manceuvrer. En cas de mention
stretch’, tourner le règle-point en Ion
gueur sur “stretch.
Fancy stitches and combinations
Pattern combinations can be produced
by pressing the keys in connection with
the fancy stitches. The table shows the
stitches and under them the correspond
ing buttons to push. If they are marked
“stretch”, set the stitch length control at
“stretch”.
4 Punti ornamentali e abbinamenti
Diversi abbinamenti sono possibili
schiacciando I tasti insieme ai punti
ornamentali, La tabella illustra ii punto e
sotto ii tasto che si deve azionare per
ottenerlo. L’indicatore “stretch” significa
ruotare ii regolatore della lunghezza dei
punti su “stretch”.
27
Nadel auswechseln (System 130/705 H):
• Hauptschalter 125 ausscha/ten.
Schraube N lösen. Nadel herausnehmen
Neue Nadel (flache Kolbenseite nach
hinten) ganz nach oben schieben.
Schraube festdrehen.
Changing the needle (System
130/705 H): • Switch off master switch
125, Loosen screw N. Take out the
needle. Push new needle (with its flat
side facing towards the back) up as far
as it will go. Tighten the screw.
Remplacement de I ‘aiguille (système
130/705 H>: • Tourner I’interrupteur
general 125 sur ‘Arrét”. Desserrer Ia vis
N et retirer laiguille. Engager l’aiguille
neuve (le méplat du talon vers l’arriere)
jusqu’à Ia butée et serrer Ia vis.
Sostituzione deII’ago (sistema
130/705 H): • Disinserire l’interruttore
principale 125. Allentare vite N. Togliere
l’ago. Inserire ago nuovo (parte piatta
del fusto verso dietro) completamente in
sU. Fissare a vite.
Transporteur versenken
Klappe 119 ãffnen.
Versenkschieber nach 0 schieben
versenkt, nach P schieben = zum
Nähen.
=
Dropping the feed dog
Open free arm cover 119. Push the
dropteed control toward 0 (feed dog
dropped) or toward P (sewing position).
Abaissement de a griffe
Ouvrir Ie cache 119 et déplacer le cur
seur abaisse-griffe dans le sens 0 =
grifte escamotée; le déplacer vers P
pour Ia couture.
Come abbassare ii trasporto:
Aprire lo sportello 119. Spostare Ia leva
dell’abbassatore verso 0 = abbassato,
spostando verso P = per cucire.
ähfuB auswechseln: • HauptschaIterN
1
N
125 ausschalten. Roten Knopf N
drücken. Der FuB rastet aus.
Changing the sewing foot: • Switch
off master switch 125. To release the
sewing foot, push the red button N.
Changement de Ia semelle du pied:
• Tourner I nterrupteur general 125 sur
Arrét”. Enfoncer le bouton rouge N; a
semelle est libérée.
Sostituzione del piedino: • Disinserire
linterruttore priricipale 125. Premere bot
oncino rosso N. II piedino si disinnesta)
4
NähfuB anbringen: Stoffdrückerhebel
senken und den Ful3 dabei so schieben,
daB der Steg 0 in die Nuten P einrastet.
Attaching the sewing foot: Lower the
presser bar lifter and at the same time
reposition the sewing foot so that stud 0
fits in slots P.
Mise en place de Ia semelle: Abaisser
le levier du pied presseur et deplacer Ia
semelle de manière que l’étrier 0 sem
boite dans les rainures P.
Applicazione del piedino: Abbassare Ia
eva premistoffa e inserire il piedino in
maniera che 1 perno 0 si innesti nella
scanalatura P.
r
Q und R sind zum Zubehör betestigen.
S ist die NähfuBhalterschraube.
Screws Q and R are for securing acces
sories. S is the sewing foot retaining
screw.
Q et R servent a fixer les accessoires.
S est Ia vis de fixation du support de
semelle.
o e R servono per fissare gIl accessori.
S è Ia vito di fissaggio del supporto per
piedino.
29
4 Verwandlungsnähtläche
Die Nähfläche etwas anheben und her
ausnehmen (N).
Zum Arisetzen die Nähfläche, wie der
Pfeil zeigt, an die Maschine schieben
(0).
Detachable work support
Lift and remove the work support (N).
To fit the work support to the machine
push is close to the machine as indi
cated by the arrow (0).
Plan de travail variable
Soulever quelque peu et enle ver le plan
de couture (N).
Pour Ia remettre en place, glisser le plan
de couture contre Ia machine, comme on
volt sur Ia figure (0).
Piano variabile dl cucitura
Sollevare un po ed estrarre ii piano di
cucitura (N).
Per reinserire Il piano di cucitura, spin
gerlo contro a macchina, come indicato
dalla freccia (0).
4Zubehörfach
Den Deckel der Nähflãche 108 öffnen.
Darunter 1st Platz für Nãhzubehör.
Accessory box
Open the cover of work support 108.
Under this lid there is room for your
sewing accessories.
Boite de rangement
Ouvrir le couvercle du plan de couture
108. L’espace en dessous permet le ran
gement aisé des accessoires.
Scomparto per accessori
Aprire ii coperchio del piano variabile
108. Sotto si trova posto per sistemare
gil accessori.
30
4
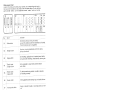
NähfüBe (Normalzubehör)
4 FRei8verschlu6fu8
1 Normalnähfu6
5 KnopflochfuB
2 Klarsichtfu8
6 Lineal
3 Blindstichfu6
7 Filzscheibe
Sewing feet (standard accessories)
1 Ordinary sewing 4 Zipper foot
5 Buttonhole foot
foot
2 Clear-view foot 6 Edge guide
3 Blindstitch foot 7 Felt washer
Pieds presseurs (accessoires standards)
4 Semellepourposer
1 Semelle
Ia fermeture a
normale
glissiere
2 Semelle
5 Semelle a
transparente
boutonnières
3 Semelle a point
6 Guide-bord
invisible
7 Rondelle de
feutre
D
Piedini (corredo normale)
4 piedino per
1 piedino
cerniere
normale
5 piedino per
2 piedino
occhielli
trasparente
6 lineale
3 piedino per
punto invisibile 7 disco di feltro
I31
4
N7
Abstepparbeiten
Nàhful3: Normal-Nähfu8 oder Klarsichtful3
und Fuhrungslineal
Taste G
Stich:
Das Fuhrungslineal N kann bei fast allen
Nähfül3en zum Einsatz kommen.
Topstitching
Sewing foot: Ordinary sewing foot or
clear-view foot and edge
guide
Button G
Stitch:
Edge guide N can be used with nearly
all sewing feet.
Befestigung des Lineals
Lineal N durch die Bohrung 0 schieben
und mit der Schraube P festdrehen. Je
nach Verwendungszweck läBt sich das
Lineal auf den gewunschten Abstand
einstellen.
Parallel verlaufende Stepplinien oder
Abstepparbeiten an Kanten näht man
mühelos mit dem Fuhrungslineal.
Dabei läuft die Stoffkante (Abb. 0), oder
bei parallel verlaufenden Stepplinien die
zuvor genahte Stepplinie am Fuhrungs
lineal entlang (Abb. R). Der Nahtverlauf
wird immer ordentlich und korrekt aus
sehen.
Fitting the edge guide
Push edge guide N through hole 0 and
secure it in position with screw P. The
guide can be adjusted to the desired stit
ching margin for various applications.
With the edge guide attached, it is easy
to sew parallel lines of stitches or to
stitch parallel to the edge. The guide
either follows an edge (Fig. Q) or, when
making parallel lines of stitches, runs
along the preceding line of stitches
(Fig. R). The seam thus made looks neat
and accurate.
4Surpiquage
Pied presseur: pied presseur normal ou
pied a semelle en plexi
glas et guide-droit
Bouton-poussoir G
Point:
Le guide-droit N convient a presque tous
es pieds presseurs.
Fixation du guide-droll
Glisser le guide N par le trou 0 et serrer
a vis P. Suivant ‘application, regler le
guide sur l’écartement désiré.
Le guide-droit facilite corisidérablement
es surpiqires paralléles et le surpiquage
des bords. Ce faisant, le bord du tissu
(fig. Q) ou bien Ia piqüre précédente suit
le guide-droit (fig. R). La couture sera
toujours nette et réguliere.
4Lavori di impunture
Piedino: piedino normale 0 piedino
trasparente e lineale di guida
Punto: Tasto G
II lineale N si puô usare con quasi tutti i
piedini.
Fissaggio del lineale
(accessorio fuori corredo)
Passare ii lineale N attraverso ii foro 0 e
fissarlo con Ia vite P; a seconda della
neccessitã Si pUO regolare a distanza
desiderata.
E facile eseguire cuciture parallele
usando ii lineale. II bordo del tessuto
(fig. 0) oppure Ia cucitura parallela
precedente (fig. R) servono die guida.
La direzione della cucitura sara cosi
sempre corretta.
3
_____-
I’
4
Blindstich
Nähfu8:
Spannung:
Garn:
Stich:
Stichlänge:
Nadel:
Blindstltch
Sewing foot:
Tension:
blindstitch foot
needle thread tension a
little slack.
ordinary sewing thread
Thread:
Button H
Stitch:
Stitch length: 3—4
size 70 or 80
Needle:
Blindstichfu8
Oberfaden etwas leichter
Nahgarn
Taste H
3—4
Stârke 70 odor 80
So wird der Eiristich der Nadel
reguliert
Den vorbereiteten Saum unter den Blind
stichful3 legen. Der Stoffbruch des Ober
stoffes lãuft dabei am Anschlag 0 des
Blindstichfu8es entlang.
Mit der Stellschraubo N den Anschlag 0
soweit nach links drehen, daB die Nadel
beim linken Einstich in den Oberstoff nur
omen Faden erfal3t (Abb. P u. 0).
Nâhen Sie zunâchst eine Probenaht auf
elnem Stoff rest.
How to regulate the needle
penetration
Place the prepared hem under the blin&
stitch sewing foot. The crease line of the
outer fabric runs along edge guide 0 of
the blindstitch sewing foot.
Turn screw N to adjust edge guide 0 so
far to the left that the needle picks up
only one thread of the outer fabric when
penetrating on the left side (Fig. P
and 0).
First make a sewing test using a piece
of waste material.
I
9
2
2
2
9
Point invisible
Pied presseur:
Tension:
Fib:
Point:
Longueur do
point:
Aiguible:
Pied a points invisibles
Fib d’aiguilbe moms tendu
Fib a coudre
Touche H
Punto invisibile
piedino per punto invisibile
Piedino:
allentare leggermente Ia
Tensione:
tensione superiore
filato per cucire
Fibato:
Tasto H
Pu nto:
3 a 4
Grosseur 70 ou 80
punto:
Lunghezza
Ago:
Réglage de Ia jetée de l’aiguille
Poser ‘ourbet prepare sous be pied a
points invisibles. La cassure du tissu
extérleur bongo Ia butée 0 du pied a
points invisibles.
A ‘aide de a vis do réglage N, déplacer
Ia butée 0 vers Ia gauche do sorte que
l’aiguilbe, au point gauche, no saisisse
qu’un fib du tissu extérieur (fig. P et Q).
Réaliser tout d’abord une couture
d’essai sur une chute do tissu.
3-4
grossezza 70 0 80
Ecco come & regola l’entrata dell’ago
nel tessuto
Porre l’orlo preparato sotto ii piedino per
punto invisibile. La piegatura della stoffa
superiore scorre in tal maniera lungo a
guida 0 del piedino.
Girare con Ia Vito N Ia guida 0 verso
sinistra in modo che l’ago prenda
nell’entrata a sinistra solo un fib della
stoff a superiore (fig. P e Q).
Si consiglia di eseguire prima una prova
su un ritaglio di stoffa.
J
a
/
Some safety rules
valid for United Kingdom only
The wires in this mains lead are
coloured according to the following code:
Blue: Neutral
Brown: Live
As the colours of the wires in the mains
lead of this appliance may not
correspond with the colour coding of the
terminals in your plug, proceed as
follows: the wire which is coloured blue
must be connected to the terminal which
is marked with the letter N or coloured
black.
The wire which is coloured brown must
be connected to the terminal which is
marked with the letter L or coloured red.
Please note:
When a 13-ampere plug is used, a
3-ampere fuse has to be fitted.
4
Knoptioch einstellen
Taste C tippen. Obertadenspannung in
den Knopflochberech bel 3 stellen.
Knopflochful3 anbringen. Stichdichte rn
Knopflochbereich N einstellen Einlauf
faden wie folgt rn NähfuB einlegen:
Faden über die hintere Nocke 0 legen,
straft ziehen und n der vorderen Nocke
P ernklemmen. Beirn Nähen Iäuft der
Pfeil 0 an der Skala R entlang. Dadurch
kann die Knopflochlänge bestimmt wer
den. Zum Knopflochnahen feines Näh
garn verwenden.
Buttonhole setting
Push button C. Set the needle thread
tension at range 3 for buttonhole sewing.
Attach the buttonhole foot. Set the stitch
density at range N. Insert a gimp thread
in the sewing foot as shown in the illu
stration: Place the thread over the back
ridge 0, and pull it taut so that it is held
in tab P at the front. During sewing,
arrow Q runs along scale A. This is how
the buttonhole length is determined.
For sewing buttonholes use light sewing
thread.
4 Regolazione
Reglage de Ia boutonniere
Appuyer sur a touche C. Regler a ten
sion du uI daiguille dans a zone bou
tonnières sur 3. Fixer a sernelle
boutonniéres Régler a densité des
points dans Ia zone boutonniere N. Intro
dure le hI de passe dans Ia semelle
comme suit: Poser le fit sur to crochet
arriére 0, le teridre et l’accrocher dans
le crochet avant P Pendant Ia couture Ia
flèche 0 coulisse le long de léchelle
graduêe A. Ainsi, it ost possible de
determiner Ia Iongueur do Ia boutonniere,
Utiliser du fil a coudre fin.
per I’occhielio
Prernere it tasto C. Regolare Ia tensione
superiore net settore occhiello 3. Appli
care ii piedino per occhielli. Fittezza del
punto nel settore per occhielli N. lnserire
come segue 1 fib rinforzo: appoggiare it
fib sopra il gancio 0 posteriore, tenderlo
bone e fissarbo nel gancio anteriore P.
Cucendo, Ia freccia 0 scorre lungo Ia
scala R. In tale maniera si puô determi
nare con esattezza Ia lunghezza dell’
occhielbo. Usare per l’occhielbo del filato
fine.
J
37
4
Knopflochnahen
Schiene bis zum Anschlag nach vorne
ziehen.
1 Erste Raupe in der gewunschten
Lange nähen.
2 Taste B tippen und festhalten, 4 bis 6
Riegeistiche nähen. Den Stoff dabei
festhalten. Taste loslassen.
3 Taste A tippen. Zweite IRaupe in der
gleichen Lange wie die erste nähen.
4 Taste B tippen und festhalten, 4 bis 6
Riegeistiche nähen. Den Stoff dabei
festhalten, Taste loslassen.
5 Elnige Vernãhstiche nàhen. Den Stoff
herausnehmen. Einlauffaden anziehen
und abschneiden.
6 Knopfloch aufschneiden.
Es empfiehlt sich, vor dem Nähen der
Knopflöcher in das Kleidungsstück, em
Probeknopfloch zu nähen.
Sewing buttonholes
Pull the bottom of the buttonhole foot
forward as far as it will go.
1 Sew first buttonhole seam. Raise the
needle.
2 Push button B in until 4 to 6 bartacking stitches are sewn, holding the
workpiece firmly, then release the but
ton.
3 Push button A. Sew the second but
tonhole seam the same length as the
first.
4 Push button B in until 4 to 6 bartacking stitches are sewn, holding the
material firmly, then release the but
ton.
5 Sew a few tying stitches. Remove the
fabric, pull the filler cord taut and trirr
6 Cut the buttonhole open.
Before sewing buttonholes in the gar
ment it is recommended to sew a buttor
hole as a test.
Zeichnungen sind ohne Nähful3.
Drawings do not include sewing foot.
Les illustrations ne montrent pas Ia semelle du
p!ed presseur.
I disegni sono eseguiti senza piedino.
Execution de boutonnières
Tirer a semelle mobile vers l’avant
jusqu’à Ia butée.
1 Executer Ia premiere lèvre a a Ion
gueur désirêe.
2 Appuyer sur Ia touche B et Ia mainte
fir pendant 4 a 6 points d’arrêt. Main
tenir Ia matière. Relâcher a touche.
3 Appuyer sur a touche A. Executer Ia
deuxième Ièvre dans Ia méme Ion
gueur que Ia premiere.
4 Appuyer sur a touche B et Ia mainte
nir pendant 4 a 6 points d’arrét. Main
tenir Ia matière. Relâcher Ia touche.
5 Brider par quelques points de nouage.
Enlever Ia matière. Tenir le fil de
passe Iegerement tendu et le couper.
6 Ouvrir a boutonniere.
Nous recommandons d’exécuter une
boutonniere a titre dessai sur le vête
ment avant de commencer a coudre es
boutonnières.
Confezionare occhielli
Spostare Ia feritoia in avanti sino
all’arresto.
1 Cucire a prima costina nella un
ghezza desiderata.
2 Premendo ii tasto B, cucire 4—6 punti
di travetta. II lavoro va tenuto nel frat
tempo fermo. Rilasciare ii tasto B.
3 Premere il tasto A. Cucire a seconda
costina nella stessa Iunghezza della
prima.
4 Premere il tasto B e tenerlo premuto,
mentre si cuciono 4-6 punti di tra
vetta. Rilasciare il tasto.
5 Cucire alcuni punti di fissaggio.
Togliere ii tessuto. Tirare ii cordoncino
e tagliarlo.
6 Aprire l’occhiello con ii taglia-asole.
Si consiglia di eseguire un campione
prima di cucire sul capo.
J
3
4Knopt annähen
40
4 Sewing on buttons
Nàhfu8
ohne Nähfu8 oder
mit KlarsichtfuB
Taste E
Stich:
Transporteur: versenken
feines Nahgarn
Gain:
Drehen Sie das Handrad auf sich zu, bis
die Nadel in linker Stichlage abwärts
geht.
Legen Sie nun den Knopf auf die zuvor
markierte Stelle. Vorsichtig Stoff mit
Knopf unter den Nähfulihalter schiebon,
Nähfuf3halter senken und die Nadel in
die linke Knopfbohrung einstechen las
sen. Handrad weiter drehen, bis die
Nadel in die rechte Knopfbohrung em
sticht. Dabei am Knopf evtl. eine Korrek
tur vornehmen. 6—8 Uberstiche nähen
(Abb. N).
Taste B tippen, loslassen und einige
Steppstiche in der linken Knopfbohrung
nähen.
Sewing foot: Clear-view foot or without
sewing foot
Stitch type: Button E
Fine sewing thread
Thread:
Drop the machine feed. Move the neec
to its left position, and turn the balancE
wheel towards you until the needle des
cends.
Position the button on the previously
marked material: Carefully place mater
and button under the sewing foot holdE
Lower the sewing foot holder and let fr
needle stitch into the left hole of the bt
ton. Turn the balance wheel further uni
the needle stitches into the right hole c
the button. If necessary, alter the posi
tion of the button. Sew 6 to 8 zigzag
stitches (Fig. N).
Press button B, release it again, and
sew a few straight stitches in the left
hole of the button.
Knopt mit Stiel
Grol3e Knöpfe in schweren Stoffen benä
tigen einen Stiel.
Die Nadel in die linke Knoptbohrung em
stechen lassen. Bevor Sie den NähfuB
senken, legen Sie einen Maschinen
nadelkolben oder em Streichholz auf die
Knopfmitte (Abb. 0). Einige Uberstiche
nähen und Ca. 15 cm Fadenlange stehen
lassen. Ober- und Unterfaden durch
fädeln (Abb. P) und den Stiel umwickeln
(Abb. Q). Die Fadenenden von Hand ver
knoten.
Buttons with shank
Large buttons in heavy materials requil
a shank.
Let the needle stitch into the left hole
the button. Before lowering the sewing
foot place a sewing machine needle
shank or a match on the middle of the
button (Fig. 0). Sew a few zigzag
stitches and leave a thread end, about
15 cm long. Pull needle and bobbin
threads through (Fig. P) and wrap the
stem (Fig. Q). Knot the threads by han
4
7Pose de boutons
Pied-presseur: sans pied-de-biche ou
avec pied en plexiglas
Bouton-poussoir E
Point:
‘abaisser
Griffe:
Fil a coudre fin
Fil:
Tourner le volant vers soi usqu’à ce que
‘aiguille descendante se trouve en jetée
gauche.
Poser le bouton a ‘emplacement voulu
sur le tissu et sous le pied-presseur.
Glisser precautionneusement le tissu et
le bouton sous le support du pied
presseur. Abaisser celul-ci et faire piquer
l’aiguille dans le trou gauche du bouton.
Continuer a burner le volant jusqu’a ce
quo l’aiguille pique dans le trou droit.
Rectifier éventuellement Ia position du
bouton. Ensuite, executer 6 a 8 points
zigzag (fig. N), Appuyer sur to bouton
poussoir B, retâcher celui-ci ensuite et
coudre quelques points sur place dans
le trou gauche du bouton.
Bouton a queue
Les grands boutons sur es tissus lourds
sont a fixer a distance, c’est-a-dire avec
une queue.
Faire piquer laiguille dans le trou gau
che du bouton. Avant d’abaisser le pied
presseur, poser le talon d’une aiguille ou
urie allumette sur le centre du bouton
(fig. 0). Coudre quelques points zigzag
et laisser depasser 15 cm de Iii env.
Passer es fils d’aiguille et de canette
sur l’envers par les trous du bouton
(fig. P) et enrouler les fils lâches autour
de Ia queue du bouton (fig. Q). Ensuite
nouer es bouts do fil a a main.
4 Attaccatura bottone
senza piedino oppure
piedino trasparente
tasto E
Punto:
Trasportatore: abbassato
fib da cucire sottibe
Fib:
Girare it volantino verso di se, finché
l’ago si ferma in posizione di sinistra
verso ii basso.
Mettere 1 bottone nella posizione prima
segnata. Spostare cautamente il tessuto
assieme al bottone sotto il piedino.
Abbassare 1 piedino e far entrare l’ago
net foro sinistro del bottone. Girare
ancora il volantino affinché ‘ago entri
net foro destro. Ripassare 6—8 volte
(fig. N).
Si preme II tasto B e si eseguorio alcuni
punti nob foro sinistro del bottone.
Piedino:
Bottone con attaccatura lunga
Bottoni grandi su tessuti pesanti hanno
bisogno di un’attaccatura lunga.
Far entrare ‘ago net foro sinistro del
bottone. Prima di abbassare it piedino si
mette Ia parte grossa di un ago da
macchina oppure un fiammifero sub
centro del bottone (fig. 0). Eseguire
qualche punto e lasciare circa 15 cm di
fib. Infilare fib superiore e inferiore
(fig. P) e avvolgerbi intorno all’ attacca
tura (fig. 0). Poi annodare i fill a mano.
N
4
ReiBverschluB einnähen
ReiBverschluBful3
NähfuB:
Stichlange: 2—3
Taste 13
Stich:
Nahgarn
Garn:
So wird der ReiBverschluBfuB
eingerastet
FuB mit dem hinteren Steg in die hintere
Nute R einhangen und die Sohle nach
oben drücken, bis der vordere Steg S
einrastet. Der Fuf3 kann in die Positionen
rechts (Abb. N). links oder Mitte gescho
ben werden.
Beidseitig verdeckt eingenähter
Reif3verschlul3
Reil3verschluB einheften. Den Nähful3
nach links bis zum Anschlag schieben.
Geötfneten ReiBverschlul3 so unter den
FuB legen, daB die Zähne am rechten
Fuhrungssteg entlang laufen (Abb. 0).
ReiBverschluB bis Ca. zur Hälfte in der
gewunschten Breite absteppen. Nadel im
Staff stehen lassen, Nähful3 anheben
und Rei8verschlul3 schliel3en (Abb. P).
NähfuB senken, die Naht bis zum ReiB
verschlul3ende weiterführen und die
Quernaht steppen.
Die zweite Rei8verschlul3seite parallel im
gleichen Abstand nãhen. Kurz var
Nahtende Nadel im Staff stehen lassen.
Nähful3 anheben und den Reil3verschlu6
dffnen (Abb. Q). NähfuB senken, Naht zu
Ende nähen.
A’?
4 Sewing in zippers
Sewing foot:
Stitch length:
Stitch:
Thread:
zipper sewing foot
2 to 3
Button G
sewing thread
This is how the zipper foot is engaged
Insert the toot with the back pin in the
back groove R and push the shoe of the
foot upwards, until the front pin S snaps
in. The zipper foot can be pushed to the
positions: left (Fig. N), right, or centre.
Completely concealed zip closure
Baste in zip by hand first. Push the
zipper foot to the left as far as it will go.
Place the open zip under the foot so tha
its teeth run along the right guiding edge
on the sole of the foot (Fig. 0). Sew
about half the length of the zip at the
required width. Leave the needle down
in the material, raise the zipper foot and
close the zip (Fig. P). Lower the zipper
foot again, continue the seam and then
sew across the end.
Sew the other side of the zip at the
same margin. Shortly before the end of
the seam leave the needle down in the
material, raise the zipper foot and open
the zip (Fig. Q). Lower the zipper foot
again and sew to the end.
Insertion de fermetures a glissiere
Pied a fermeture a
Pied presseur:
glissiere
Longueur de point: 2 a 3 mm
Bouton-poussoir G
Point:
Fil a coudre
Fil:
Mise en place du pied a fermeture a
glissière
Accrocher le pied avec sa tige arrière
dans Ia rainure arrière R et faire remon
ter Ia semelle jusqu’a ce que Ia tige
avant S s’accroche a son tour. Le pied
presseur peut être glisse a droite, a
gauche (fig. N) ou au milieu.
Insertion d’une fermeture a glisslere
couverte
Bâtir tout d’abord Ia fermeture a glis
sière. Faire glisser le pied presseur vers
Ia gauche jusqu’à Ia butée; poser Ia fer
meture a glissiere ouverte sous le pied
presseur de sorte que les dents longent
a barrette droite (fig. 0). Surpiquer Ia
fermeture a glissiere jusqu’au milieu
environ a Ia distance voulue. L’aiguille
restant dans l’ouvrage, remonter le pied
presseur et fermer Ia fermeture a glis
siére (fig. P). Rabaisser le pied presseur,
continuer a coudre jusqu’ã l’extrémité de
a fermeture a glissiere et faire Ia couture
transversale. Coudre parallèlement Ia
deuxiéme bande de Ia fermeture a glis
sière a distance egale. Peu avant Ia fin
de Ia couture, laisser I’aiguille dans le
tissu, remonter le pied presseur et ouvrir
a fermeture a glissiere (fig. Q). Rabaisser
le pied presseur et terminer Ia couture.
a lampo
4 Attaccatura della cernier
piedino per cerniere
Piedino:
Lunghezza punto: 2—3
Tasto G
Punto:
filato per cucire
Filato:
Agganciare ii piedino per cerniere con
ii perno posteriore nella scanalatura
posteriore R e premere Ia suoletta in al
to, finché il perno anteriore S si innesti.
II piedino puô essere spostato nelle posi
zioni destra, sinistra (fig N) o centro.
Cerniera lampo coperta al due lati
lmbastire Ia cerniera. Spostare ii piedino
a destra fino all’arresto, porre Ia cerniera
aperta sotto il piedino in maniera che i
dentini scorrano lungo Ia guida destra
(fig. 0). Cucire Ia cerniera per circa a
metà nella larghezza desiderata. Las
ciare l’ago nella stoffa. Alzare ii piedino
e chiudere Ia cerniera (fig. P). Abbassare
ii piedino, cucire fino al termine della
cerniera ed eseguire infine una cucitura
trasversale di fissaggio.
Cucire Ia seconda parte della cerniera
parallelamente in uguale distanza. Poco
prima del termine lasciare I’ago nella
stoffa. Alzare ii piedino e aprire Ia
cerniera (fig. 0). Abbassare ii piedino,
terminare Ia cucitura.
4
ThN4
Nahtreil3verschlu6
MaschinenEinsteIIung sieho Seite 42.
So wird der Reil3verschlul3 vorbereitet
und angelegt:
Die Schlitzkanten bugeln. Linke Naht
breite nach aul3en drehen (Abb. N).
Linke geaffnete Reil3verschlul3seite, wie
Abb. 0 zeigt, auflegen. Die Rei8verschlul3zähne stehen etwas über die
gebugelte Kante. Die Steppnaht verläuft
in der gebugelten Kante.
Nähfulf in die Mitte schieben, so daB die
Nadel in die mittlere Einstichsöffnung
einsticht. Die ReiBverschluBzähne laufen
in der linken Fuhrungsrille im FuB em
(Abb. P). Zu Beginn der Naht die Zähne
zum Einführen in die Führungsrille etwas
aufrichten. Naht bis zum Ende nahen
und vernähen,
ReiBverschlul3 schlieBen. Zweite Reil3verschlul3seite am Nahtantang feststecken
(Abb. 0) und ReiBverschluB öffnen. Die
rechte Nahtbreite mit dem Rei8verschlul3band nach auBen drehen, zuvor die
Nadel entfernen und, wie Abb. R zeigt,
das Reil3verschlul3band auf der Naht
feststecken. Die ReiBverschlul3zähne au
ten nun in der rechten Fuhrungsrille im
FuB em (Abb. 5). ReiBverschlufl fertig
einnähen. Das Reil3verschlul3band tuB
breit aut die Naht steppen. Die ReiB
verschluBzähne laufen auBen am Füh
rungssteg entlang (Abb. T).
44
Seam-like zipper closure
For machine setting see page 42.
How the zipper is prepared and inserted:
Press the edges ot the placket. Fold out
the left seam allowance (Fig. N). Place
the left side of the open zip in position
so that its teeth protrude a little beyond
the pressed edge (Fig. 0). The seam is
sewn along this edge.
Move the zipper foot to the middle so
that the needle stitches into the middle
opening. The zip teeth run into the left
guiding groove in the foot (Fig. P). At the
beginning of the seam lift up the teeth a
little to feed them into the guiding
groove. Sew the seam to the end and
secure it.
Close zip. Pin other side of zip to
material at beginning of seam (Fig. 0).
Open zip. Remove the pin, turn out the
right seam allowance with the zip tape,
and pin the latter to the fabric, as shown
in Fig. R. The zip teeth now run into the
right guiding groove in the foot (Fig. S).
Finish sewing the zip. Now sew down
the zip tape, letting the zip teeth run
along the guiding edge of the foot
(Fig. Ti.
\\
1\\\\
Jr/‘\
\%
\\
\NL \
\+_
\\\
Fermeture a glissière invisible
Reglage de Ia machine voir pages 42, 43.
Voici comment 1 faudra procéder pour
insérer Ia fermeture a glissière:
Repasser es bords de Ia fente. Replier
le relarge gauche du tissu vers l’extérieur
(fig. N). Ouvrir Ia fermeture a glissiere et
mettre Ia bande gauche en place, comme
le montre Ia figure 0, les dents dépas
sant quelque peu le bord repasse. La
piqüre se trouve dans Ia cassure. Aligner
le pied presseur au milieu de sorte que
l’aiguille pique exactement dans le trou
d’aiguille median. Les dents de Ia ferme
ture 4 glissiere s’engagent dans Ia rai
nure gauche du pied (fig. P). Au debut
de Ia couture, afin d’introduire les dents
dans Ia rainure, es dresser quelque
peu. Terminer Ia couture et coudre quel
ques points de fixation.
Fermer Ia fermeture a glissière. Epingler
a deuxième partie de Ia fermeture 4
glissiere au debut de a couture (fig. 0)
et ouvrir Ia fermeture 4 glissiCre. Replier
le relarge droit du tissu avec Ia bande
de Ia fermeture vers l’extérieur, mais
enlever d’abord les epingles et comme
le montre Ia figure R, ópingler Ia bande
de Ia fermeture a glissiére sur le relarge
de couture. Les dents de a fermeture 4
glissiere s’engagent dans Ia rainure droite
du pied (fig S). Terminer ‘insertion de
a fermefure 4 glissiere. Surpiquer Ia
bande de Ia fermeture a glissière a une
distance correspondant 4 Ia largeur du
pied presseur. Les dents de Ia fermeture
a glissiere longent Ia barrette a l’extéri
eur (fig. T).
\\\
4Cerniera americana:
Per a regolazione della macchina vedi a
pag. 42, 43.
Ecco come si prepara e si applica Ia cer
niera:
Stirare i bordi deIl’apertura. Voltare il
bordo sinistro da cucire verso l’esterno
(fig. N). Porre sopra Ia parte siniStra
aperta della cerniera come indicato in
fig. 0. I dentini della cerniera sporgono
leggermente dal bordo stirato. La cucitura
viene eseguita sul bordo stirato.
Spostare ii piedino in centro, in maniera
che l’ago penetri nell’apertura centrale
del piedino. I dentini della cerniera
scorrono nella scanalatura di guida
sinistra del piedino (fig. P). Per
introdurre i dentini aII’inizio della cucitura
nella scanalatura alzarli leggermente.
Eseguire Ia cucitura fino aI termine e fis
sarla. Chiudere Ia cerniera. Spillare Ia
seconda parte della cerniera all’inizio
della cucitura (fig. 0) a aprire Ia cer
niera. Voltare 1 bordo destro con Ia
fettuccia della cerniera verso l’esterno
prima di togliere l’ago e spillare Ia cer
niera sulla cucitura come indicato da
fig. R. I dentini della cerniera scorrono
ora nella scanalatura destra del piedino
(fig. S). Terminare Ia cucitura della car
niera. Cucire Ia fettuccia della cerniera a
distanza di piedino sulla cucitura. I den
tini della cerniera scorrono all’esterno
della guida. (fig. T).
445
4
4Hosenreil3verschluB (Damen)
MaschinenEinstellung siehe Seite 42.
Den Reif3verschlul3fuf3 nach links bis zurn
Anschlag schieben.
Die Schlitzkanten bügeln. Den geschlos
senen Reil3verschlul3 so unter den rech
ten gebugelten Schlitzrand heften, daB
die Reil3verschlul3zãhne noch sichtbar
sind. Vorbereitete Untertrittsleiste 0
anstecken und beirn Aufsteppen mit
fassen. Die ReiBverschlul3zähne laufen
am rechten Fuhrungssteg entlang
(Abb. N). Kurz vor Nahtende Nadel im
Stoff stehen lassen, NähfuB anheben,
Reil3verschlu8 ôttnen. NähfuB senken
und die Naht fertig nähen. Den Reil3verschiuB schliel3en.
Ubertretenden Schlitzrand nach Nahtver
lauf zustecken. Linke Reil3verschlul3seite
einheften (Abb. 0).
Reil3verschluB äffnen. Das Fuhrungs
lineal anbringen und auf die Abstepp
breite so ausrichten, daB das Fuhrungs
lineal an der Kante des Stoffes entlang
läuft (Abb. P). Kurz vor Nahtende Nadel
rn Stoff stehen lassen, Nähfuf3 anheben,
Reil3verschlul3 schlieBen, Nähful3 senken
und die Naht fertig nahen. Das Ende der
Reil3verschluBnaht durch einen Riegol
sichern.
Zippers in ladies’ slacks
For machine setting see page 42.
Move the zipper foot to the left as far as
it will go. Press the edges of the placket.
Baste the closed zip to the right edge of
the placket on the wrong side so that its
teeth are still visible. Pin facing strip Q
to the underside and stitch it down at
the same time as you sew the zip. The
zip teeth run along the right guiding
edge of the foot (Fig. N). Shortly before
the end of the seam, leave the needle
down in the fabric, raise the zipper foot,
open the zip, lower the zipper foot again
and finish sewing the seam. Close the
zip.
Pin the overlapping edge along the
intended seam line. Baste left zip edge
(Fig. 0).
Open zip. Attach the edge guide and
position it for the desired seam margin
so that it moves along the edge of the
fabric (Fig. P). Shortly before the end of
the seam, leave the needle down in the
fabric, raise the zipper foot and close the
zip. Lower the zipper foot and finish
sewing the seam. Secure the end of the
zip seam with a bartack.
Fermeture a glissière pour pantalon
dame
Reglage de Ia machine voir pages 42, 43.
Glisser Ie pied pour fermetures a gus
sière vers Ia gauche jusqu’à Ia butée.
Repasser les bords de Ia fente. Bâtir Ia
fermeture a ghssiere fermée sous ie
bord droit de Ia fente de manière que es
dents de Ia fermeture soient encore visi
bies. Epingler a sous-patte Q et assem
bier ie tout par une couture. Les dents
de Ia fermeture a giissiere iongent Ia
barrette droite, comme ie montre Ia
figure N. Peu avant Ia fin de Ia couture,
iaisser I’aiguille dans le tissu, relever le
pied presseur, ouvrir ia fermeture a gus
sière, rabaisser ie pied presseur, et ter
miner Ia couture. Fermer Ia fermeture a
gtissiere.
Epingler Ia sous-patte depassante seion
le trace de Ia couture. Bâtir Ia partie
gauche de Ia fermeture a guissiére
(fig. 0).
Ouvrir Ia fermeture a glissiere. Mettre en
place et aiigner le guide-droit sur Ia lar
geur de Ia piqUre de sorte que le guide
droit longe ie bord du tissu (fig. P). Peu
avant Ia fin de Ia couture, laisser iaiguiiie
dans le tissu, remonter ie pied presseur
et fermer Ia fermeture a glissiere.
Rabaisser ie pied presseur et terminer Ia
couture. A Ia fin de Ia couture, coudre
un arrét.
4
Cerniere per pantaIon (per signora)
Per regolazione delia macchina vedi
pag. 42, 43.
Spostare ii piedino per cerniera fino
aII’arresto a sinistra. Stirare i bordi
dellapertura. Porre Ia cerniera chiusa
sotto il bordo stirato a destra e imbastire
in maniera che i dentini delia cerniera
siano ancora visibili. Fissare Ia patella
preparata Q con degli spiHi e cucirla
insieme alla cerniera. I dentini della
cerniera scorrono iungo (a guida destra
(fig. N). Poco prima del termine della
cucitura fermarsi con ‘ago nelia stoffa.
Alzare il piedino, aprire Ia cerniera.
Abbassare il piedino e terminare Ia
cucitura. Chiudere Ia cerniera. Fissare ii
bordo sporgente dell’apertura con degli
spilli in direzione della cucitura.
Imbastire Ia parte sinistra della cerniera
(fig. 0).
Aprire Ia cerniera. Applicare ii iineaie di
guida e fissarlo in maniera che scorra
iungo ii bordo della stoffa (fig. P). Poco
prima del termine delia cucitura fermarsi
con I’ago nella stoffa. Alzare ii piedino,
chiudere Ia cerniera. Abbassare ii pie
dino e terminare Ia cucitura.
Fermare il termine della cucitura con
una travetta.
Stopten mit Geradstich
Stopffu8
NähfuI3:
(Sonderzubehör)
Taste G
Stich:
Oberfadenspannung: etwas leichter
feines Maschinen
Garn:
stickgarn
Stàrke 70
Nadel:
versenkt
Transporteur:
nach hinten
Stopfanschlag 121:
schiebon Stoff
drOckerhebel
senken
Stopftuf3 anbringen
Die Nadel hochstellen: Den Bugel P
nach hinten drücken und festhalten. Den
Stift des FuBes in die Bohrung N einfüh
ren, die Gabel R greift dabei urn die
Stotfdruckerstange, und den Fu13 bis
zum Anschlag einsetzen. Den Sugel P
loslassen, wobei er sich auf die Halte
schraube Q egt. Die Schraube 0 test
drehen.
Untertaden nach oben holen. Beide
Fäden bei Nâhbeginn festhaiten. Zuerst
einige Stiche rn Stoff nähen. Spannen
Sie die Fäden dicht nebeneinander und
überstopfen Sie die schadhafte Stelle,
Jeweils am Nahtende in runden Bogen
stopfen (Fig. S). Sobald die Stopfstelle
gleichmai3ig bedeckt st, drehen Sie den
Stoft urn 90 Grad und stopfen über die
zuvor gespannten Fáden, bis die Stopf
stelle geschlossen ist (Fig. T).
Die Stichlange bestimmen Sie bei dieser
Arbeit selbst, indem Sie das Nahgut hin
und herbewegen.
4 Darning with straight stitch
Darning foot
(special accessory)
Button G
Stitch type:
Ease needle thread
Tension:
tension
Fine machine
Thread:
embroidery thread
Size 70
Needle:
Drop the machine feed
Darning stop 121: push backwards,
lower presser bar
lifter
Sewing foot:
Attaching the darning toot
Position the needle up. Push bar P to
the back and hold it there. Fit the pin of
the foot in hole N (at the same time, fork
A engages the presser bar) and push
the foot fully in. Let go of bar P, which
then rests on retaining screw Q. Tighten
screw 0.
Draw up the bobbin thread. Hold both
threads until the machine has made a
few stitches. First sew a few stitches
over the damaged spot from one side to
the other in serpentine fashion, placing
the lines of stitching close together
(Fig. 5). When the damaged spot has
been covered completely, turn the work
through 90 and darn at right angles
to the preceding row of stitches
(see Fig. T).
You determine the length of the darning
stitches by the rate at which you move
the fabric back and forth.
4
—
(t t+tt i1
t-t- -I- -i-1-f-t-
-)
——
— —
,1
‘rt-i--t-t-i’-i— ————mI
tt t t t
\
\
\
\‘.\
‘t-\
\
‘
S’\
s.
r r- 1—
—
_-1
N
4Rammendare
Reprisage au point droit
Pied presseur: Pied a repriser
(contre supplement)
Bouton-poussoir G
Point;
Tension du fil
moms forte
d’aigutlle:
Fil a broder fin
Fil:
Grosseur 70
Aiguille:
abaissee
Griffe;
La glisser vers l’arrière
Butée 121:
Abaisser le levier
presse-tissu
Fixation du pied a repriser
Lever a barre a aiguille. Deplacer l’étrier
P vers l’arrière et le maintenir. Introduire
le tenon do Ia semelte dans Ic trou N; a
fourche R entoure Ia barre du pied
presseur; introduire le pied jusqu’a Ia
butée. Lãcher létrier P; ii se pose sur Ia
vis do maintien Q, Ensuite resserrer Ia
vis 0.
Remonter Ic fil de canette et maintenir
los deux [us pendant los premiers points.
Ancrer dabord quelques points dans Ic
tissu puis. tendre les fils d’un bord a
lautre du trou, en serpentin (fig. S). Des
quo Ic trou est régulierement recouvert
do fils couches dans un sens, tourner
I’ouvrage de 90 et recouvrir los fils
uniformément do petits points (fig. T).
Determiner soi-mème a longueur des
points en deplaçant Iouvrage plus ou
moms vite.
Piedmno:
Punto:
Tensione
superiore:
Filato:
col punto diritto
piedino per rammendo
(acessorio fuori corredo)
Tasto G
eggermente allentata
fib per ricamo a
macchina
grossezza 70
abbassato
Ago:
Trasporto:
Posizione per
rammendo 121; spingere indietro e
abbassare eva
aizapiedmno
Appicazione piedino da rammendo
Alzare ago Premere Ia staffa P verso
dietro e tenerla ferma. Inserire ii porno
del piedino nd foro N, Ia forcella R si
aggancia in tal maniera sulla barra
premistoffa, quindi innestare ii piedino
fino aIl’arresto. Rilasciare Ia staffa P che
si appoggerà sulla vite di fissaggio Q.
Avvitare a vito 0,
Far salire ii fib inferiore. Trattenere
ambedue I flu allinizio della cucitura.
Cucire dapprima alcuni punti nobla stotfa.
Tendore ora i [iii uno accanto all’altro e
rammendare a parte strappata. AIIa tine
di ogni cucitura fare un tomato completo
come si vede nel diSegno (fig. S). Quando
a stoffa e coperta di tanto cuciture
paralbebe e uniformi e equidistanti, allora
girare Ia stoffa di 90 gradi e continuare ii
rammendo passando sopra i tili primi
tesi, fino che Ia parte danneggiata è per
fettamente rammendata (fig. T). La un
ghezza del punto dove deciderla Lei
durante ii lavoro stesso, spostando scm
plicemente Ia stoffa in avanti ed indietro.
/
Stopten mit WoUe
Nàhful3:
StopffuB
(Sonderzubehär)
Stich:
Taste G
Oberfadenspannung: im Knopfloch
bereich bei 3
Nahgarn:
Stick- und
Stopfgarn, Wolle
Nadel:
Stärke 70
Transporteur:
versenkt
Stopfschlag 121:
nach hinten
schieben, Stoff
drückerhebel
senken
Führen Sie den Wolifaden durch den
Stichlochausschnitt des Stopfful3es und
legen Sie ihn in die Fadenfuhrung P.
Der Faden liegt unter dem Stopiful3. Be
ginnen Sie oben links und spannen Sie
die Wollfäden quer über die Stopfstelle
(Abb. N).
Anschliel3end wird der Wolifaden abge
schnitten und die zuvor gespannten
Wollfàden mit Zickzackstichen oder mit
der Elastiknaht übernäht (Abb, 0).
Bitte beachten Sie, daB die Stichreihen
nicht zu dicht nebeneinander liegen, da
sonst die Stopfstelle zu hart wird.
Die oben beschriebenen Arbeitsgange
werden auf der linken Seite genaht. Die
Stopfstelle sieht dadurch von rechts
schöner aus.
!fl
Darning with wool
Sewing foot:
Darning foot
(special accessory)
Stitch type:
Button G
Tension:
3 in buttonhole range
Sewing thread:
Embroidery and
darning thread
Needle:
Size 70
Feed dog:
lowered
Darning stop 121: push backwards,
lower presser bar
lifter
Draw the wool thread through the needl
hole of the darning foot and into the
thread guide P.
Place the wool thread under the darninç
foot. Start at the top left and place the
wool thread back and forth across the
damaged area (Fig. N).
Then cut the wool thread and sew over
the rows of wool thread with zigzag
stitches or an elastic-stitch seam
(Fig. 0).
Do not place the lines of stitching too
close together, as this would make the
darn too hard.
All darning work described above is
carried out on the reverse side of the
fabric, so that the darn looks neater on
the face side.
Reprise a Ia lame
Pied presseur: Pied a repriser
(contre supplement)
Bouton-pouSsoir G
Point:
Tension du fit
Zone boutonnières (3)
d’aiguilte:
fit a broder ou a repriser
Fit:
fit de tame
Grosseur 70
Aiguille:
abaissée
Griffe:
La glisser vers larriére
Butee 121:
Abaisser te levier
presse-tissu
Enfiler le fit de tame par te trou du pied
a repriser et le coucher dans Ia rainure
de guidage P, sous le pied a repriser.
Tourner t’ouvrage a t’envers. Commen
cer a fixer Ia lame a gauche et couvrir te
trou dun bord a t’autre (fig. N).
Couper le fit de lame et couvrir-te de
points zigzag ou de points zigzag piqués
(fig. 0).
Veilter a ce que tes rangées de points
zigzag ne soient pas trop serrées, a
reprise deviendrait trop dure et trop
raide.
En reprisant de l’envers, le raccommo
dage est moms voyant.
4Rammendare con lana
Piedino:
Punto:
Tensione
superiore:
File:
piedino per rammendo
(acessorio fuori corredo)
Taste G
net settore
occhielbo (3)
fib per ricamo e
rammendo, lana
grossezza 70
abbassato
Ago:
Trasportatore:
Posizione per
rammendo 121: spingere indietro e
abbassare teva
atzapiendino
Lei deve infitare it file di lana per it foro
del piedino per rammendo eppoi nelta
guida P del file. It fib si trova sotto it
piedino per rammendare. Lei deve inizia
re in alto a sinistra e deve tendere it fib
di lana attraverso a parte che Si intende
rammendare (fig. N).
tnfine it file di lana viene tagliato ed i fill
di lana tesi prima sulta stoffa vengono
era cucite con un punto zig-zag oppure
con una cucitura elastica (fig. 0).
Cucendo con detle cuciture troppo vicine
Si corre it pericoto di ottenere un
rammendo motto duro.
Le operazioni descritte vengono esegumte
sut rovescio delta stoffa, it diritto della
Stessa sara plü belle.
4
I!!l
/
0
_]
/—.-—
Reinigen
mid Olen
• Netzstecker ziehen. Nadel hochstel
len. Spuienkapsel herausnehmen und
NahfuB ausrasten. Die vordere Nocke N
des Knoptlochtul3es in die Offnung 0 an
der inken Kante der Stichplatte stecken.
Den Ful3 nach unten drucken, wobei sich
die Stichplatte lOst Stichplatte heraus
nehmen. Mit dem Pinsel den Transpor
teur und den Greiterraum reinigen. Die
Maschine nicht Olen. Nur ab und zu
einen Tropfen 0!, wie die Zeichnung
zeigt, in die Greiferbahn geben.
Cleaning and oiling
• Pull out the mains plug Raise the
needle. Remove bobbin case and let
sewing toot snap out. Insert the tront tn
N ot the buttonhole toot into the openin
o on the left edge of the needle plate.
Push the toot downwards the needle
plate is loosened. Remove needle plate
Clean both machine feed and the vicinil
of the sewing hook with a soft brush. D
not oil the machine. All you have to do
is put a drop of oil into the hook race
way now and then (as shown in the illu
stration).
L
-
Nettoyage et graissage
• DObrancher Is machine du secteur.
Amener l’aiguille en position haute.
Sortir a boite a canette et degager a
semelle. Engager le tenon avant N du
pied a boutonnibres dans louverture 0 a
gauche de Ia plaque. Abaisser Ia
semelle et a plaque a aiguille est
libOrée. Enlever Ia plaque a aiguille.
A ‘aide d’un pinceau nettoyer Ia griffe et
le compartiment du crochet. Ne pas hui
er Ia machine. De temps a autre, ii suffit
de mettre une goutte d’huile dans Ia
coursière.
52
Pulizia e lubriticazione
• Togliere Ia spina dalla presa a muro.
Alzare lago. Togliere Ia capsula della
spolina e sganciare il piedino. Inserire l
linguetta anteriore N del piedino per
occhielli nell’apertura 0 a sinistra della
placca d’ago, in maniera da staccare Ia
placca. Togliere Ia placca dago. Pulire
con il penello trasporto e vano crochet.
Non lubrificare Ia macchina, Mettere sol
ogni tanto una goccia d’olio nel crochet
come mostra Ia figura.
4
GlUhlampe auswechseln
• Netzstecker ziehen.
Fuhrungslineal etwas schräg in die Off
nung N auf dem Kopf der Maschine
stecken, Lampengehause niederdrücken
und festhalten. Die Glühlampe hoch
drücken, nach 0 drehen und herausneh
men. Die neue Lampe so einsetzen, dal3
die Fuhrungen in den Schlitzen 0 glei
ten. Die Gluhlampe hochdrücken und
nach P drehen.
Changing the bulb
• Pull Out the mains plug.
Place the edge guide, slightly diagonally,
into opening N in the head of the
machine. Press down the housing of the
lamp and hold it fast. Push the bulb
upwards, then in direction 0 and pull it
out. Insert the new bulb so that the pins
enter slots 0, push the bulb upwards
and turn it in direction P.
4
Changement de l’ampoule
• Débrancher Ia machine du secteur.
Placer le guide-bord de façon oblique
dans l’ouverture N sur Ia tête de Ia
machine. Descendre et maintenir le
boltier cle Ia lampe. Pousser l’ampoule
vers le haut, Ia tourner vers 0 et ‘enle
ver. Placer I’ampoule neuve de maniêre
que ses tenons sengagent dans les ten
tes Q. Pousser l’ampoule vers le haut et
a tourner vers P.
Sostituzione della lampadina:
• Togliere Ia spins dalla presa a muro.
Introdurre il lineale di guida obliqua
mente nell’apertura N sulla testa della
macchina. Premere in giü il porta
lampade e tenerlo fermo. Spingere Ia
lampadina in sü, girarla verso 0 e
toglierla. Inserire Ia nuova lampadina
in maniera che perni entrino nelle
fessure 0. Premere Ia lampadina in sü e
girarla in senso P.
53
N ade i-Ta belie
Die Wahi der richtigen Nadel garantiert
eine bessere Verarbeitung des Nähmaterials
Stoffqualitat
Stoffqualitat
Stoffqualitát
Ieicht
mittel
schwer
Nadel
60 70 75
Nadel
80 90
100
Nadel
110 120
Nadelspitzen
Nadelspitze und
I Nadelöhr
Profil
j Bezeichnung
Geeignet für
--
—---------
-—
-
:
; 130/705 H
Nadelstärke:
70/80
r
—---------—
kleine Kugelspitze Universalnadel für feinmaschige Synthetik
gewebe, feines Leinen, Chiffon, Batist,
Organdy, Wolistofte, Samt, Ziernáhte,
Stickereien
mittlere
Kugelspitze
Grobmaschige Strickstoffe, Wirkstoffe,
Lastex, Interlock, Quiana, Simplex
mittlere
Kugelspitze
Speziell für Pfaff entwickelte Stretchnadel.
Besonders gut geeignet für emptindliche
Stretch- und Wirkstoffe
grol3e
Kugelspitze
Grobmaschige Miederwaren, Lycra,
Simplex, Lastex
130/705 H-J
spitze
Rundspze
KOper, Berufsbekleidung, schwere Leinen
stoffeBkieJeans feinesSegeltuch
130/705 H-LR
Nadelstärke:
70—120
Schneidspitze
Leder, Wildleder, Kalbsieder, Ziegenleder
130/705 H-SUK
Nadelstärke:
-
130/705 H-PS
Nadelstärke:
75 90
—
—
-
—
—
130/705 H-SKF
Nadelstärke:
70/110
—
—
—
-
—
(rechts
schneidend)
.
-
...
--
-
--
130/705 H-PCL
Nadelstärke:
80—110
Schneidspitze
mit Spitzenrinne
(linkslaufend)
-
-
-
------.,--
--
------
130 H-N
Nadelstärke:
70—110
130/705 H-WING
Nadelstärke:
cA
.-.--—
--
Kunstleder, Plastic, Folien, Wachstuch
-
-----,--
--.---
------.-...-.--......--
--------
kleine Kugelspitze Absteppnähte mit Knopflochseide
oder synthetischem Garn 30/3
langes Nadelähr
4.
..
...—
-E
Hohlsaum-Spitze
Effektvolle Hohlsaumnähte bei stark appre
tierten Geweben, Organdy, Glasbatist
_—
_____
Nadel-Tabelle
F
-
Stichlange
Nadelentfernung
Geeignet für
1,6mm
2,0mm
normaleBiesen
normale Biesen
2,5mm
3,0mm
4,0 mm
breite Biesen
extra brefte
Biesen
-
Stichbreite
-—
Bezeichnung
I
-__
130/705H-ZWI
I Stärke: 80
2,5mm
2,5mm
130/705H-ZWI
Stärke: 80
Stärke: 90
Stärke: 100
2,5mm
2,5mm
3,0mm
—
—
—
—
—
Ziermuster mit Zwiflingsnadeln
Sie durch Drehung des Handrades, ob
Bevor Sie die gewunschte Verzierung ausnähen, kontrollieren
rechen weitgehendst ausgeschaltet
die Nadein einwandfrei einstechen Dadurch wird em Nadeib
Zierstichmuster/Zickzack-Muster
—
130/705H-ZWI
0,5—1,5 mm
Stärke: 80
0,5—1,5mm
Stärke: 80
Srke:805-L5mm
breit
schmal
schm&
1,6 mm
2,0 mm
5mm
Verzierungen
Verzierungen
Verzierungeri
Hohisaum/Spezial Doppelnadel
H——
130/705
—
HZWIH0
Stärke: 80
Stärke: 100
sehr schmal
sehr schmal
2,0—3,0mm
2,0—3,0mm
j
J__
Dekorativer
Hohlsaumeffekt.
Stark appretierte
Gewebe und
Glasbatistsind
besonders gut
geeignet
Needle chart
Using the adequate needle guarantees a better
working up of the material.
Fabric weight;
light
Fabric weight;
medium
Needle size;
60, 70, 75
Needle size;
80, 90
Needle size;
100, 110, 120
Fabric weight;
heavy
Needle points
System & No.
Profile
130/705 H
70, 80
Point & eye
Suitable for
Light ball point
Universal needle for fine-meshed
synthetics, fine linen, chiffon, batiste,
organdy, woolens, velvet, fancy seams
and embroidery work.
—
130/705H-SUK
70, 110
Medium
ball point
-
-
oarsekruttedfabhcLastex,double1
C
jersey fabrics, Quiana and Simplex.
Medium
ball point
Stretch-fabric needle developed
especially for Pfaff. Particularly suitable
for delicate stretch and knitted fabncs.
130/705 H-SKF
70, 110
Heavy
ball point
Wide-meshed corsetry, Lycra, Simplex
and Lastex.
130/705 H-J
90—110
Acute
round point
Twill, workwear, heavy linen, blue jeans
and light canvas.
130/705 H-LR
70—120
Narrow
twist point
Leather, suede, calf and goatskin
leathers.
130/705 H-PCI..
80—110
Narrow wedge
point with
left-twist groove
Imitation leathers, plastic materials,
plastic sheeting and oilcloth.
130 H-N
70—110
Light ball point,
long eye
Seams topstitched with buttonhole silk
or No. 30/3 synthetic thread.
Hemstitching
point
Attractive hemstitching on heavily
dressed materials, organdy and
glass cambric.
130/705 H-PS
75, 90
130/705 H-WING
100
—
—
_—
C
—
___
____
\leedle chart
r
System & No.
130/705H-ZWI
80
Stitch width
Stitch length
2.5 mm
2.5 mm
—
—
Needle
spacing
Suitable for
1.6mm
2.0mm
Medium-wide
cording
2.5 mm
3.0 mm
4.0mm
Wide cording
Extra wide cording
Extra-widecording{
-
130/705 H-ZWI
80
90
100
2.5 mm
2.5 mm
3.0mm
—
—
.
—
-
Decorative designs sewn with twin needles
make sure the needles stitch into the
Before you start sewing, turn the handwheel and check to
ted.
fabric properly. In this way, needle breakage can be largely preven
Decorative and zigzag patterns
Ornamentations
Ornamentations
Ornamentations
1.6 mm
2.0mm
2.5mm
wide
narrow
narrow
0.5—1.5 mm
0.5—1.5mm
0.5—1.5mm
80
80
80
—
—
—
—
—
—
__1
—
Special hemstitching twin needle
-
—
—
130/705
H-ZWI-Ho
80
100
I
I
i
very narrow
very narrow
2.0—3.0 mm
2.0—3.0mm
.
——
—
—r
—
—
Decorative hem
stitching effect
Heavily dressed
fabrics are par
ticularly suitable.
Tableau des aiguilles
trés
Le choix de Ia pointe daiguille adequate est
important et garantit de meilleurs résultats.
Matiéres:
Matiéres:
legets
moyennes
Aiguilles:
60 70 75
Aiguilles:
80 90
Matières:
—
lourdes
Aiguilles:
100 110 120
Pointes d’aiguille
Utilisations
Pointe et
chas de l’aigudle
Forme
de pointe
Designation
Aiguille universelle pour tissus synthetiques
maille fine, tin fin, chiffon, batiste, organdi,
tissus lame, velours, pour coutures d’orne
mentation et pour brodenes
pointe
bille fine
130/705 H
Grosseur de
l’aiguille: 70, 80
—
130/705 H-SUK
Grosseur de
I’aiguille: 70 a 110
pointe
bille moyenne
Tissus tricotés grancle maiNe, tissus maille,
Lastex, Interlock, Quiana, Simplex
130/705 H-PS
Grosseur de
l’aiguille: 75 a 90
pointe
bille moyenne
Aiguille Stretch, spécialement développee
pour machines Pfaff. Convient tout particuli
rement pour tissus stretch et maille délicats
grande pointe
bille
Lycra grande maille (gaines, combines, etc.
Lycra, Simplex, Lastex
pointe ronde
pointue
Croisé, vêtements de travail, tins lourds,
blue-jeans, toile a voiles fine
pointe coupante
Cuir, daim, veau, chevreau
I
130/705 l1-SKF
Grosseur de
l’aiguille: 70 a 110
-
130/705 H-J
Grosseur de
l’aiguille: 90 a 110
—
—
—
130/705 H-LR
j Grosse
ur de
a droite
I’aiguille: 70 a 120
p-——
130/705 H-PCL
Grosseur de
l’aiguille: 80 a 110
pointe coupante Similicuir, plastique, feuilles piastiques,
avec rainure obli- toite cirée
que (a gauche)
._
130 H-N
Grosseur de
l’aiguille: 70 a 110
130/705 H-Wing
Grosseur de
l’aiguille: 100
—
1
—C
-——
CE
-C
Piqures avec soie a boutonniere ou
fII synthetique 30/3
petite pointe
bille,
chas tong
pointe pour
broderies ajours
—
Coutures ajours trés décoratives
J tissus fins, organdi, batiste.
.1
äbleau des aiguilles
Designation
Longueur de
Largeur de
point
point
130/705H-ZW
2,5 mm
Grosseur: 80
2,5 mm
130/705 H-ZW1
Grosseur: 80
Grosseur: 90
Grosseur: 100
2,5mm
2.5 mm
3.0mm
—
—
i
Espacement
des aiguilles
lJtdisations
16mm
2,0 mm
nervures
2,5 mm
3,0 mm
40mm
nervures larges
nervures
normales
extraarges
Coutures décoratives avec aiguilles jumelees
contrOler Si les aiguilles pénetrent
Avant Ia couture d’ornementation, tourner le volant et
pas que les aiguilles cassent au cours de
risquez
ne
vous
impeccablement dans Ia plaque. Ainsi
Ia couture.
Motifs au point dCcoratives/Motifs au point zigzag
130/705H-ZWI
Grosseur: 80
Grosseur: 80
Grosseur: 80
0,5—1,5 mm
0,5—1,5 mm
0,5—1,5mm
large
étroite
étroite
1,6 mm
2,0 mm
2,5mm
Ornementations
Ornementations
Ornementations
Ourlet ajour/Aiguille double spéciale
9
130/705
H-ZWI-l1O
Eff e t d’ecora H
es tissus trés ap
prétésetle
7
._
________
Tabella degli aghi
La scelta dellago giusto garantisce una migliore
lavorazione del materiale da cucire.
QualitA della stofta
leggera
Qualita della stoff a
media
Qualita della stofta
ago
60/70/75
ago
80/90
ago
100/110/120
pesante
Le punte degh aghi
-T
Punta e Cruna
Indicata per
130/705 H
Grossezza ago:
70/80
punta a sfera
piccola
ago universale per tessuti sintetici a
maglia fine, lino fino, chiffon, batista,
organdis. stoffe di lana, velluto, cuciture
omamentali, ricami
130/705 H-SUK
Grossezza ago:
70/110
punta a sfera
media
stoffe a maglia larga, tessuti in maglia in
genere, Lastex, Interlock, Quiana,
Simplex
Denominazione
Profilo
I
punta a sfera
media
ago speciale Pfaff per punti flexi. Adatto
particolarmente per stoffe delicate
elastiche e in maglia
130/705 H-SKF
Grossezza ago:
70/110
punta a sfera
grande
tessuti per busti a maglia larga, Lycra,
Simplex. Lastex
130/705 H-J
Grossezza ago:
90-110
punta rotonda
fustagno, abiti da lavoro. tessuti di mo
pesante blue jeans, tela per vela fine
130/705 H-LR
Grossezza ago:
70/120
punta a lama
(tagllo a destra)
pelle, scamosciato, nappa, capretto
punta alama
(scanalatura
cruna verso
similpelle. plastica, fogli di nailon, tela
cerata
130/705 H-PS
Grossezza ago
75+90
-
130/705 H-PCL
Grossezza ago:
80-110
sinistra
punta a sfera
-
130 H-N
Grossezza ago.
70-110
130/705 H-Wing
Grossezza ago.
100
EE
C
piccola
crunalunga
punta per punto
agiorno
impunture con seta grossa o fib
30/3
sintetico
lavori di punto a giorno di eftetto su
tessuti fortemente apprettati, organdis,
batista rigido
ibella degli aghi
Denominazione
unghezzaIarghezza
punto
punto
distanza aghi
Indicato per
130/705 HZWl
Grossezza: 80
2,5 mm
2,5 mm
1,6 mm
2,0 mm
nervature normali
nervature normali
130/750H-ZWI
Grossezza: 80
Grossezza 90
Grossezza: 100
2,5 mm
2.5 mm
3,0mm
2.5mm
3.0mm
4,0mm
nervature Iarghe
nervature parti
colarmente larghe
Motivi ornamentali con aghi gemelli
Hare girando ii volantino se gli aghi
Prima di eseguire ii motivo ornamentale desiderato contro
cosi possibili rotture di aghi.
evitano
Si
d’ago.
placca
della
entrano senza ditticoltä nel toro
Motivi ornamentali/Motivi a zigzag
130/705 H-ZW1
Grossezza: 80
Grossezza: 80
Grossezza: 80
0,5 1,5mm
0,5 1,5 mm
0,5-1,5mm
-
-
motivi ornamentali
motivi ornamentali
motivi ornamentali
1,6 mm
2,0 mm
2,5 mm
argo
stretto
stretto
I
Orb a giomo/cucitura speciale doppia
130/705
H-ZW1+HO
Grossezza: 80
rGrossezza 100
r
2,0-3,0mm
moTto stretto
jEffettoa punto
a giorno decora
tivo. Si prestano
particolarmente
tessuti fortemente
apprettati e tes
suti in batista
-
f
Ld0
4
Nahstorungen und ihre Beseitigung
Ursache:
1. Die Maschine Iäf3t Stiche aus
Die Nadel 1st nicht richtig eirigesetzt.
Es ist eine falsche Nadel eingesetzt.
Die Nadel ist verbogen oder stumpf.
Beseitigung:
Nadel bis zum Anschlag hochschieben.
Flache Kolbenseite nach hinten,
Nadel System 130/705 H einsetzen.
Neue Nadel einsetzen.
Die Maschine st nicht richtig eingefadelt.
Die Nadel 1st für das Garn zu feb.
Einfadelweg uberprüfen.
Stärkere Nadel einsetzen.
2. Der Oberfaden rei6t
Aus vorgenannten Gründen.
Siehe unter 1.
8ei zu starker Faderispannung.
Bei schlechtem ocler knotigem Garn.
oder bei soichem, das durch lange
Lagerung zu trocken geworden 1st.
3. Die Nadel bricht ab
Die Nadel 1st nicht bbs zum Anschlag
eingesetzt.
Fadenspannung regulieren.
Nur gutes Nähgarn verwenden.
Neue Nadel bis zum Anschlag schieben.
Die Nadel ist verbogen.
Die Nadel ist zu dunn oder zu dick.
Neue Nadel einsetzen.
Durch Ziehen oder Schieben des Stoffes
wird die Nadel verbogen und stöi3t auf
die Stichplatte.
Die Spulenkapsel 1st nicht richtig
eingesetzt.
Maschine allein transportieren lassen.
Nahgut nur lebcht führen.
4. Die Naht 1st nicht gleichmäl3ig
Die Spannung 1st verstellt.
Zu starkes, knotiges oder hartes Garn.
Der Unterfaden 1st ungleich aufgespult.
Fadenschlingen unterhalb oder oberhaib
des Stoffes.
Nadeltabelle beachten.
Beim Einsetzen der Spulenkapsel diese
bis zum Anschlag nach hbnten schieben.
Ober- und Unterfadenspannung
kontrollieren.
Nur einwandfreies Garn verwenden.
Nicht freihandig aufspulen, sondern den
Faden durch die Spulervorspannung
laufen lassen.
Richtig einfädeln. Ober- und Unterfaden
spannung kontrollieren.
Ursache:
Beseitigung:
5. Die Maschine transportiert nicht oder unregelmaBig
Stichplatte abnehmen. Nähstaub mit
Zwischen den TransporteurZahnreihen
Pinsel entfernen.
hat sich Nähstaub festgeprel3t.
Versenkschieber nach inks stelten.
Transporteur st versenkt.
Versenkschieber steht rechts.
6. Die Maschine geht schwer
Fadenreste betinden sich in der
Greiferbahn.
Fadenreste entfernen und einen
Tropfen O in die Greiferbahn geben,
7. Wichtige 1-linweise
Beim Auswechseln von Nähfül3en und Nadeln muS der Hauptschalter 125
ausgeschaltet werden.
Die eingefadelte Masohine nicht ohne Stoff in Bewegung setzen.
Beim Verassen der Maschine, auch kurzzeitig, den Hauptschalter ausschalten.
Dies st wichtig, wenn Kinder in der Nâhe sind.
4
Faults and their remedies
Cause:
1. Machine skips stitches
Needle not inserted correctly.
Wrong needle used.
Needle bent or blunt.
Machine threaded improperly.
Needle too thin for thread used.
2. Needle thread breaks
For any of above reasons.
Thread tension too strong.
Poor-quality or knotty thread used,
or thread that has become too dry by
excessive storage.
3. Needle breaks
Needle not pushed up as far as it
will go.
Needle bent.
Needle too thin or too thick.
Needle bent and strikes needle plate
because work is pushed or pulled.
Bobbin case improperly inserted.
4. Seam is not uniform
Tension out of adjustment.
Thread too thick, knotty or hard.
Bobbin thread wound unevenly.
Kinks appear on top and bottom of
material.
Remedy:
Push needle up as far as it will go, its
flat shank side facing toward the back.
Insert system 130/705 H needle.
Insert new needle.
Check threading.
Insert thicker needle.
See par. 1 above.
Regulate thread tension.
Use onty. good-quality thread.
Insert new needle and push it up as far
as it will go.
Insert new needle.
Refer to needle table.
Let machine feed the work alone.
Only guide the material lightly.
When inserting the bobbin case, push it
in as far as it will go.
Check upper and lower tensions.
Use first-class thread only.
During bobbin winding, do not hold
thread in hand, but pass it through the
bobbin tension stud.
Thread machine properly and check
both tensions.
Cause:
Remedy:
5. Machine feeds irregularly or not at all
Remove needle plate and clean out lint.
Lint has accumulated between tooth
rows of feed dog.
Feed dog dropped. (Drop-teed control is
Flick drop-feed control to the left.
at right.)
6. Machine runs with difficulty
Thread ends in hook raceway.
Remove thread ends and put a drop of
oil into hook raceway.
7. Fundamental rules
125.
Before exchanging either sewing foot or needle, switch off master switch
Never run a threaded machine unless there is a piece of fabric under the sewing
off
foot. If you have to leave the machine, even for a short while, be sure to switch
around.
are
children
when
important
the master switch. This is particularly
)
Causes de derangements et remédes
Remèdes:
Causes:
1. Points manqués
Laiguille n’est pas placée selon es
prescriptions
L’aiguille nest pas du système prescrit.
Engager l’aiguille a fond, le meplat du
talon vers l’arrière.
Nutiliser que des aiguilles du système
130/705 H.
L’aiguille est déformée ou épointée.
Utiliser une aiguille neuve.
Lenfilage nest pas correct.
ContrOter es passages du fit.
L’aiguille est trop fine pour le fit.
Utilier une aiguille plus forte.
2. Casse du iii d’aiguille
Pour es causes précitées.
Voir 1.
Tensions trop fortes.
Régler convenablement les tensions.
Fit de mauvaise quatite, noueux ou
cassant.
N’employer que du fit de qualité.
3. Casse d’aiguille
L’aiguille nest pas engagée
a
fond.
Introduire Ia nouvelle aiguille
a
fond.
Laiguille est déforrnée.
Remplacer l’aiguille.
L’aiguille est trop grosse ou trop fine.
En tirant ou poussant l’ouvrage. l’aiguilie
dévie sur a plaque a aiguille.
Tenir compte du tableau des aiguilles.
La boite a canette n’est pas introduite
correctement.
Appuyer sur a boite a canette
en place. jusquà l’emboItage
perceptible.
4. Couture laissant a desirer
La tension est déreglée.
Le fit est trop gros, noueux ou dur.
Canette irrégutièrement garnie.
Des boucles de fit se torment sur ou
sous l’ouvrage.
Laisser a machine entralner seule.
Guider legerement I’ouvrage.
a
sa mise
Verifier les tensions des fits d’aiguille et
de crochet.
N’utiliser que des fits de bonne qualité.
Ne pas bobiner a main libre mais faire
passer le I it par Ia pretension du
dévidoir.
Veitter a l’enfilage correct; contrôler Ies
tensions des fits.
Causes:
Remèdes
nt
5. La machine n’entraine pas ou entraine irréguliereme
a aiguille, ôter les
a
plaque
r
Enleve
Bourres agglomerées entre les dents de
u.
pincea
s
au
bourre
Ia griffe.
Placer le bouton abaisse-grifte a gauche.
Griffe abaissée (levier de marche arrière
.
droite)
n
en positio
6. Marche dure de Ia machine
Des bribes de fit se sont prises dans Ia
coursière du crochet.
Enlever les bribes de fit et mettre une
goutte d’huite dans a coursière.
7. Remarques importantes
upteur general 125
Pour remptacer le pied presseur et l’aiguille, placer l’interr
sur Arrèt”.
tissu sous le pied presseur.
Ne jamais mettre en marche Ia machine enfilée sans
l, méme si I’on ne quitte Ia
genera
upteur
t’interr
er
débray
rs
Ne pas oublier de toujou
aire sit y a des enfants
nécess
t
surtou
est
machine que pour quetques instants. Ceta
pièce.
dans Ia méme
4
Possibili inconvenienti e come ovviarli
Come ovviare
Inconveniente
1. La macchina salta punti
Lago non è inserito bene.
Inserire l’ago fino allarresto.
La parte piatta del fusto verso dietro.
E
Inserire un ago sistema 130/705 H.
stato inserito un ago sbagliato.
Cambiare ‘ago.
L’ago è storto o spuntato.
La macchina non
e
infilata bene.
Utilizar una aguja mas grused.
L’ago è troppo fine per ii fib.
2. II f lb
Controllare I’infilatura.
superiore Si rompe
Vedi punto 1.
Vedi i motivi precedenti.
La tensione
e
Regolare bene Ia tensione.
troppo stretta.
Filato nodoso o di cattiva qualità o filato
troppo secco perché vecchio.
Usare sempre solo filato di buona
qualita.
3. L’ago si rompe
ago nuovo sino all’arresto.
L’ago non è stato inserito sino
all’arresto.
lnserire
Lago è storto.
Cambiare ago.
Lago
e
troppo sottile o troppo grosso.
Vedere tabella degli aghi.
Tirando o spingendo ii materiale durante
Ia cucitura lago Si piega e urta sulla
placca delI’ago.
La macchina deve trasportare 1
materiale da sola. II tessuto va
solamente guidato con mano leggera.
La capsula non è stata bene inserita.
Dopo avere inserito Ia capsula premere
leggermente finché non si è innestata.
4. La cucitura non è regolare
Controllare Ia tensione superiore e
quella inferiore.
La tensione non è corretta.
Filato troppo nodoso, grosso
0
duro.
Usare solo filato perfetto.
II fib inferiore non è stato bobinato in
maniera regolare.
Mai bobinare a mano libera, ma passare
ii fib sempre attraverso a tensione per
I’annaspatoio.
Si formano della asole sopra o sotto 1
tessuto,
Infilare bene e controllare bene Ia
tensioni superiore ed inferiore.
Inconveniente
Come ovviaro
5. La macchina non trasporta o trasporta solo irregolarmente
Togliere a placa dell’ago e pulire I
Tra I dentini del trasporto si è pressata
dentini con un pennello.
delta polvere di cucito.
II trasporto è abbassato.
ii dispositivo per abbassare ii trasporto
Si trova a destra.
Spostare ii dispositivo a sinistra.
6. La macchina sforza
Vi sono del residui di fill net crochet.
Eliminare residui di flu e mettere una
goccia di 0110 sul corchet,
7. Avvisi importanti
Per sostituire piedini e gil aghi, bisogna disinserire l’interruttore principale 125.
Non far funzionare Ia macchina senza aver messo prima della stoffa sotto ii piedino.
Quando si abbandona a macchina anche per breve tempo occorre spegnere
l’interruttore principale. Importante se si trovano del bambini nella vicinanza.
61
Sonderzubehör
Das Sonderzubehör 1st für speziefle Näharbeiten. Es 1st be) ihrern Handler gegen
Berechnung erhältlich.
Für Nähtüe mt Schaft
Zum Lösen der Befestigungsschraube des Nähful3schalters elne Münze verwenden.
-_______________
Besteli-Nr.
N dharheit
A9p1 iation sfu It
93035920-91
zum Aoplizieren
Bandeinfasser (Ndhfulthaiter entfernen)
98-053 484-91
zum Einfassen von Kanten mit Band
BesenfuI3 5 RilIen
(Zwillingsnadeln mit Nadelabstand 18—25)
93-035950-91
zum BiesennShen
(Nade)stdrke 80,
fur feine Biesen
Nadstbrke70)
/ ZubenCr
Biesenful3 7 Rillen
93-035 943-91
Fransenful3
zum Ndhen von Fransen und zum
Durchschlagen
Stichplatte mit Rundloch
98-694803-00 I für Absteppnbhte und zum Nähen von
besonders feinen und weichen Stoffen
(SdiJsey etc.)
93-032087-91
Kapper 4,5 mm
93-035946-91
Geradstichfult
—----.--——
-------
—-————
-----
——
-__
—---
Kapper 6.5 mm
für Kappndhte
1 93-035948-91
Krbuselfulf
93-035998-91
zum Krduseln von Volants etc.
KordonerfuI3
93-035915-91
zum Kordonieren
Overlockfu{3
98-620404-00
zum Versdubern von Schnittkanten und zun
gleichzeitigen Zusammennahen und Ver
säubern von eastischen Stotfen
Rollsdumer 2 mm
98-694804-00
zum Säumen von Kanten mit Zickzackstich
Sáumer 3 mm
98-694401-00
zum SSumen von Kanten
Stopffult
93-035960-91
Stopfen und Wollestopfen
Strickkantenfu6
93-035957-91
zum Nähen von Strickmaterial
TeflonfuIt
98-694801-00
zum Nähen von Plastik und Kunststoff
ZirstichfuB
98-694 879-00
zum Ndhen von Ziermustern
Inhaltsverzeichnis
Abstepparbeiten
Anlasser
Blindstich
Einstellracl für Zierstiche
Elektrischer Anschki6
Fadenabschneider
Glühlampe auswechseln
Hosenreil3verschluB (Damen)
Knopfannáhen
Knopflochnahen
Nadel auswechseln
Nadeltabelle
Nahtreil3verschlul3
Nàhfül3e
Nähfü8e auswechseln
NähstOrungen und ihre Beseitigung
Nähwerk aus- und einschalten
Nutzstiche einsteNen
Nutz- und Stretchstichkombinationen
Oberfaden einegen
Oberfadenspannung prüfen
Programmtabeiie
Reinigen und O!en
Rei8verschlul3 einnähen
Rückwärtsnähen
Sicherheitsbestimmungen
Spulen vorbereiten
Spulen
Spule elniegen
Spulenkapsel einsetzen
Stichiage einstellen bei Geradstich
Stichlange einstelleri
Stoffdruckerhebel
Stopfen mit Geradstich
Stopfen mit WoVe
Stretchstiche einstellen
Tipptasten (Modelle mit Nutzstichen)
Tipptasten (Modelle mit Nutz- und Stretchstichen)
Transporteur versenken
Unterfaden heraufholen
Unterfadenspannung prüfen
Verwandlungsnähfläche
Zierstiche und Kombinationen
Zubehörfach
32, 33
3, 12
34, 35
26
3
13
53
46, 47
40, 41
37—39
28
54, 55
44, 45
31
29
62, 63
5, 7
22
24
9
12
78—79
52
42
15
16
4, 5
6
7
8
25
14
11, 13
48, 49
50, 51
23
17
19
28
10
8
30
27
30
Special accessories
The special accessories listed below are intended for special sewing jobs. They can
be obtained from your dealer at an extra charge.
Use a coin to loosen the screw of the sewing foot holder.
Part No.
Sewing Operation
Appliqué toot
93-035920-91
For appliqué work
Binder (remove sewing toot holder)
98-053484-91
For binding edges with tape
Cording foot. 5 grooves
(twin needle with 18—2.5 mm needle gauge)
93-03595091
Cording toot, 7 grooves
(twin_needle with 1.4—1.8 mm needle gauge)
-91
For cording work
(needle size 80,
tor tine cording
needle size 70)
ssory
Fringe sewing foot
Straight-stitch toot
93-035943-91
For sewing fringes and for basting
98694 80300
For topstitching and
sewing very delicate
and soft fabrics (silk jersey, etc.)
—-
Needle plate with round needle hole
93-032087-91
Felling foot, 4.5 mm
93-035946-91
Felling foot, 6.5 mm
93-035948-91
Shirring foot
93-035998-91
For shirring valances
Single-needle cording foot
93-035915-91
For single-needle cording
Qverlock foot
98-620404-00
For tinishing raw edges or for joining elasti
tabrics and simultaneously overcasting thei
edges
Hemmer foot (rolled edge), 2 mm
98-694804-00
For hemming edges with zigzag stitches
Hemmer foot, 3 mm
98-694401-00
For hemming edges
Darning foot
93-035960-91
Darning fabric and wool
Knitted edge toot
93-035957-91
For sewing knitted materials
Teflon foot
98-694 801 -00
For sewing plastic materials
98-694 879-00
For sewing fancy patterns
For felled seams
Faicy-stitch toot
Contents
Blindstitching
Bobbin winding
Bobbin winding preparations
Changing the bulb
Changing the needle
Changing the sewing foot
Checking the bobbin thread tension
Checking the needle thread tension
Cleaning and oiling
Darning with straight stitches
Darning with wool
nism
Disengaging and engaging the sewing mecha
thread
bobbin
the
Drawing up
Dropping the feed
Electrical connection
Fancy stitches and combinations
Faults and how to remedy them
Finger-tip controls (models with utility stitches)
stitches)
Finger-tip controls (models with utility and stretch
bobbin
the
ng
Inserti
Inserting the bobbin case
Needle chart
Needle thread tension
Operating the foot control
Presser bar lifter
Program table
Reverse sewing
Safety rules
Seam-like zipper closure
Setting stretch stitches
Setting the needle position for straight stitch
Setting the stitch length
Setting the utility stitches
Sewing buttonholes
Sewing feet
Sewing in zippers
Sewing on buttons
Thread cutter
Thumb wheel for fancy stitches
Topstitching
Upper threading
Utility- and stretch-stitch combinations
Work support/accessory box
Zippers for ladies’ slacks
34, 35
6
4, 5
53
28
29
8
12
52
48, 49
50, 51
5, 7
10
28
3
27
64, 65
17
20
7
8
56, 57
12
3, 12
11, 13
80—81
15
16
44, 45
23
25
14
22
37—39
31
42, 43
40, 41
13
26
32, 33
9
24
30
46, 47
73
Accessoires spéclaux
Ces accessoires pour des travaux particuliers sont en vente chez votre dépositaire.
Pour pieds pressure a tige
Prendre une pièce de monnaie pour desserrer a vis de fixation du support du pied
presseur.
Références
Operations
Pied pour applications
93-035 920-91
applications
Bordeur (enlever support du pied)
98-053484-91
bordage au ruban
93J3595fJ91
couture de nervures
0 80;
(aiguilles n
pour nervu as fines,
aiguilles n 70)
/“essoires
Pied a nervures, 5 rainures (aiguilles
jumelees en ecartements de 1,8; 2,5 mm)
Pied a nervures. 7 rainures (aiguilles
jumelées en écartements de 1,4; 1,8 mm)
-
_________
couture de franges; bãtissage
Pied pose franges
93-035943-91
Pied pour point droit
98-694 803-00
Plaque a aiguille avec trou rond
93-032087-91
Rabatteur 4,5 mm
93-035946-91
Rabatteur 6,5 mm
93-035948-91
Pied fronceur
93-035998-91
froncement de volants, etc.
Pied guide-cordonnet
93-035915-91
pose de cordons
Pied overlock
98-620404-00
surfilage de bords de coupe;
assemblage et surfilage simultané de
bords de coupe
Ourleur (bord route) 2 mm
98-694804-00
ourlage de bords au point zigzag
Ourleur 3 mm
98-694401-00
ourlage de bords
93-035960-91
reprisage normal et
93-035957-91
coutures tissus-mailles
98-694801-00
coutures sur matières plastiques et
synthétiques
98-694 879-00
couture de motifs décoratifs
-
surpiqures et coutures sur tissus
trés fins et souples (jersey de sole)
coutures rabattues
Pied
a
repriser
Pied guide-bord pour tricot
,
Pied a semelle Teflon
:
pour points décoratifs
7A
a
Ia lame
Table des matières
Abassement de a griffe
Bobinage
Boite de rangement des accessoires
Branchement électrique
Changement de ‘aiguille
Changement de l’ampoute
Changement du pied presseur
Combinaisons de points elastiques at utilitaires
ContrOle de a tension du fil d’aiguiile
ContrOle de a tension du fil de canette
Coupe-fl
Couture en marche arrière
Deport du point droit
Disque de réglage des points décoratifs
Embrayage et dêbrayage des organes de couture
Enfilage du fil d’aiguille
Execution de boutonniCres
Fermeture a glissiere invisible
Fermeture a glissiere pour pantalons femmes
Insertion de fermetures a glissiere
Levier presse-tissu
Mesures de sécurité
Mise en place de a canette
Mice en place de Ia boIte a canette
Nettoyage et graissage
Perturbations et remédes correspondants
Pieds presseurs
Plan de couture variable
Points d’ornementation. points combines
Points invisibles
Pose des boutons
Preparation des canettes
Reglage de a ongueur de point
Reglage des points utilitaires
Réglage des points éiastiques
Remontée du fil de canette
Reprisage au fil de lame
Reprisage au point droit
Rheostat a pédale
Surpiquage
Tableau des aiguilles
Tableau des motifs
Touches (modèles avec points utilitaires)
Touches (modéles avec points utilitaires et elastiques)
28
6
30
3
28
53
29
24
12. 13
8
13
15
25
26
5, 7
9
37—39
44, 45
46, 47
42, 43
11 13
16
7
8
52
66, 67
31
30
27
34, 35
40, 41
4, 5
14
22
23
10
50, 51
48, 49
3, 12
32, 33
58, 59
82, 83
18
20, 21
Accessori fuori corredo
Gli accessori fuori corredo servono per lavori di cucito speciali. Si possono
acquistare nei negozi Pfaff.
Per piedini con gambo
Per allentare Ia vite del porta-piedino usare una moneta.
No. dordine
essorio
avoro di Cucito
per lavoridiapplicazioni
Piedino per applicazioni
Pedino per bordare
(rimuovere portapeduio)
I
98-053484-91
Piedino nervature 5 scanalature
93-035950-91
(ago gemello con dtanza aghi l,-Smm
Bordare con ii bordatore
Piedino nervature 7 scanalature
(ago gemello con distanza aghi 14-18mm)
93-035953-91
cuciture di neature
(grossezza ago 80,
per nervature fini 70)
Piedino per frange
93-035943-91
per cucire frange e per passare le marche
98-694803-00
per impunture e per cucire
tessuti particolarmente fini
e morbidi (maglina d jersey ccc.)
Piedino per punto diritto
—_______________
-——--____________
—-
Placca dago con foro rotondo
Ribattitore 4,5 mm
93-032087-91
93-035946-91
—
__,_______________
per ribattiture
Ribattitore 6,5 mm
93-035948-91
Piedino arricciatore
93-035998-91
per cucire volante e arricciature in genere
Piedino per cordoncino
93-035915-91
per eseguire cordoncini
Piedino overlock
98-620404-00
per cucire e contemporaneamente rifinire
bordi di stoffe tagliate; particolarmente
adattoperstoffe&asbche.
Piedino orlatore (roulé) 2 mm
98-694804-00
per orlature con punto a zig-zag
Piedino orlatore 3 mm
98-694401-00
per orlature
Piedino da rammendo
93-035960-91
rammendare
Piedino per impunture su maglia
93-035957-91
per eseguire impunture su materiali in mag
Pedino TEFLON
98-694801-00
per cucire plastica e materiale
sintetico in genere
98-694879-00
per cucire punti ornamentali
\Piec1no ornamentale
Indice
Attaccatura bottoni
Avvolgere Ia spolina
Cerniera lampo americana
Cerniere lampo
Cerniere lampo per pantaloni da signora
Collegamento elettrico
Combinazioni di punti utili e di punti flexi (stretch)
Come abbassare ii trasporto
Controllo della tensione inferiore
Controllo della tensione superiore
Cucire all’indietro
Fare satire ii fib superiore
Innestare e disinnestare ii meccanismo di cucito
Inserimento del fib superiore
Inserimento della capsula della spolina
Inserimento della spolina
Lavori d’impunture
Leva alza-piedino
Norme di sicurezza
Occhielli
Piano di lavoro variabile e somparto per accessori
Piedini
Posizione dell’ago nella cucitura diritta
Possibili inconvenienti e come ovviarli
Preparazione per avvolgere Ia spolina
Pulizia e lubrificazione
Punti ornamentali e abbinamenti
Punto invisibile
Rammendo con lana
Rammendo con punto diritto
Regolatore punti ornamentali
Regolazione del punti flexi (stretch)
Regolazione dei punti utill
Regolazione della lunghezza del punto
Reostato a pedale
Sostituzione dei piedini
Sostituzione dell’ago
Sostituzione della lampadina
Tabella degli aghi
Tabella dei programmi
Tagliafibo
Tasti automatici (modelli del punti flexi)
Tasti automatici (modebli del punti utili)
.
.
.
40, 41
6
44, 45
42, 43
46,47
30, 21
24
28
8
13
15
10
5, 7
9
8, 12
73
32, 33
11, 13
16
37-39
30, 13
31
25
68, 69
4, 5
52
27-39
34, 35
50, 51
48, 49
26, 69
23
22
14
3, 12
29, 51
28, 49
53
60, 61
84, 85
13
20, 21
18, 85
Programmtabelle
Die Tabelle zeigt die Programmnummer, den dazugeharenden Stich und darunter,
welche Tasten zu drücken sind. Bei alien Programmen mit dem Hinweis stretch” ist
der Stichlängen-Einsteiler bis zum Anschiag auf ,,stretch” zu drehen. Bei alien übri
02
iLI
I
€D
Bezeichnung
I
cD c
G
H
I
03
/
\
/
\
/
04
—
—-—
-..
—
—
—
—
—....
---
E
F
—-..
D
—--
S..—.
—
D
E
05
III
III
III
Ilinl
06
-
..--.
II
II
I0
c
--
G9DM
C)
D
C)
z
C)
Anwendung
01
Knopflocher
Ohne Drehen des Stoffes, nur tippen und das Knopf
loch ist fertig. Die Stichdichte läBt sich regulieren.
02
Geradstich
Für alle Näharbeiten und einen 6 mm Ziersteppstich
03
Zickzackstich
Vielseitig anwendbar; zum Versäubern von Nähten,
Applizieren, Spitzen einsetzen, Nähen von Raupen
nähten, Sticken, Knöpfe annähen, Stopfen usw.
04
Stretch-3fachGeradstich
Nähte, die etwas aushalten müssen, dehnen sich bei
jeder Beanspruchung ohne zu reiBen mit.
05
Stretch-3fachZickzackstich
Besonders flache, elastische Nahtverstarkung,
zum Beispiel für Miederwaren.
06
Elasticstich
Zum Einsetzen von Flicken oder Ausbessern
von Rissen in dehnbarem Material.
07
Wabenstich
Zum Aufnähen von Gummifäden oder zum
Uberdecken von Frotteenähten.
08
Blindstich
Für unsichtbare Saumnähte an dickeren Stoffen.
09
Pulloverstich
Elastische SchlieB- und Versauberungsnaht
für Jerseymaterialien.
M uschelkantenstich
Effektvoller KantenabschluB an zarten Materialien.
..
.
.
en ist die Stichlänge nach Wunsch zu wählen. In der Texttabelle sind Bezeichnung
md Anwendung der einzelnen Programme angegeben.
07
/\/
\/\
/\/
\/\
/\/
\/\
M
09
..—iI
08
z
—
I
H
-.Ji
.—.iI
-.JI
..—II
11
10
tØ
Ii
I
H
II
‘.ø
Ii
K
12
13
%‘
I
\/\
—ii
\/\
-i/
\/\
K
K.
.
C)
C)
C)
>
.)
14
M
15
..—
\\
M
I
-
16
r—
L—I
18
17
L.
I
>
M
.
L
L
9..
—
C)
I
19
I
XI
“I
XI
‘1
20
“
,u
L—l
F.J
Th
XI
I
SR.
L
I
LLL
ISR.KSR.M.
C)
C)
C)
K
C)
“j..
-
Bezeichnung
Anwendung
Overlockstich
Elastische SchlieB— und Versauberungsnaht
fur Maschenware.
12
Kordelstich
Eine lockere Schmucknaht für luftige Bekleidung.
3
Zierelasticstich
Zum Flicken einsetzen oder Risse ausbessern
in dehnbarem Material oder für dekorative Schmuck
nähte auf elastischen Geweben,
4
Federstich
Eine schmückende Uberdecknaht,
zum Beisplel fur Schurzen.
5
Griechenstich breit
Eine klassische Dekorationsnaht für alle Unistoffe.
Geschlossener
OverlockstIch
Zum schmückenden und materialgerechten
Ubernähen offener Saumkanten.
17
Griechenstich schmal
Eine klassische Dekorationsnaht für Unistoffe.
18
Webstich
Eine Schmucknaht, zum Beispiel für rustikale Kleider.
19
DIagonal-Stlch
Eine Schmucknaht,
zum Beispiel für moderne, schlichte Klelder.
1
,
-.
b
Dreiecksstich
j
Eine Ziernaht, zum Beispiel für Kindernachthernden.
7q
Stitch program chart
Lted n tn s chart are the stitch program number, the corresponGng sttch and, in
the lower half, the buttons to be pressea to sew this seam pattern. For all stitch pro
grams marked stretch” turn the stitch control toward “stretch” as far as it will go.
fl[71
1[
L]••
B
7o,
01
I
cD
C
\
\
/
/
i
Ic
05
04
03
02
..—
-‘
.—
.—
.—.——
—
—
—
---
-.---
.
—..
Ill
I
—
..—
----.
1 D
D
ElF
E
06
II
cD
It
-
-
1
G
bW
n
F
C)
D
Stitch
Application
Buttonholes
Buttonholes v;thout turrnng the fabnc.
Just push the buttons and the buttonhole is finished.
The stitch density can be reguiate
-
02
Straight stitch
Au rrorar’y sewing operations and 6-mm fancy
stitchng oorations
03
Zigzag stitch
Edge finishing, appliqué work, inserting lace, button
sewing and satin stitching, embroidering darning etc
04
Elastic triple
straight stitch
Seams exposed to great stress which stretch
under stress.
Elastic triple
zgzag stich
Flat, elastic reinforcing seams, as well as sewing
and mending corsetry.
06
Elastic stitch
Inserting patches and darning rips on elastic fabrics.
07
Honeycomb stitch
Sewing on elastic threads or covering seams on tern
cloth.
08
Blindstitch
Hemming heavier fabrics with invisible stitches.
09
Pullover strtch
Elastic edges finishing seams on jersey fabrics.
10
Shell-edge stitch
Effective edge finish on dainty fabrics.
05
-
L
For all other programs, select the stitch length as desirged. The individual stitch
programs and their application are described in more detail in the table below.
07
08
/\/
\/\
ii
\/\
/\/
\/\
09
10
.-Jl
—Il
W i
R.
.
C)
11
12
Ii
\/\
ii
t_
Ii
\f\
—II
\/\
KK
13
ç
14
M
I
17
18
—
I—I
i’%
-
16
19
20
—
j
—I
ii
i%.
‘m
iJ
I
0
C)
15
0
l—l
r-i
T
£P.
0
••
r
NJ
-n
NJ
X
“
Xl
“
,
/11
X
ii
IKSM.
0
ol
No.
Stitch
Application
11
Overlock stitch
Elastic assembly and edge finishing seams
on knitted fabrics.
12
Knurl stitch
Ornamental seam on light clothing.
13
Elastic ornamental
stitch
Inserting patches and darning rips on elastic materials
or sewing ornamental seams on elastic fabrics.
14
Feather stitch
Decorative cover seams, e. g. on aprons.
15
Lampshade stitch, wide
Classical ornamental seam on all plain fabrics.
16
Closed overlock stitch,
wide
17
Lampshade stitch,
narrow
Classical ornamental seam on plain fabrics.
18
Loom stitch
Ornamental seam, e. g. for country-look dresses.
19
Diagonal stitch
Ornamental seam, e. g. for plain-look,
modern dresses.
20
Triangular stitch
Ornamental seam, e. g. for children’s night dresses.
I
Covering folded fabric edges with a fancy seam.
‘
RI
Tableau des programmes
Le tableau indique le numéro du programme, le schema du point correspondant et
es différents reglages a effectuer sur a machine. Pour bus es programmes pour
vus de Ia mention stretch, le bouton réglant a Iongueur du point est a tourner a
:04
.03
02
I
I
I
I
I
/
/
\
/
\
—
:
-
Iliil
—
—.
“-
—
—
.
cD GD I C
GHDDEF
E
-
I
0
N
Designation des points
0506
ii
il
IA
:—
I
--
-
‘-
in
-
CE)
-- -
III
‘I
cz
GDM
CD
DH
C)
CD
,FD-I
Utilisations
01
: Boutonniere
Sans tourner I’ouvrage, ii suffit d’appuyer sur des
touches: densité des points réglable.
02
Point droit
Point de base pour executer les coutures et pour
rèaliser un point décoratif de 6 mm (surpiqOres).
03
Point zigzag
Emplois multiples surfilage, applications. incrustatior
de dentelle, nervures, broderies
04
Triple couture
point droit
Coutures élastiques soumises a effort; elles sétirent
sans casse du fil (pantalons de ski...).
05
Triple point zigzag
Pour renforcer les coutures élastiques
igaines, combines, soutiensgorge...).
06
Point zigzag piqué
Pose de pièces ou raccommodage dans les tissus
élastiques.
07
Point nid d’abeille
Pose de fils élastiques (smocks) et couture
d’assemblage sur tissu éponge.
08
Point invisible
Ourlets nvisibles sur tissus moyens et épais.
09
Point de tricot
Assemblage et surfilage du jersey.
10
Point cocotte
Réalisation dun bord coquille.
fond sur Ia position stretch. Pour es autres programmes a longucur du point peut
être choisie a volonté. Dans le tableau descriplif figurent es designations et es
applications des différents points
O7O8O9HO1112u13H4
/\/
\/\
/\/
\/\
zc
—.il
I
.—il
-ll
\/\
M
.—il
‘—Jt
H
H.lK
Ii
f
0
I
i
i
Ii
\/\
l
\/\
.
M
—‘
K
.
.
C)
181920
1611
15
.?
\/\
K?H
MP
L
L
C)
01
i
.—.
-it
i-.--i
I
0
I
l
i
0
it
L
I
L L
c
D
L
M
o
K
-
N
Designation des points
Utilisations
11
Point overlock
Assemblage et surfilage élastique sur tissus a mailles
12
Point de corde
Couture decorative fine pour vètements légers.
r
Point zigzag fantaisie
13
r
Pose de pièces ou raccommodage dans es tissus
éiastiques ou encore pour coutures décoratives sur
tissus élastiques.
.
-
14
Point d’épine
Couture decorative sur tabliers,..
15
Point grec large
Couture decorative classique sur tons es tissus fins.
16
Point overlock
fermé large
Pour poser et raccommoder es bords et executer
des ourlets apparents sur es sous-vCtements,
17
Point grec ètroit
Couture decorative classique sur tissus unis.
18
Point de tissage
Couture decorative pour robes paysannes.
19
Point diagonal
Couture decorative pour robes modernes
et simples
20
Point triangle
Couture decorative sur chemises
1
deenfant)
La tabella dei programmi
quail tasti occorre premere.
La tabelia indica ii programma, ii relativo punto e, sotto,
punto
e ii regolatore del
in tutu programmi con indicazione “flexi” occorre regolar
1mb ali’arresto su “stretch.”
,
I
I
I
I
“
\
/
\
j
CD CD (E)
H
G
I
I
‘ii
I
—
—
.-...
..——
—
—--
-..----.--.
—..--..-----.
--
/
\
D
05
04
03
02
-.
D
E
E
--.
F
III
III
III
III
III
III
06
“•
CD CD
2GD
C)
D
C)
D
M
0
F
Descrizione
Applicazione
01
0CC h’ e I
si eseguono senza dover girare Ia stoffa, basta
premere i tasti. La fittezza del punto é regolabile.
02
punto diritto
per tutti i avon di cucito in genere e per una cucitu
di 6 mm su bordi,
03
punto zig-zag
molto versatile; per rifinire bordi, eseguire applicazic
inserire pizzi, cucite cordoncini, ricamare, attaccare
bottoni, rammendare ecc.
04
cucitura tripla flexi
per cuciture resistenti; si estende sotto sforzo
senza rompere.
05
cucitura tripia
zig-zag fiexi
rinforzo elastico e particolarmente piatto della
cucitura, ad esempio per busti.
06
punto elastico
V
V
per inserire toppe o rammendare strappi nel tessuti
elasticizzati,
.
r
V
VZ
08
punto invisibile
per orli invisibili su stoffe pesanti.
09
punto pullover
una cucitura elastica per unire e rifinire
contemporaneamente stoffe in maglia.
10
orb
a conchiglia
rifinitura di effetto su bordi di stoffe morbide.
gli actri punti Si PuÔ regotare a unghezza dcl puill 1 v
tto denominazione e applicazione der singoli progrdmrTn
08
7
/
\/
\/\
H
09
11
10
I
12
ii
\/\
iI
—‘—Ii
iI
:
ii
\/\
Ii
\/\
H
K
ri
-
A
i
%‘
L
’.
K
1
K
L
I
_—
‘.
,‘
£2.
CD
1
CD
17
19
18
L—i
A
_—//
CD
:
15 :16
14
A
‘-...lI
CD.
13
luii
ii
L
20
/1
L---I
fli
l—l
/11
‘
,Xi
/11
I’
----
I
CD
L
L
I
I2.
L L
K2.M
o
(Dl
c,
Descnzione
Applicazione
punto overlock
una cucitura elastica per giuntare e sorlilare
contemporaneamente materiali in maglia.
2
punto corda
un ornamento arioso per abbigliamento eggero.
3
punto elastico
ornamentale
per inserire toppe e rammendare strappi in tessuti
elasticizzati 0 cuciture ornamentali su stoffe
estensibili.
pinto piuma
una cucitura di copertura, ad es. per grembiuli.
punto greco argo
una classica decorazione per stoffe a tinta unita.
punto overlock chiuso
per coprire in maniera ornamentale orli scoperti.
17
punto greco stretto
una classica decorazione su stoffe in tinta unita.
13
punto tessuto
una cucitura ornamentale, ad es per abiti rusticali.
punto diagonale
una cucitura ornamentale, ad es. per abiti semplici
e moderni.
punto triangolo
una cucitura ornamentae, ad es. per pigiama per
bambini.
:
)
.
._
---
-
-..
8t