1
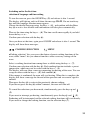
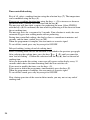
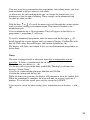
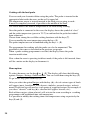
ISTRUZIONI D'USO E MANUTENZIONE
PER FORNI DA INCASSO B460
USE AND MAINTENANCE INSTRUCTIONS
FOR B460 BUILT-IN OVENS
INSTRUCCIONES DE USO Y EL MANTENIMIENTO
PARA HORNOS EMPOTRADOS B460
INSTRUÇÕES DE' USO E MANUTENÇÃO
PARA FORNOS DE ENCASTRAR B460
Istruzioni per l’utente
Vi ringraziamo per la scelta di uno dei nostri prodotti e speriamo che otteniate
da questo elettrodomestico le migliori prestazioni.
Pertanto Vi invitiamo a seguire attentamente le istruzioni ed i suggerimenti di
questo manuale per un corretto utilizzo dei nostri prodotti.
La Casa Produttrice declina ogni responsabilità per danni alle persone ed agli
oggetti, dovuti ad una cattiva od impropria installazione dell’apparecchio
stesso.
La casa Produttrice si riserva il diritto di apportare ai propri prodotti modifiche
che si ritenessero necessarie ed utili, senza alcun preavviso.
Caratteristiche tecniche
Dimensioni:
Altezza: 460 mm
Larghezza: 597 mm
Profondità: 570 mm
Volume:
Lordo: 43 dm3
Netto: 37 dm3
Tensione d'alimentazione: 220-240 V a.c. - 50 Hz
Assorbimento Watt (potenza):
Lampada:
25W
Ventilatore radiale:
20W
Ventilatore tangenziale: 11W
Suola:
1300W
Cielo:
600W
Grill:
1400W
Circolare:
2000W
Prog. Elettronico
1W
3
DICHIARAZIONE DI CONFORMITÀ CE
Questo apparecchio è confome alle seguenti direttive CE:
93/68/CEE : Norme Generali
2006/95/CE : Bassa tensione
89/336/CEE : Compatibilità elettromagnetica
Regolamento CE n° 1935/2004 : Idoneità dei materiali al contatto con i cibi
ISTRUZIONI PER L' UTENTE
Questo manuale costituisce parte integrante dell apparecchio.
Si raccomanda di conservarlo per l intero ciclo di vita dell apparecchio e di leggerlo
attentamente per procedere all installazione, utilizzo, manutenzione, pulizia e
trattamento dell apparecchio.
Qualsiasi intervento deve essere effettuato con l'apparecchio disinserito
elettricamente.
Attenzione: il collegamento a terra è obbligatorio a norma di legge.
Durante il funzionamento del forno tenere lontani i bambini.
Durante il funzionamento il forno diventa molto caldo. Non toccare gli elementi
riscaldanti all'interno.
Non usare pulitori a vapore per la pulizia del forno.
Non usare l'apparecchio per riscaldare la stanza.
Il produttore declina ogni responsabilità nei casi in cui le norme antinfortunistiche
non vengano rispettate.
Il produttore declina ogni responsabilità per danni alle persone e agli oggetti, dovuti
ad una cattiva o impropria manutenzione dell'apparecchio.
Il produttore si riserva il diritto di apportare ai propri prodotti modifiche ritenute
necessarie e utili senza alcun preavviso.
Gli elementi dell imballaggio (p. es. polistirolo, sacchetti, ecc.) possono risultare
pericolosi per i bambini (pericolo di soffocamento).
Tenere le parti dell imballaggio fuori della portata dei bambini.
L apparecchio è previsto per essere usato da adulti che conoscono le presenti
istruzioni per l uso.
I bambini spesso non sono in grado di riconoscere i rischi connessi all uso
dell apparecchio.
Si prega quindi di provvedere alla necessaria sorveglianza e a non far giocare i
bambini con l'apparecchio.
Durante la cottura si sviluppa calore; lo sportello dell'apparecchio, in particolare se di
vetro può diventare molto caldo: c'è pericolo di ustione, non toccare e tenere lontani i
bambini.
I portatori di handicap devono essere assistiti da persone adulte idonee.
4
Non è permesso eseguire modifiche, manipolazioni o tentativi di riparazione, in
particolare con l'uso di utensili (cacciavite, ecc.), internamente o esternamente
all'apparecchio.
Le riparazioni, specialmente quelle delle parti elettriche, possono essere eseguite
esclusivamente da personale specializzato.
Le riparazioni non appropriate possono provocare gravi incidenti, danneggiare
l'apparecchio e l' equipaggiamento, nonchè provocare disturbi nel funzionamento.
Agli apparecchi riparati dai centri di assistenza devono essere eseguite le prove di
routine, in particolare la prova di continuità del circuito di terra.
QUESTO PRODOTTO È STATO PROGETTATO PER UN IMPIEGO DI TIPO
DOMESTICO.
IL COSTRUTTORE DECLINA OGNI RESPONSABILITÀ NEL CASO DI
EVENTUALI DANNI A COSE O PERSONE DERIVANTI DA UNA NON
CORRETTA INSTALLAZIONE, DA UN USO IMPROPRIO, ERRONEO,
ASSURDO.
ATTENZIONE:
IN CASO DI SMONTAGGIO, MANUTENZIONE E PULIZIA DELL
APPARECCHIO, FARE ATTENZIONE IN QUANTO ALCUNE PARTI
POTREBBERO ESSERE TAGLIENTI.
SI RACCOMANDA PERCIÒ L UTILIZZO DI ADEGUATI STRUMENTI DI
PREVENZIONE E PROTEZIONE (GUANTI, ECC.).
In caso di guasto di funzionamento o di una riparazione indispensabile, richiedere
l'intervento del servizio assistenza clienti. Se il forno presenta danni visibili non
metterlo in funzione, staccarlo dalla rete elettrica e rivolgersi al servizio assistenza
clienti.
Non appena viene rilevato un problema di funzionamento, il forno deve essere
staccato dalla rete elettrica.
Assicurarsi che il cavo di collegamento degli apparecchi elettrici non venga
schiacciato nello sportello del forno: l' isolamento elettrico potrebbe risultarne
danneggiato.
Quando il cavo di collegamento è stato danneggiato, deve essere sostituito dal
servizio assistenza clienti per evitare situazioni di pericolo.
Prima di chiudere lo sportello del forno assicurarsi che nella camera di cottura non si
trovino corpi estranei o animali domestici.
Non depositare nella camera di cottura materiali sensibili al calore o infiammabili,
come per es. detergenti, spray per il forno, ecc.
5
Durante il funzionamento il forno si surriscalda fortemente. Il forno surriscaldato
rimane tale per lungo tempo, anche dopo averlo disinserito e si raffredda solo
lentamente fino a raggiungere la temperatura ambiente.
Attendere un periodo di tempo sufficientemente lungo prima di intraprendere, per
esempio, lavori di pulizia del forno.
Al momento di aprire lo sportello del forno possono fuoriuscire vapore e gocce
d'acqua.
Se il forno contiene vapore, si consiglia di non introdurre le mani.
I grassi e gli oli surriscaldati prendono facilmente fuoco. È pericoloso riscaldare
l'olio nella camera di cottura per cuocere la carne e va evitato. Non cercare mai di
spegnere con l'acqua olio o grasso che bruciano (pericolo di esplosione); soffocare le
fiamme con dei panni bagnati.
La griglia, le piastre e i contenitori di cottura diventano caldissimi.
Usare guanti di protezione o canovacci per pentole.
Durante l'uso e la cura del forno fare attenzione a non mettere le dita nelle cerniere
della porta, per evitare schiacciamenti o ferite.
Prestare attenzione a ciò soprattutto in presenza di bambini.
Lasciare aperto lo sportello del forno solo in posizione appoggiata.
Se lo sportello è aperto c'è pericolo di inciampare o di schiacciamento delle dita.
Non sedersi e non appoggiarsi alla porta del forno e non utilizzarla come superficie
da lavoro.
Tutti gli interventi sugli elettrodomestici devono essere effettuati da personale
qualificato.
Per la manutenzione, la movimentazione, l installazione e la pulizia dell apparecchio
usare opportuni mezzi di prevenzione e protezione (guanti, ecc.).
Il sollevamento e la movimentazione di apparecchi di peso >25kg o di dimensioni
che non consentono agevole presa deve essere fatto adoperando mezzi idonei o con
l'intervento di due persone al fine di evitare rischi o disagi.
6
Il forno è dotato di un ventilatore di raffreddamento che entra in funzione alla
selezione del ciclo di cottura creando un leggero flusso d’aria che fuoriesce dalla
fessura posta sotto al pannello comandi e si arresta dopo 10-30 min dallo spegnimento
del forno (in funzione delle temperature del forno).
ISTRUZIONI PER L’INSTALLAZIONE DELL’APPARECCHIO
È importante che tutte le operazioni relative all’installazione dell’apparecchio
vengano eseguite da personale qualificato.
Qualsiasi intervento dev’essere effettuato con l’apparecchio disinserito elettricamente.
Collegamento elettrico:
assicurarsi che il voltaggio corrisponda a quello indicato nella targhetta segnaletica
posta nella parete laterale.
Il forno dev’essere collegato con un cavo di sezione minima di 1,5mm nel retro,
prevedendo un interruttore omnipolare conforme alle norme in vigore, avente una
distanza di apertura fra i contatti di almeno 3mm.
Attenzione: il collegamento a terra è obbligatorio a norma di legge.
Il produttore declina ogni responsabilità nel caso in cui le norme antinfortunistiche
non vengano rispettate.
Inserimento nel mobile:
L’apparecchio può essere inserito sia sotto un piano di lavoro, sia in posizionamento a
colonna. In entrambi i casi rispettare le dimensioni indicate come da fig.1 e 2.
Nell’inserimento del forno a colonna è indispensabile, al fine di assicurare una
sufficiente ventilazione, praticare un’apertura di almeno 85-90mm come indicato in
figura 1.
Il fissaggio del forno al mobile avviene per mezzo di 4 viti “A” poste negli appositi
fori della cornice perimetrale (vedi fig. 1).
Fare attenzione a non usare la porta come leva per l’installazione del forno.
Non esercitare pressioni eccessive sulla porta del forno quando è aperta.
7
SCHEMA INCASSO (fig. 1)
8
Fig. 2
9
Prima di usare il forno per la prima volta
Dopo aver sballato il forno, averlo incassato nel mobile ed avere estratto gli accessori
(leccarde e griglie) è opportuno riscaldarlo alla massima temperatura per una durata di
circa 20 minuti in modo da eliminare eventuali residui oleosi dovuti alla lavorazione
che potrebbero causare sgradevoli odori durante la cottura. Durante questa fase
ventilare l’ambiente. Risciacquare leccarde e griglie con detersivo per stoviglie.
Durante i primi minuti di funzionamento del forno è possibile riscontrare sul frontale
un’eventuale formazione di condensa che non compromette il funzionamento
dell’apparecchiatura.
10
ISTRUZIONI PER L USO DEL FORNO
5
_____
_____
__________
3
8
7
_________
_________ ____
2
______ __
_______
______ __
10
_____________
1
6
11
4
9
DESCRIZIONE PULSANTI
1
2
3
4
5
6
7
8
9
10
11
Tasti di scelta della temperatura per le cotture con le funzioni
preimpostate ( + per aumentare, - per diminuire)
Tasti di scelta della temperatura per le cotture con la sonda cibo
( + per aumentare, - per diminuire)
Tasti di scelta del tempo di cottura per cotture programmate
( + per aumentare, - per diminuire)
Tasti di regolazione ora e selezione lingua display
Tasti di scelta del menù impostazioni del forno
Tasto di conferma
Tasti di scelta funzioni di cottura
Simboli delle funzioni di cottura preimpostate
Tasto di accensione/spegnimento del forno
Tasto di accensione/spegnimento manuale della luce interna del forno
Simbolo del timer
11
La prima accensione:
selezione della lingua e regolazione dell ora
Per accendere il forno premere il tasto ON/OFF (9) e rilasciarlo dopo 1 secondo:
il display si illumina e compare la scritta WAIT . Non toccare alcun tasto e
attendere che compaia il menù di selezione della lingua.
Scegliere la lingua desiderata con i tasti + - (4) , quindi confermare la scelta con il
tasto Invio (6) oppure attendere qualche secondo e verrà confermata
automaticamente.
Quindi procedere alla regolazione dell ora, utilizzando ancora i tasti + - (4).
Tenendo premuto il tasto + o - lo scorrimento del tempo procede più velocemente;
confermare quindi la scelta con il tasto (6).
Compiuta anche la regolazione dell ora, premere nuovamente ON/OFF e rilasciarlo
dopo 1 secondo. Sul display compaiono le scritte:
SELEZIONE COTTURA
MENÙ
selezione cottura consente di accedere alla scelta delle funzioni di cottura
preimpostate del forno, mentre menù permette la scelta fra le varie impostazioni
accessorie del forno.
Selezionare una funzione di cottura fra le disponibili utilizzando i tasti + - (7),
e confermare la scelta con il tasto (6). Ogni funzione di cottura prevede una
temperatura preimpostata, che non può essere variata con i tasti + - (1).
A questo punto compare sul display un messaggio di richiesta di preriscaldamento
del forno, accettare o rifiutare con i tasti + - (4), quindi digitare conferma (6).
Nel caso di conferma della richiesta, ha inizio il riscaldamento del forno,
completato il quale compare sul display un messaggio di termine dell operazione e
viene emesso un segnale sonoro.
Premere quindi il tasto (6) per attivare la cottura scelta in precedenza.
Se non viene premuto il tasto (6) entro 5 minuti, il forno si spegne.
Per annullare le scelte effettuate, premere insieme i tasti
e
(5).
Se si desidera interrompere il preriscaldamento, premere insieme i tasti
e
(5):
viene interrotto il preriscaldamento e viene iniziata direttamente la funzione di
cottura selezionata; se si desidera cambiare funzione di cottura, agire con i tasti di
scelta (7).
12
Cotture a tempo programmato
Scegliere innanzitutto una funzione di cottura con i tasti di scelta (7). La
temperatura può essere modificata con i tasti (1).
È possibile impostare un tempo di durata della cottura, utilizzando i tasti + - (3) per
aumentare o diminuire il tempo desiderato e confermare la scelta con il tasto (6).
Quindi compare sul display un messaggio di richiesta di preriscaldamento del
forno: scegliere SI/NO con i tasti (4). In caso di conferma, il tempo impiegato dal
forno per compiere il preriscaldamento viene scalato dal tempo di cottura
impostato.
Il messaggio resta in attesa di risposta per 5 secondi, se non viene effettuata alcuna
scelta il forno entra automaticamente in funzione in modalità di cottura, senza
effettuare il preriscaldamento.
Durante la cottura a tempo programmato, sul display compare il conto alla rovescia
con minuti e secondi e rimane acceso il simbolo del timer (11).
Al termine del programma, il forno emette un segnale acustico.
Per interrompere il suono, premere un tasto qualsiasi, tranne ON/OFF.
Cottura ritardata (impostazione dell orario di fine cottura):
selezionare una cottura e impostare il tempo di durata come descritto nel paragrafo
precedente.
Dopo aver selezionato il tempo di cottura, premere i tasti o
(5), fino a
visualizzare la voce fine cottura . Confermare la selezione con il tasto (6), quindi
impostare l orario di fine della cottura.
Compiuta questa impostazione, sul display comparirà ogni 15 secondi un avviso
che informa sul tempo mancante all accensione del forno.
Se si desidera modificare i tempi, agire sempre con i tasti - (3).
Se invece si desidera annullare il programma, premere insieme i tasti (5).
Al termine del programma, il forno emette un segnale acustico.
Per interrompere il suono, premere un tasto qualsiasi, tranne ON/OFF.
Nota: durante il funzionamento del forno in modalità di scongelamento, non è
possibile impostare nessun tempo di fine cottura.
13
Il vostro nuovo forno vi offre la possibilità di memorizzare i programmi e le
cotture da voi sperimentate e che più si adattano alle vostre esigenze:
come illustrato, per ogni cottura è possibile modificare la temperatura, impostare
un tempo di durata oppure un orario di fine cottura. Queste impostazioni possono
essere memorizzate e richiamate ogni volta che si desidera.
o
(5) richiamare il menù e scorrere le varie opzioni fino a
Con i tasti
selezionare la memorizzazione del ciclo di cottura, quindi associare un numero al
ciclo memorizzato.
È possibile memorizzare fino a un massimo di 10 programmi, che vengono
visualizzati sul display come programma 1, programma 2, ecc.
Per richiamare un programma memorizzato, entrare nel menù con i tasti o
(5), e scorrere le varie opzioni fino alla voce Ricette, confermare con il tasto (6),
quindi selezionare la voce Ricette Personali e confermare con il tasto (6).
Compare sul display un nuovo menù, che offre la possibilità di richiamare i
programmi memorizzati, oppure di cancellarli.
Contaminuti
Il forno è dotato di contaminuti elettronico indipendente dal funzionamento del
forno che permette di fare il conto alla rovescia del tempo impostato.
Per impostare il tempo, utilizzare i tasti + - (4).
Digitando i tasti (4) si accende il simbolo del timer (11) e compare sul display la
scritta Sveglia .
Può essere impostato un tempo compreso fra 00h00m e 23h59m.
Confermare l impostazione con il tasto (6).
Durante il funzionamento del contaminuti, resta acceso sul display il simbolo (11).
Al termine del conto alla rovescia, il forno emette un segnale acustico, per un
periodo di 5 minuti. Per interrompere il suono, premere un tasto qualsiasi, tranne
ON/OFF.
Se si desidera cancellare l impostazione del contaminuti, premere insieme i tasti +
e (4).
14
Cottura con utilizzo della sonda cibo
È possibile cucinare le proprie pietanze preferite utilizzando la sonda, che va
inserita nell apposito foro all interno del forno, sulla parete sinistra in alto.
Il sensore della temperarura invece va inserito nella pietanza che si desidera
cuocere. Deve essere inserito interamente, e possibilmente al centro della pietanza.
Il sensore rileva la temperatura interna della pietanza durante la cottura.
Una volta collegata la sonda al forno, si accendono sul display il simbolo di una
barra / e la temperatura della sonda (preimpostata a 70°C) a conferma
dell avvenuto collegamento della sonda.
Scegliere una funzione di cottura fra le disponibili con i tasti (7).
È possibile modificare la temperatura del forno con i tasti (1).
La temperatura della sonda invece può essere modificata con i tasti + - (2).
Anche i programmi di cottura con la sonda possono essere memorizzati, la
procedura è la stessa illustrata nei paragrafi precedenti.
Quando viene richiamato un programma di cottura con la sonda, compare sul
display l avviso di inserimento della sonda.
Nota: durante il funzionamento del forno in modalità di scongelamento, se la sonda
è rimasta inserita, appare sul display un messaggio che avvisa di scollegarla.
Opzioni del menù
Per selezionare il menù, utilizzare i tasti o
(5). Compaiono sul display le
seguenti opzioni: Ricette, Impostazioni, Guida e Uscita, per scorrere fra le quali
utilizzare i tasti (5). Per retrocedere di un passo, digitare insieme entrambi i tasti
(5).
Dopo aver selezionato l opzione Ricette con il tasto (6), compare una serie di
tipologie di pietanze (carne, pane/pizza, pesce, dolci, sformati, ricette personali e,
per ultima, uscita menù). Ciascuna pietanza ha a sua volta un sottogruppo di ricette
proposte (per esempio, selezionando dolci con il tasto (6) compare la scelta:
biscotti,ecc.).
Ciascuna di queste ricette, quando viene selezionata, prevede l attivazione del
forno secondo un programma di cottura con tempo e temperatura predefiniti.
È comunque possibile modificare sia la temperatura che i tempi di cottura, agendo
rispettivamente sui tasti (1) e (3).
15
Selezionando con i tasti (5) il menù e poi Impostazioni, compare sul display un
ulteriore menù di scelta, che comprende le seguenti voci:
lingua : consente di modificare la lingua impostata
impostazione orologio: comprende a sua volta 3 opzioni.
-possibilità di avere l orologio visualizzato sul display ( scelta SI/NO)
-regolazione l ora
-modalità notturna: il display si illumina a bassa luminosità dalle 22 alle 7
impostazione blocco tastiera: può essere automatico oppure manuale.
Impostando il blocco automatico, quest ultimo si attiva dopo 1 minuto di inattività
della tastiera. Per sbloccarla, premere insieme il tasto estremo di sinistra e il tasto
estremo di destra +.
Il blocco manuale è anch esso attivato e disattivato premendo insieme il tasto
estremo di sinistra e il tasto estremo di destra + .
segnale acustico: scegliere l intensità del segnale fra basso/medio/alto
illuminazione: scelta fra spegnimento automatico o manuale della luce interna del
forno. Nel primo caso, dopo averla accesa digitando il tasto (10), la luce si spegne
dopo 5 minuti. Con spegnimento manuale inserito, la luce deve essere spenta
digitando il tasto (10).
ripristino impostazioni: azzera ogni impostazione (lingua, ora, programmi),
ripristinando quelle iniziali.
Selezionando con i tasti (5) il menù e poi Guida, viene visualizzata sul display una
serie di indicazioni per la cottura e l uso del forno.
Selezionando con i tasti (5) il menù e poi Uscita, si esce dalle opzioni del menù.
16
Funzioni del forno
Cottura tradizionale
Si consiglia di preriscaldare il forno prima di introdurre le vivande.
Indicata per arrosti tradizionali e per cotture in genere di pietanze poste al centro
della griglia.
Cottura tradizionale ventilata
La ventilazione consente una distribuzione del calore omogenea e uniforme
all interno delal cavità del forno. Cottura indicata per pane, pizza, lasagne.
Cottura inferiore
Il calore viene diretto dal basso verso l alto sulle pietanze.
Questo tipo di cottura è particolarmente adatto per riscaldare le vivande oppure per
cotture lente.
Cottura inferiore ventilata
Questa cottura è indicata per piatti delicati oppure per riscaldare piatti precotti.
Indicata per piatti di pasticceria, e in genere per pietanze che richiedono una
concentrazione di calore dal basso.
Grill centrale
Il calore viene diretto dall alto verso il basso sulle pietanze.
Cottura indicata per grigliare piccole quantità di alimenti oppure per toast, panini
caldi, ecc.
Tenere la porta del forno chiusa durante questa cottura.
17
Doppio grill
Cottura consigliata per grigliare porzioni medie e grandi di alimenti come salsicce,
pancetta, pesce.
Doppio grill ventilato
Questa funzione consente di grigliare i cibi senza doverli girare durante la cottura.
Indicata per cuocere bistecche, larghe porzioni di carne in genere, hamburgers.
Cottura ventilata
Questa funzione prevede l utilizzo combinato della ventola e dell elemento
riscaldante circolare, che permettono una distribuzione ottimale e rapida del
calore. È possibile cucinare contemporaneamente diversi tipi di alimento su livelli
diversi delle griglie, senza ceh si verifichino commistioni di sapori o aromi fra le
pietanze.
Funzione pizza
Questa funzione prevede il riscaldamento con l elemento inferiore e circolare, e la
ventola distribuisce il calore, riproducendo così le stesse condizioni del forno a
legna tradizionale.
Scongelamento
Per questa funzione si attiva solamente la ventola, senza alcuna propagazione di
calore da parte degli elementi riscaldanti. La porta del forno deve rimanere chiusa.
Questa funzione permette lo scongelamento delle vivande impiegando circa 1/3
del tempo normalmente impiegato.
18
Tabella consigli di cottura
Tipo di Pietanza
x Pane e Biscotti
Pizza
Pane in cassetta
Pane Farcito
Pane Bianco
Biscotti
x Crostate e Pasticceria
Focaccia
Dolce Millefoglie
Dolce al cioccolato
Crostata alla Frutta
Vol-au-vent
Ciambella
Pan di Spagna
Souffle
Meringata
x Carni
Stufato di Vitello (1/1,5Kg)
Arrosto di Vitello (1/1,5Kg)
Polpettone di Carne (1/1,5Kg)
Agnello (gamba o spalla)
Capretto (gamba o spalla)
Maiale (lombata o coscia)
x Selvaggina
Arrosto di Lepre
Arrosto di Fagiano
Camoscio, Arrosto di Cervo
x Pollame
Pollo
Piccione Arrosto
Anatra
x Pesce
Pesce in generale
Temp.
°C
Tempo di cottura Livello
(dal
in minuti
Basso)
Ciclo
220
190/200
150/160
175/210
140/150
20/30
45/60
20/25
25/40
20/30
1
1
1o2
1o2
1o2
175
190
175
140
175
180
150
180/200
120/125
40/45
25/35
30/40
50/70
20
35/45
20/25
20/30
25/35
2
2
2
2
2
2
2
2
2
150/160
150/160
180/190
180/190
180
180
180/210
120/150
90/120
60/90
45/60
60/90
1o2
1o2
1o2
1o2
1o2
2
oppure
180
180
175
60/90
60/90
90/120
1o2
1o2
1o2
oppure
170
150/160
175
90/120
80/100
180/200
1o2
1o2
1
oppure
200
15/20
2
oppure
oppure
oppure
oppure
19
Cibi da grigliare
Carni basse o sottili
Carni normali
Pesce (es. trote, salmone)
Salsicce
Toast
Tempo di cottura in minuti
Sopra
Sotto
6
4
8
5
15
12
12
10
5
2
In relazione al tipo di vivanda (es. carni, pesce, pollame, ecc..) è necessario
rivoltare le vivande per esporre i due lati ai raggi infrarossi.
I dati sopra riportati sono indicativi perché il tipo di cottura e il tempo variano, sia
per l’esperienza di chi usa il forno, sia per la quantità e qualità delle vivande.
I tempi di cottura indicati non comprendono il preriscaldamento, si consiglia di
preriscaldare il forno per circa 15 min.
Con funzione grill ventilato non selezionare temperature superiori a 190°C.
20
PULIZIA E MANUTENZIONE DEL FORNO
Importante: Prima di procedere alla manutenzione occorre sempre scollegare
elettricamente il forno (staccando la spina dalla presa di corrente o togliendo la
corrente dalla linea di alimentazione a mezzo dell’interruttore omnipolare
dell’impianto elettrico.
Pulizia del forno:
x
x
x
x
x
x
Dopo ogni uso lasciare raffreddare il forno e pulirlo per evitare che le
incrostazioni vengano ripetutamente scaldate.
Se lo sporco è tenace, usare un prodotto specifico per la pulizia del forno
seguendo le istruzioni sulla confezione.
Pulire l’esterno con una spugna inumidita di acqua tiepida.
Non usare abrasivi, pagliette metalliche, pulitori elettrici a vapore e prodotti
infiammabili.
Non usare materiali o sostanze abrasive per la pulizia dei vetri per evitare il
loro danneggiamento.
Lavare gli accessori in lavastoviglie o a mano usando un prodotto per la
pulizia del forno.
ATTENZIONE: per le seguenti operazioni si raccomanda l’utilizzo di guanti
protettivi.
21
Come togliere la porta forno (fig. 4)
Per facilitare la pulizia del forno è possibile togliere la porta del forno agendo sulle
cerniere in questo modo:
Le cerniere A sono provviste di 2 cavallotti mobili B.
Quando i cavallotti B sono sollevati, le cerniere sono sganciate dalla propria sede.
x Fatto ciò, sollevare la porta verso l’alto ed estrarla verso l’esterno, facendo
presa sui fianchi della porta in prossimità delle cerniere.
Per rimontare la porta:
x Infilare le cerniere nelle apposite scanalature e aprire completamente la porta.
x Ruotare i cavallotti mobili B nella posizione iniziale prima di richiudere la
porta.
Fig. 4
ATTENZIONE:
fare attenzione a non togliere il sistema di bloccaggio delle cerniere mentre si
rimuove la porta. Il meccanismo della cerniera ha un sistema a molla molto potente.
Non immergere mai la porta in acqua.
22
Pulizia delle griglie laterali – Fig. 5
Le griglie laterali vanno agganciate alla parete del forno. Infilare nelle griglie laterali
le griglie e il vassoio in dotazione.
Per togliere le griglie laterali basta esercitare una leggera pressione sul particolare A
come illustrato.
Fig. 5
_______A
Sostituzione lampada forno (fig. 6)
x
x
x
x
x
Disinserire il forno elettricamente.
Rimuovere la copertura della lampada servendosi di un cacciavite.
Sostituire la lampada
Reinserire la copertura della lampada
Ridare tensione
N.B. : usare solo lampade da 25W 230V, tipo E-14, T 300°C, disponibili presso il
nostro servizio assistenza.
Fig. 6
23
24
User instructions
Thank you for choosing one of our products. We hope you will get the very best
performance from this appliance.
Therefore we would ask you to carefully comply with the the suggestions and
instructions in this manual for proper use of our products.
The manufacturer shall not be held liable for damage to persons and property
which is due to poor or incorrect installation of the appliance.
The manufacturer reserves the right to modify its products as deemed fit without
prior notice.
Technical characteristics
Dimensions:
Height: 460 mm
Width: 597 mm
Depth: 570 mm
Volume:
Gross: 43 dm3
Net: 37 dm3
Power supply voltage: 220-240 V a.c. - 50 Hz
Input watts (power):
Lamp:
Radial fan:
Tangential fan:
Bottom:
Top:
Grill:
Circular:
Electronic Prog.
25W
20W
11W
1300W
600W
1400W
2000W
1W
25
DECLARATION OF CE COMPLIANCE
This appliance is in compliance with the following European Directives:
93/68 : General regulations
2006/95/CE : Concerning low tensions
89/336/CEE : Electromagnetic compatibility
CE Regulation n° 1935/2004 :
this appliance is suitable to come in contact with food products.
INSTRUCTIONS FOR THE USER
This manual is an integral part of the appliance.
It is necessary to keep it for the life cycle of the oven and to read it carefully for the
installation, use, maintenance, cleaning and handling of the appliance.
Unplug the appliance before undertaking any sort of intervention on it.
Attention: earth connection is required by law.
During oven operation, keep children away.
During operation the oven becomes very hot.
Do not touch heating elements on the inside.
Do not use steam cleaners to clean the oven.
Do not use the appliance to heat the room.
The manufacturer will not be held liable if accident prevention measures are not observed.
The manufacturer will not be held liable for damage to persons or property due to poor or
lacking maintenance of the appliance.
The manufacturer reserves the right to make any changes to the product which are felt to
be useful or necessary without any advance notice.
Packaging materials (sheets, polystyrene) may be hazardous to children (danger of
suffocation). Keep packaging materials out of the reach of children.
The appliance is designed for adult users who are familiar with these instructions.
Children are often not able to recognize the risks involved with the use of the appliance.
Please supervise properly and do not let children play with the appliance.
Heat is generated during cooking; the door of the appliance may get very hot, specially if
it is made of glass. There is the risk of burns; do not touch and keep children away.
The physically impaired must be assisted by capable adults.
Do not carry out any modifications, tampering or repair attempts, especially with tools
such as screwdrivers on the inside or outside of the appliance.
Repair work, especially on the electrical parts, must be performed only by specialized
personnel.
26
Improper repair work can cause serious accidents, damage the appliance and equipment as
well as impair proper operation.
Appliances repaired in technical service centres must undergo routine tests, especially a
continuity test of the earth circuit.
THIS PRODUCT WAS DESIGNED FOR HOME USE.
THE MANUFACTURER WILL NOT BE HELD LIABLE FOR DAMAGE TO
PERSONS OR PROPERTY CAUSED BY IMPROPER INSTALLATION, OR BY
IMPROPER, WRONG OR SENSELESS USE.
WARNING: IN CASE OF DISASSEMBLY, MAINTENANCE AND CLEANING OF
THE APPLIANCE, BE CAREFUL SOME PARTS COULD BE SHARP.
PLEASE USE SUITABLE PREVENTION AND PROTECTION EQUIPMENT
(GLOVES, ECT.).
In case of a failure in operation or an indispensable repair job, ask for the intervention of
the customer technical service centre.
If the oven shows visible signs of damage, do not use it.
Unplug it and contact the customer technical service centre.
The oven must be unplugged as soon as an operating problem is discovered.
Make sure the power cord of the appliance is not crushed by the oven door as this may
damage the electrical insulation.
If the power cord has been damaged, it must be replaced by the technical service centre in
order to avoid the creation of hazardous situations.
Before closing the oven door, make sure there are no foreign bodies or pets inside the
oven.
Do not place heat-sensitive or flammable materials in the oven such as detergents, oven
sprays, and so on.
The oven gets extremely hot during operation.
The oven remains hot for a long time, even after it has been turned off, and cools off only
very slowly until reaching room temperature. Wait for a suitable period of time before
carrying out work such as cleaning.
When opening the oven door, steam and water droplets may come out.
If the oven contains steam, it is not advisable to insert the hands.
Superheated grease and oil may easily catch fire.
Never use water in an attempt to extinguish burning grease or oil (there is the danger of
explosion). Suffocate the fire with wet cloths.
The rack, the plates and the cooking containers become extremely hot.
Use insulated glove or pot holders.
When using and maintaining the oven, be careful not to get fingers caught in the door
hinges to avoid crushing or other injuries.
This is specially important when children are around.
Leave the door open only in an ajar position.
If the door is open there is the hazard of tripping or crushing the fingers.
Do not sit or lean on the door and do not use it as a work surface.
27
All work on the appliances must be carried out by qualified personnel.
For maintenance, moving, installation and cleaning of the appliance use suitable
prevention and protection equipment (gloves, etc.).
Lifting and moving of appliances weighing more than 25 kg must be carried out using
proper equipment, or by two persons, in order to avoid risks or injuries.
INSTRUCTIONS FOR INSTALLATION OF THE UNIT
All tasks involved in installing the appliance must be carried out by a skilled professional.
Any work is to be performed with the appliance unplugged.
Electrical connection:
make sure that the voltage corresponds to that indicated on the lable on the side.
The oven must be connected using a cable with a minimum cross-section of 1.5 mm
on the rear, and with an omni-polar switch compliant with current standards with a
distance of aperture between contacts of at least 3 mm.
Attention: earth connection is required by law.
The manufacturer will in no way be held liable if accident prevention standards area
not observed.
Insertion into the furniture unit:
The appliance can be inserted either under a worktop or into a column. In either case
comply with the dimensions shown in figures 1 and 2.
For column installation, in order to ensure proper ventilation, it is very important to
provide an opening of at least 85-90mm as shown in figure 1.
The oven is secured to the furniture unit by four screws A located in the holes of
the perimeter frame (see fig. 1).
Do not use the door as a lever when installing the oven.
Do not place excessive pressure on the oven door when it is open.
28
BUILT-IN DIAGRAM Fig. 1
29
Fig. 2
Column
Under top
30
Before using the oven for the first time
After unpacking the oven, installing it in the furniture unit and removing the
accessories (drip pan and racks), it is advisable to run it at the highest temperature for
about 20 minutes to remove any oily residues left from the manufacturing process
which may cause unpleasant odours during cooking. Aerate the room while doing
this. Wash the drip pan and racks with washing up liquid.
For the first few minutes that the oven is in operation, condensation may form on the
front. This does not in any way compromise operation of the unit.
31
INSTRUCTIONS FOR USE
5
_____
_____
__________
3
8
7
_________
_________ ____
2
______ __
_______
______ __
10
_____________
1
6
11
4
9
KEYS DESCRIPTION
1
2
3
4
5
6
7
8
9
10
11
32
Keys for selecting temperature for cooking with pre-set functions( +
to increase, - to decrease)
Keys for selecting temperature for cooking with food probe
( + to increase, - to decrease)
Keys to select time for programmed cooking
( + to increase, - to decrease)
Keys to set time and to select display language
Selection keys for oven setting menus
Confirm key
Keys for selecting cooking functions
Pre-set cooking function symbols
Oven on/off key
Manual on/off key for internal oven light
Timer symbol
Switching on for the first time
selection of language and time setting
To turn the oven on, press the ON/OFF key (9) and release it after 1 second.
The display will light up and it will show the message WAIT . Do not touch any
key until the language selection menu appears.
Choose the desired language using the keys + - (4) , and confirm with the Enter
key (6) or wait a few seconds and confirmation will take place automatically.
Then set the time using the keys + - (4). The time scrolls more rapidly if you hold
down the keys + or -.
Confirm your selection with the key (6).
Once you have set the time, again press ON/OFF and release it after 1 second. The
display will show these messages:
COOKING SELECTION
MENU
Cooking selection" lets you access the choice of preset cooking functions of the
oven, while "menu" lets you choose from the various accessory settings of the
oven.
Select a cooking function from among those available using the keys + - (7).
Confirm your selection with the key (6). Each cooking function includes a preset
temperature, which may not be varied with the keys + - (1).
The display will now show a message requesting pre-heating of the oven. You can
accept or refuse with the keys + - (4), then confirm (6).
If the request is confirmed, the oven will start heating. When this is complete, the
display will show a message for the end of the operation and an acoustic signal is
emitted.
Then press the key (6) to activate the previously chosen cooking.
If you do not press the key (6) within 5 minutes, the oven will shut off.
To cancel the selections you have made, simultaneously press the keys
(5).
and
If you want to interrupt pre-heating, simultaneously press the keys and
(5).
Preheating will be interrupted and the selected cooking functions will start directly.
If you want to change the cooking function, use the selection keys (7).
33
Time-controlled cooking
First of all, select a cooking function using the selection keys (7). The temperature
can be modified using the keys (1).
You can set a cooking duration time using the keys + - (3) to increase or decrease
the desired time. Confirm your selection with the key (6).
The message will then show a request for preheating the oven. Select YES/NO
with the keys (4). If confirmed, the time used for preheating will be detracted from
the set cooking time.
The message waits for a response for 5 seconds. If no selection is made, the oven
automatically goes into cooking mode with no preheating.
During time-controlled cooking, the display shows a countdown in minutes and
seconds, and the timer symbol stays on (11).
When the programme is complete, the oven emits an acoustic signal.
To cut off this sound, press any key except for ON/OFF.
Delayed cooking (setting of end of cooking time)
Select a cooking mode and set the duration as described in the previous paragraph.
After selecting the cooking time, press the keys or
(5), until you come the
item "end of cooking". Confirm the selection with the key (6), then set the end of
cooking time.
After you have made this setting, a message will appear on the display every 15
seconds which shows the time remaining until the oven switches on.
If you want to modify the times, use the keys - (3).
If you want to delete the programme, simultaneously press the keys (5).
When the programme is complete, the oven emits an acoustic signal.
To cut off this sound, press any key except for ON/OFF.
Note: during operation of the oven in defrost mode, you may not set any end of
cooking time.
34
Your new oven lets you memorize the programmes and cooking modes you have
tried and found to be best suited to your needs.
As illustrated, for each cooking mode you can change the temperature, set a
duration or a time for end of cooking. These settings can be memorized and
recalled any time you like.
With the keys or
(5), recall the menu and scroll through the various options
until you select cooking cycle memorization. Then match a number to the
memorized cycle.
You can memorize up to 10 programmes. They will appear on the display as
programme 1, programme 2, and so on.
To recall a memorized programme, enter the menu with the keys or
(5).
Scroll through the various options until you come to Recipes. Confirm this with
key (6). Then select Personal Recipes and confirm with the key (6).
The display will show a new menu. It lets you recall memorized programmes or
delete them.
Timer
The oven is equipped with an electronic timer that is independent of oven
operation. It allows a countdown of the set time.
To set the time, use the keys + - (4).
Use the keys (4) to turn on the timer symbol(11). The display will show the
message "Alarm Clock".
You can set a time including between 00h00m and 23h59m.
Confirm the setting with the key (6).
While the time is in operation, the display will continue to show the symbol (11).
When the countdown is complete, the oven will emit an acoustic signal for 5
minutes. To cut off this sound, press any key except for ON/OFF.
If you want to cancel the timer setting, press simultaneously on the keys + and
(4).
35
Cooking with the food probe
You can cook your favourite dishes using the probe. The probe is inserted in the
appropriate hole inside the oven, on the wall at upper left.
The temperature sensor is instead inserted in the food you are going to cook..
It must be completely inserted, if possible in the middle of the food.
The sensor detects the internal temperature of the food during cooking.
Once the probe is connected to the oven, the display shows the symbol of a bar /
and the probe temperature (preset to 70°C) to confirm that the probe has indeed
been connected.
Choose from among the available cooking functions with the keys (7).
You can modify the oven temperature using the keys (1).
The probe temperature can be modified using the keys + - (2).
The programmes for cooking with the probe can also be memorized. The
procedure is the same as described in the previous paragraphs.
When a probe cooking programme is recalled, the display shows the probe
insertion notification.
Note: when the oven is operating in defrost mode, if the probe is left inserted, there
will be a notice on the display to disconnect it.
Menu options
To select the menu, use the keys or
(5). The display will show the following
options: Recipes, Settings, Guide and Exit. You can scroll them using the keys (5).
To go back a step, press both keys (5).
After you select the option Recipes with the key (6), a list of various types of foods
will appear (meat, bread/pizza, fish, desserts, timbales, personal recipes, and exit
menu). Each food type in turn has a sub-group of suggested recipes (for example, if
you select "desserts" with key (6) a selection will appear: biscuits, etc.).
Each of these recipes, when selected, will activate the oven according to a cooking
programmes with predefined time and temperature.
It is possible to modify the cooking times and temperatures using respectively the
keys(1) and (3).
36
Use the keys (5) to select the menu followed by Settings. The display will show a
further selection menu, which includes the following:
language: lets you modify the set language
clock setting: includes 3 options.
- possibility to show clock on display (YES/NO selection)
- adjustment of time
- night mode: the display is lit at low intensity from 10:00 pm until 7:00 am.
lock keypad: can be automatic or manual.
With automatic lock, it is activated after the keypad is inactive for 1 minute. To
release it, press simultaneously the key at far left and the key at far right +.
Manual lock is also activated and de-activated by simultaneously pressing the key
at far left and the key at far right + .
acoustic signal: choose the volume from among low, medium and high
illumination: choose whether to shut off the light in the oven automatically or
manually. If automatic, after turning it on with key (10), the light will switch off
after 5 minutes. With manual shut-off, the light must be turned off using key (10).
restore settings: resets all settings (language, time, programme) to their defaults
settings.
If you use the keys (5) to select the menu followed by Guide, the menu shows a
series of suggestions for cooking and for using the oven.
If you use the keys(5) to select the menu followed by Exit, you will leave the menu
options.
37
Cooking functions
Traditional cooking
It is recommended that the oven is pre-heated before introducing the food.
Traditional cooking with fan
Cooking mode suited to bake bread, pizzas and lasagne.
It is recommended that the oven be pre-heated.
Keep the oven door closed during this function.
Bottom element only
Suitable for very slow cooking and warming up of food.
Bottom element with fan
This type of cooking is specially slow and delicate.
Centre grill
This kind of cooking is specially suited to small amounts of food.
Keep the oven door closed during this function.
Double grill
This kind of cooking is specially suited for larger quantities of food that require
full width grilling.
Keep the oven door closed during this function.
Double grill with fan
The action of the fan, combined with the action of the grill, allows for quick,
thorough cooking of food.
It is advisable to heat the oven for a few minutes before putting food in it.
38
Fan cooking
This type of cooking allows even heat distribution to all parts of the oven.
It is possible to cook two different types of food (e.g. meat and fish) while using
their different respective cooking times.
Pizza function
This kind of cooking is ideal for pizza and vegetable dishes.
With this function, all the heating elements and the fan work together.
Defrosting
Only the fan works, so there is no transmission of heat.
The oven door must be closed. This function makes it possible to defrost foods
using only about one-third of the time that would normally be required.
39
Table of cooking suggestions
Type of dish
Bread and biscuits
Pizza
Bread
Bread with filling
White bread
Biscuits
Pie and pastry
Focaccia
Sponge cake
Chocolate cake
Fruit pie
Vol-au-vent
Doughnut
Angel cake
Souffle
Meringue
Meats
Veal stew (1/1,5Kg)
Roast veal (1/1,5Kg)
Meat loaf(1/1,5Kg)
Lamb (leg or chop)
Beef (leg or chop)
Pork (loin or leg)
Game
Temp.
°C
Cooking time in Level
(from
minutes
bottom)
Cycle
220
190/200
150/160
175/210
140/150
20/30
45/60
20/25
25/40
20/30
1
1
1 or 2
1 or 2
1 or 2
175
190
175
140
175
180
150
180/200
120/125
40/45
25/35
30/40
50/70
20
35/45
20/25
20/30
25/35
2
2
2
2
2
2
2
2
2
150/160
150/160
180/190
180/190
180
180
180/210
120/150
90/120
60/90
45/60
60/90
1 or 2
1 or 2
1 or 2
1 or 2
1 or 2
2
or
Roast pheasant
Venison
Poultry
Chicken
180
175
60/90
90/120
1 or 2
1 or 2
or
170
90/120
1 or 2
Duck
175
180/200
1
Fish
Fish in general
200
15/20
2
or
or
or
or
40
or
Foods to be grilled
Cuts of thin meat
Cuts of normal meat
Fish (e.g. trout, salmon)
Sausages
Toast
Cooking time in minutes
Over
Under
6
4
8
5
15
12
12
10
5
2
Depending on the type of food (e.g. meats, fish, poultry, etc.), you will need to turn
the food to expose both sides to the infrared rays.
The data provided above is approximate. Cooking times vary based on the
experience of the person using the oven and the amount and quality of the foods.
The cooking times do not include pre-heating. It is advisable to pre-heat the oven
for about 15 min.
With the ventilated grill function, do not select a temperature of more than 190°C.
41
CLEANING AND MAINTENANCE OF THE OVEN
Important: Before performing any maintenance, you must either unplug the oven or
disconnect the power supply via the omni-polar switch of the electrical system.
Cleaning the oven:
Let the oven cool after each use and clean it to keep burnt on residues
from being repeatedly heated.
For tough dirt, use a product specifically for oven cleaning.
Follow the instructions on the container of the product.
Clean the outside with a sponge dampened in lukewarm water.
Do not use abrasive products, steel wool pads, electrical or steam cleaners, or
flammable products.
Do not use abrasive substances or materials to clean the glass as they may
damage it.
Wash accessories in a dishwasher or by hand using a product for oven
cleaning.
ATTENTION: use protective gloves for the following tasks.
42
How to remove the oven door (fig. 4)
To make it easier to clean the oven, it is possible to remove the door from the hinges
as follows:
The hinges A are equipped with 2 mobile U-bolts B.
When the U-bolts B are lifted, the hinges are disconnected from their housing.
After this, lift the door up and pull it outwards, holding the door on both sides
near the hinges.
To re-install the door:
Slide the hinges into the grooves and open the door all the way.
Turn the mobile U-bolts to their starting position before closing the door
again.
Fig. 4
ATTENTION:
Please ensure that you do not remove the hinge locking system when you remove the
door. The hinge mechanism has a very strong spring. Never immerse the door in
water.
43
Cleaning the side rails - Fig. 5
The side rails are to be hooked onto the wall of the oven. Slide the racks and tray
provided into the side rails.
To remove the side rails press on part A as shown .
Fig. 5
Replacement of oven lamp (fig. 6)
Disconnect the oven from the electrical power supply.
Use a screwdriver to remove the light cover.
Replace the lamp
Put the light cover back
Restore the power supply
N.B. : use only lamps that are 25W 230V, type E -14, T 300°C, available from our
technical service.
Fig. 6
44