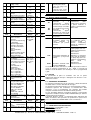
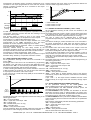
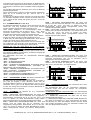
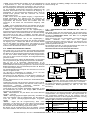
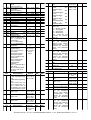
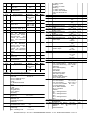
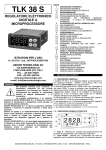
1
TLK 31 D
TERMOREGOLATORE
ELETTRONICO CON
REGOLAZIONE DIFFERENZIALE
INDICE
1
1.1
1.2
2
2.1
2.2
2.3
2.4
2.5
3
3.1
3.2
3.3
3.4
4
4.1
4.2
4.3
4.4
4.5
4.6
4.7
4.8
4.9
ISTRUZIONI PER L'USO
Vr. 01 (ITA) - cod.: ISTR MTLK31DITA1
TECNOLOGIC S.p.A.
VIA INDIPENDENZA 56
27029 VIGEVANO (PV) ITALY
TEL.: +39 0381 69871
FAX: +39 0381 698730
internet : http:\\www.tecnologic.it
e-mail: [email protected]
PREMESSA
Nel presente manuale sono contenute le
informazioni necessarie ad una corretta
installazione e le istruzioni per l'utilizzo e la
manutenzione del prodotto, si raccomanda
pertanto di leggerlo attentamente
e di
conservarlo.
La presente pubblicazione è di esclusiva proprietà della
TECNOLOGIC S.p.A. la quale pone il divieto assoluto di
riproduzione e divulgazione, anche parziale, se non
espressamente autorizzata.
La TECNOLOGIC S.p.A. si riserva di apportare modifiche
estetiche e funzionali in qualsiasi momento e senza alcun
preavviso.
Qualora un guasto o un malfunzionamento dell'apparecchio
possa creare situazioni pericolose o dannose per persone, cose o animali si ricorda che l'impianto deve essere predisposto
con dispositivi aggiuntivi atti a garantire la sicurezza.
La Tecnologic S.p.A. ed i suoi legali rappresentanti non si ritengono in alcun modo responsabili per eventuali danni a persone, cose o animali derivanti da manomissioni, uso improprio, errato o comunque non conforme alle caratteristiche dello strumento.
4.10
4.11
4.12
4.13
4.14
4.15
4.16
5
6
6.1
6.2
6.3
7
7.1
7.2
7.3
7.4
7.5
7.6
DESCRIZIONE STRUMENTO
DESCRIZIONE GENERALE
DESCRIZIONE PANNELLO FRONTALE
PROGRAMMAZIONE
IMPOSTAZIONE RAPIDA DEI SET POINT
SELEZIONE DEGLI STATI DI REGOLAZIONE E
PROGRAMMAZIONE DEI PARAMETRI
LIVELLI DI PROGRAMMAZIONE PARAMETRI
STATI DI REGOLAZIONE
SELEZIONE DEL SET POINT ATTIVO
AVVERTENZE PER INSTALLAZIONE ED USO
USO CONSENTITO
MONTAGGIO MECCANICO
COLLEGAMENTO ELETTRICO
SCHEMA ELETTRICO DI COLLEGAMENTO
FUNZIONAMENTO
MISURA E VISUALIZZAZIONE
CONFIGURAZIONE DELLE USCITE
REGOLATORE CON TEMPERATURA ASSOLUTA O
DIFFERENZIALE
REGOLATORE ON/OFF
REGOLATORE ON/OFF A ZONA NEUTRA
REGOLATORE PID A SINGOLA AZIONE
REGOLATORE PID A DOPPIA AZIONE
FUNZIONI DI AUTOTUNING E SELFTUNING
RAGGIUNGIMENTO DEL SET POINT A VELOCITA'
CONTROLLATA
E COMMUTAZIONE AUTOMATICA
TRA DUE SET POINT
FUNZIONE DI SOFT-START
FUNZIONAMENTO DEGLI ALLARMI
FUNZIONE ALLARME DI LOOP BREAK
FUNZIONAMENTO DEL TASTO U
INGRESSI DIGITALI
INTERFACCIA SERIALE RS 485
CONFIGURAZIONE PARAMETRI CON KEY 01 O A01
PARAMETRI PROGRAMMABILI
PROBLEMI , MANUTENZIONE E GARANZIA
SEGNALAZIONI DI ERRORE
PULIZIA
GARANZIA E RIPARAZIONI
DATI TECNICI
CARATTERISTICHE ELETTRICHE
CARATTERISTICHE MECCANICHE
DIMENSIONI MECCANICHE, FORATURA PANNELLO E
FISSAGGIO
CARATTERISTICHE FUNZIONALI
TABELLA RANGE DI MISURA
CODIFICA DELLO STRUMENTO
1 - DESCRIZIONE STRUMENTO
1.1 - DESCRIZIONE GENERALE
Il modello TLK 31 D
è un termoregolatore digitale a
microprocessore "single loop", con regolazione ON/OFF, ON/OFF
a Zona Neutra, PID a singola azione o PID a doppia azione (diretta
e inversa) dotato di due ingressi per sonde di temperatura di tipo
PTC o NTC attraverso i quali è possibile realizzare la regolazione
differenziale di temperatura ed è pertanto utilizzabile nelle applicazioni che richiedono un controllo in funzione della differenza di temperatura tra due diversi ambienti come ad esempio raffreddatori di
fluido (chiller), sistemi di climatizzazione naturale degli ambienti
attraverso il ricircolo dell’aria, riscaldamento attraverso pannelli
solari termici o comunque in molte altre applicazioni dove sono
richieste due misure di temperatura .
Il regolatore è inoltre dotato delle funzioni di AUTOTUNING Fast e
Oscillatorio, SELFTUNING e FUZZY OVERSHOOT CONTROL
per la regolazione PID.
Lo strumento offre la possibilità di disporre di due ingressi digitali
programmabili e di interfaccia di comunicazione seriale RS485 con
protocollo di comunicazione MODBUS-RTU e con velocità di
trasmissione sino a 38400 baud.
TECNOLOGIC spa - TLK 31 D - ISTRUZIONI PER L’USO - Vr. 01 - ISTR-MTLK31DITA1 - PAG. 1
Il valore di processo viene visualizzato su 4 display rossi mentre lo
stato delle uscite viene segnalato da 4 led.
L’apparecchio dispone inoltre di un indicatore di scostamento
programmabile costituito da 3 led.
Lo strumento prevede la memorizzazione di 4 Set-Point di
regolazione e può avere sino a 4 uscite a relè o per il pilotaggio di
relè statici (SSR).
Altre importanti funzioni presenti sono: funzione di Loop-Break
Alarm, Raggiungimento Set Point a velocità controllata, controllo a
due spezzate con tempo di mantenimento intermedio, funzione di
Soft-Start, funzione di protezione compressore per controllo a zona
neutra, protezione parametri con password personalizzabile e
gestione parametri su vari livelli.
1.2
- DESCRIZIONE PANNELLO FRONTALE
9
4
TLK 31 D
AT
ST
3
2
1
Out1 Out2
5
6
-
=
+
11 12 13
Out3 Out4
7
10
8
1 - Tasto P : Utilizzato per accedere alla programmazione dei
parametri di funzionamento e per confermare la selezione.
2 - Tasto DOWN : Utilizzato per il decremento dei valori da
impostare e per la selezione dei parametri. Se mantenuto premuto
consente inoltre di passare al precedente livello di
programmazione sino ad uscire dalla modalità di programmazione.
3 - Tasto UP : Utilizzato per l'incremento dei valori da impostare e
per la selezione dei parametri. Se mantenuto premuto consente
inoltre di passare al precedente livello di programmazione sino ad
uscire dalla modalità di programmazione. Quando non ci si trova in
modalità di programmazione consente di visualizzare la potenza di
regolazione in uscita.
4 - Tasto U :
Utilizzato per visualizzare le temperature misurate dalle sonde (Pr1
e Pr2) e la loro differenza (Pr1-Pr2). Inoltre può essere programmato tramite il par. “USrb” per: Attivare Autotuning o Selftuning,
Mettere lo strumento in regolazione manuale, Tacitare l’allarme,
Cambiare il Set Point attivo, Disattivare la regolazione.
5 - Led OUT1 : Indica lo stato dell'uscita OUT1
6 - Led OUT2 : Indica lo stato dell'uscita OUT2
7 - Led OUT3 : Indica lo stato dell'uscita OUT3
8 - Led OUT4 : Indica lo stato dell'uscita OUT4
9 - Led SET : Lampeggiando indica l’ingresso nella modalità di
programmazione
10 - Led AT/ST : Indica la funzione Selftuning inserita (acceso) o
Autotuning in corso (lampeggiante)
11 - Led - Indice di scostamento: Indica che il valore di processo
è inferiore rispetto al Set del valore impostato al par. “AdE”.
12 - Led = Indice di scostamento: Indica che il valore di processo
è all’interno del campo [SP+AdE ... SP-AdE]
13 - Led + indice di scostamento: Indica che il valore di processo
è superiore rispetto al Set del valore impostato al par. “AdE”.
aumenta ulteriormente per consentire il rapido raggiungimento del
valore desiderato.
Una volta impostato il valore desiderato premendo il tasto P si esce
dalla modalità rapida di impostazione oppure si passa alla
visualizzazione delle soglie di allarme (vedi par. 2.3).
L'uscita dal modo di impostazione rapida dei Set avviene alla
pressione del tasto P dopo la visualizzazione dell’ultimo Set oppure
automaticamente non agendo su alcun tasto per circa 15 secondi,
trascorsi i quali il display tornerà al normale modo di
funzionamento.
2.2 - SELEZIONE DEGLI STATI DI REGOLAZIONE E
PROGRAMMAZIONE DEI PARAMETRI
Premendo il tasto "P" e mantenendolo premuto per circa 2 sec. si
accede al menù di selezione principale.
Mediante i tasti "UP" o DOWN” è possibile quindi scorrere le
selezioni:
permette di accedere al menù dei parametri
"OPEr"
operativi
permette di accedere al menù dei parametri di
"ConF"
configurazione . L’accesso a questa modalità può
essere protetta con una password personalizzabile.
permette di porre il regolatore nello stato di
"OFF"
regolazione OFF
permette di porre il regolatore in stato di regolazione
"rEG"
automatica
permette di attivare la funzione di Autotuning o
"tunE"
Selftuning
"OPLO" permette di porre il regolatore nello stato di
regolazione manuale e quindi di impostare il valore
di regolazione % da attuare mediante i tasti UP e
DOWN
Una volta selezionata la voce desiderata premere il tasto "P" per
confermarla.
Le selezioni "OPEr" e "ConF" fanno accedere a sottomenù
contenenti più parametri e precisamente:
"OPEr" - Menù parametri operativi: contiene normalmente i
parametri di impostazione dei Set point ma può contenere tutti i
parametri desiderati (vedi par. 2.3).
"ConF" - Menù parametri di configurazione: contiene tutti i
parametri operativi e i parametri di configurazione funzionamento
(Configurazione allarmi, regolazione, ingresso, ecc.) .
"rEG "
Ho ld for
2 sec.
"O FF"
2 - PROGRAMMAZIONE
2.1 - IMPOSTAZIONE RAPIDA DEI SET POINT
Questa procedura permette di impostare in modo veloce il Set
Point attivo ed eventualmente le soglie di allarme (vedi par. 2.3).
Premere il tasto P quindi rilasciarlo e il display visualizzerà “SP n”
(dove n è il numero del Set Point attivo in quel momento) alternato
al valore impostato.
Per modificarlo agire sui tasti UP per incrementare il valore o
DOWN per decrementarlo.
Questi tasti agiscono a passi di un digit ma se mantenuti premuti
oltre un secondo il valore si incrementa o decrementa in modo
veloce e, dopo due secondi nella stessa condizione, la velocità
AU TO TU N IN G
SEL FTU N IN G
AT
ST
"OPL O"
TECNOLOGIC spa - TLK 31 D - ISTRUZIONI PER L’USO - Vr. 01 - ISTR-MTLK31DITA1 - PAG. 2
Per accedere al menù “OPEr” selezionare quindi l’opzione “OPEr”
e premere il tasto P.
A questo punto il display visualizzerà il codice che identifica il
primo gruppo di parametri (“ ]SP “) e con i tasti UP e DOWN sarà
possibile selezionare il gruppo di parametri che si intende editare.
Una volta selezionato il gruppo di parametri desiderato premere il
tasto P e verrà visualizzato il codice che identifica il primo
parametro del gruppo selezionato.
Sempre con i tasti UP e DOWN si può selezionare il parametro
desiderato e, premendo il tasto P, il display visualizzerà
alternativamente il codice del parametro e la sua impostazione che
potrà essere modificata con i tasti UP o DOWN.
Impostato il valore desiderato premere nuovamente il tasto P: il
nuovo valore verrà memorizzato e il display mostrerà nuovamente
solo la sigla del parametro selezionato.
Agendo sui tasti UP o DOWN è quindi possibile selezionarne un
altro parametro (se presente) e modificarlo come descritto.
Per tornare a selezionare un altro gruppo di parametri mantenere
premuto il tasto UP o il tasto DOWN per circa 2 sec. trascorsi i
quali il display tornerà a visualizzare il codice del gruppo di
parametri.
Rilasciare quindi il tasto premuto e con i tasti UP e DOWN sarà
possibile selezionare un altro gruppo (se presente).
Per uscire dal modo di programmazione non agire su alcun tasto
per circa 20 secondi, oppure mantenere premuto il tasto UP o
DOWN sino ad uscire dalla modalità di programmazione.
Per accedere al menù "ConF" potrebbe essere invece richiesta
una PASSWORD personalizzabile attraverso il par. “PASS”.
Qualora si desideri disporre di questa protezione impostare al parametro “PASS” il numero di password desiderato e uscire dalla
programmazione parametri.
Quando la protezione è attiva, per poter aver accesso ai parametri,
del menu “ConF” occorre impostare la password programmata.
Alla richiesta della password impostare, attraverso i tasti UP e
DOWN, il numero programmato al par. “PASS” e premere quindi il
tasto "P".
Se si imposta una password errata lo strumento ritorna nello stato
di regolazione in cui si trovava precedentemente.
Se la password è corretta il display visualizzerà il codice che
identifica il primo gruppo di parametri (“ ]SP “) e con i tasti UP e
DOWN sarà possibile selezionare il gruppo di parametri che si
intende editare.
Le modalità di programmazione e di uscita dalla programmazione
del menù “ConF” sono le stesse descritte per il menù “OPEr”.
La protezione mediante password è disabilitata impostando il par.
“PASS” = OFF.
è acceso significa che il parametro è programmabile anche nel
menù “OPEr”.
Per modificare la visibilità del parametro premere il tasto U: il led
SET cambierà stato indicando il livello di accessibilità del
parametro (acceso = menù ”OPEr” e “ConF”; spento = solo menù
“ConF”).
Al livello di impostazione rapida dei Set Point descritto al par. 2.1
saranno resi visibili il Set Point Attivo e le soglie di allarme solo se i
relativi parametri sono configurati come operativi (sono cioè
presenti nel menù “OPEr”).
La possibile modifica di questi Set con la procedura descritta al
par. 2.1 è invece subordinata a quanto programmato al par. “Edit”
(contenuto nel gruppo “ ]PAn “).
Questo parametro può essere impostato come:
= SE: Il Set point attivo risulta editabile mentre le soglie di allarme
non sono editabili .
= AE : Il Set point attivo risulta non editabile mentre le soglie di
allarme sono editabili.
= SAE: Sia il Set point attivo che le soglie di allarme sono editabili.
= SAnE: Sia il Set point attivo che le soglie di allarme non sono
editabili.
2.4 - STATI DI REGOLAZIONE
Il controllore può assumere 3 diversi stati : regolazione automatica
(rEG),
regolazione disattivata (OFF) e regolazione manuale
(OPLO).
Lo strumento può passare da uno stato di regolazione all'altro:
- Da tastiera selezionando lo stato desiderato nel menù di
selezione principale.
- Da tastiera tramite il tasto U programmando opportunamente il
par. “USrb” (“USrb” = tunE; “USrb” = OPLO; “USrb” = OFF) si può
passare dallo stato “rEG” allo stato programmato al parametro e
viceversa.
- Mediante l’ingresso digitale 1 opportunamente programmato
attraverso il par. “diF” (“diF” = OFF) si può passare dallo stato
“rEG” allo stato “OFF”.
- Automaticamente (lo strumento si porta nello stato "rEG" al
termine dell'esecuzione dell'autotuning).
All'accensione, lo strumento si porta automaticamente nello stato
che aveva al momento dello spegnimento.
REGOLAZIONE AUTOMATICA (rEG) - Lo stato di regolazione
automatica è il normale stato di funzionamento del controllore.
Durante la regolazione automatica è possibile visualizzare la
potenza di regolazione sul display premendo il tasto "UP".
I valori visualizzabili per la potenza variano da H100 (100% di
potenza in uscita con azione inversa) a C100 (100% di potenza in
uscita con azione diretta).
REGOLAZIONE DISATTIVATA (OFF) - Lo strumento può essere
messo in stato di "OFF" , il che significa che la regolazione e le
relative uscite vengono disattivate.
Le uscite di allarme invece risultano normalmente operative.
REGOLAZIONE MANUALE BUMPLESS (OPLO) - Tramite questa
opzione è possibile impostare manualmente la percentuale di
potenza fornita in uscita dal regolatore disattivando la regolazione
Hold for
Hold for
2 sec.
2 sec.
automatica.
Quando lo strumento viene messo in regolazione manuale la
percentuale di potenza attuata è l’ultima fornita in uscita e può
NOTA: In caso di smarrimento della password togliere alimentazio- essere editata mediante i tasti UP e DOWN. In caso di regolazione
ne allo strumento, premere il tasto P e ridare alimentazione allo di tipo ON/OFF lo 0% corrisponde all’uscita disattivata mentre un
qualsiasi valore diverso da 0 corrisponde all’uscita attivata.
strumento mantenendo premuto il tasto per circa 5 sec.
Si avrà così accesso a tutti i parametri del menu “ConF” e sarà Come nel caso della visualizzazione i valori impostabili per la
potenza variano da H100 (+100%) a C100 (-100%).
possibile pertanto verificare e modificare il parametro “PASS”.
Per riportare il regolatore nello stato di regolazione automatica,
selezionare "rEG" nel menù di selezione.
2.3 - LIVELLI DI PROGRAMMAZIONE PARAMETRI
Il menù “OPEr” contiene normalmente i parametri di impostazione
dei Set point, tuttavia è possibile fare comparire o scomparire a 2.5 - SELEZIONE DEL SET POINT ATTIVO
questo livello tutti i parametri desiderati mediante la seguente Lo strumento permette di preimpostare fino a 4 diversi Set point di
regolazione (“SP1”, “SP2”, “SP3”, “SP4”) e poi di selezionare
procedura:
Accedere al menù “ConF” e selezionare il parametro che si vuole quale rendere attivo.
Il numero massimo di set point viene determinato dal parametro
rendere o non rendere programmabile nel menù “OPEr”.
]
Un volta selezionato il parametro se il led SET è spento significa "nSP" nel gruppo di parametri “ SP “.
Il
set
point
attivo
può
essere
selezionato
:
che il parametro è programmabile solo nel menù “ConF” se invece
- Attraverso il parametro "SPAt" nel gruppo di parametri “ ]SP “.
TECNOLOGIC spa - TLK 31 D - ISTRUZIONI PER L’USO - Vr. 01 - ISTR-MTLK31DITA1 - PAG. 3
- Mediante il tasto U se il parametro "USrb" = CHSP.
- Mediante gli ingressi digitali opportunamente programmati
attraverso il par. “diF” (“diF” = CHSP , = SP1.2 , =SP1.4 o = HE.Co)
- Automaticamente tra SP1 e SP2 nel caso venga impostato un
tempo di mantenimento "dur.t" (vedi par. 4.8).
I Set point "SP1", "SP2", "SP3", "SP4", saranno visibili in funzione
del numero massimo di Set point selezionato al parametro "nSP" e
saranno impostabili con un valore compreso tra il valore
programmato al par. “SPLL” e il valore programmato al par.
“SPHL”.
Nota: negli esempi che seguono il Set point viene indicato
genericamente come "SP", comunque operativamente lo strumento
agirà in base al Set point selezionato come attivo.
Per l’alimentazione dello strumento si raccomanda l’uso
dell'apposito trasformatore TCTR, o di trasformatore con
caratteristiche equivalenti, e si consiglia di utilizzare un
trasformatore per ogni apparecchio in quanto non vi è isolamento
tra alimentazione ed ingresso. Infine si raccomanda di controllare
che i parametri impostati siano quelli desiderati e che l’applicazione
funzioni correttamente prima di collegare le uscite agli attuatori
onde evitare anomalie nell’impianto che possano causare danni a
persone, cose o animali.
3.4 - SCHEMA ELETTRICO DI COLLEGAMENTO
Pr1
DIG
IN1
PTC-NTC
RS 485
DIG
IN2
B
Pr2
3 - AVVERTENZE PER INSTALLAZIONE ED USO
3.1 - USO CONSENTITO
Lo strumento è stato concepito come apparecchio di
misura e regolazione in conformità con la norma
EN61010-1 per il funzionamento ad altitudini sino a
2000 m. L’utilizzo dello strumento in applicazioni non
espressamente previste dalla norma sopra citata
deve prevedere tutte le adeguate misure di protezione. Lo
strumento NON può essere utilizzato in ambienti con atmosfera
pericolosa (infiammabile od esplosiva) senza una adeguata
protezione. Si ricorda che l’installatore deve assicurarsi che le
norme relative alla compatibilità elettromagnetica siano rispettate
anche dopo l’installazione dello strumento, eventualmente
utilizzando appositi filtri. Qualora un guasto o un malfunzionamento
dell'apparecchio possa creare situazioni pericolose o dannose per
persone, cose o animali si ricorda che l'impianto deve essere
predisposto con dispositivi elettromeccanici aggiuntivi atti a
garantire la sicurezza.
3.2 - MONTAGGIO MECCANICO
Lo strumento, in contenitore 78 x 35 mm , è concepito per il
montaggio ad incasso a pannello entro un involucro. Praticare
quindi un foro 71 x 29 mm ed inserirvi lo strumento fissandolo con
le apposite staffe fornite. Si raccomanda di montare l'apposita
guarnizione per ottenere il grado di protezione frontale dichiarato.
Evitare di collocare la parte interna dello strumento in luoghi
soggetti ad alta umidità o sporcizia che possono provocare
condensa o introduzione nello strumento di parti o sostanze
conduttive. Assicurarsi che lo strumento abbia una adeguata
ventilazione ed evitare l’installazione in contenitori dove sono
collocati dispositivi che possano portare lo strumento a funzionare
al di fuori dai limiti di temperatura dichiarati. Installare lo strumento
il più lontano possibile da fonti che possono generare disturbi
elettromagnetici come motori, teleruttori, relè, elettrovalvole ecc.
3.3 - COLLEGAMENTI ELETTRICI
Effettuare le connessioni collegando un solo conduttore per
morsetto e seguendo lo schema riportato, controllando che la
tensione di alimentazione sia quella indicata sullo strumento e che
l'assorbimento degli attuatori collegati allo strumento non sia
superiore alla corrente massima consentita. Lo strumento, essendo
previsto per collegamento permanente entro un'apparecchiatura,
non è dotato nè di interruttore nè di dispositivi interni di protezione
da sovracorrenti. Si raccomanda pertanto di prevedere
l’installazione di un interruttore/sezionatore di tipo bipolare,
marcato come dispositivo di disconnessione, che interrompa
l’alimentazione dell’apparecchio. Tale interruttore deve essere
posto il più possibile vicino allo strumento e in luogo facilmente
accessibile dall’utilizzatore. Inoltre si raccomanda di proteggere
adeguatamente tutti i circuiti connessi allo strumento con dispositivi
(es. fusibili) adeguati alle correnti circolanti. Si raccomanda di
utilizzare cavi con isolamento appropriato alle tensioni, alle
temperature e alle condizioni di esercizio e di fare in modo che i
cavi relativi ai sensori di ingresso siano tenuti lontani dai cavi di
alimentazione e da altri cavi di potenza al fine di evitare l’induzione
di disturbi elettromagnetici. Se alcuni cavi utilizzati per il cablaggio
sono schermati si raccomanda di collegarli a terra da un solo lato.
1
2
3
4
5
6
7
8
GND
A
9 10 11 12
SSR:10mA/10VDC
RELAY:8A-AC1(3A-AC3)/250VAC
TLK31 D
C
NO
C
NO
C
NC
NO
C
NC
NO
13 14 15 16 17 18 19 20 21 22 23 24
OUT4
OUT3
OUT2
OUT1
SUPPLY
4 - FUNZIONAMENTO
4.1 - MISURA E VISUALIZZAZIONE
Tutti i parametri riguardanti la misura sono contenuti nel gruppo
“]InP”.
Mediante il par. “SEnS” è possibile selezionare la tipologia di sonde che si desidera utilizzare e che può essere: termistori PTC
KTY81-121 (Ptc) o NTC 103AT-2 (ntc).
Al cambio di questo parametro si raccomanda di spegnere e
riaccendere lo strumento per ottenere una misura corretta.
Una volta selezionato il tipo di sonde utilizzate, mediante il parametro “Unit” è possibile selezionare l’unità di misura della temperatura (°C o °F) e, mediante il parametro “dP”, la risoluzione di misura
desiderata 0=1°; 1=0,1°).
Se la sonda Pr2 non viene utilizzata impostare il par. “Pr 2” = no in
modo da evitare l’indicazione dell’errore quando la sonda non è
connessa.
Lo strumento consente la calibrazione delle misure, che può
essere utilizzata per una ritaratura dello strumento secondo le
necessità dell’applicazione, mediante i par. “OFS1”, “OFS2” e
“rot”.
Impostando il par. “rot”=1,000, al par. “OFS” (1 e/o 2) è possibile
impostare un offset positivo o negativo che viene semplicemente
sommato al valore letto dalla sonda prima della visualizzazione e
che risulta costante per tutte le misure.
Se invece si desidera che l’offset impostato non sia costante per
tutte le misure è possibile effettuare la calibrazione su due punti a
piacere. In questo caso, per stabilire i valori da impostare ai
parametri “OFSt” e “rot”, occorrerà applicare le seguenti formule:
“rot” = (D2-D1) / (M2-M1)
“OFS” = D2 - (“rot” x M2)
dove:
M1 =valore misurato 1
D1 = valore da visualizzare quando lo strumento misura M1
M2 =valore misurato 2
D2 = valore da visualizzare quando lo strumento misura M2
Ne deriva che lo strumento visualizzerà:
DV = MV x “rot” + “OFS”
dove: DV = Valore visualizzato
MV= Valore misurato
Esempio: Si desidera che lo strumento visualizzi il valore realmente
misurato a 20 ° ma che a 100° visualizzi un valore inferiore di 10°
(90°).
Ne deriva che : M1=20 ; D1=20 ; M2=100 ; D2=90
“rot” = (90 - 20) / (100 - 20) = 0,875
“OFS” = 90 - (0,875 x 100) = 2,5
Mediante il par. “FiL” è possibile impostare la costante di tempo
del filtro software relativo alla misura del valore in ingresso in modo
TECNOLOGIC spa - TLK 31 D - ISTRUZIONI PER L’USO - Vr. 01 - ISTR-MTLK31DITA1 - PAG. 4
Viceversa il modo “Func” = HEAt viene utilizzato per le applicazioni
in cui l’azione dell’attuatore fa aumentare la differenza Pr1-Pr2
(contrastando quindi la differenza Pr1-Pr2 che tende a diminuire).
Ovviamente la modalità a Zona Neutra o la doppia azione
realizzeranno entrambe le azioni di contrasto.
T e m
p .
SP1+HSEt
P r 1
SP1
da poter diminuire la sensibilità ai disturbi di misura (aumentando il
tempo).
In caso di errore di misura lo strumento provvede a fornire in uscita
la potenza impostata al par. “OPE”. Questa potenza sarà calcolata
in base al tempo di ciclo programmato per il regolatore PID mentre
per i regolatori ON/OFF viene automaticamente considerato un
tempo di ciclo di 20 sec. (es. in caso di errore sonda con
regolazione ON/OFF e “OPE”= 50 l’uscita di regolazione si attiverà
per 10 sec. quindi resterà disattivata per 10 sec. e così via sino al
permanere dell’errore di misura).
Mediante il par. “InE” è possibile anche stabilire quali sono le
condizioni di errore dell’ingresso che portano lo strumento a fornire
in uscita la potenza impostata al par. “OPE”.
Le possibilità del par. “InE” sono:
=Or : la condizione è determinata dall’overrange o dalla rottura della sonda.
= Ur : la condizione è determinata dall’underrange o dalla rottura
della sonda.
= Our :la condizione è determinata dall’overrange o dall’underrange o dalla rottura della sonda.
Attraverso il par. “diSP” presente nel gruppo “]PAn” è possibile
stabilire la normale visualizzazione del display che può essere la
misura della sonda Pr1 (Pr 1), la misura della sonda Pr2 (Pr 2), la
differenza di temperatura Pr1-Pr2 (P1-2), la potenza di regolazione
(Pou), il Set Point attivo (SP.F), il Set Point operativo quando vi
sono delle rampe attive (SP.o) o la soglia di allarme AL1,2,3 (AL1,
AL2, AL3).
Indipendentemente da quanto impostato al par. “diSP” è possibile
visualizzare le variabili Pr1, Pr2 e Pr1-Pr2 a rotazione premendo e
rilasciando il tasto U, il display mostrerà alternativamente il codice
che identifica la variabile (Pr 1, Pr 2, P1-2) e il suo valore.
L’uscita da questa modalità di visualizzazione avviene automaticamente dopo 15 secondi circa dall’ultima pressione del tasto U.
Sempre nel gruppo “]PAn” è presente il par. “AdE” che stabilisce
Il funzionamento dell’indice di scostamento a 3 led.
L’accensione del led verde = Indica che il valore di processo è all’interno del campo [SP+AdE ... SP-AdE], l’accensione del led - che
il valore di processo è inferiore al valore [SP-AdE] e l’accensione
del led + che il valore di processo è superiore al valore [SP+AdE].
P r 2
P r 1 - P r 2
H S E t
S P 1
tim
O
N
O
1 .r E G
N
O
o ff
e
N
o ff
Esempio di regolazione differenziale ON/OFF (On.FA) con “Func”
=CooL
Attenzione: Il regolatore è già programmato in fabbrica per
eseguire la regolazione differenziale e visualizzare la differenza di
temperatura Pr1-Pr2.
4.4 - REGOLATORE ON/OFF (1.rEG)
Tutti i parametri riguardanti la regolazione ON/OFF sono contenuti
nel gruppo “]rEG”.
Questo modo di regolazione è attuabile impostando il parametro
"Cont" = On.FS o = On.FA ed agisce sull'uscita configurata come
1.rEG in funzione del valore di processo stabilito dal par. “PrrG”,
del Set point "SP" attivo, del modo di funzionamento "Func” e
dell'isteresi "HSEt" programmati.
Lo strumento attua una regolazione ON/OFF con isteresi
simmetrica se “Cont" = On.FS oppure con isteresi asimmetrica se
“Cont” = On.Fa.
Il regolatore si comporta nel seguente modo: in caso di azione
inversa, o di riscaldamento (“FunC”=HEAt), disattiva l'uscita
quando il valore di processo raggiunge il valore [SP + HSEt] nel
caso di isteresi simmetrica oppure [SP] nel caso di isteresi
asimmetrica, per riattivarla quando scende sotto al valore [SP HSEt].
4.2 - CONFIGURAZIONE DELLE USCITE
Viceversa, in caso di azione diretta o di raffredamento
Le uscite dello strumento possono essere configurate nel gruppo di ("Func”=CooL), disattiva l'uscita quando il valore di processo
]
parametri “ Out” dove si trovano, in funzione del numero di uscite raggiunge il valore [SP - HSEt] nel caso di isteresi simmetrica
disponibili sullo strumento, i relativi parametri “O1F” , “O2F” oppure [SP] in caso di isteresi asimmetrica, per riattivarla quando
,“O3F” ,“O4F”.
sale al di sopra del valore [SP + HSEt].
Le uscite possono essere configurate per i seguenti funzionamenti:
PV
PV
- Uscita di regolazione primaria (1.rEG)
SP
H S Et
- Uscita di regolazione secondaria (2.rEG)
H SE t
SP
- Uscita di allarme normalmente aperta (ALno)
tim e
tim e
- Uscita di allarme normalmente chiusa (ALnc)
ON
ON
ON
ON
ON
ON
OUT
O
U
T
- Uscita di allarme normalmente chiusa ma con indicazione del led 1 .rE G
o ff
o ff
o ff
o ff
1 .r E G
frontale dello strumento negata (ALni)
H E A t - O n .F A
C o o L - O n .F A
- Uscita disabilitata (OFF)
PV
PV
L’abbinamento numero uscita-numero allarme viene invece
H S Et
H SE t
SP
]
]
]
SP
effettuata nel gruppo relativo all’allarme (“ AL1”,” AL2” o “ AL3”)
H S Et
H SE t
4.3 - REGOLATORE CON TEMPERATURA ASSOLUTA O
DIFFERENZIALE
Attraverso il par. “PrrG” è possibile stabilire la variabile di processo utilizzata dal regolatore per operare.
Il regolatore può infatti operare considerando come variabile di processo il valore misurato dall’ingresso 1 (Pr1), il valore misurato dall’ingresso 2 (Pr2) oppure può considerare la differenza tra i 2
ingressi Pr1-Pr2 (P1-2).
La selezione “PrrG” = P1-2 porta il regolatore ad operare come regolatore differenziale.
In questo caso il regolatore agisce sulle uscite di regolazione in
modo da mantenere la differenza Pr1-Pr2 pari al valore del Set
Point.
Il modo di funzionamento “Func” = CooL viene utilizzato per le
applicazioni in cui l’azione dell’attuatore fa diminuire la differenza
Pr1-Pr2 (contrastando quindi la differenza Pr1-Pr2 che tende
naturalmente ad aumentare).
tim e
OUT
1 .rE G
ON
ON
o ff
ON
o ff
H E A t - O n .F S
tim e
OUT
1 .r E G
ON
ON
o ff
ON
o ff
C o o L - O n .F S
4.5 - REGOLAZIONE ON/OFF A ZONA NEUTRA (1.rEG - 2.rEG)
Tutti i parametri riguardanti la regolazione ON/OFF a Zona Neutra
sono contenuti nel gruppo “]rEG”.
Questo funzionamento è attuabile quando sono configurate 2
uscite rispettivamente come 1.rEG e 2.rEG e si ottiene
programmando il par. “Cont” = nr .
Il funzionamento a Zona Neutra viene utilizzato per il controllo degli
impianti che possiedono un elemento che causa un incremento
positivo (ad es. Riscaldante, Umidificante ecc.) e un elemento che
causa un incremento Negativo (ad es. Refrigerante, Deumidificante
ecc.).
TECNOLOGIC spa - TLK 31 D - ISTRUZIONI PER L’USO - Vr. 01 - ISTR-MTLK31DITA1 - PAG. 5
Il funzionamento di regolazione agisce sulle uscite configurate in
funzione della misura, del Set point "SP" attivo, e dell'isteresi
"HSEt" programmati.
Il regolatore si comporta nel seguente modo: spegne le uscite
quando il valore di processo raggiunge il Set e attiva l'uscita 1.rEG
quando il valore di processo è minore di [SP-HSEt], oppure
accende l'uscita 2.rEG quando il valore di processo è maggiore di
[SP+HSEt].
Di conseguenza l'elemento che causa incremento Positivo andrà
collegato all'uscita configurata come 1.rEG mentre l'elemento di
incremento negativo andrà collegato all'uscita configurata come
2.rEG.
PV
HSEt
SP
HSEt
L'algoritmo di regolazione PID a singola azione dello strumento
prevede l'impostazione dei seguenti parametri:
"Pb" - Banda Proporzionale
"tcr1" - Tempo di ciclo dell'uscita 1rEG
"Int" - Tempo Integrale
"rS" - Reset manuale (solo se “Int” =0)
"dEr" - Tempo derivativo
“FuOC” - Fuzzy Overshoot Control
Quest’ultimo parametro premette di eliminare le sovraelongazioni
della variabile (overshoot) all’avviamento del processo o al
cambiamento del Set Point.
Occorre tener presente che un valore basso del parametro riduce
l’overshoot mentre un valore alto lo aumenta.
PV
SP
2
1
3
time
OUT 1.rEG
(heating)
0N
0N
off
off
0N
OUT 2.rEG
(cooling)
t im e
off
off
Nel caso in cui l’uscita 2.rEG venga utilizzata per il comando di un
compressore è prevista la funzione di protezione compressore da
partenze ravvicinate.
Tale funzione prevede un controllo a tempo sull'accensione
dell'uscita 2.rEG indipendentemente dalla richiesta del regolatore.
La protezione è del tipo con ritardo dopo lo spegnimento.
La protezione consiste nell'impedire che si verifichi un'attivazione
dell'uscita durante il tempo impostato al parametro “CPdt”
(espresso in sec.), e conteggiato a partire dall'ultimo spegnimento
dell'uscita, e quindi che l’eventuale attivazione si verifichi solo allo
scadere del tempo “CPdt”.
Se durante la fase di ritardo attuazione per inibizione della funzione
protezione compressore la richiesta del regolatore dovesse venire
a mancare naturalmente viene annullata la prevista attuazione
dell'uscita.
La funzione risulta disattivata programmando “CPdt” = OFF.
Durante la fase di ritardo di attuazione uscita per inibizione della
funzione di protezione compressore il led relativo all’uscita 2.rEG è
lampeggiante.
4.6 - REGOLATORE PID A SINGOLA AZIONE (1.rEG)
Tutti i parametri riguardanti la regolazione PID sono contenuti nel
gruppo “]rEG”.
Il modo di regolazione di tipo PID a Singola Azione è attuabile
impostando il parametro "Cont" = Pid ed agisce sull'uscita 1.rEG
in funzione del Set point “SP” attivo , del modo di funzionamento
"FunC", e del risultato dell’algoritmo di controllo PID a due gradi di
libertà dello strumento.
PV
SP
1: Valore “FuOC” OK
2: Valore “FuOC” troppo alto
3: Valore “FuOC” troppo basso
4.7 - REGOLATORE PID A DOPPIA AZIONE (1.rEG - 2.rEG)
Tutti i parametri riguardanti la regolazione PID sono contenuti nel
gruppo “]rEG”.
La regolazione PID a Doppia Azione viene utilizzata per il controllo
degli impianti che possiedono un elemento che causa un
incremento positivo (ad es. Riscaldante) e un elemento che causa
un incremento negativo (ad es. Raffreddante) e viene attuata
quando sono configurate 2 uscite rispettivamente come 1.rEG e
2.rEG e programmando il par. “Cont” = Pid.
L'elemento che causa incremento Positivo andrà collegato
all'uscita configurata come 1rEG mentre l'elemento di incremento
negativo andrà collegato all'uscita configurata come 2.rEG.
Il modo di regolazione di tipo PID a doppia azione agisce pertanto
sulle uscite 1.rEG e 2.rEG in funzione del Set point “SP” attivo e
del risultato dell’algoritmo di controllo PID a due gradi di libertà
dello strumento.
Per ottenere una buona stabilità della variabile in caso di processi
veloci, i tempi di ciclo “tcr1” e “tcr2” devono avere un valore basso
con un intervento molto frequente delle uscite di regolazione.
In questo caso si raccomanda l’uso di un relè statico (SSR) per il
comando degli attuatori.
L'algoritmo di regolazione PID a doppia azione dello strumento
prevede l'impostazione dei seguenti parametri:
"Pb" - Banda Proporzionale
"tcr1" - Tempo di ciclo dell'uscita 1.rEG
"tcr2" - Tempo di ciclo dell'uscita 2.rEG
"Int" - Tempo Integrale
"rS" - Reset manuale (solo se “Int” =0)
"dEr" - Tempo derivativo
“FuOC” - Fuzzy Overshoot Control
"Prat" - Power Ratio o rapporto tra potenza dell'elemento
comandato dall'uscita 2.rEG e potenza dell'elemento comandato
dall'uscita 1.rEG.
tim e
OUT
1 .r E G
( H E a t)
0N
0N
0N
0N
0N
0N
0N
4.8 - FUNZIONI DI AUTOTUNING E SELFTUNING
Tutti i parametri riguardanti le funzioni di AUTOTUNING e SELFTUNING sono contenuti nel gruppo “]rEG”.
tc r 1 t c r 1 t c r 1 tc r 1 tc r 1 t c r 1 t c r 1
La funzione di AUTOTUNING e la funzione di SELTUNING permettono la sintonizzazione automatica del regolatore PID.
Per ottenere una buona stabilità della variabile in caso di processi
La funzione di AUTOTUNING prevede il calcolo dei parametri PID
veloci, il tempo di ciclo “tcr1” deve avere un valore basso con un
attraverso un ciclo di sintonizzazione di tipo FAST oppure di tipo
intervento molto frequente dell’uscita di regolazione.
OSCILLATORIO, terminato il quale i parametri vengono memorizIn questo caso si raccomanda l’uso di un relè statico (SSR) per il
zati dallo strumento e durante la regolazione rimangono costanti.
comando dell’attuatore.
o ff
o ff
o ff
o ff
o ff
o ff
TECNOLOGIC spa - TLK 31 D - ISTRUZIONI PER L’USO - Vr. 01 - ISTR-MTLK31DITA1 - PAG. 6
La funzione di SELFTUNING (rule based "TUNE-IN") prevede invece il monitoraggio della regolazione ed il continuo ricalcolo dei parametri durante la regolazione.
Entrambe le funzioni calcolano in modo automatico i seguenti
parametri:
"Pb" - Banda Proporzionale
"tcr1" - Tempo di ciclo dell'uscita 1.rEG
"Int" - Tempo Integrale
"dEr" - Tempo derivativo
“FuOC” - Fuzzy Overshoot Control
e, per la regolazione PID a doppia azione, anche:
"tcr2" - Tempo di ciclo dell'uscita 2.rEG
"Prat" - Rapporto P 2.rEG/ P 1.rEG
Per attivare la funzione di AUTOTUNING procedere come segue:
1) Impostare ed attivare il Set point desiderato.
2) Impostare il parametro "Cont" =Pid.
3) Se il controllo è a singola azione impostare il parametro "Func"
in funzione del processo da controllare attraverso l'uscita 1.rEG.
4) Configurare un’uscita come 2.rEG se lo strumento comanda un
impianto con doppia azione
5) Impostare il parametro "Auto" come:
= 1 : se si desidera che l’autotuning FAST venga avviato automaticamente ogni volta che si accende lo strumento a condizione che il
valore di processo sia minore (per “Func” =HEAt) di [SP- |SP/2|] o
maggiore (per “Func” =CooL) di [SP+ |SP/2|]
= 2 : se si desidera che l’autotuning FAST venga avviato automaticamente all’accensione successiva dello strumento a condizione
che il valore di processo sia minore (per “Func” =HEAt) di [SP|SP/2|] o maggiore (per “Func” =CooL) di [SP+ |SP/2|], e, una volta
terminata la sintonizzazione, venga posto automaticamente il par.
“Auto”=OFF.
= 3 : se si desidera avviare l’autuning FAST manualmente, mediante la selezione della voce “tunE” nel menù principale o mediante il
tasto U opportunamente programmato (“USrb” = tunE). In questo
caso l’autotuning parte a condizione che il valore di processo sia
minore (per “Func” =HEAt) di [SP- |SP/5|] o maggiore (per “Func”
=CooL) di [SP+ |SP/5|].
= 4 : se si desidera che l’autotuning FAST venga avviato automaticamente ad ogni modifica del Set di regolazione o al termine del ciclo di Soft-Start programmato. L’autotuning verrà comunque eseguito a condizione che il valore di processo sia minore (per “Func”
=HEAt) di [SP- |SP/5|] o maggiore (per “Func” =CooL) di [SP+
|SP/5|].
= - 1 : se si desidera che l’autotuning OSCILLATORIO venga avviato automaticamente ogni volta che si accende lo strumento
= - 2 : se si desidera che l’autotuning OSCILLATORIO venga avviato automaticamente all’accensione successiva dello strumento
e, una volta terminata la sintonizzazione, venga posto automaticamente il par. “Auto”=OFF.
= - 3 : se si desidera avviare l’autuning OSCILLATORIO manualmente mediante il tasto U.
= - 4 : se si desidera che l’autotuning OSCILLATORIO venga avviato automaticamente ad ogni modifica del Set di regolazione o al
termine del ciclo di Soft-Start programmato.
NOTA: L’Autotuning di tipo Fast risulta particolarmente rapido e
non manifesta alcun effetto sulla regolazione poichè calcola i parametri del regolatore durante la fase di raggiungimento del Set
Point.
Per la corretta esecuzione dell’autotuning di tipo Fast è però necessario che all’avvio del ciclo vi sia una certa differenza tra la variabile di processo ed il Set Point, per questa ragione lo strumento
avvia l’autotuning Fast solo quando:
- Per “Auto” = 1 o 2 : il valore di processo è minore (per “Func”
=HEAt) di [SP- |SP/2|] o maggiore (per “Func” =CooL) di [SP+
|SP/2|]
- Per “Auto” = 3 o 4 : il valore di processo è minore (per “Func”
=HEAt) di [SP- |SP/5|] o maggiore (per “Func” =CooL) di [SP+
|SP/5|].
L’Autotuning FAST non è indicato quando il Set point è prossimo
alla lettura iniziale o quando la variabile misurata varia in modo
irregolare durante il ciclo di sintonizzazione (per motivi dovuti al
processo la variabile sale o scende).
In questi casi si consiglia l'uso dell’Autotuning di tipo oscillatorio il
quale attua alcuni cicli di regolazione ON-OFF che portano il valore
di processo ad oscillare intorno al valore di Set point terminati i
quali passa alla regolazione di tipo PID con i parametri calcolati
dall’Autotuning.
6) Uscire dalla programmazione parametri.
7) Collegare lo strumento all'impianto comandato.
8) Attivare l'autotuning spegnendo e riaccendendo l’apparecchio se
“Auto” = 1o 2, oppure mediante la selezione della voce “tunE” nel
menù principale (o mediante il tasto U opportunamente programmato) se “Auto” = 3, oppure ancora variando il valore di Set se
“Auto” = 4.
A questo punto la funzione di Autotuning è attivata e viene segnalata attraverso il led AT/ST lampeggiante.
Il regolatore attua quindi una serie di operazioni sull'impianto collegato al fine di calcolare i parametri della regolazione PID più
idonei. Qualora non siano verificate le condizioni di valore di processo per avviare l’Autotuning, il display visualizzerà “ErAt” ad indicare l’impossibilità di eseguire l’operazione e lo strumento si porrà nel normale modo di regolazione secondo i parametri impostati
precedentemente.
Per far scomparire l’errore “ErAt” è sufficiente premere il tasto P.
La durata del ciclo di Autotuning è limitata ad un massimo di 12
ore.
Nel caso in cui il processo non sia terminato nell'arco di 12 ore lo
strumento visualizzerà "noAt" .
Nel caso invece si dovesse verificare un errore della sonda lo strumento naturalmente interromperà il ciclo in esecuzione.
I valori calcolati dall’Autotuning saranno memorizzati automaticamente dallo strumento al termine della corretta esecuzione del ciclo di Autotuning nei parametri relativi alla regolazione PID.
Per attivare la funzione di SELFTUNING procedere come segue:
1) Impostare ed attivare il Set point desiderato.
2) Impostare il parametro "Cont" =Pid oppure = 3 Pt , se lo strumento comanda un azionamento motorizzato a posizionamento
temporale.
3) Se il controllo è a singola azione impostare il parametro "Func"
in funzione del processo da controllare attraverso l'uscita 1.rEG.
4) Configurare un’uscita come 2.rEG se lo strumento comanda un
impianto con doppia azione o un azionamento motorizzato a posizionamento temporale.
5) Impostare il parametro "SELF" =yES
6) Uscire dalla programmazione parametri.
7) Collegare lo strumento all'impianto comandato.
8) Attivare il Selftuning mediante la selezione della voce “tunE” nel
menù principale (o mediante il tasto U opportunamente
programmato).
Quando la funzione di Selftuning è attiva, il led AT/ST si accende in
modo fisso, e tutti i parametri di regolazione PID ("Pb", "Int", "dEr",
ecc.) non vengono più visualizzati.
Per interrompere il ciclo di Autotuning o disattivare il Selftuning selezionare dal menù "SEL" uno qualsiasi degli stati di regolazione:
"rEG", "OPLO" o "OFF".
Se lo strumento viene spento durante l'autotuning o con la funzione
di Selftuning attivata, alla sua riaccensione le funzioni risulteranno
inserite.
4.9 - VARIAZIONE DINAMICA DEL SET POINT E COMMUTAZIONE AUTOMATICA TRA DUE SET POINT (RAMPE E TEMPO DI
MANTENIMENTO)
Tutti i parametri riguardanti il funzionamento delle rampe sono
contenuti nel gruppo “]rEG”.
E' possibile fare in modo che il Set point venga raggiunto in un
tempo predeterminato (comunque maggiore del tempo che il sistema impiegherebbe naturalmente).
Questo può essere utile in quei processi (trattamenti termici, chimici, ecc.) in cui il Set point deve essere raggiunto gradatamente, in
tempi prestabiliti.
Inoltre è possibile fare in modo che, dopo l’accensione dello strumento, raggiunto il primo Set (SP1) lo strumento commuti
TECNOLOGIC spa - TLK 31 D - ISTRUZIONI PER L’USO - Vr. 01 - ISTR-MTLK31DITA1 - PAG. 7
automaticamente sul secondo Set (SP2) dopo un tempo programmabile realizzando così un ciclo automatico.
Queste funzioni sono disponibili per tutti i tipi di regolazione programmabili .
Il funzionamento è stabilito dai seguenti parametri:
"SLor" - Pendenza della prima rampa espressa in unità/minuto.
"SLoF" - Pendenza della seconda rampa espressa in unità/minuto.
"dur.t" - Tempo di mantenimento del Set Point “SP1” prima di
commutare automaticamente su “SP2” (espresso in ore e min.).
Le funzioni risultano disattivate quando si impostano i relativi parametri = InF.
Se si desidera il solo raggiungimento del Set Attivo (es. “SP1”) a
velocità controllata è sufficiente impostare il par. “SLor” al valore
desiderato.
La rampa “SLor” risulterà sempre operativa all’accensione dello
strumento e quando viene cambiato il valore di set point attivo.
Se invece si desidera realizzare un ciclo automatico dall’accensione dello strumento occorre programmare il par. “nSP”= 2, impostare i due valori “SP1” e “SP2” e naturalmente programmare i par.
“SLor”, “dur.t” e “SLoF” con i valori desiderati.
In questo caso al termine del ciclo tutte le rampe non saranno più
attive.
SV
[U n it]
SLor
SP1
SLor
SP1
ch a n g e
S P 1 V a lu e
SV
[ U n it]
d u r .t
SP1
SLor
tim e [m in .]
SLoF
SP2
AU TO
ch an ge
Set
tim e [m in .]
Gli esempi sono con partenza da valori inferiori a SP1 e con successiva diminuzione del Set Point.
Nota: In caso di regolatore PID se si desidera effettuare l’autotuning ed è attiva una rampa questa non viene eseguita. Si raccomanda pertanto di eseguire l’Autotuning senza attivare alcuna rampa e quindi, una volta eseguita la sintonizzazione, disabilitare l’Autotuning (“Auto” = 0), programmare le rampe desiderate e, se si desidera la sintonizzazione automatica, abilitare la funzione di
Selftuning.
4.10 - FUNZIONE DI SOFT-START
Tutti i parametri riguardanti il funzionamento del Soft Start sono
contenuti nel gruppo “]rEG”.
La funzione di Soft-Start è attuabile solo con regolazione PID e
consente di limitare la potenza di regolazione all’accensione dello
strumento per un tempo prefissato.
Ciò risulta utile quando l’attuatore comandato dallo strumento si
potrebbe danneggiare a causa di una potenza troppo elevata fornita quando questi non è ancora in condizioni di regime (ad esempio
nel caso di alcuni elementi riscaldanti).
Il funzionamento è stabilito dai seguenti parametri:
“St.P” - Potenza di Soft Start
“SSt” - Tempo massimo di Soft Start (espresso in hh.mm)
“HSEt” - Soglia disabilitazione ciclo Soft Start
Una volta impostati i parametri ai valori desiderati, all’accensione lo
strumento provvederà a fornire in uscita la potenza impostata al
par. “St.P” per il tempo impostato al par. “SSt” o sino al raggiungimento del valore assoluto impostato al par. “HSEt”.
In pratica lo strumento opera in regolazione manuale per commutare automaticamente in regolazione automatica al termine del
tempo “SSt” o quando il valore di processo è uguale al valore programmato al par. “HSEt”.
Per escludere la funzione di Soft Start è sufficiente impostare il par.
“SSt” = OFF
Qualora, durante l’esecuzione del Soft Start, si verifichi un errore di
misura la funzione viene interrotta e lo strumento passa a fornire in
uscita la potenza impostata al par. “OPE”.
Se la misura si ripristina, il Soft Start rimane comunque disattivato.
Se si desidera eseguire l’Autotuning con il Soft Start inserito occorre programmare il par. “Auto” = 4 / - 4.
In questo modo l’autotuning verrà eseguito al termine del ciclo di
Soft-Start.
4.11 - FUNZIONAMENTO DELLE USCITE DI ALLARME (AL1,
AL2, AL3)
Per la configurazione di funzionamento degli allarmi il cui intervento è legato al valore di processo (AL1, AL2, AL3) è necessario prima stabilire a quale uscita deve corrispondere l’allarme.
Per fare questo occorre configurare innanzitutto nel gruppo di parametri “]Out” i parametri relativi alle uscite che si desiderano utilizzare come allarmi (“O1F” , “O2F” ,“O3F”, “O4F”) programmando il
parametro relativo all’uscita desiderata :
= ALno se l’uscita di allarme deve essere attivata quando l'allarme
è attivo, mentre è disattivata quando l'allarme non è attivo.
= ALnc se l’uscita di allarme deve essere attivata quando l'allarme
non è attivo, mentre è disattivata quando l'allarme è attivo (in questo caso il led frontale dello strumento segnala lo stato dell’allarme)
= ALni se si desidera lo stesso funzionamento di ALnc ma con funzionamento del led frontale negato (in questo caso il led frontale
dello strumento segnala lo stato dell’uscita)
Nota: In tutti gli esempi che seguono viene fatto riferimento all’allarme AL1. Naturalmente il funzionamento degli altri allarmi risulta
analogo.
Accedere quindi al gruppo “]AL1” e programmare al parametro
“OAL1” , su quale uscita dovrà essere destinato il segnale di
allarme.
Il funzionamento dell’allarme AL1 è invece stabilito dai parametri:
"PrA1 " - VALORE DI PROCESSO PER L’ALLARME
"AL1t " - TIPO DI ALLARME
"Ab1" - CONFIGURAZIONE DELL'ALLARME
“AL1” - SOGLIA DI ALLARME
“AL1L” - SOGLIA INFERIORE ALLARME (per allarme a finestra)
O LIMITE INFERIORE DEL SET DI ALLARME “AL1” (per allarmi di
minima o di massima)
“AL1H” - SOGLIA SUPERIORE ALLARME (per allarme a finestra)
O LIMITE SUPERIORE DEL SET DI ALLARME “AL1” (per allarmi
di minima o di massima)
“HAL1” - ISTERESI DEGLI ALLARMI
“AL1d” - RITARDO ATTIVAZIONE DELL’ALLARME (in sec.)
"AL1i" - COMPORTAMENTO ALLARME IN CASO DI ERRORE DI
MISURA
"PrA1" - VALORE DI PROCESSO ALLARME: Attraverso il parametro è possibile stabilire la variabile di processo utilizzata dall’allarme per operare.
L’allarme può infatti operare considerando come variabile di processo il valore misurato dall’ingresso 1 (Pr1), il valore misurato dall’ingresso 2 (Pr2) oppure può considerare la differenza tra i 2
ingressi (Pr1-Pr2).
"AL1t" - TIPO DI ALLARME: Si possono avere 6 differenti comportamenti dell'uscita di allarme.
LoAb = ALLARME ASSOLUTO DI MINIMA: L'allarme viene attivato
quando il valore di processo scende al di sotto della soglia di allarme impostata al parametro "AL1" per disattivarsi quando sale al di
sopra della soglia [AL1 + HAL1].
Con questa modalità è possibile impostare ai par. “AL1L” e AL1H” i
limiti entro i quali è possibile programmare la soglia “AL1”.
HiAb = ALLARME ASSOLUTO DI MASSIMA: L'allarme viene attivato quando il valore di processo sale al di sopra della soglia di allarme impostata al parametro "AL1" per disattivarsi quando scende
al di sotto della soglia [AL1 - HAL1]. Con questa modalità è possibile impostare ai par. “AL1L” e AL1H” i limiti entro i quali è possibile
programmare la soglia “AL1”.
TECNOLOGIC spa - TLK 31 D - ISTRUZIONI PER L’USO - Vr. 01 - ISTR-MTLK31DITA1 - PAG. 8
P V
PV
PV
AL1
HAL1
HAL1
A L1
AL1
tim e
O N
OUT
AL1
ON
off
ON
off
time
off
OUT
AL1
ON
ON
time
+0
o ff
off
off
O N
off
+1
o ff
HiAb
LodE = ALLARME RELATIVO DI MINIMA: L'allarme viene attivato
quando il valore di processo scende al di sotto del valore [SP +
AL1] per disattivarsi quando sale al di sopra della soglia [SP + AL1
+ HAL1]. Con questa modalità è possibile impostare ai par. “AL1L”
e AL1H” i limiti entro i quali è possibile programmare la soglia
“AL1”.
HidE = ALLARME RELATIVO DI MASSIMA: L'allarme viene attivato quando il valore di processo sale al di sopra del valore [SP +
AL1] per disattivarsi quando scende al di sotto della soglia [SP +
AL1 - HAL1]. Con questa modalità è possibile impostare ai par.
“AL1L” e AL1H” i limiti entro i quali è possibile programmare la soglia “AL1”.
PV
SP
HAL1
AL1
-AL1
HAL1
o ff
A b1
LoAb
PV
O N
SP
o ff
Nell’esempio il comportamento è rappresentato con un allarme di
minima assoluto
RITARDO ALLARME: Si possono avere 2 differenti comportamenti
dell'uscita di allarme, a seconda del valore sommato al par. “Ab1”.
+0 = ALLARME NON RITARDATO: L'allarme si attiva immediatamente al verificarsi delle condizioni di allarme.
+2 = ALLARME RITARDATO: Al verificarsi delle condizioni di allarme viene fatto partire il ritardo impostato al par. “AL1d” (espresso
in sec.) e solo trascorso tale tempo l’allarme verrà attivato.
MEMORIA ALLARME: Si possono avere 2 differenti comportamenti
dell'uscita di allarme, a seconda del valore sommato al par. “Ab1”.
+ 0 = ALLARME NON MEMORIZZATO: L'allarme rimane attivo solo nelle condizioni di allarme
+ 4 = ALLARME MEMORIZZATO: L'allarme si attiva quando vi sono le condizioni di allarme e rimane attivo anche se tali condizioni
non permangono sino a quando non viene premuto il pulsante U se
opportunamente programmato (“USrb”=Aac) o interviene l’ingresso
digitale 1 opportunamente programmato (“diF”=Aac).
P V
OUT
AL1
ON
off
ON
off
time
off
OUT
AL1
ON
off
LodE
ON
off
time
A L1
off
HidE
tim e
O N
LHAb = ALLARME ASSOLUTO A FINESTRA: L'allarme viene attivato quando il valore di processo scende al di sotto della soglia di
allarme impostata al parametro "AL1L" oppure sale al di sopra della soglia di allarme impostata al parametro "AL1H" e si disattiva
quando rientra nel campo [AL1H - HAL1 ... AL1L + HAL1].
LHdE = ALLARME RELATIVO A FINESTRA: L'allarme viene attivato quando il valore di processo scende al di sotto del valore [SP
+ AL1L] oppure quando il valore di processo sale al di sopra del
valore [SP + AL1H] e si disattiva quando rientra nel campo [SP +
AL1H - HAL1 ... SP + AL1L + HAL1].
PV
PV
AL1H
HAL1
HAL1
AL1L
OUT
AL1
ON
off
ON
off
LHAb
time
off
HAL1
AL1H
SP
AL1L
OUT
AL1
HAL1
ON
ON
off
off
LHdE
time
off
+0
o ff
+4
o ff
O N
A b1
o ff
Nell’esempio il comportamento è rappresentato con un allarme di
massima assoluto
TACITAZIONE ALLARME: Si possono avere 2 differenti comportamenti dell'uscita di allarme, a seconda del valore sommato al par.
“Ab1”.
+ 0 = ALLARME NON TACITABILE: L'allarme rimane sempre attivo
nelle condizioni di allarme
+ 8 = ALLARME TACITABILE: L'allarme si attiva quando vi sono le
condizioni di allarme e può essere disattivato mediante il pulsante
U, se opportunamente programmato (“USrb”=ASi), o interviene l’ingresso digitale 1 opportunamente programmato (“diF”=ASi), anche
se le condizioni di allarme permangono.
COMPORTAMENTO ALLARME AL CAMBIO DEL SET POINT
(SOLO PER ALLARMI RELATIVI): Si possono avere 2 differenti
comportamenti dell'uscita di allarme, a seconda del valore sommato al par. “Ab1”.
+0 = COMPORTAMENTO NORMALE: L'allarme viene attivato
sempre quando vi sono le condizioni di allarme.
+16 = ALLARME NON ATTIVO AL CAMBIO DEL SET POINT: Se
dopo il cambio del Set Point lo strumento si trova nelle condizioni
di allarme questo non viene attivato. L'allarme si attiverà solo quando il valore di processo, dopo il cambio del Set, non si è portato
nelle condizioni di non allarme e successivamente nelle condizioni
di allarme.
"AL1i" - ATTIVAZIONE ALLARME IN CASO DI ERRORE DI MISURA: consente di stabilire in che condizione si deve porre l’allarme quando lo strumento ha un errore di misura (yES=allarme
attivo; no=allarme disattivato)
"Ab1" - CONFIGURAZIONE DELL'ALLARME: Il parametro può
assumere un valore compreso tra 0 e 31.
Il numero da impostare, che corrisponderà al funzionamento desiderato, viene ottenuto sommando i valori riportati nelle seguenti
descrizioni:
COMPORTAMENTO ALLARME ALL'ACCENSIONE: Si possono
avere 2 differenti comportamenti dell'uscita di allarme, a seconda
del valore sommato al par. “Ab1”.
+0 = COMPORTAMENTO NORMALE: L'allarme viene attivato
sempre quando vi sono le condizioni di allarme.
+1 = ALLARME NON ATTIVO ALL'AVVIAMENTO: Se all'avviamento lo strumento si trova nelle condizioni di allarme questo non viene
attivato. L'allarme si attiverà solo quando il valore di processo, do- 4.12 - FUNZIONE ALLARME DI LOOP BREAK
po l'accensione, non si è portato nelle condizioni di non allarme e Tutti i parametri riguardanti le funzioni relativi all’allarme di Loop
successivamente nelle condizioni di allarme.
Break sono contenuti nel gruppo “]LbA”.
Su tutti gli strumenti, è disponibile l’allarme di Loop Break che interviene quando, per un motivo qualsiasi (cortocircuito di una
TECNOLOGIC spa - TLK 31 D - ISTRUZIONI PER L’USO - Vr. 01 - ISTR-MTLK31DITA1 - PAG. 9
termocoppia, inversione di una termocoppia, interruzione del
carico) si interrompe l'anello di regolazione.
Per la configurazione dell’uscita a cui destinare l’allarme di Loop
Break è necessario prima stabilire a quale uscita deve corrispondere l’allarme.
Per fare questo occorre configurare nel gruppo di parametri “]Out”
il parametro relativo all’uscita che si desidera utilizzare (“O1F”,
“O2F”, “O3F”, “O4F”) programmando il parametro relativo all’uscita
desiderata :
= ALno se l’uscita di allarme deve essere attivata quando l'allarme
è attivo, mentre è disattivata quando l'allarme non è attivo.
= ALnc se l’uscita di allarme deve essere attivata quando l'allarme
non è attivo, mentre è disattivata quando l'allarme è attivo.
= ALni se si desidera lo stesso funzionamento di ALnc ma con funzionamento del led frontale negato (in questo caso il led frontale
dello strumento segnala lo stato dell’uscita)
Quindi accedere al gruppo “]LbA” e programmare al parametro
“OLbA”, su quale uscita dovrà essere destinato il segnale di
allarme.
L’allarme di Loop Break viene attivato se la potenza di uscita rimane al valore del 100 % per il tempo impostato al par. "LbAt"
(espresso in sec.).
Per non dar luogo a falsi allarmi, il valore di impostazione di questo
parametro va eseguita tenendo conto del tempo di raggiungimento
del valore di Set quando il valore misurato è lontano da questo (ad
esempio all’accensione dell’impianto).
All’intervento dell’allarme lo strumento visualizza il messaggio
“LbA” e si comporta come nel caso di un errore di misura fornendo in uscita la potenza impostata al par. “OPE” (programmabile
nel gruppo “ ]InP”).
Per ripristinare il normale funzionamento dopo l'allarme selezionare
il modo di regolazione “OFF” e quindi reimpostare il funzionamento
di regolazione automatica (“rEG”) dopo aver controllato il corretto
funzionamento della sonda e dell’attuatore.
Per escludere l’allarme di Loop Break è sufficiente programmare
“OLbA” = OFF.
4.13 - FUNZIONAMENTO DEL TASTO U
Oltre alla normale funzione di visualizzazione delle variabili Pr1,
Pr2 e P1-2 il tasto U può essere programmato per eseguire altre
funzioni mediante il parametro “USrb” contenuto nel gruppo
“]PAn”.
Il parametro può essere programmato come:
= noF : Il tasto non esegue nessuna funzione.
= tunE : Premendo il tasto per almeno 1 sec. è possibile
attivare/disattivare l’Autotuning o il Selftuning se abilitati con i
relativi parametri.
= OPLO : Premendo il tasto per almeno 1 sec. è possibile passare
dal modo di regolazione automatica (rEG) a quello manuale
(OPLO) e viceversa.
= Aac : Premendo il tasto per almeno 1 sec. è possibile resettare
un allarme memorizzato (vedi par. 4.10.1)
= ASi :Premendo il tasto per almeno 1 sec. è possibile tacitare un
allarme attivo (vedi par. 4.10.1)
= CHSP : Premendo il tasto per almeno 1 sec. è possibile
selezionare a rotazione uno dei 4 Set Point memorizzati.
= OFF : Premendo il tasto per almeno 1 sec. è possibile passare
dal modo di regolazione automatica (rEG) a quello di regolazione
disattivata (OFF) e viceversa.
4.14 - INGRESSI DIGITALI
Lo strumento può essere dotato di due ingressi digitali il cui
funzionamento
è configurabile mediante il parametro "diF"
contenuto nel gruppo “]InP”.
Il parametro può essere programmato come:
= noF : nessuna funzione
= AaC : Chiudendo il contatto connesso all’ingresso digitale 1 è
possibile resettare un allarme memorizzato (vedi par. 4.10.1)
= ASi :Chiudendo il contatto connesso all’ingresso digitale 1 è
possibile tacitare un allarme attivo (vedi par. 4.10.1)
= HoLd : Chiudendo il contatto connesso all’ingresso digitale 1
viene bloccata l’acquisizione della misura in quell’istante (N.B.:
non la lettura sul display, quindi l’indicazione potrebbe stabilizzarsi
con un ritardo proporzionale al filtro di misura). Con la funzione di
hold inserita lo strumento opera la regolazione in funzione della
misura memorizzata. Riaprendo il contatto lo strumento riprende la
normale acquisizione della misura.
= OFF : Quando lo strumento è nello stato “rEG” chiudendo il
contatto connesso all’ingresso digitale 1 lo strumento viene posto
nello stato di OFF. Riaprendo il contatto lo strumento ritorna nello
stato di regolazione automatica “rEG”.
= CHSP : Chiudendo e riaprendo il contatto connesso all’ingresso
digitale 1 è possibile selezionare a rotazione uno dei 4 Set Point
memorizzati.
= SP1.2 : La chiusura del contatto connesso all’ingresso digitale 1
seleziona come attivo il set point SP2 mentre l’apertura del contatto seleziona come attivo il set point SP1. La funzione è attuabile
solo con “nSP” = 2 , inoltre quando è attivata disabilita la selezione
del set attivo tramite il parametro “SPAt” e tramite il tasto U.
= SP1.4 : La seguente combinazione di chiusura dei contatti connessi ai due ingressi digitali permette l’attivazione di uno dei 4 set
point memorizzati.
DIG IN1
DIG IN2
SET POINT
off
off
SP1
on
off
SP2
off
on
SP3
on
on
SP4
Quando la funzione è attivata disabilita la selezione del set attivo
tramite il parametro “SPAt” e tramite il tasto U.
= HE.Co : La chiusura del contatto connesso all’ingresso digitale 1
seleziona come attivo il set point SP2 con modalità di regolazione
“CooL” mentre l’apertura del contatto seleziona come attivo il set
point SP1 con modalità di regolazione “HEAt”. La funzione è attuabile solo con “nSP” = 2 , inoltre quando è attivata disabilita la selezione del set attivo tramite il parametro “SPAt” e tramite il tasto U.
4.15 - INTERFACCIA SERIALE RS 485
Lo strumento può essere dotato di una interfaccia di
comunicazione seriale del tipo RS 485 attraverso la quale è
possibile collegarlo ad un rete in cui sono inseriti altri strumenti
(regolatori o PLC) e facente capo tipicamente ad un personal
computer utilizzato come supervisore dell'impianto.
Attraverso il personal computer è quindi possibile acquisire tutti i
dati di funzionamento e programmare tutti i parametri di
configurazione dello strumento.
Il protocollo software adottato nel TLK 31 D è del tipo
MODBUS-RTU largamente utilizzato in molti PLC e programmi di
supervisione disponibili sul mercato (il manuale del protocollo di
comunicazione degli strumenti della serie TLK è disponibile a
richiesta).
Il circuito d'interfaccia consente di collegare sino a 32 strumenti
sulla stessa linea.
Per mantenere la linea in condizioni di riposo, è richiesto il
collegamento di una resistenza (Rt) al termine della linea del valore
di 120 Ohm.
Lo strumento è dotato di due morsetti chiamati A e B che devono
essere connessi a tutti i morsetti omonimi della rete.
Per il cablaggio della linea è sufficiente quindi un doppino
intrecciato di tipo telefonico.
Tuttavia, in particolare quando la rete risulta molto lunga o
disturbata è consigliabile adottare un cavo a 3 poli intrecciato e
schermato collegato come in figura.
Se lo strumento è dotato di interfaccia seriale devono essere
programmati i seguenti parametri tutti disponibili nel gruppo di
parametri “]SEr” :
"Add" : Indirizzo della stazione. Impostare un numero diverso per
ogni stazione, da 1 a 255
"baud" : Velocità di trasmissione (baud-rate), impostabile da 1200
a 38400 baud. Tutte le stazioni devono avere la stessa velocità di
trasmissione.
"PACS" : Accesso alla programmazione. Se impostato come
"LoCL" significa che lo strumento è programmabile solo da tastiera,
se impostato come "LorE" significa che è programmabile sia da
tastiera che tramite linea seriale.
TECNOLOGIC spa - TLK 31 D - ISTRUZIONI PER L’USO - Vr. 01 - ISTR-MTLK31DITA1 - PAG. 10
Quando si tenta di entrare in programmazione da tastiera mentre è Gruppo “InP” (parametri relativi all’ingresso di misura)
in corso una comunicazione tramite la porta seriale lo strumento
Par.
Descrizione
Range
Def.
visualizza "buSy" ad indicare lo stato di occupato.
9 SEnS Tipo sonde in ingresso
Ptc / ntc
ntc
HOST
10 Pr2 Presenza sonda 2
yES / no
yES
(PC/PLC)
shield
11 dP Numero di cifre
0/1
0
A
decimali
Rt
12 Unit Unità di misura della
°C / °F
°C
B
120 ohm
temperatura
GND
13 FiL Filtro digitale ingresso
OFF÷ 20.0
1.0
sec.
RS485
Interface
14 OFS1 Offset della misura Pr1 -1999 ÷ 9999
0
A
B
GND
A
B
GND
A
B
GND
15 OFS2 Offset della misura Pr2 -1999 ÷ 9999
0
16 rot Rotazione della retta di 0.000 ÷ 2.000 1.000
10 8 9
10 8 9
10 8 9
misura
TLK31 n.1
TLK31 n.2
TLK31 n.N
17 InE Condizioni per funz.
Our / Or / Ur OUr
“OPE” in caso di errore
4.16 - CONFIGURAZIONE PARAMETRI CON “KEY 01” e “A01”
di misura
Lo strumento è dotato di un connettore che permette il 18 OPE Potenza in uscita in ca- -100 ÷ 100
0
trasferimento da e verso lo strumento dei parametri di
so di errore di misura
%
funzionamento attraverso i dispositivi TECNOLOGIC KEY01 o
19 dIF Funzione
ingressi noF / AaC /
noF
TECNOLOGIC A01con connettore a 5 poli.
digitali:
ASi / HoLd /
Questi dispositivi sono utilizzabili per la programmazione in serie
noF = nessuna
OFF / CHSP /
di strumenti che devono avere la stessa configurazione dei
funzione
SP1.2/ SP1.4
parametri o per conservare una copia della programmazione di uno
Aac= Reset memoria
HE.Co
strumento e poterla ritrasferire rapidamente.
allarmi mediante DIG
Per l’utilizzo dei dispositivi KEY 01 o A01 è possibile alimentare
IN1
solo il dispositivo o solo lo strumento.
ASi= Tacitazione allarStrumento alimentato e dispositivo non alimentato
mi mediante DIG IN1
HoLd = Blocco misura
SUPPLY
mediante DIG IN1
OFF= messa in OFF
della regolazione mediante DIG IN 1
CHSP= Selezione Set
point a rotazione mediante DIG IN1
SP1.2 = Selezione Set
“SP1” e “SP2” medianStrumento alimentato dal dispositivo
te DIG IN 1
SP1.4= Selezione Set
mediante DIG IN 1 e 2
HE.Co= Selezione
HEAt con “SP1” o CooL
con “SP2” mediante
DIG IN 1
Gruppo “Out” (parametri relativi alle uscite)
SUPPLY ADAPTER
Par.
Descrizione
Range
Def.
12 VDC
AC SUPPLY
20 O1F Funzione dell’uscita 1: 1.rEG / 2.rEG 1.rEG
1.rEG= Uscita di regola- ALno / ALnc
N.B.: Per gli strumenti dotati di porta di comunicazione seriale
zione 1
ALni / OFF
RS485 è indispensabile che il parametro “PACS” sia impostato =
2.rEG= Uscita di regolaLorE.
zione 2
Per maggiori informazioni e le indicazioni delle cause di errore
ALno= Uscita di allarme
vedere il manuale d’uso relativo al dispositivo KEY 01.
normalmente aperta
ALnc= Uscita di allarme
5 - PARAMETRI PROGRAMMABILI
normalmente chiusa
Di seguito vengono descritti tutti i parametri di cui lo strumento può
ALni= Uscita di allarme
essere dotato, si fa presente che alcuni di essi potranno non
normalmente chiusa
essere presenti o perchè dipendono dal tipo di strumento utilizzato
con funz. led negato
o perchè sono automaticamente disabilitati in quanto parametri non 21 O2F Funzione dell’uscita 2: 1.rEG / 2.rEG ALno
necessari.
vedi “O1F”
ALno / ALnc
Gruppo “SP” (parametri relativi al Set Point)
ALni / OFF
Par.
Descrizione
Range
Def.
Note
22 O3F Funzione dell’uscita 3: 1.rEG / 2.rEG ALno
1÷4
1
1 nSP Numero Set point
vedi “O1F”
ALno / ALnc
programmabili
ALni / OFF
2 SPAt Set point Attivo
1 ÷ nSP
1
23 O4F Funzione dell’uscita 4: 1.rEG / 2.rEG ALno
vedi “O1F”
ALno / ALnc
3 SP1 Set Point 1
SPLL ÷ SPHL
0
ALni / OFF
4 SP2 Set Point 2
SPLL ÷ SPHL
0
Gruppo
“AL1”
(parametri
relativi
all’allarme
AL1)
5 SP3 Set Point 3
SPLL ÷ SPHL
0
Par.
Descrizione
Range
Def.
6 SP4 Set Point 4
SPLL ÷ SPHL
0
24 OAL1 Uscita destinata all’alOut1 / Out2 Out2
7 SPLL Set Point minimo
-1999 ÷ SPHL -1999
larme AL1
Out3 / Out4
8 SPHL Set Point massimo
SPLL ÷ 9999 9999
OFF
TECNOLOGIC spa - TLK 31 D - ISTRUZIONI PER L’USO - Vr. 01 - ISTR-MTLK31DITA1 - PAG. 11
Note
Note
Note
Pr1 / Pr2 /
25 PrA1 Valore di processo per
allarme AL1
P1-2
26 AL1t Tipo allarme AL1:
LoAb / HiAb
LoAb= minima assoluto LHAb / LodE
HiAb=
massima HidE / LHdE
assoluto
LHAb=
a
finestra
assoluti
LodE= minima relativo
HidE= massima relativo
LHdE= a finestra relativi
27 Ab1 Configurazione
0 ÷ 31
funzionamento AL1:
+1
=
non
attivo
all’avviamento
+2 = ritardato
+4 = memorizzato
+8 = tacitabile
+16 = non attivo al
cambio Set (All. relativi)
28 AL1 Soglia allarme AL1
AL1L÷ AL1H
29 AL1L Soglia inferiore allarme -1999 ÷ AL1H
AL1 a finestra o limite
inferiore del set AL1 per
allarmi di minima o
massima
30 AL1H Soglia inferiore allarme AL1L ÷ 9999
AL1 a finestra o limite
inferiore del set AL1 per
allarmi di minima o
massima
31 HAL1 Isteresi allarme AL1
OFF ÷ 9999
32 AL1d Ritardo attivazione alOFF ÷ 9999
larme AL1
sec.
33 AL1i Attivazione allarme AL1
no / yES
in caso di errore di
misura
Gruppo “AL2” (parametri relativi all’allarme AL2)
Par.
Descrizione
Range
34 OAL2 Uscita destinata all’alOut1 / Out2
larme AL2
Out3 / Out4
OFF
35 PrA2 Valore di processo per
Pr1 / Pr2 /
allarme AL2
P1-2
36 AL2t Tipo allarme AL2:
LoAb / HiAb
vedi “AL1t”
LHAb / LodE
HidE / LHdE
37 Ab2 Configurazione
0 ÷ 31
funzionamento allarme
AL2:
vedi “AL1t”
38 AL2 Soglia allarme AL2
AL2L÷ AL2H
39 AL2L Soglia inferiore allarme -1999 ÷ AL2H
AL2 a finestra o limite
inferiore del set AL2 per
allarmi di minima o
massima
40 AL2H Soglia inferiore allarme AL2L ÷ 9999
AL2 a finestra o limite
inferiore del set AL2 per
allarmi di minima o
massima
41 HAL2 Isteresi allarme AL2
OFF ÷ 9999
42 AL2d Ritardo attivazione alOFF ÷ 9999
larme AL2
sec.
43 AL2i Attivazione allarme AL2
no / yES
in caso di errore di
misura
Gruppo “AL3” (parametri relativi all’allarme AL3)
Par.
Descrizione
Range
44 OAL3 Uscita destinata all’alOut1 / Out2
larme AL3
Out3 / Out4
OFF
Pr1
45 PrA3 Valore di processo per
allarme AL3
46 AL3t Tipo allarme AL3:
vedi “AL1t”
LoAb
0
0
-1999
9999
1
OFF
no
Def.
OFF
Note
Pr1
LoAb
0
0
-1999
9999
1
OFF
no
Def.
OFF
Note
Pr1 / Pr2 /
P1-2
LoAb / HiAb
LHAb / LodE
HidE / LHdE
0 ÷ 31
Pr1
LoAb
47 Ab3 Configurazione
0
funzionamento allarme
AL3:
vedi “AL1t”
48 AL3 Soglia allarme AL3
AL3L÷ AL3H
0
49 AL3L Soglia inferiore allarme -1999 ÷ AL3H -1999
AL3 a finestra o limite
inferiore del set AL3 per
allarmi di minima o
massima
50 AL3H Soglia inferiore allarme AL3L ÷ 9999 9999
AL3 a finestra o limite
inferiore del set AL3 per
allarmi di minima o
massima
OFF ÷ 9999
1
51 HAL3 Isteresi allarme AL3
52 AL3d Ritardo attivazione alOFF ÷ 9999
OFF
larme AL3
sec.
53 AL3i Attivazione allarme AL3
no / yES
no
in caso di errore di
misura
Gruppo “LbA” (parametri relativi al Loop Break Alarm)
Par.
Descrizione
Range
Def.
54 OLbA Uscita destinata all’alOut1 / Out2 / OFF
larme LbA
Out3 / Out4
OFF
55 LbAt Tempo per allarme LbA OFF ÷ 9999
OFF
sec.
Gruppo “rEG” (parametri relativi alla regolazione)
Par.
Descrizione
Range
Def.
56 Cont Tipo di regolazione:
Pid / On.FA
Pid
Pid= PID
On.FS / nr
On.FA= ON/OFF asim.
On.FS= ON/OFF simm.
nr= ON/OFF a Zona
Neutra
57 Func Modo di funzionamento HEAt / CooL HEAt
uscita 1.rEG:
HEAt= Riscaldamento
CooL= Raffreddamento
58 PrrG Valore di processo per
Pr1 / Pr2 /
P1-2
regolazione
P1-2
59 HSEt Isteresi
regolazione
0 ÷ 9999
1
ON/OFF
(o
Soglia
disinserzione Soft Start)
60 CPdt Tempo
ritardo OFF÷ 9999
0
protezione
sec.
compressore 2.rEG
0
61 Auto Abilitazione dell’autotu- -4 / -3 / -2 / -1
ning Fast:
/0/
OFF = Non abilitato
1/2/3/4
1 = Avvio ad ogni
accensione
2= Avvio alla prima
accensione
3= Avvio manuale
4= Avvio dopo SoftStart
o al cambio Set Point
62 SELF Abilitazione selftuning
no / yES
no
63 Pb Banda proporzionale
0 ÷ 9999
50
64 Int Tempo integrale
OFF ÷ 9999
200
sec.
OFF÷ 9999
50
65 dEr Tempo derivativo
sec.
66 FuOc Fuzzy overshoot control 0.00 ÷ 2.00
0.5
67 tcr1 Tempo di ciclo uscita
0.1 ÷ 130.0
20.0
1rEg
sec.
TECNOLOGIC spa - TLK 31 D - ISTRUZIONI PER L’USO - Vr. 01 - ISTR-MTLK31DITA1 - PAG. 12
Note
Note
68 Prat Rapporto potenza
2.rEg / 1.rEg
69 tcr2 Tempo di ciclo uscita
2.rEg
70 rS Reset manuale
0.01 ÷ 99.99
1.00
0.1 ÷ 130.0
10.0
sec.
-100.0÷100.0 0.0
%
71 SLor Velocità della prima
0.00 ÷ 99.99
InF
/ InF
rampa:
InF= Rampa non attiva
unit/min.
72 dur.t Tempo di mantenimen- 0.00 ÷ 99.59
InF
to tra le due rampe:
/ InF
InF= Tempo non attivo
hrs.-min.
73 SLoF Velocità della seconda 0.00 ÷ 99.99
InF
rampa:
/ InF
InF= Rampa non attiva
unit / min.
-100 ÷ 100 %
0
74 St.P Potenza Soft Start
75 SSt Tempo Soft Start
OFF /
OFF
0.1÷7.59
/ InF
hrs.-min.
Gruppo “PAn” (parametri relativi all’ interfaccia operatore)
Par.
Descrizione
Range
Def.
Note
76 USrb Funzione del tasto “U”:
noF / tunE /
noF
noF = nessuna
OPLO / Aac /
funzione
ASi / CHSP /
tune= Avvio Autotuning
OFF
o Selftuning
OPLO= Regolazione
manuale (open loop)
Aac= Reset memoria
allarmi
ASi= Tacitazione
allarmi
CHSP= Cambio Set att.
OFF= messa in OFF
della regolazione
77 diSP Variabile visualizzata
Pr1 / Pr2 /
P1-2
sul display:
P1-2 / Pou /
Pr1= Valore misura Pr1 SP.F / SP.o /
Pr2= Valore misura Pr2 AL1 / AL2 /
P1-2= Valore misura
AL3
Pr1-Pr2
Pou= Potenza di
regolazione
SP.F= Set attivo
SP.o = Set operativo
AL1 = Soglia AL1
AL2 = Soglia AL2
AL3 = Soglia AL3
78 AdE Valore di scostamento
OFF...9999
2
per funzionamento
indice
79 Edit Modifica Set e allarmi
SE / AE /
SAE
con procedura rapida:
SAE / SAnE
SE= Set editabile e Allarmi non editabili
AE= Allarmi editabili e
Set non editabile
SAE= Set e allarmi
editabili
SAnE= Set e allarmi
non editabili
80 PASS Password di accesso ai OFF ÷ 9999 OFF
parametri
di
funzionamento
Gruppo “SEr” (parametri relativi alla comunicazione seriale)
Par.
Descrizione
Range
Def. Note
81 Add Indirizzo della stazione
0 … 255
1
per
comunicazione
seriale
82 baud Baud rate porta seriale 1200 / 2400 / 9600
9600 / 19.2 /
38.4
83 PACS Accesso programmaz.
tramite porta seriale:
LoCL = No, progr. solo
da tastiera
LorE= Si, progr. sia da
seriale che da tastiera
LoCL / LorE
LorE
6 - PROBLEMI, MANUTENZIONE E GARANZIA
6.1 - SEGNALAZIONI DI ERRORE
Errore
Motivo
La sonda Pr1 può essere
E1
interrotta
o
in
-E1
cortocircuito,
oppure
misurare un valore al di
fuori dal range consentito
La sonda Pr2 può essere
E2
interrotta
o
in
-E2
cortocircuito,
oppure
misurare un valore al di
fuori dal range consentito
Valore di processo non
---disponibile
Autotuning
non
ErAt
eseguibile perchè non
sono
verificate
le
condizioni per poterlo
avviare.
noAt
Autotuning non terminato
entro 12 ore
LbA
Interruzione dell'anello di
regolazione (Loop break
alarm)
Azione
Verificare la corretta
connessione
della
sonda con lo strumento
e quindi verificare il
corretto funzionamento
della sonda
Premere il tasto P per
far scomparire l’errore.
Provare
quindi
a
ripetere
l’autotuning
quando le condizioni lo
permettono.
Provare a ripetere l’autotuning dopo aver controllato il funzionamento
della sonda e
dell’attuatore
Rimettere lo strumento
nello stato di regolazione (rEG) dopo aver controllato il funzionamento
della
sonda
e
dell’attuatore
Premere il tasto P
Possibile anomalia nella
memoria EEPROM
In condizioni di errore di misura lo strumento provvede a fornire in
uscita la potenza programmata al par. “OPE” e provvede ad
attivare le uscite di allarme se il relativo par. “ALni” è programmato
= yES.
ErEP
6.2 - PULIZIA
Si raccomanda di pulire lo strumento solo con un panno
leggermente imbevuto d’acqua o detergente non abrasivo e non
contenente solventi.
6.3 - GARANZIA E RIPARAZIONI
Lo strumento è garantito da vizi di costruzione o difetti di materiale
riscontrati entro i 12 mesi dalla data di consegna.
La garanzia si limita alla riparazione o la sostituzione del prodotto.
L'eventuale apertura del contenitore, la manomissione dello
strumento o l'uso e l'installazione non conforme del prodotto
comporta automaticamente il decadimento della garanzia.
In caso di prodotto difettoso in periodo di garanzia o fuori periodo
di garanzia contattare l'ufficio vendite TECNOLOGIC per ottenere
l'autorizzazione alla spedizione.
Il prodotto difettoso, quindi , accompagnato dalle indicazioni del
difetto riscontrato, deve pervenire con spedizione in porto franco
presso lo stabilimento TECNOLOGIC salvo accordi diversi.
7 - DATI TECNICI
7.1 - CARATTERISTICHE ELETTRICHE
Alimentazione: 12 VAC/VDC +/- 10%
Frequenza AC: 50/60 Hz
Assorbimento: 4 VA circa
TECNOLOGIC spa - TLK 31 D - ISTRUZIONI PER L’USO - Vr. 01 - ISTR-MTLK31DITA1 - PAG. 13
min. 15 mm
29
71
min. 12 mm
Ingresso/i: 2 ingressi per sonde di temperatura PTC KTY 81-121
(990 Ω @ 25 °C) o NTC 103AT-2 (10KΩ @ 25 °C); 2 ingressi
digitali per contatti liberi da tensione
Uscita/e: Sino a 4 uscite. A relè 2 SPDT e 2 SPST-NO (8 A-AC1, 3
A-AC3 / 250 VAC) ; o in tensione per pilotaggio SSR (10mA/
10VDC).
Vita elettrica uscite a relè: 100000 operaz.
Categoria di installazione: II
Categoria di misura: I
Classe di protezione contro le scosse elettriche: Frontale in Classe
II
Isolamenti: Rinforzato tra parti in bassa tensione (uscite a relè) e
frontale; Rinforzato tra parti in bassa tensione (uscite a relè) e parti
in bassissima tensione (alimentazione, ingresso e uscite statiche);
Rinforzato tra alimentazione e uscite a relè; Nessun isolamento tra
alimentazione e ingresso. Nessun isolamento tra alimentazione,
ingresso e uscite statiche; Isolamento a 50 V tra RS485 e parti in
bassissima tensione.
RECOMMENDED
PANEL CUTOUT
7.4 - CARATTERISTICHE FUNZIONALI
Regolazione: ON/OFF, ON/OFF a Zona Neutra, PID a singola
azione, PID a doppia azione.
Range di misura: Secondo la sonda utilizzata (vedi tabella)
Risoluzione visualizzazione: 1° o 0,1°
Precisione totale: +/- 0,5 % fs
Tempo di campionamento misura : 130 ms
Tipo interfaccia seriale : RS 485 isolata
Protocollo di comunicazione: MODBUS RTU (JBUS)
Velocità di trasmissione seriale: selezionabile 1200 ... 38400 baud
Display: 4 Digit Rosso h 12 mm
Conformita': Direttiva CEE EMC 2004/108/CE (EN 61326), Direttiva
CEE BT 2006/95/CE (EN 61010-1)
7.2 - CARATTERISTICHE MECCANICHE
Contenitore: Plastico autoestinguente UL 94 V0
Dimensioni: 78 x 35 mm, prof. 75,5 mm
Peso: 150 g circa
Installazione: Incasso a pannello in foro 71 x 29 mm
Connessioni: Morsettiera a vite 2,5 mm 2
Grado di protezione frontale: IP 65 con guarnizione
Grado di polluzione: 2
Temperatura ambiente di funzionamento: 0 ... 50 °C
Umidità ambiente di funzionamento: 30 ... 95 RH% senza
7.5 - TABELLA RANGE DI MISURA
condensazione
INPUT
“dP” = 0
Temperatura di trasporto e immagazzinaggio: -10 ... 60 °C
-55 ... 150 °C
PTC (KTY81-121)
“SEnS” = Ptc
7.3 - DIMENSIONI MECCANICHE, FORATURA PANNELLO E
-67 ... 302 °F
FISSAGGIO[mm]
-50 ... 110 °C
NTC (103-AT2)
11,5
5,5
78
“SEnS” = ntc
-58 ... 230 °F
“dP”= 1
-55.0 ... 150.0 °C
-67.0 ...302.0 °F
-50.0 ... 110.0 °C
-58.0 ... 230.0 °F
TLK 31 D
19
28
35
AT
ST
Out1 Out2
-
=
+
TLK31 a b c d e f g hh D
Out3 Out4
64
a : INGRESSO
T = termistori (PTC, NTC)
b : USCITA OUT1
R = A relè
O = Uscita in tensione per SSR
BRACKETS
MAX 12 mm
34
PANEL + GASKET
7.6 - CODIFICA DELLO STRUMENTO
c : USCITA OUT2
R = A relè
O = Uscita in tensione per SSR
- = Non presente
d : USCITA OUT3
R = A relè
O = Uscita in tensione per SSR
- = Non presente
e : USCITA OUT4
R = A relè
O = Uscita in tensione per SSR
- = Non presente
f : INTERFACCIA DI COMUNICAZIONE
S = Interfaccia Seriale RS 485
- = Nessuna Interfaccia
g : INGRESSI DIGITALI
I = Presenti
- = Non presenti
hh : CODICI SPECIALI
TECNOLOGIC spa - TLK 31 D - ISTRUZIONI PER L’USO - Vr. 01 - ISTR-MTLK31DITA1 - PAG. 14
TLK 31 D
ELECTRONIC
THERMOCONTROLLER WITH
DIFFERENTIAL CONTROL MODE
INDEX
1
1.1
1.2
2
2.1
2.2
2.3
2.4
2.5
3
3.1
3.2
3.3
3.4
4
4.1
4.2
4.3
4.4
4.5
4.6
4.7
4.8
4.9
OPERATING INSTRUCTIONS
Vr. 02 (ENG) - cod.: ISTR MTLK31DENG2
TECNOLOGIC S.p.A.
VIA INDIPENDENZA 56
27029 VIGEVANO (PV) ITALY
TEL.: +39 0381 69871
FAX: +39 0381 698730
internet : http:\\www.tecnologic.it
e-mail: [email protected]
4.10
4.11
4.12
4.13
4.14
4.15
4.16
5
6
6.1
6.2
6.3
7
7.1
7.2
7.3
7.4
7.5
7.6
INSTRUMENT DESCRIPTION
GENERAL DESCRIPTION
FRONT PANEL DESCRIPTION
PROGRAMMING
FAST PROGRAMMING OF SET POINT
SELECTION OF CONTROL STATE AND PARAMETER
PROGRAMMING
PARAMETER PROGRAMMING LEVELS
CONTROL STATES
ACTIVE SET POINT SELECTION
INFORMATION ON INSTALLATION AND USE
PERMITTED USE
MECHANICAL MOUNTING
ELECTRICAL CONNECTIONS
ELECTRICAL WIRING DIAGRAM
FUNCTIONS
MEASURING AND VISUALIZATION
OUTPUTS CONFIGURATION
REGULATOR WITH ABSOLUTE OR DIFFERENTIAL
TEMPERATURE
ON/OFF CONTROL
NEUTRAL ZONE ON/OFF CONTROL
SINGLE ACTION PID CONTROL
DOUBLE ACTION PID CONTROL
AUTO-TUNING AND SELF-TUNING FUNCTIONS
REACHING OF SET POINT AT CONTROLLED SPEED
AND AUTOMATIC COMMUTATION BETWEEN TWO
SET POINTS
SOFT-START FUNCTION
ALARM FUNCTIONS
LOOP BREAK ALARM FUNCTION
FUNCTION OF KEY “U”
DIGITAL INPUT
RS 485 SERIAL INTERFACE
PARAMETERS CONFIGURATION BY KEY01 or A01
PROGRAMMABLE PARAMETERS
PROBLEMS , MAINTENANCE AND GUARANTEE
ERROR SIGNALLING
CLEANING
GUARANTEE AND REPAIRS
TECHNICAL DATA
ELECTRICAL DATA
MECHANICAL DATA
MECHANICAL DIMENSIONS, PANEL CUT-OUT AND
MOUNTING
FUNCTIONAL DATA
MEASUREMENT RANGE TABLE
INSTRUMENT ORDERING CODE
FOREWORD
1 - INSTRUMENT DESCRIPTION
This
manual
contains
the
information
necessary for the product to be installed
correctly and also instructions for its
maintenance and use; we therefore recommend
that the utmost attention is paid to the following
instructions and to save it.
This document is the exclusive property of TECNOLOGIC
S.p.A. which forbids any reproduction and divulgation , even
in part, of the document, unless expressly authorized.
TECNOLOGIC S.p.A. reserves the right to make any formal or
functional changes at any moment and without any notice.
Whenever a failure or a malfunction of the device may cause
dangerous situations for persons, thing or animals, please
remember that the plant has to be equipped with additional
devices which will guarantee safety.
Tecnologic S.p.A. and its legal representatives do not assume
any responsibility for any damage to people, things or animals
deriving from violation, wrong or improper use or in any case
not in compliance with the instrument’s features.
1.1 - GENERAL DESCRIPTION
The TLK 31D model is a digital thermoregulator with a single loop
microprocessor, with ON/OFF regulation, Neutral Zone ON/OFF,
single or double action PID (direct and inverse) fitted with two
inputs for PTC or NTC temperature probes by means of which it is
possible to obtain differential temperature regulation. It can
therefore be used in applications that require a control for the
temperature difference between two different environments such as
liquid coolers (chillers), natural air-conditioning systems through
the recirculation of air, heating by solar panels or in many other
applications where two temperature readings are needed.
Furthermore the regulator is fitted with Fast and Oscillatory
AUTOTUNING, SELFTUNING and FUZZY OVERSHOOT
CONTROL for regulating the PID. Furthermore, the instrument
allows for 2 digital inputs and RS485 serial communication using
MODBUS-RTU communication protocol and a transmission speed
up to 38.400 baud. The process value is visualized on 4 red
displays, while the output status is indicated by 4 LED displays.
The instrument is equipped with a 3 LED programmable shift
indexes . The instrument provides for the storage of 2 Set Points
and can have up to 4 outputs: relay type or can drive solid state
TECNOLOGIC spa - TLK 31 D - OPERATING INSTRUCTIONS - Vr. 02 - ISTR-MTLK31DENG2 - PAG. 1
relays type (SSR). Other important available functions are:
Loop-Break Alarm function, reaching of the Set Point at controlled
speed, ramp and dwell function, Soft-Start function, protection
compressor function for neutral zone control, parameters protection
on different levels.
1.2
- FRONT PANEL DESCRIPTION
9
4
TLK 31 D
AT
ST
3
2
1
Out1 Out2
5
6
-
=
+
11 12 13
Out3 Out4
7
10
8
1 - Key P : This is used to access the programming parameters
and to confirm selection.
2 - Key DOWN : This is used to decrease the values to be set and
to select the parameters. If the key is held down, the user returns to
the previous programming level until he exits the programming
mode. Outside the programming mode it permits visualisation of
the current measured by the TAHB input.
3 - Key UP : This is used to increase the values to be set and to
select the parameters. If the key is held down, the user returns to
the previous programming level until he exits the programming
mode. Outside the programming mode it permits visualisation of
the output control power.
4 - U key :
This is used to display the temperatures read by the probes (Pr1
and Pr2) and their difference (Pr1-Pr2). It can also be programmed
through the “USrb” parameter for: Activating Autotuning or
selftuning, setting the instrument to manual regulation, setting the
alarm, changing the active Set Point and deactivating the
regulation.
5 - Led OUT1 : indicates the state of output OUT1
6 - Led OUT2 : indicates the state of output OUT2
7 - Led OUT3 : indicates the state of output OUT3
8 - Led OUT4 : indicates the state of output OUT4
9 - Led SET : when flashing, it indicates access to the
programming mode.
10 - Led AT/ST : indicates that the Self-tuning function is activated
(light on) or that Auto-tuning (flashing ) is in progress.
11 - Led – Shift index: indicates that the process value is lower
than the one programmed on par. “AdE”.
12 - Led = Shift index: indicates that the process value is within
the range [SP+AdE ... SP-AdE]
13 - Led + Shift index: indicates that the process value is higher
than the one set on par. “AdE”.
is pressed for approx. 15 seconds, the display will return to normal
functioning automatically.
2.2 - SELECTION OF THE CONTROL STATE AND PARAMETER
PROGRAMMING
By pushing key "P" and holding it down for approx. 2 sec. it is
possible to enter into the main selection menu.
Using the "UP" or DOWN” keys, it is then possible to roll over the
selections:
to enter into the operating parameters menu
"OPEr"
to enter into the configuration parameters menu
"ConF"
to swap the regulator into the OFF state
"OFF"
to swap the regulator into the automatic control state
"rEG"
to activate the Auto-tuning or Self-tuning function
"tunE"
to swap the regulator to the manual control state
"OPLO
and therefore to program the % control value using
"
the “UP” and “DOWN” keys
Once the desired item has been selected, push key “P” to confirm.
Selecting "OPEr" and "ConF" gives the possibility of accessing
other menus containing additional parameters and more precisely :
"OPEr" - Operating parameters Menu: this normally contains the
Set Point parameters but it can contain all the desired parameters
(see par. 2.3).
"ConF" - Configuration parameters Menu: this contains all the
operating parameters and the functioning configuration parameters
(alarm configuration, control, input, etc.)
"rEG "
Ho ld for
2 sec.
"O FF"
AU TO TU N IN G
SEL FTU N IN G
AT
ST
"OPL O"
2 - PROGRAMMING
2 .1 - FAST PROGRAMMING OF THE SET POINT
This procedure permits rapid programming of the active Set Point
and possibly the alarm thresholds (see par 2.3)
Push key “P”, then release it and the display will visualise “SP n”
(where n is the number of the Set Point active at that moment)
alternatively to the programmed value.
To modify the value, press “UP” key to increase it or the “DOWN”
key to decrease it.
These keys change the value one digit at a time but if they are
pressed for more than one second, the value increases or
decreases rapidly and, after two seconds in the same condition,
the changing speed increases in order to allow the desired value to
be reached rapidly.
Once the desired value has been reached, by pushing key P it is
possible to exit by the fast programming mode or it is possible to
visualise the alarm thresholds (see par. 2.3).
To exit the fast Set programming it is necessary to push key P,
after the visualisation of the last Set Point, or alternatively, if no key
To enter the menu “OPEr”, select the option “OPEr” and press the
key “P”.
The display will now show the code identifying the first group of
parameters (“ ]SP “) and by pressing the “UP” and “DOWN” keys it
will be possible to select the group of parameters to be modified.
Once the desired group of parameters has been selected, the code
identifying the first parameter of the selected group will be
visualised by pushing the “P” key.
Again using the “UP” and “DOWN” keys, it is possible to select the
desired parameter and, if the key “P” is pressed, the display will
alternatively show the parameter’s code and its programming
value, which can be modified by using the “UP” or “DOWN” keys.
Once the desired value has been programmed, push key “P” once
more: the new value will be memorised and the display will show
only the code of the selected parameter.
TECNOLOGIC spa - TLK 31 D - OPERATING INSTRUCTIONS - Vr. 02 - ISTR-MTLK31DENG2 - PAG. 2
By using the “UP” or “DOWN” keys, it is then possible to select a
new parameter (if present) and modify it as described above.
To select another group of parameters, keep the “UP” or “DOWN”
key pressed for approx. 2 sec., afterwards the display will return to
visualise the code of the group of parameters.
Release the key and by using the “UP” and “DOWN” keys, it will be
possible to select a new group (if present).
To exit the programming mode, no key should be pressed for
approx. 20 seconds, or keep the “UP” or “DOWN” pressed until exit
from the programming mode is obtained.
To bring up the “ConF” menu a personalized PASSWORD can be
made necessary through the “PASS” parameter.
If this protection is required, set the password number desired in
the “PASS” parameter and exit the programming parameters.
When the protection is activated, to be able to gain access to the
parameters, it will be necessary to type in the programmed
password from the "ConF" menu.
When the password is required type in, using the UP and DOWN
keys, the number programmed at the “PASS” parameter and then
press the “P” key.
If the wrong password is typed in the instrument returns to the
regulatory state that it was previously in.
If the password is correct, the display will visualise the code
identifying the first group of parameters (“ ]SP “) and with keys “UP”
and “DOWN” it will be possible to select the desired group of
parameters
The programming and exit modes for the “ConF” menu are the
same as those described for menu “OPEr”.
This protection by password is deactivated by setting the “PASS”
parameter = OFF.
=AE : The active Set Point cannot be modified while the alarm
thresholds can be modified
=SAE : Both the active Set Point and the alarm thresholds can be
modified
=SAnE : Both the active Set Point and the alarm thresholds cannot
be modified
2.4 - CONTROL STATES
The controller can act in 3 different ways : automatic control (rEG),
control off (OFF) and manual control (OPLO).
The instrument is able to pass from one state to the other :
- by selecting the desired state from the main selection menu suing
the keyboard.
- By using the key “U” on the keyboard; suitably programming par.
“USrb” (“USrb” = tunE; “USrb” = OPLO; “USrb” = OFF) it is possible
to pass from “rEG” state to the state programmed on the parameter
and vice versa.
- By using the digital input 1 suitably programming par. “diF” (“diF”
= = OFF) it is possible to pass from “rEG” state to the state OFF
and vice versa.
- Automatically (the instrument swaps into "rEG" state at the and of
the auto-tuning execution)
When switched on, the instrument automatically reassumes the
state it was in when it was last switched off.
AUTOMATIC CONTROL (rEG) – Automatic control is the normal
functioning state of the controller.
During automatic control it is possible to visualize the control power
on the display by pushing key “UP”.
The range of the power values goes from H100 (100% of the
output power with reverse action) to C100 (100% of the output
power with direct action).
CONTROL OFF (OFF) – The instrument can be swapped into the
“OFF” state, i.e. the control and the relative outputs are
deactivated.
The alarm outputs are instead working normally.
BUMPLESS MANUAL CONTROL (OPLO) – By means of this
option it is possible to manually program the power percentage
given as output by the controller by deactivating automatic control.
Hold for
Hold for
2 sec.
2 sec.
When the instrument is swapped to manual control, the power
percentage is the same as the last one supplied and can be
modified using the “UP” and “DOWN” keys.
PLEASE NOTE: If the password is lost, turn off the instrument, As in the case of automatic control, the programmable values
range from H100 (+100%) to C100 (-100%).
press the P key and turn the instrument back on keeping the key
To return to automatic control, select "rEG" in the selection menu.
held down for about 5 seconds.
In this way access is made to all parameters of the “ConF” menu
and it will therefore be possible to check and modify the “PASS” 2.5 - ACTIVE SET POINT SELECTION
This instrument permits pre-programming of up to 4 different Set
parameter.
points (“SP1”, “SP2”, “SP3”, “SP4”) and then selection of which
one must be active.
2.3 - PARAMETERS PROGRAMMING LEVELS
by the par.
The menu “OPEr” normally contains the parameters used to The maximum number of Set points is determined
]
SP
“.
"nSP"
located
in
the
group
of
parameters
“
program the Set Point; however it is possible to make all desired
parameters appear or disappear on this level, by following this The active Set point can be selected :
- by parameter "SPAt" in the group of parameters “ ]SP “.
procedure:
Enter the menu “ConF” and select the parameter to be made - by key “U” if par. "USrb" = CHSP
- by the digital inputs if diF” = CHSP , = SP1.2 , =SP1.4 or = HE.Co
programmable or not programmable in the menu “OPEr”.
Once the parameter has been selected, if the LED SET is switched - Automatically between SP1 and SP2 if a time “dur.t” (see par. 4.8)
off, this means that the parameter is programmable only in the has been programmed.
menu “ConF”, if instead the LED is on, this means that the Set Points “SP1”, “SP2”, “SP3”, “SP4” will be visible depending on
the maximum number of Set Points selected on par. “nSP” and
parameter is also programmable in the menu “OPEr”.
To modify the visibility of the parameter, push key “U” : the LED they can be programmed with a value that is between the value
SET will change its state indicating the parameter accessibility level programmed on par. “SPLL” and the one programmed on par.
“SPHL”.
(on = menu ”OPEr” and “ConF”; off = menu “ConF” only).
The active Set Point and the alarm thresholds will only be visible on Note : in all the following examples the Set point is indicated as
the Set Point fast programming level (described in par. 2.1) if the "SP", however the instrument will act according to the Set point
relative parameters are programmed to be visible (i.e. if they are selected as active.
present in the menu “OPEr”).
The possible modification of these Sets, with the procedure 3 - INFORMATION ON INSTALLATION AND USE
described in par. 2.1, is instead subordinate to what is programmed
in par. “Edit” (contained in the group “ ]PAn “).
3.1 - PERMITTED USE
This parameter can be programmed as :
The instrument has been projected and
=SE : The active Set Point can be modified while the alarm
manufactured as a measuring and control device to
thresholds cannot be modified.
be used according to EN61010-1 for the altitudes
operation until 2000 ms.
TECNOLOGIC spa - TLK 31 D - OPERATING INSTRUCTIONS - Vr. 02 - ISTR-MTLK31DENG2 - PAG. 3
The use of the instrument for applications not expressly permitted
by the above mentioned rule must adopt all the necessary
protective measures. The instrument CANNOT be used in
dangerous environments (flammable or explosive) without
adequate protection. The installer must ensure that EMC rules are
respected, also after the instrument installation, if necessary using
proper filters. Whenever a failure or a malfunction of the device
may cause dangerous situations for persons, thing or animals,
please remember that the plant has to be equipped with additional
devices which will guarantee safety.
3.2 – MECHANICAL MOUNTING
The instrument, in case 78 x 35 mm, is designed for flush-in panel
mounting. Make a hole 71 x 29 mm and insert the instrument,
fixing it with the provided special brackets. We recommend that the
gasket is mounted in order to obtain the front protection degree as
declared. Avoid placing the instrument in environments with very
high humidity levels or dirt that may create condensation or
introduction of conductive substances into the instrument. Ensure
adequate ventilation to the instrument and avoid installation in
containers that house devices which may overheat or which may
cause the instrument to function at a higher temperature than the
one permitted and declared. Connect the instrument as far away
as possible from sources of electromagnetic disturbances such as
motors, power relays, relays, solenoid valves, etc.
3.3 - ELECTRICAL CONNECTION
Carry out the electrical wiring by connecting only one wire to each
terminal, according to the following diagram, checking that the
power supply is the same as that indicated on the instrument and
that the load current absorption is no higher than the maximum
electricity current permitted. As the instrument is built-in equipment
with permanent connection inside housing, it is not equipped with
either switches or internal devices to protect against overload of
current: the installation will include a two-phase circuit-breaker,
placed as near as possible to the instrument, and located in a
position that can easily be reached by the user and marked as
instrument disconnecting device which interrupts the power supply
to the equipment.It is also recommended that all the electrical
circuits connected to the instrument must be protect properly, using
devices (ex. fuses) proportionate to the circulating currents. It is
strongly recommended that cables with proper insulation,
according to the working voltages and temperatures, be used.
Furthermore, the input cable of the probe has to be kept separate
from line voltage wiring. If the input cable of the probe is screened,
it has to be connected to the ground with only one side. For the
electrical supply of the instrument it’s recommended to use an
external transformer TCTR, or with equivalent features, and to use
only one transformer for each instrument because there is no
insulation between supply and input. We recommend that a check
should be made that the parameters are those desired and that the
application functions correctly before connecting the outputs to the
actuators so as to avoid malfunctioning that may cause
irregularities in the plant that could cause damage to people, things
or animals.
3.4 - ELECTRICAL WIRING DIAGRAM
Using par. “SEnS”, it’s possible to select the type of input probe,
which can be thermistors PTC KTY81-121 (Ptc) or NTC 103AT-2
(ntc)
We recommend to switch on and off the instrument when these
parameters are modified, in order to obtain a correct measuring.
Once the type of probe has been chosen through the “Unit”
parameter it is possible to choose the temperature measurement
unit (°C or °F) and through the “dP” parameter, the resolution of
the measurement desired 0=1°; 1= 0.1°).
If the Pr2 probe is not used set the “Pr2” parameter = NO to avoid
an error being indicated when the probe is not connected.
The instrument allows for measuring calibration, which may be
used to recalibrate the instrument according to application needs,
by using par. “OFSt” and “rot”.
Programming par. “rot”=1,000, in par. “OFSt” it is possible to set a
positive or negative offset that is simply added to the value read by
the probe before visualisation, which remains constant for all the
measurements.
If instead, it is desired that the offset set should not be constant for
all the measurements, it is possible to operate the calibration on
any two points.
In this case, in order to decide which values to program on par.
“OFSt” and “rot”, the following formulae must be applied :
“rot” = (D2-D1) / (M2-M1)
“OFSt” = D2 - (“rot” x M2)
where:
M1 =measured value 1
D1 = visualisation value when the instrument measures M1
M2 =measured value 2
D2 = visualisation value when the instrument measures M2
It then follows that the instrument will visualise :
DV = MV x “rot” + “OFSt”
where: DV = visualised value
MV= measured value
Example 1: It is desired that the instrument visualises the value
effectively measured at 20° but that, at 200°, it visualises a value
lower than 10° (190°).
Therefore : M1=20 ; D1=20 ; M2=200 ; D2=190
“rot” = (190 - 20) / (200 - 20) = 0,944
“OFSt” = 190 - (0,944 x 200) = 1,2
Example 2: It is desired that the instrument visualises 10° whilst the
value actually measured is 0°, but, at 500° it visualises a 50° higher
value (550°).
Therefore : M1=0 ; D1=10 ; M2=500 ; D2=550
“rot” = (550 - 10) / (500 - 0) = 1,08
“OFSt” = 550 - (1,08 x 500) = 10
By using par. “FiL” it is possible to program time constant of the
software filter for the input value measured, in order to reduce
noise sensitivity (increasing the time of reading).
In case of measurement error, the instrument supplies the power
as programmed on par. “OPE”.
This power will be calculated according to cycle time programmed
for the PID controller, while for the ON/OFF controllers the cycle
time is automatically considered to be equal to 20 sec. (e.g. In the
event of probe error with ON/OFF control and “OPE”=50, the
Pr1
RS 485
control output will be activated for 10 sec., then it will be
DIG
DIG
PTC-NTC
IN2
IN1
deactivated for 10 sec. and so on until the measurement error
B GND A
Pr2
remains.).
By using par. “InE” it is also possible to decide the conditions of
1 2 3 4 5 6 7 8 9 10 11 12
the input error, allowing the instrument to give the power
programmed on par. “OPE” as output.
SSR:10mA/10VDC
RELAY:8A-AC1(3A-AC3)/250VAC
The possibilities of par. “InE” are :
TLK31 D
= Or : the condition occurs in case of over-range or probe breakage
= Ur : the condition occurs in case of under-range or probe
C
NO
C
NO C
NC NO C
NC NO
breakage
= Our : the condition occurs in case of over-range or under-range
13 14 15 16 17 18 19 20 21 22 23 24
or probe breakage
OUT4
OUT3
OUT1
OUT2
Through the “diSP” parameter of the “]PAn” unit it is possible to
SUPPLY
decide what the display is to show normally- this could be the
reading of probe Pr1 (Pr 1), the reading of probe Pr2 (Pr 2), the
4 - FUNCTIONS
difference of temperature Pr1-Pr2 (P1-2), the regulation voltage
4.1 - MEASURING AND VISUALIZATION
All the parameters referring measurements are contained in the (Pou), the active Set Point (SP.F), the operative Set Point when
there are ramps activated (SP,o) or the alarm limit AL 1,2,3 (AL1,
group “]InP”.
AL2 ,AL3).
TECNOLOGIC spa - TLK 31 D - OPERATING INSTRUCTIONS - Vr. 02 - ISTR-MTLK31DENG2 - PAG. 4
Regardless of that set on the “diSP" parameter it is possible to
show the variables Pr1, Pr2 and Pr1-Pr2 in rotation by pressing
down and releasing the U key, the display will show the code that
identifies the variable (P2 1, Pr2, P1-2) and its measurement.
After 15 seconds following the last time the U key is pressed, this
type of display ends automatically.
Again in the group “]PAn” the par. “AdE” is present that defines
the 3 led shift index functioning.
The lighting up of the green led = indicates that the process value
is within the range [SP+AdE ... SP-AdE], the lighting up of the led
– indicates that the process value is lower than [SP-AdE] and the
lighting up of the led + indicates that the process value is higher
than [SP+AdE].
4.2 - OUTPUTS CONFIGURATION
The instrument’s outputs can be programmed by entering the
group of parameters “]Out, where the relative parameters “O1F” ,
“O2F” ,“O3F” ,“O4F” (depending on the number of outputs
available on the instrument) are located.
The outputs can be set for the following functions :
- Main control output (1.rEG)
- Secondary control output (2.rEG)
- Alarm output normally open (ALno)
- Alarm output normally closed (ALnc)
- Alarm output normally closed with led reverse indication (ALni)
- Output deactivated (OFF)
The coupling outputs number outputs – number alarms can be
made in the group referring to the alarm to the alarm (“]AL1”,”]AL2”
o “]AL3”).
On exceeding the limits set “P2HL” and “P2LL” by the Pr2 temperature, regulation takes place as if the Pr2 temperature is the value of
the limit regardless of the value actually read.
The aim of this function is to limit the differential regulation to
within a maximum range of the Pr2 measurement.
With the differential regulation the working mode “Func”= CooL is
used for applications with which the action of the actuator reduces
the Pr1-Pr2 difference (thus countering the Pr1-Pr2 difference that
naturally tends to increase).
Viceversa the “Func”= HEAt mode is used for applications with
which the action of the actuator increases the Pr1-Pr2 difference
(thus countering the Pr1-Pr2 difference that naturally tends to
decrease).
Obviously the Neutral Zone mode or the double action mode will
set off both actions.
4.4 - ON/OFF CONTROL (1.rEG)
All the parameters referring to the ON/OFF control are contained in
the group “]rEG”.
This type of control can be obtained by programming par."Cont" =
On.FS or = On.FA and works on the output programmed as 1.rEG,
depending on the measure, on the active Set Point “SP”, on the
functioning mode "Func” and on the hysteresis "HSEt".
The instrument carries out an ON/OFF control with symmetric
hysteresis if “Cont" = On.FS or with asymmetrical hysteresis if
“Cont” = On.Fa.
PV
PV
SP
HSEt
HSEt
SP
4.3 - REGULATOR WITH ABSOLUTE OR DIFFERENTIAL
TEMPERATURE
O UT
Through the “PrrG” parameter it is possible to set the process 1.rEG
variable used by the regulator to operate.
PV
In fact the regulator can operate considering the process variable
as the value measured at input 1 (Pr1), the value measured at
SP
input 2 (Pr2), the difference between the two inputs Pr1-Pr2 (P1-2)
or can consider the difference between the two inputs Pr1-Pr2 but
with a maximum limit and a minimum limit for the Pr2 measurement
Pr2 (P1-L).
O UT
The “PrrG” choices = P1-2 or = P1-L make the regulator operate as 1.rEG
a differential regulator.
T e m p .
SP1
SP1+HSEt
P r1
P r2
P r1 -P r2
H S E t
S P 1
tim e
O N
1 .rE G
O N
o ff
O N
o ff
Example of differential ON/OFF regulation (On.FA) with “Func”=
CooL
Attention: The regulator is already programmed in production to
carry out differential regulation and display the temperature
difference Pr1-Pr2.
In these cases the regulator acts on the regulation outputs so it
keeps the difference Pr1-Pr2 equal to the Set Point value.
The difference between the two modes lies in the fact that the P1-L
mode activates a limit in the regulator in terms of the calculation of
the temperature difference according to the “P2HL” and “P2LL”
parameters (both contained in the “]SP”) so that:
If Pr2 is >/= P2HL the process value considered by the regulator is
[Pr1-P2HL]
If Pr2 is< /= P2LL the process value considered by the regulator is
[Pr1-P2LL]
time
time
ON
ON
ON
OUT
1.rEG
off
off
ON
ON
off
HEAt - On.FA
ON
off
CooL - On.FA
PV
HSEt
HSEt
HSEt
SP
HSEt
time
ON
ON
off
ON
off
HEAt - On.FS
time
OUT
1.rEG
ON
ON
off
ON
off
CooL - On.FS
The control works in the following way : in the case of reverse
action, or heating (“FunC”=HEAt), it deactivates the output, when
the process value reaches [SP + HSEt] in case of symmetrical
hysteresis, or [SP] in case of asymmetrical hysteresis and is then
activated again when the process value goes below value [SP HSEt].
Vice versa, in case of direct action or cooling ("Func”=CooL), it
deactivates the output, when the process value reaches [SP HSEt] in case of symmetrical hysteresis, or [SP] in case of
asymmetrical hysteresis and is activated again when the process
value goes above value [SP + HSEt].
4.5 - NEUTRAL ZONE ON/OFF CONTROL (1.rEG - 2.rEG)
All the parameters referring to Neutral Zone ON/OFF control are
contained in the group “]rEG”.
This type of control can be obtained when 2 outputs are
programmed respectively as 1.rEG and 2.rEG and the par. “Cont”
= nr .
The Neutral Zone control is used to control plants in which there is
an element which causes a positive increase (ex. Heater,
humidifier, etc.) and an element which causes a negative increase
(ex. Cooler, de-humidifier, etc).
The control functions works on the programmed outputs depending
on the measurement, on the active Set Point “SP” and on the
hysteresis "HSEt".
The control works in the following way : it deactivates the outputs
when the process value reaches the Set Point and it activates the
output 1.rEG when the process value goes below value [SP HSEt], or it activates the output 2.rEG when the process value
goes above [SP + HSEt].
TECNOLOGIC spa - TLK 31 D - OPERATING INSTRUCTIONS - Vr. 02 - ISTR-MTLK31DENG2 - PAG. 5
Consequently, the element causing a positive increase has to be Please remember that a low value on this parameter reduces the
connected to the output programmed as 1rEG while the element overshoot while a high value increase it.
causing a negative increase has to be connected to the output
PV
programmed as 2.rEG.
SP
PV
3
HSEt
SP
2
1
HSEt
t im e
OUT 1.rEG
(heating)
OUT 2.rEG
(cooling)
0N
0N
off
time
off
0N
off
off
If 2.rEG output is used to control compressor is possible to use the
“Compressor Protection” function that has the meaning to avoid
compressor “short cycles”.
This function allows a control by time on the output 2.rEG
activation, independently by the temperature control request.
The protection is a “delayed after deactivation” type.
This protection permits to avoid the output activation for a time
programmable on par. “CPdt” (expressed in sec.); the output
activation will occurs only after the elapsing of time “CPdt”.
The time programmed on parameter “CPdt” is counted starting
from the last output deactivation.
Obviously, whether during the time delay caused by the
compressor protection function, the regulator request should stop,
the output activation foreseen after time “CPdt” would be erased.
The function is not active programming “CPdt” =OFF.
The led relative to 2.rEG output blinks during the phases of output
activation delay, caused by “Compressor Protection” function.
4.6 - SINGLE ACTION PID CONTROL (1.rEG)
All the parameters referring to PID control are contained in the
group “]rEG”.
The Single Action PID control can be obtained by programming
par."Cont" = Pid and works on the output 1rEG depending on the
active Set Point “SP”, on the functioning mode "Func” and on the
instrument’s PID algorithm with two degree of freedom.
In order to obtain good stability of the process variable, in the event
of fast processes, the cycle time “tcr1” has to have a low value with
a very frequent intervention of the control output.
In this case use of a solid state relay (SSR) is recommended for
driving the actuator.
PV
SP
1: Value “FuOC” OK
2: Value “FuOC” too high
3: Value “FuOC” too low
4.7 - DOUBLE ACTION PID CONTROL (1.rEG - 2.rEG)
All the parameters referring to PID control are contained in the
group “]rEG”.
The Double Action PID control is used to control plants where there
is an element which causes a positive increase (ex. Heating) and
an element which causes a negative increase (ex. Cooling).
This type of control can be obtained when 2 outputs are
programmed respectively as 1.rEG and 2.rEG and the par. “Cont”
= Pid.
The element causing a positive increase has to be connected to
the output programmed as 1rEG while the element causing a
negative increase has to be connected to the output programmed
as 2.rEG.
The Double Action PID control works on the outputs 1.rEG and
2.rEG depending on the active Set Point “SP” and on the
instrument’s PID algorithm with two degrees of freedom.
In order to obtain good stability of the process variable, in case of
fast processes, the cycle times “tcr1” and “tcr2” have to have a low
value with a very frequent intervention of the control outputs.
In this case use of solid state relays (SSR) to drive the actuators is
recommended.
The Double Action PID control algorithm needs the programming of
the following parameters :
"Pb" – Proportional Band
"tcr1" – Cycle time of the output 1.rEG
“tcr 2” – Cycle time of the output 2.rEG
"Int" – Integral Time
"rS" – Manual Reset (if “Int =0 only)
"dEr" – Derivative Time
“FuOC” - Fuzzy Overshoot Control
"Prat" - Power Ratio or relation between power of the element
controlled by output 2.rEG and power of the element controlled by
output 1rEG.
If par. “Prat” = 0, the output 2.rEG is disabled and the control
behaves exactly as a single action PID controller, through output
1.rEG.
4.8 - AUTOTUNING AND SELFTUNING FUNCTIONS
All the parameters referring to the AUTO-TUNING and
SELF-TUNING functions are contained in the group “]rEG”.
tim e
The AUTO-TUNING and SELF-TUNING functions permit the
0N
0N
0N
0N
0N
0N
0N
OUT
automatic tuning of the PID controller.
1 .r E G
o ff
o ff
o ff
o ff
o ff
o ff
The AUTOTUNING function provides the calculation of the PID
( H E a t)
parameters through a FAST or OSCILLATORY type tuning cycle,
tc r 1 t c r 1 t c r 1 tc r 1 tc r 1 t c r 1 t c r 1
and, at the end of this operation, the parameters are stored into the
instrument’s memory and remain constant during control.
The Single Action PID control algorithm foresees the setting of the The SELF-TUNING function (rule based "TUNE-IN") instead allows
following parameters :
control monitoring and the continuous calculation of the parameters
"Pb" – Proportional Band
during control.
"tcr1" – Cycle time of the output 1rEG
Both functions automatically calculate the following parameters :
"Int" – Integral Time
"Pb" – Proportional Band
"rS" – Manual Reset (if “Int =0 only)
"tcr1" – Cycle time of the output 1.rEG
"dEr" – Derivative Time
"Int" – Integral Time
“FuOC” - Fuzzy Overshoot Control
"dEr" – Derivative Time
This last parameter allows the variable overshoots at the start up of “FuOC” - Fuzzy Overshoot Control
the process or at the changing of the Set Point to be avoided.
and, for the Double Action PID control, also :
TECNOLOGIC spa - TLK 31 D - OPERATING INSTRUCTIONS - Vr. 02 - ISTR-MTLK31DENG2 - PAG. 6
“tcr 2” – Cycle time of the output 2rEG
"Prat" - Ratio P 2.rEG/ P 1.rEG
To activate the AUTO-TUNING function proceed as follows :
1) Program and activate the desired Set Point.
2) Program par. "Cont" =Pid.
3) Program par. "Func" according to the process to be controlled
through output 1rEG.
4) Program an output as 2rEG if the instrument controls a plant
with double action
5) Program par. "Auto" as:
= 1 : if FAST autotuning is desired automatically, each time the
instrument is switched on, on the condition that the process value
is lower (with “Func” =HEAt) than [SP- |SP/2|] or higher (with
“Func” =CooL) than [SP+ |SP/2|].
= 2 : if FASTautotuning is desired automatically, the next time the
instrument is switched on, on the condition that the process value
is lower (with “Func” =HEAt) than [SP- |SP/2|] or higher (with
“Func” =CooL) than [SP+ |SP/2|], and once the tuning is finished,
the par. “Auto” is automatically swapped to the OFF state
= 3 : if manual FAST auto-tuning is desired, by selecting par.
“tunE” in the main menu or by correctly programming key “U” as
“USrb” = tunE. The Autotuning will start at the condition that the
process value is lower (with “Func” =HEAt) than [SP- |SP/5|] or
higher (with “Func” =CooL) than [SP+ |SP/5|].
= 4 : if it’s desired to activate the FAST autotuning automatically
to every change of Set Point, or at the end of programmed
Soft-Start cycle. The Autotuning will start at the condition that the
process value is lower (with “Func” =HEAt) than [SP- |SP/5|] or
higher (with “Func” =CooL) than [SP+ |SP/5|].
= - 1 : If OSCILLATORY autotuning should be automatically
activated every time the machine is turned on
= - 2 : If OSCILLATORY autotuning should be activated
automatically the next time the instrument is turned on and, once
the tuning is finished, the “Auto”=OFF parameter is automatically
activated.
= - 3 : If OSCILLATORY autotuning should be activated manually
through the U key.
= - 4 : If OSCILLATORY autotuning should be automatically
activated with every modification to the regulation Set or at the end
of the Soft-Start cycle programmed.
PLEASE NOTE: The Fast-type Autotuning is particularly quick and
shows no signs of having any effect on the regulation as it
calculates the parameters of the regulator during the phase when
the Set Point is reached.
For the correct execution of the Fast-type autotuning it is however
necessary that at the cycle start-up there is a certain difference
between the process variable and the Set Point. For this reason
the instrument only activates the Fast autotuning when:
- For “Auto” = 1 or 2 : The process value is less (for “Func”= HEAt)
than [SP- |SP/2|] or greater (for “Func” =CooL) than [SP+ |SP/2|]
- For “Auto” = 3 or 4 : the process value is less (for “Func”= HEAt)
than [SP- |SP/5|] or greater (for “Func” =CooL) than [SP+ |SP/5|].
The FAST autotuning is not indicated when the Set point is close
to the initial reading or when the variable measured varies in an irregular way during the tuning cycle (for reasons due to the process
the variable rises or decreases).
In these cases it is advisable to use the Oscillatory-type Autotuning
which implements some ON-OFF regulation cycles that make the
process value oscillate around the Set point values that once finished pass to the PID-type regulation with parameters calculated by
the Autotuning.
6) Exit from the parameter programming.
7) Connect the instrument to the controlled plant.
8) Activate the Auto-tuning by switch off and turn on the instrument
if “Auto”=1 or 2 , or by selecting par. “tunE” in the main menu (or
by correctly programming key “U” ).
At this point the Auto-tuning function is activated and is indicated
by the flashing led AT/ST.
The regulator carries out several operations on the connected plant
in order to calculate the most suitable PID parameters.
If, at the Auto-tuning start, the condition for the lower or higher
process value is not found the display will show “ErAt” and the
instrument will be swapped to normal control conditions according
to the previously programmed parameters.
To make the error “ErAt” disappear, press key P.
The Auto-tuning cycle duration has been limited to 12 hours
maximum.
If Auto-tuning is not completed within 12 hours, the instrument will
show "noAt" on the display.
In case of probe error, the instrument automatically stops the cycle
in progress.
The values calculated by Auto-tuning are automatically stored in
the instrument’s memory at the end of the correct PID parameters
tuning.
To activate the SELF-TUNING function proceed as follows
1) Program and activate the desired Set Point.
2) Program par. "Cont" =Pid.
3) Program par. "Func" according to the process to be controlled
through output 1rEG.
4) Program an output as 2rEG if the instrument controls a
dual-action plant
5) Program par. "SELF" = yES
6) Exit from the parameter programming.
7) Connect the instrument to the controlled plant.
8) Activate Self-tuning selecting par. “tunE” in the main menu (or
by correctly programming key “U”).
When the Self-tuning function is active, the led AT/ST is
permanently lit up and all the PID parameters ("Pb", "Int", "dEr",
etc.) are no longer visualized.
To stop the Auto-tuning cycle or deactivate the Self-tuning function
select one of the control types : "rEG", "OPLO" or "OFF" from the
menu “SEL”. If the instrument is switched off during Auto-tuning or
with the Self-tuning function activated, these functions will remain
activated the next time it is switched on.
4.9 - REACHING OF THE SET POINT AT CONTROLLED SPEED
AND AUTOMATIC SWITCHING BETWEEN TWO SET POINTS
(RAMPS AND DWELL TIME)
All the parameters referring to the ramps functioning are contained
in the group “]rEG”.
It is possible to reach the set point in a predetermined time (in any
case longer than the time the plant would naturally need). This
could be useful in those processes (heating or chemical
treatments, etc.) where the set point has to be reached gradually,
in a predetermined time.
Once the instrument has reached the first Set Point (SP1) it is possible to have automatic switching to the second Set Point (SP2) after a set time, thus obtaining a simple automatic process cycle.
These functions are available for all the programmable controls
(PID single and double action, ON/OFF and Neutral Zone
ON/OFF).
The function is determined by the following parameters :
"SLor" - Gradient of first ramp expressed in unit/minute
"SLoF" - Gradient of second ramp expressed in unit/minute.
"dur.t" - Dwell time of Set Point “SP1” before automatic switching
to Set Point “SP2” (expressed in hrs. and min.).
The functions are deactivated when the relative parameters are =
InF.
If is desired only one ramp (ex. to reach “SP1”) it is enough to
program on the par. "SLor" the desired value.
The ramp "SLor" it will always active at power on and when the
Active Set Point value is changed.
PV
[ U n it ]
SP1
SLor
S Lor
SP1
change
S P 1 V a lu e
t im e [ m in . ]
If it is desired an automatic cycle from the power on instead it is
necessary to program the par. "nSP" = 2, to program the two Set
Point values "SP1" and "SP2" and naturally to program the par.
"SLor", "dur.t" and "SLoF" with the desired values.
TECNOLOGIC spa - TLK 31 D - OPERATING INSTRUCTIONS - Vr. 02 - ISTR-MTLK31DENG2 - PAG. 7
In this case at the end of the cycle all the ramps won't be more “PrA1”- 1 ALARM PROCESS MEASUREMENT
active.
"AL1t " - ALARM TYPE
"Ab1" - ALARM CONFIGURATION
PV
“AL1” - ALARM THRESHOLD
[U n it]
d u r .t
“AL1L” - LOW ALARM THRESHOLD (for band alarm) OR
SP1
SLoF
MINIMUM SET OF AL1 ALARM THRESHOLD (for low or high
SLor
alarm)
SP2
“AL1H” - HIGH ALARM THRESHOLD (for band alarm) OR
MAXIMUM SET OF AL1 ALARM THRESHOLD (for low or high
AUTO
alarm)
t im e [ m in .]
change
S et
“HAL1” - ALARM HYSTERESIS
Examples with starts from values lower than SP and with “AL1d” - ALARM ACTIVATION DELAY (in sec.)
"AL1i" - ALARM BEHAVIOUR IN THE EVENT OF
decreasing of SP.
Note: In case of PID control, if Auto-tuning is desired whilst the MEASUREMENT ERROR
ramp function is active, this will not be carried out until the tuning
cycle has been completed. It is therefore recommended that "PrA1" – ALARM PROCESS MEASUREMENT: Through this
Auto-tuning be started avoiding activating the ramp function and, parameter it is possible to set the process variable used by the
once the tuning is finished, deactivate Auto-tuning (“Auto” = OFF), alarm for operating.
program the desired ramp and, if it automatic tuning is desired, In fact the alarm can operate considering the process variable as
the value measured at input 1 (Pr1), the value measured at input 2
enable the Self-tuning function.
(Pr2), the difference between the two inputs Pr1-Pr2 (P1-2) or can
consider the difference between the two inputs Pr1-Pr2 but with a
4.10 - SOFT-START FUNCTION
All the parameters referring to the Soft -Start functioning are maximum limit and a minimum limit for the Pr2 measurement Pr2
(P1-L).
contained in the group “]rEG”.
The Soft-Start function only works through PID control and allows "AL1t" – ALARM TYPE : the alarm output can behave in six
the limitation of control power when the instrument is switched on, different ways.
LoAb = ABSOLUTE LOW ALARM: The alarm is activated when
for a programmable period of time.
This is useful when the actuator, driven by the instrument, may be the process value goes below the alarm threshold set on parameter
damaged excess power supplied when the application is not yet in "AL1” and will be deactivated when it goes above the value
[AL1+HAL1].
the normal rating. (ex. for certain heating elements).
With this mode is possible to program the minimum and the
The function depends on the following parameters :
maximum set of “AL1” by “AL1L” and “AL1H” parameters.
“St.P” - Soft-Start power
HiAb = ABSOLUTE HIGH ALARM: The alarm is activated when the
“SSt” - Soft-Start time (expressed in hh.mm)
process value goes higher than the alarm threshold set on
“HSEt” - End Soft Start cycle threshold
If both parameters are programmed with values other than OFF, parameter "AL1" and will be deactivated when it goes below the
when switched on the instrument gives an output power as value [AL1 - HAL1].
programmed on par. “St.P” for the time programmed on par. “SSt” With this mode is possible to program the minimum and the
or when is reached the absolute value programmed at par. “HSEt”. maximum set of “AL1” by “AL1L” and “AL1H” parameters.
Practically, the instrument works in manual condition and switches PV
PV
to automatic control at the elapsing of time “SSt” or when is
AL1
reached the absolute value programmed at par. “HSEt”.
HAL1
To disable the Soft-Start function simply program par. “SSt” = OFF.
HAL1
Whenever, a measurement errors occurs during the Soft-Start AL1
execution, the function is interrupted and the instrument gives an
output power as programmed on par. “OPE”.
ON
ON
ON
ON
time
time
If the measurement is restored, the Soft-Start is still deactivated.
OUT
OUT
If it’s desired to activate the Autotuning with Soft-Start set par. AL1
AL1 off
off
off
off
off
off
“Auto”=4.
The Autotuning will start automatically at the end of programmed
LoAb
HiAb
Soft-Start cycle at the condition that the process value is lower LodE = DEVIATION LOW ALARM: The alarm is activated when
(with “Func” =HEAt) than [SP- |SP/5|] or higher (with “Func” =CooL) the process value goes below the value [SP + AL1] and will be
than [SP+ |SP/5|].
deactivated when it goes above the value [SP + AL1 + HAL1].
411- ALARMS OUTPUTS FUNCTIONS (AL1, AL2, AL3)
The alarms (AL1, AL2, AL3) are depending on the process value
and before to set his functioning it’s necessary to establish to which
output the alarm has to correspond to.
First of all it’s necessary to configure, in the parameters group
“]Out”, the parameters relative to the outputs required as alarm
(“O1F” , “O2F” ,“O3F”, “O4F”) programming the parameter relative
to the desired output as follows :
= ALno if the alarm output has to be ON when the alarm is active,
while it’s OFF when the alarm is not active
= ALnc if the alarm output has to be ON when the alarm is not
active, while it’s OFF when the alarm is active
= ALni if the alarm output has to be ON when the alarm is not
active, while it is OFF when the alarm is active but with reverse led
indication (led ON= alarm OFF).
Note: In all the examples that follow is made reference to the alarm
AL1. Naturally the operation of the other alarms results analogous.
Have now access at the group “]AL1”, and program on par.
“OAL1” , to which output the alarm signal has to be sent.
The alarm functioning is instead defined by parameters :
With this mode is possible to program the minimum and the
maximum set of “AL1” by “AL1L” and “AL1H” parameters.
HidE = DEVIATION HIGH ALARM: The alarm is activated when the
process value goes above the value [SP + AL1] and will be
deactivated when it goes below the value [SP + AL1 - HAL1].
With this mode is possible to program the minimum and the
maximum set of “AL1” by “AL1L” and “AL1H” parameters.
PV
PV
SP
OUT
AL1
HAL1
AL1
-AL1
ON
off
ON
off
LodE
off
HAL1
SP
time
OUT
AL1
ON
ON
off
off
time
off
HidE
LHAb = ABSOLUTE BAND ALARM: The alarm is activated when
the process value goes under the alarm threshold set on parameter
TECNOLOGIC spa - TLK 31 D - OPERATING INSTRUCTIONS - Vr. 02 - ISTR-MTLK31DENG2 - PAG. 8
"AL1L" or goes higher than the alarm threshold set on parameter
"AL1H" and will be deactivated when it goes below the value [AL1H
- HAL1] or when it goes above the value [AL1L + HAL1].
LHdE = DEVIATION BAND ALARM: The alarm is activated when
the process value goes below the value [SP + AL1L] or goes above
than the value [SP + AL1H] and will be deactivated when it goes
below the value [SP + AL1H - HAL1] or when it goes above the
value [SP + AL1L + HAL1].
PV
AL1H
PV
HAL1
HAL1
AL1L
OUT
AL1
ON
ON
off
off
time
off
HAL1
AL1H
SP
- AL1L
OUT
AL1
HAL1
ON
ON
off
LHAb
off
time
off
LHdE
"Ab1" - ALARM CONFIGURATION: This parameter can assume a
value between 0 and 31.
The number to be set, which will correspond to the function
desired, is obtained by adding the values reported in the following
descriptions :
ALARM BEHAVIOUR AT SWITCH ON: the alarm output may
behave in two different ways, depending on the value added to par.
“Ab1”.
+0 = NORMAL BEHAVIOUR: The alarm is always activated when
there are alarm conditions.
+1 = ALARM NOT ACTIVATED AT SWITCH ON: If, when switched
on, the instrument is in alarm condition, the alarm is not activated.
It will be activated only when the process value is in non-alarm
conditions and then back in alarm conditions.
PV
AL1
+0
o ff
Ab1
+1
tim e
O N
O N
o ff
O N
o ff
o ff
ALARM AKNOWLEDGEMENT: : the alarm output may behave in
two different ways depending on the value added to par. “Ab1”.
+ 0 = ALARM NOT AKNOWLEDGED: The alarm always remains
active in alarm conditions.
+ 8 = ALARM AKNOWLEDGED: The alarm is active in alarm
conditions and can be deactivated by key “U” if properly
programmed (“USrb”=ASi), and also if alarm conditions still exist.
ALARM BEHAVIOUR AT SET POINT CHANGE (DEVIATION
ALARMS ONLY): the alarm output may behave in two different
ways, depending on the value added to par. “Ab1”.
+0 = NORMAL BEHAVIOUR: The alarm is always activated when
there are alarm conditions.
+16 = ALARM NOT ACTIVATED AT SET POINT CHANGE: If,
when Set Point change, the instrument is in alarm condition, the
alarm is not activated. It will be activated only when the process
value is in non-alarm conditions and then back in alarm conditions.
"AL1i" - ALARM ACTIVATION IN CASE OF MEASUREMENT
ERROR: This allows one to establish how the alarm have behave
in the event of a measurement error (yES=alarm active; no=alarm
deactivated).
4.12- LOOP BREAK ALARM FUNCTION
All the parameters referring to the Loop Break alarm function are
contained in the group “]LbA”.
The Loop Break alarm is available on all the instruments, which
intervenes when, for any reason (short-circuit of a thermocouple,
thermocouple inversion, load interruption), the loop control is
interrupted.
First of all, it is necessary to establish to which output the alarm
has to correspond.
To do this it is necessary to set the parameter relative to the output
to be used (“O1F” , “O2F” ,“O3F”, “O4F”) in the group “]Out”,
programming the parameter as :
= ALno if the alarm output has to be ON when the alarm is active
while it is OFF when the alarm is not active.
= ALnc if the alarm output has to be ON when the alarm is not
active while it is OFF when the alarm is active.
= ALni if the alarm output has to be ON when the alarm is not
active, while it is OFF when the alarm is active but with reverse led
indication (led ON= alarm OFF).
Enter group “]LbA” and program which output the alarm signal
has to be addressed to on par. “OLbA”,.
The Loop Break alarm is activated if the output power remains at
the 100% of the value for the time programmed on par. "LbAt"
(expressed in sec.).
To avoid false alarms, the value of this parameter has to be set
considering the time the plant takes to reach the Set point when
the measured value is a long distance from it (for example at the
plant start-up).
On alarm intervention, the instrument visualizes the message
“LbA” and behaves as in the case of a measurement error giving a
power output as programmed on par. “OPE” (programmable in
the group “]InP”).
To restore normal functioning after the alarm, select the control
mode “OFF” and then re-program the automatic control (“rEG”)
after checking the correct functioning of probe and actuator.
To exclude the Loop Break alarm, set “OLbA” = OFF.
exemple with absolute low alarm
ALARM DELAY: the alarm output may behave in two different
ways depending on the value added to par. “Ab1”.
+0 = ALARM NOT DELAYED: The alarm is immediately activated
when the alarm condition occurs.
+2 = ALARM DELAYED: When the alarm condition occurs, delay
counting begins, as programmed on par. “AL1d” (expressed in
sec.) and the alarm will be activated only after the elapsing of that
time.
ALARM LATCH: : the alarm output may behave in two different
ways depending on the value added to par. “Ab1”.
+ 0 = ALARM NOT LATCHED: The alarm remains active in alarm
conditions only.
+ 4 = ALARM LATCHED: The alarm is active in alarm conditions
and remains active even when these conditions no longer exist, 4.13- FUNCTIONING OF KEY “U”
until the correctly programmed key “U”, (“USrb”=Aac) has been The function of key “U” can be set through par. “USrb” contained
in the group ““]PAn”.
pushed.
The
parameter can be programmed as :
P V
= noF : no function
= tunE : Pushing the key for 1 sec. at least, it is possible to
AL1
activate/deactivate Auto-tuning or Self-tuning
= OPLO : Pushing the key for 1 sec. at least, it is possible to swap
tim e
from automatic control (rEG) to manual one (OPLO) and vice
O N
versa.
o ff
o ff
+0
= Aac : Pushing the key for 1 sec. at least, it is possible to
O N
A b1
acknowledge the alarm. (see par. 4.10)
+4
o ff
= ASi : Pushing the key for 1 sec. at least, it is possible to
acknowledge an active alarm (see par. 4.10)
exemple with absolute high alarm
TECNOLOGIC spa - TLK 31 D - OPERATING INSTRUCTIONS - Vr. 02 - ISTR-MTLK31DENG2 - PAG. 9
= CHSP : Pushing the key for 1 sec. at least, it is possible to select If an attempt is made to enter the programming from the keyboard
whilst a communication through the serial port is in progress the
one of the 4 pre-programmed Set Points on rotation.
= OFF : Pushing the key for 1 sec. at least, it is possible to swap instrument will visualise "buSy" to indicate the busy state.
HOST
from automatic control (rEG) to OFF control (OFF) and vice versa.
(PC/PLC)
4.14 - DIGITAL INPUT
The instrument can be equipped with an digital input.
The function of the digital input can be set through par. “diF”
contained in the group ““]InP”.
The parameter can be programmed as :
= noF : no function
= Aac : Closing the contact connected to the digital input 1 it is
possible to acknowledge the alarm. (see par. 4.11)
= ASi :Closing the contact connected to the digital input 1 it is
possible to acknowledge an active alarm (see par. 4.11)
= HoLd :Closing the contact connected to the digital input 1 there
is the hold of the measure in that instant (P.A.: not the reading on
the display, therefore the indication could settle with a proportional
delay to the filter of measure). With the function hold the instrument
operate the control in base to the memorized measure.
Reopening the contact the instrument come back to the normal
acquisition of the measure.
= OFF :Closing the contact connected to the digital input 1 it is
possible to select the OFF control (OFF).
= CHSP :Closing and opening the contact connected to the digital
input 1 it is possible to select one of the 4 pre-programmed Set
Points on rotation.
= SP1.2 : Closing the contact connected to the digital input 1 it is
possible to select as active the set point SP2. Reopening the
contact is select as active the set point SP1. This function is
possible only when “nSP” = 2, and when is selected it disables the
selection of the active set through the parameter "SPAt" and
through the key U.
= HE.Co : Closing the contact connected to the digital input 1 it is
possible to select as active the set point SP2 in “CooL” mode. Reopening the contact is select as active the set point SP1 in “HEAt”
mode. This function is possible only when “nSP” = 2.
4.15 - RS 485 SERIAL INTERFACE
The instrument can be equipped with a RS 485 serial
communication interface, by means of which it is possible to
connect the regulator with a net to which other instruments
(regulators of PLC) are connected, all depending typically on a
personal computer used as plant supervisor. Using a personal
computer it is possible to acquire all the function information and to
program all the instrument’s configuration parameters. The
software protocol adopted for TLK31D is a MODBUS RTU type,
widely used in several PLC and supervision programs available on
the market (TLK series protocol manual is available on request).
The interface circuit allows the connection of up to 32 instruments
on the same line.
To maintain the line in rest conditions a 120 Ohm resistance (Rt)
must be connected to the end of the line.
The instrument is equipped with two terminals called A and B which
have to be connected with all the namesake terminals of the net.
For the wiring operation they must be interlaced with a double
cable (telephonic type).
Nevertheless, particularly when the net results very long or noised,
it is advisable to adopt a screened cable wired as in the drawing.
If the instrument is equipped with a serial interface, the parameters
to be programmed are the following, all present in the parameters
group “]SEr” :
"Add" : Address of the station. Set a different number for each
station, from 1 to 255.
"baud" : Transmission speed (baud-rate), programmable from
1200 to 38400 baud. All the stations have to have the same
transmission speed.
"PACS" : Programming access. If programmed as "LoCL" this
means that the instrument is only programmable from the
keyboard, if programmed as "LorE" it is programmable both from
the keyboards and serial line.
shield
A
Rt
B
120 ohm
GND
RS485
Interface
A
B
10 8
GND
9
TLK31 n.1
A
B
10 8
GND
9
TLK31 n.2
A
B
10 8
GND
9
TLK31 n.N
4.16 - PARAMETERS CONFIGURATION BY “KEY01” and “A01”
The instrument is equipped with a connector that allows the transfer from and toward the instrument of the functioning parameters
through the device TECNOLOGIC KEY01 or TECNOLOGIC A01
with 5 poles connector.
This device it’s mainly useable for the serial programming of the
instruments which need to have the same parameters configuration
or to keep a copy of the programming of an instrument and allow its
rapid retransmission.
To use the device KEY01 or A01 it’s necessary that the device or
instrument are being supplied.
Instrument supplied and device not supplied
SUPPLY
Instrument supplied from the device
SUPPLY ADAPTER
12 VDC
AC SUPPLY
P.A.: For the instruments equipped with RS485 serial
communication, it’s indispensable that the parameter “PACS” is
programmed = LorE.
For additional info, please have a look at the KEY01 or A01
instruction manual.
5 - PROGRAMMABLE PARAMETERS
Here following are described all the parameters available on the
instrument. Some of them could be not present or because they
are depending on the type of instrument or because they are
automatically disabled as unnecessary.
Group “SP” (parameters relative to the Set Point)
Par.
Description
Range
Def.
1÷2
1
1 nSP Number of the
programmable Set
point
2 SPAt Active Set point
1 ÷ nSP
1
3 SP1 Set Point 1
SPLL ÷ SPHL
0
4 SP2 Set Point 2
SPLL ÷ SPHL
0
-1999 ÷ 9999 9999
5 P2HL Upper Pr2
measurement limit for
differential control
TECNOLOGIC spa - TLK 31 D - OPERATING INSTRUCTIONS - Vr. 02 - ISTR-MTLK31DENG2 - PAG. 10
Note
-1999 ÷ 9999 -1999
6 P2LL Lower Pr2
measurement limit for
differential control
7 SPLL Low Set Point
-1999 ÷ SPHL -1999
8 SPHL High Set Point
SPLL ÷ 9999 9999
Group “InP” (parameters relative to the measure input)
Par.
Description
Range
Def.
9 SEnS Probes type
Ptc / ntc
ntc
10 Pr2 Probe Pr2 presence
yES / no
yES
0/1
0
11 dP Number of decimal
figures
°C / °F
°C
12 Unit Temperature unit of
measurement
13 FiL Input digital filter
OFF÷ 20.0
1.0
sec.
14 OFS1 Measuring Offset Pr1
-1999 ÷ 9999
15 OFS2 Measuring Offset Pr2
-1999 ÷ 9999
16 rot Rotazione della retta di 0.000 ÷ 2.000
misura
17 InE “OPE” functioning in Our / Or / Ur
case of measuring error
18 OPE Output power in case of -100 ÷ 100
measuring error
%
noF / AaC /
19 dIF Digital inputs function:
ASi / HoLd /
noF = No Function
OFF / CHSP /
Aac= Reset Alarms
SP1.2/
latch
HE.Co
ASi= Aknowledged
Alarms
HoLd = Hold Measure
OFF= Control OFF
CHSP = Sel. Set Point
SP1.2 = Sel. SP1/SP2
HE.Co = Sel. HeatSP1/Cool -SP2
Group “Out” (parameters relative to the outputs)
Par.
Description
Range
20 O1F Functioning of output 1: 1.rEG / 2.rEG
1.rEG= Control output 1 ALno / ALnc
2.rEG= Control output 2 ALni / OFF
ALno= Alarm Out normally opened
ALnc= Alarm Out normally closed
ALni= Alarm Out normally closed with reverse led func.
21 O2F Functioning of output 2: 1.rEG / 2.rEG
see “O1F”
ALno / ALnc
ALni / OFF
22 O3F Functioning of output 3: 1.rEG / 2.rEG
ALno / ALnc
see “O1F”
ALni / OFF
23 O4F Functioning of output 4: 1.rEG / 2.rEG
ALno / ALnc
see “O1F”
ALni / OFF
Group “AL1” (parameters relative to alarm AL1)
Par.
Description
Range
Out1 / Out2
24 OAL1 Output where alarm
Out3 / Out4
AL1 is addressed
OFF
25 PrA1 AL1 alarm process
Pr1 / Pr2 /
measurement reference P1-2 / P1-L
LoAb / HiAb
26 AL1t Alarm AL1 type:
LHAb / LodE
LoAb= Absolute Low
HidE / LHdE
HiAb= Absolute High
LHAb= Absolute Band
LodE= Deviation Low
HidE= Deviation High
LHdE= Deviation Band
Note
0
0
1.000
OUr
0
noF
Def.
1.rEG
Note
ALno
ALno
ALno
Def.
Out2
Pr1
LoAb
Note
0 ÷ 31
27 Ab1 Alarm AL1 functioning:
+1 = not activated at
power on
+2 = delayed
+4 = latch
+8 = aknowledged
28 AL1 Alarm AL1 threshold
AL1L÷ AL1H
29 AL1L Low threshold band -1999 ÷ AL1H
alarm AL1 or Minimum
set alarm AL1 for high
or low alarm
30 AL1H High threshold band AL1L ÷ 9999
alarm AL1 or Maximum
set alarm AL1 for high
or low alarm
31 HAL1 Alarm AL1 hysteresis
OFF ÷ 9999
32 AL1d Activation delay of
OFF ÷ 9999
alarm AL1
sec.
no / yES
33 AL1i Alarm AL1 activation in
case of measuring error
Group “AL2” (parameters relative to alarm AL2)
Par.
Description
Range
Out1 / Out2
34 OAL2 Output where alarm
Out3 / Out4
AL2 is addressed
OFF
Pr1 / Pr2 /
35 PrA2 AL2 alarm process
measurement reference P1-2 / P1-L
LoAb / HiAb
36 AL2t Alarm AL2 type:
LHAb / LodE
see “AL1t”
HidE / LHdE
0 ÷ 31
37 Ab2 Alarm AL2 functioning:
see “Ab1”
38 AL2 Alarm AL2 threshold
AL2L÷ AL2H
39 AL2L Low threshold band -1999 ÷ AL2H
alarm AL2 or Minimum
set alarm AL2 for high
or low alarm
40 AL2H High threshold band AL2L ÷ 9999
alarm AL2 or Maximum
set alarm AL2 for high
or low alarm
41 HAL2 Alarm AL2 hysteresis
OFF ÷ 9999
42 AL2d Activation delay of
OFF ÷ 9999
alarm AL2
sec.
no / yES
43 AL2i Alarm AL2 activation in
case of measuring error
Group “AL3” (parameters relative to alarm AL3)
Par.
Description
Range
Out1 / Out2
44 OAL3 Output where alarm
Out3 / Out4
AL3 is addressed
OFF
Pr1 / Pr2 /
45 PrA3 AL3 alarm process
measurement reference P1-2 / P1-L
LoAb / HiAb
46 AL3t Alarm AL3 type:
LHAb / LodE
see “AL1t”
HidE / LHdE
0 ÷ 31
47 Ab3 Alarm AL3 functioning:
see “Ab1”
48 AL3 Alarm AL3 threshold
AL3L÷ AL3H
49 AL3L Low threshold band -1999 ÷ AL3H
alarm AL3 or Minimum
set alarm AL3 for high
or low alarm
50 AL3H High threshold band AL3L ÷ 9999
alarm AL3 or Maximum
set alarm AL3 for high
or low alarm
51 HAL3 Alarm AL3 hysteresis
OFF ÷ 9999
52 AL3d Activation delay of
OFF ÷ 9999
alarm AL3
sec.
no / yES
53 AL3i Alarm AL3 activation in
case of measuring error
0
0
-1999
9999
1
OFF
no
Def.
OFF
Note
Pr1
LoAb
0
0
-1999
9999
1
OFF
no
Def.
OFF
Pr1
LoAb
0
0
-1999
9999
TECNOLOGIC spa - TLK 31 D - OPERATING INSTRUCTIONS - Vr. 02 - ISTR-MTLK31DENG2 - PAG. 11
1
OFF
no
Note
Group “LbA” (parameters relative to Loop Break Alarm)
Par.
Description
Range
Def.
54 OLbA Output where alarm
Out1 / Out2 / OFF
Out3 / Out4
LbA is addressed
OFF
OFF
55 LbAt Time necessary to acti- OFF ÷ 9999
vate alarm LbA
sec.
Group “rEG” (parameters relative to the control)
Par.
Description
Range
Def.
Pid / On.FA
Pid
56 Cont Control type:
Pid= PID
On.FS / nr
On.FA= ON/OFF asym.
On.FS= ON/OFF sym.
nr= Neutral Zone
ON/OFF
HEAt / CooL HEAt
57 Func Functioning mode
output 1.rEG
Pr1 / Pr2 /
Pr1
58 PrrG Control process measurement reference
P1-2 / P1-L
59 HSEt Hysteresis of ON/OFF
0 ÷ 9999
1
control (or end Soft
Start cycle threshold)
0
60 CPdt Compressor Protection OFF÷ 9999
time for 2.rEG
sec.
-4 / -3 / -2 / -1
0
61 Auto Autotuning enable
/0/
OFF = Not active
1 = Start each power on 1 / 2 / 3 / 4
2= Start at first power
on
3= Start manually
4= Start after Soft Start
or change Set Point
62 SELF Selftuning enable
no / yES
no
63 Pb Proportional band
0 ÷ 9999
50
64 Int Integral time
OFF ÷ 9999
200
sec.
65 dEr Derivative time
OFF÷ 9999
50
sec.
66 FuOc Fuzzy overshoot control 0.00 ÷ 2.00
0.5
67 tcr1 Cycle time of output
0.1 ÷ 130.0
20.0
1.rEg
sec.
0.01 ÷ 99.99 1.00
68 Prat Power ratio 2.rEg /
1.rEg
69 tcr2 Cycle time of 2.rEg
0.1 ÷ 130.0
10.0
sec.
70
-100.0÷100.0
0.0
%
InF
71 SLor Gradient of first ramp : 0.00 ÷ 99.99
/ InF
InF= Ramp not active
unit/min.
InF
72 dur.t Duration time between 0.00 ÷ 99.59
/ InF
two ramps
hrs.-min.
InF= Time not active
0.00 ÷ 99.99
InF
73 SLoF Gradient of second
/ InF
ramp:
unit / min.
InF= Ramp not active
74 St.P Soft-Start power
-100 ÷ 100 %
0
OFF /
OFF
75 SSt Soft-Start time
0.1÷7.59
/ InF
hrs.-min.
Group “PAn” (parameters relative to the user interface)
Par.
Description
Range
Def.
noF / tunE /
noF
76 USrb Funzione del tasto “U”:
OPLO / Aac /
noF = nessuna
ASi / CHSP /
funzione
OFF
tune= Avvio Autotuning
o Selftuning
OPLO= Regolazione
manuale (open loop)
Aac= Reset memoria
allarmi
rS
Note
Note
Manual reset
ASi= Tacitazione
allarmi
CHSP= Cambio Set att.
OFF= messa in OFF
della regolazione
Pr1 / Pr2 /
P1-2
77 diSP Variable visualized on
P1-2 / Pou /
the display:
SP.F / SP.o /
Pr1= Pr1 Value
AL1 / AL2 /
Pr2= Pr2 Value
AL3
P1-2= Pr1-Pr2 Value
Pou= Control Power
SP.F= Active Set Value
SP.o = Operative Set
value
AL1 = AL1 threshold
AL2 = AL2 threshold
AL3 = AL3 threshold
78 AdE Shift value for the shift
OFF...9999
2
index functioning
SE / AE /
SAE
79 Edit Fast progr. Active Set
and alarms:
SAE / SAnE
SE= Active Set can be
modified while the
alarm thresholds cannot be modified
AE= Active Set cannot
be modified while the
alarm thresholds can
be modified
SAE= Active Set and
alarm thresholds can
be modified
SAnE= Active Set and
alarm thresholds cannot be modified
80 PASS Password “ConF” menu OFF ÷ 9999 OFF
Group “SEr” (parameters relative to the serial communication)
Par.
Description
Range
Def. Note
0 … 255
1
81 Add Station address in case
of serial communication
speed 1200 / 2400 / 9600
82 baud Transmission
9600 / 19.2 /
(Baud rate)
38.4
LoCL / LorE LorE
83 PACS Access at the
programming through
serial port:
LoCL = No (Local only)
LorE = Yes (Local and
remote progr.)
6 - PROBLEMS, MAINTENANCE AND GUARANTEE
Note
6.1 - ERROR SIGNALLING
Error
Reason
The
probe
Pr1 may be
E1
interrupted or in short
-E1
circuit, or may measure a
value outside the range
allowed
The probe Pr2 may be
E2
interrupted or in short
-E2
circuit, or may measure a
value outside the range
allowed
Process measurement
---not available
Auto-tuning not possible
ErAt
because the process
value is too higher or too
lower
Action
Check
the
correct
connection of the probe
with the instrument and
check the probe works
correctly
Push key “P” in order to
make
the
error
message
disappear.
Once the error has
been found, try to
repeat the auto-tuning.
TECNOLOGIC spa - TLK 31 D - OPERATING INSTRUCTIONS - Vr. 02 - ISTR-MTLK31DENG2 - PAG. 12
Loop control interrupted
(Loop break alarm)
Check the functioning of
probe and actuator and
try
to
repeat
the
auto-tuning.
Check the working of
probe and actuator and
swap the instrument to
(rEG) control
Push key “P”
7.3 – MECHANICAL DIMENSIONS, PANEL CUT-OUT AND
MOUNTING [mm]
TLK 31 D
AT
ST
Out1 Out2
-
Possible anomaly of the
EEPROM memory
In error conditions, the instrument provides an output power as
programmed on par. “OPE” and activates the desired alarms, if the
relative parameters “ALni” have been programmed = yES.
=
+
Out3 Out4
64
min. 15 mm
71
7 - TECHNICAL DATA
7.1 - ELECTRICAL DATA
Power supply: 12 VAC/VDC +/- 10%
Frequency AC: 50/60 Hz
Power consumption: 4 VA approx.
Input/s: 2 inputs for temperature probes PTC KTY 81-121 (990 Ω
@ 25 °C); NTC 103AT-2 (10KΩ @ 25 °C); 2 digital inputs for free
voltage contacts.
Output/s: Up to 4 outputs.
2 SPDT and 2 SPST-NO (8 A-AC1, 3 A-AC3 / 250 VAC) ; or in
tension to drive SSR (10mA/ 10VDC).
Electrical life for relay outputs: 100000 operat.
Installation category: II
Measurement category: I
Protection class against electric shock: Class II for Front panel
Insulation: Reinforced insulation between the low voltage section
(relay outputs) and the front panel; Reinforced insulation between
the low voltage section (relay outputs) and the extra low voltage
section (inputs, SSR outputs); No insulation between supply,
inputs and SSR outputs; 50 V insulation between RS485 and extra
low voltage section.
RECOMMENDED
PANEL CUTOUT
BRACKETS
34
MAX 12 mm
6.3 - GUARANTEE AND REPAIRS
The instrument is under warranty against manufacturing flaws or
faulty material, that are found within 12 months from delivery date.
The guarantee is limited to repairs or to the replacement of the
instrument. The eventual opening of the housing, the violation of
the instrument or the improper use and installation of the product
will bring about the immediate withdrawal of the warranty’s effects.
In the event of a faulty instrument, either within the period of
warranty, or further to its expiry, please contact our sales
department to obtain authorisation for sending the instrument to
our company. The faulty product must be shipped to
TECNOLOGIC with a detailed description of the faults found,
without any fees or charge for Tecnologic, except in the event of
alternative agreements.
PANEL + GASKET
6.2 - CLEANING
We recommend cleaning of the instrument with a slightly wet cloth
using water and not abrasive cleaners or solvents which may
damage the instrument.
min. 12 mm
29
ErEP
11,5
5,5
78
19
28
LbA
Auto-tuning not finished
within 12 hours
35
noAt
7.4 - FUNCTIONAL FEATURES
Control: ON/OFF, Neutral zon, single and double action PID
Measurement range: according to the used probe (see range table)
Display resolution: according to the probe used 1/0,1/0,01/0,001
Overall accuracy: +/- (0,5 % fs + 1 digit)
Sampling rate: 130 ms.
Serial Interface : RS485 insulated
Communication protocol: MODBUS RTU (JBUS)
Baud rate: Programmable from 1200 ... 38400 baud
Display: 4 Digit Red h 12 mm
Compliance: ECC directive EMC 2004/108/CE (EN 61326), ECC
directive LV 2006/95/CE (EN 61010-1)
7.5 - MEASURING RANGE TABLE
.2 – MECHANICAL DATA
INPUT
“dP” = 0
Housing: Self-extinguishing plastic, UL 94 V0
-55 ... 150 °C
PTC
(KTY81-121)
Dimensions: 78 x 35 mm, depth 64 mm
“SEnS” = Ptc
-67 ... 302 °F
Weight: 150 g approx.
-50 ... 110 °C
NTC (103-AT2)
Mounting: Flush in panel in 71 x 29 mm hole
“SEnS” = ntc
-58 ... 230 °F
Connections: 2,5 mm 2 screw terminals block
Degree of front panel protection : IP 65 mounted in panel with
gasket
Pollution situation: 2
7.6 - INSTRUMENT ORDERING CODE
Operating temperature: 0 ... 50 °C
Operating humidity: 30 ... 95 RH% without condensation
TLK31 a b c d e f g hh D
Storage temperature: -10 ... +60 °C
“dP”= 1
-55.0 ... 150.0 °C
-67.0 ...302.0 °F
-50.0 ... 110.0 °C
-58.0 ... 230.0 °F
a : INPUTS
T = thermistors (PTC, NTC)
TECNOLOGIC spa - TLK 31 D - OPERATING INSTRUCTIONS - Vr. 02 - ISTR-MTLK31DENG2 - PAG. 13
b : OUTPUT OUT1
R = Relay
O = VDC for SSR
c : OUTPUT OUT2
R = Relay
O = VDC for SSR
- = None
d : OUTPUT OUT3
R = Relay
O = VDC for SSR
- = None
e : OUTPUT OUT4
R = Relay
O = VDC for SSR
- = None
f : COMMUNICATION INTERFACE
S = RS 485 Serial interface
- = No interface
g : DIGITAL INPUTS
I = 2 digital inputs
- = None
hh : SPECIAL CODES
TECNOLOGIC spa - TLK 31 D - OPERATING INSTRUCTIONS - Vr. 02 - ISTR-MTLK31DENG2 - PAG. 14
TLK 31 D
ELEKTRONISCHER
WÄRMEREGLER MIT
DIFFERENZREGELUNG
BEDIENUNGSANLEITUNG
Vr. 02 (DEU) - cod.: ISTR MTLK31DDEU2
TECNOLOGIC S.p.A.
VIA INDIPENDENZA 56
27029 VIGEVANO (PV) ITALY
TEL.: +39 0381 69871
FAX: +39 0381 698730
internet : http:\\www.tecnologic.it
e-mail: [email protected]
VORTWORT
In der vorliegenden Anleitung sind alle
Angaben enthalten, die für eine einwandfreie
Installation und Verwendung sowie Wartung
des Produktes erforderlich sind.
Daher sollten die nachstehenden Anweisungen
aufmerksam gelesen werden.
Alle Rechte der vorliegenden Unterlagen sind vorbehalten.
Nachdruck auch auszugsweise verboten, soweit nicht
ausdrücklich zuvor von TECNOLOGIC S.p.A. genehmigt.
TECNOLOGIC S.p.A. behält sich das Recht vor, jederzeit ohne
besondere Anzeige jene Änderungen vorzunehmen, die sie als
notwendig erachtet.
Falls eine Betriebsstörung des Gerätes Personen- oder
Sachschäden verursachen kann, muss die Anlage mit
zusätzlichen
elektromechanischen
Schutzeinrichtungen
abgesichert werden.
Die Firma Tecnologic S.p.A. und ihre gesetzlichen Vertreter
weisen jede Haftung für Personen- oder Sachschäden von
sich, die auf Abänderungen, unsachgemäße, falsche oder
nicht den Merkmalen des Gerätes entsprechende Verwendung
zurückzuführen sind.
INHALT
1
1.1
1.2
2
2.1
2.2
BESCHREIBUNG DES GERÄTES
ALLGEMEINE BESCHREIBUNG
BESCHREIBUNG DER FRONTTAFEL
PROGRAMMIERUNG
SCHNELLEINSTELLUNG DER SOLLWERTE
WAHL DER REGELZUSTÄNDE UND
PROGRAMMIERUNG DER PARAMETER
PROGRAMMIEREBENEN DER PARAMETER
2.3
2.4
REGELZUSTÄNDE
2.5
WAHL DES AKTIVEN SOLLWERTES
3
HINWEISE ZUR INSTALLATION UND ZUM GEBRAUCH
3.1
BESTIMMUNGSGEMÄSSER GEBRAUCH
MECHANISCHER EINBAU
3.2
3.3
ELEKTRISCHE ANSCHLÜSSE
3.4
ANSCHLUSSPLAN
4
BETRIEB
4.1
MESSUNG UND ANZEIGE
4.2
KONFIGURATION DER AUSGÄNGE
4.3
WÄRMEREGLER MIT ABSOLUTER TEMPERATUR
ODER TEMPERATURDIFFERENZ
4.4
EIN/AUS-REGELUNG
EIN/AUS-REGELUNG BEI NEUTRALER ZONE
4.5
4.6
PID-REGELUNG MIT EINFACHER WIRKUNG
4.7
PID-REGELUNG MIT DOPPELTER WIRKUNG
4.8
AUTOTUNING- UND SELFTUNING-FUNKTIONEN
ERREICHEN DES SOLLWERTES BEI VORGEGEBENER
4.9
GESCHWINDIGKEIT UND AUTOMATISCHE
UMSCHALTUNG ZWISCHEN ZWEI SOLLWERTEN
4.10 SOFT-START-FUNKTION
4.11 BETRIEB DER ALARME
4.11.1 KONFIGURATION DER ALARMAUSGÄNGE
4.11.2 ALARMHYSTERESE
4.12 FUNKTION DES LOOP BREAK ALARMS
4.13 FUNKTION DER TASTE U
4.14 DIGITALER EINGANGE
4.15 SERIELLE SCHNITTSTELLE RS 485
4.16 KONFIGURATION DER PARAMETER MIT “KEY 01” oder
“A01”
5
PROGRAMMIERBARE PARAMETER
6
STÖRUNGEN, WARTUNG UND GARANTIE
6.1
FEHLERMELDUNGEN
6.2
REINIGEN
6.3
GEWÄHRLEISTUNG UND INSTANDSETZUNG
TECHNISCHE DATEN
7
ELEKTRISCHE MERKMALE
7.1
7.2
MECHANISCHE MERKMALE
7.3
MECHANISCHE EINBAUMASSE, DURCHBOHREN DER
TAFEL UND BEFESTIGUNG
FUNKTIONSMERKMALE
7.4
7.5
TABELLE DER MESSBEREICHE
CODIERUNG DES GERÄTES
7.6
1 - BESCHREIBUNG DES GERÄTES
1.1 - ALLGEMEINE BESCHREIBUNG
Das Modell TLK 31 D ist ein digitaler Wärmeregler mit Single Loop
Mikroprozessor mit EIN/AUS-Regelung, EIN/AUS im neutralen
Bereich, PID mit einfacher Wirkung oder PID mit doppelter
Wirkung (direkt und umgekehrt), mit zwei Eingängen für
Temperaturfühler vom Typ PTC oder NTC, über die die Regelung
der
Temperaturdifferenz ausgeführt werden kann. Der
Wärmeregler kann deshalb in Anwendungen, bei denen eine
Regelung in Abhängigkeit von dem Temperaturunterschied
zwischen zwei Bereichen, wie z. B. Flüssigkühler (Chiller),
Umluftsysteme für die natürliche Raumkühlung, Solarzellenheizung
und in vielen anderen Anwendungen, in denen zwei
Temperaturmessungen erforderlich sind, eingesetzt werden.
Der Regler verfügt außerdem über die Funktionen AUTOTUNING
Fast und Oszillierend, SELFTUNNING und FUZZY OVERSHOOT
CONTROL für die PID-Regelung.
Außerdem kann das Gerät auch mit 2 konfigurierbaren
Digitaleingange und einer seriellen Kommunikationsschnittstelle
TECNOLOGIC spa - TLK 31 D - BEDIENUNGSANLEITUNG - Vr. 02 - ISTR-MTLK31DDEU2 - PAG. 1
RS485 mit MODBUS-RTU Kommunikationsprotokoll und einer
max. Übertragungsgeschwindigkeit von 38400 Baud ausgestattet
werden.
Der Istwert wird auf einer vierstelligen roten Anzeige angezeigt und
der Sollwert über 4 Leds.
Das Gerät verfügt zudem über eine aus 3 Leds bestehende
programmierbare Abweichungsanzeige.
Im Gerät können bis zu 2 Sollwerte gespeichert werden und es
kann über bis zu 4 Relaisausgänge verfügen oder zur Steuerung
von Statikrelais (SSR) verwendet werden.
Weitere wichtige Funktionen sind: Loop-Break Alarmfunktion,
Erreichen des Sollwertes bei überwachter Geschwindigkeit,
Steuerung in zwei Schritten bei durchschnittlicher Erhaltungszeit,
Soft-Start Funktion, Kompressorschutz Funktion für Regelung bei
Neutral Zone, Parameterschutz auf verschiedenen Ebenen.
1.2
- BESCHREIBUNG DER FRONTTAFEL
9
4
TLK 31 D
AT
ST
3
2
1
Out1 Out2
5
6
-
=
+
11 12 13
Out3 Out4
7
10
8
1 - Taste P : Wird für den Zugriff auf den Programmiermodus der
Betriebsparameter und zur Eingabebestätigung verwendet.
2 - Taste DOWN : Anhand dieser Taste wird der einzustellende
Wert reduziert bzw. ein Parameter angewählt. Wird die Taste
gedrückt
gehalten,
geht
man
zur
vorangegangenen
Programmierebene zurück, bis der Programmiermodus verlassen
wird.
3 - Taste UP : Anhand dieser Taste wird der einzustellende Wert
erhöht bzw. ein Parameter angewählt. Wird die Taste gedrückt
gehalten, geht man zur nächsten Programmierebene über, bis der
Programmiermodus verlassen wird. Befindet man sich nicht im
Programmiermodus, wird anhand dieser Taste die Regelleistung
am Ausgang angezeigt.
4 - Taste U :Bei Betätigen dieser Taste werden die von den
Fühlern (Pr1 und Pr2) erfassten Temperaturen und deren Differenz
(Pr1-Pr2) angezeigt. Außerdem kann die Taste über den
Parameter „USrb“ für folgende Funktionen programmiert werden:
Autotuning oder Selftuning einschalten, manuelle Regelung für das
Gerät einschalten, Alarm ausschalten, aktiven Set Point ändern,
Regelung ausschalten.
5 - Led OUT1 : Signalisiert den Zustand des Ausgangs OUT1
6 - Led OUT2 : Signalisiert den Zustand des Ausgangs OUT2
7 - Led OUT3 : Signalisiert den Zustand des Ausgangs OUT3
8 - Led OUT4 : Signalisiert den Zustand des Ausgangs OUT4
9 - Led SET : Blinkend signalisiert diese Led den Zugriff auf den
Programmiermodus
10 - Led AT/ST : Signalisiert, dass die Selftuning-Funktion
eingeschaltet ist (leuchtet) bzw. das Autotuning gerade läuft (blinkt)
11 - Led - Abweichungsindex: Signalisiert, dass der Ist-Wert den
im Parameter “AdE” eingegebenen Wert unterschritten hat.
12 - Led = Abweichungsindex: Signalisiert, dass der Ist-Wert im
Bereich [SP+AdE ... SP-AdE] liegt.
13 - Led + Abweichungsindex: Signalisiert, dass der Ist-Wert den
im Parameter “AdE” eingegebenen Wert überschritten hat.
Bei Betätigung dieser Tasten steigt oder sinkt der Wert um eine
Einheit; werden die Tasten hingegen mindestens eine Sekunde
gedrückt gehalten, steigt bzw. sinkt der Wert schnell und nach zwei
Sekunden noch schneller, wodurch der gewünschte Wert schnell
erreicht wird.
Wurde der gewünschte Wert eingestellt und die Taste P gedrückt,
wird der Schnelleinstellmodus verlassen, bzw. auf der Anzeige
erscheinen die Alarmgrenzwerte (siehe Abschnitt 2.3).
Der Schnelleinstellmodus wird nach Drücken der Taste P nach
Anzeige des letzten Sollwertes verlassen oder automatisch, wenn
ca. 15 Sekunden lang keine Taste mehr gedrückt wurde. Daraufhin
kehrt die Anzeige zum normalen Betriebsmodus zurück.
2.2 - WAHL DER REGELZUSTÄNDE UND PROGRAMMIERUNG
DER PARAMETER
Wird die Taste "P" ca. 2 Sekunden lang gedrückt gehalten, öffnet
sich das Hauptmenü.
Anhand der Tasten "UP" oder DOWN” werden die verschiedenen
Wahlmöglichkeiten angezeigt:
"OPEr" öffnet das Menü der Betriebsparameter
"ConF" öffnet das Menü der Konfigurationsparameter
versetzt den Regler in den ÖFF-Zustand
"OFF"
aktiviert den automatischen Regelzustand des
"rEG"
Reglers
Aktiviert die Autotuning- oder Selftuning-Funktion
"tunE"
"OPLO aktiviert die Handregelung des Reglers und
ermöglicht eine Einstellung des Regelwertes in %
"
anhand der Tasten UP und DOWN
Wurde der gewünschte Menüpunkt angewählt, wird er durch
Drücken der Taste "P" bestätigt.
Die Menüpunkte "OPEr" und "ConF" öffnen Untermenüs mit
verschiedenen Parametern und zwar:
"OPEr" – Menü der Betriebsparameter: Dieses enthält
normalerweise die Einstellparameter der Sollwerte; hier können
jedoch auch alle gewünschten Parameter stehen (siehe Abschnitt
2.3).
"ConF" – Menü der Konfigurationsparameter: Dieses enthält alle
Betriebsparameter
und
Konfigurationsparameter
(Alarmkonfiguration, Regelung, Eingang, usw.) .
"rEG "
Ho ld for
2 sec.
"O FF"
AU TO TU N IN G
SEL FTU N IN G
AT
ST
2 - PROGRAMMIERUNG
"OPL O"
2.1 - SCHNELLEINSTELLUNG DER SOLLWERTE
Anhand dieses Vorgangs lässt sich der aktive Sollwert und ggf. die
Alarmgrenzwerte schnell einstellen (siehe Abschnitt 2.3).
Die Taste P kurz drücken; auf der Anzeige erscheint “SP n” (n
steht für die Nummer des zu diesem Zeitpunkt aktiven Sollwertes)
und abwechselnd der eingestellte Wert.
Das Menü “OPEr” wird durch Anwählen des entsprechenden
Erhöht wird der Wert anhand der Taste UP, reduziert wird er Menüpunktes“OPEr” und Drücken der Taste P geöffnet.
anhand der Taste DOWN.
TECNOLOGIC spa - TLK 31 D - BEDIENUNGSANLEITUNG - Vr. 02 - ISTR-MTLK31DDEU2 - PAG. 2
Nun erscheint auf der Anzeige eine Abkürzung, mit der die erste
Parametergruppe (“ ]SP “) identifiziert wird; anhand der Tasten UP
und DOWN kann die zu verändernde Parametergruppe angezeigt
werden.
Wurde die gewünschte Parametergruppe angewählt, muss die
Eingabe durch Drücken der Taste P bestätigt werden, um die
Abkürzung des ersten Parameters anzuzeigen.
Der gewünschte Parameter wird anhand der Tasten UP und
DOWN angezeigt und durch Drücken der Taste P bestätigt; auf der
Anzeige erscheint abwechselnd die Parameterabkürzung und der
eingestellte Wert, der wiederum durch Drücken der Tasten UP
oder DOWN verändert werden kann.
Wurde der gewünschte Wert eingestellt, ist erneut die Taste P zu
drücken: Der neue Wert wird nun gespeichert und auf der Anzeige
erscheint lediglich die Abkürzung des angewählten Parameters.
Anhand der Tasten UP oder DOWN kann nun ein weiterer
Parameter (sofern vorhanden) angewählt und wie beschrieben
verändert werden.
Soll eine neue Parametergruppe geöffnet werden, ist die Taste UP
oder die Taste DOWN ca. 2 Sekunden lang gedrückt zu halten;
daraufhin erscheint auf der Anzeige die Abkürzung der
Programmgruppe.
Die gedrückte Taste loslassen; anhand der Tasten UP und DOWN
kann nun eine neue Parametergruppe (sofern vorhanden)
angewählt werden.
Der Programmiermodus wird verlassen, wenn ca. 20 Sekunden
lang keine Taste mehr gedrückt wird, bzw. indem die Taste UP
oder DOWN solange gedrückt gehalten wird, bis der
Programmiermodus verlassen wurde.
Für den Zugriff auf das Menü „ConF“ wird eventuell ein
persönliches PASSWORT über den Parameter „PASS“
angefordert.
Für die Aktivierung dieser Schutzfunktion für den Parameter
„PASS“ die gewünschte Zahlenkombination eingeben und
anschließend die Funktion für die Programmierung der Parameter
verlassen.
Wenn die Schutzvorrichtung aktiviert ist, muss für den Zugriff auf
die Parameter im Menü „ConF“ das programmierte Passwort
eingegeben werden.
Bei der Anfrage des Passworts mit den Tasten UP und DOWN die
Zahlen für das im Parameter „PASS“ eingestellte Passwort
auswählen und anschließend die Taste „P“ drücken.
Wenn das eingegebene Passwort nicht korrekt ist, kehrt das Gerät
in den vorhergehenden Programmstatus zurück.
Bei richtiger Passworteingabe erscheint eine Abkürzung, mit die
erste Parametergruppe (“ ]SP “) identifiziert wird; anhand der
Tasten UP und DOWN kann die zu verändernde Parametergruppe
angewählt werden.
Programmierart und Verlassen des Menüs “ConF” entsprechen
dem Menü “OPEr”.
Für die Deaktivierung der Passwortfunktion in dem Parameter
„PASS“ die Option „PASS“ = OFF einstellen.
Hold for
2 sec.
Hold for
2 sec.
HINWEIS: Bei Verlust des Passworts das Gerät von der
Stromversorgung trennen, die Taste P drücken, das Gerät wieder
an die Stromversorgung anschließen und anschließend die Taste
ca. 5 Sekunden gedrückt halten.
Auf diese Weise haben Sie auf alle Parameter im Menü „ConF“
Zugriff und in dem Parameter „PASS“ kann das Passwort überprüft
bzw. geändert werden.
2.3 - PROGRAMMIEREBENEN DER PARAMETER
Das Menü “OPEr” enthält normalerweise die Einstellparameter der
Sollwerte, allerdings kann auf dieser Ebene bestimmt werden,
welche Parameter angezeigt oder ausgeblendet werden sollen.
Hierzu ist wie folgt beschrieben vorzugehen:
Das Menü “ConF” öffnen und den Parameter, der im Menü “OPEr”
programmierbar oder nicht programmierbar sein soll, anwählen.
Wurde der Parameter angewählt und ist die Led SET aus, so ist
der Parameter lediglich im Menü “ConF” programmierbar; leuchtet
die Led hingegen, so kann der Parameter auch im Menü “OPEr”
programmiert werden.
Zur Änderung der Parameteranzeige ist die Taste U zu drücken:
Die Led SET signalisiert den Anzeigezustand des Parameters
(leuchtet = Menü ”OPEr” und “ConF”; aus = nur Menü “ConF”).
Auf der unter Abschnitt 2.1 beschriebenen Schnelleinstellebene
der Sollwerte erscheinen der aktive Sollwert und die
Alarmgrenzwerte nur dann, wenn die entsprechenden Parameter
als operative Parameter konfiguriert wurden (d.h. sie stehen im
Menü “OPEr”).
Eine Änderung dieser Sollwerte nach der unter Abschnitt 2.1
beschriebenen
Vorgehensweise
unterliegt
hingegen
der
Programmierung unter Abschnitt “Edit” (in der Gruppe“ ]PAn “).
Dieser Parameter kann wie folgt beschrieben verändert werden:
= SE: Der aktive Sollwert ist editierbar, während die
Alarmgrenzwerte nicht editierbar sind.
= AE : Der aktive Sollwert ist nicht editierbar, während die
Alarmgrenzwerte editierbar sind.
= SAE: Sowohl der aktive Sollwert als auch die Alarmgrenzwerte
sind editierbar.
= SAnE: Weder der aktive Sollwert noch die Alarmgrenzwerte sind
editierbar.
2.4 - REGELZUSTÄNDE
Der Regler kann 3 verschiedene Zustände annehmen:
Automatische Regelung (rEG), Regelung deaktiviert (OFF) und
Handregelung (OPLO).
Das Gerät kann von einem Regelzustand in den anderen
übergehen:
- Über die Tastatur durch anwählen des gewünschten Zustands im
Hauptmenü.
- Über die Tastatur durch Drücken der Taste U und entsprechende
Programmierung des Parameters “USrb” (“USrb” = tunE; “USrb” =
OPLO; “USrb” = OFF) kann vom Zustand “rEG” zu dem im
Parameter programmierten Zustand übergegangen werden und
umgekehrt.
- Mit entsprechender Programmierung des Parameters “diF”
(“diF”=OFF) kann über den Digitaleingang 1 von Zustand “rEG” auf
Zustand “OFF” umgeschaltet werden.
- Automatisch (das Gerät versetzt sich nach Abschluss des
Autotuning-Vorgangs in den Zustand "rEG").
Bei Einschaltung versetzt sich das Gerät automatisch in den
Zustand, in dem es sich vor der Abschaltung befand.
AUTOMATISCHE REGELUNG (rEG) – Der automatische
Regelzustand ist der normale Betriebszustand des Reglers.
Während der automatischen Regelung kann die Regelleistung
durch Drücken der Taste "UP" angezeigt werden.
Für die Leistung können die Werte H100 (100% Leistung am
Ausgang mit umgekehrter Wirkung) und C100 (100% Leistung am
Ausgang mit direkter Wirkung) angezeigt werden.
DEAKTIVIERTE REGELUNG (OFF) – Der Regler kann in den
"OFF"-Zustand versetzt werden, d.h. Regelung und entsprechende
Ausgänge werden deaktiviert.
Die Alarmausgänge funktionieren jedoch normal weiter.
HANDREGELUNG BUMPLESS (OPLO) – Durch diese Option
kann nach Deaktivierung der Automatikregelung von Hand der
Prozentanteil der am Ausgang vom Regler abgegebenen Leistung
eingestellt werden.
Wenn das Gerät in die Handregelung versetzt wird ist der
Prozentanteil der ausgeführten Leistung die zuletzt am Ausgang
abgegebene Leistung und kann anhand der Tasten UP und DOWN
verstellt werden. Bei Regelung EIN/AUS entspricht der Wert 0%
dem deaktivierten Ausgang während ein beliebiger von 0
verschiedener Wert einem aktivierten Ausgang entspricht.
TECNOLOGIC spa - TLK 31 D - BEDIENUNGSANLEITUNG - Vr. 02 - ISTR-MTLK31DDEU2 - PAG. 3
Genau wie bei der Anzeige können für die Leistung die Werte Gerät
angeschlossenen
Verbraucher
den
vorgesehenen
H100 (+100%) und C100 (-100%) eingegeben werden.
Höchstwert nicht überschreitet.
Im Wahlmenü "rEG" anwählen, um den Regler wieder in den Da das Gerät für einen permanenten Anschluss in einer
automatischen Regelmodus zu versetzen.
Einrichtung vorgesehen ist, verfügt es weder über Schalter noch
über interne Schutzvorrichtungen gegen Überstrom.
Daher ist ein als Abschalteinrichtung markierter bipolarer
2.5 - WAHL DES AKTIVEN SOLLWERTES
Im Regler können bis zu 2 verschiedene Sollwerte eingestellt Schalter/Trennschalter vorzusehen, der die Stromversorgung zum
werden (“SP1”, “SP2”), daraufhin kann bestimmt werden, welcher Gerät unterbricht.
Dieser Schalter muss so nah wie möglich am Gerät und an einer
Sollwert aktiviert werden soll.
Die Höchstzahl der Sollwerte wird im Parameter "nSP" in der für den Betreiber gut erreichbaren Stelle installiert werden.
Außerdem sind alle am Gerät angeschlossenen Kreisläufe durch
Parametergruppe“ ]SP “ bestimmt.
geeignete, den vorhandenen Stromwerten entsprechende
Der aktive Sollwert kann gewählt werden:
Vorrichtungen (z.B. Sicherungen) abzusichern.
- Durch den Parameter "SPAt" in der Parametergruppe “ ]SP “.
- Durch Drücken der Taste U, wenn der Parameter "USrb" = CHSP. Es sind Kabel zu verwenden, die über geeignete, den
Temperaturen
und
Betriebsbedingungen
- Über den entsprechend programmierten Digitaleingange durch Spannungen,
entsprechende Isolierung verfügen und es muss darauf geachtet
den Parameter “diF” (“diF” = CHSP , = SP1.2 , = HE.Co)
- Automatisch zwischen SP1 und SP2, wenn eine Erhaltungszeit werden, dass die Kabel der Eingangsfühler separat von den
Stromkabeln und anderen Leistungskabeln verlegt werden, um
"dur.t" (siehe Abschnitt 4.9).
Die Sollwerte "SP1", "SP2" werden nach der Höchstzahl der im eine Induktion elektromagnetischer Störungen zu vermeiden.
Parameter "nSP" eingestellten Sollwerte angezeigt und nach einem Bei Verwendung von abgeschirmten Kabeln sind diese nur
Wert zwischen dem im Parameter “SPLL” und dem im Parameter einseitig zu erden.
“SPHL” eingestellten Wert verändert. “SPLL”
ist der im Zur Speisung des Gerätes wird die Verwendung des
Transformators
TCTR
bzw.
eines
Transformators
mit
Parameter programmierte Eingang.
entsprechenden
Merkmalen
empfohlen;
es
sollte
für
jedes
Gerät
Hinweis: In den folgenden Beispielen steht für den Sollwert
normalerweise "SP", jedoch funktioniert das Gerät nach dem ein Trafo verwendet werden, da zwischen Speisung und Eingang
keine Isolierung besteht.
aktivierten Sollwert.
Vor Anschluss der Ausgänge an die Verbraucher ist unbedingt
sicherzustellen, dass die eingestellten Parameter auch tatsächlich
3 - HINWEISE ZUR INSTALLATION UND ZUM GEBRAUCH
den gewünschten Parameterwerten entsprechen und die
Anwendung richtig funktioniert, damit keine Störungen in der
3.1 - BESTIMMUNGSGEMÄSSER GEBRAUCH
Anlage verursacht werden, die zu Personen- oder Sachschäden
Das Gerät wurde als Mess- und Regelgerät führen könnten.
konzipiert und entspricht der Vorschrift EN61010-1
für das Funktionieren zu Höhen bis 2000 m.
3.4 - ANSCHLUSSPLAN
Bei einem Gebrauch des Gerätes für nicht
Pr1
RS 485
DIG
DIG
ausdrücklich in dieser Vorschrift vorgesehene
PTC-NTC
IN2
IN1
B
GND A
Anwendungen müssen sämtliche Schutzmaßnahmen getroffen
Pr2
werden.
Das Gerät darf ohne angemessene Absicherung NICHT in
1 2 3 4 5 6 7 8 9 10 11 12
explosionsgefährdeter
Atmosphäre
verwendet
werden
(entzündbarer oder explosiver Atmosphäre).
SSR:10mA/10VDC
RELAY:8A-AC1(3A-AC3)/250VAC
Der Installateur hat sicherzustellen, dass die Normen in bezug auf TLK31 D
elektromagnetische Kompatibilität auch nach Installation des
Gerätes erfüllt werden, ggf. durch Verwendung von Spezialfiltern.
C
NO
C
NO C
NC NO C
NC NO
Falls eine Betriebsstörung des Gerätes Personen- oder
13 14 15 16 17 18 19 20 21 22 23 24
Sachschäden verursachen kann, muss die Anlage mit zusätzlichen
OUT4
OUT3
OUT1
OUT2
elektromechanischen Schutzeinrichtungen abgesichert werden.
SUPPLY
3.2 - MECHANISCHER EINBAU
Das Gerät befindet sich in einem 78 x 35 mm Gehäuse und ist für
den Schalttafeleinbau vorgesehen.
Es wird in eine 29 x 71 mm Aussparung gesetzt und daraufhin mit
dem vorgesehenen Klemmbügel befestigt.
Es wird darauf hingewiesen, dass zur Gewährleistung der
angegebenen Front-Schutzart die zur Ausstattung gehörende
Dichtung zu verwenden ist.
Die Innenseite des Gerätes sollte weder Staub noch starker
Feuchtigkeit ausgesetzt werden, da sich Kondenswasser bilden
könnte oder in das Geräteinnere leitende Teile oder Stoffe
gelangen könnten.
Außerdem ist sicherzustellen, dass das Gerät ausreichend belüftet
ist; ein Einbau in Bereichen, in denen sich Einrichtungen befinden,
die einen Betrieb des Reglers außerhalb der angegebenen
Temperaturgrenzwerte verursachen könnten, ist unbedingt zu
vermeiden.
Das Gerät ist so weit wie möglich entfernt von Quellen, die starke
elektromagnetische Störungen verursachen könnten, d.h. von
Motoren, Schützen, Relais, Magnetventilen usw. zu installieren.
4 - BETRIEB
4.1 - MESSUNG UND ANZEIGE
Alle Parameter der Messfunktion befinden sich in der Gruppe
“]InP”.
Nachdem eingestellt wurde, welche Fühler verwendet werden
sollen, können mit dem Parameter „Unit“ die Maßeinheit für die
Temperatur (°C oder °F) und mit dem Parameter „dP“ die
Temperaturauflösung ausgewählt werden.
Wenn der Fühler Pr2 nicht verwendet wird, muss für den
Parameter „Pr 2“ die Einstellung „Pr 2“ = no gewählt werden, um
zu vermeiden, dass eine Fehlermeldung erscheint, wenn der
Fühler nicht angeschlossen ist.
Das Gerät ermöglicht eine Messkalibrierung, die je nach
Anwendung zur Neueinrichtung des Gerätes verwendet werden
kann; hierzu werden die Parameter “OFS1”, “OFS2” und “rot”
verwendet.
Wird der Parameter “rot”=1,000 gestellt, kann im Parameter “OFS”
(1 und/oder 2) ein positiver oder negativer Offset eingestellt
3.3 - ELEKTRISCHE ANSCHLÜSSE
werden, der einfach vor der Anzeige zu dem vom Fühler
Das Gerät anschließen; dazu jeweils einen Leiter je Klemme gemessenen Wert hinzuaddiert wird und bei allen Messungen
anschließen und entsprechend beiliegendem Anschlussschema konstant bleibt.
vorgehen; dabei sicherstellen, dass die Netzspannung den
Hinweisen auf dem Gerät entspricht und der Anschlusswert der am
TECNOLOGIC spa - TLK 31 D - BEDIENUNGSANLEITUNG - Vr. 02 - ISTR-MTLK31DDEU2 - PAG. 4
4.2 - KONFIGURATION DER AUSGÄNGE
Die Ausgänge des Gerätes können in der Parametergruppe “]Out”
konfiguriert werden, und zwar je nach der Anzahl der im Gerät
verfügbaren Ausgänge bestehen die folgenden Parameter “O1F” ,
“O2F” ,“O3F” ,“O4F”.
4.3 - WÄRMEREGLER MIT ABSOLUTER TEMPERATUR ODER
TEMPERATURDIFFERENZ
Mithilfe des Parameters „PrrG“ kann die Prozessvariable, die der
Wärmeregler während des Betriebs verwenden soll, eingestellt
werden.
Der Wärmeregler kann als Prozessvariable den Wert, der am
Eingang 1 (Pr1) oder am Eingang 2 (Pr2) gemessen wurde, oder
die Temperaturdifferenz zwischen beiden Eingängen Pr1-Pr2
(P1-2) verwenden, oder er geht von der Differenz der beiden
Eingänge Pr1-Pr2 aus und legt einen Höchstwert und einen
Mindestwert für die Messung Pr2 (P1-L) zugrunde.
Mit den Einstellungen „PrrG“ = P1-2 oder P1-L arbeitet der
Wärmeregler wie ein Differenzregler.
In diesen Fällen wirkt der Regler auf die Regelausgänge so, dass
die Differenz Pr1-Pr2 immer dem Wert des Set Points entspricht.
Der Unterschied zwischen den beiden Betriebsarten liegt darin,
dass die Betriebsart P1-L in dem Regler einen Grenzwert für die
Berechnung der Temperaturdifferenz aktiviert, der auf den
Parametern „P2HL“ und „P2LL“ beruht (beide sind in der Gruppe
„]SP“enthalten), damit:
der Regler, wenn Pr2 >/= P2HL, von einem Prozesswert
[Pr1-P2HL] ausgeht.
der Regler, wenn Pr2 </= P2HLL, von einem Prozesswert
[Pr1-P2LL] ausgeht.
Wenn die Temperatur Pr2 die festgelegten Schwellenwerte „P2HL“
und „P2LL“ überschreitet, wird die Regelung so ausgeführt, als ob
die Temperatur Pr2, unabhängig von dem tatsächlich erfassten
Wert, der Schwellenwert wäre.
Mit dieser Funktion soll die Differenzregelung auf einen maximalen
Messbereich Pr2 begrenzt werden.
Bei der Differenzregelung wird die Betriebsart „Func“ = CooL für
die Anwendungen eingesetzt, bei denen sich die Differenz Pr1-Pr2
durch die Wirkung des Stellantriebs verringert (und sich folglich
dem natürlichen Anstieg der Differenz Pr1-Pr2 widersetzt).
Umgekehrt wird die Betriebsart „Func“ = HEAt für die
Anwendungen eingesetzt, bei denen sich die Differenz Pr1-Pr2
durch die Wirkung des Stellantriebs erhöht (und sich folglich dem
natürlichen Abfall der Differenz Pr1-Pr2 widersetzt).
Natürlich haben die Betriebsart Neutraler Bereich oder die doppelte
Wirkung beide eine kontrastierende Wirkung.
T e m p .
P r1
SP1+HSEt
Beispiel : Das Gerät soll bei 20° den tatsächlich gemessenen Wert
anzeigen und bei 100° einen um 10° niedrigeren Wert (90°).
Daraus ergibt sich: M1=20 ; D1=20 ; M2=100 ; D2=90
“rot” = (90 - 20) / (100 - 20) = 0,875
“OFS” = 90 - (0,875 x 100) = 2,5
Im Parameter “FiL” kann die Zeitkonstante des Softwarefilters der
Messung des Eingangswertes derart eingestellt werden, dass die
Empfindlichkeit gegen Messstörungen reduziert wird (Zeit wird
erhöht).
Bei Messfehlern sorgt das Gerät dafür, dass am Ausgang die im
Parameter “OPE” eingegebene Leistung abgegeben wird.
Diese Leistung wird nach der für den PID-Regler programmierten
Zykluszeit berechnet, während für die EIN/AUS Regler automatisch
eine Zykluszeit von 20 Sekunden angenommen wird.
(z.B. bei Fühlerfehler und EIN/AUS Regelung und “OPE”= 50 wird
der Einstellausgang 10 Sekunden lang aktiviert, bleibt dann 10
Sekunden lang deaktiviert und so weiter, solange der Messfehler
besteht).
Im Parameter “InE” kann auch bestimmt werden, welche
Einfangsfehler dazu führen, dass das Gerät die im Parameter
“OPE” eingestellte Leistung abgibt.
Folgende Eingaben sind für den Parameter “InE” möglich:
=Or : Der Zustand wird vom Overrange bzw. vom Fühlerbruch
bestimmt.
= Ur : Der Zustand wird vom Underrange bzw. vom Fühlerbruch
bestimmt.
= Our : Der Zustand wird vom Overrange oder Underrange bzw.
vom Fühlerbruch bestimmt.
Mit dem Parameter „diSP“ in der Gruppe „]PAn“ kann für das
Display die normale Anzeige z. B. der Messung des Fühlers Pr1
(Pr 1) oder des Fühlers Pr2 (Pr 2), der Temperaturdifferenz Pr1-Pr2
(P1-2), der Regelungsleistung (Pou), des aktiven Set Points
(SP.F), des Set Points für den Betrieb, wenn die Rampen aktiviert
sind (SP.o) und der Alarmschwelle AL1,2,3 (AL1, AL2, AL3)
ausgewählt werden.
Unabhängig von der Einstellung für den Parameter „diSP“ können
die Variablen Pr1, Pr2 und Pr1-Pr2 im Rotationsverfahren
angezeigt werden. Dazu die Taste U drücken und loslassen. Auf
dem Display erscheinen jetzt abwechselnd der Code für die
Identifizierung der Variablen (Pr 1, Pr 2, P1-2) und dessen Wert.
Dieser Anzeigemodus schaltet sich automatisch 15 Sekunden,
nachdem die Taste zum letzten Mal gedrückt wurde, aus.
Zur Gruppe “]PAn” gehört auch der Parameter “AdE”; dieser legt
den Betrieb des 3-stelligen Led-Abweichungsindex fest.
Durch Aufleuchten der grünen Led = wird signalisiert, dass der
Istwert im Bereich [SP+AdE ... SP-AdE] liegt, das Aufleuchten der
Led – bedeutet, dass der Istwert niedriger ist als der Wert [SP-AdE]
und das Aufleuchten der Led + heißt, dass der Istwert höher als
der Wert [SP+AdE] ist.
Die Ausgänge lassen sich für die folgenden Betriebsarten
konfigurieren:
- Hauptregelausgang (1.rEG)
- Nebenregelausgang (2.rEG)
- Alarmausgang normalerweise auf (ALno)
- Alarmausgang normalerweise zu (ALnc)
- Alarmausgang normalerweise zu aber mit Hinweis vom Vorder led
des Gerätes leugnet (ALni)
- Ausgang deaktiviert (OFF)
Die Kombination Ausgangsnummer – Alarmnummer wird hingegen
in der entsprechenden Alarmgruppe vorgenommen (“]AL1”,”]AL2”
oder “]AL3”)
SP1
Soll der eingestellte Offset hingegen nicht bei allen Messungen
konstant bleiben, kann die Kalibrierung an zwei beliebigen Punkten
vorgenommen werden.
In diesem Fall sind zur Bestimmung der in den Parametern “OFS”
und “rot” einzugebenden Werte die folgenden Formeln zu
verwenden:
“rot” = (D2-D1) / (M2-M1)
“OFS” = D2 - (“rot” x M2)
Hierbei ist:
M1 = der gemessene Wert 1
D1 = der anzuzeigende Wert, wenn das Gerät M1 misst
M2 = der gemessene Wert 2
D2 = der anzuzeigende Wert, wenn das Gerät M2 misst
Daraus ergibt sich für das Gerät die folgende Anzeige:
DV = MV x “rot” + “OFS”
Hierbei ist:
DV = der angezeigte Wert
MV= der gemessene Wert
P r2
P r1 -P r2
H S E t
S P 1
tim e
O N
1 .rE G
O N
o ff
O N
o ff
Beispiel für die Differenzregelung ON/OFF (On.FA) mit „Func“ =
CooL
Achtung: Der Regler wurde schon werkseitig für die
Differenzregelung und die Anzeige der Temperaturdifferenz
Pr1-Pr2 programmiert.
TECNOLOGIC spa - TLK 31 D - BEDIENUNGSANLEITUNG - Vr. 02 - ISTR-MTLK31DDEU2 - PAG. 5
4.4 - EIN/AUS-REGELUNG (1.rEG)
Alle Parameter der EIN/AUS-REGELUNG befinden sich in der
Gruppe “]rEG”.
Diese Regelart kann durch Einstellen des Parameters "Cont" =
On.FS oder = On.FA aktiviert werden und wirkt auf den als 1.rEG
konfigurierten Ausgang, nach der programmierten Messung, dem
aktiven Sollwert "SP", der Betriebsart "Func” und der Hysterese
"HSEt".
Das Gerät nimmt bei “Cont" = On.FS eine EIN/AUS-REGELUNG
mit symmetrischer Hysterese vor, bzw. bei “Cont” = On.Fa eine
EIN/AUS-REGELUNG mit asymmetrischer Hysterese.
Der Regler verhält sich dabei wie folgt: bei umgekehrtem
Wirkungssinn oder Heizen (“FunC”=HEAt) deaktiviert er den
Ausgang, wenn der Istwert den Wert [SP + HSEt] bei
symmetrischer Hysterese bzw. [SP] bei asymmetrischer Hysterese
erreicht hat, und aktiviert ihn wieder, wenn der Wert unter [SP HSEt] sinkt.
Umgekehrt, d.h. bei direktem Wirkungssinn oder Kühlen
("Func”=CooL) deaktiviert der Regler den Ausgang, wenn der
Istwert den Wert [SP - HSEt] bei symmetrischer Hysterese bzw.
[SP] bei asymmetrischer Hysterese erreicht hat, und aktiviert ihn
wieder, wenn er den Wert [SP + HSEt] überschreitet.
PV
PV
SP
HSEt
HSEt
SP
ON
ON
off
ON
OUT
1.rEG
off
ON
ON
off
HEAt - On.FA
off
PV
HSEt
SP
HSEt
HSEt
SP
HSEt
time
OUT
1.rEG
ON
ON
off
ON
off
HEAt - On.FS
HSEt
SP
OUT 1.rEG
(heating)
HSEt
0N
time
0N
off
off
0N
OUT 2.rEG
(cooling)
off
off
ON
CooL - On.FA
PV
PV
time
time
OUT
1.rEG
Beider Schutzart handelt es sich um eine Abschaltverzögerung.
Der Schutz besteht darin, dass der Ausgang während einer im
Parameter “CPdt“ (angegeben in Sekunden) vorgegebenen Zeit,
die nach der letzten Abschaltung des Ausgangs beginnt, aktiviert
wird; d.h. eine mögliche Aktivierung kann erst nach Ablauf der Zeit
„CPdt“ erfolgen.
Sollte während der Aktivierverzögerung wegen Hemmung der
Funktion „Cpmpressor Protection“ keine Ansteuerung des Reglers
erfolgen, wird die Aktivierung des Ausgangs natürlich aufgehoben.
Die Funktion wird durch Programmierung von “CPdt“ = OFF
deaktiviert.
Während aller Phasen der Aktivierverzögerungdes Ausgangs zur
Hemmung der Funktion „Compressor Protection“ blinkt die Led von
des Ausgangs 2.rEG.
time
OUT
1.rEG
ON
ON
ON
4.6 - PID-REGELUNG MIT EINFACHER WIRKUNG (1rEG)
Alle Parameter der PID-Regelung befinden sich in der Gruppe
“]rEG”.
Die PID-Regelung mit einfacher Wirkung wird aktiviert, indem der
Parameter "Cont" = Pid gestellt wird und wirkt auf den Ausgang
1rEG nach dem aktiven Sollwert “SP”, der Betriebsart "FunC"
und dem Ergebnis des 2-stufigen PID-Regelalgorithmus des
Gerätes.
PV
off
off
CooL - On.FS
4.5 - EIN/AUS-REGELUNG BEI NEUTRALER ZONE (1.rEG 2.rEG)
Sämtliche Parameter der EIN/AUS-Regelung bei neutraler Zone
befinden sich in der Gruppe “]rEG”.
Dieser Betrieb kann aktiviert werden, wenn 2 Ausgänge als 1.rEG
und
2.rEG konfiguriert wurden; die Funktion wird durch
Programmieren des Parameters “Cont” = nr bestimmt.
Die Regelart mit neutraler Zone wird zur Steuerung von Anlagen
verwendet, die über ein Element verfügen, das einen positiven
Anstieg erzeugt (z.B. ein Heizen, Anfeuchten usw..) und über ein
Element, das einen negativen Anstieg erzeugt (z.B. Kühlen,
Entfeuchten usw.).
Der Regelbetrieb wirkt auf die Ausgänge, die nach der
programmierten Messung, dem aktiven Sollwert "SP" und der
Hysterese "HSEt" konfiguriert wurden.
Dabei verhält sich der Regler wie folgt: Er schaltet die Ausgänge
ab, wenn der Istwert den Sollwert erreicht und aktiviert den
Ausgang 1.rEG wenn der Istwert niedriger ist als [SP-HSEt], bzw.
er schaltet den Ausgang 2.rEG ein, wenn der Istwert höher ist als
[SP+HSEt].
Folglich muss das Element, das den positiven Anstieg erzeugt, an
den als 1.rEG konfigurierten Ausgang und das Element, das den
negativen Anstieg erzeigt, an den als 2.rEG konfigurierten Ausgang
angeschlossen werden.
Wurde der Ausgang 2.rEG als Kompressorschaltung verwendet, ist
die Funktion „Compressor
Protection“
(Verdichterschutz)
vorgesehen; diese Funktion hat die Aufgabe, ein ständiges Einund Ausschalten des Verdichters zu vermeiden.
Die Funktion bewirkt eine Zeitschaltung bei Aktivierung von
Ausgang 2.rEG, die unabhänging von der Austeuerung des
Temperaturreglers ist.
SP
tim e
OUT
1 .rE G
(H E a t)
0N
tc r1
0N
0N
o ff
o ff
tc r1
tc r1
0N
o ff
tc r1
0N
0N
o ff
o ff
tc r1
tc r1
0N
o ff
tc r1
Zur Gewährleistung einer guten Stabilität der Variable bei
schnellen Abläufen, muss als Zykluszeit “tcr1” niedrig sein und der
Regelausgang häufig ansprechen.
In diesem Fall sollte ein Statikrelais (SSR) zur Steuerung des
Verbrauchers verwendet werden.
Für den PID-Regelalgoritmus mit einfacher Wirkung des Gerätes
können die folgenden Parameter eingestellt werden:
"Pb" - Proportionalband
"tcr1" – Zykluszeit von Ausgang 1.rEG
"Int" – Integralzeit
"rS" – manuelle Rücksetzung (nur bei “Int =0)
"dEr" – Vorhaltezeit
“FuOC” – Fuzzy Overshoot Control
Durch diesen letzen Parameter können Überschwingungen der
Variable (overshoot) bei Einschaltung des Prozesses bzw. bei
Änderung des Sollwertes vermieden werden.
Hierbei ist jedoch zu berücksichtigen, dass ein niedriger
Parameterwert das Overshoot reduziert, während es ein hoher
Wert erhöht.
TECNOLOGIC spa - TLK 31 D - BEDIENUNGSANLEITUNG - Vr. 02 - ISTR-MTLK31DDEU2 - PAG. 6
PV
2
1
SP
3
t im e
1: Wert “FuOC” OK
2: Wert “FuOC” zu hoch
3: Wert “FuOC” zu niedrig
4.7 - PID-REGELUNG MIT DOPPELTER WIRKUNG (1.rEG 2.rEG)
Alle Parameter der PID-Regelung befinden sich in der Gruppe
“]rEG”.
Die PID-Regelung mit doppelter Wirkung wird zur Steuerung von
Anlagen verwendet, die über ein Element verfügen, das einen
positiven Anstieg erzeugt (z.B. Heizen) und über ein Element, das
einen negativen Anstieg (z.B. Kühlen). Die Funktion wird aktiviert,
wenn 2 Ausgänge als 1.rEG und 2.rEG konfiguriert und der
Parameter “Cont” = Pid gestellt wurde.
Das den positiven Anstieg erzeugende Element muss an den als
1.rEG konfigurierten Ausgang angeschlossen werden, während
das den negativen Anstieg erzeugende Element an den als 2.rEG
konfigurierten Ausgang angeschlossen wird.
Die PID-Regelung mit doppelter Wirkung wirkt folglich auf die
Ausgänge 1.rEG und 2.rEG nach dem aktiven Sollwert “SP” und
dem Ergebnis des 2-stufigen PID-Regelalgorithmus des Gerätes.
Zur Gewährleistung einer guten Stabilität der Variable bei
schnellen Abläufen müssen die Zykluszeiten “tcr1” und “tcr2”
niedrig sein und die Regelausgänge häufig ansprechen.
In diesem Fall sollte ein Statikrelais (SSR) zur Steuerung der
Verbraucher verwendet werden.
Für den PID-Regelalgorithmus mit doppelter Wirkung des Gerätes
können die folgenden Parameter eingestellt werden:
"Pb" - Proportionalband
"tcr1" – Zykluszeit von Ausgang 1.rEG
"tcr2" – Zykluszeit von Ausgang 2.rEG
"Int" – Integralzeit
"rS" – manuelle Rücksetzung (nur bei “Int =0)
"dEr" – Vorhaltezeit
“FuOC” – Fuzzy Overshoot Control
"Prat" – Power Ratio oder Verhältnis zwischen der Leistung des
vom Ausgang 2.rEG angesteuerten Elements und der Leistung des
vom Ausgang 1.rEG angesteuerten Elements.
4.8 - AUTOTUNING- UND SELFTUNING-FUNKTIONEN
Alle Parameter der AUTOTUNING- und SELFTUNING-Funktionen
befinden sich in der Gruppe“]rEG”.
Die AUTOTUNING-Funktion und die SELTUNING-Funktion
gestatten eine automatische Einstellung des PID-Reglers.
Die Funktion AUTOTUNING sieht die Berechnung der
PID-Parameter in einem Abstimmzyklus vom Typ FAST oder
OSZILLIEREND vor ; nach Abschluss des Zyklus werden die
Parameter vom Gerät gespeichert und bleiben während der
Regelung konstant.
Die SELFTUNING-Funktion (rule based "TUNE-IN") beinhaltet
hingegen die Steuerung der Regelung und eine fortwährende
Neuberechnung der Parameter während der Regelung.
Beide Funktionen berechnen automatisch die folgenden
Parameter:
"Pb" - Proportionalband
"tcr1" – Zykluszeit von Ausgang 1.rEG
"Int" – Integralzeit
"dEr" – Vorhaltezeit
“FuOC” - Fuzzy Overshoot Control
und für die PID-Regelung mit doppelter Wirkung auch:
"tcr2" – Zykluszeit von Ausgang 2.rEG
"Prat" – Das Verhältnis P 2.rEG/ P 1.rEG
Zur Aktivierung der AUTOTUNING-Funktion ist wie folgt
beschrieben vorzugehen:
1) Den gewünschten Sollwert einstellen und aktivieren.
2) Den Parameter "Cont" =Pid stellen.
3) Bei Steuerung mit einfacher Wirkung ist der Parameter "Func"
nach dem über Ausgang 1rEG zu steuernden Prozess einzustellen.
4) Einen Ausgang als 2rEG konfigurieren, wenn das Gerät eine
Anlage mit doppelter Wirkung steuert.
5) Den Parameter "Auto" wie folgt einstellen:
= 1
: wenn das FAST Autotuning automatisch bei jeder
Geräteeinschaltung gestartet werden soll, sofern der Istwert kleiner
(bei “Func” =HEAt) als [SP- |SP/2|] oder größer (bei “Func” =CooL)
als [SP+ |SP/2|].
= 2 : wenn das FAST Autotuning automatisch bei der nächsten
Geräteeinschaltung gestartet werden soll, sofern der Istwert kleiner
(bei “Func” =HEAt) als [SP- |SP/2|] oder größer (bei “Func” =CooL)
als [SP+ |SP/2|] ist und nach Abschluss der Einstellung
automatisch der Parameter “Auto”=OFF gestellt wird.
= 3 : wenn das FAST Autotuning von Hand durch Aktivieren des
Punktes “tunE” im Hauptmenü bzw. durch Betätigen der
entsprechend programmierten Taste U (“USrb” = tunE) gestartet
werden soll, sofern der Istwert kleiner (bei “Func” =HEAt) als [SP|SP/5|] oder größer (bei “Func” =CooL) als [SP+ |SP/5|].
= 4 : wenn es wünscht, daß der FAST Autotuning automatisch am
Änderung des Sollwert oder Ende der programmiert Zyklus von
Soft-Start gestartet wird. Sofern der Istwert kleiner (bei “Func”
=HEAt) als [SP- |SP/5|] oder größer (bei “Func” =CooL) als [SP+
|SP/5|] ist.
= - 1 : wenn beim Einschalten des Geräts immer automatisch ein
OSZILLIERENDES Autotuning durchgeführt werden soll.
= - 2 : wenn beim nachfolgenden Einschalten des Geräts immer ein
OSZILLIERENDES Autotuning durchgeführt und nach Abschluss
der Abstimmung automatisch der Wert „Auto“=OFF eingestellt
werden soll.
= - 3 : wenn das OSZILLIERENDE Autotuning manuell mit der
Taste U eingestellt werden soll.
= - 4 : wenn das OSZILLIERENDE Autotuning automatisch bei
jeder Veränderung des Set Points für die Regelung oder nach
Abschluss des programmierten Soft-Start-Zyklus eingeschaltet
werden soll.
HINWEIS: Das Autotuning Fast ist besonders schnell und hat keine
Auswirkung auf die Regelung, weil es die Parameter für den Regler
während des Erreichens des Set Points kalkuliert.
Für die korrekte Ausführung des Autotunings Fast muss aber bei
Start des Vorgangs eine geringfügige Differenz zwischen der
Prozessvariablen und dem Set Point bestehen. Deshalb schaltet
das Gerät das Autotuning Fast nur dann ein, wenn:
- Für „Auto“ = 1 oder 2 gilt: Der Prozesswert ist kleiner (für „Func“
=HEAt) als [SP- |SP/2|] oder größer (für „Func“ =CooL) als [SP+
|SP/2|].
- Für „Auto“ = 3 oder 4 gilt: Der Prozesswert ist kleiner (für „Func“
=HEAt) als [SP- |SP/5|] oder größer (für „Func“ =CooL) als [SP+
|SP/5|].
Es wird empfohlen, kein Autotuning FAST auszuführen, wenn der
Set Point kurz vor dem ersten Ablesen steht, oder wenn die
gemessene Variable ungleichmäßige Abweichungen während des
Abstimmzyklus (weil die Variable aus Prozessgründen steigt oder
abfällt) aufweist.
In dem Fall wird das oszillierende Autotuning empfohlen, das
einige ON-OFF-Regelungszyklen durchführt, die bewirken, dass
der Prozesswert zwischen dem Wert der abgeschlossenen Set
Points schwankt, die zu einer Regelung vom Typ PID mit den
während des Autotunings ermittelten Werten überwechseln.
6) Die Programmierung der Parameter verlassen.
7) Den Regler an die zu steuernde Anlage anschließen.
8) Das Autotuning durch Ab- und Einschalten des Gerätes starten,
wenn der Parameter “Auto” = 1 oder 2 bzw. durch Aktivieren des
Menüpunktes “tunE” im Hauptmenü (oder über die entsprechend
programmierte Taste U).
Nun wurde die Autotuning-Funktion aktiviert und dieser Zustand
wird durch Blinken der Led AT/ST signalisiert.
TECNOLOGIC spa - TLK 31 D - BEDIENUNGSANLEITUNG - Vr. 02 - ISTR-MTLK31DDEU2 - PAG. 7
Der Regler nimmt nun an der überwachten Anlage zur Berechnung
der Parameter für die PID-Regelung eine Reihe von Einstellungen
vor.
Bei “Auto” = 1 oder “Auto” = 2 und falls zu Beginn des Autotunings
der Istwert (bei “Func” =HEAt) als [SP- |SP/2|] oder größer (bei
“Func” =CooL) als [SP+ |SP/2|] war, erscheint auf der Anzeige
“ErAt” und das Gerät versetzt sich in den normalen
Betriebsmodus, nach den zuvor programmierten Parametern.
Um die Fehlermeldung “ErAt” zu löschen, muss der Regler in den
OFF-Regelzustand (OFF) und daraufhin auf die automatische
Regelung (rEG) gestellt werden.
Die Dauer eines Autotuning-Zyklus ist auf maximal 12 Stunden
begrenzt.
Wurde der Vorgang innerhalb dieser 12 Stunden nicht
abgeschlossen, erscheint auf der Anzeige "noAt" .
Sollte hingegen eine Fühlerstörung eintreten, unterbricht das Gerät
natürlich den laufenden Zyklus.
Die vom Autotuning berechneten Werte werden automatisch vom
Regler nach Abschluss eines ordnungsgemäß erfolgten
Autotuning-Zyklus in den entsprechenden Parametern der
PID-Regelung gespeichert.
Die Funktionen sind deaktiviert, wenn die entsprechenden
Parameter auf = InF gestellt werden.
Wenn es nur das Erreichung des Aktivsollwert bestand wünscht,
(Beispiel "SP1"), es ist zum den Abs. "SLor" gewünschten Wert zu
gliedern zu beherrschter Schnelligkeit genügend.
Die Rampe wird "SLor" sich immer zur Zündung des Gerätes
wirksam als erweisen und wenn es den Wert von Aktivsollwert
gewechselt wird.
Wenn es jedoch wünscht von der Zündung des Gerätes einen
automatischen Zyklus zu verwirklichen, ist es notwendig, den Abs.
"nSP" zu programmieren = 2, die zwei Sollwertes "SP1" und "SP2"
gliedern und natürlich mit den die Abs. "SLor", "dur.t" und "SLoF"
gewünschten Werten.
Alle Rampen werden nicht in dieser Fall am Ende der Zyklus
aktiver sein.
SV
[U n it]
SP1
SLor
SLor
SP1
Zur Aktivierung der SELFTUNING-Funktion ist wie folgt
beschrieben vorzugehen:
ch a n g e
tim e [m in .]
1) Den gewünschten Sollwert einstellen und aktivieren.
S P 1 V a lu e
2) Den Parameter "Cont"=Pid einstellen.
3) Bei Steuerung mit einfacher Wirkung ist der Parameter "Func"
SV
nach dem durch Ausgang 1.rEG zu überwachenden Prozess
[ U n it]
einzustellen.
d u r .t
4) Einen Ausgang als 2.rEG konfigurieren, wenn das Gerät eine S P 1
SLoF
Anlage mit doppelter Wirkung steuert
SLor
SP2
5) Den Parameter "SELF" =yES stellen
6) Die Programmierung der Parameter verlassen.
7) Das Gerät an die angesteuerte Anlage anschließen.
8) Das Selftuning im Menüpunkt “tunE” des Hauptmenüs
AU TO
tim e [m in .]
ch an ge
anwählen (oder über die entsprechend programmierte Taste U).
Set
Bei aktiver Selftuning-Funktion leuchtet die Led AT/ST fest und alle
Parameter der PID-Regelung ("Pb", "Int", "dEr", usw.) werden nicht Beispiele mit Start bei niedrigeren Werten als SP1 und
Reduzierung des Sollwertes.
mehr angezeigt.
Hinweis: Ist bei PID-Regelung ein Autotuning durchzuführen und
Um das Autotuning abzubrechen oder das Selftuning zu eine Rampe aktiv, wird diese nicht durchgeführt, solange der
deaktivieren, ist im Menü "SEL" ein beliebiger Regelzustand Einstellzyklus nicht abgeschlossen wurde.
Folglich muss das Autotuning ohne Rampe aktiviert und nach
anzuwählen: "rEG", "OPLO" oder "OFF".
Wird das Gerät während eines Autotuning-Zyklus bzw. bei erfolgter Abstimmung wieder deaktiviert werden (“Auto” = OFF);
aktivierter Selftuning-Funktion abgeschaltet, sind diese Funktionen daraufhin sind die gewünschten Rampen zu programmieren und
wird eine automatische Abstimmung gewünscht, so ist die
bei Wiedereinschaltung des Gerätes noch aktiv.
Selftuning-Funktion zu aktivieren.
4.9 - ERREICHEN DES SOLLWERTES BEI VORGEGEBENER
GESCHWINDIGKEIT UND AUTOMATISCHE UMSCHALTUNG
ZWISCHEN
ZWEI
SOLLWERTEN
(RAMPEN
UND
ERHALTUNGSZEIT)
Alle Parameter der Rampenfunktionen befinden sich in der Gruppe
“]rEG”.
Es kann eine Einstellung vorgenommen werden, damit der Sollwert
innerhalb einer vorgegebenen Zeit erreicht wird (wobei diese höher
ist, als die Zeit, die das System normalerweise benötigen würde).
Dies kann in Prozessen (Wärmebehandlungen, chemische
Behandlungen usw.) nützlich sein, in denen der Sollwert
schrittweise und innerhalb einer vorgegebenen Zeit erreicht werden
muss.
Außerdem kann dafür gesorgt werden, dass das Gerät, sobald der
erste Sollwert (SP1) erreicht wurde, automatisch nach einer
programmierten Zeit auf den zweiten Sollwert (SP2) umschaltet,
wodurch ein einfacher automatischer Wärmezyklus erzeugt wird.
Diese Funktionen sind für alle programmierbaren Regelarten
verfügbar.
Dem Betrieb liegen die folgenden Parameter zugrunde:
"SLor" – Neigung der erste rampe, angegeben in Einheit/Minute.
"SLoF" – Neigung der zweiter rampe, angegeben in
Einheit/Minute.
"dur.t" – Erhaltungszeit des Sollwertes SP1 bevor automatisch auf
SP2 umgeschaltet wird (angegeben in Stunden und Minuten).
4.10 - SOFT-START-FUNKTION
Alle Parameter des Soft-Start-Betriebs befinden sich in der Gruppe
“]rEG”.
Die Soft-Start-Funktion ist nur bei vorhandener PID-Regelung
aktivierbar und gestattet eine Einschränkung der Regelleistung bei
Einschaltung des Gerätes während einer vorgegebenen Zeit.
Dies ist dann nützlich, wenn der vom Gerät angesteuerte
Verbraucher durch eine zu hohe Leistung beschädigt werden
könnte, die abgegeben wird, wenn er noch nicht hochgefahren ist
(z.B. im Fall von einigen Heizelementen).
Der Betrieb wird durch die folgenden Parameter bestimmt:
“St.P” – Soft-Start-Leistung
“SSt” – Max. Soft-Start-Zeit (angegeben in hh.mm)
“HSEt” - Ausschaltung Zyklus Soft Start pflegt
Gliedert einmal zu den gewünschten Werten, der Zündung die
Parameter das Gerät, es wird sorgen, im Ausgang die zum Abs.
gegliederte Macht "St.P" für die zum Abs. gegliederte Zeit "SSt" zu
liefern oder bis zur Erreichung des absoluten Wertes gegliedert
zum Abs. "HSEt."
Darin übt das Gerät Werk in manueller Regelung aus, um
automatisch in automatischer Regelung am Ende die Zeit "SSt"
auszutauschen oder wenn der Wert von Prozeß zum zum Abs.
programmierten Wert "HSEt" gleich ist.
Zur Abschaltung der Soft-Start-Funktion ist der Parameter “SSt” =
OFF zu stellen.
TECNOLOGIC spa - TLK 31 D - BEDIENUNGSANLEITUNG - Vr. 02 - ISTR-MTLK31DDEU2 - PAG. 8
Tritt während der Durchführung des Soft-Start ein Messfehler auf,
wird die Funktion abgebrochen und das Gerät sorgt dafür, dass am
Ausgang die im Parameter “OPE” eingestellte Leistung abgegeben
wird.
Der Soft-Start bleibt dennoch deaktiviert, auch wenn die Messung
wiederhergestellt wurde.
Wenn es wünscht den Autotuning mit dem Soft Start auszuführen,
steckt ein, es ist notwendig, den Abs. "Auto"=4 oder -4 zu
programmieren.
Auf diese Art und Weise wird der autotuning am Ende der Zyklus
von Soft-Start ausgeführt werden, natürlich der Istwert kleiner (bei
“Func” =HEAt) als [SP- |SP/5|] oder größer (bei “Func” =CooL) als
[SP+ |SP/5|].
4.11 - ALARMBETRIEB (AL1, AL2, AL3)
Zur Betriebskonfiguration der Alarme, deren Ansprechen mit dem
Istwert (AL1, AL2, AL3) verbunden ist, muss vorher bestimmt
werden, welchem Ausgang der Alarm entsprechen soll.
Herzu müssen zunächst in der Parametergruppe “]Out” die
Parameter der Ausgänge, die als Alarme (“O1F” , “O2F”, “O3F”)
verwendet werden sollen, konfigurieren werden, indem der
Parameter des gewünschten Ausgangs programmiert wird:
= ALno wenn der Alarmausgang bei aktivem Alarm aktiviert
werden soll und bei nicht aktivem Alarm deaktiviert sein soll.
= ALnc wenn der Alarmausgang bei deaktiviertem Alarm aktiviert
werden soll und bei aktivem Alarm deaktiviert sein soll.
= ALni wenn es das gleiche Funktionieren von ALnc wünscht aber
mit Funktionieren des verneinten Vorder led zeigt (der Vorder led
des Gerätes den Staat des Ausganges in dieser Fall an)
Hinweis: Ihm wird zum Alarm Bezug AL1 in alle Beispiele
gemacht, die folgen. Natürlich erweist das Funktionieren der
anderen Alarme sich als analog.
Die Gruppe “]AL1” des zu konfigurierenden Alarms öffnen und bei
dem Parameter “OAL1” programmieren, für welchen Ausgang das
Alarmsignal bestimmt werden soll.
Der Alarmbetrieb wird durch die nachstehenden Parameter
festgelegt:
"PrA1" - PROZESSWERT ALARM
"AL1t " – ALARMART
"Ab1" – ALARMKONFIGURATION
“AL1” – ALARMGRENZWERT
“AL1L” – UNTERER ALARMGRENZWERT (für Bandwert-Alarme)
ODER TIEFSTER ALARMGRENZWERT SOLLWERT (für
tiefstwertalarm und höchstwertalarm)
“AL1H” – OBERER ALARMGRENZWERT (für Bandwert-Alarme)
ODER HÖCHSTER ALARMGRENZWERT SOLLWERT (für
tiefstwertalarm und höchstwertalarm)
“AL1d” – ALARMEINSCHALTVERZÖGERUNG (in sec.)
"AL1i" – ALARMVERHALTEN BEI MESSFEHLER
"PrA1" - PROZESSWERT ALARM: Mit diesem Parameter kann
die Prozessvariable für den Alarm eingestellt werden.
Der Alarm kann als Prozessvariable den Wert, der am Eingang 1
(Pr1) oder am Eingang 2 (Pr2) gemessen wurde, oder die
Temperaturdifferenz zwischen beiden Eingängen Pr1-Pr2 (P1-2)
verwenden, oder er geht von der Differenz der beiden Eingänge
Pr1-Pr2 aus und legt einen Höchstwert und einen Mindestwert für
die Messung Pr2 (P1-L) zugrunde.
"AL1t" - ALARMART: Es bestehen bis zu 6 verschiedene
Verhalten des Alarmausgangs.
LoAb = ABSOLUTER TIEFSTWERTALARM: Der Alarm wird
aktiviert, wenn der Istwert den im Parameter "AL1" eingegebenen
Alarmgrenzwert unterschreitet. Es ist zu den Abs. "AL1L" und
AL1H" zu gliedern mit dieser Beschaffenheit möglich tiefster
alarmgrenzwert sollwert und höchster alarmgrenzwert sollwert
HiAb = ABSOLUTER HÖCHSTWERTALARM: Der Alarm wird
aktiviert, wenn der Istwert über den im Parameter "AL1"
eingegebenen Alarmgrenzwert überschreitet. Es ist zu den Abs.
"AL1L" und AL1H" zu gliedern mit dieser Beschaffenheit möglich
tiefster alarmgrenzwert sollwert und höchster alarmgrenzwert
sollwert.
PV
PV
AL1
OUT
AL1
HAL1
HAL1
AL1
ON
off
ON
off
time
off
OUT
AL1
ON
ON
off
LoAb
off
time
off
HiAb
LodE = RELATIVER TIEFSTWERTALARM: Der Alarm wird
aktiviert, wenn der Istwert den Wert [SP + AL1] unterschreitet. Es
ist zu den Abs. "AL1L" und AL1H" zu gliedern mit dieser
Beschaffenheit möglich tiefster alarmgrenzwert sollwert und
höchster alarmgrenzwert sollwert.
HidE = RELATIVER HÖCHSTWERTALARM: Der Alarm wird
aktiviert, wenn der Istwert den Wert [SP + AL1] überschreitet. Es ist
zu den Abs. "AL1L" und AL1H" zu gliedern mit dieser
Beschaffenheit möglich tiefster alarmgrenzwert sollwert und
höchster alarmgrenzwert sollwert.
PV
PV
SP
OUT
AL1
HAL1
AL1
-AL1
ON
off
ON
off
HAL1
SP
time
OUT
AL1
off
ON
off
LodE
ON
off
time
off
HidE
LHAb = ABSOLUTER BANDWERT-ALARM: Der Alarm wird
aktiviert, wenn der Istwert den im Parameter "AL1L" eingegebenen
Grenzwert unterschreitet oder den im Parameter "AL1H"
eingegebenen Grenzwert überschreitet.
LHdE = RELATIVER BANDWERT-ALARM: Der Alarm wird
aktiviert, wenn der Istwert den Wert [SP + AL1L] unterschreitet
oder wenn er den Wert [SP + AL1H] überschreitet
PV
PV
AL1H
HAL1
HAL1
AL1L
OUT
AL1
ON
off
ON
off
LHAb
time
off
HAL1
AL1H
SP
AL1L
OUT
AL1
HAL1
ON
ON
off
off
time
off
LHdE
"Ab1" - ALARMKONFIGURATION: Der Parameter kann einen
Wert zwischen 0 und 31 annehmen.
Die einzugebende Zahl, die der gewünschten Betriebsart
entspricht, ergibt sich aus der Summe der nachstehend
beschriebenen Werte:
ALARMVERHALTEN BEI EINSCHALTUNG: Der Alarmausgang
verhält sich je nach dem im Parameter “Ab1” summierten Wert auf
2 verschiedene Arten.
+0 = NORMALES VERHALTEN: Der Alarm wird bei einem
Alarmzustand stets aktiviert.
+1 = BEI EINSCHALTUNG NICHT AKTIVER ALARM: Befindet sich
das Gerät bei Einschaltung in einem Alarmzustand, wird dieser
nicht aktiviert. Der Alarm wird lediglich aktiviert, wenn der Istwert
nach erfolgter Einschaltung nicht den alarmfreien Zustand und
dann den Alarmzustand erreicht hat.
TECNOLOGIC spa - TLK 31 D - BEDIENUNGSANLEITUNG - Vr. 02 - ISTR-MTLK31DDEU2 - PAG. 9
P V
A L1
O N
tim e
O N
+0
o ff
o ff
A b1
O N
+1
o ff
o ff
Beispiel mit ABSOLUTER TIEFSTWERTALARM
ALARMVERZÖGERUNG: Der Alarmausgang verhält sich je nach
dem im Parameter “Ab1” summierten Wert auf 2 verschiedene
Arten.
+0 = NICHT VERZÖGERTER ALARM: Der Alarm wird sofort beim
Auftreten des Alarmzustands aktiviert.
+2 = VERZÖGERTER ALARM: Beim Auftreten eines
Alarmzustands startet die im Parameter “AL1d” eingegebene
Verzögerung (angegeben in Sekunden) und erst nach Ablauf
dieser Zeit wird der Alarm aktiviert.
ALARMSPEICHER: Der Alarmausgang verhält sich je nach dem im
Parameter “Ab1” summierten Wert auf 2 verschiedene Arten.
+ 0 = NICHT GESPEICHERTER ALARM: Der Alarm bleibt nur im
Alarmzustand aktiv
+ 4 = GESPEICHERTER ALARM: Der Alarm aktiviert sich im
Alarmzustand und bleibt auch dann noch bestehen, wenn dieser
Zustand nicht mehr besteht, bis die Taste U gedrückt wird, sofern
sie entsprechend programmiert wurde (“USrb”=Aac)
P V
A L1
tim e
O N
+0
o ff
+4
o ff
O N
A b1
o ff
Beispiel mit ABSOLUTER HÖCHSTWERTALARM
ALARMQUITTIERUNG: Der Alarmausgang verhält sich je nach
dem im Parameter “Ab1” summierten Wert auf 2 verschiedene
Arten.
+ 0 = NICHT QUITTIERBARER ALARM: Der Alarm bleibt in einem
Alarmzustand stets aktiv
+ 8 = QUITTIERBARER ALARM: Der Alarm wird in einem
Alarmzustand aktiviert und lässt sich anhand der Taste U
quittieren, sofern diese Taste entsprechend programmiert wurde
(“USrb”=ASi), auch wenn der Alarmzustand weiterhin besteht.
ALARMVERHALTEN BEI WECHSEL DES SOLLWERT, (NUR
FÜR RELATIVER ALARM): Man kann 2 verschiedene Verhalten
vom Ausgang von Alarm haben, nach dem zum Abs. addierten
Wert "Ab1."
+0 = NORMALES VERHALTEN: Der Alarm wird bei einem
Alarmzustand stets aktiviert.
+16 = ALARMVERHALTEN BEI WECHSEL DES SOLLWERT:
Wenn das Gerät in den Bedingungen von Alarm dieser nach dem
Wechsel des Sollwert ist, wird es nicht betätigt. Der Alarm wird nur
betätigen, wenn der Wert von Prozeß nach dem Wechsel des Sets
den Bedingungen von nicht Alarm nicht gebracht wird und spät in
die Bedingungen von Alarm.
"AL1i" – ALARMAKTIVIERUNG BEI MESSFEHLER: Hier wird
bestimmt, in welchen Zustand sich der Alarm bei einem
Gerätemessfehler zu versetzen hat (yES=Alarm aktiv; no=Alarm
nicht aktiv)
4.12 - FUNKTION DES LOOP BREAK ALARMS
Alle Parameter des Loop Break Alarms befinden sich in der Gruppe
“]LbA”.
Bei allen Geräten ist ein Loop Break Alarm verfügbar, der den
Regler sofort abschaltet, wenn aus irgendeinem Grund
(Kurzschluss eines Thermoelements, Umschaltung eines
Thermoelements, Lastausfall) der Einstellring unterbrochen wird.
Zur Konfiguration des Ausgangs, dem der Loop Break Alarm
zugewiesen werden soll, muss jedoch zuerst bestimmt werden,
welchem Ausgang der Alarm entsprechen soll.
Dazu muss in der Parametergruppe “]Out”
der Parameter des Ausgangs, der verwendet werden soll (“O1F” ,
“O2F”, “O3F”, “O4F”) unter Eingabe des entsprechenden
Parameters des gewünschten Ausgangs konfiguriert werden:
= ALno wenn der Alarmausgang bei aktivem Alarm aktiviert
werden soll und bei nicht aktivem Alarm deaktiviert sein soll.
= ALnc wenn der Alarmausgang bei deaktiviertem Alarm aktiviert
werden soll und bei aktivem Alarm deaktiviert sein soll.
= ALni wenn es das gleiche Funktionieren von ALnc wünscht aber
mit Funktionieren des verneinten Vorder led zeigt (der Vorder led
des Gerätes den Staat des Ausganges in dieser Fall an).
Die Gruppe “]LbA” öffnen und im Parameter “OLbA” eingeben,
für welchen Ausgang das Alarmsignal bestimmt werden soll.
Der Loop Break Alarm wird aktiviert, wenn die Ausgangsleistung
während der im Parameter "LbAt" eingegebenen Zeit (angegeben
in Sekunden) beim Wert von 100 % bleibt.
Zur Vermeidung von Fehlalarmen muss der Einstellwert dieses
Parameters unter Berücksichtigung der Zeit zum Erreichen des
Sollwertes eingegeben werden, wenn der gemessene Wert stark
hiervon abweicht (z.B. bei Einschaltung der Anlage).
Bei Ansprechen des Alarms erscheint auf der Geräteanzeige die
Meldung “LbA” und das Gerät verhält sich wie bei einem
Messfehler, wobei am Ausgang die im Parameter “OPE”
(programmierbar in der Gruppe “ ]InP”) eingestellte Leistung
abgegeben wird.
Zur Wiederherstellung des normalen Betriebs nach einem Alarm ist
die Regelart “OFF” anzuwählen und schließlich der automatische
Regelbetrieb (“rEG”) zu aktivieren, nachdem der Fühler und der
Verbraucher auf ihre einwandfreie Funktionstüchtigkeit überprüft
wurden.
Zur Deaktivierung des Loop Break Alarms ist lediglich “OLbA” =
OFF zu programmieren.
4.13 - FUNKTION DER TASTE U
Die Funktion der Taste U kann im Parameter “USrb” der Gruppe
“]PAn” bestimmt werden.
Folgende Einstellungen sind für diesen Parameter möglich:
= noF : Keine Funktionsbelegung der Taste.
= tunE : Wird die Taste mindestens 1 Sekunde lang gedrückt kann
das Autotuning oder Selftuning aktiviert/deaktiviert werden.
= OPLO : Wird die Taste mindestens 1 Sekunde lang gedrückt,
kann zum automatischen Regelbetrieb (rEG) oder zum normalen
Regelbetrieb (OPLO) und umgekehrt übergegangen werden.
= Aac : Wird die Taste mindestens 1 Sekunde lang gedrückt, kann
ein gespeicherter Alarm zurückgesetzt werden (siehe Abschnitt
4.11.1)
= ASi : Wird die Taste mindestens 1 Sekunde lang gedrückt, kann
ein aktiver Alarm quittiert werden (siehe Abschnitt 4.11.1).
= CHSP : Wird die Taste mindestens 1 Sekunde lang gedrückt,
kann nacheinander einer der 4 gespeicherten Sollwerte angewählt
werden.
= OFF : Wird die Taste mindestens 1 Sekunde lang gedrückt, kann
vom automatischen Regelmodus (rEG) zum deaktivierten
Regelmodus (OFF) und umgekehrt übergegangen werden.
4.14 - DIGITALER EINGANGE
Das Gerät kann mit zwei Digitaleingange ausgestattet sein dessen
Funktion über den in der Gruppe “]InP” befindlichen Parameter
"diF" konfigurierbar ist.
Folgende Einstellungen sind für diesen Parameter möglich:
= noF : Dem Eingange ist keine Funktion zugeordnet.
= Aac : Durch Schließen des Kontakts, der an den Digitaleingang 1
angeschlossen ist kann ein gespeicherter Alarm zurückgestellt
werden (siehe Abschnitt 4.11)
= ASi : Durch Schließen des Kontakts, der an den Digitaleingang 1
angeschlossen ist kann ein aktiver Alarm quittiert werden (siehe
Abschnitt 4.11)
TECNOLOGIC spa - TLK 31 D - BEDIENUNGSANLEITUNG - Vr. 02 - ISTR-MTLK31DDEU2 - PAG. 10
= HoLd : Durch Schließen des Kontakts, der an den Digitaleingang
1 angeschlossen ist wird die Erfassung des Messwertes im
gleichen Augenblick unterbrochen (Anmerkung: dies gilt nicht für
den Lesevorgang auf dem Display, die Anzeige kann sich mit einer
mit dem Messfilter proportionalen Verzögerung stabilisieren). Mit
aktivierter Hold-Funktion führt das Instrument die Regelung in
Abhängigkeit von dem gespeicherten Messwert durch. Wird der
Kontakt erneut geöffnet, setzt das Instrument die normale
Messwerterfassung fort.
= OFF : Wenn der an den digitalen Eingang 1 angeschlossene
Kontakt geschlossen wird, während sich das Instrument im
Zustand “rEG” befindet, wird das Instrument in den Zustand OFF
umgeschaltet. Bei erneutem Öffnen des Kontakts kehrt das
Instrument in den Status der automatischen Regelung “rEG”
zurück.
= CHSP : Durch wiederholtes Öffnen und Schließen des an den
Digitaleingang 1 angeschlossenen Kontakts kann aus der Sequenz
einer der 2 gespeicherten Sollwerte ausgewählt werden.
= SP1.2 : Bei Schließen des an den Digitaleingang 1
angeschlossenen Kontakts wird Sollwert SP2 als aktiv ausgewählt,
während das Öffnen des Kontakts Sollwert SP1 als aktiv festlegt.
Die Funktion ist nur bei “nSP” = 2 verfügbar und sperrt, wenn sie
aktiviert ist, die Auswahl des aktiven Sollwerts über den Parameter
“SPAt” und die Taste U.
= HE.Co : Bei Schließen des an den Digitaleingang 1
angeschlossenen Kontakts wird Sollwert SP2 als aktiv ausgewählt
mit regelung “CooL”, während das Öffnen des Kontakts Sollwert
SP1 als aktiv festlegt mit regelung “HEAt”. Die Funktion ist nur bei
“nSP” = 2 verfügbar, wenn sie aktiviert ist, die Auswahl des aktiven
Sollwerts über den Parameter “SPAt” und die Taste U.
4.15 - SERIELLE SCHNITTSTELLE RS 485
Das Gerät kann mit einer seriellen Kommunikationsschnittstelle
Typ RS 485 ausgestattet werden; mit Hilfe dieser Schnittstelle kann
das Gerät an ein Kommunikationsnetzwerk angeschlossen werden,
an dem auch andere Geräte (Regler oder SPS) angeschlossen
sind und von einem Personal Computer als Anlagenüberwachung
gesteuert werden.
Der Personal Computer erfasst alle Betriebsdaten und ermöglicht
eine Programmierung aller Konfigurationsparameter des Gerätes.
Das im TLK 31 D verwendete Softwareprotokoll ist ein
MODBUS-RTU Protokoll, das in zahlreichen SPS und in auf dem
Markt erhältlichen Überwachungsprogrammen verwendet wird (die
Bedienungsanleitung des Kommunikationsprotokolls der Baureihe
TLK ist auf Anfrage erhältlich).
Der Schnittstellenkreislauf ermöglicht den Anschluss von bis zu 32
Geräten am gleichen Netz.
Um das Netz in Ruhestellung zu belassen, ist ein 120 Ohm
Widerstand (Rt) am Leitungsende anzuschließen.
Das Gerät ist mit zwei Klemmen, A und B genannt, versehen, die
an die entsprechenden Klemmen in der Leitung anzuschließen
sind.
Für den Netzanschluss ist eine verflochtene Telefonkabelschleife
zu verwenden.
Insbesondere bei einer sehr langen bzw. gestörten Leitung und bei
Leistungsunterschieden zwischen den Klemmen GND, sollte ein
abgeschirmtes
3-aderiges
Flechtkabel
verwendet
und
entsprechend Abbildung angeschlossen werden.
Ist das Gerät mit einer seriellen Schnittstelle ausgestattet, so sind
die nachstehenden und alle in der Gruppe “]SEr” enthaltenen
Parameter zu programmieren:
"Add" : Stationsadresse. Für jede Station eine andere Nummer
eingeben, 1 bis 255.
"baud" : Übertragungsgeschwindigkeit (baud-rate), einstellbar auf
einen Wert zwischen 1200 und 38400 Baud. Für alle Stationen
muss die gleiche Übertragungsgeschwindigkeit eingegeben
werden.
"PACS" : Zugriff auf die Programmierung. Wird "LoCL"
eingegeben, ist das Gerät nur über die Tastatur programmierbar;
wird hingegen "LorE" eingegeben, kann sowohl über die Tastatur
als auch über die serielle Leitung programmiert werden.
Bei Zugriff auf die Programmierung über die Tastatur, während
eine Kommunikation über die serielle Schnittstelle läuft, erscheint
auf der Anzeige die Meldung "buSy" und weist damit auf den
Zustand „belegt“ hin.
HOST
(PC/PLC)
shield
A
Rt
B
120 ohm
GND
RS485
Interface
A
B
10 8
GND
9
TLK31 n.1
A
B
10 8
GND
9
TLK31 n.2
A
B
10 8
GND
9
TLK31 n.N
4.16 - KONFIGURATION DER PARAMETER MIT “KEY 01”
ODER “A01”
Das Gerät verfügt über eine Steckbuchse, die eine Übertragung
der Betriebsparameter von und zum Gerät gestattet; hierzu wird die
Einrichtung TECNOLOGIC KEY01 oder A01 mit 5 poligem
Steckverbinder verwendet.
Diese Einrichtung wird zur serienmäßigen Programmierung von
Geräten
verwendet,
die
alle
über
die
gleiche
Parameterkonfiguration verfügen sollen bzw. zur Sicherung einer
Kopie der Programmierung eines Gerätes, damit diese schnell
wiederhergestellt werden kann.
Bei Verwendung der KEY 01 oder A01 Einrichtung kann auch nur
die Einrichtung oder nur das Gerät gespeist werden.
Gespeistes Gerät und nicht gespeiste Einrichtung
SUPPLY
Von der Einrichtung gespeistes Gerät
SUPPLY ADAPTER
12 VDC
AC SUPPLY
Hinweis: Bei Geräten, die über den seriellen Kommunikationsport
RS485 verfügen, muss der Parameter “PACS” auf = LorE stehen.
Für weitere Informationen und Hinweise zu Fehlerursachen siehe
entsprechende Bedienungsanleitung der KEY 01 oder A01
Einrichtung.
5 - PROGRAMMIERBARE PARAMETER
Nachstehend werden alle Parameter beschrieben, über die das
Gerät verfügt. Es wird darauf hingewiesen, dass einige Parameter
möglicherweise nicht angezeigt werden; dies liegt entweder an
dem verwendeten Gerätetyp oder an der Tatsache, dass die
betreffenden Parameter für die ausgewählte Betriebsart unwichtig
sind und folglich automatisch ausgeblendet werden.
Gruppe “ ] SP” (Parameter des Sollwertes)
Par.
Beschreibung
Bereich
Def.
Note
1÷4
1
1 nSP Anzahl der
programmierbaren
Sollwerte
2 SPAt Aktiver Sollwert
1 ÷ nSP
1
3 SP1 Sollwert 1
SPLL ÷ SPHL
0
4 SP2 Sollwert 2
SPLL ÷ SPHL
0
TECNOLOGIC spa - TLK 31 D - BEDIENUNGSANLEITUNG - Vr. 02 - ISTR-MTLK31DDEU2 - PAG. 11
5 P2HL Obere Grenze Wert Pr2 -1999 ÷ 9999
für die
Differenzregelung
-1999 ÷ 9999
6 P2LL Untere Grenze Wert
Pr2 für die
Differenzregelung
7 SPLL Tiefster Sollwert
-1999 ÷ SPHL
8 SPHL Höchster Sollwert
SPLL ÷ 9999
Gruppe “ ] InP” (Parameter des Messeingangs)
Par.
Beschreibung
Bereich
9 SEnS Fühlerart am Eingang
Ptc / ntc
10 Pr2 Fühler vorhanden Pr2
yES / no
11 dP Dezimalzahlen
0/1
°C / °F
12 Unit Maßeinheit der
Temperatur
13 FiL Digitaler Eingangsfilter
OFF÷ 20.0
sec.
14 OFS1 Offset der Messung Pr1 -1999 ÷ 9999
15 OFS2 Offset der Messung Pr2 -1999 ÷ 9999
der 0.000 ÷ 2.000
16 rot Rotation
Messgeraden
für Our / Or / Ur
17 InE Betriebszustand
“OPE” bei Messfehler:
Our = Overrange und
Underrange
Or = nur Overrange
Ur = nur Underrange
18 OPE Ausgangsleistung bei -100 ÷ 100
Messfehler
%
noF / AaC /
19 dIF Funktion
ASi / HoLd /
Digitaleingang:
OFF / CHSP /
noF = keine Funktion
SP1.2/
Aac=Reset
HE.Co
gespeicherter Alarm
ASi=Alarm quittiert
HoLd = Erfassung des
Messwertes
OFF= Zustand OFF
CHSP= Auswahl
Sequenz aktiv
Sollwerte
SP1.2 = Sollwerte“SP1”
oder “SP2”
HE.Co=Auswahl HEAt
mit “SP1” oder CooL
mit “SP2
Gruppe “ ] Out” (Parameter der Ausgänge)
Par.
Beschreibung
Bereich
1.rEG / 2.rEG
20 O1F Funktion Ausgang 1:
1.rEG=Hauptregelausg ALno / ALnc
ALni / OFF
ang
2.rEG=Nebenregelausg
ang
ALno = Alarm norm. auf
ALnc = Alarm norm. zu
ALni = Alarm norm. zu
mit Hinweis vom Vorder
led des Gerätes leugnet
21 O2F Funktion Ausgang 2: 1.rEG / 2.rEG
siehe “O1F”
ALno / ALnc
ALni / OFF
22 O3F Funktion Ausgang 3: 1.rEG / 2.rEG
ALno / ALnc
siehe “O1F”
ALni / OFF
23 O4F Funktion Ausgang 4: 1.rEG / 2.rEG
ALno / ALnc
siehe “O1F”
ALni / OFF
Gruppe “ ] AL1” (Parameter des Alarms AL1)
Par.
Beschreibung
Bereich
24 OAL1 Ausgang für Alarm AL1 Out1 / Out2
Out3 / Out4
OFF
9999
-1999
-1999
9999
Def.
ntc
yES
0
°C
Note
1.0
0
0
1.000
OUr
0
noF
Def.
1.rEG
Note
ALno
ALno
ALno
Def.
Out2
Note
Pr1 / Pr2 /
25 PrA1 Prozesswert für Alarm
AL1
P1-2 / P1-L
26 AL1t Alarmart AL1:
LoAb / HiAb
LoAb
=
Abs. LHAb / LodE
HidE / LHdE
Tiefstwertalarm
HiAb
=
Abs.
Höchstwertalarm
LHAb
=
Abs.
Bandwert-alarm
LodE
=
Rel.
Tiefstwertalarm
HidE
=
Rel.
Höchstwertalarm
LHdE
=
Rel.
Bandwert-alarm
0 ÷ 31
27 Ab1 Betriebskonfiguration
Alarm AL1:
+1 = Einsch. nicht akt.
+2 = Verzögerter
+4 = Gespeicher
+8 = Quitterbarer
+16 =nicht akt. bei
wechsel des Sollwert
Rel. Al.)
28 AL1 Alarmgrenzwert AL1
AL1L÷ AL1H
29 AL1L Unterer Alarmgrenzwert -1999 ÷ AL1H
AL1 (für BandwertAlarme) oder Tiefster
alarmgrenzwert
AL1
sollwert (für tiefstwert
alarm und höchstwert
alarm)
30 AL1H Oberer Alarmgrenzwert AL1L ÷ 9999
AL1 (für BandwertAlarme) oder Höchster
alarmgrenzwert
AL1
sollwert (für tiefstwert
alarm und höchstwert
alarm)
31 HAL1 Hysterese auf Alarm OFF ÷ 9999
AL1
OFF ÷ 9999
32 AL1d Einschaltverzögerung
Alarm AL1
sec.
no / yES
33 AL1i Alarmaktivierung AL1
bei Messfehler
Gruppe “ ] AL2” (Parameter des Alarms AL2)
Par.
Beschreibung
Bereich
34 OAL2 Ausgang für Alarm AL2 Out1 / Out2
Out3 / Out4
OFF
35 PrA2 Prozesswert für Alarm
Pr1 / Pr2 /
AL2
P1-2 / P1-L
LoAb / HiAb
36 AL2t Alarmart AL1:
LHAb / LodE
siehe “AL1t”
HidE / LHdE
0 ÷ 31
37 Ab2 Betriebskonfiguration
Alarm AL2: siehe “Ab1”
38 AL2 Alarmgrenzwert AL2
AL2L÷ AL2H
39 AL2L Unterer Alarmgrenzwert -1999 ÷ AL2H
AL2 (für BandwertAlarme) oder Tiefster
alarmgrenzwert
AL2
sollwert (für tiefstwert
alarm und höchstwert
alarm)
40 AL2H Oberer Alarmgrenzwert AL2L ÷ 9999
AL2 (für BandwertAlarme) oder Höchster
alarmgrenzwert
AL2
sollwert (für tiefstwert
alarm und höchstwert
alarm)
TECNOLOGIC spa - TLK 31 D - BEDIENUNGSANLEITUNG - Vr. 02 - ISTR-MTLK31DDEU2 - PAG. 12
Pr1
LoAb
0
0
-1999
9999
1
OFF
no
Def.
OFF
Pr1
LoAb
0
0
-1999
9999
Note
1
41 HAL2 Hysterese auf Alarm OFF ÷ 9999
AL2
OFF ÷ 9999
OFF
42 AL2d Einschaltverzögerung
Alarm AL2
sec.
no / yES
no
43 AL2i Alarmaktivierung AL2
bei Messfehler
Gruppe “ ] AL3” (Parameter des Alarms AL3)
Par.
Beschreibung
Bereich
Def.
44 OAL3 Ausgang für Alarm AL3 Out1 / Out2 OFF
Out3 / Out4
OFF
Pr1 / Pr2 /
Pr1
45 PrA3 Prozesswert für Alarm
AL3
P1-2 / P1-L
LoAb / HiAb LoAb
46 AL3t Alarmart AL3:
LHAb / LodE
siehe “AL1t”
HidE / LHdE
47 Ab3 Betriebskonfiguration
0 ÷ 31
0
Alarm AL3: siehe “Ab1”
48 AL3 Alarmgrenzwert AL3
AL3L÷ AL3H
0
49 AL3L Unterer Alarmgrenzwert -1999 ÷ AL3H -1999
AL3 (für BandwertAlarme) oder Tiefster
alarmgrenzwert
AL3
sollwert (für tiefstwert
alarm und höchstwert
alarm)
50 AL3H Oberer Alarmgrenzwert AL3L ÷ 9999 9999
AL3 (für BandwertAlarme) oder Höchster
alarmgrenzwert
AL3
sollwert (für tiefstwert
alarm und höchstwert
alarm)
1
51 HAL3 Hysterese auf Alarm OFF ÷ 9999
AL3
OFF ÷ 9999
OFF
52 AL3d Einschaltverzögerung
Alarm AL3
sec.
no / yES
no
53 AL3i Alarmaktivierung AL3
bei Messfehler
Gruppe “ ] LbA” (Parameter des Loop Break Alarms)
Par.
Descrizione
Range
Def.
54 OLbA Ausgang für Alarm LbA Out1 / Out2 / OFF
Out3 / Out4
OFF
OFF ÷ 9999
OFF
55 LbAt Zeit für LbA
sec.
Gruppe “ ] rEG” (Parameter der Regelung)
Par.
Beschreibung
Bereich
Def.
56 Cont Regelart :
Pid / On.FA
Pid
Pid= PID
On.FS / nr
On.FA= EIN/AUS asym.
On.FS= EIN/AUS
symm.
nr= EIN/AUS Neutrale
Zone
HEAt / CooL HEAt
57 Func Betriebsart Ausgang
1.rEG:
HEAt= Heizen
(umgekehrtem)
CooL= Kühlen
(direktem)
Pr1 / Pr2 /
Pr1
58 PrrG Prozesswert für die
Regelung
P1-2 / P1-L
59 HSEt Regelhysterese
0 ÷ 9999
1
EIN/AUS und
Ausschaltung Zyklus
Soft Start
60 CPdt Verzögerungs
zeit OFF÷ 9999
0
verdichterschutz 2.rEG
sec.
0
61 Auto Aktivierung
Fast -4 / -3 / -2 / -1
/0/
Autotuning:
1/2/3/4
OFF = Befähigt nicht
Note
Note
Note
1 = Start zu jeder
Zündung
2 = Start zur ersten
Zündung
3 = Start Handbuch
4 = Start nach SoftStart
oder zum Wechsel Set
Point
62 SELF Aktivierung Selftuning
63 Pb Proportionalband
64 Int Integralzeit
no / yES
no
0 ÷ 9999
50
OFF ÷ 9999
200
sec.
65 dEr Vorhaltezeit
OFF÷ 9999
50
sec.
66 FuOc Fuzzy overshoot control 0.00 ÷ 2.00
0.5
0.1 ÷ 130.0
20.0
67 tcr1 Zykluszeit Ausgang
1.rEg
sec.
68 Prat Leistungsverhältnis
0.01 ÷ 99.99 1.00
2.rEg / 1.rEg
0.1 ÷ 130.0
10.0
69 tcr2 Zykluszeit Ausgang
2.rEg
sec.
70 rS Manueller Reset
-100.0÷100.0
0.0
%
0.00 ÷ 99.99
InF
71 SLor Geschwindigkeit der
/ InF
erste rampe
unit/min.
0.00 ÷ 99.59
InF
72 dur.t Duration time
/ InF
hrs.-min.
0.00 ÷ 99.99
InF
73 SLoF Geschwindigkeit der
/ InF
zweiter rampe
unit / min.
74 St.P Soft Start Leistung
-100 ÷ 100 %
0
OFF /
OFF
75 SSt Soft Start Zeit
0.1÷7.59
/ InF
hrs.-min.
Gruppe “ ] PAn” (Parameter der Benutzerschnittstelle)
Par.
Beschreibung
Bereich
Def.
noF
76 USrb Funktion der Taste “U”: noF / tunE /
OPLO / Aac /
noF = keine Funktion
tune= Start Autotuning / ASi / CHSP /
OFF
Selftuning
OPLO Handregelung
(open loop)
Aac=Reset
gespeicherter Alarm
ASi= Alarm quittiert
CHSP= Auswahl
Sequenz aktiv Sollwerte
OFF= Zustand OFF
77 diSP Angezeigte Variable:
Pr1 / Pr2 /
P1-2
P1-2 / Pou /
Pr1= Pr1 variable
SP.F / SP.o /
Pr2= Pr2 variable
AL1 / AL2 /
P1-2= Pr1-Pr2 variable
AL3
Pou= Regelleistung
SP.F= aktive Sollwert
SP.o = operative
Sollwert
AL1 = Alarmgrenzwert
AL1
AL2 = Alarmgrenzwert
AL2
AL3 = Alarmgrenzwert
AL3
78 AdE Abweichungswert für
OFF...9999
2
Indexbetrieb
SE / AE /
SAE
79 Edit Änderung des aktiven
Sollwertes und der SAE / SAnE
Alarme
im
Schnellverfahren:
TECNOLOGIC spa - TLK 31 D - BEDIENUNGSANLEITUNG - Vr. 02 - ISTR-MTLK31DDEU2 - PAG. 13
Note
SE= Aktive Sollwert
editierbar,Alarmgrenzw
nicht editierbar
AE= Aktive Sollwert
nicht
editierbar,
Alarmgrenzwerte
editierbar
SAE= Sowohl aktive
Sollwert als auch die
Alarmgrenzwerte sind
editierbar.
SAnE= Weder aktive
Sollwert
noch
die
Alarmgrenzwerte sind
editierbar.
80 PASS Passwort für den Zugriff OFF ÷ 9999 OFF
auf
die
Betriebsparameter
Gruppe “ ] SEr” (Parameter der seriellen Kommunikation)
Par.
Beschreibung
Bereich
Def.
für
0 … 255
1
81 Add Stationsadresse
serielle Kommunikation
82 baud Baud rate serieller Port 1200 / 2400 / 9600
9600 / 19.2 /
38.4
LoCL / LorE LorE
83 PACS Zugriff auf die
Programmierung über
seriellen Port:
LoCL =Gerät lediglich
über die Tastatur
programmierbar
LorE = Gerät sowohl
über die Tastatur als
auch über den seriellen
Port programmiert
Mögliche
Störung
im
EEPROM Speicher
Bei einem Messfehler gibt das Gerät am Ausgang die im
Parameter “OPE” eingestellte Leistung ab und aktiviert alle
gewünschten Alarme ,wenn bei den entsprechenden Parametern
“ALni” = yES eingegeben wurde.
ErEP
6.2 – REINIGEN
Es wird empfohlen, das Gerät mit einem feuchten Tuch mit etwas
Wasser
oder
mit
einem
lösungsmittelfreien,
leichten
Reinigungsmittel zu reinigen.
Note
6 - STÖRUNGEN, WARTUNG UND GARANTIE
6.1 - FEHLERMELDUNGEN
Fehler
Ursache
Der Fühler Pr1 kann
E1
unterbrochen
oder
-E1
kurzgeschlossen sein oder
einen Wert messen, der
außerhalb des zulässigen
Bereichs liegt.
Der Fühler Pr2 kann
E2
unterbrochen
oder
-E2
kurzgeschlossen sein oder
einen Wert messen, der
außerhalb des zulässigen
Bereichs liegt.
Prozesswert nicht verfügbar
---Autotuning
nicht
ErAt
durchführbar da der Istwert
größeroder kleiner als
erlauben Werte
noAt
Autotuning nicht innerhalb
von
12
Stunden
abgeschlossen
LbA
Unterbrechung
Einstellrings (Loop
alarm)
des
break
und der Verbraucher
auf ihre
Funktionstüchtigkeit
überprüft wurden
Die Taste P drücken
Abhilfe
Den Fühleranschluss
am Gerät und die
Funktionstüchtigkeit
des
Fühlers
überprüfen
Die Taste P drücken
um den Fehler zu
beseitigen.
Das
Autotuning
wiederholen,
nachdem
die
Fehlerursache
gefunden wurde.
Das Autotuning
wiederholen,
nachdem der Fühler
und der Verbraucher
auf ihre
Funktionstüchtigkeit
überprüft wurden
Das Gerät wieder in
den Regelzustand
versetzen (rEG)
nachdem der Fühler
6.3 – GEWÄHRLEISTUNG UND INSTANDSETZUNG
Das Gerät hat ab Lieferdatum eine Garantielaufzeit von 12
Monaten auf Baufehler oder Materialmängel.
Die Garantie ist begrenzt auf Reparatur bzw. Auswechslung des
Produktes.
Das Öffnen, die eigenständige Arbeit am Gerät sowie eine
unsachgemäße Verwendung bzw. Installation des Gerätes führen
automatisch zum Ausschluss der Garantieleistung.
Bei defektem
Produkt innerhalb oder außerhalb der
Garantielaufzeit ist die Abteilung “Verkauf” der Fa. TECNOLOGIC
zu benachrichtigen, um die Erlaubnis zum Versand des Gerätes
einzuholen.
Unter Angabe der aufgetretenen Störung ist das defekte Gerät
frachtfrei an die Fa. TECNOLOGIC zu senden, es sei denn, es
wurden andere Vereinbarungen getroffen.
7 - TECHNISCHE DATEN
7.1 - ELEKTRISCHE MERKMALE
Stromversorgung: 12 VAC/VDC +/- 10%
Frequenz AC: 50/60 Hz
Aufnahme: ca. 4 VA
Fühler: 2 Eingang für Temperaturfühler: PTC KTY 81-121 (990 Ω
@ 25 °C); NTC 103AT-2 (10KΩ @ 25 °C)
Ausgang/Ausgänge: bis zu 4 Ausgänge. 2 Relaisausgänge SPDT
und 2 SPST-NO (8 A-AC1, 3 A-AC3 / 250 VAC) oder
Spannungsausgänge zur SSR-Steuerung (10mA/ 10VDC).
Ausgang Hilfsversorgung: max. 12 VDC / 20 mA
Elektrische Lebensdauer der Relaisausgänge: 100000 Schaltspiele
Installationskategorie: II
MaßKategorie: I
Schutzart gegen Stromschläge: Frontseitig Klasse II
Verstärkung
zwischen
den
Isolierungen:
Niederspannungsbauteilen (Relaisausgänge) und Frontseite;
Verstärkung
zwischen
den
Niederspannungsbauteilen
(Relaisausgänge)
und
den
Unterspannungsbauteilen
(Versorgung,Eingang, Statikausgänge); Keine Isolierung zwischen
Versorgung und Eingang; Keine Isolierung zwischen Eingang und
Statikausgängen; 50 V Isolierung zwischen RS485 und
Unterspannungsbauteilen.
7.2 - MECHANISCHE MERKMALE
Gehäuse: UL 94 V0 Kunststoff
Einbaumaße: 78 x 35 mm, Einbautiefe 75,5 mm
Gewicht: ca. 150 g
Einbau: Schalttafel in 29 x 71 mm
Anschluss: Schraubklemmleiste 2,5 mm 2
Front-Schutzart: IP 65 mit Dichtung
Umweltbelastung: 2
Betriebstemperatur: 0 ... 50 °C
Feuchte im Betriebsbereich: 30 ... 95 relative Luftfeuchte % nicht
kondensierend
Transport- und Lagertemperatur: -10 ... 60 °C
TECNOLOGIC spa - TLK 31 D - BEDIENUNGSANLEITUNG - Vr. 02 - ISTR-MTLK31DDEU2 - PAG. 14
7.3 - MECHANISCHE
BEFESTIGUNG [mm]
MERKMALE,
AUSSPARUNG
TLK31 a b c d e f g hh D
11,5
5,5
78
UND 7.6 - CODIERUNG DES GERÄTES
TLK 31 D
19
28
35
AT
ST
Out1 Out2
-
=
+
a : EINGANG
T = Thermistoren( PTC, NTC)
b : AUSGANG OUT1
R = Relaisausgang
O = Spannungsausgang VDC für SSR
Out3 Out4
64
min. 15 mm
c : AUSGANG OUT2
R = Relaisausgang
O = Spannungsausgang VDC für SSR
- = Nicht vorhanden
min. 12 mm
29
71
d : AUSGANG OUT3
R = Relaisausgang
O = Spannungsausgang VDC für SSR
- = Nicht vorhanden
RECOMMENDED
PANEL CUTOUT
e : AUSGANG OUT4
R = Relaisausgang
O = Spannungsausgang VDC für SSR
- = Nicht vorhanden
BRACKETS
f : KOMMUNIKATIONSSCHNITTSTELLE
S = Serielle Schnittstelle RS 485
- = Keine Schnittstelle
34
MAX 12 mm
PANEL + GASKET
g : DIGITALEINGANGE
I = Mit Digitaleingange
- = Keine Digitaleingange
hh : SONDERCODIERUNGEN
7.4 - FUNKTIONSMERKMALE
Regelung: EIN/AUS,EIN/AUS bei Neutraler Zone, PID mit einfacher
Wirkung, PID mit doppelter Wirkung,
Messbereich: je nach Fühlerausführung (siehe Tabelle)
Anzeigegenauigkeit: je nach Fühlerausführung. 1/0,1 °
Gesamtgenauigkeit: +/- (0,5 % fs + 1 digit)
Erfassungsgeschwindigkeit: 130 ms
Art der seriellen Schnittstelle: RS 485 optoisoliert
Kommunikationsprotokoll: MODBUS RTU (JBUS)
Serielle Übertragungsgeschwindigkeit: wählbar zwischen 1200 ...
38400 Baud
Display: 4-stellige rote Ledanzeige Höhe 12 mm
Konformität: Vorschrift EWG EMC 2004/108/CE (EN 61326),
Vorschrift CEE NS 2006/95/CE (EN 61010-1)
7.5 - TABELLE DER MESSBEREICHE
EINGANG
PTC (KTY81-121)
“SEnS” = Ptc
NTC (103-AT2)
“SEnS” = ntc
“dP” = 0
-55 ... 150 °C
-67 ... 302 °F
-50 ... 110 °C
-58 ... 230 °F
“dP”= 1
-55.0 ... 150.0 °C
-67.0 ...302.0 °F
-50.0 ... 110.0 °C
-58.0 ... 230.0 °F
TECNOLOGIC spa - TLK 31 D - BEDIENUNGSANLEITUNG - Vr. 02 - ISTR-MTLK31DDEU2 - PAG. 15