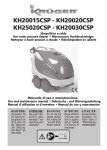
1
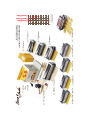
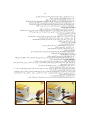
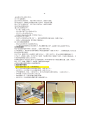
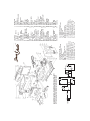
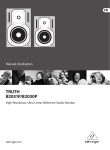
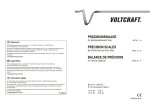
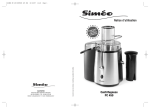
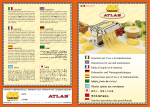
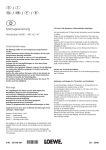
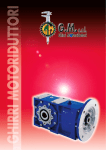
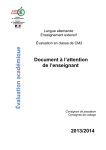
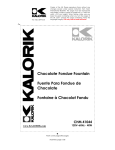
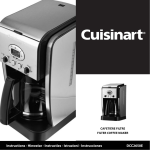
Istruzioni per l’uso e la manutenzione
Instructions for use and maintenance
Mode d’emploi et d’entretien
Gebrauchs und Wartungsanleitungen
Instrucciones para el uso y el mantenimiento
8) Capelli d’Angelo
9) Spaghetti
6 ) Roller 220 mm
7) Pizz@ round
1 ) Electric
Mixer
10 Kg /h
10) Trenette
11) Lasagnette
12 ) Ravioli
5) Lasagna
4) Tagliolini
3) Fettuccine
2) Misurone
SOLO PER USO CASALINGO
FOR HOUSEHOLD USE ONLY
UNIQUEMENT POUR USAGE DOMESTIQUE
1
2
3
4
5
6
7
8
9
10
11
12
OPTIONAL ACCESS.
SOLD SEPARATELY
INCLUDED
Pasta Mixer
Pasta
asta Fresca
a
Pasta&Pizza
4
1) PRECAUZIONI E SUGGERIMENTI PER LA VOSTRA SICUREZZA
- Togliete sempre il cavo di alimentazione prima di iniziare la pulizia della macchina!
- Non staccate né inserite la spina elettrica con le mani bagnate o solamente umide!
- Non bagnate la macchina: pericolo di scarica elettrica!
- Non permettete a persone di età inferiore a 14 anni di usare la macchina!
- Non lasciate la macchina incustodita con la spina della corrente inserita!
- Non usate la macchina in prossimità di fornelli o lavelli!
- Usate questa macchina solo per l’uso descritto in questo manuale.
- Usate solamente il cavo fornito in dotazione e prolunghe adeguate alla corrente indicata
sulla targa della macchina.
- Non inserite coltelli, oggetti metallici, oggetti di legno o di stoffa attraverso i rulli in movimento.
- Quando lavorate con la macchina non indossate cravatte, foulard o lunghe collane;
raccogliete i capelli lunghi con un fermaglio.
- Prima di aprire il coperchio accertatevi che l’interruttore ➀ (Fig. 1) sia nella posizione OFF.
2) COME SI PREPARA LA MACCHINA ALL’USO
- Quando si usa la macchina per la prima volta pulirla completamente con un panno.
- Per la pulizia dei rulli fate passare attraverso di essi una piccola quantità di pasta che
poi dovrà essere eliminata.
- Vi preghiamo di controllare che la tensione di alimentazione corrisponda a quella riportata
sulla targa della macchina.
A) PULSANTI E INTERRUTTORI (Fig. 1)
➀ Interruttore On/Off.
➁ Spia rossa tappo di chiusura: è accesa se il tappo non è perfettamente chiuso.
➂ Spia verde: è accesa quando la macchina è pronta all’uso.
➃ Spia rossa coperchio aperto: è accesa se il coperchio non è perfettamente chiuso.
➄ Pulsante di servizio per funzionamento ad impulsi (Pulse).
B) COME TOGLIERE E METTERE LA PALA
- Svitare il tappo (Fig. 2).
- Spingere la pala verso il foro lasciato dal tappo (Fig. 3).
- Tirare verso l’alto la pala (Fig. 4).
- Per inserire la pala ripetere l’operazione al contrario.
1
1
2
3
4
5
2
5
C) COME TOGLIERE E METTERE IL COPERCHIO
- Aprire il coperchio fino al fermo (90°) e spingerlo indietro finchè si libera dal perno (Fig. 5).
- Per inserire il coperchio ripetere l’operazione al contrario.
D) COME MONTARE E SMONTARE GLI ACCESSORI
- Rimuovere il Misurone tirandolo verso l’alto (Fig. 6).
- Inserire l’accessorio nell’apposito foro, presentandolo dalla parte dell’esagono.
- Ruotare l’accessorio di 30° fino al fermo (Fig. 7).
3) COME PREPARARE GLI IMPASTI
Dosate gli ingredienti con l’apposito Misurone (vedi Ricettario allegato) Fig. 8 e 9.
Aprite il coperchio della macchina e versate il contenuto del Misurone nella vasca
dell’impastatrice (Fig. 10). Assicuratevi che il tappo laterale sia chiuso e la spia ➁ spenta.
Chiudete il coperchio ed accendete la macchina (Fig.11) premendo l’interruttore ➀.
Dopo circa 5 minuti, si sarà formato un impasto omogeneo e compatto.
Aprite il coperchio per estrarre l’impasto. Per rendere l’estrazione più age vole f ate fermare la
macchina quando l’impasto si trova nella parte superiore della vaschetta.
Eventualmente aiutatevi con il tasto ➄ Pulse (Fig. 12-13).
Troverete ricette, istruzioni e suggerimenti per preparare ottimi impasti per: pasta, pizza, pane,
biscotti, grissini, crackers, krapfen, pretzel e bagels, all’interno del
nostro ricettario “Le ricette di Francesco”.
I suoi preziosi consigli vi aiuteranno ad ottenere grandi risultati e soddisfazioni.
4) MANUTENZIONE E PULIZIA DELLA MACCHINA
- Togliete il cavo di alimentazione prima di procedere alla manutenzione.
- Non lavate mai la macchina e gli accessori in acqua o in lavastoviglie (Fig. 26).
- Per pulire la macchina dopo l’uso utilizzate un pennello e un bastoncino di legno (Fig. 27).
- Alcuni componenti come il Misurone e la pala possono essere lavati con acqua
e detersivo (Fig. 28).
- Eventuali riparazioni devono essere eseguite da personale specializzato.
- É vietato accedere alle parti interne a chi non è autorizzato.
- Dopo l’uso riponete la macchina e gli accessori nella propria scatola.
3
4
6
1) SAFETY INSTRUCTIONS AND SUGGESTIONS
- Always unplug the machine before cleaning it!
- Do not plug or unplug the machine with wet or damp hands!
- Do not wash the machine as it may short-circuit!
- Do not let anyone under the age of 14 use the machine!
- Do not leave the machine unattended, especially when it is plugged in!
- Do not use the machine near gas or electric burners or sinks!
- Use the machine according to the purposes indicated in this booklet only.
- Use the provided cable only. Any other extension must be checked against
the machine’s voltage.
- Do not put any knives or tools (metal, wooden tools or cloth) in between the rollers when
the machine is working.
- When using the machine do not wear ties, scarves or long necklaces and tie up long hair
with a clip.
- Always turn off the switch ➀ (Fig. 1) before taking the cover off.
2) PREPARING THE MACHINE FOR USE
- When using the machine for the first time, clean it thoroughly with a cloth.
- Use a bit of dough to clean the rollers in between, then throw it away.
- Always check the machine’s voltage against the supply before using it.
A) BUTTONS AND SWITCHES (Fig. 1)
➀ On/Off Switch.
➁ Red light for the closing knob: it turns on when the closing knob is not perfectly closed.
➂ Green light: it is on when the machine is ready for use.
➃ Red light for the cover: it turns on when the cover is not perfectly closed.
➄ Pulse button: for manual pulse operation.
B) HOW TO REMOVE AND INSERT THE MIXING BLADE
- Unscrew the closing knob (Fig. 2).
- Push the mixing blade towards the hole (Fig. 3).
- Lift the mixing blade (Fig. 4).
- Reverse the process to insert the mixing blade.
5
6
7
C) HOW TO REMOVE AND REPLACE THE COVER
- Open the cover by 90° and then unlock it by pushing (Fig. 5).
- Reverse the process to put it back.
D) HOW TO REMOVE AND REPLACE THE ACCESSORIES
- Remove the Measuring Cup by pulling it upwards (Fig. 6).
- Insert the accessory into the proper opening introducing it by the hexagon side.
- Twist it by 30° until it is fastened (Fig. 7).
3) HOW TO MAKE THE DOUGH
- Measure the ingredients (cfr. “Mr Francesco’s recipes” booklet)
by the Measuring cup (Fig. 8 and 9).
- Lift the cover and pour the ingredients into the tank (Fig. 10).
Make sure that the closing knob is tightened and the light ➁ is off.
- Replace the cover and turn on the switch ➀ (Fig. 11).
The ingredients will be mixed to a smooth and thick dough in about 5 minutes.
- Lift the cover and take the dough out. For easier removal, stop the machine when the dough
is in the upper section of the tank. You can help this along by pressing
the Pulse button ➄ (Fig. 12 and 13).
- “Mr Francesco’s recipes” booklet contains all the necessary instructions and suggestions to make
excellent dough for pasta, pizza, bread, bread sticks, crackers, biscuits, krapfen,
pretzel and bagels. Great results and satisfactions are guaranteed!
4) MAINTENANCE OF THE MACHINE
- Always unplug the machine before cleaning it.
- Do not wash the machine and its accessories by hands or dishwasher (Fig. 26).
- To clean the machine after use, use only a small brush or a wooden stick (Fig. 27).
- Only the mixing blade and the Measuring cup can be washed with water and
washing-up liquid (Fig. 28).
- All mending must be done by specialised technicians only. Any other mending is
severely forbidden.
- After use place the machine and the attachments back into the original box.
7
a
b
8
8
1) PRECAUTIONS ET CONSEILS DE SÉCURITÉ
- Débrancher toujours la machine avant de la nettoyer!
- Ne pas brancher ou débrancher la machine avec des mains mouillées ou humides!
- Ne pas laver la machine à l’eau – risque de décharge électrique!
- Utilisation de cette machine interdite aux moins de 14 ans!
- Débrancher la machine après chaque usage!
- Ne pas utiliser la machine près d’une source de feu ou d’eau!
- Se conformer exclusivement aux instructions d’utilisation de la machine.
- Utiliser uniquement le câble fourni comme accessoire ou éventuellement des rallonges compatibles
avec le voltage marqué sur la plaquette de la machine.
- Pendant le fonctionnement de la machine ne pas utiliser de couteaux ou d’objets (en bois, en tissu,
métalliques, etc.) entre les rouleaux.
- Le port de cravatte, foulards ou colliers longs est interdit pendant l’utilisation de la machine.
Les cheveux doivent être rassemblés et retenus par une barrette ou autre système.
- Avant d’enlever le couvercle de la machine il faut s’assurer que l’interrupteur ➀ (Fig. 1) soit éteint.
2) INSTALLATION DE LA MACHINE
- Avant d’utiliser la machine pour la première fois, il convient de la nettoyer complètement
avec un chiffon.
- Pour nettoyer les rouleaux utiliser un morceau de pâte que vous jetterez ensuite.
- S’assurer que le voltage de la prise de courant corresponde à celui de la machine.
A) INTERRUPTEURS ET VOYANTS (Fig. 1)
➀ Interrupteur On/Off.
➁ Voyant rouge pour le bouchon latéral : il s’allume si le bouchon n’est pas complètement fermé.
➂ Voyant vert : il s’allume quand la machine est prête.
➃ Voyant rouge pour le couvercle : il s’allume si le couvercle n’est pas complètement fermé.
➄ Bouton optionnel pour le fonctionnement par à-coups (Pulse).
B) COMME ENLEVER ET MONTER LA PALE
- Dévisser le bouchon (Fig. 2)
- Pousser la pale vers le trou (Fig. 3).
- Tirer la pale en haut (Fig. 4)
- Procéder à l’envers pour monter la pale.
9
10
9
C) COMME ENLEVER ET MONTER LE COUVERCLE
- Pour enlever le couvercle il faut l’ouvrir de 90° et le pousser jusqu’au le déblocage (Fig. 5).
- Procéder à l’envers pour monter le couvercle.
D) COMME ENLEVER ET MONTER LES ACCESSOIRES
- Pour enlever la mesure tirer en haut (Fig. 6)
- Introduire l’accessoire dans le trou en présentant le côté de l’hexagone.
- Le tourner de 30° jusqu’à la fermeture (Fig. 7).
3) MODE D’EMPLOI DE LA MACHINE
- Préparer les ingrédients (voir “Les recettes de M. Francesco”) en utilisant la mesure (Fig. 8-9).
- Enlever le couvercle et verser les ingrédients dans la machine (Fig. 10).
S’assurer que le bouchon latéral soit bien fermé et que le voyant ➁ soit éteint.
- Mettre en place le couvercle et actionner la machine à l’aide de l’interrupteur ➀ (Fig. 11).
- Une pâte homogène et compacte sera prête en environ 5 minutes.
- Enlever le couvercle pour prendre la pâte. Il vaut mieux arrêter la machine quand la pâte
se trouve au-dessus de la pale. Éventuellement utiliser le bouton Pulse ➄ pour atteindre cette
position (Fig. 12-13).
- Pour préparer d’excellentes pâtes à pain, à gressins, à biscuits, à pizza, à pasta, à crackers, à krapfen,
à Bretzeln et à bagels consulter les conseils et “Les recettes de M. Francesco” le succès est garanti!
4) ENTRETIEN ET NETTOYAGE DE LA MACHINE
- Débrancher toujours la machine avant de la nettoyer.
- Il ne faut jamais laver la machine et les accessoires à l’eau ou dans la lave-vaisselle (Fig. 26).
- Pour nettoyer la machine utiliser uniquement un petit pinceau ou un petit bâton en bois (Fig. 27).
- Seules la mesure et la pale peuvent être lavées avec de l’eau et du détergent (Fig. 28).
- Les réparations éventuelles doivent être faites par un spécialiste.
- Il est interdit d’accéder aux parties internes de la machine.
- Après usage ranger la machine dans son emballage.
11
5 min.
12
10
1) VORSICHTSMAßNAHMEN UND HINWEISE FÜR IHRE SICHERHEIT
- Nehmen Sie immer das Versorgungskabel ab, bevor Sie mit der Reinigung der Maschine beginnen!
- Den Stromstecker nie mit nassen oder auch nur feuchten Händen einstecken oder ziehen!
- Machen Sie die Maschine nicht nass: Stromschlaggefahr!
- Lassen Sie nicht zu, dass Personen unter 14 Jahren die Maschine benutzen!
- Lassen Sie die Maschine mit eingestecktem Stromstecker nie unbewacht!
- Benutzen Sie die Maschine nicht in der Nähe von Kochstellen oder Spülen!
- Benutzen Sie diese Maschine nur für den in der vorliegenden Anleitung beschriebenen Zweck.
- Benutzen Sie nur das mitgelieferte Kabel und Verlängerungen, die für den Stromwert auf dem
Schild der Maschine geeignet sind.
- Stecken Sie keine Messer, Metall-, Holz- oder Stoffgegenstände durch die sich bewegenden Walzen.
- Tragen Sie keine Krawatten, Halstücher oder lange Halsketten, wenn Sie mit der Maschine arbeiten;
halten Sie langes Haar mit einer Haarspange zusammen.
- Bevor Sie den Deckel öffnen, stellen Sie sicher, dass sich der Schalter ➀ (Abb. 1) auf Position OFF befindet.
2) VORBEREITUNG DER MASCHINE AUF DEN GEBRAUCH
- Reinigen Sie die ganze Maschine vor der ersten Benutzung mit einem Tuch.
- Zur Reinigung der Walzen, etwas Nudelteig durch die Walzen drehen; diesen Nudelteig werden
Sie dann wegwerfen.
- Bitte prüfen Sie, ob die Versorgungsspannung mit der Spannung übereinstimmt, die auf dem
Schild der Maschine angegeben ist.
A) TASTEN UND SCHALTER (Abb. 1)
➀ On/Off Schalter (ein/aus).
➁ Roter Leuchtmelder: er leuchtet, wenn der Stopfen nicht einwandfrei geschlossen ist.
➂ Grüner Leuchtmelder: er leuchtet, wenn die Maschine betriebsbereit ist.
➃ Roter Leuchtmelder Deckel geöffnet: er leuchtet, wenn der Deckel nicht einwandfrei geschlossen ist.
➄ Taste für Impulsbetrieb (Pulse).
B) MONTAGE UND DEMONTAGE DES FLÜGELS
- Den Stopfen losschrauben (Abb. 2).
- Den Flügel zur Öffnung schieben, die der Stopfen frei gemacht hat (Abb. 3).
- Den Flügel nach oben ziehen (Abb. 4).
- Für die Montage des Flügels, den Vorgang umgekehrt ausführen.
13
14
11
C) ENTFERNEN UND ANBRINGEN DES DECKELS
- Den Deckel bis zum Anschlag (90°) öffnen und nach hinten schieben, bis er sich
vom Zapfen löst (Abb. 5).
- Für das Anbringen des Deckels, den Vorgang umgekehrt wiederholen.
D) MONTAGE UND DEMONTAGE DER ZUBEHÖRTEILE
- Den Messbehälter entfernen, indem er nach oben gezogen wird (Abb. 6).
- Das Zubehör mit der sechskantigen Seite in die dazu vorgesehene Öffnung stecken.
- Das Zubehör um 30° bis zum Anschlag drehen (Abb. 7).
3) ZUBEREITUNG DES TEIGS
Dosieren Sie die Zutaten mit dem Messbehälter (siehe Rezeptbuch), (Abb. 8 und 9).
Öffnen Sie den Deck el der Maschine und geben Sie den Inhalt des Messbehälters in die
Mixerwanne (Abb. 10). Stellen Sie sicher , dass der seitliche Stopfen geschlossen und der
Leuchtmelder ➁ ausgeschaltet ist. Schließen Sie den Deck el und schalten Sie die Maschine
(Abb. 11) durch Druck auf Schalter ➀ ein. Nach ca. 5 Minuten wird sich ein homogener und
kompakter Teig gebildet haben.Öffnen Sie den Deckel, um den Teig herauszunehmen. Um diesen
Vorgang zu erleichtern, halten Sie die Maschine an, wenn sich der Teig im oberen Teil der
Mixerwanne bef indet. Nehmen Sie ggf. die Taste ➄ Pulse zu Hilfe (Abb . 12-13). Rezepte,
Anweisungen und Hinweise, um beste Teigarten für Nudeln, Pizza, Brot, Kekse, Grissini,
Crackers, Krapfen, Pretzeln und Bagels zuzubereiten, finden Sie in unserem Rezeptb uch
“Le ricette di Francesco” - “Die Rezepte v on Francesco”. Mit diesen wertv ollen Hinweisen werden sie beste Resultate erzielen und viel Freude haben.
4) INSTANDHALTUNG UND REINIGUNG DER MASCHINE
- Nehmen Sie das Versorgungskabel ab, bevor Sie die Instandhaltung ausführen.
- Waschen Sie die Maschine und das Zubehör nie im Wasser oder im Geschirrspüler (Abb. 26).
- Verwenden Sie zur Reinigung der Maschine nach dem Gebrauch einen Pinsel
und ein Holzstäbchen (Abb. 27).
- Bestimmte Teile wie der Messbehälter, der Deckel, der Flügel und der Stopfen können
hingegen mit Wasser und Spülmittel gereinigt werden (Abb. 28).
- Eventuelle Reparaturen müssen von Fachpersonal ausgeführt werden.
- Der Zugriff auf die Innenteile ist Unberechtigten untersagt.
- Bewahren Sie Maschine und Zubehör nach Gebrauch in der Originalschachtel auf.
15
16
12
1) PRECAUCIONES Y CONSEJOS DE SEGURIDAD
- Antes de limpiar la máquina quite siempre el cable de alimentación!
- Nunca quite el enchufe con las manos mojadas o húmedas!
- Con la máquina enchufada, nunca la limpie con agua. Peligro de cortocircuito!.
- No deben utilizar la máquina los menores de 14 años!
- No dejar la máquina enchufada después de utilizarla!
- Nunca utilice la máquina cerca de fuentes de calor (p.ej.: Horno, hornillo, etc.) o en zonas
con agua (p.ej.: Fregadero)
- Utilice la máquina únicamente según estas instrucciones.
- Utilice el cable original y, cuando sean necesarios, alargadores resistentes a la corriente indicada en la
placa de la máquina.
- Con la máquina en marcha nunca acerque a los rodillos: cuchillos, paños, objetos metalicos o de madera.
- Cuando se utilice la máquina deben tener recogido el pelo y no llevar corbatas, pañuelos,
collares largos, pulseras, etc.
- Antes de quitar la tapa asegúrese que el interruptor ➀ esté apagado (Fig. 1).
2) INSTRUCCIONES PARA EL USO
- Limpie bien toda la máquina con un paño cuando se utilice por primera vez.
- Para limpiar los rodillos haga pasar por ellos una pequeña cantidad de masa que luego se desechará.
- Asegúrese que la toma de corriente sea compatible con la tensión indicada en la placa de la máquina.
A) PULSADORES E INDICADORES (Fig. 1)
➀ Interruptor On/Off.
➁ Indicador rojo para el tapón de cierre: si está encendido señala que el tapón no está perfectamente cerrado.
➂ Indicador verde: si está encendido señala que se puede utilizar la máquina.
➃ Indicador rojo tapa abierta: si está encendido señala que la tapa no está perfectamente cerrada.
➄ Pulsador para la marcha a impulsos (Pulse).
B) CÓMO QUITAR Y MONTAR LA PALA
- Desatornillar el tapón (Fig. 2).
- Empujar la pala hacia el orificio. (Fig. 3).
- Tirar la pala hacia arriba (Fig. 4).
- Para montar la pala proceder a la inversa.
17
18
13
C) CÓMO QUITAR Y MONTAR LA TAPA
- Abrir la tapa hasta el bloqueo (90°) y empujar para que se desbloque (Fig. 5).
- Para montar la tapa proceder a la inversa.
D) CÓMO QUITAR Y MONTAR LOS ACCESORIOS
- Quitar el medidor tirandolo hacia arriba (Fig. 6).
- Introducir el accesorio por el perno hexagonal. Girarlo aproximadamente 300 hasta bloquearlo (Fig. 7).
3) COMO PREPARAR LA MASA
- Dosificar los ingredientes (véase “Las recetas de Francesco”) con el medidor (Fig. 8-9).
- Quitar la tapa y echar los ingredientes en el recipiente de la máquina (Fig.10).
Asegurese que el tapón esté cerrado y que el indicador ➁ esté apagado.
- Cierre la tapa y ponga en marcha la máquina (Fig. 11) por medio del interruptor ➀.
Esperar unos 5 minutos para que se forme una masa densa y homogénea.
- Quite la tapa para cojer la masa. Es aconsejable desconectar la máquina cuando la masa se halle en la parte
superior del recipiente. Si es necesario utilícese el pulsador ➄. Pulse para este fin (Fig.12-13).
- “Las recetas de Francesco” ofrecen muchos consejos e informaciones útiles para preparar masas riquísimas
para pasta, pizza, pan, bizcochos, colines, crackers, krapfen, bretzeln y bagels.
Le ayudaran para obtener buenos resultados y muchas satisfacciones.
4) LIMPIEZA Y CUIDADOS
- Antes de limpiar la máquina siempre se debe desenchufar.
- No limpie nunca la máquina o sus accesorios con agua o en el lavavajillas (Fig. 26).
- Para limpiar la máquina utilícese únicamente un pincel y una varilla de madera (Fig. 27).
- Sólo se pueden limpiar con agua y detergente: el medidor y la pala (Fig. 28).
- La máquina y sus accesorios deben ser reparados únicamente por técnicos especializados.
- Se prohíbe acceder al interior de la máquina a quienes no esté autorizado por MARCATO S.p.a.
- Después del uso, guarde la máquina y los accesorios en su caja.
19
20
14
21
22
15
23
30°
3
30°
30°
2
24
16
25
26
17
27
28
11
12
8
13
14
16
LINEA AC
110/220 V
SP 1
F1
LA
IN 1
P1
L2
L1
1
1
4
4
MSW2
2
2
MSW1
C1
D2
D1
QUESTA PARTE DEL MANUALE E’ RISERVATA A PERSONALE SPECIALIZZATO
THIS PART OF THE MANUAL IS RESERVED TO SPECIALIZED TECHNICIANS
CETTE PARTIE DU MANUEL EST RESERVÉE À PERSONNEL SPECIALISÉ
10
9
7
6
5
4
15
D3
D2
21
20
C3
L1
C2
L2
A
18
2
3
17
1
M1
19
23
25
24
26
28
27
34
37
36
35
F1 = Fusibile Ø 5 x 20 mm - 2 A
SP = Spina 220 V o 110 V polarizzata
LA = Lampada neon verde
P1 = Pulsante
IN1 = Interruttore
MSW1 = Micro Coperchio giallo
MSW2 = Micro Tappo
L1 = Lampada neon gialla – Coperchio
L2 = Lampada neon gialla – Tappo
C1 = Condensatore 0,22 µF X2 - p. 22,5 mm
D1-D2-D3-D4 = Diodi BY255 – 1300 V 3 A
C2 = Condensatore 0,1 µF X2 - p. 15 mm
L1 - L2 = Bobine assiali 47 µH - 1,2 A
M1 = Motore in c.c. 120 V o 220 V – 170 W
C3 = Condensatore 250 V – 1nF – CLY
33
32
31
30
29
22
1
2
3
4
5
6
7
8
9
10
11
12
13
14
15
16
17
18
19
20
21
22
23
24
25
26
27
28
29
30
31
32
33
34
35
36
37
Mixing blade
Left side
Closing knob
Gasket for closing knob
Tank
Release button
Front side
Template
Switch
Yellow light
Green light
Pulse button
Fuse 2 A
Motor
Support for lights
Micro rod
Cover
Cover pin
Back side
Micro cover
Complete circuit
Electric cord
Gasket for square
Square support
Gasket for large gear
Large gear
Pulley
Medium gear
Toothed belt
Motor pinion
Base
Feet
Bottom
Gear plate
Right side
Washer
Coupling
F1 = Fuse Ø 5 x 20 mm - 2 A
SP = Plug 220 V or 110 V polarized
LA = Green neon light
P1 = Pulse Button
IN1 = Switch
MSW1 = Micro Yellow Cover
MSW2 = Micro Closing Knob
L1 = Yellow neon light – Cover
L2 = Yellow neon light – Closing Knob
C1 = Condenser 0,22 µF X2 - p. 22,5 mm
D1-D2-D3-D4 = Diode BY255 – 1300 V 3 A
C2 = Condenser 0,1 µF X2 - p. 15 mm
L1 - L2 = Axial inductance 47 µH - 1,2 A
M1 = Motor DC 120 V or 220 V – 170 W
C3 = Condenser 250 V – 1nF – CLY
1 Spatola
2 Fiancata sinistra
3 Tappo
4 ORing tappo
5 V asca
6 Pulsante Triplo
7 Fiancata anteriore
8 Mascher ina
9 Interruttore
10 Lampada spia gialla
11 Lampada spia verde
12 Pulsante
13 Fusibile 2 A
14 Motore
15 P onticello luci
16 Astina Micro
17 Coperchio
18 P erno coperchio
19 Fiancata posteriore
20 Micro coperchio
21 Circuito completo
22 Ca vo
23 ORing squadra
24 Supporto a squadra
25 ORing ruota grande
26 Ruota grande
27 Puleggia
28 Ruota media
29 Cinghia dentata
30 Pignone motore
31 Base
32 Piedino
33 F ondo
34 Piastr a ingranaggi
35 Fiancata destra
36 Rondella
37 Baionetta
WARRANTY
GARANZIA
Tutti i prodotti MARCATO sono costruiti con i
migliori materiali disponibili e vengono sottoposti a
continui controlli di qualità. Per questo, essi sono
garantiti per 3 anni dalla data di acquisto da ogni
difetto di fabbricazione. La garanzia non copre
invece i danni provocati alla macchina da un uso
improprio o diverso da quello illustrato in questo
manuale.
All MARCATO products are manufactured using
only the finest materials available and are subject to
continuos quality control. Because of this, they are
guaranteed for 3 full years from the date of purchase against any manufacturing defect. This guarantee
does not cover damage to the machine caused by
improper use or by use other than that illustrated in
this manual.
GARANTIE
GARANTIE
Tous les produits MARCATO sont costruits avec les
meilleurs matériaux disponibles et sont soumis continuellement à des contrôles de qualité. C’est pourquoi ils sont garantis contre tout vice de fabrication
pendant 3 ans à compter de la date de achat. La
garantie ne couvre pas cependant les dommages
provoqués à la machine par un usage impropre ou
differént de celui qui a été illustré dans ce manuel.
Alle Produkte von MARCATO werden mit den
besten erhältlichen Materialien gebaut und ständigen
Qualitätskontrollen unterzogen. Deswegen wird ab
Kaufdatum 3 Jahre Garantie für jede Art
Fabrikationsfehler gawährt. Die Garantie deckt
jedoch keine Schäden, die durch unsachgemäben
oder von den Beschreibungen des vorliegenden
Anleitungsheftes abweichenden Gebrauch verursacht wurden.
GARANTÍA
Todos los productos MARCATO han sido fabricados
con los mejores materiales existentes y son sometidos a continuos controles de calidad. Por esta razón,
están garantizados durante 3 anõs a partir de la fecha
de compra de todos los defectos de producción. La
garantíà no cubre, por el contrario, los daños provocados a la maquiná por un uso no adecuado o distinto de el que se ilustra en el manual.
MARCATO
.
.
,
3
.
.
MARCATO
COPYRIGHT © 2006 MARCATO S.p.A. - IMPRIMÉ EN ITALIE - PRINTED IN ITALY
DATE :
................................................
STAMP
................................................
MARCATO S.p.A. - Via Rossignolo, 12 - 35011 Campodarsego (PADOVA) Italy Tel. +39 049 9200988 - Fax +39 049 9200970 - www.marcato.net