1
CONTENTS
English
........................................................ 1 ~ 57
Français
......................................................... 1 ~ 57
Español
......................................................... 1 ~ 57
Deutsh
......................................................... 1 ~ 57
Italiano
........................................................ 1 ~ 57
Dutch
........................................................ 1 ~ 57
English
CONTENTS
WARNINGS AND PRECAUTIONS
Important Safety Instructions...................................................................... 1
Antenna Safety Instructions........................................................................ 3
INTRODUCING THE LED TV
Package Contents ................................................................................................... 4
Setting Your LED TV ................................................................................ 5
Your LED TV ............................................................................................. 7
Your Remote Control ................................................................................. 10
INTRODUCING THE LED TV
.
12
Connecting a TV Cable or an Antenna ......................................................
Connecting an AV Equipment with SCART Connector ........................... 14
Connecting an AV Equipment with YPbPr Connector ............................. 15
Connecting an AV Equipment with HDMI Connector .............................. 16
Connecting an AV Equipment with DVI Connector ................................. 17
Connecting a PC....................................................................................... 18
Connecting an Audio Receiver.................................................................. 19
USING THE FEATURES
Customizing the CHANNEL Settings ......................................................... 20
Customizing the PICTURE Settings .......................................................... 25
Customizing the SOUND Settings ............................................................ 27
Customizing the TIME Settings ................................................................. 29
Customizing the OPTION Settings ............................................................ 32
Customizing the LOCK Settings ................................................................. 34
Customizing the OTHER MENU Settings ................................................. 36
Customizing the MULTIMEDIA Settings .................................................... 39
Customizing the PVR Settings .................................................................. 46
TROUBLESHOOTING
.................................................................................................................56
SPECIFICATIONS
23”LED ....................................................................................................... 57
˪˴̅́˼́˺̆ʳ˴́˷ʳˣ̅˸˶˴̈̇˼̂́̆
:$51,1*6$1'35(&$87,216
˧̂ʳ̃̅˸̉˸́̇ʳ˴́̌ʳ˼́˽̈̅˼˸̆ʿʳ̇˻˸ʳ˹̂˿˿̂̊˼́˺ʳ̆˴˹˸̇̌ʳ̃̅˸˶˴̈̇˼̂́̆ʳ̆˻̂̈˿˷ʳ˵˸ʳ̂˵̆˸̅̉˸˷ʳ˼́ʳ̇˻˸ʳ˼́̆̇˴˿˿˴̇˼̂́ʿʳ̈̆˸ʿ
ʳ̆˸̅̉˼˶˼́˺ʳ˴́˷ʳ̀˴˼́̇˸́˴́˶˸ʳ̂˹ʳ̇˻˼̆ʳ˸̄̈˼̃̀˸́̇ˁ˕˸˹̂̅˸ʳ̂̃˸̅˴̇˼́˺ʳ̇˻˼̆ʳ˸̄̈˼̃̀˸́̇ʿʳ̃˿˸˴̆˸ʳ̅˸˴˷ʳ̇˻˼̆ʳ̀˴́̈˴˿
˧˻˼̆ʳ̆̌̀˵̂˿ʳ˼̆ʳ˼́̇˸́˷˸˷ʳ̇̂ʳ˴˿˸̅̇ʳ̇˻˸ʳ̈̆˸̅ʳ̇̂ʳ˴̉̂˼˷ʳ̇˻˸ʳ̅˼̆˾ʳ̂˹ʳ˸˿˸˶̇̅˼˶ʳ̆˻̂˶˾ˁʳ˧˻˼̆ʳ˸̄
ʳ̀̈̆̇ʳʳ́̂̇ʳ˵˸ʳ˷˼̆˴̆̆˸̀˵˿˸˷ʳ˵̌ʳ˴́̌̂́˸ʳ˸̋˶˸̃̇ʳ̄̈˴˿˼˹˼˸˷ʳ̆˸̅̉˼˶˸ʳ̃˸̅̆̂́́˸˿ˁ
˧˻˼̆ʳ̆̌̀˵̂˿ʳ˼̆ʳ˼́̇˸́˷˸˷ʳ̇̂ʳ˴˿˸̅̇ʳ̇˻˸ʳ̈̆˸̅ʳ̇̂ʳ̇˻˸ʳ̃̅˸̆˸́˶˸ʳ̂˹ʳ˼̀̃̂̅̇˴́̇ʳ̂̃˸̅˴̇˼́˺ʳ˴́˷ʳ
ʳ̀˴˼́̇˸́˴́˶˸ʳ˼́̆̇̅̈˶̇˼̂́̆ʳ˼́ʳ̇˻˸ʳ˿˼̇˸̅˴̇̈̅˸ʳ˴˶˶̂̀̃˴́̌˼́˺ʳ̇˻˸ʳ˴̃̃˿˼˴́˶˸ˁ
˧̂ʳ̅˸˷̈˶˸ʳ̇˻˸ʳ̅˼̆˾ʳ̂˹ʳ˹˼̅˸ʳ̂̅ʳ˸˿˸˶̇̅˼˶ʳ̆˻̂˶˾ʿʳ˷̂ʳ́̂̇ʳ˸̋̃̂̆˸ʳ̇˻˼̆ʳ˸̄̈˼̃̀˸́̇ʳ̇̂ʳ̅˴˼́ʳ̂̅ʳ̀̂˼̆̇̈̅˸ˁ
كʳ˧ˢʳ˥˘˗˨˖˘ʳ˧˛˘ʳ˥˜˦˞ʳˢ˙ʳ˘˟˘˖˧˥˜˖ʳ˦˛ˢ˖˞ʿˣ˘˥˦ˢˡˡ˘˟ˁ
كʳ˗ˢʳˡˢ˧ʳ˥˘ˠˢ˩˘ʳ˖ˢ˩˘˥ʳʻˢ˥ʳ˕˔˖˞ʼˁ
كʳˡˢʳ˨˦˘˥ˀ˦˘˥˩˜˖˘˔˕˟˘ʳˣ˔˥˧˦ʳ˜ˡ˦˜˗˘ˁ
كʳ˥˘˙˘˥ʳ˦˘˥˩˜˖˜ˡ˚ʳ˧ˢʳˤ˨˔˟˜˙˜˘˗ʳ˦˘˥˩˜˖˘ʳ
˨̆˸ʳ̂˹ʳ˶̂́̇̅̂˿̆ʿʳ˴˷˽̈̆̇̀˸́̇̆ʳ̂̅ʳ̃˸̅˹̂̅̀˴́˶˸ʳ̂˹ʳ̃̅̂˶˸˷̈̅˸̆ʳ̂̇˻˸̅
ʳ̇˻˴́ʳ̇˻̂̆˸ʳ̆̃˸˶˼˹˼˸˷ʳ˻˸̅˸˼́ʳ̀˴̌ʳ̅˸̆̈˿̇ʳ˼́ʳ˻˴̍˴̅˷̂̈̆ʳ̅˴˷˼˴̇˼̂́ʳ˸̋̃̂̆̈̅˸ˁ
˧˻˼̆ʳ̆̌̀˵̂˿ʳ˼́˷˼˶˴̇˸̆ ʳʳʳʳʳʳʳʳʳʳʳʳʳʳʳ˧˻˼̆ʳ̆̌̀˵̂˿ʳ˼́˷˼˶˴̇˸̆
˶˴̈̇˼̂́ʳ̃̂˼́̇̆ˁ
ʳʳʳʳʳʳʳʳʳʳʳʳʳʳʳ˴˶̇˼̂́̆ʳ̇˻˴̇ʳ̆˻̂̈˿˷ʳ́̂̇
ʳʳʳʳʳʳʳʳʳʳʳʳʳʳʳʳ˵˸ʳ˷̂́˸ˁ
ʳʳʳʳʳʳ˧˻˼̆ʳ̆̌̀˵̂˿ʳ˼́˷˼˶˴̇˸̆ʳ
ʳʳʳ˴˶̇˼̂́̆ʳ̇˻˴̇ʳ̀̈̆̇ʳ˵˸ʳ
ʳʳʳʳʳʳʳʳʳʳʳʳʳ̃˸̅˹̂̅̀˸˷ˁ
كʳ˗̂ʳ́̂̇ʳ̃˿˴˶˸ʳ̇˻˸ʳ˸̄̈˼̃̀˸́̇ʳ̂́ʳ˴́̌ʳ̈́˸̉˸́ʳ̂̅ʳ̈́̆̇˴˵˿˸ʳ˶˴̅̇̆ʿʳ̆̇˴́˷̆ʿʳ̇˴˵˿˸̆ʿʳ̆˻˸˿̉˸̆ʳ˸̇˶ˁʳ
ʳʳ˧˻˸ʳ˸̄̈˼̃̀˸́̇ʳ̀˴̌ʳ˹˴˿˿ʿʳ˶˴̈̆˼́˺ʳ̆˸̅˼̂̈̆ʳ˼́˽̈̅̌ʳ̇̂ʳ˶˻˼˿˷̅˸́ʳ̂̅ʳ˴˷̈˿̇̆ʳ˴́˷ʳ̆˸̅˼̂̈̆ʳ˷˴̀˴˺˸ʳ̇̂ʳ
ʳʳ̇˻˸ʳ˸̄̈˼̃̀˸́̇ʳ˼̇̆˸˿˹ˁ
كʳ˨̆˸ʳ̂́˿̌ʳ˴ʳ˶˴̅̇ʳ̂̅ʳ̆̇˴́˷ʳ̅˸˶̂̀̀˸́˷˸˷ʳ˵̌ʳ̇˻˸ʳ̀˴́̈˹˴˶̇̈̅˸̅ˁʳ˧˻˼̆ʳ˸̄̈˼̃̀˸́̇ʳ˴́˷ʳ
ʳʳ̅˸˶̂̀̀˸́˷˸˷ʳ˶˴̅̇ʳ̂̅ʳ̆̇˴́˷ʳ̆˻̂̈˿˷ʳ˵˸ʳ˻˴́˷˿˸˷ʳ̊˼̇˻ʳ˶˴̅˸ˁʳˤ̈˼˶˾ʳ̆̇̂̃̆ʿʳ˸̋˶˸̆̆˼̉˸ʳ˹̂̅˶˸ʿʳ
ʳʳ˴́˷ʳ̈́˸̉˸́ʳ̆̈̅˹˴˶˸̆ʳ̀˴̌ʳ˶˴̈̆˸ʳ̇˻˸ʳ˸̄̈˼̃̀˸́̇ʳ˴́˷ʳ˶˴̅̇˂̆̇˴́˷ʳ̇̂ʳ̂̉˸̅̇̈̅́ˁ
كʳ˗̂ʳ́̂̇ʳ˷˼̆˴˵˿˸ʳ̇˻˸ʳˆˀ̊˼̅˸ʳ˺̅̂̈́˷˼́˺ʳ̇̌̃˸ʳ̃˿̈˺ˁʳ˧˻˸ʳ˺̅̂̈́˷˼́˺ʳ̃˼́ʳ̂́ʳ̇˻˸ʳˆˀ̃̅̂́˺ʳ̃˿̈˺ʳ˼̆ʳ
ʳʳ˴́ʳ˼̀̃̂̅̇˴́̇ʳ˹˸˴̇̈̅˸ˁʳ˥˸̀̂̉˼́˺ʳ̇˻˸ʳ˺̅̂̈́˷˼́˺ʳ̃˼́ʳ̊˼˿˿ʳ˼́˶̅˸˴̆˸ʳ̇˻˸ʳ̅˼̆˾ʳ̂˹ʳ˷˴̀˴˺˼́˺ʳ̇˻˸ʳ
˸̄̈˼̃̀˸́̇ˁ
كʳ˜˹ʳ̌̂̈ʳ˶˴́ʳ́̂̇ʳ˹˼̇ʳ̇˻˸ʳ̃˿̈˺ʳ˼́̇̂ʳ̇˻˸ʳ˸˿˸˶̇̅˼˶˴˿ʳ̂̈̇˿˸̇ʿʳ˶̂́̇˴˶̇ʳ˴́ʳ˸˿˸˶̇̅˼˶˼˴́ʳ̇̂ʳ˼́̆̇˴˿˿ʳ˴ʳ
ʳʳ˺̅̂̈́˷˼́˺ʳ̂̈̇˿˸̇ˁ
كʳ˔˿̊˴̌̆ʳ̂̃˸̅˴̇˸ʳ̇˻˼̆ʳ˸̄̈˼̃̀˸́̇ʳ˹̅̂̀ʳ̇˻˸ʳ̇̌̃˸ʳ̂˹ʳ̃̂̊˸̅ʳ̆̂̈̅˶˸ʳ˼́˷˼˶˴̇˸˷ʳ̂́ʳ̇˻˸ʳ̅˸˴̅ʳ̂˹ʳ̇˻˸ʳ
ʳʳ̆˸̅˼˴˿˂̀̂˷˸˿ʳ˼́˹̂̅̀˴̇˼̂́ʳ˿˴˵˸˿ˁ
كʳˡ˸̉˸̅ʳ̂̉˸̅˿̂˴˷ʳ̊˴˿˿ʳ̂̈̇˿˸̇̆ʳ˴́˷ʳ˸̋̇˸́̆˼̂́̆ˁ
كʳ˨̆˸ʳ˴́˷ʳ˻˴́˷˿˸ʳ̇˻˸ʳ̃̂̊˸̅ʳ˶̂̅˷ʳ̊˼̇˻ʳ˶˴̅˸ˁʳ˗̂ʳ́̂̇ʳ̃˿˴˶˸ʳ˴́̌ʳ˻˸˴̉̌ʳ̂˵˽˸˶̇̆ʳ̂́ʳ̇˻˸ʳ˔˖ʳ
ʳʳ̃̂̊˸̅ʳ˶̂̅˷ˁ
كʳ˗̂ʳ́̂̇ʳ̃̈˿˿ʳ̇˻˸ʳ˔˖ʳ̃̂̊˸̅ʳ˶̂̅˷ˁʳ˗̂ʳ́̂̇ʳ˻˴́˷˿˸ʳ̇˻˸ʳ˔˖ʳ̃̂̊˸̅ʳ˶̂̅˷ʳ̊˼̇˻ʳ˴ʳ̊˸̇ʳ˻˴́˷ˁ
كʳ˗̂ʳ́̂̇ʳ̇̂̈˶˻ʳ̇˻˸ʳ̃̂̊˸̅ʳ˶̂̅˷ʳ˴́˷ʳ˴́̇˸́́˴ʳ˶˴˵˿˸ʳ˷̈̅˼́˺ʳ˿˼˺˻̇́˼́˺ˁ
˪˴̅́˼́˺̆ʳ˴́˷ʳˣ̅˸˶˴̈̇˼̂́̆
كʳ˥˸̀̂̉˸ʳ̇˻˸ʳ̃˿̈˺ʳ˹̅̂̀ʳ̇˻˸ʳ̊˴˿˿ʳ̂̈̇˿˸̇ʿʳ˼˹ʳ̇˻˸ʳ˸̄̈˼̃̀˸́̇ʳ̊˼˿˿ʳ́̂̇ʳ˵˸ʳ̈̆˸˷ʳ˹̂̅ʳ˴ʳ˿̂́˺ʳ̃˸̅˼̂˷ʳ
ʳʳ̂˹ʳ̇˼̀˸ˁ
˸˶˴˿̃ ̇̂́ ̂˗ كʿ ̈̆˸ ̂̅ ˻˴́˷˿˸ ̇˻˼̆ ˸̄̈˼̃̀˸́̇ ́˸˴̅ ̊˴̇˸̅ˁ
كʳˡ˸̉˸̅ʳ˸̋̃̂̆˸ʳ̇˻˸ʳ˸̄̈˼̃̀˸́̇ʳ̇̂ʳ˿˼̄̈˼˷ʿʳ̅˴˼́ʿʳ̂̅ʳ̀̂˼̆̇̈̅˸ˁʳ˦˸˸˾ʳ˹̂̅ʳ̆˸̅̉˼˶˸ʳ˼˹ʳ˴́̌ʳ̂
ʳʳ˴˵̂̉˸ʳ˼̆ʳ̆̃˼˿˿˸˷ʳ˼́̇̂ʳ̇˻˸ʳ˸̄̈˼̃̀˸́̇ˁ
كʳ˗̂ʳ́̂̇ʳ˸̋̃̂̆˸ʳ̇˻˸ʳ˸̄̈˼̃̀˸́̇ʳ̇̂ʳ˸̋̇̅˸̀˸ʳ̇˸̀̃˸̅˴̇̈̅˸ʳ̂̅ʳ̇̂ʳ˷˼̅˸˶̇ʳ̆̈́˿˼˺˻̇ʿʳ˴̆ʳ̇˻˸ʳ
ʳʳ˸̄̈˼̃̀˸́̇ʳ̀˴̌ʳ˻˸˴̇ʳ̈̃ʳ˴́˷ʳ̆̈˹˹˸̅ʳ˷˴̀˴˺˸ˁ
كʳ˗̂ʳ́̂̇ʳ˼́̆̇˴˿˿ʳ̇˻˸ʳ˸̄̈˼̃̀˸́̇ʳ́˸˴̅ʳ˴́̌ʳ˻˸˴̇ʳ̆̂̈̅˶˸̆ʳ̆̈˶˻ʳ˴̆ʳ̅˴˷˼˴̇̂̅̆ʿʳ˻˸˴̇ʳ̅˸˺˼̆̇˸̅̆ʿʳ
ʳʳ̆̇̂̉˸̆ʿʳ̂̅ʳ˴́̌ʳ̂̇˻˸̅ʳ˴̃̃˴̅˴̇̈̆ʳ̇˻˴̇ʳ̀˼˺˻̇ʳ̃̅̂˷̈˶˸ʳ˻˸˴̇ˁ
كʳ˗̂ʳ́̂̇ʳ˴̇̇˸̀̃̇ʳ̇̂ʳ̆˸̅̉˼˶˸ʳ̇˻˸ʳ˸̄̈˼̃̀˸́̇ʳ̌̂̈̅̆˸˿˹ˁ
كʳˢ̃˸́˼́˺ʳ˴́˷ʳ̅˸̀̂̉˼́˺ʳ̇˻˸ʳ˶̂̉˸̅̆ʳ̀˴̌ʳ˸̋̃̂̆˸ʳ̌̂̈ʳ̇̂ʳ˷˴́˺˸̅̂̈̆ʳ̉̂˿̇˴˺˸ʳ̂̅ʳ̂̇˻˸̅ʳ˻˴̍˴̅˷̆ʳ
ʳʳ˴́˷ʳ̀˴̌ʳ̉̂˼˷ʳ̌̂̈̅ʳ̊˴̅̅˴́̇̌ˁʳ˥˸˹˸̅ʳ̆˸̅̉˼˶˸ʳ̇̂ʳ̄̈˴˿˼˹˼˸˷ʳ̃˸̅̆̂́́˸˿ˁ
كʳ˗̂ʳ́̂̇ʳ̃˿˴˶˸ʳ̂̅ʳ˷̅̂̃ʳ˴́̌ʳ̂̇˻˸̅ʳ̂˵˽˸˶̇̆ʳ̂́ʳ̇̂̃ˁ
كʳ˗̂ʳ́̂̇ʳ˼́̆˸̅̇ʳ˴́̌̇˻˼́˺ʳ˼́̇̂ʳ̇˻˸ʳ̉˸́̇˼˿˴̇˼̂́ʳ˻̂˿˸̆ʳ̂˹ʳ̌̂̈̅ʳ˸̄̈˼̃̀˸́̇ˁʳ˜́̆˸̅̇˼́˺ʳ˴́̌ʳ̀˸̇˴˿ʳ
ʳʳʳ̂̅ʳ˹˿˴̀̀˴˵˿˸ʳ̂˵˽˸˶̇̆ʳ̀˴̌ʳ̅˸̆̈˿̇ʳ̇̂ʳ˹˼̅˸ʳ̂̅ʳ˸˿˸˶̇̅˼˶ʳ̆˻̂˶˾ˁ
كʳ˗̂ʳ́̂̇ʳ̃˿˴˶˸ʳ̇˻˸ʳ˸̄̈˼̃̀˸́̇ʳ̂́ʳ̈́˸̉˸́ʳ̂̅ʳ̈́̆̇˴˵˿˸ʳ˶˴̅̇̆ʿʳ̆̇˴́˷̆ʿʳ̇˴˵˿˸̆ʿʳ̆˻˸˿̉˸̆ʳ˸̇˶ˁʳ˧˻˸ʳ
ʳʳʳ˸̄̈˼̃̀˸́̇ʳ̀˴̌ʳ˹˴˿˿ʿʳ˶˴̈̆˼́˺ʳ̆˸̅˼̂̈̆ʳ˼́˽̈̅̌ʳ̇̂ʳ˶˻˼˿˷̅˸́ʳ̂̅ʳ˴˷̈˿̇̆ʳ˴́˷ʳ̆˸̅˼̂̈̆ʳ˷˴̀˴˺˸ʳ̇̂ʳ̇˻˸ʳ
ʳʳʳ˸̄̈˼̃̀˸́̇ʳ˼̇̆˸˿˹ˁʳ˔˿̊˴̌̆ʳ̃˿˴˶˸ʳ̇˻˸ʳ˸̄̈˼̃̀˸́̇ʳ̂́ʳ̇˻˸ʳ˹˿̂̂̅ʳ̂̅ʳ̂́ʳ˴ʳ̆̈̅˹˴˶˸ʳ̇˻˴̇ʳ˼̆ʳ̆̇̈̅˷̌ʿʳ
ʳʳʳ˿˸̉˸˿ʿʳ̆̇˴˵˿˸ʳ˴́˷ʳ̆̇̅̂́˺ʳ˸́̂̈˺˻ʳ̇̂ʳ̆̈̃̃̂̅̇ʳ̇˻˸ʳ̊˸˼˺˻̇ʳ̂˹ʳ̇˻˸ʳ˸̄̈˼̃̀˸́̇ˁ
كʳ˗̂ʳ́̂̇ʳ˵˿̂˶˾ʳ˴́̌ʳ̉˸́̇˼˿˴̇˼́˺ʳ̂̃˸́˼́˺̆ˁʳ˟˸˴̉˸ʳ˴́ʳ̂̃˸́ʳ̆̃˴˶˸ʳ˴̅̂̈́˷ʳ̇˻˸ʳ˸̄̈˼̃̀˸́̇ˁʳˡ˸̉˸̅
ʳʳʳʳ̃˿˴˶˸ʳ̇˻˸ʳ˸̄̈˼̃̀˸́̇ʳˍʳ̂́ʳ˴ʳ˵˸˷ʿʳ̆̂˹˴ʿʳ̅̈˺ʿʳ̂̅ʳ˴́̌ʳ̂̇˻˸̅ʳ̆˼̀˼˿˴̅ʳ̆̈̅˹˴˶˸̆ˎʳ̇̂̂ʳ˶˿̂̆˸ʳ̇̂ʳ
ʳʳʳʳ˷̅˴̃˸̆˂˶̈̅̇˴˼́̆˂̊˴˿˿̆ʿʳ˼́ʳ˴ʳ˵̂̂˾˶˴̆˸ʿʳ˵̈˼˿̇ˀ˼́ʳ˶˴˵˼́˸̇ʿʳ̂̅ʳ˴́̌ʳ̂̇˻˸̅ʳ̆˼̀˼˿˴̅ʳ̃˿˴˶˸̆ʳ̇˻˴̇ʳ̀˴̌
ʳʳʳʳ˶˴̈̆˸ʳ̃̂̂̅ʳ̉˸́̇˼˿˴̇˼̂́ˁ
كʳ˨́̃˿̈˺ʳ̇˻˼̆ʳ˴̃̃˴̅˴̇̈̆ʳ˷̈̅˼́˺ʳ˿˼˺˻̇́˼́˺ʳ̆̇̂̅̀̆ʳ̂̅ʳ̊˻˸́ʳ̈́̈̆˸˷ʳ˹̂̅ʳ˿̂́˺ʳ̃˸̅˼̂˷̆ʳ̂˹ʳ̇˼̀˸ˁ
كʳ˥˸˹˸̅ʳ˴˿˿ʳ̆˸̅̉˼˶˼́˺ʳ̇̂ʳ̄̈˴˿˼˹˼˸˷ʳ̆˸̅̉˼˶˸ʳ̃˸̅̆̂́́˸˿ˁʳ˦˸̅̉˼˶˼́˺ʳ˼̆ʳ̅˸̄̈˼̅˸˷ʳ̊˻˸́ʳ̇˻˸ʳ˴̃̃˴̅˴̇̈̆ʳ
ʳʳʳ˻˴̆ʳ˵˸˸́ʳ˷˴̀˴˺˸˷ʳ˼́ʳ˴́̌ʳ̊˴̌ʿʳ̆̈˶˻ʳ˴̆ʳ̃̂̊˸̅ˀ̆̈̃̃˿̌ʳ˶̂̅˷ʳ̂̅ʳ̃˿̈˺ʳ˼̆ʳ˷˴̀˴˺˸˷ʿʳ˿˼̄̈˼˷ʳ˻˴̆ʳ
ʳʳʳ˵˸˸́ʳ̆̃˼˿˿˸˷ʳ̂̅ʳ̂˵˽˸˶̇̆ʳ˻˴̉˸ʳ˹˴˿˿˸́ʳ˼́̇̂ʳ̇˻˸ʳ˴̃̃˴̅˴̇̈̆ʿʳ̇˻˸ʳ˴̃̃˴̅˴̇̈̆ʳ˻˴̆ʳ˵˸˸́ʳ˸̋̃̂̆˸˷ʳ̇̂
ʳʳʳʳ̅˴˼́ʳ̂̅ʳ̀̂˼̆̇̈̅˸ʿʳ˷̂˸̆ʳ́̂̇ʳ̂̃˸̅˴̇˸ʳ́̂̅̀˴˿˿̌ʿʳ̂̅ʳ˻˴̆ʳ˵˸˸́ʳ˷̅̂̃̃˸˷ˁ
كʳ˔˿̊˴̌̆ʳ̅˸̀̂̉˸ʳ̇˻˸ʳ̃̂̊˸̅ʳ˶̂̅˷ʳ˹̅̂̀ʳ̇˻˸ʳ̂̈̇˿˸̇ʳ˵˸˹̂̅˸ʳ˶˿˸˴́˼́˺ʳ̇˻˸ʳ˸̄̈˼̃̀˸́̇ˁ
كʳˡ˸̉˸̅ʳ̈̆˸ʳ˿˼̄̈˼˷ʳ̂̅ʳ˴˸̅̂̆̂˿ʳ˶˿˸˴́˸̅̆ʳ̂́ʳ̇˻˸ʳ˸̄̈˼̃̀˸́̇ˁ
ʳʳʳ˖˿˸˴́ʳ̂́˿̌ʳ̊˼̇˻ʳ˴ʳ̆̂˹̇ʳ˷̅̌ʳ˶˿̂̇˻ˁ
كʳˢ́˿̌ʳ̈̆˸ʳ˴̇̇˴˶˻̀˸́̇̆˂˴˶˶˸̆̆̂̅˼˸̆ʳ̆̃˸˶˼˹˼˸˷ʳ˵̌ʳ̇˻˸ʳ̀˴́̈˹˴˶̇̈̅˸̅ˁ
˟˜˦˧˘ˡ˜ˡ˚ ˪˜˧˛ ˘˔˥ˣ˛ˢˡ˘˦
كʳ˟˼̆̇˸́ʳ˴̇ʳ̀̂˷˸̅˴̇˸ʳ˩̂˿̈̀˸̆ʳ̇̂ʳ˴̉̂˼˷ʳ˻˸˴̅˼́˺ʳ˷˴̀˴˺˸ˁ
كʳ˜˹ʳ̌̂̈ʳ˻˸˴̅ʳ́̂ʳ̆̂̈́˷ʳ˷̈̅˼́˺ʳ̃˿˴̌˵˴˶˾ʿʳ˷̂ʳ́̂̇ʳ̇̈̅́ʳ̇˻˸ʳ˩̂˿̈̀˸ʳ̈̃ʳ˴̆ʳ̇˻˸ʳ̀̈̆˼˶ʳ̀˴̌ʳ
ʳʳʳ̆̈˷˷˸́˿̌ʳ˵˸˺˼́ʳ˴̇ʳ˴ʳ˻˼˺˻ʳ˩̂˿̈̀˸ˁʳ˘̋˶˸̆̆˼̉˸ʳ̆̂̈́˷ʳ̃̅˸̆̆̈̅˸ʳ˹̅̂̀ʳ˸˴̅̃˻̂́˸̆ʳ˴́˷ʳ
ʳʳʳ˻˸˴˷̃˻̂́˸̆ʳ˶˴́ʳ˶˴̈̆˸ʳ˻˸˴̅˼́˺ʳ˿̂̆̆ˁ
كʳ˧̂ʳ˴̉̂˼˷ʳ˷˴̀˴˺˼́˺ʳ̌̂̈̅ʳ˸˴̅̆ʿʳ˴˷˽̈̆̇ʳ̇˻˸ʳ˩̂˿̈̀˸ʳ̇̂ʳ̇˻˸ʳ˿̂̊˸̆̇ʳ˿˸̉˸˿ʳ˵˸˹̂̅˸ʳ̃˿˴̌˵˴˶˾ʿʳ˴́˷
ʳʳʳʳ̇̈̅́ʳ̈̃ʳ̇̂ʳ̇˻˸ʳ˷˸̆˼̅˸˷ʳ˿˸̉˸˿ʳ̊˻˸́ʳ̃˿˴̌˵˴˶˾ʳ˻˴̆ʳ̆̇˴̅̇˸˷ˁ
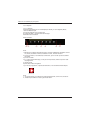
ˡ̂̇˸ˍ ˧˻˼̆ ̈̆˸̅ ̀˴́̈˴˿ ˼̆ ˹̂̅ ̅˸˹˸̅˸́˶˸ ̂́˿̌ʿ ̇˻˸ ˴˶̇̈˴˿ ̈́˼̇ ̀˴̌˵˸ ˶˻˴́˺˸˷
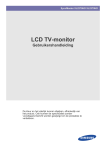
This sign indicates that this product may not be disposed of with your regular household
waste. The recycling and separate collection of such products is your responsibility. Please
drop off the above-mentioned waste at a designated place for recycling waste electrical and
electronic equipment. If you do not know where to drop off your waste equipment for
recycling, please contact your local city office or household waste collection servi
If an outdoor antenna is connected, follow the precautions below:
كAn outdoor antenna should not be located in any area where it could come in contact with
overhead power lines, or any other electric light or power circuits.
كWhen installing an outdoor antenna system, extreme caution should be taken to prevent
contact with power lines. Direct contact with power lines may be fatal and should be
avoided at all costs.
3
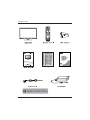
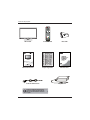
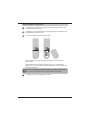
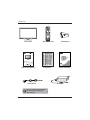
Package Contents
Warranty Card
Warranty Book
AC Adapter
Power cord
4
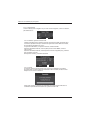
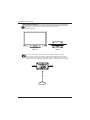
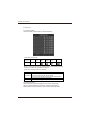
Setting Up Your LED TV
How to install the TV Stand
Open the box, and make sure all necessary parts are in the box.
The package contains:
LED TV
Stand
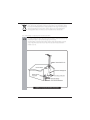
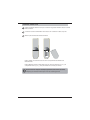
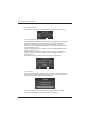
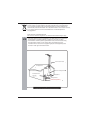
Cover an even stable surface with a soft cloth. Place the LED TV unit
face-down on the cloth. Fit the stand onto the bottom of the LED TV
unit as shown, then use a screw driver to tighten the screw on the bottom
of the stand until the screw is firmly fixed in place.
5
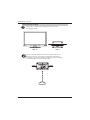
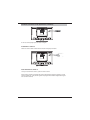
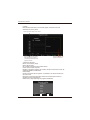
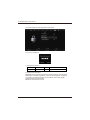
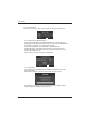
How to setup the TV
Use a supplied antenna cable to connect the VHF/UHF signal to the LED TV’s ANT.
terminal
Connect the AC power cord at the back of the TV and connect the power cord to
wall outlet.
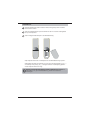
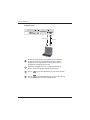
Insert the 2 batteries supplied in remote control.
Step1 Slide the back cover up to open the battery compartment of the remote control.
Step2 Insert two AAA size batteries. Make sure to match the (+) and ( - ) ends of the
batteries with the (+) and ( - ) ends indicated in the battery compartment. Slide the
cover back into place.
6
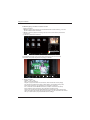
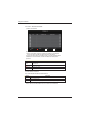
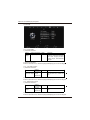
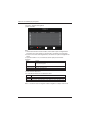
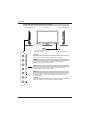
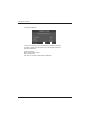
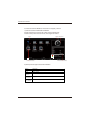
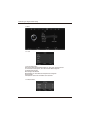
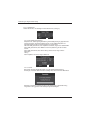
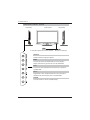
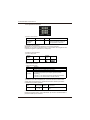
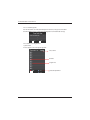
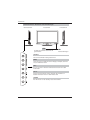
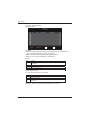
Your LED TV
Front/left/Right Side View and Controls
Right Side View
Front View
LED
The LED light indicates when the LED TV
is activated.
Left Side View
IR
Infrared Receiver
SOURCE
Chooses from different input signal sources.
MENU
Press once to display the OSD (on screen display),
press again to turn the OSD off.
CHA
CH+/Scans up and down through channels. Selects submenu item when in the OSD mode.
VOL+/Adjusts the volume up and down. Selects the main-menu item and
change values for items when in the OSD mode..
POWER
Turns the LED TV on and into standby mode.
7
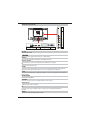
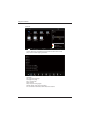
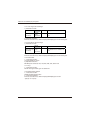
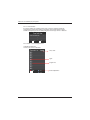
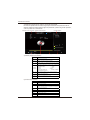
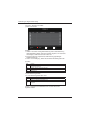
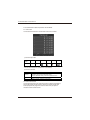
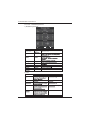
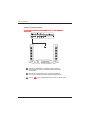
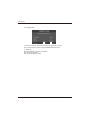
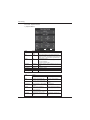
Reae View and Jacks
DC 12V
Input 12V DC power.
Allows access to digital content stored on a USB storage.
HDMI IN
Connects the all digital AV equipment with HDMI connector.
VGA/PC AUDIO
Connects the PC, or other AV equipment with VGA and line in jacks.
CI
Insert the CI card into the slot
SCART
Connect to external equipment with scart socket. The SCART interface offers RGB, AV
signals with audio input/output between the TV and external
.
video equipment
YPbPr
Connects to the DVD player, Digital Set-Top-Box, or other AV equipment with component
(YPbPr) video
HEAD PHONE
Connect the head phone.
COAXIAL
Connects to the audio jack on the digital/standard 5.1 audio system.
AUDIO IN L/R
CVBS and YPbPr audio input jacks.
RF
Connects RF input from VHF/UHF antenna or cable to receive high/standard definition
television.
VIDEO
Connect the Video output jack of DVD or VCR.
8
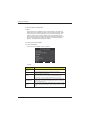
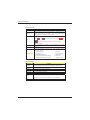
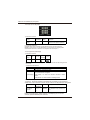
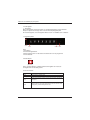
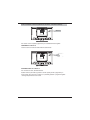
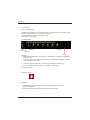
How to connect CI(Common Interface) card
CI SLOT
To view the scrambled (pay) services in digital TV mode.
TO INSERT A CI CARD
Insert the CI card into the slot in the direction of the arrow until it fits.
TO REMOVE A CI CARD
When removing the CI card, do pull it from its slot.
This function enables you to watch the scrambled services (payservices) in some channels. If you
remove the CI Module, you can watch the available digital/analogue programme in some channels.
9
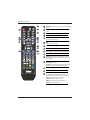
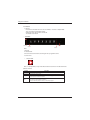
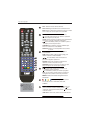
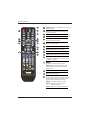
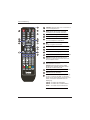
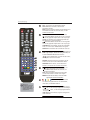
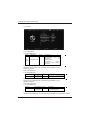
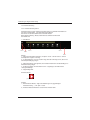
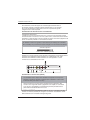
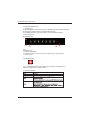
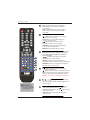
Your Remote Control
STANDBY Turns the LED TV on and into standby
mode.
POWER
MUTE
SOURCE
AUDIO
P.SIZE
AUTO Press to adjust the picture automatically in PC
P.MODE
S.MODE
mode.
MUTE Mutes and restores your LED TV sound.
0-9 Pressing a number selects a channel.
C/L Press this button continuously to select
Country and Language.
6ZLWFKHVEDFNDQGIRUWKEHWZHHQWKHFXUUHQW
DQGSUHYLRXVFKDQQHOV
INFO
ASPECT Cycles through Wide mode settings.
AUDIO Audio selection button.
VOL+/VOL- ,QFUHDVHVDQGGHFUHDVHVYROXPH
CH+/CH- Scans up and down the channels.
D.SETUP
DISPLAY 3UHVVLQJRQFHGLVSOD\VDYDULHW\RI
LQIRUPDWLRQVXFKDVWKHFXUUHQWFKDQQHODQGWKH
input source.
P+
V+
V-
P-
REPEAT
ZOOM
GOTO
USB/SD
DTV/RADIO
PVR LIST TIME SHIFT
/ENTER 7KHIRXUGLUHFWLRQVDOORZ\RX
WRQDYLJDWHWKHPHQX
ENTER Press this key enters chose item or into
FKDQQHOOLVW%RWK(17(5DQG2.IXQFWLRQ
MENU Displays the OSD menu on the screen.
EXIT Exits the OSD menu.
INPUT Pressing INPUT displays the source
OLVWXVHŸźWRVHOHFWWKHYLGHRHTXLSPHQW
FRQQHFWHGWRWKHYLGHRLQSXWVRI\RXU/('79
DQGSUHVV(17(5EXWWRQWRFRQILUP
PMODE Selection picture mode.
SMODE 6HOHFWVVRXQGHIIHFWRSWLRQV
SLEEP Set the sleep timer.
10
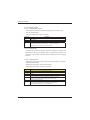
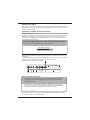
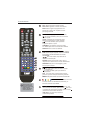
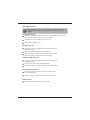
ˬ̂̈̅ʳ˥˸̀̂̇˸ʳ˖̂́̇̅̂˿
)$96KRZWKHOLVWRIIDYRULWHFKDQQHOV
)$9)$9,QFUHDVHGHFUHDVHIDYRULWHFKDQQHOV
32:(5
302'(
602'(
087(
6285&(
$8',2
36,=(
(3* 'LVSOD\VWKH3URJUDPPH*XLGHRQWKH
VFUHHQLQ'79PRGH3UHVVLQJDJDLQWRWXUQ
*8,'(RII
7(;7 7XUQVRQDQGRIIWKH7HOHWH[WIXQFWLRQ
,Q0HGLDPRGHSUHVVWRMXPSWRWKHSUHYLRXV
RIWKHFXUUHQWO\SOD\HGFKDSWHURUWUDFN
+2/' )UHH]HDPXOWLSDJHSDVVDJHRQVFUHHQ
LQ7HOHWH[WPRGH
,Q0HGLDPRGHSUHVVWRMXPSWRWKHQH[WRI
WKHFXUUHQWO\SOD\HGFKDSWHURUWUDFN
795$',2 ,Q'79PRGHSUHVV795$',2
EXWWRQWRHQWHU'79RU5$',2PRGH
,1)2
68%7,7/( 2SHQRUFORVHVXEWLWOH
,1'(; 'LVSOD\WKHPDLQLQGH[LQ7HOHWH[WPRGH
6,=( 'LVSOD\VWKHWRSERWWRPRUDOORISDJH
WRHDVLO\UHDGLQ7(/(7(;7PRGH
3
9
'6(783
9
3
5(3($7
=220
*272
86%6'
'795$',2
395/,67 7,0(6+,)7
,Q0HGLDPRGHXVHWRUHYHUVHDGYDQFH
SOD\EDFNUDSLGO\
5(9($/ 5HYHDOVKLGGHQLQIRUPDWLRQVXFKDVWKH
DQVZHUWRDTXL]LQ7(/(7(;7PRGH
68%3$*( 3UHVVLWWRVHHVXESDJHDQGSUHVV
DJDLQWRFDQFHO
,Q0HGLDPRGHSUHVVWRVWDUWSOD\EDFN RUSDXVH
,Q0HGLDPRGHSUHVVWRVWRSSOD\EDFN
395 ,Q'79PRGHSUHVV395EXWWRQWRVWDUW
UHFRUGLQJSUHVVEXWWRQWRVWRSUHFRUGLQJ
0(',$ 3UHVVWRVZLWFKWR86%VLJQDOVRXUFHGLUHFWO\
3UHVVWKHDSSURSULDWHFRORXUWR
GLUHFWDFFHVVIXQFWLRQVLQ7(/(7(;7(3*26'
DQG0(',$VLJQDOVRXUFHPRGH
(
7,0(6+,)7 ,Q'79PRGHSUHVV76EXWWRQWR
VWDUWWKHGHOD\IXQFWLRQSUHVVWKHEXWWRQ
WRVWDUWSOD\LQJGHOD\SURJUDPSUHVVWKH
EXWWRQWRWHUPLQDWHWKHGHOD\IXQFWLRQV
395/,67 ,Q'79PRGHGLVSOD\VWKHH[HFXWHG
395/,67
Installing the LED TV
Refer to the owner’s manual of any external equipment to be connected.When
connecting any external equipment, do not connect any AC power cords to wall
outlets until all other connections are completed.
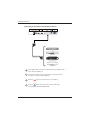
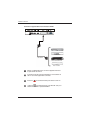
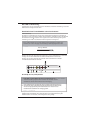
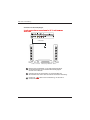
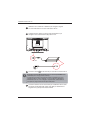
Connecting a TV Cable or an Antenna
Antenna Connection
The antenna requirements for good color TV.
Use one of the following two diagrams when connecting an outdoor antenna.
A: Shows how to use a VHF/UHF combination outdoor antenna.
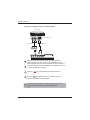
B: Shows how to use a separate VHF and/or UHF outdoor antenna.
A. Combination VHF/UHF antenna
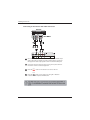
Cable TV (CATV) Connection
For more specific instructions on installing cable TV, consult your cable
TV company. One possible method of connecting the converter/descrambler
provided by your cable TV company is shown in the diagram below
.
12
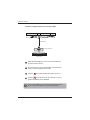
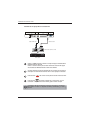
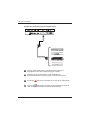
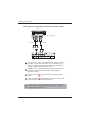
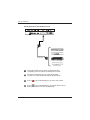
Installing the LED TV
Use a supplied antenna cable to connect the TV signal to the LED TV
’s TV CABLE terminal.
Connect the AC power cord at the back of the TV and connect
the power cord to wall outlet.
DC 12V
Press the
button on the remote to turn on the LED TV.
E
E
E
Press the SOURCE button on the remote to display the Source List.
8VHWKHŸźEXWWRQVWRVHOHFW'79VRXUFHDQGSUHVVWKH(17(5EXWWRn.
13
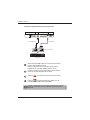
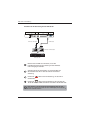
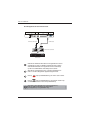
Installing the LED TV
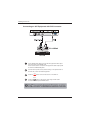
Connecting an A/V Device with SCART Connector
Use a SCART cable to connect the external A/V device’s SCART socket
to the LED TV’s SCART jack.
Connect all AC power sources, before turning on the power switch of
the LED TV or other connected equipment.
Press the
power
button on the remote to turn on the LED TV.
SOURCE
3UHVVWKHEXWWRQRQWKHUHPRWHWKHQXVLQJŸRUźEXWWRn
to select SCART and press ENTER button.
14
Installing the LED TV
Connecting an A/V Device with YPbPr Connector
Use a YPbPr cable to connect the external A/V device’s YPbPr output
jacks to the LED TV’s YPbPr jack. Use an audio cable to connect the
AV equipment’s audio output jacks to LED TV’s YPbPr AUDIO jacks.
Connect all AC power sources, before turning on the power switch of
the LED TV or other connected equipment.
power
Press the
button on the remote to turn on the LED TV.
SOURCE
3UHVVWKHEXWWRQRQWKHUHPRWHWKHQXVLQJŸRUźEXWWRn
to select YPBPR and press ENTER button.
15
Installing the LED TV
Connecting an AV Equipment with HDMI Connector
Use a HDMI cable to connect the AV equipment’s HDMI output jack
to the LED TV’s HDMI IN jacks.
Connect all AC power sources, before turning on the power switch of
the LED TV or other connected equipment.
power
Press the
button on the remote to turn on the LED TV.
SOURCE
3UHVVWKHEXWWRQRQWKHUHPRWHWKHQXVLQJŸRUźEXWWRn
to select HDMI and press ENTER button.
16
Installing the LED TV
Connecting an A/V Equipment with DVI Connector
Use a HDMI-to-DVI cable to connect the AV equipment’s DVI output
jack to the LED TV’s HDMI IN jacks.
Use an audio cable to connect the AV equipment’s audio output jacks
to LED TV’s HDMI AUDIO jacks.
Connect all AC power sources, before turning on the power switch of
the LED TV or other connected equipment.
power
Press the
button on the remote to turn on the LED TV.
SOURCE
3UHVVWKHEXWWRQRQWKHUHPRWHWKHQXVLQJŸRUźEXWWRn
to select HDMI and press ENTER button.
E
17
Installing the LED TV
Connecting a PC
Use a D-SUB cable to connect the PC’s D-SUB output jack to the LED
TV’s VGA input jack. Use an audio cable to connect the PC’s audio
output jacks to LED TV’s.
Connect all AC power sources, before turning on the power switch of
the LED TV or other connected equipment.
power
Press the
button on the remote to turn on the LED TV.
SOURCE
3UHVVWKHEXWWRQRQWKHUHPRWHWKHQXVLQJŸRUźEXWton
to select VGA and press ENTER button.
18
Installing the LED TV
Connecting an Audio Receiver
For better sound quality, you may want to play the LED TV audio through your
stereo system.
Use an audio cable to connect the audio receiver’s audio LINE IN
jacks to LED TV’s COAXIAL audio jacks.
Connect all AC power sources, before turning on the power switch of
the LED TV or other connected equipment.
power
Press the
button on the remote to turn on the LED TV.
19
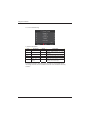
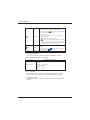
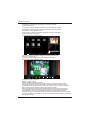
Using the Features
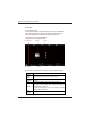
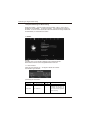
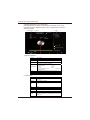
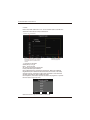
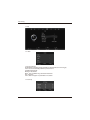
1. Main Menu outlook and description
Main Menu items˄from right order CHANNEL –> PICTURE -> SOUND ->
TIME -> OPTION -> LOCK ˅ at DTV/ATV input sourceˈthe first page showed is
CHANNEL. At non DTV/ATV input sourceˈthe first page is PICTURE as default.
Currently press ENTER to get in sub menu
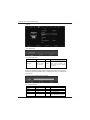
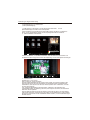
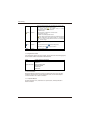
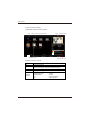
1.1
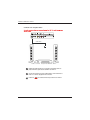
CHANNEL:
Programme edit
Signal Information
CI Information
MENU
Back
OK
Select
EXIT
Quit
Note˖
1) CHANNELcan be only selected under ATV/DTV conditionˈothers can’t be
used.
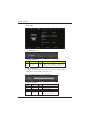
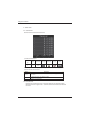
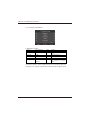
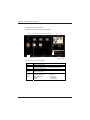
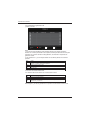
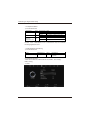
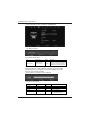
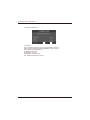
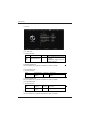
1.1.1 Auto Scan˖
Enter Auto Scanˈit shows the frames of ‘country’ and ‘tune type’ optional.
Move
OK
EXIT
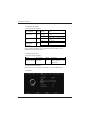
1) function declaaration˖
Items
Adjust item
Scan Type
DTV + ATV ->
DTV -> ATV
Country
selection
UK -> Australia
-> …
Default
description
DTV + ATV
The default country depends on the
shipping place or clients appointed place, if
no appointed, put UK as default..
20
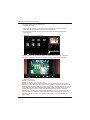
Using the Features
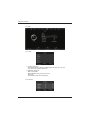
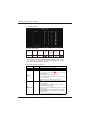
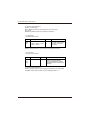
2) operation declaration
˖
Press move to select up and down, press DONE to start scanning. When scanning, the
first 50% processing means ATV tuning, the last 50% processing means DTV tuning.
Data
MENU
Back
EXIT
Quit
When ATV tuning, you can press exit to skip ATV tuning and start DTV tuning, as
following:
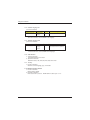
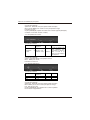
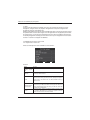
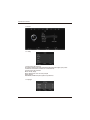
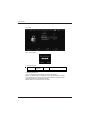
1.1.2 DTV manual tuning:
Bad
Normal
MENU
Back
Good
EXIT
Quit
1) function description˖
Item
CH
Adjust item
Depends
countries
on
default
description
Select channel with leftright button, and
press ENTER to confirm if any signal
strength shows.
2) Press ENTER to confirm tuning˄only in DTV condition˅.
21
Using the Features
1.1.3 ATV manual tuning:
EXIT
Quit
1) function description:
Item
Adjust item
Storage To
1 – 100
System
BG -> I -> DK -> L
Current CH
1 – 100
default
1
Description
Current storage space shows
Default option
selection
1
depends
on
country
Current channel shows
Search
Can be searched at full channel condition
Fine-Tune
Fine-tune
Frequency
When gray ˈ no
selected
Show the current frequency, and follow
Search or Fine-Tune to adjust.
2) operation instruction: after tuning by hand, make sure to press RED button
for storage,otherwise all channels searched would not be stored after switching
condition.
22
Using the Features
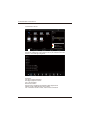
1.1.4 Programme Edit
:
ok
Select
MENU
Back
1) format and description
Encryption
identity
LCN
CH Name
S
21
ABC1
Skip
identity
Lock
identity
Fav
identity
Systerm
1. the Cannel menu includes“Delete/Move/Skip /Rename /Fav”. “ Lock、
Fav、Skip” can be used when clients do some settings to the channel.
(Fav can not be fixed together with Skip).
2) keypress operation introduction
Button
range
description
Ʒ
ATV/DTV
ͩ
ATV/DTV
Page down, can turn page by circle
ATV/DTV
Delete current channel, as follows:
to enter DELETE mode
1) at normal condition, press
2) at DELETE modeˈthe button can be used as˖
MENU˖ exit DELETE to enter normal condition
EXIT˖ exit menu
˖cancel current channel, and turn back to normal
ATV
Modify current channel name, only used in ATV mode.
Operation instruction˖
to enter RENAME
1) at normal condition, press
2) at RENAME mode,˖
MENU˖exit RENAME modeˈback to normal
EXIT˖exit menu
UP/DOWN˖switch letters, numbers or signs
LEFT/RIGHT˖switch left and right, can select by circle
˖exit RENAME modeˈreturn normal condition.
(DELETE)
(RENAME)
Page up, can turn page by circle
23
Using the Features
(move)
ATV/DTV
Channel switching functionˈATV available as default, DTV
available at non open LCN auto ordering condition.
1) at normal condition ˈenter SWAP mode, and current
sellected channel is mobile channel X.
2) at SWAP mode˖
MENU˖exit SWAP modeˈturn to normal condition
EXIT˖exit menu
UP/DOWN˖choose switching channels
˖if current selected channle is what selected before
X, no any other action; otherwise, the current channel is
channle Y, need to exchange X and Y condition. But the
channel number stays 1,2,3…order as before.
(SKIP)
ATV/DTV
Choose if skip the current channel when CH+/- channel
tuning.
At non Skip channel, press ˈand Skip the current channel˗
to cancle Skip.
At Skip channel, press
(FAV)
ATV/DTV
Set your favorable channel
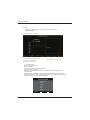
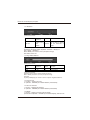
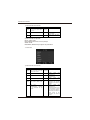
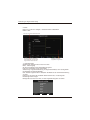
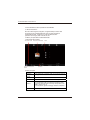
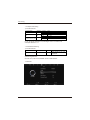
1.1.5 Signal Information
It only make use at DTV condition,shows signal information, includes:
channel /network /modulation /quality /strength.
Item
Signal Information
Showed signal parameter
Pop out Signal Information menu, shows as follows:
Channel 21
Network
Digita Finland
Modulation 64QAM
Quality
66%
Strength
80%
1.1.6 CI Information
Only be available at DTV condition, it remind if didn’t insert CI card. When
inserting CI card, you can enter menu to check all information in CI card.
1.1.7 Recorded Mode
Enter Recorder menu, do reservation of recording, check PVR specification
in details.
24
Using the Features
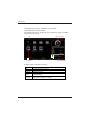
1.2 PICTURE
Menu
Back
ok
Select
EXIT
Quit
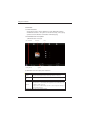
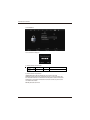
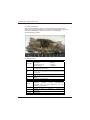
1.2.1 Picture Mode
Menu
Back
EXIT
Quit
1) Function instruction
Item
Picture
Mode
Adust range
Standard -> Mild
->
User
->
Dynamic
default
description
Standard
Default˖at non User mode, you can select Contrastǃ
Brightness ǃ Color ǃ Sharpness ǃ Tint to do the
adjustment, the mode turn to User automatically.
2) operation instruction
Change mode with left right button; turn back to picture main menu by press
MENU button, and press EXIT to exit main menu.
1.2.2 Contrast / Brightness / Color / Sharpness
Menu
Back
EXIT
Quit
1) function instruction
Item
Contrast
Adust range default
0 - 100
description
50
Brightness
0 - 100
50
Color
0 - 100
50
Sharpness
0 - 100
50
VGA not available
0
Only in NTSC systerm condition˗
PAL and SECAM recover to 0˗
Tint
R50 - 0 - G50
VGA not available
25
Using the Features
2) Operation instruction
Adjust :LEFT,RIGHT to adjust numerics size;
Menu :press MENU to return picture main menu;
Exit :EXIT to exit menu;
UP,DOWN: adjust content with up/down button: as
Contrast / Brightness / Color / Sharpness;
1.2.3 Color Temperature
Menu
Back
EXIT
Quit
1) function instruction
Item
Color
Temperature
Adust range
Standard-> Cool -> User
-> Warm
default
description
Standard
At non User mode, you can select
Red/Green/Blue options to amend the
color. The mode will adjusted for User
mode automaticly.
2) operation instruction
Adjust :LEFT,RIGHT to adjust content;
Menu :MENU to turn back;
Exit :EXIT to exit menu;
1.2.4 Red /green /blue
Menu
Back
EXIT
Quit
1) Function instruction
Item
Adust range
default description
Red
0 - 100
Green
0 - 100
50
50
Blue
0 - 100
50
2) Operation instruction
Adjust :LEFT,RIGHT to adjust numerics size;
Menu :MENUto turn back picture main menu;
Exit :EXIT to exit main menu;
UP,DOWN button to select adjustable content:
they are Red /green /blue button;
26
Using the Features
1.2.5 Aspect Ratio
1) function instruction
Panel
resolusion
16:9 / 16:10
4:3
default
16:9
4:3
4:3
(physical
demensions
16:9)
16:9
Input
source
mode
No VGA
16:9 -> Zoom1 -> Zoom2 -> Auto -> 4:3
VGA
16:9 -> 4:3
No VGA
4:3 -> 16:9 -> Zoom1 -> Zoom2 -> Auto
VGA
4:3 -> 16:9
No VGA
16:9 -> Zoom1 -> Zoom2 -> Auto -> 4:3
VGA
16:9 -> 4:3
Note:When panel resolusion is 4:3,demension is 16:9 and 4:3 mode,
acturally theoutput resolusiuon is 1:1.
1.2.6 Noise Reduction
1) Function instruction
Items
Noise Reduction
Adjust item
On -> Off
Default
On
description
VGA set as Offˈnot adjustable
2) Operation instructio
Enter into the menu, choose with UP,DOWN:off /low /middle /default.
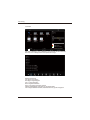
1.3 SOUND
Menu
Back
OK
27
Select
EXIT
Quit
Using the Features
1.3.1 Sound mode
Menu
Back
EXIT
Quit
1) Function instruction
Items
Sound Mode
Adjust item
Default
description
Standard -> Music
-> Movie -> Sports
-> User
Standard
At non User mode, Treble and Bass can’t
be selected and adjusted
2) Operation instruction
Adjust :LEFT,RIGHT adjustable:Standard -> Music -> Movie -> Sports -> User
Menu :MENU to return picturemain menu
Exit :EXIT to exit menu
1.3.2 Treble/ Bass /Balance
Menu
Back
EXIT
Quit
1) Function instruction ˖
Items
Adjust item
Default
description
Treble
0 – 100
50
High sound adjust
Bass
0 – 100
50
Low sound adjust
2) Operation instruction
Adjust:LEFT,RIGHT control data size
Menu :MENU for return to picture main menu
Exit :EXIT
UP,DOWN to choose adjusting content:Treble /Bass /Balance
1.3.3 Auto Volume
1)Function:auto sound adjust
2)operation:ENTER to set ON/OFF
1.3.4 Surround sound
1)function :surround settings
2)operation:ENTER to set ON/OFF
1.3.5 SPDIF
1)function :set the SPDIF’s output mode.
2) Operation instruction:ENTER to set Off, PCM or Auto.
28
Using the Features
1.4 TIME
Menu
Back
OK
Select
EXIT
Quit
1.4.1 Clock
Menu
Back
EXIT
Quit
1) function instruction
The default rate isn’t get the time information from DTV, but I can set
it by hand when enter CLOCK menu.
2) Operation instruction
Move :UP,DOWN
Menu :MENU to back picture main menu
Exit :EXIT
LEFT,RIGHT button to set parameter
1.4.2 Off time
Menu
Back
29
EXIT
Quit
Using the Features
1) function instruction
Items
Defa
ult
Adjust item
description
Repeat
Off -> Once -> Everyday
-> Mon~Fri -> Mon~Sat
-> Sat~Sun -> Sun
Off
Hour
00 - 23
00
When Activate turns Off ˈ Gray,
availble
no
Minute
00 - 59
00
When Activate turns Off ˈ Gray,
availble
no
2) Operation instruction
Move :UP,DOWN
Menu :MENU to back picture main menu
Exit :EXIT
LEFT,RIGHT button to set parameter
1.4.3 On time
Menu
Back
EXIT
Quit
1 ) function instruction
Items
Adjust item
Defa
ult
description
Repeat
Off -> Once -> Everyday
-> Mon~Fri -> Mon~Sat
-> Sat~Sun -> Sun
Off
Hour
00 -> 23
12
Minute
00 -> 59
00
When Repeat turns OffˈGray
Volume
0 - > 100
30
When Repeat turns OffˈGray
Source
DTV -> Radio -> Data
-> ATV -> …
DTV
When Repeat turns OffˈGray, no availble˗
The order depends on Input Source order
Channel.
ATV˖1 – 100
DTV/Radio/Data
˖
depending
to
the
channel’s information
See
Note
When Repeat turns OffˈGray, no availble
When choose non TV Source, it turn gray˗
At Source, choose DTV/Raido/Dataˈbut it
shows blank when there is no input channel
information.
When Repeat turns OffˈGray
30
Using the Features
2)Operation instruction
Move :UP,DOWN
Menu :MENU to back picture main menu
Exit :EXIT
LEFT,RIGHT button to set parameter
1.4.4 Sleep time
1) function instruction
Items
Sleep Timer
Adjust item
Off -> 10min -> 20min
-> 30min -> 60min ->
90min -> 120min ->
180min -> 240min
Defa
ult
Off
description
Reminding at last 60 seconds:
Stop reminding when press it ˈ sleep
setting turns Off
2) Operation instruction
Enter second menu, use UP,DOWN to set sleep time.
1.4.5 Time zone
1) function instruction
Items
Adjust item
Defa
ult
description
Default choice confirmed as shipping
areaand clients demand.
When Auto tuning, it switched
automatically according to current
selected country.
Time Zone
2)Operation instruction
Enter second menu, use UP,DOWN to set time zone:canary
GMT ./Lisbn GMT /London GMT /Amsterdam GMT+1…….
31
Using the Features
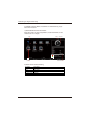
1.5 OPTION
OSD Duration
Menu
Back
OK
30S
Select
EXIT
Quit
1.5.1 OSD Language
1) Function instruction
Items
OSD Language
Adjust item
Defa
ult
description
Choose the default language according to
shipping address and clients demand.
Default language˖
english/french/germany/italian/portugal
Supported language
2) Operation instruction
Enter second menu, use UP,DOWN to set language
1.5.2 Audio Language 1st
1) Function instruction
Items
Audio Language 1st
Adjust item
Default
First language
selected
description
Not selected at non DTV condition
2) Operation instruction
Enter second menu, use UP,DOWN to set language.
1.5.3 Audio Language 2nd
1) Function instruction
Items
Audio Language 2nd
Adjust item
Default
Second language
selected
description
Not selected at non DTV condition
2) Operation instruction
Enter second menu, use UP,DOWN to set language.
32
Using the Features
1.5.4 Subtitle Language 1st
1) function instruction
Items
Subtitle Language 1st
Adjust item
Default
First language
selected
description
Not selected at non DTV condition
2) Operation instruction
Enter second menu, use UP,DOWN to set language.
1.5.5 Subtitle Language 2nd
1) Function instruction
Items
Subtitle Language 2nd
Adjust item
Default
Second
language
selected
description
Not selected at non DTV condition
2) Operation instruction:
Enter second menu, use UP,DOWN to set language.
1.5.6 OSD Duration
1) function instruction:
The OSD’s duration in the screen.
2) Operation instruction:
ENTER to set 5S, 10S, 15S, 20S, 25S, 30S, 35S or 40S.
1.5.7 Country
1)function instruction:
Show the current language, gray, no selected.
1.5.8 Restore factory default
1)function instruction:
Restore factory default.
2)Operation instruction:
Enter second menu, use UP,DOWN button to select “yes” or “no”.
33
Using the Features
1.6 LOCK
Lock Channel
Menu
Back
OK
Select
EXIT
Quit
1.6.1 Lock System
1) Function instruction
Items
Lock System
Adjust item
Defa
ult
Off/On
Off
description
2) Operation instruction
LEFT to quit passport,turn back main menu
RIGHT to delete password wrote and rewrite correct one. It need
input correct password to enter the LOCK submenu. It shows wrong
password when you put uncorrect password.
MENU to exit to LOCK menu
34
Using the Features
1.6.2 Set Password
1) Function instruction
Items
Adjust item
Defa
ult
description
Enter the submenu, insert new password and
confirm it
Set Password
2)Operation instruction
LEFT to exit reset password, back to main menu
RIGHT to cancle the written password, and then rewrite it. If the password
get wrong twice, it shows “password doesn’t match”.
1.6.3 Block Program
1) Format and description
Encrypt
sign
LCN
CH Name
S
21
ABC1
Lock sign
systerm
Note
: . Lock sign is used when clients do some changes of the channel.
2) Button operation
Button
Ʒ
function
Page upˈcan circle paging˗
ͩ
Page downˈcan circle paging˗
ƽ(LOCK)
Check if locked the current channle, if locked, it need password before
watching.
When press ƽ at non lock mode: lock the current channle
When press ƽ at lock mode: lock cancled
1.6.4 Parental Guidance
1) Function:when setted Parental Guidance is lower than programme true
class, it need to lock the channle and then input password to watch it.
Items
Adjust item
Defa
ult
Parental Guidance
Off -> 4 -> 5
-> … -> 18
Off
description
Not selected at non DTV condition
2)Operation instruction
Enter second menu, use UP,DOWN button to choose data,press
ENTER to confirm it.
35
Using the Features
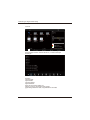
2. Other menu
2.1 Channel List
Channel List shows all searched channel.
Move
OK
Select
EXIT
Quit
1) format and description
Encryption
sign
LCN
CH Name
S
21
ABC1
Skip sign
Lock sign
Fav sign
systerm
Note:1. Lock、Fav、Skip sign can be only used when channles do any audits.
2) Button function and instruction
Button
Function
CH List
At DTV/ATV and non Channel Listˈclose non Mute menu to pop out Channel
List menu˗
At Channel List menu, exit Channel List menu˗
Ʒ
Page up, can circle paged˗
ͩ
Page down, can circle paged˗
2.2 Favourite List
Favourite List and Channel List is of the same settings, but showed as clients
favourite channel in Program edit.,use FAV button to show and close Favourite
List menu.
36
Using the Features
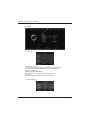
2.3 EPG
EPG is only available in DTV,channel information classfied by
CHANNLE /TIME.
Can choose up and down˖Channel /Time
OK
Select
EXIT
Quit
All programme information, if classified
by time, it shows all programme
informationa at currently time.
Details information of selected programme.
1)operation notes
Move: move up and down
Menu:exit EPG
OK: switch to current selected programme
Index: switch to type option
Record: record programme. It show record mode when selected(check PVR
manual details).
Schedule: record information. Check details at PVR’s Schedule List introduction.
Remind: programme reserved. Choose Remind to show the following settings menu.
Use up and down to choose setted programme.
Programme
Mode
Minute
Hour
Date
Month
Move
OK
Select
MENU
37
Back
Using the Features
2.4 Installation Guide
Please set the following options, then
OK
Select
EXIT
Quit
1) Function and instruction: If not stored channel information,
power on and turn to DTV/ATV condition,it shows Installation
Guide menu.
2)Operation
Move: move up and down
Exit:exit menu
OK:enter setted tuning mode
38
Using the Features
3. Multimedia
3.1 Brief introduction
At Input Source menu, choose USB source to enter Multimedia condition.
At Multimedia condition,the systerm can do the files clariufy, order, playing
operation and other Browser work besides multimedia playing.
3.2 Multimedia main menu pattern
1) Multimedia main menu style
USB information
multimedia
Discs
Menu
Inserting HD info
Menu
OK
Select
operation
2) Multimedia main menu spare parts introduction
Equip
Instruction
Equip inserting
messege
If inspect the USB equip inserted, it turn bright; otherwise, it turn gray.
Multimedia
style
From left to right PHOTOǃMUSICǃMOVIEǃTEXT for what need play.
Disc
Shows the insert discs, and order them as letters, from C on.
USB info
It shows current USB equipment information. When no inserting USBˈit
shows No Device˗when inserting USB equipment, it shows USB equipˈsuch
as USB2.0ǃUSB1.1 and so on˗
If inspect there is USB inserting, but with no correct inspeciton messege, it
shows as Reinsert Device.
Operation guide Show the current available operation.
39
Using the Features
3.3 PHOTO submenu pattern
1) Multimedia PHOTO’s submenu pattern
Disc
File folders in disc,press ENTER button to enter
page
review
Delete Current File
Add/Remove all
OK
Full screen
Menu
Menu
EXIT
Add/Remove to playlist
Quit
Picture overview
Picture information
2) PHOTO submenu instruction
equip
descrip
Disc
Show the current disc
Page
Show the page of files, such as 1/2 formatˈthe previous number is current
page, the last one is total page
Picture list
Picture list at Current page
preview
window
Pictures at current point
Document
information
???.jpg
[Resolution] 800 x 600
[Size] 28521 Bytes
Data
Time
----files name
----resolusion
----picture size
---- create date
---- create time
40
Using the Features
3)Operation instruction
When choose picture, it shows picture preview frame and details, then press
ENTER to enter full screem picture playing.
When after picture full playing, press ENTER to show the following operation
button.
In
Out
4) Button instruction
Button
Function
Info/Display
Show current picture preview, the information is showed as follows:
Blue Hills.jpg
----files name
[Resolution] 1024 x 768
----resousion
[Size] 28521 Bytes
----picture size
Exit
Exit playing, enter previous menu, focus to the multimedia menu PHOTO
Play
Full screen playing of photos, if several files need to play, it would switch
automatically after some time.( default as 5 second)
Pause
Pause
Stop
Stop playing,enter list menu, focus at the files when exit.
Prev.
Play previous file
Next
Play next file
Repeat
Circle mode, can choose repeat 1, repeat all, repeat none, single pic repeat,
selected pics all repeat or non repeat.
Playlist
Playlist
Rotate
Turn pictures by clockwise/ counter clockwise.
Zoom in
Zoom in
Zoom out
Zoom out
41
Using the Features
3.4 MUSIC submenu pattern, equip and button introduction.
1) Multimedia MUSIC submenu pattern.
When selected songs in the list, press ENTER to show the songs preview,
as follows:
page preview
disc
Delete Current File
Add/Remove all
OK
Full screen
Menu
Menu
EXIT
Songs list
Files information
2) MUSIC submenu equip description
equip
Disc
Add/Remove to playlist
Quit
descrip
Show selected euqip disc
Page
Show pages
songs list
Show song lists.
Preview
window
Music picture
Fils
information
Show songs name and size etc.
42
Using the Features
3) MUSIC playing conditon and keys function
MUSIC playing is the menu just like playing software in PC, mainly have playlist,
basic information, processing sign, operation guide part, as follows:
Songs information
Songs name
Songs list
Screen Saver
1/1
Remove
Remove all from playlist
Goto Time
Operation guide
progress bar
MUSIC image
Play time
4) MUSIC playing equip function
Equip
Descrip
Songs name
Current songs name
MUSIC image
One image used to sign MUSIC
Songs list
Songs marked in browser, from the top files on, orders by letters.
Songs
information
Iterms shows and files show at Browser MUSIC is of the same˖
Artist: ABC
Year: 2005
----artist
Title:
DEF
----title
Album: GHI
----album
Bit Rate: 128K
Sampling: 44K
----bit rate and sampling
All of them are get from files
Playing time
Show playing time and in total, such as 00:01:23/00:04:56 format
Operation
guide
Show current operation guide
Processing sign
Show current procession time and rate
5) Button function
Button
Function
Enter
Play focus files, if focus is current file, it play from the beginning.
Up/Down
Move focus at songs list
Exit
Exit MUSIC playing menu, but keep playing songs, when exit to browser
menu, focus the current playing files.
Play
Play
Pause
Pause
Stop
Stop playing,enter browser menuˈfocus at played files before exit
Next
Play next files
Repeat
Repeat playing, can choose repeat 1, repeat all, repeat none, all repeat and so
on
43
Using the Features
3.5 MOVIE playing condition and button function
1) Playing condition
1. MOVIE is playing at full screen for all marked files when clients browsing,from the
top files folder to order with letters.
2. MOVIE’ s zooming requires: Zooming it at most in the current size to preserve the
original size.
2)submenu pattern and instruction
Delete Current File
Add/Remove all
OK
Full screen
Menu
Menu
EXIT
Add/Remove to playlist
Quit
Press ENTER to select image, which shows the files preview frame and files
information, then press Play to start full playing as follows:
+
Slow
Step
Goto Time
1)Button instruction
Repeat :1, ALL, none
Set A : set A circle playing
Playlist: It pop out File list on the left screen, which shows the current playing
list. Clients can browse the list with up down button, and to select files by enter
button, then press list or no operation for 10 seconds, it would exit.
Info:Show the current MOVIE information, includes: current film’s file name,
film’s resolusion, film’s frequency, film’s total time and playing time.
Goto: It pop out the frame as: 00:00:00/01:23:45, the first time is what clients input,
clients can switch the position with left or right button, you can also switch the number
with up or down button, and press ENTER to time settings.
44
Using the Features
3.6 TEXT
Delete Current File
Add/Remove all
OK
Full screen
Menu
Menu
EXIT
Add/Remove to playlist
Quit
Choose TEXT files, press ENTER and it shows the above frame. Press
play to star full screem playing as follows:
Operation :
Prev page: previous page
Next page: next page
Prev.: previous files
Next: next files
Stop: stop auto turning pages
Playlist: playlist, show as top right place
Info: current files information, shows files name and size
45
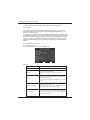
Using the Features
4. Personal Video Recorder(PVR)
4.1 Brief
PVR funcition is only available for DTV, includes Record, Timeshift and
Playback function. Recording includes in time record and preserve record.
In-time record can be worked through short-cut button immediately, and
preserve record need to preserve before. Record and Playback can be
done of the same time, that means record DTV and playing USB equip at
the same time.Timeshift is another function for both record and playing
together. The follows it would explain in details.
4.2 PVR menu function details.
4.2.1 PVR File System
Enter PVR from CHANNEL menu, as follows:
Move
OK
Select
MENU
Back
Function
Items
Notes
Check PVR File
System
USB Disk
If not inserting USB equip, it shows Not Find Any USB Device
If inserting USB equip, it shows Pass
Format
It can set MStar Format. Press Enter button to through USB and enter
Format menu, after enter Format, USB can complete PVR functions.
If the function works well, or USB is MStar Format, it shows Pass.
Time Shift Size
Can’t be chosen. After Check PVR File System, it means the USB passed.
MStar Format can be used at Timeshift space, the size is choosen by
clients when doing format.
Speed
Can’t be chosen. After Check PVR File System, it shows the USB
available speed and remind client to operate it safely with this availabel
speed.
46
Using the Features
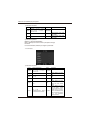
4.2.1.1 Select Disk
Choose the disc to store whatever content need record, as follows, default as C:
Move
OK
Select
4.2.1.2 Check PVR File System
Check storage equipment PVR File System is well established. Default as Start,
press Enter button to inspect the USB files systerm and speed, the processiong
shows Checking….
When no inserting USB, or inspection failed, it shows FAIL.
When inserting USB but didn’t pass MStar Format, enter Format menu.
When inserting USB but inspecting unnormal no partition, it shows No Partition
Found.
If inspection normal, it shows SUCCESS.
Move
OK
Select
4.2.1.3 Format
At Format, press Enter button to start Checking PVR File System, after confirmed
USB equip information, it pop out Format Disk menu as follows:
After Formating, the systerm would establish PVR file systerm according to previous
confirmed PVR File System Size.
47
Using the Features
4.2.1.4 Time shift size
When finish Creating PVR file system, it pop out Time Shift Size setting menu, and
clients can set the space size for time shift as follows:
OK
Select
MENU
Back
4.2.2 Channel – Recorder List
1) Pattern for reference
The menu is as follows
Title, ordering
sign
programme
OK
Operation guide
Select
48
Using the Features
2) Menu instruction
Items
Notes
Title
Recorded List
Ordering
Show in title right, means the current ordering way, List/Index button can
switch option˖Program -> Channel -> Time, which make orders by
programme name, channel order and record time.
Show current condition, recoreded programme shows no mark, if
shows
and
, it means recording, and if it shows
PLAY
and
Mark
PLAY
, it means on the playing, if Focused, it shows color image,
otherwise it is gray.
The programme name is construct by channel number and record channel
number.
Prgramme name
Operation guide
Show the current available operation
Programme notes
Info/Display and Right can pop out current Focus programme, which no
ticked in the picture.
[DATE] 2005/07/20
----record date
[TIME] 15:29:02
----recard starting time
[DURATION] 0000:01:52
----duration time
[CHANNEL NAME] 40 BBC NEWS
----channel list
[PROGRAM NAME] No Information
----programme name.
3) Button struction
Button
Function
List/Index
When no menu, press Recorded List
When it show Recorded List menu, switch recording programme orders.
Up/Down
Up and down to move Focus to select programme
Left/Right
Close/pop out the programmer instruction
Enter
Play Focus programme
Info/Display
Pop or close programme instruction
ƽ(DELETE)
Delete Focused programme
Menu
Enter Recorded Listˈpress Menu to back to PVR menu, Focus at Recorder
List.
When enter by List shorcut, exit Recorded List, return current menu.
Exit
Exit
49
Using the Features
4.2.3 PVR – Record Mode
1) Recorded mode
Date
Month
2010/07/20
Jan
Date
2010/07/20
Month
Jan
Move
Item
OK
Select
MENU
format
Back
notes
Menu title
Recorder Mode
Menu topic
Title
655335
When choose Auto, get current programme to set
recording, Title shows its current name.
Otherwise, show“—”, can’t be used
Once
Choose recording mode
Switch order˖Once -> Everyday -> Weekly
Delete Auto option
Put Auto to record in EPG
Mode
Start Date
2005/07/20
Start record date, use Left/Right to set menu.
Start Time
14:00
Start recording time
1End Date
2005/07/20
End recording date
End Time
15:00
Recording end time.
Operation guide
Show current operation
2) Button
Button
Function
Recorder menu
Time set menu
Menu
Exit Recorder, enter PVR menu,
Focus Record Mode
Exit time setting
Up/Down
Move Focus up and down
Move Focus up and down
Left/Right
Adjust Mode, or enter time settings
Adjust data
ENTER
Store current recording and exit
Recorder to enter Recorder
Schedule List
Confirm current settings and exit time
setting
ƽ(Schedule)
Not stored, exit Recorder to enter
Recorder Schedule List
----
Exit
Not stored, exit menu
Not stored, exit menu
50
Using the Features
4.2.4 PVR – Recorder Schedule
1) Menu and function
Move
Delete
MENU
Back
EXIT
Quit
Note:
1.Iterms in the blank start time ordering according to record plans
If enter the menu to add new plans, focus to new plans.
2.It enter the menu when recording, focus on current recording plans.
3.Besides 1 and 2 condition, focus to the latest non-start plans.
2) button
Button
Function
Menu
Exit Recorder Schedule List menu, enter PVRmenu, Focus on Recorder
Schedule List
Move
Move Focus up and down
ƽ(Delete)
Delete Focus items
Exit
Exit menu
4.3 PVR shortcut function
4.3.1 PVR shortcut buttons under the DTV
Button
PVR
Function
Enter Record mode
TS
Enter Timeshift mode
PVR List
Pop out Recorded List menu, enter OK/Enter to enter Playbackˈplay it
Note:Record and Recorded List can be enter from PVR menu
51
Using the Features
4.3.2 Record
1)Record
Record menu includes two kind: one is Full Mode,the other is Simple Mode.
They can switch by Record/Exit button.
At Record mode, Record menu shows still.
The details is as follows:
一. Full Mode
Note1)
Note4)
Note3)
Note2)
Note:
1. Record
2. recorded time
3. the left row is channel name and the right row is programme name
4. current time
二. Simple Mode
[00:00:20]
Note:At Simple Mode, it only shows Record and record time on the left bottom side.
2) Button function
Button
Function
Stop
Exit Record, shows Processing
Record/Exit
Switch Record menu mode
Play
Enter Playback mode, play it from the start recorded programme
Check Playback instruction in details
List
Close Record menu, pop out Recorded List menu
enter Playback from menu Recorded List
when exit from Recorded List menu, it shows Record again
52
Using the Features
4.3.3 Timeshift
4.3.3.1 Timeshift menu
Timeshift is similar with Record menu, includes two kind: one is Full Mode and the other
is Simple Mode.
They can switch by Exit button.
At Timeshift mode, Timeshift keeps still.
As follows shows:
Full Mode:
Note3)
Note1
Note4)
Note2
Note5)
Note:
1)Shows the current operation, such as Play、Pause、Fast Forward、
Fast Rewind、Next、Prev.
2)A->B circle signs, when mark A or B, highlight showings, which only
show at play condition.
3)Timeshift procession showings, the processing tick can show the total
length of Timeshift.
4)There are two time, one time is start by “-”, the other time is stored
content lenghth.
5)Current true time.
Simple Mode:
[-00:03:35]
Note:
1)At Simple Mode, it shows current Timeshift playing conditon, such as
Play、Pause.
2)Simple Mode shows on the left bottom side.
53
Using the Features
4.3.3.2 Timeshift conditon
4.3.3.2.1 Timeshift Start conditon
Enter Timeshift to press Pause, and the image paused and it start record
from the paused position.
It shows Timeshift Start condition, as follows:
Button
Function
Play
Enter Timeshift Play condition
Stop
Stop Timeshift
Exit
Switch Timeshift menu mode
List
Close Timeshift, pop out Recorded List
From Recorded List menu to enter Playback, and then exit Timeshift
Exit Recorded List first and then show menu Timeshift
4.3.3.2.2 Timeshift Play
At Timeshift Play condition, the systerm record DTV amd play it at the same time.
Timeshift Play is start by press Timeshift button, at Timeshift Play condition, it can
work Pause、Fast Forward、Fast Rewind, and it would enter A->B circle playing
condition.
4.3.3.2.4 Timeshift Record
Timeshift Play can forward by press Fast Forward or Next button, it would enter
Timeshift Record condition.
Timeshift Record condition, similar to Record mode.
Timeshift Record condition, the button is as follows:
Button
Function
Pause
Pause playing, and return to Timeshift Play condition
Stop
Stop Timeshift mode
Fast Forward
No use
Fast Rewind
Return to Timeshift Play condition, and operate next part.
Prev.
Return to Timeshift Play condition and previous playing for 30 seconds.
If previous to Timeshift recorded content, play it from this place.
Exit
Switch Timeshift menu mode
List
Close Timeshift menu, pop out Recorded List.
Enter playback from Recorded List and then quit Timeshift ,mode.
When quit from Recorded List, show Timeshift menu.
54
Using the Features
4.3.4 Playback
4.3.4.1 Playback
Playback is similar with Timeshift, one is Full Mode, and the other is Simple Mode.
They can be switch by Exit button.
At Playback mode,Playback shows still.
Menu mode as following shows:
Full Mode:
Note2) Note1
Note6)
Note3)
Note7)
Note4)
Note5)
Note:
1) Shows the current playing condition, shows as different operation such as: Play、
Pause、Fast Forward、Fast Rewind、Next、Prev.
2) A->Bcircle notes, A or B be marked, high light, which only show in Play condition.
3) Play processing stick shows.
4) There are two time showing, one is for current playng time and the oterh is for
rest programme time.
5) Current time.
6) Recored channel name.
7) The programme name, if no name it shows No Information.
Simple Mode:
[00:03:35]
Note:
1)At Simple Mode, it shows current Playback mode, such as Play、Pause
and so on.
2)Simple Mode shows on the left bottom side.
55
TROUBLESHOOTING
TV will not turn on
Make sure the power cord is plugged in, then press the POWER button on the remote
The batteries in the remote control may be exhausted
Replace the batteries.
No picture, no sound
Check the interface cable between TV and antenna.
Press the POWER button on the remote.
Press the SOURCE button on the remote repeatedly to select the connected video
sources.
Poor picture, sound OK
Check the interface cable between TV and antenna.
Try another channel, the station may have broadcast diffculties
.
Adjust the Brightness/Contrast options in the Menu.
Picture OK, poor sound
Sound may be muted. Press the MUTE
button on the remote.
Press the VOL+ button to increase the volume.
Audio noise
Move any infrared equipment away from the TV.
56
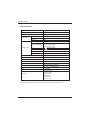
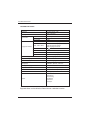
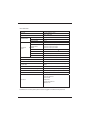
Specifications
SPECIFICATIONS
Items
Relevant illustration
Panel
23”Wide Screen LED
1920 x 1080 pixels
Resolution
Features
Compatible areas
Multiform
TV standard
DTV standard
PAL ˈSECAM
DVB-T
PC
D-sub 15pin input interface
CVBS, YPbPr,HDMI
Composite video input interface,
YPbPr input interface
RF
75¡ aerial interface
SCART
Standard Full SCART interface
Audio
Left, right audio input interface
HDMI input interface
Input interface
USB
USB devices input interface
Headphone Output
Headphone output interface
Speaker Output
3W x 2
COAXIAL Output
COAXIAL output interface
OSD language
English, German, French, Dutch, Spanish, Italian
Power supply
AC in 100-240V, 50/60Hz; DC out 12V,4.0A
Power consumption
Working 40W(Max), Standby 1W
Dimension
623 x 463 x 125 mm (Gift Box)
Weight
4.125Kg (Net)
Accessories
User Manual
Warranty Card
Remote Control
AAA Battery
Power Cord
AC Adapter
Features and Specifcations are subject to change without notice
57
Français
CONTENUS
Les avertissement et les précautions
Instructions importantes de sécurité............................................................ 1
Instruction d’antenne de sécurité.................................................................3
Présentation de la LED TV
Contenus du paquet ................................................................................... 4
Installer Votre LED TV ............................................................................... 5
Votre LED TV ............................................................................................. 7
Votre télécommande ...................................................................................10
PRESENTER LA
.
12
Connecter à un Câble TV ou une Antenne ................................................
Connecter à un Equipement AV avec le connecteur SCART .................. 14
Connecter à un Equipement AV avec le connecteur YPbPr ................... 15
Connecter à un Equipement AV avec le connecteur HDMI .................... 16
Connecter à un Equipement AV avec le connecteur DVI ....................... 17
Connecter à un PC.................................................................................... 18
Connecter à un Récepteur Audio.............................................................. 19
UTILISER LES CARACTERISTIQUES
Personnaliser les dispositifs de CHAINE ................................................... 20
Personnaliser les dispositifs de PHOTO .................................................... 25
Personnaliser les dispositifs de SON ....................................................... 27
Personnaliser les dispositifs de TEMPS .................................................... 29
Personnaliser les dispositifs de OPTION .................................................. 32
Personnaliser les dispositifs de VERROUILLAGE ..................................... 34
Personnaliser les dispositifs de AUTRE MENU ......................................... 36
Personnaliser les dispositifs de MULTIMEDIA ........................................... 39
Personnaliser les dispositifs de PVR ........................................................ 46
TROUBLESHOOTING
.................................................................................................................56
SPECIFICATIONS
23”LED ....................................................................................................... 57
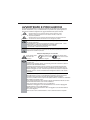
AVERTISSEMENT ET PRECAUTIONS
AVERTISSEMENT ET PRECAUTIONS
Pour éviter les dégâts éventuels, les précautions de sécurité ci-dessous doivent être prises
en compte dans les installations, les utilisations, les nettoyages et les maintenances de cet
équipement. Avant la mise en service cet équipement, veuillez lire ce manuel.
WARNING
CAUTION
Ce symbole est prévu pour alerter les utilisateurs afin d’éviter tous les risques de
chocs électriques. Cet équipement ne doit pas être démonté sauf par le personnel
qualifié du service.
Ce symbole est prévu pour alerter les utilisateurs l’existence des instructions
concernant les opérations et les maintenances dans les documents accompagnés
dans cet appareil.
Pour réduire les risques de feu ou des chocs électroniques, il ne faut pas exposer
l’appareil dans l’humidité ou les moisissures.
ƒ32855('8,5(/(65,648('(6&+2&6(/(&7521,48(3(56211(/
ƒ1(3$6'(3/$&(5/(&289(5&/('(668628'(55,(5(
ƒ3$6'(3,(&(65(03/$&$%/(6$/¶,17(5,(85(
ƒ3,(&(65()(5(17(6'$16816(59,&(48$/,),(
Utilisations des contrôles, des ajustements ou d’autres procédés qui ne sont pas
mentionnés ici pourraient avoir des résultats dangereux des irritations.
Ce symbole indique
les endroits de
précautions.
Ce symbole indique
les actions interdites.
Ce symbole indique
les actions qui doivent
s’exécuter
ƒ1HSDVSODFHUO¶pTXLSHPHQWGDQVXQHQGURLWLQVWDEOHLUUpJXOLHUHWF
L’équipement peut tomber et causer des blessures importantes aux enfants ou
aux adultes et des dégâts importants à l’appareil lui-même.
ƒ8WLOLVHUVHXOHPHQWXQHFKDUUHWWHRXXQHWDEOHUHFRPPDQGpHVSDUOHIDEULFDQW
Cet équipement et la charrette recommandée ou la table doit être utilisé
attentivement. Les arrêts brusques, les forces excessives et les surfaces
irrégulières peuvent faire tomber l’appareil et la charrette.
ƒ,OQHIDXWSDVGpVDFWLYHUOHVILOGHSULVHGHWHUUH/DILFKHGHWHUUHSDUPLOHV
prises est une caractéristique très importante. Enlever la prise de terre va
augmenter le risque d’endommager l’appareil.
ƒ6LYRXVQ¶DYH]SDVGHVRUWLHGHSULVHGHWHUUHFRQWDFWHUXQpOHFWULFLHQSRXU
installer une sortie de terre.
ƒ7RXMRXUVpTXLSHUO¶DSSDUHLODYHFODVRXUFHG¶DOLPHQWDWLRQLQGLTXpHVXUOHV
informations du modèle et de la série.
ƒ1HMDPDLVVXUFKDUJHUOHVVRUWLHVGHPXUHWOHVH[WHQVLRQV
ƒ8WLOLVHUHWHPSOR\HUOHFRUGRQG¶DOLPHQWDWLRQDWWHQWLYHPHQW1HSDVSODFHUOHV
objets lourds sur le cordon d’alimentation de l’AC.
ƒ1HSDVWLUHUOHFRUGRQG¶DOLPHQWDWLRQGHO¶$&1HSDVSUHQGUHOHFRUGRQDYHFGHV
mains mouillées.
ƒ1HSDVWRXFKHUOHFRUGRQG¶DOLPHQWDWLRQHWOHFkEOHGHO¶DQWHQQHSHQGDQWO¶DOOXPDJH
1
AVERTISSEMENT ET PRECAUTIONS
ƒ(QOHYHUODSULVHGHODVRUWLHGXPXUVLO¶DSSDUHLOQHYDSDVrWUHXWLOLVpSRXUORQJWHPSV
ƒ1HSDVSODFHUXWLOLVHUHWPDQLSXOHUO¶DSSDUHLOSUqVGHO¶HDX
ƒ1HMDPDLVH[SORVHUO¶pTXLSHPHQWDX[OLTXLGHVDX[SOXLHVRXDX[PRLVLVVXUHV$OOHUYRLU
OHVHUYLFHVLXQGHVpOpPHQWVFLGHVVRXVUHQWUHGDQVO¶pTXLSHPHQW
ƒ1HSDVH[SRVHUO¶DSSDUHLOjODWHPSpUDWXUHH[WUrPHRXGLUHFWHPHQWVRXVOHVROHLOSDUFH
TXHO¶DSSDUHLOSHXWVHFKDXIIHUHWYDrWUHHQGRPPDJp
ƒ1HSDVLQVWDOOHUO¶DSSDUHLOSUqVGHODFKDOHXUFRPPHOHUDGLDWHXUODSODTXHFKDXIIDQWH
OHIRXURXG¶DXWUHVDSSDUHLOVTXLSURGXLVHQWGHODFKDOHXU
ƒ1HSDVWHQWHUG¶HQWUHWHQLUO¶DSSDUHLOYRXVPrPH
ƒ2XYULUHWGpSODFHUOHVFRXYHUFOHVYRXVPHWWHQWDXYROWDJHGDQJHUHX[RXLOSHXW\DYRLU
GHVSUREOqPHVVpULHX[HWYRXVQ¶rWHVSDVVRXVJDUDQWLHSDUFHWDFWH9RLUOHSHUVRQQHO
TXDOLILpDXVHUYLFH ƒ1HSDVPHWWUHRXIDLUHWRPEHUGHVREMHWVDXGHVVXV
ƒ1HSDVLQVpUHUTXRLTXHFHVRLWGDQVOHVVRUWLHVGHYHQWLODWLRQ,QVpUHUGXPpWDORXGHV
REMHWVLQIODPPDEOHVSHXYHQWFDXVHUOHIHXRXOHFKRFpOHFWURQLTXH
ƒ1HSDVSODFHUO¶pTXLSHPHQWVXUXQHFKDUUHWWHXQVWDQGXQHWDEOHRXXQHpWDJqUH
LUUpJXOLHUHWLQVWDEOH/¶pTXLSHPHQWSRXUUDLWWRPEHUFDXVHUOHVEOHVVXUHVLPSRUWDQWHV
DX[HQIDQWVRXDX[DGXOWHVHWHQGRPPDJHUDLWO¶DSSDUHLOOXLPrPH7RXMRXUVSODFHU
O¶pTXLSHPHQWVXUOHVRORXVXUXQHVXUIDFHVWDEOHUpJXOLqUHSODWHHWVXIILVDPPHQW
VROLGHYLVjYLVDXSRLGVGHO¶DSSDUHLO
ƒ1HSDVEORTXHUODVRUWLHGHODYHQWLODWLRQ/DLVVHUXQSHXG¶HVSDFHDXWRXUGHO¶DSSDUHLO
-DPDLVSODFHUO¶DSSDUHLOVXUOHOLWVXUOHFDQDSpVXUOHWDSLVRXG¶DXWUHVVXUIDFHV
VLPLODLUHVSDVWRXWSUqVGXULGHDXGXYRLODJHGXPXURXGDQVODELEOLRWKqTXHGDQVXQH
FDELQHLQWpJUpHRXG¶DXWUHVHQGURLWVVLPLODLUHVTXLHPErWHQWODYHQWLODWLRQ
ƒ'pEUDQFKHUO¶DSSDUHLOORUVGHVpFODLUVRXTXDQGYRXVQHO¶XWLOLVH]SDVSRXUORQJWHPSV
ƒ/DUpYLVLRQGRLWrWUHIDLWHGDQVXQVHUYLFHDYHFGXSHUVRQQHOTXDOLILp/¶HQWUHWLHQWHVW
H[LJpTXDQGO¶DSSDUHLODpWpGpMjHQGRPPDJpSDUH[HPSOHOHFRUGRQG¶DOLPHQWDWLRQRX
ODSULVHHVWHQGRPPDJpOHOLTXLGHHVWUHQWUpHGHGDQVRXGHVREMHWVVRQWWRPEpVGHVVXV
O¶DSSDUHLODpWpH[SRVpVRXVODSOXLHRXVRXVOHVPRLVLVVXUHVO¶DSSDUHLOQHIRQFWLRQQHSDV
QRUPDOHPHQWRXLOHVWWRPEp
ƒ7RXMRXUVGpEUDQFKHUOHFRUGRQG¶DOLPHQWDWLRQDYDQWGHQHWWR\HUO¶DSSDUHLO
ƒ-DPDLVXWLOLVHUOHVOLTXLGHVRXGHVERPEHVDpURVROVSRXUQHWWR\HUO¶DSSDUHLO
(VVX\HUVHXOHPHQWDYHFXQFKLIIRQGRX[HWVHF
ƒ6HXOHPHQWXWLOLVHUOHVSLqFHVDFFHVVRLUHVVSpFLILpVSDUOHIDEULFDQW
(&287(5$9(&/(625(,//(77(6
ƒ(FRXWHUDYHFYROXPHGHVRQPRGpUpSRXUpYLWHUHQGRPPDJHUO¶DXGLWLRQ
ƒ6LYRXVQ¶HQWHQGH]SOXVSHQGDQWOHSOD\EDFNQHSDVDXJPHQWHUOHYROXPHGH
VRQSDUFHTXHODPXVLTXHYDFRPPHQFHUVRXGDLQWUqVIRUW/HVSUHVVLRQV
H[FHVVLYHVGXVRQGHSXLVOHVRUHLOOHWWHVDQVOHVpFRXWHXUVSHXYHQWFDXVHUOD
SHUWHGHO¶DXGLWLRQ ƒ3RXUpYLWHUHQGRPPDJHUYRV2UHLOOHVDMXVWHUOH9ROXPHDXQLYHDXOHSOXVEDV
DYDQWOHSOD\EDFNHWDXJPHQWHUDSUqVVHORQYRVGpVLUpV
1RWH&HPDQXHOHVWMXVWHUpIpUHQWLHOO¶XQLWpDFWXHOOHSHXWrWUHFKDQJH
2
Cette consigne indique que ce produit ne peut pas se jeter dans la poubelle ordinaire.
Prenez la responsabilité pour le faire recycler. Veuillez jeter dans un endroit indiqué
destines aux déchets électroniques ou équipements électriques. Si vous ne savez
pas où faut il jeter, veuillez contacter la marie au service des déchets.
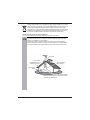
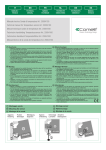
Consignes de sécurité de l’antenne extérieure
Si la connexion est avec une antenne extérieure, suivre les précautions ci-dessous:
ƒ8QHDQWHQQHjO¶H[WpULHXUHQHGRLWSDVVHVLWXHUGDQVXQHQGURLWRLOSHXW\DYRLU
des contacts avec les lignes au dessus, ni avec d’autres câbles électroniques ni
des circuits d’électricité.
ƒ/RUVGHO¶LQVWDOODWLRQG¶XQHDQWHQQHHQGHKRUVGHODPDLVRQLOIDXWIDLUHH[WUrPHPHQW
attention de ne pas toucher les lignes d’alimentation de courant. Contact direct avec
les câbles de courant est mortel et il faut l’éviter absolument.
Câble d’Antenne rentrant
Champs de Terre
8QLWpGH'pFKDUJHPHQW
d’Antenne
Service d’
Equipement
Conducteur de Terre
Electrique
Champs de Terre
Power service grounding
(;(03/(GH/¶$17(11('(7(55('(+256
3
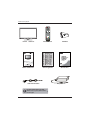
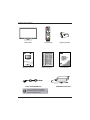
Contenus du paquet
LED TV
téléviseur
Manuel d’utilisateur
Télécommande
Carte de garantie
Cable d’alimentation
AAA Piles
Garantie livre
Adaptateur AC
Le câble d’alimentation peut être
différent selon la prise d’alimentation
de votre pays.
4
Installation de votre LED TV
Comment installer le Stand du TV
Ouvrir la boite, et soyez sur que tous les parties nécessaires sont dans la boite.
Le packet contient:
LED TV
Stand
Couvrir une surface stable et régulière avec un chiffon doux. Placer l’unité du LED TV
avec la face sur le chiffon. Mettre le stand au bout de l’unité du LED TV comme dans
l’image, et puis utiliser un tourne vis pour serrer le vis du bout pour que ce soit bien fixé.
5
Comment monter le TV
Utiliser le cable de l’antenne fourni pour connecter le signal de VHF/UHF avec le Terminal
ANT du LED TV.
Connecter le cordon d’alimentation AC au dos du TV et brancher le dans une prise.
Mettre 2 piles fournies dans la télécommande.
Etape 1 Glisser le couvercle du dos et ouvrir le compartiment de batterie de la
télécommande.
Etape 2 Mettre 2 piles de la taille AAA. Soyez sur avec les extrémités (+) et (- ) du
compartiment et les (+) et ( - ) des piles. Glisser le couvercle pour fermer
Ne pas utiliser les nettoyeurs caustiques (porcelaine, acier, toilette, ou bombe
nettoyant) pour la télécommande pour éviter les endommagements.
6
Votre LED TV
Face/Gauche /Droit Vu du profil et contrôle
Vu du côté droit
Vu du devant
LED
La lumière du LED indique l’activation
du LED TV
Vu du côté gauche
IR
Récepteur Infrarouge
SOURCE
Choisir parmi de différentes sources de signal d’entrée.
MENU
Appuyer une fois pour faire afficher l’OSD (affichage sur l’écran),
appuyer encore pour éteindre l’OSD.
CHA
CH+/Glisser vers le haut ou vers le bas parmi les chaines. Sélectionner les
sous menus quand c’est en mode d’OSD.
VOL+/Ajuster le volume haut ou bas. Sélectionner le menu principal et changer
quand c’est en mode d’OSD.
POWER
Allumer le LED TV et le mettre en mode standby.
7
Vu de derrière et les ports
DC 12V
Entrée Alimentation. 12V DC
Permettre l’accès des contenus enregistrés dans une clé USB.
HDMI IN
Connecter tous les équipements digitaux AV avec le connecteur HDMI
VGA/PC AUDIO
Connecter le PC, ou autre équipement AV avec VGA et des entrées de ligne
CI
Insérer le CI dans ce port.
SCART
Connecter un équipement externe avec la prise scart. L’interface SCART offre les signaux
de RGB, AV avec les entrées/sorties d’audio entre le TV .et l’équipement vidéo externe.
YPbPr
Connecter à un lecteur DVD, un Set-Top-Box Digital, ou autre équipement AV avec
composant(YPbPr) vidéo et les sorties d’audio.
HEAD PHONE
Connecter les écouteurs.
COAXIAL
Connecter au jack audio sur le système d’audio 5.1 digital/standard
AUDIO IN L/R
Jacks d’Entrée audio CVBS et YPbPr.
RF
Connecter l’entrée RF depuis l’antenne VHF/UHF ou le câble pour recevoir la télévision
haute/standard définition.
VIDEO
Connecter le jack d’entrée du lecteur DVD ou VCR.
8
Comment connecter carte CI(Interface commune)
CI SLOT
A voir les services payant pour la mode TV digital.
A INSERER LA CARTE CI
Insérer la carte CI dans la fente dans la direction marqué par la flèche
POUR ENLEVER LA CARTE CI
Lors que vous retirez la carte CI, juste tirer la de la fente.
Cette fonction permet de regarder les services payants dans certaines chaines. Si vous
retirez la module CI, vous pouvez regarder les programmes valables digitaux/analogues
avec certaines chaines.
9
Votre télécommande
STANDBY Allumer le LED TV et le mettre
en mode.
POWER
MUTE
SOURCE
AUDIO
P.SIZE
AUTO Appuyer pour ajuster les images
P.MODE
S.MODE
DXWRPDWLTXHPHQWHQPRGH3&
MUTE Silence et restaurer le son du LED TV.
0-9 Appuyer un chiffre pour sélectionner une chaine.
C/L Appuyer continuellement sur cette touche pour
choisir pays et langues.
Switcher entre les chaines actuelles et les
chaines précédantes
INFO
ASPECT %RXFOHOHVPRGHVGHPLVHjO¶pFKHOOH
AUDIO Bouton de la sélection Audio.
VOL+/VOL- Augmenter et diminuer le volume.
CH+/CH- Presser ces boutons pour sélectionner
XQHFKDvQHGHPDQLqUHVpTXHQWLHOOH
P+
V+
D.SETUP
V-
P-
REPEAT
ZOOM
GOTO
USB/SD
DTV/RADIO
PVR LIST TIME SHIFT
DISPLAY DISPLAY(affichage): Presser pour
DIILFKHUOHVLQIRUPDWLRQVjODVRXUFHG¶HQWUpHHW
des chaines actuelles.
/ENTER /HVTXDWUHGLUHFWLRQVYRXV
permettent de naviguer dans le menu.
ENTER Appuyer sur cette touche pour entrer
dans l'article de choix ou dans la liste de chaînes.
Fonction d'ENTRER et OK à la foi.
MENU $IILFKHUOHPHQX26'GXUO¶pFUDQ
EXIT Sortir du menu OSD.
INPUTPresser INPUT pour afficher la liste de
VRXUFH8WLOLVHUŸźSRXUVpOHFWLRQQHUO¶pTXLSHPHQW
vidéo connecté au vidéo input de votre LED TV,
et presser ENTRER pour valider
PMODE Sélectionner la mode de limage.
SMODE 6pOHFWLRQQHUO¶RSWLRQGHO¶HIIHWGHVRQ
SLEEP (Mise en veille programmé):
Programmer la durée de veille.
10
Votre télécommande
FAV affiche la liste de chaines favorites.
FAV+/ FAV-Augmenter/diminuer les chaines favorites.
POWER
P.MODE
S.MODE
MUTE
SOURCE
AUDIO
P.SIZE
EPG Afficher le Guide du Programme sur l’écran en mode
DTV. Presser de nouveau pour fermer le GUIDE.
TEXT Ouvrir ou fermer la fonction de Télétexte.
En mode media, presser pour sauter au précédent
de l’actuel chapitre pour de piste.
HOLD Presser pour faire une pause sur la page télétexte
courante en mode de visualisation multipages.
Sous mode Média, presser pour sauter à la piste et
le chapitre prochain depuis l’actuel.
TV/RADIO Sous mode DTV, presser TV/RADIO pour
entrer en mode DTV ou mode RADIO.
INFO
SUBTITLE Afficher ou faire disparaitre les sous-titres
à l’écran.
INDEX Presser pour accéder à l’index principal en
mode Télétexte.
SIZE Afficher le haut, le bas ou toute la page, pour
faciliter la lecture en mode Télétexte.
P+
V+
D.SETUP
V-
P-
REPEAT
ZOOM
GOTO
USB/SD
DTV/RADIO
PVR LIST TIME SHIFT
En mode Média, utiliser arrière/avancer
/
pour faire le playback rapidement.
REVEAL Afficher les informations masquées du
télétexte. Comme la réponse d’un quiz.
SUBPAGE Presser le bouton pour accéder aux sous
pages et appuyer de nouveau pour supprimer.
En mode media, presser pour commencer le
playback ou faire une pause.
En mode Média, presser pour arrêter le playback.
PVR En DTV mode, presser PVR pour commencer
l’enregistrement, presser de nouveau pour arrêter.
MEDIA Presser pour accéder au signal de source
directement
Presser pour approprier la couleur
avec accès direct au TELETEXT, EPG OSD,
Echelle Effective: La
télécommande peut
commander
le LED TV
E
à une distance de 5m,
à condition de la pointer
directement au receveur.
et MEDIA.
TIME SHIFT TIME SHIFT: En DTV mode, presser TS
pour commencer la fonction retard, presser
pour
commencer le programme retard presser pour terminer
la fonction retard.
PVR LIST En DTV mode, afficher la liste PVR exécuté.
11
Installer the LED TV
Cela dépend du manuel des équipements externes à connecter. Lors la connexion avec un
équipement externe, ne pas brancher le cordon d’alimentation avant que toutes les autres
connexions soient établies.
Connecter un Câble TV ou une Antenne
Connexion d’antenne
L’antenne est importante pour la réception de TV en couleur, plus que des TV en réception
noir&blanc. Pour cette raison, la bonne qualité de l’antenne à l’extérieur est vivement
recommandée. Ci dessous est une explication brève sur le type de connexion provenant
des systèmes d’antenne variés.
A 75-ohm système est généralement un câble rond(non inclus)avec un connecteur
type-IEC qui s’attache facilement à un terminal sans outils.
Connecteur IEC-type
75-ohm coaxial câble (rond)
Utiliser les deux diagrammes ci-dessous quand c’est pour une connexion avec l’antenne
à l’extérieure.
A: Montrer comment utiliser une antenne à l’extérieure avec une combinaison de VHF/UHF.
B: Montre comment utiliser un VHF séparé et/ou une antenne UHF.
A. Antenne avec la Combinaison VHF/UHF
Cable TV (CATV) Connection
A 75-ohm coaxial cable connector is built into the set for easy hookup. When
connecting the 75-ohm coaxial cable to the set, connect the 75-ohm cable
into the ANT.terminal.
Some cable TV companies offer premium pay channels. Since the signals of
these premium pay channels are scrambled, a cable TV converter/descrambler
is generally provided to the subscriber by the cable TV company..
For more specific instructions on installing cable TV, consult your cable TV company.
One possible method of connecting the converter/descrambler provided by your cable
TV company is shown in the diagram below.
.
12
Installer le LED TV
Utiliser l’antenne fournie pour connecter le signal de TV et le
terminal du CABLE LED TV.
Connecter le cordon d’alimentation AC au dos du TV et brancher
le avec une prise
DC 12V
Presser le
sur la télécommande pour allumer le LED TV.
E
E
Toujours débrancher le LED
TV quand il n’est pas utilisé pour longtemps.
/HERXWRQ32:(5PDUFKHDUUrWVXUODIDFHQHVHUWTXHSRXUPHWWUHOH/('
E
79HQVWDQGE\LOQHGpFRQQHFWHSDVO¶DSSDUHLOGXFRXUDQW3RXUGpFRQQHFWHU
FRPSOqWHPHQWGXFRXUDQWpOHFWULTXHYHXLOOH]GpEUDQFKHUOHFRUGRQGHODSULVH
Presser le bouton Source sur la télécommande pour afficher la liste des
6RXUFHV8WLOLVHUŸźSRXUVpOHFWLRQQHUXQHVRXUFH'79HWSUHVVHU(175(5
13
Installer le LED TV
Connecter un appareil A/V avec Connecteur SCART
VCR
LECTEUR DVD
Câble SCART
RECEPTION SATELLITE
BOX TV CABLE
Utiliser un câble SCART pour connecter l’appareil externe A/V
au jack SCART du LED TV.
Connecter toutes les sources d’alimentation, avant d’allumer le
LED TV ou autres ‘équipements connectés.
Presser le
sur la télécommande pour allumer le LED TV.
3UHVVHUOHVXUODWpOpFRPPDQGHSXLVXWLOLVHUŸRXźSRXU
sélectionner SCART et presser ENTRER.
14
Installer le LED TV
Connecter un appareil A/V avec le connecteur YPbPr
DVD ou VCR
DVD ou arrière VCR
câble YPBPR
câble AUDIO
Utiliser un câble YPbPr pour connecter les sorties YPbPr d’un
appareil externe A/V au jack YPbPr du LED TV. Utiliser un cable
audio pour établir la connexion entre l’équipement audio et le LED TV.
Connecter toutes les sources d’alimentation, avant d’allumer le LED TV
ou autres ‘équipements connectés.
Presser le
sur la télécommande pour allumer le LED TV.
3UHVVHUOHVXUODWpOpFRPPDQGHSXLVXWLOLVHUŸRXźSRXU
sélectionner YPBPR et presser ENTRER.
Les jacks marqués sur l’appareil A/V sont des fois YPbPr, ou YCbCr. Pour
l’explication du composant vidéo, voir le guide de l’appareil A/V.
15
Installer le LED TV
Connecter un Equipement AV avec Connecteur HDMI
CABLE HDMI
DVD ou arrière VCR
DVD ou VCR
Utiliser UN câble HDMI pour connecter les sorties HDMI avec
les jacks entrées du LED TV.
Connecter toutes les sources d’alimentation, avant d’allumer le
LED TV ou autres ‘équipements connectés.
Presser le
sur la télécommande pour allumer le LED TV
3UHVVHUOHVXUODWpOpFRPPDQGHSXLVXWLOLVHUŸRXźSRXU
sélectionner HDMI et presser ENTRER.
Le connecteur HDMI fourni en même temps les signaux vidéo et
audio, il n’est pas nécessaire de connecter le câble audio.
16
Installer le LED TV
Connecter un Equipement AV avec Connecteur DVI
câble HDMI-to-DVI
câble AUDIO
DVD ou arrière VCR
DVD ou VCR
Utiliser UN câble HDMI-to-DVI pour connecter les sorties DVI
avec les entrées HDMI du LED TV.
Utiliser un câble audio pour connecter les jacks sortie de
l’équipement AV et les jacks HDMI AUDIO du LED TV.
Connecter toutes les sources d’alimentation, avant d’allumer
le LED TV ou autres ‘équipements connectés.
Presser le
sur la télécommande pour allumer le LED TV.
3UHVVHUOHVXUODWpOpFRPPDQGHSXLVXWLOLVHUŸRXź
pour sélectionner HDMI et presser ENTRER.
Si le LED TV est connecté au connecteur DVI de l’équipement AV, vous avez
besoins d’un câble HDMI-to-DVI ou un adaptateur (non fourni) HDMI et un
câble audio
17
Installer le LED TV
Connecter à un PC
Câble AUDIO
Câble VGA
Utiliser un câble D-SUB pour connecter l’entrée de D-SUB du PC
au jacks VGA de LED TV. Utiliser un câble audio pour connecter la
sortie de jacks du PC au celui du LED TV.
Connecter toutes les sources d’alimentation, avant d’allumer le
LED TV ou autres ‘équipements connectés.
Presser le
sur la télécommande pour allumer le LED TV.
$SSX\HUOHERXWRQVXUODWpOpFRPPDQGHSXLVXWLOLVHUŸRXź
pour sélectionner VGA et appuyer le bouton ENTRER.
18
Installer le téléviseur LED TV
Connecter à un récepteur Audio
Câble AUDIO
Récepteur Audio
Utiliser UN câble audio pour connecter le récepteur audio du
jacks LINE IN au jacks audio COAXIAL du LED TV..
Connecter toutes les sources d’alimentation, avant d’allumer le
LED TV ou autres ‘équipements connectés.
Presser le
sur la télécommande pour allumer le LED TV.
19
Utiliser les caractéristiques principales
1. Vue du menu principal et les descriptions
Thèmes du Menu Principal( Ordre par le droit CHAINE –> IMAGE ->
SON -> L’HEURE -> OPTION -> VERROUILLER ) à la source d’entrée
DTV/ATV,la première page montrée est CHAINE. A la source non
entrée DTV/ATV,la première page est IMAGE par défaut. Actuellement
presser ENTRER pour avoir le sous menu.
1.1 CHAINE
Programme edit
Signal Information
CI Information
OK
Note:
1) CHANAINE ne peut que être choisi sous condition ATV/DTV,
d’autres ne peuvent pas l’avoir.
1.1.1 Auto Scan
Entrer à Auto Scan,il montre le cadre du pays et une option
du type TUNE.
OK
EXIT
1) Déclaration de fonction
Thèmes
Thème d’ajustement
Défaut
Type Scan
DTV + ATV -> DTV -> ATV
DTV + ATV
Pay
sélection
Description
Le pays par défaut depend de
l’endroit de chargment ou du pays
clientele, si ce n’est pas precise,
c’est UK par défaut.
UK -> Australie -> …
20
Utiliser les caractéristiques principales
2) Déclaration Opération:
Presser MOVE(DEPLACER) pour sélectionner haut ou down, presser DONE
(fini) pour commencer le scan. Lors du scan, le premier 50% de la processing
(en cours) veut dire ATV déclenché, le dernier 50% de la procession (en cours)
veut dire DTV déclenché.
Data
MENU
Back
EXIT
Quit
Quand le ATV est déclenché, vous pouvez sortir et sauter du ATV commencer
le DTV, comme ci-dessous:
1.1.2 DTV Régler manuellement
Bad
Normal
MENU
Back
Good
EXIT
Quit
1) Déclaration de fonction:
Thèmes
CH
Thème d’ajustement
Défaut
description
Sélectionner la chaine avec le
bouton droit et gauche, et presser
ENTRER pour valider si le signal
fort montre.
Dépend du pays
.
2) Presser ENTRER pour confirmer le déclenchement (seulement sous DTV)
21
Utiliser les caractéristiques principales
1.1.3 ATV régler manuellement:
EXIT
Quit
1) Description Fonction:
Thèmes
Thème d’ajustement
Défaut
description
Enregistrer au
1 – 100
1
L’espace de stockage actuelle montre
Système
BG -> I -> DK -> L
CH actuelle
1 – 100
Option Défaut dépend de la sélection
du pays
1
Fine-Tune
Fréquence
Chaine actuelle montre
Recherche possible pour toutes les
chaines
Recherche
Fine-tune
Quand c’est
sélectionné
gris
pas
Afficher la fréquence actuelle, et
suivre Recherche ou Fine-Tune
adjuster.
2) instruction opération: après le réglage manuel, être sur que presser RED pour
enregistrer, sinon, toutes les chaines recherchées seront pas enregistrées après.
22
Utiliser les caractéristiques principales
1.1.4 Programme Edit
:
ok
Select
MENU
Back
1) Format et description
Symbole
codage
S
LCN
Nom CH
21
ABC1
Symbole Symbole
Symbole
Passer
verrrouillage Favoris
Système
1. The Cannel menu includes“Delete/Move/Skip /Rename /Fav”. “ Lock、
Fav、Skip” can be used when clients do some settings to the channel.
(Fav can not be fixed together with Skip).
2) key press operation introduction
Bouton
Champs
Description
Ÿ
ATV/DTV
Page précédente, peut tourner la page entière
ź
ATV/DTV
Page prochain, can turn page by circle
Supprimer la chaine actuelle, comme ci-dessous:
1) en condition normale, presser
(DELETE)
ATV
pour entrer en mode
DELETE(supprimer)
2) En mode DELETE’supprimer)ˈle bouton se sert :
MENU˖ exit DELETE(supprimer) pour entrer en condition normale.
EXIT˖ exit du menu
˖Supprimer la chaine actuelle, et retourner au normal.
Modifier le nom actuel de la chaine, utiliser seulement en mode
ATV.
Instruction Opération˖
(RENOMMER)
ATV
1) en condition normale, presser pour entrer le nouveau nom
2)en mode RENAME(renommer)˖
MENU˖exit de mode RENAME(renommer)ˈrevenir au normal
EXIT˖exit du menu
UP(haut)/DOWN(bas)˖changer de liges, des mots ou symboles
LEFT(gauche)/RIGHT(droit)˖pour la direction droite et gauche,
dans les deux sens.
˖exit de mode RENAME(renommer)ˈrevenir au normal
23
Utiliser les caractéristiques principales
(Déplacer)
ATV/DTV
Fonction de switcher les chaines, ATV valable par défaut, DTV
Valable à condition LCN ouvert auto ordre.
ˈentrer en mode SWAP, et la chaine
1) en condition normale
actuelle choisie est mobile chaine X.
2) En mode SWAP˖
MENU˖exit SWAP modeˈrevenir en condition normal
EXIT˖exit du menu
UP(haut)/DOWN(bas)˖choisir les chaines à switcher.
˖Si la chaine actuelle choisie est celle sélectionnée avant
X, plus d’autre action; sinon, la chaine actuelle est chaine Y,
besoins d’échanger X et Y. Mais le numéro des chaines restent
1,2,3…ordre comme avant.
Choisir si sauter de la chaine actuelle quand chaine CH+/- en cours
En chaine non Skip(sauter), presser
(SKIP(sauter)
ATV/DTV
En chaine Skip(sauter), presser
(FAV)
ATV/DTV
ˈet sauter de la chaine
actuelle ;
pour annuler d’action.
Etablire les chaines favorites
1.1.5 Information Signal
:
C’est seulement pour DTV, l’affichage des informations de signal comprend :
chaine /network /modulation /qualité /force.
Thème
Afficher le parameter du signal
Information Signal
Sortir le menu Information Signal, afficher comme ci-dessous:
Chaine 21
Network Digita Finlande
Modulation 64QAM
Qualité 66%
Force 80%
1.1.6 CI Information
Seulement valable pour DTV, cela rappelle si la carte CI n’est pas insérée.
Vous pouvez entrer au menu pour vérifier toutes des informations de la carte CI.
1.1.7 Mode Enregistrement
Entrer au menue Enregistrement, réserver ce que veut enregistrer, vérifier
spécifications dans les détails.
24
Utiliser les caractéristiques principales
1.2 IMAGE
Menu
Back
ok
Select
EXIT
Quit
1.2.1 Mode Image
Menu
Back
Quit
EXIT
1) Instruction Fonction
Thème
Mode Image
Champs
d’Ajustement
Standard -> Fort ->
Utilisateur->
Dynamique
défaut
description
Standard
Défaut˖En mode non utilisateur, vous
pouvez
sélectionner
Contraste,
Luminosité, couleur, finesse, teint pour
adjuster,
la
mode
reviens
à
l’Utilisateur automatiqument.
2) Instruction opération
Changer de mode avec le bouton droit/gauche; revenir à l’image menue
principale en pressant MENU, et presser EXIT pour sortir du menu principal.
1.2.2 Contraste / Luminosité / Couleur / Finesse
Menu
Back
EXIT
Quit
1) Instruction Fonction
Thème
Champs
d’ajutement
Défaut
Contraste
0 - 100
50
Luminosité
0 - 100
50
Couleur
0 - 100
50
VGA non valable
Finesse
0 - 100
50
VGA non valable
Teint
R50 - 0 - G50
0
Seulement pour le système
NTSC˗PAL et SECAM se met au
0.
25
Description
Utiliser les caractéristiques principales
2) Instruction Opération
Ajustement : GAUCHE, Droit pour ajuster la taille numérique;
Menu :presser MENU pour revenir au menu principale de l’image.
Exit :EXIT du menu;
UP(haut),DOWN(bas): adjuster le contenu avec le bouton up(haut)/down(bas):
Contraste / Luminosité / Couleur / Finesse;
1.2.3 Température de Couleur
Menu
Back
EXIT
Quit
1) Instruction Fonction
Champs
d’ajutement
Thème
Température
couleur
de
Standard-> Cool ->
Utilisateur -> Doux
Défaut
description
Standard
En mode non utilisateur, vous
pouvez sélectionner entre
rouge/ver/bleu pour adoucir la
couleur. La mode va se
réajuster en mode d’utilisateur
automatiquement.
2) Instruction Opération
Ajuster : GAUCHE, DROIT pour ajuster
; le contenu;
Menu : MENU pour revenir;
Exit :EXIT au menu exit.
1.2.4 ROUGE/VERT/BLEU
Menu
Back
EXIT
Quit
1) Instruction Fonction
Thème
Champs
d’ajutement
Défaut
Rouge
0 - 100
50
Vert
0 - 100
50
Bleu
0 - 100
50
Description
2) Instruction Opération
Ajustement : GAUCHE, Droit pour ajuster la taille numérique;
Menu :MENU pour revenir au menu principale de l’image;
Exit : EXIT au menu exit.
UP(haut),DOWN(bas) pour sélectionner le contenu ajustable
Ils sont bouton rouge/vert/bleu.
26
Utiliser les caractéristiques principales
1.2.5 Aspect Ratio
1) Instruction Fonction
Résolution décran
défaut
Source
Entrée
16:9 / 16:10
16:9
No VGA
16:9 -> Zoom1 -> Zoom2 -> Auto -> 4:3
VGA
16:9 -> 4:3
4:3
4:3
4:3
(dimensions
physiquel 16:9)
16:9
mode
No VGA
16:9 -> Zoom1 -> Zoom2 -> Auto -> 4:3
VGA
4:3 -> 16:9
No VGA
16:9 -> Zoom1 -> Zoom2 -> Auto -> 4:3
VGA
16:9 -> 4:3
Note:Quand la résolution d’écran est 4:3,la dimension est16:9 et mode 4:3,
actuellement la résolution de sortie est 1:1.
1.2.6 Réduction du bruit
1) Instruction Fonction
Thème
Champs
d’Ajustement
Défaut
description
Noise Reduction
On -> Off
On
VGA set
adjustable
as
Off ˈ not
2) Instructio Opération
Entrer dans le menu, choisir avec UP/haut), DOWN(bas): fermer/bas/milieu/défaut.
1.3 SON
Menu
Back
OK
27
Select
EXIT
Quit
Utiliser les caractéristiques principales
1.3.1 Mode Son
Menu
Back
EXIT
Quit
1) Instruction Fonction
Thème
Champs
Défaut
description
Standard
En mode non utilisateur,
Aigu et Basse ne peuvent
pas être sélectionnés et
ajustés.
d’Ajustement
Mode Son
Standard
->
Musique -> Film ->
Sports
->
Utilisateur
2) Instructio Opération
Ajustement :GAUCHE, DROIT adjustable:Standard -> Musique ->
Film-> Sports -> Utilisateur
Menu :MENU pour revenir au menu principal de l’image
Exit :EXITau menu exit.
1.3.2 Aigu/ Basse /Balance
Menu
Back
EXIT
Quit
1) Instruction Fonction
Champs
d’Ajustement
Défaut
description
Aigu
0 – 100
50
Son haut ajuster
Basse
0 – 100
50
Son bas ajuster
Thème
2) Instructio Opération
Ajustement :Droit, gauche contrôle la taille des fichiers
Menu : MENU pour revenir au menu principal de l’image
Exit :EXIT
UP(haut),DOWN(bas) pour choisir le contenu à ajuster: Aigu/basse/balance.
1.3.3 Volume Auto
1)Fonction:ajuster le son auto
2)opération:ENTRER pour installer ON/OFF (marche/arrêt)
1.3.4 Son aux alentours
1)fonction :Réglage des alentours
2)opération:ENTRER pour installer ON/OFF(marche/arrêt)
1.3.5 SPDIF
1)fonction :Régler la mode de sortie de SPDIF.
2) Instruction d’Opération:ENTRER pour installer Off(arrêt), PCM ou Auto.
28
Utiliser les caractéristiques principales
1.4 HEURE
Menu
Back
OK
Select
EXIT
Quit
1.4.1 Horloge
Menu
Back
EXIT
Quit
1) Instruction Fonction
Le taux du défaut n’est pas venu des information de l’heure du DTV,
mais je peut l’installer une fois entré au menu CLOCK(Horloge)
2) Instructio Opération
Déplacer : UP(haut),DOWN(bas)
Menu : MENU pour revenir au menu principal de l’image
Exit :EXIT
Le bouton GAUCHE, DROIT pour régler le paramètre
1.4.2 l’heure étiente
Menu
Back
29
EXIT
Quit
Utiliser les caractéristiques principales
1) Instruction Fonction
Thème
Champs d’Ajustement
Défaut
description
Off(éteint) -> Une fois -> Tous les
Répéter
Off(étiente)
jours-> Lun-Ven -> Lun~Sam ->
Sam~Dim-> Dim
Heure
00 - 23
00
Quand Activer ferme, Gris,
pas valable
Minute
00 - 59
00
Quand Activer ferme, Gris,
pas valable
2) Instructio Opération
Déplacer : UP(haut),DOWN(bas)
Menu : MENU pour revenir au menu principal de l’image
Exit :EXIT
Le bouton GAUCHE, DROIT pour régler le paramètre
1.4.3 A l’heure
Menu
Back
EXIT
Quit
1) Instruction Fonction
Thème
Champs d’Ajustement
Défaut
description
Off(éteint) -> Une fois -> Tous les
Répéter
jours-> Lun-Ven -> Lun~Sam ->
Off(éteint)
Sam~Dim-> Dim
Heure
00 -> 23
12
Quand Répéter est éteint,
Gris
Minute
00 -> 59
00
Quand Répéter est éteint,
Gris
Volume
0 - > 100
30
Quand Répéter est éteint,
Gris
Source
DTV -> Radio -> Données->
ATV -> …
DTV
Quand Répéter est éteint,
Gris non valable ˗ L’ordre
dépend de l’ordre d’entrée
source
Voir Note
Quand Répéter est éteint,
Gris non valable ˗ Quand
choisir une Source non TV, il
apparait gris, à la Source,
choisir DTV/Radio/Données
mais il montre blanc quand il
n’y a pas d’information
d’entrée de chaine.
Chaine.
ATV˖1 – 100
DTV/Radio/Données ˖dépend
des informations des chaines
30
Utiliser les caractéristiques principales
2)Instruction Opération
Déplacer : UP(haut),DOWN(bas)
Menu : MENU pour revenir au menu principal de l’image
Exit :EXIT
Le bouton GAUCHE, DROIT pour régler le paramètre
1.4.4 L’heure de veille
1) Instruction Fonction
Thème
Champs d’Ajustement
Veilleuse
Off -> 10min -> 20min -> 30min
-> 60min -> 90min -> 120min ->
180min -> 240min
Défaut
description
Off(étiente)
Rapeler
minimum
60
secondes: Arrêter le rapelle
une fois presser, la mise en
veille est fermée.
2) Instructio Opération
Enter second menu, use UP,DOWN to set sleep time.
1.4.5 Heure des zones
1) Instruction Fonction
Thème
Champs
d’Ajustement
Défaut
description
Par défaut, c’est l’heure de l’endroit du
débarquement que le client a
demandé. Quand c’est mis en auto, il
va changer automatiquement selon le
pays choisi.
Heure
des
zones
2)Operation instruction
Entrer au seconde menu, utiliser UP(haut),DOWN(bas) pour régler
l’heure de la zone: Canaries
GMT ./Lisbonne GMT /Londre GMT /Amsterdam GMT+1.
31
Utiliser les caractéristiques principales
1.5 OPTION
OSD Duration
Menu
Back
OK
30S
Select
EXIT
Quit
1.5.1 Langue OSD
1) Instruction Fonction
Thème
Champs d’Ajustement
OSD
Langue
Langues compatibles
Défaut
description
Choisir par défaut la langue de
l’endroit du débarquement demandé
par le client. Langues par défaut :
Anglais, français, allemande/Italien,
portugais.
2) Instructio Opération
Entrer au seconde menu, utiliser UP(haut),DOWN(bas) pour choisir les langues
1.5.2 1ère Audio Langue
1) Instruction Fonction
Thème
Champs
d’Ajustement
1ère Audio Langue
Premier
Langue
sélectionnée
Défaut
description
Pas sélectionné sous condition non
DTV.
2) Operation instruction
Entrer au seconde menu, utiliser UP(haut),DOWN(bas) pour choisir les langues
1.5.3 2ème Audio Langue
1) Instruction Fonction
Champs
d’Ajustement
Thème
2ème
Langue
Audio
Défaut
deuxième
langue
sélectionnée
description
Pas sélectionné sous condition non
DTV.
2) Instruction Opération
Entrer au seconde menu, utiliser UP(haut),DOWN(bas) pour choisir les langues
32
Utiliser les caractéristiques principales
1.5.4 1ère Langue de sous titrage
1) Instruction Fonction
Thème
Champs
d’Ajustement
1ère langue de
sous titrage
Première
Langue
sélectionnée
Défaut
description
Pas sélectionné sous condition non
DTV.
2) Instruction Opération
Entrer au seconde menu, utiliser UP(haut),DOWN(bas) pour choisir les langues
1.5.5 2ème langue de sous titrage
1) Instruction Fonction
Thème
Champs
d’Ajustement
2ème langue de
sous titrage
2ème
langue
sélectionnée
Défaut
description
Pas sélectionné sous condition non
DTV.
2)Instruction Opération:
Entrer au seconde menu, utiliser UP(haut),DOWN(bas) pour choisir les langues
1.5.6 Durée OSD
1)Instruction Fonction:
La durée d’OSD sur l’écran.
2) Operation instruction:
ENTRER pour mettre 5S, 10S, 15S, 20S, 25S, 30S, 35S or 40S.
1.5.7 Pays
1)Instruction Fonction:
Montrer la langue actuelle, gris non sélecionné
1.5.8 Restore factory default
1)Instruction Fonction:
Rétablir le défaut sortie d’usine.
2)Instruction Opération:
Entrer au seconde menu, utiliser UP(haut),DOWN(bas) pour choisir
“yes(oui)” or “no(non)”.
33
Utiliser les caractéristiques principales
1.6 Verrouillage
Lock Channel
Menu
Back
OK
Select
EXIT
Quit
1.6.1 Système de verrouillage
1) Instruction Fonction
Thème
Système
verrouillage
de
Champs
d’Ajustement
Défaut
Off/On
Off(éteint)
description
2) Instruction Opération
GAUCHE pour quitter le mot de passe, revenir au menu principal.
DROT pour supprimer le mot de passé et récrit un correcte. Il a besoins d’entrer
un mot de passe correcte pour entrer au sous menu LOCK(Verrouillage). Il va
afficher mot de passe incorrecte quand c’est mal saisi.
MENU pour exit au menu LOCK(Verrouillage)
34
Utiliser les caractéristiques principales
1.6.2 créer un mot de passe
1) Instruction Fonction
Champs
d’Ajustement
Thème
Défaut
description
Créer un mot de
passe
Entrer au sous menu et resaisir le
nouveau mot de passe et confirer le.
2)Instruction Opération
GAUCHE pour exit le nouveau mot de passé et revenir au menu principal
DROIT pour annuler le mot de passe saisi, et puis resaisir. Si le mot de passe
est saisi faut deux fois, il s’affiche « mot de passe ne marche pas ».
1.6.3 Programme de blockage
1) Instruction Fonction
Consigne
de
codage
LCN
Nom CH
S
21
ABC1
Symbole
de
verrouillage
système
Note: Le symbole de verrouillage est utilisé quand le client fait des changements
de chaines
2) Opération des Boutons
Bouton
fonction
Ÿ
Page précédenteˈpeut tourner la page˗
ź
Page suivanteˈpeut tourner la page˗
Ɣ(Verrouillage)
Vérifier si la chaine actuelle est vérouillée ou pas, si oui, il faut le
mot de passé avant de la regarder.
Quand presser Ɣ en mode non verrouillé: verrouiller la chaine
actuelle.
Quand presser Ɣ en mode verrouillé: verrouillage annulé
1.6.4 Surveillance parentale
1) Fonction:Quand la surveillance Parentale est plus basse que le programme
classe vraie, il faut verrouiller la chaine et puis entrer le mot de passe pour la regarder.
Thème
Champs
Défaut
description
Off(éteint)
Pas sélectionné sous condition non
DTV.
d’Ajustement
Surveillance
Parental
Off(éteint) ->
4 -> 5 -> … ->
18
2)Instruction Opération
Entrer au seconde menu, utiliser UP(haut),DOWN(bas) pour choisir les
données, presser ENTRER pour confirmer.
35
Utiliser les caractéristiques principales
2. Autre menu
2.1 Liste des chaines
La liste des chaines montrent toutes les chaines trouvées.
Move
OK
Select
EXIT
Quit
1) Format et description
Symbole
codage
LCN
Nom de
CH
S
21
ABC1
Symbole
sauter
Symbole
verrouillage
Symbole
Fav
Système
Note:1. Verrouiller、Fav、Sauter, ces symboles peuvent s’utiliser seulement
quand les chaines ne font pas d’analyses.
2) Boutons de fonction et instruction
Bouton
fonction
Liste CH
Au DTV/ATV et pas liste des chaines, fermer non Mute menu pour
faire sortir le menu de liste chaines;
Au menu de Liste Chaines, exit le menu Liste Chaine;
Ÿ
Page précédenteˈpeut tourner la page˗
ź
Page suivanteˈpeut tourner la page˗
2.2 Liste des favoris
Liste des favoris et Liste de Chaines sont faites pareillement,
mais affichée comme chaine favorite dans le programme Edit,
utiliser le bouton FAV pour afficher et fermer le menu de la
liste des favoris.
36
Utiliser les caractéristiques principales
2.3 EPG
EPG est seulement valuable en DTV,information de chaine classée
CHAINE /HEURE.
On peut choisir up (haut) et down (bas): chaine/Heure
OK
Select
EXIT
Quit
Toutes les informations du programme,
si c’est classé par heure, elles s’affichent
les informations à l’heure actuelle.
Informations détaillées du
programme choisi.
1)notes des opérations
Déplacer: déplacer vers le haut et le bas.
Menu:exit EPG
OK: changer au programme actuel sélectionné
Index: changer aux options type
Enregistrement: programme d’enregistrement. Il affiche mode d’enregistrement une
fois sélectionné (vérifier PVR détailles manuelles)
Agenda: information d’enregistrement. Vérifier les détailles à l’agenda liste d’introduction.
Rappel: programme réservé. Choisir Rappel pour afficher le menu de réglage ci dessous:
Utiliser up (haut) et down(bas) pour choisir le programmé.
Programme
Mode
Minute
Hour
Date
Month
Move
OK
Select
MENU
37
Back
Utiliser les caractéristiques principales
2.4 Guide d’Installation
Please set the following options, then
OK
Select
EXIT
Quit
1) Fonction et instruction: Si les informations de chaine ne sont
pas enregistrées, allumer et arriver au DTV/ATV, cela donne le
menu du Guide d’installation.
2)Opération
Déplacer: déplacer vers le haut et le bas.
Exit:exit menu
OK:entrer en mode de réglage en cours
38
Utiliser les caractéristiques principales
3. Multimédia
3.1 Introduction Brève
Au menu d’entrée Source, choisir USB source pour entrer au Multimédia.
A la condition Multimédia, le système peut faire des fichiers par ordre,
lecture des opérations et autres lectures multimédias à parcourir.
3.2 Modèle du menu principal Multimédia
1) Style du menu principal Multimédia
information USB
multimédia
Disques
Menu
info HD inséré
Menu
OK
Select
opération
2) Présentation des pièces de rechange du menu principal Multimédia
Equiper
Présentation
messege
Equipe
inseré
Quand USB est bien inséré, s’allume, sinon, c’est gris.
style
Multimedia
Du Gauche à droite PHOTOǃMUSIQUEǃFILMEǃTEXTE pour ce qui
va jouer.
Disque
Afficher insérer disque, et lister les par letters, à partir de C.
info USB
Il affiche information d’USB. Quand pas de USB inséré, il n’affiche
pas d’objet; une fois branché USB, il affiché USB équipé, par
exemple USB2.0ǃUSB1.1 etc.˗
Si USB est détecté inséré, mais sans message d’inspection
correcte, il affiche Réinsérer le.
guide
Opération
Afficher l’opération actuelle valable.
39
Utiliser les caractéristiques principales
3.3 Modèle du sous menu PHOTO
1) Modèle du sous menu PHOTO de Multimédia
Disque
Dossier dans disque, presser ENTRER pour entrer
page
revu
Delete Current File
Add/Remove all
OK
Full screen
Menu
Menu
EXIT
Add/Remove to playlist
Quit
Vu d’ensemble d’Image
Information Image
2) Instruction du sous menu PHOTO
Equipement
Instruction
Disque
Afficher le disque actuel
Page
Afficher la page des fichiers comme format ½, le chiffre précédent
est la page actuelle, le dernier est le nombre de page totale.
list Image
Picture list at Current page
Avant-première
Fenêtre
Image au point actuel
Information
Document
???.jpg
[Résolution] 800 x 600
[Size] 28521 Bytes
Données
Heure
----Nom du ficher
----résolusion
----Taille d’image
---- Créer la date
---- create l’heure
40
Utiliser les caractéristiques principales
3)Instruction Operation
Quand choisir l’image, il affiche le cadre de l’image précédente et ses
détailles, puis presser ENTRER pour entrer en plein écran. Après l’mage
en plein écran, presser ENTRER pour afficher le bouton d’opération
ci-dessous.
In
Out
4) Instruction Bouton
Bouton
Fonction
Info/Démonstration
Afficher l’image actuelle, les informations sont affichées ainsi:
Bleu Hills.jpg
----Nom du fichier
[Resolution] 1024 x 768
----résolution
[Size] 28521 Bytes
----Taille de l’image
Exit
Exit playing, entrer au menu precedent, centrer au menu PHOTO
multimédia
Play
Visionner les photos en plein écran, si quelques fichiers doivent être
visionnées, ça va changer automatiquement dans quelques
instants. ( défaut avec 5 secondes)
Pause
Pause
Stop
Stop playing, entrer au menu liste, fixer au fichier quand exit.
Prev.
Lire le fichier précédent
Next
Lire le fichier prochain
Répéter
Mode tourner en rond, on peut choisir répéter 1, répéter tout,
répéter rien, répéter l’image singulière, sélectionner les images à
répéter toutes ou à ne pas répéter.
Playliste
Playliste
Rotation
Tourner les images dans le sens de l’aigu/contre sens
Zoom entrée
Zoom entrée
Zoom sortie
Zoom sortie
41
Utiliser les caractéristiques principales
3.4 Modèle de sous menu MUSIQUE, équipement et présentation des boutons
1) Modèle du sous menu Multimédia MUSIQUE.
Quand les chansons choisies dans la liste, presser ENTRER pour afficher les
chansons précédents, comme ci-dessous:
disque
page précédent
Delete Current File
Add/Remove all
OK
Full screen
Menu
Menu
EXIT
Add/Remove to playlist
Quit
Liste des chansons
Information des fichiers
2) Description du sous menu MUSIQUE
equip
descrip
Disque
Afficher le disque choisi
Page
Afficher pages
Liste
des
chansons
Afficher la liste des chansons
Fenêtre
précédente
information
Fichiers
Image musique
Afficher les titres des chansons et les tailles etc.
42
Utiliser les caractéristiques principales
3) Condition de playing MUSIQUE et Fonction des clés
MUSIQUE playing est le menu juste comme lire software dans un PC,
avoir principalement playliste, information basique, avancement, partie
du guide d’opération, comme ci-dessous :
Information des chansons
Titre des chansons
Liste des chansons
Screen Saver
1/1
Remove
Remove all from playlist
Goto Time
Guide d’Opération
Image MUSIQUE
Bar d’avancement
Heure de lecture
4) Fonction partie MUSIQUE playing
equip
descrip
Titres
chansons
Titres des chansons actuelles
Image
MUSIQUE
Une image utilisée pour signer MUSIQUE
Songs list
Chansons marquees à parcourir, depuis les fichier du top, ordre par
letter.
Songs
information
Affichage des thèmes et les fichiers affichent à parcourir MUSIQUE
est pareil:
Artiste: ABC Year: 2005
----artiste
Titre: DEF
----titre
Album: GHI
----album
Taux Bit : 128K échantillon: 44K
échantillon
Tous sont venus des fichiers
Playing time
---- taux bit et
Afficher l’heure de lecture et au total, comme le format
00:01:23/00:04:56 format
Operation
guide
Afficher le guide d’opération actuelle.
Etat
d’avancement
Afficher l’état d’avancement et le taux
5) Fonction Bouton
Bouton
Fonction
Entrer
Lire les fichiers du centre, si c’est celui actuel, il va commencer par
le début.
Up(haut)/Down(bas)
Déplacer le fichier du centre dans la liste des chansons
Exit
Exit playing menu MUSIC, mais garder les chansons en lecture,
quand exit pour parcourir le menu, centrer les fichiers actuels.
Play
Play
Pause
Pause
Stop
Stop playing(lecture),entrer au menu de navigation, centrer au
fichier lus avant l’exit.
Next(prochain)
Lires les fichiers suivants
Répéter
Répéter playing, on peut choisir répéter 1, répéter tout, répéter rien,
etc.
43
Utiliser les caractéristiques principales
3.5 Lecture de film et fonction des boutons
1) Condition de lecture
1. MOVIE(FILME) s’affiche en plein écran pour tous les fichiers marqués quand les
clients parcourent, du fichier du haut par ordre alphabétique.
2. Zoom du filme demande: Zoom le minimum de la taille actuelle pour préserver la
taille d’origine.
2)Modèle du sous menu et Instruction
Delete Current File
Add/Remove all
OK
Full screen
Menu
Menu
EXIT
Add/Remove to playlist
Quit
Presser ENTRER pour sélectionner l’image, qui affiche des fichiers et les informations
des fichiers, puis presser Play pour commencer la lecture totale comme ci-dessous:
+
Slow
Step
Goto Time
1)instruction Bouton
Répéter :1, TOUT, Rien
Réglage A : Régler A lecture tourne en rond.
Playliste: La liste des fichiers sortent sur l’écran gauche, qui affiche la liste de lecture
actuelle. Les clients parcourt la liste avec le bouton up(haut) et down(bas), et sélectionner
les fichiers avec le bouton entrer, puis presser liste ou pas d’opération pendant 10 secondes,
il va fermer. Info:Afficher les informations du FILME actuel, comprend : le nom du fichier
du filme, la résolution du filme, la fréquence, la durée totale et le temps de la lecture.
Goto(Aller à): La fenêtre qui sort affiche ainsi: 00:00:00/01:23:45, le premier temps est ce
que le client entre, le client peut changer de position avec le bouton droit ou gauche, on
peut aussi changer de numéro avec up(haut) ou down(bas), et presser ENTRER pour
régler l’heure.
44
Utiliser les caractéristiques principales
3.6 TEXTE
Delete Current File
Add/Remove all
OK
Full screen
Menu
Menu
EXIT
Add/Remove to playlist
Quit
Choisir les fichiers TEXTE, presser ENTRER et ça s’affiche au dessus de la
fenêtre. Presser play pour commencer la lecture en plein écran comme
ci-dessous :
Opération :
Page Précédente: page précédente
Page suivante : page suivante
Prev.: fichiers precedents
Next(prochain): fichiers suivants
Stop: stop tourney pages auto
Playliste: playliste, affichier en haut droit.
Info: info des fichiers actuels, afficher le nom des fichiers et la taille.
45
Utiliser les caractéristiques principales
4.1 Bref
Fonction PVR est seulement valuable pour DTV, elle comprent les focntions comme
Enregistrer, changer d’heure, et playback. Enegistrement comprend enregistrement
du début et preserver l’enregistrement.
Réglage d’enregistrement peut se faire immédiatement avec le bouton short-cut(raccourci),
et la préservation a besoin d’être régler avant. Enregistrement et le playback peut se faire
en même temps, ça veut dire que enregistrement DTV et lire la clé USB en même temps.
Timeshift(changement de temps) est une autre fonction pour l’enregistrement et la lecture
les deux. Le suivant va expliquer les détailles.
4.2 Détailles de fonction du menu PVR
4.2.1 Système du Fichier PVR
Entrer au PVR depuis le menu CHAINE? Comme suivant :
Move
OK
Select
MENU
Back
Fonction
Bouton
Vérifier
système
PVR
Fonction
le
fichier
USB Disk
Format
Si pas de clé USB insérée, ça va afficher USB non détecté, si c’est
bien inséré, il affiche Passer.
ON peut mettre le Format MStar. Presser Entrer pour voir USB et
entrer au menu Format, puis entrer le format, USB peut compléter la
fonction PVR. Il cela marche bien, ou USB est MStar Format, ça
s’affiche Passer.
Time
Shift(changerment
du temps) Taille
Ne pas être choisi. Après avoir Vérifié le système du Fichier PVR,
cela veut dire que USB passé. MStar Format peut être utilisé dans
l’espace Timeshift(changement du temps), la taille est choisie par
les clients lors de la fabrication
Vitesse
Ne pas être choisi. Après avoir Vérifié le système du Fichier PVR,
ça va afficher USB valable pour la vitesse et rappeler le client de
travailler en sécurité avec cette vitesse valable
46
Utiliser les caractéristiques principales
4.2.1.1 Select Disque
Choisir le disque pour enregistrer ce que vous voulez enregistrer, comme ci-dessous,
par défaut avec C:
Move
OK
Select
4.2.1.2 Vérifier le système du fichier PVR
Vérifier l’enregistrement du système du fichier PVR est bien établi. Par défaut pour
commencer, presser Entrer pour surveiller le système du fichier USB et sa vitesse,
et la bar affiche Vérification en cours…
Lors pas de USB inséré, ou inspection échoue, il affiche ECHEC
Quand la clé USB est insérée, mais ne passe pas au Format MStar, entrer au
menu Format.
Quand la clé USB est insérée, mais inspection anormale et apparait pas, ça affiche
pas de Partition Trouvée
Si inspection normale, ça s’affiche SUCCES.
Move
OK
Select
4.2.1.3 Format
Au Format, presser le bouton Entrer pour commencer Vérification du système
du fichier PVR, une fois confirmé les informations de la clé USB, le menu Format
Disque s’ouvre comme ci-dessous:
Après avoir formaté, le système pourrrait établir le système fichier PVR selon la
confirmation précédente de la taomme du système Fichier PVR.
47
Utiliser les caractéristiques principales
4.2.1.4 Time shift size
Une fois la création du système Fichier PVR, le menu du réglage de taille du
changement de temps (Time Shift) va apparaitre, et les clients peuvent régler
la taille de d’espace pour le time shift(changement du temps) comme ci-dessous:
OK
Select
MENU
Back
4.2.2 Chaine – Liste d’enregistrement
1) Modèle de reference
Le menu est comme ci-dessous:
Titre, ordre
signe
programme
OK
Guide d’Opération
Select
48
Utiliser les caractéristiques principales
2) Instruction Menu
Thème
Notes
Titre
Liste d’enregistrement
Ordre
Par Droitest l’ordre actuel, le bouton Liste/index peut changer d’option:
Programme -> Chaine -> Heure, qui forme les ordres par le nom du
programme, d’ordre de chaine et l’heure d’enregistrement.
Marque
Afficher les conditions actulles, programme enregistré affiche pas de
marquee, si ça affiche
et
, ça veut dire en cours
d’enregistrement, et s’il affiche
et
, ça veut dire en cours de lecture, si centre, ça affiche la couleur de
l’image, sinon c’est gris.
Nom
du
Prgramme
Le nom du programme est construit par le numéro de chaine est le numéro
de chaine enregistrée.
Guide
d’Opération
Afficher les opérations actuelles valables
Notes
Info/Afficher et Droit ouvre le centre actuel du programme, qui Affichie et
Programme
Droit peut montrer le programme acutuel qui n’est pas cohé dans l’image.
[DATE] 2005/07/20 ----Date d’enregistrement
[HEURE] 15:29:02 ----L’heure du début de l’enregistrement
[DURE] 0000:01:52 ----La durée
[NOM DE CHAINE] 40 BBC NEWS ----Liste de chaine
[NOM du PROGRAMME] Non Information ---- nom du programme
3) Instruction Bouton
Bouton
Fonction
Liste/Index
When no menu, press Recorded List
When it show Recorded List menu, switch recording programme
orders.
Up(haut)/Down(bas)
Up and down to move Focus to select programme
Left(gauche)/Right(droit)
Close/pop out the programmer instruction
Entrer
Play Focus programme
Info/Affichage
Sortir ou fermer une instruction d’un programme
Ɣ(DELETE-ANNULER)
Supprimer le programme centre
Menu
Entrer à la Liste d’Enregistrement, presser Menu pour revenir au
menu PVR, Centrer à la liste d’enregistrement. Quand rentrer par
liste de racourci(short cut), exit Liste d’Enregistrement, revenir au
menu actuel.
Exit
Exit
49
Utiliser les caractéristiques principales
4.2.3 PVR – Mode Enregistrer
1) mode Enregistrée
Date
Month
2010/07/20
Jan
Date
2010/07/20
Month
Jan
Move
OK
Select
MENU
Back
Thème
format
notes
Titre Menu
Mode
D’enregistrement
Menu sujet
Titre
655335
Quand choisir Auto, obtenir le programme actuel
pour installer l’enregistrement, Titre affiche leur
non actuel, sinon, afficher“—”, ne pas pouvoir
utiliser
Mode
Une fois
Choisir la mode d’enregistrement ordre du
changement: Une fois -> tous les jours -> Une fois
par semaine
Supprimer Option Auto
Mettre Auto en enregistrement dans EPG
Date Début
2005/07/20
Date du début d’enregistrement, utiliser
droit/gauche pour régler le menu.
Heure de
commencement
14:00
Heure du début d’enregistrement
Date Fin1
2005/07/20
Date de fin d’enregistrement
Heure de Fin
15:00
Heure de fin d’enregistrement
Guide Opération
Afficher l’Opération actuelle
2) Bouton
Button
Fonction
menu d’enregistreur
Heure de la mise en
menu
Menu
Exit Enregistreur, entrer PVR menu,
Mode d’enregistrement Centré
Heure Exit
Up(haut)/Down(bas)
Déplacer Centrer up(haut) et
down(bas)
Move Focus up and
down
Left(Gauche)/Right(Droit)
Ajuster Mode, ou entrer Heure des
installations.
Données des
ajustements
ENTRER
Enregistrer l’actuel enregistrement et
exit l’enregistreur pour entrer à la liste
Agenda Enregistreur
Confirmer les
installations actuelles
et l’heure d’exit.
Ɣ(Agenda)
Pas enregistré, exit l’Enregistreur pour
entrer à la liste Agenda Enregistreur.
----
Exit
Pas enregistré, exit menu
Pas enregistré, exit
menu
50
Utiliser les caractéristiques principales
4.2.4 PVR – Agenda d’Enregistreur
1) Menu et fontion
Move
Delete
MENU
Back
EXIT
Quit
Note:
1. Thèmes dans le blanc l’heure du début, l’ordre selon le plan d’enregistrement.
Si entrer le menu pour ajouter un nouveau plan, concentrer au nouveau plan.
2. Il entre le menu lors de l’enregistrement, concentrer sur le plan d’enregistrement
actuel.
3. A part la condition 1 et 2, concentrer au dernier plan pas-commencer.
2) Bouton
Bouton
Fonction
Menu
Exit menu Liste Agenda Enregistreur, Entrer menu PVR, Centrer à la
liste Agenda Enregistreur.
Déplacer
Déplacer Centre up(vers le haut) et down(vers le bas)
Ɣ(Delete-Supprimer)
Supprimer les themes fixes
Exit
Exit menu
4.3 PVR Fonction Raccourci
4.3.1 PVR Bouton Raccourci en dessous du DTV
Bouton
Fonction
PVR
Entre mode Enregistrement
TS
Enter mode Timeshift
PVR Liste
Ouvrir menu Liste Enregistrée, entrer OK/Entrer à entrer Playback, lire le.
Note:L’accès à la Liste A enregistrer et liste enregistrée se fait par menu PVR.
51
Utiliser les caractéristiques principales
4.3.2 Enregister
1)Enregistrer
Menu d’enregistrer comprend 2 sortes: un est Mode Full(pleine), l’autre est Mode
Simple. Ils peuvent se changer avec le bouton Record(enregistrer)/Exit .
En mode Enregistrer, menu Enregistrer affiche encore. Les détailles sont ci-dessous:
1. Full(pleine) Mode
Note 1
Note 3
Note 2
Note 4
Note:
1. Enregistrer
2. Heure d’enregistrement
3.Flèche gauche est le non de chaine et la droite est le non du programme
4. Heure actuelle
2. Mode Simple
[00:00:20]
Note:En Mode Simple, ça affiche seulement Enregistrer et L’heure de
l’enregistrement en bas côté gauche.
2) Fonction Bouton
Bouton
Fonction
Stop
Exit Enregistrer, Afficher l’état
Enregistrer/Exit
Changer mode menu Enregistrer.
Play
Entrer mode Playback, play le par le commencement du programme
enregistré.
Liste
Fermer le menu Enregistrer, ouvrir menu Liste Enregistrée etrer
playback dans le menu Liste Enregistrée quand exit du menu Liste
Enregistrée, ça affiche Enregistrer encore.
52
Utiliser les caractéristiques principales
4.3.3 Timeshift(temps décalé)
4.3.3.1 menu Timeshift (temps décalé)
Timeshift(temps décalé) est silimaire avec le menu Enregistrer, il comprend deux
types: un est Full(pleine) Mode et l’autre est Mode Simple.
They can switch by Exit button.
En mode Timeshift(temps décalé), Timeshift reste immobile.
Comme montre ci-dessous:
1. Full(pleine) Mode:
Note 3
Note 1
Note 4
Note 2
Note 5
Note:
1)Afficher l’opération actuelle, comme Play、Pause、Accélérer Forward(devant)、
Accélérer Rewind(derrière)、Next(Suivant)、Prev.(précédent)
2)A->B consigne de cycle, quand c’est A ou B, lumière forte montre, juste quand
c’est en lecture.
3)L’état d’avancement peut montrer la longueur totale du Timeshift(Temps décalé).
4)Il y a deux temps, un commence par “-”, un autre est enregistré contient longueur.
5)L’heure vraie actuelle.
Mode Simple:
[-00:03:35]
Note:
1)En Mode Simple, ça affiche condition de lecture du Timeshift(temps décalé)
actuel comme Play、Pause.
2)Mode Simple s’affiche en bas à gauche.
53
Utiliser les caractéristiques principales
4.3.3.2 conditon Timeshift (Temps décalé)
4.3.3.2.1 conditon de commencement du Timeshift(Temps décalé)
Entrer Timeshift(Temps décalé) pour presser Pause, et l’image en pause et elle commence
l’enregistrement depuis la position en pause.
Condition Timeshif(temps décalé) Start(début) est ci-dessous :
Bouton
Fonction
Play
Entrer Timeshift(temps décalé)
Stop
Stop Timeshift(temps décalé)
Play condition
Exit
Changer mode menu Timeshift (temps décalé)
Liste
Fermer Timeshift(temps décalé), ouvrir Liste Enregistrée depuis le
menu Liste Enregistrée pour entrer playback, et puis Quitter
Timeshift(temps décalé)
Quitter Liste Enregistrée en premier et puis menu Timeshift(Temps
décalé).
4.3.3.2.2 Timeshift(Temps décalé) Play
En condition Timeshift(temps décalé) Play, le système d’enregistrement DTV et lire
le en meme temps. Timeshift Play commence par presser le bouton Timeshift
(temps décalé), dans cette condition, ça fonctionne Pause、Fast Forward(accélérer
vers devant)、Fast Rewind(accéléer en arrière), et on peut entrer A->B condition
cycle playing.
4.3.3.2.4 Enregistrer en Timeshift(Temps décalé)
Timeshift(Temps décalé) Play peut aller devant en pressant Fast Forward(accélérer
vers devant) ou le bouton Next(suivant),
Timeshift(Temps décalé) condition Enregistrer.
Timeshift(Temps décalé) condition Enregistrer, similaire que mode Enregistrer.
Timeshift(Temps décalé) condition Enregistrer, les boutons sont les suivants :
Bouton
Fonction
Pause
Pausede lecture, et revenir au play Timeshift(Temps décalé)
Stop
Stop mode Timeshift (Temps décalé)
Fast
Forward(accélérer
vers devant)
Non utilisé
Fast
Rewind
(accéléer
en
arrière)
Revenir au play Timeshift(Temps décalé) et et enfile à la partie
suivante.
Prev.(precedent)
Revenir au play Timeshift(Temps décalé) et lire le précédent pour 30
secondes.
Si le précédent contient le Timeshif(temps décalé) , on le lire depuis
ici.
Exit
Changer en mode menu (Temps décalé)
Liste
Fermer le menu Timeshift(Temps décalé), ouvrir la Liste
Enregistrée.
Entrer au playback depuis la Liste Enregistrée et puis quitter mode
Timeshift(temps décalé)
Quand on quitte la Liste Enregistrée, le menu Timeshift(Temps
décalé) s’affiche.
54
Utiliser les caractéristiques principales
4.3.4 Playback
4.3.4.1 Playback
Playback est similaire avec le Timeshift(temps décalé), un est Full(pleine) Mode,
l’autre est Mode Simple.
On peut les changer avec le bouton Exit.
En mode Playback,Playback reste sans bouger.
Mode Menu est ci-dessous:
Mode complète:
Note 2 Note 1
Note 6
Note 3
Note 7
Note 4
Note 5
Note:
1) Montrer les conditions actuelles de lecture, montrer d’différentes opérations comme:
lire, Pause, accélérer en arrière, accélérer en avant, Prochain et avant.
2) A->B cycle notes, A ou B effectué, lumière forte, qui ne montre que sous condition
de lecture.
3) Lire en morceau.
4) Il y a deux temps d’affichage, un est pour le temps actuel, l’autre est pour le reste
du programme.
5) Temps actuel.
6) Nom de la chaine enregistrée.
7) Le nom du programme, si pas de dénomination, il ne sera affiché. Mode Simple:
[00:03:35]
Note:
1)En mode simple, ça va afficher la mode playback actuel, comme Lire, Pause etc.
2)Mode Simple s’affiche en bas à gauche de l’écran.
55
TROUBLESHOOTING
Avant de consulter le personnel du service, vérifier les possibilistes ci-dessous
pour trouver les raison possible qui causent le problème et tenter de trouver une
solution.
TV ne s’allume pas
Etre sur que le cordon de l’alimentation est bien branchée, puis appuyer le bouton
POWER sur la télécommande
Les piles de la télécommande sont peut être épuisées.
Remplacer les piles.
Pas d’image, pas de son
Vérifier le câble de l’interface entre le TV et l’antenne/câble TV.
Appuyer le bouton POWER sur la télécommande.
Appuyer plusieurs fois le bouton de SOURCE sur la télécommande pour
sélectionner les sources de vidéo connectées.
Image pas claire, le son OK
Vérifier l’interface entre le TV et l’antenne/câble TV
Essayer une autre chaine, la station a peut être des difficultés
.
de diffusion.
Ajuster la luminosité/contraste dans le Menu VIDEO.
Image OK, sound faible
Le son est peut être muet. Appuyer le bouton MUTE sur la télécommande.
Appuyer le bouton VOL+ pour augmenter le volume.
Bruit d’Audio
Eloigner tous les équipements d’infrarouge du téléviseur.
56
SPECIFICATIONS
SPECIFICATIONS
Article
Illustration relative
Panneau
LED de 23'' à grand écran
Résolution
1920 x 1080 pixels
Secteurs compatibles
Caractéristiques
Interface d'entrée
Multiforme
Norme TV
PAL, SECAM
Norme DTV
DVB-T
PC
Interface d'entrée D-sub à 15 épingles
CVBS, YPbPr,HDMI
Interface d'entrée vidéo composée
Interface d'entrée YPbPr
Interface d'entrée HDMI
RF
75
SCART
Interface Full SCART normale
Audio
Interface d'entrée audio gauche, droite
USB
Interface d'entrée de la clé USB
interface aérienne
Sortie d'écouteur
Interface de sortie d'écouteur
Sortie de haut-parleur
3W x 2
Sortie COAXIAL
Interface de sortie COAXIAL
OSD language
anglais, allemand, français, hollandais, espagnol,italien
Alimentation
AC in 100-240V, 50/60Hz; DC out 12V,4.0A
Puissance
Working 40W(Max), Standby 1W
Dimensions
623 x 463 x 125 mm (Gift Box)
Poids
4.125Kg (Net)
Accessoires
Manuel d'utilisateur
Carte de garantie
Télécommande
Batterie AAA
Fil d'alimentation
Adapteur A C
Les caractéristique et les Spécifcations sont susceptible de changer sans notification.
57
Español
CONTENIDO
AVERTENCIAS Y PRECAUCIONES
Intrucciones importantes de seguridad........................................................1
Intrucciones de seguridad de la antena.......................................................3
PRESENTACIÓN DEL TELEVISOR LED
Contenidos del paquete ............................................................................. 4
Configuración de su TV de LED ................................................................ 5
Su TV de LED ........................................................................................... 7
Su Control Remoto ..................................................................................... 10
PRESENTACIÓN DEL TELEVISOR LED
.
12
Conectar el cable de TV o la Antena .........................................................
Conectando el equipo de AV con el conector SCART ............................. 14
Conectando el equipo de AV con el conector YPbPr ...............................15
Conectando el equipo de AV con el conector HDMI ................................ 16
Conectando el equipo de AV con el conector DVI ................................... 17
Conectando el PC.......................................................................................18
Conectando el recividor de Audio..................................................................
19
USO DE LAS FUNCIONES
Personalizar la configuración del CANAL .................................................. 20
Personalizar la configuración de las IMAGENES ...................................... 25
Personalizar la configuración del SONIDO ............................................... 27
TPersonalizar la configuración del Temporizador ..................................... 29
Personalizar la configuración de las OPCIONES ......................................32
Personalizar la configuración del BLOQUEO .............................................34
Personalizando los ajustes del menú OTROS -OTHER MENU ................ 36
Personalizando los ajustes MULTIMEDIA .................................................. 39
Personalizando los ajustes de PVR .......................................................... 46
SOLUCIÓN DE PROBLEMAS
.................................................................................................................56
ESPECIFICACIONES
23”LED ....................................................................................................... 57
Alertas y precauciones
Alertas y precauciones
Para evitar cualquier lesión, las medidas de seguridad siguientes se deben seguir en la
instalación, en el uso y el mantenimiento de este equipo. Antes de usar este equipo,
por favor lea este manual.
:$51,1*
&$87,21
Este símbolo es para alertar al usuario para que evite el riesgo por descarga
eléctrica. Este equipo no debe ser desensamblada por ninguna persona
excepto personal calificado.
Este símbolo es para alertar al usuario de la presencia de funcionamiento y
de instrucciones importantes del mantenimiento en la literatura que
acompaña la aplicación.
Para reducir el riesgo de fuego o de descarga eléctrica, no exponga este
HTXLSRDODOOXYLDRDODKXPHGDG
ƒ3$5$5('8&,5(/5,(6*2'('(6&$5*$(/e&75,&$3(5621$/
ƒ1248,7$/$&8%,(57$23267(5,25
ƒ12,1752'8=&$3,(=$6(1(/,17(5,25
ƒ3$5$(/0$17(1,0,(172(61(&(6$5,26(59,&,2&$/,),&$'2
El uso de controles, ajustes u otros procedimientos a excepción de los
especificados puede dar lugar a la exposición de radiación peligrosa.
Este símbolo indica
precaución.
Este símbolo indica
que estas acciones
no deben ser
realizadas.
Este símbolo indica las
acciones que deben
ser realizadas.
ƒ(OQRFRORFDHOHTXLSRHQQLQJXQRVFDUURVVRSRUWHVYHFWRUHVHVWDQWHV
desiguales o inestables etc.
El equipo puede caer, causando lesión seria a los niños o a los adultos y el
daño grave al equipo sí mismo.
8VRGHOƒVRODPHQWHXQFDUURRXQVRSRUWHUHFRPHQGDGRSRUHOIDEULFDQWH(VWH
equipo y carro o soporte recomendado se deben manejar con cuidado. Las
paradas rápidas, la fuerza excesiva, y las superficies desiguales.
ƒ1RGHVDFWLYHHOHQFKXIHDWLHUUDGHKLORV/DWRPDGHWLHUUDHQHOHQFKXIHGH
SDWDVHVXQDFDUDFWHUtVWLFDLPSRUWDQWH([WUDFFLyQGHODWRPDGHWLHUUD
aumenta el riesgo de dañar el equipo.
ƒ6LQRSXHGHLQVHUWDUHOHQFKXIHHQODWRPDGHFRUULHQWHSyQJDVHHQFRQWDFWR
con un electricista para que instale una toma a tierra.
ƒ8WLOLFHHVWHHTXLSRVLHPSUHFRQHOWLSRGHIXHQWHGHDOLPHQWDFLyQLQGLFDGDHQ
la parte posterior de la serie / etiqueta de información del modelo.
ƒ1RVREUHFDUJXHORVHQFKXIHV\H[WHQVLRQHV
ƒ8WLOLFH\PDQLSXOHHOFDEOHGHDOLPHQWDFLyQFRQFXLGDGR1RFRORTXHREMHWRV
pesados sobre el cable de alimentación de CA.
ƒ1RWLUHGHOFDEOHGHDOLPHQWDFLyQGH&$1RPDQLSXOHHOFDEOHGHDOLPHQWDFLyQ
de CA con las manos mojadas.
ƒ1RWRTXHHOFDEOHGHDOLPHQWDFLyQ\FDEOHGHODDQWHQDGXUDQWHXQDWRUPHQWD
1
Alertas y precauciones
ƒ5HWLUHHOHQFKXIHGHODWRPDGHFRUULHQWHVLHOHTXLSRQRYDDVHUXWLOL]DGRGXUDQWHXQ
ODUJRSHULRGRGHWLHPSR
ƒ1RFRORTXHXWLOLFHQLPDQLSXOHHVWHHTXLSRFHUFDGHODJXD
ƒ1RH[SRQJDHOHTXLSRDOtTXLGRVOOXYLDRKXPHGDG6ROLFLWHHOVHUYLFLRVLDOJXQRGHORV
DQWHULRUHVVHGHUUDPDHQHOHTXLSR
ƒ1RH[SRQJDHOHTXLSRDWHPSHUDWXUDVH[WUHPDVRDODOX]VRODUGLUHFWD\DTXHHOHTXLSR
SRGUtDVREUHFDOHQWDUVH\VXIULUGDxRV
ƒ1RLQVWDOHHOHTXLSRFHUFDGHIXHQWHVGHFDORUWDOHVFRPRUDGLDGRUHVFDOHIDFWRUHV
HVWXIDVXRWURVDSDUDWRVTXHSXHGDQSURGXFLUFDORU
ƒ1RLQWHQWHUHSDUDUHOHTXLSRXVWHGPLVPR
ƒ$SHUWXUD\GHUHWLUDUODVFXELHUWDVSXHGHH[SRQHUOHDWHQVLRQHVSHOLJURVDVXRWURVULHVJRV
\SXHGHDQXODUVXJDUDQWtD$FXGDDSHUVRQDOFDOLILFDGR
ƒ1RFRORTXHQLGHMHFDHUQLQJ~QREMHWRHQODSDUWHVXSHULRU
ƒ1RLQWURGX]FDQDGDHQORVRULILFLRVGHYHQWLODFLyQGHVXHTXLSR,QVHUFLyQGHFXDOTXLHU
REMHWRPHWiOLFRRLQIODPDEOHSXHGHFDXVDUXQLQFHQGLRRXQDGHVFDUJDHOpFWULFD
ƒ1RFRORTXHHOHTXLSRHQFDUULWRVLQHVWDEOHVRLUUHJXODUHVVWDQGVPHVDVHVWDQWHVHWF
(OHTXLSRSRGUtDFDHUVH\FDXVDUOHVLRQHVJUDYHVDQLxRVRDGXOWRV\VHULRVGDxRVDO
SURSLRHTXLSR&RORTXHVLHPSUHHOHTXLSRHQHOVXHORRVREUHXQDVXSHUILFLHTXHHV
UHVLVWHQWHHOQLYHOHVWDEOH\ORVXILFLHQWHPHQWHIXHUWHFRPRSDUDVRSRUWDUHOSHVRGHO
HTXLSR
ƒ1REORTXHHODVDEHUWXUDVGHYHQWLODFLyQ'HMDXQHVSDFLRDELHUWRDOUHGHGRUGHOHTXLSR
1XQFDFRORTXHHOHTXLSRHQXQDFDPDVRIiDOIRPEUDRFXDOTXLHURWUDVXSHUILFLHVLPLODU
GHPDVLDGRFHUFDGHFRUWLQDVFRUWLQDVRSDUHGHVHQXQDHVWDQWHUtDDUPDULRHPSRWUDGR
RFXDOTXLHURWUROXJDUVLPLODUTXHSXHGHFDXVDUXQDPDODYHQWLODFLyQ
ƒ'HVHQFKXIHHVWHDSDUDWRGXUDQWHWRUPHQWDVHOpFWULFDVRFXDQGRQRVHXVHSRUODUJRV
SHUtRGRVGHWLHPSR
ƒODVUHSDUDFLRQHVDSHUVRQDOWpFQLFRFXDOLILFDGR6HUHTXLHUHVHUYLFLRFXDQGRHODSDUDWR
KD\DVLGRGDxDGRGHDOJXQDPDQHUDVLHOFDEOHGHDOLPHQWDFLyQRHOHQFKXIHHVWiQ
GDxDGRVVHKDGHUUDPDGROtTXLGRRKDQFDtGRREMHWRVGHQWURGHODSDUDWRHODSDUDWR
KDVLGRH[SXHVWRDOOXYLDRKXPHGDGVLQRIXQFLRQDQRUPDOPHQWHRVHKDFDtGR
ƒ6LHPSUHUHWLUHHOFDEOHGHDOLPHQWDFLyQGHOWRPDFRUULHQWHDQWHVGHOLPSLDUHOHTXLSR
ƒ1RXWLOLFHOLPSLDGRUHVOtTXLGRVRHQDHURVROHQHOHTXLSR
/LPSLHVyORFRQXQSDxRVXDYH\VHFR
ƒ8WLOLFH~QLFDPHQWHORVDFFHVRULRVHVSHFLILFDGRVSRUHOIDEULFDQWH
(6&8&+$5&21$85,&8/$5(6
ƒ(VFXFKHDXQYROXPHQPRGHUDGRSDUDHYLWDUGDxRVDORtGR
ƒ6LQRR\HQLQJ~QVRQLGRGXUDQWHODUHSURGXFFLyQQRVXEDHOYROXPHQFRPROD
P~VLFDGHUHSHQWHSXHGHSUHVHQWDUVHHQXQYROXPHQDOWR(OH[FHVRGHSUHVLyQ
GHVRQLGRGHORVDXULFXODUHVSXHGHFDXVDUSpUGLGDGHDXGLFLyQ
ƒ3DUDHYLWDUGDxRVHQORVRtGRVDMXVWDUHOYROXPHQDOQLYHOPiVEDMRDQWHVGHOD
UHSURGXFFLyQ\VXELUKDVWDHOQLYHOGHVHDGRFXDQGRODUHSURGXFFLyQVHKDLQLFLDGR
1RWD(VWHPDQXDOGHOXVXDULRHVVyORGHUHIHUHQFLDODXQLGDGUHDOSXHGHQ
VHUPRGLILFDGRV
2
Este signo indica que este producto no pueden ser eliminados con la basura
doméstica. El reciclaje y la recogida selectiva de estos productos es su
responsabilidad. Deposite los residuos mencionados anteriormente en un lugar
designado para el reciclaje de residuos de aparatos eléctricos y electrónicos.
Si usted no sabe de dónde tirar los residuos para su reciclaje, póngase en
contacto con su oficina local o el servicio de recogida de residuos domésticos.
Si una antena exterior está conectada, siga las siguientes precauciones:
ƒ/DVDQWHQDVH[WHULRUHVQRGHEHQHVWDUVLWXDGRVHQXQD]RQDHQODTXH
puedan entrar en contacto con líneas eléctricas aéreas, o cualquier otra
OX]HOpFWULFDRFLUFXLWRVHOpFWULFRV
ƒ$OLQVWDODUXQVLVWHPDGHDQWHQDH[WHULRUHVQHFHVDULRH[WUHPDUODV
precauciones adoptadas para evitar el contacto con líneas eléctricas.
El contacto directo con las líneas de energía puede ser fatal y debe ser
evitado a toda costa.
$QWHQDFDEOHGHHQWUDGD
$EUD]DGHUDVGHWLHUUD
Unidad de descarga
de la antena
Equipo eléctrico
Conductores de puesta
de servicio
a tierra
$EUD]DGHUDVGHWLHUUD
Puesta a la tierra del
servicio de energía
Ejemplo de antena exterior de puesta a tierra
3
Contenido del paquete
LED TV SET
Control remoto
Pilas AAA
Manual del usuario
Tarjeta de garantía
Garantía Libro
Cable de alimentación
Adaptador AC
El tipo de cable de alimentación
puede ser diferente dependiendo
del tipo de alimentación usada en
su país.
4
Configuración de la TV LED
Cómo instalar el TV Stand
Abra la caja, y asegúrese de que todas las piezas están en la caja.
El paquete contiene:
LED TV
Stand
Cubrir con un paño suave en superficie plana y estable. Coloque el televisor
LED boca abajo sobre el paño. Montar el soporte en la parte inferior de la unidad
de TV LED como se muestra, a continuación, utilizar un destornillador para apretar
el tornillo de la parte inferior del soporte hasta que el tornillo esté bien fijo en su lugar.
5
Cómo configurar el televisor
Utilice el cable de antena incluido para conectar la señal VHF / UHF a la TV ANT
LED. Terminal.
Conecte el cable de alimentación de CA en la parte posterior del televisor
y conecte el cable de alimentación al enchufe de pared.
Inserte las 2 pilas incluidas en el control remoto.
Paso 1 Deslice la cubierta posterior para abrir el compartimento de las pilas
del mando a distancia.
Paso 2 Inserte dos pilas AAA. Asegúrese de que coincida con el (+) y (-) de las
pilas con el (+) y (-) que se indica en el compartimiento de la batería. Deslice
la carcasa trasera en su lugar.
No utilice limpiadores cáusticos (porcelana, acero inoxidable, cuarto de baño,
o limpiador de hornos, etc) en el control remoto, ya que puede sufrir daños.
6
Su TV LED
Frente / Izquierda / vista del lado derecho y controles
Vista Lateral Derecho
Vista frontal
LED
La luz LED indica cuando está
el TV LED se activo.
Vista lateral izquierda
IR
Receptor de infrarrojos
SOURCE
Elijan de entre las diferentes fuentes de señal de entrada
MENU
Presione una vez para mostrar el OSD (On Screen Display),
pulse de nuevo para desactivar la OSD.
CHA
CH+/Analiza de arriba y hacia abajo a través de canales. Selecciona
sub-elemento de menú en el modo OSD.
VOL+/Ajusta el volumen hacia arriba y hacia abajo. Selecciona el elemento
de menú principal y cambiar los valores de los elementos cuando
en el modo OSD.
POWER
Enciende el televisor LED conectado y en modo de espera.
7
Vista posterior y Gatos
DC 12V
Entrada de corriente. continúa 12V
Permite acceso al contenido digital almacenado en el dispositivo de almacenamiento USB.
HDMI IN
Conecta todos los equipos digitales AV con conector HDMI
VGA/PC AUDIO
Connects the PC, or other AV equipment with VGA and line in jacks.
CI
Inserte la tarjeta en la ranura de CI.
SCART
Conectar a un equipo externo con euroconector. La interfaz SCART RGB ofrece, las
señales AV con entrada y salida de audio entre el televisor
. y equipo de vídeo externo.
YPbPr
Se conecta al reproductor de DVD, Digital Set-Top-Box, o cualquier otro equipo AV
con componente (YPbPr) de vídeo y audio de salida.
HEAD PHONE
Conecta los auriculares.
COAXIAL
Se conecta a la toma de audio en el digital / estándar 5.1 del sistema de audio.
AUDIO IN L/R
Cables de entrada de audio CVBS y YPbPr.
RF
Conecta la entrada de RF de antena VHF / UHF o cable de alta para recibir y televisión de
definición estándar.
VIDEO
Conecte el enchufe de video del DVD o VCR
8
Cómo conectar la tarjeta de CI (Interface común)
CI SLOT
Para ver los servicios codificados (pagar) en la modalidad de televisión digital.
Insertar la tarjeta IC
Inserte la tarjeta en la ranura de CI en la dirección de la flecha
Para retirar una tarjeta IC
Al retirar la tarjeta de CI, tire de él
Esta función permite que usted mire los servicios codificados (los servicios de pago) en
algunos canales. Si quita el módulo CI, se puede ver los programas digital / análogo
disponibles de los canales
9
Su Control Remoto
STANDBY Activar el encendido de la TV LED y el
modo de espera.
POWER
MUTE
SOURCE
AUDIO
P.SIZE
AUTO Pulse para ajustar automáticamente la
P.MODE
S.MODE
imagen en modo PC.
MUTE Silenciar y restaura el sonido del televisor LED.
0-9 Al pulsar un número se selecciona un canal.
C/L Presione este botón continuamente para
seleccionar el País e Idioma.
Cambia al anterior y siguiente entre los
canales actual y anterior.
INFO
ASPECT Se desplaza por los ajustes de modo panorámico.
AUDIO Botón de selección de audio
VOL+/VOL- Aumenta y disminuye el volumen
CH+/CH- Explora arriba y hacia abajo los canales.
D.SETUP
DISPLAY pulsa una vez, muestra una
variedad de información como el canal actual
y la fuente de entrada.
P+
V+
V-
P-
REPEAT
ZOOM
GOTO
USB/SD
DTV/RADIO
PVR LIST TIME SHIFT
/ENTER Las cuatro direcciones
SHUPLWHQTXHXVWHGQDYHJXHHOPHQ~
ENTER Presione esta tecla entrar a elegir
el artículo o lista de canal. Ambos función
ENTER y OK.
MENU Muestra el menú OSD en la pantalla.
EXIT Sale del menú OSD.
INPUTpulse INPUT muestra la lista fuentes,
XVHŸźSDUDVHOHFFLRQDUHOHTXLSRFRQHFWDGR
a las entradas de vídeo de su televisor LED,
y pulse el botón INTRO para confirmar.
PMODE modo de selección de imagen.
SMODE Selecciona las opciones por
defecto del sonido.
SLEEP Ajusta el temporizador para dormir.
10
Su Control Remoto
FAV Muestra la lista de canales favoritos
FAV+/ FAV- Siguiente o anterior canal favorito.
POWER
P.MODE
S.MODE
MUTE
SOURCE
AUDIO
P.SIZE
EPG Muestra la guía de programación en la
pantalla en el modo DTV. Al pulsar de nuevo
para apagar la GUÍA.
TEXT Enciende y apaga la función de teletexto.
IEn el modo de Media, pulse para ir al anterior
capítulo o pista.
HOLD Congelación de un pasaje de varias
páginas en la pantalla en el modo Teletexto.
En el modo de Media, pulse para saltar
al siguiente capítulo o pista.
TV/RADIO En el modo DTV, presione el botón
TV / RADIO para entrar en el modo DTV o RADIO.
INFO
SUBTITLE Abrir o cerrar los subtítulos.
P+
V+
D.SETUP
V-
P-
REPEAT
ZOOM
GOTO
USB/SD
DTV/RADIO
PVR LIST TIME SHIFT
INDEX Muestra el índice principal en el modo Teletexto.
SIZE Muestra la parte superior, inferior o la totalidad
de la página, para leer fácilmente en el modo
TELETEXTO.
En el modo media, la reproducción se
/
rebobina o avanza rápido.
REVEAL Revela la información oculta, como la
respuesta a un cuestionario en el modo TELETEXTO.
SUBPAGE Pulse para ver la subpágina y pulse
de nuevo para cancelar.
En el modo media, pulse para iniciar o pausar
la reproducción.
En el modo de Media, pulse para detener la
reproducción.
PVR en el modo DTV, pulse PVR para iniciar la
grabación, pulse el botón para detener la grabación.
MEDIA Pulse para cambiar a la fuente de señal USB.
Pulse el color adecuado a las funciones
de acceso directo en TELETEXTO, EPG OSD, y la
fuente de señal del modo MEDIA .
Alcance efectivo: Si se
apunta directamente al
E
receptor
el control remoto
puede controlar el
televisor LED hasta a 5
metros de distancia.
TIME SHIFT En el modo DTV, pulse el botón TS para
iniciar la función de retardo, pulse el botón
para iniciar
la reproducción del programa pausado, oprima el botón
para terminar las funciones de demora.
PVR LIST En el modo DTV, muestra la
LISTA PVR ejecutada.
11
Instalación del televisor LED
Consulte el manual de cualquier equipo externo al ser conectado. Al conectar un equipo externo,
no conecte los cables de alimentación de CA a la pared hasta que todos los puntos de las
demás conexiones estén conectados.
Conexión a la antena o al cable de TV
Conexión de Antena
Los requisitos para una buena recepción de la antena de televisión en color son más
importantes que los de una recepción de TV en blanco y negro. Por esta razón, una
buena calidad de la antena al aire libre es muy recomendable. La siguiente es una breve
explicación del tipo de conexión que se proporciona con los sistemas de antenas diferentes
Un sistema de 75-ohm es generalmente un cable redondo (no incluido) con
conector IEC-tipo que puedan adaptarse con facilidad a un terminal sin
necesidad de herramientas.
conector tipo IEC
75-ohm cable coaxial (y vuelta)
Utilice uno de los siguientes dos diagramas cuando se conecta una antena exterior.
A: Muestra cómo utilizar una antena de VHF / UHF combinada al aire libre.
B: Muestra cómo usar una antena de VHF / UHF separada al aire libre.
A. Combinación de VHF / UHF
Conexión de la Televisión por cable (CATV)
Un conector de cable coaxial de 75 ohmios está integrado en el conjunto de fácil
conexión. Al conectar el cable coaxial de 75 ohm para el conjunto, conecte el
cable de 75-ohm en el ANT.terminal.
Algunas empresas de televisión por cable ofrecen canales de pago. Como las
señales de estos canales de pago están codificados, un convertidor de TV por
cable / decodificador suele facilitar al abonado por la empresa de televisión por
cable..
Para obtener instrucciones más específicas sobre la instalación de televisión por cable,
consulte a su compañía de televisión por cable. Un posible método de conexión del
convertidor / decodificador suministrado por su empresa de televisión
por cable se
.
muestra en el siguiente diagrama.
12
Instalación del televisor LED
Utilice un cable de antena incluido para conectar la señal de TV a la TV de la
TV LED de terminal del cable.
Conecte el cable de alimentación de CA en la parte posterior del televisor y
conecte el cable de alimentación al enchufe de pared.
DC 12V
Pulse el botón
del control remoto para encender el televisor LED.
Desconecte siempre el televisor
de LED de la toma de corriente cuando
el
E
E
televisor LED no será usado durante un largo periodo de tiempo.
El botón POWER del panel frontal sólo se utiliza para cambiar el televisor
E
/('HQPRGRGHHVSHUDQRGHVFRQHFWDHOGLVSRVLWLYRGHODFRUULHQWHSULQFLSDO
3DUDGHVFRQHFWDUFRPSOHWDPHQWHODFRUULHQWHSULQFLSDOSRUIDYRUUHWLUHHO
enchufe de alimentación de la toma.
Pulse el botón SOURCE del mando a distancia para mostrar la lista de
IXHQWHV8WLOLFHORVERWRQHVŸźSDUDVHOHFFLRQDUODIXHQWHGH'79
y pulse el botón ENTER.
13
Instalación del televisor LED
Conexión de un dispositivo A / V con conector SCART
VCR
REPRODUCTOR DE DVD
CABLE SCART
RECEPTOR SATELITE
CAJA TV POR CABLE
Utilice un cable SCART para conectar la toma del exterior
aparato A / V SCART a la toma de la TV LED de SCART.
Conecte todas las fuentes de alimentación de CA antes de
encender el interruptor de encendido del televisor LED
o otros equipos conectados.
Pulse el botón
del control remoto para encender el televisor LED
Pulse el botón
del mando a distancia, a continuación, con los botones
ŸRźSDUDVHOHFFLRQDU6&$57\SXOVHHOERWyQ$FHSWDU
14
Instalación del televisor LED
Conexión de un dispositivo A / V con conector YPbPr
DVD o VCR
Parte trasera de DVC o VCR
Cable de YPbPr
Cable de audio
Utilice un cable YPbPr para conectar las tomas exteriores de
A / V de salida YPbPr a la toma de la TV LED YPbPr. Utilice
un cable de audio para conectar las tomas de audio del equipo
AV a la salida YPbPr del televisor LED tomas AUDIO.
Conecte todas las fuentes de alimentación de CA antes de encender
el interruptor de encendido del televisor LED o otros equipos conectados.
Pulse el botón
del control remoto para encender el televisor LED.
Pulse el botón
del mando a distancia, a continuación, con los
ERWRQHVŸRźSDUDVHOHFFLRQDU<3%35\SXOVHHOERWyQ$FHSWDU
Los conectores de vídeo YPbPr eres un dispositivo A / V a veces son
etiquetados YPbPr, YCbCr o. Para una explicación de vídeo por componentes,
consulte la guía aparato A / V de usuario.
15
Instalación del televisor LED
Conexión de un equipo AV con conector HDMI
Cable HDMI
Parte trasera de DVC o VCR
DVD o VCR
Utilice un cable HDMI para conectar la clavija del equipo
AV de salida HDMI a HDMI del televisor LED IN.
Conecte todas las fuentes de alimentación de CA antes de encender
el interruptor de encendido del televisor LED o otros equipos conectados.
Pulse el botón
del control remoto para encender el televisor LED.
Pulse el botón
del mando a distancia, a continuación, con los
ERWRQHVŸRźSDUDVHOHFFLRQDU+'0,\SXOVHHOERWyQ$FHSWDU
(OFRQHFWRU+'0,SURSRUFLRQDVHxDOHVGHYtGHR\GHDXGLRQRHV
necesario conectar el cable de audio.
16
Instalación del televisor LED
Conexión de un equipo AV con conector DVI
Cable HDMI a DVI
Cable de audio
Parte trasera de DVC o VCR
DVD o VCR
Utilice un HDMI-DVI para conectar la clavija del equipo AV Salida DVI a
HDMI del televisor LED IN.
Utilice un cable de audio para conectar las tomas de audio del equipo
AV de salida de HDMI del televisor LED tomas AUDIO.
Conecte todas las fuentes de alimentación de CA antes de encender el
interruptor de encendido del televisor LED o otros equipos conectados.
Pulse el botón
del control remoto para encender el televisor LED
Pulse el botón
del mando a distancia, a continuación, con los
ERWRQHVŸRźSDUDVHOHFFLRQDU+'0,\SXOVHHOERWyQ$FHSWDU
Si el televisor LED está conectado al conector DVI de equipo AV, necesitará un
FDEOH+'0,D'9,FDEOHRXQDGDSWDGRUGH+'0,QRVXPLQLVWUDGR\XQFDEOH
de audio.
17
Instalación del televisor LED
La conexión de un PC
Cable de audio
Cable VGA
Utilice un cable D-SUB para conectar la clavija del PC D-SUB de salida
al conector de entrada VGA del televisor LED. Utilice un cable de audio
para conectar las tomas de audio de la PC de salida a la TV LED.
Conecte todas las fuentes de alimentación de CA antes de encender el
interruptor de encendido del televisor LED o otros equipos conectados.
Pulse el botón
del control remoto para encender el televisor LED.
Pulse el botón
del mando a distancia, a continuación, con los botones
ŸRźSDUDVHOHFFLRQDU9*$\SXOVHHOERWyQ$FHSWDU
18
Instalación del televisor LED
Conexión de un receptor de audio
Geluidsontvanger
Utilice un cable de audio para conectar la línea de audio del receptor
de audio COAXIAL IN a las tomas de audio del televisor LED.
Conecte todas las fuentes de alimentación de CA antes de encender
el interruptor de encendido del televisor LED o otros equipos conectados.
Pulse el botón
del control remoto para encender el televisor LED
19
Usando las funciones
1. Menú principal y descripción del Outlook
Opciones del menú principal (en orden desde la derecha CANAL --> IMAGEN -->
SONIDO--> HORA --> OPCIÓN --> BLOQUEO) en fuente de entrada DTV / ATV,
la primera página mostrada es CANAL. que la fuente de entrada no sea DTV / ATV,
la primera página es la imagen por defecto. Presione INTRO para entrar en el
submenú
1.1 CANAL
Programme edit
Signal Information
CI Information
OK
Nota:
1) CANAL sólo puede ser seleccionada en el modo ATV / DTV,
en otros modos no puede ser
utilizado.
1.1.1 Auto Scan
Introduzca escaneo automático, muestrar los marcos de "país" y
"tipo de canción' es opcional.
OK
EXIT
1) declaración de funciones:
Opciones
Ajuste de opción
Defecto
Tipo de Scan
DTV + ATV -> DTV -> ATV
DTV + ATV
Selecionar País
UK -> Australia -> …
Descripción
El valor predeterminado depende
del lugar de envío o clientes lugar
de la cita, si no se nombra el
Reino Unido estará por defecto
20
Usando las funciones
2) Declaración de la operación:
Pulse mover para seleccionar arriba y abajo, pulse OK para iniciar la exploración.
Durante la búsqueda, la primera transformación del 50% significa ajuste ATV,
la última transformación del 50% significa ajuste DTV.
Data
MENU
Back
EXIT
Quit
Durante la sintonización de ATV, puede presionar la salida para salir de ATV
y empezar a sintonizar DTV, de la siguiente manera:
1.1.2 Sintonización manual DTV
Bad
Normal
MENU
Back
Good
EXIT
Quit
1) Descripción de la función:
Opciones
CH
Ajuste opciones
Defecto
Descripción
Seleccione el canal con el botón
derecho izquierda y si hay alguna
muestra de intensidad de la señal
pulse INTRO para confirmar.
Depende de los paises
.
2) Pulse INTRO para confirmar sintonización (sólo en modo DTV).
21
Usando las funciones
1.1.3 Ajuste manual del ATV:
EXIT
Quit
1) Descripción de la función:
Opciones
Ajuste opciones
Almacenar en
1 – 100
Sistema
BG -> I -> DK -> L
Canal actual
1 – 100
Descripción
1
Muestra el espacio
almacenamiento
actual
de
Opción por defecto depende de la
selección de países
1
Muestra el canal actual
Puede ser buscado en condición de
canal completo
Buscar
Sincronización fina
Frecuencia
Defecto
Afina
En gris cuando no esta
seleccionado
Mostrar la frecuencia actual, y
seguir la búsqueda o ajustar con
ajuste fino.
2) instrucciones de uso: después de sintonizar a mano, asegúrese de pulsar el
botón ROJO para el almacenamiento, de lo contrario todos los canales de
búsqueda no se almacenarán después de cambiar la condición.
22
Usando las funciones
1.1.4 Editar programa
:
ok
Select
MENU
Back
1) Format and description
Icono
encriptación
LCN
S
21
Nombre
canal
Icono
saltar
Icono
Bloqueo
Icono
favorito
Sistema
ABC1
1.El menú canal incluye "Eliminar / Mover / Saltar / Renombrar / Favoritos".
"Bloquear, Fav, Saltar " pueden ser utilizados cuando los clientes hacen
algunos ajustes para el canal.(FAV no puede ser agregado con Skip).
2) La introducciones de las tecla de operación
Botón
Rango
Descripción
Ÿ
ATV/DTV
Página atrás, puede voltear la página circulármente
ź
ATV/DTV
Página abajo, puede voltear la página circulármente
Eliminar canal actual, de la siguiente manera:
1) en condiciones normales, pulse
(Borrar)
ATV
para entrar en el modo de
borrado
2) en el modo de borrado, el botón se puede utilizar como:
MENÚ: salir de SUPR para entrar en condiciones normales
EXIT: Salir del menú
˖Cancelar canal actual, y volver a la normalidad
Modificar el nombre del canal actual, sólo se utiliza en el modo ATV.
Operación de instrucciones:
(Renombrar)
ATV
1) en condiciones normales, pulse para entrar en RENOMBRAR
2) en el modo RENOMBRAR:
MENU: se sale del modo RENOMBRAR, volver a la normalidad
EXIT: Salir del menú
ARRIBA / ABAJO: cambiar las letras, números o signos
IZQUIERDA / DERECHA: mover el interruptor a izquierda y a la
derecha, puede seleccionarse por el circulármente
˖Salir del modo RENOMBRAR, volver a la condición normal.
23
Usando las funciones
(Mover)
ATV/DTV
Función de conmutación de canal, disponibles por defecto ATV,
condición DTV disponible, en auto ordenado LCN no abierto.
ˈentrar en el modo de SWAP y el
1) en condiciones normales
canal actual
será movido al canall X.
2) en el modo de SWAP:
MENU: salir del modo de enfoque sectorial, a su vez a la condición
normal
EXIT: Salir del menú
ARRIBA / ABAJO: elegir cambiar de canal
˖Si el canal seleccionado actualmente es el seleccionado antes
como
X, no habrá ninguna otra acción, de lo contrario, el canal actual es
canal Y, necesita cambiar las condiciones X e Y. Pero el
número de canal se queda 1,2,3 ... como antes.
ATV / DTV Si saltar el canal actual sintoniza CANAL + / - elija.
(Saltar)
ATV/DTV
(FAV)
ATV/DTV
No saltar el canal, pulse
Saltar el canal, pulse
ˈy salte el canal actual;
para cancelar saltar.
Establecer como canal favorito
1.1.5 Información de la señal
Sólo se puede hacer uso en modo DTV, muestrar información de la señal,
: incluye:
canal / red / modulación / calidad / fuerza.
Opción
Mostrar parámetros de la señal
Información de la
señal
Menú de información de la señal de salida Pop, muestra lo
siguiente:
Canal 21
Red digital de finlandia
Modulación 64QAM
Calidad 66%
Fuerza 80%
1.1.6 Información CI
Recuerde si no inserta la tarjeta CI sólo estará disponible el modo de DTV.
Al insertar la tarjeta CI, puede entrar en el menú para comprobar toda la
información en la tarjeta de CI.
1.1.7 Modo de Grabado
Entre en el menú de grabación, para hacer la reserva de la grabación,
compruebe la especificación PVR en los detalles.
24
Usando las funciones
1.2 Imagen
Menu
Back
ok
Select
EXIT
Quit
1.2.1 Modo de imagen
Menu
Back
EXIT
Quit
1) Instruciones de las funciones
Opción
Modo Imagen
rango de ajuste
Estándard -> Leve
->
Usuario
->
Dinámico
defecto
descripción
Estándar
Por defecto: en el modo de usuario,
puede seleccionar para ajustar el
contraste, brillo, color, nitidez, Matiz, a
su vez tiene el modo de usuario
automático.
2) Instrucciones de operación
Cambiar el modo con los botones derecho e izquierdo; volver a la foto del
menú principal, pulse el botón MENÚ, y pulse SALIR para salir al menú principal.
1.2.2 Contraste / Brillo / Color / Nitidez
Menu
Back
EXIT
Quit
1) Instruciones de las funciones
Opción
rango de ajuste
Defecto
Contraste
0 - 100
50
Brillo
Color
0 - 100
0 - 100
50
50
Nitidez
0 - 100
50
VGA no disponible
0
Sólo en sistema NTSC; PAL y
SECAM vuelve a 0;
Tinte
R50 - 0 - G50
25
Descripción
VGA no disponible
Usando las funciones
2) Instrucciones de operación
Ajuste: IZQUIERDA, DERECHA para ajustar el tamaño;
Menú: pulse MENÚ para volver al menú principal;
Salida: SALIR para salir del menú;
ARRIBA, ABAJO: Ajusta el contenido con el botón arriba / abajo: como
Contraste / Brillo / Color / Nitidez;
1.2.3 Temperatura del color
Menu
Back
EXIT
Quit
1) Instrucciones de funciones
Opción
Temperatura
color
rango de ajuste
del
Estándar-> Frío ->
Usuario -> Calido
Defecto
Descripción
Estándar
En el modo de usuario, puede
seleccionar las opciones Rojo /
Verde / Azul para modificar el
color. El modo se ajustará al
modo
de
usuario
automáticamente.
2) Instrucciones de operación
Ajuste: IZQUIERDA, DERECHA para ;
ajustar el contenido;
Menú: MENÚ para volver atrás;
Salida: SALIR para salir del menú;
1.2.4 rojo / verde / azul
Menu
Back
EXIT
Quit
1) Instrucciones de funciones
Opción
rango de ajuste
Defecto
Rojo
0 - 100
50
Verde
0 - 100
50
Azul
0 - 100
50
Descripción
2) Instrucciones de operación
Ajuste: IZQUIERDA, DERECHA para ajustar el tamaño;
Menú: MENÚ para volver al menú principal;
Salir: Salir para salir del menú principal de imagenes;
ARRIBA, ABAJO para seleccionar el contenido ajustable:
son de color rojo / verde / botón azul;
26
Usando las funciones
1.2.5 Relación de aspecto
1) Instrucciones de funciones
Panel resolusion
Defecto
16:9 / 16:10
16:9
4:3
4:3
(Dimensiones
físicas 16:9)
4:3
16:9
Fuente
entrada
modo
No VGA
16:9 -> Zoom1 -> Zoom2 -> Auto
-> 4:3
VGA
16:9 -> 4:3
No VGA
16:9 -> Zoom1 -> Zoom2 -> Auto
-> 4:3
VGA
4:3 -> 16:9
No VGA
16:9 -> Zoom1 -> Zoom2 -> Auto
-> 4:3
VGA
16:9 -> 4:3
Nota: Cuando la resolusion es 4:3, la dimensión es modo 16:9 y 4:3, la
salida de resolución actual es de 1:1.
1.2.6 Reducción de ruido
1) Instrucciones de funciones
Opción
Reducción de ruido
rango de ajuste
Act -> Desc
Defecto
Descripción
Act
El VGA está establecido
como desactivado, no se
puede ajustar
2) Instrucciones de operación
Enter into the menu, choose with UP,DOWN:off /low /middle /default.
1.3 SONIDO
Menu
Back
OK
27
Select
EXIT
Quit
Usando las funciones
1.3.1 Modo de sonido
Menu
Back
EXIT
Quit
1) Instrucciones de funciones
Opción
rango de ajuste
Modo de sonido
Estándar -> Música
->Película->
Deportes-> usuario
Defecto
Descripción
Estándar
Solo en el modo de usuario
se pueden seleccionar y
ajustar los agudos y graves
2) Instrucciones de operación
Ajuste: IZQUIERDA, DERECHA ajusta a: Estándar -> Música -> Película ->
Deportes -> usuario
Menú: MENÚ para volver al menú principal de imagen
Salida: SALIR para salir del menú
1.3.2 Agudos / Bass / Balance
Menu
Back
EXIT
Quit
1) Instrucciones de funciones
Opción
rango de ajuste
Defecto
Descripción
Agudos
0 – 100
50
Ajusta sonidos agudos
Bajo
0 – 100
50
Ajusta sonidos bajos
2) Instrucciones de operación
Ajuste: IZQUIERDA, DERECHA control del tamaño de los datos
Menú: MENú para volver al menú principal de la imagen
Salida: SALIR
ARRIBA, ABAJO para elegir el ajuste contenido: agudos / Bass / Balance
1.3.3 Volumen automático
1) Función: ajuste automático del sonido
2) Operación: INTRO para Activar / Desactivar
1.3.4 Sonido envolvente
1)Función: configuración del sonido envolvente
2)Operación: INTRO para Activar / Desactivar
1.3.5 SPDIF
1) Función: establecer el modo de salida de la SPDIF.
2) Instrucciones para la operación: INTRO para fijar Desc, PCM o Auto.
28
Usando las funciones
1.4 Fecha
Menu
Back
OK
Select
EXIT
Quit
1.4.1 Reloj
Menu
Back
EXIT
Quit
1) Instrucciones de funciones
Por defecto establece la fecha obteniendola de la televisión digital, pero puede
modificarle manualmente entrando en el menú RELOJ.
2) Instrucciones de operación
Mover: Arriba, Abajo
Menú: MENÚ para volver al menú principal
Salida: SALIR
IZQUIERDA, DERECHA para ajustar los parámetros
1.4.2 Apagar
Menu
Back
29
EXIT
Quit
Usando las funciones
1) Instrucciones de funciones
Opción
rango de ajuste
Defecto
Descripción
Desc -> Una vez -> Todos los días ->
Repetir
Lun ~ Vie -> Lun ~ Sáb -> Sáb ~
Desactivar
Dom -> Dom
Hora
00 - 23
00
Cuando Activar esta Desc,
gris, no avalible
Minute
00 - 59
00
Cuando Activar esta Desc,
gris, no avalible
2) Instrucciones de operación
Mover: Arriba, Abajo
Menú: MENÚ para volver al menú principal
Salida: SALIR
IZQUIERDA, DERECHA para ajustar los parámetros
1.4.3 En hora
Menu
Back
EXIT
Quit
1) Instrucciones de funciones
Opción
rango de ajuste
Defecto
Repeatir
Desc -> Una vez -> Todos los
días -> Lun ~ Vie -> Lun ~ Sáb
-> Sáb ~ Dom - Dom>
Desactivado
Hora
00 -> 23
12
Cuando
repetir
apagado es gris
está
Minuto
00 -> 59
00
Cuando
repetir
apagado es gris
está
Volumen
0 - > 100
30
Cuando
repetir
apagado es gris
está
Fuente
DTV -> Radio -> Datos -> ATV
-> …
DTV
Cuando
repetir
está
apagado es gris; El orden
depende de la fuente de
entrada
Canal.
ATV˖1 – 100
DTV/Radio/Datos ˖ Depende
See Note
Cuando
repetir
apagado es gris
de la información
canales
de
los
Descripción
está
Cuando elija Fuente de que
no sea televisión, se vuelve
gris, en la fuente, elija DTV /
Raido / Datos, se muestra en
blanco cuando no hay
información del canal de
entrada.
30
Usando las funciones
2)Instrucciones de operación
Mover: Arriba, Abajo
Menú: MENÚ para volver al menú principal
Salida: SALIR
IZQUIERDA, DERECHA para ajustar los parámetros
1.4.4 Tiempo de apagado
1) Instrucciones de funciones
Opción
rango de ajuste
Tiempo
de
apagado
Desc -> 10min -> 20min ->
30min -> 60min -> 90min ->
120min -> 180min -> 240min
Defecto
Descripción
Desc
Recuerde que en los últimos
60 segundos: Se deteniene
pulsando, el tiempo de
apagado se desactivará
2) Instrucciones de operación
Entre en el segundo menú, use ARRIBA y ABAJO para ajustar el tiempo
de apagado.
1.4.5 Zona horaria
1) Instrucciones de funciones
Opción
rango de ajuste
Defecto
Descripción
La elección predeterminada depende
de la demanda de los clientes y del
área.
Cuando sintoniza automáticamente,
cambia automáticamente según el país
seleccionado actual.
Zona
horaria
2)Instrucciones de operación
Entre en el segundo menú, Arriba y Abajo para definir la zona horaria: Canarias
GMT. / GMT Lisboa / GMT Londres / Amsterdam GMT +1 .
31
Usando las funciones
1.5 OPCIÓN
OSD Duration
Menu
Back
OK
30S
Select
EXIT
Quit
1.5.1 Idioma OSD
1) Instrucciones de funciones
Opción
Idioma
OSD
rango de ajuste
Defecto
Descripción
Elija el idioma predeterminado de
acuerdo con la dirección de envío y
la demanda de los
clientes.
Lenguaje por defecto: Inglés Alemán
Francés / Italiano portugues
Idioma soportados
2) Instrucciones de operación
Entre en el segundo menú, Arriba y Abajo para configurar el idioma
1.5.2 Primer idioma de audio
1) Instrucciones de funciones
Opción
rango de ajuste
Primer idioma de
audio
Primer
idioma
selecionado
Defecto
Descripción
No seleccionable en modos no DTV
2) Instrucciones de operación
Entre en el segundo menú, Arriba y Abajo para configurar el idioma.
1.5.3 Segundo idioma de audio
1) Instrucciones de funciones
Opción
rango de ajuste
Segundo
de audio
Segundo
idioma
selecionado
idioma
Defecto
Descripción
No seleccionable en modos no DTV
2) Instrucciones de operación
Entre en el segundo menú, Arriba y Abajo para configurar el idioma.
32
Usando las funciones
1.5.4 Primer idioma de subtítulos
1) Instrucciones de funciones
Opción
rango de ajuste
Primer idioma de
subtítulos
Primer idioma
selecionado
Defecto
Descripción
No seleccionable en modos no DTV
2) Instrucciones de operación
Entre en el segundo menú, Arriba y Abajo para configurar el idioma.
1.5.5 Segundo idioma de subtítulos
1) Instrucciones de funciones
Opción
rango de ajuste
Segundo idioma
de subtítulos
Segundo
idioma
selecionado
Defecto
Descripción
No seleccionable en modos no DTV
2) Instrucciones de operación
Entre en el segundo menú, Arriba y Abajo para configurar el idioma.
1.5.6 Duración del OSD
1) Instrucciones de funciones:
La duración del OSD en la pantalla.
2) Instrucciones de operación:
INTRO para fijar 5S, 10S, 15S, 20S, 25S, 30S, 35S o 40S.
1.5.7 País
1) Instrucciones de funciones:
Mostrar el lenguaje común, gris, no seleccionado.
1.5.8 Restaurar por defecto de fábrica
1) Instrucciones de funciones:
Restaurar por defecto de fábrica.
2) Instrucciones de operación:
Entrar en el segundo menú, Arriba y Abajo para seleccionar "sí" o "no".
33
Usando las funciones
1.6 BLOQUEO
Lock Channel
Menu
Back
OK
Select
EXIT
Quit
1.6.1 Sistema de bloqueo
1) Instrucciones de funciones
Opción
Sistema
bloqueo
de
rango de ajuste
Defecto
Desc / Act
Desc
Descripción
2) Instrucciones de operación
IZQUIERDA para salir de pasaporte, volver menú principal
DERECHA para eliminar la contraseña escrita y volver a escribir otra.
Se necesita introducir la contraseña correcta para acceder al submenú
de Bloqueo. Si muestra contraseña incorrecta cuando se pone la una
contraseña incorrecta.
MENÚ para salir del menú
34
Usando las funciones
1.6.2 Establecer contraseña
1) Instrucciones de funciones
Opción
rango de ajuste
Defecto
Establecer
contraseña
Descripción
Entre en el submenú, introduzca la
nueva contraseña y confirme
2)Instrucciones de operación
IZQUIERDA para salir de restablecimiento de contraseña, volver al menú principal
DERECHA para cancelar la contraseña escrita, y luego escribirla de nuevo. Si la
contraseña se introduce mal dos veces, se muestrará "las contraseñas no coinciden".
1.6.3 Bloqueo de Programa
1) Instrucciones de funciones
Icono
encriptado
LCN
Nombre
canal
S
21
ABC1
Icono
bloqueo
Sistema
Nota: El icono de bloqueo se utiliza para cuando los clientes hacen algunos
cambios en el canal.
2) Botón de operación
Botón
funcción
Ÿ
Página arriba, puede paginar círcularmente;
ź
Página abajo, puede paginar círcularmente;
Ɣ(Bloquear)
Verifica si el canal actual está bloqueado, si está bloqueado, se
necesita contraseña para visualizar.
Cuando presioneƔen el modo no bloqueo: bloquea el canal actual
Cuando presione Ɣen el modo de bloqueo: cancela el bloqueo
1.6.4 Orientación parental
1) Función:cuando establece la orientación parental es inferior a la clase
real del programa, lo necesita para bloquear el canal e introducir la contraseña
y así poder visionarlo.
Opción
rango de ajuste
Defecto
Descripción
Orientación
parental
Desc -> 4 ->
5 -> … -> 18
Desc
No seleccionable en modos no DTV
2)Instrucciones de operación
Entre en el segundo menú, Arriba y Abajo para elegir los datos,
pulse INTRO para confirmar.
35
Usando las funciones
2. Otro menú
2.1 Lista de canales
Lista de canales muestra todos los canales buscados.
Move
OK
Select
EXIT
Quit
1) Formato y descripción
Icono
encriptado
LCN
Nombre
canal
S
21
ABC1
Icono
salto
Icono
bloqueo
Icono
Fav
Sistema
Nota: 1. Los iconos de Lock, Fav, Saltar pueden ser utilizados solamente
cuando los canales es para todos los publicos.
2) Función e instrucciones de los botones
Botón
funcción
Lista canales
En DTV / ATV y en no lista de canales, cerrar el menú de no
Silencio para salir al menú de Lista de canales;
En el menú Lista de canales, salir del menú de Lista de canales;
Ÿ
Página arriba, puede paginar círcularmente;
ź
Página abajo, puede paginar círcularmente;
2.2 Lista de favoritos
Lista de favoritos y lista de canales tienen la misma configuración,
pero los canales favoritos se mostrará en la Edición de programa,
utilice el botón FAV para mostrar y cerrar el menú Lista de favoritos.
36
Usando las funciones
2,3 EPG
EPG está disponible sólo en la televisión digital, información del canal
clasificado por canal y fecha.
Puede elegir arriba a abajo: Canal / Fecha.
OK
Select
EXIT
Quit
Toda la información del programa,
están clasificados por la fecha, s
e muestra toda información de los
programas actuales.
Información detallada del
programa seleccionado.
1) Notas de operación
Mover: mueve arriba y abajo
Menú: Salir del EPG
OK: cambiar al programa seleccionado actual
índice: cambia el tipo de opción
Registro: programa de registro. Se muestra cuando se selecciona el modo de
grabación (detalles de verificación
manual PVR).
Horario: información de los registros. ver detalles en la Lista de introducción
de horario PVR.
Recuerde: Programas reservados. Seleccione Recordar para mostrar el
siguiente menú de configuración.
Utilice arriba y abajo para elegir el programa establecido.
Programme
Mode
Minute
Hour
Date
Month
Move
OK
Select
MENU
37
Back
Usando las funciones
2.4 Guía de instalación
Please set the following options, then
OK
Select
EXIT
Quit
1) Función e instrucción: Si no se almacena la información del canal,
encender y cambiar el modo la DTV / ATV, esto muestra el menú de
la Guía de instalación.
2) Funcionamiento
Mover: mueve arriba y abajo
Salir: Salir del menú
OK: entrar en el modo de sintonización establecido
38
Usando las funciones
3. Multimedia
3.1 Breve introducción
En el menú de fuente de entrada, seleccione la fuente USB para introducir la
condición Multimedia. En condición multimedia, el sistema puede hacer
archivos clariufy,orden, ejecutando operación y otros trabajos del navegador.
3.2 Pauta del menú principal Multimedia
1) Estilo del menú principal Multimedia
información USB information
multimedia
Discos
Menu
Insertando información HD
Menu
OK
Select
operación
2) Introducción de piezas de recambio del menú principal Multimedia
Equipo
Instrucción
Mensaje de
equipo
insertado
Si al inspeccionar el equipo USB insertado, este ilumina, de lo
contrario se vuelve gris.
Estilo
Multimedia
De izquierda a derecha de fotos, música, peliculas, para lo que
necesite reproducir.
Disco
Muestra los discos inserctados, y las ordena por letras, de C en
adelante.
Información
del USB
Muestra la información actual de los equipos USB. Cuando no
insertar USB, no muestra dispositivos, cuando inserta equipos USB,
se muestra USB equipado, tales como USB 2.0, USB 1.1 y así
sucesivamente;
Si inspecciona el USB insertado, pero no correctamentes, se
muestra Reinsertar Dispositivo.
Guía
de
operación
Mostrar las operación disponibles actualmente.
39
Usando las funciones
3,3 Pauta del submenú Foto
1) Pauta Multimedia del submenú Foto
Carpetas de archivos en disco,
pulse INTRO para entrar
Disco
página
revisión
Delete Current File
Add/Remove all
OK
Full screen
Menu
Menu
EXIT
Add/Remove to playlist
Quit
Vista previa
Información de la foto
2) Instrucción del submenú FOTO
Equipo
Instrucción
Disco
Mostrar el disco actual
Página
Mostrar la página de archivos, tales como formato 1 / 2, el número
anterior es la página actual, la última es la página total
Lista
Imagenes
de
Imagen lista en la página actual
vista previa
ventana de imágenes en el punto actual
Información
del
documento
???.jpg
[Resolución] 800 x 600
[Tamaño] 28521 Bytes
Datos
Fecha
--- nombre archivos
----resolución
---- Tamaño imagen
---- crear cita
---- crear fecha
40
Usando las funciones
3)Instrucciones de funciones
Cuando elija la fotografía, se muestrará una vista previa y el marco para
fotos de detalles, a continuación, pulse INTRO para entrar en reproducción
a pantalla completa de la foto.
Cuando después de reproducir completamente, pulse INTRO para mostrar
el botón de siguiente operación.
In
Out
4) Botón de instrucciones
Botón
función
Info/ Mostrar
Mostrar la previsualización de la imagen actual, la información se
muestra como:
Azul Hills.jpg ---- nombre archivos
[Resolución] 1024 x 768 ---- resousion
[Tamaño] 28521 Bytes ---- tamaño de la foto
Salir
Salir reproducción, entrar en el meú anterior, selecionar el menú
multimedia de fotos
Reproducir
Reproducción de fotos a pantalla completa, si hay varios archivos
que necesitan reproducirse, se cambiara automáticamente depues
de de un tiempo.( por defecto 5 segundos)
Pausa
Pausa
Detener
Detener la reproducción, entrar en el menú de lista, se selecciona
los archivos al salir.
Anterior
Reproducir archivo anterior
Siguiente
Reproducir archivi siguiente
Repetir
Modo de repetición circular, puede elegir repetir una, repetir todo, ninguna
repetición, repetición imagenes individualmente, pics, repetir todas las
imagenes seleccionadas o no repetir.
Lista
de
reproducción
Lista de reproducción
Rotar
Rotar imágenes en sentido horario o antihorario.
Zoom in
Acerca la imagen
Zoom out
Alejar la imagen
41
Usando las funciones
3,4 Pauta del submenú MÚSICA, introducción de equipos y botones.
1) Pauta del submenú Multimedia de MÚSICA
Cuando selecione las canciones de la lista, presione INTRO para
mostrar la vista previa de las canciones, de la siguiente manera:
disco
página vista previa
Delete Current File
Add/Remove all
OK
Full screen
Menu
Menu
EXIT
Lista de canciones
Información de archivos
2) Descripción del equipo del submenú MÚSICA
Equipo
Descripción
Disco
Mostrar los discos seleccionados
Página
Lista
canciones
Mostrar páginas
de
Mostrar lista de canciones
Ventanta de
previsualizar
Imagen de laMúsica
Información
de los ficheros
Mostrar nombre, tamaño etc
Add/Remove to playlist
Quit
42
Usando las funciones
3) Modos de reproducción de música y funciones de las teclas
El menú de reproducción de música es igual que el software de reproducción del PC,
dispone de lista información básica, signo de procesando, parte de la guía de operación,
como se puede ver a continuación:
Información de las canciones Nombres de las canciones
Lista de canciones
Screen Saver
1/1
Remove
Remove all from playlist
Goto Time
Guía de operación
Imagen de MúSICA
La barra de progreso
Tiempo de reproducción
4) MUSIC playing equip function
Equipo
descripción
Nombre
de
canciones
Nombre de las canciones actuales
Imagen de la
MúSICA
Una imagen para utilizarla como firmar de MÚSICA
Lista
de
canciones
Canciones marcadas en el navegador, empezando po los archivos de
arriba, ordenadas por las letras.
Información
de la cancion
La información muestrada de los archivos se verán en este formato
en el explorador de música:
Artista: ABC Year: 2005
---- Artista
Título: DEF
---- Título
Álbum: GHI
----Álbum
Bit Ratio: 128K muestreo: 44K
----bit ratio y muestreo
Todo se obtiene de los archivos
Tiempo
de
reproducción
Muestra el tiempo reproducido y el total, como 00:01:23 / 00:04:56
Guia
de
operación
Muestra la guía de operación actual
Procesamiento
de la señal
Mostrar la hora de procesión actual y el ritmo
5) función de los botónes
Botón
función
Intro
Reproducir archivos selecionado, si el foco está en el archivo actual, este
se reproduce desde el principio.
Arriba / Abajo
Mover el foco por la Lista de canciones
Salir
Salir del menú de reproducción de música, pero segue reproduciendo
canciones, cuando salga al menú de navegación, el foco estará en el
archivo que se está reproduciendo.
Reproducir
Reproducir
Pausa
Pausa
Detener
Detener la reproducción, introduzca en el menú de navegación, el foco
está en el archivo que se estaba reproduciendo antes de salir
Siguiente
Reproducir el siguiente archivo
Repetir
Repite la reproducción, puede elegir repetir una, repetir todo, no repetir y
así sucesivamente
43
Usando las funciones
3.5 Condición y funciones de los botones al reproducir películas
1) Modo reproducción
1. Cuando los clientes navegan las película serán mostradas en pantalla
completa para todos los archivos marcados, desde los archivos de arriba
hacia abajo en orden alfabeticamente.
2. Hacer zoom en PELICULA requiere: El tamaño del Zoom actual debe
conservar el tamaño del original.
2) Pauta de submenú e instrucciones
Delete Current File
Add/Remove all
OK
Full screen
Menu
Menu
EXIT
Add/Remove to playlist
Quit
Pulse INTRO para seleccionar la imagen, muestra la vista previa de
archivos y su información, a
continuación, presione Reproducir para comenzar a reproducir
completamente de la siguiente manera:
+
Slow
Step
Goto Time
1) Instrucciones de los botones
Repetir: 1, todos, ninguno
Serie A: Establecer reprocción circular
Lista de reproducción: Aparecerá la lista de archivos en la izquierda de la pantalla,
que muestra la lista de reproducción actual. Los clientes pueden navegar por la lista
los botones arriba y abajo, y para seleccionar los archivos use Intro, entonces presione
lista o no haga ninguna operación durante 10 segundos y saldrá.
Información: Muestra la información de la película actual, incluye: nombre del archivo
actual, resolusion, frecuencia, tiempo total de la película y el tiempo de reproducción.
Ir a: Aparecerá un marco como: 00:00:00 / 01:23:45, en el primer tiempo es lo que
introduce los clientes, los clientes pueden intercambiar sus posiciones con botón izquierdo
o derecho, también puede cambiar el número con los botones arriba o abajo y pulse INTRO
para ajustar el tiempo.
44
Usando las funciones
3.6 TEXTO
Delete Current File
Add/Remove all
OK
Full screen
Menu
Menu
EXIT
Add/Remove to playlist
Quit
Seleccione los archivos de texto, presione INTRO y muestrará la imagen de
arriba. Presione reproducción a pantalla completa, como a continuación:
Operación:
Página Anterior: página anterior
Página siguiente: página siguiente
Anterior: archivo anterior
Siguiente: archivo siguiente
Parar: parar auto girardo de las páginas
Lista de reproducción: lista de temas, se muestra en la parte de arriba a la derecha
Información: archivos actuales, muestra el nombre de archivos y el tamaño
45
Usando las funciones
4. Grabador de vídeo personal (PVR)
4.1 Breve
Funcición PVR sólo está disponible para la televisión digital, incluye las funciones
de Grabación, Timeshift y Reproducción. La grabación incluye el tiempo de
grabación y conservar la grabación.
Grabacio en tiempo se puede trabajar a través de botón de rápido inmediatamente
y preservar la grabación que se necesita preservar. Grabación y reproducción se
puede hacer al mismo tiempo, lo que significa grabar DTV y reproducir USB al
mismo tiempo.Timeshift es otra función para grabar y reproducir a la vez. A
continuación se explicará detalladamente.
4,2 Detalles de las funciones del menú de PVR.
4.2.1 Archivos de sistema PVR
Entre en PVR desde el menú CANAL, de la siguiente manera:
Move
OK
Select
MENU
Back
Funcción
Botón
Función
Verificar
archivos
de
sistema PVR
Disco USB
Si no insertar equipos USB, se muestra no encontró ningún
dispositivo USB
Si la inserción de un equipo USB, se muestra correcto
Formato
Puede configurar el formato de MStar. Pulse la tecla INTRO a través
del USB y entre en
menú de Formato, después de entrar en Formato, el USB puede
completar las funciones de PVR.
Si la función a sido satisfactoria, o el USB está en formato MStar,
muestra Correcto
Tamaño del
TimeShift
No puede ser elegido. Después de verificar los archivos del sistema
PVR, significa que el USB a pasado.
El formato MStar se puede utilizar en el espacio Timeshift, el
tamaño es elegido por los clientes al realizar el formato.
Velocidad
No se puede elegir.Después de verificar los archivos del sistema
PVR, se muestra la velocidad USB disponible y recuerda a los
clientes que deben operar a una velocidad segura.
46
Usando las funciones
4.2.1.1 Seleccionar disco
Elija el disco para almacenar todo el contenido de grabación, según se indica,
por defecto es C:
Move
OK
Select
4.2.1.2 Verificar los archivos de sistema PVR
Compruebe está bien establecidas los archivos de sistema PVR de almacenaje.
Por defecto es Comenzar, presione la tecla INTRO para inspeccionar los archivos
de sistema del USB y la velocidad, al procesar muestra Comprobando ....
Cuando no inserta USB, o la inspección falla, muestra FALLO.
Al insertar USB, pero no pasa el Formato MStar, entrar en el menú Formato.
Al insertar USB, pero la inspección es una partición anormal, muestra No se
ha encontrado particiones.
Si la inspección es normal, muestra ÉXITO.
Move
OK
Select
4.2.1.3 Formato
En Formato, pulse la tecla Intro para empezar a comprobar los archivos
de sistema PVR, después de confirmar la información USB, aparecerá el
menú de Formato del disco como a continiación:
Después de formatear, el sistema establecerá los archivo de sistema PVR
de acuerdo a las anteriores
confirmación del Tamaño del archivo del sistema PVR.
47
Usando las funciones
4.2.1.4 Tamaño del Time Shift
Cuando termine de crear los archivos de sistema PVR, aparecerá el menú de
configuración del tamaño del TimeShift y los clientes pueden configurar el
tamaño del espacio para la variar el spacio de TimeShift como a continuación:
OK
Select
MENU
Back
4.2.2 Canal - Lista Grabaciones
1) Pauta de referencia
El menú es el siguiente
Título, ordenando
Icono
programa
OK
Guía de operación
Select
48
Usando las funciones
2) Menú de instrucciones
Opciones
Notas
título
Lista de grabación
Ordenando
Derecho, significa que el actual modo de ordenar, el botón Lista / índice
puede cambiar la opción: Programa -> Canal -> Hora, para ordenar por
nombre del programa, orden de los canales y un tiempo grabación.
Marca
Muestra la condición actual, los programas grabados se muestran como no
marcados, si
y
muestra
y
, significa que se está grabando, y si muestra
, significa que se está reproduciendo, si está selecionado, muestra
la imagen en color, de lo contrario es gris.
Nombre
del
programa
El nombre del programa es construir por el número del canal y el número del
canal de grabación.
Guía de
operación
Mostrar las operación disponibles actualmente.
Notas
de
programas
Información / Pantalla y derecho puede hacer salir el programa actual
selecionado, que no marca en la imagen.
[FECHA] 2005/07/20 ---- día de la grabación
[HORA] 15:29:02 ---- hora de inicio de la grabación
[Duración] 0000:01:52 ---- tiempo de duración
[Nombre canal] 40 BBC Mundo ---- lista de canales
[NOMBRE DEL PROGRAMA] Sin información ---- nombre del programa.
3) Instruciones de los botones
Botón
función
Lista / índice
Cuando no hay menú, pulse Lista de grabación
Cuando se muestra el menú de la lista de grabación, cambia el orden de los
programas grabados.
Arriba / abajo
Mover arriba y abajo el foco a seleccionar el programa
Izquierda/Derecha
Cerrar / Mostrar información del programa
Intro
Información
Pantalla
Reproduce el programa selecionado
/
Muestra o cierra las instrucciones del programa
Ɣ(Borrar)
Eliminar programa selecionado
Menú
Entrar en la Lista de grabación, pulse Menú para volver al menú de
PVR, selecione la Lista de grabación.
Cuando entre por el atajo de lista, salir de la la Lista de grabación,
regresa al menú actual.
Salir
Salir
49
Usando las funciones
4.2.3 Modo de grabación PVR
1) Modo de Grabación
Date
Month
2010/07/20
Jan
Date
2010/07/20
Month
Jan
Move
Opción
formato
Título del menú
Modo
grabación
Título
655335
OK
Select
MENU
Back
notas
de
Tema del menú
Cuando seleccione Auto, el programa que se recibe actual se
establecerá para grabar, el título muestra su nombre actual.
Modo
Una
Elejir modo de grabación
Elejir orden˖Una -> Todos los dias -> Semanalmente
Opción auto borrado
Poner en Auto la grabaciíon en EPG
Fecha de inicio
2005/07/20
fecha de inicio de la grabación, utilice Izquierda / Derecha para
configurar el menú.
Hora de inicio
14:00
tiempo de inicio de la grabación
Fecha
de
finalización
2005/07/20
Fecha de finalización de la grabación
Hora
de
finalización
15:00
Tiempo de dinalización de la grabación
Guía de
Operación
Mostrar la de uso actual de la operación
2) Botón
Botón
función
Menú de grabación
Menú de configuración de fecha
Salir de Menú grabación, selecionar modo
de grabación
Salir de la configuración del tiempo
Mover el enfoque de arriba a abajo
Mover el enfoque de arriba a abajo
Ajustar el modo, o introducir en los ajustes
de tiempo
Ajustar datos
Intro
Grabar y salir del almacenaje actual registro
y salida
Grabación para entrar en grabación
Lista de Calendario
Confirmar la configuración actual y
salir de la configuración de tiempo
Ɣ(Calendario)
No almacenar, salida de la grabación
para entrar en la lista del calendario de
grabación
----
Salir
No almacenado, salir del menú
No almacenado, salir del menú
Menú
Arriba / Abajo
Izquierda
Derecha
/
50
Usando las funciones
4.2.4 Calendario de grabación PVR
1) Menú y función
Move
Delete
MENU
Back
EXIT
Quit
Nota:
1.La hora de inicio está blanco será ordenado según a los planes de registro
Si entrar en el menú para añadir nuevos planes, el enfoque estará en el nuevo plan.
2.Si entrar en el menú cuando se está grabando, se enfocará en los planes de
grabación actual.
3. las condiciones 1 y 2, el enfoque estarán en los últimos planes sin comenzar.
2) Botón
Botón
función
Menú
Salir del menú de la lista de calendario de grabación, entrar en el menú PVR,
Enfoque en la lista de calendario de grabación
Mover
Mover el enfoque arriba y abajo
Ɣ(Borrar)
Borrar el enfocado
Salir
Salir del menú
4,3 Función de acceso directo PVR
4.3.1 Botones de acceso directo en el marco del DTV PVR
Botón
función
PVR
Entra en el modo de grabación
TS
Entra en el modo Timeshift
Lista
PVR
Aparecerá el menú de la Lista de Grabación, OK / Enter para entrar en la
reproducción, y reproducirlo
Nota: Registro y la lista de grabadoción se pueden acceder desde el menú PVR
51
Usando las funciones
4.3.2 Grabación
1) Grabación
Menú grabación incluye dos tipos: uno es el modo completo,
el otro es el Modo Simple.
Se puede cambiar mediante el botón Grabar/salir.
En el modo de grabación, el menú de grabacion se muestran.
Los detalles son los siguientes:
1. Modo completo
Nota 1
Nota 3
Nota 2
Nota 4
Nota:
1. Grabar
2. tiempo registrado
3. la fila de la izquierda es el nombre del canal y la fila de la derecha
es el nombre del programa
4. hora actual
2. Modo Simple
[00:00:20]
Nota: El modo simple sólo aparece el expediente y el tiempo grabación
en la parte inferior izquierda.
2) Botón de función
Botón
Función
Detener
Salir de la grabación, se mostrará procesando
Grabar/Salir
Cambia el modo del menú de grabación
Reproducir
Entre en el modo de reproducción, ésta se reproduce desde el comienzo
del programa grabado.
Compruebe las instrucciones de reproducción en los detalles
Lista
Cerrar el menú de grabación, salta el menú de Lista de Grabación,
entrar a reproducción desde el menú de Lista de Grabado, cuando
se sale de menú de Lista de Grabado, se muestra Grabando de
nuevo
52
Usando las funciones
4.3.3 Timeshift
4.3.3.1 Menú Timeshift
Timeshift es similar que el menú de grabación, incluye dos tipos:
uno es el modo completo y el otro
es el modo simple.
Se puede cambiar mediante el botón Salir.
En el modo Timeshift, Timeshift se mantiene.
Como se muestra a continuación:
1. De modo completo:
Nota 3
Nota 1
Nota 4
Nota 2
Nota 5
Nota:
1) Muestra la operación actual, tales como reproducción, pausa, avance rápido,
rebobinado rápido, Siguiente, Anterior.
2) El icono circular A->B, aparece cuando la marca A o B, proyecciones resaltadas,
que sólo muestran en condición de reproducción.
3) Proyecciones Timeshift, el procesamiento muestra la longitud total de Timeshift.
4) Hay dos tiempo, un tiempo empieza por "-", la otra vez se almacena.
5) El tiempo actual.
Modo simple:
[-00:03:35]
Note:
1) En el Modo Simple, se muestra la actual reproducción Timeshift,
como reproducción, Pausa.
2) Modo simple muestra en la parte inferior izquierda.
53
Usando las funciones
4.3.3.2 Modo Timeshift
4.3.3.2.1 Empezar modo Timeshift
Introduzca el Timeshift para hacer una pausa y la imagen en pausa empezará
a grabar desde la posición de pausa.
Muestra la condición de incio del Timeshift, de la siguiente manera:
Botón
función
Reproducción
Entra a reproducir en condición Timeshift
Parar
Parar Timeshift
Salir
Cambiar al modo de menú del Timeshift
Lista
Cerra Timeshift, muestra lista de grabación
Reproducir desde el menu de lista de grabación y salir de Timeshift
Salir primero de la lista de grabacion y entonces aparecerá el menú
de Timeshift
4.3.3.2.2 Reproducir Timeshift
En condiciones Escuchar Timeshift, el sistema puede grabar DTV y
reproducirlo al mismo tiempo.
Reproducir Timeshift empezar pulsando el botón Timeshift, a condición
reproduce en modo Timeshift.
Se puede pausar, avance rápido, rebobinado rápido, y puede entrar en
reproducción circular A->B.
4.3.3.2.4 Grabación Timeshift
Reproducir en modo Timeshift puede rebobinar pulsando rebobinado
rapido o el botón Siguiente.
Grabación en modo Timeshift.
Grabación en modo Timeshift, es similar al Modo de grabación.
Grabación en modo Timeshift, los botones son los siguientes:
Botón
función
Pausa
Pausa la reproducción y volver a la condición de reproducción
Timeshift
Parar
Parar el modo Timeshift
Avance
rápido
Ningún uso
Rebobinado
rápido
Vuelve a la condición de reproducción Timeshift, y operar la próxima
parte.
Anterior
Volver a la condición reproducción Timeshift y reproduce los 30 segundos
anteriores.
Si antes de grabar Timeshift, reproduce esto en su lugar.
Salir
Cambia al modo de menú de Timeshift
Lista
Cerrar el menú Timeshift, muestra la lista grabación.
Entrar en la reproducción de la Lista Grabado y después salga del
Timeshift.
Cuando salga de la lista grabación, mostrará el menú Timeshift.
54
Usando las funciones
4.3.4 Reproducción
4.3.4.1 Reproducción
La reproducción es similar al Timeshift, uno es el modo completo,
y el otro es el Modo Simple.
Se pueden cambiar mediante el botón Salir.
En el modo reproducción, la reproducción se muestra todavía.
El menú se muestra de la siguiente manera:
De modo completo:
Nota 2 Nota 1
Nota 6
Nota 3
Nota 7
Nota 4
Nota 5
Nota:
1) Muestra el estado de reproducción actual, muestra las diferentes
operaciones, tales como: reproducción, pausa, avance rápido,
rebobinado rápido, Siguiente, Anterior.
2) las notas circular A->B se marcan, luz alta, que sólo se mostró en
estado de reproducción.
3) Reproducción muestra el procesamiento.
4) Hay dos que muestran el tiempo, uno es para la hora actual, para
la reproducción y está el tiempo de descanso del programa.
5) La hora actual.
6) el nombre del canal grabado.
7) El nombre del programa, si no hay nombre muestra No hay información.
Modo simple:
[00:03:35]
Nota:
1) En el Modo Simple, muestra el modo actual de reproducción,
tales como reproducción, pausa, etc.
2) El modo simple se muestra en la parte inferior izquierda.
55
SOLUCIÓN DE PROBLEMAS
Antes de consultar a personal de servicio, consulte la tabla siguiente para
una posible causa del problema y para una posible solución. .
TV no se enciende
Asegúrese de que el cable de alimentación está conectado, a continuación,
presione el botón POWER del mando a distancia
Las pilas del control remoto se puede agotar
Cambie las pilas.
No hay imagen ni sonido
Compruebe el cable de interfaz entre la televisión y la antena o por cable.
Pulse el botón POWER del mando a distancia.
Presione el botón SOURCE en el control remoto repetidamente para
seleccionar las fuentes de vídeo conectadas.
Mala imagen, sonido aceptable
Compruebe el cable de interfaz entre la televisión y la antena o por cable.
Pruebe con otro canal, la estación podría tener dificultades
.
de transmisión.
Ajuste el brillo y contraste en las opciones del menú de vídeo.
La imagen es correcta el sonido pobre
El sonido puede ser silenciado. Pulse el botón MUTE en el mando a distancia.
Pulse el botón VOL + para aumentar el volumen.
Ruido de Audio
Mueva cualquier equipo infrarrojo alejado de la televisión.
56
GEGEVENS
GEGEVENS
Artículos
Ilustración relevante
Panel
23 " LED de pantalla ancha
Resolución
1920 x 1080 pixeles
Características
Interfaz de
entrada
Áreas compatibles
Multiform
Estándar de TV
PAL, SECAM
Estándar de DTV
DVB-T
PC
Interfaz de entrada D-sub 15 pin
CVBS, YPbPr,
HDMI
Interfaz de entrada del vídeo compuesto,
Interfaz de entrada del YPbPr
Interfaz de entrada de HDMI
RF
Interfaz aereo 75
SCART
Interfaz estándar de SCART completo
Audio
Interfaz de entrada de audio Izquierda, derecha
USB
Interfaz de entrada de dispositivos USB
Salida del auricular
Interfaz de salida del auricular
Salida del altavoz
3W x 2
Salida del COAXIAL
Interfaz de salida del COAXIAL
Lengua de OSD
Inglés, Alemán, Francés, Holandés, Español,
Italiano
Fuente de alimentación
AC in 100-240V, 50/60Hz; DC out 12V,4.0A
Consumo de energía
Trabajando 40W (Máximo), espera 1W
Dimensión
623 x 463 x 125 mm (Gift Box)
Peso
Accesorios
4.125Kg (Net)
Manual de usuario
Tarjeta de garantía
Control remoto
Batería AAA
Cable eléctrico
Adaptador AC
Las características y especificaciones están sujetas a cambios sin previo aviso.
57
Deutsh
INHALTSVERZEICHNIS
WARNUNGEN UND VORSICHTSMAßNAHMEN
Wichtige Sicherheitsinstruktionen................................................................1
Antenne-Sicherheitsinstruktionen................................................................ 3
EINFÜHREN DES LED TV
Paket-Inhalt. ............................................................................................... 4
Einstellung Ihres LED TV .......................................................................... 5
Ihr LED TV ................................................................................................ 7
Ihre Fernbedienung ................................................................................... 10
EINFÜHREN DES LED TV
.
12
$QVFKOXȕHLQHV)HUQVHKNDEHOVRGHUHLQHU$QWHQQH
Anschluß einer AV Ausrüstung mit dem SCART Stecker ........................14
Anschluß einer AV Ausrüstung mit dem YPbPr Stecker ......................... 15
Anschluß einer AV Ausrüstung mit dem HDMI Stecker .......................... 16
Anschluß einer AV Ausrüstung mit dem DVI Stecker ............................. 17
$QVFKOXȕHLQHV3&V 18
Anschluß eines Audioempfängers.............................................................19
VERWENDUNG DER EIGENSCHAFTEN
Kundenanpassung der KANAL-Einstellungen ........................................... 20
Kundenanpassung der BILD-Einstellungen ............................................... 25
Kundenanpassung der TON-Einstellungen .............................................. 27
Kundenanpassung der ZEIT-Einstellungen ............................................... 29
Kundenanpassung der WAHL-Einstellungen ........................................... 32
Kundenanpassung der SCHLOSS-Einstellungen ...................................... 34
Kundenanpassung der ANDEREN MENÜ-Einstellungen ......................... 36
Kundenanpassung der MULTIMEDIA-Einstellungen ................................. 39
Kundenanpassung der PVR Einstellungen .............................................. 46
FEHLERBEHEBUNG
.................................................................................................................56
TECHNISCHE DATEN
23”LED ....................................................................................................... 57
WARNUNGEN UND VORSICHTSMAßNAHMEN
WARNUNGEN UND VORSICHTSMAßNAHMEN
Um irgendwelche Verletzungen zu verhindern, sollten die folgenden Vorsichtsmaßnahmen
bei Einstellung, Verwendung, Bedienung und Wartung dieses Geräts beobachtet werden.
Lesen Sie bitte dieses Handbuch vor der Anwendung dieses Geräts.
WARNUNG
VORSICHT
Dieses Symbol wird benutzt, um den Benutzer von dem Gefähr des Elektroschocks
zu warnen. Diese Ausrüstung muss nur von dem qualifizierten Fachpersonal
auseinander genommen werden.
Dieses Symbol ist benutzt, um den Benutzer zur Anwesenheit wichtiger Betriebsund Wartungsinstruktionen in der Literatur, die das Gerät begleitet, zu warnen.
Um Feuer oder Elektroschock zu vermeiden, setzen Sie Ihr Gerät nicht Regen
oder Feuchtigkeit aus.
ƒ80(/(.7526&+2&.=89(50(,'(10866'$6*(5b7185921
'(0)$&+3(5621$/.203/(77,(57:(5'(1
ƒ(17)(51(16,('(1'(&.(/2'(5'(15h&.(11,&+7
ƒ.(,1(%(187=(59(5:(1'%$5(17(,/(,11(1
ƒ9(5:(,6(16,(:$5781*$8)'$6)$&+3(5621$/ Der Gebrauch von Steuerungen, Anpassungen oder Leistung von Verfahren,
die in dem Handbuch nicht angegeben sind, kann auf gefährliche
Strahlenaussetzung hinauslaufen.
Dieses Symbol zeigt
Vorsichtspunkte.
Dieses Symbol
zeigt Handlungen,
die nicht getan
werden sollen.
Dieses Symbol zeigt
Handlungen, die
durchgeführt werden
müssen.
ƒ6HW]HQ6LHGDV*HUlWDXIXQHEHQHRGHUQLFKWVWDQGIHVWH.DUUHQ6WDQGSOlW]HQ
Tischen, Regale usw. nicht.
'DV*HUlWNDQQIDOOHQXQGHUQVWH9HUOHW]XQJ.LQGHUQ(UZDFKVHQHQRGHUHUQVWH
Schaden an das Gerät selbst anrichten.
ƒ*HEUDXFKHQ6LHQXUHLQHQ.DUUHQRGHU6WDQGSODW]GLHYRP+HUVWHOOHUHPSIRKOHQ
VLQG'LHVHV*HUlWXQGGHUHPSIRKOHQH.DUUHQRGHU6WDQGSODW]VROOHQPLWGHU6RUJH
EHKDQGHOWZHUGHQ6FKQHOOHU+DOWEHUPlLJH.UDIWXQGXQHEHQH2EHUIOlFKHQ
N|QQHQGDV*HUlWXQGGHQ.DUUHQ6WDQGSODW]XPNLSSHQ
ƒ0DFKHQ6LHGHQJUQGHQGHQ/HLWXQJHQ7\S6WHFNHUQLFKWXQEUDXFKEDU'LH
JUQGHQGH1DGHODXIGHP=DFNHQ6WHFNHULVWHLQHZLFKWLJH(LJHQVFKDIW'LH
Entfernung der gründenden Nadel wird die Gefahr, das Gerät zu beschädigen,
vergrößern.
ƒ:HQQ6LHGHQ6WHFNHULQGHQHOHNWULVFKHQ$XVJDQJQLFKWVWHFNHQN|QQHQUXIHQ
Sie einen Elektriker an, damit er einen gründenden Ausgang zu einstellen.
ƒ%H]LHKHQ6LHLPPHUGLHVHV*HUlWPLWGHP7\SGHU6WURPTXHOOHDXIGHU+LQWHUVHLWH
GHV5HLKHYRUELOGOLFKHQ,QIRUPDWLRQVHWLNHWWV
ƒhEHUODVWHQ6LHGLH:DQGDXVJlQJHXQG(UZHLWHUXQJHQQLFKW ƒ*HEUDXFKHQ6LHGLH6WURPNDEHOPLWGHU6RUJH/HJHQ6LHNHLQHVFKZHUHQ
Gegenstände auf der AC Stromkabel.
ƒ=LHKHQ6LHGLH$&6WURPNDEHOQLFKW%HKDQGHOQ6LHGLH$&6WURPNDEHOPLWHLQHU
nassen Hand nicht.
ƒ%HUKUHQ6LHGLH6WURP6FKQXUXQGGDV$QWHQQHNDEHOEHL*HZLWWHUQLFKW
1
WARNUNGEN UND VORSICHTSMAßNAHMEN
ƒ(QWIHUQHQ6LHGHQ6WHFNHUYRP:DQGDXVJDQJZHQQGDV*HUlWVHLWGHUODQJHQ=HLW
QLFKWYHUZHQGHWZLUG
ƒ6HW]HQYHUZHQGHQRGHUEHKDQGHOQ6LHGDV*HUlWQDKHV:DVVHUQLFKW ƒ6HW]HQ6LH,KU*HUlWQLFKW5HJHQRGHU)HXFKWLJNHLWDXV)DOOV:DVVHULQGDV*HUlW
JHODQJWLVWVFKDOWHQ6LHHVQLFKWHLQ/DVVHQ6LHHVVRIRUWYRQHLQHP)DFKPDQQ
ZDUWHQ ƒ6HW]HQ6LH,KU*HUlWNHLQHUGLUHNWHQ6RQQHQVWUDKOXQJRGHU+LW]HDXV
ƒ6HW]HQ6LH,KU*HUlWLQGHU1lKHYRQLUJHQGZHOFKHQ+LW]HTXHOOHQZLH+HL]N|USHU
+LW]HUHJLVWHUgIHQRGHUMHGHUDQGHUH$SSDUDWGHU+LW]HHU]HXJHQN|QQHQQLFKW ƒ9HUVXFKHQ6LHQLFKWGDV*HUlWVHOEVW]XEHGLHQHQ ƒgIIQXQJXQG(QWIHUQXQJGHU'HFNHONDQQ6LH]XUJHIlKUOLFKHQ6WURPVSDQQXQJRGHU
DQGHUHQ*HIDKUHQDXVVWHOOHQXQGNDQQ,KUH*DUDQWLHOHHUHQ9HUZHLVHQ6LHGLH
%HGLHQXQJDQGDVTXDOLIL]LHUWH3HUVRQDO
ƒ/HJHQ6LHNHLQHDQGHUH'LQJHDXIGLH2EHUIOlFKH ƒ6WHFNHQ6LHQLFKWVLQGLH9HQWLODWLRQV|IIQXQJHQ:HQQ6LH0HWDOORGHUHWZDV
%UHQQEDUHVLQGLHVHgIIQXQJHQVWHFNHQNDQQ)HXHURGHU(OHNWURVFKRFNDOV)ROJH
HLQWUHWHQ
ƒ6HW]HQ6LHGDV*HUlWDXIXQHEHQHRGHUQLFKWVWDQGIHVWH.DUUHQ6WDQGSOlW]HQ
7LVFKHQ5HJDOHXVZQLFKW'DV*HUlWNDQQIDOOHQXQGHUQVWH9HUOHW]XQJ.LQGHUQ
(UZDFKVHQHQRGHUHUQVWH6FKDGHQDQGDV*HUlWVHOEVWDQULFKWHQ/HJHQ6LHLPPHU
GDV*HUlWDXIGHQ)XERGHQRGHUDXIHLQH2EHUIOlFKHGLHVWDUNJHQXJLVWGDV
*HZLFKWGHV*HUlWV]XXQWHUVWW]HQ
ƒ9HUGHFNHQ6LHGLH9HQWLODWLRQV|IIQXQJHQQLFKW9HUODVVHQ6LHHLQH/LFKWXQJXPGDV
*HUlW6HW]HQ6LHQLHGDV*HUlWDXIHLQHP%HWW&RXFK7HSSLFKRGHULUJHQGZHOFKHQ
DQGHUHQlKQOLFKHQ2EHUIOlFKHQ]XQDKH]X*DUGLQHQ9RUKlQJHQ:lQGHQLQHLQHP
%FKHUUHJDOHLQJHEDXWHP.DELQHWWRGHULUJHQGZHOFKHQDQGHUHQlKQOLFKHQ3OlW]HQ
GLHVFKOHFKWH/IWXQJYHUXUVDFKHQN|QQHQ
ƒ=LHKHQGHQ6WHFNHUEHL*HZLWWHURGHUZHQQXQEHQXW]WVHLWODQJHU=HLWKHUDXV
ƒ9HUZHLVHQ6LHGLH%HGLHQXQJDQGDVTXDOLIL]LHUWH3HUVRQDO'LH%HGLHQXQJLVW
HUIRUGHUOLFKZHQQGDV*HUlWEHVFKlGLJWZRUGHQLVW]XP%HLVSLHOGLH
(QHUJLHYHUVRUJXQJVVFKQXURGHUGHU6WHFNHUVLQGEHVFKlGLJWZRUGHQ)OVVLJNHLWRGHU
*HJHQVWlQGHVLQGLQGDV*HUlWJHIDOOHQZRUGHQGDV*HUlWLVW5HJHQRGHU)HXFKWLJNHLW
DXVJHVWHOOWZRUGHQGDV*HUlWIXQNWLRQLHUWQRUPDOHUZHLVHQLFKWRGHULVWJHIDOOHQ
ƒ=LHKHQ6LHLPPHUGHQ6WHFNHUYRUGHU5HLQLJXQJGHV*HUlWVKHUDXV
ƒ%HQXW]HQ6LH)OVVLJNHLWVRGHU$HURVRO5HLQLJXQJVPLWWHODXIGDV*HUlW 5HLQLJHQ6LHQXUPLWHLQHPZHLFKHQWURFNHQHQ6WRII
ƒ%HQXW]HQ6LHQXU9HUKDIWXQJHQ=XVlW]HGLHYRP+HUVWHOOHUDQJHJHEHQZLUG
'$6+g5(10,72+5+g5(51
ƒ+|UHQ6LHDQJHPlLJWHQ7RQXPGHQ+|UVFKDGHQ]XYHUPHLGHQ
ƒ:HQQ6LHNHLQHQ/DXWK|UHQN|QQHQGUHKHQ6LHGLH/DXWVWlUNHQLFKWQDFKREHQ
ZHLOGLH0XVLNDQHLQHU*URVHULHSO|W]OLFKEHJLQQHQNDQQ'HUEHUPlLJHJHVXQGH
'UXFNYRQ2KUK|UHUQXQG.RSIK|UHUQNDQQ+|UHQ9HUOXVWYHUXUVDFKHQ
ƒ8PGHQ+|UVFKDGHQ]XYHUPHLGHQUHJXOLHUHQ6LHGLH/DXWVWlUNHGHP7LHIVWVWDQG
YRUGHP3OD\%DFNXQGVWHOOHQ6LHGHQJHZQVFKWHQ7RQHLQDOV3OD\%DFN
DQJHIDQJHQLVW
2
Dieses Symbol zeight, dass die Verpackung dieses Produkts wiederverwendbar ist.
=XURUGQXQJVJHPlȕHQ(QWVRUJXQJZHQGHQ6LHVLFKDQGLH|UWOLFKHQ%HK|UHQ%LWWH
halten Sie sich an die ortsüblichen Regeln und entsorgen Sie Ihre alten Geräte nicht
PLWGHPQRUPDOHQ+DXVPOO'LHULFKWLJH(QWVRUJXQJ,KUHV*HUlWHVYHUKLQGHUW
Umwelt- und Gesunheitsschäden.
Außenantenne-Sicherheitsinstruktionen:
Wenn eine Außenantenne angeschlossen wird, folgen Sie den
Vorsichtsmaßnahmen unten:
ƒ(LQH$XHQDQWHQQHVROOLQNHLQHP*HELHWJHOHJHQZHUGHQZRHVPLW
2EHUVWDUNVWURPOHLWXQJHQRGHUDQGHUHQHOHNWULVFKHQ/LFKW%HUKUXQJNRPPHQNDQQ
ƒ%HLP$QWHQQHHLQVWHOOXQJVROOHQlXHUVWH9RUVLFKWJHQRPPHQZHUGHQXP
Kontakt mit Starkstromleitungen zu verhindern. Der direkte Kontakt mit
6WDUNVWURPOHLWXQJHQNDQQW|GOLFKVHLQXQGVROOXQEHGLQJWYHUPLHGHQZHUGHQ
Leiter der Gründung
%RGHQ.ODPPHUQ
$QWHQQH(QWODGXQJVHLQKHLW
(OHNWULVFKH
Gründung von Leitern
Dienstausrüstung
%RGHQ.ODPPHUQ
Power service grounding
%HLVSLHOGHU$XHQDQWHQQH*UQGXQJ
3
Paket-Inhalt
LED TV-GERÄT
Benutzerhandbuch
Fernbedienung
Buchen Garantie
Strom-Schnur
AAA Batterien
Garantieheft
AC Adapter
Der Typ Ihrer Stromkabel kann
verschieden sein. Das hängt von
dem Stromtyp Ihres Landes ab.
4
Einstellung Ihres LED TV
Befestigung des Ständers
Öffnen Sie den Kasten, und vergewissern Sie sich, dass alle notwendigen Teile im
Kasten sind. Das Paket enthält:
LED TV
Stand
Bedecken Sie eine sogare standfeste Oberfläche mit einem weichen Stoff. Legen
Sie die LED TV-Gerät (Schriftseite nach unten) auf dem Stoff. Befestigen Sie den
Standplatz auf den Boden der LED TV-Geräts, dann verwenden Sie einen
Schraubenzieher, um die Schraube auf dem Boden des Ständes zusammenzuziehen,
bis die Schraube im Platz fest befestigt wird.
5
Fernseheinstellung
Benutzen Sie ein Antenne-Kabel, um das VHF/UHF Signal mit dem ANT
Terminal des LED TV.
6FKOLHȕHQ6LHGLH$&6WURPNDEHOPLWGHU5FNVHLWHYRP)HUQVHKHQXQGVWHFNHQ
6LHGHQ6WHFNHULQHLQH:DQGVWHFNGRVHDQ
6HW]HQ6LHGLHDQJHORJHQHQ%DWWHULHQLQGLH)HUQEHGLHQXQJHLQ
6FKULWW(QWIHUQHQ6LHGHQ=XUFNGHFNHOXPGDV%DWWHULHUDXPGHU)HUQEHGLHQXQJ
zu öffnen.
Schritt2. Setzen Sie zwei AAA Batterien ein. Vergewissern Sie sich, dass Sie (+)
und (-) Enden der Batterien mit (+) und (-) Enden im Batterieraum zusammenpassen.
/DVVHQ6LHGHQ'HFNHO]XUFNLQGHQ3ODW]JOHLWHQ
%HQXWHQ6LHbW]UHLQLJXQJVPLWWHO3RU]HOODQURVWIUHLHU6WDKO7RLOHWWHRGHU
2IHQ5HLQLJHUXVZDXIGHU)HUQEHGLHQXQJZHLOHV6FKDGHQOHLGHQNDQQ
6
Ihr LED TV
Frontansicht/ linke / rechte Seiteansicht und Steuerungen
Rechte Seiteansicht
Frontansicht
Linke Seiteansicht
LED
Das LED Licht zeigt an, wenn das
LED TV aktiviert wird.
IR
Infrarotempfänger
SOURCE
Wählt von verschiedenen Eingangssignalquellen.
MENU
Drücken Sie einmal, um den OSD (auf dem Bildschirm) einzudrehen,
und drücken Sie wieder, um den OSD abzudrehen.
CHA
CH+/Ansieht oben und unten durch Kanäle. Wählt Untermenü, wenn der
OSD eingeschaltet wird .
VOL+/Reguliert das Lautstärke oben und unten. Wählt das Hauptmenü und
die Änderungswerte für Artikeln, wenn der OSD angestellt wird.
POWER
Stellt das LED TV an und schaltet es in den Standby-Modus ein.
7
Hintere Ansicht und Eingänge
DC 12V
Schaltet 12V DC ein..
Erlaubt Zugang zum Digitalinhalt, der auf einer USB Lagerung aufgefäuft ist
HDMI IN
Verbindet die ganze AV Digitalausrüstung mit dem HDMI Stecker.
VGA/PC AUDIO
Verbindet den PC, oder andere AV Ausrüstung mit VGA und Linie in Eingänge.
CI
Fügt Sie die CI Karte ins Ablagefach ein.
SCART
Steht die Außenausrüstung mit der scart Steckdose in Verbindung. Die SCART-Schnittstelle
bietet RGB, AV Signale mit dem Audioeingang / Produktion
. zwischen dem TV und der
Außenvideoausrüstung an.
YPbPr
6FKOLHȕW]XP'9'6SLHOHUGHP'LJLWDOHQ6DW]6SLW]HQNDVWHQRGHUDQGHUHQ$9$XVUVWXQJ
mit dem Bestandteil (YPbPr) Video und Audioausgang-Wagenheber an.
HEAD PHONE
9HUELQGHWGDV+DXSWWHOHIRQ
COAXIAL
Zum Anschließen an den Audio-Buchse auf der digital / Standard 5.1 Audio-System.
AUDIO IN L/R
CVBS-und YPbPr-Audio-Eingänge.
RF
Verbindet HF-Eingang von VHF / UHF-Antenne oder Kabel, um Hoch / Standard Definition-Fernsehen
]XHPSIDQJHQ
VIDEO
Schließen Sie das Video-Ausgäng des DVD oder VCR an.
8
&,&RPPRQ,QWHUIDFH.DUWH$QVFOXȕ
CI SLOT
Zum Ansicht der verschlüsselten (Pay-) Dienstleistungen in der digitalen TV-Modus
EIN CI CARD-EINSETZEN
Stecken Sie das CI-Karte in den Schlitz in der Richtung des Pfeils, bis es passt.
EIN CI CARD-ENTFERNEN
Beim Entfernen der CI-Karte, ziehen Sie es ihrem Steckplatz aus.
Mit dieser Funktion können Sie die verschlüsselten Programme (Pay-Diensten) in einigen
Senden zu sehen. Wenn Sie das CI-Modul entfernen, können Sie die verfügbaren Digital /
Analog-Programm in einigen Sendern sehen.
9
Ihre Fernbedienung
STANDBY Stellt das LED TV an und schaltet es
in den Standby-Modus ein.
POWER
MUTE
SOURCE
AUDIO
P.SIZE
AUTO Drücken Sie die Taste, um das Bild
P.MODE
S.MODE
automatisch in den PC-Modus einzustellen.
MUTE Dämpft und reguliert den Ton Ihres LED TV.
0-9 Zum direkten Zugriff auf den Programmen.
C/L Drücken Sie diesen Knopf ununterbrochen
um Land und Sprache auszuwählen.
Um zwischen dem zulezt gesehenen und
jetzigen Programm zu wechseln.
INFO
ASPECT Springt durch die Weit-Modus-Einstellungen.
AUDIO Auswahltaste der Tonstärke
VOL+/VOL- Zur Bestätigung der Auswahl.
CH+/CH- Um zwischen den Programmen zu wechseln.
D.SETUP
DISPLAY Drücken Sie die Taste um eine
Vielzahl von Informationen wie den Kanal und
die Input-Quelle u sehen.
P+
V+
V-
P-
REPEAT
ZOOM
PVR LIST TIME SHIFT
USB/SD
GOTO
/ENTER Die vier Richtungen erlauben
Ihnen, das Menü zu steuern,
ENTER Drücken Sie diese Taste um wählte
Einzelteil oder in Kanalliste einzugeben.Sowohl
ENTER als auch OK Funktion sein.
DTV/RADIO
MENU Zeigt das OSD-Menü auf dem Bildschirm
EXIT Beendet das OSD-Menü.
INPUTDrücken Sie INPUT, um die Quellelistung
]XVHKHQYHUZHQGHQ6LHŸźXPGDV9LGHR
Geräte an den Videoeingängen Ihres LED TV zu
wählen, und drücken Sie ENTER Taste zur
Bestätigung.
PMODE Zur Wählen des Bild-Modus.
SMODE Zur Wählen des Lautstärke-Modus.
SLEEP Zum Stellen des Kurzzeitweckers.
10
Ihre Fernbedienung
POWER
P.MODE
S.MODE
MUTE
SOURCE
AUDIO
P.SIZE
FAV Zum Schauen der beliebtesten Kanäle.
FAV+/ FAV- Zum Zunahme / Abnahme der
beliebtesten Kanäle
EPG Zeigt den Programm-Guide auf dem Bildschirm im
DTV-Modus. Drücken Sie die Taste wider, um den
GUIDE auszuschalten.
TEXT Schaltet den Teletextfunktion ein und aus.
Beim Media-Modus drücken Sie um zur vorherigen
vom zurzeit gespielten Kapitel oder Track zu springen.
HOLD Zum Einfrieren einer mehrseitigen Stelle auf
dem Bildschirm im Videotext-Modus.
Beim Media-Modus drücken Sie um zur folgenden
vom zurzeit gespielten Kapitel oder Track zu springen.
TV/RADIO Beim DTV Modus, drücken Sie TV/RADIO
Taste, um in DTV oder RADIO-Modus einzugehen.
INFO
SUBTITLE Zum Schalten den Untertitel ein oder aus.
INDEX Zum Zeigen den Hauptindex in dem Videotext-Modus.
SIZE Zeigt die Spitze, Boden oder das ganze Bild, um
in dem VIDEOTEXT-Modus leicht zu lesen.
P+
V+
D.SETUP
V-
P-
REPEAT
ZOOM
GOTO
USB/SD
DTV/RADIO
PVR LIST TIME SHIFT
In dem Mediamodus, benutzen Sie die Tasten,
/
um Play-Back schnell zu wechseln.
REVEAL Offenbart verborgene Information wie die
Antwort auf ein Quiz in dem VIDEOTEXT-Modus.
SUBPAGE Drücken Sie es, um die Subseite zu
schauen, und drücken Sie es wieder abzubauen
Beim Mediamodus drücken Sie die Taste, um
Play-Back anzufangen oder zu stoppen.
Beim Mediamodus drücken Sie die Taste, um
Play-Back aufzuhören.
PVR Beim DTV-Modus drücken Sie PVR-Taste,
um das Einschreiben zu starten oder stoppen.
MEDIA Drücken Sie die Taste, um auf die USBSignalquelle direkt umzuschalten.
Drücken Sie die passende Farbe
zum direkten Zugriffsfunktionen von VIDEOTEXT,
EPG OSD, und MEDIEN-MODUS.
:LɫKWLJ'LH
Fernbedienung kann das
E TV von bis zu 5 M
LED
weg kontrollieren, wenn
sie direkt am Empfänger
angespitzt wird.
TIME SHIFT TIME SHIFT: Beim DTV Modus drücken
Sie Taste, um die Verzögerungsfunktion anzufangen,
drücken Sie Taste , um die Verzögerungsfunktionen
zu begrenzen.
PVR LIST Beim DTV Modus, zeigt die durchgeführte
PVR-LISTUNG
11
Das LED TV-Einstellung
Verbinden Sie nicht zu viele Geräte mit einer Steckdose, da dadurch Überlastung, Feuer oder
Elektroschock als Folge eintreten kann.
Anschluß eines Fernsehkabels oder einer Antenne
$QWHQQDDQVFKOXȕ
Die Antenne-Voraussetzungen für den guten Farbfernsehen-Empfang sind wichtiger als
diejenigen für einen schwarzen & weißen Fernsehempfang. Deshalb wird eine gute Qualität
der Außenantenne stark empfohlen. Der folgende ist eine kurze Erklärung des Typs der
Verbindung, die mit den verschiedenen Antenne-Systemen versorgt wird
Ein 75-Ohm-System ist ein rundes Kabel (nicht eingeschlossen) mit IEC-TypStecker der zu einen Eingang ohne Werkzeuge leicht beigefügt werden kann.
IEC-Typ-Stecker
Koaxiales 75-Ohm-Kabel (rund)
Benutzen Sie eines der folgenden zwei Diagramme, um eine Außenantenne zu verbinden.
A: Zeigt, wie man eine Kombination der VHF/UHF Außenantenne verwendet.
B: Zeigt, wie man eine getrennte VHF und/oder UHF Außenantenne verwendet.
A. Kombinationsantenne der VHF/UHF
$QVFKOXȕGHV79&$79.DEHOV
Ein koaxialer 75-Ohm-Kabelstecker wird in den Satz für die leichte
Zusammenschaltung eingebaut. Beim Verbinden des koaxialen 75-OhmKabelstecker, stecken Sie den Stecker in den ANT Eingang.
Einige Kabelfernsehen-Gesellschaften bieten erstklassige Bezahlungskanäle an.
Da die Signale dieser erstklassigen Bezahlungskanäle zusammengerafft werden,
wird eine Umgangsausrüstung des Kabelfernsehens dem Kunden von der
Kabelfernsehen-Gesellschaft zur Verfügung gestellt.
Für spezifischere Instruktionen auf der Installation des Kabelfernsehens, befragen Sie Ihre
Kabelfernsehen-Gesellschaft. Eine mögliche Weise, die Umgangsausrüstung des
Kabelfernsehens zu verbinden, wird im Diagramm unten gezeigt.
.
12
Das LED TV-Einstellung
Verwenden Sie ein angelogenes Antenne-Kabel, um das Fernsehsignal mit dem
LED TV-Kabeleingang zu verbinden.
Verbinden Sie das AC Stromkabel an der Rückseite des TV und stecken Sie
den Stecker in die Steckdose.
DC 12V
Drücken Sie
Taste auf der Fernbedienung, um das TV einzuschalten.
(QWIHUQHQ6LHGHQ6WHFNHUYRP:DQGDXVJDQJZHQQGDV*HUlWVHLWGHU
E
E
langen Zeit nicht verwendet wird.
Die POWER Taste auf der Frontplatte wird nur verwendet, um das LEDETV
LQGDV6WDQGE\0RGXV]XVFKDOWHQHVWUHQQWGDV*HUlWYRQGHU
Hauptstromspannung nicht. Um die Hauptstromspannung völlig zu trennen,
entfernen Sie bitte den Stromkabel von der Steckdose.
Drücken Sie Source Taste auf der Fernbedienung, um die Quelllistung zu
VHKHQ1HQXW]HQ6LHŸź7DVWHQXP'794XHOOHDXV]XZlKOHQXQG
dann drücken Sie ENTER Taste.
13
Das LED TV-Einstellung
Anschluß einer AV Ausrüstung mit dem SCART Stecker
VCR
DVD-SPIELER
SCART Stecker
SATELLITENEMPFÄNGER
FERNSEH-KABELKASTEN
Benutzen Sie ein SCART Kabel, um die SCART Steckdose des A/V
Außengeräts mit dem LED TV SCART-Eingang zu verbinden.
Verbinden Sie alle AC Stromquellen, vor dem Einschalten des
Stromschalters des LED TV oder der anderen verbundenen Ausrüstung.
Drücken Sie
Taste auf der Fernbedienung, um das LED TV einzuschalten.
'UFNHQ6LH7DVWHDXIGHU)HUQEHGLHQXQJGDQQEHQXW]HQ6LHŸRGHUź
Taste, um SCART auszuwählen und drücken Sie ENTER Taste.
14
Das LED TV-Einstellung
Anschluß einer AV Ausrüstung mit dem YPbPr Stecker
DVD oder VCR
DVD oder VCR Rückseite
YPBPR Kabel
AUDIO Kabel
Verwenden Sie ein YPbPr Kabel, um die YPbPr Produktionseingänge
des A/V Außengeräts mit dem YPbPr-Eingang des LED TV zu verbinden.
Verwenden Sie ein Audiokabel, um die Audio-Eingang der AV Ausrüstung
mit den YPbPr AUDIO-Eingang des LED TV zu verbinden.
Verbinden Sie alle AC Stromquellen, vor dem Einschalten des Stromschalters
des LED TV oder der anderen verbundenen Ausrüstung.
Drücken Sie
einzuschalten
Taste auf der Fernbedienung, um das LED TV
'UFNHQ6LH7DVWHDXIGHU)HUQEHGLHQXQJGDQQEHQXW]HQ6LHŸRGHUź
Taste, um YPBPR auszuwählen und drücken Sie ENTER Taste.
Die YPbPr Video-Eingänge werden auf Ihrem A/V Gerät manchmal YPbPr, oder
YCbCr genannt. Für eine Erklärung des Teilvideos, finden Sie dem
Benutzerguide des A/V Geräts.
15
Das LED TV-Einstellung
Anschluß einer AV Ausrüstung mit dem HDMI Stecker
HDMI CABLE
DVD oder VCR Rückseite
DVD oder VCR
Benutzen Sie ein HDMI Kabel, um den HDMI Produktionseinganger
der AV Ausrüstung mit dem HDMI des LED TV-Eingang zu verbinden.
Verbinden Sie alle AC Stromquellen, vor dem Einschalten des
Stromschalters des LED TV oder der anderen verbundenen
Ausrüstung.
Drücken Sie
einzuschalten.
Taste auf der Fernbedienung, um das LED TV
Drücken Sie
Taste auf der Fernbedienung, dann benutzen Sie
ŸRGHUź7DVWHXP+'0,DXV]XZlKOHQXQGGUFNHQ6LH
ENTER Taste.
Der HDMI Stecker stellt Video und Audiosignale zur Verfügung,
HVLVWQLFKWQRWZHQGLJGDV$XGLRNDEHO]XYHUELQGHQ
16
Das LED TV-Einstellung
Anschluß einer AV Ausrüstung mit dem DVI Stecker
HDMI- auf -DVI Kabel
AUDIO kabel
DVD oder VCR Rückseite
DVD oder VCR
Benutzen Sie ein HDMI- auf -DVI Kabel, um den DVI
Produktionseinganger der AV Ausrüstung mit dem HDMI des
LED TV-Eingang zu verbinden .
Verbinden Sie alle AC Stromquellen, vor dem Einschalten des
Stromschalters des LED TV oder der anderen verbundenen
Ausrüstung.
Drücken Sie
einzuschalten
Taste auf der Fernbedienung, um das LED TV
Drücken Sie
Taste auf der Fernbedienung, dann benutzen Sie
ŸRGHUź7DVWHXP+'0,DXV]XZlKOHQXQGGUFNHQ6LH(17(57DVWH
:HQQGDV/('79PLWGHP'9,6WHFNHUGHU$9$XVUVWXQJYHUEXQGHQZLUG
ZHUGHQ6LHHLQ+'0,WR'9,.DEHORGHUHLQHQ+'0,$GDSWHUQLFKWDQJHORJHQ
und ein Audiokabel brauchen.
17
Das LED TV-Einstellung
$QVFKOXȕHLQHV3&V
AUDIO Kabel
VGA Kabel
Benutzen Sie ein D-SUB-Kabel, um den D-SUB--Einganger des PCs
mit dem VGA-Einganger des LED TV zu verbinden. Benutzen Sie ein
Audiokabel, um die Audioausgang des PCs mit dem LED TV zu verbinden.
Verbinden Sie alle AC Stromquellen, vor dem Einschalten des
Stromschalters des LED TV oder der anderen verbundenen Ausrüstung.
Drücken Sie
Taste auf der Fernbedienung, um das LED TV einzuschalten.
'UFNHQ6LH7DVWHDXIGHU)HUQEHGLHQXQJGDQQEHQXW]HQ6LHŸRGHUź
Taste, um VGA auszuwählen und drücken Sie ENTER Taste.
18
Das LED TV-Einstellung
Anschluß eines Audioempfängers
AUDIO-Kabel
Audioempfänger
Benutzen Sie ein Audiokabel, um die Audio-LINE IN Eingänger
des Audioempfängers zu den KOAXIALEN Audioeingängern
des LED TV zu verbinden.
Verbinden Sie alle AC Stromquellen, vor dem Einschalten des
Stromschalters des LED TV oder der anderen verbundenen Ausrüstung.
Drücken Sie
einzuschalten.
Taste auf der Fernbedienung, um das LED TV
19
Verwendung fer Eigenschaften Using
1. Hauptmenümeinung und Beschreibung
Hauptmenü artikeln( aus der richtigen Ordnung KANAL-> BILD-> TON-> ZEIT->
AUSWAHL-> SCHLIEßEN ) an DTV/ATV-Quelle, die erste Seite die gezogen ist,
ist KANAL. An non DTV/ATV-Quelle die erste Seite ist BILD als Verzug. Drücken Sie
zurzeit ENTER, um im Sub-Menü zu tretten.
1.1 KANAL
Programme edit
Signal Information
CI Information
OK
Hinwies:
1) KANAL kann nur bei ATV/DTV Bedingungen ausgewäht werden,
andere Weisen können benuzt ausgewählt werden nicht sein.
1.1.1 Auto-Ansehen
Treten Sie Auto-Ansehen ein,es zeigt die Tabelle 'des Landes'
und 'Melodie-Typs' fakultativ.
OK
EXIT
1) Erklärung der Functionen:
Artikeln
Anpassungsartikel
Verzug
Ansehen-Typ
DTV + ATV -> DTV -> ATV
DTV + ATV
Landauswahl
Beschreibung
Das Verzug-Land hängt vom
Schiffsplatz oder dem Platz, wo
die Kunden sich befinden, ab,
wenn nichts ernanntes, gestellten
Sie UK als Verzug.
UK -> Australia -> …
20
Verwendung fer Eigenschaften Using
2) ) Erklärung der Operationen:
Drücken Sie MOVE, um oben und unten auszuwählen, drücken Sie DONE,
um anzufangen, anzusehen, die ersten bearbeiten 50 % bedeutet die ATVEinstimmung, die letzten bearbeiten 50 % bedeutet DTV-Einstimmung.
Data
MENU
Back
EXIT
Quit
Bei der ATV-Einstimmung, können Sie EXIT drücken, um ATV-Einstimmung
auszulassen und DTV-Einstimmung anzufangen:
1.1.2 DTV Hand-Einstimmung
Bad
Normal
MENU
Back
Good
EXIT
Quit
1) Beschreibung der Functionen
Artikel
n
CH
Anpassungsartikel
Verzug
Beschreibung
Wählen Sie den Kanal mit der
linken richtigen Tasse aus, und
drücken Sie ENTER, um zu
bestätigen,
ob
Signalkraft
erscheint.
Hängt von Ländern
.
2) Drücken Sie ENTER, um die Wahlzu bestätigen(nur im DTV-Modus)
21
Verwendung fer Eigenschaften Using
1.1.3 ATV Hand-Einstimmung:
EXIT
Quit
1) Erklärung der Functionen:
Artikeln
Anpassungsartikel
Verzug
Beschreibung
Lagerung
1 – 100
1
Gegenwärtige Abstellraum-Zeigen
System
BG -> I -> DK -> L
Gegenwärtiger CH
1 – 100
Verzug-Auswahl
Landauswahl ab
1
von
Gegenwärtige Kanalzeegen
Kann an der vollen Kanalbedingung
gesucht werden
Suche
Anpassung
Frequenz
hängt
Anpassung
Wenn
grau,
ausgewählte
keine
Zeigt die gegenwärtige Frequenz, und
folgt Suche oder Anpassung, um sich
anzupassen.
2) Operationsinstruktion: Nach der Handeinstimmung, überzeugen Sie sich,
um RED Taste für die Lagerung zu drücken, sonst würden alle gesuchten
Kanäle nach der umschaltenden Bedingung nicht versorgt.
22
Verwendung fer Eigenschaften Using
1.1.4 Programauswahl
:
ok
Select
MENU
Back
1) Format und Beschreibung
Verschlüsselungside
ntität
LCN
CH Namen
S
21
ABC1
Identitätsauslassung
Identitätschloss
Fav
Identität
System
1. Das Menü Cannel stellt " Delete/Move/Skip /Rename /Fav " aus.
"Lock,Fav, Skip" kann verwendet werden, wenn Kunden einige
Einstellungen zum Kanal tun.(Fav kann nicht zusammen mit dem
Skip befestigt werden).
2) Schlüsseltasteeoperationseinführung
Taste
Reihe
Beschriebung
Ÿ
ATV/DTV
Obenseite,Sie können die Seiten durch den Kreis drehen
ź
ATV/DTV
Untenseite,Sie können die Seiten durch den Kreis drehen
Löschen Sie den gegenwärtigen Kanal:
1) Beim üblichen Zustand, Drücken Sie
(DELETE/
ATV
Löschung)
,um das DELETE-Modus
einzutreten
2) Beim DELETE-Modusˈdie Taste verwendet werden Kann:
MENÜ: DELETE-Ausgang, um in üblichen Zustand einzugehen
EXIT: Menü-Verlassung
:Zum Abbauen des Kanals, und Kehren zu normal zurück
Modifizieren Sie gegenwärtigen Kanalnamen, die nur in der
ATV-Modus verwendet ist.
Operationsinstruction˖
(RENAME/
Benennung)
ATV
1) beim üblichen Zustand, drücken Sie ,um RENAME einzutreten
2) Bei RENAME-Modus, ˖
MENU˖RENAME-Ausgang, um in üblichen Zustand einzugehen
EXIT˖Menü-Verlassung
UP/DOWN˖zum Veränderung der Briefe, Zahlen oder Zeichen
LEFT/RIGHT˖zum Links- und Rechts-Veränderung, Sie können es
durch den Kreis drehen
˖Zum Abbauen des RENAME-Modus, und Kehren zu normal
zurück
23
Verwendung fer Eigenschaften Using
ATV/DTV KanalfunctionenˈATV verfügbar als Verzug, DTV das
verfügbar an nicht öffnen LCN Auto-Einrichtungsbedingung ist.
(Move/
Bewegung)
ATV/DTV
1) beim üblichen Zustand
, treten Sie SWAP-Modus ein, und der
Ausgewählt Kanal ist beweglicher Kanal X.
2) beim SWAP-Modus˖
MENÜ˖SWAP-Ausgang, um in üblichen Zustand einzugehen
EXIT˖Menü-Verlassung
UP/DOWN˖Zum Auswahl der Kanäle
˖Wenn der ausgewählter Kanal was vorher
Auswählte X ist, keine jede andere Handlung gebraucht ist;
sonst ist der gegenwärtige Kanal Kanal Y, Sie müssen X und Y
Bedingung
verändern.
Aber
Kanalnummer
bleibt
1,2,3 …-Ordnung wie zuvor.
Wählen Sie bei CH +/-Kanal Einstimmung, um den gegenwärtige
Kanal zu auszulassen.
(SKIP/
ATV/DTV
Beim non-SKIP-Kanal, drücken Sie
Beim SKIP-Kanal, drücken Sie
(FAV)
, um
den Kanal
auszulassen˗
HOPSER)
ATV/DTV
um SKIP abzubauen.
Setzen Sie Ihren günstigen Kanal
1.1.5 Signalinformation
Es kann nur bei der DTV Bedingung benutzt werden, zeigt Signalinformation,
und stellt aus: Kanal / Netz / Modulation / Qualität / Kraft.
Artikel
Signalinformation
Zeigte Signalparameter
Zur Aufforderung des Signalinformationsmenüs:
Kanal 21
Netz Digital Finnland
Modulation 64QAM
Qualität 66 %
Kraft 80 %
1.1.6 CI Information
Nur bei DTV Bedingung verfügbar ist, es erinnert, wenn CI Karte nicht einfügtet
worden ist. Indem Sie CI Karte einfügen, können Sie in Menü eingehen, um die
ganze Information in der CI Karte zu überprüfen.
1.1.7 Recorded Mode
Gehen Sie in Recorder-Menü ein, tun Sie Bedenken der Aufnahme, überprüfen
Sie PVR Spezifizierung in Details.
24
Verwendung fer Eigenschaften Using
1.2 BILD
Menu
Back
ok
Select
EXIT
Quit
1.2.1 Bild-Modus
Menu
Back
EXIT
Quit
1) Functionsinstruction
Artike
Bild-Modus
Anpassungreiche
Standard -> Mild ->
User -> Dynamic
Verzug
Standard
Beschreibung
Beim nicht Benutzer-Modus können
Sie Unähnlichkeit, Helligkeit, Farbe,
Schärfe, Tönung auswählen, das
Modus wendet sich dem Benutzer
automatisch zu.
2) Operationinstruction
Ändern Sie das Modus mit der linken richtigen Tasse; kehren Sie zurück im
Hauptmenü durch den MENU-Tasse, und drücken Sie EXIT, um Hauptmenü
zu herrschen.
1.2.2 Kontrast / Helligkeit / Farbe / Schärfe
Menu
Back
EXIT
Quit
1) Functionsinstruction
Artikel
Anpassungreiche
Verzug
Kontrast
0 - 100
50
Helligkeit
0 - 100
50
Farbe
0 - 100
50
Schärfe
0 - 100
50
nicht verfügbare VGA
Tönung
R50 - 0 - G50
0
Nur bei NTSC-Systembedienung˗
PAL und SECAM sind zu 0 genest.
25
Beschreibung
nicht verfügbare VGA
Verwendung fer Eigenschaften Using
2) Operationsinstruction
5HJXOLHUHQ/()75,*+7XPGLH1XPHUJU|ȕH]XUHJXOLHUHQ
0HQGUFNHQVLH0(1hXP]XP%LOG+DXSWPHQX]XUFN]XJHKHQ
Pflegen:EXIT zum Menüpflegen
Oben,Unten: Regulieren Sie das Inhalt (Kontrast / Helligkeit / Farbe / Schärfe)
mit der UP/DOWN Taste:
1.2.3 Farbtemperatur
Menu
Back
EXIT
Quit
1) Functionsinstruction
Artikel
Farbtemperatur
Anpassungreiche
Verzug
Temperaturstandard->
Kühl->
Benutzer->
Warmer
Beschreibung
Standard
Bei nicht dem Benutzer-Modus
können Sie Rote/grüne/blaue
Optionen auswählen, um die
Farbe zu amendieren. Das
Modus
wird
für
die
Benutzerweise
automatisch
reguliert.
2) Operationsinstruction
Regulieren:LEFT, RIGHT, um das Inhalt
; zu regulieren.
Menü:MENU, um zurück zu drehen
Pflegen:EXIT zum Menüpflegen
1.2.4 Rot / Grün / Blau
Menu
Back
EXIT
Quit
1) Functionsinstruction
Artikel
Anpassungreiche
Verzug
Rot
0 - 100
50
Grün
0 - 100
50
Blau
0 - 100
50
Beschreibung
2) Operationsinstruction
5HJXOLHUHQ/()75,*+7XPGLH1XPHUJU|ȕH]XUHJXOLHUHQ
0HQGUFNHQVLH0(1hXP]XP%LOG+DXSWPHQX]XUFN]XJHKHQ
Pflegen:EXIT zum Menüpflegen
UP/DOWN-Taste: zum Auswählen des anpassenden Inhalts
(Rot/Grün?Blau Tasten)
26
Verwendung fer Eigenschaften Using
1.2.5 Aspekt-Verhältnis
1) Functionsinstruction
Tafelerlaubnis
Verzug
16:9 / 16:10
16:9
4:3
4:3
4:3
(physische
Dimensionen 16:9)
16:9
Eingangsquelle
Modus
No VGA
16:9 -> Zoom1 -> Zoom2 -> Auto -> 4:3
VGA
16:9 -> 4:3
No VGA
16:9 -> Zoom1 -> Zoom2 -> Auto -> 4:3
VGA
4:3 -> 16:9
No VGA
16:9 -> Zoom1 -> Zoom2 -> Auto -> 4:3
VGA
16:9 -> 4:3
Hinwies:Wenn Tafelerlaubnis 4:3 ist,ist demension 16:9, und 4:3 Modus,
Die Ausgangerlaubnis ist 1:1.
1.2.6 Die Geräuschverminderung
1) Functionsinstruction
Artikel
Geräuschverminderung
Artikelanpassung
Verzug
Beschreibung
On -> Off
On
Der Off-VGA-Satz ist nicht
regulierbar
2) Operationsinstruction
Treten Sie ins Menü ein, wählen Sie mit UP, DOWN:aus / niedrig /
Mitte / Verzug.
1.3 TON
Menu
Back
OK
27
Select
EXIT
Quit
Verwendung fer Eigenschaften Using
1.3.1 Ton-Modus
Menu
Back
EXIT
Quit
1) Functionsinstruction
Artikel
Ton-Modus
Artikelanpassung
Verzug
Standard->
Musik->
Film->
Sport->
Benutzerstandard
Beschreibung
Bei keinem Benutzer-Modus,
können Dreifach und Bass
nicht
ausgewählt
und
reguliert werden
Standard
2) Operationsinstruction
Regulieren :LEFT,RIGHT Zum Regulieren:Standard-> Musik-> Film-> Sport->
Benutzerstandard Menü :MENU Zum Zurückgehen zum Hauptbildmenü
Pflegen:EXIT zum Menüpflegen
1.3.2 Zittern / Bass/ Balance
Menu
Back
EXIT
Quit
1) Functionsinstruction
Artikeln
Artikelanpassung
Verzug
Beschreibung
Zittern
0 – 100
50
Hoher Ton passt sich an
Bass
0 – 100
50
Niedriger Ton passt sich an
2) Operationsinstruction
Regulieren:LEFT, RIGHT, um die Daten zu regulieren;
Menü :MENU Zum Zurückgehen zum Hauptbildmenü
Pflegen :EXIT
UP,DOWN Zum Auswählen des Inhalts:Zittern / Bass/ Balance
1.3.3 Auto-Ton
1)Function:auto Ton passt sich an
2)operation:ENTER zum ON/OFF-Einstellung
1.3.4 Raumklangeffekt
1)function :Raumklangeffekt-Einstellungen
2)operation:ENTER zum ON/OFF-Einstellung
1.3.5 SPDIF
1)Function :die Einstellung des SPDIF’s Modus
2) Operationsinstruction:ENTER zum ON –Einstellung, PCM oder Auto.
28
Verwendung fer Eigenschaften Using
1.4 ZEIT
Menu
Back
OK
Select
EXIT
Quit
1.4.1 Uhr
Menu
Back
EXIT
Quit
1) Functionsinstruction
Die Verzug-Rate hat die Zeitinformation von DTV nicht, aber Sie können
es mit der Hand untergehen, wenn Sie ins UHR-Menü eingehen.
2) Operationsinstruction
Sich bewegen:UP/DOWN
Menü:MENU zum Zurückbild des Hauptmenüs einzugehen
Ausgang:EXIT
LEFT,RIGHT Tasten Zum Einstellen der Parameter
1.4.2 Abschaltzeit
Menu
Back
29
EXIT
Quit
Verwendung fer Eigenschaften Using
1) Functionsinstruction
Artikeln
Wiederholung
Artikelanpassung
Verzug
Aus-> Einmal-> Täglich-> Mon~Fri->
Mon~Sam-> Sam~Son-> Son
Beschreibung
Aus
Stunde
00 - 23
00
Wenn
Aktivierung
ausgedreht istˈ Grau, oder
unverfügbar
Minute
00 - 59
00
Wenn
Aktivierung
ausgedreht istˈ Grau, oder
unverfügbar
2) Operationsinstruction
Sich bewegen:UP/DOWN
Menü:MENU zum Zurückbild des Hauptmenüs einzugehen
Ausgang:EXIT
LEFT,RIGHT Tasten Zum Einstellen der Parameter
1.4.3 Einschaltzeit
Menu
Back
EXIT
Quit
1) Functionsinstruction
Artikeln
Wiederholung
Artikelanpassung
Verzug
Aus-> Einmal-> Täglich-> Mon~Fri->
Mon~Sam-> Sam~Son-> Son
Beschreibung
Aus
Stunde
00 -> 23
12
Wenn
Wiederholung
ausgedreht istˈ Grau
Minute
00 -> 59
00
Wenn
Wiederholung
ausgedreht istˈ Grau
Tonstärke
0 - > 100
30
Wenn
Wiederholung
ausgedreht istˈ Grau
Quelle
DTV -> Radio -> Daten -> ATV
-> …
DTV
Wenn
Wiederholung
ausgedreht istˈ Grau, oder
unverfügbar ˗ Die Ordnung
hängt
von
Eingangsquellordnung ab.
Siehe
Hinweis
Wenn
Wiederholung
ausgedreht istˈ Grau, oder
unverfügbar.
Wenn Sie non TV-Quelle
auswählen, es wird grau˗Bei
der Quelle, wählen Sie
DTV/Raido/Daten ˈ aber es
zeigt Formblatt, wenn es
keine
Eingangskanalinformation
gibt.
Kanal
ATV˖1 – 100
DTV/Radio/Daten ˖ von der
Information
des
Kanals
abhängend ist.
30
Verwendung fer Eigenschaften Using
2) Operationsinstruction
Sich bewegen:UP/DOWN
Menü:MENU zum Zurückbild des Hauptmenüs einzugehen
Ausgang:EXIT
LEFT,RIGHT Tasten Zum Einstellen der Parameter
1.4.4 Schlaf-Zeit
1) functionsinstruction
Artikeln
Artikelanpassung
Schlaf-Teimer
Verzug
Aus -> 10min -> 20min ->
30min -> 60min -> 90min ->
120min -> 180min -> 240min
Aus
Beschreibung
Erinnernt seit letzten 60
Sekunden: hört auf, zu
erinnern, wenn Sie es
drücken ˈ Schlafeinstellung
wird geschaltet.
2) Operationsinstruction
Gehen Sie ins zweite Menü ein, verwenden Sie UP/DOWN, um Schlaf-Zeit
zu setzen.
1.4.5 Zeitzone
1) functionsinstruction
Artikeln
Artikelanpassung
Verzug
Beschreibung
Verzug-Wahl ist als Schiffsgebiet und
Kundennachfrage bestätigt.
Bei der Auto-Einstimmung, wird es
automatisch in Übereinstimmung mit
der Lansauswahl geschaltet.
Zeitzone
2)Bedieningsinstructie
Ga naar tweede menu, gebruik UP,DOWN om tijdzone in te stellen:canary
GMT ./Lisbn GMT /London GMT /Amsterdam GMT+1.
31
Verwendung fer Eigenschaften Using
1.5 OPTION
OSD Duration
Menu
Back
OK
30S
Select
EXIT
Quit
1.5.1 OSD Sprache
1) Functionsinstruction
Artikeln
OSD
Sprache
Artikelanpassung
Verzug
Unterstützte Sprache
Beschreibung
Wählen Sie die Verzug-Sprache in
Übereinstimmung
mit
der
Schiffsadresse
und
Kundennachfrage.
Verzug-Sprache:
Englisch,
Französisch, Deutsch, italienisch,
Portugiesisch.
2) Operationsinstruction
Gehen Sie ins zweite Menü ein, verwenden Sie UP,DOWN, um die
Sprache zu setzen
1.5.2 Audio-Sprache 1
1) Functionsinstruction
Artikeln
Artikelanpassung
Audio-Sprache 1
Zum Stetzen die
erste Sprache
Verzug
Beschreibung
Kann bei der non-DTV Bedingung
nicht ausgewählt werden
2) Operationsinstruction
Gehen Sie ins zweite Menü ein, verwenden Sie UP,DOWN, um die
Sprache zu setzen
1.5.3 Audio-Sprache 2
1) Functionsinstruction
Artikeln
Artikelanpassung
Audio-Sprache 2
Zum Stetzen die
zweite Sprache
Verzug
Beschreibung
Kann bei der non-DTV Bedingung
nicht ausgewählt werden
2) Operationsinstruction
Gehen Sie ins zweite Menü ein, verwenden Sie UP,DOWN, um die Sprache zu setzen
32
Verwendung fer Eigenschaften Using
1.5.4 Untertitel-Sprache 1
1) Functionsinstruction
Artikeln
Artikelanpassung
Untertitel-Sprache
1
Zum Stetzen die
erste Sprache
Verzug
Beschreibung
Kann bei der non-DTV Bedingung
nicht ausgewählt werden
2) Operationsinstruction
Gehen Sie ins zweite Menü ein, verwenden Sie UP,DOWN, um die Sprache
zu setzen
1.5.5 Untertitel-Sprache 2
1) Functionsinstruction
Artikeln
Artikelanpassung
Untertitel-Sprache
2
Zum Stetzen die
zweite Sprache
Verzug
Beschreibung
Kann bei der non-DTV Bedingung
nicht ausgewählt werden
2) Operationsinstruction
Gehen Sie ins zweite Menü ein, verwenden Sie UP,DOWN, um die Sprache
zu setzen
1.5.6 OSD Dauer
1) functionsinstruction:
Die Dauer des OSD im Schirm.
2) Operationsinstruction:
ENTER Zum Setzen 5S, 10S, 15S, 20S, 25S, 30S, 35S oder 40S.
1.5.7 Land
1)functionsinstruction:
Zeigt die gegenwärtige Sprache, grau, nicht ausgewählt.
1.5.8 Zum Wiederstellen des Fabrikverzuges
1)functionsinstruction:
Wiederstellung des Fabrikverzuges
2)Operationsinstruction:
Gehen Sie ins zweite Menü ein, verwenden Sie UP,DOWN, um “Ja” oder
“Nein” zu setzen
33
Verwendung fer Eigenschaften Using
1.6 SCHLOSS
Lock Channel
Menu
Back
OK
Select
EXIT
Quit
1.6.1 Schloss-System
1) Functionsinstruction
Artikeln
Artikelanpassung
Verzug
Schloss-System
Aus/Ein
Aus
Beschreibung
2) Operationsinstruction
LEFT Zum Verlassen das Kennwort und Eintreten das Hauptmenü
RIGHT Zum Löschen das geschiebenden Kennwort und zum Schreiben ein
anderes Kennwort. Sie brauchen richtiges Kennwort eingeben, um ins
SCHLOSS-Untermenü einzugehen. Es zeigt falsches Kennwort, wenn Sie
unrichtiges Kennwort stellen.
MENÜ, zum Eingehen das LOCK-Menü
34
Verwendung fer Eigenschaften Using
1.6.2 Kennwortsetzung
1) Functionsinstruction
Artikeln
Artikelanpassung
Verzug
Beschreibung
Gehen Sie ins Untermenü ein, geben
Sie das neue Kennwort ab und
bestätigen Sie es.
Kennwortsetzung
2)Operationsinstruction
LEFT Zum Verlassen die Kennwortstzung und Eintreten das Hauptmenü
RIGHT Zum Löschen und Umschreiben des Kennworts. Wenn das Kennwort
zweimal falsch ist, zeigt es, dass "Kennwort zusammenpasst nicht ".
1.6.3 Block-Programm
1) Functionsinstruction
Verschlüsselung
Zeichen
LCN
CH Name
S
21
ABC1
Schloss-Zeichen
system
Hinweis:Schloss-Zeichen wird verwendet, wenn Kunden einige Änderungen
des Kanals tun
2) Tastenoperation
Taste
funktion
Ÿ
Page upˈkann Seite wechseln
ź
Page downˈkann Seite wechseln
Ɣ(LOCK/SCHLUSS)
Prüfen Sie, ob den gegenwärtigen Kanal geschlossen ist, wenn er
geschlossen ist, braucht er Kennwort vor dem Fernsehen.
Drücken Sie Ɣ bei non-SCHLOSS-Modus, um den gegenwärtigen
Kanal zu schlieȕen
Drücken Sie Ɣ bei SCHLOSS-Modus, um den gegenwärtigen
Kanal zu öffnen.
1.6.4 Elterliche Schutz
1) Function:wenn gesetzte Elterliche Leitung niedriger als Programm wahre
Klasse ist, muss es den Kanal schließen und dann Kennwort eingeben,
um es zu Sehen.
Artikeln
Artikelanpassung
Elterliche Schutz
Aus -> 4 -> 5
-> … -> 18
Verzug
Beschreibung
Aus
Kann bei der non-DTV Bedingung
nicht ausgewählt werden
2)Operationsinstruction
Gehen Sie ins Untermenü ein, benutzen Sie UP,DOWN Taste, um Daten zu
wählen und drücken Sie ENTER, um es zu bestätigen.
35
Verwendung fer Eigenschaften Using
2. Anderes Menü
2.1 Kanalliste
Kanalliste zeigt die allen gesuchten Kanäle.
Move
OK
Select
EXIT
Quit
1) Format und beschreibung
Verschlüssel
ungZeichen
LCN
CH
Name
S
21
ABC1
Durchlassen-Zei
chen
Schloss-Zeich
nen
Fav-Zeich
en
system
Hinweis:1. Schloss-, Fav-, Durchlassen- Zeichen kann nur verwendet werden,
wenn Kanäle irgendwelche Rechnungskontrollen tun.
2) Tasten- function und instruction
Taste
CH Listung
funktion
Bei DTV/ATV und non-Kanalliste ˈ schlieȕen Sie
non-MUTE-Menü , um Kanalliste-Menü anzurufen ˗
Kanalliste-Menü, verlassen Sie das Kanallistung-Menü.
Ÿ
Page upˈkann Seite wechseln
ź
Page downˈkann Seite wechseln
das
bei
2.2 Lieblingsliste
Lieblingsliste und Kanalliste sind von denselben Einstellungen, aber sie als der
Kundenlieblingskanal im Programm gezeigt sind. Benutzen Sie FAV-Taste, um
das Liebligslistmenü ein- und auszuschalten.
36
Verwendung fer Eigenschaften Using
2.3 EPG
EPG ist nur in der DTV verfügbar,Kanalsnformation ist klassifiziert
KANAL / ZEIT.
Kann oben und unten wählen:Kanal / Zeit
OK
Select
EXIT
Quit
Die ganze Programm-Information,
wenn klassifiziert, zeigt das ganze
Programminformation in der Zeit.
Detail-Information des
ausgewählten Programmes.
1)Operationschritte
Sich Bewegen: Bewegen Sie sich oben und unten
Menü: EPG-Ausgang
OK: Zum Umschalten auf das ausgewählte Programm
Index: Zum Umschalten auf die Typ-Auswahl
Aufzeichnung: Programmaufzeichnung. Es zeigt Rekord-Modus, wenn es ausgewählt
ist (überprüfen Sie PVR Handdetails).
Liste: Aufzeichnungsinformation. Überprüfen Sie Details an der Terminlisteneinführung
von PVR.
Erinnern Sie: Programm ist vorbestellt. Wählen Sie Erinnern, um das folgende
Einstellungsmenü zu zeigen.
Bewegen Sie nach oben und unten, um das eingestellte Programm zu wählen.
Programme
Mode
Minute
Hour
Date
Month
Move
OK
Select
MENU
37
Back
Verwendung fer Eigenschaften Using
2.4 Installationsführer
Please set the following options, then
OK
Select
EXIT
Quit
1) Funktion und instruction: Wenn es keine versorgte Kanalinformation
gibt, schalten Sie das TV ein und wenden Sie sich an DTV/ATV-Bedienungen,
es zeigt Installationsführer-Menü.
2)Operation
Bewegen Sie sich: Bewegen Sie sich oben und unten
Exit:zum Menüverlassen
OK:Zum Eintreten das gesezte Modus
38
Verwendung fer Eigenschaften Using
3. Multimedia
3.1 Kurze Einführung
Beim Eingangsquelle-Menü, wählen Sie USB Quelle, um in Multimediabedingung
einzugehen. Bei Multimediabedingung,kann das System die Dateien klären,
bestellen, und andere Browser-Arbeit außer dem Multimediaspielen spielen.
3.2 Multimedia main menu pattern
1) Multimediahauptmenüstil
USB Information
Multimedia
Discs
Menu
Einfügendes HD Info
Menu
OK
Select
Operation
2) Multimediahauptmenüersatzteil-Einführung
Ausstatten
Instruktion
Statten Sie die
einfügende
Nachricht aus
Wenn den USB angeschlossen ist, wird es hell; sonst wird es grau.
Multimediastil
Disc
USB info
Operationsführer
Von links bis rechts PHOTO,MUSIC,MOVIE,TEXT für was Sie
benutzen wünschen.
Zeigt die gesteckenden Discs, und bestellen Sie ihnen als Letten,
von C und weiter.
Es zeigt USB gegenwärtige Ausrüstungsinformation. Wenn kein
USB gesteckt ist ˈ zeigt es
„Keine Ausrüstung“ ˗ beim
USB-Einstecken zeigt es „USB Ausrüstungsmodell“, Z.B.
USB2.0,USB1.1 usw.
Wenn untersuchen, gibt es USB einfügend, aber ohne richtigen
Nachricht, zeigt es „Setzen Sie die Ausrüstung Wieder Ein“.
Zeigt die gegenwärtige verfügbare Operation.
39
Verwendung fer Eigenschaften Using
3.3 FOTO-Untermenü-Muster
1) Multimedia FOTO-Untermenü-Muster
Disc
Dateimappen im Disc, drücken
Sie ENTER Taste, um hereinzugehen
Seite
Rezension
Delete Current File
Add/Remove all
OK
Full screen
Menu
Menu
EXIT
Add/Remove to playlist
Quit
Bilderübersicht
Bilderinformation
2) FOTO-Untermenü-Instruktion
Ausstatten
Disc
Seite
Bilderliste
Instruction
Zeigt die gegenwärtige Disc
Zeiget die Seite von Dateien, im 1/2 Formatˈdie vorherige Zahl ist
gegenwärtige Seite, die lezte Zahl ist die Gesamtseite.
Bilderliste an der Gegenwärtigen Seite
Vorschau-Fenster
Bilder am gegenwärtigen Punkt
Dokumenteninformation
???.jpg
[Resolution] 800 x 600
[Size] 28521 Bytes
Data
Time
40
---- Dateiname
----Auflösung
---- Bildergröße
---- Datum der Erschaffung
---- Zeit der Erschaffung
Verwendung fer Eigenschaften Using
3)Operationsinstruktion
Wenn Sie das Bild wählen, zeigt das Program Bildervorschau-Rahmen und
Details, dann drücken Sie ENTER, um ins volle screem Bilderspielen einzugehen.
Nach dem volle Bildspielen, drücken Sie ENTER, um den folgenden
Operationstassen anzurufen.
Out
In
4) Tasteninstruction
Taste
Function
Info/Display
Zum Zeigen gegenwärtige Bildervorschau, die Information ist:
Blue Hills.jpg
---- Dateiname
[Resolution] 1024 x 768
---- Auflösung
[Size] 28521 Bytes
---- Bildergröße
Exit
Das Ausgangsspielen, gehen Sie in vorheriges Menü ein, Fokus
zum multimedialen Menü PHOTO.
Play
Das volle Schirm-Spielen von Fotos, wenn mehrere Dateien spielen
müssen, würde es automatisch nach einer Zeit umschalten. (Verzug
als 5 Sekunde)
Pause
Pause
Stop
Halten Sie das Spielen, gehen Sie in Listenmenü ein, Fokus an den
Dateien.
Prev.
Zum Spielen die vorherige Datei
Next
Zum Spielen die folgende Datei
Repeat
Wiederholun-Modus, kann Wiederholung 1 wählen, alle zu
wiederholen,
niemanden,
einzelne
Foto-Wiederholung,
ausgewählte Filme, die ganze Wiederholung oder nicht
Wiederholung zu wiederholen.
Playlist
Playlist
Rotate
Umdrehts die
Uhrzeigersinn.
Zoom in
Zum Annähern
Zoom out
Zum Entfernen
Bilder
im
41
Uhrzeigersinn
/
entgegen
dem
Verwendung fer Eigenschaften Using
3.4 MUSIK-Untermenü-Muster, Ausstatten und Tasteeinführung. equip
and button introduction.
1) Multimedia MUSIC-Untermenü-Muster.
Wenn Sie Lieder in der Liste ausgewählen, drücken Sie ENTER, um die
Liedvorschau wie zu zeigen.
Disc
Seite
Vorschau
Delete Current File
Add/Remove all
OK
Full screen
Menu
Menu
Liedliste
Add/Remove to playlist
Quit
Dateiinformation
2) MUSIK-Untermenü Beschreibung
Ausstatten
EXIT
Beschreibung
Disc
Zeigt die ausgewählte Disc
Seite
Zeiget Seiten
Liedliste
Zeigt Liedliste
Fenstervorschau
Musik-Bild
Dateiinformation
Zeigt Liednamen, Größe usw.
42
Verwendung fer Eigenschaften Using
3) MUSIK Spielbedienung und Tastefunktion
DAS MUSIK-Spielen ist gerade wie das Spielen der Software im PC, es hat
hauptsächlich playlist, Basisinformation, Zeichen, Operationsführer-Teil. Das
wird unten gezeigt:
Liedinformation
Liedname
Liedliste
Screen Saver
1/1
Remove
Remove all from playlist
Goto Time
Operationsführer
MUSIK-Bild
Fortschritt-Bar
Spielzeit
4) MUSIK-spielfunktion
Ausstatten
Beschreibung
Liedname
Gegenwärtiger Liedname
MUSIK-Bild
Ein Bild, das benutzt wird, um MUSIK zu unterzeichnen
Liedliste
Lieder, die im Browser, von den Spitzendateien
gekennzeichnet sind, bestellen durch Briefe.
darauf
Liederdaten enthalten die folgende Information˖
Artist: ABC Year: 2005
---- Sänger
Title: DEF
----Titel
Album: GHI
----Album
Bit Rate: 128K Sampling: 44K
---- Bit-Rate und
Stichprobenerhebung
Liedinformation
Spielzeit
Zeigt Spielzeit und Insgesamtzeit im 0:01:23 Uhr/00:04:56 Format
Operationsführer
Zeigt den gegenwärtigen Operationsführer
Fortschritt-Bar
Zeigt diegegenwärtige Umzug-Zeit und Rate
5) Tastefunktion
Taste
Funktion
Enter
Spiel-Fokus-Dateien, wenn Fokus gegenwärtige Datei ist, spielt es
vom Anfang an.
Up/Down
Exit
Play
Bewegt Fokus an der Liedliste
Verlässt das MUSIK-Menü, sondern behaltet, Lieder zu spielen,
wenn ins Browser-Menü ein tritt, stellt es die Strom-Spielen-Dateien
ein.
Spielen
Pause
Pause
Stop
Stoppt zu speilen, geht ins Browser-Menüˈstellt gespielten Dateien
vor dem Ausgang ein.
Next
Spielt die folgende Dateien
Repeat
Wiederholt zu spielen, kann Wiederholung 1 wählen, alle oder
niemanden zu wiederholen, die ganze Wiederholung und so weiter
zu wiederholen.
43
Verwendung fer Eigenschaften Using
3.5 FILM-Bedingung und Tastefunktion
1) Die Spielenbedingung
1. FILM spielt am vollen Schirm um alle gekennzeichneten Datei, von der
Spitzendateimappe und weiter nach dem Alphabet.
2. Die Annähernung und Entfernenung des FILMs verlangt: Annähern und Entfernen
Sie es in der gegenwärtigen Größe, um die ursprüngliche Größe zu bewahren.
2)submenu-Muster und Instruktion
Delete Current File
Add/Remove all
OK
Full screen
Menu
Menu
EXIT
Add/Remove to playlist
Quit
Drücken Sie ENTER, um das Bild auszuwählen, das den Dateivorschau-Rahmen und
die Dateiinformation zeigt, dann drücken Sie Spiel(Play), um das volle Spielen anzufangen:
+
Slow
Step
Goto Time
1)Tasteinstruktion
Wiederholen:1, ALLE, nichts
Satz A: Fängt an, A Kreis zu spielen
Playlist: Es lässt Dateiliste auf dem linken Schirm knallen, der die Strom-Spielen-Liste
zeigt. Kunden können die Liste und Dateien mit UP/DOWN-Taste und ENTER Taste
auszuwählen, dann drücken sie Liste oder Keine Operation seit 10 Sekunden, und das
Program wird abgehen.
Info:Zeigt die gegenwärtige FILM-Information, schließt ein: der Dateiname des
gegenwärtigen Films, die Auflösung des Films, die Frequenz des Films, die Gesamtzeit
des Films und die Spielzeit.
Goto: Es lässt den Rahmen angerufen werden: 0:00:00 Uhr/01:23:45, das erste Zeit ist,
was Kunden eingeben, Kunden können die Position mit der RIGHT/LEFT Taste schalten,
Sie können auch die Zahl mit der UP/DOWN TASTE schalten, und zum Zeiteinstellungen
ENTER drücken.
44
Verwendung fer Eigenschaften Using
3.6 TEXT
Delete Current File
Add/Remove all
OK
Full screen
Menu
Menu
EXIT
Add/Remove to playlist
Quit
Wählen Sie TEXT-Dateien, drücken Sie ENTER, und es zeigt den
obengenannten Rahmen. Drücken Sie PLAY, m vollen Schirmspiel
anzufangen. :
Operation :
vorherige Seite
folgende Seite
vorherige Dateien
folgende Dateien
Hören Sie Auto-Drehen-Seiten auf
Playlist, es wird im obenrichtiger Platz gezeigt
gegenwärtige Dateiinformation, zeigt Dateiname und Größe
45
Verwendung fer Eigenschaften Using
4. Personal Video Recorder(PVR)/ Persönlicher Videokassettenrekorder
4.1 Schriftsatz
PVR funcition ist nur für DTV verfügbar, schließt Aufzeichnung, Timeshift und
Play-Back-Funktion ein. Die Aufzeichnenung schließt die Zeitaufzeichnung und
Konserve-Aufzeichnung ein.
Rechtzeitig kann Aufzeichnung durch den Abkürzungstaste sofort gearbeitet werden,
und Konserve-Aufzeichnung muss vorher bewahren. Aufzeichnung und Play-Back
können von derselben Zeit getan werden, die bedeutet, dass Rekord-DTV und das
Spielen von USB zur gleichen Zeit ausstatten. Timeshift ist eine andere Funktion
sowohl für die Aufzeichnung als auch für Zusammenspielung. Das Folgen wird es
erklären.
4.2 PVR Menüfunktionsdetails.
4.2.1 PVR Dateisystem
Gehen Sie in PVR aus dem Menü CHANNEL ein:
Move
OK
Select
MENU
Back
Funktion
Taste
Funktion
PVR
Dateisystemsüberprüfung
USB Disk
Format
Zeitverschiebungsgröȕe
Geschwindigkeit
Falls kein USB-Ausrüstung gesteckt wird, informieret es
„Keine USB Einrichtung Auffindet“
Falls kein USB-Ausrüstung gesteckt wird, informieret es
„Passt“
Es kann MStar-Format setzen. Drücken Sie ENTER Taste, um
durch USB zu Format-Menü zu gehen. Beim Format-Menü kann
USB PVR-Funktionen vollenden.
Wenn die Funktion gut arbeitet, oder USB MStar Format ist, zeigt
es „Passt“
Kann nicht gewählt werden. Nach der Kontrolle PVR
Dateisystems passt der USB.
MStar Format kann am Zeitschift-Raum verwendet werden, die
Größe wird von Kunden bei Formatauswahl gewählt
Kann nicht gewählt werden. Nach der Kontrolle PVR
Dateisystems zeigt es die USB verfügbare Geschwindigkeit, und
erinnert dem Kunden daran, es mit dieser verfügbaren
Geschwindigkeit zu operieren.
46
Verwendung fer Eigenschaften Using
4.2.1.1 Diskauswahl
Wählen Sie die CD, um beliebigen Inhalt aufzuzeichnen (Verzug C):
Move
OK
Select
4.2.1.2 PVR Dateisystemsprüfung
Überprüfen Sie, dass Lagerungsausrüstung PVR-Dateisystems gut gegründet wird.
Verzug als Anfang, drücken Sie ENTER Taste, um die USB Dateisystem und
Geschwindigkeit und die Process-Überprüfung zu untersuchen.
Falls kein USB gesteckt wird, oder Inspektion scheiterte, zeigt es sich SCHEITERN.
Wenn USB gesteckt wird, aber MStar-Format nicht passierte, geht es ins Menü
Format.
Wenn USB gesteckt wird, aber keine Teilung untersuchend, zeigt es Keine
Gefundene
Teilung.
Wenn Inspektion normal ist, zeigt es ERFOLG.
Move
OK
Select
4.2.1.3 Format
Bei Format, drücken Sie ENTER Taste, um PVR Dateisystemüberprüfung
anzufangen, nachdem USB-Information bestätigt wird, erscheint Format Disk-Menü
Nachdem Formatieren würde der System PVR Dateisystem in Übereinstimmung
mit gemäß vorherig gründen PVR Dateisystemgröße bestätigten.
47
Verwendung fer Eigenschaften Using
=HLWYHUVFKLHEXQJVJU|ȕH
Nach dem PVR Dateisystem-Schafft- Schluss, es Endzeit-VerschiebungsgrößeSetzen-Menü knallen lässt, und Kunden können die Raumgröße für die
Zeitverschiebung setzen:
OK
Select
MENU
Back
4.2.2 Kanalaufzeichnungsliste
1) Muster für die Verweisung
Das Menü sieht so aus:
Titel, Ordnung
Zeichen
Programm
OK
Operationsführer
Select
48
Verwendung fer Eigenschaften Using
2) Menüinstruktion
Artileln
Nachrichten
Titel
Registrierte Liste
Ordnung
Recht, bedeutet die gegenwärtige Einrichtung Weg, List/Index Knopf
kann Schalteroption ˖ Program-> Kanal-> Zeit, die Ordnungen
dadurch Programm-Name, Kanalordnung und Rekordzeit machen..
Zeichen
Zeigt die gegenwärtige Bedingung, aufgezeichnetes Programm kein
Zeichen zeigt. Wenn es
Registrierung, und wenn es
und
zeigt bedeutet es
und
,zeigt, bedeutet es
Spielen. Wenn Eingestellt, zeigt es ein Farbenbild, sonst ist es grau.
Programm-Name
Der Programm-Name steht
Rekordkanalnummer aus.
der
Kanalnummer
und
der
Operationsführer
Zeigt die gegenwärtige verfügbare Operation
Programmnachrichten
Info/Anzeige und Recht können gegenwärtiges Fokus-Programm
knallen lassen, das im Bild bemerkt wird.
[DATUM] 2005/07/20 ----Aufzeichnendatum
[ZEIT] 15:29:02 ---- Aufzeichnenstartzeit
[DAUER] 0000:01:52 ----Dauerzeit
[KANALNAME] 40 BBC NEWS ----Kanalliste
[PROGRAMNAME] Keine Information ----programname.
3) Tasteinstruktion
Button
Funktion
List/Index
Bei keinem Menü, drücken Sie Registrierte-Liste. Wenn es Recorded List Menü
zeigt, schalten Sie Aufzeichnen-Programm-Ordnungen zeigt.
Up/Down
Oben und unten, um Fokus zu bewegen, um Programm auszuwählen
Left/Right
Zum Schlieȕen/ zeigen Programinstruktion
Enter
Zum Spielen Focus-Programme
Info/Display
Zum Schlieȕen/ zeigen Programinstruktion
Ɣ(DELETE)
Zum Ziehen Focus-programm
Menu
Gehen Sie in Registrierten-List einˈDrücken Sie Menü, um zum PVR Menü
zurükzukommen, Fokus Registrierten-List
Um durch die Liste Abkürzung in die Registrierte Listeausgang hereinzugehen,
geben Sie gegenwärtiges Menü zurück.
Exit
Ausgang
49
Verwendung fer Eigenschaften Using
4.2.3 PVR –Aufzeichnen-Modus
1) Aufzeichnen-Modus
Date
Month
2010/07/20
Jan
Date
2010/07/20
Month
Move
Jan
OK
Select
MENU
Back
Artikel
Format
Titel des Menüs
Aufzeichnen-Modus
Nachrichten
Menüthema
Titel
655335
Beim Auto-Wählen, schalten Sie das gegenwärtige
Programm, um Aufzeichnen anzufangen. Der
Titel zeigt seinen gegenwärtigen Namen.
Sonst, zeigt" - "kann nicht verwendet werden
Modus
Einmal
Wählen Sie Aufzeichnen-Modus
Schalter order˖Einmal-> Täglich-> Wöchentlich
Löschen Sie die Auto-Auswahl
Stellten Sie Auto ein, um in EPG zu registrieren
Datumeinstellung
2005/07/20
Setzen Sie das Aufzeichnendatum, verwenden Sie
Link/recht, um Menü zu setzen.
Zeiteinstellung
14:00
Datenschluȕ
2005/07/20
Schließen Sie
das Aufzeichnendaten ab
Zeitschluȕ
15:00
Schließen Sie
Aufzeichnenzeit ab
Operationsführer
Setzen Sie die Aufzeichnenzeit
Zeigen Sie die gegenwärtige Operation
2) Tasten
Taste
Funktion
Aufzeichnen-Menü
Zeiteinstellungsmenü
Menü
Verlassen Sie das Aufzeichnen-Menü,
gehen Sie in Menü PVR ein, und
stellen Sie das Aufzeichnen-Menü ein.
Ausgangszeiteinstellung
Up/Down
Bewegen Sie den Fokus oben und
unten
Bewegen Sie den Fokus oben und
unten
Left/Right
Regulieren Sie den Modus, oder
gehen Sie in Zeiteinstellungen ein
Regulieren Sie Daten
ENTER
Versorgen Sie gegenwärtige
Aufzeichnen und verlassen den
Rekorder, um in Recorder Terminliste
einzugehen
Bestätigen Sie die gegenwärtigen
Einstellungen und verlassen Sie die
Zeiteinstellungen.
Ɣ(Schedule)
Nicht versorgt, verlassen Sie den
Recorder, um Recorder-Terminliste
hereinzugehen
----
Exit
Nicht versorgt, Ausgangsmenü
Nicht versorgt, Ausgangsmenü
50
Verwendung fer Eigenschaften Using
4.2.4 PVR – Recorder-Terminliste
1) Menü und Funktion
Move
Delete
MENU
Back
EXIT
Quit
Hinweis:
1. Artikeln in der leeren Anfang-Zeit-Einstellung wird in Übereinstimmung
mit Rekordplänen gesetzt. Wenn Sie ins Menü eingehen, um neue Pläne
hinzuzufügen, stellen Sie die neuen Plänen ein.
2. Es geht ins Menü ein registrierend, stellen Sie die gegenwärtigen
Aufnahme-Pläne ein.
3. Außer 1 und 2 Bedingung, stellen Sie die letzten Nichtanfang-Pläne ein.
2) Tasten
Taste
Funktion
Menu
Ausgangsmenü Recorder Schedule List, gehen Sie in PVRmenu ein, stellen Sie
Recorder Terminliste ein.
Move
Bewegen Sie den Fokus oben und unten
Ɣ(Delete)
Löschen Sie Fokus-Artikeln
Exit
Menüausgang
4.3 PVR Abkürzungsfunktion
4.3.1 PVR Abkürzungstasten beim DTV
Taste
Funktion
PVR
Gehen Sie in Aufzeichnen-Modus ein
TS
Gehen Sie in Zeitverschiebung-Modus ein
PVR
List
Zum Anrufen das Aufzeichnen-List-Menü, drücken Sie OK/ENTER, um in Playback
einzugehen.
Hinweis:Registrierte und Rekordliste kann aus dem Menü PVR
angerufen werden.
51
Verwendung fer Eigenschaften Using
4.3.2 Aufzeichnen
1)Aufzeichnen
Das Aufzeichnen-Menü schließt zwei Artikeln ein: der erste ist Voller Modus,
der zweite ist Einfacher Modus.
Sie können mit der Record/Exit-Taste umschaltet werden.
Beim Aufzeichnen-Modus, behält das sich Aufzeichnen-Menü still.
Die Details sind:
1. Voller Modus
Notiz 1
Notiz 3
Notiz 2
Notiz 4
Notizen:
1. Die Aufzeichnung
2. Die Zeit der Aufzeichnung
3. Die linke Reihe ist Kanalname, und die
richtige Reihe ist Programm-Name
4. Die gegenwärtige zeit
2. Einfacher Modus
[00:00:20]
Hinweis:Beim Einfachen Modus, zeigt es nur die Aufzeichnung und die
Zeit der Aufzeichnung auf der linken untersten Seite.
2) Funktion der Tasten
Taste
Funktion
Stop
Aufzeichnungsausgang, zeigt es die Verarbeitung
Record/Exit
Zum Schalten den Aufzeichnung-Menü-Modus
Play
Zum Eingehen den Play-Back-Modus, Spielen vom Anfang des
registrierten Programms
Überprüfen Sie Play-Back-Instruktion sorgfältig
List
Zum Schließen Aufzeichnung-Menü, Anrufen das Menü der
Aufzeichnung-Liste
Zum Eingehen in Play-Back aus dem Aufzeichnung-Liste
Beim Ausgang aus dem Aufzeichnung-Liste Menü, zeigt
es Aufzeichnung wieder
52
Verwendung fer Eigenschaften Using
4.3.3 Zeitsverschiebung
4.3.3.1 Zeitsverschiebung-Menü
Zeitsverschiebung ist dem Aufzeichnung-Menü ähnlich, es schließt zwei Artikeln ein:
der erste ist Voller Modus,der zweite ist Einfacher Modus.
Sie können mit der Record/Exit-Taste umschaltet werden.
Beim Zeitsverschiebung -Modus, behält sich das Aufzeichnen-Menü still.
Die Details sind:
1. Voller Modus
Notiz 1
Notiz 3
Notiz 4
Notiz 2
Notiz 5
Notizen:
1)Zeigt die gegenwärtige Operation, wie Spiel、Pause、Schnell Voraus、Schnell
Zurückspulen、Folgend、Vorherig.
2)A->B Kreiszeichen, wenn es A oder B zeigt, hebt die Vertretung hervor, die sich nur
bei der Spiel-Bedingung zeigen.
3)Zeitsverschiebung- Umzugswerte, die Prozession-Zecke kann die Gesamtlänge von
Zeitsverschiebung zeigen.
4)Es gibt zwei Zeiten, die erste Zeit wird mit "-" angefangen, die zweite Zeit ist
versorgt Inhaltslänge.
5)Gegenwärtige Zeit.
Einfacher Modus:
[-00:03:35]
Hinweis:
1)Beim Einfachen Modus, zeigt es die Bedienungen der gegenwärtigen
Zeitsverschiebung , Z.B. Speil、Pause.
2)Einfacher Modus befindet sich auf der linken untersten Seite
53
Verwendung fer Eigenschaften Using
4.3.3.2 die Bedienungen der Zeitsverschiebung
4.3.3.2.1 die Bedienungen der Anfang-Zeitsverschiebung
Gehen Sie in Zeitsverschiebung ein, um Pause zu drücken, und das stoppt die
Aufzeichnung, und sie fängt von der gemachten Pause-Position an.
Es zeigt Anfang-Zeitsverschiebung -Bedingung:
Taste
Funktion
Play
Zum Eintreten die Zeitsverschiebung –Spiel-Bedingung
Stop
Zum Stopp Zeitsverschiebung
Exit
Zum Schalten Zeitsverschiebung-Menü
List
Zum schlieȕen die Zeitsverschiebung, Anrufen das Menü der
Aufzeichnung-Liste
Zum Eingehen in Play-Back aus dem Aufzeichnung-Liste, und zum
Zeitsverschiebung-Ausgang
Zuerst schlieȕen Sie die Aufzeichnung-Liste und dann rufen Sie das
Zeitsverschiebung-Menü an.
4.3.3.2.2 Zeitsverschiebungspiel
Beim der Bedienung desZeitsverschiebungspiels, das System zeichnet DTV
auf und zeigt es zur gleichen Zeit
Zeitsverschiebungspiel wird mit der Zeitsverschiebung-Taste angefangen, bei der
Zeitsverschiebungspiel -Bedingung, kann es Pause, Fast Forward Schnell Voraus、
Schnell Zurückspulen machen und es geht in A-> B Kreisspielen-Bedingung.
4.3.3.2.4 Zeitsverschiebung- Aufzeichnung
Zeitsverschiebung-Spiel kann mit dem Fast Forward- oder Next-Taste geschaltet
werden, es wird hereingehen Zeitsverschiebung- Aufzeichnung-Bedingung.
Zeitsverschiebung- Aufzeichnung-Bedingung ist dem Aufzeichnung-Modus ähnlich.
Die Taste:
Taste
Funktion
Pause
Zum
Aufhören
des
Spiels,
Zeitsverschiebung-Spiel- Bedingung
Stop
Zum Aufhören des Zeitsverschiebung-Spiel-Menus
Fast
Forward
Kein Gebrauch
Fast Rewind
Kehren Sie zur Zeitsverschiebung-Spiel-Bedingung zurück, und
operieren Sie den folgenden Teil
Prev.
Kehren Sie zur Zeitsverschiebung-Spiel-Bedingung zurück und
Spielen Sie das vorherige Spiel seit 30 Sekunden.
Exit
Schalten sie Zeitsverschiebung-Menü ein
List
Zum schlieȕen die Zeitsverschiebung, Anrufen das Menü der
Aufzeichnung-Liste
Zum Eingehen in Play-Back aus dem Aufzeichnung-Liste, und zum
Zeitsverschiebung-Ausgang
Zuerst schlieȕen Sie die Aufzeichnung-Liste und dann rufen Sie das
Zeitsverschiebung-Menü an.
54
und
zum
Eingehen
Verwendung fer Eigenschaften Using
4.3.4 Play-Back
4.3.4.1 Play-Back
Play-Back ist dem Zeitsverschiebung-Menü ähnlich, es schließt zwei Artikeln ein:
der erste ist Voller Modus,der zweite ist Einfacher Modus.
Sie können mit der Exit-Taste umschaltet werden.
Beim Play-Back -Modus, behält sich das Aufzeichnen-Menü still.
Die Details sind:
Voller Modus:
Notiz 2 Notiz 1
Notiz 6
Notiz 3
Notiz 7
Notiz 4
Notiz 5
Notizen:
1)Zeigt die gegenwärtige Operation, wie Spiel、Pause、Schnell Voraus、
Schnell Zurückspulen、Folgend、Vorherig.
2)A->B Kreiszeichen, wenn es A oder B zeigt, hebt die Vertretung hervor,
die sich nur bei der Spiel-Bedingung zeigen.
3)Zeitsverschiebung- Umzugswerte, die Prozession-Zecke kann die
Gesamtlänge von Zeitsverschiebung zeigen.
4)Es gibt zwei Zeiten, die erste Zeit ist die egenwärtige Zeit, die zweite
Zeit ist versorgt Inhaltslänge.
5)Gegenwärtige Zeit.
6) Kanalname.
7) Programname, wenn es keinen namen hast, zeigt es „No Information“.
Einfacher Modus:
[00:03:35]
Hinweis:
1)Beim Einfachen Modus, zeigt es die Bedienungen des Play-Backs,
Z.B. Speil、Pause.
2)Einfacher Modus befindet sich auf der linken untersten Seite
55
Störungsbehebung
Nachstehend finden Sie eine Liste von Symptomen, die bei Ihrem TV-Gerät
vorkommen können. Bevor Sie den Kundendienst informieren, prüfen Sie
Folgendes:
TV funkzioniert nicht
Prüfen Sie, ob das Anschlusskabel korrekt in die Hauptsteckdose gesteckt wurde
und drücken Sie POWER Tasse auf der Fernbedienung.
Die Batterien in der Fernbedienung können leer sein.
Stellen Sie andere Batterien ein.
Kein Bild, kein Ton
Prüfen Sie, ob die Anschlusskabel oder Antennenstecker korrekt
angeschlossen sind.
Drücken Sie POWER Tasse auf der Fernbedienung.
Drücken Sie SOURCE Tasse auf der Fernbedienung, um auf die
Quelliste zu gelangen und die richtige Quelle zu wählen. .
Schlechtes Bild, guter Ton
Prüfen Sie, ob die Anschlusskabel oder Antennenstecker korrekt
angeschlossen sind.
.
Versuchen Sie, einen anderen Kanal auszuwählen.
Anpassen Sie Kontrast, Helligkeit und Farbe in dem VIDEO-Menü.
Gutes Bild, schlechter Ton
Der Ton kann gedämpft werden. Drücken Sie die MUTE-Taste
auf der Fernbedienung.
Drücken Sie die VOL + Taste, um die Tonstärke zu vergrößern.
Audiogeräusch
Entfernen Sie alle Infrarotausrüstung vom TV weg.
56
TECHNISCHE DATEN
TECHNISCHE DATEN
Einzelteile
Relevante Abbildung
Verkleidung
23” Breiter Schirm- LED
Auflösung
1920 x 1080 Pixel
Eigenschaften
Kompatible Bereiche
Mehrformig
Fernsehstandard
PAL, SECAM
DTV standard
DVB-T
PC
D-Sub 15- Nadel Eingangsschnittstelle
CVBS, YPbPr, HDMI
Kombinationsvidoeeingangsschnittstelle,
YPbPr Eingangsschnittstelle
HDMI Eingangsschnittstelle
Eingangsschnittstelle
RF
75
SCART
Volle SCART Standardschnittstelle
Antenneschnittstelle
Audio
Link-, Rechtaudioeingangsschnittstelle
USB
USB - Vorrichtungseingangsschnittstelle
Kopfhörerausgang
Kopfhörerausgangsschnittstelle
Lautsprecherausgang
3W x 2
COAXIAL ausgang
COAXIAL ausgangsschnittstelle
OSD Sprache
Englisch,Deutsch,Französisch,
Holländisch, Spanisch, Italienisch
Spannungsversorgung
AC in 100-240V, 50/60Hz; DC out 12V,4.0A
Energieverbrauch
Arbeit 40W (maximal), Bereitschafts1W
Dimension
623 x 463 x 125 mm (Gift Box)
Gewicht
4.125Kg (Net)
Benutzerhandbuch
Garantiekarte
Fernsteuerung
AAA Batterie
Stromschnur
AC adapter
Zubehör
Eigenschaften und technische Daten können verändert werden.
57
Italiano
INDICE
AVVERTENZE E PRECAUZIONI
Istruzioni importanti per la sicurezza............................................................1
Istruzioni di Sicurezza per Antenna Esterna................................................ 3
PRESENTAZIONE DELLA LED TV
Contenuto della confezione ....................................................................... 4
Installazione della LED TV .........................................................................5
LA VOSTRA LED TV ................................................................................. 7
Telecomando ...............................................................................................10
INSTALLAZIONE DELLA LED TV
.
12
Connessione di una TV via cavo o un'antenna ..........................................
Connessione di un dispositivo A/V tramite il connettore SCART. .............. 14
Connessione di un dispositivo A/V tramite il connettore YPbPr .................15
Connessione di un dispositivo A/V tramite il connettore HDMI. ..................16
Connessione di un dispositivo A/V tramite il connettore DVI ...................... 17
Connessione a PC........................................................................................18
Connessione di un ricevitore audio.................................................................
19
FUNZIONALITÀ DELLA VOSTRA LED TV.
Personalizzazione delle impostazioni dei CANALI ..................................... 20
Personalizzazione delle impostazioni dell’IMMAGINE. .............................. 25
Personalizzazione delle impostazioni del SUONO .................................... 27
Personalizzazione delle impostazioni dell'ORA.......................................... 29
Personalizzazione delle impostazioni delle OPZIONI ............................... 32
Personalizzazione delle impostazioni di BLOCCO .................................... 34
Personalizzazione delle impostazioni ALTRI MENU................................... 36
Personalizzazione delle impostazioni MULTIMEDIA .................................. 39
Personalizzazione delle impostazioni PVR..................................................46
RISOLUZIONE DEI PROBLEMI
.................................................................................................................56
DATI SPECIFICI.
23”LED ....................................................................................................... 57
AVVERTENZE E PRECAUZIONI
Per evitare eventuali lesioni, le seguenti precauzioni di sicurezza sono da osservare
durante l'installazione, l’uso, la manutenzione e la riparazione di questa apparecchiatura.Prima di utilizzare l'apparecchio, leggere attentamente questo manuale.
Questo simbolo serve ad avvisare l'utente di evitare il rischio di scosse
elettriche. Questo apparecchio non deve essere smontato, eccetto che
da personale qualificato.
PERICOLO
ATTENZIONE
Questo simbolo serve ad avvisare l'utente della presenza di importanti istruzioni
di manutenzione nella documentazione che accompagna il prodotto.
Per ridurre il rischio di incendi o scosse elettriche, non esporre questa apparecchiatura
alla pioggia o all'umidità.
ƒ3(55,'855(,/5,6&+,2',6&266((/(775,&+(/¶87(17(121'(9(
5,0829(5(,/&23(5&+,2$17(5,25(23267(5,25(
ƒ1(6681$3$57(,17(51$Ê5,3$5$%,/('$//
87(17(
ƒ5,92/*(56,$/6(59,=,248$/,),&$72 L'uso di controlli, regolazioni o procedure diversi da quelli qui specificati può causare
l'esposizione a radiazioni pericolose.
Istruzioni importanti per la sicurezza
Questo simbolo indica
attenzione nelle
operazioni
Questo simbolo indica
azioni che non devono
essere eseguite
Questo simbolo indica
azioni che devono essere
eserguite
ƒ1RQFROORFDUHO
DSSDUHFFKLRVXFDUUHOOLQRQSLDQLRLQVWDELOLSLHGLVWDOOLWDYROL
mensole, ecc
L'apparecchio potrebbe cadere, provocando gravi lesioni a bambini o adulti e
gravi danni alle attrezzature stesse.
ƒ8WLOL]]DUHHVFOXVLYDPHQWHFDUUHOOLRVXSSRUWLUDFFRPDQGDWLGDOIDEEULFDQWH
Questo dispositivo e l’eventuale carrello o piedistallo raccomandato devono
HVVHUHPDQHJJLDWLFRQFXUD)HUPDWHLPSURYYLVHIRU]DHFFHVVLYDHVXSHUILFL
irregolari possono causare unribaltamento dell'apparecchiatura o del carrello
/ piedistallo.
ƒ1RQGLVDWWLYDUHODVSLQDFRQPHVVDDWHUUDFRQWDWWL,OSHUQRGLPHVVDD
WHUUDGHOODVSLQDDSROLqXQDFDUDWWHULVWLFDLPSRUWDQWH5LPXRYHUHLOSHUQR
di messa a terra aumenta il rischio di danneggiare l'apparecchiatura.
ƒ6HQRQqSRVVLELOHLQVHULUHODVSLQDQHOODSUHVDHOHWWULFDFRQWDWWDUHXQHOHWWULFLVWD
per installare una presa a terra.
ƒ3HUTXHVWRDSSDUHFFKLRXVDUHVHPSUHLOWLSRGLDOLPHQWD]LRQHLQGLFDWRVXOUHWUR
dell’ etichetta informative o del numero di fabbrica.
ƒ1RQVRYUDFFDULFDUHOHSUHVHDPXURHOHHVWHQVLRQL
ƒ8WLOL]]DUHHPDQHJJLDUHLOFDYRGLDOLPHQWD]LRQHFRQFXUD1RQDSSRJJLDUH
oggetti pesanti sul cavo di alimentazione.
ƒ1RQWLUDUHLOFDYRGLDOLPHQWD]LRQH1RQPDQHJJLDUHLOFDYRGLDOLPHQWD]LRQH
con le mani bagnate.
ƒ1RQWRFFDUHLOFDYRGLDOLPHQWD]LRQHHLOFDYRDQWHQQDGXUDQWHLWHPSRUDOL
1
Contenuto della confezione
ƒ7RJOLHUHODVSLQDGDOODSUHVDDPXURVHO
DSSDUHFFKLRQRQYHUUjXWLOL]]DWR
SHUXQOXQJRSHULRGRGLWHPSR
ƒ1RQFROORFDUHXVDUHRPDQHJJLDUHTXHVWDDSSDUHFFKLDWXUDYLFLQRDOO
DFTXD ƒ1RQHVSRUUHO
DSSDUHFFKLRDOLTXLGLSLRJJLDRXPLGLWj&RQWDWWDUHO¶DVVLVW
HQ]DVHXQRTXDOVLDVLGLTXHVWLOLTXLGLqYHUVDWRVXOO¶DSSDUHFFKLR
ƒ1RQHVSRUUHO
DSSDUHFFKLRDWHPSHUDWXUHHVWUHPHRDOODOXFHVRODUHGLUHWWD
LQTXDQWRO
DSSDUHFFKLDWXUDSRWUHEEHVXUULVFDOGDUVLHVXELUHGDQQL
ƒ1RQLQVWDOODUHO
DSSDUHFFKLRYLFLQRDIRQWLGLFDORUHFRPHUDGLDWRULFDORULIHUL
VWXIHRDOWULDSSDUDWLFKHSRVVRQRSURGXUUHFDORUH ƒ1RQWHQWDUHGLULSDUDUHO
DSSDUHFFKLRGDVROL
ƒ/¶DSHUWXUDHODULPR]LRQHGLTXDOVLVDVLSDUWHGHOO¶DSSDUHFFKLDWXUDSXzHVSRUUH
DWHQVLRQLSHULFRORVHRDGDOWULULVFKLHSXzLQYDOLGDUHODJDUDQ]LD&RQWDWWDUH
SHUVRQDOHTXDOLILFDWRLQFDVRGLQHFHVVLWj
ƒ1RQFROORFDUHRIDUFDGHUHRJJHWWLVXOO¶DSSDUHFFKLR
ƒ1RQLQVHULUHDOFXQRJJHVWWRQHLIRULGLYHQWLOD]LRQHGHOYRVWURPDWHULDOH
,QVHULPHQWRGLRJJHWWLPHWDOOLFLRLQILDPPDELOLSXzSURYRFDUHLQFHQGLRVFRVVH
HOHWWULFKH
ƒ1RQFROORFDUHO
DSSDUHFFKLRVXFDUUHOOLLUUHJRODULRLQVWDELOLVXSSRUWLWDYROL
PHQVROHHFF/
DSSDUHFFKLRSRWUHEEHFDGHUHSURYRFDQGRJUDYLOHVLRQLD
EDPELQLRDGXOWLHJUDYLGDQQLDOOHDWWUH]]DWXUHVWHVVH$SSRJJLDUHVHPSUH
O¶DSSDUHFFKLRVXOSDYLPHQWRRVXVXSHUILFLUREXVWHSLDQHVWDELOLHDEEDVW
DQ]DIRUWLSHUVRVWHQHUHLOSHVRGHOO¶DWWUH]]DWXUD
ƒ1RQRVWUXLUHOHDSHUWXUHGLYHQWLOD]LRQH/DVFLDUHXQRVSD]LROLEHURLQWRUQR
DOO
DSSDUHFFKLR1RQFROORFDUHO
DSSDUHFFKLRVXOHWWLGLYDQLWDSSHWLRDOWUH
VXSHUILFLVLPLOLWURSSRYLFLQRDWHQGHWHQGDJJLPXULLQXQDOLEUHULDFRVWUXLWD
PRELOHWWLRDOWULSRVWLVLPLOLFKHSRVVRQRFDXVDUHXQDVFDUVDYHQWLOD]LRQH
ƒ6FROOHJDUHO
DSSDUHFFKLRGXUDQWHWHPSRUDOLRVHLQXWLOL]]DWRSHUOXQJKLSHULRGL
GLWHPSR
ƒ3HUWXWWLLWLSLGLPDQXWHQ]LRQHIDUHULIHULPHQWRDSHUVRQDOHGLVHUYL]LR
TXDOLILFDWR/DPDQXWHQ]LRQHqQHFHVVDULDTXDQGRO¶DSSDUDWRqVWDWR
GDQQHJJLDWRLQXQPRGRTXDOVLDVLSHUHVHPSLRTXDQGRLOFDYRG¶DOLPHQWD]LRQH
RODVSLQDqGDQQHJJLDWDTXDQGRqVWDWRYHUVDWRGHOOLTXLGRVXOO¶DSSDUDWR
RSSXUHVRQRVWDWLIDWWLFDGHUHGHJOLRJJHWWLDOVXRLQWHUQRTXDQGRO¶DSSDUDWR
qVWDWRHVSRVWRDSLRJJLDRGXPLGLWjTXDQGRQRQIXQ]LRQDQRUPDOPHQWH
RSSXUHTXDQGRqVWDWRIDWWRFDGHUH
ƒ5LPXRYHUHVHPSUHLOFDYRGLDOLPHQWD]LRQHGDOODSUHVDSULPDGLSXOLUH
O
DSSDUHFFKLR
ƒ1RQXWLOL]]DUHGHWHUJHQWLOLTXLGLRVSUD\VXLGLVSRVLWLYL
3XOLUHVRORFRQXQSDQQRPRUELGRHDVFLXWWR
ƒ8VDUHVRORGLVSRVLWLYLRS]LRQDOLDFFHVVRULVSHFLILFDWLGDOSURGXWWRUH
862',&8)),(($85,&2/$5,
ƒ8VDUHXQYROXPHPRGHUDWRSHUHYLWDUHGLGDQQHJJLDUHO¶XGLWR
ƒ6HQRQVLVHQWHDOFXQVXRQRGXUDQWHODULSURGX]LRQHQRQDO]DUHLOYROXPH
GHOODPXVLFDSHUFKH¶SRWUHEEHLPSURYYLVDPHQWHLQFRPLQFLDUHDYROXPHHOHYDWR
8Q¶HFFHVVLYDSUHVVLRQHVRQRUDGDDXULFRODULHFXIILHSXzFDXVDUHODSHUGLWD
GHOO
XGLWR
ƒ3HUHYLWDUHGLGDQQHJJLDUHOHYRVWUHRUHFFKLHUHJRODUHLOYROXPHDOOLYHOORSL
EDVVRSULPDGHOODULSURGX]LRQHHDXPHQWDUHILQRDOOLYHOORGHVLGHUDWRTXDQGROD
ULSURGX]LRQHqLQL]LDWD
1RWD4XHVWRPDQXDOHqVRORGLULIHULPHQWRO
XQLWjUHDOHSRWUHEEHHVVHUHGLYHUVD
Questo simbolo indica che il prodotto non può essere smaltito con i normali
rifiuti domestici. Il riciclaggio e la raccolta differenziata di questi prodotti è di
vostra responsabilità. Si prega di lasciare i rifiuti di cui sopra in un luogo
designato per il riciclo dei rifiuti di apparecchiature elettriche ed elettroniche.
Qualora non si sapesse dove lasciare questa apparecchiatura per il riciclo,
si prega di contattare l'ufficio comunale o il servizio di raccolta rifiuti.
Istruzioni di Sicurezza per Antenna Esterna
Se un'antenna esterna è connessa, seguire le seguenti precauzioni:
ƒ/HDQWHQQHHVWHUQHGHYRQRHVVHUHFROORFDWHDGLVWDQ]DGDOOHOLQHHG¶DOWD
tensione, cavi della luce o cavi elettrici.
ƒ4XDQGRVLLQVWDOODXQVLVWHPDHVWHUQRGLDQWHQQDVLSUHJDGLDGRWWDUH
estrema cautela per evitare il contatto con linee elettriche. Il contatto diretto
con le linee elettriche può essere fatale e deve essere evitato a tutti i costi.
ANTENNA
/IVE//ATORE
UNITÀ DI SCARICO
DE//¶ANTENNA
ATTREZZATURA PER I/
SERVIZIO E/ETTRICO
/IVE//ATORE A
TERRA
CONDUTTORI DI MESSA A TERRA
SISTEMA AD E/ETTRODI PER I/ SERVIZIO DI MESSA A
TERRA DE//¶A/IMENTAZIONE
3
Contenuto della confezione
LED TV SET
Manuale di istruzioni
Telecomando
Scheda di garanzia
Batterie tipo AAA
Garanzia Book
Adattatore Corrente
Cavo di alimentazione
l cavo di alimentazione potrebbe
essere diverso a seconda della
nazione di appartenenza.
4
Installazione della LED TV
1. Aprire la scatola, e assicurarsi che tutte le parti necessarie siano
presenti. Il pacco contiene:
LED TV
Supporto TV
2. Coprire una superficie piana e stabile con un panno morbido. Posizionare
l'unità LED TV a faccia in giù sul panno. Montare il supporto sul fondo del
mobile TV LED come indicato nella figura, quindi utilizzare un cacciavite
per stringere la vite sul fondo del supporto stesso fino a quando la vite è
saldamente fissata.
5
Come configurare la televisione
1. Utilizzare il cavo antenna in dotazione per collegare il segnale VHF / UHF
al terminale ANT della TV LED.
2. Collegare il cavo di alimentazione sul retro del televisore e collegare il cavo
di alimentazione alla presa a muro.
3. Inserire le 2 batterie fornite nel telecomando.
Step1 Far scorrere il coperchio posteriore per aprire il vano batterie del
telecomando.
Step2 Inserire due batterie AAA. Assicurarsi che il (+) e (-) delle batterie
corrisponda con il (+) e (-) indicato nel vano batterie. Far scorrere il coperchio
posteriore in posizione
Non utilizzare detergenti caustici (tipo detergenti per porcellana, acciaio inox,
WC, o forno ecc) sul telecomando, in quanto potrebbe subire danni.
4
4. Collegare ad “other” un dispositivo AV esterno.
6
La Vostra LED TV
Vista Frontale e Laterale – Controlli
Lato destro
Vista frontale
Lato sinistro
LED
Il LED indica quando la TV LED e’ attivata.
IR
Ricevitore a infrarossi
SOURCE
Scelta fra diverse sorgenti di ingresso.
MENU
Premere per attivare la modalità OSD (on screen display –
display sullo schermo), premere di nuovo per disattivarla.
CHA
CH+/Scorrimento canali. Selezionamento dei sub-menu quando in
modalità OSD.
VOL+/Regolazione volume. Selezionamento del menu principale e
variazione dei valori dei sotto menu in modalità OSD.
POWER
Accensione della TV LED e modalità standby.
7
Vista posteriore e Jack
DC 12V
Ingresso alimentazione 12V DC.
Permette di accedere a memoria stick USB .
HDMI IN
Connessione a tutte le apparecchiature digitali AV con connettore HDMI.
VGA/PC AUDIO
Connessione del PC o altri dispositivi AV con VGA e jack in ingresso.
CI
Slot per inserimento della carta CI.
SCART
Connessione a dispositivi esterni con presa SCART. L'interfaccia SCART RGB offre,
segnali AV con ingresso / uscita audio tra il televisore e le apparecchiature video esterna.
YPbPr
Connessione al lettore DVD, Digital Set-Top-Box, o di altri dispositivi AV con il componente
(YPbPr), video e jack di uscita audio
HEAD PHONE
Connessione auricolari/cuffie.
COAXIAL
Connessione al jack audio sul sistema sonoro 5.1 digitale/standard.
AUDIO IN L/R
Jack audio di ingresso per CVBS e YPbPr.
RF
Ingresso di connessione RF da VHF / UHF o via cavo per ricevere TV a definizione standard o
ad alta definizione.
VIDEO
Connessione del jack di uscita video di DVD o VCR.
8
Come connettere la carta CI (Interfaccia commune - Common Interface)
SLOT CI
Per vedere i servizi criptati (a pagamento) in modalità televisione digitale.
INSERIMENTO CARTA CI
Inserire la carta CI nello slot nella direzione della freccia.
PER RIMUOVARE LA CARTA CI
Per rimuovere la carta, estrarla dallo slot
Questa funzione permette di guardare i servizi criptati (servizi a pagamento) in
alcuni canali. Se si rimuove il modulo CI, è possibile guardare i programmi digitale
/ analogici disponibili su alcuni canali.
9
Your Remote Control
STANDBY: Consente di accendere il
televisore o di spegnerlo in standby.
POWER
P.MODE
S.MODE
MUTE
SOURCE
AUDIO
P.SIZE
AUTO: Premere per regolare automaticamente l'immagine in modalità PC.
MUTE: Consente di attivare e disattivare
l’audio.
0-9: Selezione canale.
C/L: Appuyer continuellement sur cette
touche pour choisir pays et langues.
: Avanti – indietro tra il canale attuale e
quello precedente.
INFO
ASPECT: Scorre impostazioni della modalità
Wide screen.
AUDIO: Tasto per selezionare l’audio.
VOL+/VOL-: Consente di regolate il volume.
CH+/CH-: Scorrimento canali.
D.SETUP
DISPLAY: Premendo una volta mostra una
serie di informazioni quali il canale corrente
e la sorgente di ingresso.
P+
V+
V-
P-
REPEAT
ZOOM
GOTO
USB/SD
DTV/RADIO
PVR LIST TIME SHIFT
/ENTER: Le quattro direzioni
permettono di navigare tra i menu.
ENTER: Preme questo tasto per entrare
nel'articolo scelto o nella lista dei canali.
Entrambe le funzioni di ENTER e OK.
MENU: Premere per attivare la modalità OSD
(on screen display – display sullo schermo).
EXIT: Uscita dal menu OSD.
INPUT: Premendo INPUT visualizza la lista
GHOHOVRUJHQWLGLVHJQDOHXWLOL]]DUHŸźSHU
selezionare l’apparecchiatura video connessa
agli ingressi video del Vostro televisore, e
premere il tasto ENTER per confermare.
PMODE: Selezione modalità immagine.
SMODE: Selezione degli effetti sonori.
SLEEP: Con questo tasto è possibile
impostare un periodo di tempo dopo il
quale la TV passa in standby.
10
Your Remote Control
FAV Lista canali favoriti.
FAV+/ FAV-:Scorrimento lista canali favoriti.
EPG: Mostra la guida ia programmi in modalità
DTV. Premere di nuovo per uscire.
POWER
P.MODE
S.MODE
MUTE
SOURCE
AUDIO
P.SIZE
INFO
P+
V+
D.SETUP
V-
P-
REPEAT
ZOOM
GOTO
USB/SD
DTV/RADIO
PVR LIST TIME SHIFT
TEXT: Per accedere alla funzione Televideo
(Televideo è un servizio di informazioni organizzate come un giornale, fornito da alcune
stazioni TV in aggiunta alla normale trasmissione televisiva).
:In modalità media, premere per passare
al capitolo o track precedente.
HOLD: Blocca un passaggio a pagine multiple
sullo schermo in modalità Televideo.
:In modalità media, premere per passare al
capitolo o track successivo.
TV/RADIO: In modalità DTV, premere TV / radio
button per entrare DTV o in modalità RADIO.
SUBTITLE: Abilita o diasbilita i sottotitoli.
INDEX: Visualizza l'indice principale in modalità
Televideo.
SIZE: Visualizza la parte superior o inferiore
della pagina oppure la pagina completa, per
facilitare la lettura in modalità Televideo.
In modalità media, premere questo tasto
per avanzare o tornare indietro rapidamente
durante la riproduzione del filmato.
REVEAL: Rivela informazioni nascoste, come la
risposta a un quiz in modalità Televideo.
SUBPAGE: Premere per vedere la sottopagina e
premere di nuovo per cancellare.
:In modalità media, premere questo tasto per
avviare la riproduzione o mettere in pausa.
:In modalità media, premere questo tasto per
fermare la riproduzione.
PVR: In modalità DTV, premere il pulsante per
avviare la registrazione, premerelo di nuovo per
interrompere la registrazione.
MEDIA: Premere per passare direttamente alla
sorgente del segnale USB.
Distanza di funzionamento:
il telecomando può controllare
la TV LED da una
E
distanza massima di 5 metri,
se puntato direttamente verso
il ricevitore.
: Premere il colore appropriato
alle funzioni di accesso diretto in TELEVIDEO,
EPG, OSD, e per la sorgente di segnale in
modalità MEDIA.
TIME SHIFT: In modalità DTV, premere il
pulsante TS per avviare la funzione di ritardo,
premere il pulsante per avviare la riproduzione del programma ritardo, premere il tasto
per terminare la funzione di ritardo
PVR LIST: In modalità DTV, viene visualizzata
la lista PVR che e’ stata eseguita.
11
Installazione della LED TV
Fare riferimento al manuale proprio di eventuali apparecchiature esterne
da collegare. Quando si collegano apparecchiature esterne, non collegare
alcun cavo di alimentazione alle prese a muro fino a quando tutti gli altri
collegamenti sono stati completati.
Connessione di una TV via cavo o un'antenna
Collegamento dell’Antenna
I requisiti per una buona ricezione antenna TV a colori sono più importanti di quelli
di ricezione della TV in bianco e nero. Per questo motivo, è fortemente raccomandato
di utilizzare un’antenna esterna di buona qualità. Di seguito una breve spiegazione del
tipo di connessione possibile con vari sistemi di antenna:
Un sistema a 75-ohm è in genere un cavo rotondo (non incluso) con connettore
IEC (coassiale) che può facilmente essere collegato a un terminale senza attrezzi
Connettore tipo IEC
75-ohm cavo coassiale (rotondo)
Utilizzare uno dei due seguenti schemi durante il collegamento di un'antenna esterna.
A: Mostra come utilizzare un’antenna esterna con combinazione VHF / UHF.
B: Mostra come utilizzare un’antenna esterna con VHF separata e / o UHF.
A. Antenna con combinazione VHF / UHF
Connessione a TV via cavo (CATV)
Un connettore 75-ohm di tipo cavo coassiale è incorporato nel set per una
semplice connessione. Quando si collega il cavo coassiale a 75 ohm usare
il terminale ANT (anch’esso a 75 ohm).
Alcune società di TV via cavo offrono canali premium a pagamento. Dal
momento che i segnali dei canali a pagamento sono criptati, un convertitore
di TV via cavo / decodificatore è generalmente previsto per l'abbonato da
parte della società stessa della TV via cavo.
Per istruzioni specifiche sull'installazione della TV via cavo, consultare la società
fornitrice. Un metodo possibile per collegare il convertitore / decodificatore fornito
dalla società via cavo è mostrato nella figura seguente.
12
Installazione della LED TV
Utilizzare il cavo di antenna in dotazione per collegare il segnale
TV al terminale della TV via cavo nella Vostra LED TV.
Collegare prima il cavetto 12V DC sul retro del televisore e poi
collegare il cavo di alimentazione alla presa a muro.
DC 12V
Premere il bottone
sul telecomando per accendere la Vostra LED TV.
Scollegare sempre la TV
E LED dalla presa di corrente qualora Enon la si
utilizzasse per un lungo periodo di tempo.
Il pulsante di accensione sul pannello frontale è utilizzata solo per Eil
passaggio della TV LED in standby, non per scollegare il dispositivo
dalla tensione di rete. Per scollegare completamente l'alimentazione
principale, si prega di staccare la spina dalla presa.
Premere il tasto Source sul telecomando per visualizzare l'elenco delle
VRUJHQWLGLVHJQDOHGLVSRQLELOL8VDUHLWDVWLŸźSHUVHOH]LRQDUHOD
sorgente DTV, quindi premere il tasto ENTER.
13
Installazione della LED TV
Connessione di un dispositivo A/V tramite il connettore SCART
VCR
Lettore DVD
Cavo SCART
Ricevitore satellitare
Box per TV via cavo
Utilizzare un cavo SCART per collegare la presa SCART del
dispositivo A / V esterno alla presa SCART del TV LED.
Collegare tutte le sorgenti di alimentazione AC, prima di
accendere l'interruttore di alimentazione del televisore LED
e degli altri apparecchi collegati.
Premere il bottone
LED TV..
power
sul telecomando per accendere il Vostro
SOURCE
Premere il bottone
sul telecomando, poi usare i tasti
ŸRźSHUVHOH]LRQDUH6&$57HSUHPHUHLOWDVWR(17(5
14
Installazione della LED TV
Connessione di un dispositivo A/V tramite il connettore YPbPr
DVD o VCR
DVD o VCR – lato posteriore
Cavo YPBPR
Cavo AUDIO
Utilizzare un cavo YPbPr per collegare il jack di uscita del dispositivo
A/V esterno al jack YPbPr della Vostra LED TV. Utilizzare un cavo
audio per collegare il jack di uscita del canale audio del dispositivo
A/V al jack YPbPr AUDIO della Vostra LED TV.
Collegare tutte le sorgenti di alimentazione AC, prima di accendere
l'interruttore di alimentazione del televisore LED e degli altri
apparecchi collegati.
power
Premere il bottone
LED TV.
sul telecomando per accendere il Vostro
SOURCE
3UHPHUHLOERWWRQHVXOWHOHFRPDQGRSRLXVDUHLWDVWLŸRźSHU
selezionare YPBPR e premere il tasto ENTER.
I jack video YPbPr su un apparecchio audio / video sono a volte etichettate
YPbPr o YCbCr. Per una spiegazione del video a componenti, riferirsi al
manuale proprio del dispositivo A / V
15
Installazione della LED TV
Connessione di un dispositivo A/V tramite il connettore HDMI
Cavo HDMI
DVD 0 VCR – lato posteriore
DVD o VCR
Utilizzare un cavo HDMI per collegare l'apparecchio A/V al jack di
uscita tipo HDMI della Vostra LED TV.
Collegare tutte le sorgenti di alimentazione AC, prima di accendere
l'interruttore di alimentazione del televisore LED e degli altri
apparecchi collegati.
Premere il bottone
LED TV.
power
sul telecomando per accendere il Vostro
SOURCE
3UHPHUHLOERWWRQHVXOWHOHFRPDQGRSRLXVDUHLWDVWLŸRźSHU
selezionare HDMI e premere il tasto ENTER.
Il connettore HDMI fornisce sia i segnali video e audio, non è necessario
collegare il cavo audio
16
Installazione della LED TV
Connessione di un dispositivo A/V tramite il connettore DVI
Cavo HDMI-DVI
Cavo AUDIO
DVD 0 VCR – lato posteriore
DVD o VCR
Utilizzare un cavo HDMI-DVI per collegare l'apparecchio A/V al jack
di uscita tipo HDMI della Vostra LED TV.
Utilizzare un cavo audio per collegare il jack di uscita audio del
dispositivo A/V al jack HDMI AUDIO della Vostra LED TV.
Collegare tutte le sorgenti di alimentazione AC, prima di accendere
l'interruttore di alimentazione del televisore LED e degli altri
apparecchi collegati.
power
Premere il bottone
LED TV.
sul telecomando per accendere il Vostro
SOURCE
3UHPHUHLOERWWRQHVXOWHOHFRPDQGRSRLXVDUHLWDVWLŸRź
per selezionare HDMI e premere il tasto ENTER.
Se la EVostra LED TV è collegata al connettore DVI di apparecchiature A/V,
avrete bisogno di un cavo HDMI-DVI o di un adattatore HDMI (non fornito)
e un cavo audio.
17
Installazione della LED TV
Connessione a PC
Cavo AUDIO
Cavo VGA
Utilizzare un cavo D-SUB per collegare l’uscita del PC al jack
VGA d’ingresso della Vostra LED TV. Utilizzare un cavo audio
per collegare l’uscita audio del PC all’ingresso audio della V
ostra LED TV.
Collegare tutte le sorgenti di alimentazione AC, prima di accendere
l'interruttore di alimentazione del televisore LED e degli altri
apparecchi collegati.
power
Premere il bottone
LED TV.
sul telecomando per accendere il Vostro
SOURCE
3UHPHUHLOERWWRQHVXOWHOHFRPDQGRSRLXVDUHLWDVWLŸRź
per selezionare VGA e premere il tasto ENTER.
18
Installazione della LED TV
Connessione di un ricevitore audio
For better sound quality, you may want to play the LED TV audio through your
stereo system.
Cavo AUDIO
Ricevitore AUDIO
Utilizzare un cavo audio per collegare il ricevitore audio LINE IN
all’ingresso COAXIAL della Vostra LED TV.
Collegare tutte le sorgenti di alimentazione AC, prima di accendere
l'interruttore di alimentazione del televisore LED e degli altri
apparecchi collegati.
power
Premere il bottone
LED TV.
sul telecomando per accendere il Vostro
19
Funzionalità della Vostra LED TV
1. Introduzione e descrizione del Menu Principale
La figura mostra la pagina relativa alla voce CANALE del Menu Principale.
Le voci del Menu Principale con DTV / ATV sorgente del segnale di
ingresso sono, in alto, da destra: CANALE –> IMMAGINE -> SUONO ->
TEMPO -> OPZIONI -> BLOCCO. Se il segnale di ingresso non è DTV /
ATV, la pagina di default è IMMAGINE. Premere INVIO per entrare nei
sottomenu
1.1 Personalizzazione delle impostazioni dei CANALI
Programme edit
Signal Information
CI Information
MENU
Back
OK
Select
EXIT
Quit
Nota:
1) CANALE puo’ essere selezionato solo nella condizione ATV/DTV,
altrimenti non può essere usato.
1.1.1 Scansione Automatica
Cliccando sulla scansione automatica,si presenteranno le opzioni “
Selezione paese” e “tipo di scansione”.
Move
OK
EXIT
1) Funzioni disponibili:
Voce
Valori possibili
Default
Descrizione
Tipo di
sintonizzazione
DTV + ATV ->
DTV -> ATV
DTV + ATV
Selezione
paese
UK -> Australia
-> …
Il valore predefinito del paese dipende dal
luogo di spedizione o se designato dal clienti.
In caso contrario, il Regno Unito (UK) è di
default.
20
Funzionalità della Vostra LED TV
2) Selezione dell’operazione
Premere MOVE per selezionare su e giù, premere DONE per avviare la
scansione. Durante la scansione, il primo 50% del processo equivale alla
sintonizzazione dell’ATV (TV analogica), il restante 50% la sintonizzazione
della DTV (TV digitale)
Data
MENU
Back
EXIT
Quit
Durante la ricerca della sintonia per ATV (ATV tuning), si può uscire premendo
YES per saltare ATV tuning e avviare la sintonizzazione DTV, come mostrato
nella figura seguente:
1.1.2 Sintonizzazione manuale della DTV
Bad
Normal
MENU
Back
Good
EXIT
Quit
1) Funzioni disponibili
Voci
CH
Valori possibili
Default
Dipende dal paese di
appartenenza
Descrizione
Selezionare il canale con il tasto
sinistra/destra e premere ENTER
per confermare, se la potenza del
segnale è sufficiente per mostrare
qualche canale.
.
Selezionare il canale con il tasto sinistra/destra e premere
ENTER per
confermare, se la potenza del segnale è sufficiente per mostrare qualche
canale.
21
Aan de slag
1.1.3 Sintonizzazione manuale della ATV
EXIT
Quit
1) Funzioni disponibili
Voci
Valoripossibili
Spazio salvataggio
1 – 100
Sistema
BG -> I -> DK -> L
Canale corrente
Ricerca
1 – 100
Default
1
Il valore di default dipende dalla selezione
della nazione
1
Mostra il canale corrente
Si può effettuare la ricerca su tutti i canali
Sintonia fine
Sintonia fine
Frequenza
Descrizione
Spazio corrente di salvataggio
Mostra la frequenza corrente e viene
regolata dopo una ricerca o sintonia fine..
Non cambiare se il
campo è grigio
2) istruzione di funzionamento: dopo la regolazione a mano, assicurarsi di
premere il pulsante ROSSO per l'archiviazione, altrimenti tutti i canali
selezionati non sarebbero salvati.
22
Funzionalità della Vostra LED TV
1.1.4 Programma Edit
:
ok
Select
MENU
Back
1) Formato e descrizione
Simbolo
codifica
LCN
Nome CH
21
ABC1
S
Salto
Blocco
Favoriti
Sistema
1. Il menu canali comprende “Cancella / Sposta / Salta / Rinomina / Favoriti”.
“ Blocco、Favoriti、Salta” può essere utilizzato quando i clienti fanno qualche i
mpostazione per il canale(Favoriti non può essere scelto insieme a Salta).
2) Introduzione sull’utilizzo dei tasti
Pulsante
Valori possib
Descrizione
Ÿ
ATV/DTV
Pagina sopra, può girare pagina
ź
ATV/DTV
Pagina sotto, può girare pagina
Elimina il canale corrente, come di seguito:
1)in condizioni normali, premere
CANCELLA
ATV
(DELETE)
per entrare in CANCELLA
2) in CANCELLA,il tasto può essere utilizzato come:
MENU:esce da CANCELLA ed entra in modo normale
EXIT:esce dal menu
:annulla il canale corrente, e ritorna in normale
RINOMINA
ATV
(RENAME)
Modificare il nome del canale corrente, usare solo in modalità ATV.
Introduzione sull’utilizzo:
1) in condizioni normali, premere per entrare in RINOMINA
2) in modo RINOMINA:
MENU:esce da CANCELLA ed entra in modo normale
EXIT:esce dal menu
SU / GIU’:commuta da lettere a numeri o segni
SINISTRA / DESTRA:commuta da destra a sinistra
:esce dal modo RINOMINA,ritorna in normale
23
Funzionalità della Vostra LED TV
SPOSTA ATV/DTV
(move)
Canale funzioni di commutazione, ATV disponibile di default, DTV
valido se LCN non è nella condizione di ordinamento automatico.
1) in condizione normale , entra in modo SCAMBIO,
e il canale selezionato è il canale mobile X..
2) in modo SCAMBIO:
MENU:esce da SPOSTA,ed entra in modo normale
EXIT:esce dal menu
SU / GIU’:scegliere il cambio dei canali
:Se il canale selezionato ora è quello selezionato
precedentemente X, nessun azione è effettuata; altrimenti se il
canale corrente è il canale Y, bisogna cambiare le condizioni di
X e Y. Ma il numero del canale rimane 1,2,3 ... come prima.
Scegli se saltare il canale corrente durante la sintonia dei canali.
Se il canale non è predisposto per essere Saltato, premere
SALTA
(SKIP)
ATV/DTV
,
e saltare il canale corrente;
Se il canale è predisposto per essere Saltato, premere
per cancellare il salto.
AVORITI ATV/DTV
(FAV)
Impostare il canale favorito
1.1.5 Informazioni sul segnale
Solo a condizione di utilizzare DTV, le informazioni sul segnale includono:
:
canale / network / modulazione / qualità / resistenza.
Voce
Informazioni sul
segnale
Parametri dei segnali mostrati
Apre un menu Informazioni segnali, si presenta come segue:
Canale 21
Network Digitale Finlandia
Modulazione 64QAM
Qualità 66%
Resistenza 80%
1.1.6 Informazioni su CI
Disponibili solo in condizione di DTV, ricorda se non è inserita la carta CI.
Quando inserisci la scheda CI , puoi entrare nel menu per controllare tutte le
informazioni della scheda CI.
1.1.7 Modo Registrato
Entrare nel menu Recorder, si riserva la registrazione, PVR specifica
i dettagli dei controlli
24
Funzionalità della Vostra LED TV
1.2 Personalizzazione delle impostazioni dell’IMMAGINE
Menu
Back
ok
Select
EXIT
Quit
1.2.1 Modo Immagine
Menu
Back
EXIT
Quit
1) Istruzione sulle Funzioni
Voce
Modo Immagine
Adjust range
default
Standard->Lieve->
Utente->Dinamico
Standard
Descrizione
Default: non in modalità utente, è possibile
selezionare Contrasto, Luminosità, Colore,
Nitidezza, Tinta. Per fare la regolazione, la
modalità passa su Utenti automaticamente.
2) Istruzioni per le operazioni
Cambia modalità con il tasto SINISTRA / DESTRA; per tornare indietro
all’immagine del menu principale, premere il tasto MENU, poi premere
EXIT per uscire dal menu pricipale.
1.2.2 Contrasto / Luminosità / Colore / Nitidezza
Menu
Back
EXIT
Quit
1) Istruzione sulle funzioni
Voce
Campo taratura
Default
Contrasto
0 - 100
50
Luminosità
0 - 100
50
Colore
0 - 100
50
Nitidezza
0 - 100
50
VGA non disponibile
Sfumatura (Tint)
R50 - 0 - G50
0
Solo con il sistema in NTSC ;
PAL e SECAM ritornano a 0;
25
Descrizione
VGA non disponibile
Funzionalità della Vostra LED TV
2) Istruzioni sulle operazioni
Regolazione: SINISTRA / DESTRA per regolare le dimensioni numeriche ;
Menu: premere MENU per tornare al menu principale;
Exit :EXIT per tornare al menu exit;
Su/giù: spostarsi con su/giù sul campo delle voci:
Contrasto / Luminosità / Colore / Nitidezza
1.2.3 Temperatura del colore
Menu
Back
EXIT
Quit
1) Istruzioni sulle funzioni
Voce
Valori
Temperatura
del colore
Standard-> Freddo ->
Utente -> Caldo
Default
Descrizione
Standard
Se non in modalità Utente, è
possibile selezionare le opzioni
Rosso / Verde / Blu per
modificare il colore. Se Utente
si regola automaticamente
2) Istruzioni sulle operazioni
Regolazione: SINISTRA / DESTRA per
; regolare il contenuto;
Menu :MENU per tornare indietro;
Exit :EXIT esce dal menu;
1.2.4 Rosso / Verde / Blu
Menu
Back
EXIT
Quit
1) Istruzioni sulle funzioni
Optie
Campo taratura
Default
Rosso
0 - 100
50
Verde
0 - 100
50
Blu
0 - 100
50
Descrizione
2) Istruzioni sulle operazioni
Regolazione: SINISTRA / DESTRA per regolare le dimensioni numeriche ;
Menu: MENU per ritornare all'immagine del menu principale;
Exit :EXIT per uscire dal menu pricipale;
Su/giù, tasti per selezionare le voci da regolare:
sono il tasto rosso / verde / blu;
26
Funzionalità della Vostra LED TV
1.2.5 Dimensione Immagine
1) Istruzioni sulle funzioni
Rapporto d'aspetto
Default
16:9 / 16:10
16:9
4:3
4:3
4:3
(Dimensioni fisiche 16:9)
16:9
Sorgente di
ingresso
Modo
No VGA
16:9 -> Zoom1 -> Zoom2 -> Auto -> 4:3
VGA
16:9 -> 4:3
No VGA
16:9 -> Zoom1 -> Zoom2 -> Auto -> 4:3
VGA
4:3 -> 16:9
No VGA
16:9 -> Zoom1 -> Zoom2 -> Auto -> 4:3
VGA
16:9 -> 4:3
Note:Quando il rapporto d’aspetto è 4:3,la dimensione è 16:9 e il modo
4:3, la scala dell’immagine reale è 1:1.
1.2.6 Riduzione del rumore
1) Istruzioni sulle funzioni
Voce
Riduzione rumore
Voce da regolare
On -> Off
Default
Descrizione
On
VGA settato Off,
non regolabile
2) Istruzioni sulle operazioni
Entrare nel menu, scegliere con Su/giù: off / basso / medio / default.
11.3 Personalizzazione delle impostazioni del SUONO
Menu
Back
OK
27
Select
EXIT
Quit
Funzionalità della Vostra LED TV
1.3.1 Modalità Audio
Menu
Back
EXIT
Quit
1) Istruzioni sulle funzioni
Voce
Voce da regolare
Default
Descrizione
Modalità audio
Standard-> Musica ->
Film-> Sport-> User
Standard
Se non in modalità Utente,
Acuti e Bassi non possono
essere selezionati e cambiati.
2) Istruzioni sulle operazioni
Regolare: regolabile con SINISTRA / DESTRA:Standard-> Musica->
Film-> Sport-> User
Menu :MENU per tornare al menu principale.
Exit :EXIT per uscire dal menu
1.3.2 Alti / Bassi / Bilanciamento
Menu
Back
EXIT
Quit
11) Istruzioni sulle funzioni
Voce
Campo taratura
Default
Descrizione
Alti
0 – 100
50
Regolazione suono alti
Bassi
0 – 100
50
Regolazione suono bassi
2) Istruzioni sulle operazioni
Regolare: SINISTRA / DESTRA controllo della dimensione dei dati
Menu : MENU per ritornare all'immagine del menu principale
Exit :EXIT
SU / GIU' per scegliere la regolazione di: Alti / Bassi / Bilanciamento
1.3.3 Volume Auto
1)Funzione: Regolazione automatica del suono
2)Operatione:ENTER per impostare ON / OFF
1.3.4 Surround (circondare) il suono
1)Funzione :settare suono surround
2)Operazione:ENTER per impostare ON/OFF
1.3.5 SPDIF
1)Funzione :impostare la modalità di uscita SPDIF's.
2) Istruzioni sulle operazioni:ENTER per impostare Off, PCM o Auto.
28
Funzionalità della Vostra LED TV
1.4 Personalizzazione delle impostazioni dell'ORA
Menu
Back
OK
Select
EXIT
Quit
1.4.1 Orologio
Menu
Back
EXIT
Quit
1) Istruzioni sulle funzioni
Per default non prendere le informazioni dell'ora da DTV, ma viene
impostata a mano entrando nel menu CLOCK..
2) Istruzioni sulle operazioni
Sposta: con tasti su/giù
Menu : MENU per ritornare all'immagine del menu principale
Esci :uscita
SINISTRA / DESTRA: Tasti per impostare il parametro
1.4.2 Off Time
Menu
Back
29
EXIT
Quit
Funzionalità della Vostra LED TV
1) Istruzioni sulle funzioni
Voce
Voce da regolare
Ripetere
Off->Una volta->Tutti i giorni-> Lun~
Ven->Lun~Sab->Sab~Dom->Dom
Default
Descrizione
Off
Ora
00 - 23
00
Si spegne se attivato.
Grigio, non disponibile.
Minuti
00 - 59
00
Si spegne se attivato.
Grigio, non disponibile.
2) Istruzioni sulle operazioni
Sposta: con tasti su/giù
Menu : MENU per ritornare all'immagine del menu principale
Esci :uscita
SINISTRA / DESTRA: tasto per impostare il parametro
1.4.3 Sincronizzato
Menu
Back
EXIT
Quit
11 ) Istruzioni sulle funzioni
Voce
Voce da regolare
Default
Ripetere
Off->Una volta->Tutti i giorni->
Lun~Ven->Lun~Sab->Sab~
Dom->Dom
Off
Ora
00 -> 23
12
Si spegne se ripetuto.
Grigio, non disponibile.
Minuti
00 -> 59
00
Si spegne se ripetuto.
Grigio, non disponibile.
Volume
0 - > 100
30
Sorgente
DTV -> Radio -> Data -> ATV
-> …
DTV
Canale
ATV:1 – 100
DTV / Radio / Dati: secondo le
informazioni del canale
Vedi Nota
30
Descrizione
Si spegne se ripetuto.
Grigio, non disponibile.
Si spegne se ripetuto.
Grigio, non disponibile.
L’ordine dipende dall’ordine
delle sorgenti di ingresso.
Si spegne se ripetuto.
Grigio, non disponibile.
Quando la TV non è la
sorgente del segnale, il
campo è grigio. Nella lista
sorgenti, scegliere DTV/radio/
data, ma il campo resta vuoto
quando non ci sono
informazioni sul canale.
Funzionalità della Vostra LED TV
2)Istruzioni sulle operazioni
Sposta: con tasti su/giù
Menu : MENU per ritornare all'immagine del menu principale
Esci :uscita
SINISTRA / DESTRA: tasto per impostare il parametro
1.4.4 Sleep time
1) Istruzioni sulle funzioni
Voce
Sleep
time
Voce da regolare
Off -> 10min -> 20min -> 30min
-> 60min -> 90min -> 120min > 180min -> 240min
Default
Descrizione
Off
Allarme d’avviso per almeno
60 secondi. Si ferma premendo il tasto e lo sleep time
viene spento.
2) Istruzioni sulle operazioni
Entrare nel secondo menu, usare su/giù per impostare sleep time.
1.4.5 Time zone
1) Istruzioni sulle funzioni
Voce
Voce da regolare
Default
Descrizione
La scelta di default dipende dal paese di
spedizione o dalle scelte dell’utente.
Quando la sintonizzazione è automatica,
cambia automaticamente in base al paese
selezionato.
Fuso
orario
2)Istruzioni sulle operazioni
Entrare nel secondo menu, usare su/giù per impostare il fuso orario GMT
CANARIE / GMT Lisbona / GMT Londra / Amsterdam GMT +1 ... ....
31
Funzionalità della Vostra LED TV
1.5 Personalizzazione delle impostazioni delle OPZIONI
OSD Duration
Menu
Back
OK
30S
Select
EXIT
Quit
1.5.1 Linguaggio OSD
1) Istruzioni sulle funzioni
Voce
Voce da regolare
Default
Linguaggio
linguaggio supportato
OSD
Descrizione
Scegli la lingua predefinita secondo
l'indirizzo di spedizione e la domanda
dei clienti.
Lingue di default: Inglese Francese
Tedesco Italiano Portoghese
2) Istruzioni sulle operazioni
Entrare nel secondo menu, usare il tasto su/giù per impostare la lingua
1.5.2 Lingua audio – Prima
1) Istruzioni sulle funzioni
Voce
Voce da regolare
Lingua audio Prima -
Prima lingua
selezionata
Default
Descrizione
Non selezionata alla condizione
di non DTV
2) Istruzioni sulle operazioni
Entrare nel secondo menu, usare il tasto su/giù per impostare la lingua
1.5.3 Lingua audio – Seconda
1) Istruzioni sulle funzioni
Voce
Voce da regolare Default
Lingua audio Seconda-
Seconda lingua
selezionata
Descrizione
Non selezionata alla condizione di
non DTV
2) Istruzioni sulle operazioni
Entrare nel secondo menu, usare il tasto su/giù per impostare la lingua
32
Funzionalità della Vostra LED TV
1.5.4 Lingua dei sottotitoli -Prima
1) Istruzioni sulle funzioni
Voce
Voce da regolare
Lingua dei
sottotitoli -Prima-
Prima lingua
selezionata
Default
Descrizione
Non selezionata alla condizione di
non DTV
2) Istruzioni sulle operazioni
Entrare nel secondo menu, usare il tasto su/giù per impostare la lingua.
1.5.5 Lingua dei sottotitoli -Seconda
1) Istruzioni sulle funzioni
Voce
Voce da regolare
Lingua dei
sottotitoli Seconda-
Seconda lingua
selezionata
Default
Descrizione
Non selezionata alla condizione di
non DTV
2)Istruzioni sulle operazioni
Entrare nel secondo menu, usare il tasto su/giù per impostare la lingua.
1.5.6 Durata OSD
1)Istruzioni sulle funzioni:
La durata del OSD sullo schermo.
2) Istruzioni sulle operazioni:
ENTER per impostare 5S, 10S, 15S, 20S, 25S, 30S, 35S or 40S.
1.5.7 Paese
1)Istruzioni sulle funzioni:
Mostra la lingua corrente, grigio, non selezionata.
1.5.8 Ripristino di fabbrica
1)Istruzioni sulle funzioni:
Ripristino di fabbrica
2)Istruzioni sulle operazioni:
Entrare nel secondo menu, usare il tasto su/giù per selezionare "sì" o "no".
33
Funzionalità della Vostra LED TV
1.6 Personalizzazione delle impostazioni di BLOCCO
Lock Channel
Menu
Back
OK
Select
EXIT
Quit
1.6.1 Blocco del Sistema
1) Istruzioni sulle funzioni
Voce
Voce da regolare
Default
Lock System
Off/On
Off
Descrizione
2) Istruzioni sulle operazioni
SINISTRA per interrompere l’operazione e tornare indietro al menu principale
DESTRA per cancellare la password e riscrivere quella giusta. E' necessario
un ingresso con password corretta per accedere al menu LOCK. Segala
password errata inserendola male.
MENU per uscire dal menu LOCK
34
Funzionalità della Vostra LED TV
1.6.2 Impostazione Password
1) Istruzioni sulle funzioni
Voce
Voce da regolare
Default
Descrizione
Impostazione
password
Entrare nel sottomenu, inserire la
nuova password e confermare
2)Istruzioni sulle operazioni
SINISTRA per uscire da resetta password, torna al menù principale
DESTRA per cancellare la password scritta , e poi riscriverla. Se si sbaglia due volte
la password segnala "la password non corrisponde".
1.6.3 Blocco dei Programmi
1) Funzioni disponibili
Simbolo
codifica
LCN
Nome CH
S
21
ABC1
Simbolo
blocco
Sistema
Nota: Il simbolo blocco è usato quando l’utente effettua
cambiamenti del canale.
2) Descrizione dei tasti
Tasto
Funzione
Ÿ
Pagina precedente, sfogliamento delle pagine;
ź
Pagina successiva, sfogliamento delle pagine;
Ɣ(LOCK)
Controllare se il canale corrente è bloccato: in caso affermativo,
è necessaria la password prima di poter guardare qualsiasi
programma..
Premendo Ɣ su un canale non bloccato: il canale diviene bloccato
Premendo Ɣ su un canale bloccato: il canale si sblocca
1.6.4 Controllo Genitori
1) Funzione: se il valore impostato per il Controllo Genitori è inferiore alla
classe reale del programma, è necessario bloccare il canale e poi inserire
la password per poterlo guardare.
Voce
Valori possibili SDefault
Controllo Genitori
Off -> 4 -> 5 > … -> 18
Off
Descrizione
Non selezionato se non in modalità
DTV
2)Istruzioni:
(QWUDUHQHOVHFRQGRPHQXXVDUHLWDVWLŸHźSHUWURYDUHLFDQDOLGHVLGHUDWLH
premere ENTER per la conferma.
35
Funzionalità della Vostra LED TV
2. Personalizzazione delle impostazioni ALTRI MENU
2.1 Lista Canali
La Lista Canali mostra tutti i canali trovati nella ricerca iniziale
Move
OK
Select
EXIT
Quit
1) Funzioni disponibili:
Simbolo
codifica
LCN
Nome CH Saltare
S
21
ABC1
Bloccato
Favorito
Sistema
Nota:l’etichetta di canale bloccato, favorito o da saltare si può applicare
solo su canali che fanno verifiche tra i consumatori/
2) Funzione dei tasti
Tasto
Funzione
Lista CH
In modalità DTV/ATV non all’interno della Lista Canali, chiude il
menu Mute e apre la finestra della Lista Canali;
All’interno della Lista Canali, questo tasto permette di uscire;
Ÿ
Pagina precedente, sfogliamento delle pagine;
ź
Pagina successiva, sfogliamento delle pagine;
2.2 Lista Canali Favoriti
La Lista Canali Favoriti e la Lista Canali usano le stesse impostazioni,
ma la Lista Canali Favoriti mostra i canali che l’utente sceglie nella
scelta principale dei programmi, usando il tasto FAV per aprire e
chiudere la Lista Canali Favoriti.
36
Funzionalità della Vostra LED TV
2.3 EPG
EPG è disponibile solamente in DTV. Le informazioni relative ai canali sono
classificate a seconda dei campi Canale/Orario.
Scelta su e giù: Canale/Orario
OK
Select
EXIT
Quit
Tutte le informazioni relative ai programmi:
se classificati secondo l’orario, mostra le
informazioni relative ai canali all’orario
corrente.
Deattaglio informazioni
relative al programma.
1)Descrizione operazioni:
Scelta (Move): su e giù
Menu:uscita da EPG
OK: passa al programma selezionato
Indice: passa alle opzioni battitura.
Record (Registrazione): registrazione programma. Mostra la modalità di
Registrazione (fare riferimento alla sezione PVR del manuale, vedi sotto!)
Schedule (Orario): Informazioni relative alla registrazioni. Fare riferimento
alla lista programazioni della modalità PVR sotto.
Remind (Memo): Informazioni promemoria relative al programma. L’opzione
Remind mostra il seguente menu:
Programme
Mode
Minute
Hour
Date
Month
Move
OK
Select
MENU
Back
Usare le frecce su e giù per la scelta e premere OK.
37
Funzionalità della Vostra LED TV
2.4 Guida di Installazione
Please set the following options, then
OK
Select
EXIT
Quit
11) Istruzioni
Se le informazioni dei canali non sono memorizzate, al momento
dell’accensione e della scelta della modalitàDTV / ATV, mostra il
menu della Guida di Installazione.
2)Operazioni possibili:
Scelta (Move): su e giù
Uscita (Exit):uscita dal menu
OK:selezione dell’opzione corrente
38
Funzionalità della Vostra LED TV
3. Personalizzazione delle impostazioni MULTIMEDIA
3.1 Breve introduzione
Nel menu della Sorgente di ingresso, scegliere USB per entrare nella
schermata per la modalità Multimedia. Oltre che alla riproduzione
multimediale dei files, il sistema è in grado di effettuare altre
operazioni su immagini, files musicali, film, etc.
3.2 Menu principale della modalità Multimedia
1) Schermata tipica iniziale:
informazioni USB
File/cartella multimediale
Menu
Inserimento informazioni
dell’HD
Dischi
Menu
OK
Select
operazione
2) Menu principale
Voce
Funzione
Dispositivo
inserito
Se sta analizzando un dispositivo USB, l’icona si illumina, altrimenti
resta grigia.
Tipo file
Multimediale
Da sinistra a destra: IMMAGINI, MUSICA, FILM, TESTO
Disco
Mostra i dischi inseriti, ordinandoli alfabeticamente, partendo da C.
USB info
Mostra le informazioni del dispositivo USB inserito. Quando non
c’ è alcun dispositivo USB, non mostra alcuna periferica; quando
si inseriscono dispositivi USB, mostra il tipo corrispondente, come
USB2.0, USB1.1 e così via;
In caso di problemi, apparirà il messaggio: Reinserire il dispositivo.
Operazioni
Mostra le operazioni disponibili allo stato corrente.
39
Funzionalità della Vostra LED TV
3.3 Sottomenu IMMAGINI
1) Schermata sottomenu IMMAGINI:
Disco
Cartelle nel disco, premere INVIO per entrare
Pagina
Anteprima
Delete Current File
Add/Remove all
OK
Full screen
Menu
Menu
EXIT
Add/Remove to playlist
Quit
Miniature delle immagini
Informazioni immagine
2) Descrizione del sottomenu
Voce
Descrizione
Disco
Mostra il disco corrente
Pagina
Mostra la pagina dell’archivio, nel formato 1/2
(pagina 1 di 2 in totale).
Lista immagini
Lista immagini della pagina corrente
Anteprima
Immagine selezionata
Informazioni
???.jpg
----nome del file
[Resolution] 800 x 600
----risoluzione
[Size] 28521 Bytes
----dimensioni immagine
Data
---- data di creazione
Ora
---- ora di creazione
40
Funzionalità della Vostra LED TV
3)Operazioni
Quando un’immagine viene selezionata, mostra un'anteprima con cornice e
dettagli, quindi premendo INVIO, l’immagine viene mostrata su schermo intero
Quando l’immagine è su schermo intero, premendo INVIO appariranno i
bottoni spiegati nella sezione seguente.
In
Out
4) Descrizione delle operazioni
Tasto
Funzione
Info/Display
Mostra l’anteprima dell’immagine corrente, con le seguenti informazioni:
Blue Hills.jpg
----nome del file
[Resolution] 1024 x 768
----risoluzione
[Size] 28521 Bytes
----dimensioni immagine
Uscita
Uscita dalla riproduzione dell’immagine, ritorno al menu
precedente, schermata del sottomenu IMMAGINI.
Play
Riproduzione immagini a tutto schermo. Se più immagini sono
selezionate, lo schermo cambia dopo un certo tempo
(default: 5 secondi).
Pausa
Pausa
Stop
Interruzione della riproduzione delle immagini, ritorno alla lista dei
file lasciando aperta l’ultima immagine quando si è premuto Stop.
Precedente
Mostra il file precedente
Successivo
Mostra il file successivo
Ripetere
Modalità di ripetizione: si può scegliere di ripetere una immagine,
tutte, nessuna, una selezione di immagini o non ripetere.
Playlist
Lista delle immagini riprodotte.
Ruotare
Ruota l’immagine in senso orario/antiorario.
Zoom in
Ingrandimento
Zoom out
Riduzione
41
Funzionalità della Vostra LED TV
3.4 Sottomenu MUSICA
1) Schermata sottomenu MUSICA.
disco
pagina
anteprima
Delete Current File
Add/Remove all
OK
Full screen
Menu
Menu
lista canzoni
EXIT
Add/Remove to playlist
Quit
informazioni del file
2) Descrizione del sottomenu
Voce
Descrizione
Disco
Mostra il disco corrente
Pagina
Mostra la pagina corrente
Lista canzoni
Mostra la lista delle canzoni
Anteprima
Immagine della canzone
Informazioni
Mostra il nome della canzone, la dimensione del file, etc.
3) Operazioni
Il menu per la riproduzione musicale è simile a molti software musicali per
computer, dove appare la lista delle canzoni (playlist), qualche informazione
relativa al file, la barra che indica l’esecuzione della canzone, e qualche
semplice operazione, come segue:
42
Funzionalità della Vostra LED TV
Informazioni del file Nome della canzone
Lista delle canzonit
Screen Saver
1/1
Remove
Remove all from playlist
Goto Time
Guida alle operazioni
mmagine del
menu MUSICA
Barra indicante
l’esecuzione
Tempo/durata
4) Informazioni nel sottomenu
Voce
Descrizione
Nome della canzone Nome della canzone corrente
Immagine del
menu MUSICA
Immagine del menu MUSICA
Lista delle canzoni
Canzoni disponibili nel lettore, in ordine alfabetico.
Informazioni relative al file selezionato:
Artista: ABC Year: 2005
----artista
Titolo: DEF
----titolo canzone
----album
Informazioni del file Album: GHI
Bit Rate: 128K Sampling: 44K
----bit rate e frequenza
Tutte le informazioni sono ricavate dal file.
Tempo/durata
Mostra il tempo della canzone eseguito e il tempo totale, nel
formato: 00:01:23/00:04:56
Guida alle operazioni Guida all’operazione corrente
Barra indicante
l’esecuzione
Mostra come procede l’esecuzione del file corrente.
5) Descrizione delle operazioni
Tasto
Funzione
Invio
Inizia l’esecuzione del file evidenziato, dall’inizio.
Up/Down
Relativo alla lista delle canzoni.
Uscita
Uscita dal sottomenu MUSICA, continuando però ad eseguire
la canzone corrente. ritorno al menu precedente.
Play
Play/Esecuzione
Pausa
Pausa
Stop
Interruzione della riproduzione sonora, ritorno alla lista dei file
lasciando evidenziata l’ultima canzone quando si è premuto Stop.
Successiva
Esegue la canzone successiva.
Ripetizione
Modalità di ripetizione: si può scegliere di ripetere una canzone,
tutte, nessuna, una selezione di canzoni o non ripetere.
43
Funzionalità della Vostra LED TV
3.5 Sottomenu FILM
1) Esecuzione filmato
1. I filmati sono eseguiti a schermo intero, dal primo file, ordinati alfabeticamente.
2. Il sistema effettuerà automaticamente lo zoom in/out necessario per mantere la
dimensione originale del file in esecuzione.
2)Schermata sottomenu FILM
Delete Current File
Add/Remove all
OK
Full screen
Menu
Menu
EXIT
Add/Remove to playlist
Quit
Premere INVIO per selezionare un filmato: questo mostrerà la cornice di anteprima
del file e le informazioni relative al file selezionato. Premere poi PLAY per iniziare
l’esecuzione a schermo intero del film:
+
Slow
Step
Goto Time
1)Descrizione tasti:
Ripetizione :1, tutti, nessuno
Set A : esecuzione circolare del set A
Playlist: mostra sullo schermo un finestrella con la lista dei file disponibili e la playlist
corrente. L’utente può navigare nella lista usando le frecce su/giù e selezionare file
premendo INVIO. Se nessuna operazione viene eseguita per 10 secondi, la finestrella
si chiude.
Informazioni:mostr ai dati relativi al film in esecuzione, tipo nome del file, risoluzione,
frequenza, tempo totale e tempo trascorso.
Goto: si aprirà una cornice con l’indizione del tempo trascorso/tempo totale, 00:00:00/
01:23:45. L’utente può cambiare la posizione di esecuzione corrente usando i tasti
sinistra/destra e cambiare il tempo trascorso usando le frecce su/giù, premendo INVIO
per confermare la scelta.
44
Funzionalità della Vostra LED TV
3.6 Sottomenu TESTO
Delete Current File
Add/Remove all
OK
Full screen
Menu
Menu
EXIT
Add/Remove to playlist
Quit
Selezionare l’opzione TESTO, premere INVIO e apparirà l’immagine
precedente. Selezionare un file e premere PLAY per mostrare il file a tutto
schermo, come nella figura seguente:
Operazioni:
Prev page: pagina precedente
Next page: pagina successiva
Prev.: file precedente
Next: fiel successivo
Stop: fermare lo sfogliamento automatico delle pagine del file
Playlist: mostra la lista dei files in alto a destra
Info: informazioni del file corrente, mostra nome e dimensioni
45
Funzionalità della Vostra LED TV
4. Personalizzazione delle impostazioni PVR - Personal Video Recorder
(Registrazione personalizzata dei video)
4.1 Introduzione
La funzione PVR è disponibile solo nella modalità DTV. Comprende
Registrazione, Timeshift e la funzione Riproduzione (Playback). La
registrazione include tempo reale e programmazione.
Nella registrazione in temp oreale si usano bottoni disponibili sullo schermo,
mentre per registrare appositi canali, è necessaria la programmazione del
sistema. Registrazione e riproduzione può essere fatto contemporaneamente:
si puo’ registrare un canale della DTV e utilizzare un dispositivo USB allo
stesso tempo.
La modalità Timeshift stesso è un'altra funzione usata per registrare e
riprodurre programmi allo stesso tempo.
Maggiori dettagli nei paragrafi seguenti.
4.2 Dettaglio delel funzioni del menu PVR
4.2.1 File di sistema PVR
Dal menu del CANALE, si può entrare in PVR ottenendo la schermata seguente
Move
Bottone
OK
Select
MENU
Back
Funzione
Controllo del
file di sistema
PVR
Disco USB
Se non c’ è un dispositivo USB collegato compare il messaggio
“Nessun Dispositivo USB Disponibile”.
Se c’ è un dispositivo USB collegato, mostra il messaggio : Pass
Formato
Si può usare per impostare il formato MStar. Premere il tasto
Invio per selezionare il dispositivo USB e accedervi.
Dal menu Formato, il dispositivo USB è in grado di completare le
funzioni PVR.
Se non ci sono problemi, mostra il messaggio: Pass
Dimensione
TimeShift
Non può essere selezionato.
Dopo il controllo del file di sistema PVR, se il dispositivo USB
passa il controllo, mostra che il formato Mstar può essere usato
in modalità Timeshift. La dimensione è impostata dall’utente in
fase di formattazione.
Velocità
Non può essere selezionato.
Dopo il controllo del file di sistema PVR, se il dispositivo USB
passa il controllo, mostra la velocità disponibile per il sistema e
ricorda all’utente in quali limiti può operare.
46
Funzionalità della Vostra LED TV
4.2.1.1 Selezione Disco
Scelta del disco dove salvare il contenuto della registrazione (default: disco C)
Move
OK
Select
4.2.1.2 Controllo del file di sistema PVR
Il controllo del file di sistema PVR dei dispositivi di salvataggio è ben consolidato.
Inizia come predefinito, premere il tasto Invio per controllare i file di sistema
dell’USB e la velocità. Ilsistema durante l’elaborazione mostra “Controllo”.
Quando non c’ è un dispositivo USB collegato, o l’ispezione fallisce, il sistema
mostra il messaggio “FAIL”.
Quando si inserisce USB, ma non passa il controllo del formato MStar, bisogna
entrare nel menu Formato.
Quando si inserisce un dispositivo USB, ma il controllo trova o una partitzione
abnorme o nessuna partizione, il sistema mostra il messaggio “Nessuna
partizione trovata”.
Se il controllo normale, il sistema mostra il messaggio “SUCCESSO”.
Move
OK
Select
4.2.1.3 Formato
Nel menu Formato, premere il tasto Invio per avviare il controllo PVR File System.
Dopo la conferma delle informazioni del dispositivo USB, si apre una finestrella
che mostra l’esecuzione della formattazione del disco:
Dopo la formattazione, il sistema scriverà il file di sistema PVR in base alla
Dimensione del file di sistema PVR, confermato in precedenza.
47
Funzionalità della Vostra LED TV
4.2.1.4 Timeshift grootte
Als het aanmaken van PVR bestandssysteem voltooid is, het popt out Time Shift
Grootte instelling menu, en klant kunt ruimtegrootte voor timeshift als vervolgt
OK
Select
MENU
Back
4.2.2 Canali –Lista Registrazioni
1) Schermata:
Il menu appare come nella figura seguente
itolo, ordine
Simbolo
programma
OK
guida alle operazioni
Select
48
Funzionalità della Vostra LED TV
2) Menu istruzioni
3) Tasti
49
Funzionalità della Vostra LED TV
4.2.3 PVR – Modalità Registrazione
1) Modalità Registrazione
Date
Month
2010/07/20
Jan
Date
2010/07/20
Month
Move
Jan
OK
Select
2) Tasti
50
MENU
Back
Funzionalità della Vostra LED TV
4.2.4 PVR – Programmazione Regiatrazione
1) Menu e funzioni
Move
Delete
MENU
Back
EXIT
Quit
Note:
1. Le voci senza l’ora di inizio sono ordinate a seconda della programmazione
di registrazione.
Se si entra il menu per aggiungere una nuova programmazione, la selezione
resta su di essi.
2. Si entra in questo menu durante la registrazione, la registrazione corrente
resta selezionata.
3. A parte i casi 1 e 2, la selezione resta sulla programmazione di registrazione
più recente.
2) Operazioni
4.3 Funzioni PVR di scelta rapida
4.3.1 Scelta rapida da DTV
Nota:Modalità Registrazione e la Lista Registrazione possono essere
aperti dal menu PVR.
51
Funzionalità della Vostra LED TV
4.3.2 Modalità Registrazione
1)Registrazione
I menu di Registrazione presetna due opzioni: Modalità Avanzata e Modalità Semplice.
Si passa da una all’altra tramite il tasto Registrazione/Uscita.
In modalitàRegistrazione, premendo Uscita, si resta nella stessa modalità.
Il menu è il seguente
Modalità Avanzata
Nota 1
Nota 4
Nota 3
Nota 2
Note:
1. Registrazione
2. tempo di registrazione,
3. a sinistra è mostrato il nome del canale e a destra il nome del programma,
4. tempo corrente
2. Modalità Semplice
[00:00:20]
Note:In Modalità Semplice mostra solamente la condiizone di Registrazione e
il tempo di registrazione, in basso a sinistra.
2) Operazioni possibili
52
Funzionalità della Vostra LED TV
4.3.3 Modalità Timeshift
4.3.3.1 Menu della modalità Timeshift
La modalità Timeshift è simile al menu di Registrazione, con Modalità Avanzata e
Modalità Semplice.
Si passa da una all’altra tramite il tasto Uscita.
In modalità Timeshift, premendo Uscita, si resta nella stessa modalità.
Il menu è il seguente
1. Modalità Avanzata
Nota 3
Nota 1
Nota 4
Nota 2
Nota 5
Note:
1) Mostra la condizione attuale durante la riproduzione, cioè i possibili diversi
funzionamenti, quali: Play, Pausa, Avanti veloce, Indietro veloce, Avanti, Indietro.
2) Segnale A->B: mostra solo in condizione Play canale A o B.
3) Barra che mostra l’avanzamento della riproduzione.
4) Ci sono due indicazioni del tempo: uno è per il tempo trascorso durante la
riproduzione corrente e l’altro il tempo fino alla fine del programma.
5) Tempo trascorso.
Modalità Semplice
[-00:03:35]
Nota:
1) In modalità semplice, mostra lo stato della riproduzione della modalità Timeshift
in corso, come Play, Pause e così via.
2) La modalità semplice appare sul lato basso a sinistra
53
Funzionalità della Vostra LED TV
4.3.3.2 Operazioni in modalità Timeshift
4.3.3.2.1 Start in modalità Timeshift
Entrare la modalità Timeshift premendo Pausa: l’immagine sullo schermo si blocca
e la registrazione inizia dalla posizione di pausa.
Le operazioni possibili sono
4.3.3.2.2 Play in modalità Timeshift
Nella condizione Play della modalità Timeshift, il sistema registra il programma
della DTV e allo stesso tempo mostra la riproduzione.
La condizione Play inizia premendo il tasto per la modalità Timeshift: durante
questa operazione, i tasti attivati sono Pausa, Avanti veloce, Indietro veloce e
permette di entrare il menu A->B per sfogliare i programmi in riproduzione.
4.3.3.2.4 Registrazione in modalità Timeshift
Nella condizione Play della modalità Timeshift, i tasti Avanti veloce o Successivo
permettono di entrare nelal condizione Registrazione.
La condizione Registrazione è simile alla modalità di Registrazione.
Le operazioni possibili sono
54
Funzionalità della Vostra LED TV
4.3.4 Playback
4.3.4.1 Playback
La riproduzione Playback è simile a Timeshift, con Modalità Avanzata e Modalità
Semplice.
Si passa da una all’altra tramite il tasto Exit.
In modalità riproduzione (Playback), premendo Uscita, si resta nella stessa modalità.
Il menu è il seguente:
1.Modalità Avanzata
Nota 2
Nota 1
Nota 6
Nota 3
Nota 7
Nota 4
Nota 5
Note:
1) Mostra la condizione attuale durante la riproduzione, cioè i possibili diversi
funzionamenti, quali: Play, Pausa, Avanti veloce, Indietro veloce, Avanti, Indietro.
2) Segnale A->B: mostra solo in condizione Play canale A o B.
3) Barra che mostra l’avanzamento della riproduzione.
4) Ci sono due indicazioni del tempo: uno è per il tempo trascorso durante la
riproduzione corrente e l’altro il tempo fino alla fine del programma.
5) Tempo trascorso.
6) Nome del canale registrato.
7) Nome del programma, se non disponibile appare: “No Information”.
Modalità Semplice
[00:03:35]
Nota:
1) In modalità semplice, mostra la modalità di riproduzione in corso, come Play,
Pause e così via.
2) La modalità semplice appare sul lato basso a sinistra
55
RISOLUZIONE DEI PROBLEMI
TROUBLESHOOTING
Prima di contattare il personale del servizio di consulenza, controllare la
seguente tabella per una possibile causa del problema e per una possibile
soluzione..
La TV non si accende
Assicurarsi che il cavo di alimentazione è collegato, quindi premere il tasto
POWER sul telecomando
Le batterie del telecomando possono essere esaurite
Sostituire le batterie.
Nessuna immagine, nessun suono
Controllare il cavo di interfaccia tra il televisore e l'antenna o il cavo della TV
via cavo.
Premere il tasto POWER sul telecomando.
Premere il tasto SOURCE del telecomando per selezionare le sorgenti
video collegate.
Immagine di scarsa qualita’, suono OK
Controllare il cavo di interfaccia tra il televisore e l'antenna o il cavo della TV
via cavo.
Provare un altro canale, la stazione potrebbe avere difficoltà di trasmissione..
Regolare la luminosità e contrasto delle opzioni nel menu VIDEO.
Immagine OK, suono di scarsa qualita’.
Il suono potrebbe essere disattivato. Premere il tasto MUTE sul telecomando.
Premere il pulsante VOL + per aumentare il volume.
Suono disturbato
Allontanare il televisore da qualsiasi apparecchiatura a raggi infrarossi..
56
DATI SPECIFICI
Articoli
Illustrazione relativa
Pannello
23” LED Schermo Largo
1920 x 1080 pixel
Risoluzione
Caratteristiche
Interfaccia
input
di
Zone compatibili
Multiforma
TV standard
PAL, SECAM
DTV standard
DVB-T
PC
D-sub interfaccia di input ai 15 spilli
CVBS,YPbPr,
HDMI
Interfaccia composita di input del video ,
Interfaccia di input per YPbPr
Interfaccia di input per HDMI
RF
Interfaccia dell'antenna di 75
SCART
Standard Full SCART Interfaccia
Audio
Interfaccia di input audio di sinistra, destra
USB
Interfaccia di input dei dispositivi USB
Uscita Della Cuffia
Interfaccia dell'uscita della cuffia
Uscita dell'altoparlante
3W x 2
Uscita COAXIAL
Interfaccia dell'uscita COAXIAL
Lingua OSD
Inglese, Tedesco, Francese, Olandese, Spagnolo,
Italiano
Alimentazione elettrica
AC in 100-240V, 50/60Hz; DC out 12V,4.0A
Assorbimento di corrente di energia
Funzionamento 40W (Massimo), Standby 1W
Dimensione
623 x 463 x 125 mm (Gift Box)
Peso
4.125Kg (Net)
Accessori
Manuale dell'utente
Carta della garanzia
Telecomando
Batterie AAA
Cavo di alimentazione
Adattatore AC
Caratteristiche e I dati specifici possono essere soggetti a modifiche senza preavviso
57
Dutch
INHOUDSOPGAVE
WAARSCHUWINGEN EN VOORZORGEN
Belangrijke Veiligheidsinstructies................................................................ 1
Antenne Veiligheidsinstructies.................................................................... 3
INTRODUCTIE NAAR LED TV
Pakketinhoud ............................................................................................. 4
Uw LED TV Installeren ................................................................................5
Uw LED TV ................................................................................................ 7
Uw Afstandsbediening .................................................................................10
INTRODUCTIE NAAR LED TV
.
12
Aansluiten TV kabel of Antenne ................................................................
Sluit AV Apparaat aan door SCART Connector ....................................... 14
Sluit AV Apparaat aan door YPbPr Connector ........................................ 15
Sluit AV Apparaat aan door HDMI Connector .......................................... 16
Sluit AV Apparaat aan door DVI Connector ............................................. 17
Aansluiten op PC....................................................................................... 18
Aansluiten op Geluidsontvanger..................................................................19
AAN DE SLAG
CHANNEL Instellingen Aanpassen .........................................................
PICTURE Instellingen Aanpassen ..........................................................
SOUND Instellingen Aanpassen ............................................................
TIME Instellingen Aanpassen .................................................................
OPTION Instellingen Aanpassen ............................................................
LOCK Instellingen Aanpassen .................................................................
OTHER MENU Instellingen Aanpassen .................................................
MULTIMEDIA Instellingen Aanpassen ....................................................
PVR Instellingen Aanpassen ..................................................................
20
25
27
29
32
34
36
39
46
PROBLEMEN EN OPLOSSINGEN
.................................................................................................................56
GEGEVENS
23”LED ....................................................................................................... 57
WAARSCHUWINGEN EN VOORZORGEN
WAARSCHUWINGEN EN VOORZORGEN
Om verwondingen te voorkomen, de vervolgde veiligheidsvoorzorgen moeten tijdens
de installatie, het gebruik, dienstverlening en onderhoud van het apparaat goed op te
letten worden. Voordat het apparaat bedient wordt, lees a.u.b deze handleiding door.
WAARSCHUWING
/(723
Dit symbool is bedoeld om de gebruiker te waarschuwen over het gevaar
van elektrische schok. Het apparaat mag niet gedemonteerd worden door
iemand die niet gekwalificeerde personeel is.
Dit symbool is bedoeld om de gebruiker te waarschuwen over het aanwezigheid
van belangrijke werkzame en onderhoudelijke instructies bijgaand met het apparaat.
Om risico van brand of elektrische schok te voorkomen, het apparaat niet aan
regen of vocht blootstellen.
ƒ205,6,&29$1(/(&75,6&+(6&+2.7(9225.20(13(5621((/
ƒ'('(.2)$&+7(5=,-',*('(.1,(79(5:,-'(5(1 ƒ*((1*(%58,.%(67(0'(21'(5'(/(1%,11(1
ƒ*$1$$5',(1679(5/(1,1*9225*(.:$/,),&((5'(6(59,&(
Het gebruik van bedieningen, aanpassingen of procedures van prestatie anders
dan hierin verwijzen, zou gevaarlijke stralingsblootstelling veroorzaken.
Dit symbool verwijst
aandachtspunten
Dit symbool verwijst
onbevoegde acties.
Dit symbool verwijst
gewensde actie.
ƒ3ODDWVGLWDSSDUDDWQLHWRSRQHYHQRIRQVWDELHOHZDJHQVVWDQGHQWDIHOV
planken, e.d.
Dit apparaat kunt vallen, ernstige verwondingen aan kinderen of volwassenen
veroorzaken, en tevens ernstige schade aan het apparaat brengen.
ƒ*HEUXLNVOHFKWVHHQZDJHQDDQEHYROHQGRRUGHIDEULNDQW'LWDSSDUDDWHQ
aanbevolen wagen en stand moet met zorg gehanteerd worden. Snelle stop,
excessieve kracht, en oneven oppervlakte zou de kanteling van het apparaat
kunnen veroorzaken.
ƒ9HUDQGHUGHIDVHDDUGLQJVWHNNHUQLHW'HDDUGLQJSLQRSGHIDVHVWHNNHULV
belangrijk. Het verwijderen van aarding pin zou de risico van schade aan het
apparaat vergroten.
ƒ$OVXGHVWHNNHULQKHWHOHFWULVFKHVWRSFRQWDFWQLHWNXQWLQVWHNHQFRQWDFWRSQHPHQ
met een elektricien om aarding stopcontact te installeren.
ƒ$OWLMGGLWDSSDUDDWDDQVOXLWHQRSKHWYHUZH]HQWRHYRHUGHYHUZLM]LQJHQVWDWHQRS
de achterkant van serie/model informatie label..
ƒ1RRLWVWRSFRQWDFWHQYHUOHQJVQRHURYHUODGHQ
ƒ*HEUXLNHQKDQWHHUVQRHUPHW]RUJ3ODDWVJppQ]ZDUHYRRUZHUSHQRS$&VQRHU
ƒ7UHN$&VQRHUQLHWRS$&VQRHUQLHWPHWQDWWHKDQGHQKDQWHUHQ
ƒ5DDNGHVQRHUHQDQWHQQHNDEHOQLHWDDQWLMGHQVEOLNVHPVWRUP
1
WAARSCHUWINGEN EN VOORZORGEN
ƒ+DDOVWHNNHUXLWKHWVWRSFRQWDFWDOVKHWDSSDUDDWODQJQLHWLQJHEUXLNZRUGWJHQRPHQ
ƒ+HWDSSDUDDWQLHWGLFKELMZDWHUSODDWVHQJHEUXLNHQRIKDQWHUHQ
ƒ1RRLWKHWDSSDUDDWDDQYORHLVWRIUHJHQRIYRFKWEORRWVWHOOHQ'LHQVWDDQYUDJHQDOV
HHQYDQERYHQVWDDQGHJHYDOOHQJHEHXUW ƒ1RRLWKHWDSSDUDDWDDQH[WUHPHWHPSHUDWXXURI]RQOLFKWEORRWVWHOOHQRPGDWKHWKHW
DSSDUDDWYHUKLWHQVFKDGHWRHEUHQJW
ƒ,QVWDOOHHUKHWDSSDUDDWQLHWGLFKWELMKLWWHEURQQHQ]RDOVUDGLDWRUHQKLWWHUHJLVWHUVRYHQV
RIDQGHUHDSSDUDWHQGLHKLWWHSURGXFHUHQ
ƒ+HWDSSDUDDWQLHWGRRUX]HOIRQGHUKRXGHQ
ƒ+HWRSHQHQHQKHWYHUZLMGHUHQYDQGHNNHQ]RXXDDQJHYDDUOLMNHVSDQQLQJHQRIDQGHUH
JHYDDUEORRWVWHOOHQHQXZJDUDQWLHNUDFKWHORRVPDNHQ2QGHUKRXGYDQJHNZDOLILFHHUGH
SHUVRQHHORPYUDJHQ
ƒ$QGHUYRRUZHUSQLHWRSGHWRSSODDWVHQRIODWHQYDOOHQ
ƒ1RRLWLHWVLQGHYHQWLODWLHJDWMHVYDQXZDSSDUDDWLQVWHNHQ+HWPHWDDORIYODPEDUH
YRRUZHUSHQLQVWHNHQ]RXEUDQGRIHOHNWULVFKHVFKRNYHURRU]DNHQ
ƒ3ODDWVGLWDSSDUDDWQLHWRSRQHYHQRIRQVWDELHOHZDJHQVVWDQGHQWDIHOVSODQNHQHG
'LWDSSDUDDWNXQWYDOOHQHUQVWLJHYHUZRQGLQJHQDDQNLQGHUHQRIYROZDVVHQHQ
YHURRU]DNHQHQWHYHQVHUQVWLJHVFKDGHDDQKHWDSSDUDDWEUHQJHQ$OWLMGKHWDSSDUDDW
RSYORHURIRSHHQSODWWHKRUL]RQWDOHVWDELHOHHQKDUGHRSSHUYODNWHSODDWVHQZDDUKHW
JHZLFKWYDQKHWDSSDUDDWNXQWVWHXQHQ
ƒ9HQWLODWLHJDWMHVQLHWEORNNHUHQ5XLPHSODDWVDFKWHUODWHQURQGRPKHWDSSDUDDW1RRLWKHW
DSSDUDDWSODDWVHQRSEHGRSGHEDQNRSGHNRIVRRUWJHOLMNHRSSHUYODNWHQLHWGLFKWELM
JRUGLMQHQGRHNHQPXUHQLQHHQERHNHQNDVWLQJHERXZGHNDELQHWRIVRRUWHJHOLMNH
SODDWVHQRPGDWKHWVOHFKWHYHQWLODWLHYHURRU]DDNW
ƒ+DDOVWHNNHUXLWKHWVWRSFRQWDFWWLMGHQVEOLNVHPVWRUPRIDOVKHWDSSDUDDWODQJQLHWLQ
JHEUXLNZRUGWJHQRPHQ
ƒ$OOHGLHQVWHQDDQYUDJHQYDQJHNZDOLILFHHUGHSHUVRQHHO'LHQVWLVEHQRGLJGDOVKHW
DSSDUDDWLQLHGHUJHYDOEHVFKDGLJGLV]RDOVVQRHURIVWHNNHUNDSRWLVYORHLVWRIRI
YRRUZHUSMHLQKHWDSSDUDDWJHGURQJHQZRUGWKHWDSSDUDDWDDQUHJHQRIYRFKW
EORRWJHVWHOGZRUGWQLHWMXLVWEHGLHQGRIJHYDOOHQLV
ƒ$OWLMGGHVQRHUYDQKHWVWRSFRQWDFWXLWKDOHQYRRUGDWKHWVFKRRJHPDDNWZRUGW
ƒ1RRLWYORHLVWRIRIDsURVROHZDVPLGGHOHQJHEUXLNHQRSKHWDSSDUDDW
0DDNKHWVFKRRQDOOHHQPHWHHQ]DFKWGURJHGRHNMH
ƒ*HEUXLNVOHFKWVPHHJHOHYHUGHQDFFHVRLUHVDDQJHGXLGGRRUGHIDEULNDQW
/8,67(5(10(7.237(/()221
ƒ/XLVWHURSPHGLXPYROXPHRPJHKRRUEHVFKDGLJLQJWHYRRUNRPHQ
ƒ$OVXJHHQJHOXLGWLMGHQVGHDIVSHOLQJKRRUWQLHWSORWVHOLQJ9ROXPHYHUJURWHQRP
KRJH9ROXPHWHYRRUNRPHQ([FHVVLHYHJHOXLGGUXNXLWNRSWHOHIRRQ]RXJHKRRU
EHVFKDGLJLQJYHURRU]DNHQ
ƒ2PEHVFKDGLJLQJDDQKHWJHKRRUWHYRRUNRPHQSDV9ROXPHDDQRSODDJVW
QLYHDXYRRUGHDIVSHOLQJHQGDQQDKHWVWDUWODQJ]DDPKHWYROXPHQDDUJHZHQVW
QLYHDXDDQSDVVHQ
/HWRS*H]HJHEUXLNHUVKDQGOHLGLQJLVEHVWHPGYRRUUHIHUHQWLHKHWZHUNHOLMNH
SURGXFW]RXYHUVFKLOOHQG]LMQ
2
Dit symbool verwijst dat dit product niet met uw huishoudelijk afval afgehandeld wordt.
Voor de omloop en aparte collectie van zulke producten bent u verantwoordelijk.
A.u.b bovengenoemde afval bij een bestemde plaats van omloop elektrische en
elektronische producten afhandelen. Als u de plaats waartoe u kunt terecht niet weet,
a.u.b contact opnemen met uw locale stadskantoor of huishoudelijke afval
reinigingsdienst.
Buiten Antenne Veiligheidsinstructies
Als een buiten antenne aangesloten is, onderstaande waarschuwingen volge:
ƒ(HQEXLWHQDQWHQQHPDJQLHWJHSODDWVGLQHHQSODDWVZDDUKHWLQFRQWDFWPHW
bovenliggende hoogspanningslijnen of andere licht of circuit zou raken.
ƒ$OVHHQEXLWHQDQWHQQHV\VWHHPJHwQVWDOOHHUGZRUGWH[WUHPHZDDUVFKXZLQJ
moet gevolgd te worden om het contact raken van elektrische lijnen te
voorkomen. Direct contact met hoogspanningslijnen is doodsgevaarlijk, dus
het moet in ieder geval vermeden worden.
Antenne lead-in kabel
Aardingsklemen
Antenne ontladingseenheid
(OHNWULVFKHGLHQVW
Aardgeleiders
apparaat
Aardingsklemen
Power service grounding
Voorbeeld aarding van buiten antenne
3
Pakketinhoud
LED TV STEL
Gebruikershandleiding
Afstandsbediening
Garantiekaart
Voedingskabel
AAA Batterijen
Onderhoudsboekje
AC Adaptor
Het type van snoer kunt afhankelijk
van uw landelijke voedingstype
verschillend zijn.
4
Uw LED TV Installeren
Installatie TV Stand
De doos openen, en zorg ervoor dat alle benodigde onderdelen in de doos zitten.
De pakket bevat:
LED TV
Stand
Gebruik een zacht doekje om stabile oppervlakte te bedekken. Plaatse de LED TV
erop bij het scherm naar beneden. Installeer de stand op de bodem van de LED TV
als de afbeelding, dan gebruik een schroefdraaier om het op de bodem van de stand
te bevestigen totdat de schroefjes vast ter plaatse staan.
5
Installatie TV
Gebruik meegeleverde antenne kabel om VHF/UHF signaal op LED TV’s ANT's
Terminal aan te sluiten.
Sluit AC voedingskabel aan op de achterkant van de TV en sluit de voedingskabel
aan op het stopcontact.
Steek 2 meegeleverde batterijen in de afstandsbediening.
Stap1 Glijd de achtercover om batterijdoos van de afstandsbediening te openen.
Stap2 Steek twee AAA type batterijen in. Zorg ervoor dat de polariteiten (+) en ( - )
van batterijen met juiste (+) en ( - ) richtingen verwezen in batterijdoos geplaats
worden. Glijd de achtercover terug.
Gebruik geen bijtende wasmiddelen (porcelein, edelstalen, toilet, of oven
wasmiddelen, e.d.) op de afstandsbediening, omdat het schade ertoe
zou brengen.
6
Uw LED TV
Vooraan-/Linkeraan- /Rechteraan- zicht en Bedieningen
Rechteraanzicht
Vooraanzicht
LED
De LED licht geeft aan als de LED TV
geactiveerd is.
Linkeraanzicht
IR
Infrarode Ontvanger
SOURCE
Kies uit verschillende invoersignaal bronnen.
MENU
Druk eens erop om OSD (On Screen Display) te bekijken, druk weer
erop om OSD uit te zetten.
CHA
CH+/Ga voor en achter in kanalen. Selecteer submenu als het in OSD
modus staat.
VOL+/Vergroot of verminder het volume. Selecteer de hoofdmenu en
waarden veranderen als het in OSD modus staat.
POWER
Zet LED TV aan en naar standby modus omschakelen.
7
Achteraanzicht en Contactbusjes
DC 12V
12V DC voeding invoer.
.
Toegang naar digitale inhoud opgeslaan op een USB opslagruimte.
HDMI IN
Verbindt aan alle digitale AV apparaat met HDMI connector.
VGA/PC AUDIO
Verbindt aan de PC, of andere AV apparaat met VGA en Line-in contactbusjes.
CI
Steek CI kaart in de sleuf.
SCART
Verbindt aan extern apparaat met SCART contactbusje. De SCART interface geeft RGB,
AV signalen met geluidsinvoer/uitvoer aan tussen TV en .extern video apparaat.
YPbPr
Verbindt aan DVD speler, Digitale Set-Top-Box, of ander AV apparaat met component
(YPbPr) video en geluid uitvoer contactbusjes.
HEAD PHONE
Verbindt aan koptelefoon
COAXIAL
Verbindt aan geluidscontactbusje op digitale/standaar 5.1 geluidssysteem.
AUDIO IN L/R
CVBS en YPbPr geluidsinvoer contactbusjes.
RF
Verbindt aan RF invoer van VHF/UHF antenne of kabel om hoge/standaard definitie televisie te
ontvangen.
VIDEO
Verbindt aan Video uitvoer contactbusje van DVD of VCR.
8
Aansluiten op CI(Algemene Interface) Kaart
CI SLOT
Om vergrendelde services (Betaalde services) te bekijken in digitale TV modus.
STEEK CI KAART IN
Steek CI kaart in de sleuf als het verwijst tot het ter plaatse zit.
VERWIJDER CI KAART
Trek CI kaart uit de sleuf als het verwijderd wordt.
Deze functie helpt u om vergrendelde services (Betaalde services) te bekijken in sommige
kanalen. Als u CI modula wilt verwijderen, u kunt beschikbare digitale/analoge programma's
bekijken in sommige kanalen.
9
Uw Afstandsbediening
STANDBY Zet LED TV aan en naar standby
modus schakelen
POWER
MUTE
SOURCE
AUDIO
P.SIZE
AUTO Druk erop om beeld automatisch in PC
P.MODE
S.MODE
modus aan te passen
MUTE Stil en geluid van uw LED TV weer terugbrengen
0-9 Druk op een nummer om kanaal te selecteren
C/L Druk deze toets continu om taal en land
te selecteren
Omschakelen tussen huidige en vorige
kanalen
INFO
ASPECT Omschakelen tussen Wide modus instellingen
AUDIO Geluidsselectie knop
VOL+/VOL- Volume vergroten en verminderen
CH+/CH- Kanalen naar voren of achteren selecteren.
D.SETUP
DISPLAY Druk eens erop om verschillende
informatie weer te geven zoals kanaal en
invoerbron
P+
V+
V-
P-
REPEAT
ZOOM
PVR LIST TIME SHIFT
USB/SD
GOTO
/ENTER Met de vier richtingen kunt
u het menu navigeren
ENTER Druk deze toets voor het gekozen item
of in de kanaallijst. Zowel ENTER en OK functie.
DTV/RADIO
MENU OSD menu op scherm weergeven.
EXIT Annuleren van OSD menu
INPUTDruk op INPUT om lijst van bronnen weer
WHJHYHQJHEUXLNŸźRPYLGHRDSSDUDDW
aangesloten op LED TV te selecteren, en druk op
ENTER te bevestigen.
PMODE Selectie Beeld modusSelection
picture mode.
SMODE Selecteer geluidseffect opties.
SLEEP Slaaptimer instellen
10
Your Remote Control
POWER
P.MODE
S.MODE
MUTE
SOURCE
AUDIO
P.SIZE
FAV Lijst van favoriete kanalen weergeven.
FAV+/ FAV-favoriete kanalen vermeerderen
of verminderen.
EPG Programme Guide op scherm weergeven
in DTV modus. Druk weer erop om GUIDE
uit te zetten.
TEXT Teletext functie aan of uitzetten.
In Media modus, druk erop om naar vorige
hoofdstuk of clip van huidige.
HOLD Blijf in een multi-pagina passage op
scherm in Teletext modus.
In Media modus, druk erop om naar
volgende hoofdstuk of clip van huidige.
TV/RADIO In DTV modus, druk op TV/RADIO
knop naar DTV of Radio modus.
INFO
SUBTITLE Ondertiteling openen of sluiten.
P+
V+
D.SETUP
V-
P-
REPEAT
ZOOM
GOTO
USB/SD
DTV/RADIO
PVR LIST TIME SHIFT
INDEX Hoofdelijke index weergeven in Teletext modus.
SIZE Geef de top, bodem of alles van het pagina
weer, zodat gemakkelijk gelezen kunt worden in
TELETEXT modus.
In Media modus, gebruik voorspoelen/
/
achterspoelen om snel af te spelen.
REVEAL Verborgen informatie weergeven in
TELETEXT modus als antwoorden van een vragenspel.
SUBPAGE Druk erop om subpagina te bekijken en
druk weer erop om te annuleren.
In Media modus, druk erop om afspeling te
starten of onderbreken.
In Media modus, druk erop om afspeling te stoppen.
PVR In DTV modus, druk op PVR knop om opname
te starten, druk weer erop om opname te stoppen.
MEDIA Press to switch to USB signal source directly.
Druk op passende kleur om direct
naar TELETEXT, EPG OSD, en MEDIA signaal bron
modus in te gaan.
Effectieve gebied:
Afstandsbediening van
E TV kunt van 5m weg
LED
functioneren, als het direct
op de ontvanger richt.
TIME SHIFT In DTV modus, druk op TS knop om
functiesuitstel te starten, druk op
knop om
afspelingsuitstel te starten, druk op knop om uitstel
functie te deactiveren.
PVR LIST In DTV modus, geef de uitgevoerde
PVR LIST weer.
11
LED TV Installeren
Ga naar handleidingen om de aansluitingsmethod van extern apparaat uit te zoeken. Als extern
apparaat aangesloten wordt, sluit geen AC voedingskabel aan op stopcontact totdat alle
verbindingen voltooid zijn.
Aansluiten op TV Kabel of Antenne
Aansluiting antenne
De vereisten over antenne voor goede kleur TV prestatie zijn belangrijker dan zwart-witte TV.
Om dit reden, een goede kwaliteit buiten antenne is aanbevolen. De vervolgde informatie is een
uitleg van type aansluiting waarbij met verschillende antenne systemen aangeboden worden.
A 75-ohm systeem is in het algemeen een ronde kabel (niet ingehouden) met
IEC-type connector die gemakkelijk op een terminal aangehecht kunt worden
zonder gereedschappen.
IEC-type connector
75-ohm coaxial kabel(rond)
Gebruik een van vervolgde diagrammen als een buiten antenne wordt aangesloten.
A: Geeft aan hoe een VHF/UHF combinatie buiten antenne wordt gebruikt.
B: Geeft aan hoe een aparte VHF en/of UHF buiten antenne wordt gebruikt.
A. Combinatie VHF/UHF antenne
Aansluiting Kabel TV (CATV)
A 75-ohm coaxial cable connector is ingebouwd voor gemakkelijke hookup. Als
een 75-ohm coaxial kabel op het stel aangesloten aangesloten wordt, sluit 75-ohm
kabel aan op de ANT.terminal.
Sommige kabel TV bedrijven bieden premium betaalkanalen aan. Sinds de
signalen van deze premium betaalkanalen zijn vergrendeld, een kabel TV
converter/ontvergrendeler is in het algemeen aan de abonnee aangeboden
door kabel TV bedrijf.
Voor meer specifieke instructies over kabel TV installatie, neem contact met uw kabel TV
bedrijf op. Een mogelijk method van het aansluiten op door uw kabel TV bedrijf aangeboden
converter/ontvergrendeler is aangegeven in onderstaand diagram.
.
12
LED TV Installeren
Gebruik een aangeboden antenne kabel om TV signaal op LED TV's
TV kabel terminal aan te sluiten.
Sluit AC voedingskabel aan op de achterkant van de TV en sluit de
voedingskabel aan op het stopcontact.
DC 12V
Druk op
knop op afstandsbediening om LED TV aan te zetten.
E
E
Altijd LED TV met stopcontact
losmaken als LED TV lang niet in gebruik
wordt genomen.
E
'H32:(5NQRSRSYRRUSDQHHOLVVOHFKWVEHVWHPGYRRUKHWRPVFKDNHOLQJ
YDQ/('79QDDUVWDQGE\PRGXVKHWNXQWGHDDQVOXLWLQJYDQYRHGLQJQLHW
ORVPDNHQ2PYRHGLQJORVWHPDNHQKDDOGHVWHNNHUXLWKHWVWRSFRQWDFW
Druk op Source knop op afstandsbediening om Source lijst weer te geven.
*HEUXLNŸźNQRSSHQRP'79EURQWHVHOHFWHUHQHQGDQGUXNRS(17(5NQRS
13
LED TV Installeren
Sluit AV Apparaat aan door SCART Connector
VCR
DVD SPELER
SCART kabel
SATELLIET ONTVANGER
TV KABEL DOOS
Gebruik een SCART kabel om extern AV apparaat’s SCART
contactbusje op LED TV’s SCART contactbusje aan te sluiten.
Sluit alle AC voedingsbronnen aan, voordat de schakelaar
van LED TV of andere aangesloten apparaat aangezet wordt.
Druk op
knop op afstandsbediening om LED TV aan te zetten.
'UXNRSNQRSRSDIVWDQGVEHGLHQLQJGDQJHEUXLNŸRIźNQRSRP
SCART te selecteren en dan druk op ENTER knop.
14
Installing the LED TV
Sluit AV Apparaat aan door YPbPr Connector
DVD of VCR
DVD of VCR Achterkant
YPBPR Kabel
AUDIO Kabel
Gebruik een YPbPr kabel om extern AV apparaat’s YPbPr
contactbusje op LED TV’s YPbPr contactbusje aan te sluiten.
Sluit alle AC voedingsbronnen aan, voordat de schakelaar
van LED TV of andere aangesloten apparaat aangezet wordt.
Druk op
knop op afstandsbediening om LED TV aan te zetten.
'UXNRSNQRSRSDIVWDQGVEHGLHQLQJGDQJHEUXLNŸRIźNQRS
om YPbPr te selecteren en dan druk op ENTER knop.
De YPbPr video contactbusje op uw A/V apparaat zijn soms genoemd
als YPbPr, of YCbCr. Voor een uitleg van component video, see uw
A/V apparaat’s gebruikershandleiding.
15
LED TV Installeren
Sluit AV Apparaat aan door HDMI Connector
HDMI KABEL
DVD of VCR Achterkant
DVD of VCR
Gebruik een YPbPr kabel om extern AV apparaat’s HDMI
contactbusje op LED TV’s HDMI contactbusje aan te sluiten.
Sluit alle AC voedingsbronnen aan, voordat de schakelaar
van LED TV of andere aangesloten apparaat aangezet wordt.
Druk op
knop op afstandsbediening om LED TV aan te zetten.
'UXNRSNQRSRSDIVWDQGVEHGLHQLQJGDQJHEUXLNŸRIźNQRS
om HDMI te selecteren en dan druk op ENTER knop.
De HDMI connector produceert beide video en geluid signalen,
het is niet nodig om geluidskabel aan te sluiten.
16
LED TV Installeren
Sluit AV Apparaat aan door DVI Connector
HDMI-naar-DVI kabel
AUDIO kabel
DVD of VCR achterkant
DVD of VCR
Gebruik een HDMI-naar-DVI kabel om AV apparaat’s DVI uitvoer
contactbusje op LED TV’s HDMI IN contactbusje aan te sluiten.
Gebruik GELUID kabel om AV apparaat’s uitvoer contactbusje
op LED TV’s HDMI AUDIO contactbusjes aan te sluiten.
Sluit alle AC voedingsbronnen aan, voordat de schakelaar van
LED TV of andere aangesloten apparaat aangezet wordt.
Druk op
knop op afstandsbediening om LED TV aan te zetten.
'UXNRSNQRSRSDIVWDQGVEHGLHQLQJGDQJHEUXLNŸRIźNQRS
om HDMI te selecteren en dan druk op ENTER knop.
Als de LED TV op AV apparaat’s DVI connector aangesloten is, u
heeft een HDMI-naar-DVI kabel of een HDMI adaptor
(niet aangeboden) en een geluidskabel nodig.
17
LED TV Installeren
Aansluiten op PC
AUDIO Kabel
VGA Kabel
Gebruik een D-SUB kabel om PC’s D-SUB uitvoer contactbusje
op LED TV’s VGA invoer contactbusje aan te sluiten. Gebruik
geluidskabel om PC’s geluidsuitvoer contactbusje op LED TV’s
geluidsuitvoer contactbusje aan te sluiten.
Sluit alle AC voedingsbronnen aan, voordat de schakelaar van
LED TV of andere aangesloten apparaat aangezet wordt.
Druk op
knop op afstandsbediening om LED TV aan te zetten.
'UXNRSNQRSRSDIVWDQGVEHGLHQLQJGDQJHEUXLNŸRIźNQRS
om VGA te selecteren en dan druk op ENTER knop.
18
LED TV Installeren
Aansluiten op Geluidsontvanger
Geluidsontvanger
Gebruik een geluidskabel om geluidsontvanger’s LINE IN
contactbusjes aan LED TV’s COAXIAL geluidscontactbusjes
aan te sluiten.
Sluit alle AC voedingsbronnen aan, voordat de schakelaar
van LED TV of andere aangesloten apparaat aangezet wordt.
Druk op
knop op afstandsbediening om LED TV aan te zetten.
19
Aan de slag
1. Hoofdmenu en omschrijving
Hoofdmenu opties (van rechterkant af CHANNEL –> PICTURE ->
SOUND -> TIME -> OPTION -> LOCK )op DTV/ATV invoerbron,
het eerste pagina geeft aan CHANNEL. Zonder DTV/ATV invoerbron,
het eerste pagina is PICTURE als standaard. Dan druk op ENTER naar
submenu.
1.1 Kanaal
Programme edit
Signal Information
CI Information
OK
Let op:
1) CHANNEL kunt alleen geselecteerd onder ATV/DTV modus,
anders het kan niet.
1.1.1 Auto Scan
Ga naar Auto Scan, het geeft aan de beelden van ‘country’ en ‘tune
type’ opties.
OK
EXIT
1) Functie omschrijvingen:
Opties
Optie aanpassen
Standaard
Scan Type
DTV + ATV -> DTV -> ATV
DTV + ATV
Land selectie
Omschrijving
De standaard land is afhankelijk
van afgeleverde landen of
klantengerichte landen, als het
niet weergegeven worden, UK is
standaard.
UK -> Australia -> …
20
Aan de slag
2) Bediening omschrijving
Druk erop naar beneden en boven, druk op DONE om scanning te starten.
Als het scant, eerste 50% betekent ATV instelling, de resterende 50% betekent
DTV instelling.
Data
MENU
Back
EXIT
Quit
Als ATV aan het instellen is, u kunt op EXIT drukken om ATV instelling te
annuleren en DTV instelling te starten, als vervolgt:
1.1.2 DTV handmatige instelling
Bad
Normal
MENU
Back
Good
EXIT
Quit
1) Functie Omschrijving
Opties
CH
Optie aanpassen
Standaard
Omschrijving
Kanaal
selecteren
met
pijlenknoppen, dan druk op
ENTER om te bevestigen als er
signaal sterkte verschijnt.
Afhankelijk van Landen
.
2) Druk op ENTER om instelling te bevestigen (alleen in DTV modus)
21
Aan de slag
1.1.3 ATV handmatige instelling:
EXIT
Quit
1) Functie Omschrijving
Opties
Optie aanpassen
Standaard
Omschrijving
Opslaan naar
1 – 100
1
Huidige opslagruimte weergeven
Systeem
BG -> I -> DK -> L
Huidige
CH
Standaard optie afhankelijk van land
selectie
1 – 100
1
Zoeken
Fine-Tune
Frequentie
Huidig kanaal weergeven
Zoekbaar onder volle kanaal conditie.
Fine-tune
Alshet grijs is,niks
geselecteerd
Huidige frequentie weergeven, en
Zoek of Fine-tune aan te passen.
2) Bedieningsinstructies: na de handmatige instelling, zorg ervoor dat de RED
knop gedrukt wordt om op te slaan, anders alle kanalen die uitgezocht zijn
worden niet opgeslaan.
22
Aan de slag
1.1.4 Programma Bewerken
:
ok
Select
MENU
Back
1) Formaat en Omschrijving
Identiteit
Vergrendeling
LCN
CH Naam
S
21
ABC1
Skip
Identiteit
Lock
Identiteit
Fav
Identiteit
Systeem
1. De Kanaal menu bevat “Delete/Move/Skip /Rename /Fav”. “ Lock、Fav、
Skip” worden gebruikt als de klanten de instellingen van kanaal wilt veranderen.
(Fav kunt niet gebruikt met Skip).
2) Knop druk bediening introductie
Knop
Gebied
Omschrijving
Ÿ
ATV/DTV
Page up, pagina door de cirkel draaien
ź
ATV/DTV
Page down, pagina door de cirkel draaien
Huidig kanaal wissen, als vervolgt:
1) onder normale modus, druk op
(DELETE)
ATV
naar DELETE modus.
2) In DELETE modus, de knop kunt gebruikt als:
MENU: annuleren van DELETE naar normale modus
EXIT: annuleren van menu
: annuleren van huidig kanaal, en terug naar normaal.
Naam van huidig kanaal wijzigen, alleen gebruikt in ATV modus:
Bedieningsinstructies:
(RENAME)
ATV
naar RENAME modus
1) In normaal modus, druk op
2) in RENAME modus
MENU: annuleren van RENAME naar normale modus
EXIT: annuleren van menu
UP/DOWN: schakel letters, nummers of symbolen om
LEFT/RIGHT: schakel linker en rechter, selecteer door de cirkel om
: annuleren van RENAME modus en terug naar normaal.
23
Aan de slag
Kanaal omschakelingsfunctie, ATV beschikbaar als standaard, DTV
beschikbaar in open LCN auto ordering modus.
(MOVE)
, naar SWAP modus, en huidig
1) in normaal modus
geselecteerde kanaal is mobiele kanaal X.
2) in SWAP modus:
MENU: annuleren van SWAP naar normale modus
EXIT: annuleren van menu
UP/DOWN: omschakelingskanalen kiezen
ATV/DTV
: als het huidige geselecteerde kanaal een geselecteerde kanaal
X is, geen actie; anders, het huidige kanaal is Y, verwisseling
tussen X en Y modus is nodig. Maar het nummer van kanaal blijft
1,2,3… orde als vroeger.
Kies als u huidig kanaal wilt skippen en als CH+/- kanaal aan het
instellen.
(SKIP)
ATV/DTV
(FAV)
ATV/DTV
Op non Skip kanaal, druk op
In Skip kanaal, druk op
, en Skip huidig kanaal;
om Skip te annuleren.
Uw favoriet kanaal instellen
1.1.5 Signaal Informatie
Het maakt alleen gebruik van DTV modus, signaal informatie wordt weergegeven,
:
bevat: Kanaal /netwerk /modulatie /kwaliteit /sterkte.
Optie
Signaal parameter weergegeven
Signaal Informatie
Pop out Signaal Informatie menu, Geeft weer als:
Kanaal 21
Netwerk Digita Finland
Modulatie 64QAM
Kwaliteit 66%
Sterkte 80%
1.1.6 CI Informatie
Alleen beschikbaar onder DTV modus, het waarschuwt als er geen CI kaart
ingestoken wordt. Als een CI kaart ingestoken wordt, u kunt menu bekijken
om alle informatie van CI kaart controleren.
1.1.7 Opname Modus
Ga naar Recorder menu, reservatie van opname doen, PVR specificatie in
detail controleren.
24
Aan de slag
1.2 BEELD
Menu
Back
ok
Select
EXIT
Quit
1.2.1 Afbeelding Modus
Menu
Back
EXIT
Quit
1) Functie instructie
Optie
Afbeelding Modus
Gebied aanpassen
Standard -> Mild ->
User -> Dynamic
Standaard
Omschrijving
Standaard
Standaard: in non User modus, u kunt
Contrast, Helderheid, Kleur, Scherpte,
Tint aanpassen, het modus gaat
automatisch naar User.
2) Bedieningsinstructie
Modus veranderen met pijlenknopen; terug naar afbeelding hoofdmenu door
het opdrukkenvan MENU knop, en druk op EXIT annuleren naar hoofdmenu.
1.2.2 Contrast / Helderheid / Kleur / Scherpte
Menu
Back
EXIT
Quit
1) Functie instructie
Optie
Gebied aanpassen
Standaard
Contrast
0 - 100
50
Helderheid
0 - 100
50
Kleur
0 - 100
50
Scherpte
0 - 100
50
VGA niet beschikbaar
Tint
R50 - 0 - G50
0
Alleen in NTSC systeem conditie;
PAL en SECAM terug naar 0;
25
Omschrijving
VGA niet beschikbaar
Aan de slag
2) Bedieningsinstructie
Aanpassen :LEFT,RIGHT om numerische afmeting aan te passen.
Menu : druk op MENU terug naar beeld hoofdmenu.
Exit : EXIT annuleren van menu.
UP,DOWN: Inhoud met pijlenknoppen aanpassen: als
Contrast / Helderheid / Kleur / Scherpte
1.2.3 Kleurrtemperatuur
Menu
Back
EXIT
Quit
1) Functie instructie
Optie
Gebied aanpassen
Standard-> Cool ->
User -> Warm
Kleurtemperatuur
standaard
Omschrijving
Standaard
In non User modus, u kunt
Rood/Groen/Blauw
opties
selecteren
om
kleur
te
wijzigen. Het modus wordt
automatisch aangepasd voor
User modus.
2) Bedieningsinstructie
Aanpassen :LEFT,RIGHT om inhoud ;
aan te passen.
Menu : druk op MENU terug naar hoofdmenu.
Exit : EXIT annuleren van menu.
1.2.4 Rood /green /blauw
Menu
Back
EXIT
Quit
1) Functie instructie
Optie
Gebied aanpassen
Standaard
Rood
0 - 100
50
Groen
0 - 100
50
Blauw
0 - 100
50
Omschrijving
2) Bedieningsinstructie
Aanpassen : LEFT,RIGHT om numerische afmeting aan te passen.
Menu : druk op MENU terug naar beeld hoofdmenu.
Exit : EXIT annuleren van menu.
UP,DOWN: Inhoud met pijlenknoppen aanpassen:
Ze zijn Rood /groen /blauw knop.
26
Aan de slag
1.2.5 Aspect Verhouding
1) Functie instructie
Paneel resolutie
Standaard
16:9 / 16:10
16:9
4:3
4:3
4:3
(Fysische afmeting 16:9)
16:9
Invoerbron
modus
Niet VGA
16:9 -> Zoom1 -> Zoom2 -> Auto -> 4:3
VGA
16:9 -> 4:3
Niet VGA
16:9 -> Zoom1 -> Zoom2 -> Auto -> 4:3
VGA
4:3 -> 16:9
Niet VGA
16:9 -> Zoom1 -> Zoom2 -> Auto -> 4:3
VGA
16:9 -> 4:3
Let op: Als paneel resolutie is 4:3, afmeting is 16:9 en 4:3 modus, het
werkelijke resolutie is 1:1.
1.2.6 Lawaaivermindering
1) Functie instructie
Optie
Lawaaivermindering
Optie aanpassen
Aan -> Uit
Standaard
Omschrijving
Aan
VGA ingesteld als Uit, niet
aanpasbaar
2) Bedieningsinstructie
Ga naar menu, kies met UP,DOWN: off /low /middle /default.
1.3 GELUID
Menu
Back
OK
27
Select
EXIT
Quit
Aan de slag
1.3.1 GELUID modus
Menu
Back
EXIT
Quit
1) Functie instructie
Optie
Optie aanpassen
Geluid Modus
Standard -> Music
-> Movie -> Sports
-> User
Standaard
Omschrijving
Standaard
In non User modus, Treble
en
Bass
kunt
niet
geselecteerd en aangepast
worden.
2) Bedieningsinstructie
Aanpassen : LEFT,RIGHT aanpasbaar: Standard -> Music -> Movie ->
Sports -> User
Menu : druk op MENU terug naar beeld hoofdmenu.
Exit : EXIT annuleren van menu.
1.3.2 Treble/ Bass /Balans
Menu
Back
EXIT
Quit
1) Functie instructie
Optie
Optie aanpassen
Standaard
Omschrijving
Treble
0 – 100
50
Hoog geluid aanpassen
Bass
0 – 100
50
Laag geluid aanpassen
2) Bedieningsinstructie
Aanpassen : LEFT,RIGHT data grootte aanpassen.
Menu : druk op MENU terug naar beeld hoofdmenu.
Exit : Annuleren
UP,DOWN om aangepaste inhoud te selecteren: Treble /Bass /Balans
1.3.3 Auto Volume
1)Functie: auto geluid aanpassen
2)Bediening: ENTER om Aan/Uit in te stellen.
1.3.4 Rondom Geluid
1)Functie: Rondom instellingen
2)Bediening: ENTER om Aan/Uit in te stellen.
1.3.5 SPDIF
1)Functie: SPDIF’s uitvoer modus in te stellen.
2) Bedieningsinstructie: ENTER om Aan/Uit, PCM of Auto in te stellen.
28
Aan de slag
1.4 Tijd
Menu
Back
OK
Select
EXIT
Quit
1.4.1 Klok
Menu
Back
EXIT
Quit
1) Functie instructie
De standaard verhouding is niet ingesteld om tijd informatie uit DTV te krijgen,
maar u kunt het handmatig instellen bij CLOCK menu.
2) Bedieningsinstructie
Bewegen: UP,DOWN
Menu : druk op MENU terug naar beeld hoofdmenu.
Exit: Annuleren.
LEFT, RIGHT knoppen om parameters in te stellen.
1.4.2 UIT tijd
Menu
Back
29
EXIT
Quit
Aan de slag
1)Functie instructie
Optie
Herhalen
Optie aanpassen
Standaard
Off -> Once -> Everyday -> Mon~Fri
-> Mon~Sat -> Sat~Sun -> Sun
Omschrijving
Uit
Uur
00 - 23
00
Als Activate uitgezet is, Grijs,
niet beschikbaar
Minuut
00 - 59
00
Als Activate uitgezet is, Grijs,
niet beschikbaar
2) Bedieningsinstructie
Bewegen :UP,DOWN
Menu : druk op MENU terug naar beeld hoofdmenu.
Exit : Annuleren.
LEFT, RIGHT knoppen om parameters in te stellen.
1.4.3 AAN tijd
Menu
Back
EXIT
Quit
1)Functie instructie
Optie
Optie aanpassen
Standaard
Herhalen
Off -> Once -> Everyday ->
Mon~Fri -> Mon~Sat ->
Sat~Sun -> Sun
Uit
Omschrijving
Uur
00 -> 23
12
Als Herhalen uit is, Grijs
Minuut
00 -> 59
00
Als Herhalen uit is, Grijs
Volume
0 - > 100
30
Als Herhalen uit is, Grijs
DTV
Als Herhalen uit is, Grijs ,
niet beschikbaar; de orde is
afhankelijk van Invoerbron
orde
Zie let op
Als Herhalen uit is, Grijs ,
niet beschikbaar
Als
non-TV
bron
geselecteerd
wordt, het
wordt grijs; in Bron, kies
DTV/Raido/Data, maar het is
blank als er geen invoer
kanaal informatie is.
Bron
Kanaal.
DTV -> Radio -> Data -> ATV
-> …
ATV:1 – 100
DTV/Radio/Data: afhankelijke
van kanaal’s informatie
30
Aan de slag
2)Bedieningsinstructie
Bewegen :UP,DOWN
Menu : druk op MENU terug naar beeld hoofdmenu.
Exit : Annuleren.
LEFT,RIGHT knop om parameters in te stellen.
1.4.4 Slaap tijd
1) functie instructie
Optie
Slaap
Timer
Optie aanpassen
Off -> 10min -> 20min -> 30min
-> 60min -> 90min -> 120min ->
180min -> 240min
Standaard
Omschrijving
Uit
Herinneren in laatste 60
seconden: stopt herinnering
als er opgedrukt wordt, slaap
instelling is uit.
2) Bedieningsinstructie
Ga naar tweede menu, gebruik UP,DOWN om slaap tijd in te stellen.
1.4.5 Tijdzone
1) functie instructie
Optie
Optie aanpassen
Standaard
Omschrijving
Standaard
kies
bevestigd
als
bestemmingslanden door vereisten.
Als auto aangepast wordt, het schakelt
automatisch volgens geselecteerd land
om.
Tijdzone
2)Bedieningsinstructie
Ga naar tweede menu, gebruik UP,DOWN om tijdzone in te stellen:canary
GMT ./Lisbn GMT /London GMT /Amsterdam GMT+1.
31
Aan de slag
1.5 OPTIE
OSD Duration
Menu
Back
OK
30S
Select
EXIT
Quit
1.5.1 OSD Taal
1) Functie instructie
Optie
OSD
Taal
Optie aanpassen
Standaard
Omschrijving
Kies de standaard taal volgens adres
of vereiste.
Standaard talen: Engels, Frans, Duits
Italiaans, Portuguees.
Ondersteunede talen
2) Bedieningsinstructie
Ga naar tweede menu, gebruik UP,DOWN om Taal in te stellen
1.5.2 Geluidstaal 1ste
1) Functie instructie
Optie
Optie Aanpassen
Geluidstaal 1ste
Eerste
gekozen
Standaard
taal
Omschrijving
Niet geselecteerd in non DTV
modus
2) Bedieningsinstructie
Ga naar tweede menu, gebruik UP,DOWN om Taal in te stellen
1.5.3 Geluidstaal 2de
1) Functie instructie
Optie
Optie
Aanpassen
Geluidstaal 2de
Tweede
gekozen
Standaard
taal
Omschrijving
Niet geselecteerd in non DTV modus
2) Bedieningsinstructie
Ga naar tweede menu, gebruik UP,DOWN om Taal in te stellen
32
Aan de slag
1.5.4 Ondertiteling taal 1ste
1) functie instructie
Optie
Optie
Aanpassen
Ondertiteling
Taal 1ste
Eerste
taal
gekozen
Standaard
Omschrijving
Niet geselecteerd in non DTV modus
2) Bedieningsinstructie
Ga naar tweede menu, gebruik UP,DOWN om Taal in te stellen
1.5.4 Ondertiteling taal 1ste
1) functie instructie
Optie
Optie
Aanpassen
Ondertiteling
Taal 2de
Tweede taal
gekozen
Standaard
Omschrijving
Niet geselecteerd in non DTV modus
2)Bedieningsinstructie
Ga naar tweede menu, gebruik UP,DOWN om Taal in te stellen
1.5.6 OSD Duur
1) functie instructie
De OSD’s duur op scherm.
2) Bedieningsinstructie
ENTER drukken om 5S, 10S, 15S, 20S, 25S, 30S, 35S of 40S in te stellen.
1.5.7 Land
1)functie instructie
Huidige taal weergeven, grijs, niet geselecteerd.
1.5.8 Terug naar fabrikantsinstellingen
1)functie instructie
Terug naar fabrikantsinstellingen.
2)Bedieningsinstructie
Ga naar tweede menu, gebruik UP,DOWN om "Ja” of “Nee” te selecteren.
33
Aan de slag
1.6 LOCK
Lock Channel
Menu
Back
OK
Select
EXIT
Quit
1.6.1 Lock Systeem
1) Functie instructie
Optie
Optie
Aanpassen
Standaard
Lock Systeem
Uit/Aan
Uit
Omschrijving
2) Bedieningsinstructie
LEFT om wachtwoord te annuleren, terug naar hoofdmenu.
RIGHT om wachtwoord te verwijderen en een juist wachtwoord schrijven.
Juist wachtwoord invoeren en ga naar LOCK submenu. Het geeft onjuist
wachtwoord aan als u onjuist wacht invoert.
MENU drukken om LOCK menu te annuleren.
34
Aan de slag
1.6.2 Wachtwoord Instellen
1) Functie instructie
Optie
Aanpassen
Optie
Standaard
Omschrijving
Wachtwoord
instellen
Ga
naar
submenu,
nieuw
wachtwoord invoer en bevestigen.
2)Bedieningsinstructie
LEFT drukken om wachtwoord opnieuw in te stellen, en terug naar hoofdmenu.
RIGHT drukken om ingevoerde wachtwoord te annuleren, en opnieuw invoeren.
Als het wachtwoord twee keer verkeerd ingevoerd wordt, het geeft aan
“wachtwoord onjuist”.
1.6.3 Block Programma
1) Formaat en Omschrijving
Vergrendeld
symbool
LCN
CH
Naam
S
21
ABC1
Lock
Icoon
systeem
Let op: Lock icoon is gebruikt als iets van het kanaal verandert is
2) Knop bediening
Knop
Functie
Ÿ
Page up, kunt pagina’s bekijken;
ź
Page down, kunt pagina’s bekijken;
Ɣ(LOCK)
Controleer als huidig kanaal op slot is, als op slot is, wachtwoord is
nodig.
Als Ɣ wordt gedrukt in non lock modus: huidig kanaal op slot doen.
Als Ɣ wordt gedrukt in lock modus: lock annuleren
1.6.4 Kijkwijzer
1) Functie: als Kijkwijzer lager dan programma ware klasse, het is nodig om
kanaal op slot doen en dan wachtwoord invoer te bekijken.
Optie
Optie
Aanpassen
Standaard
Omschrijving
Kijkwijzer
Uit -> 4 -> 5
-> … -> 18
Uit
Niet geselecteerd in non DTV modus
2)Bedieningsinstructie
Ga naar tweede menu, gebruik UP,DOWN om optie te selecteren en druk op
ENTER te bevestigen.
35
Aan de slag
2. Andere Menu
2.1 Kanaallijst
Kanaallijst gegeven alle uitgezocht kanalen weer.
Move
OK
Select
EXIT
Quit
1) Formaat en omschrijving
Vergrendeld
symbool
LCN
CH
Naam
S
21
ABC1
Skip
Icoon
Lock
Icoon
Fav
Icoon
systeem
Let op: 1. Lock、Fav、Skip icoon kunt alleen gebruikt als kanalen verificatie
nodig hebben.
2) Knop functie en instructie
Knop
functie
CH Lijst
In DTV/ATV en non Kanaallijst modi, sluit non Mute menu om
Kanaallijst menu op te poppen.
In Kanaallijst menu, annuleren van Kannaallijst menu.
Ÿ
Page up, kunt pagina’s bekijken;
ź
Page down, kunt pagina’s bekijken.
2.2 Favoriete Lijst
Favoriete Lijst en Kanaallijst hebben dezelfde instellingen, maar geeft weer
als klantenfavoriete kanaal in Programma Bewerken, gebruik FAV knop om
Favoriete Lijst menu weer te geven of sluiten.
36
Aan de slag
2.3 EPG
EPG is alleen beschikbaar in DTV, kanaal informatie geclassficeerd door
KANAAL/TIJD.
Boven en Beneden kiezen: Kanaal /Tijd
OK
Select
EXIT
Quit
Alle programma’s informatie,
als geclassficeerd door tijd,
het geeft alle informatie op
huidige tijdstip weer.
Gedetaileerde informatie van
geselecteerde programma’s.
1)Bedieningsnota’s
Bewegen: naar boven en beneden bewegen
Menu: annuleren van EPG
OK: Schakel naar huidige geselecteerde programma’s
Index: Schakel naar type optie.
Record: Opname programma. Het geeft opname modus als geselecteerd (controleer
PVR handleidingsdetails).
Schedule: opname informatie. Controleer details in PVR’s Rooster Lijst introductie.
Remind: programma gereserveerd. Kies Remind om volgende instelling menu te kieze.
Gebruik Boven en Beneden knop om programma te selecteren.
Programme
Mode
Minute
Hour
Date
Month
Move
OK
Select
MENU
37
Back
Aan de slag
2.4 Installatie Gids
Please set the following options, then
OK
Select
EXIT
Quit
1) Functie en instructie: als kanaal informatie niet opgeslaan is, zet het
aan en naar DTV/ATV modus, het geeft Installatie Gids menu weer.
2)Bediening
Bewegen: Beweeg naar boven en beneden
Exit: Annuleren van menu
OK: ga naar aanpassing modus.
38
Aan de slag
3. Multimedia
3.1 Inleiding
In Input Source menu, kies USD bron naar Multimedia Modus. In Multimedia modus,
het systeem kunt bestanden controleren, in orde maken en afspelen, en andere
Browser werkt zonder multimedia af te spelen.
3.2 Multimedia hoofdmenu pattern
1) Multimedia hoofdmenu stijl
USB informatie
Multimedia
Disks
Menu
HD info invoeren
Menu
OK
Select
Bediening
2) Multimedia Hoofdmenu reserveonderdelen introductie
Apparaat
Instructie
Apparaat
invoerbericht
Als ingestopd USB apparaat gevonden is, het wordt helder, anders,
het is grijs.
Multimedia stijl
Van links naar rechts PHOTOǃMUSICǃMOVIEǃTEXT voor wat
afgespeeld moet worden.
Disk
Ingestopde disks weergeven en door letters in orde maken, van C.
USB info
Huidige apparaat informatie weergeven. Als geen USB ingestopd
wordt, het geeft weer als No Device; als USB apparaat ingestopd
wordt, zoals USB2.0, USB1.1 e.d;
Als ingestopd USB apparaat gevonden is, maar geen juiste
inspectie bericht, het geeft weer als Reinsert Device.
Bedieningsgids
Huidige beschikbare bediening weergeven.
39
Aan de slag
3.3 PHOTO submenu pattern
1) Multimedia PHOTO’s submenu pattern
Disk
Mappen in disk, druk op ENTER knop
Pagina
Bekijken opnieuw
Delete Current File
Add/Remove all
OK
Full screen
Menu
Menu
EXIT
Add/Remove to playlist
Quit
Afbeelding Overzicht
Afbeelding informatie
2) PHOTO submenu instructie
Apparaat
Instructie
Disk
Huidige disk weergeven
Pagina
Pagina van bestanden weergeven, zoals 1/2 formaat, het vorige
nummer is huidig pagina, de laatste is totaal aantal pagina’s.
Afbeeldingslijst
Afbeeldingen in huidige lijst
Voorbekijken
Afbeeldingen in huidig punt
Document
informatie
???.jpg
[Resolution] 800 x 600
[Size] 28521 Bytes
Data
Time
----Bestandsnaam
----resolutie
----Grootte
---- Datum aangemaakt
---- Tijd aangemaakt
40
Aan de slag
3)Bedieningsinstructie
Als de afbeelding gekozen wordt, het geeft weer dat de afbeelding voorbekijken
venster en details, dan druk op ENTER naar volledig scherm om afbeelding te bekijken.
Als de afbeelding volledig scherm afgespeeld wordt, druk op ENTER om vervolgende
bedieningsknoppen weer te geven.
In
Out
4) Knop instructie
Knop
Functie
Info/Weergave
Voorkijk van huidige afbeelding weergeven, de informatie is
weergegeven als vervolgd:
Blue Hills.jpg
----bestandsnaam
[Resolution] 1024 x 768
----resolutie
[Size] 28521 Bytes
----grootte
Annuleren
Afspeling annuleren, naar
multimedia menu PHOTO
Afspelen
Fotos volledig scherm afspelen, als een paar bestanden afspelingen
nodig heeft, het schakelt automatisch na een paar keer (standaard
na 5 seconden)
Onderbreken
Onderbreken
Stoppen
Afspeling stoppen, naar lijst menu, concentreren aan bestanden als
het annuleert.
vorige
menu,
concentreren
aan
Vorig.
Vorige bestand afspelen
Volgend
Volgende bestand afspelen
Herhalen
Circle modus, kunt 1 herhalen, alles herhalen, niet herhalen, singel
afb. Herhalen, geselecteerd afb. Herhalen of niet herhalen
selecteren.
Afspelingslijst
Afspelingslijst
Rotatie
Afbeeldingen tegen de klok in en met de klok mee draaien.
Zoom in
Inzomen
Zoom out
Uitzomen
41
Aan de slag
3.4 MUZIEK submenu pattern, apparaat en knop introductie.
1) Multimedia MUSIC submenu pattern.
Als geselecteerde clippen in de lijst staan, druk op ENTER om clippen voorbelijken
weer te geven, als vervolgt:
Disk
Pagina Voorbekijken
Delete Current File
Add/Remove all
OK
Full screen
Menu
Menu
EXIT
Add/Remove to playlist
Quit
Clippenlijst
Bestandeninformatie
2) MUSIC submenu apparaat omschrijving
Apparaat
Omschrijving
Disk
Geselecteerde apparaat weergeven
Pagina
Pagina’s weergeven
Clippenlijst
Clippenlijst weergeven
Voorbekijken
Venster
Muziek afbeeldingen
Bestanden
information
Clippennamen en grootte e.d. weergeven.
42
Aan de slag
3) MUSIC afspeling modus en knoppen functie
MUSIC afspeling is de menu zoals afspelingssoftware in PC, en afspelingslijst,
basisinformatie, processymbool, bedieningsgids heeft, als vervolgt:
Clippeninformatie Clippennamen
Clippenlijst
Screen Saver
1/1
Remove
Remove all from playlist
Goto Time
Bedieningsgids
MUSIC afbeelding
Voortgang balk
Afspelingstijd
4) MUSIC afspeling apparaat functie
Apparaat
Omschrijving
Clippennamen
Huidige namen van clippen
MUSIC afbeelding
Een afbeelding gebruik om MUSIC te markeren
Clippenlijst
Clippen gemarkeerd in browser, van top bestanden aan, orden
door letters.
Clippeninformatie
Opties weergeven en bestanden weergeven in Browser MUSIC is
dezelfde:
Artist: ABC Year: 2005
----artiest
Title: DEF
----titel
Album: GHI
----album
Bit Rate: 128K Sampling: 44K
----bit rate en sampling
Alles is gekregen van bestanden zelf.
Afspelingstijd
Afspelingstijd en in totaal, zoals 00:01:23/00:04:56 formaat
Bedieningsgids
Huidige bedieningsgids weergeven
Voortgang balk
Huidige voortgaan tijd en rate weergeven
5) Knop functie
Knop
Functie
Enter
Gekozen bestanden afspelen, als huidig bestand is gekozen, het
start van het beging.
Boven/Beneden
Bewegen in clippenlijst
Annuleren
Annuleren van MUSIC afspeling menu, maar clippen afspelen, als
browser menu annuleert, kies huidige afspelingsbestanden.
Afspelen
Afspelen
Onderbreken
Onderbreken
Stoppen
Afspeling stoppen, naar browser menu, kies in afgespeelde
bestanden voor het annuleren.
Volgend
Volgende bestanden afspelen
Herhalen
Afspeling herhalen, 1 herhalen, alles herhalen, niet herhalen e.d.
selecteren.
43
Aan de slag
3.5 MOVIE afspelen modus en knoppen functie
1) Afspelingmodus
1. MOVIE is afgespeeld in volledig scherm voor alle gemarkeerde bestanden als de
klant bekijkt, van top map naar beneden, in orde gemaakt door letters.
2. MOVIE’s zooming vereist: Het zomen hooguit in het huidige grootte aan de originale
grootte te houden.
2)submenu pattern en instructie
Delete Current File
Add/Remove all
OK
Full screen
Menu
Menu
EXIT
Add/Remove to playlist
Quit
Druk op ENTER om afbeelding te selecteren, het geeft weer dat de bestanden voorkijk en
bestandsinformatie, dan druk op Play om volledig scherm afspeling te starten, als vervolgt:
+
Slow
Step
Goto Time
1)Knop instructie
Herhalen :1, ALLES, NIET
A INSTELLEN: A cirkel afspeling instellen
Afspelingslijst: Het popt uit Bestandslijst op linkerscherm, die geeft huidige afspelingslijst
weer. Klant kunt lijst van boven naar beneden bekijken door pijlenknoppen, en dan
bestanden selecteren door ENTER knop, dan druk op lijst of niets doen in 10 seconden,
het gaat zelf annuleren.
Info: geeft huidige MOVIE informatie weer, bevat: naam huidig film bestand, resolutie film,
frequentie film, totale tijd film en afspelingstijd.
Goto: Het popt uit als: 00:00:00/01:23:45, de eerste tijd is wat de klant invoert, klant kunt
positie met linker of rechter knop selecteren, u kunt ook nummer met pijlenknoppen
schakelen, en dan druk op ENTER om tijd in te stellen.
44
Aan de slag
3.6 TEKST
Delete Current File
Add/Remove all
OK
Full screen
Menu
Menu
EXIT
Add/Remove to playlist
Quit
Kies TEXT bestanden, druk op ENTER en het geeft weer als bovenstaande.
Druk erop om in volledig scherm af te spelen als vervolgt:
Bedieningsinstructie
Prev page: Vorig pagina
Next page: Volgend pagina
Prev.: Vorige bestanden
Next: Volgende bestanden
Stop: auto pagina’s opzoeken stoppen
Playlist: Afspelingslijst, weergeven op rechtertop plaats
Info: Huidige bestandsinformatie, bestandsnamen en grootte weergeven.
45
Aan de slag
4. Personal Video Recorder(PVR)
4.1 Inleiding
PVR functie is alleen beschikbaar voor DTV, bevat Record, Timeshift en Playback
functies. Opname bevat tijd opname en opname behouden.
In-time opname kunt bewerkt worden via short-cut knop onmiddelijk, en opname
behouden heeft behoudingen nodig. Opname en Afspeling kunt op dezelfde tijd
gedaan worden, dat betekent DTV en USB apparaat met dezelfde tijd afspelen.
Timeshift is andere functie voor beide opname en afspeling. Het vervolgende
informatie zou het in details uitleggen.
4.2 PVR menu functie details.
4.2.1 PVR Bestand Systeem
Ga naar PVR van CHANNEL menu, als vervolgt:
Move
OK
Select
MENU
Back
Functie
Knop
Functie
Controleer
PVR Bestand
Systeem
USB Disk
Als USB apparaat niet ingestopd is, het geeft weer: NO USB
Device.
Als USB apparaat ingestopd is, het geeft weer Pass.
Formaat
Het kan MStar Format instellen. Druk op Enter knop om USB en
Formaat menu te bekijken, na naar Formaat, USB kunt PVR
functies voltooien.
Als de functie goed werkt, of USB is MStar Formaat, het geeft
weer Pass.
Timeshift
Grootte
Niet gekozen kunt worden. Na het controle op PVR
bestandssysteem, het betekent de USB geslaagt is.
MStar Formaat kunt gebruikt worden in Timeshift ruimte, de
grootte is gekozen door kant als formatteerd wordt.
Snelheid
Niet gekozen kunt worden. Na het controle op PVR
bestandssysteem, het geeft de USB beschikbare snelheid weer,
en herinnert de klant dat deze met beschikbare snelheid bedient
worden.
46
Aan de slag
4.2.1.1 Disk selecteren
Kies disk om inhoud op te slaan, opname nodig, als vervolgt, standaard als C:
Move
OK
Select
4.2.1.2 Controleer PVR Bestandssysteem
Control als de opslagruimte van PVR Bestandssysteem in het apparaat goed
opgeschappen wordt. Standaard als Start, druk op Enter knop om USB bestanden
en snelheid te constateren, de voortgang is als Checking….
Als geen USB ingestopt is, of controle mislukt, het geeft weer FAIL.
Als USB ingestopt is, maar Mstar Formaat niet juist, ga naar Formaat menu.
Als USB ingestopt is maar niet normaal of geen disk geconstateerd wordt, het
geeft weer No Partition Found.
Als het controle normaal is, het geeft weer SUCCESS.
Move
OK
Select
4.2.1.3 Formatteren
In Formatteren, druk op ENTER knop om PVR Bestandssysteem controle te s
tarten en bevestigen.
USB Apparaat informatie, het popt out Format Disk menu als vervolgt:
Na Formatteren, het systeem kunt PVR bestandssysteem bevestigen volgens
vorige bevestigde PVR bestandssysteem grootte.
47
Aan de slag
4.2.1.4 Timeshift grootte
Als het aanmaken van PVR bestandssysteem voltooid is, het popt out Time Shift
Grootte instelling menu, en klant kunt ruimtegrootte voor timeshift als vervolgt:
OK
Select
MENU
Back
4.2.2 Kanaal – Opnamelijst
1) Pattern voor referentie
De menu is als vervolgt
Titel, ordening
Symbool
Programma
OK
Bedieningsinstructie
Select
48
Aan de slag
2) Menu instructie
Optie
Opmerkingen
Titel
Opnamelijst
Ordening
Rechts, betekent de huidige ordeningsmethod, lijst/index knop kunt
optie omschakelen: Program -> Channel -> Time, het maakt ordes
door programma naam, kanaal orde en opnamestijd.
Markering
Huidig modus weergeven, opgenomen programma weergeven geen
markering, als het weergeeft als
en
, het betekent dat het
en
, het
aan het opnemen is, en als het geeft weer
betekent dat het aan het afspelen is, als gekozen, het geeft
kleurafbeelding weer, anders is het grijs.
Prgramma naam
Het programma naam bestaat uit kanaal nummer en opname kanaal
nummer.
Bedieningsgids
Huidige beschikbare bediening weergeven.
Programma
opmerkingen
Info/Weergave en Recht kan oppoppen huidig gekozen programma,
en weergeven in afbeelding.
[DATE] 2005/07/20 ----Datum opname
[TIME] 15:29:02 ----Starttijd opname
[DURATION] 0000:01:52 ----Tijdsduur
[CHANNEL NAME] 40 BBC NEWS ----Kanaallijst
[PROGRAM NAME] No Information ----programma naam.
3) Knop Instructie
Knop
Functie
Lijst/Index
Als geen menu, druk op Opnamelijst.
Asl het Opnamelijst weergeeft, schakel opname programma ordes om.
Boven/Beneden
Boven en Beneden pijlen bewegen om programma te selecteren.
Links/rechts
Sluiten/oppoppen programma instructie
Enter
Gekozen Programma afspelen
Info/Weergave
Sluiten/oppoppen programma instructie
Ɣ(DELETE)
Gekozen programma wissen
Menu
Naar Opnamelijst, druk op MENU terug naar PVR menu, kies
Opnamelijst. Naar Lijst shortcut, annuleren van opnamelijst, terug naar
huidige menu.
Annuleren
Annuleren
49
Aan de slag
4.2.3 PVR –Opname modus
1) Opname Modus
Date
Month
2010/07/20
Jan
Date
2010/07/20
Month
Move
Jan
OK
Select
MENU
Back
Optie
formaat
Opmerkingen
Menu titel
Recorder
Modus
Menu onderwerp
Titel
655335
Als Auto wordt gekozen, kies huidig programma om
opname in te stellen, Titel geeft zijn huidige naam weer.
Anders, geeft “—” weer, niet kunnen gebruikt worden.
Modus
Eens
Opnamemodus kiezen
Orde omschakelen: Eens -> Iedere dag -> Wekelijk
Auto optie verwijderen
Leg Auto in opname in EPG
Startdatum
2005/07/20
Startdatum opname, gebruik links/rechts om menu in te
stellen.
Starttijd
14:00
Starttijd opname.
Eindedatum
2005/07/20
Eindedatum opname.
Eindetijd
15:00
Bedieningsgids
Eindetijd opname.
Huidige bediening weergeven
2) Knop
Knop
Functie
Recorder menu
Time instelling menu
Menu
Annuleren van Recorder, naar
PVR menu, Kies opname modus
Annuleren van tijd instelling
Boven/Beneden
Beweeg keuze boven en beneden
Beweeg keuze boven en
beneden
Links/rechts
Modus aanpassen of tijdsinstelling
invoeren
Data aanpassen
ENTER
Huidige opname opslaan en
annuleren van opname naar
opname rooster lijst
Huidige instellingen bevstigen en
tijdsinstelling annuleren
Ɣ(Rooster)
Niet opgeslaan, annuleren van
opname naar opname rooster lijst
----
Annuleren
Niet opgeslaan, annuleren van
menu
Niet opgeslaan, annuleren van
menu
50
Aan de slag
4.2.4 PVR – Opname Rooster
1) Menu en functie
Move
Delete
MENU
Back
EXIT
Quit
Opmerking:
1. Opties in blanke starttijd ordes volgens opnamesplannen. Als nieuwe plannen
aan menu toegevoegd worden, kies nieuwe plannen.
2. Naar menu als het opneemt, kies huidige opnamesplannen.
3. Behalve 1 en 2 modus, kies laatste non-start plannen.
2) Knop
Knop
Functie
Menu
Annuleren van Opname Rooster lijst menu, naar PVR menu, kies Opname
Rooster lijst.
Bewegen
Beweeg keuze boven en beneden
Ɣ(Delete)
Gekozen opties verwijderen
Annuleren
Annuleren van menu
4.3 PVR shortcut functie
4.3.1 PVR shortcut knoppen in DTV modus
Knop
Functie
PVR
Naar Opname modus
TS
Naar Timeshift modus
PVR
List
Pop out Opgenomen lijst menu oppoppen, druk op OK/ENTER naar Afspeling,
speel het af.
Opmerking: Opname en Opnameslijst kunt bekijken in PVR menu.
51
Aan de slag
4.3.2 Opname
1)Opname
Opname menu bevat twee soorten: Volledig modus, en Eenvoudig modus.
Zij kunnen door Opname/Annuleren knop omgeschakeld worden.
In Opname modus, Opname menu geeft stil weer.
De details is als vervolgt:
1. Volledig Modus
Opmerking 1
Opmerking 4
Opmerking 3
Opmerking 2
Opmerking:
1. Opname
2. Opnamestijd
3. De linkerrij is kanaalnaam en rechterrij is programma naam.
4. Huidige tijd
2. Eenvoudig Modus
[00:00:20]
Opmerking: In Eenvoudig modus, het geeft alleen Opname Opnamestijd
op linker bodem kant weer.
2) Knop functie
Knop
Functie
Stop
Opname annuleren, geeft voortgang weer
Opname/
Annuleren
Opname menu modus omschakelen
Afspelen
Naar Afspeling modus, speel het af van het start opgenomen
programma.
Controleer afspeling instructie in details.
Lijst
Sluit Opname menu, oppoppen Opname menu en naar Afspeling
van Opname lijst menu.
Als opname lijst menu geannuleerd wordt, het geeft opnieuw
Opname weer.
52
Aan de slag
4.3.3 Timeshift
4.3.3.1 Timeshift menu
Timeshift lijkt op Opname menu, bevat twee soorten: Volledig modus, en Eenvoudig modus.
Zij kunnen door Annuleren knop omgeschakeld worden.
In Timeshift modus, Timeshift menu geeft stil weer.
De weergave is als vervolgt:
1. Volledig Modus
Opmerking 3
Opmerking 1
Opmerking 2
Opmerking 4
Opmerking 5
Opmerking:
1)Geeft huidig bediening weer, zoals Afspelen, Onderbreken, Voorspoelen, Terugspoelen,
Volgend, Vorig.
2)A->B cirkel iconen, als A of B gemarkeerd wordt, de afbeeldingen highlighten, het geeft
allen in Afspeling modus weer.
3)Timeshift voortgang weergaves, de voortgang geeft de totale Timeshift weer.
4)Er zijn twee tijden, een tijd start door “-“, een ander is totale lengte.
5)Huidige echte tijd.
Eenvoudig modus:
[-00:03:35]
Opmerking:
1)In Eenvoudig modus, het geeft huidige Timeshift afspelingsmodus weer, als
Afspelen, Onderbreken.
2)Eenvoudig modus geeft weer op de linkerbodem van het scherm..
53
Aan de slag
4.3.3.2 Timeshift Modus
4.3.3.2.1 Timeshift Start Modus
Naar Timeshift door het opdrukken op Onderbreken, en de afbeelding
onderbreekt, en het start op te nemen van onderbroken positie.
Het geeft Timeshift Start modus weer, als vervolgt:
Knop
Functie
Afspelen
Naar Timeshift Afspelingsmodus
Stoppen
Timeshift stoppen
Annuleren
Timeshift menu modus omschakelen
Lijst
Timeshift sluiten, Opnamelijst oppoppen
Van opnamelijst menu naar Afspeling, en dan annuleren van
Timeshift.
Annuleren van opnamelijst en dan Timeshift menu weergeven.
4.3.3.2.2 Timeshift Afspelen
In Timeshift Afspelen modus, het systeem neem DTV op en speel het op dezelfde tijd af.
Timeshift Afspelen is gestart door het opdrukken op Timeshift knop, in Timeshift Afspelen
Modus, het kan werk Onderbreken, Voorspoelen, Terugspoelen, en naar A->B cirkel
afspelingsmodus.
4.3.3.2.4 Timeshift Opname
Timeshift Afspelen kunt voorspoelen door het opdrukken aan Voorspoelen of Volgend
knop, het gaat naar Timeshift Opname modus.
Timeshift Opname modus, lijkt op Opname modus.
Timeshift Opname modus, de knop is als vervolgt:
Knop
Functie
Onderbreken
Afspeling onderbreken, en terug naar Timeshift Afspelen modus
Stoppen
Timeshift modus stoppen
Voorspoelen
Geen gebruik
Terugspoelen
Terug naar Timeshift Afspelen modus, en volgende gedeelte
Vorig.
Terug naar Timeshift Afspelen modus en vorige afspeling voor 30
seconden.
Als vorige Timeshift opname inhoud is, speel het hiervan af.
Annuleren
Sluit Timeshift menu modus
Lijst
Timeshift menu sluiten, Opnamelijst oppoppen.
Ga naar afspeling van Opnamelijst en dan annuleren van Timeshift
modus. Als Opnamelijst geannuleerd word, geeft Timeshift menu
weer.
54
Aan de slag
4.3.4 Afspelen
4.3.4.1 Afspelen
Afspelen lijkt op Timeshift menu, bevat twee soorten: Volledig modus, en Eenvoudig
modus. Zij kunnen door Annuleren knop omgeschakeld worden.
In Afspelen modus, Afspelen menu geeft stil weer.
De weergave is als vervolgt:
1. Volledig Modus
Opmerking 2
Opmerking 1
Opmerking 6
Opmerking 3
Opmerking 7
Opmerking 4 Opmerking 5
Opmerking:
1)Geeft huidig afspelingsmodus weer, verschillende bedieningen zoals Afspelen,
Onderbreken, Voorspoelen, Terugspoelen, Volgend, Vorig.
2)A->B cirkel iconen, als A of B gemarkeerd wordt, de afbeeldingen highlighten,
het geeft allen in Afspeling modus weer.
3)De voortgang geeft de totale afspeling weer.
4)Er zijn twee tijden, een tijd is huidige afspelingstijd, een ander is totale
afspelingstijd.
5) Huidige tijd.
6) Naam opgenomen kanaal
7) Naam programma, als er geen naam is, dan geeft niets weer.
Eenvoudig modus:
[00:03:35]
Opmerking:
1)In Eenvoudig modus, het geeft huidige Afspelen afspelingsmodus weer,
als Afspelen, Onderbreken, e.d.
2)Eenvoudig modus geeft weer op de linkerbodem van het scherm.
55
Problemen en Oplossingen
Voordat u contact met de service personeel opneemt, controleer volgende tabel
voor mogelijke oorzaak van probleem en voor een mogelijke oplossing.
TV is niet aan
Zorg ervoor dat de voedingskabel ingestopd wordt, dan druk op POWER knop op de
afstandsbediening.
De batterijen in afstandsbediening kunnen leeg zijn.
Batterijen vervangen.
Geen beeld, geen geluid
Controleer de interface kabel tussen TV en antenne/kabel TV.
Druk op POWER knop op de afstandsbediening.
Druk op SOURCE knop op de afstandsbediening om aangesloten video bronnen
te selecteren.
Slecht beeld, geluid OK
Controleer de interface kabel tussen TV en antenne/kabel TV.
Een ander kanaal proberen, het station uitzendt niet goed.
.
Pas Helderheid/Contrast opties aan in VIDEO menu.
Beeld OK, Slecht geluid
Geluid staat op Stil. Druk op MUTE knop op afstandsbediening.
Druk op VOL+ knop om geluid te vergroten.
Geluidslawaai
Alle infrarode apparaten weg van TV verplaatsen.
56
GEGEVENS
GEGEVENS
Items
Relevante illustratie
Paneel
23” Breedscherm LED
1920 x 1080 pixels
Resolutie
Functies
Compatibel gebieden
Multiform
TV standaard
PAL, SECAM
DTV standaard
DVB-T
PC
D-sub 15 pin ingang interface
CVBS, YPbPr, HDMI
Composiet video ingang interface,
YPbPr ingang interface
HDMI ingang interface
Ingang interface
Oortelefoon uitgang
RF
75
SCART
Standaard volle SCART interface
aeriale interface
Audio
Links, rechter audio ingang interface
USB
USB apparaten ingang interface
Hoofdtelefoon uitgang interface
Luidspreker uitgang
3W x 2
COAXIAL uitgang
COAXIAL uitgang interface
OSD taal
Engels, Duits,
Italiaans
Frans,
Nederlands,
Spaans,
Voeding
AC in 100-240V, 50/60Hz; DC out 12V,4.0A
Voedingsverbruik
Werkend 40W(Max), Standby 1W
Afmeting
623 x 463 x 125 mm (Gift Box)
Gewicht
4.125Kg (Net)
Onderdelen
Gebruikershandleiding
Garantiekaart
Afstandsbediening
AAA Batterij
Netsnoer
AC adaptor
Gegevens en Specificaties kunnen verschillend zijn zonder voorafgaande aankondigingen.
57