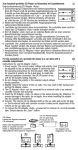
1
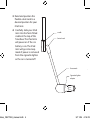
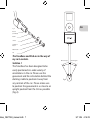
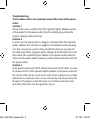
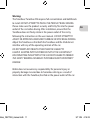
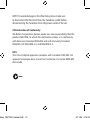
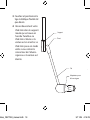
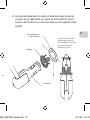
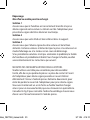
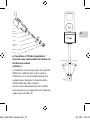
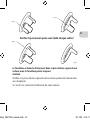
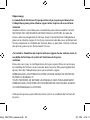
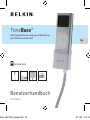
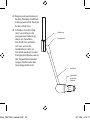
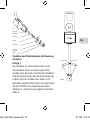
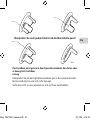
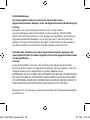
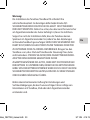
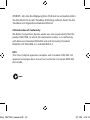
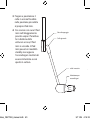
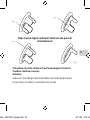
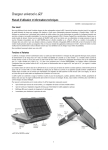
TuneBase™
Mount, power, and charge your
iPod mini as you drive
En
Fr
De
Es
for iPod® mini
It
for iPod® mini
User Manual
F8V7098ea
66ea_F8V7098_manual.indb 1
9/11/04 4:16:01
Introduction
Congratulations and thank you for purchasing the innovative TuneBase
from Belkin.
This product is designed to mount, stabilize, charge, and power your
iPod mini as you drive. Please review this User Manual carefully so
that you can be sure you’ll get the most from your iPod mini, virtually
anywhere you go.
66ea_F8V7098_manual.indb 2
9/11/04 4:16:01
Setup instructions
1. Turn your car stereo volume down.
2. Connect the Belkin TuneBase to your cigarette lighter adapter in
your car. The LED on the TuneBase indicates proper connection.
En
Warning: Avoid excessive force when rotating the connector in the cigarette
lighter adapter. If you encounter resistance, unplug the connector from the
outlet and reinsert it in the desired position. Failure to do so may result in
damage to the car’s cigarette lighter adapter or power outlet.
NOTE: The exact dimensions of power outlets vary by make and model
of the car. In some cases, the fit might be improved by pressing the collar
(included with the product) into the power outlet before inserting the
connector in order to ensure a tight fit. However, the collar will not be
necessary in most cars (and will not fit in the power outlet).
66ea_F8V7098_manual.indb 3
9/11/04 4:16:01
3. Bend and position the
flexible-steel neck to a
desired position for your
iPod mini.
4. Carefully slide your iPod
mini into the form-fitted
cradle at the top of the
TuneBase. The iPod mini
will power on if the car
battery is on. The iPod
mini will go into sleep
mode if power is removed
from the cigarette lighter
or the car is turned off.
66ea_F8V7098_manual.indb 4
cradle
Swivel neck
Gooseneck
Cigarette lighter
adapter
9/11/04 4:16:02
5. As an optional user method, connect your FM transmitter, cassette
adapter, or audio cables to the 3.5mm audio-out jack and listen to
your iPod mini through your car stereo or portable stereo device.
En
Power outlet or cigarette
lighter adapter
Make sure the ring is
positioned properly around
the metal contact to ensure
proper electrial connection
with the power outlet
Fit ring
k
ghter
66ea_F8V7098_manual.indb 5
Connector
9/11/04 4:16:02
Troubleshooting
My iPod does not seem to be charging.
Solution 1
Please make sure that the TuneBase is connected to the power outlet
of the car correctly. The green indicator light on the cigarette lighter
adapter portion of the product should be lit up at all times.
Solution 2
Please make sure that the iPod is pushed all the way into the cradle.
Solution 3
Please make sure that the power outlet of your car is provided with
power. Some cars do not provide power to the power outlet unless
the car is in ignition mode or the engine is started. In case all previous
solutions did not solve the problem the fuse of the TuneBase might
be burned. In order to exchange the fuse, please follow these steps
carefully:
DO NOT ATTEMPT TO DO THIS IN THE CAR.
Please use a clean table for disassembly so that components do not
get lost. The contact piece at the front end of the cigarette lighter
adapter is spring loaded. Carefully remove the nut at the front end with
pliers. Remove it slowly so that the spring inside the cigarette lighter
adapter does not get lost. The fuse will be easily accessible now. Please
exchange for a new one available at any car supply store. Please refer to
Fig. B for correct order of assembly. Make sure to tighten the nut firmly
with pliers.
66ea_F8V7098_manual.indb 6
9/11/04 4:16:02
En
Fig. B
Ressort
(non illustré)
fusible
contact
rondelle de
friction
Metal washer
nut
The TuneBase and iPod are in the way of
my car’s controls.
Solution 1
The TuneBase has been designed to be
easily positioned in a wide variety of
orientations in the car. Please use the
gooseneck and the articulation behind the
docking cradle to position it away from
any controls of the car. Please make sure
to position the gooseneck in as close to an
upright position from the CLA as possible
(Fig. A).
66ea_F8V7098_manual.indb 7
Max. 30 degrés
Max. 30 degrés
Fig. A
9/11/04 4:16:02
Troubleshooting
The Tunebase rotates out of position around the center of the power
outlet.
Solution 1
Please make sure to solidly attach the cigarette lighter adapter portion
of the product in the power outlet. Test the stability by pushing the
product sideways before driving.
Solution 2
In some cars, the power outlet is bigger in diameter than the cigarette
lighter adapter. You will notice a wiggle in the TuneBase when pushing
it. In that case, please use the collar provided to decrease any play. Fit
the collar around the cigarette lighter adapter of the TuneBase first and
then attach the cigarette lighter adapter in the power outlet. Slide the
collar into the power outlet making sure that all four protrusions fit into
the power outlet.
Solution 3
Some power outlets will not fit all four protrusions of the collar. In order
to improve the fit of the cigarette lighter adapter in the power outlet of
the car the collar can be cut to size. In order to do so please cut as many
protrusions as necessary with scissors. Cut one by one always trying the
fit again in the power outlet after each cut. Cut the protrusions from
one side to the other, not the opposites (Fig. C).
66ea_F8V7098_manual.indb 8
9/11/04 4:16:03
cut
cut
En
Test fit in power outlet after each cut!
cut
Fig. C
The TuneBase connects firmly to the power outlet of my car but the
TuneBase still rotates.
Solution
Please see if the power outlet of your car rotates in its socket. If so,
please consult your car manufacturer.
66ea_F8V7098_manual.indb 9
9/11/04 4:16:03
Troubleshooting
The rubber friction washer is out of position and I cannot insert the
cigarette lighter adapter into the car’s power outlet.
Solution
Please use a clean and empty table for disassembly. DO NOT ATTEMPT
TO DO THIS IN THE CAR. Please use pliers to loosen the nut at the end of
the cigarette lighter adapter slightly. It is not necessary to unscrew the
entire nut. Move the friction washer back into centered position. Use
pliers to tighten the nut firmly.
I pulled the TuneBase out of the power outlet of my car but the rubber
washer slipped off and remained in the power outlet.
Solution
In some rare cases the specific make up ot the power outlet may cause
the friction washer to get stuck in the power outlet and potentially slip
off the cigarette lighter adapter.
DISCONNECT THE BATTERY OF YOUR CAR BEFORE ATTEMPTING TO
REMOVE THE WASHER! ANY ATTEMPT TO REMOVE THE WASHER
WITHOUT DISCONNETING THE BATTERY MAY RESULT IN PHYSICAL
HARM OR DAMAGE TO THE CAR.
Use pliers to carefully remove the friction washer from the power outlet.
66ea_F8V7098_manual.indb 10
9/11/04 4:16:03
Warning:
The TuneBase/ TuneBase FM requires full concentration and bothhands
to install. DO NOT ATTEMPT TO INSTALL THE PRODUCT WHILE DRIVING.
Please make sure the product securely and firmly fits into the power
outlet of the car before driving. After installation, ensure that the
TuneBase does not freely rotate in the power outlet of the car by
following the instructions in the user manual. DO NOT ATTEMPT TO
ADJUST OR RETRIVE AN UNSECURED TUNEBASE OR IPOD WHILE DRIVING.
Adjust the TuneBase so that both the TuneBase and the iPod do not
interfere with any of the operating controls of the car.
DO NOT INSERT ANY OBJECTS OTHER THAN THE CIGARETTE
LIGHTER ADAPTER INTO THE POWER OUTLET OF THE CAR WITHOUT
DISCONNECTING THE BATTERY OF THE CAR FIRST. FAILURE TO OBSERVE
THIS SAFETY WARNING CAN RESULT IN POSSIBLE INJURY OR PROPERTY
DAMAGE.
En
Belkin does not assume any responsibility for personal injury or
property damage incurred due to hazardous driving as a result of
interaction with the TuneBase,the iPod or the power outlet of the car
66ea_F8V7098_manual.indb 11
9/11/04 4:16:04
NOTE: To avoid damage to the iPod mini, please make sure
to disconnect the iPod mini from the TuneBase cradle before
disconnecting the TuneBase from the power outlet of the car.
CE Declaration of Conformity
We, Belkin Corporation, declare under our sole responsibility that the
product F8V7098, to which this declaration relates, is in conformity
with Emissions Standard EN55022 and with Immunity Standard
EN55024, LVP EN61000-3-2, and EN61000-3-3.
ICES
This Class B digital apparatus complies with Canadian ICES-003. Cet
appareil numérique de la classe B est conforme á la norme NMB-003
du Canada.
66ea_F8V7098_manual.indb 12
9/11/04 4:16:04
Belkin Corporation Limited 3-Year Product Warranty
Belkin Corporation warrants this product against defects in materials and
workmanship for three years. If a defect is discovered, Belkin will, at its
option, repair or replace the product at no charge provided it is returned
during the warranty period, with transportation charges prepaid, to the
authorized Belkin dealer from whom you purchased the product. Proof of
purchase may be required. This warranty does not apply if the product has
been damaged by accident, abuse, misuse, or misapplication; if the product
has been modified without the written permission of Belkin; or if any Belkin
serial number has been removed or defaced.
THE WARRANTY AND REMEDIES SET FORTH ABOVE ARE EXCLUSIVE IN LIEU
OF ALL OTHERS, WHETHER ORAL OR WRITTEN, EXPRESSED OR IMPLIED.
BELKIN SPECIFICALLY DISCLAIMS ANY AND ALL IMPLIED WARRANTIES,
INCLUDING, WITHOUT LIMITATION, WARRANTIES OF MERCHANTABILITY AND
FITNESS FOR A PARTICULAR PURPOSE.
No Belkin dealer, agent, or employee is authorized to make any modification,
extension, or addition to this warranty.
BELKIN IS NOT RESPONSIBLE FOR SPECIAL, INCIDENTAL, OR CONSEQUENTIAL
DAMAGES RESULTING FROM ANY BREACH OF WARRANTY, OR ANY OTHER
LEGAL THEORY, INCLUDING BUT NOT LIMITED TO, LOST PROFITS, DOWNTIME,
GOODWILL, DAMAGE TO OR REPROGRAMMING OR REPRODUCING, ANY
PROGRAM OR DATA STORED IN OR USED WITH BELKIN PRODUCTS.
Some states do not allow the exclusion or limitation of incidental or
consequential damages or exclusion of implied warranties, so the above
limitations or exclusions may not apply to you. This warranty gives you
specific legal rights, and you may also have other rights that vary from
state to state.
66ea_F8V7098_manual.indb 13
En
9/11/04 4:16:04
Belkin Corporation
501 West Walnut Street
Compton, CA, 90220, USA
+1 310-898-1100
+1 310-898-1111 fax
Belkin Ltd.
Express Business Park, Shipton Way
Rushden, NN10 6GL, United Kingdom
+44 (0) 1933 35 2000
+44 (0) 1933 31 2000 fax
Belkin B.V.
Boeing Avenue 333
1119 PH Schiphol-Rijk, The Netherlands
+31 (0) 20 654 7300
+31 (0) 20 654 7349 fax
Belkin GmbH
Hanebergstrasse 2
80637 München • Germany
+49 (0) 89 143405 0
+49 (0) 89 143405 100 fax
Tech Support
US: 310-898-1100 ext. 2263
800-223-5546 ext. 2263
Europe: 00 800 223 55 460
Australia: 1800 235 546
New Zealand: 0800 235 546
© 2004 Belkin Corporation. All rights reserved.
All trade names are registered trademarks of respective manufacturers listed.
iPod is a trademark of Apple Computer, Inc., registered in the U.S. and other countries.
66ea_F8V7098_manual.indb 14
P74666ea-A
9/11/04 4:16:05
TuneBase™
Positionnez, alimentez et écoutez votre musique
sur votre iPod mini, tout en conduisant
Fr
for iPod® mini
®
pour
iPod
mini
for iPod®
mini
Manuel de l’utilisateur
F8V7098ea
66ea_F8V7098_manual.indb 15
9/11/04 4:16:08
Introduction
Félicitations et merci d’avoir choisi le Cordon d’alimentation pour la
voiture TuneBase (le TuneBase) de Belkin.
Ce produit vous permet de positionner, alimenter et recharger votre
iPod mini, tout en conduisant. Veuillez prendre connaissance de la
totalité de ce manuel, afin de tirer le meilleur de votre iPod mini, où que
vous soyez.
66ea_F8V7098_manual.indb 16
9/11/04 4:16:09
Instructions de mise en route
1. Baissez le son de votre autoradio.
2. Branchez le TuneBase de Belkin dans l’allume-cigare de votre voiture.
Le témoin lumineux du TuneBase indique si le raccordement est
bon.
Fr
Avertissement : N’employez pas une force excessive lorsque vous pivotez
le connecteur dans l’allume-cigare. Si vous rencontrez une résistance,
débranchez le connecteur de la prise et réinsérez-le dans la position désirée.
Si vous ne le faites pas, vous risquez d’endommager gravement l’adaptateur
ou l’allume-cigare.
REMARQUE : Les dimensions des allume-cigares peuvent varier selon la
marque ou le modèle de la voiture. En fonction de ces variations et pour un
meilleur ajustement, il se peut que vous deviez utiliser la rondelle fournie et
l’insérer dans l’allume-cigare avant d’y insérer le connecteur. Cependant, il
n’est pas nécessaire d’utiliser la rondelle avec la plupart des allume-cigares.
Autrement, elle ne conviendra pas à la prise.
66ea_F8V7098_manual.indb 17
9/11/04 4:16:09
3. Courbez et positionnez la
tige métallique flexible tel
que désiré.
4. Glissez doucement votre
iPod mini dans le support
moulé qui se trouve en
haut du TuneBase. Le
iPod mini s’allume si la
voiture est en marche. Le
iPod mini passe en mode
veille si vous retirez le
connecteur de l’allumecigare ou si la voiture est
éteinte.
66ea_F8V7098_manual.indb 18
Support
Pivot
Col
Adaptateur pour
allume-cigare
9/11/04 4:16:09
5. Vous pouvez également raccorder un adaptateur pour lecteur de
cassettes ou un câble audio sur la prise de sortie audio 3,5 mm et
écouter votre iPod mini sur votre autoradio ou votre appareil stéréo
portatif.
Fr
Prise d’alimentation
ou allume-cigare
Assurez-vous que la rondelle
est bien en place autour du
contact métallique afin d’assurer
une connexion électrique
adéquate avec la prise.
Rondelle
r pour
are
66ea_F8V7098_manual.indb 19
Connecteur
9/11/04 4:16:10
Dépannage
Mon iPod ne semble pas être rechargé.
Solution 1
Assurez-vous que le TuneBase est correctement branché à la prise
allume-cigare de votre voiture. Le témoin vert de l’adaptateur pour
prise allume-cigare doit être allumé en tout temps.
Solution 2
Assurez-vous que votre iPod est bien enfoncé dans le support.
Solution 3
Assurez-vous que l’allume-cigare de votre voiture est bel et bien
alimenté. Certaines voitures n’alimentent pas la prise si la voiture est en
mode d’allumage ou si le moteur est en cours de démarrage.
Si les précédentes solutions n’ont pas solutionné le problème, le fusible
du TuneBase est probablement brûlé. Pour changer le fusible, veuillez
suivre attentivement les instructions qui suivent :
NE FAITES PAS CES MANIPULATIONS DANS LA VOITURE.
Veuillez utiliser une table peu encombrée pour désassembler
l’unité, afin de ne pas perdre de pièces. La pièce de contact à l’avant
de l’adaptateur pour allume-cigare possède un ressort. Retirez
délicatement l’écrou à l’aide de pinces. Retirez-le doucement, pour
éviter de perdre le ressort de l’adaptateur pour prise allume-cigare.
Vous avez maintenant un accès facile au fusible. Veuillez changer
celui-ci pour un nouveau fusible, que vous trouverez en quincaillerie.
Consultez la Fig. B pour connaître l’ordre d’assemblage. Assurez-vous
d’avoir serré l’écrou fermement à l’aide de pinces.
66ea_F8V7098_manual.indb 20
9/11/04 4:16:10
Fig. B
Ressort
(non illustré)
Fr
fusible
contact
rondelle de
friction
Rondelle de métal
écrou
Le TuneBase et l’iPod m’empêchent
d’accéder aux commandes du tableau de
bord de ma voiture
Solution 1
Le TuneBase a été conçu pour être placé à
différents endroits dans votre voiture.
Utilisez le col et l’articulation derrière le
support pour éloigner le TuneBase des
commandes de votre voiture.
Assurez-vous de positionner le col dans
une position aussi rapprochée de l’allumecigare que possible. A).
66ea_F8V7098_manual.indb 21
Max. 30 degrés
Max. 30 degrés
Fig. A
9/11/04 4:16:10
Dépannage
Le TuneBase pivote hors position, dans la prise de l’allume-cigare.
Solution 1
Assurez-vous que l’adaptateur pour prise allume-cigare du TuneBase
est solidement branché dans la prise allume-cigare de votre voiture.
Vérifiez sa stabilité en tentant de faire bouger l’unité de gauche à
droite, avant de conduire votre voiture.
Solution 2
Dans certaines voitures, le diamètre de la prise est plus grand que celui
de l’adaptateur pour prise allume-cigare.
Vous remarquerez que le TuneBase se déplace lorsque vous le bougez.
Dans ce cas, utilisez le manchon fourni pour augmenter le diamètre
de l’adaptateur. Placez le manchon autour de l’adaptateur pour prise
allume-cigare du TuneBase et branchez l’adaptateur dans la prise
allume-cigare de votre voiture. Faites glisser le manchon dans la prise
pour allume-cigare, en vous assurant que les quatre saillies sont bien en
place dans la prise.
Solution 3
Certaines prises ne conviendront pas aux quatre saillies du manchon.
Pour améliorer l’ajustement de l’adaptateur dans la prise pour allumecigare, vous pouvez tailler le manchon de la longueur désirée.
Pour ce faire, taillez autant de saillies que désiré à l’aide d’une paire de
ciseaux. Taillez une saillie à la fois et vérifiez l’ajustement en branchant
l’adaptateur dans la prise.
Taillez une saillie d’un côté, puis de l’autre, et non pas des deux côtés à
la fois (Fig. C).
66ea_F8V7098_manual.indb 22
9/11/04 4:16:10
Couper
Couper
Fr
Vérifiez l’ajustement après avoir taillé chaque saillie !
Couper
Fig. C
Le TuneBase se branche fermement dans la prise allume-cigare de ma
voiture, mais le TuneBase pivote toujours.
Solution
Vérifiez si la prise allume-cigare de votre voiture pivote elle-même dans
son réceptacle.
Si c’est le cas, contactez le fabricant de votre voiture.
66ea_F8V7098_manual.indb 23
9/11/04 4:16:11
Dépannage
La rondelle de friction est hors position et je ne peux pas brancher
l’adaptateur pour prise allume-cigare dans la prise de ma voiture.
Solution
Veuillez utiliser une table peu encombrée pour désassembler l’unité.
NE FAITES PAS CES MANIPULATIONS DANS LA VOITURE. À l’aide de
pinces, dévissez légèrement l’écrou situé à l’extrémité de l’adaptateur
pour prise allume-cigare. Il n’est pas nécessaire de dévisser entièrement
l’écrou. Replacez la rondelle de friction dans sa position centrée. Utilisez
des pinces pour serrer fermement l’écrou.
J’ai retiré le TuneBase de la prise allume-cigare de ma voiture mais la
rondelle de friction est restée à l’intérieur de la prise.
Solution
Dans des cas rares, la configuration de la prise peut faire en sorte que
la rondelle de friction reste coincée dans la prise. Elle peut également
glisser hors de l’adaptateur pour prise allume-cigare.
DÉBRANCHEZ LA BATTERIE DE VOTRE VOITURE AVANT DE TENTER DE
RETIRER LA RONDELLE !
TOUTE TENTATIVE DE RETIRER LA RONDELLE SANS PRÉALABLEMENT
DÉBRANCHER LA BATTERIE PEUT ENTRAÎNER DES BLESSURES GRAVES
OU ENDOMMAGER LA VOITURE.
Utilisez des pinces pour délicatement retirer la rondelle de friction de
la prise.
66ea_F8V7098_manual.indb 24
9/11/04 4:16:11
Avertissement :
L’installation du TuneBase/TuneBase FM requiert de la concentration et
vos deux mains.
N’ESSAYEZ PAS D’INSTALLER LE PRODUIT PENDANT LA CONDUITE.
Assurez-vous que le produit est bien en place dans la prise allumecigare de votre voiture avant de conduire votre véhicule.
Après l’installation, assurez-vous que le TuneBase ne pivote pas dans
la prise allume-cigare, en suivant les instructions dans le manuel de
l’utilisateur.
NE TENTEZ PAS D’AJUSTER OU DE REPLACER UN TUNEBASE QUI N’EST
PAS STABLE EN COURS DE CONDUITE.
Ajustez le TuneBase de façon à ce que le TuneBase et l’iPod
n’empêchent pas l’accès aux commandes de votre voiture.
N’INSÉREZ AUCUN OBJET AUTRE QUE L’ADAPTATEUR POUR PRISE
ALLUME-CIGARE DANS LA PRISE DE LA VOITURE SANS PRÉALABLEMENT
DÉBRANCHER LA BATTERIE DE LA VOITURE.
IGNORER CET AVERTISSEMENT PEUT ENTRAÎNER DES BLESSURES
SÉRIEUSES OU DES DOMMAGES MATÉRIELS.
Belkin n’accepte aucune responsabilité pour les blessures corporelles
ou les dommages matériels des suites d’une conduite dangereuse,
résultant de l’interaction avec le TuneBase, l’iPod, la prise allume-cigare
ou la voiture.
66ea_F8V7098_manual.indb 25
Fr
9/11/04 4:16:11
REMARQUE : Afin d’éviter des dommages à votre iPod mini, assurezvous de débrancher le iPod mini du support sur TuneBase, avant de
débrancher le TuneBase de l’allume-cigare.
CE Declaration of Conformity
We, Belkin Corporation, declare under our sole responsibility that the
product F8V7098, to which this declaration relates, is in conformity
with Emissions Standard EN55022 and with Immunity Standard
EN55024, LVP EN61000-3-2, and EN61000-3-3.
ICES
This Class B digital apparatus complies with Canadian ICES-003. Cet
appareil numérique de la classe B est conforme á la norme NMB-003
du Canada.
66ea_F8V7098_manual.indb 26
9/11/04 4:16:12
Belkin Corporation Limited 3-Year Product Warranty
Belkin Corporation warrants this product against defects in materials and
workmanship for three years. If a defect is discovered, Belkin will, at its
option, repair or replace the product at no charge provided it is returned
during the warranty period, with transportation charges prepaid, to the
authorized Belkin dealer from whom you purchased the product. Proof of
purchase may be required. This warranty does not apply if the product has
been damaged by accident, abuse, misuse, or misapplication; if the product
has been modified without the written permission of Belkin; or if any Belkin
serial number has been removed or defaced.
THE WARRANTY AND REMEDIES SET FORTH ABOVE ARE EXCLUSIVE IN LIEU
OF ALL OTHERS, WHETHER ORAL OR WRITTEN, EXPRESSED OR IMPLIED.
BELKIN SPECIFICALLY DISCLAIMS ANY AND ALL IMPLIED WARRANTIES,
INCLUDING, WITHOUT LIMITATION, WARRANTIES OF MERCHANTABILITY AND
FITNESS FOR A PARTICULAR PURPOSE.
No Belkin dealer, agent, or employee is authorized to make any modification,
extension, or addition to this warranty.
BELKIN IS NOT RESPONSIBLE FOR SPECIAL, INCIDENTAL, OR CONSEQUENTIAL
DAMAGES RESULTING FROM ANY BREACH OF WARRANTY, OR ANY OTHER
LEGAL THEORY, INCLUDING BUT NOT LIMITED TO, LOST PROFITS, DOWNTIME,
GOODWILL, DAMAGE TO OR REPROGRAMMING OR REPRODUCING, ANY
PROGRAM OR DATA STORED IN OR USED WITH BELKIN PRODUCTS.
Some states do not allow the exclusion or limitation of incidental or
consequential damages or exclusion of implied warranties, so the above
limitations or exclusions may not apply to you. This warranty gives you
specific legal rights, and you may also have other rights that vary from
state to state.
66ea_F8V7098_manual.indb 27
Fr
9/11/04 4:16:12
Belkin Corporation
501 West Walnut Street
Compton, CA, 90220, États-Unis
+1 310-898-1100
+1 310-898-1111 fax
Belkin Ltd.
Express Business Park, Shipton Way
Rushden, NN10 6GL, Royaume-Uni
+44 (0) 1933 35 2000
+44 (0) 1933 31 2000 fax
Belkin B.V.
Boeing Avenue 333
1119 PH Schiphol-Rijk, Pays-Bas
+31 (0) 20 654 7300
+31 (0) 20 654 7349 fax
Belkin GmbH
Hanebergstrasse 2
80637 München • Allemagne
+49 (0) 89 143405 0
+49 (0) 89 143405 100 fax
Assistance technique Belkin
US: 310-898-1100 ext. 2263
800-223-5546 ext. 2263
Europe: 00 800 223 55 460
Australia: 1800 235 546
New Zealand: 0800 235 546
© 2004 Belkin Corporation. All rights reserved.
All trade names are registered trademarks of respective manufacturers listed.
iPod is a trademark of Apple Computer, Inc., registered in the U.S. and other countries.
66ea_F8V7098_manual.indb 28
P74666ea-A
9/11/04 4:16:12
TuneBase™
Befestigung, Stromversorgung und Benutzung
des iPod mini auf der Fahrt
De
for iPod® mini
für iPod®
iPod®mini
mini
for
Benutzerhandbuch
F8V7098ea
66ea_F8V7098_manual.indb 29
9/11/04 4:16:16
Einführung
Wir freuen uns, dass Sie sich für das innovative TuneBase
Mobilnetzkabel von Belkin entschieden haben.
Dieses Produkt dient zum Befestigen und Laden Ihres iPod mini
und versorgt ihn während der Fahrt mit Strom. Bitte lesen Sie das
Benutzerhandbuch sorgfältig durch, damit Sie Ihren iPod mini überall
nach Lust und Laune nutzen können.
66ea_F8V7098_manual.indb 30
9/11/04 4:16:16
Installation
1. Stellen Sie Ihr Autoradio leise.
2. Schließen Sie den Belkin TuneBase an den Zigarettenanzünder Ihres
Autos an.
Die Leuchte auf dem TuneBase dient zur Kontrolle der Verbindung.
Warnung: Üben Sie beim Eindrehen des Steckers in den Zigarettenanzünder
keinen übermäßigen Druck aus! Wenn Sie auf Widerstand stoßen, ziehen
Sie den Stecker aus der Buchse, und stecken Sie ihn in der korrekten Position
erneut ein. Andernfalls kann es zu Schäden am Zigarettenanzünder oder an
der Buchse kommen.
De
HINWEIS: Die Abmessungen der Anschlussbuchsen hängen von Hersteller
und Modell Ihres Autos ab. In manchen Fällen hält der Stecker besser, wenn
Sie die enthaltene Manschette in die Buchse drücken, bevor Sie den Stecker
einstecken. Allerdings ist die Manschette bei den meisten Automodellen
nicht erforderlich (und passt in diesem Fall auch nicht in die Buchse).
66ea_F8V7098_manual.indb 31
9/11/04 4:16:17
3. Biegen und positionieren
Sie den flexiblen Stahlhals
in die gewünschte Position
für den iPod mini.
4. Schieben Sie den iPod
mini vorsichtig in die
passgenaue Halterung
oben am TuneBase.
Der iPod mini schaltet
sich ein, wenn die
Autobatterie aktiv ist.
Der iPod wechselt in den
Energiespar-Modus, wenn
der Zigarettenanzünder
ausgeschaltet oder das
Auto abgestellt wird.
66ea_F8V7098_manual.indb 32
Halterung
Drehgelenk
Stahlhals
ZigarettenanzünderAdapter
9/11/04 4:16:17
5. Sie können auch Ihren Kassettenadapter oder ein Audiokabel an
den 3,5-mm-Audioausgang anschließen und den iPod mini über die
Autostereoanlage oder ein tragbares Stereogerät abspielen.
Strombuchse oder
Zigarettenanzünder-Anschluss
Stellen Sie sicher, dass die
Manschette richtig am
Metallkontakt abschließt,
um die Stromversorgung
zu gewährleisten.
De
Einpassmanschette
66ea_F8V7098_manual.indb 33
Stecker
9/11/04 4:16:17
Fehlerbehebung
Mein iPod wird scheinbar nicht aufgeladen.
Lösung 1
Vergewissern Sie sich, dass der TuneBase korrekt an den
Zigarettenanzünder des Autos angeschlossen ist. Die grüne Leuchte auf
dem Zigarettenanzünder-Adapterteil des Geräts sollte immer leuchten.
Lösung 2
Stellen Sie sicher, dass der iPod fest in die Halterung gedrückt ist.
Lösung 3
Vergewissern Sie sich, dass der Zigarettenanzünder des Autos mit Strom
versorgt wird. Bei manchen Autos funktioniert die Stromzufuhr nur, wenn die
Zündung eingeschaltet ist oder der Motor gestartet wird. Wenn Sie alle oben
genannten Schritte beachtet haben, das Problem dadurch aber nicht gelöst wird,
ist die Sicherung des TuneBase möglicherweise durchgebrannt. Wenn Sie die
Sicherung auswechseln wollen, folgen Sie bitte genau den folgenden Schritten:
TUN SIE DIES NICHT IM AUTO.
Benutzen Sie einen sauberen Tisch, so dass beim Auseinanderbauen
keine Einzelteile verloren gehen. Der Kontakt an der Vorderseite des
Zigarettenanzünder-Adapters ist federbelastet. Entfernen Sie die Mutter an der
Vorderseite vorsichtig mit einer Zange. Entfernen Sie sie langsam, damit die
Feder im Zigarettenanzünder-Adapter nicht verloren geht. Jetzt können Sie die
Sicherung entfernen. Setzen Sie jetzt eine neue Sicherung ein. Sie erhalten Sie
bei jedem Autohandel. Siehe Abb. B zur Installation in der richtigen Reihenfolge.
Ziehen Sie die Mutter fest mit der Zange an.
66ea_F8V7098_manual.indb 34
9/11/04 4:16:18
Abb. B
Feder (nicht
abgebildet)
Sicherung
De
Kontakt
Gleitscheibe
Gleitscheibe
aus Metall
Mutter
TuneBase und iPod behindern die Steuerung
des Autos.
Lösung 1
Der TuneBase ist so konzipiert, dass er auf
verschiedene Arten im Auto ausgerichtet
werden kann. Benutzen Sie bitte den Stahlhals
und das Gelenk hinter der Docking-Halterung,
so dass Sie beim Schalten des Autos nicht
behindert werden. Bitte achten Sie darauf, dass
Sie den Stahlhals am ZigarettenanzünderAdapter so senkrecht wie möglich ausrichten
(Abb. A).
66ea_F8V7098_manual.indb 35
Mac 30 Grad
Mac 30 Grad
Abb. A
9/11/04 4:16:18
Troubleshooting
Der TuneBase löst sich vom Mittelpunkt des Zigarettenanzünders
Lösung 1
Befestigen Sie den Zigarettenanzünder-Adapter gut am
Zigarettenanzünder. Sie können überprüfen, ob das Gerät wirklich gut
befestigt ist, indem Sie es zur Seite drücken, bevor Sie losfahren.
Lösung 2
Der Zigarettenanzünder in manchen Autos hat einen größeren
Durchmesser als der Zigarettenanzünder-Adapter. Wenn Sie ihn
leicht drücken, merken Sie, ob der TuneBase lose sitzt. In diesem
Fall sollten Sie mit der mitgelieferten Manschette den Spielraum
des TuneBase verringern. Befestigen Sie erst die Manschette am
Zigarettenanzünder-Adapter des TuneBase und befestigen Sie dann den
Zigarettenanzünder-Adapter am Zigarettenanzünder. Schieben Sie die
Manschette in den Zigarettenanzünder. Achten Sie dabei darauf, dass Sie
die vier Verbindungsstücke genau in den Zigarettenanzünder passen.
Lösung 3
Nicht bei allen Zigarettenanzündern passen die vier Verbindungsstücke
der Manschette. Sie können die Manschette so zurechtschneiden, dass
der Zigarettenanzünder-Adapter genau in den Zigarettenanzünder des
Autos passt. Schneiden Sie dafür so viele Verbindungsstücke wie nötig
mit der Schere aus. Schneiden Sie jeweils eins ab und versuchen Sie
danach, den Adapter am Zigarettenanzünder anzubringen. Schneiden
Sie nebeneinanderliegende Verbindungsstücke heraus; nicht die jeweils
gegenüberliegenden (Abb. C).
66ea_F8V7098_manual.indb 36
9/11/04 4:16:18
Schnitt
Schnitt
Überprüfen Sie nach jedem Schnitt, ob die Manschette passt!
De
Schnitt
Abb. C
Der TuneBase passt genau in den Zigarettenanzünder des Autos, aber
er bewegt sich trotzdem.
Lösung
Überprüfen Sie, ob der Zigarettenanzünder gut in der entsprechenden
Buchse befestigt ist und sich nicht bewegt.
Sollte das nicht so sein, wenden Sie sich an Ihren Autohändler.
66ea_F8V7098_manual.indb 37
9/11/04 4:16:18
Fehlerbehebung
Die Gummigleitscheibe ist verrutscht und ich kann den
Zigarettenanzünder-Adapter nicht am Zigarettenanzünder befestigen.
Lösung
Benutzen Sie einen sauberen, leeren Tisch, so dass beim
Auseinanderbauen keine Einzelteile verloren gehen. TUN SIE DIES
NICHT IM AUTO. Benutzen Sie eine Zange, um die Mutter am Ende des
Zigarettenanzünder-Adapters ein wenig zu lösen. Sie brauchen die
Mutter nicht ganz loszudrehen. Bringen Sie die Gleitscheibe wieder in
die Mitte. Ziehen Sie die Mutter mit der Zange wieder fest an.
Ich habe den TuneBase aus dem Zigarettenanzünder gezogen; die
Gummigleitscheibe ist dabei abgerutscht und im Zigarettenanzünder
steckengeblieben.
Lösung
In Ausnahmefällen (bei einer bestimmten Art Zigarettenanzünder)
kann die Gleitscheibe im Zigarettenanzünder stecken bleiben und sich
möglicherweise vom Zigarettenanzünder-Adapter lösen.
ENTFERNEN SIE DAS KABEL DER AUTOBATTERIE, BEVOR SIE VERSUCHEN,
DIE GLEITSCHEIBE ZU ENTFERNEN! JEDER VERSUCH, DIE GLEITSCHEIBE
ZU ENTFERNEN, OHNE DIE STROMZUFUHR AUSZUSCHALTEN, KANN ZU
VERLETZUNGEN UND BESCHÄDIGUNG IHRES AUTOS FÜHREN.
Benutzen Sie eine Zange, um die Gleitscheibe vom Zigarettenanzünder
zu entfernen.
66ea_F8V7098_manual.indb 38
9/11/04 4:16:19
Warnung:
Die Installation des TuneBase/TuneBase FM erfordert Ihre
volle Aufmerksamkeit. Sie benötigen dafür beide Hände. AUS
SICHERHEITSGRÜNDEN SOLLTEN SIE DAS GERÄT NICHT WÄHREND
DER FAHRT EINSETZEN. Stellen Sie sicher, dass das Gerät fest und sicher
am Zigarettenanzünder des Autos befestigt ist, bevor Sie losfahren.
Sorgen Sie nach der Installation dafür, dass der Tunebase keinen
Spielraum im Zigarettenanzünder hat, indem Sie den Anleitungen
im Benutzerhandbuch genau folgen. VERSUCHEN SIE WÄHREND DER
FAHRT NICHT, EINEN SCHLECHT BEFESTIGTEN TUNEBASE ODER IPOD
ZU ENTFERNEN ODER ZU ANDERS ANZUBRINGEN. Bringen Sie den
TuneBase so an, dass iPod und TuneBase die Steuerung Ihres Autos
nicht behindern. STECKEN SIE AUSSER DEM ZIGARETTENANZÜNDERADAPTER KEINE ANDEREN GEGENSTÄNDE IN DEN
ZIGARETTENANZÜNDER DES AUTOS, OHNE ERST DIE STROMZUFUHR
DER BATTERIE ZU UNTERBRECHEN, INDEM SIE DAS ENTSPRECHENDE
KABEL VON DER BATTERIE ENTFERNEN. WENN SIE SICH NICHT AN DIESE
SICHERHEITSVORSCHRIFTEN HALTEN, KANN DIES ZU VERLETZUNGEN
ODER SACHBESCHÄDIGUNG FÜHREN.
De
Belkin übernimmt keinerlei Haftung für Verletzungen und
Sachbeschädigungen, die durch unvorsichtiges Fahren infolge von
Interaktionen mit TuneBase, iPod oder dem Zigarettenanzünder
entstanden sind.
66ea_F8V7098_manual.indb 39
9/11/04 4:16:19
HINWEIS: Um eine Beschädigung Ihres iPod mini zu vermeiden,sollten
Sie den iPod mini aus der TuneBase-Halterung nehmen, bevor Sie den
TuneBase vom Zigarettenanzünderentfernen
CE Declaration of Conformity
We, Belkin Corporation, declare under our sole responsibility that the
product F8V7098, to which this declaration relates, is in conformity
with Emissions Standard EN55022 and with Immunity Standard
EN55024, LVP EN61000-3-2, and EN61000-3-3.
ICES
This Class B digital apparatus complies with Canadian ICES-003. Cet
appareil numérique de la classe B est conforme á la norme NMB-003
du Canada.
66ea_F8V7098_manual.indb 40
9/11/04 4:16:19
Belkin Corporation Limited 3-Year Product Warranty
Belkin Corporation warrants this product against defects in materials and
workmanship for three years. If a defect is discovered, Belkin will, at its
option, repair or replace the product at no charge provided it is returned
during the warranty period, with transportation charges prepaid, to the
authorized Belkin dealer from whom you purchased the product. Proof of
purchase may be required. This warranty does not apply if the product has
been damaged by accident, abuse, misuse, or misapplication; if the product
has been modified without the written permission of Belkin; or if any Belkin
serial number has been removed or defaced.
THE WARRANTY AND REMEDIES SET FORTH ABOVE ARE EXCLUSIVE IN LIEU
OF ALL OTHERS, WHETHER ORAL OR WRITTEN, EXPRESSED OR IMPLIED.
BELKIN SPECIFICALLY DISCLAIMS ANY AND ALL IMPLIED WARRANTIES,
INCLUDING, WITHOUT LIMITATION, WARRANTIES OF MERCHANTABILITY AND
FITNESS FOR A PARTICULAR PURPOSE.
No Belkin dealer, agent, or employee is authorized to make any modification,
extension, or addition to this warranty.
BELKIN IS NOT RESPONSIBLE FOR SPECIAL, INCIDENTAL, OR CONSEQUENTIAL
DAMAGES RESULTING FROM ANY BREACH OF WARRANTY, OR ANY OTHER
LEGAL THEORY, INCLUDING BUT NOT LIMITED TO, LOST PROFITS, DOWNTIME,
GOODWILL, DAMAGE TO OR REPROGRAMMING OR REPRODUCING, ANY
PROGRAM OR DATA STORED IN OR USED WITH BELKIN PRODUCTS.
Some states do not allow the exclusion or limitation of incidental or
consequential damages or exclusion of implied warranties, so the above
limitations or exclusions may not apply to you. This warranty gives you
specific legal rights, and you may also have other rights that vary from
state to state.
66ea_F8V7098_manual.indb 41
De
9/11/04 4:16:19
Belkin Corporation
501 West Walnut Street
Compton, CA, 90220, USA
+1 310-898-1100
+1 310-898-1111 fax
Belkin Ltd.
Express Business Park, Shipton Way
Rushden, NN10 6GL, Großbritannien
+44 (0) 1933 35 2000
+44 (0) 1933 31 2000 fax
Belkin B.V.
Boeing Avenue 333
1119 PH Schiphol-Rijk, Niederlande
+31 (0) 20 654 7300
+31 (0) 20 654 7349 fax
Belkin GmbH
Hanebergstrasse 2
80637 München • Deutschland
+49 (0) 89 143405 0
+49 (0) 89 143405 100 fax
Belkin Technischer Support
US: 310-898-1100 ext. 2263
800-223-5546 ext. 2263
Europa: 00 800 223 55 460
Australia: 1800 235 546
New Zealand: 0800 235 546
© 2004 Belkin Corporation. All rights reserved.
All trade names are registered trademarks of respective manufacturers listed.
iPod is a trademark of Apple Computer, Inc., registered in the U.S. and other countries.
66ea_F8V7098_manual.indb 42
P74666ea-A
9/11/04 4:16:20
TuneBase™
Monte, recargue y utilice su
iPod mini mientras conduce
Es
for iPod® mini
®
para
iPodmini
mini
for
iPod®
Manual del usuario
F8V7098ea
66ea_F8V7098_manual.indb 43
9/11/04 4:16:24
Introducción
Ennhorabuena y gracias por adquirir el innovador cable de
alimentación portátil TuneBase (el TuneBase) de Belkin.
Este producto está diseñado para montar, estabilizar, cargar y alimentar
su iPod mini mientras conduce. Lea atentamente el presente manual
del usuario para asegurarse de sacar todo el partido de su iPod mini,
prácticamente en todas partes.
66ea_F8V7098_manual.indb 44
9/11/04 4:16:24
Instrucciones de instalación
1. Baje el volumen del equipo estéreo de su vehículo.
2. Conecte el TuneBase de Belkin a la toma del encendedor de
su vehículo. El LED del Tunebase indica que está conectado
correctamente
Atención: evite ejercer excesiva fuerza cuando gire la clavija para
introducirla en la toma del encendedor. Si encuentra resistencia, desconecte
la clavija de la salida y vuelva a insertarla en la posición deseada. En caso
contrario, podría dañar la toma del encendedor de su vehículo o la salida de
alimentación.
Es
ATENCIÓN: las dimensiones exactas de las salidas de alimentación pueden
variar dependiendo de la marca y el modelo del vehículo. En algunos casos,
es posible mejorar el ajuste introduciendo el cuello adaptador (adjunto con
el producto) en la salida de alimentación antes de insertar la clavija con el
fin de garantizar un ajuste perfecto. No obstante, el cuello adaptador no
será necesario en la mayoría de vehículos (y no encajará en la salida de la
alimentación).
66ea_F8V7098_manual.indb 45
9/11/04 4:16:24
3. Doble y coloque el cuello
de acero flexible en la
posición deseada para su
iPod mini.
4. Introduzca
cuidadosamente su iPod
mini en la base ajustable
de la parte superior del
TuneBase. El iPod mini se
activará cuando la batería
del coche esté encendida.
El iPod mini pasará al
modo de suspensión
cuando sea extraído de
la toma del encendedor
o cuando el coche esté
apagado.
66ea_F8V7098_manual.indb 46
Base
Cuello giratorio
Cuello flexible
Adaptador para
encendedor
9/11/04 4:16:25
5. Como método opcional para el usuario, conecte sus cables de
audio o de adaptación de cassettes a la toma de audio de 3,5mm y
reproduzca su iPod mini a través del equipo estéreo de su vehículo o
equipo estéreo portátil.
Salida de alimentación o
toma de encendedor
Asegúrese de que el anillo
esté correctamente colocado
alrededor del contacto de
metal para garantizar una
conexión eléctrica adecuada
con la salida de alimentación.
Anillo de ajuste
Es
ible
para
or
66ea_F8V7098_manual.indb 47
Clavija
9/11/04 4:16:25
Resolución de problemas
Parece que mi iPod no se recarga.
Solución 1
Asegúrese de que el TuneBase está conectado a la toma de
alimentación del coche del modo correcto. La luz verde del indicador
del adaptador debe estar encendida todo el tiempo.
Solución 2
Asegúrese de que el iPod está completamente introducido en la base.
Solución 3
Asegúrese de que la toma de alimentación de su coche está provista
de corriente. Algunos coches no proporcionan alimentación a la toma
a no ser que el coche esté en modo de ignición o de que el motor esté
en marcha. En caso de que todas las soluciones previas no resuelvan su
problema, puede deberse a que el fusible del TuneBase esté quemado.
Para cambiar el fusible, siga los siguientes pasos cuidadosamente:
NO INTENTE HACER ESTO EN EL COCHE.
Use una mesa limpia para que no se pierdan los componentes al desmontarlos.
La pieza del contacto en la parte frontal del adaptador para el encendedor está
accionada por resorte. Extraiga cuidadosamente la tuerca delantera mediante
unos alicates. Debe retirarla lentamente para que el resorte dentro del
adaptador no se pierda. Ahora será fácil acceder al fusible. Cámbielo por uno
nuevo disponible en cualquier almacén de suministro para coches. Remítase a
la Fig. B para consultar el orden de ensamblaje correcto.
Asegúrese de ajustar firmemente la tuerca mediante unos alicates.
66ea_F8V7098_manual.indb 48
9/11/04 4:16:25
Fig. B
Tuerca (no aparece
en el dibujo)
fusible
contacto
arandela
anti-fricción
Es
Arandela de metal
tuerca
El TuneBase y el iPod me dificultan el
acceso a los mandos del coche.
Solución 1
El TuneBase ha sido diseñado para
colocarse fácilmente con una amplia
variedad de orientaciones dentro del
vehículo. Utilice el cuello flexible y la
articulación que se encuentra detrás de
la base de acoplamiento para alejarlo
de los mandos del vehículo. Asegúrese
de colocar el cuello flexible lo más
verticalmente que sea posible. (Fig. A).
66ea_F8V7098_manual.indb 49
Máx. 30 grados
Máx. 30 grados
Fig. A
9/11/04 4:16:26
Resolución de problemas
El Tunebase rota hasta salirse de su posición del centro de la toma de
alimentación.
Solución 1
Asegúrese de fijar firmemente el adapdator del encendedor del
producto en la toma de alimentación. Compruebe su estabilidad
moviendo el producto hacia los lados antes de conducir.
Solución 2
En algunos coches, la toma de alimentación tiene un diámetro mayor
que el adaptador para el encendedor. Notará un ligero movimiento al
empujar el TuneBase. En ese caso, utilice la abrazadera incluida para
reducirlo. Primero, ajuste la abrazadera alrededor del adaptador para
el encendedor del TuneBase y después fije dicho adaptador a la toma
de alimentación. Deslice la abrazadera en la toma de alimentación
asegurándose de que las cuatro protuberancias se mantengan dentro
de la toma de alimentación.
Solución 3
En algunas tomas de alimentación las protuberancias no están dentro
de la agarradera. Para mejorar el ajuste del adaptador en la toma de
alimentación del coche, la agarradera puede cortarse para dejarla del
tamaño adecuado. Si esto es necesario, corte tantas protuberancias
como sean necesarias con unas tijeras. Córtelas de una en una. Cada vez
que corte una, intente encajar la agarradera en la toma de alimentación.
Inicie a cortar las protuberancias de un lado al otro, no las opuestas.
(Fig. C).
66ea_F8V7098_manual.indb 50
9/11/04 4:16:26
Corte
Corte
¡Compruebe que se ajusta en la toma de alimentación después
de cada corte!
Corte
Es
Fig.C
El TuneBase se conecta a la toma de alimentación del vehículo pero el
TuneBase todavía rota.
Solución
Compruebe que la toma de alimentación del coche rota en el enchufe.
Si es así, consulte con el fabricante del vehículo.
66ea_F8V7098_manual.indb 51
9/11/04 4:16:26
Resolución de problemas
La arandela de goma anti-fricción está fuera de posición y no puedo
inserir el adaptador para el encendedor en la toma de alimentación
del vehículo.
Solución
Use una mesa limpia para que no se pierdan los componentes al
desmontarlos. NO INTENTE HACER ESTO EN EL COCHE. Utilice unos
alicates para aflojar un poco la tuerca que se encuentra al final del
adaptador. No es necesario desenroscar la tuerca completamente.
Centre la arandela anti-fricción. Utilice alicates para apretar firmemente
la tuerca.
Al extraer el TuneBase de la toma de alimentación del vehículo, la
arandela de goma se resbala y permanece dentro de la toma.
Solución
En algunos casos la específica elaboración de la toma de alimentación
puede causar que la arandela anti-fricción se quede encajada en la
toma de alimentación y pueda resbalarse del adaptador..
¡DESCONECTE LA BATERÍA DEL VEHÍCULO ANTES DE INTENTAR EXTRAER
LA ARANDELA! CUALQUIER INTENTO DE EXTRAER LA ARANDELA SIN
DESCONECTAR LA BATERÍA PUEDE CAUSAR DAÑO FÍSICO O PERJUCIO
AL VEHÍCULO.
Utilice alicates para extraer la arandela anti-fricción de la toma de
alimentación cuidadosamente.
66ea_F8V7098_manual.indb 52
9/11/04 4:16:26
Atención:
El TuneBase/ TuneBase FM requiere una concentración total y ambas
manos para su instalación. NO INTENTE INSTALAR EL PRODUCTO
MIENTRAS CONDUCE. Asegúrese de que el producto se ajusta de
modo seguro y firme en la toma de alimentación del vehículo antes
de conducir. Tras la instalación, asegúrese de que el TuneBase no rota
libremente en la toma de alimentación del coche. Siga las instrucciones
del manual del usuario. NO INTENTE AJUSTAR O RETIRAR UN TUNEBASE
O UN IPOD QUE NO ESTÉ SEGURO MIENTRAS ESTÉ CONDUCIENDO.
Ajuste el TuneBase para que tanto el TuneBase como el iPod no
interfieran con ninguno de los mandos del coche. NO INSERTE NINGÚN
OBJETO QUE NO SEA EL ADAPTADOR PARA EL ENCENDEDOR EN LA
TOMA DE ALIMENTACIÓN DEL VEHÍCULO SIN DESCONECTAR PRIMERO
LA BATERÍA DEL COCHE. SI NO TOMA EN CONSIDERACIÓN ESTE AVISO
DE SEGURIDAD, PUEDE CAUSAR HERIDAS O DAÑOS A LA PROPIEDAD.
Es
Belkin no se responsabiliza de ninguna herida personal ni de ningún
daño a la propiedad en el que se incurra debido a una conducción
peligrosa que sea el resultado de la interacción con el TuneBase, el iPod
o la toma de alimentación del vehículo.
66ea_F8V7098_manual.indb 53
9/11/04 4:16:27
ATENCIÓN: Para evitar cualquier daño al iPod mini, asegúrese de
desconectarlo de la base del TuneBase antes de desconectar este útimo
de la toma de alimentación del vehículo. .
CE Declaration of Conformity
We, Belkin Corporation, declare under our sole responsibility that the
product F8V7098, to which this declaration relates, is in conformity
with Emissions Standard EN55022 and with Immunity Standard
EN55024, LVP EN61000-3-2, and EN61000-3-3.
ICES
This Class B digital apparatus complies with Canadian ICES-003. Cet
appareil numérique de la classe B est conforme á la norme NMB-003
du Canada.
66ea_F8V7098_manual.indb 54
9/11/04 4:16:27
Belkin Corporation Limited 3-Year Product Warranty
Belkin Corporation warrants this product against defects in materials and
workmanship for three years. If a defect is discovered, Belkin will, at its
option, repair or replace the product at no charge provided it is returned
during the warranty period, with transportation charges prepaid, to the
authorized Belkin dealer from whom you purchased the product. Proof of
purchase may be required. This warranty does not apply if the product has
been damaged by accident, abuse, misuse, or misapplication; if the product
has been modified without the written permission of Belkin; or if any Belkin
serial number has been removed or defaced.
THE WARRANTY AND REMEDIES SET FORTH ABOVE ARE EXCLUSIVE IN LIEU
OF ALL OTHERS, WHETHER ORAL OR WRITTEN, EXPRESSED OR IMPLIED.
BELKIN SPECIFICALLY DISCLAIMS ANY AND ALL IMPLIED WARRANTIES,
INCLUDING, WITHOUT LIMITATION, WARRANTIES OF MERCHANTABILITY AND
FITNESS FOR A PARTICULAR PURPOSE.
No Belkin dealer, agent, or employee is authorized to make any modification,
extension, or addition to this warranty.
BELKIN IS NOT RESPONSIBLE FOR SPECIAL, INCIDENTAL, OR CONSEQUENTIAL
DAMAGES RESULTING FROM ANY BREACH OF WARRANTY, OR ANY OTHER
LEGAL THEORY, INCLUDING BUT NOT LIMITED TO, LOST PROFITS, DOWNTIME,
GOODWILL, DAMAGE TO OR REPROGRAMMING OR REPRODUCING, ANY
PROGRAM OR DATA STORED IN OR USED WITH BELKIN PRODUCTS.
Some states do not allow the exclusion or limitation of incidental or
consequential damages or exclusion of implied warranties, so the above
limitations or exclusions may not apply to you. This warranty gives you
specific legal rights, and you may also have other rights that vary from
state to state.
66ea_F8V7098_manual.indb 55
Es
9/11/04 4:16:27
Belkin Corporation
501 West Walnut Street
Compton, CA, 90220, USA
+1 310-898-1100
+1 310-898-1111 fax
Belkin Ltd.
Express Business Park, Shipton Way
Rushden, NN10 6GL, United Kingdom
+44 (0) 1933 35 2000
+44 (0) 1933 31 2000 fax
Belkin B.V.
Boeing Avenue 333
1119 PH Schiphol-Rijk, The Netherlands
+31 (0) 20 654 7300
+31 (0) 20 654 7349 fax
Belkin GmbH
Hanebergstrasse 2
80637 München • Germany
+49 (0) 89 143405 0
+49 (0) 89 143405 100 fax
Tech Support
US: 310-898-1100 ext. 2263
800-223-5546 ext. 2263
Europe: 00 800 223 55 460
Australia: 1800 235 546
New Zealand: 0800 235 546
© 2004 Belkin Corporation. All rights reserved.
All trade names are registered trademarks of respective manufacturers listed.
iPod is a trademark of Apple Computer, Inc., registered in the U.S. and other countries.
66ea_F8V7098_manual.indb 56
P74666ea-A
9/11/04 4:16:28
TuneBase™
La soluzione giusta per fissare, alimentare ed
ascoltare l’iPod quando si è in viaggio
for iPod® mini
It
®
periPod®
iPodmini
mini
for
Manuale utente
F8V7098ea
66ea_F8V7098_manual.indb 57
9/11/04 4:16:32
Introduzione
Congratulazioni e grazie per aver acquistato l’innovativo cavo di
alimentazione veicolare (TuneBase) di Belkin.
Questo prodotto è stato creato per consentirvi di fissare, caricare,
stabilizzare ed alimentare l’iPod mentre vi trovate in viaggio.
Vi invitiamo a leggere attentamente il contenuto dell’intero Manuale
Utente in modo da poter essere certi di trarre il massimo in termini di
prestazioni dal vostro iPod, ovunque siate diretti.
66ea_F8V7098_manual.indb 58
9/11/04 4:16:32
Istruzioni per l’installazione
1. Abbassare il volume dello stereo della vettura.
2. Collega il cavo TuneBase Belkin all’accendisigari dell’auto.
Il LED sul TuneBase indica che la connessione è avvenuta
correttamente.
Avvertenza: non esercitare troppa forza nel ruotare il connettore
nell’adattatore dell’accendisigari. Se si dovesse trovare resistenza, staccare
il connettore dalla presa ed inserirlo nella posizione desiderata. In caso
contrario, si possono provocare gravi danni all’adattatore dell’accendisigari
o alla presa di corrente.
It
NOTA: le dimensioni esatte delle prese di corrente variano in base al
marchio e al modello della vettura. In alcuni casi, si possono ottenere
risultati migliori premendo l’anello in dotazione nella presa di
alimentazione prima di inserire il connettore. Tuttavia, non sarà necessario
ricorrere all’anello nella maggior parte delle vetture (che non sarà per altro
adatto ad essere infilato nella presa di corrente).
66ea_F8V7098_manual.indb 59
9/11/04 4:16:32
3. Piegare e posizionare il
collo in acciaio flessibile
nella posizione più adatta
al proprio iPod mini.
4. Far scorrere con cura l’iPod
mini nell’alloggiamento
previsto sopra il TuneBase.
Se la batteria della
vettura è accesa, l’iPod
mini si accende. L’iPod
mini passerà in modalità
standby non appena
l’accendisigari smetterà di
essere alimentato o sarà
spenta la vettura.
66ea_F8V7098_manual.indb 60
Base di appoggio
Collo girevole
collo in acciaio
Adattatore per
accendisigari
9/11/04 4:16:32
5. In alternativa, è possibile collegare anche l’adattatore delle cassette
o i cavi audio al jack di uscita audio da 3,5 mm ed ascoltare l’iPod
mini dallo stereo della vettura o da un eventuale altro dispositivo
stereo portatile.
Presa di alimentazione o
adattatore accendisigari
Per ottenere il collegamento
elettrico adatto con la presa di
corrente, accertarsi che l’anello
sia posizionato correttamente
attorno al contatto in metallo.
Anello di fissaggio
It
ciaio
per
ari
66ea_F8V7098_manual.indb 61
Connettore
9/11/04 4:16:33
Rilevazione e risoluzione delle anomalie
L’iPod non si ricarica
Soluzione 1
Accertarsi che il TuneBase sia ben collegato alla presa di alimentazione
dell’automobile. La spia verde sull’adattatore per l’accendisigari (che fa
parte del prodotto) dovrebbe essere sempre accesa.
Soluzione 2
Accertarsi che l’iPod sia ben inserito nell’alloggiamento
Soluzione 3
Accertarsi che la presa di alimentazione dell’automobile riceva corrente.
Alcune automobili distribuiscono alimentazione solamente a motore
acceso. Nel caso in cui nessuna delle soluzioni sopra riportate
funzionasse, il fusibile del TuneBase potrebbe essere bruciato. Per
cambiarlo, seguire le seguenti istruzioni:
NON CAMBIARE IL FUSIBILE ALL’INTERNO DELL’AUTOMOBILE.
Servirsi di un tavolo libero per smontare le parti, in modo tale che i pezzi
non vadano persi. Il contatto sull’estremità anteriore dell’adattatore
per l’accendisigari è caricato a molla. Rimuovere delicatamente il dado
sull’estremità anteriore con delle pinze. Toglierlo lentamente in modo tale che
la molla all’interno dell’adattatore per l’accendisigari non vada persa. Ora il
fusibile dovrebbe essere facilmente raggiungibile. Sostituirlo con un nuovo
fusibile che può essere acquistato in un negozio di accessori per automobili.
Vedere la fig. B per la corretta sequenza del montaggio. Accertarsi di avvitare
saldamente il dado con le pinze.
66ea_F8V7098_manual.indb 62
9/11/04 4:16:33
Fig. B
Molla (non
rappresentata)
fusibile
contatto
rondella
antifrizione
Rondella in metallo
It
dado
Il TuneBase e l’iPod intralciano l’accesso
ai comandi dell’automobile.
Soluzione 1
Il Tunebase è stato progettato per essere
facilmente collocato in varie posizioni
all’interno della vettura. Usare il collo in
acciaio e lo snodo sul retro della base di
appoggio per allontanarlo dai comandi
dell’automobile. Assicurarsi di posizionare
il collo in acciaio il più perpendicolare
possibile rispetto all’adattatore (Fig. A).
66ea_F8V7098_manual.indb 63
Max 30º
Max 30º
Fig. A
9/11/04 4:16:33
Rilevazione e risoluzione delle anomalie
Il Tunebase si sposta dal centro della presa di alimentazione.
Soluzione 1
Assicurarsi di inserire saldamente l’adattatore per accendisigari nella
presa di alimentazione.Verificare la stabilità del prodotto spingendolo
lateralmente prima di iniziare a guidare.
Soluzione 2
In alcune vetture, il diametro dell’accendisigari è più grande di quello
dell’adattatore. In quel caso il TuneBase si muoverà quando si cercherà
di inserirlo. Usare l’anello riduttore in dotazione per ridurre il gioco.
Posizionarlo intorno all’adattatore del TuneBase e, quindi, inserire
l’adattatore nella presa di alimentazione. Inserire l’anello riduttore nella
presa di alimentazione, assicurandosi che le quattro sporgenze entrino
nella presa di alimentazione.
Soluzione 3
In alcune prese di alimentazione non sarà possibile inserire tutte e
quattro le sporgenze dell’anello riduttore. Per fare in modo che l’anello
riduttore aderisca maggiormente all’adattatore per accendisigari,
l’anello può essere tagliato. Per fare ciò tagliare tante sporgenze quanto
sia necessario con le forbici. Tagliarne una alla volta e dopo ciascun
taglio verificare l’adesione alla presa di alimentazione. Tagliare le
sporgenze da un lato all’altro e non opposte tra loro (Fig. C).
66ea_F8V7098_manual.indb 64
9/11/04 4:16:33
Taglia
Taglia
Taglia
Dopo ciascun taglio verificare l’adesione alla presa di
alimentazione!
It
Fig. C
Il TuneBase è inserito saldamente nell’accendisigari, tuttavia il
TuneBase continua a ruotare.
Soluzione
Vedere se l’accendisigari dell’automobile ruota nella propria presa.
Se così fosse, consultare il costruttore del veicolo.
66ea_F8V7098_manual.indb 65
9/11/04 4:16:34
Rilevazione e risoluzione delle anomalie
La rondella antifrizione in gomma si è spostata e non riesco ad
inserire l’adattatore nell’accendisigari.
Soluzione
Servirsi di un tavolo libero per smontare le parti. NON SMONTARE
LE PARTI ALL’INTERNO DELL’AUTOMOBILE. Usare delle pinze per
allentare leggermente il dado situato sull’estremità dell’adattatore.
Non è necessario svitare completamente il dado. Muovere la rondella
antifrizione in modo che sia centrata. Quindi, usare le pinze per avvitare
saldamente il dado.
Ho tolto il TuneBase dall’accendisigari e la rondella in gomma si è
staccata, rimanendo nella presa.
Soluzione
In alcuni rari casi e soltanto con determinate marche di accendisigari,
la rondella antifrizione potrebbe rimanere incastrata nella presa
accendisigari e staccarsi dall’adattatore. DISCONNETTERE LA BATTERIA
DELL’AUTOMOBILE PRIMA DI RIMUOVERE LA RONDELLA! UN
EVENTUALE TENTATIVO DI RIMUOVERE LA RONDELLA SENZA AVER
PRIMA DISCONNESSO LA BATTERIA, POTREBBE CAUSARE DANNI FISICI A
PERSONE E ALL’AUTOMOBILE.
Servirsi delle pinze per rimuovere la rondella antifrizione dalla presa di
alimentazione.
66ea_F8V7098_manual.indb 66
9/11/04 4:16:34
Avvertenza:
Il TuneBase/TuneBase FM deve essere installato con cura e usando
entrambe le mani. NON INSTALLARE IL PRODOTTO MENTRE SI STA
GUIDANDO. Assicurarsi che il prodotto sia inserito saldamente nella
presa accendisigari dell’automobile, prima di iniziare a guidare. Ad
installazione avvenuta, assicurarsi che il TuneBase non si muova
all’interno della presa accendisigari seguendo le istruzioni riportate
nel manuale utente. NON CERCARE DI REGOLARE O STACCARE UN
TUNEBASE O IPOD,CHE NON SIA STATO CORRETTAMENTE COLLEGATO,
MENTRE SI STA GUIDANDO. Regolare il TuneBase in modo tale che il
Tunebase e l’iPod non interferiscano con i comandi dell’automobile.
NON INSERIRE ALCUN OGGETTO CHE NON SIA L’ADATTATORE PER
ACCENDISIGARI NELLA PRESA DI ALIMENTAZIONE DELL’AUTOMOBILE,
SENZA AVER PRIMA DISCONNESSO LA BATTERIA DELLA VETTURA.
LA MANCATA OSSERVANZA A QUESTA AVVERTENZA DI SICUREZZA
POTREBBE CAUSARE LESIONI PERSONALI O DANNI MATERIALI.
It
Belkin non si assume alcuna responsabilità per lesioni personali o danni
materiali causati da una guida spericolata dovuta all’interazione con il
TuneBase, l’iPod o la presa accendisigari dell’automobile.
66ea_F8V7098_manual.indb 67
9/11/04 4:16:34
NOTA: per non danneggiare l’iPod mini, accertarsi di scollegare lo stesso
dall’alloggiamento del TuneBase prima di scollegare quest’ultimo dalla
presa di alimentazione della vettura.
CE Declaration of Conformity
We, Belkin Corporation, declare under our sole responsibility that the
product F8V7098, to which this declaration relates, is in conformity
with Emissions Standard EN55022 and with Immunity Standard
EN55024, LVP EN61000-3-2, and EN61000-3-3.
ICES
This Class B digital apparatus complies with Canadian ICES-003. Cet
appareil numérique de la classe B est conforme á la norme NMB-003
du Canada.
66ea_F8V7098_manual.indb 68
9/11/04 4:16:35
Belkin Corporation Limited 3-Year Product Warranty
Belkin Corporation warrants this product against defects in materials and
workmanship for three years. If a defect is discovered, Belkin will, at its
option, repair or replace the product at no charge provided it is returned
during the warranty period, with transportation charges prepaid, to the
authorized Belkin dealer from whom you purchased the product. Proof of
purchase may be required. This warranty does not apply if the product has
been damaged by accident, abuse, misuse, or misapplication; if the product
has been modified without the written permission of Belkin; or if any Belkin
serial number has been removed or defaced.
THE WARRANTY AND REMEDIES SET FORTH ABOVE ARE EXCLUSIVE IN LIEU
OF ALL OTHERS, WHETHER ORAL OR WRITTEN, EXPRESSED OR IMPLIED.
BELKIN SPECIFICALLY DISCLAIMS ANY AND ALL IMPLIED WARRANTIES,
INCLUDING, WITHOUT LIMITATION, WARRANTIES OF MERCHANTABILITY AND
FITNESS FOR A PARTICULAR PURPOSE.
No Belkin dealer, agent, or employee is authorized to make any modification,
extension, or addition to this warranty.
BELKIN IS NOT RESPONSIBLE FOR SPECIAL, INCIDENTAL, OR CONSEQUENTIAL
DAMAGES RESULTING FROM ANY BREACH OF WARRANTY, OR ANY OTHER
LEGAL THEORY, INCLUDING BUT NOT LIMITED TO, LOST PROFITS, DOWNTIME,
GOODWILL, DAMAGE TO OR REPROGRAMMING OR REPRODUCING, ANY
PROGRAM OR DATA STORED IN OR USED WITH BELKIN PRODUCTS.
Some states do not allow the exclusion or limitation of incidental or
consequential damages or exclusion of implied warranties, so the above
limitations or exclusions may not apply to you. This warranty gives you
specific legal rights, and you may also have other rights that vary from
state to state.
66ea_F8V7098_manual.indb 69
It
9/11/04 4:16:35
Belkin Corporation
501 West Walnut Street
Compton, CA, 90220, USA
+1 310-898-1100
+1 310-898-1111 fax
Belkin Ltd.
Express Business Park, Shipton Way
Rushden, NN10 6GL, Regno Unito
+44 (0) 1933 35 2000
+44 (0) 1933 31 2000 fax
Belkin B.V.
Boeing Avenue 333
1119 PH Schiphol-Rijk, Paesi Bassi
+31 (0) 20 654 7300
+31 (0) 20 654 7349 fax
Belkin GmbH
Hanebergstrasse 2
80637 München • Germania
+49 (0) 89 143405 0
+49 (0) 89 143405 100 fax
Assistenza tecnica Belkin
US: 310-898-1100 ext. 2263
800-223-5546 ext. 2263
Europe: 00 800 223 55 460
Australia: 1800 235 546
New Zealand: 0800 235 546
© 2004 Belkin Corporation. All rights reserved.
All trade names are registered trademarks of respective manufacturers listed.
iPod is a trademark of Apple Computer, Inc., registered in the U.S. and other countries.
66ea_F8V7098_manual.indb 70
P74666ea-A
9/11/04 4:16:35