1
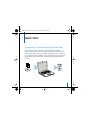
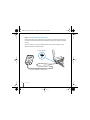
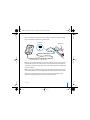
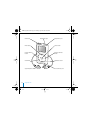
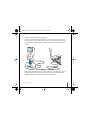
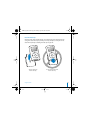
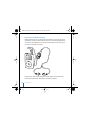
LL2596_border.book Page 1 Monday, April 26, 2004 4:09 PM
iPod mini
User’s Guide
LL2596_border.book Page 2 Monday, April 26, 2004 4:09 PM
LL2596_border.book Page 3 Monday, April 26, 2004 4:09 PM
Contents
5 Quick Start
7 What You Need to Get Started
10 Setting Up iPod mini to Play Music
16
16
22
24
31
34
39
45
Using iPod mini
Using iPod mini Controls
Connecting and Disconnecting iPod mini
Organizing and Transferring Your Music
Adjusting iPod mini Settings
Using the Extra Features of Your iPod mini
iPod mini Accessories
Charging the iPod mini Battery
48 Tips and Troubleshooting
54 Learning More, Service, and Support
56 Safety and Cleaning
3
LL2596_border.book Page 4 Monday, April 26, 2004 4:09 PM
LL2596_border.book Page 5 Monday, April 26, 2004 4:09 PM
1
Quick Start
Congratulations on purchasing your iPod mini. Read
this section to get started using iPod mini quickly.
iPod mini works with the iTunes music software included on the iPod mini CD. Use
iTunes to import songs from your CD or digital music collection to your computer, or
use the iTunes Music Store (available in some countries only) to purchase songs and
download them to your computer. Then organize the songs and transfer them to
iPod mini.
5
LL2596_border.book Page 6 Monday, April 26, 2004 4:09 PM
iPod mini Features
iPod mini is a music player and much more. With iPod mini, you can:
• Store songs from your CD or digital music collection, for listening on the go
• Listen to audiobooks purchased from the iTunes Music Store (you must have an
Internet connection)
• Store and synchronize contact, calendar, and to-do list information from
your computer
• Store text notes
• Set an alarm
• Play games, and more
Learning to Use iPod mini
Read this chapter to set up iPod mini and get started playing music quickly. To learn
more about playing music on iPod mini and using some of its other features, see
“Using iPod mini” on page 16.
iPod mini Tutorial
For an in-depth tutorial on transferring music to and playing music on iPod mini, see
the iPod mini Tutorial on the iPod mini CD.
6
Quick Start
LL2596_border.book Page 7 Monday, April 26, 2004 4:09 PM
What You Need to Get Started
To use iPod mini with a Macintosh, you must have:
• A Macintosh with built-in FireWire
6-pin FireWire 400 port
• Mac OS X v10.1.5 or later
Some features require Mac OS X v10.2 or later (Mac OS X v10.3.3 or later is
recommended).
• iTunes 4.2 or later (iTunes is included on the iPod mini CD)
To be sure you have the latest version of iTunes, go to www.apple.com/itunes.
• iSync 1.1 and iCal 1.0.1 or later
iSync and iCal are optional for synchronizing contact and calendar information with
iPod mini. You must have Mac OS X v10.2 or later to use iSync and iCal.
Quick Start
7
LL2596_border.book Page 8 Monday, April 26, 2004 4:09 PM
To use iPod mini with a Windows PC, you must have:
• A Windows PC with 500 MHz or higher processor speed
• Windows 2000 with Service Pack 4 or later, or Windows XP Home or Professional
• iTunes 4.2 or later (iTunes is included on the iPod mini CD)
To be sure you have the latest version of iTunes, go to www.apple.com/itunes.
• iPod software (included on the iPod mini CD)
• Built-in 6-pin FireWire port or a FireWire card installed, or a built-in high-power USB
2.0 port or a high-power USB 2.0 card installed
Note: If your computer has a 4-pin FireWire port (see below), you can use it with
iPod mini if you purchase an optional 6-pin–to–4-pin FireWire adapter. You can’t
charge iPod through your computer using a 4-pin FireWire port.
USB 2.0 port
6-pin FireWire 400 port
(IEEE 1394)
4-pin FireWire 400 port
(with optional adapter)
For more information about compatible FireWire and USB cards and iPod cables,
go to www.apple.com/ipod.
8
Quick Start
LL2596_border.book Page 9 Monday, April 26, 2004 4:09 PM
Your iPod mini includes the following components:
iPod mini
iPod Dock Connector to FireWire Cable
iPod Power Adapter
Quick Start
Belt Clip
iPod Dock Connector to USB 2.0 Cable
Apple Earphones
9
LL2596_border.book Page 10 Monday, April 26, 2004 4:09 PM
Setting Up iPod mini to Play Music
To set up iPod mini, you charge the battery, install software from the iPod mini CD, and
import songs from your music CD collection to your computer. Then you transfer the
songs to iPod mini and start listening to music.
Step 1: Charge the Battery
Connect iPod mini to the iPod Power Adapter using the iPod Dock Connector to
FireWire Cable. The built-in battery is 80-percent charged in about an hour, and fully
charged in about four hours.
iPod Dock Connector to FireWire Cable
10
Quick Start
LL2596_border.book Page 11 Monday, April 26, 2004 4:09 PM
Step 2: Install the Software
Insert the iPod mini CD into your computer and install iTunes and the iPod software.
Step 3: Import Music to Your Computer
Complete this step if you haven’t already transferred music to your computer. You can
import music from your audio CDs, or if you have an Internet connection, you can buy
music online and download it to your computer using the iTunes Music Store. You can
browse hundreds of thousands of songs and listen to a 30-second preview of any song
in the store. The iTunes Music Store is available in some countries only.
To import music to your computer from an audio CD:
1 Insert a CD into your computer. iTunes opens automatically and the CD is selected in
the iTunes Source list.
2 Uncheck songs you don’t want to transfer, then click Import.
3 Repeat for any other CDs with songs you’d like to import.
To buy music online:
1 Open iTunes and click Music Store in the Source list.
2 Click the Account button and follow the onscreen instructions to set up an account or
enter your existing Apple Account or America Online (AOL) account information.
For an in-depth tutorial on transferring music to and playing music on iPod mini, see
the iPod mini Tutorial on the iPod mini CD.
Quick Start
11
LL2596_border.book Page 12 Monday, April 26, 2004 4:09 PM
Step 4: Connect iPod mini and Transfer Music
Connect iPod mini to your computer using one of the two included cables. Be sure the
connectors on both ends of the cable are oriented correctly. They can only be inserted
one way.
If you have a Mac, or if you have a Windows PC with a 6-pin FireWire 400 port, use the
iPod Dock Connector to FireWire Cable.
FireWire 400 port
iPod Dock Connector to FireWire Cable
12
Quick Start
LL2596_border.book Page 13 Monday, April 26, 2004 4:09 PM
If you have a Windows PC that doesn’t have a FireWire port, but has a high-power USB 2.0
port, use the iPod Dock Connector to USB 2.0 Cable.
USB 2.0 port
Windows PC
iPod Dock Connector to USB 2.0 Cable
Note: Be sure to connect iPod mini to a USB 2.0 port directly on your computer, or to a
powered USB 2.0 hub that’s connected to your computer. iPod mini won’t work if it’s
connected to a low-power USB 2.0 port, such as those sometimes found on keyboards
or other peripherals.
Note: If you’re using a Windows PC laptop computer with a high-power USB 2.0 port,
connect the computer to a power outlet before connecting iPod mini for best results.
When you connect iPod mini to your computer, iTunes opens automatically and
transfers the songs and playlists in your music library to iPod mini.
Quick Start
13
LL2596_border.book Page 14 Monday, April 26, 2004 4:09 PM
When the transfer is complete, a message on the iPod mini screen says “OK to
disconnect.”
If your Windows PC doesn’t have a 6-pin FireWire 400 (IEEE 1394) port or a high-power
USB 2.0 port, here are other ways you can connect iPod mini:
• If your computer has a 4-pin FireWire port, use an optional 6-pin–to–4-pin FireWire
adapter.
Note: You can’t charge iPod mini through your computer using a 4-pin FireWire port.
• If your computer doesn’t have a FireWire port or a USB 2.0 port, you can purchase a
FireWire card or USB 2.0 card, and install it.
For more information on cables and compatible FireWire and USB cards,
go to www.apple.com/ipod.
14
Quick Start
LL2596_border.book Page 15 Monday, April 26, 2004 4:09 PM
Step 5: Play Music
When the song transfer is complete, disconnect iPod mini from your computer.
Squeeze both sides of the Dock connector to disconnect the cable from iPod mini.
Then use the Click Wheel and Select button to browse for a song. Press the Play or
Select button and enjoy!
To Learn More
Read the next chapter to learn more about using the Click Wheel and the other
iPod mini controls, transferring music to and managing music on iPod mini, using other
features of iPod mini, charging the battery, and using iPod mini accessories.
Quick Start
15
LL2596_border.book Page 16 Monday, April 26, 2004 4:09 PM
1
Using iPod mini
Read this section to learn about using iPod mini
controls, transferring music, charging the battery,
and using the extra features of your iPod mini.
Using iPod mini Controls
Press the Select button (in the center of iPod mini) to turn on iPod mini. The main
menu appears.
Use the Click Wheel and Select button to navigate through onscreen menus, play
songs, change settings, and view information. Move your thumb lightly around the
Click Wheel to highlight a menu item. Press the Select button to select the item. Press
Menu on the Click Wheel to go back to the previous menu.
16
Using iPod mini
LL2596_border.book Page 17 Monday, April 26, 2004 4:09 PM
Hold switch
17
iPod Remote port
Headphones port
Menu button
Select button
Previous/Rewind
button
Next/Fast-forward
button
Click Wheel
Play/Pause button
Apple Earphones
Dock connector port
Using iPod mini
LL2596_border.book Page 18 Monday, April 26, 2004 4:09 PM
iPod mini Controls
Reset iPod mini
(For use during troubleshooting)
Toggle the Hold switch (set it to Hold, then turn
it off again). Then press the Menu and Select
buttons simultaneously for about 6 seconds, until
the Apple logo appears.
Turn on iPod mini
Press the Select button.
Turn off iPod mini
Press and hold Play/Pause.
Turn the backlight on or off
Press and hold Menu or select Backlight from
the main menu.
Select a menu item
Scroll to the item and press the Select button.
Go back to the previous menu
Press Menu.
Browse for a song
Select Playlists or Browse from the main menu.
Play a song
Highlight the song and press the Select or
Play/Pause button. iPod mini must be
disconnected from your computer to play songs.
Play all the songs in a list
Highlight the list title (an album title, or the title
of a playlist, for example) and press Play/Pause.
Change the volume
From the Now Playing screen, use the
Click Wheel. You can also use the optional iPod
Remote (available at www.apple.com/store)
from any screen.
Pause a song
Press Play/Pause when no song or list is
highlighted.
Using iPod mini
18
LL2596_border.book Page 19 Monday, April 26, 2004 4:09 PM
iPod mini Controls
19
Disable iPod mini controls
(So you don’t press them accidentally)
Set the Hold switch to Hold (an orange bar
appears).
Skip to any point in a song
From the Now Playing screen, press the Select
button. Then scroll to any point in the song.
Skip to the next song
Press Next/Fast-forward.
Start a song over
Press Previous/Rewind.
Play the previous song
Press Previous/Rewind twice.
Fast-forward
Press and hold Next/Fast-forward.
Rewind
Press and hold Previous/Rewind.
Using iPod mini
LL2596_border.book Page 20 Monday, April 26, 2004 4:09 PM
Disabling iPod mini Buttons Using the Hold Switch
If you’re carrying iPod mini in your pocket and you don’t want to activate the controls
or turn it on accidentally, you can make the controls inactive.
n
Set the Hold switch to Hold.
Slide the switch toward
the center (so you can
see the orange stripe)
to disable the controls.
Using iPod mini
20
LL2596_border.book Page 21 Monday, April 26, 2004 4:09 PM
Queueing Up a List of Songs
You can set iPod mini to play the songs you want in the order you want. When you
create a list of songs on your iPod mini, the songs appear in an On-The-Go playlist.
To create an On-The-Go playlist:
1 Highlight a song and press and hold the Select button until the song title flashes.
2 Repeat step 1 for other songs you want to add.
3 Select Playlists > On-The-Go to view your list of songs.
You can also queue entire lists of songs at once. For example, to queue an album,
highlight the album title and press and hold the Select button until the album title
flashes.
n
n
n
To play songs in the On-The-Go playlist:
Select Playlists > On-The-Go and select a song.
To clear the On-The-Go playlist:
Select Playlists > On-The-Go > Clear Playlist.
To transfer On-The-Go playlists to your computer:
If iPod mini is set to transfer songs automatically (see page 28), and you create an
On-The-Go playlist, the playlist automatically transfers to iTunes when you connect
iPod mini. You see the new On-The-Go playlist in the iTunes Source list.
Rating Songs
You can assign a rating to a song (from 1 to 5 stars) to indicate how much you like it.
You can use song ratings to help you create playlists automatically in iTunes (see
“About Smart Playlists” on page 27).
21
Using iPod mini
LL2596_border.book Page 22 Monday, April 26, 2004 4:09 PM
To rate a song:
1 Start playing the song.
2 From the Now Playing screen, press the Select button twice.
3 Use the Click Wheel to select a rating.
Connecting and Disconnecting iPod mini
You connect iPod mini to your computer to transfer and manage music, and, in most
cases, to charge the battery. If you have a Mac, you connect iPod mini using the
included FireWire cable. If you have a Windows PC, use the FireWire or the USB 2.0
cable, depending on which port your computer has (see page 12 for illustrations and
more information).
To play songs through headphones or speakers connected to the Headphones port,
iPod mini must be disconnected from your computer.
n
n
To connect iPod mini to your computer:
Plug the appropriate cable in to a FireWire or high-power USB 2.0 port on your
computer, then connect the other end to iPod mini. Be sure to orient the connectors
on both ends of the cable correctly. Each connector can only be inserted one way.
Or, if you have an optional iPod mini Dock (see page 40), connect the appropriate
cable to a FireWire or high-power USB 2.0 port on your computer and connect the
other end to the Dock. Then put iPod mini in the Dock. The iPod mini Dock is available
at www.apple.com/store.
By default, iPod mini imports songs automatically when you connect it to your
computer. When this automatic transfer is done, it’s OK to disconnect iPod mini.
Using iPod mini
22
LL2596_border.book Page 23 Monday, April 26, 2004 4:09 PM
Disconnecting iPod mini
If you set iPod mini to transfer songs manually (see page 29) or enable iPod mini for
use as a hard disk (see page 35), you must eject iPod mini before disconnecting it.
If it’s not OK to disconnect iPod mini, this screen appears:
Important: Don’t disconnect iPod mini if you see the “Do not disconnect” message.
You could damage files on iPod mini. If you see this message, you must eject iPod mini
before disconnecting it.
n
To eject iPod mini:
Select iPod mini in the iTunes Source list and click the Eject button.
Eject button
If you’re using a Mac, you can also eject iPod mini by dragging the iPod mini icon on the
desktop to the Trash.
If you’re using a Windows PC, you can eject iPod mini by clicking the Safely Remove
Hardware icon in the Windows system tray and selecting your iPod mini.
23
Using iPod mini
LL2596_border.book Page 24 Monday, April 26, 2004 4:09 PM
If it’s OK to disconnect iPod mini from your computer, this screen appears:
Or, a large battery icon appears:
To disconnect iPod mini:
• If iPod mini is in the Dock, simply remove it.
• If iPod mini is connected to an iPod cable, squeeze both sides of the Dock connector to
disconnect the cable from iPod mini.
Organizing and Transferring Your Music
For instructions for getting started playing music on iPod mini, see “Setting Up
iPod mini to Play Music” on page 10. Read on for more information about organizing
and transferring your music.
Using iPod mini
24
LL2596_border.book Page 25 Monday, April 26, 2004 4:09 PM
About iTunes
iTunes is the software application you use to manage the music on your computer and
transfer music to iPod mini. When you connect iPod mini to your computer, iTunes
opens automatically.
Here are some of the things you can do with iTunes:
• Purchase and download songs from the iTunes Music Store
• Listen to CDs and digital music
• Add music from CDs to your music library, so you don’t need to have the CD in
the drive to play music
• Organize songs into playlists you create
• Make your own CDs (if your computer has a CD-writable optical drive)
• Listen to Internet radio stations
This booklet explains how to transfer songs to iPod mini using iTunes and manage
songs on iPod mini. For information about using the other features of iTunes, open
iTunes and choose Help > iTunes and Music Store Help.
About the iTunes Music Store
Using iTunes, you can preview, purchase, and download your favorite songs from the
iTunes Music Store (available in some countries only). There are hundreds of thousands
of songs available. You can use an Apple Account to sign on to the music store, or if
you have an America Online (AOL) account, you can use that.
25
Using iPod mini
LL2596_border.book Page 26 Monday, April 26, 2004 4:09 PM
To browse for and purchase music:
1 Open iTunes and click Music Store in the Source list.
2 Click the Account button and follow the onscreen instructions to set up an account or
enter your existing Apple Account or AOL account information.
You can only have music from five different Music Store accounts on one iPod mini.
For more information about the iTunes Music Store, open iTunes and choose Help >
iTunes and Music Store Help.
Audio File Formats Supported by iPod mini
•
•
•
•
•
•
•
•
AAC (M4A, M4B, M4P) (up to 320 kbps)
Apple Lossless (a high-quality compressed format, available using iTunes 4.5 or later)
MP3 (up to 320 kbps)
MP3 Variable Bit Rate (VBR)
WAV
AA (Audible spoken word)
AIFF
ALAC (using iTunes 4.5 or later)
A song encoded using Apple Lossless format has the same quality as the same song
encoded using AIFF or WAV format, but takes up about half the amount of space on
iPod mini. The same song encoded in AAC or MP3 format takes up even less space.
When you import music from a CD using iTunes, it is converted to AAC format by
default.
Using iPod mini
26
LL2596_border.book Page 27 Monday, April 26, 2004 4:09 PM
If you are using iTunes 4.5 or later on a Windows PC, you can convert nonprotected
WMA files to AAC or MP3 format. This can be useful if you have a library of music
encoded in WMA format. For more information, open iTunes and choose Help > iTunes
and Music Store Help.
iPod mini does not support MPEG Layer 1 or MPEG Layer 2 audio files.
About Playlists
Using iTunes, you can organize songs into playlists. For example, you can create a
playlist with songs to listen to while exercising or with songs for a particular mood.
You can create as many playlists as you like using any of the songs in your computer’s
music library. Putting a song in a playlist doesn’t remove it from the library.
When you connect and update iPod mini, the playlists are transferred to iPod mini. To
browse through playlists, select Playlists in the iPod mini main menu.
About Smart Playlists
Using iTunes, you can automatically create customized Smart Playlists from the songs
in your library. You can create a Smart Playlist that includes only certain genres of
music, songs by certain artists, or songs that match particular criteria. For example, you
could create a playlist that’s no more than 3 gigabytes (GB) in size and includes only
songs you have rated 3 stars or higher (see “Rating Songs” on page 21).
After you create a Smart Playlist, any songs on iPod mini that meet the Smart Playlist’s
criteria are automatically added to the Smart Playlist.
27
Using iPod mini
LL2596_border.book Page 28 Monday, April 26, 2004 4:09 PM
Creating Playlists on Your Computer
n
n
To create a playlist:
In iTunes, click the Add (+) button and type a name for the playlist, then drag songs
from the library or another playlist to the new playlist.
To create a Smart Playlist:
In iTunes, choose File > New Smart Playlist and choose the criteria for your playlist. Any
songs from your library that match the criteria you choose are automatically added to
the playlist.
Transferring Songs and Playlists to iPod mini Automatically
By default, iPod mini updates automatically when you connect it to your computer.
iTunes updates the iPod mini music library to match the songs and playlists in your
computer’s music library, transferring new songs to iPod mini and deleting songs from
iPod mini that aren’t in your music library.
You can set iPod mini to transfer only certain songs in the iTunes library. This is useful if
you have more music on your computer than will fit on your iPod mini.
To update iPod mini with only certain songs:
1 In iTunes, check the boxes next to songs you want to transfer (by default, all songs are
checked).
2 Select iPod mini in the iTunes Source list and click the Options button.
Options button
Using iPod mini
28
LL2596_border.book Page 29 Monday, April 26, 2004 4:09 PM
3 Select “Only update checked songs.”
To set iPod mini to update only selected playlists:
1 In iTunes, select iPod mini in the Source list and click the Options button.
Options button
2 Select “Automatically update selected playlists only.”
Transferring Songs and Playlists to iPod mini Manually
You can set iPod mini to transfer songs manually, so you can transfer individual songs
and playlists.
When iPod mini is set to transfer songs manually, it doesn’t synchronize automatically
when you connect it to your computer.
To set iPod mini to transfer songs manually:
1 In iTunes, select iPod mini in the Source list and click the Options button.
Options button
2 Select “Manually manage songs and playlists.”
29
Using iPod mini
LL2596_border.book Page 30 Monday, April 26, 2004 4:09 PM
n
To transfer a song or playlist to iPod mini manually:
In iTunes, drag a song or playlist to iPod mini in the Source list.
Deleting Songs and Playlists From iPod mini Manually
If you have set iPod mini to transfer songs manually (see above), you can delete songs
and playlists from iPod mini individually. Songs deleted from iPod mini manually are
not deleted from the iTunes library.
To delete a song or playlist from iPod mini:
1 Select iPod mini in the iTunes Source list.
2 Select a song or playlist and press the Delete key on the keyboard.
If you delete a playlist, the songs in the playlist remain on iPod mini.
Modifying Playlists on iPod mini Manually
If you have set iPod mini to transfer songs manually (see above), you can create
new playlists on iPod mini, and add songs to or delete songs from playlists already on
iPod mini.
To create a new playlist on iPod mini:
1 Select iPod mini in the iTunes Source list and click the Add (+) button.
2 Drag songs to the new playlist.
n
To modify a playlist on iPod mini:
Drag a song to a playlist on iPod mini to add the song. Select a song in a playlist and
press the Delete key on your keyboard to delete the song.
Using iPod mini
30
LL2596_border.book Page 31 Monday, April 26, 2004 4:09 PM
Listening to Spoken Word Audio
You can purchase and download spoken word audiobooks from the iTunes Music Store
(available in some countries only) and listen to them on your iPod mini.
You can use iTunes to transfer audiobooks to your iPod mini the same way you transfer
songs.
If you stop listening to an audiobook on iPod mini and go back to it later, the
audiobook begins playing from where you left off.
Seeing How Many Songs Are on iPod mini
To see how many songs are stored on iPod mini, how much disk space is left, and other
information, select Settings > About in the iPod mini main menu.
Adjusting iPod mini Settings
You can change settings directly on iPod mini in the Settings menu.
Setting iPod mini to Shuffle or Repeat Songs
You can set iPod mini to repeat a song over and over, or to repeat a sequence of songs.
You can also set it to shuffle (play songs or albums in random order).
iPod mini repeats or shuffles songs within the list (album or playlist, for example) from
which the first song was selected.
n
31
To set iPod mini to repeat songs:
Select Settings from the iPod mini main menu.
• To repeat all songs in the list, set Repeat to All.
• To repeat one song over and over, set Repeat to One.
Using iPod mini
LL2596_border.book Page 32 Monday, April 26, 2004 4:09 PM
To set iPod mini to shuffle songs or albums:
1 Select Settings from the iPod mini main menu.
2 Set Shuffle to Songs or to Albums.
When you set iPod mini to shuffle albums, it plays all the songs on an album in order,
then randomly selects another album and plays through it in order.
When set to shuffle, iPod mini won’t repeat a song or album until it has played through
the entire list from which the first song or album was selected.
Setting Songs to Play at the Same Relative Volume Level
iTunes can automatically adjust the volume of songs, so they play at the same relative
volume level. You can set iPod mini to use the iTunes volume settings.
To set iTunes to adjust all songs to play at the same relative sound level:
1 In iTunes, choose iTunes > Preferences if you are using a Mac, or choose
Edit > Preferences if you are using a Windows PC.
2 Click Effects and select Sound Check.
n
To set iPod mini to use the iTunes volume settings:
Select Settings > Sound Check.
If you have not activated Sound Check in iTunes, setting it on iPod mini has no effect.
Using the iPod mini Equalizer
You can use equalizer presets to change iPod mini sound to suit a particular music
genre or style. For example, to make rock music sound better, set the equalizer to Rock.
n
Select Settings > EQ and select an equalizer preset.
Using iPod mini
32
LL2596_border.book Page 33 Monday, April 26, 2004 4:09 PM
Setting the Backlight Timer
You can set the backlight to turn on for a certain amount of time when you press a
button or use the Click Wheel.
n
Select Settings > Backlight Timer and select the time you want.
Even if you don’t set the backlight timer, you can turn on the backlight at any time by
pressing and holding Menu on the iPod mini Click Wheel or selecting Backlight from
the main menu. After a few seconds, the backlight turns off.
Setting the Screen Contrast
1 Select Settings > Contrast.
2 Use the Click Wheel to adjust the contrast.
If you accidentally set the screen contrast too light or too dark, you can reset it to the
default by pressing and holding Menu on the Click Wheel for about four seconds.
Adding or Removing Items From the Main Menu
You can add often-used items to the iPod mini main menu. For example, you can add a
“Songs” item to the main menu, so you don’t have to select Browse before you select
Songs.
n
To add or remove items from the main menu:
Select Settings > Main Menu.
Setting and Viewing Date and Time
n
n
33
To set the date and time:
Select Settings > Date & Time.
To view the date and time:
Select Extras > Clock.
Using iPod mini
LL2596_border.book Page 34 Monday, April 26, 2004 4:09 PM
n
To set iPod mini to display the time in the title bar:
Select Settings > Date & Time.
If you set iPod mini to display the time in the title bar, you can see the time from
any iPod mini menu screen.
Setting the Language
iPod mini can be set to use different languages.
n
Select Settings > Language and select a language.
If you accidentally set iPod mini to use a language you don’t understand, you can
reset the language.
1 Press Menu repeatedly until the main menu appears.
2 Select the fourth menu item (Settings).
3 Select the last menu item (Reset All Settings).
4 Select the second menu item (Reset) and select a language.
Other iPod mini settings, such as song repeat, are also reset.
Note: If you have added or removed items from your main menu (see page 33), the
Settings menu may be in a different place.
Using iPod mini
34
LL2596_border.book Page 35 Monday, April 26, 2004 4:09 PM
Using the Extra Features of Your iPod mini
Using iPod mini as an External Hard Disk
You can use iPod mini as a hard disk, to store and transfer data files.
To enable iPod mini as a hard disk:
1 In iTunes, select iPod mini in the Source list and click the Options button.
Options button
2 Select “Enable disk use.”
When you use iPod mini as a hard disk, the iPod mini disk icon appears on the desktop
on the Mac, or as the next available drive letter in Windows Explorer on a Windows PC.
Note: Selecting “Manually manage songs and playlists” in the Options window also
enables iPod mini to be used as a hard disk.
Note: To transfer songs to iPod mini for playing, you must use iTunes. Songs transferred
via iTunes do not appear on iPod mini in the Macintosh Finder or Windows Explorer.
Likewise, if you copy music files to iPod mini in the Macintosh Finder or Windows
Explorer, you won’t be able to play them on iPod mini.
Preventing iTunes From Opening Automatically
If you use iPod mini primarily as a hard disk, you may want to disable iTunes from
opening automatically when you connect iPod mini to your computer.
35
Using iPod mini
LL2596_border.book Page 36 Monday, April 26, 2004 4:09 PM
To prevent iTunes from opening automatically when you connect
iPod mini to your computer:
1 In iTunes, select iPod mini in the Source list.
2 Click the Options button and deselect “Open iTunes when attached.”
Options button
Setting the Sleep Timer
You can set iPod mini to turn off automatically after a specific period of time.
n
Select Extras > Clock > Sleep Timer and select the time you want.
When you set the sleep timer, a clock icon and the number of minutes left until
iPod mini turns off appear in the Now Playing screen on iPod mini.
Setting the Alarm
You can use iPod mini as an alarm clock.
To set an alarm:
1 Select Extras > Clock > Alarm Clock.
2 Set Alarm to On.
3 Select a sound.
If you select Beep, the alarm will be audible through the internal speaker. If you select a
playlist, you’ll need to connect iPod mini to speakers or headphones to hear the alarm.
Using iPod mini
36
LL2596_border.book Page 37 Monday, April 26, 2004 4:09 PM
Importing Addresses, Phone Numbers, Calendar Events,
and To-Do Lists
Your iPod mini can store contacts, calendar events, and to-do lists, for viewing on the
go. If you are using a Mac and iSync, it’s as easy as clicking a button.
To import all information using a Mac and iSync:
1 Connect iPod mini to your computer.
2 Open iSync and choose Devices > Add Device. You only need to do this step the
first time you use iSync with your iPod mini.
3 Select iPod mini and click Sync Now.
The next time you want to sync iPod mini, you can simply open iSync and click Sync
Now. You can also choose to have iPod mini sync automatically when you connect it.
iSync imports information from iCal and Mac OS X Address Book.
Note: iSync transfers information from your computer to your iPod mini. You can’t use
iSync to transfer information from your iPod mini to your computer.
If you are using Windows, or you don’t want to import using iSync, you can transfer
information to iPod mini manually. iPod mini must be enabled as a hard disk (see
“Using iPod mini as an External Hard Disk” on page 35).
To import contact information manually:
1 Connect iPod mini to your computer and open your favorite email or contacts
application. Importing contacts works with Palm Desktop, Microsoft Outlook, Microsoft
Entourage, and Eudora, among others.
2 Drag contacts from the application’s address book to the iPod mini Contacts folder.
37
Using iPod mini
LL2596_border.book Page 38 Monday, April 26, 2004 4:09 PM
To import appointments and other calendar events manually:
1 Export calendar events from any calendar application that uses the standard iCalendar
format (filenames end in .ics) or vCal format (filenames end in .vcs).
2 Drag the files to the Calendars folder on iPod mini.
Note: You can only view to-do lists on iPod mini using iSync and iCal.
n
n
n
To view contacts on iPod mini:
Select Extras > Contacts.
To view calendar events:
Select Extras > Calendar.
To view to-do lists:
Select Extras > Calendar > To Do.
Storing and Reading Notes and Other Information
You can store and read text notes on iPod mini. iPod mini must be enabled as a hard
disk (see page 35).
To store notes on iPod mini:
1 Save a document in any word-processing application as a text (.txt) file.
2 Place the file in the Notes folder on iPod mini.
n
To view notes:
Select Extras > Notes.
Using iPod mini
38
LL2596_border.book Page 39 Monday, April 26, 2004 4:09 PM
Playing Games
iPod mini has a number of games.
n
To play a game:
Select Extras > Games and select a game.
iPod mini Accessories
iPod mini comes with some accessories, and many other accessories are available at
www.apple.com/store.
Apple Earphones
iPod mini comes with a pair of high-quality earbud headphones.
n
To use the earbud headphones:
Plug them in to the Headphones port, then place the earbud in your ear as shown.
Warning Listening to music at high volume over extended periods of time can
damage your hearing.
39
Using iPod mini
LL2596_border.book Page 40 Monday, April 26, 2004 4:09 PM
iPod mini Dock (Available Separately)
The iPod mini Dock holds iPod mini upright as it charges or transfers music. Connect
the Dock to your computer using the same cable you use with iPod mini, or connect it
to a power outlet using the FireWire cable and power adapter. Then put iPod mini in
the Dock.
Note: Be sure the connectors on the cable are oriented correctly. Each connector can
only be inserted one way. Your computer must be on and not in sleep mode (some
models of Macintosh can charge iPod mini while in sleep mode).
Using iPod mini
40
LL2596_border.book Page 41 Monday, April 26, 2004 4:09 PM
Using the iPod mini Dock, you can play music from iPod mini over external powered
speakers or a home stereo. You need an audio cable with a standard 3.5 millimeter
stereo miniplug (many external speakers have this type of cable attached). To play
music from iPod mini using the Dock, the Dock must not be connected to your
computer.
To play music from iPod mini using the Dock:
1 Connect the Dock to the power adapter using the iPod Dock Connector to FireWire
Cable, then plug the power adapter in to an electrical outlet.
2 Place iPod mini in the Dock.
3 Connect the speakers or stereo to the Dock Line Out port using an audio cable with a
3.5 millimeter stereo miniplug.
Dock connector
Line Out port
4 Use the iPod mini controls to play a song.
When the Dock is connected to an external audio source, use the volume controls on
the external source to change the volume.
41
Using iPod mini
LL2596_border.book Page 42 Monday, April 26, 2004 4:09 PM
iPod mini Belt Clip
iPod mini comes with a handy belt clip. To use the belt clip, snap iPod mini into the
casing, then attach the clip to your belt, purse strap, backpack, or a lanyard. Do not
attach the clip directly to clothing. The belt clip may slip off.
Snap the iPod mini
into the belt clip.
Using iPod mini
Do not slide the iPod mini
into the belt clip.
42
LL2596_border.book Page 43 Monday, April 26, 2004 4:09 PM
iPod Remote (Available Separately)
With the iPod Remote, you can control iPod mini while it’s in your pocket. To use the
iPod Remote, connect it to the iPod Remote port, then connect the Apple Earphones
(or another set of headphones) to the remote. Use the buttons on the remote just as
you would use the iPod mini buttons.
Use the remote’s Hold switch to disable the remote’s buttons. The iPod mini Hold
switch and the iPod Remote Hold switch do not affect one another.
43
Using iPod mini
LL2596_border.book Page 44 Monday, April 26, 2004 4:09 PM
Available Accessories
To purchase iPod mini accessories, go to www.apple.com/store.
Available accessories include:
• iPod mini Dock
• iPod mini Armband
• iPod Remote + Earphones
• iPod In-Ear Headphones
• iPod Dock Connector to FireWire Cable
• iPod Stereo Connection Kit
• iPod Power Adapter
• World Travel Adapter Kit
• Third-party accessories such as speakers, headsets, backup batteries, car stereo
adapters, power adapters, and more
Using iPod mini
44
LL2596_border.book Page 45 Monday, April 26, 2004 4:09 PM
Charging the iPod mini Battery
The iPod mini battery is 80-percent charged in about an hour, and fully charged in
about four hours. If you charge iPod mini while transferring files or playing music, it
may take longer.
iPod mini has an internal, nonremovable battery. If iPod mini isn’t used for a while, the
battery may need to be charged.
You can charge the iPod mini battery in two ways:
• If you have a Mac, you can charge iPod mini by connecting it to your computer. If you
have a Windows PC with a 6-pin FireWire port or a high-power USB 2.0 port, in most
cases you can charge iPod mini by connecting it to your computer.
• You can also charge iPod mini by connecting it to the power adapter and a working
electrical outlet.
n
To charge the battery using your computer:
Connect iPod mini to your computer using the included FireWire cable or USB 2.0
cable. The computer must be turned on and not in sleep mode (some models of
Macintosh can charge iPod mini while in sleep mode).
If the battery icon in the top-right corner of the screen shows a lightning bolt, the
battery is charging.
If you don’t see the lightning bolt, you must charge the battery using the iPod Power
Adapter.
45
Using iPod mini
LL2596_border.book Page 46 Monday, April 26, 2004 4:09 PM
To charge the battery using the iPod Power Adapter:
1 Connect the AC plug adapter to the power adapter (this may already be assembled).
2 Connect the FireWire cable to the power adapter, and plug the other end of the cable
in to iPod mini.
3 Plug the power adapter in to a working electrical outlet.
AC plug adapter
iPod Dock Connector
to FireWire Cable
Power adapter
Warning Make sure the power adapter is fully assembled before plugging it in to an
electrical outlet.
Using iPod mini
46
LL2596_border.book Page 47 Monday, April 26, 2004 4:09 PM
Battery States
When iPod mini is not connected to a power source, a battery icon in the top-right
corner of the screen shows about how much charge is left.
Battery about
halfway charged
If iPod mini is connected to a power source, the battery icon animates to show that the
battery is charging.
Battery charging
If you connect iPod mini to a power source and the battery icon does not animate, the
battery is fully charged.
Battery fully charged
(if not animated)
You can disconnect and use iPod mini before it is fully charged.
Note: Rechargeable batteries have a limited number of charge cycles and may
eventually need to be replaced. Battery life and number of charge cycles vary by use
and settings. For more information, go to www.apple.com/batteries.
47
Using iPod mini
LL2596_border.book Page 48 Monday, April 26, 2004 4:09 PM
1
Tips and Troubleshooting
Most problems with iPod mini can be solved quickly
by following the advice in this chapter.
Resetting iPod mini
Most problems with iPod mini can be solved by resetting iPod mini.
To reset iPod mini:
1 Connect iPod mini to a power outlet using the iPod Power Adapter.
2 Toggle the Hold switch on and off (set it to Hold, then turn it off again).
3 Press and hold the Menu and Select buttons for at least 6 seconds, until the
Apple logo appears.
If Your iPod mini Won’t Turn On or Respond
• Make sure the Hold switch is off.
• If you’re using the iPod Remote, make sure the remote’s Hold switch is off.
• If that doesn’t work, connect iPod mini to the power adapter and connect the
adapter to a working electrical outlet. Your battery may need to be recharged.
• If that doesn’t work, your iPod mini may need to be reset (see above).
48
Tips and Troubleshooting
LL2596_border.book Page 49 Monday, April 26, 2004 4:09 PM
• If you’re using the optional iPod Dock Connector to USB 2.0 + FireWire Cable and
your computer has USB and FireWire ports, don’t plug the cable’s USB and FireWire
connectors in to your computer at the same time. If you have done this, unplug the
cables and reset iPod mini (see above).
• If that doesn’t work, you may need to restore iPod software. See “Software Update
and Restore” on page 52.
If You Want to Disconnect iPod mini, but the Screen Says
“Do Not Disconnect”
• If iPod mini is transferring music, wait for the transfer to complete.
• Select iPod mini in the iTunes Source list and click the Eject button.
• If iPod mini disappears from the iTunes Source list, but you still see the “Do Not
Disconnect” message on the screen, go ahead and disconnect iPod mini.
• If iPod mini doesn’t disappear from the iTunes Source list, drag the iPod mini icon
from the desktop to the Trash (if you’re using a Mac) or click the Safely Remove
Hardware icon in the system tray and select your iPod mini (if you’re using a Windows
PC). If you still see the “Do Not Disconnect” message, restart your computer and eject
iPod mini again.
49
Tips and Troubleshooting
LL2596_border.book Page 50 Monday, April 26, 2004 4:09 PM
If Your iPod mini Isn’t Playing Music
•
•
•
•
•
Make sure the Hold switch is off.
If you’re using the iPod Remote, make sure the remote’s Hold switch is off.
Make sure the headphones connector is pushed in all the way.
Make sure the volume is adjusted properly.
If that doesn’t work, push the Play/Pause button on the Click Wheel. Your iPod mini
may be paused.
• If you are using the optional iPod mini Dock, be sure the iPod mini is seated firmly in
the Dock and make sure all cables are connected properly.
• If you’re using the Dock Line Out port, make sure your external speakers or stereo are
turned on and working properly.
If You Connect iPod mini to Your Computer and Nothing Happens
• Make sure you have installed the software on the iPod mini CD.
• Make sure you have the required computer and software. See “What You Need to Get
Started” on page 7.
• Your iPod mini may need to be reset (see page 48).
• Check the cable connections. Unplug the cable at both ends and make sure no
foreign objects are in the FireWire or USB 2.0 ports. Then plug the cable back in
securely. Use only Apple iPod cables. Be sure the connectors on the cable are
oriented correctly. They can only be inserted one way.
• If you’re connecting iPod mini to a Windows PC using the USB 2.0 cable, be sure
you’re connecting it to a high-power USB 2.0 port. Typically, USB 2.0 ports located
directly on your computer are high-power ports.
Tips and Troubleshooting
50
LL2596_border.book Page 51 Monday, April 26, 2004 4:09 PM
• If you’re connecting iPod mini to a Windows PC laptop computer using the USB 2.0
cable, connect the laptop to a power outlet before connecting iPod mini.
• If that doesn’t work, restart your computer.
• If that doesn’t work, you may need to restore iPod software. See “Software Update
and Restore” on page 52.
If You Connect iPod mini to a USB Port and It Doesn’t Work
Correctly
• If you’re using a Mac, connect iPod mini to a FireWire port on your Mac using the
FireWire cable.
• If you’re using iPod mini with a USB 1.1 port on your computer, you must use a
FireWire port or a high-power USB 2.0 port. USB 1.1 is not supported and is
significantly slower than FireWire and USB 2.0. If your Windows PC doesn’t have a
FireWire port or high-power USB 2.0 port, you can purchase a Windows-certified
FireWire card or USB 2.0 card and install it. For more information, go to
www.apple.com/ipod.
• If you’re connecting iPod mini to a Windows PC using the USB cable, be sure you’re
connecting it to a high-power USB 2.0 port. Typically, USB 2.0 high-power ports are
located directly on your computer.
Note: You can also connect iPod mini to a self-powered USB 2.0 hub that’s connected
to a high-power USB 2.0 port on your computer.
• If you’re connecting iPod mini to a Windows PC laptop computer using the USB
cable, connect the laptop to a power outlet before connecting iPod mini.
51
Tips and Troubleshooting
LL2596_border.book Page 52 Monday, April 26, 2004 4:09 PM
• If you’re connecting iPod mini to a Windows PC using the USB 2.0 cable, and it has
been a long time since you’ve used your iPod mini or charged it, the battery may be
very low. It may take up to 10 minutes before the iPod mini battery is charged
enough to begin transferring music. Leave iPod mini connected to your computer
while it charges. After a few minutes, the low-battery icon disappears and your iPod
mini connects normally.
If Your Optional iPod Remote Isn’t Working
• Make sure the remote’s Hold switch is off.
• Make sure the remote is plugged firmly in to iPod mini, and that the headphones are
plugged firmly in to the remote.
The iPod Remote is available for purchase at www.apple.com/store.
Software Update and Restore
Apple periodically updates iPod software to improve performance or add features. It is
recommended that you update your iPod mini to use the latest software.
You can choose either to update or to restore the iPod software.
• If you choose to update, the software is updated, but your settings and songs are not
affected.
• If you choose to restore, all data is erased from your iPod mini, including songs, files,
contacts, calendar information, and any other data. All iPod mini settings are restored
to their original state.
Tips and Troubleshooting
52
LL2596_border.book Page 53 Monday, April 26, 2004 4:09 PM
To update or restore iPod mini with the latest software:
1 Go to www.apple.com/support/ipod and download the iPod Updater application.
2 Double-click the software install file and follow the onscreen instructions to install
the iPod Updater application.
3 Connect iPod mini to your computer and open iTunes. The iPod Updater application
opens.
If you’re using a Windows PC and the iPod Updater application doesn’t open
automatically, you can find the updater by choosing Start > All Programs > iPod.
4 Follow the onscreen instructions to update or restore iPod software.
If you use the iPod Updater application and it doesn’t see that iPod mini is connected
to your computer, reset iPod mini (see page 48).
If you want to restore iPod software and you don’t have an Internet connection, you
can use the iPod Updater application that was installed on your computer when you
installed the software from the iPod mini CD.
To restore iPod software without downloading the latest version:
• If you have a Mac, you can find the updater in Applications/Utilities.
• If you have a Windows PC, you can find the updater by choosing
Start > All Programs > iPod.
53
Tips and Troubleshooting
LL2596_border.book Page 54 Monday, April 26, 2004 4:09 PM
1
Learning More,
Service, and Support
There is more information about using iPod mini
on the web and in onscreen help.
iPod mini Tutorial
For an in-depth tutorial on transferring music to and playing music on iPod mini, see
the iPod mini Tutorial on the iPod mini CD.
iPod mini User’s Guide
This booklet is also included as a file on the iPod mini CD.
Online Resources
For the latest information on iPod mini, go to www.apple.com/ipodmini.
For iPod service and support information, a variety of forums with product-specific
information and feedback, and the latest Apple software downloads, go to
www.apple.com/support/ipod.
To register iPod mini (if you didn’t do it when you installed software from the iPod mini
CD), go to www.apple.com/register.
For an online iTunes tutorial (available in some areas only), go to
www.apple.com/support/itunes.
54
Learning More, Service, and Support
LL2596_border.book Page 55 Monday, April 26, 2004 4:09 PM
Onscreen Help
• To learn more about using iTunes, open iTunes and choose
Help > iTunes and Music Store Help.
• To learn more about using iSync (on Mac OS X), open iSync and choose
Help > iSync Help.
• To learn more about using iCal (on Mac OS X), open iCal and choose
Help > iCal Help.
Obtaining Warranty Service
If the product appears to be damaged or does not function properly, please follow
the advice in this booklet, the onscreen help, and the online resources.
If the unit still does not function, go to www.apple.com/support for instructions
on how to obtain warranty service.
Finding the Serial Number of Your iPod mini
The serial number is printed on the back of your iPod mini. You can also find it by
selecting Settings > About.
55
Learning More, Service, and Support
LL2596_border.book Page 56 Monday, April 26, 2004 4:09 PM
1
Safety and Cleaning
Read on to learn about using iPod mini safely and
cleaning iPod mini.
Important Safety Instructions
When setting up and using your iPod mini, remember the following:
• Read all the installation instructions carefully before you plug your iPod Power
Adapter in to a power outlet.
• Keep these instructions handy for reference by you and others.
• Follow all instructions and warnings dealing with your iPod mini.
Warning Electrical equipment may be hazardous if misused. Operation of this
product, or similar products, must always be supervised by an adult. Do not allow
children access to the interior of any electrical product and do not permit them to
handle any cables.
56
Safety and Cleaning
LL2596_border.book Page 57 Monday, April 26, 2004 4:09 PM
Avoid Hearing Damage
Warning Permanent hearing loss may occur if earbuds or headphones are used at
high volume. You can adapt over time to a higher volume of sound, which may sound
normal but can be damaging to your hearing. Set your iPod mini volume to a safe
level before that happens. If you experience ringing in your ears, reduce the volume
or discontinue use of your iPod mini.
Do Not Use While Driving
Important: Use of headphones while operating a vehicle is not recommended and is
illegal in some areas. Be careful and attentive while driving. Stop listening to your
iPod mini if you find it disruptive or distracting while operating any type of vehicle or
performing any other activity that requires your full attention.
Connectors and Ports
Never force a connector into a port. If the connector and port do not join with
reasonable ease, they probably don’t match. Make sure that the connector matches the
port and that you have positioned the connector correctly in relation to the port.
Battery
Do not attempt to remove the iPod mini battery. iPod mini must be disposed of
according to local environmental battery disposal regulations.
57
Safety and Cleaning
LL2596_border.book Page 58 Monday, April 26, 2004 4:09 PM
Using the Power Adapter
• Use only the power adapter that came with your iPod mini. Adapters for other
electronic devices may look similar, but they may damage your iPod mini.
• The only way to shut off power completely to your power adapter is to disconnect it
from the power source.
• Always leave space around your power adapter. Do not use this equipment in a
location where airflow around the power adapter is confined, such as a bookcase.
• When connecting or disconnecting your power adapter, always hold the power
adapter by its sides. Keep fingers away from the metal part of the plug.
• Before connecting the FireWire cable to the power adapter, make sure there are no
foreign objects inside the power adapter’s FireWire port.
• The power adapter for your iPod mini is a high-voltage component and should not
be opened for any reason, even when the iPod mini is off. If the power adapter needs
service, see “Learning More, Service, and Support” on page 54.
• Never force a connector into the power adapter FireWire port. If the connector and
port do not join with reasonable ease, they probably don’t match. Make sure that the
connector matches the port and that you have positioned the connector correctly in
relation to the port.
Safety and Cleaning
58
LL2596_border.book Page 59 Monday, April 26, 2004 4:09 PM
About Operating and Storage Temperatures
• Operate your iPod mini in a place where the temperature is always between
0º and 35º C (32º to 95º F).
• Store your iPod mini in a place where the temperature is always between
–20º and 45º C (–4º to 113º F). Don’t leave iPod mini in your car, since temperatures in
parked cars can exceed this range.
• iPod mini play time may temporarily shorten in low-temperature conditions.
• When you’re using your iPod mini or charging the battery, it is normal for the bottom
of the case to get warm. The bottom of the iPod mini case functions as a cooling
surface that transfers heat from inside the unit to the cooler air outside.
Avoid Wet Locations
Warning To reduce the chance of shock or injury, do not use your iPod mini in or near
water or wet locations.
• Keep your iPod mini and power adapter away from sources of liquids, such as drinks,
washbasins, bathtubs, shower stalls, and so on.
• Protect your iPod mini and the power adapter from direct sunlight and rain or other
moisture.
• Take care not to spill any food or liquid on iPod mini or its power adapter. If you do,
unplug iPod mini before cleaning up the spill.
In case of a spill, you may have to send your equipment to Apple for service. See
“Learning More, Service, and Support” on page 54.
59
Safety and Cleaning
LL2596_border.book Page 60 Monday, April 26, 2004 4:09 PM
Do Not Make Repairs Yourself
Warning Do not attempt to open your iPod mini or power adapter, disassemble it, or
remove the battery. You run the risk of electric shock and voiding the limited
warranty. No user-serviceable parts are inside.
For service, see “Learning More, Service, and Support” on page 54.
Cleaning
Follow these general rules when cleaning the outside of your iPod mini and its
components:
• Make sure your iPod mini is unplugged.
• Use a damp, soft, lint-free cloth. Avoid getting moisture in openings.
• Don’t use aerosol sprays, solvents, alcohol, or abrasives.
About Handling
Your iPod mini may be damaged by improper storage or handling. Be careful not to
drop your iPod mini when playing or transporting the device.
Safety and Cleaning
60
LL2596_border.book Page 61 Monday, April 26, 2004 4:09 PM
Communications Regulation Information
FCC Compliance Statement
This device complies with part 15 of the FCC
rules. Operation is subject to the following two
conditions: (1) This device may not cause
harmful interference, and (2) this device must
accept any interference received, including
interference that may cause undesired
operation. See instructions if interference to
radio or television reception is suspected.
Radio and Television Interference
This computer equipment generates, uses, and
can radiate radio-frequency energy. If it is not
installed and used properly—that is, in strict
accordance with Apple’s instructions—it may
cause interference with radio and television
reception.
This equipment has been tested and found to
comply with the limits for a Class B digital
device in accordance with the specifications in
Part 15 of FCC rules. These specifications are
designed to provide reasonable protection
against such interference in a residential
installation. However, there is no guarantee that
interference will not occur in a particular
installation.
You can determine whether your computer
system is causing interference by turning it off.
If the interference stops, it was probably caused
by the computer or one of the peripheral
devices.
If your computer system does cause
interference to radio or television reception, try
to correct the interference by using one or more
of the following measures:
• Turn the television or radio antenna until the
interference stops.
• Move the computer to one side or the other
of the television or radio.
• Move the computer farther away from the
television or radio.
• Plug the computer in to an outlet that is on a
different circuit from the television or radio.
(That is, make certain the computer and the
television or radio are on circuits controlled by
different circuit breakers or fuses.)
If necessary, consult an Apple Authorized
Service Provider or Apple. See the service and
support information that came with your Apple
product. Or, consult an experienced radio/
television technician for additional suggestions.
61
LL2596_border.book Page 62 Wednesday, April 28, 2004 3:30 PM
Important: Changes or modifications to this
product not authorized by Apple Computer, Inc.
could void the EMC compliance and negate
your authority to operate the product.
This product was tested for EMC compliance
under conditions that included the use of Apple
peripheral devices and Apple shielded cables
and connectors between system components.
It is important that you use Apple peripheral
devices and shielded cables and connectors
between system components to reduce the
possibility of causing interference to radios,
television sets, and other electronic devices. You
can obtain Apple peripheral devices and the
proper shielded cables and connectors through
an Apple Authorized Reseller. For non-Apple
peripheral devices, contact the manufacturer or
dealer for assistance. Responsible party (contact
for FCC matters only): Apple Computer, Inc.
Product Compliance, 1 Infinite Loop M/S 26-A,
Cupertino, CA 95014-2084, 408-974-2000.
Industry Canada Statement
This Class B device meets all requirements of the
Canadian interference-causing equipment
regulations.
Cet appareil numérique de la classe B respecte
toutes les exigences du Règlement sur le
matériel brouilleur du Canada.
62
VCCI Class B Statement
European Community
Complies with European Directives 72/23/EEC
and 89/336/EEC.
Apple and the Environment
At Apple, we recognize our responsibility to
minimize the environmental impacts of our
operations and products. For more information,
go to www.apple.com/about/environment.
© 2004 Apple Computer, Inc. All rights reserved.
Apple, the Apple logo, Apple Store, FireWire, iCal,
iPod, iTunes, Mac, Macintosh, and Mac OS are
trademarks of Apple Computer, Inc., registered in
the U.S. and other countries.
Finder and the FireWire logo are trademarks of
Apple Computer, Inc.
LL2596_border.book Page 63 Monday, April 26, 2004 4:09 PM
LL2596_border.book Page 64 Monday, April 26, 2004 4:09 PM
www.apple.com/ipod
www.apple.com/support/ipod
034-2596-A
Printed in XXXX