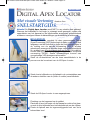
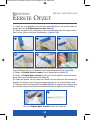
1
Apex Locator Quick Guide HS:Apex Locator Quick Guide HS 02/03/09 13:07 Página 1
ENGLISH
Digital apex locator
With visual display • Audible alarms
QUICK START GUIDE
®
ATTENTION! The Digital Apex Locator is not supplied in a sterile state. All
surfaces of the device and its accessories should be disinfected when the unit is
initially received and thereafter between procedures, to prevent cross-infection.
IMPORTANT
In order to gain the maximum advantage of this advanced
DSP technology, the file must be manipulated in slow movements towards the apical constriction (APEX) in clockwise
and counterclockwise motions. This is due to the extremely
high accuracy and rapidity of measurement of each minute
movement of the file. This is especially important in the critical area between 0.5 to the apical constriction (APEX). Swift
movement of the file may cause an unsteady LED display.
|
Insert the sockets of the two main lead wires onto the pins at
the top of the HS-Apex Locator.
|
Insert the mini file holder and lip hook into the sockets located
at the end of the lead wires (either left or right).
|
Insert the HS-Apex Locator into a disposable sleeve.
|
Placement of the device on the patient.
Place the file at the entrance to the canal and then connect it
to the mini file holder located at the end of the file clip cable.
Place the lip hook on the opposite side of the tooth being treated.
Apex Locator Quick Guide HS:Apex Locator Quick Guide HS 02/03/09 13:07 Página 2
ENGLISH
|
Activate the HS-Apex Locator by pressing the “On” button on
the face of the unit or by making contact between the lip hook
and the mini file holder. Once activated, the LEDs will flash in
sequence as a “self check”.
|
As the file enters the canal, the LEDs will light up, until the
“0,5” mm orange LED lights up, and the alarm will sound. This
is the commonly accepted working length. Any further
entrance into the canal should be made very carefully.
Maintain constant contact with the side of the canal, in order
to facilitate the measurement.
If you pass the biological apex, the “Apex” mm red LED will
begin to flash and the alarm will sound (fastest pitch).
|
Battery replacement:
remove the battery by gently pulling out the battery drawer at
the bottom of the HS-Apex Locator.
|
replace with a fresh battery (type cr2450). Be sure to insert
the battery into the drawer with the + sign facing upwards. Slide
the drawer back into the battery housing with the + sign to the
rEAr of the device.
Green LEDs
2,0 - 1,5mm
Orange LEDs
1,0 - 0,5mm
red LEDs
0,25mm - Apex
Digital
apex locator
Distributed by:
Distribuido por:
Vertrieb durch:
Distribué par:
Distribuito da:
HEnry ScHEIn Inc.
Melville, ny 11747 USA
EC REP
Henry Schein U.K. Holdings Ltd.
Gillingham ME8 0SB U.K.
www.henryscheinbrand.com
Apex Locator Quick Guide HS:Apex Locator Quick Guide HS 02/03/09 13:07 Página 3
ESPAÑOL
Digital apex locator
Con pantalla de visualización • Alarmas sonoras
GUÍA RÁPIDA DE USO
®
¡ATENCIÓN!: El Digital Apex Locator no se entrega esterilizado. Todas las superficies del dispositivo y de sus accesorios deben ser desinfectadas una vez recibida
la unidad y luego entre procedimientos, para prevenir el contagio de infecciones.
IMPORTANTE
Para aprovechar al máximo las ventajas de esta tecnología DSP
avanzada, hay que manipular la lima con movimientos lentos
hacia la constricción apical (APEX) siguiendo la dirección de la
agujas del reloj y en sentido contrario. Esto se debe a la precisión y rapidez de la medición con cada movimiento diminuto
de la lima. Esto resulta especialmente importante en el área crítica ubicada entre 0,5 y la constricción apical. Un movimiento rápido de la lima puede hacer que la pantalla LED se vuelva inestable.
|
Inserte las conexiones de los dos cables principales en los
pivotes de la punta del HS-Apex Locator.
|
Inserte el sostén de la mini lima y engánchelo en las conexiones
que se encuentran en el extremo de los cables (a la izquierda o
derecha).
|
Inserte el HS-Apex Locator en una funda desechable.
|
colocación del dispositivo en el paciente.
coloque la lima en la entrada del canal y luego conéctelo al
soporte que se encuentra en el extremo del cable con pinza
para la lima.
coloque el gancho del lado opuesto al diente bajo tratamiento.
Apex Locator Quick Guide HS:Apex Locator Quick Guide HS 02/03/09 13:07 Página 4
ESPAÑOL
|
Active el HS-Apex Locator pulsando el botón On en la unidad
o conectando el gancho y el mini soporte. Una vez activado,
los indicadores luminosos parpadearán secuencialmente
como “control automático”.
|
A medida que la lima penetra en el canal, se encenderán los
indicadores luminosos hasta que se encienda el indicador
naranja "0,5" mm y se escuchará una alarma sonora. Está marcando la longitud de trabajo aceptable normalmente. cualquier
penetración mayor en el canal debe ser hecha cuidadosamente.
Mantenga contacto constante con el lado del canal para facilitar la medición.
Si excede el ápice biológico, el indicador luminoso rojo
“Apex" comienza a parpadear y se escucha la alarma (un
timbre más rápido).
|
cambio de la batería.
retire la batería tirando suavemente de la gaveta de baterías
en la base del HS-Apex Locator.
|
reemplace con baterías nuevas (tipo cr2450). Asegúrese de
insertar la batería en la gaveta con el signo (+) hacia arriba.
Vuelva a deslizar la gaveta en el compartimiento de las
baterías del dispositivo.
Indicador verde
2,0 - 1,5mm
Indicador naranja
1,0 - 0,5mm
Indicador rojo
0,25mm - Apex
Digital
apex locator
Distributed by:
Distribuido por:
Vertrieb durch:
Distribué par:
Distribuito da:
HEnry ScHEIn Inc.
Melville, ny 11747 USA
EC REP
Henry Schein U.K. Holdings Ltd.
Gillingham ME8 0SB U.K.
www.henryscheinbrand.com
Apex Locator Quick Guide HS:Apex Locator Quick Guide HS 02/03/09 13:07 Página 5
FRANÇAIS
Digital apex locator
Avec écran de visualisation • Alarme sonore
GUIDE DE DEMARRAGE RAPIDE
®
¡ATTENTION!: Le Digital Apex Locator n’est pas stérile au moment de sa remise.
Toutes les surfaces du dispositif et de ses pièces devront être désinfectées à la livraison, ainsi qu’après chaque procédure pour éviter la transmission d’agents infectieux.
IMPORTANT
|
Pour profiter au mieux de cette technologie DSP de pointe, il faut
manipuler la lime avec précaution, sans mouvements brusques,
vers la constriction apicale (APEX). Effectuer des mouvements
dans le sens des aiguilles d’une montre et dans le sens inverse
des aiguilles d’une montre. Chaque minute de mouvement de la
lime est mesuré avec une extrême rapidité et une grande précision. ceci est particulièrement important pour la région critique
entre 0.5 et la constriction apicale (APEX). Un mouvement rapide de la lime pourrait déstabiliser l’affichage de la DEL.
Insérer les douilles des deux fils de sortie dans les broches
en haut de le HS-Apex Locator.
|
Insérer le mini porte-lime et le crochet labial dans les douilles
situées à l’extrémité des fils de sortie (droite ou gauche).
|
Insérer le HS-Apex Locator dans un manchon jetable.
|
Positionnement de l’appareil sur le patient.
Placer la lime à l’entrée du canal puis la connecter au mini
porte-lime situé à l’extrémité du câble à clip de la lime.
Placer le crochet labial sur la lèvre du patient du côté opposé
à la dent à traiter.
Apex Locator Quick Guide HS:Apex Locator Quick Guide HS 02/03/09 13:07 Página 6
FRANÇAIS
|
Activer l’Apex Locator HS en appuyant sur le bouton "On" situé
à l’avant de l’unité ou en créant un contact entre le crochet labial et le mini porte-lime. Une fois activée, la DEL clignotera par
intermittence.
|
Une fois la lime dans le canal, la DEL s’allumera puis la DEL
orange "0.5" mm. A cette profondeur de travail standard, une
alerte sera émise. Pour aller plus avant dans le canal, travailler
avec grande précaution.
Maintenir un contact constant avec le côté du canal pour faciliter
la mesure.
En cas de dépassement de l’apex biologique, la DEL rouge
"APEX" clignotera et une alerte sonnera (rapide).
|
Pour changer les piles :
Enlever la pile en ouvrant doucement le tiroir à pile au bas de
L’Apex Locator HS.
|
Mettre une pile neuve (type cr2450). Veillez à bien l’insérer
dans le tiroir, le côté indiqué par un + étant vers le haut.
refermer le tiroir.
DEL vert
2,0 - 1,5mm
DEL orange
1,0 - 0,5mm
DEL rouge
0,25mm - Apex
Digital
apex locator
Distributed by:
Distribuido por:
Vertrieb durch:
Distribué par:
Distribuito da:
HEnry ScHEIn Inc.
Melville, ny 11747 USA
EC REP
Henry Schein U.K. Holdings Ltd.
Gillingham ME8 0SB U.K.
www.henryscheinbrand.com
Apex Locator Quick Guide HS:Apex Locator Quick Guide HS 02/03/09 13:07 Página 7
DEUTSCH
Digital apex locator
Mit graphische Darstellung • Akustische Alarme
QUICK START HANDBUCH
®
ACHTUNG! Der Digital Apex Locator wird nicht steril ausgeliefert. Alle
Oberflächen des Gerätes und seines Zubehörs sollten nach Empfang sowie zwischen den Anwendungen desinfiziert werden, um Kreuzinfektionen zu vermeiden.
WICHTIG!
|
Um mit der innovativen DSP Technologie die optimalen
resultate zu erzielen, bewegen Sie die Feile langsam sowohl
im Uhrzeigersinn als auch gegenläufig den Wurzelkanal in
richtung des biologischen Apex (APEX) hinab. Gehen Sie
nicht zu schnell vor, denn jede kleinste Bewegung der Feile
wird extrem präzise und schnell ausgewertet. Dies ist besonders im kritischen Bereich zwischen 0.5 und dem biologischen Apex (APEX) zu beachten. Zu schnelle Bewegungen
mit der Feile können zu flackernden LEDs führen.
Verbinden Sie die Stecker der zwei Hauptkabel mit den oben
am HS-Apex Locator befindlichen Kabelbuchsen.
|
Schließen Sie den Minifeilenclip und den Lippenhaken an die
Anschlüsse am Ende des Einsteckkabels an (entweder rechts
oder links).
|
Legen Sie eine Einweghülle um den Apex Locator.
|
Positionierung des Gerätes am Patienten:
Platzieren Sie die Feile am Eingang des Kanals, dann verbinden
Sie sie mit dem Minifeilenhalter am Ende des Feilencliphalters.
Der Lippenhaken sollte auf der dem zu behandelnden Zahn
gegenüber liegenden Seite zum Einsatz kommen.
Apex Locator Quick Guide HS:Apex Locator Quick Guide HS 02/03/09 13:08 Página 8
DEUTSCH
|
Schalten Sie den Apex Locator durch Betätigen des “On”
Schalters an der Vorderseite des Gerätes oder durch
Berührung des Mini-Feilenhalters mit dem Lippenhaken ein.
Direkt nach dem Einschalten werden die LEDs durchlaufend
aufleuchten, der “Selbsttest”.
|
Mit dem Einführen der Feile in den Wurzelkanal werden die
LEDs aufleuchten, bis die “0.50” mm LED orange aufleuchtet
und der Signalton zu hören ist. Jetzt ist die allgemein übliche
Arbeitstiefe erreicht. Tieferes Eindringen sollte nur unter
äußerster Vorsicht geschehen.
Halten Sie kontinuierlich Kontakt mit der Wand des
Wurzelkanals, um die Messergebnisse zu optimieren. Falls Sie
den biologischen Apex durchstoßen, wird die ”APEX” rote LED
anfangen zu blinken, und der Alarmton wird ertönen (schnellste Tonfolge).
|
Batteriewechsel:
Entfernen Sie die Batterie, indem Sie behutsam das am Boden
des HS-Apex Locator befindliche Batteriefach herausziehen.
|
Setzen Sie eine neue Batterie (Typ cr2450) Art. nr. 900 3648
ein. Vergewissern Sie sich, dass die Batterie mit der +
Markierung nach oben in das Batteriefach eingesetzt wurde.
Schieben Sie das Batterieschubfach zurück in das Gehäuse.
Grün LEDs
2,0 - 1,5mm
Orange LEDs
1,0 - 0,5mm
rote LEDs
0,25mm - Apex
Digital
apex locator
Distributed by:
Distribuido por:
Vertrieb durch:
Distribué par:
Distribuito da:
HEnry ScHEIn Inc.
Melville, ny 11747 USA
EC REP
Henry Schein U.K. Holdings Ltd.
Gillingham ME8 0SB U.K.
www.henryscheinbrand.com
Apex Locator Quick Guide HS:Apex Locator Quick Guide HS 02/03/09 13:08 Página 9
ITALIANO
Digital apex locator
Di visualizzazione • Acustici
GUIDA D’AVVIO RAPIDO
®
ATTENZIONE!: Il Digital Apex Locator che viene fornito non è sterilizzato. Tutte le
superfici del dispositivo e i suoi accessori devono essere disinfettate non appena si
riceve l’unità e, in seguito, dopo ogni procedura, per evitare un’infezione crociata.
IMPORTANTE
Per poter ottenere il Massimo beneficio da questa tecnologia
DSP, la lima deve essere manipolata con movimenti leggeri
verso la compressione apicale (APEX) con movimenti orari e
antiorari. Questo a causa dell’estrema accuratezza e rapidità
della misurazione di ciascun movimento per minuto della lima.
Questo è particolarmente importante nella zona critica tra 0.5
alla costrizione apicale (APEX). Un movimento rapido della lima
può causare una visualizzazione del LED non stabile.
|
Inserire le spine dei due fili di piombo principali sugli spinotti
alla cima del HS-Apex Locator.
|
Inserire il mini supporto della lima e il gancio per labbro nelle
prese situate alla fine del filo di piombo (sia a sinistra sia a destra).
|
Inserire il HS-Apex Locator in un manicotto monouso.
|
Posizionamento del dispositivo sul paziente.
Posizionare la lima all'ingresso del canale e poi collegarlo al supporto della mini lima che si trova alla fine del cavo clip della lima.
Posizionare il gancio per labbra sul lato opposto del dente da
trattare.
Apex Locator Quick Guide HS:Apex Locator Quick Guide HS 02/03/09 13:08 Página 10
ITALIANO
|
Attivare il HS-Apex locator premendo il tasto "On" sul fronte
dell’unità o facendo contatto tra il gancio per labbro e il supporto della mini lima. Una volta attivati, i LED lampeggeranno in
sequenza come un "self-controllo".
|
come la lima entra nel canale, i LED lampeggeranno fino a che
il LED arancione da "0.5" mm si illumina e l’allarme suona.
Questa è la lunghezza di lavoro comunemente accettata.
Qualsiasi ulteriore ingresso nel canale deve essere eseguito
molto attentamente.
Mantenere il contatto costante con il lato del canale per facilitare
la misurazione.
Se si supera l'apex biologico, il LED rosso da "APEX" inizia a
lampeggiare e l'allarme suonerà (passo velocissimo).
|
Sostituzione della batteria:
rimuovere la batteria tirando fuori con delicatezza il cassetto
della batteria in fondo al HS-Apex Locator.
|
Sostituire con una batteria nuova (tipo cr2450). Accertarsi di
inserire la batteria nel cassetto con il segno + verso l’alto. rimettere
il cassetto nell’alloggiamento della batteria del dispositivo.
LED verde
2,0 - 1,5mm
LED arancione
1,0 - 0,5mm
LED rosso
0,25mm - Apex
Digital
apex locator
Distributed by:
Distribuido por:
Vertrieb durch:
Distribué par:
Distribuito da:
HEnry ScHEIn Inc.
Melville, ny 11747 USA
EC REP
Henry Schein U.K. Holdings Ltd.
Gillingham ME8 0SB U.K.
www.henryscheinbrand.com
Apex Locator Quick Guide HS:Apex Locator Quick Guide HS 02/03/09 13:08 Página 11
NEDERLANDS
Digital apex locator
Met visuele Vertoning • Hoorbaar Alarm
SNELSTARTGIDS
®
Attentie! De Digital Apex Locator wordt nIET in een steriele staat geleverd.
Wanneer het toestelletje in het begin in ontvangst wordt genomen, moeten alle
oppervlakten van het apparaat en de bijbehorende accessoires gedesinfecteerd
worden en vervolgens tussen de behandelingen om kruisinfectie te voorkomen.
BELANGRIJK
|
Om het maximale voordeel uit deze geavanceerde Digital
Signal Processing (DSP) technologie te halen, moet de vijl met
langzame, met de klok mee en tegen de klok in bewegingen in
de richting van de apicale vernauwing (APEX) worden
gehanteerd vanwege de extreem hoge metingnauwkeurigheid
en -snelheid van de minste beweging van de vijl. Dit is van bijzonder belang in het cruciale gebied tussen 0,5 en de apicale
vernauwing (APEX). Snelle vijlbewegingen kunnen een
onregelmatige LED weergave veroorzaken.
Steek de contrastekkers van de twee aansluitkabels in de
pennen aan de bovenkant van de HS-Apex Locator.
|
Steek de mini-vijlhouder en de liphaak in de contrastekkers aan
de andere uiteinden van de (linker of rechter) aansluitkabels.
|
Steek de HS-Apex Locator in een wegwerphoes.
|
Plaatsing van het apparaat op de patiënt:
Plaats de vijl aan het begin van het kanaal en verbind het daarna met de mini-vijlhouder aan het kabeluiteinde van de vijlklem.
Plaats de liphaak aan de tegenoverliggende kant van de te
behandelen tand.
Apex Locator Quick Guide HS:Apex Locator Quick Guide HS 02/03/09 13:08 Página 12
NEDERLANDS
|
Zet de HS-Apex Locator in werking door de ‘On’ (= AAn) knop
aan de voorkant van de toestelletje in te drukken of door de
liphaak contact te laten maken met de mini-vijlhouder. Eenmaal
in werking gesteld, zullen de LEDs in volgorde opblinken als
een soort ‘zelfcontrole’.
|
Zodra de vijl het kanaal ingaat, zullen de LEDs oplichten totdat de oranje ‘0,5’ mm LED oplicht en het alarm afgaat. Dit is
de algemeen aanvaarde werklengte. Elke verdere ingang in
het kanaal moet erg voorzichtig worden gedaan.
Houd constant contact met de zijkant van het kanaal om de
meting te bevorderen.
Als u de biologische apex overschrijdt, zal de rode ‘APEX'
LED beginnen te flikkeren en zal een alarm afgaan (snelste
toonfrequentie).
|
Vervanging van de batterij:
Verwijder de batterij door de batterijlade aan de onderkant van
de HS-Apex Locator er voorzichtig uit te trekken.
|
Vervang de oude batterij door een nieuwe (type cr2450). Zorg
ervoor dat de batterij met de + naar boven in de lade komt te
liggen. Schuif de lade terug in het batterijhuis van het apparaat.
Groen LEDs
2,0 - 1,5mm
Oranje LEDs
1,0 - 0,5mm
rode LEDs
0,25mm - Apex
Digital
apex locator
Distributed by:
Distribuido por:
Vertrieb durch:
Distribué par:
Distribuito da:
HEnry ScHEIn Inc.
Melville, ny 11747 USA
EC REP
Henry Schein U.K. Holdings Ltd.
Gillingham ME8 0SB U.K.
www.henryscheinbrand.com
Apex Locator IFU HS:Apex Locator IFU HS 02/03/09 12:52 Página 2
Digital apex locator
Copyright © 2009 by Henry Schein Inc.
All rights reserved. No part of these instructions may be reproduced or copied in any form by any means – graphic, electronic
or mechanical, including photocopying, typing or information retrieval systems – without written permission of Henry Schein Inc.
Todos los derechos reservados. Ninguna parte de estas instrucciones puede ser reproducida o copiada de ninguna manera y
por ningún medio – gráfico, electrónico o mecánico, incluyendo el fotocopiado, tipeo o los sistemas de recuperación de información – sin la autorización expresa por escrito de Henry Schein Inc.
Tous les droits réservés. Aucune partie de ces instructions ne peut être reproduite ou copiée par aucun moyen – graphique, électronique ou mécanique, y compris la photocopie, la copie à main ou les systèmes de récupération de l’information – sans l’autorisation par écrit de Henry Schein Inc.
Alle Rechte vorbehalten. Dieses Benutzerhandbuch darf ohne schriftliche Genehmigung von Henry Schein Inc weder ganz noch
in Auszügen in jedweder Form- grafisch, elektronisch oder mechanisch- reproduziert oder kopiert werden, was Fotokopien,
Abschriften oder das Weiterleiten über andere Kommunikationsmittel einschließt.
Tutti i diritti riservati. Nessuna parte di queste istruzioni può essere riprodotta o copiata in nessuna forma e con nessun mezzo
– grafico, elettronico o meccanico, includendo la fotocopiatura, la battitura o sistemi di recupero delle informazioni – senza il permesso scritto della Henry Schein Inc.
Alle rechten voorbehouden. Deze instructies of een deel ervan mogen niet worden gereproduceerd of gekopieerd in welke
vorm dan ook d.m.v. grafische, elektronische of mechanische (inclusief fotokopiëren, typen of informatieherstel) systemen
zonder de schriftelijke toestemming van Henry Schein Inc.
Apex Locator IFU HS:Apex Locator IFU HS 02/03/09 12:52 Página 3
900-3637
Digital
apex locator
With visual Display • Audible alarms
OPERATING MANUAL
Con pantalla de visualización • Alarmas sonoras
INSTRUCCIONES DE USO
Avec écran de visualisation • Alarme sonore
MODE D’EMPLOI
Mit graphische Darstellung • Akustische Alarme
BENUTZERHANDBUCH
Di visualizzazione • Acustici
MANUALE D’USO
Met visuele Vertoning • Hoorbaar alarm
GEBRUIKSAANWIJZING
®
• 50 MONTH GUARANTEE
• GARANTÍA DE 50 MESES
• GARANTIE DE 50 MOIS
• 50 MONATE GARANTIE
• 50 MESI DI GARANZIA
• 50 MAANDWAARBORG
HeNRy SCHeIN INC.
Melville, Ny 11747 USA
EC REP
0473
MADE IN ISRAEL
Fabricado en Israel
Fabriqué en Israel
Hergestellt in Israel
Prodotto in Israel
Gemaakt in Israël
Distributed by:
Distribuido por:
Vertrieb durch:
Distribué par:
Distribuito da:
Henry Schein U.K. Holdings Ltd.
Gillingham Me8 0SB U.K.
www.henryscheinbrand.com
Apex Locator IFU HS:Apex Locator IFU HS 02/03/09 12:52 Página 4
Digital apex locator
PARTS
1
2
3
4
5
6
7
8
A
- File Clip cable
- Mini file holder
- Mini sensor probe
- Lip hook
- Apron clasp
- Main lead wires
- Flashing LeDs
- Battery drawer
1
2
5
3
4
6
7
8
2
Digital apex locator
The Digital Apex Locator is designed to meet international
safety and performance standards. Personnel operating the
instrument must have a thorough understanding of the proper
operation of the instrument. These instructions have been prepared to aid medical and technical personnel to understand and
operate the instrument. Do not operate the instrument before
reading and fully understanding the manual. If any part of this
manual is not clear, please contact your representative for clarification.
The Digital Apex Locator calculates the distance from the tip
of your endodontic file to the Major Apical Foramen by using
multi-frequency currents.
The Digital Apex Locator measures the response of the root
canal between two electrodes, depending on the frequency. The
first electrode is the lip hook (3) (Pic.A). The second is the mini
file holder (2) which makes contact with a file that has been
inserted into the root canal.
The Digital Apex Locator monitors the changes in the canal's
response as the file probe approaches the apex.
3
ENGLISH
Apex Locator IFU HS:Apex Locator IFU HS 02/03/09 12:52 Página 5
Apex Locator IFU HS:Apex Locator IFU HS 02/03/09 12:52 Página 6
Digital apex locator
initial Setup
1. Insert the two main lead wires into the outlets at the top of the Digital
Apex Locator (Pic. B).
2. Insert the file clip and lip hook into the sockets located at the end of the
main plug cable (either left or right) (Pic. C+D).
B
C
D
E
F
G
3. Attach the apron clasp to the lead wires by inserting them into the two wire
holders on the clasp handles (Pic. E).
4. Insert the Digital Apex Locator into a disposable sleeve (Pic. F).
5. Place the Digital Apex Locator near the mouth of the patient and attach
the clasp to the apron. (Pic. G).
6. Place the lip hook located at the end of the cable to the lower lip, preferably on the opposite side of the tooth being treated.
7. Place the file at the entrance to the canal (Pic. H) and then connect it to the
mini file holder located at the end of the file clip cable (Pic. I).
H
I
The Digital Apex Locator is now ready for operation.
4
Digital apex locator
DirectionS for uSe
NOTE: The Digital Apex Locator should be used only as an adjunct to normal endodontic procedures. While the unit can reduce the number of radiographs necessary, an initial radiograph must be taken to estimate working
length. Clinical judgment, including knowledge of root canal anatomy, is
paramount when interpreting results.
1. Activate the Digital Apex Locator by pressing
J
the “ON” button on the face of the unit or by making contact between the lip hook and the mini file
holder (Pic. J). Once activated, the LeDs will flash
in sequence as a “self-check”.
2. Following this check, the green LeD will blink, indicating the Digital Apex Locator is in stand-by mode.
3. When the file reaches the “2.00” mm point, the green LeD will stay lit.
4. Work the file towards the apex in a clockwise and counter-clockwise filing motion
until the “0.50” mm orange LeD turns on and the alarm sounds (slow pitch).
NOTE: The unit is sensitive and responds to minute changes in file position.
It is essential to maintain contact between the file and the side of the canal
to facilitate measurement.
5. Before reaching the biological apex, you will reach the “0.25”
mm and the orange LeD will light.
6. When the file reaches the biological apex, the “Apex” red LeD
will light and the alarm sound changes to a faster pitch.
7. Mark the depth of the canal with the file rubber stop. Measure
the length of the file and prepare the rest of the files for the treatment according to this length. If you pass the biological apex,
the “Apex” mm red LeD will begin to flash and the alarm will
sound (fastest pitch). At this stage, gently pull file back out of the
canal until the “Apex” mm red LeD lights and the alarm sound
slows its pitch.
Please refer to our recommendations for a successful
treatment (page 8) and our troubleshooting guide (page
10) for more information.
5
ENGLISH
Apex Locator IFU HS:Apex Locator IFU HS 02/03/09 12:52 Página 7
Apex Locator IFU HS:Apex Locator IFU HS 02/03/09 12:52 Página 8
Digital apex locator
Device power off
As an energy-conservation feature, the Digital Apex Locator will turn off
after approximately 90 seconds of inactivity.
auDiBle alarm
K
NOTE: To cancel the audible alarm, press the grey button on the rear
of the device (Pic. K). To reactivate it, press the button once again.
Battery power
When the Digital Apex Locator recognizes low battery power, upon turning on the
unit, three intermittent LeD lights will light simultaneously along with beeping sounds.
This is a warning to change the battery soon (still functional). If after an additional period of time the operator has not changed the battery, the unit will turn off automatically upon being turned on and will not allow the operator to use the unit. Replace
the battery immediately. There are no other user serviceable items within the unit.
Opening the device will void the warranty.
Warning! Low battery power affects accuracy.
Battery replacement
• Remove the battery by gently pulling out the battery drawer at the bottom of the Digital
Apex Locator (Pic. L).
• Remove the battery from the drawer (Pic. M) and replace with a fresh battery (type CR2450).
• Be sure to insert the battery with the + sign facing upwards, (Pic. N).
• Slide the drawer back into the battery housing.
Dispose of depleted battery in accordance to local regulations.
L
M
N
NOTE: When storing the Digital Apex Locator for an extended period of time without use,
it is recommended to remove the battery from the device in order to lengthen the battery life.
6
Digital apex locator
SteriliSation
• Warning! Do not place the Digital Apex Locator into the Autoclave!!
• Do not submerge the device or allow liquid to enter the unit enclosure!
Attention! The Digital Apex Locator is not supplied in a sterile state. All
surfaces of the device and its accessories should be disinfected when the unit
is initially received and thereafter between procedures, to prevent cross-infection. Wipe the surface of the unit with a clean cloth moistened in 70% ethyl
alcohol solution.
The main lead wires (5), mini file holder (2), lip hook (3) and apron clasp (4)
can be sterilized in the autoclavable at 121ºC for 20 minutes or at 134ºC for
5 minutes.
Only accessories specifically mentioned as autoclave save may be sterilized
in the autoclave.
FOR YOUR CONVENIENCE
O
After the length of the canal has been
defined and marked on all of the files,
the compact and convenient Sensor
Probe can be used to confirm the
depth of the entering file during the
procedure.
The result of the momentary contact with the file will be shown on your
apex locator immediately.
PLEASE NOTE: Contact should be made increasingly often when
approaching the biological apex, in order to prevent perforation. The
location of the file will be shown on the apex locator only during direct
contact with the sensor probe.
7
ENGLISH
Apex Locator IFU HS:Apex Locator IFU HS 02/03/09 12:52 Página 9
Apex Locator IFU HS:Apex Locator IFU HS 02/03/09 12:52 Página 10
Digital apex locator
recommenDationS for a
Prior to measuring root canal length with your Digital Apex Locator:
• Make sure that the pulp chamber is dry before insert2
ing the measuring file. It is recommended to dry the 3
pulp chamber (1) with a cotton pellet or by a slight
aspiration of the moisture with an aspiration syringe.
Also ensure that all canals are isolated from each
other. excessive fluids in the pulp chamber or canals
may form a conductive bridge between canals or with
1
a metallic restoration or crown. Drying the canal with
a paper point may help increase accuracy.
• When the walls of the pulp chamber are damaged (2),
4
or there are damaged fillings (3), saliva leakage can
occur from the oral cavity, which will prevent drying of
the chamber. A moist chamber may cause the immediate formation of a
closed electrical circuit, i.e., a short circuit. In this event, the apex locator will
issue a warning (flashing red LeD and audible alarm) as if it reached the apex
(false positive reading). In such cases the missing chamber wall should be
temporarily restored, but only with nonconductive materials such as
Composite, IRM, GI (glass ionomer), etc. After restoration, a dry chamber can
be achieved and accurate measurement can be reached.
• Continuous contact with metal or amalgam fillings will ground the device, so
take special care to prevent contact between the file and any existing metalbased restoration of the tooth by amalgam filing or metal crown. In such
instances, an adequate insulation of the file from the metallic environment can
be achieved by fitting 2-3 rubber stoppers onto the part of the file that may
contact the metal of the restoration.
• A preliminary extirpation is recommended before beginning measurement.
Residual tissue may result in a premature and erroneous reading.
• When using a rubber dam, make sure that it is properly sealed around the
insertion area. Any aperture between the rubber dam and tooth can be sealed
with a temporary restoration. Leading endodontists recommend the use of
rubber dams during every root canal treatment.
• ensure the lip hook fully contacts the patient’s moist mucosa. The lip hook
should not make contact with any adjacent teeth, which may have metal fillings.
• Check all connections.
• While some of the accessories are autoclavable, if any accessory seems
damaged after a number of autoclave cycles, please replace with a new part.
Particularly check the lead wire cables. (see the section on "sterilization" for a
full list of the autoclavable items).
8
Digital apex locator
SucceSSful treatment
Recommendations foR the measuRement pRocess
Prepare a wide canal orificium and prepare the first 2/3 in a tapered way to
prevent contact with premature constrictions in the canal.
• The file should be inserted into the canal in a filing motion (clockwise and
counter-clockwise). Rotation of the file in one direction may cause the file to
break inside the canal!
• Take care to ensure continuous contact between the file and the root canal
wall. It is recommended to use the largest possible file that will reach the estimated working length. A loose file that does not make continuous contact with
the canal wall will be unable to perform accurate measurements.
• ensure continuous and strong contact between the file and its holder (this
may be problematic with the thinner files 6, 8, 10 mm).
• In excessively desiccated canals, moistening is recommended to improve conductivity. This can be performed by slight irrigation and/or by slight lubrication of the file.
• If the canal is too dry, introduce Sodium HypoChlorite to the apical third of the canal.
exceptions
• In a very wide canal, the Digital Apex Locator may be able to read the measurement only at the tip where the canal constricts toward the apical foramen. In such
cases only a depth of 0.5 mm and apical foramen, will be identified. Reading may
be improved by using a larger file and making definite contact with the canal wall.
• The Digital Apex Locator reading may be unstable in the following tooth pathology situations: decay (caries in the pulp chamber), strong bleeding in the canal,
metallic restoration, periapical lesion, open apex (4), excessively wide canal.
• Bone or periodontal ligament loss (indicated by a radiolucency on the film)
can cause inaccurate readings.
• A worn out battery will reduce the accuracy of the reading. The battery
should be replaced as soon as the instrument's warning signal appears, as
detailed in the user manual. Take care to follow the instructions for connecting the cables to the instrument as specified in the user manual.
In all instances of erroneous readings as described above only a premature reading situation is possible, due to ostensible recognition of the apex. However, the
device will not show a delayed reading that may endanger the periapical tissues.
The Digital Apex Locator is a digital electronic device and as such requires
a minimum residual battery voltage to drive the circuitry. It therefore requires
replacement when this point has been reached even thought there may be
sufficient power left for the LeDs to turn on.
9
ENGLISH
Apex Locator IFU HS:Apex Locator IFU HS 02/03/09 12:52 Página 11
Apex Locator IFU HS:Apex Locator IFU HS 02/03/09 12:52 Página 12
Digital apex locator
trouBleShooting
Question
Solution
(see user manual for fuller explanations)
• Unit shows that the file is at the
apex when instrument has only just
been introduced to the canal.
• either pulp chamber floor is not completely dry or the file has contacted a
metallic restoration. In either case, the
inaccurate readings are due to shorting
the circuit. Dry the pulp chamber if it is wet.
• Reading on unit is not steady.
• File is in intermittent contact with the
canal walls. either place a curve at the
tip of the file or try a larger size file so
the tip touches the wall near the apex.
• No lights show.
• Battery is flat or has not been
replaced correctly (see below).
• 3 LeDs illuminate simultaneously.
• Warning to replace battery as soon
as possible.
• The reading on the device does not
coincide with the result of the X-ray.
• The X-ray is a two-dimensional image
that cannot accurately find the biological
apex. Therefore, the result of the apex
locator should be relied upon for determining the correct working length. In
addition, bone or periodontal ligament
loss (indicated by a radiolucency on the
film) can cause inaccurate readings.
• The unit will not switch off.
• Battery is low. Replace battery.
• Unit does not work when battery
has been replaced.
• Please check each of the following
points:
A. The battery is placed upside down.
B. The battery is not fresh. Please ensure
you are replacing with a new battery.
C. Please make sure you are using a
CR2450 type battery.
10
Digital apex locator
proDuct featureS
INCLUDED IN BOX:
• Digital Apex Locator (1 unit)
• Lead Wires (4 units) - autoclave safe
• Apron Clasp (2 units) - autoclave safe
• Lip Hook (2 units) - autoclave safe
• Traditional File Clip (1 unit) - autoclave safe
• Mini File Holder (3 units) - autoclave safe
• Mini Sensor probe (1 unit) - autoclave safe
• Disposable Sleeves (20 units)
• Battery (type CR2450)
ACCESSORIES:
In order to facilitate your operating area, Henry Schein has developed a wide
range of accessories that are fully compatible with the Digital Apex Locator
• Mini Sensor Probe - autoclave safe (included!)
• Long Sensor Probe - autoclave safe
CLASSIFICATION:
• Type BF applied part.
• IeC 601-1 Compliant Medical equipment
TECHNICAL SPECIFICATIONS:
• Power Supply: Single CR2450 battery
• Power input: 2.4 – 3.0 V
• Maximum current: 12mA
• Operating temperature: +10ºC - +40ºC
• Humidity: 10% - 90% without condensation.
WARNING:
The Digital Apex Locator should NOT be used on a patient with a pacemaker.
TECHNOLOGICAL ADVANTAGES FOR PRECISION:
• There are 6 LeDs to mark the advancement of the file, for maximal control
of the measurement and precision.
• The Digital Apex Locator provides precise measurements of the canal
under all conditions, including wet, dry and bleeding canals. you can immediately measure another canal without any special preparations.
• Calibration is automatic. NO manual calibration is required.
11
ENGLISH
Apex Locator IFU HS:Apex Locator IFU HS 02/03/09 12:52 Página 13
Apex Locator IFU HS:Apex Locator IFU HS 02/03/09 12:52 Página 14
Digital apex locator
DESPIECE
1
2
3
4
5
6
7
8
A
- Cable-soporte de la lima
- Mini soporte de lima
- Mini sonda sensor
- Gancho para el labio
- Broches para delantal
- Cables principales
- Indicadores luminosos
- Cajón de batería
1
2
5
3
4
6
7
8
12
Apex Locator IFU HS:Apex Locator IFU HS 02/03/09 12:52 Página 15
el Digital Apex Locator (Localizador de Ápice Digital) está diseñado de acuerdo a los estándares internacionales de seguridad y normas de funcionamiento. el personal que ponga en funcionamiento el instrumento debe tener pleno conocimiento de su
correcto uso. estas instrucciones fueron preparadas para ayudar
al personal médico y técnico a comprender y utilizar el instrumento. No poner en funcionamiento el aparato antes de leer este
manual y obtener una clara comprensión del funcionamiento del
mismo. Si alguna parte de este manual necesitara aclaraciones,
por favor, póngase en contacto con su representante.
el Digital Apex Locator calcula la distancia desde la punta de
su lima endodóntica hasta el foramen, al medir las señales entre
dos electrodos. el primer electrodo es el gancho para labio (3)
(Fig.A). el segundo es el mini soporte de lima (2) que hace contacto con una lima o un taponador (plugger), insertado dentro
del canal radicular.
el Digital Apex Locator controla los cambios de respuesta en
el canal radicular a medida que la sonda se aproxima al ápice.
13
ESPAÑOL
Digital apex locator
Apex Locator IFU HS:Apex Locator IFU HS 02/03/09 12:52 Página 16
Digital apex locator
configuración inicial
1. Inserte los dos cables principales en las entradas de la parte superior del
Digital Apex Locator (Fig. B).
2. Inserte la clavija de la lima y el gancho para el labio en las entradas ubicadas en la punta del cable principal (izquierdo o derecho). (Fig.C+D).
B
C
D
E
F
G
3. enganche el broche para el delantal a los cables principales, introduciendo las dos clavijas finales de los cables en los orificios del broche (Fig. E).
4. Inserte el Digital Apex Locator en una funda desechable (Fig. F).
5. Ubique el Digital Apex Locator cerca de la boca del paciente, y enganche el broche al delantal (Fig. G).
6. Coloque el gancho para labio ubicado en la punta del cable en el labio inferior, preferentemente del lado contrario al diente en el que se hará el tratamiento.
7. Ubique la lima en la entrada del canal (Fig. H) y luego conéctela al mini
soporte que está al final del cable que sostiene la lima (Fig. I).
H
I
el Digital Apex Locator está listo para funcionar.
14
Apex Locator IFU HS:Apex Locator IFU HS 02/03/09 12:52 Página 17
Digital apex locator
NOTA: El Digital Apex Locator debe ser utilizado solamente como accesorio en
los procedimientos endodónticos normales. Aunque la unidad puede reducir la
cantidad de radiografías necesarias, debe sacarse una radiografía inicial para estimar la duración del trabajo. El diagnóstico, incluyendo el conocimiento de la
anatomía del canal radicular, es de suma importancia para interpretar los resultados.
1. Active el Digital Apex Locator presionando el
J
botón de encendido o haciendo contacto entre el gancho para el labio y el mini soporte de lima (Fig. J).
Una vez activado, los LeDs se encenderán secuencialmente a modo de “auto chequeo”.
2. Después de este control, el LeD verde parpadeará,
indicando que el Digital Apex Locator está “en espera”.
3. Cuando la lima alcance el punto de “2.00” mm, el LeD verde quedará encendido.
4. Trabaje con la lima hacia el ápice de manera circular en el sentido de las agujas del reloj y en el contrario hasta que el LeD naranja de los “0.50” mm se
encienda y suene la alarma (tono bajo).
NOTA: La unidad es sensible y responde al menor cambio en la posición de
la lima. Es fundamental mantener el contacto entre la lima y el costado del
canal para facilitar la medición.
5. Antes de alcanzar el ápice biológico, llegará a los “0.25” mm
y se encenderá el LeD naranja.
6. Cuando la lima alcance el ápice biológico, el LeD rojo indicador del “Ápice” se encenderá y el sonido de la alarma cambiará por uno más veloz.
7. Marque la profundidad del canal con el tope de goma de la
lima. Mida la longitud de la lima y prepare las demás limas para
el tratamiento de acuerdo a esa longitud. Si pasara el ápice
biológico, el LeD rojo de los “Apex” mm comenzará a parpadear
y la alarma sonará más rápido aún. en este caso, retire suavemente la lima del canal hasta que el LeD rojo “Ápice” se encienda y la alarma disminuya la velocidad de su tono.
Por favor, remítase a nuestras recomendaciones para un
tratamiento exitoso (Pág. 8) y al cuadro de solución de
problemas (Pág. 10) para más información.
15
ESPAÑOL
moDo De empleo
Apex Locator IFU HS:Apex Locator IFU HS 02/03/09 12:52 Página 18
Digital apex locator
apagaDo Del aparato
Para favorecer el ahorro de energía, el Digital Apex Locator se apagará
después de aproximadamente 90 segundos de inactividad.
alarma Sonora
K
NOTA: Para parar el sonido de alarma, presione el botón gris en la
parte trasera (Fig. K). Para reactivarlo, pulse de nuevo el botón.
potencia De la Batería
Cuando el Digital Apex Locator advierte una baja potencia de la batería al conectar la unidad, se encenderán tres LeDs intermitentes simultáneos junto con un sonido
de alarma. Esta es una advertencia para cambiar rápidamente la batería (que
aún funciona). Si al cabo de un período adicional, no se cambia la batería, la unidad
se apagará automáticamente una vez encendida y no permitirá su uso. Reemplace
inmediatamente la batería. No hay otras piezas que puedan recibir mantenimiento por
parte del usuario en el interior de la unidad. Si abre el aparato se perderá la garantía.
¡Atención!: La baja potencia de la batería afecta la precisión.
SuStituir la Batería
• Para sacar la batería tire suavemente de la pieza protectora (Fig. K).
• Saque la batería del compartimento (Fig. L) y cámbiela por una batería nueva (tipo CR2450).
• Asegúrese de insertar la batería con el signo + hacia arriba (Fig. M).
• Coloque de nuevo el compartimiento en su posición original.
Tire la batería gastada, de acuerdo a las leyes locales.
K
L
M
NOTA: Cuando guarde el Digital Apex Locator por un largo período de tiempo sin ser
utilizado, se recomienda hacerlo sin la batería, para prolongar así la vida de la misma.
16
Apex Locator IFU HS:Apex Locator IFU HS 02/03/09 12:52 Página 19
Digital apex locator
• ¡Advertencia! ¡No ponga el Digital Apex Locator dentro del Autoclave!
• ¡No sumerja el dispositivo ni permita que le entren líquidos!
¡Atención!: el Digital Apex Locator no se entrega esterilizado. Todas las
superficies del dispositivo y de sus accesorios deben ser desinfectadas una
vez recibida la unidad y luego entre procedimientos, para prevenir el contagio de infecciones. Limpie la superficie de la unidad con un paño limpio
humedecido en una solución de alcohol etílico al 70%.
Los cables principales (5), el mini soporte de lima (2), el gancho para el labio
(3) y el broche para delantal (4) pueden esterilizarse en la autoclave a 121ºC
durante unos 20 minutos o a 134ºC durante 5 minutos.
Sólo los accesorios específicamente indicados como aptos para la autoclave
pueden ser esterilizados de esa manera.
PARA SU COMODIDAD
N
Una vez que la longitud del canal es
definida y marcada en todas las limas,
la cómoda y compacta Sonda Sensor
puede ser utilizada para confirmar la
profundidad de introducción de la lima
durante el procedimiento.
el resultado del breve contacto con la lima aparecerá inmediatamente
en su localizador de ápice.
TOME NOTA: Deberá hacer contacto con mayor frecuencia a medida
que se acerca al ápice biológico, a fin de evitar perforaciones. La ubicación de la lima se verá en el localizador de ápice sólo durante el
contacto directo con la Sonda Sensor.
17
ESPAÑOL
eSterilización
Apex Locator IFU HS:Apex Locator IFU HS 02/03/09 12:52 Página 20
Digital apex locator
recomenDacioneS para
Antes de medir el largo del canal radicular con su Digital Apex Locator:
• Asegúrese de que la cavidad pulpar (1) esté limpia y seca
antes de insertar la lima medidora. Se recomienda secar la 3
2
cavidad pulpar con un bastoncillo o mediante una suave
aspiración de la humedad (del canal radicular también) con
una jeringa aspiradora. También asegúrese de que todos
los canales estén aislados entre sí. Seque el canal con la
punta de un papel para aumentar la precisión cuando el
1
exceso de fluidos del conducto forme un puente conductor
entre los canales o con un arreglo metálico o corona.
• Cuando las paredes de la cavidad pulpar están dañadas
(2), puede haber derrames de saliva desde la cavidad
4
bucal, que impedirán el secado de la cavidad pulpar. Una
cavidad húmeda generará la inmediata formación de un circuito eléctrico cerrado,
por ej. un corto circuito. en este caso el localizador de ápice emitirá una alarma (luz
roja) como si hubiera alcanzado el ápice. en esos casos la pared de la cavidad
dañada debe ser permanente o momentáneamente arreglada, pero sólo con materiales no conductores como Composite, IRM, Cemento de Ionómero de Vidrio (GI)
etc. Después del arreglo, puede obtenerse una cavidad absolutamente seca y efectuarse las mediciones con precisión.
• Verifique que todo relleno dañado (3) haya sido extraído a fin de evitar derrames
marginales. esos derrames humedecerían el área de trabajo interfiriendo con la lectura del Digital Apex Locator. La luz roja parpadeará indicando que se ha alcanzado el ápice, cuando en realidad la lima sólo está en el área de la entrada del canal.
• el contacto continuo con metal o rellenos de amalgama hará que el dispositivo
haga masa, por lo que debe tenerse especial cuidado en impedir el contacto
entre la lima y cualquier restauración metálica del diente con amalgama o corona. en esos casos, puede obtenerse un aislamiento apropiado del medio metálico
ajustando 2 ó 3 topes de goma en la parte de la lima que puede tocar el arreglo.
• Además de asegurarse de que la cavidad pulpar esté seca y aislada, asegúrese
de sacar todo el tejido blando que pueda del canal de la raíz, mediante extracción,
antes de medir. el tejido residual puede provocar una lectura apresurada y errónea.
• Al utilizar diques de goma, asegúrese de que sellen adecuadamente el área
de inserción. Cualquier espacio entre el dique de goma y el diente puede ser
sellado con una restauración temporal (Cimpat).
• Asegúrese de que el gancho para el labio esté completamente en contacto
con la mucosa húmeda del paciente.
• Controle todas las conexiones.
• Aunque algunos de los accesorios son aptos para autoclave, si alguno
pareciera dañado después de cierto número de ciclos de autoclave, reemplácelo por uno nuevo.
18
Apex Locator IFU HS:Apex Locator IFU HS 02/03/09 12:52 Página 21
Digital apex locator
Recomendaciones paRa el pRoceso de medición
Prepare un orificio ancho en el canal y prepare los primeros 2/3 en forma de
cono para impedir el contacto con obturaciones anteriores en el canal.
• Inserte la lima haciéndola girar en el sentido de las agujas del reloj y en el
contrario, y haga lo mismo al retirarla. ¡La rotación de la lima en una sola
dirección puede causar su rotura dentro del canal!
• Asegúrese de que haya contacto continuo entre la lima y la pared del canal
radicular. Se recomienda la utilización de la lima más delgada posible que alcance
la longitud estimada del trabajo. Una lima suelta que no haga contacto permanente
con la pared del canal no podrá realizar las mediciones con precisión.
• Asegure un continuo y fuerte contacto entre la lima y su soporte (esto puede
ser difícil con las limas más delgadas de 6, 8, y 10 mm).
• en canales excesivamente resecos, se recomienda humedecerlos para mejorar la conductividad. esto puede realizarse mediante una leve irrigación y/o lubricación de la lima con CANAL +.
• Si el canal está demasiado seco, introduzca NaOCl en los vértices del canal.
excepciones
• en un canal muy ancho, el Digital Apex Locator puede ser capaz de leer las medidas sólo en la punta, donde el canal se estrecha hacia el tejido apical. en esos casos
sólo detectará la profundidad de los 0,5 mm y del foramen apical. La lectura puede ser
mejorada utilizando una lima más delgada y presionándola contra la pared del canal.
• La lectura del Digital Apex Locator puede ser inestable ante estas situaciones
de patologías dentarias: caries, fuertes hemorragias en el canal, restauraciones
de metal, lesiones periapicales, ápice abierto (4), canal excesivamente ancho.
• La pérdida ósea o de cartílago (que puede observarse en la radiografía)
puede originar lecturas inexactas.
• La descarga de la batería reduce la precisión de la lectura. La batería debe ser
reemplazada tan pronto como aparezca la alarma correspondiente en el instrumento, como se detalla en el manual del usuario. Fíjese de seguir las instrucciones para
conectar los cables al instrumento tal como se especifica en este manual.
en todos los casos de lectura errónea como los descritos arriba, sólo una lectura
anticipada es posible, debido al ostensible reconocimiento del ápice. Sin embargo
el aparato no mostrará una lectura tardía que pueda perjudicar al tejido periapical.
el Digital Apex Locator es un aparto electrónico digital que requiere una mínima carga de batería para funcionar. Por tanto hay que cambiarla al llegar a este
punto, incluso aunque haya energía suficiente para que las luces se enciendan.
19
ESPAÑOL
un tratamiento aDecuaDo
Apex Locator IFU HS:Apex Locator IFU HS 02/03/09 12:52 Página 22
Digital apex locator
Solución De proBlemaS
Pregunta
Solución
• La unidad muestra que la lima está
en el ápice cuando el instrumento
fue recién introducido en el canal.
• O la base de la cavidad pulpar no está
completamente seca, o la lima hizo un
contacto. en ambos casos, la inexactitud
de la lectura se debe a un corto circuito.
Seque la cavidad pulpar si está mojada.
• La lectura de la unidad no es
estable.
• La lima toca las paredes del canal.
Curve la punta de la lima o pruebe con
una lima más gruesa de manera que la
punta toque la pared cerca del ápice.
• No se ven luces.
• La batería está gastada o no fue reemplazada correctamente (ver abajo).
• 3 LeDs se encienden simultáneamente.
• Aviso para reemplazar la batería lo
antes posible.
• La lectura del dispositivo no coincide con el resultado de la radiografía.
• La radiografía es una imagen de dos
dimensiones que no localiza con precisión el ápice biológico. Por ello, debe
confiarse en el resultado del aparato para
determinar la longitud correcta. Además,
la pérdida de hueso o de cartílago (indicada mediante radiolucencia en la película)
puede causar lecturas inexactas.
• La unidad no se apaga.
• La batería está gastada. Cámbiela.
• La unidad no funciona aunque la
batería fue sustituida.
• Revise los siguientes puntos:
(ver manual de usuario para más información)
A. La batería está puesta al revés.
B. La batería no es nueva. Asegúrese
de sustituirla por una que sí lo sea.
C. Asegúrese de estar usando una
batería tipo CR2450.
20
Apex Locator IFU HS:Apex Locator IFU HS 02/03/09 12:52 Página 23
Digital apex locator
LA CAJA INCLUYE:
• Digital Apex Locator (1 unidad)
• Cables principales (4 unid.) – apto para autoclave
• Broche para Delantal (2 unid.) – apto para autoclave
• Gancho labial (2 unid.) - apto para autoclave
• Soporte tradicional de la lima (1u.) – apto para autoclave
• Mini soporte de lima (3 unid.) – apto para autoclave
• Mini sonda sensor (1 unid.) – apto para autoclave
• Fundas desechables (20 unid.)
• Batería (tipo CR2450)
ACCESORIOS:
Para facilitar su área de trabajo, Henry Schein ha desarrollado una amplia gama
de accesorios que son totalmente compatibles con el Digital Apex Locator
• Mini sonda sensor – apta para autoclave (¡incluida!)
• Sonda sensor larga – apta para autoclave
CLASIFICACIÓN:
• Aplique tipo BF.
• equipo Médico conforme con la IeC 601-1.
ESPECIFICACIONES TÉCNICAS:
• Fuente de energía: Una sola batería CR2450
• Potencia: 2.4 – 3.0 V
• Corriente máxima: 12mA
• Temp. de funcionamiento: +10ºC - +40ºC
• Humedad: 10% - 90% sin condensación.
ADVERTENCIA:
el Digital Apex Locator NO DeBe ser usado en pacientes con marcapasos.
VENTAJAS TECNOLÓGICAS PARA UNA MAYOR PRECISIÓN:
• Hay 6 LeDs para marcar el avance de la lima, para obtener el máximo control de la medición y una mayor precisión.
• el Digital Apex Locator puede filtrar el más efímero contacto con amalgamas o emplomaduras y brinda una medición precisa del canal bajo
cualquier condición, inclusive de aquellos húmedos, secos y con sangrado.
Podrá medir inmediatamente otro canal sin ninguna preparación especial.
• La calibración es automática, NO se necesita calibración manual.
21
ESPAÑOL
caracteríSticaS
Apex Locator IFU HS:Apex Locator IFU HS 02/03/09 12:52 Página 24
Digital apex locator
PIÈCES
1
2
3
4
5
6
7
8
A
- Mini sonde senseur
- Mini porte lime
- Mini sonde senseur
- Clip de lèvre
- Agrafe de tablier
- Câbles conducteurs
- LeDs clignotants
- Tiroir de batterie
1
2
5
3
4
6
7
8
22
Apex Locator IFU HS:Apex Locator IFU HS 02/03/09 12:52 Página 25
Le Digital Apex Locator (Localisateur d’Apex Numérique) est
conçu selon les normes internationales de sécurité et de performance. Le personnel en charge de l’utiliser doit avoir une
compréhension totale de son bon fonctionnement. Ces instructions ont été préparées pour aider le personnel médical et technique à comprendre et à mettre en fonctionnement l’appareil. Il
ne faudra pas mettre en marche l’instrument sans avoir lu ce
mode d’emploi et sans avoir acquis une compréhension globale
de son fonctionnement. Si vous avez besoin d’éclaircissements
supplémentaires, veuillez contacter votre représentant.
Le Digital Apex Locator calcule la distance du bout de votre
lime endodontique jusqu’au foramen, par la mesure des signaux
entre deux électrodes. La première électrode est le clip de lèvre
(3) (Image A). Le deuxième est le mini porte lime (2) qui est en
contact avec une lime ou un excavateur qui a été inséré dans le
canal pulpaire.
Le Digital Apex Locator affiche les changements dans le
canal au fur et à mesure que la lime approche de l’apex.
23
FRANÇAIS
Digital apex locator
Apex Locator IFU HS:Apex Locator IFU HS 02/03/09 12:52 Página 26
Digital apex locator
inStallation initiale
1. Insérez les deux câbles conducteurs dans les prises de la partie
supérieure du Digital Apex Locator (Image B).
2. Insérez la porte lime et le clip de lèvre dans les prises situées au bout des
câbles conducteurs (à droite ou à gauche). (Images C+D).
B
C
D
E
F
G
3. Fixez l’agrafe de tablier aux câbles conducteurs en les introduisant dans
les deux portes câbles des manches de l’agrafe (Image E).
4. Introduisez le Digital Apex Locator dans une pochette jetable. (Image F).
5. Situez le Digital Apex Locator près de la bouche du patient, et fixez l’agrafe au tablier (Image G).
6. Mettez le clip de lèvre situé au bout du câble dans la lèvre inférieure, de
préférence du côté opposé à celui de la dent traitée.
7. Mettez la lime à l’entrée du canal (Image H) et puis raccordez-la au mini
porte lime situé au bout du câble du porte lime (Image I).
H
I
Le Digital Apex Locator est prêt à fonctionner.
24
Apex Locator IFU HS:Apex Locator IFU HS 02/03/09 12:52 Página 27
Digital apex locator
moDe D’emploi
1. Activez le Digital Apex Locator en pressant le
J
bouton de mise en marche “ON” du devant de l’unité
ou en mettant en contact le clip de lèvre et le mini porte
lime (Image J). Une fois actif, vous apercevrez l’allumage séquentiel des LeDs en guise de vérification.
2. Une fois la vérification réalisée, la LeD vert clignotera,
indiquant que l’appareil est en mode “en attente”.
3. Lorsque la lime atteint le point des “2.00” mm, la LeD vert reste allumée.
4. Travaillez avec la lime vers l’apex de façon circulaire dans le sens des aiguilles d’une montre et dans le sens contraire jusqu’à ce que la LeD orange des
“0.50” mm s’allume et que l’alarme sonne (ton bas).
REMARQUE: L’unité est sensible et répond au moindre changement de la
position de la lime. C’est très important de maintenir en contact la lime avec
le côté du canal afin de faciliter la mesure.
5. Avant d’atteindre l’apex biologique, la lime arrivera aux “0.25”
mm et la LeD orange s’allumera.
6. Lorsque la lime sera au niveau de l’apex biologique, la LeD
rouge indicateur de l’Apex s’allumera et la sonnerie de l’alarme
deviendra plus rapide.
7. Marquez la profondeur du canal avec le stop de la lime.
Mesurez la longueur de la lime et préparez les autres limes pour
le traitement selon cette mesure. Dans le cas où vous dépassez
l’apex biologique, la LeD rouge de “Apex” mm commencera à
clignoter et l’alarme sonnera encore plus vite. Dans ce cas là,
retirez doucement la lime du canal jusqu’à ce que la LeD rouge
“Apex” s’allume et que le son de l’alarme se réduise.
Veuillez vous rapporter à nos recommandations pour la réussite
du traitement (Page 8) et à notre tableau de résolution des problèmes (Page 10) pour tout renseignement supplémentaire.
25
FRANÇAIS
REMARQUE: Le Digital Apex Locator doit être utilisé seulement comme une
annexe des procédures endodontiques normales. Bien que l’appareil puisse
réduire le nombre nécessaire de radiographies, au moins une devra être prise pour
estimer la profondeur du travail. Cependant, le diagnostic et la connaissance de
l’anatomie du canal radiculaire est fondamental pour l’interprétation des résultats.
Apex Locator IFU HS:Apex Locator IFU HS 02/03/09 12:53 Página 28
Digital apex locator
arrêt De l’appareil
Par économie d’énergie, le Digital Apex Locator s’éteindra après une inactivité d’environ 90 secondes.
alarme Sonore
K
REMARQUE: Pour désactiver l’alarme, appuyer sur le bouton gris sur l’arrière de l’appareil. (Image. K).Pour le réactiver, appuyer sur ce même bouton
puiSSance De la pile
Lorsque le Digital Apex Locator constate que la puissance de la pile est faible, au
moment de la mise en marche de l’unité, trois LeDS clignotants s’allumeront simultanément avec alarme sonore. Ceci est un avertissement pour changer rapidement la pile (qui fonctionne encore). Si au bout d’un moment l’opérateur n’a pas
encore changé la pile, l’unité s’éteindra automatiquement dès sa mise en marche, ne
laissant pas l’opérateur l’utiliser. Remplacez immédiatement la pile. Il n’existe pas
d’autres pièces qui puissent être entretenues par l’usager à l’intérieur de l’unité.
Démonter le dispositif mettra fin à la garantie.
¡Attention!: La faible puissance de la pile affecte la précision du dispositif.
remplacement De la pile
• enlevez la pile en poussant doucement le tiroir du fond du l’appareil (Image K).
• Retirez la pile du tiroir (Image L) et remplacez-la avec une pile nouvelle (modèle CR2450).
• Assurez-vous d’insérer la pile avec le signe + vers le haut (Image M).
• Glissez le tiroir une fois de plus à l’intérieur du compartiment de la pile.
Jetez la pile selon les régulations locales.
K
L
M
REMARQUE: Si le Digital Apex Locator n’est pas utilisé pendant une longue période, il
est recommandé de le ranger sans la pile, afin de prolonger sa durée vie.
26
Apex Locator IFU HS:Apex Locator IFU HS 02/03/09 12:53 Página 29
Digital apex locator
StériliSation
¡Attention!: Le Digital Apex Locator n’est pas stérile au moment de sa
remise. Toutes les surfaces du dispositif et de ses pièces devront être désinfectées à la livraison, ainsi qu’après chaque procédure pour éviter la transmission d’agents infectieux. Nettoyez la surface de l’unité avec une serviette
propre trempée dans une solution d’alcool éthylique à 70%.
Les câbles conducteurs (5), le mini porte-lime (2), le clip de lèvre (3) et l’agrafe de tablier (4) peuvent être stérilisés dans l’autoclave à une température
de 121ºC pendant 20 minutes ou à 134ºC pendant 5 minutes.
Seuls les accessoires que l’on identifie spécifiquement comme pouvant aller
à l’autoclave peuvent être stérilisés de cette façon-là.
POUR VOTRE CONFORT
N
Une fois que vous avez défini la
longueur du canal et que vous l’avez
marquée sur toutes les limes, vous
pouvez utiliser la Sonde Senseur pour
confirmer la profondeur d’insertion de la
lime pendant la procédure.
Le résultat du bref contact avec la lime s’affichera immédiatement dans
votre localisateur de l’apex.
REMARQUE: Vous devrez faire contact de plus en plus souvent à
mesure que vous vous approchez de l’apex biologique, afin d’éviter
des perforations. Vous ne verrez la localisation de la lime que pendant
le contact direct avec la Sonde Senseur.
27
FRANÇAIS
• ¡Attention! ¡Ne pas introduire le Digital Apex Locator dans l’Autoclave!
• ¡Ne pas immerger le dispositif et ne pas permettre l’écoulement de liquides
à l’intérieur!
Apex Locator IFU HS:Apex Locator IFU HS 02/03/09 12:53 Página 30
Digital apex locator
recommenDationS pour
Avant de mesurer la longueur du canal radiculaire avec votre Digital Apex Locator:
• Assurez-vous que la cavité pulpaire (1) soit propre et sèche
avant d’insérer la lime qui mesure. Il est indiqué de sécher 3
2
la chambre pulpaire au moyen d’un tampon ou d’une
légère aspiration de l’humidité (du canal radiculaire aussi)
avec une seringue aspiratrice. Assurez-vous aussi que
tous les canaux soient isolés entre eux. Séchez la chambre avec une pointe de papier pour augmenter la précision
1
lorsque l’excès de fluides du conduit forme un pont conducteur entre les canaux ou avec une obturation coronaire.
• Si les parois de la chambre pulpaire sont délabrées (2),
il peut y avoir des écoulements de salive depuis la cavité
4
buccale, ce qui empêchera le séchage de la cavité pulpaire. Une chambre humide entraînera aussitôt la formation d’un circuit électrique fermé, c’est-à dire d’un court circuit. Dans ce cas là, le localisateur de
l’apex émettra une alarme (lumière rouge). Dans ces cas-là, la paroi de la chambre délabrée doit être obturée de façon permanente ou provisoire, mais seulement avec des matériaux non conducteurs tels que Composite, IRM, Verre
Ionomère, etc. Une fois obturée, on peut obtenir une cavité complètement sèche
et réaliser les mesures avec précision.
• Vérifiez que tout le tissu dentaire abîmé (3) soit retiré à fin d’éviter des écoulements
marginaux. Ces écoulements mouilleront la surface de travail, en brouillant la lecture du Digital Apex Locator. La lumière rouge clignotera en indiquant que l’apex
a été atteint, lorsqu’en réalité la lime n’a pas dépassé la surface d’accès du canal.
• Le contact continu avec du métal ou avec des obturations à l’amalgame entraînera
la mise à terre du dispositif, il faudra donc faire très attention à empêcher le contact
entre la lime et les dents obturées à l’amalgame ou portant des couronnes métalliques.
Dans ces cas-là on peut obtenir l’isolement approprié du milieu métallique en fixant 2
ou 3 butoirs de gomme dans la partie de la lime qui peut toucher l’obturation.
• Outre que de s’assurer que la cavité pulpaire soit sèche et bien isolée, prenez soin
de retirer tout le tissu mou résiduel du canal radiculaire, à l’aide d’un tire-nerf par exemple, avant de mesurer. Du tissu résiduel peut causer une lecture hâtive et erronée.
• Lorsque vous utiliserez une digue, prenez soin de bien sceller la zone d’insertion. Le moindre espace entre la digue et la dent peut être scellé avec une
obturation provisoire (Cimpat).
• Assurez-vous que le clip de lèvre soit complètement en contact avec la
muqueuse humide du patient.
• Contrôlez toutes les connections.
• Bien que certains accessoires sont aptes pour l’autoclave, si l’un d’eux vous
semble endommagé après quelques cycles à l’autoclave, veuillez le remplacer par un nouveau.
28
Apex Locator IFU HS:Apex Locator IFU HS 02/03/09 12:53 Página 31
Digital apex locator
la reuSSite Du traitement
Préparez une large ouverture dans le canal et préparez les premiers 2/3 de
façon conique pour éviter le contact avec des obturations antérieures du canal.
• Insérez la lime en la faisant tourner dans le sens des aiguilles d’une montre
et dans le sens contraire, et faites de même pour la retirer. ¡La rotation de la
lime dans un seul sens peut entrainer sa fracture à l’intérieur du canal!
• Prenez soin d’assurer le contact permanent entre la lime et la paroi du canal
radiculaire. Il est indiqué d’utiliser la lime plus fine possible de la longueur
estimée de travail. Une lime qui ne soit pas en contact permanent avec la paroi
du canal ne pourra pas mesurer avec précision.
• Assurez un fort et permanent contact entre la lime et son support (cela n’est
pas toujours évident avec les limes plus fines de 6, 8, et 10 mm).
• Dans les canaux trop desséchés, il est indiqué de les humidifier pour améliorer la conductivité. Cela peut être fait au moyen d’une légère irrigation et/ou lubrification de la lime avec CANAL +.
• Si le canal est trop sec, introduisez du NaOCl dans les pointes du canal.
exceptions
• Dans un canal trop large, le Digital Apex Locator ne peut lire les mesures que dans
la pointe, là ou le canal se rétrécit vers le tissu apical. Dans ces cas-là, seules les profondeurs des 0,5 mm et du foramen apical seront détectées. La lecture peut être optimisée par l’utilisation d’une lime plus fine et en la pressant contre la paroi du canal.
• La lecture du Digital Apex Locator peut se être instable face aux situations
pathologiques suivantes: caries, fortes hémorragies à l’intérieur du canal, obturations métalliques, lésions périapicales, apex ouvert (4), canal excessivement large.
• La perte osseuse (que l’on voit à l’aide d’une image radiodense) peut
entraîner des lectures inexactes.
• L’épuisement de la pile réduit la précision de la lecture. La pile doit être remplacée aussitôt que l’alarme retentit, de la façon décrite dans le manuel de
l’usager. Prenez soin de suivre les instructions pour connecter les câbles à l’appareil de la façon consignée dans ce manuel.
A part tous les exemples de lectures incorrectes décrits ci dessus, seulement une
situation prématurée de lecture est possible en raison de l’identification apparente
de l’apex. Toutefois l’appareil n’indiquera pas des mesures retardées, ceci pour ne
pas mettre en danger le periapex.
L’Digital Apex Locator est un dispositif électronique et en tant que tel il nécessite un
minimum de batterie résiduelle pour assurer la conductivité. C’est pour cela que la batterie doit être changée dès la première alarme, même si les LeD continuent à s’allumer.
29
FRANÇAIS
Recommandations pouR la pRocéduRe de mesuRe
Apex Locator IFU HS:Apex Locator IFU HS 02/03/09 12:53 Página 32
Digital apex locator
reSolution De proBlemeS
Question
Solution
• L’Unité montre que la lime est dans
l’apex lorsque l’instrument n’est qu’à
l’entrée du canal.
• Le fond de la cavité pulpaire n’est pas
complètement sec ou la lime a touché
une obturation métallique. Dans les deux
cas, un court circuit est à l’origine de
l’inexactitude de la lecture. Séchez la
chambre pulpaire si elle est mouillée.
• La lecture de l’unité est instable.
• La lime touche par intervalles les parois
du canal. Courber l’extrémité de la lime
ou essayez avec une lime plus grosse
de façon à ce que le bout touche la paroi
tout près de l’apex.
• On ne voit pas de lumières.
• La pile est épuisée ou elle n’a pas été
correctement remplacée (voir ci-dessous).
• 3 LeDs s’allument simultanément.
• Avertissement pour remplacer aussitôt la pile.
• La lecture du dispositif ne concorde
pas avec le résultat de la radiographie.
• La radiographie est une image à deux
dimensions avec laquelle on ne peut
pas situer avec précision l’apex
biologique. Pour cela, il faut se référer
au résultat du localisateur d’apex pour
déterminer la bonne longueur de travail.
A part la perte osseuse (que l’on voit à
l’aide une image radiodense) qui peut
entraîner des lectures inexactes.
• L’unité ne s’éteint pas.
• La pile est épuisée. Remplacez-la.
• L’unité ne fonctionne pas même
lorsque la pile a été remplacée.
• Vérifier chacun de ces points:
(voir le manuel de l’usager pour d’autres explications)
A. La pile a été mise à l’envers.
B. La pile n’était pas nouvelle. Prenez
soin de la remplacer par une qui le soit.
C. Prenez soin d’utiliser une pile modèle CR2450.
30
Apex Locator IFU HS:Apex Locator IFU HS 02/03/09 12:53 Página 33
Digital apex locator
LA BOÎTE INCLUT:
• Le Digital Apex Locator (1 unité)
• Câbles conducteurs (4 unités) – aptes pour l’autoclave
• Agrafes de Tablier (2 unités) – aptes pour l’autoclave
• Clip de lèvre (2 unités) – aptes pour l’autoclave
• Support traditionnel pour la lime (1u.) – apte pour l’autoclave
• Mini Porte-Lime (3 unités) – aptes pour l’autoclave
• Mini sonde senseur (1u.) – apte pour l’autoclave
• Pochettes jetables (20 unités)
• Pile (modèle CR2450)
ACCESSOIRES:
Pour rendre plus facile votre travail, Henry Schein a développé une large gamme
d’accessoires absolument compatibles avec le Digital Apex Locator
• Mini sonde senseur – apte pour l’autoclave (¡inclue!)
• Sonde senseur longue – apte pour l’autoclave
CLASSIFICATION:
• Prise type BF.
• Équipement Médical de conformité avec l’IeC 601-1.
SPÉCIFICATIONS TECHNIQUES:
• Source d’énergie: Une seule pile CR2450
• Puissance: 2.4 – 3.0 V
• Courant maximal: 12mA
• Temp. de Fonctionnement: +10ºC - +40ºC
• Humidité: 10% - 90% sans condensation
AVERTISSEMENT:
Le Digital Apex Locator Ne DOIT PAS être utilisé avec des patients qui portent un pacemaker.
DES AVANTAGES TECHNOLOGIQUES EN VUE DE LA PRÉCISION:
• Il y a 6 LeDs pour suivre le progrès de la lime, pour un contrôle maximal de
la mesure et de la précision.
• Le Digital Apex Locator peut filtrer le moindre contact avec les amalgamesou les obturations occlusales métalliques et donne une mesure précise
du canal dans toutes circonstances, y compris les canaux secs, mouillés et
présentant une perte de sang. Il est possible de mesurer tout de suite un
autre canal, sans besoin de préparation spéciale.
• La calibration est automatique, pas besoin de calibration manuelle.
31
FRANÇAIS
caractériStiqueS
Apex Locator IFU HS:Apex Locator IFU HS 02/03/09 12:53 Página 34
Digital apex locator
TEILE
1
2
3
4
5
6
7
8
A
- Feilenclip Kabel
- Mini-Feilen Halter
- Mini Messfühler
- Lippenhaken
- Schürzenklammer
- Hauptladekabel
- Flash-LeDs
- Batteriefach
1
2
5
3
4
6
7
8
32
Apex Locator IFU HS:Apex Locator IFU HS 02/03/09 12:53 Página 35
Digital apex locator
Der Digital Apex Locator berechnet die Länge vom Ansatz
Ihres Dentalinstruments bis zum Foramen durch Auswertung.
Der Digital Apex Locator Messergebnisse auf Grundlage der
Signale zwischen zwei elektroden. Am Lippenhaken sitzt die
erste elektrode (3) (Bild A). Die zweite befindet sich an der
Mini- Feilenhalterung (2), die in Kontakt mit Feile oder Bohrer
kommt, die in den Wurzelkanal eingeführt werden.
Der Digital Apex Locator überwatcht die Veränderungen des
Kanals je nach nähe der Feilenspitze zum APeX.
33
DEUTSCH
Der Digital Apex Locator (Digitale Apex Locator) wurde nach internationalen Sicherheits- und Verbraucherstandards entwickelt. Die
Benutzung dieses Instruments setzt grundlegendes Verständnis in
Anwendung und Handhabung voraus. Dieses Benutzerhandbuch
soll dazu dienen, medizinischem und technischem Personal die
kompetente Handhabung dieses Geräts zu erleichtern. Nehmen Sie
das Gerät nicht in Betrieb, bevor Sie das Benutzerhandbuch
gründlich gelesen und sich eine klares Bild über die Funktionsweise
verschafft zu haben. Sollten sich Unklarheiten in Bezug auf dieses
Benutzerhandbuch herauskristallisieren, kontaktieren Sie bitte den
zuständigen Repräsentanten, um diese abzuklären.
Apex Locator IFU HS:Apex Locator IFU HS 02/03/09 12:53 Página 36
Digital apex locator
inBetrieBnahme
1. Verbinden Sie die zwei Hauptkabel mit den oben am Digital Apex Locator
befindlichen Kabelbuchsen (Bild B).
2. Setzen Sie den Feilenclip und den Lippenhaken in die Anschlüsse am ende
des einsteckkabels ein(entweder rechts oder links). (Bild C+D).
B
C
D
E
F
G
3. Verbinden Sie die Hauptkabel mit der Schürzenklammer, indem Sie die
Kabel in die zwei Kabelhalter an den Klammergriffen einlegen (Bild E).
4. Legen Sie eine einweghülle um den Digital Apex Locator (Bild F).
5. Positionieren Sie den Digital Apex Locator nahe des Munds des Patienten
und befestigen Sie die Klammer an der Schürze. (Bild G).
6. Benutzen Sie den Lippenhaken, der sich am ende des Kabels befindet, um die Lippeherunterzudrücken, im Idealfall auf der dem zu behandelnden Zahn gegenüberliegenden Seite.
7. Positionieren Sie die Feile am Kanaleingang (Bild H) und verbinden Sie sie mit der
Mini-Feilenhalterung am ende des Feilenclipkabels (Bild I).
H
I
Jetzt ist der Digital Apex Locator betriebsbereit.
34
Apex Locator IFU HS:Apex Locator IFU HS 02/03/09 12:53 Página 37
Digital apex locator
BenutzerhinweiSe
J
1. Schalten Sie den Digital Apex Locator durch Betätigen
des “ON” Schalters an der Vorderseite des Gerätes oder
durch Berührung des Mini- Feilenhalters mit dem Lippenhaken ein (Bild J). Direkt nach dem einschalten werden
die LeDs durchlaufend aufleuchten, der “Selbsttest“.
2. Die grüne LeD blinkt nach dem Selbsttest, so wird
angezeigt, dass sich der Digital Apex Locator im Stand-by Modus befindet.
3. Die grüne LeD leuchtet durchgehend, sobald die Feile den “2.00” mm Punkt erreicht hat.
4. Bewegen Sie die Feile sowohl im Uhrzeigersinn als auch gegenläufig in Richtung
Wurzelkanal, bis die “0.50” mm LeD orange aufleuchtet und der Signalton erklingt. (jetzt
behutsamer vorgehen).
BITTE BEACHTEN: Es handelt sich hierbei um ein Präzisionsgerät, das empfindlich
auf kleinste Veränderungen in der Position der Feile reagiert. Es erleichtert die Einmessung
ungemein, wenn zwischen der Feile und der Seite des Wurzelkanals kontinuierlich
Kontakt gehalten wird.
5. Bevor Sie den natürlichen Apex erreichen, werden Sie bei “0.25”
mm ankommen, und die orange LeD wird aufleuchten.
6. Sobald die Feile den biologischen Apex erreicht, wird die “Apex”
rote LeD aufleuchten und der Signalton wird schneller.
7. Markieren Sie die Kanaltiefe mit dem zur Feile gehörenden
Gummistopper. Messen Sie die Länge der Feile und legen Sie die
restlichen Feilen in der entsprechenden Länge zur weiteren Behandlung
bereit. Falls Sie den biologischen Apex passieren, wird das “Apex” mm
rote LeD anfangen zu blinken, und der Alarmton wird ertönen (schnellste Tonfolge). An diesem Punkt sollten Sie die Feile vorsichtig aus dem
Kanal zurückziehen, bis das rote “Apex” mm LeD wieder kontinuierlich
leuchtet und die Frequenz des Signaltons langsamer geworden ist.
Um eine erfolgreiche Behandlung zu gewährleisten, beachten Sie
bitte unsere Benutzerhinweise (seite 8) und unsere Anleitung zur
Fehlerbehebung (seite 10) für weiterführende Informationen.
35
DEUTSCH
BITTE BEACHTEN SIE: Der Digital Apex Locator sollte ausschließlich als eine
Ergänzung der gebräuchlichen zahnmedizinischen Behandlungsmethoden eingesetzt werden. Auch wenn dieses Gerät die Zahl der benötigten Röntgenaufnahmen
reduzieren kann, muss doch anfangs eine Röntgenaufnahme gemacht werden, um
das Arbeitsfeld einschätzen zu können. Klinisches Urteilsvermögen in Verbindung
mit guten anatomischen Kenntnissen des Wurzelkanals ist bei der Auswertung der
Ergebnisse von entscheidender Bedeutung.
Apex Locator IFU HS:Apex Locator IFU HS 02/03/09 12:53 Página 38
Digital apex locator
automatiSche aBSchaltfunktion
energiesparfunktion: Der Digital Apex Locator schaltet sich nach circa 90
Sekunden Inaktivität selbsttätig ab.
akuStiSche alarme
K
BEACHTEN SIE: Um die akustischen Alarme zu deaktivieren,
drücken sie den grauen Knopf auf der Rückseite des Gerätes (Bild
K). Um sie wieder ein zuschalten drücken sie den Knopf erneut.
BatterieStanD
Sollte der Digital Apex Locator beim Anschalten des Gerätes einen niedrigen
Batteriestand feststellen, werden 3 LeDs simultan mit den Signaltönen blinken. Dies ist
ein Warnhinweis, baldmöglichst die Batterie zu wechseln (noch besteht
Funktionalität). Sollte eine weitere Zeitspanne ohne Batteriewechsel verstreichen, wird
sich das Gerät direkt nach Inbetriebnahme automatisch abschalten und so die weitere
Nutzung verhindern. Wechseln Sie umgehend die Batterie aus. Dies ist das einzige Teil
vom Nutzer zu wartende Teil des Gerätes.
Warnung! Niedriger Batteriestand wirkt sich negativ auf die Messgenauigkeit aus.
BatteriewechSel
• entfernen Sie die Batterie, indem Sie behutsam das am Boden des Digital Apex Locator
befindliche Batteriefach herausziehen (Bild K).
• entnehmen Sie dem Schubfach die Batterie (Bild L) und ersetzen Sie diese durch eine neue
Batterie (Typ CR2450).
• Vergewissern Sie sich, dass die Batterie mit der + Markierung nach oben. (Bild M).
• Schieben Sie das Batterieschubfach.
Bitte entsorgen Sie verbrauchte Batterien entsprechend den örtlichen Bestimmungen.
K
L
M
BITTE BEACHTEN: Sollten Sie den Digital Apex Locator für eine längere Zeitspanne einlagern, ohne ihn zu benutzen, sollten Sie die Batterie aus dem Gerät zu entfernen, um so eine
längere Lebensdauer der Batterie zu gewährleisten.
36
Apex Locator IFU HS:Apex Locator IFU HS 02/03/09 12:53 Página 39
Digital apex locator
SteriliSation
• Warnung! Niemals den Digital Apex Locator autoklavieren!!
• Tauchen Sie das Gerät nie in Wasser und/oder vermeiden Sie das eindringen
von Flüssigkeit in das Gerätegehäuse!
Achtung! Der Digital Apex Locator wird nicht steril ausgeliefert. Alle
Oberflächen des Gerätes und seines Zubehörs sollten nach empfang sowie
zwischen den Anwendungen desinfiziert werden, um Kreuzinfektionen zu vermeiden. Wischen Sie die Oberfläche des Gerätes mit einem sauberen in 70
prozentiger ethylalkohollösung getränkten Tuch ab.
MEHR NUTZERKOMFORT
N
Nachdem die Länge des Kanals auf allen
Feilen definiert und markiert wurde, kann
der kleine und handliche Messfühler
benutzt werden, um zu überprüfen, wie
weit die jeweils benutzte Feile während
der Behandlung eingeführt wird.
Das ergebnis dieses kurzen Kontakts wird sofort auf dem Apex Locator
angezeigt.
BITTE BEACHTEN: Je näher Sie dem natürlichen Apex kommen,
desto mehr Überprüfungen sollten Sie vornehmen, um Perforationen
zu vermeiden. Die Lage der Feile wird auf dem Apex Locator nur
während des direkten Kontaktes mit dem Messfühler angezeigt
37
DEUTSCH
Die Hauptkabel (5), die Mini- Feilenhalterung (2), der Lippenhaken (3) und die
Schürzenklammer (4) können im Autoklav 20 Minuten lang bei 121ºC oder 5
Minuten lang bei 134ºC sterilisiert werden.
Nur die ausdrücklich als autoklavierbar klassifizierten Zubehörteile sollten im
Autoklav sterilisiert werden.
Apex Locator IFU HS:Apex Locator IFU HS 02/03/09 12:53 Página 40
Digital apex locator
vorauSSetzungen für eine
Was bei der Messung der Länge des Wurzelkanals mit dem Digital Apex
Locator zu beachten ist:
• Stellen Sie sicher, dass die Pulpakammer (1) sauber und 3
2
trocken ist, bevor Sie die Messfeile einführen. es ist empfehlenswert, die Pulpakammer mit einer Baumwolltamponade
oder durch vorsichtiges Absaugen der Flüssigkeit (auch aus
dem Wurzelkanal) mittels einer Aspirationsspritze zu trocknen.
Außerdem sollten alle Kanäle voneinander isoliert werden.
1
Tupfen Sie den Kanal mit einer Papierspitze ab, um exaktere
ergebnisse zu erzielen, falls übermäßig austretende leitfähige
Flüssigkeiten eine Leiterbrücke zwischen einzelnen Kanälen
oder mit Metallfüllungen oder Kronen bilden.
• Falls die Wände der Pulpakammer (2), beschädigt sind, kann
4
Speichel aus der Mundhöhle dort eindringen, dies verhindert
das effektive Trockenlegen der Kammer. eine nasse Kammer bedeutet die sofortige
Ausformung eines geschlossenen Stromkreises, wie z. B. einen Kurzschluss. In diesem Fall
wird der Apex Locator denselben Alarm (leuchtende rote LeD) geben, wie auch beim
erreichen des Apex. In diesen Fällen sollte die schadhafte Kammerwand permanent oder
provisorisch wieder hergestellt werden, allerdings dürfen hier nur nicht leitfähige Materialien
wie Komposit, IRM, GI (Glasiononer) usw. zum einsatz kommen. Nach der
Wiederherstellung kann eine absolut trockene Kammer und damit exakte Messergebnisse
erzielt werden.
• Überzeugen Sie sich, ob alle schadhaften Füllungen (3), entfernt worden sind, um so dem
eindringen von Flüssigkeit vorzubeugen. Diese Lecks erzeugen ein nasses Arbeitsfeld und
können die Datenerfassung des Digital Apex Locators stören. Die rote LeD wird blinken, als
ob der Apex geortet wurde, obwohl sich die Feile praktisch erst am Kanaleingang befindet.
• Das Gerät wird durch längeren Kontakt mit Metall oder amalgam Füllungen geerdet,
deshalb achten Sie penibel darauf, jeden Kontakt zwischen der Feile und jedweden vorhandenen metallbasierenden Instandsetzungmaterialien der Zähne wie Amalgam-füllungen
oder Kronen zu vermeiden. Hier kann durch das Aufziehen von 2-3 Gummi-stoppern auf die
Feilenbereiche, die mit metallhaltigem Zahnersatz in Kontakt kommen könnten, eine
adäquate Isolierung der Feile vom metallhaltigen Umfeld erzielt werden.
• Abgesehen davon, dass sichergestellt wird, dass die Kammer trocken und abisoliert ist,
sollte vor der Messung möglichst viel weiches Gewebe mittels extirpation aus dem
Wurzelkanal entfernt werden. Gewebereste können ein ungenaues oder fehlerbehaftetes
ergebnis bedingen.
• Sollten Sie einen Kofferdamm benutzen, stellen Sie sicher, dass dieser das Arbeitsfeld dicht
abschließt. Jeder Durchlass zwischen Kofferdamm und Zahn kann durch provisorische
Instandsetzung geschlossen werden(Cimpat). Stellen Sie sicher, dass der Lippenhaken in
vollem Kontakt mit der feuchten Schleimhaut des Patienten steht.
• Überprüfen Sie alle Verbindungen.
• Auch wenn einige der Zubehörteile autoklavierbar sind, sollten Sie Teile, falls diese nach
einigen Autoklavierzyklen schadhaft zu sein scheinen, durch neue ersetzen.
38
Apex Locator IFU HS:Apex Locator IFU HS 02/03/09 12:53 Página 41
Digital apex locator
erfolgreiche BehanDlung
Bereiten Sie einen großen Kanaleingang vor und formen Sie die ersten 2/3
konisch zulaufend, um Kontakt mit weiter oben auftretenden engstellen zu
vermeiden.
• Bewegen Sie die Feile vor und gegen den Uhrzeigersinn, während Sie sie
einführen, und ziehen Sie sie dann etwas zurück. Wird die Feile nur in eine
Richtung zu bewegt, kann dazu führen, dass diese im Wurzelkanal abbricht!
• Achten Sie darauf, dass ständiger Kontakt zwischen der Feile und der Wand
des Wurzelkanals bestehen bleibt. Sie sollten immer die größtmögliche Feile
benutzen, sofern der Durchmesser noch die gewünschte Arbeitstiefe erlaubt.
eine zu kleine Feile hat keinen beständigen Kontakt mit der Kanalwand und
kann so keine präzisen Messergebnisse liefern.
• es muss ein ständiger stabiler Kontakt zwischen der Feile und dem
Feilenhalter bestehen (bei den dünneren Feilen- 6,8, 10 mm- könnte sich das
als schwierig erweisen).
• Bei stark ausgetrockneten Kanälen sollte nachgefeuchtet werden, um die
Leitfähigkeit zu verbessern. Dies kann durch eine kleine Spülung und/oder
durch leichtes Benetzen der Feile mit CANAL +.geschehen.
• Falls der Kanal zu trocken ist, bringen Sie NaOCl in den oberen
Bereich(apikal) des Kanals ein.
spezialfälle
• Bei sehr weiten Kanälen kann es passieren, dass der Digital Apex
Locator die Messdaten nur an der Spitze, wo sich der Kanal zum
Apikalgewebe hin verengt, lesen kann. In diesen Fällen kann nur bis zur Tiefe
von 0,5 mm und das apikale Foramen dargestellt werden. Die ergebnisse
können durch Benutzung einer dickeren Feile und forcierten Kontakt mit der
Kanalwand optimiert werden.
• Die Messdaten des Apex Locators können in diesen zahnmedizinisch
pathologischen Situationen ungenau werden: Fäulnis(Karies) starke
einblutungen im Wurzelkanal, Metallfüllungen (4), peri-apikale Läsionen,
offener Apex, extrem weiter Wurzelkanal.
• Knochenschwund oder Schwund des peridontalen Ligamentums (Höhere
Radio-luzenz auf dem Film ist ein Hinweis darauf) kann zu falschen
Messergebnissen führen.
• eine fast leere Batterie kann zu weniger präzisen Messdaten führen. Die
Batterie sollte immer ausgewechselt werden, sobald das Warnsignal erklingt,
wie detailliert in den Benutzerhinweisen beschrieben. Achten Sie darauf, die
Anleitung zum Anschluss der Kabel, wie in den Benutzerhinweisen ausgeführt, genau zu befolgen.
39
DEUTSCH
VoRaussetzungen füR die messung
Apex Locator IFU HS:Apex Locator IFU HS 02/03/09 12:53 Página 42
Digital apex locator
fehlerBeheBung
Problem
Lösung
• Gerät zeigt Wurzelkontakt an, während sich die Feile gerade erst im
Wurzelkanal befindet.
• entweder ist der Boden der Pulpakammer
nicht absolut trocken, oder die Feile hat eine
Metallfüllung berührt. In beiden Fällen führt ein
vorzeitig geschlossener Stromkreis zu falschen
Messergebnissen. Trocknen Sie die Pulpakammer,
falls sich dort Flüssigkeit angesammelt hat.
• Unkontinuierliche Anzeige am Gerät.
• Die Feile hat keinen kontinuierlichen Kontakt
mit den Wänden des Kanals. Benutzen Sie
entweder einen gekrümmten Aufsatz oder
eine größere Feile, damit die Spitze die
Kanalwand nahe der Wurzel berührt.
• Lichter gehen nicht an.
• Die Batterie ist leer oder nicht korrekt ausgewechselt worden(siehe unten).
• 3 LeDs leuchten gleichzeitig.
• Batterie sollte baldmöglichst ausgetauscht werden.
• Die Anzeige am Gerät passt nicht
zum Röntgenbild.
• Röntgen ist eine zweidimensionale
Darstellung, die den biologischen Apex
nicht genau darstellen kann. Deshalb sollten Sie sich auf die Angaben das Apex
Locators verlassen, um die exakte
Arbeitstiefe zu bestimmen. Außerdem können Schwund der Knochensubstanz oder
des peridontalen Ligamentums (Transparenz
auf dem Film ist ein Hinweis) zu falschen
ergebnissen führen.
• Das Gerät schaltet nicht ab.
• Niedriger Batteriestand. Batterie wechseln.
• Nach Batteriewechsel arbeitet das
Gerät nicht.
• Bitte überprüfen Sie die folgenden Punkte:
A. Die Batterie wurde falsch herum eingesetzt.
B. Die Batterie war nicht voll. Bitte stellen Sie
sicher, dass Sie eine volle Batterie einsetzen.
C. Beachten Sie bitte, dass dies eine
CR2450 Batterie sein muss.
40
(Benutzerhandbuch enthält ausführlichere Erläuterungen)
Apex Locator IFU HS:Apex Locator IFU HS 02/03/09 12:53 Página 43
Digital apex locator
proDukt-merkmale
IN DER BOX SIND ENTHALTEN:
• Digital Apex Locator (1 Stück)
• Hauptkabel (4 Stück) – autoklavierbar
• Schürzenklammer (2 Stück) - autoklavierbar
• Gebräuchlicher Feilen Clip (2 Stück) - autoklavierbar
• Feilenclip (1 Stück) - autoklavierbar
• Mini Feilenhalterung (3 Stück) - autoklavierbar
• Mini Messfühler (1 Stück) - autoklavierbar
• einweghüllen (20 Stück)
• Batterie (Typ CR2450)
KLASSIFIZIERUNG:
• Typ BF anwendungsbezogenes Teil.
• IeC 601-1 entsprechende medizinische
Standardausrüstung.
TECHNISCHE SPEZIFIKATIONEN:
• energieversorgung: Monobatterie CR2450
• Strom/Anschlussleistung: 2.4 – 3.0 V
• Maximale Spannung: 12mA
• Betriebstemperatur: +10ºC - +40ºC
• Luftfeuchtigkeit: 10% - 90% ohne Kondensation.
WARNUNG:
Der Digital Apex Locator darf NICHT bei Patienten mit Herzschrittmacher
eingesetzt werden.
TECHNISCHER FORTSCHRITT FÜR MEHR PRÄZISION:
• 6 LeDs markieren den Verlauf, für maximale Kontrolle in Messung und Präzision.
• Der Digital Apex Locator filtert die meisten vorübergehenden Kontakte
mit Amalgam oder Metallfüllungen aus.
• Der Digital Apex Locator bietet präzise Messergebnisse des Wurzelkanals
unter allen Bedingungen, auch bei nassen, trockenen und blutenden Kanälen. Die
Vermessung eines weiteren Kanals ist sofort ohne weitere Vorbereitung möglich.
• Automatische Kalibrierung, KeINe manuelle Kalibrierung notwendig.
41
DEUTSCH
ZUBEHÖR:
Um Ihr Arbeitsumfeld komfortabler zu gestalten, hat Henry Schien eine große Auswahl
an Zubehör entwickelt, das völlig kompatibel mit dem Digital Apex Locator ist.
• Mini Messfühler - autoklavierbar (liegt bei!)
• Langer Messfühler - autoklavierbar
Apex Locator IFU HS:Apex Locator IFU HS 02/03/09 12:53 Página 44
Digital apex locator
PARTI
1
2
3
4
5
6
7
8
A
- Cavo morsetto per Lima
- Mini portalima
- Minisonda a sensore
- Gancio del labbro
- Fermo del grembiule
- Cavi principali
- LeD luminosi
- Cassetto della batteria
1
2
5
3
4
6
7
8
42
Apex Locator IFU HS:Apex Locator IFU HS 02/03/09 12:53 Página 45
Digital apex locator
Il Digital Apex Locator (Localizzatore di Apice Digitale) è stato
progettato per soddisfare gli standard internazionali di sicurezza
e prestazioni. Il personale che utilizza questo strumento deve
conoscere perfettamente l’esatto funzionamento dello strumento. Tali istruzioni sono state preparate per aiutare il personale
medico e tecnico a capire e far funzionare lo strumento. Non attivare lo strumento prima di aver letto il presente manuale e aver
compreso chiaramente il funzionamento dello strumento.
Qualora vi siano parti di questo manuale non chiare, chiedere
delucidazioni al proprio rappresentante.
Il Digital Apex Locator riflette i cambiamenti nella risposta del
canale mentre la sonda dell'archivio si avvicina all'apex.
43
ITALIANO
Il Digital Apex Locator calcola la distanza dalla punta della
lima endodontica al forame, misurando i segnali tra due elettrodi. Il primo elettrodo è il gancio del labbro (3) (Fig.A). Il secondo
è il mini portalima (2) che viene a contatto con una lima o un
otturatore che è stato inserito nel canale della radice.
Apex Locator IFU HS:Apex Locator IFU HS 02/03/09 12:53 Página 46
Digital apex locator
configurazione iniziale
1. Inserire i due cavi principali nelle prese ubicate nella parte superiore del
Digital Apex Locator (Fig. B).
2. Inserire il morsetto della lima e il gancio del labbro negli attacchi situati alla
fine del cavo principale (sinistra o destra). (Fig.C+D).
B
C
D
E
F
G
3. Collegare il fermo del grembiule ai cavi principali, inserendoli nei due serracavi nelle maniglie del fermo (Fig. E).
4. Inserire il Digital Apex Locator in un contenitore monouso (Fig. F).
5. Posizionare il Digital Apex Locator vicino alla bocca del paziente e fissare il fermo al grembiule (Fig. G).
6. Posizionare il gancio del labbro situato alla fine del cavo sul labbro inferiore,
preferibilmente dal lato opposto del dente che si sta trattando.
7. Posizionare la lima all’ingresso del canale (Fig. H) quindi collegarla al mini
portalima situato alla fine del cavo del morsetto della lima (Fig. I).
H
I
Ora il Digital Apex Locator è pronto per il funzionamento.
44
Apex Locator IFU HS:Apex Locator IFU HS 02/03/09 12:53 Página 47
Digital apex locator
iStruzioni per l’uSo
NOTA: Il Digital Apex Locator deve essere usato solamente come un’aggiunta alle
normali procedure endodontiche. Sebbene l’unità possa ridurre il numero delle radiografie necessarie, sarà necessario eseguire una radiografia iniziale per valutare la
lunghezza dell’intervento. Il giudizio clinico, che comprende la conoscenza dell’anatomia del canale della radice, è di estrema importanza nell’interpretazione dei risultati.
1. Attivare il Digital Apex Locator premendo il pulJ
sante “ON” sulla parte frontale dell’unità o mettendo
il gancio del labbro a contatto con il mini portalima
(Fig. J). Una volta attivato, i LeD lampeggeranno in
sequenza eseguendo un “autocontrollo”.
2. Dopo tale controllo, il LeD verde lampeggerà, indicando che il Digital Apex Locator è in modalità di attesa.
3. Quando la lima raggiunge il punto di “2,00” mm, il LeD verde rimane acceso.
4. Operare con la lima verso l’apice in modo circolare in senso orario e antiorario fino a quando il LeD arancione “0,50” mm si accenda e l’allarme si attivi
(tono basso).
5. Prima di raggiungere l’apice biologico, verrà raggiunto il punto
di “0,25” mm e il LeD arancione si accenderà.
6. Quando la lima raggiunge l’apice biologico, il LeD rosso
dell’“Apice” si accende e il suono dell’allarme diventa più rapido.
7. Megnare la profondità del canale con il bloccalima di gomma.
Misurare la lunghezza della lima e preparare le restanti lime per
il trattamento sulla base di tale lunghezza. Se l’apice biologico
viene superato, il LeD rosso “Apex” mm inizierà a lampeggiare
e l’allarme suonerà (più rapidamente). A questo punto, estrarre
delicatamente la lima dal canale fino a quando il LeD rosso mm
dell’“Apice” non si sarà acceso e l’allarme acustico non avrà rallentato la sua velocità.
Fare riferimento alle nostre raccomandazioni per la riuscita
del trattamento (Pág. 8) e alla nostra guida alla risoluzione
dei problemi (Pág. 10) per maggiori informazioni.
45
ITALIANO
NOTA: l’unità è sensibile e risponde a piccolissime variazioni di posizione
della lima. È esenziale mantenere il contatto tra la lima e il lato del canale per
facilitare la misurazione.
Apex Locator IFU HS:Apex Locator IFU HS 02/03/09 12:53 Página 48
Digital apex locator
Spegnimento Del DiSpoSitivo
Per la funzione del risparmio energetico, il Digital Apex Locator si spegnerà
dopo circa 90 secondi di inattività.
alarme acuStico
K
NOTA: Per annullare l'allarme acustico, premi il bottone grigio sulla
parte posteriore dell'unità (Fig. K). Per riattivarlo, premi una altra volta.
alimentazione Della Batteria
Quando il Digital Apex Locator sente che la batteria si sta scaricando, all’accensione dell’unità, tre LeD intermittenti si attivano simultaneamente insieme a dei segnali acustici. In questo modo si avvisa della necessità di sostituire la batteria
al più presto (ancora funzionante). Se dopo un ulteriore periodo di tempo l’operatore
non avrà sostituito la batteria, l’unità si spegnerà automaticamente all’accensione e
non consentirà all’operatore di utilizzare l’unità. Sostituire la batteria immediatamente.
L’unità non contiene altre parti che richiedono interventi di manutenzione da parte dell’utente. L'apertura dell'unità svuoterà la garanzia.
Avvertenza!: La batteria scarica pregiudica la precisione.
SoStituzione Della Batteria
• Togliere la batteria estraendo delicatamente il cassetto della batteria nella parte inferiore del Localizzatore di Apice Digitale (Fig. K).
• Togliere la batteria dal cassetto (Fig. L) e sostituirla con una nuova (tipo CR2450).
• Assicurarsi di inserire la batteria con il segno + rivolto verso l’alto (Fig. M).
• Riposizionare il cassetto nell’alloggiamento della batteria.
Smaltire la batteria esausta secondo le disposizioni locali.
K
L
M
NOTA: quando il Digital Apex Locator deve restare inutilizzato per un lungo periodo di tempo,
si raccomanda di rimuovere la batteria dal dispositivo per allungare la vita della batteria stessa.
46
Apex Locator IFU HS:Apex Locator IFU HS 02/03/09 12:53 Página 49
Digital apex locator
Sterilizzazione
• Avvertenza! Non collocare il Digital Apex Locator nell’Autoclave!!
• Non immergere il dispositivo ed evitare che il liquido entri nell’involucro dell’unità!
Attenzione!: Il Digital Apex Locator che viene fornito non è sterilizzato.
Tutte le superfici del dispositivo e i suoi accessori devono essere disinfettate
non appena si riceve l’unità e, in seguito, dopo ogni procedura, per evitare
un’infezione crociata. Strofinare la superficie dell’unità con un panno pulito
inumidito in una soluzione di alcool etilico al 70%.
I cavi principali (5), il mini portalima (2), il gancio del labbro (3) e il fermo del
grembiule (4) possono essere sterilizzati nell’autoclave a 121ºC per 20 minuti o
a 134ºC per 5 minuti.
Soltanto gli accessori indicati specificatamente come adatti per l’autoclave
possono essere sterilizzati nell’autoclave.
PER VOSTRA COMODITÀ
NOTA: il contatto dovrà avvenire con una frequenza crescente a mano
a mano che ci si avvicina all’apice biologico, al fine di evitare la perforazione. L’ubicazione della lima sarà indicata sul localizzatore di apice
solamente durante il contatto diretto con la sonda a sensore.
47
ITALIANO
N
Dopo aver definito la lunghezza del
canale e averla riportata su tutte le
lime, si può utilizzare la comoda
Sonda a Sensore per confermare la
profondità della lima di ingresso
durante il procedimento.
Il risultato del contatto momentaneo con la lima sarà indicato immediatamente sul localizzatore di apice.
Apex Locator IFU HS:Apex Locator IFU HS 02/03/09 12:53 Página 50
Digital apex locator
raccomanDazioni per la
Prima di misurare la lunghezza del canale della radice con il Digital
Apex Locator:
2
• Assicurarsi che la camera della polpa (1) sia pulita e asciut- 3
ta prima di inserire la lima di misurazione. Si raccomanda di
asciugare la camera della polpa con un batuffolo di cotone
o aspirando leggermente l’umidità (anche dal canale della
radice) con una siringa per aspirazione. Verificare inoltre che
tutti i canali siano isolati tra loro. Asciugare il canale con una
1
punta di carta per aumentare la precisione quando un
eccesso di fluidi conduttivi formano un ponte conduttivo tra i
canali o con una ricostruzione metallica o una corona.
• Quando le pareti della camera della polpa sono danneg4
giate (2), possono verificarsi delle perdite di saliva dalla cavità
orale, che impediranno di mantenere asciutta la camera. Una camera umida provocherà
la formazione immediata di un circuito elettrico chiuso, ad es. un cortocircuito. In questa
eventualità il localizzatore di apice emetterà un allarme (luce rossa) come se avesse raggiunto l’apice. In questi casi la parete danneggiata della camera deve essere ripristinata
in modo permanente o provvisorio, ma solo con materiali non conduttori come ad es.
Composto, IRM, GI (ionomero di vetro), ecc. Dopo la ricostruzione è possibile ottenere
una camera perfettamente asciutta ed eseguire una misurazione precisa.
• Controllare che tutte le otturazioni danneggiate (3) siano state al fine di evitare perdite
marginali. Tali perdite renderebbero umida l’area di lavoro e potrebbero interferire con la
lettura del Digital Apex Locator. La spia rossa lampeggerà per indicare che ha identificato l’apice quando in effetti la lima si trova solamente nella zona d’i ingresso del canale.
• Il contatto continuo con materiali da otturazione di amalgama o metallo bloccherà
il dispositivo, quindi bisogna fare molta attenzione ad evitare il contatto tra la lima
e qualsiasi ricostruzione a base di metallo esistente del dente con otturazioni di
amalgama o corone. In questi casi si può isolare in maniera adeguata la lima dall’ambiente metallico con l’applicazione di 2-3 tamponi di gomma sulla parte della
lima che potrebbe trovarsi a contatto con il metallo della ricostruzione.
• Oltre a garantire che la camera sia asciutta e isolata, assicurarsi di rimuovere la maggior parte del tessuto molle dal canale della radice, mediante estirpazione, prima della
misurazione. Il tessuto residuo può determinare una lettura prematura ed errata.
• Quando si utilizza una diga in gomma, assicurarsi che fornisca un isolamento
adeguato della zona di inserimento. Qualsiasi apertura tra la diga in gomma e il
dente può essere sigillata con una ricostruzione provvisoria (Cimpat).
• Assicurarsi che il gancio del labbro sia perfettamente a contatto con la mucosa
umida del paziente.
• Controllare tutti i collegamenti.
• Sebbene alcuni degli accessori siano adeguati per l’autoclave, qualora un
accessorio risulti danneggiato dopo un certo numero di cicli in autoclave, sostituirlo con uno nuovo.
48
Apex Locator IFU HS:Apex Locator IFU HS 02/03/09 12:53 Página 51
Digital apex locator
riuScita Del trattamento
Raccomandazioni peR il pRocesso di misuRazione
Preparare un ampio orificio del canale e dare ai primi 2/3 una forma conica
per evitare il contatto con i restringimenti prematuri nel canale.
• Inserire la lima facendola ruotare in senso orario e antiorario, poi fare la
stessa cosa quando la si estrae. La rotazione della lima in una direzione ne
può causare la rottura all’interno del canale!
• Verificare che vi sia un contatto continuo tra la lima e la parete del canale della
radice. Si raccomanda di utilizzare la lima più spessa possibile che raggiunga la
lunghezza di lavoro prevista. Una lima lasca che non garantisce un contatto continuo con la parete del canale non consentirà di eseguire delle misurazioni precise.
• Assicurare un contatto continuo e stabile tra la lima e il suo supporto (ciò
può essere problematico con le lime più sottili da 6, 8 e 10 mm).
• Si raccomanda di inumidire i canali eccessivamente essiccati per migliorare la
conduttività. Ciò può essere effettuato con una leggera irrigazione e/o leggera
lubrificazione della lima con CANAL +.
• Se il canale è troppo asciutto, introdurre NaOCl nella parte apicale del canale.
• In un canale molto ampio, il Digital Apex Locator può essere in grado di leggere la
misurazione solo in punta, dove il canale si restringe verso il tessuto apicale. In questi casi
sarà possibile identificare solo una profondità di 0,5 mm e il forame apicale. La lettura può
essere migliorata utilizzando un lima più spessa e premendola contro la parete del canale.
• La lettura del Digital Apex Locator può essere instabile in queste situazioni
di patologie dentali: carie, forte sanguinamento nel canale, ricostruzione metallica, lesione periapicale, apice aperto (4), canale eccessivamente ampio.
• La perdita di legamento osseo o periodontale (indicato da una radiolucenza
sulla radiografia) può determinare letture imprecise.
• Una batteria scarica ridurrà la precisione della lettura. La batteria deve essere sostituita non appena compare il segnale di avviso dello strumento, come specificato
nel manuale utente. Seguire attentamente le istruzioni per collegare ei cavi allo strumento come specificato nel manuale utente.
In tutti i casi delle letture erronee come precedentemente descritto soltanto una
situazione prematura della lettura è possibile, dovuto il riconoscimento apparente dell'apex. Tuttavia, l'unità non mostrerà indicare in ritardo che possa.
Le Digital Apex Locator è un apparecchio elettronico digitale e poichè tale
richiede una tensione residua minima della batteria di guidare i circuiti. Quindi
richiede la sostituzione quando questo punto è stato raggiunto anche ha pensato
che ci potesse essere potenza sufficiente lasciata affinchè il LeD accendesse.
49
ITALIANO
eccezioni
Apex Locator IFU HS:Apex Locator IFU HS 02/03/09 12:53 Página 52
Digital apex locator
riSoluzione Dei proBlemi
Domanda
Soluzione (vd. le spiegazioni complete nel manuale utente)
• L’unità indica che la lima è nell’apice quando lo strumento è appena stato introdotto nel canale.
• Il pavimento della camera della polpa non
è completamente asciutto o la lima è entrata in contatto con una ricostruzione metallica. In entrambi i casi, le letture imprecise
sono dovute a un cortocircuito. Asciugare
la camera della polpa, se è bagnata.
• La lettura nell’unità non è
costante.
• La lima provoca un contatto intermittente
con le pareti del canale. Posizionare una
curva sulla punta della lima o provare con
una lima di maggiori dimensioni in modo
che la punta tocchi la parete vicino all’apice.
• Non si vedono le luci.
• La batteria è scarica o non è stata sostituita correttamente (vd. sotto).
• 3 LeD si accendono simultaneamente.
• È necessario sostituire la batteria
al più presto possibile.
• La lettura nel dispositivo non coincide con il risultato dei raggi X.
• I raggi X forniscono un’immagine bidimensionale che non permette di trovare
con precisione l’apice biologico. Bisogna
quindi basarsi sul risultato del localizzatore di apice per determinare la lunghezza di lavoro corretta. Inoltre, la perdita di
legamento osseo o parodontale (indicata
da una radiolucenza sulla radiografia) può
determinare letture imprecise.
• L’unità non si spegne.
• La batteria si sta scaricando. Sostituire.
• L’unità non funziona dopo aver
sostituito la batteria.
• Controllare i seguenti punti:
A. La batteria è stata inserita al contrario.
B. La batteria non era nuova.Verificare che
sia stata sostituita con una batteria nuova.
C. Assicurarsi che la batteria utilizzata sia del tipo CR2450.
50
Apex Locator IFU HS:Apex Locator IFU HS 02/03/09 12:53 Página 53
Digital apex locator
caratteriStiche
LA SCATOLA CONTIENE:
• Digital Apex Locator (1 unità)
• Cavi principali (4 unità) – adatti per autoclave
• Fermo del Grembiule (2 unità) - adatto per autoclave
• Gancio del labbro (2 unità) - adatto per autoclave
• Morsetto per Lima Tradizionale (1u.) - adatto per autoclave
• Mini Portalima (3 unità) - adatta per autoclave
• Mini sonda a sensore (1 u.) - adatta per autoclave
• Contenitori Monouso (20 unità)
• Batteria (tipo CR2450)
ACCESSORI:
Per facilitare il Vostro lavoro, Henry Schein ha sviluppato un’ampia gamma di
accessori perfettamente compatibili con il Digital Apex Locator
• Minisonda a Sensore - adatta per l’autoclave (inclusa!)
• Sonda a Sensore lunga - adatta per l’autoclave
SPECIFICHE TECNICHE:
• Alimentazione elettrica: batteria singola CR2450
• Potenza: 2,4 – 3,0 V
• Corrente massima: 12mA
• Temperatura di esercizio: +10ºC - +40ºC
• Umidità: 10% - 90% senza condensazione.
AVVERTENZA:
Il Digital Apex Locator NON deve essere usato sui pazienti che utilizzano un pacemaker.
VANTAGGI TECNOLOGICI PER LA PRECISIONE:
• Vi sono 6 LeD che indicano l’avanzamento della lima, garantendo così il
massimo controllo della misurazione e della precisione.
• Il Digital Apex Locator è in grado di filtrare la maggior parte del contatto momentaneo
con l’amalgama o il materiale per le otturazioni in metallo e garantisce misurazioni precise
del canale in qualsiasi condizione, anche in caso di canali bagnati, asciutti e sanguinanti.
È possibile misurare immediatamente un altro canale senza alcun preparato speciale.
• La calibrazione è automatica, NON è richiesta la calibrazione manuale.
51
ITALIANO
CLASSIFICAZIONE:
• Parte applicata tipo BF.
• Apparecchiatura Medica conforme a IeC 601-1.
Apex Locator IFU HS:Apex Locator IFU HS 02/03/09 12:53 Página 54
Digital apex locator
ONDERDELEN
1
2
3
4
5
6
7
8
A
- Traditionele vijlklem kabel
- Mini-vijlhouder
- Mini-verklikkersonde
- Liphaak
- Patiëntenservet-klem
- Aansluitkabels
- Blinkende LeDs
- Batterijlade
1
2
5
3
4
6
7
8
52
Apex Locator IFU HS:Apex Locator IFU HS 02/03/09 12:53 Página 55
Digital apex locator
De Digital Apex Locator (Digitale Apex Plaatsbepaler) is zo ontworpen dat het voldoet aan internationale veiligheids- en prestatienormen. Personen die met het instrument werken moeten
grondige kennis hebben van de correcte werking van het instrument. Deze instructies zijn speciaal geschreven om medische en
technische personen te helpen bij het begrip en de werking van het
instrument. Gebruik het instrument pas als u deze handleiding
heeft gelezen en u een helder begrip van de werking van het instrument heeft verkregen. Als welk deel van deze handleiding u niet
duidelijk, neemt u dan contact op met de vertegenwoordiger voor
uw gebied en vraag hem/haar om opheldering.
De Digital Apex Locator berekent de afstand van de top van
uw endodontische vijl tot de belangrijkste apicale foramen d.m.v.
multifrequentie stroomstootjes.
De Digital Apex Locator meet afhankelijk van de frequentie
tussen twee elektroden de reactie van het wortelkanaal. De
eerste elektrode is de liphaak (3) (foto A). De tweede is de minivijlhouder (2), die contact maakt met een vijl die in het wortelkanaal gestoken is.
53
NEDERLANDS
De Digital Apex Locator controleert de veranderingen in de
reactie van het wortelkanaal terwijl de vijlsonde de apex nadert.
Apex Locator IFU HS:Apex Locator IFU HS 02/03/09 12:53 Página 56
Digital apex locator
eerSte opzet
1. Steek de contrastekkers van de twee aansluitkabels in de pennen aan de
bovenkant van de Digital Apex Locator (foto B).
2. Steek de vijlklem en de liphaak in de contrastekkers aan de andere uiteinden van de (linker of rechter) hoofdkabels . (foto’s C+D).
B
C
D
E
F
G
3. Bevestig de patiëntenservet-klem aan de aansluitkabels door deze in de
twee draadhouders op de hendels van de patiëntenservet-klem (foto E).
4. Steek de Digital Apex Locator in een wegwerphoes (foto F).
5. Plaats de Digital Apex Locator in de buurt van de patiënt’s mond en bevestig de klem aan het patiëntenservet. (foto G).
6. Plaats de liphaak, die zich aan het uiteinde van de kabel aan de onderste lip
bevindt, bij voorkeur aan de tegenoverliggende kant van de te behandelen tand.
7. Plaats de vijl aan de ingang tot het kanaal (foto H) en verbindt deze daarna met
de mini-vijlhouder die zich aan het kabeluiteinde van de vijlklem bevindt (foto I).
H
I
Nu is de Digital Apex Locator klaar voor gebruik.
54
Apex Locator IFU HS:Apex Locator IFU HS 02/03/09 12:53 Página 57
Digital apex locator
geBruikSaanwijzing
NB: gebruik de Digital Apex Locator alleen maar als een hulpmiddel bij een
normale endodontische behandeling. Hoewel het toestelletje het aantal benodigde röntgenfoto’s kan verminderen, moet een eerste röntgenfoto worden
genomen om de werklengte te schatten. Klinische beoordeling inclusief kennis van de anatomie van het wortelkanaal is van het grootste belang bij het
interpreteren van de resultaten.
5. Voordat u de biologische apex bereikt, bereikt u het ‘0,25’ mm
punt en de oranje LeD zal aangaan.
6. Als de vijl de biologische apex bereikt, zal de rode ‘Apex’ LeD
aangaan en zal het alarm op een snellere toonfrequentie afgaan.
7. Markeer de diepte van het kanaal met de rubbersluiter van de
vijl. Meet de lengte van de vijl en leg de rest van de vijlen klaar
voor de behandeling volgens deze vijllengte. Als u de biologische apex overschrijdt, zal de rode ‘Apex’ mm LeD beginnen te
flikkeren en zal een alarm afgaan (snelste toonfrequentie). In
deze fase trekt u de vijl voorzichtig uit het kanaal totdat de rode
‘Apex’ LeD aangaat en het alarm op een lagere toonfrequentie
overgaat.
Voor meer informatie raadpleeg onze aanbevelingen voor een
succesvolle behandeling (pagina 8) en onze gids voor het
opsporen van fouten (pagina 10).
55
NEDERLANDS
1. Zet de Digital Apex Locator in werking door
J
de ‘ON’ (= AAN) knop aan de voorkant van de toestel in te drukken of door de liphaak contact te laten
maken met de mini-vijlhouder (foto J). eenmaal in
werking gesteld, zullen de LeDs in volgorde
opblinken als een soort ‘zelfcontrole’.
2. Na deze controle zal de groene LeD flikkeren ter
aanduiding dat de Digital Apex Locator stand-by staat.
3. Als de vijl het ‘2,00’ mm punt bereikt heeft, zal de groene LeD continu branden.
4. Beweeg de vijl met langzame, met de klok mee en tegen de klok in vijlbewegingen in de richting van de apex totdat het oranje ‘0,50’ mm LeD aangaat
en het alarm afgaat (langzame toonfrequentie).
NB: het toestelletje is erg gevoelig en reageert op de kleinste verandering in
vijlstand. Het is van het grootste belang voor de meting dat de vijl contact
houdt met de zijkant van het wortelkanaal.
Apex Locator IFU HS:Apex Locator IFU HS 02/03/09 12:53 Página 58
Digital apex locator
uitSchakelen van het toeStel
Als een energiebesparende voorziening zal de Digital Apex Locator na
ongeveer 90 seconden van inactiviteit uitgaan.
hoorBaar alarm
K
NB: Druk op de grijze knop aan de achterkant van het apparaat
(foto K) om het hoorbare alarm uit te schakelen.
BatterijvoeDing
Als de Digital Apex Locator een lage batterijvoeding bemerkt na het aanzetten van het
toestelletje zullen drie knipperende LeDs tegelijk met een piepgeluid aangaan. Dit is
een waarschuwing om spoedig van batterij te wisselen (het toestelletje kan nog
functioneren). Als na een tijdje de persoon die met het toestelletje werkt de batterij niet
verwisseld heeft dan zal het toestelletje automatisch uitgaan nadat het aangezet wordt en
zal het niet gebruikt kunnen worden. Vervang de batterij onmiddellijk. Druk nogmaals op
dezelfde knop om het opnieuw in werking te stellen.
Waarschuwing! Lage batterijvoeding beïnvloedt de nauwkeurigheid.
vervanging van De Batterij
• Verwijder de batterij door de batterijlade aan de onderkant van de Digital Apex Locator
er voorzichtig uit te trekken (foto K).
• Verwijder de batterij uit de lade (foto L) en vervang door een nieuwe (type CR2450).
• Zorg ervoor dat de batterij met de + naar boven (foto M).
• Schuif de lade terug in het batterijhuis.
Gooi lege batterijen weg overeenkomstig de plaatselijke regelingen.
K
L
M
NB: Als u de Digital Apex Locator voor langere tijd opbergt zonder het te gebruiken,
dan is het aanbevolen om de batterij uit het apparaat te verwijderen om de levensduur ervan te verlengen.
56
Apex Locator IFU HS:Apex Locator IFU HS 02/03/09 12:53 Página 59
Digital apex locator
SteriliSatie
• Waarschuwing! Zet de Digital Apex Locator NIeT in een autoclaaf!
• Het apparaat mag NIeT ondergedompeld worden en laat vloeistoffen NIeT in
de behuizing van het toestelletje komen!
Attentie! De Digital Apex Locator wordt NIeT in een steriele staat
geleverd. Wanneer het toestelletje in het begin in ontvangst wordt genomen,
moeten alle oppervlakten van het apparaat en de bijbehorende accessoires
gedesinfecteerd worden en vervolgens tussen de behandelingen om kruisinfectie te voorkomen. Veeg het oppervlak van het toestelletje af met een in een
70% ethylalcohol-oplossing gedrenkte schone doek.
In een autoclaaf kunnen de aansluitkabels (5), mini-vijlhouder (2), liphaak (3)
en patiëntenservet-klem (4) bij 121 ºC voor 20 minuten of bij 134 ºC voor 5
minuten gesteriliseerd worden.
Alleen accessoires, die m.n. als autoclaafbestendig genoemd worden, mogen
in een autoclaaf gesteriliseerd worden.
VOOR UW GEMAK
N
ATTENTIE: Contact moet steeds vaker gemaakt worden bij het
benaderen van de biologische apex om perforatie te voorkomen. De
locatie van de vijl zal alleen maar op de Apex Plaatsbepaler getoond
worden tijdens het directe contact met de verklikkersonde.
57
NEDERLANDS
Nadat de kanaallengte is bepaald en
gemarkeerd op alle vijlen kan de compacte
en gemakkelijk te gebruiken verklikkersonde (= Sensor Probe) gebruikt worden om
de diepte van de binnendringende vijl tijdens de behandeling te bevestigen.
Het resultaat van het kortstondige contact met de vijl zal onmiddellijk op uw
Apex Plaatsbepaler getoond worden.
Apex Locator IFU HS:Apex Locator IFU HS 02/03/09 12:53 Página 60
Digital apex locator
aanBevelingen voor een
Voorafgaand aan de meting van de lengte van het wortelkanaal met uw
Digital Apex Locator:
• Zorg ervoor dat het tandmerg (1) droog is voordat u er de 3
2
metende vijl insteekt. Aanbevolen wordt om het tandmerg te
drogen met een wattenbolletje of door enige afzuiging van
het vocht met een aspiratienaald. Zorg er ook voor dat alle
kanalen van elkaar afgezonderd zijn. Overdadig vocht in het
tandmerg of de kanalen kunnen een geleidende brug vor1
men tussen de kanalen of met een metaalhoudende restauratie of kroon. Het kanaal drogen met een papieren puntje
kan de nauwkeurigheid mede verhogen.
• Als de wanden van het tandmerg beschadigd zijn (2), of als er
beschadigde vullingen (3) zijn, kan slijmlekkage uit de mond4
holte voorkomen hetgeen het drogen van het tandmerg zal verhinderen. een vochtig tandmerg kan de directe vorming van een gesloten elektrisch circuit
(d.w.z. een kortsluiting) veroorzaken. De Apex Plaatsbepaler zal in dat geval een
waarschuwing (een knipperend rood LeD en een hoorbaar alarm) geven alsof het de apex
heeft bereikt (een onjuiste positieve afleesbare waarneming). In zulke gevallen moet de
ontbrekende wand van het tandmerg tijdelijk hersteld worden maar alleen met niet-geleidende materialen zoals composiet materiaal, Intermediate Restorative Material (IRM =
tussentijds restauratiemateriaal), glas-iononer (GI), etc. een droog tandmerg kan na
restauratie tot stand gebracht worden en er kan een exacte meting verkregen worden.
• Continu contact met metaal- of amalgaamvullingen zal echter het apparaat aarden dus
wees bijzonder voorzichtig om contact van de vijl met elke voorkomende op metaal
gebaseerde tandrestauratie door amalgaamvullingen of metalen kronen te
voorkomen. De vijl kan in zulke gevallen afdoende geïsoleerd worden van de metaalhoudende omgeving door 2-3 rubberstops op dat deel van de vijl te plaatsen dat
mogelijkerwijs in contact komt met het metaal van de restauratie.
• Aanbevolen wordt voordat u begint met meten een voorafgaande extirpatie uit te
voeren. Overgebleven weefsel kan leiden tot een te vroege en foutieve afleesbare
waarneming.
• Wanneer u een rubberdam gebruikt, zorg er dan voor dat deze correct afgedicht is
rondom insertiegebied. elk gaatje tussen de rubberdam en de tand kan met een
tijdelijke restauratie worden afgedicht. Vooraanstaande endodontische tandartsen
bevelen het gebruik van rubberdammen tijdens elke wortelkanaalbehandeling aan.
• Zorg dat de liphaak volledig contact maakt met het vochtige slijmvlies van de patiënt.
De liphaak mag geen contact maken met geen enkele tand die mogelijk metalen
vullingen hebben.
• Controleer alle verbindingen.
• Alhoewel enkele accessoires autoclaafbestendig zijn, moet u welk accessoire dan
ook dat beschadigd lijkt na een aantal cycli in het autoclaaf vervangen door een nieuw
item. Controleer vooral de aansluitkabels (zie de ‘Sterilisatie’ sectie voor een complete
lijst van autoclaafbestendige items).
58
Apex Locator IFU HS:Apex Locator IFU HS 02/03/09 12:53 Página 61
Digital apex locator
SucceSvolle BehanDeling
aanbeVelingen VooR het meetpRoces
Maak een breed orificium van het kanaal en maak de eerste 2/3 ervan taptoelopend om contact met vroegtijdige verengingen in het kanaal te voorkomen.
• De vijl moet in het kanaal ingebracht worden met een vijlende beweging
(met de klok mee en tegen de klok in). Roteren van de vijl in één richting kan
breken van de vijl in het kanaal veroorzaken!
• Zorg voor continu contact van de vijl met de wand van het wortelkanaal.
Aanbevolen wordt om de grootst mogelijke vijl te gebruiken die de geschatte
werklengte haalt. een losse vijl die geen continu contact maakt met de wand
van het wortelkanaal zal niet in staat zijn om precieze metingen uit te voeren.
• Zorg voor continu en stevig contact van de vijl met de houder. (Dit kan problematisch zijn met dunnere vijlen van 6, 8, en 10 mm.).
• In overdadig gedroogde kanalen wordt bevochtiging om het geleidend vermogen te verbeteren aanbevolen. Dit kan bewerkstelligd worden door geringe
bevochtiging en/of geringe smering van de vijl.
• Als het kanaal te droog is, breng dan natriumhypochloriet (NaOCL) in het
apicale 1/3 van het kanaal aan.
• De Digital Apex Locator kan in een erg breed kanaal de meting slechts waarnemen bij de top waar het kanaal zich verengt in de richting van het apicale foramen.
Slechts een diepte van 0,5 mm en het apicale foramen zullen in zulke gevallen geconstateerd worden. De afleesbare waarneming kan verbeterd worden door gebruik te
maken van een grotere vijl en door blijvend contact te maken met de kanaalwand.
• De afleesbare waarneming van de Apex Plaatsbepaler kan veranderlijk worden in de volgende
situaties van tandpathologie: bederf (cariës in het tandmerg), sterke bloeding in het kanaal,
metaalhoudende restauratie, peri-apicale laesie, open apex (4), en extreem breed kanaal.
• Verlies van bot of ligament van de parodontitis (aangegeven door een radiolucentie
op de film) kunnen onjuiste afleesbare waarnemingen veroorzaken.
• een uitgeputte batterij zal de nauwkeurigheid van de afleesbare waarneming verminderen.
De batterij moet vervangen worden zodra het waarschuwingssignaal van het instrument
zoals beschreven in de gebruikshandleiding verschijnt. Zorg dat u de instructies m.b.t. de
kabelverbindingen met het instrument zoals beschreven in de gebruikshandleiding opvolgt.
In alle gevallen van onjuiste afleesbare waarnemingen zoals hierboven beschreven is
een vroegtijdige afleesbare waarneming slechts mogelijk vanwege een ogenschijnlijke
herkenning van de apex. De Apex•NRG zal echter een vertraagde afleesbare waarneming, die mogelijkerwijs het peri-apicaal weefsel in gevaar brengen, NIeT tonen.
De Digital Apex Locator is een digitaal elektronisch apparaat en vereist als
zodanig een minimum aan voltage dat over is in de batterij om de schakeling
te voeden. Dus vereist het vervanging wanneer dit punt bereikt wordt, zelfs als
er nog voldoende stroom over is om de LeDs te laten werken.
59
NEDERLANDS
uitzondeRingen
Apex Locator IFU HS:Apex Locator IFU HS 02/03/09 12:53 Página 62
Digital apex locator
foutopSporing
Vraag
Oplossing
• Het toestelletje laat zien dat de vijl
bij de apex is terwijl het instrument
nog maar net het kanaal is binnengebracht.
• Of het tandmerg is niet geheel droog of
de vijl heft contact gemaakt met een
metaalhoudende restoratie. De onjuiste
afleesbare waarnemingen komen in ieder
geval vanwege kortsluiting. Droog het tandmerg als deze nat is.
• Afleesbare waarneming op het
toestelletje is niet stabiel.
• Vijl maakt periodiek contact met de
kanaalwanden. Zet een ronding op de kop
van de vijl of probeer een grotere maat vijl
zodat de kop van de vijl de wand in de
buurt van de apex aanraakt.
• Lichtjes lichten niet op.
• Batterij is leeg of is niet correct vervangen (zie hieronder).
• 3 LeDs lichten tegelijk op.
• Dit is een waarschuwing om de batterij
z.s.m. te vervangen.
• De afleesbare waarneming op het
apparaat valt niet samen met het
resultaat van de röntgenfoto.
• De röntgenfoto is een 2D beeld dat de
biologische apex niet precies kan vinden.
Dus moet het resultaat van de Apex
Plaatsbepaler worden vertrouwd voor het
bepalen van de juiste werklengte. Verder
kunnen verlies van bot of ligament van de
parodontitis (aangegeven door een radiolucentie op de film) onjuiste afleesbare
waarnemingen veroorzaken.
• Het toestel is niet uit te schakelen.
• Batterij is bijna leeg. Vervang de batterij.
• Het toestelletje werkt niet terwijl de
batterij vervangen is.
• Controleer elk van de volgende punten:
A. De batterij is er op z’n kop ingezet.
B. De batterij was niet nieuw. Zorg ervoor dat
u de oude met een nieuwe batterij vervangt.
C. Zorg ervoor dat u een batterij van het
type CR2450 gebruikt.
60
(zie de gebruikshandleiding voor gedetailleerde uitleg)
Apex Locator IFU HS:Apex Locator IFU HS 02/03/09 12:53 Página 63
Digital apex locator
proDuct kenmerken
DE VERPAKKING BEVAT:
• Digital Apex Locator (1 toestel)
• Aansluitkabels (4 items) - autoclaafbestendig
• Patiëntenservet-klem (2 items) - autoclaafbestendig
• Liphaak (2 items) - autoclaafbestendig
• Traditionele vijlklem (1 item) - autoclaafbestendig
• Mini-vijlhouder (3 items) - autoclaafbestendig
• Mini-verklikkersonde – autoclaafbestendig
• Wegwerphoezen (20 items)
• Batterij (type CR2450)
ACCESSOIRES:
Henry Schein heeft voor uw werkgebied/operatiekamer een breed assortiment accessoires ontwikkeld die volledig aangepast zijn aan de Digital Apex
Locator.
• Mini-verklikkersonde – autoclaafbestendig (inclusief!)
• Lange verklikkersonde - autoclaafbestendig
CLASSIFICATIE:
• Type BF toegepast onderdeel.
• Medische apparatuur overeenkomstig
IeC 601-1
TECHNOLOGISCHE VOORDELEN T.B.V. PRECISIE:
• T.b.v. de precisie en voor een maximale beheersing van de meting zijn er 6
LeDs om de voortgang van de vijl te markeren.
• De Digital Apex Locator levert precieze metingen van het kanaal onder
alle omstandigheden (inclusief natte, droge en bloedende kanalen). U kan
onmiddellijk en zonder speciale voorbereidingen een ander kanaal opmeten.
• Ijking gebeurt automatisch. er is GeeN handmatige ijking vereist.
61
NEDERLANDS
TECHNISCHE SPECIFICATIES:
• Voeding: één CR2450 batterij
• Input: 2,4 - 3,0 V
• Maximum stroom: 12mA
• Bedrijfstemperatuur: +10ºC - +40ºC
• Vochtigheid: 10% - 90% zonder condensatie
WAARSCHUWING:
De Digital Apex Locator mag NIeT worden gebruikt op patiënten met een
pacemaker.