1
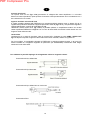
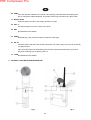
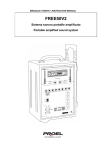
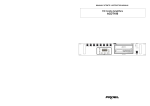
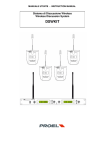
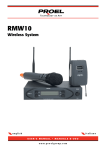
PDF Compressor Pro
MANUALE UTENTE / INSTRUCTION MANUAL
FREE50V3
Sistema sonoro portatile amplificato
Portable amplified sound system
PDF Compressor Pro
2
PDF Compressor Pro
INDICE
1.
2.
3.
4.
5.
6.
7.
PRECAUZIONI D’USO ........................................................................................................................... 4
DESCRIZIONE ....................................................................................................................................... 6
PANNELLO FRONTALE – FUNZIONI E CONTROLLI .......................................................................... 6
COMANDI ED USO DEL LETTORE CD/DVD/MP3 CON SINTONIZZATORE FM ............................... 7
UTILIZZO DEL RADIOMICROFONO PALMARE, LAVALLIER E LORO RICEVITORI ....................... 12
CONNESSIONI ED UTILIZZO DELLA CASSA AMPLIFICATA ........................................................... 14
CARATTERISTICHE TECNICHE ......................................................................................................... 16
3
PDF Compressor Pro
1. PRECAUZIONI D’USO
AVVERTENZA:Per ridurre il rischio di folgorazione, non rimuovere il coperchio (o il pannello posteriore). All’interno non sono
contenute parti riparabili dall’utente; affidare la riparazione a personale qualificato.
ATTENZIONE: Per ridurre il rischio d’incendio o di folgorazione, non esporre questo apparecchio alla pioggia o all’umidità.
Questo simbolo, ove compare, segnala la presenza di un voltaggio pericoloso non isolato all’interno del corpo
dell’apparecchio – voltaggio sufficiente a costituire un rischio di folgorazione.
Questo simbolo, ove appare, segnala, importanti istruzioni d’uso e manutenzione nel testo allegato. Leggere il
manuale
.
RACCOMANDAZIONI:
Tutte le istruzioni di sicurezza e funzionamento devono essere lette prima di mettere in funzione l’apparecchio.
Conservare le istruzioni:
Le istruzioni di sicurezza e di funzionamento devono essere conservate per un futuro riferimento.
Il presente manuale è parte integrante del prodotto e lo deve accompagnare in caso di eventuali cambi di proprietà. In questo modo il
nuovo proprietario potrà conoscere le istruzioni relative a installazione, funzionamento e sicurezza.
Prestare attenzione:
Tutte le avvertenze sull’apparecchio e nelle istruzioni di funzionamento devono essere seguite fedelmente.
Osservare tutti gli avvertimenti.
Seguire le istruzioni:
Tutte le istruzioni per il funzionamento e per l’utente devono essere seguite.
Le note precedute dal simbolo
contengono importanti informazioni sulla sicurezza: leggerle con particolare attenzione.
ISTRUZIONI DI SICUREZZA IN DETTAGLIO.
Acqua ed umidità:
L’apparecchio non deve essere utilizzato in prossimità di acqua (per es. vicino a vasche da bagno, lavelli da cucina, in prossimità
di piscine ecc.).
Ventilazione:
L’apparecchio deve essere posto in modo tale che la sua collocazione o posizione non interferisca con l’adeguata ventilazione.
Per esempio, l’apparecchio non deve essere collocato su un letto, copri-divano, o superfici simili che possono bloccare le aperture
di ventilazione, o posto in una installazione ad incasso, come una libreria o un armadietto che possono impedire il flusso d’aria
attraverso le aperture di ventilazione.
Calore:
L’apparecchio deve essere posto lontano da fonti di calore come radiatori, termostati, asciuga biancheria, o altri apparecchi che
producono calore.
Alimentazione:
•
L’apparecchio deve essere collegato soltanto al tipo di alimentazione descritto nelle istruzioni d’uso o segnalato
sull’apparecchio.
•
Se la spina in dotazione non combacia con la presa, rivolgersi ad un elettricista per farsi installare una presa appropriata.
Messa a terra o polarizzazione:
•
Si devono prendere precauzioni in modo tale che la messa a terra e la polarizzazione dell’ apparecchio non siano
pregiudicate.
•
Le parti metalliche dell’apparecchiatura sono collegate a massa tramite il cavo d’alimentazione.
•
Se la presa utilizzata per alimentazione non possiede collegamento a massa, rivolgersi ad un elettricista qualificato per fare
collegare l’apparato a massa tramite il terminale.
Protezione del cavo di alimentazione:
Il cavo di alimentazione elettrica deve essere installato in modo che non venga calpestato o pizzicato da oggetti posti sopra o
contro, prestando particolare attenzione a cavi e spine, prese a muro.
Pulizia:
•
Quando l’unità deve essere pulita, è possibile eliminare la polvere utilizzando un getto d’aria compressa o un panno inumidito.
•
Non pulire l’unità utilizzando solventi quali trielina, diluenti per vernici, fluidi, alcol, fluidi ad alta volatilità o altri liquidi
infiammabili.
Periodi di non utilizzo:
Il cavo di alimentazione dell’apparecchio deve essere staccato dalla presa se rimane inutilizzato per un lungo periodo.
4
PDF Compressor Pro
Ingresso di liquidi o oggetti:
Si deve prestare attenzione che non cadano oggetti e non si versino liquidi nel corpo dell’apparecchio attraverso le griglie.
Uso sicuro della linea d’alimentazione:
•
Quando si scollega l’apparato alla rete tenere saldamente sia la spina che la presa.
•
Quando l’unità non viene utilizzata per un periodo prolungato, interrompere l’alimentazione estraendo la spina dalla presa
dell’alimentazione
•
Per evitare danni alla linea d’alimentazione dell’apparato, non mettere in trazione il cavo d’alimentazione e non utilizzare un
cavo attorcigliato.
•
Per evitare il danneggiamento del cavo d’alimentazione dell’apparato, assicurarsi che questo non venga calpestato o
schiacciato da oggetti pesanti.
Spostamento dell’unità:
Prima di ogni spostamento, verificare che l’unità sia spenta. Il cavo d’alimentazione deve essere estratto dalla presa, così come i
collegamenti dell’unità con altre linee.
Non smontare l’unità:
Non tentare di smontare né riparare da soli l’unità. Per qualsiasi problema non risolvibile con l’aiuto del presente manuale,
rivolgersi a un tecnico qualificato o consultare la nostra compagnia. Qualsiasi uso non appropriato può causare incendi o scosse
elettriche.
Malfunzionamenti:
•
Non tentare mai di eseguire riparazioni diverse da quelle descritte nel presente manuale.
•
Contattare un centro di servizio autorizzato o del personale altamente qualificato nei seguenti casi:
- Quando l’apparato non funziona o funziona in modo anomalo.
- Se il cavo d’alimentazione o la spina sono danneggiati.
- Sono penetrati oggetti estranei o è stato versato del liquido nell’apparecchio.
- L’apparecchio è stato esposto alla pioggia.
- L’apparecchio non sembra funzionare normalmente o presenta un evidente
cambiamento nelle prestazioni.
- L’apparecchio è caduto, o il corpo è danneggiato.
Manutenzione:
L’utente non deve tentare di riparare l’apparecchio al di là di quanto descritto nelle istruzioni di funzionamento. Ogni altra
riparazione deve essere affidata a personale specializzato.
IMPORTANTI NORME DI SICUREZZA:
•
Installare seguendo le istruzioni.
•
Il voltaggio d’alimentazione dell’unità è abbastanza elevato per evitare il rischio di scosse elettriche, non installare, collegare o
sconnettere l’alimentazione quando l’apparato è acceso.
•
Non aprire mai l’apparecchiatura: all’interno non esistono parti utilizzabili dall’utente.
•
Se si avverte uno strano odore proveniente dall’apparato, spegnerlo
immediatamente e sconnettere il cavo
dell’alimentazione.
•
Non ostruire le griglie di ventilazione dell’apparato.
•
Evitare che l’unità lavori in sovraccarico per tempo prolungato.
•
Non forzare i comandi (pulsanti, controlli, ecc.)
•
Avvitare completamente i terminali a vite degli altoparlanti per garantire la sicurezza dei contatti.
•
•
•
•
•
•
Per ragioni di sicurezza, non annullare il collegamento a massa della spina. Il collegamento a massa è necessario per
salvaguardare la sicurezza dell’operatore
Utilizzare unicamente i connettori e gi accessori specificati dal produttore.
L’apparato deve essere collocato in un rack metallico (vedi INSTALLAZIONE) e tenuto lontano da:
Ü Luoghi umidi
Ü Esposizione diretta a fonti di calore (come luce solare).
Ü Luoghi non sufficientemente ventilati
In presenza di temporali con fulmini o quando l’apparato non è utilizzato, estrarre la spina d’alimentazione dalla presa.
Per prevenire il rischio di incendi e scosse elettriche, è necessario tenere l’apparato lontano da spruzzi e gocce. Sopra
l’apparato non devono essere collocati vasi o altri oggetti contenenti liquidi. In caso si verifichino interferenze nel circuito di
provenienza, il valore di THD sarà superiore al 10%. Non installare questo apparato in una libreria o in altri luoghi a spazio
ristretto
PROEL S.P.A. declina ogni responsabilità in caso di scorretta installazione dell’unità.
LIMITAZIONI D’USO:
Il sistema amplificato portatile FREE50V2 è destinato esclusivamente ad un utilizzo specifico di tipo sonoro.
GARANZIE E RESI:
Il sistema FREE50V2 è provvisto della garanzia di funzionamento e di conformità alle proprie specifiche, come dichiarate dal
costruttore. La garanzia è di 24 mesi dalla data di acquisto. I difetti rilevati entro il periodo di garanzia, attribuibili a materiali difettosi o
difetti di costruzione, devono essere tempestivamente segnalati al proprio rivenditore o distributore, allegando documentazione relativa
alla data di acquisto e la descrizione del tipo di difetto riscontrato. Sono esclusi dalla garanzia difetti causati da uso improprio o
manomissione. Proel SpA constata tramite verifica sui resi la difettosità dichiarata, correlata all’appropriato utilizzo, e l’effettiva validità
della garanzia; provvede quindi alla sostituzione o riparazione dei prodotti, declinando tuttavia ogni obbligo di risarcimento per danni
diretti o indiretti eventualmente derivanti dalla difettosità.
5
PDF Compressor Pro
Grazie per aver scelto un prodotto Proel e della fiducia riposta nel nostro marchio, sinonimo di
professionalità, accuratezza, elevata qualità ed affidabilità. Tutti i nostri prodotti sono conformi alle normative
CE per utilizzazione continua in impianti di diffusione sonora.
2. DESCRIZIONE
Il FREE50V3 è la risposta PROEL alla crescente richiesta di sistemi audio portatili autonomi che
permettano di amplificare voce e musica in siti dove non sono disponibili prese d’alimentazione o
possibilità di stesura cavi.
Trattasi di un completo set d’amplificazione portatile dotato di eccellenti prestazioni acustiche fornite da un
sistema di altoparlanti a due vie con amplificatore da 80W RMS.
Il suo utilizzo è indicato nel rinforzo voce per conferenze, manifestazioni fieristiche, sportive, religiose o
presentazioni commerciali; il tutto è supportato da due sistemi radiomicrofonici funzionanti in banda VHF
quarzati con alta stabilità in frequenza in grado di rendere completamente libero l'oratore.
Il FREE50V3 è inoltre completo di lettore CD/DVD/MP3/USB/SD MMD card player e sintonizzatore radio
AM/FM, tre ingressi microfonici, un ingresso AUX per una eventuale sorgente esterna ed una uscita per
registrazione o per pilotaggio di altra cassa acustica amplificata gemella.
La batteria interna ricaricabile è dimensionata per fornire una buona autonomia di esercizio, mentre il peso
complessivo resta comunque contenuto per una ottima portabilità.
Il cabinet è completato con un robusto maniglione estensibile tipo "trolley" e da una flangia sul lato
inferiore per l'utilizzo su asta da pavimento.
Funzioni principali:
N° 2 radiomicrofoni palmari VHF in dotazione.
Su richiesta possono essere forniti anche radiomicrofoni lavalier.
Sistema due vie con Woofer da 8" e Tweeter da 1".
Due modi di alimentazione: Batteria interna ricaricabile – 230/117Vca.
Lettore CD/DVD/MP3/USB/SD MMD e tuner AM/FM.
Due ingressi microfono, un ingresso AUX ed una uscita LINEA ad alto livello.
Controllo di master in uscita e toni.
3. PANNELLO FRONTALE – FUNZIONI E CONTROLLI
1 Interruttore di accensione
2 Connessione per cavo di alimentazione rete
3 Cambio tensione
4 Monitor funzione di carica (quando il led 25% lampeggia ricaricare le batterie)
5 Spia di indicazione apparecchio in funzione
6 Gruppo lettore CD/DVD/MP3/USB SD MMD e tuner AM/FM
7 Moduli ricevitori per radiomicrofoni VHF
8 Ingressi microfonici Jack mono
9 Controlli di livello per ingressi microfonici
10 Uscita Video
11 Ingresso AUX IN e Uscita AUDIO OUT
12 Controllo livello ingresso AUX
13 Controllo livello lettore CD/DVD- Tuner
14 Controllo livello MASTER
15 Controllo di tono
16 Controllo effetto ECHO
17 Connessione alimentazione DC 18V
6
PDF Compressor Pro
fig. 1
4. COMANDI ED USO DEL LETTORE CD/DVD/MP3 CON SINTONIZZATORE FM
fig. 2
7
PDF Compressor Pro
Funzionamento Lettore DVD
1. Ingresso USB
Inserire la chiave USB e premere il tasto DISC/USB (fig 2, rif 14) per passare alla modalità
USB.
2. Schermo LCD
Quando il lettore viene acceso, sul display LCD compare la scritta DISC, e se non è presente
nessun DVD/CD lo schermo visualizza NO DISC.
3. Ingresso Disco
Quando il lettore è impostato su DISC/USB o quando il display visualizza NO DISC o
CLOSED il DVD può essere inserito. Se il dispositivo è in modalità RADIO, nessun DVD può
essere inserito.
4. POWER
Premere questo tasto per accendere/spegnere il lettore.
5. MUTE
Premere questo tasto per sospendere l'emissione di suono e premerlo nuovamente per
riprendere l'emissione di suono.
6. PLAY/PAUSE
Questo tasto funziona solo se il tasto DISC/USB è selezionato. Premerlo una volta per mettere
in pausa la riproduzione; premerlo una seconda volta per riprendere la riproduzione.
7. EJECT
Quando il lettore è in modalità DISC/USB, se si preme questo tasto l'ingresso DVD restituisce
il disco, mentre se lo si preme nuovamente il disco viene reinserito. (Se il dispositivo è in
modalità RADIO, questo tasto non funziona)
8. ►►|
Quando il lettore è in modalità DISC/USB, se si preme questo tasto il lettore riproduce la
traccia successiva; quando il lettore è in modalità RADIO, se si preme questo tasto il lettore
cerca la stazione radio sulla frequenza successiva.
9. VOL +
Premere questo tasto per aumentare il volume.
10. VOLPremere questo tasto per diminuire il volume.
11. |◄◄
Quando il lettore è in modalità DISC/USB, se si preme questo tasto il lettore riproduce la
traccia precedente; quando il lettore è in modalità RADIO, se si preme questo tasto il lettore
cerca la prima stazione radio presente sulle frequenze precedenti.
12. RADIO
Premere questo tasto per passare dalla modalità DISC/USB alla modalità RADIO FM.
13. IR
Sensore del telecomando
14. DISC/USB
Premere questo tasto per passare dalla modalità RADIO alla modalità DISC/USB. Se nel
dispositivo sono presenti sia un disco che una chiavetta USB, premendo questo tasto si
passerà dalla modalità USB alla modalità DISC.
8
PDF Compressor Pro
Telecomando
fig. 3
1. Tasto d'accensione
Premere questo tasto per accendere o spegnere il lettore.
2. MODE
Premere questo tasto per selezionare la modalità di funzionamento del lettore passando dalla
modalità RADIO alla modalità USB alla modalità DISC.
3. RADIO
Premere questo tasto per passare dalla modalità DISC/USB alla modalità RADIO FM.
4.
/
/
Quando il lettore è in modalità DISC/USB premendo questo tasto “ ” / “ ” si può passare alle
tracce precedente/successive, premendo questo tasto “ ” / “ ” si attiva la funzione indietro
veloce/avanti veloce. Quando il lettore è in modalità RADIO, premendo questo tasto “ ” / “ ”
si attiva la scansione delle frequenze precedenti/successive alla ricerca di altre stazioni radio.
Sempre nella modalità radio premendo “ ”, “ ” si scorre tra le frequenze memorizzate
5. ENTER
Premere questo tasto per confermare la selezione effettuata tramite le freccette.
Se si procede alla ricerca di una stazione, premendo poi il tasto “ENTER” la stzione verrà
memorizzata sul n° di memoria corrente.
6. STOP
In modalità DVD, premere il tasto “STOP” per sospendere la riproduzione.
7. RPT
Durante la riproduzione premere il tasto RPT perché la traccia corrente venga riprodotta
ciclicamente.
9
PDF Compressor Pro
8. ST/ PROG
Riproduzione personalizzata In modalità MP3, CD, VCD, DVD, si può personalizzare l'ordine
con cui riprodurre le tracce registrate sul supporto. Premere il tasto PROG; sullo schermo del
televisore compare P00:00; usare i tasti da 1 a 10 per impostare l'ordine di riproduzione,
quindi selezionare “START” dal menu a video e premere il tasto “ENTER” . Per cancellare il
programma premere 2 volte di seguito il tasto “STOP”.
9. LOC/RDM
In modalità DVD/VCD/CD/MP3, premendo questo tasto si possono riprodurre le tracce senza
seguire l'ordine sul supporto digitale;
In modalità RADIO è invece attiva la funzione frequenze locali “LOC”
10. ◄◄ / ►►
In modalità DISC/USB, premere questi tasti per passare alle tracce precedenti / seguenti.
Quando il lettore funziona in modalità RADIO, premendo questo tasto si scansionano le
frequenze seguenti o precedenti alla ricerca di una nuova stazione radio.
11. PBC
In modalità DVD\VCD, premere una prima volta il tasto PBC per visualizzare le tracce del
disco sullo schermo (MENU DISCO)
12. OSD
In modalità DISC, premere questo tasto per visualizzare la traccia riprodotta in quel momento
e il tempo di riproduzione. Premere nuovamente per visualizzare la traccia riprodotta e il
tempo di riproduzione della traccia rimanente.
13. Tasti numerati
Permettono di accedere direttamente al brano desiderato. Quando le tracce sono più di dieci,
premere prima il tasto 10+ e poi il tasto corrispondente alle unità oltre la decina. In modalità
DVD/VCD/CD/MP3, si deve prima premere il tasto STOP, quindi i tasti numerati, quindi il tasto
“PLAY”.
14. GPS
Non disponibile su questo lettore.
15. Luminosità multistadio
Non disponibile su questo lettore.
16. EJECT
Quando il lettore è in modalità DISC/USB, se si preme questo tasto l'ingresso DVD restituisce
il disco, mentre se lo si preme nuovamente il disco viene reinserito. (Se il dispositivo è in
modalità RADIO, questo tasto non funziona)
17. PLAY/PAUSE
In modalità DVD/VCD/CD/MP3 premere il tasto una volta per sospendere la riproduzione,
premerlo nuovamente per riprendere dal punto in cui la si era sospesa.
18. MUTE
Premere il tasto una volta per escludere l'emissione di audio; premerlo nuovamente per
riabilitare l'emissione di audio.
19. TITLE/MENU
Premendo questo tasto si accede al menu del disco.
Nota: a) Le lingue disponibili sono quelle indicate dal disco.
b) Alcuni dischi sono registrati solo in una lingua.
c) Quando si seleziona una lingua, la lingua selezionata viene visualizzata sullo
schermo del televisore.
d) L'impostazione dei sottotitoli è disponibile solo in modalità DVD.
10
PDF Compressor Pro
20. SETUP
Premendo questo tasto si accede alle impostazioni video del lettore, la navigazione avviene
utilizzando le “frecce” (fig. rif 4) la conferma mediante il tasto “ENTER”.
21. ANGLE
In modalità DVD si possono vedere i diversi angoli del DVD. Non è utilizzabile con
VCD/CD/MP3.
22. SUB-T
Durante la riproduzione premere questo pulsante per cambiare la lingua dei sottotitoli se il
disco dispone di più lingue selezionabili. Questo tasto funziona solo in modalità DVD.
23. Zoom multiplo
Funzione di zoom dell’immagine corrente.
24. VOL +/Premere questo tasto per alzare o abbassare il volume.
25. SEL
Non disponibile su questo lettore.
26. AUDIO
Durante la riproduzione, premere questo tasto per selezionare il tipo di audio.
27. GOTO
Per riprodurre una traccia
Premere questo tasto seguito dal n° della traccia che si vuole riprodurre.
Per riprodurre la traccia corrente da un punto preciso
Premere questo tasto due volte di seguito e inserire il tempo di traccia (ora/min/sec) dal
quale si vuole iniziare la riproduzione
28. LOUD
Non disponibile su questo lettore.
11
PDF Compressor Pro
5. UTILIZZO DEL RADIOMICROFONO PALMARE, LAVALLIER E LORO RICEVITORI
fig.4
1
2
3
4
5
6
fig.5
Vano batterie
Interruttore di accensione
Spia di microfono acceso
Quando il led lampeggia indifferentemente
dal colore la batteria è scarica
Tasto di Mute
Capsula microfonica
1
2
3
4
5
6
Vano batterie
Connettore d’ingresso microfono
Interruttore di accensione / Stand by
Quando il led si accende la batteria è
scarica
Microfono Lavalier
Antenna
Nota: Nella dotazione di serie sono forniti due radiomicrofoni palmari (fig.3), i trasmettitori bodipack (fig.4)
sono opzionali
12
PDF Compressor Pro
fig.6
1
2
3
4
Antenna
Volume radiomicrofono
Led di aggancio a RF
Indicatore vu-meter segnale ricevuto
Il FREE50V3 è fornito di serie di due ricevitori (fig.6) e due trasmettitori radiomicrofonici VHF (fig.4), per
l’utilizzo è sufficiente:
• Installare le due antenne (fig.6 rif.1) a corredo in posizione verticale
• Inserire la batteria a 9V correttamente nell’apposito vano (fig.4,5 rif.1)
• Accendere i trasmettitori (fig.4 rif.2 - fig.5 rif.3) e regolare il volume di riproduzione (fig.5 rif.2) di
ciascuno quanto serve. Accendendo il radiomicrofono, il corrispondente led “RF” (fig.5 rif.3) si
accenderà ad indicare che il ricevitore è agganciato alla portante del trasmettitore, mentre il
rispettivo vu-meter (fig.6 rif.4) sul ricevitore visualizzerà il livello del segnale audio trasmesso dallo
stesso radiomicrofono.
Nota: nel microfono palmare, commutando il selettore sulla posizione PWR (fig.3 rif.2) il
trasmettitore radio viene acceso e viene trasmessa la portante, contemporaneamente il led power
(fig.4 rif.3)si attiva. Commutando successivamente il selettore (fig.4 rif.5) su ON il segnale audio
ripreso dal microfono viene trasmesso
In caso di lunghi periodi di non utilizzo dei radiomicrofoni è sempre consigliabile togliere dalla propria
sede le batterie.
13
PDF Compressor Pro
6. CONNESSIONI ED UTILIZZO DELLA CASSA AMPLIFICATA
Primo utilizzo
Dopo avere estratto l’unità dall’imballo, è necessario ricaricare le batterie per almeno 8/10 ore prima
dell’utilizzo.
Le batterie interne sono caricate completamente in fabbrica, ma è possibile che durante lo stoccaggio a
magazzino queste si scarichino leggermente non garantendo l’autonomia prescritta.
E’ possibile utilizzare l’apparecchio anche durante la ricarica, l’alimentazione CA è distribuita in modo
tale da consentirne il funzionamento contemporaneo alla ricarica.
Utilizzo con Alimentazione da rete
La FREE50V3 è predisposta per il funzionamento con tensione di rete a 230-117VCA 50/60Hz. In
dotazione all’apparecchio è fornito un cavo con connessione di terra, utilizzare questo cavo per
connettere la FREE50V3 alla rete elettrica, portando successivamente il commutatore di accensione
(fig.1 rif.1) sulla posizione ON la cassa acustica sarà pronta a funzionare alimentata dalla rete elettrica.
L’alimentatore è protetto da un apposito fusibile alloggiato nell’apposito vano della spina di rete.
Spegnere sempre dopo l'uso per prolungare l'efficienza della batteria.
La batteria entra in funzione automaticamente quando viene a mancare l'alimentazione a corrente
alternata.
Nota: Staccare la spina dalla presa di corrente quando l'unità non viene utilizzata per lunghi
periodi di tempo e dopo aver caricato la batteria.
Utilizzo a Batteria interna
Caricare la batteria per circa 8 ore per avere un'autonomia di funzionamento di circa 5/8 ore.
Commutare il selettore di accensione (fig.1 rif.2) sulla posizione ON.
Quando l'autonomia della batteria è scarsa, la spia BATT LOW (fig.1 rif.4) lampeggia, sarà necessario
provvedere alla ricarica della batteria collegando la FREE50V3 ad una presa di corrente.
Importante.
Dopo l'uso, spegnere l'unità utilizzando l'interruttore POWER (posizione di
spegnimento: OFF/O). In caso contrario la batteria incorporata continua a funzionare e
potrà subire danni.
La scarica completa delle batterie potrebbe compromettere definitivamente la loro
funzione, pertanto, evitare di portare a scarica completa le batterie durante l’utilizzo,
spegnendo la FREE50V2 non appena il led di carica inizia a lampeggiare.
Nel caso di inutilizzo per lunghi periodi al fine di preservare l’integrità delle batterie
interne è consigliabile ricaricarle ogni tre mesi.
Caricabatteria interno
La FREE50V3 è dotata al suo interno di un caricabatteria di tipo intelligente, il caricabatteria provvede
infatti a mantenere costantemente carica la batteria interna in modo completamente automatico; il
caricabatteria si attiva quando la FREE50V3 viene collegata alla rete elettrica.
Sostituzione della batteria DELLA BATTERIA
L'unità dispone di una batteria 18V7,5 AH. Se usata in modo appropriato può essere ricaricata più di 500
volte.
L'autonomia della batteria dovrebbe arrivare a coprire 5/8 ore di funzionamento. Se la batteria non dura
per più di 5 ore, significa che la batteria è consumata e deve essere sostituita.
La batteria va collegata correttamente: il cavo rosso è positivo, il cavo nero è negativo. Una volta
sostituita la batteria, ricordarsi di riavvitare il coperchio.
Nota: tale operazione dovrebbe essere effettuata da personale esperto. Contattare un centro di
servizio autorizzato o del personale altamente qualificato.
14
PDF Compressor Pro
Ingressi microfonici
Le 2 prese Jack 6,3 mm (fig.1 rif.8) permettono di collegare alla cassa amplificata n° 2 microfoni
dinamici a bassa impedenza, questi possono funzionare contemporaneamente ed in miscelazione con i
due radiomicrofoni a corredo.
Ingresso ausiliario ed uscita di linea
E’ inoltre possibile collegare alla FREE50V3 una sorgente ausiliaria esterna come un lettore CD od un
registratore/riproduttore utilizzando l’apposita presa RCA AUX IN (fig.1 rif.11), l’ampiezza del segnale è
regolata dall’apposito controllo di livello (fig.1 rif.12).
Utilizzando l’uscita AUDIO OUT (fig.1 rif.11) è possibile pilotare un amplificatore esterno od un’altra
cassa amplificata FREE50V3 collegando con un cavo di linea JACK mono/RCA l’uscita linea di una con
l’ingresso linea della seconda.
Uscita Video
L’apparecchio è in grado di riprodurre video in formato DVD. Collegare la presa CVBS (VIDEO OUT
fig.1 rif.10) ad una presa di ingresso video CVBS del monitor utilizzato, settato su ingresso AV.
Per il suo utilizzo, è consigliabile collocare la FREE50V3 in posizione rialzata da terra, in tal caso può
essere installata su di apposito treppiede da pavimento (PA SPSK290BK) innestandolo nella flangia
situata sul fondo della cassa.
Per realizzare le possibili tipologie di collegamento riferirsi ai seguenti schemi:
Connessione di tipo sbilanciata:
Connessione di tipo bilanciata:
Connessione di tipo sbilanciato con jack mono
Connessione RCA
15
PDF Compressor Pro
7. CARATTERISTICHE TECNICHE
Model
Output Power RMS
INPUTS
2 x Microphone
AUX IN
Frequency range (+/- 3dB)
Tone Control
OUTPUTS
Audio OUT
THD distortion
S/N Ratio
Power Supply
FREE50V3
80W
100mV / 600ohm
1V / 1Kohms
80Hz -18KHz
Low/High
Ambient temperature
Dimensions (WxHxD)
Weight
1V / 1Kohms
<0,5% @ (Pnom. 1Kz)
>80 dB
230-117V~-50/60Hz
DC 18V
0 - 40 °C
300 x 400 x 260 mm
18 Kg
RECEIVER
Frequency
Frequency Stability
distorsion
Sensitivity
S/N Ratio
VHF 174-223MHz
<30TBM (quartz)
<0.5
40Hz -15KHz
>90 dB
TRASMITTER
Trasmitter power
Harmonic ratio
Frequency Stability
Modulate
Voltage
Current consuption
<30mW
>45
<30TBM (quartz)
FE3
DC9V
<30mA
La Proel SpA persegue una politica di costante ricerca e sviluppo, di conseguenza si riserva il diritto di apportare miglioramenti ai
prodotti esistenti, senza preavviso e in qualunque momento.
REV.01 - 34/11
16
PDF Compressor Pro
INDEX
1.
2.
3.
4.
5.
6.
7.
IMPORTANT SAFETY INSTRUCTIONS ............................................................................................. 18
DESCRIPTION ..................................................................................................................................... 20
FRONT PANEL – FUNCTIONS AND CONTROL ............................................................................... 20
CD PLAYER- AM/FM TUNER USE AND CONTROL .......................................................................... 21
PALMAR, LAVALIER AND RECEIVERS USE ..................................................................................... 25
CONNECTIONS AND USE OF AMPLIFIED ACOUSTIC CABINET.................................................... 27
TECHNICAL CHARACTERISTICS ...................................................................................................... 29
17
PDF Compressor Pro
1.
IMPORTANT SAFETY INSTRUCTIONS
CAUTION:
To reduce the risk of electric shock do not remove cover (or back panel). No user serviceable parts inside. Refer
servicing to qualified personnel only.
WARNING:
To reduce the risk of fire or electric shock, do not expose this apparatus to rain or moisture.
This symbol is intended to alert the user of the presence of uninsulated dangerous voltage within the product
enclosure that may be of sufficient magnitude to constitute a risk of electric shock to persons.
This symbol is intended to alert the user of the presence of important operating and maintenance (servicing)
instruction in the literature accompanying the appliance. Please carefully read the owner’s manual.
INSTRUCTIONS:
All safety and operating instructions should be read before the product is operated.
Retain these instructions:
All safety and operating instructions should be retained for future reference.
This owner’s manual should be considered as a part of the product and it must accompany it every time, and delivered to the new
user when this product is sold. In this way the new owner will be aware of all the installations, operating and safety instructions.
Heed all warnings:
All warnings on the product and in owner’s manual should be adhered to.
Heed all warnings.
Follow all instructions:
All operating and user’s instructions must be followed.
Sentences preceded by
symbol contain important safety instruction. Please read it carefully.
DETAILED SAFETY INSTRUCTIONS.
Water and moisture:
This apparatus should not be used near water (i.e. bathtub, kitchen sink, swimming pools, etc.)
Ventilation:
This apparatus should be placed in a way that his position doesn’t interfere with correct ventilation. This unit, for example, should
not be placed on a bed, sofa cover o similar surfaces that could cover ventilation openings, or placed in a built-in installation, such
a bookcase or a cabinet that could block air flow trough ventilation openings.
Heat:
This apparatus should be placed away from heat sources, like radiators, heat registers, stoves or other products (including
amplifiers) that produce heat.
Power sources:
•
This apparatus should be connected only to power source type specified in this owner’s manual or on the unit.
•
If the supplied AC power cable plug is different from wall socket, please contact an electrician to change the AC power plug.
Grounding or Polarization:
•
All precautions must be observed in order to avoid grounding or polarization defeating.
•
Unit metal parts are grounded through the AC power cord.
•
If the AC power outlet doesn’t have grounding, consult an electrician for outlet grounding.
Power cord protection:
The power cord should be routed in a way it will not be walked on or pinched by items placed upon or against it, paying particular
attention to cords at plugs, convenience receptacles and wall outlet.
Cleaning:
•
You can clean the unit with a compressed air flow or a wet cloth.
•
Don’t clean the unit using solvents like trichloroethylene, thinners, alcohol, or other fluids with very strong volatility and
flammability.
18
PDF Compressor Pro
Non use periods:
The unit AC power cord should be unplugged from the outlet if it’s unused for a long period.
Objects or liquid entry inside the unit:
Be careful that no objects fall or liquid is spilled inside the unit through ventilation openings.
Safe power line use:
•
Keep firmly the plug and the wall outlet while disconnecting the unit from AC power.
•
When the unit will not be used for a long period of time, please unplug the power cord from AC power outlet.
•
To avoid unit power cord damaging, please don’t strain the AC power cable and don’t bundle it.
•
In order to avoid unit power cord damaging, please be sure that the power cord is not walked on or pinched by heavy objects.
Unit relocation:
Before any unit relocation please control the unit is turned off. The power cord must be unplugged by the wall outlet, and all the
connections wires should be disconnected as well.
Don’t open this unit:
Don’t attempt to open or to repair by yourself this unit. For any problem solution not described in this owner’s manual, please refer
to qualified personnel only or consult us or your National Distributor. Any improper operation could result in fire or electric shock.
Damages requiring services:
•
Don’t attempt to do operations not described in this user’s manual.
•
In the following cases please refer to an authorized maintenance center or skilled personnel:
- When the unit works improperly or it doesn’t work at all.
- If power cord or plug are damaged.
- If liquid has spilled, or objects have fallen into the unit.
- The unit has been exposed to rain.
- The unit doesn’t operate normally o it exhibits a marked change in performance.
- If the product has dropped or it has been damaged in any way.
Maintenance:
The user shouldn’t attempt maintenance operation not described in this user’s manual. Every maintenance operation should be
done by qualified personnel only.
IMPORTANT SAFETY INSTRUCTIONS:
•
Install this unit following owner’s manual instructions.
•
Don’t install, connect or disconnect power supply when the unit is powered, otherwise there’s an high risk of electric shock.
•
Don’t open the unit, there are no user serviceable parts inside.
•
If you detect a particular smell from the unit, please immediately turn it off and disconnect the AC power cord.
•
Don’t block the unit ventilation openings.
•
Avoid using this unit in overload for a long period.
•
Don’t force commands (switches, controls, etc.)
•
To obtain good speakers wire contacts, please tighten the screw terminals firmly.
•
•
•
•
•
•
For safety reason, don’t defeat the grounding connection. Grounding is useful for user safety.
Use only connectors and accessories suggested by the manufacturer. .
This unit should be placed in a rack (see INSTALLATION) and kept far from:
Ü Wet places
Ü Direct exposure to heat sources (like sun light)
Ü Non properly ventilated places
Disconnect the power cord during storms or when the unit is not used.
In order to prevent fire and electric shock risks, it’s necessary to keep the unit far from sprinkling and drops. Please don’t
put cups, vases or other object containing liquids over the unit. In case of interferences from source signal, THD value will
raise over 10%. Don’t place this unit in a bookshelf o in other places with small room.
PROEL S.P.A. is not responsible for any damage that occurs due to a wrong unit installation.
19
PDF Compressor Pro
Thank you for choosing one of Proel products, and for your confidence towards our brand, synonymous of
professionalism, accuracy, high quality and reliability. All our products are CE approved and designed for
continuous use in professional installation systems.
2. DESCRIPTION
FREE50V3 unit is Proel answer to the continuous increase demand of audio autonomous portable
systems. System dedicated to voice and music sound reinforcement in ambient where there is no voltage
power supply source or cable connections difficulties due to length to be covered between the power
source and the unit to be powered.
FREE50V3 is a complete portable amplified system featuring high acoustic performance and is two ways
loudspeakers and 50W RMS amplifier equipped.
Such unit is suitable for voice sound reinforcement during conferences, exhibitions, sportive or religious
events etc.. FREE50V2 is VHF wireless microphone system and quartz equipped to ensure High
frequency stability level to allow orator free movements .
FREE50V3 is CD/DVD/MP3/USB/SD MMD card, AM/FM tuner, three microphone inputs, one AUX input
dedicated to external source one output for recording purposes or for twin acoustic cabinet piloting.
The internal rechargeable battery has been designed to ensure a good operating autonomy whilst the unit
weight has been contained to easy the unit transportable purposes.
FREE50V2 acoustic cabinet is trolley strong extensible handle equipped for portable need whilst the
dedicated flange set on bottom of the unit allows stand floor use.
Main functions:
N° 2 VHF palmar wireless microphone included in the standard unit package.
On request FREE50V3 can be supplied with lavalier microphone.
System 2 ways 8” woofer and 1”tweeter.
Two power supply options: Internal rechargeable battery – 230/117Vca.
CD/MP3/USB/SD MMD card player and AM/FM tuner.
Two microphone inputs , one AUX input and one high level LINE output.
Tone and Master output control.
3. FRONT PANEL – FUNCTIONS AND CONTROL
1 ON/OFF power switch
2 Connection for power supply cable
3 Main voltage value variation
4 Charge function indicator (when the 25% led flashes recharge the batteries)
5 Power On status/ battery discharge indicator
6 CD/DVD/MP3/USB/SD MMD card player – AM/FM tuner
7 VHF wireless microphone receivers module
8 XLR microphone inputs
9 Microphone inputs level control
10 Video Output
11 AUX input and AUDIO output
12 AUX input level control
13 CD/DVD player –Tuner level control
14 MASTER level control
15 Tone control
16 ECHO effect control
17 Connection for DC 18V
fig. 1
20
PDF Compressor Pro
4. CD PLAYER- AM/FM TUNER USE AND CONTROL
fig. 2
21
PDF Compressor Pro
DVD Reader: Operation
1. USB Input
Insert your USB key and press the DISC/USB button (fig. 2, rif. 14) to select USB mode.
2. LCD Screen
When you switch the reader, the LCD screen reads DISC; if there is no DVD/CD inside, the
screen will read NO DISC.
3. Disc Insertion Slot
Whenever the reader is in DISC/USB mode and the display reads NO DISC or CLOSED, you
can insert a disk. No disc can be inserted if the unit is in RADIO mode.
4. POWER
Press this button to switch the unit ON/OFF.
5. MUTE
Press this button to mute the unit; switch it again when you want to unmute it.
6. PLAY/PAUSE
This button works only when the DISC/USB button is pressed. Press it once to pause the
reproduction and press it again if you want to un-pause it.
7. EJECT
When the unit is in DISC/USB mode, press this button to eject disc, and press it again to insert
disc. (if the unit is in RADIO mode, this button does not work).
8. ►►|
When the unit is in DISC/USB mode, press this button to skip to the next track; when the unit
is in FM RADIO mode, press this button to scan frequencies to the next radio station.
9. VOL+
Volume Increase.
10. VOLVolume reduction.
11. |◄◄
When the reader is in DISC/USB mode, press this button to skip to the preceding track; when
the reader is in FM RADIO, press this button to tune to the preceding frequency.
12. RADIO
Press this button to switch from DISC/USB mode to FM RADIO.
13. IR
Remote Control Sensor
14. DISC/USB
Press this button to pass from the RADIO mode to the DISC/USB mode. If there is a disc
inserted and a USB unit connected at the same time, pressing this button switches between
USB mode and DISC mode.
22
PDF Compressor Pro
Remote Control
fig. 3
1. POWER
Press this button to turn the device ON or OFF.
2. MODE
Press this button to select the operating mode, switching between RADIO, USB and DISC.
3. RADIO
Press this button to switch from DISC/USB mode to FM RADIO mode.
4.
/
/
When the device is in DISC/USB mode, if you press the “ ” / “ ” buttons you can skip to the
next/preceding track; if you press the “ ” / “ ” buttons you can fast forward/backward the
disc reproduction. When the device is in FM RADIO mode, press the “ ” / “ ” buttons to scan
up/down the frequency range for more radio stations. Pressing the “ ” “ ” buttons skips
down/up to the next memorized frequency.
5. ENTER
Press this button to confirm the selection made by using the arrows. When looking for a radio
station, if you press the ENTER button once you have found the station you were looking for
the station will be memorized on the current memory number.
6. STOP
In DVD mode, press the STOP button to stop the reproduction.
7. RPT
While playing a track, if you press this button you will have this track played repeatedly.
23
PDF Compressor Pro
8. ST/ PROG
Personalized Programming. In MP3, CD, VCD, DVD mode you can customize the order in
which the tracks on the storage device will be played. Press the PROG button; the TV screen
will show P00:00; use the number keys from 1 to10 to set the playing order, then select
START from the video menu and press ENTER. You can cancel the program by pressing the
STOP button twice.
9. LOC/RDM
In DVD/VCD/CD/MP3 mode, press this button to play the disc tracks at random; in FM RADIO
mode this button activates the local radio stations – LOC – function.
10. ◄◄ / ►►
In DISC/USB mode, press these buttons to skip to the preceding/following tracks. When in FM
RADIO mode, use these buttons to scan the following/preceding frequencies and search for a
different radio station.
11. PBC
In DVD\VCD mode, press the PBC button once to show the disc tracks on the TV screen
(DISC MENU)
12. OSD
In DISC mode, press this button to display the track that is being played and its playing time.
Press it again to show the remaining playing time of the same track.
13. Number keys
Press the number keys to select a track directly. If tracks are more than ten, press the 10+
button, then the number key corresponding to the second digit after ten in the desired track
number. When in DVD/VCD/CD/MP3 mode, press STOP first, then the number key, then
PLAY.
14. GPS
Not available on this reader.
15. Multistage Brightness
Not available on this reader.
16. EJECT
When the device is in DISC/USB mode, press this button to eject the disc and press it again to
insert it anew. (This button does not work while in RADIO mode).
17. PLAY/PAUSE
When in DVD/VCD/CD/MP3 mode, press this button once to pause the reproduction, press it
again to restart it from where you had paused it.
18. MUTE
Press this button once to mute the device; press it again to un-mute it.
19. TITLE/MENU
Press this button to access the disc menu.
Note: a) Available languages are those featured on the disc.
b) Some discs feature only one language.
c) Once the language is selected, the selection appears on the TV screen.
d) Subtitles are available only in DVD mode.
20. SETUP
Press this button to access the video setup menu. Use the arrows (ref. 4 on figure) to navigate
and confrim your choice by pressing ENTER.
21. ANGLE
When in DVD mode, you can use this button to see the different angles of the DVD. It does not
work when in VCD/CD/MP3 mode.
24
PDF Compressor Pro
22. SUB-T
If the disc features subtitles in more than one language, press this button while playing the
disc to change the subtitle language. This button works only if the device is in DVD mode.
23. Multiple Zoom
Press this button to zoom in the image currently on screen.
24. VOL +/Use these buttons to turn the volume up or down.
25. SEL
Not available on this reader.
26. AUDIO
While playing a disc press this button to select the audio type.
27. GO TO
Press this button and select the number of the track you want to play if you want to go directly
to a specific track.
Also, press this button twice followed by the track time (hour/minute/second) if you want to
play a track starting from a specific point in it.
28. LOUD
Not available on this reader.
5. PALMAR, LAVALIER AND RECEIVERS USE
fig.4
fig.5
25
PDF Compressor Pro
1
2
3
4
5
6
Battery compartment
ON/OFF switch
ON microphone status indicator.
When led lights, it indicates, independently
of light colour , the battery discharge
Mute key
Microphone capsule
1
2
3
4
5
6
Microphone compartment
Microphone input connector
Power ON/Stand by switch
when the LED is On the battery is
discharged
Lavalier Microphone
Antenna
Nota: The standards package is including two palmar wireless microphones (fig.3) whilst bodypack (fig.4)
transmitter are optional.
fig.5
1
2
3
4
Antenna
Wireless microphone volume
RF synchronization led indicator
Vu- meter signal in receipt indicator
FREE50V2 is supplied with Two receivers (fig.6) and with two VHF wireless transmitters (fig.4), For use
the necessary steps are as follows:
• Install the two antenna included in the supply in vertical positions (fig.6 ref.1)
• Insert 9V battery correctly in the dedicated compartment (fig.4,5 ref.1)
• Power on the transmitters (fig.4 ref.2 - fig.5 ref.3) and set reproduction volume (fig.6 ref.2) of each
transmitter. Power on the wireless microphone, the relevant RF led will light indicating that the
receiver is synchronized to transmitter frequency range (fig.6 ref.3),While the respective v-meter
(fig.6 rif.4) will visualize on the receiver the relevant wireless audio signal level transmitted.
Nota: On palmar microphone , commuting the selector on position PWR (fig.4 ref.2) the radio
transmitter is powered ON and the range is transmitted. Contemporaneously Power led (fig.4 ref.3)
is activated .Commuting subsequently the selector (fig.4 ref.5) on position ON the audio signal
reported by the microphone is transmitted
Remove batteries in case of long period or non units use.
26
PDF Compressor Pro
6. CONNECTIONS AND USE OF AMPLIFIED ACOUSTIC CABINET
First use
Once the unit unpacked , the battery must be recharged for 8/10 hours before the first use.
The internal battery is charged in the factory but the warehousing purposes can reduce the charge level
and modify charge autonomy duration indication.
FREE50V3 can be used whilst under battery charge operation, AC voltage power supply can ensure
both battery charge and unit operating mode.
Use with mains – A.C. - power
FREE50V3 has been designed for 230-117VCA 50/60Hz main power supply. The unit is supplied with
earth main power supply cable . Use such cable to connect to the main power source setting the
subsequently the power ON commutator on position ON, FREE50V3 is ready to operate powered by the
main power supply source. The main power supply unit is protected by the appropriate fuse located in
the main power supply plug (fig.1 ref.1) .
Always switch the power OFF: it will help the battery to last longer.
The battery starts operating whenever AC stops powering the unit.
Note: Unplug your unit form the mains outlet whenever you plan not to use it for some time.
Remeber to charge the battery before you unplug it.
Use with Internal Battery
Charge the battery for about 8 hours in order to have 5-8 hours of operation.
Switch the power button ON (fig. 1, ref. 2).
When the battery is low, the indicator BATT LOW (fig. 1, ref. 4) flashes. The battery should be
recharged: Connect your FREE50V3 to a mains outlet.
Warning
Always switch OFF the power when you stop using the unit. If you do not, the battery
keeps on working and could be damaged.
The full discharge of the batteries could permanently compromise their functionality,
therefore, avoid to discharge the batteries completely during the use, turning the
FREE50V3 off as soon as the charging led goes on.
In case of long period of unuse it is recommended to recharge them each 3 months to
preserve their integrity.
Internal battery charger
FREE50V3 is internally clever battery charger equipped. Such battery charger ensures automatically a
constant charge level. The battery charter is activated when FREE50V3 unit is connected to a AC main
power supply source.
BATTERY Replacement
This unit features an 18V7AH battery. When properly used, it can be recharged more than 500 times.
The battery should power the unit for 5 to 8 hours. If the battery doesn't last more than 5 hours, it is
probably at the end of its operational life, and needs to be changed.
The battery needs to be correctly connected. Once the battery has been replaced, remember to screw
the battery cover back onto the unit.
Note: This operation should always be carried out by qualified personnel. Contact an
authorized/qualified service center
Microphone inputs
2 XLR combo inputs (fig.1 ref.8) allows to connect to FREE50V3 acoustic cabinet 2 low impedance
dynamic microphones. Such microphones can operate contemporaneously or in miscellaneous with two
wireless microphones included in the standard supply.
Auxiliary input and line output
FREE50V3 can be connected to an auxiliary and external source so as a CD player or
recorder/reproduced using the appropriate AUX IN RCA input (fig.1 rif.11), The signal wideness can be
set throughout level control (fig.1 ref.12).
27
PDF Compressor Pro
Using output AUDIO OUT (fig.1 ref.11) to pilot an external amplifier or other amplified acoustic cabinet
FREE50V3 connecting with JACK mono/RCA line cable the line output of one LINE with the input of the
second line.
Video Output
The apparatus reproduces DVD format. Connect the CVBS output (VIDEO OUT fig.1 rif.10) to CVBS
Monitor Input and set this in AV mode.
FREE50V3 is recommended to be used lifted up from the ground. For such purposes FREE50V3 ,
thanks to its fixing flange, can be set on the floor tripod -part reference (PA SPSK290BK) .
To realize the different possible connections revert to the following schemes:
Unbalanced connection:
Balanced connection:
Jack Mono connection unbalanced:
RCA connection:
28
PDF Compressor Pro
7. TECHNICAL CHARACTERISTICS
Model
Output Power RMS
INPUTS
2 x Microphone
AUX IN
Frequency range (+/- 3dB)
FREE50V2
80W
100mV / 600ohm
1V / 1Kohms
80Hz -18KHz
RECEIVER
Frequency
Frequency Stability
distorsion
Sensitivity
S/N Ratio
VHF 174-223MHz
<30TBM (quartz)
<0.5
40Hz -15KHz
>90 dB
TRASMITTER
Trasmitter power
Harmonic ratio
Frequency Stability
Modulate
Voltage
Current consuption
<30mW
>45
<30TBM (quartz)
FE3
DC9V
<30mA
Proel SpA pursue a policy of continuous research and development. Proel SpA reserve the right to modify product circuitry and
appearance at any moment, without prior notice.
REV.01 - 34/11
29
PDF Compressor Pro
Il prodotto è conforme alla Direttiva 89/336/CEE (Compatibilità Elettromagnetica)
e successive modifiche 92/31/CEE e 93/68/CEE.
The product is in compliance with Directive 89/336/EEC (Electromagnetic Compatibility) and following modifications
92/31/EEC and 93/68/EEC
inoltre, è conforme alla Direttiva 73/23/CEE (Bassa Tensione)
e successive modifiche 93/68/CEE.
it is also in compliance with Directive 73/23/EEC (Low Voltage)
and following modifications 93/68/EEC.
FREQUENZE DISPONIBILI (MHz) DESTINATE ALL’UTILIZZO IN ITALIA:
AVAILABLE FREQUENCIES (MHz) INTENDED FOR USE IN ITALY:
BAND: 174MHz - 223MHz
Con la presente PROEL S.p.A. dichiara che questo sistema radiomicrofonico è conforme ai requisiti essenziali ed alle altre disposizioni pertinenti, stabilite
dalla direttiva 1999/5/CE.
Hereby, PROEL S.p.A. declares that this wireless microphone system complies with the essential requirements and other relevant provisions of Directive
1999/5/EC.
Informarsi con le autorità competenti sulle possibili restrizioni o autorizzazioni necessari prima dell’utilizzo di questo apparecchio a corto raggio.
Consult local or national radio spectrum authorities for information on possible restrictions or necessary authorizations before using this Short Range
Device.
30
PDF Compressor Pro
31
PDF Compressor Pro
PROEL S.p.A
(World Headquarters - Factory)
Via alla Ruenia 37/43
64027 Sant’Omero (Te) – Italy
Tel: +39 0861 81241
Fax: +39 0861 887862
E-mail: [email protected]
www.proel.com
32