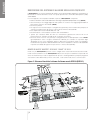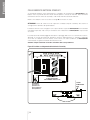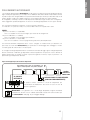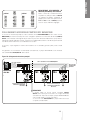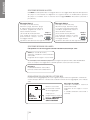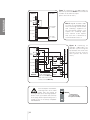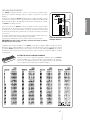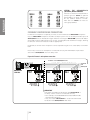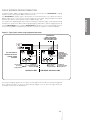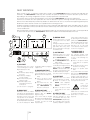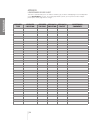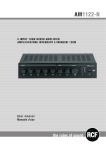
1
SE5120
SE5121
LIFE SAFETY VOICE ALARM SYSTEM
SISTEMA AUDIO PER ANNUNCI D’EMERGENZA
User manual
Manuale d’uso
the rules of sound
ITALIANO
INDICE Note importanti
Descrizione del sistema di allarme vocale SE5120/SE5121
Disposizioni per il cablaggio
Montaggio dell’SE5120/SE5121
Disposizione dei cavi di collegamento
Collegamento alla rete e connessione PSU (Alimentatore)
Collegamento batteria di stand-by
Collegamento altoparlanti
Collegamento interfaccia allarme antincendio
Collegamento microfono pompieri
Collegamento apparecchio PA di annunci
Collegamento apparecchio per musica di sottofondo (BGM)
Cablaggio amplificatore slave
Selezione messaggi evacuazione
Spie guasti
Appendice
Caratteristiche tecniche
2
3
6
9
9
11
13
14
15
16
19
20
21
22
23
25
29
30
CONTENUTO DELL’IMBALLAGGIO
Questo prodotto viene fornito con la seguente dotazione:
• Manuale utente (questo manuale)
• Chiave a brugola, per fissaggio e apertura del coperchio dell’SE5120/SE5121
• Pacchetto di accessori elettrici contenente:
1 x Cavo rosso batteria
1 x Cavo nero batteria
1 x Cavo collegamento batteria
2 x Moduli finali linea altoparlanti
1 x Fusibile alimentazione, di riserva
1 x Fusibile batteria, di riserva
PROGETTAZIONE DEL SISTEMA
Il progetto del sistema di allarme vocale va oltre l’ambito del presente documento. Si presume una
comprensione di base dei componenti generali del sistema di allarme vocale e del loro uso.
Si consiglia vivamente di consultare qualcuno che sia sufficientemente qualificato e competente in
merito al sistema di allarme vocale e di collaudare e prestare assistenza al sistema in conformità
alle specifiche qui esposte ed alle norme nazionali. Il funzionario incaricato o il rappresentante dei
pompieri con competenza sull’immobile deve essere contattato con il dovuto anticipo nel caso
abbia qualche esigenza particolare.
Consigliamo di leggere la norma BS 5839 Parte 8 (1998): Codice della pratica per la progettazione,
l’installazione e l’assistenza di sistemi di allarme vocale e la norma BS EN 60849 (1998): Sistemi
acustici per le emergenze (compresi eventuali successivi aggiornamenti). Tutte e due sono
disponibili presso le librerie oppure possono essere acquistate dal British Standards Institute,
Customer Services Dept., 389 Chiswick High Road, London, W4 4AL. Tel.: +44 (0)20 8996 9001.
Internet: www.bsi-global.com.
GARANZIA
questo apparecchio non è garantito a meno che tutto il sistema non sia installato e collaudato, in
conformità alle norme nazionali citate, da persona o ditta approvata e competente.
3
NOTE IMPORTANTI
ITALIANO
L’installazione e la manutenzione di questo apparecchio devono essere eseguite solo da personale
competente e qualificato.
Questo apparecchio è di Classe 1 e deve avere la MESSA A TERRA.
Questo apparecchio funziona con voltaggi pericolosi presenti all’interno del telaio.
NON lasciare aperto il coperchio durante il normale funzionamento.
ITALIANO
IMPORTANTE
Prima di collegare ed utilizzare questo prodotto, leggere attentamente le istruzioni contenute in
questo manuale, il quale è da conservare per riferimenti futuri. Il presente manuale costituisce parte
integrante del prodotto e deve accompagnare quest’ultimo anche nei passaggi di proprietà, per
permettere al nuovo proprietario di conoscere le modalità d’installazione e d’utilizzo e le avvertenze
per la sicurezza.
L’installazione e l’utilizzo errati del prodotto esimono la RCF S.p.A. da ogni responsabilità.
ATTENZIONE: Per prevenire i rischi di fiamme o scosse elettriche, non esporre mai questo prodotto
alla pioggia o all’umidità (salvo il caso in cui sia stato espressamente progettato e costruito per l’uso
all’aperto).
AVVERTENZE PER LA SICUREZZA
1. Tutte le avvertenze, in particolare quelle relative alla sicurezza, devono essere lette con
particolare attenzione, in quanto contengono importanti informazioni.
2.1 ALIMENTAZIONE DIRETTA DA RETE
a)
b)
c)
d)
e)
La tensione di alimentazione dell’apparecchio ha un valore sufficientemente alto da costituire
un rischio di folgorazione per le persone: non procedere mai all’installazione o connessione
dell’apparecchio con l’alimentazione inserita.
Prima di alimentare questo prodotto, assicurarsi che tutte le connessioni siano corrette e che la
tensione della vostra rete di alimentazione corrisponda a quella di targa dell’apparecchio,
in caso contrario rivolgetevi ad un rivenditore RCF.
Le parti metalliche dell’apparecchio sono collegate a terra tramite il cavo di alimentazione.
Nel caso la presa di corrente utilizzata per l’alimentazione non fornisca il collegamento con la
terra, contattare un elettricista qualificato, che provvederà a connettere a terra l’apparecchio
tramite l’apposito morsetto.
Accertarsi che il cavo di alimentazione dell’apparecchio non possa essere calpestato o
schiacciato da oggetti, al fine di salvaguardarne la perfetta integrità.
Per evitare il rischio di shock elettrici, non aprire mai l’apparecchio: all’interno non vi sono
parti che possono essere utilizzate dall’utente.
2.2 ALIMENTAZIONE TRAMITE ALIMENTATORE ESTERNO
a)
b)
c)
Alimentare il prodotto utilizzando solo l’alimentatore dedicato; verificare che alla tensione
della vostra rete corrisponda quella di targa dell’alimentatore e che il valore ed il tipo
(continua o alternata) di tensione d’uscita dello stesso corrisponda a quella d’ingresso
del prodotto, in caso contrario rivolgersi ad un rivenditore RCF; verificare inoltre che
l’alimentatore non sia stato danneggiato da eventuali urti o sovraccarichi.
La tensione di rete, alla quale è connesso l’alimentatore, ha un valore sufficientemente alto da
costituire un rischio di folgorazione per le persone: prestare attenzione durante la connessione
alla rete (es. non effettuarla con le mani bagnate) e non aprire mai l’alimentatore.
Accertarsi che il cavo dell’alimentatore non sia o possa essere schiacciato da altri oggetti
(prestando particolare attenzione alla parte del cavo vicino alla spina ed al punto dove questo
esce dall’alimentatore).
3. Impedire che oggetti o liquidi entrino all’interno del prodotto, perché potrebbero causare un corto circuito.
4. Non eseguire sul prodotto interventi / modifiche / riparazioni se non quelle espressamente
descritte sul manuale istruzioni.
Contattare centri di assistenza autorizzati o personale altamente qualificato quando:
• l’apparecchio non funziona (o funziona in modo anomalo);
• il cavo di alimentazione ha subito gravi danni;
• oggetti o liquidi sono entrati nell’apparecchio;
• l’apparecchio ha subito forti urti.
5. Qualora questo prodotto non sia utilizzato per lunghi periodi, togliere la tensione dal cavo di
alimentazione (o scollegare l’alimentatore esterno).
4
ITALIANO
6. Nel caso che dal prodotto provengano odori anomali o fumo, spegnerlo immediatamente e
togliere la tensione dal cavo di alimentazione (o scollegare l’alimentatore esterno).
7. Non collegare a questo prodotto altri apparecchi e accessori non previsti.
Quando è prevista l’installazione sospesa, utilizzare solamente gli appositi punti di ancoraggio e
non cercare di appendere questo prodotto tramite elementi non idonei o previsti allo scopo.
Verificare inoltre l’idoneità del supporto (parete, soffitto, struttura ecc., al quale è ancorato il prodotto)
e dei componenti utilizzati per il fissaggio (tasselli, viti, staffe non fornite da RCF ecc.) che devono
garantire la sicurezza dell’impianto / installazione nel tempo, anche considerando, ad esempio,
vibrazioni meccaniche normalmente generate da un trasduttore.
Per evitare il pericolo di cadute, non sovrapporre fra loro più unità di questo prodotto, quando
questa possibilità non è espressamente contemplata dal manuale istruzioni.
8. La RCF S.p.A. raccomanda vivamente che l’installazione di questo prodotto sia eseguita
solamente da installatori professionali qualificati (oppure da ditte specializzate) in grado di
farla correttamente e certificarla in accordo con le normative vigenti.
Tutto il sistema audio dovrà essere in conformità con le norme e le leggi vigenti in materia di
impianti elettrici.
9. Sostegni e Carrelli
Se previsto, il prodotto va utilizzato solo su carrelli o sostegni consigliati dal produttore. L’insieme
apparecchio-sostegno / carrello va mosso con estrema cura. Arresti improvvisi, spinte eccessive e
superfici irregolari o inclinate possono provocare il ribaltamento dell’assieme.
10. Vi sono numerosi fattori meccanici ed elettrici da considerare quando si installa un sistema
audio professionale (oltre a quelli prettamente acustici, come la pressione sonora, gli angoli di
copertura, la risposta in frequenza, ecc.).
11. Perdita dell’udito
L’esposizione ad elevati livelli sonori può provocare la perdita permanente dell’udito. Il livello di
pressione acustica pericolosa per l’udito varia sensibilmente da persona a persona e dipende dalla
durata dell’esposizione. Per evitare un’esposizione potenzialmente pericolosa ad elevati livelli di
pressione acustica, è necessario che chiunque sia sottoposto a tali livelli utilizzi delle adeguate
protezioni; quando si fa funzionare un trasduttore in grado di produrre elevati livelli sonori è
necessario indossare dei tappi per orecchie o delle cuffie protettive.
Consultare i dati tecnici contenuti nel manuale istruzioni per conoscere la massima pressione sonora
che il diffusore acustico è in grado di produrre.
NOTE IMPORTANTI
Per evitare fenomeni di rumorosità indotta sui cavi che trasportano segnali dai microfoni o di LINEa
(per esempio 0dB), usare solo cavi schermati ed evitare di posarli nelle vicinanze di:
• apparecchiature che producono campi elettromagnetici di forte intensità
(per esempio trasformatori di grande di potenza);
• cavi di rete;
• LINEe che alimentano altoparlanti.
PRECAUZIONI D’USO
• Non ostruire le griglie di ventilazione dell’unità. Collocare il prodotto lontano da fonti di calore
e garantire la circolazione dell’aria in corrispondenza delle griglie di aerazione.
• Non sovraccaricare questo prodotto per lunghi periodi.
• Non forzare mai gli organi di comando (tasti, manopole ecc.).
• Non usare solventi, alcool, benzina o altre sostanze volatili per la pulitura delle parti esterne dell’unità.
5
ITALIANO
DESCRIZIONE DEL SISTEMA DI ALLARME VOCALE SE5120/SE5121
Il SE5120/SE5121 è un sistema modulare di allarme vocale di alta qualità studiato per semplificare la
fornitura di un sistema di allarme vocale che rispetti pienamente le norme BS 5839 parte 8 (1998)
ed EN 60849.
In un solo apparecchio compatto installabile a parete, l’SE5120/SE5121 comprende:
• Interfacce d’allarme antincendio tradizionale ed analogica (ApolloXP95/Xplorer/Discovery) (SE5120).
• Una memoria per messaggi digitali di alta qualità che contiene messaggi programmabili di
Evacuazione, Allerta e di Collaudo (SE5120).
• Un mixer a priorità.
• Tre ingressi line level bilanciati per il collegamento (opzionale) di un microfono dei pompieri, di
una base microfonica per gli annunci e di una fonte di musica di sottofondo.
• Due amplificatori Classe D da 60 Watt rms cad.
• Un alimentatore e carica batteria conforme alla norma EN54-4.
• Spazio per 2 batterie VRLA da 7Ah che normalmente garantiscono almeno 24 ore di
funzionamento in “stand-by” più 30 minuti con allarme in funzione.
• Un’uscita “slave line level” che permette il collegamento fino a 10 amplificatori “slave” SE5121
(gli amplificatori “slave” vengono normalmente utilizzati per estendere la copertura degli
altoparlanti in zone come magazzini di grosse dimensioni; permettono inoltre una maggiore
flessibilità nella separazione della distribuzione di annunci al pubblico e di musica di sottofondo
in quanto sono dotati di ingressi loro per annunci e musica di sottofondo).
GRUPPI DI UNITÀ “MASTER” SE 5120 E “SLAVE” SE 5121
Il fatto che più SE5120/SE5121 possano essere collegati ad un sistema di rilevamento antincendio,
rende il sistema di allarme vocale SE5120/SE5121 l’ideale non solo per le installazioni semplici ad una
zona, ma virtualmente per tutte le applicazioni di piccola e media grandezza (compresi progetti di
evacuazione a fasi differenziate) in zone come uffici, centri commerciali, hotel e centri ricreativi.
Figura 1: Schema a blocchi del sistema di allarme vocale SE5120 (SE5121).
6
La funzione principale del sistema di allarme vocale della famiglia RCF-SE è quello di generare
messaggi vocali chiari e comprensibili per allertare le persone sulla presenza di un incendio. Ciò
avviene normalmente dietro comando di un sistema di rilevamento antincendio.
Quando l’SE5120 riceve un comando dal sistema di rilevamento antincendio, reagisce riproducendo
un messaggio appropriato (Evacuazione, Allerta o Collaudo) tra quelli presenti nella memoria dei
messaggi digitali. Il messaggio viene amplificato e diffuso nei locali dagli altoparlanti del sistema.
Sono inoltre previsti tre ingressi “line level” bilanciati per il collegamento di apparecchi come un
microfono pompieri (all’Ingresso Fire Mic) per permettere annunci di istruzioni dal vivo da parte dei
servizi d’emergenza, apparecchi per annunci PA (es. basi microfoniche all’Ingresso Paging) ed una
sorgente di musica di sottofondo, es. un lettore CD o una radio (all’Ingresso BGM).
Gli ingressi Paging e BGM hanno attenuatori in modo da poter utilizzare una vasta gamma di livelli
del segnale d’ingresso. Il volume di ognuno dei quattro canali audio (memoria messaggi digitali,
fire mic., paging e BGM) può essere impostato tramite i quattro comandi di livello interni dell’SE5120
(SE5121).
Se si attivano allo stesso tempo più ingressi e/o gli inneschi dei messaggi digitali, il mixer a priorità
dell’SE5120 (SE5121) assicura che venga diffuso solo il segnale audio più urgente, come indicato
nella tabella seguente:
PRIORITÀ
1
2
3
4
DESCRIZIONE
Microfono pompieri
Messaggi di Evacuazione, Allerta o Collaudo
(quello di Evacuazione esclude l’Allerta e quello di Allerta esclude il Collaudo)
Microfono/i di annunci/PA
Sorgente/i di musica di sottofondo
L’INTERFACCIA D’ALLARME ANTINCENDIO DELL’RCF-SE
Il sistema di rilevamento antincendio può essere collegato all’SE5120 tramite tre ingressi d’innesco
polarizzati, isolati otticamente: Evacuazione (M1), Allerta (M2) e Collaudo (M3). Questi ingressi
controllano la memoria dei messaggi digitali dell’SE5120 e si attivano quando arriva loro una tensione
a 24V DC (se non è disponibile una tensione esterna, c’è un collegamento locale a 24V DC che
funge da interruttore sugli ingressi sotto il controllo del sistema di rilevamento antincendio). Tutti gli
ingressi hanno un livello di priorità in base al messaggio che innescano e possono essere impostati
per funzionamento “autoritenuto” (latching) o “momentaneo” (non-latching) tramite un collegamento
interno.
Quando vengono impostati su “autoritenuto” (come disposto dalla norma BS5839-8), i messaggi si
ripetono continuamente fino a che non si impone un ingresso o un messaggio a priorità superiore
oppure l’apparato non viene resettato (RES). Quando invece vengono impostati per funzionamento
sbloccato, i messaggi terminano quanto viene a meno l’attivazione sull’ingresso (controllare con le
autorità competenti, prima dell’installazione, che ciò sia permesso). Questa caratteristica permette
che sistemi di rilevamento antincendio senza “reset” possano ugualmente pilotare l’SE5120.
NB: L’SE5120 non accetta segnali acustici intermittenti come Allerta – tutti gli inneschi devono
essere continui.
L’SE5120 può anche essere collegato direttamente, tramite il suo ingresso LOOP a qualsiasi loop
d’allarme antincendio analogico indirizzabile di tipo Apollo protocollo XP95, Discovery o Xplorer.
Quando è collegato in questo modo, l’SE5120 emula un modulo di controllo acustico Apollo e gli
deve essere assegnato un indirizzo singolo (e opzionalmente di ‘gruppo’) utilizzando i due DIP
switch previsti per permettergli di essere riconosciuto dal loop analogico. Una volta indirizzato, il
sistema risponde al pannello comandi del dispositivo attivando il proprio messaggio di Evacuazione
quando riceve un comando acustico continuo ed il messaggio di Allerta quando riceve un comando
acustico intermittente. Segnala inoltre qualsiasi condizione di guasto al loop analogico come guasto
7
ITALIANO
FUNZIONAMENTO
ITALIANO
generale lasciando al sistema di rilevamento antincendio di indicare il punto del guasto.
Anche se il protocollo analogico dell’Apollo non comprende uno stato di collaudo nella sua
configurazione bit, alcuni sistemi di rilevamento antincendio, come quelli che utilizzano un pannello
incendio C-TEC AFP, hanno un modello bit “collaudo” compreso nel loro software. Quando è così,
la funzione “abilita collaudo” RCF-SE permette ai sistemi di rilevamento antincendio compatibili di
mettere l’SE5120/SE5121 in collaudo – vedi i dati di compatibilità nell’Appendice 1.
Se necessario, l’interfaccia convenzionale d’allarme antincendio RCF-SE (cioè i suoi inneschi M1,
M2 e M3) e la sua interfaccia analogica (cioè il suo ingresso LOOP) possono essere utilizzate
contemporaneamente. Se vengono inviati dei comandi in conflitto, il messaggio a priorità superiore
esclude sempre gli altri.
MONITORAGGIO
Nel rispetto delle attuali norme di sicurezza salvavita Britanniche e Europee, le linee dei diffusori
SE5120/SE5121, l’alimentazione, le batterie, il microfono pompieri e la memoria dei messaggi digitali
sono monitorati contro cortocircuiti, circuiti aperti, dispersioni verso massa, scarico, disconnessione e
corruzione dei dati a seconda dei casi.
I segnali non critici come gli annunci PA e la musica di sottofondo non sono monitorati e, nel caso di
mancanza di tensione di rete, vengono automaticamente spenti per salvaguardare la durata delle batterie.
Ciò contribuisce all’ottima capacità di funzionamento in “stand-by” dell’SE5120/SE5121 – normalmente 24
ore (più 30 minuti di funzionamento in allarme) utilizzando 2 batterie VRLA da 7Ah.
Se il sistema è cablato correttamente, come mostrato nel presente manuale, un guasto nell’SE5120/
SE5121 è segnalato al sistema di rilevamento antincendio al quale è collegato, mentre maggiori
dettagli sul guasto vengono segnalati sul pannello frontale dell’SE5120/SE5121 stesso.
SELEZIONE MESSAGGI DIGITALI
Tutti i messaggi digitali dell’SE5120 sono memorizzati in formato MP3 su una scheda di memoria
fissa monitorata, collegata direttamente sulla scheda madre dell’SE5120.
Il contenuto di tali messaggi può essere modificato per essere adattato ad ogni applicazione tramite
una serie di collegamenti interni. Per esempio, il messaggio Evacuazione può essere configurato
per dire che ‘si è creata una situazione’ o che ‘è stato segnalato un incendio’ e, se è il caso, per
avvertire le persone di non utilizzare gli ascensori.
AMPLIFICATORE E CIRCUITO DIFFUSORI
Il sistema SE sia nella configurazione master (SE5121) che slave(SE5121) viene fornito con un minimo
di due amplificatori separati di Classe D da 60W (A e B). Questi pilotano i due circuiti di altoparlanti
dell’SE5120/SE5121 attraverso trasformatori con uscita 100V.
Sui terminali dell’ultimo altoparlante di ogni circuito deve essere collegato un dispositivo finale (“end
of line”) e tutti e due i circuiti devono essere calibrati al momento del collaudo utilizzando il tasto di
calibratura del dispositivo per garantire un corretto monitoraggio.
CONFIGURAZIONE A PIÙ SE5120/SE5121
Non ci sono limiti al numero di (SE5120) master utilizzabili per ogni sistema. Notare però che il microfono
pompieri BM 5001WM può essere collegato in cascata con un massimo di 10 master (SE5120).
Per aumentare la copertura acustica in aree come magazzini, ecc., si possono collegare ad un
master fino a 10 slave.
Gli “slave” SE5121 ripetono tutti i messaggi digitali ed il segnale del microfono pompieri originati dal
master al quale sono collegati. Sono inoltre dotati dei loro ingressi per annunci e BGM. Se, quindi,
vengono utilizzati più SE5120 master e/o SE5121 slave, si possono facilmente ottenere annunci e
musica di sottofondo differenziati per area.
8
Tutto il cablaggio del sistema deve essere effettuato in conformità alle appropriate parti delle
norme BS5839-8 (1998), BS EN 60849 (1998) e BS 7671 (Regolamento di cablaggio). Quando
applicabili, vanno rispettate le ulteriori norme nazionali di installazione.
Nel rispetto del regolamento EMC (Electro Magnetic Compatibilità) e per ridurre il rischio di
interferenze elettriche nel cablaggio del sistema, si consiglia di utilizzare, in tutta l’installazione, cavi
antincendio (schermati per segnali; con fili intrecciati per linee altoparlanti).
Tutti i cavi devono entrare nel corpo dell’apparecchio tramite i fori previsti e devono essere fissati
bene sui relativi morsetti. Per una descrizione sommaria dei collegamenti necessari per l’interfaccia
allarme antincendio, altoparlanti, microfono pompieri, apparecchiature di annunci/musica di
sottofondo ed amplificatori slave, vedere le relative sezioni più avanti nel presente manuale (vedi
Indice a pag. 2).
Notare che è essenziale fissare bene i passacavi e va prestata la debita attenzione a qualsiasi
specifica di sistema che richieda un certo tipo di cavo (ammesso che questo rispetti gli appropriati
regolamenti nazionali di cablaggio).
MONTAGGIO DELL’SE5120/SE5121
Il corpo dell’RCF-SE può essere montato esternamente o a semi-incasso (vedi pag. 11). E’ dotato di
coperchio metallico incernierato e di scatola di sostegno in metallo che contiene tutta l’elettronica
del sistema. Per proteggere l’elettronica dai possibili danni durante l’installazione, tutte le schede
elettroniche dell’SE5120/SE5121 (tranne quella delle spie montata sul coperchio) sono situate su un
telaio amovibile, come illustrato nella figura 1 qui sotto.
L’apparecchio deve essere posto all’interno in un’area non soggetta a condizioni che possano
comprometterne le prestazioni, come per es.: umidità, salsedine, introduzione d’acqua, temperature
estreme, pericolo di urti, ecc. Andrebbe situato ad un’altezza che lo renda facilmente accessibile ed
in una posizione prominente all’interno dell’edificio. Idealmente, le spie sul frontale dell’apparecchio
dovrebbero essere ad altezza d’occhi.
Figura 1: L’apparecchio SE5120/SE5121 aperto
FASCETTA MESSA A TERRA TELAIO
FASCETTA DI MESSA A
TERRA COPERCHIO
INDICATORE
SCHEDA
PL2
SCHEDA
AMPLIFICATORE
PL1
PL6
CAVI DI COLLEGAMENTO
COPERCHIO/BASE
SCHEDA
MADRE
scheda
memoria
messaggi
digitali
SCHEDA
ALIMENTATORE
PL5
PIASTRA TELAIO
9
ITALIANO
DISPOSIZIONI PER IL CABLAGGIO
ITALIANO
RIMOZIONE DEL COPERCHIO E DELLA PIASTRA DEL TELAIO
Per scoprire tutti i fori di montaggio della base dell’SE5120/SE5121, occorre rimuovere, prima
dell’installazione, il coperchio e la piastra del telaio dall’apparecchio.
CARICHE ANTI STATICHE: Prima di maneggiare qualsiasi componente interno dell’SE5120/SE5121,
occorre liberarsi delle cariche elettrostatiche toccando per un attimo qualsiasi collegamento a terra
come per es. un radiatore.
PER RIMUOVERE IL COPERCHIO:
• Svitare le due viti sul lato destro dell’SE5120/SE5121 con la chiave a brugola
in dotazione.
• Aprire il coperchio di 180° verso sinistra e rimuovere la fascetta di messa a
terra del coperchio dalla connessione a terra della base (assicurarsi di non
forzare le cerniere).
• Scollegare i cavi di collegamento coperchio/base (PL6 e PL5) dalla scheda
madre. Assicurarsi di premere la linguetta di bloccaggio del connettore (tipo
RJ) per non danneggiarlo.
• Rimuovere con attenzione i quattro dadi alettati e le rondelle che fissano le
cerniere.
PER RIMUOVERE LA PIASTRA DEL TELAIO:
• Verificare che l’alimentazione all’SE5120/SE5121 sia stata tolta e che la Scheda
dell’alimentatore sia sicura da toccare (vedi pag. 13).
• Togliere la fascetta di messa a terra dal connettore a forcella del punto di
massa della base.
• Togliere tutte le viti di fissaggio della piastra del telaio ad eccezione delle due
viti inchiavettate nella parte superiore della piastra del telaio che vanno solo
allentate di circa tre giri.
• Spingere in alto la piastra del telaio e sopra le due viti inchiavettate.
Ora si possono rimuovere sia il coperchio che la piastra del telaio per evitare danni accidentali
durante il fissaggio del corpo. Riporli in un luogo pulito ed asciutto al riparo da vibrazioni, polvere
ed eccessivo calore.
10
ITALIANO
DISPOSIZIONE DEI CAVI DI COLLEGAMENTO
Tutti i cavi con segnali che entrano nell’apparecchio devono essere tenuti separati dalle linee a 100V
dei diffusori e dai cavi che portano la corrente. Vedere la Fig. 2 (sotto) per una migliore comprensione
e per importanti informazioni su come rimuovere i coprifori dell’apparecchio. Assicurarsi sempre
che se un foro viene aperto, vi venga montato un passacavo di buona qualità. Tutti i fori non utilizzati
devono restare chiusi.
Figura 2: Dislocazione dei fori per l’ingresso dei cavi e dettagli sulla rimozione dei coprifori
Portare la corrente
all’interno
dell’apparecchio tramite
uno di questi fori da
aprire.
Le batterie di scorta dell’SE5120/
SE5121 vanno alloggiate sulla
destra di questa area ombreggiata
– assicurarsi di lasciarla libera.
I coprifori vano rimossi
con un colpo secco sul
bordo del copriforo
utilizzando un cacciavite
piatto largo 6 mm.
FISSAGGIO DELLA BASE ALLA PARETE
Sfruttando i cinque fori di montaggio previsti (vedi Fig. 3 sotto), fissare la base in modo sicuro alla
parete. I fori di montaggio sono adatti per viti svasate da 8-10 e 4-5mm.
Valutare le condizioni e la costruzione della parete ed utilizzare dei tasselli adatti.
Polvere e sfridi creati durante il fissaggio vanno tolti completamente dall’apparecchio e va prestata
inoltre grande attenzione a non danneggiare cavi o componenti.
Figura 3: Vista interna della scatola di sostegno con le PCB (schede) rimosse / vista laterale per montaggio
ad incasso
ATTENZIONE
Se si montano più SE5120/SE5121
uno vicino all’altro, lasciare uno
spazio di almeno 80mm tra le
basi per permettere l’apertura dei
coperchi.
PARETE
11
ITALIANO
COLLEGAMENTO DEL PANNELLO DELL’RCF-SE
Il collegamento alle connessioni interne dell’SE5120/SE5121 è bene sia eseguito immediatamente prima
del collaudo dopo aver rimontato il coperchio, la piastra del telaio, il cavo di collegamento coperchio
base e le fascette di messa a terra eseguendo all’inverso la procedura descritta a pag. 10.
Prima di collegare qualsiasi cavo alle schede, si consiglia di verificare tutti gli apparecchi accessori
(altoparlanti, microfono pompieri, pannelli di annunci, sorgenti di musica di sottofondo, ecc.) per
assicurarsi che non abbiano problemi e di verificare inoltre l’integrità dei cavi in tutta l’installazione.
E’ essenziale che i cavi e gli altoparlanti siano testati con un audiometro o un ohmmetro per
assicurarsi che la potenza totale del carico collegato su ogni canale dell’SE5120/SE5121 non superi
i 60 Watt (non meno di 167 Ohm) ad 1 kHz. Vedi pag. 15 per importanti informazioni sul carico dei
circuiti degli altoparlanti.
NON utilizzare un tester con isolamento per alte tensioni con nessuno degli apparecchi elettronici
collegati.
12
ITALIANO
COLLEGAMENTO ALLA RETE E DATI DI CONNESSIONE
Il requisito generico di fornitura di corrente all’alimentatore dell’SE5120 o SE5121, è da impianto fisso
con un cavo a tre fili (non inferiore a 1mm2 e non superiore a 2,5mm2) o un sistema a tre conduttori e
con derivazione da scatola con interruttore e fusibile da 3A. Tale derivazione deve essere messa in
sicurezza contro interventi non autorizzati e riportare la dicitura “SISTEMA DI ALLARME VOCALE: NON
SPEGNERE”. L’alimentazione deve essere riservata all’apparecchio.
(In alternativa alla derivazione con interruttore e fusibile, si può utilizzare un dispositivo d’isolamento
a due poli (vedi diagramma sotto) ammesso che rispetti i regolamenti nazionali di cablaggio).
PANNELLO
PRINCIPALE DI
DISTRIBUZIONE
SE5120
SE5121
NON effettuare il collegamento dell’SE5120/SE5121 alla rete senza essere pienamente a conoscenza
dello schema e delle caratteristiche dell’alimentatore, descritte di seguito.
L’alimentatore combina in sé le funzioni di un’unità d’alimentazione a interruttore rete/DC, carica
batteria e unità di monitoraggio delle batterie.
L’ALIMENTATORE E’ ATTRAVERSATO DA TENSIONI FINO A 400V DC E PUO’ ESSERE LETALE
SE VIENE TOCCATO. NON TOCCARE L’ALIMENTATORE QUANDO E’ ACCESA LA SPIA ROSSA
“PRESENZA DI TENSIONI PERICOLOSE”.
FASCETTA DI MESSA A TERRA
DELL’UNITÀ
Il cavo di rete deve
essere separato da
altri cavi e deve entrare
nell’apparecchio solo
tramite uno dei fori sul
lato destro. Vanno montati
passacavi di buona
qualità.
Il conduttore di terra del
cavo di rete DEVE essere
collegato al morsetto
marcato
e non al
telaio o al punto di massa
della base.
NON
utilizzare
l’SE5120/SE5121
senza la sua fascetta di messa a
terra collegata in questa esatta
configurazione (la fascetta di messa a
terra dell’unità dell’alimentatore (PSU)
collega la scheda dell’alimentatore
(PCB) al punto di massa del telaio
che a sua volta è collegato al punto
di massa della base).
SPIA PRESENZA TENSIONI PERICOLOSE
Quando è accesa la luce rossa, sono presenti
tensioni pericolose sui componenti compresi
nell’area tratteggiata della scheda. Certi
componenti sono sotto tensione pericolosa
durante il funzionamento fino a quando
l’alimentazione di rete non è più presente.
Quando la luce rossa si spegne, non vi sono
tensioni pericolose.
FUSIBILE PRIMARIO (F1)
20 x 5mm 1A HRC
Ceramica - IEC 127
(EN60127 Parte 2). In
questa posizione non
utilizzare fusibili di nessun
altro tipo o dimensione.
ATTACCO CAVO BATTERIA
(i cavi delle batterie sono comprese
nel pacchetto accessori dell’SE5120/
SE5121). Vedi pag. 14 per la
posizione delle batterie ed i dettagli
di collegamento.
FUSIBILE BATTERIA (F2)
20 X 5MM 5A F – IEC
127 (EN60127 Parte 2).
In questa posizione non
utilizzare fusibili di nessun
altro tipo o dimensione.
Figura 4
13
ITALIANO
COLLEGAMENTO BATTERIA STAND-BY
Si consiglia di utilizzare come alimentazione in “stand-by” di emergenza per l’SE5120/SE5121, due
batterie nuove al piombo da 7Ah 12V, di buona qualità e caricate al massimo. Esse forniranno
normalmente almeno 24 ore di “stand-by” e 30 minuti di funzionamento dell’allarme.
Notare che le batterie sono necessarie su tutti gli SE sia master che slave.
ATTENZIONE: Al fine di evitare rischi di esplosione o ridotto tempo di “stand-by” del sistema si
consiglia di non utilizzare altri tipi di batteria.
Le batterie devono essere collegate in serie e poste dentro il corpo dell’SE5120/SE5121 come illustrato
nella figura 5 qui sotto. Tutti i cavi per le batterie sono in dotazione all’SE5120/SE5121 nel pacchetto
accessori.
La sofisticata unità di monitoraggio delle batterie le protegge dall’essere eccessivamente scariche,
attivando un circuito di isolamento quando la tensione d’alimentazione in “stand-by” raggiunge
circa i 21V. Se le batterie non sono inserite, sono scariche o in cattive condizioni, sull’SE5120/SE5121
verrà mostrato un guasto all’unità di alimentazione PSU.
Smaltire sempre le batterie secondo le istruzioni della casa produttrice.
Figura 5: Posizione e collegamento delle batterie di stand-by
METTERE LE BATTERIE
IN QUESTA POSIZIONE
(CON I TERMINALI VERSO L’ALTO)
lasciare libera
quest’area per
permettere una
buona ventilazione
dell’amplificatore
14
SCHEDA
ALIMENTATORE
I circuiti degli altoparlanti dell’SE5120/SE5121 (A e B) hanno una potenza nominale di 60 watt ognuno.
Ogni circuito può sopportare, per esempio, fino a 10 diffusori da 6 watt o 20 da 3 watt o 40 da 1,5 watt.
In pratica si possono collegare diffusori con potenza diversificata per circuito (cioè due da 6 watt, sei da
3 watt e 20 da 1,5 watt). Ciò è fattibile ammesso che l’assorbimento totale non superi i 60 watt.
E’ consigliabile, comunque, lasciare un 20% di potenza inutilizzata su ogni circuito come consigliano in
molti. Suggeriamo pertanto di applicare un carico sui circuiti degli altoparlanti che non superi i 50 watt.
Per convertire l’impedenza in potenza, si usa la seguente equazione:
P = V2/Z dove P = potenza in watt, V = tensione RMS in Volt e Z = impedenza in Ohm
ESEMPI:
1. per Z = 167 Ohm, P = 59,88 Watt
Così è accettabile ma non lascia margine per l’aumento di collegamenti.
2. per Z = 200 Ohm, P = 50 Watt
Così è accettabile e lascia margine per modifiche
3. per Z = 150 Ohm, P = 66,67 Watt
Così non è accettabile e causa lo spegnimento (protezione) dell’amplificatore.
Sui terminali dell’ultimo altoparlante deve essere collegato un modulo finale (in dotazione nel
pacchetto accessori dell’SE5120/SE5121) per permettere il monitoraggio del cablaggio e rilevare
eventuali guasti di cortocircuito o circuito aperto.
Si consiglia l’uso degli altoparlanti idonei conformi alle normative di legge vigenti. Tutti gli altoparlanti
devono funzionare a 100 Volt; gli altoparlanti a bassa impedenza non possono essere utilizzati. A
pagina 29 forniamo un modulo nel quale si possono registrare il numero, il tipo, la posizione e la
potenza di ogni altoparlante utilizzato.
Figura 6: Cablaggio tipico del circuito di altoparlanti
Ogni diffusore deve avere un trasformatore con
ingresso 100V, impostato alla potenza adeguata.
UNITÀ DI
CONTROLLO
“END OF LINE”
AL CIRCUITO
DIFFUSORI B
NON COLLEGARE SU LINEA DERIVATA
(CABLAGGIO NON MONITORATO)
E’ pratica comune utilizzare 2 circuiti di altoparlanti per
massimizzare la distribuzione del suono nel caso che uno di
questi si guastasse.
IMPORTANTE - Per garantire che i circuiti degli altoparlanti vengano monitorati
correttamente, devono essere calibrati utilizzando il tasto SW1 sulla Scheda spie
dell’SE5120/SE5121. Vedi pag. 16 per maggiori dettagli.
15
ITALIANO
COLLEGAMENTO ALTOPARLANTI
ITALIANO
CALIBRATURA DEI CIRCUITI
I circuiti degli altoparlanti dell’SE5120/SE5121 sono monitorati dalla generazione di un tono costante
a 20kHz (che percorre le linee dei diffusori).
Ogni dispositivo finale dei circuiti assorbe il segnale del tono la cui corrente è regolarmente misurata
rispetto a quella impostata inizialmente (il valore normale).
Per memorizzare il valore normale, il tecnico del collaudo deve attivare la funzione di calibratura
degli altoparlanti dell’SE5120/SE5121. Quest’operazione va fatta solo quando tutti e due i circuiti sono
completi (cioè quando tutti gli altoparlanti sono collegati e debitamente regolati in potenza).
Per dare inizio alla procedura di calibratura, premere e tenere premuto il tasto di calibratura (SW1)
sulla scheda (PCB) delle spie. La spia (IND1) sulla scheda madre lampeggia lentamente fino a
che non inizia il processo di calibratura. Il segnale che ciò è avvenuto viene dato dalla spia che
lampeggia più velocemente ed a questo punto si può lasciare il tasto di calibratura. Quando la spia
si spegne, la procedura di calibratura è terminata.
Se, in qualsiasi momento, viene fatta qualche modifica sui circuiti dei diffusori – per esempio se
viene aggiunto o tolto un diffusore o se viene tarato per una diversa potenza – il processo descritto
sopra va ripetuto per stabilire un nuovo livello ‘normale’ di riferimento.
Per maggiori informazioni specifiche sul cablaggio degli altoparlanti, vedere le istruzioni di
installazione di ogni singolo altoparlante.
CONNESSIONE INTERFACCIA ALLARME ANTINCENDIO
L’interfaccia allarme antincendio dell’SE5120/SE5121 è composto di due parti: un’interfaccia
convenzionale ed una analogica.
L’INTERFACCIA CONVENZIONALE
L’interfaccia convenzionale ha quattro ingressi polarizzati – Evacuazione (M1 “EVAC”), Allerta
(M2 “ALERT”), Collaudo (M3) e Reset (RES) – più un’uscita a relè per la segnalazione guasti. Tutti
e quattro gli ingressi sono isolati otticamente e progettati per essere attivi quando vengono loro
applicati +24V. Questi ingressi sono normalmente innescati da un circuito acustico convenzionale
di allarme antincendio o da un’uscita relé o da uno o più unità ingressi/uscite da un loop analogico
indirizzabile (vedi Figure 7 & 8 qui di seguito per maggiori dettagli).
Notare che i sistemi antincendio Apollo XP95, Discovery e Xplore possono essere collegati
direttamente all’interfaccia analogica dell’SE5120/SE5121 come esposto in dettaglio a pag. 18.
Nel rispetto della norma BS5839-8, tutti e quattro gli ingressi convenzionali sono impostati come
“autoritenuti” per “default” (cioè il jumper 3 dei collegamenti opzionali PLK4 viene fornito montato).
Quando viene applicata ad un ingresso una tensione costante di +24V, viene riprodotto il relativo
messaggio fino a che non ne subentra un altro a priorità superiore (notare che i segnali ad impulsi
non sono compatibili con l’SE5120/SE5121). Quando viene rimossa la tensione d’innesco, il messaggio
selezionato continua ad essere riprodotto. Solo quando subentra il segnale “Reset” all’SE5120/SE5121
il sistema ritorna alla normalità. Quando si rilascia il comando “Reset”, non viene riprodotto nessun
messaggio a meno che non subentrino altri comandi.
Per avere compatibilità con i sistemi di rilevamento antincendio che non sono in grado di pilotare
l’uscita reset dell’SE5120/SE5121, togliendo il Jumper 3 sui collegamenti opzionali PLK4 si impostano
tutti gli ingressi per l’attivazione come non autoritenuti di messaggio su sbloccato. Verificare con le
autorità competenti che questa soluzione sia accettabile prima di eseguire l’installazione, in quanto
tale soluzione non rispetta appieno la norma BS5839-8.
16
CONVENTIONAL
FIRE PANEL
0V
Figura 7: Interfacciamento di un sistema di rilevamento
antincendio non indirizzabile, all’SE5120/SE5121
tramite un circuito acustico convenzionale e uscita
reset (vedi anche nota 1).
+24V
NO
FAULT
RELAY
C
SOUNDER
CIRCUIT
EOLD
Nota 1: Quando si collegano
apparecchi esterni di comando
e
indicazioni
all’interfaccia
convenzionale occorre tenere in
considerazione la Clausola 6.4
della norma BS5839 parte 8.
Essa prescrive che i segnali di
comando siano bloccati. Dispone
inoltre che ogni collegamento
sia monitorato come prescrive la
Clausola 7
NC
M1 (EVAC)
M2 (ALERT)
+
+24V
–
0V
SOUNDER
CIRCUIT
+
–
M3 (TEST)
+
–
RES
+
+24V
–
0V
RESET
OUTPUT
NO
FAULT
RELAY
C
I/O UNIT
EOLD
NC
M1 (EVAC)
INPUT
MONITOR
+
–
M2 (ALERT)
+
–
M3 (TEST)
ADDRESSABLE LOOP
0V
+24V
Figura 8: Interfacciamento
di un sistema di rilevamento
antincendio analogico
indirizzabile tramite due unità
ingressi/uscite; tutte e due le
unità devono essere a riposo
per resettare il dispositivo (vedi
anche nota 1)
I/O UNIT
+
–
RES
+
INPUT
MONITOR
–
SE5120
AVAC
MAIN
PCB
MAIN PCB
Locateleinput/output
Disporre
unità
I/O UNIT
units local to AVAC
ingressi/uscite
(Both units havevicino
to be
at rest to(Tutte
reset AVAC)
all’SE5120
e due le unità devono
essere a riposo per resettare l’SE5120).
Se non è disponibile un’uscita
reset, la rimozione del Jumper
3
dei
collegamenti
opzionali
PLK4 modifica tutti i segnali di messaggio in
funzionamento non autoritenuto. Leggere il testo
in alto di questa pagina prima di effettuare tale
cambiamento in quanto ciò non è strettamente
conforme alla norma BS5839-8.
Rimuovere il jumper 3
per rendere i segnali di
messaggio sbloccati.
17
ITALIANO
AVAC
SE5120
MAIN PCB
MAIN PCB
ITALIANO
L’INTERFACCIA ANALOGICA
L’interfaccia analogica del master SE5120 può essere collegata a qualsiasi loop analogico Apollo
XP95, Discovery o Xplore (vedi Figura 9, a fianco, per i dettagli di collegamento).
Se si usa questo metodo, occorre assegnare all’SE5120 un suo indirizzo ID
utilizzando i primi sette segmenti del DIP switch a 8 interruttori (SW2) sulla
scheda madre. Durante la ricezione di un comando, si illumina il LED verde per
un momento per confermare che l’SE5120 funziona correttamente.
Una volta entrato nel loop, l’SE5120 emula un modulo di comando acustico
Apollo e risponde ai comandi del sistema di allarme antincendio, riproducendo il
messaggio di allerta quando riceve un comando Allerta (suono intermittente) ed
il messaggio di Evacuazione quando riceve un comando Evacuazione (suono
continuo). Se si utilizza un pannello di allarme antincendio AFP, l’interruttore 8 del
DIP switch (ad 8 interruttori) può essere usato per selezionare una periferica di
messaggio di collaudo (“Test enable”).
Anche certi altri pannelli analogici possono essere in grado di usare questa
funzione.
Figura 9: Interfacciamento
all’interfaccia analogica
dell’SE5120
IMPORTANTE: l’AFP ad oggi non è in grado di ripristinare il corretto
funzionamento del SE 5120 dopo il collaudo.
Oltre al proprio indirizzo ID, all’SE5120 può essere assegnato un indirizzo di
‘gruppo’ utilizzando il DIP switch a quattro interruttori (SW1). L’indirizzo di
gruppo viene utilizzato dal sistema di rilevamento antincendio per attivare le
uscite di più SE5120 allo stesso tempo. Se si utilizza questa possibilità, notare
che i singoli SE5120 continuano a riportare il loro stato al sistema di rilevamento antincendio usando
i loro indirizzi ID.
IMPOSTAZIONE DELL’INDIRIZZO ID DELL’SE5120
Usare gli interruttori da 1 a 7 del DIP switch (a otto int., SW2) per dare
all’SE5120 il suo proprio indirizzo ID (il 13 nell’esempio illustrato a lato con
collaudo abilitato). L’ID può essere uno qualsiasi tra il numero 1 ed il 126
(se non si utilizza la modalità di gruppo) o dall’1 al 111 (se si utilizza la
modalità si gruppo) (vedi fondo pagina)
Indirizzi
Indirizzi
Indirizzi
Indirizzi
(Gli indirizzi dal 112 al 126
non sono disponibili se si usa
anche un indirizzo di gruppo)
18
Indirizzi
ITALIANO
Indirizzi
IMPOSTAZIONE DELL’INDIRIZZO DI
GRUPPO (OPZIONALE) DELL’SE5120
Usare i cursori da 1 a 4 del DIP switch
a quattro vie (SW1) per dare all’SE5120
un indirizzo di gruppo. L’indirizzo di
gruppo può essere uno qualsiasi tra il
112 ed il 126. Più di un SE5120 possono
avere lo stesso indirizzo di gruppo.
COLLEGAMENTO MICROFONO POMPIERI RCF BM5001WM
Se occorre un microfono pompieri, si deve utilizzare il mod. RCF BM5001WM. Si deve usare un solo
BM5001WM per sistema. Questo può essere collegato in parallelo su un massimo di 10 unità SE5120/
SE5121 come illustrato nella Figura 10 più sotto. La pressione del tasto d’attivazione (PTT) inibisce
tutti gli altri segnali audio del sistema, compresi i messaggi di Evacuazione e di Allerta, permettendo
così di fare annunci dal vivo a seconda della necessità.
Se occorre, si può regolare il volume del microfono con il comando generale (VR1) sulla scheda
madre.
Per garantire che il microfono sia monitorato correttamente, il jumper PLK2 DEVE essere montato
solo sull’ULTIMO SE5120/SE5121 della catena.
Figura 10: Collegamento microfono pompieri
Nero – non collegare
Blu (+24V)
Giallo (PTT)
Bianco (0V)
Verde (Audio- / Neutro)
Rosso (Audio+ / Fase)
UNITA’ OPZIONALI EXTRA SE5120/5121
Al successivo
SE5120/5121
opzionale
BM5001WM
FIRE MIC.
Girare in senso orario per
aumentare il volume del
microfono.
Girare in senso orario per
aumentare il volume del
microfono.
IMPORTANTE
Il jumper PLK2 va messo SOLO sull’ultimo SE5120/
SE5121 della catena per assicurare che venga monitorato
correttamente. In questo esempio, il jumper NON VA MESSO
sulle schede madri 1 e 2 ma solo sulla 3.
Se si usa un solo SE5120/SE5121, il jumper PLK2 va messo
su quella scheda madre.
19
ITALIANO
COLLEGAMENTO ANNUNCI/PA
Se richiesto, si può collegare, all’ingresso “paging” dell’SE5120/SE5121, un apparecchio per annunci
non di emergenza.
L’ingresso “paging” dell’SE5120/SE5121 accetta segnali di linea bilanciati tra 300mV e 1,5V RMS. Se
si desidera collegare un segnale di livello maggiore, montando il jumper PLK3 sulla scheda madre
il segnale in ingresso verrà attenuato con un rapporto di circa 10:1.
Il volume del segnale degli annunci (dopo essere passato dall’amplificatore) si può regolare
con il comando del volume VR2 sulla scheda madre. Per una diffusione globale degli annunci,
basta collegare in parallelo gli ingressi “paging” in tutte le unità SE5120/SE5121. Se si utilizzano più
SE5120/SE5121, si possono ottenere annunci localizzati utilizzando altri apparecchi o delle console
multizonali (vedi Figura 11, qui sotto, per maggiori dettagli).
Figura 11: Collegamento tipico di apparecchio di annunci
COLLEGARE IN ALTERNATIVA
IN QUESTO PUNTO UN
APPARECCHIO AGGIUNTIVO
PER ANNUNCI LOCALIZZATI
CONTINUARE IL
COLLEGAMENTO
IN PARALLELO
ALL’SE5120/SE5121
SUCCESSIVO PER
ANNUNCI SU ALTRE
ZONE, SE RICHIESTO.
CONTATTI “PULITI”
USCITA “LINE” BILANCIATA
DALL’APPARECCHIO PER
ANNUNCI/PA
Audio - )
Audio + )
Girare in senso
orario per
aumentare il
volume
Montare plk3
per attenuare
il segnale di
paging di 10:1
UNITÀ SE5120/5121
Girare in senso
orario per
aumentare il
volume
Montare plk3
per attenuare
il segnale di
paging di 10:1
UNITÀ AGGIUNTIVA
SE5120/5121
Premendo il tasto di attivazione “PTT” (push to talk) dell’apparecchio per annunci vengono inibiti
tutti i segnali di musica di sottofondo, ma questo non ha alcun effetto su eventi con priorità superiore
(come messaggi di Allerta, Evacuazione o annunci microfonici dei pompieri).
20
Può essere collegata all’SE5120/SE5121 qualsiasi sorgente di musica di sottofondo con un’uscita di
linea bilanciata (lettore CD, radio, ecc.). L’ingresso della musica di sottofondo è quello a priorità
inferiore si diffonde continuamente a meno che non ci siano altri ingressi audio attivi nel sistema.
L’ingresso BGM (musica di sottofondo), così come l’ingresso “paging”, accetta segnali di linea
bilanciati tra 300mV e 1,5V rms. Se si desidera collegare un segnale con livello maggiore, montando
il jumper PLK1 sulla scheda madre si attenua il segnale d’ingresso con un rapporto di circa 10:1.
Il volume del segnale della musica di sottofondo (dopo essere passato dall’amplificatore) può
essere regolato con il comando VR3 sulla scheda madre.
Per la diffusione globale della musica di sottofondo, basta collegare in parallelo l’ingresso BGM
su tutte le unità SE5120/SE5121. Se si utilizzano più SE5120/SE5121, si possono selezionare diverse
sorgenti di musica di sottofondo per aree diverse, per es.: radio locale nei magazzini, musica
registrata (o silenzio) negli uffici, ecc. (vedi Figura 12, qui sotto, per maggiori dettagli).
Figura 12: Collegamento tipico della musica di sottofondo
COLLEGARE IN ALTERNATIVA
(IN QUESTO PUNTO) UNA
DIVERSA SORGENTE
MUSICALE PER UNA
DIFFUSIONE LOCALIZZATA
USCITA LINE BILANCIATA
DALLA SORGENTE MUSICALE
Girare in senso
orario per
aumentare il
volume della
musica
AI SUCCESSIVI
SE5120/5121
Audio- )
Audio+)
Montare plk1
per attenuare il
segnale della
musica con un
rapporto di 10:1
UNITÀ SE5120/5121
Girare in senso
orario per
aumentare il
volume della
musica
Montare plk1
per attenuare il
segnale della
musica con un
rapporto di 10:1
UNITÀ AGGIUNTIVA SE5120/5121
21
ITALIANO
COLLEGAMENTO MUSICA DI SOTTOFONDO
ITALIANO
COLLEGAMENTO DI SE5121 (SLAVE)
Per aumentare la copertura in ambienti di grandi dimensioni come i magazzini, i centri commerciali,
ecc, si possono collegare ad un SE5120 (master) fino a 10 SE5121 (slave).
Ai fini del rispetto della norma BS5939-8 tutti gli annunci importanti di sicurezza effettuati dal SE5120
(annunci dal microfono dei pompieri e messaggi di Evacuazione, di Allerta e di Collaudo) vengono
automaticamente passati per la diffusione al o ai relativi SE 5121.
Per permettere una maggiore flessibilità per gli annunci e la diffusione di musica di sottofondo
(BGM), ogni SE5121 ha i propri ingressi per gli annunci e la musica. In alternativa, per ottenere una
diffusione unica degli annunci e della musica di sottofondo, si possono collegare in parallelo le
sorgenti audio sul o sugli SE5120 con gli ingressi degli SE5121, come spiegato alle pagg. 19 e 20.
Gli SE5121 si collegano agli SE5120 come illustrato nella Fig. 13 qui sotto. Va notato che per garantire
che gli SE5121 vengano monitorati correttamente, il jumper PLK2 DEVE essere montato solo
SULL’ULTIMO apparecchio SE5121 slave della configurazione.
Figura 13: Collegamento tipico degli SE5121
Tutte le diffusioni del microfono pompieri e dei messaggi vengono
automaticamente inviate agli SE5121 tramite questi quattro cavi.
(Vedere alle pag. 19 e 20 come ottenere una copertura globale o
settoriale per gli annunci e la BGM)
Al successivo
SE5121
MASTER
SE5120
SLAVE
SE5121
Girare in senso orario
per aumentare il volume
dell’SE5121 slave
SLAVE
SE5121
Girare in senso orario
per aumentare il volume
dell’SE5121 slave
IMPORTANTE
Il jumper PLK2 deve essere messo SOLO
sull’ultimo SE5121 della catena per
garantire che sia monitorato correttamente.
Se si utilizza un solo SE5120/SE5121, il jumper PLK2
va messo sulla scheda madre di quell’SE5120/
SE5121.
SELEZIONE MESSAGGI DIGITALI
La scheda di memoria dei messaggi digitali è situata sulla scheda madre dell’SE5120. Contiene
una memoria elettronica non volatile (sulla quale sono registrati in formato MP3 i messaggi di
Evacuazione, Allerta e Collaudo), un lettore MP3 ed un comando di volume.
22
Le caratteristiche generali dei messaggi di Evacuazione, Allerta e Collaudo dell’SE5120 sono
conformi alla norma BS5839-8 (1998) clausola 14 e sono costituiti da un suono tipo sirena per
attirare l’attenzione, un breve silenzio, il messaggio vero e proprio seguito da un altro breve silenzio
prima della ripetizione del messaggio.
I jumper opzionali PLK4 sulla scheda madre possono essere utilizzati per selezionare diverse versioni
dei messaggi per adattarli alle varie applicazioni. Per esempio, in edifici ad un piano solo, montando
il jumper 8 si toglie la frase “Non utilizzare gli ascensori” da tutti i messaggi di Evacuazione mentre
montando il jumper 7 i messaggi di Evacuazione ed Allerta vengono riferiti ad una ‘situazione’
invece che ad incendio. Se si utilizza il messaggio Collaudo dell’SE5120, montando il jumper 4 si
predispone il sistema a diffondere il messaggio “Il collaudo dell’allarme antincendio è terminato”
quando il sistema viene riportato alla normalità. Più avanti in questa sezione viene fornito il dettaglio
dei messaggi disponibili.
IMPORTANTE:
A seconda di come è configurata l’interfaccia dell’allarme antincendio, i messaggi di Evacuazione,
Allerta e Collaudo si interrompono solo quando:
• L’SE5120 viene resettato (nei sistemi che utilizzano l’interfaccia convenzionale
dell’SE5120 ed è stato messo il jumper 3 sui collegamenti PLK4)
• Viene rimosso il comando sull’ingresso Evacuazione, Allerta o Collaudo
(nei sistemi che utilizzano l’interfaccia convenzionale dell’SE5120 e sui
collegamenti PLK4 non è stato messo il jumper 3. NB: la rimozione del
jumper 3 rende gli ingressi non “autoritenuti” e questa condizione non
rispetta appieno la norma BS5839-8 – controllare con le autorità competenti
che sia accettabile prima di scegliere questo metodo).
• Il sistema viene tacitato o resettato tramite un pannello di protocollo Apollo
per l’allarme antincendio collegato all’interfaccia analogica dell’SE5120.
(Vedere a pag. 16 “Collegamento interfaccia allarme antincendio” per
maggiori dettagli).
SELEZIONE MESSAGGI EVACUAZIONE
Elencati di seguito ci sono i quattro messaggi di Evacuazione attualmente disponibili oltre ai dettagli
dei collegamenti opzionali PLK4 che occorre mettere (o togliere) per selezionarli.
Messaggio Evacuazione 1
Messaggio Evacuazione 2
Sirena (tre secondi di silenzio), Jumper 7
Attenzione prego, attenzione prego. & 8 NON
E’ stata rilevata la presenza di fuoco montati
nell’edificio. Preghiamo di abbandonare
l’edificio immediatamente attraverso
l’uscita più vicina.
Non usare gli ascensori.
(tre secondi di silenzio e ripetizione del messaggio)
Sirena (tre secondi di silenzio),
Attenzione prego, attenzione
Jumper 8
prego. E’ stata rilevata la presenza
montato
di fuoco nell’edificio. Preghiamo
di abbandonare l’edificio
immediatamente attraverso l’uscita
più vicina.
(tre secondi di silenzio e ripetizione del messaggio)
Messaggio Evacuazione 3
Messaggio Evacuazione 4
Sirena (tre secondi di silenzio),
Jumper 7
Attenzione prego, attenzione prego.
montato
Si è creata una situazione per la quale
dobbiamo sgomberare l’edificio.
Preghiamo di abbandonare l’edificio
immediatamente attraverso l’uscita più
vicina. Non usare gli ascensori.
(tre secondi di silenzio e ripetizione del messaggio)
Sirena (tre secondi di silenzio),
Jumper 7 &
Attenzione prego, attenzione prego.
8 montati
Si è creata una situazione per la quale
dobbiamo sgomberare l’edificio.
Preghiamo di abbandonare l’edificio
immediatamente attraverso l’uscita
più vicina.
(tre secondi di silenzio e ripetizione del messaggio)
23
ITALIANO
CONTENUTO MESSAGGI
ITALIANO
SELEZIONE MESSAGGI ALLERTA
Nell’SE5120 sono disponibili due messaggi di allerta. Il messaggio diffuso dipende dalla posizione
del jumper 7 come illustrato nei diagrammi che seguono. Notare che modificando la posizione
del jumper 7 si modifica anche il contenuto del messaggio SE5120 di Evacuazione (descritto in
precedenza).
Messaggio Allerta 1
Messaggio Allerta 2
Sirena (tre secondi di silenzio)
Attenzione prego, attenzione prego.
E’ stata rilevata la presenza di fuoco
nell’edificio: preghiamo di restare in
attesa di ulteriori istruzioni.
Jumper 7
(10 secondi di silenzio) Din Don.
non
montato
Siete pregati di rimanere al vostro
posto di lavoro. Questo è solo un
messaggio di allerta.
(ripetizione delle ultime tre frasi ogni 22 secondi).
Sirena (tre secondi di silenzio)
Attenzione prego, attenzione prego.
Si è creata una situazione particolare
nell’edificio: preghiamo di restare in
attesa di ulteriori istruzioni.
Jumper 7
(10 secondi di silenzio) Din Don.
montato
Siete pregati di rimanere al vostro
posto di lavoro. Questo è solo un
messaggio di allerta.
(ripetizione delle ultime tre frasi ogni 22 secondi).
SELEZIONE MESSAGGI COLLAUDO
È disponibile un solo messaggio di collaudo nell’SE5120, descritto qui sotto:
Sirena (tre secondi di silenzio)
Stiamo per collaudare il sistema di allarme
antincendio.
Preghiamo di non reagire in nessun modo.
Se, comunque, viene montato il jumper 3 sui collegamenti opzionali PLK4, l’SE5120 diffonderà
anche un semplice messaggio di fine collaudo quando il sistema torna alla normalità:
Ding dong
Il collaudo dell’allarme antincendio è
terminato. Grazie della collaborazione.
REGOLAZIONE DEL VOLUME DEL LETTORE MP3
Il volume dei messaggi digitali può essere regolato complessivamente regolando il comando del
volume del lettore MP3 che è situato sulla scheda di memoria dei messaggi digitali, come indicato
sotto:
Messaggio di collaudo
Stiamo per collaudare il sistema di
allarme antincendio.
Girare in senso orario
Preghiamo di non reagire in nessun
per aumentare il volume
modo.
dei messaggi digitali
Il collaudo dell’allarme antincendio è
terminato.
Jumper per la
DIGITAL
MESSAGE
STORE PCB
24
programmazione iniziale di
fabbrica - NON MONTARE
NESSUN JUMPER IN
QUESTA POSIZIONE
ITALIANO
SPIE GUASTO
Quando si verifica un guasto, suona un cicalino continuo sull’SE5120/SE5121 e si illumina la relativa spia di guasto. Si
attiva anche il relè di guasto dell’SE5120/SE5121 per segnalare il guasto al sistema di rilevamento antincendio al quale,
a seconda della configurazione di cablaggio usata, viene solitamente riportato come guasto a un “sounder”.
Premendo il tasto Silence Internal Sounder sul frontale dell’SE5120/SE5121 si spegne il cicalino. Dato che tutti i guasti
vengono comunque riportati anche al sistema di rilevamento antincendio, rimovendo il jumper PLK5 (situato sotto il
cicalino sulla scheda madre) si può disabilitare permanentemente il cicalino. Verificare con le autorità competenti che
la disabilitazione del segnale acustico interno sia legale prima di rimuovere tale jumper.
Tutti i guasti devono venire registrati nel rapporto del sistema di rilevamento antincendio e devono essere presi i
debiti provvedimenti per correggerli. Qui di seguito si trovano le spiegazioni del significato di ogni spia e le misure da
prendere per rimediare al guasto al quale si riferiscono.
Notare che tutti i guasti (con l’esclusione dei guasti di sistema e dei guasti dell’amplificatore) sono di tipo non
autoritenuto e quindi quando il guasto è risolto, ammesso che non ve ne sia un altro, il cicalino dell’SE5120/SE5121 e
la relativa spia si spengono.
A) GUASTO PSU
(ALIMENTATORE)
Si accende quando si verifica una
delle seguenti cause:
1) il fusibile della batteria è
bruciato.
2) la tensione della batteria è
troppo bassa.
3) il circuito di ricarica delle
batterie è guasto.
4) La modalità d’alimentazione a
commutazione è guasta.
5) L’uscita 24V sulla scheda madre
è in cortocircuito o sovraccarica.
B) GUASTO RETE
Si illumina quando manca la
tensione di rete o il fusibile
relativo è bruciato (Vedere
anche la sezione 1.1 a pag.
26). Notare che quando si
accende questa spia, il sistema
funziona solo per il periodo di
“stand-by” ottenibile a seconda
delle dimensioni delle batterie
montate e, per preservarle, gli
annunci non d’emergenza e la
musica vengono soppressi.
C) GUASTO MICROFONO
Si illumina quando si verifica
una o più delle seguenti
cause:
1) Il microfono pompieri è
guasto.
2) C’è un guasto (circuito
aperto o
cortocircuito) sul
cavo del microfono pompieri.
3) Il jumper master del
microfono pompieri (PLK2) non
è montato sull’ultimo SE5120/
SE5121 al quale è collegato.
D) GUASTO MESSAGGIO
Si accende quando c’è un
problema con la memoria dei
messaggi digitali dell’SE5120.
Verificare che la scheda di
memoria dei messaggi digitali
sia inserita correttamente. Se lo
è ed il messaggio di guasto si
ripresenta, la scheda potrebbe
essere guasta.
E) GUASTO GENERALE
Lampeggia quando c’è un
guasto in una qualsiasi parte
del sistema. Questa spia si
accende sempre insieme ad
almeno un’altra spia di guasto
che fornisce informazioni più
precise sul tipo di guasto
rilevato.
F) GUASTO DI SISTEMA
B
E
F
H
G
aperto o un cortocircuito sul
cablaggio dello “slave”.
H) GUASTO A, GUASTO B
Si illumina nei seguenti casi:
1) il microprocessore si è
resettato.
2) La scheda madre non è
funzionante.
Questa
segnalazione
può
essere rimossa solo premendo
il tasto “Reset” (SW2) della
scheda interna.
Nel caso che la segnalazione
si presenti, la scheda madre
potrebbe essere guasta (vedere
inoltre la sezione 1.2 a pag. 27)
Se c’è un problema con uno
degli amplificatori dell’SE5120/
SE5121 (A, B) si illumina la
relativa spia. Se si accende
una qualsiasi di queste spie,
provare a premere il tasto
Reset (SW2), sulla scheda
delle spie dell’SE5120/SE5121
dentro il pannello, per vedere
se la segnalazione di guasto
viene eliminata; se torna dopo
un breve intervallo, vedere la
Sezione 1.3 a pag. 27.
G) GUASTO SU SLAVE
I) GUASTO LINEA DIFFUSORI A
GUASTO LINEA DIFFUSORI B
Si illumina quando si verifica
una delle seguenti cause:
1) C’è un guasto su un
qualsiasi amplificatore “slave”
SE5121 collegato all’SE5120.
2) C’è un guasto di circuito
D
C
A
La relativa spia si accende
quando si verifica una delle
seguenti cause:
1) C’è un guasto (circuito
aperto o cortocircuito) su una
linea di diffusori.
2) Manca l’”end of line” su una
linea di diffusori.
3) C’è una dispersione a
terra. Per verificare aprire
l’SE5120/SE5121 e controllare
se c’è accesa una delle spie
di guasto di dispersione a
terra sulla scheda madre
dentro il pannello. Se non
c’è nessuna spia accesa, il
guasto è un circuito aperto o
un cortocircuito.
Sono
state
calibrate le linee
dei diffusori ? (vedi pag. 15).
Tale dimenticanza può causare
la segnalazione di guasto.
(Vedere anche la sezione 1.3
a pag. 27).
25
I
ITALIANO
1.1. GUASTI ALIMENTAZIONE / RETE
Un guasto di alimentazione/rete è dovuto ad una o più delle seguenti cause:
L’ALIMENTAZIONE È TROPPO BASSA O NON C’È ASSOLUTAMENTE.
Sintomi: l’SE5120/SE5121 funziona a batterie, ma non con la rete. Verificare che la spia rossa
“Presenza di tensione pericolosa” sulla scheda dell’alimentatore sia accesa (se non c’è la rete il
LED è spento).
Interventi consigliati:
a) Isolare l’alimentazione di rete e testare i collegamenti neutro e di fase con un multimetro.
b) Con le dovute precauzioni, ridare corrente e misurare la tensione.
c) Isolare di nuovo l’alimentazione di rete.
Se la lettura non è corretta (vedi Caratteristiche Tecniche alla fine del presente manuale) riparare la
rete. Se la lettura è corretta, controllare se il fusibile di rete (F1) è bruciato. Se il fusibile è intatto e la
spia di presenza di tensione pericolosa sulla scheda dell’alimentatore è accesa, allora l’alimentatore
è guasto e va sostituito.
IL FUSIBILE DI RETE (F1) È BRUCIATO.
Sintomi: l’SE5120/SE5121 funziona a batterie, ma non con la rete. La spia rossa “Presenza di tensioni
pericolose” sulla scheda dell’alimentatore è spenta.
Interventi consigliati:
a) Isolare l’alimentazione di rete e controllare l’integrità del fusibile di rete (F1) dell’alimentatore.
b) Se il fusibile è bruciato, può essere dovuto ad un eccessivo sbalzo della rete o a un guasto,
dell’alimentatore. Controllare l’integrità dei componenti dell’alimentatore. Se nessun componente è
guasto sostituire il fusibile con uno avente le stesse caratteristiche e ridare corrente. Se la spia rossa
“Presenza di tensioni pericolose” non si accende allora l’alimentatore è guasto e va sostituito.
IL FUSIBILE DELLA BATTERIA (F2) È BRUCIATO.
Sintomi: l’SE5120/SE5121 funziona con la corrente di rete ma non a batteria.
Interventi consigliati:
a) Isolare l’alimentazione di rete e scollegare le batterie.
b) Controllare l’integrità del fusibile delle batterie (F2) sulla scheda dell’alimentatore.
c) Se il fusibile è bruciato, controllare se ci sono segni di danni sulla scheda dell’alimentatore e sulla
scheda madre. Se non ce ne sono, sostituire il fusibile con uno dello stesso tipo facendo attenzione
a non danneggiare la clip del fusibile mentre lo si inserisce.
d) Rimontare la scheda madre e ricollegare le batterie.
Se si accende la spia verde ‘Alimentazione presente’, ridare corrente e controllare che non sia più
segnalato il guasto di alimentazione. Se la spia verde ‘Alimentazione presente’ non si accende, o la
scheda dell’alimentatore o la scheda madre sono guaste e vanno sostituite.
e) Se il fusibile delle batterie (F2) è integro, controllare la tensione delle batterie (vedi sotto).
LA TENSIONE DELLE BATTERIE È TROPPO BASSA.
Sintomi: l’SE5120/SE5121 funziona con la corrente di rete, ma non va a batterie.
Se l’alimentazione di rete è venuta meno e le batterie si sono scaricate al punto che la tensione è
troppo bassa (cioè inferiore a 21V), l’SE5120/SE5121 si spegne automaticamente per non danneggiare
le batterie scaricandole eccessivamente. L’SE5120/SE5121 non riparte fino a che non vengono
collegate delle batterie nuove pienamente cariche o non si ripristina l’alimentazione di rete.
Se la rete non è venuta a meno, ma la tensione complessiva delle batterie è inferiore a 21V,
l’alimentatore non carica le batterie per evitare di danneggiare il circuito di ricarica. Se la tensione
ai terminali delle batterie è superiore a 21V, le batterie possono essere caricate, ma l’SE5120/SE5121
continua a segnalare un guasto di alimentazione fino a che non si sono caricate a sufficienza ed a
questo punto la segnalazione di guasto all’alimentazione si spegne automaticamente. A seconda
delle dimensioni delle batterie e della carica, possono essere necessarie diverse ore. Se le batterie
sono in cattive condizioni devono essere sostituite.
Notare che il circuito di ricarica è impostato in fabbrica e la temperatura è compensata. Non c’è
nessuna necessità di regolare la tensione.
26
SPIA ALIMENTAZIONE PRESENTE SPENTA
Se la spia “Alimentazione Presente” non è accesa si è verificata una delle seguenti cause:
1) E’ venuta a meno l’alimentazione di rete e le batterie sono guaste/scariche.
Intervento consigliato: Riallacciare la rete (se possibile) e la spia “Alimentazione presente” dovrebbe
riaccendersi. Se, però, le batterie si sono scaricate, ciò viene rilevato come guasto e segnalato di
conseguenza. Vedi il precedente “LA TENSIONE DELLE BATTERIE È TROPPO BASSA”.
2) La scheda dell’alimentatore, la scheda madre e/o il cavo che le connette è guasto.
Se la corrente di rete è presente (indicata dalla spia rossa “Tensioni pericolose” accesa sulla
scheda dell’alimentatore), controllare che il cavo di connessione tra la scheda dell’alimentatore e la
scheda madre sia ben inserito da tutte e due le parti. In questo caso, o la scheda dell’alimentatore
e/o la scheda madre e/o il cavo di connessione sono guasti e vanno sostituiti.
1.2 GUASTI DI SISTEMA
I guasti di sistema sono diversi dagli altri in quanto non cessano automaticamente di essere segnalati
una volta corretti.
Intervento consigliato:
Premere il tasto Reset sulla scheda delle spie dell’SE5120/SE5121. Ciò dovrebbe risolvere il guasto.
Se il guasto persiste, la scheda madre è guasta e va sostituita.
1.3 GUASTI AMPLIFICATORE/ALTOPARLANTE:
L’SE5120/SE5121 INDICA UN GUASTO ALTOPARLANTE/AMPLIFICATORE DOPO LA CALIBRATURA
OPPURE SE L’AGGIUNTA O LA RIMOZIONE DI UN “END OF LINE” NON VIENE RILEVATA.
Intervento consigliato:
Prima di iniziare questi collaudi assicurarsi di aver annotato il numero, il tipo, la posizione e la
potenza di ogni altoparlante su ogni circuito. Il modulo di pag. 29 può essere fotocopiato a tale
scopo.
Controllare se il guasto è nell’SE5120/SE5121, nei moduli “end of line” o nelle linee altoparlanti.
Scollegare le linee degli altoparlanti, collegare il modulo “end of line” all’SE5120/SE5121 e premere il
tasto di calibratura.
Se il guasto non scompare, controllare se il guasto è nei moduli “end of line” o nell’SE5120/SE5121
scambiando i moduli “end of line” e ricalibrando.
Se si tratta di un modulo “end of line” o dell’SE5120/SE5121, contattare il fornitore per l’assistenza.
Se il guasto è invece nel cablaggio esterno, le cause possono essere diverse.
Innanzitutto rimontare i moduli “end of line” in fondo alla linea.
1) Il circuito degli altoparlanti potrebbe essere sovraccarico
Il carico massimo per ogni amplificatore è di 60 watt (167 Ohm l’impedenza minima). Se questo
limite viene superato, l’amplificatore si spegne non appena viene lanciato un annuncio o diffuso un
qualsiasi segnale audio. Dato che i segnali variano d’intensità, l’amplificatore potrebbe funzionare
ad intermittenza.
L’errore più comune d’installazione è quello di lasciare gli altoparlanti regolati ad una potenza (così
come vengono forniti), che normalmente è al massimo.
Per esempio: un ufficio richiede normalmente che gli altoparlanti a soffitto da 6W vengano regolati
a 1,5W ognuno. Si possono quindi collegare ad un circuito d’amplificazione da 60W un massimo di
40 altoparlanti da 1.5W. Se però, vengono lasciati a 6W, il carico diventa di 240W e l’amplificatore
si spegne (in protezione).
Per trovare il problema, usare un impedenzimetro per misurare l’impedenza della linea: essa deve
essere di almeno 167 Ohm ad 1kHz; oppure utilizzare un misuratore di carico audio per misurare
direttamente la potenza (che non deve superare i 60W).
Se si supera la potenza di 60W (meno di 167 Ohm), il carico deve essere ridotto togliendo degli
altoparlanti o riducendo la potenza (di alcuni).
27
ITALIANO
Se le batterie sono in buone condizioni e tutti gli altri controlli sono stati eseguiti senza riscontrare
guasti, significa che la scheda dell’alimentatore è guasta e va sostituita.
NB: batterie non collegate, collegate a rovescio (con polarità opposta) producono la segnalazione
di un guasto all’alimentazione.
ITALIANO
2) Se il guasto è intermittente o se gli altoparlanti diffondono ad intermittenza, uno o più segnali
d’ingresso potrebbe essere troppo elevato.
Se ciò avviene solo molto raramente, è probabilmente dovuto ad una fonte audio usata di rado.
Provare un segnale d’ingresso per volta per vedere se il problema si verifica.
Scollegare tutti gli ingressi. Premere il tasto reset. Se il guasto sparisce, ciò significa che un segnale
sovraccarica l’unità.
Ricollegare gli ingressi uno alla volta e mettere in funzione la sorgente audio. Se il guasto si verifica,
abbassare il volume di quel segnale.
Gli altri guasti possono essere difficili da trovare quindi a questo punto è meglio controllare quali
altoparlanti funzionano e se sono impostati in potenza correttamente.
Collegare un generatore di rumore rosa sui pin audio + e – dell’ingresso BGM (musica di
sottofondo).
Regolare il livello dell’ingresso BGM in modo che si senta ma non disturbi. Se è troppo forte,
l’amplificatore va a intermittenza.
Seguire il circuito ascoltando ogni altoparlante e valutando se funziona e se è regolato al volume
giusto.
3) Potrebbero esserci uno o più collegamenti non fissati bene sul circuito degli altoparlanti.
Un cavo/contatto allentato innalza l’impedenza al circuito rendendo il modulo “E.O.L.” meno
efficace.
4) Uno o più altoparlanti possono essere collegati male.
Un altoparlante sembra collegato ma non funziona.
Gli altoparlanti da 100V hanno dei trasformatori con uscite di diversa potenza e non è affatto strano
collegarli in modo errato. Quando si collauda il circuito con un impedenzimetro, la lettura può essere
superiore a 167 Ohm e ciò può sembrare regolare, ma il sistema di monitoraggio del carico continua
a segnalare un problema.
Applicare la regola delle metà:
Rimuovere il modulo “end of line”, dividere il circuito a metà, collegare il modulo “end of line” e
calibrare. Se la calibratura non avviene, suddividere ancora a metà e ripetere. Se non calibra
ricollegare la linea e dividere ancora a tre quarti della lunghezza.
Continuare così finché non si riesce ad identificare l’altoparlante mal collegato.
5) Uno o più altoparlanti possono essere danneggiati o guasti.
Come nella sezione (4), cercare fili non isolati, infiltrazioni d’acqua e danni fisici.
SI VERIFICANO GUASTI AMPLIFICATORE NEL SISTEMA, MA DOPO IL RESET NON SI RIPRESENTANO
PER UN CERTO TEMPO.
Un segnale audio non attualmente in uso potrebbe essere regolato in modo non corretto,
sovraccaricando ad intermittenza gli amplificatori. Vedi punto (2) qui sopra.
Se è installato un apparecchio per annunci: c’è stato qualche feedback? Controllare se ci sono
diffusori troppo vicino a telefoni o a microfoni e spostare l’apparecchio un po’ più lontano.
Il carico può variare a causa di cattive connessioni – vedi punto (4) qui sopra.
IL MICROFONO POMPIERI INDICA UN GUASTO.
L’ultimo pannello SE5120/SE5121 collegato al microfono pompieri deve avere il jumper PLK2
montato.
Il microfono pompieri utilizzato non è compatibile – si deve utilizzare il BM5001WM.
Non c’è nessun microfono d’emergenza montato e la resistenza per il controllo della linea non è
stato montata.
COLLEGARE QUALCHE SEGNALE CAUSA DEL RUMORE.
Utilizzare contatti di commutazione “puliti” sull’ingresso “paging”.
Evitare messe a terra e connessioni 0V multiple in quanto potrebbero causare correnti circolanti e
eccessivo rumore.
28
ITALIANO
APPENDICE
SCHEDA ANNOTAZIONI ALTOPARLANTI
Questo modulo serve ad annotare il numero, tipo, posizione e regolazione in potenza di ogni
altoparlante sui circuiti dell’SE5120/SE5121. Con sistemi con molti altoparlanti serviranno più
fotocopie di questa pagina.
TIPO
DIFFUSORE
POSIZIONE
DIFFUSORE
POTENZA POSIZIONE CIRCUITO
DIFFUSORE SE5120/21 SE5120/21
COMMENTI
AGGIUNTIVI
29
ITALIANO
CARATTERISTICHE TECNICHE
ALIMENTATORE E CARICA BATTERIA
Ingresso alimentazione da rete
Alimentatore interno
Assorbimento massimo continuo
Assorbimento di picco
Monitoraggio guasto su alimentatore e carica batteria
Monitoraggio collegamento e guasto batterie
Protezione batterie contro scarica eccessiva
Dimensione e tipo batterie
Fusibile di rete
Fusibile batteria
Corrente massima di carico delle batterie
230Va.c +/- 10% 50/60Hz
27Vd.c. Nominali
5A @ 230 Va.c. (più 500mA con batterie in carica)
7A @ 230 Va.c.
SI (carica batteria con conpensazione temperatura)
SI
SI (Stacco batterie scariche a circa 21 Volt)
2 x 12V 7Ah VRLA collegate in serie
240V 1A HRC ceramica 20mm
– conforme IEC (EN60127 Parte 2)
5A F 20mm - conforme IEC (EN60127 Parte 2)
0,5A
INGRESSI
Livello d’ingresso per 100V RMS (Tono 1kHz)
BGM (Musica di sottofondo)
BGM senza jumper
Annunci
Annunci senza jumper
Ingresso FM
Contatti PTT “puliti” per annunci, non innescati
Contatti PTT senza voltaggio per annunci , innescati
Microfono pompieri PTT, non innescato
Microfono pompieri PTT, innescato
Ingressi manuali M1,M2,M3,RES
Guadagno impostato alla massima sensibilità
230mV RMS
2,3V RMS
230mV RMS
2,3V RMS
230mV RMS
Circuito aperto
Circuito chiuso
6K8
1K in parallelo con 6K8
24V 2,5mA (isolati otticamente)
OUTPUTS
Massima corrente AUX 24V (solo Master)
Massima corrente microfono pompieri 24V
Massima tensione/corrente diffusori
Massima potenza continua (Tono a 1kHz) con batteria scarica
Potenza di picco per 4 secondi (secondo Alimentatore e temperatura)
Risposta in frequenza a 15W per linea pilotati dal microfono pompieri da
Risposta in frequenza a 30W per linea pilotati dal microfono pompieri da
Risposta in frequenza a 45W per linea pilotati dal microfono pompieri da
Risposta in frequenza a 60W per linea pilotati dal microfono pompieri da
Risposta in frequenza a 60W per linea pilotati da annunci o BGM da
100mA
100mA
100V/0,6A RMS x 2
2 x 30W
2 x 60W RMS
152Hz to 20kHz
152Hz to 12kHz
152Hz to 9.2kHz
152Hz to 8kHz
218Hz to 6.2kHz
CALCOLI BATTERIE
Corrente media in “stand-by” a pieno carico
Corrente media in allarme a pieno carico (audio su mic.pompieri)
Alimentazione a AUX e Mic.pompieri aumentano il fabbisogno
97mA
1,2A
Tono monitoraggio diffusori
20kHz
30
Important notes CONTENTS
An overview of the SE5120/SE5121 voice alarm system
Planning the wiring
Mounting the SE5120/SE5121
Connecting the wiring
Mains wiring and PSU connection
Stand-by battery connection
Loudspeaker connection
Fire alarm interface connection
Fireman’s microphone connection
Public address paging connection
Background music connection
Slave amplifier wiring
Digital message selection
Fault indication
Appendices
Technical specifications
31
ENGLISH
32
35
38
38
40
42
43
44
45
48
49
50
51
51
54
58
60
ENGLISH
IMPORTANT NOTES
This equipment must only be installed and maintained by a suitably skilled and technically competent
personnel.
This equipment is a piece of Class 1 equipment and MUST BE EARTHED.
This equipment operates with hazardous voltages present inside its enclosure.
DO NOT leave the enclosure door open during normal operation.
ITEMS SUPPLIED
This product is supplied with the following items:
• User manual (this manual)
• Allen key, for unfastening/securing the SE5120/SE5121’s lid
• Electrical accessory pack containing the following items:
1 x Red battery lead
1 x Black battery lead
1 x Battery link lead
2 x Loudspeaker end of line modules
1 x Spare primary mains fuse
1 x Spare battery fuse
SYSTEM DESIGN
Voice alarm system design is beyond the scope of this document. A basic understanding of general
voice alarm system components and their use is assumed.
We strongly recommend that a suitably qualified and competent person is consulted in connection
with the design of the voice alarm system and that the system is commissioned and serviced
in accordance with the laid down specification and national standards. The client/fire officer
concerned with the property should be contacted at an early stage in case he or she has any
special requirements.
We recommend you read BS 5839 Part 8 (1998) : The code of practice for the design, installation &
servicing of voice alarm systems and BS EN 60849 (1998) : Sound systems for emergency purposes
(plus any subsequent updates) both of which are available at your local reference library or or can
be purchased from the British Standards Institute, Customer Services Dept., Tel:. Web:
EQUIPMENT GUARANTEE
This equipment is not guaranteed unless the complete system is installed and commissioned
in accordance with the laid down national standards by an approved and competent person or
organisation.
32
SAFETY PRECAUTIONS
1. All the precautions, in particular the safety ones, must be read with special attention, as they
provide important information.
2.1 POWER SUPPLY FROM MAINS (direct connection)
a)
b)
c)
d)
e)
The mains voltage is sufficiently high to involve a risk of electrocution;
therefore, never install or connect this product with the power supply
switched on.
Before powering up, make sure that all the connections have been made
correctly and the voltage of your mains corresponds to the voltage shown
on the rating plate on the unit, if not, please contact your RCF dealer.
The metallic parts of the unit are earthed by means of the power cable. In
the event that the current outlet used for power does not provide the earth
connection, contact a qualified electrician to earth this product by using
the dedicated terminal.
Protect the power cable from damage; make sure it is positioned in a way
that it cannot be stepped on or crushed by objects.
To prevent the risk of electric shock, never open the product: there are no
parts inside that the user needs to access.
2.2 POWER SUPPLY BY MEANS OF AN EXTERNAL ADAPTER
a)
b)
c)
Use the dedicated adapter only; verify the mains voltage corresponds to
the voltage shown on the adapter rating plate and the adapter output
voltage value and type (direct / alternating) corresponds to the product
input voltage, if not, please contact your RCF dealer; verify also that the
adapter hasn’t been damaged due to possible clashes / hits or overloads.
The mains voltage, which the adapter is connected to, is sufficiently high to
involve a risk of electrocution: pay attention during the connection (i.e. never
do it with wet hands) and never open the adapter.
Make sure that the adapter cable is not (or cannot be) stepped on or crushed
by other objects (pay particular attention to the cable part near the plug and
the point where it leads out from the adapter).
3. Make sure that no objects or liquids can get into this product, as this may cause a short circuit.
4. Never attempt to carry out any operations, modifications or repairs that are not expressly described
in this manual.
Contact your authorized service centre or qualified personnel should any of the following occur:
•
the product does not function (or functions in an anomalous way);
•
the power supply cable has been damaged;
•
objects or liquids have got into the unit;
•
the product has been subject to a heavy impact.
5. If this product is not used for a long period, switch it off and disconnect the power cable.
6. If this product begins emitting any strange odours or smoke, switch it off immediately and
disconnect the power supply cable.
33
IMPORTANT NOTES
ENGLISH
Before connecting and using this product, please read this instruction manual carefully and keep
it on hand for future reference. The manual is to be considered an integral part of this product and
must accompany it when it changes ownership as a reference for correct installation and use as well
as for the safety precautions.
RCF S.p.A. will not assume any responsibility for the incorrect installation and / or use of this
product.
WARNING: To prevent the risk of fire or electric shock, never expose this product to rain or humidity
(except in case it has been expressly designed and made for outdoor use).
ENGLISH
7. Do not connect this product to any equipment or accessories not foreseen.
For suspended installation, only use the dedicated anchoring points and do not try to hang this
product by using elements that are unsuitable or not specific for this purpose.
Also check the suitability of the support surface to which the product is anchored (wall, ceiling,
structure, etc.), and the components used for attachment (screw anchors, screws, brackets not
supplied by RCF etc.), which must guarantee the security of the system / installation over time, also
considering, for example, the mechanical vibrations normally generated by transducers.
To prevent the risk of falling equipment, do not stack multiple units of this product unless this
possibility is specified in the instruction manual.
8. RCF S.p.A. strongly recommends this product is only installed by professional qualified
installers (or specialised firms) who can ensure correct installation and certify it according to
the regulations in force.
The entire audio system must comply with the current standards and regulations regarding
electrical systems.
9. Supports and trolleys
The equipment should be only used on trolleys or supports, where necessary, that are recommended
by the manufacturer. The equipment / support / trolley assembly must be moved with extreme caution.
Sudden stops, excessive pushing force and uneven floors may cause the assembly to overturn.
10. There are numerous mechanical and electrical factors to be considered when installing a
professional audio system (in addition to those which are strictly acoustic, such as sound pressure,
angles of coverage, frequency response, etc.).
11. Hearing loss
Exposure to high sound levels can cause permanent hearing loss. The acoustic pressure level that
leads to hearing loss is different from person to person and depends on the duration of exposure.
To prevent potentially dangerous exposure to high levels of acoustic pressure, anyone who is
exposed to these levels should use adequate protection devices. When a transducer capable of
producing high sound levels is being used, it is therefore necessary to wear ear plugs or protective
earphones.
See the technical specifications in the instruction manual for the maximum sound pressure the
loudspeaker is capable of producing.
IMPORTANT NOTES
To prevent the occurrence of noise on the cables that carry microphone signals or LINE signals
(for example, 0 dB), only use screened cables and avoid running them in the vicinity of:
• equipment that produces high-intensity electromagnetic fields (for example, high power
transformers);
• mains cables;
• LINEs that supply loudspeakers.
OPERATING PRECAUTIONS
• Do not obstruct the ventilation grilles of the unit. Situate this product far from any heat sources
and always ensure adequate air circulation around the ventilation grilles.
• Do not overload this product for extended periods of time.
• Never force the control elements (keys, knobs, etc. ).
• Do not use solvents, alcohol, benzene or other volatile substances for cleaning the external
parts of this product.
34
AN OVERVIEW OF THE SE5120/SE5121 VOICE ALARM SYSTEM
The SE5120/SE5121 is a high-quality modular voice alarm system specially designed to simplify the
provision of a fully BS 5839 part 8 (1998) and EN 60849 compliant voice alarm system.
In one compact wall-mountable enclosure, the SE5120/SE5121 comprises:
ENGLISH
• A high-quality digital message store containing programmable Evacuate,
Alert and Test messages (SE5120).
• A prioritised mixer.
• Three balanced line level inputs for the (optional) connection of a fireman’s
microphone, paging/public address equipment and a background music
source.
• Two x 60-Watt rms Class D amplifiers.
• An EN54-4 compliant switch-mode power supply and battery charger.
• Space for 2 x 7Ah VRLA batteries typically providing at least 24 hours (standby) and 30 minutes (alarm running) time.
• A slave line level output (SE5120) allowing the connection of up to 10 slave
SE5121 amplifiers.
(Slave amplifiers are typically used to extend loudspeaker coverage in
areas such as large warehouses. They also allow greater flexibility in the
segregation of public address paging and background music distribution as
they have their own paging and background music inputs).
• Conventional and analogue (ApolloXP95/Xplorer/Discovery) fire alarm
interfaces (SE5120).
GROUPS OF “MASTER” UNITS SE2120 AND “SLAVE” SE5121
The fact that multiple SE5120/SE5121 can be connected to one host fire detection system makes
the RCF-SE voice alarm system ideal not just for simple one zone installations but for virtually all
small to medium sized applications (including phased evacuation projects) in areas such as offices,
shopping centres, hotels and leisure centres.
Figure 1 : SE5120 (SE5121) Block Diagram
35
ENGLISH
OPERATION
The principal function of the RCF-SE voice alarm system is to generate clear, intelligible voice
messages to alert people to the presence of fire, normally under the control of a host fire detection
system.
When the SE5120 receives a message trigger from the host fire detection system, it responds by
playing an appropriate message (Evacuate, Alert or Test) from its digital message store. This
message is amplified and broadcast around the site via the system’s loudspeakers.
Three balanced line level audio inputs are also provided for the connection of optional equipment
such as a fireman’s microphone (to the Fire Mic. Input) to allow live directive announcements by the
emergency services, public address paging equipment (to the Paging Input) and a background
music source such as CD player or radio tuner (to the BGM Input).
The Paging and BGM inputs have attenuators so that a wide range of inputs can be used.
The level of all four audio channels (digital message store, fire mic., paging and BGM) can be set
using the SE5120 (SE5121)’s four internal level controls.
If multiple inputs and/or digital message triggers are active at the same time, the SE5120 (SE5121)’s
prioritised mixer ensures that only the most urgent audio signal is broadcast, as indicated on the
chart below:
PRIORITY
1
2
3
4
DESCRIPTION
Fireman’s microphone
Evacuate, Alert or Test message
(Evacuate overrides Alert, Alert overrides Test)
Paging / public address microphone(s)
Background music source(s)
THE RCF-SE’S FIRE ALARM INTERFACE
The host fire detection system can be connected to the SE5120 via three polarized, opto-isolated
trigger inputs - Evacuate (M1), Alert (M2) and Test (M3). These inputs are designed to control the
SE5120’s digital message store and will activate when a voltage of 24V d.c. is applied to them (if
an external voltage is not available, a local 24V d.c. connection is available for switching into the
inputs under the control of the host fire detection system). All inputs are prioritised according to the
messages they trigger and can be set for latching or non-latching operation via an internal link.
When set to latch (required by BS5839-8), messages will play continuously until a higher priority
message/input is asserted or the device’s reset output (RES) is activated. When set for non-latching
operation, messages will clear when the input stimulus is removed (please check with the approving
authority that this is permissible prior to installation). This facility is provided to allow host fire detection
systems without a reset output to drive the SE5120.
NB: the SE5120 cannot interpret a pulsing sounder input as Alert - all trigger inputs must be
steady.
The SE5120 can also be connected directly to any Apollo protocol XP95, Discovery or Xplorer
analogue addressable fire alarm loop via its LOOP input. When connected in this way, the SE5120
emulates an Apollo sounder control module and must be given an individual (and optional ‘group’)
address using the two DIPswitches provided to allow it to be recognised by the analogue loop.
Once addressed, the system responds to the host panel’s commands by activating its Evacuate
message when it receives a continuous sounders command and its Alert message when it receives
an intermittent sounders command. It also reports any fault conditions back to the analogue loop as
a general fault allowing the host fire detection system to annunciate the fault location accordingly.
Although Apollo’s analogue protocols do not include a Test state in their output bit configurations,
some fire detection systems, such as those using a C-TEC AFP fire panel, have a ‘test’ bit pattern
built into their software. If this is the case, the SE5120’s ‘test enable’ facility allows compatible fire
detection systems to put the SE5120 into test – see Appendix 1 for compatibility details.
36
If required, the SE5120’s conventional fire alarm interface (i.e. its M1, M2 and M3 triggers) and its
analogue interface (i.e. its LOOPinput) can be used at the same time. If conflicting stimulus are
applied, the highest priority message always overrides other stimuli.
MONITORING
Provided the system is wired as detailed in this manual, a fault condition on the SE5120/SE5121 will
be reported as a sounder fault on the host fire detection system to which it is connected, with more
detailed fault indication provided on the front of the SE5120/SE5121 itself.
DIGITAL MESSAGE SELECTION
All of the SE5120’s digital messages are stored in MP3 format on a monitored, non-volatile memory
card that plugs directly onto the SE5120’s Main PCB.
The content of these messages can be adjusted to suit the application using a series of internal
links. For example, the Evacuate message can be configured to state that ‘a situation has arisen’ or
‘a fire has been reported’ and to warn people - if appropriate - not to use the building’s lifts.
AMPLIFIER AND SPEAKER CIRCUITS
Both SE5120 and SE5121 are supplied with a minimum of two separate Class D 60W amplifiers (A
and B). These are designed to drive the SE5120/SE5121’s two loudspeaker circuits through 100V line
transformers.
An end of line device must be connected across the terminals of the last loudspeaker on each circuit
and both circuits must be calibrated at commissioning using the SE5120/SE5121’s calibrate button to
ensure correct monitoring.
MULTIPLE SE5120/SE5121
There is no limit to the number of master (SE5120) that can be used per system. Please note however
that the BM5001WM fireman’s microphone can be daisy chained to a maximum of 10 master
SE5120 only.
To increase audio coverage in areas such as warehouses, etc., up to 10 slave SE5121s can be
connected to one master SE5120.
Slave SE5121s repeat all fireman’s microphone and digital message broadcasts that are made at the
master to which they are connected. They also feature their own paging and BGM inputs.
Therefore, if multiple master SE5120s and/or slave SE5121s are used, localised paging and
background music can be easily implemented.
37
ENGLISH
In order to comply with current British and European life safety standards, the SE5120/SE5121’s
speaker lines, PSU, batteries, fireman’s microphone and digital message store are all monitored
for short circuits, open circuits, earth faults, discharge, disconnection and data corruption as
appropriate.
Non-critical inputs such as public address paging and background music are not monitored and,
in the event of mains failure, are automatically cut off to conserve battery life. This contributes to
the SE5120/SE5121’s extremely efficient stand-by time - typically 24 hours (plus 30 minutes running)
using 2 x 7Ah VRLA batteries.
PLANNING THE WIRING
ENGLISH
All System wiring should be installed to meet the appropriate parts of BS5839-8 (1998), BS
EN 60849 (1998) and BS 7671 (Wiring Regulations). Other national standards of installation
should be adhered to where applicable.
To comply with EMC (Electro Magnetic Compatibility) regulations and to reduce the risk of electrical
interference in the system wiring, we recommend the use of fire-resistant (screened for signals)
cables throughout the installation.
All wiring should come into the enclosure via the knockouts provided and be fixed tidily to the relevant
terminals. For an overview of the connections required for the fire alarm interface, loudspeakers,
fireman’s microphone, paging/background music equipment and slave amplifiers, please refer to
the relevant sections later in this manual (see Contents on page 31).
Note that correct cable glanding is essential and due regard should be paid to any system
specifications which demand a certain cable type (providing it meets the appropriate national wiring
regulations).
MOUNTING THE SE5120/SE5121
The SE5120/SE5121’s enclosure can be surface or semi-flush mounted (see page 40). It comprises
a hinged metal lid and metal back box containing all of the system’s electronics. To protect the
electronics against damage during first fix installation, all of the SE5120/SE5121’s PCBs (apart from its
lid mounted Indicator PCB) are located on a removable chassis plate, as shown in Figure 1 below.
The enclosure must be sited internally in an area not subject to conditions likely to affect its
performance, e.g. damp, salt-air, water ingress, extremes of temperature, physical abuse, etc.
It should be positioned at a height where it is easily accessible and in a prominent position within the
building. Ideally, the indicators on the front of the enclosure should be at eye level.
Figure 1 : The SE5120/SE5121 Enclosure
CHASSIS EARTH STRAP
LID EARTH STRAP
PL2
INDICATOR
PCB
AMPLIFIER
PCB
DIGITAL
Message
Store
PCB
PL1
PL6
LID/BASE CONNECTING CABLES
38
MAIN
PCB
PL5
CHASSIS PLATE
POWER
SUPPLY
PCB
REMOVING THE LID AND CHASSIS PLATE
To expose all of the SE5120/SE5121’s base mounting holes, the lid and chassis plate should be
removed from the enclosure prior to first fix installation.
TO REMOVE THE LID:
• Undo the two screws on the right hand side of the SE5120/SE5121 using the
Allen key provided.
• Hinge the lid 180° to the left and remove the lid earth strap from the base
earth connection
(take care not to overbend the hinges).
• Disconnect the lid/base connecting cables (PL6 and PL5) from the Main PCB.
Take care to depress the telecoms-style locking tab on the PL6 connector to
prevent damage.
• Carefully remove the four wing nuts and washers that secure the hinges.
TO REMOVE THE CHASSIS PLATE:
• Ensure power has been removed from the SE5120/SE5121 and that the Power
Supply PCB is safe to handle (see page 42).
• Pull the chassis earth strap off the spade connector on the base earth
point.
• Remove all of the chassis plate’s retaining screws with the exception of the
two keyhole retaining screws at the top of the chassis plate which should be
loosened by about three turns.
• Push the chassis plate up and over the two keyhole retaining screws.
The lid and chassis plate can now be removed from site to prevent accidental damage. They should
be stored in a clean, dry place which is free from vibration, dust and excessive heat.
39
ENGLISH
ANTI-STATIC HANDLING GUIDELINES: Prior to handling any of the SE5120/SE5121’s internal
components, operators should rid themselves of any personal electro-static charge by momentarily
touching any sound connection to safety earth, e.g. a radiator.
PLANNING THE CABLE LAYOUT IN THE ENCLOSURE
ENGLISH
All low voltage wiring coming into the enclosure should be segregated away from the 100V speaker
lines and incoming mains voltages. Refer to Figure 2 (below) for guidance and important information
on how to remove the enclosure’s knockouts. Always ensure that if a knock-out is removed, the hole
is filled with a good quality cable gland. Any unused knockouts must be securely blanked off.
Figure 2 : Location of knockouts for cable entry and knockout removal details
Bring mains into the
enclosure through one of
these knockouts
The SE5120/SE5121’s backup
batteries will be located to the right of
this shaded area - ensure this area is
kept clear
Knockouts should be
removed with a sharp tap
in the rim of the knockout
using a flat 6mm broadbladed screwdriver
FIXING THE BASE TO THE WALL
Using the five mounting holes provided (see Figure 3 below), fix the base securely onto/into the wall.
The mounting holes are suitable for use with No.8-10 or 4-5mm countersunk screws.
Assess the condition and construction of the wall and use a suitable screw fixing.
Any dust or swarf created during the fixing process must be kept out of the enclosure and great care
must be taken not to damage any wiring or components.
Figure 3 : Internal view of the back box with PCBs removed / side view for flush mounting
CAUTION
If mounting multiple SE5120/
SE5121 next to each other, take
care to leave a gap of at least
80mm between each of their bases
to allow their lids to swing open.
40
CONNECTING THE PANEL
Connecting the RCF-SE’s internal connections is best undertaken immediately prior to commissioning
and after you have refitted the SE5120/SE5121’s lid, chassis mounting plate, lid/base connecting
cable and earth straps by reversing the process described on page 39.
It is essential that the wiring and speakers are tested with an audio load meter or an impedance meter
to ensure that the total total power of the load connected to each of the SE5120/SE5121 channels is
not greater than 60 Watts (not less than 167 Ohms) at 1 kHz. See page 44 for important information
on the loading of loadspeaker circuits.
DO NOT use a high voltage insulation tester with any electronic devices connected.
41
ENGLISH
Before connecting any wiring to the PCBs, we recommend you check all equipment (loudspeakers,
fireman’s microphone, paging panels, background music sources, etc) to ensure they are correctly
fitted and that cable integrity is verified throughout the installation.
ENGLISH
MAINS WIRING & CONNECTION DETAILS
The general requirement for the mains supply to the SE5120/SE5121’s power supply PCB is fixed
wiring, using three core cable (no less than 1mm2 and no more than 2.5mm2) or a suitable three
conductor system, fed from an isolating switched fused spur, fused at 3A. This should be secure
from unauthorised operation and be marked ‘VOICE ALARM SYSTEM: DO NOT SWITCH OFF’. The
mains supply must be exclusive to the device unit.
(As an alternative to a switched fused spur, a double pole isolating device may be used (see diagram
below) providing it meets the appropriate national wiring regulations).
MAIN
PANNELLO
DISTRIBUTION
PRINCIPALE DI
BOARD
DISTRIBUZIONE
SE5120
SE5121
Do not attempt to connect mains to the SE5120/SE5121 until you are fully conversant with the layout
and features of the Power Supply PCB, as described below.
The Power Supply PCB combines the functions of a mains to d.c. switched mode power supply unit,
battery charging unit and battery monitoring unit.
THE POWER SUPPLY PCB STORES VOLTAGES AT UP TO 400V DC AND MAY BE LETHAL IF
TOUCHED. DO NOT TOUCH THE PCB WHILST THE RED ‘HAZARDOUS VOLTAGES PRESENT’
INDICATOR IS LIT.
PSU EARTH STRAPS
DO NOT operate the SE5120/SE5121
without its earth straps connected in
this exact configuration
(The PSU earth strap connects the
power supply PCB to the chassis
earth post which in turn is connected
to the base earth post).
HAZARDOUS VOLTAGES
PRESENT LIGHT
When lit red, hazardous voltages will be present
on the components in the hatched area of the
PCB. Certain components are alive under this
hazardous voltage during operation, until the
mains supply has been removed. When the red
light extinguishes, the voltage has got to a safe
level.
BATTERY LEAD CONNECTOR
(battery leads are supplied in the
SE5120/SE5121’s accessory pack).
See page 43 for battery position and
connection details.
42
Incoming Mains cable
must be segregated from
other cables and should
only enter the enclosure
through one of the knockouts on the right side.
Good quality cable glands
must be fitted.
The incoming mains earth
wire MUST be connected
to the terminal marked
and not to the chassis or
base earth post.
PRIMARY FUSE (F1)
20 x 5mm 1A HRC Ceramic
to IEC 127 (EN60127 Part 2).
Do not use any other type
or size
of fuse in this position.
BATTERY FUSE (F2)
20 x 5mm 5A F to IEC 127
(EN60127 Part 2).
Do not use any other
type or size of fuse in this
position.
STAND-BY BATTERY CONNECTION
We recommend two new, good quality and fully charged 7Ah 12V valve regulated lead acid batteries
are used as the SE5120/SE5121’s emergency stand-by power supply. These will typically provide at
least 24 hours stand-by time and 30 minutes alarm running time.
CAUTION: No other type of battery should be used due to risk of explosion and smaller batteries will
reduce the stand-by time of the system considerably.
The batteries should be connected in series and located in the SE5120/SE5121’s enclosure as shown
in figure 5 below. The battery leads and link wire are provided in the SE5120/SE5121’s accessory
pack.
The sophisticated battery monitoring unit protects the batteries against deep discharge by activating
a cut off circuit when the stand-by supply voltage reaches 21V approx. If batteries are not fitted, are
discharged or in poor condition, a PSU fault will show at the SE5120/SE5121.
Always dispose of used batteries according to the battery manufacturer’s instructions.
Figure 5 : Stand-by battery location and connection
43
ENGLISH
Note that batteries are required at all SE5120/SE5121 (masters and slaves).
ENGLISH
LOUDSPEAKER CONNECTION
The SE5120/SE5121’s loudspeaker circuits (A and B) are rated at 60 watts each. Each circuit can
accommodate, for example, up to 10 speakers tapped at 6 watts or 20 speakers tapped at 3 watts
or 40 speakers tapped at 1.5 watts. In practice, a mixture of different speaker tappings may be
required per circuit (i.e. two speakers tapped at 6 watts, six at 3 watts and 20 at 1.5 watts).
This is acceptable provided the total wattage per circuit does not exceed 60 watts. It is good practice
to leave 20% spare capacity on each loudspeaker circuit and many specifications call for this. We
therefore recommend that the designed loudspeaker load is no more than 50 Watts.
To convert impedance into power, use the following equation:
P= V2/Z where P= power in Watts, V = r.m.s voltage in Volts and Z = impedance in Ohms
EXAMPLES:
1. for Z = 167 Ohms, P= 59.88 Watt
This is acceptable, but leaves no margin for increasing tappings on any
loudspeakers
2. for Z = 200 Ohms, P= 50 Watts
This is acceptable and leaves a margin for changes
3. for Z = 150 Ohms, P= 66.67 Watts
This is not acceptable and will cause the amplifier to shutdown.
An end of line module (provided in the SE5120/SE5121’s accessory pack) must be connected across
the terminals of the last loudspeaker to allow the wiring to be monitored for open or short circuit fault
conditions.
We recommend loudspeakers in compliance with present local norms. All loudspeakers must be
suitable for 100 Volt line operation, low impedance loudspeakers cannot be used. Note that a form
is provided on page 58 where you can record the number, type, location and tapping of each
loudspeaker used.
Figure 6 : Typical loudspeaker circuit wiring
Each speaker MUST have a line transformer suitable
for 100V operation tapped to the appropriate wattage.
It is common practice to use 2 loudspeaker circuits to maximise sound
distribution in the event of one of these fails.
IMPORTANT - To ensure the loudspeaker circuits are monitored correctly, they must
be calibrated using the SW1 button on the SE5120/SE5121’s Indicator PCB. See page
45 for details.
44
CALIBRATING THE CIRCUITS
The SE5120/SE5121’s loudspeaker circuits are monitored by the generation of a constant 20kHz tone
(which is passed down the speaker lines).
To store the normal value the commissioning engineer must activate the SE5120/SE5121’s loudspeaker
calibration feature. This should only be done when both loudspeaker circuits are complete (i.e. when
all loudspeakers are connected and appropriately tapped).
To start the calibration procedure, press and hold down the calibrate button (SW1) on the Indicator
PCB. The indicator light (IND1) on the Main PCB will pulse slowly until the calibration process begins.
This will be signified by the indicator light flashing more quickly at which stage you can let go of the
calibrate button. When the indicator light goes out, the calibration procedure is complete.
If any changes are made to the speaker circuits at any time - for example, if a speaker is added,
removed or is tapped differently - the above process should be repeated to establish a new ‘normal’
reference level.
For more specific loudspeaker wiring information, please refer to each loudspeaker’s indiviudal
installation instructions.
FIRE ALARM INTERFACE CONNECTION
The SE5120/SE5121’s fire alarm interface comprises two parts - a conventional and an analogue
interface.
THE CONVENTIONAL INTERFACE
The conventional interface has four polarized inputs - Evacuate (M1), Alert (M2), Test (M3) and
Reset (RES) - plus a fault relay output. All four inputs are optically isolated and designed to be active
when supplied with +24V. These inputs are typically triggered via a conventional fire alarm sounder
circuit or relay output or via one or more input/output units from an analogue addressable loop (see
Figures 7 & 8 below for details).
Note that Apollo XP95, Discovery and Xplorer fire systems can be connected directly to the
SE5120/SE5121’s analogue interface as detailed on page 47.
For compliance with BS5839-8, all four conventional inputs are set to latch by default (i.e. Link 3 of
the PLK4 option links is supplied fitted). When a steady voltage of +24V is applied to an input, the
relevant message plays until a higher priority message is asserted (note that pulsing inputs are not
compatible with SE5120/SE5121). When the trigger voltage is removed, the selected message will
continue to play. Only when the SE5120/SE5121’s Reset input is asserted will the system return
to normal. When the Reset stimulus is released no message will play unless other inputs are
asserted.
For compatibility with fire detection systems that do not have the capability of driving the SE5120/
SE5121’s reset output, removing Link 3 on the PLK4 option links will set all message inputs to nonlatching. Be sure to check with the approving authority that this arrangement is acceptable prior to
installation as this does not allow full compliance with BS5839-8.
45
ENGLISH
Each circuit’s “end of line” device absorbs the tone signal and the current taken is regularly measured
against the current drawn at setup (the normal value).
AVAC
SE5120
MAIN PCB
MAIN PCB
CONVENTIONAL
FIRE PANEL
0V
Figure 7: Interfacing a non-addressable fire
detection system to the SE5120 via a conventional
sounder circuit and reset output.
(please also refer to note 1)
+24V
C
SOUNDER
CIRCUIT
EOLD
Note 1: Regard should be made
NC
M1 (EVAC)
M2 (ALERT)
+
+24V
–
0V
to Clause 6.4 of BS5839 part 8
when connecting external control
and indicating equipment to
the conventional interface. This
requires the controlling inputs
to be latched. It also requires
that each link is monitored as
recommended in Clause 7.
SOUNDER
CIRCUIT
+
–
M3 (TEST)
+
–
RES
+
+24V
–
0V
RESET
OUTPUT
Figure
0V
+24V
NO
FAULT
RELAY
C
I/O UNIT
EOLD
NC
M1 (EVAC)
INPUT
MONITOR
+
–
M2 (ALERT)
8: Interfacing an
analogue addressable fire
detection system using two
input/output units - both units
must be at rest to reset the
device (please also refer to
note 1).
+
–
M3 (TEST)
ADDRESSABLE LOOP
ENGLISH
NO
FAULT
RELAY
I/O UNIT
+
–
RES
+
INPUT
MONITOR
–
SE5120
AVAC
MAIN
PCB
MAIN PCB
Locate
input/output
Locate
input/output
I/O UNIT
units local to AVAC
units(Both
local
tohave
SE5120
units
to be
at units
rest to reset
(Both
haveAVAC)
to be
at rest to reset SE5120)
If a reset output is not available,
removing Link 3 of the PLK4
option links will change all
message inputs to non-latching operation.
Please ensure you read the text at the top
of this page before implementing such a
change as this is not strictly compatible
with BS5839-8
46
Remove link 3
to make message
inputs non-latching
THE ANALOGUE INTERFACE
Once on the loop, the SE5120 emulates an Apollo sounder control module
and responds to fire alarm system commands as such, playing an Alert
message when an Alert (intermittent sounders) command is received and
an Evacuate message when an Evacuate (continuous sounders) command
is received.
If using an AFPfire alarm panel, segment 8 of the eight way DIP switch can
be used to select a test message facility (Test Enable).
Certain other analogue panels may also be able to use this facility.
IMPORTANT: The AFP at this time does not have the facility to release
the SE5120 from test cleanly.
ENGLISH
The SE5120’s analogue interface can be connected to any Apollo XP95,
Discovery or Xplorer analogue loop (see Figure 9, right, for connection
details).
If using this method, the SE5120 should be given a unique ID address using
the first seven segments of the eight way DIPswitch (SW2) on the Main PCB.
When polled, the green polling LED will illuminate momentarily to confirm
the SE5120 is working correctly.
Figure 9: Interfacing to the SE5120’s
analogue interface
In addition to its unique ID address, the SE5120 can be given a ‘group’ address using the four way
DIPswitch (SW1). A group address is used by the host fire detection system to activate the outputs
of multiple SE5120s simultaneously. If this facility is used, note that indiviudal SE5120s will continue
to report back their status to the host fire detection system using their unqiue ID address numbers
as appropriate.
SETTING THE SE5120’S UNIQUE ID ADDRESS
Use bits 1 to 7 of the eight way DIPswitch (SW2) to give the SE5120 a
unique ID address (i.e.13 in the example shown right with test enabled).
This can be any address between 1-126 (if group mode is not utilised) or
1-111 (if group mode is utilised (see bottom of page).
47
SETTING
THE
SE5120/SE5121’S
(OPTIONAL) GROUP ADDRESS
ENGLISH
Use bits 1 to 4 of the four way DIPswitch
(SW1) to give the SE5120 an optional
group address. A group address can
be any address between 112-126.
More than one SE5120 can have the
same group address.
FIREMAN’S MICROPHONE CONNECTION
If a fireman’s microphone is required, you must use the manufacturer’s BM 5001WM microphone.
Only one BM 5001WM microphone should be used per system. This can be daisychained to up to 10
SE5120/SE5121 units as illustrated in Figure 10 below. Pressing the BM 5001WM’s push to talk button
will override all other audio signals on the system, including Evacuate and Alert messages, allowing
live directive announcements to be made as appropriate.
If required, the volume of the microphone can be adjusted using the level control (VR1) on the Main
PCB.
Please note, to ensure the microphone is monitored correctly, link PLK2 MUST only be fitted
at the LAST SE5120/SE5121 unit in the daisy chain.
Figure 10: Fireman’s microphone connection
OPTIONAL EXTRA SE5120/5121 UNITS
To optional
next
SE5120/5121
BM5001WM
FIRE MIC.
Turn clockwise
to increase fire
mic. volume
Turn clockwise
to increase fire
mic. volume
Turn clockwise
to increase fire
mic. volume
IMPORTANT
Link PLK2 must ONLY be fitted at the last SE5120/SE5121 in
the daisy chain to ensure it is monitored correctly.
In this example, the link WOULD NOT be fitted at Main PCBs
1 and 2 but at PCB 3 only.
If only one master SE5120/SE5121 is used, Link PLK2 would
be fitted on that SE5120/SE5121’s Main PCB.
48
PUBLIC ADDRESS PAGING CONNECTION
Figure 11 : Typical public address paging equipment connection
ALTERNATIVELY,
CONNECT ADDITIONAL
PAGING EQUIPMENT HERE
FOR LOCALISED PAGING
CONTINUE
DAISYCHAIN TO
NEXT SE5120/5121
FOR OPTIONAL
LARGER AREA
PAGING IF
REQUIRED
VOLT FREE CONTACTS
BALANCED LINE OUTPUT
FROM PA / PAGING
EQUIPMENT
Turn clockwise
to increase
paging volume
Fit PLK3 to
attenuate paging
signal by 10:1
SE5120/5121 UNIT
Turn clockwise
to increase
paging volume
Fit PLK3 to
attenuate paging
signal by 10:1
ADDITIONAL SE5120/5121 UNIT
Pressing the paging equipment’s PTT (push to talk) button will override all relevant background
music signals, but have no effect on higher priority triggers (such as Alert messages, Evacuate
messages or Fireman’s mic broadcasts).
49
ENGLISH
If required, public address paging equipment can be connected to the SE5120/SE5121’s paging
input for non-life safety public address announcements.
The SE5120/SE5121’s paging input is designed to accept balanced line level signals of between
300mV and 1.5V rms. If you wish to connect a larger line level signal, fitting link PLK3 on the Main
PCB will attenuate the input signal by a ratio of approximately 10:1.
The volume of the paging signal (after it has been through the amplifier stage) can be adjusted using
the VR2 level control on the Main PCB. For global paging, simply daisy chain the paging input to all
relevant SE5120/SE5121 units. If multiple SE5120/SE5121 amplifiers are used, localised paging can be
achieved using additional equipment or multi-zone consoles (see Figure 11, below, for details).
ENGLISH
BACKGROUND MUSIC CONNECTION
Any background music source with a line level output (CD player, radio tuner, etc.) can be connected
to the SE5120/SE5121. Background music is the lowest priority input and it will play continuously
unless there are other audio inputs active on the system.
The BGM input, like the paging input, is designed to accept balanced line level signals of between
300mV and 1.5V rms. If you wish to connect a larger line level signal, fitting link
PLK1 on the Main PCB will attenuate the input signal by a ratio of approximately 10:1.
The volume of the background music signal (after it has been through the amplifier stage) can
be adjusted using the VR3 level control on the Main PCB.
For global background music, simply daisy chain the paging input to all relevant SE5120/SE5121
units. If multiple SE5120/SE5121s amplifiers are used, different background music sources can be
selected to play in different areas, i.e. local radio in warehouses, piped music (or silence) in offices,
etc. (see Figure 12, below, for details).
Figure 12 : Typical background music connection
ALTERNATIVELY, CONNECT
A DIFFERENT BGM SOURCE
HERE FOR LOCALISED
BACKGROUND MUSIC
LINE OUTPUT
FROM BGM SOURCE
Turn clockwise
to increase
background
music volume
CONTINUE DAISYCHAIN
TO NEXT SE5120/5121 IF
REQUIRED
Audio- )
Audio+)
Fit PLK1 to
attenuate
BGM signal
by 10:1
MASTER SE5120 UNIT
50
Turn clockwise
to increase
background
music volume
Fit PLK1 to
attenuate
BGM signal
by 10:1
ADDITIONAL MASTER
(OR SLAVE) SE5120 (5121) UNIT
SLAVE SE5121 CONNECTION
ENGLISH
To increase audio coverage in large areas such as warehouses, shopping centres, etc, up to 10
slave SE5121s can be connected to one master SE5120.
For compliance with BS5939-8, all critical life safety broadcasts made at the SE5120 (“master”) (i.e.
fire microphone announcements, Evacuate, Alert and Test messages) are automatically passed to
the relevant slave(s) for output.
To allow greater paging and background music flexibility, each slave SE5121 has its own paging
and BGM inputs. Alternatively, for global paging and background music, the audio source(s) at the
master SE5120 can be daisychained to the slave SE5121’s inputs as explained on pages 49 and 50.
Slave SE5121s connect to master SE5120 as shown in Figure 13 below. Please note, to ensure slave
SE5121s are monitored correctly, link PLK2 MUST only be fitted at the LAST slave SE5121 unit in the
daisy chain.
Figure 13 : Typical slave SE5120/SE5121 connection
All fire microphone and message broadcasts are
automatically routed to slave SE5121(s) via these four wires.
(Refer to pages 49 and 50 for information on how to
implement global and/or localised paging and BGM)
MASTER
SE5120
Turn clockwise to
increase slave
SE5121 volume
SLAVE
SE5121
SLAVE
SE5121
Turn clockwise to
increase slave
SE5121 volume
IMPORTANT
Link PLK2 must ONLY be fitted at the last
SE5121 in the daisy chain to ensure it is
monitored correctly.
If only one SE5120/SE5121 is used, Link
PLK2 would be fitted on that SE5120/
SE5121’s Main PCB.
DIGITAL MESSAGE SELECTION
The SE5120’s digital message store PCB is located on the SE5120’s Main PCB. It comprises a nonvolatile solid state memory (on which the “Evacuate”, “Alert” and “Test” messages are stored in MP3
format), an MP3 player and a volume control.
MESSAGE CONTENT
The general characteristics of the SE5120’s Evacuate and Alert digital messages are designed
to meet BS5839-8 (1998) Clause 14 and consist of a siren type sound to attract attention, brief
silence, the body of the message followed by another brief period of silence before the message is
repeated.
51
ENGLISH
The PLK4 option links on the Main PCB can be used to select different message arrangements
to suit various applications. For example, in single storey buildings, fitting Link 8 will remove the
statement “Do not use a lift” from all Evacuate messages whilst fitting Link 7 will report Evacuate or
Alert conditions as ‘situations’ rather than fires. If the SE5120’s Test message facility is used, fitting
Link 4 will prompt the system to broadcast “The fire alarm test is now complete” when the system is
returned to normal. A full breakdown of the messages available can be found later in this section.
IMPORTANT:
Depending on how the fire alarm interface is configured, Evacuate, Alert and Test messages will
only clear when:
• The SE5120’s reset input is asserted (on systems where the SE5120’s
conventional interface is used and Link 3 on the PLK4 links is fitted)
• The Evacuate, Alert or Test input stimulus is removed (on systems where the
SE5120’s conventional
interface is used and Link 3 on the PLK4 links is not fitted. NB: removing Link
3 renders the inputs non-latching and this does not allow full compliance with
BS5839-8 - please check with the approving authority that this is acceptable
before using this method)
• The system is silenced or reset via an Apollo protocol fire alarm panel
connected to the SE5120/SE5121’s analogue interface.
(Refer to page 45 ‘Fire Alarm Interface Connection’ for further details).
EVACUATE MESSAGE SELECTION
Listed below are the four Evacuate messages currently available at the SE5120/SE5121 together with
details of the PLK4 option links you need to fit (or remove) to select them.
Evacuate message 1
Evacuate message 2
Siren (three seconds silence),
Attention please, attention please.
Links 7 & 8
Fire has been reported in the building. not fitted
Please leave the building immediately
by the nearest available exit.
Do not use a lift.
(three seconds silence then repeat)
Siren (three seconds silence)
Attention please, attention please.
Fire has been reported in the
building.
Please leave the building immediately
by the nearest available exit.
(three seconds silence then repeat)
Evacuate message 3
Evacuate message 4
Siren (three seconds silence)
Attention please, attention please.
A situation has arisen where we need
to clear the building.
Please leave the building immediately
by the nearest available exit.
Do not use a lift.
(three seconds silence then repeat)
Siren (three seconds silence)
Attention please, attention please.
A situation has arisen where we need
to clear the building.
Please leave the building immediately
by the nearest available exit.
(three seconds silence then repeat)
52
Link 7 fitted
Link 8 fitted
Links 7 & 8
fitted
ALERT MESSAGE SELECTION
Two Alert messages are available on the SE5120. The actual message played will depend on the
position of Link 7 as shown in the diagrams below. Note altering the position of Link 7 will also affect
the content of the SE5120’s Evacuate message (described previously).
Alert message 2
Siren (three seconds silence)
May I have your attention please, may I
have your attention please
Fire has been reported in the building.
please listen for further instructions.
(10 seconds silence) Ding dong.
Links 7
You are reminded to remain at your
not fitted
workplace whilst the fire alert exists
(repeat last two segments
every 22 seconds).
Siren (three seconds silence)
Attention please, attention please
A situation as arisen in the building,
please listen for further instructions.
(10 seconds silence) Ding dong.
You are reminded to remain at your
workplace whilst the fire alert exists
(repeat last two segments
every 22 seconds).
TEST MESSAGE SELECTION
Only one SE5120 test message is available, as detailed below:
Siren (three seconds silence)
A fire alarm system is about to be tested.
Please take no further action.
However, if Link 3 of the PLK4 option links is fitted, the SE5120 will also broadcast a simple test
cancellation message when the system is returned to normal, as described below:
Ding dong
The fire alarm test is now complete.
Thank you for your cooperation.
ADJUSTING THE MP3 PLAYER LEVEL
The level of the digital messages can be globally adjusted using the MP3 player’s volume control
which is located on the digital message store PCB, as shown below:-
Turn clockwise to
increase digital
message level.
DIGITAL
MESSAGE
STORE PCB
Test message
A fire alarm system is about to be
tested, please take no further action.
The fire alarm test is now complete.
Factory programming
link only - DO NOT FIT A
LINK IN THIS POSITION
53
ENGLISH
Alert message 1
Links 7
fitted
FAULT INDICATION
ENGLISH
When a fault occurs, a continuous fault buzzer sounds at the SE5120/SE5121 and the relevant fault indicator will
illuminate. The SE5120/SE5121’s fault relay also activates to report the fault to the host fire detection system where,
depending on the wiring configuration used, it is usually reported as a sounder fault.
Pressing the Silence Internal Sounder button on the front of the SE5120/SE5121 will mute the fault buzzer.
However, as all faults are also reported to the host fire detection system, removing link PLK5 (located below the
buzzer on the Main PCB) will permanently disable the fault buzzer. Be sure to check with the approving authority that
disablement of the internal sounder is acceptable before removing this link.
All faults should be recorded in the fire detection system’s log book and appropriate action should be taken to correct
them. An explanation of what each indicator means and the steps that can be taken to correct the faults they relate to
can be found below.
Note that all faults (except system faults and amplifier faults) are non-latching so when the fault is cleared, provided
no other faults are present, the SE5120/SE5121’s fault buzzer and all relevant fault indicators will clear.
D
C
A
E) GENERAL FAULT
Flashes when there is a fault
on any part of the voice alarm
system.
This light is always lit in tandem
with at least one other fault
light which will convey more
precise information on the type
of fault detected.
B
E
F) SYSTEM FAULT
F
H
G
A) PSU FAULT
I
Illuminates when one or more
of the following has occurred:
1) The battery fuse has
blown.
2) The battery supply voltage
is too low.
3) The battery charging
circuitry is faulty.
4) The switch mode power
supply is faulty.
5) The 24V output on the
main PCB is shorted or
overloaded.
(See also section 1.1 on page 55).
and public address paging is
suppressed.
B) MAINS FAULT
D) MESSAGE FAULT
Illuminates when the Mains
has failed or the primary Mains
fuse has blown. Note that when
this light is lit the system will
only operate for the stand-by
period dictated by the size of
the backup batteries fitted and
to conserve battery life, BGM
54
C) MICROPHONE FAULT
Illuminates when one or more
of the following has occurred:
1) The fireman’s microphone is
faulty.
2) There is an open or short
circuit fault on the fire mic.
wiring.
3) The master fire mic. link
(PLK2) is not fitted at the
last SE5120/SE5121 to
which it is connected.
Illuminates when there is a
problem with the SE5120’s
digital message
store. Check that the Digital
Message Store PCB is plugged
in correctly. If it is and the fault
message reoccurs the PCB
may be faulty.
Illuminates when one or more
of the following has occurred:
1) The SE5120/SE5121’s
microprocessor has reset.
2) The SE5120/SE5121’s Main
PCB is faulty.
These types of fault can only be
cleared by pressing the Reset
button (SW2) on the SE5120/
SE5121’s indicator PCB inside
the panel. If the fault reoccurs
the Main PCB may be faulty.
(See also section 1.2, page 56).
G) SLAVE FAULT
Illuminates when one or more
of the following has occurred:
1) There is a fault on any
SE5121 slave amplifiers
that are connected to the
SE5120
2) There is an open or short
circuit fault on the slave
wiring.
H) A FAULT, B FAULT
The relevant amplifier fault
indicator illuminates if there
is a problem with any of the
SE5120/SE5121’s amplifiers (A,
B or stand-by). Note that the
stand-by amplifier is optional.
If any of these indicators are lit,
try pressing the Reset button
(SW2) on the SE5120/SE5121’s
indicator PCB inside the panel
to see if the fault clears. If the
fault does not or if the fault
comes back soon after, refer to
Section 1.3 on page 56.
I) SPEAKER FAULT A
SPEAKER FAULT B
The relevant speaker fault
indicator illuminates when one
or more of the following has
occurred:
1) There is an open or short
circuit fault on a speaker
circuit.
2) The speaker circuit’s end of
line device is missing.
3) There is a speaker earth
fault.
To ascertain if there is an earth
fault, open the SE5120/SE5121
and check to see if either of the
speaker earth fault lights on
the Main PCB inside the panel
are lit. If they are not, the fault
is an open or short circuit.
Have
you
calibrated
the speaker
circuits (see
page 45)?
Failure to do so could also lead
to speaker circuit faults.
(Refer also to section 1.3 on
page 56).
1.1 POWER SUPPLY / MAINS FAULTS
A power supply/mains fault is indicative of one or more of the following faults.
THE MAINS SUPPLY IS TOO LOW OR HAS FAILED COMPLETELY.
THE PRIMARY MAINS FUSE (F1) IS RUPTURED.
Symptoms: the SE5120/SE5121 runs on batteries, but not on mains. The red ‘Hazardous Voltages
Present’ light on the Power Supply PCB is off.
Suggested action:
a) Isolate the mains supply and check the PSU’s primary mains fuse (F1) for continuity.
b) If the fuse is ruptured, it will be due to an excessive mains surge or a PSU fault. Check the
components on the PSU for damage. If none is found, replace the fuse with the correct type and
reconnect the mains supply. If the red ‘Hazardous Voltages Present’ light does not come on then the
PSU is faulty and should be replaced.
THE BATTERY FUSE (F2) IS RUPTURED.
Symptoms: the SE5120/SE5121 runs on mains, but not on batteries.
Suggested action:
a) Isolate the mains supply and disconnect the batteries.
b) Check the Battery Fuse (F2) on the Power Supply PCB for continuity.
c) If the fuse is ruptured check the Power Supply PCB and Main Control PCB for signs of damage.
If none is found, replace the fuse with the correct type, ensuring that the fuse clip is not damaged
when re-inserting the fuse.
d) Refit the Main PCB and reconnect the batteries.
If the green ‘Supply Present’ light is lit, reconnect the mains supply and check that the power supply
fault has cleared. If the ‘Supply Present’ light is not lit, either the Power Supply PCB or the Main PCB
is faulty and should be replaced.
e) If the Battery Fuse (F2) is intact, proceed to check the battery voltage (see below).
THE BATTERY VOLTAGE IS TOO LOW.
Symptoms: the SE5120/SE5121 runs on mains, but does not run on batteries.
If the mains supply has failed and the battery supply has been discharged to the point where the
voltage is too low (i.e less than 21V), the SE5120/SE5121 will automatically turn off to avoid damaging
the batteries by allowing them to deep discharge. The SE5120/SE5121 will not restart unless fresh,
fully charged batteries are connected, or the mains supply is restored.
If the mains supply has not failed, but the total battery voltage is less than 21V, the PSU will not
charge the batteries to avoid damage to the charging circuit. If the battery terminal voltage is greater
than 21V, the batteries can be charged, but the SE5120/SE5121 will continue to show a power supply
fault until they have sufficient charge, at which point the power supply fault will automatically be
cleared. Depending on battery size and the depth of discharge, this may take several hours. If the
batteries are in poor condition they must be replaced.
Please note that the charging circuit is set up during manufacturing, and is temperature
compensated.
There is no need to adjust the voltage.
If the batteries are in good condition and all the other checks have been performed and no faults
55
ENGLISH
Symptoms: the SE5120/SE5121 runs on batteries, but not on mains. Verify the red “Hazardous Voltages
Present” light on the Power Supply PCB is lit (if Mains has failed the LED will be off).
Suggested actions:
a) Isolate the mains supply and probe the live and neutral connections with a multimeter.
b) Taking all due precautions, reapply the mains and measure the voltage.
c) Isolate the mains supply again.
If the reading was incorrect (see Technical Specifications at the end of this manual) repair the mains
supply. If the reading was correct, check to see if the primary mains fuse (F1) is ruptured.
If the fuse is intact and the red hazardous voltages present light on the Power Supply PCB is lit, then
the PSU is faulty and should be replaced.
found, the Power Supply PCB is faulty and should be replaced.
NB: batteries that are not connected or in reverse (with opposite polarities) will also cause a power
supply fault condition.
ENGLISH
SUPPLY PRESENT LIGHT NOT LIT
If the ‘Supply Present’ light is not lit one of the following faults has occurred:
1) Both the mains supply and the stand-by batteries have failed.
Suggested action: restore the mains supply (if possible) and the “Supply Present” light should come
back on. However, if the batteries are discharged this will be recognised as a fault and indicated as
such. See the previous “THE BATTERY VOLTAGE IS TOO LOW”.
2) The Power Supply PCB, the Main PCB and/or the cable that connects them is faulty.
If the mains supply is present (indicated by the red hazardous voltages light being lit on the Power
Supply PCB), check that the connector cable between the Power Supply PCB and the Main Control
PCB is fully inserted at both ends. If so, either the Power Supply PCB and/or the Main Control PCB
and/or the connector cable are faulty and should be replaced.
1.2 SYSTEM FAULTS
System faults are unique in that they do not automatically clear when rectified.
Suggested action:
Press the Reset button on the SE5120/SE5121’s indicator PCB. This should clear the fault. If the fault
persists, the Main PCB is faulty and must be replaced.
1.3 AMPLIFIER/LOUDSPEAKER FAULTS:
THE SE5120/SE5121 SHOWS A LOUDSPEAKER/AMPLIFIER FAULT AFTER CALIBRATION OR ADDING
OR REMOVING AN “END OF LINE” DEVICE (EOLD) IS NOT DETECTED.
Suggested action:
Before starting these tests please ensure that you have a record of the number, type, location and
tapping of each loudspeaker on each circuit. The form on page 58 can be photocopied and used
for this Check whether the fault is with the SE5120/SE5121, EOLD(s) or in the wiring. Remove the
loudspeaker wiring, connect the EOLD(s) at the SE5120/SE5121 and press calibrate.
If the fault does not clear, check whether the fault is with the EOLDs or the SE5120/SE5121 by swapping
the EOLDs and recalibrating.
If it is an EOLD or the SE5120/SE5121, contact your supplier for assistance.
If the fault lies with the external wiring there may be several causes.
First refit the EOLDs at the end of line
1) The Loudspeaker circuit may be overloaded.
The absolute maximum loading for each amplifier module is 60 Watts (167 Ohms minimum
impedance). If this is exceeded, the amplifier will shut down as announcements are made or audio
is played. As the signal varies in loudness, the amplifier may operate intermittently.
The most common installation error is to leave loudspeakers tapped (as supplied), which is normally
the maximum load setting.
For example, a typical office environment may require 6W ceiling loudspeakers to be tapped at
1.5W each. A maximum of 40 1.5W loudspeakers can be connected to one 60W amplifier circuit.
However, if they are tapped at 6W, the load will be 240W and the amplifier will shut down.
To identify this problem, use an impedance meter to measure the line impedance; which should be
at least 167 Ohms at 1 kHz or use an audio load meter to measure the load directly (it must not be
more than 60W).
If it is more than 60W (less than 167 Ohms), the load must be reduced by removing loudspeakers or
lowering the tappings (of some loudspeakers).
2) If the fault is intermittent or the loudspeakers cut out intermittently, one or more input sources
may be set too high.
If this problem only occurs very rarely, it is likely to be related to an audio source that is seldom used.
Try each of the sources in turn to see if the problem occurs.
Unplug all input sources. Press the reset button. If the fault clears, this indicates that one of the
inputs is overdriving the unit.
56
3) There may be one or more bad connections on the loudspeaker circuit.
A loose contact/wire adds impendence to the circuit causing the EOL to be less effective.
4) One or more loudspeakers may be mis-connected
A loudspeaker may appear to be connected but it doesn’t work.
100 Volt loudspeakers have transformers with tappings and it is not impossible to connect them
incorrectly. When the circuit is tested with an impedance meter, the reading can be more than
167 Ohms, which appears to be acceptable, but the load monitoring system will still detect the
problem.
Apply the rule of halves:
remove the end of line, split the circuit at the middle, connect the EOLD and attempt to recalibrate.
If it does not recalibrate, split the line in half again and repeat. If it does recalibrate reconnect the line
and split again at the three-quarter point.
Continue until the mis-connected loudspeaker is identified.
5) One or more of the loudspeakers may be damaged or faulty.
As section (4), look for uninsulated cores, water damage and physical damage.
AMPLIFIER FAULTS OCCUR ON THE SYSTEM, BUT WHEN RESET THEY DO NOT REOCCUR FOR
SOME CONSIDERABLE TIME.
An audio input which is not currently running may be set incorrectly, intermittently overdriving the
amplifiers. See section (2) above.
If paging is installed: has there been any feedback? Check for speakers near phones or microphones
and move the equipment further apart.
The load may be changing due to bad connections – see section (4) above.
THE FIREMAN’S MIC SHOWS A FAULT.
The last SE5120/SE5121 panel connected to the fireman’s microphone should have the PLK2 link
fitted.
The fireman’s mic that has been used is not compatible – you must use the MB 5001WM.
There is no emergency mic fitted and the EOL resistor has been omitted.
CONNECTING SOME INPUT SOURCES CAUSES NOISE.
Use volt free switch contacts on the paging input.
Avoid multiple earth screen and muliple 0V connections as circulating currents and excessive noise
could result.
57
ENGLISH
Re-attach the inputs one at a time and set the audio working. If the fault recurs, lower the level on
that input.
The remaining faults can be difficult to find so at this point it is best to check which loudspeakers are
working and whether you think they are tapped correctly.
Connect a pink noise generator on the audio + and – pins of the BGM (background music) input.
Adjust the BGM input level so that it can be heard but is not annoying. If it is too loud, the amplifier
will cut off intermittently.
Walk the circuit listening to each loudspeaker in turn and assessing whether it is working and if it is
set to the correct level.
APPENDIX
LOUDSPEAKER RECORD SHEET
ENGLISH
This form is provided for you to record the number, type, location and tapping of each loudspeaker
on the SE5120/SE5121’s circuits. On heavily populated systems you may wish to make multiple
photocopies of this page before using it.
SPEAKER
TYPE
SPEAKER
LOCATION
58
SPEAKER
TAPPING
SE5120/21 SE5120/21
LOCATION CIRCUIT
ADDITIONAL
COMMENTS
TECHNICAL SPECIFICATION
POWER SUPPLY AND CHARGER
Battery fuse
Max Battery Charge current
230Va.c +/- 10% 50/60Hz
27Vd.c. Nominal
5A @ 230 Va.c. (derate by 500mA if batteries are charging)
7A @ 230 Va.c.
YES (battery charger is also temperature compensated)
YES
YES (Deep discharge cut off approx. 21 Volts)
2 x 12V 7Ah VRLA connected in series
240V 1A HRC ceramic 20mm - compliant with IEC
(EN60127 Pt2)
5A F 20mm - compliant with IEC (EN60127 Pt2)
0.5A
INPUTS
Input level for 100V RMS (1kHz tone)
BGM
BGM without link
Page
Page without link
FM input
Page PTT Volt Free contacts non triggered state
Page PTT Volt Free contacts triggered state
Fire Mic PTT non triggered state
Fire Mic PTT triggered state
Manual inputs M1,M2,M3,RES
Gain adjust set to Max. sensitivity
230mV RMS
2.3V RMS
230mV RMS
2.3V RMS
230mV RMS
Open circuit
Close circuit
6K8
1K in parallel with 6K8
24V 2.5mA (optically isolated)
OUTPUTS
Max Output AUX 24V (Master only)
Max Output Fire Mic 24V
Max Speaker Output
Max Continuous Output power (Tone at 1kHz) With discharged battery
Peak output power for 4 Seconds (dependent upon PSU and temperature)
Frequency response at 15W load / line driven from the Fire Mic
Frequency response at 30W load / line driven from the Fire Mic
Frequency response at 45W load / line driven from the Fire Mic
Frequency response at 60W load / line driven from the Fire Mic
Frequency response at 60W load / line driven from Page or BGM
100mA
100mA
100V/0.6A (RMS x 2)
2 x 30W
2 x 60W RMS
152Hz to 20kHz
152Hz to 12kHz
152Hz to 9.2kHz
152Hz to 8kHz
218Hz to 6.2kHz
BATTERY CALCULATIONS
Average stand-by current at full load
Average alarm current at full load (audio on Fire Mic)
AUX and Fire Mic supplies will add to the requirements
97mA
1.2A
Speaker Monitoring Tone
20kHz
59
ENGLISH
AC input
Internal power supply
Max continuous output current limited to
Pulse peak output current limited to
Supply & battery charger monitored for failure
Batteries monitored for disconnection and failure
Batteries protected against deep discharge
Battery size and type
Mains fuse
Salvo eventuali errori ed omissioni.
RCF S.p.A. si riserva il diritto di apportare modifiche senza preavviso.
Except possible errors and omissions.
RCF S.p.A. reserves the right to make modifications without prior notice.
10307075/A
the rules of sound
RCF SpA: Via Raffaello, 13 - 42010 Reggio Emilia > Italy
tel. +39 0522 274411 - fax +39 0522 274484 - e-mail: [email protected]