1
PR3094
PR3093
User manual
1
ENGLISH 4
DEUTSCH 57
ITALIANO 118
PR3094, PR3093
FRANÇAIS 176
4
ENGLISH
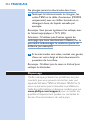
Introduction
Congratulations on your purchase and welcome to
3KLOLSV7RIXOO\EHQHÀWIURPWKHVXSSRUWWKDW3KLOLSV
offers, register your product at www.philips.com/
pain-management/register.
Read this user manual carefully before you use the
Wireless TENS (PR3093) or the Wireless TENS
Pro (PR3094) and save it for future reference. The
Wireless TENS (PR3093) and the Wireless TENS
Pro (PR3094) are available without prescription.
To achieve optimal treatment success with your
Wireless TENS device, you have to use it according
to the treatment instructions in this user manual.
If you need further information or have questions,
please visit www.philips.com/
pain-management or contact the Philips
Consumer Care Centre in your country.
Intended use
The Wireless TENS (PR3093) and the Wireless
TENS Pro (PR3094) are intended to be used by
adult consumers experiencing mild to moderate
chronic musculoskeletal pain. The devices are
intended to be used for transcutaneous electrical
nerve stimulation (TENS) for the purpose of pain
relief and for monitoring activity with the integrated
activity monitor.
The Wireless TENS device may be brought to
appointments with a medically trained healthcare
professional who is responsible for using the TENS
device according to the user manual and who is
skilled in:
- analysing the patient’s activity and treatment
patterns
ENGLISH
5
- determining individual treatment and adapting
settings of the TENS device by means of the
Wireless TENS Pro PC Application (PR3094 only)
The Wireless TENS Pro PC Application is only for use
by a healthcare professional in combination with the
Wireless TENS Pro device (PR3094), which enables
WKHKHDOWKFDUHSURIHVVLRQDOWRRIIHUPRUHVSHFLÀF
TENS treatment programs and enables the healthcare
professional to track and analyse the patient’s activity
patterns in relation to the use of the device.
The device is intended to be used and operated by
and on one single adult person. It should always be
used in accordance with the safety information and
operating instructions included in this user manual
and for the purpose for which it is designed.
TENS and pain management
Transcutaneous electrical nerve stimulation (TENS) is a
non-invasive pain relief method for which clinical proof
exists that it can help relieve pain.TENS is used daily
by physiotherapists and other healthcare professionals.
During TENS treatment, electrical pulses are passed
across the intact surface of the skin to activate the
underlying nerves. Clinical evidence suggests that TENS
produces pain relief in a similar way to the nervous
system’s own pain-relief mechanisms, for instance
similar to massaging a painful area.
The pulses are generated by the battery-powered
TENS units, which have to be connected to the selfadhesive hydrogel electrodes. You can choose from
a set of preset TENS programs with different pulse
settings and can adjust the intensity of the pulse
according to your own preference. This booklet
contains information on the placing of the electrodes
and the programs used for treatment.
6
ENGLISH
Activity monitoring and pain management
We all want to enjoy doing our daily activities.
When you experience pain, however, the instinctive
reaction is to avoid pain by reducing your activity
OHYHO$VDUHVXOW\RXEHFRPHOHVVÀWDQGOHVVDEOH
to enjoy doing the things you like. Staying active,
without overdoing it, is important to avoid being
trapped in a persistent pain cycle. The key to selfmanaging your pain is pacing: distributing periods of
activity and periods of rest over the day in a way
that feels most comfortable for you. The key to
pacing is spreading out your activities and ‘taking a
break before you need it’. An activity monitor can
help you keep track of how well you pace your
activities over the day. The remote control of the
Wireless TENS device has a built-in activity monitor
that records your activity when you wear it attached
to your belt or waistband or when you carry it
around in the pocket of your trousers or skirt. It
can record and store the activity data of 60 days. In
this way, you cannot only check your activity pattern
over the last 24 hours, but also your activity pattern
of the previous week and the previous month. If
you want to get more tips on pacing and how to
self-manage your pain, please read the Pain Toolkit
booklet included in the packaging.*
* Note:Only the German version of the Pain Toolkit
is included in the package. If you want to have the
English, French or Italian version, please go to
www.philips.com/pain-management to
download your preferred version.
ENGLISH
7
Information for the healthcare professional
(PR3094 only)
The Wireless TENS Pro (PR3094) can be used
in combination with the Wireless TENS Pro PC
Application, which is designed for use by medically
trained healthcare professionals who are responsible
for using the TENS device according to the user
manual and who are skilled in:
- analysing patient activity patterns in relation to
patient treatment patterns using an external PC
application
- determining individual treatment and adapting
settings of the TENS device by means of an
external PC application
The Wireless TENS Pro PC Application enables
KHDOWKFDUHSURIHVVLRQDOVWRRIIHUPRUHVSHFLÀF7(16
treatment programs to their patients and to track and
analyse patients’ activity patterns on a PC in relation to
the use of the device and the patient’s pain experience.
The Wireless TENS Pro PC Application is not included
in the package, but can be downloaded on request.
Please go to www.philips.com/tens-download
and leave your contact details.You will receive a link
from where you can download the Wireless TENS
Pro PC Application. Via this link you can also access or
download the user manual of this PC application.
USB cable
The Wireless TENS Pro PC Application works when
the remote control is connected to your PC with
a mini USB cable. You can obtain this standard mini
USB cable in two ways:
1 You can leave your contact details on
www.philips.com/tens-download and
indicate that you would like to receive a mini
USB cable. When we have received your details,
we will send you a mini USB cable by post.
8
ENGLISH
2
If you received a trial kit from our sales force,
this kit should contain the mini USB cable.
If you have other questions regarding the availability
of the Wireless TENS Pro PC Application or the
mini USB cable, please contact the Consumer Care
Centre in your country.
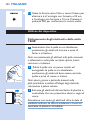
Important
Contra-indications
Do not use the device if:
- you have a cardiac pacemaker, implanted
GHÀEULOODWRURURWKHULPSODQWHGPHWDOOLFRU
electronic device (e.g. a drug delivery system),
as use in these cases could cause electric shock,
burns, electrical interference, or even death.
- you have a heart disease.
- you have epilepsy.
- you are pregnant, as the safety of electric
stimulation during pregnancy has not yet been
established.
- you have a cognitive impairment.
Adverse reactions
You should stop using the device and consult your
doctor if you experience adverse reactions from the
device.
Possible adverse reactions may include the following:
- skin irritation beneath the electrodes, although the
gel used on the electrodes is not known to cause
allergic reactions
- burns beneath the electrodes
- headaches or other painful sensations
- nausea or feeling faint
ENGLISH
9
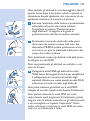
Important safety information
Warning
- This is a medical device. Keep the device out of
the reach of children.
- Read this user manual carefully and always adhere
to the treatment instructions.
- This appliance is not intended for use by adults
with reduced sensory or mental capabilities.
- Do not use the device on children.
- Do not use the device if your pain cannot be
FOHDUO\GHÀQHGDVPLOGWRPRGHUDWHPXVFRVNHOHWDO
pain. If you are not certain about the cause of
your pain, consult your doctor.
- If you are in the care of a doctor, consult your
doctor before you use the device.
- Do not apply stimulation on your neck, as
this could cause severe muscle spasms that
could close your airway and result in breathing
GLIÀFXOWLHVDQGWKDWPD\DOVRKDYHDQDGYHUVH
effect on your heart rhythm or blood pressure.
- Do not apply stimulation across your chest
because electric current entering into the chest
may cause heart rhythm disturbances, which could
be lethal.
- Since the effects of stimulation of the brain are
unknown, stimulation should not be applied across
the head and electrodes should not be placed on
opposite sides of the head.
- Be careful when you have a tendency to bleed
internally due to any impact or injury.
- Consult your doctor if you recently had surgery,
as stimulation may have a negative effect on the
healing process.
- Do not apply stimulation over or near cancerous
lesions.
10
ENGLISH
- Do not apply stimulation over open wounds
or rashes, or over swollen, red, infected or
LQÁDPHGDUHDVRUVNLQHUXSWLRQVHJSKOHELWLV
thrombophlebitis and varicose veins).
- Do not apply stimulation on areas of skin that lack
normal sensation.
- Only apply stimulation to normal, intact, clean and
healthy skin.
- Use of electric stimulation and conductive
electrodes may lead to skin irritation or skin
sensitisation.
- Do not apply stimulation while driving, operating
machines or while performing any other activity
in which electrical stimulation can put you at risk
of injury.
- Do not apply stimulation while sleeping. If the
device is used at bedtime, set the timer to make it
switch off automatically.
- Do not use the device and electrodes internally.
- Do not apply stimulation near electronic
monitoring equipment (e.g. cardiac monitors,
ECG alarms), as this equipment may not operate
properly when the device is in use.
- Do not apply stimulation in the bath, shower or
swimming pool.
- Do not use plaster or tape to attach the
electrodes to the skin.
- Always check the device and the electrodes for
damage before use.
- Do not use the device or an electrode if it is
damaged.
- Do not modify the device or the electrodes.
ENGLISH 11
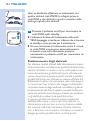
Caution
- Only use this device with the charger, cables,
electrodes and accessories recommended by the
manufacturer.
- The device is not waterproof. Do not use the device
in wet surroundings and prevent it from getting wet.
- The device can be used indoors and outdoors,
but it has not been designed to withstand all
weather conditions.
- The device cannot withstand high and low
temperatures. Please check the operating
FRQGLWLRQVLQFKDSWHU¶6SHFLÀFDWLRQV·
- The USB connection port is only to be used by
a healthcare professional in conjunction with the
Wireless TENS Pro PC Application (PR3094)
supplied by Philips.
- The electrodes have a limited shelf life. Please
check the packaging for the use-by date prior to
use. Do not use electrodes whose use-by date has
expired. For ordering replacement electrodes, see
chapter ‘Ordering accessories’.
- Make sure that you end the treatment by
switching off the TENS units or by setting the
intensity to 0 mA on the remote control before
you remove the TENS units, the extension cable
(if used, PR3094 only), or the electrodes. If you do
not end the treatment, you may experience an
XQSOHDVDQWVHQVDWLRQLQ\RXUÀQJHUV7KLVVHQVDWLRQ
is not harmful, but can be unpleasant.
- Always use and store the electrodes according to
the instructions in chapters ‘Using the device’ and
‘After use’.
- If the device does not function as described in this
manual, stop using it and contact the Consumer
Care Centre. For contact details, see chapter
‘Guarantee and support’.
12
ENGLISH
Compliance with standards
- The device meets the relevant standards for this
type of Class IIa electrical medical appliance and
appliances using electrical stimulation for home use.
- This Philips appliance complies with all applicable
standards and regulations regarding exposure to
HOHFWURPDJQHWLFÀHOGV
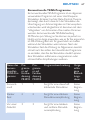
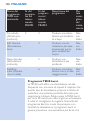
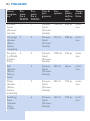
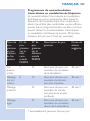
Preset programs
Program overview
The device comes standard with 8 preset programs
(PR3093) or 15 preset programs (PR3094). There
are three different TENS types: Conventional TENS,
Burst TENS and Frequency-modulated TENS. For
more details, see below.
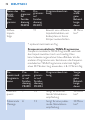
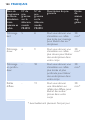
Conventional TENS programs
Conventional TENS is a common TENS program
with high-frequency stimulation. It is based on the
Gate Control Theory that states that this type
of stimulation will cause the transmission of pain
signals in the nervous system to be blocked. It is
comparable to ‘rubbing the pain away’. Most people
use Conventional TENS for 30 minutes per session,
but you can use it as often and as long as you
feel comfortable with. The effect is usually most
perceptible during stimulation. The effect generally
wears off rather quickly when stimulation has ended.
You should adjust the intensity of the program so that
you clearly feel the stimulation. Stimulations should
not give an unpleasant or painful sensation, however.
ENGLISH 13
Name of
Conventional
TENS
program
Program
no. on
remote
control
PR3093
Program
no. on
remote
control
PR3094
Program description
Suggested
treatment
time
Conventional
1
1
May give you a continuous tingling stimulation
No limit
Thorough 2
stimulus
2
May give you a more
thorough stimulating
sensation
No limit
Pre-activity
3
3
May give you a more
local and soft stimulating
stimulation
No limit
Soft
stimulus
-
4
May give you a softer
stimulating sensation, e.g.
for sensitive body parts
No limit
Deep
stimulus
-
5
May give you a deeper
stimulating sensation
No limit
Radiating
pulse
-
6
May give you a more
radiating stimulation
sensation
No limit
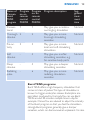
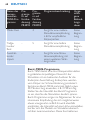
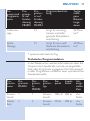
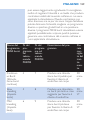
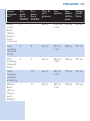
Burst TENS programs
Burst TENS offers a high-frequency stimulation that
comes in trains of pulses.This type of stimulation is
known to trigger endorphin release. Endorphins are
pain killers produced by the body.You can use Burst
TENS around 30 minutes multiple times a day, for
example 3 times.You are advised to adjust the intensity
of the Burst program so that you feel the stimulation
strongly. Burst programs generally give a sharper
sensation, which can feel somewhat unpleasant. It is also
14
ENGLISH
advised to adjust the intensity to a level that produces
visible muscle contractions in the stimulation area.
7KHVHFRQWUDFWLRQVDUHQRWKDUPIXO,I\RXÀQGWKHVH
contractions too uncomfortable, you can decrease
the intensity, choose a different program or move the
electrodes to a different place. Burst TENS should
preferably be applied while resting, since it can result in
muscle contraction in the stimulation area.
Name
of
Burst
TENS
program
Program
no.on
remote
control
PR3093
Program
no. on
remote
control
PR3094
Program description
Suggested
treatment
time
Continuous
Burst
4
7
May give you a pulsing burst
stimulation to release endorphins in your body
30
min.*
Slow
kneading
5
8
May give you a slower and
massaging burst stimulation
to release endorphins
30
min.*
Mild
kneading
6
9
May give you a milder burst
stimulation to release endorphins in your body
30
min.*
Deep
kneading
-
10
30
May give you a more local
and deeper burst stimulation min.*
to release endorphins in your
body
Diffuse Burst
11
May give you a more diffuse
burst stimulation to release
endorphins in your body
* optionally multiple times a day
30
min.*
ENGLISH 15
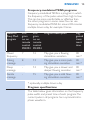
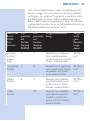
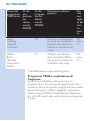
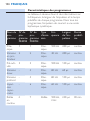
Frequency-modulated TENS programs
Frequency-modulated TENS is a program in which
the frequency of the pulse varies from high to low.
This can be more comfortable or effective than
the other programs in some cases. You can use
frequency-modulated TENS for around 30 minutes
multiple times a day, for example 3 times.
Name of
Freq. Mod.
program
Program
no. on
remote
control
PR3093
Program description
Program
no. on
remote
control
PR3094
Suggested
treatment
time
Mixed
frequency
7
12
0D\JLYH\RXDÁRZLQJ
stimulation sensation
30
min.*
Pulsing
massage
8
13
May give you a more pulsing stimulation sensation
30
min.*
Deep
massage
-
14
May give you a slower and
GHHSHUÁRZLQJVHQVDWLRQ
30
min.*
Gentle
massage
-
15
0D\JLYH\RXDPLOGÁRZing stimulation sensation
30
min.*
* optionally multiple times a day
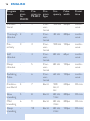
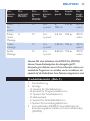
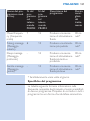
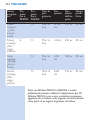
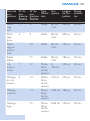
3URJUDPVSHFLÀFDWLRQV
The table below gives information on the frequency,
pulse width and preset time of each program. The
current pulse in all programs has a symmetrical biphase waveform.
16
ENGLISH
Program
name
Program
no.
PR3093
ProProgram no. gram
PR3094 type
FrePulse
quency width
Preset
time
Conventional
1
1
Conventional
100 Hz 200µs
continuous
Thorough 2
stimulus
2
Conventional
40 Hz
200µs
continuous
Preactivity
3
3
Conventional
100 Hz 150µs
continuous
Soft
stimulus
-
4
Conventional.
80 Hz
60µs
continuous
Deep
stimulus
-
5
Conventional
80 Hz
150µs
continuous
Radiating
Pulse
-
6
Conventional
60 Hz
150µs
continuous
Continuous Burst
4
7
Burst
100
Hz, 2
Hz
250µs
30 min.
Slow
kneading
5
8
Burst
80 Hz,
1 Hz
200µs
30 min.
Mild
kneading
6
9
Burst
80 Hz,
3 Hz
200µs
30 min.
Deep
kneading
-
10
Burst
80 Hz,
2 Hz
150µs
30 min.
ENGLISH 17
Program
name
Program
no.
PR3093
ProProgram no. gram
PR3094 type
FrePulse
quency width
Preset
time
Diffuse
Burst
-
11
Burst
80 Hz,
2 Hz
180µs
30 min.
Mixed
Frequency
7
12
Freq.
Mod.
8-100
Hz
250µs
30 min.
Pulsing
massage
8
13
Freq.
Mod.
2-8 Hz
250µs
30 min.
Deep
massage
-
14
Freq.
Mod.
2-80
Hz
180µs
30 min.
Gentle
massage
-
15
Freq.
Mod.
8-80
Hz
150µs
30 min.
Note:With the Wireless TENS Pro (PR3094), healthcare
professionals can use the Wireless TENS Pro PC
application to create and install additional programs
tailored to their patient’s needs as part of a painmanagement regimen.
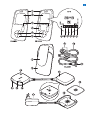
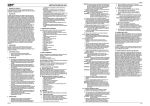
Product overview (Fig. 1)
1
2
-
Remote control
Display
A. Home screen symbol
B. Program screen symbol
C. Timer screen symbol
D. Battery symbol
E. Activity screen symbol
F. Settings screen symbol
18
ENGLISH
3
5
6
7
8
9
10
11
12
13
14
15
16
17
18
19
Intensity button (PR3093); intensity button for
extension channel (third and fourth electrode)
(PR3094)
,QWHQVLW\EXWWRQIRUPDLQFKDQQHOÀUVWDQG
second electrode) (PR3094)
OK button
Selector with up, down, right and left arrows
Removable belt clip
Battery compartment cover
Extension channel connectors for third and
fourth electrode (PR3094 only)
Extension channel cable (PR3094 only)
Plug to connect extension channel cable to
TENS units (PR3094 only)
On/off button of TENS units
TENS units
Removable corner piece (PR3094 only)
Battery status indicator of TENS units
Treatment status indicator of TENS units
Adapter
Charger
Self-adhesive hydrogel electrode
1RWH<RXÀQGWKHUHODWHGSLFWXUHRQWKHLQVLGHRIWKH
front cover.
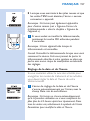
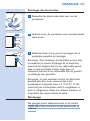
Preparing for use
Charging the TENS units
7REHDEOHWRXVHWKHGHYLFH\RXÀUVWKDYHWR
charge the TENS units. Charging the TENS units
takes approx. 3 hours, if the device is at room
temperature. When the rechargeable battery is fully
FKDUJHGLWFRQWDLQVVXIÀFLHQWHQHUJ\IRUDSSUR[
hours of continuous use under normal operating
conditions.
ENGLISH 19
Note: If the rechargeable battery of the TENS units
is not fully charged when you start a treatment, the
batteries may run out during the treatment.We advise
you to always fully charge the TENS units before you
start a treatment.
Note:Treatment is not possible when the TENS units
are charging.
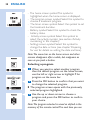
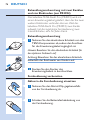
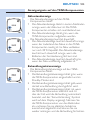
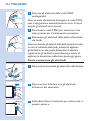
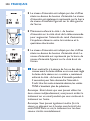
1 Insert the adapter of the charger in a wall
socket.
2 Place the TENS unit with the rechargeable
battery (the one without the on/off button and
the indicators) in the charger.
, The battery status indicator on the other TENS
XQLWÁDVKHVJUHHQGXULQJFKDUJLQJ
, 7KHEDWWHU\VWDWXVLQGLFDWRUVWRSVÁDVKLQJDQGLV
solid green when the battery is fully charged.
3 Remove the TENS unit from the charger when
the battery is fully charged.
Note: Always disconnect the charger from the mains
after use by removing the adapter from the wall socket.
20
ENGLISH
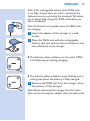
Preparing for treatment with two channels
and four electrodes (PR3094 only)
The Wireless TENS pro (PR3094) comes with an
extension cable that allows you to connect two
extra electrodes. Because the Wireless TENS pro
(PR3094) has two channels, its remote control has
two intensity buttons, one for each channel.
Preparing for treatment
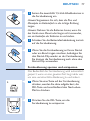
1 Remove the detachable corner from the TENS
units to make the socket for the extension
cable accessible.
Note: Store the detachable corner for later use.
Caution: Store the detachable corner out of the
reach of children.
2 Insert the plug of the extension cable into the
socket.
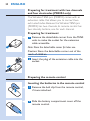
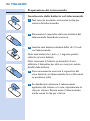
Preparing the remote control
Inserting the batteries in the remote control
1 Remove the belt clip from the remote control,
if it was attached.
2 Slide the battery compartment cover off the
remote control.
ENGLISH 21
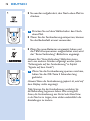
3 Put the two AAA 1.5-volt alkaline batteries in
the remote control.
Note: Make sure that the - and + poles point in the
direction indicated in the battery compartment.
Note: Remove the batteries if you are not going to use
the device for a month or more to prevent battery
leakage.
4 Slide the battery compartment cover back
onto the remote control.
5 If you want to wear the remote control
attached to your belt or waistband, reattach
the belt clip to the remote control.You can
also use the remote control without the belt
clip.
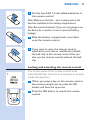
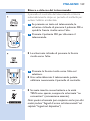
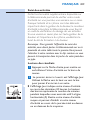
Locking and unlocking the remote control
The control panel of the remote control locks
automatically after some time of inactivity to prevent
accidental operation.
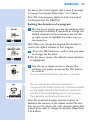
1 When you press a key on the remote control,
the screen prompts you to press the OK
button and then the up arrow.
2 Press the OK button to unlock the remote
control.
22
ENGLISH
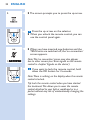
, The screen prompts you to press the up arrow.
3 Press the up arrow on the selector.
, When you unlock the remote control, you can
use the control panel again.
, When you have inserted new batteries and the
TENS units are switched off, the ‘no connection’
screen appears.
Note:This ‘no connection’ screen may also appear
due to other causes (see ‘Error signals on the remote
control’ in chapter ‘Signals on the device’).
4 If you want to lock the remote control, hold
down the OK button for 2 seconds.
Note:There is nothing on the display when the remote
control is locked.
Tip: Lock the remote control when you have started
the treatment.This allows you to wear the remote
control attached to your belt or waistband or in a
pocket without any risk of unintentionally changing the
settings.
ENGLISH 23
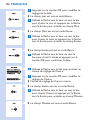
Setting the date and time
If you want to use activity monitoring to keep track
of your activity and treatment pattern, you have to
set the date and time on your remote control.
1 The date and time setting screen opens
DXWRPDWLFDOO\RQWKHGLVSOD\ZLWKWKHGDWHÀHOG
highlighted.
1RWH7KLVVFUHHQRQO\RSHQVDXWRPDWLFDOO\DWÀUVWXVH
and if you replace the batteries more than 24 hours
after the batteries ran out. Select the settings screen
symbol to change the date and time in all other cases.
2 Press the OK button to be able to change the
date setting.
, 7KHGD\ÀHOGLVKLJKOLJKWHG
3 Use the up or down arrow to choose the day
and press the right arrow to go to the month
ÀHOG
, 7KHPRQWKÀHOGLVKLJKOLJKWHG
4 Use the up or down arrow to choose the
month and press the right arrow to go to the
\HDUÀHOG
, 7KH\HDUÀHOGLVKLJKOLJKWHG
5 Use the up or down arrow to choose the year
DQGSUHVVWKH2.EXWWRQWRFRQÀUPWKHGDWH
24
ENGLISH
6 Use the down arrow to go to the time setting
ÀHOG
7 Press the OK button to be able to change the
time set.
, The time setting screen opens.
, 7KHKRXUÀHOGLVKLJKOLJKWHG
8 Use the up or down arrow to choose the hour
and press the right arrow to go to the minutes
ÀHOG
, 7KHPLQXWHVÀHOGLVKLJKOLJKWHG
9 Use the up or down arrow to choose the
PLQXWHVDQGSUHVVWKH2.EXWWRQWRFRQÀUP
the time.
10 Use the down arrow to go to the time format
ÀHOG
11 Press the OK button to be able to change the
time format.
12 Use the up or down arrow to toggle between
the 24-hour clock and the 12-hour clock. Press
WKH2.EXWWRQWRFRQÀUP\RXUFKRLFH
ENGLISH 25
Using the device
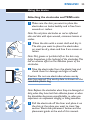
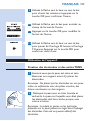
Attaching the electrodes and TENS units
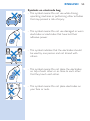
1 Make sure the skin you want to place the
electrodes on looks healthy and is free from
wounds or rashes.
1RWH'RQRWSODFHHOHFWURGHVRQUHGRULQÁDPHG
skin and skin with open wounds, cancerous lesions or
rashes.
2 Clean the skin with a moist cloth and dry it.
The skin you want to place the electrodes
on must be dry, clean and free from cream or
lotion.
Note: Dirt, grease or particles left on the skin may
lodge themselves in the hydrogel of the electrodes.This
has an adverse effect on the adhesive power of the
electrodes.
3 Take the electrodes from the plastic bag and
check them for damage and signs of wear.
Caution: Do not use electrodes whose use-by
date has expired. The use-by date is shown on the
resealable plastic bag.
Note: Replace the electrodes when they are damaged or
dirty, when they have lost their adhesive power or when
the stimulation becomes uncomfortable, i.e. when you
experience an unpleasant stinging or biting sensation.
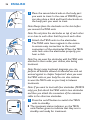
4 Pull the electrode off the liner and place it on
the skin at the place you want to treat. See
section ‘Electrode placement’ below and the
placement guide at the end of this manual.
26
ENGLISH
5 Place the second electrode on the body part
you want to treat. In the case of PR3094, you
can also place a third and fourth electrode on
the body part you want to treat.
Note: Always place the electrodes on the skin before
you connect the TENS units
Note: Do not place the electrodes on top of each other
or so close to each other that they touch each other.
6 Attach the TENS units to the electrodes.
The TENS units have magnets in the centre
to ensure easy connection to the metal
connectors of the electrodes. When the TENS
units lock onto the electrodes properly, you
hear a click.
Note:You can wear the electrodes with the TENS units
attached to them under your clothes, also during
treatment.
Note: During many treatment programs, you can
perform all activities allowed as intended use and not
warned against in chapter ‘Important’ when you wear
the TENS units on your body.You can also continue
to wear the TENS units on your body in between
treatments.
Note: If you want to treat with four electrodes (PR3094
RQO\\RXÀUVWDWWDFKWKH7(16XQLWVWRWZRHOHFWURGHV
and then you attach the connectors of the extension
cable to the other two electrodes.
7 Press the on/off button to switch the TENS
units to standby.
, The treatment status indicator on the TENS
XQLWVÁDVKHVJUHHQWRLQGLFDWHWKDWWKH\DUHLQ
standby and ready for treatment.
ENGLISH 27
, If you do not start the treatment within 5
minutes, the TENS units switch off automatically.
,IWKLVKDSSHQV\RXÀUVWKDYHWRSUHVVWKHRQRII
button again to start a treatment.
Electrode placement
To receive maximum results from your stimulation, it
is important to place the electrodes correctly. Always
make sure that you have normal skin sensation in
the place you want to treat before you attach the
electrodes. The optimal place may vary slightly from
person to person, so try moving the electrodes
around until you get the most effective results. In
some cases it can be helpful to mark the spot for
future use. For suggestions regarding placement
of the electrodes, see the placement guide at the
end of this manual. Please note that you may need
assistance to place the electrodes on certain spots
on your body.
As a rule, the electrodes should be placed on or
near the painful area. Stimulation may result in
visible muscle contraction in the stimulation area.
7KLVLVQRWKDUPIXOEXWLI\RXÀQGWKHVHFRQWUDFWLRQV
uncomfortable, move the electrodes to a different
place.
Do not place electrodes on your neck or across
your chest. Do not place electrodes on red or
LQÁDPHGVNLQDQGVNLQZLWKRSHQZRXQGVRQ
cancerous lesions or rashes.
Start and stop treatment
This is the home screen. On it you see the program,
the treatment time and the intensity selected. On
the menu bar at the bottom of the screen you see
from left to right:
28
ENGLISH
- The home screen symbol: This symbol is
highlighted when the home screen is displayed.
- The program screen symbol: Select this symbol to
choose a treatment program.
- The timer screen symbol: Select this symbol to set
the treatment duration.
- Battery symbol: Select this symbol to check the
battery status.
- Activity screen symbol: Select this symbol to
select the activity monitor (see section ‘Activity
monitoring’ in this chapter).
- Settings screen symbol: Select this symbol to
change the date or time (see chapter ‘Preparing
for use’ for details on setting the date and time).
Note:The menu bar on the home screen and other
screens disappears after a while, but reappears as
soon as you push a button.
Selecting a program
1 When you want to select another program
than the default program on the home screen,
use the left or right arrow to highlight P for
program on the menu bar.
2 3UHVVWKH2.EXWWRQWRFRQÀUPWKDW\RXZDQW
to change the selected program.
, The program screen opens with the previously
selected program highlighted.
3 Use the up or down arrow to choose a
SURJUDPDQGSUHVVWKH2.EXWWRQWRFRQÀUP
your choice.
Note:The program selected is saved as default in the
memory of the remote control.The next time you use
ENGLISH 29
the device, this is the program that is used. If you want
to change the program follow steps 1 to 3 above.
Note:The same program applies to both channels of
the Wireless Tens Pro (PR3094).
Setting the duration of a program
1 On the home screen you see the duration that
is selected as default. If you want to change the
default duration of the treatment, use the left
or right arrow to highlight the timer icon on
the menu bar.
Note:When you change the program, the duration is
reset to the default duration of that program.
2 3UHVVWKH2.EXWWRQWRFRQÀUPWKDW\RXZDQW
to change the duration.
, On the timer screen, the default preset duration
is highlighted.
3 Use the up or down arrow to choose the
duration you prefer and press the OK button
WRFRQÀUP
- You can set the treatment duration in minutes.
- You can also set the treatment duration to
‘continuous’, the screen shows the continuous symbol
on the display instead of the treatment duration in
PLQXWHV,IWKLVV\PEROÁDVKHVRQWKHKRPHVFUHHQ
the treatment continues until you end it.
Note:The treatment duration selected is saved as
default in the memory of the remote control.The next
time you use the device, this is the duration setting that
is used. If you want to change the duration, follow steps
4 to 6 above.
30
ENGLISH
Note:The same duration applies to both channels of
the Wireless TENS Pro (PR3094).
Starting and stopping a treatment (PR3093)
7RVWDUWDWUHDWPHQW\RXÀUVWKDYHWRVZLWFKRQWKH
TENS units with the on/off button and then you
press the + side of the intensity button to increase
the intensity.
1 Press + side of the intensity button to set the
intensity. The intensity always starts to increase
from 0 mA. The treatment starts and the timer
starts to count down as soon as the intensity
is higher than 0 mA. The higher the intensity,
the stronger the pulse in the area to which the
electrodes are attached.
, Hold down the + side of the intensity button
to increase the intensity constantly and slowly.
Release the intensity button when you feel you
have found the right level of stimulation.
Note: For Conventional TENS and Frequency-modulated
TENS, you should clearly feel the stimulation, but this
should not be an unpleasant sensation and should not
be painful.
Note: For Burst TENS, you should feel the stimulation
strongly, which generally gives a sharper sensation and can
feel somewhat unpleasant. It is also advised to adjust the
intensity to a level that produces visible muscle contractions
in the stimulation area.These contractions are not harmful.
,I\RXÀQGWKHFRQWUDFWLRQVWRRXQFRPIRUWDEOH\RXFDQ
decrease the intensity, choose a different program or move
the electrodes to a different place.
, The intensity level is shown in numbers above
the intensity button. The intensity ranges from 0
mA to 60 mA. The intensity level is shown by the
intensity level bar on the right side of the screen.
The higher the bar, the higher the intensity.
ENGLISH 31
, When the treatment starts, the treatment status
LQGLFDWRURQWKH7(16XQLWVVWDUWVWRÁDVK\HOORZ
, The home screen of the remote control shows
the program selected, the treatment time left
and the intensity selected.
, If the intensity feels uncomfortable, press the
- side of the intensity button to reduce the
intensity constantly and slowly.
Note: Since your body initially adapts to the intensity
of the stimulation, you may have to adjust the intensity
level after some time to ensure optimal stimulation.
2 To end the treatment before the set treatment
time has elapsed or if you set the treatment
duration to ‘continuous’, hold down the - side of
the intensity button for 3 seconds to make the
intensity drop to 0 mA. When the intensity level
is 0 mA, no pulse is emitted by the TENS units.
Note:You can also end the treatment by pressing the
on/off button on the TENS units. In that case, treatment
on both channels stops immediately.
Starting and stopping a treatment (PR3094)
7RVWDUWDWUHDWPHQW\RXÀUVWKDYHWRVZLWFKRQWKH
TENS units with the on/off button and then you
press the + sides of the intensity buttons to increase
the intensity.
1 Press the + side of the intensity buttons to set
the intensity for the main and the extension
channel separately and start the treatment.
, Hold down the + side of the intensity button on
the left side of the remote control to increase
the intensity of the main channel. This starts the
SXOVHEHWZHHQWKHÀUVWWZRHOHFWURGHV
32
ENGLISH
, The intensity level is shown in numbers above
the left intensity button. The intensity level is
also shown by the intensity level bar on the left
side of the screen.
, Hold down the + side of the intensity button on
the right side of the remote control to increase
the intensity of the extension channel. This starts
the pulse to the third and the fourth electrode.
, The intensity level is shown in numbers above
the right intensity button. The intensity level is
also shown by the intensity level bar on the right
side of the screen.
2 To end the treatment of one or both channels
before the set treatment time has elapsed or if
you set the treatment duration to ‘continuous’,
hold down the - side of the intensity button for
3 seconds to make the intensity drop to 0 mA.
When the intensity level is 0 mA, no pulse is
emitted by the TENS units.
Note: Because you can operate the two channels
independently, you can stop treatment on one channel
while you continue treatment on the other.
Note:You can also end the treatment by pressing the
on/off button on the TENS units. In that case, treatment
on both channels stops immediately.
ENGLISH 33
Activity monitoring
This additional feature available on the remote
control allows you to check your activity pattern
over a day, a week or a month. Since activity and
pacing are important elements in pain management,
the activity monitor included in the remote control
provides you with a tool to check how well you
pace your activities. If you want to know more about
self-managing your pain and the importance of
pacing, please read the Pain Toolkit booklet.
Note:To ensure activity monitoring works effectively, you
have to wear the remote control on or close to your
waist all day.You can attach it to your belt or waistband
with the belt clip or you can carry it around in the
pocket of your trousers or skirt.
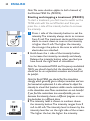
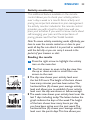
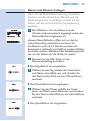
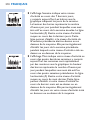
Reading the results
1 Press the right arrow to highlight the activity
icon on the menu bar.
2 7KHÀUVWVFUHHQWRRSHQLVWKHGD\YLHZ8VH
the up or down arrow to scroll from one
screen to the next.
, The day view shows your activity level over
the last 24 hours. The height of the bars shows
how many minutes you have been active. The
horizontal line (A) shows your average activity
level and allows you to establish if your activity
level over the day was above or below average.
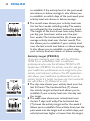
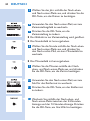
, The week view shows your activity level over the
last 7 days including today. The letters below the
graph indicate the days of the week. The height
of the bars shows how many hours per day
you have been active over the past week. The
horizontal line (A) shows your average activity
level over the past 6 days. This line allows you
34
ENGLISH
to establish if the activity level in the past week
was above or below average. It also allows you
to establish on which days of the past week your
activity level was above or below average.
, The month view shows your activity level over
the last four weeks including today. The weeks
are indicated by the numbers below the graph.
The height of the bars shows how many hours
per day you have been active over the past
four weeks. The horizontal line (A) shows your
average activity level over the last month. This
line allows you to establish if your activity level
over the last month was below or above average.
It also allows you to establish on which days
your activity level was above or below average.
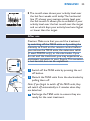
Activity target (PR3094)
If you are managing your pain with the Wireless
TENS Pro in consultation with a healthcare
professional who uses the Wireless TENS Pro PC
Application (PR3094), the activity monitor will give
your healthcare professional more insight into your
activity and treatment patterns. The PC application
also allows your healthcare professional to set an
activity target. If a target has been set, the horizontal
line will show a (T) instead of an (A).
, The day view shows your activity level over the
last 24 hours. The horizontal line (T) shows
the activity target set level and allows you to
establish if your activity level over the day met
the target.
, The week view shows your activity level over
the last 7 days until today. The horizontal line
(T) shows the activity target set for the week.It
allows you to establish if the activity level over the
past week met the target and on which days your
activity level was higher or lower than the target.
ENGLISH 35
, The month view shows your activity level over
the last four weeks until today. The horizontal
line (T) shows your average activity level over
the last month. It allows you to establish if your
activity level over the last month met the target
and on which days your activity level was higher
or lower than the target.
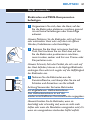
After use
Caution: Make sure that you end the treatment
by switching off the TENS units or by setting the
intensity to 0 mA on the remote control before
you remove the TENS units, the extension cable
(if used, PR3094 only), or the electrodes. If you
do not end the treatment, you may experience an
XQSOHDVDQWVHQVDWLRQLQ\RXUÀQJHUV7KLVVHQVDWLRQ
is not harmful, but can be unpleasant.
1 Switch off the TENS units by pressing the on/
off button.
2 Detach the TENS units from the electrodes by
pulling them off.
Note: If you forgot to switch off the TENS units, they
will switch off automatically in 5 minutes when they
are detached.
3 Recharge the TENS units to ensure they are
ready for the next treatment.
36
ENGLISH
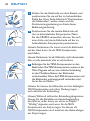
4 Peel the electrodes off the skin by pulling at
the edge.
Note: Do not leave the electrodes on the skin overnight.
If you develop skin irritation, try attaching the
electrodes in a different spot. Make sure that you move
the electrodes to a different spot regularly so that you
do apply stimulation at the same spot every day.
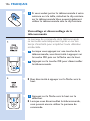
Storage of the electrodes
1 Place the electrodes back on the liner.
2 Slide the liner with the electrodes back into
the bag.
3 Reseal the bag for dustfree storage.
Note:To keep the electrodes in good condition and
prevent the hydrogel layer from drying out, always store
them in the resealable bag when they are not attached
to your body for treatment. Seal the resealable bag to
guarantee dustfree storage.
Note: If you want to store electrodes for more than a
month, keep them at temperatures between +5°C and
27°C. Do not store the electrodes in the freezer or the
refrigerator. Avoid extreme heat and exposure to direct
sunlight.
ENGLISH 37
Cleaning
Do not immerse the remote control and the TENS
units in water or rinse them under the tap.
Do not immerse the electrodes in water.
1 Clean the remote control, the charger, the
TENS units and the extension cable (PR3094
only) with a damp cloth and a mild cleaning
agent, e.g. dishwashing liquid.
Note:You can also clean them with 70% isopropyl
alcohol (IPA).
Caution: Do not use any other cleaning agents than
the ones mentioned above, as these cleaning agents
could damage the material, e.g. cause loss of gloss.
2 If the electrodes are dirty, put a drop of water
RQ\RXUÀQJHUDQGJHQWO\UXEWKHGLUWRIIWKH
surface.
Note: Do not use soap or alcohol to clean the
electrodes.
Troubleshooting
This chapter summarises the most common
problems you could encounter with the Wireless
TENS and the Wireless TENS Pro. If you are unable
to solve the problem with the information below,
visit www.philips.com/support for a list of
frequently asked questions or contact the Philips
Consumer Care Centre in your country.
38
ENGLISH
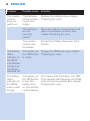
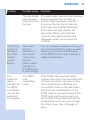
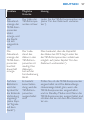
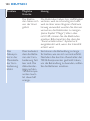
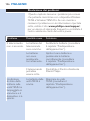
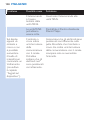
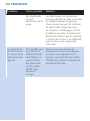
Problem
Possible cause
Solution
The remote
control
does not
switch on.
The batteries
of the remote
control are
empty.
Replace the batteries (see chapter
‘Preparing for use’).
The batteries
are not
correctly
placed.
Open the battery compartment and
place the batteries correctly (see
chapter ‘Preparing for use’).
The remote
control may
be broken.
Contact the Philips Consumer Care
Centre.
The battery The battery of Charge the TENS units (see chapter
the TENS units ‘Preparing for use’).
status
indicator on is empty.
the TENS
XQLWVÁDVKHG
orange and
the device
switched off.
The battery
status
indicator on
the TENS
units is solid
orange.
The battery of
the TENS units
is low. The
battery icon
on the remote
FRQWUROÁDVKHV
This means that the battery has 30%
of its capacity left. Recharge the TENS
units as soon as possible (see chapter
‘Preparing for use’).
ENGLISH 39
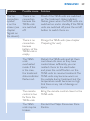
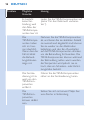
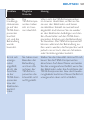
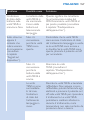
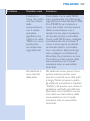
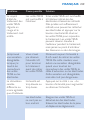
Problem
Possible cause
Solution
The ‘no
connection
symbol’
is on the
screen (see
chapter
‘Signals on
the device’).
There is no
connection
because the
TENS units
are switched
off.
Check if the TENS units are switched
on. The treatment status indicator
ÁDVKHVJUHHQZKHQWKH7(16XQLWVDUH
switched on and in standby. If the TENS
units are switched off, press the on/off
button to switch them on.
There is no
connection
because
battery of the
TENS units is
empty.
Charge the TENS units (see chapter
‘Preparing for use’).
The TENS
units
overheated
inside. If this
is the case,
the treatment
status indicator
ÁDVKHVUHG
Detach the TENS units and let them
cool down. As soon as they have
FRROHGGRZQVXIÀFLHQWO\\RXFDQ
reattach them to the electrodes
and press the on/off button on the
TENS units to resume treatment. The
TENS units may become warm on
the outside during treatment, but the
temperature never becomes so high
that there is any risk of damage or
injury.
The remote
control is too
far from the
TENS units.
Bring the remote control closer to the
TENS units.
The TENS
units may be
broken.
Contact the Philips Consumer Care
Centre.
40
ENGLISH
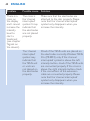
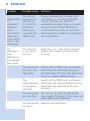
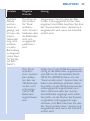
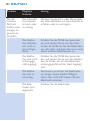
Problem
Possible cause
Solution
There is a
cross on
the display
and I cannot
increase the
intensity
level to
start a
treatment
(see chapter
‘Signals on
the device’).
The cross is
the ‘channel
interrupted’
symbol. It may
indicate that
the electrodes
are not placed
properly.
Make sure that the electrodes are
attached to the skin properly. Please
note that the ‘channel interrupted’
symbol only disappears when you
increase the intensity.
The ‘channel
interrupted’
symbol may
indicate that
the TENS unit
or units are
not placed on
the electrodes
properly.
Check if the TENS units are placed on
the electrodes correctly. Wireless TENS
Pro (PR3094) only: If the ‘channel
interrupted’ symbol is above the left
intensity button, check if the TENS units
are connected properly. If the cross is
above the right intensity button, check
if the connectors of the extension
cable are connected properly. Please
note that the ‘channel interrupted’
symbol only disappears when you
increase the intensity.
ENGLISH 41
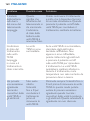
Problem
Possible cause
Solution
The electrodes
have become
detached from
the skin.
The electrodes have lost their adhesive
power because they are dirty or
because they have been used for a
long time. You can try to clean the
electrodes (see chapter ‘Cleaning’).
If this does not help, replace the
electrodes. Please note that the
‘channel interrupted’ symbol only
disappears when you increase the
intensity.
The battery
symbol on
the menu
bar of the
remote
control
ÁDVKHV
This means
that the
batteries of
the remote
control are
low. The
battery status
indicator on
the TENS units
is solid orange.
You can continue treatment as long as
the treatment feels the same as usual.
When you press the on/off button
of the TENS units to stop treatment,
replace the batteries.
The
treatment
status
indicator on
the TENS
XQLWVÁDVKHV
red and the
treatment
has stopped.
The TENS
units
overheated
inside.
If the TENS units overheat inside,
remove them from the electrodes and
let them cool down. As soon as they
KDYHFRROHGGRZQVXIÀFLHQWO\\RX
can reattach them to the electrodes
and press the on/off button on the
TENS units to resume treatment. The
TENS units may become warm on
the outside during treatment, but the
temperature never becomes so high
that there is any risk of damage or
injury.
42
ENGLISH
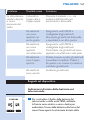
Problem
Possible cause
Solution
I
experienced
an
unpleasant
sensation
when I
touched the
connectors
of the TENS
units or the
electrodes.
You did not
decrease the
intensity to
0 to end the
treatment
before you
removed the
TENS units.
Always decrease the intensity to 0
mA before you remove the TENS
units. In this way you avoid the
unpleasant sensation when you touch
the connectors of the TENS units
or the extension cable, or touch the
electrodes. This sensation is unpleasant
but not harmful.
The intensity
The
is too high or
stimulation
too low.
feels
different or
less pleasant
than usual.
Press the + or - side of the intensity
button to increase or decrease the
intensity.
The electrodes Switch off the TENS units and detach
are not in the them from the electrodes. Remove
right place.
the electrodes from the skin and move
them to a slightly different place.
The
electrodes are
not properly
attached.
Switch off the TENS units and detach
them from the electrodes.Check if the
electrodes are attached to the skin
properly.
The electrodes You can try to clean the electrodes
are too dirty.
(see chapter ‘Cleaning’). If this does not
help, replace the electrodes.
The electrodes Replace the electrodes.
are worn.
ENGLISH 43
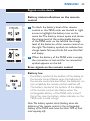
Signals on the device
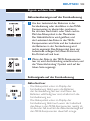
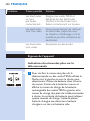
Battery status indications on the remote
control
1 To check the battery level of the remote
control or the TENS units, use the left or right
arrow to highlight the battery icon on the
menu bar. The battery screen opens and shows
the charge level of the rechargeable battery
of the TENS units on the left and the charge
level of the batteries of the remote control on
the right. The battery symbol can indicate four
charge levels: full, two-thirds full, one-third full
and empty.
2 When the battery of the TENS units is empty,
the connection is lost and the ‘no connection’
symbol appears on the left.
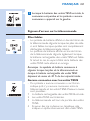
Error signals on the remote control
Battery low
- The battery symbol at the bottom of the display of
WKHUHPRWHFRQWUROÁDVKHVZKHQWKHEDWWHULHVRI
the remote control are low. When the batteries run
out completely, the remote control switches off.
- The battery symbol at the bottom of the display
RIWKHUHPRWHFRQWURODOVRÁDVKHVZKHQWKH
rechargeable battery of the TENS units is low. If
that is the case, the battery status indicator on the
TENS units is solid orange.
1RWH7KHEDWWHU\V\PEROVWDUWVÁDVKLQJZKHQWKH
batteries of the remote control or the rechargeable
battery of the TENS units have less than 30% of their
total capacity left.
44
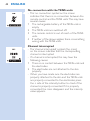
ENGLISH
No connection with the TENS units
- This ‘no connection’ symbol on the screen
indicates that there is no connection between the
remote control and the TENS units. This may have
several causes:
1 The rechargeable battery of the TENS units is
empty.
2 The TENS units are switched off.
3 The remote control is out of reach of the TENS
units.
4 If neither of the above applies, there is something
wrong with the TENS units.
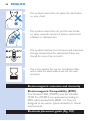
Channel interrupted
- The ‘channel interrupted’ symbol (the cross)
on the screen indicates that the corresponding
channel is interrupted.
- If a channel is interrupted, this may have the
following causes:
1 There is no contact between the TENS units and
the electrodes.
2 The electrodes are not attached to the skin
properly.
- When you have made sure the electrodes are
properly attached to the skin and the TENS units
are properly connected to the electrodes, press
the + side of the intensity button to check if the
channel is properly connected. If it is properly
connected, the cross disappears and the intensity
value appears.
ENGLISH 45
Indicator signals on the TENS units
Battery status indicator
- The battery status indicator on the TENS units
ÁDVKHV
7KHEDWWHU\VWDWXVLQGLFDWRUÁDVKHVRUDQJH
EULHÁ\ZKHQWKHUHFKDUJHDEOHEDWWHU\LVHPSW\
and then the TENS units switch off.
7KHEDWWHU\VWDWXVLQGLFDWRUÁDVKHVJUHHQZKHQ
the TENS units are charging.
- The battery status indicator is burning solid:
1 The battery status indicator is solid orange when
the rechargeable battery of the TENS units is
low. The rechargeable battery has only 30% of
its total capacity left. The battery status indicator
also turns solid orange when the batteries of the
remote control are low.
2 The battery status indicator is solid green when
the rechargeable battery is fully charged.
Treatment status indicator
- The treatment status indicator on the TENS units
ÁDVKHV
7KHWUHDWPHQWVWDWXVLQGLFDWRUÁDVKHVJUHHQ
when the TENS units are switched on and in
standby.
7KHWUHDWPHQWVWDWXVLQGLFDWRUÁDVKHV\HOORZ
during treatment to indicate that the treatment
is in progress.
7KHWUHDWPHQWVWDWXVLQGLFDWRUÁDVKHVUHGZKHQ
the TENS units overheated. When the TENS
units become overheated, the treatment stops
automatically and the ‘no connection’ symbol
appears on the display. Detach the TENS units
from the electrodes and let them cool down.
$VVRRQDVWKH\KDYHFRROHGGRZQVXIÀFLHQWO\
reattach them and resume treatment.
46
ENGLISH
Note: It is normal for the TENS units to become warm
during treatment. During normal operation, they do not
become so hot that there is any risk of damage or injury.
Note: If you use the device at maximum setting for
several hours, the TENS units may overheat and switch
off as a safety precaution.
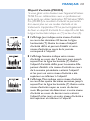
Replacement
Electrodes
Replace the electrodes if:
- they are damaged or torn.
- they are past the use-by date indicated on the
resealable bag.
- they have lost their adhesive power. Never use
plaster or tape to attach them to your skin.
- stimulation feels less strong.
- when the stimulation is uncomfortable, i.e. when
you experience an unpleasant stinging or biting
sensation.
Note: Always replace the electrodes with electrodes
recommended for this device by the manufacturer. New
electrodes can be ordered at www.philips.com/
tens-electrodes.
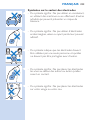
Batteries of the remote control
Replace the batteries of the remote control when
WKHEDWWHU\V\PERORQWKHGLVSOD\ÁDVKHV$OZD\V
replace them with two AAA 1.5-volt alkaline
batteries (see ‘Preparing the remote control’ in
chapter ‘Preparing for use’).
ENGLISH 47
Ordering accessories
To buy accessories or spare parts, visit
www.shop.philips.com/service or go to your
Philips dealer. You can also contact the Philips
Consumer Care Centre in your country.
Electrodes
You can order new electrodes on
www.philips.com/tens-electrodes.
Caution: Only use this device with the charger,
cables, electrodes and accessories recommended
by the manufacturer.
Guarantee and support
Your Wireless TENS device has been designed
and developed with the greatest possible care to
guarantee an expected service life of 5 years.
If you need service or information or if you have a
problem, please visit our website at
www.philips.com/support. You can also contact
the Philips Consumer Care Centre in your country.
Its telephone number is:
- Germany: 0800 0007522 (free of charge for calls
within Germany)
- Austria: 0800 880932 (free of charge for landline
calls within Austria; costs for mobile phone calls
depend on provider)
- Switzerland: 0800 002050 (free of charge for
landline calls); 0848 000292 (costs for mobile
phone calls depend on provider)
- United Kingdom: 0844 338 04 89 (5p/min. from a
BT landline, other landline and mobile providers
may charge more)
48
ENGLISH
Guarantee restrictions
The electrodes are not covered by the terms of the
guarantee because they are subject to wear and
have to be replaced regularly.
Manufacturer’s legal address
Philips Consumer Lifestyle B.V.
Tussendiepen 4 9206 AD Drachten
The Netherlands
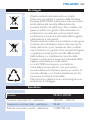
Recycling
- This crossed-out wheeled bin symbol on a
product means that the product is covered by
European Directive 2012/19/EU. Please inform
yourself about the local separate collection system
for electrical and electronic products. Never
dispose of the product with normal household
waste. Correct disposal of your product helps
prevent potentially negative consequences for the
environment and human health.
- This symbol indicates that batteries contain
substances that may be harmful to human health
and the environment. Never dispose of batteries
with normal household waste. Follow the local
rules for separate collection of batteries. Correct
disposal of batteries helps prevent potentially
negative consequences for the environment and
human health.
- The TENS units contain a built-in rechargeable
battery that cannot be removed by the user. Take
WKHPWRDQRIÀFLDOFROOHFWLRQSRLQWRUDVHUYLFH
centre to have the rechargeable battery removed.
ENGLISH 49
- All plastic parts are marked with recycle symbols.
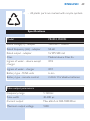
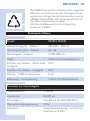
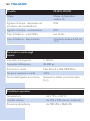
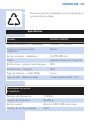
6SHFLÀFDWLRQV
Model
PR3094, PR3093
Rated voltage(V) - adapter
100-240 ~ 150mA
Rated frequency (Hz) - adapter
50-60
Rated output - adapter
5V , 500 mA
Class
Medical device Class IIa
Ingress of water - device except
charger
IP22
Ingress of water - charger
IP21
Battery type - TENS units
Li-Ion
Battery type - remote control
2 AAA 1.5V alkaline batteries
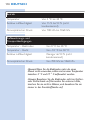
Pulse output parameters
Frequency range
1-120 Hz
Pulse width
40-400 µs
Current output
Max. 60mA at 500-1000 Ohm
Maximum output voltage
120V
50
ENGLISH
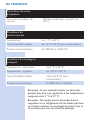
Pulse output parameters
Current pulse shape
Biphase symmetrical (net current
0dc)
Operating conditions
Temperature
from 5°C to +40°C
Relative humidity
from 15% to 93% (non-condensing)
Atmospheric pressure
from 700hPa to 1060hPa
Storage and transport conditions
Temperature - electrodes
from 0°C to +40°C
Temperature - device
from -10°C to 50°C
Relative humidity
less than 93% (non-condensing)
Atmospheric pressure
from 700hPa to 1060hPa
Note: If you want to store the electrodes for more than
a month, keep them at temperatures between +5°C
and +27°C.
Note: Do not store the electrodes in the freezer or
refrigerator. Do not leave them in extreme heat, nor
immerse them in water, or leave them outside of the
plastic bag.
ENGLISH 51
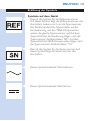
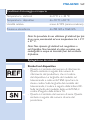
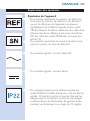
Explanation of symbols
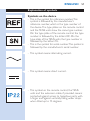
Symbols on the device
- This is the symbol for reference number. This
symbol is followed by the manufacturer’s
reference number, which is the type number of
the device. The type plates on the remote control
and the TENS units show the same type number.
On the type plate of the remote control, the type
number is followed by the letters RC. On the
type plate of the TENS units, the type number is
followed by the letters TU.
- This is the symbol for serial number. This symbol is
followed by the manufacturer’s serial number.
- This symbol means: alternating current.
- This symbol means: direct current.
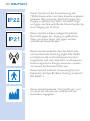
- This symbol on the remote control, the TENS
units and the extension cable, if provided, means:
protected against access to hazardous parts with
DÀQJHUDQGDJDLQVWYHUWLFDOO\IDOOLQJZDWHUGURSV
when tilted up to 15 degrees.
52
ENGLISH
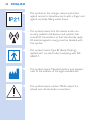
- This symbol on the charger means: protected
DJDLQVWDFFHVVWRKD]DUGRXVSDUWVZLWKDÀQJHUDQG
against vertically falling water drops.
- This symbol means that this device emits nonionising radiation. All devices and systems that
include RF transmitters or that intentionally apply
RF electromagnetic energy must be labelled with
this symbol.
- This symbol means: Type BF (Body Floating)
applied part (i.e. electrode) complying with IEC
60601-1.
- This symbol means ‘Manufactured by’ and appears
next to the address of the legal manufacturer.
- This symbol means: caution TENS output. It is
placed near all electrode connections.
ENGLISH 53
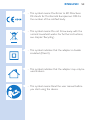
- This symbol means: Conforms to EC Directives.
CE stands for ‘Conformité Européenne’. 0344 is
WKHQXPEHURIWKHQRWLÀHGERG\
- This symbol means: Do not throw away with the
normal household waste. For further instructions,
see chapter ‘Recycling’.
- This symbol indicates that the adapter is double
insulated (Class II).
- This symbol indicates that the adapter may only be
used indoors.
- This symbol means: Read the user manual before
you start using the device.
54
ENGLISH
- This symbol means: Keep dry.
- 7KLVV\PEROLVWKHPDUNWKDWLGHQWLÀHVWKHRQRII
button.
- This is the TENS pulse symbol. It is shown next to
the treatment status indicator.
- This is the battery symbol. It is shown next to the
battery status indicator.
- 7KLV8/FODVVLÀFDWLRQPDUNLQGLFDWHVWKDWWKLV
device complies with both Canadian and US
requirements. MEDICAL-APPLIED CURRENT/
ENERGY EQUIPMENT AS TO ELECTRICAL
SHOCK, FIRE AND MECHANICAL HAZARDS
ONLY IN ACCORDANCE WITH ANSI/AAMI
ES60601-1 (2005, C1:09, A2:10), IEC 606011 (2005), CAN/CSA C22.2 No.60601.1 (2008,
R:2011), IEC 60601-2-10 (2012), CAN/CSA
C22.2 No.60601-1-11 (2010)
ENGLISH 55
Symbols on electrode bag
- This symbol means: Do not use while driving,
operating machines or performing other activities
that may present a risk of injury.
- This symbol means: Do not use damaged or worn
electrodes or electrodes that have lost their
adhesive power.
- This symbol indicates that the electrodes should
be used by one person and not shared with
others.
- This symbol means: Do not place the electrodes
on top of each other or so close to each other
that they touch each other.
- This symbol means: Do not place electrodes on
your face or neck.
56
ENGLISH
- This symbol means: Do not place the electrodes
on your chest.
- This symbol means: Do not put the electrodes
on open wounds, cancerous lesions, rashes and
LQIHFWHGRULQÁDPHGVNLQ
- This symbol indicates the minimum and maximum
storage temperature for electrodes if they are
stored for more than a month.
- This is the symbol for ‘use by’. It indicates after
which date the electrodes must not be used
anymore.
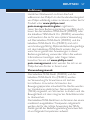
Electromagnetic emissions and immunity
Electromagnetic Compatibility (EMC)
The Wireless TENS (PR3093) and the Wireless
TENS Pro (PR3094) are approved according to
EMC safety standard EN 60601-1-2. They are
designed to be used in typical domestic or clinical
environments.
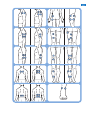
Electrode placement guide (Fig. 101)
DEUTSCH 57
Einführung
Herzlichen Glückwunsch zu Ihrem Kauf und
willkommen bei Philips! Um das Kundendienstangebot
von Philips vollständig nutzen zu können, sollten Sie Ihr
Produkt unter www.philips.com/
pain-management/register registrieren.
Lesen Sie diese Bedienungsanleitung sorgfältig durch,
bevor Sie das kabellose TENS-Gerät (PR3093) oder
das kabellose TENS-Gerät Pro (PR3094) verwenden,
und bewahren Sie sie für eine spätere Verwendung
auf. Das kabellose TENS-Gerät (PR3093) und das
kabellose TENS-Gerät Pro (PR3094) sind nicht
YHUVFKUHLEXQJVSÁLFKWLJ2SWLPDOH%HKDQGOXQJVHUIROJH
mit dem kabellosen TENS-Gerät erzielen Sie nur,
wenn Sie es gemäß den Anweisungen in dieser
Bedienungsanleitung verwenden. Wenn Sie weitere
Informationen benötigen oder Fragen haben,
besuchen Sie uns auf www.philips.com/
pain-management, oder wenden Sie sich an ein
Philips Service-Center in Ihrem Land.
Verwendungszweck
Das kabellose TENS-Gerät (PR3093) und das
kabellose TENS-Gerät Pro (PR3094) wurden
zur Verwendung für Erwachsene mit leichten
bis mittleren chronischen Schmerzen des
Bewegungsapparates entwickelt. Die Geräte werden
zur transkutanen elektrischen Nervenstimulation
(TENS) eingesetzt, um Schmerzen zu lindern und die
Beweglichkeit mit dem integrierten Aktivitätsmonitor
zu überwachen.
Das kabellose TENS-Gerät kann zu Terminen bei einem
medizinisch ausgebildeten Therapeuten mitgebracht
werden, der für die richtige Anwendung des TENSGeräts gemäß der Bedienungsanleitung verantwortlich
ist und folgende Kompetenzen aufweist:
58
DEUTSCH
- Analyse der Beweglichkeit des Patienten und
Behandlungsmuster
- Bestimmen der individuellen Behandlungs- und
Anpassungseinstellungen des TENS-Geräts mittels
der PC-Anwendung für das kabellose TENS-Gerät
Pro (nur PR3094)
Die PC-Anwendung für das Gerät TENS Pro
ist nur für den Gebrauch durch medizinisches
Fachpersonal in Kombination mit dem kabellosen
TENS-Gerät Pro (PR3094) bestimmt. Sie
ermöglicht es dem Therapeuten, genauere TENSBehandlungsprogramme anzubieten und die
Bewegungsabläufe des Patienten hinsichtlich der
Anwendung des Geräts aufzuzeichnen und zu
analysieren.
Das Gerät darf nur von einer einzigen erwachsenen
Person angewendet und bedient werden. Es sollte
ausschließlich gemäß den Sicherheitshinweisen und
den Anweisungen in dieser Bedienungsanleitung
sowie für den Zweck, für den es entwickelt wurde,
verwendet werden.
TENS und Schmerztherapie
Die transkutane elektrische Nervenstimulation
(TENS) ist eine nicht-invasive Methode zur
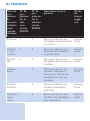
Schmerzlinderung, die laut klinischen Tests die
Schmerzlinderung unterstützen kann. TENS wird
täglich von Krankengymnasten und anderen
medizinischen Fachkräften eingesetzt. Während
der TENS-Behandlung werden elektrische Impulse
EHUGLHLQWDNWH+DXWREHUÁlFKHJHOHLWHWXPGLH
darunter liegenden Nerven zu aktivieren. Klinische
Ergebnisse legen nahe, dass TENS zu einer
Schmerzlinderung führt, die dem körpereigenen
Schmerzlinderungsmechanismus des Nervensystems
entspricht, wie z. B. dem Massieren eines
schmerzenden Bereichs.
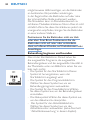
DEUTSCH 59
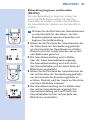
Die Impulse werden von den akkubetriebenen
TENS-Komponenten erzeugt, die mit den
selbsthaftenden Hydrogel-Elektroden verbunden
werden müssen. Sie können aus voreingestellten
TENS-Programmen mit verschiedenen
Impulseinstellungen auswählen und die Intensität
der Impulse nach Ihren Vorlieben anpassen.
Diese Broschüre beinhaltet Informationen
zum Positionieren der Elektroden und zu den
Programmen, die zur Behandlung verwendet werden.
Überwachung der Aktivität und
Schmerztherapie
Wir alle möchten unsere täglichen Aktivitäten
genießen. Wenn Sie Schmerzen haben, ist die
instinktive Reaktion, den Schmerz durch weniger
Bewegung zu vermeiden. Folglich nimmt Ihre Fitness
ab, und Sie können nicht mehr alle Dinge tun, die
Ihnen Spaß machen. Die Erhaltung der Beweglichkeit
ist wichtig (ohne es zu übertreiben), um nicht in
einem kontinuierlichen Schmerzzyklus gefangen zu
bleiben. Der Schlüssel zur eigenen Schmerztherapie
ist die richtige Einteilung: Verteilen Sie die Aktivitätsund Ruheperioden so über den Tag, wie es für Sie
am angenehmsten ist. Das wichtigste dabei ist, die
Aktivitäten gleichmäßig zu verteilen und Pausen
einzulegen, bevor diese wirklich erforderlich sind.
Ein Bewegungsmonitor kann Ihnen helfen, die
Verteilung der Aktivitäten über den Tag hinweg zu
überwachen. Die Fernbedienung des kabellosen
TENS-Geräts verfügt über einen eingebauten
Bewegungsmonitor, der Ihre körperliche Aktivität
aufzeichnet, wenn sie ihn an Ihrem Gürtel bzw. am
Bund oder in der Hosen- oder Rockrasche tragen.
60
DEUTSCH
Er kann die Aktivitätsdaten von 60 Tagen aufzeichnen
und speichern. Auf diese Weise können Sie nicht
nur Ihr Aktivitätsmuster der letzten 24 Stunden
überprüfen, sondern auch das der vorherigen Woche
und des vorherigen Monats. Wenn Sie weitere Tipps
zur Einteilung und zur eigenen Schmerztherapie
benötigen, lesen Sie bitte die mitgelieferte Broschüre
“Toolkit zur Schmerzlinderung”.*
* Hinweis:Es liegt nur die deutsche Version des Toolkits
zur Schmerzlinderung bei.Wenn Sie die englische,
französische oder italienische Ausgabe benötigen,
können Sie diese unter www.philips.com/
pain-management herunterladen.
Informationen für den Therapeuten
(nur PR3094)
Das kabellose Gerät TENS Pro (PR3094) kann
in Kombination mit der dazugehörenden PCAnwendung verwendet werden. Diese wurde
zur Anwendung durch medizinische Fachkräfte
entwickelt, die für die richtige Anwendung des
TENS-Geräts gemäß der Bedienungsanleitung
verantwortlich sind und folgende Kompetenzen
aufweisen:
- Analyse der Aktivitätsmuster des Patienten in
Bezug auf Behandlungsmuster des Patienten
mithilfe einer externen PC-Anwendung
- Bestimmen der individuellen Behandlungs- und
Anpassungseinstellungen des TENS-Geräts mittels
einer externen PC-Anwendung
Die PC-Anwendung für das kabellose Geräte
TENS Pro ermöglicht Therapeuten, ihren Patienten
genauere TENS-Behandlungsprogramme anzubieten
und die Aktivitätsmuster der Patienten bei Gebrauch
GHV*HUlWVVRZLHGDV6FKPHU]HPSÀQGHQGHV
Patienten auf einem PC zu verfolgen und zu
analysieren.
DEUTSCH 61
Die PC-Anwendung für das kabellose Gerät TENS
Pro ist nicht im Lieferumfang enthalten, kann aber
auf Wunsch heruntergeladen werden. Hinterlassen
Sie dazu unter www.philips.com/tens-download
Ihre Kontaktdaten. Sie erhalten einen Link, über
den Sie die PC-Anwendung für das kabellose Gerät
TENS Pro herunterladen können. Über diesen Link
steht ebenfalls die Bedienungsanleitung dieser PCAnwendung zum Herunterladen bereit.
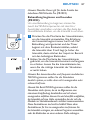
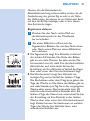
USB-Kabel
Die PC-Anwendung für das kabellose Gerät
TENS Pro kann verwendet werden, wenn die
Fernbedienung über ein Mini-USB-Kabel an Ihren PC
angeschlossen ist. Es gibt zwei Möglichkeiten, dieses
standardmäßige Mini-USB-Kabel zu beziehen:
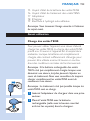
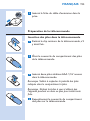
1 Sie können Ihre Kontaktdaten auf
www.philips.com/tens-download
hinterlassen und angeben, dass Sie ein Mini-USBKabel erhalten möchten. Nach Erhalt Ihrer Daten
senden wir Ihnen ein Mini-USB-Kabel auf dem
Postweg zu.
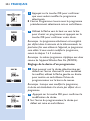
2 Wenn Sie von unseren Vertriebsmitarbeitern ein
Testgerät erhalten haben, sollte das Mini-USBKabel bereits enthalten sein.
Bei weiteren Fragen zur Verfügbarkeit der PCAnwendung für das kabellose Gerät TENS Pro oder
zum Mini-USB-Kabel wenden Sie sich bitte an ein
Service-Center in Ihrem Land.
62
DEUTSCH
Wichtig
Gegenanzeigen
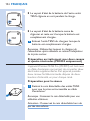
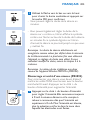
Verwenden Sie das Gerät nicht, wenn Folgendes
zutrifft:
- Sie haben einen Herzschrittmacher, einen
LPSODQWLHUWHQ'HÀEULOODWRURGHUDQGHUH
implantierte Metall- oder Elektronikgeräte (z. B.
Systeme zur Verabreichung von Arzneimitteln),
da der Gebrauch in diesen Fällen zu Stromschlag,
Verbrennungen, elektrischen Interferenzen oder
sogar zum Tod führen könnte.
- Sie haben eine Herzkrankheit.
- Sie haben Epilepsie.
- Sie sind schwanger, da die Sicherheit der
elektrischen Stimulation während der
Schwangerschaft noch nicht nachgewiesen wurde.
- Sie haben eine kognitive Behinderung.
Unerwünschte Reaktionen
Sie sollten das Gerät nicht mehr verwenden und
Ihren Arzt konsultieren, wenn unerwünschte
Reaktionen durch das Gerät auftreten.
Zu den unerwünschten Reaktionen zählen u. a.:
- Hautirritationen unter den Elektroden, obwohl
nicht bekannt ist, dass das Gel auf den Elektroden
allergische Reaktionen verursacht
- Verbrennungen unter den Elektroden
- Kopfschmerzen oder andere schmerzhafte
(PSÀQGXQJHQ
- Übelkeit oder Schwächegefühl
DEUTSCH 63
Wichtige Sicherheitshinweise
Warnhinweis
- Dies ist ein medizinisches Gerät. Halten Sie das
Gerät außerhalb der Reichweite von Kindern.
- Lesen Sie diese Bedienungsanleitung sorgfältig
durch, und halten Sie sich stets an die
Anwendungsanweisungen.
- Dieses Gerät ist nicht für Erwachsene mit
verringerten sensorischen oder psychischen
Fähigkeiten geeignet.
- Verwenden Sie das Gerät nicht bei Kindern.
- Verwenden Sie das Gerät nicht, wenn Ihr Schmerz
nicht eindeutig als milder oder mittlerer MuskelSkelett-Schmerz bestimmt werden kann. Wenn Sie
die Ursache für den Schmerz nicht genau kennen,
konsultieren Sie Ihren Arzt.
- Wenn Sie bereits von einem Arzt betreut
werden, konsultieren Sie ihn, bevor Sie das Gerät
verwenden.
- Verwenden Sie das Gerät nicht am Hals, da die
Stimulation schwere Muskelkrämpfe verursachen
könnte, die Ihre Luftröhre verschließen und
zu Atemnot führen könnten, was wiederum
Auswirkungen auf Ihren Herzrhythmus oder
Blutdruck haben könnte.
- Wenden Sie die Stimulation nicht auf Ihrer Brust
an, da in die Brust eindringende elektrische
Ströme Herzrhythmusstörungen verursachen
könnten, die tödlich sein könnten.
- Da die Wirkungen der Stimulation auf das Gehirn
unbekannt sind, sollte die Stimulation nicht am
Kopf angewendet werden, und die Elektroden
sollten nicht an gegenüber liegenden Seiten des
Kopfes positioniert werden.
64
DEUTSCH
- Gehen Sie besonders vorsichtig vor, wenn Sie ein
erhöhtes Risiko für innere Blutungen aufgrund
einer Prellung oder einer Verletzung haben.
- Konsultieren Sie Ihren Arzt, wenn Sie kürzlich
operiert wurden, da sich die Stimulation negativ
auf den Heilungsprozess auswirken kann.
- Wenden Sie die Stimulation nicht auf oder nahe
Krebsläsionen an.
- Wenden Sie die Stimulation nicht auf offenen
Wunden oder Hautreizungen oder auf geschwollenen,
URWHQLQÀ]LHUWHQRGHUHQW]QGHWHQ%HUHLFKHQ
oder Ausschlägen an (z. B.Venenentzündung,
Thrombophlebitis und Krampfadern).
- Wenden Sie die Stimulation nicht auf gefühllosen
Hautpartien an.
- Wenden Sie die Stimulation nur auf normaler,
unversehrter, sauberer und gesunder Haut an.
- Der Gebrauch der elektrischen Stimulation und der
leitfähigen Elektroden kann zu Hautirritationen oder
]XhEHUHPSÀQGOLFKNHLWGHU+DXWIKUHQ
- Wenden Sie die Stimulation nicht an, während Sie
ein Fahrzeug führen, eine Maschine bedienen oder
eine andere Aktivität ausführen, bei der durch die
elektrische Stimulation ein Verletzungsrisiko besteht.
- Wenden Sie die Stimulation nicht beim Schlafen
an. Wenn das Gerät im Bett verwendet wird,
sollten Sie den Timer stellen, damit es sich
automatisch ausschaltet.
- Verwenden Sie das Gerät und die Elektroden
nicht innerlich.
- Wenden Sie die Stimulation nicht in der Nähe
von elektronischen Überwachungsgeräten
an (z. B. Herzmonitoren, EKG), da diese
Geräte möglicherweise nicht ordnungsgemäß
funktionieren, wenn das Gerät in Gebrauch ist.
DEUTSCH 65
- Wenden Sie die Stimulation nicht in der
Badewanne, unter der Dusche oder im
Schwimmbad an.
- Befestigen Sie die Elektroden nicht mithilfe von
3ÁDVWHURGHU.OHEHEDQGDQGHU+DXW
- Überprüfen Sie das Gerät und die Elektroden vor
dem Gebrauch immer auf Schäden.
- Verwenden Sie das Gerät oder die Elektroden
nicht, wenn sie beschädigt sind.
- 0RGLÀ]LHUHQ6LHZHGHUGDV*HUlWQRFKGLH
Elektroden.
Achtung
- Verwenden Sie dieses Gerät mit dem Ladegerät,
den Kabeln, den Elektroden und den Zubehörteilen,
die vom Hersteller empfohlen werden.
- Das Gerät ist nicht wasserdicht. Verwenden
Sie das Gerät nicht in feuchter Umgebung, und
schützen Sie es vor Nässe.
- Das Gerät kann im Haus oder im Außenbereich
verwendet werden, es hält jedoch nicht allen
Witterungen stand.
- Das Gerät verträgt keine hohen und
niedrigen Temperaturen. Bitte prüfen Sie die
Betriebsbedingungen in Kapitel “Technische Daten”.
- Der USB-Anschluss darf nur von einem
Gesundheitsexperten in Verbindung mit der von
Philips bereitgestellten PC-Anwendung für das
kabellose Gerät TENS Pro (PR3094) verwendet
werden.
- Die Elektroden haben eine begrenzte Haltbarkeit.
Bitte überprüfen Sie vor dem Gebrauch das
Haltbarkeitsdatum auf der Verpackung. Verwenden
Sie keine Elektroden, deren Haltbarkeitsdatum
überschritten wurde. Informationen zum Bestellen
YRQ(UVDW]HOHNWURGHQÀQGHQ6LHLQ.DSLWHO
“Zubehör bestellen”.
66
DEUTSCH
- Vergewissern Sie sich, dass Sie die Behandlung
durch Ausschalten der TENS-Komponenten
oder durch Einstellen der Intensität auf 0 mA
auf der Fernbedienung beenden, bevor Sie die
TENS-Komponenten, das Verlängerungskabel (falls
verwendet, nur PR3094) oder die Elektroden
abnehmen. Wenn Sie die Behandlung nicht
beenden, kann ein unangenehmes Gefühl in Ihren
Fingern auftreten. Dieses Gefühl ist nicht schädlich,
kann jedoch unangenehm sein.
- Verwenden und verwahren Sie die Elektroden
stets gemäß den Anweisungen in den Kapiteln
“Gerät verwenden” und “Nach dem Gebrauch”.
- Wenn das Gerät nicht wie in dieser
Bedienungsanleitung beschrieben funktioniert,
stellen Sie den Gebrauch ein, und wenden Sie sich
DQHLQ6HUYLFH&HQWHU'LH.RQWDNWGDWHQÀQGHQ
Sie in Kapitel “Garantie und Support”.
Normerfüllung
- Das Gerät erfüllt die geltenden Normen für
elektromedizinische Geräte der Klasse IIa und
für Geräte zur elektrischen Stimulation für den
Heimgebrauch.
- Dieses Philips Gerät erfüllt sämtliche Normen
und Regelungen bezüglich der Exposition in
elektromagnetischen Feldern.
Voreingestellte Programme
Programmübersicht
Auf dem Gerät sind standardmäßig 8 Programme
(PR3093) bzw. 15 Programme (PR3094)
voreingestellt. Es gibt drei verschiedene Arten der
TENS-Behandlung: Konventionelle TENS, BurstTENS und Frequenz-modulierte TENS. Weitere
Informationen erhalten Sie weiter unten.
DEUTSCH 67
Konventionelle TENS-Programme
Ein konventionelles TENS-Programm ist ein allgemein
verwendetes Programm mit einer HochfrequenzStimulation. Es basiert auf der Gate-Control-Theorie,
die besagt, dass durch diese Art der Stimulation die
Übertragung von Schmerzsignalen im Nervensystem
unterbunden wird.Vergleichbar ist dies etwa mit dem
“Wegreiben” von Schmerzen. Die meisten Personen
wenden die konventionelle TENS-Behandlung
30 Minuten pro Sitzung an. Sie können sie jedoch so
KlXÀJXQGVRODQJHDQZHQGHQZLHHVIU6LHDQJHQHKP
ist. Die Wirkung lässt sich für gewöhnlich am besten
während der Stimulation wahrnehmen. Nach der
Stimulation lässt die Wirkung im Allgemeinen ziemlich
schnell nach. Sie sollten die Intensität des Programms
so einstellen, dass Sie die Stimulation deutlich spüren.
Eine Stimulation sollte keine unangenehmen oder
VFKPHU]KDIWHQ(PSÀQGXQJHQDXVO|VHQ
Name des
konventionellen
TENS-Programms
Programmnr. auf
Fernbedienung
PR3093
Programmnr. auf
Fernbedienung
PR3094
Programmbeschreibung
Vorgeschlagene
Behandlungsdauer
Konventionell
1
1
Sorgt für eine dauerhaft
kribbelnde Stimulation
Keine
Begrenzung
Starker
Reiz
2
2
Sorgt für eine stärkere
6WLPXODWLRQVHPSÀQGXQJ
Keine
Begrenzung
Vor einer
Aktivität
3
3
Sorgt für eine lokalere
und sanftere StimulatiRQVHPSÀQGXQJ
Keine
Begrenzung
68
DEUTSCH
Programmnr. auf
Fernbedienung
PR3094
Programmbeschreibung
Vorgeschlagene
Behandlungsdauer
Milder Reiz -
4
Sorgt für eine mildere
6WLPXODWLRQVHPSÀQGXQJ
]%IUHPSÀQGOLFKH
Körperpartien
Keine
Begrenzung
Tiefgehender
Reiz
-
5
Sorgt für eine tiefere
6WLPXODWLRQVHPSÀQGXQJ
Keine
Begrenzung
Ausstrahlender
Impuls
-
6
Sorgt für eine StimuODWLRQVHPSÀQGXQJPLW
einem weiteren Strahlungsradius
Keine
Begrenzung
Name des
konventionellen
TENS-Programms
Programmnr. auf
Fernbedienung
PR3093
Burst-TENS-Programme
Burst-TENS bietet eine Hochfrequenzstimulation
in getakteten Impulsfolgen. Diese Art der
Stimulation ist ein bekannter Auslöser für die
Endorphin-Ausschüttung. Endorphine werden
vom Körper zur Schmerzlinderung produziert.
Sie können Burst-TENS mehrmals täglich etwa
30 Minuten lang anwenden, z. B. 3 Mal am Tag.
Stellen Sie die Intensität des Burst-Programms
so ein, dass Sie die Stimulation deutlich spüren.
Burst-Programme sorgen im Allgemeinen für eine
LQWHQVLYHUH(PSÀQGXQJGLHVLFKP|JOLFKHUZHLVH
etwas unangenehm anfühlt. Es wird ebenfalls
empfohlen, die Intensität auf eine Höhe einzustellen,
bei der sich die Muskeln im Stimulationsbereich
sichtbar zusammenziehen. Diese Kontraktionen
DEUTSCH 69
sind nicht schädlich. Wenn diese Kontraktionen für
Sie zu unangenehm sind, können Sie die Intensität
verringern, ein anderes Programm auswählen oder
die Elektroden an einer anderen Stelle anbringen.
Burst-TENS sollte vorzugsweise in einer Ruhephase
angewendet werden, da es im Stimulationsbereich zu
Muskelkontraktionen kommen kann.
Name des
BurstTENSProgramms
Programmnr.
auf
Fernbedienung
PR3093
ProgrammbeschreiProgrammnr. bung
auf
Fernbedienung
PR3094
Vorgeschlagene
Behandlungsdauer
Kontinuierliche
Impulsfolge
4
7
Bewirkt eine pulsieren- 30 Minuten*
de Impulsstimulation,
um Endorphine in Ihrem
Körper auszuschütten
Langsames 5
Kneten
8
Bewirkt eine langsamere 30 Minuund massierende Impuls- ten*
stimulation, um Endorphine auszuschütten
Mildes
Kneten
6
9
Bewirkt eine mildere
Impulsstimulation, um
Endorphine in Ihrem
Körper auszuschütten
30 Minuten*
Tiefes
Kneten
-
10
Bewirkt eine lokalere
und tiefere Impulsstimulation, um Endorphine in Ihrem Körper
auszuschütten
30 Minuten*
70
DEUTSCH
Name des
BurstTENSProgramms
Programmnr.
auf
Fernbedienung
PR3093
ProgrammbeschreiProgrammnr. bung
auf
Fernbedienung
PR3094
Vorgeschlagene
Behandlungsdauer
Diffuse
Impulsfolge
-
11
30 Minuten*
Bewirkt eine diffusere
Impulsstimulation, um
Endorphine in Ihrem
Körper auszuschütten
* optional mehrmals am Tag
Frequenz-modulierte TENS-Programme
Frequenz-modulierte TENS-Programme wechseln
den Impuls zwischen hoch und niedrig. Dies
kann teilweise angenehmer bzw. effektiver als die
anderen Programme sein. Sie können die frequenzmodulierten TENS-Programme mehrmals täglich
etwa 30 Minuten lang anwenden, z. B. 3 Mal am Tag.
Frequenz-mod.
Programmname
Programmnr. auf
Fernbedienung
PR3093
Programmnr. auf
Fernbedienung
PR3094
Programmbeschreibung
Vorgeschlagene
Behandlungsdauer
Mischfrequenz
7
12
6RUJWIUHLQHÁLHßende StimulationsHPSÀQGXQJ
30 Minuten*
Pulsierende
Massage
8
13
Sorgt für eine pulsierende StimulationsHPSÀQGXQJ
30 Minuten*
DEUTSCH 71
Frequenz-mod.
Programmname
Programmnr. auf
Fernbedienung
PR3093
Programmnr. auf
Fernbedienung
PR3094
Programmbeschreibung
Vorgeschlagene
Behandlungsdauer
Tiefenmassage
-
14
Sorgt für eine langsamere und tiefer
gehende StimulationsHPSÀQGXQJ
30 Minuten*
Sanfte
Massage
-
15
Sorgt für eine sanft
ÁLHHQGH6WLPXODWLRQVHPSÀQGXQJ
30 Minuten*
* optional mehrmals am Tag
Technische Programmdaten
In der Tabelle unten werden Informationen über die
Frequenz, die Impulsbreite und die voreingestellte
Zeit jedes Programms angegeben. Der Stromimpuls
in allen Programmen verläuft in einer symmetrischen
Zweiphasenwelle.
ProProgramm- grammtyp
nr.
PR3094
Frequenz
Impulsbreite
Voreingestellte
Zeit
Konven- 1
tionell
1
Konventionell
100 Hz 200 µs
stufenlos
Starker
Reiz
2
Konventionell
40 Hz
stufenlos
Programmname
Programmnr.
PR3093
2
200 µs
72
DEUTSCH
ProProgramm- grammtyp
nr.
PR3094
Frequenz
Impulsbreite
Voreingestellte
Zeit
Vor
3
einer
Aktivität
3
Konventionell
100 Hz 150 µs
stufenlos
Milder
Reiz
-
4
Konventionell
80 Hz
60 µs
stufenlos
Tiefgehender
Reiz
-
5
Konventionell
80 Hz
150 µs
stufenlos
Ausstrahlender
Impuls
-
6
Konventionell
60 Hz
150 µs
stufenlos
Kontinuierliche
Impulsfolge
4
7
Impulsfolge
100 Hz, 250 µs
2 Hz
30 Minuten
Langsames
Kneten
5
8
Impulsfolge
80 Hz,
1 Hz
200 µs
30 Minuten
Mildes
Kneten
6
9
Impulsfolge
80 Hz,
3 Hz
200 µs
30 Minuten
Tiefes
Kneten
-
10
Impulsfolge
80 Hz,
2 Hz
150 µs
30 Minuten
Diffuse
Impulsfolge
-
11
Impulsfolge
80 Hz,
2 Hz
180 µs
30 Minuten
Programmname
Programmnr.
PR3093
DEUTSCH 73
Programmname
Programmnr.
PR3093
ProProgramm- grammtyp
nr.
PR3094
Frequenz
Impulsbreite
Voreingestellte
Zeit
Mischfrequenz
7
12
Freq.-mod.
8250 µs
100 Hz
30 Minuten
8
Pulsierende
Massage
13
Freq.-mod.
2-8 Hz
250 µs
30 Minuten
Tiefen- massage
14
Freq.-mod.
2-80 Hz 180 µs
30 Minuten
Sanfte
Massage
15
Freq.-mod.
8-80 Hz 150 µs
30 Minuten
Hinweis: Mit dem kabellosen Gerät TENS Pro (PR3094)
können Gesundheitsexperten die dazugehörige PCAnwendung im Rahmen einer Schmerztherapie nutzen, um
zusätzliche Programme zu erstellen und zu installieren, die
speziell auf die Bedürfnisse ihres Patienten abgestimmt sind.
Produktübersicht (Abb. 1)
1
2
3
Fernbedienung
Anzeige
A. Symbol für Startbildschirm
B. Symbol für Programmbildschirm
C. Symbol für Timerbildschirm
D. Akkusymbol
E. Symbol für Aktivitätsbildschirm
F. Symbol für Einstellungsbildschirm
Intensitätstaste (PR3093); Intensitätstaste für
Erweiterungskanal (dritte und vierte Elektrode)
(PR3094)
74
DEUTSCH
4
5
6
7
8
9
10
11
12
13
14
15
16
17
18
19
Intensitätstaste für Hauptkanal (erste und zweite
Elektrode) (PR3094)
OK-Taste (Bestätigungstaste)
Wählschalter mit Nach-oben-, Nach-unten-,
Nach-rechts- und Nach-links-Pfeilen
Abnehmbarer Gürtel-Clip
Batteriefachabdeckung
Erweiterungskanal-Anschlüsse für die dritte und
vierte Elektrode (nur PR3094)
Kabel für Erweiterungskanal (nur PR3094)
Stecker zum Anschließen des Kabels für den
Erweiterungskanal an die TENS-Komponenten
(nur PR3094)
Ein-/Ausschalter der TENS-Komponenten
TENS-Komponenten
Abnehmbares Eckstück (nur PR3094)
Akkustandanzeige der TENS-Komponenten
Behandlungsstatusanzeige der TENSKomponenten
Adapter
Ladegerät
Selbsthaftende Hydrogel-Elektrode
+LQZHLV'DVHQWVSUHFKHQGH%LOGÀQGHQ6LHDXIGHU
Innenseite der Frontabdeckung.
Für den Gebrauch vorbereiten
'LH7(16.RPSRQHQWHQDXÁDGHQ
Um das Gerät verwenden zu können, müssen
6LH]XHUVWGLH7(16.RPSRQHQWHQDXÁDGHQ'DV
$XÁDGHQGHU7(16.RPSRQHQWHQGDXHUWXQJHIlKU
3 Stunden, wenn das Gerät Raumtemperatur
hat. Wenn der Akku vollständig aufgeladen ist,
enthält er ausreichend Energie für ungefähr
8 Stunden dauerhaften Gebrauch unter normalen
Betriebsbedingungen.
DEUTSCH 75
Hinweis:Wenn der Akku der TENS-Komponenten zu
Beginn der Behandlung nicht vollständig aufgeladen
ist, kann der Energievorrat des Akkus während der
Behandlung erschöpfen.Wir empfehlen Ihnen, die
TENS-Komponenten immer vollständig aufzuladen,
bevor Sie eine Behandlung beginnen.
Hinweis: Es ist keine Behandlung möglich, während die
TENS-Komponenten aufgeladen werden.
1 Stecken Sie den Adapter des Ladegeräts in eine
Steckdose.
2 Setzen Sie die TENS-Komponente mit dem
Akku (diejenige ohne Ein-/Ausschalter und
Anzeigen) in das Ladegerät.
, Die Akkustandanzeige der anderen TENS.RPSRQHQWHEOLQNWZlKUHQGGHV$XÁDGHQVJUQ
, Die Akkustandanzeige hört auf zu blinken
XQGOHXFKWHWGDXHUKDIWJUQZHQQGHU$NNX
vollständig aufgeladen ist.
3 Nehmen Sie die TENS-Komponente vom
Ladegerät, wenn der Akku vollständig
aufgeladen ist.
Hinweis:Trennen Sie das Ladegerät nach der
Verwendung immer von der Stromversorgung, indem
Sie den Adapter aus der Steckdose ziehen.
76
DEUTSCH
Behandlungsvorbereitung mit zwei Kanälen
und vier Elektroden (nur PR3094)
Das kabellose TENS-Gerät Pro (PR3094) wird mit
einem Erweiterungskabel geliefert, über das Sie zwei
weitere Elektroden verbinden können. Weil das
kabellose TENS-Gerät Pro (PR3094) zwei Kanäle
aufweist, hat die zugehörige Fernbedienung zwei
Intensitätstasten, eine für jeden Kanal.
Behandlungsvorbereitung
1 1HKPHQ6LHGDVDEQHKPEDUH(FNVWFNYRQGHQ
TENS-Komponenten ab, sodass der Anschluss
IUGDV(UZHLWHUXQJVNDEHO]XJlQJOLFKLVW
Hinweis: Bewahren Sie das abnehmbare Eckstück für
den späteren Gebrauch auf.
$FKWXQJ%HZDKUHQ6LHGDVDEQHKPEDUH(FNVWFN
außerhalb der Reichweite von Kindern auf.
2 Stecken Sie den Stecker des
Erweiterungskabels in den Anschluss.
Fernbedienung vorbereiten
Akkus in die Fernbedienung einsetzen
1 1HKPHQ6LHGHQ*UWHO&OLSJHJHEHQHQIDOOV
von der Fernbedienung ab.
2 Schieben Sie die Batteriefachabdeckung von
der Fernbedienung.
DEUTSCH 77
3 Setzen Sie zwei AAA 1,5-Volt-Alkalibatterien in
die Fernbedienung ein.
Hinweis:Vergewissern Sie sich, dass die Plus- und
Minuspole im Batteriefach in die richtige Richtung
zeigen.
Hinweis: Nehmen Sie die Batterien heraus, wenn Sie
das Gerät einen Monat oder länger nicht verwenden,
um ein Auslaufen der Batterien zu verhindern.
4 6FKLHEHQ6LHGLH%DWWHULHIDFKDEGHFNXQJ]XUFN
auf die Fernbedienung.
5 :HQQ6LHGLH)HUQEHGLHQXQJDQ,KUHP*UWHO
oder am Bund tragen möchten, befestigen Sie
GHQ*UWHO&OLSZLHGHUDQGHU)HUQEHGLHQXQJ
Sie können die Fernbedienung auch ohne den
*UWHO&OLSYHUZHQGHQ
Fernbedienung sperren und entsperren
Das Bedienfeld der Fernbedienung wird automatisch
gesperrt, wenn es eine gewisse Zeit lang inaktiv war,
um eine versehentliche Bedienung zu verhindern.
1 Wenn Sie eine Taste auf der Fernbedienung
GUFNHQZHUGHQ6LHGD]XDXIJHIRUGHUWGLH
OK-Taste und anschließend den Nach-oben3IHLO]XGUFNHQ
2 'UFNHQ6LHGLH2.7DVWHXPGLH
Fernbedienung zu entsperren.
78
DEUTSCH
, Sie werden aufgefordert, den Nach-oben-Pfeil zu
GUFNHQ
3 'UFNHQ6LHDXIGHP:DKOVFKDOWHUGHQ1DFK
oben-Pfeil.
, Wenn Sie die Fernbedienung entsperren, können
Sie das Bedienfeld erneut verwenden.
, Wenn Sie neue Batterien eingesetzt haben und
die TENS-Komponenten ausgeschaltet sind, wird
der “Keine Verbindung”-Bildschirm angezeigt.
Hinweis: Der “Keine Verbindung”-Bildschirm kann
auch aus anderen Gründen angezeigt werden (siehe
“Fehlersignale auf der Fernbedienung” in Kapitel
“Signale auf dem Gerät”).
4 Wenn Sie die Fernbedienung sperren möchten,
halten Sie die OK-Taste 2 Sekunden lang
JHGUFNW
Hinweis:Wenn die Fernbedienung gesperrt ist, wird auf
dem Display nichts angezeigt.
Tipp: Sperren Sie die Fernbedienung, nachdem Sie
die Behandlung begonnen haben. Dies ermöglicht
Ihnen, die Fernbedienung am Gürtel oder Bund bzw.
in der Tasche zu tragen, ohne dabei unabsichtlich die
Einstellungen zu ändern.
DEUTSCH 79
Datum und Uhrzeit festlegen
Wenn Sie die Aktivitätsüberwachung verwenden
möchten, um den Verlauf Ihrer Aktivität und das
Behandlungsmuster zu verfolgen, müssen Sie das
Datum und die Uhrzeit auf Ihrer Fernbedienung
einstellen.
1 'HU%LOGVFKLUPIUGDV'DWXPXQGGLH
Uhrzeit wird automatisch angezeigt, wobei das
Datumsfeld hervorgehoben ist.
Hinweis: Dieser Bildschirm öffnet sich nur bei der
ersten Verwendung automatisch und wenn Sie
die Batterien mehr als 24 Stunden, nachdem der
Energievorrat vollständig erschöpft ist, ersetzen.Wählen
Sie in allen anderen Situationen das Einstellungssymbol
aus, um das Datum und die Uhrzeit zu ändern.
2 'UFNHQ6LHGLH2.7DVWHXPGLH
Datumseinstellung zu ändern.
, Das Tagesfeld ist hervorgehoben.
3 Wählen Sie den Tag mithilfe der Nach-obenXQG1DFKXQWHQ3IHLOHDXVXQGGUFNHQ6LH
den Nach-rechts-Pfeil, um zum Monatsfeld zu
wechseln.
, Das Monatsfeld ist hervorgehoben.
4 Wählen Sie den Monat mithilfe der NachREHQXQG1DFKXQWHQ3IHLOHDXVXQGGUFNHQ
Sie den Nach-rechts-Pfeil, um zum Jahresfeld zu
wechseln.
, Das Jahresfeld ist hervorgehoben.
80
DEUTSCH
5 Wählen Sie das Jahr mithilfe der Nach-obenXQG1DFKXQWHQ3IHLOHDXVXQGGUFNHQ6LHGLH
OK-Taste, um das Datum zu bestätigen.
6 Verwenden Sie den Nach-unten-Pfeil, um zum
Zeiteinstellungsfeld zu wechseln.
7 'UFNHQ6LHGLH2.7DVWHXPGLH
Zeiteinstellung zu ändern.
, Der Bildschirm zur Zeiteinstellung wird geöffnet.
, Das Stundenfeld ist hervorgehoben.
8 Wählen Sie die Stunde mithilfe der Nach-obenXQG1DFKXQWHQ3IHLOHDXVXQGGUFNHQ6LH
den Nach-rechts-Pfeil, um zum Minutenfeld zu
wechseln.
, Das Minutenfeld ist hervorgehoben.
9 Wählen Sie die Minuten mithilfe der NachREHQXQG1DFKXQWHQ3IHLOHDXVXQGGUFNHQ
Sie die OK-Taste, um die Zeit zu bestätigen.
10 Verwenden Sie den Nach-unten-Pfeil, um zum
)HOGIUGDV=HLWIRUPDW]XZHFKVHOQ
11 'UFNHQ6LHGLH2.7DVWHXPGDV=HLWIRUPDW
zu ändern.
12 Wechseln Sie mithilfe der Nach-oben- und
Nach-unten-Pfeile zwischen der 24-Stunden$Q]HLJHXQGGHU6WXQGHQ$Q]HLJH'UFNHQ
Sie die OK-Taste, um Ihre Wahl zu bestätigen.
DEUTSCH 81
Gerät verwenden
Elektroden und TENS-Komponenten
befestigen
1 Vergewissern Sie sich, dass die Haut, auf der
Sie die Elektroden platzieren möchten, gesund
ist und keine Verletzungen oder Ausschläge
aufweist.
Hinweis: Platzieren Sie die Elektroden nicht auf roter
oder entzündeter Haut oder auf Haut mit offenen
Wunden, Krebsläsionen oder Ausschlägen.
2 Reinigen Sie die Haut mit einem feuchten
Tuch, und trocknen Sie sie. Die Haut, auf der
Sie die Elektroden positionieren möchten,
muss trocken, sauber und frei von Creme oder
Körperlotion sein.
Hinweis: Schmutz, Fett oder Partikel, die sich noch auf
GHU+DXWEHÀQGHQN|QQHQLQGLH+\GURJHO(OHNWURGHQ
eindringen. Dies wirkt sich negativ auf die Haftfähigkeit
der Elektroden aus.
3 Nehmen Sie die Elektroden aus der
.XQVWVWRIIWDVFKHXQGEHUSUIHQ6LHVLHDXI
Schäden und Anzeichen von Verschleiß.
Achtung:Verwenden Sie keine Elektroden
mit abgelaufenem Haltbarkeitsdatum.
Das Haltbarkeitsdatum ist auf der
wiederverschließbaren Kunststofftasche angegeben.
Hinweis: Ersetzen Sie die Elektroden, wenn sie
beschädigt oder schmutzig sind, wenn sie nicht mehr
haften oder wenn die Stimulation unangenehm wird, d. h.
wenn ein unangenehmes stechendes Gefühl auftritt.
82
DEUTSCH
4 Ziehen Sie die Elektrode aus dem Einsatz, und
positionieren Sie sie auf der zu behandelnden
Stelle der Haut. Siehe Abschnitt “Positionieren
der Elektroden” weiter unten und die
Positionierungsanleitung am Ende dieser
Bedienungsanleitung.
5 Positionieren Sie die zweite Elektrode auf
der zu behandelnden Körperpartie. Wenn
Sie das PR3094 verwenden, können Sie auch
eine dritte und vierte Elektrode auf der zu
behandelnden Körperpartie positionieren.
Hinweis: Positionieren Sie immer zuerst die Elektroden
auf der Haut, bevor Sie die TENS-Komponenten
anschließen.
Hinweis: Positionieren Sie die Elektroden nicht übereinander
bzw. so nahe aneinander, dass sie sich berühren.
6 Befestigen Sie die TENS-Komponenten an den
Elektroden. Die TENS-Komponenten weisen in der
Mitte Magnete auf, um eine einfache Verbindung
]XGHQ0HWDOODQVFKOVVHQGHU(OHNWURGHQ
sicherzustellen.Wenn die TENS-Komponenten und
die Elektroden ordnungsgemäß verbunden sind,
hören Sie ein Klicken.
Hinweis: Sie können die Elektroden mit den befestigten
TENS-Komponenten unter Ihrer Kleidung tragen –
auch während der Behandlung.
Hinweis:Während zahlreicher Behandlungsprogramme
können Sie alle Aktivitäten im Anwendungsumfang
durchführen, außer denen, vor denen im Kapitel
“Wichtig” abgeraten wird, wenn Sie die TENSKomponenten am Körper tragen. Sie können die
TENS-Komponenten auch zwischen den Behandlungen
am Körper tragen.
DEUTSCH 83
Hinweis:Wenn Sie eine Behandlung mit vier Elektroden
(nur PR3094) durchführen möchten, müssen Sie zuerst
die TENS-Komponenten an den beiden Elektroden und
dann die Stecker des Erweiterungskabels an die beiden
anderen Elektroden anschließen.
7 'UFNHQ6LHGHQ(LQ$XVVFKDOWHUXPGLH
TENS-Komponenten in den Standby-Modus zu
schalten.
, Die Behandlungsstatusanzeige auf den TENS.RPSRQHQWHQEOLQNWJUQXQG]HLJWGDPLWDQ
GDVVVLHVLFKLP6WDQGE\0RGXVEHÀQGHQXQG
einsatzbereit sind.
, Wenn Sie die Behandlung nicht innerhalb
von 5 Minuten beginnen, werden die TENSKomponenten automatisch ausgeschaltet. Wenn
GLHVJHVFKLHKWPVVHQ6LH]XP6WDUWHQHLQHU
Behandlung zuerst erneut den Ein-/Ausschalter
GUFNHQ
Positionieren der Elektroden
Um optimale Ergebnisse durch die Stimulation zu
erhalten, ist die ordnungsgemäße Positionierung
der Elektroden wichtig. Vergewissern Sie sich stets,
dass die Haut im Behandlungsbereich gesund ist,
bevor Sie die Elektroden befestigen. Die ideale
Stelle kann sich von Person zu Person etwas
unterscheiden. Testen Sie also unterschiedliche
Stellen, bis Sie die effektivsten Ergebnisse erhalten.
In einigen Fällen kann es hilfreich sein, die Stelle für
spätere Behandlungen zu markieren. Vorschläge
]XU3RVLWLRQLHUXQJGHU(OHNWURGHQÀQGHQ6LHLQ
der Positionierungsanleitung am Ende dieser
Bedienungsanleitung. Bitte beachten Sie, dass Sie
84
DEUTSCH
möglicherweise Hilfe benötigen, um die Elektroden
an bestimmten Körperstellen anzubringen.
In der Regel sollten die Elektroden auf oder nahe
der schmerzhaften Stelle positioniert werden.
Die Stimulation kann im Stimulationsbereich zu
sichtbaren Muskelkontraktionen führen. Dies ist nicht
schädlich. Wenn Sie diese Kontraktionen jedoch als
XQDQJHQHKPHPSÀQGHQEULQJHQ6LHGLH(OHNWURGHQ
an einer anderen Stelle an.
Positionieren Sie die Elektroden nicht am Hals
RGHUEHU,KUHU%UXVW3RVLWLRQLHUHQ6LHGLH
(OHNWURGHQQLFKWDXIURWHURGHUHQW]QGHWHU
Haut, auf offenen Wunden, auf Krebsläsionen oder
Ausschlägen.
Behandlung beginnen und beenden
Dies ist der Startbildschirm. Darauf sehen Sie
das ausgewählte Programm, die ausgewählte
Behandlungsdauer und die ausgewählte Intensität. In
der Menüleiste unten am Bildschirm sehen Sie von
links nach rechts:
- Das Symbol für den Startbildschirm: Dieses
Symbol ist hervorgehoben, wenn der
Startbildschirm angezeigt wird.
- Das Symbol für den Programmbildschirm:
Wählen Sie dieses Symbol aus, um ein
Behandlungsprogramm auszuwählen.
- Das Symbol für den Timerbildschirm: Wählen
Sie dieses Symbol aus, um die Behandlungsdauer
einzustellen.
- Das Akkusymbol: Wählen Sie dieses Symbol aus,
um den Akkustand zu überprüfen.
- Das Symbol für den Aktivitätsbildschirm:
Wählen Sie dieses Symbol aus, um den
Aktivitätsmonitor auszuwählen (siehe Abschnitt
“Aktivitätsüberwachung” in diesem Kapitel).
DEUTSCH 85
- Das Symbol für den Einstellungsbildschirm: Wählen
Sie dieses Symbol aus, um das Datum oder die
Uhrzeit zu ändern (weitere Informationen zum
Einstellen von Datum und Uhrzeit erhalten Sie in
Kapitel “Für den Gebrauch vorbereiten”).
Hinweis: Die Menüleiste auf dem Startbildschirm
und andere Bildschirme werden nach einer Weile
ausgeblendet, bei Tastendruck jedoch wieder
eingeblendet.
Programm auswählen
1 Wenn Sie ein anderes Programm als das
Standardprogramm auf dem Startbildschirm
auswählen möchten, verwenden Sie den
1DFKOLQNVRGHU1DFKUHFKWV3IHLOXP´3µIU
3URJUDPPLQGHU0HQOHLVWHKHUYRU]XKHEHQ
2 'UFNHQ6LHGLH2.7DVWHXP]XEHVWlWLJHQ
dass Sie das ausgewählte Programm ändern
möchten.
, Der Programmbildschirm wird angezeigt,
wobei das zuvor ausgewählte Programm
hervorgehoben ist.
3 Wählen Sie mithilfe des Nach-oben- oder
Nach-unten-Pfeils ein Programm aus, und
GUFNHQ6LH]XU%HVWlWLJXQJ,KUHU:DKOGLH
OK-Taste.
Hinweis: Das ausgewählte Programm wird als
Standardwert im Speicher der Fernbedienung
gespeichert.Wenn Sie das Gerät das nächste Mal
verwenden, wird dieses Programm verwendet.Wenn
Sie das Programm ändern möchten, befolgen Sie die
Schritte 1 bis 3 oben.
86
DEUTSCH
Hinweis: Das gleiche Programm gilt für beide Kanäle
des kabellosen TENS-Geräts Pro (PR3094).
Dauer eines Programms einstellen
1 Auf dem Startbildschirm sehen Sie die Dauer,
die als Standardwert ausgewählt wurde. Wenn
Sie die Standarddauer der Behandlung ändern
möchten, verwenden Sie den Nach-links- oder
Nach-rechts-Pfeil, um das Timersymbol in der
0HQOHLVWHKHUYRU]XKHEHQ
Hinweis:Wenn Sie das Programm ändern, wird die
Dauer auf die Standarddauer dieses Programms
zurückgesetzt.
2 'UFNHQ6LHGLH2.7DVWHXP]XEHVWlWLJHQ
dass Sie die Dauer ändern möchten.
, Auf dem Timerbildschirm wird der
YRUHLQJHVWHOOWH6WDQGDUGZHUWIUGLH'DXHU
hervorgehoben angezeigt.
3 :lKOHQ6LHGLHJHZQVFKWH'DXHUPLWKLOIHGHU
Nach-oben- und Nach-unten-Pfeile aus, und
GUFNHQ6LH]XU%HVWlWLJXQJGLH2.7DVWH
- Sie können die Behandlungsdauer in Minuten
einstellen.
- Sie können die Behandlungsdauer auch auf
“Kontinuierlich” einstellen. Auf dem Bildschirm
wird dann das entsprechende Symbol anstelle der
Behandlungsdauer in Minuten angezeigt. Wenn
dieses Symbol auf dem Startbildschirm blinkt, wird
die Behandlung so lange fortgesetzt, bis Sie sie
beenden.
Hinweis: Die ausgewählte Behandlungsdauer wird
als Standardwert im Speicher der Fernbedienung
gespeichert.Wenn Sie das Gerät das nächste Mal
verwenden, wird diese Dauer verwendet. Zum Ändern
der Dauer befolgen Sie die Schritte 4 bis 6 oben.
DEUTSCH 87
Hinweis: Dieselbe Dauer gilt für beide Kanäle des
kabellosen TENS-Geräts Pro (PR3094).
Behandlung beginnen und beenden
(PR3093)
Um eine Behandlung zu beginnen, müssen Sie
zuerst die TENS-Komponenten mit dem Ein-/
Ausschalter einschalten und dann die Plus-Seite der
Intensitätstaste drücken, um die Intensität zu erhöhen.
1 'UFNHQ6LHGLH3OXV6HLWHGHU,QWHQVLWlWVWDVWH
um die Intensität einzustellen. Die Erhöhung
der Intensität beginnt immer bei 0 mA. Die
Behandlung wird gestartet und der Timer
EHJLQQWPLWGHP5FNZlUWV]lKOHQVREDOG
GLH,QWHQVLWlWEHUP$OLHJW-HK|KHUGLH
Intensität, desto stärker der Impuls im Bereich
mit den befestigten Elektroden.
, Halten Sie die Plus-Seite der Intensitätstaste
JHGUFNWXPGLH,QWHQVLWlWNRQVWDQWXQGODQJVDP
zu erhöhen. Lassen Sie die Intensitätstaste los,
wenn Sie die richtige Intensität der Stimulation
erreicht haben.
Hinweis: Bei konventionellen und frequenz-modulierten
TENS-Programmen sollten Sie die Stimulation
deutlich spüren, es sollte aber nicht unangenehm oder
schmerzhaft sein.
Hinweis: Bei Burst-TENS-Programmen sollten Sie die
Stimulation stark spüren, da sie im Allgemeinen eine
LQWHQVLYHUH(PSÀQGXQJEHUHLWVWHOOHQXQGVLFKHWZDV
unangenehm anfühlen können. Es wird ebenfalls empfohlen,
die Intensität auf eine Höhe einzustellen, bei der sich die
Muskeln im Stimulationsbereich sichtbar zusammenziehen.
Diese Kontraktionen sind nicht schädlich.Wenn diese
Kontraktionen für Sie zu unangenehm sind, können Sie
die Intensität verringern, ein anderes Programm auswählen
oder die Elektroden an einer anderen Stelle anbringen.
88
DEUTSCH
, Die Intensitätseinstellung wird in Zahlen
EHUGHU,QWHQVLWlWVWDVWHDQJH]HLJW'LH
Intensität liegt zwischen 0 mA und 60 mA. Die
Intensitätseinstellung wird vom Intensitätsbalken
auf der rechten Seite des Bildschirms
verdeutlicht. Je höher der Balken, desto höher
die Intensität.
, Wenn die Behandlung beginnt, blinkt die
Behandlungsstatusanzeige auf den TENSKomponenten gelb.
, Auf dem Startbildschirm der Fernbedienung
werden das ausgewählte Programm, die
verbleibende Behandlungsdauer und die
ausgewählte Intensität angezeigt.
, :HQQVLFKGLH,QWHQVLWlWXQDQJHQHKPDQIKOW
GUFNHQ6LHGLH0LQXV6HLWHGHU,QWHQVLWlWVWDVWH
um die Intensität kontinuierlich und langsam zu
verringern.
Hinweis: Da sich Ihr Körper anfangs auf die Intensität
der Stimulation einstellt, müssen Sie möglicherweise die
Intensitätseinstellung nach einiger Zeit anpassen, um
eine ideale Stimulation sicherzustellen.
2 Um die Behandlung vor Ablauf der festgelegten
Behandlungsdauer zu beenden, oder wenn
Sie die Behandlungsdauer auf “Kontinuierlich”
eingestellt haben, halten Sie die Minus-Seite der
,QWHQVLWlWVWDVWH6HNXQGHQODQJJHGUFNWXP
die Intensität auf 0 mA zu verringern. Wenn die
Intensität bei 0 mA liegt, wird von den TENSKomponenten kein Impuls ausgesendet.
Hinweis: Sie können die Behandlung auch durch
Drücken des Ein-/Ausschalters auf den TENSKomponenten beenden. In diesem Fall wird die
Behandlung auf beiden Kanälen sofort beendet.
DEUTSCH 89
Behandlung beginnen und beenden
(PR3094)
Um eine Behandlung zu beginnen, müssen Sie
zuerst die TENS-Komponenten mit dem Ein-/
Ausschalter einschalten und dann die Plus-Seiten
der Intensitätstasten drücken, um die Intensität zu
erhöhen.
1 'UFNHQ6LHGLH3OXV6HLWHGHU,QWHQVLWlWVWDVWHQ
XPGLH,QWHQVLWlWIUGHQ+DXSWXQGGHQ
Erweiterungskanal separat einzustellen, und
beginnen Sie die Behandlung.
, Halten Sie die Plus-Seite der Intensitätstaste auf
GHUOLQNHQ6HLWHGHU)HUQEHGLHQXQJJHGUFNW
um die Intensität des Hauptkanals zu erhöhen.
Dadurch wird der Impuls zwischen den ersten
zwei Elektroden gestartet.
, Die Intensitätseinstellung wird in Zahlen
EHUGHUOLQNHQ,QWHQVLWlWVWDVWHDQJH]HLJW
Die Intensitätseinstellung wird auch durch
den Intensitätsbalken auf der linken Seite des
Bildschirms verdeutlicht.
, Halten Sie die Plus-Seite der Intensitätstaste auf
GHUUHFKWHQ6HLWHGHU)HUQEHGLHQXQJJHGUFNW
um die Intensität des Erweiterungskanals zu
erhöhen. Dadurch wird der Impuls auf die dritte
und vierte Elektrode erweitert.
, 'LH,QWHQVLWlWVHLQVWHOOXQJZLUGLQ=DKOHQEHU
der rechten Intensitätstaste angezeigt. Die
Intensitätseinstellung wird auch durch den
Intensitätsbalken auf der rechten Seite des
Bildschirms verdeutlicht.
90
DEUTSCH
2 Um die Behandlung auf einem oder auf
beiden Kanälen vor Ablauf der festgelegten
Behandlungsdauer zu beenden, oder wenn
Sie die Behandlungsdauer auf “Kontinuierlich”
eingestellt haben, halten Sie die Minus-Seite der
,QWHQVLWlWVWDVWH6HNXQGHQODQJJHGUFNWXP
die Intensität auf 0 mA zu verringern. Wenn die
Intensität bei 0 mA liegt, wird von den TENSKomponenten kein Impuls ausgesendet.
Hinweis: Da sich die beiden Kanäle unabhängig
voneinander bedienen lassen, können Sie die
Behandlung auf einem Kanal beenden, während Sie die
Behandlung auf dem anderen fortsetzen.
Hinweis: Sie können die Behandlung auch durch
Drücken des Ein-/Ausschalters auf den TENSKomponenten beenden. In diesem Fall wird die
Behandlung auf beiden Kanälen sofort beendet.
Aktivitätsüberwachung
Diese zusätzliche Funktion auf der Fernbedienung
ermöglicht Ihnen, Ihr Aktivitätsmuster über einen
Tag, eine Woche oder einen Monat zu überprüfen.
Da Aktivität und Zeiteinteilung wichtige Elemente
in der Schmerztherapie sind, stellt Ihnen der in
der Fernbedienung integrierte Aktivitätsmonitor
ein Werkzeug bereit, mit dem Sie überprüfen
können, wie gut Sie Ihre Aktivitäten einteilen. Wenn
Sie mehr über die selbständige Schmerztherapie
und die Bedeutung der Einteilung erfahren
möchten, lesen Sie bitte die Broschüre “Toolkit zur
Schmerzlinderung”.
DEUTSCH 91
Hinweis: Um die Wirksamkeit der
Aktivitätsüberwachung sicherzustellen, müssen Sie die
Fernbedienung den ganzen Tag an oder in der Nähe
der Hüfte tragen. Sie können sie am Gürtel oder Bund
mit dem Gürtel-Clip befestigen oder in Ihrer Hosenbzw. Rocktasche tragen.
Ergebnisse ablesen
1 'UFNHQ6LHGHQ1DFKUHFKWV3IHLOXP
GDV$NWLYLWlWVV\PEROLQGHU0HQOHLVWH
hervorzuheben.
2 Als erster Bildschirm öffnet sich die
Tagesansicht. Blättern Sie mit dem Nach-obenoder Nach-unten-Pfeil von einem Bildschirm
zum nächsten.
, Die Tagesansicht zeigt Ihre Aktivität im Verlauf
der letzten 24 Stunden. Die Höhe der Balken
gibt an, wie viele Minuten Sie aktiv waren. Die
horizontale Linie (A) stellt Ihre durchschnittliche
$NWLYLWlWGDUXQGXQWHUVWW]W6LHEHLGHU
Ermittlung, ob Ihre Aktivität im Verlauf des Tages
EHURGHUXQWHUGHP'XUFKVFKQLWWVZHUWOLHJW
, Die Wochenansicht zeigt Ihre Aktivität am
heutigen Tag und im Verlauf der letzten 7 Tage.
Die Buchstaben unter dem Diagramm geben die
Tage der Woche an. Die Höhe der Balken gibt an,
wie viele Stunden pro Tag Sie in der vergangenen
Woche aktiv waren. Die horizontale Linie (A)
VWHOOW,KUHGXUFKVFKQLWWOLFKH$NWLYLWlWEHUGLH
OHW]WHQ7DJHGDU'LHVH/LQLHXQWHUVWW]W6LHEHL
der Ermittlung, ob Ihre Aktivität in der letzten
:RFKHEHURGHUXQWHUGHP'XUFKVFKQLWWVZHUW
liegt. Zudem können Sie bestimmen, an welchen
7DJHQGHU:RFKH,KUH$NWLYLWlWEHURGHU
unterdurchschnittlich war.
92
DEUTSCH
, Die Monatsansicht zeigt Ihre Aktivität am
heutigen Tag und im Verlauf der letzten vier
Wochen. Die Wochen werden von den Zahlen
unter dem Diagramm gekennzeichnet. Die
Höhe der Balken gibt an, wie viele Stunden
pro Tag Sie in den vergangenen vier Wochen
aktiv waren. Die horizontale Linie (A) stellt
,KUHGXUFKVFKQLWWOLFKH$NWLYLWlWEHUGHQ
OHW]WHQ0RQDWGDU'LHVH/LQLHXQWHUVWW]W6LH
bei der Ermittlung, ob Ihre Aktivität im Verlauf
GHVOHW]WHQ0RQDWVEHURGHUXQWHUGHP
Durchschnittswert liegt. Zudem können Sie
EHVWLPPHQDQZHOFKHQ7DJHQ,KUH$NWLYLWlWEHU
oder unterdurchschnittlich war.
Aktivitätsziel (PR3094)
Wenn Sie Ihren Schmerz mit dem kabellosen
Gerät TENS Pro unter Absprache mit einem
Gesundheitsexperten behandeln, der die PCAnwendung für das kabellose Gerät TENS
Pro (PR3094) verwendet, übermittelt der
Aktivitätsmonitor Ihrem Gesundheitsexperten
weitere Informationen zu Ihrer Aktivität und Ihrem
Behandlungsmuster. Mit der PC-Anwendung kann
Ihr Gesundheitsexperte zudem ein Aktivitätsziel
festlegen. Wenn ein Ziel festgelegt wurde, wird an
der horizontalen Linie statt eines “(A)” ein “(T)”
angezeigt.
, Die Tagesansicht zeigt Ihre Aktivität im Verlauf
der letzten 24 Stunden. Die horizontale Linie (T)
stellt das Aktivitätsziel dar, sodass Sie ermitteln
können, ob Ihre Aktivität im Verlauf des Tages die
Zielvorgabe erreicht hat.
DEUTSCH 93
, Die Wochenansicht zeigt Ihre Aktivität am
heutigen Tag und im Verlauf der letzten 7 Tage.
Die horizontale Linie (T) stellt das Aktivitätsziel
IUGLH:RFKHGDU'DGXUFKN|QQHQ6LH
ermitteln, ob die Aktivität in der vergangenen
Woche die Zielvorgabe erreicht hat, und
an welchen Tagen Ihre Aktivität höher oder
niedriger als das Ziel war.
, Die Monatsansicht zeigt Ihre Aktivität in den
vergangenen vier Wochen bis heute. Die
horizontale Linie (T) gibt Ihr Aktivitätsziel an.
Dadurch können Sie ermitteln, ob die Aktivität
im vergangenen Monat die Zielvorgabe erreicht
hat, und an welchen Tagen Ihre Aktivität höher
oder niedriger als das Ziel war.
Nach dem Gebrauch
Achtung:Vergewissern Sie sich, dass Sie die
Behandlung durch Ausschalten der TENSKomponenten oder durch Einstellen der Intensität
auf 0 mA auf der Fernbedienung beenden, bevor
Sie die TENS-Komponenten, das Verlängerungskabel
(falls verwendet, nur PR3094) oder die Elektroden
abnehmen. Wenn Sie die Behandlung nicht beenden,
NDQQHLQXQDQJHQHKPHV*HIKOLQ,KUHQ)LQJHUQ
DXIWUHWHQ'LHVHV*HIKOLVWQLFKWVFKlGOLFKNDQQ
jedoch unangenehm sein.
1 Schalten Sie die TENS-Komponenten durch
'UFNHQGHV(LQ$XVVFKDOWHUVDXV
94
DEUTSCH
2 Ziehen Sie die TENS-Komponenten von den
Elektroden ab.
Hinweis:Wenn Sie vergessen haben, die TENSKomponenten auszuschalten, werden sie 5 Minuten
nach dem Abziehen automatisch ausgeschaltet.
3 Laden Sie die TENS-Komponenten auf, um sie
IUGLHQlFKVWH%HKDQGOXQJYRU]XEHUHLWHQ
4 Nehmen Sie die Elektroden durch Ziehen an
der Kante von der Haut ab.
Hinweis: Lassen Sie die Elektroden nicht über Nacht
auf der Haut.Wenn Hautirritationen auftreten,
versuchen Sie, die Elektroden an einer anderen Stelle
zu befestigen.Vergewissern Sie sich, dass Sie die
Elektroden regelmäßig an eine andere Stelle setzen,
damit die Stimulation nicht jeden Tag am gleichen Fleck
durchgeführt wird.
Elektroden aufbewahren
1 /HJHQ6LHGLH(OHNWURGHQ]XUFNLQGHQ(LQVDW]
2 Schieben Sie den Einsatz mit den Elektroden
]XUFNLQGLH7DVFKH
DEUTSCH 95
3 Verschließen Sie die Tasche, um eine staubfreie
Aufbewahrung zu gewährleisten.
Hinweis: Damit die Elektroden gut erhalten bleiben
und die Hydrogel-Schicht nicht austrocknet, sollten
Sie die Elektroden stets in der wiederverschließbaren
Tasche aufbewahren, wenn sie nicht verwendet
werden.Verschließen Sie die Tasche, um eine staubfreie
Aufbewahrung zu gewährleisten.
Hinweis:Wenn Sie die Elektroden mehr als einen
Monat nicht verwenden, sollten sie bei einer
Temperatur zwischen 5 °C und 27 ° C aufbewahrt
werden. Bewahren Sie die Elektroden nicht im Gefrieroder Kühlschrank auf.Vermeiden Sie extreme Hitze
und direkte Sonneneinstrahlung.
3ÁHJH
Tauchen Sie die Fernbedienung und die TENS.RPSRQHQWHQQLFKWLQ:DVVHUVSOHQ6LHVLHDXFK
QLFKWXQWHUÁLHHQGHP:DVVHUDE
Tauchen Sie die Elektroden nicht in Wasser.
1 Reinigen Sie die Fernbedienung, das
Ladegerät, die TENS-Komponenten und
das Erweiterungskabel (nur PR3094) mit
einem feuchten Tuch und einem milden
5HLQLJXQJVPLWWHO]%6SOPLWWHO
Hinweis: Sie können zur Reinigung auch 70-prozentiges
Isopropanol (IPA) verwenden.
Achtung:Verwenden Sie nur die oben genannten
Reinigungsmittel, da andere Reinigungsmittel das
Material beschädigen könnten, z. B. Glanzverlust.
96
DEUTSCH
2 Wenn die Elektroden schmutzig sind, geben
Sie einen Tropfen Wasser auf Ihre Finger, und
reiben Sie den Schmutz vorsichtig von der
2EHUÁlFKHDE
Hinweis:Verwenden Sie zum Reinigen der Elektroden
weder Seife noch Alkohol.
Fehlerbehebung
,QGLHVHP$EVFKQLWWZHUGHQGLHKlXÀJVWHQ
Probleme zusammengestellt, die mit dem kabellosen
TENS-Gerät und dem kabellosen Gerät TENS Pro
auftreten können. Sollten Sie ein Problem mithilfe
der nachstehenden Informationen nicht beheben
können, besuchen Sie unsere Website
www.philips.com/support, auf der Sie eine Liste
PLWKlXÀJJHVWHOOWHQ)UDJHQÀQGHQ:HQGHQ6LHVLFK
andernfalls an ein Service-Center in Ihrem Land.
Problem
Mögliche
Ursache
Lösung
Die Fernbedienung
lässt sich
nicht einschalten.
Die Batterien
Ersetzen Sie die Batterien (siehe Kapitel
der Fernbedie- “Für den Gebrauch vorbereiten”).
nung sind leer.
Die Batterien
sind nicht richtig eingelegt.
Öffnen Sie das Batteriefach, und legen
Sie die Batterien richtig ein (siehe Kapitel “Für den Gebrauch vorbereiten”).
Die Fernbedienung kann
defekt sein.
Setzen Sie sich mit einem Philips Service-Center in Verbindung.
DEUTSCH 97
Problem
Mögliche
Ursache
Lösung
Der Akku der Laden Sie die TENS-Komponenten auf
Die
Akkustand- TENS-Kompo- (siehe “Für den Gebrauch vorbereianzeige der nenten ist leer. ten”).
TENS-Komponenten
blinkt
orange, und
das Gerät
hat sich
ausgeschaltet.
Die
Akkustandanzeige der
TENS-Komponenten
leuchtet
dauerhaft
orange.
Der Ladestand des
Akkus in den
TENS-Komponenten ist
niedrig. Das
Akkusymbol auf der
Fernbedienung
blinkt.
Dies bedeutet, dass die Kapazität
des Akkus bei 30 % liegt. Laden Sie
die TENS-Komponenten sobald wie
möglich auf (siehe Kapitel “Für den
Gebrauch vorbereiten”).
Auf dem
Bildschirm
wird das
Symbol für
die fehlende
Verbindung
angezeigt
(siehe Kapitel “Signale
auf dem
Gerät”).
Es besteht
keine Verbindung, weil die
TENS-Komponenten
ausgeschaltet
sind.
Prüfen Sie, ob die TENS-Komponenten
eingeschaltet sind. Die Behandlungsstatusanzeige blinkt grün, wenn die
TENS-Komponenten eingeschaltet
und im Standby-Modus sind. Wenn die
TENS-Komponenten ausgeschaltet sind,
schalten Sie sie mit dem Ein-/Ausschalter ein.
98
DEUTSCH
Problem
Mögliche
Ursache
Lösung
Laden Sie die TENS-Komponenten auf
Es besteht
(siehe “Für den Gebrauch vorbereikeine Verten”).
bindung, weil
der Akku der
TENS-Komponenten leer ist.
Die
TENS-Komponenten haben
sich im Inneren überhitzt.
Wenn dies der
Fall ist, blinkt
die Behandlungsstatusanzeige rot.
Nehmen Sie die TENS-Komponenten
ab, und lassen Sie sie abkühlen. Sobald
sie ausreichend abgekühlt sind, können
Sie sie wieder an den Elektroden
befestigen und den Ein-/Ausschalter
auf den TENS-Komponenten drücken,
um die Behandlung fortzusetzen. Die
TENS-Komponenten können während
der Behandlung außen warm werden,
die Temperatur wird jedoch nie so
hoch, dass ein Schadens- oder Verletzungsrisiko besteht.
Die Fernbedienung ist zu
weit von den
TENS-Komponenten
entfernt.
Führen Sie die TENS-Komponenten
näher an die Fernbedienung heran.
Die
TENS-Komponenten
können defekt
sein.
Setzen Sie sich mit einem Philips Service-Center in Verbindung.
DEUTSCH 99
Problem
Mögliche
Ursache
Lösung
Auf dem
Display
wird ein
Kreuz angezeigt, und
ich kann die
Intensitätseinstellung nicht
erhöhen,
um eine
Behandlung
zu beginnen
(siehe Kapitel “Signale
auf dem
Gerät”).
Das Kreuz ist
das Symbol
für “Kanal
unterbrochen”. Es kann
bedeuten, dass
die Elektroden
nicht ordnungsgemäß
positioniert
sind.
Vergewissern Sie sich, dass die Elektroden ordnungsgemäß auf der Haut
angebracht sind. Bitte beachten Sie, dass
das “Kanal unterbrochen”-Symbol erst
ausgeblendet wird, wenn die Intensität
erhöht wird.
Das “Kanal
unterbrochen”-Symbol
kann bedeuten, dass die
TENS-Komponenten nicht
ordnungsgemäß an die
Elektroden
angeschlossen
sind.
Prüfen Sie, ob die TENS-Komponenten
richtig an die Elektroden angeschlossen
sind. Gilt nur für das kabellose Gerät
TENS Pro (PR3094): Wenn sich das
“Kanal unterbrochen”-Symbol über der
OLQNHQ,QWHQVLWlWVWDVWHEHÀQGHWVROOWHQ
Sie prüfen, ob die TENS-Komponenten
ordnungsgemäß angeschlossen sind.
Wenn das Kreuz über der rechten
Intensitätstaste angezeigt wird, sollten
Sie prüfen, ob die Stecker des Erweiterungskabels ordnungsgemäß angeschlossen sind. Bitte beachten Sie, dass
das “Kanal unterbrochen”-Symbol erst
ausgeblendet wird, wenn die Intensität
erhöht wird.
100 DEUTSCH
Problem
Das
Akkusymbol in der
Menüleiste
der Fernbedienung
blinkt.
Mögliche
Ursache
Lösung
Die Elektroden haben sich
von der Haut
gelöst.
Die Elektroden haben ihre Haftfähigkeit
verloren, weil sie schmutzig sind oder
weil sie über einen längeren Zeitraum
hinweg verwendet wurden. Sie können
versuchen, die Elektroden zu reinigen
VLHKH.DSLWHO´3ÁHJHµ:HQQGLHV
nicht hilft, müssen Sie die Elektroden
ersetzen. Bitte beachten Sie, dass das
“Kanal unterbrochen”-Symbol erst
ausgeblendet wird, wenn die Intensität
erhöht wird.
Dies bedeutet,
dass die Batterien der Fernbedienung fast
leer sind. Die
Akkustandanzeige auf den
TENS-Komponenten leuchtet dauerhaft
orange.
Sie können die Behandlung so lange
fortsetzen, wie sie sich normal anfühlt.
Nachdem Sie den Ein-/Ausschalter der
TENS-Komponenten gedrückt haben,
um die Behandlung zu beenden, sollten
Sie die Batterien ersetzen.
DEUTSCH 101
Problem
Mögliche
Ursache
Lösung
Die Behandlungsstatusanzeige auf den
TENS-Komponenten
leuchtet
rot, und die
Behandlung
wurde
beendet.
Die
TENS-Komponenten haben
sich im Inneren überhitzt.
Wenn sich die TENS-Komponenten
im Inneren überhitzen, entfernen Sie
sie von den Elektroden und lassen
sie abkühlen. Sobald sie ausreichend
abgekühlt sind, können Sie sie wieder
an den Elektroden befestigen und den
Ein-/Ausschalter auf den TENS-Komponenten drücken, um die Behandlung
fortzusetzen. Die TENS-Komponenten
können während der Behandlung außen warm werden, die Temperatur wird
jedoch nie so hoch, dass ein Schadensoder Verletzungsrisiko besteht.
Es hat sich
unangenehm
angefühlt,
als ich die
Anschlüsse der
TENS-Komponenten
bzw. der
Elektroden
berührt
habe.
Sie haben zum
Beenden der
Behandlung
und zum Abnehmen der
TENS-Komponenten die
Intensität nicht
auf 0 gestellt.
Stellen Sie die Intensität stets auf 0 mA,
bevor Sie die TENS-Komponenten
abnehmen. Auf diese Weise vermeiden
Sie das unangenehme Gefühl, wenn Sie
die Elektroden oder die Anschlüsse der
TENS-Komponenten bzw. des Erweiterungskabels berühren. Dieses Gefühl ist
unangenehm aber nicht schädlich.
102 DEUTSCH
Problem
Mögliche
Ursache
Lösung
Die Stimulation
fühlt sich
anders oder
weniger angenehm an
als üblich.
Die Intensität
ist entweder
zu hoch oder
zu niedrig.
Drücken Sie die Plus- oder Minus-Seite
der Intensitätstaste, um die Intensität zu
erhöhen oder zu verringern.
Die ElektroGHQEHÀQGHQ
sich nicht an
der richtigen
Stelle.
Schalten Sie die TENS-Komponenten
aus, und ziehen Sie sie von den Elektroden ab. Entfernen Sie die Elektroden
von der Haut, und legen Sie sie an einer
etwas anderen Stelle wieder an.
Die Elektroden sind nicht
ordnungsgemäß angelegt.
Schalten Sie die TENS-Komponenten
aus, und ziehen Sie sie von den Elektroden ab. Prüfen Sie, ob die Elektroden
ordnungsgemäß auf der Haut angelegt
sind.
Die Elektroden sind zu
schmutzig.
Sie können versuchen, die Elektroden
]XUHLQLJHQVLHKH.DSLWHO´3ÁHJHµ
Wenn dies nicht hilft, müssen Sie die
Elektroden ersetzen.
Die Elektroden sind
abgenutzt.
Ersetzen Sie die Elektroden.
DEUTSCH 103
Signale auf dem Gerät
Akkustandanzeigen auf der Fernbedienung
1 Um den Ladestand der Batterien in der
Fernbedienung oder des Akkus in den TENS.RPSRQHQWHQ]XEHUSUIHQPDUNLHUHQ
Sie mit dem Nach-links- oder Nach-rechts3IHLOGDV$NNXV\PEROLQGHU0HQOHLVWH
Der Akkubildschirm wird geöffnet, und
der Ladestand des Akkus in den TENSKomponenten wird links und der Ladestand
der Batterien in der Fernbedienung wird
rechts angezeigt. Das Akkusymbol kann vier
Ladestände anzeigen:Voll, Zwei-Drittel-voll,
Ein-Drittel-voll und Leer.
2 Wenn der Akku in den TENS-Komponenten
leer ist, wird die Verbindung unterbrochen, und
das “Keine Verbindung”-Symbol wird auf der
linken Seite angezeigt.
Fehlersignale auf der Fernbedienung
Akku fast leer
- Das Akkusymbol unten im Display der
Fernbedienung blinkt, wenn die Batterien
der Fernbedienung fast leer sind. Wenn die
Batterien vollständig leer sind, schaltet sich die
Fernbedienung aus.
- Das Akkusymbol unten im Display der
Fernbedienung blinkt auch, wenn der Ladestand
des Akkus in den TENS-Komponenten niedrig ist.
Ist dies der Fall, leuchtet die Akkustandanzeige auf
den TENS-Komponenten dauerhaft orange.
104 DEUTSCH
Hinweis: Das Akkusymbol blinkt, wenn in den Batterien
der Fernbedienung oder dem Akku der TENSKomponenten weniger als 30 % Kapazität verbleibt.
Keine Verbindung mit den TENSKomponenten
- Das auf dem Bildschirm angezeigte “Keine
Verbindung”-Symbol gibt an, dass zwischen der
Fernbedienung und den TENS-Komponenten
keine Verbindung besteht. Dies kann mehrere
Ursachen haben:
1 Der Akku der TENS-Komponenten ist leer.
2 Die TENS-Komponenten sind ausgeschaltet.
3 Die Fernbedienung ist zu weit von den TENSKomponenten entfernt.
4 Wenn keiner der oben genannten Punkte zutrifft,
sind die TENS-Komponenten defekt.
Kanal unterbrochen
- Das auf dem Bildschirm angezeigte “Kanal
unterbrochen”-Symbol (das Kreuz) gibt an, dass
der entsprechende Kanal unterbrochen wurde.
- Wenn ein Kanal unterbrochen wurde, kann dies
folgende Ursachen haben:
1 Es gibt keinen Kontakt zwischen den TENSKomponenten und den Elektroden.
2 Die Elektroden sind nicht ordnungsgemäß auf
der Haut angelegt.
- Wenn Sie sich vergewissert haben, dass die
Elektroden korrekt auf der Haut angelegt sind
und die TENS-Komponenten richtig mit den
Elektroden verbunden sind, drücken Sie die PlusSeite der Intensitätstaste, um zu prüfen, ob der
Kanal ordnungsgemäß verbunden ist. Wenn dies
der Fall ist, wird das Kreuz ausgeblendet und der
Intensitätswert eingeblendet.
DEUTSCH 105
Anzeigesignale auf den TENS-Komponenten
Akkustandanzeige
- Die Akkustandanzeige auf den TENSKomponenten blinkt:
1 Die Akkustandanzeige blinkt in kurzen Abständen
orange, wenn der Akku leer ist. Die TENSKomponenten schalten sich anschließend aus.
2 Die Akkustandanzeige blinkt grün, wenn die
TENS-Komponenten aufgeladen werden.
- Die Akkustandanzeige leuchtet dauerhaft:
1 Die Akkustandanzeige leuchtet dauerhaft orange,
wenn der Ladestand des Akkus in den TENSKomponenten niedrig ist. Im Akku verbleiben
nur noch 30 % Kapazität. Die Akkustandanzeige
leuchtet auch dauerhaft orange, wenn die
Batterien der Fernbedienung fast leer sind.
2 Die Akkustandanzeige leuchtet dauerhaft grün,
wenn der Akku vollständig aufgeladen ist.
Behandlungsstatusanzeige
- Die Behandlungsstatusanzeige auf den TENSKomponenten blinkt:
1 Die Behandlungsstatusanzeige blinkt grün, wenn
die TENS-Komponenten eingeschaltet und im
Standby-Modus sind.
2 Die Behandlungsstatusanzeige blinkt gelb, wenn
derzeit eine Behandlung durchgeführt wird.
3 Die Behandlungsstatusanzeige blinkt rot, wenn
die TENS-Komponenten überhitzt sind. Ist
dies der Fall, wird die Behandlung automatisch
beendet, und das “Keine Verbindung”-Symbol
wird auf dem Display angezeigt. Nehmen Sie
die TENS-Komponenten von den Elektroden
ab, und lassen Sie sie abkühlen. Sobald sie
ausreichend abgekühlt sind, können Sie sie
wieder anbringen und die Behandlung fortsetzen.
106 DEUTSCH
Hinweis: Es ist normal, dass die TENS-Komponenten
während der Behandlung warm werden.Während des
normalen Betriebs werden sie nicht so heiß, dass ein
Schadens- oder Verletzungsrisiko besteht.
Hinweis:Wenn Sie das Gerät mehrere Stunden mit der
höchsten Einstellung verwenden, können sich die TENSKomponenten überhitzen. In diesem Fall schalten sie
sich aus Sicherheitsgründen aus.
Ersatz
Elektroden
Ersetzen Sie die Elektroden in folgenden Fällen:
- Sie sind beschädigt oder haben Risse.
- Sie haben das Haltbarkeitsdatum überschritten,
das auf der wiederverschließbaren Tasche
angegeben ist.
- Sie haben ihre Haftfähigkeit verloren. Verwenden
6LHNHLQ3ÁDVWHURGHU.OHEHEDQGXPVLHDXIGHU
Haut zu befestigen.
- Die Stimulation fühlt sich weniger stark an.
- Wenn die Stimulation unangenehm ist, d. h. wenn
6LHHLQXQDQJHQHKPHV6WHFKHQHPSÀQGHQRGHU
ein beißendes Gefühl auftritt.
Hinweis: Ersetzen Sie die Elektroden immer mit
Elektroden, die für dieses Gerät vom Hersteller
empfohlen werden. Neue Elektroden können unter
www.philips.com/tens-electrodes bestellt
werden.
Batterien in der Fernbedienung
Ersetzen Sie die Batterien in der Fernbedienung,
wenn das Akkusymbol auf dem Display blinkt.
Ersetzen Sie sie stets mit zwei AAA 1,5-VoltAlkalibatterien (siehe “Fernbedienung vorbereiten” in
Kapitel “Für den Gebrauch vorbereiten”).
DEUTSCH 107
Zubehör bestellen
Um Zubehör oder Ersatzteile zu kaufen, gehen Sie
auf www.shop.philips.com/service oder zu
Ihrem Philips Händler. Sie können auch ein Philips
Service-Center in Ihrem Land kontaktieren.
Elektroden
Sie können neue Elektroden unter
www.philips.com/tens-electrodes bestellen.
Achtung:Verwenden Sie dieses Gerät mit dem
Ladegerät, den Kabeln, den Elektroden und den
Zubehörteilen, die vom Hersteller empfohlen
werden.
Garantie und Support
Ihr kabelloses TENS-Gerät wurde mit der
größtmöglichen Sorgfalt entwickelt, um eine
voraussichtliche Nutzungsdauer von 5 Jahren zu
garantieren.
Wenn Sie weitere Informationen benötigen oder
Probleme auftreten, besuchen Sie bitte unsere
Website unter www.philips.com/support. Sie
können auch ein Philips Service-Center in Ihrem
Land kontaktieren. Die Telefonnummer lautet:
- Deutschland: 0800 0007522 (kostenlos für Anrufe
innerhalb Deutschlands)
- Österreich: 0800 880932 (kostenlos für
Festnetzanrufe innerhalb Österreichs; Kosten für
Anrufe aus dem Mobilfunknetz abhängig vom
Anbieter)
- Schweiz: 0800 002050 (kostenlos für
Festnetzanrufe innerhalb der Schweiz),
0848 000292 (Kosten für Anrufe aus dem
Mobilfunknetz abhängig vom Anbieter)
108 DEUTSCH
- Großbritannien: 0844 338 04 89 (5 p/Min. aus
dem BT-Festnetz, Kosten anderer Festnetz- und
Mobilfunkbetreiber sind möglicherweise höher)
Garantieeinschränkungen
Die Elektroden werden nicht von den
Garantiebedingungen abgedeckt, weil sie der
Abnutzung unterliegen und regelmäßig ersetzt
werden müssen.
2IÀ]LHOOH$QVFKULIWGHV+HUVWHOOHUV
Philips Consumer Lifestyle B.V.
Tussendiepen 4 9206 AD Drachten
Niederlande
Recycling
- %HÀQGHWVLFKGLHVHV6\PEROGXUFKJHVWULFKHQH
Abfalltonne auf Rädern) auf einem Gerät, gilt
für dieses Gerät die Europäische Richtlinie
2012/19/EU. Bitte informieren Sie sich über
die örtlichen Bestimmungen zur getrennten
Entsorgung von elektrischen und elektronischen
Produkten. Entsorgen Sie Ihr Gerät niemals über
den normalen Hausmüll. Durch die korrekte
Entsorgung Ihrer Altgeräte werden Umwelt
und Menschen vor möglichen negativen Folgen
geschützt.
- Dieses Symbol zeigt an, dass in den Batterien
Stoffe enthalten sind, die für die Gesundheit
und die Umwelt schädlich sein können.
Entsorgen Sie die Batterien niemals über den
normalen Hausmüll. Befolgen Sie die örtlichen
Bestimmungen zur getrennten Entsorgung von
Batterien. Durch die korrekte Entsorgung von
Batterien werden Umwelt und Menschen vor
möglichen negativen Folgen geschützt.
DEUTSCH 109
- Die TENS-Komponenten enthalten einen integrierten
Akku, der vom Verbraucher nicht herausgenommen
werden kann. Bringen Sie die Komponenten zu einer
RIÀ]LHOOHQ6DPPHOVWHOOHRGHUHLQ6HUYLFH&HQWHUXP
den Akku herausnehmen zu lassen.
- Alle Kunststoffelemente sind mit RecyclingSymbolen markiert.
Technische Daten
Modell
PR3094, PR3093
Nennspannung (V) – Adapter
100-240 ~ 150 mA
Nennfrequenz (Hz) – Adapter
50 - 60
Nennausgabe – Adapter
5 V, 500 mA
Klasse
Medizinische Geräteklasse: IIa
Eintreten von Wasser – Gerät außer
Ladegerät
IP22
Eintreten von Wasser – Ladegerät
IP21
Akkutyp – TENS-Komponenten
Li-Ion
Batterietyp – Fernbedienung
2 AAA 1,5-V-Alkalibatterien
Parameter zur Impulsausgabe
Frequenzbereich
1-120 Hz
Impulsbreite
40-400 µS
Stromabgabe
Max. 60 mA bei 500-1000 Ohm
Maximale Ausgangsspannung
120 V
Impulsform
Zweiphasenanpassung – symmetrisch
(Nettostrom 0 DC)
110 DEUTSCH
Betrieb
Temperatur
Von 5 °C bis 40 °C
Relative Luftfeuchtigkeit
Von 15 % bis 93 % (nicht
kondensierend)
Atmosphärischer Druck
Von 700 hPa bis 1060 hPa
Aufbewahrungs- und
Transportbedingungen
Temperatur – Elektroden
Von 0 °C bis 40 °C
Temperatur – Gerät
Von -10 °C bis 50 °C
Relative Luftfeuchtigkeit
Weniger als 93 % (nicht
kondensierend)
Atmosphärischer Druck
Von 700 hPa bis 1060 hPa
Hinweis:Wenn Sie die Elektroden mehr als einen
Monat nicht verwenden, sollten sie bei einer Temperatur
zwischen 5 °C und 27 ° C aufbewahrt werden.
Hinweis: Bewahren Sie die Elektroden nicht im Gefrieroder Kühlschrank auf.Vermeiden Sie extreme Hitze,
tauchen Sie sie nicht in Wasser, und bewahren Sie sie
immer in der Kunststofftasche auf.
DEUTSCH 111
Erklärung der Symbole
Symbole auf dem Gerät
- Dies ist das Symbol für die Referenznummer.
Auf dieses Symbol folgt die Referenznummer des
Herstellers, wobei es sich um die Typennummer
des Geräts handelt. Die Typenschilder auf der
Fernbedienung und den TENS-Komponenten
weisen die gleiche Typennummer auf. Auf dem
Typenschild der Fernbedienung folgen nach der
Typennummer die Buchstaben “RC”. Auf dem
Typenschild der TENS-Komponenten folgen nach
der Typennummer die Buchstaben “TU”.
- Dies ist das Symbol für die Seriennummer. Auf
dieses Symbol folgt die Seriennummer des
Herstellers.
- Dieses Symbol bedeutet: Wechselstrom.
- Dieses Symbol bedeutet: Gleichstrom.
112 DEUTSCH
- Dieses Symbol auf der Fernbedienung, den
TENS-Komponenten und dem Erweiterungskabel
bedeutet, falls vorhanden: Geschützt gegen den
Zugang zu gefährlichen Teilen mit einem Finger
und gegen vertikal auftreffende Wassertropfen bei
einer Neigung bis 15 Grad.
- Dieses Symbol auf dem Ladegerät bedeutet:
Geschützt gegen den Zugang zu gefährlichen
Teilen mit einem Finger und gegen vertikal
auftreffende Wassertropfen.
- Dieses Symbol bedeutet, dass das Gerät eine
nicht-ionisierende Strahlung abgibt. Alle Geräte
und Systeme, die mit Hochfrequenz-Sendern
ausgestattet sind oder absichtlich hochfrequente
elektromagnetische Energie anwenden, müssen
mit diesem Symbol beschriftet sein.
- Dieses Symbol bedeutet: Anwendungsteil (d. h.
Elektrode) des Typs BF (Body Floating) entspricht
IEC 60601-1.
- Dieses Symbol bedeutet: “Hergestellt von” und
ist neben der Adresse des verantwortlichen
Herstellers angegeben.
DEUTSCH 113
- Dieses Symbol bedeutet: Achtung, TENS-Ausgang.
Es ist an allen Elektrodenanschlüssen angebracht.
- Dieses Symbol bedeutet: Entspricht den ECRichtlinien. CE steht für “Conformité Européenne”;
0344 ist die Nummer der gemeldeten Stelle.
- Dieses Symbol bedeutet: Nicht mit dem normalen
Hausmüll entsorgen. Weitere Anweisungen
erhalten Sie in Kapitel “Recycling”.
- Dieses Symbol bedeutet, dass der Adapter
zweifach isoliert ist (Klasse II).
- Dieses Symbol bedeutet, dass der Adapter nur im
Haus verwendet werden darf.
114 DEUTSCH
- Dieses Symbol bedeutet: Lesen Sie vor dem
Gebrauch des Geräts die Bedienungsanleitung
durch.
- Dieses Symbol bedeutet: Vor Nässe schützen.
- Dieses Symbol ist die Markierung für den Ein-/
Ausschalter.
- 'LHVLVWGDV7(16,PSXOVV\PERO(VEHÀQGHWVLFK
neben der Behandlungsstatusanzeige.
- 'LHVLVWGDV$NNXV\PERO(VEHÀQGHWVLFKQHEHQ
der Akkustandanzeige.
DEUTSCH 115
- 'LHVH8/.ODVVLÀ]LHUXQJ]HLJWDQGDVVGDV*HUlW
sowohl den kanadischen als auch den US-amerikanischen Bedingungen entspricht. MEDIZINISCH
ANGEWANDTES STROM-/ENERGIEGERÄT
BEZÜGLICH RISIKO VON ELEKTROSCHOCKS,
FEUER UND MECHANISCHER GEFAHREN NUR
GEMÄSS ANSI/AAMI ES60601-1 (2005, C1:09,
A2:10), IEC 60601-1 (2005), DOSE/CSA C22.2 Nr.
60601.1 (2008, R:2011), IEC 60601-2-10 (2012),
DOSE/CSA C22.2 Nr. 60601-1-11 (2010)
Symbole auf der Elektrodentasche
- Dieses Symbol bedeutet: Nicht verwenden
während Sie ein Fahrzeug führen, eine Maschine
bedienen oder eine andere Aktivität ausführen, bei
der ein Verletzungsrisiko besteht.
- Dieses Symbol bedeutet: Verwenden Sie keine
beschädigten oder abgenutzten Elektroden oder
Elektroden, die nicht mehr haften.
- Dieses Symbol zeigt an, dass die Elektroden von
einer einzigen Person und nicht mit anderen
gemeinsam genutzt werden sollten.
- Dieses Symbol bedeutet: Positionieren Sie die
Elektroden nicht übereinander bzw. so nahe
aneinander, dass sie sich berühren.
116 DEUTSCH
- Dieses Symbol bedeutet: Positionieren Sie die
Elektroden nicht im Gesicht oder am Hals.
- Dieses Symbol bedeutet: Positionieren Sie die
Elektroden nicht auf Ihrer Brust.
- Dieses Symbol bedeutet: Legen Sie die Elektroden
nicht auf offene Wunden, Krebsläsionen,
$XVVFKOlJHXQGLQÀ]LHUWHRGHUHQW]QGHWH+DXW
- Dieses Symbol gibt die minimale und maximale
Aufbewahrungstemperatur für die Elektroden an,
wenn sie mehr als einen Monat nicht verwendet
werden.
- Dies ist das Haltbarkeitssymbol. Es zeigt an,
nach welchem Tag die Elektroden nicht mehr
verwendet werden dürfen.
DEUTSCH 117
Elektromagnetische Emissionen und
Immunität
Elektromagnetische Kompatibilität (EMC)
Das kabellose TENS-Gerät (PR3093) und das
kabellose Gerät TENS Pro (PR3094) erfüllen die
EMC-Sicherheitsnorm EN 60601-1-2. Die Geräte
wurden zur Verwendung in typisch privater oder
klinischer Umgebung entwickelt.
Anleitung zur
Elektrodenpositionierung (Abb. 101)
118 ITALIANO
Introduzione
Congratulazioni per l’acquisto e benvenuti in Philips!
Per trarre il massimo vantaggio dall’assistenza Philips,
registrate il vostro prodotto su www.philips.com/
pain-management/register.
Prima di utilizzare l’apparecchio Wireless TENS
(PR3093) o Wireless TENS Pro (PR3094), leggete
attentamente il presente manuale utente e
conservatelo per eventuali riferimenti futuri. Wireless
TENS (PR3093) e Wireless TENS Pro (PR3094)
sono disponibili senza prescrizione. Per ottenere
un trattamento ottimale con il vostro dispositivo
Wireless TENS, è necessario utilizzarlo seguendo le
istruzioni contenute in questo manuale dell’utente.
Per ulteriori informazioni o in caso di domande,
visitate il sito www.philips.com/
pain-management o contattate il Centro
Assistenza Clienti Philips del vostro paese.
Uso previsto
Wireless TENS (PR3093) e Wireless TENS Pro
(PR3094) sono destinati all’uso da parte di adulti per
alleviare dolore cronico muscolo-scheletrico da lieve
a moderato. I dispositivi sono destinati all’uso per la
stimolazione elettrica transcutanea dei nervi (TENS)
allo scopo di alleviare il dolore e per monitorare
l’attività con il monitor integrato dell’attività.
Il dispositivo Wireless TENS può essere portato
alle sedute con medici professionisti che sono
responsabili per l’uso del dispositivo TENS come da
manuale dell’utente e che sono in grado di:
- analizzare l’attività del paziente e le modalità di
trattamento
- determinare il trattamento individuale e adattare
le impostazioni del dispositivo TENS mediante
l’applicazione per PC Wireless TENS Pro (solo
PR3094)
ITALIANO 119
L’applicazione per PC Wireless TENS Pro è destinata
all’uso esclusivo da parte di medici professionisti in
combinazione con il dispositivo Wireless TENS Pro
(PR3094) e consente al medico di offrire trattamenti
7(16SLVSHFLÀFLGLWHQHUHWUDFFLDGHOO·DWWLYLWjGHO
paziente e di analizzare le modalità di trattamento in
relazione all’uso del dispositivo.
Il dispositivo è destinato all’uso esclusivo da parte
di una sola persona adulta. Deve essere sempre
utilizzato in conformità alle informazioni di sicurezza
e alle istruzioni di funzionamento incluse nel
presente manuale e per lo scopo per la quale è stata
creato.
TENS e gestione del dolore
La stimolazione elettrica transcutanea dei nervi
(TENS) è una metodologia non invasiva per alleviare
LOGRORUHODFXLHIÀFDFLDqGLPRVWUDWDGDWHVWFOLQLFL
La TENS viene utilizzata quotidianamente dai
ÀVLRWHUDSLVWLHGDDOWULPHGLFLSURIHVVLRQLVWL'XUDQWH
il trattamento con TENS, vengono inviati impulsi
elettrici attraverso la pelle sana per attivare i nervi
VRWWRVWDQWL/HSURYHVFLHQWLÀFKHLQGLFDQRFKHOD
TENS allevia il dolore in modo simile ai meccanismi
di riduzione del dolore applicati dallo stesso sistema
nervoso, simile ad esempio al massaggio di una zona
dolente.
Gli impulsi sono generati dalle unità TENS alimentate
a batteria, che devono essere collegate ad elettrodi
in idrogel autoadesivi. Potete scegliere tra una
VHULHGLSURJUDPPL7(16SUHGHÀQLWLFRQYDULH
impostazioni di impulsi e potete regolare l’intensità
degli impulsi in base alle vostre preferenze. Questo
libretto contiene informazioni sul posizionamento
degli elettrodi e sui programmi utilizzati per il
trattamento.
120 ITALIANO
Monitoraggio dell’attività e gestione del
dolore
Tutti quanti vogliamo svolgere al meglio le nostre
attività quotidiane. Tuttavia, quando si prova dolore,
istintivamente si cerca di alleviarlo riducendo il livello
di attività. Di conseguenza, ci si sente meno in forma
e si apprezzano meno anche le attività preferite.
Rimanere attivi senza esagerare è importante per
evitare di rimanere intrappolati in un ciclo continuo
di dolore. Per gestire il dolore è essenziale saper
dosare il movimento, distribuendo i periodi di attività
e i periodi di riposo durante il giorno nel modo
per voi più confortevole. A tale scopo è essenziale
distribuire l’attività nel corso di tutta la giornata e
di sapersi fermare prima di avvertirne il bisogno.
Un monitor dell’attività può aiutarvi a capire se
state distribuendo le vostre attività nel modo giusto
durante la giornata. Il telecomando del dispositivo
Wireless TENS ha un monitor dell’attività integrato
che tiene traccia della vostra attività quando lo
indossate in vita o lo portate in tasca. Può registrare
HVDOYDUHLGDWLGHOO·DWWLYLWjGLJLRUQLSHUYHULÀFDUH
sia la vostra attività delle ultime 24 ore che della
settimana o del mese precedente. Se desiderate
ulteriori consigli su come distribuire l’attività nel
corso della giornata e su come auto-gestire il dolore,
consultate l’opuscolo Pain Toolkit incluso nella
confezione.*
* Nota:la confezione include solo la versione in tedesco
dell’opuscolo Pain Toolkit. Se desiderate la versione in
inglese, francese o italiano, visitate il sito
www.philips.com/pain-management per
scaricare la versione desiderata.
ITALIANO 121
Informazioni per i professionisti (solo
PR3094)
Il dispositivo Wireless TENS Pro (PR3094) può
essere usato in combinazione con l’applicazione per
PC Wireless TENS Pro, destinata all’uso da parte
GLSURIHVVLRQLVWLFRQIRUPD]LRQHVSHFLÀFDFKHVRQR
responsabili per l’uso del dispositivo TENS come da
manuale dell’utente e che sono in grado di:
- analizzare l’attività del paziente in relazione al
trattamento utilizzando un’applicazione esterna
per computer
- determinare il trattamento individuale e adattare
le impostazioni del dispositivo TENS mediante
un’applicazione esterna per computer
L’applicazione per PC Wireless TENS Pro consente
ai professionisti di offrire ai loro pazienti programmi
GLWUDWWDPHQWR7(16SLVSHFLÀFLHGLWHQHUHWUDFFLD
e analizzare su un computer l’andamento dell’attività
del paziente in relazione all’uso del dispositivo e al
dolore provato.
L’applicazione per PC Wireless TENS Pro non è
inclusa nella confezione, ma può essere scaricata su
richiesta. Visitate il sito www.philips.com/
tens-download e digitate i vostri dati di contatto.
Riceverete un collegamento che vi consentirà di
scaricare l’applicazione per PC Wireless TENS
Pro. Tramite questo collegamento potrete inoltre
accedere o scaricare il manuale dell’utente di questa
applicazione per computer.
Cavo USB
L’applicazione per PC Wireless TENS Pro funziona
quando il telecomando è collegato al computer
mediante cavo mini USB. Potete reperire un cavo
mini USB in due modi:
122 ITALIANO
1
potete lasciare i vostri dati di contatto sul sito
www.philips.com/tens-download e indicare
che desiderate riceve un cavo mini USB. Una
volta ricevuti i vostri dati, vi invieremo un cavo
mini USB per posta.
2 Se avete ricevuto un kit di prova dai nostri
venditori, il kit dovrebbe contenere un cavo mini
USB.
Per altre domande relative alla disponibilità
dell’applicazione per PC Wireless TENS Pro o al
cavo mini USB, vi preghiamo di contattare il centro
assistenza clienti Philips del vostro paese.
Importante
Controindicazioni
Non usate il dispositivo se:
- siete portatori di stimolatore cardiaco,
GHÀEULOODWRUHRDOWURGLVSRVLWLYRPHWDOOLFRR
elettronico sottocutaneo (ad esempio un
dispositivo di somministrazione di farmaci), poiché
l’uso in questi casi potrebbe provocare scosse
elettriche, bruciature, interferenza elettrica o
SHUÀQRODPRUWH
- soffrite di problemi cardiaci.
- soffrite di epilessia.
- VLHWHLQFLQWHSRLFKpQRQqDQFRUDVWDWDYHULÀFDWD
la sicurezza della stimolazione elettrica durante la
gravidanza.
- VRIIULWHGLGHÀFLWFRJQLWLYR
ITALIANO 123
Effetti collaterali
Interrompete l’utilizzo del dispositivo e consultate il
vostro medico in caso di effetti collaterali provocati
dal dispositivo.
I possibili effetti collaterali possono includere:
- irritazione della pelle sotto gli elettrodi, sebbene
il gel usato sugli elettrodi in genere non causi
reazioni allergiche
- ustioni sotto gli elettrodi
- mal di testa o altre sensazioni dolorose
- nausea o debolezza
Informazioni di sicurezza importanti
Avviso
- Questo è un dispositivo medico. Tenere fuori dalla
portata dei bambini.
- Leggete attentamente questo manuale dell’utente
e seguite sempre le istruzioni per il trattamento.
- L’apparecchio non è destinato a persone adulte
con capacità mentali o sensoriali ridotte.
- Non usate il dispositivo sui bambini.
- Non usate il dispositivo se il dolore non può
HVVHUHGHÀQLWRLQPRGRFKLDURFRPHGRORUH
muscolo-scheletrico da lieve a moderato. Se non
siete certi della causa del dolore, consultate il
vostro medico.
- Se siete seguiti da un medico, consultatelo prima
di utilizzare il dispositivo.
- Non applicate la stimolazione sul collo, poiché questo
potrebbe causare forti spasmi muscolari in grado di
FKLXGHUHOHYLHUHVSLUDWRULHHJHQHUDUHGLIÀFROWjGL
respirazione. Inoltre potrebbe avere effetti negativi sul
ritmo cardiaco o sulla pressione sanguigna.
124 ITALIANO
- Non applicate la stimolazione sul torace, poiché la
corrente elettrica potrebbe causare alterazioni del
ritmo cardiaco che potrebbero rivelarsi letali.
- Poiché gli effetti della stimolazione sul cervello non
sono noti, gli elettrodi non devono essere applicati
sulla sommità né sui lati della testa.
- Prestate attenzione nel caso in cui abbiate la
tendenza ad emorragie interne dovute a incidenti
o traumi.
- Consultate il medico se avete subito di recente
un intervento chirurgico, poiché la stimolazione
potrebbe avere effetti negativi sul processo di
guarigione.
- Non applicate la stimolazione sopra o vicino a
lesioni cancerose.
- Non applicate la stimolazione su ferite aperte
RLUULWD]LRQLVXDUHHJRQÀHDUURVVDWHLQIHWWHR
LQÀDPPDWHRVXHUX]LRQLFXWDQHHDGHVHPSLR
ÁHELWLWURPERÁHELWLRYHQHYDULFRVH
- Non applicate la stimolazione su aree della pelle
prive della normale sensibilità.
- Applicate la stimolazione solo su pelle normale,
intatta, pulita e sana.
- L’uso della stimolazione elettrica e degli elettrodi
conduttivi può causare irritazione cutanea o
sensibilizzazione della pelle.
- Non applicate la stimolazione quando siete alla
guida, quando usate macchine o quando svolgete
un’attività nella quale la stimolazione elettrica può
mettervi in pericolo.
- Non applicate la stimolazione quando dormite.
Se il dispositivo viene usato prima di dormire,
impostate il timer in modo che si spenga
automaticamente.
- Non usate il dispositivo e gli elettrodi
internamente.
ITALIANO 125
- Non applicate la stimolazione vicino ad
apparecchiature di monitoraggio elettroniche (ad
esempio monitor cardiaci, allarmi ECG), poiché
queste apparecchiature potrebbero non funzionare
correttamente quando il dispositivo è in uso.
- Non applicate la stimolazione nel bagno, nella
doccia o in piscina.
- Non utilizzate cerotti o nastro adesivo per
applicare gli elettrodi sulla pelle.
- Prima dell’uso, controllate sempre che il
dispositivo e gli elettrodi non siano danneggiati.
- Non usate il dispositivo o un elettrodo se è
danneggiato.
- 1RQPRGLÀFDWHLOGLVSRVLWLYRRJOLHOHWWURGL
Attenzione
- Usate questo dispositivo solo con il caricabatterie,
i cavi, gli elettrodi e gli accessori consigliati dal
produttore.
- Il dispositivo non è impermeabile. Non usate il
dispositivo in ambienti umidi e non bagnatelo.
- Il dispositivo può essere usato al chiuso e
all’aperto, ma non è stato progettato per resistere
a tutte le condizioni climatiche.
- Il dispositivo non è adatto alle temperature
WURSSRDOWHHWURSSREDVVH9HULÀFDWHOHFRQGL]LRQL
RSHUDWLYHQHOFDSLWROR´6SHFLÀFKHµ
- La porta di connessione USB può essere usata
solo da un medico insieme all’applicazione per PC
Wireless TENS Pro (PR3094) fornita da Philips.
- Gli elettrodi hanno una durata limitata. Prima
di utilizzarli, controllate la data di scadenza
sull’imballaggio. Non usate elettrodi che siano
già scaduti. Per ordinare gli elettrodi di ricambio,
consultare il capitolo “Ordinazione degli accessori”.
- Assicuratevi di concludere il trattamento e di
spegnere l’unità TENS oppure di impostare il
126 ITALIANO
telecomando su 0 mA prima di rimuovere l’unità
TENS, la prolunga (se utilizzata, solo PR3094) o
gli elettrodi. Se non concludete il trattamento
potreste provare una sensazione sgradevole nelle
dita. Non si tratta di una sensazione dannosa, ma
può essere sgradevole.
- Usate e riponete sempre gli elettrodi seguendo
le istruzioni contenute nei capitoli “Utilizzo del
dispositivo” e “Dopo l’uso”.
- Se il dispositivo non funziona come descritto
in questo manuale, interrompetene l’utilizzo e
contattate il Centro assistenza clienti. Per i dettagli
di contatto, consultare il capitolo “Garanzia e
assistenza”.
Conformità agli standard
- Il dispositivo soddisfa gli standard relativi a questo
tipo di apparecchi elettro-medicali di Classe IIa
che utilizzano la stimolazione elettrica per l’uso
casalingo.
- Questo apparecchio Philips è conforme a tutti
gli standard e alle norme relativi all’esposizione ai
campi elettromagnetici.
3URJUDPPLSUHGHÀQLWL
Panoramica dei programmi
,OGLVSRVLWLYRqGRWDWRGLSURJUDPPLSUHGHÀQLWL
35RSURJUDPPLSUHGHÀQLWL35
standard. Esistono tre diversi tipi di TENS: TENS
convenzionale, TENS burst e TENS a modulazione
di frequenza. Per ulteriori informazioni, vedere di
seguito.
ITALIANO 127
Programmi TENS convenzionali
La TENS convenzionale è un normale programma
TENS con stimolazione ad alta frequenza. Si basa
sulla teoria del cancello (Gate Control Theory),
secondo cui questo tipo di stimolazione porta al
blocco della trasmissione dei segnali dolorosi nel
sistema nervoso. È simile all’azione del massaggio
per alleviare il dolore. Nella maggioranza dei casi la
TENS convenzionale viene utilizzata per sessioni di
30 minuti, ma potete usarla per il tempo e il numero
GLVHVVLRQLFKHULWHQHWHYLRIIUDQRPDJJLRUEHQHÀFLR
L’effetto in genere è maggiormente percepibile
durante la stimolazione. L’effetto svanisce piuttosto
rapidamente una volta terminato il trattamento. Vi
consigliamo di regolare l’intensità del programma in
modo da percepire chiaramente la stimolazione. In
ogni caso, la stimolazione non deve generare una
sensazione sgradevole o dolorosa.
Nome del
programma
TENS convenzionale
N. del
programma sul
telecomando
PR3093
N. del
programma sul
telecomando
PR3094
Descrizione del
programma
Durata
consigliata
del
trattamento
Conventional
(Convenzionale)
1
1
Può causare una sti- Nesmolazione continua sun
limite
con sensazione di
formicolio
Thorough
stimulus
(Stimolazione
completa)
2
2
Causa una sensazio- Nesne di stimolazione
sun
più profonda
limite
128 ITALIANO
Nome del
programma
TENS convenzionale
N. del
programma sul
telecomando
PR3093
N. del
programma sul
telecomando
PR3094
Descrizione del
programma
Durata
consigliata
del
trattamento
Pre-activity
(Attività preparatoria)
3
3
Produce una stimo- Neslazione più localizza- sun
ta e lieve
limite
Soft stimulus
(Stimolazione
lieve)
-
4
Produce una stimolazione più lieve,
ad esempio per le
parti sensibili del
corpo
Nessun
limite
Deep stimulus
(Stimolazione
profonda)
-
5
Produce una
stimolazione più
profonda
Nessun
limite
Radiating
pulse (Impulso
che si irradia)
6
Produce una stimo- Neslazione che si irradia sun
maggiormente
limite
Programmi TENS burst
La TENS burst offre una stimolazione ad alta
frequenza con una serie di impulsi. È risaputo che
questo tipo di stimolazione provoca il rilascio di
HQGRUÀQDXQDVRVWDQ]DSURGRWWDGDOFRUSRSHU
sopprimere il dolore. Potete usare la TENS burst
per circa 30 minuti più volte al giorno, ad esempio
3 volte. Vi consigliamo di regolare l’intensità del
programma Burst in modo da percepire con
intensità la stimolazione. I programmi burst in
genere provocano una sensazione più forte, che
ITALIANO 129
può essere leggermente sgradevole. Vi consigliamo
inoltre di regolare l’intensità a un livello che produca
contrazioni visibili del muscolo nell’area in cui viene
applicata la stimolazione. Queste contrazioni non
sono dannose, ma se per voi sono troppo fastidiose
potete diminuire l’intensità, scegliere un programma
diverso o spostare gli elettrodi in una posizione
diversa. I programmi TENS burst dovrebbero essere
applicati possibilmente a riposo, poiché possono
generare una contrazione del muscolo nell’area in
cui è applicata la stimolazione.
Nome del
programma
TENS burst
N. del
programma
sul
telecomando
PR3093
Descrizione del proN. del
program- gramma
ma sul
telecomando
PR3094
Durata
consigliata del
trattamento
Continuous Burst
(Stimolazione burst
continua)
4
7
Produce una stimolazione burst pulsata per
favorire il rilascio di
HQGRUÀQHQHOFRUSR
30
minuti*
Slow
kneading
(Impasto
lento)
5
8
Produce una stimolazio- 30
ne burst più lenta e mas- minuti*
saggiante per favorire il
ULODVFLRGLHQGRUÀQH
Mild
kneading
(Impasto
lieve)
6
9
Produce una stimolazione burst più lieve
per favorire il rilascio di
HQGRUÀQHQHOFRUSR
30
minuti*
130 ITALIANO
Nome del
programma
TENS burst
N. del
programma
sul
telecomando
PR3093
Descrizione del proN. del
program- gramma
ma sul
telecomando
PR3094
Durata
consigliata del
trattamento
Deep
kneading
(Impasto
profondo)
-
10
Produce una stimolazione burst più localizzata e
profonda per favorire il
ULODVFLRGLHQGRUÀQHQHO
corpo
30
minuti*
Diffuse
Burst
(Stimolazione burst
diffusa)
-
11
Produce una stimolazione burst più diffusa
per favorire il rilascio di
HQGRUÀQHQHOFRUSR
30
minuti*
* facoltativamente varie volte al giorno
Programmi TENS a modulazione di
frequenza
La TENS a modulazione di frequenza è un
programma in cui la frequenza degli impulsi sale e
scende. In alcuni casi questo programma può essere
SLFRQIRUWHYROHRHIÀFDFHGHJOLDOWULSURJUDPPL
Potete usare la TENS a modulazione di frequenza
per circa 30 minuti varie volte al giorno, ad esempio
3 volte.
ITALIANO 131
Nome del programma a mod.
di freq.
N. del
programma
sul
telecomando
PR3093
N. del
programma
sul
telecomando
PR3094
Descrizione del
programma
Durata
consigliata
del
trattamento
Mixed frequency (Frequenza
mista)
7
12
Produce una sensa30 mizione di stimolazione nuti*
ÁXLGD
Pulsing massage
(Massaggio
pulsato)
8
13
Produce una stimola- 30 mizione più pulsata
nuti*
Deep massage
(Massaggio
profondo)
-
14
30 miProduce una sensazione di stimolazione nuti*
ÁXLGDSLOHQWDH
profonda
Gentle massage
(Massaggio
gentile)
-
15
Produce una sensa30 mizione di stimolazione nuti*
ÁXLGDSLOLHYH
* facoltativamente varie volte al giorno
6SHFLÀFKHGHOSURJUDPPD
La tabella seguente fornisce informazioni sulla
IUHTXHQ]DDPSLH]]DGHJOLLPSXOVLHWHPSLSUHGHÀQLWL
di ciascun programma. L’impulso di corrente in tutti i
programmi ha una forma d’onda bifase simmetrica.
132 ITALIANO
Nome
Proprogram- gramma
ma n.
PR3093
Tipo di
Proprogramgramma
ma n.
PR3094
Frequenza
Tempo
Ampiezza prededell’im- ÀQLWR
pulso
1
1
Conven- 100 Hz
tional
(Convenzionale)
200 µs
continuo
Thorough 2
stimulus
(Stimolazione
completa)
2
Conven- 40 Hz
tional
(Convenzionale)
200 µs
continuo
Pre-activi- 3
ty (Attività
preparatoria)
3
Conven- 100 Hz
tional
(Convenzionale)
150 µs
continuo
-
4
Conven- 80 Hz
tional
(Convenzionale).
60 µs
continuo
Deep
stimulus
(Stimolazione
profonda)
5
Conven- 80 Hz
tional
(Convenzionale)
150 µs
continuo
-
6
Conven- 60 Hz
tional
(Convenzionale)
150 µs
continuo
Conventional
(Convenzionale)
Soft
stimulus
(Stimolazione
lieve)
Radiating
Pulse
(Impulso
che si
irradia)
ITALIANO 133
Nome
Proprogram- gramma
ma n.
PR3093
Tipo di
Proprogramgramma
ma n.
PR3094
Frequenza
Tempo
Ampiezza prededell’im- ÀQLWR
pulso
Continuous
Burst
(Stimolazione
burst
continua)
4
7
Burst
100 Hz, 250 µs
2 Hz
30 min.
Slow
kneading
(Impasto
lento)
5
8
Burst
80 Hz,
1 Hz
200 µs
30 min.
Mild
kneading
(Impasto
lieve)
6
9
Burst
80 Hz,
3 Hz
200 µs
30 min.
Deep
kneading
(Impasto
profondo)
10
Burst
80 Hz,
2 Hz
150 µs
30 min.
-
11
Burst
80 Hz,
2 Hz
180 µs
30 min.
Diffuse
Burst
(Stimolazione
burst
diffusa)
134 ITALIANO
Nome
Proprogram- gramma
ma n.
PR3093
Tipo di
Proprogramgramma
ma n.
PR3094
Frequenza
Tempo
Ampiezza prededell’im- ÀQLWR
pulso
Mixed
Frequency (Frequenza
mista)
7
12
Mod. di
freq.
8-100
Hz
250 µs
30 min.
Pulsing
massage
(Massaggio
pulsato)
8
13
Mod. di
freq.
2-8 Hz
250 µs
30 min.
Deep
massage
(Massaggio profondo)
-
14
Mod. di
freq.
2-80
Hz
180 µs
30 min.
Gentle
massage
(Massaggio
gentile)
-
15
Mod. di
freq.
8-80
Hz
150 µs
30 min.
Nota: con Wireless TENS Pro (PR3094), i medici
professionisti possono utilizzare l’applicazione per PC
Wireless TENS Pro per creare e installare programmi
aggiuntivi che si basano sulle esigenze dei loro pazienti
come parte di un regime di gestione del dolore.
ITALIANO 135
3DQRUDPLFDGHOSURGRWWRÀJ
1
2
3
Telecomando
Display
A. Simbolo della schermata principale
B. Simbolo della schermata del programma
C. Simbolo della schermata del timer
D. Simbolo della batteria
E. Simbolo della schermata dell’attività
F. Simbolo della schermata delle impostazioni
Pulsante dell’intensità (PR3093); pulsante
dell’intensità per il canale di estensione (terzo e
quarto elettrodo) (PR3094)
4 Pulsante dell’intensità per il canale principale
(primo e secondo elettrodo) (PR3094)
5 Pulsante OK
6 Selettore con frecce direzionali verso l’alto, il
basso, sinistra e destra
7 Clip per cintura rimovibile
8 Coperchio del vano batterie
9 Connettori del canale di estensione per il terzo
e il quarto elettrodo (solo PR3094)
10 Cavo del canale di estensione (solo PR3094)
11 Spinotto per collegare il canale di estensione
all’unità TENS (solo PR3094)
12 Pulsante on/off delle unità TENS
13 Unità TENS
14 Elemento angolare rimovibile (solo PR3094)
15 Indicatore di stato della batteria delle unità TENS
16 Indicatore di stato del trattamento delle unità
TENS
17 Adattatore
18 Caricabatterie
19 Elettrodo in idrogel autoadesivo
Nota: potete trovare la relativa immagine all’interno del
coperchio anteriore.
136 ITALIANO
Predisposizione dell’apparecchio
Ricarica delle unità TENS
Per poter usare il dispositivo, è necessario
innanzitutto caricare le unità TENS. La ricarica
richiede circa 3 ore, se il dispositivo è a temperatura
ambiente. Quando la batteria ricaricabile è
FRPSOHWDPHQWHFDULFDRIIUHHQHUJLDVXIÀFLHQWHSHU
circa 8 ore di uso continuo in condizioni normali.
Nota: se la batteria ricaricabile dell’unità TENS non
è completamente carica quando cominciate un
trattamento, la carica potrebbe esaurirsi durante
il trattamento.Vi consigliamo di caricare sempre
completamente le unità TENS prima di cominciare un
trattamento.
Nota: non è possibile effettuare un trattamento quando
le unità TENS sono in carica.
1 Inserite l’adattatore del caricabatterie in una
presa di corrente a muro.
2 Posizionate l’unità TENS con la batteria
ricaricabile (il dispositivo senza il pulsante on/
off e gli indicatori) nel caricabatterie.
, L’indicatore di stato della batteria sull’altra unità
TENS lampeggia in verde durante la ricarica.
ITALIANO 137
, L’indicatore di stato della batteria smette di
ODPSHJJLDUHHGLYHQWDYHUGHÀVVRTXDQGROD
batteria è completamente carica.
3 Rimuovete l’unità TENS dal caricabatterie una
volta completata la ricarica.
Nota: scollegate sempre il caricabatterie
dall’alimentazione dopo l’uso rimuovendo l’adattatore
dalla presa di corrente a muro.
Preparazione per il trattamento con due
canali e quattro elettrodi (solo PR3094)
Il dispositivo Wireless TENS pro (PR3094) è
dotato di una prolunga che consente di collegare
due elettrodi aggiuntivi. Poiché Wireless TENS pro
(PR3094) dispone di due canali, il suo telecomando
ha due pulsanti di regolazione dell’intensità, uno per
ciascun canale.
Preparazione per il trattamento
1 Rimuovete l’elemento angolare rimovibile dalle
unità TENS per rendere accessibile la presa per
la prolunga.
Nota: conservate l’elemento angolare rimovibile per
l’uso successivo.
Attenzione: riponete l’elemento angolare rimovibile
fuori della portata dei bambini.
2 Inserite la spina della prolunga nella presa.
138 ITALIANO
Preparazione del telecomando
Inserimento delle batterie nel telecomando
1 Nel caso sia presente, rimuovete la clip per
cintura dal telecomando.
2 Rimuovete il coperchio del vano batterie del
telecomando facendolo scorrere.
3 Inserite due batterie alcaline AAA da 1,5 volt
nel telecomando.
Nota: assicuratevi che i poli - e + seguano quanto
indicato nel vano batterie.
Nota: rimuovete le batterie se prevedete di non
utilizzare il dispositivo per oltre un mese per evitare
perdite della batteria.
4 Fate nuovamente scorrere il coperchio del
YDQREDWWHULHVXOWHOHFRPDQGRÀQRDEORFFDUOR
in posizione (clic).
5 Se desiderate indossare il telecomando
applicato alla cintura o in vita, riposizionate la
clip per cintura. Potete usare il telecomando
anche senza la clip per cintura.
ITALIANO 139
Blocco e sblocco del telecomando
Il pannello di controllo del telecomando si blocca
automaticamente dopo un periodo di inattività per
evitare l’utilizzo accidentale.
1 Se premete un tasto sul telecomando, lo
schermo richiede di premere il pulsante OK e
quindi la freccia rivolta verso l’alto.
2 Premete il pulsante OK per sbloccare il
telecomando.
, La schermata richiede di premere la freccia
rivolta verso l’alto.
3 Premete la freccia rivolta verso l’alto sul
selettore.
, Una volta sbloccato il telecomando, potete
utilizzare nuovamente il pannello di controllo.
, Se avete inserito nuove batterie e le unità
TENS sono spente, compare la schermata “no
connection” (connessione assente).
Nota: questa schermata può comparire anche per altri
motivi (vedere “Segnali di errore sul telecomando” nel
capitolo “Segnali sul dispositivo”).
140 ITALIANO
4 Se desiderate bloccare il telecomando, tenete
premuto il pulsante OK per 2 secondi.
Nota: sul display non compare niente quando il
telecomando è bloccato.
Consiglio: bloccate il telecomando quando avete cominciato
il trattamento. In questo modo potete indossare il
telecomando sulla cintura, in vita o in una tasca senza il
ULVFKLRGLPRGLÀFDUHLQYRORQWDULDPHQWHOHLPSRVWD]LRQL
Impostazione di data e ora
Se desiderate usare il controllo dell’attività per
tenere traccia dell’andamento della vostra di attività
e del trattamento, è necessario impostare la data e
l’ora sul telecomando.
1 La schermata di data e ora si apre
automaticamente sul display, con il campo data
evidenziato.
Nota: questa schermata si apre automaticamente solo al
primo utilizzo e se sostituite le batterie oltre 24 ore dopo
che le precedenti batterie si sono esaurite. In tutti gli altri
casi è necessario selezionare il simbolo della schermata
GHOOHLPSRVWD]LRQLSHUPRGLÀFDUHODGDWDHO·RUD
2 3UHPHWHLOSXOVDQWH2.SHUSRWHUPRGLÀFDUH
l’impostazione della data.
, Viene evidenziato il campo del giorno.
3 Usate la freccia verso l’alto o verso il basso per
scegliere il giorno e premete la freccia verso
destra per passare al campo del mese.
, Viene evidenziato il campo del mese.
4 Usate la freccia verso l’alto o verso il basso
per scegliere il mese e premete la freccia verso
destra per passare al campo dell’anno.
ITALIANO 141
, Viene evidenziato il campo dell’anno.
5 Usate la freccia verso l’alto o verso il basso per
scegliere l’anno e premete il pulsante OK per
confermare la data.
6 Usate la freccia verso il basso per passare al
campo di impostazione dell’ora.
7 3UHPHWHLOSXOVDQWH2.SHUSRWHUPRGLÀFDUH
l’ora.
, Si apre la schermata delle impostazioni dell’ora.
, Viene evidenziato il campo dell’ora.
8 Usate la freccia verso l’alto o verso il basso per
scegliere l’ora e premete la freccia verso destra
per passare al campo dei minuti.
, Viene evidenziato il campo dei minuti.
9 Usate la freccia verso l’alto o verso il basso per
scegliere i minuti e premete il pulsante OK per
confermare l’ora.
10 Usate la freccia verso il basso per passare al
campo del formato dell’ora.
11 3UHPHWHLOSXOVDQWH2.SHUSRWHUPRGLÀFDUHLO
formato dell’ora.
142 ITALIANO
12 Usate la freccia verso l’alto o verso il basso per
alternare tra l’orologio con formato a 24 ore
e l’orologio con formato a 12 ore. Premete il
pulsante OK per confermare la vostra scelta.
Utilizzo del dispositivo
Collegamento degli elettrodi e delle unità
TENS
1 Assicuratevi che la pelle su cui desiderate
posizionare gli elettrodi sia sana e priva di
ferite o irritazioni.
Nota: non posizionate gli elettrodi sulla pelle arrossata
RLQÀDPPDWDHVXOODSHOOHFRQIHULWHDSHUWHOHVLRQL
cancerose o irritazioni.
2 Pulite la pelle con un panno umido ed
asciugatela. La pelle su cui desiderate
posizionare gli elettrodi deve essere asciutta,
pulita e priva di creme o lozioni.
Nota: sporco, grasso o particelle presenti sulla
pelle potrebbero incollarsi all’idrogel degli elettrodi,
riducendone il potere adesivo.
3 Estraete gli elettrodi dal sacchetto di plastica e
controllate che non presentino danni o segni di
usura.
Attenzione: non usate gli elettrodi oltre la data di
scadenza indicata. La data di scadenza si trova sul
sacchetto di plastica richiudibile.
ITALIANO 143
Nota: sostituite gli elettrodi se sono danneggiati o sporchi,
quando hanno perso il loro potere adesivo o quando la
stimolazione diventa sgradevole, cioè in presenza di una
sgradevole sensazione di bruciore o di puntura.
4 Estraete l’elettrodo dalla fodera e posizionatelo
sulla pelle nel punto che volete trattare.
Consultare la sezione “Posizionamento
degli elettrodi” di seguito e la guida al
SRVL]LRQDPHQWRDOODÀQHGLTXHVWRPDQXDOH
5 Posizionate il secondo elettrodo sulla parte
del corpo che volete trattare. Nel caso del
dispositivo PR3094, potete posizionare anche
un terzo e un quarto elettrodo sulla parte del
corpo che volete trattare.
Nota: posizionate sempre gli elettrodi sulla pelle prima
di collegare le unità TENS
Nota: non posizionate gli elettrodi uno sull’altro o così
vicini da toccarsi.
6 Collegate le unità TENS agli elettrodi. Le unità
7(16KDQQRGHLPDJQHWLDOFHQWURSHUVHPSOLÀFDUH
il collegamento ai connettori di metallo degli
elettrodi. Udirete uno scatto quando le unità TENS
si bloccano in modo corretto sugli elettrodi.
Nota: potete indossare gli elettrodi con le unità TENS
collegate ad essi sotto i vestiti, anche durante il trattamento.
Nota: quando indossate le unità TENS sul vostro
corpo, durante molti programmi di trattamento, potete
eseguire tutte le attività consentite tra gli utilizzi previsti
e non sconsigliate nel capitolo “Importante”. Potete
inoltre continuare a indossare le unità TENS sul vostro
corpo tra un trattamento e l’altro.
144 ITALIANO
Nota: se desiderate effettuare un trattamento con
quattro elettrodi (solo PR3094), collegate prima le
unità TENS a due elettrodi e quindi i connettori della
prolunga agli altri due elettrodi.
7 Premete il pulsante on/off per commutare le
unità TENS sullo standby.
, L’indicatore di stato del trattamento sulle unità
TENS lampeggia in verde per indicare che si trovano
in standby e sono pronte per il trattamento.
, Se non cominciate il trattamento entro 5 minuti,
le unità TENS si spengono automaticamente.
In questo caso, sarà necessario premere
nuovamente il pulsante on/off per cominciare un
trattamento.
Posizionamento degli elettrodi
Per ottenere risultati ottimali dalla stimolazione, è importante posizionare correttamente gli elettrodi. Assicuratevi
sempre di trattare un punto in cui la vostra pelle è sana
prima di posizionare gli elettrodi. Il punto ottimale può
variare da persona a persona, perciò provate a spostare
JOLHOHWWURGLÀQFKpQRQRWWHQHWHODPDVVLPDHIÀFDFLDGDO
trattamento. In alcuni casi può essere utile contrassegnare il punto per l’uso in futuro. Per maggiori informazioni
sul posizionamento degli elettrodi, consultate la guida al
SRVL]LRQDPHQWRDOODÀQHGLTXHVWRPDQXDOH7HQHWHSUHsente che potreste avere bisogno di aiuto per posizionare gli elettrodi su determinati punti del corpo.
In genere gli elettrodi devono essere posizionati
direttamente sopra o vicino alla zona dolente. La
stimolazione può portare a una contrazione visibile
del muscolo nell’area interessata. Questa reazione
non è dannosa, ma se queste contrazioni vi causano
disagio, spostate gli elettrodi in un altro punto.
ITALIANO 145
non posizionate gli elettrodi sul collo o sul torace.
Non posizionate gli elettrodi su pelle arrossata o
LQÀDPPDWDHFRQIHULWHDSHUWHOHVLRQLFDQFHURVHR
irritazioni.
Avvio e conclusione del trattamento
Questa è la schermata principale. In questa
schermata è indicato il programma, la durata del
trattamento e l’intensità selezionata. Sulla barra del
menu nella parte inferiore della schermata potete
vedere, da sinistra a destra:
- Il simbolo della schermata principale: questo
simbolo è evidenziato quando viene visualizzata la
schermata principale.
- Il simbolo della schermata del programma:
selezionate questo simbolo per scegliere un
programma di trattamento.
- Il simbolo della schermata del timer: selezionate
questo simbolo per impostare la durata del
trattamento.
- Il simbolo della batteria: selezionate questo
simbolo per controllare lo stato della batteria.
- Il simbolo della schermata dell’attività: selezionate
questo simbolo per visualizzare il monitor
dell’attività (consultare la sezione “Monitoraggio
dell’attività” in questo capitolo).
- Il simbolo della schermata delle impostazioni:
VHOH]LRQDWHTXHVWRVLPERORSHUPRGLÀFDUHODGDWD
o l’ora (consultare il capitolo “Predisposizione
dell’apparecchio” per maggiori informazioni su
come impostare la data e l’ora).
Nota: la barra del menu sulla schermata principale e
su altre schermate scompare dopo un po’, ma riappare
non appena premete un pulsante.
146 ITALIANO
Selezione di un programma
1 Se volete selezionare un programma diverso
GDOSURJUDPPDSUHGHÀQLWRVXOODVFKHUPDWD
principale, utilizzate la freccia verso sinistra
o destra per evidenziare la lettera P di
programma sulla barra del menu.
2 Premete il pulsante OK per confermare
FKHGHVLGHUDWHPRGLÀFDUHLOSURJUDPPD
selezionato.
, Viene aperta la schermata del programma,
dove è evidenziato il programma selezionato in
precedenza.
3 Usate la freccia verso l’alto o il basso per
scegliere un programma e premete il pulsante
OK per confermare la scelta.
Nota: il programma selezionato viene salvato come
SUHGHÀQLWRQHOODPHPRULDGHOWHOHFRPDQGR,O
dispositivo selezionerà questo programma all’utilizzo
VXFFHVVLYR6HYROHWHPRGLÀFDUHLOSURJUDPPDVHJXLWHL
passaggi da 1 a 3 indicati in precedenza.
Nota: lo stesso programma viene applicato a entrambi i
canali del dispositivo Wireless Tens Pro (PR3094).
Impostazione della durata di un programma
1 Sulla schermata principale viene visualizzata
ODGXUDWDVHOH]LRQDWDFRPHSUHGHÀQLWD6H
GHVLGHUDWHPRGLÀFDUHODGXUDWDSUHGHÀQLWDGHO
trattamento, utilizzate la freccia verso sinistra
o destra per evidenziare l’icona del timer sulla
barra del menu.
1RWDTXDQGRPRGLÀFDWHLOSURJUDPPDYLHQH
ULSULVWLQDWDODGXUDWDSUHGHÀQLWDGLTXHOSURJUDPPD
ITALIANO 147
2 Premete il pulsante OK per confermare che
YROHWHPRGLÀFDUHODGXUDWD
, Sulla schermata del timer viene evidenziata la
GXUDWDSUHGHÀQLWD
3 Usate la freccia verso l’alto o il basso per
scegliere la durata che preferite e premete il
pulsante OK per confermare.
- Potete impostare la durata del trattamento in
minuti.
- Inoltre potete impostare la durata del trattamento
su “continuous” (continuo), nel display della
schermata compare il relativo simbolo invece
della durata del trattamento in minuti. Se questo
simbolo lampeggia nella schermata principale, il
WUDWWDPHQWRFRQWLQXDÀQFKpQRQORLQWHUURPSHWH
Nota: la durata del trattamento selezionata
YLHQHVDOYDWDFRPHSUHGHÀQLWDQHOODPHPRULD
del telecomando.Il dispositivo selezionerà questa
impostazione della durata la prossima volta che lo
XWLOL]]HUHWH6HYROHWHPRGLÀFDUHODGXUDWDVHJXLWHL
passaggi da 4 a 6 indicati in precedenza.
Nota: la stessa durata viene applicata a entrambi i
canali del dispositivo Wireless Tens Pro (PR3094)
Avvio e conclusione del trattamento
(PR3093)
Per avviare un trattamento, è necessario innanzitutto
accendere le unità TENS con il pulsante on/
off e quindi premere il simbolo + del pulsante
dell’intensità per aumentare l’intensità.
148 ITALIANO
1 Premete il simbolo + del pulsante dell’intensità
per impostare l’intensità. L’intensità comincia
ad aumentare da 0 mA. Il trattamento viene
avviato e il timer procede con il conto alla
rovescia non appena l’intensità supera 0 mA.
Gli impulsi nell’area in cui sono applicati gli
elettrodi diventano più forti mano a mano che
viene aumentata l’intensità.
, Tenete premuto il simbolo + sul pulsante
dell’intensità per incrementarla in modo lento
e costante. Rilasciate il pulsante quando avete
raggiunto il livello giusto di stimolazione.
Nota: per la TENS convenzionale e a modulazione
di frequenza, dovete percepire chiaramente la
stimolazione, ma non dovete provare una sensazione
sgradevole né dolore.
Nota: per la TENS burst, dovete percepire una
stimolazione vigorosa, che in genere trasmette una
sensazione più nitida e può sembrare vagamente
sgradevole.Vi consigliamo inoltre di regolare l’intensità
a un livello che produca contrazioni visibili del muscolo
nell’area in cui viene applicata la stimolazione. Queste
contrazioni non sono dannose, ma se per voi sono
troppo fastidiose potete diminuire l’intensità, scegliere
un programma diverso o spostare gli elettrodi in una
posizione diversa.
, Il livello di intensità viene visualizzato in cifre
sopra il pulsante dell’intensità. L’intensità va da 0
mA 60 mA. Il livello di intensità è indicato dalla
relativa barra sul lato destro della schermata.
/·DOWH]]DGHOODEDUUDULÁHWWHLOOLYHOORGLLQWHQVLWj
, Quando avviate il trattamento, l’indicatore di
stato del trattamento sul dispositivo TENS
comincia a lampeggiare in giallo.
ITALIANO 149
, Nella schermata principale del telecomando viene
visualizzato il programma selezionato, la durata
rimanente del trattamento e l’intensità selezionata.
, Se l’intensità provoca disagio, premete il simbolo
- sul pulsante dell’intensità per ridurla in modo
lento e costante.
Nota: poiché il corpo si adatta all’intensità della
stimolazione, di tanto in tanto potrebbe essere
necessario regolare il livello di intensità per ottenere
una stimolazione ottimale.
2 3HUFRQFOXGHUHLOWUDWWDPHQWRSULPDGHOODÀQH
della durata impostata o se avete impostato
la durata del trattamento su “continuous”
(continuo), tenete premuto il simbolo - sul
pulsante dell’intensità per 3 secondi per ridurla
a 0 mA. Quando il livello di intensità raggiunge
0 mA, le unità TENS non emettono più impulsi.
Nota: potete concludere il trattamento premendo
anche il pulsante on/off sull’unità TENS. In tal caso, il
trattamento viene interrotto subito su entrambi i canali.
Avvio e conclusione del
trattamento(PR3094)
Per avviare un trattamento, è necessario innanzitutto
accendere le unità TENS con il pulsante on/
off e quindi premere il simbolo + del pulsante
dell’intensità per aumentare l’intensità.
1 Premete il simbolo + del pulsante dell’intensità
per impostare separatamente l’intensità per
il canale principale e il canale di estensione e
avviate il trattamento.
, Tenete premuto il simbolo + sul pulsante
dell’intensità sul lato sinistro del telecomando
per aumentare l’intensità del canale principale.
In questo modo vengono avviati gli impulsi tra i
primi due elettrodi.
150 ITALIANO
, Il livello di intensità viene visualizzato in cifre
sopra il pulsante dell’intensità a sinistra. Il livello
di intensità è indicato anche dalla relativa barra
sul lato sinistro della schermata.
, Tenete premuto il simbolo + sul pulsante
dell’intensità sul lato destro del telecomando per
aumentare l’intensità del canale di estensione.
In questo modo vengono avviati gli impulsi tra il
terzo e il quarto elettrodo.
, Il livello di intensità viene visualizzato in cifre
sopra il pulsante dell’intensità a destra. Il livello
di intensità è indicato anche dalla relativa barra
sul lato destro della schermata.
2 Per concludere il trattamento di uno o
HQWUDPELLFDQDOLSULPDGHOODÀQHGHOODGXUDWD
impostata o se avete impostato la durata del
trattamento su “continuous” (continuo), tenete
premuto il simbolo - sul pulsante dell’intensità
per 3 secondi per ridurla a 0 mA. Quando
il livello di intensità raggiunge 0 mA, le unità
TENS non emettono più impulsi.
Nota: dal momento che è possibile utilizzare i due
canali in modo indipendente, potete interrompere il
trattamento su un canale e proseguirlo sull’altro.
Nota: potete concludere il trattamento premendo
anche il pulsante on/off sull’unità TENS. In tal caso, il
trattamento viene interrotto subito su entrambi i canali.
ITALIANO 151
Controllo dell’attività
Questa funzionalità aggiuntiva disponibile sul
telecomando consente di controllare l’andamento della
vostra attività nel corso di un giorno, una settimana o
un mese. Poiché saper dosare l’attività è importante
nella gestione del dolore, il monitor dell’attività presente
sul telecomando vi offre la possibilità di controllare se
state distribuendo le vostre attività nel modo giusto
durante la giornata. Per ulteriori informazioni sulla
gestione autonoma del dolore e sull’l’importanza di
dosare il movimento, consultate l’opuscolo Pain Toolkit
incluso nella confezione.
1RWDDIÀQFKpLOPRQLWRUDJJLRGHOO·DWWLYLWjVLDHIÀFDFH
è necessario indossare il telecomando tutto il giorno.
Potete indossarlo sulla cintura con una clip oppure
portarlo in tasca.
Lettura dei risultati
1 Premete la freccia verso destra per evidenziare
l’icona dell’attività sulla barra del menu.
2 La prima schermata che viene aperta è la vista
del giorno. Usate la freccia verso l’alto o verso
il basso per passare da uno schermo a quello
successivo.
, Nella vista del giorno viene visualizzato il vostro
livello di attività nelle ultime 24 ore. L’altezza
delle barre indica per quanti minuti siete stati
attivi. La linea orizzontale (A) indica il livello
medio di attività e vi consente di stabilire se il
vostro livello di attività nel corso della giornata è
stato superiore o inferiore alla media.
152 ITALIANO
, Nella vista della settimana viene visualizzato
il vostro livello di attività degli ultimi 7 giorni,
compreso il giorno in corso. Le lettere sotto il
JUDÀFRLQGLFDQRLJLRUQLGHOODVHWWLPDQD/·DOWH]]D
delle barre indica per quante ore al giorno siete
stati attivi nell’ultima settimana. La linea orizzontale
(A) indica il livello medio di attività negli ultimi 6
giorni e vi consente di stabilire se il vostro livello di
attività nel corso della settimana è stato superiore
o inferiore alla media. Inoltre vi consente di stabilire
in quali giorni dell’ultima settimana il vostro livello
di attività è stato superiore o inferiore alla media.
, Nella vista del mese viene visualizzato il vostro
livello di attività delle ultime quattro settimane,
compreso il giorno in corso. Le settimane sono
LQGLFDWHGDLQXPHULVRWWRLOJUDÀFR/·DOWH]]DGHOOH
barre indica per quante ore al giorno siete stati
attivi nelle ultime quattro settimane. La linea
orizzontale (A) indica il livello medio di attività
nell’ultimo mese e vi consente di stabilire se il
vostro livello di attività nel corso del mese è
stato superiore o inferiore alla media. Inoltre vi
consente di stabilire in quali giorni il vostro livello
di attività è stato superiore o inferiore alla media.
Obiettivo per il livello di attività (PR3094)
Se effettuate la gestione del dolore con Wireless
TENS Pro consultandovi con un professionista
che utilizza l’applicazione per PC Wireless TENS
Pro (PR3094), il monitor dell’attività consentirà
al professionista di conoscere in modo più
approfondito l’andamento della vostra attività e dei
trattamenti. L’applicazione per computer consente
inoltre a chi vi segue di impostare un obiettivo per il
livello di attività. Se viene impostato un obiettivo, la
linea orizzontale mostrerà la lettera (T) invece di (A).
ITALIANO 153
, Nella vista del giorno viene visualizzato il vostro
livello di attività nelle ultime 24 ore. La linea
orizzontale (T) indica l’obiettivo per il livello di
attività impostato e vi consente di stabilire se avete
raggiunto il vostro obiettivo durante il giorno.
, Nella vista della settimana viene visualizzato il
YRVWUROLYHOORGLDWWLYLWjGHJOLXOWLPLJLRUQLÀQRD
oggi. La linea orizzontale (T) indica l’obiettivo del
livello di attività impostato per la settimana e vi
consente di stabilire se quest’ultimo ha raggiunto
l’obiettivo e in quali giorni il vostro livello di
attività è stato superiore o inferiore all’obiettivo.
, Nella vista del mese viene visualizzato il vostro
livello di attività delle ultime quattro settimane
ÀQRDRJJL/DOLQHDRUL]]RQWDOH7LQGLFD
l’obiettivo per il livello di attività impostato per
il mese e vi consente di stabilire se quest’ultimo
ha raggiunto l’obiettivo e in quali giorni il vostro
livello di attività è stato superiore o inferiore
all’obiettivo.
Dopo l’uso
Attenzione: Assicuratevi di concludere il
trattamento e di spegnere l’unità TENS oppure
di impostare il telecomando su 0 mA prima di
rimuovere l’unità TENS, la prolunga (se utilizzata,
solo PR3094) o gli elettrodi. Se non concludete
il trattamento potreste provare una sensazione
sgradevole nelle dita. Non si tratta di una
sensazione dannosa, ma può essere sgradevole.
1 Per spegnere le unità TENS, premete una volta
il pulsante on/off.
154 ITALIANO
2 Staccate gli elettrodi dalle unità TENS
scollegandoli.
Nota: se avete dimenticato di spegnere le unità TENS,
esse si spegneranno automaticamente entro 5 minuti
quando gli elettrodi sono staccati.
3 Ricaricate le unità TENS per assicurarvi che
siano pronte per il trattamento successivo.
4 Rimuovete gli elettrodi dalla pelle sollevandoli
dai bordi.
Nota: non lasciate gli elettrodi sulla pelle durante la notte.
In caso di irritazione della pelle, provate ad applicare
gli elettrodi in un altro punto. Assicuratevi di spostare
regolarmente gli elettrodi in punti diversi per evitare di
applicare la stimolazione nello stesso punto ogni giorno.
Come conservare gli elettrodi
1 Riponete nuovamente gli elettrodi nella fodera.
2 Fate scorrere la fodera con gli elettrodi
all’interno del sacchetto.
3 Richiudete bene il sacchetto per evitare che vi
penetri polvere.
ITALIANO 155
Nota: per preservare lo stato degli elettrodi e impedire
che lo strato di idrogel si essicchi, conservateli sempre
nel sacchetto richiudibile quando non sono in uso
durante i trattamenti. Richiudete bene il sacchetto per
evitare che vi penetri polvere.
Nota: se prevedete di non utilizzare gli elettrodi per
più di un mese, manteneteli ad una temperatura tra
+ 5°C e 27° C. Non riponeteli nel congelatore o nel
frigorifero. Evitate il calore eccessivo e l’esposizione alla
luce diretta del sole.
Pulizia
non immergete il telecomando e le unità TENS in
acqua né risciacquateli sotto il rubinetto.
non immergete gli elettrodi nell’acqua.
1 Pulite il telecomando, il caricabatterie, le unità
TENS e la prolunga (solo PR3094) con un
panno umido ed un detergente delicato, ad
esempio il detersivo per piatti.
Nota: potete pulire le varie parti anche con alcol
isopropilico al 70% (IPA).
Attenzione: non usate detergenti diversi da
quelli indicati in precedenza poiché potrebbero
danneggiare il materiale, ad esempio rovinare la
OXFHQWH]]DGHOOHVXSHUÀFLH
2 Se gli elettrodi sono sporchi, bagnate
OHJJHUPHQWHLOGLWRHVWURÀQDWHORVXJOLHOHWWURGL
per rimuovere delicatamente lo sporco.
Nota: non usate sapone o né alcol per pulire gli elettrodi.
156 ITALIANO
Risoluzione dei problemi
Questo capitolo riassume i problemi più comuni
che potreste riscontrare con i dispositivi Wireless
TENS e Wireless TENS Pro. Se non riuscite a
risolvere il problema con le informazioni riportate
sotto, visitate il sito www.philips.com/support
per un elenco di domande frequenti o contattate il
centro assistenza clienti del vostro paese.
Problema
Possibile causa
Soluzione
Il telecomando
non si accende.
Le batterie del
telecomando
sono scariche.
Sostituite le batterie (consultare
il capitolo “Predisposizione
dell’apparecchio”).
Le batterie
non sono
posizionate
correttamente.
Aprite il vano batterie e
posizionate le batterie
correttamente (consultare
il capitolo “Predisposizione
dell’apparecchio”).
Il telecomando
potrebbe
essere rotto.
Contattate il Centro Assistenza
Clienti Philips.
L’indicatore
di stato della
batteria sulle
unità TENS ha
lampeggiato in
arancione e il
dispositivo si è
spento.
La batteria delle Ricaricare le unità
unità TENS è
TENS (consultare il
scarica.
capitolo “Predisposizione
dell’apparecchio”).
ITALIANO 157
Problema
Possibile causa
Soluzione
L’indicatore
di stato della
batteria sulle
unità TENS è
DUDQFLRQHÀVVR
La batteria delle
unità TENS si
sta scaricando.
L’icona della
batteria sul
telecomando
lampeggia.
4XHVWRVLJQLÀFDFKHODEDWWHULD
ha un’autonomia residua del
30%. Ricaricate le unità TENS al
più presto possibile (consultare
il capitolo “Predisposizione
dell’apparecchio”).
Sullo schermo
appare il
simbolo che
indica assenza
di connessione
(consultare
il capitolo
“Segnali sul
dispositivo”).
Non c’è
connessione
perché le unità
TENS sono
spente.
Controllate che le unità TENS
siano accese. L’indicatore di stato
del trattamento lampeggia in verde
se le unità TENS sono accese e
in standby. Se le unità TENS sono
spente, premete il pulsante on/off
per accenderle.
Non c’è
connessione
perché la
batteria delle
unità TENS è
scarica.
Ricaricare le unità
TENS (consultare il
capitolo “Predisposizione
dell’apparecchio”).
Le unità
TENS si sono
surriscaldate.
In tal caso,
l’indicatore
di stato del
trattamento
lampeggia in
rosso.
Staccate le unità TENS e lasciatele
raffreddare. Non appena si sono
raffreddate, potete riattaccarle agli
elettrodi e premere il pulsante on/
off sulle unità TENS per riprendere
il trattamento. Le unità TENS
potrebbero scaldarsi all’esterno
durante il trattamento, ma la
temperatura non sale mai tanto da
provocare danni o lesioni.
158 ITALIANO
Problema
Sul display
appare un
simbolo a
croce e non
è possibile
aumentare
il livello di
intensità per
cominciare un
trattamento
(consultare
il capitolo
“Segnali sul
dispositivo”).
Possibile causa
Soluzione
Il telecomando
è troppo
lontano dalle
unità TENS.
Avvicinate il telecomando alle
unità TENS.
Le unità TENS
potrebbero
essere rotte.
Contattate il Centro Assistenza
Clienti Philips.
Il simbolo a
croce indica
un’interruzione
della
comunicazione
con il canale.
Potrebbe
indicare che gli
elettrodi non
sono posizionati
correttamente.
Assicuratevi che gli elettrodi siano
posizionati correttamente sulla
pelle. Ricordate che il simbolo a
croce che indica un’interruzione
della comunicazione con il canale
scompare solo se aumentate
l’intensità.
ITALIANO 159
Problema
Possibile causa
Soluzione
Il simbolo a
croce che indica
un’interruzione
della
comunicazione
con il canale
potrebbe
VLJQLÀFDUHFKH
l’unità o le unità
TENS non sono
posizionate
correttamente
sugli elettrodi.
Controllate che le unità TENS
siano posizionate correttamente
sugli elettrodi. Solo Wireless TENS
Pro (PR3094): se il simbolo a
croce che indica un’interruzione
della comunicazione con il
canale si trova sopra il pulsante
di intensità sinistro, controllate
che le unità TENS siano collegate
correttamente. Se il simbolo a
croce si trova sopra il pulsante
di intensità destro, controllate
che i connettori della prolunga
siano collegati correttamente.
Ricordate che il simbolo a croce
che indica un’interruzione della
comunicazione con il canale
scompare solo se aumentate
l’intensità.
Gli elettrodi si
sono staccati
dalla pelle.
Gli elettrodi hanno perso il loro
potere adesivo perché sono
sporchi o perché sono stati usati
a lungo. Potete provare a pulire
gli elettrodi (consultare il capitolo
“Pulizia”). Se questo non risolve il
problema, sostituite gli elettrodi.
Ricordate che il simbolo a croce
che indica un’interruzione della
comunicazione con il canale
scompare solo se aumentate
l’intensità.
160 ITALIANO
Problema
Possibile causa
Soluzione
Il simbolo
della batteria
sulla barra
del menu del
telecomando
lampeggia.
Questo
VLJQLÀFDFKH
la batteria del
telecomando si
sta scaricando.
L’indicatore
di stato della
batteria sulle
unità TENS è
DUDQFLRQHÀVVR
Potete continuare il trattamento
a patto che il dispositivo fornisca
la normale stimolazione. Quando
premete il pulsante on/off delle
unità TENS per concludere il
trattamento, sostituite le batterie.
Le unità
L’indicatore
TENS si sono
di stato del
surriscaldate.
trattamento
sulle unità
TENS
lampeggia
in rosso e il
trattamento è
stato interrotto.
Ho provato
una sensazione
sgradevole
toccando i
connettori delle
unità TENS o
gli elettrodi.
Non avete
ridotto
l’intensità
ÀQRDSHU
concludere il
trattamento
prima di
rimuovere le
unità TENS.
Se le unità TENS si surriscaldano,
staccatele dagli elettrodi e
lasciatele raffreddare. Non
appena si sono raffreddate,
potete riattaccarle agli elettrodi
e premere il pulsante on/off
sulle unità TENS per riprendere
il trattamento. Le unità TENS
potrebbero scaldarsi all’esterno
durante il trattamento, ma la
temperatura non sale mai tanto da
provocare danni o lesioni.
'LPLQXLWHVHPSUHO·LQWHQVLWjÀQRD
0 mA prima di rimuovere le unità
TENS. In questo modo potete
evitare di provare sensazioni
sgradevoli quando toccate i
connettori delle unità, la prolunga
o gli elettrodi. Questa sensazione è
sgradevole ma non dannosa.
ITALIANO 161
Problema
Possibile causa
Soluzione
La stimolazione
sembra diversa
o meno
piacevole del
solito.
L’intensità è
troppo alta o
troppo bassa.
Premete il simbolo + o - sul
pulsante dell’intensità per
aumentarla o diminuirla.
Gli elettrodi
non sono
applicati nel
punto giusto.
Spegnete le unità TENS e
scollegatele dagli elettrodi.
Rimuovete gli elettrodi dalla pelle
e spostateli in un altro punto.
Gli elettrodi
non sono
applicati
correttamente.
Spegnete le unità TENS e
scollegatele dagli elettrodi.
Controllate che gli elettrodi siano
applicati correttamente sulla pelle.
Gli elettrodi
sono troppo
sporchi.
Potete provare a pulire gli elettrodi
(consultare il capitolo “Pulizia”).
Se questo non risolve il problema,
sostituite gli elettrodi.
Gli elettrodi
sono usurati.
Sostituite gli elettrodi.
Segnali sul dispositivo
Indicazioni di stato della batteria sul
telecomando
1 Per controllare il livello della batteria del
telecomando o delle unità TENS, utilizzate
la freccia verso sinistra o verso destra per
evidenziare l’icona della batteria sulla barra del
menu.Viene aperta la schermata di stato della
162 ITALIANO
batteria e viene visualizzato il livello di carica della
batteria ricaricabile delle unità TENS sulla sinistra
e il livello di ricarica della batteria del telecomando
sulla destra. Il simbolo della batteria può indicare
quattro livelli di carica: carica completa, carica a
due terzi, carica a un terzo e scarica.
2 Quando la batteria delle unità TENS è scarica,
non si ha connessione e sulla sinistra appare il
simbolo che indica assenza di connessione.
Segnali di errore sul telecomando
Batteria scarica
- Il simbolo della batteria nella parte inferiore del
display del telecomando lampeggia quando le
batterie del telecomando sono scariche. Quando
le batterie sono completamente scariche, il
telecomando si spegne.
- Il simbolo della batteria nella parte inferiore del
display del telecomando lampeggia anche quando
la batteria ricaricabile delle unità TENS è scarica.
In tal caso, l’indicatore di stato della batteria sulle
XQLWj7(16qDUDQFLRQHÀVVR
Nota: il simbolo della batteria comincia a lampeggiare
quando le batterie del telecomando o la batteria
ricaricabile delle unità TENS hanno un’autonomia
residua inferiore al 30%.
Nessuna connessione con le unità TENS
- Questo simbolo che indica assenza di connessione
sullo schermo indica che non si ha connessione
tra il telecomando e le unità TENS. Le cause sono
varie:
ITALIANO 163
1
2
3
4
La batteria ricaricabile delle unità TENS è scarica.
Le unità TENS sono spente.
Il telecomando è distante dalle unità TENS.
Se nessuna di queste cause è applicabile, c’è un
malfunzionamento nelle unità TENS.
Interruzione del canale
- Il simbolo a croce che indica un’interruzione della
comunicazione con il canale sullo schermo indica
che il canale corrispondente è interrotto.
- L’interruzione di un canale può avere varie cause:
1 Non c’è contatto tra le unità TENS e gli elettrodi.
2 Gli elettrodi non sono applicati correttamente
sulla pelle.
- 4XDQGRDYHWHYHULÀFDWRFKHJOLHOHWWURGLVRQR
applicati correttamente sulla pelle e che le unità
TENS sono collegate correttamente agli elettrodi,
premete il simbolo + sul pulsante di intensità per
controllare che il canale sia collegato correttamente.
Se è collegato correttamente, il simbolo a croce
scompare ed appare il valore dell’intensità.
Segnali di indicazione sulle unità TENS
Indicatore dello stato della batteria
- L’indicatore di stato della batteria sulle unità TENS
lampeggia:
1 L’indicatore di stato della batteria lampeggia
brevemente in arancione quando la batteria
ricaricabile è scarica e quindi le unità TENS si
spengono.
2 L’indicatore di stato della batteria lampeggia in
verde durante la ricarica delle unità TENS.
- /·LQGLFDWRUHGLVWDWRGHOODEDWWHULDqDFFHVRÀVVR
164 ITALIANO
1
l’indicatore di stato della batteria è arancione
ÀVVRTXDQGRODEDWWHULDULFDULFDELOHGHOOHXQLWj
TENS si sta scaricando. La batteria ricaricabile
ha un’autonomia residua del 30%. L’indicatore
di stato della batteria diventa arancione anche
quando le batterie del telecomando si stanno
scaricando.
/·LQGLFDWRUHGLVWDWRGHOODEDWWHULDqYHUGHÀVVR
quando la batteria ricaricabile è completamente
carica.
Indicatore di stato del trattamento
- L’indicatore di stato del trattamento sulle unità
TENS lampeggia:
1 l’indicatore di stato del trattamento lampeggia
in verde quando le unità TENS sono accese e in
standby.
2 L’indicatore di stato del trattamento lampeggia
in giallo durante il trattamento per indicarne
l’avanzamento.
3 L’indicatore di stato del trattamento lampeggia in
rosso quando le unità TENS si sono surriscaldate.
Quando le unità TENS si surriscaldano, il
trattamento si interrompe automaticamente e
sul display compare il simbolo che indica assenza
di connessione. Scollegate le unità TENS dagli
elettrodi e lasciatele raffreddare. Non appena si
sono raffreddate, potete riattaccarle agli elettrodi
e riprendere il trattamento.
Nota: è normale che le unità TENS si scaldino durante
il trattamento. Durante il normale funzionamento, la
temperatura non sale mai tanto da provocare danni o
lesioni.
Nota: se voi usate il dispositivo con le impostazioni
più elevate per varie ore, le unità TENS potrebbero
surriscaldarsi e spegnersi come precauzione di
sicurezza.
ITALIANO 165
Sostituzione
Elettrodi
Sostituite gli elettrodi se:
- sono danneggiati o usurati.
- la data di scadenza indicata sul sacchetto
richiudibile è stata superata.
- hanno perso il loro potere adesivo. Non utilizzate
mai cerotti o nastro adesivo per applicarli sulla
pelle.
- la stimolazione è meno intensa.
- quando la stimolazione vi provoca disagio, ovvero
quando provate una sgradevole sensazione di
bruciore o di puntura.
Nota: sostituite sempre gli elettrodi con gli elettrodi
consigliati per questo dispositivo dal produttore. I nuovi
elettrodi possono essere ordinati su www.philips.
com/tens-electrodes.
Batterie del telecomando
Sostituite le batterie del telecomando quando
il simbolo della batteria sul display lampeggia.
Sostituitele sempre con due batterie alcaline AAA
da 1,5-volt (vedere “Preparazione del telecomando”
nel capitolo “Predisposizione dell’apparecchio”).
Ordinazione degli accessori
Per acquistare accessori o parti di ricambio, visitate
il sito www.shop.philips.com/service oppure
recatevi presso il vostro rivenditore Philips. Potete
contattare anche il centro assistenza Philips del
vostro paese.
Elettrodi
Potete ordinare nuovi elettrodi su
www.philips.com/tens-electrodes.
166 ITALIANO
Attenzione: Usate questo dispositivo solo con il
caricabatterie, i cavi, gli elettrodi e gli accessori
consigliati dal produttore.
Garanzia e assistenza
Il vostro dispositivo Wireless TENS è stato
progettato e sviluppato con la massima cura per
garantire una durata prevista di 5 anni.
Per assistenza, informazioni o in caso di problemi
visitate il sito Web Philips all’indirizzo
www.philips.com/support. Potete anche
contattare il Centro Assistenza Clienti Philips nel
vostro paese. I suoi numeri di telefono sono:
- Germania: 0800 0007522 (numero gratuito per le
chiamate all’interno della Germania)
- Austria: 0800 880932 (numero gratuito per le
FKLDPDWHGDUHWHÀVVDDOO·LQWHUQRGHOOD$XVWULD
i costi per le chiamate da telefono cellulare
dipendono dall’operatore)
- Svizzera: 0800 002050 (numero gratuito per
OHFKLDPDWHGDUHWHÀVVDLFRVWL
per le chiamate da telefono cellulare dipendono
dall’operatore)
- Regno Unito: 0844 338 04 89 (5p/min. da rete
ÀVVD%7DOWULRSHUDWRULGLUHWLÀVVHHPRELOL
possono applicare tariffe più elevate)
Limitazioni della garanzia
Gli elettrodi non sono coperti dai termini della
garanzia perché soggetti ad usura e devono essere
sostituiti ad intervalli regolari.
Indirizzo del produttore legittimo
Philips Consumer Lifestyle B.V.
Tussendiepen 4, 9206 AD Drachten
Paesi Bassi
ITALIANO 167
Riciclaggio
- Questo simbolo del cassonetto su rotelle
indica che il prodotto è coperto dalla Direttiva
Europea 2012/19/EU. Informatevi sulle normative
locali relative alla raccolta differenziata dei
prodotti elettrici ed elettronici. Non smaltite mai
TXHVWLSURGRWWLFRQJOLDOWULULÀXWLGRPHVWLFL/R
smaltimento corretto dei vostri prodotti usati
contribuisce a prevenire potenziali effetti negativi
sull’ambiente e sulla salute.
- Questo simbolo indica che le batterie contengono
sostanze che potrebbero essere dannose per la
salute dell’uomo e per l’ambiente. Non smaltite
PDLOHEDWWHULHFRQJOLDOWULULÀXWLGRPHVWLFL6HJXLWH
i regolamenti locali per la raccolta differenziata
delle batterie. Lo smaltimento corretto delle
batterie contribuisce a prevenire potenziali effetti
negativi sull’ambiente e sulla salute.
- Le unità TENS contengono una batteria
ricaricabile incorporata che non può essere
rimossa dall’utente. Recatevi presso un centro di
UDFFROWDXIÀFLDOHRXQ&HQWUR$VVLVWHQ]DSHUIDU
rimuovere la batteria ricaricabile.
- Tutte le parti in plastica sono contrassegnate con
simboli per il riciclaggio.
6SHFLÀFKH
Modello
PR3094, PR3093
Tensione nominale (V) - adattatore
100-240 ~ 150 mA
Frequenza nominale (Hz) - adattatore
50-60
Potenza nominale in uscita - adattatore
5 V, 500 mA
168 ITALIANO
Modello
PR3094, PR3093
Classe
Classe di dispositivo
medico IIa
Ingresso di acqua - dispositivo ad
eccezione del caricabatterie
IP22
Ingresso di acqua - caricabatterie
IP21
Tipo di batteria - unità TENS
Ioni di litio
Tipo di batteria - telecomando
2 batterie alcaline AAA da
1,5 V
Parametri in uscita degli
impulsi
Intervallo di frequenza
1-120 Hz
Ampiezza dell’impulso
40-400 µs
Corrente in uscita
Max. 60 mA a 500-1000 Ohm
Tensione massima in uscita
120 V
Forma dell’impulso di corrente
Simmetrico bifase (corrente netta
0 cc)
Condizioni operative
Temperatura
da 5 °C a + 40 °C
Umidità relativa
da 15% a 93% (senza condensa)
Pressione atmosferica
da 700 hPA a 1060 hPA
ITALIANO 169
Condizioni di stoccaggio e trasporto
Temperatura - elettrodi
da 0 °C a + 40 °C
Temperatura - dispositivo
da -10 °C a 50 °C
Umidità relativa
meno di 93% (senza condensa)
Pressione atmosferica
da 700 hPA a 1060 hPA
Nota: Se prevedete di non utilizzare gli elettrodi per più
di un mese, manteneteli ad una temperatura tra + 5°C
e 27° C.
Nota: Non riponete gli elettrodi nel congelatore o
nel frigorifero. Non lasciateli al calore eccessivo, non
immergeteli in acqua né lasciateli fuori dal sacchetto
di plastica.
Spiegazione dei simboli
Simboli sul dispositivo
- Questo è il simbolo del numero di riferimento.
Questo simbolo è seguito dal numero di
riferimento del produttore, che è il codice
del dispositivo. Le targhette del modello sul
telecomando e sulle unità TENS riportano lo
stesso codice. Sulla targhetta del modello del
telecomando, il codice è seguito dalle lettere RC.
Sulla targhetta del modello delle unità TENS, il
codice è seguito dalle lettere TU.
- Questo è il simbolo del numero di serie. Questo
simbolo è seguito dal numero di serie del
produttore.
170 ITALIANO
- 4XHVWRVLPERORVLJQLÀFDFRUUHQWHDOWHUQDWD
- 4XHVWRVLPERORVLJQLÀFDFRUUHQWHFRQWLQXD
- Questo simbolo sul telecomando, sulle unità TENS
e sulla prolunga, se fornita, indica la protezione
dall’accesso con le mani alle parti pericolose e da
JRFFHG·DFTXDLQFDGXWDYHUWLFDOHVHLQFOLQDWRÀQR
a 15 gradi.
- Questo simbolo sul caricabatterie indica la
protezione la protezione dall’accesso con le mani
alle parti pericolose e da gocce d’acqua in caduta
verticale.
- Questo simbolo indica che il dispositivo emette
radiazioni non ionizzanti. Tutti i dispositivi
e i sistemi che includono trasmettitori RF
o che applicano intenzionalmente energia
elettromagnetica RF devono riportare questo
simbolo.
ITALIANO 171
- Questo simbolo indica che le parti applicate BF
(Body Floating) (ad esempio gli elettrodi) sono
conformi a IEC 60601-1.
- 4XHVWRVLPERORVLJQLÀFD´)DEEULFDWRGDµHDSSDUH
accanto all’indirizzo del produttore legittimo.
- 4XHVWRVLPERORVLJQLÀFDDWWHQ]LRQHXVFLWD7(16Ë
posto accanto a tutti i collegamenti degli elettrodi.
- Questo simbolo indica la conformità alle direttive
GHOODFRPXQLWjHXURSHD&(VLJQLÀFD´&RQIRUPLWp
Européenne”. 0344 è il numero del corpo
QRWLÀFDWR
- Questo simbolo indica che il prodotto non va
VPDOWLWRFRQLQRUPDOLULÀXWLGRPHVWLFL3HUXOWHULRUL
istruzioni, consultare il capitolo “Riciclaggio”.
172 ITALIANO
- Questo simbolo indica che l’adattatore è dotato di
doppio isolamento (Classe II).
- Questo simbolo indica che l’adattatore può essere
utilizzato solo in interni.
- 4XHVWRVLPERORVLJQLÀFDOHJJHUHLOPDQXDOH
dell’utente prima di cominciare ad utilizzare il
dispositivo.
- 4XHVWRVLPERORVLJQLÀFDPDQWHQHUHDVFLXWWR
- 4XHVWRVLPERORLGHQWLÀFDLOSXOVDQWHRQRII
ITALIANO 173
- Questo è il simbolo degli impulsi TENS. È
visualizzato accanto all’indicatore di stato del
trattamento.
- Questo è il simbolo della batteria. È visualizzato
accanto all’indicatore di stato della batteria.
- 4XHVWRPDUFKLRGLFODVVLÀFD]LRQH8/LQGLFDFKH
questo dispositivo è conforme ai requisiti sia
canadesi sia americani. APPARECCHIATURA
AD USO DI CORRENTE/ENERGIA PER
APPLICAZIONE MEDICA PER QUANTO
RIGUARDA SCOSSE ELETTRICHE, INCENDI
E PERICOLI MECCANICI SOLO IN
CONFORMITÀ CON ANSI/AAMI ES60601-1
(2005, C1:09, A2:10), IEC 60601-1 (2005), CAN/
CSA C22.2 No.60601.1 (2008, R:2011), IEC
60601-2-10 (2012), CAN/CSA C22.2 No.606011-11 (2010)
Simboli sul sacchetto degli elettrodi
- Questo simbolo indica che il dispositivo non
va utilizzato alla guida o quando si utilizzano
macchine o quando si svolgono attività che
possono mettere in pericolo.
174 ITALIANO
- Questo simbolo indica che non si devono essere
utilizzati elettrodi o danneggiati o usurati che
hanno perso il loro potere adesivo.
- Questo simbolo indica che gli elettrodi devono
essere usati da una sola persona e non condivisi
con altri.
- Questo simbolo indica che gli elettrodi non
devono essere posizionati uno sull’altro o così
vicini da toccarsi.
- Questo simbolo indica che gli elettrodi non
devono essere posizionati sul viso o sul collo.
- Questo simbolo indica che gli elettrodi non
devono essere posizionati sul torace.
ITALIANO 175
- Questo simbolo indica che gli elettrodi non
devono essere posizionati ferite aperte, lesioni
cancerose, irritazioni o sulla pelle arrossata o
LQÀDPPDWD
- Questo simbolo indica la temperatura massima e
minima di stoccaggio per gli elettrodi se riposti per
più di un mese.
- Questo è il simbolo della scadenza. Indica la data
dopo la quale gli elettrodi non devono essere più
usati.
Emissioni elettromagnetiche e immunità
Electromagnetic Compatibility (EMC)
I dispositivi Wireless TENS (PR3093) e Wireless
TENS Pro (PR3094) sono approvati in base allo
standard di sicurezza EMC EN 60601-1-2. Sono
destinati all’uso in ambienti domestici o clinici.
Guida al posizionamento degli
HOHWWURGLÀJ
176 FRANÇAIS
Introduction
Félicitations pour votre achat et bienvenue dans
O·XQLYHUV3KLOLSV3RXUSURÀWHUSOHLQHPHQWGH
l’assistance Philips, enregistrez votre produit sur le
site à l’adresse suivante : www.philips.com/
pain-management/register.
Lisez attentivement ce mode d’emploi avant
d’utiliser l’appareil Wireless TENS (PR3093) ou
l’appareil Wireless TENS Pro (PR3094) et conservezle pour un usage ultérieur. L’appareil Wireless
TENS (PR3093) et l’appareil Wireless TENS Pro
(PR3094) sont disponibles sans prescription. Pour
un traitement optimal avec votre appareil Wireless
TENS, vous devez l’utiliser conformément au
programme de traitement de ce mode d’emploi. Si
vous avez besoin d’informations supplémentaires ou
si avez une question, consultez le site
www.philips.com/pain-management ou
contactez le Service Consommateurs Philips de
votre pays.
Application
Les appareils Wireless TENS (PR3093) et Wireless
TENS Pro (PR3094) sont destinés à être utilisés
par des consommateurs adultes qui éprouvent des
douleurs musculo-squelettiques chroniques faibles
à modérées. Les appareils sont conçus pour être
utilisés pour la neurostimulation transcutanée dans
le but de soulager la douleur et de surveiller l’activité
avec le moniteur d’activité intégré.
Vous pouvez amener l’appareil Wireless TENS lors
de rendez-vous chez des professionnels de la santé,
qui s’engagent à utiliser l’appareil conformément aux
instructions du mode d’emploi et spécialisés dans les
domaines suivants :
FRANÇAIS 177
- analyse des traitements et des activités du patient
- détermination d’un traitement individuel et adaptation
des paramètres de l’appareil grâce à l’application
Wireless TENS Pro PC (PR3094 uniquement)
L’application PC Wireless TENS Pro ne doit être
utilisée que par un professionnel de la santé
avec l’appareil Wireless TENS Pro (PR3094).
Celle-ci lui permet de proposer des séances de
QHXURVWLPXODWLRQWUDQVFXWDQpHSOXVVSpFLÀTXHVHWGH
suivre et d’analyser les modes d’activité du malade
avec l’utilisation de l’appareil.
L’appareil est destiné à être utilisé par et sur une
personne adulte unique. Il doit toujours être utilisé
conformément aux instructions d’utilisation et
aux consignes de sécurité incluses dans ce mode
G·HPSORLHWDX[ÀQVSRXUOHVTXHOOHVLODpWpFRQoX
Neurostimulation transcutanée et gestion
de la douleur
La neurostimulation transcutanée est une méthode de
soulagement de la douleur non invasive pour laquelle il
existe une preuve clinique de diminution de la douleur.
L’appareil de neurostimulation transcutanée est utilisé
quotidiennement par des kinésithérapeutes et autres
professionnels de la santé. Lors du traitement avec
cet appareil, des impulsions électriques sont envoyées
sur la surface de la peau pour activer les nerfs juste
en dessous. Des données cliniques indiquent que cet
appareil produit un soulagement de la douleur similaire
aux mécanismes de soulagement de la douleur du
système nerveux, comme le massage d’une zone
douloureuse par exemple.
Les impulsions sont générées par des unités de
neurostimulation transcutanée alimentées par batterie,
qui doivent être connectées aux électrodes à hydrogel
auto-adhésives.Vous pouvez choisir parmi un ensemble
178 FRANÇAIS
de programmes de neurostimulation transcutanée
préréglés avec différents paramètres d’impulsion et
vous pouvez régler l’intensité de l’impulsion en fonction
de vos préférences. Ce livret contient des informations
sur le placement des électrodes et les programmes
utilisés pour le traitement.
Suivi des activités et gestion de la douleur
1RXVYRXORQVWRXVSURÀWHUGHQRVDFWLYLWpV
quotidiennes. Toutefois, lorsque vous ressentez une
douleur, votre réaction instinctive est de l’éviter en
réduisant votre niveau d’activité. Par conséquent,
vous êtes moins en forme et moins disposé à
SURÀWHUGHVFKRVHVTXHYRXVDLPH]5HVWHUDFWLIVDQV
trop en faire, est important pour éviter d’être pris
au piège dans un cycle de douleur persistante. La clé
de l’auto-gestion de votre douleur est de la réguler :
offrez-vous des périodes d’activité et des périodes
de repos au cours de la journée selon ce qui vous
convient le mieux. Pour réussir votre stimulation,
vous devez répartir vos activités et « faire une pause
avant d’en ressentir besoin ». Un moniteur d’activités
peut vous aider à suivre le rythme de vos activités au
cours de la journée. La télécommande de l’appareil
Wireless TENS dispose d’un moniteur d’activités
intégré qui enregistre votre activité lorsque vous la
portez attachée à votre ceinture ou lorsque vous
la transportez dans la poche de votre pantalon ou
jupe. Elle peut enregistrer et stocker 60 jours de
données d’activité. De cette façon, non seulement
YRXVSRXYH]YpULÀHUYRVDFWLYLWpVDXFRXUVGHV
dernières 24 heures, mais également votre rythme
d’activités de la semaine et du mois précédents.
Si vous souhaitez obtenir plus de conseils sur la
stimulation et l’auto-gestion de votre douleur, veuillez
lire le livret du kit de formation à la douleur inclus
dans l’emballage.*
FRANÇAIS 179
* Remarque :Seule la version allemande du kit de
formation à la douleur est incluse dans l’emballage. Si
vous souhaitez obtenir la version anglaise, française ou
italienne, accédez au site suivant :
www.philips.com/pain-management pour
télécharger la version souhaitée.
Informations destinées aux professionnels
de la santé (PR3094 uniquement)
L’appareil Wireless TENS Pro (PR3094) peut être
utilisé avec l’application PC Wireless TENS Pro,
conçue pour une utilisation par les professionnels de
la santé responsables d’une utilisation de l’appareil
conformément aux instructions du mode d’emploi
et spécialisés dans les domaines suivants :
- analyse des modes d’activité des patients
relativement à leurs modes de traitement à l’aide
d’une application PC externe
- détermination d’un traitement individuel et
adaptation des paramètres de l’appareil TENS au
moyen d’une application PC externe
L’application PC Wireless TENS Pro permet aux
professionnels de la santé de proposer des séances de
QHXURVWLPXODWLRQWUDQVFXWDQpHSOXVVSpFLÀTXHVjOHXUV
patients et de suivre et d’analyser les modes d’activité
physique des patients sur un ordinateur selon
l’utilisation de l’appareil et les douleurs du patient.
L’application PC Wireless TENS Pro n’est pas incluse
dans l’emballage, mais peut être téléchargée sur
demande. Veuillez accéder à www.philips.com/
tens-download et indiquer vos coordonnées. Vous
recevrez un lien de téléchargement de l’application
PC Wireless TENS Pro. Grâce à ce lien, vous pourrez
accéder ou télécharger également le mode d’emploi
de cette application PC.
180 FRANÇAIS
Câble USB
L’application PC Wireless TENS Pro fonctionne
lorsque la télécommande est connectée à un PC via
un mini-câble USB. Vous pouvez obtenir ce minicâble USB standard de deux manières :
1 Vous pouvez indiquer vos coordonnées sur la
page www.philips.com/tens-download
et mentionner que vous aimeriez recevoir un
mini-câble USB. Lorsque nous recevrons vos
coordonnées, nous vous enverrons un mini-câble
USB par courrier postal.
2 Si notre service commercial vous a fait parvenir
un kit d’essai, celui-ci doit contenir le mini-câble
USB.
Si vous avez d’autres questions quant à la
disponibilité de l’application PC Wireless TENS Pro
ou du mini-câble USB, veuillez contacter le Service
Consommateurs Philips de votre pays.
Important
Contre-indications
N’utilisez pas l’appareil si :
- vous portez un stimulateur cardiaque, un
GpÀEULOODWHXURXWRXWDXWUHGLVSRVLWLIpOHFWURQLTXH
implanté ou métallique (par exemple un système
d’administration de médicaments). Une utilisation
dans ces conditions pourrait provoquer un
choc électrique, des brûlures, des interférences
électriques, voire même la mort ;
- vous souffrez d’une maladie cardiaque ;
- vous souffrez d’épilepsie ;
- vous êtes enceinte, étant donné que la sécurité de
la stimulation électrique pendant la grossesse n’a
pas encore été établie ;
- YRXVVRXIIUH]G·XQHGpÀFLHQFHFRJQLWLYH
FRANÇAIS 181
Effets indésirables
Vous devez arrêter d’utiliser l’appareil et consulter
votre médecin si vous éprouvez des effets
indésirables lors de l’utilisation de l’appareil.
Les effets indésirables possibles peuvent inclure ce
qui suit :
- irritation de la peau au niveau des électrodes, bien
que le gel utilisé sur les électrodes ne soit pas une
cause connue de réactions allergiques
- brûlures au niveau des électrodes
- maux de tête ou autres sensations douloureuses
- nausée ou évanouissement
Informations de sécurité importantes
Avertissement
- Ceci est un appareil médical. Tenez-le hors de
portée des enfants.
- Lisez attentivement ce mode d’emploi et
conformez-vous toujours aux instructions de
traitement.
- Cet appareil n’est pas destiné à être utilisé par des
adultes dont les capacités physiques, sensorielles
ou intellectuelles sont réduites.
- N’utilisez pas l’appareil sur les enfants.
- N’utilisez pas l’appareil si votre douleur ne peut
FODLUHPHQWrWUHGpÀQLHFRPPHGRXOHXUPXVFXOR
squelettique faible à modérée. Si vous n’êtes pas
certain de la cause de votre douleur, consultez
votre médecin.
- Si vous êtes suivi par un médecin, consultez-le
avant d’utiliser l’appareil.
- N’appliquez pas de stimulation sur votre
cou, cela pourrait provoquer des spasmes
musculaires graves qui pourraient bloquer vos
YRLHVUHVSLUDWRLUHVHWHQJHQGUHUGHVGLIÀFXOWpV
182 FRANÇAIS
-
-
-
-
-
respiratoires qui pourraient également avoir un
effet défavorable sur votre rythme cardiaque ou
votre tension artérielle.
N’appliquez pas de stimulation sur votre torse car
le courant électrique qui circule dans le torse peut
provoquer des troubles du rythme cardiaque,
pouvant s’avérer mortels.
Les effets de stimulation sur le cerveau étant
inconnus, la stimulation ne doit pas être appliquée
à la tête et les électrodes ne doivent pas être
placées de chaque côté de la tête.
Faites attention si avez une disposition aux
hémorragies internes suite aux impacts ou
blessures.
Consultez votre médecin si vous avez
récemment subi une intervention chirurgicale,
car la stimulation peut avoir un effet négatif sur le
processus de guérison.
N’appliquez pas de stimulation sur ou à proximité
de lésions cancéreuses.
N’appliquez pas de stimulation sur des plaies
ouvertes ou sur des zones blessées, rouges,
LQIHFWpHVRXHQÁDPPpHVRXGHVpUXSWLRQV
cutanées (par exemple phlébite, thrombophlébite
et varices).
N’appliquez pas de stimulation sur des zones
cutanées dont les sensations ne sont pas normales.
Appliquez uniquement la stimulation sur une peau
normale, intacte, propre et saine.
L’utilisation de la stimulation électrique et des
électrodes conductrices peut entraîner une
irritation ou une sensibilisation de la peau.
N’appliquez pas de stimulation en conduisant, en
utilisant des machines ou en exécutant toute autre
activité dans laquelle la stimulation électrique peut
vous exposer à un risque de blessure.
FRANÇAIS 183
- N’appliquez pas de stimulation pendant votre
sommeil. Si l’appareil est utilisé à l’heure du
coucher, réglez le programmateur pour qu’il
s’éteigne automatiquement.
- L’appareil et les électrodes sont conçus pour un
usage externe.
- N’appliquez pas de stimulation près d’appareils de
surveillance électronique (moniteurs cardiaques
ou alarmes d’électrocardiogramme par exemple)
car ces appareils peuvent ne pas fonctionner
correctement si l’appareil est en cours d’utilisation.
- N’appliquez pas de stimulation dans le bain, la
douche ou la piscine.
- 1·XWLOLVH]SDVGHSOkWUHRXGHEDQGHSRXUÀ[HUOHV
électrodes sur la peau.
- 9pULÀH]WRXMRXUVVLO·DSSDUHLOHWOHVpOHFWURGHVQH
présentent pas de signe de détérioration avant
utilisation.
- N’utilisez pas l’appareil ou une électrode si vous
constatez un quelconque endommagement.
- 1HPRGLÀH]SDVO·DSSDUHLORXOHVpOHFWURGHV
Attention
- Utilisez uniquement cet appareil avec le chargeur,
les câbles, les électrodes et les accessoires
recommandés par le fabricant.
- L’appareil n’est pas étanche. N’utilisez jamais
l’appareil dans des environnements humides et
évitez de le mouiller.
- L’appareil peut être utilisé aussi bien en intérieur
qu’en extérieur, mais il n’a pas été conçu pour
résister à toutes les conditions climatiques.
- L’appareil ne résiste pas à des températures
EDVVHVRXpOHYpHV9pULÀH]OHVFRQGLWLRQV
de fonctionnement dans le chapitre
« Caractéristiques ».
184 FRANÇAIS
- Le port de connexion USB doit uniquement
être utilisé par un professionnel de la santé avec
l’application PC Wireless TENS Pro (PR3094)
fournie par Philips.
- Les électrodes ont un temps de conservation
OLPLWp9pULÀH]ODGDWHG·H[SLUDWLRQVXUO·HPEDOODJH
avant utilisation. N’utilisez pas d’électrodes dont la
date d’expiration est dépassée. Pour commander
des électrodes de rechange, consultez le chapitre
« Commande d’accessoires ».
- Assurez-vous de terminer le traitement en
pWHLJQDQWOHVXQLWpV7(16RXHQGpÀQLVVDQWXQH
intensité de 0 mA sur la télécommande avant
de retirer les unités TENS, la rallonge (si utilisée,
PR3094 uniquement) ou les électrodes. Si vous ne
terminez pas le traitement, vous pouvez éprouver
une sensation désagréable dans vos doigts. Cette
sensation n’est pas nuisible, mais elle peut être
désagréable.
- Utilisez et stockez toujours les électrodes en
suivant les instructions des chapitres « Utilisation
de l’appareil » et « Après utilisation ».
- Si l’appareil ne fonctionne pas comme décrit dans
ce mode d’emploi, cessez de l’utiliser et contactez
le Service Consommateurs Philips. Consultez le
chapitre « Garantie et assistance » pour obtenir
toutes les coordonnées.
Conforme aux normes
- L’appareil est conforme à toutes les normes
relatives aux appareils médicaux électriques de
classe IIa et aux appareils utilisant la stimulation
électrique pour une utilisation à domicile.
- Cet appareil Philips est conforme à toutes les
normes et à tous les règlements applicables relatifs
à l’exposition aux champs électromagnétiques.
FRANÇAIS 185
Présélection de programmes
Présentation des programmes
L’appareil est livré avec 8 programmes préréglés
(PR3093) ou 15 programmes préréglés (PR3094). Il
existe trois types de neurostimulation transcutanée :
classique, en rafale et en modulation de fréquence.
Pour plus de détails, voir ci-dessous.
Programmes de neurostimulation
transcutanée classique
La neurostimulation transcutanée classique est
un programme de neurostimulation transcutanée
courante avec stimulation à haute fréquence. Celui-ci
est basé sur la théorie de la porte qui indique que
ce type de stimulation entraîne une transmission
de signaux de douleur et la bloque dans le système
nerveux. Il peut être comparable à un système
d’élimination de la douleur. La plupart des utilisateurs
emploie la neurostimulation transcutanée classique
pendant 30 minutes par session, mais vous pouvez
l’utiliser aussi souvent et aussi longtemps que vous le
souhaitez. L’effet est généralement plus perceptible
lors de la stimulation. L’effet se dissipe généralement
assez rapidement lorsque la stimulation s’arrête. Vous
GHYH]UpJOHUO·LQWHQVLWpGXSURJUDPPHDÀQGHELHQ
ressentir la stimulation. Toutefois, les stimulations ne
doivent pas procurer de sensations désagréables ni
douloureuses.
186 FRANÇAIS
Nom du
programme
de
neurostimulation
transcutanée
classique
N° de
programme
sur la
télécommande
PR3093
Description du proN° de
gramme
programme
sur la
télécommande
PR3094
Durée
de
séance
suggérée
Classique
1
1
Peut vous donner une
Aucune
stimulation de picotement limite
en continu
Stimulus
en profondeur
2
2
Peut vous donner une
sensation de stimulation
en profondeur
Aucune
limite
Pré-activité
3
3
Peut vous donner une
stimulation plus douce et
localisée
Aucune
limite
Stimulus
doux
-
4
Peut vous donner une
sensation stimulante
douce, pour les parties
sensibles du corps, par
exemple
Aucune
limite
Stimulus
profond
-
5
Peut vous donner une
sensation stimulante
profonde
Aucune
limite
Impulsion
rayonnante
-
6
Peut vous donner une
sensation de stimulation
plus rayonnante
Aucune
limite
FRANÇAIS 187
Programmes de neurostimulation
transcutanée en rafale
La neurostimulation transcutanée en rafale offre une
stimulation à haute fréquence en série d’impulsions.
Ce type de stimulation est connu pour déclencher la
libération d’endorphines. Les endorphines sont des
analgésiques produits par le corps.Vous pouvez utiliser
le programme de neurostimulation transcutanée en
rafale environ 30 minutes plusieurs fois par jour, en
3 fois par exemple. Il est conseillé de régler l’intensité
du programme en rafale pour ressentir fortement
la stimulation. Les programmes en rafale procurent
généralement une sensation plus forte, qui peut être
un peu désagréable. Il est également conseillé de régler
l’intensité à un niveau qui produit des contractions
musculaires visibles dans la zone de stimulation.
Ces contractions ne sont pas nocives. Si elles sont
inconfortables, vous pouvez diminuer l’intensité, choisir
un programme différent ou déplacer les électrodes.
La neurostimulation transcutanée en rafale doit être
appliquée de préférence au repos, car elle peut entraîner
une contraction musculaire dans la zone de stimulation.
Nom du
programme
de neurostimulation
transcutanée en
rafale
N° de
programme
sur la
télécommande
PR3093
N° de
programme
sur la
télécommande
PR3094
Description du programme
Durée
de
séance
suggérée
Rafale en
continu
4
7
30
Peut vous donner une
min.*
stimulation en rafale
d’impulsions pour
libérer des endorphines
dans votre corps
188 FRANÇAIS
Nom du
programme
de neurostimulation
transcutanée en
rafale
N° de
programme
sur la
télécommande
PR3093
N° de
programme
sur la
télécommande
PR3094
Description du programme
Durée
de
séance
suggérée
Pétrissage
lent
5
8
Peut vous donner une
stimulation en rafale
plus lente par massage
pour libérer des endorphines
30
min.*
Pétrissage
doux
6
9
Peut vous donner une 30
min.*
stimulation en rafale
plus douce pour libérer
des endorphines dans
votre corps
Pétrissage
en profondeur
-
10
Peut vous donner une
stimulation en rafale
plus locale et plus
profonde pour libérer
des endorphines dans
votre corps
30
min.*
Rafale
diffuse
-
11
Peut vous donner
une stimulation en
rafale plus diffuse pour
libérer des endorphines dans votre
corps
30
min.*
* éventuellement plusieurs fois par jour
FRANÇAIS 189
Programmes de neurostimulation
transcutanée en modulation de fréquence
La neurostimulation transcutanée en modulation
de fréquence est un programme dans lequel la
fréquence de l’impulsion varie d’un niveau bas à
pOHYp,OSHXWrWUHSOXVFRQIRUWDEOHRXSOXVHIÀFDFH
que les autres programmes dans certains cas. Vous
pouvez utiliser la neurostimulation transcutanée
en modulation de fréquence environ 30 minutes,
plusieurs fois par jour (3 fois par exemple).
Nom du
programme
en modulation
de fréquence
N° de
programme
sur la
télécommande
PR3093
Description du proN° de
gramme
programme
sur la
télécommande
PR3094
Fréquence
mixte
7
12
Peut vous donner une 30 min.*
sensation de circulation
de la stimulation
Massage
par impulsion
8
13
Peut vous donner une
sensation de stimulation plus impulsive
30 min.*
Massage
profond
-
14
Peut vous donner une
sensation de circulation plus lente et plus
profonde
30 min.*
Massage
léger
-
15
Peut vous donner une 30 min.*
sensation de circulation
douce de la stimulation
* éventuellement plusieurs fois par jour
Durée de
séance
suggérée
190 FRANÇAIS
Caractéristiques des programmes
Le tableau ci-dessous fournit des informations sur
la fréquence, la largeur de l’impulsion et le temps
SUpGpÀQLGHFKDTXHSURJUDPPH'DQVWRXVOHV
programmes, l’impulsion de courant a une onde
biphasique symétrique.
Nom du N° de
proprogramme gramme
PR3093
Type
FréN° de
d’émis- quence
programme sion
PR3094
Largeur
de l’impulsion
Durée
SUpGpÀnie
Classique
1
1
Classique
100 Hz
200 µs
continu
Stimulus
en profondeur
2
2
Classique
40 Hz
200 µs
continu
Pré-activité
3
3
Classique
100 Hz
150 µs
continu
Stimulus
doux
-
4
Classique.
80 Hz
60 µs
continu
Stimulus
profond
-
5
Classique
80 Hz
150 µs
continu
Impulsion
rayonnante
-
6
Classique
60 Hz
150 µs
continu
Rafale
en
continu
4
7
Rafale
100 Hz,
2 Hz
250 µs
30 min
FRANÇAIS 191
Nom du N° de
proprogramme gramme
PR3093
Type
FréN° de
d’émis- quence
programme sion
PR3094
Largeur
de l’impulsion
Durée
SUpGpÀnie
Pétrissage
lent
5
8
Rafale
80 Hz,
1 Hz
200 µs
30 min
Pétrissage
doux
6
9
Rafale
80 Hz,
3 Hz
200 µs
30 min
Pétrissage en
profondeur
-
10
Rafale
80 Hz,
2 Hz
150 µs
30 min
Rafale
diffuse
-
11
Rafale
80 Hz,
2 Hz
180 µs
30 min
Fréquence
mixte
7
12
Modu- 8100 Hz
lation
de fréquence
250 µs
30 min
Massage
par impulsion
8
13
Modu- 2-8 Hz
lation
de fréquence
250 µs
30 min
Massage
profond
-
14
Modu- 2-80 Hz 180 µs
lation
de fréquence
30 min
Massage
léger
-
15
Modu- 8-80 Hz 150 µs
lation
de fréquence
30 min
192 FRANÇAIS
Remarque : Avec les appareils Wireless TENS Pro
(PR3094), les professionnels de la santé peuvent
utiliser l’application PC Wireless TENS Pro pour créer
et installer des programmes supplémentaires adaptés
aux besoins de leurs patients dans le cadre d’un
programme de gestion de la douleur.
3UpVHQWDWLRQGXSURGXLWÀJ
1 Télécommande
$IÀFKHXU
- A. Symbole de l’écran d’accueil
- B. Symbole de l’écran Programme
- C. Symbole de l’écran Programmateur
- D. Symbole de batterie
- E. Symbole de l’écran Activité
- F. Symbole de l’écran Paramètres
3 Bouton d’intensité (PR3093) ; bouton d’intensité
pour le canal d’extension (troisième et
quatrième électrodes) (PR3094)
4 Bouton d’intensité pour le canal principal
(première et deuxième électrodes) (PR3094)
5 Bouton OK
6pOHFWHXUDYHFÁqFKHVYHUVOHKDXWOHEDVOD
droite et la gauche
7 Clip ceinture détachable
8 Couvercle du compartiment à pile
9 Connecteurs de canal d’extension pour la
troisième et la quatrième électrodes (PR3094
uniquement)
10 Câble de canal d’extension (PR3094 uniquement)
11 Prise de raccordement du câble de canal
d’extension aux unités TENS (PR3094
uniquement)
12 Bouton marche/arrêt des unités TENS
13 Unités TENS
14 Coin amovible (PR3094 uniquement)
FRANÇAIS 193
15
16
17
18
19
Voyant d’état de la batterie des unités TENS
Voyant d’état de traitement des unités TENS
Adaptateur
Chargeur
Électrode à hydrogel auto-adhésive
Remarque :Vous trouverez l’image associée à l’intérieur
du capot avant.
Avant utilisation
Charge des unités TENS
Pour pouvoir utiliser l’appareil, vous devez d’abord
charger les unités TENS. La charge des unités TENS
prend env. 3 heures si l’appareil est à température
ambiante. Lorsque la batterie est complètement
FKDUJpHHOOHFRQWLHQWVXIÀVDPPHQWG·pQHUJLHSRXU
pouvoir être utilisée environ 8 heures en continu
dans des conditions normales de fonctionnement.
Remarque : Si la batterie rechargeable des unités
TENS n’est pas complètement chargée lorsque vous
démarrez une séance, les piles peuvent s’épuiser en
cours de traitement. Nous vous conseillons de toujours
charger complètement les unités TENS avant de
commencer une séance.
Remarque : Le traitement n’est pas possible lorsque les
unités TENS sont en charge.
1 Insérez l’adaptateur du chargeur dans une prise
secteur.
2 Placez l’unité TENS avec la batterie
rechargeable (celle sans le bouton marche/
arrêt et les voyants) dans le chargeur.
194 FRANÇAIS
, Le voyant d’état de la batterie de l’autre unité
TENS clignote en vert pendant la charge.
, Le voyant d’état de la batterie cesse de
clignoter et reste vert lorsque la batterie est
complètement chargée.
3 Enlevez l’unité TENS du chargeur lorsque la
batterie est complètement chargée.
Remarque : Débranchez toujours le chargeur de
l’alimentation après utilisation en retirant l’adaptateur
de la prise secteur.
Préparation au traitement avec deux canaux
et quatre électrodes (PR3094 uniquement)
L’appareil Wireless TENS Pro (PR3094) est livré avec
un câble d’extension qui permet de connecter deux
électrodes supplémentaires. Cet appareil possède
deux canaux. Sa télécommande dispose de deux
boutons d’intensité, un pour chaque canal.
Préparation pour la séance
1 Retirez le coin détachable des unités TENS
pour que la prise soit accessible au câble
d’extension.
Remarque : Conservez le coin détachable pour une
utilisation ultérieure.
Attention : Conservez le coin détachable hors de
portée des enfants.
FRANÇAIS 195
2 ,QVpUH]ODÀFKHGXFkEOHG·H[WHQVLRQGDQVOD
prise.
Préparation de la télécommande
Insertion des piles dans la télécommande
1 Retirez le clip ceinture de la télécommande, s’il
\pWDLWÀ[p
2 Ôtez le couvercle du compartiment des piles
de la télécommande.
3 Insérez deux piles alcalines AAA 1,5 V neuves
dans la télécommande.
Remarque :Veillez à respecter la polarité des piles
indiquée dans le compartiment à piles.
Remarque : Retirez les piles si vous n’utilisez pas
l’appareil pendant un mois ou plus pour éviter toute
fuite.
4 Repositionnez le couvercle du compartiment
des piles sur la télécommande.
196 FRANÇAIS
5 Si vous voulez porter la télécommande à votre
ceinture ou à la taille, rattachez le clip ceinture
sur la télécommande.Vous pouvez également
utiliser la télécommande sans le clip ceinture.
Verrouillage et déverrouillage de la
télécommande
Le panneau de commande de la télécommande
se verrouille automatiquement après un certain
temps d’inactivité pour empêcher toute utilisation
accidentelle.
1 Lorsque vous appuyez sur une touche de la
télécommande, vous êtes invité à appuyer sur
ODWRXFKH2.SXLVVXUODÁqFKHYHUVOHKDXW
2 Appuyez sur la touche OK pour déverrouiller
la télécommande.
, 9RXVrWHVLQYLWpjDSSX\HUVXUODÁqFKHYHUVOH
haut.
3 $SSX\H]VXUODÁqFKHYHUVOHKDXWVXUOH
sélecteur.
, Lorsque vous déverrouillez la télécommande,
vous pouvez encore utiliser le panneau de
commande.
FRANÇAIS 197
, Lorsque vous avez inséré des piles neuves et que
les unités TENS sont éteintes, l’écran « aucune
connexion » apparaît.
Remarque : Cet écran peut également apparaître
pour d’autres raisons (voir « Signaux d’erreur de
la télécommande » dans le chapitre « Signaux de
l’appareil »).
4 Si vous voulez verrouiller la télécommande,
maintenez la touche OK enfoncée pendant
2 secondes.
Remarque : L’écran apparaît vide lorsque la
télécommande est verrouillée.
Conseil :Verrouillez la télécommande lorsque vous avez
commencé la séance. Cela vous permet de porter la
télécommande attachée à votre ceinture ou dans une
SRFKHVDQVDXFXQULVTXHGHPRGLÀFDWLRQDFFLGHQWHOOH
des réglages.
Réglage de la date et de l’heure
Si vous souhaitez utiliser le suivi des activités pour
enregistrer les modes de traitement et les activités,
vous devez régler la date et l’heure de votre
télécommande.
1 L’écran de réglage de la date et de l’heure
s’ouvre automatiquement sur l’écran, avec le
champ Date mis en surbrillance.
Remarque : Cet écran ne s’ouvre automatiquement
qu’à la première utilisation ou si vous remplacez les
piles plus de 24 heures après leur épuisement. Dans
tous les autres cas, sélectionnez le symbole de l’écran
3DUDPqWUHVSRXUPRGLÀHUODGDWHHWO·KHXUH
198 FRANÇAIS
2 $SSX\H]VXUODWRXFKH2.SRXUPRGLÀHUOH
réglage de la date.
, Le champ Jour est mis en surbrillance.
3 8WLOLVH]ODÁqFKHYHUVOHKDXWRXYHUVOHEDV
SRXUFKRLVLUOHMRXUHWDSSX\H]VXUODÁqFKH
vers la droite pour accéder au champ Mois.
, Le champ Mois est mis en surbrillance.
4 8WLOLVH]ODÁqFKHYHUVOHKDXWRXYHUVOHEDV
SRXUFKRLVLUOHPRLVHWDSSX\H]VXUODÁqFKH
vers la droite pour accéder au champ Année.
, Le champ Année est mis en surbrillance.
5 8WLOLVH]ODÁqFKHYHUVOHKDXWRXYHUVOH
bas pour choisir l’année et appuyez sur la
WRXFKH2.SRXUFRQÀUPHUODGDWH
6 8WLOLVH]ODÁqFKHYHUVOHEDVSRXUDFFpGHUDX
champ de réglage de l’heure.
7 $SSX\H]VXUODWRXFKH2.SRXUPRGLÀHUOH
réglage de l’heure.
, L’écran de réglage de l’heure s’ouvre.
, Le champ Heure est mis en surbrillance.
8 8WLOLVH]ODÁqFKHYHUVOHKDXWRXYHUVOHEDV
SRXUFKRLVLUO·KHXUHHWDSSX\H]VXUODÁqFKH
vers la droite pour accéder au champ Minutes.
, Le champ Minutes est mis en surbrillance.
FRANÇAIS 199
9 8WLOLVH]ODÁqFKHYHUVOHKDXWRXYHUVOHEDV
pour choisir les minutes et appuyez sur la
WRXFKH2.SRXUFRQÀUPHUO·KHXUH
10 8WLOLVH]ODÁqFKHYHUVOHEDVSRXUDFFpGHUDX
champ de format de l’heure.
11 $SSX\H]VXUODWRXFKH2.SRXUPRGLÀHUOH
format de l’heure.
12 8WLOLVH]ODÁqFKHYHUVOHKDXWRXYHUVOHEDV
pour passer de l’horloge 24 heures à l’horloge
12 heures. Appuyez sur la touche OK pour
FRQÀUPHUYRWUHFKRL[
Utilisation de l’appareil
Fixation des électrodes et des unités TENS
1 Assurez-vous que la peau est saine et sans
blessures ou rougeurs avant d’y placer les
électrodes.
Remarque : Ne placez pas les électrodes sur une peau
LUULWpHRXHQÁDPPpHDYHFGHVSODLHVRXYHUWHVGHV
lésions cancéreuses ou des rougeurs.
2 Nettoyez la peau avec un tissu humide et
séchez-la. La peau sur laquelle vous allez placer
les électrodes doit être sèche, propre, sans
crème ni lotion.
Remarque : La saleté, la graisse ou les particules
présentes sur la peau peuvent se loger dans l’hydrogel
des électrodes. Cela nuit au pouvoir adhésif des
électrodes.
200 FRANÇAIS
3 Sortez les électrodes du sachet en plastique et
YpULÀH]TX·HOOHVQHSUpVHQWHQWSDVGHVLJQHVGH
détérioration ou d’usure.
Attention : N’utilisez pas les électrodes dont la
date d’expiration est dépassée. La date d’expiration
est indiquée sur le sachet en plastique refermable.
Remarque : Remplacez les électrodes lorsqu’elles
sont endommagées ou sales, lorsqu’elles ont perdu
leur pouvoir adhésif ou lorsque la stimulation devient
inconfortable, c’est-à-dire lorsque vous éprouvez une
sensation de picotement ou de pincement désagréable.
4 Retirez l’électrode du sachet et placez-la sur la
peau, sur la zone de traitement. Reportez-vous
à la section « Mise en place des électrodes »
ci-dessous et au guide de positionnement
ÀJXUDQWjODÀQGHFHPRGHG·HPSORL
5 Placez la deuxième électrode sur la partie du
corps que vous allez traiter. Dans le cas du
PR3094, vous pouvez placer également une
troisième et une quatrième électrodes sur la
partie du corps que vous allez traiter.
Remarque : Placez toujours les électrodes sur la peau
avant de connecter les unités TENS
Remarque : Ne placez pas les électrodes les unes audessus des autres et évitez qu’elles soient en contact
les unes avec les autres.
FRANÇAIS 201
6 Fixez les unités TENS aux électrodes. Les
unités TENS disposent d’aimants situés
au centre pour faciliter la connexion aux
connecteurs en métal des électrodes. Lorsque
les unités TENS sont correctement verrouillées
sur les électrodes, vous entendez un clic.
5HPDUTXH9RXVSRXYH]SRUWHUOHVpOHFWURGHVÀ[pHV
aux unités TENS sous vos vêtements, même pendant
la séance.
Remarque : Avec de nombreuses séances, vous pouvez
continuer d’effectuer toutes les activités autorisées
et qui ne sont pas déconseillées dans le chapitre
« Important » lorsque vous portez des unités TENS sur
votre corps.Vous pouvez également continuer à porter
les unités TENS sur votre corps entre les séances.
Remarque : Si vous souhaitez effectuer une séance
avec quatre électrodes (PR3094 uniquement), attachez
G·DERUGOHVXQLWpV7(16jGHX[pOHFWURGHVSXLVÀ[H]
les connecteurs du câble d’extension aux deux autres
électrodes.
7 Appuyez sur le bouton marche/arrêt pour
passer les unités TENS en mode veille.
, Le voyant d’état de la séance des unités TENS
clignote en vert pour indiquer qu’elles sont en
mode veille et prêtes pour la séance.
, Si vous ne commencez pas la séance dans
les 5 minutes, les unités TENS s’éteignent
automatiquement. Si cela se produit, vous devez
appuyer à nouveau sur le bouton marche/arrêt
pour commencer une séance.
202 FRANÇAIS
Mise en place des électrodes
Pour obtenir un résultat de stimulation optimal, il
est essentiel de placer les électrodes correctement.
Veillez à toujours avoir une sensation de peau
normale dans la zone de traitement avant de
poser les électrodes. La zone optimale peut varier
légèrement d’une personne à une autre. Par
conséquent, essayez de déplacer les électrodes
jusqu’à ce que vous obteniez les résultats les
SOXVHIÀFDFHV'DQVFHUWDLQVFDVLOSHXWrWUH
utile de marquer l’endroit pour un usage futur.
Pour toute remarque concernant la mise en
place des électrodes, reportez-vous au guide
GHSRVLWLRQQHPHQWÀJXUDQWjODÀQGHFHPRGH
d’emploi. Veuillez noter que vous aurez peut-être
besoin d’aide pour placer les électrodes sur certains
endroits de votre corps.
En règle générale, les électrodes doivent être
placées sur ou à proximité de la zone douloureuse. Il
possible que la stimulation entraîne une contraction
de muscle visible dans la zone traitée. Cela ne
présente aucun danger, mais si vous trouvez que
ces contractions sont inconfortables, déplacez les
électrodes.
Ne placez pas les électrodes sur votre cou ou
sur votre torse. Ne placez pas les électrodes sur
XQHSHDXLUULWpHRXHQÁDPPpHDYHFGHVSODLHV
ouvertes, des lésions cancéreuses ou des rougeurs.
'pEXWHWÀQGHODVpDQFH
Voici l’écran d’accueil. Vous pouvez voir le
programme, la durée de séance et l’intensité
sélectionnés. Sur la barre de menus au bas de l’écran,
vous pouvez voir de gauche à droite :
FRANÇAIS 203
- Le symbole de l’écran d’accueil : ce symbole est
mis en surbrillance lorsque l’écran d’accueil est
DIÀFKp
- Le symbole de l’écran Programme : sélectionnez
ce symbole pour choisir un programme de
traitement.
- Le symbole de l’écran Programmation :
VpOHFWLRQQH]FHV\PEROHSRXUGpÀQLUODGXUpHGH
la séance.
- Le symbole de la batterie : sélectionnez ce
V\PEROHSRXUYpULÀHUOHQLYHDXGHODEDWWHULH
- Le symbole de l’écran Activité : sélectionnez ce
symbole pour sélectionner le moniteur d’activité
(reportez-vous à la section « Suivi des activités »
de ce chapitre).
- Le symbole de l’écran Paramètres : sélectionnez
FHV\PEROHSRXUPRGLÀHUODGDWHRXO·KHXUH
(reportez-vous au chapitre « Avant utilisation »
pour obtenir plus de détails sur le réglage de la
date et de l’heure).
Remarque : La barre de menus de l’écran d’accueil et
des autres écrans disparaît au bout d’un instant, mais
elle réapparaît dés que vous appuyez sur une touche.
Sélection d’un programme
1 Lorsque vous voulez sélectionner un autre
programme que celui par défaut sur l’écran
G·DFFXHLOXWLOLVH]ODÁqFKHJDXFKHRXGURLWH
pour mettre en surbrillance la lettre P de
programme sur la barre de menus.
204 FRANÇAIS
2 $SSX\H]VXUODWRXFKH2.SRXUFRQÀUPHU
TXHYRXVYRXOH]PRGLÀHUOHSURJUDPPH
sélectionné.
, L’écran Programme s’ouvre avec le programme
précédemment sélectionné mis en surbrillance.
3 8WLOLVH]ODÁqFKHYHUVOHKDXWRXYHUVOHEDV
pour choisir un programme et appuyez sur la
WRXFKH2.SRXUFRQÀUPHUYRWUHFKRL[
Remarque : Le programme sélectionné est enregistré
par défaut dans la mémoire de la télécommande. La
prochaine fois vous utiliserez l’appareil, ce programme
VHUDXWLOLVp6LYRXVYRXOH]PRGLÀHUOHSURJUDPPH
suivez les étapes 1 à 3 ci-dessus.
Remarque : Le même programme s’applique aux deux
canaux de l’appareil Wireless Tens Pro (PR3094).
Réglage de la durée d’un programme
1 Vous pouvoir voir la durée sélectionnée par
défaut sur l’écran d’accueil. Si vous souhaitez
ODPRGLÀHUXWLOLVH]ODÁqFKHJDXFKHRXGURLWH
pour mettre en surbrillance l’icône du
programmateur sur la barre de menus.
5HPDUTXH/RUVTXHYRXVPRGLÀH]OHSURJUDPPH
la durée est réinitialisée à la durée par défaut de ce
programme.
2 $SSX\H]VXUODWRXFKH2.SRXUFRQÀUPHUOD
PRGLÀFDWLRQGHGXUpH
, Sur l’écran du programmateur, la durée par
défaut est mise en surbrillance.
FRANÇAIS 205
3 8WLOLVH]ODÁqFKHYHUVOHEDVRXYHUVOHKDXW
pour choisir la durée souhaitée et appuyez sur
ODWRXFKH2.SRXUFRQÀUPHU
- Vous pouvez régler la durée de la séance en
minutes.
- Vous pouvez également régler la durée de la
VpDQFHVXU©FRQWLQXªO·pFUDQDIÀFKHOHV\PEROH
continu sur l’écran au lieu de la durée de la séance
en minutes. Si ce symbole clignote sur l’écran
d’accueil, la séance se poursuit jusqu’à ce que vous
\PHWWLH]ÀQ
Remarque : La durée de séance sélectionnée est
enregistrée comme valeur par défaut dans la mémoire
de la télécommande. La prochaine fois vous utiliserez
l’appareil, ce réglage de durée sera utilisé. Si vous
VRXKDLWH]PRGLÀHUODGXUpHVXLYH]OHVpWDSHVj
ci-dessus.
Remarque : La même durée s’applique aux deux
canaux de l’appareil Wireless TENS Pro (PR3094).
Démarrage et arrêt d’une séance (PR3093)
Pour commencer une séance, vous devez d’abord
mettre les unités TENS sous tension avec le bouton
marche/arrêt avant d’appuyer sur le côté + du
bouton d’intensité pour augmenter l’intensité.
1 Appuyez sur le côté + du bouton d’intensité
pour régler l’intensité. Elle commence toujours
à 0 mA. La séance démarre et le compte à
rebours commence dès que l’intensité est
supérieure à 0 mA. Plus l’intensité est élevée,
plus la pulsation est forte dans la zone dans
ODTXHOOHOHVpOHFWURGHVVRQWÀ[pHV
206 FRANÇAIS
, Maintenez enfoncé le côté + du bouton
d’intensité pour augmenter l’intensité lentement
et de façon constante. Relâchez le bouton
d’intensité lorsque vous avez trouvé le niveau de
stimulation voulu.
Remarque : Pour les programmes de neurostimulation
transcutanée classique et en modulation de fréquence,
vous devez sentir nettement la stimulation, mais celle-ci
ne doit pas vous procurer de sensation désagréable, ni
être douloureuse.
Remarque : Pour le programme de neurostimulation
transcutanée en rafale, vous devez sentir fortement la
stimulation, elle procure généralement une sensation
plus nette, voire un peu désagréable. Il est également
conseillé de régler l’intensité à un niveau qui produit
des contractions musculaires visibles dans la zone
de stimulation. Ces contractions ne sont pas nocives.
Si elles sont inconfortables, vous pouvez diminuer
l’intensité, choisir un autre programme ou déplacer les
électrodes.
, Le niveau d’intensité est indiqué par des chiffres
situés au-dessus du bouton d’intensité. Les
plages d’intensité s’étendent de 0 mA à 60 mA.
Le niveau d’intensité est indiqué par la barre de
QLYHDXG·LQWHQVLWpÀJXUDQWVXUOHF{WpGURLWGH
l’écran. Plus la barre est élevée, plus l’intensité
est forte.
, Lorsque la séance démarre, le voyant d’état
de traitement des unités TENS commencent à
clignoter en jaune.
, /·pFUDQG·DFFXHLOGHODWpOpFRPPDQGHDIÀFKHOH
programme sélectionné, la durée de la séance et
l’intensité choisie.
FRANÇAIS 207
, Si l’intensité est douloureuse, appuyez sur
le côté - du bouton d’intensité pour réduire
l’intensité de manière lente et constante.
Remarque :Votre corps s’adapte tout d’abord à
l’intensité de la stimulation, vous devrez peut-être
ajuster le niveau d’intensité après un certain temps
DÀQG·DVVXUHUXQHVWLPXODWLRQRSWLPDOH
2 3RXUPHWWUHÀQjODVpDQFHDYDQWODGXUpH
GpÀQLHRXVLYRXVDYH]UpJOpODGXUpHGHOD
séance sur « continu », maintenez enfoncé
le côté - du bouton d’intensité pendant
3 secondes pour faire descendre l’intensité
à 0 mA. Une fois cette intensité atteinte, les
unités TENS n’émettent plus de pulsations.
5HPDUTXH9RXVSRXYH]pJDOHPHQWPHWWUHÀQjOD
séance en appuyant sur le bouton marche/arrêt des
unités TENS. Dans ce cas, le traitement sur les deux
canaux s’arrête immédiatement.
Démarrage et arrêt d’une séance (PR3094)
Pour commencer une séance, vous devez d’abord
mettre les unités TENS sous tension avec le bouton
marche/arrêt avant d’appuyer sur les côtés + des
boutons d’intensité pour augmenter l’intensité.
1 Appuyez sur le côté + des boutons d’intensité
pour régler l’intensité pour le canal principal et
le canal d’extension séparément et commencer
la séance.
, Maintenez enfoncé le côté + du bouton
d’intensité situé sur le côté gauche de la
télécommande pour augmenter l’intensité du
canal principal. L’impulsion démarre entre les
deux premières électrodes.
208 FRANÇAIS
, Le niveau d’intensité est indiqué par des chiffres
situés au-dessus du bouton d’intensité. Le niveau
d’intensité est également représenté par la barre
GHQLYHDXG·LQWHQVLWpÀJXUDQWVXUOHF{WpJDXFKH
de l’écran.
, Maintenez enfoncé le côté + du bouton
d’intensité sur le côté droit de la télécommande
pour augmenter l’intensité du canal d’extension.
L’impulsion démarre entre la troisième et la
quatrième électrodes.
, Le niveau d’intensité est indiqué par des chiffres
situés au-dessus du bouton d’intensité droit. Le
niveau d’intensité est représenté par la barre de
QLYHDXG·LQWHQVLWpÀJXUDQWVXUOHF{WpGURLWGH
l’écran.
2 3RXUPHWWUHÀQjODVpDQFHGHO·XQRXGHVGHX[
FDQDX[DYDQWODGXUpHGpÀQLHRXVLYRXVDYH]UpJOp
la durée de la séance sur « continu », maintenez
enfoncé le côté - du bouton d’intensité pendant
3 secondes pour faire descendre l’intensité à
0 mA. Une fois cette intensité atteinte, les unités
TENS n’émettent plus de pulsations.
Remarque : Étant donné que vous pouvez utiliser les
deux canaux indépendamment, vous pouvez arrêter le
traitement sur un canal pendant que vous continuez le
traitement sur l’autre.
5HPDUTXH9RXVSRXYH]pJDOHPHQWPHWWUHÀQjOD
séance en appuyant sur le bouton marche/arrêt des
unités TENS. Dans ce cas, le traitement sur les deux
canaux s’arrête immédiatement.
FRANÇAIS 209
Suivi des activités
Cette fonctionnalité supplémentaire disponible sur
ODWpOpFRPPDQGHSHUPHWGHYpULÀHUYRWUHPRGH
d’activité sur une journée, une semaine ou un mois.
Puisque l’activité et le rythme sont des éléments
importants dans la gestion de la douleur, le moniteur
d’activité inclus dans la télécommande vous fournit
XQRXWLOGHYpULÀFDWLRQGXGRVDJHGHYRVDFWLYLWpV
Si vous voulez en savoir plus sur l’auto-gestion de la
douleur et l’importance du rythme, veuillez lire le
livret du kit de formation à la douleur.
5HPDUTXH3RXUJDUDQWLUO·HIÀFDFLWpGXVXLYLGHV
activités, vous devez porter la télécommande sur ou à
proximité de votre taille toute la journée.Vous pouvez
l’attacher à votre ceinture avec le clip ceinture ou vous
pouvez la transporter dans la poche de votre pantalon
ou jupe.
Lecture des résultats
1 $SSX\H]VXUODÁqFKHGURLWHSRXUPHWWUHHQ
surbrillance l’icône d’activité sur la barre de
menus.
2 /HSUHPLHUpFUDQjV·RXYULUHVWO·DIÀFKDJH-RXU
8WLOLVH]ODÁqFKHYHUVOHKDXWRXYHUVOHEDV
pour passer d’un écran à un autre.
, /·DIÀFKDJH-RXULQGLTXHYRWUHQLYHDXG·DFWLYLWp
au cours des dernières 24 heures. La hauteur
des barres représente le nombre de minutes
pendant lesquelles vous avez été actif. La ligne
horizontale (A) illustre votre niveau d’activité
moyen et permet d’établir si votre niveau
d’activité au cours de la journée était au-dessus
ou en dessous de la moyenne.
210 FRANÇAIS
, /·DIÀFKDJH6HPDLQHLQGLTXHYRWUHQLYHDX
d’activité au cours des 7 derniers jours,
y compris aujourd’hui. Les lettres sous le
graphique indiquent les jours de la semaine.
La hauteur des barres représente le nombre
d’heures par jour pendant lesquelles vous avez
été actif au cours de la semaine écoulée. La ligne
horizontale (A) illustre votre niveau d’activité
moyen au cours des 6 derniers jours. Cette
ligne permet d’établir si le niveau d’activité de
la semaine précédente était au-dessus ou en
dessous de la moyenne. Elle permet également
d’établir les jours de la semaine précédente
pendant lesquels votre niveau d’activité a été audessus ou en-dessous de la moyenne.
, /·DIÀFKDJH0RLVLQGLTXHYRWUHQLYHDXG·DFWLYLWpDX
cours des quatre dernières semaines, y compris
aujourd’hui. Les semaines sont représentées
par des numéros sous le graphique. La hauteur
des barres représente le nombre d’heures par
jour pendant lesquelles vous avez été actif au
cours des quatre semaines précédentes. La ligne
horizontale (A) illustre votre niveau d’activité
moyen au cours du mois dernier. Cette ligne
permet d’établir si votre niveau d’activité au
cours du dernier mois est au-dessus ou en
dessous de la moyenne. Elle permet également
d’établir les jours où votre niveau d’activité à été
en dessous ou au-dessus de la moyenne.
FRANÇAIS 211
Objectif d’activité (PR3094)
Si vous gérez votre douleur avec l’appareil Wireless
TENS Pro en collaboration avec un professionnel
de la santé qui utilise l’application PC Wireless TENS
Pro (PR3094), le moniteur d’activité lui permettra
d’en savoir plus sur vos modes d’activité et de
traitements. L’application PC lui permet également
GHÀ[HUXQREMHFWLIG·DFWLYLWp6LXQREMHFWLIDpWpÀ[p
la ligne horizontale indique un (T) au lieu d’un (A).
, /·DIÀFKDJH-RXULQGLTXHYRWUHQLYHDXG·DFWLYLWp
au cours des dernières 24 heures. La ligne
horizontale (T) illustre le niveau d’objectif
G·DFWLYLWpGpÀQLHWSHUPHWG·pWDEOLUVLYRWUH
niveau d’activité au cours de la journée
correspond à l’objectif.
, /·DIÀFKDJH6HPDLQHLQGLTXHYRWUHQLYHDX
d’activité au cours des 7 derniers jours jusqu’à
aujourd’hui. La ligne horizontale (T) illustre
O·REMHFWLIG·DFWLYLWpGpÀQLSRXUODVHPDLQH(OOH
permet d’établir si le niveau d’activité au cours
de la semaine précédente a atteint l’objectif
et les jours où votre niveau d’activité a été
supérieur ou inférieur à l’objectif.
, /·DIÀFKDJH0RLVLQGLTXHYRWUHQLYHDXG·DFWLYLWp
au cours des quatre dernières semaines, jusqu’à
aujourd’hui. La ligne horizontale (T) illustre votre
niveau d’activité moyen au cours du dernier
mois. Elle permet de déterminer si votre niveau
d’activité au cours du dernier mois a atteint
l’objectif et les jours où votre niveau d’activité a
été supérieur ou inférieur à l’objectif.
212 FRANÇAIS
Après utilisation
Attention : Assurez-vous de terminer le traitement
HQpWHLJQDQWOHVXQLWpV7(16RXHQGpÀQLVVDQW
une intensité de 0 mA sur la télécommande avant
de retirer les unités TENS, la rallonge (si utilisée,
PR3094 uniquement) ou les électrodes. Si vous ne
terminez pas le traitement, vous pouvez éprouver
une sensation désagréable dans vos doigts. Cette
sensation n’est pas nuisible, mais elle peut être
désagréable.
1 Mettez les unités TENS hors tension en
appuyant sur le bouton marche/arrêt.
2 Retirez les unités TENS des électrodes en les
détachant.
Remarque : Si vous avez oublié de mettre les unités
TENS hors tension, elles s’éteindront automatiquement
dans les 5 minutes après avoir été détachées.
3 Rechargez les unités TENS pour qu’elles soient
prêtes pour le prochain traitement.
4 Retirez les électrodes de la peau en tirant sur
le bord.
Remarque : Ne laissez pas les électrodes sur la peau
pendant la nuit. Si vous présentez une irritation de
ODSHDXHVVD\H]GHÀ[HUOHVpOHFWURGHVVXUXQHDXWUH
zone. Assurez-vous de déplacer régulièrement les
pOHFWURGHVDÀQGHQHSDVDSSOLTXHUODVWLPXODWLRQWRXV
les jours au même endroit.
FRANÇAIS 213
Stockage des électrodes
1 Remettez les électrodes dans leur sac de
protection.
2 Insérez le sac de protection avec les électrodes
dans le sac.
3 Refermez bien le sac pour le protéger de la
poussière pendant le stockage.
Remarque : Pour maintenir les électrodes en bon état
et empêcher la couche d’hydrogel de se dessécher,
conservez-les toujours dans le sac refermable quand
HOOHVQHVRQWSDVÀ[pHVjYRWUHFRUSVSRXUXQ
WUDLWHPHQW)HUPH]OHVDFUHIHUPDEOHDÀQGHJDUDQWLU
un stockage sans poussière.
Remarque : Si vous souhaitez stocker les électrodes
pendant plus d’un mois, conservez-les à des
températures comprises entre +5 °C et 27 °C. Ne
conservez pas les électrodes dans le congélateur ni
dans le réfrigérateur. Évitez les chaleurs extrêmes et
l’exposition aux rayons directs du soleil.
Nettoyage
Ne plongez pas la télécommande ni les unités
TENS dans l’eau et ne les rincez jamais sous le
robinet.
214 FRANÇAIS
Ne plongez jamais les électrodes dans l’eau.
1 Nettoyez la télécommande, le chargeur, les
unités TENS et le câble d’extension (PR3094
uniquement) avec un chiffon humide et un
détergent doux, du liquide vaisselle par
exemple.
Remarque :Vous pouvez également les nettoyer avec
de l’alcool isopropylique à 70 % (IPA).
Attention : N’utilisez pas d’autres agents de
nettoyage que ceux mentionnés ci-dessus, car ils
pourraient endommager le matériau (perte de
brillance, par exemple).
2 Si les électrodes sont sales, mettez une goutte
d’eau sur votre doigt et ôtez doucement la
poussière de la surface.
Remarque : N’utilisez pas de savon ni d’alcool pour
nettoyer les électrodes.
Dépannage
Cette rubrique présente les problèmes les plus
courants que vous pouvez rencontrer avec vos
appareils Wireless TENS et Wireless TENS Pro. Si
vous ne parvenez pas à résoudre le problème à
l’aide des informations ci-dessous, rendez-vous sur
www.philips.com/support pour consulter les
questions fréquemment posées, ou contactez le
Service Consommateurs de votre pays.
FRANÇAIS 215
Problème
Cause possible
La
Les piles de la
télécommande télécommande
ne s’allume pas. sont épuisées.
Solution
Remplacez les piles (voir le
chapitre « Avant l’utilisation »).
Les piles
ne sont pas
correctement
placées.
Ouvrez le compartiment à piles
et placez les piles correctement
(reportez-vous au chapitre « Avant
utilisation »).
La
télécommande
est peut-être
cassée.
Contactez le
Service Consommateurs Philips.
Le voyant
d’état de la
batterie des
unités TENS
a clignoté en
orange et
l’appareil s’est
éteint.
La batterie des
unités TENS est
vide.
Chargez les unités TENS
(reportez-vous au chapitre « Avant
utilisation »).
Le voyant
d’état de la
batterie des
unités TENS
reste allumé en
orange.
La batterie des
unités TENS
est déchargée.
L’icône de la
batterie de la
télécommande
clignote.
Ceci indique que le niveau de
charge de la batterie est de 30 %.
Rechargez les unités TENS dès
que possible (reportez-vous au
chapitre « Avant utilisation »).
216 FRANÇAIS
Problème
Cause possible
Solution
Le symbole
« aucune
connexion »
apparaît
sur l’écran
(reportez-vous
au chapitre
« Signaux de
l’appareil »).
Il n’y a pas de
connexion
car les unités
TENS sont hors
tension.
9pULÀH]VLOHVXQLWpV7(16VRQW
allumées. Le voyant d’état de
traitement clignote en vert lorsque
les unités TENS sont allumées
et en mode veille. Si elles sont
éteintes, appuyez sur le bouton
marche/arrêt pour les allumer.
Il n’y a pas de
connexion
parce que la
batterie des
unités TENS est
vide.
Chargez les unités TENS
(reportez-vous au chapitre « Avant
utilisation »).
Les unités TENS
ont surchauffé
à l’intérieur. Le
cas échéant, le
voyant d’état
de traitement
clignote en
rouge.
Détachez les unités TENS et
laissez-les refroidir. Dès qu’elles ont
VXIÀVDPPHQWUHIURLGLYRXVSRXYH]
les rattacher aux électrodes et
appuyer sur le bouton marche/
arrêt situé sur les unités TENS
pour reprendre le traitement.
Les unités TENS peuvent devenir
chaudes à l’extérieur pendant le
traitement, mais jamais au point
d’entraîner des blessures ou des
dommages.
La
télécommande
est trop
éloignée des
unités TENS.
Rapprochez-la des unités TENS.
FRANÇAIS 217
Problème
Cause possible
Solution
Les unités TENS Contactez le
peuvent être
Service Consommateurs Philips.
cassées.
Il y a une croix
VXUO·DIÀFKHXU
et je ne peux
pas augmenter
le niveau
d’intensité pour
commencer
un traitement
(reportez-vous
au chapitre
« Signaux de
l’appareil »).
La croix
représente le
symbole « canal
interrompu ».
Elle peut
indiquer que les
électrodes ne
sont pas placées
correctement.
Assurez-vous que les électrodes
VRQWÀ[pHVFRUUHFWHPHQWVXU
la peau. Notez que le symbole
« canal interrompu » ne disparaît
que lorsque vous augmentez
l’intensité.
Le symbole
« canal
interrompu »
peut indiquer
que l’unité
ou les unités
TENS ne sont
pas placées
correctement
sur les
électrodes.
9pULÀH]VLOHVXQLWpV7(16VRQW
placées correctement sur les
électrodes. Wireless TENS Pro
(PR3094) uniquement : si le
symbole « canal interrompu »
se situe au-dessus du bouton
G·LQWHQVLWpJDXFKHYpULÀH]VLOHV
unités TENS sont connectées
correctement. Si la croix se situe
au-dessus du bouton d’intensité
GURLWYpULÀH]VLOHVFRQQHFWHXUVGX
câble d’extension sont branchés
correctement. Notez que le
symbole « canal interrompu »
ne disparaît que lorsque vous
augmentez l’intensité.
218 FRANÇAIS
Problème
Le symbole de
pile de la barre
de menus de la
télécommande
clignote.
Cause possible
Solution
Les électrodes
se sont
détachées de la
peau.
Les électrodes ont perdu leur
pouvoir adhésif car elles sont sales
ou utilisées depuis longtemps.
Vous pouvez essayer de nettoyer
les électrodes (reportez-vous
au chapitre « Nettoyage »). Si le
problème persiste, remplacez les
électrodes. Notez que le symbole
« canal interrompu » ne disparaît
que lorsque vous augmentez
l’intensité.
&HFLVLJQLÀHTXH
les piles de la
télécommande
sont faibles. Le
voyant d’état
des piles situé
sur les unités
TENS reste
allumé en
orange.
Vous pouvez poursuivre le
traitement comme à l’ordinaire.
Lorsque vous appuyez sur le
bouton marche/arrêt des unités
TENS pour arrêter le traitement,
remplacez les piles.
FRANÇAIS 219
Problème
Cause possible
Les unités TENS
Le voyant
ont surchauffé à
d’état de
traitement des l’intérieur.
unités TENS
clignote en
rouge et le
traitement s’est
arrêté.
J’ai éprouvé
une sensation
désagréable
lorsque j’ai
touché les
connecteurs
des unités
TENS ou les
électrodes.
Vous n’avez
pas diminué
l’intensité à 0
pour terminer
le traitement
avant de retirer
les unités TENS.
L’intensité est
La stimulation
trop élevée ou
semble
trop basse.
différente ou
moins agréable
que d’habitude.
Les électrodes
ne sont pas au
bon endroit.
Solution
Si les unités TENS ont surchauffé
à l’intérieur, retirez-les des
électrodes et laissez-les refroidir.
'qVTX·HOOHVRQWVXIÀVDPPHQW
refroidi, vous pouvez les rattacher
aux électrodes et appuyer sur le
bouton marche/arrêt situé sur
les unités TENS pour reprendre
le traitement. Les unités TENS
peuvent devenir chaudes à
l’extérieur pendant le traitement,
mais jamais au point d’entraîner
des blessures ou des dommages.
Diminuez toujours l’intensité à
0 mA avant de retirer les unités
TENS. De cette manière, vous
évitez une sensation désagréable
quand vous touchez les
connecteurs des unités TENS, le
câble d’extension ou les électrodes.
Cette sensation est désagréable,
mais elle n’est pas dangereuse.
Appuyez sur le côté + ou - du
bouton d’intensité pour augmenter
ou diminuer l’intensité.
Éteignez les unités TENS et
détachez-les des électrodes.
Enlevez les électrodes de la peau
et déplacez-les légèrement.
220 FRANÇAIS
Problème
Cause possible
Solution
Les électrodes
ne sont
SDVÀ[pHV
correctement.
Éteignez les unités TENS et
détachez-les des électrodes.
9pULÀH]VLOHVpOHFWURGHVVRQW
À[pHVFRUUHFWHPHQWVXUODSHDX
Les électrodes
sont trop sales.
Vous pouvez essayer de nettoyer
les électrodes (reportez-vous
au chapitre « Nettoyage »). Si le
problème persiste, remplacez les
électrodes.
Les électrodes
sont usées.
Remplacez les électrodes.
Signaux de l’appareil
Indications du niveau des piles sur la
télécommande
1 3RXUYpULÀHUOHQLYHDXGHVSLOHVGHOD
télécommande ou des unités TENS, utilisez la
ÁqFKHYHUVODJDXFKHRXYHUVODGURLWHSRXU
sélectionner l’icône de batterie dans la barre
de menus. L’écran de la batterie s’ouvre et
DIÀFKHOHQLYHDXGHFKDUJHGHODEDWWHULH
rechargeable des unités TENS à gauche et le
niveau de charge des piles de la télécommande
à droite. Le symbole de batterie peut indiquer
quatre niveaux de charge : batterie pleine,
batterie chargée aux deux tiers, batterie
chargée à un tiers et batterie vide.
FRANÇAIS 221
2 Lorsque la batterie des unités TENS est vide, la
connexion est perdue et le symbole « aucune
connexion » apparaît sur la gauche.
Signaux d’erreur sur la télécommande
Piles faibles
- /HV\PEROHGHEDWWHULHDIÀFKpHQEDVGHO·pFUDQGH
la télécommande clignote lorsque les piles de celleci sont faibles. Lorsque qu’elles sont complètement
déchargées, la télécommande s’éteint.
- /HV\PEROHGHEDWWHULHDIÀFKpHQEDVGHO·pFUDQ
de la télécommande clignote également lorsque
la batterie rechargeable des unités TENS est faible.
Si tel est le cas, le voyant d’état de la batterie des
unités TENS reste allumé en orange.
Remarque : Le symbole de batterie commence à
clignoter lorsque les piles de la télécommande ou
lorsque la batterie rechargeable des unités TENS
disposent de moins de 30 % de leur capacité totale.
Aucune connexion avec les unités TENS
- Ce symbole « aucune connexion » sur l’écran
indique qu’il n’y a aucune connexion entre la
télécommande et les unités TENS. Plusieurs causes
sont possibles :
1 La batterie rechargeable des unités TENS est vide.
2 Les unités TENS sont éteintes.
3 La télécommande est hors de portée des unités
TENS.
4 Si aucun des cas ci-dessus ne s’applique, cela
indique un dysfonctionnement des unités TENS.
222 FRANÇAIS
Canal interrompu
- Le symbole « canal interrompu » (croix)
sur l’écran indique une interruption du canal
correspondant.
- Si un canal est interrompu, plusieurs causes sont
possibles :
1 Il n’y a pas de contact entre les unités TENS et
les électrodes.
/HVpOHFWURGHVQHVRQWSDVÀ[pHVFRUUHFWHPHQW
sur la peau.
- Après vous être assuré que les électrodes
VRQWFRUUHFWHPHQWÀ[pHVjODSHDXHWTXHOHV
unités TENS sont correctement connectées
aux électrodes, appuyez sur le côté + du
ERXWRQG·LQWHQVLWpSRXUYpULÀHUVLOHFDQDOHVW
correctement connecté. Si tel est le cas, la croix
GLVSDUDvWHWODYDOHXUG·LQWHQVLWpV·DIÀFKH
Voyants des unités TENS
Indicateur d’état de la batterie
- L’indicateur d’état de la batterie des unités TENS
clignote :
1 L’indicateur d’état de la batterie clignote
en orange brièvement lorsque la batterie
rechargeable est vide puis les unités TENS
s’éteignent.
2 L’indicateur d’état de la batterie clignote en vert
lorsque les unités TENS sont en charge.
- L’indicateur d’état de la batterie reste allumé en
orange :
1 L’indicateur d’état de la batterie reste allumé
en orange lorsque la batterie rechargeable des
unités TENS est faible. La batterie rechargeable
ne dispose plus que de 30 % de sa capacité
totale. L’indicateur d’état de la batterie reste
également allumé en orange quand les piles de
la télécommande sont faibles.
FRANÇAIS 223
2
L’indicateur d’état de la batterie reste allumé
en vert lorsque la batterie rechargeable est
complètement chargée.
Voyant d’état de traitement
- Le voyant d’état de traitement des unités TENS
clignote :
1 Le voyant d’état de traitement clignote en vert
lorsque les unités TENS sont allumées et en
mode veille.
2 Le voyant d’état de traitement clignote en jaune
pendant le traitement pour indiquer que le
traitement est en cours.
3 Le voyant d’état de traitement clignote en rouge
lorsque les unités TENS sont en surchauffe.
Lorsque les unités TENS sont en surchauffe,
le traitement s’arrête automatiquement et
le symbole « aucune connexion » apparaît
VXUO·DIÀFKHXU'pWDFKH]OHVXQLWpV7(16GHV
électrodes et laissez-les refroidir. Dès qu’elles ont
VXIÀVDPPHQWUHIURLGLUDWWDFKH]OHVHWUHSUHQH]
le traitement.
Remarque : Il est normal que les unités TENS
deviennent chaudes pendant le traitement. En
fonctionnement normal, leur chaleur n’entraîne ni
blessures ni dommages.
Remarque : Si vous utilisez l’appareil au réglage
maximum pendant plusieurs heures, les unités TENS
peuvent surchauffer et s’éteindre par mesure de
sécurité.
224 FRANÇAIS
Remplacement
Électrodes
Remplacez les électrodes si :
- elles sont endommagées ou déchirées.
- elles ont dépassé la date d’expiration indiquée sur
le sachet refermable.
- elles ont perdu leur pouvoir adhésif. N’utilisez pas
GHSOkWUHRXGHEDQGHSRXUOHVÀ[HUVXUODSHDX
- la stimulation semble moins forte.
- lorsque la stimulation est inconfortable, c’està-dire lorsque vous éprouvez une sensation de
picotement ou de pincement désagréable.
Remarque : Remplacez uniquement les électrodes par
des électrodes recommandées pour cet appareil par
le constructeur. Les nouvelles électrodes peuvent être
commandées à l’adresse : www.philips.com/
tens-electrodes.
Piles de la télécommande
Remplacez les piles de la télécommande lorsque le
symbole de batterie clignote à l’écran. Remplacezles uniquement par deux piles alcalines AAA de
1,5 volts (reportez-vous à la section « Préparation
de la télécommande » dans le chapitre « Avant
utilisation »).
Commande d’accessoires
Pour acheter des accessoires ou des pièces
détachées, visitez le site Web
www.shop.philips.com/service ou rendez-vous
chez votre revendeur Philips. Vous pouvez également
contacter le Service Consommateurs Philips de
votre pays.
FRANÇAIS 225
Électrodes
Vous pouvez commander de nouvelles électrodes à
l’adresse : www.philips.com/tens-electrodes.
Attention : Utilisez uniquement cet appareil
avec le chargeur, les câbles, les électrodes et les
accessoires recommandés par le fabricant.
Garantie et assistance
Votre appareil Wireless TENS a été conçu et
développé avec le plus grand soin pour garantir une
durée de vie prévue de 5 ans.
Si vous souhaitez obtenir des informations
supplémentaires ou faire réparer l’appareil, rendezvous sur le site Web de Philips à l’adresse
www.philips.com/support. Vous pouvez
également contacter le Service Consommateurs
Philips de votre pays. Son numéro de téléphone est
le suivant :
- Allemagne : 0800 0007522 (gratuit pour les appels
nationaux en Allemagne)
- Autriche : 0800 880932 (gratuit pour les appels
QDWLRQDX[YHUVGHVOLJQHVÀ[HVHQ$XWULFKHOHV
coûts des appels vers des téléphones portables
dépendent de l’opérateur)
- Suisse : 0800 002050 (gratuit pour les appels
QDWLRQDX[YHUVGHVOLJQHVÀ[HV
(les coûts des appels vers des téléphones
portables dépendent de l’opérateur)
- Royaume-Uni : 0844 338 04 89 (5 p/min à partir
d’une ligne BT, les autres fournisseurs de lignes
À[HVHWPRELOHVSHXYHQWH[LJHUGDYDQWDJH
226 FRANÇAIS
Limites de la garantie
Les électrodes ne sont pas couvertes par les termes
de la garantie, car elles sont sujettes à l’usure et
doivent être remplacées régulièrement.
Adresse légale du fabricant
Philips Consumer Lifestyle B.V.
Tussendiepen 4 9206 AD Drachten
Pays-Bas
Recyclage
- La présence du symbole représentant une
poubelle barrée sur un produit indique que ce
dernier est conforme à la directive européenne
2012/19/UE. Renseignez-vous sur les dispositions
en vigueur dans votre région concernant la
collecte séparée des appareils électriques et
électroniques. Ne jetez pas ce produit avec les
ordures ménagères ordinaires. La mise au rebut
correcte de votre produit permet de préserver
l’environnement et la santé.
- Ce symbole indique que les piles contiennent
des substances pouvant être nocives pour la
santé et l’environnement. Ne jetez pas les piles
avec les ordures ménagères ordinaires. Suivez les
réglementations locales relatives au système de
collecte des piles. La mise au rebut citoyenne des
piles permet de protéger l’environnement et la
santé.
- Les unités TENS contiennent une batterie
intégrée rechargeable qui ne peut pas être retirée.
Déposez-les dans un centre de service aprèsvente ou un point de collecte agréé pour faire
retirer la batterie rechargeable.
FRANÇAIS 227
- Toutes les pièces en plastique sont marquées d’un
symbole de recyclage.
6SpFLÀFLWpV
Modèle
PR3094, PR3093
Tension nominale (V) - adaptateur
100-240 ~ 150 mA
Fréquence nominale (Hz) adaptateur
50-60
Sortie nominale - adaptateur
5 V , 500 mA
Classe
Appareil médical de classe IIa
Entrée d’eau - appareil sauf chargeur
IP22
Entrée d’eau - chargeur
IP21
Type de batterie - unités TENS
Li-Ion
Type de pile - télécommande
2 piles alcalines AAA 1,5 V
Paramètres de sortie
d’impulsion
Gamme de fréquences
1-120 Hz
Largeur de l’impulsion
40-400 µs
Sortie courant
60 mA à 500-1 000 ohms max.
Tension de sortie maximale
120 V
228 FRANÇAIS
Paramètres de sortie
d’impulsion
Forme de l’impulsion de
courant
Biphase symétrique (courant net
0 c.c.)
Conditions de
fonctionnement
Température
de 5 °C à 40 °C
Taux d’humidité relative
de 15 % à 93 % (sans condensation)
Pression atmosphérique
de 700 hPa à 1 060 hPa
Conditions de stockage et
transport
Température - électrodes
de 0 °C à 40 °C
Température - appareil
de -10 °C à 50 °C
Taux d’humidité relative
moins de 93 % (sans
condensation)
Pression atmosphérique
de 700 hPa à 1 060 hPa
Remarque : Si vous souhaitez stocker les électrodes
pendant plus d’un mois, gardez-les à des températures
comprises entre 5 °C et 27 °C.
Remarque : Ne stockez pas les électrodes dans le
congélateur ou le réfrigérateur. Ne les laissez pas dans
une chaleur extrême, ne les plongez pas dans l’eau et
ne les laissez pas hors du sachet en plastique.
FRANÇAIS 229
Explication des symboles
Symboles de l’appareil
- Ce symbole représente le numéro de référence.
Il est suivi du numéro de référence du fabricant,
qui est la référence de l’appareil. Les plaques
signalétiques de la télécommande et des unités
TENS indiquent la même référence. Sur celle de la
télécommande, la référence est suivie des lettres
RC. Sur celle des unités TENS, elle est suivie des
lettres TU.
- Ce symbole représente le numéro de série. Il est
suivi du numéro de série du fabricant.
- &HV\PEROHVLJQLÀHFRXUDQWDOWHUQDWLI
- &HV\PEROHVLJQLÀHFRXUDQWGLUHFW
- Ce symbole présent sur la télécommande, les
unités TENS et le câble d’extension (s’il est fourni)
VLJQLÀH3URWHFWLRQFRQWUHOHWRXFKHUGHVSDUWLHV
dangereuses et protection contre les dommages
occasionnés par la pénétration de gouttes d’eau
tombant verticalement à un angle de 15 degrés.
230 FRANÇAIS
- Ce symbole sur le chargeur indique : Protection
contre le toucher des parties dangereuses et
protection contre les dommages occasionnés
par la pénétration de gouttes d’eau tombant
verticalement.
- &HV\PEROHVLJQLÀHTXHFHWDSSDUHLOpPHWGHV
rayonnements non ionisants. Tous les appareils
et systèmes qui incluent des émetteurs RF ou
qui appliquent intentionnellement de l’énergie
électromagnétique RF doivent porter ce symbole.
- &HV\PEROHVLJQLÀH3DUWLHDSSOLTXpHGHW\SH
BF (Body Floating) (électrode par exemple)
conforme à la norme IEC 60601-1.
- &HV\PEROHVLJQLÀH©)DEULTXpSDUªHWDSSDUDvWj
côté de l’adresse du fabricant légal.
- &HV\PEROHVLJQLÀH$WWHQWLRQVRUWLHGHOD
neurostimulation transcutanée. Il est placé à côté
de toutes les connexions d’électrode.
FRANÇAIS 231
- &HV\PEROHVLJQLÀH&RQIRUPHDX['LUHFWLYHV&(
CE correspond à « Conformité Européenne ».
HVWOHQXPpURGHO·RUJDQLVPHQRWLÀp
- &HV\PEROHVLJQLÀH1HSDVMHWHUO·DSSDUHLO
avec les ordures ménagères normales. Pour de
plus amples instructions, consultez le chapitre
« Recyclage ».
- &HV\PEROHLQGLTXHTXHFHWDGDSWDWHXUEpQpÀFLH
d’une double isolation (classe II).
- Ce symbole indique que l’adaptateur ne peut être
utilisé qu’à l’intérieur.
- &HV\PEROHVLJQLÀH/LUHOHPRGHG·HPSORLDYDQW
de commencer à utiliser l’appareil.
232 FRANÇAIS
- &HV\PEROHVLJQLÀH*DUGHUDXVHF
- &HV\PEROHHVWODPDUTXHTXLLGHQWLÀHOHERXWRQ
marche/arrêt.
- Il s’agit du symbole d’impulsion de
QHXURVWLPXODWLRQWUDQVFXWDQpH,OHVWDIÀFKpjF{Wp
du voyant d’état de traitement.
- ,OV·DJLWGXV\PEROHGHEDWWHULH,OHVWDIÀFKpjF{Wp
du voyant de niveau de la batterie.
- &HWWHPDUTXHGHFODVVLÀFDWLRQ8/LQGLTXHTXHFHW
appareil est conforme aux exigences canadiennes
et américaines. MATÉRIEL MÉDICAL EN
CONFORMITÉ AVEC LES NORMES ANSI/AAMI
ES60601-1 (2005, C1:09, A2:10), IEC 60601-1
(2005), CAN/CSA C22.2 No.60601.1 (2008,
R:2011), IEC 60601-2-10 (2012), CAN/CSA
C22.2 No.60601-1-11 (2010) CONCERNANT
LES CHOCS ÉLECTRIQUES, LES INCENDIES ET
LES DANGERS MÉCANIQUES.
FRANÇAIS 233
Symboles sur le sachet des électrodes
- &HV\PEROHVLJQLÀH1HSDVXWLOLVHUHQFRQGXLVDQW
en utilisant des machines ou en effectuant d’autres
activités qui peuvent présenter un risque de
blessure.
- &HV\PEROHVLJQLÀH1HSDVXWLOLVHUG·pOHFWURGHV
endommagées, usées ou ayant perdu leur pouvoir
adhésif.
- Ce symbole indique que les électrodes doivent
être utilisées par une seule personne et qu’elles
ne doivent pas être partagées avec d’autres.
- &HV\PEROHVLJQLÀH1HSDVSODFHUOHVpOHFWURGHV
les unes au-dessus des autres ou éviter qu’elles
soient en contact.
- &HV\PEROHVLJQLÀH1HSDVSODFHUOHVpOHFWURGHV
sur votre visage ou votre cou.
234 FRANÇAIS
- &HV\PEROHVLJQLÀH1HSDVSODFHUOHVpOHFWURGHV
sur votre torse.
- &HV\PEROHVLJQLÀH1HSDVSODFHUOHVpOHFWURGHV
sur des plaies ouvertes, des lésions cancéreuses,
des rougeurs ou sur une peau infectée ou
HQÁDPPpH
- Ce symbole indique la température de stockage
minimum et maximum des électrodes si leur
stockage dure plus d’un mois.
- Il s’agit du symbole de « Date d’expiration ». Il
indique la date après laquelle les électrodes ne
doivent plus être utilisées.
Émissions électromagnétiques et immunité
Compatibilité électromagnétique (EMC)
Les appareils Wireless TENS (PR3093) et Wireless
TENS Pro (PR3094) sont conformes aux normes de
sécurité EMC EN 60601-1-2. Ils sont conçus pour
être utilisés à domicile ou en milieu hospitalier.
Guide de positionnement des
pOHFWURGHVÀJ
101
4222.100.0803.1 (05/2013)