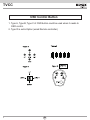
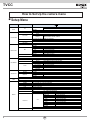
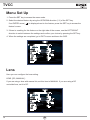
1
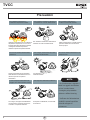
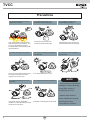
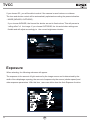
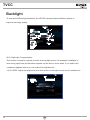
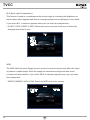
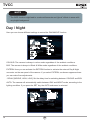
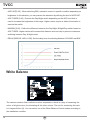
MANUALE UTENTE
46316.210
46312.004
46322.004
46326.210
46332.012
TELECAMERA A COLORI DAY & NIGHT HD-SDI DNR
TVCC
TVCC
ATTENZIONE
CAUTION
CAUTION
RISK OF ELECTRIC SHOCK
RISK OF
DOELECTRIC
NOT OPENSHOCK
DO NOT OPEN
CAUTION:TO REDUCE THE RISK OF ELECTRIC SHOCK
CAUTION:TO REDUCE THE RISK OF ELECTRIC SHOCK
DO NOT REMOVE COVER(OR BACK).
DO NOT REMOVE COVER(OR BACK).
NO USER-SERVICEABLE PARTS INSIDE.
NO USER-SERVICEABLE PARTS INSIDE.
REFER SERVICING TO QUALIFIED SERVICE PERSONNEL.
REFER SERVICING TO QUALIFIED SERVICE PERSONNEL.
ISO14001
ISO14001
RISCHIO DI SCOSSA ELETTRICA
NON APRIRE
ATTENZIONE:PER RIDURRE IL RISCHIO DI SCOSSA ELETTRICA
NON RIMUOVERE IL COPERCHIO(O LA PARTE POSTERIORE).
NESSUNA PARTE RIPARABILE DALL’UTENTE AL L’INTERNO.
RIMANDARE L’ASSISTENZA A PERSONALE QUALIFICATO.
ISO9001:2008
Il simbolo della freccia a forma di fulmine inserito in un triangolo equilatero
serve ad avvertire l'utente della presenza di tensione elettrica pericolosa non
isolata, all'interno del contenitore del prodotto, che può essere di intensità tale
da costituire pericolo di scossa elettrica per le persone.
Il simbolo del triangolo con il punto esclamativo serve ad avvisare l'utente della
presenza di importanti istruzioni di funzionamento e manutenzione (assistenza)
nella documentazione che accompagna il dispositivo.
INFORMAZIONI: Questo apparecchio è stato testato ed è risultato conforme ai limiti stabiliti
per i dispositivi digitali di Classe A, ai sensi della Parte 15 degli standard FCC e CE.
Questi limiti sono progettati per offrire protezione adeguata contro le interferenze dannose
quando l'apparecchiatura è utilizzata in un ambiente commerciale.
L'attrezzatura genera, utilizza e può irradiare frequenze radio e, se non installata e utilizzata
secondo il manuale di istruzioni, può provocare interferenze dannose alle comunicazioni radio.
L'utilizzo di questa attrezzatura in aree residenziali può causare interferenze dannose che
l'utente potrebbe dover correggere a proprie spese.
AVVERTENZE: I cambiamenti o le modifiche non espressamente approvati dal costruttore
potrebbero invalidare il diritto dell'utente a utilizzare l'apparecchiatura.
ATTENZIONE: Per evitare il rischio di scosse elettriche e incendi:
☞NON utilizzare fonti di alimentazione diverse da quelle specificate.
☞NON esporre il dispositivo alla pioggia o all'umidità.
L'installazione deve essere effettuata da un tecnico qualificato e
deve essere conforme a tutte le normative locali.
2
IT
TVCC
Indice
3
Indice
3
Caratteristiche generali
4
Precauzioni
5
Avvertenze
6
Configurazione del menu
7
▶Pulsante di controllo OSD
▶Menu Set Up (impostazioni)
▶Configurazione del menu
▶Lens (obiettivo)
▶Exposure (esposizione)
▶Back Light (controluce)
▶Day & Night
▶White Bal. (bilanciamento del bianco)
▶DNR (riduzione rumore digitale)
▶Image (immagine)
▶Motion (movimento)
▶System (sistema)
▶Exit (esci)
7
8
10
Risoluzione dei problemi
23
10
11
13
15
16
18
18
21
22
22
IT
TVCC
3D-DNR
DSP
Digital
Noise
3D-DNR
DNR
DSP
3D-DNR
Reduction
DSP
HD
Digital
3D-DNR
Noise
Reduction
Digital
High
Definition
DSP
Noise
DNR
Reduction
Caratteristiche generali
DNR(riduzione rumore digitale)
La tecnologia DNR di queste telecamere, utilizza sia un filtro adattativo 2D per ridurre il
rumore che si crea nella luminosità dell'immagine, sia un filtro adattativo 3D per
l'attenuazione del rumore causato dal movimento. Di conseguenza, la telecamera
HD-SDI supporta la funzione Motion Adaptive DNR che elimina il rumore e riduce
notevolmente l'effetto movimento.
DNR
3D-DNR
DSP
ACCE
3D-DNR
HD
3D-DNR
HD
Digital
Noise
Adaptive
Color
Reduction
Contrast
Enhanment
DSP
DNR
High Definition
DSP
Digital
High Definition
Noise
Reduction
Sorveglianza HD(alta definizione)
La telecamera HD-SDI offre condizioni di sorveglianza superiori a quelle delle normali
telecamere VGA.
DNR
HD
ACCE
HLC
Adaptive
Color
ACCE
Contrast Enhanment
Adaptive Color
Contrast Enhanment
HD
Digital
Noise
Reduction
Digital
DNR
Noise
High Definition
Reduction
3D-DNR
High Definition
HD
ACCE
0.017
Adaptive Lux
Color
600
Contrast
Enhanment
HLC
Minimum
Illumination
High Definition
Horizontal
Resolution
HLC
ACCE
Adaptive Color
Contrast Enhanment
ACCE
Contrast
Enhanment
WDR
0.017
Lux
HLC
Minimum
Illumination
Adaptive Color
Privacy
Zone
Minimum
Illumination
Digital
Wide Dynamic Range
0.017 Lux
HLC
ACCE(miglioramento del contrasto e del colore adattivo)
Il software può attivare la funzione che migliora le Immagini. Migliora le immagini
HD-SDI, esaltando la nitidezza delle immagini catturate in condizioni non ottimali, come
nebbia, fumo, pioggia o neve. Applicata alle immagini video in diretta o registrate, offre
risultati in tempo reale e mostra dettagli visivi che altrimenti sarebbero difficili da vedere.
HLC(compensazione della luce forte)
La funzione Compensazione della luce forte è particolarmente efficace per leggere
targhe delle auto di notte. Gli utenti possono selezionare e definire l'area di osservazione
necessaria per l'oggetto di destinazione e ignorare le aree con luminosità intensa.
Minimum
Illumination
HLC
0.017
Lux
BLC
OSD
Privacy Zone
Backlight
Compensation
Minimum
Privacy
Zone
Illumination
0.017 Lux
Minimum
Illumination
Minimum
0.017
Lux
Illumination
Privacy Zone
OSD
0.00001 Lux
Illuminazione
Con una illuminazione minima incredibile di 0.017Lux, è in grado di catturare immagini di
buona qualità anche in condizioni di luce estremamente bassa e il rumore correlato è
significativamente ridotto dalla tecnologia ultra avanzata DNR (riduzione rumore digitale).
OSD
Privacy Zone
Privacy Zone
OSD
Smart-IR
Zone di privacy
Una "Zona di privacy" può essere configurata se si desidera bloccare la visualizzazione
di aree specifiche nell'immagine, in osservanza della normativa sulla Privacy.
OSD
OSD
OSD
Funzioni aggiuntive
Menu OSD - On Screen Display
Mascheramento privacy - 8 zone, Sens-Up - x60 volte, Zoom digitale - x64
4
IT
TVCC
Precauzioni
Non installare la telecamera in
condizioni di temperatura estreme.
Utilizzare la telecamera solo in condizioni di
temperatura compresa fra -10°C e +50°C.
Prestare particolare attenzione a garantire
un'adeguata ventilazione quando la
telecamera opera a temperature elevate.
Non toccare l'obiettivo anteriore della
telecamera.
Questa è una delle parti più importanti
della telecamera. Fare attenzione a non
lasciare impronte sul coperchio
dell'obiettivo.
Evitare di esporre la telecamera alla
pioggia e non versare liquidi su di essa.
Non installare o utilizzare la telecamera
in ambienti con valori di umidità elevati.
Non installare o utilizzare la telecamera in
ambienti con valori di umidità elevati.
Non rivolgere la telecamera verso fonti
luminose ad alta intensità.
Non installare la telecamera in
condizioni di luminosità instabile.
Sbalzi di illuminazione o sfarfallii possono
portare la telecamera a funzionare in
modo improprio.
Non lasciar cadere la telecamera e non
sottoporla a urti.
Ciò potrebbe causare un
malfunzionamento.
NOTA
Non esporre la telecamera a radiazioni.
* Se la telecamera è esposta a
faretti o a oggetti che riflettono
la luce in modo intenso,
l'immagine può presentare
striature o effetto blooming.
* Verificare che l'alimentazione
Se si bagna, asciugare immediatamente.
I liquidi possono contenere minerali che
corrodono i componenti elettronici.
Se esposto a radioattività, il CCD smette
di funzionare.
soddisfi le normali specifiche
prima di collegare la
telecamera.
5
IT
TVCC
Avvertenze
Precauzioni per l'uso
◑La telecamera deve essere installata solo da personale qualificato
◑Non contiene parti riparabili dall'utente
◑Non smontare la telecamera se non per effettuare le regolazioni iniziali
◑Utilizzare alimentazione regolata a 24 volt c.a. o 12 volt c.c. approvata UL
◑Utilizzare un cavo di alimentazione a basso voltaggio adatto a evitare
incendi o scosse elettriche
◑Assicurarsi che l'area di installazione supporti il peso della telecamera
Maneggiare la telecamera con cura:
◑Non utilizzare detergenti forti o abrasivi per pulire la telecamera
◑ Non esporre la telecamera alla luce diretta del sole
◑Non installare la telecamera in luoghi ad alto tasso di umidità
◑Non installare vicino a dispositivi di raffreddamento o riscaldamento
◑Non esporre la telecamera alla pioggia o all'umidità
6
IT
TVCC
Pulsante di controllo OSD
1.Il pulsante di controllo OSD del tipo A, B e C può essere utilizzato
quando è necessario il controllo OSD.
2.Il tipo D è un'opzione extra (telecomando a filo)
Tipo B
Tipo A
Tipo D (Opzione)
Tipo C
7
IT
TVCC
Come impostare il menu della telecamera
● Menu
Set Up (impostazioni)
MENU
LENS
(Obiettivo)
DC
INDOOR (Modo interno)
OUTDOOR (Modo esterno)
MODE
RETURN
MANUAL
BRIGHTNESS (Luminosità) 0~20 Livello selezionabile
AUTO
SHUTTER (Otturatore)
EXPOSURE
(Esposizione)
SENSE-UP
AGC
RETURN
HLC
BLC
BACKLIGHT
WDR
Manuale
1/25,1/30,1/60,1/50, 1/120, 1/240, 1/500, 1/1000, 1/2000, 1/4000,
1/8000,1/16000, 1/30000, 1/60000
x2 , x3, x4, x8, x16, x32, x64 Livello selezionabile
OFF
0 ~ 20 Livello selezionabile
0 ~ 20 Livello selezionabile
RETURN
0 ~ 20 Livello selezionabile
H - POS
0 ~ 20 Livello selezionabile
V - POS
0 ~ 20 Livello selezionabile
H - SIZE
V - SIZE
0 ~ 20 Livello selezionabile
RETURN
LOW / MIDDLE / HIGH (Basso, Medio, Alto)
PESO
RETURN
OFF
COLOR
B/W
EXT
DAY/NIGHT
(Giorno/notte)
AUTO
ATW
PRESET
WHITE BAL
DNR
IMAGE
8
MANUAL
DELAY
RETURN
ANTI-SAT
AGC THRES
MARGIN
DELAY
RETURN
PUSHING
R - GAIN
B - GAIN
RETURN
LOW / MIDDLE / HIGH Livello selezionabile
0~20 Livello selezionabile
0~20 Livello selezionabile
0 ~ 20 Livello selezionabile
LOW / MIDDLE / HIGH Livello selezionabile
0 ~ 20 Livello selezionabile
0 ~ 20 Livello selezionabile
AWB
LOW / MIDDLE / HIGH Livello selezionabile
OFF
SHARPNESS (Nitidezza) 0 ~ 10 Livello selezionabile
O.45, 0.5, 0.55, 0.6, 0.65 Livello selezionabile
GAMMA
GUADAGNO COLORE 0 ~ 20 Livello selezionabile
ON / OFF Selezionabile
MIRROR
ON / OFF Selezionabile
FLIP
D - ZOOM
x1 ~ x8 Livello selezionabile
OFF / LOW / MIDDLE / HIGH Livello selezionabile
D - WDR
1% ~ 100% Livello selezionabile
ON
SHADING (Ombreggiature)
OFF
0 ~ 31 Livello selezionabile
ZONE NUM
ON / OFF Selezionabile
ZONE DISP
0 ~ 60 Livello selezionabile
H - POS
0 ~ 40 Livello selezionabile
V - POS
0 ~ 40 Livello selezionabile
H - SIZE
ON
PRIVACY
0 ~ 40 Livello selezionabile
V - SIZE
0 ~ 20 Livello selezionabile
Y LEVEL
0 ~ 20 Livello selezionabile
CR LEVEL
0 ~ 20 Livello selezionabile
CB LEVEL
RETURN
OFF
RETURN
IT
TVCC
Come impostare il menu della telecamera
● Menu
MOTION
Set Up (impostazioni)
ON
OFF
COM.
SYSTEM
COLOR SPACE
FRAMERATE
CVBS
RESET
RETURN
SENSIBILITÀ
DET H - POS
DET V - POS
DET H - SIZE
DET V - SIZE
OSD MOVIMENTO
ALLARME
RETURN
0 ~ 20 Livello selezionabile
0 ~ 60 Livello selezionabile
0 ~ 40 Livello selezionabile
0 ~ 60 Livello selezionabile
0 ~ 40 Livello selezionabile
ON / OFF Selezionabile
ON / OFF Selezionabile
0 ~ 20 Livello selezionabile
CAM ID
2400 / 4800 / 9600 / 57600 / 115200 Selezionabile
BAUDRTE
ON / OFF Selezionabile
ID DISPLAY
RETURN
OFFCOLOR1 / COLOR2 / COLOR3 Selezionabile
25 FPS / 30 FPS Selezionabile
NTSC / PAL Selezionabile
PUSHING
ON
EXIT
9
IT
TVCC
Configurazione del menu
1. Premere il tasto SET (impostazione) per accedere alla modalità menu.
2. Selezionare la funzione desiderata utilizzando la direzione SU/GIÙ (/\ \/) del tasto SET.
Se la freccia del tasto ENTER (
) è visualizzata accanto alla funzione, premere il tasto
SET per accedere al menu di funzione.
3. Se c'è un'impostazione per questa funzione sul lato destro dello schermo, utilizzare la
direzione SINISTRA/DESTRA per alternare le impostazioni e confermare la scelta
premendo il tasto SET.
4. Quando le impostazioni sono complete, andare su ESCI per salvare e uscire dal menu OSD.
MENU
LENS
EXPOSURE
BACKLIGHT
DAY / NIGHT
WHITE BAL
DNR
IMAGE
MOTION
SYSTEM
EXIT
DC
OFF
AUTO
ATW
MIDDLE
OFF
Lens (obiettivo)
Qui è possibile configurare le impostazioni dell'obiettivo.
LENS [DC, MANUAL]:
Se si utilizza un obiettivo con diaframma manuale, impostare questa voce su MANUAL.
Se si utilizza un obiettivo controllato da DC, impostarla su DC.
MENU
LENS
EXPOSURE
BACKLIGHT
DAY / NIGHT
WHITE BAL
DNR
IMAGE
MOTION
SYSTEM
EXIT
10
DC
OFF
AUTO
ATW
MIDDLE
OFF
IT
TVCC
Se si sceglie DC, si potrà decidere di utilizzare la telecamera al chiuso o all'aperto.
Il controllo dell'obiettivo e dell'otturatore è ottimizzato automaticamente in base alla situazione
del momento.
- MODE [INDOOR, OUTDOOR]: Modo interno, esterno
Se si sceglie INDOOR, Interno il diaframma e l'otturatore sono impostati su valori fissi.
Ciò previene l'"effetto rolling" dell'immagine. Se si sceglie OUTDOOR, (Esterno)
le impostazioni del diaframma e dell'otturatore sono flessibili e si adattano all'intensità della
luminosità del momento.
DC
MODE
RETURN
INDOOR
Exposure (esposizione)
Selezionando, apparirà il seguente sottomenu.
L'esposizione è la quantità di luce ricevuta dal sensore di immagine ed è determinata dalla
larghezza dell'apertura del diaframma dell'obiettivo, il tempo di esposizione del sensore
(velocità dell'otturatore) e altri parametri di esposizione. Con questa voce, gli utenti possono
definire la funzione di Esposizione automatica.
MENU
LENS
EXPOSURE
BACKLIGHT
DAY / NIGHT
WHITE BAL
DNR
IMAGE
MOTION
SYSTEM
EXIT
11
DC
OFF
AUTO
ATW
MIDDLE
OFF
IT
TVCC
EXPOSURE
|IIIIIIIIIIIIIIIIIII| 10
AUTO
x4
|IIIIIIIIIIIIIIIIIII| 15
BRIGHTNESS
SHUTTER
SENS-UP
AGC
RETURN
BRIGHTNESS (Luminosità) [0 ~20]:
Questa funzione è utilizzata per regolare la luminosità dell'immagine della telecamera.
SHUTTER [1/25, 1/30, 1/60, 1/50, 1/120, 1/240, 1/500, 1/1000, 1/2000, 1/4000, 1/8000,
1/16000, 1/30000, 1/60000]:
È possibile selezionare una delle 14 opzioni da 1/25 a 1/60000K per l'otturatore elettronico fisso
ad alta velocità, che è in gran parte utilizzato per l'imaging di un oggetto in rapido movimento.
SENS-UP [OFF, AUTO, x2~x64]:
Rileva automaticamente il livello di oscurità dell'ambiente in luoghi bui o a basso contrasto,
per estendere il tempo accumulato mantenendo l'immagine luminosa e nitida.
AGC (Controllo del guadagno automatico) [0-20]:
La funzione AGC (Controllo del guadagno automatico) è usata per amplificare il segnale video
quando scende sotto il parametro impostato. Aumentando il livello dell'AGC la schermata
generale diventa più brillante ma, allo stesso tempo, aumenta il anche livello del rumore.
12
IT
TVCC
Backlight (controluce)
Per superare situazioni di luce difficili, le telecamere HD-SDI offrono diverse opzioni per
migliorare la qualità dell'immagine.
MENU
LENS
EXPOSURE
BACKLIGHT
DAY / NIGHT
WHITE BAL
DNR
IMAGE
MOTION
SYSTEM
EXIT
DC
OFF
AUTO
ATW
MIDDLE
OFF
HLC(Compensazione della luce forte):
Questa funzione viene utilizzata allo scopo di sopprimere o mascherare una forte sorgente
luminosa (ad esempio fari di autoveicoli di notte) in modo che altri soggetti possano essere visti
in maggiore dettaglio. Se si seleziona HLC, compare un sottomenu da cui è possibile effettuare
regolazioni più precise.
- HLC LEVEL: Regolare il livello di luminosità necessario per mascherare la sorgente luminosa.
HLC
LEVEL
RETURN
13
|IIIIIIIIIIIIIIIIIII|
IT
10
TVCC
BLC (Compensazione controluce):
Questa funzione viene utilizzata per controbilanciare l'immagine dello schermo aumentando
la luminosità in modo che un soggetto che appare scuro a causa di una forte controluce può
essere visualizzato in modo più dettagliato. Se si seleziona BLC, compare un sottomenu da
cui è possibile effettuare regolazioni più precise.
- H-POS/ V-POS/ H-SIZE/ V-SIZE: Definire la posizione e la dimensione dell'area di
interesse cambiando la posizione e la dimensione.
BLC
H-POS
V-POS
H-SIZE
V-SIZE
RETURN
7
5
7
5
WDR:
La funzione WDR (ampia gamma dinamica) corregge la luce in eccesso all'interno del
fotogramma per produrre un'immagine utilizzabile. Quando l'immagine presenta aree chiare
e scure contemporaneamente, rende entrambe le aree distinte. Se si seleziona WDR,
compare un sottomenu da cui è possibile effettuare regolazioni più precise.
-WEIGHT [MIDDLE, HIGH, LOW (Medio, Alto, Basso)]: Selezionare il livello di WDR della
telecamera.
WDR
WEIGHT
RETURN
14
MIDDLE
IT
TVCC
NOTA
* La funzione WDR potrebbe portare ad un framerate ridotto e ad effetti "fantasma" in zone
con sfondo molto luminoso.
Day / Night: (Giorno /Notte)
Qui è possibile scegliere diverse impostazioni per il controllo della funzione DAY&NIGHT.
MENU
LENS
EXPOSURE
BACKLIGHT
DAY / NIGHT
WHITE BAL
DNR
IMAGE
MOTION
SYSTEM
EXIT
DC
OFF
AUTO
ATW
MIDDLE
OFF
COLOUR: La telecamera è sempre in modalità colore, indipendentemente dalle condizioni ambientali.
B/W: La telecamera è sempre in modalità bianco e nero, indipendentemente dalle condizioni ambientali.
EXTERN: Qui è possibile attivare la funzione EXTERN per attivare il connettore esterno e Day & Night
sul pannello posteriore della telecamera. Se si seleziona EXTERN, compare un sottomenu da cui è
possibile effettuare regolazioni più precise.
- DELAY [MIDDLE, HIGH, LOW (Medio, Alto, Basso)]: Impostare il tempo di ritardo per alternare colore
e B/N.
AUTO: La telecamera alterna automaticamente le modalità DAY e NIGHT in base alle condizioni di
illuminazione. Se si preme il tasto SET, si seleziona il sottomenu AUTO.
DAY / NIGHT
|IIIIIIIIIIIIIIIIIII
|
| 10
|IIIIIIIIIIIIIIIIIII
|
|8
|IIIIIIIIIIIIIIIIIII
| 10
|
LOW
ANTI SAT.
AGC THRES
MARGIN
DELAY
RETURN
15
IT
TVCC
- ANTI-SAT[0-20]: Quando si passa a B/W, la saturazione si verifica in condizioni specifiche a seconda
della luminosità. In questa situazione, è possibile evitare la saturazione definendo il livello di anti-SAT.
- AGC THRES [0-20]: Attivare l'alternanza giorno/notte a seconda del livello di AGC utilizzato per
aumentare la luminosità dell'immagine. Valori più alti richiedono un'illuminazione più bassa per attivare
tale alternanza.
- MARGIN [0-20]: Definire la differenza tra giorno/notte e notte/giorno in base a AGC THRES. Valori più
alti aumentano tale differenza e possono aiutare a prevenire il passaggio continuo fra giorno e notte.
- DELAY [MIDDLE, HIGH, LOW (Medio, Alto, Basso)]: Impostare il tempo di ritardo per alternare colore e
B/N.
Guadagno AGC
Margine alternanza notte/giorno
AGC THRES
Margine alternanza giorno/notte
White Balance (bilanciamento del bianco)
MENU
LENS
EXPOSURE
BACKLIGHT
DAY / NIGHT
WHITE BAL
DNR
IMAGE
MOTION
SYSTEM
EXIT
DC
OFF
AUTO
ATW
MIDDLE
OFF
La telecamera deve trovare una temperatura di colore di riferimento, che è un modo per misurare il
colore di una sorgente luminosa, per calcolare tutti gli altri colori. L'unità di misurazione di questo
rapporto è il grado Kelvin (K). È possibile selezionare una delle modalità di controllo del bilanciamento
del bianco in base alle condizioni di installazione.
16
IT
TVCC
ATW (rilevamento automatico del bilanciamento del bianco):
Con la funzione di rilevamento automatico del bilanciamento del bianco, il bilanciamento del bianco
in un luogo viene automaticamente regolato mentre il colore della temperatura cambia. La modalità
ATW è adatta ad ambienti con sorgenti luminose che hanno una temperatura di colore compresa
nell'intervallo 1800 ~ 10500K.
ATW (bilanciamento del bianco automatico):
In questa modalità, il bilanciamento del bianco lavora all'interno dell'intervallo della temperatura di
colore. Questa modalità calcola l'output del valore di bilanciamento del bianco utilizzando le
informazioni di colore da tutto lo schermo. Produce il valore corretto utilizzando la temperatura di
colore che irradia da un soggetto nero.
PRESET:
Questa modalità è impostata alla condizione di bilanciamento del bianco del momento e mantiene il
suo valore. Selezionare questa modalità, quindi premere il tasto SET. Se avviene un cambiamento
nella posizione o nella fonte luminosa, ripetere questa procedura.
MANUAL
R-GAIN
B-GAIN
RETURN
|IIIIIIIIIIIIIIIIIII| 15
|IIIIIIIIIIIIIIIIIII| 10
MANUAL:
Può essere utilizzato per la regolazione fine. Impostare il bilanciamento del bianco utilizzando
prima ATW o AWC e poi passare a MANUAL e premere il tasto SET. Aumentare o diminuire il
valore di R-Gain (rosso) e B-Gain (blu) durante il monitoraggio del colore dell'immagine.
- R-GAIN: Regola il bilanciamento del bianco per il colore rosso.
- B-GAIN: Regola il bilanciamento del bianco per il colore blu.
17
IT
TVCC
DNR(riduzione rumore digitale)
Questa funzione è utilizzata per migliorare la qualità dell'immagine filtrando il rumore che viene
generato in condizioni di scarsa luminosità brillante. È possibile impostare diversi livelli qui.
MENU
LENS
EXPOSURE
BACKLIGHT
DAY / NIGHT
WHITE BAL
DNR
IMAGE
MOTION
SYSTEM
EXIT
DC
OFF
AUTO
ATW
MIDDLE
OFF
Image (immagine)
Selezionando, apparirà il seguente sottomenu.
MENU
LENS
EXPOSURE
BACKLIGHT
DAY / NIGHT
WHITE BAL
DNR
IMAGE
MOTION
SYSTEM
EXIT
DC
OFF
AUTO
ATW
MIDDLE
OFF
Qui si può ottimizzare la qualità dell'immagine regolando le diverse opzioni.
SHARPNESS [1 ~ 10]:
Consente di regolare la nitidezza dell'immagine. Se il livello sale eccessivamente, può
influenzare l'immagine video e generare rumore.
GAMMA [0.45 ~ 0.65]:
Modifica la curva di gamma della telecamera.
18
IT
TVCC
COLOR GAIN [0 ~ 20]: Controllare la saturazione del colore dell'immagine video.
MIRROR [ON, OFF]: Capovolge l'immagine orizzontalmente sullo schermo.
FLIP [ON, OFF]: Ribalta l'immagine verticalmente sullo schermo.
D-ZOOM [1.0x~8.0x]: È possibile utilizzare lo zoom digitale lineare bi-cubico fino a x8.
D-WDR [LOW, MIDDLE, HIGH, OFF]:
La funzione WDR (ampia gamma dinamica) corregge la luce in eccesso all'interno del
fotogramma per produrre un'immagine utilizzabile. Quando l'immagine presenta aree chiare
e scure contemporaneamente, rende entrambe le aree distinte.
IMAGE
|IIIIIIIIIIIIIIIIIII| 5
0.45
|IIIIIIIIIIIIIIIIIII| 15
OFF
OFF
1.0x
OFF
OFF
OFF
SHARPNESS
GAMMA
COLOR GAIN
MIRRPR
FLIP
D-ZOOM
D-WDR
SHADING
PRIVACY
RETURN
SHADING (Ombreggiature) [ON, OFF]:
Compensa gli effetti di shading degli obiettivi quando l'obiettivo è impostato su un angolo
molto ampio. Questa funzione riduce la differenza di luminosità tra il centro e i bordi. Se si
seleziona ON, compare un sottomenu da cui è possibile effettuare regolazioni più precise.
- WEIGHT [1%~100%]: È possibile impostare diversi livelli qui.
SHADING
WEIGHT
RETURN
19
100%
IT
TVCC
PRIVACY [ON, OFF]:
Maschera le aree che si desiderano nascondere sullo schermo. La telecamera può attivare
fino a 32 maschere privacy. Alternare ON e OFF per attivare o disattivare questa funzione.
PRIVACY
ZONE NUM
ZONE DISP
H-POS
V-POS
H-SIZE
V-SIZE
Y LEVEL
CR LEVEL
CB LEVEL
RETURN
0
ON
12
2
3
3
|IIIIIIIIIIIIIIIIIII| 10
|IIIIIIIIIIIIIIIIIII| 10
|IIIIIIIIIIIIIIIIIII| 10
-ZONE NUM [0 ~ 32]: Selezionare una maschera fra le 32 aree di mascheratura e
impostare le opzioni qui di seguito per la maschera selezionata.
-ZONE DISP [ON, OFF]: Scegliere ON per attivare le maschere di privacy e premere OFF
per disattivare le maschere.
- H-POS [0 ~ 60]: Definire la posizione di partenza orizzontale della maschera di privacy.
- V-POS [0 ~ 40]: Definire la posizione di partenza verticale della maschera di privacy.
- H-SIZE [0 ~ 40]: Definire le dimensioni orizzontali della maschera di privacy.
- V-SIZE [0 ~ 40]: Definire le dimensioni verticali della maschera di privacy.
- Y LEVEL [0 ~ 20]: Definire la luminosità del colore della maschera.
- CR LEVEL [0 ~ 20]: Definire la quantità di rosso del colore della maschera.
- CB LEVEL [0 ~ 20]: Definire la quantità di blu del colore della maschera.
20
IT
TVCC
Motion (movimento)
Questa funzione viene utilizzata per rilevare oggetti in movimento nell'area monitorata. Quando si
sceglie ON, compare il seguente sottomenu, da cui è possibile regolare le impostazioni per la
funzione MOVIMENTO.
MENU
LENS
EXPOSURE
BACKLIGHT
DAY / NIGHT
WHITE BAL
DNR
IMAGE
MOTION
SYSTEM
EXIT
DC
OFF
AUTO
ATW
MIDDLE
OFF
SENSITIVITY [1 ~ 20]: Impostare la sensibilità della rilevazione di movimento.
DET H-PS [0 ~ 60]: Definire la posizione di partenza orizzontale dell'area da monitorare.
DET V-PS [0 ~ 40]: Definire la posizione di partenza verticale dell'area da monitorare.
DET H-SIZE [0 ~ 60]: Definire le dimensioni orizzontali dell'area da monitorare.
DET V-SIZE [0 ~ 40]: Definire le dimensioni verticali dell'area da monitorare.
OSD MOVIMENTO [ON, OFF]: Controlla lo stato ON/OFF della visualizzazione del blocco di
rilevazione del movimento.
ALARM [ON, OFF]:
Quando è attivata la funzione ALLARME, la telecamera rileva il movimento all'interno di una zona di
controllo e poi invia automaticamente una segnalazione di allarme. Il messaggio "MOVIMENTO !!!"
lampeggia nell'angolo in alto a sinistra dello schermo. Quando la telecamera si muove, il messaggio
"IN MOVIMENTO!!!" lampeggia nell'angolo in alto a sinistra dello schermo.
MOTION
|IIIIIIIIIIIIIIIIIII| 10
4
4
30
26
ON
ON
SENSITIVITY
DET H-PS
DET V-PS
DET H-SIZE
DET V-SIZE
MOTION OSD
ALARM
RETURN
21
IT
TVCC
System (sistema)
Selezionando, apparirà il seguente sottomenu.
MENU
LENS
EXPOSURE
BACKLIGHT
DAY / NIGHT
WHITE BAL
DNR
IMAGE
MOTION
SYSTEM
EXIT
DC
OFF
AUTO
ATW
MIDDLE
OFF
COLOR SPACE [COLOR1~3]: Selezionare diverse impostazioni di colore per un'immagine più
calda o più fredda.
FRAME RATE [25 FPS, 30 FPS]: Selezionare il frame rate.
CVBS [PAL, NTSC]: Selezionare il formato video che corrisponde al sistema TV del momento
RESET [ON↓]: Tutte le impostazioni sono ripristinate ai valori di fabbrica.
Exit (esci)
Premere il pulsante Set nel menu esci per salvare le impostazioni correnti e uscire dal menu
Impostazione.
22
IT
TVCC
Risoluzione dei problemi
PROBLEMA
CAUSA PROBABILE
Assenza di immagini
nel monitor.
☞Controllare il cavo di alimentazione, l'uscita di alimentazione e il
collegamento video tra la telecamera e il monitor.
L'immagine sullo schermo
è fioca.
☞L'obiettivo della telecamera o il vetro dell'obiettivo sono sporchi?
Pulire l'obiettivo / il vetro con un panno morbido e pulito.
☞Regolare i controlli del monitor in base alla necessità.
☞Se la telecamera è rivolta verso una fonte luminosa molto forte,
cambiare la posizione della telecamera.
☞Regolare la messa a fuoco dell'obiettivo.
L'immagine sullo schermo
è scura.
☞Regolare il controllo del contrasto del monitor.
☞Se vi è un dispositivo intermedio, impostare correttamente 75Ω/Hi-z.
La telecamera
non funziona correttamente e ☞Verificare che la telecamera sia collegata correttamente a una fonte di
la superficie della telecamera alimentazione regolata appropriata.
è calda.
Il rilevamento del movimento ☞MOTION DET è stato impostato su ON nel menu?
☞MD AREA è stato definito in modo adeguato?
non è attivato.
Il colore dell'immagine
non è corretto.
23
☞Controllare le impostazioni nel menu WHITE BALANCE.
L'immagine sullo schermo
presenta uno sfarfallio.
☞Assicurarsi che la telecamera non sia esposta alla luce solare diretta o a
luci fluorescenti. Se necessario, modificare la posizione della telecamera.
Il SENS-UP
non funziona.
☞Verificare che l'impostazione AGC nel menu EXPOSURE non sia su OFF.
☞Controllare il menu EXPOSURE e assicurarsi che SHUTTER sia impostato su-----.
IT
Via Pontarola, 14/a
35011 Campodarsego PD - Italia
Tel. +39 049 920 2511
Fax +39 049 920 2603
www.elvox.com
S6I.TVC.001 RL. 00 13 03
ELVOX - Campodarsego - Italia
USER MANUAL
46316.210
46312.004
46322.004
46326.210
46332.012
HD-SDI DNR DAY & NIGHT COLOR CAMERA
TVCC
TVCC
CAUTION
CAUTION
CAUTION
RISK OF ELECTRIC SHOCK
RISK OF
DOELECTRIC
NOT OPENSHOCK
DO NOT OPEN
CAUTION:TO REDUCE THE RISK OF ELECTRIC SHOCK
CAUTION:TO REDUCE THE RISK OF ELECTRIC SHOCK
DO NOT REMOVE COVER(OR BACK).
DO NOT REMOVE COVER(OR BACK).
NO USER-SERVICEABLE PARTS INSIDE.
NO USER-SERVICEABLE PARTS INSIDE.
REFER SERVICING TO QUALIFIED SERVICE PERSONNEL.
REFER SERVICING TO QUALIFIED SERVICE PERSONNEL.
ISO14001
ISO14001
RISK OF ELECTRIC SHOCK
DO NOT OPEN
CAUTION:TO REDUCE THE RISK OF ELECTRIC SHOCK
DO NOT REMOVE COVER(OR BACK).
NO USER-SERVICEABLE PARTS INSIDE.
REFER SERVICING TO QUALIFIED SERVICE PERSONNEL.
ISO9001:2008
The lightning flash with an arrowhead symbol, within an equilateral
triangle is intended to alert the user to the presence of uninsulated
dangerous voltage within the product's enclosure that may be of
sufficient magnitude to constitute a risk of electric shock to persons.
The exclamation point within an equilateral triangle is intended to alert
the user to the presence of important operating and maintenance
(servicing) instructions in the literature accompanying the appliance.
INFORMATION - This equipment has been tested and found to comply with limits for
a Class A digital device, pursuant to part 15 of the FCC Rules & CE Rules.
These limits are designed to provide reasonable protection against harmful
interference when the equipment is operated in a commercial environment.
This equipment generates, uses, and can radiate radio frequency energy and, if not
installed and used in accordance with the instruction manual, may cause harmful
interference to radio communications.
Operation of this equipment in a residential area is likely to cause harmful interference
in which case the user will be required to correct the interference at his own expense.
WARNING - Changes or modifications not expressly approved by the manufacturer
could void the user’s authority to operate the equipment.
CAUTION : To prevent electric shock and risk of fire hazards:
☞Do NOT use power sources other than those specified.
☞Do NOT expose this appliance to rain or moisture.
This installation should be made by a qualified service person
and should conform to all local codes.
2
EN
TVCC
Contents
3
Contents
3
General Features
4
Precautions
5
Sefety Instructions
6
Menu Set Up
7
▶OSD Control Button
▶Set Up Menu
▶Menu Set Up
▶Lens
▶Exposure
▶Back Light
▶Day & Night
▶White Bal.
▶DNR
▶Image
▶Motion
▶System
▶Exit
7
8
10
Trouble Shooting
23
10
11
13
15
16
18
18
21
22
22
EN
TVCC
3D-DNR
General Features
DSP
3D-DNR
Digital
DSP
Noise
DSP
DNR(Digital Noise Reduction)
Reduction
DNR
Digital
Digital
3D-DNR
Noise
Noise
Reduction
Reduction
DSP
HD
DNR
DNR
High Definition
HDPRO DNR technology utilizes both an adaptive 2D filter reducing noise in the
brightness of the image and an adaptive 3D filter reducing noise caused by
movement. The result is that HD-SDI camera supports Motion Adaptive DNR function
that removes noise and greatly reduce motion blur.
3D-DNR
Digital
DSP
Noise
HD
ACCE
Reduction
DNR
High
High Definition
Definition
Adaptive Color
3D-DNR
3D-DNR
Contrast
Enhanment
HD(High Definition) Surveillance
HD-SDI Camera provides the superb surveillance conditions than normal VGA camera.
DSP
Digital
DSP
Noise
Reduction
HD
ACCE
DNR
ACCE(Adaptive Color & Contrast Enhanment)
Adaptive
Color
High
Definition
Adaptive
Color
Contrast
Enhanment
Contrast
Enhanment
Digital
Digital
Noise
Noise
Reduction
Reduction
HLC
HD
ACCE
DNR
3D-DNR
High Definition
Adaptive Color
Contrast
Enhanment
Minimum
HLC
HD
600
0.017
Lux
Illumination
Horizontal
High
Definition
Resolution
ACCE
Adaptive Color
Contrast Enhanment
Minimum
Minimum
Illumination
Illumination
HLC
0.017
Lux
ACCE
WDR
Adaptive Color
Privacy Zone
Digital
Contrast
Enhanment
Wide
Dynamic
Range
HLC
Minimum
Illumination
HD-SDI Image Enhancer source of the software can be activated. HD-SDI Image Enhancer
improves the clarity of images taken in poor conditions such as fog, smoke, rain or snow.
Applied to live or recorded color video, it delivers real-time results and displays visual details
that would otherwise have been difficult to see.
HLC(High Light Compensation)
High Light Compensation function is especially effective for reading car number plates at
night time. Users can select and define the required observation area for the target object
and ignore strong highlight areas.
0.017 Lux
Privacy
Privacy Zone
Zone
BLC
OSD
Backlight
Compensation
Minimum
Illumination
HLC
0.017 Lux
Privacy Zone
OSD
OSD
Minimum
Minimum
Illumination
Illumination
0.017 Lux
0.00001
Lux
Illumination
With an Incredibly Minimum Illumination of Amazing 0.017Lux can Capture Good Images Even in
Extremely Low Light Conditions and Related Noises are Significantly Reduced by the Ultra
Advanced DNR(Digital Noise Reduction) Technology.
Privacy Zone
OSD
Privacy
Zone
Smart-IR
Privacy Zone
A "Privacy zone" can be set if you desire to block viewing of specific areas in the picture.
OSD
Additional Functions
OSD
OSD
4
OSD - On Screen Display menu
Privacy Masking - 8 zones, Sens-Up - x60 times, Digital Zoom - x64
EN
TVCC
Precautions
Do not install the camera in extreme
temperature conditions.
Do not install or use the camera in an
environment where the humidity is high.
Do not install the camera under
unstable lighting conditions.
Only use the camera under conditions
where temperatures are between -10°C
and +50°C. Be especially careful to
provide ventilation when operating under
high temperatures.
Do not install or use the camera in an
environment where the humidity is high.
Severe lighting change or flicker can
cause the camera to work improperly.
Never keep the camera pointed directly
at strong light.
Do not drop the camera or subject it to
physical shocks.
Do not touch the front lens of the camera.
This is one of the most important parts of
the camera. Be careful not to leave
fingerprints on the lens cover.
Do not expose the camera to rain or spill
liquids on it.
It can cause malfunctions to occur.
Do not expose the camera to radioactivity.
NOTE
* If the camera is exposed to
spotlight or object reflecting
strong light, smear or
blooming may occur.
* please check that the
power satisfies the normal
If it gets wet, wipe dry immediately.
Liquids can contain minerals that corrode
the electronic components.
5
If exposed to radioactivity the CCD will fail.
specification before
connecting the camera.
EN
TVCC
Sefety Instructions
Precautions for use
◑ This camera should be installed by qualified personnel only
◑ There are no user serviceable parts inside
◑ Do not disassemble this camera other than to make initial adjustments
◑ Use a UL approved regulated 24 volt AC or 12 volt DC power supply
se appropriate low voltage power cable to prevent fire or electrical shock
◑U
lease insure that your installation area can support the weight of the camera
◑P
Please handle this camera carefully :
◑ Do not use a strong or abrasive detergent when cleaning the camera
◑ Do not expose the camera to direct sun
◑ Do not install camera in places where humidity is high
◑ Do not install near cooling or heating device
o not expose camera to rain or moisture
◑D
6
EN
TVCC
OSD Control Button
1.Type A, Type B, Type C of OSD button could be used when it needs to
OSD control.
2.Type D is extra Option (wired Remote controller)
7
EN
TVCC
How to Set Up the camera menu
●
Setup Menu
MENU
DC
LENS
INDOOR
OUTDOOR
MODE
RETURN
MANUAL
BRIGHTNESS
SHUTTER
0~20 Level Selectable
AUTO
Manual
EXPOSURE
SENSE-UP
AGC
RETURN
HLC
BLC
BACKLIGHT
WDR
1/25,1/30,1/60,1/50, 1/120, 1/240, 1/500, 1/1000, 1/2000, 1/4000,
1/8000,1/16000, 1/30000, 1/60000
x2 , x3, x4, x8, x16, x32, x64 Level Selectable
OFF
0 ~ 20 Level Selectable
0 ~ 20 Level Selectable
RETURN
0 ~ 20 Level Selectable
H - POS
0 ~ 20 Level Selectable
V - POS
0 ~ 20 Level Selectable
H - SIZE
V - SIZE
0 ~ 20 Level Selectable
RETURN
LOW / MIDDLE / HIGH
WEIGHT
RETURN
OFF
COLOR
B/W
EXT
DAY/NIGHT
AUTO
ATW
PRESET
WHITE BAL
DNR
IMAGE
8
MANUAL
DELAY
RETURN
ANTI-SAT
AGC THRES
MARGIN
DELAY
RETURN
PUSHING
R - GAIN
B - GAIN
RETURN
LOW / MIDDLE / HIGH Level Selectable
0 ~20 Level Selectable
0 ~20 Level Selectable
0 ~ 20 Level Selectable
LOW / MIDDLE / HIGH Level Selectable
0 ~ 20 Level Selectable
0 ~ 20 Level Selectable
AWB
LOW / MIDDLE / HIGH Level Selectable
OFF
0 ~ 10 Level Selectable
SHARPNESS
O.45, 0.5, 0.55, 0.6, 0.65 Level Selectable
GAMMA
COLOR GAIN
0 ~ 20 Level Selectable
ON / OFF Selectable
MIRROR
ON / OFF Selectable
FLIP
D - ZOOM
x1 ~ x8 Level Selectable
OFF / LOW / MIDDLE / HIGH Level Selectable
D - WDR
1% ~ 100% Level Selectable
ON
SHADING
OFF
0 ~ 31 Level Selectable
ZONE NUM
ON / OFF Selectable
ZONE DISP
0 ~ 60 Level Selectable
H - POS
0 ~ 40 Level Selectable
V - POS
0 ~ 40 Level Selectable
H - SIZE
ON
PRIVACY
0 ~ 40 Level Selectable
V - SIZE
0 ~ 20 Level Selectable
Y LEVEL
0 ~ 20 Level Selectable
CR LEVEL
0 ~ 20 Level Selectable
CB LEVEL
RETURN
OFF
RETURN
EN
TVCC
How to Set Up the camera menu
●
Setup Menu
MOTION
ON
SENSITIVITY
DET H - POS
DET V - POS
DET H - SIZE
DET V - SIZE
MOTION OSD
ALARM
RETURN
0 ~ 20 Level Selectable
0 ~ 60 Level Selectable
0 ~ 40 Level Selectable
0 ~ 60 Level Selectable
0 ~ 40 Level Selectable
ON / OFF Selectable
ON / OFF Selectable
OFF
COM.
SYSTEM
COLOR SPACE
FRAME RATE
CVBS
RESET
RETURN
0 ~ 20 Level Selectable
CAM ID
2400 / 4800 / 9600 / 57600 / 115200 Selectable
BAUDRTE
ON / OFF Selectable
ID DISPLAY
RETURN
OFFCOLOR1 / COLOR2 / COLOR3 Selectable
25 FPS / 30 FPS Selectable
NTSC / PAL Selectable
PUSHING
ON
EXIT
9
EN
TVCC
Menu Set Up
1. Press the SET key to access the menu mode.
2. Select the desired feature by using the UP/DOWN direction (/\ \/) of the SET key.
If an ENTER arrow (
) is displayed next to the feature, press the SET key to access the
feature's menu.
3. If there is a setting for this feature on the right side of the screen, use the LEFT/RIGHT
direction to switch between the settings and confirm your choice by pressing the SET key.
4. When the settings are completed, go to EXIT to save and leave the OSD.
MENU
LENS
EXPOSURE
BACKLIGHT
DAY / NIGHT
WHITE BAL
DNR
IMAGE
MOTION
SYSTEM
EXIT
DC
OFF
AUTO
ATW
MIDDLE
OFF
Lens
Here you can configure the lens setting.
LENS [DC, MANUAL] :
If you are using a lens with manual Iris, set this item to MANUAL. If you are using a DC
controlled lens, set it to DC.
MENU
LENS
EXPOSURE
BACKLIGHT
DAY / NIGHT
WHITE BAL
DNR
IMAGE
MOTION
SYSTEM
EXIT
10
DC
OFF
AUTO
ATW
MIDDLE
OFF
EN
TVCC
If you choose DC, you will be able to select if the camera is used indoors or outdoors.
The lens and shutter control will be automatically optimised according the present situation.
- MODE [INDOOR, OUTDOOR] :
If you choose INDOOR, the Iris and the shutter are set to fixed values. This will prevent a
“rolling effect” of the image. If you choose OUTDOOR, the Iris and shutter settings are
flexible and will adjust accordingly to the current brightness situation.
DC
MODE
RETURN
INDOOR
Exposure
When selecting, the following submenu will appear.
The exposure is the amount of light received by the image sensor and is determined by the
width of lens diaphragm opening, the amount of exposure by the sensor (shutter speed) and
other exposure parameters. With this item, users can define how the Auto Exposure function.
MENU
LENS
EXPOSURE
BACKLIGHT
DAY / NIGHT
WHITE BAL
DNR
IMAGE
MOTION
SYSTEM
EXIT
11
DC
OFF
AUTO
ATW
MIDDLE
OFF
EN
TVCC
EXPOSURE
|IIIIIIIIIIIIIIIIIII| 10
AUTO
x4
|IIIIIIIIIIIIIIIIIII| 15
BRIGHTNESS
SHUTTER
SENS-UP
AGC
RETURN
BRIGHTNESS [0 ~20] :
This function is used to adjust the brightness of the camera picture.
SHUTTER [1/25, 1/30, 1/60, 1/50, 1/120, 1/240, 1/500, 1/1000, 1/2000, 1/4000, 1/8000,
1/16000, 1/30000, 1/60000] :
You can select one of 14 options from 1/25 to 1/60000K for the fixed high speed
electronic shutter, which is mostly used for imaging a fast moving object.
SENS-UP [OFF, AUTO, x2~x64] :
Automatically detects the ambient level of darkness in a dark or low contrast scene to
extend the accumulated time, keeping the image bright and sharp.
AGC (Automatic Gain Control) [0-20] :
The AGC (Auto Gain Control) function is used to amplify the video signal when it falls
below the set parameter. As the AGC level increases, the overall screen gets brighter but
the level of noise will also increase at the same time.
12
EN
TVCC
Backlight
To overcome difficult light situations, the HD-SDI cameras feature different options to
improve the image quality.
MENU
LENS
EXPOSURE
BACKLIGHT
DAY / NIGHT
WHITE BAL
DNR
IMAGE
MOTION
SYSTEM
EXIT
DC
OFF
AUTO
ATW
MIDDLE
OFF
HLC (High Light Compensation):
This function is used to surpress or mask a strong light source (for example, headlights of
cars during night-time) so that other subjects can be seen in more detail. If you select HLC,
a submenu appears where you can make finer adjustments.
- HLC LEVEL: Adjust the brightness level from which on the light source is to be masked out.
HLC
LEVEL
RETURN
13
|IIIIIIIIIIIIIIIIIII|
EN
10
TVCC
BLC (Back Light Compensation):
This function is used to counterbalance the screen image by increasing the brightness so
that a subject which appears dark due to a strong backlight can be displayed in more detail.
If you select BLC, a submenu appears where you can make finer adjustments.
-H-POS/ V-POS/ H-SIZE/ V-SIZE: Define the position and size of the area of interest by
changing the position & size.
BLC
H-POS
V-POS
H-SIZE
V-SIZE
RETURN
7
5
7
5
WDR:
The WDR (Wide Dynamic Range) function works to correct excessive light within the frame
to produce a usable image. When the image has simultaneous bright and dark areas,
it makes both areas distinct. If you select WDR, a submenu appears where you can make
finer adjustments.
-WEIGHT [MIDDLE, HIGH, LOW]: Select the WDR level of the camera.
WDR
WEIGHT
RETURN
14
MIDDLE
EN
TVCC
NOTE
*The WDR function might lead to a reduced framerate and “ghost” effects in areas with
very bright background.
Day / Night
Here you can choose different settings to control the DAY&NIGHT function.
MENU
LENS
EXPOSURE
BACKLIGHT
DAY / NIGHT
WHITE BAL
DNR
IMAGE
MOTION
SYSTEM
EXIT
DC
OFF
AUTO
ATW
MIDDLE
OFF
COLOUR: The camera is always in colour mode regardless of the ambient conditions.
B/W: The camera is always in Black & White mode regardless of the ambient conditions.
EXTERN: Here you can activate the EXTERN function to activate the external Day & Night
connector on the rear panel of the camera. If you select EXTERN, a submenu appears where
you can make finer adjustments.
- DELAY [MIDDLE, HIGH, LOW]: Set the delay time for switching between COLOUR and B/W.
AUTO: The camera will automatically switch between DAY and NIGHT mode, according to the
lighting condition. If you press the SET key, the AUTO sub-menu is selected.
DAY / NIGHT
|IIIIIIIIIIIIIIIIIII
|
| 10
|IIIIIIIIIIIIIIIIIII
|
|8
|IIIIIIIIIIIIIIIIIII
| 10
|
LOW
ANTI SAT.
AGC THRES
MARGIN
DELAY
RETURN
15
EN
TVCC
-ANTI-SAT[0-20] : When switching B/W, saturation occurs in specific condition depending on
brightness. In this situation, you can prevent the saturation by defining the level of ANTI-SAT.
-AGC THRES [0-20] : Execute the Day/Night switch depending on the AGC level that is
used to increase the brightness of the image. Higher values require a darker illumination to
execute the switch.
- MARGIN [0-20] : Define the difference between the Day/Night & Night/Day switch based on
AGC THRES. Higher values will increase this distance and can help to prevent continuous
switching between Day & Night mode.
-DELAY [MIDDLE, HIGH, LOW]: Set the delay time for switching between COLOUR and B/W.
White Balance
MENU
LENS
EXPOSURE
BACKLIGHT
DAY / NIGHT
WHITE BAL
DNR
IMAGE
MOTION
SYSTEM
EXIT
DC
OFF
AUTO
ATW
MIDDLE
OFF
The camera needs to find a reference colour temperature, which is a way of measuring the
colour of a light source, for calculating all the other colours. The unit for measuring this ratio
is in degree Kelvin (K). You can select one of the White Balance Control modes according to
the installation condition.
16
EN
TVCC
ATW (Auto Tracking White Balance):
With the Auto Tracking White Balance function, the white balance in a scene will be
automatically adjusted while temperature colour is changing. The ATW Mode is suitable for
environments with a light source having a colour temperature in the range roughly from
1800 ~ 10500K.
AWB (Auto White Balance):
In this mode, white balance works within its colour temperature range. This mode computes
the white balance value output using the colour information from the entire screen. It outputs
the proper value using the colour temperature radiating from a black subject.
PRESET:
This mode is set to the current white balance condition and keeps its value. Select this mode
and then press the SET key. If there is a change in location or light source, please repeat this
procedure.
MANUAL
R-GAIN
B-GAIN
RETURN
|IIIIIIIIIIIIIIIIIII| 15
|IIIIIIIIIIIIIIIIIII| 10
MANUAL:
Can be used for fine adjustment. Set the White Balance by first using ATW or AWC and then
change to MANUAL and press the SET key. Increase or decrease the value of R-Gain (Red)
and B-Gain (Blue) while monitoring the colour of the image.
- R-GAIN: Adjusts the White Balance for the colour Red.
- B-GAIN: Adjusts the White Balance for the colour Blue.
17
EN
TVCC
DNR(Digital Noise Reduction)
This function is used to improve the picture quality by filtering the noise which is generated
under low bright light conditions. You can set different levels here.
MENU
LENS
EXPOSURE
BACKLIGHT
DAY / NIGHT
WHITE BAL
DNR
IMAGE
MOTION
SYSTEM
EXIT
DC
OFF
AUTO
ATW
MIDDLE
OFF
Image
When selecting, the following submenu will appear.
MENU
LENS
EXPOSURE
BACKLIGHT
DAY / NIGHT
WHITE BAL
DNR
IMAGE
MOTION
SYSTEM
EXIT
DC
OFF
AUTO
ATW
MIDDLE
OFF
Here you can optimise the image quality by adjusting different options.
SHARPNESS [1 ~ 10] :
Adjusts the image sharpness. If the level goes up excessively, it may affect the video image
and generate a noise.
GAMMA [0.45 ~ 0.65] :
Changes the gamma curve of the camera.
18
EN
TVCC
COLOR GAIN [0 ~ 20] : Kontrollieren Sie die Farbsättigung des Video-Bildes.
MIRROR [ON, OFF] : Mirrors the image horizontally on the screen.
FLIP [ON, OFF] : Flips the image vertically on the screen.
D-ZOOM [1.0x~8.0x] : You can use the up to x8 bi-cubic linear digital zoom.
D-WDR [LOW, MIDDLE, HIGH, OFF] :
The WDR (Wide Dynamic Range) function works to correct excessive light within the frame
to produce a usable image. When the image has simultaneous bright and dark areas, it
makes both areas distinct.
IMAGE
|IIIIIIIIIIIIIIIIIII| 5
0.45
|IIIIIIIIIIIIIIIIIII| 15
OFF
OFF
1.0x
OFF
OFF
OFF
SHARPNESS
GAMMA
COLOR GAIN
MIRRPR
FLIP
D-ZOOM
D-WDR
SHADING
PRIVACY
RETURN
SHADING [ON, OFF] :
Compensates the shading effects of lenses when the lens is set to a very wide angle.
This function will reduce the brightness difference between the centre and the edges.
If you select ON, a submenu appears where you can make finer adjustments.
- WEIGHT [1%~100%] : You can set different levels here.
SHADING
WEIGHT
RETURN
19
100%
EN
TVCC
PRIVACY [ON, OFF] :
Masks areas that you want to hide on the screen. The camera can activate up to 32 privacy
masks. Switch between ON and OFF to activate or deactivate this function.
PRIVACY
ZONE NUM
ZONE DISP
H-POS
V-POS
H-SIZE
V-SIZE
Y LEVEL
CR LEVEL
CB LEVEL
RETURN
0
ON
12
2
3
3
|IIIIIIIIIIIIIIIIIII| 10
|IIIIIIIIIIIIIIIIIII| 10
|IIIIIIIIIIIIIIIIIII| 10
- ZONE NUM [0 ~ 32]: Select a mask out of the 32 mask areas and set the options below for
the selected mask.
- ZONE DISP [ON, OFF]: Choose ON to activate privacy masks and press OFF to
deactivate masks.
- H-POS [0 ~ 60]: Define the horizontal start position of the privacy mask.
- V-POS [0 ~ 40]: Define the vertical start position of the privacy mask.
- H-SIZE [0 ~ 40]: Define the horizontal size of the privacy mask.
- V-SIZE [0 ~ 40]: Define the vertical size of the privacy mask.
- Y LEVEL [0 ~ 20]: Define the brightness of the mask colour.
- CR LEVEL [0 ~ 20]: Define the red amount of the mask colour.
- CB LEVEL [0 ~ 20]: Define the blue amount of the mask colour.
20
EN
TVCC
Motion
This function is used to detect moving objects in the monitored area. When choosing ON, the
following submenu will appear where you can adjust the settings for the MOTION function.
MENU
LENS
EXPOSURE
BACKLIGHT
DAY / NIGHT
WHITE BAL
DNR
IMAGE
MOTION
SYSTEM
EXIT
DC
OFF
AUTO
ATW
MIDDLE
OFF
SENSITIVITY [1 ~ 20] : Set the sensitivity of the motion detection.
DET H-PS [0 ~ 60] : Define the horizontal start position of the monitoring area.
DET V-PS [0 ~ 40] : Define the vertical start position of the monitoring area.
DET H-SIZE [0 ~ 60] : Define the horizontal size of the monitoring area.
DET V-SIZE [0 ~ 40] : Define the vertical size of the monitoring area.
MOTION OSD [ON, OFF] : Controls the ON/OFF status of the motion detection block display.
ALARM [ON, OFF] :
When the ALARM function is activated, the camera will detect movement within a monitoring
area and then send an alarm signal automatically. The flash warning notice "MOTION !!!" will
be displayed in the upper left corner of the screen. When the camera is moved, the flash
warning notice "MOVING !!!" will be displayed in the upper left corner of the screen.
MOTION
|IIIIIIIIIIIIIIIIIII| 10
4
4
30
26
ON
ON
SENSITIVITY
DET H-PS
DET V-PS
DET H-SIZE
DET V-SIZE
MOTION OSD
ALARM
RETURN
21
EN
TVCC
System
When selecting, the following submenu will appear.
MENU
LENS
EXPOSURE
BACKLIGHT
DAY / NIGHT
WHITE BAL
DNR
IMAGE
MOTION
SYSTEM
EXIT
DC
OFF
AUTO
ATW
MIDDLE
OFF
COLOR SPACE [COLOR1~3] : Select different colour settings for a warmer or a colder image.
FRAME RATE [25 FPS, 30 FPS] : Choose a frame rate.
CVBS [PAL, NTSC] : Select the video format that matches the present TV system
RESET [ON] : All settings will be restored to factory default.
Exit
Press the Set button in the exit menu to save the current settings and exit the Set Up menu.
22
EN
TVCC
Trouble Shooting
PROBLEM
Northing appears on
the screen.
23
POSSIBLE CAUSE
☞Check the power cable, power supply output and video
connection between the camera and monitor.
The image on the
screen is dim.
☞Are the camera lens or the lens glass dirty?
Clean the lens / glass with a soft clean cloth.
☞Adjust the monitor controls, as required.
☞If the camera is facing a very strong light, change the
camera position.
☞Adjust the lens focus.
The image on the
screen is dark.
☞Adjust the contrast control of the monitor.
☞If there is an intermediate device, correctly set the 75Ω/Hi-z.
The camera is not
working properly
and the surface of
the camera is hot.
☞Check the camera is correctly connected to an appropriate
Motion Detection
is not activated.
☞Has MOTION DET been set to ON in the menu?
The color of the
picture is not correct.
☞Check the settings in WHITE BALANCE menu.
regulated power source.
☞Has MD AREA been properly defined?
The image on the
screen flickers.
☞Make sure that the camera isn’t facing direct sunlight or
fluorescent lighting. If necessary,change the camera position.
The SENS-UP does
not work.
☞ Check that the AGC setting in the EXPOSURE menu is’t set to OFF.
☞ Check the EXPOSURE menu and make sure SHUTTER is set to----.
EN
Via Pontarola, 14/a
35011 Campodarsego PD - Italy
Tel. +39 049 920 2511
Fax +39 049 920 2603
www.elvox.com
S6I.TVC.001 RL. 00 13 03
ELVOX - Campodarsego - Italy