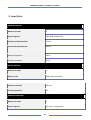
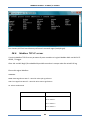
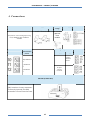
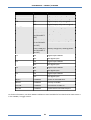
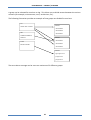
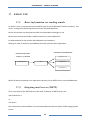
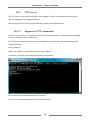
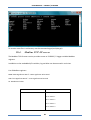
1
MANUALE UTENTE
Z-GPRS2 / Z-LOGGER
Z-GPRS2
Datalogger / RTU multiprotocollo avanzato con modem GSM/GPRS e I/O integrato
Z-LOGGER
Datalogger / RTU multiprotocollo avanzato con I/O integrato
SENECA s.r.l.
PADOVA – ITALY
Tel. +39.049.8705355 – 8705359 Fax. +39.049.8706287
Web site: www.seneca.it
Assistenza tecnica: [email protected] (IT), [email protected] (Other)
Informazioni Commerciali: [email protected] (IT), [email protected] (Other)
This document is property of SENECA srl. Duplication and reproduction of its are forbidden (though partial), if not
authorized. Contents of present documentation refers to products and technologies described in it. Though we strive for
reach perfection continually, all technical data contained in this document may be modified or added due to technical and
commercial needs; it’s impossible eliminate mismatches and discordances completely. Contents of present
documentation is anyhow subjected to periodical revision. If you have any questions don’t hesitate to contact our
structure or to write us to e-mail addresses as above mentioned.
MI003134
Page 1
MANUALE UTENTE – Z-GPRS2 / Z-LOGGER
Data
Versione
Modifiche
14/05/2013
12
Modifiche per firmware 2670_200
Aggiunti comandi lettura tag modbus via SMS
Aggiunto capitolo soluzione problemi
Aggiunti registri Modbus I/O interni
Aggiunto log dei contaore
Modificato Webserver: aggiunto segnale GSM, Tipo
alimentazione.
Aggiornato capitolo Installazione driver USB
Modificato capitolo E-MAIL
Aggiunto commento sul funzionamento degli ingressi
digitali in caso di blackout
Aggiunto il capitolo sul logger eventi
07/06/2013
13
Cambiato l’ordine dei capitoli e aggiunti nuovi capitoli
15/07/2013
14
Modifiche per firmware versione 2670_300:
Cambiato livello segnale GSM in Dbm
Aggiornato il capitolo riguardo il Syslog
Aggiornato il capitolo sulla gestione degli errori via
FTP/E-MAIL
Modificato il capitolo Soluzione ai problemi
Aggiunta la funzione di resume solo per connessione GPRS
e invio FTP
Aggiunto capitolo “Attivare la porta di debug”
Aggiunto capitolo “Comandi disponibili tramite software
di configurazione”
Modificato “Test di configurazione per l’invio delle email”
Modificato “Test di configurazione per l’invio ftp”
Aggiunto capitolo “nome dei file di log”
2
MANUALE UTENTE – Z-GPRS2 / Z-LOGGER
Sommario
SENECA Z-GPRS2 / Z-LOGGER ....................................................................................... 9
1. INFORMAZIONI PRELIMINARI .................................................................................... 9
2. CARATTERISTICHE .................................................................................................. 11
3. SPECIFICHE ............................................................................................................... 13
4. CONNESSIONI ........................................................................................................... 16
5. LED DI SEGNALAZIONE ........................................................................................... 18
5.1.
LED Z-GPRS2 ......................................................................................................... 18
5.2.
LED Z-LOGGER ...................................................................................................... 19
6. NOZIONI DI BASE ...................................................................................................... 21
7. SIM CARD SUPPORTATE (SOLO Z-GPRS2) ........................................................... 22
8. SEGNALE GSM (SOLO Z-GPRS2) ............................................................................ 23
9. LA CONNESSIONE GPRS (SOLO Z-GPRS2) ........................................................... 25
10.
10.1.
COORDINATE GPS ................................................................................................ 25
COORDINATE GPS VIA RETE GPRS (SOLO Z-GPRS2) .................................. 26
11.
BATTERIE DI BACKUP .......................................................................................... 26
12.
IL DATALOGGER ................................................................................................... 27
12.1.
ACQUISIZIONE DEI DATI ................................................................................... 27
12.2.
INVIO DEI DATI DEL DATALOGGER ................................................................. 27
3
MANUALE UTENTE – Z-GPRS2 / Z-LOGGER
12.3.
OROLOGIO INTERNO ......................................................................................... 27
12.4.
LOG DELL’I/O EMBEDDED ................................................................................ 28
12.5.
IL LOGGER MODBUS RTU E MODBUS TCP-IP ................................................ 28
12.5.1.
12.6.
12.6.1.
GESTIONE DEGLI ERRORI DEL LOG MODBUS ........................................... 30
FILE DI LOG......................................................................................................... 30
NOME DEL FILE DI LOG ................................................................................. 30
12.7.
CONFIGURAZIONE DEL LOGGER .................................................................... 31
12.8.
CONFIGURAZIONE DELL’INVIO DEI LOG ........................................................ 32
12.9. CONFIGURAZIONE DEL LOG SERIALE SU PROTOCOLLO MODBUS RTU E
MODBUS TCP-IP .............................................................................................................. 33
12.9.1.
CONFIGURAZIONE DEI REGISTRI MODBUS DA LOGGARE ....................... 33
12.9.2.
CAMPI CONFIGURABILI DEI FILE DI LOG .................................................... 34
12.10.
SMS DI LOG ..................................................................................................... 36
12.11.
SALVATAGGIO DEI LOG SU MICROSD CARD ............................................. 37
12.12.
SALVATAGGIO DEI CONTATORI/TOTALIZZATORI...................................... 37
12.13.
TEMPI DI INVIO VIA GPRS DEI FILE DI LOG (SOLO Z-GPRS2) ................... 37
12.14.
GESTIONE DEGLI ERRORI DI CONNESSIONE ED INVIO DATI AI SERVER
FTP E SMTP...................................................................................................................... 38
12.15.
FUNZIONE DI RIDONDANZA DEL CANALE DI COMUNICAZIONE
ETHERNET/GPRS (SOLO Z-GPRS2) .............................................................................. 38
12.16.
TEST DELLA CONFIGURAZIONE PER L’INVIO DELLE E-MAIL................... 39
12.17.
TEST DELLA CONFIGURAZIONE PER L’INVIO DEI LOG VIA FTP .............. 39
4
MANUALE UTENTE – Z-GPRS2 / Z-LOGGER
13.
LOG DI SISTEMA (LOG DEGLI EVENTI E DEGLI ALLARMI) SU MICRO SD...... 39
13.1.
CONTENUTO DEL FILE “SYSLOG.CSV” .......................................................... 39
13.2.
INVIO DEL FILE “SYSLOG.CSV” ....................................................................... 40
14.
LA RUBRICA CONTATTI E I GRUPPI DI INVIO .................................................... 40
14.1.
CONTATTO “UTENTE” ....................................................................................... 40
14.2.
CONTATTO “OPERATORE”............................................................................... 40
14.3.
CONTATTO “AMMINISTRATORE” .................................................................... 40
14.4.
GRUPPI DI INVIO................................................................................................. 41
15.
COMANDI SUPPORTATI (SOLO Z-GPRS2) .......................................................... 42
15.1.
IMPOSTARE L’ALFABETO CARATTERI SMS DEL TELEFONO ...................... 42
15.2.
ELENCO DEI COMANDI SMS SUPPORTATI ..................................................... 42
15.3.
COMANDI SMS “FAST” (SOLO Z-GPRS2) ........................................................ 46
15.4.
COMANDI SU SQUILLO “A COSTO ZERO” (SOLO Z-GPRS2) ....................... 48
15.5.
PASSWORD COMANDI (SOLO Z-GPRS2) ........................................................ 49
16.
TIMER ...................................................................................................................... 50
16.1.
TIMER PERIODICI ............................................................................................... 50
16.2.
TIMER CALENDARIO .......................................................................................... 50
17.
UTILIZZO DELLE E-MAIL ....................................................................................... 52
17.1.
INFORMAZIONI DI BASE SULL’INVIO DELLE E-MAIL ..................................... 52
17.2.
SERVER DI POSTA IN USCITA (SMTP) ............................................................. 52
17.3.
AUTENTICAZIONE SMTP: USER NAME E PASSWORD .................................. 53
5
MANUALE UTENTE – Z-GPRS2 / Z-LOGGER
17.4.
CONNESSIONE PROTETTA AL SERVER SMTP (SOLO Z-GPRS2)................. 53
17.5. PARAMETRI DEI PRINCIPALI SERVER SMTP SENZA CONNESSIONE
PROTETTA ....................................................................................................................... 54
17.6. PARAMETRI DEI PRINCIPALI SERVER SMTP CON CONNESSIONE
PROTETTA VIA GPRS (SOLO Z-GPRS2) ....................................................................... 55
18.
ALLARMI SU INGRESSI ANALOGICI .................................................................... 56
18.1.
FILTRAGGIO DEGLI INGRESSI ANALOGICI..................................................... 56
18.2.
ALLARME SU ALTO E MASSIMO ...................................................................... 56
18.3.
ALLARME SU BASSO E MINIMO ....................................................................... 57
18.4.
FILTRO PER ALLARME ...................................................................................... 57
18.5.
TEMPO DI INIBIZIONE DELL’ALLARME ........................................................... 58
19.
ALLARMI SU INGRESSI DIGITALI ........................................................................ 59
19.1.
FILTRAGGIO SUGLI INGRESSI DIGITALI ......................................................... 59
19.2.
TEMPO DI INIBIZIONE DELL’ALLARME ........................................................... 60
20.
20.1.
21.
21.1.
ALLARMI SU TOTALIZZATORI/CONTATORI ....................................................... 61
TEMPO DI INIBIZIONE DELL’ALLARME ........................................................... 61
ALLARME BLACKOUT TENSIONE DI RETE ........................................................ 62
TEMPO DI INIBIZIONE DELL’ALLARME ........................................................... 62
22.
ALLARME SU INCREMENTO DEI TOTALIZZATORI ............................................ 63
23.
ALLARME SU PERDITE DI UN IMPIANTO ............................................................ 64
24.
ALLARME SU CONTAORE .................................................................................... 66
25.
ALLARME SU ANOMALIA FUNZIONAMENTO PANNELLI SOLARI.................... 66
6
MANUALE UTENTE – Z-GPRS2 / Z-LOGGER
26. ALLARMI AUSILIARI DIGITALI / ANALOGICI SU PERIFERICHE MODBUS RTU /
MODBUS TCP-IP .............................................................................................................. 66
27.
AZIONE SU EVENTO .............................................................................................. 68
28.
FUNZIONALITA’ SERVER VIA PORTA ETHERNET ............................................. 70
28.1.
CONNESSIONE LOCALE ALLA PORTA ETHERNET ....................................... 70
28.2.
SERVIZIO SERVER VIA PORTA ETHERNET: WEB SERVER ......................... 70
28.2.1.
28.3.
MISURE REAL TIME SUL WEBSERVER ........................................................ 73
FTP SERVER ....................................................................................................... 77
28.3.1.
28.4.
COMANDI FTP SUPPORTATI ......................................................................... 77
MODBUS TCP-IP SERVER ................................................................................. 80
28.4.1.
STRUTTURA DEI REGISTRI MODBUS REAL TIME LOG .............................. 82
29. ACCESSO A Z-GPRS2 / Z-LOGGER DA INTERNET (SOLO TRAMITE PORTA
ETHERNET) ...................................................................................................................... 83
30.
AGGIORNAMENTO DEL FIRMWARE.................................................................... 85
30.1. AGGIORNAMENTO VIA USB (TRAMITE SOFTWARE EASY Z-GPRS2/ZLOGGER / EASY SETUP) ................................................................................................ 85
30.2.
AGGIORNAMENTO VIA MICROSD CARD (SENZA USO DI PC) ...................... 86
31.
ATTIVARE LA PORTA DI DEBUG ......................................................................... 87
32.
COMANDI DISPONIBILI TRAMITE SOFTWARE DI CONFIGURAZIONE ............. 88
33. SOFTWARE EASY SETUP ED EASY Z-GPRS2/Z-LOGGER, INSTALLAZIONE
DEI DRIVER USB .............................................................................................................. 88
34.
IL KIT-USB .............................................................................................................. 90
35.
SOLUZIONE AI PROBLEMI.................................................................................... 91
7
MANUALE UTENTE – Z-GPRS2 / Z-LOGGER
8
MANUALE UTENTE – Z-GPRS2 / Z-LOGGER
Seneca Z-GPRS2 / Z-LOGGER
1. Informazioni Preliminari
ATTENZIONE!
Contattare il proprio gestore telefonico per quanto riguarda i costi dei servizi GSM e GPRS, è
opportuno quantificare i costi di invio dei log e degli SMS prima di procedere alla configurazione
e installazione di Z-GPRS2.
L’utilizzo di Z-GPRS2 in modalità di roaming dati (ad esempio utilizzo all’estero con sim italiana)
può comportare costi inattesi. Contattare il proprio gestore telefonico per ulteriori informazioni.
IN NESSUN CASO SENECA O I SUOI FORNITORI SARANNO RITENUTI RESPONSABILI PER
EVENTUALI PERDITE DI DATI ENTRATE O PROFITTI, O PER CAUSE INDIRETTE, CONSEQUENZIALI O
INCIDENTALI, PER CAUSE (COMPRESA LA NEGLIGENZA), DERIVANTI O COLLEGATE ALL' USO O
ALL' INCAPACITÀ DI USARE Z-GPRS2 E Z-LOGGER, ANCHE SE SENECA E’ STATA AVVISATA DELLA
POSSIBILITÀ DI TALI DANNI.
SENECA, LE SUSSIDIARIE O AFFILIATE O SOCIETÀ DEL GRUPPO O DISTRIBUTORI E RIVENDITORI
SENECA NON GARANTISCONO CHE LE FUNZIONI SODDISFERANNO FEDELMENTE LE ASPETTATIVE
E CHE Z-GPRS2 E/O Z-LOGGER, IL LORO FIRMWARE E SOFTWARE SIA ESENTE DA ERRORI O CHE
FUNZIONI ININTERROTTAMENTE.
SENECA UTILIZZA LA MASSIMA CURA ED ATTENZIONE NELLA STESURA DEL SEGUENTE MANUALE,
TUTTAVIA E’ POSSIBILE CHE VI SIANO CONTENUTI ERRORI O OMISSIONI, SENECA SRL SI RISERVA
DI MODIFICARE E/O VARIARE PARTI DEL SEGUENTE MANUALE A FRONTE DI ERRORI O DI
MODIFICHE DELLE CARATTERISTICHE DEL PRODOTTO SENZA ALCUN PREAVVISO.
ATTENZIONE!
-Contattare il proprio gestore telefonico per quanto riguarda i costi dei servizi GSM e GPRS
specie se si sta utilizzando Z-GPRS2 con sim di uno stato differente da dove ci si trova (roaming
internazionale).
-E’ opportuno stimare i costi telefonici prima di procedere alla configurazione di Z-GPRS2.
-Il costo di ciascun SMS è fissato dal gestore telefonico.
9
MANUALE UTENTE – Z-GPRS2 / Z-LOGGER
-Il costo dell’invio/ricezione GPRS può essere legato al Kbyte inviato/ricevuto, ad un massimo
mensile compreso in un pacchetto, o al tempo di connessione GPRS, contattare l’operatore
telefonico per ulteriori informazioni.
-Nel caso di connessione GPRS il cui costo è dato dal tempo di connessione si consideri che la
comunicazione è attiva per un tempo che dipende dal numero di righe di log da inviare.
Tipicamente un log di 2 Kbyte di dati impiega circa 10-15 secondi per l’invio a cui va aggiunto il
tempo necessario alla connessione (dai 5 ai 30 secondi) e il tempo dovuto agli eventuali tentativi
di accesso al server.
-Verificare la quantità di invii via GPRS e via SMS dei dati prima di effettuare la messa in
funzione di Z-GPRS2.
Si ricorda che in ogni transazione GPRS gli operatori di telefonia mobile considerano traffico dati
anche tutta la comunicazione che permette la trasmissione del file (quindi nel conteggio va
calcolato anche l’overhead della trasmissione dati, il numero di tentativi di connessione etc…) e
non solo la sua dimensione.
10
MANUALE UTENTE – Z-GPRS2 / Z-LOGGER
2. Caratteristiche
Z-GPRS2
Z-GPRS2 è un datalogger/RTU programmabile multiprotocollo con modem GSM/GPRS e IO
integrati.
•
•
•
•
•
•
•
•
•
•
•
•
•
•
•
•
•
•
•
•
•
•
•
•
•
•
•
•
•
Tensione nominale di ingresso 11..40 Vdc; 19..28 Vac max 6.5 W
2 Batterie di backup AAA 1.2 V ricaricabili, NiMh
Modem GSM/GPRS Quad-Band
Isolamento 500 Vac tra alimentazione restanti circuiti
Rapido montaggio su guida DIN 46277
LED di indicazione degli stati: Ingressi digitali, uscite digitali, Ethernet, GSM, RS485, Power,
microSD
4 Ingressi digitali
2 Ingressi analogici a 16 bit configurabili in tensione/corrente
2 Uscite digitali a relè contatto pulito
Ethernet RJ45 frontale 10/100 Mbps
2 Porte RS485
1 Porta miniUSB tipo B per la configurazione
Supporto per microSD (microSD o microSDHC max 32 Gb)
4 Totalizzatori a 32 bit max 30 Hz
4 Contatori resettabili a 32 bit max 30 Hz
Possibilità di estendere il numero allarmi digitali o analogici via Modbus TCP-IP o Modbus
RTU fino ad un massimo di 30
Massimo numero di canali sul datalogger: 128 (di cui 100 via Modbus RTU/TCP-IP)
Protocolli di sistema supportati via GSM: SMS, chiamata voce (comando a costo zero)
Protocolli di sistema supportati via GPRS: FTP client, SMTP client, SMTPS client.
Protocolli di sistema supportati via porta Ethernet: FTP client, FTP server*, SMTP client,
ModBUS TCP-IP Server*
Protocollo su RS485: Modbus RTU Master
Webserver tramite porta Ethernet*
protocolli seriali custom implementabili.
Memoria RAM 128 kB
Espansione memoria con micro SD fino a 32 GB
Memoria FLASH 512 kB + 1,5 MB (log) + 0,5 MB (aggiornamento firmware)
Processore ARM, 100 MHz, 32 bit
Sistema operativo Real Time multitasking
Aggiornamento firmware via USB / microSD
*= servizi ethernet non attivabili contemporaneamente
11
MANUALE UTENTE – Z-GPRS2 / Z-LOGGER
Z-LOGGER
Z-LOGGER è un datalogger/RTU programmabile multiprotocollo con IO integrati.
•
•
•
•
•
•
•
•
•
•
•
•
•
•
•
•
•
•
•
•
•
•
•
•
•
•
Tensione nominale di ingresso 11..40 Vdc; 19..28 Vac max 6.5 W
2 Batterie di backup AAA 1.2 V ricaricabili, NiMh
Isolamento 500 Vac tra alimentazione restanti circuiti
Rapido montaggio su guida DIN 46277
LED di indicazione degli stati: Ingressi digitali, uscite digitali, Ethernet, RS485, Power,
microSD
4 Ingressi digitali
2 Ingressi analogici a 16 bit configurabili in tensione/corrente
2 Uscite digitali a relè contatto pulito
Ethernet RJ45 frontale 10/100 Mbps
2 Porte RS485
1 Porta miniUSB tipo B per la configurazione
Supporto per microSD (microSD o microSDHC max 32 Gb)
4 Totalizzatori a 32 bit max 30 Hz
4 Contatori resettabili a 32 bit max 30 Hz
Possibilità di estendere il numero allarmi digitali o analogici via Modbus TCP-IP o Modbus
RTU fino ad un massimo di 30
Massimo numero di canali sul datalogger: 128 (di cui 100 via Modbus RTU/TCP-IP)
Protocolli di sistema supportati via porta Ethernet: FTP client, FTP server*, SMTP client,
ModBUS TCP-IP Server*
Protocollo di sistema su RS485: Modbus RTU Master
Webserver tramite porta Ethernet*
protocolli seriali custom implementabili.
Memoria RAM 128 kB
Espansione memoria con micro SD fino a 32 GB
Memoria FLASH 512 kB + 1,5 MB (log) + 0,5 MB (aggiornamento firmware)
Processore ARM, 100 MHz, 32 bit
Sistema operativo Real Time multitasking
Aggiornamento firmware via USB / microSD
*= servizi ethernet non attivabili contemporaneamente
12
MANUALE UTENTE – Z-GPRS2 / Z-LOGGER
3. Specifiche
INGRESSI DIGITALI
Numero di canali
4
Tipo di ingresso
PNP, NPN configurabili.
Tensione di alimentazione
12 Vdc
Corrente di alimentazione
20 mA
Massima frequenza
30 Hz
Corrente assorbita
3 mA
USCITE DIGITALI
Numero di canali
2
Tipo di uscita
Relè a contatto pulito
Tensione massima
250 Vac
Corrente massima
2A
INGRESSI ANALOGICI
Numero di canali
2
Tipo di ingresso
mA / Vdc, configurabile
13
MANUALE UTENTE – Z-GPRS2 / Z-LOGGER
Ingresso tensione
0..30V precisione 0,1% del FS
Ingresso corrente
0..20 mA precisione 0,1% del FS
Protezione ingressi
Sì, 12Vdc o 25mA
Risoluzione
16 bit
PORTE DI COMUNICAZIONE
RS 485 #1
Port #1, posteriore su IDC10
RS 485 #2
Port #2, morsetto M10/M11/M12
Ethernet
10/100 Mbit, RJ45 frontale con autoswitch
USB mini B
Mini B, laterale
UNITA' DI MEMORIZZAZIONE
Micro SD
microSD e microSDHC, max 32 GB (non fornita)
ALIMENTAZIONE
Tensione
11..40 Vdc; 19..28 Vac
Assorbimento
6,5 W
CONDIZIONI AMBIENTALI
Temperatura
Da -10 a +40 °C
Umidità
30..90% a 40 °C non condensante
Temperatura di stoccaggio
Da -20 a +45 °C < 6 mesi
14
MANUALE UTENTE – Z-GPRS2 / Z-LOGGER
Grado di protezione
IP20
NORMATIVE
EN61000-6-4/2002-10
Electromagnetic emission, industrial environment.
EN61000-6-2/2006-10
Electromagnetic immunity, industrial environment.
EN 301 511 (solo Z-GPRS2)
Harmonized standard for mobile stations in the
GSM
900 and 1800 bands.
EN 301 489-1 (solo Z-GPRS2)
ElectroMagnetic Compatibility standard for radio
equipment and services.
EN 301 489-7 (solo Z-GPRS2)
Specific (EMC) conditions for mobile radio
equipment
(GSM 900 and 1800).
EN 60950
Safety of information Technology Equipment.
SPECIFICHE CONTENITORE
Dimensioni e peso
100 x 111 x 35 mm, 280 g
Materiale
PBT, colore nero
ISOLAMENTO 500 Vac
15
MANUALE UTENTE – Z-GPRS2 / Z-LOGGER
4. Connessioni
DESCRIZIONE
Ingressi Analog.
V/I [2]
V/I [1]
Configurabili 0..10 Vdc 0..20 mA
Configurare gli ingressi analogici in
tensione o in corrente tramite il software
di configurazione Easy Z-GPRS2/ZLogger.
Morsetti
Comunicazione
RS485 port #2
Tensione
ausiliaria
Alimentazione
12..15 Vdc
@40 mA dal
modulo
Uscite digitali
DO[2]
DO[1]
N. Aperto
Comune
N.Chiuso
GND, RS485 Port
#2
A, RS 485 Port
#2
N. Aperto
Comune
N.Chiuso
B, RS 485 Port
#2
SIM CARD (SOLO Z-GPRS2)
SIM, Inserimento tramite
connettore a slitta. Se
correttamente inserita la SIM
sporgerà dal frontale di 4.5 mm.
16
Morsetti
MANUALE UTENTE – Z-GPRS2 / Z-LOGGER
Micro SD, SDHC massimo 32GB.
Connettore push push per
inserimento ed estrazione
Ethernet, RJ45 10/100 Mbit
USB mini B
SW1
Non usato
SW COMUNICAZIONE ■ = ON
SW2
1
IDC10 connettore posteriore, CANopen (non supportato)
■ IDC10 connettore posteriore, RS485
17
MANUALE UTENTE – Z-GPRS2 / Z-LOGGER
5. LED DI SEGNALAZIONE
5.1.
Led Z-GPRS2
.
LED
DO1
DO2
PWR/ STS
STATO
SIGNIFICATO
ON
Uscita digitale, relè eccitato
OFF
Uscita digitale, relè non eccitato
ON
Uscita digitale, relè eccitato
OFF
Uscita digitale, relè non eccitato
ON
Z-GPRS2 attivo ma il log è fermo
OFF
In attesa di Boot
LAMPEGGIO
Log attivato, funzionamento
LENTO (3 sec ON normale
e 0.5 OFF)
LAMPEGGIO
Funzionamento a batteria di backup,
MEDIO(1 sec ON log non attivo
e 1 sec OFF)
LAMPEGGIO
Batteria sotto la soglia di
VELOCE (0.2 sec funzionamento, spegnimento in
ON e 0.2 sec OFF) atto.
18
MANUALE UTENTE – Z-GPRS2 / Z-LOGGER
GSM
LAMPEGGIO
Registrato in rete GSM/GPRS
LENTO (3 sec ca.)
LAMPEGGIO
VELOCE
(0.5 sec ca.)
Ricerca rete GSM/GPRS
ON
Ingresso digitale PRESENTE
OFF
Ingresso digitale ASSENTE
ON
Ingresso digitale PRESENTE
OFF
Ingresso digitale ASSENTE
ON
Ingresso digitale PRESENTE
OFF
Ingresso digitale ASSENTE
ON
Ingresso digitale PRESENTE
OFF
Ingresso digitale ASSENTE
SD/STS
LAMPEGGIO
Accesso a microSD card
485 ACT
LAMPEGGIO
Attività su RS485
ETH LNK
LAMPEGGIO
Connessione su RJ45 attivata
ETH TRF
LAMPEGGIO
Transito pacchetti su porta Ethernet
DI1
DI2
DI3
DI4
5.2.
Led Z-Logger
19
MANUALE UTENTE – Z-GPRS2 / Z-LOGGER
LED
DO1
DO2
PWR/ STS
STATO
SIGNIFICATO
ON
Uscita digitale, relè eccitato
OFF
Uscita digitale, relè non eccitato
ON
Uscita digitale, relè eccitato
OFF
Uscita digitale, relè non eccitato
ON
Z-GPRS2 attivo ma il log è fermo
OFF
In attesa di Boot
LAMPEGGIO
Log attivato, funzionamento
LENTO (3 sec ON normale
e 0.5 OFF)
LAMPEGGIO
Funzionamento a batteria di backup,
MEDIO(1 sec ON log non attivo
e 1 sec OFF)
LAMPEGGIO
Batteria sotto la soglia di
VELOCE (0.2 sec funzionamento, spegnimento in
ON e 0.2 sec OFF) atto.
DI1
ON
Ingresso digitale PRESENTE
OFF
Ingresso digitale ASSENTE
ON
Ingresso digitale PRESENTE
OFF
Ingresso digitale ASSENTE
ON
Ingresso digitale PRESENTE
OFF
Ingresso digitale ASSENTE
ON
Ingresso digitale PRESENTE
OFF
Ingresso digitale ASSENTE
SD/STS
LAMPEGGIO
Accesso a microSD card
485 ACT
LAMPEGGIO
Attività su RS485
ETH LNK
LAMPEGGIO
Connessione su RJ45 attivata
ETH TRF
LAMPEGGIO
Transito pacchetti su porta Ethernet
DI2
DI3
DI4
Per ulteriori informazioni, consultare il manuale installazione di Z-GPRS2 scaricabile gratuitamente dal sito
www.seneca.it nella sezione Z-GPRS2.
20
MANUALE UTENTE – Z-GPRS2 / Z-LOGGER
6. Nozioni di Base
Z-GPRS2/Z-Logger è dotato di 4 contatori e 4 totalizzatori, è possibile acquisire segnali fino ad un
massimo di 30 Hz, 4 ingressi digitali, 2 ingressi analogici e due uscite digitali a relè.
E’ possibile effettuare anche un log degli I/O di cui è dotato Z-GPRS2 e di registri Modbus RTU o
Modbus TCP-IP esterni al sistema; questi log possono essere inviati sotto forma di file nello
standard csv (comma separated values) tramite ftp o email e possono anche essere salvati su
microSD, Z-GPRS2 può anche inviare l’ultima riga del file di log via SMS.
L'overflow dei contatori e totalizzatori è a 999.999.999, un ulteriore cambio di stato dell’ingresso
porta il valore a 0.
La dimensione della flash interna (da non confondersi con la scheda microSD) permette di salvare
fino a 11774 righe di log (Se attivato il log modbus il numero di righe di log salvabili decresce fino
ad un minimo di 2943). Al termine dello spazio disponibile, Z-GPRS2/Z-Logger sovrascriverà le
righe più vecchie nella propria memoria flash.
E’ possibile scalare sia gli ingressi contatore/totalizzatore che gli ingressi analogici, nel log saranno
archiviati i valori già scalati.
Sono disponibili 4 diverse soglie di allarme per ciascuna delle 2 analogiche di ingresso, in seguito a
questo allarme è possibile inviare un SMS (solo Z-GPRS2) o una E-MAIL con un testo configurabile
(max 31 caratteri).
Altre tipologie di allarme riguardano i valori dei contatori, dei totalizzatori, degli incrementi, gli
ingressi digitali, l’allarme su mancanza di tensione di rete, l’allarme su perdite idriche, su contaore
oltre ad altri allarmi che dipendono dal tipo di applicazione.
E’ possibile configurare fino a 2 azioni differenti che possono essere eseguite come conseguenza di
un allarme.
Sono disponibili fino a 8 timer a minuti/ore o a calendario per eseguire azioni cicliche o acicliche.
Z-GPRS2 riconosce ed esegue una serie di comandi anche da SMS, è anche possibile definire dei
comandi “Fast”, questi comandi possono essere collegati al testo dell’SMS 0, 1 … fino a 15.
Z-GPRS2/Z-LOGGER può inviare i file di log oltre che via FTP o via E-MAIL, gli stessi file possono
anche essere salvati su una microSD (max 32 GB).
Tutte le configurazioni sono realizzabili tramite il software Easy Setup/Easy Z-GPRS2/Z-Logger
scaricabile gratuitamente dal sito www.seneca.it nella sezione Z-GPRS2 o Z-LOGGER.
Z-GPRS2 include una rubrica contatti utilizzata per l’invio degli allarmi o dei log (max 20 contatti
SMS e max 20 contatti E-MAIL).
Z-LOGGER include una rubrica contatti utilizzata per l’invio degli allarmi o dei log (max 20 contatti
E-MAIL).
21
MANUALE UTENTE – Z-GPRS2 / Z-LOGGER
Sono inoltre gestite alcune applicazioni tipiche di utilizzo quali il controllo correnti di stringa su
sistemi fotovoltaici etc…
E’ possibile loggare anche un file di sistema ( syslog ) che contiene gli eventi, allarmi, errori e
comandi ricevuti.
7. SIM CARD SUPPORTATE (SOLO Z-GPRS2)
Z-GPRS2 può operare con il seguenti tipi di SIM CARD:
SIM CARD voce ricaricabili
SIM CARD voce in abbonamento
SIM CARD solo trasmissione dati
Nel caso di SIM CARD di tipo voce è possibile far eseguire operazioni “a costo zero” tramite l’invio di squilli
in risposta alle quali Z-GPRS2 effettuerà le operazioni configurate
Nel caso di SIM CARD di tipo “ricaricabile” Z-GPRS2 può gestire il credito residuo richiedendo all’operatore
telefonico l’importo.
ATTENZIONE!
-Prima di inserire la SIM CARD su Z-GPRS2 ELIMINARE TUTTI I MESSAGGI PRESENTI NELLA
SCHEDA TRAMITE L’USO DI UN CELLULARE.
-Prima di inserire la SIM CARD su Z-GPRS2 ELIMINARE TUTTI I NUMERI IN RUBRICA PRESENTI
NELLA SCHEDA TRAMITE L’USO DI UN CELLULARE.
-NON sono supportate le SIM CARD UMTS
-Il Prodotto è stato testato con le SIM CARD dei principali operatori internazionali, tuttavia non è
garantito il funzionamento con tutti gli operatori.
22
MANUALE UTENTE – Z-GPRS2 / Z-LOGGER
8. Segnale GSM (Solo Z-GPRS2)
Tramite il software Easy Setup / Easy Z-GPRS2/Z-Logger è possibile conoscere il livello di segnale
GSM di Z-GPRS2 (nella sezione test configurazione).
Per visualizzare il valore del segnale GSM è necessario avere inserita una SIM card dell’operatore
telefonico che si utilizzerà (questo perché il segnale può cambiare radicalmente in base
all’operatore scelto).
Il campo è espresso in DBm dove -115 dBm è il minimo, -52 dBm è il massimo.
Si faccia riferimento alla seguente tabella di equivalenza:
Segnale GSM Segnale gsm[dBm]
0 (MINIMO)
-115
1
-106
2
-97
3
-88
4
-79
5
-70
6
-61
7 (MASSIMO)
-52
Dove 0 è segnale minimo, mentre 7 è il massimo.
Per il corretto funzionamento di Z-GPRS2 utilizzato per log ftp o email il livello del campo minimo
richiesto è di 2/7 (si tenga comunque presente che il segnale spesso è fluttuante).
Per il funzionamento di Z-GPRS2 utilizzato solo via SMS il livello del campo minimo richiesto è di
2/7.
Per i valori di segnale si faccia riferimento alla seguente tabella:
LIVELLO SEGNALE 0 =CAMPO NULLO (INSUFFICIENTE)
LIVELLO SEGNALE 1 =SEGNALE INSUFFICIENTE (NON AFFIDABILE PER SMS, AUDIO E GPRS)
LIVELLO SEGNALE 2 =SEGNALE SUFFICIENTE (SEGNALE MINIMO PER SMS, AUDIO E GPRS)
LIVELLO SEGNALE 3 =SEGNALE AFFIDABILE (AFFIDABILE PER SMS, AUDIO E GPRS)
LIVELLO SEGNALE 4 =SEGNALE BUONO
23
MANUALE UTENTE – Z-GPRS2 / Z-LOGGER
LIVELLO SEGNALE 5 =SEGNALE MOLTO BUONO
LIVELLO SEGNALE 6 =SEGNALE OTTIMO
LIVELLO SEGNALE 7 =SEGNALE ECCELLENTE
Per aumentare il livello del campo GSM Seneca dispone di vari modelli di antenne GSM da
abbinare a Z-GPRS2 che permettono di raggiungere il livello minimo di campo nella maggior
parte delle situazioni.
Riferirsi al sito internet (www.seneca.it) oppure al catalogo generale o contattare Seneca srl per
ulteriori informazioni.
ATTENZIONE!
-Inserire la SIM card con Z-GPRS2 spento.
-Prima di inserire la SIM card su Z-GPRS2 eliminare tutti gli SMS presenti nella SIM utilizzando un
cellulare
-Per una lettura corretta del valore del segnale GSM attendere almeno 5 minuti.
ATTENZIONE!
-Contattare il proprio gestore telefonico per quanto riguarda i costi dei servizi GSM e GPRS
specie se si sta utilizzando Z-GPRS2 con sim di uno stato differente da dove ci si trova (roaming
internazionale).
-E’ opportuno stimare i costi telefonici prima di procedere alla configurazione di Z-GPRS2.
-Il costo di ciascun SMS è fissato dal gestore telefonico.
-Il costo dell’invio/ricezione GPRS può essere legato al Kbyte inviato/ricevuto, ad un massimo
mensile compreso in un pacchetto, o al tempo di connessione GPRS, contattare l’operatore
telefonico per ulteriori informazioni.
-Nel caso di connessione GPRS il cui costo è dato dal tempo di connessione, si consideri che la
comunicazione è attiva per un tempo che dipende dal numero di righe di log da inviare.
Tipicamente un log di 2 Kbyte di dati impiega circa 10-15 secondi per l’invio a cui va aggiunto il
tempo necessario alla connessione (dai 5 ai 30 secondi) e il tempo dovuto agli eventuali tentativi
di accesso al server.
-Verificare la quantità di invii via GPRS e via SMS dei dati prima di effettuare la messa in
funzione di Z-GPRS2.
24
MANUALE UTENTE – Z-GPRS2 / Z-LOGGER
Si ricorda che in ogni transazione GPRS gli operatori di telefonia mobile considerano traffico dati
anche tutta la comunicazione che permette la trasmissione del file (quindi nel conteggio va
calcolato anche l’overhead della trasmissione dati, il numero di tentativi di connessione etc… e
non solo la pura dimensione del file).
9. La connessione GPRS (solo Z-GPRS2)
La servizio GPRS (General Packet Radio Service ) è necessario per le operazioni di:
-Invio file di log via FTP
-Invio dei log/allarmi via E-mail
Senza l’utilizzo di una connessione ad internet via Etherent.
Nel caso di utilizzo dei soli SMS il servizio GPRS può non essere utilizzato.
Per effettuare una connessione GPRS è indispensabile inserire un APN (Access Point Name) e
rappresenta il tramite per accedere ad internet.
Al termine di ogni operazione GPRS (invio di allarme o invio di log) la connessione GPRS è chiusa e
riattivata solo quando necessario, questo per minimizzare il tempo di connessione GPRS.
ATTENZIONE!
-Alcuni operatori applicano tariffe di connessione differenti a seconda dell’APN utilizzato,
contattare il proprio operatore mobile per ulteriori informazioni.
-Alcune offerte relative alla connessione internet sono legate ad un particolare APN, contattare
il proprio operatore mobile per ulteriori informazioni.
-Se viene impostata la sincronizzazione dell’orologio interno è indispensabile inserire un APN
poiché la data/ora sincronizzata è ottenuta tramite connessione ad internet.
-Solitamente gli operatori mobili danno una priorità inferiore alla connessione GPRS rispetto alle
chiamate voce. Questo significa che la connessione può essere inaspettatamente interrotta in
qualsiasi momento a causa di una congestione del traffico voce sulla particolare cella. Nel
calcolo del costo del traffico GPRS vanno considerati anche questi eventuali tentavi di
connessione.
10. Coordinate GPS
E’ possibile inserire manualmente o recuperare da rete GPRS (solo Z-GPRS2) le coordinate GPS in
formato compatibile con Google Maps ™.
25
MANUALE UTENTE – Z-GPRS2 / Z-LOGGER
La conoscenza delle coordinate GPS da parte di Z-Logger/ Z-GPRS2 permette, in base al calendario
interno , di calcolare l’ora dell’alba e del tramonto.
Queste informazioni possono essere utilizzate per effettuare varie tipologie di automazioni .
10.1. Coordinate GPS via rete GPRS (solo Z-GPRS2)
E’ possibile recuperare le coordinate GPS attuali tramite la rete GPRS, le coordinate saranno
relative alla cella GSM dove si è attualmente connessi. Sebbene la precisione rispetto la reale
posizione sia attorno a qualche Km, ai fini del calcolo dell’ora dell’alba/tramonto l’errore è del
tutto trascurabile.
11. Batterie di Backup
Z-GPRS2 / Z-Logger sono equipaggiati con batterie ricaricabili, nel caso venga a mancare
l’alimentazione la scheda effettua il seguente algoritmo:
1)
2)
3)
4)
5)
Termina l’esecuzione di eventuali invii di dati
Invia gli eventuali allarmi legati alla mancanza di tensione di rete
Esegue le eventuali azioni legate alla mancanza di tensione di rete
Chiude gli eventuali file aperti su microSD
La scheda si spegne
Se non ci sono invii dati in corso Z-GPRS2/Z-logger impiega dai 5 ai 10 secondi per spegnersi a
fronte di un blackout.
ATTENZIONE!
Z-GPRS2/Z-LOGGER VIENE FORNITO CON BATTERIE NON CARICHE, E’ NECESSARIO RICARICARE LE
BATTERIE ALIMENTANDO Z-GPRS2/Z-LOGGER PER ALMENO 48 ORE PRIMA DEL LORO UTILIZZO.
QUANDO Z-GPRS2/Z-LOGGER FUNZIONA A BATTERIE GLI INGRESSI DIGITALI SMETTONO DI
FUNZIONARE, AFFINCHE’ IL LORO FUNZIONAMENTO CONTINUI ANCHE IN CASO DI BLACKOUT
VANNO ALIMENTATI ESTERNAMENTE.
DIVERSAMENTE GLI INGRESSI ANALOGICI E LE USCITE DIGITALI CONTINUANO A FUNZIONARE
NORMALMENTE FINO ALLO SPEGNIMENTO DELLA SCHEDA.
26
MANUALE UTENTE – Z-GPRS2 / Z-LOGGER
12. IL DATALOGGER
12.1. ACQUISIZIONE DEI DATI
Il Datalogger permette di acquisire dati provenienti da:
-I/O integrato di Z-GPRS2/ Z-Logger
-I/O collegato alle porte RS485 tramite il protocollo Modbus RTU
-I/O collegato alla porta ethernet tramite il protocollo Modbus TCP-IP
Il massimo numero di canali registrabili è 128 (100 via Modbus RTU/Modbus TCP-IP, 28 da I/O
integrato).
Vengono anche acquisiti i valori di alcune variabili interne e dell’orologio.
Tutti i dati sono salvati nella flash interna di Z-GPRS2.
12.2. INVIO DEI DATI DEL DATALOGGER
E’ possibile inviare i file di log via FTP/E-MAIL/SMS e/o salvarli su microSD card:
-il valore dei totalizzatori con il delta rispetto al valore precedente.
-il valore degli ingressi analogici istantaneo con il minimo, massimo e la media rispetto all’ultima
acquisizione, il campionamento degli ingressi analogici è fissato a 50ms.
-il valore istantaneo degli ingressi digitali, dello stato dell’alimentazione e della batteria
-il valore dei contaore
-il valore istantaneo delle uscite digitali
-il valore dei registri modbus configurati
-il valore del segnale GSM (solo Z-GPRS2)
Per l’invio dei dati del datalogger Z-GPRS2/Z-Logger utilizzano l’orologio interno.
12.3. Orologio interno
Z-GPRS2 e Z-Logger sono dotati di un orologio/calendario interno, questo orologio può essere
sincronizzato tramite il software Easy setup/ Easy Z-GPRS2/Z-Logger (nella sezione “Test
Configurazione” o all’invio di una nuova configurazione) oppure tramite una connessione ad
internet, la gestione dell’ora legale può essere selezionata tra manuale o automatica.
27
MANUALE UTENTE – Z-GPRS2 / Z-LOGGER
Quando l’ora non è attendibile il log continua a funzionare con una data/ora fittizia ( a partire dal
01/01/1970) fino alla prossima eventuale sincronizzazione.
L’ora può essere non attendibile quando:
-Z-GPRS2 / Z-Logger è stato acceso per la prima volta senza essere stato configurato
-Z-GPRS2 / Z-Logger è stato spento.
in questi casi l’ora rimane non attendibile fino alla prossima connessione ad internet avvenuta con
successo.
12.4.
Log dell’I/O Embedded
Z-GPRS2 e Z-Logger sono equipaggiati con un’ampia serie di ingressi analogici e digitali e con 2
uscite a relè.
Il tempo di acquisizione delle variabili nel datalogger è indipendente dal tempo di campionamento
degli ingressi analogici, dei contatori e dei totalizzatori.
In particolare:
Tutti gli ingressi contatore/totalizzatore sono campionati ogni 5 ms circa, filtrati a 15ms.
Tutti gli ingressi analogici sono sempre campionati ogni 50 ms.
Inserendo un ingresso analogico si otterranno le seguenti variabili:
VALORE ATTUALE (al tempo di acquisizione)
VALORE MEDIO NEL TEMPO DI ACQUISIZIONE (con campionamento a 50 ms)
VALORE MASSIMO NEL TEMPO DI ACQUISIZIONE (con campionamento a 50 ms)
VALORE MINIMO NEL TEMPO DI ACQUISIZIONE (con campionamento a 50 ms)
Impostando, quindi, un tempo di filtraggio basso è possibile riuscire a loggare anche veloci picchi
di tensione/corrente.
12.5. Il Logger Modbus RTU e Modbus TCP-IP
Z-GPRS2 e Z-Logger supportano il protocollo Modbus RTU Master tramite ciascuna delle due porte
seriali RS485, è possibile loggare fino ad un massimo di 100 tag Modbus RTU provenienti da
dispositivi che supportano il protocollo Modbus RTU Slave (ad esempio tutta la serie di moduli
Modbus RTU Seneca Z-PC, per maggiori informazioni fare riferimento al sito www.seneca.it).
28
MANUALE UTENTE – Z-GPRS2 / Z-LOGGER
Tramite la porta Ethernet il logger supporta protocollo Modbus TCP-IP Client, è possibile loggare
fino ad un massimo di 100 tag Modbus TCP-IP provenienti da dispositivi che supportano il
protocollo Modbus TCP-IP Server ( ad esempio la serie di moduli Modbus TCP-IP Seneca ZE, per
maggiori informazioni fare riferimento al sito www.seneca.it).
ATTENZIONE!
Il numero di TAG modbus RTU sommati al numero di TAG modbus TCP-IP non può superare 100.
Il software di configurazione limiterà automaticamente il numero di TAG.
Ogni tag può contenere più registri Modbus, la seguente tabella raccoglie i principali TAG
configurabili sul Datalogger seriale/ethernet:
Tipo
Numero registri Modbus
Descrizione TAG
16 BITS Unsigned
1
Registro senza segno per
valori da 0 a 65535
16 BITS Signed
1
Registro con segno per
valori da -32768 a +32767
32 BITS Unsigned
2
TAG senza segno per
valori da 0 a 4294967295.
Registro Modbus con la
word (16 bit) più
significativa configurabile.
32 BITS Signed
2
TAG con segno per valori
da -2147483647 a
2147483647.
Registro Modbus con la
word (16 bit) più
significativa configurabile.
32 BITS Floating Point
2
TAG Floating Point a
precisione singola
secondo ANSI/IEEE Std 7541985 / IEC 60559:1989
E’ possibile loggare fino ad un massimo di 100 diversi dispositivi Modbus RTU Slave.
29
MANUALE UTENTE – Z-GPRS2 / Z-LOGGER
E’ possibile loggare fino ad un massimo di 6 diversi dispositivi Modbus TCP-IP Server.
E’ possibile gestire le seriali RS485 in modalità indipendente (quindi anche con due differenti baud
rate).
12.5.1.
Gestione degli errori del Log Modbus
In base al tipo di errore che avviene nel Bus Modbus il file di log viene scritto in modo differente:
-Se nel tempo di log, Z-GPRS2/Z-Logger non è mai riuscito ad acquisire 1 valore del TAG valido nel
file di log viene loggato “Undef” al posto del valore numerico.
-Se il dispositivo Modbus RTU risponde con il codice “Address error Exception” nel file di log viene
loggato “Abort”.
-Se il dispositivo Modbus RTU Slave non risponde entro il tempo di Timeout il logger passa al TAG
successivo, il TAG che non ha risposto sarà interrogato nuovamente al giro successivo.
12.6.
File di log
Il file salvato su microSD, inviato via FTP o via EMAIL è del tipo CSV, ad esempio:
INDEX;TYPE;TIMESTAMP;TOT1;DELTA;TOT2;DELTA;TOT3;DELTA;TOT4;DELTA
1;LOG;11/07/2012 11:17:00;+881;+10;+881;+10;+881;+10;+881;+10
una volta aperto da un software tipo Microsoft EXCEL ™ o OpenOffice Calc ™ si ottiene
(impostando come separatore il “;”):
INDEX
TYPE
TIMESTAMP
TOT1
DELTA
TOT2
DELTA
TOT3
DELTA
TOT4
DELTA
1
LOG
11/07/2012 11:00
881
0
881
0
881
0
881
0
2
LOG
11/07/2012 11:10
890
9
881
0
881
0
882
1
12.6.1.
Nome del file di log
Ad ogni invio E-mail / FTP è creato un nuovo file di log con il seguente nome:
•
Se i log sono inviati via E-MAIL (via GPRS o Ethernet) oppure via FTP (solo via Ethernet):
NomeStrumentoLogAnnoMeseGiornoOreMinutiSecondiXXX.csv
Dove:
AnnoMeseGiornoOreMinutiSecondi è il timestamp del primo campione presente nel file.
30
MANUALE UTENTE – Z-GPRS2 / Z-LOGGER
XXX è il numero di tentativi effettuati per l’invio del file di dimensione variabile in base al numero
di tentaivi:
Un esempio di nome di file è:
GPRS_Padova_log2012071217401000.csv
“GPRS_Padova_” è il nome dello strumento configurato con il software Easy Setup / Easy ZGPRS2/Z-Logger
La data del primo campione è quindi il 12/07/2012 alle ore 17:40 e 10 secondi, sono stati
effettuati 00 ritentativi di invio.
•
Se l’invio è tramite FTP e modem GPRS (Solo Z-GPRS2):
In questo caso per minimizzare la quantità di dati inviata è utilizzata la funzione di resume del file
in caso di fail su invio ftp. In questo caso si ha che il nome del file è:
NomeStrumentoLogAnnoMeseGiornoOreMinutiSecondi.csv
Dove:
AnnoMeseGiornoOreMinutiSecondi è il timestamp dell’invio del file
Un esempio di nome di file è:
GPRS_Padova_log20120712174010.csv
“GPRS_Padova_” è il nome dello strumento configurato con il software Easy Setup / Easy ZGPRS2/Z-Logger
La data di invio del file sul server è quindi il 12/07/2012 alle ore 17:40 e 10 secondi.
Questa gestione del nome dei file permette di non sovrascrivere file precedenti nella procedura di
resume.
12.7. Configurazione del Logger
Nella sezione “Configurazione logger” del software Easy Setup / Easy Z-GPRS2/Z-Logger è possibile
configurare :
•
Il tempo di acquisizione/campionamento delle variabili; espresso in minuti.
•
Quali variabili (totalizzatori, ingressi analogici) si desidera loggare.
•
L'invio dei log prodotti via ftp, e-mail e salvataggio su microSD.
31
MANUALE UTENTE – Z-GPRS2 / Z-LOGGER
•
L'abilitazione all'invio di un SMS contenente l'ultima riga del file di log prodotto ad un
gruppo di contatti (solo per Z-GPRS2).
12.8.
Configurazione dell’invio dei Log
La pagina successiva “Configurazione invio log” permette di configurare le tempistiche di invio dei
file di log via FTP, E-MAIL, SD e SMS (solo Z-GPRS2).
•
Il menu a tendina (8) permette di selezionare il tipo di cadenza di invio.
•
Se nel menu (8) è stata selezionata l'opzione “MINUTI”, verrà abilitata la finestra “Invio a
minuti” in cui si potrà decidere ogni quanti minuti (9) Z-GPRS2 dovrà inviare i log.
•
Se nel menu (8) è stata selezionata l'opzione “GIORNALIERO”, verrà abilitata la finestra
“Invio giornaliero” in cui si potrà decidere l'ora del giorno (10) di invio dei log.
•
Se nel menu (8) è stata selezionata l'opzione “SETTIMANALE”, verrà abilitata la finestra
“Invio settimanale” in cui si potranno decidere i giorni della settimana (11) e l'ora (12) di
invio dei log.
•
Se nel menu (8) è stata selezionata l'opzione “MENSILE”, verrà abilitata la finestra “Invio
mensile” in cui si potrà decidere il giorno del mese (13) e l'ora (14) di invio dei log.
32
MANUALE UTENTE – Z-GPRS2 / Z-LOGGER
Nota : Nella scelta dei tempi di campionamento (1) e di invio dei log (8-9-...-14), occorre tenere
conto di alcuni fattori:
1. Il tempo di invio deve essere un multiplo intero del tempo di campionamento. Ad esempio
NON è possibile selezionare un tempo di campionamento (1) pari a 15 minuti e un invio a
“Minuti” (8) con una cadenza di 25 minuti (9). Il software Easy Setup/ Easy Z-GPRS2 / Easy
Z-LOGGER provvederà ad arrotondare automaticamente il tempo di invio (9) in modo che
sia multiplo del tempo di campionamento. In questo caso il nuovo valore sarà 30.
Nel caso il tipo di invio sia “Giornaliero”, sarà invece il tempo di campionamento (1) ad
essere arrotondato per poter essere contenuto in un giorno esatto (corrispondente a 1440
minuti). Easy Setup/ Easy Z-GPRS2 / Easy Z-LOGGER visualizzerà un messaggio di avviso con
il nuovo valore del tempo di campionamento.
2. Il tempo di campionamento (1) è riferito all'orologio interno; questo significa che la prima
acquisizione non viene eseguita dopo i minuti impostati a partire dall'invio della
configurazione, ma all'ora stessa. Ad esempio se l'utente configura l’acquisizione delle
variabili ogni 10 minuti e invia la configurazione alle ore 10:01, il dispositivo eseguirà la
prima acquisizione alle ore 10:10.
12.9. Configurazione del log seriale su protocollo Modbus
RTU e Modbus TCP-IP
12.9.1.
Configurazione dei registri Modbus da loggare
Se il dispositivo Modbus RTU Slave / Modbus TCP-IP Server è Seneca basta selezionare dal
database il registro che si desidera loggare e l'indirizzo della stazione Modbus assegnata.
Se il dispositivo Modbus è di terze parti selezionare “CUSTOM” ed inserire:
-il tipo di registro da loggare (vedi capitoli precedenti per il tipo di TAG).
-l'indirizzo del registro da loggare
-l'indirizzo della stazione Modbus RTU da loggare oppure l’indirizzo TCP-IP della stazione TCP-IP e
la porta.
E' possibile fornire una tempistica di interrogazione del TAG (tempo di polling), questo parametro
permette di fornire tempistiche di acquisizione differenti per ciasun TAG.
Se ad esempio interessa acquisire il valore di un TAG solo ogni 10 minuti è possibile inserire il
tempo di 600s come tempo di polling.
33
MANUALE UTENTE – Z-GPRS2 / Z-LOGGER
ATTENZIONE!
-Il tempo di Polling di ciascun TAG può essere rispettato solo se il suo valore è compatibile con il
tempo di ritardo delle richieste seriali e con il numero di TAG.
Ad esempio se si devono loggare 10 TAG Modbus con un tempo di ritardo delle richieste seriali di
1 secondo il giro completo dei TAG richiede circa 10 secondi. Se il tempo di Polling è impostato a
0,1 secondi sarà impossibile rispettarlo.
Diversamente se il tempo di ritardo delle richieste seriali è 0,1 secondi allora il giro completo dei
TAG richiede circa 1 secondo. Se il tempo di Polling è impostato a 5 secondi questo sarà
certamente rispettato.
12.9.2.
Campi configurabili dei file di log
I campi nel file di log sono:
INDEX
E' sempre il numero progressivo del numero di campionamenti eseguiti dall'ultimo spegnimento di
Z-GPRS2.
TYPE
E' sempre il tipo di log per usi futuri, attualmente compare il testo “LOG”
TIMESTAMP
E' sempre la data-ora di Z-GPRS2 nel formato gg/mese/anno ora:minuti:secondi
DIN1
DIN2
DIN3
DIN4
DOUT1
DOUT2
VBAT
POWER
Dove il significato è il seguente
34
MANUALE UTENTE – Z-GPRS2 / Z-LOGGER
DINx è il valore dell'ingresso digitale x-esimo, se OFF = ingresso aperto, se ON = ingresso chiuso
DOUTx è il valore dell'uscita x-esima, se OFF = uscita aperta, se ON = uscita chiusa
VBAT indica lo stato di funzionamento con batterie di backup, se OFF = funzionamento con
tensione di rete, se ON = funzionamento con batterie di backup
POWER indica lo stato della tensione di rete, se ON = tensione di rete presente, se OFF = tensione
di rete assente.
ANALOGn
valore istantaneo scalato dell'ingresso analogico n
AVERAGE ANALOGn
valore medio sul periodo di campionamento del log dell'ingresso analogico n (eventualmente
scalato)
MIN ANALOGn
valore minimo sul periodo di campionamento del log dell'ingresso analogico n (eventualmente
scalato)
MAX ANALOGn
valore massimo sul periodo di campionamento del log dell'ingresso analogico n (eventualmente
scalato)
TOTALIZERn
valore attuale del totalizzatore n-esimo
DELTAn
incremento del totalizzatore n rispetto al campione precedente
CONTAOREn
Valore attuale del contaore n-esimo
GSM
Valore attuale del segnale GSM da 0 (minimo) a 7 (massimo)
MODBUS TAGs
35
MANUALE UTENTE – Z-GPRS2 / Z-LOGGER
vi è lo stato del tag Modbus:
VAL_MODBUS1 valore istantaneo del 1° tag Modbus configurato
VAL_MODBUS2 valore istantaneo del 2° tag Modbus configurato
VAL_MODBUS3 valore istantaneo del 3° tag Modbus configurato
VAL_MODBUS4 valore istantaneo del 4° tag Modbus configurato
…
VAL_MODBUS100 valore istantaneo del 100° tag Modbus configurato
12.10. SMS di log
Poiché via SMS è possibile inviare un numero limitato di caratteri l’SMS include solamente l’ultima
riga del file di log ed è ad esempio del tipo:
11/07/2012 11:17:00 +881 +10 +881 +10 +881 +10 +881 +10
Dove l’ordine dei campi (separati dal carattere spazio “ “) è dato dalla configurazione effettuata sul
software di configurazione, in questo caso:
TIMESTAMP TOT1 DELTA TOT2 DELTA TOT3 DELTA TOT4 DELTA
Nota : La priorità di invio dei log è la seguente:
1) Invio log via FTP/EMAIL
2) Invio log via SMS
E’ quindi possibile utilizzare l’invio log via SMS per essere avvertiti di quando è stato completato
l’invio del log su FTP/E-MAIL .
Per il significato del contenuto del messaggio fare rifermento alla configurazione dei TAG nel
datalogger.
ATTENZIONE!
-L’invio dell’SMS con l’ultima riga di log può essere inviato anche se l’invio del file su ftp non è
andato a buon fine (questo perché il segnale necessario per l’invio di un file di log è superiore a
quello necessario all’invio di un sms), per analizzare gli eventuali errori di connessione al server
ftp attivare la funzionalità di invio degli errori via SMS.
-Poichè la quantità di caratteri che è possibile inserire in un SMS è 160 può accadere (specie se si
stanno loggando registri Modbus) che non tutta la riga di log sia presente. In questo caso il
software aggiunge “...” per indicare la fine dei caratteri a disposizione.
36
MANUALE UTENTE – Z-GPRS2 / Z-LOGGER
12.11. Salvataggio dei log su microSD card
Il salvataggio di log su microSD card è possibile tramite una scheda microSD formattata con il
filesystem FAT16 o FAT32 (solitamente le microSD card acquistate sono già formattate in questo
modo).
I file di log vengono salvati sulla cartella /log della microSD in formato testo csv.
Z-GPRS2/ Z-LOGGER creerà un nuovo file in base al periodo di invio dei log configurato. Il tempo
minimo di salvataggio del file è di 2 minuti.
Nel caso la microSD card non sia inserita, Z-GPRS2 e Z-LOGGER gestiscono una coda di log, al
momento dell’inserimento della microSD verranno salvati i log rimasti in coda.
ATTENZIONE!
-Per evitare di corrompere il contenuto della MicroSD ESTRARRE LA MICROSD SOLO A Z-GPRS2/
Z-LOGGER SPENTO oppure smontare la microSD con il comando disponibile sul software di
configurazione nella sezione Test Configurazione (VEDI CAPITOLO 32).
-NON ESTARRE MAI LA microSD con Z-GPRS2 / Z-LOGGER ACCESO SENZA AVER SMONTATO LA
MICRO SD!
12.12. Salvataggio dei contatori/totalizzatori
Il valore dei contatori/totalizzatori è salvato nella flash almeno 1 volta ogni 24h dall’accensione, il
salvataggio è effettuato anche ad ogni spegnimento.
ATTENZIONE!
Le batterie non sono consegnate cariche, è necessario lasciare alimentato per almeno 48 ore ZGPRS2 / Z-LOGGER prima di ottenere una carica completa delle batterie di backup.
Lo spegnimento di Z-GPRS2 / Z-LOGGER con batterie scariche comporta la perdita dei valori dei
contatori/totalizzatori (al successivo riavvio assumeranno il valore salvato alle ore 4:00 o, nel
caso Z-GPRS2 / Z-LOGGER non fosse acceso da tale data il valore 0).
12.13. Tempi di invio via GPRS dei file di log (solo Z-GPRS2)
La velocità della comunicazione via GPRS dipende da svariati fattori quali l’occupazione della rete,
il livello di segnale etc…
37
MANUALE UTENTE – Z-GPRS2 / Z-LOGGER
E’ comunque possibile effettuare una stima dei tempi di invio in base alle varie prove effettuate
nei laboratori Seneca, un file di 1440 Righe di log (circa 200Kbytes) è mediamente inviato in circa
14 minuti.
Sebbene queste tempistiche tipicamente non incidono nel costo della comunicazione GPRS
(questa è quasi sempre legata ai byte spostati e non in base al tempo di connessione) è utile
tenerne conto nel caso si vogliano inviare un grosso numero di log al giorno.
Sebbene Z-GPRS2 sia stato sviluppato per inviare file di log di qualunque dimensione, Seneca
sconsiglia di inviare via GPRS file di dimensioni > 250 Kbytes, questo permette di limitare la
durata e gli eventuali errori della connessione ftp (sgancio del server, timeout etc…).
12.14. Gestione degli errori di connessione ed invio dati ai
server FTP e SMTP
Z-GPRS2 e Z-LOGGER includono una gestione avanzata degli errori di connessione ai server, prima
di decretare un fail vengono effettuati vari tentativi di fila. Se questi tentativi danno sempre esito
negativo, la scheda si ferma e riproverà l’invio dopo 2 ore circa. E’ possibile configurare l’invio
degli errori di connessione al server FTP e SMTP via SMS agli amministratori (solo Z-GPRS2).
Solo via GPRS (quindi solo per Z-GPRS2) e solo per l’invio dei log su FTP è disponibile la funzione di
resume del file: Mentre Z-GPRS2 sta inviando un file di log è possibile che venga persa la
comunicazione con il server FTP. In questo caso Z-GPRS2 effettua un “resume” ovvero si
riconnette nuovamente al server e crea un nuovo file con il nuovo
AnnoMeseGiornoOreMinutiSecondi contenente i rimanenti dati.
Il resume su invio dei log via E-MAIL o via FTP in modalità ethernet non è disponibile, è quindi
consigliato mantenere la dimensione del file di log abbastanza contenuta (<100 Kbytes), è
comunque necessario avere un livello di segnale GSM alto nel caso di invio GPRS.
ATTENZIONE!
Alcuni server di ricezione delle E-MAIL potrebbero considerare SPAM le E-MAIL di Z-GPRS2 e ZLOGGER, verificare anche la cartella “SPAM” della propria E-mail.
12.15. Funzione di ridondanza del canale di comunicazione
Ethernet/GPRS (solo Z-GPRS2)
E’ possibile configurare Z-GPRS2 in modo che utilizzi il canale di comunicazione Ethernet come
primario e la connessione GPRS come backup. Questo funzionamento permette a Z-GPRS2 di
38
MANUALE UTENTE – Z-GPRS2 / Z-LOGGER
tentare sempre l’invio dei dati tramite la porta ethernet, nel caso vi fosse un qualsiasi problema di
connessione (dopo vari tentativi intervallati) il sistema passa all’invio dei dati tramite rete GPRS, il
passaggio dalla connessione Ethernet a quella Ethernet può richiedere fino a 2 ore di tentativi.
Quando si utilizza la modalità con canale di invio ridondato non è disponibile la funzione di
resume nella connessione GPRS su server FTP.
12.16. Test della configurazione per l’invio delle E-MAIL
E’ disponibile un comando da inviare via SMS o tramite un pulsante del software di configurazione,
per forzare l’invio di una E-MAIL con allegato al primo degli amministratori della rubrica E-MAIL.
E’ così possibile conoscere se la configurazione impostata è funzionante o se vi sono degli errori.
Il comando via SMS va inviato da un cellulare registrato in rubrica come “amministratore”, può
essere inviato con caratteri sia maiuscoli che minuscoli:
email test
12.17. Test della configurazione per l’invio dei log via FTP
E’ disponibile un comando da inviare via SMS o tramite un pulsante del software di configurazione,
per forzare l’invio di un file di testo al server FTP impostato per l’invio dei log.
E’ così possibile conoscere se la configurazione impostata è funzionante o se vi sono degli errori.
Il comando via SMS va inviato da un cellulare registrato in rubrica come “amministratore”, può
essere inviato con caratteri sia maiuscoli che minuscoli:
ftp test
13. LOG DI SISTEMA (LOG DEGLI EVENTI E DEGLI ALLARMI) SU
MICRO SD
Se viene inserita una microSD card è possibile attivare il log di tutti gli eventi (allarmi, comandi SMS ricevuti,
comandi su squillo).
Il log è salvato nel formato testo nel file “syslog.csv” nella directory principale della microSD.
13.1.
CONTENUTO DEL FILE “SYSLOG.CSV”
Il file “syslog.csv” contiene l’elenco degli eventi (allarmi, comandi ricevuti etc…).
39
MANUALE UTENTE – Z-GPRS2 / Z-LOGGER
Ogni evento è dotato di un timestamp contenete data e ora dell’evento stesso.
13.2.
INVIO DEL FILE “SYSLOG.CSV”
Il file Syslog.csv può essere inviato via FTP o via E-MAIL (al primo degli amministratori) tramite i seguenti
comandi SMS:
email syslog
Invia il file di testo in allegato alla e-mail del primo degli amministratori
ftp syslog
Invia il file di testo sull’ftp configurato dei log (deve essere stato configurato l’fto per l’invio dei log)
14.
LA RUBRICA CONTATTI E I GRUPPI DI INVIO
I contatti configurabili sono:
MAX 20 contatti SMS (solo Z-GPRS2)
MAX 20 contatti E-MAIL
Per ciascun contatto è possibile scegliere il tipo tra:
- utente
- operatore
- amministratore
Nel caso di Z-Logger il contatto “utente” coincide con il contatto “operatore” poiché non è
possibile inviare comandi SMS.
14.1.
Contatto “Utente”
Un contatto di tipo “Utente” è abilitato solo alla ricezione di allarmi.
14.2.
Contatto “Operatore”
Un contatto di tipo “Operatore” è abilitato alla ricezione di allarmi e all’invio di comandi sms (solo
Z-GPRS2).
14.3.
Contatto “Amministratore”
40
MANUALE UTENTE – Z-GPRS2 / Z-LOGGER
Un contatto di tipo “Amministratore” è abilitato alla ricezione di tutti gli allarmi (poiché è
automaticamente inserito in tutti i gruppi), all’invio di comandi e alla ricezione dei messaggi SMS
amministratore (solo Z-GPRS2).
Fanno parte dei messaggi SMS amministratore quelli arrivati a Z-GPRS2 da parte degli operatori
telefonici o da parte di numeri non abilitati (ad esempio da numeri non presenti in rubrica
contatti).
14.4.
Gruppi di invio
Per ogni allarme è possibile scegliere un gruppo di contatti a cui l’SMS o la MAIL di allarme può
essere inviata. Z-GPRS2 e Z-Logger possono gestire fino a 30 diversi gruppi di invio differenti, ogni
gruppo può contenere fino a 20 contatti (SMS o EMAIL).
E’ possibile scegliere a quale gruppo inviare un allarme o un log, questo permette di ripartire gli
eventi ai differenti contatti (ad esempio manutentori, utenti, tecnici etc…).
La seguente figura mostra un esempio di ripartizione per gruppi di un allarme:
SMS
GRUPPO 1
ALLARME INGRESSO
DIGITALE 1
+39123456789
+39123456790
SMS
+39123456791
ALLARME SU MASSIMO
ANALOGICO 2
GRUPPO 2
+39123456792
E-MAIL
+39123456793
ALLARME MANCANZA
TENSIONE ELETTRICA
+39123456794
GRUPPO 3
[email protected]
[email protected]
[email protected]
E’ possibile inviare lo stesso messaggio di allarme al massimo a 3 diversi gruppi.
41
MANUALE UTENTE – Z-GPRS2 / Z-LOGGER
15.
COMANDI SUPPORTATI (SOLO Z-GPRS2)
15.1. IMPOSTARE L’ALFABETO CARATTERI SMS DEL TELEFONO
Alcuni smartphone inviano gli SMS con i caratteri UNICODE invece che utilizzare l’alfabeto GSM.
Z-GPRS2 esegue comandi SMS solo con alfabeto GSM.
Nella maggior parte dei casi i caratteri SMS sono di default impostati su alfabeto GSM, nel caso Z-GPRS2
non riconoscesse alcun comando sms verificare l’alfabeto utilizzato dal telefono.
Nel caso di smartphone Android:
Premere l’icona Messaggi -> Impostazioni -> Modalità scrittura -> Alfabeto GSM
15.2. ELENCO DEI COMANDI SMS SUPPORTATI
Z-GPRS2 permette di eseguire dei comandi se il numero del mittente dell’SMS è abilitato (quindi
deve provenire da un operatore o da un amministratore).
L’elenco dei comandi è il seguente:
COMANDI SMS PER INGRESSI/CONTATORI/TOTALIZZATORI DIGITALI
GET DIN
Stato di tutti i contatori
GET DINn
Stato di tutti i contatori dell’ingresso n-esimo
GET DINn.TOT
Stato dei totalizzatori dell’ingresso n-esimo
GET DINn.CNT
Stato dei contatori dell’ingresso n-esimo
RESET DIN
Resetta tutti i contatori
RESET CNTn
Resetta il contatore n-esimo
COMANDI SMS PER INGRESSI/CONTATORI/TOTALIZZATORI DIGITALI
42
MANUALE UTENTE – Z-GPRS2 / Z-LOGGER
GET DIN
Stato di tutti i contatori
GET DINn
Stato di tutti i contatori dell’ingresso n-esimo
GET DINn.TOT
Stato dei totalizzatori dell’ingresso n-esimo
GET DINn.CNT
Stato dei contatori dell’ingresso n-esimo
RESET DIN
Resetta tutti i contatori
RESET CNTn
Resetta il contatore n-esimo
COMANDI SMS PER REGISTRI MODBUS
GET MBUS <LABEL>
Ritorna il valore via SMS del tag Modbus con la
label indicata
GET MBUSn
Ritorna il valore via SMS del tag Modbus nesimo
COMANDI SMS PER USCITE DIGITALI
GET DOUT
Ritorna il valore dell’uscita digitale
GET DOUTn
Ritorna il valore dell’uscita digitale n-esima
SET DOUTn.OPEN
Apre uscita digitale n-esima
SET DOUTn.CLOSE
Chiude uscita digitale n-esima
SET TOGGLEn
Cambia stato uscita digitale n-esima
SET PULSEn.OPEN
Apre l’uscita n-esima temporizzata
43
MANUALE UTENTE – Z-GPRS2 / Z-LOGGER
COMANDI SMS PER LE RUBRICHE
SET PHONE +nnnnnnn
Inserisce in rubrica come amministratore il
numero +nnnnnnn
RESET PHONE +nnnnnnn
Elimina dalla rubrica il numero +nnnnnnn
SET EMAIL [email protected]
Inserisce in rubrica come amministratore la email [email protected]
RESET EMAIL [email protected]
Elimina dalla rubrica la e-mail [email protected]
COMANDI SMS VARI
CREDIT
Ritorna il credito residuo (solo per SIM ricaricabili)
STATUS
Ritorna le variabili impostate da software di
configurazione. E’ possibile includere tutte le variabili
disponibili, se si superano i 160 caratteri nel testo
dell’SMS questo sarà troncato ( tre punti “…” alla fine
dell’SMS ).
SET GSM.APN apn_name user password
Imposta l'APN passando il nome dell'APN, l'user e la
password. Ad esempio per impostare l'APN di
vodafone che non richiede user name e password:
SET GSM.APN web.omnitel.it
SET GSM.FTP path name_ip porta user password
Imposta le configurazione della connessione ftp:
path è la cartella del server ftp su cui inviare i file
name_ip è l'indirizzo ip o il nome del server ftp
porta è la porta del server ftp
44
MANUALE UTENTE – Z-GPRS2 / Z-LOGGER
user è il nome utente per l'accesso al server ftp
password è la password per l'accesso al server ftp
ad esempio:
SET /prova/ 192.168.180.33 21 pippo pluto
SET GSM.SMTP name_ip porta user password
Imposta la configurazione della connessione al server
SMTP per l'invio delle e-mail.
name_ip è l'indirizzo ip o il nome del server smtp
porta è la porta del server smtp
user è il nome utente per l'accesso al server smtp
password è la password per l'accesso al server smtp
Ad esempio:
SET GSM.SMTP out.alice.it 25 pippo pluto
GET AIN
Ritorna il valore dei due ingressi analogici
EMAIL TEST
Forza l’invio di una email con allegato al primo
amministratore nella rubrica e-mail
FTP TEST
Forza l’invio di un file di testo al server ftp della
configurazione attuale
EMAIL TAG
Invia al primo contatto E-MAIL la misura individuata
da “TAG”
EMAIL AIN invia una email con il valore delle 2
analogiche
EMAIL AIN1 invia una email con il valore
dell’analogica 1
EMAIL AIN2 invia una email con il valore
dell’analogica 2
EMAIL DIN invia una email con il valore degli ingressi
digitali
EMAIL DIN1 invia una email con il valore dell’ingresso
digitale 1
EMAIL DIN2 invia una email con il valore dell’ingresso
45
MANUALE UTENTE – Z-GPRS2 / Z-LOGGER
digitale 2
EMAIL DIN3 invia una email con il valore dell’ingresso
digitale 3
EMAIL DIN4 invia una email con il valore dell’ingresso
digitale 4
EMAIL TEMP invia una email con il valore della
temperatura del sensore interno
EMAIL SYSLOG
Invia il file di log comandi presente in microSD via EMAIL (primo indirizzo amministratore della rubrica)
FTP SYSLOG
Invia il file di log comandi presente in microSD via FTP
In caso di comando non riconosciuto Z-GPRS2 invierà un SMS di errore:
“COMMAND NOT RECOGNIZED”
E’ possibile configurare l’avvenuta esecuzione del comando in modo che MyALARM2 invii un SMS
di conferma o uno squillo.
NOTA
La modalità di avvenuta esecuzione di un comando tramite la generazione di uno squillo è
possibile solo nel caso si stia utilizzando una SIM voce (le SIM dati non permettono il servizio di
chiamata vocale).
15.3. COMANDI SMS “FAST” (SOLO Z-GPRS2)
E’ possibile definire fino a 16 differenti comandi “fast” selezionabili dall’elenco delle azioni.
Ogni comando è eseguito se il testo dell’SMS è “0” oppure “1” etc… fino a “15”.
Anche per questi comandi è indispensabile che il numero del mittente dell’SMS sia abilitato
all’operazione (quindi deve provenire da un operatore o da un amministratore).
E’ possibile configurare tramite software Easy Z-GPRS2/Z-Logger/Easy Setup quali comandi
associare scegliendo tra quelli in tabella:
46
MANUALE UTENTE – Z-GPRS2 / Z-LOGGER
AZIONE
COMMENTO
CHIUDE USCITA1/2
Chiude l’uscita1/2
APRE USCITA1/2
Apre l’uscita 1/2
CHIUDE USCITA TEMPORIZZATA1/2
Chiude l’uscita 1/2 per il tempo indicato, poi la apre
APRE USCITA TEMPORIZZATA 1/2
Apre l’uscita 1/2 per il tempo indicato, poi la chiude
TOGGLE USCITA 1/2
Cambia lo stato dell’uscita 1/2
RESET CONTATORI
Carica il valore 0 su tutti i contatori
RESET CONTATORE 1
Carica il valore 0 sul contatore1
RESET CONTATORE 2
Carica il valore 0 sul contatore2
RESET CONTATORE 3
Carica il valore 0 sul contatore3
RESET CONTATORE 4
Carica il valore 0 sul contatore4
RICHIESTA CREDITO RESIDUO
Ritorna il valore del credito residuo
(solo per SIM ricaricabili)
RICHIESTA VALORE CONTATORE E RESET
Ritorna il valore del contatore 1, 2, 3 o 4 e poi lo
resetta
START LOGGER (TIMER 1)
Fa partire il datalogger
STOP LOGGER (TIMER 1)
Ferma il datalogger
START TIMER
Fa partire il timer 2 o 3,… 10
STOP TIMER
Ferma il timer 2 o 3,… 10
ABILITA ALLARME SU MANCANZA TENSIONE DI
RETE
Abilita allarme su mancanza tensione di rete
con i parametri configurati
DISABILITA ALLARME SU MANCANZA TENSIONE
DI RETE
Disabilita allarme su mancanza tensione di rete
ABILITA ALLARME SU INGRESSO DIGITALE
Abilita allarme su ingresso digitale 1, 2, 3 o 4
DISABILITA ALLARME SU INGRESSO DIGITALE
Disabilita allarme su ingresso digitale 1, 2, 3 o 4
RIARMA ALLARME SU INGRESSO DIGITALE
Riarma allarme su ingresso digitale 1,2,3 o 4 se
configurato in riarmo manuale
ABILITA ALLARME ANALOGICO SU
Abilita l’allarme analogico 1 o 2 su minimo
47
MANUALE UTENTE – Z-GPRS2 / Z-LOGGER
MINIMO/BASSO/ALTO/MASSIMO
/basso/alto/massimo
RIARMA ALLARME ANALOGICO SU
MINIMO/BASSO/ALTO/MASSIMO
Riarma l’allarme analogico 1 o 2 su minimo
/basso/alto/massimo se configurato in riarmo
manuale
ABILITA ALLARME SU TOTALIZZATORE
Abilita l’allarme su valore (eventualmente
scalato) del totalizzatore 1 o 2 o 3 o 4
DISABILITA ALLARME SU TOTALIZZATORE
Disabilita l’allarme su valore (eventualmente
scalato) del totalizzatore 1 o 2 o 3 o 4
ABILITA ALLARME SU CONTATORE
Abilita l’allarme su valore (eventualmente
scalato) del contatore 1 o 2 o 3 o 4
DISABILITA ALLARME SU CONTATORE
Disabilita l’allarme su valore (eventualmente
scalato) del contatore 1 o 2 o 3 o 4
ABILITA ALLARME SU CONTAORE
Abilita allarme su contaore 1 o 2 o 3 o 4
DISABILITA ALLARME SU CONTAORE
Disabilita allarme su contaore 1 o 2 o 3 o 4
ABILITA ALLARME SU INCREMENTO
CONTATORE / PERDITE
Abilita l’allarme su incremento del conteggio o
su perdite idriche (se attivata l’applicazione
controllo perdite idriche)
DISABILITA ALLARME SU INCREMENTO
CONTATORE / PERDITE
Disabilita l’allarme su incremento del conteggio
o su perdite idriche (se attivata l’applicazione
controllo perdite idriche)
ABILITA ALLARME SU CONTROLLO CORRENTI DI
STRINGA
Abilita allarme su controllo correnti di stringa
DISABILITA ALLARME SU CONTROLLO CORRENTI
DI STRINGA
Disbilita allarme su controllo correnti di stringa
Per una lista esaustiva dei possibili comandi FAST fare riferimento al software Easy Setup/ Easy ZGPRS2 / Easy Z-Logger.
15.4. COMANDI SU SQUILLO “A COSTO ZERO” (SOLO ZGPRS2)
48
MANUALE UTENTE – Z-GPRS2 / Z-LOGGER
Z-GPRS2 permette di eseguire fino a 3 azioni associate all’arrivo di uno squillo proveniente da un
numero abilitato all’operazione (quindi deve provenire da un operatore o da un amministratore).
Questa modalità permette di ottenere l’esecuzione di comandi “a costo zero”.
NOTA
-Per mantenere il costo nullo per Z-GPRS2, NON rispondere allo squillo! La durata dello squillo è
circa di 40 secondi passati i quali Z-GPRS2 chiude la chiamata automaticamente.
-Non tutti gli operatori mobili permettono di ricevere squilli da SIM dati, verificare se il servizio è
disponibile con il proprio operatore.
15.5.
PASSWORD COMANDI (SOLO Z-GPRS2)
Z-GPRS2 permette l’esecuzione dei comandi SMS anche se non si sta inviando un comando da un
numero presente in rubrica. Perché il numero venga riconosciuto come autorizzato bisogna
anteporre una password numerica che è univoca per ogni Z-GPRS2.
La password è ottenuta dalle ultime 4 cifre del codice IMEI del modem GSM.
E’ possibile ottenere il valore della password legata al proprio Z-GPRS2 connettendosi tramite il
software Easy Setup / Easy Z-GPRS2/Z-Logger nella sezione test configurazione.
In questa sezione verrà visualizzata la password segreta che è sempre composta da 4 cifre
numeriche, per attivare la password premere il pulsante RESET.
Se ad esempio la password è 5287 è possibile chiudere l’uscita digitale anche da un numero non
presente in rubrica inviando il seguente SMS:
5287 SET DOUT1.CLOSE
49
MANUALE UTENTE – Z-GPRS2 / Z-LOGGER
16.
TIMER
Sono disponibili fino a 10 timer per l’esecuzione di azioni:
Sono disponibili 2 tipologie di timer: i Timer periodici e i Timer calendario.
16.1. TIMER PERIODICI
Ogni timer periodico può eseguire fino a 3 azioni, è possibile scegliere la data di attivazione e
spegnimento del timer e la cadenza di intervento del timer.
La cadenza può essere:
A minuti (le azioni sono eseguite ogni x minuti, ad esempio ogni 30 minuti)
Giornaliero (le azioni sono eseguite ogni giorno all’ora indicata, ad esempio alle 12:30)
Settimanale (le azioni sono eseguite i giorni della settimana indicati all’ora indicata, ad esempio il
lunedì, Martedì e Domenica alle 18:00)
Mensile (le azioni sono eseguite ogni giorno x del mese all’ora indicata, ad esempio ogni 1° del
mese alle ore 14:30)
Utilizzando lo stesso timer è possibile impostare anche l’esecuzione di un secondo gruppo di 3
azioni ogni x minuti.
ATTENZIONE!
Nell’utilizzare i timer periodici con cadenza mensile non impostare mai un giorno superiore al 28
del mese.
16.2. TIMER CALENDARIO
Ogni timer calendario può eseguire fino a 3 azioni di “ON”, e fino a 3 azioni di “OFF” è possibile
scegliere la data di attivazione e spegnimento del timer.
Ogni gruppo di azioni può essere eseguito su max 4 fasce orarie per giorno della settimana, ad
esempio è possibile configurare la chiusura/apertura dell’uscita 1 utilizzando il timer in questo
modo:
TIMER 9 CALENDARIO
50
MANUALE UTENTE – Z-GPRS2 / Z-LOGGER
LUNEDI’ – CHIUSURA USCITA 1 ALLE ORE 8:00, APERTURA ALLE ORE 12:30
LUNEDI’ – CHIUSURA USCITA 1 ALLE ORE 14:00, APERTURA ALLE ORE 18:00
MARTEDI’ – CHIUSURA USCITA 1 ALLE ORE 8:00, APERTURA ALLE ORE 12:30
MARTEDI’ – CHIUSURA USCITA 1 ALLE ORE 14:00, APERTURA ALLE ORE 18:00
MERCOLEDI’ – CHIUSURA USCITA 1 ALLE ORE 8:00, APERTURA ALLE ORE 12:30
MERCOLEDI’ – CHIUSURA USCITA 1 ALLE ORE 14:00, APERTURA ALLE ORE 18:00
GIOVEDI’ – CHIUSURA USCITA 1 ALLE ORE 8:00, APERTURA ALLE ORE 12:30
GIOVEDI’ – CHIUSURA USCITA 1 ALLE ORE 14:00, APERTURA ALLE ORE 18:00
VENERDI’ – CHIUSURA USCITA 1 ALLE ORE 8:00, APERTURA ALLE ORE 12:00
51
MANUALE UTENTE – Z-GPRS2 / Z-LOGGER
17. UTILIZZO DELLE E-MAIL
17.1. Informazioni di base sull’invio delle e-mail
L’invio di una e-mail avviene tramite la connessione ad un server di tipo SMTP (Simple Mail
Transfer Protocol), successivamente questo server si incarica di recapitare la e-mail agli indirizzi
richiesti.
La connessione con il server può essere protetta (con scambio dati criptati) oppure no.
Ogni e-mail contiene l’indirizzo del mittente e di uno o più destinatari.
Per inviare una mail è indispensabile creare un indirizzo di posta elettronica (mittente) da cui
inviare le E-mail agli indirizzi di destinazione.
I parametri utili all’invio di una E-mail sono forniti dal gestore di posta elettronica al momento
della registrazione.
INDIRIZZI DI DESTINAZIONE
INDIRIZZO MITTENTE
Z-GPRS2 / Z-LOGGER
[email protected]
[email protected]
SMTP
[email protected]
[email protected]
Vediamo in dettaglio quali sono i parametri necessari alla corretta configurazione di un server
SMTP:
17.2. Server di posta in uscita (SMTP)
Si tratta del nome del server SMTP che si deve utilizzare, esempi di server SMTP sono:
mail.clubnet.tin.it
oppure
52
MANUALE UTENTE – Z-GPRS2 / Z-LOGGER
out.alice.it
queste informazioni sono disponibili anche sui software di gestione della posta elettronica sotto il
nome “server di posta in uscita SMTP”.
La porta tipica di un server SMTP senza connessione protetta è la 25.
La porta tipica di un server SMTP con connessione protetta è la 587 o la 465.
17.3. Autenticazione SMTP: user name e password
E’ possibile connettersi con un server SMTP fornendo o no un’autenticazione, Z-GPRS2 permette la
connessione al server tramite autenticazione con uno user name ed una password.
Tipicamente lo user name coincide con la prima parte dell’indirizzo della e-mail (ad esempio:
info), oppure tutto l’indirizzo e-mail (ad esempio: [email protected]).
17.4. Connessione protetta al server SMTP (solo Z-GPRS2)
La connessione al server SMTP protetta è disponibile solo su Z-GPRS2 e solo tramite porta di
comunicazione GPRS.
Non è possibile attivare la connessione protetta per l’invio di E-MAIL tramite porta Ethernet ma
SOLO ATTRAVERSO LA CONNESSIONE GPRS .
ATTENZIONE!
•
Z-logger supporta solo server SMTP che NON prevedono la connessione protetta SSL (ad
esempio il server “smtp.gmail.com” non può essere adoperato).
•
Z-GPRS2 supporta server SMTP che prevedono la connessione protetta SSL (ad esempio il
server “smtp.gmail.com” può essere adoperato) ma solo tramite la connessione GPRS
(l’invio di E-MAIL tramite ethernet avviene senza connessione protetta).
•
Alcuni gestori di rete mobile obbligano ad utilizzare i propri server SMTP per l’invio delle
E-MAIL, fare riferimento al servizio clienti del proprio operatore mobile.
•
Anche se tutte le operazioni di invio della e-mail sono andate a buon fine, l’arrivo della email stessa agli indirizzi di destinazione non è assicurato poiché è il server SMTP che si
occupa dell’effettivo recapito. Ad esempio l’utilizzo di un server SMTP di un gruppo
ritenuto in concorrenza con l’operatore telefonico utilizzato può non ritornare alcun
errore mentre in realtà la e-mail non verrà mai recapitata.
53
MANUALE UTENTE – Z-GPRS2 / Z-LOGGER
17.5. Parametri dei principali server SMTP senza connessione
protetta
In laboratorio sono stati effettuati vari test per l’invio di e-mail senza utilizzo della connessione
protetta (quindi utilizzabile anche per la porta ethernet), di seguito l’elenco dei parametri che
hanno permesso il corretto invio delle e-mail:
La porta è sempre la 25:
OPERATORE
SIM
SERVER SMTP
ESEMPIO
INDIRIZZO EMAIL
AUTENTICAZIONE
Nome utente
password
Invio
allarme
NECESSARIA
(no
allegato)
TIM
WIND
VODAFONE
Invio log
(con
allegato)
out.alice.it
[email protected]
sì
[email protected]
password
sì
sì
smtp.libero.it
[email protected]
sì
[email protected]
password
sì
sì
smtp.net.vodafone.it
qualsiasi
no
-
-
sì
no
54
MANUALE UTENTE – Z-GPRS2 / Z-LOGGER
17.6. Parametri dei principali server SMTP con connessione
protetta via GPRS (solo Z-GPRS2)
SERVER SMTP
ESEMPIO
INDIRIZZO
EMAIL
AUTENTICAZIONE
CONNESSIONE
NECESSARIA
PROTETTA
PORTA
Nome utente
password
465
[email protected]
password
SSL
smtp.gmail.com
[email protected]
sì
sì
La configurazione tipica per l’invio solo via GPRS delle e-mail con GMAIL è la seguente:
NOTA
Se possibile attivare sempre la funzionalità di connessione protetta, questo aumenta le
probabilità di recapito delle e-mail (poiché sono considerate sicure)
55
MANUALE UTENTE – Z-GPRS2 / Z-LOGGER
18. ALLARMI SU INGRESSI ANALOGICI
Nella sezione “Configurazione ingressi Analogici” è possibile configurare ciascuno dei 2 ingressi
analogici in tensione o corrente, il tempo di acquisizione degli ingressi è fissato a 50ms.
Seneca consiglia di abilitare SEMPRE il filtraggio sugli ingressi analogici (voce “filtro misura
attivato”) per ottenere una misura più stabile non affetta da disturbi esterni.
E’ possibile impostare gli ingressi in modalità tensione con range da 0 a 30V.
Gli ingressi in modalità corrente hanno un range da 0 a 20mA.
E’ anche possibile scalare le misure analogiche in unità tecniche.
Sono definibili 4 allarmi differenti per ciascun ingresso:
Allarme su valore ALTO
Allarme su valore BASSO
Allarme su valore MASSIMO
Allarme su valore MINIMO
18.1.
Filtraggio degli ingressi analogici
E’ possibile impostare un filtraggio degli ingressi analogici, questo filtraggio è di tipo a media
mobile su 20 campioni. Questo tipo di filtraggio permette di stabilizzare la misura anche con
segnali rumorosi.
18.2.
Allarme su Alto e Massimo
Gli allarmi su “Alto” e “Massimo” permettono di abilitare due diversi allarmi di massima. E’
definibile un’isteresi (nella figura rappresentata come “ist”).
La figura qui sotto permette di comprendere il funzionamento dell’allarme con i relativi valori di
rientro, ad esempio nel caso di allarme su massimo si ha (Con Ritardo allarme=0 e Tempo di
riarmo allarme = 0):
56
MANUALE UTENTE – Z-GPRS2 / Z-LOGGER
ALLARME SU MASSIMO
ALLARME SU MASSIMO
RIENTRO ALLARME SU MASSIMO
RIENTRO ALLARME SU MASSIMO
Analogo funzionamento è quello relativo all’allarme su alto.
18.3.
Allarme su Basso e Minimo
Gli allarmi su “Basso” e “Minimo” permettono di abilitare due diversi allarmi di massima. E’
definibile un’isteresi (nella figura rappresentata come “ist”).
La figura qui sotto permette di comprendere il funzionamento dell’allarme con i relativi valori di
rientro, ad esempio nel caso di allarme su massimo si ha (Con Ritardo allarme=0 e Tempo di
riarmo allarme = 0):
ALLARME SU MINIMO
18.4.
RIENTRO ALLARME SU MINIMO
Filtro per Allarme
E’ possibile scegliere un filtraggio sull’ingresso analogico, viene definito in secondi. L’effetto che si
ottiene è un filtraggio sia sull’allarme che sul suo riarmo, come si può vedere dalla figura:
57
MANUALE UTENTE – Z-GPRS2 / Z-LOGGER
ALLARME SU MASSIMO
T filtro
allarme
T filtro
allarme
RIARMO ALLARME SU MASSIMO
18.5.
Tempo di inibizione dell’allarme
E possibile impostare anche un tempo di inibizione al prossimo allarme. Diversamente dal
Filtraggio precedente l’allarme è subito attivo ma durante il tempo di inibizione l’allarme è
ignorato. Questo tempo è ricaricato dopo ogni allarme.
ALLARME
ALLARME
ALLARME
T inibiz T inibiz
T inibiz
ATTENZIONE!
NON SUPERARE I SEGUENTI VALORI DEGLI INGRESSI ANALOGICI PENA LA ROTTURA DELLO
STADIO DI INGRESSO E CONSEGUENTE PERDITA DELLA GARANZIA:
INGRESSI TENSIONE: MAX TENSIONE 35V
INGRESSI CORRENTE: MAX TENSIONE AI CAPI 12V (PROTETTA IN CORRENTE)
58
MANUALE UTENTE – Z-GPRS2 / Z-LOGGER
19. ALLARMI SU INGRESSI DIGITALI
Nella sezione “Configurazione ingressi Digitali” è possibile configurare ciascuno dei 4 ingressi
digitali.
Sono disponibili 5 differenti tipologie di allarme:
Allarme su cambio di stato da aperto a chiuso
L’allarme è attivo nel cambio di stato da aperto a chiuso
Allarme su cambio di stato da chiuso ad aperto
L’allarme è attivo nel cambio di stato da aperto a chiuso
Allarme su stato aperto
L’allarme è attivo sullo stato aperto indipendentemente dal fatto che sia stata eseguita o no una
transizione dell’ingresso.
Allarme su stato chiuso
L’allarme è attivo sullo stato chiuso indipendentemente dal fatto che sia stata eseguita o no una
transizione dell’ingresso.
Allarme su cambio di stato
L’allarme è attivo nel cambio di stato da aperto a chiuso o da chiuso ad aperto.
19.1. Filtraggio sugli ingressi digitali
E’ possibile abilitare un filtro sull’allarme digitale, tale filtro è espresso in secondi (con la
risoluzione del decimo di secondo). Il filtro permette di eliminare gli effetti dovuti ai rimbalzi
dell’ingresso. Impostato un tempo di filtro T il filtro permette il cambio di stato dell’ingresso solo
se per un tempo T il valore è rimasto nella stessa condizione precedente:
59
MANUALE UTENTE – Z-GPRS2 / Z-LOGGER
Ingresso
non filtrato
Ingresso
filtrato
19.2.
T filtro
Tempo di inibizione dell’allarme
E possibile impostare anche un tempo di inibizione al prossimo allarme. Durante il tempo di
inibizione l’allarme è ignorato. Questo tempo è ricaricato dopo ogni allarme.
Nell’esempio si può notare l’effetto del tempo di inibizione su un allarme da aperto a chiuso:
ALLARME
ALLARME
ALLARME
1=CHIUSO
0=APERTO
T inibiz T inibiz
T inibiz
60
MANUALE UTENTE – Z-GPRS2 / Z-LOGGER
20. ALLARMI SU TOTALIZZATORI/CONTATORI
Nella sezione “Configurazione totalizzatori/contatori” è possibile impostare un valore di allarme
dei contatori / totalizzatori. Sono presenti sia i contatori che i totalizzatori perché è possibile
utilizzare i contatori come valori parziali.
20.1.
Tempo di inibizione dell’allarme
E possibile impostare anche un tempo di inibizione al prossimo allarme. Durante il tempo di
inibizione l’allarme è ignorato. Questo tempo è ricaricato dopo ogni allarme.
61
MANUALE UTENTE – Z-GPRS2 / Z-LOGGER
21. ALLARME BLACKOUT TENSIONE DI RETE
Nella sezione “Allarme Blackout” è possibile impostare un allarme in caso di mancanza di tensione
di rete continuativo per un tempo impostabile.
E’ anche possibile abilitare l’allarme in caso di ritorno della tensione di rete.
NOTA
In molte situazioni è comodo ottenere un allarme di avviso ad ogni avvio a tal fine attivare
l’allarme di ritorno tensione di rete.
ATTENZIONE!
•
•
Attivando l’allarme di ritorno tensione di rete, ad ogni accensione/spegnimento della
scheda verranno generati entrambi gli allarmi.
In condizione di mancanza di tensione di rete gli ingressi digitali smettono di funzionare
se non alimentati esternamente da un circuito di backup. Gli ingressi analogici e le uscite
digitali, invece, continuano a funzionare fino allo spegnimento di Z-GPRS2/Z-Logger.
21.1.
Tempo di inibizione dell’allarme
E possibile impostare anche un tempo di inibizione al prossimo allarme. Durante il tempo di
inibizione l’allarme è ignorato. Questo tempo è ricaricato dopo ogni allarme.
62
MANUALE UTENTE – Z-GPRS2 / Z-LOGGER
22. ALLARME SU INCREMENTO DEI TOTALIZZATORI
Nella sezione “Allarme su incremento degli ingressi” è possibile impostare fino a 4 allarmi (1 per
ogni ingresso) in caso di alto o basso incremento del totalizzatore. Questi allarmi permettono di
controllare delle portate (gas, liquido etc…) oppure avvisare in caso di mal funzionamento dei
generatori di energia (pannelli fotovoltaici, eolico etc…).
ATTENZIONE!
-Al fine di ottenere valori coerenti e sincronizzati, l’allarme su incremento dei totalizzatori è
gestito dal datalogger, non è quindi possibile attivare contemporaneamente l’allarme su
perdite di un impianto.
- Al fine di ottenere valori coerenti e sincronizzati, l’allarme su incremento dei totalizzatori è
gestito dal datalogger, le tempistiche sono quindi condivise con quelle del logger (tempo di
acquisizione e tempo di invio)
63
MANUALE UTENTE – Z-GPRS2 / Z-LOGGER
23. ALLARME SU PERDITE DI UN IMPIANTO
L’allarme su perdite permette di inviare un allarme nel caso vi siano delle perdite (ad esempio
idriche) in un impianto.
Il concetto di base è che nel, funzionamento normale, in un tempo di osservazione T, il flusso in un
impianto deve essere stato minore di Q per almeno un tempo di conteggio t.
Z-GPRS2 e Z-Logger suddividono il tempo di osservazione T in sottomultipli t e analizzano i
conteggi dei consumi su ciascuno di questi sottomultipli t.
Ad esempio si consideri un impianto idrico che alimenta 2 utenze, statisticamente, nell’arco di una
giornata (tempo di osservazione T = 24 ore) il flusso consentito deve essere stato <0.1 m3/h (flusso
massimo consentito Q=0.1 m3/h) per almeno uno dei 10 minuti t (tempo di conteggio t=10
minuti):
MYALAM
2
UTENZA 1
IMPIANTO IDRICO
CONTATORE
UTENZA
“PARASSITA”
UTENZA 2
Se questo non è verificato significa che oltre alle 2 utenze esiste un’utenza “parassita” che
continuamente sottrae liquido (specialmente la notte è improbabile che le utenze utilizzino acqua
su tutti gli intervallo di 10 minuti).
Nell’ allarme è possibile impostare il tempo di osservazione T, il tempo di conteggio t ed il valore
del massimo flusso Q nel tempo di conteggio t.
ATTENZIONE!
- Al fine di ottenere valori coerenti e sincronizzati, l’allarme su perdite idriche è gestito dal
datalogger, le tempistiche sono quindi condivise con quelle del logger (tempo di acquisizione (t))
e tempo di invio (T))
64
MANUALE UTENTE – Z-GPRS2 / Z-LOGGER
- Al fine di ottenere valori coerenti e sincronizzati, l’allarme su perdite idriche è gestito dal
datalogger, non è quindi possibile attivare contemporaneamente l’allarme su incremento dei
totalizzatori.
65
MANUALE UTENTE – Z-GPRS2 / Z-LOGGER
24. ALLARME SU CONTAORE
Z-GPRS2 / Z-Logger permette il controllo di NR4 contatti contaore indipendenti. Questa funzione permette
di ottenere un allarme nel caso venga superato un numero di ore impostabile in cui l’ingresso digitale è in
determinato stato logico. La tipica applicazione è l’avviso automatico della manutenzione di pompe,
caldaie, macchine utensili, forni etc…
La risoluzione dei 4 contaore è di 1 secondo.
E’ possibile configurare gli ingressi in modo indipendente in modo che il contaore conti su stato aperto o su
stato chiuso. E’ consigliabile il funzionamento di contatore su stato chiuso in modo da contare
correttamente anche nella condizione di mancanza di tensione di rete.
Il conteggio è salvato in memoria non volatile prima di ogni spegnimento.
Il numero massimo di ore conteggiabili è di pari a circa 127 anni.
ATTENZIONE!
-Attivando l’allarme su contaore non è possibile attivare contemporaneamente l’allarme sugli
ingressi digitali.
25. ALLARME SU ANOMALIA FUNZIONAMENTO PANNELLI SOLARI
Z-GPRS2 / Z-Logger permette il controllo di NR 2 stringhe di pannelli fotovoltaici, tramite la lettura
dei due valori analogici provenienti da 2 TA connessi. Quando la differenza tra le due correnti di
stringa supera il valore K viene generato l’evento di anomalia. Questo permette di evidenziare
problematiche dovute ad una stringa utilizzando la seconda per confronto. L’allarme può sempre
essere attivato indipendentemente dal giorno/notte.
26. ALLARMI AUSILIARI DIGITALI / ANALOGICI SU PERIFERICHE
MODBUS RTU / MODBUS TCP-IP
Z-GPRS2 / Z-Logger supportano fino a 30 allarmi ausiliari collegati alle seriali RS485 tramite il
protocollo Modbus RTU o attraverso la porta ethernet tramite il protocollo Modbus TCP-IP.
Nel software di configurazione è possibile estendere gli IO embedded con un qualsiasi modulo
Modbus Seneca (sia Modbus TCP-IP che Modbus RTU) oppure con un modulo di terze parti che
supporti i protocolli Modbus TCP-IP server o Modbus RTU slave.
NOTA
66
MANUALE UTENTE – Z-GPRS2 / Z-LOGGER
E’ possibile collegare fino 30 allarmi sia che siano digitali o analogici, ad esempio è possibile
collegare 3 moduli Seneca Z-10-D-IN ottenendo 30 ingressi digitali supplementari oppure 2
moduli Seneca Z-10-D-IN e 1 modulo Z-8AI ottenendo 20 ingressi digitali e 8 ingressi analogici
supplementari.
67
MANUALE UTENTE – Z-GPRS2 / Z-LOGGER
27. AZIONE SU EVENTO
Z-GPRS2 / Z-Logger in caso di evento allarme oltre ad inviare l’allarme via SMS/E-MAIL può anche eseguire
fino a 3 azioni, l’elenco delle azioni che possono eseguire sono:
AZIONE
COMMENTO
CHIUDE USCITA1/2
Chiude l’uscita1/2
APRE USCITA1/2
Apre l’uscita 1/2
CHIUDE USCITA TEMPORIZZATA1/2
Chiude l’uscita 1/2 per il tempo indicato, poi la apre
APRE USCITA TEMPORIZZATA 1/2
Apre l’uscita 1/2 per il tempo indicato, poi la chiude
TOGGLE USCITA 1/2
Cambia lo stato dell’uscita 1/2
RESET CONTATORI
Carica il valore 0 su tutti i contatori
RESET CONTATORE 1
Carica il valore 0 sul contatore1
RESET CONTATORE 2
Carica il valore 0 sul contatore2
RESET CONTATORE 3
Carica il valore 0 sul contatore3
RESET CONTATORE 4
Carica il valore 0 sul contatore4
RICHIESTA CREDITO RESIDUO
Ritorna il valore del credito residuo
(solo per SIM ricaricabili)
RICHIESTA VALORE CONTATORE E RESET
Ritorna il valore del contatore 1, 2, 3 o 4 e poi lo
resetta
START LOGGER (TIMER 1)
Fa partire il datalogger
STOP LOGGER (TIMER 1)
Ferma il datalogger
START TIMER
Fa partire il timer 2 o 3,… 10
STOP TIMER
Ferma il timer 2 o 3,… 10
ABILITA ALLARME SU MANCANZA TENSIONE DI
RETE
Abilita allarme su mancanza tensione di rete con i
parametri configurati
DISABILITA ALLARME SU MANCANZA TENSIONE DI
RETE
Disabilita allarme su mancanza tensione di rete
ABILITA ALLARME SU INGRESSO DIGITALE
Abilita allarme su ingresso digitale 1, 2, 3 o 4
DISABILITA ALLARME SU INGRESSO DIGITALE
Disabilita allarme su ingresso digitale 1, 2, 3 o 4
68
MANUALE UTENTE – Z-GPRS2 / Z-LOGGER
RIARMA ALLARME SU INGRESSO DIGITALE
Riarma allarme su ingresso digitale 1,2,3 o 4 se
configurato in riarmo manuale
ABILITA ALLARME ANALOGICO SU
MINIMO/BASSO/ALTO/MASSIMO
Abilita l’allarme analogico 1 o 2 su minimo
/basso/alto/massimo
RIARMA ALLARME ANALOGICO SU
MINIMO/BASSO/ALTO/MASSIMO
Riarma l’allarme analogico 1 o 2 su minimo
/basso/alto/massimo se configurato in riarmo
manuale
ABILITA ALLARME SU TOTALIZZATORE
Abilita l’allarme su valore (eventualmente scalato)
del totalizzatore 1 o 2 o 3 o 4
DISABILITA ALLARME SU TOTALIZZATORE
Disabilita l’allarme su valore (eventualmente
scalato) del totalizzatore 1 o 2 o 3 o 4
ABILITA ALLARME SU CONTATORE
Abilita l’allarme su valore (eventualmente scalato)
del contatore 1 o 2 o 3 o 4
DISABILITA ALLARME SU CONTATORE
Disabilita l’allarme su valore (eventualmente
scalato) del contatore 1 o 2 o 3 o 4
ABILITA ALLARME SU CONTAORE
Abilita allarme su contaore 1 o 2 o 3 o 4
DISABILITA ALLARME SU CONTAORE
Disabilita allarme su contaore 1 o 2 o 3 o 4
ABILITA ALLARME SU INCREMENTO CONTATORE /
PERDITE
Abilita l’allarme su incremento del conteggio o su
perdite idriche (se attivata l’applicazione controllo
perdite idriche)
DISABILITA ALLARME SU INCREMENTO
CONTATORE / PERDITE
Disabilita l’allarme su incremento del conteggio
o su perdite idriche (se attivata l’applicazione
controllo perdite idriche)
ABILITA ALLARME SU CONTROLLO CORRENTI DI
STRINGA
Abilita allarme su controllo correnti di stringa
DISABILITA ALLARME SU CONTROLLO CORRENTI
DI STRINGA
Disbilita allarme su controllo correnti di stringa
Per un elenco esaustivo fare riferimento al software Easy Setup / Easy Z-GPRS2 / Easy Z-LOGGER
69
MANUALE UTENTE – Z-GPRS2 / Z-LOGGER
28. FUNZIONALITA’ SERVER VIA PORTA ETHERNET
Tramite la porta ethernet è possibile abilitare un servizio server tra:
Web server
FTP server
Modbus TCP-IP server
28.1. CONNESSIONE LOCALE ALLA PORTA ETHERNET
Per connettere una periferica via ethernet a Z-GPRS2 o Z-Logger bisogna che entrambe abbiano un indirizzo
IP compatibile.
Se la connessione è fatta sul webserver e il browser utilizza un proxy server è meglio disabilitarne l’utilizzo:
Per esempio se l’indirizzo IP di Z-GPRS2 / Z-Logger è 192.168.90.101 con subnet mask 255.255.255.0 l’altra
periferica deve avere un indirizzo IP che comincia con 192.168.90, così ad esempio 192.168.90.102 è
corretto.
L’ Ethernet montata supporta l’auto-switching mode, è possibile connettere due periferiche in puntopunto senza bisogno di router o switch Ethernet.
28.2. Servizio Server via porta ethernet: Web server
Il servizio web server può essere abilitato tramite la porta Ethernet (non è disponibile via GPRS), è
possibile proteggere l’accesso alle pagine Web tramite la configurazione di un nome utente e di
una password.
Tramite Web server è possibile visualizzare in real time:
70
MANUALE UTENTE – Z-GPRS2 / Z-LOGGER
-Il valore degli ingressi digitali
-Il valore degli ingressi analogici
-Il valore delle uscite digitali
-il valore dei contatori / totalizzatori
-il valore delle variabili di log in tempo reale
-Il segnale GSM
-Il funzionamento a batterie o a tensione di rete
Il web server è stato testato con i principali browser e gli apparati mobili i-phone ™, i-pad ™, e
telefoni o tablet android ™ .
Il webserver può essere protetto da uno user name e una password.
Fatto questo, aprire il browser e digitare:
http://192.168.90.101:port
Dove port è la porta configurata per il Webserver (configurazione di fabbrica 80), quindi con le impostazioni
di fabbrica:
http://192.168.90.101:80
Se la configurazione degli ip è fatta correttamente il webserver è visualizzato:
71
MANUALE UTENTE – Z-GPRS2 / Z-LOGGER
72
MANUALE UTENTE – Z-GPRS2 / Z-LOGGER
ATTENZIONE!
PER RAGIONI DI SCUREZZA ATTIVARE SEMPRE L’AUTENTICAZIONE CON NOME UTENTE E PASSWORD PER
L’ACCESSO AL WEBSERVER
28.2.1.
Misure Real Time sul WEBSERVER
Il Webserver può essere adoperato per visualizzare le misure in real-time sia gli ingressi/uscite integrate sia
i valori loggati dal datalogger.
La Pagina “Status” permette di visualizzare alcune informazioni e il livello del segnale GSM.
La pagina “Digital IO” riporta il valore degli ingressi e uscite digitali, le uscite possono essere comandate.
73
MANUALE UTENTE – Z-GPRS2 / Z-LOGGER
La pagina “Analog IN” riporta il valore degli ingressi analogici eventualmente scalati:
La pagina “Counters” riporta il valore degli ingressi contatore/totalizzatore eventualmente scalati:
74
MANUALE UTENTE – Z-GPRS2 / Z-LOGGER
La pagina “MMBUS REGISTERS” riporta i valori loggati in tempo reale dei TAG Modbus (sia Modbus
TCP-IP e Modbus RTU):
75
MANUALE UTENTE – Z-GPRS2 / Z-LOGGER
La pagina “Set Real Time Clock” riporta il valore della data ora che può anche essere impostato:
76
MANUALE UTENTE – Z-GPRS2 / Z-LOGGER
28.3. FTP server
Il servizio FTP server permette di poter accedere ai log contenuti nella microSD di Z-Logger/ Zalarm tramite la porta ethernet senza fermare il normale funzionamento del logger.
E’ possibile proteggere l’accesso ai log della microSD via FTP tramite un nome utente ed una
password
28.3.1.
Comandi FTP supportati
L’ FTP server supporta un set ristretto di comandi FTP che lo rendono incompatibile con i principali
software FTP client quali FileZilla etc…
Per la connessione al server FTP verificare che sia inserita una microSD card, aprire il prompt dei
comandi di windows e per connettersi al server ftp digitare:
ftp <ip_address>
dove <ip_address> è l’indirizzo ip della connessione ethernet.
Se necessario verranno richiesti il nome utente e la password:
A questo punto si è ottenuto l’accesso ai file presenti nella microSD.
Tramite il comando “ls” è possibile ottenere la lista del contenuto della microSD:
77
MANUALE UTENTE – Z-GPRS2 / Z-LOGGER
I file di log si trovano nella cartella /LOG
È possibile accedere alla cartella /LOG con il comando “cd”:
Con il comando “ls” si ottiene la lista dei log contenuti nella cartella:
78
MANUALE UTENTE – Z-GPRS2 / Z-LOGGER
Per copiare il file nella directory di partenza (c:\Users\Prove) basta digitare il comando:
get <nomefile>
ad esempio:
Per la lista completa dei comandi ftp disponibili digitare:
“help”
79
MANUALE UTENTE – Z-GPRS2 / Z-LOGGER
Per ricevere più file di una directory utilizzare il comando mget (multiple get).
28.4. Modbus TCP-IP server
Il servizio Modbus TCP-IP server permette di poter accedere ai registri Modbus delle variabili di ZGPRS2 / Z-Logger.
Oltre alle variabili degli I/O embedded è possibile accedere in tempo reale alle variabili di log.
Elenco dei registri Modbus:
LEGENDA:
MSW “Most Significant Word” – Word da 16 bit più significativa
LSW “Less Significant World” – Word da 16 bit meno significativa
0x -Valore esadecimale
INDIRIZZO MODBUS
CONTENUTO REGISTRO
40006
INGRESSI DIGITALI
BIT 0 = INPUT 1
BIT 1 = INPUT 2
BIT 2 = INPUT 3
80
MANUALE UTENTE – Z-GPRS2 / Z-LOGGER
BIT 3 = INPUT 4
49001 0x0020
49002 0x0010
49003 0x0200
REGISTRI SCRITTI IN UN’UNICA
SCRITTURA:
APRE USCITA 1
49001 0x0020
49002 0x0020
49003 0x0200
REGISTRI SCRITTI IN UN’UNICA
SCRITTURA:
CHIUDE USCITA 1
49001 0x0020
49002 0x1000
49003 0x0200
REGISTRI SCRITTI IN UN’UNICA
SCRITTURA:
APRE USCITA 2
49001 0x0020
49002 0x2000
49003 0x0200
REGISTRI SCRITTI IN UN’UNICA
SCRITTURA:
CHIUDE USCITA 2
40129
ANALOG INPUT 1 (signed 16 bits)
40143
ANALOG INPUT 2 (signed 16 bits)
LSW 49407
COUNTER 1
MSW 49408
LSW 49411
COUNTER 2
MSW 49412
LSW 49415
COUNTER 3
MSW 49416
LSW 49419
COUNTER 4
MSW 49420
LSW 49405
TOTALIZER 1
MSW 49406
LSW 49409
TOTALIZER 2
81
MANUALE UTENTE – Z-GPRS2 / Z-LOGGER
MSW 49410
LSW 49413
TOTALIZER 3
MSW 49414
LSW 49417
TOTALIZER 4
MSW 49418
40156
GSM LEVEL (0-7)
40126
VBAT (min 2200, max 2800)
40006
BIT 7 = 1 POWER SOURCE OK
BIT 7 = 0 POWER SOURCE DOWN
48001
INIZIO DELLA STRUTTURA REAL TIME
DEI LOG MODBUS
…
…
48201
FINE DELLA STRUTTURA REAL TIME
DEI LOG MODBUS
28.4.1.
Struttura dei Registri Modbus Real time log
Tramite modbus è possibile accedere a tutti i valori Real Time del datalogger loggati da Modbus
TCP-IP e Modbus RTU.
La struttura è realizzata in questo modo: i registri loggati sono inseriti nella struttura uno dopo
l’altro senza lasciare registri vuoti.
Se ad esempio si stanno loggando i seguenti registri:
Registro 1: 16 bit unsigned
Registro 2: 32 bit unsigned
Registro 3: Floating point single precision
Registro 4: 16 bit signed
La struttura di esempio che si ottiene è la seguente:
Indirizzo Modbus
Registro
82
MANUALE UTENTE – Z-GPRS2 / Z-LOGGER
48001
Registro 1
48002
Registro 2 MSW
48003
Registro 2 LSW
48004
Registro 3 MSW
48005
Registro 3 LSW
48006
Registro 4
29. ACCESSO A Z-GPRS2 / Z-LOGGER DA INTERNET (SOLO
TRAMITE PORTA ETHERNET)
Utilizzando un indirizzo IP statico è possibile configurare il router per l'accesso a Z-GPRS2/Z-Logger
da internet.
Questa operazione è nota come "server virtuale" o "Port forwarding" fare riferimento alla
documentazione del router per ulteriori informazioni.
L'indirizzo IP della connessione Internet deve avere un indirizzo IP statico pubblico, se il vostro
indirizzo IP pubblico non è statico, è possibile ottenere uno utilizzando un DNS dinamico come
Dyndns (http://dyn.com/).
Ad esempio:
L'indirizzo IP del router è 192.168.90.1 e l'indirizzo del modulo Z-GPRS2 è 192.168.90.101 con il
web server configurato sulla porta 80. L'indirizzo pubblico del router è 73.13.150.123.
83
MANUALE UTENTE – Z-GPRS2 / Z-LOGGER
ROUTER
ROUTER
INDIRIZZO IP
PUBBLICO
INDIRIZZO IP
LOCALE:
73.13.150.123
192.168.90.1
INTERNET
Z-GPRS2/ZLOGGER:
192.168.90.101
Webserver Port
80
Ora dobbiamo aprire la porta 80 sul router e trasmissione al IP 192.168.90.101:
Quindi la configurazione sul router deve essere:
IP ADDRESS
PRIVATE PORT
PUBLIC PORT
PROTOCOL
192.168.90.101
80
8080
UDP/TCP
Con questa configurazione, tutto il traffico Internet sulla porta 8080 con indirizzo IP 73.13.150.123
verrà reindirizzato al webserver di Z-GPRS2/Z-Logger sulla porta 80 all'indirizzo IP
192.168.90.101.
Quindi, per l'accesso al webserver utilizzando un browser dobbiamo digitare:
http://73.13.150.123:8080
Una configurazione simile può essere adoperata per l'accesso via Modbus TCP-IP:
IP ADDRESS
PRIVATE PORT
PUBLIC PORT
PROTOCOL
192.168.90.101
502
502
UDP/TCP
84
MANUALE UTENTE – Z-GPRS2 / Z-LOGGER
Mentre per l’accesso all’ftp server:
IP ADDRESS
PRIVATE PORT
PUBLIC PORT
PROTOCOL
192.168.90.101
21
21
UDP/TCP
30. AGGIORNAMENTO DEL FIRMWARE
Al fine di includere nuove funzionalità il sistema prevede la possibilità di aggiornare il firmware ZGPRS2.
Assieme ad ogni release del software Easy Z-GPRS2/Z-Logger/Easy Setup è inclusa l’ultima
versione di firmware disponibile.
Sono disponibili 2 diverse modalità per aggiornare il firmware:
Via USB: E’ il metodo più semplice, un aggiornamento completo impiega circa 5 minuti. E’
necessario collegare Z-GPRS2 / Z-Logger ad un PC con installato il software Easy Z-GPRS2/ZLogger/Easy Setup.
Via microSD card: E’ il metodo più veloce, un aggiornamento impiega circa 20 secondi. E’
necessario disporre di un adattatore microSD per PC (anche molti cellulari possono
leggere/scrivere microSD) e di una microSD card. Questo metodo è comodo quando si devono
aggiornare più schede.
30.1. Aggiornamento via USB (tramite software Easy ZGPRS2/Z-Logger / Easy Setup)
L’aggiornamento del firmware via USB è realizzabile nella sezione “Aggiornamento Software”.
Seguire le indicazioni che compaiono nello schermo per eseguire correttamente l’operazione.
ATTENZIONE!
-PRIMA DI EFFETTUARE L'AGGIORNAMENTO firmware prendere nota dell'attuale configurazione
-Una volta aggiornato il firmware la precedente configurazione è possibile che venga cancellata
ed è quindi obbligatorio configurare nuovamente Z-GPRS2 / Z-Logger.
-Tenere in considerazione che una successiva versione del software Easy Z-GPRS2/Z-Logger/ Easy
Setup potrebbe non essere compatibile con il file di configurazione generato da una precedente
versione.
85
MANUALE UTENTE – Z-GPRS2 / Z-LOGGER
30.2.
Aggiornamento via microSD card (senza uso di PC)
L'aggiornamento del firmware è possibile tramite una scheda microSD formattata con il filesystem
FAT32/FAT16 (solitamente le microSD card acquistate sono già formattate in questo modo).
Per aggiornare il firmware seguire la seguente procedura :
1. Copiare in una scheda microSD il file contenente il firmware di nome
“ZGPRS2.BIN”; il file è
incluso nel software gratuito Easy Z-GPRS2 / Easy Setup (scaricabile dal sito
www.seneca.it) e
viene copiato automaticamente durante l'installazione nella cartella
“\Documents\Seneca\Easy_ZGPRS2\update”.
Il file va copiato sulla cartella principale della microSD.
2. Spegnere e riaccendere il modulo
3. Con il modulo acceso inserire la scheda microSD nello slot apposito
4. Il led SD/STS inizierà a lampeggiare a intervalli di 1 secondi per
circa 20 secondi. In questa fase il modulo scrive il nuovo firmware sulla
memoria flash.
5. Al termine della fase di scrittura il led SD/STS inizia a lampeggiare
lentamente, circa 3 secondi spento e mezzo secondo acceso (se rimane
acceso fisso significa che la versione di firmware presente coincide con
quella caricata nella microSD).
6. A questo punto togliere la microSD
7. Il led verde PWR comincia a lampeggiare velocemente (più volte al
secondo); in questa fase il modulo sta copiando il firmware dalla flash
alla flash del microprocessore.
8. Al termine del procedimento modulo si spegne e si riavvia
automaticamente
E’ possibile verificare l’aggiornamento del firmware:
-Collegando il modulo al software Easy Z-GPRS2/Z-Logger la revisione firmware (in basso a sinistra:
“Connesso a … FW XXXX”) è cambiata.
ATTENZIONE!
-PRIMA DI EFFETTUARE L'AGGIORNAMENTO firmware prendere nota dell'attuale configurazione
-Una volta aggiornato il firmware la precedente configurazione può essere cancellata ed è
quindi obbligatorio configurare nuovamente Z-GPRS2 / Z-LOGGER.
-Tenere in considerazione che una successiva versione del software Easy Z-GPRS2/Z-Logger/ Easy
Setup potrebbe non essere compatibile con il file di configurazione generato da una precedente
versione.
86
MANUALE UTENTE – Z-GPRS2 / Z-LOGGER
31. ATTIVARE LA PORTA DI DEBUG
E’ possibile attivare la porta di debug posta lateralmente a Z-GPRS2.
Tramite la porta di debug è possibile visualizzare e salvare su file il log delle operazioni eseguite da ZGPRS2/Z-Logger.
Per connettere la porta di debug utilizzare l’adattatore USB “Easy USB” acquistabile direttamente nel sito
Seneca (www.seneca.it) oppure è possibile contattare Seneca srl per maggiori informazioni:
La connessione con il PC avviene tramite un software Terminale (ad esempio Hyperterminal) con le
seguenti configurazioni:
Una volta eseguita l’operazione attivare il debug nella sezione Test Configurazione del software di
configurazione, selezionando i flag del tipo di debug voluto.
87
MANUALE UTENTE – Z-GPRS2 / Z-LOGGER
32. COMANDI DISPONIBILI TRAMITE SOFTWARE DI
CONFIGURAZIONE
Nella sezione “Test configurazione” del software di configurazione sono disponibili una serie di pulsanti che
permettono di impartire dei comandi a Z-GPRS2/Z-Logger utili per il debug e alcuni importanti funzioni:
COMANDO
COMMENTO
TEST E-MAIL
Invia una mail di test al primo degli amministratori email. E’ richiesto che sia configurato l’invio delle e-mail.
TEST FTP
Invia un file di test in formato .txt nel server ftp
configurato. Se l’invio avviene via Ethernet è richiesto
che sia inserita una microSD card.
UNMOUNT SD
Permette di estrarre la microSD senza dover spegnere ZGPRS2. Prima di estrarre la microSD attendere che il led
SD sia spento. Successivamente è possibile inserire la
microSD, il sistema salverà i file non salvati per mancanza
della scheda.
L’inserimento della microSD avviene con successo se il
led SD si accende.
COPY FLASH ON SD
Permette di copiare tutto il contenuto della Flash interna
di Z-GPRS2/Z-Logger su microSD.
Viene creato il file “LOG_BAK.CSV” nella directory
principale della microSD.
Durante questa operazione il led SD lampeggia, ad
operazione ultimata il led rimane acceso. A questo punto
è possibile estrarre la microSD con il comando
UNMOUNT SD.
33. SOFTWARE EASY SETUP ED Easy Z-GPRS2/Z-Logger,
INSTALLAZIONE DEI DRIVER USB
Per configurare il modulo Seneca Z-GPRS2 e Z-Logger si deve utilizzare il software Easy Z-GPRS2/
Easy Z-Logger o EasySetup.
88
MANUALE UTENTE – Z-GPRS2 / Z-LOGGER
Entrambi i software sono scaricabili gratuitamente dal sito www.seneca.it.
Il software di configurazione include anche il driver per l’utilizzo della connessione su USB.
ATTENZIONE!
Solo per la prima installazione, prima di connettere Z-GPRS2 o Z-Logger alla porta USB è
necessario aver installato il software Easy Z-GPRS2/Z-Logger o Easy Setup. Quindi:
1) Installare il software Easy Z-GPRS2/Z-Logger o Easy Setup su un PC dotato di sistema
operativo Micorsoft ™ Windows xp ™, Micorsoft ™ Windows Vista ™, Micorsoft ™
Windows 7 ™
2) Al termine dell’installazione confermare l’installazione del driver facendo click su
“Installa il software del driver”:
Al termine dell’installazione del driver il sistema è pronto per essere connesso con Z-GPRS2/ZLogger.
3) Terminata l’installazione connettere Z-GPRS2 o Z-Logger al PC tramite un cavo miniUSB
(vedi il capitolo 34)
Fare click sull’icona di installazione driver dispositivo
4) Il PC effettua la ricerca del driver
89
MANUALE UTENTE – Z-GPRS2 / Z-LOGGER
Per velocizzare la procedura di installazione fare click su “Ignora download di driver da
Windows Update” (altrimenti l’operazione può richiedere oltre 5 minuti).
5) E’ ora possibile utilizzare la connessione miniUSB
34. IL KIT-USB
The KIT-USB può essere acquistato da Seneca (anche tramite il sito di E-commorce
www.seneca.it)
Il kit contiene:
•
•
NR1 CD con I driver per Windows e i software di configurazione Easy
NR1 cavo standard USB mini-B e NR1 cavo standard micro USB
I software Easy di configurazione più aggiornati possono essere scaricati liberamente dal
sito:
www.seneca.it
90
MANUALE UTENTE – Z-GPRS2 / Z-LOGGER
35. SOLUZIONE AI PROBLEMI
SOLUZIONE
PROBLEMA
Inviando il comando SMS :
email test
nessuna e-mail arriva all’ indirizzo e-mail
dell’ amministratore
-Verificare che l’APN impostato corrisponda a quello
dell’operatore mobile e se l’accesso necessita di
autorizzazione fare riferimento a:
http://wiki.apnchanger.org/Main_Page
- Verificare che il segnale GSM sia superiore a 2/7
-La mail è finita nello SPAM
-Il server SMTP supporta la protezione SSL e non è stata
impostata la porta corretta
-E’ stato impostato un server SMTP di una compagnia
telefonica concorrente rispetto la SIM utilizzata
Tramite il software di configurazione
nella sezione “Test configurazione” alla
pressione del pulsante:
Nel caso di invio tramite porta Ethernet Seneca
consiglia di utilizzare un server SMTP proprietario.
-La mail è finita nello SPAM
TEST E-MAIL
nessuna e-mail arriva all’ indirizzo e-mail
dell’ amministratore
-Il server SMTP supporta la protezione SSL, tramite
porta ethernet non è possibile attivare la protezione
SSL
-E’ stato impostato un server SMTP di una compagnia
telefonica concorrente rispetto la SIM utilizzata
Inviando il comando SMS :
ftp test
-Se si sta utilizzando la porta ethernet per l’invio dei file
FTP la microSD card deve essere inserita
-La cartella sul server FTP su cui vengono creati i file
non esiste, creare prima la cartella nel server ftp
-Verificare la correttezza dell’IP/nome del server ftp
nessun file ftp arriva nel server ftp
configurato
-Verificare che il nome utente/password per l’accesso
al server ftp siano corretti
Tramite il software di configurazione
nella sezione “Test configurazione” alla
pressione del pulsante:
-Se si sta utilizzando la porta ethernet per l’invio dei file
FTP la microSD card deve essere inserita
-La cartella sul server FTP su cui vengono creati i file
non esiste, creare prima la cartella nel server ftp
TEST FTP
-Verificare la correttezza dell’IP/nome del server ftp
-Verificare che il nome utente/password per l’accesso
91
MANUALE UTENTE – Z-GPRS2 / Z-LOGGER
nessun file ftp arriva nel server ftp
configurato
al server ftp siano corretti
Il segnale GSM è sempre 0 e il led GSM
continua sempre a lampeggiare
velocemente
-La SIM inserita non è riconosciuta, pulire o sostituire la
SIM
-La SIM ha il PIN abilitato, inserire la SIM in un cellulare
e disabilitare il PIN, oppure abilitare e inserire il codice
PIN nel software di configurazione
Il segnale GSM è troppo basso
-Attendere almeno 10 minuti prima di leggere il valore
GSM dall’accensione
-Provare ad utilizzare una SIM di un altro operatore
mobile
- Spostare l’installazione di Z-GPRS2
-Utilizzare un’antenna esterna opzionale: per maggiori
informazioni contattare Seneca o il sito internet
www.seneca.it nella sezione Z-GPRS2.
Non è possibile ottenere il credito residuo
della SIM
-Verificare il metodo da utilizzare per recuperare il
credito residuo richiesto dall’operatore mobile (squillo
o SMS, testo dell’SMS di richiesta).
-La SIM non è di tipo ricaricabile ma ad abbonamento
Non vi è nessuna comunicazione dalla
seriale RS485 #1 BUS IDC10
-Portare lo switch SW2 in posizione “ON” vedi capitolo
4
Z-GPRS2 ha funzionato correttamente per
alcuni giorni/mesi poi ha smesso di
inviare sia gli SMS che i log.
-Il credito della SIM è esaurito, ricaricare la SIM card.
L’aggiornamento firmware di Z-GPRS2/ZLogger dal software Easy via USB fallisce
-L’aggiornamento via USB richiede che Z-GPRS2 / ZLogger siano alimentati da una fonte esterna all’USB.
-La SIM card è scaduta perché il credito non è mai stato
ricaricato nell’arco di un anno. Sostituire la SIM card o
contattare l’operatore telefonico mobile.
Alimentare i moduli da Morsetto o da connettore
IDC10.
-Togliere la microSD card prima di cominciare
l’aggiornamento via USB
Utilizzando Z-GPRS2 via ethernet si
ottiene l’errore via SMS “NTP error”
E’ stata attivata la sincronizzazione dell’orologio, via
ethernet questa avviene tramite i server NTP (network
time protocol), non è possibile contattare i server NTP:
-Verificare che nella rete la porta UDP 123 sia aperta
-Verificare l’indirizzo dei server NTP impostati
92
USER MANUAL
Z-GPRS2 / Z-LOGGER
Z-GPRS2
Multi-protocol Datalogger/RTU with GSM/GPRS modem and embedded I/O
Z-LOGGER
Multi-protocol Datalogger/RTU with embedded I/O
SENECA s.r.l.
PADOVA – ITALY
PADOVA – ITALY
Tel. +39.049.8705355 – 8705359 Fax. +39.049.8706287
Web site: www.seneca.it
Customer service: [email protected] (IT), [email protected] (Other)
Informazioni Commerciali: [email protected] (IT), [email protected] (Other)
This document is property of SENECA srl. Duplication and reproduction of its are forbidden (though partial), if not
authorized. Contents of present documentation refers to products and technologies described in it. Though we strive for
reach perfection continually, all technical data contained in this document may be modified or added due to technical and
commercial needs; it’s impossible eliminate mismatches and discordances completely. Contents of present
documentation is anyhow subjected to periodical revision. If you have any questions don’t hesitate to contact our
structure or to write us to e-mail addresses as above mentioned.
MI003134
Page 1
USER MANUAL – Z-GPRS2 / Z-LOGGER
Date
Version
Changes
14/05/2013
12
Changes for firmware 2670_200
Added modbus tag reading commands via SMS
Added troubleshooting chapter
Added internal Modbus I/O registers
Added hour meter log
Changed Webserver: added GSM signal, Power type.
Updated USB driver installation chapter
Changed E-MAIL chapter
Added comment on digital input operations in the event of
blackout
Added chapter on event logger
07/06/2013
13
Changed chapter order and added new chapters
10/09/2013
14
New features Firmware 2670_300:
Changed GSM level into Dbm
Changed chapter Syslog
Changed chapter FTP/E-MAIL errors
Changed chapter troubleshooting
FTP resume function only for GPRS connection
Added chapter “Enable the debug port”
Added chapter “Commands available from configuration
software”
Changed chapter “Configuration test for e-mail sending”
Changed chapter “Configuration test for ftp sending”
Added chapter “Log file name”
2
USER MANUAL – Z-GPRS2 / Z-LOGGER
Contents
SENECA Z-GPRS2 / Z-LOGGER ....................................................................................... 8
1.
PRELIMINARY INFORMATION ................................................................................. 8
2.
CHARACTERISTICS ................................................................................................. 10
3.
SPECIFICATIONS ...................................................................................................... 12
4.
CONNECTIONS.......................................................................................................... 15
5.
SIGNAL LEDS ............................................................................................................ 18
5.1.
Z-GPRS2 LEDS ........................................................................................................ 18
5.2.
Z-LOGGER LEDS ................................................................................................... 19
6.
BASIC NOTIONS ........................................................................................................ 21
7.
SUPPORTED SIM CARDS (Z-GPRS2 ONLY) ............................................................ 22
8.
GSM SIGNAL (Z-GPRS2 ONLY) ................................................................................ 23
9.
GPRS CONNECTION (ZGPRS2 ONLY) ..................................................................... 25
10.
10.1.
GPS COORDINATES .............................................................................................. 26
GPS COORDINATES VIA GPRS NETWORK (Z-GPRS2 ONLY) ........................ 26
11.
BACKUP BATTERIES ............................................................................................ 27
12.
DATALOGGER ....................................................................................................... 28
12.1.
DATA ACQUISITION .......................................................................................... 28
12.2.
SENDING DATALOGGER DATA ........................................................................ 28
12.3.
INTERNAL CLOCK ............................................................................................. 28
12.4.
EMBEDDED I/O LOG .......................................................................................... 29
3
USER MANUAL – Z-GPRS2 / Z-LOGGER
12.5.
12.5.1.
12.6.
12.6.1.
MODBUS RTU AND MODBUS TCP-IP LOGGERS ............................................. 29
MODBUS LOG ERROR MANAGEMENT ........................................................ 31
LOG FILE ............................................................................................................ 31
LOG FILE NAME ............................................................................................. 31
12.7.
LOGGER SETUP ................................................................................................. 33
12.8.
SETTING UP LOG DELIVERY ........................................................................... 33
12.9.
SERIAL LOG SETUP ON MODBUS RTU AND MODBUS TCP-IP PROTOCOL 34
12.9.1.
SETTING MODBUS REGISTERS TO BE LOGGED ........................................ 35
12.9.2.
LOG FILE SETTABLE FIELDS ........................................................................ 35
12.10.
LOG SMS ............................................................................................................. 37
12.11.
LOG SAVE ON MICROSD CARD........................................................................ 38
12.12.
SAVING COUNTERS/TOTALIZERS ................................................................... 38
12.13.
LOG FILE SEND TIME VIA GPRS (Z-GPRS2 ONLY) ........................................ 39
12.14. FTP AND SMTP SERVER DATA CONNECTION AND SEND ERROR
MANAGEMENT ................................................................................................................ 39
12.15. ETHERNET/GPRS COMMUNICATION CHANNEL REDUNDANT FUNCTION
(Z-GPRS2 ONLY) .............................................................................................................. 40
12.16.
CONFIGURATION TEST FOR EMAIL SEND..................................................... 40
12.17.
CONFIGURATION TEST FOR LOG SEND VIA FTP .......................................... 40
13.
SYSTEM LOG (EVENT AND ALARM LOG) ON MICRO SD ................................. 40
13.1.
“SYSLOG.CSV” FILE CONTENT ........................................................................ 41
13.2.
“SYSLOG.CSV” FILE SEND ................................................................................ 41
4
USER MANUAL – Z-GPRS2 / Z-LOGGER
14.
CONTACT ADDRESS BOOK AND DELIVERY GROUPS ...................................... 42
14.1.
"USER" CONTACT ............................................................................................. 42
14.2.
"OPERATOR" CONTACT ................................................................................... 42
14.3.
"ADMINISTRATOR" CONTACT ........................................................................ 42
14.4.
DELIVERY GROUPS ........................................................................................... 42
15.
SUPPORTED COMMANDS (Z-GPRS2 ONLY) ....................................................... 44
15.1.
SET THE TELEPHONE SMS CHARACTER ALPHABET................................... 44
15.2.
LIST OF SUPPORTED SMS COMMANDS .......................................................... 44
15.3.
"FAST" SMS COMMANDS (Z-GPRS2 ONLY) .................................................... 48
15.4.
"ZERO COST" RING COMMANDS (Z-GPRS2 ONLY)....................................... 51
15.5.
COMMAND PASSWORD (Z-GPRS2 ONLY) ....................................................... 51
16.
TIMERS ................................................................................................................... 52
16.1.
PERIODIC TIMERS ............................................................................................. 52
16.2.
CALENDAR TIMERS .......................................................................................... 52
17.
EMAIL USE ............................................................................................................. 54
17.1.
BASIC INFORMATION ON SENDING EMAILS ................................................. 54
17.2.
OUTGOING MAIL SERVER (SMTP) .................................................................. 54
17.3.
SMTP AUTHENTICATION: USER NAME AND PASSWORD ............................ 55
17.4.
SMTP SERVER PROTECTED CONNECTION (Z-GPRS2 ONLY) ...................... 55
17.5.
MAIN SMTP SERVER SETTINGS WITHOUT PROTECTED CONNECTION ... 55
5
USER MANUAL – Z-GPRS2 / Z-LOGGER
17.6.
MAIN SMTP SERVER PARAMETERS WITH GPRS PROTECTED
CONNECTION (Z-GPRS2 ONLY) ..................................................................................... 57
18.
ALARMS ON ANALOG INPUTS............................................................................. 58
18.1.
ANALOG INPUT FILTER .................................................................................... 58
18.2.
ALARM ON HIGH AND MAXIMUM .................................................................. 58
18.3.
ALARM ON LOW AND MINIMUM ..................................................................... 59
18.4.
ALARM FILTER .................................................................................................. 59
18.5.
ALARM INHIBITION TIME ................................................................................ 60
19.
ALARMS ON DIGITAL INPUTS ............................................................................. 61
19.1.
DIGITAL INPUT FILTER .................................................................................... 61
19.2.
ALARM INHIBITION TIME ................................................................................ 62
20.
20.1.
21.
21.1.
TOTALIZER/COUNTER ALARMS ........................................................................ 63
ALARM INHIBITION TIME ................................................................................ 63
BLACKOUT ALARM .............................................................................................. 64
ALARM INHIBITION TIME ................................................................................ 64
22.
ALARM ON TOTALIZER INCREASE .................................................................... 65
23.
ALARM ON PLANT LOSS ...................................................................................... 66
24.
HOUR COUNTER ALARM ..................................................................................... 68
25.
ALARM ON SOLAR PANEL MALFUNCTION ....................................................... 68
26.
AUXILIARY DIGITAL/ANALOG ALARMS ON MODBUS RTU / MODBUS TCP-IP
PERIPHERALS ................................................................................................................. 68
27.
ACTION ON EVENT ............................................................................................... 69
6
USER MANUAL – Z-GPRS2 / Z-LOGGER
28.
SERVER FUNCTION VIA ETHERNET PORT ....................................................... 71
28.1.
LOCAL CONNECTION TO THE ETHERNET PORT ......................................... 71
28.2.
SERVER SERVICE VIA ETHERNET PORT: WEB SERVER.............................. 71
28.2.1.
28.3.
28.3.1.
28.4.
28.4.1.
REAL TIME READINGS ON WEBSERVER .................................................... 74
FTP SERVER ....................................................................................................... 78
SUPPORTED FTP COMMANDS ...................................................................... 78
MODBUS TCP-IP SERVER .................................................................................. 81
MODBUS REAL-TIME LOG REGISTER FORMAT ........................................ 83
29.
Z-GPRS2 / Z-LOGGER ACCESS VIA INTERNET (ONLY VIA ETHERNET PORT)
85
30.
FIRMWARE UPDATE ............................................................................................. 87
30.1.
UPDATE VIA USB (USING EASY Z-GPRS2/Z-LOGGER / EASY SETUP
SOFTWARE) ..................................................................................................................... 87
30.2.
UPDATE VIA MICROSD CARD (WITHOUT USING A PC) ................................ 87
31.
DEBUG PORT ENABLE .......................................................................................... 89
32.
COMMANDS AVAILABLE THROUGH THE CONFIGURATION SOFTWARE .... 90
33.
EASY SETUP ED EASY Z-GPRS2/Z-LOGGER SOFTWARE, USB DRIVER
INSTALLATION ............................................................................................................... 90
34.
USB KIT .................................................................................................................. 92
35.
TROUBLESHOOTING ............................................................................................ 93
7
USER MANUAL – Z-GPRS2 / Z-LOGGER
Seneca Z-GPRS2 / Z-LOGGER
1. Preliminary Information
CAUTION!
Contact your telephone provider for information on GSM and GPRS service costs. It is best to
quantify log and SMS costs before setting up and installing Z-GPRS2.
The use of Z-GPRS2 in data roaming (for example, abroad with an Italian SIM card) may
generate unexpected costs. Contact your telephone provider for further information.
IN NO CASE MAY SENECA OR ITS SUPPLIERS BE HELD LIABLE FOR ANY INCOMING DATA OR
PROFIT LOSSES DUE TO INDIRECT, CONSEQUENTIAL OR INCIDENTAL CAUSES (INCLUDING
NEGLIGENCE) CONNECTED WITH THE USE OR INABILITY TO USE Z-GPRS2 AND Z-LOGGER, EVEN IF
SENECA WAS INFORMED OF THE POTENTIAL OF THESE DAMAGES.
SENECA, ITS SUBSIDIARIES OR AFFILIATES OR GROUP PARTNERS OR DISTRIBUTORS AND SENECA
DEALERS DO NOT GUARANTEE THAT THE FUNCTIONS FAITHFULLY MEET THE EXPECTATIONS AND
THAT Z-GPRS2 AND/OR Z-LOGGER, THEIR FIRMWARE AND SOFTWARE ARE FREE OF ERRORS OR
FUNCTION UNINTERRUPTEDLY.
SENECA HAS TAKEN THE UTMOST CARE AND CAUTION IN DRAFTING THIS MANUAL. HOWEVER,
IT MAY CONTAIN ERRORS OR OMISSIONS. SENECA SRL RESERVES THE RIGHT TO MODIFY
AND/OR VARY PARTS OF THIS MANUAL TO CORRECT ERRORS OR TO ADJUST TO PRODUCT
FEATURE CHANGES WITHOUT ANY PRIOR NOTICE.
CAUTION!
-Contact your telephone service provider for GSM and GPRS service costs especially when using
Z-GPRS2 with a sim issued by a country other than the one in which it is used (international
roaming).
-It is best to estimate telephone costs before setting up Z-GPRS2.
-The cost of each SMS is set by the telephone service provider.
-GPRS send/receive costs can be tied to Kbytes sent/received, a monthly ceiling included in a
package or GPRS connection time. Contact your telephone service provider for further
information.
8
USER MANUAL – Z-GPRS2 / Z-LOGGER
-For GPRS connections whose costs is associated with connection time, please remember that
communications are active for an amount of time that depends on the number of log rows to be
sent. Typically, a 2 Kbyte data log takes about 10-15 seconds to be sent in addition to the time
necessary to establish the connection (from 5 to 30 seconds) and the time due to any server login
attempts.
-Check the data quantity sent via GPRS and SMS before using Z-GPRS2.
Please remember that mobile phone service providers also consider the entire communication
that permits file transmission (and thus data transmission overhead, the number of connection
attempts, etc.) and not just the dimensions as data traffic in each GPRS transaction.
9
USER MANUAL – Z-GPRS2 / Z-LOGGER
2. Characteristics
Z-GPRS2
Z-GPRS2 is a multi-protocol programmable datalogger/RTU with GSM/GPRS modem and
embedded IO.
•
•
•
•
•
•
•
•
•
•
•
•
•
•
•
•
•
•
•
•
•
•
•
•
•
•
•
•
•
Supply voltage 11..40 Vdc; 19..28 Vac max 6.5 W
2 AAA 1.2 V, NiMh rechargeable backup batteries
GSM/GPRS Quad-Band modem
500 Vac insulation between remaining circuit power
Quick installation on DIN 46277 guide
Status indication LED: digital inputs, digital outputs, Ethernet, GSM, RS485, Power, microSD
NR 4 digital inputs
NR 2 16-bit voltage/current programmable analog inputs
NR 2 relay digital outputs
10/100 Mbps frontal Ethernet RJ45
NR 2 RS484 ports
1 type B miniUSB port for settings
MicroSD support (microSD or microSDHC max 32 Gb)
NR 4 32 bit max 30 Hz totalizers
NR4 32 bit max 30 Hz resettable counters
Possibility of expanding the number of digital or analog alarms via Modbus TCP-IP or
Modbus RTU to a maximum of 30
Maximum number of channels on datalogger: 128 (of which 100 via Modbus RTU/TCP-IP)
Supported system protocols via GSM: SMS, voice calls (zero cost command)
Supported system protocols via GPRS: FTP client, SMTP client, SMTPS client
Supported system protocols via Ethernet port: FTP client, FTP server*, SMTP client,
ModBUS TCP-IP Server*
Protocol on RS485: Modbus RTU Master
Webserver via Ethernet* port
custom serial protocols supported.
128 KB RAM memory
Memory expansion up to 32 GB with micro SD
512 KB + 1.5 MB (log) FLASH memory + 0.5 MB (firmware update)
100 MHz, 32 bit ARM processor
Real Time multitasking operating system
Firmware update via USB / microSD
*= Ethernet services cannot be used simultaneously
10
USER MANUAL – Z-GPRS2 / Z-LOGGER
Z-LOGGER
Z-LOGGER is a multi-protocol programmable datalogger/RTU with embedded IO.
•
•
•
•
•
•
•
•
•
Supply voltage 11..40 Vdc; 19..28 Vac max 6.5 W
NR 2 AAA 1.2 V, NiMh rechargeable backup batteries
500 Vac insulation between remaining circuit power
Quick installation on DIN 46277 guide
Status indication LED: digital inputs, digital outputs, Ethernet, RS485, Power, microSD
NR 4 digital inputs
NR 2 16-bit voltage/current programmable analog inputs
NR 2 clean contact relay digital outputs
10/100 Mbps frontal Ethernet RJ45
NR 2 RS484 ports
1 type B miniUSB port for settings
MicroSD support (microSD or microSDHC max 32 Gb)
NR 4 32 bit max 30 Hz totalizers
NR 4 32 bit max 30 Hz resettable counters
Possibility of expanding the number of digital or analog alarms via Modbus TCP-IP or
Modbus RTU to a maximum of 30
Maximum number of channels on datalogger: 128 (of which 100 via Modbus RTU/TCP-IP)
Supported system protocols via Ethernet port: FTP client, FTP server*, SMTP client,
ModBUS TCP-IP Server*
System protocol on RS485: Modbus RTU Master
Webserver via Ethernet* port
custom serial protocols supported.
128 KB RAM memory
Memory expansion up to 32 GB with micro SD
512 KB + 1.5 MB (log) FLASH memory + 0.5 MB (firmware update)
100 MHz, 32 bit ARM processor
Real Time multitasking operating system
Firmware update via USB / microSD
•
*= Ethernet services cannot be used simultaneously
•
•
•
•
•
•
•
•
•
•
•
•
•
•
•
•
•
11
USER MANUAL – Z-GPRS2 / Z-LOGGER
3. Specifications
DIGITAL INPUTS
Number of channels
4
Input type
Settable PNP, NPN.
Power voltage
12 Vdc
Power current
20 mA
Maximum frequency
30 Hz
Absorbed current
3 mA
DIGITAL OUTPUTS
Number of channels
2
Output type
Clean contact relay
Maximum voltage
250 Vac
Maximum current
2A
ANALOG INPUTS
Number of channels
2
Input type
mA / Vdc, settable
Voltage input
0..30V precision 0,1% FS
12
USER MANUAL – Z-GPRS2 / Z-LOGGER
Current input
0.0.20 mA precision 0,1% FS
Input protections
Yes, 12Vdc or 25mA
Resolution
16 bits
COMMUNICATION PORTS
RS 485 #1
Port #1, on IDC10 back
RS 485 #2
Port #2, M10/M11/M12 terminal
Ethernet
10/100 Mbit, frontal RJ45 with autoswitch
USB mini B
Mini B, side
STORAGE UNIT
Micro SD
microSD and microSDHC, max 32 GB (not supplied)
POWER SUPPLY
Voltage
11..40 Vdc; 19..28 Vac
Absorption
6.5 W
ENVIRONMENTAL CONDITIONS
Temperature
From -10 to +40 ℃
Humidity
30..90% to 40 °C non condensing
Storage temperature
From -20 to +45 °C < 6 months
Protection rating
IP20
13
USER MANUAL – Z-GPRS2 / Z-LOGGER
REGULATIONS
EN61000-6-4/2002-10
Electromagnetic emission, industrial environment.
EN61000-6-2/2006-10
Electromagnetic immunity, industrial environment.
EN 301 511 (Z-GPRS2 only)
Harmonized standard for mobile stations in the
GSM
900 and 1800 bands.
EN 301 489-1 (Z-GPRS2 only)
ElectroMagnetic Compatibility standard for radio
equipment and services.
EN 301 489-7 (Z-GPRS2 only)
Specific (EMC) conditions for mobile radio
equipment
(GSM 900 and 1800).
EN 60950
Safety of information Technology Equipment.
CASE SPECIFICATIONS
Dimensions and weight
100 x 111 x 35 mm, 280 g
Material
Black PBT
INSULATION 500 Vac
14
USER MANUAL – Z-GPRS2 / Z-LOGGER
4. Connections
DESCRIPTION
Analog inputs
V/I [2]
V/I [1]
Settable 0..10 Vdc 0..20 mA
Set power or current analog inputs using
Easy Z-GPRS2/Z-Logger installation
software.
Terminals
RS485
communication
port #2
Auxiliary
voltage
Power supply
12..15 Vdc
@40 mA
from
module
Digital outputs
DO[2]
DO[1]
N. Open
Shared N.
Closed
GND, RS485 Port
#2
A, RS 485 Port
#2
N. Open
Shared
N. Closed
B, RS 485 Port
#2
SIM CARD (Z-GPRS2 ONLY)
SIM, Insertion via tray connector.
If correctly inserted, the SIM
protrudes 4.5 mm from the front.
15
Terminals
USER MANUAL – Z-GPRS2 / Z-LOGGER
Micro SD, SDHC maximum 32GB.
Push push connector for
insertion and removal
Ethernet, RJ45 10/100 Mbit
USB mini B
SW1
Not used
16
USER MANUAL – Z-GPRS2 / Z-LOGGER
SW COMMUNICATION ■ = ON
SW2
1
IDC10 back connector: CANopen (not supported)
■ IDC10 back connector: RS485
17
USER MANUAL – Z-GPRS2 / Z-LOGGER
5. SIGNAL LEDS
5.1.
Z-GPRS2 leds
.
LED
DO1
DO2
PWR/ STS
STATUS
MEANING
ON
Digital output, relay energised
OFF
Digital output, relay not energised
ON
Digital output, relay energised
OFF
Digital output, relay not energised
ON
Z-GPRS2 on but log stopped
OFF
Awaiting Boot
SLOW FLASH (3
sec ON and 0.5
OFF)
Log on, normal operations
MEDIUM FLASH
(1 sec ON and 1
sec OFF)
Backup battery powered, log off
FAST FLASH (0.2
sec ON and 0.2
sec OFF)
Battery charge low, shutting down.
18
USER MANUAL – Z-GPRS2 / Z-LOGGER
GSM
SLOW FLASH
(about 3 sec)
Registered on GSM/GPRS network
FAST FLASHING
(about 0.5 sec)
Searching GSM/GPRS network
ON
Digital Input FOUND
OFF
NO digital input
ON
Digital Input FOUND
OFF
NO digital input
ON
Digital Input FOUND
OFF
NO digital input
ON
Digital Input FOUND
OFF
NO digital input
SD/STS
FLASHING
Access to microSD card
485 ACT
FLASHING
Activity on RS485
ETH LNK
FLASHING
Connection on RJ45 on
ETH TRF
FLASHING
Packet transit on Ethernet port
DI1
DI2
DI3
DI4
5.2.
Z-Logger leds
19
USER MANUAL – Z-GPRS2 / Z-LOGGER
LED
DO1
STATUS
MEANING
ON
Digital output, relay energised
OFF
Digital output, relay not energised
ON
Digital output, relay energised
OFF
Digital output, relay not energised
ON
Z-GPRS2 on but log stopped
OFF
Awaiting Boot
SLOW FLASH (3
sec ON and 0.5
OFF)
Log on, normal operations
MEDIUM FLASH
(1 sec ON and 1
sec OFF)
Backup battery powered, log off
FAST FLASH (0.2
sec ON and 0.2
sec OFF)
Battery charge low, shutting down.
ON
Digital Input FOUND
OFF
NO digital input
ON
Digital Input FOUND
OFF
NO digital input
ON
Digital Input FOUND
OFF
NO digital input
ON
Digital Input FOUND
OFF
NO digital input
SD/STS
FLASHING
Access to microSD card
485 ACT
FLASHING
Activity on RS485
ETH LNK
FLASHING
Connection on RJ45 on
ETH TRF
FLASHING
Packet transit on Ethernet port
DO2
PWR/ STS
DI1
DI2
DI3
DI4
For further information, see the Z-GPRS2 installation manual available for free download at www.seneca.it
in the Z-GPRS2 / Z-Logger section.
20
USER MANUAL – Z-GPRS2 / Z-LOGGER
6. Basic Notions
Z-GPRS2/Z-Logger is equipped with 4 counters and 4 totalizers. Up to a maximum of 30 Hz signals
can be acquired, 4 digital inputs, 2 analog inputs and 2 relay digital outputs.
Z-GPRS2 I/O and remote Modbus RTU or Modbus TCP-IP registers can be logged and sent as a file
in csv format (comma separated values) via ftp or email and saved on microSD. Z-GPRS2 can also
send the last row of the log file via SMS.
Counter and totalizer overflow is 999,999,999. An additional input status change switches the
value to 0.
Up to 11774 log rows can be saved in the internal flash memory (not to be confused with the
microSD card), If all 100 TAG modbus is activated only 2943 log rows can be saved on internal
flash. At the end of available space, Z-GPRS2/Z-Logger overwrites the oldest rows in the memory.
Counter/totalizer inputs and analog inputs can be scaled. The scaled values will be saved in the
log.
4 different alarm thresholds are available for each of the two analog inputs. An SMS (only for ZGPRS2) or EMAIL can be sent with a settable text when this alarm trips (max 31 characters).
Other types of alarms concern counters, totalizers, digital input increases, power outage, plumbing
leaks and the hour counter in addition to other alarms that depend on the type of application.
Up to 2 different actions can be set and run as a consequence to an alarm.
NR 10 minute/hour or calendar timers are available to run cyclic or acyclic actions.
Z-GPRS2 recognises and runs a series of commands also via SMS. A set of "FAST" commands can
also be set. These commands can be linked to the text in SMS 0, 1 up to 15.
Z-GPRS2/Z-LOGGER can send log files via FTP or via E-MAIL. These files can also be saved on
microSD or microSDHC (max 32 GB).
All configurations are possible via Easy Setup/Easy Z-GPRS2/Z-Logger software, available for free
download at www.seneca.it in the download or Z-GPRS2 / Z-LOGGER section.
Z-GPRS2 includes an address book used to send alarms or logs (max 20 SMS contacts and max 20
email contacts).
Z-LOGGER includes an address book used to send alarms or logs (max 20 email contacts).
Some typical applications such as string current control on photovoltaic systems, etc. can also be
managed.
A system file (syslog) with events, alarms, errors and commands received can also be logged.
21
USER MANUAL – Z-GPRS2 / Z-LOGGER
7. SUPPORTED SIM CARDS (Z-GPRS2 ONLY)
Z-GPRS2 supports the following types of SIM CARDS:
Top-up voice SIM CARD
Subscription voice SIM CARD
Data transmission only SIM CARD
"Zero cost" operations can be run only on voice type SIM CARDS, if Z-GPRS2 receive a ring an action can be
made.
For "top-up" SIM CARDS Z-GPRS2 can manage residual credit requesting the amount from the telephone
service provider.
CAUTION!
-Before inserting the SIM CARD in Z-GPRS2, CANCEL ALL MESSAGES ON THE CARD USING A
MOBILE PHONE.
-Before inserting the SIM CARD in Z-GPRS2, CANCEL ALL ADDRESS BOOK CONTACTS ON THE
CARD USING A MOBILE PHONE.
-UMTS SIM CARDS are NOT supported.
-The Product was tested with leading international provider SIM CARDS. However, operations
are not guaranteed with all providers.
22
USER MANUAL – Z-GPRS2 / Z-LOGGER
8. GSM signal (Z-GPRS2 only)
The Z-GPRS2 GSM signal level can be found via Easy Setup / Easy Z-GPRS2/Z-Logger software (in
the “test“ section).
To view the GSM signal level, the SIM CARD supplied by the telephone service provider to be used
must be inserted (signal may change radically based on the selected provider).
The field is expressed in DBm where -115 dBm it’s the minimum, -52 dBm it’s the maximum.
This table can be used:
GSM Signal
GSM signal [dBm]
0 (MINIMUM)
-115
1
-106
2
-97
3
-88
4
-79
5
-70
6
-61
7 (MAXIMUM)
-52
Where 0 it’s the minimum, and 7 it’s maximum.
For correct ftp or email log operations the minimum required field level is 2/7 (please remember
that the signal often fluctuates).
For SMS operations only the minimum required field level is 2/7.
Refer to the following table for signal values:
SIGNAL LEVEL 0 = NO SIGNAL (INSUFFICIENT)
SIGNAL LEVEL 1 = INSUFFICIENT SIGNAL (NOT RELIABLE FOR SMS AND GPRS)
SIGNAL LEVEL 2 = SUFFICIENT SIGNAL (MINIMUM SIGNAL FOR SMS AND GPRS)
SIGNAL LEVEL 3 = RELIABLE SIGNAL (RELIABLE FOR SMS AND GPRS)
SIGNAL LEVEL 4 = GOOD SIGNAL
SIGNAL LEVEL 5 = VERY GOOD SIGNAL
23
USER MANUAL – Z-GPRS2 / Z-LOGGER
SIGNAL LEVEL 6 = OPTIMAL SIGNAL
SIGNAL LEVEL 7 = EXCELLENT SIGNAL
To increase the GSM signal level, Seneca provides various GSM antenna models for Z-GPRS2 to
reach the minimum signal level in most situations.
Visit (www.seneca.it) or refer to the general catalogue or contact Seneca srl for further information.
CAUTION!
-Insert the SIM card only with Z-GPRS2 off.
-Before inserting the SIM card in Z-GPRS2, delete all SMS on the SIM using a mobile phone
-Wait at least 5 minutes in order for the GSM signal to be correctly read.
CAUTION!
-Contact your telephone service provider for GSM and GPRS service costs especially when using
Z-GPRS2 with a sim issued by a country other than the one in which it is used (international
roaming).
-It is best to estimate telephone costs before setting up Z-GPRS2.
-The cost of each SMS is set by the telephone service provider.
-GPRS send/receive costs can be tied to Kbytes sent/received, a monthly ceiling included in a
package or GPRS connection time. Contact your telephone service provider for further
information.
-For GPRS connections whose costs is associated with connection time, please remember that
communications are active for an amount of time that depends on the number of log rows to be
sent. Typically, a 2 Kbyte data log takes about 10-15 seconds to be sent in addition to the time
necessary to establish the connection (from 5 to 30 seconds) and the time due to any server login
attempts.
-Check the data quantity sent via GPRS and SMS before using Z-GPRS2.
Please remember that mobile phone service providers also consider the entire communication
that permits file transmission (and thus data transmission overhead, the number of connection
attempts, etc.) and not just the dimensions as data traffic in each GPRS transaction.
24
USER MANUAL – Z-GPRS2 / Z-LOGGER
9. GPRS connection (ZGPRS2 only)
GPRS (General Packet Radio Service ) connection is required to:
-Send log files via FTP
-Send logs/alarms via email
Without using an Ethernet internet connection.
If only SMS are used, you don’t need to use the GPRS service.
An APN (Access Point Name) that represents the gateway to the internet access must be entered
for GPRS connections.
At the end of each GPRS operation (alarm send or log send) the GPRS connection is disconnected
and only reconnected when necessary to minimize GPRS connection time.
CAUTION!
-Some providers apply connection rates that vary according to the APN used. Contact your
mobile service provider for further information.
-Some internet connection offers are tied to a specific APN. Contact your mobile provider for
further information.
-If internal clock synchronisation is set, an APN must be entered since the synchronised
date/time is obtained via internet connection.
-Mobile providers usually give GPRS data lower priority than voice calls. This means that the
connection could be suddenly interrupted at any time due to voice traffic congestion on a
specific cell. These connection attempts should also be considered when calculating GPRS traffic
costs.
25
USER MANUAL – Z-GPRS2 / Z-LOGGER
10. GPS coordinates
GPS coordinates can be manually entered or acquired from the GPRS network (Z-GPRS2 only) in
Google Maps ™ compatible format.
Sunrise and sunset can be calculated by Z-Logger/Z-GPRS2 based on the internal calendar when
the GPS coordinates are known.
This information can be used for various types of automations.
10.1. GPS coordinates via GPRS network (Z-GPRS2
only)
Current GPS coordinates can be acquired via the GPRS network. The coordinates will be for the
connected GSM cell. Although the precision compared to the real position is around a few
kilometres, the error is fully negligible for sunrise and sunset calculations.
26
USER MANUAL – Z-GPRS2 / Z-LOGGER
11. Backup batteries
Z-GPRS2 / Z-Logger are equipped with rechargeable batteries. In the event of a blackout, the card
runs the following algorithm:
1)
2)
3)
4)
5)
Ends sending data
Sends any alarms tied to the blackout
Runs any actions tied to the blackout
Closes all files opened on microSD
The card turns off
If data is not being sent, Z-GPRS2/Z-logger take between 5 and 10 seconds to turn off in the event
of blackout.
CAUTION!
Z-GPRS2/Z-LOGGER IS SUPPLIED WITHOUT CHARGED BATTERIES. CHARGE THE BATTERIES BY
CHARGING Z-GPRS2/Z-LOGGER FOR AT LEAST 48H BEFORE USE.
WHEN Z-GPRS2/Z-LOGGER IS BATTERY POWERED, THE DIGITAL INPUTS STOP WORKING. THEY
MUST BE EXTERNALLY POWERED TO CONTINUE THEIR OPERATIONS IN THE EVENT OF
BLACKOUT.
ANALOG INPUTS AND DIGITAL OUTPUTS, ON THE OTHER HAND, CONTINUE TO OPERATE
NORMALLY UNTIL THE CARD TURNS OFF.
27
USER MANUAL – Z-GPRS2 / Z-LOGGER
12. DATALOGGER
12.1.
DATA ACQUISITION
The Datalogger lets you acquire data from:
-Z-GPRS2/ Z-Logger built-in I/O
-I/O connected to the RS485 ports via Modbus RTU protocol
-I/O connected to the Ethernet port via Modbus TCP-IP protocol
The maximum number of recordable channels is 128 (100 via Modbus RTU/Modbus TCP-IP, 28
from built-in I/O).
The values of some internal variables and the clock are also acquired.
All data is saved in the Z-GPRS2 / Z-Logger internal flash memory.
12.2.
SENDING DATALOGGER DATA
Log files can be sent via FTP/E-MAIL/SMS and/or saved on microSD card:
-the value of totalizers with the delta over the previous value.
-the real-time value of analog input with the minimum, maximum and average compared to the
last acquisition. Analog inputs are sampled every 50 ms (fixed value).
-the real-time value of digital inputs, power and battery status
-the hour counters values
-the real-time digital outputs values
-real-time modbus log register values
-the GSM signal value (Z-GPRS2 only)
To send datalogger data, Z-GPRS2/Z-Logger use the internal clock.
12.3.
Internal clock
Z-GPRS2 and Z-Logger come with an internal clock/calendar. This clock can be synchronised using
Easy setup/ Easy Z-GPRS2/Z-Logger software (in the "Test setup" section or when a new setup is
sent) or via internet connection. Daylight savings time management can be either manual or
automatic.
28
USER MANUAL – Z-GPRS2 / Z-LOGGER
Then the time is not reliable, the log continues to operate with a false date/time (starting from
01/01/1970) until the next synchronisation.
The time cannot be considered reliable when:
-Z-GPRS2 / Z-Logger was turned on for the first time without being set
-Z-GPRS2 / Z-Logger was turned off.
in these cases, the time remains unreliable until the next successful internet connection.
12.4.
Embedded I/O log
Z-GPRS2 and Z-Logger are equipped with a wide range of analog and digital inputs and 2 relay
outputs.
Variable acquisition time in the datalogger is independent of the analog input, counter and
totalizer sampling time.
Specifically:
All counter/totalizer inputs are sampled approximately every 5 ms, filtered at 15 ms.
All analog inputs are always sampled every 50 ms.
Entering an analog inputs provides the following variables:
CURRENT VALUE (at acquisition)
AVERAGE VALUE IN ACQUISITION TIME (with sampling every 50 ms)
MAXIMUM VALUE IN ACQUISITION TIME (with sampling every 50 ms)
MINIMUM VALUE IN ACQUISITION TIME (with sampling every 50 ms)
Thus, fast voltage/current surges can be logged when a low filtering time is set.
12.5.
Modbus RTU and Modbus TCP-IP loggers
Z-GPRS2 and Z-Logger support Modbus RTU Master protocol on each of the two RS485 serial
ports. up to a maximum of 100 tag Modbus RTU can be logged from devices that support Modbus
RTU Slave protocol (for example, the entire series of Modbus RTU Seneca Z-PC modules. For
further information, visit www.seneca.it).
The logger supports Modbus TCP-IP Client protocol via the Ethernet port. Up to a maximum of
100 tag Modbus TCP-IP from devices that support Modbus TCP-IP Server protocol can be logged
29
USER MANUAL – Z-GPRS2 / Z-LOGGER
(for example, the series of Modbus TCP-IP Seneca ZE modules. For further information, visit
www.seneca.it).
CAUTION!
The number of modbus RTU TAG added to the number of modbus TCP-IP TAG cannot exceed 100.
Setup software will automatically limit the number of TAGS.
Each tag can contain several Modbus registers. The following table provides the main TAGS that
can be set on the serial/Ethernet datalogger:
Type
Number of Modbus
registers
TAG description
16 BITS Unsigned
1
Register without sign for
values from 0 to 65535
16 BITS Signed
1
Register with sign for
values from -32768 to
+32767
32 BITS Unsigned
2
TAG without sign for
values from 0 to
4294967295.
Modbus register with
settable most significant
word (16 bit).
32 BITS Signed
2
TAG with sign for values
from -2147483647 to
2147483647.
Modbus register with
settable most significant
word (16 bit).
32 BITS Floating Point
Single precision TAG Floating
Point according to ANSI/IEEE
Std 754-1985 / IEC
60559:1989
2
30
USER MANUAL – Z-GPRS2 / Z-LOGGER
Up to a maximum of 100 different Modbus RTU Slave devices can be logged.
Up to a maximum of 6 different Modbus TCP-IP Server devices can be logged.
RS485 serial ports can be managed independently (thus even with two different baud rates).
12.5.1.
Modbus Log Error Management
Based on the type of Modbus bus error, the log file is written differently:
-If in log time, Z-GPRS2/Z-Logger did not successfully acquire 1 valid TAG value, “Undef” is logged
in the log file instead of a numeric value.
-If the Modbus RTU device responds with code “Address error Exception”, “Abort” is logged in the
log file.
-If the Modbus RTU Slave device does not respond within the Timeout time, the logger moves on
to the next TAG, the TAG that did not respond will be queried again the next time around.
12.6.
Log file
The file are saved on microSD or sent via FTP or email, is in CSV format
for example:
INDEX;TYPE;TIMESTAMP;TOT1;DELTA;TOT2;DELTA;TOT3;DELTA;TOT4;DELTA
1;LOG;11/07/2012 11:17:00;+881;+10;+881;+10;+881;+10;+881;+10
once opened by Microsoft EXCEL ™ or OpenOffice Calc ™ type software, the following is obtained
(setting “;” as separator):
INDEX
TYPE
TIMESTAMP
TOT1
DELTA
TOT2
DELTA
TOT3
DELTA
TOT4
1 LOG
11/07/2012 11:00
881
0
881
0
881
0
881
0
2 LOG
11/07/2012 11:10
890
9
881
0
881
0
882
1
12.6.1.
Log file name
At every send a new file is created with each send under the following name:
•
DELTA
If the log is sent by E-MAIL (by GPRS or Ethernet) or by FTP (only by Ethernet):
31
USER MANUAL – Z-GPRS2 / Z-LOGGER
DeviceNameLogYearMonthDayHourMinutesSecondsXXX.csv
Where:
YearMonthDayHourMinutesSeconds in the timestamp of the first sample in the file.
XXX it’ s the number of attempts for sending the file (the chapters number can be 2 or more):
An example of a file name:
GPRS_Padova_log2012071217401000.csv
“GPRS_Padova_” is the name of the device set with Easy Setup / Easy Z-GPRS2/Z-Logger software
The first sample date is thus 12/07/2012 at 17:40 and 10 seconds.
00 is the number of attempts.
•
If the log is sent by FTP from GPRS (only Z-GPRS2):
In this case, to minimize the amount of data sent, the function “resume” is used if there is a
sending error.
The file name is:
DeviceNameLogYearMonthDayHourMinutesSeconds.csv
where:
YearMonthDayHourMinutesSeconds is the timestamp of when the file is sent
An example file name is:
GPRS_Padova_log20120712174010.csv
"GPRS_Padova_" is the name of the instrument configured with the software Easy Setup / Easy ZGPRS2/Z-Logger
The date you sent the file to the server is 12/07/2012 at 17:40 and 10 seconds.
This management of file name not overwrite previous files in the process of resume.
CAUTION!
-EMAIL resume is not possible due to SMTP server restrictions. Thus we recommend you limit log
file dimensions when sending by EMAIL (<50 Kbytes).
-Some E-MAIL servers could consider Z-GPRS2 and Z-LOGGER emails as SPAM. Check your email
SPAM folder!
32
USER MANUAL – Z-GPRS2 / Z-LOGGER
12.7.
Logger setup
The following can be set in the Easy Setup / Easy Z-GPRS2/Z-Logger software "Logger setup"
section:
•
Variable acquisition/sampling time, expressed in minutes.
•
The variables to be logged (totalizers, analog inputs).
•
Log send via ftp, email and save on microSD.
•
Enable SMS send with the last row of the log file to a group of contacts (for Z-GPRS2 only).
12.8.
Setting up Log delivery
The next "Log send setup" page lets you set the file send times via FTP, E-MAIL, SD and SMS (ZGPRS2 only).
•
The dropdown menu (8) lets you select send frequency.
•
If the "MINUTES" option was selected in the menu (8), the "Send at minutes" window will
be enabled where you can set every how many minutes (9) Z-GPRS2 will send the log.
•
If the "DAILY" option was selected in the menu (8), the "Send daily" window will be
enabled where you can set the time of day (10) Z-GPRS2 will send the log.
•
If the "WEEKLY" option was selected in the menu (8), the "Send weekly" window will be
enabled where you can set the days of the week (11) and time (12) Z-GPRS2 will send the
log.
•
If the "MONTHLY" option was selected in the menu (8), the "Send monthly" window will be
enabled where you can set the day of the month (13) and time (14) Z-GPRS2 will send the
log.
33
USER MANUAL – Z-GPRS2 / Z-LOGGER
Note: When selecting sampling (1) and log send times (8-9-...-14), keep the following factors in
mind:
1. Send time must be a whole multiple of sampling time. For example, 15 minute sampling
time time (1) and send in "Minutes" (8) every 25 minutes (9) are NOT possible. Easy Setup/
Easy Z-GPRS2 / Easy Z-LOGGER software will automatically round send time (9) to a
multiple of sampling time. In this case, the new value will be 30. If send time is "Daily", the
sampling time (1) will be automatically rounded to be within an exact day (corresponding
to 1440 minutes). Easy Setup/ Easy Z-GPRS2 / Easy Z-LOGGER will display a warning
message with the new sampling time.
2. Sampling time (1) refers to the internal clock; this means that the first acquisition is not run
after the set minutes starting from configuration send, but at the set time. For example, if
the user sets variable acquisition every 10 minutes and sends the configuration at 10:01,
the device will run the first acquisition at 10:10.
12.9. Serial log setup on Modbus RTU and Modbus
TCP-IP protocol
34
USER MANUAL – Z-GPRS2 / Z-LOGGER
12.9.1.
Setting Modbus registers to be logged
If the Modbus RTU Slave / Modbus TCP-IP Server device is manufactured by Seneca, simply select
the register to be logged and assigned Modbus station address from the database.
If the Modbus device is manufactured by third parties, select “CUSTOM” and enter:
-the type of register to be logged (see previous chapters for TAG type).
-the address of the register to be logged
-the address of the Modbus RTU station to be logged or the TCP-IP address of the TCP-IP station
and port.
A TAG polling time can be entered. This setting lets you set different acquisition times for each
TAG.
If, for example, you want to acquire the value of a TAG every 10 minutes, 600s can be entered as
polling time.
CAUTION!
-Polling time for each TAG can only be met if its value is compatible with the serial request delay
time and the number of TAGS.
For example, if 10 TAG Modbus are to be logged with 1 second serial request delay time, the
complete TAG cycle takes about 10 seconds. If Polling time is set to 0,1 seconds, it cannot be
met.
Otherwise, if serial request delay time is 0,1 seconds, the full TAG cycle takes about 1 second. If
Polling time is set to 5 seconds, it can be met.
12.9.2.
Log file settable fields
Log file fields are:
INDEX
It is always the sequential number of sampling run from the last time Z-GPRS2 was turned off.
TYPE
It is always the type of log for future use, currently the message "LOG" appears.
TIMESTAMP
35
USER MANUAL – Z-GPRS2 / Z-LOGGER
It is always the Z-GPRS2 date-time in dd/month/year hour:minutes:seconds format
DIN1
DIN2
DIN3
DIN4
DOUT1
DOUT2
VBAT
POWER
Where the meanings are the following
DINx is the xth digital input value. If OFF = input open, if ON = input closed
DOUTx is the xth output value. If OFF = output open, if ON = output closed
VBAT indicates backup battery operations. If OFF = mains powered, if ON = backup battery
powered
POWER indicates mains power status. If ON = power on, if OFF = power off.
ANALOGn
real-time scaled value of analog input 1
AVERAGE ANALOGn
average value on the log sample period for the n analog input (scaled if necessary)
MIN ANALOGn
minimum value on the log sample period for the n analog input (scaled if necessary)
MAX ANALOGn
maximum value on the log sample period for the n analog input (scaled if necessary)
TOTALIZERn
current n-th totalizer value
36
USER MANUAL – Z-GPRS2 / Z-LOGGER
DELTAn
n totalizer increase from previous sample
CONTAOREn
current n-th hour meter value
GSM
Current GSM signal value from 0 (minimum) to 7 (maximum)
MODBUS TAGs
Modbus tag status:
VAL_MODBUS1 real-time value of the 1st set Modbus tag
VAL_MODBUS2 real-time value of the 2nd set Modbus tag
VAL_MODBUS3 real-time value of the 3rd set Modbus tag
VAL_MODBUS4 real-time value of the 4th set Modbus tag
…
VAL_MODBUS100 real-time value of the 100th set Modbus tag
12.10. Log SMS
Since only a limited number of characters can be sent via SMS, the SMS only includes the last row
of the log file and is, for example:
11/07/2012 11:17:00 +881 +10 +881 +10 +881 +10 +881 +10
Where field order (separated by the space character " ") is given by the setup software settings. In
this case:
TIMESTAMP TOT1 DELTA TOT2 DELTA TOT3 DELTA TOT4 DELTA
Note: Log send priority is the following:
1) Log send via FTP/EMAIL
2) Log send via SMS
Thus log send via SMS can be used to be alerted when the log file was successfully sent via
FTP/EMAIL.
37
USER MANUAL – Z-GPRS2 / Z-LOGGER
For the meaning of message content, see the TAG setup in the datalogger.
CAUTION!
-The SMS with the last log row can also be sent if file send on FTP failed (since the signal
required to send a log file is higher than the one needed to send an SMS), to analyse any FTP
server connection errors, enable the send error via SMS function.
-Since only 160 characters can be sent in an SMS, the log row may be truncated (especially when
logging Modbus registers). In this case, the software adds “...” to indicate the end of available
characters.
12.11. Log save on microSD card
Logs can be saved on a microSD card formatted with the FAT16 or FAT32 filesystem (purchased
microSD cards are usually already formatted this way).
Log files are saved in the microSD folder/log in .csv text format.
Z-GPRS2/ Z-LOGGER will create a new file based on the set log send period. Minimum file save
time is 2 minutes.
If the microSD card is not inserted, Z-GPRS2 and Z-LOGGER manage a maximum of 11774 row log
queue (depending from the tag numbers). Logs in the queue will be saved when the microSD card
is inserted.
CAUTION!
-To avoid corrupting microSD card content, ONLY REMOVE THE microSD card when Z-GPRS2/ ZLOGGER IS OFF or unmount first the microSD with the command available on the configuration
software in the Test Configuration.
-NEVER EXTRACT THE microSD with Z-GPRS2 / Z-LOGGER POWER ON WITHOUT HAVING
UNMOUNTED THE MICROSD !
12.12. Saving counters/totalizers
Counter/totalizer values are saved in the flash memory at least once every 24 hours from when
the device is turned on. Data is also saved every time it is turned off.
CAUTION!
Batteries are not delivered charged. Z-GPRS2 / Z-LOGGER must be charged for at least 48 hours
for backup batteries to be fully charged.
38
USER MANUAL – Z-GPRS2 / Z-LOGGER
Counter/totalizer values are lost when Z-GPRS2 / Z-LOGGER is turned off with the batteries dead
(the next time it is turned on, the value saved at 4:00 will be used or, if Z-GPRS2 / Z-LOGGER was
not on at that date, 0).
12.13. Log file send time via GPRS (Z-GPRS2 only)
Communication speed via GPRS depends on a number of factors such as network load, signal level,
etc…
Send time can be estimated based on the various tests conducted in Seneca laboratories. A 1440row log file (about 200Kbytes) takes an average of about 14 minutes to be sent.
Although these times typically do not influence GPRS communication costs (almost always tied to
bytes transferred and not connection time) it is helpful to keep in mind when sending a large
number of logs per day.
Although Z-GPRS2 was developed to send log files of any dimension, Seneca does not
recommend you send files dimensioned > 250 Kbytes via GPRS to limit FTP connection duration
and errors (server interruption, timeout, etc.).
12.14. FTP and SMTP server data connection and send
error management
Z-GPRS2 and Z-LOGGER include an advanced error handling to connect to the servers, before
decreeing a fail several attempts are made. If these attempts always give a negative result, the
device will stop and will retry to send after about 2 hours. The device can be configured to send
error connecting to the servers by SMS to the administrators (only Z-GPRS2).
Only via GPRS (so only for Z-GPRS2) and only sending by FTP, a “resume” function is available:
While Z-GPRS2 is sending a log file, you may lose communication with the server FTP. In this case
Z-GPRS2 make a "connection resume" to the server again and creates a new file with the new
YearMonthDayHoursMinutesSeconds containing the remaining data.
The resume of a sending log by E-mail or via FTP by Ethernet mode is not available, it is therefore
recommended to keep the size of the log file quite small (<100 Kbytes), it is necessary to have a
high level of GSM signal in the case sending GPRS
CAUTION!
Some of the mail server might consider like SPAM the Z-GPRS2 and Z-LOGGER E-MAIL, so check
also the "spam" folder of your E-mail.
39
USER MANUAL – Z-GPRS2 / Z-LOGGER
12.15. Ethernet/GPRS communication channel redundant
function (Z-GPRS2 only)
Z-GPRS2 can be set to use the Ethernet communication channel as the primary and GPRS as
backup. This function allows Z-GPRS2 to always attempt to send data via the Ethernet port, if
there are any connection problems (after various attempts), the system switches to send data via
the GPRS network.
The transition from the Ethernet connection to the GPRS may take up to 2 hours of attempts.
When using the redundant channel function the FTP resume function is not available.
12.16. Configuration test for EMAIL send
A command is available to force the delivery of an email with an attachment via SMS or by a
button on the configurator software, to the first administrator in the email address book.
This you can learn whether the set configuration is working or if there are errors.
The command is sent by a mobile phone saved in the address book as "administrator". It can be
sent with both upper and lower case characters:
email test
12.17. Configuration test for log send via FTP
A command is available to force a text file to be sent via SMS or by a button on the configurator
software, to the FTP server set for log send.
This you can learn whether the set configuration is working or if there are errors.
The command is sent by a mobile phone saved in the address book as "administrator". It can be
sent with both upper and lower case characters:
ftp test
13. SYSTEM LOG (EVENT AND ALARM LOG) ON MICRO SD
If a microSD card is inserted, a log can be enabled for all events (alarms, received SMS commands, ring
commands etc..).
The log is saved in text format in the "syslog.csv" file in the main microSD directory.
40
USER MANUAL – Z-GPRS2 / Z-LOGGER
13.1.
“SYSLOG.CSV” FILE CONTENT
The file "syslog.csv" contains a list of events (alarms, commands received etc ...).
Every event has a timestamp containing time and date of the event itself.
13.2.
“SYSLOG.CSV” FILE SEND
The Syslog file can be sent via FTP or EMAIL (to the first administrator) using the following SMS commands:
email syslog
It sends the text file in an email attachment to the first administrator
ftp syslog
It sends the text file on the set FTP server (the fto must be set to send logs)
41
USER MANUAL – Z-GPRS2 / Z-LOGGER
14.
CONTACT ADDRESS BOOK AND DELIVERY GROUPS
Settable contacts are:
MAX 20 SMS contacts (Z-GPRS2 only)
MAX 20 EMAIL contacts
One of the following types can be selected for each contact:
-user
-operator
-administrator
For Z-Logger, the "user" contact is the "operator" contact since commands cannot be sent via
SMS.
14.1.
"User" contact
A "User" type contact is only enabled to receive alarms.
14.2.
"Operator" contact
An "Operator" type contact is enabled to receive alarms and send SMS commands (Z-GPRS2 only).
14.3.
"Administrator" contact
An “Administrator” type contact is enabled to receive all alarms (since automatically included in all
groups), send commands and receive administrator SMS messages (Z-GPRS2 only).
Administrator SMS messages include those received by Z-GPRS2 by telephone service providers or
unclassified numbers (for example, numbers not in the contact address book).
14.4.
Delivery groups
A group of contacts can be selected to receive alarm SMS or EMAILS for each alarm. Z-GPRS2 and
Z-Logger can manage up to 30 different delivery groups. Each group can contain up to 20 contacts
(SMS or EMAIL).
42
USER MANUAL – Z-GPRS2 / Z-LOGGER
A group can be selected for an alarm or log. This allows you to divide events between the various
contacts (for example, maintenance, users, technicians, etc.).
The following illustration provides an example of how groups are divided for an alarm:
Sms
GROUP 1
DIGITAL INPUT 1 ALARM
+39123456789
+39123456790
SMS
+39123456791
ALARM ON MAXIMUM
ANALOG 2
GROUP 2
+39123456792
E-MAIL
+39123456793
BLACKOUT ALARM
+39123456794
GROUP 3
[email protected]
[email protected]
[email protected]
The same alarm message can be sent to a maximum of 3 different groups.
43
USER MANUAL – Z-GPRS2 / Z-LOGGER
15.
SUPPORTED COMMANDS (Z-GPRS2 ONLY)
15.1. SET THE TELEPHONE SMS CHARACTER
ALPHABET
Some Smartphones send SMS with UNICODE characters instead of using the GSM alphabet.
Z-GPRS2 only runs SMS commands with GSM alphabet.
In most cases, SMS characters are set to GSM alphabet by default. If Z-GPRS2 does not recognise any SMS
command, check the alphabet used by the phone.
For Android smartphones:
Press the Message icon -> Settings -> Change writing -> GSM alphabet
15.2.
LIST OF SUPPORTED SMS COMMANDS
Z-GPRS2 lets you run commands if the SMS sender number is enabled (thus it must come from an
operator or administrator).
Command list:
SMS COMMANDS FOR DIGITAL INPUTS/COUNTERS/TOTALIZERS
GET DIN
Status from all counters
GET DINn
All nth input counter status
GET DINn.TOT
All nth input totalizers status
GET DINn.CNT
All nth input counters status
RESET DIN
Reset all counters
RESET CNTn
Reset the nth counter
44
USER MANUAL – Z-GPRS2 / Z-LOGGER
SMS COMMANDS FOR DIGITAL INPUTS/COUNTERS/TOTALIZERS
GET DIN
Status from all counters
GET DINn
All nth input counter status
GET DINn.TOT
All nth input totalizers status
GET DINn.CNT
All nth input counters status
RESET DIN
Reset all counters
RESET CNTn
Reset the nth counter
SMS COMMANDS FOR MODBUS REGISTERS
GET MBUS <LABEL>
Returns the value of the Modbus tag with the
indicated label via SMS
GET MBUSn
Returns the value of the n-th Modbus tag via
SMS
SMS COMMANDS FOR DIGITAL OUTPUTS
GET DOUT
Returns the value of the digital output
GET DOUTn
Returns the value of the nth digital output
SET DOUTn.OPEN
Opens the nth digital output
SET DOUTn.CLOSE
Closes the nth digital output
SET TOGGLEn
Toggle the nth digital output
45
USER MANUAL – Z-GPRS2 / Z-LOGGER
SET PULSEn.OPEN
Opens the nth timed output
SMS COMMANDS FOR ADDRESS BOOKS
SET PHONE +nnnnnnn
Add number +nnnnnn to address book as
administrator
RESET PHONE +nnnnnnn
Remove number +nnnnnn from the address
book
SET EMAIL [email protected]
Add email [email protected] to address book as
administrator
RESET EMAIL [email protected]
Delete email [email protected] from the address
book
VARIOUS SMS COMMANDS
CREDIT
Returns residual credit (for top-up SMS only)
STATUS
Returns the variables set by setup software. All
available variables can be included. If the SMS
text exceeds 160 characters, it will be truncated
(three dots “…” at the end of the SMS ).
SET GSM.APN apn_name user password
Set the APN with the APN name, user and
password. For example, set vodafone APN that
does not require user name and password:
SET GSM.APN web.omnitel.it
SET GSM.FTP path name_ip port user password
Set FTP connection settings:
46
USER MANUAL – Z-GPRS2 / Z-LOGGER
path the FTP server folder where files are sent
name_ip IP address or FTP server name
port FTP server gateway
user FTP server login user name
password FTP server login password
for example:
SET /prova/ 192.168.180.33 21 pippo pluto
SET GSM.SMTP name_ip port user password
set SMTP server connection settings to send emails
name_ip IP address or FTP server name
port smtp server gateway
user FTP server login user name
password smtp server login password
for example:
SET GSM.SMTP out.alice.it 25 pippo pluto
GET AIN
Returns the two analog input values
EMAIL TEST
Forces an email sent with an attachment to the first
administrator in the email address book
FTP TEST
Forces a text file sent to the currently set ftp server
EMAIL TAG
Sends the value indicated by "TAG" to the first email
contact
EMAIL AIN sends an email with the value of the 2
analogs
EMAIL AIN1 sends an email with the value of the
analog 1
EMAIL AIN2 sends an email with the value of the
analog 2
EMAIL DIN sends an email with the value of the
digital inputs
47
USER MANUAL – Z-GPRS2 / Z-LOGGER
EMAIL DIN1 sends an email with the value of the
digital input 1
EMAIL DIN2 sends an email with the value of the
digital input 2
EMAIL DIN3 sends an email with the value of the
digital input 3
EMAIL DIN4 sends an email with the value of the
digital input 4
EMAIL TEMP sends an email with the internal
temperature sensor value
EMAIL SYSLOG
Sends the command log file on microSD via email
(first administrator address in the address book)
FTP SYSLOG
Sends the command log file in the microSD via FTP
If the command is not recognised by Z-GPRS2, an error SMS will be sent:
“COMMAND NOT RECOGNIZED”
You can set MyALARM2 to send a confirmation SMS or ring when the command is successfully
completed.
NOTE
When a command is successfully completed, a ring can only be generate when a voice SIM is
used (data SIM do not permit voice call service).
15.3.
"FAST" SMS COMMANDS (Z-GPRS2 ONLY)
Up to 16 different "fast" commands can be selected from the action list.
Each command is run if the SMS text is "0" or "1" up to "15".
For these commands, the SMS sender number must be enabled (thus it must come from an
operator or administrator).
48
USER MANUAL – Z-GPRS2 / Z-LOGGER
The commands to be associated can be selected from the table using Easy Z-GPRS2/Z-Logger/Easy
Setup software:
ACTION
COMMENT
CLOSE OUTPUT1/2
Closes output 1/2
OPEN OUTPUT1/2
Opens output 1/2
CLOSE TIMED OUTPUT 1/2
Closes output 1/2 for the indicated time, then
opens it
OPEN TIMED OUTPUT 1/2
Opens output 1/2 for the indicated time, then
closes it
TOGGLE OUTPUT 1/2
Changes output 1/2 status
RESET COUNTERS
Loads value 0 on all counters
RESET COUNTER 1
Loads value 0 on counter 1
RESET COUNTER 2
Loads value 0 on counter 2
RESET COUNTER 3
Loads value 0 on counter 3
RESET COUNTER 4
Loads value 0 on counter 4
RESIDUAL CREDIT REQUEST
Returns residual credit value
(for top-up SIM only)
COUNTER VALUE REQUEST AND RESET
Returns the value of the counter 1, 2, 3 or 4 and
resets it
START LOGGER (TIMER 1)
Starts the datalogger
STOP LOGGER (TIMER 1)
Stops the datalogger
START TIMER
Starts timer 2 or 3...10
STOP TIMER
Stops timer 2 or 3...10
ENABLE ALARM ON POWER OUTAGE
Enables the power outage alarm with set
parameters
DISABLE ALARM ON POWER OUTAGE
Disables the power outage alarm
ENABLE ALARM ON DIGITAL INPUT
Enables alarm on digital input 1, 2, 3 or 4
49
USER MANUAL – Z-GPRS2 / Z-LOGGER
DISABLE ALARM ON DIGITAL INPUT
Disables alarm on digital input 1, 2, 3 or 4
RESET ALARM ON DIGITAL INPUT
Resets alarm on digital input 1, 2, 3 or 4 if set
with manual reset
ENABLE ANALOG ALARM ON
MINIMUM/LOW/HIGH/MAXIMUM
Enables analog 1 or 2 alarm on
minimum/low/high/maximum
RESET ANALOG ALARM ON
MINIMUM/LOW/HIGH/MAXIMUM
Resets analog 1 or 2 alarm on
minimum/low/high/maximum if set with
manual reset
ENABLE ALARM ON TOTALIZER
Enables totalizer 1 or 2 or 3 or 4 alarm (scaled if
necessary)
DISABLE ALARM ON TOTALIZER
Disables totalizer 1 or 2 or 3 or 4 alarm (scaled
if necessary)
ENABLE ALARM ON COUNTER
Enables counter 1 or 2 or 3 or 4 alarm (scaled if
necessary)
DISABLE ALARM ON COUNTER
Disables counter 1 or 2 or 3 or 4 alarm (scaled if
necessary)
ENABLE ALARM ON HOUR METER
Enables alarm on hour meter 1 or 2 or 3 or 4
DISABLE ALARM ON HOUR METER
Disables alarm on hour meter 1 or 2 or 3 or 4
ENABLE ALARM ON COUNTER/LOSS INCREASE
Enables alarm on counter increase or plumbing
leak (if plumbing leak control application is
enabled)
DISABLE ALARM ON COUNTER/LOSS INCREASE
Disables alarm on counter increase or plumbing
leak (if plumbing leak control application is
enabled)
ENABLE ALARM ON STRING STREAM CONTROL
Enables alarm on string stream control
DISABLE ALARM ON STRING STREAM CONTROL
Disables alarm on string stream control
For a full list of possible FAST commands, see Easy Setup/ Easy Z-GPRS2 / Easy Z-Logger software.
50
USER MANUAL – Z-GPRS2 / Z-LOGGER
15.4.
"ZERO COST" RING COMMANDS (Z-GPRS2
ONLY)
Z-GPRS2 lets you run up to 3 actions tied to a ring from a classified number (thus from an operator
or administrator).
This mode lets you run "zero cost" commands.
NOTE
-To keep zero cost for Z-GPRS2, DO NOT answer the call! The phone will ring for about 40
seconds after which Z-GPRS2 automatically hangs up.
-Not all mobile service providers let you receive rings from data SIM. Check whether the service
is offered by your provider.
15.5.
COMMAND PASSWORD (Z-GPRS2 ONLY)
Z-GPRS2 lets you run SMS commands even if the command is not sent by a number in the address
book. For the number to be recognised as authorised, the command must be preceded by a
numeric password, univocal to each Z-GPRS2.
The password is obtained from the last 4 numbers in the GSM modem IMEI code.
You can find your Z-GPRS2 password in the test configuration section in the Easy Setup / Easy ZGPRS2/Z-Logger software.
The secret password, always made up of 4 numbers, will be displayed in this section.
If, for example, the password is 5287, the digital output can be closed by a number not in the
address book by sending the following SMS:
5287 SET DOUT1.CLOSE
51
USER MANUAL – Z-GPRS2 / Z-LOGGER
16.
TIMERS
Up to 10 timers are available to run actions:
2 types of timers are available: periodic Timers and calendar Timers.
16.1.
PERIODIC TIMERS
Each periodic timer can run up to 3 actions. The timer start and end date and timer trip frequency
can be selected.
Frequency can be:
In minutes (actions run every x minutes, for example, every 30 minutes)
Daily (actions run every day at the indicated time, for example, 12:30)
Weekly (actions run on the indicated days of the week, for example, Monday, Tuesday and Sunday
at 6 PM)
Monthly (actions run every day of the month at the indicated time, for example, every 1st day of
the month at 2:30 PM)
A second group of 3 actions every x minutes can also be set using the same timer.
CAUTION!
When using periodic timers with monthly frequency, never set a day higher than the 28th!
16.2.
CALENDAR TIMERS
Each calendar timer can run up to 3 "ON" actions and up to 3 "OFF" actions. The timer start and
end date can be selected.
Each group of actions can be run on max 4 time bands per day of the week, for example, output 1
can be opened/closed using the timer as follows:
CALENDAR TIMER 9
MONDAY - CLOSE OUTPUT 1 AT 8:00, OPEN AT 12:30
MONDAY - CLOSE OUTPUT 1 AT 14:00:00, OPEN AT 18:00:00
TUESDAY - CLOSE OUTPUT 1 AT 8:00, OPEN AT 12:30
52
USER MANUAL – Z-GPRS2 / Z-LOGGER
TUESDAY - CLOSE OUTPUT 1 AT 14:00:00, OPEN AT 18:00:00
WEDNESDAY - CLOSE OUTPUT 1 AT 08:00:00, OPEN AT 12:30:00
WEDNESDAY - CLOSE OUTPUT 1 AT 14:00:00, OPEN AT 18:00:00
THURSDAY - CLOSE OUTPUT 1 AT 08:00:00, OPEN AT 12:30:00
THURSDAY - CLOSE OUTPUT 1 AT 14:00:00, OPEN AT 18:00:00
FRIDAY - CLOSE OUTPUT 1 AT 08:00:00, OPEN AT 12:00:00
53
USER MANUAL – Z-GPRS2 / Z-LOGGER
17. EMAIL USE
17.1.
Basic information on sending emails
An email is sent via connections with an SMTP type server (Simple Mail Transfer Protocol). This
server is assigned to delivering the email to the required addresses.
Server connections can be protected (with encrypted data exchange) or not.
Each email contains the sender's address and one or more addressees.
An email address for the sender and addressee are mandatory.
Settings to send an email are provided by the email provider upon registration.
INDIRIZZI DI DESTINAZIONE
INDIRIZZO MITTENTE
Z-GPRS2 / Z-LOGGER
[email protected]
[email protected]
SMTP
[email protected]
[email protected]
Details of which parameters are required to correctly set an SMTP server are provided below:
17.2.
Outgoing mail server (SMTP)
This is the name of the SMTP server to be used. Examples of SMTP servers are:
mail.clubnet.tin.it
or
out.alice.it
this information is also available in email setup software under the name "SMTP outgoing mail
server".
54
USER MANUAL – Z-GPRS2 / Z-LOGGER
The usual SMTP server port without protected connection is 25.
The usual SMTP server port with protected connection is 587 or 465.
17.3.
SMTP authentication: user name and password
Connections can be made to an SMTP server with or without authentication. Z-GPRS2 permits
server connections via authentication with a user name and password.
The user name typically coincides with the first part of the email address (for example: info), or the
entire email address (for example: [email protected]).
17.4.
SMTP server protected connection (Z-GPRS2 only)
Protected SMTP server connection is only available on Z-GPRS2 and only via the GPRS
communication port.
Protected connection cannot be used to send email via the Ethernet port but ONLY THROUGH
GPRS CONNECTION .
CAUTION!
•
Z-logger only supports SMTP servers that DO NOT have SSL protected connection (for
example, server “smtp.gmail.com” cannot be used).
•
Z-GPRS2 supports SMTP servers that use SSL protected connection (for example,
“smtp.gmail.com” can be used) but only via GPRS connection (sending email via Ethernet
can be made only without protected connection).
•
Some mobile network providers require their SMTP servers are used to send emails.
Contact your mobile service operator for further information.
•
Even if all email send operations were successful, the email arrival at the mailboxes of
the recipients is not ensured since the SMTP server is the one that delivers it. For
example, using a competitor's SMTP server may not return any error while the email is
not actually sent.
17.5. Main SMTP server settings without protected
connection
55
USER MANUAL – Z-GPRS2 / Z-LOGGER
Various email delivery tests were conducted in the laboratory without using protected
connections (thus also useable for the Ethernet port). A list of parameters that permitted correct
email delivery is provided below:
The port is always 25:
SIM
PROVIDER
SMTP SERVER
EMAIL ADDRESS
EXAMPLE
AUTHENTICATIO
N
User name
password
NECESSARY
TIM
WIND
VODAFON
E
Send alarm
Log send
(no
attachment
)
(with
attachment
)
out.alice.it
[email protected]
yes
[email protected]
passwor
d
yes
yes
smtp.libero.it
[email protected]
t
yes
[email protected]
t
passwor
d
yes
yes
smtp.net.vodafone.i
t
any
no
-
-
yes
no
56
USER MANUAL – Z-GPRS2 / Z-LOGGER
17.6. Main SMTP server parameters with GPRS
protected connection (Z-GPRS2 only)
SMTP SERVER
EMAIL ADDRESS
EXAMPLE
AUTHENTICATION
SSL
NECESSARY
PROTECTED
PORT
User name
password
465
[email protected]
password
CONNECTION
smtp.gmail.com
[email protected]
yes
yes
The typical setup to send email with GMAIL via GPRS only is the following:
NOTE
The protected connection function could be always enabled. This increases the probability that
the emails are sent (since are considered secure)
57
USER MANUAL – Z-GPRS2 / Z-LOGGER
18. ALARMS ON ANALOG INPUTS
Voltage or current can be set for each of the 2 analog inputs in the “Analog Input Setup” section.
Input acquisition time is 50ms.
Seneca recommends you ALWAYS enable analog input filter ("read filter on" item) to obtain the
most stable reading not influenced by external disturbances.
You can set input voltage mode with range from 0 to 30V.
Inputs in current mode have a range from 0 to 20 mA.
You can also scale analog readings in technical units.
4 different alarms can be set for each input:
Alarm on HIGH value
Alarm on LOW value
Alarm on MAXIMUM value
Alarm on MINIMUM value
18.1.
Analog input filter
A filter can be set for analog inputs. This filter is mobile mean type on 20 samples. This type of
filter lets you stabilise the reading even with highly disturbed signals.
18.2.
Alarm on High and Maximum
“High” and “Maximum” alarms let you enable two different maximum alarms. A hysteresis can
also be set (shown as “hist” in the illustration).
The following illustration shows how an alarm works with the relevant reset values. For example,
for an alarm on maximum (with Alarm Delay = 0 and Alarm Reset Time = 0):
58
USER MANUAL – Z-GPRS2 / Z-LOGGER
ALARM ON MAXIMUM
ALARM ON MAXIMUM
ALARM ON MAXIMUM CLEARED
ALARM ON MAXIMUM CLEARED
Alarm on high works in the same way.
18.3.
Alarm on Low and Minimum
“Low” and “Minimum” alarms let you enable two different maximum alarms. A hysteresis can also
be set (shown as “Hist” in the illustration).
The following illustration shows how an alarm works with the relevant reset values. For example,
for an alarm on maximum (with Alarm Delay = 0 and Alarm Reset Time = 0):
ALARM ON MINIMUM
18.4.
ALARM ON MINIMUM CLEARED
Alarm filter
A filter can be selected on the analog input, defined in seconds. The resulting effect is a filter on
both the alarm and reset, as illustrated below:
59
USER MANUAL – Z-GPRS2 / Z-LOGGER
ALARM ON MAXIMUM
T filter
alarm
T filter
alarm
ALARM ON MAXIMUM RESET
18.5.
Alarm inhibition time
An inhibition time on the next alarm can be set. Unlike the previous filter, the alarm is
immediately active but ignored during the alarm inhibition time. This time is reset after each
alarm.
ALARM
ALARM
ALARM
T inhibition T inhibition
T inhibition
CAUTION!
DO NOT EXCEED THE FOLLOWING ANALOG INPUT VALUES OR THE INPUT STAGE COULD BREAK
AND VOID THE WARRANTY:
INPUT VOLTAGE: MAX VOLTAGE 35V
INPUT CURRENT: MAX VOLTAGE AT 12V HEADS (CURRENT PROTECTED)
60
USER MANUAL – Z-GPRS2 / Z-LOGGER
19. ALARMS ON DIGITAL INPUTS
Each of the 4 digital inputs can be set in the "Digital Input Settings" section.
5 types of alarms are available:
Alarm on status change from open to closed
The alarm is active when status changes from open to closed
Alarm on status change from closed to open
The alarm is active when status changes from open to closed
Alarm on open status
The alarm is only active on open status regardless of whether the input status switched.
Alarm on closed status
The alarm is only active on closed status regardless of whether the input status switched.
Alarm on status change
The alarm is active when status changes from open to closed or from closed to open.
19.1.
Digital input filter
A digital alarm filter can be enabled. This filter is expressed in seconds (with tenth of a second
resolution). The filter lets you eliminate effects due to input rebounds. Setting a filter T time, the
filter lets the input status change only if it has remained in the previous conditions for T time:
61
USER MANUAL – Z-GPRS2 / Z-LOGGER
Input not
filtered
Input
filtered
19.2.
T filter
Alarm inhibition time
An inhibition time on the next alarm can be set. The alarm is ignored during inhibition time. This
time is reset after each alarm.
The effect of inhibition time on an open to close alarm can be seen in the example:
ALARM
ALARM
ALARM
1=CLOSE
0=OPEN
T
T
T
62
USER MANUAL – Z-GPRS2 / Z-LOGGER
20. TOTALIZER/COUNTER ALARMS
A counter/totalizer alarm value can be set in the "Totalizer/counter settings" section. Both
totalizers and counters are included because counters can be used as partial values.
20.1.
Alarm inhibition time
An inhibition time on the next alarm can be set. The alarm is ignored during inhibition time. This
time is reset after each alarm.
63
USER MANUAL – Z-GPRS2 / Z-LOGGER
21. BLACKOUT ALARM
An alarm can be set for a continuous blackout for a settable time in the "Blackout Alarm" section.
The alarm can also be enabled when power returns.
CAUTION!
•
•
Activating the power return alarm, both alarms will be generated each time the card is
turned on/off.
In the event of blackout, digital inputs stop working if not externally powered by a
backup circuit. Analog inputs and digital outputs, on the other hand, continue to work
until Z-GPRS2/Z-Logger turns off.
NOTE
•
In many situations it is convenient to receive a warning whenever the device turns on to
activate the power return alarm.
21.1.
Alarm inhibition time
An inhibition time on the next alarm can be set. The alarm is ignored during inhibition time. This
time is reset after each alarm.
64
USER MANUAL – Z-GPRS2 / Z-LOGGER
22. ALARM ON TOTALIZER INCREASE
Up to 4 alarms can be set in the "Alarm on input increase" section (1 per input) for high or low
totalizer increase. These alarms monitor flows (gas, liquid, etc.) or warn in the event of energy
generator malfunctions (photovoltaic, panels, wind generators, etc.).
CAUTION!
-To obtain coherent and synchronised values, the alarm on totalizer increase is managed by the
datalogger and thus the alarm on plant loss cannot be simultaneously activated.
- In order to obtain coherent and synchronised values, the alarm on totalizer increase is
managed by the datalogger. Times are thus shared with the logger (acquisition and send times).
65
USER MANUAL – Z-GPRS2 / Z-LOGGER
23. ALARM ON PLANT LOSS
The alarm on plant loss generates an alarm in the event of loss (for example plumbing leaks) in a
plant.
The basic concept is that in normal operations, in observation time T, plant flow must be less than
Q for at least the count time t.
Z-GPRS2 and Z-Logger divide observation time T into sub-multiples t and analyses consumption
counts on each of these sub-multiples t.
For example, considering a plumbing plant that supplies 2 utilities. Statistically, during one day
(observation time T = 24 hours) the admitted flow must be <0.1 m3/h (maximum admitted flow
Q=0.1 m3/h) for at least one of the 10 minute t (count time t= 10 minutes).
MYALAM
2
UTILITY 1
PLUMBING PLANT
COUNTER
“PARASITE”
UTILITY
UTILITY 2
If this is not the case it means that there is a "parasite" utility in addition to the 2 utilities that
continuously subtracts liquid (especially at night it is improbable that the utilities use water on all
the 10 minute intervals).
Observation time T, count time t and the maximum flow value Q in count time t can be set for the
alarm.
CAUTION!
- In order to obtain coherent and synchronised values, the alarm on plumbing loss is managed by
the datalogger. Times are thus shared with the logger (acquisition (t) and send (T) times).
66
USER MANUAL – Z-GPRS2 / Z-LOGGER
-To obtain coherent and synchronised values, the alarm on plumbing loss is managed by the
datalogger and thus the alarm on totalizer increase cannot be simultaneously activated.
67
USER MANUAL – Z-GPRS2 / Z-LOGGER
24. HOUR COUNTER ALARM
Z-GPRS2 / Z-Logger let you control NR4 independent hour counters. This function generates an alarm if the
number of hours set in which the digital input is in a certain logic status is exceeded. The typical application
is an automatic pump, boiler, utility, oven, etc. maintenance alert.
The resolution for the 4 hour meters is 1 second.
Inputs can be set independently so that the hour meter counts on open or closed status. We recommend
enabling the counter on closed status to correctly count in the blackout condition.
The count is saved in the non volatile memory before the device is turned off.
The maximum number of countable hours is about 127 years.
CAUTION!
The hour meter alarm cannot be simultaneously activated with the digital input alarm on the
same input.
25. ALARM ON SOLAR PANEL MALFUNCTION
Z-GPRS2 / Z-Logger allows NR 2 strings of photovoltaic panels to be controlled by reading the two analog
values from the 2 TA connected to the inputs. When the difference between the two string streams
exceeds the K value, a malfunction event is generated. This indicates problems due to a string using the
second as a comparison. The alarm can be activated regardless of the day/night.
26. AUXILIARY DIGITAL/ANALOG ALARMS ON MODBUS
RTU / MODBUS TCP-IP PERIPHERALS
Z-GPRS2 / Z-Logger support up to 30 auxiliary alarms connected to RS485 serial ports via Modbus RTU
protocol or via the Ethernet port via Modbus TCP-IP protocol.
Embedded IO can be extended in the setup software with any Seneca Modbus module (both Modbus TCPIP and Modbus RTU) or with a third party module that supports Modbus TCP-IP server or Modbus RTU slave
protocols.
NOTE
Up to 30 digital or analog alarms can be connected, for example, 3 Seneca Z-10-D-IN modules
can be connected to create 30 additional digital inputs or 2 Seneca Z-10-D-IN modules and 1 Z8AI module to create 20 digital inputs and 8 analog inputs.
68
USER MANUAL – Z-GPRS2 / Z-LOGGER
27. ACTION ON EVENT
In the event of alarm, in addition to sending the alarm via SMS/email, Z-GPRS2 / Z-Logger can run up to 3
actions. The list of possible actions are:
ACTION
COMMENT
CLOSE OUTPUT1/2
Closes output 1/2
OPEN OUTPUT1/2
Opens output 1/2
CLOSE TIMED OUTPUT 1/2
Closes output 1/2 for the indicated time, then opens it
OPEN TIMED OUTPUT 1/2
Opens output 1/2 for the indicated time, then closes it
TOGGLE OUTPUT 1/2
Changes output 1/2 status
RESET COUNTERS
Loads value 0 on all counters
RESET COUNTER 1
Loads value 0 on counter 1
RESET COUNTER 2
Loads value 0 on counter 2
RESET COUNTER 3
Loads value 0 on counter 3
RESET COUNTER 4
Loads value 0 on counter 4
RESIDUAL CREDIT REQUEST
Returns residual credit value
(for top-up SIM only)
COUNTER VALUE REQUEST AND RESET
Returns the value of the counter 1, 2, 3 or 4 and resets it
START LOGGER (TIMER 1)
Starts the datalogger
STOP LOGGER (TIMER 1)
Stops the datalogger
START TIMER
Starts timer 2 or 3...10
STOP TIMER
Stops timer 2 or 3...10
ENABLE ALARM ON POWER OUTAGE
Enables the power outage alarm with set parameters
DISABLE ALARM ON POWER OUTAGE
Disables the power outage alarm
ENABLE ALARM ON DIGITAL INPUT
Enables alarm on digital input 1, 2, 3 or 4
DISABLE ALARM ON DIGITAL INPUT
Disables alarm on digital input 1, 2, 3 or 4
RESET ALARM ON DIGITAL INPUT
Resets alarm on digital input 1, 2, 3 or 4 if set with
manual reset
ENABLE ANALOG ALARM ON
MINIMUM/LOW/HIGH/MAXIMUM
Enables analog 1 or 2 alarm on
minimum/low/high/maximum
69
USER MANUAL – Z-GPRS2 / Z-LOGGER
RESET ANALOG ALARM ON
MINIMUM/LOW/HIGH/MAXIMUM
Resets analog 1 or 2 alarm on
minimum/low/high/maximum if set with manual reset
ENABLE ALARM ON TOTALIZER
Enables totalizer 1 or 2 or 3 or 4 alarm (scaled if
necessary)
DISABLE ALARM ON TOTALIZER
Disables totalizer 1 or 2 or 3 or 4 alarm (scaled if
necessary)
ENABLE ALARM ON COUNTER
Enables counter 1 or 2 or 3 or 4 alarm (scaled if
necessary)
DISABLE ALARM ON COUNTER
Disables counter 1 or 2 or 3 or 4 alarm (scaled if
necessary)
ENABLE ALARM ON HOUR METER
Enables alarm on hour meter 1 or 2 or 3 or 4
DISABLE ALARM ON HOUR METER
Disables alarm on hour meter 1 or 2 or 3 or 4
ENABLE ALARM ON COUNTER/LOSS INCREASE
Enables alarm on counter increase or plumbing leak (if
plumbing leak control application is enabled)
DISABLE ALARM ON COUNTER/LOSS INCREASE
Disables alarm on counter increase or plumbing
leak (if plumbing leak control application is
enabled)
ENABLE ALARM ON STRING STREAM CONTROL
Enables alarm on string stream control
DISABLE ALARM ON STRING STREAM CONTROL
Disables alarm on string stream control
For a full list, see Easy Setup / Easy Z-GPRS2 / Easy Z-LOGGER software
70
USER MANUAL – Z-GPRS2 / Z-LOGGER
28. SERVER FUNCTION VIA ETHERNET PORT
A server service can be enabled via Ethernet port between:
Web server
FTP server
Modbus TCP-IP server
28.1. LOCAL CONNECTION TO THE ETHERNET
PORT
To connect a peripheral via Ethernet to Z-GPRS2 or Z-Logger, both must have a compatible IP address.
If the connection is made on web server and the browser uses a proxy server, it is best to disable-it:
For example, if the Z-GPRS2 / Z-Logger IP address is 192.168.90.101 with subnet mask 255.255.255.0 the
other peripheral must have an IP address that starts with 192.168.90, thus, for example, 92.168.90.102 is
correct.
The installed Ethernet supports auto-switching mode. Two peripherals can be connected point-to-point
without the need of a router or Ethernet switch.
28.2.
Server service via Ethernet port: Web server
The web server service can be enabled via Ethernet port (not available via GPRS). Access to web
pages can be protected by setting a user name and password.
The following can be viewed via web server in real time:
-the value of digital inputs
71
USER MANUAL – Z-GPRS2 / Z-LOGGER
-the value of analog inputs
-the value of digital outputs
-the hour meter/totalizer values
-the value of log variables in real-time
-the GSM signal
-battery or mains power
The web server was tested with leading browsers and i-phone ™, i-pad ™ and android ™
telephones or tablets.
The web server can be protected by a user name and password.
Once set, open the browser and enter:
http://192.168.90.101:port
Where port is the port set for the web server (80 by default), thus with factory settings:
http://192.168.90.101:80
If the IP addresses were correctly set, the web server is displayed:
72
USER MANUAL – Z-GPRS2 / Z-LOGGER
73
USER MANUAL – Z-GPRS2 / Z-LOGGER
CAUTION!
FOR SECURITY REASONS, ALWAYS ENABLE USER NAME AND PASSWORD AUTHENTICATION FOR WEB
SERVER ACCESS
28.2.1.
Real Time readings on WEBSERVER
The web server can be used to view real-time embedded input/output readings and values logged by the
datalogger.
The "Status" page displays some information and the GSM signal level.
The "Digital IO" page displays digital input and output values. Outputs can be controlled.
74
USER MANUAL – Z-GPRS2 / Z-LOGGER
The "Analog IN" page displays analog input values, scaled if activated:
The "Counters" page displays counter/totalizer input values, scaled if activated:
75
USER MANUAL – Z-GPRS2 / Z-LOGGER
The “MMBUS REGISTERS” page displays the Modbus TAG values logged in real time (both Modbus
TCP-IP and Modbus RTU):
76
USER MANUAL – Z-GPRS2 / Z-LOGGER
The “Set Real Time Clock” page displays the date and time that can also be set:
77
USER MANUAL – Z-GPRS2 / Z-LOGGER
28.3.
FTP server
The FTP server lets you access the logs in the Z-Logger/ Z-alarm microSD via the Ethernet port
without stopping normal logger operations.
MicroSD log access via FTP can be protected by a user name and password
28.3.1.
Supported FTP commands
The FTP server supports a restricted set of FTP commands that make it incompatible with leading
FTP client software such as FileZilla etc…
For FTP server connection, make sure a microSD card is inserted, open the windows command
prompt and enter:
ftp <ip_address>
where <ip_address> is the Ethernet connection IP address.
If necessary, the user name and password will be requested:
At this point, files on the microSD can be accessed.
Use the "Is" command to obtain a list of microSD content:
78
USER MANUAL – Z-GPRS2 / Z-LOGGER
Log files are in the /LOG folder
Use the "cd" command to open the /LOG folder:
Use the "Is" command to obtain the list of logs in the folder:
79
USER MANUAL – Z-GPRS2 / Z-LOGGER
To copy the file in the source directory (c:\Users\Prove) enter:
get <filename>
for example:
For the full list of available ftp commands, enter:
“help”
80
USER MANUAL – Z-GPRS2 / Z-LOGGER
To receive more files in a directory use the command mget (multiple get).
28.4.
Modbus TCP-IP server
The Modbus TCP-IP server service provides access to Z-GPRS2 / Z-Logger variable Modbus
registers.
In addition to the embedded I/O variables, log variables can be accessed in real-time.
List of Modbus registers:
MSW “Most Significant Word” – Most significant 16 bit word
LSW “Less Significant Word” – Least significant 16 bit word
0x -Hexadecimal value
MODBUS ADDRESS
REGISTER CONTENT
40006
DIGITAL INPUTS
BIT 0 = INPUT 1
BIT 1 = INPUT 2
BIT 2 = INPUT 3
BIT 3 = INPUT 4
81
USER MANUAL – Z-GPRS2 / Z-LOGGER
49001 0x0020
49002 0x0010
49003 0x0200
REGISTERS WRITTEN IN A SINGLE
WRITE:
OPEN OUTPUT 1
49001 0x0020
49002 0x0020
49003 0x0200
REGISTERS WRITTEN IN A SINGLE
WRITE:
CLOSE OUTPUT 1
49001 0x0020
49002 0x1000
49003 0x0200
REGISTERS WRITTEN IN A SINGLE
WRITE:
OPEN OUTPUT 2
49001 0x0020
49002 0x2000
49003 0x0200
REGISTERS WRITTEN IN A SINGLE
WRITE:
CLOSE OUTPUT 2
40129
ANALOG INPUT 1 (signed 16 bits)
40143
ANALOG INPUT 2 (signed 16 bits)
LSW 49407
COUNTER 1
MSW 49408
LSW 49411
COUNTER 2
MSW 49412
LSW 49415
COUNTER 3
MSW 49416
LSW 49419
COUNTER 4
MSW 49420
LSW 49405
TOTALIZER 1
MSW 49406
LSW 49409
TOTALIZER 2
MSW 49410
82
USER MANUAL – Z-GPRS2 / Z-LOGGER
LSW 49413
TOTALIZER 3
MSW 49414
LSW 49417
TOTALIZER 4
MSW 49418
40156
GSM LEVEL (0-7)
40126
VBAT (min 2200, max 2800)
40006
BIT 7 = 1 POWER SOURCE OK
BIT 7 = 0 POWER SOURCE DOWN
48001
REAL TIME MODBUS LOG WRITE
START
…
…
48201
REAL TIME MODBUS LOG WRITE END
28.4.1.
Modbus real-time log register format
All Datalogger real-time values logged by Modbus TCP-IP and Modbus RTU can be accessed via
modbus.
The format is created as follows: Logged registers are placed in the format one after the other
without leaving empty registers.
If, for example, the following registers are being logged:
Register 1: 16 bit unsigned
Register 2: 32 bit unsigned
Register 3: Floating point single precision
Register 4: 16 bit signed
The obtained format is the following:
Modbus address
Register
48001
Register 1
48002
Register 2 MSW
83
USER MANUAL – Z-GPRS2 / Z-LOGGER
48003
Register 2 LSW
48004
Register 3 MSW
48005
Register 3 LSW
48006
Register 4
84
USER MANUAL – Z-GPRS2 / Z-LOGGER
29. Z-GPRS2 / Z-LOGGER ACCESS VIA INTERNET (ONLY
VIA ETHERNET PORT)
The router can be set to access Z-GPRS2/Z-Logger via Internet using a static IP address.
This operation is known as “virtual server” or “Port forwarding”. See the router documentation
for further information.
The Internet connection IP address must be a public static IP address. If your public IP address is
not static, you can obtain one using a dynamic DNS like Dyndns (http://dyn.com).
for example:
The router IP address is 192.168.90.1 and the Z-GPRS2 module address is 192.168.90.101 with the
web server set on port 80. The router’s public address is 73.13.150.123.
ROUTER
ROUTER
PUBLIC IP
ADDRESS
LOCAL IP
ADDRESS:
73.13.150.123
192.168.90.1
INTERNET
Z-GPRS2/ZLOGGER:
192.168.90.101
Webserver Port
80
Now open port 80 on the router and IP transmission 192.168.90.101:
Thus the router must be set as follows:
IP ADDRESS
PRIVATE PORT
PUBLIC PORT
PROTOCOL
192.168.90.101
80
8080
UDP/TCP
With this configuration, all Internet traffic on port 8080 with IP address 73.13.150.123 will be rerouted to the Z-GPRS2/Z-Logger web server on port 80 at IP address 192.168.90.101.
Thus, to access the web server using a browser, enter:
http://73.13.150.123:8080
Similar settings can be used for access via Modbus TCP-IP:
85
USER MANUAL – Z-GPRS2 / Z-LOGGER
IP ADDRESS
PRIVATE PORT
PUBLIC PORT
PROTOCOL
192.168.90.101
502
502
UDP/TCP
86
USER MANUAL – Z-GPRS2 / Z-LOGGER
While to access the ftp server:
IP ADDRESS
PRIVATE PORT
PUBLIC PORT
PROTOCOL
192.168.90.101
21
21
UDP/TCP
30. FIRMWARE UPDATE
In order to include new functions, the system includes Z-GPRS2/Z-Logger firmware update options.
The last available firmware version is included with each Easy Z-GPRS2/Z-Logger/Easy Setup
software release.
2 different update modes are available for firmware:
Via USB: This is the easiest method. A complete update takes about 5 minutes. Z-GPRS2 / ZLogger must be connected to a PC with Easy Z-GPRS2/Z-Logger/Easy Setup software installed.
Via microSD card: This is the faster method. A complete update takes about 20 seconds. A
microSD adapter for PC (many mobile phones can also read/write microSD) and a microSD card
are required. This method is convenient when several devices are to be updated.
30.1.
Update via USB (using Easy Z-GPRS2/Z-Logger /
Easy Setup software)
Open the "Software Update" section to update firmware via USB. Follow the on-screen
instructions to successfully complete this operation.
CAUTION!
-BEFORE UPDATING firmware, note the current configuration.
-Once the firmware is updated, the previous setup may be deleted and thus Z-GPRS2 / Z-Logger
must be setup again.
-Keep in mind that a subsequent Easy Z-GPRS2/Z-Logger/ Easy Setup software version may not
be compatible with the setup file generated by a previous version.
30.2.
Update via microSD card (without using a PC)
Firmware can be updated via microSD card formatted with the FAT16 or FAT32 filesystem
(purchased microSD cards are usually already formatted this way).
87
USER MANUAL – Z-GPRS2 / Z-LOGGER
Proceed as follows to update firmware:
1. Copy the file called “ZGPRS2.BIN” containing the firmware to a microSD card; the file is
included in Easy Z-GPRS2 / Easy Setup software (available for download at www.seneca.it)
and is automatically copied during installation to folder
“\Documents\Seneca\Easy_ZGPRS2\update”.
The file must be copied to the main microSD folder.
2. Turn the module off and than on
3. With the module on, insert the microSD card in the slot
4. The SD/STS led starts to flash at 1 second intervals for about 20 seconds. The new firmware
is written in flash memory during this phase.
5. When finished, the SD/STS led starts to flash slowly, about 3 seconds off and a half a
second on (if it remains on it means the firmware is the same as the one loaded in the
microSD).
6. At this point, remove the microSD
7. The green PWR led starts to flash fast (several times a second); in this phase the module is
copying firmware from flash to the microprocessor flash.
8. When finished, the module automatically turns off and back on
The firmware update can be checked:
-Connecting the module to Easy Z-GPRS2/Z-Logger software, the firmware version (at the bottom
left: “Connected to ...FW XXXX”) has changed.
CAUTION!
-BEFORE UPDATING firmware, note the current configuration.
-Once the firmware is updated, the previous setup may be deleted and thus Z-GPRS2 / ZLOGGER must be setup again.
-Keep in mind that a subsequent Easy Z-GPRS2/Z-Logger/ Easy Setup software version may not
be compatible with the setup file generated by a previous version.
88
USER MANUAL – Z-GPRS2 / Z-LOGGER
31. DEBUG PORT ENABLE
You can activate the debug port located on the Z-GPRS2 side.
Using the debug port, you can view and save to a file log of operations performed by Z-GPRS2/ZLogger.
To connect to the debug port you must use the USB adapter "Easy USB" , buy-it directly on the site
Seneca (www.seneca.it) or contact Seneca srl for more info:
The connection to the PC is performed by a terminal software (for example HyperTerminal) with
the following configurations:
89
USER MANUAL – Z-GPRS2 / Z-LOGGER
When the operation is done, you must activate the debugging in the Test Configuration section of
the Software Configuration, by selecting the type of debug flags that you need.
32. COMMANDS AVAILABLE THROUGH THE
CONFIGURATION SOFTWARE
In the "Test configuration" of the configuration software, a series of buttons are available, This
buttons allow you to send commands to Z-GPRS2/Z-Logger :
COMMAND
COMMENT
TEST E-MAIL
Send a test email to the first email administrators. It’s
required that the e-mail section is configured..
TEST FTP
Send a test TXT file into the ftp server configured.
If you send the log via Ethernet, first a microSD card is
required.
UNMOUNT SD
Allows you to remove the microSD without turning off ZGPRS2. Before removing the microSD wait until the LED
SD is off. You can then insert the microSD, the system
will save the unsaved files.
The microSD card insertion is successful if the SD LED is
ON.
COPY FLASH ON SD
Allows you to copy all the contents of the internal ZGPRS2/Z-Logger flash on microSD.
This creates the file "LOG_BAK.CSV" in the root directory
of the microSD.
During this operation, the SD LED is blinking, when the
action is completed, the LED remains ON. At this point
you can remove the microSD with the SD UNMOUNT
command.
33. EASY SETUP ED Easy Z-GPRS2/Z-Logger SOFTWARE,
USB DRIVER INSTALLATION
90
USER MANUAL – Z-GPRS2 / Z-LOGGER
To set up the Seneca Z-GPRS2 and Z-Logger module, use Easy Z-GPRS2/ Easy Z-Logger or EasySetup
software.
Both software packages are free for download at www.seneca.it.
The setup software also includes drivers for connection on USB.
CAUTION!
For the first installation only, before connecting Z-GPRS2 or Z-Logger to the USB port, make sure
Easy Z-GPRS2/Z-Logger or Easy Setup software is installed.
1) Install Easy Z-GPRS2/Z-Logger or Easy Setup software on a PC with OS Microsoft ™
Windows xp ™, Microsoft ™ Windows Vista ™, Microsoft ™ Windows 7 ™
2) When finished, confirm driver installation by clicking "Install driver software":
When the driver is installed the system is ready for connection with Z-GPRS2/Z-Logger.
3) When finished, connect Z-GPRS2 or Z-Logger to a PC using a miniUSB cable (see chapter )
Click on the device driver installation icon
4) The PC searches for the driver
91
USER MANUAL – Z-GPRS2 / Z-LOGGER
For faster installation, click "Ignore driver download from Windows Update" (otherwise the
operation may take over 5 minutes).
5) MiniUSB connection can now be used
34. USB KIT
The USB KIT can be purchased from Seneca (also on the e-commerce site www.seneca.it)
The kit contains:
•
•
NR1 CD with drivers for Windows and Easy setup software
NR1 standard mini-B USB cable and NR1 standard micro USb cable.
The latest Easy setup software version is free for download at:
www.seneca.it
92
USER MANUAL – Z-GPRS2 / Z-LOGGER
35. TROUBLESHOOTING
PROBLEM
Sending the SMS command:
SOLUTION
-Make sure the set APN corresponds to the mobile service
provider's and whether access requires authorisation. See:
email test
http://wiki.apnchanger.org/Main_Page
no email reaches the administrator's email
address
-Make sure the GSM signal is over 2/7
-The email ended up in SPAM
-The SMTP server supports SSL protection and the gateway
was not correctly set
Using the configuration software in the
"Test configuration" section when you
press the button:
If you send Log via Ethernet, Seneca recommended to
use an owner SMTP server.
-The email is in the SPAM directory
TEST E-MAIL
-The SMTP server supports only SSL security, in the
ethernet port you can not enable SSL protection
no e-mail arrives at the administrator email address
Sending the SMS command:
-The FTP server folder does not exist. Create the folder on
the ftp server first.
-Make sure the ftp server IP address/name are correct
ftp test
-Make sure the ftp server login user name/password are
correct
no ftp file reaches the set ftp server
Using the configuration software in the
"Test configuration" section when you
press the button:
TEST FTP
-If you are using the ethernet port for sending FTP file
the microSD card must be inserted
-The folder on the FTP server on which you created the
file does not exist, first create the folder in the ftp
server
-Check the correctness of the IP / name of the FTP
server
-Make sure that the username / password to access the
ftp server are correct
no ftp file arrives in the configured ftp
server
The GSM signal is always 0/7 and the GSM led
continues to flash fast
-The inserted SIM is not recognised. Clean or replace the SIM
-The SIM PIN is enabled. Insert the SIM in a mobile phone
93
USER MANUAL – Z-GPRS2 / Z-LOGGER
and disable the PIN or enable it and insert the PIN code in the
setup software
The GSM signal is too low
-Wait at least 10 minutes from turning on the device before
reading the GSM value
-Try using another mobile service provider's SIM
-Move the Z-GPRS2 installation
-Use an optional external antenna: for further information,
contact Seneca or visit the Z-GPRS2 section at
www.seneca.it.
Residual credit is not sent for the SIM
-Check the method used to receive residual credit from the
mobile service provider (ring or SMS, SMS request text).
-The SIM is not top-up but subscription
No communications from RS485 serial #1 BUS
IDC10
-Turn switch SW2 to “ON” see chapter 4
Z-GPRS2 worked correctly for a few
days/months but stopped sending SMS and
logs.
-No SIM credit. Top-up the SIM card.
Z-GPRS2/Z-Logger firmware update from
Easy software via USB fails
-Update via USB requires Z-GPRS2 / Z-Logger to be
powered by a source other than the USB: Power
modules from Terminal or IDC10 connector.
-The SIM card expired, replace the SIM card or contact your
mobile phone provider.
-Extract the microSD card
Using Z-GPRS2 via ethernet, you get the
SMS: "NTP error"
The clock synchronization is activated, via ethernet this
is done via NTP (network time protocol),but you can
not contact the NTP server:
-Make sure that the UDP port 123 is open
-Check the configured NTP server address
94