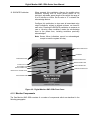
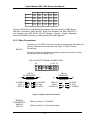
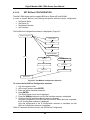
1
Digital Monitor AMC-1DBx Series User Manual Filename: 3367405B Digital Gas Monitor 1dbx Series User Manual.Doc Revised 2015 Apr 27 Copyright ©, 2014 Jan 20, AMC The Armstrong Monitoring Corporation Digital Monitor AMC-1DBx Series User Manual 215 Colonnade Road South, Ottawa, Ontario, Canada K2E 7K3 Tel: (613) 225-9531 • Fax: (613) 225-6965 • Canada & U.S. Toll Free: 1-800-465-5777 E-mail: [email protected] • Internet: www.armstrongmonitoring.com This page intentionally left blank. ii Digital Monitor AMC-1DBx Series User Manual TABLE OF CONTENTS 1 INTRODUCTION .................................................................................................................... 6 1.1 OVERVIEW ................................................................................................................. 6 1.2 SAFETY CONVENTIONS............................................................................................ 6 1.3 OTHER DOCUMENTS ................................................................................................ 6 2 GENERAL INFORMATION .................................................................................................... 7 2.1 WARRANTY ................................................................................................................ 7 2.2 LIABILITY .................................................................................................................... 7 2.3 MODIFICATIONS AND SUBSTITUTIONS................................................................... 7 2.4 PRODUCT RETURN ................................................................................................... 7 2.5 GLOSSARY ................................................................................................................. 8 3 PRODUCT INFORMATION ...................................................................................................10 3.1 DIGITAL MONITOR AMC-1DBx .................................................................................10 3.2 AMC-1DPS Power Supply ..........................................................................................11 3.3 AMC-1DA-RPT4 4 Port Repeater ...............................................................................12 3.4 AMC-1DA-RPT Single Port Repeater..........................................................................13 3.5 AMC-1D-8R RS-485 8-Relays, 2-Analog Outputs .......................................................14 4 PRODUCT DESCRIPTION ....................................................................................................15 4.1 GENERAL DESCRIPTION .........................................................................................15 5 INSTALLATION.....................................................................................................................32 5.1 MOUNTING INSTRUCTIONS.....................................................................................32 5.2 WIRING ......................................................................................................................35 5.3 ALARMS.....................................................................................................................38 6 OPERATION AND CALIBRATION........................................................................................40 6.1 OPERATION...............................................................................................................40 6.2 LCD ............................................................................................................................41 6.3 LEDS ..........................................................................................................................43 6.4 External Buzzer and Annunciator Control ...................................................................45 6.5 Analog Outputs ...........................................................................................................46 6.6 Logging.......................................................................................................................46 6.7 USB FIRMWARE UPGRADE......................................................................................47 6.8 AMC MANAGER PC Application.................................................................................48 6.9 BACNET-IP INTERFACE............................................................................................49 6.10 BAS MODBUS-RTU INTERFACE ...........................................................................49 6.11 DATABASE ON USB DEVICE ................................................................................49 6.12 MENU SYSTEM AND FEATURES..........................................................................51 6.13 MONITOR COMMISSIONING AND INSTALLATION SCENARIOS.........................89 7 PREVENTIVE MAINTENANCE .............................................................................................94 7.1 GENERAL ..................................................................................................................94 7.2 VERIFICATION OF OPERATION ...............................................................................94 8 INSTALLATION TIPS AND TRICKS .....................................................................................95 8.1 CABLING....................................................................................................................95 8.2 EQUIPMENT LOCATION ...........................................................................................95 8.3 POWER AND GROUNDING.......................................................................................95 APPENDIX A GAS TYPES FULL SCALE AND ALARM VALUES ..........................................97 APPENDIX B GENERAL LOG ITEMS .....................................................................................98 APPENDIX A.1 SENSOR.LOG Items..................................................................................103 APPENDIX A.2 RELAY.LOG Items .....................................................................................104 APPENDIX A.3 ALARM.LOG Items.....................................................................................106 APPENDIX A.4 SYSTEM.LOG Items ..................................................................................107 iii Digital Monitor AMC-1DBx Series User Manual APPENDIX A.5 ADMIN.LOG Items .....................................................................................109 APPENDIX A.6 SECURITY. LOG Items ..............................................................................110 APPENDIX A.7 COMM.LOG Items......................................................................................110 LIST OF FIGURES Figure 4-1: Typical System Network Diagram ...........................................................................16 Figure 4-2: Digital Monitor AMC-1DBx Front Cover..................................................................18 Figure 4-3: Digital Monitor Components....................................................................................19 Figure 4-4 System Configuration DIP Switch ............................................................................20 Figure 4-5 Downstream RS-485 Interfaces ...............................................................................22 Figure 4-6 BAS RS-485 Interface..............................................................................................23 Figure 4-7 Ethernet / USB Connector........................................................................................25 Figure 4-8 Battery and Battery Holder for Real-Time Clock.......................................................26 Figure 4-9 8-Pin Headers for Relays .........................................................................................27 Figure 4-10 External Annunciator Connector ............................................................................28 Figure 4-11 System Fault Connector.........................................................................................29 Figure 4-12 Integral Analog Output Terminal Block...................................................................30 Figure 5-1: Location of Mounting Holes for AMC-1DBx Digital Monitor .....................................33 Figure 5-2: Location of Mounting Holes for AMC-1DPS ............................................................33 Figure 5-3: Location of Mounting Holes for AMC-1DA-RPT4.....................................................34 Figure 5-4: Location of Mounting Holes for AMC-1DA-RPT.......................................................34 Figure 5-5: Location of Mounting Holes for AMC-1D-8R ...........................................................35 Figure 5-6: Monitor Wiring.........................................................................................................36 Figure 5-7 Relay Terminal Connections ....................................................................................37 Figure 6-1: Select Sensor Menu................................................................................................64 Figure 6-2: Select Relay Menu..................................................................................................68 Figure 6-3: Select Zone Menu...................................................................................................71 Figure 6-4: Set Options Menu ...................................................................................................74 Figure 6-5: Set Interface (RS-485) Menu ..................................................................................78 Figure 6-6: Set IP Configuration Submenu................................................................................80 Figure 6-7: Set BACnet Configuration Submenu .......................................................................82 Figure 6-8: Set MODBUS Configuration....................................................................................84 Figure 6-9: Set Analog Outputs.................................................................................................86 LIST OF TABLES Table 4-1: System Configuration DIP Switch Functionality ........................................................20 Table 4-2 RS-485 driver IC .......................................................................................................22 Table 4-3: Dual-Row 5-Pin Terminal Block Pin-out ...................................................................22 Table 4-4: Dual-Row 4-Pin Terminal Block Pin-out ...................................................................23 Table 4-5: RS-485 Field Configuration ......................................................................................23 Table 4-6: Cable Shield Termination .........................................................................................24 Table 4-7: RJ-45 Connector Pin-out..........................................................................................25 Table 4-8: USB Standard A-Type Connector Pin-out ................................................................26 Table 4-9 Wiring between Relay and Monitor Connectors.........................................................27 Table 4-10: Audio Alarm and Terminal Block Pin-out ................................................................28 Table 4-11: Fail Relay Terminal Block and Pin-out....................................................................29 Table 4-12: Integral Analog Output and Terminal Block Pin-out ................................................30 Table 4-13: Analog Output and Voltage vs Current Switches ....................................................30 Table 5-1 1DBx MODBUS Connections....................................................................................36 iv Digital Monitor AMC-1DBx Series User Manual Table 5-2: Audio Alarm Operation .............................................................................................39 Table 5-3: Enable Audio Cadence.............................................................................................39 Table 6-1: Select Sensor Submenu...........................................................................................65 Table 6-2: Select Relay Menu ...................................................................................................69 Table 6-3: Select Zone Submenu..............................................................................................72 Table 6-4: Set Options Submenu ..............................................................................................75 Table 6-5: Set Interface Submenu.............................................................................................79 Table 6-6: Set IP Configuration Submenu .................................................................................81 Table 6-7: Set BACnet Configuration Submenu ........................................................................83 Table 6-8: Set MODBUS Configuration Submenu.....................................................................85 Table 6-9: Analog Out Submenu...............................................................................................87 v Digital Monitor AMC-1DBx Series User Manual 1 INTRODUCTION 1.1 OVERVIEW This manual has been prepared to assist you in becoming familiar with the Armstrong AMC1DBx Digital Monitor. This manual contains the information necessary to install and operate the AMC-1DBx Digital Monitor and is intended for personnel who are responsible for installing and operating this equipment. 1.2 SAFETY CONVENTIONS The following safety conventions are used in this manual to indicate safety practices that should be adhered to when installing or operating the Digital Monitor. ELEMENT CONVENTION NOTE Used to highlight additional information pertinent to the process being described. CAUTION Used to highlight processes that should be performed with care and to obtain the best result. WARNING USED TO HIGHLIGHT PROCESSES THAT MUST BE PERFORMED WITH CARE TO AVOID POSSIBLE DANGEROUS SITUATIONS TO EQUIPMENT OR PERSONNEL. 1.3 OTHER DOCUMENTS Refer to the following documents for additional and amplifying information when using and interfacing with the AMC-1DBx Digital Monitor: AMC Manager User Manual AMC-1DBx BAS Interface Manual AMC400 Series User Manual These additional manuals may be requested from Armstrong Monitoring Corp. 6 Digital Monitor AMC-1DBx Series User Manual 2 GENERAL INFORMATION 2.1 WARRANTY The Digital Monitor AMC-1DBx is warranted against defects in material and workmanship for a period of two (2) years from date of shipment. During the warranty period, The Armstrong Monitoring Corporation (AMC) will repair or replace components that prove to be defective in the opinion of AMC. AMC is not liable for auxiliary interfaced equipment, or consequential damage. This warranty shall not apply to any product, which has been modified in any way, which has been repaired by any other party other than a qualified technician or authorized AMC representative, or when such failure is due to misuse or conditions of use. Any equipment deemed to be defective by the user should be returned to The Armstrong Monitoring Corporation for evaluation. For information about returning products, refer to the PRODUCT RETURN section in this manual. 2.2 LIABILITY CAUTION All AMC products must be installed and maintained according to instructions to ensure proper operation. Only qualified technicians should install and maintain the equipment. AMC shall have no liability arising from auxiliary interfaced equipment, for consequential damage, or the installation and operation of this equipment. AMC shall have no liability for labor or freight costs, or any other costs or charges in excess of the amount of the invoice for the products. THIS WARRANTY IS IN LIEU OF ALL OTHER WARRANTIES, EXPRESSED OR IMPLIED, AND SPECIFICALLY THE WARRANTIES OF MERCHANTABILITY AND FITNESS FOR A PARTICULAR PURPOSE. THERE ARE NO WARRANTIES THAT EXTEND BEYOND THE DESCRIPTION ON THE FACE THEREOF. WARNING USE THE PROPER SAFETY PRECAUTIONS AND CHECK TO ENSURE THE WORKING AREA IS FREE FROM HAZARDS DURING INSTALLATION OR WHEN PERFORMING MAINTENANCE. 2.3 MODIFICATIONS AND SUBSTITUTIONS Due to an ongoing development program, AMC reserves the right to substitute components and change specifications at any time without incurring any obligations. 2.4 PRODUCT RETURN All products returned for warranty service will be by prepaid freight. Please obtain a Return Material Authorization (RMA) number from AMC prior to shipping and ensure this RMA number is clearly visible on the outside of the shipping container. Material shipped without a RMA number issued by AMC will be rejected and returned. All products returned to the client will be freight collect. 7 Digital Monitor AMC-1DBx Series User Manual Service Department contact information: Web: www.armstrongmonitoring.com North America toll free: 1 (800) 465-5777 2.5 GLOSSARY Term BACnet Description Building Automation and Control networks. BACnet is a communications protocol for building automation and control networks. It is an ASHRAE, ANSI, and ISO standard protocol. BACnet allows communication of building automation and control systems for applications such as heating, ventilating, and air-conditioning control, lighting control, access control, and fire detection systems and their associated equipment. The BACnet protocol provides mechanisms for computerized building automation devices to exchange information, regardless of the particular building service they perform. BAS Building Automation System. The control system is a computerized, intelligent network of electronic devices designed to monitor and control building mechanical and lighting systems. Bps Bits per Second. In telecommunications and computing, bit rate (sometimes written bitrate, data rate or as a variable R) is the number of bits that are conveyed or processed per unit of time. DCS Distributed Control System. The control system is a computerized, intelligent network of electronic devices designed to monitor and control the mechanical and lighting systems in a building. EMT and EMI Electrical Metal Tube conduit also adds an added degree of electrical shielding against EMI (Electro Magnetic Interference) from devices such as RF (Radio Frequencies) radio sources. IP The Internet Protocol (IP) is the principal communications protocol used for relaying datagrams (also known as network packets) across an internetwork using the Internet Protocol Suite. Responsible for routing packets across network boundaries, it is the primary protocol that establishes the Internet. IP Address An IP address consists of four numbers, each of which contains one to three digits, with a single dot (.) separating each number or set of digits. Each of the four numbers can range from 0 to 255. An example IP address is: 78.125.0.209. MODBUS Modbus is a serial communications protocol published by Modicon in 1979 for use with its programmable logic controllers (PLCs). Simple and robust, it has since become one of the de-facto standard communications protocols in the industry, and it is now amongst the most commonly available means of connecting industrial electronic devices. MODBUS ASCII Modbus ASCII is used in serial communication and makes use of ASCII characters for protocol communication. The ASCII format uses a longitudinal redundancy check checksum. Modbus ASCII messages are framed by leading colon (‘:’) and trailing newline (CR/LF). MODBUS RTU Modbus RTU is used in serial communication and makes use of a compact, binary representation of the data for protocol communication. The RTU format follows the commands/data with a cyclic redundancy check checksum as an error check mechanism to ensure the reliability of data. Modbus RTU is the most common implementation available for Modbus. A Modbus RTU message must be transmitted continuously without inter-character hesitations. Modbus messages are framed (separated) by idle (silent) periods. 8 Digital Monitor AMC-1DBx Series User Manual Parity PLC QVGA Router UART UDP UI Zone RS-485 A parity bit is a bit that is added to ensure that the number of bits with the value one in a set of bits is even or odd. Parity bits are used as the simplest form of error detecting code. There are two variants of parity bits: even parity bit and odd parity bit. When using even parity, the parity bit is set to 1 if the number of ones in a given set of bits (not including the parity bit) is odd, making the number of ones in the entire set of bits (including the parity bit) even. If the number of on-bits is already even, it is set to a 0. When using odd parity, the parity bit is set to 1 if the number of ones in a given set of bits (not including the parity bit) is even, keeping the number of ones in the entire set of bits (including the parity bit) odd. If the number of set bits is already odd, the odd parity bit is set to 0. In other words, an even parity bit will be set to "1" if the number of 1's + 1 is even, and an odd parity bit will be set to "1" if the number of 1's +1 is odd. A Programmable Logic Controller (PLC) or programmable controller is a digital computer used for automation of electromechanical processes, such as control of machinery on factory assembly lines, amusement rides, or light fixtures. The Quarter Video Graphics Array (also known as Quarter VGA, QVGA, or qVGA) is a popular term for a computer display with 320×240 display resolution. QVGA displays are most often used in mobile phones, personal digital assistants (PDA), and some handheld game consoles. Often the displays are in a “portrait” orientation (i.e., taller than they are wide, as opposed to “landscape”) and are referred to as 240×320. A network device that forwards packets from one network to another. Based on internal routing tables, routers read each incoming packet and decide how to forward it. The destination address in the packets determines which line (interface) outgoing packets are directed to. In large-scale enterprise routers, the current traffic load, congestion, line costs and other factors determine which line to forward to. A Universal Asynchronous Receiver/Transmitter, abbreviated UART, is a type of "asynchronous receiver/transmitter", a piece of computer hardware that translates data between parallel and serial forms. UARTs are commonly used in conjunction with communication standards such as EIA RS-232, RS-422 or RS-485. The universal designation indicates that the data format and transmission speeds are configurable and that the actual electric signalling levels and methods (such as differential signalling etc.) typically are handled by a special driver circuit external to the UART. User Diagram Protocol – see IETF RFC 768 User Interface, the space where interaction between humans and machines occurs. An area which is being monitored for which an alarm anywhere in the zone will cause the same result – i.e. if there are three sensors in “Zone 1” and if any of those sensors goes into alarm “Fan A” will turn on. If there were only one sensor per zone, each would turn on its own fan. Rs-485 is a standard defining the electrical characteristics of drivers and receivers for use in balance digital multipoint systems. The standard is published by the Telecommunications Industry Association/Electronic Industries Alliance (TIA/EIA). 9 Digital Monitor AMC-1DBx Series User Manual 3 PRODUCT INFORMATION The following information is provided for the AMC-1DBx Series Digital Monitor. The Digital Monitor AMC-1DBx Series consists of several optional assemblies. The product information for those assemblies, if provided, is found in the following sections: 3.1 DIGITAL MONITOR AMC-1DBx 3.2 AMC-1DPS Power Supply 3.3 AMC-1DA-RPT4 (RS-485 4-Port Repeater) 3.4 AMC-1DA-RPT (RS-485 Single Port Repeater) 3.5 AMC-1D-8R (RS-485 8-Relays, 2-Analog Outputs) This following section provides information about part numbers and serial numbers. 3.1 DIGITAL MONITOR AMC-1DBx Part Number AMC-1DB_______ Serial Number _______________ MAC Address 4C-80-4F-__-__-__ Warranty Period 2 Years Power Supply Requirement 120 VAC, 60 Hz, 100 VA 24V AC/DC 4A Operating Temperature -20 °C to +40 °C (-4 °F to + 104 °F) Operating Pressure Ambient atmospheric pressure Relative Humidity 0 – 95% non-condensing Buzzer 90 dBa Relay Ratings CAUTION Maximum Rated current A Maximum Rated voltage DC/AC V DC/AC Single phase motor rating (230 V AC) kW Breaking capacity DC1: 30V A 10 30/240 0.37 10 All AMC products must be installed and maintained according to instructions to ensure proper operation. Only qualified technicians should install and maintain the equipment. 10 Digital Monitor AMC-1DBx Series User Manual 3.2 AMC-1DPS Power Supply Part Number __________________ Serial # __________________ Warranty Period 1 year Model/Type Specific AMC-1DPS-7A Power Requirement 120VAC 3.6A 60Hz 4A 120V Slow Blow Input Fuse 10A 120V Output Fuse Slow Blow 3AG 24VDC 7A Secondary Power Dimensions 406.4mm H x 406.4mm W x 152.4mm D (16” x 16” x 4”) NEMA1(Metal): 10.5 kg Weight (23 lbs) 0°C to +40°C Operating Temperature. (32°F to +104°F) Operating Pressure...… Ambient Atmospheric Pressure 0 – 90% non-condensing Relative Humidity 11 Digital Monitor AMC-1DBx Series User Manual 3.3 AMC-1DA-RPT4 4 Port Repeater Part Number __________________ Serial # __________________ Warranty Period. ……….. 1 year Power Requirement….. 9 – 30VDC 30 mA Input Fuse……………… None Enclosure Nema 1 (Metal) wall mount, with conduit knockouts Dimensions 305mm H x 305mm W x 127mm D (12” x 12” x 5”) Weight NEMA1(Metal): 10.6 kg (23 lbs) Operating Temperature. -40°C to +85°C (-40°F to +185°F) Operating Pressure...… Ambient Atmospheric Pressure Relative Humidity…….… 0 – 90% non-condensing 12 Digital Monitor AMC-1DBx Series User Manual 3.4 AMC-1DA-RPT Single Port Repeater Part Number __________________ Serial # __________________ Warranty Period. ……….. 1 year Power Requirement….. 9 – 30VDC 30 mA Input Fuse……………… None Enclosure Nema 1 (Metal) wall mount, with conduit knockouts Dimensions 203 mm H x 203 mm W x 102mm D (8” x 8” x 4”) Weight NEMA1(Metal): info to be added Operating Temperature. -40°C to +85°C (-40°F to +185°F) Operating Pressure...… Ambient Atmospheric Pressure Relative Humidity…….… 0 – 90% non-condensing 13 Digital Monitor AMC-1DBx Series User Manual 3.5 AMC-1D-8R RS-485 8-Relays, 2-Analog Outputs Part Number __________________ Serial # __________________ Warranty Period. ……….. 1 year Power Requirement….. 24VDC None Input Fuse……………… Enclosure Nema 1 (Metal) wall mount, with conduit knockouts 254mm H x 254mm W Dimensions x 127mm D (10” x 10” x 5”) Weight NEMA1(Metal): 3.8 kg (8.4 lbs) Operating Temperature. 0°C to +55°C (32°F to +131°F) Operating Pressure...… Ambient Atmospheric Pressure Relative Humidity…….… 0 – 90% non-condensing 14 Digital Monitor AMC-1DBx Series User Manual 4 PRODUCT DESCRIPTION This section provides a general product description about the AMC-1DBx gas monitor. 4.1 GENERAL DESCRIPTION The Gas Monitor AMC-1DBx provides for the power and monitoring of attached sensors. Initially, the communications with the sensors is via digital highways employing RS-485/MODBUS. Actions such as relay activation and/or alarm notification result from information from the sensors, combined with user configurations (i.e. thresholds and timers). User displays provide detailed information on the operation of the monitor and attached devices. The system state/status is reported to supervisory systems through the use of multiple interfaces; contact transfer on relays, current loop interfaces, and digital communications employing protocols such as BACnet and MODBUS. The digital monitor communicates with the digital devices (i.e. AMC400 transmitter/sensors) over RS-485. The monitor supports four (4) RS-485 interfaces for this purpose. Up to 988 transmitter/sensors are supported. The monitor also provides 24VDC power for powering a limited number transmitters/sensors (up to 20 AMC-400). The AMC-1DBx Digital Monitor provides the following functionality: Automatic scanning of up to 988 AMC-400 network sensors Sensors may be assigned to any of 128 zones. 4 integral analog outputs plus up to 2, AMC-1D-8R (2 cards per downstream interface) with 2 analog outputs per card. One analog output is assignable to each zone to reflect the zone’s maximum or average gas concentration. Independent alarms per zone; ALARM1, ALARM2 ALARM3 and FAIL. Triple threshold alarm set points; alarm ON and alarm OFF gas concentrations. Alarm thresholds may be independently set for each individual transmitter/sensor. 16 integral SPDT 10A relays plus up to 8 AMC-1D-8R (2 cards per downstream interface) with 8 relays each per card . Each relay is user selectable to be linked to any combination of sensor sources: ALARM3, ALARM2 ALARM1 and FAIL for all 128 zones. Independent sensor activation delay to turn ON relays, minimum run time and post run time delays to turn Off relays. Four RS-485 / MODBUS highways to communicate with MODBUS slaves (AMC-400 transmitters and relay modules). Front panel LCD and membrane keypad user interface. 15 Digital Monitor AMC-1DBx Series User Manual Figure 4-1 shows the Typical System Network Diagram for the AMC-1DBx Digital Monitor. Building Automation System MODBUS Building Automation System BACnet RS-485 MODBUS AMC Digital Monitor 1DBx Release 1.0 Maximum 988 Transmitters Maximum 128 Zones Maximum 80 Relays Maximum 20 Analog Outputs 10/100BT Ethernet BACnet AMC-1DB Gas Monitor SENSOR√988CO 0 PPM 16x Relay 4x Analog Output 120VAC 24V AC/DC Optional 4x RS-485 Interfaces to MODBUS Slaves On each RS-485 Interface - Up to 247 Devices -Up to 2 Relay Modules 8x Relay 2x Analog Output 8x Relay 2x Analog Output Relay Module Relay Module RS-485 MODBUS RS-485 MODBUS 8x Relay 2x Analog Output 8x Relay 2x Analog Output Relay Module Relay Module RS-485 MODBUS RS-485 MODBUS Figure 4-1: Typical System Network Diagram Figure 4-2: Digital Monitor AMC-1DBx Front Cover shows a view of the AMC-1DBx Digital Monitor front cover. 4.1.1 Monitor Features FEATURE DESCRIPTION 1. System Status 1 x Green SYSTEM LED: Power indicator representing power supply health. 1 x Amber FAULT LED: Fault indicator representing system health. 2. ALARM Indication 3 x Red LEDS: Indicators representing 3 alarm indications. OFF – Typically, gas concentration at transmitter(s) is below alarm thresholds. ON – Typically, gas concentration at transmitter(s) has exceeded alarm threshold. 3. MODBUS Operation 1 x Amber LED: Blinks ON when the controller sends MODBUS traffic. 1 x Green LED: Blinks ON when the controller receives MODBUS traffic. 16 Digital Monitor AMC-1DBx Series User Manual 4. ETHERNET 1 x Green LED to indicate Link Activity 1 x Green/Red LED to indicate Link Speed (10/100) Collision 5. Display A QVGA LCD with backlight used to display menu system operation. 6. DOWN Pushbutton Editing pushbuttons used to scroll through the current menus, select parameters, and increment or decrement selected parameter options or values. 7. BACK Pushbutton Editing pushbutton used to move to the previous highest menu level, or exits setup mode from the top level of the setup menu. 8. ENTER Pushbutton Editing pushbutton that selects a sub-menu or confirms a menu (parameter) choice. 9. RESET RELAY Pushbutton When pressed, resets any latching relays, providing the alarm condition has subsided. 10. TEST Pushbutton When pressed, causes continuous activation of all relay outputs (energized or de-energized, depending on configuration), activation of the system fail relay output (to the de-energized state), and continuous activation of the audio alarm (if enabled). Sensor processing and updating of internal status and timers continues. When released, all outputs return to normal operation 11. HOLD Pushbutton While pressed during normal operation, this pushbutton freezes the display on the currently displayed sensor until it is released. Upon release, the display immediately advances to the next sensor (depending on the display mode selected), allowing the HOLD pushbutton to be used to quickly step through multiple sensors 17 Digital Monitor AMC-1DBx Series User Manual 12. SILENCE Pushbutton When pressed, this pushbutton silences the audible alarm indication resulting from all active sensor alarms for an individual, adjustable, preset length of time within the range of 0 to 60 minutes or infinite. Set its value to “0” to disable the acknowledge feature. Configure this pushbutton to also reset all associated relay output indications, subject to defined minimum run times for each relay. Pressing the SILENCE pushbutton in response to new or recurring alarm conditions resets the acknowledge timer to the preset time, including conditions previously acknowledged. Note: Sensor failure indications cannot be acknowledged, except to reset the system fail relay. MODBUS OPERATION ETHERNET ALARM INDICATION BACK PUSHBUTTON ENTER PUSHBUTTON SYSTEM STATUS HOLD PUSHBUTTON UP PUSHBUTTON DOWN PUSHBUTTON SILENCE PUSHBUTTON RESET RELAY PUSHBUTTON TEST PUSHBUTTON Figure 4-2: Digital Monitor AMC-1DBx Front Cover 4.1.2 Monitor Components The Gas Monitor AMC-1DBx consists of a number of components which are described in the following paragraphs. 18 T P11 R173 SPEED / COLLISION L6 +C153 Q3 Q2 D17 1 R80 C147 R43 C65 R160 Q4 D22 C148 SH R81 T P9 R39 R44 R16 IE R17 C113 R86 LD 1 R174 J1 B 75 AS R163 J11 C52 TE C87 RN4 RN2 C86 C138 C140 C139 C141 C132 L5 C118 R122 C114 C60 R85 R M SH 1 R152 R142 R135 R131 IE T P23 LD R106 R6 C75 R32 1 C74 RN7 R166 TE T P10 R19 R13 M J O 17 D 6 BU S U6 C42 MH11 RN6 R91 C88 C55 R35 R5 C43 R 1 R56 R51 M 1 K T P21 IE C151 1 +D21 A R94 R88 R73 R68 R57 R53 SH MH12 RN3 T P18 R72 R67 U5 U4 RN1 T P6 C41 L4 L3 LD 1 C67 R69 L1 L2 C56 C10 C21 C76 C8 C61 C64 C59 M J1 O 7 D 7 BU S R 2 1 M C134 C106 C103 C101 C81 C84 C85 C82 C83 C89 C90 C92 TE R165 J9 R101 R92 R79 R74 R70 R58 R54 R52 R50 R46 C46 C40 C36 C22 R9 J2 K 1 S C45 C38 C51 C63 T P16 IE MH9 H C150 D19 A T P20 C143 C126 C25 C28 LD C12 C54 M R105 R95 R89 R78 R71 R61 R55 R10 C23 R C26 C17 TE R40 C108 C24 O J17 D 8 B U S3 R164 C107 MH6 M C11 1 C9 D2 K 1 J6 T P14 IE R140 C149 K D20 A C15 C19 SH C112 T P15 U8 U7 A K C115 C102 C99 C72 D6 LD C142 C34 A C53 C133 D7 C32 R162 TE C127 K M D5 MH7 A MH8 C44 R M J O 17 D 9 B U S4 MH13 R138 C124 C116 C117 U2 A C31 T P12 R154 C136 C135 R125 K D18 A 1 K C50 + A D16 K R144 J7 - D4 + K R93 T P17 1 R146 C131 C122 C111 R172 R132 SW 12 ANA1 C29 A D12 R133 1 K C110 C109 T P19 R170 1 1 R1 C1 T P1 C14 R12 R4 C2 T P3 R168 R169 1 T P22 SW10 SW7 SW6 SW3 SW9 R171 J180 Install U9 into socket T P8 SW8 SW5 SW4 C57 R41 ON MH14 Install U10 into socket J181 C47 R29 C16 R18 C5 R7 8 7 6 5 43 2 1 R155 C146 C144 MH5 R139 R156 C130 1 1 1 J43 TO RELAYS 1 TO 4 J27 TO RELAYS 5 TO 8 1 J12 SW 11 SW 13 TO RELAYS 13 TO 16 ANA3 ANA4 1 J25 TO RELAYS 9 TO 12 T P13 C6 C35 C4 T P2 R143 C125 SW 14 ANA2 D1 D10 A 1 + + J10 C137 C128 D14 C105 PCB5 Q1 J3 NC COM NO SYSTEM FAIL TO BUZZER MH15 PCB2 1 R118 R127 R148 R33 R130 R119 R128 R149 C58 RN5 R87 J8 R112 C68 1 R47 R14 R36 R113 MH4 C39 C18 C30 C78 C73 C70 C95 C97 C94 C71 C79 C37 R96 U3 C129 C120 C62 C77 R97 J1 R98 C33 1 K R38 MH3 R99 C27 C48 R11 C49 D3 R153 SW2 R167 R150 R129 LINK STATUS R158 R151 R159 C96 C91 R100 C66 R82 R121 C121 R141 R161 R15 R124 R136 R83 1 R31 C98 1 R90 R104 R84 J19 C154 C119 R37 K A 1 C104 J16 1 J22 1 R115 C69 1 C93 1 A 1 R48 J18 1 R116 T P4 R109 R3 C20 1 R145 R2 R20 R23 PCB6 1 C3 C123 19 + Figure 4-3: Digital Monitor Components + SYSTEM R24 FAULT R134 ALARM1 R137 ALARM2 + ALARM3 BT-H1 BATTERY FOR REAL TIME CLOCK C145 SW1 MH10 D15 C80 C152 A PCB1 T P7 1 D13 T P5 1 K A D11 K D9 A K D8 + R157 1 RS485 TX + 1 1 1 RS485 RX + 1 SYSTEM CONFIGURATION DIP SWITCH MH1 MH16 MH2 Digital Monitor AMC-1DBx Series User Manual PCBA POWER ENTRY AC2 F1 J41 J34 J14 J28 J15 J17 J30 J29 J42 AC1 J23 CHASSIS GROUND R76 J24 J44 RS-232 J26 AUDIO ALARM 2NO 1NO J38 1COM 2COM 1NC ANALOG OUTPUTS CABLE SHIELD CABLE SHIELD J39 GROUND GROUND SIGNAL3 SIGNAL4 CABLE SHIELD J40 CABLE SHIELD GROUND GROUND SIGNAL1 SIGNAL2 RS485B USB 2NC POWER GROUND RS485B J37 RS485A MODBUS4 J13 CABLE SHIELD POWER GROUND RS485B J32 RS485A RS485B MODBUS3 CABLE SHIELD POWER J31 GROUND J36 RS485A CABLE SHIELD MODBUS2 J20 POWER GROUND J35 RS485A RS485B MODBUS1 J21 CABLE SHIELD GROUND TO BUILDING AUTOMATION J33 RS485A CABLE SHIELD ETHERNET 10/100BASE-T C100 Digital Monitor AMC-1DBx Series User Manual 4.1.2.1 System Configuration DIP Switch The functionality for the supplied dipswitch is identified in Table 4-1. Table 4-1: System Configuration DIP Switch Functionality Switch 1 Function Audio Disable Normal Position ON 2 Delay Disable ON OFF to disable all sensor activation delays 3 Zero Buff Disable ON OFF to disable zero buffering 4 Min Run Disable ON OFF to disable all relay minimum run times 5 CAL Mode OFF ON to activate CAL mode 6 Post Run Timer ON OFF to disable the POST run timer 7, 8 Language Select See Description Description OFF to disable audio alarm 7 OFF, 8 OFF = ENGLISH 7 ON, 8 OFF = FRENCH 7 OFF, 8 ON = SPANISH (future) 7 ON, 8 OFF = GERMAN (future) Refer to Figure 4-3: Digital Monitor Components for the location of the System Configuration DIP switch. Figure 4-4 System Configuration DIP Switch 1. Audio Disable: When in the OFF position this switch will prevent the external buzzer and annunciator from activating on sensor alarm or device failure. Please refer to 4.1.2.10 for connection detail of the buzzer and annunciator. The buzzer can be activated for the following reasons: System or Device (Sensor/Relay/Analog Output) Failure, Sensor or Zone Sensor Alarm, Power-up Data Base Checking, 20 Digital Monitor AMC-1DBx Series User Manual SILENCE, RESET_RELAY, TEST or Data Base initialization pushbutton pressed. Note: Audio beeps for SlLENCE, RESET_RELAY, TEST or Data Base initialization pushbutton action are not disabled by this switch. 2. Delay Disable: When in the OFF position this switch will override and programmable delays associated with sensor activation. Sensor activation delays can be configured from 03600 seconds for Alarm1-3 and Fail sensor thresholds. 3. Zero Buffering Disable: When in the OFF position this switch will override the programmable Zero Buffering value. Zero Buffering is used to inhibit display of gas concentration below a specific threshold. When below this value the sensor will display 0 gas concentration. It can be configured from 0-5% of full scale gas concentration and applies to the all sensors. Note: An analog output will still assert its assigned zone sensor(s) gas concentration regardless of the zero buffer setting. 4. Minimum Run Timer Disable: When in the OFF position this switch will override any relays currently executing their minimum run timer requirements, thus releasing them from their energised or de-energised state. Minimum run timers can be configured for each relay from 0 to 60minutes and will hold an active relay for the duration once a sensor/zone sensor alarm has occurred. Note: Scheduled zone events don’t utilise Minimum Run Timers. 5. Calibration Mode: When in the OFF position this switch will ensure all sensor/zone sensor alarms will be de-activated and ignored. This will include any current relay activations held active by their associated minimum and post run timers. Fail devices status will still be displayed, but external audio buzzer and annunciator will be de-activated. Calibration mode should be used when making configuration changes through logged in menu navigation, AMC Manager downloading or MODBUS writes to prevent unnecessary transitions on building’s fan controller driven by relays. Note: An analog output will still assert its assigned zone sensor(s) gas concentration regardless of calibration mode. 6. Post Run Timer Disable: When in the OFF position this switch will override any relays currently executing their post run timer requirements, thus releasing them from their energised or de-energised state. Post run timers can be configured for each relay from 0 to 60minutes and will hold an active relay for the duration once a sensor/zone sensor alarm has cleared. Note: Scheduled zone events don’t utilise Post Run Timers. 4.1.2.2 RS-485 Five RS-485 interfaces are provided on terminal blocks, one for each of four MODBUS interfaces to transmitters and a single RS-485 interface to a Building Automation System. To facilitate field replacement, the RS-485 driver IC is mounted in a socket. Power down the Digital Monitor before replacing any RS-485 driver ICs. CAUTION Ensure proper ESD precautions are taken before handling ICs. 21 Digital Monitor AMC-1DBx Series User Manual Table 4-2 RS-485 driver IC Interface IC Location To Building Automation J175 To MODBUS 1 J176 To MODBUS 2 J177 To MODBUS 3 J178 To MODBUS 4 J179 The four downstream RS-485 interfaces are provided on dual-row, 5-pin terminal blocks. Pins on the upper row are wired in parallel to the lower row to facilitate placing the monitor in the middle of the bus, thereby requiring two wires per connection. The terminal block supports wire gauges from 14 to 26 AWG. Silks screening is provided on the PCB to identify each pin by function. Refer to Figure 4-3: Digital Monitor Components to identify the connectors associated with each interface. Table 4-3 shows the pin-out for the dual-row t-pin terminal block. Figure 4-5 Downstream RS-485 Interfaces Table 4-3: Dual-Row 5-Pin Terminal Block Pin-out Signal Cable Shield Terminal Block Pin # 1 RS-485 A Signal 2 RS-485 B Signal 3 Ground 4 Power 5 22 Digital Monitor AMC-1DBx Series User Manual The BAS RS-485 interface is provided on a dual-row, 4-pin terminal block. Pins on the upper row are wired in parallel to the lower row to facilitate placing the monitor in the middle of the bus, thereby requiring two wires per connection. The terminal block supports wire gauges from 14 to 26 AWG. Silk screening is provided on the PCB to identify each pin, by function. Table 4-4 shows the pin-out for the dual-row 4-pin terminal block. Figure 4-6 BAS RS-485 Interface Table 4-4: Dual-Row 4-Pin Terminal Block Pin-out Signal Cable Shield Terminal Block Pin # 1 RS-485 A Signal 2 RS-485 B Signal 3 Ground 4 4.1.2.3 Termination For each RS-485 interface, field configuration is provided. See Table 4-5. Table 4-5: RS-485 Field Configuration Interface Strap Location To Building Automation To MODBUS 1 To MODBUS 2 To MODBUS 3 To MODBUS 4 J16 J22 J17 J15 J14 Strap Position Not at End of Bus End of Bus end of bus DC Termination AC Termination remove 1-2 2-3 remove 1-2 2-3 remove 1-2 2-3 remove 1-2 2-3 remove 1-2 2-3 23 Digital Monitor AMC-1DBx Series User Manual 4.1.2.4 Shield Termination The RS-485 cable is a shielded cable. The cable shield is terminated on the terminal block. How this shield is handled varies based upon the system wiring. A strap allows the user to select different among three options to select the best solution that works in their site. The cable shield is shorted to chassis ground at only one point, in order to avoid ground loops with large currents. Typically, the Digital Monitor connects the cable shield of the MODBUS channel to chassis ground. The cable shield of the interface to the Build Automation System is typically not connected to chassis ground at the Digital Monitor; the Building Automation System would provide this connection. The Digital Monitor provides interface strapping options for connecting the cable shield to ground; No connection to chassis ground Connected directly (shorted) to chassis ground Connected through a parallel resistor-capacitor network to chassis ground Table 4-6: Cable Shield Termination Interface Strap Location To Building Automation To MODBUS 1 To MODBUS 2 To MODBUS 3 To MODBUS 4 J19 J21 J20 J18 J13 Strap Position No Connection Shorted RC Network To Chassis Gnd To Chassis Gnd To Chassis Gnd Remove (Typical) 2-3 1-2 remove 2-3 (Typical) 1-2 remove 2-3 (Typical) 1-2 remove 2-3 (Typical) 1-2 remove 2-3 (Typical) 1-2 4.1.2.5 Bias For each of the downstream RS-485 interfaces, resistors are provided to pull the idle (un-driven) lines to the mark level. 4.1.2.6 Ethernet A 10/100 Base-T Ethernet connection is provided by the monitor. The Ethernet cable is terminated in an RJ-45 connector which is provided. The connector is mounted so that the cable is parallel to the PCB assembly. The connector is mounted along the bottom edge of the printed circuit board. Refer to Figure 4-3: Digital Monitor Components for the location of the Ethernet connector. It is a hybrid connector and has the USB interface integrated into it. 24 Digital Monitor AMC-1DBx Series User Manual Figure 4-7 Ethernet / USB Connector Table 4-7 shows the pin-out for the dual-row 4-pin terminal block. Table 4-7: RJ-45 Connector Pin-out Pin Signal 1 Transmit Positive 2 Transmit Negative 3 Receive Positive 4 Connected to 5, unused, 75R AC termination to chassis ground 5 Connected to 4, unused, 75R AC termination to chassis ground 6 Receive Negative 7 Connected to 8, unused, 75R AC termination to chassis ground 8 Connected to 7, unused, 75R AC termination to chassis ground 4.1.2.7 USB A USB standard-A type connector is provided for interfacing with devices such as USB FLASH drives. The connector is mounted along the edge of the printed circuit board. The USB interface will support USB 1.0 and USB 2.0 devices. Up to 500 mA is available on this interface for powering external devices. Refer to Figure 4-3: Digital Monitor Components for the location of the USB connector. It is a hybrid connector and also has an Ethernet interface integrated into it. Refer to Figure 4-7 Ethernet / USB Connector. Table 4-8 shows the pin-out for the USB standard A-type connector. 25 Digital Monitor AMC-1DBx Series User Manual Table 4-8: USB Standard A-Type Connector Pin-out Pin Signal 1 Vbus (power, +5V) 2 D+ 3 D- 4 Power/Signal Ground shell Chassis Ground 4.1.2.8 Real-Time Clock The real time clock of the monitor has backup power provided by an on-PCBA power source. The real time clock is initially set at the factory and arrives at the customer site with the time as per the manufacturing time zone. The real time clock device may be powered off for as much as 6 mouths between manufacturing and initial customer commissioning. The real time clock will survive power outages lasting weeks without loss of the current time. A 24.5mm 3V (CR2450) lithium coin cell battery is provided on the PCBA to power the real time clock in order to meet the objectives. The battery is replaceable in the field through a battery carrier/socket provided. See Figure 4-8 Battery and Battery Holder for Real-Time Clock. Refer to Figure 4-3: Digital Monitor Components for the location of the battery holder. Figure 4-8 Battery and Battery Holder for Real-Time Clock 4.1.2.9 Relays The monitor is capable of supporting up to 16 relays within the enclosure for controlling HVAC devices. Additional relays are available with remote devices. The relays are connected to the monitor through 8 pin plugs. Refer to 26 Digital Monitor AMC-1DBx Series User Manual Figure 4-3: Digital Monitor Components for the locations of J12, J25, J27 and J43. These connectors are shown in Figure 4-9 8-Pin Headers for Relays below. Figure 4-9 8-Pin Headers for Relays The wiring between the Digital Monitor PCB and the relay is summarized in Table 4-9 Wiring between Relay and Monitor Connectors. Table 4-9 Wiring between Relay and Monitor Connectors Relay Connector 1 2 3 4 J43 J43 J43 J43 5 6 7 8 J27 J27 J27 J27 Coil Coil Positive Negative 1 2 3 4 5 6 7 8 1 3 5 7 Relay Connector 2 4 6 8 27 9 10 11 12 J25 J25 J25 J25 13 14 15 16 J12 J12 J12 J12 Coil Coil Positive Negative 1 2 3 4 5 6 7 8 1 3 5 7 2 4 6 8 Digital Monitor AMC-1DBx Series User Manual 4.1.2.10 External Buzzer and Annunciator An off-board audio alarm is provided with a buzzer located on the side of the enclosure. Facilities are provided to drive a secondary audio alarm. The audio alarms are activated with on-board relay drivers. The terminal block supports wire gauges from 14 to 26 AWG. Connection for the audio alarm is facilitated with terminal block J26 and the External Annunciator is provided with terminal block J38. Refer to Figure 4-3: Digital Monitor Components for the location of J38. Figure 4-10 External Annunciator Connector Table 4-10 shows the pin-out for the audio alarm and terminal block. Table 4-10: Audio Alarm and Terminal Block Pin-out Pin Signal 1 +24V (up to 1.0A) 2 Open Collector to ground 4.1.2.11 System Fail Relay A fault relay is provided on the monitor. The fault relay is a normally energized relay. A power failure will place it in the state which indicates a fault. The software places this relay in the active state (de-energized) upon a failure being detected from any of the sensor/transmitters. The fail relay outputs are available on terminal block J24. The relay is rated for 1A at up to 42VDC/30VAC. Refer to 28 Digital Monitor AMC-1DBx Series User Manual Figure 4-3: Digital Monitor Components for the location of J34. Figure 4-11 System Fault Connector Table 4-11 shows the pin-out for the fail relay and terminal block. The terminal block supports wire gauges from 14 to 26 AWG. Table 4-11: Fail Relay Terminal Block and Pin-out Pin Signal 1 Normally Closed 2 Common 3 Normally Open 4.1.2.12 Analog Outputs There are four integral analog outputs provided to drive VFD (variable frequency drive) motors. Additional analog outputs are available with remote devices. The signal on the analog output is a function (sensor average or peak, averaged over time) of the detected gas levels found on the sensors within a zone. The integral analog outputs can be configured with an switch for voltage or current mode. An analog output can be configured for two ranges; 4-20mA or 0-20mA. These ranges are with reference to current mode, but also determine the full range operation for voltage mode. The 0-20mA range will give full range for voltage mode. In voltage mode the integral analog output will swing from 0 to 10 volts when configured for full range. In current mode the maximum load for an integral analog output is 500 ohms. Please refer to 6.12.21 SET ANALOG OUTPUTS for complete configuration details. Note: Failed sensors have a zero gas level and thus the analog output will reflect this. Disabling a zone will return the analog output to its zero gas level. Disabling an active analog output will leave it with its last gas level. In order to prevent this configure the analog output to out of service mode. 29 Digital Monitor AMC-1DBx Series User Manual A shielded cable is employed to wire this signal to the target system. For each local analog output, a three-position terminal block is provided. The terminal block supports wire gauges from 16 to 26 AWG. Table 4-12 shows the pin-out and description for the integral analog outputs and terminal blocks (39, J40). Table 4-12: Integral Analog Output and Terminal Block Pin-out Pin 1 2 3 4 5 6 Front Row Ch 1 Signal Chassis Ch 3 Signal Chassis Ch1, 3 Signal Ground Ground Signal Ground Ground Back Row Ch 2 Signal Chassis Ch 4 Signal Chassis Ch2, 4 Signal Ground Ground Signal Ground Ground Refer to Figure 4-3: Digital Monitor Components for the location of the Analog Output Terminal block. Figure 4-12 Integral Analog Output Terminal Block The analog output is configured for either voltage or current by the use of a dip switch. Table 4-13: Analog Output and Voltage vs Current Switches Channel Analog Output 1 Analog Output 2 Analog Output 3 Analog Output 4 30 Switch SW12 SW14 SW11 SW13 Digital Monitor AMC-1DBx Series User Manual 4.1.3 Power Supply An integral power supply is provided within the monitor. The monitor provides sufficient power to support up to 20 transmitters (AMC-400) on MODBUS lanes 1 through 4 and requires the use of external AMC-1DPS for powering additional units Manufacturing options allow for the following power sources: 120VAC o Isolation provided by transformer for industrial controls. 24VAC o No Isolation is provided between power inputs and feeds to transmitters. 24VDC o No Isolation is provided between power inputs and feeds to transmitters. The switch/circuit breaker is installed on the DIN rail, the right-hand side, within the enclosure. A terminal block is provided for connecting power at the power entry point. (8 to 24 AWG wiring) A ground lug is provided to connect safety ground to the chassis ground of the enclosure. (2 to 14 AWG wiring) 31 Digital Monitor AMC-1DBx Series User Manual 5 INSTALLATION Follow the guidelines in this section for proper locations and installation of the Digital Monitor AMC-1DBx. In addition to these instructions, ensure installation is compliant with local building and electrical codes. This section covers topics related to installation location, mounting, cable selection, wiring instructions and monitor function programming for the following products: AMC Digital Monitor 1DBx AMC-1DPS AMC-1DA-RPT4 (RS-485 4-Port Repeater) AMC-1DA-RPT (RS-485 Single Port Repeater) AMC-1D-8R (RS-485 8-Relays, 2-Analog Outputs) 5.1 MOUNTING INSTRUCTIONS Follow the guidelines in this section for proper locations and installation of the Digital Monitor AMC-1DBx series monitor. In addition to these instructions, ensure installation is compliant with local building and electrical codes. This section covers topics related to installation location, mounting, cable selection, wiring instructions and monitor function programming for the Digital Monitor AMC-1DBx series monitor. 5.1.1 AMC-1DBx Digital Monitor Mounting Securely fasten the AMC-1DBx gas monitor on a solid, non-vibrating surface or structure. Install the unit where it is not exposed to rain or water spray. Install in an area where the local concentration of gas is unaffected by the presence of ventilation systems and away from sources of interference gases. Mount the monitor where the unit can be observed periodically. For most applications the monitor should be mounted at eye level (1.2 -1.8 m (4-6 ft) from the floor) using the mount provided on the enclosure. See Figure 5-1for mounting-hole locations. WARNING ALL CABLE ENTRY MUST BE MADE THROUGH THE BOTTOM OF THE MONITOR ENCLOSURE ONLY. OTHER ENTRY LOCATIONS COULD ALLOW FOREIGN MATERIAL TO ENTER THE ENCLOSURE, CAUSING POSSIBLE DAMAGE TO THE INTERNAL COMPONENTS. 32 Digital Monitor AMC-1DBx Series User Manual 241 mm (9.500") 327 mm (12.875") Ø 9.5 mm (Ø 0.375") 4 HOLES Figure 5-1: Location of Mounting Holes for AMC-1DBx Digital Monitor 5.1.2 AMC-1DPS 403.6 mm (16.000") 403.6 mm (16.000") MOUNTING HOLES DIA 6.35 mm (0.250") X4 25.4 mm (1.000") TYP. 4 SIDES Figure 5-2: Location of Mounting Holes for AMC-1DPS 33 Digital Monitor AMC-1DBx Series User Manual 5.1.3 AMC-1DA-RPT4 245 mm (9.65") 330 mm (12.996") Ø9.5 mm (Ø0.375") 4 HOLES Figure 5-3: Location of Mounting Holes for AMC-1DA-RPT4 5.1.4 AMC-1DA-RPT 140 mm (5.5") 225 mm (8.875") Ø9.5 mm (Ø0.375") 4 HOLES Figure 5-4: Location of Mounting Holes for AMC-1DA-RPT 34 Digital Monitor AMC-1DBx Series User Manual 5.1.5 AMC-1D-8R 245 mm (9.65") 330 mm (12.996") Ø9.5 mm (Ø0.375") 4 HOLES Figure 5-5: Location of Mounting Holes for AMC-1D-8R 5.1.6 TRANSMITTER/SENSOR MOUNTING Mount the sensor/transmitter on a solid, non-vibrating surface or structure in an area where the ambient concentration of gas is not directly affected by the presence of clean air supply, ventilation systems, or blockage by surrounding articles and sources of interference gases. Please, refer to local codes for sensor/transmitter installation information. The installer is required to provide any mounting hardware that may be required. The recommended mounting height is specified in the SENSOR MODULE(S) SPECIFICATION. The conduit entry is from bottom of box to avoid moisture flow into box through conduit. 5.2 WIRING See Sect 4.1GENERAL DESCRIPTION for specific wire gauges supported by connectors. 5.2.1 Monitor Wiring WARNING POWER SUPPLY: ENSURE TO TAKE ALL RELEVANT SAFETY PRECAUTIONS WHEN HANDLING HIGH VOLTAGE POWER SOURCES. The monitor is available with either 120 VAC, 60 Hz or 24V AC/DC powering options. A terminal block is provided for the power entry connections. 35 Digital Monitor AMC-1DBx Series User Manual Figure 5-6: Monitor Wiring DIGITAL MONITOR AMC-1DBX MAIN PCB BOARD 8 7 6 5 4 3 2 1 1 1 + 1 1 1 1 1 + ON + SW2 1 1 1 1 B T-H 1 B A TTE R YFO R R E A LTIM EC LO C K DISPLAY 1 1 + + 1 TE R D 1 1 SW14 ANA2 SW11 ANA3 4x ANALOG OUTPUT J34 J40 SW13 ANA4 2x AUDIO OUTPUT J39 1 1 1 J25 TO RELAYS 9 TO 12 J27 TO RELAYS 5 TO 8 J43 TO RELAYS 1 TO 4 J44 J42 J38 J12 TO RELAYS 13 TO 16 J41 J37 SW12 ANA1 1 F1 TO MODBUS4 1 1 J24 J28 1 J23 J32 1 J26 J31 TO MODBUS3 MO J17 DB 9 US 4 TOB U ZZE R J36 1 1 M S Y S TE MFA IL J30 1 TE R IEL D J14 TO MODBUS2 MO J DB 178 US 3 SH M J13 J35 J29 1 TE R D J15 J20 + TO MODBUS1 MO J DB 177 US 2 IEL J18 1 1 SH M J17 MO J DB 176 US 1 J22 J21 J16 TO BAS J33 SH IEL TE RM 1 J BA 175 S + SH IELD RM + TE + 1 IELD + SH J19 S P E E D/C O L L IS IO N L IN KS T A T U S 1 5 1 CGND RS485 B 3 RS485 A 1 1. See AMC-1DBX Digital Monitor Wiring Details below J34 J37 2 6 CGND RS485 B 4 3 SGND +24VDC RS485 A 4 2 SGND +24VDC RS485 A RS485 B SHIELD SIG GND AC 1 AC 2 GND VDD V+ Shielded Power cabling is optional TO POWER DISTRIBUTION PANEL L N G Unit 1 CONNECTOR HOT NEUT. GND Table 5-1 1DBx MODBUS Connections 36 Unit 2 Digital Monitor AMC-1DBx Series User Manual MODBUS 1 MODBUS 2 MODBUS 3 MODBUS 4 CGND RS485 A RS485 B J35-3 J35-5 J35-1 J35-4 J35-6 J35-2 J36-1 J36-3 J36-5 J36-6 J36-2 J36-4 J32-1 J32-3 J32-5 J32-2 J32-4 J32-6 J37-1 J37-3 J37-5 J37-6 J37-2 J37-4 SGND +24VDC J30-1 J30-3 J30-2 J30-4 J31-1 J31-3 J31-2 J31-4 J28-1 J28-3 J28-2 J28-4 J34-1 J34-3 J34-2 J34-4 There is a 32 Device limit per RS-485 bus segment. Devices include the 1DBX Monitor, AMC-400 Transmitters, AMC-1DA-RPT Single Port Repeater and AMC-1DA-RPT4 4 port Repeater and AMC-1D-8R (RS-485 8-Relays, 2-Analog Outputs). Repeaters expand the MODBUS capacity by creating additional RS-485 segments. 5.2.2 Relay Connections There are up to 16 SPDT relays which operate as programmed with alarms. For the relay socket terminal connections, see Figure 5-7 Relay Terminal Connections. RELAYS: The relay contacts are available for activating a remote alarm and/or, blower motors and pumps or lighting circuits. RELAY SOCKET TERMINAL CONNECTIONS A2 22 24 21 COIL N/C A1 N/O COM 12 14 11 RELAY DE-ENERGIZED A1 CLOSED 12 COM 11 OPEN 14 RELAY ENERGIZED A2 A1 22 CLOSED 21 COM 24 OPEN OPEN 12 COM 11 CLOSED 14 Figure 5-7 Relay Terminal Connections SENSOR/ TRANSMITTER: ANALOG OUTPUT: Refer to section 4.1.2.2 RS-485. Refer to section 4.1.2.12 Analog Outputs 37 A2 22 OPEN 21 COM 24 CLOSED Digital Monitor AMC-1DBx Series User Manual 5.2.3 Cable Selection The wiring consists of two subsystems: the monitor communication power supply wiring A cable is used to connect the RS-485 signals from the digital monitor to digital transmitters in a bus topology. It is required that shielded, twisted pair, cable, 120 ohm impedance is used for the communications wiring. This bus can be up to 1 Km (1092 yards) in length. An AMC-Repeater is required to extend beyond this distance. Power supply wiring requires two conductors (+24VDC and SGND). The length of the power supply wiring is dictated by the voltage drop in the wiring. Using thicker wire results in longer distances. For best signal transmission and maximum noise rejection, run the cable through a steel conduit (the cable shield must be grounded at the monitor). WARNING ALL CABLES MUST PASS THROUGH CONDUIT SEALS INSTALLED BETWEEN THE HAZARDOUS (CLASS I, DIVISION 1 OR 2) AND NONHAZARDOUS AREAS FOR SAFETY REASONS AND TO COMPLY WITH THE LOCAL MUNICIPAL, PROVINCIAL, STATE, OR FEDERAL ELECTRICAL REGULATIONS. FOR UL ONLY (U.S.), FOLLOW THE NATIONAL ELECTRICAL CODE (NFPA 70) AND THE AUTOMOTIVE & MARINE SERVICE STATION CODE (NFPA 30A0. 5.2.4 External Power Supply Wiring Users must connect the AMC-1DPS Power Supply ground to the Monitor’s SigGnd if the monitor is powered by isolated 120VAC Power Supply and the AMC-1DPS is used to power transmitters/sensors. The 24VDC terminal block for the AMC-1DPS supports wire gauges from 10 to 22 AWG. 5.3 ALARMS Alarm detection for each sensor input may be individually programmed to operate in one of four modes: alarms disabled, alarm thresholds on increasing concentration, alarm thresholds on decreasing concentration, and windowed alarm (high/low) operation. Up to three alarm thresholds may be configured for each sensor input (two thresholds for windowed operation). Each alarm threshold is individually adjustable in increments of % full scale. An adjustable hysteresis value is applied to alarm detection. This hysteresis is provided to prevent multiple alarms and relay oscillation should a sensor level remain near the 38 Digital Monitor AMC-1DBx Series User Manual threshold setting. The hysteresis level is adjustable from 0 to 5% of full scale in 0.1% increments at the system level for all sensors simultaneously. Sensors can also be assigned to zones. Zones have up to four relays assigned to them; three alarm thresholds and one fail. When sensors are assigned to a zone they carry in their alarm thresholds as configured in their sensor properties. Additionally one analog output is assigned to the zone representing the peak or average gas concentration for the assigned sensors. This gas concentration is pre-scale based on gas type. Please refer to APPENDIX A GAS TYPES FULL SCALE AND ALARM VALUES for specific fixed pre-scale values. 5.3.1 Enable Audio Cadence The AMC-1DBx Gas Monitor supports two modes for Audible Alarms; Pulse and Continuous. The AMC-1DBx audio alarm can pulses for various alarm conditions. When external alarm device such as RAM3/RAM4 are connected, the pulse mode causes these attached device(s) to fail (i.e. latching the audio silence). This Audio Cadence sub-menu item allows the user to select the Pulsing or a Continuous alarm signal. Information about the audio alarm operation can found in Table 5-2. Table 5-2: Audio Alarm Operation Status Output Normal Off Device Failure (Sensor, Relay or Analog Out) Slow pulsing or Continuous. Alarm Faster pulsing or Continuous. Notes: 1. The Dipswitch (see Table 4-1: System Configuration DIP Switch Functionality) enables/disables the audio alarm. The Audio Cadence submenu is accessed from the Audible Alarms submenu. Values are changed by using the UP/DOWN, PREVIOUS and ENTER pushbuttons on the front panel of the AMC-1DBx gas monitor as shown in Table 5-3. Table 5-3: Enable Audio Cadence Input (Pushbutton) UP DOWN PREV ENTER Action Toggles between the available options: Continuous Pulse Move up one level in menu system to Set Options. Saves the selection. Advances to the next option Zero Buffering. 39 Digital Monitor AMC-1DBx Series User Manual 6 OPERATION AND CALIBRATION This section provides information about the operation and calibration procedures for the Gas Monitor AMC-1DBx. 6.1 OPERATION The Gas Monitor AMC-1DBx provides the power and monitoring functionality for attached sensors. It communicates with the sensors via digital highways employing RS-485\MODBUS, and can access a maximum of 988 sensors/transmitters (4 interfaces x 247 MODBUS addresses per interface). User displays provide detailed information on the operation of the monitor and attached devices (for example, sensors, relays and analog outputs) through the use of menu and submenu items. The user interface also consist of LEDS as indicated in 4.1.1 Monitor Features. Additionally there is an External Buzzer and Annunciator which offers feedback on the state of the system. Formally the system state/status is reported to supervisory systems through the use of multiple interfaces. These include local devices such as Analog Outputs and digital interfaces employing protocols such as BACnet-IP and MODBUS-RTU. The monitor must be configured to define the sequence of operation. There are several methods to configure the monitor: Using AMC Manager PC Application, Using BAS MODBUS-RTU Interface, Using Monitor’s Menu System. The menu system is password protected for making changes. When the operator is not logged in, they are limited to inspecting the configuration. When the user is logged in, then they can make changes to the configuration. Once logged in any menu navigation, AMC Manager downloads or BAS MODBUS writes will automatically save the current context to the data base storage device (not including USB) device after idle activity of 60 seconds. Idle activity of 30 seconds or more will also transfer current data base state to the system which will include the RS-485, Ethernet and BACnet-IP subsystems. Care must be taken not to power off the system until changes are secure in the data base storage device. Note: Updating the RS-485, Ethernet and BACnet-IP subsystem will cause outages on remote devices. Due to conflicting nature of implementing incomplete data base changes the operator should use the System Configuration DIP Switches to alleviate people’s concerns and protect the buildings fan controllers. Please refer to 4.1.2.1 with respect to Audio Disable and CAL Mode for details. Additionally the Monitor’s USB port can be used to save, restore database and upgrade the firmware. The USB Port with a USB storage device can create and append log files for the following states: 40 Digital Monitor AMC-1DBx Series User Manual Sensor, Relay, Alarm, System, Administration, Security, Communication. 6.2 LCD The user interface includes a QVGA graphical LCD screen with backlight. The following several examples of screen layouts: AMC-1DB Gas Monitor 1.0 Display Log Run Mode The above display can be configured to show AMC logo when system is idle when Option/Display Mode is set for Disp New Alarms only; Disp Alarms only. The top line of the Gas Monitor AMC-1DBx displays the monitor banner, consisting of the product name and software revision. When the system enters alarm or failed sensor it will switch to the sensor status. The following display is example of sensor status: 41 Digital Monitor AMC-1DBx Series User Manual AMC-1DB Gas Monitor 1.0 Display Log Sensor3 Good, No Alarms Remote MODBUS:1 Admin. Enabled MODBUS Address:003 Instance:1 Type: Enhanced AMC411 Number of Alarms:2 Alarm1 Relay:9 Delay:0s Alarm2 Relay:10 Delay:0s Alarm3 Relay: Not Used Fail Relay:4 Delay:0s Sensor Model: N/A Sensor S/N: N/A Calibration Period Days: N/A Days before Calibration: N/A Days before End of Life: N/A Sensor Supply Voltage: N/A Sensor Temperature: N/A -------------------------------- Sensor Status:√S#003 CO 0 PPM The above display can be configured to cycle through sensor device information for each sensor connected to the monitor when Option/Display Mode is set for Disp All Data. Please refer to Get Sensor Status for complete details. Alternatively the display can be configured for relay status. The following display is example of relay status: AMC-1DB Gas Monitor 1.0 Display Log Relay:1 Status Remote MODBUS:1 Admin. Enabled MODBUS Address:001 Instance:1 Type AMC-1D8R -------------------------------- Relay:√004 Alarms 000 De-Energized The above display can be configured to cycle through relay device information for each relay connected to the monitor when Option/Display Mode is set for Disp All Relay. Please refer to Get Relay Status for complete details. 42 Digital Monitor AMC-1DBx Series User Manual 6.3 LEDS The user interface consists of 9 product LEDs, 4 power supply LEDs, and 3 Self-Test indicators. Nine of the product LEDS are present on Front Panel and also the monitor board itself. These include: System Fault Alarm1 Alarm2 Alarm3 RS-485 TX RS-485 RX Ethernet Activity Ethernet Speed/Collision Inside the cabinet there are four power supply LEDs (CH1-CH4 V+) one for each 24v MODBUS channel. Also inside the cabinet are 3 Self-Test LEDs (D1-D3). 6.3.1 System LED The System LED is lit when the system is up and running without problem. This LED will turn off under the following conditions: Startup operation, Runtime operation after watchdog or brown-out reset, IP or BACnet duplication or configuration fault. During startup the System LED will turn on and off as self-test and system startup progresses. During start-up and at various times the self-test indicators D1-D3 may be light up. If these self-test LEDs remain lit a hardware problem exists and this system fault must be reported to qualified technician for repair. The System LED will turn off and remain off during system operation when the reset cause indicates a watchdog or brown-out reset. A watchdog reset indicates software operation was unable to process the operation of the system. A brown-out reset occurs when the internal VDD power supply drops below 3v. A watchdog or brown-out reset must be reported to qualified technician. This fault can be cleared by pressing the HOLD pushbutton. The System LED will turn off when the system detects duplication or configuration problem with the IP and/or BACnet interfaces. The buzzer and External Annuniciator will also be activated as a Pulse or Continuous as defined by the Option Audio Cadence configuration. 6.3.2 Fault LED The Fault LED is illuminated when a device failure is detected by the system. Device failure could be: 43 Digital Monitor AMC-1DBx Series User Manual Failed Sensor Threshold, Missing Remote Device (Sensor, Relay or Analog Output). A failed sensor may be either digital or analog in nature. When a digital sensor fails to respond to a poll request from the digital monitor, the monitor will activate the Fault LED. When the current from an analog sensor is less than (or equal) to the configured fail threshold, the monitor will activate the Fault LED. The typical failed threshold is 2mA for a 4-20mA input current loop. When Fault LED is lit and the Audible Alarms are set for All Alarms & Fail in the Option Audible Alarms configuration; the buzzer and External Annunciator will be activated as a Pulse or Continuous defined by the Option Audio Cadence configuration. 6.3.3 Alarm1 LED The Alarm1 LED is illuminated when a sensor has equaled or exceeded its sensor ALARM1 threshold. When Alarm2 LED is illuminated and the Audible Alarms are set for All Alarms & Fail or All Alarms in the Option Audible Alarms configuration; the buzzer and External Annunciator will be activated as a Pulse or Continuous defined by the Option Audio Cadence configuration. 6.3.4 Alarm2 LED The Alarm2 LED is illuminated when a sensor has equaled or exceeded its sensor ALARM2 threshold. When Alarm2 LED is illuminated and the Audible Alarms are set for All Alarms & Fail or All Alarms in the Option Audible Alarms configuration; the buzzer and External Annunciator will be activated as a Pulse or Continuous defined by the Option Audio Cadence configuration. Also if the Audible Alarms are set for High Alarm Only and the Sensor Alarm Condition is configured for two alarms then the buzzer and External Annuniciator will also be activated. 6.3.5 Alarm3 LED The Alarm3 LED is illuminated when a sensor has equaled or exceeded its sensor ALARM3 threshold. When Alarm3 LED is illuminated and the Audible Alarms are set for All Alarms & Fail, All Alarms, or High Alarm Only in the Option Audible Alarms configuration; the buzzer and External Annunciator will be activated as a Pulse or Continuous defined by the Option Audio Cadence configuration. 44 Digital Monitor AMC-1DBx Series User Manual 6.3.6 RS-485 TX LED This RS-485 TX LED is illuminated for 1 second and turned off for 1 second every time one or more MODBUS character is transmitted. 6.3.7 RS-485 RX LED This RS-485 TX LED is illuminated for 1 second and turned off for 1 second every time one or more MODBUS character is received. 6.3.8 ETHERNET ACTIVITY LED This ETHERNET ACTIVITY LED is illuminated when the physical media has activity. 6.3.9 ETHERNET SPEED/COLLISION LED This ETHERNET SPEED/COLLISION LED is two colors; Green and Red. The Green LED is illuminated when speed of the physical media is 100Mb/s and not Green when physical media is 10Mb/s. This LED will light Red when the physical media detects a collision. 6.3.10 24V POWER SUPPLY LEDS There are four 24V Power Supply LEDS, one for each MODBUS channel. Each channel will be illuminated if the fuse associated with that channel is not open. 6.3.11 Self-Test LEDs (D1-D3) These LEDs will light during various self-test operations and should not be stay illuminated for more that 15 seconds. If these self-test LEDs remain illuminated a hardware problem exists and this system fault must be reported to qualified technician for repair. 6.4 External Buzzer and Annunciator Control The external buzzer and annunciator are activated as a Pulse or Continuous defined by the Option Audio Cadence configuration. The external buzzer and Annunciator will be activated under the following: Alarm1 LED is illuminated with Option Audible Alarms; All Alarms & Fail Alarm2 LED is illuminated with Option Audible Alarms; All Alarms & Fail, All Alarms (with Sensor Alarm Condition set for 2 thresholds. Alarm3 LED is illuminated with Option Audible Alarms; All Alarms & Fail, All Alarms, High Alarm Only. Fault LED is illuminated with Option Audible Alarms; All Alarms & Fail. The external buzzer and annunciator will also be activated when the data base Integrity is checked or when the SILENCE, RESET_RELAY or TEST pushbuttons are pressed and when data base initialization confirmation pushbutton is pressed. 45 Digital Monitor AMC-1DBx Series User Manual 6.5 Analog Outputs The system contains 4 integral analog outputs and can control additional remote analog outputs on each of the 4 MODBUS channels. An analog output can be configured for voltage or current, this configuration is controlled by hardware switches located on the monitor board. There are four switches; one for each integral analog output channel. In voltage or current mode the database configuration can also provide an additional range setting; 0-20mA(0-10V) or 4-20mA(2-10V) this is known as range in the database configuration context. The analog output is assigned to a Zone. An analog output can be configured for peak or average operation and this is known as type in the database configuration context. The peak operation provides the highest gas concentration for the sensors assigned in that zone while the average provides a sum gas concentration over the number of sensors. The gas type definition (at the sensor definition) plays a significant role in the peak and average mechanism. For each gas type definition, there exists system fixed scaling value which is used to pre-scaled gas readings prior to peak detection and sensor gas concentration averaging. Gas types like CO and NO2 have different pre-scale values and are fixed in the monitor’s system. Please refer to the table GAS TYPES FULL SCALE AND ALARM VALUES for specific fixed pre-scale values. A gas type like NO2 which has a highest alarm point set to 3ppm will be pre-scale by 3.3. This will normalizes the gas concentration to the same level as CO which has its highest alarm point set to 100ppm and uses a pre-scale of 1.0. This pre-scaling is applied to the analog output level. An additional scaling can be configured and applied to the analog output above and beyond the gas type fixed prescale mechanism previously discussed and this scaling is known as scale in the database configuration context. It is applied to final peak or average result. Additionally there is a filtering of the analog output over a short period of time; 160seconds. This configuration is known as period in the database configuration context. Remote analog output can take many seconds for their updates and therefore can result in delayed and reduced filtering. Integral analog outputs offer better filtering in this respect. 6.6 Logging The AMC-1DBx can log monitor’s runtime information to various devices and ports. The monitor has several different information categories: Sensor, Relay, Alarm, System, Administration, Security, Communication. The monitor’s information can be logged to the following devices and ports: 46 Digital Monitor AMC-1DBx Series User Manual USB Storage Device, Display (LCD), Printer Port, Console (Remote Telnet over Ethernet). The logging through USB storage device creates and appends specific information to following files: SENSOR, RELAY, ALARM, SYSTEM, ADMIN, SECURITY, COMM. At the end of each day (local time) any files present on the USB storage device will be renamed with the previous date appended to its filename. The system will then create new log files with the name above for each category enabled. The USB log file can be viewed by removing and installing the USB storage device in a PC. User should eject the USB storage device from the Option, Log File, Eject USB menu item. The User does not need to be logged in to eject the USB device. Using the Eject USB menu item will ensure latest information is written to the storage device. When logging to the Display is enabled information items directed to the USB storage device can be concurrently seen on the LCD Display. Note: Enabling Display logging will impact performance of the UI and should be limited to the System category. Some categories such as Sensors can output many records. When logging to Printer Port is enabled all possible information items can be concurrently streamed to the printer port along with default printer data. This streaming to printer port is only available when the Option Serial menu item is configured for Printer. A PC can be used to capture the printer stream into a file with an appropriate communication terminal program such as TeraTerm. When logging to the Console Port is enabled information items directed to the USB storage device can be concurrently streamed to a remote telnet session. This remote telnet session can be available on PC connected to the same Ethernet network as the monitor. 6.7 USB FIRMWARE UPGRADE The AMC-1DBx has a firmware upgrade mechanism through the USB Port triggered after a power-up. User can obtain latest Firmware image files from Armstrong Monitoring. The mechanism uses two files placed on a USB storage device installed into the monitor USB port; an image and check file. The image and check files are matched to each other 47 Digital Monitor AMC-1DBx Series User Manual to a specific version of the firmware. The image version and checksum must match the information in the check file in order for a successful upgrade. The monitor’s operation will only upgrade current or newer versions of the firmware. Upgrade will require initial system power restart and will reboot upon completion. This section contains a procedure for upgrading the Firmware on the AMC-1DBx Gas Monitor from a USB storage device: 1. Install a USB storage device into a PC and connected to ArmstrongMonitoring.com. Navigate your browser to the latest AMC-1DBx firmware location. 2. Download the image and check files onto the USB storage device. The site containing the images may have names similar to 10Aquila_1DBx.rbin_V1.0 and the check file may have names similar to 10Aquila_1DBx.csum_V1.0. Choose and download the latest matching versions of image and check files. 3. On the USB storage device rename the image file to 10Aquila.rbin and check file to 10Aquila.csum. 4. Place the USB storage device into the USB port of the AMC-1DBx Monitor. 5. Cycle the main power on the system to initiate firmware upgrade. If presence of 10Aquila.csum file is detected by Monitor’s operation after restart it will proceed to try to upgrade the firmware. Firmware upgrade will take place after the USB database restore. 6. After about 30seconds the bottom two lines will display: USB to Flash Upgrade DON’T POWER OFF! 7. Upon completion; the Display Log middle area will indicate: FLASH Upgrade: Need to Reboot... If Display and System logs are enabled additionally information may appear in the Display Log middle area pertaining to FLASH Upgrade. 8. System will automatically reboot. The USB storage device will now have the 10Aquila.csum file renamed to 10Aquila.csum_V{Version Number}. This will prevent the upgrade from occurring again. 6.8 AMC MANAGER PC Application The AMC Manager is a monitor database configuration tool that facilitates the configuration of the database associated with this product. It can be used as an alternative to using the menu buttons located on the front panel. It allows quick and easy changes to the monitor’s database including changes to options, sensors, relays, analog outputs and zoning. Additionally, AMC Manager provides a database backup/restore in the event that the current configuration is lost or damaged. When AMC Manager is progressing in the background the middle area of the monitors LCD display will indicate “AMC Manager in use”. 48 Digital Monitor AMC-1DBx Series User Manual Please refer to the supplementary manual 3370405A, AMC Manager User Manual.doc for details. The database can be saved or restored from or to the monitor through the serial communication link or through ADF file placed on a USB storage device. Using the serial communication link requires some initial menu configuration as described in the menu navigation section Set Options, Serial Mode. Using USB storage device to restore database will requires a system restart. Please refer to the section DATABASE ON USB STORAGE DEVICE. 6.9 BACNET-IP INTERFACE BACnet is a communications protocol for building automation and control networks. It is an ASHRAE, ANSI, and ISO standard protocol. The BACnet-IP offers plug and play of objects used for monitoring the state of the system over Ethernet. Please refer to the supplementary manual 3369405A, AMC-1DBx BAS Interface Manual.doc for details. 6.10 BAS MODBUS-RTU INTERFACE The BAS MODBUS-RTU is a RS-485 physical link using the MODBUS-RTU digital communication protocol that facilitates the monitoring of the system operation. Additionally, the BAS MODBUS-RTU can configure the database associated with this product and can be used as alternative to using the menu buttons or AMC Manager PC Tool. Please refer to the supplementary manual 3369405A, AMC-1DBx BAS Interface Manual.doc for details. 6.11 DATABASE ON USB DEVICE Once the monitor’s database is configured and stored in Non Volatile RAM a USB storage device can be used to save it. This database can be loaded in AMC Manager or used to restore the monitor’s database at a later time. This section contains a procedure for saving database on to USB storage device and a procedure for restoring the database from the USB port. In order to save the Database using USB storage device: 1. Install a USB storage device into the USB port on the monitor. 2. Log in to the system through the menu described in the section menu system Logging In. 3. Log out of the menu system. 49 Digital Monitor AMC-1DBx Series User Manual 4. After a moment the bottom two lines will display: USB-DB Saving… Please Wait! 5. Upon success when Display (LCD) logs are enabled; the Display Log middle area will indicate: Database Saved from USB c:\amc-... Database+ Saved from USB c:\amc... The USB storage device will contain the AMC-1DB.ADF file with the name AMC-1DB.ADF_SAVED{_YEAR_MON_DAY_HOUR_MINUTE} The USB storage device will contain the AMC1DB_P.ADF file on the name AMC1DB_P.ADF_SAVED{_YEAR_MON_DAY_HOUR_MINUTE}. These files can now be used to restore the database from a USB storage device. Additionally the AMC-1DB.ADF_SAVED… file can be transferred and opened by the AMC Manager PC tool. 6. If unsuccessful when Display (LCD) logs are enabled; the Display Log middle area will indicate: Can’t Save DB to USB No AMC-1DB.ADF_SAVED… or AMC1DB_P.ADF_SAVED… files will be available on the USB storage device. In order to restore the Database using USB storage device: 1. Rename and place the previous saved ADF file onto the USB storage device with the filename “AMC-1DB.ADF” and the supplement file “AMC1DB_P.ADF. Currently the supplementary file “AMC1DB_P.ADF” cannot be obtained from AMC Manager and must be obtained through saving the database to USB storage device described previously. Additionally future versions of AMC-1DB.ADF obtained from AMC Manager may remove the need for using the supplementary file. 2. Reboot system by power restart. 3. After self-test and during startup the monitor LCD Display will show a progress bar just above the bottom two lines. If the ADF file is found the bottom two lines will display: USB-DB Restoring… Please Wait! 4. Upon success when Display (LCD) logs are enabled; the Display Log middle area will indicate: 50 Digital Monitor AMC-1DBx Series User Manual Database Restore from USB c:\... Database+ Restore from USB c:\.. Monitor database save complete The AMC-1DB.ADF file on the USB storage device will be renamed to AMC-1DB.ADF_RESTORED{_YEAR_MON_DAY_HOUR_MINUTE} The AMC1DB_P.ADF file on the USB storage device will be renamed to AMC1DB_P.ADF_RESTORED{_YEAR_MON_DAY_HOUR_MINUTE}. 5. If unsuccessful when Display (LCD) logs are enabled; the Display Log middle area will indicate: Can’t Restore DB from USB Using previous DB Possible a database mismatch ID message will appear if ADF file is incompatible with existing monitor F/W: Data Base ID Mis-match When restore is unsuccessful the AMC-1DB.ADF and AMC1DB_P.ADF filenames will remain unmodified on USB storage device. 6.12 MENU SYSTEM AND FEATURES 6.12.1 Menu Navigation System setup, configuration and maintenance are performed using the LCD display and the programming keypad located on the front panel of the Gas Monitor AMC-1DBx. Four pushbuttons are provided, labeled BACK, UP, DOWN and ENTER. BACK Pushbutton Moves to the previous highest menu level or exits setup mode from the top level of the setup menu. UP, DOWN Pushbutton Scrolls through the current menus, selects parameters, increments or decrements selected parameter options or values. ENTER Pushbutton Selects a submenu or confirms a menu (parameter) choice. Note: Access to the configuration functions is password protected. All systems parameters, except selection of the default Display Mode, require a passwordprotected log in before any parameters can be modified. 51 Digital Monitor AMC-1DBx Series User Manual 6.12.2 LOGGING IN Entry into System Setup mode is gained by pressing the ENTER pushbutton while in any Display mode. To log into the monitor 1. Press the ENTER pushbutton. The Log In screen is displayed. 2. Press the ENTER pushbutton again. The Enter password screen is displayed. 3. Enter the valid 4-character alphanumeric password. 4. Press ENTER. The Select Sensor menu item is displayed. The default password is 1234. Each digit of the password is blanked while the ensuing (following) digits are being entered. Note: Until a correct password is used to log into the product application, setup data may be viewed but not changed. The user password shall be changeable only after you have logged-in using a valid password. 6.12.3 Changing Password Once logged-in, you can choose to change the 4-character alphanumeric password. To change the password 1. 2. 3. 4. 5. 6. 7. 8. Log into the gas monitor. At the Log In screen, press ENTER. Enter the valid 4-character password. Press ENTER. The Select Sensor menu item is displayed. Press the DOWN pushbutton. The Select Relay menu item is displayed. Continue pressing the DOWN pushbutton until the Change Password screen is displayed. Press ENTER. The New Password screen is displayed. Use the UP pushbutton to set the new password to the 4 alphanumeric characters you want and press ENTER. The Exit Setup screen is displayed. 52 Digital Monitor AMC-1DBx Series User Manual 6.12.4 ADDITIONAL BUTTONS Four additional buttons are provided on the front panel of the Gas Monitor AMC-1DBx. TEST Pushbutton While pressed, this pushbutton causes continuous activation of all relay outputs (energized or de-energized, depending on configuration), activation of the system fail relay output (to the de-energized state), and continuous activation of the audio alarm (if enabled). Sensor processing and updating of internal status and timers continues. When released, all outputs return to normal operation. HOLD Pushbutton While pressed during normal operation, this pushbutton freezes the display on the currently displayed sensor until released. Upon release, the display immediately advances to the next sensor (depending on the display mode selected), allowing the HOLD pushbutton to be used to quickly step through multiple sensors. SILENCE Pushbutton When pressed, this pushbutton silences the audible alarm indication resulting from all active sensor alarms for an individual, adjustable, preset length of time within the range of 0 to 60 minutes or infinite. Set its value to “0” to disable the acknowledge feature. You can configure this pushbutton to also reset all associated relay output indications, subject to defined minimum run times for each relay. Pressing the SILENCE pushbutton in response to new or recurring alarm conditions resets the acknowledge timer to the preset time, including conditions previously acknowledged. Note: Sensor failure indications cannot be acknowledged except to reset the system fail relay. RESET RELAY Pushbutton When pressed, this pushbutton resets any latching relays, providing the alarm condition has subsided. 6.12.5 Menu Options The monitor offers several menu options accessible from the main screen including: Menu Option Get Sensor Status Get Relay Status Get RS-485 Status Get Ethernet Status Set Options Set Interface Description Allows operational status and statistics to be viewed for a specific sensor. Allows operational status and statistics to be viewed for a specific relay. Allows operational status and statistics to be viewed for a specific interface. Allows operational status and statistics to be viewed for the Ethernet interface. Allows configuration of the system-wide configuration items. Allows configuration of the monitor digital interfaces and includes 53 Digital Monitor AMC-1DBx Series User Manual Select Relay Select Sensor Select Zone Change Password Get License Info the following submenu items: Set IP Configuration Set BACnet Configuration Set MODBUS Configuration Set Analog Outputs Provides access to the menu items which configure the system relays. Provides access to the menu items which configure the system sensors. Provides access to menu items for grouping sensors associated with alarm/fail relays and analog output with a provision for a scheduled relay event. Allows changing of the system password, once logged in. Allows you to view the application license information. Since the monitor’s programming functions are password protected, it is necessary to access the login screen. See Menu Navigation. 6.12.6 Allowable Operations When Not Logged In You can navigate menus without logging into the monitor. This feature is provided to allow you to view configuration information. Without logging in, you can view new menu items which provide status/statistics information about transmitters and relays. From the Log In screen, and before entering a password to log in, use the DOWN pushbutton to scroll to and access the following menus: Set Options Select Sensor Select Relay Get Sensor Status Get Relay Status Get RS-485 Status Get Ethernet Status Get License Info Exit Setup 6.12.7 GET SENSOR STATUS The Get Sensor status display allows you to view operational status and statistics about the sensor in question. It is available when system is running with Option/Menu Display Mode set for Disp All Data or through the logged out menu; Get Sensor Status. The bottom two-line display is employed to navigate to the sensor status window. The two-line display indicates; Line 1: menu item title sensor number a check mark (√) indicating the sensor ID is unique within the system Line 2: target gas 54 Digital Monitor AMC-1DBx Series User Manual current gas concentration reading engineering units assigned The bottom first line contains the Sensor number; a check mark indicates the Sensor does not have a conflict in the system. A conflict can occur due to duplicate instance or MODBUS addresses assignments. The second line of bottom displays the target gas and current gas concentration with engineering unit assigned. The middle sensor status area is similar to below and may contain status with N/A (Not Available); these items indicate future features not currently available: AMC-1DB Gas Monitor 1.0 Display Log Sensor3 Good, No Alarms Remote MODBUS:1 Admin. Enabled MODBUS Address:003 Instance:1 Type: AMC411 Number of Alarms:2 Alarm1 Relay:1 Delay:0s Alarm2 Relay:2 Delay:0s Alarm3 Relay: Not Used Fail Relay:4 Delay:0s Sensor Model: N/A Sensor S/N: N/A Calibration Period Days: N/A Days before Calibration: N/A Days before End of Life: N/A Sensor Supply Voltage: N/A Sensor Temperature: N/A --------------------------------- SensorStatus:√S#003 CO 0 PPM To access the Get Sensor Status menu 1. At the Log In screen, press the DOWN pushbutton. The Set Options screen is displayed 2. Press the DOWN pushbutton. The Select Sensor screen is displayed. 3. Press the DOWN pushbutton. The Select Relay screen is displayed. 4. Press the DOWN pushbutton. The Get Sensor Status screen is displayed. Get Sensor Status Press ENTER and navigate to the sensor number and press another ENTER to display sensor information. 55 Digital Monitor AMC-1DBx Series User Manual 6.12.8 GET RELAY STATUS The Get Relay status display allows you to view operational status and statistics about the relay in question. It is available when system is running with Option/Menu Display Mode is set for Disp All Relay or through the logged out menu; Get Relay Status. The bottom two-line display is employed to navigate to the relay status window. The bottom two-line display indicates; Line 1: menu item title relay number a check mark (√) indicating the relay ID is unique within the system Alarms count indicating the number of sensor or zone sensor device(s) associated with the current relay state. Line 2: Relay state. The bottom two lines of the relay status have shortened relay state items when necessary. The bottom first line contains the Relay number with Alarm Counts; a check mark indicates the Relay does not have a conflict in the system. A conflict can occur due to duplicate instance or MODBUS addresses assignments. The second line of bottom displays the following information with shortened items in bold: Power-On delay, Not Found, Energized(Ene) and De-Energized(De-Ene) associated with or without a Zone Event (ZE), Energized(Ene) and De-Energized(De-Ene) Pending(Pend) associated with or without a Zone Event(ZE), Energized(Ene) and De-Energized(De-Ene) Latched associated with or without a Zone Event(ZE), Energized(Ene) and De-Energized(De-Ene) Minimum Run Time(MRT) associated with or without a Zone Event(ZE), Energized and De-Energized Post Run Time(PRT) associated with or without a Zone Event(ZE). The middle relay status area is similar to below and carries two forms (Remote and Local items): 56 Digital Monitor AMC-1DBx Series User Manual AMC-1DB Gas Monitor 1.0 Display Log Relay: 17 Status Remote MODBUS:1 Admin. Enabled MODBUS Address:100 Instance:1 Type: AMC-1D8R --------------------------------- Relay√017 Alarms 001 DeEnergized AMC-1DB Gas Monitor 1.0 Display Log Relay: 1 Status Local Relay Admin. Enabled LOCAL Instance:13 --------------------------------- Relay√001 Alarms 000 DeEnergized Latched To access Get Relay Status menu 1. At the Log In screen, press the DOWN pushbutton. The Set Options screen is displayed 2. Press the DOWN pushbutton. The Select Sensor screen is displayed. 57 Digital Monitor AMC-1DBx Series User Manual 3. Press the DOWN pushbutton. The Select Relay screen is displayed. 4. Press the DOWN pushbutton. The Get Sensor Status screen is displayed. 5. Press the DOWN pushbutton. The Get Relay Status screen is displayed. Get Relay Status Press ENTER and navigate to the relay number and another ENTER to display relay information. 58 Digital Monitor AMC-1DBx Series User Manual 6.12.9 GET RS485 STATUS The Get RS485 status menu allows you to view operational status and statistics about the interface in question before having to log into the monitor. To access the Get RS485 Status menu 1. At the Log In screen, press the DOWN pushbutton. The Set Options screen is displayed 2. Press the DOWN pushbutton. The Select Sensor screen is displayed. 3. Press the DOWN pushbutton. The Select Relay screen is displayed. 4. Press the DOWN pushbutton. The Get Sensor Status screen is displayed. 5. Press the DOWN pushbutton. The Get Relay Status screen is displayed. 6. Press the DOWN pushbutton. The Get RS-485 Status screen is displayed. Get RS-485 Status 7. Press ENTER and navigate to the interface number and press another ENTER to display information. The bottom two lines contain the interface number (P) and the total number of bytes transmitted (T) and received (R). The middle RS485 area contains other statistics. The statistics include transaction total good and bad, packets transmitted and received with number of timeouts and good and bad CRCs. Additionally communication errors are counted. The middle RS485 area is similar to the following: 59 Digital Monitor AMC-1DBx Series User Manual AMC-1DB Gas Monitor 1.0 Display Log MODBUS1 RS485 Statistics: Transaction Total:93746 Good:93746, Bad:0 RTU Pkt(s) TX:93756,RX:93756 CRC(s): Good:93756,Bad:0 Timeout(s):0 RX Communication Error(s):0 Gap(s):0,Bad Length(s):0 Dtimer Err(s):0 --------------------------------- RS485 Bytes: P1 T113065 R105400 6.12.10 GET ETHERNET STATUS The Get Ethernet status menu allows you to view operational status and statistics about the ethernet in question before having to log into the monitor. To access the Get Ethernet Status menu 1. At the Log In screen, press the DOWN pushbutton. The Set Options screen is displayed 2. Press the DOWN pushbutton. The Select Sensor screen is displayed. 3. Press the DOWN pushbutton. The Select Relay screen is displayed. 4. Press the DOWN pushbutton. The Get Sensor Status screen is displayed. 5. Press the DOWN pushbutton. The Get Relay Status screen is displayed. 6. Press the DOWN pushbutton. The Get RS485 Status screen is displayed. 7. Press the DOWN pushbutton. The Get Ethernet Status screen is displayed. Get Ethernet Status 8. Press ENTER to navigate to the ethernet information. The bottom two lines of the display will show the Ethernet MAC. The middle Ethernet Status area contains other statistics and information including the IP Address, Subnet MASK, IP Router address and BACnet UDP. The statistics include transmitted and received 60 Digital Monitor AMC-1DBx Series User Manual octets and packets and counts for Unicast, multicast and broadcast. Additionally received losses and unsent packets are counted. The middle Ethernet status area is similar to the following: AMC-1DB Gas Monitor 1.0 Display Log IP Address:010.000.000.103 IP Subnet: 255.255.255.000 IP Router: 010.000.000.001 BACnet UDP Port:0xbac0 Octet Received:1434911 RX Packets:15168 Uni:0 RX Multi:0 Broad:15168 Loss no resources:0 Loss int. errors:0 Loss other reasons:0 Octet Sent:0 TX Packets:0 Uni:0 TX Multi:0 Broad:0 Unsent no resources:0 Unsent int. errors:0 Bad Destination:0 --------------------------------- Ethernet MAC: 4c:80:4f:00:00:00 61 Digital Monitor AMC-1DBx Series User Manual 6.12.11 GET LICENSE INFO. The Get License Info menu allows you to view information about the application license. To access the Get License Info screen 1. At the Log In screen, press the DOWN pushbutton. The Set Options screen is displayed 2. Press the DOWN pushbutton. The Select Sensor screen is displayed. 3. Press the DOWN pushbutton. The Select Relay screen is displayed. 4. Press the DOWN pushbutton. The Get Sensor Status screen is displayed. 5. Press the DOWN pushbutton. The Get Relay Status screen is displayed. 6. Press the DOWN pushbutton. The Get RS485 Status screen is displayed. 7. Press the DOWN pushbutton. The Get Ethernet Status screen is displayed. 8. Press the DOWN pushbutton. The Get License Info Screen is displayed. Get License Info. 9. Press ENTER to navigate to the license information. The license information is displayed across several screens. Press ENTER to navigate to next screens. 6.12.12 EXIT SETUP The Exit Setup menu allows you to exit from the monitor setup. To access the Exit Setup screen 1. At the Log In screen, press the DOWN pushbutton. The Set Options screen is displayed 2. Press the DOWN pushbutton. The Select Sensor screen is displayed. 3. Press the DOWN pushbutton. The Select Relay screen is displayed. 4. Press the DOWN pushbutton. The Get Sensor Status screen is displayed. 5. Press the DOWN pushbutton. The Get Relay Status screen is displayed. 6. Press the DOWN button. The Get RS485 Status screen is displayed. 7. Press the DOWN pushbutton. The Get Ethernet Status screen is displayed. 8. Press the DOWN pushbutton. The Get License Info Screen is displayed. 9. Press the DOWN pushbutton. 62 Digital Monitor AMC-1DBx Series User Manual The Exit Setup screen is displayed. Exit Setup 10. Press ENTER to exit the monitor setup. 6.12.13 SELECT SENSOR The Select Sensor menu allows you to view and change configuration information about the sensor in question. See Figure 6-1: Select Sensor Menu 63 Digital Monitor AMC-1DBx Series User Manual Select Sensor Select Sensor Number Set Sensor Admin State Select Sensor Label Remote Set Interface Local/RS-485 Port (1-4) Set Sensor Address (1-246) Local Set Instance Select Location Label (Optional) Select Engineering Units Set Full Scale Set Zero Scale Set Alarm Conditions Number of Alarms Select Alarm Relays Set Activation Delay Select Alarm Thresholds Select Fail Alarm Relay Select Fail Threshold Figure 6-1: Select Sensor Menu 64 Digital Monitor AMC-1DBx Series User Manual The submenu items listed have various choices selectable with Up and Down pushbuttons. Choice is selectable by the Enter pushbutton, which advances you to the next item. The Previous pushbutton moves you up the hierarchy. Note: The √ found in the display indicates sensor, relay or analog output is unique. A unique device is one that is not duplicated within systems, address, interface, and instance configuration. The (down-arrow) located between the display items indicates that the user must press the ENTER pushbutton to drill-down to the next submenu item. To access the Select Sensor menu 1. 2. 3. 4. Log into the gas monitor. At the Log In screen, press ENTER. Enter the valid 4-character password. Press ENTER. The Select Sensor menu item is displayed. Table 6-1 describes the submenu items found in the Select Sensor menu. Table 6-1: Select Sensor Submenu SUBMENU DESCRIPTION DISPLAY Select Sensor Allows the selection of the sensor of interest for displaying the sensor configuration. (1-988) Select 1 Set Sensor Admin State Shows the selection of the sensor admin state. (Enable/Disable) Sensor Enable Select Sensor Label Shows the selection of the sensor label. (See Appendix of gas types) Sensor Admin √S#001 Existing CO Label√S#001 Sensor Interface Shows the selection of the sensor interface.(MODBUS 1-4) Sen Interface √S#001 Modbus1 Sensor Address Shows the selection of the sensor address. (1-247) Sen 89 Set Instance Shows the selection of the sensor instance. (1-4) Sen R Instance√S#001 4 Address √S#001 65 Digital Monitor AMC-1DBx Series User Manual Set Location Label (Optional) Shows the setting of the location label. (If option configured from Option menu) Location L1 Label√S#001 Set Engineering Units Shows the setting of the engineering units.(PPM, PPB, %LEL,) Eng. Units √S#001 PPM Set Full Scale Shows the setting of full scale. Full Scale 100.0 PPM Set Zero Scale Shows the setting of zero scale. (Only available on certain gas types. See Appendix of gas types) Zero Scale 0.0 DegC Set Alarm Conditions Shows the setting of alarm conditions. (Incr. Decr. Disabled, Window) Alm Condition √S#001 Incr Alarm √S#001 √S#001 Number of Alarms Shows the setting for the number of alarms. (1-3. See Appendix of gas types) No 2 Select Alarm Relays Shows the setting of alarm relays. (1= relay; A1=Alarm Point 1; S=sensor) Alarm Relay A1√S#001 1 of Alarms √S#001 Set Activation Delay Set Alarm Thresholds Shows the setting of the activation delay. (in seconds) – Activation delay is the amount of time a sensor must meet the alarm threshold to trigger the sensor alarm. Act. Delay A1 √S#001 14 sec Shows the setting of the alarm thresholds. Alarm Set A1 √S#001 25 %FS 25.0 PPM Set Fail Alarm Relay Shows the setting of the fail alarm relay. (select 1-256); (relay=10) F-Alarm Relay √S#001 10 Set Fail Activation Delay Shows the setting of the fail activation delay. (select 0-3600 seconds) Act. Delay A4 √S#001 315 sec 66 Digital Monitor AMC-1DBx Series User Manual Set Fail Threshold Note: Shows the setting of the fail threshold. Fail Thresh 2.0 mA √S#001 The digital monitor uses an internal representation of a 4 – 20 mA interface when dealing with sensors. Operational sensors have gas concentrations represented by mA concentrations between 4 and 20 mA. When a digital sensor is in failure mode, the representation of it’s gas concentration will be set to 0 mA. 67 Digital Monitor AMC-1DBx Series User Manual 6.12.14 SELECT RELAY The Select Relay menu provides access to menu items which configure the system relays. See Figure 6-2. Figure 6-2: Select Relay Menu 68 Digital Monitor AMC-1DBx Series User Manual To access the Select Relay menu 1. 2. 3. 4. Log into the gas monitor. At the Log In screen, press ENTER. Enter the valid 4-character password. Press ENTER. The Select Sensor menu item is displayed. 5. Press the DOWN pushbutton. The Select Relay menu item is displayed. Table 6-2 describes the submenu items found in the Select Relay menu. Table 6-2: Select Relay Menu SUBMENU DESCRIPTION DISPLAY Select Relay Allows the selection of the relay of interest for displaying the relay configuration. (1-256) Select 1 Set Relay Admin State Shows the selection of the relay admin state. (Enable/Disable) Select Enable Set Interface Shows the selection of the relay interface. (Local, Modbus1-4) Rly Interface √R#001 Local Set Relay Address Shows the selection of the relay address. (1-256) Rly 1 Relay Admin √R#001 L Address√R#001 Set Relay Instance Shows the selection of the relay instance. (1-32) (L=local) Set Alarm Count Shows the selection for the number of alarms. (1-99) Alarm count √R#001 22 Set Minimum Run Timer Shows the minimum run time. (0-60, ensures minimum relay active state regardless of alarm/fail event) Min Run 5 min Set Post Run Timer Shows the selection of the post run timer. (0-60, holds the relay in active state after alarm/fail event has cleared) Post Run Time √R#001 10 min Shows the setting for the normal state of the relay. (De-energized/Energized) Relay Normal √R#001 De-energized Rly L Instance√R#001 1 Set Normal State Time 69 √R#001 Digital Monitor AMC-1DBx Series User Manual Set Relay Type Shows the setting for the type of relay. (Blank; Latching/Non-latching) Relay Type Non-latching √R#001 Enable Acknowledge Allows the acknowledgement to reset to Reset the relay. (No/Yes) 70 Ackn to Reset √R#001 No Digital Monitor AMC-1DBx Series User Manual 6.12.15 SELECT ZONE The Select Zone menu (Figure 6-3) creates the following associations: Between sensors and analog outputs Between sensors and multiple relays Between time of day and relays Figure 6-3: Select Zone Menu 71 Digital Monitor AMC-1DBx Series User Manual To access the Select Zone menu 1. 2. 3. 4. Log into the gas monitor. At the Log In screen, press ENTER. Enter the valid 4-character password. Press ENTER. The Select Sensor menu item is displayed. 5. Press the DOWN pushbutton. The Select Relay menu item is displayed. 6. Press the DOWN pushbutton again. The Select Zone menu item is displayed. Table 6-3 describes the submenu items found in the Select Zone menu. Table 6-3: Select Zone Submenu SUBMENU DESCRIPTION DISPLAY Select Zone Allows the selection of the zone of interest to review or configure. (1-128) Select 1 Set Zone Admin State Shows the selection of the zone admin state. (Enable/Disable) Select Enable Zone Number Zone Z#001 Set Zone Label Shows the selection of the zone label that identifies a geographic area. (Zone labels have a max of 20 characters). Set Zone Label Z#128 4E Parking Garage Zone Time Menu Zone Schedule Schedule Start Schedule End Timed Action Provides access to timed zone events configuration options. (Zone schedule, Timed action, Schedule Start/End) Zone Time Menu Z#001 Zone Schedule Shows the selection of the zone schedule state. (Never, Sunday’s, Monday’s, Tuesday’s, Wednesday’s, Thursday’s, Friday’s, Mon. to Fri., Mon. to Sun.) Zone Schedule Disabled Shows the selection of the time of day that relays are asserted to the enable or disable state. Schedule Start Z#001 23:59 Shows the selection of the time of day that relays are released from the enable or disable state. Schedule 00:01 Shows the selection of the relays action. (Enable/Disable) Timed Action Enable Relay 72 Z#001 End Z#001 Z#001 Digital Monitor AMC-1DBx Series User Manual Select Sensor Shows the selection of the sensors associated to the defined zone. Up to 128 sensors may be associated with a zone, which are stored in the IDs indicated by the S#. Consecutive IDs can be filled or blanked for a range starting at S#. (ID001-ID128,QUIT) Zone Sensors Z#001 ID001 for:001 @ S987 The display’s middle area shows the current 128 IDs for the zone (see the following example). AMC-1DB Gas Monitor 1.0 Display Log 001,002,003,004,005,006,007,008 009,010,011,012,013,014,015,016 017,018,019,020,021,022,023,024 025,026,027,028,029,030,031,032 033,034,035,036,037,038,039,040 041,042,043,044,045,046,047,048 049,050,051,052,053,054,055,056 057,058,059,060,061,062,063,064 065,066,067,068,069,070,071,072 073,074,075,076,077,078,079,080 073,074,075,076,077,078,079,080 081,082,083,084,085,086,087,088 089,090,091,092,093,094,095,096 097,098,099,100,101,102,103,104 105,106,107,108,109,110,111,112 121,122,123,124,125,126,127,128 --------------------------------- Zone Sensors Z#128 ID001 for:001 @ S001 Select Relay Select Analog Output Shows the selection of the relays associated with each zone’s alarms. (Alarm1 Relay, Alarm2 Relay, Alarm3 Relay, Fail Relay) Note: Actual activation of Alarm Relays is dependent on the sensor’s No. of Alarms setting. Zone Relays Alarm1 Relay Shows the selection of the zone associated to an Alarm/Fail (1-256) Alarm1 Relay Z#001 1 Relay. Shows the selection of the zone associated to an analog output. (1-128) 73 Z#001 Zone AnaOut Z#001 128 Digital Monitor AMC-1DBx Series User Manual 6.12.16 SET OPTIONS Configuration items which are used system-wide are configured from the Set Options Menu. See Figure 6-4: Set Options Menu Figure 6-4: Set Options Menu 74 Digital Monitor AMC-1DBx Series User Manual To access the Set Options submenu 1. 2. 3. 4. Log into the gas monitor. At the Log In screen, press ENTER. Enter the valid 4-character password. Press ENTER. The Select Sensor menu item is displayed. 5. Press the DOWN pushbutton. The Select Relay menu item is displayed. 6. Press the DOWN pushbutton again. The Select Zone menu item is displayed. 7. Continue pressing the DOWN pushbutton until the Set Options submenu is displayed. Table 6-4 describes the submenu items found in the Set Options menu. Table 6-4: Set Options Submenu SUBMENU DESCRIPTION DISPLAY Display Mode Allows the selection of the display mode. (Disp All Data; Disp All Relay; Disp New Alarms only; Disp Alarms only; Disp Raw input) Display Mode Disp All Data Show Location Labels Allows the selection of showing the location labels. (Yes/No) Show Location Labels Yes Default Fail Threshold Shows the selection of the default fail threshold. (0.1-4.0mA) Def Fail Threshold 1.9 mA Power Up Alarm Delay Shows the selection of the power up alarm delay setting. (1-999 seconds) Power Up Alarm Delay 60 sec Acknowledge Timer Audible Alarms Audio Cadence Shows the selection of the acknowledge timer setting. (Blank; 0-60 minutes infinite) Ackn Timer 0 min Shows the selection of the audible alarm. (All Alarms; all Alarms & Fail; H-Alarms On) Audible Alarms All Alarms & Fail Shows the selection of the audible cadence. (Continuous; Pulse) Audio Cadence Continuous Zero Buffering Shows the selection of zero buffering. (0.0 %FS to 5.0 % FS) Zero Buffering 2.0 %FS 75 Digital Monitor AMC-1DBx Series User Manual Alarm Hysteresis Shows the selection of the alarm hysteresis. (0.0 %FS to 5.0 % FS) Alarm Hysteresis 2.5 %FS Enable Dew Point Alarm Shows the selection to enable the alarm dew point. (Yes/No) Enable Dew Point Alm No Serial Mode Shows the selection of the Serial Mode choice. (Remote; Printer) Printer serial mode will configure a port to dump periodic system information. Remote serial mode allows transfer of system configuration to and from a remote AMC Manager application. Serial Mod 57600,7,E REMOTE Shows the selection of the date and time. This selection contains fields for local date and time and can be adjusted using the UP and DOWN buttons. The ENTER button will progress to the next field. The time fields use a 24 hour h:m:s format. Date & Time 2012 Mar 1 00:38:48 Shows the selection of the log file enables; Sensor; Relay; Alarm; System; Admin; Security; Comm; Display; Printer; Console; Eject USB; Format USB (Enable/Disable). Log File Sensor Backlight Shows the selection of the backlight setting. (Always On; Power Save) Backlight Always On Unit Node ID Allows the selection of the unit node ID (1-9). Unit node ID is applicable when Serial Mode is configured for Remote. A remote AMC Manager application can support up to 9 nodes. Unit Node ID 1 Shows the selection of the user label (USER1 through USER9). User label allows custom gas labels to be added to the sensor configuration menu. Allows the modification of the user label. (Labels USER1 through USER9 can be changed to a 7 character custom label) Select User label USER1 Date and Time Log File Select User Label Modify User Label 76 Modify User label #1 USER1 Digital Monitor AMC-1DBx Series User Manual Select Unit Label Modify Unit Label Allows the selection of the unit label. Engineering Unit Label allows custom gas units to be added to the sensor configuration menu. Select Unit Label #1 ENG1 Allows the modification of the unit label. (Unit ENG1 through ENG9 can be changed to a 4-character custom unit) Modify Unit Label #1 ENG1 77 Digital Monitor AMC-1DBx Series User Manual 6.12.17 SET INTERFACE The Set Interface menu is the top level menu item used to configure the digital interfaces for the monitor. See Figure 6-5. From this top level you can navigate to configuration menus for the following interfaces: RS-485 interfaces facing downstream to the MODBUS slave devices (transmitters, relay modules and annunciators) RS-485 interface facing upstream to the BAS Ethernet/IP interface to the attached LAN (see Set IP Configuration) BACnet interfaces to the BAS (see Set BACnet Configuration) MODBUS interface facing upstream to the BAS (see Set MODBUS Configuration) Analog outputs (Set Analog Out) RS-485 Port Select Port Set Type Port 1,2,3,4 – RTU or ASCII Port 5 – RTU or BACNET MS/TP Set Baud Rate Set Character Length <DOWN> Set Parity Set Stop Bits Set Administrative State <Enter> Port 5 Figure 6-5: Set Interface (RS-485) Menu 78 <ENTER> Ports 1-4 Digital Monitor AMC-1DBx Series User Manual To access the Set Interface menu 1. 2. 3. 4. Log into the gas monitor. At the Log In screen, press ENTER. Enter the valid 4-character password. Press ENTER. The Select Sensor menu item is displayed. 5. Press the DOWN pushbutton until the Set Interface submenu is displayed. Table 6-5 describes the submenu items found in the Set Interface menu. Table 6-5: Set Interface Submenu SUBMENU DESCRIPTION RS485 Port Allows the selection of the RS-485 port. RS-485 ports are configured here for use in sensor; relay and analog output set interface selection. RS485 Port Select RS485 Port Provides the changing of the RS-485 port. (Ports 1-4 to sensors, relays and analog outputs 5 to BAS) Change RS485 Port 1 (To Sensor etc.) Allows the selection of the RS-485 protocol. (MODBUS RTU; BACNET MSTP; MODBUS ASCII) RS485 Protocol P1 MODBUS RTU Allows the selection of the RS-485 baud rate. (1200, 2400, 4800, 9600, 19200, 38400, 76800, 115200) RS485 Baud P1 1200 bps Allows the selection of the RS-485 character length. (MODBUS ASCII= 7, 8 bits; MODBUS RTU/BACNET MSTP= 8 bits only) RS485 Char. Len. P1 8 bits Allows the selection of the RS-485 parity. (MODBUS ASCII/MODBUS RTU=None, Even, Odd; BACNET MSTP=None only) RS485 Parity P1 Even Allows the selection of the RS-485 stop bits. (MODBUS ASCII/MODBUS RTU=1, 1.5, 2 bits; BACNET MSTP=1 bit) RS485 Stop Bits P1 1 bit Allows the selection of the RS-485 admin state. (Enable/Disable) RS485 Admin P1 Enable Change RS485 Port RS485 Protocol RS485 Baud P1 RS485 Character Length P1 RS485 Parity P1 RS485 Stop Bits P1 RS485 Admin P1 DISPLAY 79 Digital Monitor AMC-1DBx Series User Manual 6.12.18 SET IP CONFIGURATION The AMC-1DBx digital monitor contains one 10/100baseT Ethernet power. The monitor supports the IP protocol over this interface. The IP protocol is required to support BACnet/IP, MODBUS TCP, web and telnet services. The IP protocol requires the following configuration items to enable successful communications: IP Address Subnet mask Router IP Address The default IP Configuration parameters are: IP Address 10.0.0.103, IP Subnet Mask 255.255.255.0, Router IP Address 10.0.0.1 The IP Address, IP Subnet Mask or Router IP Address cannot be set to all 1’s or all 0’s. The Set IP Configuration submenu is displayed in Figure 6-6. This submenu is accessed from the Set Interface menu. Set IP Configuration Set IP Address Set Subnet Mask <DOWN> Set Router IP Address <ENTER> Figure 6-6: Set IP Configuration Submenu To access the Set IP Configuration submenu 1. 2. 3. 4. Log into the gas monitor. At the Log In screen, press ENTER. Enter the valid 4-character password. Press ENTER. The Select Sensor menu item is displayed. 5. Press the DOWN pushbutton until the Set Interface submenu is displayed. 6. Configure the Set Interface submenu items as necessary. 80 Digital Monitor AMC-1DBx Series User Manual Once the configuration of the Set Interface submenu items is completed, the IP Configuration submenu is displayed. Table 6-6 describes the items found in the Set IP Configuration submenu. Table 6-6: Set IP Configuration Submenu SUBMENU DESCRIPTION IP Configuration Allows the selection of the IP address. (Set IP Address, Set Net Mask, Set Router IP Addr) IP Configuration Set IP Address IP Address Shows the selection of the IP address. (0-255 for each network segment) IP Address 010.000.000.103 IP NetMask Shows the selection of the IP NetMask. (0-255 for each network segment) IP NetMask 255.255.255.000 Set IP Address DISPLAY IP Router Shows the selection of the IP router. (0-255 for each network segment) 81 IP Router 010.000.000.001 Digital Monitor AMC-1DBx Series User Manual 6.12.19 SET BACnet CONFIGURATION The AMC-1DBx digital monitor supports BACnet or EthernetIP and RS-485. In order to support BACnet, the following site-specific attributes require configuration: Set Device Name Set Device ID Set Network Number Set Transport The Set BACnet Configuration submenu is displayed in Figure 6-7. BACNET Configuration Device Name Device ID Network Number BACnet Transport IP <DOWN> MS/TP UDP Port MS/TP Address BAC IP BBMD ADDRESS Max Masters BACnet TTL Timeout MODBUS BAS Figure 6-7: Set BACnet Configuration Submenu To access the Set BACnet Configuration submenu 1. 2. 3. 4. Log into the gas monitor. At the Log In screen, press ENTER. Enter the valid 4-character password. Press ENTER. The Select Sensor menu item is displayed. 5. Press the DOWN pushbutton until the Set Interface submenu is displayed. 6. Configure the Set Interface submenu items as necessary. Once the configuration of the Set Interface submenu items has been completed, the IP Configuration submenu is displayed. Once the configuration of the IP Configuration submenu is completed, the Set BACnet Configuration submenu is displayed. Table 6-7 describes the items found in the Set BACnet Configuration 82 Digital Monitor AMC-1DBx Series User Manual submenu. Table 6-7: Set BACnet Configuration Submenu SUBMENU DESCRIPTION DISPLAY BACnet BAS SetDevice Name Allows the setting of the device name. (Set Device Name, Set Transport, Set Network Number, Set Device ID) BACnet BAS Set Device Name BACnet Name Shows the selection of the BACnet name. (maximum of 20 characters) BACnet Name AMC-1DBx BACnet Name BACnet ID Shows the selection of the BACnet ID. (any number between 0 and 4,194,303) BACnet ID 1000003 BACnet Network Number Shows the selection of the BACnet network number. (0-65534) BACnet Network Number 00000 Configure BACnet Transport Shows the selection of the BACnet transport types. (BACnet IP, BACnet MSTP). (If transport set to BACNET IP, go to Set BAC IP UDP Port) Shows the selection of the BAC MSTP address. (Min value=1, max value=127, default value=127) Set BACnet Transport BACNET MSTP Set BAC MSTP Max Master Shows the selection of the BAC MSTP max master number. (Min value=1, max value=127, default value=127) BAC MSTP Max Masters 127 Set BAC MSTP Timeout Shows the selection of the BAC MSTP timeout. (20-100ms, default value=20ms) BAC MSTP Timeout 72 ms Set BAC MSTP Address Set BAC MSTP Address 127 Set BAC IP UDP Port Set BAC IP BBMD Address Set BAC IP TimetoLive Shows the selection of the BAC IP UDP protocol. (UDP port is a 16-bit value between 47808 and 47823. BACnet typically uses port 47808) Set BAC IP UDP Port 47820 Shows the selection of the BAC IP BBMD address. (0-255 for each network segment) A non-zero value will require registration with a BACnet Broadcast Master Device. Shows the selection of the BAC IP Time to Live setting (0-65535 seconds). BAC IP BBMD Address 000.000.000.000 BAC IP TimetoLive 00060 seconds 83 Digital Monitor AMC-1DBx Series User Manual 6.12.20 SET MODBUS CONFIGURATION The monitor provides a single RS-485 port which interfaces to management systems such as BAS, DCS or PLC. The following menu items shown in Figure 6-8 provide the necessary site-specific configurations for interconnecting the MODBUS interface between systems. These configuration items consist of: MODBUS Address MODBUS Lock Code MODBUS Type MODBUS Configuration MODBUS Address MODBUS Lock Code DOWN MODBUS TCP Port Figure 6-8: Set MODBUS Configuration To access the Set MODBUS Configuration submenu 1. 2. 3. 4. Log into the gas monitor. At the Log In screen, press ENTER. Enter the valid 4-character password. Press ENTER. The Select Sensor menu item is displayed. 5. Press the DOWN pushbutton until the Set Interface submenu is displayed. 6. Configure the Set Interface submenu items as necessary. Once the configuration of the Set Interface submenu items has been completed, the IP Configuration submenu is displayed. Once the configuration of the IP Configuration submenu is completed, the BACnet Configuration submenu is displayed. Once the configuration of the BACnet submenu is completed, the MODBUS BAS submenu is displayed. 84 Digital Monitor AMC-1DBx Series User Manual Table 6-8 describes the items found in the Set MODBUS Configuration submenu. Table 6-8: Set MODBUS Configuration Submenu SUBMENU DESCRIPTION DISPLAY Set MODBUS Allows the setting of the MODBUS device. (Slave Address, Protocol, Un-Lock Code) MODBUS BAS Slave Address Slave MODBUS Address Shows the selection of MODBUS address. (1-247) Slave MODBUS Address 156 the slave Slave MODBUS Lockcode Slave MODBUS Protocol Shows the selection of the slave MODBUS lockcode (0-65534). BAS must write this pattern into the MODBUS register at 500 to unlock write access to all other writable BAS MODBUS registers. See Appendix for BAS MODBUS register memory map. Slv MODBUS Lockcode 55535 Shows the selection of the slave MODBUS protocol. (TCP or RTU) Slv MODBUS Protocol SLAVE MODBUS RTU 85 Digital Monitor AMC-1DBx Series User Manual 6.12.21 SET ANALOG OUTPUTS The Set Analog Outputs menu shown in Figure 6-9 provides access to the items which configure the system analog outputs. The Analog Outputs require the following items to be configured for correct operation: Analog Output port number Administrative State Interface (either a unique device and instance on the MODBUS, or a local device and instance on the monitor) Range (0-10V or 2-10V) Scaling Type (group average or group maximum) Sample Period Figure 6-9: Set Analog Outputs 86 Digital Monitor AMC-1DBx Series User Manual To access the Analog Out submenu 1. 2. 3. 4. Log into the gas monitor. At the Log In screen, press ENTER. Enter the valid 4-character password. Press ENTER. The Select Sensor menu item is displayed. 5. Press the DOWN pushbutton until the Set Interface submenu is displayed. 6. Configure the Set Interface submenu items as necessary. Once the configuration of the Set Interface submenu items has been completed, the IP Configuration submenu is displayed. Once the configuration of the IP Configuration submenu is completed, the BACnet Configuration submenu is displayed. Once the configuration of the BACnet submenu is completed, the MODBUS BAS submenu is displayed. Once the configuration of the MODBUS BAS submenu is completed, the Analog Out submenu is displayed. Table 6-9 describes the items found in the Analog Out submenu. Table 6-9: Analog Out Submenu SUBMENU DESCRIPTION Analog Out Allows the setting of the analog out menu items which configure the system analog outputs. Analog Out Analog Out Select Analog Out # Shows the setting of the analog out item. (Analog Out Admin, AnaOut Interface, AnaOut Range, AnaOut Scale, AnaOut Type, AnaOut Sample) Analog Out AnaOut Interface Shows which analog interface is to be configured. (1 to 128) Select Analog Out # 1 Analog Output Number DISPLAY Analog Output Admin State Analog Output Interface Analog Output Address Shows the setting of the analog output admin state. (Out of Service, Disable/Enable) Out of Service mode enables the analog output at a fixed 0.0mA level when proper communication to the device is achieved. Aout Admin √O#001 Enable Shows the setting of the analog output interface. (local, Modbus1, Modbus2, Modbus3, Modbus4) Aout Interface√O#001 Modbus1 Shows the setting of the analog output address. (1-247) Aout Address √O#001 101 87 Digital Monitor AMC-1DBx Series User Manual Analog Output Instance Shows the setting of the analog output instance. Instances can be local (L) or remote (R). Aout RInstance√O#001 2 Analog Output Range Shows the setting of the analog output range. (0-20mA, 4-20mA) Aout Range √O#001 4-20mA Analog Output Scale Analog Output Type Analog Output Sampling Period Shows the setting of the analog output scale. (0.1 to 20.0) Scale will multiply the outputs level by the scale value. Using a scale greater then one (1) can saturate the output. Aout Scale √O#001 20.0 Shows the setting of the analog output type. (Average, peak) The Average and Peak selection refers to how zone data is assigned to this output. Peak will select to highest level from the list of zone sensors while average will calculate a mean level from the list of zone sensors. When an Analog Output is assigned to more than one zone, the higher numbered zone’s data will prevail. Aout Type √O#001 Peak Shows the setting of the analog output sampling period (0 to 60 seconds). The sampling period provides a running averaging of up to 60 samples over a period of 60 seconds. This allows output smoothing over the sampling period. System performance and periodic device updates prevent ideal smoothing. Aout Sample √O#001 60 seconds 88 Digital Monitor AMC-1DBx Series User Manual 6.13 MONITOR COMMISSIONING AND INSTALLATION SCENARIOS 6.13.1 System Startup. System startup begins at powering on the monitor and continues until the monitor is in communications with the downstream peripherals and the upstream peers and masters. Item 1. Power-On Reset Voltage Monitor holds CPU in reset for 3 seconds Places the System Fail relay in fail safe position. 2. Board Level Self-Test – failures reported to display and LEDs. During startup the System LED will turn on and off as Power On Self-test is performed. The LCD backlight with turn and Display will begin to perform screen fills with white and black patterns. Remarks If voltages are too low, the Monitor will be stuck in this state. If the processor or FLASH memory is faulty no LED activity may occur. Exercises DDR2 memory and the Display Controller, if any test fails: FAULT LED will remain lit with other combinations of D1-D3 and ALARM1-3 LEDs will indicate failure. The monitor will reboot over and over. This monitor faults must be reported to qualified technician for repair. Do not advance to the next step. 3. AMC Monitor Banner and Firmware version will be displayed. System Initialized, if any test fails: The System LED will turn off and remain off at this point. If the reset cause was a watchdog or brown-out reset. This fault can be cleared by pressing the HOLD pushbutton. This monitor fault must be reported to qualified technician for repair. 4. Database Verification Data Base and Data Base storage device are checked. The verification test prompts the user to accept default 89 Digital Monitor AMC-1DBx Series User Manual database and self-test will be performed on data base storage device, if any test fails: FAULT LED will remain lit with other combinations of D1-D3 and ALARM1-3 LEDs. The monitor will reboot over and over. These monitor faults must be reported to qualified technician for repair. Do not advance to the next step. 5. Establish communications with downstream If the system detects a peripherals; relays, analog outputs and sensors. missing device the FAULT LED will turn on, the external buzzer and Annuniciator will also be activated. 6. Establish communications with Upstream peer and If the system detects a masters. duplication or configuration problem with the IP and/or BACnet interfaces. The System LED will turn off, the extern buzzer and Annuniciator will also be activated. 6.13.2 Adding a New Transmitter. New transmitters will be added to the monitor when customers increase the number of transmitters, either as a result of increased floor plan space or additional gas types. Follow the steps outlined in the following table to add a new transmitter: Step 1. Action Set the monitor’s appropriate RS-485 Interfaces to “Admin Disable” mode. 2. Install the transmitter. Comment It is very likely that MODBUS errors will be seen during this install. Disabling the monitor’s appropriate RS-485 will force the alarming functions into fail state for that interface. Audio alarms can be disabled with position 1 of dipswitch. The mounting instructions for transmitters are provided in the transmitter user manual. Select an appropriate location for the transmitter with the following considerations: 90 Digital Monitor AMC-1DBx Series User Manual Coverage – ensure it will physically monitor the intended area. Airflow – ensure it is not mounted under any air intake ducts. Wiring – the RS-485 wiring is a bus. Long stubs are not permitted. Conduit – ensure that the wiring is in EMT. Powering – is the power supply appropriately sized? After voltage drops in the wiring, will there remain sufficient voltage for the transmitter to operate? See the transmitter specifications. Access – ensure the transmitter is located where service personnel can have access for calibration purposes. Mount the transmitter housing to a solid structure (i.e. a wall) at nose height. Run the wiring to the Transmitter. 3. Configure the MODBUS address on the transmitter. 4. Add configuration If the transmitter is added in the middle of the bus, be aware that while the bus is “opened” to add a new transmitter, the monitor will be able to communicate with transmitters on the same side of the open. If the transmitter extends the bus and becomes the new end unit, ensure the bus termination is removed from the previous end unit. The new unit must be strapped to provide bus termination. If the transmitter has been ordered with the correct MODBUS address factory configured, this step will not be required. If the transmitter has been taken from inventory or service stock, then the configured MODBUS address contained within it is likely not correct. Determine the correct MODBUS address to be employed (see the monitor configuration) and configure it into the transmitter. For as long as an incorrect MODBUS remains configured in the transmitter, monitor indications may be that a previously serviceable transmitter is experiencing communication problems due to the duplicate MODBUS address. Use the Select Sensor menu to configure the 91 Digital Monitor AMC-1DBx Series User Manual information for the new transmitter into the monitor database. 5. new transmitter into the monitor database. Use AMC Manager as an alternative when configuring the monitor from the front panel. Set the monitor’s appropriate RS-485 Interfaces to “Admin Enable” mode. 6.13.3 Downstream MODBUS Timeout. The MODBUS protocol provides error checking to ensure that messages that are received are verified to be intact and error free. However, errors can occur on the RS-485 interface, which cause the messages to fail the error checking by the receiver of the message. This results in either the transmitter not ‘seeing’ a message from the monitor, or the monitor does not ‘see’ the response to a message. For this reason, when the monitor fails to receive a response from a transmitter, the message will be sent up to 2 times, - the original message plus one retry – before moving to the next transmitter. When the monitor discards frames due to error checking, the sensor will appear as fail in the sensor display and the monitor enters fail state. Considerations: disable a transmitter that requires too many retries. 12. Sensor Activation Delay. When gas concentration crosses a given alarm threshold, the alarm is not activated until the concentration remains above the threshold for the Activation Delay period of time. If the gas concentration falls below the alarm threshold, then the channel activation timer is cleared. The activation delay is set in seconds. Use of the activation delay avoids reacting to temporary transients and/or noise from the sensor. 13. Minimum Run Timer. After gas concentration decreases/increases to below/above the Threshold (subject to hysteresis), the relay is kept activated for a minimum period of time defined in the Minimum Run Timer. The minimum run timer ensures that the external fan operation does not suffer from stutter starts, where the fan is activated for under 5 seconds, then deactivated. Fan stutter starts can be a major source of maintenance on the mechanical components (motors, belts, pulleys, etc.) of the fans. The Minimum Run Timer may expire while the sensor signal is still in the alarm state. The Minimum Run Timer is commonly confused with the Post Run Timer described in the following paragraph. 14. Post Run Timer. Once the sensor signal falls below the alarm threshold, then the Post Run Timer keeps the relay activated until the timer expires. The Post Run Timer provides the benefits of the Minimum Run Timer, and additionally ensures that the ventilation is activated long enough to ensure that the gas concentration is well below alarm thresholds. The Post Run Timer is commonly confused with the Minimum Run Timer previously described. 92 Digital Monitor AMC-1DBx Series User Manual 6.13.4 Zone Operation. The Zone programming allows a group of sensors to be applied to a dedicated set of Alarm/Fail relays. This group could be located on a single floor of an underground parking facility where the group of sensors controls the same ventilation component. The sensors act as a group controlling these relays with the same thresholds set forth in their sensor configuration. Any sensor of the group meeting or exceeding its gas concentration threshold will trigger the assigned ventilation fan. If additional sensors have similar gas concentrations no change to the fan is experienced. The ventilation fan will not be turned off until all sensors in a group fall below their threshold. Additionally an analog output assigned to the zone will track the zone’s average or peak gas concentration. A scenario for VFD fans is described in the Analog Output Operation content below. Additionally, the zone contains scheduled relay events whereby these fans can be activated during high use periods such as a rush hour where fresh air is desirable. These scheduled relay events could also be used by the facility during routine inspections. 6.13.5 Analog Output Operation. The analog output is representative (average or peak) of the readings seen by all the transmitters in a zone. The analog output is intended to control devices such as variable frequency drive (VFD) fans, in which case the fans turn faster for higher gas concentrations. 6.13.6 AMC-1DA-RPT4 REPEATER The AMC-1DA-RPT4 is a rugged, industrial-grade, optically-isolated RS-485 Hub / Splitter /Repeater, which can be used to expand RS-485 networks by splitting one RS-485 network into four, in turn increasing the maximum number of nodes and the distance covered by an RS-485 network. It was designed so that data coming from the input (RS-485) will transmit to all four loops of RS-485 networks. However, each loop of RS-485 devices will transmit data back to the input only, thus reducing any possible interference between each loop of the RS-485 devices. Also, the failure of any individual loop will not affect other loops, making the RS-485 networks more robust and reliable. The product features opto-isolation circuitry, which effectively protects your RS-485 devices from ground loops, transient surges, remote lightning and spikes. Opto-isolation also eliminates ground loop and noise problems. The unit supports data rates up to 115,200 bps and features data format auto-sensing and self-adjusting; therefore, no DIP switch or jumpers are required. Three indicators (only visible when the enclosure door is open) are provided: Power Indicator Traffic on Slave Bus Indicator Traffic on Master Bus Indicator 93 Digital Monitor AMC-1DBx Series User Manual 7 PREVENTIVE MAINTENANCE This section covers all preventive maintenance aspects of the Gas Monitor AMC-1DBx. First, a description of general maintenance is provided followed by a verification of operation 7.1 GENERAL The monitor unit should be brushed or wiped clean, once a year or more, of any dust or dirt, depending on the accumulation. The unit SHOULD NOT be submerged in water or other liquids. Also, hosing and other conditions that could cause a liquid to enter the enclosure should be avoided. 7.2 VERIFICATION OF OPERATION Verification of operation should be performed at least once every 6 months. For highly demanding applications more frequent verification is recommended. To verify the operation of the system, make sure that the green power LED indicator is on steady state. Push and hold the test button to verify the audio and WARNING and ALARM relays are operational. 94 Digital Monitor AMC-1DBx Series User Manual 8 INSTALLATION TIPS AND TRICKS 8.1 CABLING The Communications Cable must have the following characteristics; o Shielded, twisted pair, 14-26AWG o Characteristic Impedance:120ohms o Low Capacitance: ~13pf/ft conductor to conductor and ~ 23pf/ft conductor to shield The recommended Power Cable is 14-26 AWG o Selected cable must meet Application and/or local regulatory requirements. o Wire gauge will affect maximum distance between transmitters and power supply. Thicker wire, greater distance. o Route cabling in conduit to avoid damage to cabling. Route cabling in conduit to avoid damage to cabling. The communications cable shield must be grounded at the monitor end. The shield is wired to the T-connector at each transmitter, to maintain end to end continuity. Route cabling away from AC power cabling and any source of electro-magnetic interference (EMI) or radio frequency interference (RFI) such as power transformers, electric motors, etc. EMT (Electrical Metal Tube) conduit also adds an added degree of electrical shielding against EMI (Electro-Magnetic Interference) from devices such as RF (i.e. radio) sources. All cabling must enter the sensors and monitors from the bottom to ensure protection against water damage due to water inside the conduit from condensation or leaks. Ensure that there are no short or open circuits in the sensor cabling. Verify that there is no AC or DC voltage present on the sensor cabling prior to connecting the cabling to either the sensor or the monitor. 8.2 EQUIPMENT LOCATION Mount all equipment away from any source of electro-magnetic interference (EMI) or radio frequency interference (RFI) such as power transformers, electric motors, etc. Mount sensors in accordance with the installation guidelines for the specific species of gas to be detected; i.e. CO sensors should be mounted at breathing height etc. Equipment must be positioned such that the chance of water damage is minimized; i.e. away from fire suppression sprinkler heads, away from wet or damp locations where there would be a risk of water damage. Ensure a balanced layout of sensors in order to cover the intended area. Ensure that sensors are not in close proximity to clean air sources. 8.3 POWER AND GROUNDING All power and grounding connections to equipment must be made in accordance with applicable electrical and building codes. 95 Digital Monitor AMC-1DBx Series User Manual Use a separate, dedicated, noise free, 15 amp power circuit, with an appropriately labeled circuit breaker. 96 Digital Monitor AMC-1DBx Series User Manual APPENDIX A GAS TYPES FULL SCALE AND ALARM VALUES The values in the following table are the default values applied in the sensor configuration when a specific gas label is initially selected. Use this table to help determine whether to change the sensor configuration from its default configuration to meet a specific application. Ontario Exposure Limits 2010 Nov Name TWA STEL Carbon Monoxide Nirogen Dioxide 25 3 100 5 Gas Type Span Alarm1 Eng Units Alarm1 %FS Alarm2 Eng Units Alarm2 %FS Alarm3 Eng Units Alarm3 %FS Eng Units Alarm Type Number Of Alarms Analog Out Fixed Pre-Scale CO NO2 100 10 0.1 1 25.00% 10.00% 100 3 100.00% 30.00% 97 PPM PPM INCR. INCR. 2 2 1.0 3.3 Digital Monitor AMC-1DBx Series User Manual APPENDIX B GENERAL LOG ITEMS This appendix describes the log items for Sensor, Relay, Alarm, Security, Administration, Communication and System. Once enabled messages assigned to its group will be logged on a file in the USB Storage device. Log files are text files. The following list of active log files are found in the root directory of the storage device. SENSOR.LOG, RELAY.LOG, ALARM.LOG, SYSTEM.LOG, ADMIN.LOG, SECURITY.LOG, COMM.LOG. Log files are created in the root directory. At the start of each day, the active log files are moved into an archive folder. The archive folder name identifies the year and month of the archive. For example folder “2014_02” holds the log files for the month of February, in the year 2014. The log files themselves are renamed, the three digit extension “.log” is replaced with a two digit day of month value. For example “RELAY.05” would be the log file “RELAY.LOG” from the fifth day of the month. Lastly, it is recommended that periodically the USB storage device be backed-up to secure, offline storage to ensure the information are not lost. For performance reasons, at this time the log files can be removed from the USB storage device. Log messages can be displayed on the Printer Port when menu item Log File>Printer is enabled while menu item Option>Remote is configured for Printer. Additionally these messages can be directed to the LCD Display or a Telnet Console if the menu item Log File>Display or Log File>Console are enabled. All log files get timestamps every 10 seconds and will display MODBUS traffic summary every minute. Additional messages listed in this general group will also appear in all log files. The TIME message contains the following format: TIME <YEAR,MONTH,DAY> <24HR:MIN:SEC> Day <1-7=Sun.to Sat.> The example below indicates a timestamp of Monday Aug 27/2012 at 12:00:17 am: TIME 2013,8,27 00:00:17 Day 2 The Date and Time Changed message will appear when the date and time is changed from various sources; Remotely (AMC Manager), from Menu, or from BAS. The Date and Time Changed message contains the following formats: Date and Time Changed <Source> There are five MODBUS channels; 1-4 are for sensors, relays, and analog output devices and channel 5 for BAS communication. The MB5 summary will appear periodically (every minute) when this channel is active. The MB (MODBUS) summary message contains the following format: MB<Channel> TA(s) T:<Total Transactions>,G:<Good Transactions>,B:<Bad Transactions> The following messages typically appear at start up in all log files and are also described below: TIME <Date and Time> AMC-1DB Gas Monitor <Version> MAC:<MAC> from FLASH 98 Digital Monitor AMC-1DBx Series User Manual SN:<SN> from FLASH Reset Cause:<Cause> Watch-dog enabled No USB Restore DB File No USB Device to Restore DB Database Restore from USB <Filename> Database+ Restore from USB <Filename> Monitor database save complete MODBUS Updated from Data Base BACnet Updated from Data Base The “AMC-1DB Gas Monitor V1.0” message will appear on system start next to the TIME keyword. It displays the current F/W version. The F/W can be upgraded to the FLASH device from the USB Storage device, please check Armstrong Monitoring for latest available F/W. Additionally the MAC: and SN messages will appear at system start up. These items are fixed in the FLASH device. The “Reset Cause:0x08 PowerUp” messages will appear on system start up. Additionally there are several other reset causes; 0x08 PowerUP, 0x04 Ext. Reset and 0x02 Watchdog Reset. External Reset is further decoded into an additional message indicating the type of external reset; Brown Out or Multiple. The “Watch-dog enabled” message will appear at start up when the watch-dog device has been activated. The Watch-dog device provides checking of the system integrity and will reset the system when incorrect operation is detected. A Watch-dog reset cause message will be displayed whenever the system restarts due to this issue. Additionally the System LED will stay turned off upon watch-dog restart and can be re-lit by pressing the HOLD Pushbutton. The “No USB Restore DB File” message will appear if there is no data base restore file present on the USB Storage device at start up. The “No USB Device to Restore DB” message will appear if there is no USB Storage device installed. The data base restore file is used on start up to change the configuration created by AMC Manager or restores a previous save data base. A message similar to “Database Restore from USB c:\amc-1db.adf_restored_2013_8_27_10_45” and “Database Restore+ from USB c:\amc1db_P.adf_restored_2013_8_27_10_45 will appear if the files amc-1db.adf and amc1db_P.adf are present on the USB Storage device at start up. The “Monitor database save complete” message will appear when the system has successfully saved data base changes into the battery backed storage device. This message can appear whenever the data is changed. During lengthy data base change the data base is only save when change activity ceases for a period of 1 minute. The “MODBUS Updated from Data Base” message will appear when the RS-485 MODBUS subsystem is configured. It can also occur when MODBUS is reconfigured due to data base changes. Again during lengthy data base change the MODBUS is only updated when change activity ceases for a period of 30 seconds. The “BACnet Updated from Data Base” message will also appear when BACnet is configured or reconfigured after data base changes. The BACnet is only updated when change activity ceases for a period of 30 seconds. The following are other possible log messages that are always logged: Battery(Database/RTC) Okay This occurs after a battery warning log message has occurred and the battery is replaced. This battery backs up the DataBase NV (Non-Volatile) storage and RTC (Real Time Clock). 99 Digital Monitor AMC-1DBx Series User Manual DIP Switch Changed Detected Old:0xD0 New:0x90 DIP Switch bits:LANGB,LANGA,PRT,CAL_MODEn,MRT,ZERO_BUFFER,SENSOR_DELAY This occurs when a user mode dip switch change is detected. The initial value will also be display unless equal to 0x00. The Admin and Alarm logs will also display details related to specific bits decode. Network Updated from Data Base The “Network Updated from Data Base” message will also appear when the IP configuration has been changed. The Network is only updated when change activity ceases for a period of 30 seconds. No Sensors Available The “No Sensors Available” will appear when system is currently running with no sensors discovered and can occur briefly at system start. This message may also be displayed when no sensors have been configured in the data base. USB Device Plugged In USB Stick Ejected from Menu USB Device Unplugged The “USB Device Plugged In” or “USB Device Unplugged” messages will appear when USB storage device is inserted or removed. The “USB Stick Ejected from Menu” message will appear when the USB device is un-mounted through the menu; this will ensure all existing log messages are flushed to their appropriate log file and closed. USB Format Selected from Menu USB Format Skipped Device Ejected USB Format Complete The “USB Format Selected from Menu” message will appear when built in USB Storage formatting facility is performed. The message “USB Format Complete” is logged upon successful USB format. This USB formatting can be quite lengthy and can be alternatively performed on any PC platform in less time. The message “USB Format Skipped Device Ejected” will be displayed if the USB device is not detected upon format request. FLASH Upgrade: Need to Reboot to re-initialize NANDFLASH Driver and start new image The “FLASH Upgrade: Need to Reboot to re-initialize NANDFLASH Driver and start new image” occurs at system start up when FLASH F/W upgrade is complete. The FLASH F/W can be upgraded when the 10Aquila.elf.bin and 10Aquila.elf.csum files are detected at start up on the USB Storage device. Further log details about FLASH Upgrade can be found in the system log file when enabled. No USB Device to Save DB Database Saved to USB <Filename> Database+ Saved to USB <Filename> The “No USB Device to Save DB” message will appear if there is no USB device present when the data base save is activated. Data base save is activated when user logs off the menu system. A message similar to “Database Saved to USB c:\amc-1db.adf_saved_2013_8_27_10_45” and “Database+ Saved to USB c:\amc1db_P.adf_saved_2013_8_27_10_45 will appear upon completion if the USB storage device is present. Display Logging suspended during remote AMC Manager activity Console Logging suspended during remote AMC Manager activity 100 Digital Monitor AMC-1DBx Series User Manual Display Logging re-enabled after remote AMC Manager activity Console Logging re-enabled after remote AMC Manager activity AMC Manager in use. These messages are displayed when AMC Manager activity causes the Display and/or Console logging to be suspended or re-enabled. Due to improved transfer times of the AMC Manager Printer Port these interfaces are suspended. The following are exceptional messages that are not normally logged they indicate a problem in the system and should be addressed: Low Voltage detected on Battery(Database/RTC) at Startup Low Voltage detected on Battery(Database/RTC) Could not create MONITOR_TASK Could not create UPGRADE_FW_TASK Could not create DB_SAVE_TASK Could not create DEBUG_PRINT_TASK Could not create SENSOR_LOG_TASK Could not create RELAY_LOG_TASK Could not create ALARM_LOG_TASK Could not create SYSTEM_LOG_TASK Could not create ADMIN_LOG_TASK Could not create SECURITY_LOG_TASK Could not create COMM_LOG_TASK Could not create PRT_LOG_TASK Could not create TELNET_TASK Could not create NETSETUP_TASK Could not create LCD_DISPLAY_TASK Could not create LCD_TIME_TASK Could not create DB_RESTORE_USB_TASK Could not create DB_RESTORE_USB_TASK Could not create MONITOR_TASK Could not create UPGRADE_FW_TASK Could not create LOCAL_RELAY_ANALOG_OUT_TASK Could not create MODBUS1_TASK Could not create MODBUS2_TASK Could not create MODBUS3_TASK Could not create MODBUS4_TASK Could not create SLV_MODBUS_TASK Could not create MODBUS_RX_LED_TASK Could not create MODBUS_TX_LED_TASK Could not create MODBUS_UPDATE_TASK Could not create MONITOR_SWITCH_TASK Could not create MONITOR_SCOM_TASK Could not create DEVICE_UNIQUENESS_TASK Could not create BACSERVER_TASK Could not create FORMAT_USB_TASK Could not create DB_SAVE_USB_TASK Could not create ZONE_SCHEDULING_TASK Could not create Telnet_server Could not create SHELL_TASK Could not create USB_MFS_TASK Error Installing <NV Device Name> 101 Digital Monitor AMC-1DBx Series User Manual Error installing dtim<DMA Timer #> Error Installing <Printer Device Name> Error Installing <Console Device Name> Error Installing <Log Device Name> Error installing < NV Device Name> RTCS failed to initialize, error = <Error Number> USB Failed to Install eGUI/D4D initialization failed tfs install returned: <TFS Eror #> Opening <Log Device Name> device driver failed Opening dtim<DMA Timer #> interrupt driver failed Opening <Device Name> device driver failed Opening <Printer Device Name> device driver failed Opening <Console Device Name> device driver failed Unable to open flash device <NV Device Name> Could not open <I2C Device Name> device FLASH Upgrade: Bad USB image file:10aquila.elf.rbin:<CS>cksum differs from 10aquila.elf.csum:<CS> FLASH Upgrade: Need to Reboot to re-initialize NANDFLASH Driver FLASH Upgrade Fatal: Will retry until successful; check USB files:10aquila.elf.rbin and 10aquila.elf.csum FLASH_IOCTL_ENABLE_BUFFERING failed. FLASH_IOCTL_GET_BLOCK_MAP failed. Monitor Image Save Compare failed BAD IP:<IP Address> In Use BAD BACnet ID <ID> In Use BACnet Abort: <Reason> BACnet Reject: <Reason> Watch-dog disabled by USER ENTER_PB at start-up Watch-dog disabled compiled time definition Watch-dog not kicked; incorrect running task count:<Task Count #> Can't Display; BAD VRAM BWalk Field of Zeros Can't Display; BAD VRAM BWalk Field of Ones Can't Display; BAD VRAM AWalk Field of Zeros Can't Display; BAD VRAM AWalk Field of Ones Can't Display; BAD VRAM March Field of Ones Can't Display; BAD VAM March Field of Zeros Failed to get <Buffer Name> buffer NAND Flash Bad Block #<Block Number>Found No Monitor Database in <NV Device Name>, can't Seek: ERROR No Monitor Database in <NV Device Name>, can't read: ERROR No Monitor Database in <NV Device Name>, block erased Failed Monitor Database Save Compare Can't Save DB to USB Device Can't Restore DB from USB Using previous DB Can't save Database; BAD SRAM BWalk Field of Zeros Can't save Database; BAD SRAM BWalk Field of Ones Can't save Database; BAD SRAM AWalk Field of Zeros Can't save Database; BAD SRAM AWalk Field of Ones 102 Digital Monitor AMC-1DBx Series User Manual Can't save Database; BAD SRAM March Field of Ones Can't save Database; BAD SRAM March Field of Zeros Data Base ID Mis-match Can't _timer_create_component Can't create save_monitor_db_timer event Can't create update_modbus_timer event Can't create Monitor_reenable_console_display_logs_event_ptr Can't create Monitor_lite_lcd_event_ptr Can't open save_monitor_db_timer event Can't open update_modbus_timer event Can't open Monitor_reenable_console_display_logs_event_ptr Can't open Monitor_lite_lcd_event_ptr _timer_start_oneshot_after() failed for Save_Monitor_Database _timer_start_oneshot_after() failed for Modbus_update _timer_start_oneshot_after() failed for Monitor_reenable_console_display_logs _timer_start_oneshot_after() failed for Monitor_lite_lcd Writing to dtim<DMA Timer #> interrupt failed dtim<DMA Timer #>: Couldn’t flip MB<Channel #> TO_WRITE dtim<DMA Timer #>: Couldn’t flip MB<Channel #> TO_READ Couldn't set I2C DAC Bus address I2C DAC not available Bad parameters for Do_MAS_Modbus_sensors Bad parameters for Do_MAS_Modbus_relays"); Bad parameters for Do_MAS_Modbus_analog_outs"); UE_ISR In ISR: <0 or 1> ,PC: 0x<Address> and SR: 0x<Status Register> UE_ISR TIME <Year,Month,Day Hour:Minute:Second> Day:<0 to 7> UE_ISR Vector #: <Vector Number> UE_ISR Task Id: 0x<Task Number> and Stack Frame: 0x<Stack Pointer> WD_ISR In ISR: <0 or 1> ,PC: 0x<Address> and SR: 0x<Status Register> WD_ISR TIME <Year,Month,Day Hour:Minute:Second> Day:<0 to 7> WD_ISR Vector #: <Vector Number> WD_ISR Task Id: 0x<Task Number> and Stack Frame: 0x<Stack Pointer> APPENDIX A.1 SENSOR.LOG Items The sensor log file messages can appear in the USB Storage device when the menu item Log File>Sensor is enabled. The RS-485 messages will appear when the RS-485 system has been reconfigured due to changes to the sensor configuration. The will list all sensors configured on the Modbus channels 1-4 whether enabled or disabled for the system. Local device will not appear is this list. The RS-485 number can range from 1:4 while the Sensor number is from 1-988. It contains the following format: RS485:<Channel #> Sensor:<Sensor #> <Enabled or Disabled> 103 Digital Monitor AMC-1DBx Series User Manual The Sensor messages will appear once per minute listing all configured sensors for the system. The Alarms/Activity format is base on the number alarms configured and the current sensor activity. The “_” indicates no activity while the “*” indicates active and “#” indicates silenced. In the MB variant the channel number will be from 1:4. It contains the following format: Sensor <Sensor #> <Gas Type> <Gas Concentration> <Alarms/Activity> The example below indicates Sensor 248 is a NO2 sensor with 0 ppm gas concentration and configured for 2 alarms and has no alarms active: Sensor 248 NO2 0 PPM ALM:1_2_ The example below indicates Sensor 1 is a CO sensor with 100 ppm gas concentration and configured for 2 alarms and has all alarms currently active: Sensor 001 CO 100 PPM ALM:1*2* The example below indicates Sensor 1 is a CO sensor with 100 ppm gas concentration and configured for 2 alarms and has all alarms currently silenced: Sensor 001 CO 100 PPM ALM:1#2# In the Sensor MB variant the Modbus channel number will be from 1:4 and displays the temperature at the sensor Modbus device. It contains the following format: Sensor <MB Channel #>:<MB Address> Inst:<MB Instance #> TEMP<Temperature in Degrees C> The following are exceptional sensor messages that are not normally logged; they indicate a problem in the system and should be addressed: Sensor <MB Channel #>:<MB Address> Inst:<Instance #> Bad <Device Name> Gas Type Fault Sensor <MB Channel #>:<MB Address> Inst:<Instance #> Bad <Device Name> Product Type Fault Sensor <MB Channel #>:<MB Address> Inst:<Instance #> Bad <Device Name> Not Ready Fault Sensor <MB Channel #>:<MB Address> Inst:<Instance #> Bad <Device Name> Bad Status Fault Sensor <MB Channel #>:<MB Address> Inst:<Instance #> Bad <Device Name> Bad TEMP Read Fault Sensor <MB Channel #>:<MB Address> Inst:<Instance #> Bad <Device Name> Bad Registration Fault APPENDIX A.2 RELAY.LOG Items The relay log file messages can appear in the USB Storage device when the menu item Log File>Relay is enabled. The RS-485 messages will appear when the RS-485 system has been reconfigured due to changes to the relay or Analog Output configuration. It will list all relay or analog output remotely configured on the MB1-4 whether enabled or disabled in the system. Local devices will not appear is this list. The RS-485 number will be from 1:4 while the Relay number is from 1-256 and Analog Output number is from 1-128. It contains the following formats: RS485:<Channel #> Relay:<Relay #> <Enabled or Disabled> RS485:<Channel #> Analog Output:<Analog Output #> <Enabled or Disabled> The Local messages will appear when a Relay or Analog Output that are integral to the system has been reconfigured as local in their configuration. It will list all integral relay or analog output devices locally configured whether enabled or disabled in the system. Remote devices will not appear is this list. The Local 104 Digital Monitor AMC-1DBx Series User Manual Relay instance number is from 1-16 and Local Analog Output instance number is from 1-4. It contains the following formats: Local Relay :<Instance #> <Enabled or Disabled> Local: Analog Output :<Instance #> <Enabled or Disabled> The Relay number messages will appear once a minute to display the state of all configured relays. It shows the number of Alarm counts and current relay position. The Relay number is from 1-256. The Alarms count is the total of triggered sensors and zones assigned to that relay. The relay state can include seconds of Power-On, No Relays Found, Not Found, Enerigized, DeEnergized, Pending, Latched, Zone Event (ZE), Minimum Run Time (MRT) minutes and Post Run Time (PRT) minutes fields. It contains the following format: Relay <Relay #> Alarms <Alarm count> <relay state> In the MB variant the Modbus channel number will be from 1:4 while displaying Relay’s Modbus device state in Boolean. It contains the following format: Relay <MB Channel #>:<MB Address>:<MB Instance #> Value:<Boolean 0 or 1> The following are exceptional Relay messages that are not normally logged; they indicate a problem in the system and should be addressed: Relay <MB Channel #>:<MB Address>:<Remote Instance #> Bad <Device Name> Product Type Fault Relay <MB Channel #>:<MB Address>:<Remote Instance #> Not Ready Fault Relay <MB Channel #>:<MB Address>:<Remote Instance #> Bad Registration Fault The Relay Local messages will appear once a minute to display the state of all local integral relays. The Local instance number will be 1 to 16 and the value will be 0 or 1 representing the relays current state. A value of 0 for a relay configured for DeEnergized is normal, while a value of 1 is normal for relay configured as Energized. It contains the following format: Relay Local Inst: <Local Instance #> Value :<relay state> The Analog Out messages will appear once a minute to display percentage of full scan and the analog output type (0-20mA or 4-20mA) for the analog outputs assigned to zones. It contains the following formats: Analog Out<Analog Output #>:%<percentage> full scale with <type mA> type Service Analog Out<Analog Output #>:<%> full scale with <type mA> type The following are exceptional Analog Out messages that are not normally logged; they indicate a problem in the system and should be addressed: Analog_out <MB Channel #>:<MB Address>:< MB Instance #> Bad <Device Name> Product Type Fault Analog_out <MB Channel #>:<MB Address>:< MB Instance #> Bad <Device Name> Not Ready Fault Analog_out <MB Channel #>:<MB Address>:< MB Instance #> Bad Registration Fault The Zone event messages will appear throughout a schedule cycle for a zone relay. A zone event involves a relay number which is enabled or disabled on schedule defined by its configuration. The schedule field is shown as day Event, Monday to Sunday Event or Monday to Friday Event. The zone event cycle consists of three phases; created, cleared and completed. The creation will enable or disable the Relay number as per the configuration. The clear will start the de-activation of the relay number and the completion indicates when the relay number associated with the zone has returned to normal operation. The day number is 1-7 with Sunday being 1 and Saturday being 7 and a Zone event messages can be cleared and completed on the same or next day. 105 Digital Monitor AMC-1DBx Series User Manual Zone <Zone #> Relay <Relay #> <Schedule> <Phase> <Day, Same Day, Next Day> <Day #> APPENDIX A.3 ALARM.LOG Items The alarm log file messages can appear in the USB Storage device when the menu item Log File>Alarm is enabled. The Buzzer messages will appear when it is activated or cleared for various reasons. The Buzzer message contains the following format: Buzzer <Activated or Cleared> <reason>. These reasons can also be blank or: checking the Data Base, System Failure, Alarm, Device Failure, SILENCE Pushbutton, RESET_RELAY Pushbutton, TEST Pushbutton, Sensor Alarm. In some cases the buzzer cleared reason is log on a separate line as follows: System Failure Cleared Sensor Alarm Cleared Device Failure Cleared Test Pushbutton Cleared Data Base Failure Cleared Cleared Data Base Good. The Alarm LED message will appear when front panel LEDs are cleared or activated. The ALARM LED message contains the following formats: <Fault Alarm> LED <Cleared or Activated> Alarm<number> LED <Cleared or Activated> The Start Alarm Sensor message will appear when sensor delay timer is started. The level can be 1 to3 and sensor number can be 1-988. The Start Alarm Sensor message contains the following format: Start Alarm <Level> Sensor:<Sensor #> Delay The Increasing, Decreasing, Window Alarm message will appear when sensor alarm state becomes active. The Level can be 1 to 3 and sensor number can be 1-988. The Increasing, Decreasing and Window Alarm message contains the following formats: Increasing Alarm <Alarm Level> Sensor:<Sensor #> Active Decreasing Alarm <Alarm Level> Sensor:<Sensor #> Active Window Alarm <Alarm Level> Sensor:<Sensor #> Active The Alarm Relay message will appear when Relay alarm state changes. The following alarm states and timer types are possible; Pending or Activated with Delay Timer or MRT (Minimum Run Time) and PRT (Post Run Time) values with and without LATCHING. The Alarm Relay message contains the following format: Alarm Relay:<Alarm Level> <Pending or Activated> with <timer type> <and Latching> 106 Digital Monitor AMC-1DBx Series User Manual The Zone Alarm/Fail message will appear when alarm or failed relay associated with a zone is active or inactive. The zone number is 1-128 and the alarm level is 1-3 and sensor number can be 1-988. The Zone Alarm/Fail message contains the following formats: Zone:<Zone #> Alarm<Level> Sensor:<Sensor #> <Active or Inactive> Zone:<Zone #> Fail Sensor:<Sensor #> <Active or Inactive> Other possible Alarm log file messages: Dew Point Alarm ambient temperature Sensor:<Sensor #> Active Dew Point Alarm surface temperature Sensor:<Sensor #> Active Dew Point Alarm relative Humidity Sensor:<Sensor #> Active. Additionally the Alarm log tracks detail of the DIP Switch User Options when change is detected: DIP Switch Audio:<Disabled or Enabled> DIP Switch Sensor Delay:<Disabled or Enabled> DIP Switch Minimum Run Time:<Disabled or Enabled> DIP Switch Post Run Time:<Disabled or Enabled> DIP Switch Calibration Mode:<Disabled or Enabled>. APPENDIX A.4 SYSTEM.LOG Items The system log file messages can appear in the USB Storage device when the menu item Log File>System is enabled. The System Log displays the following messages associated with BACnet: AMC-1DBx BACnet Name GNU SourceForge BACnet Stack Version 0.5.7 Max APDU: 1476 BACnet BIP Device ID: 677003 The System Log displays the Buzzer messages similar to ALARM.LOG items: Buzzer Activated for Checking Data Base Reset Cause Cleared by Hold Pushbutton Buzzer Activated Buzzer Activated for Silence Pushbutton Buzzer Activated for RESET_RELAY Pushbutton Buzzer Activated for System Failure Buzzer Activated for Sensor Alarm Buzzer Activated for Device Failure Buzzer Activated for Test Pushbutton Buzzer Cleared System Failure Cleared Sensor Alarm Cleared Device Failure Cleared Test Pushbutton Cleared Data Base Failure Cleared The System Log displays the system tasks as they are created. Below is a list of task creation message that appear at start up (due to start up sequence not all messages are displayed in System log file): 107 Digital Monitor AMC-1DBx Series User Manual TELNET_Server created TELNET_TASK created DB_RESTORE_USB_TASK created MONITOR_TASK created MONITOR_SWITCH_TASK created BACSERVER_TASK created DEVICE_UNIQUENESS_TASK created LOCAL_RELAY_ANALOG_OUT_TASK created ZONE_SCHEDULING_TASK created. DB_SAVE_TASK created UPGRADE_FW_TASK created NETSETUP_TASK created MODBUS1_TASK created MODBUS2_TASK created MODBUS3_TASK created MODBUS4_TASK created SLV_MODBUS_TASK created MODBUS_RX_LED_TASK created MODBUS_TX_LED_TASK created MODBUS_UPDATE_TASK created MONITOR_SWITCH_TASK created MONITOR_SCOM_TASK created DB_SAVE_USB_TASK created ZONE_SCHEDULING_TASK created SHELL2_TASK created USB_MFS_TASK created. Additionally the following FLASH Upgrade messages can be displayed when 10Aquila.elf.csum and 10Aquila.elf.bin file are detected on USB storage upon start up (Some of the messages only occur during a fault situation): FLASH Upgrade: Ignoring Version detected in USB check file:10aquila.elf.csum FLASH Upgrade: No USB EMAC file:EMAC.txt FLASH Upgrade: Obtained MAC:<MAC> in FLASH FLASH Upgrade: Proceeding with upgrade; Ignoring checksum in 10aquila.elf.csum FLASH Upgrade: Need to Reboot to re-initialize NANDFLASH Driver and start new image FLASH Upgrade: No USB check file:10aquila.elf.csum FLASH Upgrade: No USB image file:10aquila.elf.rbin FLASH Upgrade: Bad USB image file:10aquila.elf.rbin FLASH Upgrade: No USB check file:10aquila.elf.csum FLASH Upgrade: Bad USB check file:10aquila.elf.csum FLASH Upgrade: Old Version detected in USB check file:10aquila.elf.csum FLASH Upgrade: Upgrade skipped; Flash contents newer then USB check file:10aquila.elf.csum FLASH Upgrade: No USB EMAC file:EMAC.txt FLASH Upgrade: Bad USB EMAC file:EMAC.txt FLASH Upgrade: Obtained SN:<Serial Number> in USB file:EMAC.txt FLASH Upgrade: Obtained MAC:<MAC Number> in USB file:EMAC.txt FLASH Upgrade: Checksum mismatch between USB image file:10aquila.elf.rbin:<CS> and FLASH Device:<CS> FLASH Upgrade: Proceeding with upgrade; Flash contents differ from USB image file:10aquila.elf.rbin FLASH Upgrade: Checksum match between USB image file:10aquila.elf.rbin:<CS> and FLASH Device:<CS> FLASH Upgrade: No upgrade needed; EMAC.txt file same as FLASH MAC FLASH Upgrade: No upgrade needed; Flash contents the same as USB image file:10aquila.elf.rbin FLASH Upgrade: Flash contents the same as USB image file:10aquila.elf.rbin FLASH Upgrade: Proceeding with upgrade; EMAC.txt file differs from FLASH MAC 108 Digital Monitor AMC-1DBx Series User Manual Other possible SYSTEM Log messages: Date and Time Changed from Menu Date and Time Changed Remotely (AMC Manager) Date and Time Changed from BAS Error Installing CONSOLE_PORT Shell2 exited... APPENDIX A.5 ADMIN.LOG Items The administration log file messages can appear in the USB Storage device when the menu item Log File>Admin is enabled. The Data Base Changed messages are logged when Data base is changed from various sources; AMC Manager, Menu or BAS. Additionally the Data Base Changed can be forced due to; Init_db, Data Base Recovery or Sensor Default. The Data base Changed has the following format: Data base Changed <Source> The Logging choice changes are track changes from the various sources. The logging items are 1 to 10 representing; Sensor, Relay, Alarm, System, Admin, Communication, Security, Telnet Console, LCD Display and Printer Port. The Boolean change is 0 or 1 for disabled or enabled. The sources are Remotely (AMC Manager), Menu or BAS. The Logging Choice message has the following format: Logging Choice Item<1 to 10>=<Boolean 0 or 1> Changed <Source> Data base change items are specifically tracked when initiated by AMC Manager. The following messages are logged during AMC Manager downloads: Data Base ID Changed Remotely (AMC Manager) Configuration 1 Values Changed Remotely (AMC Manager) Serial Mode Changed Remotely (AMC Manager) Configuration 2 Values Changed Remotely (AMC Manager) Other Gas Labels Changed Remotely (AMC Manager) Engineering Units Changed Remotely (AMC Manager) Zone Labels Changed Remotely (AMC Manager) Sensor Values Changed Remotely (AMC Manager) Relay Values Changed Remotely (AMC Manager) Analog Output Values Changed Remotely (AMC Manager) Zone Values Changed Remotely (AMC Manager) Zone SensorID Values Changed Remotely (AMC Manager) Interface Values Changed Remotely (AMC Manager) MODBUS Ports 1-4 Values Changed Remotely (AMC Manager) Additionally the Administration log tracks changes to the MODBUS, RS-485, BAS and PRINTER PORT interfaces: Modbus Changed due to Menu Action RS485:<Channel> <Enabled or Disabled> BAS MODBUS <Enabled or Disabled> Serial Mode Changed to Printer from Menu Additionally the Administration log tracks detail of the DIP Switch User Options when change is detected: 109 Digital Monitor AMC-1DBx Series User Manual DIP Switch Language:English DIP Switch Language:French DIP Switch Audio:<Disabled or Enabled> DIP Switch Sensor Delay:<Disabled or Enabled> DIP Switch Zero Buffer:<Disabled or Enabled> DIP Switch Minimum Run Time:<Disabled or Enabled> DIP Switch Post Run Time:<Disabled or Enabled> DIP Switch Calibration Mode:<Disabled or Enabled>. APPENDIX A.6 SECURITY. LOG Items The security log file messages can appear in the USB Storage device when the menu item Log File>Admin is enabled. The Security log tracks password changes, system menu log in and log out and BAS MODBUS write access. The following messages can appear in the security log file: Password Accepted from Menu Password Changed from Menu Log In Attempted from Menu Log Out Occurred from Menu Logged Out Remotely (AMC Manager) BAS MODBUS Lockcode Write Match Achieved from BAS BAS MODBUS Lockcode Updated from Menu APPENDIX A.7 COMM.LOG Items The communication log file messages can appear in the USB Storage device when the menu item Log File>Comm is enabled. The communication log monitors Ethernet and MODBUS conditions. The following is The following running Ethernet and BACnet messages appear in the communication log file every minute: IPAddr:<IP Address> IP Subnet:<IP IP Router:<Router Address> BACnet ID:<BACnet ID> Octet Received:<RX OCTETS> RX Packets:<RX PACKETS> Uni:<RX UNICAST> RX Multi:<RX MULTICAST> Broad:<RX BROADCAST> Loss no resources:<RX MISSED> Loss int. errors:<RX ERRORS> Loss other reasons:<RX DISCARDED> Octet Sent:<TX OCTETS>; TX Packets:<TX PACKETS> Uni:<TX UNICAST> TX Multi:<TX MULTICAST> Broad:<TX BROADCAST> Unsent no resources:<TX MISSED> Unsent int. errors:<TX ERRORS> Bad Destinations:<TX DISCARDED> Subnet Mask> The following Ethernet and BACnet exception messages appear in the communication log file when they occur and indicate problem(s) in the system which should be addressed: BAD IP:<IP Address> In Use BAD BACnet ID <ID> In Use BAD BACnet ID:<UDP Port> 110 Digital Monitor AMC-1DBx Series User Manual The following running MODBUS messages appear in the communication log file every minute for each Modbus channel: MB<Channel #> Pkt(s) TX:<Count> RX:<Count> MB<Channel #> CRCs G:<Count>,B: <Count> MB<Channel #> TO:<Count>,dtim:<Count> MB<Channel #> CE:<Count>,Gap:<Count>,Len:<Count> MB<Channel #> Char(s) TX:<Count>,RX:<Count> The following MODBUS exception messages appear in the communication log file when they occur and indicate problem(s) in the system which should be addressed: MB<MB Channel #>:<MB Address> Timeout MB<MB Channel #>:<MB Address> Short Message MB<MB Channel #>:<MB Address> Bad RX CRC MB<MB Channel #>:<MB Address> RX PARITY: <Count> FRAMING: <Count> OVERRUNS: <Count> DROPPED:<Count> MB<MB Channel #>:<MB Address> RX PACKET GAP:<Count> PARITY: <Count> FRAMING: <Count> OVERRUNS: <Count> DROPPED: <Count> The following Sensor exception messages also appear in the communication log file as a result previous MODBUS exception messages: Sensor <MB Channel #>:<MB Address> Inst:<MB Instance> Missing Device Fault Sensor <MB Channel #>:<MB Address> Inst:<MB Instance> Bad Read of Status Fault Sensor <MB Channel #>:<MB Address> Inst:<MB Instance> <Device Name> Bad Read Fault The following Relay exception messages also appear in the communication log file as a result previous MODBUS exception messages: Relay <MB Channel #>:<MB Address>:<MB Instance> Missing Device Fault Relay <MB Channel #>:<MB Address>:<MB Instance> Bad Read Fault Relay <MB Channel #>:<MB Address>:<MB Instance> Bad Write Fault The following Analog Output exception messages also appear in the communication log file as a result previous MODBUS exception messages: Analog_out <MB Channel #>:<MB Address>:<MB Instance> Missing Device Fault Analog_out <MB Channel #>:<MB Address>:<MB Instance> Bad Read of Status Fault Analog_out <MB Channel #>:<MB Address>:<MB Instance> Bad Write Fault 111