1
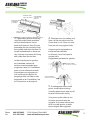
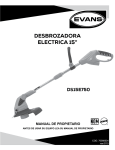
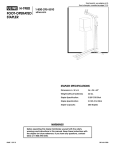
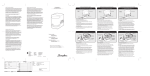
CONVEYOR
ASHLAND PRODUCTS
Clipper® Vise Lacer
Operating Instructions • Instrucciones de Operacion
Phone
Fax
800-587-0045
419-281-1096
F.O.B. Ashland, Ohio 44805
www.ashlandconveyor.com
CONVEYOR
ASHLAND PRODUCTS
re Belt Thickness
CONVEYOR
ASHLAND PRODUCTS
ss with Clipper® hook gauge, micrometer, or caliper
ression cover, skive the impression off prior to
ess (Fig. 2).
Prior to Lacing the Belt
Fig.
1
How
How
to to
Properly
Properly
Square
Square
a Belt
aEnd
Belt
End
End
How
to
Properly
Square
a Belt
Los
Preparativos
Antes
De
Engrapar
La Banda
re Pulley
Diameter
he smallest pulley that has a belt wrap of at least 90
r ‘minimum pulley diameter’ measurement.
15 to
20 ft.
15 to
20 ft.
Awl or
Nail
Awl or
Nail
Center
Line
15 to
20 ft.
BC
B
B
C
C
B
Center
Line
BC
Awl or
Nail
Center
Line
B
C
C
B
BC
B
C
C
mine Hook Choices
Selection Chart on page 4, identify possible fastener
Step
2 21
Step Step
32 3
4 4
5 5
6 6
7 7
2 Step
Step diameter.
3Step
Step 43Step
Step 5 Step Step
Step 6 Step Step
Step 7 Step Step
Step
Step
thickness and Step
minimum
pulley
Note:
ForStep
there are a The
number
ofsimple
hooks
that
can
be selected.
TheThe
following
following
simple
simple
steps
steps
willensure
will
helphelp
ensure
thatthat
a belt
is properly
issquared
properly
squared
squared
prior
to mechanical
to mechanical
fastener
installation.
installation.
following
steps
will
help
thatensure
a belt
isa belt
properly
prior
toprior
mechanical
fastenerfastener
installation.
Fig.
2
2. If using
a rough top belt skive
1. Square belt ends, then cut.
back about 1” (26 mm) from belt
Step
6. 6.
Measure
Measure
backback
fromfrom
the the
intended
intended
splice
to ato a
Step
1. 1.
Prior
Prior
towork
any
to any
work
work
on conveyors,
your
on
your
conveyors,
conveyors,
be certain
be Step
certain
edge.
6.Step
Measure
back
from
the
intended
splice
areasplice
toarea
a area
Step 1.StepPrior
to
any
on
your
be certain
Cuadrar
la
banda
fines.
Entonces
distance
approximately
approximately
equal
equal
totimes
three
to three
times
times
the
belt
the belt
width.
At At
thatpower
that
the the
power
has has
beenbeen
turned
offthat
off
and and
thatbelt
that
theisthe
beltdistance
belt
is isdistance
approximately
equal to
three
the
belt
width.
At width.
that the
has
been
turned
offturned
and
the
corte
lapower
banda.
this
this
point
point
drive
drive
a
nail
a
nail
or
an
or
awl
an
awl
on
the
on
the
center
center
line.
line.
Using
Using
the
the
“locked
out.”out.”
this point
drive
a
nail
or
an
awl
on
the
center
line.
Using
the
“locked“locked
out.”
Si están usando banda
maller diameter offer:
oras awl
awl
as aas
pivot
a pivot
point,
point,
swing
swing
anmarking
arc,
an arc,
marking
marking
the the
beltbelt
nail ornail
awlnail
aorpivot
point,
swing
an arc,
the
belt
antiderrapante
con
cubierta
across
its
entire
its
entire
width.
width.
Step
2. Measure
2. the
Measure
the
beltbelt
width
and and
establish
establish
center
center
points
at atacross
across
its
entire
width.
Step 2.Step
Measure
beltthe
width
andwidth
establish
center
points
at points
superior de acabado áspero,
contacts conveyor components.
intervals
to3 5(1
tofeet
5 feet
(1 to
(1
1.5
to(A1.5
m).
m).
(A distance
(Aofdistance
of to
15 to
intervals
ofintervals
3 toof53of
feet
to
1.5
m).
distance
15 of
to 15
usar el desbastador Clipper,
components.
Step
7. Where
7.thisWhere
this
arc intersects
arc the
intersects
the
twotwo
smaller
smaller
(B &
(B &
feet
20 to
feet
[4.5
to back
6tom]
6 from
m]
backback
fromintended
from
the the
intended
intended
splice
area
is 7.
isStep
Where
arcthis
intersects
twothesmaller
lines
(Blines
&lines
20 feet20[4.5
6 [4.5
m]
the
splice
areasplice
isareaStep
antes
del
calíbrador
(Desbastar
C) marked
C)
marked
parallel
to the
to
belt
the belt
center
line,line,
astraight
steel
a steel
straight
straight
recommended.)
recommended.)
C) marked
parallel
to parallel
the belt
center
line,center
align
aalign
steelalign
recommended.)
aproximadamente 1”, 26mm, del
edgeedge
through
through
thesethese
points
andthe
and
trace
trace
the
the
line line
across
the the
width
width
edge through
these
points
andpoints
trace
line
across
the across
width
borde
de
la
banda).
rger diameter
offer:
the
ofThe
the
belt.belt.
TheThe
resulting
resulting
is the
issquare.
the
truetrue
square.
square.
Step
3. 3.
Using
Using
either
either
astraight
steel
a steel
straight
straight
or aorline,
chalk
a chalk
line,
line,of
of the
belt.
resulting
line
is line
the line
true
Step 3.StepUsing
either
a steel
edge
oredge
a edge
chalk
mark
mark
the
the
average
average
center
center
line
line
through
through
the
the
points
points
measured
measured
mark
the
average
center
line
through
the
points
measured
e increased wire mass.
Fig. 3
Step
8. the
8.
Cut
Cut
theatthe
belt
atline
this
atusing
this
line line
using
using
of
the
of the
specially
specially
in Step
2. 2.
Step 8.Step
Cut
belt
thisbelt
one
ofone
theone
specially
in Stepin2.Step
e.
engineered
engineered
beltbelt
cutters
cutters
fromfrom
Flexco.
Flexco.
engineered
belt cutters
from
Flexco.
Step
4. 4.
Using
Using
a square,
a square,
draw
aperpendicular
line
a line
perpendicular
perpendicular
to your
Step 4.Step
Using
a square,
draw
adraw
line
to yourto your
Step
9. Repeat
9.Steps
Repeat
Steps
Steps
1-8
on
the
on belt
the
other
other
beltbelt
end.end.
average
center
line line
across
the
beltbelt
width.
width.
Step 9.Step
Repeat
1-8
on
the1-8
other
end.
averageaverage
center
linecenter
across
the across
beltthewidth.
Wire Diameter/Shape
® squaring
Step
5.even
For
5. greater
For
eveneven
greater
greater
accuracy
in preparing
in preparing
youryour
squaring
Step 5.Step
For
accuracy
inaccuracy
preparing
your squaring
se Style:
Carded
or
Unibar
line line
– and
– and
onwith
belts
on worn
belts
withwith
worn
worn
edges
–completion
after
– after
completion
completion
of Step
line – and
on
belts
edges
–edges
after
of Stepof Step
3 ,two
mark
3 , lines
mark
two(B
two
lines
(Bequal
&(BC)
&distance
equal
C) equal
distance
distance
from
from
the center
the
line line
3 , mark
& lines
C)
from
the
center
linecenter
the
inwhere
the
areaarea
where
the the
splice
will
be installed.
be Lines
installed.
Lines
in the in
area
the where
splice
will splice
bewill
installed.
B
&Lines
CB &B C& C
must
must
be parallel
be
the
to the
center
line.line.
must be
parallel
to parallel
the to
center
line.center
t Hook Leg Length
Flexible
SteelSteel
Lacing
Lacing
Company
Company
FlexibleFlexible
Steel
Lacing
Company
ions, it is recommended to use a standard leg length for
ere failures have occurred due to fastener comb-out or
select a hook with a longer leg for greater reachback.
2
CONVEYOR
ASHLAND PRODUCTS
t Material
Phone
Fax
800-587-0045
419-281-1096
25252525
Wisconsin
Wisconsin
Avenue
Avenue
2525 Wisconsin
Avenue
Downers
Grove,
Grove,
IL 60515-4200
IL 60515-4200
U.S.A.
DownersDowners
Grove,
IL
60515-4200
U.S.A. U.S.A.
Telephone:
Telephone:
(630)(630)
971-0150
971-0150
Telephone:
(630)
971-0150
Fax:971-1180
Fax:
(630)(630)
971-1180
971-1180
Fax: (630)
E-mail:
[email protected]
[email protected]
E-mail: E-mail:
[email protected]
Visit
our
our
Web
site at:
sitewww.flexco.com
at: www.flexco.com
Visit ourVisit
Web
siteWeb
at: www.flexco.com
F.O.B. Ashland, Ohio 44805
www.ashlandconveyor.com
Australia:
61-2-9680-3322
61-2-9680-3322
• England:
• England:
44-1457-891000
44-1457-891000
• Germany:
• Germany:
49-7428-9406-0
49-7428-9406-0
Mexico:
• Mexico:
52-5-674-5326
52-5-674-5326
Australia:Australia:
61-2-9680-3322
• England:
44-1457-891000
• Germany:
49-7428-9406-0
• Mexico:• 52-5-674-5326
New Zealand:
New
Zealand:
64-9-415-4488
64-9-415-4488
• Republic
• Republic
of
South
of27-11-974-2771
South
Africa:Africa:
27-11-974-2771
27-11-974-2771
New Zealand:
64-9-415-4488
• Republic
of South
Africa:
hook on
optimal s
belt faces
LOS PREPARATIVOS ANTES DE ENGRAPAR LA put unlaced hooks in these two slots. See later instrucCorrect Position
tions for lacing belts wider than the vise lacer.
BANDA:
ASHLAND
• Escuadrar ambas
puntas de la banda.
CONVEYOR
• Usar el calíbrador
Clipper para determinar el tamaño
PRODUCTS
correcto del gancho.
• Si están usando banda antiderrapante con cubierta
superior de acabado áspero, usar el desbastador
Clipper, antes del calíbrador (Desbastar
aproximadamente 1”, 26mm, del borde de la banda).
Pressure Plate
placa de presión
Extra Deep Slots
hendiduras
profundas
Posición Correcta
Instale el cartón con los ganchos en el retenedor,
remueva el cartón e inserte el pasador para
asegurarlos. Nota: Las 2 hendiduras extras se usan
solamente cuando la banda que va a engraparse es
más ancha que la máquina. No pongan ganchos sin
haberse sido engrapado en las 2 hendiduras. Ver
Incorrectmás
Position
instrucciones
adelante.
Insertar la
de mane
retenedor
operación
sin engra
extremo d
del giro).
la banda
Posición Incorrecta
Hook Retainer
retenedor de
ganchos
3. If carding paper covers hook points, remove prior to lacing.
If carding paper covers loop area of fastener, remove after
lacing.
Lacer Pin
pasador de guía
OPERATING INSTRUCTIONS FOR
Si las puntas están cubiertas con el cartón, removerlo
antes
de engrapar.
Si el cartón cubre el area de la curva
USING VISE
LACERS
del gancho, se debe quitar después del engrapado.
INSTRUCCIONES
OPERACION
1. If applicable, remove DE
reinforcing
strip from card of PARA EL USO DE LA
3.
Ifand
applicable,
remove
reinforcing
4.4.Place
into vise
making
surebelt down firmly
Insert
belt
between
hook
points. Hold
hooks
place
card
into
hook
retainer.
Secure hooks
MAQUINA VISE LACER (ENGRAPADORA
DE lacer
BANCO)
onto hook retainer. (Note: For best operating results, leave
strip
from
hooks
anddeep
place
with
lacer
pin. card
Note:of
The
two extra
slots are used
only
when
lacing
a
belt
wider
than
the
lacer.
Do not
card into hook retainer. Secure
put unlaced hooks in these two slots. See later instruchooks
with belts
lacerwider
pin.than
Note:
tions
for lacing
theThe
vise two
lacer.
extra deep slots are used only when
Instale el THE
con los ganchos en el retenedor, 2.
PRIOR TO LACING
BELT:
lacing aelcartón
belt
wider
than the lacer. Do
remueva
cartón
e inserte el pasador para
• Square both ends of belt.
not put
in these
twose usan
asegurarlos.
Nota: Las
2 hendiduras
extras
• Use the Clipper
Hookunlaced
Gauge
tohooks
determine
the proper
la banda que va
engraparse es
size hook.solamente
slots. Seecuando
later instructions
fora lacing
• If using a Rough
Top Belt
skive No
off the
roughganchos
top
más ancha
que Skiver,
la máquina.
pongan
sin
beltsbelt
wider
thansize
theen
vise
lacer.
before gauging
for proper
hook.
back
haberse
sido
engrapado
las (Skive
2 hendiduras.
Ver
about 1" (26
mm) from belt
instrucciones
másedge.)
adelante.
Instale el ANTES
cartón con
los ganchosLA
LOS PREPARATIVOS
DE ENGRAPAR
en
el
retenedor,
remueva
el
BANDA:
lacer is all the way down into vise.
1/4" (6mm) on each belt edge unlaced; and use one less
Center
lacer
in vise.
hook
on trailing
endClose
of beltvise
thanuntil
on pulling end). For
splice,
it isagainst
recommended
that the bottom side of
laceroptimal
jaws are
snug
hooks.
belt faces the pressure plates.
Place
lacer
into que
vise
making
sure las
lacer
isse
all de
thelos
way
Insertar
la banda
entre
puntas
ganchos, centrarla
Asegurar
la engrapadora
down intode
vise.
Center
lacer in vise.
Close vise
until laceren el
manera
uniforme,
y sostenerla
firmemente
bien
centrada(Nota: Para mejores resultados de
jawsencuentra
are snug
against
retenedor
de hooks.
ganchos.
dejar ¼”,
6mm,que
en cada
en eloperación,
banco. Cerrar
hasta
las extremo de la banda
y usar un
menos
cada lado del
Asegurar sin
queengrapar,
la engrapadora
se gancho
encuentra
bien en
centrada
guijadas
de la la banda
extremo
queguijadas
se encuentre
en el banco.
Cerrardehasta
que las
de la en contra sentido
del giro).
También
se recomienda
que la parte inferior de
engrapadora
presionen
los ganchos.
engrapadora
presionen
los ganchos.
la banda quede colcada hacia las placas de presión.
Correct Position
Posición Correcta
• Escuadrar ambas
de laelbanda.
cartónpuntas
e inserte
pasador para
• Usar el calíbrador Clipper para determinar el tamaño
Nota: Las 2 hendiduras
correcto delasegurarlos.
gancho.
• Si están usando
banda
antiderrapante
concuando
cubierta
extras se usan solamente
superior de acabado áspero, usar el desbastador
la banda
que va(Desbastar
a engraparse es
Clipper, antes
del calíbrador
aproximadamente
1”, 26mm,
borde de laNo
banda).
más ancha
que del
la máquina.
pongan
ganchos
haberse sido
Pressure
Plate sin
Hook Retainer
placa
de
presión
de
engrapado en las 2retenedor
hendiduras.
Vea
ganchos
las
instrucciones
en
la
página
6.
Extra Deep Slots
hendiduras
profundas
Incorrect Position
Posición Incorrecta
5.
3. If cardingIfpaper
covers
hookcovers
points, remove
carding
paper
hook prior to lacing.
If carding paper covers loop area of fastener, remove after
points, remove prior to lacing.
lacing.
Lacer Pin
pasador de guía
1. If applicable, remove reinforcing strip from card of
hooks and place card into hook retainer. Secure hooks
with lacer pin. Note: The two extra deep slots are used
only when lacing a belt wider than the lacer. Do not
put unlaced hooks in these two slots. See later instructions for lacing belts wider than the vise lacer.
If carding paper covers loop area of
Si las puntas están cubiertas con el cartón, removerlo
fastener, remove after lacing.
antes de engrapar. Si el cartón cubre el area de la curva
del gancho, se debe quitar después del engrapado.
Si las puntas están cubiertas con
4. Insert
between
hook points.
Holdde
belt down firmly
el belt
cartón,
removerlo
antes
onto hook retainer. (Note: For best operating results, leave
engrapar. Si el cartón cubre el area
1/4" (6mm) on each belt edge unlaced; and use one less
hookde
onla
trailing
belt than on
curvaend
delof gancho,
sepulling
debe end). For
optimal splice, it is recommended that the bottom side of
quitar después del engrapado.
belt faces the pressure plates.
ASHLAND
Instale el cartón con los ganchos en el retenedor,
Insertar la banda entre las puntas de los ganchos,
centrarla
CONVEYOR
remueva 800-587-0045
el cartón e inserte el pasador
para
en el
Phone
F.O.B. Ashland,
Ohio 44805de manera uniforme, y sostenerla firmemente
PRODUCTS
asegurarlos. Nota: Las 2 hendiduras extras se usan
retenedor de ganchos. (Nota: Para mejores resultados de
Fax solamente419-281-1096
cuando la banda quewww.ashlandconveyor.com
va a engraparse es
operación, dejar ¼”, 6mm, en cada extremo de la banda
más ancha que la máquina. No pongan ganchos sin
sin engrapar, y usar un gancho menos en cada lado del
extremo de la banda que se encuentre en contra sentido
haberse sido engrapado en las 2 hendiduras. Ver
3
r instruc-
hook on trailing end of belt than on pulling end). For
optimal splice, it is recommended that the bottom side of
belt faces the pressure plates.
dor,
Insertar la banda entre las puntas de los ganchos, centrarla
de manera uniforme, y sostenerla firmemente en el
retenedor de ganchos. (Nota: Para mejores resultados de
operación, dejar ¼”, 6mm, en cada extremo de la banda 5.
sin engrapar, y usar un gancho menos en cada lado del
extremo de la banda que se encuentre en contra sentido
del giro). También se recomienda que la parte inferior de
la banda quede colcada hacia las placas de presión.
e usan
arse es
hos sin
Ver
CONVEYOR
ASHLAND PRODUCTS
Close vise as tightly as possible to embed hooks.
(Note: A vise 6" (150mm) or larger is recommended.)*
Cerrar la engrapadora tan fuerte como sea posible
para empotrar los ganchos. (Nota: Una máquina de
6”, 150mm, o más grande es recomendable).
9. Whe
up a
Cua
haci
6. Insert belt between hook points.
Hold belt down firmly onto hook
retainer. (Note: For best operating
results, leave 1/4” (6mm) on each
belt edge unlaced; and use one less
hook on trailing end of belt than on
pulling end). For optimal splice, it is
recommended that the bottom side
of belt faces the pressure plates.
Insertar la banda entre las puntas
de los ganchos, centrarla de manera
uniforme, y sostenerla firmemente
en el retenedor de ganchos.
(Nota: Para mejores resultados de
operación, dejar ¼”, 6mm, en cada
extremo de la banda sin engrapar,
y usar un gancho menos en cada
lado del extremo de la banda que
se encuentre en contra sentido del
giro). También se recomienda que
la parte inferior de la banda quede
colcada hacia las placas de presión.
4
ASHLAND
CONVEYOR
PRODUCTS
Phone
Fax
7.
TO INSURE
MAXIMUM
HOOK
Close vise
as tightly
as CLINCH AND
5. Close vise as tightly as possible to embed hooks.
JOINT
STRENGTH,
THE
NEXT
4 STEPS
MUST BE
(Note:
A viseto
6"embed
(150mm)hooks.
or larger
is recommended.)*
possible
(Note:
(CRUCIAL
FOR
LACING
CerrarFOLLOWED
la engrapadora
tan fuerte
como
sea posible
ARECTANGULAR
vise
6” (150mm)
orTENSILE
larger
isHOOKS):
HIGH
para
empotrar
los ganchos.
(Nota: Una
máquina de
6”,recommended).*
150mm, o más grande es recomendable).
PARA ASEGURAR UN MAXIMO REMACHADO
DEL GANCHO Y FUERZA EN EL EMPALME
DEBERAN
SEGUIR LOS tan
SIGUIENTES
Cerrar
la engrapadora
fuerte 4
PASOS.(ES
IMPORTANTE
PARA
EMPALMES
como sea posible para empotrar
los
CON GANCHOS PARA UNA GRAN TENSION
ganchos. (Nota:
Una
máquina
de
RECTANGULAR):
6”, 150mm, o más grande es
6. Release pressure of vise and slide attached
recomendable).*
Pressure
Plate to one end of lacer.
Deslice la placa de presión hacia un extemo de la
engrapadora.
TO INSURE MAXIMUM HOOK CLINCH AND
JOINT STRENGTH, THE NEXT 4 STEPS MUST BE
FOLLOWED (CRUCIAL FOR LACING
RECTANGULAR HIGH TENSILE HOOKS):
PARA ASEGURAR UN MAXIMO REMACHADO
DEL GANCHO Y FUERZA EN EL EMPALME
DEBERAN SEGUIR LOS SIGUIENTES 4
PASOS.(ES
IMPORTANTE
PARA
EMPALMES
7. Close vise tightly
again. This
concentrates
all the
CON GANCHOS
GRAN
TENSION
power
of the vise PARA
on thisUNA
one-inch
section
and
RECTANGULAR):
clinches the hooks
properly.
Cierre la máquina de nuevo firmemente. Esto
concentrapressure
la fuerzaofde
la máquina
esta sección
6. Release
vise
and slideen
attached
de una pulgada
los ganchos de
Pressure
Plate toengrapando
one end of lacer.
manera laadecuada.
Deslice
placa de presión hacia un extemo de la
engrapadora.
8. Repeat this operation (Steps 6 & 7) across the
entire width of belt, remembering to do an inch at
a time.
Repetir esta operación (pasos 6 y 7) a través de
todo el ancho de la banda. Recuerde hacerlo 1”
(26mm) pulgada cada vez.
7. Close vise tightly again. This concentrates all the
power of the vise on this one-inch section and
800-587-0045
F.O.B.
Ashland, Ohio 44805
clinches the hooks
properly.
Cierre
la
máquina
de
nuevo
firmemente. Esto
419-281-1096
www.ashlandconveyor.com
concentra la fuerza de la máquina en esta sección
de una pulgada engrapando los ganchos de
CLIPPER BELT LACER COMPANY 1999
manera adecuada.
Lit Code 1118 REV. 11/03
©
FOR LA
• Afte
anot
leav
• Follo
• Inse
alrea
• Now
• If ne
lace
COMO H
LA ENG
• Desp
desc
9. Whe
reten
up a
2 he
Cuan
• hacia
Segu
• Inse
FORcolo
LA
hend
• After
• anot
Segu
• leave
Si e
• Follo
anch
• Inser
alrea
*NOTE:
•must
Now
be
• If ne
A. A
laced
COMO H
LA ENG
• Desp
desc
reten
2 he
• Segu
B. C
• Inser
C. S
coloc
j
hend
S
• Segu
•*NOTA:
Si es
anch
engrapa
A. A
*NOTE:d
mustB.beC
A.
C. A
D
d
b
c
B. C
C. S
ja
PARA ASEGURAR UN MAXIMO REMACHADO
DEL GANCHO
Y FUERZA EN EL EMPALME
CONVEYOR
DEBERAN
SEGUIR LOS SIGUIENTES 4
PRODUCTS
PASOS.(ES IMPORTANTE PARA EMPALMES
CON GANCHOS PARA UNA GRAN TENSION
RECTANGULAR):
ASHLAND
6. Release pressure of vise and slide attached
Pressure Plate to one end of lacer.
Deslice la placa de presión hacia un extemo de la
engrapadora.
5. Close vise as tightly as possible to embed hooks.
(Note: A vise 6" (150mm) or larger is recommended.)*
Cerrar la engrapadora tan fuerte como sea posible
para empotrar los ganchos. (Nota: Una máquina de
6”, 150mm, o más grande es recomendable).
7. Close vise tightly again. This concentrates all the
power Release
of the visepressure
on this one-inch
and
of visesection
and slide
clinches the hooks properly.
attached
Pressure
Plate
to one end
Cierre
la máquina
de nuevo
firmemente.
Esto
concentra
la
fuerza
de
la
máquina
en
esta
sección
of lacer.
de una pulgada engrapando los ganchos de
manera adecuada.
8.
Deslice la placa de presión hacia un
8. Repeat this operation (Steps 6 & 7) across the
extemo
debelt,
la engrapadora.
entire
width of
remembering to do an inch at
TO INSURE
MAXIMUM HOOK CLINCH AND
a time.
Repetir esta
operación
y 7) a BE
través de
JOINT STRENGTH,
THE
NEXT 4 (pasos
STEPS6MUST
todo el ancho
de la banda.
Recuerde hacerlo 1”
FOLLOWED
(CRUCIAL
FOR LACING
(26mm) pulgada
vez. HOOKS):
RECTANGULAR
HIGH cada
TENSILE
9. Close vise tightly again. This
PARA ASEGURAR
UN MAXIMO
REMACHADO
concentrates
all the
power of the
DEL GANCHO Y FUERZA EN EL EMPALME
vise
on
this
one-inch
section
DEBERAN SEGUIR LOS SIGUIENTES
4 and
the hooks
PASOS.(ESclinches
IMPORTANTE
PARA properly.
EMPALMES
CON GANCHOS PARA UNA GRAN TENSION
RECTANGULAR):
Cierre la máquina de nuevo
6. Release pressure
of vise and
slide
attached la fuerza
firmemente.
Esto
concentra
Pressure Plate to one end of lacer.
de
en esta
sección
CLIPPER
BELTla
LACER
COMPANYhacia
1999
Deslice
la placa
demáquina
presión
un extemo
de la
Lit Code 1118 REV. 11/03
engrapadora.
de una pulgada engrapando los
©
ganchos de manera adecuada.
laced.
COMO HACER EMPALMES EN BANDAS MAS ANCHAS QUE
LA ENGRAPADORA:
• Después de engrapar la primera sección de la banda
descrita anteriormente, colocar otra tira de grapas en el
retenedor de ganchos. Asegurar de que queden libres las
2 hendiduras extras.
• Seguir los pasos 2 y 3.
• Insertar la sección de banda engrapada en la máquina
colocando los 2 ganchos ya engrapados en las 2
hendiduras profundas.
• Seguir los pasos 5 al 9.
• Si es necesario, repetir el procedimiento hasta que todo el
ancho de la banda esté engrapada.
*NOTE: If lacer is wider than jaw of vise, the following steps
must be used:
A. Align lacer with edge of vise jaw.
9. When complete, remove lacer pin, grasp lacer and lift belt
up and out.
When complete, remove lacer
Cuando termine, remueva el pasador y levante la banda
pin,afuera.
grasp
lacer and lift belt up and
hacia
B. Complete lacing Steps 5 thru 8.
out. C. Slide tool so next section of lacer is in contact with vise
FOR LACING BELTS
WIDER THAN
LACER:
jaws. Complete
lacingTHE
steps
5 thru 8 again. Finish with
• After lacing first section of belt as described above, place
Step 9.
another
card termine,
of hooks into
the hookelretainer. Be sure to
Cuando
remueva
leave the two extra deep slots empty.
*NOTA:
es máshacia
ancho que las guijadas de la
pasador
levante
la banda
• Follow
Steps y2Si
&el3.empalme
engrapadora,
hay
queinto
seguir
losplacing
siguientes
• Insert
laced
section
of
belt
lacer,
last pasos:
two
afuera.engrapadora
presionen
los
A.
Alinear
la
engrapadora
con
el
borde
already laced hooks into the two extra deep slots.de las guijadas
del banco.
ganchos.
• Now
follow Steps
5 thru 9.
B.
los pasosuntil
5 alentire
8. width of belt is
• If necessary,Completar
repeat procedure
Deslizar
herramienta
paraas
que la siguiente sección
After C.
lacing
firstlasection
of belt
laced.
de
la
engrapadora
esté
en
contacto
con lasQUE
guijadas del
COMOdescribed
HACER EMPALMES
EN BANDAS MAS ANCHAS
above,
place
banco.
Completar
los pasos 5 al 8 otra vez. Terminar
LA ENGRAPADORA:
con
el of
paso
9.
another
card
hooks
into
the hook
• Después
de engrapar
la primera
sección
de la banda
descrita
anteriormente,
colocar otra tiraCLIPPER
de grapas
en el
retainer.
Be sure to
BELT LACER COMPANY
retenedor de ganchos. Asegurar de que queden
libres
lassubsidiary of:
A wholly
owned
leave the extras.
two extra deep
slotsSTEEL LACING
2 hendiduras
FLEXIBLE
COMPANY
• Seguir
los pasos 2 y 3. 2525 Wisconsin Avenue • Downers Grove, IL 60515-4200
empty.
Phone: 630-971-0150 • FAX: 630-971-1180
• Insertar
la sección
banda
en our
la Web
máquina
site at www.flexco.com
• Follow
Stepsde4 &
5. engrapadaVisit
colocando los 2 ganchos ya engrapados en las 2
• Insert laced section of belt into
hendiduras profundas.
lacer,
• Seguir
losplacing
pasos 5 last
al 9. two
• Si already
es necesario,
repetir
el procedimiento
hasta que todo el
laced
hooks
into the two
ancho de la banda esté engrapada.
11.
extra deep slots.
10. Repeat this operation (Steps 8
7.
& 9) across the entire width of belt,
remembering to do an inch at a
time. again. This concentrates all the
Close vise tightly
power of the vise on this one-inch section and
clinches the hooks properly.
Repetir
Cierre la máquina
deesta
nuevooperación
firmemente.(pasos
Esto 8 y
concentra la9)fuerza
de lade
máquina
esta sección
a través
todo en
el ancho
de la
de una pulgada engrapando los ganchos de
banda.
Recuerde
hacerlo
1”
(26mm)
manera adecuada.
pulgada cada vez.
• Now
follow
Steps
7 thru
11.the following steps
*NOTE:
If lacer
is wider
than jaw
of vise,
must be used:
• If necessary, repeat procedure until
A. Align lacer with edge of vise jaw.
entire width of belt is
laced.
B. Complete lacing Steps 5 thru 8.
C. Slide tool so next section of lacer is in contact with vise
jaws. Complete lacing steps 5 thru 8 again. Finish with
Step 9.
8. Repeat this operation (Steps 6 & 7) across the
*NOTA: Si el empalme es más ancho que las guijadas de la
entire width of belt, remembering to do an inch at
engrapadora, hay que seguir los siguientes pasos:
a time.
A. Alinear la engrapadora con el borde de las guijadas
Repetir esta operación (pasos 6 y 7) a través de
CONVEYOR
del banco.
todo
el
ancho
de
la
banda.
Recuerde
hacerlo
1”
Phone
800-587-0045
F.O.B. Ashland, Ohio 44805 B. Completar los pasos 5 al 8.
PRODUCTS
(26mm) pulgada cada vez.
C. Deslizar la herramienta para que la siguiente sección
Fax
419-281-1096
www.ashlandconveyor.com
de la engrapadora esté en contacto con las guijadas del
banco. Completar los pasos 5 al 8 otra vez. Terminar
ASHLAND
5
DEL GANCHO Y FUERZA EN EL EMPALME
DEBERAN SEGUIR LOS SIGUIENTES 4
PASOS.(ES IMPORTANTE PARA EMPALMES
CON GANCHOS PARA UNA GRAN TENSION
RECTANGULAR):
Release
of as
vise
and slide
attached
Close
visepressure
as tightly
possible
to embed
hooks.
Pressure
Plate6"to(150mm)
one endor
of larger
lacer. is recommended.)*
Note: A vise
Deslicelalaengrapadora
placa de presión
haciacomo
un extemo
de la
Cerrar
tan fuerte
sea posible
ara empotrar los ganchos. (Nota: Una máquina de
engrapadora.
”, 150mm, o más grande es recomendable).
LA ENGRAPADORA:
Después de engrapar la primera sección de la banda
descrita anteriormente, colocar otra tira de grapas en el
retenedor de ganchos. Asegurar de que queden libres las
2 hendiduras extras.
• Seguir los pasos 2 y 3.
• Insertar la sección de banda engrapada en la máquina
colocando los 2 ganchos ya engrapados en las 2
hendiduras profundas.
• Seguir los pasos*NOTE:
5 al 9. IF LACER IS WIDER THAN
• Si es necesario, repetir el procedimiento hasta que todo el
JAW OF VISE, THE FOLLOWING
ancho de la banda esté engrapada.
•
CONVEYOR
ASHLAND PRODUCTS
FOR LACING BELTS WIDER
THAN THE LACER:
STEPS MUST BE USED:
*NOTE: If lacer is wider than jaw of vise, the following steps
After lacing first section of belt must
as When
9.
complete, remove
lacer
pin,with
graspedge
lacer and
lift belt
be used:
Align
lacer
of vise
jaw.
up and
A.
Alignout.
lacer with edge of vise jaw.
described above, place another card
Cuando termine, remueva el pasador y levante la banda
of hooks into the hook retainer. Behacia afuera.
A.
sure to leave the two extra deep
FOR LACING BELTS WIDER THAN THE LACER:
slots empty.
• After lacing first section of belt as described above, place
Close vise tightly again. This concentrates all the
another card of hooks into the hook retainer. Be sure to
power of the vise on this •one-inch
Follow section
Steps 4and
& 5.
leave the two extra deep slots empty.
clinches the hooks properly.
• Insert laced section of belt into
• B.
Follow
Steps 2lacing
& 3. Steps 5 thru 8.
Cierre la máquina de nuevo firmemente. Esto
Complete
TO INSURE
MAXIMUM
HOOK
CLINCH
AND
• Insert laced section of belt into lacer, placing last two
concentra
la fuerza
de la lacer,
máquina
en estalast
sección
placing
two
C. Slide tool so B.
nextComplete
section of lacer is inSteps
contact
7 with
thruvise
10.
INTuna
STRENGTH,
THE NEXTlos
4 STEPS MUST
already laced hooks
into the two lacing
extra deep slots.
de
pulgada engrapando
de BE
alreadyganchos
laced hooks
into the two
Complete
FOLLOWED
• Nowjaws.
follow
Steps 5 lacing
thru 9.steps 5 thru 8 again. Finish with
manera
adecuada.(CRUCIAL FOR LACING
Step 9. repeat procedure until entire width of belt is
RECTANGULAR HIGHextra
TENSILE
HOOKS):
• If necessary,
deep
slots.
C. Slide tool so next section of
laced.
Repeat this operation (Steps 6 & 7) across the
• Now follow
Steps 7 thru 11. COMO
*NOTA:HACER
Si el empalme
es más
ancho
que MAS
las guijadas
de la
EMPALMES
ENcontact
BANDAS
ANCHAS
QUE
entire
of belt, remembering
do an inch at
ARA width
ASEGURAR
UN MAXIMO to
REMACHADO
lacer
is in
with
vise
jaws.
engrapadora,
hay
que
seguir
los
siguientes
pasos:
LA
ENGRAPADORA:
a DEL
time.GANCHO Y FUERZA
• If EN
necessary,
repeat
procedure
until
EL EMPALME
Complete
lacing
steps
10
A. Alineardelaengrapar
engrapadora
con
elsección
borde
de
las
guijadas
Repetir
esta operación
6 y 7) a través
de
• Después
la primera
de7
lathru
banda
DEBERAN
SEGUIR(pasos
LOS
SIGUIENTES
entire
width
of4belt
is
del
banco.
odo
el
ancho
de
la
banda.
Recuerde
hacerlo
1”
descrita anteriormente,
otra
tiraStep
de grapas
again.colocar
Finish
with
11. en el
PASOS.(ES IMPORTANTE PARA EMPALMES
B. Completar
los pasosAsegurar
5 al 8. de que queden libres las
26mm)
pulgada cada
vez.
laced.
retenedor
de ganchos.
CON
GANCHOS
PARA
UNA
GRAN TENSION
RECTANGULAR):
•
•
C.hendiduras
Deslizar laextras.
herramienta para que la siguiente sección
2
de la engrapadora esté en contacto con las guijadas del
Seguir los pasos 2 y 3.
banco. Completar los pasos 5 al 8 otra vez. Terminar
Insertar
la paso
sección
de bandaSIengrapada
en la máquina
EL EMPALME
ES MÁS
con el
9.*NOTA:
colocando los 2 ganchos ya engrapados en las 2
ANCHO QUE
LAS GUIJADAS DE
CLIPPER BELT LACER COMPANY
hendiduras profundas.
A wholly owned
subsidiary
of:
LA
ENGRAPADORA,
HAY
QUE
Seguir los pasos 5 FLEXIBLE
al 9.
STEEL LACING COMPANY
LOS
PASOS:
Si es necesario,SEGUIR
repetir
el procedimiento
hasta
todo el
2525
Wisconsin
AvenueSIGUIENTES
• Downers
Grove,que
IL 60515-4200
Phone: 630-971-0150 • FAX: 630-971-1180
ancho de la banda esté engrapada.
COMO HACER EMPALMES EN
BANDAS MAS ANCHAS QUE
•
LA ENGRAPADORA:•
Release pressure of vise and slide attached
Pressure Plate to one end of lacer.
Deslice la placa de presión hacia un extemo de la
engrapadora.
Visit our Web site at www.flexco.com
Después de engrapar la primera
A.
Alinear
la
engrapadora
el
*NOTE:
If
lacer
is
wider
than
jaw
of
vise,
the followingcon
steps
ER BELT LACER COMPANY 1999
sección de la banda descrita must be used:
1118 REV. 11/03
borde de las guijadas del banco.
anteriormente, colocar otra tira deA. Align lacer with edge of vise jaw.
grapas en el retenedor de ganchos.
Asegurar de que queden libres las
2 hendiduras extras.
Close vise tightly again. This concentrates all the
Seguir section
los pasos
power of the vise on this •one-inch
and 4 y 5.
clinches the hooks properly.
• Insertar la sección de banda
Cierre la máquina de nuevo firmemente. Esto
B. Complete lacing Steps 5 thru 8.
engrapada
en la
máquina
concentra la fuerza de la máquina en esta
sección
los ispasos
7 al with
10. vise
C. Slide tool so B.
nextCompletar
section of lacer
in contact
de una pulgada engrapando
los ganchos
de
colocando
los
2
ganchos
ya
jaws.
Complete
lacing
steps
5
thru
8
again.
Finish
with
manera adecuada.
Step
9.
engrapados en las 2
C. Deslizar la herramienta para
Repeat this operation (Steps
6 & 7) across
the
hendiduras
profundas.
*NOTA: Si el empalme
ancho que
las guijadas
queeslamás
siguiente
sección
de la de la
entire width of belt, remembering to do an inch at
engrapadora, hay que seguir los siguientes pasos:
• Seguir los pasos 7 al 11.
a time.
engrapadora
esté
en
contacto
con
A. Alinear la engrapadora con el borde de las guijadas
Repetir esta operación (pasos
6 ynecesario,
7) a través de
•
Si
es
repetir
el
del banco. las guijadas del banco. Completar
odo el ancho de la banda. Recuerde hacerlo 1”
pasos 5 al 8.
procedimiento hasta que todo el B. Completar loslos
26mm) pulgada cada vez.
pasos 7 al 10 otra vez. Terminar
C. Deslizar la herramienta para que la siguiente sección
ancho de la banda esté engrapada. de la engrapadora
en 11.
contacto con las guijadas del
con elesté
paso
banco. Completar los pasos 5 al 8 otra vez. Terminar
con el
pasoCompany.
9.
Clipper® is a registered U.S. trademark of Flexible Steel
Lacing
Clipper® es una marca registrada de Flexible Steel Lacing Company.
6
ASHLAND
ER BELT LACER COMPANY 1999
CONVEYOR
PRODUCTS
Phone
Fax
CLIPPER BELT LACER COMPANY
A wholly owned subsidiary of:
FLEXIBLE F.O.B.
STEELAshland,
LACING Ohio
COMPANY
800-587-0045
44805
2525 Wisconsin Avenue • Downers Grove, IL 60515-4200
419-281-1096 Phone:
630-971-0150 • FAX: 630-971-1180
www.ashlandconveyor.com
Visit our Web site at www.flexco.com