1
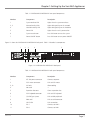
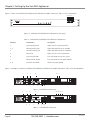
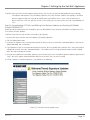
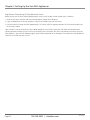
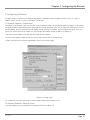
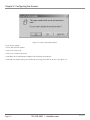
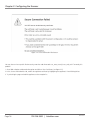
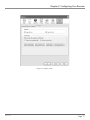
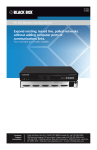
LVN5200A-R2 LVN5250A-R2 LVN5400A-R2 LVN5600A-R2 LVN5800A-R2 Veri-NAC Quick Start Guide Veri-NAC™—the fastest to deploy, easiest to use BOX Network Access Control (NAC) BLACK appliance for intrusion prevention, vulnerability management, and regulatory compliance. ® Customer Support Information LVN5200A-R2 Order toll-free in the U.S.: Call 877-877-BBOX (outside U.S. call 724-746-5500) • FREE technical support 24 hours a day, 7 days a week: Call 724-746-5500 or fax 724-746-0746 • Mailing address: Black Box Corporation, 1000 Park Drive, Lawrence, PA 15055-1018 • Web site: www.blackbox.com • E-mail: [email protected] Trademarks Used in this Manual Trademarks Used in this Manual Black Box and the Double Diamond logo are registered trademarks, and Veri-NAC is a trademark, of BB Technologies, Inc. Microsoft and Internet Explorer are registered trademarks of Microsoft Corporation. Mozilla and Firefox are registered trademarks of Mozilla Foundation Corporation. Opera is a trademark of Opera Software ASA Corporation Norway. Any other trademarks mentioned in this manual are acknowledged to be the property of the trademark owners. Page 2 724-746-5500 | blackbox.com LVN5200A-R2 FCC and IC RFI Statements Federal Communications Commission and Industry Canada Radio Frequency Interference Statements This equipment generates, uses, and can radiate radio-frequency energy, and if not installed and used properly, that is, in strict accordance with the manufacturer’s instructions, may cause interference to radio communication. It has been tested and found to comply with the limits for a Class A computing device in accordance with the specifications in Subpart B of Part 15 of FCC rules, which are designed to provide reasonable protection against such interference when the equipment is operated in a commercial environment. Operation of this equipment in a residential area is likely to cause interference, in which case the user at his own expense will be required to take whatever measures may be necessary to correct the interference. Changes or modifications not expressly approved by the party responsible for compliance could void the user’s authority to operate the equipment. This digital apparatus does not exceed the Class A limits for radio noise emission from digital apparatus set out in the Radio Interference Regulation of Industry Canada. Le présent appareil numérique n’émet pas de bruits radioélectriques dépassant les limites applicables aux appareils numériques de la classe A prescrites dans le Règlement sur le brouillage radioélectrique publié par Industrie Canada. LVN5200A-R2 Page 3 NOM Statement Instrucciones de Seguridad (Normas Oficiales Mexicanas Electrical Safety Statement) 1. Todas las instrucciones de seguridad y operación deberán ser leídas antes de que el aparato eléctrico sea operado. 2. Las instrucciones de seguridad y operación deberán ser guardadas para referencia futura. 3. Todas las advertencias en el aparato eléctrico y en sus instrucciones de operación deben ser respetadas. 4. Todas las instrucciones de operación y uso deben ser seguidas. 5. El aparato eléctrico no deberá ser usado cerca del agua—por ejemplo, cerca de la tina de baño, lavabo, sótano mojado o cerca de una alberca, etc. 6. El aparato eléctrico debe ser usado únicamente con carritos o pedestales que sean recomendados por el fabricante. 7. El aparato eléctrico debe ser montado a la pared o al techo sólo como sea recomendado por el fabricante. 8. Servicio—El usuario no debe intentar dar servicio al equipo eléctrico más allá a lo descrito en las instrucciones de operación. Todo otro servicio deberá ser referido a personal de servicio calificado. 9. El aparato eléctrico debe ser situado de tal manera que su posición no interfiera su uso. La colocación del aparato eléctrico sobre una cama, sofá, alfombra o superficie similar puede bloquea la ventilación, no se debe colocar en libreros o gabinetes que impidan el flujo de aire por los orificios de ventilación. 10. El equipo eléctrico deber ser situado fuera del alcance de fuentes de calor como radiadores, registros de calor, estufas u otros aparatos (incluyendo amplificadores) que producen calor. 11. El aparato eléctrico deberá ser connectado a una fuente de poder sólo del tipo descrito en el instructivo de operación, o como se indique en el aparato. 12. Precaución debe ser tomada de tal manera que la tierra fisica y la polarización del equipo no sea eliminada. 13. Los cables de la fuente de poder deben ser guiados de tal manera que no sean pisados ni pellizcados por objetos colocados sobre o contra ellos, poniendo particular atención a los contactos y receptáculos donde salen del aparato. 14. El equipo eléctrico debe ser limpiado únicamente de acuerdo a las recomendaciones del fabricante. 15. En caso de existir, una antena externa deberá ser localizada lejos de las lineas de energia. 16. El cable de corriente deberá ser desconectado del cuando el equipo no sea usado por un largo periodo de tiempo. 17. Cuidado debe ser tomado de tal manera que objectos liquidos no sean derramados sobre la cubierta u orificios de ventilación. 18. Servicio por personal calificado deberá ser provisto cuando: A: El cable de poder o el contacto ha sido dañado; u B: Objectos han caído o líquido ha sido derramado dentro del aparato; o C: El aparato ha sido expuesto a la lluvia; o D: El aparato parece no operar normalmente o muestra un cambio en su desempeño; o E: El aparato ha sido tirado o su cubierta ha sido dañada. Page 4 724-746-5500 | blackbox.com LVN5200A-R2 Table of Contents 1. Setting Up the Veri-NAC Appliance.......................................................................................................................................................... 6 1.1 What’s Included................................................................................................................................................................................... 6 1.2LVN5200A-R2/LVN5250A-R2 and LVN5400A-R2/LVN5600A-R2/LVN5800A-R2 Appliances................................................................ 6 2. Configuring the Browser.........................................................................................................................................................................13 2.1 Internet Explorer—Cache Issues..........................................................................................................................................................13 2.2Internet Explorer—Security Issues........................................................................................................................................................13 2.3Mozilla Firefox—Security Issues...........................................................................................................................................................15 3. Troubleshooting..................................................................................................................................................................................... 18 We‘re here to help! If you have any questions about your application or our products, contact Black Box Tech Support at 724-746-5500 or go to blackbox.com and click on “Talk to Black Box.” You’ll be live with one of our technical experts in less than 30 seconds. LVN5200A-R2 Page 5 Chapter 1: Setting Up the Veri-NAC Appliances 1. Setting Up the Veri-NAC Appliance The Veri-NAC Appliance can help provide better Network Access Control and help prevent intrusions on your network. There are five Veri-NAC models: LVN5200A-R2, LVN5250A-R2, LVN5400A-R2, LVN5600A-R2, and LVN5800A-R2 rackmountable 1U appliances. 1.1 What’s Included Your package should include the following items. If anything is missing or damaged, contact Black Box Technical Support at 724-746-5500. LVN5200A-R2, LVN5250A-R2: • Veri-NAC appliance • (2) EVNSL81-0010 cables • This printed Quick Start Guide, a Default Password Sheet, and a License Agreement • This QSG, full manual, readme file, and FAQ on CD-ROM • Printed read.me document LVN5400A-R2, LVN5600A-R2, LVN5800A-R2: • Veri-NAC appliance • EVNSL81-0010 cables ([4] for LVN5400A-R2, [6] for LVN5600A-R2, [8] for LVN5800A-R2) • This printed Quick Start Guide, a Default Password Sheet, and License Agreement • Printed full manual • This QSG, full manual, readme file, and FAQ on CD-ROM • Printed read.me document 1.2 LVN5200A-R2/LVN5250A-R2 and LVN5400A-R2/LVN5600A-R2/LVN5800A-R2 Applicances To set up the Veri-NAC appliance on your network, connect it to the first switch or hub inside your firewall. Then follow these steps: Step One: Connect to Your Network 1. A power cable is included with each Veri-NAC. Connect the power cable to the power jack on the rear side, on the far left end of the appliance and to a 3-prong grounded 120-VAC, 60-Hz outlet. NOTE: We strongly recommend that you plug your Veri-NAC appliance into a surge protector to ensure that your appliance is protected from voltage spikes. 2. Connect your local area network to the Ethernet 0 port (labeled Eth0) on the rear of the Veri-NAC appliance (see Figure 1-2 or 1-4). Figure 1-1 shows the LVN5200A-R2/LVN5250A-R2 front panel. Table 1-1 describes its components. 1 2 34 5 6 7 Figure 1-1. LVN5200A-R2/LVN5250A-R2 front panel. Page 6 724-746-5500 | blackbox.com LVN5200A-R2 Chapter 1: Setting Up the Veri-NAC Appliances Table 1-1. LVN5200A-R2/LVN5250A-R2 front panel components. Number Component Description 1 System overheat LED Lights when the system overheats 2, 3 Network activity LEDs Lights during activity on the network 4 Hard drive activity LED Lights during activity on the hard drive 5 Power LED Lights when the unit is powered on 6 System reset button Press this button to reset the system 7 Power ON/OFF button Press this button to turn power ON/OFF Figure 1-2 shows the LVN5200A-R2/LVN5250A-R2 back panel. Table 1-2 describes its components. 1 2 3 6 7 4 8 9 10 11 5 12 Figure 1-2. LVN5200A-R2/LVN5250A-R2 back panel. Table 1-2. LVN5200A-R2/LVN5250A-R2 back panel components. Number Component Description 1 IEC 320 power connector Connects to power 2 PS/2 mouse connector Links to PS/2 mouse 3, 12 Air holes Allow cooling 4 Not used — 5 Expansion slot cover Covers expansion slots 6 PS/2 keyboard connector Links to PS/2 keyboard 7 (2) USB Type A ports Links to USB peripherals 8 DB9 serial Links to serial connector 9 HD15 VGA Links to monitor 10 Eth 1 Connects to LAN 2 11 Eth 0 Connects to LAN 1 LVN5200A-R2 Page 7 Chapter 1: Setting Up the Veri-NAC Appliances Figure 1-3 shows the LVN5400A-R2/LVN5600A-R2/LVN5800A-R2 models’ front panel. Table 1-3 lists its components. 1 2 34 5 6 7 Figure 1-3. LVN5400A-R2/LVN5600A-R2/LVN5800A-R2 front panel. Table 1-3. LVN5400A-R2/LVN5600A-R2/LVN5800A-R2 components. Number Component Description 1 System overheat LED Lights when the system overheats 2, 3 Network activity LEDs Lights during activity on the network 4 Hard drive activity LED Lights during activity on the hard drive 5 Power LED Lights when the unit is powered on 6 System reset button Press this button to reset the system 7 Power ON/OFF button Press this button to turn power ON/OFF 8, 9 Vent holes for airflow Allows for system cooling Figures 1-4 through 1-6 show the LVN5400A-R2/LVN5600A-R2/LVN5800A-R2 models’ back panels. Table 1-4 lists their components. 1 2 5 3 6 4 7 8 9 12 11 10 Figure 1-4. LVN5400A-R2 back panel. 1 2 3 5 6 4 7 8 14 13 12 11 9 10 Figure 1-5. LVN5600A-R2 back panel. Page 8 724-746-5500 | blackbox.com LVN5200A-R2 Chapter 1: Setting Up the Veri-NAC Applicance 1 2 5 3 6 4 7 8 18 17 16 15 12 11 9 10 Figure 1-6. LVN5800A-R2 back panel. Table 1-4. LVN5400A-R2/LVN5600A-R2/LVN5800A-R2 components. Number Component Description 1 IEC 320 power connector Connects to power 2 PS/2 mouse connector Links to PS/2 mouse 3 Air holes Allow cooling 4 Not used — 5 PS/2 keyboard connector Links to PS/2 keyboard 6 (2) USB Type A ports Links to USB peripherals 7 DB9 serial Links to serial connector 8 HD15 VGA Links to monitor 9 Eth 0 (LVN5400A-R2, LVN5600A-R2, LVN5800A-R2) Connects to LAN 0 10 Eth 1 (LVN5400A-R2, LVN5600A-R2, LVN5800A-R2) Connects to LAN 1 11 Eth 2 (LVN5400A-R2, LVN5600A-R2, LVN5800A-R2) Connects to LAN 2 12 Eth 3 (LVN5400A-R2, LVN5600A-R2, LVN5800A-R2) Connects to LAN 3 13 Eth 4 (LVN5600A-R2) Connects to LAN 4 14 Eth 5 (LVN5600A-R2) Connects to LAN 5 15 Eth 4 (LVN5800A-R2) Connects to LAN 4 16 Eth 5 (LVN5800A-R2) Connects to LAN 5 17 Eth 6 (LVN5800A-R2) Connects to LAN 6 18 Eth 7 (LVN5800A-R2) Connects to LAN 7 NOTE: The network cable must be CAT5 cable or higher with RJ-45 connectors. LVN5200A-R2 Page 9 Chapter 1: Setting Up the Veri-NAC Appliances Step Two: Connect the Monitor and Keyboard 1. Connect the monitor cable to the 15-pin (VGA color) Monitor port on the rear of the appliance. 2. Connect a keyboard to the Keyboard outlet on the rear of the appliance. 3. Press the Power button on the far right front panel of the appliance. The Power LED indicates that power is on, and the network LED flashes indicating network traffic is occurring. On the rear panel, adjacent to the Ethernet port, another LED begins flashing to indicate that network traffic is occurring. After a scan completes, a bootup screen appears. Step Three (A): If Your Environment Is DHCP In a DHCP environment, the IP address, subnet mask, and default gateway settings have been assigned automatically and should appear on the next menu. Do not make any selections or change any settings. Do not save any settings if you have not changed anything. 1. IMPORTANT: Write down the appliance IP address for later use. __________________________________________ 2. Disconnect the monitor, keyboard, and computer from the appliance. No further direct connection to the appliance is required. Step Three (B): If Your Environment Is Non-DHCP In a Non-DHCP environment, you must assign the IP address/other settings: 1. Type the number of a parameter at <Make a selection>, then press <Enter>. As prompted, type a new value and press <Enter>. To enter Network Configuration, press <1>. 2. IMPORTANT: Write down the appliance IP address. __________________________________________________ 3. To set the IP address, press <2> and press <Enter>. At the Enter new IP address prompt, type the IP address (i.e., 192.168.254.156) and press <Enter>. The list of settings is displayed with the IP address you entered. 4. Enter values for the Subnet mask <3>, Default gateway <4>, and Host name <6> that apply to your network. 5. To add a DNS server, press <5> and <Enter>. After you have added your DNS servers, press <3> to save your server values, then press <Q> and <Enter> to return to the Main Menu. 6. Disconnect the monitor and keyboard from the Veri-NAC. No further direct connection to the appliance is required. Step Four: Open Ports for Automatic Download To enable downloads to take place, have your System Administrator or Network Engineer open port 443 on your firewall server. Next, access the Veri-NAC through a Web browser window on any system on the same subnet or Local Area Network (LAN). Step Five: Use a Browser to Configure the Veri-NAC 1. To log on, open a secure browser window (with the protocol https instead of just http) using the IP address of the Veri-NAC as the URL. For example, if the Veri-NAC has IP address 192.168.254.156, the URL to open in your browser would be: https://192.168.254.156 (using the default SSL port) OR https://192.168.254.156:<custom SSL port number> 2. The Veri-NAC login window appears. 3. Enter the user name and password provided on the Password Sheet delivered with your appliance. 4. Click on the Login button. The License Agreement appears first. Accept this license using the button at the bottom of the screen. (This request to accept will appear at every log in until you accept it.) 5. Next, the Help/Product Overview page of the Veri-NAC opens in the browser with brief descriptions and links to all the other product pages. Page 10 724-746-5500 | blackbox.com LVN5200A-R2 Chapter 1: Setting Up the Veri-NAC Applicance CAUTION: To be sure that Veri-NAC produces accurate results, you must be sure you have downloaded the latest Common Vulnerabilities and Exposure (CVE) vulnerability signatures; later, when Veri-NAC updates itself regularly, it will download new signatures daily, but if you do not add all known vulnerabilities when it starts, it will not realize that it doesn’t have them. To be sure you have the latest CVEs initially, you must carry out the next step—Downloading CVE Tests. Step Six: Downloading CVE Tests and Making Sure Malware Updates are Running (All Models Except LVN5200A-R2) Before you take any other action with the product, you must download the latest Common Vulnerabilities and Exposures (CVEs) tests into the Veri-NAC database. CAUTION: If you skip this step, Veri-NAC will not do its job effectively. 1. Go to the left frame menu bar and select UpdatesgVulnerability Signatures. 2. Click the Update Now button. 3. As long as the appliance is on a network connected to the Internet, you just need to click “Download Updates” and, after the updates download, click “Install Now.” 4. If your appliance is NOT on a network connected to the Internet, you must update from a machine that is. Go to that machine and log into Veri-NAC, then click “Download Updates.” Then browse to the file using the Browse button and click “Upload Now” to install the update on Veri-NAC. 5. After you have updated the vulnerability signatures, you may now return to the Vulnerability Signature Updates page and select “Daily” so that the updates automatically occur daily. Be sure to click “Save” to save the setting. 6. Click on “Updates => Malware Signatures.” You should see the following: Figure Q1-7. Veri-NAC malware updates status. LVN5200A-R2 Page 11 Chapter 1: Setting Up the Veri-NAC Appliances Step Seven: Discovering All Your Network Assets Before you can turn on alerts and the blocking engine, create a list of all your trusted network assets. To do this: 1. Go to the left frame menu bar and select Network Access ControlgAsset Discovery. 2. If you use NetBIOS on any of your equipment, click the Use NetBIOS Scans for host names. 3. Click the Refresh IPs button and wait approximately 5-15 minutes while the appliance discovers all the trusted network assets on the current subnet. Your Veri-NAC is now up and running. Start reading through the User Guide. In particular, learn about the Network Access ControlgDynamic Detection System as well as the Inventory Alerts. Remember, one of the most powerful features of your VeriNAC appliance is your Veri-NAC blocking engine, so you’ll also need to look at the Manage IPs list to determine how to add and remove assets to and from your trust list. Page 12 724-746-5500 | blackbox.com LVN5200A-R2 Chapter 2: Configuring the Browser 2. Configuring the Browser Veri-NAC has been verified with the following Web browsers: Microsoft® Internet Explorer® Versions 5.0, 6.0, 7.0, and 8.0; Mozilla® Firefox® Versions 2.x and 3.x; and Opera® Version 9.63. 2.1 Internet Explorer—Cache Issues Occasionally, if you perform a task with Veri-NAC, Internet Explorer 6.0 does not immediately update the display. If, for example, you decide to add a custom comment to a report and then recreate the report, when you next open that report or view the Text of Vulnerabilities, your new comment may not display. Instead, you may see the older, cached version of the report. To be sure you see the newest version of the report every time, change your browser settings as follows (see Figure 2-1): • Go to the Internet Explorer menu bar and select ToolsgInternet Options. • In the Internet Options window, click on the General tab, and then click the Settings button. • Under Check for newer versions of stored pages, select Every visit to the page. Figure 2-1. Settings screen. This setting clears the cache and ensures all edits to reports display upon subsequent visits. 2.2 Internet Explorer—Security Issues In Internet Explorer, you may frequently receive prompts like this (see Figure 2-2): LVN5200A-R2 Page 13 Chapter 2: Configuring the Browser Figure 2-2. Security information prompt. To turn off this prompt: • Select ToolsgInternet Options. • Click on the Security tab. • Click on the Custom Level button. • Scroll down to the Miscellaneous category and find Display mixed content. • To change the prompt setting, select Enable for this setting, then click OK to save it (see Figure 2-3). Page 14 724-746-5500 | blackbox.com LVN5200A-R2 Chapter 2: Configuring the Browser Figure 2-3. Security settings. 2.3 Mozilla Firefox—Security Issues To get rid of certificate errors in Firefox: 1. On the screen that comes up when you get a certificate error, click on “Or you can add an exception” (see Figure 2-4). 2. Click on Add Exception. 3. The appliance’s IP should be automatically filled in the Server Location field. 4. Click Get CertificategConfirm Security Exception. LVN5200A-R2 Page 15 Chapter 2: Configuring the Browser FIgure 2-4. Secure connection failed screen. You may also run into a specific Firefox security error that reads Error code: sec_error_reused_issuer_and_serial. To remedy this problem: 1. Go to ToolsgOptionsgAdvancedgEncryption and click on View Certificates (see FIgure 2-5). 2. In the Servers and Authorities tab, remove the appliance certificate by highlighting the appliance’s IP and clicking Delete. 3. Try refreshing the page and add the appliance to the exception list. Page 16 724-746-5500 | blackbox.com LVN5200A-R2 Chapter 2: Configuring Your Browser Figure 2-5. Options screen. LVN5200A-R2 Page 17 Chapter 3: Troubleshooting 3. Troubleshooting For additional help, please consult the User Guide or Black Box Network Services Technical Support at 724-746-5500. Additionally, you can contact your Authorized Black Box Network Services Reseller for support. For more information, contact Black Box Network Services at 724-746-5500. Please have the following information ready: • Total number of network assets • Veri-NAC model and serial number • Veri-NAC firmware/software version • A network topology diagram • Type of firewalls and switches you are using • Presence of VLANs, proxy servers, remote subnets • What symptoms or issues you are experiencing We‘re here to help! If you have any questions about your application or our products, contact Black Box Tech Support at 724-746-5500 or go to blackbox.com and click on “Talk to Black Box.” You’ll be live with one of our technical experts in less than 30 seconds. Page 18 724-746-5500 | blackbox.com LVN5200A-R2 NOTES LVN5200A-R2 Page 19 Black Box Tech Support: FREE! Live. 24/7. Tech support the way it should be. Great tech support is just 30 seconds away at 724-746-5500 or blackbox.com. About Black Box Black Box Network Services is your source for more than 118,000 networking and infrastructure products. You’ll find everything from cabinets and racks and power and surge protection products to media converters and Ethernet switches all supported by free, live 24/7 Tech support available in 30 seconds or less. © Copyright 2010. All rights reserved. LVN5200A-R2, rev. 2 724-746-5500 | blackbox.com