1
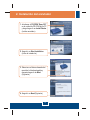
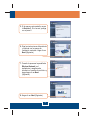
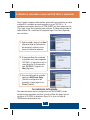
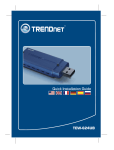
Quick Installation Guide
TEW-432BRP
Table ofofContents
Table
Contents
Español .....................................................................................................
1. Antes de iniciar ..................................................................................
2. Instalación del enrutador ...................................................................
3. Añadir el enturador a una red 192.168.1.x existente .........................
1
1
2
5
Troubleshooting ........................................................................................ 6
Version 09.25.2006
1. Antes de iniciar
Contenidos del paquete
TEW-432BRP
CD-ROM “Easy Go”
Guía de instalación rápida
Cable RJ-45
Adaptador de corriente AC (7.5V,1A)
Requisitos del sistema
Navegador Web: Internet Explorer (5.0 ó superior)
PC con adaptador de red instalado
Internet de banda ancha
Cable Módem o DSL instalado
¡Importante! No conecte el enrutador hasta que no se le indique. Siga los
pasos mostrados a continuación antes de introducir el CD-ROM “Easy Go” en
la unidad de CD-ROM de su PC.
1. Compruebe que existe una
conexión directa entre su cable
módem o DSL y su PC.
También verifique su conexión a
Internet, trate de acceder a un sitio
Web como por ejemplo
http://www.trendnet.com.
Internet
Cable/DSL Modem
1
Español
2. Instalación del enrutador
1. Introduzca el CD-ROM “Easy GO”
en la unidad de CD-ROM de su PC
y luego haga clic en Install Router
(Instalar enrutador).
2. Haga clic en Start Installation
(Iniciar la instalación).
3. Seleccione el idioma deseado del
menú de la lista desplegable y
después haga clic en Next
(Siguiente).
4. Haga clic en Next (Siguiente).
2
Español
5. Si le aparece esta pantalla, vaya a
la Sección 3. Si no es así, prosiga
con el paso 6.
6. Siga las instrucciones del asistente
y continué con los pasos de
instalación restantes. Haga clic en
Next (Siguiente)
7. Cuando le aparezca la pantalla de
Wireless Network (red
inalámbrica), asegúrese de
introducir un nombre de red único y
luego haga clic en Next
(Siguiente).
8. Haga clic en Next (Siguiente).
3
Español
9. Haga clic en Next (Siguiente).
10. Una vez configurado el enrutador,
seleccione Exit Router Setup
(Salir de la configuración del
enrutador) y luego haga clic
en Finish (Finalizar).
Su instalación ha finalizado.
Para más información sobre la configuración del TEW-432BRP y de las
configuraciones avanzadas, por favor consulte la Guía del Usuario que se
incluye en el CD-ROM de instalación “Easy Go” o en el sitio Web de
TRENDnet en www.trendnet.com.
4
Español
3. Añadir el enturador a una red 192.168.1.x existente
Nota: Cuando le aparezca esta ventana, quiere decir que usted tiene un cable
módem/DSL o enrutador que está operando en la red 192.168.1.x. Si
reemplaza su enrutador actual con el TEW-432BRP, por favor seleccione Yes
(Sí) y haga clic en Next (siguiente) para continuar. Si añade este enrutador al
cable módem/ DSL, seleccione No y después haga clic en Next (Siguiente)
para continuar.
1. Seleccione No y haga clic en Next
(Siguiente).Siga las instrucciones
del asistente y continué con los
pasos de instalación restantes.
2. El programa Easy Go actualizará
el enrutador a un nuevo segmento
192.168.0.x y reiniciará su red. La
nueva dirección IP del enrutador
será 192.168.0.1. Haga clic en
Next (Siguiente).
3. Una vez configurado el enrutador,
seleccione Exit Router Setup
(Salir de la configuración del
enrutador) y luego haga clic en
Finish (Finalizar).
Su instalación ha finalizado.
Para más información sobre la configuración del TEW-432BRP y de las
configuraciones avanzadas, por favor consulte la Guía del Usuario que se
incluye en el CD-ROM de instalación “Easy Go” o en el sitio Web de
TRENDnet en www.trendnet.com.
5
Español
Troubleshooting
Q1: I inserted the Easy Go CD-ROM into my computer's CD-ROM drive and the installation menu does not appear
automatically. What should I do?
A1: If the installation menu does not appear automatically, click Start, click Run, and type D:\Autorun.exe where
"D" in "D:\Autorun.exe" is the letter assigned to your computer's CD-ROM Drive. And then click OK to start the I
nstallation.
Q2: How can I get into the TEW-432BRP web configuration page?
A2: After you install the TEW-432BRP Wireless Router, you can access the web configuration page by opening
your web browser and entering http://192.168.1.1 into the web browser's address bar, where http://192.168.1.1 is
the default IP address of the TEW-432BRP Wireless Router. If you follow the installation instructions in section 3
for adding the router behind an existing 192.168.1.x network, type in http://192.168.0.1 into the web browser's
address bar. The default user name and password is admin.
Q3: I am not sure what type of Internet Account Type I have for my Cable/DSL connection. How do I find out?
A3: Contact your Internet Service Provider's (ISP) Customer Service for the correct information.
Q4: I received an error while running the Install Wizard. What should I do?
A4: Make sure that your computer's CD-ROM is in working condition. Also verify that all cable connections are
secure and that you are able to connect to the Internet, and then retry installing the router. During setup, the Install
Wizard will check the operation of your network adapter and Internet connection.
Q5: All the settings are correct, but I can not make a wireless connection to the Router. What should I do?
A5: First, double check that the WLAN light on the Router is lit. Second, power cycle the TEW-432BRP. Unplug
the power to the TEW-432BRP. Wait 15 seconds, then plug the power back in to the TEW-432BRP. Third, log into
the TEW-432BRP by entering http://192.168.1.1 into the web browser's address bar. If you follow the installation
instructions in section 3 for adding the router behind an existing 192.168.1.x network, type in http://192.168.0.1
into the web browser's address bar. Click on Wireless. Make sure Enabled is selected. Fourth, contact the
manufacturer of your wireless network adapter and make sure the wireless network adapter is configured with the
proper SSID.
Q6: After I finish installing the router, then Network Magic Installation Wizard appears. What should I do?
A6: Network Magic is an optional bonus program. It works with your router to setup, manage, repair and protect
your home network. To install Network Magic, select Install Network Magic, click Next and then follow the
Installation Wizard instructions. If you do not want to install Network Magic, select Exit Router Setup and then
click Finish.
If you still encounter problems or have any questions regarding the TEW-432BRP, please refer to the User's Guide
included on the Easy Go Setup CD-ROM or contact Trendnet's Technical Support Department.
6
Certifications
This equipment has been tested and found to comply with FCC and CE Rules.
Operation is subject to the following two conditions:
(1) This device may not cause harmful interference.
(2) This device must accept any interference received. Including interference that may
cause undesired operation.
Waste electrical and electronic products must not
be disposed of with household waste. Please
recycle where facilities exist. Check with you Local
Authority or Retailer for recycling advice.
NOTE: THE MANUFACTURER IS NOT RESPONSIBLE FOR ANY RADIO OR TV
INTERFERENCE CAUSED BY UNAUTHORIZED MODIFICATIONS TO THIS
EQUIPMENT. SUCH MODIFICATIONS COULD VOID THE USER’S AUTHORITY TO
OPERATE THE EQUIPMENT.
ADVERTENCIA
En todos nuestros equipos se mencionan claramente las caracteristicas del adaptador de
alimentacón necesario para su funcionamiento. El uso de un adaptador distinto al
mencionado puede producir daños fisicos y/o daños al equipo conectado. El adaptador
de alimentación debe operar con voltaje y frecuencia de la energia electrica domiciliaria
existente en el pais o zona de instalación.
TRENDnet Technical Support
US . Canada
Toll Free Telephone: 1(866) 845-3673
24/7 Tech Support
Europe (Germany . France . Italy . Spain . Switzerland . UK)
Toll Free Telephone: +00800 60 76 76 67
English/Espanol - 24/7
Francais/Deutsch - 11am-8pm, Monday - Friday MET
Worldwide
Telephone: +(31) (0) 20 504 05 35
English/Espanol - 24/7
Francais/Deutsch - 11am-8pm, Monday - Friday MET
Product Warranty Registration
Please take a moment to register your product online.
Go to TRENDnet’s website at http://www.trendnet.com
20675 Manhattan Place
Torrance, CA 90501
USA
Copyright ©2006. All Rights Reserved. TRENDnet.