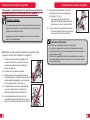
1
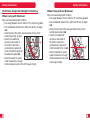
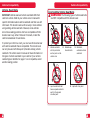
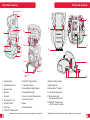
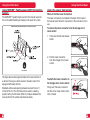
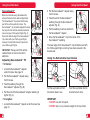
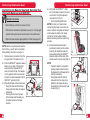
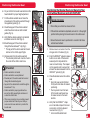
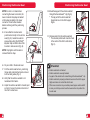
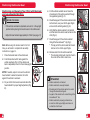
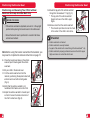
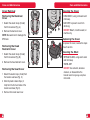
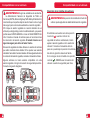
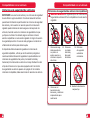
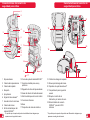
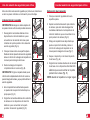
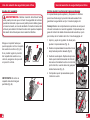
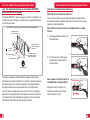
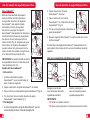
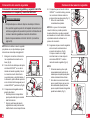
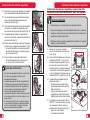
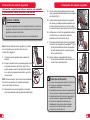
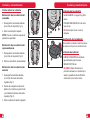
Britax Child Safety, Inc.
13501 South Ridge Drive
Charlotte, NC 28273
(704) 409.1700
STATUS:
APPROVED
THIS ARTWORK IS THE PROPERTY OF BRITAX CHILD SAFETY, INC.
INFORMATION CONTAINED HERIN IS CONFIDENTIAL AND MAY NOT
BE LENT, COPIED, OR OTHERWISE DISCLOSED TO THIRD PARTIES
WITHOUT EXPRESS WRITTEN CONSENT.
DATE:
CREATED BY:
12 JAN 2012 JJMc
PART NUMBER:
P465900
REVISION LEVEL: 1
TITLE:
Parkway SGL - US User Guide ENG/SPN
MEDIA:
White 60# Opaque Offset (Self
Cover)
Fonts Used:
Swis721 BT family
Colors:
PMS 186 C, Black
Binding:
Saddle Stitch
DIMENSIONS:
4.75 x 6.625 inches
IMPORTANT NOTES:
Drill a hole 1/8” in diameter 1/8” from top and bind side as indicated by blue circle
guide.
Revision Log:
R1 - New user guide with Spanish added
TOXICITY REQUIREMENTS: All materials used shall not exceed the levels of phthalates and lead content specified in
the most recent Consumer Product Safety Improvement Act (CPSIA). The 6 phthalates listed below cannot exceed
0.1% in any individually tested component or item:
diisononyl phthalate (DINP)
diisodecyl phthalate (DIDP)
di-n-octyl phthalate (DnOP)
di-(2-ethylhexyl) phthalate (DEHP)
dibutyl phthalate (DBP) benzyl butyl phthalate (BBP)
DO NOT PRINT THIS PAGE
Parkway® SGL
User Guide
Guía del usuario
PARKWAY
SGL
IMPORTANT: To ensure your child is as safe as possible, read all
instructions thoroughly before installing this booster seat. Store
this manual under the base. (See features pages for reference).
IMPORTANTE: Para garantizar la seguridad del niño, lea detenidamente todas
las instrucciones antes de instalar este asiento regulable. Guarde este manual
bajo la base (utilice las páginas sobre las características de referencia).
Table of Contents
Safety Information...................................................................... 2
Warnings...................................................................................... 2
Important Notes........................................................................... 4
Certification ................................................................................. 5
Registration.................................................................................. 5
Child Size: Height and Weight Limitations................................. 6
Vehicle Compatibility................................................................. 8
Vehicle Buckle Position............................................................... 9
Vehicle Seat Belts........................................................................ 10
Incompatible Vehicle Seat Belts................................................. 11
Child Seat Features.................................................................... 12
Using the Child Seat.................................................................. 14
Attaching the Backrest................................................................ 14
Removing the Backrest............................................................... 15
Adjusting the Backrest................................................................ 16
Adjusting Head Restraint Height................................................ 17
Using ISOFLEX™......................................................................... 18
SecureGuard™............................................................................ 20
Using the Retractable Cup Holders........................................... 21
Positioning the Booster Seat
Positioning the Booster Seat and Securing
Your Child with Backrest and ISOFLEX™.................................. 22
Positioning the Booster Seat and Securing
Your Child without Backrest and with ISOFLEX™..................... 25
Positioning and Securing Your Child
with Backrest and Lap-shoulder Belt Only................................ 28
Positioning and Securing Your Child
without Backrest and Lap-shoulder Belt Only........................... 30
Care and Maintenance............................................................... 32
Warranty...................................................................................... 34
©2010 Britax Child Safety, Inc. All rights reserved. P465900_R1:09.11
This product and its components are subject to change without notice.
WARNING!
DEATH or SERIOUS INJURY can occur:
• Use only with children who weigh between 40 and 120 lbs
(18.1 and 54.4 kg) and whose height is between 38 and 63
inches (96.5 and 160 cm).
• Use only the vehicle’s lap and shoulder belt system when
restraining the child in this booster seat.
• Secure this child restraint with the vehicle child restraint
anchorage system if available, or with a vehicle seat belt.
• Follow all instructions on this child restraint and in the
written instructions located under the base of the seat.
• Register your child restraint with the manufacturer.
• This booster seat is NOT for use with children who weigh
less than 40 lbs (18.1 kg).
• Use this booster seat forward-facing only.
• DO NOT use this booster seat as a backless booster seat
unless it is used in a seating position with a vehicle head
restraint.
• DO NOT use this booster seat as a backless booster seat
unless proper vehicle belt placement can be achieved.
• This booster seat must not be used in the home, in boats, or
in other non-certified applications.
• Secure this booster seat with a vehicle child restraint
anchorage system or a vehicle seat belt even when it is not
occupied. In a crash, an unsecured booster seat may injure
other occupants.
2
• Based on crash statistics, the National Highway Traffic
Safety Administration (NHTSA) recommends that parents
select the rear seat as the safest location for a properly
positioned booster seat. Please study the section on Vehicle
Compatibility in this booklet to ensure the child’s safety. If in
doubt about installing this booster seat, consult the vehicle
owner’s manual.
• DO NOT use any part of this booster seat with other seat
cushions or backrests.
• The use of non-Britax covers, inserts, toys, accessories or
tightening devices is not approved by Britax. Their use could
cause this booster seat not to perform as intended.
• To prevent injury due to deterioration, discontinue use of
a booster seat that is older than six years or has been in a
severe crash.
• The primary protection for occupants of a vehicle in a
collision is the structure of the vehicle itself; a booster
seat will not protect a child when the vehicle is seriously
impacted. However, correctly installed, a booster seat
will substantially improve the chances for survival in most
crashes. Make sure that all users fully understand the
correct ways to use this booster seat in a vehicle.
3
Safety Information
Safety Information
Important Notes
Certification
• The NHTSA and the American Academy of Pediatrics
recommends that children should remain in a child seat with
a 5-point harness until reaching the maximum weight or
height allowed.
• Cover the booster seat when the vehicle is parked in direct
sunlight. Parts of the booster seat could become hot enough
to burn a child.
• Store the booster seat in a safe place when it is not being
used. Avoid placing heavy objects on top of the booster
seat.
• DO NOT leave children alone in a vehicle, even for a short
time.
• DO NOT, except as described in this booklet, attempt to
disassemble any part of the booster seat or change the way
the vehicle’s seat belts are used.
• DO NOT leave loose objects, e.g. books, bags, etc., in
the back of a vehicle. In the event of a sudden stop, loose
objects will keep moving, potentially causing serious
injuries.
• DO NOT leave folding vehicle seats unsecured. In the event
of a sudden stop, a loose seat back could cause the booster
seat not to perform as intended.
• DO NOT allow children to play with this booster seat.
• DO NOT use anything to raise the booster seat off the
vehicle seat. In a crash, this could cause the booster seat
not to perform as intended.
This child restraint system conforms to all applicable Federal
Motor Vehicle Safety Standards (FMVSS 213). This Child
Restraint is Approved for Use in Motor Vehicles. This Restraint
is Not Certified for Use in Aircraft, because Aircraft do not
have shoulder belts.
4
Registration
Child restraints could be recalled for safety reasons. You
must register this restraint to be reached in a recall. Send
your name, address, e-mail address if available, and the
restraint’s model number and manufacturing date to Britax
Child Safety, Inc. P.O. Box 91167 Allentown, PA 18109-9925,
or call 1-888-427-4829, or register online at www.BritaxUSA.
com/registration. For recall information, call the U.S.
Government’s Vehicle Safety Hotline at 1-888-327-4236
(TTY 1-800-424-9153), or go to http://www.NHTSA.gov.
For your convenience, record all the information about
your booster seat below. Refer to the Serial Number and
Manufacture Date Label for all information, see page 13.
Model Name and Number:________________________________
Serial Number:__________________________________________
Batch Number:__________________________________________
Date of Manufacture:_____________________________________
5
Safety Information
Child Size: Height and Weight Limitations
When Using with Backrest
Only use forward-facing with children:
• who weigh between 40 and 120 lbs (18.1 and 54.4 kg) and
• who are between 38 and 63 in. (96.5 and 160 cm) in height
and
• when the top of the child’s ears are below the top of the
head restraint (Fig. A) and
• when the shoulder belt
lies across the center of
the child’s chest and is
positioned at or above the
child’s shoulder through the
shoulder belt guide and
A
• when the lap belt is routed
under the armrests, through
the SecureGuard, across the child’s upper thighs.
6
Safety Information
When Using without Backrest
Only use forward-facing with children:
• who weigh between 40 and 120 lbs (18.1 and 54.4 kg) and
• who are between 38 and 63 in. (96.5 and 160 cm) in height
and
• when the top of the child’s ears are below the top of the
vehicle head restraint and
• when the shoulder belt
lies across the center of
the child’s chest and is
positioned at or above the
child’s shoulder (Fig. C) and
• when the lap belt is routed
under the armrests, through
C
the SecureGuard, across the
child’s upper thighs.
7
Vehicle Compatibility
WARNING! Based on crash statistics, the National
Highway Traffic Safety Administration (NHTSA) recommends
that parents select the back seat as the safest location for a
properly positioned booster seat.
DO NOT place a booster seat on the front seat with an air
bag unless it is deactivated. DEATH or SERIOUS INJURY
can occur. See your vehicle owner’s manual for booster seat
positioning instructions. The back seat is the safest place
for children 12 and under.
This booster seat must only be used in forward-facing vehicle
seats. Side-facing or rear-facing seats CANNOT be used.
For questions about positioning the booster seat consult the
vehicle owner’s manual.
Some vehicles have no seating positions which are
compatible with this booster seat or any other child seat.
See diagram below.
8
Vehicle Compatibility
Vehicle Buckle Position
WARNING! The position of the vehicle seat belt
buckle can adversely affect the stability of the booster seat.
If the buckle lies near the incorrect
position ( ) when the vehicle seat belt
is tightened, try fitting the booster seat
in another seating position OR consult
your vehicle owner’s manual to see if you
can lower the vehicle buckle position by
twisting the vehicle buckle stalk.
If it is not possible to achieve the correct
position ( ) for the buckle, then another
seating position or child seat MUST be
used.
9
Vehicle Compatibility
Vehicle Seat Belts
IMPORTANT: Vehicle seats and vehicle seat belts differ from
vehicle to vehicle. Refer to your vehicle owner’s manual for
specific information about vehicle seat belts and their use with
child seats. This booster seat can fit securely in most vehicles
using existing vehicle seat belts. However, some vehicles
do not have seating positions which are compatible with this
booster seat or any other child seat. If in doubt, contact the
vehicle manufacturer for assistance.
To protect your child in a crash, you must use this booster seat
with vehicle seat belts that are compatible. This booster seat
can only be used with three-point (shoulder and lap) vehicle
seat belts. The vehicle owner’s manual will have information on
the types of vehicle seat belts in your vehicle. If your vehicle
seat belt type is identified on page 11 as incompatible, select
another seating position.
10
Vehicle Compatibility
Incompatible Vehicle Seat Belts
WARNING! The following types of vehicle seat belts
are NOT compatible with this booster seat:
1
Vehicle seat belts
with top or bottom
anchor points on the
vehicle door.
2
4
Lap-shoulder belts that
have a separate retractor
each for the lap and
shoulder parts.
Inflatable lapshoulder belts.
5
3
Motorized,
automatic vehicle
seat belts
Lap belts of any kind.
11
Child Seat Features
Child Seat Features
1
2
PARKWAY
21
SGL
PARKWAY SG
L
Parkway® SGL
User Guide
3
13
IMPORTANT: To ensure your child is as safe as possible, read all
instructions thoroughly before installing this child seat. Store this
manual under the base. (See features pages for reference).
4
12
22
5
6
7
13
18
9
10
8
20
11
14
19
16
15
= 17
23
1
Head Restraint
10 ISOFLEX™ Adjuster Strap
18 Backrest Hinge Cylinder
2
Head Restraint Cover
11 Cup/Snack Holders
19 Base Hinge Slot
3
Backrest Cover
12 Head Restraint Height Adjuster
20 SecureGuard™ Adjuster
4
Backrest
13 Shoulder Belt Guides
21 User Guide Storage Slot
5
Armrests
14 Lower Connector Release Button
6
SecureGuard™ Clip
15 Lower Connectors
22 Serial Number and
Manufactured Date Label
7
Base Belt Guide
16 Base
8
Base Cover
17 Elastic Retainers
9
ISOFLEX™ Release Button
12
* Appearance of actual product may vary from images in this user guide.
23 ISOFLEX™ Flexible Lower
LATCH Connection System
* Appearance of actual product may vary from images in this user guide.
13
Using the Child Seat
Using the Child Seat
Before you use this booster seat for the first time, you will
have to complete the assembly steps below.
Removing the Backrest
Attaching the Backrest
2 Detach the seat cover from the base by
unhooking the elastic loops from the
elastic retainers on the back of the base
(Fig. E).
IMPORTANT: Keep fingers away from moving
parts to avoid potential injury.
1 Detach the elastic loops from the elastic
retainers on the base cover from the back
of the booster seat base (Fig. A).
2 Place the base on a flat surface. From the
child’s left side of the booster seat, align
the backrest hinge cylinder with the hinge
slot on the base.
3 Push the backrest hinge all the way into
the base hinge slot (Fig. B).
IMPORTANT: DO NOT rotate the backrest
until the cylinder has been completely inserted
into the base hinge slot. Rotating the backrest
before it has been completely inserted may
result in damage to the booster seat.
A
1 Place the booster seat on a flat surface.
3 Push the backrest down until it lies flat
and align the backrest hinge cylinder with
the hinge slot on the base (Fig. F).
E
4 Slide the backrest from the child’s left
side of the base (Fig. G).
B
5 Attach the elastic loops of the base cover
to the elastic retainers on the back of the
base (Fig. H).
F
NOTE: Store the backrest in a safe place.
C
G
D
H
4 Rotate the backrest up until it doesn’t rotate
into the flat position under its own weight
(Fig. C).
5 Attach the elastic loops of the base cover
to the elastic retainers on the back of the
booster seat (Fig. D).
14
15
Using the Child Seat
Using the Child Seat
Adjusting the Backrest
WARNING! Reclining the vehicle seat back may
adversely affect the position of the vehicle seat belt across
the child and may result in death or serious injury in a crash.
Refer to your vehicle owner’s manual for information on
adjusting the vehicle seat back with child seats.
Adjusting Head Restraint Height
The head restraint can be adjusted and locked into
different positions. Choose the position best suited to your
child’s safety. See page 6.
Tip: Check the fit with child seated in booster seat. Ensure
that the shoulder belt guides are even with, or just above,
the child’s shoulder. See page 6.
1 Squeeze and hold the height adjustment handle to
adjust the head restraint (Fig. A).
Push the backrest until it rests
against the vehicle seat back
(Fig. A). If the vehicle seat back
is adjustable, move it to the
upright position.
2 Slide head restraint up or down to the
desired level (Fig. B).
A
3 Release the adjustment handle. Repeat
this process until the shoulder belt rests
comfortably across the center of the
child’s chest when positioned through
the shoulder belt guide (Fig. C).
A
4 Ensure the head restraint has locked
into place.
IMPORTANT: Do not recline
the backrest past the allowable
adjustable range (Fig. B).
B
B
C
16
17
Using the Child Seat
Using the Child Seat
Using ISOFLEX™ Flexible Lower LATCH Connection
System
The ISOFLEX™ System helps to anchor the booster seat into
the car for added stability and safety in the event of a crash.
LOWER UNIVERSAL ANCHORAGE SYSTEM LOCATIONS
Using the Lower Connectors
Where to find the Lower Connectors
The lower connectors are located in the back of the base of
the booster seat. Store the connectors in the slots when not in
use.
To remove the lower connector from the storage slot or
lower anchor:
1
Press and hold the red release
button.
2
Pull the lower connector
from the storage slot or lower
anchor.
Lower
Lower Anchors
The figure above shows typical locations for lower anchors in
a vehicle. Check your vehicle owner’s manual to learn if it is
equipped with lower anchors.
Standard vehicle seat spacing between lower anchors is 11
inches (27.9 cm). This child seat can be used in a seating
position with up to 20 inches (50.8 cm) of space between the
lower anchors if the vehicle manufacturer allows.
18
To attach the lower connector to
the storage slot or lower anchor:
Top
Firmly push the lower connector
into the slot or lower anchor until a
click is heard.
19
Using the Child Seat
Using the Child Seat
2 Pull the SecureGuard™ adjuster away
from the base.
SecureGuard™
Britax recommends using SecureGuard to
achieve the best vehicle seat belt placement.
The SecureGuard™ clip should hold the lap
part of the vehicle seat belt in place. The
SecureGuard™ clip should be adjusted to keep
the lap part of the vehicle seat belt positioned
low across your child’s upper thighs (Fig. A).
Ensure the bottom edge of the SecureGuard™
clip is level with your child’s upper thighs,
however, the clip itself should not press into
your child’s upper thighs.
3 Feed the end of the SecureGuard™
webbing through the SecureGuard™
adjuster (Fig. D).
A
D
5 Move the SecureGuard™ clip to the center of the
SecureGuard™ webbing.
IMPORTANT: The lap part of the vehicle
seat belt must not rest on the child’s
abdomen.
Adjusting SecureGuard™ Fit
• To Shorten:
4 Pull the webbing to remove slack from
the SecureGuard™ adjuster.
B
The lower edge of the SecureGuard™ clip should be level with
the child’s upper thighs once they have been secured in the
booster seat.
Using the Retractable Cup Holders
1 Locate the SecureGuard™ adjuster
under the base. See page 13.
2 Pull the SecureGuard™ adjuster away
from the base.
C
3 Feed the webbing through the
SecureGuard™ adjuster (Fig. B).
4 Pull the end of the SecureGuard™ adjuster webbing to
tighten (Fig. C).
• To Lengthen:
1 Locate the SecureGuard™ adjuster under the base. See
page 13.
20
Pull the cup holder out from
the booster base to use.
Push the cup holder into the
booster base to store.
IMPORTANT:
• DO NOT use with hot liquids.
• DO NOT step on or put excess weight on the cup holder.
21
Positioning the Booster Seat
Positioning the Booster Seat
Positioning the Booster Seat and Securing Your
Child with Backrest and ISOFLEX™
4
BEFORE YOU BEGIN:
99Check that your vehicle has lower anchors.
99If the vehicle seat back is adjustable, ensure it is in the upright
position before placing the booster seat on the vehicle seat.
99Adjust the head restraint appropriately to fit child (see page 17).
1
Remove lower connectors from the
storage slots in the base (Fig. A).
2
Push the ISOFLEX™ adjuster release
button on one side of the booster
seat and pull to fully extend the
lower connector strap. Then repeat
on the opposite side to ensure that
all slack has been released from the
ISOFLEX™ system (Fig. B).
3
Place the booster on the vehicle seat.
* Using the lower anchor farthest
from you first will allow for easiest
positioning.
* You may need to turn the back
of the booster seat towards you
for easier access to the lower
anchors.
NOTE: If a click is not heard when
connecting the lower connectors, the
lower connector strap may be twisted
or there may be debris in the lower
connector. Correct either situation
before continuing with the positioning
process.
5
NOTE: Before using the booster seat for
the first time, you will need to complete
the assembly instructions on page 14.
A
Verify that the ISOFLEX™ straps
are not twisted and push the lower
connectors onto their adjacent
lower anchors (Fig. C).
* A click confirms attachment.
Ensure that the booster seat is
positioned correctly on the vehicle
seat (Fig. D). Guide the seat into
place while pulling the ISOFLEX™
adjuster strap on either side of the
booster seat to remove slack (Fig. E).
NOTE:
* If needed, adjust or remove the
vehicle’s head restraint to allow
the backrest to lie flat against the
vehicle’s seat back.
* Only tighten until the slack is
removed from the strap. Overtightening the strap can force
the backrest of the booster seat
forward (Fig. F).
C
D
E
B
F
22
23
Positioning the Booster Seat
6
Sit your child in the booster seat and check the
head restraint for proper height adjustment.
7
Pull the vehicle seat belt out and route the
shoulder part of the vehicle seat belt through
the upper belt guide (Fig. F).
8
Route the lap part of the vehicle seat belt
under the armrest and over both red belt
guides (Fig. G).
9
Positioning the Booster Seat
Positioning the Booster Seat and Securing Your
Child without Backrest and with ISOFLEX™
BEFORE YOU BEGIN:
99Check that your vehicle has lower anchors.
F
99If the vehicle seat back is adjustable, ensure it is in the upright
position before placing the booster seat on the vehicle seat.
Verify that the vehicle seat belt is not twisted
and fasten across the child (Fig. H).
99Ensure the booster seat is positioned in a location that has a
vehicle head restraint.
10 Route the lap part of the vehicle seat belt
through the SecureGuard™ clip (Fig. I).
* The lap part of the vehicle seat belt should
rest low on the child’s upper thighs.
G
11 Remove slack from the vehicle seat belt.
* The shoulder part should cross the chest in
the center of the child’s collar bone.
Checklist
99Vehicle seat belt is not twisted
99Vehicle seat belt is securely fastened
99Shoulder part of the vehicle seat belt is routed
through the shoulder belt guide
99Lap part of the vehicle belt is routed through the
SecureGuard™ clip
99Vehicle seat belt is properly positioned low
across the child’s upper thighs and does not
contact the child’s neck
99If the lower connectors in your vehicle prevent
proper vehicle belt fit across your child you
cannot use the lower anchors to position this
booster seat
24
1
Remove lower connectors from the
storage slots in the base (Fig. A).
2
Push the ISOFLEX™ adjuster release
button on one side of the booster
seat and pull to fully extend the
lower connector strap. Then repeat
on the opposite side to ensure that
all slack has been released from the
ISOFLEX™ system (Fig. B).
H
3
I
4
Place the booster seat on the vehicle
seat.
* Using the lower anchor farthest
from you first will allow for easiest
positioning.
* You may need to turn the back
of the booster seat toward you
for easier access to the lower
anchors.
Verify that the ISOFLEX™ straps
are not twisted and push the lower
connectors onto their adjacent
lower anchors (Fig. C).
* A click confirms attachment.
A
B
C
25
Positioning the Booster Seat
Positioning the Booster Seat
NOTE: If a click is not heard when
connecting the lower connectors, the
lower connector strap may be twisted
or there may be debris in the lower
connector. Correct either situation
before continuing with the positioning
process.
5
Ensure that the booster seat is
positioned correctly on the vehicle
seat (Fig. D). Guide the seat into
place while pulling the ISOFLEX™
adjuster strap on either side of the
booster to remove slack (Fig. E).
10 Route the lap part of the vehicle seat belt
through the SecureGuard™ clip (Fig. G).
* The lap part of the vehicle seat belt
should rest low on the child’s upper
thighs.
G
D
11 Remove slack from the vehicle seat belt.
* The shoulder part should cross the chest
in the center of the child’s collar bone
(Fig. H).
NOTE: Only tighten until the slack is
removed from the strap.
H
E
6
Sit your child in the booster seat.
7
Pull the vehicle seat belt out, positioning
the lap belt under both armrests and over
both red belt guides (Fig. F).
8
Verify that the vehicle seat belt is not
twisted and then fasten.
9
Adjust the vehicle seat belt’s shoulder part
so that it crosses the chest and center of
the child’s collar bone.
26
Checklist
F
99Vehicle seat belt is not twisted
99Vehicle seat belt is securely fastened
99Lap part of the vehicle belt is routed through the SecureGuard™ clip
99Vehicle seat belt is properly positioned low across the child’s upper
thighs and does not contact the child’s neck
99If the lower connectors in your vehicle prevent proper vehicle belt fit
across your child you cannot use the lower anchors to position this
booster seat
27
Positioning the Booster Seat
Positioning the Booster Seat
Positioning and Securing Your Child with Backrest
and Lap-shoulder Belt Only
BEFORE YOU BEGIN:
99If the vehicle seat back is adjustable, ensure it is in the upright
position before placing the booster seat on the vehicle seat.
4
Pull the vehicle seat belt out and route the
shoulder part of the vehicle seat belt through
the upper belt guide (Fig. C).
5
Route the lap part of the vehicle seat belt under
both armrests, over your child’s upper thighs
and over both red belt guides (Fig. D).
6
Verify that the vehicle seat belt is not twisted
and then fasten the vehicle seat belt across the
child (Fig. E).
7
Route the lap part of the vehicle seat belt
through the SecureGuard™ clip (Fig. I).
* The lap part of the vehicle seat belt should
rest low on the child’s upper thighs.
99Adjust the head restraint appropriately to fit child (see page 17).
Note: Before using the booster seat for the first
time, you will need to complete the assembly
instructions on page 14.
1
Place the booster seat on the vehicle seat.
2
Push the backrest until it rests against the
vehicle seat back (Fig. A). If the vehicle seat
back is adjustable, move it to the normal upright
position.
8
A
28
Sit your child in the booster seat and check the
head restraint for proper height adjustment (Fig.
B).
D
Remove slack from the vehicle seat belt.
* The shoulder part should cross the chest in
the center of the child’s collar bone.
E
NOTE: If needed, adjust or remove the vehicle’s
head restraint to allow the backrest to lie flat
against the vehicle’s seat back.
3
C
B
Checklist
99Vehicle seat belt is not twisted
99Vehicle seat belt is securely fastened
99Shoulder part of the vehicle seat belt is routed
through the shoulder belt guide
99Lap part of the vehicle belt is routed through the
SecureGuard™ clip
99Vehicle seat belt is properly positioned low
across the child’s upper thighs and does not
contact the child’s neck
F
29
Positioning the Booster Seat
Positioning the Booster Seat
Positioning and Securing Your Child without
Backrest and Lap-shoulder Belt Only
BEFORE YOU BEGIN:
99If the vehicle seat back is adjustable, ensure it is in the upright
position before placing the booster seat on the vehicle seat.
99Ensure the booster seat is positioned in a location that has a
vehicle head restraint.
Note: Before using the booster seat without the backrest, you
may need to complete the removal instructions on page 15.
9
14 Route the lap part of the vehicle seat belt
through the SecureGuard™ clip (Fig. C).
* The lap part of the vehicle seat belt
should rest low on the child’s upper
thighs.
15 Remove slack from the vehicle seat belt.
* The shoulder part should cross the chest
in the center of the child’s collar bone.
C
Checklist
99Vehicle seat belt is not twisted
99Vehicle seat belt is securely fastened
99Lap part of the vehicle belt is routed through the SecureGuard™ clip
99Vehicle seat belt is properly positioned low across the child’s upper
thighs and does not contact the child’s neck
Place the booster seat base on the vehicle
seat and push it back against the vehicle
seat back.
10 Sit your child in the booster seat.
11 Pull the vehicle seat belt out from the
retractor, positioning the lap belt under both
armrests and over both red belt guides
(Fig. A).
A
12 Verify that the vehicle seat belt is not
twisted and then fasten across the child.
13 Adjust the vehicle seat belt’s shoulder part
so that it crosses the chest and center of
the child’s collar bone (Fig. B).
B
30
31
Care and Maintenance
Care and Maintenance
Cover Removal
Cleaning the Cover
Removing the Backrest
Cover
• HAND WASH, using cold water and
mild soap.
• LINE DRY, to prevent cover from
shrinking.
• DO NOT: Bleach, machine wash, or
machine dry.
1 Detach the elastic loops (6 total)
from the backrest (Fig. A).
2 Remove the backrest cover.
NOTE: Be careful not to damage the
EPS foam.
A
C
Replacing the Cover
To replace the cover, reverse the steps
of each section.
Removing the Head
Restraint Cover
Cleaning the Shell
1 Detach the elastic loops (6 total)
from the backrest (Fig. B).
2 Remove the head restraint cover.
Removing the Seat Cover
1 Detach the elastic loops (4 total) from
the booster seat base (Fig. C).
2 Slide the plastic retainer flaps (3
total) from the front and sides of the
booster seat base (Fig. D).
B
D
• SPONGE CLEAN, using warm water
and mild soap.
• TOWEL DRY
• DO NOT: Use solvents, abrasive
cleaners, or disassemble the
booster seat in any way, except as
instructed.
3 Remove the booster seat cover.
32
33
Warranty
This booster seat was manufactured by Britax. Britax Child Safety, Inc. (“Britax”) warrants this
product to the original retail purchaser as follows:
LIMITED WARRANTY
This booster seat is warranted against defective materials or workmanship for one year from
the date of original purchase. Proof of purchase is required. The exclusive remedy for this
warranty is that Britax will, at its option, provide repair or replacement components for this
product. Britax reserves the right to discontinue or change fabrics, parts, models or products,
or to make substitutions.
To make a claim under this warranty, contact Britax Consumer Services at
1-888-427-4829 or write to us using the address on the back cover of this booklet. Proof of
purchase is required.
PLEASE COMPLETE AND MAIL THE OWNER REGISTRATION CARD WITHIN (30) DAYS
OF PURCHASE OR VISIT WWW.BRITAXUSA.COM/REGISTRATION.
WARRANTY LIMITATIONS
This warranty does not include damages that arise from negligence, misuse or use not in
accordance with the product instruction.
The use of non-Britax Child Safety, Inc. covers, inserts, toys, accessories, or tightening devices
is not approved by Britax. Their use could cause this child seat to fail Federal Safety Standards
or not perform as intended in a crash. Their use automatically voids the Britax warranty.
LIMITATION OF DAMAGES
The warranty and remedies as set forth above are exclusive and in lieu of all others, oral or
written, express or implied. In no event will Britax, or the retailer selling this product, be liable
for any damages, including incidental or consequential damages, or loss of use arising out of
the use or inability to use this product.
LIMITATIONS OF WARRANTIES AND OTHER WARRANTY TERMS AND STATE LAWS
Any implied warranties, including implied warranties of merchantability and fitness for a
particular purpose, shall be limited to the duration and terms of the express written warranty.
Some states do not allow limitations on how long an implied warranty lasts or the exclusion or
limitation of incidental or consequential damages, so the above limitations may not apply. This
warranty gives you specific legal rights, and you may have other rights, which vary from state to
state. Neither Britax, nor the retailer selling this product, authorizes any person to create for it
any other warranty, obligation, or liability in connection with this product.
34
Índice
Información de seguridad...............................................................38
Advertencias...................................................................................... 38
Notas importantes............................................................................. 40
Certificación ...................................................................................... 41
Registro.............................................................................................. 41
Tamaño del niño: Limitaciones de altura y de peso....................... 42
Compatibilidad con el vehículo......................................................44
Posición de la hebilla del vehículo................................................... 45
Cinturones de seguridad de vehículo.............................................. 46
Cinturones de seguridad de vehículo incompatibles..................... 47
Características del asiento de seguridad para niños...................48
Uso del asiento de seguridad para niños......................................50
Instalación del respaldo.................................................................... 50
Extracción del respaldo.................................................................... 51
Ajuste del respaldo........................................................................... 52
Cómo ajustar la altura del reposacabezas...................................... 53
Uso del sistema ISOFLEX™............................................................. 54
SecureGuard™.................................................................................. 56
Uso de los soportes extraíbles para vasos...................................... 57
Colocación del asiento regulable
Colocación del asiento regulable y sujeción del niño
en asientos con respaldo y sistema ISOFLEX™............................. 58
Colocación del asiento regulable y sujeción del niño
en asientos con sistema ISOFLEX™ pero sin respaldo................. 59
Colocación y sujeción del niño en asientos
con respaldo y cinturones de banda horizontal y transversal....... 64
Colocación y sujeción del niño en asientos
sin respaldo y cinturones de banda horizontal y transversal......... 66
Cuidado y mantenimiento...............................................................68
Garantía.............................................................................................70
©2011 Britax Child Safety, Inc. Reservados todos los derechos. P465900_R1:03.11
Este producto y sus componentes están sujetos a cambios sin previo aviso.
37
ADVERTENCIA
Esto podría causar DAÑOS GRAVES o incluso el
FALLECIMIENTO del niño.
• Únicamente se debe utilizar con niños que pesan entre 18,1 y 54,4 kg
(entre 40 y 120 lb) y miden entre 96,5 y 160 cm (38 y 63 pulgadas).
• Cuando se esté utilizando este asiento regulable para sujetar al
niño, solo debe usarse el sistema de cinturón de seguridad de
banda horizontal y transversal del vehículo.
• Asegure este dispositivo de retención infantil con el sistema
de anclaje de retención para niños del vehículo (si hay uno
disponible) o con el cinturón de seguridad del automóvil.
• Siga todas las instrucciones de este dispositivo de retención
infantil, así como las instrucciones que se encuentran bajo la
base del asiento.
• Registre este dispositivo de retención infantil con el fabricante.
• Este asiento reclinable no debe utilizarse con niños de peso
inferior a 18,1 kg (40 lb).
• Utilice este asiento regulable solo orientado hacia delante.
• NO utilice este asiento regulable sin respaldo salvo que se utilice
en un asiento del vehículo que disponga de reposacabezas.
• NO utilice este asiento regulable sin respaldo salvo que se pueda
colocar el cinturón de seguridad del vehículo debidamente.
• Este asiento regulable no debe utilizarse en casas ni embarcaciones,
ni darle cualquier otro uso para el que no esté certificado.
• Sujete este asiento regulable con un sistema de anclaje de
retención para niños del vehículo o con uno de los cinturones de
seguridad del automóvil, aun cuando no esté ocupado, ya que de
no estar asegurado podría, en caso de accidente, lastimar a otros
ocupantes del vehículo.
38
• Según las estadísticas de accidentes, la Administración Nacional
de Seguridad de Tráfico en Carreteras (NHTSA, National Highway
Traffic Safety Administration) recomienda que los padres elijan
el asiento trasero como el lugar más seguro para colocar
adecuadamente un asiento regulable. A fin de garantizar la
seguridad del niño, lea detenidamente la sección Compatibilidad
con el vehículo incluida en este manual. Si tiene dudas acerca de
cómo instalar el asiento regulable, consulte el manual del vehículo.
• NO utilice ninguna pieza de este asiento regulable con respaldos
o cojines de otros asientos.
• Britax no aprueba el uso de cubiertas, piezas, juguetes,
accesorios o dispositivos de ajuste que no sean de Britax. El uso
de estos podría hacer que el asiento regulable no rinda como
debiera.
• Para evitar lesiones debido a deterioro, este asiento regulable
debe dejar de utilizarse tras seis años de antigüedad o si ha
estado implicado en un accidente grave.
• En cualquier colisión, la principal protección para los ocupantes
es la propia estructura del vehículo; un asiento regulable no
protegerá al niño si el vehículo sufre un impacto muy fuerte.
Sin embargo, si está instalado correctamente, el asiento regulable
aumentará considerablemente las posibilidades de supervivencia
en la mayoría de los accidentes. Asegúrese de que todos los
usuarios comprenden bien cómo usar este asiento regulable en
un vehículo.
39
Información de seguridad
Información de seguridad
Notas importantes
Certificación
• La Administración Nacional de Seguridad de Tráfico en Carreteras
(NHTSA) y la Academia Americana de Pediatría recomiendan
dejar a los niños en un asiento de seguridad infantil con arnés
de cinco puntos hasta que alcancen el peso o la altura máximos
permitidos.
El sistema de retención infantil cumple con todas las normas federales
de seguridad automotriz (FMVSS 213). Este sistema de retención
infantil está aprobado para su uso en vehículos de motor. Este sistema
de retención no está certificado para su uso en aviones, ya que los
asientos de estos no vienen equipados con cinturones de seguridad
transversales.
• Cubra el asiento regulable si deja el vehículo expuesto al sol, ya
que las piezas pueden calentarse y quemar al niño.
Registro
• Guarde el asiento regulable en un lugar seguro cuando no lo
esté utilizando. No coloque objetos pesados encima del asiento
regulable.
• NO deje niños desatendidos en el vehículo, ni siquiera durante
un corto periodo de tiempo.
• NO intente desmontar ninguna pieza del asiento regulable, a
menos que lo haga según se indica en este manual. Utilice los
cinturones de seguridad del vehículo únicamente como se indica.
• NO deje objetos sueltos, como libros, maletas, etc., en la parte
posterior del vehículo, ya que en caso de frenado brusco, los
objetos sueltos podrán desplazarse y causar lesiones graves.
• NO deje asientos plegables sin asegurar adecuadamente, ya que
en caso de frenado brusco, un respaldo suelto podría hacer que
el asiento regulable no rinda como debiera.
• NO deje que los niños jueguen con el asiento regulable.
• NO utilice ningún elemento para elevar el asiento regulable, ya que
en caso de accidente, esto podría hacer que el asiento regulable
no rinda como debiera.
Es posible que algunos dispositivos de retención para niños pudieran
tener que retirarse del mercado por cuestiones de seguridad.
Es importante registrar este asiento para que podamos ponernos
en contacto con usted en caso de que fuera necesario. Envíenos
su nombre, dirección postal y de correo electrónico (si dispone de
una), el número de modelo del dispositivo de retención y la fecha
de fabricación a la dirección siguiente: Britax Child Safety, Inc., P.O.
Box 91167 Allentown, Pennsylvania 18109-9925 (EE. UU.). También
puede optar por llamarnos al teléfono 1 888 427 4829 o registrarse
en línea en www.BritaxUSA.com/registration. Para obtener
información sobre la retirada de asientos del mercado, llame a
la línea gratuita de seguridad automotriz de EE. UU. al 1 888 327
4236 (teléfono para sordomudos:1 800 424 9153) o visite http://
www.NHTSA.gov.
Para su propia comodidad, le recomendamos anotar toda la
información relativa a su asiento regulable a continuación. En la
etiqueta con la fecha de fabricación y el número de serie podrá
encontrar toda la información necesaria (consulte la página 49).
Nombre y número de modelo:____________________________
Número de serie:_______________________________________
Número de lote:_________________________________________
Fecha de fabricación:____________________________________
40
41
Información de seguridad
Información de seguridad
Tamaño del niño: Limitaciones de altura y de peso
Si no se utiliza respaldo
Si se utiliza con respaldo
Usar la orientación delantera únicamente con niños que:
• pesan entre 18,1 y 54,4 kg (entre 40 y 120 lb) y
• tienen una altura comprendida entre 96,5 y 160 cm (38 y 63 pulg.);
• si el borde superior de las orejas del niño queda por debajo de
la parte superior del reposacabezas del vehículo y
• si la banda transversal del cinturón cruza el centro del pecho del
niño y queda a la altura de los
hombros o por encima (Fig. C), y
• si el cinturón de banda
horizontal pasa por el
SecureGuard y debajo de los
apoyabrazos, cruzando la parte
superior de los muslos del niño. C
Usar la orientación delantera únicamente con niños que:
• pesan entre 18,1 y 54,4 kg (entre 40 y 120 lb) y
• tienen una altura comprendida entre 96,5 y 160 cm (38 y 63 pulg.);
• si el borde superior de las orejas del niño queda por debajo del
filo del reposacabezas (Fig. A) y
• si la banda transversal del
cinturón cruza el centro del
pecho del niño, además de
estar debidamente colocada a
la altura de los hombros o por
encima de estos mediante la
guía del cinturón, y
A
• si el cinturón de banda horizontal
pasa por el SecureGuard y debajo de los apoyabrazos, cruzando la
parte superior de los muslos del niño.
42
43
Compatibilidad con el vehículo
ADVERTENCIA Según las estadísticas de accidentes,
la Administración Nacional de Seguridad de Tráfico en
Carreteras (NHTSA, National Highway Traffic Safety Administration)
recomienda que los padres elijan el asiento trasero como el lugar
más seguro para colocar adecuadamente un asiento regulable.
NO coloque el asiento regulable en el asiento delantero de un
vehículo que tenga airbag, si este no está desactivado, ya que esto
podría causar DAÑOS GRAVES o incluso el FALLECIMIENTO del
niño. Consulte el manual del vehículo para ver las instrucciones
de colocación del asiento regulable. El asiento trasero es el
lugar más seguro para niños de hasta 12 años.
Este asiento regulable solo debe utilizarse en asientos del vehículo
que estén orientados hacia delante. NO se pueden usar asientos
orientados hacia atrás o hacia los laterales. Si tiene alguna duda sobre
la colocación del asiento regulable, consulte el manual del vehículo.
Algunos vehículos no tienen asientos compatibles con este
asiento regulable ni ningún otro asiento de seguridad para niños.
Consulte el siguiente diagrama.
44
Compatibilidad con el vehículo
Posición de la hebilla del vehículo
ADVERTENCIA La posición de la hebilla del cinturón del
vehículo puede perjudicar la estabilidad del asiento regulable.
Si la hebilla se encuentra cerca de la posición
incorrecta ( ) cuando el cinturón de
seguridad del vehículo está tensado, intente
ajustar el asiento regulable en otro asiento del
vehículo O consulte el manual del vehículo
para ver si puede bajar la posición de la hebilla
del vehículo girando la base de la hebilla.
Si no consigue colocar la hebilla en la posición
correcta (
), DEBERÁ usar otro asiento del
vehículo o asiento de seguridad para niños.
45
Compatibilidad con el vehículo
Cinturones de seguridad de vehículos
IMPORTANTE: Los asientos del vehículo y los cinturones de seguridad
de este difieren según el automóvil. Consulte el manual del vehículo
para obtener información específica sobre los cinturones de seguridad
del vehículo y cómo usarlos con asientos para niños. Este asiento
regulable puede instalarse de manera segura en la mayoría de los
vehículos, haciendo uso de los cinturones de seguridad de los que
ya dispone el vehículo. No obstante, algunos vehículos no tienen
asientos compatibles con este asiento regulable ni ningún otro asiento
de seguridad para niños. En caso de duda, póngase en contacto con
el fabricante del vehículo para obtener ayuda.
Es importante utilizar este asiento regulable con cinturones de
seguridad compatibles, a fin de que el niño esté bien protegido en
caso de accidente. Este asiento regulable solo puede utilizarse con
cinturones de seguridad de tres puntos (con banda horizontal y
transversal). En el manual de su vehículo se incluye información sobre
el tipo de cinturones con el que viene equipado este. Si el cinturón
de seguridad de su vehículo aparece en la página 47 en la lista de
cinturones incompatibles, debe seleccionar otro asiento en el vehículo.
46
Compatibilidad con el vehículo
Cinturones de seguridad de vehículo incompatibles
ADVERTENCIA Los siguientes tipos de cinturones de
seguridad de vehículos NO son compatibles con este asiento
regulable:
1
Cinturones de seguridad para vehículos,
con puntos de
anclaje superiores o
inferiores en la puerta
del vehículo.
2
4
Cinturones con
banda horizontal y
transversal, y retractores
independientes para
cada banda.
Cinturones
con banda
horizontal y
transversal
hinchables.
5
3
Cinturones
de seguridad
automáticos
motorizados.
Bandas horizontales de
cualquier tipo.
47
Características del asiento de
seguridad para niños
Características del asiento de
seguridad para niños
1
2
PARKWAY
21
SGL
L
22
13
18
9
10
8
PARKWAY SG
7
Parkway® SGL
12
5
6
User Guide
3
13
IMPORTANT: To ensure your child is as safe as possible, read all
instructions thoroughly before installing this child seat. Store this
manual under the base. (See features pages for reference).
4
20
11
14
19
16
15
= 17
23
1
Reposacabezas
10 Correa de ajuste del sistema ISOFLEX™
18 Cilindro de la bisagra del respaldo
2
Cubierta del reposacabezas
19 Ranura para la bisagra de la base
3
Cubierta del respaldo
11 Soportes extraíbles para vasos y
aperitivos
4
Respaldo
12 Regulador de altura del reposacabezas
5
Apoyabrazos
21 Compartimento para la guía del
usuario
6
Enganche SecureGuard™
7
Guía del cinturón de la base
8
Cubierta de la base
9
Botón de desbloqueo del
sistema ISOFLEX™
48
13 Guías del cinturón de banda transversal
14 Botón de desbloqueo del conector inferior
15 Conectores inferiores
16 Base
17 Dispositivos de retención elásticos
* Es posible que el aspecto del producto real difiera de las imágenes que
aparecen en esta guía del usuario.
20 Dispositivo de ajuste SecureGuard™
22 Etiqueta con la fecha de
fabricación y el número de serie
23 Sistema flexible de conexión
ISOFLEX™ para los LATCH
inferiores
* Es posible que el aspecto del producto real difiera de las imágenes que 49
aparecen en esta guía del usuario.
Uso del asiento de seguridad para niños
Antes de utilizar este asiento regulable por primera vez, debe llevar
a cabo los pasos indicados a continuación para el montaje.
Instalación del respaldo
IMPORTANTE: Mantenga los dedos alejados de
las piezas móviles a fin de evitar posibles lesiones.
1 Desenganche las bandas elásticas de los
dispositivos de retención elásticos que se
encuentran en la cubierta de la base, para
retirarlas de la parte posterior de la base del
asiento regulable (Fig. A).
2 Coloque la base sobre una superficie plana.
Desde el lateral izquierdo del asiento regulable,
alinee el cilindro de la bisagra del respaldo con
la ranura para la bisagra de la base.
A
Extracción del respaldo
1 Coloque el asiento regulable sobre una
superficie plana.
2 Separe la cubierta del asiento para retirarla
de la base; para ello debe desenganchar
las bandas elásticas de los dispositivos de
retención elásticos que se encuentran en la
parte posterior de la base (Fig. E).
E
3 Empuje el respaldo hacia abajo hasta que
quede en posición horizontal y alinee el
cilindro de la bisagra del respaldo con la
ranura para la bisagra de la base (Fig. F).
B
4 Saque el respaldo por el lateral izquierdo
de la base (Fig. G).
F
5 Enganche las bandas elásticas de la cubierta
de la base en los dispositivos de retención
3 Deslice la bisagra del respaldo
completamente en la ranura (Fig. B).
IMPORTANTE: NO gire el respaldo hasta que el
cilindro esté completamente dentro de la ranura
para la bisagra de la base, ya que podría dañar el
asiento regulable.
Uso del asiento de seguridad para niños
elásticos que se encuentran en la parte
posterior de la base (Fig. H).
C
NOTA: Guarde el respaldo en un lugar seguro.
G
4 Gire el respaldo hacia arriba hasta que este
no pueda rotar a la posición horizontal por su
propio peso (Fig. C).
5 Enganche las bandas elásticas de la cubierta
de la base en los dispositivos de retención
elásticos que se encuentran en la parte
posterior del asiento regulable (Fig. D).
50
D
H
51
Uso del asiento de seguridad para niños
Ajuste del respaldo
Cómo ajustar la altura del reposacabezas
ADVERTENCIA Reclinar el asiento del vehículo hacia
atrás puede provocar que el cinturón de seguridad del vehículo
quede mal colocado, lo que a su vez podría provocar daños graves
e incluso la muerte, en caso de accidente. Consulte el manual del
vehículo para obtener información sobre cómo ajustar el respaldo
del asiento del vehículo para colocar asientos infantiles.
Empuje el respaldo hasta que
quede apoyado contra el respaldo
del asiento del vehículo (Fig. A).
Si es posible regular la posición
del respaldo del asiento en su
vehículo, asegúrese de que esté
en posición vertical.
Uso del asiento de seguridad para niños
El reposacabezas puede ajustarse y bloquearse en distintas
posiciones. Debe elegir la posición más adecuada a fin de
garantizar la seguridad de su hijo. Consulte la página 42.
Consejo: Realice las comprobaciones oportunas una vez que el
niño esté colocado en el asiento regulable. Compruebe que las
guías del cinturón de banda transversal están a la altura, o justo
por encima, de los hombros del niño. Consulte la página 42.
1 Apriete y sujete el regulador de altura para
ajustar el reposacabezas (Fig. A).
2 Deslice el reposacabezas hacia arriba o hacia
abajo hasta la posición deseada (Fig. B).
A
3 Suelte el asa de ajuste. Repita este proceso
hasta que la banda transversal del cinturón
descanse cómodamente sobre el centro del
pecho del niño, cuando está en la guía para
banda transversal (Fig. C).
A
4 Compruebe que el reposacabezas queda
inmóvil en su sitio.
IMPORTANTE: No incline el
respaldo más allá del ángulo
permitido (Fig. B).
B
B
C
52
53
Uso del asiento de seguridad para niños
Uso del sistema flexible de conexión ISOFLEX™
para los LATCH inferiores
El sistema ISOFLEX™ ayuda a asegurar el asiento reclinable en el
vehículo para así conseguir una estabilidad y seguridad añadidas
en caso de accidente.
UBICACIÓN DE LOS SISTEMAS DE ANCLAJES INFERIORES UNIVERSALES
Reposacabezas del
asiento del vehículo
Uso del asiento de seguridad para niños
Uso de los conectores inferiores
Ubicación de los conectores inferiores
Los conectores inferiores se encuentran situados en la parte trasera
de la base del asiento regulable. Guarde los conectores en las ranuras
cuando no estén utilizándose.
Para extraer el conector inferior del compartimento o anclaje
inferior:
1
Mantenga pulsado el botón rojo
de desbloqueo.
2
Tire del conector inferior para
extraerlo del compartimento o
anclaje inferior.
Sistema retráctil del
cinturón de seguridad
del vehículo
Anclajes
inferiores
Cinturón de seguridad
del vehículo con banda
horizontal y transversal
Hasta 50,8 cm (20 pulg.)
Asiento del vehículo
Anclajes inferiores
La imagen que aparece arriba muestra los lugares donde suelen
encontrarse los anclajes inferiores en un vehículo. Consulte el manual
del vehículo para ver si este viene equipado con anclajes inferiores.
El espacio estándar que suele quedar libre en los asientos del
vehículo entre los anclajes inferiores es de 27,9 cm (11 pulgadas).
Este asiento de seguridad para niños puede colocarse en asientos
con hasta 50,8 cm (20 pulgadas) de separación entre los anclajes
inferiores, si el fabricante del vehículo así lo permite.
54
Para acoplar el conector inferior al
compartimento o anclaje inferior:
Parte superior
Empuje el conector inferior con
firmeza en la ranura o el anclaje
inferior hasta oír un clic.
55
Uso del asiento de seguridad para niños
2 Separe el dispositivo de ajuste
SecureGuard™ de la base.
SecureGuard™
Britax recomienda utilizar SecureGuard
para una óptima colocación del asiento
de seguridad del vehículo. El enganche
SecureGuard™ debe sujetar la banda
horizontal del cinturón de seguridad
del vehículo en su lugar. El enganche
SecureGuard™ debe ajustarse de manera que
la banda horizontal del asiento de seguridad
del vehículo cruce la parte superior de los
muslos del niño (Fig. A). Asegúrese de que el
borde inferior del enganche SecureGuard™
queda a la altura de la parte superior de los
muslos del niño. No obstante, el enganche en
sí no debe oprimir las piernas del niño.
3 Pase el extremo de la correa del
SecureGuard™ por el dispositivo de ajuste
SecureGuard™ (Fig. D).
A
B
D
El borde inferior del enganche SecureGuard™ queda alineado con la
parte superior de los muslos del niño, una vez colocados en el asiento
regulable.
Uso de los soportes extraíbles para vasos
C
2 Separe el dispositivo de ajuste SecureGuard™ de la base.
3 Pase el cinturón por el dispositivo de ajuste SecureGuard™ (Fig. B).
4 Tire del extremo de la correa del dispositivo de ajuste
SecureGuard™ para tensarla (Fig. C).
• Para alargarlo:
1 Localice el dispositivo de ajuste SecureGuard™ que se
encuentra bajo la base. Consulte la página 49.
56
4 Tire de la correa para tensar el dispositivo de
ajuste SecureGuard™.
5 Mueva el enganche SecureGuard™ a la parte central de la correa
del SecureGuard™.
IMPORTANTE: La banda horizontal del asiento
de seguridad del vehículo no debe descansar
sobre el abdomen del niño.
Ajuste del SecureGuard™
• Para acortarlo:
1 Localice el dispositivo de ajuste
SecureGuard™ que se encuentra bajo la
base. Consulte la página 49.
Uso del asiento de seguridad para niños
Extraiga el soporte para
vasos de la base del asiento
regulable para utilizarlo.
Inserte el soporte para
vasos en la base del asiento
regulable para guardarlo.
IMPORTANTE:
• NO utilizar con líquidos calientes.
• NO pise el soporte para vasos ni coloque peso excesivo encima.
57
Colocación del asiento regulable
Colocación del asiento regulable y sujeción del niño
en asientos con respaldo y sistema ISOFLEX™
Colocación del asiento regulable
4
ANTES DE COMENZAR:
99Compruebe que su vehículo dispone de anclajes inferiores.
99Si es posible regular la posición del respaldo del asiento en el
vehículo, asegúrese de que esté en posición vertical antes de
colocar el asiento regulable en el asiento del vehículo.
99Ajuste el reposacabezas en función del niño (consulte la
página 53).
1
Extraiga los conectores inferiores de
los compartimentos situados en la
base (Fig. A).
2
Pulse el botón de desbloqueo del ajuste
del sistema ISOFLEX™ en uno de los
laterales del asiento regulable y tire de
la correa del conector inferior hasta
que esta alcance su longitud máxima. A
continuación, repita la misma operación
en el otro lateral a fin de asegurar que el
sistema ISOFLEX™ quede tenso (Fig. B).
3
58
Coloque el asiento regulable sobre el
asiento del vehículo.
* Si utiliza primero el anclaje inferior
que le queda más lejos, le resultará
más fácil colocarlo.
* Si gira la parte trasera del asiento
regulable hacia usted podrá acceder
más fácilmente a los anclajes inferiores.
NOTA: Si no oye un clic al acoplar el
conector inferior, es posible que la tira
de este esté torcida o que haya suciedad
acumulada en el conector inferior. Solucione
el problema antes de continuar con el
proceso de colocación.
5
NOTA: Antes de utilizar el asiento regulable
por primera vez, es importante que siga las
instrucciones de montaje de la página 50.
A
B
Compruebe que las tiras del sistema
ISOFLEX™ no están torcidas y presione
los conectores inferiores sobre los
anclajes inferiores adyacentes (Fig. C).
* Oirá un clic cuando estén
correctamente acoplados.
Asegúrese de que el asiento regulable
esté colocado correctamente en
el asiento del vehículo (Fig. D).
Coloque el asiento en su lugar
mientras tensa la correa de ajuste
del sistema ISOFLEX™ a ambos
lados del asiento regulable (Fig. E).
NOTA:
* Si fuera necesario, ajuste o quite
el reposacabezas del vehículo de
manera que el respaldo quede plano
contra el del asiento del vehículo.
* Solo debe tensar el cinturón hasta
que no quede holgura, ya que si se
tensa demasiado puede provocar
que el respaldo del asiento regulable
quede hacia delante (Fig. F).
C
D
E
F
59
Colocación del asiento regulable
6
Siente al niño en el asiento regulable y compruebe
que el reposacabezas está a la altura adecuada.
7
Tire del cinturón de seguridad del vehículo hacia
fuera y pase la banda transversal por la guía
superior del cinturón (Fig. F).
8
Pase la banda horizontal del asiento de seguridad
del vehículo por debajo del apoyabrazos y por
encima de las dos guías rojas del cinturón (Fig. G).
9
Colocación del asiento regulable
Colocación del asiento regulable y sujeción del niño
en asientos con sistema ISOFLEX™ pero sin respaldo
ANTES DE COMENZAR:
99Si es posible regular la posición del respaldo del asiento en el vehículo,
asegúrese de que esté en posición vertical antes de colocar el asiento
regulable en el asiento del vehículo.
Compruebe que el cinturón de seguridad del
vehículo no está torcido y abróchelo pasándolo por
encima del niño (Fig. H).
10 Pase la banda horizontal del cinturón de seguridad
del vehículo por el enganche SecureGuard™ (Fig. I).
* La banda horizontal del cinturón de seguridad
del vehículo debe reposar en la parte superior
de los muslos del niño.
99Asegúrese de que el asiento regulable está colocado en un lugar del
vehículo con reposacabezas.
G
11 Tense el cinturón de seguridad del vehículo.
* La banda transversal debe cruzar el pecho
por el centro de la clavícula del niño.
Lista de verificación
99 El cinturón de seguridad del vehículo no está torcido
99El cinturón de seguridad del vehículo está
debidamente abrochado
99 La banda transversal del cinturón de seguridad del
vehículo pasa por la guía para la banda transversal
99 La banda horizontal del cinturón de seguridad del
vehículo pasa por el enganche SecureGuard™
99 El cinturón de seguridad del vehículo está
debidamente colocado a la altura de la parte superior
de los muslos del niño y no está en contacto con el
cuello del niño
99Si los anclajes inferiores de su vehículo impiden
que el cinturón del vehículo quede bien ajustado
al niño, no podrá utilizar los anclajes inferiores
para colocar este asiento regulable.
60
99Compruebe que su vehículo dispone de anclajes inferiores.
F
1
Extraiga los conectores inferiores
de los compartimentos situados en la
base (Fig. A).
2
Pulse el botón de desbloqueo del ajuste
del sistema ISOFLEX™ en uno de los
laterales del asiento regulable y tire de
la correa del conector inferior hasta
que esta alcance su longitud máxima. A
continuación, repita la misma operación
en el otro lateral a fin de asegurar que el
sistema ISOFLEX™ quede tenso (Fig. B).
H
3
I
4
Coloque el asiento regulable sobre el
asiento del vehículo.
* Si utiliza primero el anclaje inferior
que le queda más lejos, le resultará
más fácil colocarlo.
* Si gira la parte trasera del asiento
regulable hacia usted podrá acceder
más fácilmente a los anclajes inferiores.
Compruebe que las tiras del sistema
ISOFLEX™ no están torcidas y presione
los conectores inferiores sobre los
anclajes inferiores adyacentes (Fig. C).
* Oirá un clic cuando estén
correctamente acoplados.
A
B
C
61
Colocación del asiento regulable
Colocación del asiento regulable
NOTA: Si no oye un clic al acoplar el
conector inferior, es posible que la tira
de este esté torcida o que haya suciedad
acumulada en el conector inferior.
Solucione el problema antes de continuar
con el proceso de colocación.
5
Asegúrese de que el asiento
regulable esté colocado correctamente
en el asiento del vehículo (Fig. D).
Coloque el asiento en su lugar mientras
tensa la correa de ajuste del sistema
ISOFLEX™ a ambos lados del asiento
regulable (Fig. E).
10 Pase la banda horizontal del cinturón de
seguridad del vehículo por el enganche
SecureGuard™ (Fig. G).
* La banda horizontal del cinturón de seguridad
del vehículo debe reposar en la parte superior
de los muslos del niño.
G
D
11 Tense el cinturón de seguridad del vehículo.
* La banda transversal debe cruzar el pecho
por el centro de la clavícula del niño (Fig. H).
NOTA: Solo debe tensar el cinturón hasta
que no quede holgura.
H
E
6
Siente al niño en el asiento regulable.
7
Extraiga el cinturón de seguridad del vehículo y
coloque la banda horizontal debajo de ambos
apoyabrazos y por encima de las dos guías
rojas del cinturón (Fig. F).
8
Compruebe que el cinturón de seguridad
del vehículo no está torcido y, a continuación,
abróchelo.
9
Ajuste la banda transversal del cinturón de
seguridad del vehículo de manera que cruce
el pecho y el centro de la clavícula del niño.
62
Lista de verificación
F
99El cinturón de seguridad del vehículo no está torcido
99El cinturón de seguridad del vehículo está debidamente abrochado
99La banda horizontal del cinturón de seguridad del vehículo pasa por el
enganche SecureGuard™
99 El cinturón de seguridad del vehículo está debidamente colocado a la altura
de la parte superior de los muslos del niño y no está en contacto con el cuello
del niño
99Si los anclajes inferiores de su vehículo impiden que el cinturón del vehículo
quede bien ajustado al niño, no podrá utilizar los anclajes inferiores para
colocar este asiento regulable.
63
Colocación del asiento regulable
Colocación del asiento regulable
Colocación y sujeción del niño en asientos con respaldo
y cinturones de banda horizontal y transversal
ANTES DE COMENZAR:
99Si es posible regular la posición del respaldo del asiento en el vehículo,
asegúrese de que esté en posición vertical antes de colocar el asiento
regulable en el asiento del vehículo.
4
Tire del cinturón de seguridad del vehículo hacia
fuera y pase la banda transversal por la guía superior
del cinturón (Fig. C).
5
Pase la banda horizontal del asiento de seguridad
del vehículo por debajo de ambos apoyabrazos, por
encima de la parte superior de los muslos del niño y
por encima de las dos guías rojas del cinturón (Fig. D).
6
Verifique que el cinturón de seguridad del vehículo
no está torcido y, a continuación, abróchelo
pasándolo por encima del niño (Fig. E).
7
Pase la banda horizontal del cinturón de seguridad
del vehículo por el enganche SecureGuard™ (Fig. F).
* La banda horizontal del cinturón de seguridad
del vehículo debe reposar en la parte superior
de los muslos del niño.
99Ajuste el reposacabezas en función del niño (consulte la página 53).
Nota: Antes de utilizar el asiento regulable por primera
vez, es importante que siga las instrucciones de
montaje de la página 50.
1
Coloque el asiento regulable sobre el asiento del
vehículo.
2
Empuje el respaldo hasta que quede apoyado contra
el respaldo del asiento del vehículo (Fig. A). Si es
posible regular la posición del respaldo del asiento
en su vehículo, asegúrese de que esté en posición
vertical normal.
NOTA: Si fuera necesario, ajuste o quite el reposacabezas
del vehículo de manera que el respaldo quede plano
contra el del asiento del vehículo.
3
64
8
A
C
D
Tense el cinturón de seguridad del vehículo.
* La banda transversal debe cruzar el pecho por
el centro de la clavícula del niño.
E
Lista de verificación
B
Siente al niño en el asiento regulable y compruebe
que el reposacabezas está a la altura adecuada (Fig. B).
99El cinturón de seguridad del vehículo no está torcido
99El cinturón de seguridad del vehículo está
debidamente abrochado
99La banda transversal del cinturón de seguridad del
vehículo pasa por la guía para la banda transversal
99La banda horizontal del cinturón de seguridad del
vehículo pasa por el enganche SecureGuard™
99El cinturón de seguridad del vehículo está
debidamente colocado a la altura de la parte
superior de los muslos del niño y no está en
contacto con el cuello del niño
F
65
Colocación del asiento regulable
Colocación del asiento regulable
Colocación y sujeción del niño en asientos con cinturones
de banda horizontal y transversal pero sin respaldo
6
Pase la banda horizontal del cinturón de
seguridad del vehículo por el enganche
SecureGuard™ (Fig. C).
* La banda horizontal del cinturón de
seguridad del vehículo debe reposar en
la parte superior de los muslos del niño.
7
Tense el cinturón de seguridad del vehículo.
* La banda transversal debe cruzar el pecho
por el centro de la clavícula del niño.
ANTES DE COMENZAR:
99Si es posible regular la posición del respaldo del asiento en el vehículo,
asegúrese de que esté en posición vertical antes de colocar el asiento
regulable en el asiento del vehículo.
99Asegúrese de que el asiento regulable está colocado en un lugar del
vehículo con reposacabezas.
C
Lista de verificación
Nota: Antes de utilizar el asiento regulable sin respaldo, debe
seguir las instrucciones indicadas en la página 51.
1
Coloque la base del asiento regulable sobre
el asiento del vehículo y empújela hasta que
quede bien apoyada contra el respaldo del
asiento del vehículo.
2
Siente al niño en el asiento regulable.
3
Extraiga el cinturón de seguridad del vehículo
del sistema retráctil y coloque la banda horizontal
debajo de ambos apoyabrazos y por encima de
las dos guías rojas del cinturón (Fig. A).
4
Compruebe que el cinturón de seguridad del
vehículo no está torcido y, a continuación,
abróchelo pasándolo por encima del niño.
5
Ajuste la banda transversal del cinturón de
seguridad del vehículo de manera que cruce el
pecho y el centro de la clavícula del niño (Fig. B).
66
99El cinturón de seguridad del vehículo no está torcido
99El cinturón de seguridad del vehículo está debidamente abrochado
99La banda horizontal del cinturón de seguridad del vehículo pasa por el
enganche SecureGuard™
99El cinturón de seguridad del vehículo está debidamente colocado a la
altura de la parte superior de los muslos del niño y no está en contacto
con el cuello del niño
A
B
67
Cuidado y mantenimiento
Cuidado y mantenimiento
Cómo retirar la cubierta
Limpieza de la cubierta
Extracción de la cubierta del
respaldo
• LAVAR A MANO con agua fría y jabón
suave.
1 Desenganche las bandas elásticas
(6 en total) del respaldo (Fig. A).
• COLGAR PARA SECAR a fin de evitar
que encoja.
2 Quite la cubierta del respaldo.
• NO utilizar lejía ni lavar o secar a
máquina.
NOTA: Procure no dañar la espuma de
poliestireno expandido.
A
C
Sustitución de la cubierta
Para sustituir la cubierta, realice los pasos
de cada sección pero en sentido inverso.
Extracción de la cubierta del
reposacabezas
Limpieza del exterior
1 Desenganche las bandas elásticas
(6 en total) del respaldo (Fig. B).
2 Retire la cubierta del reposacabezas.
Extracción de la cubierta del
asiento
1 Desenganche las bandas elásticas
(4 en total) de la base del asiento
regulable (Fig. C).
B
D
• LIMPIAR CON ESPONJA utilizando
agua templada y jabón suave.
• SECAR CON TOALLA
• NO DEBE: Utilizar disolventes ni
productos abrasivos, ni desmontar el
asiento regulable de modo diferente
al indicado en las instrucciones.
2 Deslice las solapas de retención de
plástico (3 en total) de la parte frontal
y los laterales de la base del asiento
regulable (Fig. D).
3 Retire la cubierta del asiento regulable.
68
69
Garantía
Este asiento regulable ha sido fabricado por Britax. Britax Child Safety, Inc. (“Britax”) ofrece la
siguiente garantía al establecimiento comprador original:
GARANTÍA LIMITADA
Este asiento regulable ofrece una garantía por materiales defectuosos o defectos de fabricación
de un año a partir de la fecha de compra original. Es necesario presentar la prueba de compra.
Al amparo de esta garantía, Britax le ofrecerá, a su discreción, las piezas de repuesto o los
servicios de reparación que considere oportunos. Britax se reserva el derecho a interrumpir,
modificar o sustituir tejidos, piezas, modelos o productos.
Para realizar una reclamación de acuerdo con esta garantía, debe ponerse en contacto con
el departamento de atención al cliente de Britax llamando al 1 888 427 4829, o enviando una
carta a la dirección especificada en la contraportada de este manual. Es necesario presentar la
prueba de compra.
RELLENE Y ENVÍE LA TARJETA DE REGISTRO DE COMPRA EN UN PLAZO DE 30 DÍAS
DESDE LA FECHA DE COMPRA, O VISITE WWW.BRITAXUSA.COM/REGISTRATION.
LIMITACIONES DE LA GARANTÍA
Esta garantía no cubre los daños y perjuicios causados por negligencia, uso indebido o
utilización del producto de forma distinta a la indicada en las instrucciones del producto.
Britax no aprueba el uso de cubiertas, piezas, juguetes, accesorios o dispositivos de ajuste que
no sean de Britax Child Safety, Inc. Su uso podría hacer que el asiento de seguridad para niños
no cumpla con las normas federales de seguridad o que no rinda como debiera durante un
accidente. El uso de estos anula automáticamente la garantía de Britax.
LIMITACIÓN DE DAÑOS Y PERJUICIOS
La garantía y las soluciones expuestas anteriormente son exclusivas y sustituyen a cualquier
otra, tanto escrita como oral, de forma expresa o implícita. Britax y el establecimiento que
comercializa este producto no serán responsables por los daños y perjuicios, ya sean directos
o indirectos, o las pérdidas que pudiera ocasionar el uso inadecuado de este producto.
LIMITACIONES DE LA GARANTÍA Y OTROS TÉRMINOS RELACIONADOS CON LA
GARANTÍA Y LEYES ESTATALES
Cualquier garantía implícita de comercialización o adecuación para un propósito determinado
estará limitada a la duración y a los términos de la garantía escrita. Algunos estados no
imponen limitaciones a la duración de una garantía o a la exclusión o limitación por daños
directos o indirectos, por lo que es posible que no le afecten las limitaciones estipuladas
anteriormente. Esta garantía ofrece unos derechos legales específicos, aunque también puede
poseer otros derechos, que variarán en función del estado en que se encuentre. Ni Britax ni
el establecimiento que comercializa este producto autorizan la creación por terceros de otra
garantía, obligación o responsabilidad relacionada con el mismo.
70
71
72
Britax Child Safety, Inc.
13501 South Ridge Drive
Charlotte, NC 28273
USA
A Britax Childcare Group
Limited company
Tel. : 1-888-427-4829
www.Britax.com