1
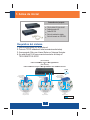
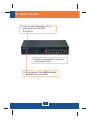
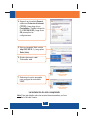
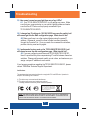
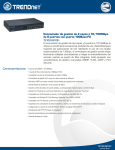
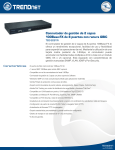
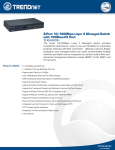
Quick Installation Guide
TE100-S800i
TE100-S810Fi
Table of Contents
Español .....................................................................................................
1. Antes de iniciar ..................................................................................
2. Cómo conectar ..................................................................................
3. Cómo utilizar el conmutador ..............................................................
1
1
2
3
Troubleshooting ........................................................................................ 5
Version 10.13.05
1. Antes de iniciar
Contenidos del paquete
TE100-S800i/TE100-S810Fi
Cable de poder AC
Cable RS-232
Guía de instalación rápida
Guía del usuario en CD-ROM
Requisitos del sistema
1. Estaciones de trabajo con tarjetas de red
2. Protocolo TCP/IP instalado en todas las estaciones de trabajo
3. Una navegador Web como Internet Explorer o Netscape Navigator
4. Un cable de red RJ-45 para conectar su estación de trabajo al
TE100-S800i/TE100-S810Fi
(TE100-S800i)
8-Port 10/100Mbps Layer 2 Managed Switch
or
(TEG-S810Fi)
8-Port 100Base-FX Layer 2 Managed Switch with 100Base-FX Port
Internet
8-port 10/100Mbps
Fast Ethernet Mini Switch
(TE100-S8P)
Servers with 32-bit PCI
Fast Ethernet Card
(TE100-PCIWA)
Accounting
Department
5-port 10/100Mbps
Fast Ethernet Mini Switch
(TE100-S5Pplus)
Servers with 32-bit PCI
Fast Ethernet Card
(TE100-PCIWA)
Sales
Department
8-port 10/100Mbps
Fast Ethernet Mini Switch
(TE100-S88Eplus)
Workstations with 32-bit PCI
Fast Ethernet Card
(TE100-PCIWA)
MIS
Department
100Mbps
1
Español
2. Cómo conectar
1. Conecte el cable de alimentación AC a la
parte posterior del TE100-S800i/
TE100-S810Fi.
2. Conecte el cable de red en la parte frontal
del conmutador y su PC.
3. Verifique que los LEDs de PWR (Encendido)
despliegan una luz verde sólida.
2
Español
3
Español
4. Haga clic en la pestaña General,
seleccione Protocolo de Internet
(TCP/IP) y luego haga clic en
Propiedades. Cambie la dirección
IP a 192.168.16.222 y haga clic en
OK para aplicar las
configuraciones.
5. Abra su navegador Web, escriba
http://192.168.16.1, y luego pulse
Enter (Intro).
6. Nombre de usuario: root
Contraseña: root
7. Seleccione la opción apropiada
para configurar el conmutador
SNMP.
La instalación ha sido completada
Nota: Para más detalles sobre las características avanzadas, por favor
consulte la Guía del Usuario.
4
Español
Troubleshooting
Q1. How come I cannot see any light from any of my LED's?
A1. Your TE100-S800i/TE100-S810Fi is not getting any power. Make
sure that your surge protector or your outlet is getting power and make
sure that the AC Power cord is properly connected to your
TE100-S800i/TE100-S810Fi.
Q2. I changed my IP settings to 192.168.16.222 to access the switch, but I
still cannot get into the Web configuration page. What should I do?
A2. Make sure there is no other network device using the same IP
address. Afterwards, consult the User's Guide to access the switch
through the Console Port. Once you reach the command line interface,
perform a factory reset and try again.
Q3. I performed a factory reset on the TE100-S800i/TE100-S810Fi, but I
still cannot access the web configuration page. What should I do?
A3. If you are configuring more than one TE100-S800i/TE100-S810Fi,
then it is possible that you are experiencing IP conflict between these two
switches. Please configure each switch one at a time, and make sure you
assign a unique IP address to each switch.
If you have any questions regarding the TE100-S800i/TE100-S810Fi, please
contact TRENDnet Technical Support Department.
Certifications
This equipment has been tested and found to comply with FCC and CE Rules. Operation is
subject to the following two conditions:
(1) This device may not cause harmful interference.
(2) This device must accept any interference received.
Including interference that may cause undesired operation.
Waste electrical and electronic products
must not be disposed of with household
waste. Please recycle where facilities
exist. Check with you Local Authority or
Retailer for recycling advice.
NOTE: THE MANUFACTURER IS NOT RESPONSIBLE FOR ANY RADIO OR TV INTERFERENCE
CAUSED BY UNAUTHORIZED MODIFICATIONS TO THIS EQUIPMENT. SUCH MODIFICATIONS
COULD VOID THE USER’S AUTHORITY TO OPERATE THE EQUIPMENT.
5
TRENDnet Technical Support
US/Canada Support Center European Support Center
Contact
Contact
Telephone: 1(866) 845-3673
Email: [email protected]
Telephone:
Deutsch : +49 (0) 6331 / 268-460
Français : +49 (0) 6331 / 268-461
0800-90-71-61 (numéro vert)
Español : +49 (0) 6331 / 268-462
English : +49 (0) 6331 / 268-463
Italiano : +49 (0) 6331 / 268-464
Dutch
: +49 (0) 6331 / 268-465
Fax: +49 (0) 6331 / 268-466
Tech Support Hours
24/7 Toll Free Tech Support
Tech Support Hours
8:00am - 6:00pm
Middle European Time
Monday - Friday
Product Warranty Registration
Please take a moment to register your product online.
Go to TRENDnet’s website at http://www.trendnet.com
3135 Kashiwa Street
Torrance, CA 90505
USA
Copyright ©2006. All Rights Reserved. TRENDnet.