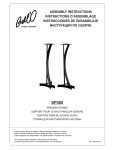
1
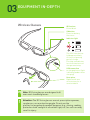
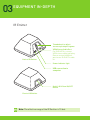
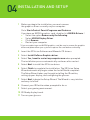
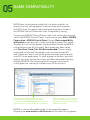
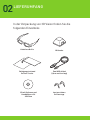
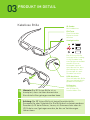
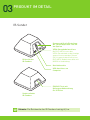
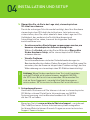
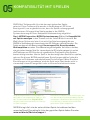
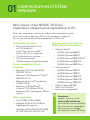
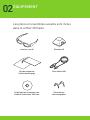
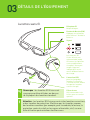
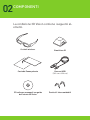
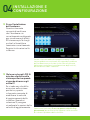
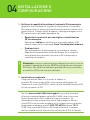
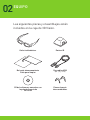
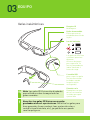
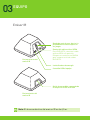
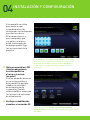
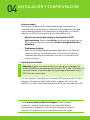
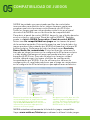
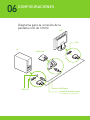
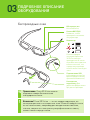
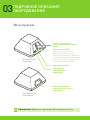
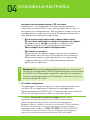
NVIDIA ® ™ QUICK START GUIDE KURZANLEITUNG GUIDE D’UTILISATION RAPIDE GUIDA RAPIDA GUÍA DE INICIO RÁPIDO РУКОВОДСТВО ПО ПОДКЛЮЧЕНИЮ NVIDIA 3D VISION ® ™ QUICK START GUIDE 01 MINIMUM SYSTEM REQUIREMENTS Thank you for choosing NVIDIA 3D Vision , the most immersive gaming experience for the PC. ® ™ Before you begin, please review the following minimum system requirements to ensure your PC is properly configured to enjoy the 3D Vision experience. Minimum System Requirements Compatible NVIDIA desktop GeForce GPU >> Microsoft® Windows® Vista or 7 32-bit/64-bit >> GeForce 8 Series • NVIDIA GeForce 8800 GT • NVIDIA GeForce 8800 GTS • NVIDIA GeForce 8800 GTS 512 • NVIDIA GeForce 8800 GTX • NVIDIA GeForce 8800 Ultra >> Intel® Core™ 2 Duo or AMD Athlon™ X2 CPU or higher >> 1GB of system memory (2GB is recommended) >> 100 MB free disk space Supported 3D Ready displays >> Acer GD245HQ/GD23HZ 120 Hz LCD display >> Alienware™ OptX ™ AW2310 120 Hz LCD display >> S amsung® SyncMaster 2233RZ 120 Hz LCD display >> V iewSonic® FuHzion™ VX2265wm 120 Hz LCD display >> GeForce 9 Series • NVIDIA GeForce 9600 GT • NVIDIA GeForce 9800 GT • NVIDIA GeForce 9800 GTX • NVIDIA GeForce 9800 GTX+ • NVIDIA GeForce 9800 GX2 >> GeForce 200 /100 Series (GeForce GT 240 or higher is recommended) >> 100 Hz and higher analogue CRTs Projectors >> Acer X1130P, X1261, H5360 >> D epthQ® HD 3D and DQ-3120 by LightSpeed Design, Inc. >> V iewSonic PJD-6210-3D, PJD-62203D, PJD-5351-3D, PJD-5111-3D Note: Please visit www.nvidia.co.uk/3dvision for a full list of supported GPUs and supported 3D Vision Ready displays. 02 EQUIPMENT The following parts and assemblies are included in the 3D Vision box. Wireless Glasses IR Emitter Storage Pouch Cleaning Cloth Two USB Cables (6 foot and 10 foot) Software and Manuals CD with 3D Vision User Guide Interchangeable Nosepieces 03 EQUIPMENT IN-DEPTH Wireless Glasses IR Receiver Do not block ON button Press for battery life status Indicator light The 3D Vision glasses hold approximately 40-hours of gaming per full charge. Flashing red indicates less than two hours of charge remaining. USB connection to charge glasses (light is blinking amber when charging) Nose piece Replace with one of three sizes for a comfortable fit Note: 3D Vision glasses are designed to fit over most standard glasses. Attention: The 3D Vision glasses are not prescription eyewear, sunglasses, nor a protective goggle. Do not use the glasses for any general eyewear purposes (e.g., driving, reading, protection from sunlight or ultraviolet light, etc.) as such use may result in injury. 03 EQUIPMENT IN-DEPTH IR Emitter Thumbwheel to adjust stereoscopic depth in game Back of IR Emitter VESA Stereo Cable Port For DLP HDTVs, connect VESA stereo cable to display. Please contact NVIDIA to purchase a DLP HDTV cable kit. Power indicator light USB connection to computer Backlit 3D Vision ON/OFF button Front of IR Emitter Note: The effective range of the IR Emitter is 15 feet. 04 INSTALLATION AND SETUP 1 Before you begin the installation, you must remove the graphics driver currently on your computer. Go to Start>Control Panel>Programs and Features If you have an NVIDIA graphics card, double click NVIDIA Drivers.* >> Select the option Remove only the following. >> Select NVIDIA Display Driver >> Click Remove >> Restart your computer * If you are replacing a non NVIDIA graphics card, be sure to remove the graphics driver and power down your system to replace the card before continuing. 2 Insert the 3D Vision Software and Manuals CD drivers. 3 Select Install GeForce Graphics driver. 4 Select Yes, I want to restart my computer now when prompted. The installation process automatically continues after restart. 5 Select Next to install the 3D Vision driver. 6 Select Finish to complete the installation. The 3D Vision Setup Wizard automatically begins when the InstallShield completes. The Setup Wizard takes you through installing the IR emitter, setting up your display, and configuring the glasses. 7 Select Next to begin the Setup Wizard. The Wizard is very intuitive and easy to follow. 8 Connect your IR Emitter when prompted to do so. 9 Select your gaming environment. 10 3D Ready display found. 11 Turn on your glasses. 04 INSTALLATION AND SETUP 12 Test your hardware setup. This screen is used to verify that your hardware is properly configured to view stereoscopic 3D effects and that your glasses and emitter are functioning properly. Follow the directions on the screen. If you cannot see the proper images, the Setup Wizard will not continue until the hardware issue is resolved. Use the Back button to check your glasses, emitter and hardware configuration. 13 (For LCD displays only) Do you notice flicker in your peripheral vision when looking through the glasses? If you are seeing excessive flicker in your peripheral vision, this screen allows you to change the refresh rate of your display. When you select Yes, the refresh rate options are displayed. Select the Test with this refresh rate button to verify that your selection helps with the flicker. 04 INSTALLATION AND SETUP 14 Verify your ability to view stereoscopic 3D content. Now that we know your hardware can interpret stereoscopic 3D content, we need to make sure you can. Inability to see the Medical Test image in stereoscopic 3D may be due to: >> Adjustments needed for improved stereoscopic 3D viewing. Select Back and verify that you can see stereoscopic 3D on the Test your hardware setup screen. >> Visual problems. Refer to the Safety Requirements located in the User Guide for precautions. Consult a physician if you suspect a physical problem seeing stereoscopic 3D. Attention: If you fail the medical test and can not see the test image, NVIDIA recommends that you do not use GeForce 3D Vision. Please consult your eye doctor for any possible vision anomalies. 3D Vision will not be enabled. 15 Setup Complete. Congratulations! You are now ready to see in stereoscopic 3D! For detailed information on the NVIDIA Control Panel, refer to the 3D Vision User Guide located on the CD. Please visit www.nvidia.co.uk/3dvision/support to access our 24x7x365 online knowledgebase system, where you can submit questions to our tech support staff. Questions may only be submitted in English. 3D Vision customers also have access to toll free technical support at 1-800-7976530 from 8:00AM-5:00PM Pacific Time, M-F. The technical support line is accessible from the U.S. and Canada only. 05 GAME COMPATIBILITY NVIDIA has tested and provided built-in driver profiles for many of the top selling games to ensure they work properly with 3D Vision. All games that have been tested are listed in the NVIDIA Control Panel with their Compatibility rating. To open the NVIDIA Control Panel, right click on the desktop and select the NVIDIA Control Panel. You can also go to Start › NVIDIA Corporation › NVIDIA Control Panel. Select View compatibility with games from the topics in the left window pane. This option displays a list of all the games that have been tested by NVIDIA using stereoscopic 3D software. Each game has been rated with Excellent, Good, Fair, Not Recommended. These ratings are based on how well the games work in stereoscopic 3D and if there are any issues in the game that may interfere with your 3D Vision experience. To view a game in the best possible quality, you must follow the Issues and Recommended settings noted by NVIDIA. Not following these settings could result in the game not running in stereoscopic 3D or artifacts. Displays the recommended settings for the game selected in the list. Use the shortcut keys Ctrl+Alt+Insert to display the information as an overlay while in the game. Check this box to see only those games loaded on your system. Unchecked, all games tested by NVIDIA are listed. NVIDIA is continually updating the list of supported games. Please go to www.nvidia.co.uk/3dvision for the latest list of games. 06 CONFIGURATIONS 120 Hz LCD Connection Diagram LCD DVI PC IR Emitter USB DVI USB Cable Dual link DVI cable (supplied with the display) www.nvidia.co.uk NVIDIA 3D VISION ® ™ KURZANLEITUNG 01 SYSTEMANFORDERUNGEN (MINIMUM) Vielen Dank, dass Sie sich für NVIDIA 3D Vision entschieden haben. Damit sichern Sie sich Spielerlebnisse mit Ihrem PC, wie Sie sie noch nie erlebt haben. ® ™ Bevor Sie mit dem Spielen beginnen, sollten Sie überprüfen, ob Ihr PC die folgenden Systemanforderungen erfüllt. Danach können Sie sich mit 3D Vision nach Herzenslust ins Abenteuer stürzen. Systemanforderungen (Minimum) Kompatible NVIDIA Desktop GeForce Grafikprozessoren >> Microsoft® Windows® Vista oder 7 32-bit/64-bit >> Intel® Core™ 2 Duo oder AMD Athlon™ X2 CPU oder höher >> 1 GB Systemspeicher (2 GB sind empfohlen) >> 100 MB verfügbarer Speicherplatz >> GeForce 8 Serie • NVIDIA GeForce 8800 GT • NVIDIA GeForce 8800 GTS • NVIDIA GeForce 8800 GTS 512 • NVIDIA GeForce 8800 GTX • NVIDIA GeForce 8800 Ultra >> GeForce 9 Serie • NVIDIA GeForce 9600 GT • NVIDIA GeForce 9800 GT • NVIDIA GeForce 9800 GTX • NVIDIA GeForce 9800 GTX+ • NVIDIA GeForce 9800 GX2 >> GeForce 200/100 Serie (GeForce GT 240 oder höher wird empfohlen) Unterstützte 3D-Monitore/ Projektoren >> Acer GD245HQ/GD23HZ 120 Hz LCD Bildschirm >> Alienware™ OptX™ AW2310 120 Hz LCD Bildschirm >> Samsung® SyncMaster 2233RZ 120 Hz LCD Bildschirm >> ViewSonic® FuHzion™ VX2265wm 120 Hz LCD Bildschirm >> 100 Hz und höher analog Röhrenbildschirme Projektoren >> Acer X1130P, X1261, H5360 >> DepthQ® HD 3D und DQ-3120 von LightSpeed Design, Inc. >> ViewSonic PJD-6210-3D, PJD-62203D, PJD-5351-3D, PJD-5111-3D Hinweis: Eine komplette Liste der unterstützten Grafikprozessoren und für 3D Vision geeigneten Anzeigegeräte finden Sie unter www.nvidia.de/3dvision. 02 LIEFERUMFANG In der Verpackung von 3D Vision finden Sie die folgenden Einzelteile: Kabellose Brille IR-Sender Reinigungstuch und Brillen-Tasche Zwei USB-Kabel (1,8 m und 3 m lang) CD mit Software und Handbüchern für 3D Vision Austauschbare Brillenstege 03 PRODUKT IM DETAIL Kabellose Brille IR-Sender Nicht abdecken EIN-Taste Zum Prüfen des Batteriestands drücken Anzeigeleuchte Die 3D Vision-Brille kann bei voller Ladung ca. 40 Stunden lang zum Spielen verwendet werden. Eine rot blinkende Leuchte weist darauf hin, dass die Ladung nur noch für weniger als zwei Stunden ausreicht. USB-Anschluss Zum Aufladen der Brille (die Leuchtdiode blinkt gelb beim Aufladen) Hinweis: Die 3D Vision-Brille ist so konzipiert, dass sie über den meisten Korrekturbrillen getragen werden kann. Brillensteg Verfügbar in drei Größen für komfortablen Sitz Achtung: Die 3D Vision-Brille ist keine Korrekturbrille, Sonnenbrille oder Schutzbrille. Die Brille darf zu keinen anderen Zwecken (z. B. beim Fahren, Lesen, als Sonnenschutz oder als UV-Schutz usw.) getragen werden, da dies zu Verletzungen führen kann. 03 PRODUKT IM DETAIL IR-Sender Daumenrad für die Einstellung der stereoskopischen Tiefe für das Spielen Rückseite des IR-Senders VESA-Stereokabelanschluss Bei DLP-HDTVs muss das VESA-Stereokabel an die Anzeige angeschlossen werden. Setzen Sie sich zwecks des Kaufs eines DLP-HDTV-Kabelsatzes bitte mit NVIDIA in Verbindung. Betriebsleuchte USB-Anschluss am Computer EIN/AUS-Taste mit Hintergrundbeleuchtung für 3D Vision Vorderseite des IR-Senders Hinweis: Die Reichweite des IR-Senders beträgt 4,5 m. 04 INSTALLATION UND SETUP 1 Bevor Sie mit der Installation beginnen, müssen Sie den auf dem Computer installierten Grafiktreiber entfernen. Rufen Sie Start > Systemsteuerung > Programme und Funktionen auf. Wenn Sie eine NVIDIA Grafikkarte haben, doppelklicken Sie auf NVIDIA Treiber.* >> >> >> >> Wählen Sie die Option Nur die folgenden Komponenten entfernen. Wählen Sie NVIDIA Grafiktreiber. Klicken Sie auf Entfernen. Starten Sie den Computer neu. * Wenn Sie eine Grafikkarte ersetzen, die nicht von NVIDIA hergestellt wurde, müssen Sie das System herunterfahren und den Grafiktreiber entfernen, bevor Sie mit dem nächsten Schritt fortfahren. 2 Legen Sie die CD mit der Software und den Handbüchern für 3D Vision ein. 3 Wählen Sie GeForce Grafiktreiber installieren. 4 Wählen Sie bei Aufforderung Ja, ich möchte meinen Computer jetzt neu starten. Der Installationsvorgang wird nach dem Neustart automatisch fortgesetzt. 5 Wählen Sie Weiter, um den Treiber für 3D Vision zu installieren. 6 Wählen Sie Fertig stellen, um die Installation abzuschließen. Nach Beendigung des InstallShield-Vorgangs wird der Setup-Assistent für 3D Vision automatisch gestartet. Der Setup-Assistent führt Sie durch die Installation des IR-Senders, die Einrichtung der Anzeige und die Konfiguration der Brille. 7 Wählen Sie Weiter, um den Setup-Assistenten zu starten. Der Assistent ist intuitiv verwendbar und leicht verständlich. 8 Schließen Sie bei Aufforderung den IR-Sender an. 9 Wählen Sie Ihre Spielumgebung. 10 Es wird bestätigt, dass eine 3D-unterstützter Monitor vorhanden ist. 11 Schalten Sie die Brille ein. 04 INSTALLATION UND SETUP 12 Überprüfen Sie das Hardware-Setup. Mit diesem Bildschirm können Sie überprüfen, ob Ihre Hardware zum Anzeigen von stereoskopischen 3D-Effekten korrekt konfiguriert ist und ob die Brille und der Sender ordnungsgemäß funktionieren. Befolgen Sie die eingeblendeten Anweisungen. Wenn Sie die richtigen Bilder nicht sehen können, wird der Setup-Assistent erst dann fortgesetzt, wenn das Hardwareproblem gelöst ist. Klicken Sie auf die Schaltfläche Zurück, um die Brille, den Sender und die Hardwarekonfiguration zu prüfen. 13 (Nur für LCD-Monitore) Nehmen Sie bei Benutzung der Brille im peripheren Sichtbereich ein Flimmern wahr? Wenn Sie im peripheren Sichtbereich ein starkes Flimmern wahrnehmen, können Sie auf der angezeigten Seite die Bildwiederholfrequenz des Monitors ändern. Wenn Sie Ja wählen, werden die BildwiederholfrequenzOptionen angezeigt. Klicken Sie auf die Schaltfläche Mit dieser Bildwiederholfrequenz prüfen, um zu testen, ob Ihre Auswahl das Flimmern beseitigt. 04 INSTALLATION UND SETUP 14 Überprüfen Sie, ob Sie in der Lage sind, stereoskopischen 3D-Inhalt zu erkennen. Durch die vorherigen Schritte wurde bestätigt, dass Ihre Hardware stereoskopischen 3D-Inhalt darstellen kann. Jetzt müssen wir sicherstellen, dass Sie selbst ebenfalls dazu in der Lage sind. Die Unfähigkeit, das medizinische Testbild dreidimensional (stereoskopisch) zu sehen, kann auf die folgenden Faktoren zurückzuführen sein: >> Es müssen weitere Einstellungen vorgenommen werden, um besseres stereoskopisches Sehen zu ermöglichen. Wählen Sie Zurück und prüfen Sie im Bildschirm Überprüfen Sie das Hardware-Setup, ob Sie stereoskopische 3D-Effekte erkennen können. >> Visuelle Probleme. Vorsichtsmaßnahmen sind unter Sicherheitsanforderungen im Benutzerhandbuch zu finden. Ziehen Sie einen Arzt zu Rate, wenn Sie vermuten, dass bei Ihnen ein körperliches Problem vorliegt, das Ihre Wahrnehmung von stereoskopischen 3D-Effekten beeinträchtigt. Achtung: Wenn Sie den medizinischen Test nicht bestehen und das Prüfbild nicht sehen können, empfiehlt NVIDIA, die 3D Vision-Brille nicht zu verwenden. Bitte wenden Sie sich an Ihren Augenarzt, um mögliche Sehstörungen zu untersuchen. 3D Vision wird in diesem Fall nicht aktiviert. 15 Setup abgeschlossen. Herzlichen Glückwunsch! Sie können sich nun in stereoskopische 3D-Welten stürzen! Detaillierte Informationen zur NVIDIA Systemsteuerung sind im Benutzerhandbuch für 3D Vision auf der CD zu finden. Besuchen Sie bitte www.nvidia.de/3dvision/support, um jederzeit (24x7x365) auf unser Online-Informationssystem zuzugreifen. Auf dieser Website können Sie auch Fragen an unser technisches Support-Team schicken. 05 KOMPATIBILITÄT MIT SPIELEN NVIDIA hat Treiberprofile für viele der meistgekauften Spiele getestet. Diese Treiberprofile werden in Verbindung mit 3D Vision bereitgestellt, um zu gewährleisten, dass die Spiele ordnungsgemäß funktionieren. Alle geprüften Spiele werden in der NVIDIA Systemsteuerung mit ihrer Kompatibilitätsbewertung aufgeführt. Start › NVIDIA Corporation › NVIDIA Systemsteuerung. Wählen Sie Kompatibilität mit Spielen anzeigen in den Themen auf der linken Bildschirmseite. Bei Wahl dieser Option wird eine Liste mit allen Spielen angezeigt, die von NVIDIA in Verbindung mit stereoskopischer 3D-Software getestet wurden. Die Spiele wurden mit den Bewertungen Hervorragend, Gut, Ausreichend oder Nicht empfohlen versehen. Diese Bewertungsnoten geben Aufschluss darüber, wie gut ein bestimmtes Spiel für stereoskopische 3D-Inhalte geeignet ist und ob die Funktionen von 3D Vision durch irgendwelche Probleme in den Spielen beeinträchtigt werden. Um ein Spiel in der bestmöglichen Qualität zu spielen, müssen Sie die von NVIDIA empfohlenen Einstellungen wählen (siehe die Hinweise zu Problemen und empfohlenen Einstellungen). Wenn Sie diese Einstellungen nicht vornehmen, wird das Spiel unter Umständen nicht in stereoskopischem 3D ausgeführt oder es können Artefakte entstehen. Zeigt die empfohlenen Einstellungen für das in der Liste ausgewählte Spiel an. Mit der Tastenkombination Strg+Alt+Einf können Sie die Informationen als Overlay im Spiel anzeigen. Aktivieren Sie dieses Kontrollkästchen, um nur die auf dem System geladenen Spiele anzuzeigen. Wird dieses Kontrollkästchen nicht aktiviert, werden alle von NVIDIA getesteten Spiele aufgeführt. NVIDIA bringt die Liste der unterstützten Spiele fortwährend auf den neuesten Stand. Eine aktuelle Liste der geprüften Spiele finden Sie unter www.nvidia.de/3dvision/support. 06 KONFIGURATIONEN Anschlussdiagramm für LCD-Monitore mit 120-Hz-Technologie LCD DVI PC IR-Sender USB DVI USB-Kabel Dual-Link-DVI-Kabel (im Lieferumfang der Anzeige enthalten) www.nvidia.de NVIDIA 3D VISION ® ™ GUIDE D’UTILISATION RAPIDE 01 CONFIGURATION SYSTÈME MINIMUM Merci d’avoir choisi NVIDIA 3D Vision , l’expérience ludique la plus captivante pour PC. ® ™ Avant de commencer, vérifiez la configuration minimale requise pour vous assurer que votre PC est correctement configuré et vous permettre de profiter pleinement de 3D Vision. Configuration minimale >> Microsoft® Windows® Vista ou 7 32-bit/64-bit >> Intel® Core™ 2 Duo ou AMD Athlon™ X2 CPU ou supérieur >> 1 Go de mémoire système (2 Go recommandé) >> 100 Mo d’espace disque disponible Écrans compatibles 3D pris en charge >> Moniteur LCD Acer GD245HQ/ GD23HZ 120 Hz >> Moniteur LCD Alienware™ OptX™ AW2310 120 Hz >> Moniteur Samsung® SyncMaster 2233RZ 120 Hz >> Moniteur LCD ViewSonic® FuHzion™ VX2265wm 120 Hz >> Moniteurs CRT analogiques 100 Hz ou plus Vidéo-projecteurs >> Acer X1130P, X1261, H5360 >> DepthQ® HD 3D et DQ-3120 par LightSpeed Design, Inc. >> ViewSonic PJD-6210-3D, PJD-62203D, PJD-5351-3D, PJD-5111-3D GPU pour ordinateurs de bureau NVIDIA GeForce compatibles >> GeForce Série 8 • NVIDIA GeForce 8600 GT • NVIDIA GeForce 8600 GT • NVIDIA GeForce 8800 GTS 512 • NVIDIA GeForce 8800 GTX • NVIDIA GeForce 8800 Ultra >> GeForce Série 9 • NVIDIA GeForce 9600 GT • NVIDIA GeForce 9800 GT • NVIDIA GeForce 9800 GTX • NVIDIA GeForce 9800 GTX+ • NVIDIA GeForce 9800 GX2 >> GeForce Série 200 /100 (GeForce GT 240 au minimum recommandé) Remarque: rendez- vous sur le site www.nvidia.fr/3dvision pour obtenir la liste complète des processeurs graphiques et écrans pris en charge et compatibles avec 3D Vision 02 ÉQUIPEMENT Les pièces et ensembles suivants sont inclus dans le coffret 3D Vision. Lunettes sans fil Émetteur IR Étui de rangement Chiffon de nettoyage Deux câbles USB (2 m et 3 m) CD de logiciels et manuels avec Guide de l’utilisateur 3D Vision Pièces de nez interchangeables 03 DÉTAILS DE L’ÉQUIPEMENT Lunettes sans fil Récepteur IR Ne pas bloquer Bouton de Marche (ON) Appuyez sur ce bouton pour afficher l’état de la batterie. Voyant Les lunettes 3D Vision offrent une autonomie de jeu de 40 heures lorsqu’elles sont complètement chargées. Un voyant rouge clignotant indique qu’il reste moins de deux heures de charge. Connexion USB pour la charge des lunettes (La lumière s’allume couleur ambre lorsque les lunettes sont en charge) Remarque : les lunettes 3D Vision sont conçues pour être utilisées au-dessus de la plupart des lunettes standard. Pièce de nez Utilisez une des trois tailles pour un confort optimal Attention : les lunettes 3D Vision ne sont ni des lunettes correctives, ni des lunettes de protection. N’utilisez pas les lunettes comme des lunettes courantes (par exemple, pour la conduite, la lecture, la protection contre le soleil ou les rayons ultraviolets, etc.) car une telle utilisation peut entraîner des blessures. 03 DÉTAILS DE L’ÉQUIPEMENT Émetteur IR Molette de réglage de la palette de couleurs stéréoscopique dans le jeu Arrière de l’émetteur IR Port pour câble stéréo VESA Pour TVHD DLP, connectez le câble stéréo VESA à écran. Contactez NVIDIA s i vous souhaitez acheter un kit de câbles DLP HDTV. Voyant d’alimentation Connexion USB à l’ordinateur Bouton Marche/Arrêt (ON/OFF) 3D Vision rétroéclairé Avant de l’émetteur IR Remarque : la portée efficace de l’émetteur IR est égale à 4,5 mètres. 04 INSTALLATION ET CONFIGURATION 1 Avant de commencer l’installation, vous devez supprimer le pilote graphique actuellement installé sur votre ordinateur. Cliquez sur Démarrer > Panneau de configuration > Programmes et fonctionnalités Si vous utilisez une carte graphique NVIDIA, double-cliquez sur Pilotes NVIDIA.* >> >> >> >> Sélectionnez l’option Ne supprimer que. Sélectionnez Pilote de carte NVIDIA. Cliquez sur Supprimer. Redémarrez l’ordinateur. * Si vous remplacez une carte graphique autre que NVIDIA, n’oubliez pas de supprimer le pilote graphique et d’éteindre votre système pour remplacer la carte avant de continuer. 2 Insérez le CD de logiciels et manuels 3D Vision. 3 Sélectionnez Installer le pilote graphique GeForce. 4 Sélectionnez Oui, je souhaite redémarrer mon ordinateur maintenant lorsque l’invite apparaît. L’installation continue automatiquement après le redémarrage. 5 Sélectionnez Suivant pour installer le pilote 3D Vision. 6 Sélectionnez Terminer pour terminer l’installation. L’Assistant Configuration de 3D Vision démarre automatiquement lorsque le programme d’installation est terminé. L’Assistant Configuration vous guide pendant l’installation de l’émetteur IR, la configuration de votre écran et des lunettes. 7 Sélectionnez Suivant pour démarrer l’Assistant Configuration. Cet assistant est très intuitif et facile à suivre. 8 Connectez l’émetteur IR lorsque vous y êtes invité. 9 Sélectionnez votre environnement ludique. 10 L’écran compatible 3D est détecté. 11 Allumez les lunettes. 04 INSTALLATION ET CONFIGURATION 12 Testez la configuration de votre matériel. Cet écran est utilisé pour vérifier que votre matériel est correctement configuré pour l’affichage des effets 3D stéréoscopiques et que les lunettes et l’émetteur fonctionnent correctement. Suivez les instructions affichées. Si vous ne voyez pas l’image correctement, l’Assistant Configuration ne continue pas tant que le problème matériel n’est pas résolu. Utilisez le bouton Retour pour vérifier la configuration des lunettes, de l’émetteur et du matériel. 13 (Pour les écrans ACL uniquement) Voyez-vous un scintillement dans votre vision périphérique lorsque vous regardez à travers les lunettes ? Si vous constatez un scintillement excessif dans votre vision périphérique, cet écran permet de modifier la fréquence de rafraîchissement de votre écran. Si vous sélectionnez Oui, les options de fréquence de rafraîchissement s’affichent. Sélectionnez le bouton Test with this refresh rate afin de vérifier que votre sélection corrige le problème de scintillement. 04 INSTALLATION ET CONFIGURATION 14 Vérifiez que vous pouvez voir le contenu 3D stéréoscopique. Maintenant que vous savez que votre matériel peut afficher le contenu 3D stéréoscopique, nous devons vérifier que vous pouvez aussi le voir. L’impossibilité d’afficher l’image du test médical 3D stéréoscopique peut être due aux facteurs suivants : >> Réglages nécessaires pour un affichage 3D stéréoscopique optimal. Sélectionnez Retour et vérifiez que vous pouvez voir en vision 3D stéréoscopique sur l’écran Testez la configuration de votre matériel. >> Problèmes visuels Voir la section Conditions de sécurité du Guide de l’utilisateur pour connaître les mesures de précaution à prendre. Consultez un médecin si vous suspectez qu’un problème physique vous empêche de voir en vision 3D stéréoscopique. Attention : si vous échouez le test médical et que vous ne pouvez pas voir l’image du test, NVIDIA recommande de ne pas utiliser 3D Vision. Consultez votre ophtalmologue afin de diagnostiquer une possible anomalie visuelle. 3D Vision ne sera pas activé. 15 Installation terminée. Félicitations ! Vous êtes prêt à voir en 3D stéréoscopique ! Pour des informations détaillées sur le Panneau de configuration NVIDIA, voir le Guide de l’utilisateur 3D Vision disponible sur le CD. Visitez le site www.nvidia.fr/3dvision/support pour accéder à notre base de connaissances en ligne 24h/24, 7j/7, 365j/an, dans laquelle vous pouvez envoyer vos questions à notre support technique. Les questions envoyées doivent être en anglais uniquement. 05 COMPATIBILITÉ DES JEUX NVIDIA a testé et fourni des profils de pilote intégrés pour de nombreux jeux parmi les plus vendus, afin de vérifier qu’ils fonctionnent correctement avec 3D Vision. Tous les jeux testés figurent dans la liste du Panneau de configuration NVIDIA avec leur note de compatibilité. Pour ouvrir le Panneau de configuration NVIDIA, cliquez avec le bouton droit sur le bureau et sélectionnez le Panneau de configuration NVIDIA. Vous pouvez également cliquer sur Démarrer > NVIDIA Corporation › NVIDIA Control Panel. Sélectionnez Afficher la compatibilité avec les jeux dans les rubriques du panneau de la fenêtre de gauche. Cette option stéréoscopique. Chaque jeu a reçu la note Excellente, Bonne, Normale ou Non recommandée. Ces notes sont basées sur la manière dont jeu particulier réagit en 3D stéréoscopique et prennent également en compte les problèmes éventuels dans le jeu qui peuvent détériorer votre vision 3D stéréoscopique. Pour l’affichage optimal d’un jeu, vous devez respecter les Problèmes et Recommandations notés par NVIDIA. Si vous ne respectez pas ces paramètres, le jeu peut ne pas s’exécuter en 3D stéréoscopique ou peut causer des distorsions. Affiche les paramètres recommandés pour le jeu sélectionné dans la liste. Utilisez le raccourci clavier Ctrl+Alt+Insér pour afficher les informations en superposition dans le jeu. Activez cette case pour afficher uniquement les jeux chargés sur votre système. Si elle n’est pas activée, tous les jeux testés par NVIDIA sont affichés. NVIDIA actualise régulièrement la liste de jeux pris en charge. Consultez la page www.nvidia.fr/3dvision pour obtenir la liste de jeux la plus récente. 06 CONFIGURATIONS Schéma de connexion ACL 120 Hz ACL DVI PC Émetteur IR USB DVI Câble USB Câble DVI double liaison (fourni avec l’écran) www.nvidia.fr NVIDIA 3D VISION ® ™ GUIDA RAPIDA 01 REQUISITI DI SISTEMA MINIMI Grazie per aver scelto NVIDIA 3D Vision , l’esperienza di gioco più coinvolgente per il PC. ® ™ Prima di iniziare, verificare i seguenti requisiti di sistema minimi per assicurarsi che il PC sia configurato correttamente per usufruire dell’esperienza 3D Vision. Requisiti di sistema minimi >> Microsoft® Windows® Vista o Windows 7 32-bit/64-bit >> CPU Intel® Core™ 2 Duo o AMD Athlon™ X2 o superiore >> 1 GB di memoria di sistema (si consigliano 2 GB) >> 100 MB di spazio su disco disponibile Schermi 3D Ready supportati >> Acer GD245HQ/GD23HZ 120 Hz LCD >> Alienware™ OptX™ AW2310 schermo LCD 120 Hz >> Samsung® SyncMaster 2233RZ 120 Hz LCD >> ViewSonic® FuHzion™ VX2265wm 120 Hz LCD >> 100 Hz and higher analogue CRTs Proiettori >> Acer X1130P, X1261, H5360 >> DepthQ® HD 3D e DQ-3120 by LightSpeed Design, Inc. >> ViewSonic PJD-6210-3D, PJD-62203D, PJD-5351-3D, PJD-5111-3D GPU GeForce desktop NVIDIA compatibile >> GeForce serie 8 • NVIDIA GeForce 8800 GT • NVIDIA GeForce 8800 GTS • NVIDIA GeForce 8800 GTS 512 • NVIDIA GeForce 8800 GTX • NVIDIA GeForce 8800 Ultra >> GeForce serie 9 • NVIDIA GeForce 9600 GT • NVIDIA GeForce 9800 GT • NVIDIA GeForce 9800 GTX • NVIDIA GeForce 9800 GTX+ • NVIDIA GeForce 9800 GX2 >> GeForce serie 200/100 (Consigliata GeForce GT 240 o superiore) Note: Visitare il sito www.nvidia.it/3dvision per un elenco completo delle GPU supportate e degli schermi 3D Vision Ready. 02 COMPONENTI La confezione 3D Vision contiene i seguenti elementi. Occhiali wireless Emettitore IR Custodia Panno pulente Due cavi USB (182 cm e 304 cm) CD software e manuali con guida dell’utente 3D Vision Ponticelli intercambiabili 03 DETTAGLIO DEI COMPONENTI Occhiali wireless Ricevitore IR Non bloccare Pulsante ON Premere per informazioni sullo stato della batteria Indicatore Gli occhiali 3D Vision consentono all’incirca 40 ore di giochi per ogni ricarica completa. La luce rossa lampeggiante indica che restano meno di due ore di ricarica. Connessione USB per ricaricare gli occhiali (la luce lampeggia di color ambra durante la carica ) Nota: gli occhiali 3D Vision si adattano alla maggior parte degli occhiali standard. Ponticello Per la massima comodità, utilizzare uno dei tre ponticelli di dimensioni diverse Attenzione: gli occhiali 3D Vision non sono da vista, né da sole, né di protezione. Non utilizzare gli occhiali per qualsiasi scopo legato alla vista (es.: guidare, leggere, proteggersi dalla luce solare o ultravioletta, ecc...), in quanto tale utilizzo potrebbe provocare delle lesioni personali. 03 DETTAGLIO DEI COMPONENTI Emettitore IR Rotellina per regolare la profondità stereoscopica nel gioco Lato posteriore dell’emettitore IR Porta cavo stereo VESA Per DLP HDTV, collegare il cavo stereo VESA allo schermo. Per acquistare un kit cavo DLP HDTV, contattare NVIDIA. Indicatore di alimentazione Collegamento USB al computer Pulsante ON/OFF retroilluminato 3D Vision Lato anteriore dell’emettitore IR Nota: il raggio di azione effettivo dell’emettitore IR è di 4,5 metri. 04 INSTALLAZIONE E CONFIGURAZIONE 1 Prima di iniziare l’installazione è necessario rimuovere il driver grafico correntemente presente nel computer. Passare a Start>Pannello di controllo>Programmi e funzioni Se si dispone di una scheda grafica NVIDIA, fare doppio clic su Driver NVIDIA.* >> Selezionare l’opzione Rimuovi solo quanto segue. >> Selezionare Driver schermo NVIDIA >> Fare clic su Rimuovi >> Riavviare il computer * Se si sta sostituendo una scheda grafica non NVIDIA, assicurarsi di rimuovere il driver grafico e di spegnere il sistema per sostituire la scheda prima di continuare. 2 Inserire il software 3D Vision e i driver del CD dei manuali. 3 Selezionare Installa driver grafici GeForce. 4 Quando viene richiesto, selezionare Sì, riavvia il computer adesso. La procedura di installazione continua automaticamente dopo il riavvio. 5 Selezionare Avanti per installare il driver 3D Vision. 6 Selezionare Fine per completare l’installazione. L’installazione guidata di 3D Vision inizia automaticamente al completamento delle operazioni di InstallShield. L’installazione guidata illustra le fasi di installazione dell’emettitore IR, l’impostazione dello schermo e la configurazione degli occhiali. 7 Selezionare Avanti per iniziare l’installazione guidata. La procedura guidata è molto intuitiva e facile da seguire. 8 Collegare l’emettitore IR quando viene richiesto. 9 Selezionare l’ambiente di gioco. 10 Viene rilevato lo schermo 3D Ready. 11 Accendere gli occhiali. 04 INSTALLAZIONE E CONFIGURAZIONE 12 Prova l’installazione dell’hardware. Questa schermata consente di verificare che l’hardware sia correttamente configurato per visualizzare gli effetti 3D stereoscopici e che gli occhiali e l’emettitore funzionino correttamente. Seguire le istruzioni sullo schermo. Se non si riesce a vedere le immagini corrette, l’installazione guidata non continuerà fino a quando il problema dell’hardware non sarà stato risolto. Usare il pulsante Indietro per controllare la configurazione degli occhiali, dell’emettitore e dell’ hardware. 13 (Solo per schermi LCD) Si nota uno sfarfallio nella visione periferica quando si guarda attraverso gli occhiali? Se si vede uno sfarfallio eccessivo nella visione periferica, questa schermata consente di modificare la velocità di aggiornamento dello schermo. Quando si seleziona Sì, vengono visualizzate le opzioni della velocità di aggiornamento. Selezionare il pulsante Prova con questa velocità di aggiornamento per verificare che l’opzione scelta consenta di risolvere il problema dello sfarfallio. 04 INSTALLAZIONE E CONFIGURAZIONE 14 Verificare la capacità di visualizzare il contenuto 3D stereoscopico. Appurato che l’hardware è in grado di interpretare il contenuto 3D stereoscopico, è necessario verificare che anche l’utente sia in grado di farlo. L’impossibilità di vedere l’immagine diagnostica in 3D stereoscopico potrebbe dipendere da: >> Regolazioni necessarie per una migliore visualizzazione 3D stereoscopica. Selezionare Indietro e verificare se è possibile vedere il 3D stereoscopico sulla schermata Prova l’installazione hardware. >> Problemi visivi. Per informazioni sulle precauzioni, consultare la sezione Requisiti di sicurezza nella Guida dell’utente. Se si sospetta un problema fisico durante la visione in 3D stereoscopico, consultare un medico. Attenzione: se non si supera la prova diagnostica e non si riesce a vedere l’immagine di prova, NVIDIA consiglia di non utilizzare 3D Vision. Per verificare eventuali problemi di vista, consultare un oculista. 3D Vision non verrà attivato. 15 Installazione completata. Congratulazioni! Adesso si è pronti a vedere in formato 3D stereoscopico! Per informazioni dettagliate sul Pannello di controllo NVIDIA, consultare la Guida dell’utente di 3D Vision presente sul CD. Nel sito www.nvidia.it/3dvision/support è possibile accedere alla nostra knowledgebase online 24x7x365, dove si possono inviare domande ai nostri addetti al supporto tecnico. Le domande possono essere fatte solo in lingua Inglese. Anche i clienti 3D Vision possono accedere all’assistenza tecnica gratuita telefonando al numero verde 1-800-797-6530 dalle ore 08:0017:00, fuso orario del Pacifico, dal lunedì al venerdì. Il numero dell’assistenza tecnica è accessibile soltanto da U.S.A. e Canada. 05 COMPATIBILITÀ CON I GIOCHI NVIDIA ha provato e fornito profili di driver incorporati per molti dei giochi di maggiore successo, per assicurarsi che funzionino correttamente con 3D Vision. Tutti i giochi che sono stati provati sono elencati nel Pannello di controllo NVIDIA, insieme alla relativa valutazione di compatibilità. Per aprire il Pannello di controllo NVIDIA, fare clic con il pulsante destro del mouse sul desktop e selezionare il Pannello di controllo NVIDIA. È anche possibile passare a Start › NVIDIA Corporation › Pannello di controllo NVIDIA. Selezionare Visualizza la compatibilità con i giochi dagli argomenti nel riquadro sinistro. Questa opzione visualizza un elenco di tutti i giochi che sono stati provati da NVIDIA utilizzando il software 3D stereoscopico. La compatibilità di ciascun gioco è stata classificata come Ottima, Buona, Discreta, Sconsigliata. Queste valutazioni sono basate sulla qualità dei giochi in 3D stereoscopico e sull’eventuale presenza di problemi che potrebbero interferire con l’esperienza 3D Vision. Per visualizzare un gioco con la qualità più elevata possibile è necessario tenere conto dei problemi segnalati e delle impostazioni consigliate da NVIDIA. Il mancato rispetto di queste impostazioni potrebbe far sì che il gioco non venga eseguito in 3D o che siano presenti degli artefatti. Visualizza le impostazioni consigliate per il gioco selezionato nell’elenco. Utilizzare i tasti di scelta rapida Ctrl+Alt+Ins per visualizzare le informazioni come sovrapposizione durante il gioco. Selezionare questa casella per vedere soltanto i giochi caricati nel sistema.Se la casella è deselezionata, vengono elencati tutti i giochi provati da NVIDIA. NVIDIA aggiorna continuamente l’elenco di giochi supportati. Per l’elenco aggiornato dei giochi, visitare il sito www.nvidia.it/3dvision. 06 CONFIGURAZIONI Schema di collegamento dell’LCD da 120 Hz LCD DVI PC Emettitore IR USB DVI Cavo USB Cavo DVI collegamento doppio (in dotazione con lo schermo) www.nvidia.it NVIDIA 3D VISION ® ™ GUÍA DE INICIO RÁPIDO 01 REQUISITOS MÍNIMOS DEL SISTEMA Le agradecemos que haya elegido NVIDIA GeForce 3D Vision , la experiencia de juegos más increíble para su PC. ® ® ™ Antes de comenzar, compruebe los siguientes requisitos mínimos para su sistema con el fin de asegurar que su PC está configurado correctamente y así poder disfrutar de la experiencia 3D Vision. Requisitos mínimos del sistema GPU GeForce para desktop NVIDIA compatible >> Microsoft® Windows® Vista o 7 32-bit/64-bit >> GeForce serie 8 • NVIDIA GeForce 8800 GT • NVIDIA GeForce 8800 GTS • NVIDIA GeForce 8800 GTS 512 • NVIDIA GeForce 8800 GTX >> Intel® Core™ 2 Duo o AMD Athlon™ X2 CPU o posterior >> 1GB de memoria del sistema (se recomiendan 2GB) >> 100 MB de espacio libre del disco Compatible con pantallas 3D Ready >> Pantalla LCD Acer GD245HQ/ GD23HZ 120 Hz >> Pantalla LCD Alienware™ OptX™ AW2310 120 Hz >> Pantalla LCD Samsung® SyncMaster 2233RZ 120 Hz >> Pantalla LCD ViewSonic® FuHzion™ VX2265wm 120 Hz >> Pantallas TRC analógicas de 100 Hz y superiores Proyectores >> Acer X1130P, X1261, H5360 >> DepthQ® HD 3D y DQ-3120 por LightSpeed Design, Inc. >> ViewSonic PJD-6210-3D, PJD-62203D, PJD-5351-3D, PJD-5111-3D • NVIDIA GeForce 8800 Ultra >> GeForce serie 9 • NVIDIA GeForce 9600 GT • NVIDIA GeForce 9800 GT • NVIDIA GeForce 9800 GTX • NVIDIA GeForce 9800 GTX+ • NVIDIA GeForce 9800 GX2 >> GeForce serie 200 /100 (GeForce GT 240 o superior recomendado) Nota: Visite www.nvidia.es/3dvision para obtener una lista completa de las GPU compatibles y pantallas compatibles 3D Vision Ready. 02 EQUIPO Las siguientes piezas y ensamblajes están incluidos en la caja de 3D Vision. Gafas inalámbricas Emisor IR Bolsa de almacenamiento Paño para limpiar Dos cables USB (de 1,8 y 3 m) CD del software y manuales con la guía de usuario de 3D Vision Piezas de nariz intercambiables 03 EQUIPO Gafas inalámbricas Receptor IR No bloquear Botón de encendido Pulsar para ver el estado de duración de la pila Luz del indicador Las gafas de 3D Vision contienen aproximadamente 40 horas de juegos por carga total. La luz roja parpadeante indica menos de 2 horas de carga. Conexión USB para cargar las gafas (La luz se enciende en ámbar cuando las gafas están recargando) Nota: Las gafas 3D Vision están diseñadas para utilizarse sobre la mayoría de las gafas normales. Pieza de nariz Reemplace con una de los tres tamaños incluidos para que ajusten bien Atención: Las gafas 3D Vision no son gafas graduadas ni de sol o protectoras. No utilice las gafas para fines generales (como conducir, leer, protección solar o contra la luz ultravioleta, etc.), ya que dicho uso puede resultar peligroso. 03 EQUIPO Emisor IR Rueda de control para ajustar la profundidad estereoscópica en los juegos Parte posterior del emisor IR Puerto del cable estéreo VESA Para DLP HDTV, conecte el cable estéreo VESA a la pantalla. Póngase en contacto con NVIDIA para comprar un kit de cables DLP HDTV. Luz indicadora de energía Conexión USB al equipo Botón de encendido y apagado de la luz posterior de 3D Vision Parte anterior del emisor IR Nota: El alcance efectivo del emisor IR es de 4,5 m. 04 INSTALACIÓN Y CONFIGURACIÓN 1 Antes de comenzar la instalación, deberá quitar el controlador gráfico que tiene ahora su equipo. Vaya a Inicio>Panel de control>Programas y Características Si tiene una tarjeta gráfica de NVIDIA, haga doble clic en Controladores NVIDIA.* >> Seleccione la opción Quitar sólo lo siguiente. >> Seleccione Controlador de pantalla NVIDIA >> Haga clic en Quitar >> Reinicie su equipo * Si está reemplazando una tarjeta gráfica que no es de NVIDIA, asegúrese de quitar el controlador gráfico y de apagar su sistema para reemplazar la tarjeta antes de continuar. 2 Introduzca los controladores del CD del software y manuales de 3D Vision. 3 Seleccione Instalar controlador gráfico GeForce. 4 Cuando se le indique, seleccione Sí, deseo reiniciar mi equipo ahora. El proceso de instalación continúa automáticamente después de reiniciar. 5 Seleccione Siguiente para instalar el controlador de 3D Vision. 6 Seleccione Finalizar para completar la instalación. El asistente de instalación de 3D Vision comienza automáticamente cuando se completa InstallShield. El asistente de instalación le ayuda a instalar el emisor IR, y a configurar su pantalla y las gafas. 7 Seleccione Siguiente para comenzar el asistente de instalación. El asistente es muy intuitivo y fácil de seguir. 8 Conecte su emisor IR cuando se le indique. 9 Seleccione su entorno de juego. 10 Se ha encontrado la pantalla 3D Ready. 11 Active sus gafas. 12 Probar la configuración de su hardware. 04 INSTALACIÓN Y CONFIGURACIÓN Esta pantalla se utiliza para verificar que su hardware ha sido configurado correctamente para ver los efectos 3D estereoscópicos, y para comprobar que sus gafas y el emisor están funcionando de forma apropiada. Siga las instrucciones de la pantalla. 13 (Sólo para pantallas LCD) Si no puede ver las imágenes apropiadas, el asistente de instalación no continuará hasta que se resuelva el problema del hardware. Utilice el botón Atrás para comprobar la configuración de sus gafas, emisor y hardware. ¿Nota un parpadeo en su visión periférica al mirar a través de las gafas? Si ve un parpadeo excesivo en su visión periférica, esta pantalla le permite cambiar la velocidad de actualización de su pantalla. Cuando selecciona Sí, se muestran las opciones de velocidad de actualización. 14 Verifique su habilidad de visualizar el contenido 3D Seleccione el botón Probar con esta velocidad de actualización para verificar que su selección ayuda con el parpadeo. 04 INSTALACIÓN Y CONFIGURACIÓN estereoscópico. Ahora que sabemos que su hardware puede interpretar el contenido 3D estereoscópico, tenemos que asegurarnos de que usted también puede. Si no puede ver la imagen de la ‘Prueba médica’ en 3D estereoscópica, esto podría deberse a: >> Ajustes necesarios para mejorar la visualización 3D estereoscópica. Seleccione Atrás y verifique que puede ver en 3D estereoscópica en la pantalla Probar configuración de su hardware. >> Problemas visuales. Consulte los Requisitos de seguridad ubicados en la ‘Guía del usuario’ para ver las precauciones. Consulte a un médico si sospecha que hay un problema físico en la visualización 3D estereoscópica. 15 Instalación finalizada. Atención: Si pasa la prueba médica y no puede ver la imagen de prueba, NVIDIA le recomienda que no utilice 3D Vision. Consulte con su oculista para comprobar que no haya ninguna anomalía visual. 3D Vision no se activará. ¡Le felicitamos! Ya puede ver contenido 3D estereoscópico! Para obtener información detallada sobre el panel de control de NVIDIA, consulte la Guía del usuario de 3D Vision ubicada en el CD. Visite www.nvidia.es/3dvision/support para acceder a nuestro sistema de información en línea 24x7x365 y podrá enviar preguntas a nuestro personal de asistencia técnica. Las preguntas sólo se pueden enviar en inglés. 05 COMPATIBILIDAD DE JUEGOS NVIDIA ha probado y proporcionado perfiles de controlador incorporados para muchos de los juegos de mayor venta para asegurar que estos funcionan correctamente con 3D Vision. Todos los juegos que han sido probados están listos en el panel de control de NVIDIA con su clasificación de compatibilidad. Para abrir el panel de control NVIDIA, haga clic con el botón derecho en el escritorio y seleccione ‘Panel de control NVIDIA’. También puede ir a Inicio › NVIDIA Corporation › Panel de control NVIDIA. Seleccione Ver compatibilidad con juegos en los temas del panel de la ventana izquierda. Esta opción muestra una lista de todos los juegos que han sido probados por NVIDIA utilizando el software 3D estereoscópico. Cada juego ha sido clasificado como Excelente, Bueno, Medio, No recomendado. Esta clasificación se basa en lo bien que un juego funciona con la configuración 3D estereoscópica y si hay algún problema en el juego que pueda interferir con su experiencia 3D Vision. Para ver un juego con la mejor calidad posible, deberá seguir los temas y valores de configuración recomendados por NVIDIA. Si no se utilizan estos valores de configuración, el resultado podría ser que el juego no se ejecutara en la configuración 3D estereotípica o que aparecieran artefactos. Muestra los valores de configuración recomendados para el juego seleccionado en la lista. Utilice las teclas de acceso rápido Ctrl+Alt+Insertar para mostrar la información como una superposición mientras está en el juego. Marque esta casilla para ver sólo aquellos juegos cargados en su sistema. Deseleccionada significa que todos los juegos probados por NVIDIA están en la lista. NVIDIA actualiza continuamente la lista de los juegos compatibles. Vaya a www.nvidia.es/3dvision para obtener la última lista de juegos. 06 CONFIGURACIONES Diagrama para la conexión de la pantalla LCD de 120 Hz LCD DVI PC Emisor IR USB DVI USB Cable Cable DVI de doble enlace (incluido con la pantalla) www.nvidia.es NVIDIA 3D VISION ® ™ РУКОВОДСТВО ПО ПОДКЛЮЧЕНИЮ 01 МИНИМАЛЬНЫЕ ТРЕБОВАНИЯ К СИСТЕМЕ Благодарим за выбор 3D Vision - системы, позволяющей наиболее полное игровое погружение на ПК. Перед началом работы ознакомьтесь со следующими минимальными требованиями к системе, чтобы правильно настроить компьютер и получить удовольствие от возможностей 3D Vision. Минимальные требования к системе Поддерживаемые карты NVIDIA GeForce для настольных систем >> Microsoft® Windows® Vista или Windows 7 32-бит/64-бит >> GeForce 8 Series • NVIDIA GeForce 8800 GT • NVIDIA GeForce 8800 GTS • NVIDIA GeForce 8800 GTS 512 • NVIDIA GeForce 8800 GTX • NVIDIA GeForce 8800 Ultra >> Процессор Intel® Core™ 2 Duo, AMD Athlon™ X2 или более мощный >> Оперативная память 1 ГБ (рекомендуется 2 ГБ) >> 100 МБ свободного пространства на диске Поддержка дисплеев 3D Ready >> Монитор Acer GD245HQ/GD23HZ 120 Hz LCD >> Монитор Alienware™ OptX™ AW2310 120 Hz LCD >> Монитор Samsung® SyncMaster 2233RZ 120 Hz LCD >> GeForce 9 Series • NVIDIA GeForce 9600 GT • NVIDIA GeForce 9800 GT • NVIDIA GeForce 9800 GTX • NVIDIA GeForce 9800 GTX+ • NVIDIA GeForce 9800 GX2 >> GeForce 200 /100 Series (Рекомендуется использовать GeForce GT 240 и выше) >> Монитор ViewSonic® FuHzion™ VX2265wm 120 Hz LCD >> Аналоговые CRT 100 Hz и выше Проекторы >> Acer X1130P, X1261, H5360 >> DepthQ® HD 3D и DQ-3120 от LightSpeed Design, Inc. >> ViewSonic PJD-6210-3D, PJD-62203D, PJD-5351-3D, PJD-5111-3D Примечание. Полный список поддерживаемых дисплеев и карт 3D Vision Ready можно найти по адресу: www.nvidia.ru/3dvision. 02 ОБОРУДОВАНИЕ Комплект поставки устройства 3D Vision включает следующие компоненты. Беспроводные очки ИК-излучатель Чехол для хранения Ткань для очистки Два кабеля USB (1,8 м и 3 м) Компакт-диск с программным обеспечением и документацией, а также Руководство пользователя 3D Vision Сменные накладки на переносицу 03 ПОДРОБНОЕ ОПИСАНИЕ ОБОРУДОВАНИЯ Беспроводные очки ИК-передатчик Не заслоняйте Кнопка ВКЛ (ON) Нажмите, чтобы проверить состояние аккумулятора Индикатор Полной зарядки аккумулятора очков 3D Vision хватает примерно на 40 часов игры.Мигание красным светом означает, что заряда аккумулятора хватит менее чем на два часа. Подключение USB для зарядки очков (во время зарядки мигает оранжевая лампочка) Накладка на переносицу Для удобства предлагается три разных размера Примечание. Очки 3D Vision можно надевать поверх большинства стандартных очков. Внимание! Очки 3D Vision -- это не корректирующие, не солнцезащитные и не защитные очки. Использование очков не по назначению, например для вождения автомобиля, чтения, защиты от солнца или ультрафиолетового света, может нанести вред глазам. 03 ПОДРОБНОЕ ОПИСАНИЕ ОБОРУДОВАНИЯ ИК-излучатель Регулятор настройки стереоскопической глубины в игре ИК-излучатель, вид сзади Стереоразъем VESA При использовании DLP HDTV подключите кабель стереоразъема VESA к дисплею. По вопросу приобретения набора кабелей DLP HDTV обратитесь в службу поддержки NVIDIA. Индикатор питания Порт USB для подключения к компьютеру Кнопка включения/ выключения 3D Vision с подсветкой ИК-излучатель, вид спереди Примечание. Дальность действия ИК-излучателя 4,5 м. 04 УСТАНОВКА И НАСТРОЙКА 1 Перед началом установки необходимо удалить графический драйвер, установленный на компьютере. Откройте меню Пуск > Панель управления > Программы и компоненты Если используется видеоплата NVIDIA, дважды щелкните пункт Драйверы NVIDIA.* >> Выберите пункт Удалить только следующее. >> Выберите Драйвер дисплея NVIDIA >> Нажмите кнопку Удалить >> Перезапустите компьютер * В случае замены видеоплаты другого производителя на плату NVIDIA обязательно удалите графический драйвер и выключите питание системы, прежде чем заменять плату. 2 Вставьте в дисковод компакт-диск с программным обеспечением, документацией и драйверами для 3D Vision. 3 Выберите пункт Установить графический драйвер GeForce. 4 Затем выберите пункт Да, перезагрузить компьютер сейчас. Процесс установки автоматически продолжится после перезапуска системы. 5 Нажмите кнопку Далее, чтобы установить драйвер 3D Vision. 6 Нажмите кнопку Готово, чтобы завершить установку. После завершения работы InstallShield автоматически появится мастер установки 3D Vision. Мастер установки поможет вам установить ИК-излучатель, настроить дисплей и очки. 7 Нажмите кнопку Далее, чтобы запустить мастер установки. Мастер интуитивно понятен и прост в использовании. 8 Когда будет предложено, подключите ИК-излучатель. 9 Выберите игровую среду. 10 Обнаружен дисплей 3D Ready. 11 Включите очки. 12 Протестируйте настройки оборудования. 04 УСТАНОВКА И НАСТРОЙКА Данный экран исполь зуется для проверки настроек оборудования, необходимых для прос мотра стереоскопических эффектов 3D, и нормаль ного функционирования очков и излучателя. Следуйте инструкциям на экране. 13 (Только для ЖК- Если соответствующие изображения не видны, мастер установки не будет работать, пока не будет устранена проблема оборудования. Нажмите кнопку Назад, чтобы проверить очки, излучатель и настройки оборудования. дисплеев) Надев очки, замечаете ли вы мерцание перифери ческим зрением? При выборе пункта Да отображаются параметры частоты обновления. 14 Убедитесь в правильности Нажмите кнопку Тестировать с данной частотой обновления, чтобы убедиться, что выбор данной частоты устраняет мерцание. 04 УСТАНОВКА И НАСТРОЙКА восприятия стереоскопического 3D-контента. Проверив то, что оборудование может воспроизводить стереоскопический 3D-контент, надо убедиться и в том, что вы можете его воспринимать. Неспособность видеть тест по изображению в стереоскопическом 3D-режиме может быть обусловлена следующими причинами: >> Для оптимального просмотра стереоскопического 3D-контента необходимы соответствующие настройки. Выберите пункт Назад и проверьте, видите ли вы стереоскопическое 3D-изображение на экране Протестируйте настройки оборудования. >> Проблемы со зрением. Ознакомьтесь с мерами предосторожности в разделе Требования безопасности Руководства пользователя. Обратитесь к врачу, если вам кажется, что просмотру стереоскопического 3D-изображения вам мешают проблемы со зрением. Внимание! Если вы не прошли медицинский тест и не видите тестового изображения, NVIDIA не рекомендует использовать очки 3D Vision. Проконсультируйтесь у врача по поводу возможных проблем со зрением. Возможно, вам нельзя пользоваться очками 3D Vision. 15 Установка завершена. Поздравляем! Теперь вы готовы к просмотру стереоскопи ческого 3D-изображения. Подробную информацию о Панели управления NVIDIA см. в Руководстве пользователя 3D Vision, которое можно найти на компакт-диске. По адресу www.nvidia.ru/3dvision/support можно найти круглосуточно работающую базу знаний, где вы можете задать вопросы сотрудникам технической поддержки. Вопросы можно задавать только по-английски. Пользователи 3D Vision также могут получить бесплатную техническую поддержку по телефону: 1-800-797-6530 с 09:00 до 18:00 PST, с понедельника по пятницу. Линия технической поддержки доступна только для пользователей из США и Канады. 05 СОВМЕСТИМОСТЬ С ИГРАМИ Для многих популярных игр NVIDIA предоставляет протестированные встроенные профили драйверов, обеспечивающие надежную работу с системой 3D Vision. Список всех протестированных игр, а также рейтинг совместимости можно найти на Панели управления NVIDIA. Чтобы открыть Панель управления NVIDIA, щелкните рабочий стол правой кнопкой мыши и выберите пункт «Панель управления NVIDIA». Можно также открыть меню Пуск › NVIDIA Corporation › Панель управления NVIDIA. В левой части окна выберите раздел Просмотр совместимости с играми. В этом разделе отображается список всех игр, протестированных NVIDIA с программным обеспечением со стереоскопическими 3D-эффектами. Совместимость с каждой игрой оценивалась по шкале Отличная, Хорошая, Посредственная или Не рекомендуется. Эти оценки основаны на том, насколько хорошо конкретная игра работает со стереоскопическими 3D-эффектами, и есть ли в игре проблемы, которые могут мешать хорошему стереоскопическому просмотру в режиме 3D с использованием 3D Vision. Для просмотра игры с наилучшим возможным качеством необходимо следовать указаниям NVIDIA, приведенным в разделе «Проблемы и рекомендуемые настройки». Несоблюдение этих настроек может привести к тому, что игра не будет работать в стереоскопическом режиме 3D, или к искажениям изображения. Отображаются рекомендуемые настройки для игр, выбранных в списке. С помощью горячих клавиш Ctrl+Alt+Insert можно отображать информацию в виде наложения во время игры. Установите этот флажок, чтобы видеть только игры, загруженные на компьютер. Если флажок не установлен, отображаются все игры, протестированные NVIDIA. NVIDIA постоянно обновляет список поддерживаемых игр. Последние обновления списка игр можно найти по адресу: www.nvidia.ru/3dvision. 06 КОНФИГУРАЦИЯ Схема подключения ЖК-дисплея 120 Гц ЖК-дисплей DVI ПК ИК-излучатель USB DVI Кабель USB Двухканальный кабель DVI (поставляется с дисплеем) www.nvidia.ru © 2010 NVIDIA Corporation. NVIDIA 3D Vision | QUICK START GUIDE | PRINTED IN CHINA 176-0080-000 176-0080-000 www.nvidia.eu