1
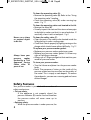
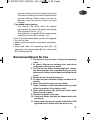
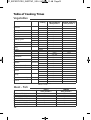
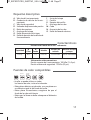
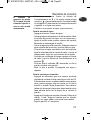
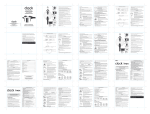
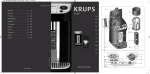
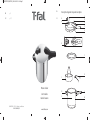
TF_EXPERT-PRO_INSFTW1_USA 04/12/13 11:48 PageC1
EN
p. 1
ES
p. 15
EN
Descriptive diagram - Esquema descriptivo
ES
A
B
C
D
E
F
G
H
I
K
J
Pressure Cooker
User’s Guide
Guía del usuario
Réf INSFTW1 • 12/2013 • Subject to modifications
ESPACE GRAPHIQUE
www.t-falusa.com
N
O
L
M
TF_EXPERT-PRO_INSFTW1_USA 04/12/13 11:48 PageC4
Table of contents
Fig 1
Fig 2
Fig 3
CLICK
Important safeguards
p 1
Descriptive diagram
p 2
Characteristics
p 2
Compatible heat sources
p 2
T-fal accessories
p 3
Operating instructions
p 3
Opening
p 3
Closing
p 3
Minimum filling
p 4
2/3
1/2
1/3
Fig 4
Fig 7
Fig 10
Fig 13
Fig 5
Fig 8
Fig 11
Fig 14
Fig 6
Fig 9
Fig 12
Maximum filling
p 4
Food preparation instructions
p 4
Using the operating valve
p 4
Using for the first time
p 5
Before cooking
p 5
During cooking
p 6
Finishing cooking
p 6
Care and cleaning
p 7
Cleaning the pressure cooker
p 6
Safety features
p 8
Recommendations for use
p 9
Regulation markings
p 10
T-fal and your frequently asked questions
p 11
Table of cooking times
p 12
Limited Warranty
p 13
TF_EXPERT-PRO_INSFTW1_USA 04/12/13 11:48 Page1
IMPORTANT
SAFEGUARDS
When using pressure cookers, basic safety precautions should
always be followed :
1. Read all instructions.
2. Do not touch hot surfaces. Use handles or knobs.
3. Close supervision is necessary when the pressure cooker is used
near children.
4. Do not place the pressure cooker in a heated oven.
5. Extreme caution must be used when moving a pressure
cooker containing hot liquids.
6. Regularly check that the handles of the pressure cooker are fitted
correctly. Tighten them if necessary.
7. Do not use pressure cooker for other than intended use.
8. This appliance cooks under pressure. Improper use may result in
scalding injury. Make certain unit is properly closed before operating. See “Operating Instructions.”
9. Do not fill the unit over 2/3 full. When cooking foods that expand
during cooking such as rice or dried vegetables, do not fill the unit
over ½ full. Over filling may cause a risk of clogging the vent pipe
and developing excess pressure. See “Food Preparation Instructions.”
10. Be aware that certain foods, such as applesauce, cranberries, pearl
barley, oatmeal or other cereals, split peas, noodles, macaroni, rhubarb, or spaghetti can foam, froth, and sputter, and clog the pressure release device (steam vent). These foods should not be cooked
in a pressure cooker.
11. Always check the pressure release devices for clogging
before use.
12. Do not open the pressure cooker until the unit has cooled and all
internal pressure has been released. If the handles are difficult to
push apart, this indicates that the cooker is still pressurized – do
not force it open. Any pressure in the cooker can be hazardous.
See “Operating Instructions”.
13. Do not use this pressure cooker for pressure frying with oil.
14. When the normal operating pressure is reached, turn the heat down
so all the liquid, which creates the steam, does not evaporate.
15. Always pour a minimum amount of a liquid of at least
8.5 oz in the unit. See "Operating Instructions".
SAVE THESE INSTRUCTIONS.
1
EN
ES
ES
PT
EL
AR
FA
TF_EXPERT-PRO_INSFTW1_USA 04/12/13 11:48 Page2
Descriptive diagram
A
B
C
D
E
F
G
H
-
Operating valve
Operating valve seat
Safety valve
Pressure indicator
Opening button
Long lid handle
Lid positioning mark
Operating valve positioning mark
I J K L MNO-
Lid gasket
Steam basket
Steam basket support
Long pressure cooker body handle
Pressure cooker body
Short pressure cooker body handle
Maximum filling mark
Characteristics
Pressure cooker base diameter - model references
Capacity
6.3 qt
6L
Cooker
Base
diameter diameter
8.6"
7.5"
Model
Item number
Lid and body
material
P25107
YS223H64
Stainless
steel
Standards information:
Upper operating pressure limit: 100 kPa (14,5 psi).
Maximum safety pressure limit: 170 kPa (25 psi).
Compatible heat sources
GAS
SOLID
HOTPLATE
CERAMIC
or
HALOGEN
INDUCTION
ELECTRIC
HOTPLATE
• The pressure cooker can be used
on all heat sources.
• When using an electric hob or induction, make sure
that the size of the hot plate does not exceed the
size of the pressure cooker base.
• On a ceramic or halogen hob, always make sure that
the pressure cooker base is clean and dry.
• On a gas hob, the flame should not extend past the
diameter of the pressure cooker base.
2
TF_EXPERT-PRO_INSFTW1_USA 04/12/13 11:48 Page3
T-fal accessories
• The following pressure cooker
accessories are available :
EN
ES
Accessory
Reference number
Gasket
X9010103
ES
• To replace other parts or have repairs performed, please
call on your local T-fal Approved Service Center.
• Only use T-fal genuine parts designed for your
product model.
PT
EL
Operating Instructions
This appliance cooks under pressure. Improper use may result in scalding injury.
Make certain unit is properly closed before operating.
Always pour a minimum amount of a liquid of at least 8.5 oz in the unit.
AR
Opening
FA
• Using your thumb, pull on the opening knob (E)
and move it back to the
position - Fig 1.
Hold the long pressure cooker handle (L) with your
left hand, while turning the long lid handle (F)
counter clockwise with your right hand, until it
opens - Fig 2. Then lift the lid off.
• Do not open the pressure cooker until the unit has
cooled and all internal pressure has been released. If
the handles are difficult to push apart, this indicates
that the cooker is still pressurized - do not force it
open. Any pressure in the cooker can be
hazardous.
Closing
• Place the lid down flat on the pressure cooker
making sure to line up the triangles on the lid and
the pressure cooker handle - Fig 3
• Turn the lid to the left until it stops - Fig 3
• Push the opening knob (E) to move it to the
position - Fig 4
3
TF_EXPERT-PRO_INSFTW1_USA 04/12/13 11:48 Page4
Minimum filling
• Always pour a minimum amount of liquid of at least
8.5 oz (about 1 cup) into the pressure cooker.
For Steaming:
• At least 25 oz (about 3 cups) of water must be
poured in.
• Place the basket (J) onto the steaming support piece
(K) provided for this purpose - Fig 5
Food placed in the
steam basket must
not touch the pressure cooker lid.
Maximum filling
• Never fill your pressure cooker more than two-thirds
full (maximum mark) - Fig 6
For some food:
For food that expands during cooking, like rice, dried
vegetables or stewed fruit... never fill your pressure
cooker more than half full - Fig 6
Food Preparation Instructions
Do not fill the unit over 2/3 full. When cooking foods that expand during
cooking such as rice or dried vegetables, do not fill the unit over ½ full. Over
filling may cause a risk of clogging the vent pipe and developing excess
pressure.
Using the operating valve (A)
To cook delicate food and vegetables:
• Set the valve to (A and H). Operates at 70 kPa
(10 psi).
To cook meat and frozen foods:
• Set the valve to (A and H). Operates at 100 kPa
(14.5 psi)
To release steam:
• Set the valve to
.
To remove the operating valve:
• Let the appliance cool down before removing the
valve (A).
• Press down on the valve and turn it to align to the dot
position
(H) - Fig 7
• Remove the valve.
4
TF_EXPERT-PRO_INSFTW1_USA 04/12/13 11:48 Page5
EN
To refit the operating valve:
• Place the operating valve in place making sure to
align it with the dot position
(H).
• Press the valve then turn it until the desired position
is reached.
ES
Using for the first time
• Fill the pressure cooker to the two-thirds mark (the
maximum mark) with water.
• Place the basket support (K) in the bottom of the
pressure cooker and place the basket (J) on top of it.
• Close the pressure cooker.
• Move the operating valve (A) to position
.
• Place the pressure cooker on a heat source set to
maximum power.
• Once steam starts to escape from the valve, turn the
heat down and set a timer for 20 minutes.
• Once the 20 minutes are up, turn off the heat.
• Turn the operating valve (A) to position
.
• Once the pressure indicator (D) drops down: your
pressure cooker is no longer under pressure.
• Open the pressure cooker.
• Rinse the pressure cooker with water and dry it.
Before cooking
• Before each use of the pressure cooker, always
remove the valve (A) (Refer to the “Using the
operating valve” heading) and visually check that
the operating valve seat (B) is not blocked. If
necessary, clean it with a toothpick - Fig 8
• Check that the safety valve (C) can move: Refer to
the “Care and Cleaning” heading.
• Refit the operating valve (A) and select the position
or .
• Always make sure that the pressure cooker is
properly closed before starting to heat it. The
opening button (E) must be in the
position.
• Place the pressure cooker on a heat source set to
maximum power.
5
ES
PT
EL
AR
FA
TF_EXPERT-PRO_INSFTW1_USA 04/12/13 11:48 Page6
During cooking
The pressure indicator
(D) prevents pressure
from rising in the pressure cooker if it is not
properly closed.
• Select your recipe. Set the operating valve to if the
recipe calls for low pressure or if it calls for high
pressure. Refer to the table on page 12 for suggested
cooking times if you are not following a recipe.
• Decide if you are going to steam cook or immersion
cook.
For steaming:
- Add at least 3 cups of water.
- Place the support piece in the pressure cooker . Fill
the steamer basket with your food and set the basket
on top of the support. Remember not to overfill the
basket.
- Close the pressure cooker lid, set on the stovetop, and
turn heat to high.
- Once the steam starts to escape from the valve, turn
the heat down and set your timer per the recipe’s
instructions.
- Once the time is up turn off the heat and turn the
operating valve to
position.
- Once the indicator (D) drops down your pressure
cooker is no longer under pressure.
- Open the pressure cooker. Rinse with water and dry.
For immersion cooking:
- Add the food you are cooking, being careful not to
fill the pressure cooker more than 2/3 full. If you wish
to brown meats or saute onions as a first step, you
can add some oil to the pressure cooker and saute
accordingly. You must do any initial browning or
sauteeing with the lid off before the pressure cooking
stage.
- Add the liquid that the recipe calls for. It must be at
least 1 cup. Keep in mind that liquids can include
water, stock, or wine, but never oil.
- Follow steps 3-7 above
Finishing cooking
To release the steam:
• Once the heat is turned off, you have two options:
• Slow pressure release: gradually turn the operating
6
TF_EXPERT-PRO_INSFTW1_USA 04/12/13 11:48 Page7
EN
valve (A) to the
position. Once the pressure
indicator (D) drops down: your pressure cooker is no
longer under pressure.
• Fast pressure release: place your pressure cooker
under a stream of cold water. Once the pressure
indicator (D) drops down: your pressure cooker is no
longer under pressure. Turn the operating valve (A)
to the
position.
• Now you can open it.
The pressure indicator
(D) prevents the pressure cooker from
being opened if it is
still under pressure.
If you observe unusual spraying during
decompression: move
the valve to position
then release pressure again making
sure to ensure that
there is no more
spraying.
ES
ES
PT
EL
AR
Care and Cleaning
Cleaning the pressure cooker
Browning and scratching that may appear following long
periods of use are
normal and will not
affect the performance of the pressure cooker.
For best appliance operation, be sure to follow these
cleaning and maintenance recommendations every
time the pressure cooker is used.
You can wash the
pressure cooker body
and the basket in a
dishwasher.
To clean the inside of the pressure cooker:
• Clean it with a scouring pad and warm soapy water.
• If the inside of the stainless steel cooker shows
iridescent reflections, clean it with vinegar.
• Always wash the pressure cooker after use with
warm water and soap. Do the same for the basket.
• Never use bleach or chlorine products.
• Never overheat the pressure cooker body when it is
empty.
To clean the outside of the pressure cooker:
• Clean it with a sponge and warm soapy water.
Never wash the lid
in a dishwasher.
To clean the lid:
• Wash the lid under a gentle stream of running warm
water using a sponge and soap.
For a longer pressure cooker life, do
not overheat your
pressure cooker pan
when it is empty.
To clean the lid gasket:
• After using the pressure cooker, always clean the
gasket (I) and its groove.
• To refit the gasket, refer to the drawings - Fig 9 - 10
7
FA
TF_EXPERT-PRO_INSFTW1_USA 04/12/13 11:48 Page8
Never use a sharp
or pointed object
to do this.
Always have your
pressure
cooker
checked by a T-fal
Approved Service
Center after 10
years of use.
To clean the operating valve (A):
• Remove the operating valve (A): Refer to the “Using
the operating valve” heading.
• Clean the operating valve (A) under running tap
water - Fig 11
To clean the operating valve seat located in the lid:
• Remove the valve (A).
• Visually inspect the seat and the steam release pipe
in daylight to make sure that it is round and clear. If
necessary, clean it with a toothpick - Fig 8
To clean the safety valve (C):
• Clean the part of the safety valve located inside the
lid by placing it under running water.
• Check that it works properly by lightly pressing on the
plunger which should move without difficulty - Fig 12
To replace your pressure cooker gasket:
• Replace your pressure cooker gasket every year.
• Replace your pressure cooker gasket if it shows any
signs of splitting or damage.
• Always use a T-fal genuine gasket that matches your
model of pressure cooker.
To store your pressure cooker:
• Turn the lid over and place it on the pressure cooker
body.
• Note: The presence of stains on the inside of the
pressure cooker base has no affect on the quality of
the metal. This is simply a scale deposit. To remove
these deposits, you can use a scouring pad and some
diluted vinegar.
Safety Features
Your pressure cooker is provided with a number of
safety mechanisms:
• Closure safety:
- If the appliance is not properly closed, the
pressure indicator (D) cannot rise and therefore
the pressure cooker will never come up to
pressure.
• Opening safety:
- While the pressure cooker is under pressure, the
8
TF_EXPERT-PRO_INSFTW1_USA 04/12/13 11:48 Page9
EN
opening knob cannot be activated. Never force
the pressure cooker open. Never tamper with the
pressure indicator. Always make sure that the
pressure inside the pressure cooker has been
released.
• Two added safety features:
- First feature: the safety valve (C) releases
pressure and the steam will escape horizontally
from the top of the lid - Fig 13
- Second feature: the gasket (I) lets steam escape
vertically from the side of the lid - Fig 14
If one of the two added safety systems are triggered:
• Turn off the heat.
• Allow the pressure cooker to cool down completely.
• Open it.
• Check and clean the operating valve (A), the
operating valve seat and pipe (B), the safety valve
(C) and the gasket (I).
ES
ES
PT
EL
AR
FA
Recommendations for Use
1 - The steam is very hot when it leaves the operating
valve.
2 - As soon as the pressure indicator rises, you can no
longer open your pressure cooker.
3 - Just like for any other cooking appliance, always
pay close attention to it, especially during use in the
presence of children. Never leave unattended while
in use.
4 - Beware of the horizontal steam jet.
5 - To move the pressure cooker, always use both of the
handles.
6 - Never leave food in your pressure cooker.
7 - Never use bleach or chlorine products for they could
affect the quality of the stainless steel.
8 - Never wash the lid in the dishwasher. Never leave
the lid to soak in water.
9 - Replace the gasket every year.
10 - A pressure cooker may only be cleaned when cold
and empty.
11 - Always have your pressure cooker checked by a T-fal
Approved Service Center after ten years of use.
9
TF_EXPERT-PRO_INSFTW1_USA 04/12/13 11:48 Page10
Regulation Markings
Marking
Location
Manufacturer's identification or trademark
Lid handle
Year and batch of manufacture
Inside the lid
Model reference
Operating pressure (PF)
Max. safety pressure (PS)
Capacity
On the outside of the pressure
cooker body
10
TF_EXPERT-PRO_INSFTW1_USA 04/12/13 11:48 Page11
EN
T-fal and Your Frequently Asked Questions
Problems
Recommendations
If the pressure cooker has • Have your pressure cooker inspected by a T-fal
heated up under pressure Approved Service Center.
with no liquid inside:
If the pressure indicator • This is normal for the first few minutes.
did not rise and nothing • If the problem persists, check that:
escapes from the valve
- There is enough heat, if not, turn up the heat.
during cooking:
- The amount of liquid in the pressure cooker is adequate.
- The operating valve is set to or .
- The pressure cooker is properly closed and the opening button is in the
position.
- The lid gasket has not perished.
If the pressure indicator • This is normal for the first few minutes.
has risen but still nothing • If the problem persists, place your appliance under cold
escapes from the valve water. Then open it.
during cooking:
• Clean the operating valve and valve seat - Fig 8 and
check that the safety valve can be pushed in without
difficulty - Fig 12.
If steam escapes from • That the lid is properly closed and the opening button
around the lid, check:
is in the
position.
• The gasket is correctly fitted into the lid.
• That the gasket is in good condition, and if necessary,
replace it.
• That the lid, the gasket, its seat in the lid, the safety
valve and the operating valve are clean.
• That the rim of the pressure cooker body is in good
condition and not damaged.
If food has burnt on the • Leave the pressure cooker to soak for a while before
bottom of the pressure washing.
cooker:
• Never use bleach or chlorine products.
If you cannot open the • Check that the pressure indicator is down.
lid:
• If not, release pressure and if necessary cool the pressure cooker under a stream of cold water.
If food is not cooked or • The cooking time.
has burnt, check:
• The heat level.
• Whether the operating valve was in the right position.
• The amount of liquid.
11
ES
ES
PT
EL
AR
FA
TF_EXPERT-PRO_INSFTW1_USA 04/12/13 11:48 Page12
Table of Cooking Times
Vegetables
Cooking
Artichoke
Asparagus
Beets
Broccoli
Brussels sprouts
Cabbage, green
Carrots
Cauliflower
Celery
Endives
Green beans
Leek
Mushrooms
Peas
Potatoes
Pumpkin (mashed)
Rice
Spinach
Turnips
White beans semi-dry
Zucchini
FRESH PRODUCE
Valve position 1
- steam
- immersion
- immersion
- steam
- steam
- steam
sliced
- steam
leaves
- steam
sliced
- steam
- immersion
- steam
- immersion
- steam
- steam
sliced
- steam
sliced
- steam
whole
- immersion
- steam
- steam
quartered
- immersion
- immersion
- immersion
- steam
- immersion
- steam
- immersion
- steam
- steam
- immersion
14 min.
12 min.
4 min.
16 - 24 min.
3 min.
5 min.
5 min.
5 min.
5 min.
3 min.
5 min.
8 min.
10 min.
6 min.
2 ½ min.
1 min.
1 ½ min.
1 ½ min.
10 min.
5 min.
6 min.
5 min.
4 min.
3 min.
5 min.
5 min.
16 min.
5 min.
2 min.
FROZEN PRODUCE
Valve position 2
3 min.
4 min. - immersion
4 min.
4 min.
7 min.
4 min.
4 min.
6 min.
7 min
steam = in the steam basket
immersion = in water
Meat - Fish
Beef (roast 2 lbs)
Chicken (whole 2.6 lbs)
Lamb (leg 2.8 lbs)
Monk fish (fillets 1.5 lbs)
Pork (roast 2 lbs)
Salmon (4 steaks 1.5 lbs)
Tuna (4 steaks 1.5 lbs)
12
FRESH
Valve position 2
8 min.
16 min.
20 min.
4 min
20 min.
5 min
5 min
FROZEN
Valve position 2
23 min.
36 min.
28 min.
5 min
36 min.
6 min
7 min
TF_EXPERT-PRO_INSFTW1_USA 04/12/13 11:48 Page13
EN
Limited Warranty
ES
•The body of your new T-fal pressure cooker comes
with a ten year limited warranty for use under the
conditions outlined in these instructions. This warranty covers:
- Any defects relating to the metal structure of the
pressure cooker body.
- Any premature deterioration of the metal base.
•For other parts, a one year parts and labor warranty is provided. This warranty covers any defects
or manufacturing faults.
•The contractual warranty is provided only on presentation of a valid proof of purchase which shows
the date of purchase.
ES
PT
EL
AR
The warranty excludes:
•The normal life of the gasket, pressure control valve or
locking indicator gasket is limited. These parts are excluded from the warranty and will require periodic renewal.
•Any damage caused by the failure to follow the major
recommendations made or due to negligent use,
especially:
- Dropping, falls, bangs or knocks, placing in an
oven…
- Washing the lid in the dishwasher.
•T-fal® SHALL NOT BE LIABLE FOR INCIDENTAL OR
CONSEQUENTIAL DAMAGES, HOWEVER CAUSED.
Some states do not allow the inclusion or limitation of
incidental or consequential damages, so the above
exclusion may not apply to you. If service becomes
necessary within the warranty period, please contact
us Monday – Friday, 8 am to 5 pm at 1-800-3958325. www.t-falusa.com
•This warranty gives you specific legal rights. You may
also have other rights which vary from state to state.
FA
13
TF_EXPERT-PRO_INSFTW1_USA 04/12/13 11:48 Page14
TF_EXPERT-PRO_INSFTW1_USA 04/12/13 11:48 Page15
EN
Indice de contenido
Instrucciones importantes de seguridad
p 16
Esquema descriptivo
p 17
Características
p 17
Fuentes de calor compatibles
p 17
Accesorios T-fal
p 18
Instrucciones de uso
p 18
Apertura
p 18
Cierre
p 18
Llenado mínimo
p 19
Llenado máximo
p 19
Instrucciones de preparación de los alimentos
p 19
Utilización de la válvula de funcionamiento
p 19
Primera utilización
p 20
Antes de la cocción
p 20
Durante la cocción
p 21
Fin de la cocción
p 22
Limpieza y mantenimiento
p 22
Limpieza de la olla
p 22
Seguridad
p 23
Recomendaciones de uso
p 24
Marcados o etiquetajes reglamentarios
p 25
T-fal responde a sus preguntas
p 26
Tabla de los tiempos de cocción
p 27
Garantía limitada
p 28
ES
ES
PT
EL
AR
FA
15
TF_EXPERT-PRO_INSFTW1_USA 04/12/13 11:48 Page16
INSTRUCCIONES
IMPORTANTES DE SEGURIDAD
Siempre que se utilizan ollas a presión, deben seguirse unas instrucciones básicas de seguridad:
1. Leer todas las instrucciones.
2. No tocar las superficies calientes. Utilizar las asas o las sujeciones.
3. Es necesario no descuidar la vigilancia de la olla a presión cuando se utiliza en presencia de niños.
4. No meter la olla a presión en un horno caliente.
5. Extremar las precauciones al mover de sitio una olla a presión que
contenga líquidos calientes.
6. Verifica regularmente que las agarraderas de la cuba estén correctamente
fijadas. Revísalas, de ser necesario.
7. No utilizar la olla a presión para otro fin que el uso para el que está destinada.
8. Esta olla cocina a presión. El uso inadecuado podría provocar lesiones por
escaldaduras. Asegurarse de que la olla está correctamente cerrada antes
de utilizarla. Ver “Instrucciones de uso”.
9. No llenar la olla más de 2/3 de su capacidad. Al cocinar alimentos que se
expanden durante la cocción, como arroz u hortalizas secas, no llenar la
olla más de 1/2 de su capacidad. Un llenado excesivo podría llegar a obstruir el orificio de salida de aire y desarrollar en el interior una presión excesiva. Ver “Instrucciones de preparación de los alimentos”.
10. Hay que tener en cuenta que determinados alimentos, como la compota
de manzana, arándanos, cebada perlada, harina de avena u otros cereales, guisantes partidos, fideos, macarrones, ruibarbo o espaguetis pueden producir espuma y saltar dentro de la olla, obstruyendo la válvula de
descarga de presión (orificio de salida de aire). Estos alimentos no deberían ser cocinados en una olla a presión.
11. Comprobar siempre que la válvula de descarga de presión no esté obstruida antes de utilizar la olla.
12. No abrir la olla a presión hasta que se haya enfriado y toda la presión del
interior haya sido descargada. Si las asas presentan resistencia al abrirlas,
esto indica que la olla tiene aún presión en su interior – no intentar abrirla
a la fuerza. Cualquier presión existente dentro de la olla puede ser peligrosa. Ver “Instrucciones de uso”.
13. No utilizar esta olla para freír a presión con aceite.
14. Una vez alcanzada la presión normal de uso, disminuir el calor para que
todo el líquido que genera el vapor no se evapore.
15. Introduzca siempre una cantidad mínima de líquido, al menos igual a
8.5 oz. Ver "Instrucciones de uso".
16
CONSERVAR ESTAS
INSTRUCCIONES
TF_EXPERT-PRO_INSFTW1_USA 04/12/13 11:48 Page17
EN
Esquema descriptivo
A - Válvula de funcionamiento
B - Conducto de válvula de funcionamiento
C - Válvula de seguridad
D - Indicador de presencia de presión
E - Botón de apertura
F - Asa larga de la tapa
G - Señal de posición de la tapa
H - Señal de posición de la válvula de
funcionamiento
I
J
K
L
M
N
O
- Junta de la tapa
- Cestillo
- Soporte del cestillo
- Asa largo de la cuba
- Cuba
- Asa corta de la cuba
- Señal de llenado máximo
ES
ES
PT
EL
Características
Diámetro del fondo de la olla - referencias
AR
Capacidad
Ø
Cuba
Ø
Fondo
Modelo
Número de
artículo
Material de tapa
y cuerpo
6.3 qt
8.6"
7.5"
P25107
YS223H64
Acero inoxidable
Información sobre normativas:
Presión superior de funcionamiento: 100 kPa (14,5 psi).
Presión máxima de seguridad: 170 kPa (25 psi).
Fuentes de calor compatibles
GAS
PLACA
ELÉCTRICA
VITROCERÁMICA
HALÓGENO
RADIANTE
INDUCCIÓN
ELECTRICIDAD
ESPIRAL
• La olla se puede utilizar en todas
las fuentes de calor, incluso la inducción.
• Sobre placa eléctrica e inducción, use una placa con
un diámetro igual al del fondo de la olla.
• Sobre placa vitrocerámica, asegúrese de que el
fondo de la cuba está limpio.
• Sobre gas, la llama no debe sobrepasar el diámetro
de la cuba.
17
FA
TF_EXPERT-PRO_INSFTW1_USA 04/12/13 11:48 Page18
Accesorios T-fal
• Los accesorios de la olla que podrá
encontrar en las tiendas, son:
Accesorio
Referencia
Junta
X9010103
• Para el cambio de otras piezas o reparaciones, llame
al Servicio Técnico Autorizado T-fal.
• Sólo utilice piezas originales T-fal adecuadas a su
modelo.
Instrucciones de uso
Esta olla cocina a presión. El uso inadecuado podría provocar lesiones por
escaldaduras. Asegurarse de que la olla está correctamente cerrada antes de
utilizarla.
Introduzca siempre una cantidad mínima de líquido, al menos igual a 8.5 oz.
No abrir la olla a presión hasta que se haya enfriado y toda la presión del
interior haya sido descargada. Si las asas presentan resistencia al abrirlas, esto
indica que la olla tiene aún presión en su interior – no intentar abrirla a la
fuerza. Cualquier presión existente dentro de la olla puede ser peligrosa.
Apertura
• Con el pulgar, tire del botón de apertura (E) y
llévelo a la posición
- Fig 1
Mientras con la mano izquierda sujete el asa largo
de la cuba (L), gire con la mano derecha el asa
largo de la tapa (F) en el sentido inverso de las
agujas de un reloj, hasta su apertura - Fig 2. Y a
continuación, retire la tapa.
Cierre
• Coloque la tapa en plano sobre la cuba alineando
los triángulos de la tapa y del asa de la cuba - Fig 3
• Gire la tapa hacia la izquierda hasta el tope - Fig 3
• Empuje el botón de apertura (E) hacia la posición
- Fig 4
18
TF_EXPERT-PRO_INSFTW1_USA 04/12/13 11:48 Page19
EN
Llenado mínimo
• Introduzca siempre una cantidad mínima de
líquido, al menos igual a 8.5 oz (2 vasos).
Para una cocción vapor:
• El llenado debe ser al menos igual a 25 oz (6 vasos).
• Coloque el cestillo (J) sobre la pieza de soporte de
cocción al vapor (K) suministrada para este fin. Fig 5.
Los alimentos que
están en el cestillo
no deben estar en
contacto con la
tapa de la olla.
ES
ES
PT
Llenado máximo
• Nunca llene la olla más de 2/3 de la altura de la cuba
(señal de llenado máximo) - Fig 6
Para algunos alimentos:
• Para los alimentos que se dilatan durante la cocción,
como el arroz, las legumbres deshidratadas, o las
compotas..., no llene la olla más de la mitad de su
capacidad - Fig 6
EL
AR
FA
Instrucciones de preparación de los alimentos
No llenar la olla más de 2/3 de su capacidad. Al cocinar alimentos que se
expanden durante la cocción, como arroz u hortalizas secas, no llenar la olla
más de 1/2 de su capacidad. Un llenado excesivo podría llegar a obstruir el
orificio de salida de aire y desarrollar en el interior una presión excesiva.
Utilización de la válvula de
funcionamiento (A)
Para cocer alimentos delicados y verduras:
• Ajuste la válvula en (A y H). Presión 1 funciona a
70 kPa (10 psi).
Para cocer carne y alimentos congelados:
• Ajuste la válvula en (A y H). Presión 2 funciona a
100 kPa (14,5 psi).
Para liberar el vapor:
• Ajuste la válvula en .
Para retirar la válvula de funcionamiento:
• Deje enfriar el aparto antes de retirar la válvula (A).
• Presione hacia abajo la válvula y gírela hasta que se alinee
con la posición del punto
(H) - Fig 7
• Retire la válvula.
19
TF_EXPERT-PRO_INSFTW1_USA 04/12/13 11:48 Page20
Para colocar de nuevo la válvula de funcionamiento:
• Coloque la válvula de funcionamiento en su lugar,
asegurándose de que se alinee con la posición del punto
(H).
• Presione sobre la válvula y gire hasta la posición deseada.
Primera utilización
• Llene de agua 2/3 de la cuba. (señal de llenado máximo).
• Coloque el soporte del cestillo (K) en el fondo de la cuba y
deposite el cestillo (J) encima.
• Cierre la olla.
• Coloque la válvula de funcionamiento (A) en
.
• Coloque la olla sobre una fuente de calor ajustada a su
potencia máxima.
• Cuando el vapor comienza a salir por la válvula, disminuya
la fuente de calor y cuente 20 min.
• Cuando los 20 min. hayan transcurrido, apague la fuente de
calor.
• Gire la válvula de funcionamiento (A) hasta la posición
.
• Cuando el indicador de presencia de vapor (D) baje: la olla
ya no tiene presión.
• Abra la olla.
• Aclare la olla con agua y séquela.
Antes de la cocción
• Antes de cada utilización, retire la válvula (A) (ver párrafo
“Utilización de la válvula de funcionamiento”) y compruebe
a la luz del día que el conducto de la válvula de
funcionamiento (B) no está obstruido. Si fuera necesario,
límpielo con un palillo de dientes - Fig 8
• Compruebe que la válvula de seguridad (C) es móvil: ver
párrafo “Limpieza y Mantenimiento”.
• Coloque la válvula de funcionamiento (A) y seleccione la
posición ó
.
• Asegúrese que la olla está correctamente cerrada antes de
ponerla en marcha.
• El botón de apertura (E) debe estar en la posición
.
• Coloque la olla sobre una fuente de calor ajustada a
su potencia máxima.
20
TF_EXPERT-PRO_INSFTW1_USA 04/12/13 11:48 Page21
Durante la cocción
El
indicador
de
presencia de presión
(D) le impide a la olla
aumentar la presión si
esta no está cerrada
correctamente.
• Seleccione su receta. Ajuste la válvula de
funcionamiento en
si la receta requiere baja
presión o si requiere alta presión. Consulte la tabla
en la página 27 para obtener los tiempos de cocción
sugeridos si no sigue una receta.
• Decida si va a cocinar al vapor o por inmersión.
Para la cocción al vapor:
- Agregue al menos 3 tazas de agua.
- Coloque la pieza de soporte en la olla a presión. Llene
el cestillo de cocción al vapor con sus alimentos y
ajuste el cestillo sobre la parte superior del soporte.
Recuerde no sobrecargar el cestillo.
- Cierre la tapa de la olla a presión, colóquela sobre la
parte superior de la cocina y ajuste el calor en alto.
- Una vez que el vapor comience a salir de la válvula,
baje la intensidad de la fuente de calor y ajuste el
temporizador según las instrucciones de su receta.
- Una vez que se cumpla el tiempo, apague la fuente
de calor y gire la válvula de funcionamiento a la
posición .
- Una vez que el indicador (D) desciende, su olla a
presión no tiene más presión.
- Abra la olla a presión. Enjuáguela con agua y
séquela.
Para la cocción por inmersión:
- Agregue los alimentos que va a cocinar, teniendo
cuidado de no llenar la olla a presión en más de 2/3.
Si desea dorar carnes o saltear cebollas como primer
paso, puede agregar algo de aceite en la olla a
presión y realizar dicha preparación. Para dorar o
saltear los alimentos al principio, debe hacerlo con la
tapa abierta antes de la etapa de la cocción a
presión.
- Agregue el líquido que requiere la receta. Debe ser al
menos 1 taza. Tenga en cuenta que los líquidos
pueden ser agua, caldo o vino, pero nunca aceite.
- Siga los pasos 3 a 7 anteriores.
21
EN
ES
ES
PT
EL
AR
FA
TF_EXPERT-PRO_INSFTW1_USA 04/12/13 11:48 Page22
Fin de la cocción
Para liberar el vapor:
• Una vez que la fuente de calor esté apagada, tiene
dos posibilidades:
• Descompresión lenta:
gire la válvula de
funcionamiento (A) hasta la posición
. Cuando
el indicador de presencia de presión (D) baje: su olla
ya no tiene presión.
• Descompresión rápida: coloque la olla debajo de un
grifo de agua fría. Cuando el indicador de
presencia de presión (D) baje: la olla ya no tiene
presión. Gire la válvula de funcionamiento (A) hasta
la posición
.
• Puede abrirla.
El indicador de presencia de presión (D)
impide la apertura de
la olla si esta se encuentra todavía bajo
presión.
Si
durante
la
descompresión, observa salpicaduras
anormales: coloque
el selector en posición
y descomprima lentamente,
asegurándose que
ya no salpica.
Limpieza y Mantenimiento
Limpieza de la olla
El ennegrecimiento
y las ralladuras que
pueden aparecer
después de una
larga utilización no
suponen ningún inconveniente.
Puede meter la
cuba y el cestillo al
lavavajillas.
No introduzca la
tapa en el lavavajillas.
22
Para el buen funcionamiento del aparato, por favor,
respete estas recomendaciones de limpieza y
mantenimiento después de cada uso.
• Lave la olla después de cada utilización con agua
tibia y un detergente para vajillas. Repita la
operación para el cestillo.
• No utilice productos con lejía.
• No ponga a calentar la cuba cuando esté vacía.
Para limpiar el interior de la cuba:
• Lave con estropajo y detergente para vajillas.
• Si el interior de la cuba de acero inoxidable presenta
reflejos irisados, límpielo con vinagre.
Para limpiar el exterior de la cuba:
• Lave con una esponja y producto lavavajillas.
Para limpiar la tapa:
• Lave la tapa con un chorro de agua tibia con una
esponja y producto lavavajillas.
Para limpiar la junta de la tapa:
• Después de cada cocción, limpie la junta (I) y su
compartimento.
TF_EXPERT-PRO_INSFTW1_USA 04/12/13 11:48 Page23
Para conservar por
más tiempo las cualidades de la olla: no
ponga a calentar la
cuba cuando está
vacía.
Nunca utilice objetos cortantes o
puntiagudos para
realizar esta operación.
Es necesario revisar
la olla en un Servicio Técnico Autorizado T-fal después
de 10 años de utilización.
• Para volver a colocar la junta, observe los dibujos Fig 9 - 10
Para limpiar la válvula de funcionamiento (A):
• Retire la válvula de funcionamiento (A): ver párrafo
“Utilización de la válvula de funcionamiento”.
• Limpie la válvula de funcionamiento (A) debajo del
chorro de agua del grifo - Fig 11
Para limpiar el conducto de la válvula de
funcionamiento situada dentro de la tapa:
• Retire la válvula (A).
• Controle a la luz del día que el conducto de
evacuación del vapor está desatascado y redondo. Si
fuera necesario, límpielo con un palillo de dientes Fig 8
Para limpiar la válvula de seguridad (C):
• Limpie la parte de la válvula de seguridad situada
dentro de la tapa, pasándola por agua.
• Compruebe que el funcionamiento es correcto,
presionando ligeramente sobre la válvula que debe
hundirse sin dificultad - Fig 12
Para cambiar la junta de la olla:
• Cambie la junta de la olla todos los años.
• Cambie la junta de la olla si presentara algún corte.
• Utilice siempre una junta original T-fal, adecuada a
su modelo.
Para guardar la olla:
• Déle la vuelta a la tapa sobre la cuba.
• Nota: la aparición de manchas en el fondo interno
de la cuba, no altera en nada la calidad del metal.
Se trata de depósitos calcáreos. Para eliminarlos,
puede utilizar un estropajo con un poco de vinagre
diluido.
Seguridad
La olla a presión está equipada con varios sistemas de
seguridad:
• Sistema de seguridad para el cierre:
- Si el aparato no está correctamente cerrado, el
indicador de presencia de presión (D) no puede
subir y por lo tanto la olla no puede tener presión.
• Sistema de seguridad para la apertura:
- Si la olla está bajo presión, el botón de apertura no
23
EN
ES
ES
PT
EL
AR
FA
TF_EXPERT-PRO_INSFTW1_USA 04/12/13 11:48 Page24
puede accionarse. Nunca abra la olla a la fuerza.
Sobre todo, no fuerce el indicador de presencia de
presión. Asegúrese que la presión interior ha
disminuido.
• Dos sistemas de seguridad para el exceso de presión:
- Primer sistema: la válvula de seguridad (C) libera la
presión y el vapor sale horizontalmente por encima
de la tapa - Fig 13
- Segundo sistema: la junta (I) deja salir el vapor
verticalmente por el borde de la tapa - Fig 14
Si uno de los sistemas de seguridad par el exceso de
presión se activa:
• Apague la fuente de calor.
• Deje enfriar por completo la olla.
• Abra.
• Compruebe y limpie la válvula de funcionamiento
(A), el conducto de evacuación de vapor (B), la
válvula de seguridad (C) y la junta (I).
Recomendaciones de uso
1 - El vapor está muy caliente cuando sale por la
válvula de funcionamiento.
2 - Cuando el indicador de presencia de presión
suba, ya no puede abrir la olla.
3 - Como para cualquier aparato de cocción, realice
una estrecha vigilancia si utiliza la olla cerca de
niños.
4 - Atención al chorro de vapor.
5 - Para desplazar la olla, utilice las asas de la cuba
6 - No almacene alimentos en la olla.
7 - Nunca utilice lejía o productos clorados que
pudieran alterar la calidad del acero inoxidable.
8 - No introduzca la tapa en el lavavajillas. No deje
la tapa en remojo.
9 - Cambie la junta todos los años.
10 - La limpieza de la olla debe realizarse en frío y con
el aparato vacío.
11 - Debe revisar la olla en un Servicio Técnico
Autorizado T-fal después de 10 años de
utilización.
24
TF_EXPERT-PRO_INSFTW1_USA 04/12/13 11:48 Page25
EN
Marcados o etiquetajes
reglamentarios
Marcado
ES
Localización
Identificación del fabricante o marca
comercial
Asa de la tapa
Año y lote de fabricación
Dentro de la tapa
Referencia modelo
Presión de funcionamiento (PF)
Presión máxima de seguridad (PS)
Capacidad
En el fondo externo de la cuba
ES
PT
EL
AR
FA
25
TF_EXPERT-PRO_INSFTW1_USA 04/12/13 11:48 Page26
T-fal responde a sus preguntas
Problemas
Recomendaciones
Si la olla se ha calen- • Lleve la olla a revisar a un Servicio Técnico
tado a presión sin Autorizado T-fal.
líquido dentro:
Si el indicador de pre- • Esto en normal durante los primeros minutos.
sencia de presión no ha • Si el fenómeno continua, compruebe que:
subido y no sale nada - La fuente de calor es bastante fuerte, si no auméntela.
por la válvula durante la - La cantidad de líquido en la cuba es suficiente.
- La válvula de funcionamiento está colocada en la pococción:
sición ó .
- La olla está bien cerrada y el botón de apertura (E)
está en la posición
.
- La junta o el borde de la cuba no están deteriorados.
Si el indicador de pre- • Esto es normal durante los primeros minutos.
sencia de presión ha su- • Si el fenómeno continúa, Pase el aparato por agua
bido y no sale nada por fría. A continuación, abra.
la válvula durante la • Limpie la válvula de funcionamiento y el conducto
de la válvula de funcionamiento - Fig 8 y comcocción:
pruebe que la válvula de seguridad se hunde sin dificultad - Fig 12
Si el vapor se escapa al- • Si la tapa está cerrada correctamente y el botón de
.
rededor de la tapa, com- apertura (E) está en la posición
• La posición de la junta de la tapa.
pruebe:
• El buen estado de la junta, si fuera necesario, cámbiela.
• La limpieza de la tapa, de la junta y de su compartimento en la tapa, de la válvula de seguridad y de
la válvula de funcionamiento.
• El buen estado del borde de la cuba.
Si se han quemado ali- • Deje la cuba en remojo durante algún tiempo antes
de lavarla.
mentos en la olla:
• Nunca utilice productos clorados.
Si no puede abrir la • Compruebe que el indicador de presencia de presión está abajo.
tapa:
• Si no: descomprima, si fuera necesario, enfríe la olla
bajo un chorro de agua fría.
Si los alimentos no se • El tiempo de cocción.
han cocido o si se han • La potencia de la fuente de calor.
quemado, compruebe: • Si la posición de la válvula de funcionamiento es correcta.
• La cantidad de líquido.
26
TF_EXPERT-PRO_INSFTW1_USA 04/12/13 11:48 Page27
EN
Tabla de los tiempos de cocción
Verduras
ES
FRESCOS
CONGELADOS
Cocción Posición de la válvula Posición de la válvula
1
2
Alcachofas
Apio
Arroz (legumbre)
Brócoli
Calabacines
Calabaza (puré)
Champiñones
Coles de Bruselas
Coliflor
Endivias
Espárragos
Espinacas
Guisantes
Judías semi secas
Judías verdes
Nabos
Patatas en cuartos
Puerros rodajas
Remolacha
Repollo
Zanahorias
- Vapor
- inmersión
- Vapor
- inmersión
- inmersión
- Vapor
- Vapor
- inmersión
- inmersión
Laminados - Vapor
enteros
- inmersión
- Vapor
- inmersión
- Vapor
- inmersión
- Vapor
- inmersión
- Vapor
- inmersión
- Vapor
- Vapor
- inmersión
- Vapor
- inmersión
- Vapor
- Vapor
Laminado - Vapor
deshojado - Vapor
Rodajas
- Vapor
14 min.
12 min.
5 min.
8 min.
6 min.
3 min.
5 min.
2 min.
6 min.
1 min.
1 ½ min.
5 min.
3 min.
10 min.
4 min.
4 min.
3 min.
1 ½ min.
16 min.
6 min.
5 min.
5 min.
10 min.
5 min.
2 ½ min.
16 - 24 min.
5 min.
5 min.
5 min.
PT
3 min.
7 min
EL
4 min.
4 min. - inmersión
4 min.
AR
FA
6 min.
4 min
7 min.
4 min.
vapor = alimento en el cestillo
inmersión = alimento en el agua
Carne - Pescado
Atún (4 filetes 1.5 lbs)
Cerdo (rollo 2 lbs)
Cordero (pierna 2.8 lbs)
Pollo (entero 2.6 lbs)
Rape (filetes 1.5 lbs)
Salmón(4 rodajas 1.5 lbs)
Ternera (2 lbs)
ES
FRESCOS
Posición de la válvula 2
CONGELADOS
Posición de la válvula 2
5 min
20 min
20 min
16 min
4 min
5 min
8 min
7 min.
36 min
28 min
36 min.
5 min.
6 min.
23 min
27
TF_EXPERT-PRO_INSFTW1_USA 04/12/13 11:48 Page28
Garantía limitada
•Su nueva olla a presión T-fal incluye una garantía
limitada de 10 años que cubre el aparato en las
condiciones de uso que se especifican en estas
instrucciones. Dicha garantía cubre:
- los defectos relacionados con la estructura
metálica del cuerpo de la olla a presión.
- cualquier deterioro prematuro de la base metálica.
•Las otras piezas están cubiertas por una garantía de
un año que incluye piezas de repuesto y mano de
obra. Dicha garantía cubre los defectos o fallos de
fabricación.
•La garantía contractual se obtiene únicamente tras
la presentación de un comprobante de compra válido
en el que aparezca la fecha de compra.
•La garantía no incluye:
•La junta, la válvula de control de la presión o la junta
del indicador de bloqueo tienen una vida útil limitada.
Dichas piezas no están incluidas en la garantía y
requerirán renovaciones periódicamente.
•Los daños causados por la incapacidad de seguir las
principales recomendaciones efectuadas o por el uso
negligente del producto, especialmente:
- por caídas voluntarias o involuntarias, golpes,
introducción en el horno, etc.
- al lavar la tapadera en el lavavajillas.
•T-fal® NO SERÁ RESPONSABLE DE LOS DAÑOS
FORTUITOS O EMERGENTES PRODUCIDOS POR
CUALQUIER CAUSA. Algunos Estados no permiten la
inclusión o la limitación de los daños fortuitos o
emergentes, de modo que es posible que el supuesto
de exclusión anterior no sea aplicable en su caso. Si
necesita asistencia técnica durante el periodo de
garantía, póngase en contacto con nosotros de lunes a
viernes, desde las 8.00 h hasta las 17.00 h, en el número
1-800-395-8325. www.t-falusa.com
•Esta garantía le concede derechos legales específicos.
Puede que también goce de otros derechos que pueden
variar de un Estado a otro.
28