Transcript
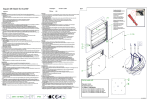
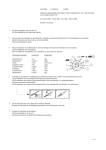
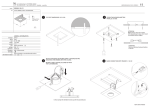
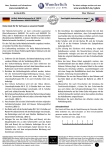
Square Moon Ext 4x24W
Lamptype :
Fitting :
106330XX
4xF16 4x 24W
MAP
Verwijder de (bedrukte) beschermfolie langs de
buitenkant van de polycarbonaten.
G5
Remove the (printed) protective foil along the
outside of the polycarbonates.
Montage
Installatie
1. Haal de 4 vijzen en rondsels uit het deksel. Neem de polycarbonaat uit.
2. Haal het sjabloon uit het inzetstuk van de doos en gebruik dit om de bevestigingsgaten af te
tekenen op de muur of het plafond.
Gebruik van het sjabloon:
- Leg het karton op de rug van het toestel zodat de doorvoertule doorheen het ronde gat (X)
van het sjabloon komt. Bepaal de oriëntatie van het toestel aan de muur of plafond (lampen
horizontaal of vertikaal)
- Houd nu enkel het sjabloon tegen de muur of plafond en haal de voedingskabel door gat X.
- Zorg ervoor dat het sjabloon waterpas hangt.
- Teken de gaten Z af op de muur.
3. Boor de gaten in de muur of het plafond.
4. Haal de voedingskabel door de opening van de ballastplaat.
5. Bevestig het toestel aan de muur of het plafond.
6. Sluit de voedingskabel aan mbv de meegeleverde waterdichte doorverbinders. Steek
hiervoor de draden per 2 in één doorverbinder en draai ze erin vast. Warm de
doorverbinder op met een warmelucht blazer en wacht tot de doorverbinder rond de draden
is gekrompen.
7. Plaats lampen in het toestel, overeenkomstig het toestelvermogen.
Klik de lampen vervolgens in de fittingen en klem deze in de lampveerhouder.
8. Zet de polycarbonaat terug in het toestel. Plaats de 4 rondsels en vijzen terug op de asjes.
Opmerking: Dit toestel is niet geschikt voor werking met bewegingsmelder.
Installation
1. Pull the 4 screws and pinions out of the lid. Remove the polycarbonate.
2. Take the template out of the box insert and use it to mark out the fixing holes on the wall or
ceiling.
Using the template:
- Place the cardboard on the back of the unit in such a way that the cable guide pokes
through the round hole (X) in the template.
- Determine the orientation of the unit on the wall or ceiling (bulbs horizontal or vertical).
- Now hold the template only against the wall or ceiling and pull the power cable through hole X.
- Make sure the template is hanging perfectly level.
- Mark holes Z on the wall.
3. Drill the holes in the wall or ceiling.
4. Pull the power cable through the opening of the ballast sheet.
5. Fix the unit to the wall or ceiling.
6. Connect the power cable using the waterproof connectors supplied. To do so, insert a pair of
wires in each connector and screw them in tightly. Heat the connector with a hot air gun and
wait until the connector has shrunk around the wires.
7. Put bulbs in the unit, being sure to respect its power rating. Then click the bulbs into the fittings
and clamp it in the lamp spring.
8. Put the polycarbonate back in the unit. Position the 4 pinions and screws back on the shafts.
Note: this appliance is not suitable for operation with motion detectors.
Installation
1. Sortez les 4 vis et les rondelles du couvercle. Sortez également la coiffe en polycarbonate.
2. Retirez le gabarit hors de la pièce rapportée de la boîte et utilisez-le pour tracer les trous de
fixation au mur ou au plafond.
Utilisation du gabarit.
- Posez le carton sur le dos de l’appareil de manière à ce que le manchon de passage
traverse le trou circulaire (X) du gabarit.
- Déterminez l’orientation de l’appareil au mur ou au plafond (lampes horizontales ou
verticales).
- A présent, maintenez uniquement le gabarit contre le mur ou le plafond et introduisez le
câble d’alimentation à travers le trou X.
- Assurez-vous que le gabarit soit bien d’aplomb.
- Tracez les trous Z au mur
3. Forez les trous dans le mur ou le plafond.
4. Introduisez le câble d’alimentation à travers l’ouverture de la tôle du ballast.
5. Fixez l’appareil au mur ou au plafond.
6. Raccordez le câble d’alimentation au moyen des connecteurs étanches livrés. Pour ce faire,
Aintroduisez les câbles par 2 dans un connecteur et fixez-les. Chauffez le connecteur avec
une
torche à air chaud et attendez que le connecteur se soit rétracté autour des fils.
7. Introduisez les ampoules dans l'appareil suivant la puissance de ce dernier.
Cliquez ensuite les ampoules dans les luminaire et bloquer dans la fixation du ressort de lampe.
8. Remontez la coiffe en polycarbonate dans l’appareil. Remettez les 4 rondelles et vis en
place sur les petits axes.
Remarque: Cet appareil n’est pas conçu pour être utilisé avec un détecteur de mouvement.
1. Nehmen Sie die 4 Schrauben und Unterlegscheiben aus dem Deckel. Entfernen Sie die
Polycarbonat-Scheibe.
2. Nehmen Sie die Schablone aus dem Einsatz des Gehäuses und zeichnen Sie mit ihrer Hilfe
die Bohrlöcher auf der Wand oder an der Decke an.
Benutzung der Schablone:
- Legen Sie den Karton auf die Rückseite der Leuchte, sodass die Durchführtülle durch das
runde Loch (X) der Schablone passt.
- Legen Sie die Ausrichtung der Leuchte an Wand oder Decke fest (Lampen horizontal oder
vertikal).
- Halten Sie jetzt nur die Schablone an Wand oder Decke und ziehen Sie das Stromkabel
durch Loch X.
- Sorgen Sie dafür, dass die Schablone waagerecht hängt.
- Zeichnen Sie die Löcher Z auf der Wand an.
3. Bohren Sie die Löcher in Wand oder Decke.
4. Ziehen Sie das Stromkabel durch die Öffnung der Ballastplatte.
5. Befestigen Sie die Leuchte an Wand oder Decke.
6. Schließen Sie das Stromkabel mithilfe der wasserdichten Schrumpfverbinder an. Stecken
Sie hierzu die Adern paarweise in einen Schrumpfverbinder und drehen Sie sie innen
zusammen. Erhitzen Sie den Schrumpfverbinder mit einer Heißluftpistole und warten Sie,
bis der Verbinder rund um die Adern geschrumpft ist.
7. Setzen Sie Lampen in die Leuchte ein, die mit deren Leistung übereinstimmen.
Klicken Sie die Lampen danach in die Fassungen und klemmen Sie sie im Frühjahr Glühbirne
8. Setzen Sie die Polycarbonat-Scheibe wieder in die Leuchte ein. Setzen Sie die 4
Unterlegscheiben und Schrauben wieder auf die Abstandhalter.
Anmerkung:diese Leuchte eignet sich nicht zu m Einsatz mit einem Bewegungsmelder.
5
Enlevez le film de protection (imprimé) par la
face extérieure des coiffes en polycarbonate.
3
Entfernen Sie die (bedruckte) Schutzfolie an
der Außenseite des Polycarbonats.
Retirar la lámina de protección (impresa) que
recubre la cara externa de las piezas de
policarbonato.
7
Togliere la pellicola protettiva (stampata) dalla
parte esterna dei policarbonati.
Instalación
1. Retire los 4 tornillos y piñones de la cubierta. Retire el policarbonato.
2. Sacar la plantilla del parche de la caja y utilizarla para marcar los taladros de fijación en la
pared o el techo.
Modo de empleo de la plantilla:
- Poner el cartón en la parte trasera del aparato, de manera que el tul de paso atraviesa el
agujero redondo (X) de la plantilla.
- Determinar la orientación del aparato en la pared o el techo (lámparas en posición horizontal
o vertical).
- Mantener solamente la plantilla contra la pared o el techo y pasar el cable de alimentación
por el agujero X.
- Procurar que la plantilla quede nivelada.
- Marcar los taladros Z en la pared.
3. Hacer los taladros en la pared o el techo.
4. Pasar el cable de alimentación por el orificio de la placa de carga.
5. Fijar el aparato en la pared o el techo.
6. Conecte el cable de alimentación con la ayuda de las conexiones impermeables
suministradas. Para ello, introduzca los hilos por pares en una misma conexión y ajústelos
en las mismas. Caliente la conexión con un soplador de agua caliente y espere hasta que la
conexión haya encogido alrededor de los hilos.
7. Coloque las lámparas en el aparato con arreglo a la potencia del mismo. Introduce las bombillas en los
portalámparas y fijalas también en los clips de la lámpara.
8. Vuelva a colocar el policarbonato en el aparato. Vuelva a colocar los 4 piñones y tornillos en
los pequeños ejes.
Obseravción:este aparato no es apto para su utilización con un indicador de movimiento.
A
L N
1/8
6
4
Installazione
1. Togliere le 4 viti e rondelle dal coperchio. Togliere il policarbonato.
2. Togliere la sagoma dal pezzo incorporato della scatola e utilizzarla per disegnare i fori di
fissaggio sul muro o sul soffitto.
Uso della sagoma:
- Posizionare il cartone sulla parte posteriore dell’apparecchio in modo che il tulle di
passaggio attraversi il foro rotondo (X) della sagoma.
- Definire l’orientamento dell’apparecchio al muro o al soffitto (lampade orizzontali o
verticali).
- A questo punto tenere soltanto la sagoma contro il muro o contro il soffitto e far passare il
cavo di alimentazione attraverso il foro X.
- Assicurarsi che la sagoma sia perfettamente orizzontale.
- Disegnare i fori Z sul muro.
3. Forare i fori nel muro o nel soffitto.
4. Far passare il cavo di alimentazione attraverso il foro della lastra di zavorra.
5. Fissare l’apparecchio al muro o al soffitto.
6. Collegare il cavo di alimentazione con i quattro passanti a tenuta d’acqua. Quindi inserire i
fili a 2 in un solo passante e avvitarli. Riscaldare il passante con un ventilatore ad aria calda
e aspettare che il passante intorno ai fili si sia ristretto.
7. Posizionare le lampade nell'apparecchio, in conformità con la potenza dell'apparecchio, Quindi
fissare con un clic le lampade. Di seguito fissare le lampadine negli alloggi e incastrarle nei clip della lampada.
8. Rimettere il policarbonato nell’apparecchio. Riposizionare le 4 rondelle e le viti sugli assi.
Nota:questo apparecchio non è adatto per il funzionamento con indicatore di movimento.
Can be used with
Square moon
Suspension set
4 cables (10630930)
230V / 50-60Hz
F
IP55
6
2
Z
X
0.5 m
elec.
V3 16/02/2011