1
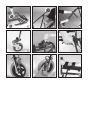
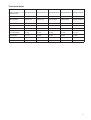
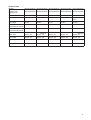
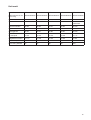
Walk Star
Bedienungsanleitung.....................................................4
Instructions for Use.......................................................8
Istruzione d‘uso............................................................12
Instrucciones de uso...................................................16
© Otto Bock HealthCare GmbH · 647H474 – 02.05/4 · Printed in Germany
1
2
3
4
5
6
7
8
9
Therapieprodukt
Therapy aid
Produit thérapeutique
Prodotto terapeutico
Producto terapéutico
• Bedienungsanleitung beachten!
• Observe instructions for use!
• Respecter les instructions de service!
• Osservare le istruzioni d’uso!
• Seguir las instrucciones para el uso!
• Leia as instruções de utilização
atentamente!
• Let op de gebruiksaanwijzing!
• Betjeningsvejledningen skal
overholdes!
• Iaktta bruksanvisningen!
• Følg bruksanvisningen!
• Lue käyttöohje läpi!
Produto terapêutico
Therapieproduct
Terapiprodukt
Terapiprodukt
Terapiprodukt
• Nur im Innenbereich verwenden!
• For indoor use only!
• N’utiliser qu’à l’intérieur !
• Utilizzare solamente all‚interno!
• Emplear solamente en el interior!
• O produto é destinado apenas à
utilização em interiores!
• Alleen binnen gebruiken!
• Kun til brug inden døre!
• Får endast användas inomhus !
• Må kun brukes innendørs !
• Käytä vain sisätiloissa!
• Nicht auf schrägem Untergrund verwenden !
• Do not use on sloping surface!
• Ne pas utiliser sur sol incliné !
• Non utilizzare su fondamento pendente!
• No emplear sobre fondo inclinado!
• Não utilize sobre superfícies inclinadas!
• Niet op een schuine ondergrond gebruiken!
• Må ikke anvendes på skråt underlag!
• Får ej användas på sluttande underlag !
• Må ikke brukes på skrått underlag !
• Älä käytä vinolla pohjalla!
• Nur unter Aufsicht von Fachpersonal verwenden!
• Use under supervision of expert staff only!
• N’utiliser que sous la surveillance de personnel
spécialisé !
• Utilizzare solamente sottoposto a soverglianza di
personale specializzato!
• Emplear solamente sometido a vigilancia de personal
especializado!
• Utilize somente sob vigilância de pessoal qualificado!
• Alleen onder toezicht van vakkundig personeel
gebruiken!
• Må kun anvendes under opsyn af fagpersonale!
• Får endast användas under uppsyn av fackpersonal!
• Må kun brukes under oppsyn av fagpersonell!
• Käytä vain hoitohenkilökunnan läsnäollessa!
• Nicht auf unebenem Untergrund verwenden !
• Do not use on uneven surface!
• Ne pas utiliser sur sol irrégulier !
• Non utilizzare su fondamento accidentato!
• No emplear sobre fondo accidentado!
• Não utilize sobre superfícies acidentadas!
• Niet op een oneffen ondergrond gebruiken!
• Må ikke anvendes på ujævnt underlag!
• Får ej användas på ojämnt underlag !
• Må ikke brukes på ujevnt underlag !
• Älä käytä epätasaisella pohjalla!
3
Bedienungsanleitung für WalkStar
Inhaltsverzeichnis
Seite
Vorwort .................................................................................................................................................................. 5
Verwendungszweck ............................................................................................................................................. 5
Sicherheitshinweise ............................................................................................................................................. 5
Konformitätserklärung ........................................................................................................................................ 5
Montage und Anpassen ....................................................................................................................................... 5
Demontage und Transport .................................................................................................................................. 6
Zubehör:
Beckenpelotten ...................................................................................................................................................... 6
Fahr- und Feststellbremse ..................................................................................................................................... 6
Schleifbremse ........................................................................................................................................................ 6
Vertikale Handgriffe mit Armschalen ...................................................................................................................... 6
Wartung und Pflege ............................................................................................................................................. 6
Technische Daten ................................................................................................................................................. 7
Technische Änderungen vorbehalten!
4
Vorwort
Vor der Inbetriebnahme des WalkStars sollten Sie diese Bedienungsanleitung sorgfältig lesen. Sie enthält wichtige
Informationen für die sichere und zuverlässige Benutzung des Gerätes. Bewahren Sie die Bedienungsanleitung
für eine spätere Bezugnahme auf.
Bei Beachtung nachstehender Hinweise und bei einer sachgemäßen Benutzung ist die Sicherheit,
Zuverlässikeit und Leistungsfähigkeit gewährleistet.
Verwendungszweck
Das Therapiegerät WalkStar wurde speziell für die Korrektur von Problemen in der Körperhaltung entwickelt.
Durch die offene Front des WalkStars und die hinter dem Körper liegende Geh- bzw. Mobilitätshilfe wird der
Benutzer automatisch animiert, sich aufzurichten. Darüber hinaus fördert diese konstruktive Lösung eine größere
Schrittlänge und ermöglicht das nahe Heranfahren an Möbel etc.. Die nach hinten arretierenden Rücklaufsperren
an den Hinterrädern verhindern ein Zurückrollen des WalkStars und vermitteln so ein Gefühl der Sicherheit. Zudem wird besonders bei Kindern die Kontaktaufnahme mit dem sozialen Umfeld erleichtert, da nicht ständig eine
Barriere vor dem Körper liegt.
Die serienmäßig nicht lenkbaren Vorderräder des WalkStars dienen dem therapeutischen Effekt. Zum einen wird
die Hüftstabilität verbessert, zum anderen muß der WalkStar für Richtungsänderungen leicht angehoben und
damit Gewicht übernommen werden. So wird insbesondere bei Kindern auf spielerische Art ein physiologisches
Gehen aufgebaut. Gleichzeitig kann auch die Neigung zum Laufen auf den Zehen reduziert werden.
Der leichte Rahmen aus Aluminium läßt sich einfach zusammenfalten, so daß der WalkStar platzsparend transportiert oder gelagert werden kann.
Sicherheitshinweise
• Prüfen Sie vor der Benutzung des Hilfsmittels dessen ordnungsgemäße Montage
(s. Seite 5 „Montage und Anpassen)
• Achten Sie bei der Anwendung darauf, daß der Weg, den Sie mit dem WalkStar im Haus fahren wollen, frei ist
von Gegenständen, die das Rollen der Gehhilfe behindern.
• Der WalkStar darf nur im Innenbereich auf ebenen waagerechten Flächen verwendet werden.
• Er darf nur von sachkundigen und eingewiesenen Personen bedient werden.
• Wenn vom zuständigen Arzt oder Therapeuten nicht anders verordnet, muß der WalkStar aus Sicherheitsgründen mit einer Fahrbremse ausgestattet sein
• Beachten Sie bitte die angegebenen Werte zu Körpergröße und zulässigem Patientengewicht
(s. Seite 7 „Technische Daten).
Konformitätserklärung
Die Firma Otto Bock erklärt als Hersteller in alleiniger Verantwortung, daß der WalkStar mit den Anforderungen der
Richtlinie 93 / 42 / EWG übereinstimmt.
Montage und Anpassen
Aufbau und Montage
Der WalkStar verfügt über ein zusammenklappbares Aluminium-Rohrgestell und ist zusätzlich höhenverstellbar.
Zum Auffalten legen Sie den WalkStar auf den Boden, fassen ihn etwa in der Mitte des Vorderrahmens (Abb. 1) an
und falten den Rahmen auf.
Bitte beachten Sie beim Aufklappen, daß die Stativfedern in den Teleskoprohren stets ordnungsgemäß
einrasten (Abb. 1 und 2), (Hörbares Klicken. Achtung: gilt für beide Seiten !).
Dies gilt ebenfalls für die mögliche Höhenverstellung bei den Vorder- und den Hinterrädern.
Die Hinterräder dürfen niemals seitenverkehrt eingebaut werden, da sonst die Bremswirkung nach hinten nicht
gewährleistet ist.
Der WalkStar wird optional mit schwenkbaren Vorderrädern angeboten:
Die schwenkbaren Vorderräder können durch einen Rastbolzen mit Arretierung auf Geradeauslauf
fixiert werden.
Die Entscheidung, welche Vorderrad-Variante für welchen Patienten bzw. welches Krankheitsbild ausgewählt wird, ist vom Arzt oder Therapeuten zu treffen!
Anpassen (Abb. 3)
Durch die mögliche Verstellbarkeit in der Höhe kann eine individuelle Anpassung für den Anwender vorgenommen
werden. Es ist darauf zu achten, daß alle 4 Räder auf eine einheitliche Höhe gerastet werden.
5
Demontage und Transport
Den WalkStar auf die Hinterräder stellen und leicht nach hinten ankippen. Anschließend beide Stativfedern gleichzeitig (Abb. 2) eindrücken und den Rahmen ein wenig in Richtung Hinterräder zusammenschieben. Den WalkStar
in umgekehrter Reihenfolge wie unter ”Aufbau und Montage” beschrieben zusammenlegen.
Achtung: Bei unsachgemäßer Handhabung besteht Quetschgefahr!
Für den Transport ist das Entfernen der 4 Räder inkl. der Rohre nicht zwingend erforderlich (Abb. 4). Im Extremfall
kann dadurch jedoch eine zusätzliche Platzeinsparung erzielt werden.
Zubehör
Beckenpelotten (Abb. 5)
Mit der Beckenpelotte kann der Patient in der Oberschenkel- bis Beckenregion seitlich gestützt werden.
In der Breite und im Winkel kann die Beckenpelotte durch Lösen der Halteschrauben eingestellt werden.
Achten Sie darauf, nach der Einstellung die Schraubverbindung wieder fest anzuziehen!
Fahr- und Feststellbremse
Die Feststellbremse ermöglicht dem Patienten zum einen ein dosiertes Bremsen, zum anderen ein sicheres Abstellen des WalkStar ohne Wegrollen.
Zum Feststellen der Bremsen den Bremsgriff ganz durchziehen, die Halteklaue mit dem Zeigefinger einrasten
(Abb. 6). Zum Lösen der Feststellbremse den Bremsgriff leicht anziehen, die Halteklaue öffnet sich.
Sollte das Bremsverhalten nicht mehr ausreichend sein, so können sie mit der Stellschraube (Abb. 7) den jeweiligen Bremszug nachstellen.
Der Bremsgriff kann wahlweise am Schiebebügel oder am vertikalen Handgriff (Abb. 9) angebracht werden.
Schleifbremse (Abb. 8)
Die Funktion der Schleifbremse dient zur dosierten Verlangsamung des Abrollvorganges.
Durch Öffnen oder Schließen der Rändelmuttern kann der Druck der Schleifbremsen auf die Reifen und damit die
Abrollgeschwindigkeit der Räder verändert werden.
Achtung: Die Funktionstauglichkeit sollte regelmäßig kontrolliert und ggf. korrigiert werden.
Abgenutzte oder beschädigte Räder bitte austauschen.
Vertikale Handgriffe mit Armschalen (Abb. 9)
Die vertikalen Handgriffe mit Armschalen wurden als Lösung für Anwender entwickelt, die sich nicht mit ausgestreckten Armen, sondern sicherer auf den Unterarmen abstützen können.
Die vertikalen Handgriffe werden zusammen mit der Höhenverstellung des WalkStar eingestellt.
Der Abstand zwischen Unterarmpolster und Griff sollte so eingestellt werden, daß es zu keinen Druckstellen oder
Krampfhaltungen kommt. Die Unterarme des Patienten werden mit je zwei Klettbändern fixiert.
Wartung und Pflege
➜ Vermeiden Sie Verschmutzungen der Laufräder, bzw. überprüfen Sie regelmäßig den sauberen Lauf der Räderpaare.
➜ Für die Reinigung des WalkStar sind alle milden Haushaltsreiniger ohne Salmiak und Scheuermittel zulässig.
Lösungsmittel (z.B. Nitro) zerstören die Beschichtung und die Oberflächen von Kunststoffteilen.
Maschinelle Reinigung und Desinfektion bzw. automatische Waschstraßenreinigung des Gerätes ist nicht
zulässig. Empfohlen wird eine feuchte Wischreinigung bzw. Desinfektion.
➜ Prüfen und kontrollieren Sie regelmäßig alle Metall- und Schraubverbindungen auf Verschleiß und Festigkeit.
Vor allem die Einrastpunkte der Federschnäpper müssen sorgfältig geprüft werden. Sollte eine Verbindung
nicht in Ordnung sein, wenden Sie sich bitte umgehend an den zuständigen Fachhändler.
Alle eigenmächtig durchgeführten Veränderungen am WalkStar, die nicht mit dem Hersteller bzw. dem
Fachhändler abgestimmt wurden, führen zum Erlöschen der Haftung. Ebenso das Überschreiten der Maximal-Angaben bei der Anwendung.
6
Technische Daten
Modelle
RR1600100000 RR1600300000 RR1600500000 RR1600700000 RR1600900000
Längenangaben in cm/ RR1600200000 RR1600400000 RR1600600000 RR1600800000 RR1601000000
Gewicht in kg
Größe
1/2
1
2
3
4
Rahmenfarbe
sparkle rot
sparkle rot
sparkle blau
sparkle blau
sparkle blaugrün
starr
39-48
45-58
53-69
63-82
83-102
lenkbarr
40-49
44-57
50-66
63-82
83-102
Griffhöhe
39-48
43-58
53-70
65-84
83-102
Abstand zwischen
den Handgriffen
ca. 35
ca. 35
ca. 35
ca. 39
ca. 44
max. Breite
ca. 57
ca. 58
ca. 60
ca. 62
ca. 65
Körpergröße
bis ca. 114
bis ca. 122
bis ca. 137
bis ca. 155
ab ca. 155
27
38
59
100
max. Patientengewicht 27
7
WalkStar – Instructions for Use
Table of Contents
Page
Preface .................................................................................................................................................................. 9
Intended Use ........................................................................................................................................................ 9
Safety Tips ............................................................................................................................................................ 9
Declaration of Conformity ................................................................................................................................... 9
Assembly and Adaptation ................................................................................................................................... 9
Disassembly and Transport .............................................................................................................................. 10
Accessories:
Pelvic pads ........................................................................................................................................................... 10
Driving brake and wheel lock ............................................................................................................................... 10
Friction brake ....................................................................................................................................................... 10
Vertical hand grips with forearm pads ................................................................................................................. 10
Maintenance and Cleaning ............................................................................................................................... 10
Technical Data .................................................................................................................................................... 11
Technical modifications reserved!
8
Preface
Before using your WalkStar, please read these instructions for use thoroughly. They contain important information for a safe and reliable use of the product. Please keep these instructions for later reference.
Safety, reliability and performance of the product are ensured provided that the following instructions are observed and that the product is used properly.
Intended Use
The WalkStar therapy aid has been specially designed for the correction of body posture problems.
The open front of the WalkStar and the walking mobility aid placed behind the body encourage the user to stand
and walk upright. Furthermore, this constructional solution promotes longer strides and allows the user to come
right up to tables, cupboards, etc. The reverse-roll locking devices at the rear wheels prevent the WalkStar from
rolling backwards and thus give the user a feeling of security. In addition, it is easier – especially for children – to
make contact with their social environment, since there is no annoying barrier in front of the body.
The non-swiveling front wheels of the WalkStar also offer a therapeutic effect; on the one hand
hip stability is increased, and on the other hand, because the WalkStar must be lifted slightly to change direction,
the user must bear weight. This is especially important for children, and helps them to learn physiological walking
in a playful manner. At the same time it can reduce the tendency children have to walk on their toes.
The light aluminum frame can be folded to allow space-saving transport or storage.
Safety Tips
• Make sure the WalkStar has been properly assembled before using it (see ”Assembly and Adaptation”).
• When using the WalkStar, always make sure that nothing that could impede rolling of the walking aid lies in the
way.
• The WalkStar may be used only indoors on level, horizontal surfaces.
• The WalkStar may only be used by persons trained in its use.
• If not prescribed otherwise by the responsible physician or therapist, the WalkStar must be provided with a driving brake for safety reasons.
• Please observe the indicated figures regarding body height and allowable patient weight (see ”Technical
Data”).
Declaration of Conformity
Otto Bock Healthcare as manufacturer with sole responsibility declares that the WalkStar conforms to the requirements of the 93 /42 /EEC Guidelines.
Assembly and Adaptation
Unfolding and assembling
The WalkStar features a folding aluminum tube frame and is also height adjustable. To unfold lay the WalkStar on
the ground, grasp approximately in the middle of the front frame (Fig. 1) and unfold the frame.
When unfolding please make sure that the supporting springs in the telescoping tubes always engage
properly (Figs. 1 and 2), (You will hear an audible snap). Attention: applies to both sides!.
This also applies to any height adjustments made to the front or rear wheels.
Never mount the rear wheels with the sides inverted! In this case the rear braking function can not be ensured.
The WalkStar is available with optional swiveling front wheels:
The swiveling front wheels can be locked with a ratchet bolt to limit the WalkStar to straight-forward movement.
The physician or therapist will decide which front wheel version should be selected for the individual
patient.
Adapting (Fig. 3)
The height adjustment feature allows for individual adaptation to the user. Make sure all 4 wheels are set (and
engage) at the same height.
9
Disassembly and Transport
Set the WalkStar on its rear wheels and slightly tip it to the rear. Press both supporting springs simultaneously
(Fig. 2) and push the frame a bit towards the rear wheels. Fold the WalkStar in reverse order as described under
”Unfolding and assembling”.
Attention: In cases of improper handling there is the risk of getting pinched!
For transport, it is not necessary to remove the 4 wheels or their tubes (Fig. 4). In extreme cases, however, this
would help to save space.
Accessories
Pelvic pads (Fig. 5)
The pelvic pads offer lateral support for the patient from femur to pelvis.
To adjust the width and the angle of the pelvic pad, loosen the holding screws.
Be sure to firmly re-tighten the screw connections after making adjustments.
Driving brake and wheel lock
The wheel lock allows the patient to both control braking and park the WalkStar safely. To activate the wheel
locks, pull the brake handle out completely and engage the retaining claw with your index finger (Fig. 6). To
loosen the wheel lock, pull the brake handle out slightly and the retaining claw will open.
If the braking function is insufficient, readjust the respective brake cable with the adjustment screw (Fig. 7).
The brake handle can be attached either to the pushbar or to the vertical hand grip (Fig. 9).
Friction brake (Fig. 8)
The friction brakes can be used to control deceleration.
The pressure of the friction brake on the tires and thus the rolling speed of the wheels can be varied by loosening
or tightening the knurled nuts.
Attention: Regularly check for proper function and correct if necessary.
Worn or damaged wheels should be replaced.
Vertical hand grips with forearm pads (Fig. 9)
The vertical hand grips with forearm pads have been designed for users who are unable to support themselves
on their extended arms and who feel safer using their forearms for support.
The vertical hand grips should be adjusted together with the height of the WalkStar.
The distance between forearm pad and grip should be adjusted so as to avoid pressure points and cramped postures. The forearms of the patient are fixed with two hook-and-loop straps on either side.
Maintenance and Cleaning
➜ Prevent the wheels from getting dirty and check for smooth function of the wheel sets on a regular basis.
➜For cleaning the WalkStar, any mild detergent without ammonia or scouring agents can be used. Solvents will
destroy the coating and surfaces of the plastic parts.
Machine-cleaning and disinfection is not recommended. To clean or disinfect the WalkStar we recommend wiping it with a damp cloth.
➜Regularly check the metal and screw connections for any wear and tear and to make sure they are stable. The
engaging points of the spring snaps are of special importance and must be checked thoroughly. If any connections are not in order, consult your healthcare provider immediately.
Any unauthorized modifications on the WalkStar, carried out without the approval from the manufacturer
or healthcare provider, as well as any situations that exceed the maximal indications while using the
product, will make manufacturer liability null and void.
10
Technical Data
Models
RR1600100000 RR1600300000 RR1600500000 RR1600700000 RR1600900000
Length in cm/
Weight in kg
RR1600200000 RR1600400000 RR1600600000 RR1600800000 RR1601000000
Size
1/2
1
2
3
4
Frame color
sparkle red
sparkle red
sparkle blue
sparkle blue
sparkle bluegreen
Grip height
39-48
43-58
53-70
65-84
83-102
with rigidly
39-48
mounted front wheels
45-58
53-69
63-82
83-102
with swivleing
40-49
mounted front wheels
44-57
50-66
63-82
83-102
hand grips
approx. 35
Distance
approx. 35
approx. 35
approx. 39
between
approx. 44
Max. width
approx. 57
approx. 58
approx. 60
approx. 62
approx. 65
Body height
up to approx. 114
up to approx. 122
up to approx. 137
up to approx. 155
from approx. 155
Max. patient weight
27
27
38
59
100
11
Istruzione d‘uso del deambulatore WalkStar
Indice
Pagina
Premessa ............................................................................................................................................................ 13
Campo d‘impiego ............................................................................................................................................... 13
Indicazioni per la sicurezza ............................................................................................................................... 13
Dichiarazione di conformitá .............................................................................................................................. 13
Montaggio e adattamento .................................................................................................................................. 13
Smontaggio e trasporto ..................................................................................................................................... 14
Accessori:
pelotte per bacino ................................................................................................................................................. 14
freno a slittamento e freno d‘arresto .................................................................................................................... 14
freno a spazzola ................................................................................................................................................... 14
manopole verticali con braccioli ........................................................................................................................... 14
Manutenzione e cura dell‘ausilio ...................................................................................................................... 14
Dati tecnici .......................................................................................................................................................... 15
Salvo modifiche tecniche!
12
Premessa
Prima di utilizzare il deambulatore WalkStar, leggete attentamente queste istruzioni d‘uso. Esse contengono importanti indicazioni per un uso sicuro e corretto dell‘ausilio. Conservatele per poterle consultare ogni qualvolta ne
abbiate bisogno.
Se vi attenete a quanto scritto in questo manuale e conseguentemente, se utilizzate in maniera appropriata
l‘apparecchio, esso vi garantirá sicurezza, affidabilitá ed efficienza.
Campo d‘impiego
Il deambulatore WalkStar é stato sviluppato in particolare allo scopo di correggere la postura del busto.
La struttura del telaio, aperta sul lato frontale e chiusa nella parte posteriore, che funge da appoggio e allo stesso
tempo da ausilio per la deambulazione, stimola automaticamente l‘utente a sollevare il busto in posizione corretta.
L‘apertura sul davanti consente un allungamento del passo e facilita l‘avvicinamento a mobili, piani di appoggio
ecc. I freni con blocco di ritorno delle ruote posteriori, diminuiscono il rischio di scivolamento all‘indietro, aumentando
la sicurezza dell‘ausilio. La riduzione delle barriere facilita, soprattutto nei bambini, il contatto col mondo circostante.
Le ruote anteriori fisse di serie hanno funzione terapeutica. In primo luogo aumentano la stabilitá e inoltre, dovendo
l‘utente sollevare leggermente WalkStar per variare direzione, deve assumerne anche il peso e ciò permette di
conseguire un cammino fisiologico.
Il telaio leggero in alluminio può essere chiuso facilmente, consentendo a WalkStar di essere trasportato e riposto
con un minimo ingombro.
Indicazioni per la sicurezza
• Prima dell‘impiego, osservate le istruzioni per il montaggio
(v. „Montaggio e adattamento“)
• Durante l‘impiego in casa, accertatevi che il percorso non sia occupato da oggetti, che impediscano il libero
scorrimento delle ruote.
• WalkStar é indicato esclusivamente per l‘impiego in ambienti interni e su terreni piani.
• Può essere utilizzato solo da personale competente autorizzato.
• Salvo diversa indicazione del medico o del terapista, WalkStar, per motivi di sicurezza, deve sempre essere
dotato di freno a slittamento
• Rispettate i valori riportati in base alla statura e al peso del paziente
(v. „Dati tecnici“).
Dichiarazione di conformitá
La Otto Bock in qualitá di produttore, dichiara sotto la propria unica responsabilitá, che WalkStar é conforme agli
obblighi della direttiva CEE 93 / 42.
Montaggio e adattamento
Montaggio
WalkStar dispone di un telaio tubolare in alluminio pieghevole, regolabile in altezza. Per chiudere WalkStar, stendetelo
per terra, afferratelo al centro del telaio anteriore (fig. 1) e piegatelo.
Quando lo aprite, accertatevi che le molle di supporto a scatto siano sempre correttamente inserite nei
tubi telescopici (fig. 1 e 2), (dovete udirne il rumore d‘incastro. Ciò vale per entrambi i lati!).
La stessa cosa riguarda anche il raggio di regolazione dell‘altezza delle ruote anteriori e posteriori.
Le ruote anteriori non devono mai essere montate con i lati invertiti, altrimenti non é consentita l‘azione frenante
all‘indietro.
WalkStar dispone in versione optional di ruote anteriori piroettanti:
le ruote anteriori piroettanti possono anche essere dotate di un particolare dispositivo per renderle
unidirezionali.(fig.4)
La scelta del tipo di ruota anteriore adatta al paziente e al suo quadro clinico deve essere effettuata dal
medico o dal terapista!
Adattamento (fig. 3)
Grazie alle possibilitá di regolazione dell‘altezza, é possibile adattare Walk Star alle esigenze individuali dell‘utente.
E‘ necessario accertarsi che tutte e 4 le ruote siano montate alla stessa altezza.
13
Smontaggio e trasporto
Collocate WalkStar sulle ruote posteriori e ribaltatelo leggermente all‘indietro. Premete infine le due molle a scatto
contemporaneamente (fig. 2) e spingete lievemente il telaio verso le ruote posteriori. Montate nuovamente WalkStar
seguendo il procedimento inverso, come descritto nel capitolo „Montaggio e adattamento“.
Attenzione a non schiacciarvi le dita durante le manovre di montaggio e smontaggio!
Per il trasporto di WalkStar non é indispensabile togliere le 4 ruote con i rispettivi tubolari (fig. 4); tuttavia può
essere utile, nel caso occorra risparmiare maggior spazio.
Accessori
Pelotte per bacino (fig. 5)
Le pelotte di bacino servono a sostenere lateralmente il paziente nella regione transfemorale e del bacino.
La pelotta può essere regolata in larghezza e angolazione, allentando la vite di fissaggio.
Ricordatevi, al termine della regolazione, di stringere nuovamente tutti i collegamenti a vite!
Freno a slittamento e freno d‘arresto
Il freno di arresto consente da un lato una frenata ammortizzata e dall‘altro un arresto sicuro di WalkStar senza
scivolamento.
Per il fissaggio dei freni, azionate completamente la manopola corrispondente e fate scattare la levetta d‘arresto
col dito indice (fig. 6). Per allentare il freno di arresto, tirate leggermente la manopola corrispondente in modo che
la levetta d‘arresto si sganci.
Se l‘efficienza dei freni risultasse insufficiente, regolate il tiraggio dei freni intervendendo sulla vite di registrazione
(fig. 7) .
La manopola del freno può essere montata a scelta o sul manubrio di spinta o sulla manopola verticale (fig. 9).
Freno a slittamento (fig. 8)
Il freno a slittamento ha la funzione di rallentare il deambulatore in maniera graduale.
Allentando o stringendo i dadi zigrinati, si può modificare la pressione dei freni a slittamento sui pneumatici e
quindi la velocitá di slittamento delle ruote.
Attenzione: verificare regolarmente la funzionalitá del freno a slittamento e apportare le dovute modifiche.
Sostituire le ruote usurate o danneggiate.
Manopole verticali con braccioli (fig. 9)
Le manopole verticali con i relativi braccioli sono state sviluppate appositamente per offrire all‘utente un supporto
sicuro sull‘avambraccio.
Le manopole verticali vengono regolate insieme all‘altezza del WalkStar.
La distanza tra l‘imbottitura per avambraccio e la manopola deve essere tale da garantire il massimo comfort, in
modo che non si formino punti di pressione e non insorgano crampi. L‘avambraccio del paziente viene fissato con
due cinturini in velcro.
Manutenzione e cura
➜ Mantenete pulite le ruote e controllate regolarmente che siano pulite le parti in cui scorrono le coppie di ruote.
➜ Per la pulizia di WalkStar é consentito l‘uso di qualsiasi detergente delicato di uso comune che non contenga
ammoniaca e sostanze abrasive. I solventi (es. nitro) danneggiano la patina di rivestimento e le superfici in
plastica.
Né la pulizia né la disinfezione meccaniche sono consentite. Si consiglia invece di utilizzare per pulizia e
disinfezione un panno umido.
➜ Controllate regolarmente lo stato e il corretto fissaggio di tutte le parti in metallo e dei collegamenti a vite, e in
particolare tutti i punti a incastro e le molle a scatto. Per anomalie riscontrate in queste parti di collegamento,
non esitate a rivolgervi al vostro rivenditore autorizzato.
Tutte le modifiche a WalkStar eseguite di propria iniziativa, non autorizzate dal rivenditore o dal produttore,
portano all‘annullamento delle condizioni di garanzia. La stessa cosa dicasi qualora, nell‘impiego dell‘ausilio,
vengano superati i valori limite indicati.
14
Dati tecnici
Modelli
RR1600100000 RR1600300000 RR1600500000 RR1600700000 RR1600900000
Dati lunghezza in cm/
Peso in kg
RR1600200000 RR1600400000 RR1600600000 RR1600800000 RR1601000000
Misura
1/2
Colori telaio
1
2
3
4
rosso iridescente rosso iridescente blu iridescente
blu iridescente
verde mare
iridescente
Altezza manubrio
39-48
43-58
53-70
65-84
83-102
rigido
39-48
45-58
53-69
63-82
83-102
maneggevole
40-49
44-57
50-66
63-82
83-102
Distanza tra
le manopole
ca. 35
ca. 35
ca. 35
ca. 39
ca. 41
Larghezza massima
ca. 57
ca. 58
ca. 60
ca. 62
ca. 65
Altezza corpo
fino a ca. 114
fino a ca. 122
fino a ca. 137
fino a ca. 155
fino a ca. 155
Peso max. paziente
27
27
38
59
100
15
Instrucciones de uso para el andador WalkStar
Índice
Página
Prólogo ................................................................................................................................................................ 17
Campo de aplicación ......................................................................................................................................... 17
Recomendaciones de seguridad ...................................................................................................................... 17
Declaración de conformidad ............................................................................................................................. 17
Montaje y ajuste/adaptación ............................................................................................................................. 17
Desmontaje y transporte ................................................................................................................................... 18
Accesorios:
Placas pélvicas .................................................................................................................................................... 18
Freno de dirección y accionamiento .................................................................................................................... 18
Freno de fricción .................................................................................................................................................. 18
Manillares verticales con apoyabrazos ................................................................................................................ 18
Mantenimiento y cuidados ................................................................................................................................ 18
Datos técnicos .................................................................................................................................................... 19
¡Nos reservamos el derecho a cambios técnios!
16
Prólogo
Antes de utilizar el andador WalkStars lea detenidamente estas instrucciones de uso, ya que presentan información
importante para un uso seguro y fiable del andador. Mantenga las instrucciones de uso para una posible consulta
posterior.
Si tiene en cuenta las recomendaciones descritas a continuación y si utiliza el andador correctamente
garantizamos su seguridad, fiabilidad y eficacia.
Campo de aplicación
El utensilio de terapia (andador) WalkStar, ha sido diseñado especialmente para la corrección de problemas
posturales del usuario.
El WalkStar consta de una parte frontal abierta y de un apoyo para caminar y para moverse situado por detrás del
cuerpo del usuario, de modo que le anima de forma automática a levantarse y erguirse. Este método de construcción
fomenta la longitud de los pasos al caminar y la posibilidad de acercarse al máximo a muebles, etc. El andador
consta de bloqueos de retroceso situados en las ruedas traseras que evitan un movimiento involuntario del WalkStar
hacia atrás, procurando la sensación de seguridad. Además, facilita especialmente en el caso de los niños, el
contacto social con el entorno, ya que no tienen constantemente una barrera situada delante del cuerpo, como
con los andadores tradicionales.
La ruedas delanteras estándadel WalkStar son rígidas para ofrecer un efecto terapeútico mayor. Por un lado,
mejoran la estabilidad de la cadera y por otro lado hacen necesario que el andador tenga que ser elevado ligeramente
para cambiar la dirección de manera que el paciente tiene que mantener el peso. De este modo se crea de una
manera lúdica una marcha fisiológica, especialmente cuando lo utilizan niños. Al mismo tiempo se puede reducir
la tendencia a caminar de puntillas.
El chasis de aluminio es ligero y se pliega fácilmente para transportar o guardar el WalkStar necesitando un
espacio mínimo.
Recomendaciones de seguridad
• Antes de utilizar el andador compruebe que esté correctamente montado
(véa „Montaje y ajuste/adaptación)
• Al usar el WalkStar tenga en cuenta que el trayecto que ha de recorrer por espacios interiores se encuentre libre
de objetos que impidan rodar el andador libremente.
• El WalkStar sólo debe ser utilizado en interiores sobre superficies horizontales.
• Sólo lo pueden utilizar personas que lo conozcan y hayan sido instruidas previamente en el modo de empleo.
• Si por parte del médico o terapeuta correspondiente no ha sido descrito nada contrario, el WallkStar deberá
estar equipado con un freno de accionamiento por motivos de seguridad.
• Recuerde los valores que indicamos a continuación de tamaño y peso corporal del paciente permitido
(véa „Datos técnicos“).
Declaración de conformidad
La empresa Otto Bock declara como fabricante y bajo su propia responsabilidad, que el andador WalkStar cumple
con los requisitos de la normativa 93 / 42 / CE.
Montaje y ajuste/adaptación
Montaje
El andador WalkStar presenta un chasis de tubos de aluminio plegable y es adicionalmente regulable en su altura.
Para desplegar el andador, coloque el WalkStar sobre el suelo y agarrando aproximadamente en el centro de la
parte delantera del chasis (Fig. 1), tire hasta que el chasis quede totalmente desplegado.
Recuerde, que al desplegar el chasis, los resortes con forme de trípode queden siempre perfectamente
encajados en los tubos telescópicos (Fig. 1 y 2), (Atención escuchará dos veces „click“, uno por cada
lado).
Lo mismo sucede en el caso de la regulación de altura en las ruedas delanteras y traseras.
Las ruedas traseras nunca deben ser montadas en el lado equivocado, ya que si no, no podemos garantizar un
efecto de frenado hacia atrás.
El andador WalkStar se puede optener de forma opcional con ruedas delanteras guiables:
Estas ruedas guiables se fijan mediante un bulón de bloqueo para que mantengan una sóla dirección.
La decisión de qué modelo de rueda delantera debe utilizar cada usuario y en qué marco de enfermedad,
la tomará siempre el médico o el terapeuta.
17
Ajuste/adaptación (Fig. 3)
Con la posibilidad de regulación en la altura, el usuario puede adaptar/ajustar el andador de forma individual a sus
necesidades. Recuerde, que las cuatro ruedas deben mantener la misma altura.
Desmontaje y transporte
Mantenga el WalkStar sobre las ruedas traseras e inclínelo ligeramente hacia atrás. A continuación presione
ambos resortes al mismo tiempo (Fig. 2) hacia dentro y pliege el chasis ligeramente en dirección de las ruedas
traseras. Para plegar el WalkStar proceda de forma inversa a lo descrito en el apartado ”Montaje” .
Atención: Si no se manipula de forma correcta, puede lastimarse los dedos.
Para el transporte no es imprescindible que extraíga las cuatro ruedas con los tubos incluidos (Fig. 4). Pero de ser
necesario, se puede disminuir así un poco más el espacio requerido para su ubicación.
Accesorios
Placas pélvicas (Fig. 5)
Con la placa pélvica el usuario se puede apoyar de forma lateral en la zona de la pélvis y del muslo adicionalmente.
La placa pélvica se regula en el ancho y en el ángulo liberando los tornillos de fijación.
Recuerde, que una vez realizada la regulación, deberá fijar los tornillos de nuevo fuertemente.
Freno de dirección y fijación
El freno de fijación la facilita al usuario por un lado el frenado a pasos dosificados y por otro lado mantener el
WalkStar parado de forma segura y sin que se ponga en funcionamiento.
Para fijar los frenos, tire de la palanca por completo y encaje el gancho de fijación con el dedo (Fig. 6). Para liberar
el freno de fijación, tire ligeramente de la palanca y el gancho se abrirá.
Si el frenado no fuese suficiente, puede regular el trayecto de frenado con el tornillo de regulación (Fig. 7).
La palanca de freno se puede situar según se desee en la barra de empuje o en el manillar vertical (Fig. 9).
Freno de fricción (Fig. 8)
La función del freno de fricción es relantizar el rodaje adecuándose a las necesidades del usuario según sus
progresos.
Abriendo o cerrando las tuercas puede cambiar la presión de los frenos sobre las ruedas y así variar la velocidad
de rodaje.
Atención: Debe comprobar la funcionalidad del andador en periodos regulares y corregirla de ser necesario.
Cambiar las ruedas desgastadas o dañadas.
Manillares verticales con apoyabrazos (Fig. 9)
Los manillares verticales con apoyabrazos se diseñaron como solución para los usuarios, que no se apoyan con
los brazos extendidos, sino que se encuentran más seguros apoyando los antebrazos.
Los manillares verticales se regulan junto con la altura del WalkStar.
La distancia entre el apoyabrazos para antebrazo y el manillar debería ser regulado de forma, que no se produzcan
puntos de presión o posiciones tensas. Los antebrazos del usuario se fijan con dos cinchas de velcro.
Mantenimiento y cuidados
➜ Evite que las ruedas se ensucien y compruebe regularmente que rueda correctamente.
➜ Utilice un detergente suave sin amoniaco o partículas que raspen para limpiar el
No está permitida la limpieza y desinfección con máquinas o por túneles de lavado. Recomendamos limpiar y
desinfectar el andador con una balleta húmeda.
➜ Compruebe y controle de forma regular que todas las uniones metálicas y todos los tornillos no estén desgastados
y se encuentren bien fijados. Ante todo los puntos de encaje de los resortes deberán ser controlados con
cuidado. Si una unión no está correcta, diríjase inmediatamente a su centro especializado.
Todos los cambios en el andador WalkStar no realizados por el fabricante o por un técnico especializado,
llevarán a que se extinga la garantía. Lo mismo en caso de sobrepasar los valores máximos indicados.
Datos técnicos
18
Modelos
RR1600100000 RR1600300000 RR1600500000 RR1600700000 RR1600900000
Longitud en cm/
Peso en kg
RR1600200000 RR1600400000 RR1600600000 RR1600800000 RR1601000000
Tamaño
1/2
1
2
3
4
Colores de chasis
rojo jaspeado
rojo jaspeado
azul jaspeado
azul jaspeado
azul/verde jasp.
Altura de los manillares 39 - 48 cm
43 -58 cm
53 - 70 cm
65 - 84 cm
83 -102 cm
rigido
39-48 cm
45-58 cm
53-69 cm
63-82 cm
83-102 cm
guiable
40-49 cm
44-57 cm
50-66 cm
63-82 cm
83-102 cm
Distancia entre los
manillares
aprox. 35 cm
aprox. 35 cm
aprox. 35 cm
aprox. 39 cm
aprox. 41 cm
Ancho máximo
aprox. 57 cm
aprox. 58 cm
aprox. 60 cm
ca. 62
aprox. 65 cm
Tamaño corporal
hasta aprox. 114 cm hasta aprox.122 cm hasta aprox. 137 cm hasta aprox.155 cm hasta aprox. 155 cm
Peso máximo del paciente 27 kg
27 kg
38 kg
59 kg
100 kg
19
Otto Bock HealthCare GmbH
Max-Näder-Straße 15 · D-37115 Duderstadt
National: Telefon (0 55 27) 848 1461/1462/1463 · Fax (0 55 27) 848 14 60
International: Phone +49-5527-848-1304/1562/1590/1594/3663 · Fax +49-5527-848-1676
e-mail: [email protected] · Internet: http://www.ottobock.com
Versandanschrift für Rücksendungen/Address for Returns
Otto Bock HealthCare GmbH
Sälzerstraße 16 · D-56235 Ransbach-Baumbach
Otto Bock HealthCare GmbH has been certified by the German Society for the Certification of Quality Assurance Systems (DQS)
in accordance with DIN EN ISO 9001 standard, reg. no. 779 (management system)
© Otto Bock · Printed in Germany · 647H474 – xx – 02.02/1
Hersteller/Manufacturer: