1
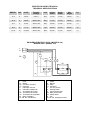
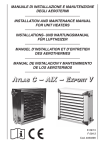
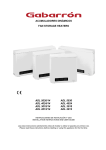
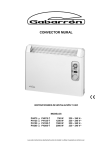
AEROTERMO INDUSTRIAL INDUSTRIAL HEATER INSTRUCCIONES DE INSTALACIÓN Y USO INSTALLATION INSTRUCTIONS AND USER GUIDE MODELOS MODELS A-4 A-6 A-9 A-12 Lea estas instrucciones atentamente antes de instalar o utilizar el aparato por primera vez. Please read these instructions before installing or using this appliance for the first time. ES 1. - IMPORTANTE La garantía del aerotermo no cubrirá cualquier daño causado por la no observancia de alguna de estas instrucciones. Las instrucciones deben conservarse para futuras referencias. Este manual debe ser conservado y dado a cualquier nuevo usuario. Este aparato pueden usarlo niños con edad de 8 años y superior y personas con capacidades físicas, sensoriales o mentales reducidas o falta de experiencia y conocimiento, si se les ha dado la supervisión o formación apropiadas respecto al uso del aparato de una manera segura y comprenden los peligros que implica. Los niños no deben jugar con el aparato. La limpieza y mantenimiento a realizar por el usuario no deben realizarlos los niños sin supervisión. Los niños desde 3 años y menores de 8 años deben sólo encender/apagar el aparato, siempre que este haya sido colocado o instalado en su posición de funcionamiento normal prevista y que sean supervisados o hayan recibido instrucciones relativas al uso del aparato de una forma segura y entiendan los riesgos que el aparato tiene. Los niños desde 3 años y menos de 8 años, no deben enchufar, regular y limpiar el aparato o realizar operaciones de mantenimiento. Los niños menores de 3 años deben mantenerse fuera del alcance del aparato a menos que sean continuamente supervisados. La instalación del aparato debe realizarse de acuerdo con la legislación eléctrica vigente. La instalación o reinstalación, y la puesta en servicio debe ser realizada por un instalador eléctrico cualificado. Compruebe que el voltaje de la placa de características del aerotermo coincide con el voltaje de la red donde se va a conectar. El uso de estos aerotermos está prohibido en presencia de gases, explosivos u objetos inflamables. Este aerotermo debe ser desconectado de la red eléctrica antes de efectuar cualquier reparación en su interior. El aerotermo no debe ser instalado justo debajo o en frente de una toma de corriente. El aerotermo debe ser instalado de forma que los interruptores u otros controles no puedan ser tocados por una persona que esté usando el baño, ducha o una piscina. El aparato deberá estar instalado de tal forma que pueda separase de todos los polos de la red, con un ancho de apertura de contacto de 3 mm como mínimo. Ni el cable de conexión ni otros objetos deben entrar en contacto con el calefactor. Este aerotermo debe ser conectado a una buena toma de tierra. Mantener entre el aerotermo y techos, cortinas u otros materiales inflamables una distancia mínima de 30 cm. Las salidas y entradas de aire del calefactor aseguran el correcto funcionamiento y lo protegen de sobrecalentamientos. No se deben tapar nunca. No deje ningún objeto encima del radiador, cubriendo la rejilla u obstruyendo el flujo de aire. El aerotermo puede ir anclado en paredes, techos o suelos. El aerotermo se puede orientar aflojando los pomos laterales. Una vez orientado apretar los pomos nuevamente. No situar el aerotermo cerca de objetos que puedan dificultar la transmisión del calor. La presencia de aire, de partículas de humo o polución puede, con el tiempo, oscurecer las paredes y superficies alrededor del aparato. ATENCIÓN – Algunas partes de este aparato pueden estar muy calientes y causar quemaduras. Particular atención debe prestarse en presencia de niños y personas vulnerables. 2.- INSTRUCCIONES DE INSTALACIÓN El aerotermo debe conectarse a una toma de tierra. Utilice un cable de alimentación de sección adecuada teniendo en cuenta la potencia del aparato y la longitud del propio cable de alimentación. Pase el cable de alimentación a través del prensaestopas de la parte trasera del aerotermo apretando la tuerca para fijar el cable. Los aerotermos conectados a 400V~ 3N necesitan siempre la conexión del hilo neutro en su borna específica. 3.- MODO DE EMPLEO A) Ventilación Interruptor con piloto verde: Conectado, se encenderá el piloto verde, poniéndose en marcha el ventilador. El ventilador funcionará ininterrumpidamente siempre que este interruptor permanezca conectado. B) Calefacción Interruptor con piloto rojo: Conectado, se encenderá el piloto rojo. El ventilador y las resistencias calefactoras estarán funcionando siempre que el termostato de control esté conectado. Termostato de control: Conecta y desconecta el sistema de calefacción. Para regular el termostato de control girar el mando del termostato hacia la derecha hasta la posición de MAXIMA TEMPERATURA; cuando se alcance la temperatura deseada gire lentamente el mando hacia la izquierda hasta que se apague el testigo rojo. El termostato mantendrá automáticamente la temperatura así elegida. Termostato de retardo: Este dispositivo tiene una doble finalidad. Por una parte mejora el rendimiento del aerotermo extrayendo el calor residual de las resistencias cuando estas son desconectadas, y por otra, alarga la vida de las resistencias al evitar sobrecalentamientos. El ventilador sigue funcionando hasta extraer totalmente el calor acumulado en las resistencias calefactores desconectadas por el termostato de control o el interruptor. Termostato de seguridad: Desconecta totalmente el aerotermo si se ha producido un exceso de temperatura. 4.- MANTENIMIENTO El aerotermo no precisa de ningún tipo de mantenimiento especial. Limpie el polvo de las rejillas de entrada y salida de aire, sólo cuando la unidad esté desconectada y fría. No utilice disolventes ni productos abrasivos. Este aerotermo ha sido fabricado dentro de un sistema de calidad asegurada y conforme a procesos respetuosos con el medio ambiente. Una vez finalizada la vida útil del aparato, llévelo a un punto limpio para que sus materiales puedan ser reciclados de forma adecuada. EN 1.- IMPORTANT INFORMATION The warranty of the heater will not cover any damage caused by non observance of any of these instructions. The instructions should be retained for future reference. This guide must be kept and given to any new owner. This appliance can be used by children aged from 8 years and above and persons with reduced physical, sensory or mental capabilities or lack of experience and knowledge if they have been given supervision or instruction concerning the use of the appliance in a safe way and understand the hazards involved. Children must not play with the appliance. Cleaning and user maintenance must not be made by children without supervision. Children aged from 3 years and less than 8 years shall only switch on/off the appliance provided that it has been placed or installed in its intended normal operating position and they have been given supervision or instruction concerning use of the appliance in a safe way and understand the hazards involved. Children aged from 3 years and less than 8 years shall not plug in, regulate and clean the appliance or perform user maintenance. Children of less than 3 years should be kept away unless continuously supervised. Please check that the voltage in the rating label fits the power supply. The installation must be performed in accordance with current electricity regulations. Please check that the voltage in the rating label fits the power supply. The use of these heaters is forbidden in any area where there is a presence of gases, explosives or inflammable objects. Before carrying out any work inside the appliance, the heater must be disconnected from the electricity supply. The heater must not be installed immediately below or in front of a socket outlet. The appliance must be installed in such a way that it is impossible for anyone using a bath or shower, to touch the controls The installation of the heaters must be carried out in such a way that each pole can be disconnected from the supply having a contact separation of at least 3 mm. The supply cord and other objects should not contact the surface of the heater. This appliance must be earthed. A minimum distance of 30cm is required for curtains and other combustible materials. The air outlet and inlet are provided to ensure the most efficient operation of the appliance. They also protect the heater from overheating; therefore, it is essential that at no time are they covered. The presence in the air of particles of smoke, dust and other pollutants could, in time, discolor the walls and surfaces around the heater. CAUTION — Some parts of this product can become very hot and cause burns. Particular attention must be given when children and vulnerable people are present. 2.- INSTALLATION Earth connection is required. Ensure voltage is suitable for the heater. Refer to the rating label. Pass cable through rear of the heater securing with cable grip. For 3x400V + N~ connection, neutral wire is required. Using the bracket, the heater can be positioned on the ceiling, wall or floor offering 360º directional movement. 3.- USING THE HEATER A) Fan only Switch with green light: Continuous operation of the ventilation fan. B) Heating Switch with red light: Operates the fan and heating working in conjunction with the thermostat. Control thermostat: Regulates the room temperature switching the fan on / off. Rotate the control knob to the maximum position. When the room reaches the required temperature gradually rotate the control knob to the left until the red light goes out. The thermostat will automatically maintain the room temperature. Delay thermostat: It operates the fan for a short period when the heating switches off to cool down the elements. Safety limiter: It disconnects the heater whenever there is an excess of temperature. 4.- MAINTENANCE The heater does not require any special maintenance. Disconnect the heater before cleaning or repair work. Clean the entrance and exit grills only when the heater is cold. Do not use abrasive or solvent cleaning products as these may damage the paint. These heaters are manufactured under an assured quality system using environment friendly procedures. Please take the heaters to a clean point once their useful life is finished, in order to recycle their materials in the right way. ESPECIFICACIONES TÉCNICAS TECHNICAL SPECIFICATIONS MODEL kW kcal/h Tensión Voltage m3/h ancho width fondo depth alto height kg A-4 4 3.456 230V~ 400 37cm 27cm 38cm 10 A-4 4 3.456 400V~3N 400 37cm 27cm 38cm 10 A-6 6 5.184 400V~3N 600 43cm 27cm 43cm 11 A-9 9 7.776 400V~3N 750 43cm 37cm 46cm 16 A-12 12 10.368 400V~3N 900 43cm 37cm 46cm 17 ESQUEMA ELECTRICO 230V~ (MODELO A-4) WIRING 230V~ (MODEL A-4) L N Ts PE M A1 C1 A2 13 5 3 1 14 6 4 2 R1 I2 TR L Fase N Neutro PE Conductor de tierra C1 Contactor I1 Interruptor aire frío I2 Interruptor calefacción T Termostato de control TR Termostato de retardo TS Termostato de seguridad M Motor ventilador R1, R2, R3 resistencias T I1 R2 R2 L Phase N Neutral PE Earth C1 Contactor I1 Fan only switch I2 Heating switch T Control thermostat TR Delay thermostat TS Safety limiter M Fan R1, R2, R3 heating elements ESQUEMA ELECTRICO CONEXIONADO 3x400V~+N (MODELOS A-4, A-6, A-9 y A-12) WIRING 3x400V~+N (MODELS A-4, A-6, A-9 and A-12) R S T N PE Ts M A1 C1 A2 13 5 3 1 14 6 4 2 R1 I2 TR I1 R2 T R2 L Fase N Neutro PE Conductor de tierra C1 Contactor I1 Interruptor aire frío I2 Interruptor calefacción T Termostato de control TR Termostato de retardo TS Termostato de seguridad M Motor ventilador R1, R2, R3 resistencias L Phase N Neutral PE Earth C1 Contactor I1 Fan only switch I2 Heating switch T Control thermostat TR Delay thermostat TS Safety limiter M Fan R1, R2, R3 heating ES El símbolo en el producto o en su embalaje indica que este producto no se puede tratar como desperdicio normales del hogar. Este producto se debe entregar al punto de recolección de equipos eléctricos y electrónicos para reciclaje. Al asegurarse de que este producto se deseche correctamente usted ayudará a evitar posibles consecuencias negativas para el ambiente y la salud pública, lo cual podría ocurrir si este producto no se manipula de forma adecuada. Para obtener información más detallada sobre el reciclaje de este producto, póngase en contacto con la administración de su ciudad, con su servicio de desechos del hogar o con la tienda donde compró el producto. Estas disposiciones solamente son válidas en los países miembros de la UE. EN The symbol on the product or in its packaging indicates that this product may not be treated as household waste. Instead it shall be handed over to the applicable collection point for the recycling of electrical and electronic equipment. By ensuring this product is disposed of correctly, you will help prevent potential negative consequences for the environment and human health, which could otherwise be caused by inappropriate waste handling of this product. For more detailed information about recycling of this product, please contact your local city office, your household waste disposal service or the shop where you purchased the product. These instructions are only valid in the EU member states. www.elnur.es Fabricado por: Manufactured by: ELNUR, S.A. Travesía de Villa Esther, 11 Pol. Ind. “El Nogal” 28110, ALGETE - Madrid Departamento de atención al cliente: Customer Service Department: +34 902 19 57 14 Como parte de la política de mejora continua, Elnur s.a. se reserva el derecho a realizar modificaciones técnicas sin previo aviso. As a part of the policy of continuous product improvement, Elnur s.a. reserves the right to alter specifications without notice. @ 2014 Cod. 30090260